dell emc integrated data protection ... - dell technologies us · encryption and copying of the...
TRANSCRIPT
Dell EMC Integrated Data ProtectionApplianceVersion 2.2
Getting Started Guide302-004-953
Rev. 03
December 2019

Copyright © 2019 Dell Inc. or its subsidiaries. All rights reserved.
Dell believes the information in this publication is accurate as of its publication date. The information is subject to change without notice.
THE INFORMATION IN THIS PUBLICATION IS PROVIDED “AS-IS.” DELL MAKES NO REPRESENTATIONS OR WARRANTIES OF ANY KIND
WITH RESPECT TO THE INFORMATION IN THIS PUBLICATION, AND SPECIFICALLY DISCLAIMS IMPLIED WARRANTIES OF
MERCHANTABILITY OR FITNESS FOR A PARTICULAR PURPOSE. USE, COPYING, AND DISTRIBUTION OF ANY DELL SOFTWARE DESCRIBED
IN THIS PUBLICATION REQUIRES AN APPLICABLE SOFTWARE LICENSE.
Dell Technologies, Dell, EMC, Dell EMC and other trademarks are trademarks of Dell Inc. or its subsidiaries. Other trademarks may be the property
of their respective owners. Published in the USA.
Dell EMCHopkinton, Massachusetts 01748-91031-508-435-1000 In North America 1-866-464-7381www.DellEMC.com
2 Dell EMC Integrated Data Protection Appliance Getting Started Guide

Introduction 5Document scope and audience............................................................................6Product features.................................................................................................6System self-protection....................................................................................... 7Network connectivity overview...........................................................................7Install Network Validation Tool............................................................................8
Setting up the DP4400 9Prepare the network environment..................................................................... 10Configuration worksheet.................................................................................... 11
Online Support...................................................................................... 11Connect to the ACM............................................................................. 11Network Configuration wizard.............................................................. 12
Appliance Configuration Manager......................................................................15Welcome...............................................................................................15License................................................................................................. 15General settings................................................................................... 15Customer information...........................................................................15Manual configuration of component IP addresses................................ 15Summary.............................................................................................. 16Configuration progress......................................................................... 16Secure Remote Services configuration for components ...................... 16Next steps............................................................................................ 16
Troubleshooting.................................................................................................16
About the dashboard 19ACM dashboard Home...................................................................................... 20IDPA System Manager panel............................................................................. 21Backup Server panel......................................................................................... 22Protection Storage panel.................................................................................. 22Reporting and Analytics panel...........................................................................22Search panel..................................................................................................... 23Cloud Disaster Recovery panel..........................................................................23Virtualization panel............................................................................................24Customer Support and General Settings panels................................................24User accounts for components......................................................................... 25Change passwords and synchronize components............................................. 26
Performing a VM backup 27VM backups overview....................................................................................... 28Define vCenter and VMware clients..................................................................28Deploy the Avamar proxy.................................................................................. 32Install the Avamar proxy hotfix..........................................................................33Create and run the backup policy......................................................................34
Restoring a VM backup 37Restore a Virtual Machine ................................................................................ 38
Chapter 1
Chapter 2
Chapter 3
Chapter 4
Chapter 5
CONTENTS
Dell EMC Integrated Data Protection Appliance Getting Started Guide 3

Restore using Instant Access.............................................................................41Restore specific files.........................................................................................43
Generating reports 45Generate a report............................................................................................. 46
47
Chapter 6
Index
Contents
4 Dell EMC Integrated Data Protection Appliance Getting Started Guide
CHAPTER 1
Introduction
This section contains the following topics:
l Document scope and audience................................................................................................ 6l Product features..................................................................................................................... 6l System self-protection............................................................................................................7l Network connectivity overview............................................................................................... 7l Install Network Validation Tool................................................................................................ 8
Dell EMC Integrated Data Protection Appliance Getting Started Guide 5
Document scope and audience
This document describes IDPA and explains how to perform the initial software configuration afterthe appliance hardware is set up. It also describes a number of procedures that you can use to getIDPA up and running in a relatively short time.
The target audience for this document includes field personnel, partners, and customersresponsible for managing and operating IDPA.
Product featuresThe IDPA provides a simplified configuration and the integration of data protection components ina consolidated solution.
Simplified deployment and configuration
The IDPA model DP4400 is a hyperconverged, 2U system that a user can install and configureonsite.
The system software for each component is installed and configured to the greatest extentpossible before the appliance is shipped. A backup application, target storage, reporting andanalytics, search, appliance configuration manager (ACM) come embedded on the appliance.
This release includes the IDPA System Manager and adds the optional Cloud Disaster Recovery(CDRA) to the software stack.
Centralized management
The ACM provides a graphical, web-based interface for configuring, monitoring, and upgrading theappliance. IDPA System Manager provides advanced monitoring and management capabilities ofthe IDPA from a single pane of glass and includes the following features:
l Comprehensive dashboards that include the following Avamar and IDPA system information:
n Backup activities
n Replication activities
n Capacity
n Health
n Alerts
l Monitoring multiple systems capabilities including system health and activities.
l Management capabilities for the backup application.
l Advanced search and recover operations through integration with Search.
l Reporting capabilities.
Backup administration
The IDPA protects virtual and physical clients, different types of file systems, applications, anddatabases.
Monitoring and analytics
The reporting and analytics feature offers robust reporting functionality with dedicated sectionsfor various features. The reports help you retrieve information about the environment so that youcan review and analyze the activities in the environment. Using these reports, you can identifyoutages in the environment, diagnose problems, plan to mitigate risks, and forecast future trends.You can run custom and system report and dashboard templates on demand or on a schedule atdefined time intervals, per the enterprise requirements.
Introduction
6 Dell EMC Integrated Data Protection Appliance Getting Started Guide
The ACM dashboard displays a summary of the configuration of the individual components andallows the administrator to monitor the appliance, change configuration details, or upgrade thesystem and its components. The dashboard also displays appliance health alert information for theserver and VMware components.
Search
The Search feature provides a powerful way to search backup data within the IDPA and thenrestore the backup or download the search results. Scheduled collection activities are used togather and index the metadata, which is then stored within the IDPA.
Disaster recovery
DD Cloud DR is an optional solution that facilitates the recovery of on-premises virtual machinesby providing the capability to recover those VMs in the cloud. DD Cloud DR integrates with thebackup application inside the IDPA to copy backups of virtual machine data to the public cloud. Itcan then perform DR tests or failover of production environments by orchestrating a completeconversion of the VM to an Amazon Web Services Elastic Compute Cloud (EC2) instance, and byrunning this instance in the cloud.
The CDRA is a built-in application that manages deployment of the necessary infrastructure to thecloud, copying of virtual machine backups to the cloud, and orchestrates the compression,encryption and copying of the backed-up VM data to the cloud.
Note: CDRA is optional.
Scalability
The IDPA is designed to be scalable so it can grow with changing needs. The base DP4400configuration includes 24TB of storage space, which can be expanded by licencing additionalcapacity in increments of 12TB up to a maximum of 96TB.
Unified support
The same Customer Support team supports both the hardware and the software used in theappliance.
Note: The IDPA is compatible with IPv4 enabled networks and does not support pure IPv6 ordual stack networks.
System self-protectionThe IDPA is configured to protect itself from data loss with the backup and storage applicationsincluded in the system. The system is are protected with self-defined and self-initiated backup jobsthat are scheduled daily and have a 30-day retention period. The system metadata is protectedusing checkpoint backup to the internal target storage.
Network connectivity overviewWhen a range of IP addresses is used during the IDPA configuration, the IP addresses are assignedin a standard order. Use the table below to determine which IP address is allocated to acomponent.
The first column in each table, IP Range Allocation, is the value to add to the first IP address in therange.
Introduction
Dell EMC Integrated Data Protection Appliance Getting Started Guide 7
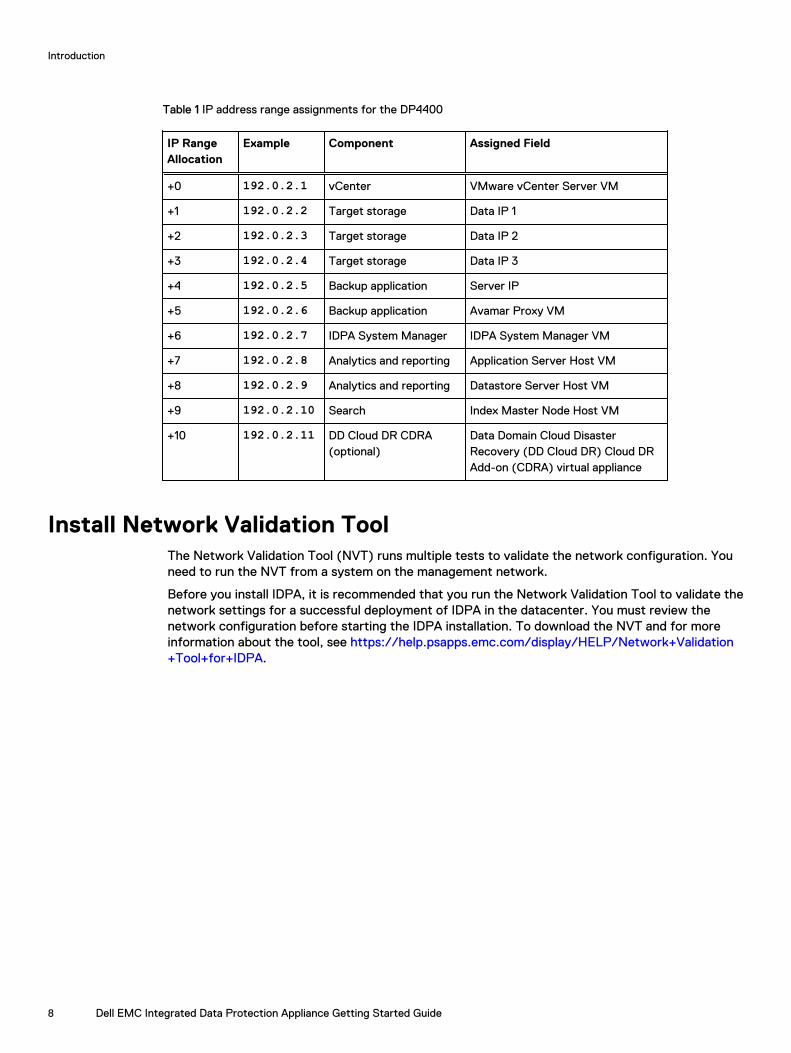
Table 1 IP address range assignments for the DP4400
IP RangeAllocation
Example Component Assigned Field
+0 192.0.2.1 vCenter VMware vCenter Server VM
+1 192.0.2.2 Target storage Data IP 1
+2 192.0.2.3 Target storage Data IP 2
+3 192.0.2.4 Target storage Data IP 3
+4 192.0.2.5 Backup application Server IP
+5 192.0.2.6 Backup application Avamar Proxy VM
+6 192.0.2.7 IDPA System Manager IDPA System Manager VM
+7 192.0.2.8 Analytics and reporting Application Server Host VM
+8 192.0.2.9 Analytics and reporting Datastore Server Host VM
+9 192.0.2.10 Search Index Master Node Host VM
+10 192.0.2.11 DD Cloud DR CDRA(optional)
Data Domain Cloud DisasterRecovery (DD Cloud DR) Cloud DRAdd-on (CDRA) virtual appliance
Install Network Validation ToolThe Network Validation Tool (NVT) runs multiple tests to validate the network configuration. Youneed to run the NVT from a system on the management network.
Before you install IDPA, it is recommended that you run the Network Validation Tool to validate thenetwork settings for a successful deployment of IDPA in the datacenter. You must review thenetwork configuration before starting the IDPA installation. To download the NVT and for moreinformation about the tool, see https://help.psapps.emc.com/display/HELP/Network+Validation+Tool+for+IDPA.
Introduction
8 Dell EMC Integrated Data Protection Appliance Getting Started Guide

CHAPTER 2
Setting up the DP4400
l Prepare the network environment......................................................................................... 10l Configuration worksheet........................................................................................................ 11l Appliance Configuration Manager.......................................................................................... 15l Troubleshooting..................................................................................................................... 16
Dell EMC Integrated Data Protection Appliance Getting Started Guide 9
Prepare the network environmentBefore you begin
You must have a computer at the install location with:
l A power adapter, C13 to NEMA 5–15 (if based in North America or country specific cord inother geographical locations), or a power cord for your laptop power adapter with a C13 plug,to power your laptop from a rack PDU
l An Ethernet port
l Latest version of Google Chrome or Mozilla Firefox
Note: The DP4400 supports only one network. Separate management, backup, or replicationnetwork configurations (such as VLAN tagging) are not supported.
About this task
The following steps must be completed before starting initial configuration with the ApplianceConfiguration Manager:
Procedure
1. Identify 14 unassigned IP addresses for the IDPA components. To simplify configuration, youmust select 14 contiguous addresses.
Note that all components must run on a single VLAN or subnet with the exception of theiDRAC interface, which can be on a separate subnet or VLAN. For further information aboutIP addresses, see Network connectivity overview on page 7.
2. Register the 14 IP addresses in DNS with forward and reverse lookup entries for eachaddress. Ensure that the router for the 14 IP addresses can be pinged.
Note: When you reserve the IP addresses, you must assign the IP addresses tohostnames in the DNS server. Ensure that the hostnames that are assigned to the pointproducts are in lower case and do not have an underscore (_) or the at (@) characters.If the hostnames have an underscore (_) or the at (@) characters, the configurationfails.
3. Download the license files for Data Domain Virtual Edition (DDVE), Avamar Virtual Edition(AVE), and Data Protection Advisor (DP Advisor) from the Dell EMC Software LicensingCentral.
The contact person mentioned on your sales order should have received the LicenseAuthorization Code (LAC) letter through an email during the order fulfillment process. TheLAC letter includes the license authorization code associated with your order, instructionsfor downloading software binaries, and instructions for activating the entitlements onlinethrough Dell EMC Software Licensing Central.
Follow the steps mentioned in the LAC letter to activate the software and download thelicense keys. For additional information, see the Standard Activation Process section in theLicense Activation Guide.
Note: The LAC letter has the link https://licensing.emc.com/deeplink/<LAC>which directs you to Dell EMC Software Licensing Central. <LAC> is a uniquealphanumeric value that is mentioned in your LAC letter.
After the activation is complete, download the license keys that are generated for DataDomain Virtual Edition (DDVE), Avamar Virtual Edition (AVE), and Data Protection Advisor(DP Advisor). Use these license keys during the IDPA configuration.
Setting up the DP4400
10 Dell EMC Integrated Data Protection Appliance Getting Started Guide

Configuration worksheetUse this worksheet to collect and record information to start setting up your appliance using thefollowing:
l Online Support
l Network Configuration wizard
l Appliance Configuration ManagerACM
Online SupportRecord the following information related to your Online Support account:
Online Support credentials
Your username and password is required for Secure Remote Services (formerly ESRS)configuration. To create an Online Support account, go to support.emc.com.
Site ID
A Site ID is created in Support systems for each location within your organization where Dell EMCproducts are installed. Your Site ID is required during initial configuration. Verify your Site IDnumber on Online Support:
1. Log in to Online Support with your credentials.
2. Select Service Center.
3. In the Administration section of the Service Center page, click View and manage companyinformation.
4. Click View Sites and ensure that the site where the IDPA is installed is listed in the My Sitesarea.
Note: You can also search for a site and add it to the My Sites list. If a site ID is not available orthe correct site ID is not listed, you must notify your local field representative to request one.
Connect to the ACMConnect to the ACM user interface and begin the configuration process. For a seamlessexperience, enable both private and public network connections to your service computer.
Before you begin
l After powering on the appliance, wait 5 minutes for startup to finish.
l Verify that the service computer is connected to the 1 GbE port identified as (10) in Figure 1 onpage 12.
l On the service computer, record the IP address settings for the Ethernet interface that isconnected to the DP4400.
Setting up the DP4400
Dell EMC Integrated Data Protection Appliance Getting Started Guide 11

Figure 1 DP4400 network and iDRAC connections
Procedure
1. On the service computer, assign the static IP address 192.168.100.98 and the subnetmask 255.255.255.0 for the Ethernet interface that is connected to the DP4400.
A default gateway is not required.
2. Verify that the ACM responds to a ping on the default ACM IP address, 192.168.100.100.
3. To connect to the ACM user interface, type https://192.168.100.100:8543/ in abrowser window.
4. Log in to the ACM with the default system account username and password:
l User Name: rootl Password: Idpa_1234
5. Provide a new password when prompted.
Note: This password will be assigned to all appliance components. It must contain 9–20characters and include at least one of each type of supported character. The followingtypes of characters are supported:
l Uppercase letters (A–Z)
l Lowercase letters (a–z)
l Numbers (0–9)
l Special characters: period (.), hyphen (-), and underscore (_)
The password must not include common names or usernames such as root or admin.
The system logs you out after changing the password. Log back in with the new password.
6. On the End User License Agreement screen, accept the EULA.
Results
The Network Configuration screen appears.
Network Configuration wizardAfter accepting the EULA, establish initial connectivity to the DP4400 components.
About this task
The information that is required for this section is recorded in the Integrated Data ProtectionAppliance Pre-Engagement Questionnaire.
Setting up the DP4400
12 Dell EMC Integrated Data Protection Appliance Getting Started Guide

Note: The IDPA is compatible with IPv4 enabled networks and does not support pure IPv6 ordual stack networks.
Procedure
1. Provide the following information to configure the basic network settings:
Subnet mask
IP address mask that identifies the range of IP addresses in the subnet where theappliance is connected.
Note: The DP4400 supports only one network. Separate management, backup, orreplication network configurations (such as VLAN tagging) are not supported.
Gateway
Default gateway IP address of the appliance.
Primary DNS server
The primary DNS server for your network environment.
Secondary DNS server
The secondary DNS server for your network environment.
Domain name
The domain name for your network environment.
Appliance Configuration Manager IP
The IP address to assign to the ACM.
ESXi IP
The IP address to assign to the ESXi server.
2. Click Submit.
After you finish
l After you configure basic networking, your web browser will automatically forward to the ACMIP address assigned during network configuration.
Note: You need to force synch the time on the hardware with the host time and ESXi withthe NTP server. To force sync the time, perform the following steps.
1. Login to the ESXi.
2. Run the following command to force a time sync on ESXi. against a functioning NTPserver.# sntp -S <NTP server>
3. Run the following command to sync the hardware time with the host time.# ipmitool sel time set "`date +"%m/%d/%Y %H:%M:%S"`"
Note: For automatic forwarding to work correctly, the computer you use to complete theconfiguration must be attached to the same network as the configured set ACM IPaddress.
l If you cannot have connections to both public and private networks at the same time,disconnect from the private appliance configuration network and then connect to the networkthat the ACM IP address is on to complete the rest of the configuration.
Setting up the DP4400
Dell EMC Integrated Data Protection Appliance Getting Started Guide 13

l Once the network configuration is complete, revert the network adapter IP address settings onthe service computer to their previous state.
Setting up the DP4400
14 Dell EMC Integrated Data Protection Appliance Getting Started Guide
Appliance Configuration ManagerThe ACM walks you through the initial set up of the IDPA and prepares the appliance for use. Usethe following list of screens and related actions as a guide to the initial configuration process.
To access the ACM UI, type the IP address you assigned to the ACM in a browser as follows:
https://<configured ACM IP address>:8543/dataprotection
WelcomeRead the prerequisite information and select the checkbox to accept.
(optional) Select Cloud Disaster Recovery.
Note: If you choose to configure Cloud Disaster Recovery, you cannot remove it from theIDPA later.
LicenseUpload the Data Domain, Avamar, and Data Protection Advisor license files you obtained fromOnline Support.
General settingsSelect your time zone and type the SMTP, SNMP, and NTP server IP addresses.
Note: The SNMP server IP is the address of an external trap host. Although this is amandatory value, you can enter the IP address of any reachable server if no SNMP server isavailable.
Select IP address range (11) and, in the associated field, type the first IP address in the sequentialrange of 11 IP addresses for the IDPA to use. The ACM assigns one IP address in the range to eachvirtual machine in the configuration.
Note: It is recommended that you specify an IP range. IP ranges are not required, but they doreduce the number of IP addresses that have to be typed manually during later wizard steps.
(optional) To specify non-sequential IP addresses for each virtual machine in the configuration, donot select IP address range.
Customer informationEnter your customer contact information, including the name, email address, and contact numberof the administrator, and also the location name, company name, and Site ID. Customer Supportwill use this information to contact you when needed.
Manual configuration of component IP addressesIf you selected IP address range on the General settings screen, go to Summary on page 16.
(manual configuration) If you did not select IP address range on the General settings screen,type an IP address in each field on the following screens:
l vCenter
l Protection Storage
l Backup Server
Setting up the DP4400
Dell EMC Integrated Data Protection Appliance Getting Started Guide 15

l IDPA System Manager
l Reporting and Analytics
l Search
l Cloud Disaster Recovery (if selected on the Welcome screen)
SummaryReview the configuration summary. To make changes, return to the previous screens.
When the configuration is correct, click Submit. The process continues automatically.
Note: The configuration process takes several hours to complete, and continues on its own ifyou disconnect from the DP4400. If your session is interrupted during configuration, verifythat you are connected to the network and type the ACM IP address in your browser asfollows:https://<configured ACM IP address>:8543/dataprotectionIf prompted, log in with the ACM credentials to view the current state of the configurationprogress.
Configuration progressWhen the configuration process is complete, you can download the configuration information as aPDF or XML file.
When you are finished, click Finish.
Secure Remote Services configuration for components(optional) Enter the Secure Remote Services gateway IP address and your Online Supportcredentials to send component system information to Customer Support and expedite issueresolution.
Note: This step repeats for each component that can be registered with Secure RemoteServices.
Next stepsResults
The ACM dashboard Home tab appears. On the dashboard Home tab, you can view the networkconfiguration and product details, manage the password, time zone, SMTP, SMNP, and NTPsettings, and modify customer support information.Refer to About the dashboard on page 19 for more information about using the ACM dashboardto monitor and manage the components of the IDPA.
TroubleshootingCreating and downloading a log bundle
You can create and download a log bundle that can be analyzed or sent to customer support.
1. In the ACM, click the log bundle icon in the upper right and select Create log bundle.
2. On the Create log bundle dialog, select the components you want included in the log bundleand click OK.
3. When the log bundle is created, reselect the log bundle icon and select Download log bundle.Then specify the download location and click OK.
Setting up the DP4400
16 Dell EMC Integrated Data Protection Appliance Getting Started Guide

Accessing vCenter
If you need to log in to vCenter to troubleshoot an issue encountered during installation, use theuser idpauser@localos and the common password for the IDPA. This user account has limitedprivileges, but has access to information that can help identify and address problems.
Setting up the DP4400
Dell EMC Integrated Data Protection Appliance Getting Started Guide 17

Setting up the DP4400
18 Dell EMC Integrated Data Protection Appliance Getting Started Guide

CHAPTER 3
About the dashboard
The ACM dashboard allows you to manage settings for the appliance and individual components,update customer support information, and upgrade software for the appliance and its components.
To access the dashboard, type https://<ACM IP address>:8543/ in a web browser and log in.The dashboard requires Google Chrome 64.0.3282.140 and later or Mozilla Firefox 47.2 and later.
Note: The dashboard is enabled only after configuring IDPA.
The initial view displays the Home page and tabs for Health and Upgrade.
l ACM dashboard Home.......................................................................................................... 20l IDPA System Manager panel..................................................................................................21l Backup Server panel..............................................................................................................22l Protection Storage panel.......................................................................................................22l Reporting and Analytics panel............................................................................................... 22l Search panel..........................................................................................................................23l Cloud Disaster Recovery panel.............................................................................................. 23l Virtualization panel................................................................................................................ 24l Customer Support and General Settings panels.................................................................... 24l User accounts for components..............................................................................................25l Change passwords and synchronize components..................................................................26
Dell EMC Integrated Data Protection Appliance Getting Started Guide 19
ACM dashboard HomeThe Home tab provides an overview of the status and settings for the IDPA and each component.
On the dashboard Home tab, you can view the network configuration and product details, managethe password, time zone, SMTP, SNMP, and NTP settings, and modify customer supportinformation.
You can also configure LDAP, create and download log bundles, update the common passwordacross all components, register components with Secure Remote Services (formerly ESRS), andinstall optional components (CDRA).
Note: Secure Remote Services configuration link is present under gear icon menu. Do mousehover on the gear icon to list all the menu options.
If DPS or DPA failed during configuration, ACM does not stop whole configuration. Theconfiguration process still continues until it finishes. After the configuration process is finished,ACM dashboard provides an option to configure the failed component (DPS or DPA).
Downloading the configuration details
To download a PDF containing the current details of the IDPA configuration, click the Adobe PDFicon.
Managing system components
The Home tab contains panels for each of the following:
l IDPA System Manager
l Backup Server
l Protection Storage
l Reporting and Analytics
l Search
l Cloud Disaster Recovery
l Virtualization
l Customer Support
l General Settings
Note: If a component cannot be reached on the network or has an incorrect stored credential,the corresponding panel prompts the user to resolve the issue.
About the dashboard
20 Dell EMC Integrated Data Protection Appliance Getting Started Guide
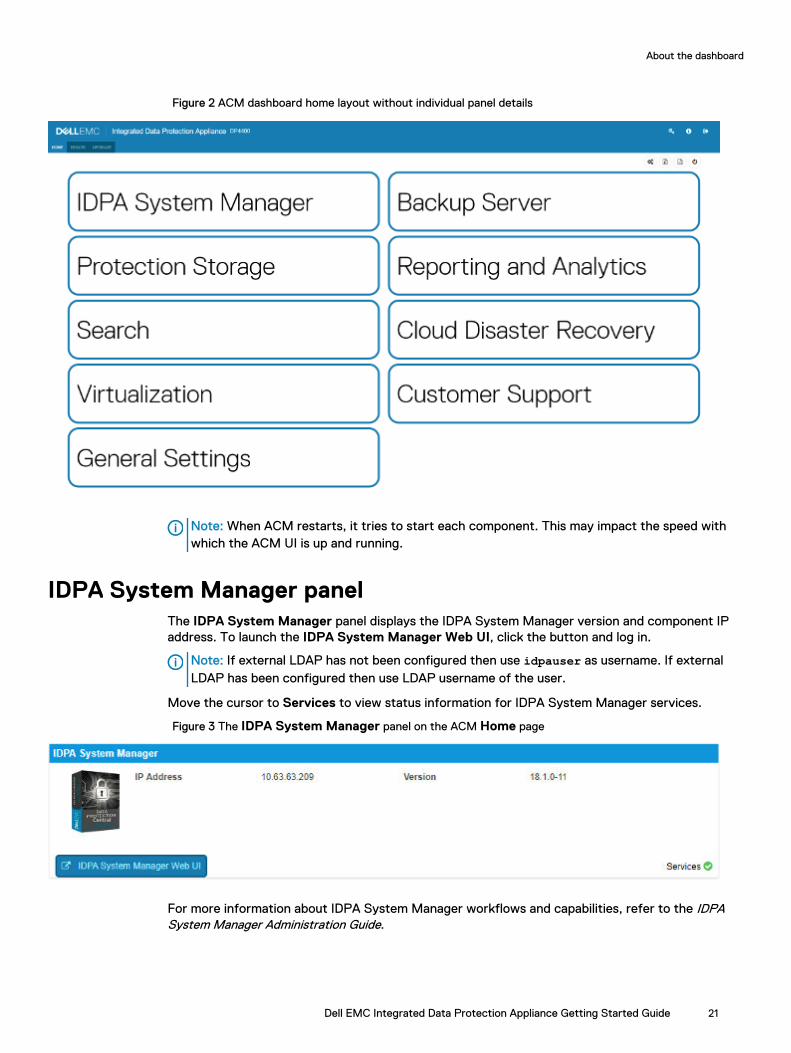
Figure 2 ACM dashboard home layout without individual panel details
Note: When ACM restarts, it tries to start each component. This may impact the speed withwhich the ACM UI is up and running.
IDPA System Manager panelThe IDPA System Manager panel displays the IDPA System Manager version and component IPaddress. To launch the IDPA System Manager Web UI, click the button and log in.
Note: If external LDAP has not been configured then use idpauser as username. If externalLDAP has been configured then use LDAP username of the user.
Move the cursor to Services to view status information for IDPA System Manager services.
Figure 3 The IDPA System Manager panel on the ACM Home page
For more information about IDPA System Manager workflows and capabilities, refer to the IDPASystem Manager Administration Guide.
About the dashboard
Dell EMC Integrated Data Protection Appliance Getting Started Guide 21
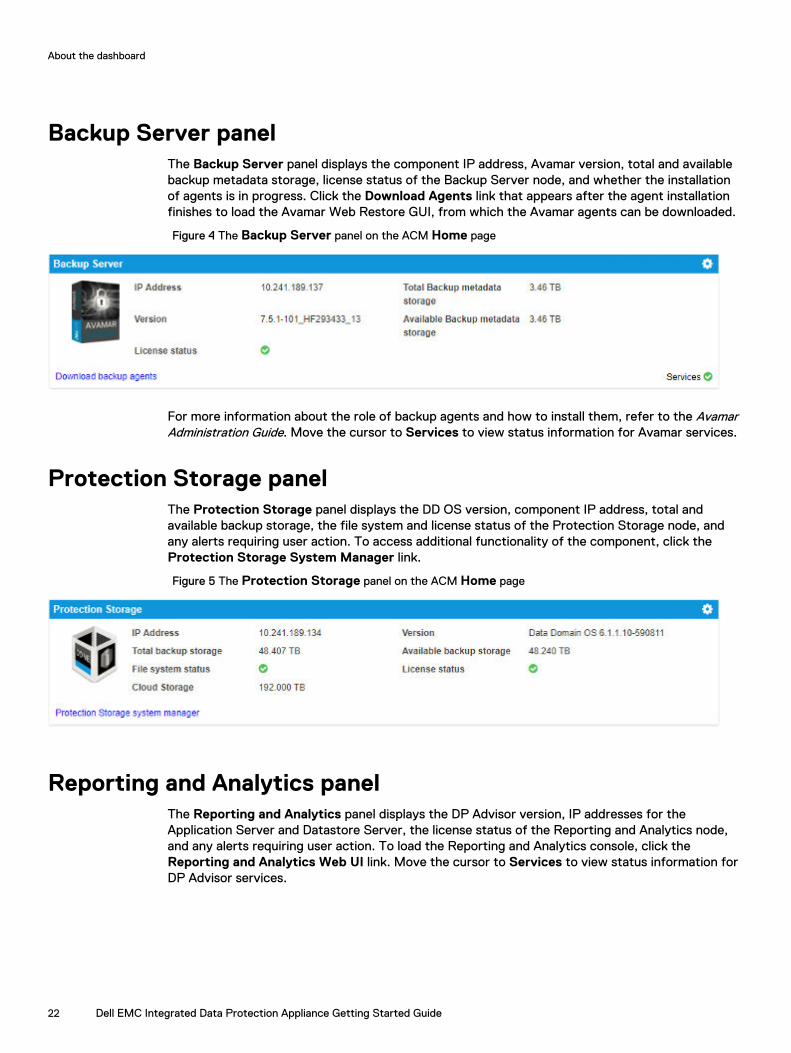
Backup Server panelThe Backup Server panel displays the component IP address, Avamar version, total and availablebackup metadata storage, license status of the Backup Server node, and whether the installationof agents is in progress. Click the Download Agents link that appears after the agent installationfinishes to load the Avamar Web Restore GUI, from which the Avamar agents can be downloaded.
Figure 4 The Backup Server panel on the ACM Home page
For more information about the role of backup agents and how to install them, refer to the AvamarAdministration Guide. Move the cursor to Services to view status information for Avamar services.
Protection Storage panelThe Protection Storage panel displays the DD OS version, component IP address, total andavailable backup storage, the file system and license status of the Protection Storage node, andany alerts requiring user action. To access additional functionality of the component, click theProtection Storage System Manager link.
Figure 5 The Protection Storage panel on the ACM Home page
Reporting and Analytics panelThe Reporting and Analytics panel displays the DP Advisor version, IP addresses for theApplication Server and Datastore Server, the license status of the Reporting and Analytics node,and any alerts requiring user action. To load the Reporting and Analytics console, click theReporting and Analytics Web UI link. Move the cursor to Services to view status information forDP Advisor services.
About the dashboard
22 Dell EMC Integrated Data Protection Appliance Getting Started Guide
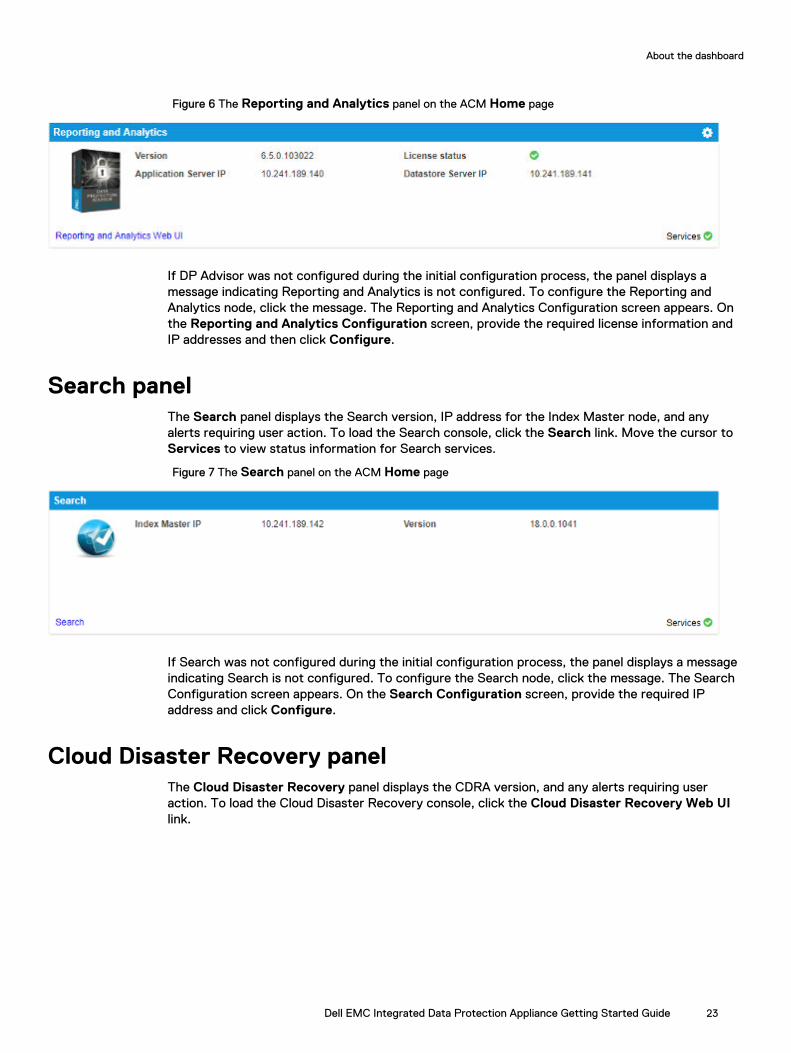
Figure 6 The Reporting and Analytics panel on the ACM Home page
If DP Advisor was not configured during the initial configuration process, the panel displays amessage indicating Reporting and Analytics is not configured. To configure the Reporting andAnalytics node, click the message. The Reporting and Analytics Configuration screen appears. Onthe Reporting and Analytics Configuration screen, provide the required license information andIP addresses and then click Configure.
Search panelThe Search panel displays the Search version, IP address for the Index Master node, and anyalerts requiring user action. To load the Search console, click the Search link. Move the cursor toServices to view status information for Search services.
Figure 7 The Search panel on the ACM Home page
If Search was not configured during the initial configuration process, the panel displays a messageindicating Search is not configured. To configure the Search node, click the message. The SearchConfiguration screen appears. On the Search Configuration screen, provide the required IPaddress and click Configure.
Cloud Disaster Recovery panelThe Cloud Disaster Recovery panel displays the CDRA version, and any alerts requiring useraction. To load the Cloud Disaster Recovery console, click the Cloud Disaster Recovery Web UIlink.
About the dashboard
Dell EMC Integrated Data Protection Appliance Getting Started Guide 23

Figure 8 The Cloud Disaster Recovery panel on the ACM Home page
If CDRA was not configured during the initial configuration process, the panel displays Click hereto configure Cloud Disaster Recovery, indicating that Cloud Disaster Recovery is not configured.To configure the Cloud Disaster Recovery node, click the message. The Cloud Disaster RecoveryConfiguration screen appears. On the Cloud Disaster Recovery Configuration screen, provide IPaddress and click Configure.
Note:
l Do not change Avamar root user password before configuring CDRA from dashboard.
l Do not change DD boost user password before configuring CDRA from Dashboard.
l If cloud account and email address are not configured in CDRA configuration, the CDRAlogin page does not work. User has to configure cloud account and email address manuallyin CDRA.
Virtualization panelThe Virtualization panel displays information about the internal virtual environment on theappliance, including the IP address and version of the vCenter server and ESXi host.
Figure 9 The Virtualization panel on the ACM Home page
Customer Support and General Settings panelsThe Customer Support panel displays the administrator contact and site information. To view thefull value of an item, hover over the item.
About the dashboard
24 Dell EMC Integrated Data Protection Appliance Getting Started Guide
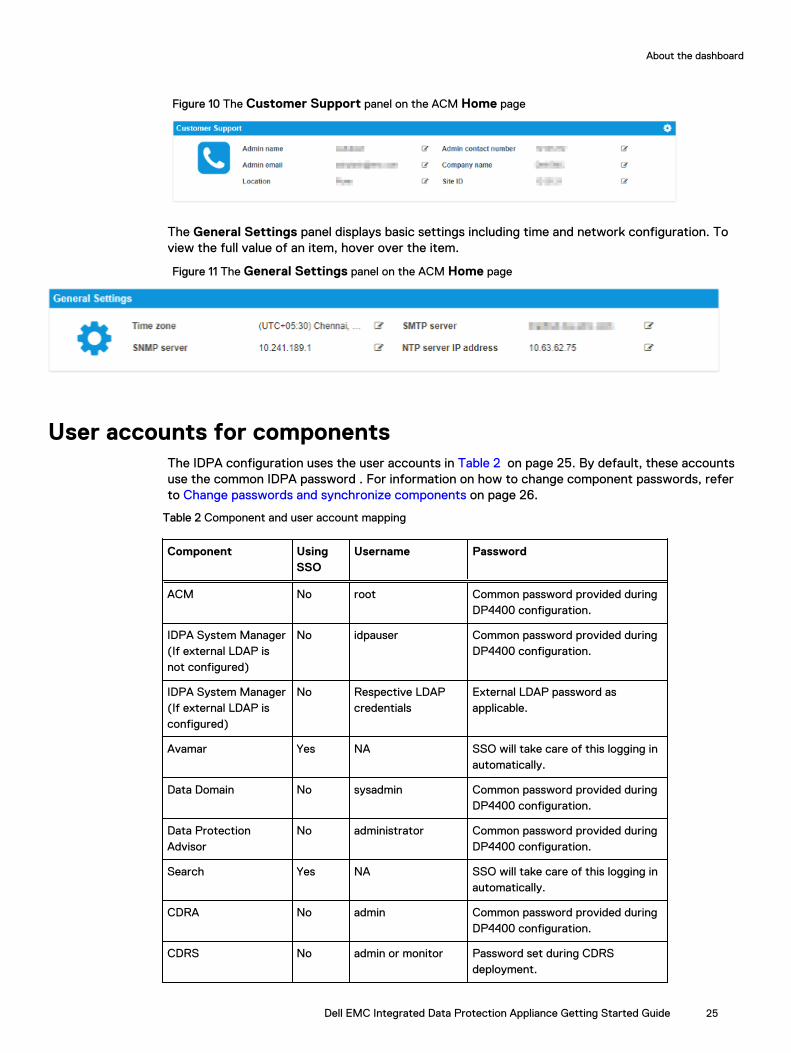
Figure 10 The Customer Support panel on the ACM Home page
The General Settings panel displays basic settings including time and network configuration. Toview the full value of an item, hover over the item.
Figure 11 The General Settings panel on the ACM Home page
User accounts for componentsThe IDPA configuration uses the user accounts in Table 2 on page 25. By default, these accountsuse the common IDPA password . For information on how to change component passwords, referto Change passwords and synchronize components on page 26.
Table 2 Component and user account mapping
Component UsingSSO
Username Password
ACM No root Common password provided duringDP4400 configuration.
IDPA System Manager(If external LDAP isnot configured)
No idpauser Common password provided duringDP4400 configuration.
IDPA System Manager(If external LDAP isconfigured)
No Respective LDAPcredentials
External LDAP password asapplicable.
Avamar Yes NA SSO will take care of this logging inautomatically.
Data Domain No sysadmin Common password provided duringDP4400 configuration.
Data ProtectionAdvisor
No administrator Common password provided duringDP4400 configuration.
Search Yes NA SSO will take care of this logging inautomatically.
CDRA No admin Common password provided duringDP4400 configuration.
CDRS No admin or monitor Password set during CDRSdeployment.
About the dashboard
Dell EMC Integrated Data Protection Appliance Getting Started Guide 25
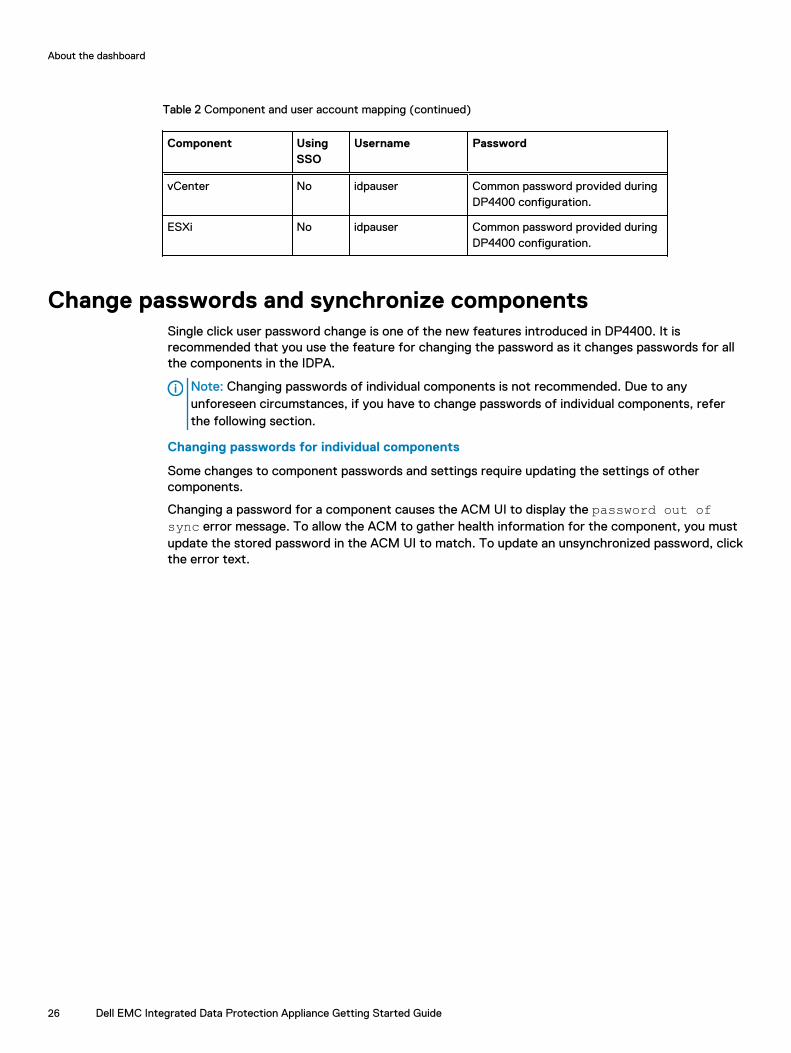
Table 2 Component and user account mapping (continued)
Component UsingSSO
Username Password
vCenter No idpauser Common password provided duringDP4400 configuration.
ESXi No idpauser Common password provided duringDP4400 configuration.
Change passwords and synchronize componentsSingle click user password change is one of the new features introduced in DP4400. It isrecommended that you use the feature for changing the password as it changes passwords for allthe components in the IDPA.
Note: Changing passwords of individual components is not recommended. Due to anyunforeseen circumstances, if you have to change passwords of individual components, referthe following section.
Changing passwords for individual components
Some changes to component passwords and settings require updating the settings of othercomponents.
Changing a password for a component causes the ACM UI to display the password out ofsync error message. To allow the ACM to gather health information for the component, you mustupdate the stored password in the ACM UI to match. To update an unsynchronized password, clickthe error text.
About the dashboard
26 Dell EMC Integrated Data Protection Appliance Getting Started Guide
CHAPTER 4
Performing a VM backup
This section contains the following topics:
l VM backups overview............................................................................................................28l Define vCenter and VMware clients...................................................................................... 28l Deploy the Avamar proxy...................................................................................................... 32l Install the Avamar proxy hotfix.............................................................................................. 33l Create and run the backup policy.......................................................................................... 34
Dell EMC Integrated Data Protection Appliance Getting Started Guide 27
VM backups overview
As soon as your environment is up and running, you can follow the steps in this section to backup aVMware client.
In case you are using Avamar for the first time, the section includes preparatory tasks, such asdefining vCenter and VMware clients and deploying an Avamar proxy.
The entire process is organized into the following procedures:
l Define vCenter and VMware clients.
l Deploy the Avamar proxy.
l Install the Avamar proxy hotfix.
l Create and run the backup policy
Further information about Avamar backups is available in the Avamar documentation, including theAvamar Administration Guide and the Avamar Backup Clients User Guide.
Define vCenter and VMware clients
About this task
This procedure shows you how to create the vCenter and VM clients and add a dataset to the VMclient.
Procedure
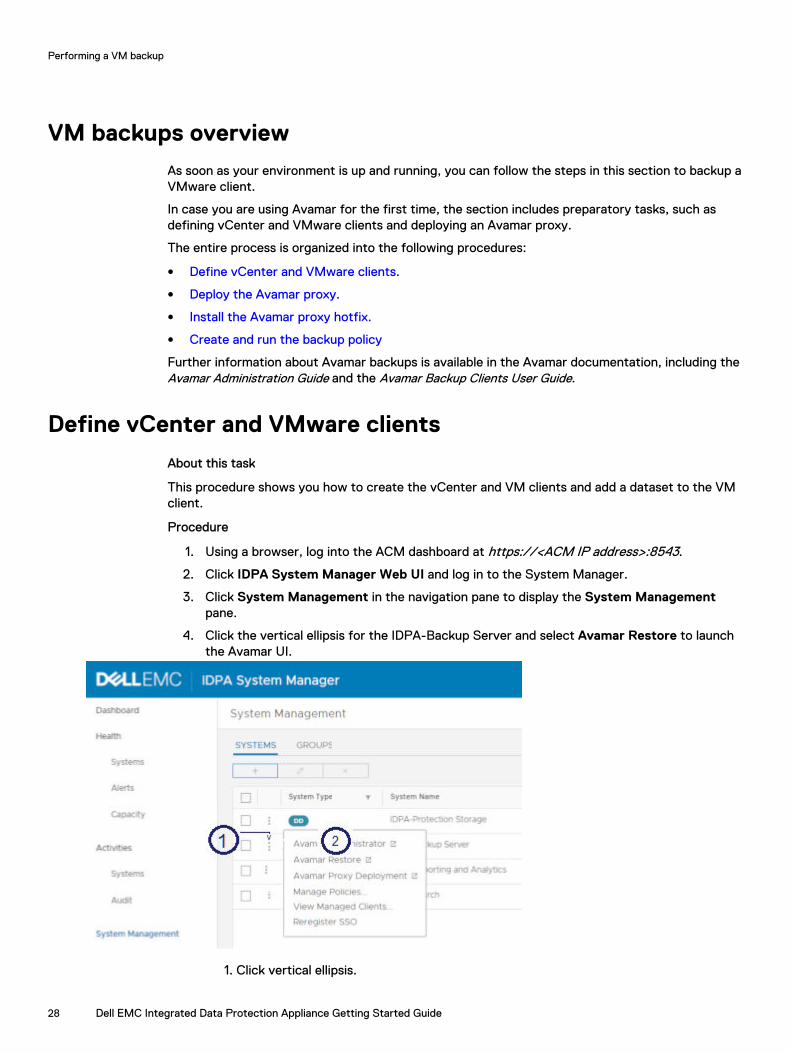
1. Using a browser, log into the ACM dashboard at https://<ACM IP address>:8543.
2. Click IDPA System Manager Web UI and log in to the System Manager.
3. Click System Management in the navigation pane to display the System Managementpane.
4. Click the vertical ellipsis for the IDPA-Backup Server and select Avamar Restore to launchthe Avamar UI.
1. Click vertical ellipsis.
Performing a VM backup
28 Dell EMC Integrated Data Protection Appliance Getting Started Guide

2. Select Avamar Restore.
5. In the Avamar navigation pane, click Administration.
6. To add the vCenter client:
a. Click the plus sign (+) and select Add vCenter to launch the wizard.
1. Click plus sign.2. Select Add vCenter
b. Use the following table to complete the fields on each page, clicking Next to proceed tothe next page.
Table 3 Adding vCenter Clients
Page Field Description
Client Information Client Type Select VMware vCenter.
New Client Name or IP Client name or IP address.
Client Domain Domain name.
vCenter Information User Name The user name of the vCenter serveradministrator.
Password The administrator password.
Port The vCenter HTTPS port number.
Advanced All fields are optional for this task.
Optional Information All fields are optional for this task.
c. Click ADD to complete the wizard. Then refresh the screen to verify the new vCenterclient.
7. To add the VMware client:
a. In the middle pane, expand the new vCenter client and click VirtualMachines.
b. In the right pane, click the plus sign (+) and select Add VMware Client.
Performing a VM backup
Dell EMC Integrated Data Protection Appliance Getting Started Guide 29
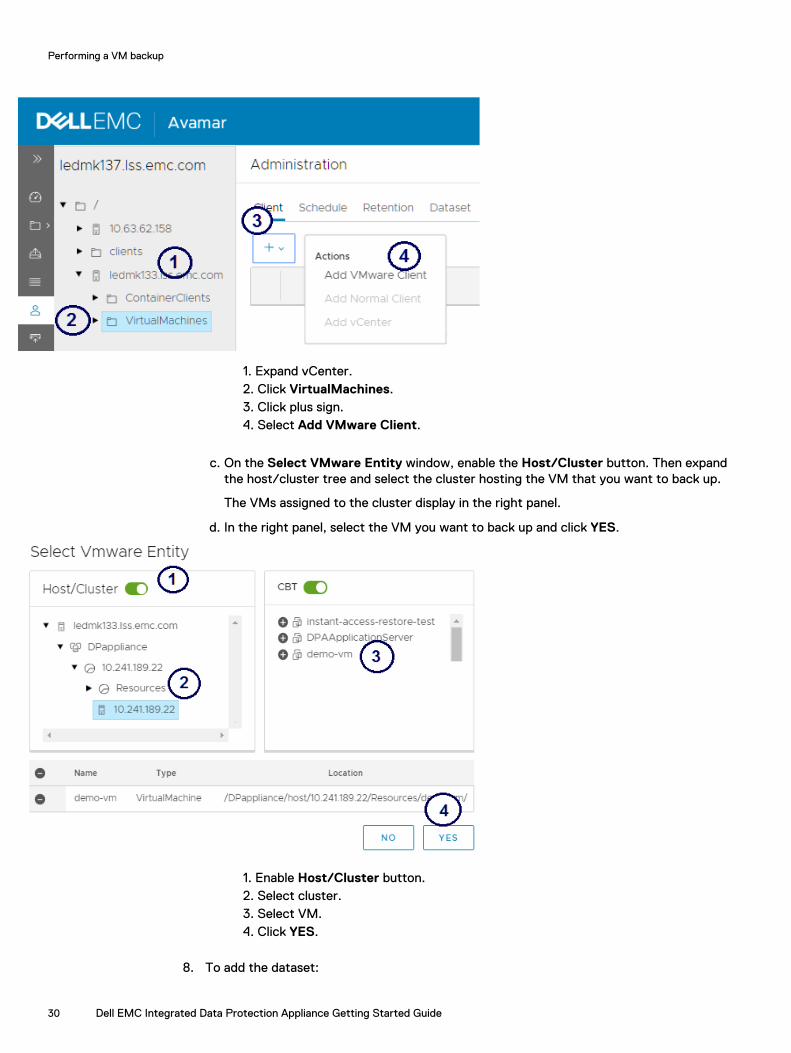
1. Expand vCenter.2. Click VirtualMachines.3. Click plus sign.4. Select Add VMware Client.
c. On the Select VMware Entity window, enable the Host/Cluster button. Then expandthe host/cluster tree and select the cluster hosting the VM that you want to back up.
The VMs assigned to the cluster display in the right panel.
d. In the right panel, select the VM you want to back up and click YES.
1. Enable Host/Cluster button.2. Select cluster.3. Select VM.4. Click YES.
8. To add the dataset:
Performing a VM backup
30 Dell EMC Integrated Data Protection Appliance Getting Started Guide

a. Click Administration in the Avamar navigation pane and select the root domain folder inthe middle pane.
b. Select Dataset in the right pane and then click the plus sign (+) to display the CreateDataSet window.
c. In the Dataset Name field, type the dataset name.
d. Click Windows VMware Image in the Plugins list to display the Windows VMwareImage page.
e. Select the Index VMware Image Backups checkbox and click Submit.
NOTE: Indexing is used for restoring specific files and is optional for backing up entireVMs. Selecting it here will allow you to restore specific files as described in Restorespecific files.
1. Enter the dataset name.2. Select Windows VMware Image.3. Select Index VMware Image Backups.4. Click Submit.
Performing a VM backup
Dell EMC Integrated Data Protection Appliance Getting Started Guide 31
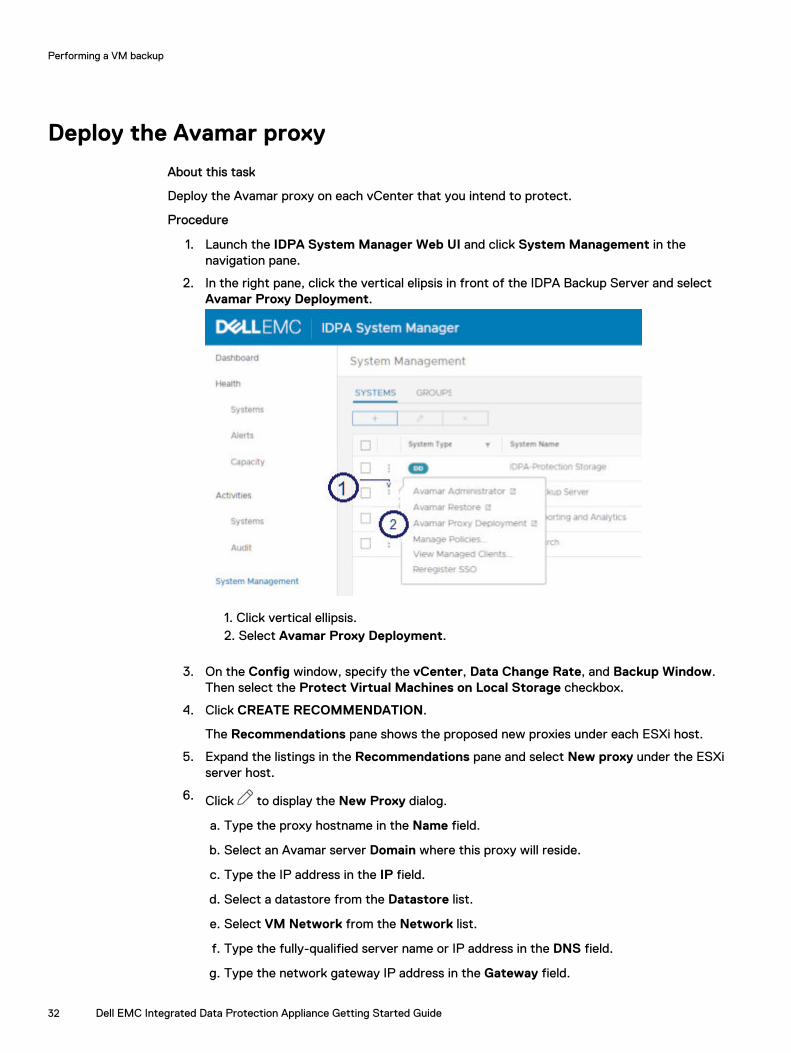
Deploy the Avamar proxy
About this task
Deploy the Avamar proxy on each vCenter that you intend to protect.
Procedure
1. Launch the IDPA System Manager Web UI and click System Management in thenavigation pane.
2. In the right pane, click the vertical elipsis in front of the IDPA Backup Server and selectAvamar Proxy Deployment.
1. Click vertical ellipsis.2. Select Avamar Proxy Deployment.
3. On the Config window, specify the vCenter, Data Change Rate, and Backup Window.Then select the Protect Virtual Machines on Local Storage checkbox.
4. Click CREATE RECOMMENDATION.
The Recommendations pane shows the proposed new proxies under each ESXi host.
5. Expand the listings in the Recommendations pane and select New proxy under the ESXiserver host.
6. Click to display the New Proxy dialog.
a. Type the proxy hostname in the Name field.
b. Select an Avamar server Domain where this proxy will reside.
c. Type the IP address in the IP field.
d. Select a datastore from the Datastore list.
e. Select VM Network from the Network list.
f. Type the fully-qualified server name or IP address in the DNS field.
g. Type the network gateway IP address in the Gateway field.
Performing a VM backup
32 Dell EMC Integrated Data Protection Appliance Getting Started Guide

h. Type the network mask in the Netmask field.
i. Click SAVE.
7. Click to deploy the proxy.
The proxy deployment displays in the lower panel.
Install the Avamar proxy hotfixTo use Virtual Machine indexing at the time of the image backup you must install Avamar Hotfix298624 on all Avamar proxies. If you do not apply the Avamar hotfix, the proxies may run out ofstorage space due to debug logging being enabled by default.
Before you begin
Download Avamar Hotfix 298624 from the following location:
ftp://avamar_ftp:[email protected]/software/hotfixes/298624/SLES12SP1_64/AvamarVMwareCombined-linux-sles12sp1-x86_64-7.5.101-101.rpm
About this task
Repeat this procedure for each Avamar proxy. The following default credentials are required toauthenticate on or connect to an Avamar proxy:
Username: rootPassword: avam@r
Procedure
1. Using the scp command or WinSCP, copy the hotfix file to /space/avamar/var on theproxy.
2. Connect with SSH to the proxy using the default credentials.
3. Type the command rm -f /tmp/*.SQL4. Go to the directory in which the hotfix file is located:
cd /space/avamar/var5. Install the hotfix:
rpm -Uvh AvamarVMwareCombined-linux-sles12sp1-x86_64-7.5.101.101.rpm --force
Results
To verify successful RPM installation, check the version with the following command:avtar --versionIf the RPM is installed, the output is:version: 7.5.101-101_HF298624
Performing a VM backup
Dell EMC Integrated Data Protection Appliance Getting Started Guide 33

Create and run the backup policy
About this task
These steps show how to create the policy to protect the VMware client and then run the policy.
Procedure
1. In the IDPA System Manager, click System Management in the navigation pane.
2. In the right pane, click the vertical ellipsis for the IDPA backup server and select ManagePolicies.
1. Click System Management.2. Click vertical ellipsis.3. Select Manage Policies.
The Manage Policies pane displays.
3. In the Manage Policies pane, click the plus sign (+) to launch the Add Policy wizard.
4. Use the following table to complete the wizard pages, clicking Next to proceed to the nextpage.
Table 4 Adding Policies
Page Field Description
Information Name The policy name.
Domain Accept the default entry.
Enable Click to enable the policy.
Dataset Select VMware Image Dataset.
Performing a VM backup
34 Dell EMC Integrated Data Protection Appliance Getting Started Guide

Table 4 Adding Policies (continued)
Page Field Description
Schedule Select Daily Schedule.
Retention Select Default Retention.
Clients Available Clients Select the VM client defined earlier in this guide.
Proxies (Optional) Available Proxies Select the proxy defined earlier in this guide.
5. Click Finish.
The new policy displays in the policy list.
6. To run the policy, select it in the policy list and click BACKUP NOW.
1. Select the policy.2. Click BACKUP NOW.
7. Monitor the policy run by clicking Systems under Activities in the navigation pane.
Performing a VM backup
Dell EMC Integrated Data Protection Appliance Getting Started Guide 35

Performing a VM backup
36 Dell EMC Integrated Data Protection Appliance Getting Started Guide

CHAPTER 5
Restoring a VM backup
This section describes three different methods of restoring the VM backup that was created in theprevious chapter:
l Restore a Virtual Machine .................................................................................................... 38l Restore using Instant Access................................................................................................. 41l Restore specific files............................................................................................................. 43
Dell EMC Integrated Data Protection Appliance Getting Started Guide 37
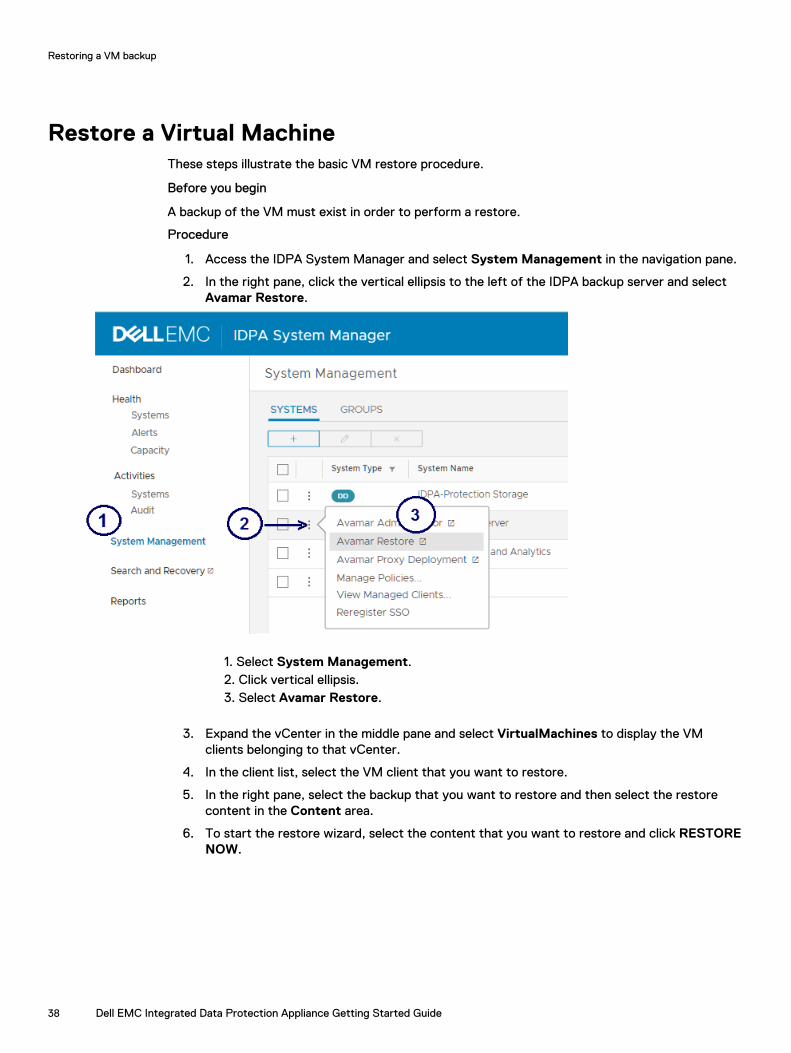
Restore a Virtual MachineThese steps illustrate the basic VM restore procedure.
Before you begin
A backup of the VM must exist in order to perform a restore.
Procedure
1. Access the IDPA System Manager and select System Management in the navigation pane.
2. In the right pane, click the vertical ellipsis to the left of the IDPA backup server and selectAvamar Restore.
1. Select System Management.2. Click vertical ellipsis.3. Select Avamar Restore.
3. Expand the vCenter in the middle pane and select VirtualMachines to display the VMclients belonging to that vCenter.
4. In the client list, select the VM client that you want to restore.
5. In the right pane, select the backup that you want to restore and then select the restorecontent in the Content area.
6. To start the restore wizard, select the content that you want to restore and click RESTORENOW.
Restoring a VM backup
38 Dell EMC Integrated Data Protection Appliance Getting Started Guide
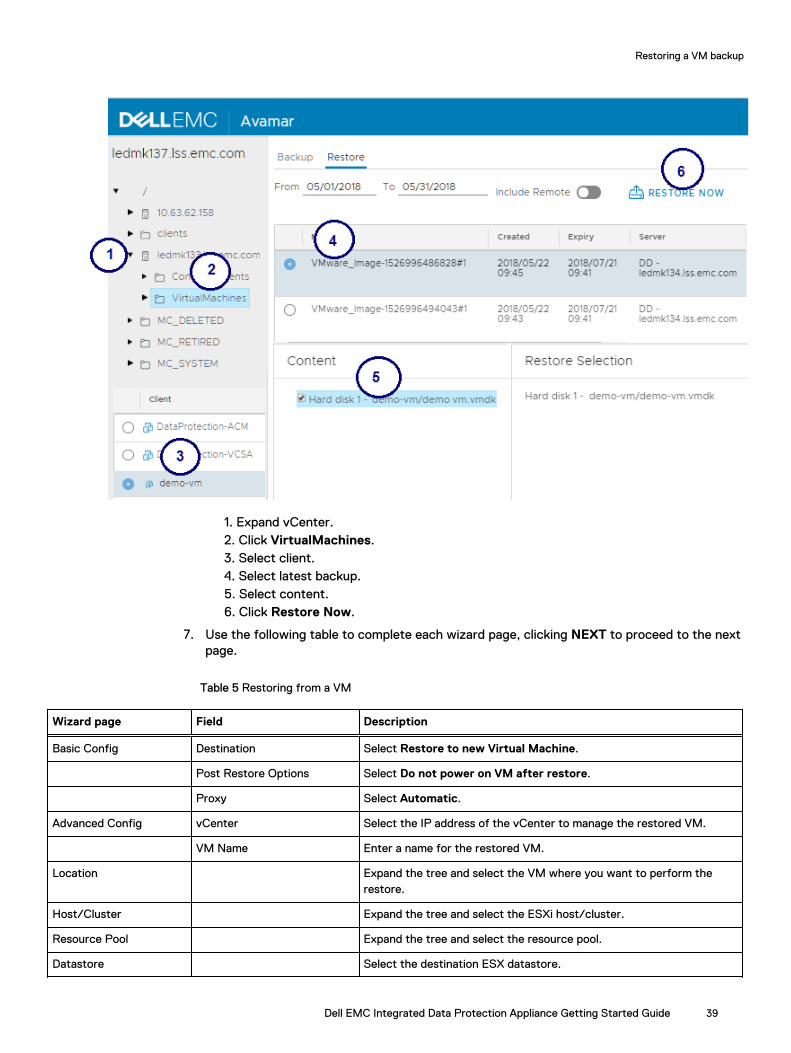
1. Expand vCenter.2. Click VirtualMachines.3. Select client.4. Select latest backup.5. Select content.6. Click Restore Now.
7. Use the following table to complete each wizard page, clicking NEXT to proceed to the nextpage.
Table 5 Restoring from a VM
Wizard page Field Description
Basic Config Destination Select Restore to new Virtual Machine.
Post Restore Options Select Do not power on VM after restore.
Proxy Select Automatic.
Advanced Config vCenter Select the IP address of the vCenter to manage the restored VM.
VM Name Enter a name for the restored VM.
Location Expand the tree and select the VM where you want to perform therestore.
Host/Cluster Expand the tree and select the ESXi host/cluster.
Resource Pool Expand the tree and select the resource pool.
Datastore Select the destination ESX datastore.
Restoring a VM backup
Dell EMC Integrated Data Protection Appliance Getting Started Guide 39

8. On the Summary page, review your entries and click FINISH to perform the restore.
9. To monitor the results, select Activity in the Avamar navigation tree and view theprocessing results in the right pane.
Restoring a VM backup
40 Dell EMC Integrated Data Protection Appliance Getting Started Guide
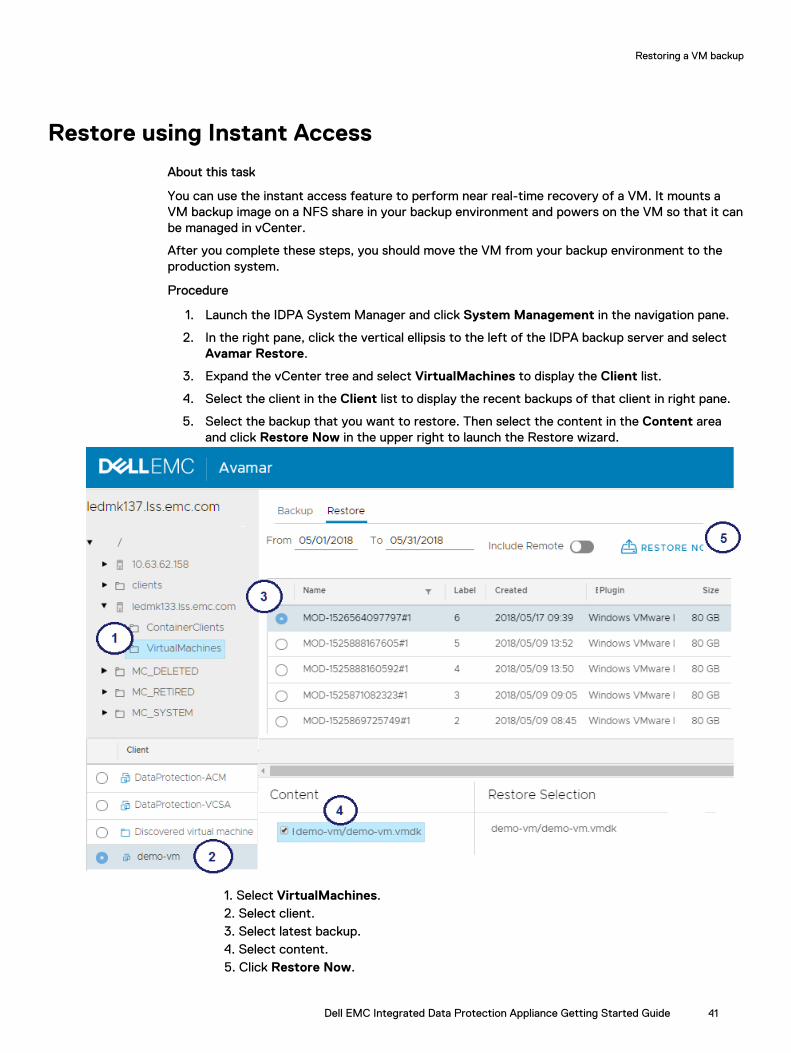
Restore using Instant Access
About this task
You can use the instant access feature to perform near real-time recovery of a VM. It mounts aVM backup image on a NFS share in your backup environment and powers on the VM so that it canbe managed in vCenter.
After you complete these steps, you should move the VM from your backup environment to theproduction system.
Procedure
1. Launch the IDPA System Manager and click System Management in the navigation pane.
2. In the right pane, click the vertical ellipsis to the left of the IDPA backup server and selectAvamar Restore.
3. Expand the vCenter tree and select VirtualMachines to display the Client list.
4. Select the client in the Client list to display the recent backups of that client in right pane.
5. Select the backup that you want to restore. Then select the content in the Content areaand click Restore Now in the upper right to launch the Restore wizard.
1. Select VirtualMachines.2. Select client.3. Select latest backup.4. Select content.5. Click Restore Now.
Restoring a VM backup
Dell EMC Integrated Data Protection Appliance Getting Started Guide 41

6. Use following table to complete each wizard page, clicking NEXT to proceed to the nextpage.
Table 6 Restore Using Instant Access
Wizard page Field Description
Basic Config Destination Select Instant Access.
Post Restore Options Select a restore option.
Proxy Select Automatic.
Advanced Config vCenter Select the IP address of the vCenter to manage the restored VM.
VM Name Enter a name for the restored VM.
Location Expand the tree and select the VM where you want to perform therestore.
Host/Cluster Expand the tree and select the ESXi host/cluster.
Resource Pool Expand the tree and select the resource pool.
7. On the Summary page, review your entries and click FINISH to perform the restore.
8. To monitor the results, select Activity in the Avamar navigation tree and view theprocessing results in the right pane.
Restoring a VM backup
42 Dell EMC Integrated Data Protection Appliance Getting Started Guide

Restore specific filesYou can restore specific files directly from search results.
Before you begin
Ensure that Avamar is indexing your backed-up VM images. For instructions, see the Dell EMCSearch Administration Guide.
About this task
In this procedure, the Search application is used to search for and restore specific files in a VMbackup.
Procedure
1. Access the IDPA System Manager and select Search and Recovery in the navigation pane.
2. Log in to the Search application.
3. In the Search field, enter a query to retrieve specific files and click Search. (You can alsouse filter options to refine the search results.)
The retrieved files display.
4. Select aone or more files that you want to restore and click Restore to display the Restoredialog.
1. Click Search.2. Enter search query.3. Select one or more files.4. Click Restore.
5. Use the following table to complete the Restore dialog.
Restoring a VM backup
Dell EMC Integrated Data Protection Appliance Getting Started Guide 43
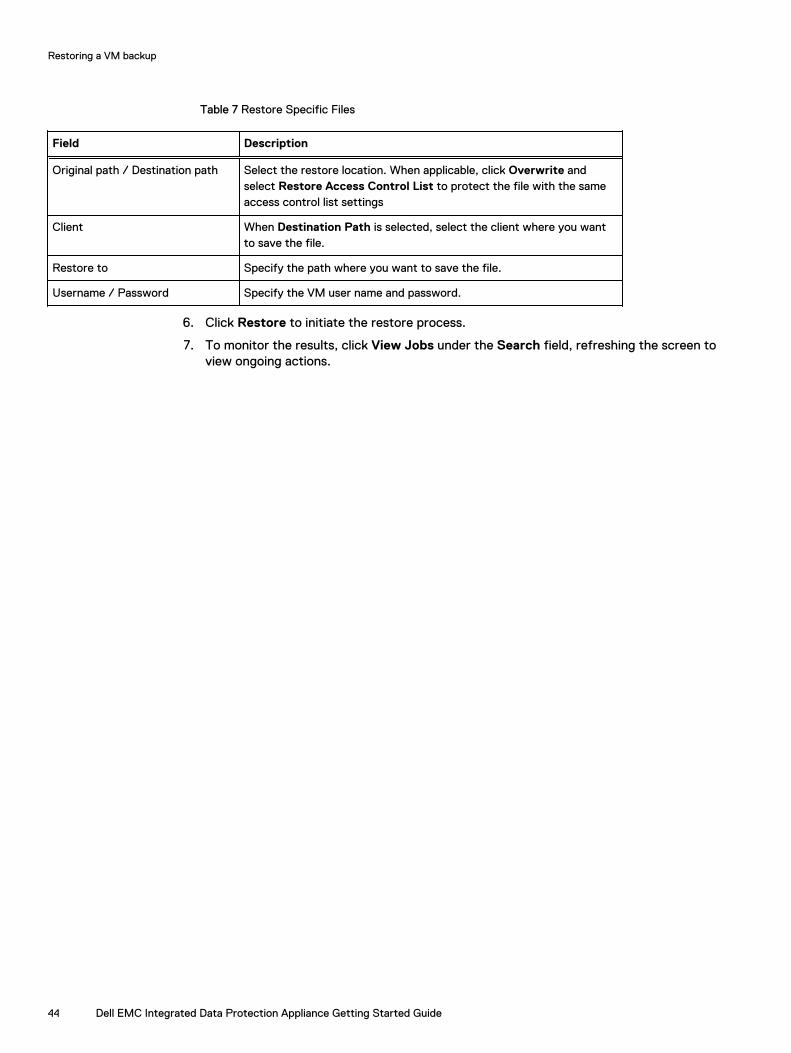
Table 7 Restore Specific Files
Field Description
Original path / Destination path Select the restore location. When applicable, click Overwrite andselect Restore Access Control List to protect the file with the sameaccess control list settings
Client When Destination Path is selected, select the client where you wantto save the file.
Restore to Specify the path where you want to save the file.
Username / Password Specify the VM user name and password.
6. Click Restore to initiate the restore process.
7. To monitor the results, click View Jobs under the Search field, refreshing the screen toview ongoing actions.
Restoring a VM backup
44 Dell EMC Integrated Data Protection Appliance Getting Started Guide
CHAPTER 6
Generating reports
This section contains the following topics:
l Generate a report..................................................................................................................46
Dell EMC Integrated Data Protection Appliance Getting Started Guide 45

Generate a report
About this task
Out of the box, you can run 11 pre-built reports for Avamar and Data Domain systems.
For more information about these reports, see the Dell EMC Data Protection Advisor Product Guide.
If you want to generate your own reports, see the Dell EMC Data Protection Custom Report Guide.
Procedure
1. Access the IDPA System Manager and select Reports in the navigation pane.
In the right pane, each report type is displayed in a separate card. The pane displays bothAvamar and Data Domain reports, but you can use the checkboxes in the upper right to filterthe reports shown.
The report period for each report displays in the lower right. The default report period is theprevious week, but you can change this by clicking Last Week and selecting a differentperiod.
2. To generate a report, click Run Report under the report name.
1. Select Reports.2. (Optional) Change time period.3. Click RUN REPORT.4. Click VIEW LAST REPORT.
IDPA generates the report and displays View Last Report when it is ready to display.
3. Click View Last Report to display the report in a new window.
Generating reports
46 Dell EMC Integrated Data Protection Appliance Getting Started Guide

INDEX
NNetwork Validation Tool 8NVT 8
Dell EMC Integrated Data Protection Appliance Getting Started Guide 47

Index
48 Dell EMC Integrated Data Protection Appliance Getting Started Guide