defining the future of technologies the future of access control head quarters - sydney nsw...
TRANSCRIPT
CS TECHNOLOGIES
Def ining the future of Access Control
Head Quarters - Sydney NSW Austral ia Sa les : sa les@cs tech .b iz , Suppor t : suppor t@cs tech .b iz
Te l . +61 2 9809 5176 , Fax . +61 2 8878 0222 Sa les : sa les@cs tech .b iz , Suppor t : suppor t@cs tech .b iz
ABN: 13 108 508 676
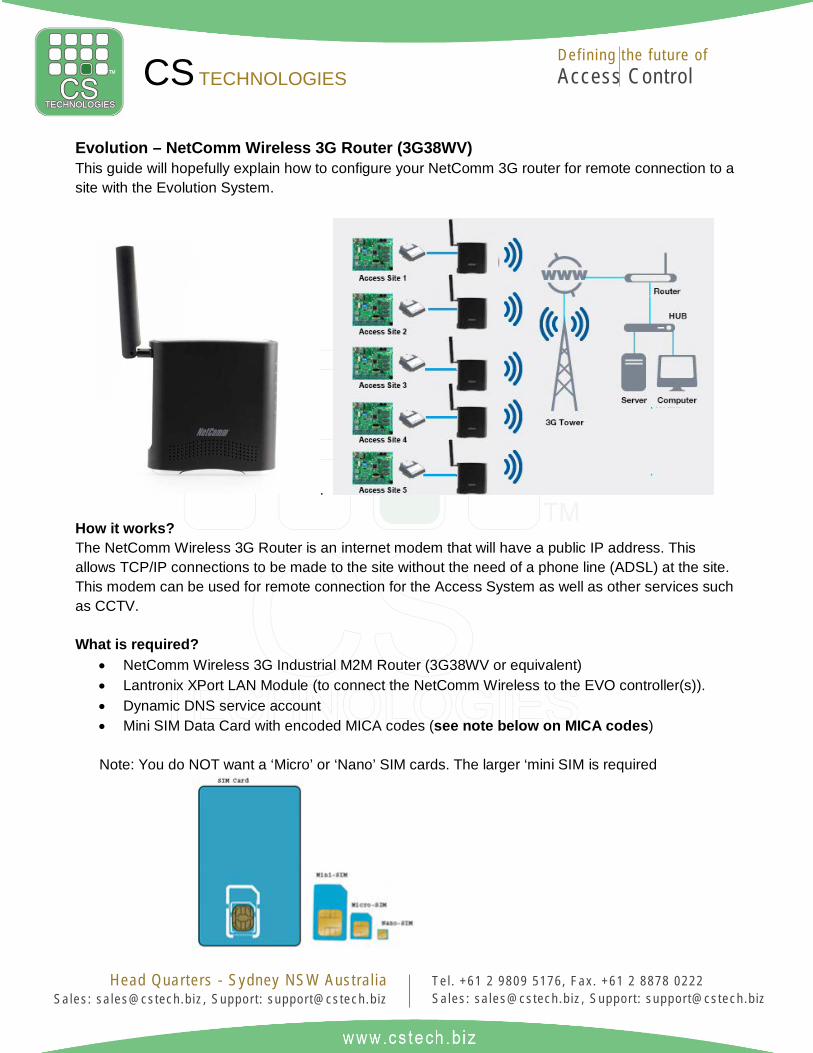
Evolution – NetComm Wireless 3G Router (3G38WV) This guide will hopefully explain how to configure your NetComm 3G router for remote connection to a site with the Evolution System.
. How it works? The NetComm Wireless 3G Router is an internet modem that will have a public IP address. This allows TCP/IP connections to be made to the site without the need of a phone line (ADSL) at the site. This modem can be used for remote connection for the Access System as well as other services such as CCTV. What is required?
• NetComm Wireless 3G Industrial M2M Router (3G38WV or equivalent) • Lantronix XPort LAN Module (to connect the NetComm Wireless to the EVO controller(s)). • Dynamic DNS service account • Mini SIM Data Card with encoded MICA codes (see note below on MICA codes) Note: You do NOT want a ‘Micro’ or ‘Nano’ SIM cards. The larger ‘mini SIM is required
CS TECHNOLOGIES
Def ining the future of Access Control
Head Quarters - Sydney NSW Austral ia Sa les : sa les@cs tech .b iz , Suppor t : suppor t@cs tech .b iz
Te l . +61 2 9809 5176 , Fax . +61 2 8878 0222 Sa les : sa les@cs tech .b iz , Suppor t : suppor t@cs tech .b iz
ABN: 13 108 508 676
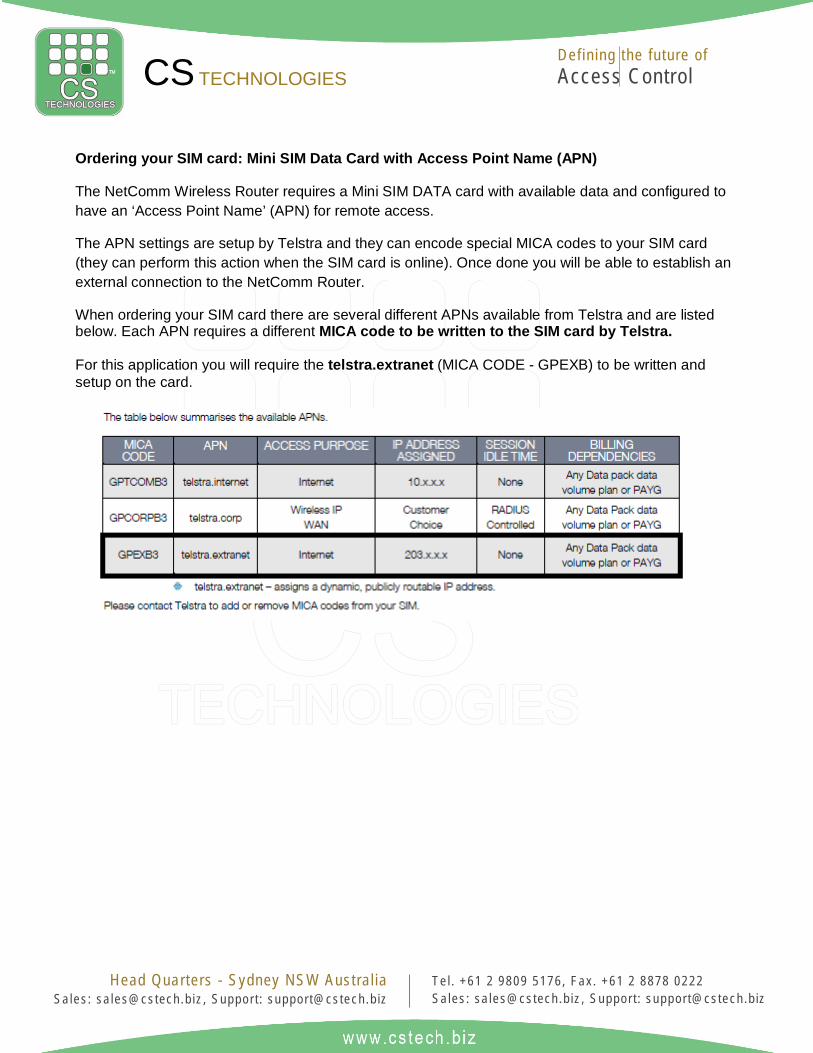
Ordering your SIM card: Mini SIM Data Card with Access Point Name (APN)
The NetComm Wireless Router requires a Mini SIM DATA card with available data and configured to have an ‘Access Point Name’ (APN) for remote access.
The APN settings are setup by Telstra and they can encode special MICA codes to your SIM card (they can perform this action when the SIM card is online). Once done you will be able to establish an external connection to the NetComm Router.
When ordering your SIM card there are several different APNs available from Telstra and are listed below. Each APN requires a different MICA code to be written to the SIM card by Telstra. For this application you will require the telstra.extranet (MICA CODE - GPEXB) to be written and setup on the card.

CS TECHNOLOGIES
Def ining the future of Access Control
Head Quarters - Sydney NSW Austral ia Sa les : sa les@cs tech .b iz , Suppor t : suppor t@cs tech .b iz
Te l . +61 2 9809 5176 , Fax . +61 2 8878 0222 Sa les : sa les@cs tech .b iz , Suppor t : suppor t@cs tech .b iz
ABN: 13 108 508 676
Configuring Your Router You will need the following hardware to set up your router. • NetComm Wireless Router • Laptop or PC • Activated Mini SIM Data card • EVO Controller with TCP/IP adapter.
Before you power up the Router, please insert an active SIM card.
Now power up your PC, NetComm Router, and EVO controller with TCP/IP adapter in a similar configuration shown above.
Note: the PC can connect to the router via WiFi (SSID name is NetComm 4061) or alternatively via a direct Network cable. The PC should be set to obtain an IP address automatically and will be given an IP address by the NetComm router.
By default the Lantronics XPort LAN adapter is set to auto DHCP so will also receive an IP address from the NetComm Router.
Please note: Ensure you do not have any other Auto DHCP routers connected to this setup network.
CS TECHNOLOGIES
Def ining the future of Access Control
Head Quarters - Sydney NSW Austral ia Sa les : sa les@cs tech .b iz , Suppor t : suppor t@cs tech .b iz
Te l . +61 2 9809 5176 , Fax . +61 2 8878 0222 Sa les : sa les@cs tech .b iz , Suppor t : suppor t@cs tech .b iz
ABN: 13 108 508 676
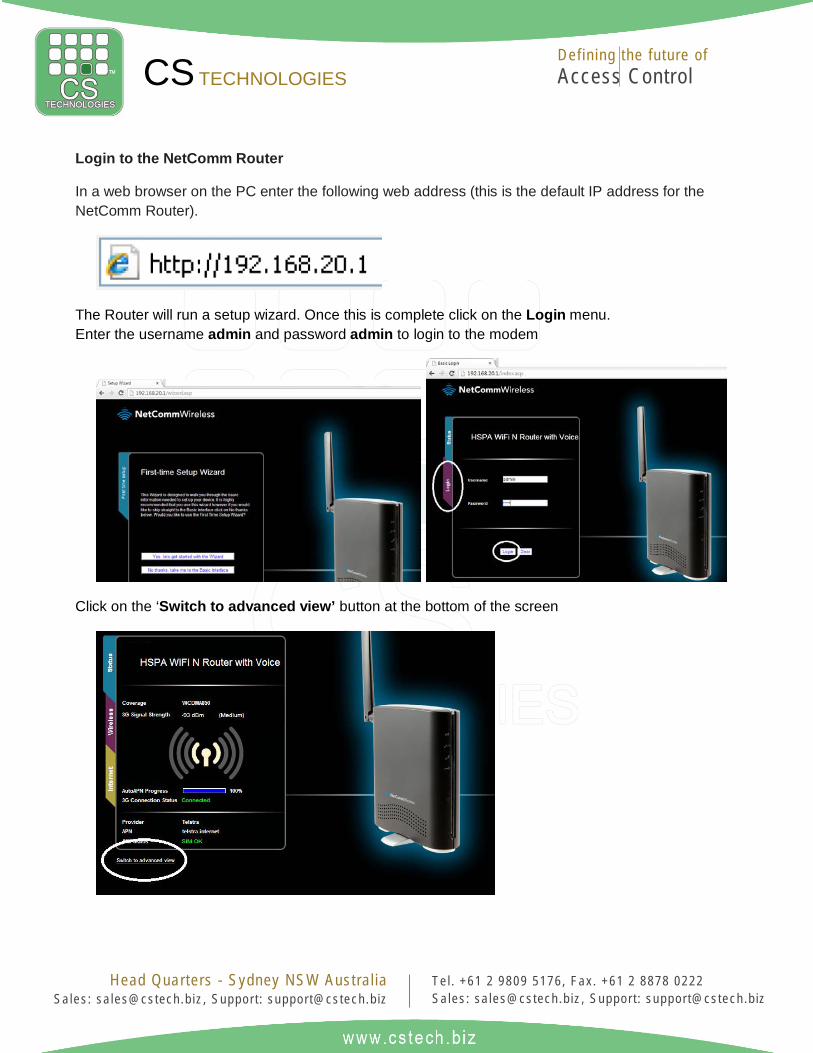
Login to the NetComm Router
In a web browser on the PC enter the following web address (this is the default IP address for the NetComm Router).
The Router will run a setup wizard. Once this is complete click on the Login menu. Enter the username admin and password admin to login to the modem
Click on the ‘Switch to advanced view’ button at the bottom of the screen

CS TECHNOLOGIES
Def ining the future of Access Control
Head Quarters - Sydney NSW Austral ia Sa les : sa les@cs tech .b iz , Suppor t : suppor t@cs tech .b iz
Te l . +61 2 9809 5176 , Fax . +61 2 8878 0222 Sa les : sa les@cs tech .b iz , Suppor t : suppor t@cs tech .b iz
ABN: 13 108 508 676
At the bottom of the page that loads you should see an connection status similar to as shown below
If the SIM Status is ‘SIM locked’ then select the Internet Settings / WWAN menu to unlock the SIM.
In the security section enter the SIM cards pin number to unlock the SIM card.
CS TECHNOLOGIES
Def ining the future of Access Control
Head Quarters - Sydney NSW Austral ia Sa les : sa les@cs tech .b iz , Suppor t : suppor t@cs tech .b iz
Te l . +61 2 9809 5176 , Fax . +61 2 8878 0222 Sa les : sa les@cs tech .b iz , Suppor t : suppor t@cs tech .b iz
ABN: 13 108 508 676
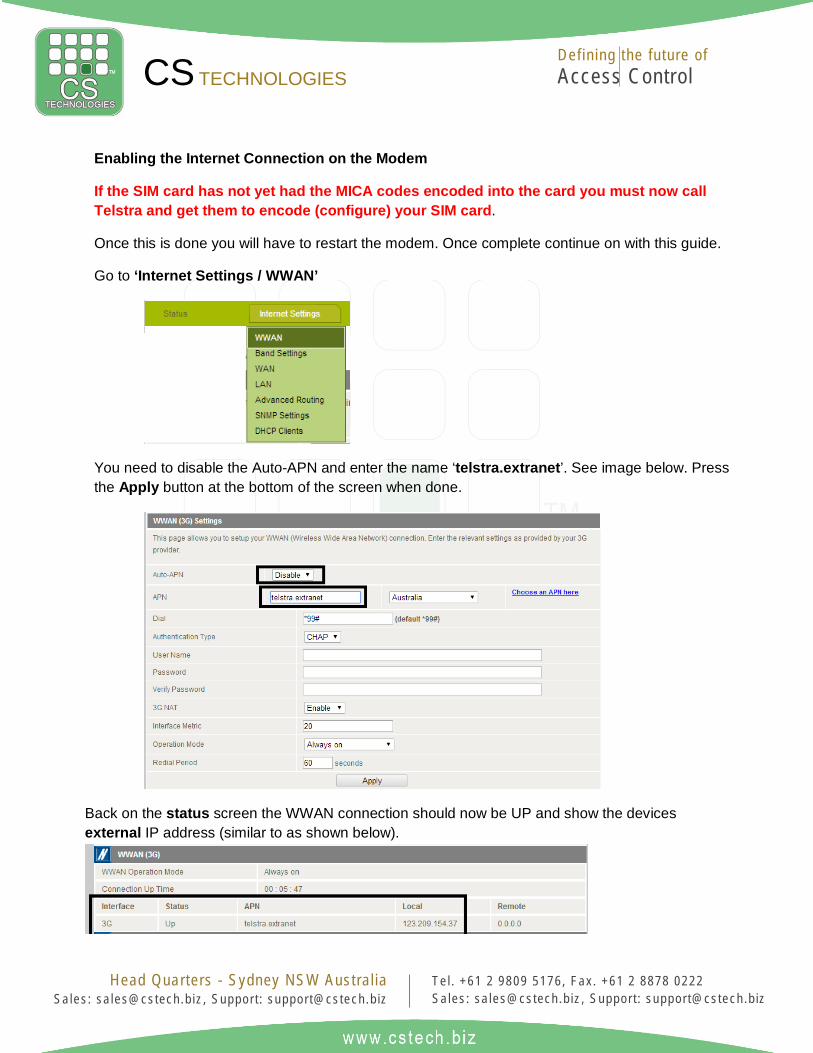
Enabling the Internet Connection on the Modem
If the SIM card has not yet had the MICA codes encoded into the card you must now call Telstra and get them to encode (configure) your SIM card.
Once this is done you will have to restart the modem. Once complete continue on with this guide.
Go to ‘Internet Settings / WWAN’
You need to disable the Auto-APN and enter the name ‘telstra.extranet’. See image below. Press the Apply button at the bottom of the screen when done.
Back on the status screen the WWAN connection should now be UP and show the devices external IP address (similar to as shown below).

CS TECHNOLOGIES
Def ining the future of Access Control
Head Quarters - Sydney NSW Austral ia Sa les : sa les@cs tech .b iz , Suppor t : suppor t@cs tech .b iz
Te l . +61 2 9809 5176 , Fax . +61 2 8878 0222 Sa les : sa les@cs tech .b iz , Suppor t : suppor t@cs tech .b iz
ABN: 13 108 508 676
Enable PING and HTTP service
A handy feature (to help with debugging) is to enable PING and HTTP on the NetComm router.
Go to ‘System / Administrator’
Enable all 3 options shown below
Once this enable you then can remotely test if you can ping the device. As well as remotely open the configuration page in a web browser (http://123.209.21.28:8080 in this example)

CS TECHNOLOGIES
Def ining the future of Access Control
Head Quarters - Sydney NSW Austral ia Sa les : sa les@cs tech .b iz , Suppor t : suppor t@cs tech .b iz
Te l . +61 2 9809 5176 , Fax . +61 2 8878 0222 Sa les : sa les@cs tech .b iz , Suppor t : suppor t@cs tech .b iz
ABN: 13 108 508 676
Setting the Lantronics XPort LAN adapters IP address.
Go to ‘Internet Settings / LAN’
Near the bottom of this screen enter the XPort LAN adapters MAC address and the IP address you would like it to be (IP address needs to be in the same address as the router).
You can alternatively set a Static IP address in the Lantronic XPort Adapter. Enter the web configuration page of the device (username admin password n/a) and set the IP address. This will ensure the IP address of this device never changes. Press Apply Settings once complete.

CS TECHNOLOGIES
Def ining the future of Access Control
Head Quarters - Sydney NSW Austral ia Sa les : sa les@cs tech .b iz , Suppor t : suppor t@cs tech .b iz
Te l . +61 2 9809 5176 , Fax . +61 2 8878 0222 Sa les : sa les@cs tech .b iz , Suppor t : suppor t@cs tech .b iz
ABN: 13 108 508 676

CS TECHNOLOGIES
Def ining the future of Access Control
Head Quarters - Sydney NSW Austral ia Sa les : sa les@cs tech .b iz , Suppor t : suppor t@cs tech .b iz
Te l . +61 2 9809 5176 , Fax . +61 2 8878 0222 Sa les : sa les@cs tech .b iz , Suppor t : suppor t@cs tech .b iz
ABN: 13 108 508 676
Port Forwarding
The next step is to port forward ports 80 and 10001 to the sites XPort LAN adapter.
Go to ‘Firewall / Port Forwarding’ -
Add two separate rule for 80 and 10001 like shown below.
In the example below the IP address of the XPort LAN module is 192.168.1.58. You must enter the IP address of the XPort LAN module at your site here.
CS TECHNOLOGIES
Def ining the future of Access Control
Head Quarters - Sydney NSW Austral ia Sa les : sa les@cs tech .b iz , Suppor t : suppor t@cs tech .b iz
Te l . +61 2 9809 5176 , Fax . +61 2 8878 0222 Sa les : sa les@cs tech .b iz , Suppor t : suppor t@cs tech .b iz
ABN: 13 108 508 676
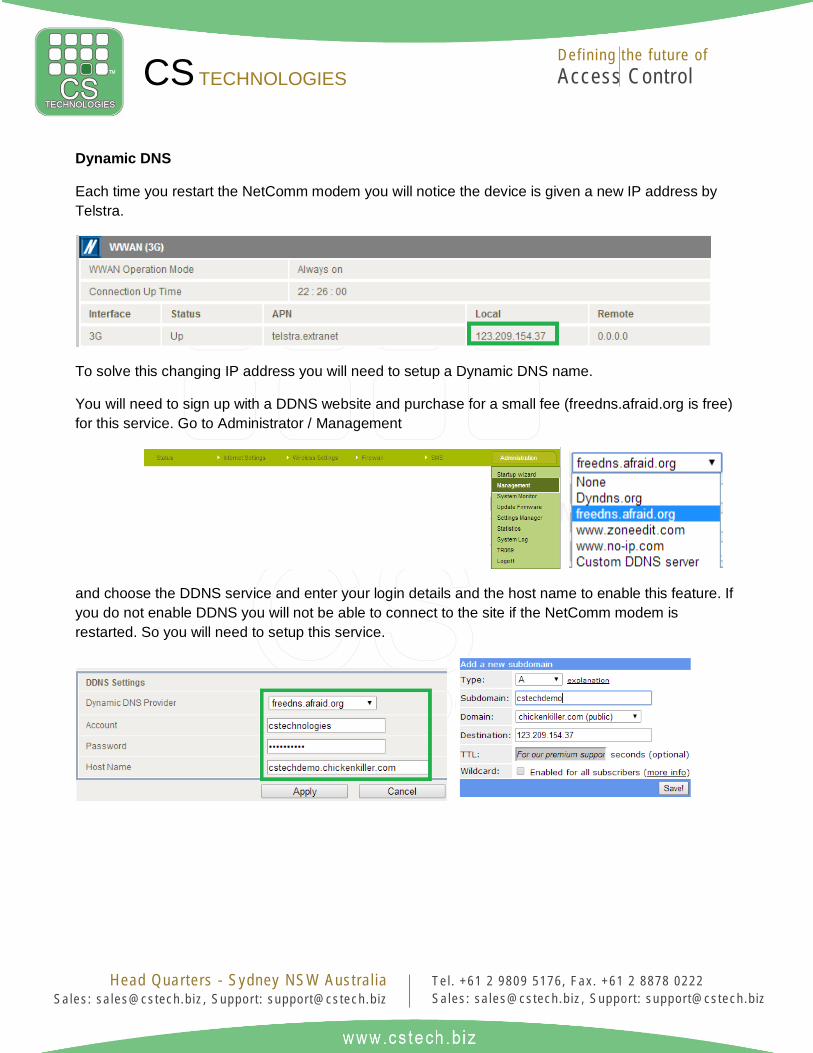
Dynamic DNS
Each time you restart the NetComm modem you will notice the device is given a new IP address by Telstra.
To solve this changing IP address you will need to setup a Dynamic DNS name.
You will need to sign up with a DDNS website and purchase for a small fee (freedns.afraid.org is free) for this service. Go to Administrator / Management
and choose the DDNS service and enter your login details and the host name to enable this feature. If you do not enable DDNS you will not be able to connect to the site if the NetComm modem is restarted. So you will need to setup this service.
CS TECHNOLOGIES
Def ining the future of Access Control
Head Quarters - Sydney NSW Austral ia Sa les : sa les@cs tech .b iz , Suppor t : suppor t@cs tech .b iz
Te l . +61 2 9809 5176 , Fax . +61 2 8878 0222 Sa les : sa les@cs tech .b iz , Suppor t : suppor t@cs tech .b iz
ABN: 13 108 508 676
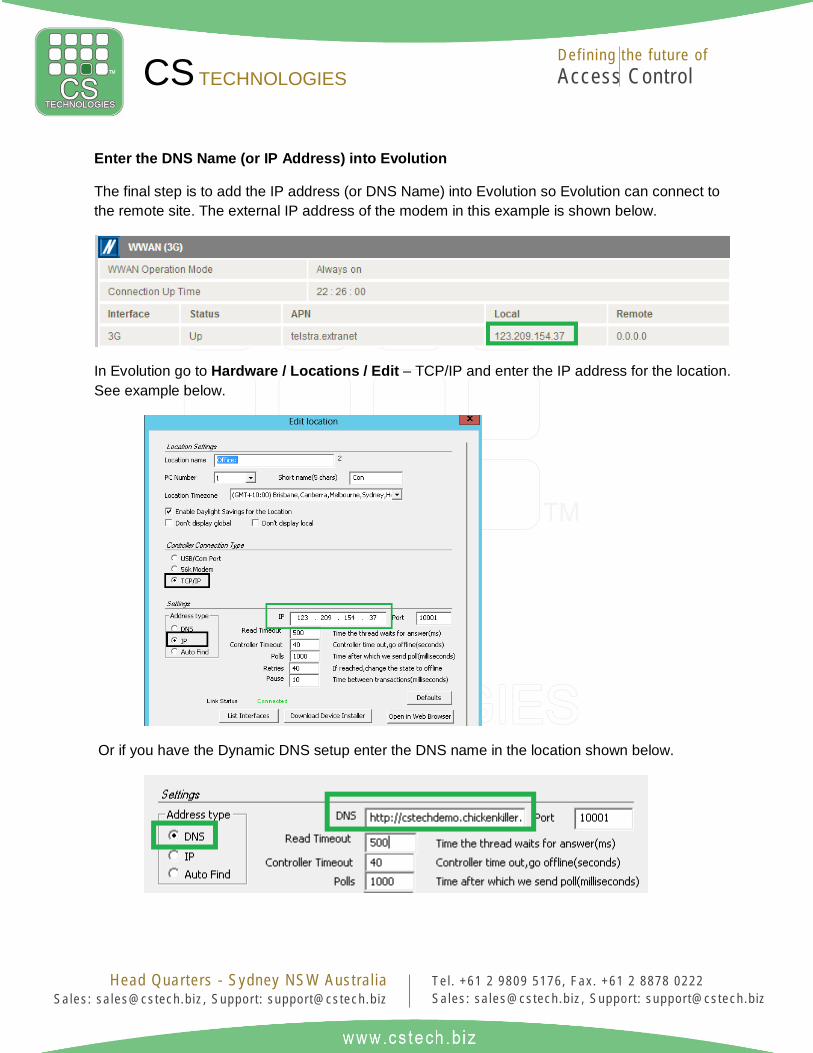
Enter the DNS Name (or IP Address) into Evolution
The final step is to add the IP address (or DNS Name) into Evolution so Evolution can connect to the remote site. The external IP address of the modem in this example is shown below.
In Evolution go to Hardware / Locations / Edit – TCP/IP and enter the IP address for the location. See example below.
Or if you have the Dynamic DNS setup enter the DNS name in the location shown below.