dec12 soundscape manual reader spreads - … soundscape is a high-performance design loaded with...
TRANSCRIPT

MC
Owners Manual
5.1 Powered Soundbar
EN-1
RECYCLING AND REUSE GUIDELINES FOR EUROPEIn accordance with the European Union WEEE (Waste Electrical and Electronic Equipment) directive e�ective August 13, 2005, we would like to notify you that this product may contain regulated materials which, upon disposal, according to the WEEE directive, require special reuse and recycling processing. For this reason Paradigm Electronics Inc. (manufacturers of Paradigm speakers and Anthem Electronics) has arranged with our distributors in European Union member nations to collect and recycle this product at no cost to you. To �nd your local distributor please contact the dealer from whom you purchased this product or go to our website at www.paradigm.com/shift. Please note that the product only falls under the WEEE directive. When disposing of packing and other shipping material we encourage you to recycle through the normal channels.
This device contains ID: WUO-WBT1010 and ID: WUO-WTX1010 and IC: 7985A-WTX1010 and 7985A-WBT1010 This device complies with Part 15 of the FCC Rules. Operation is subject to the following two conditions: (1) This device may not cause harmful interference, and (2) This device must accept any interference received, including information that may cause undesired operation. Changes or modi�cations not expressly approved by the party responsible for compliance could void the user’s authority to operate the equipment.
WIRELESS TRANSMITTER COMPLIANCE INFORMATIONThe term “IC” before the radio certi�cation number only signi�es that Industry Canada technical speci�cations were met. This equipment complies with FCC and IC radiation exposure limits set forth for an uncontrolled environment. This equipment should be installed and operated with minimum distance 20cm between the radiator and your body. This transmitter must not be co-located or operating in conjunction with any other antenna or transmitter. To reduce potential radio interference to other users, the antenna type and its gain should be so chosen that the equivalent isotropically radiated power (e.i.r.p.) is not more than that permitted for successful communication.
Dolby and the double-D symbol are registered trademarks of Dolby Laboratories.
Manufactured under license from DTS, Inc. under one or more of the following U.S. Pat. No’s: 5,956,674; 5,974,380; 6,487,535 and other U.S. and world-wide patents issued and pending. DTS, the Symbol, & DTS and the Symbol together are registered trademarks & DTS Digital Surround and the DTS logos are trademarks of DTS, Inc. © All Rights Reserved.
The Bluetooth® word mark and logos are registered trademarks owned by Bluetooth SIG, Inc. and any use of such marks by Paradigm Electronics Inc. is under license.
The “aptX® software is copyright CSR plc or its group companies. All rights reserved. The aptX® mark and the aptX logo are trade marks of CSR plc or one of its group companies and may be registered in one or more jurisdictions.”
EN-2
TABLE OF CONTENTSSAFETY PRECAUTIONS . . . . . . . . . . . . . . . . . . . . . . . . . .3
IMPORTANT SAFETY INSTRUCTIONS . . . . . . . . . . . . .4
SERIAL NUMBER . . . . . . . . . . . . . . . . . . . . . . . . . . . . . . . .5
ABOUT PARADIGM . . . . . . . . . . . . . . . . . . . . . . . . . . . . . .5
ABOUT YOUR SOUNDSCAPE . . . . . . . . . . . . . . . . . . . . .5
BREAK-IN. . . . . . . . . . . . . . . . . . . . . . . . . . . . . . . . . . . . . . .6
CLEANING . . . . . . . . . . . . . . . . . . . . . . . . . . . . . . . . . . . . . .6
PLACEMENT . . . . . . . . . . . . . . . . . . . . . . . . . . . . . . . . . . . .6 On a Flat Surface — Feet Attached . . . . . . . . . . . . . . .6
On a Wall . . . . . . . . . . . . . . . . . . . . . . . . . . . . . . . . . . . . . . . .7 Wall-Mounting Instructions . . . . . . . . . . . . . . . . . . . . . .7
CONNECTION . . . . . . . . . . . . . . . . . . . . . . . . . . . . . . . . . . .9 Power Connection . . . . . . . . . . . . . . . . . . . . . . . . . . . . . . .9
Signal Connection . . . . . . . . . . . . . . . . . . . . . . . . . . . . . . .9 Where are Connections Made? . . . . . . . . . . . . . . . . . . .9 An Introduction to Audio Cables . . . . . . . . . . . . . . . 10 Routing Sources via Digital Connection with the Television used to Switch Between . . . . . . . . . . . . . 10 Recommended Connection . . . . . . . . . . . . . . . . . . . . 11 Alternate Connection . . . . . . . . . . . . . . . . . . . . . . . . . . 12 Bluetooth Connection . . . . . . . . . . . . . . . . . . . . . . . . . 13
USING A SUBWOOFER . . . . . . . . . . . . . . . . . . . . . . . . 14 No Subwoofer . . . . . . . . . . . . . . . . . . . . . . . . . . . . . . . . . 14 Adding an External Subwoofer . . . . . . . . . . . . . . . . . 14 Wired Subwoofer Connection . . . . . . . . . . . . . . 14 Wireless Subwoofer Connection . . . . . . . . . . . . 14 Syncing an External Subwoofer with your Soundcape . . . . . . . . . . . . . . . . . . . . . . . . . . . 14
SURROUND SOUND DECODING . . . . . . . . . . . . . . . 15 Digital Inputs (Optical, Coaxial) and Bluetooth . . 15 Analog Inputs (Left/Right RCA). . . . . . . . . . . . . . . . . . 15
CONTROL OPTIONS. . . . . . . . . . . . . . . . . . . . . . . . . . . 15 Top-Panel Interface . . . . . . . . . . . . . . . . . . . . . . . . . . . . 15 Remote Control. . . . . . . . . . . . . . . . . . . . . . . . . . . . . . . . 16 Changing the Remote’s Battery . . . . . . . . . . . . . 16 Programming a Second Remote . . . . . . . . . . . . 16
MENU FLOW CHART . . . . . . . . . . . . . . . . . . . . . . . . . . . 17
THE MENU SYSTEM . . . . . . . . . . . . . . . . . . . . . . . . . . . 19 Entering and Exiting the Menu . . . . . . . . . . . . . . . . . 19 From the Soundscape’s Top Panel . . . . . . . . . . . 19 Via the Soundscape’s Remote . . . . . . . . . . . . . . . 19 How to Use the Navigation Buttons . . . . . . . . . . . . . . 20
MENU OPTIONS . . . . . . . . . . . . . . . . . . . . . . . . . . . . . . 19 MODE . . . . . . . . . . . . . . . . . . . . . . . . . . . . . . . . . . . . . . . . . 19 DISPLAY . . . . . . . . . . . . . . . . . . . . . . . . . . . . . . . . . . . . . . . 20 INSTALL . . . . . . . . . . . . . . . . . . . . . . . . . . . . . . . . . . . . . . . 20 SUB . . . . . . . . . . . . . . . . . . . . . . . . . . . . . . . . . . . . . . . . . . 20 SOURCE NAME . . . . . . . . . . . . . . . . . . . . . . . . . . . . . . . . 21 LEARN. . . . . . . . . . . . . . . . . . . . . . . . . . . . . . . . . . . . . . . . . 21 RESET . . . . . . . . . . . . . . . . . . . . . . . . . . . . . . . . . . . . . . . . . 23 EXIT . . . . . . . . . . . . . . . . . . . . . . . . . . . . . . . . . . . . . . . . . . 23
TROUBLESHOOTING . . . . . . . . . . . . . . . . . . . . . . . . . . 23
TECHNICAL SPECIFICATIONS. . . . . . . . . . . . . . . . . . . 24
LIMITED WARRANTY . . . . . . . . . . . . . . . . . . . . . . . . . . 24
EN-3
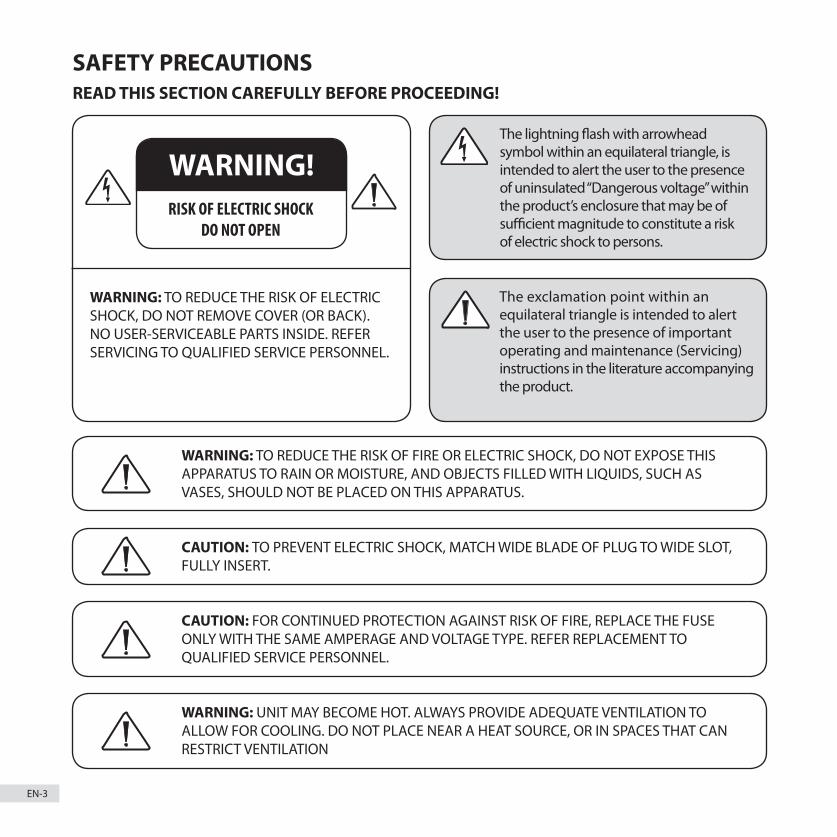
SAFETY PRECAUTIONSREAD THIS SECTION CAREFULLY BEFORE PROCEEDING!
WARNING!RISK OF ELECTRIC SHOCK
DO NOT OPEN
The lightning �ash with arrowhead symbol within an equilateral triangle, is intended to alert the user to the presence of uninsulated “Dangerous voltage” within the product’s enclosure that may be of su�cient magnitude to constitute a risk of electric shock to persons.
The exclamation point within an equilateral triangle is intended to alert the user to the presence of important operating and maintenance (Servicing) instructions in the literature accompanying the product.
WARNING: TO REDUCE THE RISK OF FIRE OR ELECTRIC SHOCK, DO NOT EXPOSE THIS APPARATUS TO RAIN OR MOISTURE, AND OBJECTS FILLED WITH LIQUIDS, SUCH AS VASES, SHOULD NOT BE PLACED ON THIS APPARATUS.
CAUTION: TO PREVENT ELECTRIC SHOCK, MATCH WIDE BLADE OF PLUG TO WIDE SLOT, FULLY INSERT.
CAUTION: FOR CONTINUED PROTECTION AGAINST RISK OF FIRE, REPLACE THE FUSE ONLY WITH THE SAME AMPERAGE AND VOLTAGE TYPE. REFER REPLACEMENT TO QUALIFIED SERVICE PERSONNEL.
WARNING: UNIT MAY BECOME HOT. ALWAYS PROVIDE ADEQUATE VENTILATION TO ALLOW FOR COOLING. DO NOT PLACE NEAR A HEAT SOURCE, OR IN SPACES THAT CAN RESTRICT VENTILATION
WARNING: TO REDUCE THE RISK OF ELECTRIC SHOCK, DO NOT REMOVE COVER (OR BACK). NO USER-SERVICEABLE PARTS INSIDE. REFER SERVICING TO QUALIFIED SERVICE PERSONNEL.

EN-4
IMPORTANT SAFETY INSTRUCTIONS1 Read these instructions.
2 Keep these instructions.
3 Heed all warnings.
4 Follow all instructions.
5 Do not use this apparatus near water.
6 Clean with a dry cloth only.
7 Do not block any ventilation openings. Install in accordance with the manufacturer’s instructions.
8 Do not install near any heat sources such as radiators, heat registers, stoves, or other apparatus (including ampli�ers) that produce heat.
9 Do not defeat the safety purpose of the polarized or grounding type plug. A polarized plug has two blades with one wider than the other. A grounding type plug has two blades and a third grounding prong. The wide blade or the third prong are provided for your safety. If the provided plug does not �t into your outlet, consult an electrician for replacement of the obsolete outlet.
10 Protect the power cord from being walked on or pinched, particularly at plugs, convenience receptacles and the point where they exit from the apparatus.
11 Only use attachments/accessories speci�ed by the manufacturer.
12 Use only with the cart, stand, feet, tripod, bracket, or table speci�ed by the manufacturer or sold with the apparatus. When a cart is used, use caution when
moving the cart/ apparatus combination, to avoid injury from tip-over.
13 Unplug this apparatus during lightning storms or when unused for long periods of time.
14 Refer all servicing to quali�ed service personnel. Servicing is required when the apparatus has been damaged in any way, such as power-supply cord or plug is damaged, liquid has been spilled or objects have fallen into the apparatus, the apparatus has been exposed to rain or moisture, does not operate normally, or has been dropped.
15 Use the mains plug to disconnect the apparatus from the mains or ”TO COMPLETELY DISCONNECT THIS APPARATUS FROM THE AC MAINS, DISCONNECT THE POWER SUPPLY CORD PLUG FROM THE AC RECEPTACLE.
16 “WARNING – TO REDUCE THE RISK OF FIRE OR ELECTRIC – SHOCK, DO NOT EXPOSE THIS APPARATUS TO RAIN OR MOISTURE”
17 “DO NOT EXPOSE THIS EQUIPMENT TO DRIPPING OR SPLASHING AND ENSURE THAT NO OBJECTS FILLED WITH LIQUIDS, SUCH AS VASES, ARE PLACED ON THE EQUIPMENT.”
18 “THE MAINS PLUG OF THE POWER SUPPLY CORD SHALL REMAIN READILY OPERABLE.
EN-5
SERIAL NUMBERThe product’s serial number is located on the Soundscape’s rear panel. In the event that you need to contact Paradigm about your Soundscape, please have the following information recorded:
Serial Number:
Retail Outlet or Website where Product was Purchased:
Retail Outlet Phone Number:
Purchase Date:
ABOUT PARADIGMIn the early 1980s Paradigm was just an idea in the minds of a couple of twenty somethings who loved music. Unlike today, there was no 225,000 square-foot factory, no 36,000-cu.-ft. on-site anechoic measurement chamber, just a desire to make really good sounding speakers and sell them at a down to earth price. Today, Paradigm speakers are sold on six continents. We’ve been voted #1 Best Price/Value 22 times* and fans scour the web to buy used versions of our original speakers. That should tell you something about Paradigm quality. In SHIFT™ Series, we’ve taken everything we’ve learned about sound and adapted it for today’s wireless world with an emphasis on great sound in an easy setup. *Rated #1 Best Price/Value. Inside Track Dealer Survey. An annual independent nationwide survey of consumer electronics specialist retailers and custom installers.
IMPORTANT: TURN OFF YOUR SOUNDSCAPE before unplugging your Soundscape from the wall.
ABOUT YOUR SOUNDSCAPE™
Your Soundscape is a high-performance design loaded with Paradigm technology. In other words, it has loads of very cool stu� you won’t �nd in any other soundbar system. It is a full-range design delivering soaring high frequencies, an authentic midrange with particularly natural dialog reproduction and rich, deep bass frequencies. Although not required, if desired an external Paradigm subwoofer (sold separately) may be added in a wired or wireless capacity, to deliver even deeper bass impact for movie special e�ects. Advanced digital signal processing technology has allowed Paradigm to replace �ve dedicated home-theater speakers with a one piece solution capable of reproducing multichannel recordings with un�inching accuracy, resolution, and detail—the inspiration behind every Paradigm design. The Soundscape reproduces front left, right, and center channels via the system’s dedicated tweeters and woofers. Surround channels are simulated using our sophisticated Paradigm Virtual Surround. Bluetooth capability aligned with aptX coding ensures high-quality streaming. For those who salivate over technical details, we’ve also included a Tech Specs section in the back of the manual to give you the skinny on why your Soundscape sounds so good!
The di�erence the Soundscape will make to your TV, music and movies can’t be put into words, but you’ll hear it and you’ll feel it. It’s an experience that takes you beyond a high performance system to a place where you’re absolutely lost in the experience. It’s the Paradigm Di�erence. We guarantee you won’t be able to keep that di�erence a secret and we hope you don’t. Spread the word. Talk about your Soundscape. BRAG about it. Play it and let others listen.
We’re all di�erent and our sound should re�ect that. Some of us like music, others love movies, others are gaming enthusiasts, others enjoy it all. No matter who you are or where you live, what you like or what you do, we want to be The O�cial Sound of YOU™.
Read this manual and follow all instructions. If you still have questions please visit the Q&A page on our website at paradigm.com.
EN-6
BREAK-INAlthough your Soundscape will sound great right ‘out of the carton’, it will sound even better when broken in. Allow it to operate for several hours before you begin to listen critically.
CLEANINGDo not use strong or abrasive cleaners on your new Soundscape. Simply wipe the cabinet gently with a soft, damp cloth.
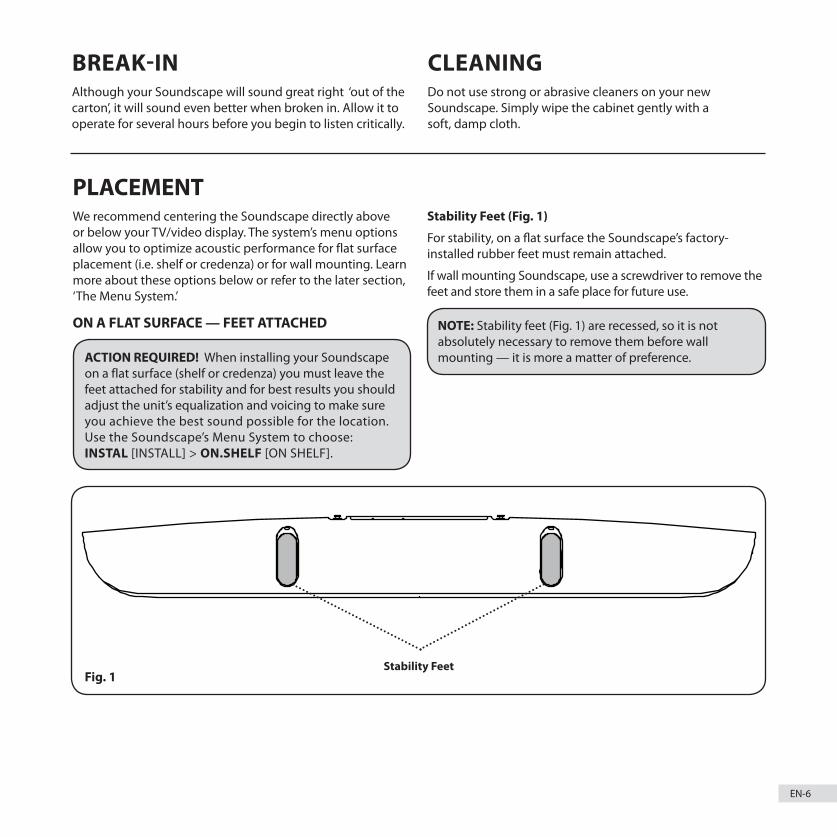
PLACEMENTWe recommend centering the Soundscape directly above or below your TV/video display. The system’s menu options allow you to optimize acoustic performance for flat surface placement (i.e. shelf or credenza) or for wall mounting. Learn more about these options below or refer to the later section, ‘The Menu System.’
ON A FLAT SURFACE — FEET ATTACHED
ACTION REQUIRED! When installing your Soundscape on a flat surface (shelf or credenza) you must leave the feet attached for stability and for best results you should adjust the unit’s equalization and voicing to make sure you achieve the best sound possible for the location. Use the Soundscape’s Menu System to choose: INSTAL [INSTALL] > ON.SHELF [ON SHELF].
Stability Feet (Fig. 1)
For stability, on a �at surface the Soundscape’s factory-installed rubber feet must remain attached.
If wall mounting Soundscape, use a screwdriver to remove the feet and store them in a safe place for future use.
NOTE: Stability feet (Fig. 1) are recessed, so it is not absolutely necessary to remove them before wall mounting — it is more a matter of preference.
Stability FeetFig. 1

EN-7
PLACEMENT (Cont’d)ON A WALL
What’s included1 x Wall-Mounting Bracket and 2 x Levelling ScrewsTools recommended (not included)1 x Stud Finder1 x Level1 x Electric drill and appropriate drill bits
Hardware (not included)5 x Screws appropriate to mounting surface and weight of Soundscape.5 x Wall anchors appropriate to mounting surface and weight of Soundscape.
Paradigm does NOT supply screws and anchor bolts to mount Soundscape to a wall. Choose screws and anchor bolts appropriate for size
and weight of Soundscape.
Dimensions of Soundscape (H x W x D): 5-1/2˝ x 42˝ x 5˝ / 14 cm x 106.7 x 12.7 cm.
Weight of Soundscape: 20 lb / 9.1 kg
We provide limited instructions for wall mounting, please contact your Paradigm Dealer for more detailed information.
The instructions that follow assume the mounting surface is drywall with
standard wood studs. Should you wish to mount to another type of surface please consult a certi�ed contractor or your Paradigm Dealer before you begin the installation.
ACTION REQUIRED: When mounting Soundcsape on a wall for best results, adjust the unit’s equalization and voicing to make sure you are achieving the best sound for the location. Remove feet, if desired, before wall mounting.
Use the Soundscape’s internal menu system to choose: INSTAL > ON WALL.
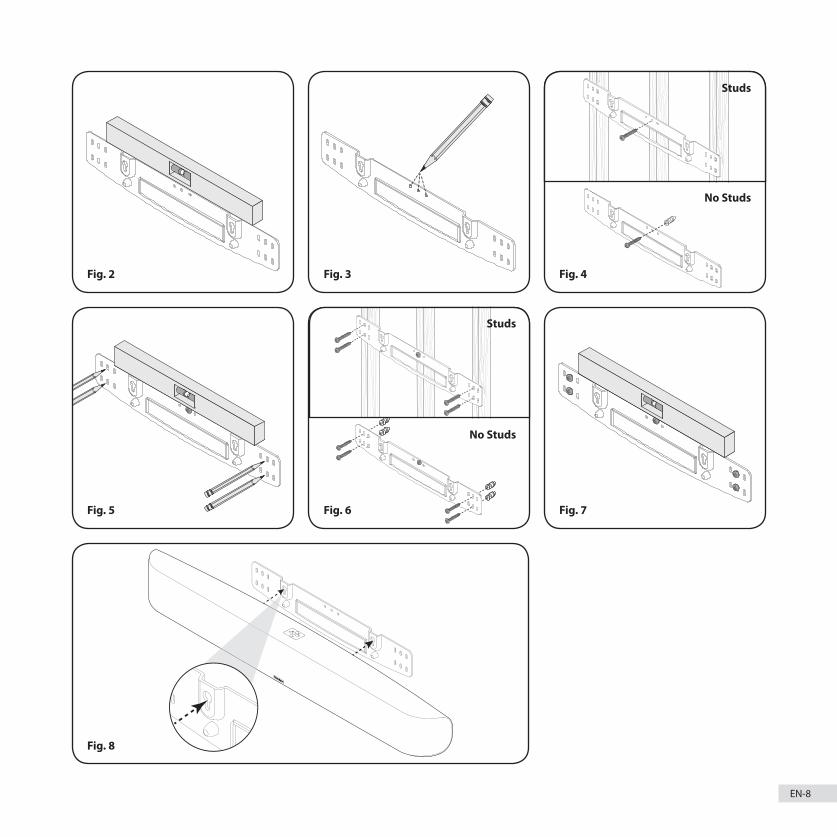
Wall-Mounting InstructionsFollow the directions below and use the illustrations (Figs. 2 – 8) provided on the following pages for guidance.
1 Decide on mounting location and use a level to make sure Soundscape’s Wall-Mounting bracket sits level (Fig. 2).
2 Mark the three center pilot hole screw locations (Fig. 3).
3 Use a stud finder to determine if there is a stud behind one of the three center screw locations (not shown).
If a stud is found drill a pilot hole. If no stud is found use the centermost screw location and drill a pilot hole for a wall anchor. Install wall anchor (not shown).
4 Using a screw, attach the bracket to the wall. DO NOT tighten the screw at this point (Fig. 4).
5 Use a stud finder to determine if a stud lies behind any of the left and right screw locations. If a stud is found the top and bottom screw holes with a stud behind them are your screw locations. If no stud is found use the top
and bottom centermost screw locations as your screw locations. Use a level to square the bracket and mark the remaining pilot hole locations (Fig. 5).
6 Remove the wall bracket or pivot bracket to allow access to the remaining screw locations. a) If a stud is found, drill pilot holes. b) If no stud is found drill pilot holes and install wall anchors.
7 Using the screws, attach the wall bracket to the wall. DO NOT fully tighten (Fig. 6).
8 Use a level to square the bracket, then tighten all screws (Fig. 7).
9 Attach audio and power cables. Refer to ‘CONNECTION’ section of this manual for more information.
10 Move Soundscape into place. Drop the shoulder bolts into the wall bracket keyholes (Fig. 8). Before releasing, make sure the Soundscape has dropped fully into the keyholes and is �rmly in place (Fig. 8 Inset).
EN-8
Fig. 2
Fig. 5
Fig. 8
Fig. 3
Fig. 6
Fig. 4
No Studs
No Studs
Studs
Studs
Fig. 7
EN-9
POWER CONNECTIONThe power cord should be inserted into the AC power receptacle on the rear panel, then to a nearby AC wall outlet. The Soundscape integrates a signal sensing power supply that automatically switches to ‘Standby’ after 20 minutes. Plugged into the wall, with no signal sensed, the Soundscape will remain in standby mode.
SIGNAL CONNECTIONWhen using the Soundscape to reproduce TV audio, your television’s audio output should be defeated. Some televisions will allow you to turn off the internal speaker via the television’s menu system. Others may require you to turn the television’s volume to ‘zero’ or ‘mute’. Follow the instructions in your TV’s Owners Manual to zero or mute the volume.
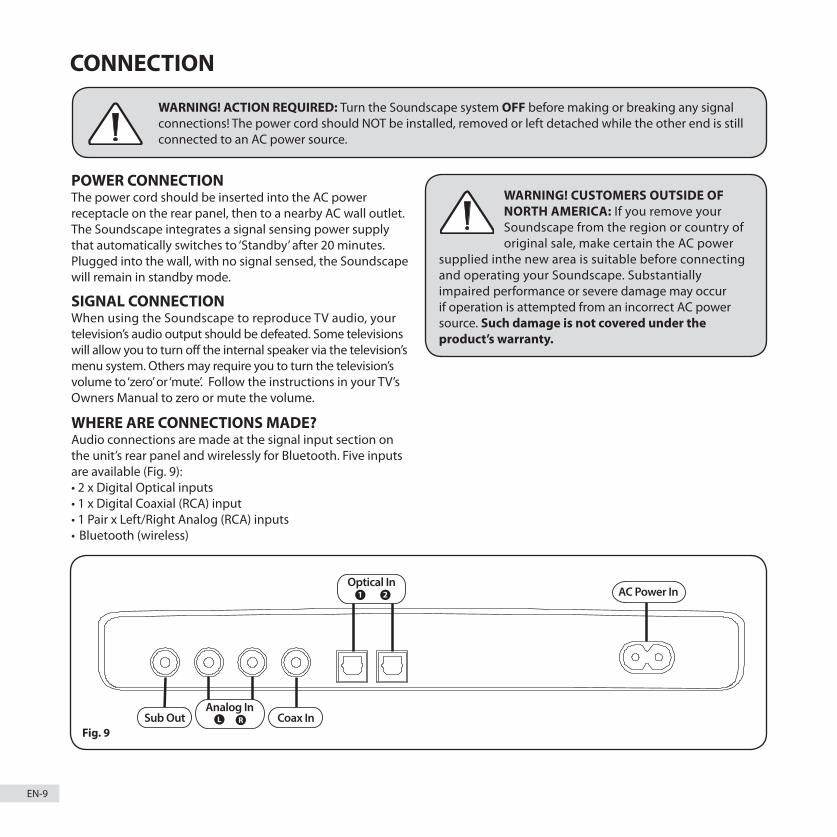
WHERE ARE CONNECTIONS MADE? Audio connections are made at the signal input section on the unit’s rear panel and wirelessly for Bluetooth. Five inputs are available (Fig. 9): • 2 x Digital Optical inputs • 1 x Digital Coaxial (RCA) input • 1 Pair x Left/Right Analog (RCA) inputs • Bluetooth (wireless)
WARNING! CUSTOMERS OUTSIDE OF NORTH AMERICA: If you remove your Soundscape from the region or country of original sale, make certain the AC power
supplied inthe new area is suitable before connecting and operating your Soundscape. Substantially impaired performance or severe damage may occur if operation is attempted from an incorrect AC power source. Such damage is not covered under the product’s warranty.
CONNECTION
WARNING! ACTION REQUIRED: Turn the Soundscape system OFF before making or breaking any signal connections! The power cord should NOT be installed, removed or left detached while the other end is still connected to an AC power source.
Analog In
AC Power In
Coax InSub Out
Optical In1 2
Fig. 9

EN-10
Digital Optical: Digital optical utilizes one cable to pass digital audio information (no video). A digital optical cable offers a high-quality digital connection and passes multi-channel encoded audio between a source component and an audio output device.
Digital Coaxial: Digital coaxial utilizes one cable to pass digital audio information (no video). A digital coaxial cable offers a high-quality digital connection and passes multi-channel encoded audio between a source component and an audio output device.
NOTE! The ‘RCA’ style end of a digital coaxial cable is identical to those found on common left/right analog RCA cables. However, a cable designed specifically for digital coaxial connections should be employed—do not use a standard left/right analog RCA style cable because it may not be up to the task of handling the high bit-rate necessary for a reliable digital connection.
Left/Right Analog RCA: Left/right analog RCA cables are used to pass audio information (no video). An analog RCA cable can only be used to pass a single channel of audio information between a source component and audio output device. To achieve two-channels of audio (left/right) you will find that analog RCA cables come bundled as a stereo pair (2 connectors on each end). Analog RCA connections are not capable of passing the digital encoding required to reproduce multi-channel audio and thus should not be used with source components where you desire surround sound output. Older gaming consoles, portable media player docks, VCRs and similar source components (which are not capable of playing multi-channel encoded content) will often offer connection only through left/right analog RCA cables. Additionally, users may find source components such as digital media player docks that utilize a special cable with a 3.5mm ‘headphone style’ jack on one end, and two analog RCA connectors on the opposite end.
AN INTRODUCTION TO AUDIO CABLES
ROUTING SOURCES VIA A DIGITAL (Optical or Coaxial) CONNECTION, WITH THE TELEVISION USED TO SWITCH BETWEEN INPUTSSome users will choose to route all sources (ex. DVD player, cable box, game console, media streamer, etc.) to their television via a digital (optical or coaxial) connection and use the television to switch between audio/video sources. The advantage of this connection method is that only one audio cable (either a digital optical or digital coaxial cable) needs to connect between the television and the Soundscape. Changing the input on your television will change the audio signal being sent to the Soundscape (without having to change the input setting.
A few important points to remember when connecting your Soundscape:
• Digital optical and digital coaxial connections will provide the highest audio fidelity when connecting to the Soundscape.
• Your Soundscape has an advanced, built-in digital decoder. However, if your Soundscape is not producing sound or surround sound from your Blu-ray player, DVD player, or other multi-channel audio-capable source through your TV, you may need to set the player’s digital audio output to “Bitstream” (also called “Raw”, “Direct Digital”, or “High Bit Rate”). If “PCM” is selected you’ll lose the multi-channel encoded sound. Some players only require you to turn PCM off to configure for multi-channel encoded sound. Please refer to your player’s owners manual for more detailed information.
• Audio-only sources capable of only stereo output (such as a portable media player docks or CD player) will often connect directly to the Soundscape via the left/right analog RCA inputs.
EN-11
Audio & Video Connections
Audio & Video Connections
Video Connections
Only
AudioConnection
Choose AudioConnection:
Audio Connections Only
AudioConnections
Only
Video Connections Only
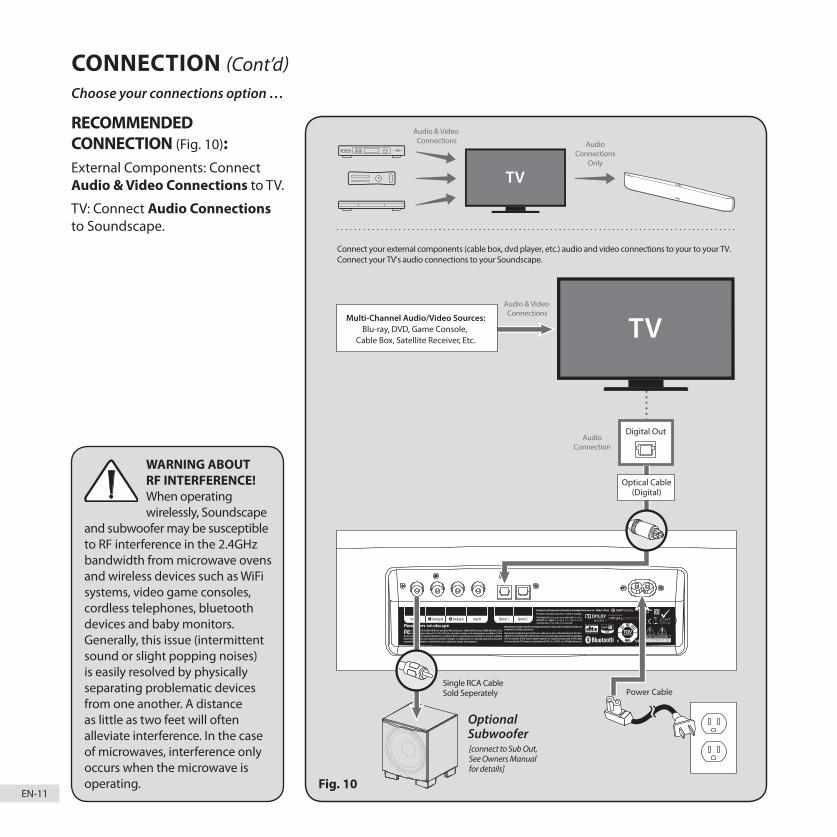
Connect your external components (cable box, dvd player, etc.) audio and video connections to your to your TV. Connect your TV’s audio connections to your Soundscape.
OptionalSubwoofer[connect to Sub Out, See Owners Manual for details]
Single RCA Cable Sold Seperately
Multi-Channel Audio/Video Sources:Blu-ray, DVD, Game Console,
Cable Box, Satellite Receiver, Etc.
Multi-Channel Audio/Video Sources:Blu-ray, DVD, Game Console,
Cable Box, Satellite Receiver, Etc.
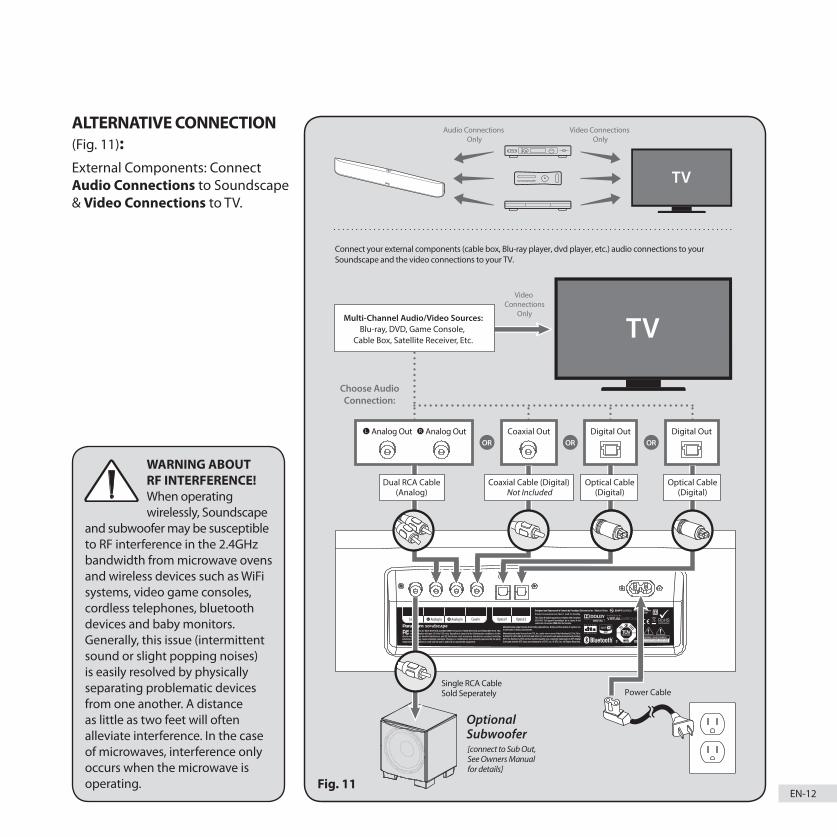
Connect your external components (cable box, Blu-ray player, dvd player, etc.) audio connections to your Soundscape and the video connections to your TV.
OptionalSubwoofer
Power Cable
Digital OutCoaxial OutAnalog Out
[connect to Sub Out, See Owners Manual for details]
Single RCA Cable Sold Seperately
ORORORDigital OutRAnalog OutLDigital Out
Power Cable
TV
TVTV
TV
Câble RCA double (analogique)
Dual RCA Cable(Analog)
Optical Cable(Digital)
Optical Cable(Digital)
Optical Cable(Digital)
Coaxial Cable (Digital) Not Included
CONNECTION (Cont’d)Choose your connections option …
RECOMMENDED CONNECTION (Fig. 10):External Components: Connect Audio & Video Connections to TV.
TV: Connect Audio Connections to Soundscape.
Fig. 10
WARNING ABOUT RF INTERFERENCE! When operating wirelessly, Soundscape
and subwoofer may be susceptible to RF interference in the 2.4GHz bandwidth from microwave ovens and wireless devices such as WiFi systems, video game consoles, cordless telephones, bluetooth devices and baby monitors. Generally, this issue (intermittent sound or slight popping noises) is easily resolved by physically separating problematic devices from one another. A distance as little as two feet will often alleviate interference. In the case of microwaves, interference only occurs when the microwave is operating.
EN-12
Audio & Video Connections
Audio & Video Connections
Video Connections
Only
AudioConnection
Choose AudioConnection:
Audio Connections Only
AudioConnections
Only
Video Connections Only
Connect your external components (cable box, dvd player, etc.) audio and video connections to your to your TV. Connect your TV’s audio connections to your Soundscape.
OptionalSubwoofer[connect to Sub Out, See Owners Manual for details]
Single RCA Cable Sold Seperately
Multi-Channel Audio/Video Sources:Blu-ray, DVD, Game Console,
Cable Box, Satellite Receiver, Etc.
Multi-Channel Audio/Video Sources:Blu-ray, DVD, Game Console,
Cable Box, Satellite Receiver, Etc.
Connect your external components (cable box, Blu-ray player, dvd player, etc.) audio connections to your Soundscape and the video connections to your TV.
OptionalSubwoofer
Power Cable
Digital OutCoaxial OutAnalog Out
[connect to Sub Out, See Owners Manual for details]
Single RCA Cable Sold Seperately
ORORORDigital OutRAnalog OutLDigital Out
Power Cable
TV
TVTV
TV
Câble RCA double (analogique)
Dual RCA Cable(Analog)
Optical Cable(Digital)
Optical Cable(Digital)
Optical Cable(Digital)
Coaxial Cable (Digital) Not Included
ALTERNATIVE CONNECTION (Fig. 11):External Components: Connect Audio Connections to Soundscape & Video Connections to TV.
Fig. 11
WARNING ABOUT RF INTERFERENCE! When operating wirelessly, Soundscape
and subwoofer may be susceptible to RF interference in the 2.4GHz bandwidth from microwave ovens and wireless devices such as WiFi systems, video game consoles, cordless telephones, bluetooth devices and baby monitors. Generally, this issue (intermittent sound or slight popping noises) is easily resolved by physically separating problematic devices from one another. A distance as little as two feet will often alleviate interference. In the case of microwaves, interference only occurs when the microwave is operating.

EN-13
CONNECTION (Cont’d)
BLUETOOTH CONNECTION
111313
1. To connect a phone/tablet to the Soundscape, press the Enable Bluetooth button on your remote or toggle through the source options using the Previous Input and Next Input on the top panel. Once the “BLUTTH” (Bluetooth) source option appears on the LCD display a short audio noti�cation will be heard. NOTE: The connection process will take approximately 1 minute. If your device has been PREVIOUSLY CONNECTED to your Soundscape via Bluetooth, renable Bluetooth and skip step 2.
2. Enable Bluetooth on your phone/tablet and search for “Paradigm Soundscape” on your Bluetooth device list. Select “Paradigm Soundscape” to establish a connection. Depending on phone/tablet you may need to change the playback device to “Paradigm Soundscape” or it may change automatically.
Bluetooth Connection
Prev Source Next Source
Top Panel Controls
Remote Control
EnableBluetooth
MODE
1 To connect a phone/tablet to the Soundscape, press the ‘Enable Bluetooth’ button on your remote or toggle through the source options using the ‘Previous Input’ and ‘Next Input’ on the top panel (Fig. 12). Once the ‘BLUTTH’ [Bluetooth] source option appears on the LCD display a short audio notification will be heard. NOTE: The connection process will take approximately 1 minute. If your device has been PREVIOUSLY CONNECTED to your Soundscape via Bluetooth, re-enable Bluetooth and skip step 2.
2 Enable Bluetooth on your phone/tablet and search for “Paradigm Soundscape” on your Bluetooth device list. Select “Paradigm Soundscape” to establish a connection. Depending on phone/ tablet you may need to change the playback device to “Paradigm Soundscape” or it may change automatically.
WIRELESS RANGE: To ensure transmission between your Bluetooth-enabled phone or device and the Soundscape, there should be no more than 6 meters /20 feet. Some situations may allow for more range. Experiment with your equipment to determine maximum range for desired placement.
Fig. 12

EN-14
No SubwooferIf you are not using an external subwoofer, use the ‘UP’arrow on the Soundscape’s menu panel to scroll to reach ‘SUB’ then use the ‘RIGHT’ arrow to choose ‘INTERNL’ [INTERNAL]. Activate by pressing the ‘Select’ button and the Soundscape will respond with ‘SET’. This sets the Soundscape to reproduce the entire frequency range when playing music and movie content.
Adding an External SubwooferIf desired, an external subwoofer in a wired or wireless capacity can be used to reinforce low-frequency channel information in multichannel and stereo recordings. For seamless system matching, we recommend a Paradigm subwoofer, however any brand of subwoofer can be connected.
Wired Subwoofer ConnectionUsing a high-quality RCA style cable, connect the ‘SUB Out’ on the the Soundscape’s back panel to the ‘LFE In/Sub In’ on the subwoofer’s back panel.Using the ‘UP’ arrow on the Soundscape’s menu panel, scroll through the options to reach ‘SUB’, then using the ‘RIGHT’ arrow scroll right, then ‘SCROLL UP’ to reach ‘WIRED’. Activate by pressing the ‘Select’ button and the Soundscape will respond with ‘SET’.
TIP! Reference your subwoofer’s Owners Manual to learn how to properly adjust the subwoofer’s level and phase controls to achieve proper blending with the Soundscape.
Wireless Subwoofer ConnectionWireless Subwoofer Receiver We have included a wireless subwoofer receiver in the box with your Soundscape. This receiver is compatible with any external Paradigm or other brand of subwoofer.
Preparing the external subwoofer for wireless operation.1 If your Soundscape is not turned on, turn it on at this point.
2 Plug the wireless receiver into the ‘LFE/SUB In’ on subwoofer.
3 Plug in the external subwoofer.
Syncing an External Subwoofer with your Soundcape1 Plug the wireless subwoofer receiver into a wall outlet.
DO NOT PRESS THE SYNC BUTTON TO INITIATE SYNCING AT THIS POINT.
2 Via the remote control or the top panel, access the Soundscape’s menu by pressing the ‘MENU’ button.
3 Using the ‘UP’ arrow, scroll through the options to reach ‘SUB’.
4 Press the ‘RIGHT’ arrow and THEN scroll ‘UP’ through the options to reach ‘WIRELES’ [WIRELESS].
5 Using the ‘Select’ button, select ‘WIRELES’ [WIRELESS].6 The Soundscape’s display will read ‘PAIRING STARTED’.
This means the Soundscape is transmitting a wireless signal. WITHIN the next 30 seconds, you must …
7 Press and hold for 3 seconds, the ‘Sync’ button on the rear panel of the wireless receiver. Its blue light will blink rapidly signalling it is ready to receive the Soundscape’s signal.
8 The wireless receiver’s LED will glow solid blue once it receives the signal and the Soundscape’s display should read ‘PAIRED’ (i.e. synced).
What to do if Pairing (syncing) FailsIf Pairing fails, it may be that too much time passed between Steps 7 and 8 above. Repeat the pairing process by pressing the ‘LEFT’ arrow. Scroll back through the menu to ‘WIRELES’ [WIRELESS] mode and repeat Steps 5 through 8 (above) until PAIRING is achieved. If pairing is not achieved on the next try, check to see that the Soundscape and receiver are within 50’ (15 m) of each other and that there are no obstructions in this path. Check that all equipment is plugged in and wall outlets are functional. If pairing cannot be achieved, contact your Paradigm Dealer.
Wireless SubwooferReceiver Included
50’50’Wireless Range
or 15 Meters
USING A SUBWOOFER

EN-15
Your Soundscape is capable of detecting and automatically decoding multichannel audio formats, such as those found on DVD and Blu-ray movies.
DIGITAL INPUTS (Optical and Coaxial)When utilizing a digital connection, your Soundscape can process the following formats:• Dolby Digital• DTS™ Digital Surround• Digital PCM• Digital Stereo
ANALOG INPUTS (Left/Right RCA)Digitally encoded sound information cannot be transmitted to an analog input. This connection method is adequate for most devices that only offer two channels of audio output (i.e. VCRs, CD players, older game consoles or portable media player docks). Although most surround-sound-capable devices such as DVD and Blu-ray players offer analog and digital connections, the digital connection should always be employed. If a source device is connected via an analog left/right RCA connection, the 5.1-channel encoded audio content will not correctly send to the Soundscape.
SURROUND SOUND DECODING
TOP-PANEL CONTROLS POWER ON/OFF & PREVIOUS SOURCE: Press and hold the ‘Power’ button for 3 seconds to turn unit on or off. Once power is turned on, this button also controls navigation to a ‘Previous Source’ selection. See Fig. 13 for a more visual description.
VOL+ / VOL–: Adjusts volume level up or down Fig. 13.
MENU / NEXT SOURCE: Press this button to enter the menu system. Once power is turned on, this button also controls navigation to a ‘Next Source’ selection. See Fig. 13 for a more visual description.
PREVIOUS / NEXT SOURCE: Use the ‘Next Source’ and ‘Previous Source’ buttons to cycle back and forth through inputs (Fig. 13). The order of inputs is: Digital Optical 1 Digital Optical 2 Digital Coaxial Analog RCA Bluetooth.
ACCESSING THE MENU FROM THE TOP PANELTo access the Menu, press and hold the top-panel ‘Menu’ button for 3 seconds (Fig. 13). After the menu has been activated, the five buttons on the top panel controls will function as ‘Scroll Up’ / ’Scroll Down’ / ’Scroll Left’ / ‘Scroll Right’ directional buttons allowing you to navigate the menu and press the ‘Select’ button to accept selections. Exit the menu by pressing the ‘Left’ button or simply wait for the automatic time out.
MUTING THE SYSTEM: Cannot be done from the top panel controls. Instead, use the remote control.
CONTROL OPTIONS
Power Control
Power On/O�
Scroll Left
Prev Source Next Source
Select
Volume Up
Volume Down
Scroll Down
Scroll Up
Menu/ Scroll Right
Volume & Source Controls
Menu Controls
Fig. 13
EN-16
CAUTION! Danger of explosion if battery is incorrectly replaced. Replace only with the
same or equivalent battery type.
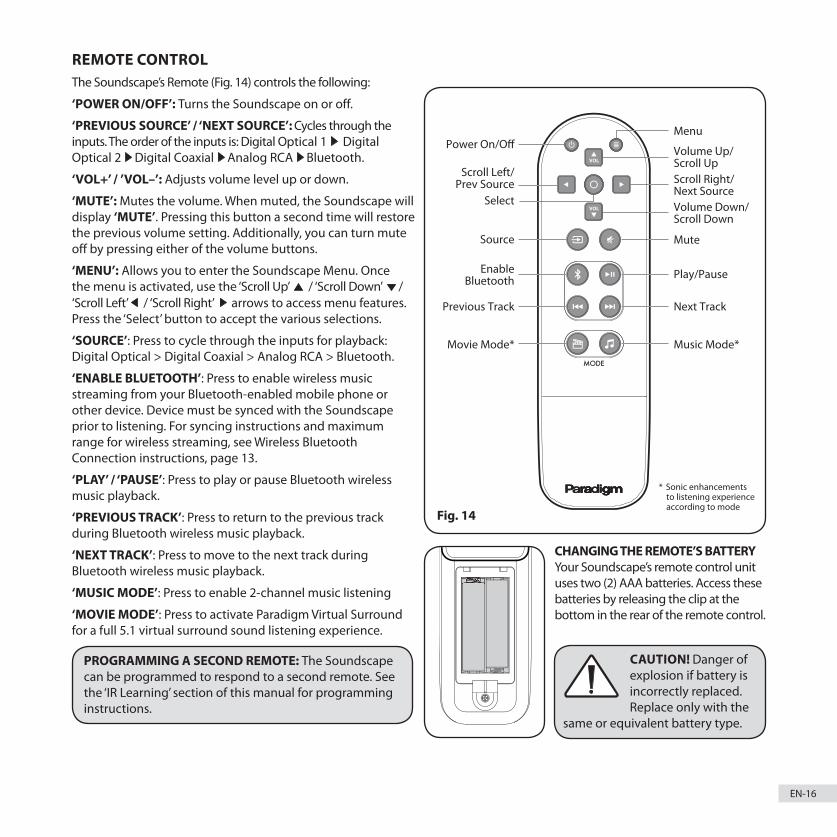
REMOTE CONTROLThe Soundscape’s Remote (Fig. 14) controls the following:
‘POWER ON/OFF’: Turns the Soundscape on or off.
‘PREVIOUS SOURCE’ / ‘NEXT SOURCE’: Cycles through the inputs. The order of the inputs is: Digital Optical 1 Digital Optical 2 Digital Coaxial Analog RCA Bluetooth.
‘VOL+’ / ’VOL–’: Adjusts volume level up or down.
‘MUTE’: Mutes the volume. When muted, the Soundscape will display ‘MUTE’. Pressing this button a second time will restore the previous volume setting. Additionally, you can turn mute off by pressing either of the volume buttons.
‘MENU’: Allows you to enter the Soundscape Menu. Once the menu is activated, use the ‘Scroll Up’ / ‘Scroll Down’ / ‘Scroll Left’ / ‘Scroll Right’ arrows to access menu features. Press the ‘Select’ button to accept the various selections.
‘SOURCE’: Press to cycle through the inputs for playback: Digital Optical > Digital Coaxial > Analog RCA > Bluetooth.
‘ENABLE BLUETOOTH’: Press to enable wireless music streaming from your Bluetooth-enabled mobile phone or other device. Device must be synced with the Soundscape prior to listening. For syncing instructions and maximum range for wireless streaming, see Wireless Bluetooth Connection instructions, page 13.
‘PLAY’ / ‘PAUSE’: Press to play or pause Bluetooth wireless music playback.
‘PREVIOUS TRACK’: Press to return to the previous track during Bluetooth wireless music playback.
‘NEXT TRACK’: Press to move to the next track during Bluetooth wireless music playback.
‘MUSIC MODE’: Press to enable 2-channel music listening
‘MOVIE MODE’: Press to activate Paradigm Virtual Surround for a full 5.1 virtual surround sound listening experience.
PROGRAMMING A SECOND REMOTE: The Soundscape can be programmed to respond to a second remote. See the ‘IR Learning’ section of this manual for programming instructions.
CHANGING THE REMOTE’S BATTERYYour Soundscape’s remote control unit uses two (2) AAA batteries. Access these batteries by releasing the clip at the bottom in the rear of the remote control.
Mute
Volume Down/Scroll Down
Scroll Right/Next Source
Menu
Volume Up/Scroll Up
Play/Pause
Next Track Previous Track
EnableBluetooth
Source
Select
Power On/O�
Music Mode*
* Sonic enhancements to listening experience according to mode
Movie Mode*
Scroll Left/Prev Source
MODE
Fig. 14
EN-17
MENU UP / DOWN (scrolling)
PAIRING STARTED (scrolling)
ANALOG
COAXIAL
OPTIC 2
OPTIC 1
COAXIAL
OPTIC 2
OPTIC 1
PREVIOUS INPUT
NEXT INPUT
MUTE
VOLUME -
VOLUME +
POWER OFF
CONFIRM
ONSHELF
ON WALL
AUTOOFF
DIM
BRIGHT
ON
OFF
ANALOG
EXIT
RESET
LEARN
SOURCE NAME
SUB
INSTALL
DISPLAY
MODE
SURROUND
TREBLE
BASS
LOUDNESS
+6 dB
+4 dB
+2 dB
0 dB
-2 dB
-4 dB
-6 dB
POWER ON
POWER TOGGLE
MUSIC
MOVIE
SELECT
RIGHT
LEFT
DOWN
UP
MENU
MUSIC
NEXT TRACK
PLAY / PAUSE
PREVIOUS TRACK
BLUETOOTH
BLUETOOTH
PAIRED
FAILED
WIRELESS
WIRED
INTERNAL
ON
OFF
+6 dB
+4 dB
+2 dB
0 dB
-2 dB
-4 dB
-6 dBMOVIE
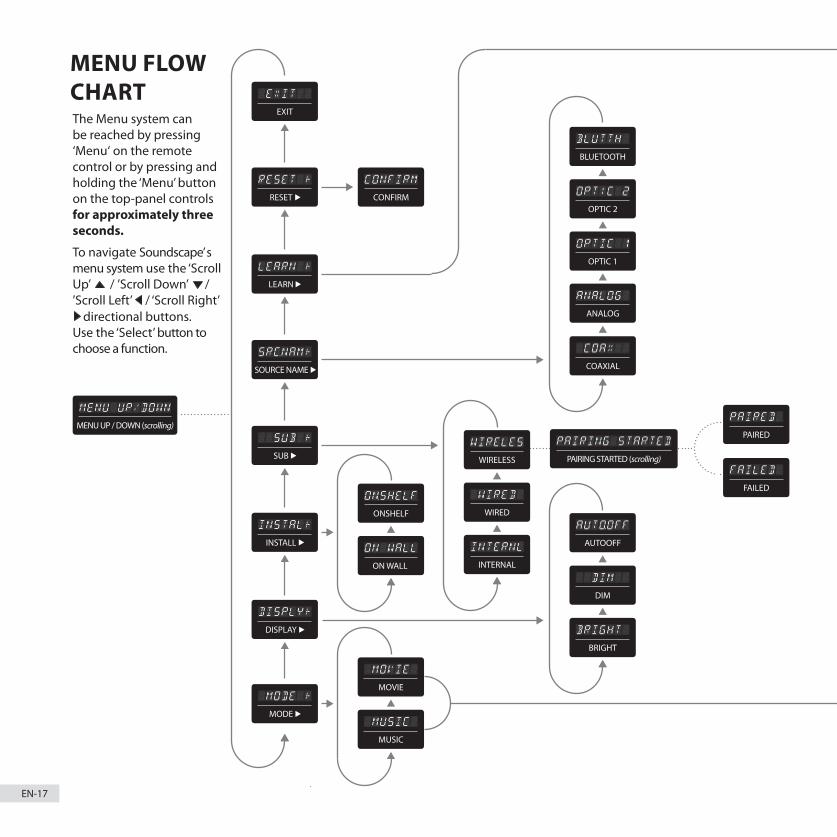
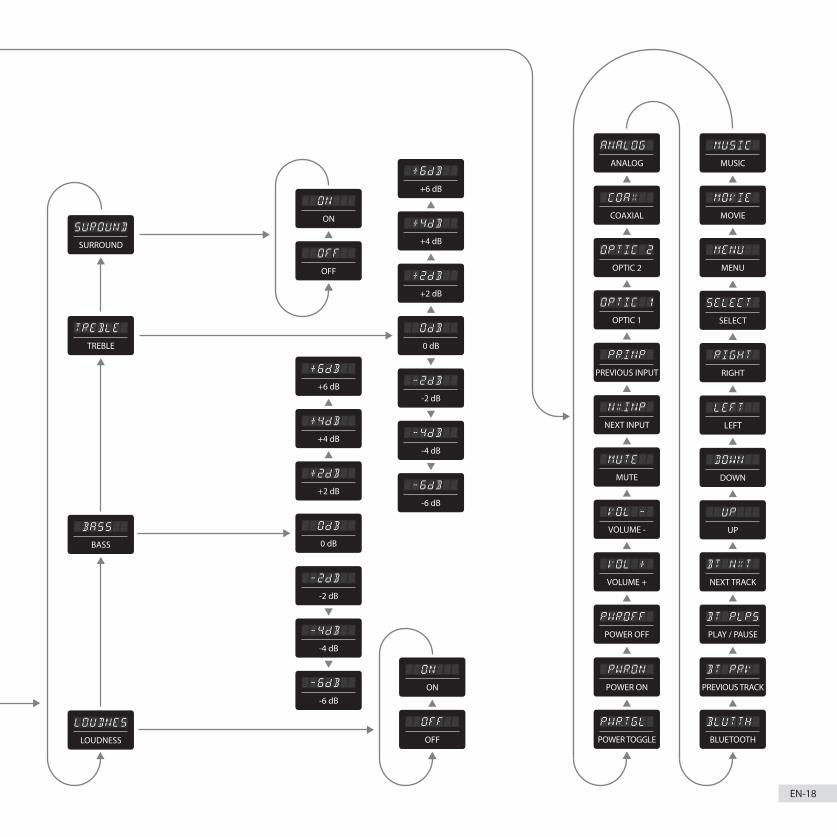
MENU FLOW CHARTThe Menu system can be reached by pressing ‘Menu‘ on the remote control or by pressing and holding the ‘Menu’ button on the top-panel controls for approximately three seconds.
To navigate Soundscape’ s menu system use the ‘Scroll Up’ / ’Scroll Down’ / ’Scroll Left’ / ‘Scroll Right’
directional buttons. Use the ‘Select’ button to choose a function.
EN-18
MENU UP / DOWN (scrolling)
PAIRING STARTED (scrolling)
ANALOG
COAXIAL
OPTIC 2
OPTIC 1
COAXIAL
OPTIC 2
OPTIC 1
PREVIOUS INPUT
NEXT INPUT
MUTE
VOLUME -
VOLUME +
POWER OFF
CONFIRM
ONSHELF
ON WALL
AUTOOFF
DIM
BRIGHT
ON
OFF
ANALOG
EXIT
RESET
LEARN
SOURCE NAME
SUB
INSTALL
DISPLAY
MODE
SURROUND
TREBLE
BASS
LOUDNESS
+6 dB
+4 dB
+2 dB
0 dB
-2 dB
-4 dB
-6 dB
POWER ON
POWER TOGGLE
MUSIC
MOVIE
SELECT
RIGHT
LEFT
DOWN
UP
MENU
MUSIC
NEXT TRACK
PLAY / PAUSE
PREVIOUS TRACK
BLUETOOTH
BLUETOOTH
PAIRED
FAILED
WIRELESS
WIRED
INTERNAL
ON
OFF
+6 dB
+4 dB
+2 dB
0 dB
-2 dB
-4 dB
-6 dBMOVIE

EN-19
THE MENU SYSTEMENTERING AND EXITING THE MENU SYSTEMFrom the Soundscape’s Top PanelTo access the Menu System from the Soundscape’s top panel, press and hold the ‘Menu’ button (Fig. 13).
Via the Soundscape RemoteTo access the Menu System from the remote, press ‘Menu’ (Fig. 14). To exit, press ‘Menu’ again or select the ‘Left’ button.
How to Use the Navigation Buttons
MENU OPTIONSMenu Option: MODE‘MUSIC’: Scroll to select ‘MUSIC’. To choose ‘MUSIC’, press ‘Select’ then ‘Scroll Up’ or ’Scroll Down’ to activate any/all of the additional mode options. ‘MOVIE’: Scroll to select ‘MOVIE’. To choose Movie press ‘Select’ ‘Scroll Up’ or ’Scroll Down’ to activate any/all of the additional mode options.‘LOUDNES’ [LOUDNESS]: Enter the ‘SUROUND’ submenu by pressing the ‘Scroll Right’ directional button. To activate press ‘Select’ for ‘ON’, to deactivate press ‘Select’ for ‘OFF’.‘BASS’: Enhance (+) or decrease (-) bass output in 2-dB increments. Activate by pressing the ‘Scroll Right’ directional button, find your desired setting, press ‘Select’ and the Soundscape will respond with ‘SET’. ‘TREBLE’: This mode allows you to enhance (+) or decrease (-) treble output in 2 dB increments. Activate by pressing the ‘Right’ directional button, find your desired setting, press ‘Select’ and the Soundscape will respond with ‘SET’.‘SUROUND’ [SURROUND]: Enter the ‘SUROUND’ submenu to engage Paradigm’s Virtual Surround Sound by pressing the ‘Scroll Right’ directional button. This menu allows you to turn Soundscape’s surround channels ‘ON’ or ‘OFF’.‘SUROUND’ > ‘ON’ [SURROUND ON]: This option configures the Soundscape (when it detects 5.1-channel encoded content) to fully reproduce all 5.1-channels of information including simulated surround channels. Activate the option by pressing the ‘Select’ button and the Soundscape will respond with ‘SET’.‘SUROUND’ >‘OFF’ [SURROUND OFF]: This option configures the Soundscape (when it detects 5.1-channel encoded content) to down-mix to 3.1-channel output (left/center/right channels + external subwoofer) and does not use simulated surround channels. All content originally intended for the surround channels is routed to the left/center/right channels. Activate the option by pressing the ‘Select’ button and the Soundscape will respond with ‘SET’.
TIP! Both multichannel and stereo sound can be heard as surround. When not in Surround Mode, the Soundscape’s default Mode is ‘Stereo’.
MODE
MODE
Power Control
Power On/O�
Prev Source Next Source
Volume Up
Volume Down
Volume & Source Controls
Power Control
Power On/O�
Prev Source Next Source
Volume Up
Volume Down
Volume & Source Controls
Power Control
Power On/O�
Prev Source Next Source
Volume Up
Volume Down
Volume & Source Controls
Power Control
Power On/O�
Prev Source Next Source
Volume Up
Volume Down
Volume & Source Controls
Power Control
Power On/O�
Prev Source Next Source
Volume Up
Volume Down
Volume & Source Controls
MODEMODE
MODE
MODE
‘Menu’ button enters top level menu or exits the menu system.
‘Right’ arrow button goes down deeper into a menu.
‘Left’ arrow button and for exiting the menu.
‘Up’ button increases the value of a setting (i.e. volume) or scrolls up through options
‘Down’ button decreases the value of a setting (i.e. volume) or scrolls down through options
‘Select’ button chooses/sets options and exits menu level.
REMOTE CONTROL
TOP PANELHOW TO USE THE NAVIGATION BUTTONS
Power Control
Power On/O�
Prev Source Next Source
Volume Up
Volume Down
Volume & Source Controls
Power Control
Power On/O�
Prev Source Next Source
Volume Up
Volume Down
Volume & Source Controls

EN-20
Menu Option: DISPLAYDISPLY [DISPLAY]: Enter the ‘DISPLY’ submenu by pressing the ‘Scroll Right’ directional button. The settings in this menu allow you to adjust the brightness of the Soundscape’s display and configure the display to turn on and off automatically.
DISPLY [DISPLAY] > BRIGHT: This option configures the Soundscape’s display to be on at full brightness.
DISPLY [DISPLAY] > DIM: This option configures the Soundscape’s display to be on at a reduced brightness when the Soundscape is on. Activate the option by pressing the ‘Select’ button and the Soundscape will respond with ‘SET’.
DISPLY [DISPLAY] > AUTO OFF: This option configures the Soundscape’s display to be on at a full brightness when a setting (such as volume or input) is changed. After a few seconds, the display will turn off. Activate by pressing the ‘Select’ button and the Soundscape will respond with ‘SET’.
Menu Option: INSTALL
‘INSTAL’ [INSTALL]: Enter the ‘INSTAL’ submenu by pressing the ‘Scroll Right’ directional button. The settings in this menu will adjust the Soundscape’s equalization and voicing for optimal performance on the wall or on a flat surface (i.e. credenza or shelf ) installation.
‘INSTAL’ [INSTALL > ‘ON WALL’: This option configures the Soundscape’s audio output to sound best in an on-wall installation. Activate the option by pressing the ‘Select’ button and the Soundscape will respond with ‘SET’.
‘INSTAL’ [INSTALL] > ‘ON.SHELF’ [ON SHELF]: This option configures the Soundscape’s audio output to sound best on a flat surface (credenzal or shelf ) installation. Activate the option by pressing the ‘Select’ button and the Soundscape will respond with ‘SET’.
Menu Option: SUBSUB: Enter the ‘SUB’ submenu by pressing the ‘Scroll Right’ directional button. Here you may configure the Soundscape for external subwoofer integration.
PLEASE NOTE: When you select the ‘SUB’ ‘WIRED’ option in the Menu, a wireless connection is no longer viable until the menu option for wireless is turned back on. However, when you select ‘SUB’ ‘WIRELES’ [WIRELESS] in the menu, the Soundscape will still support a wired subwoofer connection.
It is possible to connect multiple wired subwoofers using a ‘Y’ splitter attached to the subwoofer cable, wireless receiver, or an output on the rear of your subwoofer that is designed to daisy chaining multiple subs. See your Paradigm dealer for more information.
‘SUB’ > INTERNL’ [INTERNAL]: This option allows the Soundscape to handle all bass information. No external subwoofer is required or allowed when this mode is activated. Activate the option by pressing the ‘Select’ button and the Soundscape will respond with ‘SET’.
‘SUB’ > ‘WIRED’ : This option configures the Soundscape to use an external subwoofer connected with a cable to the Soundscape’s Sub Out RCA connection. Activate by pressing the ‘Select’ button and the Soundscape will respond with ‘SET’.
TIP! Reference your external subwoofer’s Owners Manual to learn how to correctly adjust level and phase control to achieve seamless blending with the Soundscape.
‘SUB’ > ‘WIRELES’ [WIRELESS]: Enter the ‘SUB’ ‘WIRELES’ [WIRELESS] submenu by pressing the ‘Scroll Right’ directional button. Using the included wireless subwoofer receiver you can sync the Soundscape with a Paradigm or other brand of subwoofer.

EN-21
‘SUB’ > ‘WIRELES’ [WIRELESS]> ‘PAIRING STARTED’ > ‘PAIRED’ OR ‘FAILED’: These messages, visible on the Soundscape’s front-panel display, let you know that your Soundscape is transmitting a signal that will be picked up by the supplied wireless subwoofer receiver to initiate pairing with the external subwoofer.
TIP! With all the options on the previous page, the Soundscape will operate to approximately 80 Hz below which the external subwoofer will reproduce lower bass frequencies.
Menu Option: SOURCE NAME‘SRC.NAM’ [SOURCE NAME]: Enter the ‘SRC.NAM’ submenu by pressing the ‘Scroll Right’ directional button. The settings in this menu will allow you to assign new names to display on the soundbar when changing inputs. For example, you can program the ‘OPTIC 1’ input to display ‘DVD’.
Using the ‘Scroll Up’ / ‘Scroll Down’ directional buttons, you can select and program the following input names:
• OPTIC 1 [DIGITAL OPTICAL 1]• OPTIC 2 [DIGITAL OPTICAL 2]• COAX [DIGITAL COAXIAL]• ANALOG [LEFT/RIGHT RCA ANALOG]• BLUTTH [BLUETOOTH]
Choose the input name you want to reprogram and press the ‘Scroll Right’ directional button. The Soundscape will display the current name. Pressing the ‘Scroll Up’ / ‘Scroll Down’ directional buttons will cycle through the available alpha-numeric characters. Pressing the ‘Scroll Left’ / ‘Scroll Right’ directional buttons will move to the next space. You can use up to seven characters when inputting a new name.
To finish programming an input name, use the ‘Scroll Left’ / ‘Scroll Right’ directional buttons to move all the way to the left or right.
Menu Option: LEARN
PLEASE NOTE: There may be remotes that the Soundscape cannot learn or cannot learn correctly. Due to the number of remotes on the market it is impossible to advise which remotes will or will not work.
PLEASE NOTE: When learning from a second remote, you may find it does not have buttons that directly correspond with all available soundbar commands. Not all commands have to be programmed. Some remotes offer ‘Function’ buttons (F1, F2, etc.) that can be used to program unique soundbar commands.
PLEASE NOTE: Some remote controls offer discrete ‘Power On’ and ‘Power Off’ buttons. Some offer a single button to toggle power on and off. The learning function of the soundbar allows you to program either scenario.
‘LEARN’: Enter the ‘LEARN’ submenu by pressing the ‘Scroll Right’ directional button. The settings in this menu program the soundbar to respond to a second remote control. Soundscape’s factory supplied remote control will always work with the soundbar, even if the soundbar is programmed to respond to a second remote.
Using the ‘Scroll Up’ / ‘Scroll Down’ directional buttons, you can ‘Select’ and program the following commands:
• PWR.TGL [POWER TOGGLE]• PWR.ON [POWER ON] • PWR.OFF [POWER OFF]• VOL + [VOLUME +]• VOL – [VOLUME –]• MUTE [MUTE VOLUME]• NX.INPT [NEXT INPUT]• PR.INPT [PREVIOUS INPUT]• OPTIC 1 [OPTICAL 1 INPUT]• OPTIC 2 [OPTICAL 2 INPUT]• COAX [COAXIAL INPUT] • ANALOG [LEFT/RIGHT
RCA ANALOG INPUT]
• BLUTTH [BLUETOOTH INPUT]
• BT PRV [PREVIOUS TRACK]
• BT PLPS [PLAY/PAUSE]• BT NXT [NEXT TRACK]• UP • DOWN• LEFT• RIGHT• SELECT• MENU• MOVIE• MUSIC
MENU OPTIONS (Cont’d)Menu Option: SUB (Cont’d)

EN-22
Menu Option: LEARNTIP! Before beginning the ‘LEARN’ process make sure you have the second remote (i.e. the one you wish to program) nearby.
EXAMPLE GIVEN BELOW: Learning ‘Power On’ Function
= Soundscape Remote = 2nd Remote
User Action:
In the Menu ‘Scroll Up’’ to ‘LEARN’ (IR Learning)
Result:
IR Learning Process(EXAMPLE: Learning Power On Function)
User Action: Press the right arrow to enter the IR Learning sub-menu.
Press the up arrow to scroll to PWR.ON (Power On).
User Action: In the Menu scroll up to LEARN (IR Learning)
Result:
Result:
OptionChosen(Example):
Result:
User Action: Press Select to choose PWR.ON.
User Action: Immediately push Power Toggle button on 2nd remote .
User Action: Again, immediately pushthe Power Toggle button on 2nd remote.
Result:
User Action: Wait for Soundscape to process new IR coding from 2nd remote.
Result:
User Action: Again, wait for Soundscape to processnew IR coding from 2nd remote.
= Soundscape Remote
Result:
Result:
The LCD screen will read SET if the Power Toggle function has been learned by the Soundscape.
User Action: If IR learning has failed, the LCD will read ERROR, repeat the IR Learning process.
NOTE: an ERROR warning may also indicate that your Soundscape does not recognize your remote’s IR coding (see note on page 9).
User Action: To ensure the action was successful exit the menu by pressing the right arrow 2 times. Now press the Power Toggle on the 2nd remote to check functionality
OR
2x
= 2nd Remote
User Action:
Press the ‘Scroll Right’ directional button to enter the ‘LEARN’ sub-menu.
Press the ‘Scroll Up’ directional button to ‘PWR.ON’ (Power On).
IR Learning Process(EXAMPLE: Learning Power On Function)
User Action: Press the right arrow to enter the IR Learning sub-menu.
Press the up arrow to scroll to PWR.ON (Power On).
User Action: In the Menu scroll up to LEARN (IR Learning)
Result:
Result:
OptionChosen(Example):
Result:
User Action: Press Select to choose PWR.ON.
User Action: Immediately push Power Toggle button on 2nd remote .
User Action: Again, immediately pushthe Power Toggle button on 2nd remote.
Result:
User Action: Wait for Soundscape to process new IR coding from 2nd remote.
Result:
User Action: Again, wait for Soundscape to processnew IR coding from 2nd remote.
= Soundscape Remote
Result:
Result:
The LCD screen will read SET if the Power Toggle function has been learned by the Soundscape.
User Action: If IR learning has failed, the LCD will read ERROR, repeat the IR Learning process.
NOTE: an ERROR warning may also indicate that your Soundscape does not recognize your remote’s IR coding (see note on page 9).
User Action: To ensure the action was successful exit the menu by pressing the right arrow 2 times. Now press the Power Toggle on the 2nd remote to check functionality
OR
2x
= 2nd Remote
User Action:
Press Select to choose ‘PWR.ON’.
Result:
IR Learning Process(EXAMPLE: Learning Power On Function)
User Action: Press the right arrow to enter the IR Learning sub-menu.
Press the up arrow to scroll to PWR.ON (Power On).
User Action: In the Menu scroll up to LEARN (IR Learning)
Result:
Result:
OptionChosen(Example):
Result:
User Action: Press Select to choose PWR.ON.
User Action: Immediately push Power Toggle button on 2nd remote .
User Action: Again, immediately pushthe Power Toggle button on 2nd remote.
Result:
User Action: Wait for Soundscape to process new IR coding from 2nd remote.
Result:
User Action: Again, wait for Soundscape to processnew IR coding from 2nd remote.
= Soundscape Remote
Result:
Result:
The LCD screen will read SET if the Power Toggle function has been learned by the Soundscape.
User Action: If IR learning has failed, the LCD will read ERROR, repeat the IR Learning process.
NOTE: an ERROR warning may also indicate that your Soundscape does not recognize your remote’s IR coding (see note on page 9).
User Action: To ensure the action was successful exit the menu by pressing the right arrow 2 times. Now press the Power Toggle on the 2nd remote to check functionality
OR
2x
= 2nd Remote
User Action:
Immediately push Power Toggle button on 2nd remote.
Result:
IR Learning Process(EXAMPLE: Learning Power On Function)
User Action: Press the right arrow to enter the IR Learning sub-menu.
Press the up arrow to scroll to PWR.ON (Power On).
User Action: In the Menu scroll up to LEARN (IR Learning)
Result:
Result:
OptionChosen(Example):
Result:
User Action: Press Select to choose PWR.ON.
User Action: Immediately push Power Toggle button on 2nd remote .
User Action: Again, immediately pushthe Power Toggle button on 2nd remote.
Result:
User Action: Wait for Soundscape to process new IR coding from 2nd remote.
Result:
User Action: Again, wait for Soundscape to processnew IR coding from 2nd remote.
= Soundscape Remote
Result:
Result:
The LCD screen will read SET if the Power Toggle function has been learned by the Soundscape.
User Action: If IR learning has failed, the LCD will read ERROR, repeat the IR Learning process.
NOTE: an ERROR warning may also indicate that your Soundscape does not recognize your remote’s IR coding (see note on page 9).
User Action: To ensure the action was successful exit the menu by pressing the right arrow 2 times. Now press the Power Toggle on the 2nd remote to check functionality
OR
2x
= 2nd Remote
User Action:
Wait for Soundscape to process new IR coding from 2nd remote.
Result:
IR Learning Process(EXAMPLE: Learning Power On Function)
User Action: Press the right arrow to enter the IR Learning sub-menu.
Press the up arrow to scroll to PWR.ON (Power On).
User Action: In the Menu scroll up to LEARN (IR Learning)
Result:
Result:
OptionChosen(Example):
Result:
User Action: Press Select to choose PWR.ON.
User Action: Immediately push Power Toggle button on 2nd remote .
User Action: Again, immediately pushthe Power Toggle button on 2nd remote.
Result:
User Action: Wait for Soundscape to process new IR coding from 2nd remote.
Result:
User Action: Again, wait for Soundscape to processnew IR coding from 2nd remote.
= Soundscape Remote
Result:
Result:
The LCD screen will read SET if the Power Toggle function has been learned by the Soundscape.
User Action: If IR learning has failed, the LCD will read ERROR, repeat the IR Learning process.
NOTE: an ERROR warning may also indicate that your Soundscape does not recognize your remote’s IR coding (see note on page 9).
User Action: To ensure the action was successful exit the menu by pressing the right arrow 2 times. Now press the Power Toggle on the 2nd remote to check functionality
OR
2x
= 2nd Remote
User Action:
Again, immediately push the ‘Power Toggle’ button on 2nd remote.
Result:
IR Learning Process(EXAMPLE: Learning Power On Function)
User Action: Press the right arrow to enter the IR Learning sub-menu.
Press the up arrow to scroll to PWR.ON (Power On).
User Action: In the Menu scroll up to LEARN (IR Learning)
Result:
Result:
OptionChosen(Example):
Result:
User Action: Press Select to choose PWR.ON.
User Action: Immediately push Power Toggle button on 2nd remote .
User Action: Again, immediately pushthe Power Toggle button on 2nd remote.
Result:
User Action: Wait for Soundscape to process new IR coding from 2nd remote.
Result:
User Action: Again, wait for Soundscape to processnew IR coding from 2nd remote.
= Soundscape Remote
Result:
Result:
The LCD screen will read SET if the Power Toggle function has been learned by the Soundscape.
User Action: If IR learning has failed, the LCD will read ERROR, repeat the IR Learning process.
NOTE: an ERROR warning may also indicate that your Soundscape does not recognize your remote’s IR coding (see note on page 9).
User Action: To ensure the action was successful exit the menu by pressing the right arrow 2 times. Now press the Power Toggle on the 2nd remote to check functionality
OR
2x
= 2nd Remote
User Action:
Again, wait for Soundscape to process new IR coding from 2nd remote.
IR Learning Process(EXAMPLE: Learning Power On Function)
User Action: Press the right arrow to enter the IR Learning sub-menu.
Press the up arrow to scroll to PWR.ON (Power On).
User Action: In the Menu scroll up to LEARN (IR Learning)
Result:
Result:
OptionChosen(Example):
Result:
User Action: Press Select to choose PWR.ON.
User Action: Immediately push Power Toggle button on 2nd remote .
User Action: Again, immediately pushthe Power Toggle button on 2nd remote.
Result:
User Action: Wait for Soundscape to process new IR coding from 2nd remote.
Result:
User Action: Again, wait for Soundscape to processnew IR coding from 2nd remote.
= Soundscape Remote
Result:
Result:
The LCD screen will read SET if the Power Toggle function has been learned by the Soundscape.
User Action: If IR learning has failed, the LCD will read ERROR, repeat the IR Learning process.
NOTE: an ERROR warning may also indicate that your Soundscape does not recognize your remote’s IR coding (see note on page 9).
User Action: To ensure the action was successful exit the menu by pressing the right arrow 2 times. Now press the Power Toggle on the 2nd remote to check functionality
OR
2x
= 2nd Remote
The LCD screen will read ‘SET’ if the ‘Power Toggle’ function has been learned by the Soundscape.
User Action:
If IR learning has failed, the LCD will read ‘ERROR’, repeat the IR Learning process.
NOTE: an ‘ERROR’ warning may also indicate that your Soundscape does not recognize your remote’s IR coding (see note on page 21).
User Action:
To ensure the action was successful exit the menu by pressing the ‘Scroll Left’ directional button 2 times. Now press the ‘Power Toggle’ on the 2nd remote to check functionality
Result:
Option Chosen (Example): Result:
2x
EN-23
MENU OPTIONS (Cont’d)
TROUBLESHOOTING
Problem Solution
No Sound
No Surround Sound
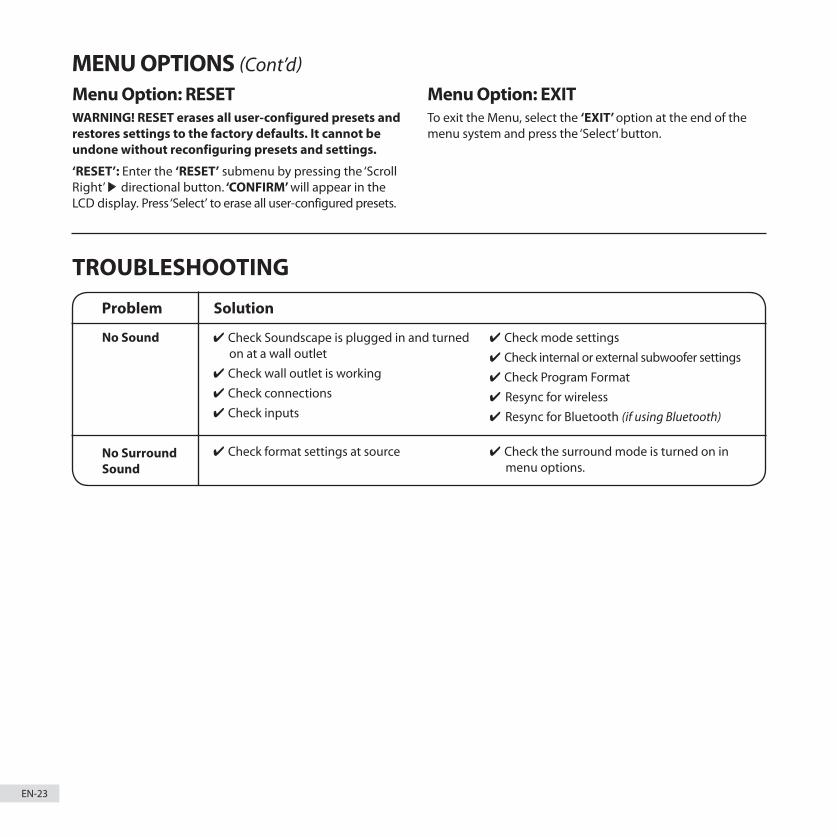
Menu Option: RESETWARNING! RESET erases all user-configured presets and restores settings to the factory defaults. It cannot be undone without reconfiguring presets and settings.
‘RESET’: Enter the ‘RESET’ submenu by pressing the ‘Scroll Right’ directional button. ‘CONFIRM’ will appear in the LCD display. Press ‘Select’ to erase all user-configured presets.
Menu Option: EXITTo exit the Menu, select the ‘EXIT’ option at the end of the menu system and press the ‘Select’ button.
4 Check Soundscape is plugged in and turned on at a wall outlet
4 Check wall outlet is working
4 Check connections
4 Check inputs
4 Check mode settings
4 Check internal or external subwoofer settings
4 Check Program Format
4 Resync for wireless
4 Resync for Bluetooth (if using Bluetooth)
4 Check format settings at source 4 Check the surround mode is turned on in menu options.

EN-24
TECHNICAL SPECIFICATIONSDesignBass-reflex design housing seven high-performance drivers each powered by its own amplifier channel. Three isolated physical channels: Left channel and right channel each feature a 2-driver complement. Center channel features 3 drivers. Paradigm Virtual Surround Sound is achieved through sophisticated DSP digital signal processing algorithms. The LFE/Sub channel harnesses the bass power of the four woofers which work together as a subwoofer below 120 Hz. Molded UV resistant ABS enclosure.
Crossover Digital 3rd-order at 2 kHz; digital 2nd order at 80 Hz
High-Frequency Drivers 3 x 25-mm (1˝) PAL™ anodized pure aluminum tweeters
Bass / Midrange Drivers 4 x 102-mm (4˝) composite cones each with a 25 mm (1˝) voice coil
Low-Frequency Extension 30 Hz (DIN*)
Frequency Response per Channel (L/C/R) 40 Hz – 20 kHz (±2 dB)
Sensitivity – Room / Anechoic 88 dB / 85 dB @ 0.1 Vrms input / Volume 88
Amplifier Power 7 x 50 watts Peak Power / 7 x 25 Watts RMS Sustained
Inputs
2 x digital optical; 1 x digital coaxial; 1 x analog RCA; 1 x Bluetooth
H x W x D (including factory pre-attached feet) 5-1/2˝ x 42˝ x 5 in 14 cm x 106.7 cm 12.7 cm
Weight (unpacked) 20 lb / 9.1 kg each
Finish High Gloss Black
Accessories (included) Wireless receiver with DC adaptor, remote control with 2 ‘AAA’ batteries, two pre-attached feet, 1 wall-mounting bracket with levelling screws, 1 power cord, 1 analog RCA 1.8-m (6’) cable, 1 x digital optical cable
*DIN 45 500. Indicates - 3 dB in a typical listening room.
LIMITED WARRANTYParadigm warrants this product against defects in materials and workmanship under normal use and operation for a period of one (1) year from the date of retail purchase by the original end-user purchaser. For warranty purposes you must retain your sales receipt and this Owners Manual for warranty to be valid.
For additional product support, call Paradigm at 905-696-2868 or email [email protected].

PRODUCT CONSUMES LESSTHAN 1 WATT IN STANDBY.
Paradigm, Soundscape and all associated proprietary and patented designs and technologies are registered trademarks of Paradigm Electronics Inc. Copyright © Paradigm Electronics Inc. All rights reserved. All other trademarks are the property of their respective owner(s). Paradigm Electronics reserves the right to change specifications and/or features without notice as design improvements are incorporated.
Paradigm Electronics Inc.205 Annagem Blvd., Mississauga, ON Canada L5T 2V1 121213
For more information visit paradigm.com

MD
MC
Manuel de l’utilisateur
5.1 Barre de son alimentée
FR-1
DIRECTIVES SUR LE RECYCLAGE ET LA RÉUTILISATION POUR L’EUROPEEn vertu de la directive WEEE de l’Union européenne (directive sur les déchets électriques et électroniques) entrée en vigueur le 13 août 2005, nous vous avisons que ce produit pourrait renfermer des matériaux réglementés dont l’élimination doit faire l’objet de procédures de réutilisation et de recyclage particulières. Pour cette raison, Paradigm Electronics Inc. (fabricant des enceintes Paradigm et des produits électroniques Anthem) a demandé à ses distributeurs dans les pays membres de l’Union européenne de reprendre et de recycler ce produit gratuitement. Pour trouver le distributeur le plus près, communiquez avec le revendeur du produit ou consultez le site Web www.paradigm.com/shift. Veuillez noter que seul le produit est régi par la directive WEEE. Nous vous encourageons à recycler les matériaux d’emballage et autres matériaux d’expédition selon les procédures normales.
Cet appareil contient ID : WUO-WBT1010 et ID : WUO-WTX1010 et IC : 7985A-WTX1010 et 7985A-WBT1010 Cet appareil est conforme à la Partie 15 du règlement FCC. Son utilisation est assujettie aux deux conditions suivantes : (1) cet appareil ne doit pas provoquer d’interférences nuisibles, et (2) cet appareil doit supporter les interférences reçues, y compris celles susceptibles de nuire à son bon fonctionnement. Les changements ou modi�cations non expressément approuvés par les autorités compétentes en matière de conformité peuvent priver l’utilisateur du droit d’utiliser l’équipement en question.
RENSEIGNEMENTS SUR LA CONFORMITÉ DU TRANSMETTEUR SANS FILL’expression « IC » apparaissant avant le numéro d’homologation radio signi�e simplement que les spéci�cations techniques d’Industrie Canada ont été respectées. Ce dispositif répond aux limites de la FCC et d’IC sur l’exposition aux rayonnements établies pour un environnement non contrôlé. Cet équipement doit être installé et mis en fonction à une distance minimale de 20 cm de l’appareil et de votre corps. Ce transmetteur ne doit pas être installé au même endroit qu’une autre antenne ou un autre transmetteur ou utilisé conjointement avec une autre antenne ou un autre transmetteur. Pour éviter que les interférences radio éventuelles a�ectent d’autres utilisateurs, le type d’antenne et son gain doivent être choisis a�n que la puissance isotrope rayonnée équivalente (p.i.r.e.) ne soit pas supérieure aux limites permises pour une communication réussie.
Dolby et le symbole de D double sont des marques de commerce déposées de Dolby Laboratories.
Fabriqué sous licence de DTS, Inc. en vertu d’un ou de plusieurs numéros de brevets américains suivants : 5,956,674; 5,974,380; 6,487,535 et autres brevets émis ou en instance aux É.-U et dans le monde en entier. DTS, le symbole, et DTS et le symbole réunis sont des marques de commerce déposées et DTS Digital Surround et les logos DTS sont des marques de commerce de DTS, Inc. © DTS, Inc. Tous droits réservés.
Le mot servant de marque Bluetooth® et les logos sont des marques de commerce déposées possédées par Bluetooth SIG, Inc. et toute utilisation de ces marques par Paradigm Electronics Inc. est autorisée par licence.
Les droits d’auteur du logiciel « aptX® » appartiennent à CSR plc ou à son groupe d’entreprises. Tous droits réservés. La marque aptX® et le logo aptX logo sont des marques de commerce de CSR plc ou de l’une des entreprises de son groupe et pourraient être déposées dans un ou plusieurs territoires ».
FR-2
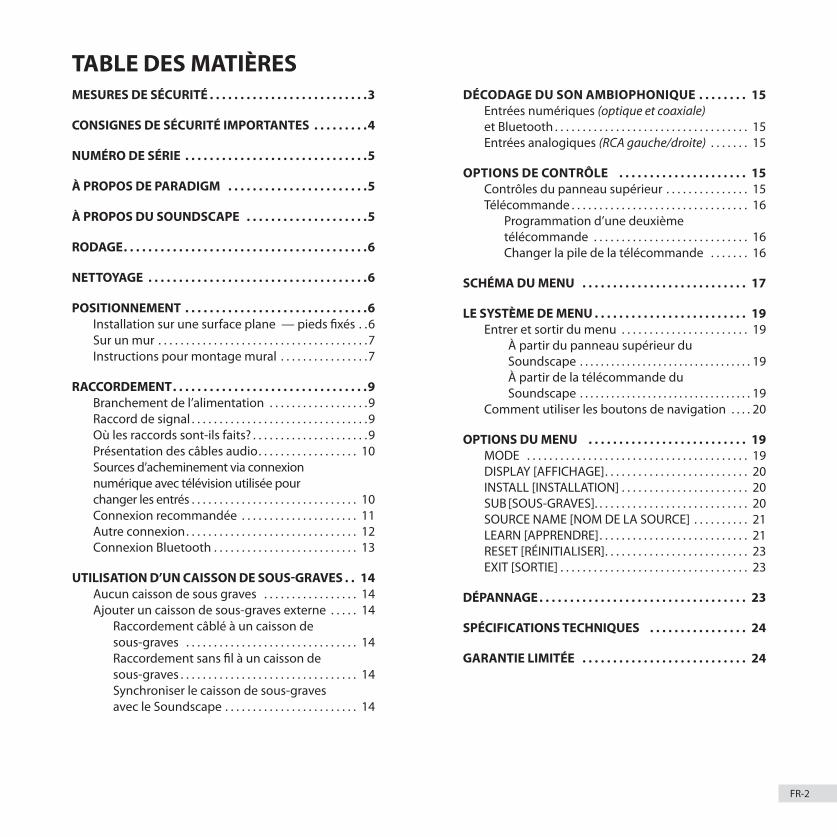
TABLE DES MATIÈRESMESURES DE SÉCURITÉ . . . . . . . . . . . . . . . . . . . . . . . . . .3
CONSIGNES DE SÉCURITÉ IMPORTANTES . . . . . . . . .4
NUMÉRO DE SÉRIE . . . . . . . . . . . . . . . . . . . . . . . . . . . . . .5
À PROPOS DE PARADIGM . . . . . . . . . . . . . . . . . . . . . . .5
À PROPOS DU SOUNDSCAPE . . . . . . . . . . . . . . . . . . . .5
RODAGE. . . . . . . . . . . . . . . . . . . . . . . . . . . . . . . . . . . . . . . .6
NETTOYAGE . . . . . . . . . . . . . . . . . . . . . . . . . . . . . . . . . . . .6
POSITIONNEMENT . . . . . . . . . . . . . . . . . . . . . . . . . . . . . .6 Installation sur une surface plane — pieds �xés . .6
Sur un mur . . . . . . . . . . . . . . . . . . . . . . . . . . . . . . . . . . . . . .7 Instructions pour montage mural . . . . . . . . . . . . . . . .7
RACCORDEMENT. . . . . . . . . . . . . . . . . . . . . . . . . . . . . . . .9 Branchement de l’alimentation . . . . . . . . . . . . . . . . . .9 Raccord de signal . . . . . . . . . . . . . . . . . . . . . . . . . . . . . . . .9 Où les raccords sont-ils faits? . . . . . . . . . . . . . . . . . . . . .9 Présentation des câbles audio. . . . . . . . . . . . . . . . . . 10 Sources d’acheminement via connexion numérique avec télévision utilisée pour changer les entrés . . . . . . . . . . . . . . . . . . . . . . . . . . . . . . 10 Connexion recommandée . . . . . . . . . . . . . . . . . . . . . 11 Autre connexion. . . . . . . . . . . . . . . . . . . . . . . . . . . . . . . 12 Connexion Bluetooth . . . . . . . . . . . . . . . . . . . . . . . . . . 13
UTILISATION D’UN CAISSON DE SOUS-GRAVES . . 14 Aucun caisson de sous graves . . . . . . . . . . . . . . . . . 14 Ajouter un caisson de sous-graves externe . . . . . 14 Raccordement câblé à un caisson de sous-graves . . . . . . . . . . . . . . . . . . . . . . . . . . . . . . . 14 Raccordement sans �l à un caisson de sous-graves . . . . . . . . . . . . . . . . . . . . . . . . . . . . . . . . 14 Synchroniser le caisson de sous-graves avec le Soundscape . . . . . . . . . . . . . . . . . . . . . . . . 14
DÉCODAGE DU SON AMBIOPHONIQUE . . . . . . . . 15 Entrées numériques (optique et coaxiale) et Bluetooth . . . . . . . . . . . . . . . . . . . . . . . . . . . . . . . . . . . 15 Entrées analogiques (RCA gauche/droite) . . . . . . . 15
OPTIONS DE CONTRÔLE . . . . . . . . . . . . . . . . . . . . . 15 Contrôles du panneau supérieur . . . . . . . . . . . . . . . 15 Télécommande . . . . . . . . . . . . . . . . . . . . . . . . . . . . . . . . 16 Programmation d’une deuxième télécommande . . . . . . . . . . . . . . . . . . . . . . . . . . . . 16 Changer la pile de la télécommande . . . . . . . 16
SCHÉMA DU MENU . . . . . . . . . . . . . . . . . . . . . . . . . . . 17
LE SYSTÈME DE MENU . . . . . . . . . . . . . . . . . . . . . . . . . 19 Entrer et sortir du menu . . . . . . . . . . . . . . . . . . . . . . . 19 À partir du panneau supérieur du Soundscape . . . . . . . . . . . . . . . . . . . . . . . . . . . . . . . . . 19 À partir de la télécommande du Soundscape . . . . . . . . . . . . . . . . . . . . . . . . . . . . . . . . . 19 Comment utiliser les boutons de navigation . . . . 20
OPTIONS DU MENU . . . . . . . . . . . . . . . . . . . . . . . . . . 19 MODE . . . . . . . . . . . . . . . . . . . . . . . . . . . . . . . . . . . . . . . . 19 DISPLAY [AFFICHAGE]. . . . . . . . . . . . . . . . . . . . . . . . . . 20 INSTALL [INSTALLATION] . . . . . . . . . . . . . . . . . . . . . . . 20 SUB [ SOUS-GRAVES]. . . . . . . . . . . . . . . . . . . . . . . . . . . . 20 SOURCE NAME [NOM DE LA SOURCE] . . . . . . . . . . 21 LEARN [APPRENDRE]. . . . . . . . . . . . . . . . . . . . . . . . . . . 21 RESET [RÉINITIALISER]. . . . . . . . . . . . . . . . . . . . . . . . . . 23 EXIT [SORTIE] . . . . . . . . . . . . . . . . . . . . . . . . . . . . . . . . . . 23
DÉPANNAGE . . . . . . . . . . . . . . . . . . . . . . . . . . . . . . . . . . 23
SPÉCIFICATIONS TECHNIQUES . . . . . . . . . . . . . . . . 24
GARANTIE LIMITÉE . . . . . . . . . . . . . . . . . . . . . . . . . . . 24
FR-3
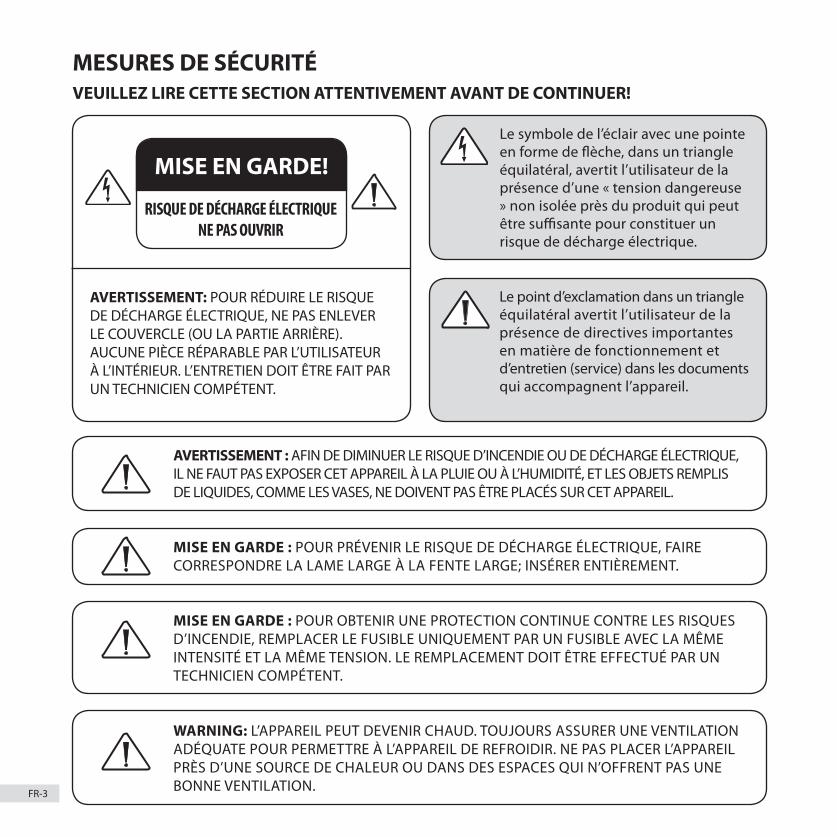
MESURES DE SÉCURITÉVEUILLEZ LIRE CETTE SECTION ATTENTIVEMENT AVANT DE CONTINUER!
MISE EN GARDE!
RISQUE DE DÉCHARGE ÉLECTRIQUENE PAS OUVRIR
Le symbole de l’éclair avec une pointe en forme de �èche, dans un triangle équilatéral, avertit l’utilisateur de la présence d’une « tension dangereuse » non isolée près du produit qui peut être su�sante pour constituer un risque de décharge électrique.
Le point d’exclamation dans un triangle équilatéral avertit l’utilisateur de la présence de directives importantes en matière de fonctionnement et d’entretien (service) dans les documents qui accompagnent l’appareil.
AVERTISSEMENT : AFIN DE DIMINUER LE RISQUE D’INCENDIE OU DE DÉCHARGE ÉLECTRIQUE, IL NE FAUT PAS EXPOSER CET APPAREIL À LA PLUIE OU À L’HUMIDITÉ, ET LES OBJETS REMPLIS DE LIQUIDES, COMME LES VASES, NE DOIVENT PAS ÊTRE PLACÉS SUR CET APPAREIL.
MISE EN GARDE : POUR PRÉVENIR LE RISQUE DE DÉCHARGE ÉLECTRIQUE, FAIRE CORRESPONDRE LA LAME LARGE À LA FENTE LARGE; INSÉRER ENTIÈREMENT.
MISE EN GARDE : POUR OBTENIR UNE PROTECTION CONTINUE CONTRE LES RISQUES D’INCENDIE, REMPLACER LE FUSIBLE UNIQUEMENT PAR UN FUSIBLE AVEC LA MÊME INTENSITÉ ET LA MÊME TENSION. LE REMPLACEMENT DOIT ÊTRE EFFECTUÉ PAR UN TECHNICIEN COMPÉTENT.
WARNING: L’APPAREIL PEUT DEVENIR CHAUD. TOUJOURS ASSURER UNE VENTILATION ADÉQUATE POUR PERMETTRE À L’APPAREIL DE REFROIDIR. NE PAS PLACER L’APPAREIL PRÈS D’UNE SOURCE DE CHALEUR OU DANS DES ESPACES QUI N’OFFRENT PAS UNE BONNE VENTILATION.
AVERTISSEMENT: POUR RÉDUIRE LE RISQUE DE DÉCHARGE ÉLECTRIQUE, NE PAS ENLEVER LE COUVERCLE (OU LA PARTIE ARRIÈRE). AUCUNE PIÈCE RÉPARABLE PAR L’UTILISATEUR À L’INTÉRIEUR. L’ENTRETIEN DOIT ÊTRE FAIT PAR UN TECHNICIEN COMPÉTENT.

FR-4
CONSIGNES DE SÉCURITÉ IMPORTANTES1 Lisez les consignes.
2 Conservez les consignes.
3 Respectez toutes les mises en garde.
4 Suivez toutes les consignes.
5 N’utilisez pas cet appareil près de l’eau.
6 Utilisez uniquement un linge sec pour nettoyer l’appareil.
7 Ne bloquez pas les ouvertures de ventilation. Installez l’appareil conformément aux instructions du fabricant.
8 N’installez pas le produit près de sources de chaleur, telles que les radiateurs, les registres de chaleur, les poêles ou les autres appareils qui produisent de la chaleur (y compris les ampli�cateurs).
9 Ne contournez pas la caractéristique de sécurité de la �che polarisée ou de type mise à la terre. Une �che polarisée comporte deux lames dont l’une est plus large que l’autre. Une �che de type mise à la terre a deux lames et une troisième qui agit à titre de broche de masse. La lame large ou la broche de masse est fournie pour votre sécurité. Si la �che fournie n’entre pas dans la prise murale, consultez un électricien pour qu’il remplace la prise obsolète.
10 Protégez le cordon d’alimentation pour qu’il ne soit pas piétiné ou écrasé, en prêtant particulièrement attention à la �che des cordons, aux réceptacles d’utilité et à l’endroit où ils sortent de l’appareil.
11 Utilisez uniquement les pièces ou les accessoires recommandés par le fabricant.
12 Utilisez uniquement avec le chariot, le pied, le trépied, le support ou la table recommandé par le fabricant ou vendu avec l’appareil. Lorsque vous utilisez un chariot, faites
attention lorsque vous déplacez le chariot/l’appareil pour éviter de vous blesser s’il bascule.
13 Débranchez l’appareil lors des orages électriques ou lorsque vous ne l’utilisez pas pendant une longue période.
14 L’entretien doit être fait par un technicien compétent. Des réparations sont nécessaires lorsque l’appareil a été endommagé de quelque façon que ce soit,; par exemple, lorsque la prise ou le cordon d’alimentation est endommagé, que du liquide ou des objets sont tombés dans l’appareil, que l’appareil a été exposé à la pluie ou à l’humidité, qu’il ne fonctionne pas normalement ou qu’il est tombé sur le sol.
15 Utilisez la prise de secteur pour débrancher l’appareil du réseau ou « POUR DÉBRANCHER COMPLÈTEMENT CET APPAREIL DE L’ALIMENTATION C.A. SECTEUR, DÉBRANCHEZ LA PRISE DU CORDON D’ALIMENTATION DE LA PRISE C.A. ».
16 « MISE EN GARDE – AFIN DE DIMINUER LE RISQUE D’INCENDIE OU DE DÉCHARGE ÉLECTRIQUE, N’EXPOSEZ PAS CET APPAREIL À LA PLUIE OU À L’HUMIDITÉ. »
17 « N’EXPOSEZ PAS CET APPAREIL AUX GOUTTES ET AUX ÉCLABOUSSURES ET ASSUREZ-VOUS QU’AUCUN OBJET CONTENANT DES LIQUIDES, COMME UN VASE, N’EST PLACÉ SUR L’APPAREIL. »
18 « LA PRISE DE SECTEUR DU CORDON D’ALIMENTATION DOIT ÊTRE FACILEMENT ACCESSIBLE. »
FR-5
NUMÉRO DE SÉRIELe numéro de série de l’appareil est situé sur le panneau arrière du Soundscape. Nous vous recommandons de noter les renseignements suivants au cas où vous auriez besoin de communiquer avec Paradigm à propos de Soundscape :
Numéro de série :
Magasin ou site Web où le produit a été acheté :
Numéro de téléphone du magasin :
Date d’achat :
À PROPOS DE PARADIGMAu début des années 80, Paradigm n’était qu’une idée dans la tête de deux jeunes dans la vingtaine qui adoraient la musique. Contrairement à aujourd’hui, ils n’avaient pas d’usine de 225 000 pieds carrés et pas de chambre de mesure anéchoïque de 36 000 pieds cubes; ils avaient juste la volonté de fabriquer des enceintes avec un très bon son et de les vendre à un prix raisonnable. Aujourd’hui, les enceintes Paradigm sont vendues sur six continents. Nous avons reçu le titre de meilleur fabricant d’enceintes qualité/prix 22 fois* et nos fans parcourent le Web pour acheter des versions usagées de nos enceintes d’origine. Cela en dit long sur la qualité des enceintes Paradigm. Pour la série SHIFTMC, nous avons pris tout ce que nous avons appris au sujet du son, et l’avons adapté au monde du sans �l en mettant l’accent sur un excellent son et une con�guration rapide et facile.
*Classé no 1 pour le meilleur rapport qualité/prix. Inside Track Dealer Survey. Un sondage annuel indépendant à l’échelle du pays mené auprès des revendeurs et des installateurs spécialisés dans l’électronique grand public.
IMPORTANT : ÉTEIGNEZ LE SOUNDSCAPE avant de le débrancher du mur.
À PROPOS DE VOTRE SOUNDSCAPEMC
Le Soundscape est un appareil à rendement élevé élaboré à l’aide de la technologie Paradigm. Autrement dit… il o�re de nombreuses caractéristiques géniales que vous ne trouverez pas dans les autres systèmes de barre de son. Sa conception pleine gamme o�re des hautes fréquences puissantes, une gamme moyenne authentique avec une reproduction particulièrement naturelle des dialogues, et des basses fréquences riches et profondes. Bien que cela ne soit pas obligatoire, vous pouvez ajouter un caisson de sous-graves Paradigm externe (vendu séparément) en mode câblé ou sans �l, a�n d’obtenir des graves encore plus profondes pour les e�ets spéciaux des �lms. La technologie de traitement du signal numérique perfectionnée permet à Paradigm de remplacer cinq enceintes dédiées de cinéma maison par une solution en une pièce capable de reproduire les enregistrements à canaux multiples sans rien perdre de la précision, de la résolution et des détails – l’inspiration derrière chaque produit Paradigm. Le Soundscape reproduit les canaux avant gauche, droit et central grâce aux haut-parleurs d’aigus et de graves dédiés du système. Les canaux ambiophoniques sont simulés à l’aide du système Paradigm Virtual Surround perfectionné. La capacité Bluetooth, alignée sur le codage aptX garantit une lecture en continu de haute qualité. Pour ceux qui ra�olent des détails techniques, nous avons inclus une section sur les spéci�cations techniques à l’endos de ce manuel qui vous indiquera pourquoi votre Soundscape o�re un son aussi exceptionnel!
La di�érence que le modèle Soundscape fera pour votre télévision, votre musique et vos �lms ne se traduit pas en mots, mais vous l’entendrez et la sentirez. Il s’agit d’une expérience qui va au-delà d’un système haute performance et qui vous submergera totalement. C’est la di�érence Paradigm. Nous vous garantissons que vous ne pourrez pas garder le secret et nous espérons que vous ne le ferez pas. Passez le mot. Parlez de votre Soundscape. Vantez-vous-en. Utilisez-le et faites-le écouter à votre entourage.
Nous sommes di�érents et notre son vous le prouvera. Certaines personnes aiment la musique, d’autres les �lms ou les jeux et certaines personnes aiment tout cela à la fois. Peu importe qui vous êtes, l’endroit où vous vivez, ce que vous aimez ou ce que vous faites, nous voulons vous o�rir Votre son o�cielMC.
Lisez ce manuel et suivez toutes les instructions. Si vous avez d’autres questions, consultez la page de questions et réponses sur notre site Web paradigm.com.

FR-6
RODAGEBien que le Soundscape o�re un son excellent « en sortant de la boîte », le son sera encore meilleur après une période de rodage. Laissez-le fonctionner pendant plusieurs heures avant toute écoute critique.
NETTOYAGEN’utilisez pas de nettoyants puissants ou abrasifs sur votre Soundscape. Essuyez délicatement le boîtier avec un linge humide doux.
POSITIONNEMENTNous recommandons de centrer le Soundscape directement en-dessous ou au-dessus de votre ensemble TV/vidéo. Les options du menu du système vous permettent d’optimiser le rendement acoustique pour un positionnement sur une surface plane (c.-à-d., étagère ou crédence) ou pour un montage mural. Pour en apprendre davantage sur ces options, lisez la section ci-dessous ou consultez la section « Système de menu » plus loin dans ce manuel.
INSTALLATION SUR UNE SURFACE PLANE – PIEDS FIXÉS
ACTION REQUISE! Lorsque vous installez le Soundscape sur une surface plane (étagère ou crédence), vous devez laisser les pieds fixés pour obtenir une meilleure stabilité et, pour obtenir de meilleurs résultats, vous devez ajuster la fonction d’égalisation et la fonction vocale de l’appareil afin de vous assurer d’obtenir le meilleur son possible pour l’emplacement. Utilisez le système de menu du Soundscape et choisissez : « INSTAL » [INSTALL (INSTALLER)] > « ON.SHELF » [ON SHELF (ÉTAGÈRE)].
Pieds stabilisateurs (Fig. 1)
Pour plus de stabilité, sur une surface plane, les pieds en caoutchouc installés en usine du Soundscape doivent rester fixés.
Si vous montez le Soundscape sur un mur, utilisez un tournevis pour enlever les pieds et rangez-les dans un endroit sûr au cas où vous voudriez les utiliser plus tard.
REMARQUE : Les pieds stabilisateurs sont encastrés; par conséquent, il n’est pas nécessaire de les enlever avant le montage mural. C’est uniquement une question de préférence.
Pieds stabilisateursFig. 1

FR-7
POSITIONNEMENT SUR UN MUR
Qu’est-ce qui est inclus?1 x Un support de montage mural et un gabarit de montage mural et 2 x vis
Outils recommandés (non compris)1 x détecteur de montant1 x niveau
1 x perceuse électrique et trépans appropriés
Matériel requis (non compris)5 x vis adaptées à la surface de montage et au poids du Soundscape.5 x ancrages muraux adaptés à la surface de montage et au poids du Soundscape.
Paradigm ne fournit PAS les vis et les boulons d’ancrage pour monter le Soundscape sur un mur. Choisissez des vis et des boulons d’ancrage
appropriés pour la taille et le poids du Soundscape.
Dimensions du Soundscape (H x l x P) : 5-1/2 po x 42 po x 5 po / 14 cm x 106,7 cm x 12,7 cm.
Poids du Soundscape : 20 lb/9,1 kgNous fournissions des instructions limitées pour le montage sur un mur; veuillez communiquer avec un revendeur Paradigm pour obtenir de plus amples renseignements.
Les instructions qui suivent supposent que la surface de montage est une
cloison sèche avec des montants en bois réguliers. Si vous souhaitez utiliser un autre type de surface pour le montage, veuillez consulter un entrepreneur compétent ou votre revendeur Paradigm avant de commencer l’installation.
ACTION REQUISE! : Lorsque vous montez le Soundscape sur un mur, pour obtenir de meilleurs résultats, vous devez ajuster la fonction d’égalisation et la fonction vocale de l’appareil afin de vous assurer d’obtenir le meilleur son possible pour l’emplacement. Utilisez le système de menu du Soundscape et choisissez « INSTAL » [INSTALLATION] > « ON WALL » [ON WALL (MUR)]
Instructions pour montage muralSuivez les instructions ci-dessous et utilisez les illustrations fournies aux pages suivantes (Fig. 2 à 8) pour vous orienter.1 Choisissez l’emplacement de montage et utilisez un niveau pour
vous assurer que le support de montage mural du Soundscape est au niveau (Fig. 2).
2 Indiquez l’emplacement des trois trous de guidage centraux et enlevez le gabarit d’installation du mur. (Fig. 3).
3 À l’aide d’un détecteur de montant, déterminez si un montant du mur se trouve directement derrière l’un des trois emplacements de vis centraux (non illustré).Si vous trouvez un montant, percez un trou de guidage dans le montant. Si vous ne trouvez pas de montant, utilisez l’emplacement de vis le plus au centre et percez un trou de guidage pour l’ancrage mural. Installez l’ancrage mural (non illustré).
4 À l’aide d’une vis, fixez le support mural au mur. NE serrez PAS la vis à cette étape-ci (Fig. 4).
5 À l’aide d’un détecteur de montant, déterminez si un montant du mur se trouve derrière l’un des emplacements de vis de
gauche ou de droite. Si vous trouvez un montant, utilisez les emplacements de vis supérieur et inférieur sur le montant. Si vous ne trouvez pas de montant utilisez l’emplacement de vis le plus au centre et percez un trou de guidage pour l’ancrage mural. Installez l’ancrage mural (Fig. 5).
6 Enlevez le support mural ou faites-le pivoter pour avoir accès aux autres emplacements de vis (Fig. 0). Si vous trouvez un montant, percez les trous de guidage. Si vous ne trouvez pas de montant, percez les trous de guidage et installez des ancrages muraux.
7 À l’aide de vis, fixez le support mural au mur. NE serrez PAS entièrement.
8 Utilisez un niveau pour cadrer le support mural, puis vissez toutes les vis (Fig. 7).
9 Fixez les câbles audio et d’alimentation. Pour obtenir de plus amples renseignements, veuillez consulter la section « RACCORDEMENT » de ce manuel.
10 Placez le Soundscape à sa place. Laissez tomber les vis à épaulement dans les trous piriformes du support mural (Fig. 8). Avant de relâcher, assurez-vous que le Soundscape est bien �xé dans les trous piriformes et qu’il est bien soutenu (Fig. 8 Inset).

FR-8
Fig. 2
Fig. 5
Fig. 8
Fig. 3
Fig. 6
Fig. 4
Pas de montants
Pas de montants
Montants
Montants
Fig. 7

FR-9
BRANCHEMENT DE L’ALIMENTATIONLe cordon d’alimentation doit être inséré dans la prise d’alimentation CA sur le panneau arrière, puis dans une prise murale CA à proximité. Le Soundscape intègre un capteur de signal d’alimentation qui bascule automatiquement en mode « Veille » après 20 minutes. S’il est branché dans le mur et qu’aucun signal n’est détecté, le Soundscape restera en mode veille.
RACCORD DE SIGNALLorsque vous utilisez le Soundscape pour reproduire l’audio, la sortie audio de la télévision doit être désactivée. Certaines télévisions vous permettent d’éteindre l’enceinte interne dans le menu système de la télévision. Pour d’autres télévisions, il peut être nécessaire de mettre le volume à zéro ou en « sourdine ».
OÙ LES RACCORDS SONT-ILS FAITS? Les raccords audio sont effectués dans la section entrée des signaux située sur le panneau arrière de l’appareil et sans fil pour le mode Bluetooth. Cinq entrées sont disponibles (Fig. 5) :
• 2 x Entrées optiques numériques• 1 x Entrée coaxiale numérique (RCA)• 1 paire x Entrée analogique gauche/droite (RCA)• Bluetooth (sans fil)
MISE EN GARDE! CLIENTS À L’EXTÉRIEUR DE L’AMÉRIQUE DU NORD : Si vous retirez le Soundscape du pays de vente d’origine, soyez certain que l’alimentation CA fournie dans
toute région ou tout pays suivant est appropriée avant de brancher et d’utiliser le Soundscape. Si l’appareil est utilisé avec une source d’alimentation CA inappropriée, son rendement peut être grandement diminué et des dommages graves peuvent survenir. De tels dommages ne sont pas couverts par la garantie du produit.
RACCORDEMENT
MISE EN GARDE! ACTION REQUISE : Éteignez le système avant de faire ou de défaire des raccords de signal! Le cordon d’alimentation ne doit PAS être installé, enlevé ou laissé détaché lorsque l’autre extrémité est raccordée à une source d’alimentation CA.
Analog In
AC Power In
Coax InSub Out
Optical In1 2
Fig. 9
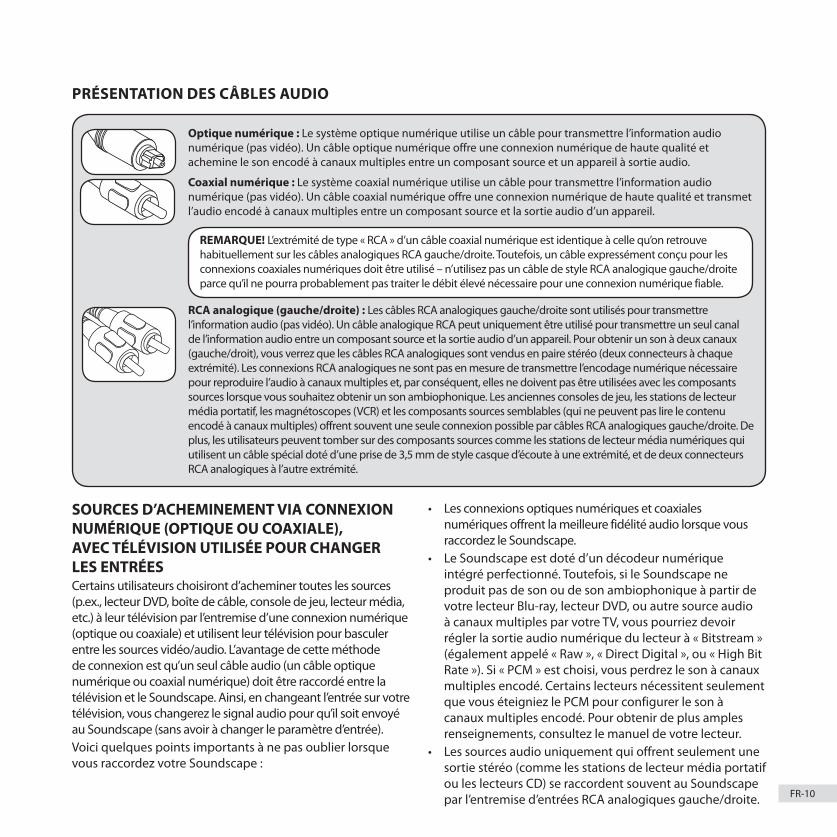
FR-10
Optique numérique : Le système optique numérique utilise un câble pour transmettre l’information audio numérique (pas vidéo). Un câble optique numérique offre une connexion numérique de haute qualité et achemine le son encodé à canaux multiples entre un composant source et un appareil à sortie audio.
Coaxial numérique : Le système coaxial numérique utilise un câble pour transmettre l’information audio numérique (pas vidéo). Un câble coaxial numérique offre une connexion numérique de haute qualité et transmet l’audio encodé à canaux multiples entre un composant source et la sortie audio d’un appareil.
REMARQUE! L’extrémité de type « RCA » d’un câble coaxial numérique est identique à celle qu’on retrouve habituellement sur les câbles analogiques RCA gauche/droite. Toutefois, un câble expressément conçu pour les connexions coaxiales numériques doit être utilisé – n’utilisez pas un câble de style RCA analogique gauche/droite parce qu’il ne pourra probablement pas traiter le débit élevé nécessaire pour une connexion numérique fiable.
RCA analogique (gauche/droite) : Les câbles RCA analogiques gauche/droite sont utilisés pour transmettre l’information audio (pas vidéo). Un câble analogique RCA peut uniquement être utilisé pour transmettre un seul canal de l’information audio entre un composant source et la sortie audio d’un appareil. Pour obtenir un son à deux canaux (gauche/droit), vous verrez que les câbles RCA analogiques sont vendus en paire stéréo (deux connecteurs à chaque extrémité). Les connexions RCA analogiques ne sont pas en mesure de transmettre l’encodage numérique nécessaire pour reproduire l’audio à canaux multiples et, par conséquent, elles ne doivent pas être utilisées avec les composants sources lorsque vous souhaitez obtenir un son ambiophonique. Les anciennes consoles de jeu, les stations de lecteur média portatif, les magnétoscopes (VCR) et les composants sources semblables (qui ne peuvent pas lire le contenu encodé à canaux multiples) offrent souvent une seule connexion possible par câbles RCA analogiques gauche/droite. De plus, les utilisateurs peuvent tomber sur des composants sources comme les stations de lecteur média numériques qui utilisent un câble spécial doté d’une prise de 3,5 mm de style casque d’écoute à une extrémité, et de deux connecteurs RCA analogiques à l’autre extrémité.
PRÉSENTATION DES CÂBLES AUDIO
SOURCES D’ACHEMINEMENT VIA CONNEXION NUMÉRIQUE (OPTIQUE OU COAXIALE), AVEC TÉLÉVISION UTILISÉE POUR CHANGER LES ENTRÉESCertains utilisateurs choisiront d’acheminer toutes les sources (p.ex., lecteur DVD, boîte de câble, console de jeu, lecteur média, etc.) à leur télévision par l’entremise d’une connexion numérique (optique ou coaxiale) et utilisent leur télévision pour basculer entre les sources vidéo/audio. L’avantage de cette méthode de connexion est qu’un seul câble audio (un câble optique numérique ou coaxial numérique) doit être raccordé entre la télévision et le Soundscape. Ainsi, en changeant l’entrée sur votre télévision, vous changerez le signal audio pour qu’il soit envoyé au Soundscape (sans avoir à changer le paramètre d’entrée).Voici quelques points importants à ne pas oublier lorsque vous raccordez votre Soundscape :
• Les connexions optiques numériques et coaxiales numériques offrent la meilleure fidélité audio lorsque vous raccordez le Soundscape.
• Le Soundscape est doté d’un décodeur numérique intégré perfectionné. Toutefois, si le Soundscape ne produit pas de son ou de son ambiophonique à partir de votre lecteur Blu-ray, lecteur DVD, ou autre source audio à canaux multiples par votre TV, vous pourriez devoir régler la sortie audio numérique du lecteur à « Bitstream » (également appelé « Raw », « Direct Digital », ou « High Bit Rate »). Si « PCM » est choisi, vous perdrez le son à canaux multiples encodé. Certains lecteurs nécessitent seulement que vous éteigniez le PCM pour configurer le son à canaux multiples encodé. Pour obtenir de plus amples renseignements, consultez le manuel de votre lecteur.
• Les sources audio uniquement qui offrent seulement une sortie stéréo (comme les stations de lecteur média portatif ou les lecteurs CD) se raccordent souvent au Soundscape par l’entremise d’entrées RCA analogiques gauche/droite.
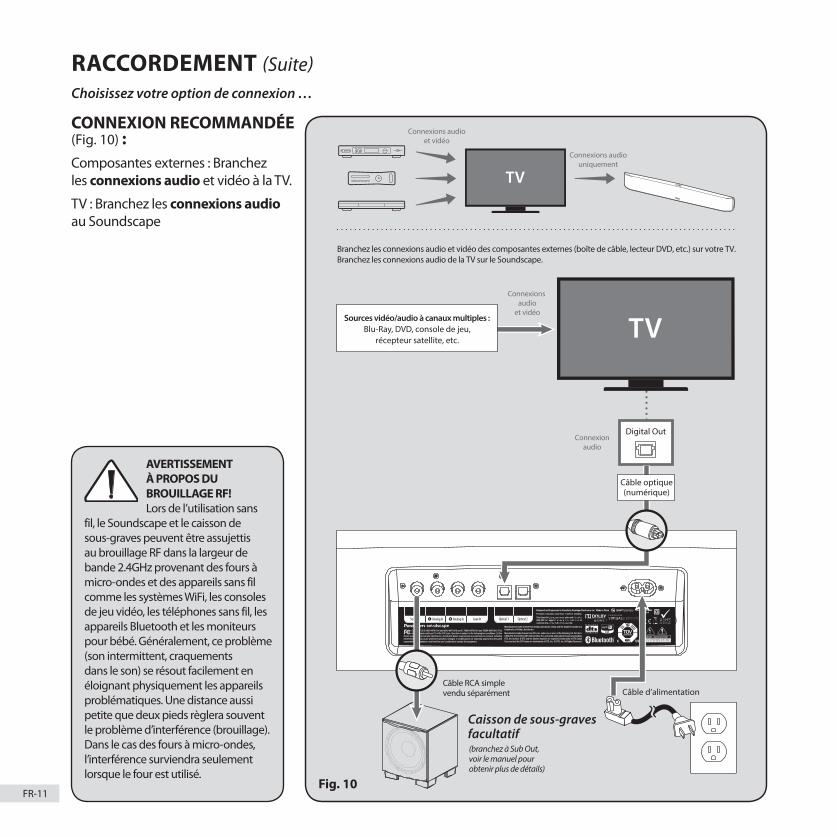
FR-11
Connexions audio
et vidéo
Connexions audioet vidéo
Connexionsvidéo
uniquement
Connexionaudio
Choisissezla connexion
audio :
Connexions audiouniquement
Connexions audiouniquement
Connexions vidéouniquement
Branchez les connexions audio et vidéo des composantes externes (boîte de câble, lecteur DVD, etc.) sur votre TV.Branchez les connexions audio de la TV sur le Soundscape.
Caisson de sous-gravesfacultatif(branchez à Sub Out,voir le manuel pourobtenir plus de détails)
Câble RCA simplevendu séparément
Sources vidéo/audio à canaux multiples :Blu-Ray, DVD, console de jeu,
récepteur satellite, etc.
Sources vidéo/audio à canaux multiples :Blu-Ray, DVD, console de jeu,
récepteur satellite, etc.
Branchez les connexions audio des composantes externes (boîte de câble, lecteur Blu-Ray, etc.) sur votreSoundscape et les connexions vidéo sur la TV.
Caisson de sous-gravesfacultatif
Câble d’alimentation
Digital OutCoaxial OutAnalog Out
(branchez à Sub Out,voir le manuel pourobtenir plus de détails)
Câble RCA simplevendu séparément
OUOUOUDigital OutRAnalog OutLDigital Out
Câble d’alimentation
TV
TVTV
TV
Câble RCA double (analogique)
Câble RCA double(analogique)
Câble optique(numérique)
Câble optique(numérique)
Câble optique(numérique)
Câble coaxial (numérique)Non compris
RACCORDEMENT (Suite)Choisissez votre option de connexion …
CONNEXION RECOMMANDÉE (Fig. 10) :Composantes externes : Branchez les connexions audio et vidéo à la TV.
TV : Branchez les connexions audio au Soundscape
Fig. 10
AVERTISSEMENT À PROPOS DU BROUILLAGE RF! Lors de l’utilisation sans
fil, le Soundscape et le caisson de sous-graves peuvent être assujettis au brouillage RF dans la largeur de bande 2.4GHz provenant des fours à micro-ondes et des appareils sans fil comme les systèmes WiFi, les consoles de jeu vidéo, les téléphones sans fil, les appareils Bluetooth et les moniteurs pour bébé. Généralement, ce problème (son intermittent, craquements dans le son) se résout facilement en éloignant physiquement les appareils problématiques. Une distance aussi petite que deux pieds règlera souvent le problème d’interférence (brouillage). Dans le cas des fours à micro-ondes, l’interférence surviendra seulement lorsque le four est utilisé.
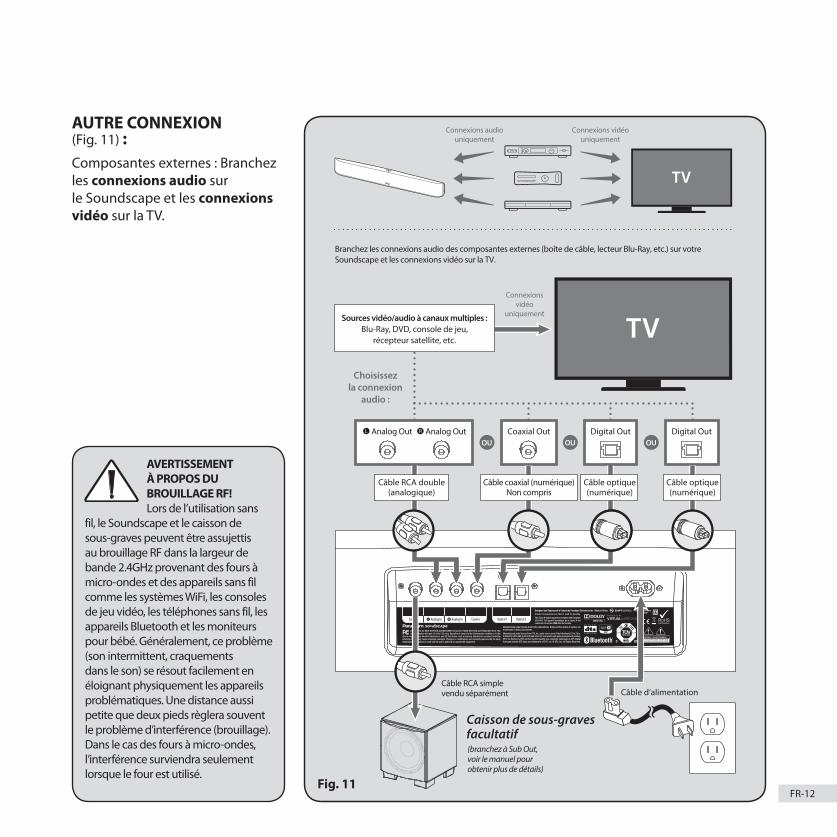
FR-12
Connexions audio
et vidéo
Connexions audioet vidéo
Connexionsvidéo
uniquement
Connexionaudio
Choisissezla connexion
audio :
Connexions audiouniquement
Connexions audiouniquement
Connexions vidéouniquement
Branchez les connexions audio et vidéo des composantes externes (boîte de câble, lecteur DVD, etc.) sur votre TV.Branchez les connexions audio de la TV sur le Soundscape.
Caisson de sous-gravesfacultatif(branchez à Sub Out,voir le manuel pourobtenir plus de détails)
Câble RCA simplevendu séparément
Sources vidéo/audio à canaux multiples :Blu-Ray, DVD, console de jeu,
récepteur satellite, etc.
Sources vidéo/audio à canaux multiples :Blu-Ray, DVD, console de jeu,
récepteur satellite, etc.
Branchez les connexions audio des composantes externes (boîte de câble, lecteur Blu-Ray, etc.) sur votreSoundscape et les connexions vidéo sur la TV.
Caisson de sous-gravesfacultatif
Câble d’alimentation
Digital OutCoaxial OutAnalog Out
(branchez à Sub Out,voir le manuel pourobtenir plus de détails)
Câble RCA simplevendu séparément
OUOUOUDigital OutRAnalog OutLDigital Out
Câble d’alimentation
TV
TVTV
TV
Câble RCA double (analogique)
Câble RCA double(analogique)
Câble optique(numérique)
Câble optique(numérique)
Câble optique(numérique)
Câble coaxial (numérique)Non compris
AUTRE CONNEXION (Fig. 11) :Composantes externes : Branchez les connexions audio surle Soundscape et les connexions vidéo sur la TV.
Fig. 11
AVERTISSEMENT À PROPOS DU BROUILLAGE RF! Lors de l’utilisation sans
fil, le Soundscape et le caisson de sous-graves peuvent être assujettis au brouillage RF dans la largeur de bande 2.4GHz provenant des fours à micro-ondes et des appareils sans fil comme les systèmes WiFi, les consoles de jeu vidéo, les téléphones sans fil, les appareils Bluetooth et les moniteurs pour bébé. Généralement, ce problème (son intermittent, craquements dans le son) se résout facilement en éloignant physiquement les appareils problématiques. Une distance aussi petite que deux pieds règlera souvent le problème d’interférence (brouillage). Dans le cas des fours à micro-ondes, l’interférence surviendra seulement lorsque le four est utilisé.
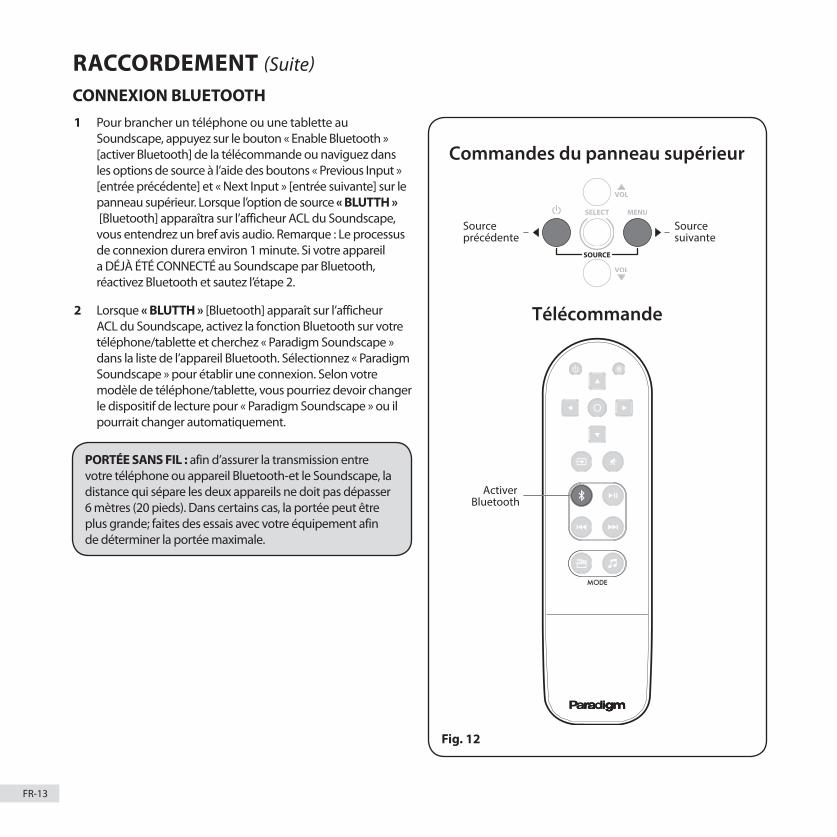
FR-13
RACCORDEMENT (Suite)
CONNEXION BLUETOOTH
111313
1. To connect a phone/tablet to the Soundscape, press the Enable Bluetooth button on your remote or toggle through the source options using the Previous Input and Next Input on the top panel. Once the “BLUTTH” (Bluetooth) source option appears on the LCD display a short audio noti�cation will be heard. NOTE: The connection process will take approximately 1 minute. If your device has been PREVIOUSLY CONNECTED to your Soundscape via Bluetooth, renable Bluetooth and skip step 2.
2. Enable Bluetooth on your phone/tablet and search for “Paradigm Soundscape” on your Bluetooth device list. Select “Paradigm Soundscape” to establish a connection. Depending on phone/tablet you may need to change the playback device to “Paradigm Soundscape” or it may change automatically.
Bluetooth Connection
Source précédente
Source suivante
Commandes du panneau supérieur
Télécommande
Activer Bluetooth
MODE
1 Pour brancher un téléphone ou une tablette au Soundscape, appuyez sur le bouton « Enable Bluetooth » [activer Bluetooth] de la télécommande ou naviguez dans les options de source à l’aide des boutons « Previous Input » [entrée précédente] et « Next Input » [entrée suivante] sur le panneau supérieur. Lorsque l’option de source « BLUTTH » [Bluetooth] apparaîtra sur l’afficheur ACL du Soundscape, vous entendrez un bref avis audio. Remarque : Le processus de connexion durera environ 1 minute. Si votre appareil a DÉJÀ ÉTÉ CONNECTÉ au Soundscape par Bluetooth, réactivez Bluetooth et sautez l’étape 2.
2 Lorsque « BLUTTH » [Bluetooth] apparaît sur l’afficheur ACL du Soundscape, activez la fonction Bluetooth sur votre téléphone/tablette et cherchez « Paradigm Soundscape » dans la liste de l’appareil Bluetooth. Sélectionnez « Paradigm Soundscape » pour établir une connexion. Selon votre modèle de téléphone/tablette, vous pourriez devoir changer le dispositif de lecture pour « Paradigm Soundscape » ou il pourrait changer automatiquement.
PORTÉE SANS FIL : afin d’assurer la transmission entre votre téléphone ou appareil Bluetooth-et le Soundscape, la distance qui sépare les deux appareils ne doit pas dépasser 6 mètres (20 pieds). Dans certains cas, la portée peut être plus grande; faites des essais avec votre équipement afin de déterminer la portée maximale.
Fig. 12

FR-14
Aucun caisson de sous gravesSi vous n’utilisez pas de caisson de sous-graves externe, utilisez la flèche vers le HAUT sur le panneau de menu du Soundscape afin de dérouler pour atteindre « INTERNL » [INTERNAL], puis utilisez la flèche DROITE pour choisir « NO SUB ». Cela règle le Soundscape pour qu’il reproduise la plage de fréquences complète lorsqu’il lit le contenu musical ou les films.
Ajouter un caisson de sous-graves externe Vous pouvez utiliser un caisson de sous-graves externe en mode câblé ou sans fil pour reproduire l’information de canal à basse fréquence des enregistrements à canaux multiples et des enregistrements stéréo. Pour un jumelage harmonieux du système, nous recommandons un caisson de sous-graves Paradigm; toutefois, vous pouvez raccorder un caisson de sous-graves d’une autre marque.
Raccordement câblé à un caisson de sous-graves À l’aide d’un câble de style RCA de qualité, raccordez la sortie « Sub Out » du Soundscape à l’entrée « LFE In/Sub In » située sur le panneau arrière du caisson de sous-graves.
Utilisez la flèche vers le HAUT sur le panneau de menu du Soundscape afin de dérouler pour atteindre « SUB » [SOUS-GRAVES], puis utilisez la flèche DROITE , puis utilisez la flèche le HAUT pour choisir « WIRED » [CÂBLÉ].
CONSEIL! Consultez le manuel du caisson de sous-graves pour savoir comment ajuster les commandes de niveau et de phase du caisson de sous-graves afin d’obtenir un mélange approprié avec le Soundscape.
Raccordement sans fil à un caisson de sous-gravesRécepteur sans fil du caisson de sous-graves
Afin de faciliter l’utilisation d’un caisson de sous-graves externe en mode sans fil, nous avons inclus un récepteur sans fil pour caisson de sous-graves dans la boîte avec le Soundscape. Ce récepteur est compatible avec un caisson de sous-graves Paradigm ou un caisson de toute autre marque.
Préparer le caisson de sous-graves externe pour un fonctionnement sans fil avec le Soundscape
1 Si le Soundscape n’est pas allumé, allumez-le maintenant.2 Branchez le récepteur sans �l dans l’entrée « LFE/SUB In » du
caisson de sous-graves. 3 Branchez le caisson de sous-graves externe.
Synchroniser un caisson de sous-graves externe avec le Soundcape1 Branchez le récepteur de caisson de sous-graves sans
�l fourni avec le Soundscape dans une prise murale. N’APPUYEZ PAS TOUT DE SUITE SUR LE BOUTON DE SYNCHRONISATION pour lancer la synchronisation.
2 Par l’entremise de la télécommande ou du panneau supérieur, accédez au menu du Soundscape en appuyant sur le bouton « MENU ».
3 À l’aide de la �èche vers le HAUT’ , naviguez les options jusqu’à « SUB » [SOUS-GRAVES]
4 Appuyez sur la �èche DROITE, PUIS naviguez les options vers le HAUT jusqu’à « WIRELESS » [SANS FIL].
5 À l’aide du bouton « SELECT » [CHOISIR], choisissez « WIRELESS » [SANS FIL].
6 L’a�chage du Soundscape indiquera « PAIRING STARTED » [JUMELAGE LANCÉ]. Cela signi�e que le Soundscape transmet un signal sans �l. DANS LES 30 SECONDES SUIVANTES, vous devez…
7 Appuyez sur le bouton de synchronisation situé sur le panneau arrière du récepteur sans �l et maintenez-le enfoncé pendant 3 secondes. Sa lumière bleue clignotera rapidement pour indiquer qu’il est prêt à recevoir le signal du Soundscape.
8 La DEL du récepteur sans �l restera allumée en bleu une fois qu’il aura reçu le signal et l’a�cheur du Soundscape devrait indiquer « PAIRED » [JUMELÉ] (c.-à-d., synchronisé).
Quoi faire si le jumelage (synchronisation) échoue
Si le jumelage échoue, il se peut que trop de temps se soit écoulé entre les étapes 7 et 8 ci-dessus. Répétez le processus de jumelage en appuyant sur la flèche GAUCHE . Naviguez dans le menu jusqu’au mode « WIRELESS » [SANS FIL] et répétez les étapes 5 à 8 (ci-dessus) jusqu’à ce que « PAIRING » [JUMELAGE] soit atteint.Si le jumelage ne fonctionne pas lors du deuxième essai, vérifiez que le Soundscape et le récepteur ne sont pas éloignés de plus de 50 pi (15 m) l’un de l’autre, et qu’aucun obstacle ne se trouve entre les deux. Vérifiez que tout l’équipement est branché et que les prises murales fonctionnent. Si le jumelage ne fonctionne pas, veuillez communiquer avec votre revendeur Paradigm.
UTILISATION D’UN CAISSON DE SOUS-GRAVES
Wireless SubwooferReceiver Included
50’50’Wireless Range
or 15 Meters

FR-15
Le Soundscape est capable de détecter et de décoder automa-tiquement les formats audio à canaux multiples, comme ceux des films sur DVD et Blu-ray.
ENTRÉES NUMÉRIQUES (optique et coaxiale)Lorsque vous utilisez une connexion numérique, le Soundscape peut traiter les formats suivants :• Dolby Digital• DTS™ Digital Surround• Digital PCM• Stéréo numérique
ENTRÉES ANALOGIQUES (RCA gauche/droite)L’information sonore encodée numériquement ne peut pas être transmise à une entrée analogique. Cette méthode de connexion est appropriée pour la plupart des appareils qui offrent seule-ment deux canaux de sortie audio (comme les VCR, les lecteurs CD, les consoles de jeu plus anciennes ou les stations d’accueil de lecteur média portatives). Bien que la plupart des appareils offrant le son ambiophonique, comme les lecteurs DVD et Blu-Ray, offrent des connexions analogiques et numériques, il faut toujours utiliser les connexions numériques. Si un appareil source est raccordé par l’entremise d’une connexion RCA analogique gauche/droite, le contenu audio encodé du canal 5.1 ne sera pas transmis au Soundscape.
DÉCODAGE DU SON AMBIOPHONIQUE
CONTRÔLES DU PANNEAU SUPÉRIEUR MISE SOUS TENSION/HORS TENSION ET ENTRÉE PRÉCÉDENTE : Appuyez et maintenez enfoncé le bouton POWER pendant 3 secondes pour allumer ou fermer l’appareil. Une fois que l’appareil est allumé, ce bouton commande également la navigation pour le choix « entrée précédente ». Voir Fig. 13 pour une description plus visuelle.
VOL+ / VOL– : Permet d’augmenter ou de baisser le volume (Fig. 13).
MENU / ENTRÉE SUIVANTE : Appuyez sur ce bouton pour entrer dans le système de menu. Une fois que l’appareil est allumé, ce bouton commande également la navigation pour le choix « suivante » . Voir Fig. 13 pour une description plus visuelle.
ENTRÉE PRÉCÉDENTE/SUIVANTE : Utilisez les flèches de gauche et de droite ’ pour basculer entre les entrées (Fig. 13). L’ordre
des entrées est : Optique numérique 1 Optique numérique 2 Coaxiale numérique RCA analogique Bluetooth.
ACCÉDER AU MENU À PARTIR DU PANNEAU SUPÉRIEURPour accéder au Menu, appuyez et maintenez enfoncé le bouton « MENU » du panneau supérieur pendant 3 secondes (Fig. 13). Après l’activation du menu, les cinq boutons des commandes du panneau supérieur serviront de flèches directionnelles haut /bas /gauche’ /droite qui vous permettront de naviguer dans le menu et utilisez le bouton « Select » [Choisir] pour votre selection. Pour sortir du menu, appuyez sur le bouton gauche ou attendez simplement la disparition automatique.
REMARQUE : Il n’est pas possible de mettre le système en sourdine à partir des commandes du panneau supérieur. Utilisez plutôt la télécommande.
OPTIONS DE CONTRÔLE
Commande de mise en marche
Sous tension/hors tension
Dé�ler à gauche
Source précédente
Source suivante
Choisir
Volume haut
Volume bas
Dé�ler vers le bas
Dé�ler vers le haut
Menu/ dé�ler vers la droite
Commandes volume/source
Commandes du menu
Fig. 13
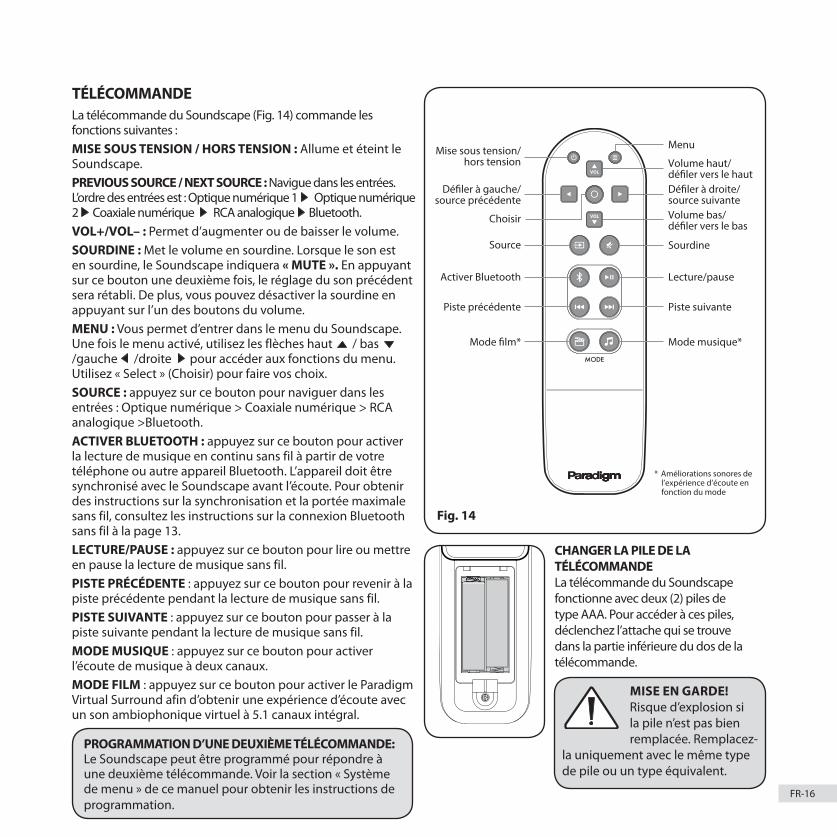
FR-16
MISE EN GARDE! Risque d’explosion si la pile n’est pas bien remplacée. Remplacez-
la uniquement avec le même type de pile ou un type équivalent.
TÉLÉCOMMANDELa télécommande du Soundscape (Fig. 14) commande les fonctions suivantes :MISE SOUS TENSION / HORS TENSION : Allume et éteint le Soundscape.PREVIOUS SOURCE / NEXT SOURCE : Navigue dans les entrées. L’ordre des entrées est : Optique numérique 1 Optique numérique 2 Coaxiale numérique RCA analogique Bluetooth.VOL+/VOL– : Permet d’augmenter ou de baisser le volume.SOURDINE : Met le volume en sourdine. Lorsque le son est en sourdine, le Soundscape indiquera « MUTE ». En appuyant sur ce bouton une deuxième fois, le réglage du son précédent sera rétabli. De plus, vous pouvez désactiver la sourdine en appuyant sur l’un des boutons du volume.MENU : Vous permet d’entrer dans le menu du Soundscape. Une fois le menu activé, utilisez les flèches haut / bas /gauche /droite pour accéder aux fonctions du menu. Utilisez « Select » (Choisir) pour faire vos choix.SOURCE : appuyez sur ce bouton pour naviguer dans les entrées : Optique numérique > Coaxiale numérique > RCA analogique >Bluetooth.ACTIVER BLUETOOTH : appuyez sur ce bouton pour activer la lecture de musique en continu sans fil à partir de votre téléphone ou autre appareil Bluetooth. L’appareil doit être synchronisé avec le Soundscape avant l’écoute. Pour obtenir des instructions sur la synchronisation et la portée maximale sans fil, consultez les instructions sur la connexion Bluetooth sans fil à la page 13.LECTURE/PAUSE : appuyez sur ce bouton pour lire ou mettre en pause la lecture de musique sans fil.PISTE PRÉCÉDENTE : appuyez sur ce bouton pour revenir à la piste précédente pendant la lecture de musique sans fil.PISTE SUIVANTE : appuyez sur ce bouton pour passer à la piste suivante pendant la lecture de musique sans fil.MODE MUSIQUE : appuyez sur ce bouton pour activer l’écoute de musique à deux canaux. MODE FILM : appuyez sur ce bouton pour activer le Paradigm Virtual Surround afin d’obtenir une expérience d’écoute avec un son ambiophonique virtuel à 5.1 canaux intégral.
PROGRAMMATION D’UNE DEUXIÈME TÉLÉCOMMANDE: Le Soundscape peut être programmé pour répondre à une deuxième télécommande. Voir la section « Système de menu » de ce manuel pour obtenir les instructions de programmation.
CHANGER LA PILE DE LA TÉLÉCOMMANDELa télécommande du Soundscape fonctionne avec deux (2) piles de type AAA. Pour accéder à ces piles, déclenchez l’attache qui se trouve dans la partie inférieure du dos de la télécommande.
Sourdine
Volume bas/dé�ler vers le bas
Dé�ler à droite/source suivante
Menu
Volume haut/dé�ler vers le haut
Lecture/pause
Piste suivantePiste précédente
Activer Bluetooth
Source
Choisir
Mise sous tension/hors tension
Mode musique*
* Améliorations sonores de l’expérience d’écoute en fonction du mode
Mode �lm*
Dé�ler à gauche/source précédente
MODE
Fig. 14
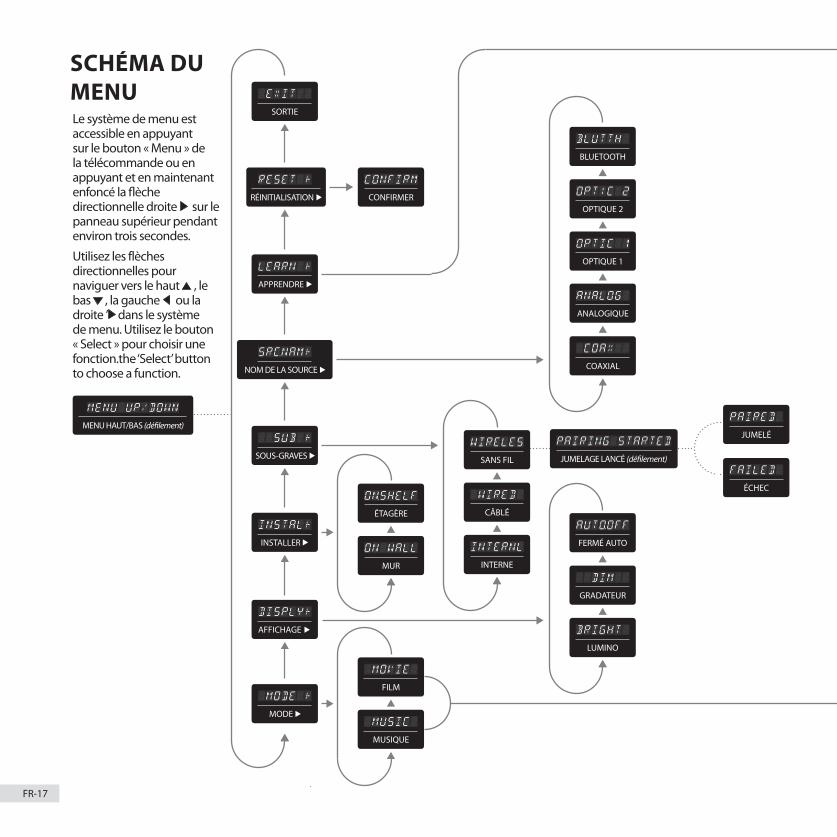
FR-17
MENU HAUT/BAS (dé�lement)
JUMELAGE LANCÉ (dé�lement)
ANALOGIQUE
COAXIAL
OPTIQUE 2
OPTIQUE 1
COAXIAL
OPTIQUE 2
OPTIQUE 1
SOURCE PRÉCÉDENTE
SOURCE SUIVANTE
SOURDINE
VOLUME -
VOLUME +
HORS TENSION
CONFIRMER
ÉTAGÈRE
MUR
FERMÉ AUTO
GRADATEUR
LUMINO
OUVERT
FERMÉ
ANALOGIQUE
SORTIE
RÉINITIALISATION
APPRENDRE
NOM DE LA SOURCE
SOUS-GRAVES
INSTALLER
AFFICHAGE
MODE
AMBIO
AIGUS
GRAVES
FORCE SONORE
+6 dB
+4 dB
+2 dB
0 dB
-2 dB
-4 dB
-6 dB
SOUS TENSION
MISE SOUS TENSION/HORS TENSION
MUSIC
FILM
CHOISIR
DROITE
GAUCHE
BAS
HAUT
MENU
MUSIQUE
SOURCE SUIVANTE
LECTURE/PAUSE
SOURCE PRÉCÉDENTE
BLUETOOTH
BLUETOOTH
JUMELÉ
ÉCHEC
SANS FIL
CÂBLÉ
INTERNE
OUVERT
FERMÉ
+6 dB
+4 dB
+2 dB
0 dB
-2 dB
-4 dB
-6 dBFILM
SCHÉMA DU MENULe système de menu est accessible en appuyant sur le bouton « Menu » de la télécommande ou en appuyant et en maintenant enfoncé la �èche directionnelle droite sur le panneau supérieur pendant environ trois secondes.
Utilisez les flèches directionnelles pour naviguer vers le haut , le bas , la gauche ou la droite ’ dans le système de menu. Utilisez le bouton « Select » pour choisir une fonction.the ‘Select’ button to choose a function.
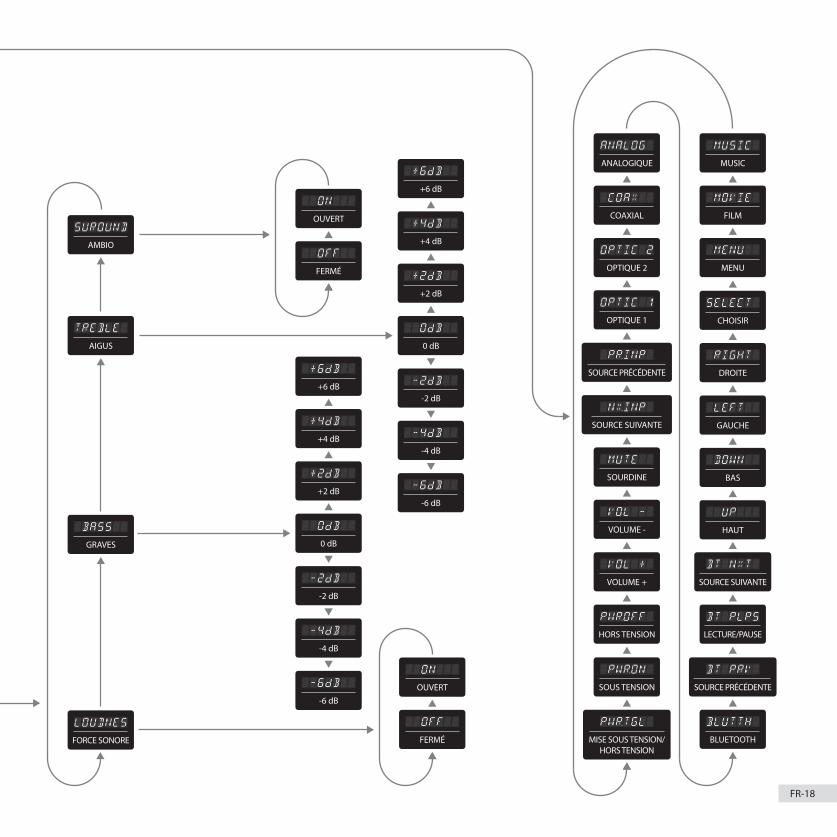
FR-18
MENU HAUT/BAS (dé�lement)
JUMELAGE LANCÉ (dé�lement)
ANALOGIQUE
COAXIAL
OPTIQUE 2
OPTIQUE 1
COAXIAL
OPTIQUE 2
OPTIQUE 1
SOURCE PRÉCÉDENTE
SOURCE SUIVANTE
SOURDINE
VOLUME -
VOLUME +
HORS TENSION
CONFIRMER
ÉTAGÈRE
MUR
FERMÉ AUTO
GRADATEUR
LUMINO
OUVERT
FERMÉ
ANALOGIQUE
SORTIE
RÉINITIALISATION
APPRENDRE
NOM DE LA SOURCE
SOUS-GRAVES
INSTALLER
AFFICHAGE
MODE
AMBIO
AIGUS
GRAVES
FORCE SONORE
+6 dB
+4 dB
+2 dB
0 dB
-2 dB
-4 dB
-6 dB
SOUS TENSION
MISE SOUS TENSION/HORS TENSION
MUSIC
FILM
CHOISIR
DROITE
GAUCHE
BAS
HAUT
MENU
MUSIQUE
SOURCE SUIVANTE
LECTURE/PAUSE
SOURCE PRÉCÉDENTE
BLUETOOTH
BLUETOOTH
JUMELÉ
ÉCHEC
SANS FIL
CÂBLÉ
INTERNE
OUVERT
FERMÉ
+6 dB
+4 dB
+2 dB
0 dB
-2 dB
-4 dB
-6 dBFILM
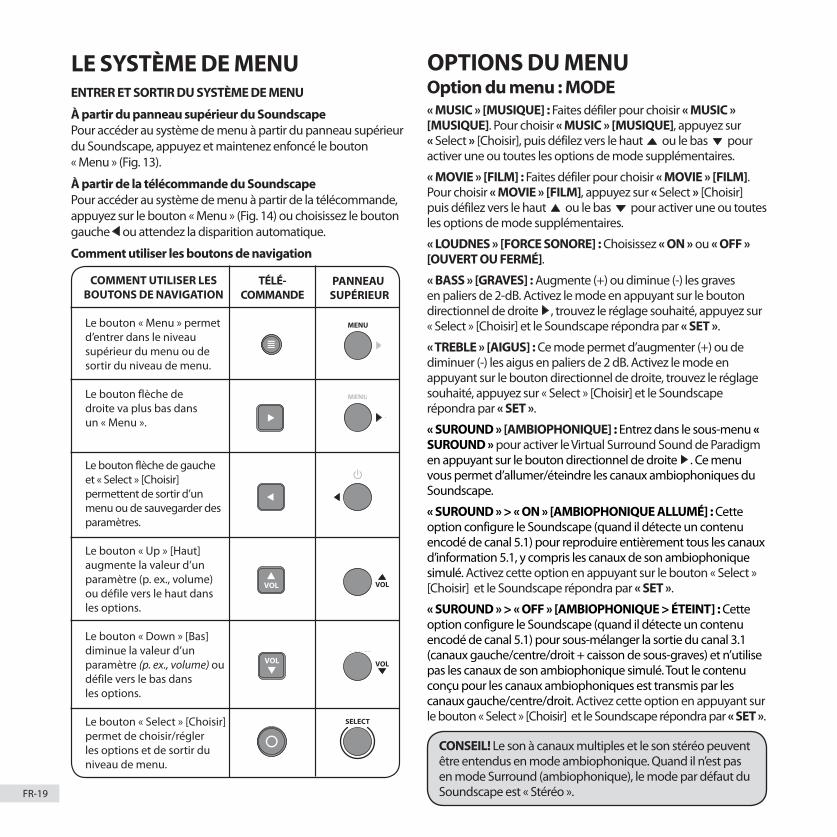
FR-19
LE SYSTÈME DE MENUENTRER ET SORTIR DU SYSTÈME DE MENU
À partir du panneau supérieur du SoundscapePour accéder au système de menu à partir du panneau supérieur du Soundscape, appuyez et maintenez enfoncé le bouton « Menu » (Fig. 13).
À partir de la télécommande du SoundscapePour accéder au système de menu à partir de la télécommande, appuyez sur le bouton « Menu » (Fig. 14) ou choisissez le bouton gauche ou attendez la disparition automatique.
Comment utiliser les boutons de navigation
OPTIONS DU MENUOption du menu : MODE« MUSIC » [MUSIQUE] : Faites défiler pour choisir « MUSIC » [MUSIQUE]. Pour choisir « MUSIC » [MUSIQUE], appuyez sur « Select » [Choisir], puis défilez vers le haut ou le bas pour activer une ou toutes les options de mode supplémentaires.
« MOVIE » [FILM] : Faites défiler pour choisir « MOVIE » [FILM]. Pour choisir « MOVIE » [FILM], appuyez sur « Select » [Choisir] puis défilez vers le haut ou le bas pour activer une ou toutes les options de mode supplémentaires.
« LOUDNES » [FORCE SONORE] : Choisissez « ON » ou « OFF » [OUVERT OU FERMÉ].
« BASS » [GRAVES] : Augmente (+) ou diminue (-) les graves en paliers de 2-dB. Activez le mode en appuyant sur le bouton directionnel de droite , trouvez le réglage souhaité, appuyez sur « Select » [Choisir] et le Soundscape répondra par « SET ».
« TREBLE » [AIGUS] : Ce mode permet d’augmenter (+) ou de diminuer (-) les aigus en paliers de 2 dB. Activez le mode en appuyant sur le bouton directionnel de droite, trouvez le réglage souhaité, appuyez sur « Select » [Choisir] et le Soundscape répondra par « SET ».
« SUROUND » [AMBIOPHONIQUE] : Entrez dans le sous-menu « SUROUND » pour activer le Virtual Surround Sound de Paradigm en appuyant sur le bouton directionnel de droite . Ce menu vous permet d’allumer/éteindre les canaux ambiophoniques du Soundscape.
« SUROUND » > « ON » [AMBIOPHONIQUE ALLUMÉ] : Cette option configure le Soundscape (quand il détecte un contenu encodé de canal 5.1) pour reproduire entièrement tous les canaux d’information 5.1, y compris les canaux de son ambiophonique simulé. Activez cette option en appuyant sur le bouton « Select » [Choisir] et le Soundscape répondra par « SET ».
« SUROUND » > « OFF » [AMBIOPHONIQUE > ÉTEINT] : Cette option configure le Soundscape (quand il détecte un contenu encodé de canal 5.1) pour sous-mélanger la sortie du canal 3.1 (canaux gauche/centre/droit + caisson de sous-graves) et n’utilise pas les canaux de son ambiophonique simulé. Tout le contenu conçu pour les canaux ambiophoniques est transmis par les canaux gauche/centre/droit. Activez cette option en appuyant sur le bouton « Select » [Choisir] et le Soundscape répondra par « SET ».
CONSEIL! Le son à canaux multiples et le son stéréo peuvent être entendus en mode ambiophonique. Quand il n’est pas en mode Surround (ambiophonique), le mode par défaut du Soundscape est « Stéréo ».
MODE
MODE
Power Control
Power On/O�
Prev Source Next Source
Volume Up
Volume Down
Volume & Source Controls
Power Control
Power On/O�
Prev Source Next Source
Volume Up
Volume Down
Volume & Source Controls
Power Control
Power On/O�
Prev Source Next Source
Volume Up
Volume Down
Volume & Source Controls
Power Control
Power On/O�
Prev Source Next Source
Volume Up
Volume Down
Volume & Source Controls
Power Control
Power On/O�
Prev Source Next Source
Volume Up
Volume Down
Volume & Source Controls
MODEMODE
MODE
MODE
Le bouton « Menu » permet d’entrer dans le niveau supérieur du menu ou de sortir du niveau de menu.
Le bouton flèche de droite va plus bas dans un « Menu ».
Le bouton flèche de gauche et « Select » [Choisir] permettent de sortir d’un menu ou de sauvegarder des paramètres.
Le bouton « Up » [Haut] augmente la valeur d’un paramètre (p. ex., volume) ou défile vers le haut dans les options.
Le bouton « Down » [Bas] diminue la valeur d’un paramètre (p. ex., volume) ou défile vers le bas dans les options.
Le bouton « Select » [Choisir] permet de choisir/régler les options et de sortir du niveau de menu.
TÉLÉ-COMMANDE
PANNEAU SUPÉRIEUR
COMMENT UTILISER LES BOUTONS DE NAVIGATION
Power Control
Power On/O�
Prev Source Next Source
Volume Up
Volume Down
Volume & Source Controls
Power Control
Power On/O�
Prev Source Next Source
Volume Up
Volume Down
Volume & Source Controls

FR-20
Option du menu : DISPLAY [AFFICHAGE]« DISPLY » [AFFICHAGE] : Entrez dans le sous-menu « DISPLY » en appuyant sur le bouton directionnel de droite . Les paramètres de ce menu vous permettent de régler la brillance de l’affichage du Soundscape, ainsi que de configurer l’affichage pour qu’il s’allume et s’éteigne automatiquement.
« DISPLY » > BRIGHT [AFFICHAGE > LUMINOSITÉ] : Cette option configure l’affichage du Soundscape pour qu’il soit à pleine brillance. Activez cette option en appuyant sur le bouton « Select » [Choisir] et le Soundscape répondra par « SET ».
« DISPLY » > DIM [AFFICHAGE> GRADATEUR] : Cette option configure l’affichage pour qu’il soit à brillance réduite lorsque le Soundscape est allumé. Activez-la en appuyant sur le bouton « Select » [Choisir] et le Soundscape répondra par « SET ».
« DISPLY AUTO OFF » [AFFICHAGE > FERMETURE AUTO] : Cette option configure l’affichage du Soundscape pour qu’il soit à pleine brillance lorsqu’un paramètre (comme le volume ou une entrée) est changé. Après quelques secondes, l’affichage s’éteindra. Activez-la en appuyant sur le bouton « Select » [Choisir] et le Soundscape répondra par « SET ».
Option du menu : INSTALL [INSTALLER]« INSTAL » [INSTALLER] : Entrez dans le sous-menu « INSTAL » en appuyant sur le bouton directionnel de droite. Les paramètres de ce menu rajusteront l’égalisation du Soundscape et la voix pour un rendement optimal en cas d’installation sur un mur ou sur une surface plane (p. ex., crédence ou étagère)
« INSTAL » > « ON WALL » [INSTALLER > SUR UN MUR] : Cette option configure la sortie audio du Soundscape pour le meilleur son possible dans le cas d’une installation sur un mur. Activez-la en appuyant sur le bouton « Select » [Choisir] et le Soundscape répondra par « SET ».
« INSTAL » > « ON.SHELF » [INSTALLER > SUR UNE ÉTAGÈRE] : Cette option configure la sortie audio du Soundscape pour le meilleur son possible dans le cas d’une installation sur une surface plane (p.ex., crédence ou étagère). Activez-la en appuyant sur le bouton « Select » [Choisir] et le Soundscape répondra par « SET ».
Option du menu : SUB [SOUS-GRAVES]« SUB » [SOUS-GRAVES) : Entrez dans le sous-menu « SUB » en appuyant sur le bouton directionnel de droite . Ici, vous pouvez configurer le Soundscape pour l’intégration d’un caisson de sous-graves externe.
VEUILLEZ NOTER : Lorsque vous choisissez l’option « SUB » > « WIRED » [CÂBLÉ] dans le Menu, une connexion sans fil n’est plus possible jusqu’à ce que l’option de menu pour le mode sans fil soit rallumée. Toutefois, lorsque vous choisissez SUB > « WIRELES » [WIRELESS (SANS FIL)] dans le menu, le Soundscape supportera encore une connexion câblée au caisson de sous-graves.
Il est possible de raccorder plusieurs caissons de sous-graves câblés à l’aide d’un séparateur en « Y » fixé au câble du caisson de sous-graves, au récepteur sans fil ou à une sortie derrière le caisson de sous-graves conçue pour brancher des caissons multiples en série. Consultez le revendeur Paradigm pour obtenir de plus amples renseignements.
« SUB INTERNL » : Cette option permet au Soundscape de traiter toutes l’information des graves. Aucun caisson de sous-graves externe n’est requis ou permis lorsque ce mode est activé. Activez cette option en appuyant sur le bouton « Select » [Choisir] et le Soundscape répondra par « SET ».
« SUB » > « WIRED » [CÂBLÉ] : Cette option configure le Soundscape pour qu’il utilise un caisson de sous-graves externe raccordé par un câble à la connexion Sub Out RCA du Soundscape. Activez-la en appuyant sur le bouton « Select » [Choisir] et le Soundscape répondra par « SET ». Avec cette option, le Soundscape fonctionnera à environ 80 Hz, point auquel le caisson de sous-graves externe prendra la relève pour reproduire les fréquences graves plus basses.
« SUB » > « WIRELES » [WIRELESS (SANS FIL)] : Entrez dans le sous-menu « SUB » > « WIRELES » en appuyant sur le bouton directionnel de droite. À l’aide du récepteur de caisson de sous-graves sans fil, vous pouvez synchroniser le Soundscape avec un caisson de sous-graves Paradigm ou un caisson de toute autre marque.
« SUB » > « WIRELES » > « PAIRING STARTED » > « PAIRED » OU « FAILED [« SUB » > « SANS FIL » > « JUMELAGE LANCÉ » > « JUMELÉ » OU « ÉCHEC »] : Ces messages, visibles sur l’afficheur du panneau avant du Soundscape, vous indiquent que le Soundscape transmet un signal qui sera capté par le récepteur de caisson de sous-graves sans fil afin de lancer le jumelage avec le caisson de sous-graves externe.
CONSEIL! Consultez le manuel du caisson de sous-graves pour savoir comment ajuster les commandes de niveau et de phase afin d’obtenir un mélange approprié avec le Soundscape. Avec ces options, le Soundscape fonctionnera à environ 80 Hz, point auquel le caisson de sous-graves externe prendra la relève pour reproduire les fréquences graves plus basses.
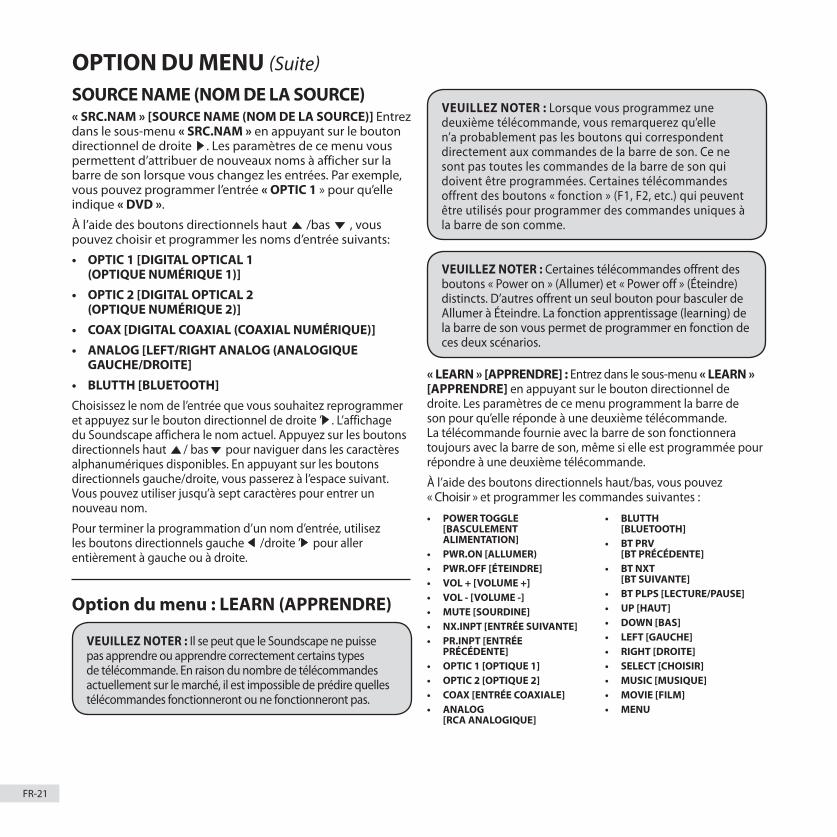
FR-21
SOURCE NAME (NOM DE LA SOURCE)« SRC.NAM » [SOURCE NAME (NOM DE LA SOURCE)] Entrez dans le sous-menu « SRC.NAM » en appuyant sur le bouton directionnel de droite . Les paramètres de ce menu vous permettent d’attribuer de nouveaux noms à afficher sur la barre de son lorsque vous changez les entrées. Par exemple, vous pouvez programmer l’entrée « OPTIC 1 » pour qu’elle indique « DVD ».
À l’aide des boutons directionnels haut /bas , vous pouvez choisir et programmer les noms d’entrée suivants:
• OPTIC 1 [DIGITAL OPTICAL 1 (OPTIQUE NUMÉRIQUE 1)]
• OPTIC 2 [DIGITAL OPTICAL 2 (OPTIQUE NUMÉRIQUE 2)]
• COAX [DIGITAL COAXIAL (COAXIAL NUMÉRIQUE)]• ANALOG [LEFT/RIGHT ANALOG (ANALOGIQUE
GAUCHE/DROITE]• BLUTTH [BLUETOOTH]Choisissez le nom de l’entrée que vous souhaitez reprogrammer et appuyez sur le bouton directionnel de droite ’ . L’affichage du Soundscape affichera le nom actuel. Appuyez sur les boutons directionnels haut / bas pour naviguer dans les caractères alphanumériques disponibles. En appuyant sur les boutons directionnels gauche/droite, vous passerez à l’espace suivant. Vous pouvez utiliser jusqu’à sept caractères pour entrer un nouveau nom.
Pour terminer la programmation d’un nom d’entrée, utilisez les boutons directionnels gauche /droite ’ pour aller entièrement à gauche ou à droite.
Option du menu : LEARN (APPRENDRE)
VEUILLEZ NOTER : Il se peut que le Soundscape ne puisse pas apprendre ou apprendre correctement certains types de télécommande. En raison du nombre de télécommandes actuellement sur le marché, il est impossible de prédire quelles télécommandes fonctionneront ou ne fonctionneront pas.
VEUILLEZ NOTER : Lorsque vous programmez une deuxième télécommande, vous remarquerez qu’elle n’a probablement pas les boutons qui correspondent directement aux commandes de la barre de son. Ce ne sont pas toutes les commandes de la barre de son qui doivent être programmées. Certaines télécommandes offrent des boutons « fonction » (F1, F2, etc.) qui peuvent être utilisés pour programmer des commandes uniques à la barre de son comme.
VEUILLEZ NOTER : Certaines télécommandes offrent des boutons « Power on » (Allumer) et « Power off » (Éteindre) distincts. D’autres offrent un seul bouton pour basculer de Allumer à Éteindre. La fonction apprentissage (learning) de la barre de son vous permet de programmer en fonction de ces deux scénarios.
« LEARN » [APPRENDRE] : Entrez dans le sous-menu « LEARN » [APPRENDRE] en appuyant sur le bouton directionnel de droite. Les paramètres de ce menu programment la barre de son pour qu’elle réponde à une deuxième télécommande. La télécommande fournie avec la barre de son fonctionnera toujours avec la barre de son, même si elle est programmée pour répondre à une deuxième télécommande.
À l’aide des boutons directionnels haut/bas, vous pouvez « Choisir » et programmer les commandes suivantes :
OPTION DU MENU (Suite)
• POWER TOGGLE [BASCULEMENT ALIMENTATION]
• PWR.ON [ALLUMER) • PWR.OFF [ÉTEINDRE]• VOL + [VOLUME +]• VOL - [VOLUME -]• MUTE [SOURDINE]• NX.INPT [ENTRÉE SUIVANTE]• PR.INPT [ENTRÉE
PRÉCÉDENTE]• OPTIC 1 [OPTIQUE 1]• OPTIC 2 [OPTIQUE 2]• COAX [ENTRÉE COAXIALE] • ANALOG
[RCA ANALOGIQUE]
• BLUTTH [BLUETOOTH]
• BT PRV [BT PRÉCÉDENTE]
• BT NXT [BT SUIVANTE]
• BT PLPS [LECTURE/PAUSE]• UP [HAUT]• DOWN [BAS]• LEFT [GAUCHE]• RIGHT [DROITE]• SELECT [CHOISIR]• MUSIC [MUSIQUE]• MOVIE [FILM]• MENU
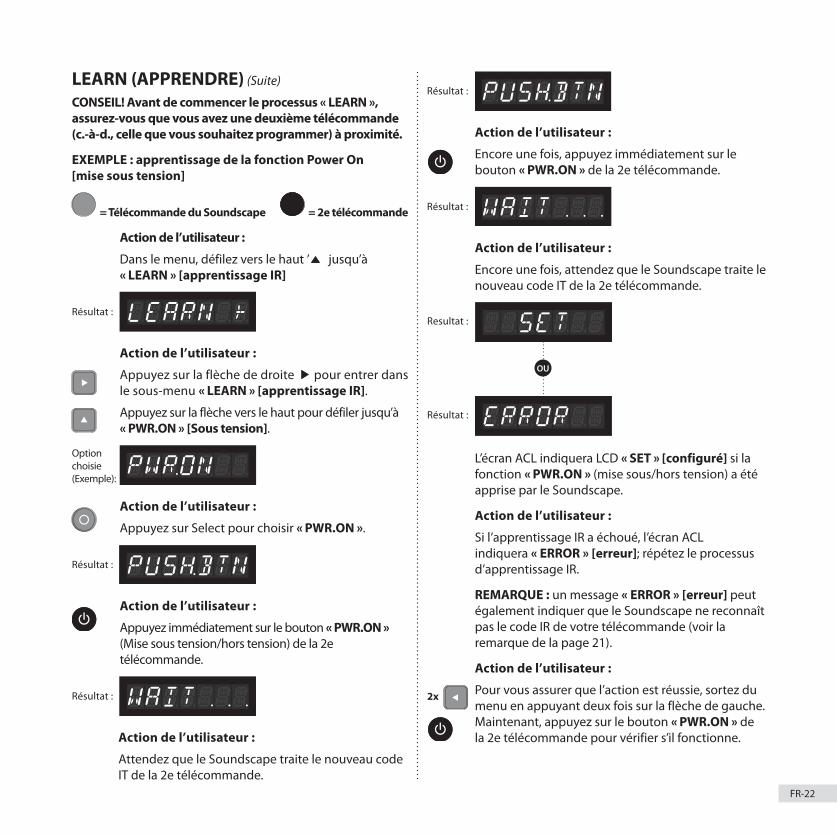
FR-22
LEARN (APPRENDRE) (Suite)
CONSEIL! Avant de commencer le processus « LEARN », assurez-vous que vous avez une deuxième télécommande (c.-à-d., celle que vous souhaitez programmer) à proximité.
EXEMPLE : apprentissage de la fonction Power On [mise sous tension]
= Télécommande du Soundscape = 2e télécommande
Action de l’utilisateur :
Dans le menu, défilez vers le haut ’ jusqu’à « LEARN » [apprentissage IR]
Résultat :
IR Learning Process(EXAMPLE: Learning Power On Function)
User Action: Press the right arrow to enter the IR Learning sub-menu.
Press the up arrow to scroll to PWR.ON (Power On).
User Action: In the Menu scroll up to LEARN (IR Learning)
Result:
Result:
OptionChosen(Example):
Result:
User Action: Press Select to choose PWR.ON.
User Action: Immediately push Power Toggle button on 2nd remote .
User Action: Again, immediately pushthe Power Toggle button on 2nd remote.
Result:
User Action: Wait for Soundscape to process new IR coding from 2nd remote.
Result:
User Action: Again, wait for Soundscape to processnew IR coding from 2nd remote.
= Soundscape Remote
Result:
Result:
The LCD screen will read SET if the Power Toggle function has been learned by the Soundscape.
User Action: If IR learning has failed, the LCD will read ERROR, repeat the IR Learning process.
NOTE: an ERROR warning may also indicate that your Soundscape does not recognize your remote’s IR coding (see note on page 9).
User Action: To ensure the action was successful exit the menu by pressing the right arrow 2 times. Now press the Power Toggle on the 2nd remote to check functionality
OR
2x
= 2nd Remote
Action de l’utilisateur :
Appuyez sur la flèche de droite pour entrer dans le sous-menu « LEARN » [apprentissage IR].
Appuyez sur la flèche vers le haut pour défiler jusqu’à « PWR.ON » [Sous tension].
IR Learning Process(EXAMPLE: Learning Power On Function)
User Action: Press the right arrow to enter the IR Learning sub-menu.
Press the up arrow to scroll to PWR.ON (Power On).
User Action: In the Menu scroll up to LEARN (IR Learning)
Result:
Result:
OptionChosen(Example):
Result:
User Action: Press Select to choose PWR.ON.
User Action: Immediately push Power Toggle button on 2nd remote .
User Action: Again, immediately pushthe Power Toggle button on 2nd remote.
Result:
User Action: Wait for Soundscape to process new IR coding from 2nd remote.
Result:
User Action: Again, wait for Soundscape to processnew IR coding from 2nd remote.
= Soundscape Remote
Result:
Result:
The LCD screen will read SET if the Power Toggle function has been learned by the Soundscape.
User Action: If IR learning has failed, the LCD will read ERROR, repeat the IR Learning process.
NOTE: an ERROR warning may also indicate that your Soundscape does not recognize your remote’s IR coding (see note on page 9).
User Action: To ensure the action was successful exit the menu by pressing the right arrow 2 times. Now press the Power Toggle on the 2nd remote to check functionality
OR
2x
= 2nd Remote
Action de l’utilisateur :
Appuyez sur Select pour choisir « PWR.ON ».
Résultat :
IR Learning Process(EXAMPLE: Learning Power On Function)
User Action: Press the right arrow to enter the IR Learning sub-menu.
Press the up arrow to scroll to PWR.ON (Power On).
User Action: In the Menu scroll up to LEARN (IR Learning)
Result:
Result:
OptionChosen(Example):
Result:
User Action: Press Select to choose PWR.ON.
User Action: Immediately push Power Toggle button on 2nd remote .
User Action: Again, immediately pushthe Power Toggle button on 2nd remote.
Result:
User Action: Wait for Soundscape to process new IR coding from 2nd remote.
Result:
User Action: Again, wait for Soundscape to processnew IR coding from 2nd remote.
= Soundscape Remote
Result:
Result:
The LCD screen will read SET if the Power Toggle function has been learned by the Soundscape.
User Action: If IR learning has failed, the LCD will read ERROR, repeat the IR Learning process.
NOTE: an ERROR warning may also indicate that your Soundscape does not recognize your remote’s IR coding (see note on page 9).
User Action: To ensure the action was successful exit the menu by pressing the right arrow 2 times. Now press the Power Toggle on the 2nd remote to check functionality
OR
2x
= 2nd Remote
Action de l’utilisateur :
Appuyez immédiatement sur le bouton « PWR.ON » (Mise sous tension/hors tension) de la 2e télécommande.
Résultat :
IR Learning Process(EXAMPLE: Learning Power On Function)
User Action: Press the right arrow to enter the IR Learning sub-menu.
Press the up arrow to scroll to PWR.ON (Power On).
User Action: In the Menu scroll up to LEARN (IR Learning)
Result:
Result:
OptionChosen(Example):
Result:
User Action: Press Select to choose PWR.ON.
User Action: Immediately push Power Toggle button on 2nd remote .
User Action: Again, immediately pushthe Power Toggle button on 2nd remote.
Result:
User Action: Wait for Soundscape to process new IR coding from 2nd remote.
Result:
User Action: Again, wait for Soundscape to processnew IR coding from 2nd remote.
= Soundscape Remote
Result:
Result:
The LCD screen will read SET if the Power Toggle function has been learned by the Soundscape.
User Action: If IR learning has failed, the LCD will read ERROR, repeat the IR Learning process.
NOTE: an ERROR warning may also indicate that your Soundscape does not recognize your remote’s IR coding (see note on page 9).
User Action: To ensure the action was successful exit the menu by pressing the right arrow 2 times. Now press the Power Toggle on the 2nd remote to check functionality
OR
2x
= 2nd Remote
Action de l’utilisateur :
Attendez que le Soundscape traite le nouveau code IT de la 2e télécommande.
Résultat :
IR Learning Process(EXAMPLE: Learning Power On Function)
User Action: Press the right arrow to enter the IR Learning sub-menu.
Press the up arrow to scroll to PWR.ON (Power On).
User Action: In the Menu scroll up to LEARN (IR Learning)
Result:
Result:
OptionChosen(Example):
Result:
User Action: Press Select to choose PWR.ON.
User Action: Immediately push Power Toggle button on 2nd remote .
User Action: Again, immediately pushthe Power Toggle button on 2nd remote.
Result:
User Action: Wait for Soundscape to process new IR coding from 2nd remote.
Result:
User Action: Again, wait for Soundscape to processnew IR coding from 2nd remote.
= Soundscape Remote
Result:
Result:
The LCD screen will read SET if the Power Toggle function has been learned by the Soundscape.
User Action: If IR learning has failed, the LCD will read ERROR, repeat the IR Learning process.
NOTE: an ERROR warning may also indicate that your Soundscape does not recognize your remote’s IR coding (see note on page 9).
User Action: To ensure the action was successful exit the menu by pressing the right arrow 2 times. Now press the Power Toggle on the 2nd remote to check functionality
OR
2x
= 2nd Remote
Action de l’utilisateur :
Encore une fois, appuyez immédiatement sur le bouton « PWR.ON » de la 2e télécommande.
Résultat :
IR Learning Process(EXAMPLE: Learning Power On Function)
User Action: Press the right arrow to enter the IR Learning sub-menu.
Press the up arrow to scroll to PWR.ON (Power On).
User Action: In the Menu scroll up to LEARN (IR Learning)
Result:
Result:
OptionChosen(Example):
Result:
User Action: Press Select to choose PWR.ON.
User Action: Immediately push Power Toggle button on 2nd remote .
User Action: Again, immediately pushthe Power Toggle button on 2nd remote.
Result:
User Action: Wait for Soundscape to process new IR coding from 2nd remote.
Result:
User Action: Again, wait for Soundscape to processnew IR coding from 2nd remote.
= Soundscape Remote
Result:
Result:
The LCD screen will read SET if the Power Toggle function has been learned by the Soundscape.
User Action: If IR learning has failed, the LCD will read ERROR, repeat the IR Learning process.
NOTE: an ERROR warning may also indicate that your Soundscape does not recognize your remote’s IR coding (see note on page 9).
User Action: To ensure the action was successful exit the menu by pressing the right arrow 2 times. Now press the Power Toggle on the 2nd remote to check functionality
OR
2x
= 2nd Remote
Action de l’utilisateur :
Encore une fois, attendez que le Soundscape traite le nouveau code IT de la 2e télécommande.
IR Learning Process(EXAMPLE: Learning Power On Function)
User Action: Press the right arrow to enter the IR Learning sub-menu.
Press the up arrow to scroll to PWR.ON (Power On).
User Action: In the Menu scroll up to LEARN (IR Learning)
Result:
Result:
OptionChosen(Example):
Result:
User Action: Press Select to choose PWR.ON.
User Action: Immediately push Power Toggle button on 2nd remote .
User Action: Again, immediately pushthe Power Toggle button on 2nd remote.
Result:
User Action: Wait for Soundscape to process new IR coding from 2nd remote.
Result:
User Action: Again, wait for Soundscape to processnew IR coding from 2nd remote.
= Soundscape Remote
Result:
Result:
The LCD screen will read SET if the Power Toggle function has been learned by the Soundscape.
User Action: If IR learning has failed, the LCD will read ERROR, repeat the IR Learning process.
NOTE: an ERROR warning may also indicate that your Soundscape does not recognize your remote’s IR coding (see note on page 9).
User Action: To ensure the action was successful exit the menu by pressing the right arrow 2 times. Now press the Power Toggle on the 2nd remote to check functionality
OU
2x
= 2nd Remote
L’écran ACL indiquera LCD « SET » [configuré] si la fonction « PWR.ON » (mise sous/hors tension) a été apprise par le Soundscape.
Action de l’utilisateur :
Si l’apprentissage IR a échoué, l’écran ACL indiquera « ERROR » [erreur]; répétez le processus d’apprentissage IR.
REMARQUE : un message « ERROR » [erreur] peut également indiquer que le Soundscape ne reconnaît pas le code IR de votre télécommande (voir la remarque de la page 21).
Action de l’utilisateur :
Pour vous assurer que l’action est réussie, sortez du menu en appuyant deux fois sur la flèche de gauche. Maintenant, appuyez sur le bouton « PWR.ON » de la 2e télécommande pour vérifier s’il fonctionne.
Resultat :
Option choisie (Exemple):
Résultat :
2x
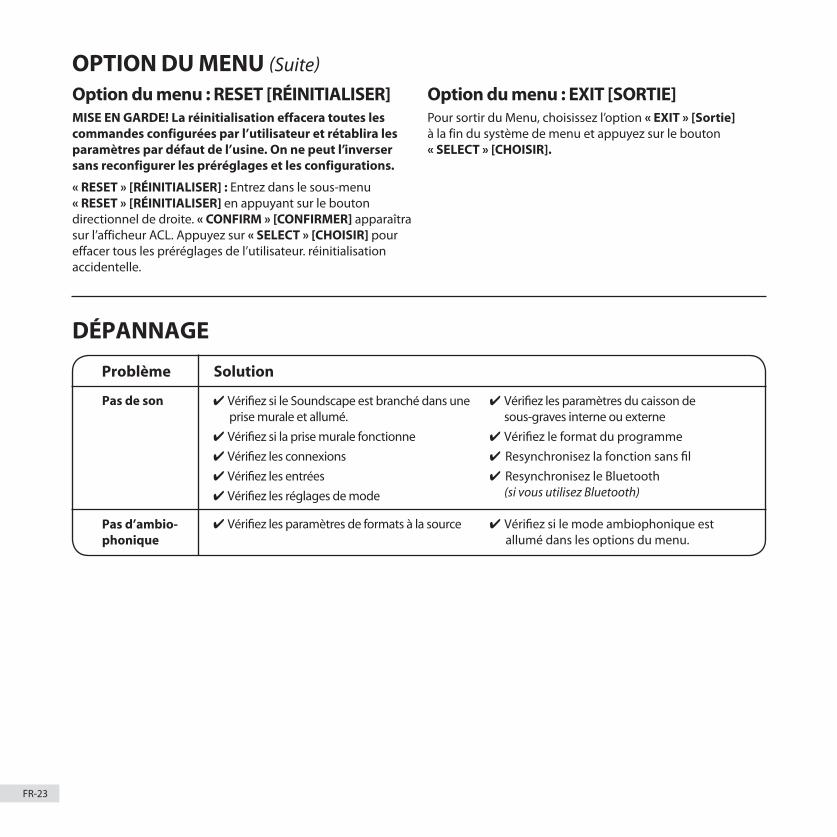
FR-23
OPTION DU MENU (Suite)
DÉPANNAGE
Problème Solution
Pas de son
Pas d’ambio- phonique
Option du menu : RESET [RÉINITIALISER]MISE EN GARDE! La réinitialisation effacera toutes les commandes configurées par l’utilisateur et rétablira les paramètres par défaut de l’usine. On ne peut l’inverser sans reconfigurer les préréglages et les configurations.
« RESET » [RÉINITIALISER] : Entrez dans le sous-menu « RESET » [RÉINITIALISER] en appuyant sur le bouton directionnel de droite. « CONFIRM » [CONFIRMER] apparaîtra sur l’afficheur ACL. Appuyez sur « SELECT » [CHOISIR] pour effacer tous les préréglages de l’utilisateur. réinitialisation accidentelle.
Option du menu : EXIT [SORTIE]Pour sortir du Menu, choisissez l’option « EXIT » [Sortie] à la fin du système de menu et appuyez sur le bouton « SELECT » [CHOISIR].
4 Vérifiez si le Soundscape est branché dans une prise murale et allumé.
4 Vérifiez si la prise murale fonctionne
4 Vérifiez les connexions
4 Vérifiez les entrées
4 Vérifiez les réglages de mode
4 Vérifiez les paramètres du caisson de sous-graves interne ou externe
4 Vérifiez le format du programme
4 Resynchronisez la fonction sans fil
4 Resynchronisez le Bluetooth (si vous utilisez Bluetooth)
4 Vérifiez les paramètres de formats à la source 4 Vérifiez si le mode ambiophonique est allumé dans les options du menu.

FR-24
SPECIFICATIONS TECHNIQUESDesignSept haut-parleurs haute performance de conception bass-reflex, chacun alimenté par son propre canal d’amplificateur. Trois canaux physiques isolés : Canal de gauche et canal de droite, chacun doté d’uncomplément de deux haut-parleurs. Le canal central est doté de trois haut-parleurs. Le Virtual Surround Sound est obtenu grâce à des algorithmes de traitement du signal numérique DSP perfectionnés. Le canal LFE/Sub rassemble la puissance des graves de quatre haut-parleurs de graves qui fonctionnent ensemble en tant que caisson de sous-graves virtuel de 120 Hz. Boîtier moulé ABS qui résiste aux UV.
Raccord (crossover) Numérique 3e ordre à 2 kHz; numérique 2e ordre à 80 Hz
Haut-parleurs de haute fréquence Trois haut-parleurs d’aigus PAL™ anodisés à l’aluminium pur de 25 mm (1 po)
Haut-parleurs de graves/moyenne fréquence Quatre cônes en composite de 102 mm (4 po), bobine acoustique de 25 mm (1 po)
Extension de basse fréquence 30 Hz (DIN*)
Réponse de fréquence par canal (G/C/D) : 40 Hz – 20 kHz (±2 dB)
Sensibilité – chambre anéchoïque 88 dB / 85 dB à 0.1 Vrms entrée / Volume 0
Puissance de l’amplificateur 7 x 50 watts puissance de pointe / 7 x 25 watts RMS soutenu
Entrées 2 x optique numérique; 1 x coaxiale numérique; 1 x analogique RCA; 1 x Bluetooth
H x l x P (comprenant les pieds de fixation pré-fixés) 5-1/2 po x 42 po x 5 po 14 cm x 106,7 cm 12,7 cm
Poids (déballé) 20 lb / 9,1 kg chacun
Fini Noir brillant
Accessoires (compris) Récepteur sans fil avec adaptateur CC, télécommande avec 2 piles AAA, deux pieds de fixation pré-fixés, un support mural, un cordon d’alimentation, un câble RCA protégé de 1,8 m (6 pi), un câble optique.
*DIN 45 500. Indique - 3 dB dans une salle d’écoute typique.
GARANTIE LIMITÉEParadigm garantit ce produit contre les défauts de matériaux et de fabrication dans des conditions normales d’utilisation pendant une période d’un (1) an à compter de la date d’achat par l’acheteur original. Aux fins de la garantie, vous devez conserver votre reçu de caisse, ainsi que ce manuel de l’utilisateur pour que la garantie soit valide.
Pour un soutien additionnel concernant le produit, appelez Paradigm au 905-696-2868 ou envoyez un courriel à l’adresse [email protected].

PRODUCT CONSUMES LESSTHAN 1 WATT IN STANDBY.
MC
Paradigm, Soundscape et les conceptions et technologies connexes exclusives et brevetées sont des marques de commerce déposées de Paradigm Electronics Inc. Droits d’auteur © Paradigm Electronics Inc. Tous droits réservés. Toutes les autres marques de commerce sont la propriété de leurs propriétaires respectifs.
Paradigm Electronics Inc.205 Annagem Blvd., Mississauga, ON Canada L5T 2V1 121213
Pour obtenir de plus amples renseignements, consultez le site Web paradigm.com