dayley/photoshop cs5 bible
DESCRIPTION
Sample ChapterTRANSCRIPT

Get the very most out of Photoshop CS5
Correct, enhance, or composite your photos
Design for the Web, video, or mobile devices
The book you need to succeed!
Lisa DaNae Dayley and Brad Dayley
Companion Web Site• Find JPEGs and Photoshop files of
all images in the book
Adobe®
Photoshop® CS5
16-Page Full Color Insert• Beautiful, full-color examples
Sample
Chapter

213
CHAPTER
Processing Photos in the Camera Raw Workspace
IN THIS CHAPTERLight settings
Color correction
Targeted adjustments
Fun effects
Finishing touches
Now that you are familiar with the Camera Raw workspace and the preferences and menus, it’s time to jump in and start adjusting your raw images. In some cases, you will find the tools and controls so
easy to use that you may start opening your JPEGs and TIFFs in Camera Raw in order to quickly make the basic adjustments. In other cases, if you are familiar with Photoshop, you will be frustrated that the tools are so com-pletely foreign and have so little actual capability compared to what is avail-able to you in Photoshop.
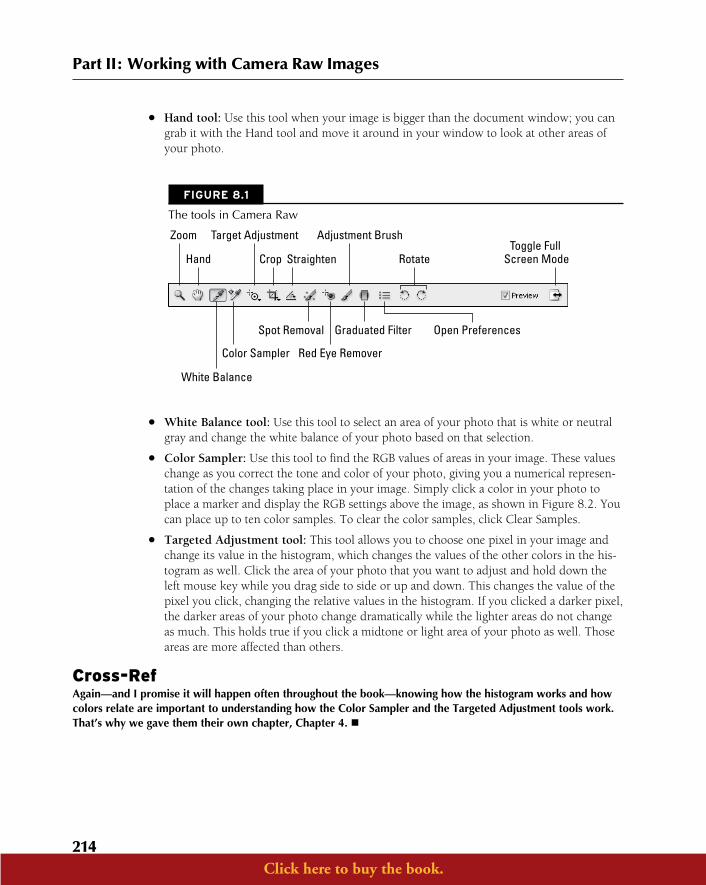
The Camera Raw ToolsBefore you can make adjustments in Camera Raw, you must understand the tools and how they work. The tools are found at the top of Camera Raw, as shown in Figure 8.1. Some of them are fairly basic, and you are probably already familiar with how they work, such as the Zoom and Hand tools. Other tools have detailed functions, such as the Targeted Adjustment tool and the Graduated Filter. I cover the more detailed tools in depth later in this chapter. For now, I’ll provide you with a quick reference list:
l Zoom tool: Use this tool to get a closer look at an area of your photo. The photo zooms to the point where you click the Zoom tool. To zoom back out, just press and hold the Alt or Option key to change the plus sign in the magnifying glass to a minus sign. You also can use the Zoom menu at the bottom of the document win-dow to choose a setting.
Click here to buy the book.
Part II: Working with Camera Raw Images
214
l Hand tool: Use this tool when your image is bigger than the document window; you can grab it with the Hand tool and move it around in your window to look at other areas of your photo.
FIGURE 8.1
The tools in Camera Raw
Crop Rotate
Adjustment Brush
Hand
Zoom Target AdjustmentToggle Full
Screen ModeStraighten
White Balance
Spot Removal
Color Sampler Red Eye Remover
Graduated Filter Open Preferences
l White Balance tool: Use this tool to select an area of your photo that is white or neutral gray and change the white balance of your photo based on that selection.
l Color Sampler: Use this tool to find the RGB values of areas in your image. These values change as you correct the tone and color of your photo, giving you a numerical represen-tation of the changes taking place in your image. Simply click a color in your photo to place a marker and display the RGB settings above the image, as shown in Figure 8.2. You can place up to ten color samples. To clear the color samples, click Clear Samples.
l Targeted Adjustment tool: This tool allows you to choose one pixel in your image and change its value in the histogram, which changes the values of the other colors in the his-togram as well. Click the area of your photo that you want to adjust and hold down the left mouse key while you drag side to side or up and down. This changes the value of the pixel you click, changing the relative values in the histogram. If you clicked a darker pixel, the darker areas of your photo change dramatically while the lighter areas do not change as much. This holds true if you click a midtone or light area of your photo as well. Those areas are more affected than others.
Cross-RefAgain—and I promise it will happen often throughout the book—knowing how the histogram works and how colors relate are important to understanding how the Color Sampler and the Targeted Adjustment tools work. That’s why we gave them their own chapter, Chapter 4. n
Click here to buy the book.

Chapter 8: Processing Photos in the Camera Raw Workspace
215
FIGURE 8.2
The Color Sample RGB information corresponds to the numbered color sample areas displayed in the photo.
Color Sample RGB values
l Crop: The Crop tool in Camera Raw is fairly straightforward. Just select it and drag around the area you want to crop. If you want to straighten as well, just use the rotating arrow that appears when you hover over one of the corners and rotate the cropped area. Double-click to finish. One difference you’ll note about cropping in Camera Raw is that even cropping is a non-destructive edit. Even after opening and closing the image and cre-ating numerous other settings, you can click the Crop tool to display the entire image and reset the crop boundaries, as shown in Figure 8.3.
l Straighten: Use this tool to straighten a photo. Drag it in what should be a straight line in your photo, and your image rotates to compensate. This tool is also non-destructive; you can correct the results at any time.
Click here to buy the book.

Part II: Working with Camera Raw Images
216
FIGURE 8.3
I cropped this image the last time I opened it. I can change the crop by clicking the Crop tool and displaying the entire image.
Cross-RefExcept for being non-destructive, cropping and straightening work in Camera Raw just like they work in Photoshop. That’s why they get just a measly little bullet point here. If you want to read more about cropping or straightening, look in Chapter 3. n
l Spot Removal: You can use this tool to correct areas in your photo that need touchups. I cover this tool in greater detail later in this chapter.
l Red-Eye Removal: Use this tool to correct red-eye. This is covered later in this chapter.
l Adjustment Brush: You can make adjustments to just one area of your photo in Camera Raw using this tool. It’s more complicated than it sounds, though, so I take you through it step by step later in this chapter.
l Graduated Filter: This tool allows you to make gradual changes to areas of your photo. For instance, you may have a darker foreground coupled with an overexposed sky. Use this tool to correct one or the other gradually for realistic results. I show you how later in this chapter.
Click here to buy the book.

Chapter 8: Processing Photos in the Camera Raw Workspace
217
Synchronizing Adjustments in Multiple Raw ImagesYou can correct several photos at once using the Camera Raw dialog box. This is a real timesaver if your photos have been taken in similar lighting conditions. You might have several outdoor shots of the same wedding, for example. When you make changes to the photo that is displayed in Camera Raw, those changes are applied to any selected photo in the filmstrip as well. Using the Synchronize option, you can choose which changes apply to selected photos and which ones do not apply to other selected photos in the filmstrip.
To make changes to more than one photo, these photos must first be open in Camera Raw. Select more than one image in Bridge, and double-click to open them in Camera Raw. You see them dis-played in the filmstrip in Camera Raw, as shown in Figure 8.4.
FIGURE 8.4
When you open more than one photo in Camera Raw, they appear in the filmstrip.
Click here to buy the book.

Part II: Working with Camera Raw Images
218
You can select more than one image at once by using the Shift key to select images in sequence or the Ctrl/Ô key to select images one at a time. You also can click Select All to select all the images in the filmstrip.
To Synchronize which changes are made to all the selected images, click Synchronize. This opens the Synchronize dialog box, shown in Figure 8.5. Use the drop-down menu or individual check marks to select which options change across all the selected photos in Camera Raw.
FIGURE 8.5
Use the Synchronize menu to choose which changes will be universally made.
After you are finished making batch changes, you can select your photos one at time to preview the changes and tweak them individually, but the bulk of the adjustments already are made, saving you lots of time in processing your files.
Adjusting the White BalanceYour camera has a White Balance setting that tells it what lighting is being used when a photo is captured. A fluorescent light leaves a greenish-yellow cast on your photos, giving your whites a greenish-yellow tinge, for example. Your camera can compensate by adjusting the color information
Click here to buy the book.

Chapter 8: Processing Photos in the Camera Raw Workspace
219
to filter out the color cast. But just as any automatic process, the camera compensation is not ideal for all images.
If your photo is a raw image, you don’t have to worry if the White Balance setting on your camera is correct or if it compensated correctly for a particular lighting situation. You can adjust the white balance after the photo has been shot using Camera Raw. Not that you want to shoot all your images in tungsten mode, but you could.
Getting the white balance correct is the single most important thing you can do to improve the col-ors in your photo. Even photos that look good can be improved with a simple white balance adjustment, and photos taken in horrible lighting situations make a dramatic improvement. The before photo in Figure 8.6 shows an image taken under indoor lighting without a flash. It’s hard to tell in the grayscale version printed here, but you can see a color version in the center insert. You’ll see that it has very yellow color cast. It’s actually hard to distinguish any other color in the photo. The after photo shows the same image after a simple White Balance adjustment. The colors have reappeared, the carpet and the cat’s eyes are blue, and his fur is white.
FIGURE 8.6
With a click of the White Balance tool, this photo goes from scary yellow to beautiful color.
Before After
On the Web SiteFind the before image saved as Figure 8-6 on the Web site. Can you fix the colors? n
In Camera Raw, you can reset the white balance correctly. You can accomplish this in three different ways:
l Change the lighting settings.
l Use the Temperature and Tint sliders.
l Use the White Balance tool.
Click here to buy the book.

Part II: Working with Camera Raw Images
220
Using the White Balance toolThe White Balance tool can be an effective way to quickly correct the color of your photo, or it could be an effort in frustration. It all depends on the photo you are trying to correct and the area on which you use the tool. The White Balance tool can be found in the tool menu at the top of the Camera Raw dialog box.
To use the White Balance tool, select it and click an area of your photo that should be white or a neutral gray, as shown in Figure 8.7. Camera Raw automatically adjusts the colors in your photo to correct the white balance based on your selection. Picking just the right color in your photo can be an effort in frustration. It’s not always easy to determine an area that is white or neutral gray. If you’re not satisfied with the results, just continue to click different areas and the white balance is set anew each time.
FIGURE 8.7
Use the White Balance tool to select a white or neutral gray area of your photo.
If you choose an area that is too bright for the White Balance tool to sample, you hear a ping and no change takes place. If you do it a second time, a dialog box pops up, letting you know that the area you are selecting is too bright to be sampled.
Click here to buy the book.

Chapter 8: Processing Photos in the Camera Raw Workspace
221
Changing the lighting settingsYou can use the White Balance menu shown in Figure 8.8 to change the lighting settings based on the lighting where your photo was taken. If you took a photo on a cloudy day and it turned out too cool, choose Cloudy to warm it up. If you took a photo under fluorescent lighting and your photo has that nasty yellow cast, choose Fluorescent to filter it out. You get the idea. You can pre-view different options before you decide. The lighting you took the photo in may not always be the best lighting setting.
FIGURE 8.8
You can use the White Balance menu to choose a lighting setting similar to the White Balance setting on your camera.
Needless to say, you probably won’t get the best white balance by using a setting from this menu. After all, it’s still a formulaic adjustment, but it can give you a sample of several different settings. You also can choose the best option from the drop-down menu and then use the Temperature and Tint sliders to tweak the colors until they are just right.
NoteIt’s not too hard to change the white balance settings so you like the colors in your image. If you ever want to start over from the camera settings, however, choose As Shot from the lighting settings menu. n
Using the Temperature and Tint slidersIf you prefer to “eyeball” the changes to your white balance, you can adjust the Temperature and Tint sliders in the Basic panel, as shown in Figure 8.9. The Temperature slider adjusts the levels of yellow and blue in your photo, and the Tint slider adjusts the levels of red and green. A good rule of thumb is to find an object in your photo that you want to be a certain color (skin tones or whites are fairly easy to determine) and tweak the sliders until you have just the color you want.
The Temperature and Tint sliders also are ideal for tweaking after you’ve made a white balance adjustment using the White Balance tool or the White Balance menu. I usually try the tool first and then tweak the results using the sliders.
Click here to buy the book.

Part II: Working with Camera Raw Images
222
FIGURE 8.9
Use the Temperature and Tint sliders to eyeball the white balance of your image.
TipAdd a neutral color card to your shot, and you can set your white balance easily by clicking the card in your photo after bringing it into the Camera Raw dialog box. A light gray piece of paper works really well. After you’ve used it to set your white balance, simply crop it out of the photo. If you are taking several photos in the same lighting conditions, you can remove the card after the first shot and set the white balance for all the photos at once. n
Adjusting LightingThe next six settings in the Basic panel adjust the exposure and lighting of your photo in different ways. This is where you’ll really see a difference in the quality of a camera raw image over a JPEG. Look at Figure 8.10, for example. The before photo is a shot of balloons taken in the early morning light, creating a dark photo where the balloons are just silhouettes on the background of the east-ern sky. If this image were a JPEG, making the image lighter would result in a grainy photo with lots of color noise. The after image in Figure 8.10 shows that fixing this image in Camera Raw turned out with a better result; some noise was created, but not nearly as much as if this image had been a JPEG.
FIGURE 8.10
Changing the exposure on a dark camera raw image created much less noise than if the image had been a JPEG.
Click here to buy the book.

Chapter 8: Processing Photos in the Camera Raw Workspace
223
On the Web SiteFind the before image saved as Figure 8-10 on the Web site. Can you fix the exposure? n
NoteTwo highlighted buttons at the top of the light and color adjustments found in the Basic panel are labeled Auto and Default. To see the settings that Camera Raw thinks are best for your image, click Auto and the settings are adjusted to a mathematical interpretation of where the colors and tonal ranges really belong in your image. Auto usually does a good job of setting your Recovery because Recovery is based entirely on the number of blown out pixels that can be recovered in your image. It is only a guess for most of your other settings, how-ever, and you probably want to do some tweaking.
The Default link resets your image to the settings that it opened with, whether these are the original camera raw settings created by your camera or settings you created on a previous opening of your image. n
As you change the light settings of your image, keep an eye on your specular highlights and deep shadows. As you increase and decrease your exposure, you run the risk of creating areas where the pixel information is lost because they are too light or too dark. Be sure to keep these areas manage-able. Click the Highlight clipping warning and Shadow clipping warning icons in the Histogram, shown in Figure 8.11, to show clipped highlights in red and clipped shadow in blue.
TipHolding down the Alt/Option key while adjusting the Exposure and Recovery shows you clipped highlights in your image. White areas have no color detail, and red and yellow areas are clipped in one or two channels. Holding down the Alt/Option key while adjusting the Blacks shows clipped Shadows in black. n
You also create some noise as you use these sliders. The noise is more visible the more the sliders are adjusted. You can reduce some noise in the Detail tab, but noise reduction is never an ideal fix if noise can be prevented in the first place.
Change the lighting of your image by using the following sliders in the Camera Raw dialog box:
l Exposure: This slider adjusts the lightness or darkness of your image. The results are sim-ilar to changing the aperture setting on your camera. In fact, the numbers on the exposure slider are in increments that correlate to f-stops; 1.0 is similar to widening your aperture one f-stop and so on.
l Recovery: The Recovery slider attempts to recover detail from highlights. Rather than darkening the entire image, this slider looks for color detail in the extreme highlights of your image and brings them back into play in an effort to recover any blown out areas of your image. You often will want to use Recovery in conjunction with other settings, such as Exposure and Fill Light so you can achieve a good balance of lighting in your photo.
l Fill Light: Adjusting the Fill Light does the opposite of Recovery, lightening the shadows in the photo. This slider is a real miracle worker when either the foreground or the back-ground of your photo is much darker than the other. Consider Figure 8.12, for instance. The exposure of this shot was adjusted for the waterfall in the distant background and in the light, leaving the subjects in the foreground in the dark. You can see that just by changing the Fill Light setting, this becomes a much better photo.
Click here to buy the book.

Part II: Working with Camera Raw Images
224
FIGURE 8.11
Use the clipping warnings to show you areas that have lost all color information.
Shadowclippingwarning
Highlightclipping
warning
Indicates clipped highlights
FIGURE 8.12
Adding fill light makes the foreground of this photo much lighter without brightening the rest of the photo.
Click here to buy the book.

Chapter 8: Processing Photos in the Camera Raw Workspace
225
On the Web SiteFind the before image saved as Figure 8-12 on the Web site. Can you bring the foreground into the light? n
l Blacks: This setting determines the color values that are mapped to black in a photo. Raising this setting affects the shadows in a photo and creates the illusion of increasing contrast.
l Brightness: Although this slider adjusts the brightness of your photo in much the same way as the Exposure slider, there is one significant difference. The Exposure setting increases the lightness or darkness of the entire image, creating the possibility of clipping highlights or shadows. The Brightness setting compresses the shadows and highlights as the slider is moved so there is no possibility of clipping. This warps the color data in the image, reducing the contrast. The Brightness slider should be used after the highlight clip-ping value is set by the Exposure and the shadow clipping value is set by the Blacks.
l Contrast: Contrast is the last tonal adjustment, and it’s the last one you should use. As you raise the contrast in your image, you see the histogram widen. The contrast affects the midtones in your image, making the dark midtones even darker and the light midtones lighter.
The amazing thing about using Camera Raw to adjust your exposure is that you can create two amazing images with the same shot. Consider the balloons again. By reducing the exposure and fill light and increasing the blacks, I can change the focus of the image from the balloons to the sky, as shown in Figure 8.13.
FIGURE 8.13
Camera raw files can be adjusted to create different looks with the same photo.
Click here to buy the book.

Part II: Working with Camera Raw Images
226
Adjusting Color and ClarityAdjusting the color of a raw image can be done in the Basic panel for a general fix, the Tone Curve panel for a targeted fix, and the HSL panel for a highly precise adjustment that allows you to make custom decisions about your color in eight different color ranges. Don’t be overwhelmed with all this ability for changing and adjusting the color of your images. As with most areas (in life as well as in Photoshop), it’s best to start with the basics and work up, depending on how much control you want to have over the color.
Working with in Photoshop is an art form, not a science—even when it comes to correcting color. Although the basic tools are fairly simple and straightforward, adjusting tonal curves takes a little practice and effort before you can do it well without thought, and adjusting color levels in the HSL panel can very quickly get out of hand! The best way to become proficient is to jump in and work with these tools until you feel comfortable using them to adjust the photos that really matter.
Clarity, vibrance, and saturationClarity, vibrancy, and saturation can be adjusted in the basic panel of Camera Raw. These adjust-ments are basic not because they are not powerful, but because they are so useful and commonly used that the default panel is the best place for them. They also are the easiest of the color adjust-ments to use and to get right.
As well as improving the color and clarity of your images generally, these settings can compensate for loss of color and clarity due to the tonal adjustments. This is a great way to create stunningly colorful images, similar to taking pictures with a high-saturation film.
You can adjust the clarity and saturation of your image by adjusting these sliders:
l Clarity: This adjustment clarifies the edges in the image, restoring definition and sharpness lost to the tonal adjustments. It works by increasing the contrast of the midtone pixels. This works like magic to reduce hazy or dull images that are a result of the conditions when the image was shot or using other settings that reduce contrast, such as the Brightness slider.
See the difference in the before and after images in Figure 8.14, for instance. The first image is very hazy and blah. The second image takes advantage of the Clarity adjustment to make a dramatic difference in the clarity and crispness of the image.
On the Web SiteTry your hand at adjusting the clarity of the before image saved as Figure 8-14 on the Web site. n
l Vibrance: This adjustment saturates only the areas of the image that are of a lower satura-tion without affecting the areas that are already highly saturated. It also leaves skin tones alone, making it ideal for saturating images with human subjects.
l Saturation: This adjustment saturates the image uniformly, giving you the ability to reduce the colors in your image to grayscale or to increase the color of your image to as much as double the saturation. Colorful photos, such as flowers or balloons, are especially fun to over-saturate in order to create a color statement.
Click here to buy the book.

Chapter 8: Processing Photos in the Camera Raw Workspace
227
FIGURE 8.14
A change using just the Clarity adjustment made a big difference in this image.
Tone CurvePlacing the Tone Curve under the heading for adjusting color isn’t exactly precise, because it adjusts the lightness of your image as much as the color. The Tone Curve gives you more control over which areas of your photo are brightened or darkened, as well as which colors pop and which fade. It takes practice to get a feel for exactly how the curve works, however, so you might find yourself inadvertently making drastic and unwanted changes. You can easily restore the default set-tings and start over, though, so don’t despair.
I’ll do my best to demystify the Tone Curve so your practice has purpose. The Tone Curve panel has two tabs: the Parametric tab, which allows you to make limited changes to the Tone Curve using sliders, and the Point tab, which allows you to make changes to the Tone Curve using points on the curve itself.
The Parametric panelIt’s harder to take your changes too far with the Parametric tab over the Points tab because it limits the changes you make to sliders. It’s quicker, easier, and generally more user-friendly. On the other hand, it doesn’t give you near the latitude for making changes as the Points tab.
Click here to buy the book.

Part II: Working with Camera Raw Images
228
The first thing you should note in the Parametric tab, shown in Figure 8.15, is the histogram within the Parametric settings that represents the tonal layout of your image. In the image shown in Figure 8.15, most of the pixels are in the midtone range or higher, as you can see by the high peaks in the middle and to the right. As a general rule, you would look at this histogram and know immediately that the photo it represented was low on contrast. That isn’t a bad thing for some images, but this one is hazy and unclear, and it has enough shadow that there should be plenty of pixels in the lower end of the histogram. This is a photo that definitely will benefit from a tonal curve correction.
FIGURE 8.15
In the Parametric Tone Curve, the histogram represents the tonal layout of this image.
NoteIt’s important to look at images in conjunction with their histograms to decide whether the histogram repre-sents areas that need to be corrected. A picture taken on a snowy day might resemble the histogram in Figure 8.15 and look bright and clear. The histogram by itself is not an indicator of whether an image is a good one or in need of improvement. Instead, it is a guide to help you make the right changes to improve your image. n
Click here to buy the book.

Chapter 8: Processing Photos in the Camera Raw Workspace
229
On the Web SiteFigure 8.15 needs lots of work. Changing the Parametric Tone Curve improves it so much. Give it a try by downloading Figure 8-15 from the Web site and following the steps for changing the tonal curve. n
Fix the photo shown in Figure 8.15 by following these steps:
1. Adjust the indicators directly under the histogram so they represent a more balanced tonal range, as shown in Figure 8.16.
This doesn’t change your image, but it affects how the tonal sliders underneath affect your image. The Shadows slider adjusts the pixels left of the first indicator, the Darks slider adjusts everything between that indicator and the next, and so on.
2. Adjust the Shadows slider.
In this image, the dark and shadow pixels need the most work, so it’s best to start there. Move the slider to the left to darken the shadow in the image. Click the shadow clipping warning in the main histogram to preview any shadows that are being clipped. (You won’t find any in this photo, but it’s a good habit to get into.) Stop when you are satisfied with the result.
3. Adjust the Darks slider.
With the balanced histogram shown in Figure 8.16, this slider is really touchy and cre-ates an image that is too dark with very little adjustment.
FIGURE 8.16
Adjusting the indicators determines how the sliders affect the image.
4. Adjust the indicators under the histogram again.
In order to get a better result with the Darks slider, adjust the middle indicator farther left, so the second pixel spike is to the right of the indicator.
5. Adjust the Darks again.
Click here to buy the book.

Part II: Working with Camera Raw Images
230
Now, as you move the Darks slider, you get a better range to play with. Again, stop when you see that you’ve found a good balance.
6. Adjust the Lights slider.
This slider also needs to move left, but not much.
7. Adjust the Highlights slider.
Moving this slider right adds contrast to the image. Again, you should take advantage of the highlight clipping warning in the main histogram. You can find clipped highlights in this image.
You can continue to tweak the indicators and the sliders to get a feel for the changes they are mak-ing and to get the best final result. When you are finished, you should have a result similar to Figure 8.17. Add Clarity and Contrast to this photo, and you have a finished product that is practi-cally a miracle considering what you began with.
FIGURE 8.17
With these final settings, you can already see a marked improvement in the photo.
Click here to buy the book.

Chapter 8: Processing Photos in the Camera Raw Workspace
231
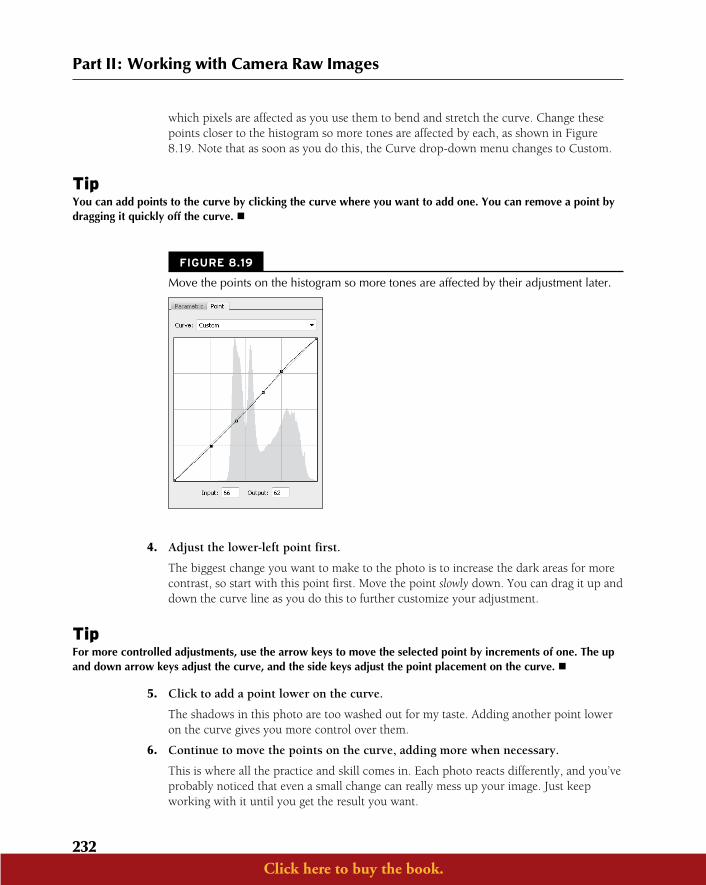
The Point tabThe Point tab gives you much more latitude for changing your image, but using that capability is more difficult. I show you how to correct the same image used in Figure 8.15 by using the Points panel instead of the Parametric panel:
1. Click the Panel menu, and choose Camera Raw Defaults to reset the image.
If you used the Parametric tab to change the curves, you want to start over from the origi-nal image settings. You should have the image and settings shown in Figure 8.18.
FIGURE 8.18
The Points Tone Curve
2. Use the drop-down menu to choose Strong Contrast.
This changes the curve based on a Strong Contrast preset. It’s an improvement to the image, but not enough.
3. Move the points on the curve.
The location of these points on the curve performs a similar function to the indicators in the Parametric histogram. By changing their location on the diagonal, you can change
Click here to buy the book.
Part II: Working with Camera Raw Images
232
which pixels are affected as you use them to bend and stretch the curve. Change these points closer to the histogram so more tones are affected by each, as shown in Figure 8.19. Note that as soon as you do this, the Curve drop-down menu changes to Custom.
TipYou can add points to the curve by clicking the curve where you want to add one. You can remove a point by dragging it quickly off the curve. n
FIGURE 8.19
Move the points on the histogram so more tones are affected by their adjustment later.
4. Adjust the lower-left point first.
The biggest change you want to make to the photo is to increase the dark areas for more contrast, so start with this point first. Move the point slowly down. You can drag it up and down the curve line as you do this to further customize your adjustment.
TipFor more controlled adjustments, use the arrow keys to move the selected point by increments of one. The up and down arrow keys adjust the curve, and the side keys adjust the point placement on the curve. n
5. Click to add a point lower on the curve.
The shadows in this photo are too washed out for my taste. Adding another point lower on the curve gives you more control over them.
6. Continue to move the points on the curve, adding more when necessary.
This is where all the practice and skill comes in. Each photo reacts differently, and you’ve probably noticed that even a small change can really mess up your image. Just keep working with it until you get the result you want.
Click here to buy the book.

Chapter 8: Processing Photos in the Camera Raw Workspace
233
NoteThe Input field tells you the actual value of the pixel you are adjusting; the output field tells you what value you are adjusting the pixel to. n
It doesn’t take long adjusting the Point curve before you can see that it is indeed more versatile, but also much more difficult to control. Because I could add points to the curve, the end result was better than I achieved with the Parametric adjustment, as you can see in Figure 8.20. Notice that the background above the cliffs is much clearer because I added another point to the highlights.
FIGURE 8.20
The Points adjustment is more precise, bringing out more detail.
HSL adjustmentsFigure 8.21 shows the HSL/Grayscale panel. HSL stands for Hue, Saturation, and Luminance. Each setting has a panel, and the color sliders in each panel allow you to make changes to the color in these precise color ranges.
Click here to buy the book.

Part II: Working with Camera Raw Images
234
FIGURE 8.21
The HSL/Grayscale panel
Hue adjustmentsIn this tab, you can literally change the color in your images. Using the red slider, you can change the reds in your image to bright pink or warm orange, for instance. Each pixel in your image is assigned to one of the color ranges represented by the sliders. The brighter the colors are in your image, the more visible these changes are.
You can use the hue adjustments to give a photo a warmer or cooler feel, or just to enhance or change specific colors in your image. Have fun playing with the colors, but watch your skin tones; they can be negatively affected.
TipUse the Default button found in each panel to reset the sliders to zero for that panel. n
Saturation adjustmentsThe Saturation tab has the same color sliders as the Hue panel, and not surprisingly, they allow you to add to or reduce the saturation of the targeted color. You can use this as a more selective color enhancement than the Vibrance slider can give you, or you can even create specialized images where only one or two selected colors are saturated at all and the rest are in grayscale.
Click here to buy the book.

Chapter 8: Processing Photos in the Camera Raw Workspace
235
Luminance adjustmentsThe Luminance tab sets the tint or shade of the selected color, adding black or white to it in order to adjust the brightness of that color. Use these sliders to get your colors just right or to add con-trast to your image.
Creating a grayscale photoThe color sliders are not just for color fixes; they make great adjustments to grayscale bright-ness values as well. Most color images don’t make great grayscale images when they are con-verted straight across—brightness value for brightness value. Using the Grayscale mix sliders, however, you can change the brightness values that the colors in your image are mapped to in order to create a fantastic grayscale image.
The first thing to do is to click the Convert to Grayscale box to map the colors in your image to the corresponding grayscale values. This brings up the Grayscale mix panel, with the same color slid-ers that are present in each of the HSL/Grayscale panels, as shown in Figure 8.22.
FIGURE 8.22
A grayscale photo with the Auto settings applied
Click here to buy the book.

Part II: Working with Camera Raw Images
236
On the Web SiteGive the Grayscale mix sliders a shot by downloading Figure 8-22 from the Web site and using the HSL/Grayscale panel to convert it to grayscale. n
When you convert your image to grayscale, you get the Auto setting, which is the Camera Raw interpretation of what’s best. You can click Default to see what the straight conversion would look like, but it’s not usually as good as the Auto setting. Or you can tweak the color sliders to map the brightness values of the selected color to different brightness values in your grayscale image, changing the brightness and contrast of selected areas of your photo. Figure 8.23 shows what a big difference changing the grayscale mix can make.
FIGURE 8.23
After tweaking the Grayscale mix, the sparkle is enhanced in the water.
Click here to buy the book.

Chapter 8: Processing Photos in the Camera Raw Workspace
237
Split ToningThe Split Toning panel is used to create a color mapping overlay over the shadows and/or high-lights of an image. On a color image, this can have the effect of creating a warming or cooling filter over an image. Using the Split Toning panel has the added benefit of applying different filters to the highlights than to the shadows. This allows you to cool down highlights while warming up shadows, for instance, to reduce the effect of heavy shadows.
When you add the Split Toning effect to a grayscale image, it adds a color tone (or two) to a gray-scale image. You can create sepia tones or other color effects over your black and white photo.
In the Split Toning panel shown in Figure 8.24, you can see the separate hue and saturation sliders for the highlights and shadows (thus the title Split Toning). The middle slider sets the balance between the highlights and the shadows. As you move it up to the right, more pixels are consid-ered highlights; as you move it down to the left, more pixels are considered shadows.
Use the Hue sliders to choose a color to add to your highlights or shadows, move the saturation up to determine how much color to add, and set the balance to determine which color to add where.
TipTo create a single color tone to any image, set the Balance slider all the way up or all the way down. n
FIGURE 8.24
The Split Toning panel maps color to your image.
Click here to buy the book.

Part II: Working with Camera Raw Images
238
Correcting and RetouchingAfter you’ve corrected the light and color of your photo in general, it’s time to move on to the on-the-spot corrections. You can remove flaws or red-eye in your photo, use the adjustment brush to make color or lighting corrections to selected areas of your photo, or create a graduated filter to apply a color or lighting effect gradually. Although all these changes have the potential to bruise your image or create noise, they are considered non-destructive edits because you can always return to the original camera raw settings.
Spot removal and cloningThe Spot Removal tool allows you to make localized spot correction and cloning fixes to anything from lens spots to blemishes. Here in Camera Raw, the tool is limited compared to the tools you find in Photoshop for cloning and healing. For the basic fixes, however, it works just fine, limiting the reasons to even take the time to open your image in Photoshop.
TipIf you have a lens or sensor spot that appears in multiple photos and can be fixed adequately in Camera Raw, be sure and take advantage of the fact that you can fix multiple photos at once. You can open them all at once in Camera Raw or use the batch editing capabilities of Bridge, which you can read about in Chapter 6. n
To use the Spot Removal tool, follow these steps:
On the Web SiteYou can download Figure 8-24 from the Web site and follow the steps to learn how to use the Spot Removal tool. n
1. Open the file Figure 8.24, as shown in Figure 8.25.
2. Click the Spot Removal tool.
This changes your cursor to a crosshair and activates it and opens the Spot Removal panel, also shown in Figure 8.25.
3. Select Heal from the Type drop-down menu.
The Heal option takes the texture, lighting, and shading from the sampled areas and places it over the blemish. The Clone brush simply makes a copy of the sampled area and places it over the blemish, feathering the edges so they blend in.
4. Select the blemish.
Drag to create a circle that is just larger than the mole, and let go of the mouse button. A red circle indicating the area to correct is created over the blemish, and a second, green, circle is also created, indicating the area that is being used to create the patch.
Click here to buy the book.

Chapter 8: Processing Photos in the Camera Raw Workspace
239
FIGURE 8.25
Is this a beauty mark or a blemish? Either way, the Spot Removal tool gets rid of it.
5. Move either circle, if needed.
Camera Raw makes a guess at which area is the best to take a patch from when it places the green circle. This guess is frequently wrong. Move either circle by hovering over the center of it until the arrow and plus sign appear, as shown in Figure 8.26, and then grab-bing and moving it to a better location.
6. Resize the circles, if needed.
You also can resize both circles by using the radius slider or by hovering over the edge of either circle until the two-directional arrow appears and then dragging them to the right size.
7. Deselect the Show Overlay option to remove the circles from view and make sure everything looks good.
Click here to buy the book.

Part II: Working with Camera Raw Images
240
8. Make as many more healing or cloning changes as you need to.
As you click to create new circles, the old red circles turn purple, indicating that they are not active, and the old green circles disappear.
9. Select any other tool to exit the Spot Removal panel.
FIGURE 8.26
Wait until you see the arrow and plus sign before you move one of the circles.
NoteTo start over, click Clear All to remove all sampled and fixed areas. n
You can use the Opacity slider to reduce the effect of the spot removal. You can do this before or after you have created the healing circles. The Opacity (as well as the Radius) works only on the active circles.
Red-eye removalYou can make quick red-eye fixes in Camera Raw from the Red Eye Removal panel that is accessed by clicking the Red Eye Removal tool. Use the tool to drag a marquee around each red eye, making the marquee a little larger than the eye itself, as shown in Figure 8.27. Deselect the Overlay so you can see how well your fix worked. Use the Pupil Size and Darken sliders to tweak the fix and get it perfect.
Click here to buy the book.

Chapter 8: Processing Photos in the Camera Raw Workspace
241
FIGURE 8.27
Red-eye removal takes seconds with the Red Eye Removal tool in Camera Raw.
Using the Adjustment BrushThe Adjustment Brush provides the ability to make targeted adjustments to only the areas in your image that need them. Camera Raw does this by creating a mask over everything but the selected areas and making adjustments over that mask, similar to the way adjustment layers work inside Photoshop.
Selecting the Adjustment Brush opens the Adjustment Brush panel and sets the Mask option to New, as shown in Figure 8.28. The Adjustment Brush works differently from anything in Photoshop, using pins instead of layers to mark each adjustment. The number of adjustments made depends entirely on how you use the Mask options.
Click here to buy the book.

Part II: Working with Camera Raw Images
242
FIGURE 8.28
The Adjustment Brush panel provides a limited number of adjustments that can be made to targeted areas of your image.
Mask options
Adjustment options
Brush options
Mask overlay color
Setting the Mask optionsThe Mask options include New, Add, and Erase. Whenever New is selected, a brush stroke over your image creates a new mask with new settings and places a new pin. After the first brush stroke, the Mask option automatically changes to Add. When Add is selected, the brush strokes you make are added to the currently selected mask. You also can select Erase, which allows you to use the brush to erase areas in the currently selected mask.
NoteDon’t be confused by all this talk of brushing on a mask. You are probably wondering how an adjustment can be applied through a mask. Actually, each new mask is applied to the entire image and the Adjustment Brush erases portions of it so the adjustment can filter through. n
Using the pinsThe pins that are placed every time a mask is created with the adjustment brush are only general indicators of the area where the adjustment is taking place. A pin is placed at the beginning of the first stroke you make in creating a new mask. To see the areas that are being affected by your adjustment, hover over the center of a placed pin, and the mask temporarily appears over the adjusted areas. Figure 8.29 shows an image with two pins placed. The pin on the moon is outlined in green (as you can see by the black circle inside of it), indicating that it is selected. Adding or erasing affects the mask this pin is associated with.
Click here to buy the book.

Chapter 8: Processing Photos in the Camera Raw Workspace
243
FIGURE 8.29
Create a new mask that places a new pin whenever you want to make a separate adjustment.
The second pin is placed at the bottom of the photo. The cursor is hovering over it, and the mask has appeared white, indicating that the mountains are being affected by the adjustment.
You can toggle off the visibility of the pins by clicking Show Pins or using the V key.
Setting the Brush optionsThe Brush options are similar to brush options you find throughout Photoshop. They determine what each of your brush strokes looks like. You can change the following options to customize your brush:
l Size: This option sets the size of the brush. The brush appears over your image as a solid circle surrounded by a dotted circle with a crosshair in the center. You can change the size by using the slider or the bracket keys.
l Feather: Feathering makes the edges of your Adjustment Brush gradually transparent so that the adjustments blend better with your image. The solid circle inside the brush indi-cates where the feathering begins, and the dotted circle around the outside of your brush indicates the amount of feathering being applied.
l Flow: Change the Flow to control how quickly the adjustment is applied.
l Density: Similar to opacity, the Density determines how translucent the adjustment is.
Click here to buy the book.

Part II: Working with Camera Raw Images
244
l Auto Mask: This option confines the edges of your brush strokes to areas that are a simi-lar color to the center of your brush stroke.
l Show Mask: To keep the mask on while you work, select Show Mask. You can change the color of the mask by double-clicking the mask color and selecting any color you like.
Setting the Adjustment optionsYou can set the Adjustment options either before or after you create a mask. As you brush to create the mask on your image, the adjustments are applied as they are set. After you have finished apply-ing the mask, you can make changes to the adjustments as long as the pin for that mask is selected. The adjustments you can make should be familiar to you by now:
l Exposure: Adjusts the amount of light in your selected area. This is a uniform adjustment and can create clipped highlights and shadows, so be aware of these areas as you tweak your exposure.
l Brightness: Adjusts the amount of light in your selected area, but instead of creating clipped areas, the pixels at the end of the image histogram are compressed, so the adjust-ment is not uniform.
l Contrast: Adjusts contrast mostly in the midtone ranges of the selected area.
l Saturation: Adjusts the amount of color in the selected area.
l Clarity: Adjusts local contrast to add depth to the selected area.
l Sharpness: Adjusts the contrast between edges in the selected area.
l Color: Adds a color to the selected area.
Now that I’ve introduced you to the options in the Adjustment Brush panel, I show you how to make targeted adjustments step by step, so you can see how it is done. Figure 8.30 is a photo of the moon. It’s notoriously difficult to take a photo that shows the face of the moon and have detail anywhere else in your image. By making targeted adjustments to this photo, you can deepen the details on the face of the moon and at the same time brighten the landscape so it is softly visible.
Make targeted adjustments to the photo of the moon by following these steps:
On the Web SiteYou can download Figure 8-30 from the Web site and follow the steps to learn how to use the Adjustment Brush. n
1. Open the image Figure 8.30 in Camera Raw.
2. Click the Adjustment Brush tool to open the Adjustment Brush panel, as shown in Figure 8.30.
3. Click the Show Mask option to display your brush strokes.
4. Set your Brush options.
Resize the brush so the solid inner circle is about the same size as the moon at 14. Set the Feather option so the dotted circle is slightly larger than the moon at 13. Set the Flow to 50 and the Density to 100. Double-click the Mask Overlay Color to set it to any bright color, except white, that you choose.
Click here to buy the book.

Chapter 8: Processing Photos in the Camera Raw Workspace
245
FIGURE 8.30
You can use the Adjustment Brush to enhance the detail of this image.
5. Center your brush on the moon and click.
This places the perfect mask over the face of the moon.
6. Deselect Show Mask so you can view the changes you make with the Adjustment options.
7. Set your Adjustment options.
Reduce the exposure and/or brightness until the detail is clearly visible on the face of the moon. Add contrast, clarity, and sharpness to bring the detail into focus.
8. Select New to create a new adjustment mask.
Click the Show Mask option again.
9. Reset your Brush options, reduce the size of your brush to 9, and increase the feather to 43.
10. Drag your brush across the mountains to create a mask over them.
11. Deselect the Show Mask option.
12. Reset your adjustment options.
Click here to buy the book.
Part II: Working with Camera Raw Images
246
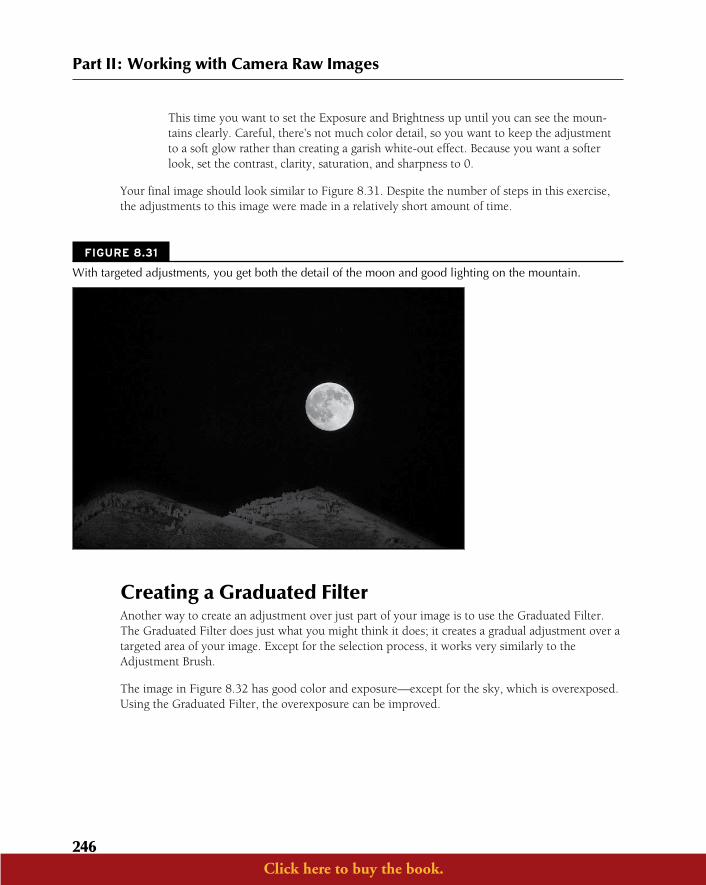
This time you want to set the Exposure and Brightness up until you can see the moun-tains clearly. Careful, there’s not much color detail, so you want to keep the adjustment to a soft glow rather than creating a garish white-out effect. Because you want a softer look, set the contrast, clarity, saturation, and sharpness to 0.
Your final image should look similar to Figure 8.31. Despite the number of steps in this exercise, the adjustments to this image were made in a relatively short amount of time.
FIGURE 8.31
With targeted adjustments, you get both the detail of the moon and good lighting on the mountain.
Creating a Graduated FilterAnother way to create an adjustment over just part of your image is to use the Graduated Filter. The Graduated Filter does just what you might think it does; it creates a gradual adjustment over a targeted area of your image. Except for the selection process, it works very similarly to the Adjustment Brush.
The image in Figure 8.32 has good color and exposure—except for the sky, which is overexposed. Using the Graduated Filter, the overexposure can be improved.
Click here to buy the book.

Chapter 8: Processing Photos in the Camera Raw Workspace
247
FIGURE 8.32
The sky in this image is washed out and overexposed, but the Graduated Filter can improve that.
On the Web SiteYou can download Figure 8-32 from the Web site and follow the steps to learn how to use the Graduated Filter. n
Let me show you how it works. Follow these steps to create a Graduated Filter:
1. Select the Graduated Filter to open the Graduated Filter panel, as shown in Figure 8.32.
It should look familiar to you; the options are identical to those used in the Adjustment Brush panel.
Click here to buy the book.

Part II: Working with Camera Raw Images
248
2. Set the Exposure and the Brightness down.
You need to decrease the exposure of this image, so setting these options first gives you a good preview of the changes being made. You can tweak the settings later.
3. Add a Graduated Filter by dragging from the top of this image down.
I drew a diagonal line through the largest wedge of the sky, as you can see in Figure 8.33. The green line (which is the top line in this figure) indicates the area where the Graduated Filter is applied most heavily. It is applied on both sides of the green line. The red line (the bottom line) indicates the outermost edge of the feathering that makes up the Graduated Filter. No adjustments are made to the outside of the red line.
FIGURE 8.33
The Graduated Filter indicators show you where the filter is being applied.
4. Adjust your selection.
You can expand, rotate, or move the Graduated Filter indicator using the icons that appear as you hover over it. Tweak it until you think you’ve got the best results.
5. Edit the Adjustment settings.
Tweak the adjustments until you get the best results. You probably want to try Steps 4 and 5 interchangeably a few times until you get the hang of how the Graduated Filter works.
When you are finished, the exposure in your image should be greatly improved, as shown in Figure 8.34.
Click here to buy the book.

Chapter 8: Processing Photos in the Camera Raw Workspace
249
FIGURE 8.34
Color and depth are added to the sky by using the Graduated Filter.
Creating Artistic EffectsYou can’t create many artistic effects in Camera Raw just yet, but you can add grain or a vignette to your image using the Effects panel. Both can add depth and interest to a photo, and as always in Camera Raw, these edits are completely reversible.
Open the Effects panel by clicking the Effects tab in the Adjustment tabs, as shown in Figure 8.35. This panel provides sliders to add and customize grain or a vignette to your image.
Adding grainWhen you add grain to your image in Camera Raw, it is added to areas that are out of focus more heavily than it is added to the focused areas. This adds depth and interest to the softness created by a short focal length. Use the following sliders to add and fine-tune grain in your image:
l Amount: Until you adjust the amount of grain above 0, no grain is added to your photo. This is a rare setting in Camera Raw, because it is always set to 0 when an image is opened. Many of the other settings remain right where you left them. Adjust the Amount slider up to add a little or a lot of grain to your image.
l Size: This determines the size of the grain added to your image.
l Roughness: This adds contrast between the grains to enhance the roughness of the texture.
You can see the effect of adding grain to an image in Figure 8.36.
Click here to buy the book.

Part II: Working with Camera Raw Images
250
FIGURE 8.35
The Effect panel
FIGURE 8.36
Adding grain to this photo turned the soft background into grittier, more interesting texture.
Click here to buy the book.

Chapter 8: Processing Photos in the Camera Raw Workspace
251
Adding a vignetteA vignette is a soft, circular border around an image that highlights an area of the image. In Camera Raw, a vignette is created uniformly around the edges of your image, targeting the center by default, so you probably want to crop these images so the focal point of your photo is close to the center.
Change these options to create a vignette, as shown in Figure 8.37:
l Style: From the Style drop-down menu, you can choose Highlight or Color priority. The Highlight priority adds black or white pixels to create the vignette. The Color priority either lightens or darkens the existing colors in the image to create the vignette.
l Amount: Adjusting this slider above 0 creates a lighter vignette; the higher the value, the more opaque the vignette is. Going lower creates a darker vignette.
l Midpoint: This adjusts the size of the vignette.
l Roundness: Moving the roundness slider up creates a rounder vignette, while moving it down causes it to conform to the shape of the image.
l Feather: This sets the softness of the vignette edges.
l Highlights: This slider is available only if you have created a dark vignette. It pulls high-lights out of the image in the darker areas to create depth.
FIGURE 8.37
Adding a vignette highlights the focal point of an image.
Click here to buy the book.

Part II: Working with Camera Raw Images
252
Correcting Camera QuirksThe Lens Correction and Camera Calibration tabs give you options to correct aberrations that occur with lenses and cameras that distort the color and tonal value of your image.
Lens correctionsIf you zoom in to an image until you can distinguish the pixels, you’ll probably notice a color fringe around some of them, especially highlights. This is called chromatic aberration, and it’s caused either by the inability of the camera lens to focus all the colors onto the sensor at once or by those colors being focused but slightly different sizes, producing color fringes.
Camera Raw can correct the second type of chromatic aberration using the sliders in the Lens Corrections tab, as shown in Figure 8.38. Zoom in tight to your image, and adjust the sliders until the color fringes are less visible. When you have set the sliders, select Defringe and use the drop-down menu to choose Highlight Edges or All Edges. You can preview both settings and use the one that works best.
FIGURE 8.38
The Lens Corrections tab
The other Lens adjustment on the Lens Corrections tab is Lens Vignetting. I just showed you how to create a vignette as an artistic effect, but what if your lens has created the vignette and you don’t want it? You can remove it by using the Lens Vignetting sliders to adjust for it, almost the exact opposite of creating one in the Effects tab.
Camera calibrationCameras all come with their own way of defining and interpreting color, and these color profiles are part of what is saved to the metadata of your image file. When you bring an image into Camera
Click here to buy the book.

Chapter 8: Processing Photos in the Camera Raw Workspace
253
Raw, it has its own methods of interpreting color and chooses profiles that are the best for your particular camera make and model.
After you click the Camera Calibration tab to open the Camera Calibrations panel, you can choose what profile to use from the Camera profile drop-down menu, as shown in Figure 8.39. You can see a significant difference in the color of your image by clicking through these profiles. After choosing a profile for your image, you can tweak it by using the color sliders to adjust individual colors and saturation.
FIGURE 8.39
Your camera profiles in the Camera Calibration tab may be different than the ones shown here.
Adjusting Sharpness and Reducing NoiseWhen you have completed all the other changes to your image in Camera Raw, you are ready to open the Detail tab shown in Figure 8.40, where you can adjust the sharpness and reduce noise in your image. You make these adjustments last because their effectiveness is reduced when other adjustments are added to them.
Click here to buy the book.

Part II: Working with Camera Raw Images
254
FIGURE 8.40
The Details tab
Noise reductionNoise is defined as random pixels throughout your image that give it a messy look. Noise is intro-duced in several ways. The higher the ISO setting on your camera, the more noise is created in your image. Lightening, as well as other adjustments, also creates noise.
You can reduce the noise in your image by adjusting the following settings:
l Luminance: Reduces the amount of grayscale noise.
l Color: Reduces the amount of color noise.
l Edge Detail: Is tied to Luminance and Color sliders and allows you to increase the con-trast of the edges in your image, reducing the blurring effect that Noise Reduction can sometimes have.
NoteKeep in mind that Photoshop reduces noise by blurring your image and decreasing contrast of individual pixels. Sharpening also affects your image at the single pixel level. It is important to preview your image zoomed in at least 100 percent in order to see and fine-tune the effects of both noise and sharpening on your image. n
SharpeningSharpening works by increasing the contrast around the edges of your image to bring it more into focus, adding detail to your image.
Click here to buy the book.
Chapter 8: Processing Photos in the Camera Raw Workspace
255
Camera Raw sets the default sharpening at 25 for raw images. This is not a huge amount; in fact, it is comparable to the sharpness your camera applies to a processed image. Lots of experts will tell you, though, that adding any sharpening by default is a bad idea, so if you want to change the default setting to 0, reset the slider and choose Set New Camera Raw Defaults from the Adjustment Tabs menu.
Sharpen your photo by using the following adjustments:
l Amount: This sets the amount of sharpening applied to your image. The amount you choose is directly tied to your Radius and Detail settings.
l Radius: Choose your Radius based on the size of the detail in your image. An image with very small detail should have a small Radius setting. Images with larger details can get away with a larger Radius setting, but keep an eye on that preview; a large Radius setting can introduce an unnatural amount of contrast to your image.
l Detail: This setting heightens the detail of your image as you raise it by applying the sharpness to higher frequency areas of your photo. A very high detail setting gives your image an almost textured look.
l Masking: Raising this setting applies more of the sharpening effect to the edges of your image and less to the overall image.
TipIf you hold down the Alt/Option key while you adjust the Sharpening sliders, you see a preview of what the control is doing to your image. This is a great way to get more familiar with the Sharpening controls and find the optimal setting for your image. n
SummaryThis chapter really got into the meat and potatoes of Camera Raw. You learned about color and light and how they can be adjusted using the tools and panels in Camera Raw. Specifically, you learned how to do the following:
l Change the light settings to improve the exposure and contrast in an image
l Make color corrections to an image or individual colors in that image
l Make targeted adjustments to only selected portions of your image
l Create artistic effects with your images
l Put the finishing touches on by correcting camera aberrations, sharpening, and reducing noise in your image
Click here to buy the book.