csatlakozás a bme eduroam hálózatához setting up the bute ... · install the attached securew2...
TRANSCRIPT

Sebők Márton v4 1/20
Csatlakozás a BME eduroam hálózatához Setting up the BUTE eduroam network Table of Contents ≤ Windows 7 ............................................................................................................................................ 2
≥ Windows 8 ............................................................................................................................................ 6
Windows Phone .................................................................................................................................... 11
Android .................................................................................................................................................. 12
iPhone .................................................................................................................................................... 14
Linux (Debian) ........................................................................................................................................ 20

2/20
≤ Windows 7 1. Telepítsük fel a mellékelt SecureW2 EAP Suite 1.1.3 programot, majd indítsuk újra a
számítógépet! A komponensek közül elég a TTLS-t kiválasztani.
Install the attached SecureW2 EAP Suite 1.1.3 software then restart your computer. It’s only
necessary to choose the TTLS component.
2. Nyissuk meg a Vezérlőpultot és válasszuk a Hálózati és megosztási központot!
Open the Control Panel and choose the Network and Sharing Center.
3. Kattintsunk az Új kapcsolat vagy hálózat beállítása menüpontra!
Click on the Set up a new connection or network item.

3/20
4. Kattintsunk a Csatlakozás kézzel vezeték nélküli hálózathoz menüpontra!
Click on the Manually connect to a wireless network item.
5. Töltsük ki az adatokat az alábbiak szerint!
Fill in the data like below.

4/20
6. Kattintsunk a Kapcsolat beállításainak módosítása menüpontra!
Click on the Change connection settings item.
7. A Biztonság fülön válasszuk ki a helyes hálózati hitelesítési módszert és kattintsunk a
mellette lévő Beállítások gombra!
On the Security tab choose the appropriate network authentication method then click on the
Settings button on its right side.
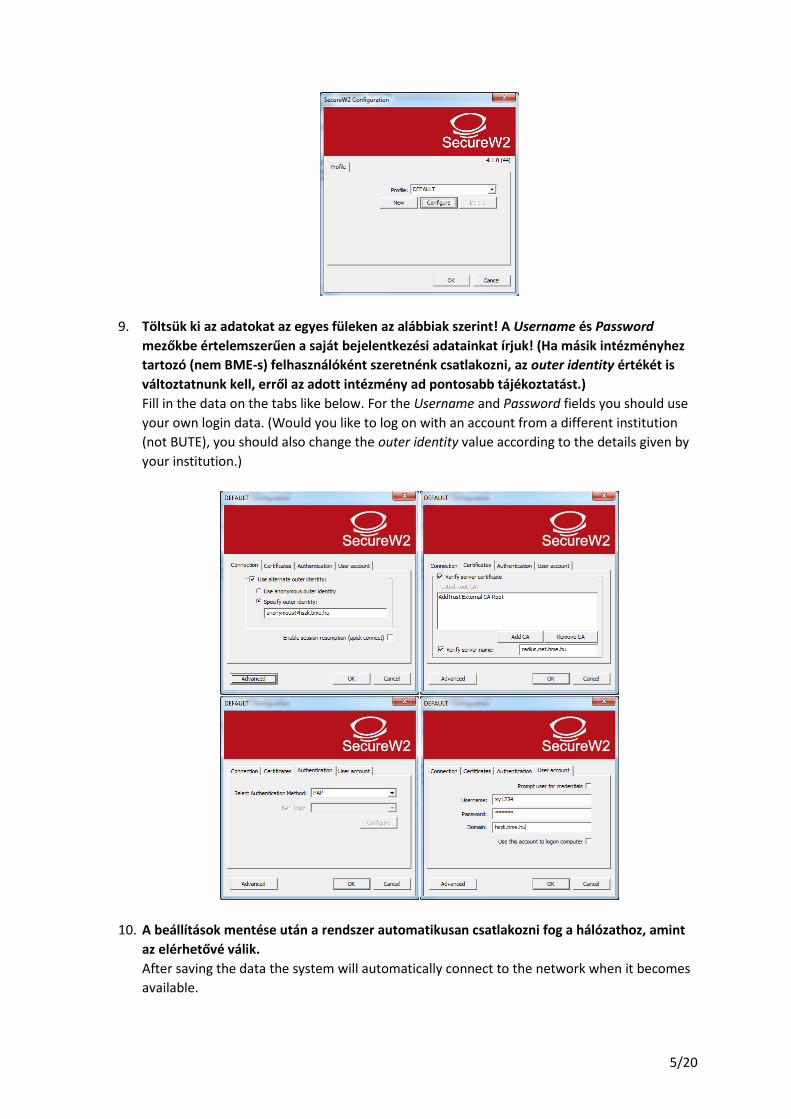
8. Kattintsunk a Configure gombra (új profilt is létrehozhatunk, ha szeretnénk)!
Click on the Configure button (you can also create a new profile, if you’d like).
5/20
9. Töltsük ki az adatokat az egyes füleken az alábbiak szerint! A Username és Password
mezőkbe értelemszerűen a saját bejelentkezési adatainkat írjuk! (Ha másik intézményhez
tartozó (nem BME-s) felhasználóként szeretnénk csatlakozni, az outer identity értékét is
változtatnunk kell, erről az adott intézmény ad pontosabb tájékoztatást.)
Fill in the data on the tabs like below. For the Username and Password fields you should use
your own login data. (Would you like to log on with an account from a different institution
(not BUTE), you should also change the outer identity value according to the details given by
your institution.)
10. A beállítások mentése után a rendszer automatikusan csatlakozni fog a hálózathoz, amint
az elérhetővé válik.
After saving the data the system will automatically connect to the network when it becomes
available.

6/20
≥ Windows 8 1. Nyissuk meg a Vezérlőpultot és válasszuk a Hálózati és megosztási központot!
Open the Control Panel and choose the Network and Sharing Center.
2. Kattintsunk az Új kapcsolat vagy hálózat beállítása menüpontra!
Click on the Set up a new connection or network item.
3. Kattintsunk a Csatlakozás kézzel vezeték nélküli hálózathoz menüpontra!
Click on the Manually connect to a wireless network item.

7/20
4. Töltsük ki az adatokat az alábbiak szerint!
Fill in the data like below.
5. Kattintsunk a Kapcsolat beállításainak módosítása menüpontra!
Click on the Change connection settings item.
6. A Biztonság fülön válasszuk ki a helyes hálózati hitelesítési módszert és kattintsunk a
mellette lévő Beállítások gombra!

8/20
On the Security tab choose the appropriate network authentication method then click on the
Settings button on its right side.
7. Töltsük ki az adatokat az alábbiak szerint! (Ha másik intézményhez tartozó (nem BME-s)
felhasználóként szeretnénk csatlakozni, az Identitásvédelem engedélyezése alatti értékét is
változtatnunk kell, erről az adott intézmény ad pontosabb tájékoztatást.)
Fill in the data like below. (Would you like to log on with an account from a different
institution (not BUTE), you should also change the value under the Enable identity privacy
checkbox according to the details given by your institution.)
8. Csatlakozzunk a hálózathoz!
Connect to the network.

9/20
9. Adjuk meg a saját bejelentkezési adatainkat!
Fill in the form with your own login data.
10. A beállítások mentése után a rendszer automatikusan csatlakozni fog a hálózathoz, amint
az elérhetővé válik.

10/20
After saving the data the system will automatically connect to the network when it becomes
available.

11/20
Windows Phone 1. Csatlakozzunk a hálózathoz és töltsük ki az adatokat az alábbiak szerint! A Felhasználónév
és Jelszó mezőkbe értelemszerűen a saját bejelentkezési adatainkat írjuk!
Connect to the network and fill in the data like below. For the User name and Password fields
you should use your own login data.
2. A beállítások mentése után a rendszer automatikusan csatlakozni fog a hálózathoz, amint
az elérhetővé válik.
After saving the data the system will automatically connect to the network when it becomes
available.

12/20
Android 1. Másoljuk fel a mellékelt addtrust.crt fájlt az SD-kártya gyökérkönyvtárába!
Copy the attached addtrust.crt file to the root directory of the SD card.
2. A Beállítások/Hely és biztonság (újabb verziókban Biztonság) menüben válasszuk a
Hitelesítőadat-tároló részben (újabb verziókban Hitelesítési adatok tárolója) a Telepítés
SD-kártyáról (újabb verziókban Telepítés tárhelyről) menüpontot! Amennyiben szükséges,
válasszuk ki az addtrust.crt fájlt, a tanúsítvány nevének adjuk meg az addtrust szót, a
hitelesítési adatok használatánál pedig a Wi-Fi opciót válasszuk! Ha most használjuk
először az Android hitelesítőadat-tároló (újabb verziókban azonosítótároló) funkcióját, ezt
is be kell állítanunk a képernyőn megjelenő utasítások szerint.
Under the Settings/Location and security (Security on newer versions) menu, in the
Credential storage block choose the Install from SD card (Install from storage on newer
versions) item. If needed, browse to the addtrust.crt file, set addtrust as the certificate name
and choose Wi-Fi for the credential use. If you’ve never used the credential storage feature
before, you need to set it up following the instructions given.
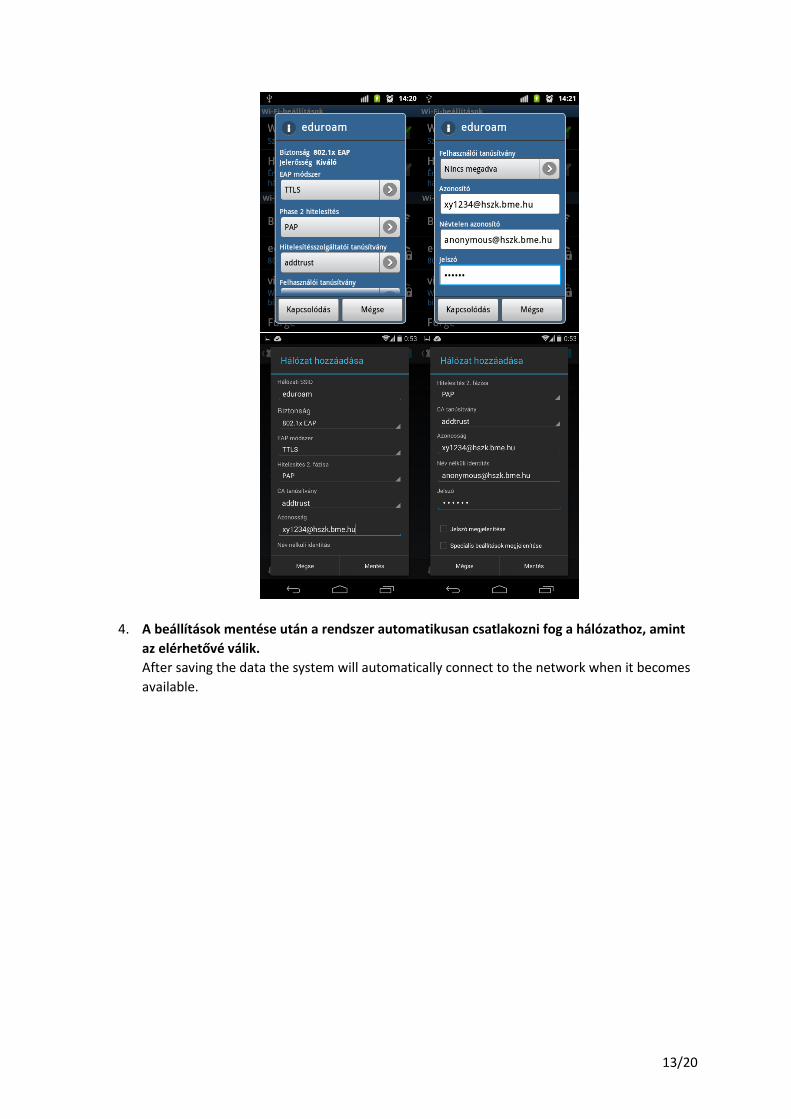
3. Csatlakozzunk a hálózathoz és töltsük ki az adatokat az alábbiak szerint! Az Azonosító
(újabb verziókban Azonosság) és Jelszó mezőkbe értelemszerűen a saját bejelentkezési
adatainkat írjuk! (Ha másik intézményhez tartozó (nem BME-s) felhasználóként szeretnénk
csatlakozni, a Névtelen azonosító (újabb verziókban Név nélküli identitás) értékét is
változtatnunk kell, erről az adott intézmény ad pontosabb tájékoztatást.)
Connect to the network and fill in the data like below. For the Identity and Password fields
you should use your own login data. (Would you like to log on with an account from a
different institution (not BUTE), you should also change the Anonymous identity value
according to the details given by your institution.)
13/20
4. A beállítások mentése után a rendszer automatikusan csatlakozni fog a hálózathoz, amint
az elérhetővé válik.
After saving the data the system will automatically connect to the network when it becomes
available.
14/20
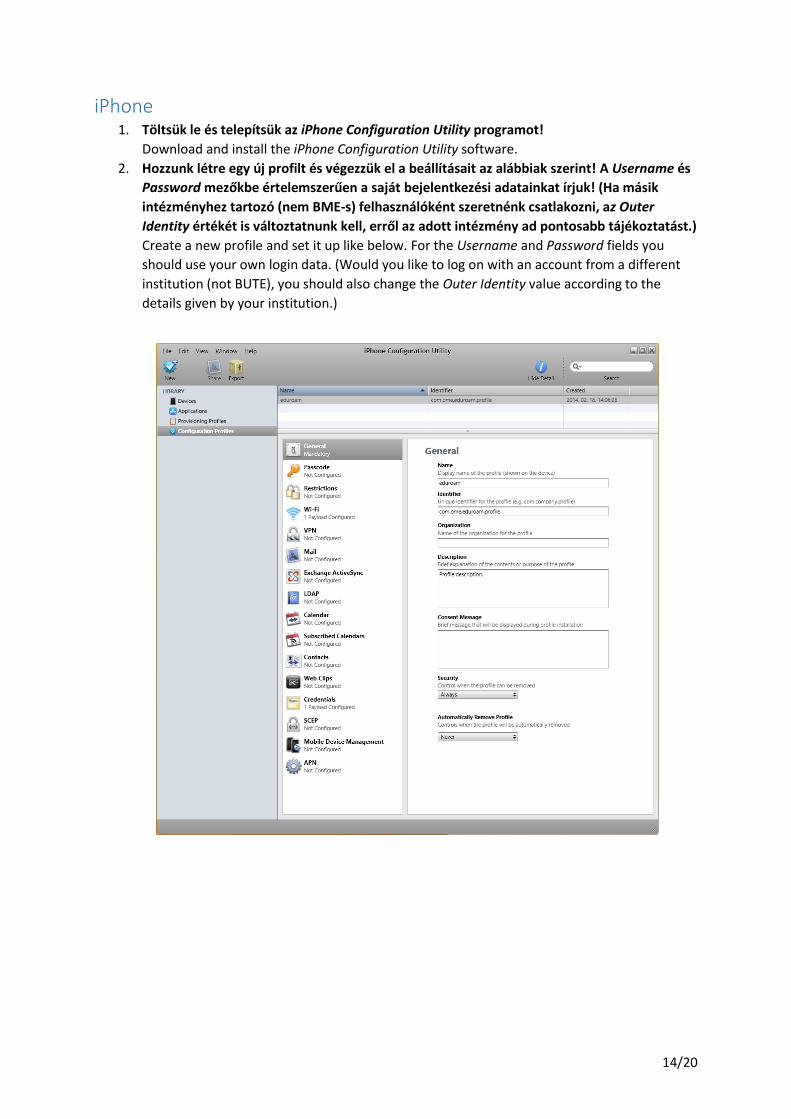
iPhone 1. Töltsük le és telepítsük az iPhone Configuration Utility programot!
Download and install the iPhone Configuration Utility software.
2. Hozzunk létre egy új profilt és végezzük el a beállításait az alábbiak szerint! A Username és
Password mezőkbe értelemszerűen a saját bejelentkezési adatainkat írjuk! (Ha másik
intézményhez tartozó (nem BME-s) felhasználóként szeretnénk csatlakozni, az Outer
Identity értékét is változtatnunk kell, erről az adott intézmény ad pontosabb tájékoztatást.)
Create a new profile and set it up like below. For the Username and Password fields you
should use your own login data. (Would you like to log on with an account from a different
institution (not BUTE), you should also change the Outer Identity value according to the
details given by your institution.)

15/20

16/20

17/20

18/20

19/20
3. Csatlakoztassuk az eszközünket, majd miután kijelöltük, a Configuration Profiles fülön
telepítsük rá a profilunkat!
Connect our device and select it. On the Configuration Profiles tab, install our new profile.
4. A beállítások mentése után a rendszer automatikusan csatlakozni fog a hálózathoz, amint
az elérhetővé válik.
After saving the data the system will automatically connect to the network when it becomes
available.

20/20
Linux (Debian) 1. Csatlakozzunk a hálózathoz és töltsük ki az adatokat az alábbiak szerint! A Username és
Password mezőkbe értelemszerűen a saját bejelentkezési adatainkat írjuk! (Ha másik
intézményhez tartozó (nem BME-s) felhasználóként szeretnénk csatlakozni, az Anonymous
identity értékét is változtatnunk kell, erről az adott intézmény ad pontosabb tájékoztatást.)
Connect to the network and fill in the data like below. For the Username and Password fields
you should use your own login data. (Would you like to log on with an account from a
different institution (not BUTE), you should also change the Anonymous identity value
according to the details given by your institution.)
2. A beállítások mentése után a rendszer automatikusan csatlakozni fog a hálózathoz, amint
az elérhetővé válik.
After saving the data the system will automatically connect to the network when it becomes
available.