cs2 manual update - altosoft · 2 remember to untick the appropriate setting under settings |...
TRANSCRIPT

1
CS2 MANUAL UPDATE
This document is additional to the Operating Manual, and describes some
of the features that have been added to the program since the manual
was last updated.
Updates in June 2014 have been highlighted in yellow.
In this document:
Pair Datums in Teams Events
Using CS2 with External Displays
New Pair Session Consolidation method – Alternate Multi
Using Carry-forwards in Pairs and Teams events
Remote BCS Functions
Managing Pair and Team Event Substitutes
Pairs Datums in Teams
Compscore2 can keep track of Pair Datums if it knows what players are sitting NS and EW
each match. This is all managed via Datum Management accessed from the Pair Setup
tab. First, however, select the Track Pair Datums in Teams Events [x] checkbox under
Setup | Preferences – Congress Directors.
Telling Compscore2 who sits where
There are 2 ways this can happen:
(a) Have the players enter their details
into the Bridgemates at the start of
each round or event. You can decide
what number they enter, and this is
managed under setup. Available methods are: enter their ABF . NZ Bridge Number, enter
their Club Number or Enter their Player Number as it appears on the Teams Slips (see
below).
(b) Let Compscore2 assign initial seating on the basis of Players 1 and 2 being NS and
Players 3 and 4 being EW, and then you can manually move players around. This is all
managed on the Datums Management form.
You may elect not to ask players for their numbers for subsequent matches. You might
choose this for example if players don’t change their seating from match to match very
much, and you are confident that you’ll be made aware of any changes. If this is the case,

2
remember to untick the appropriate setting
under Settings | Bridgemate Preferences
for subsequent matches. You will also need
to create Match 2 using a new BWS file, as
using an existing one will show player
names not team names at the start of each
new match.
If you have elected to have players enter
player numbers to the Bridgemates, you
need to click Import under the Import
Names from BWS File on the Datums
Management form. This will be done every
time players enter the numbers into the
Bridgemates – either only after the start of
the first match, or after the star of every
match.
Whether you’ve had players enter their numbers or whether you’re manually telling CS2
about the seating, you can still make any changes under Pair Seating Management. You
can manually assign players to seating position team by team and match by match.
If you are not asking players to enter numbers for subsequent matches, you will need to run
the process to Copy Match 1 Seating to all future matches. Once done, this can be changed
as necessary, and if there’s a permanent change made part way though the event, you can
elect to push the seating for any team and any match to all future matches.
In the Pair Seating Management area, you can print Team Slips. These can print put on
each table at the commencement of the event to tell players what numbers have been
assigned to each team member. You can also print All Seating, which shows whose seated
where for each match. Finally, there’s a Problems report that lists all teams where there is
incomplete information.
Reporting after each match
The Pairs Datums calculations are not part of the normal Quick Post process, so (if you want
the team personals to show player datum totals and ranks, don’t include that step in your
Quick Finalise steps, but rather do it manually after the next round has been launched.)
To produce a Modified Datums Report, you will need to have completed calculations for the
match in question, then on the Datums Management form, click the Calculate button. Once
this process is run, you can print the Modified Datums Report listing either the total field, or
a less portion if you wish.
You can control the number of matches pairs need to have played in to feature in the
report. This default to one third of the matched played so far, except for matches early in
the event.

3
You can also click Quick Post to fire the calculate and print steps with one click.
Note that with Pair Datums activated, the Personals that are distributed to tables contain
two elements of additional information:
1. They show the player names from the home team that played in the match,
separating those playing at the home and the away table; and
2. They show the accumulated Modified Datum for each pair playing in the match,
along with the current rank in the field.
This may mean that you will exclude the Personals from your Quick Finalise process, and
run them manually after you’ve done the calculations. It doesn’t matter if you’ve already
created for following round in the Bridgemate at this stage, but you may need to click the
Match dropdown to the prior match on the Bridgemate tab in order to run the Personals for
the previous match.
Transferring data to Substitutes Management
A side benefit of tracking Pair Datums is that Substitute management can be automatically
loaded from the Pair Datum Management files, and this information can be used for
masterpointing.
On the Team Setup tab, click Substitutes, and choose the button to Import All from
Datum Management.
Summary
(a) Players entering numbers every round
Tick Track Pair Datums and choose method of entry (Club Number, ABF Number,
Team Member Number) under Preferences – Directors, and if using Team
Member Numbers, print and distribute the Team Slips from the Datums
Management page
Bridgemate Preferences – tick “Ask for player number”
After each match (can be done while next match is in progress), Import then review
for errors, then Calculate, then print reports
New BWS file every match in order to have initial player number question appear on
Bridgemates each match
Don’t include printing of personals or making web site CSV files in Quick Post but run
these steps separately afterwards
(b) Players entering numbers first round only
Tick Track Pair Datums and choose method of entry (Club Number, ABF Number,
Team Member Number) under Preferences – Directors, and if Team Member
Number, print and distribute the Team Slips from the Datums Management page

4
Bridgemate Preferences - ask for player number before Match 1 only, and after
Match 1 you should untick this option
After Match 1 (can be done while next match is in progress), Import then review for
errors, then Calculate, then print reports. Also, copy Match 1 seating to all future
matches for all teams.
New BWS file for Match 2 in order to have team names not player names appear on
Bridgemates
For each future match, manage any edits as advised by players before clicking
Calculate.
(c) Players not entering numbers at all
Tick Track Pair Datums on the Preferences – Directors.
On the Datums Management page, click Default to assign team members to
seating arbitrarily, then tweak the seating using the various options. Also, copy
Match 1 seating to all future matches for all teams. This will typically be done during
Round 1.
Regardless of the method you choose:
After the completion of each match, you will need to manually calculate the Datums
– this is not done as part of Calculate or Quick Post. Note that this process rescores
all prior rounds as well as the current round, so retrospective adjustments are fine.
Don’t include printing of personals or making web site CSV files in Quick Post but
instead run these steps separately afterwards
Using Compscore2 with External
Displays
There are several features in Compscore2 that facilitate the display of session and event
results and draws on an external monitor (e.g. TV screen or data projector). The monitor
can be attached to the PC running Compscore2, or it
can be attached to a separate PC connected to the
scoring PC via a network.
The display process works by Compscore2 creating
files of the various reports (RDF files), usually by
clicking the Display button, though some display
reports are automatically built, and then places them
in a folder on the local PC. (This folder is the \Reports
sub-folder, and is located under the folder that holds
your Compscore2 program.) The Auto Previewer is
then launched (under Windows | Auto Previewer

5
Management), which opens the following form.
The top area lists all reports in the Auto Previewer folder. The list can be refreshed, and you
can also delete reports that are no longer needed. Note however that when you close
Compscore2, all reports in the list are deleted.
Opening the Report Preview window can be done as:
Automatic – the display will cycle page by page, document by document for all
documents in the list
Single Page – the highlighted report will display, cycling though multiple pages if
applicable
Single Doc – the highlighted document will display but won’t cycle through
subsequent pages (this is useful for a one page report if you want to avoid flicker
when the page is reloaded)
Open the Previewer in one of these 3 ways. This then shows the preview in a separate
window (as pictured). If a data projector is connected to this PC, you can run is as Extended
Desktop and simply drag the Previewer form to the extended desktop area.

6
At the foot of the Preview are window are controls for zoom and auto-display time between
page refreshes / changes. You can also pause the display to avoid refreshing or page
changes.
Producing subsequent Draws and Results utilises the same file name, and will simply replace
the existing file queued for the Auto Previewer. When running Automatic, next time the
particular report is shown on the display, it will be the latest one.
Displays attached to other computers
If you have displays attached to other
computers, you can set up the full network
path under Setup | Preferences Congress
Directors.
Then, when you’ve opened the Auto
Previewer form on the scoring PC, click the
checkbox Push display to other PCs [x] at
the foot of the form, and all documents
queued for display will also be copied to all the nominated folders.
On the other PCs, Compscore2 should also be installed and running. On that PC, simply
select Auto Preview Management from the Windows menu like you did on the main PC as
described above, and the contents of that PC’s reports folder will be displayed in the list,
and you can open the Previewer as Automatic and the Preview form will display on that PC.
The reports on the remote PCs will be updated within a few seconds of them being updated
on the scoring PC.
You can also send all reports to the remote PCs by clicking Copy All, and you also have the
ability to selective send one report to one or all the report PCs by right-clicking it on the list
and choosing from the popup menu.
Sizing reports to suit the display screen
It is likely that reports that are designed in Compscore2 as portrait will not display well on
big screens as the screens are either square or landscape – either you’ll lose the bottom
portion of the report or if toy size the whole report to fit the screen the type will be too
small.
The solution is to set a large bottom margin. This is done under Setup – Preferences
Congress Directors, where different bottom margins can be set for results and draws. You
7
can determine the optimum bottom margin using trial and error, and this will vary
depending on your screen size, distance from the projector and your projector settings.
Note that the results and draw can be set as landscape of portrait, and this might look
better on the big screen. In some parts of the program, right-clicking the Results or Draw
button will allow you to choose between portrait and landscape.
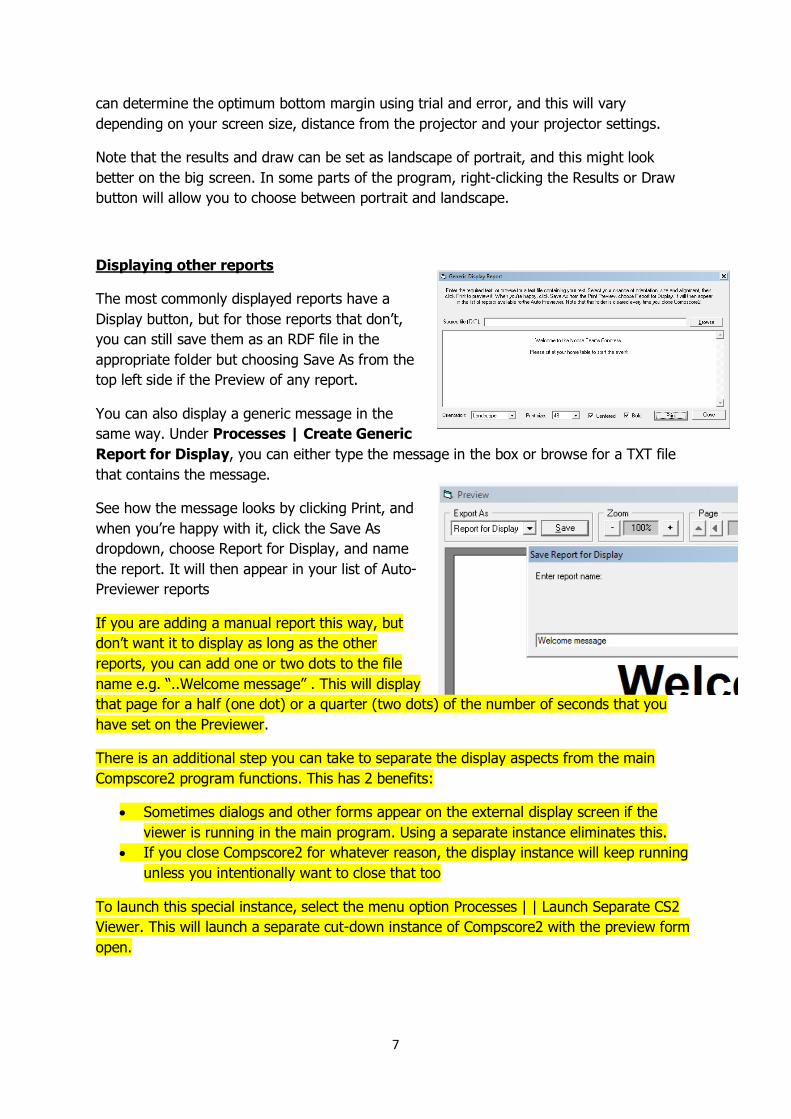
Displaying other reports
The most commonly displayed reports have a
Display button, but for those reports that don’t,
you can still save them as an RDF file in the
appropriate folder but choosing Save As from the
top left side if the Preview of any report.
You can also display a generic message in the
same way. Under Processes | Create Generic
Report for Display, you can either type the message in the box or browse for a TXT file
that contains the message.
See how the message looks by clicking Print, and
when you’re happy with it, click the Save As
dropdown, choose Report for Display, and name
the report. It will then appear in your list of Auto-
Previewer reports
If you are adding a manual report this way, but
don’t want it to display as long as the other
reports, you can add one or two dots to the file
name e.g. “..Welcome message” . This will display
that page for a half (one dot) or a quarter (two dots) of the number of seconds that you
have set on the Previewer.
There is an additional step you can take to separate the display aspects from the main
Compscore2 program functions. This has 2 benefits:
Sometimes dialogs and other forms appear on the external display screen if the
viewer is running in the main program. Using a separate instance eliminates this.
If you close Compscore2 for whatever reason, the display instance will keep running
unless you intentionally want to close that too
To launch this special instance, select the menu option Processes | | Launch Separate CS2
Viewer. This will launch a separate cut-down instance of Compscore2 with the preview form
open.

8
Any reports that have boon put in the display folder in
the main Compscore2 will be available here too, as
both instances are looking at the same folder.
Running the view this way means that you don’t need
to use the Auto Previewer form in the main instance at
all.
New Consolidation Method – Ladder
(formerly Multi Alternate)
There is a new way of consolidation multiple sessions, in addition to the existing Multi,
Across-the-Field, Eclectic and Barometer. This is referred to as a Multi - Ladder.
It works like the traditional Multi except for the following:
You can merge the results on the basis of matchpoints or percentages. Neither
method will attempt any form of factorising even when sessions are different lengths
or field sizes.
The results appear on the printed report and web site in a landscape form showing
the totals for each session plus the overall totals.
If there are carry-forwards, they show separately (other multi types will incorporate
carry forwards into the totals but the carry forwards won’t be specifically identifiable.
As with other Multis, Pairs who don’t play in all sessions can be excluded or have substitutes
recorded.
There is provision for up to 3 sessions being combined in this sort of event.
These Alternate Multi reports can also be uploaded to your Altosoft web site and will be
displayed in the same way.
When running any Multis, you
can record substitutes in the
actual session itself, rather than
trying to manage subs in the
Multi. This is done on the
session’s Names tab.

9
Carry forwards
Carry forwards have been introduced into Compscore2 for both Pairs and Teams.
Carry-forward with Pairs Sessions
Carry-forwards can be entered to any Multi consolidation of Pairs sessions.
First however, they are accumulated in a separate “names only” event (create under File |
New Event Without Bridgemates | Names File Only). You can manually enter pairs, or you
can import them from an existing event or session using the Import from Other Event
facility. (See below about exporting names from a
completed event, complete with amounts to be
carried forward.)
Once the pair names have been added or
imported, select the Seeding tab, and click
Show Carry-Forwards.
To edit carry forward amount, highlight the row,
right-click, choose Change Carry-Over
Amount and enter the amount.
Once all carry forwards have been entered, they are then
ready to be imported into a Multi Session. This is done on the
first tab of the Multi, where you tick [x] Carry-Forwards,
and choose the Names Only Event that contains the carry
forwards names and amounts.
The pair names are matched on player names.
On the second page of the Multi wizard, there’s a tick box
allowing you to display either the number of sessions the pair
has played in, or the carry forward for that pair.
Note that only Alternate Style Multi has provision to display the
carry-forward amount in a separate column on the results report. For other Multis, the carry
forwards are incorporated in the totals but aren’t identifiable.
Creating carry forwards automatically
There is a way of transferring pair names and carry forward amounts to the Names Only
Pairs event directly from a finalised Multi, for example to create Names Only files for
Championship and Plate based on the results of a two-session Qualifying event. This is done
on the last page of the foundation Multi, by clicking the Send Names button. This opens a
form titled Send Names to New Event.

10
The grid on the left lists the entire field.
You can manually select those pairs to
be transferred to the Names Only
event, or you can have Compscore2
select the names based on the finishing
position and the number of segments
you want the field divided into. Once
the automatic selection has been made,
you can still manually tick and untick
pairs.
You can elect to transfer carry forward
values as part of this process, based on
the results of this Multi, but carry
forwards can also be edited once
transferred to the Names Only event.
There are two ways to calculate the carry forward amounts to transfer:
Percent – this allows a specified proportion of the pair’s percentage to be
transferred e.g. if they achieved 58% in the qualifying, you could create a carry
forward of 0.58 (Portion is 1), or you could transfer a portion of the percentage e.g.
0.5 which would transfer 0.26. This would normally only be used if you were also
scoring the finals using percentages.
Matchpoint – this allows you to transfer a number of matchpoints based on the
relative position in the field of each pair. Enter the matchpoints that the winner will
get as their carry over. The last placegetter will get 0, and the rest of the field will
get the pro-rated value based on their finishing matchpoints.
Remember than amounts transferred in this way can still be edited from within the Names
Only event.
Carry forwards with Teams and Pairs events
In Teams events, carry forwards are entered at the Team Event Seeding Grid. Tick [x]
Event has Carry Forwards on the Event Setup tab, and on the Seeding tab, tick the box
to show carry Forwards. They can be entered or edited by right-clicking the team name in
the seeding grid.
Carry forwards appear in the landscape results report as an initial column, but not in the
portrait Results listing. However, in all reports, the carry forwards are still included.

11
Remote BCS Functions
(This document refers to Bridgemates, but the same principles apply when using Bridge
Pads and Bridge Scorer.)
You can use Compscore2 to score events where you have another PC running the
Bridgemate Control Software. This is typically done were the distance between the scoring
PC and the players is too far for the RF signal, or in events where you need multiple
Bridgemate servers due to the size or physical layout of the field.
The general principle behind this is that the scoring PC creates the movement and therefore
creates the BWS file and sends the movement to the PC driving the Bridgemates, but the
BCS is launched by the PC that has the Bridgemate server attached. Note that the PCs
running the servers still need Compscore2 to be installed on them, though only a small part
of the program will be used by those PCs. Launching by the remote server is done by
selecting Processes | Remote BCS Functions on that PC.
Once the BWS file has been created, open Remote BCS Functions on the remote PC,
navigate to the location of the BWS file and click Launch. This will launch the BCS using
that database just as it would do had the BCS been running on the scoring PC.
If you need to Relaunch the BCS
(say, after an accidental shutdown
of the remote PC) use the
Relaunch button on this same
page. This performs the same
function as the Relaunch option on
the Advanced form under Session
Setup.
There are also some other
functions on this form if the
remote PC is being used to drive a
display as well as or instead of
running the BCS. This includes
displaying slow / incomplete tables
and showing complete teams
results.
Any event or session can have its BWS file residing on a remote PC. In a Pairs or Teams
event, simply choose the remote file path and name when creating the BWS file in the
Bridgemate tab. In a normal Session, on the Bridgemate Session Setup tab, click [x]
Choose a non-standard location for the BWS file and nominate the path and file
name. Remember that in both these case, do not click Launch on the scoring PC, but all
other steps are the same.

12
Running a Teams event using multiple BWS files
Some large Teams events may need more than one Bridgemate server, and therefore you
need to create multiple BWS files, one on each remote PC.
Note that when using multiple BWS files, you won’t have the option of using the same BWS
file for multiple matches – a new file will be created each match, and therefore the BCS on
each remote PC needs to be launched each match and closed after each match.
On the Teams Event Setup tab, click [x] Multiple BWS files.
Next, on the Bridgemates tab, click Manage Multi BWS files. This opens the form as
pictured.
Enter the path and file
names for each BWS
file, recording also the
section letter and range
of tables for each.
Remember to add the
file extension “.BWS” to
all file names.
To save changing the
file names every match,
you can use the
shorthand [X] in some
part of the filename,
and this will
automatically be changed each match to the appropriate match number e.g. a file called
n:\BWS File3\Noosa Teams Match [X] Tables 1-50.bws will be converted to n:\BWS
File3\Noosa Teams Match 1 Tables 1-50.bws for the first match, n:\BWS
File3\Noosa Teams Match [2] Tables 1-50.bws for the second and so on.
Management of the event in all other respects is the same as when using one BWS file,
though some of the functions will ask you which BWS file you want.
Team and Pair Event Substitutes
Compcore2 handles substitutes in Pairs and teams events, and this is used to manage
masterpoints.
In a Pairs event, click Substitutes on the Pair Setup tab. This allows you to select any
pair, and nominate another play to replace on member of the partnership for specific
matches.
13
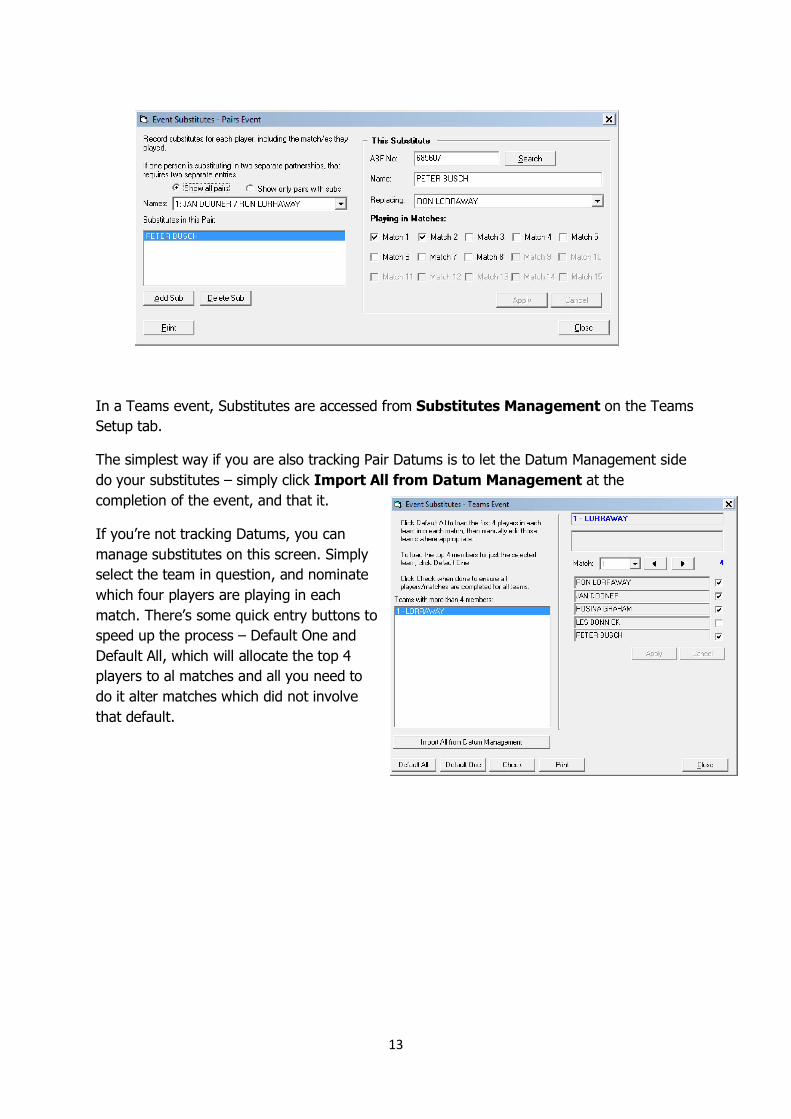
In a Teams event, Substitutes are accessed from Substitutes Management on the Teams
Setup tab.
The simplest way if you are also tracking Pair Datums is to let the Datum Management side
do your substitutes – simply click Import All from Datum Management at the
completion of the event, and that it.
If you’re not tracking Datums, you can
manage substitutes on this screen. Simply
select the team in question, and nominate
which four players are playing in each
match. There’s some quick entry buttons to
speed up the process – Default One and
Default All, which will allocate the top 4
players to al matches and all you need to
do it alter matches which did not involve
that default.