create your style mini projects innovations · mini project “innovations spring/summer 2013 ... 2...
TRANSCRIPT

WWW.CREATE-YOUR-STYLE.COM
CREATE YOUR STYLEMINI PROJECTS
SPRING/SUMMER 2013INNOVATIONS

Materials
SWAROVSKI ELEMENTS
Product Group Article No. Amount Size Color Color Code
Crystal Pearls 5810 6 pcs. 6 mm Crystal Ivory Pearl 001 708
Crystal Pearls 5810 6 pcs. 6 mm Crystal Turquoise Pearl 001 709
Crystal Pearls 5810 4 pcs. 6 mm Crystal Jade Pearl 001 715
Crystal Pearls 5810 6 pcs. 6 mm Crystal Red Coral Pearl 001 718
Crystal Pearls 5810 6 pcs. 6 mm Crystal Dark Lapis Pearl 001 719
Crystal Pearls 5810 51 pcs. 10 mm Crystal Ivory Pearl 001 708
Crystal Pearls 5810 39 pcs. 10 mm Crystal Turquoise Pearl 001 709
Crystal Pearls 5810 43 pcs. 10 mm Crystal Jade Pearl 001 715
Crystal Pearls 5810 47 pcs. 10 mm Crystal Red Coral Pearl 001 718
Crystal Pearls 5810 35 pcs. 10 mm Crystal Dark Lapis Pearl 001 719
Continuation on next page
EGYPTIAN GEMCOLLAR
MINI PROJECT “INNOVATIONS SPRING/SUMMER 2013”
WWW.CREATE-YOUR-STYLE.COM
Supplies: 2 6 mm TierraCast jump Ring 01-0025-09 120” Beadalon 0.018 stringing wire 8 1” ball head pins 10 2x2 crimp beads 10 3 mm crimp covers 2 5 hole spacer bars 6” of heavy link chain 1 large lobster clasp
STEP 1: Cut one 18“ piece of stringing wire. Secure one end (i.e. tape). String on one Crystal Pearl art. 5810 6 mm Crystal Dark Lapis Pearl, 35 10 mm Crystal Dark Lapis Pearls and one 6 mm Crystal Dark Lapis Pearl. Secure open end. Set aside.
Instructions

WWW.CREATE-YOUR-STYLE.COM
“Egyptian Gem Collar”, page 2
STEP 2: Cut one 20“ piece of stringing wire. Secure one end. String on one 6 mm Crystal Turquoise Pearl, 39 10 mm Crystal Turquoise Pearls and one 6 mm Crystal Turquoise Pearl. Secure open end. Set aside.
STEP 3: Cut one 22“ piece of stringing wire. Secure one end. String on one 6 mm Crystal Jade Pearl, 43 10 mm Crystal Jade Pearls and one 6 mm Crystal Jade Pearl. Secure open end. Set aside.
STEP 4: Cut one 24“ piece of stringing wire. Secure one end. String on one 6 mm Crystal Red Coral Pearl, 47 10 mm Crystal Red Coral Pearls and one 6 mm Crystal Red Coral Pearl. Secure open end. Set aside.
STEP 5: Cut one 26“ piece of stringing wire. Secure one end. String on one 6 mm Crystal Ivory Pearl, 51 10 mm Crystal Ivory Pearls and one 6 mm Crystal Ivory Pearl. Secure open end. Set aside.
STEP 6: Using one balled headpin, slip on one 6 mm Crystal Dark Lapis Pearl. Create a simple loop. Repeat once.
STEP 7: Repeat step 6 for 2 6 mm Crystal Turquoise Pearls, 2 6 mm Crystal Jade Pearls, 2 6 mm Crystal Red Coral Pearls and 2 6 mm Crystal Ivory Pearls. Set aside.
STEP 8: Cut the 6“ heavy link chain in half.
STEP 9: Using the strand from step 1, slide one end of the stringing wire into the outside hole of one spacer bar, slide on one 6 mm Crystal Dark Lapis Pearl and crimp to the loop on the wired bead from step 6. Cover crimp with a crimp cover. Repeat this step for the other end of the wire using the corresponding hole on the second spacer bar.
STEP 10: Using the strand from step 2, slide one end of the stringing wire into the 2nd hole on one spacer bar, slide on one 6 mm Crystal Turquoise Pearl and crimp to the loop on a corresponding wired bead from step 7. Cover crimp with a crimp cover. Repeat this step for the other end of the wire using the corresponding hole on the second spacer bar. (Note: the bead strands should be sitting side-by-side.)
STEP 11: Using the strand from step 3, slide one end of the stringing wire into the 3rd hole on one spacer bar, slide on one 6 mm Crystal Jade Pearl and crimp to the last link on one 3“ piece of chain. Cover crimp with a crimp cover. Repeat this step for the other end of the wire using the corresponding hole on the second spacer bar and crimping to the second 3“ piece of chain. (Note: the bead strands should be sitting side-by-side.)
STEP 12: Using the strand from step 4, slide one end of the stringing wire into the 4th hole on one spacer bar, slide on one 6 mm Crystal Red Coral Pearl and crimp to the loop on a corresponding wired bead from step 7. Cover crimp with a crimp cover. Repeat this step for the other end of the wire using the corresponding hole on the second spacer bar. (Note: the bead strands should be sitting side-by-side.)
STEP 13: Using the strand from step 5, slide one end of the stringing wire into the last remaining hole on one spacer bar, slide on one 6 mm Crystal Ivory Pearl and crimp to the loop on a corresponding wired bead from step 7. Cover crimp with a crimp cover. Repeat this step for the other end of the wire using the last remaining hole on the second spacer bar. (Note: the bead strands should be sitting side-by-side.)
STEP 14: Open one jump ring and attach to open end of chain on one side, close jump ring.
STEP 15: Open one jump ring and slip on lobster and attach to open end of chain on the second piece. Close ring.

Materials
SWAROVSKI ELEMENTS
Product Group Article No. Amount Size Color Color Code
Beads 5000 (Round) 2 pcs. 4 mm Pacifi c Opal 390
Beads 5040 (Briolette) 2 pcs. 8 mm Crystal Metallic Light Gold 2x 001 MLG2
Beads 5328 (XILION) 2 pcs. 4 mm Turquoise 267
Beads 5328 (XILION) 2 pcs. 4 mm Crystal Metallic Light Gold 2x 001 MLG2
Crystal Pearls 5810 20 pcs. 4 mm Crystal Dark Lapis Pearl 001 719
Crystal Pearls 5810 54 pcs. 4 mm Crystal Red Coral Pearl 001 718
Crystal Pearls 5810 2 pcs. 6 mm Crystal Ivory Pearl 001 708
Crystal Pearls 5810 2 pcs. 10 mm Crystal Ivory Pearl 001 708
Crystal Pearls 5810 2 pcs. 10 mm Crystal Jade Pearl 001 715
Crystal Pearls 5811 2 pcs. 16 mm Crystal Ivory Pearl 001 708
Crystal Pearls 5811 2 pcs. 16 mm Crystal Turquoise Pearl 001 709
Continuation on next page
QUINTET OF CRYSTAL PEARL GEMS
EARRINGS
MINI PROJECT “INNOVATIONS SPRING/SUMMER 2013”
WWW.CREATE-YOUR-STYLE.COM
Supplies: 4 Silver earwires TierraCast 90-1120-00 2 Sen Rings TierraCast 94-3017-12 2 Nisshu Charms TierraCast 94-2025-12 4 Maldive Larin Charms TierraCast 18” 20 gauge silver Artistic Wire 2” 20 gauge gold Artistic Wire 2 Copper Headpin TierraCast 01-0028-08 2 Copper earwires TierraCast 90-1120-08 2 Eternity Link TierraCast 94-3005-18 2 Silver Headpin TierraCast 01-0029-01 2 Large Shell Bead TierraCast 94-5679-61 2 Gold Earwires TierraCast 90-3170-01 2 Koi Fish Charm TierraCast 94-2306-01 1 1”piece of small cable chain gold 4 small oval jumprings TierraCast 01-0016-09 2 2x2 crimp beads 12” Beadalon 0.015 Stringing wire 2 Brass Oxidie Earwires TierraCast 90-1120-27 2 Buddha Bead TierraCast 94-5718-27 2 3” gold headpins

WWW.CREATE-YOUR-STYLE.COM
“Quintet of Crystal Pearl Gems – Earrings”, page 2
STEP 1: Cut piece of chain into two equal pieces. Open one 4 mm jump ring, slip on one end of chain and attach to one Koi fi sh charm. Repeat for the second side and set aside.
STEP 2: Cut the 2“ piece of 20 g wire into two equal pieces. Using one piece of wire, make a simple loop, slip on one Crystal Pearl art. 5810 4 mm Crystal Red Coral Pearl and create a simple loop on the opposite side. Repeat for the second side using the remaining wire. Open one loop and attach to open end of chain from step 1, close loop. Repeat for second side. Set aside.
STEP 3: Cut the beading wire in half. Secure one end and slip on 26 Crystal Pearls art. 5810 4 mm Crystal Red Coral Pearl and one crimp bead. Thread the opposite wire into the crimp bead and crimp. Repeat for the second side. (Note: beaded strand should resemble a loop.)
STEP 4: Open the remaining loop from step 2 and attach to the beaded loop from step 3 at the crimped portion and to one ear wire. Repeat for second side.
STEP 1: Cut the silver 20 g wire into 18 one inch pieces.
STEP 2: Using one piece from step one. Turn a simple loop. Slip on one Crystal Pearl art. 5810 4 mm Crystal Dark Lapis Pearl and turn a simple loop on the second side. Repeat 17 times more. Eighteen links are made.
STEP 3: Open one end on a link from step 2, slip on a second link and close loop, repeat once more. (Note: A chain link of three pearls has been created.)
STEP 4: Repeat step 3 fi ve more times.
STEP 5: Open one loop end from step 4 and attach to one Maldive Larin Charm. Repeat three more times.
STEP 6: Open one loop end from step 4 and attach to one Nisshu charm. Repeat one time more.
STEP 7: Attach the chain links to the Zen Rings. Open the end loop of the Nisshu charmed link and attach to the center hole of the Zen Ring. Repeat for the second side.
STEP 8: Open the end loop on the Maldive Larin charm link and attach to the outside hole of the Zen ring. Repeat once for the opposite side.
STEP 9: Repeat step 8 for the second pair.
STEP 10: Using one silver ear wire, slip on one Crystal Pearl art. 5810 4 mm Crystal Dark Lapis Pearl. Turn a simple loop. Repeat for the second pair.
STEP 11: Open the loop made in step 10 and attach to the top loop of the Zen ring. Repeat for the second pair.
Instructions Quintet of Crystal Pearl Gems “Go Fish”
Instructions Quintet of Crystal Pearl Gems “Year of the Dragon”

WWW.CREATE-YOUR-STYLE.COM
“Quintet of Crystal Pearl Gems – Earrings”, page 3
STEP 1: Using one copper head pin, slip on one Crystal Pearl art. 5811 16 mm Crystal Turquoise Pearl and create simple loop. Repeat for second side.
STEP 2: Open the loop on top of the pearl made in step 1 and attach to one eternity link. Repeat for second side.
STEP 3: Using one copper ear wire, slip on one Crystal Pearl art. 5810 4 mm Crystal Turquoise Pearl and create a simple loop. Repeat for second side.
STEP 4: Open the loop created from step 3 and attach to the eternity link. Repeat for second side.
STEP 1: Using one 3“ head pin, load on one Crystal Pearl art. 5810 6 mm Crystal Ivory Pearl, (1) Buddha bead, one Crystal Pearl art. 5810 10 mm Crystal Ivory Pearl, (1) Bead art. 5040 8 mm Crystal Metallic Light Gold 2x and (1) Crystal Pearl art. 5811 16 mm Crystal Ivory Pearl. Create a wire-wrapped loop or simple loop. Repeat for second side.
STEP 2: Using a brass ear wire, slip on one Bead art. 5328 4 mm Metallic Light Gold 2x. Turn a simple loop and repeat for the second side.
STEP 3: Open the loop made in step 2 and add to the piece made in step 1. Repeat for second side.
STEP 1: Use one silver head pin and slip on one Crystal Pearl art. 5810 10 mm Crystal Jade Pearl and one large shell bead. Turn a simple loop or wire-wrap. Repeat for second side.
STEP 2: Using a silver ear wire, slip on one Bead art. 5328 4 mm Pacifi c Opal and turn a simple loop. Repeat for second side.
STEP 3: Open the loop made in step 2 and add to the piece made in step 1. Repeat for second side.
Instructions Quintet of Crystal Pearl Gems “Celtic Blue”
Instructions Quintet of Crystal Pearl Gems “Serenity”
Instructions Quintet of Crystal Pearl Gems “Pacifi c Jade”

Materials
SWAROVSKI ELEMENTS
Product Group Article No. Amount Size Color Color Code
Beads 5000 (Round) 8 pcs. 10 mm Burgundy-Blue Zircon Blend 723
Beads 5040 (Briolette) 9 pcs. 8 mm Burgundy-Blue Zircon Blend 723
Pendants 6106 7 pcs. 22 mm Burgundy-Blue Zircon Blend 723
CIRCULAR BLENDS NECKLACE
MINI PROJECT “INNOVATIONS SPRING/SUMMER 2013”
WWW.CREATE-YOUR-STYLE.COM
Supplies: 30” variegated Circular Chain 36” 24 gauge Artistic Wire 7 10 mm open jump rings TierraCast 01-0026-01
STEP 1: Open one jump ring and attach to one Swarovski Pendant art. 6106 22 mm Burgundy-Blue Zircon Blend, close jump ring. Repeat six times more.
STEP 2: Attach one pendant made in step 1 randomly onto the chain. Repeat six times more.
STEP 3: Cut the 24 g wire into 10 equal pieces.
STEP 4: Using the Beads art. 5000 10 mm Burgundy-Blue Zircon Blend and the Beads art. 5040 8 mm Burgundy-Blue Zircon Blend, wire the beads to the inside wall of the large links. (Note: These Beads are randomly wired on so you choose which combination of beads you want to wire together: Single Beads art. 5000 10 mm or one Bead art. 5000 10 mm and one Bead art. 5040 8 mm or three Beads art. 5040.)
Instructions

Materials
SWAROVSKI ELEMENTS
Product Group Article No. Amount Size Color Color Code
Sew-on Stones 3251 14 pcs. 18 x 9 mm Crystal Luminous Green 001 LUMG
Pendants 6656 1 pc. 39 mm Crystal Luminous Green 001 LUMG
Continuation on next page
LUMINOUS NIGHTS IN MARRAKESH
MINI PROJECT “INNOVATIONS SPRING/SUMMER 2013”
WWW.CREATE-YOUR-STYLE.COM
Supplies: 6 medium quatrefoil TierraCast 94-3140-27 3 large quatrefoil TierraCast 94-3141-27 48 open jump rings TierraCast 01-0020-27 4 small oval jump rings TierraCast 01-0016-27 1 large tapered toggle TierraCast 94-6067-27 1 classic pinch bails TierraCast 94-5780-27
STEP 1: Attach the pinch bail to the Pendant art. 6656 39 mm Crystal Luminous Green. Open 2 jump rings and attach to the top end of the bail. Open two more jump rings and attach to the two previous jump rings and one large quatrefoil link.
STEP 2: Working one side. Open 2 jump rings and attach to one Sew-on Stone art. 3251 18 x 9 mm Crystal Luminous Green and attach to the large quatrefoil from step 1.
STEP 3: Open 2 jump rings and attach to the second side of the space cut sew-on in step 2 and attach to one medium quatrefoil link.
STEP 4: Open two jump rings and attach to one Sew-on Stone art. 3251 18 x 9 mm Crystal Luminous Green and attach to the medium quatrefoil link from step 3.
STEP 5: Open two jump rings and attach to the second side of the Swarovski Sew-on Stone and attach to one medium quatrefoil link.
STEP 6: Open two jump rings and attach to one Sew-on Stone art. 3251 18 x 9 mm Crystal Luminous Green and attach to the medium quatrefoil link from step 5.
Instructions
WWW.CREATE-YOUR-STYLE.COM
“Luminous Nights in Marrakesh”, page 2
STEP 7: Open 2 jump rings and attach to the second side of the Swarovski Sew-on Stone and attach to one medium quatrefoil link.
STEP 8: Open 2 jump rings and attach to one Sew-on Stone art. 3251 18 x 9 mm Crystal Luminous Green and attach to the medium quatrefoil link from step 7.
STEP 9: Open 2 jump rings and attach to the second side of the Swarovski Sew-on Stone and attach to one large quatrefoil link.
STEP 10: Open 2 jump rings and attach to one Sew-on Stone art. 3251 18 x 9 mm Crystal Luminous Green and attach to the large quatrefoil link from step 9.
STEP 11: Open 2 jump rings and attach to the second side of the Swarovski Sew-on Stone from step 10 and attach to one Swarovski Sew-on Stone.
STEP 12: Open 2 jump rings and attach to the second side of the Swarovski Sew-on Stone from step 11 and attach to one Swarovski Sew-on Stone.
STEP 13: Open 2 small oval jump rings and attach to the second side of the Sew-on Stone art. 3251 18 x 9 mm Crystal Luminous Green from step 12 and attach to one half of the toggle set.
STEP 14: Working second side. Repeat step 2 through 12.
STEP 15: Open 2 small oval jump rings and attach to the second side of the last space Swarovski Sew-on Stone and attach to the second half of the toggle set.

Materials
SWAROVSKI ELEMENTS
Product Group Article No. Amount Size Color Color Code
Beads 5050 12 pcs. 14 x 10 mm Crystal Vitrail Medium P 001 VM
Beads 5328 (XILION) 36 pcs. 4 mm Jet 280
Beads 5535 4 pcs. 19 x 5 mm Jet 280
Beads 5535 3 pcs. 23.5 x 5 mm Crystal Silver Shade 001 SSHA
VERTICAL COLUMN BRACELET
MINI PROJECT “INNOVATIONS SPRING/SUMMER 2013”
WWW.CREATE-YOUR-STYLE.COM
Supplies: 20” Beadalon 0.018 stringing Wire 4 2 x 2 crimp beads 4 3 mm crimp covers 1 heirloom two loop toggle clasp TierraCast 94-6073-12
STEP 1: Cut wire in two 10” pieces.
STEP 2: Using the fi rst piece of wire crimp to one side of the toggle clasp. Trim wire. Cover with crimp cover.
STEP 3: Slide on three Beads art. 5328, one Bead art. 5535 Jet, one Bead art. 5328, one Bead art. 5050, one Bead art. 5328, one Bead art. 5535 Crystal Silver Shade, one Bead art. 5328, one Bead art. 5050, one Bead art. 5328, one Bead art. 5535 Jet, one Bead art. 5328, one Bead art. 5050, one Bead art. 5328, one Bead art. 5535 Crystal Silver Shade, one Bead art. 5328, one Bead art. 5050, one Bead art. 5328, one Bead art. 5535 Jet, one Bead art. 5328, one Bead art. 5050, one Bead art. 5328, one Bead art. 5535 Crystal Silver Shade, one Bead art. 5328, one Bead art. 5050, one Bead art. 5328, one Bead art. 5535 Jet, 3 Beads art. 5328. Slip on one crimp bead and crimp to the corresponding loop on the other half of the toggle clasp. Trim wire. Cover with crimp cover.
STEP 4: Repeat steps 2 & 3 for the second strand.
Instructions

Materials
SWAROVSKI ELEMENTS
Product Group Article No. Amount Size Color Color Code
Beads 5328 2 pcs. 4 mm Crystal Red Magma 001 REDM
Beads 5535 2 pcs. 23.5 x 5 mm Crystal Red Magma 001 REDM
Pendants 6470 4 pcs. 32 mm Crystal Golden Shadow 001 GSHA
Continuation on next page
LUNAR ELLIPSEEARRINGS
MINI PROJECT “INNOVATIONS SPRING/SUMMER 2013”
WWW.CREATE-YOUR-STYLE.COM
Supplies: 1 pair earwires TierraCast 90-1120-00 4 8 mm open jump rings TierraCast 01-0020-01 3” 5 mm medium oval link chain 8 oval jump rings TierraCast 01-0018-01 3” 20 gauge Artistic Wire
STEP 1: Cut the 20 g wire into four 1“ pieces. Make a simple loop onto one end of each of the four pieces.
STEP 2: Take one piece of wire from step 1 and slip the open end into one hole of Bead art. 5535. Turn a simple loop Repeat once for the second hole.
STEP 3: Repeat step 2 for the second pair.
STEP 4: Open one 8 mm round jump ring and attach to one Swarovski Pendant art. 6470 32 mm. Repeat three times more. Set aside.
STEP 5: Link 3 oval jump rings together and attach to one Swarovski Pendant from step 4. Repeat once.
STEP 6: Attach one oval jump ring to one pendant from step 4. Repeat once.
STEP 7: Open one loop on the Bead art. 5535 from step 2 and attach to one unit made in step 5. Open the second loop on the same side of the column bead and attach one unit from step 6.
Instructions

WWW.CREATE-YOUR-STYLE.COM
“Lunar Ellipse Earrings”, page 2
STEP 8: Repeat step 7 for the second pair.
STEP 9: Cut the oval link chain into two pieces making sure there is an odd number of links total for each piece.
STEP 10: Open the opposite loops on the Bead art. 5535 from step 7 and attach each end of the same piece of chain to the two loops on the same side of the column bead.
STEP 11: Repeat step 10 for the second pair.
STEP 12: Using one silver ear wire, slip on one XILION Bead art. 5328 4 mm and turn a simple loop. Open the loop and attach to the center of the chain added in step 10.
STEP 13: Repeat step 12 for the second pair.
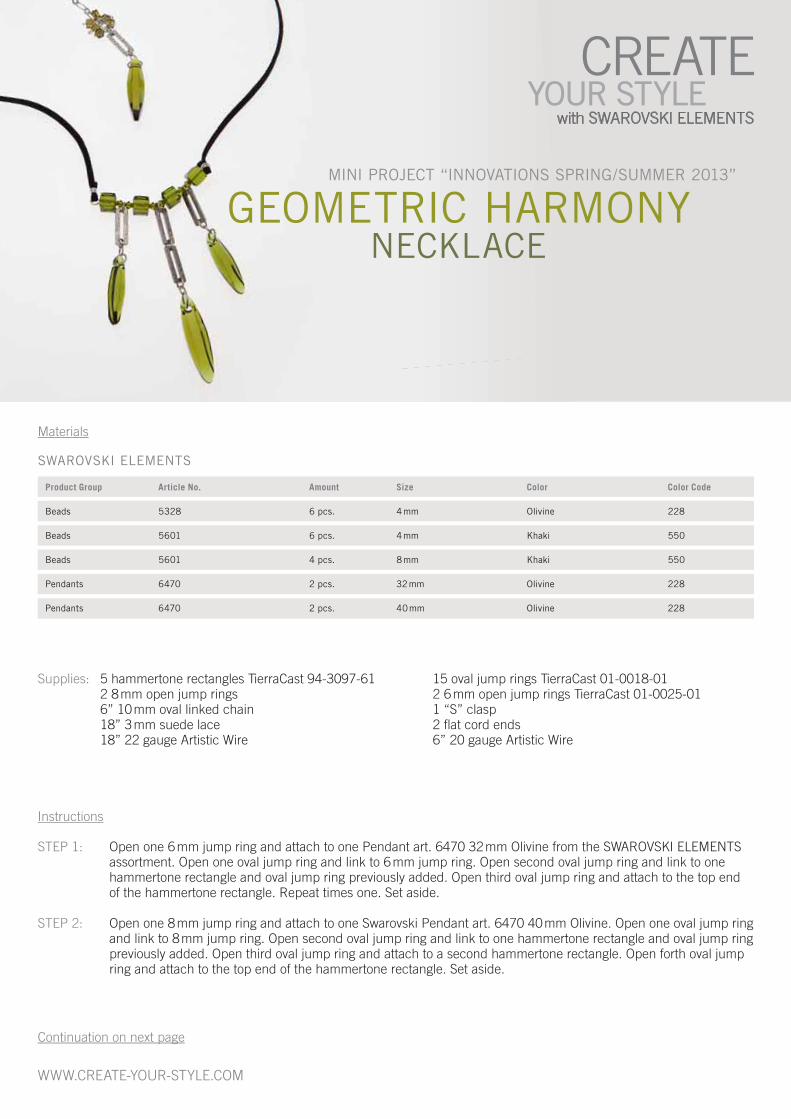
Materials
SWAROVSKI ELEMENTS
Product Group Article No. Amount Size Color Color Code
Beads 5328 6 pcs. 4 mm Olivine 228
Beads 5601 6 pcs. 4 mm Khaki 550
Beads 5601 4 pcs. 8 mm Khaki 550
Pendants 6470 2 pcs. 32 mm Olivine 228
Pendants 6470 2 pcs. 40 mm Olivine 228
Continuation on next page
WWW.CREATE-YOUR-STYLE.COM
Supplies: 5 hammertone rectangles TierraCast 94-3097-61 15 oval jump rings TierraCast 01-0018-01 2 8 mm open jump rings 2 6 mm open jump rings TierraCast 01-0025-01 6” 10 mm oval linked chain 1 “S” clasp 18” 3 mm suede lace 2 fl at cord ends 18” 22 gauge Artistic Wire 6” 20 gauge Artistic Wire
STEP 1: Open one 6 mm jump ring and attach to one Pendant art. 6470 32 mm Olivine from the SWAROVSKI ELEMENTS assortment. Open one oval jump ring and link to 6 mm jump ring. Open second oval jump ring and link to one hammertone rectangle and oval jump ring previously added. Open third oval jump ring and attach to the top end of the hammertone rectangle. Repeat times one. Set aside.
STEP 2: Open one 8 mm jump ring and attach to one Swarovski Pendant art. 6470 40 mm Olivine. Open one oval jump ring and link to 8 mm jump ring. Open second oval jump ring and link to one hammertone rectangle and oval jump ring previously added. Open third oval jump ring and attach to a second hammertone rectangle. Open forth oval jump ring and attach to the top end of the hammertone rectangle. Set aside.
Instructions
GEOMETRIC HARMONY NECKLACE
MINI PROJECT “INNOVATIONS SPRING/SUMMER 2013”
WWW.CREATE-YOUR-STYLE.COM
“Geometric Harmony Necklace”, page 2
STEP 3: Using 6” piece of 20 gauge wire perform a simple loop at one end. Slide on one Bead art. 5601 8 mm Khaki, one Bead art. 5328 4 mm Olivine, one unit from step one, one Bead art. 5328, one Bead art. 5601 8 mm, one Bead art. 5328, the unit made from step 2, one Bead art. 5328, one Bead art. 5601 8 mm, one Bead art. 5328, one unit from step 1, one Bead art. 5328, one Bead art. 5601 8 mm. Perform simple loop on open end.
STEP 4: Cut suede lace in half. Insert through simple loop in one side of unit made in step 3. Fold over suede by 1/2”. Cut 3” of 22 gauge wire and perform a wrapped coil around the both pieces of suede lace in the direction toward the simple loop. Trim ends and tuck tails. Repeat for opposite side.
STEP 5: Adjust to desired length and crimp one cord end on each side. Open two oval jump rings and attach one to each cord end.
STEP 6: Open one end of the “S” clasp and slip through jump ring on cord end. Slide on one end of chain. Close down that end of the “S” clasp.
STEP 7: Open one 8 mm jump ring and attach to one Swarovski Pendant art. 6470 40 mm Olivine. Open one oval jump ring and link to 8 mm jump ring. Open second oval jump ring and link to one hammertone rectangle and oval jump ring previously added. Open third oval jump ring and attach to the top end of the Hammertone rectangle and the end of the chain.
STEP 8: Cut remaining 22 gauge wire into 6 equal pieces. Using one piece turn a loop at one end of wire and fl atten. Repeat 5 more times.
STEP 9: Using one piece slide on one Bead art. 5601 4 mm and turn a simple loop. Repeat 5 times.
STEP 10: Open the loop from the unit above and attach to the last link of chain connected to the oval jump ring. Repeat 5 times.

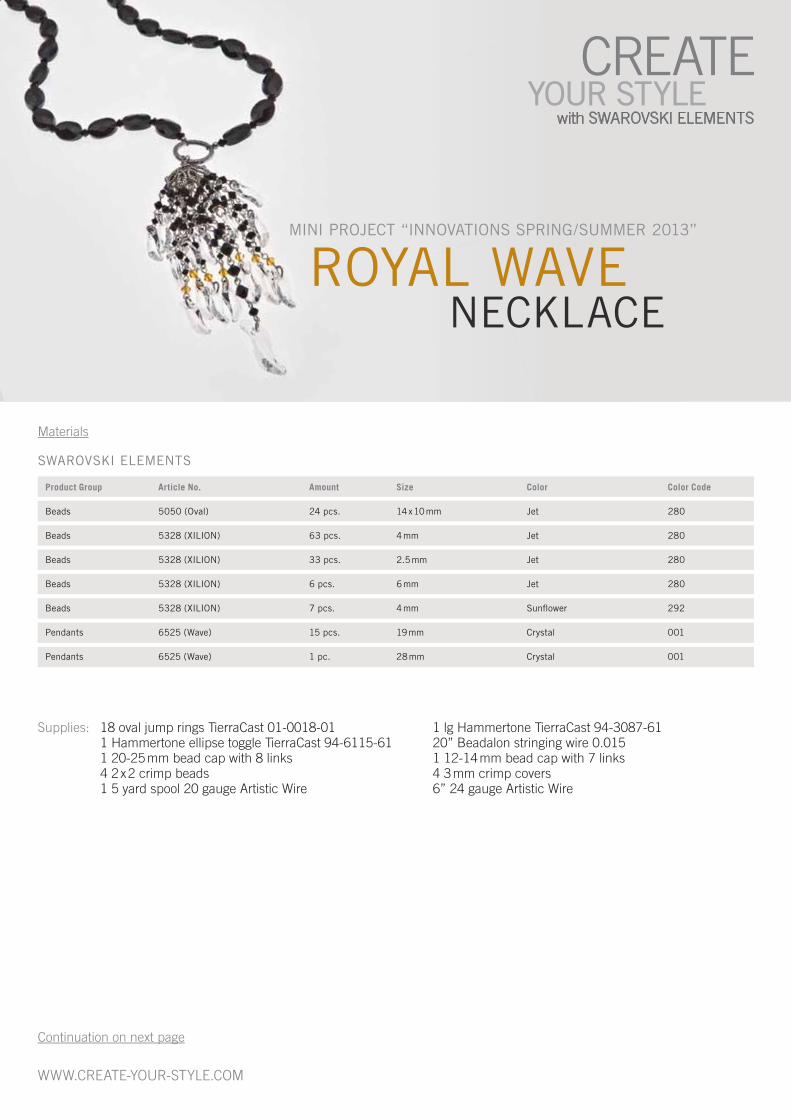
Materials
SWAROVSKI ELEMENTS
Product Group Article No. Amount Size Color Color Code
Beads 5328 (XILION) 90 pcs. 2.5 mm Jet 280
Beads 5328 (XILION) 90 pcs. 3 mm Jet 280
Beads 5328 (XILION) 81 pcs. 4 mm Jet 280
Beads 5328 (XILION) 16 pcs. 4 mm Sunfl ower 292
Beads 5525 (Wave) 16 pcs. 19 mm Crystal 001
Beads 5525 (Wave) 8 pcs. 28 mm Crystal 001
WWW.CREATE-YOUR-STYLE.COM
Supplies: 1 Vine Hook and Eye TierraCast 94-6106-12 40” Beadalon 0.015 Stringing wire 2 2 x 2 crimp beads 2 3 mm crimp covers
STEP 1: Using the stringing wire crimp to one end of clasp set. Trim wire and attach with crimp cover.
STEP 2: Slip on fi ve Swarovski Beads art. 5328 2.5 mm Jet, fi ve Beads art. 5328 3 mm Jet, nine Beads art. 5328 4 mm Jet, fi ve Beads art. 5328 3 mm Jet, fi ve Beads art. 5328 2.5 mm Jet, one Bead art. 5328 4 mm Sunfl ower, one Bead art. 5525 19 mm Crystal, one Bead art. 5525 28 mm Crystal, one Bead art. 5525 19 mm, and one Bead art. 5328 4 mm Sunfl ower. Repeat times 7.
STEP 3: Add on fi ve Beads art. 5328 2.5 mm Jet, fi ve Beads art. 5328 3 mm Jet, nine Beads art. 5328 4 mm Jet, fi ve Beads art. 5328 3 mm Jet, and fi ve Beads art. 5328 2.5 mm Jet. Slip on one crimp bead and crimp to the second half of the clasp set. Trim wire and attach crimp cover.
Instructions
CRYSTAL WAVES AT MIDNIGHT
NECKLACE
MINI PROJECT “INNOVATIONS SPRING/SUMMER 2013”
Materials
SWAROVSKI ELEMENTS
Product Group Article No. Amount Size Color Color Code
Beads 5050 (Oval) 24 pcs. 14 x 10 mm Jet 280
Beads 5328 (XILION) 63 pcs. 4 mm Jet 280
Beads 5328 (XILION) 33 pcs. 2.5 mm Jet 280
Beads 5328 (XILION) 6 pcs. 6 mm Jet 280
Beads 5328 (XILION) 7 pcs. 4 mm Sunfl ower 292
Pendants 6525 (Wave) 15 pcs. 19 mm Crystal 001
Pendants 6525 (Wave) 1 pc. 28 mm Crystal 001
ROYAL WAVE NECKLACE
MINI PROJECT “INNOVATIONS SPRING/SUMMER 2013”
WWW.CREATE-YOUR-STYLE.COM
Supplies: 18 oval jump rings TierraCast 01-0018-01 1 lg Hammertone TierraCast 94-3087-61 1 Hammertone ellipse toggle TierraCast 94-6115-61 20” Beadalon stringing wire 0.015 1 20-25 mm bead cap with 8 links 1 12-14 mm bead cap with 7 links 4 2 x 2 crimp beads 4 3 mm crimp covers 1 5 yard spool 20 gauge Artistic Wire 6” 24 gauge Artistic Wire
Continuation on next page

WWW.CREATE-YOUR-STYLE.COM
“Royal Wave Necklace”, page 2
STEP 1: Take the 6” piece of wire and slip on (1) oval jump ring. Bend the wire in half. Holding the wire take it through the underside of the small bead cap, then the underside of the large bead cap. Using both wires together, create a wire wrapped loop.
STEP 2: Cut (6) 1” pieces of 20 gauge wire. Create a simple loop on one end of the wire. Repeat 5 times.
STEP 3: Using (1) piece of wire from step 2, slide on (1) Bead art. 5328 6 mm Jet from the SWAROVSKI ELEMENTS assortment. Create a simple loop on the open side. Repeat 5 times. Using all of the pieces in this step create chained links.
STEP 4: Cut (1) piece of ¾” wire and create a simple loop on one end. Slip on (1) Bead art. 5328 4 mm Jet. Create a simple loop on the open side. Open one of the loops just created and attach to the chained links in step 3.
STEP 5: Open one jump ring and attach to (1) Swarovski Pendant art. 6525 28 mm Crystal and to the end of the chain (at the 4 mm side) created in step 4. Open the loop at the top of the 6 mm Bead unit and attach to the oval jump ring in step 1.
STEP 1: Open one oval jump ring and attach to (1) Swarovski Pendant art. 6525 19 mm Crystal. Repeat six times.
STEP 2: Cut (49) ¾” pieces of 20 gauge wire. Create a simple loop on each piece. Take one piece of wire and slip on (1) Bead art. 5328 4 mm Jet and create a simple loop on the open end. Repeat 20 times.
STEP 3: Take one piece of wire and slip on (1) Bead art. 5328 4 mm Sunfl ower and create a simple loop on the open side. Repeat 6 times.
STEP 4: Using (1) wire from step 1, slip on (1) Bead art. 5328 3 mm Jet and create a simple loop on the open side. Repeat 20 times.
STEP 5: To assemble chain dangles: attach together (1) 4 mm Jet unit, (1) 3 mm Jet unit, (1) 4 mm Jet unit, (1) 3 mm Jet unit, (1) 4 mm Jet unit, (1) 3 mm Jet unit, (1) 4 mm Sunfl ower unit, (1) Swarovski Pendant art. 6525 19 mm Crystal. Repeat 6 times more.
STEP 6: Open the top of each chain link made in step 5 and attach to each loop on the small bead cap for a total of seven inner dangles.
Instructions tassel center dangle
Instructions tassel inner dangles

WWW.CREATE-YOUR-STYLE.COM
“Royal Wave Necklace”, page 3
STEP 1: Open one oval jump ring and attach to (1) small wave pendant. Repeat six times
STEP 2: Cut (32) ¾” pieces of 20 gauge wire. Create a simple loop on each piece. Using one piece of wire and slip on (1) Bead art. 5328 3 mm Jet and create a simple loop on the open end. Repeat 16 times. Using another piece of wire slip on (1) Bead art. 5328 4 mm Jet and create a simple loop on the open end. Repeat 16 times.
STEP 3: To assemble chain dangles: attach together (1) 4 mm Jet unit, (1) 3 mm Jet unit, (1) 4 mm Jet unit, (1) 3 mm Jet unit and (1) Swarovski Pendant art. 6525 19 mm Crystal. Repeat 7 times more.
STEP 4: Open the top of each chain link made in step 3 and attach to each loop on the large bead cap for a total of eight dangles.
STEP 1: Open (1) oval jump ring and slip on (1) Hammertone ring and attach to the wired loop made in step 1 of the center dangle instructions.
STEP 2: Cut bead stringing wire into two equal parts.
STEP 3: Using (1) piece of stringing wire, crimp to the Hammertone ring. Trim wire and attach crimp cover. String on (1) Bead art. 5328 4 mm Jet and (1) Bead art. 5050 14x10 mm Jet and repeat 11 times more. Slip on one crimp bead and crimp to one half of toggle clasp. Trim wire and attach crimp cover.
STEP 4: Repeat step 3 for second side.
Instructions tassel outer dangles
Instructions necklace
Materials
SWAROVSKI ELEMENTS
Product Group Article No. Amount Size Color Color Code
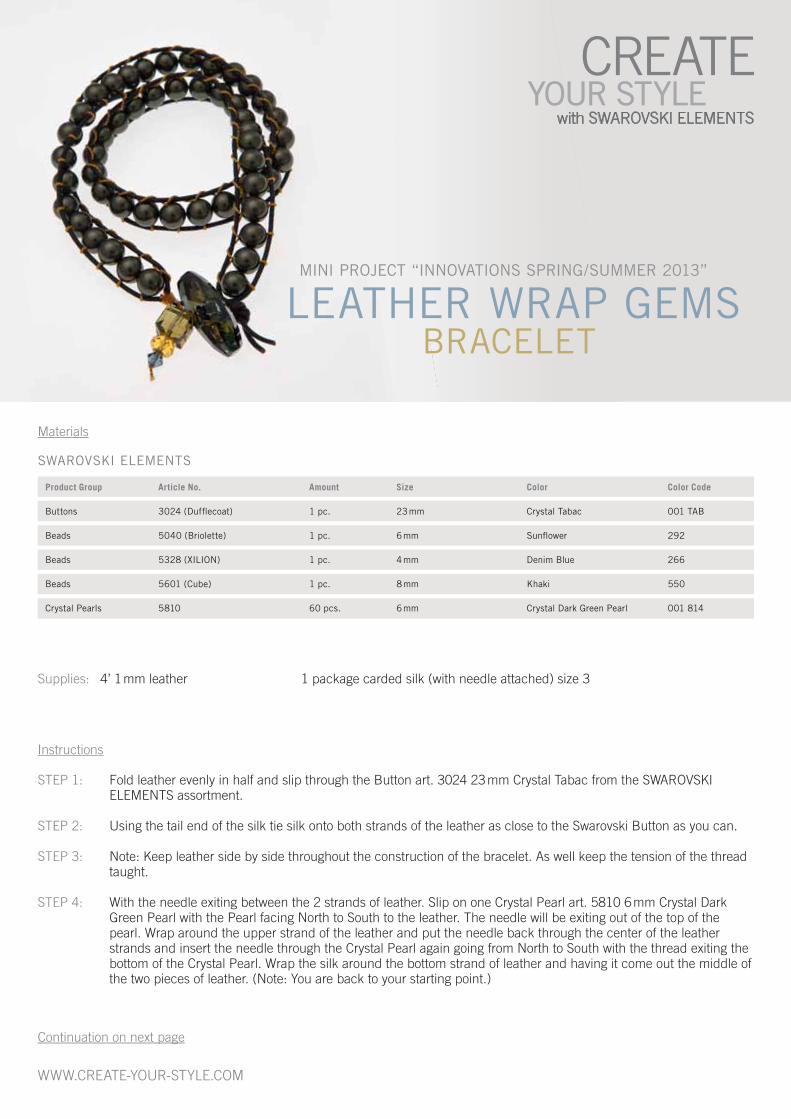
Buttons 3024 (Duffl ecoat) 1 pc. 23 mm Crystal Tabac 001 TAB
Beads 5040 (Briolette) 1 pc. 6 mm Sunfl ower 292
Beads 5328 (XILION) 1 pc. 4 mm Denim Blue 266
Beads 5601 (Cube) 1 pc. 8 mm Khaki 550
Crystal Pearls 5810 60 pcs. 6 mm Crystal Dark Green Pearl 001 814
WWW.CREATE-YOUR-STYLE.COM
Supplies: 4’ 1 mm leather 1 package carded silk (with needle attached) size 3
Continuation on next page
LEATHER WRAP GEMS BRACELET
MINI PROJECT “INNOVATIONS SPRING/SUMMER 2013”
STEP 1: Fold leather evenly in half and slip through the Button art. 3024 23 mm Crystal Tabac from the SWAROVSKI ELEMENTS assortment.
STEP 2: Using the tail end of the silk tie silk onto both strands of the leather as close to the Swarovski Button as you can.
STEP 3: Note: Keep leather side by side throughout the construction of the bracelet. As well keep the tension of the thread taught.
STEP 4: With the needle exiting between the 2 strands of leather. Slip on one Crystal Pearl art. 5810 6 mm Crystal Dark Green Pearl with the Pearl facing North to South to the leather. The needle will be exiting out of the top of the pearl. Wrap around the upper strand of the leather and put the needle back through the center of the leather strands and insert the needle through the Crystal Pearl again going from North to South with the thread exiting the bottom of the Crystal Pearl. Wrap the silk around the bottom strand of leather and having it come out the middle of the two pieces of leather. (Note: You are back to your starting point.)
Instructions

WWW.CREATE-YOUR-STYLE.COM
“Leather Wrap Gems Bracelet”, page 2
STEP 5: While keeping tension on the thread against the leather attach on each subsequent Crystal Pearl in the same manner from step 4.
STEP 6: When the last Crystal Pearl is added take the silk strand and knot it around both pieces of leather. Clip the thread to within 4” of the knot that was just made. Slip onto the tail one Swarovski Bead art. 5601 8 mm Khaki, one Bead art. 5040 6 mm Sunfl ower, and one Bead art. 5328 4 mm Denim Blue. Make a double overhand knot to hold in the trio of SWAROVSKI ELEMENTS. Put a dab of cement onto the thread exiting the end of the knot.
STEP 7: Keeping both leather tails together make an overhand knot 3/4” from the tail of the silk. Tighten knot. Clip the leather at an angle ½” from the knot.
STEP 8: Using cement glue, Put a dab of glue on the silk where the tail exits at each end of the bracelet. Let dry overnight.
STEP 9: Nip the tail off on the button side and nip the tail to within ¼” of the knot holding in the trio of SWAROVSKI ELEMENTS.

Materials
SWAROVSKI ELEMENTS
Product Group Article No. Amount Size Color Color Code
Beads 5534 (Column) 10 pcs. 14.5 x 5 mm Crystal 001
Beads 5534 (Column) 10 pcs. 19 x 5 mm Crystal 001
Beads 5534 (Column) 5 pcs. 23.5 x 5 mm Crystal 001
Crystal Pearls 5810 12 pcs. 3 mm Crystal White Pearl 001 650
Crystal Pearls 5810 20 pcs. 4 mm Crystal White Pearl 001 650
Crystal Pearls 5810 22 pcs. 6 mm Crystal White Pearl 001 650
Crystal Pearls 5821 2 pcs. 11 x 8 mm Crystal White Pearl 001 650
WWW.CREATE-YOUR-STYLE.COM
Supplies: 1 Hammertone Heart Toggle 94-6124-61 2 oval jump rings TierraCast 01-0018-01 1 pair earwires TierraCast 90-1120-00 1 spool 20 Gauge Artistic Wire
COLUMN BEAD BRIDAL SUITE
NECKLACE & EARRINGS
MINI PROJECT “INNOVATIONS SPRING/SUMMER 2013”
Continuation on next page

WWW.CREATE-YOUR-STYLE.COM
“Column Bead Bridal Suite Necklace & Earrings”, page 2
STEP 1: Cut two pieces wire 2” long. Turn a loop and fl atten on each piece. Slip on one Crystal Pearl art. 5821 11 x 8 mm Crystal White Pearl from the SWAROVSKI ELEMENTS assortment. Create a simple loop. Repeat for second wire. Set aside.
STEP 2: Cut two 3” pieces of wire and create a simple loop at one end of both pieces. Take one piece of wire and slip on one Crystal Pearl art. 5810 3 mm Crystal White Pearl, one Bead art. 5534 14.5 x 5 mm, Crystal Pearl art. 5810 3 mm, one Bead art. 5534 19 x 5 mm, one Crystal Pearl art. 5810 3 mm, one Bead art. 5534 23.5 x 5 mm, one Crystal Pearl art. 5810 3 mm, one Bead art. 5534 19 x 5 mm, one Crystal Pearl art. 5810 3 mm, one Bead art. 5534 14.5 x 5 mm, and one Crystal Pearl art. 5810 3 mm. Create a simple loop at the open end. Repeat for second pair.
STEP 3: Using one silver earwire slide on one Crystal Pearl art. 5810 4 mm and turn a simple loop. Open loop just created and attach to one end of the unit from step 2. Repeat for second pair.
STEP 4: Open loop created in step 1 and attach to opposite end of unit created in step 3. Repeat for second pair.
STEP 1: Cut three 3” pieces of wire and create a simple loop at one end of both pieces. Take one piece of wire and slip on one Crystal Pearl art. 5810 4 mm Crystal White Pearl, one Bead art. 5534 14.5 x 5 mm, one Crystal Pearl art. 5810 4 mm, one medium column bead, one Crystal Pearl art. 5810 4 mm, one Bead art. 5534 23.5 x 5 mm, one Crystal Pearl art. 5810 4 mm, one Bead art. 5534 19 x 5 mm, one Crystal Pearl art. 5810 4 mm, one Bead art. 5534 14.5 x 5 mm, and one Crystal Pearl art. 5810. Create a simple loop at the open end. Repeat two more times. Set aside.
STEP 2: Using wire cut 22 1” pieces of wire.
STEP 3: Using one piece of wire create a simple loop, slip on one Crystal Pearl art. 5810 6 mm Crystal White Pearl and create a simple loop on the open end. Repeat 21 times.
STEP 4: To connect the SWAROVSKI ELEMENTS units from step 1, use one wired unit from step 3. Open each end and attach to the fi rst and second SWAROVSKI ELEMENTS unit. Take another wired unit from step 3. Open each end and attach to the second and third SWAROVSKI ELEMENTS unit.
STEP 5: To create the chain links, open one end of every remaining link and attach to the opposite side. Repeat 9 times to create one side of necklace.
STEP 6: Repeat step 5 to create the opposite side of necklace.
STEP 7: Open one oval jump ring, insert one half of toggle clasp and attach to the end of the chain links. Repeat for opposite side.
Earring Instructions
Necklace Instructions
Materials
SWAROVSKI ELEMENTS
Product Group Article No. Amount Size Color Color Code
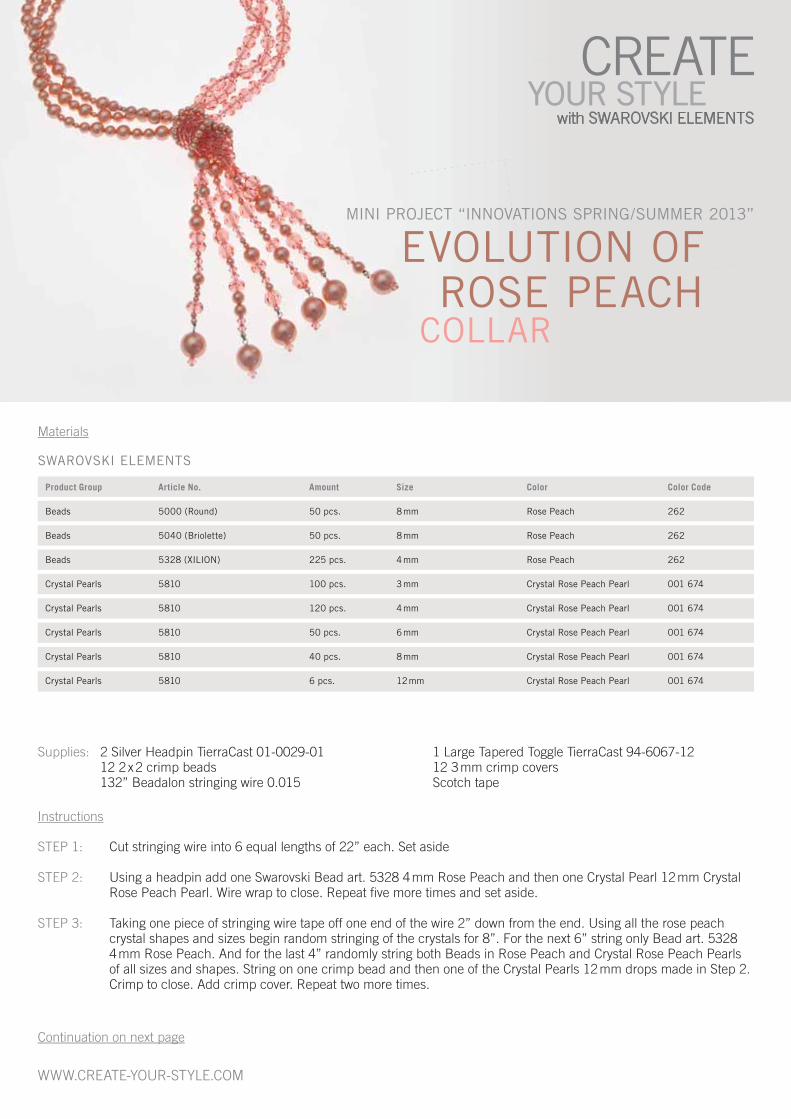
Beads 5000 (Round) 50 pcs. 8 mm Rose Peach 262
Beads 5040 (Briolette) 50 pcs. 8 mm Rose Peach 262
Beads 5328 (XILION) 225 pcs. 4 mm Rose Peach 262
Crystal Pearls 5810 100 pcs. 3 mm Crystal Rose Peach Pearl 001 674
Crystal Pearls 5810 120 pcs. 4 mm Crystal Rose Peach Pearl 001 674
Crystal Pearls 5810 50 pcs. 6 mm Crystal Rose Peach Pearl 001 674
Crystal Pearls 5810 40 pcs. 8 mm Crystal Rose Peach Pearl 001 674
Crystal Pearls 5810 6 pcs. 12 mm Crystal Rose Peach Pearl 001 674
WWW.CREATE-YOUR-STYLE.COM
Supplies: 2 Silver Headpin TierraCast 01-0029-01 1 Large Tapered Toggle TierraCast 94-6067-12 12 2 x 2 crimp beads 12 3 mm crimp covers 132” Beadalon stringing wire 0.015 Scotch tape
EVOLUTION OF ROSE PEACH COLLAR
MINI PROJECT “INNOVATIONS SPRING/SUMMER 2013”
Continuation on next page
STEP 1: Cut stringing wire into 6 equal lengths of 22” each. Set aside
STEP 2: Using a headpin add one Swarovski Bead art. 5328 4 mm Rose Peach and then one Crystal Pearl 12 mm Crystal Rose Peach Pearl. Wire wrap to close. Repeat fi ve more times and set aside.
STEP 3: Taking one piece of stringing wire tape off one end of the wire 2” down from the end. Using all the rose peach crystal shapes and sizes begin random stringing of the crystals for 8”. For the next 6” string only Bead art. 5328 4 mm Rose Peach. And for the last 4” randomly string both Beads in Rose Peach and Crystal Rose Peach Pearls of all sizes and shapes. String on one crimp bead and then one of the Crystal Pearls 12 mm drops made in Step 2. Crimp to close. Add crimp cover. Repeat two more times.
Instructions
WWW.CREATE-YOUR-STYLE.COM
“Evolution of Rose Peach Collar”, page 2
STEP 4: Taking one piece of stringing wire tape off one end of the wire 2” down from the end. Using all the Crystal Rose Peach Pearl shapes and sizes begin random stringing of the Crystal Pearls for 8”. For the next 6” string only Crystal Pearls art. 5810 3 mm and 4 mm Crystal Rose Peach Pearls. And for the last 4” randomly string both Beads in Rose Peach and Crystal Rose Peach Pearls of all sizes and shapes. String on one crimp bead and then one of the Crystal Pearls 12 mm drops made in Step 2. Crimp to close. Add crimp cover. Repeat two more times.
STEP 5: Using one string of set made in step 3 remove tape and sting on crimp bead. Using one side of toggle crimp to close. Add crimp cover. Repeat 2 more times.
STEP 6: Using one string of set made in step 4 remove tape and sting on crimp bead. Using one side of toggle crimp to close. Add crimp cover. Repeat 2 more times.
STEP 7: Taking both sides of jewelry piece and using center 6” sections of both sides as a guide complete and overhand knot to complete the piece.