control-m manual
TRANSCRIPT

_____________________________________________________________________
CONTROL-M REFERENCE DOCUMNET
Document Review and Approval
Role Name Position Scope
Owner Praveen Senior Programmer Analyst
Reviewer
Approver
_____________________________________________________________________CONTROL–M REFERENCE GUIDE 1

_____________________________________________________________________
Contents
1 Introduction……………………………………………………………………………… 32 Control M Terminology………………………………………………………………... 53 Getting Use of Control- M…………………………………………………………….. 5 3.1.1 Draft………………………………………………………………………………………..6 3.1.2 Steps to create a job……………………………………………………………….. 7
4 Different Tabs of the Job Editing Form……………………………………………8 4.1 General parameter Panel Field Description………………………..8 4.2 Scheduling parameter Panel necessary Field Description……..9 4.2.1 Create and manage of calendars……………………………………...11 4.2.2 Calendar Types……………………………………………………………...11 4.2.3 Calendar Options…………………………………………………………….12 4.3 Execution parameter Panel necessary Field Description……..15 4.4 Conditions parameter Panel necessary Field Description…….17
5 Ordering the jobs……………………………………………………………………….226 Control M New Day Procedure………………………………………………………257 Control-M for End of Day Schedule…………………………………………………26
_____________________________________________________________________CONTROL–M REFERENCE GUIDE 2
_____________________________________________________________________
1 1 IntroductionIntroduction
Control M is a standard graphical user interface Batch scheduling tool designed and developed by BMC software Singapore. This tool fits in the Infrastructure and application management of the project life cycle because of batch processing automation that the product provides.Before going to the detail of the tool as a first step it is mandatory to know about the Architecture. The below diagram explains you the distributed Control M three –tiered architecture.
_____________________________________________________________________CONTROL–M REFERENCE GUIDE 3
_____________________________________________________________________
Linux Windows Windows Unix
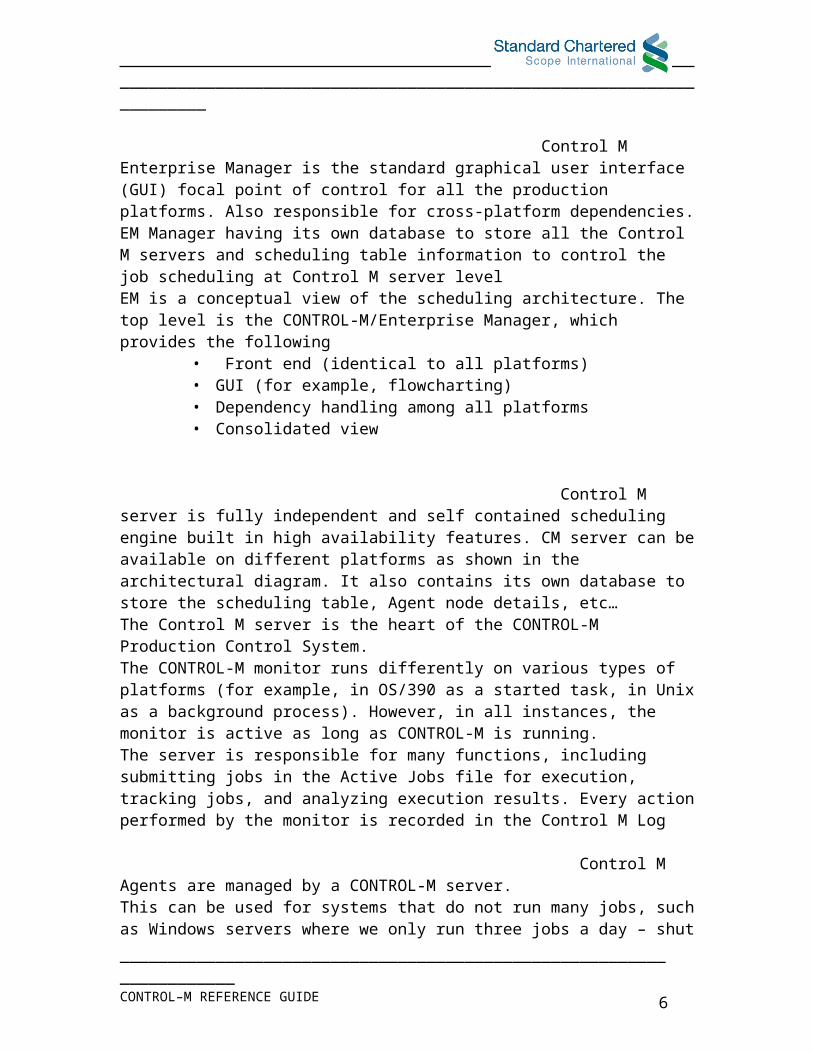
The major layers resides in the architecture are 1. Control M Enterprise Manager2. Control M server 3. Control M Agent
Control M Enterprise Manager is the standard graphical user interface (GUI) focal point of control for all the production platforms. Also responsible for cross-platform dependencies. EM Manager having its own database to store all the Control M servers and scheduling table information to control the job scheduling at Control M server level
_____________________________________________________________________CONTROL–M REFERENCE GUIDE 4
CONTROL-M /Agent
UNIXLinux Windows
CONTROL-M/
AGENT
CONTROL-M/
SERVER DB
Unix
CONTROL-M/SERVER
DB CONTROL-M/SERVER DB
CONTROL-M/Enterprise Manager
(CONTROL-M/EM)
DBGUI
MVS (Mainframe)MS Windows
Unix
GATEWAY
GATEWAY
GATEWAY GATEWAY
CONTROL-M/
AGENT
CONTROL-M/
AGENT
CONTROL-M/
AGENT
Windows

_____________________________________________________________________
EM is a conceptual view of the scheduling architecture. The top level is the CONTROL-M/Enterprise Manager, which provides the following
• Front end (identical to all platforms)• GUI (for example, flowcharting)• Dependency handling among all platforms• Consolidated view
Control M server is fully independent and self contained scheduling engine built in high availability features. CM server can be available on different platforms as shown in the architectural diagram. It also contains its own database to store the scheduling table, Agent node details, etc…The Control M server is the heart of the CONTROL-M Production Control System.The CONTROL-M monitor runs differently on various types of platforms (for example, in OS/390 as a started task, in Unix as a background process). However, in all instances, the monitor is active as long as CONTROL-M is running. The server is responsible for many functions, including submitting jobs in the Active Jobs file for execution, tracking jobs, and analyzing execution results. Every action performed by the monitor is recorded in the Control M Log
Control M Agents are managed by a CONTROL-M server.This can be used for systems that do not run many jobs, such as Windows servers where we only run three jobs a day – shut down database, back up database, start database again. You may not need to run a full function scheduler there, but you still want to have the full functionality, which is exactly what the Agent provides.
Advantages of Three-tiered Architecture:1. Job Execution performed at Agent tier, which also provides interface to
business applications like SAP, peoplesoft, etc….2. Each Control M server ,the scheduler ,in middle tier can manage multiple
Agent Of different types3. Control M /EM tier provides integrating features such as global conditions
to built the communication between different type of Control M servers
2 2 Control M TerminologyControl M Terminology
As we learnt about the architecture it is advisable to spend some time to know about the terminology used in the tool.
_____________________________________________________________________CONTROL–M REFERENCE GUIDE 5
_____________________________________________________________________
Job - A job is essentially any scheduled request for a computer to perform a specific task. In most cases, the process for creating a job requires some setup in addition to tasks performed in the CONTROL-M environment. For example, you may need to prepare a script that manipulates database objects. The job processing definition that you create describes what to do with this script and when
Data center- -A Control M managed host, usually we call the control M server as Data center.Upload -Movement of data (scheduling table) from Control M EM to a Control M serverDownload -Movement of data from Control M server to EM.
A copy of each job processing definition from an attached Control-M server is kept in the CONTROL-M/EM database. Thus, the job processing definition is kept in two places
3 3 Getting Use of Control- MGetting Use of Control- M
After successful installation of the control M tool you can able to get the two desktop icons named Control M Enterprise manager and Control M desktop.
CONTROL-M/Desktop is a production design and definition system for users of CONTROL-M. It provides you with an intuitive and easy-to-use tool for creating and maintaining job processing definitions and calendarsOnce you logged into the CM desktop an empty window is displayed. The window is initially set for Tree view in the left pane and Flow diagram view in the right pane. Before working with Control M Desktop we should aware of what is Draft
3.1.1 DRAFT Drafts are the repository for storing and working on job processing definitions in CONTROL-M/Desktop. Drafts can contain job processing definitions from either a single Scheduling table or from multiple Scheduling tables.Drafts are totally independent of CONTROL-M and the CONTROL-M production environment. Because of this independence,
• Work can be saved at time without undergoing the validity checks that occur
• When exiting the Job Editing form in CONTROL-M/Desktop. (In CONTROL-M, job processing definitions can be used immediately in the
_____________________________________________________________________CONTROL–M REFERENCE GUIDE 6

_____________________________________________________________________
production environment and therefore must be subject to validity checks whenever you exit the definition screen.)
• Users do not require direct access to CONTROL-M or the CONTROL-M platform to be able to work in CONTROL-M/Desktop. At sites where only the CONTROL-M administrator has direct access to CONTROL-M, personnel from other departments can still work in CONTROL-M/Desktop.
3.1.2 STEPS TO CREATE A JOB
1. A Job Editing form displays all of the job processing parameters for one job.To Create and edit new jobs, select Edit=>New Job... (Or click the new job icon
)
The Job Editing form will always have a CONTROL-M specified that corresponds to the CONTROL-M selected in the current skeleton. The CONTROL-M can be changed, but typically you will use specific skeletons for one CONTROL-M.
_____________________________________________________________________CONTROL–M REFERENCE GUIDE
Tree View pane
Flow diagram pane
Net Overview pane
7

_____________________________________________________________________
This form is divided into multiple panes, with each pane containing a group of parameters
4 4 Different Tabs of the Job Editing FormDifferent Tabs of the Job Editing Form
• General – parameters identifying what the job does and where it is located.
• Scheduling – when and/or how often a job should be scheduled for submission.
• Execution – defines parameters related to the execution of a job and processes that accompany the job’s execution.
• Conditions – prerequisite In conditions which must be satisfied for job submission and prerequisite Out conditions to be added/deleted upon the job ending OK.
• Resources – Quantitative and Control resources required for job submission.
• Set – AutoEdit variables to be set whenever the job is submitted.• Steps – conditional post-processing instructions.
_____________________________________________________________________CONTROL–M REFERENCE GUIDE 8
_____________________________________________________________________
• PostProc – “Shout When” and Sysout-handling post-processing instructions.
4.1 GENERAL PARAMETER PANEL FIELD DESCRIPTION
Job Name – Name of the job (Text).File Name – Name of the file that contains the job Script (Text).Path – Full path for the file that contains the Job Script (Text).Over Lib – Name of an alternate JCL library. CONTROL-M searches for the file specified in parameter Mem Name in the Over Lib library before searching the Mem Lib library (Text).Owner – Owner (user ID) on whose behalf the job is executed. This parameter is used by the CONTROL-M Security mechanism (Text).Author – original author of the job (Text).Task Type – Type of the job (task) to be performed by CONTROL-M. This parameter consists of three sub-parameter: Job; Detached Job (VAX/VMS); Command.If the Task type is job then the field’s path and filename fields must be key in If the Task type is command then the command field should be mandatory one.Table – name of the table that contains the CONTROL-M Job Processing definition. Together with parameter CONTROL-M, it determines the position of the job within the CONTROL-M/Scheduling Table hierarchy (Text).Application – Name of the application to which the job’s group belongs. Together with parameter Group, it determines the position of the job within the Application/Group hierarchy (Text).User can enter his own application name as he wish.Group – Name of the group to which the job belongs. Together with parameter Application, it determines the position of the job within the Application/Group hierarchy (Text).CONTROL-M – Name of the CONTROL-M server to which the job belongs. Together with parameter Scheduling Table Name, it determines the position of the job within the CONTROL-M/Scheduling Table hierarchy (Text).Doc Mem – name of the member in which the documentation resides. It may be viewed using the Documentation option in the job menu (Text).Doc Lib – name of a library/directory containing the documentation file (Text).Time Zone − Indicates the global time zone used to calculate when the job should run.Command – text of the command line to be submitted for the job when the Task Type parameter is Command (Text).Description – description of the Job (Text).
4.2 SCHEDULING PARAMETER PANEL NECESSARY FIELD DESCRIPTION
_____________________________________________________________________CONTROL–M REFERENCE GUIDE 9

_____________________________________________________________________
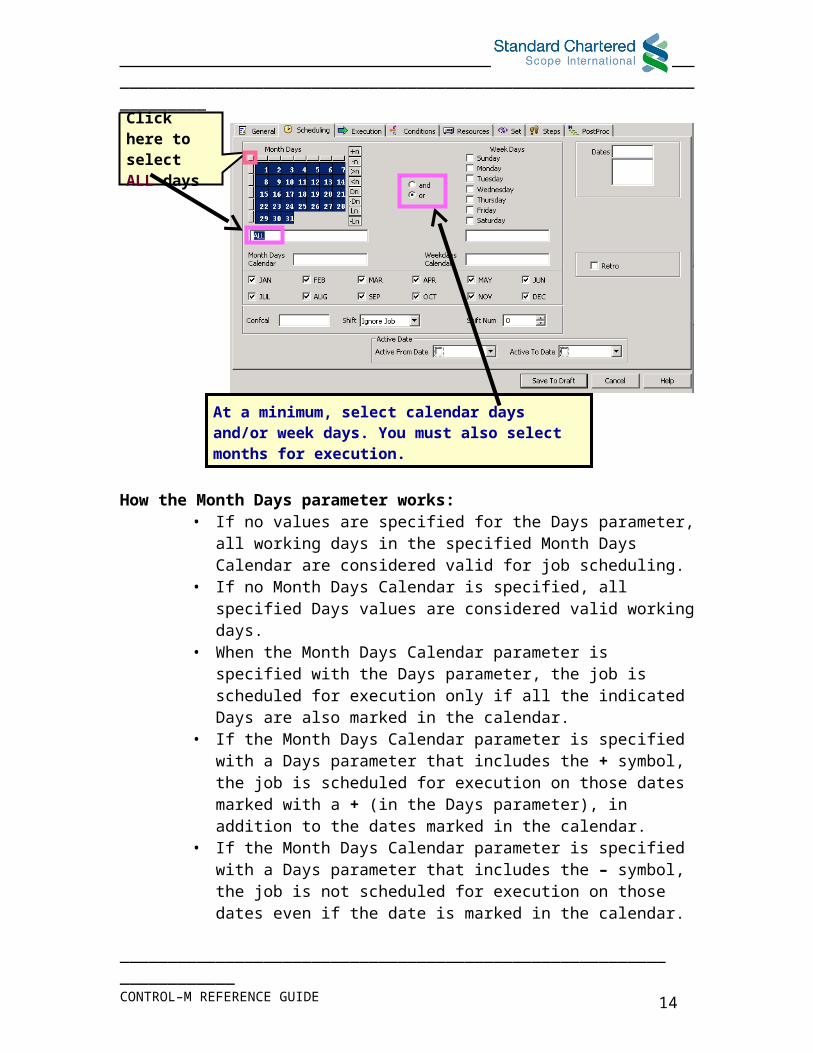
The Scheduling panel is used to set the dates that a job can be scheduled for possible submission. The Month Days, Week Days, and dates selected can optionally be used in conjunction with calendars.
How the Month Days parameter works:• If no values are specified for the Days parameter, all working days in the
specified Month Days Calendar are considered valid for job scheduling.• If no Month Days Calendar is specified, all specified Days values are
considered valid working days.• When the Month Days Calendar parameter is specified with the Days
parameter, the job is scheduled for execution only if all the indicated Days are also marked in the calendar.
• If the Month Days Calendar parameter is specified with a Days parameter that includes the + symbol, the job is scheduled for execution on those dates marked with a + (in the Days parameter), in addition to the dates marked in the calendar.
• If the Month Days Calendar parameter is specified with a Days parameter that includes the – symbol, the job is not scheduled for execution on those dates even if the date is marked in the calendar.
• The appropriate Months parameters must be checked.• The and/or relationship between Days and Weekdays is analyzed.
_____________________________________________________________________CONTROL–M REFERENCE GUIDE
Click here to select ALL days
At a minimum, select calendar days and/or week days. You must also select months for execution.
10

_____________________________________________________________________
In the below scenario, job will run every Wednesday that is an odd-numbered day if that day is selected as a working day in both of the specified calendars. It can get difficult to track complex solutions so you should always look for the simplest scheduling option.
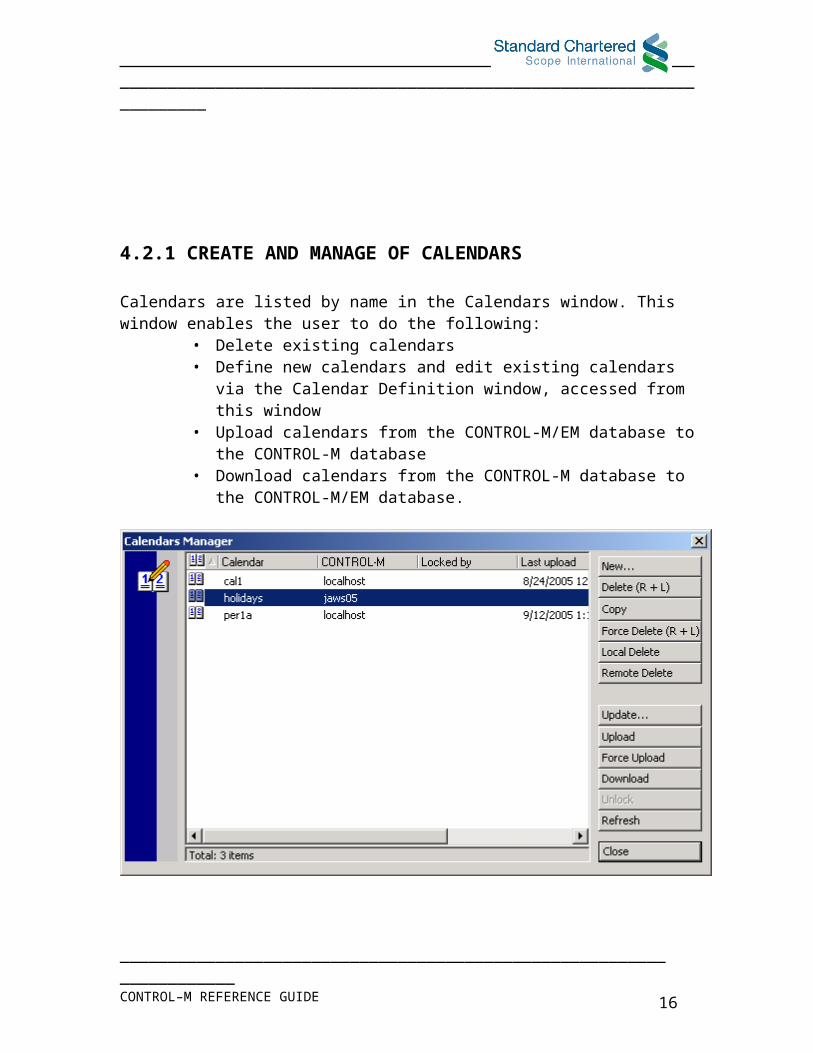
4.2.1 CREATE AND MANAGE OF CALENDARS
Calendars are listed by name in the Calendars window. This window enables the user to do the following:
• Delete existing calendars• Define new calendars and edit existing calendars via the Calendar
Definition window, accessed from this window• Upload calendars from the CONTROL-M/EM database to the
CONTROL-M database
_____________________________________________________________________CONTROL–M REFERENCE GUIDE
With no days specified, the job is scheduled for each and every day specified as a working day in the calendar mdays1.
In this example, the Month Days and Week Days are resolved independently using their respective calendars.Then, the resolutions are combined using the logical operator selected (in this case and).
AND
11
_____________________________________________________________________
• Download calendars from the CONTROL-M database to the CONTROL-M/EM database.
4.2.2 CALENDAR TYPES
Regular – regular calendar consists of a succession of dates, specifying when a job can or cannot be ordered. A job whose job processing definition points to a calendar in the Days Calendar And/Or Week Days Calendar parameter is ordered based on the set of dates in that calendar. Other Scheduling parameters can be used with a regular calendar to further control the dates on which the job is ordered.Relative – [OS/390] one which is intended for use another calendar. A relative calendar is combined (via CONTROL-M utility IOABLCAL) with a regular calendar or with another relative calendar to generate a new regular calendar. The new calendar resulting from this process is a combination of the two calendars input to the utility. For more information about relative calendars and examples of how utility IOABLCAL is used, refer to the (OS/390) CONTROL-M User Manual.Periodic – used to divide the year into working periods (that is, 13 periods, 20 periods, and so on) instead of into 12 months. Each period can be the same or different in length. Periods do not have to be specified using consecutive dates, and they can overlap. A periodic calendar is used with the Days or Week Days parameters to specify on which dates a job should be ordered.
4.2. 3 CALENDAR OPTIONS
Delete – Deletes the selected Calendar from the CONTROL-M/EM database only.
_____________________________________________________________________CONTROL–M REFERENCE GUIDE 12

_____________________________________________________________________
Force Delete – Delete the Calendar from both CONTROL-M/EM and CONTROL-M, regardless of whether or not a later version of the Calendar exists in the CONTROL-M/Server database. Local Delete – Deletes the Calendar from the CONTROL-M/EM database.Remote Delete – Deletes the Calendar from the CONTROL-M/Server database. This option is not available if the Calendar in the CONTROL-M/Server database was modified more recently than the one in the CONTROL-M/EM database. Override this restriction using the Force Delete option. For additional information, see “Table Synchronization” in the CONTROL-M/Enterprise Manager User Guide. Update – Opens the Calendar Definition window to update the selected calendar.Upload – Copies the selected calendar to the indicated CONTROL-M/Server database. The upload takes place as a background process, allowing the user to perform other actions during transmission. Upon completion, the Modified field changes to No. If the calendar in the CONTROL-M/Server database is a later version, a message appears indicating that the Upload is not allowed. This restriction can be overridden using the Force Upload option (described below).Force Upload – Copies the selected calendar to the indicated CONTROL M/Server database, regardless of whether or not a later version of the calendar exists in the CONTROL-M/Server database. The upload takes place as a background process, allowing the user to perform other actions during transmission. Upon completion, the Modified field changes to No.Download – Copies the selected calendar from the CONTROL-M/Server database to the CONTROL-M/EM database. The download takes place as a background process, allowing the user to perform other actions during transmission. Upon completion, the Modified field changes to No. To download a calendar that does not appear in the Calendar Manager window (and therefore cannot be selected), first create the calendar (using the Calendar Definition window) and then download the calendar normally.Unlock – Unlocks the selected calendar to allow modification by a different user. Refresh – Refresh the status of calendars in the window.
Perform the following steps to define a new calendar.
Steps:1. Click the [New] button. The New Calendar name window opens.2. Specify the CONTROL-M and a name for the new calendar. 3. Select [Regular/Relative] or [Periodic].
_____________________________________________________________________CONTROL–M REFERENCE GUIDE 13
_____________________________________________________________________
4. Click the [OK] button. The Calendar Definition window opens.
5. Define the calendar criteria. When you are finished selecting dates in the new calendar, click the [OK] button in the Calendar Definition window to create the calendar in the CONTROL-M/EM database.
_____________________________________________________________________CONTROL–M REFERENCE GUIDE 14

_____________________________________________________________________
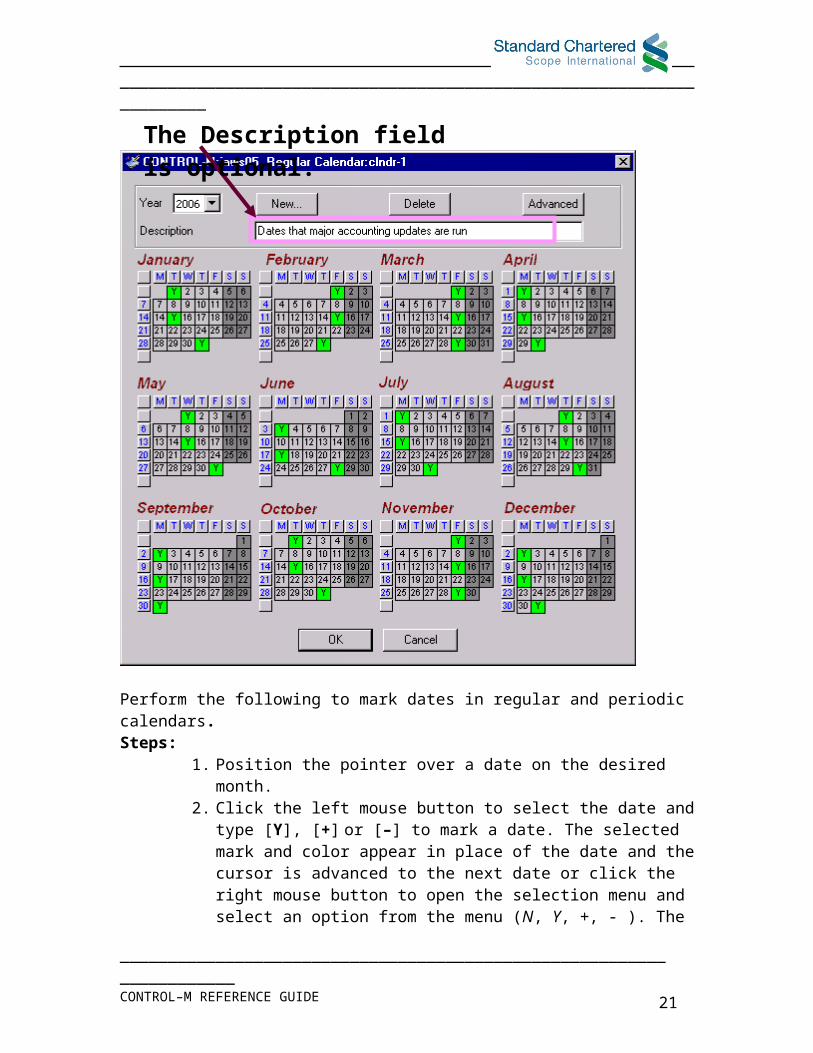
Perform the following to mark dates in regular and periodic calendars.Steps:
1. Position the pointer over a date on the desired month.2. Click the left mouse button to select the date and type [Y], [+] or [–] to
mark a date. The selected mark and color appear in place of the date and the cursor is advanced to the next date or click the right mouse button to open the selection menu and select an option from the menu (N, Y, +, - ). The selected mark and color appear in place of the date and the cursor is advanced to the next date.
3. To unmark a date, click the selected date again and change the mark to N. The Date is then displayed.
4. To mark multiple dates, click the left mouse button to select the dates and either type the appropriate mark or click the right mouse button to open the selection menu and select the option from the menu.
_____________________________________________________________________CONTROL–M REFERENCE GUIDE
The Description field is optional.
15
_____________________________________________________________________
After the successful creation of the calendar using the above steps you should upload the calendar into the specific Control M server by using the upload option in the calendar definition window
4.3 EXECUTION PARAMETER PANEL NECESSARY FIELD DESCRIPTION
Node ID/Group - Host name of the Agent platform on which the job is running. For application-specific jobs, this parameter must contain the host name of the CONTROL-M/Agent that will trigger the specified application.A Node Group is logical name that is used to refer to a list of node Ids representing Agent platforms. When the name of a Node Group is specified in the Node ID/Group parameter of the job processing definition, CONTROL-M automatically applies load-balancing to the related job.
Node Groups are defined in the Node Group menu in CONTROL-M/Server. All nodes in each group must share the following characteristics:
• Similar operating systems (for example, various Unix computers).• User environment (for example, access to the same file systems).
_____________________________________________________________________CONTROL–M REFERENCE GUIDE 16

_____________________________________________________________________
• They should all be able to execute the jobs assigned to the Node Group.
Load-balancing is the process of distributing jobs to various agents associated with a CONTROL-M/Server according to availability of specified resources. When this is implemented, CONTROL-M considers availability of resources such as Disk space, I/O load, CPU usage, and Software licenses on each Agent platform, and determines which platform is best suited to execute the job at that moment and submits the job to the selected platform.
Cyclic – If selected, indicates that the current job is cyclic. Interval – Amount of time (minutes) to wait between reruns, or between cycles of a cyclic job. Default setting is 0. (Text)Units – Specifies a unit of time for the numerical value indicated by the Interval parameter. Valid values are Minutes (1-64800), Hours(1-1080), and Days(1-45).From – Determines if the interval until the subsequent cyclic rerun of the job is calculated is calculated from the beginning or the end of the current run of the job. Valid values are Start and End. Maximum – Maximum number of reruns of the job.Max Wait – Maximum number of days that the job can wait to be executed after its original scheduling date has passed.Time – Time limits for job submission (must be specified in hh:mm format).From – Earliest submission time.Until – Latest submission time.Multi Agent – Specifies that job submission details be broadcast to all Agents within a Node Group
_____________________________________________________________________CONTROL–M REFERENCE GUIDE 17
_____________________________________________________________________
4.4 CONDITIONS PARAMETER PANEL NECESSARY FIELD DESCRIPTION
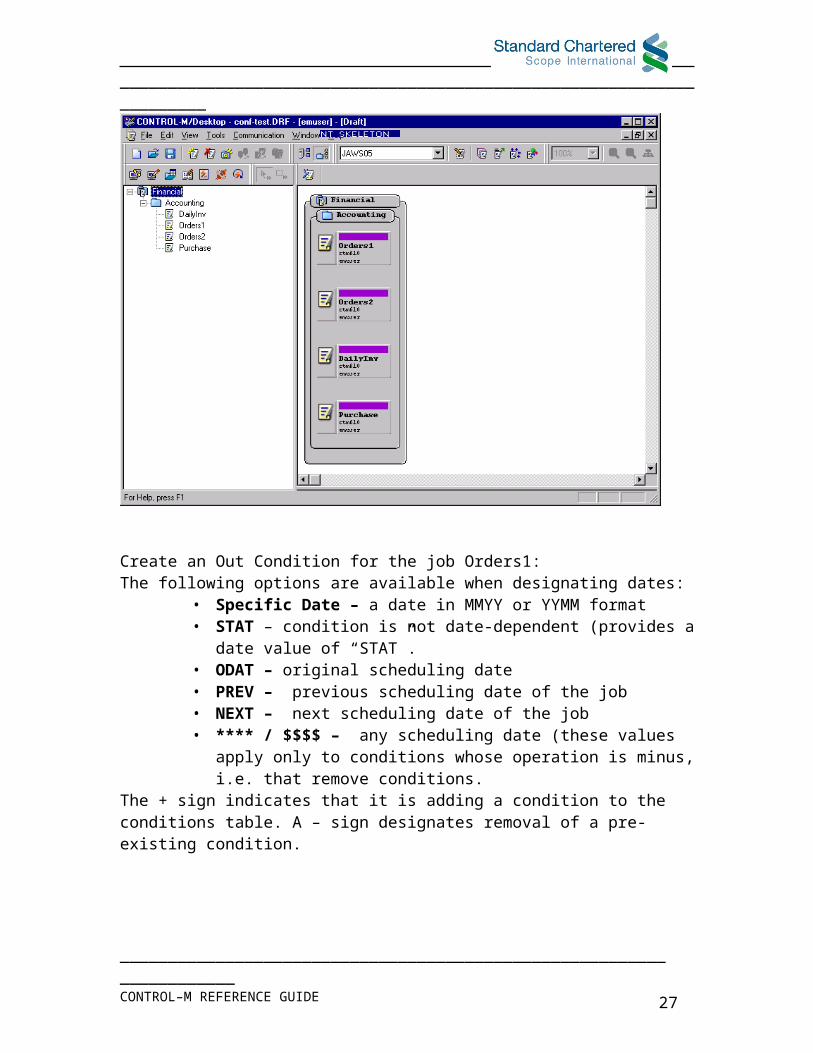
The Conditions parameter panel is used to define prerequisite In and Out conditions. The panel contains two sections. In conditions are defined in the left section; Out conditions are defined in the right section. After editing or creating a condition, click the green check mark next to the Text line to save the changes and/or add the condition to the list.The Conditions panel for this job does not currently show any In or Out conditions.The main part of each section lists already defined conditions. Below this box is a Text line used for editing already defined conditions or defining new conditions. When you select a condition in the list, its contents are displayed in the Text line. After editing or creating a condition, click the green checkmark next to the Text line to save the changes and/or add the condition.
We can easily understood the process of creating conditions by the end of below example
The jobs shown in the CONTROL-M/Desktop window shown here do not have In or Out conditions. If they did, they would be represented by arrows and lines.
_____________________________________________________________________CONTROL–M REFERENCE GUIDE 18

_____________________________________________________________________
Create an Out Condition for the job Orders1:The following options are available when designating dates:
• Specific Date – a date in MMYY or YYMM format• STAT – condition is not date-dependent (provides a date value of
“STAT”.• ODAT – original scheduling date• PREV – previous scheduling date of the job• NEXT – next scheduling date of the job• **** / $$$$ – any scheduling date (these values apply only to conditions
whose operation is minus, i.e. that remove conditions.The + sign indicates that it is adding a condition to the conditions table. A – sign designates removal of a pre-existing condition.
_____________________________________________________________________CONTROL–M REFERENCE GUIDE 19

_____________________________________________________________________
Create an In Condition for the job Orders2:
_____________________________________________________________________CONTROL–M REFERENCE GUIDE
This condition specifies that the job Orders1 must finish “OK” before Orders2 can be run.
20
_____________________________________________________________________
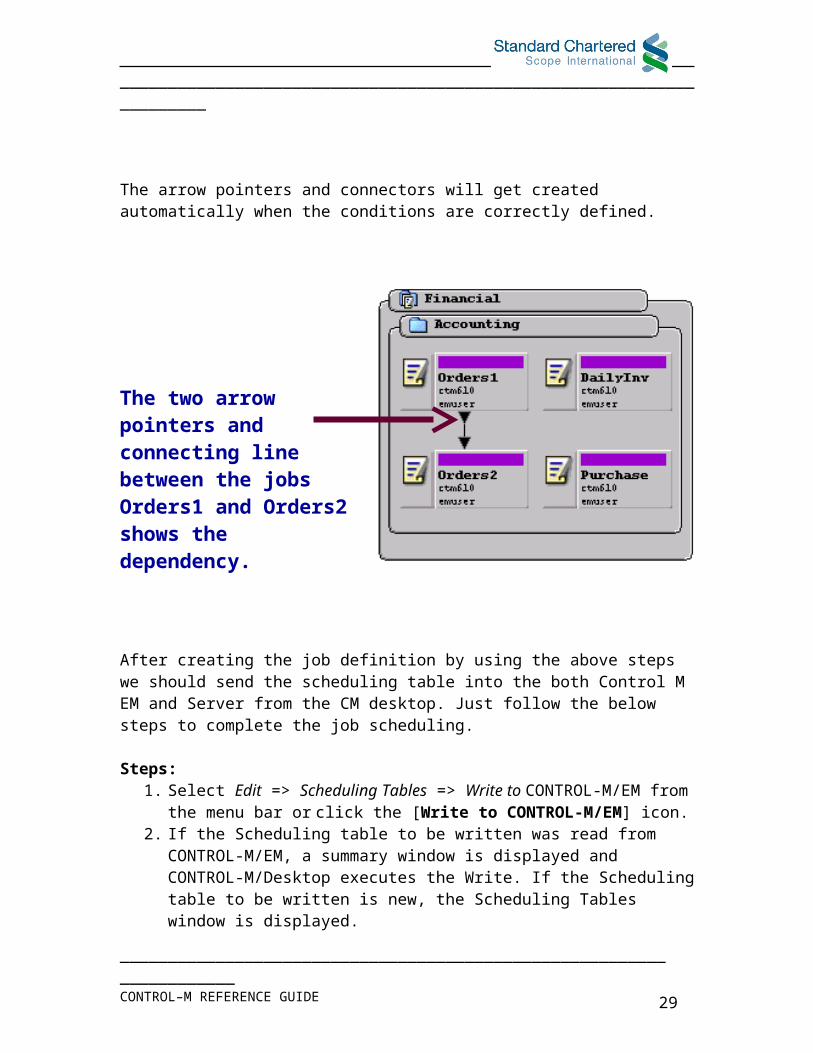
The arrow pointers and connectors will get created automatically when the conditions are correctly defined.
After creating the job definition by using the above steps we should send the scheduling table into the both Control M EM and Server from the CM desktop. Just follow the below steps to complete the job scheduling.
Steps:1. Select Edit => Scheduling Tables => Write to CONTROL-M/EM from the menu
bar or click the [Write to CONTROL-M/EM] icon.2. If the Scheduling table to be written was read from CONTROL-M/EM, a
summary window is displayed and CONTROL-M/Desktop executes the Write. If the Scheduling table to be written is new, the Scheduling Tables window is displayed.
3. Select the Scheduling table to write and click the [Write] button. CONTROL-M/Desktop validates all field values in the job processing definitions in the specified table regardless of the Tools => Options [General] panel [Job Validity] option. Errors are displayed in the Message window. Correct the errors and/or enter the missing fields. If no errors are detected before the write process, a summary window is displayed. Click the [OK] button. CONTROL-M/Desktop executes the write process, and a message window is displayed. Click the [OK] button.
_____________________________________________________________________CONTROL–M REFERENCE GUIDE
The two arrow pointers and connecting line between the jobs Orders1 and Orders2 shows the dependency.
21

_____________________________________________________________________
If the Scheduling table that you are writing already exists in the CONTROL-M/EM database, you will get a window displaying a message asking you to confirm that you want to overwrite the existing table. This includes cases where you started by reading the table from CONTROL-M/EM, or if you created new jobs with a Scheduling table name that already exists. In the latter case, you will completely overwrite the existing Scheduling table.
4. Next you need to upload the same scheduling table into the Control M server as we already know that Scheduling table copy should maintain at both CM EM and Server level
_____________________________________________________________________CONTROL–M REFERENCE GUIDE
The Scheduling table(s) referenced in the current draft are automatically listed.Select the table(s) to write, then click the [Write] button.
22
_____________________________________________________________________
5 5 Ordering the jobsOrdering the jobs In the above session we learnt about the new job creation .In order to run those jobs we supposed to follow the Control M job ordering mechanism.
1. Log in into the Control M enterprise manager by clicking the Control M Enterprise Manager Desktop icon.
2. Several predefined Viewpoints are available when you first install CONTROL-M/EM. Viewpoints are used to control what part of the production environment is displayed and how it is displayed.Select File=>Open ViewpointA ViewPoint is a means for adapting the view of the enterprise to suit the user’s requirements. A ViewPoint defines which jobs are loaded into the database (Collection), which jobs are displayed (Filter), and how they are displayed (Hierarchy) in the CONTROL-M/Enterprise Manager ViewPoint window.
_____________________________________________________________________CONTROL–M REFERENCE GUIDE
Select Edit => Scheduling Tables => Scheduling Table Manager.
23

_____________________________________________________________________
3. Order the jobs using the option Tools=>Order/Force If no individual job is selected all the jobs in the scheduling table can be ordered
_____________________________________________________________________CONTROL–M REFERENCE GUIDE 24
_____________________________________________________________________
The Order option places jobs in the Active Jobs file only if their scheduling criteria are satisfied. The Force option places jobs in the Active Jobs file regardless of scheduling criteria.
Once a job is scheduled, it is not submitted for execution until its run-time requirements
4. After the job got ordered you can see the ordered jobs in the appropriate EM view point. The Control M job is having different states in its execution cycle.
COLOR STATUS MEANING
Gray Wait Status Waiting for the time or In Condition
Blue Wait Agent Platform ConditionPink Wait User Waiting for conformationYellow Executing ExecutingGreen Ended OK Processing finished
successfullyRed Ended NOT OK Processing finish
unsuccessfully Agent platform where job was running was changed to disabled by a user
White Unknown Communication with the Agent platform was interrupted
_____________________________________________________________________CONTROL–M REFERENCE GUIDE 25

_____________________________________________________________________
6 6 Control M New Day ProcedureControl M New Day Procedure
There is an internal housekeeping activity on every day to clear the old jobs from the Control M view point. Before know about this new day process we should aware of the AJF.Active Jobs File (AJF) – Lists all jobs scheduled for submission in the current day. Each job in the Active Jobs file is not submitted until all conditions in the job processing definition for the job are satisfied. The Active Jobs file is in the CONTROL-M database.Changes made to a job order affect only the information in the Active Jobs File, not the job parameters maintained in the CONTROL-M database. To make permanent changes to job parameters, use the CONTROL-M /Desktop; and then write the changes to the CONTROL-M.During New Day processing, CONTROL-M determines whether or not the job is a candidate for execution on the particular date. If it is, the job is ordered (that is, placed in the Active Jobs File). Jobs that finish with a status of “Ended OK” are not immediately removed from the AJF. They are retained in the AJF until the daily housekeeping occurs. If the same job is scheduled for consecutive days, it will be added to the AJF as a new job order on the same day that “Ended OK” job order is removed.Max Wait Parameter (Execution tab of the job scheduling form) – specifies the number of extra days (beyond the original scheduling date) the job is allowed to remain in the Active Jobs File awaiting execution. If the job still has not run after the specified number of days, the job is removed from the Active Jobs File. The default value is 0. The range is 0-98 when specifying a number of days to remain in the AJF, or 99 to specify an indefinite retention period.
_____________________________________________________________________CONTROL–M REFERENCE GUIDE 26
_____________________________________________________________________
7 7 Control-M for End of Day ScheduleControl-M for End of Day Schedule
To implement the control-M for End of Day process we are following the below methodology
Environment setup
1. Atos Origin(Third party vendor for datacenter maintenance) is having one centralized Control M EM PG913 for all non production environments like UAT,DR,OAT and PG914EM for all the production environments
2. Control M server need to be installed in your application database environment or some other environment that will be decided by the Environment support team.
3. Control M agent installation is preferable to be in the database server, since we need to execute the shell scripts which are available in the database server and also need to connect database to get the status of the eod service.
4. After the above setup got over you need to release the Control M related files in the database server, the release document for both EOD and post engine is looks like below
5. Once the above release gone to database server make sure the below checklist is in place
(i) Under the path /apps/Batch/Common there will be a file Countrycode_eBBS_Batch.iniThis ini file contains the below fields which is used by the executeEOD.sh which is available in the same path
DBName- Name Of the database DBSchema- Schema of the Present database EODURL- A valid eod server URL need to be specify here JavaClassPath—A valid java class path in the present environment CompressionRequired- This parameter will be used during the contacting of EOD server. This parameter should be in sink with LDAP settings. TimeZone- Present server timezone JavaLocation- Valid location of the Java software path
_____________________________________________________________________CONTROL–M REFERENCE GUIDE 27

_____________________________________________________________________
(ii) There should be a soft link for the database profile like Countrycode_eBBS_profile -> /home/db2inst1/sqllib/db2profile
(iii) Also make sure that ebbseod user is having the proper rights to execute the db profile also the select privileges for BPRGSTS table in the present database.
6. Once the environment setup was done, need to implement the EOD system into the Control –M. Ensure an uniform approach towards the implementation for different countries. It is always best practice to prepare a sheet with all the required fields before start the schedule in the control M desktop. The same sheet also needs to be mention in the Country ASRM document to track the upcoming changes in the eod schedule.
Use the below terminology while naming some important fields in the job schedule
Data Center Same as the host name, which should be XX99 where XX = PG for production
RG for DRDG for developmentTG for testing
99 = machine sequence numberTable Name The Schedule Table name used in control M,XXXX_SCH XXXX Application Code Member NameThe Name of program or script file. There is no restriction of the member name. Normally we use the combination of programid, serviceid and execution sequence of the job.
Group Name
The group Name used where doing job setup in control M.Normally, will use the Application code as the group name.(like DAILY,MONTHLY)
Application Name of the application to which job’s group belongs in control M (like eBBS,eGLEX,eBRANCH…)
Job Name [e][aaaa][cc][nnn][f] Where e=first character of environment (p,o,u,d etc..)
aaaa=applicationcode
_____________________________________________________________________CONTROL–M REFERENCE GUIDE 28
_____________________________________________________________________
cc=country identifier nnn=sequence number f=job run frequency d for daily w for weekly m for monthly y for yearlyCommand Command line will have a shell script executeEOD.sh with the dynamic arguments for every job as specified in the sample run sheet in the above.
Ex: sh /apps/Batch/Common/executeEOD.sh eBBS CN 101 PRE T2045 004 040 %%ODATE
Here the eBBS-----Application name CN--------Country code 101-------mode used for EOD script PRE------ Process block T2045----Job Programid 004-------Job Service id 004-------execution sequence %%ODATE-------ODATE is the Control M variable, which is dynamically replaced with the ordered date of the job (eoddate) during the job submission.
Owner Owner filed should be populated with the username; with what userid we are going to execute the command line of the job (executeEOD.sh).Normally we use the ebbseod user to run the EOD through control M.
<END>
_____________________________________________________________________CONTROL–M REFERENCE GUIDE 29