contents - amazon web servicess3.chesshouse.com.s3.amazonaws.com/manuals/m820... · 6 2.4 selecting...
TRANSCRIPT
1
CONTENTS
1 Important information .................................................................................................... 3
1.1 Safety instructions ................................................................................................... 3
1.2 Notes on storage and cleaning ................................................................................ 3
1.3 Notes on the power supply ...................................................................................... 3
1.4 Package contents .................................................................................................... 4
2 First steps ...................................................................................................................... 4
2.1 Device description ................................................................................................... 4
2.2 The buttons and their functions .............................................................................. 4
2.3 Connect cable ......................................................................................................... 5
2.4 Selecting the language ............................................................................................ 6
2.5 Adjusting the display’s backlight ............................................................................ 6
2.6 Preparing for a new game ....................................................................................... 7
2.7 Switching on and off ............................................................................................... 7
3 Playing against the computer ......................................................................................... 8
3.1 Your moves ............................................................................................................. 8
3.1.1 General moves ................................................................................................. 8
3.1.2 Special moves .................................................................................................. 8
3.2 The computer’s moves ............................................................................................ 8
3.3 Symbols in the display during moves ...................................................................... 8
3.4 Invalid moves and positions .................................................................................... 8
3.5 Undoing or replaying moves ................................................................................... 9
3.5.1 Undoing moves ................................................................................................ 9
3.5.2 Undoing additional moves or a sequence of moves .......................................... 9
3.5.3 Continuing the game ........................................................................................ 9
3.5.4 Replaying moves .............................................................................................. 9
3.6 End of game and possible game outcomes ............................................................. 9
3.7 Saving or deleting scores ...................................................................................... 10
3.7.1 Switching off and playing again later.............................................................. 10
3.7.2 Deleting all data ............................................................................................. 10
3.8 Returning to a game .............................................................................................. 10
3.9 Starting a new game .............................................................................................. 10
4 The info screens ........................................................................................................... 11
4.1 Switching between info screens............................................................................. 11
4.2 Info screen: Large clock ........................................................................................ 11
4.3 Info screen: Score .................................................................................................. 11
4.4 Info screen: Analysis ............................................................................................. 11
4.5 Info screen: Permanent brain ................................................................................ 12
4.6 Info screen: Small clock ......................................................................................... 12
5 Special functions .......................................................................................................... 13
5.1 Overview of the special functions menu ................................................................ 13
5.2 Menu: MOVE, prompt a move ................................................................................ 14
5.3 Menu: HINT, in order to have a move suggested to you ........................................ 14
5.4 Menu: LEVEL, the various play levels ..................................................................... 14
2
5.4.1 Overview of playing levels .............................................................................. 14
5.4.2 Selecting a playing level ................................................................................. 14
5.4.3 Normal level (0–9) .......................................................................................... 15
5.4.4 Blitz level (0–8) ............................................................................................... 15
5.4.5 Fun level (0–8) ................................................................................................ 15
5.4.6 Easy level (0–8) ............................................................................................... 15
5.4.7 Tournament level (0–5) .................................................................................. 15
5.4.8 User level ....................................................................................................... 16
5.4.9 Find mate level ............................................................................................... 17
5.5 Menu: NEXTB, to be shown an alternative move .................................................... 17
5.6 Menu: START, to undo all moves ........................................................................... 17
5.7 Menu: END, to go back to the current position ...................................................... 17
5.8 Menu: ANALY, to analyse the current position ....................................................... 18
5.9 Menu: 2PLAY, two player mode ............................................................................. 18
5.10 Menu: AUTO, the computer plays against itself ................................................. 18
5.11 Menu: OPTS, the advanced options .................................................................... 18
5.11.1 Overview of the advanced options .................................................................. 18
5.11.2 Changing an option ........................................................................................ 19
5.11.3 OPTS: INVERT BOARD ..................................................................................... 19
5.11.4 OPTS: CABLE RIGHT ........................................................................................ 19
5.11.5 OPTS: PERMANENT BRAIN, permanent calculation .......................................... 19
5.11.6 OPTS: TUTOR ................................................................................................. 20
5.11.7 OPTS: BOOK ................................................................................................... 20
5.11.8 OPTS: SOUNDS ............................................................................................... 20
5.11.9 OPTS: CONTRAST ........................................................................................... 20
5.11.10 OPTS: CPU SPEED MHZ, calculation speed ....................................................... 21
5.11.11 OPTS: LANGUAGE ........................................................................................... 21
5.12 Menu: SETUP, in order to set up a particular state of play .................................. 21
5.13 Menu: VERFY, to display the current position ..................................................... 22
6 USB mode – Connect to a PC ........................................................................................ 22
7 Disposal ....................................................................................................................... 23
8 Warranty, servicing and import .................................................................................... 23
9 Technical specifications ............................................................................................... 24
3
1 Important information
Before using this device, please read the following safety notes and operating instructions
completely, and pay careful attention to them. Please store this user manual with the device,
so that you can refer to it later if needed. If you later give this device to another user, please
also give them this manual.
1.1 Safety instructions
Please note that this product is not a child’s toy within the meaning of Directive
2009/48/EC. If you let your children use the device, instruct them accordingly and ensure
that the device is used only as intended.
Keep the packaging bags and film away from babies and small children, as there is a
danger of suffocation!
In order to avoid damage, do not expose the device to heat, eg from radiators or
from direct sunlight, and do not expose it to any kind of moisture.
In order to avoid malfunctions, do not operate the device on or near devices that
create magnetic fields or electromagnetic radiation, such as for example televisions,
loudspeakers, mobile and cordless telephones, WiFi devices etc.
Do not open the device under any circumstances. It does not contain any serviceable
parts. In the event of malfunction, contact the service address listed.
1.2 Notes on storage and cleaning
Please note that this device is made from real wood. Handle the wood carefully, always
store the device where it is dry and do not expose it to strong sunlight.
When required, only clean the device’s surface with a slightly damp cloth, and ensure
that no moisture can penetrate into the device.
Do not use solvents or other aggressive or abrasive cleaning agents, as these can
damage the device’s surfaces and lettering.
1.3 Notes on the power supply
Only operate the ChessGenius Exclusive with the supplied AC adaptor.
Input 100–240 V 50/60 Hz, 0.45A max
Output 9V DC 1A
When using the AC adaptor, please observe the following:
The power socket should be located close to the device and should be easily
accessible.
The device should not be connected to more power sources than recommended.
The electrical contacts must not be short-circuited.
Before cleaning the device, ensure you disconnect the adaptor from the mains.

4
Regularly check the product and the AC adaptor for damage, and do not use either
of them if they are damaged. Never open them up.
Please observe any safety information printed on the AC adaptor.
1.4 Package contents
The ChessGenius Exclusive package contains the following components:
1 chessboard
17 white chess pieces (including an additional queen)
17 black chess pieces (including an additional queen)
1 computer unit (can also be used as a chess clock) with LCD display
1 AC adaptor
1 cable with two identical connectors, with which to connect the computer unit to the
chessboard
1 user manual
1 warranty card
After unpacking, please check the contents for completeness and any possible signs of
damage that could have occurred during transport. In the event of a complaint, please
promptly contact the dealer where you obtained the product.
2 First steps
2.1 Device description
The chessboard automatically detects the chess figures. Simply set the figures down onto a
square. The computer unit can also be used as a chess clock. The computer unit must be
connected to the chessboard for you to use it. Please see chapter 2.3 for information on
how to do this.
2.2 The buttons and their functions
Overview of the computer unit’s buttons:
RED, top Same as the bottom RED button. Cancel or return to the menu.
GREEN, top Same as GREEN, bottom. Confirm.
Note: Assignment of the RED and GREEN buttons can change
depending on the menu. If the bottom left and right of the display are
darker (inverted), the functions that RED and GREEN respectively carry
out are available: bottom left for RED, bottom right for GREEN.
If, at the bottom left and right, no function is indicated, RED and
GREEN are not assigned to this menu.
5
On/Off Switches the device on or off.
NEW Starts a new game.
BACKLIGHT Adjust the display’s backlighting.
Clockwise arrow Undo moves.
Anticlockwise arrow Replay moves.
RED, bottom Same as the top RED button.
GREEN, bottom Same as GREEN, top.
LEFT arrow Return to previous screen. Moves cursor left.
RIGHT arrow Go to the next screen. Moves cursor right.
UP arrow Switch directly between the ‘Large clock’ and ‘Score’ screens.
Moves cursor up.
DOWN arrow Switch directly between the ‘Large clock’ and ‘Score’ screens.
Moves cursor down.
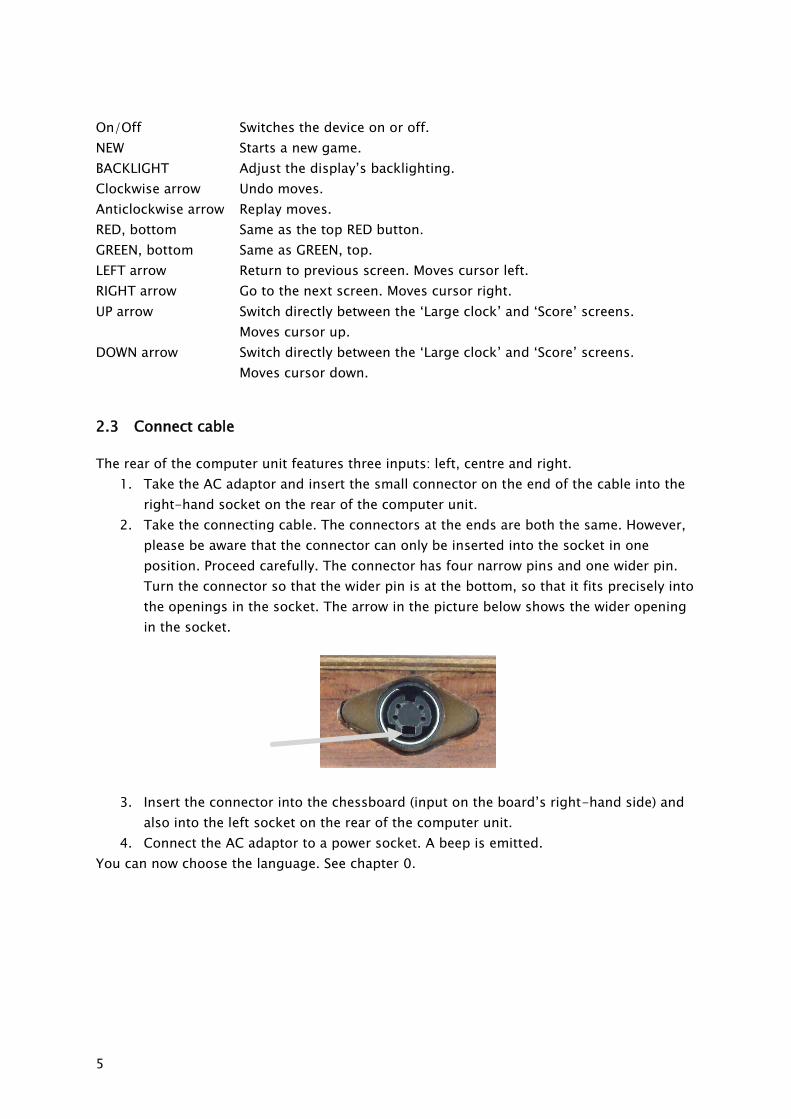
2.3 Connect cable
The rear of the computer unit features three inputs: left, centre and right.
1. Take the AC adaptor and insert the small connector on the end of the cable into the
right-hand socket on the rear of the computer unit.
2. Take the connecting cable. The connectors at the ends are both the same. However,
please be aware that the connector can only be inserted into the socket in one
position. Proceed carefully. The connector has four narrow pins and one wider pin.
Turn the connector so that the wider pin is at the bottom, so that it fits precisely into
the openings in the socket. The arrow in the picture below shows the wider opening
in the socket.
3. Insert the connector into the chessboard (input on the board’s right-hand side) and
also into the left socket on the rear of the computer unit.
4. Connect the AC adaptor to a power socket. A beep is emitted.
You can now choose the language. See chapter 0.

6
2.4 Selecting the language
The chess computer’s display can show its screens in one of the following 7 languages:
Language Shown on display
German Deutsch
English English
French Français
Dutch Nederlds
Italian Italiano
Spanish Español
Russian Pусский
Connect the chessboard and computer unit, as described in 2.3.
After the beep has sounded:
The right-hand side of the display shows the following:
The word ‘Deutsch’
a flashing arrow symbol
To select German:
Confirm with GREEN.
To choose another language:
1. Press the down arrow button
until the correct language is shown.
2. Confirm with GREEN.
You can change the language later via the options. See 5.11.11.
You can now prepare for a game (see 2.6).
2.5 Adjusting the display’s backlight
If you wish to adjust the display’s backlight, keep pressing the BACKLIGHT button as often
as necessary.
7
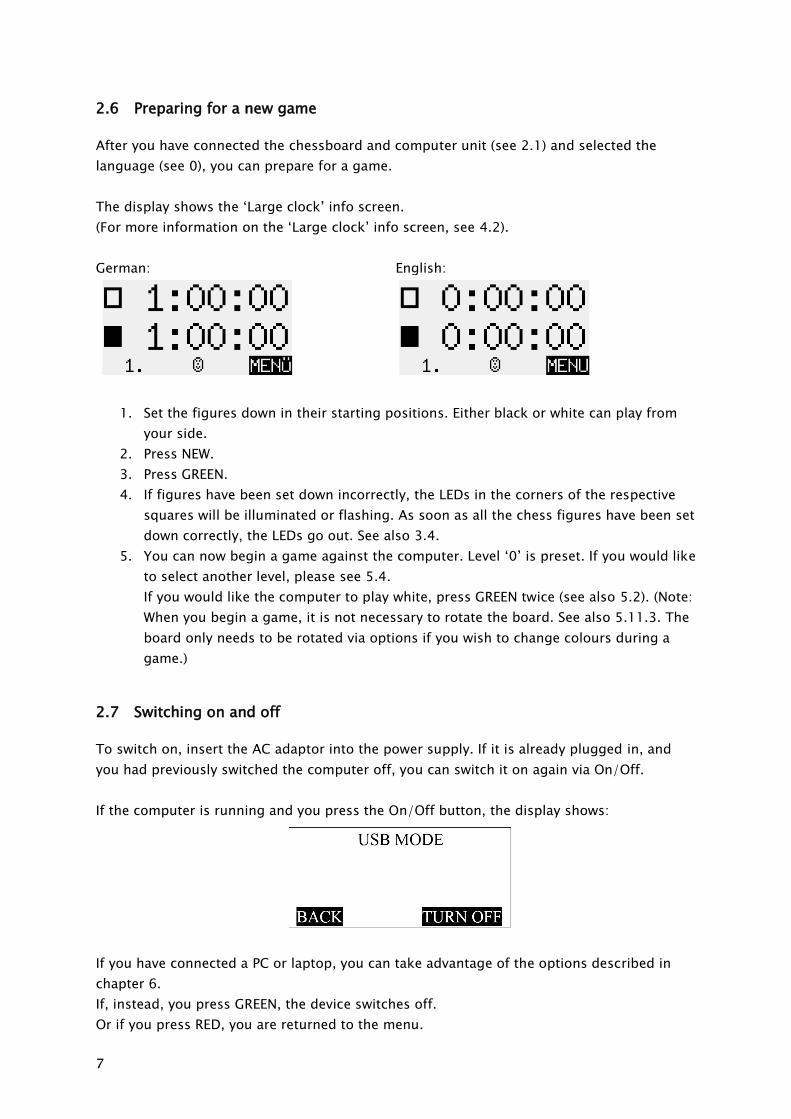
2.6 Preparing for a new game
After you have connected the chessboard and computer unit (see 2.1) and selected the
language (see 0), you can prepare for a game.
The display shows the ‘Large clock’ info screen.
(For more information on the ‘Large clock’ info screen, see 4.2).
German: English:
1. Set the figures down in their starting positions. Either black or white can play from
your side.
2. Press NEW.
3. Press GREEN.
4. If figures have been set down incorrectly, the LEDs in the corners of the respective
squares will be illuminated or flashing. As soon as all the chess figures have been set
down correctly, the LEDs go out. See also 3.4.
5. You can now begin a game against the computer. Level ‘0’ is preset. If you would like
to select another level, please see 5.4.
If you would like the computer to play white, press GREEN twice (see also 5.2). (Note:
When you begin a game, it is not necessary to rotate the board. See also 5.11.3. The
board only needs to be rotated via options if you wish to change colours during a
game.)
2.7 Switching on and off
To switch on, insert the AC adaptor into the power supply. If it is already plugged in, and
you had previously switched the computer off, you can switch it on again via On/Off.
If the computer is running and you press the On/Off button, the display shows:
If you have connected a PC or laptop, you can take advantage of the options described in
chapter 6.
If, instead, you press GREEN, the device switches off.
Or if you press RED, you are returned to the menu.

8
3 Playing against the computer
3.1 Your moves
3.1.1 General moves
Make your moves just as you would with a normal chessboard. Ensure you raise the figures
when moving them, and not just slide them across the board. This ensures that the
computer can more accurately detect and recognise your moves.
To capture, you can first raise either your own figure or the computer’s figure.
3.1.2 Special moves
Castling: First move the king, then the rook.
En passant capture: First of all move your own pawn, then remove the captured
pawn.
Pawn promotion: Move the pawn to the target square, or remove it from the board.
Set the queen (or another figure) onto the promotion square.
3.2 The computer’s moves
The computer displays its move at the bottom left of the display.
Example:
The red LEDs on the chessboard flash simultaneously, in order to show the start and target
squares.
After you have carried out the computer’s move on the board, it can be necessary to make a
special move. The LEDs indicate the square or squares where a figure must be placed or
removed.
If the computer gives check, it emits a series of beeps during the computer’s move.
3.3 Symbols in the display during moves
The following symbols can be shown at the bottom left of the display:
A rotating hourglass: The computer is thinking about its move.
: Your move, white.
: Your move, black.
3.4 Invalid moves and positions
If you try to make a move that is invalid, the computer buzzes. Set the figure back down in
its previous position and play the move again.
If the position on the board is incorrect, you cannot carry out your move.

9
The computer provides information about the error via the display and via the LEDs.
Error prompts in the display:
The field or fields that contain errors are shown at the bottom left of the display.
Example: The square c3 should be free. A white knight should be present on d2.
Error prompts from the LEDs:
The LEDs at the corners of the square or squares flash or are illuminated.
A LED that is on continuously means: An error in one adjoining square. Either the square is
empty when it should be occupied, or it is occupied by the wrong figure.
A flashing LED (once, twice or four times a second) means: An error in one, three or four
adjoining squares.
If you are not sure where the error lies, use the VERFY function. See chapter 5.13.
3.5 Undoing or replaying moves
3.5.1 Undoing moves
If you wish to take back the most recently played move, press the clockwise arrow button
(the button underneath On/Off). The LEDs on the board show you were you must place the
figure back. A note is also displayed at the bottom of the screen.
Example: (move the white bishop from h4 to g5).
3.5.2 Undoing additional moves or a sequence of moves
You can also take back additional moves or a longer sequence of moves.
If you wish to undo a longer sequence, you do not have to replay every single move on the
board. For example, if you wish to take back the last seven moves played, press the
clockwise arrow button (the button underneath On/Off) seven times. Then restore the
desired position. If you need help with this, use the VERFY function. See chapter 5.13.
3.5.3 Continuing the game
You can continue the game from the current position at any time. If it is your colour’s turn
to make a move, make your move, or press MOVE to instruct the computer to make a move
(see 5.2). The computer then assumes the current colour.
3.5.4 Replaying moves
You can use the anticlockwise arrow button (the button underneath the backlight button) to
replay a move or sequence of moves that you retracted. You can either follow the LEDs and
carry out each move again, or replay a whole sequence and then set the figures in the
appropriate positions.
3.6 End of game and possible game outcomes
The computer announces the end of the game with a series of beeps.
The result is shown on the display:
10
Mate: Checkmate
Stale: Stalemate
Drawx3: Three times repeat position
Draw50m: 50 moves rule
DrawMat: No checkmate situation possible (neither side would be able to
achieve checkmate)
TooLong: The game cannot continue, as the maximum memory would be
exceeded (maximum: approximately 220 moves per side).
3.7 Saving or deleting scores
3.7.1 Switching off and playing again later
When you switch the device off, it remembers the current score.
When you switch the device on again, you can carry on again from where you were.
3.7.2 Deleting all data
If you wish to delete all previous data:
1. Disconnect the device from the power supply.
2. Keep RED pressed and reconnect the device to the power supply.
3. Keep RED pressed until the start screen appears (for more information on the start
screen, see 0)
3.8 Returning to a game
Provided you have not started a new game, ie have not yet made the first move in a new
game, the old game remains saved.
You can replay the most recent game. See chapter 3.5.
3.9 Starting a new game
You can start a new game at any time.
Exception: If certain functions are being carried out. See chapter 5.
To begin a new game, press the NEW button.
The computer asks, ‘New game?’.
Press GREEN to confirm and to begin a new game.
Alternatively, press RED to cancel and not start a new game.
11
4 The info screens
4.1 Switching between info screens
The computer offers five different screens: Large clock, score, analysis, permanent brain and
small clock.
You can switch between the different screens.
To do so, use the left arrow and right arrow buttons.
From any info screen, press GREEN to access the menu containing special functions. See
chapter 5.
4.2 Info screen: Large clock
This display shows the current times for white and black.
In the normal, fun and easy levels (see chapter 5.4 for descriptions of the levels and how to
select them), the current elapsed time is shown.
In the blitz, tournament and user levels, the clock counts backwards, so shows the time
remaining until the next countdown begins.
4.3 Info screen: Score
German: English:
This screen shows the most recent moves.
Press the up arrow or down arrow buttons to switch directly between the ‘Large clock’
and ‘Score’ screens.
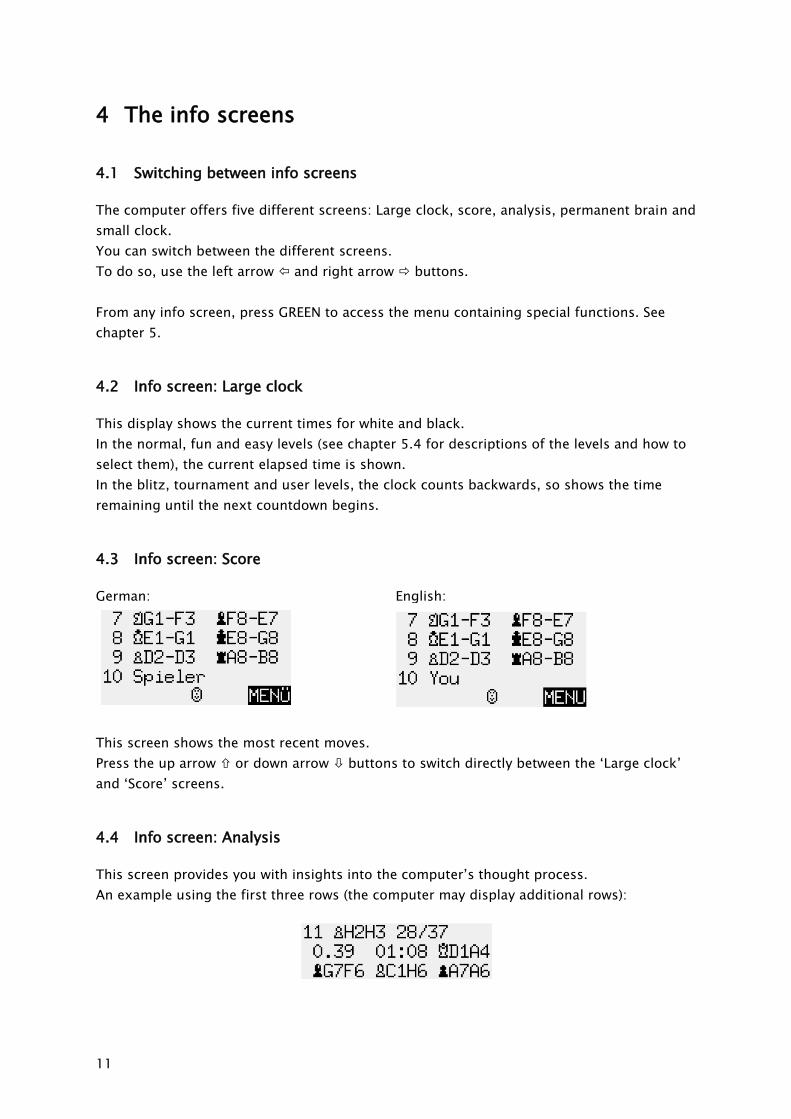
4.4 Info screen: Analysis
This screen provides you with insights into the computer’s thought process.
An example using the first three rows (the computer may display additional rows):

12
The current ‘search depth’ is indicated by the figure at the top left: The computer is
currently calculating the next 11 moves. (A move is a single move from white or black.)
In this example, there are 37 possible moves for this position. The computer is currently
analysing the move pawn h2–h3. This is the 28th move that it has analysed.
The best move that the computer has found up to now is queen d1–a4. What’s more, it
regards the best subsequent move for both sides to be the following move: Bg7–f6; Bc1–h6;
a7–a6.
0.39 is the computer’s assessment. It believes that it has a slight advantage, namely to the
value of 0.39 pawns.
Other examples that could appear in this screen:
-1.89 The computer is behind by nearly 2 pawns.
Book The position is contained in the library (see chapter 5.11.7).
Mate 7 The computer can achieve checkmate in 7 moves.
-Mate 4 The opponent can achieve checkmate in 4 moves.
In the centre of the second row, the computer displays the duration of time it needed to
calculate the best rated move.
Note the meaning of the colon and semi-colon:
01:08 1 minute, 8 seconds
02;26 2 hours, 26 minutes
4.5 Info screen: Permanent brain
When permanent brain is active (see 5.11.5), the computer analyses moves even when it’s
your turn – it analyses the consequences of the move that it regards as your best.
The information it displays is comparable to that in the analysis screen, that is to say, the
first three rows could show the following, for example:
German: English:
In this example, the computer expects you to move 23.b2–b3. It will respond with 23.Ktb6-
d5. What’s more, it also assumes the following moves: 24.Kte5–f3 Ktd5–c3 25.Rd1-d2 Qb4-
a3… etc.
The computer considers itself to have an advantage of 0.56 pawns.
4.6 Info screen: Small clock
This screen shows different information relating to time.
For example, in blitz, tournament or user modes (see 5.4 for explanations), the display
shows the following:
13
German: English:
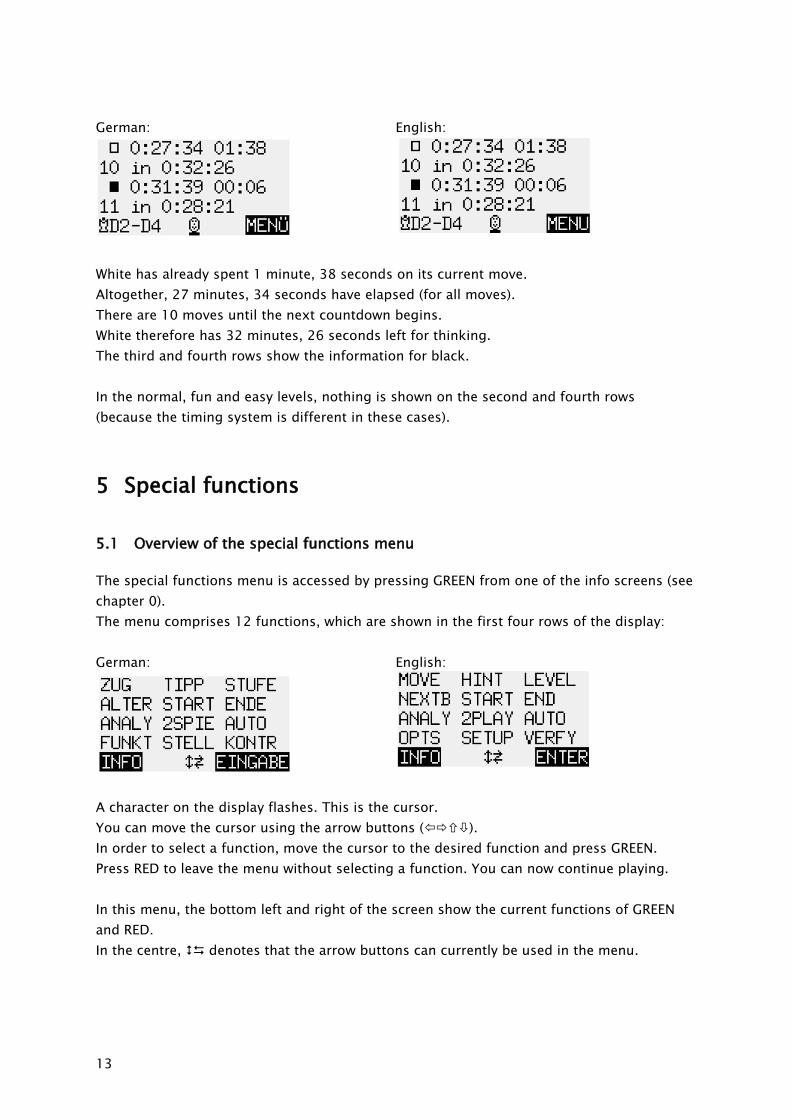
White has already spent 1 minute, 38 seconds on its current move.
Altogether, 27 minutes, 34 seconds have elapsed (for all moves).
There are 10 moves until the next countdown begins.
White therefore has 32 minutes, 26 seconds left for thinking.
The third and fourth rows show the information for black.
In the normal, fun and easy levels, nothing is shown on the second and fourth rows
(because the timing system is different in these cases).
5 Special functions
5.1 Overview of the special functions menu
The special functions menu is accessed by pressing GREEN from one of the info screens (see
chapter 0).
The menu comprises 12 functions, which are shown in the first four rows of the display:
German: English:
A character on the display flashes. This is the cursor.
You can move the cursor using the arrow buttons ().
In order to select a function, move the cursor to the desired function and press GREEN.
Press RED to leave the menu without selecting a function. You can now continue playing.
In this menu, the bottom left and right of the screen show the current functions of GREEN
and RED.
In the centre, denotes that the arrow buttons can currently be used in the menu.

14
5.2 Menu: MOVE, prompt a move
When it’s your move and you select MOVE, the computer plays the next move, and you can
assume the other colour.
If you would like the computer to play white, select MOVE to begin the game.
If it is the computer’s move and you select MOVE, the computer breaks off its calculations
and immediately plays its move.
5.3 Menu: HINT, in order to have a move suggested to you
Select HINT for the computer to suggest a move to you. The move is shown on the display.
The LEDs also show you the move. The starting square and target square flash in
alternation.
Press RED. The note on the display disappears and the LEDs go out. You can now decide
whether to follow the advice or play another move instead.
5.4 Menu: LEVEL, the various play levels
5.4.1 Overview of playing levels
The computer offers seven different levels of play:
Normal, blitz, fun, easy, tournament, user and find mate.
The following section describes how to choose a level. The levels are then described.
5.4.2 Selecting a playing level
When you select LEVEL from the menu, the current level is shown, for example *Normal 0.
The * in front of the level flashes.
Press GREEN. The * is replaced by . You can now change the level.
If required press RED to return to the menu.
To choose the normal, blitz, fun, easy, tournament, user and find mate levels:
Press the up arrow or down arrow until the desired level is shown.
Press the left arrow or right arrow until the desired level number (eg Normal 2
or Normal 5) is shown.
Note: For ‘find mate’, there are no individual level numbers. Simply select ‘Find
mate’.
Press GREEN to confirm. The sign is replaced by *.
If required press RED to return to the menu.
To choose the user level:
Press the up arrow or down arrow until the desired level (‘User’) is shown. Make
your settings, as described in the ‘User’ section (see 5.4.8).
15
5.4.3 Normal level (0–9)
The computer takes a certain average amount of time per move. The average is determined
over a sequence of 20 moves. At Normal 0, the computer moves virtually immediately. At
Normal 9, the average time per move is 2 minutes.
5.4.4 Blitz level (0–8)
These levels simulate ‘Bullet’, ‘Blitz’ or ‘Rapid’. The computer and the human player must
make all their moves within a certain period of time. At Blitz 0, this time period
is two minutes; at Blitz 8, an hour.
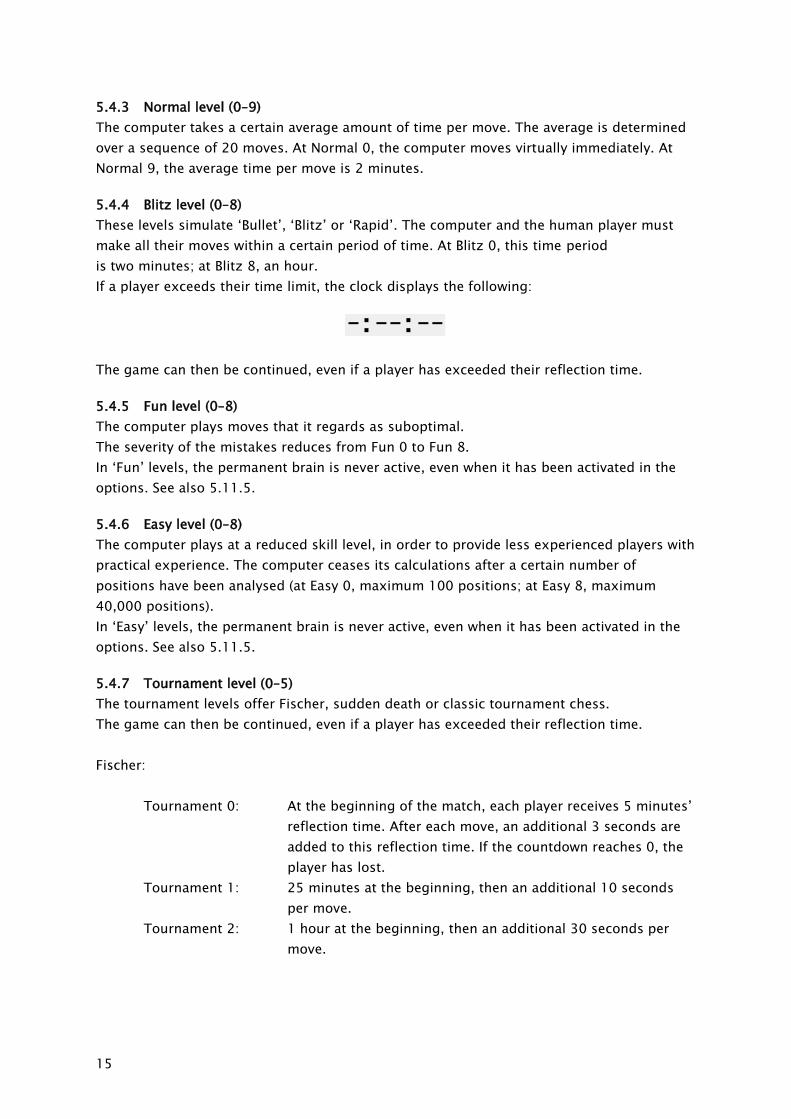
If a player exceeds their time limit, the clock displays the following:
The game can then be continued, even if a player has exceeded their reflection time.
5.4.5 Fun level (0–8)
The computer plays moves that it regards as suboptimal.
The severity of the mistakes reduces from Fun 0 to Fun 8.
In ‘Fun’ levels, the permanent brain is never active, even when it has been activated in the
options. See also 5.11.5.
5.4.6 Easy level (0–8)
The computer plays at a reduced skill level, in order to provide less experienced players with
practical experience. The computer ceases its calculations after a certain number of
positions have been analysed (at Easy 0, maximum 100 positions; at Easy 8, maximum
40,000 positions).
In ‘Easy’ levels, the permanent brain is never active, even when it has been activated in the
options. See also 5.11.5.
5.4.7 Tournament level (0–5)
The tournament levels offer Fischer, sudden death or classic tournament chess.
The game can then be continued, even if a player has exceeded their reflection time.
Fischer:
Tournament 0: At the beginning of the match, each player receives 5 minutes’
reflection time. After each move, an additional 3 seconds are
added to this reflection time. If the countdown reaches 0, the
player has lost.
Tournament 1: 25 minutes at the beginning, then an additional 10 seconds
per move.
Tournament 2: 1 hour at the beginning, then an additional 30 seconds per
move.
16
Sudden death:
Tournament 3: Each player must make their first 30 moves within an hour,
and then receives 30 minutes to complete the game.
Tournament 4: The first 40 moves within two hours, and then 30 minutes to
complete the game.
Classic:
Tournament 5: Each player must make 40 moves within the first two hours,
then 20 moves per hour.
5.4.8 User level
This mode enables you to specify your own timing system.
For example:
You would like the players to receive 1½ hours for their first 42 moves, and then 15 minutes
for each additional 7 moves, with an additional increment of 15 seconds per move.
After you have selected the ‘User’ level via the GREEN button (as described under ‘Selecting
a playing level’ in 5.4.2), the display shows the following:
German: English:
There are six different parameters. A * can be seen before each parameter.
The flashing * is the cursor. Move the cursor using the arrow buttons.
Move the cursor to the left-hand parameter in the second row. This is the number of
moves for the first countdown.
Press GREEN. The * is replaced by . You can now change the parameters using the
direction buttons. Left arrow or right arrow increases/reduces the number by an
increment of one. Up arrow or down arrow increases/reduces the number by an
increment of ten. The largest possible setting is ‘ALL’. This is the setting that follows
50.
Once you have reached 42 (in this example), press GREEN to confirm. is replaced
by *.
Move the cursor to the second parameter in the second row. This is the time (in
h:mm:ss) for the first countdown.
Press GREEN. The * is replaced by . You can now change the parameters using the
direction buttons. Left arrow or right arrow increases/reduces the number by
one minute. Up arrow or down arrow increases/reduces the number by ten
minutes.
17
Once you have reached 1:30:00 (in this example), press GREEN to confirm. is
replaced by *.
The parameters in the third row are the moves and the time for the second and third
countdown(s). Change these parameters to 7 and 15 (in this example), in the same
way as you adjusted the other parameters.
Move the cursor to the fourth row. This is the increment (in mm:ss). Press GREEN.
Left arrow or right arrow increases/reduces the increment by one second. Up
arrow or down arrow increases/reduces the increment by ten seconds.
Once you have reached 00:15 (in this example), press GREEN to confirm.
You have now set your own user level.
The display now shows the following:
German: English:
Press RED to return to the menu.
5.4.9 Find mate level
The computer searches for the quickest way to achieve checkmate from the given position.
It only moves if it has found a possibility of achieving checkmate.
5.5 Menu: NEXTB, to be shown an alternative move
With NEXTB (= next best), the computer undoes its last move, and instead plays the move
that it regarded as being next best. The LEDs and the display show you how to undo the last
move and make the new one.
You can choose NEXTB repeatedly in order to perform the third best, fourth best etc moves.
5.6 Menu: START, to undo all moves
START enables you to undo all moves at once (see 3.5). Press the arrow button to replay
one move after the other, in order to view the whole game as it happened.
5.7 Menu: END, to go back to the current position
If you have revoked moves, selecting END achieves the opposite of START. Select END to
return directly to the current state of play. The LEDs on the chessboard and the VERFY
function (see 5.13) assist you in placing the figures.
18
5.8 Menu: ANALY, to analyse the current position
With ANALY (= analyse), the computer doesn’t make any more moves, and instead analyses
the current state of play. You can make moves for white and black in turn, and view the
analyses on the analysis screen (see 4.4).
is shown in the display, to show that the computer is in analysis mode. The symbol
changes size, becoming alternately larger and smaller.
To leave analysis mode, either select ANALY once more, or give the MOVE instruction.
5.9 Menu: 2PLAY, two player mode
This function enables a game between two human opponents. In two player mode, the
computer doesn’t perform any analyses. If merely checks whether moves are permitted,
records the score and serves as a chess clock.
The display shows two faces , to indicate that the computer is in two player mode. To
leave two player mode, either select 2PLAY once more, or give the MOVE instruction.
5.10 Menu: AUTO, the computer plays against itself
In this mode, the computer assumes both roles and plays against itself. Particularly at the
start of the game, play can be very fast. Before you carry out a move for white, the LEDs and
display can already be showing the response for black, and then the following moves for
both sides. As soon as the tempo slows down, you can use the VERFY function (see 5.13) to
set down the figures in the current position.
5.11 Menu: OPTS, the advanced options
5.11.1 Overview of the advanced options
OPTS offers 9 parameters that you can configure.
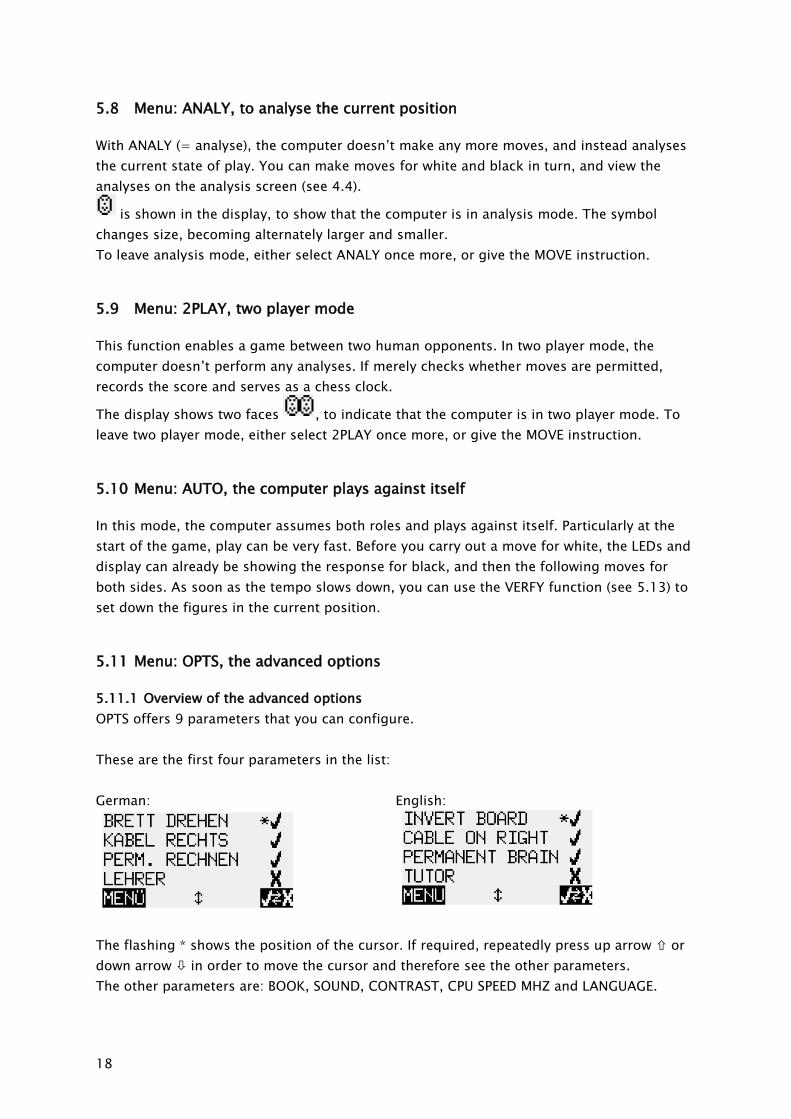
These are the first four parameters in the list:
German: English:
The flashing * shows the position of the cursor. If required, repeatedly press up arrow or
down arrow in order to move the cursor and therefore see the other parameters.
The other parameters are: BOOK, SOUND, CONTRAST, CPU SPEED MHZ and LANGUAGE.

19
5.11.2 Changing an option
The first four parameters (INVERT BOARD, CABLE ON RIGHT, PERMANENT BRAIN and TUTOR)
can only be switched on or off. A means it is active, and X means it is inactive. To switch
between active and inactive:
Use the arrow buttons to move the cursor to the relevant row.
Press GREEN.
To change BOOK, SOUND, CONTRAST, CPU SPEED MHZ and LANGUAGE, proceed as follows:
Use the arrow buttons to move the cursor to the relevant row.
Press GREEN. The flashing * is replaced by .
Press the up arrow or down arrow to move between the various settings options.
Once your desired setting has been made, press GREEN. is replaced by *.
Then press RED to return to the menu.
5.11.3 OPTS: INVERT BOARD
When, as usual, white plays from bottom to top, the first row shows the following:
German: English:
If, instead, you want black to play from bottom to top, change the X to a (see 5.11.2). Set
the figures down in their new positions. The VERFY function (see 5.13) can help you with
this.
However, this function is not necessary at the start of a game. The computer automatically
detects whether white or black is playing from the front, that is to say, whether the board is
inverted or not.
5.11.4 OPTS: CABLE RIGHT
The computer assumes that, as you look at the chessboard, the Millennium logo is facing
you and that the cable to the chessboard is at the right-hand side. If you would like to
physically rotate the board 180°, so that the cable/chess clock to your left, change the to
an X (see 5.11.2).
In this instance, an X next to INVERT BOARD (see 5.11.3) means that white plays from your
side.
5.11.5 OPTS: PERMANENT BRAIN, permanent calculation
If you set permanent brain to ‘on’, ie (see 5.11.2), the computer analyses moves even
when it’s your turn. See also 4.5.
A way of reducing the computer’s playing skill is to switch this function off (to X).
In the ‘Fun’ and ‘Easy’ levels, the computer doesn’t make permanent calculations, even if
this option is activated. Only when you switch to a level other than ‘Fun’ or ‘Easy’ will the
computer switch back to using its permanent brain during your move, therefore playing with
increased skill. (See 5.4 for information on the different levels).

20
5.11.6 OPTS: TUTOR
Use the tutor function if you would like the computer to point out your errors.
If tutor mode is enabled (with , see 5.11.2), and the computer thinks you have made a
weak move, the display shows a warning.
Example:
German: English:
In this example, the computer shows that your move gives it an advantage of 3.78 pawns.
(See also analysis screen 4.4.)
The display shows the following moves that the computer has calculated, starting with Qg5–
e3.
Press RED and undo your move (see also 3.5), or press GREEN if you would nevertheless like
to carry out your move.
5.11.7 OPTS: BOOK
The computer features opening libraries containing standard openings.
The computer is supplied with two pre-installed libraries. You can also install a third library
via USB (see chapter 6). Note: Because the opening library books for the ChessGenius
Exclusive must maintain a certain format, please register your device, so that we can keep
you informed about any changes to these specifications.
The following options are possible:
Classic Classic London Book
Master Master Book
User If you have installed a third book via USB
Off The computer plays without an opening library
To configure, see 5.11.2.
5.11.8 OPTS: SOUNDS
The following options are possible:
Loud
Medium
Quiet
Off (Mute)
To configure, see 5.11.2.
5.11.9 OPTS: CONTRAST
You have a choice of ten different LCD contrast settings.
To configure, see 5.11.2.
21
5.11.10 OPTS: CPU SPEED MHZ, calculation speed
If you would like to make your game against the computer easier, you can change its
calculation speed. You have the choice of six options, from 50 to 300 MHz. To configure,
see 5.11.2.
5.11.11 OPTS: LANGUAGE
You have a choice of seven different languages. See also 0.
To configure, see 5.11.2.
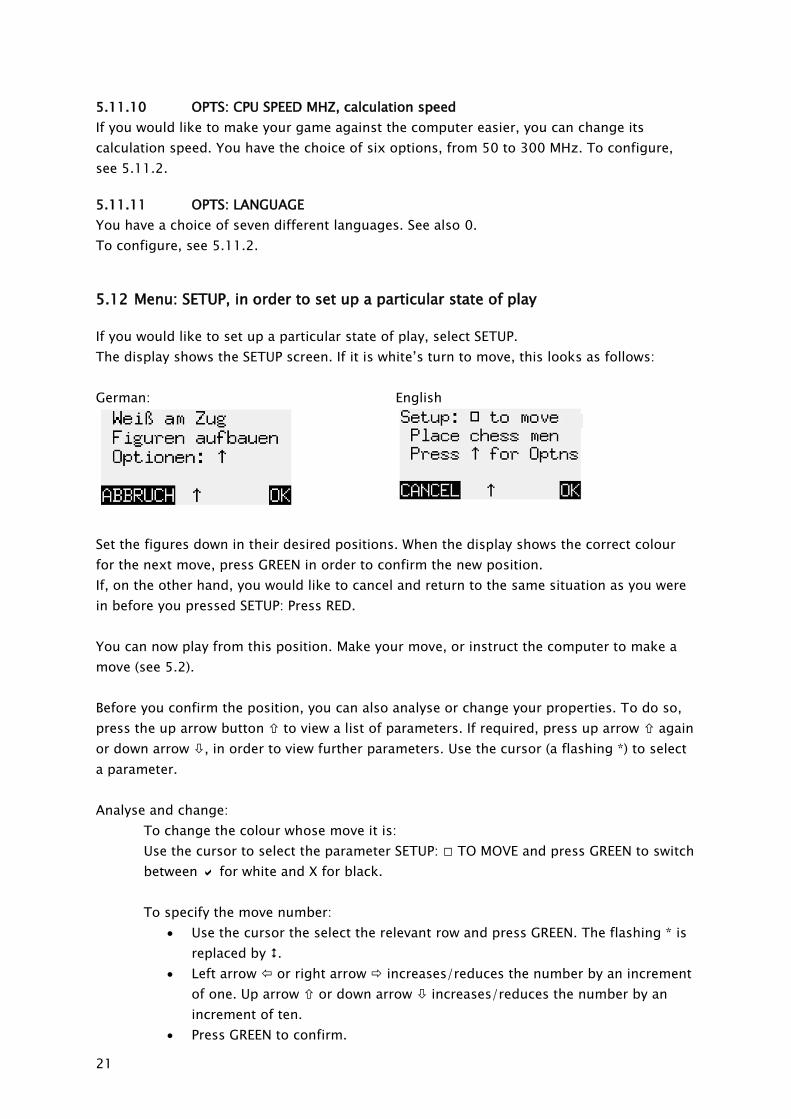
5.12 Menu: SETUP, in order to set up a particular state of play
If you would like to set up a particular state of play, select SETUP.
The display shows the SETUP screen. If it is white’s turn to move, this looks as follows:
German: English
Set the figures down in their desired positions. When the display shows the correct colour
for the next move, press GREEN in order to confirm the new position.
If, on the other hand, you would like to cancel and return to the same situation as you were
in before you pressed SETUP: Press RED.
You can now play from this position. Make your move, or instruct the computer to make a
move (see 5.2).
Before you confirm the position, you can also analyse or change your properties. To do so,
press the up arrow button to view a list of parameters. If required, press up arrow again
or down arrow , in order to view further parameters. Use the cursor (a flashing *) to select
a parameter.
Analyse and change:
To change the colour whose move it is:
Use the cursor to select the parameter SETUP: □ TO MOVE and press GREEN to switch
between for white and X for black.
To specify the move number:
Use the cursor the select the relevant row and press GREEN. The flashing * is
replaced by .
Left arrow or right arrow increases/reduces the number by an increment
of one. Up arrow or down arrow increases/reduces the number by an
increment of ten.
Press GREEN to confirm.
22
To specify whether (for example) black has the right to castle queen’s side:
Use the cursor to select the row ‘■ 0-0-0’. Press GREEN to switch between for yes
and X for no.
When you have made your desired changes, press RED to return to the SETUP screen.
Note: You cannot confirm the new position if a king is missing or if a pawn is in the first or
eighth row.
In such instances, the bottom row of the display will alert you with:
or
Note: The first move in the state of play that you have set up cannot be an en passant
capture. In order to set up a state of play in which such a move is possible, set up the
immediately preceding position instead, then carry out the move that permits the en passant
capture.
5.13 Menu: VERFY, to display the current position
VERFY shows you half of the chessboard (= four rows) in graphical form, with the figures in
the correct current position. To switch between the two halves of the chessboard, press the
up arrow or down arrow .
This function can help you examine the position of the figures on the chessboard if you are
unsure.
Press RED to return to the menu.
6 USB mode – Connect to a PC
If you wish to use the USB functions, please register with MILLENNIUM 2000 (see the
enclosed sheet) so that we can inform you about changes and/or software upgrades relating
to the ChessGenius Exclusive. On our website, we also provide additional information about
the USB functions.
You can connect the computer unit to a PC or laptop.
To do so, you will need an A to B USB cable (not supplied). This is the type that is used for
printers, for example.
Connect the USB cable to the centre socket on the rear of the computer unit and to your PC
or laptop.
You can:
Install an updated chess program onto the ChessGenius Exclusive. See our
website for more information.
Store a new opening library (see 5.11.7). See our website for more information.
Import and export games. See our website for more information.

23
Website: http://www.millennium2000.de
7 Disposal
Dispose of packing materials in an environmentally friendly manner by using the
relevant collection containers provided for the purpose.
According to EC Directive 2012/19/EU, the device must be disposed of properly at
the end of its service life. Suitable parts of the device will then be recycled, reducing
environmental pollution. For more information, please contact your local waste
disposal company or your municipal administration.
8 Warranty, servicing and import
Details of warranty conditions, warranty handling and other service information can be
found on the warranty card that is included separately with the device.
If you purchased the product in a country other than Germany, Austria or Switzerland,
please contact the dealer where you bought the product.
If you no longer have your warranty card available, please contact our office in Germany,
either by telephone or via our website [email protected].
Product development & import by
MILLENNIUM 2000 GmbH
Heisenbergbogen 1 (Dornach)
85609 Aschheim, Germany
www.millennium2000.de

24
9 Technical specifications
PRODUCT: ChessGenius Exclusive chess computer
Operates with the enclosed AC adaptor
ITEM NO: M820
HARDWARE: ARM Cortex M7
CPU configurable from 50–300 MHz
SOFTWARE: Chess program ChessGenius Copyright © Lang Software Limited (UK)
Opening library (Master Book) Copyright © Applied Computer Concepts Ltd.
(UK)
LIBRARY: Classic London Book (approx 57,000 positions)
New Master Book (approx 300,000 positions)
NOTE: This product is not protected against the effects of electrostatic charges, strong
electromagnetic radiation or other electrical interference, as malfunctioning as a result of
these conditions is not critical.
Modification of specifications (especially in respect of technical advances) reserved and
errors excepted.
This user manual was carefully compiled, and its contents carefully checked for accuracy. If,
despite all expectation, these instructions nevertheless contain errors, this shall not
constitute grounds for any claims. This user manual, including excerpts thereof, may not be
reproduced without prior written permission.
Copyright © 2017, MILLENNIUM 2000 GmbH, Aschheim, Germany.