conservative dentistry master key & explanations ans. 1...
TRANSCRIPT

Ans. 1 Ref: Sturdevant, 5th/304 – 306 Resistance form is obtained by: 1. Relatively flat pulpal and gingival floors. 2. Box shaped cavity 3. Inclusion of weakened tooth structure. 4. Rounded internal line angles. 5. Adequate thickness of restorative material.6. Reduction of cusps for capping when indicated. Deepening of pulpal floor increases the resistance form by increasing the bulk of restoration.
A. Resistance form of tooth provided by flat pulpal and gingival floor (B) In close of rounded pulpal floor, the rocking m
tion of restoration results in wedging force which may result in failure of restoration
Restrict the extensions of external wall so as to have strong marginal ridge area
Conservative Dentistry Master Key & Explanations
Relatively flat pulpal and gingival floors.
Adequate thickness of restorative material. Reduction of cusps for capping when indicated.
Deepening of pulpal floor increases the resistance form by increasing the bulk of restoration.
Resistance form of tooth provided by flat pulpal and gingival floor (B) In close of rounded pulpal floor, the rocking mtion of restoration results in wedging force which may result in failure of restoration
wall so as to have strong marginal ridge area
Resistance form of tooth provided by flat pulpal and gingival floor (B) In close of rounded pulpal floor, the rocking mo-

Sharp line angle and cavosurface margins can lead to poor resistance form because of concentration of stresses at that point Factors affecting resistance form: • Amount of occlusal stresses • Type of restoration used • Amount of remaining tooth structure Features of resistance form: • A box shaped preparation • A flat pulpal and gingival floor, which helps the tooth to resist occlusal masticatory forces without any displacement. • Adequate thickness of restorative material depending on its respective compressive and tensile strength to prevent fracture of
both the remaining tooth structure and restoration. In case of class IV preparations, we check the width of faciolingual narrness of anterior teeth, to establish the resistance form.
• Restrict the extension of external walls to allow strong marginal ridge areas with sufficient dentin support. • Inclusion of weakened tooth structure to avoid fracture under masticatory forces • Rounding of internal line angle to reduce stress concentration points in tooth preparation. • Consideration to cusp capping depending upon the amount of remaining tooth structure. Resistance form also depends upon type of restorative material being used. For example, high copper amathickness of 1.5 mm, cast metal requires thickness of 1.0 mm and porcelain requires a minimum thickness of 2.0 mm to resist fThe composite restoration and glass ionomer restorations are more dependent on occlusal wear potentirequire thickness of more than 2.5 mm.
Sharp line angle and cavosurface margins can lead to poor resistance form because of concentration of stresses at that point
A flat pulpal and gingival floor, which helps the tooth to resist occlusal masticatory forces without any displacement. restorative material depending on its respective compressive and tensile strength to prevent fracture of
both the remaining tooth structure and restoration. In case of class IV preparations, we check the width of faciolingual narrto establish the resistance form.
Restrict the extension of external walls to allow strong marginal ridge areas with sufficient dentin support. Inclusion of weakened tooth structure to avoid fracture under masticatory forces
gle to reduce stress concentration points in tooth preparation. Consideration to cusp capping depending upon the amount of remaining tooth structure.
Resistance form also depends upon type of restorative material being used. For example, high copper amathickness of 1.5 mm, cast metal requires thickness of 1.0 mm and porcelain requires a minimum thickness of 2.0 mm to resist fThe composite restoration and glass ionomer restorations are more dependent on occlusal wear potenti
Sharp line angle and cavosurface margins can lead to poor resistance form because of concentration of stresses at that point
A flat pulpal and gingival floor, which helps the tooth to resist occlusal masticatory forces without any displacement. restorative material depending on its respective compressive and tensile strength to prevent fracture of
both the remaining tooth structure and restoration. In case of class IV preparations, we check the width of faciolingual narrow-
Restrict the extension of external walls to allow strong marginal ridge areas with sufficient dentin support.
Resistance form also depends upon type of restorative material being used. For example, high copper amalgam requires minimal thickness of 1.5 mm, cast metal requires thickness of 1.0 mm and porcelain requires a minimum thickness of 2.0 mm to resist fracture. The composite restoration and glass ionomer restorations are more dependent on occlusal wear potential of restorative area and usually

Ans. 2 <b>Ref: Phillips, 11th/482 – 484; Sturdevant, 5th/570 – 574</b><br><br> <b>Resin Modified Glass Ionomer</b><br> It was first introduced as Vitrebond (3M) in powder liquid system to incorporate the best properties of both glass ionomer cement and composite resin. In this system, powder is fluorosilicate glass with photointiator or chemical initiator. The liquid contains 15 to 25% resin component in the form of HEMA, a polyacrylic acid copolymer along with photointiator and water.<br> Advantages of Resin Modified Glass Ionomer Cements:<br> RMGIs show combined advantages of both composites and glass ionomers. There are<br> • Extended working time<br> • Control on setting<br> • Good adaptation<br> • Chemical adhesion to enamel and dentin<br> • Fluoride release<br> • Improved aesthetics<br> • Low interfacial shrinkage stress<br> • Superior strength characteristics<br> Disadvantages of Resin Modified Composites:<br> • Shrinkage on setting<br> • Limited depth of cure especially with more opaque lining cements Ans. 3 <b>Ref: Vimal Sikri, 2nd/362; Sturdevant, 5th/246 – 248</b><br><br> Acid etching affects the enamel in the following ways:<br> • Removes pellicle to expose the inorganic crystalline component<br> • Creates a porous layer, the depth of the pores range from 5-10 µm<br> • Raises the surface area and increases the wettability<br> • Raises the surface energy Ans. 4 Ref: Phillips, 11th/458 Film Thickness (µm) Zinc phosphate 20 ZOE, Type I 25 ZOE + alumina + EBA (Type II) 25 ZOE + polymer (Type II) 32 Silicophosphate 25 Resin cement <25 Polycarboxylate 21 Glass ionomer 24

Ans. 5 <b>Ref: Sturdevant, 5th/849 – 871</b><br><br> • The facial and lingual margins on occlusal surface frequently must be extended towards the cusp tips to the extent of existing
restorative materials and to uncover caries<br> • Undermined occlusal enamel should be removed because it is weak; moreover, removing such enamel provides access for proper
excavation of caries<br> • When the occlusal outline is extended up the cusp slopes more than half the distance from any primary occlusal groove (central,
facial or lingual) to the cusp tips, capping the cusp should be considered<br> • If the preparation outline is extended two thirds of this distance or more, capping the cusp is usually necessary to (A) protect the
weak, underlying cuspal structure from fracture caused by masticatory forces and to (B) remove the occlusal margin from a re-gion subjected to heavy stress and wear<br>
Inlay preparation : <br> Definition<br> - Inlay: Is a restoration that is fabricated by an indirect procedure, involves one or more tooth surfaces and may cap one or more
cusps but not all cusps. <br> - Onlay: Is similar to inlay but caps all cusps. <br> Class II inlay (cast metal): Tooth preparation Procedure: Main points: <br> - Burs used: No 271 and No. 169 L. <br> - Initial cavity preparation is done much like that for Cl II amalgam with following differences : <br>
o Initial occlusal entry cut depth is 1.5 mm. <br> o All cavity margins must diverge occlusally by 2-5° : 2° when vertical walls of cavity are short and 5° when these walls are
long. <br> At this time, the proximal box margins should clear adjacent tooth by 0.2- 0.5 mm (0.5 ± 0.2 mm is ideal). <br> - Preparation of bevels and flares : <br>
o Primary and secondary flares are given on facial and lingual proximal walls thus forming the walls in 2 planes. The second-ary flare widens the proximal box which initially had a clearance of 0.5 mm from adjacent tooth. It results in:
i) Placing the marginal metal in the embrasure area where it is much more self-cleansing and easily accessible for cleaning and polish-ing without removal of excessive amount of dentin. <br>
ii) Marginal metal of 40° : Which is easily burnishable and yet strong enough. <br> iii) Enamel margin of 140° : Which makes enamel margin more blunted and stronger. <br> Note that these secondary flares are omitted on mesiofacial proximal walls of maxillary premolars and Ist molars for esthetic reasons<br> - Gingival bevels: Should be 0.5-1 mm wide & should blend with the secondary flare. They should result in a marginal metal of 30°.
These bevels serve the following purpose :- <br> I. Weak enamel is removed<br>
II. Result in a 30° marginal metal which is burnishable<br> III. A lap sliding fit is produced at the gingival margin. <br>
- Occlusal bevels: They are present on cavosurface margins of cavity on occlusal surface. Their width should be approx 1/4th the depth of the respective wall. The resultant metal margin should be 40°.<br> • Capping cusps : <br>
- Indicated when more than 1/2 cusp is involved & mandatory when 2/3rd or more is involved. <br> - Advantages: <br>
I. Removes weak enamel<br> II. Remove cavity margin from occlusal areas which are subjected to heavy forces<br>
III. Aids in visualizing the extent of caries thus increases convenience form. <br> - The cusp reduction must provide for a uniform 1.5 mm metal thickness over reduced cusps. Over maxillary premolar & 1st molar
reduction of facial cusp should be 0.75-1 mm for esthetic reasons. <br> - Reverse bevel (counter bevel) : Is the bevel given on margins of the reduced cusp. Its width varies because it must extend beyond
any occlusal contact with the opponent teeth. It should result in a marginal metal of 30°.<br> - Cusp reduction appreciably decreases the retention form because of decrease in vertical wall height of cavity. Hence proximal reten-
tive grooves usually are recommended. Retention & resistance form are also increased by use of collar & skirt features.

Ans. 6 Ref: Phillips, 11th/471; Sturdevant, 5th/215 – 220 GIC Liquid The liquid is an aqueous solution of polymers and copolymers of acrylic acid. Originally, the liquid for GIC was aqueous solution of polyacrylic acid in a concentration of about 40% to 50%. The liquid was quite viscous and had tendency to gel over time.
Composition of liquid • Polyacrylic acid (Itaconic acid, Maleic acid) 40 – 50 % • Tartaric acid 6 – 15% • Water 30%
To decrease the viscosity of liquid, itaconic and tricarboxylic acids were added to the liquid. These acids tend to: • Decrease the viscosity. • Promote reactivity between the glass and liquid. • Prevent gelation of the liquid which can result from hydrogen bonding between two polyacrylic acid chains. Polymaleic acid is often present in the liquid. It is a stronger acid than polyacrylic acid and causes the cement to harden and lose its mois-ture sensitivity faster. This occurs because polymaleic acid has more caryboxyl (COOH) groups which lead to more rapid polycarboxylate crosslinking. This also allows more conventional, less reactive glasses to be used which results in more aesthetic final set cement. Tartaric acid is also present in the liquid. It improves handling characteristics and increases the working time, but it shortens the setting time. The viscosity of tartaric acid-containing cement does not generally change over shelf life of the cement. However, a viscosity change can occur if the cement is out of date. Ans. 7 <b>Ref: Sturdevant, 5th/205; Phillips, 11th/298</b><br><br> UV light activated system: <br><br> • Curing occurs due to activation of Benzoin methyl ether when exposed to UV light. <br> • Potential health hazard to clinician and patient by UV light. <br> • Retinal and soft tissue damage. <br> • Intensity of light source gradually decreases in strength with use. <br> • Require more time to cure – 60 secs. <br> • It can cure to a thickness of 1.5 mm. whereas visible light can cure to 2 mm. Ans. 8 <b>Ref: Sturdevant, 5th/312 – 313</b><br> Locks for amalgam and grooves for cast metal restorations provide additional retention for proximal portions of tooth preparations. <br>They also increase the resistance form. These are placed in the axiofacial and axiolingual line angles 0.2 mm inside the DEJ. <br>They are started at the axiofaciogingival (or axio linguo gingival) point angle and terminated at the axio facio pulpal (or axio pul-pal) point angle. <br> High copper amalgam alloys (that include occlusal dovetail) do not require locks in preparation as they exhibit less creep. <br> 1. Amalgam : Retention is increased in amalgam restoration by the following: <br>
• Providing occlusal convergence (about 2 to 5%) to the dentinal walls towards the tooth surface. <br> • Giving slight undercut in dentin near the pulpal wall. <br> • Conserving the marginal ridges. <br> • Providing occlusal dovetail <br>
2. Cast metals: Retention is increased in cast restorations by the following: <br> • Close parallelism of the opposing walls with slight occlusal divergence of two to five degrees. <br> • Making occlusal dovetail to prevent tilting of restoration in class II preparations. <br> • Use of secondary retention in the form of coves, skirts and dentin slot. <br> • Give reverse bevel in class I compound, class II and MOD preparation to prevent tipping movements. <br>
3. Composites : In composites retention is increased by : <br>
• Micromechanical bonding between the etched and primed prepared tooth structure and the composite resin. <br> • Providing enamel bevels. <br>
4. Direct filling gold: Elastic compression of dentin and starting point in dentin provide retention in direct gold fillings by proper condensation.
Ans. 9 <b>Ref: Phillips, 11th/471</b><br><br> The solubility and disintegration data were obtained by determining the amount of nonvolatile material leached from cement speci-mens during the first 24 hours when they were immersed in water, as prescribed by American Dental Association (ADA) Specification No. 9. <br> It is absolutely contraindicated in mouth breathers. <br> <b>Advantages: </b><br> a) Translucent hence more esthetic and has a life like appearance. <br> b) Adequate strength<br> c) Anticariogenic due to fluoride release. <br> <b>Disadvantages: </b><br> a) Highly acidic due to pH around 3, which causes pulpal irritation. <br> b) Highly soluble in oral fluids. <br> c) Applicable only for anterior restorations. <br> d) Cannot be used in mouth breathers because drying of the cement makes it powdery and opaque. <br> e) Cannot be used in patients consuming high acid fluids. Ans. 10 <b>Ref: Sturdevant, 5th/355 – 356</b><br><br> "Blades on a bur are uniformly spaced with depressed areas between them. These depressed areas are called flutes. Greater the number of blades smoother is the cutting action at low speeds. Also as the number of blades increases, space between two subsequent blades decreases & so bur will cut less of the surface i.e. efficiency is reduced by increased blades on bur." -Sturdevant<br> Remember, <br> • Number of blades on a bur is always even. <br> • Excavating bur - Usually has 6-10 blades<br> • Finishing burs -12-40 blades <br> • Vibrations over 1,300 cycles/seconds. Are practically imperceptible to patient. Fewer the number of bur teeth, greater the ten-
dency for vibration. <br> • Higher RPM produce less amplitude & greater frequency of vibration. <br> • <b>Rake Angle:</b> Angle that the face of blade makes with the radial line from centre of bur to blade. <br> • Cutting efficiency: +ve rake > radial rake > -ve rake. Hence burs with a +ve rake angle are usually desired. <br> • Clogging occurs in burs with +ve rake angle. <br> • <b>Clearance angle:</b>This angle provides clearance between the working & cutting edge. <br> • <b>Run-out:</b> refers to eccentricity or maximum displacement of bur head from its axis of rotation. <br> Average value of clinically acceptable runout is about 0.023 mm. <br> • Minimum & maximum load applied by dentist through bur is : <br>
For low speed – 100 – 1500 gm<br> For high speed – 60 – 120gm<br>
• Diamond stones are hardest & most efficient abrasive stones for removing tooth enamel.
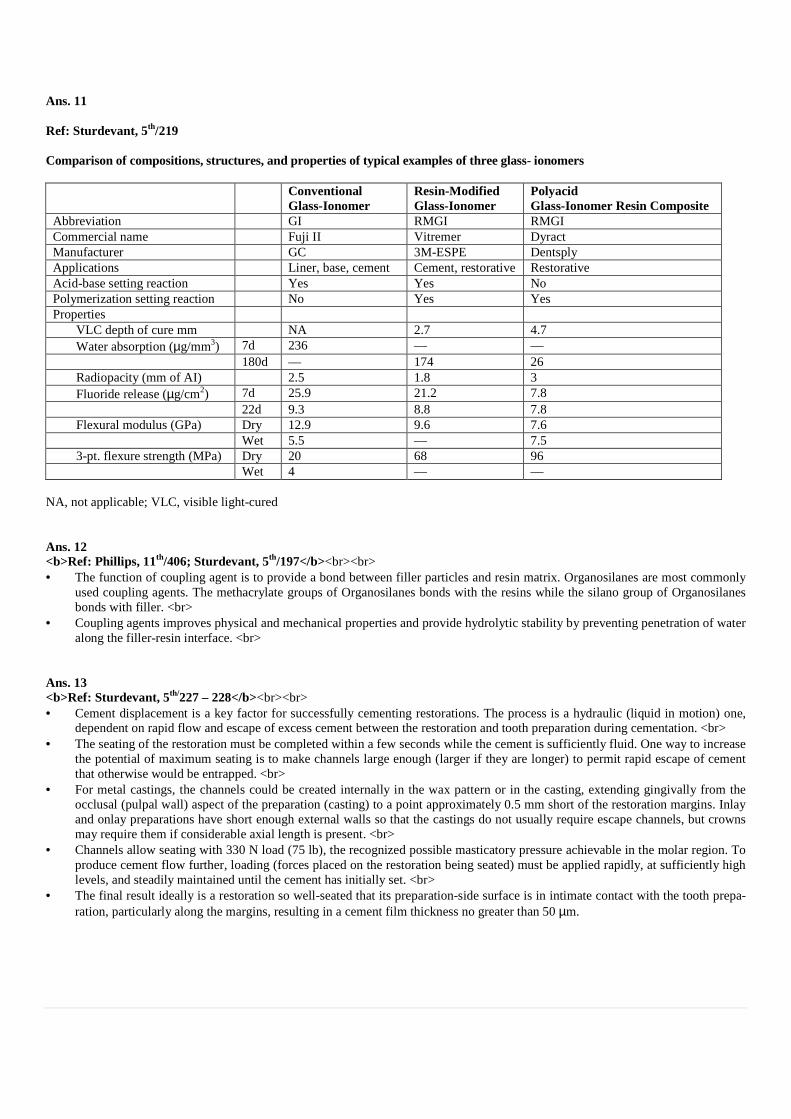
Ans. 11 Ref: Sturdevant, 5th/219 Comparison of compositions, structures, and properties of typical examples of three glass- ionomers Conventional
Glass-Ionomer Resin-Modified Glass-Ionomer
Polyacid Glass-Ionomer Resin Composite
Abbreviation GI RMGI RMGI Commercial name Fuji II Vitremer Dyract Manufacturer GC 3M-ESPE Dentsply Applications Liner, base, cement Cement, restorative Restorative Acid-base setting reaction Yes Yes No Polymerization setting reaction No Yes Yes Properties
VLC depth of cure mm NA 2.7 4.7 Water absorption (µg/mm3) 7d 236 –– –– 180d –– 174 26 Radiopacity (mm of AI) 2.5 1.8 3 Fluoride release (µg/cm2) 7d 25.9 21.2 7.8 22d 9.3 8.8 7.8 Flexural modulus (GPa) Dry 12.9 9.6 7.6 Wet 5.5 –– 7.5 3-pt. flexure strength (MPa) Dry 20 68 96 Wet 4 –– ––
NA, not applicable; VLC, visible light-cured Ans. 12 <b>Ref: Phillips, 11th/406; Sturdevant, 5th/197</b><br><br> • The function of coupling agent is to provide a bond between filler particles and resin matrix. Organosilanes are most commonly
used coupling agents. The methacrylate groups of Organosilanes bonds with the resins while the silano group of Organosilanes bonds with filler. <br>
• Coupling agents improves physical and mechanical properties and provide hydrolytic stability by preventing penetration of water along the filler-resin interface. <br>
Ans. 13 <b>Ref: Sturdevant, 5th/227 – 228</b><br><br> • Cement displacement is a key factor for successfully cementing restorations. The process is a hydraulic (liquid in motion) one,
dependent on rapid flow and escape of excess cement between the restoration and tooth preparation during cementation. <br> • The seating of the restoration must be completed within a few seconds while the cement is sufficiently fluid. One way to increase
the potential of maximum seating is to make channels large enough (larger if they are longer) to permit rapid escape of cement that otherwise would be entrapped. <br>
• For metal castings, the channels could be created internally in the wax pattern or in the casting, extending gingivally from the occlusal (pulpal wall) aspect of the preparation (casting) to a point approximately 0.5 mm short of the restoration margins. Inlay and onlay preparations have short enough external walls so that the castings do not usually require escape channels, but crowns may require them if considerable axial length is present. <br>
• Channels allow seating with 330 N load (75 lb), the recognized possible masticatory pressure achievable in the molar region. To produce cement flow further, loading (forces placed on the restoration being seated) must be applied rapidly, at sufficiently high levels, and steadily maintained until the cement has initially set. <br>
• The final result ideally is a restoration so well-seated that its preparation-side surface is in intimate contact with the tooth prepa-ration, particularly along the margins, resulting in a cement film thickness no greater than 50 µm.

Ans. 14 <b>Ref: Sturdevant, 5th/741</b><br><br> Gingival seat in class II restoration: <br> a) Should extend apical to the proximal contact or caries whichever is greater. <br> b) It should clear the adjacent tooth by 0.5 mm. <br> c) For amalgam restoration the gingival margin is beveled at 15-20° whereas for cast restorations it is beveled at 30-40°. <br> d) If gingival seat is located in root surface, beveling is contraindicated. <br> The facial and lingual walls of the proximal box are extended such that they clear the adjacent tooth by 0.2–0.3 mm. The facial and lingual walls are placed in their respective embrasures. Ans. 15 <b>Ref: Phillips, 11th/298; Sturdevant, 5th/205</b><br><br> The U.V. light curing can cause retinal damage. <br> <b>UV light activated system: </b> <br> • Curing occurs due to activation of Benzoin methyl ether when exposed to UV light. <br> • Potential health hazard to clinician and patient by UV light. <br> • Retinal and soft tissue damages. <br> • Intensity of light source gradually decreases in strength with use. <br> • Require more time to cure – 60 secs. <br> • It can cure to a thickness of 1.5 mm. <br> Ans. 16 Ref: Sturdevant, 5th/50 – 51 Capacity of Motion of the Mandible In 1952, Posselt described the capacity of motion of mandible. Using a system of clutches and flags, he recorded the mandible’s mo-tion. The resultant diagram has been termed Posselt’s diagram. By necessity, the original recordings of mandibular movement were done outside of the mouth, which magnified the vertical dimension, but not the horizontal dimension. Modern systems using digital computer techniques can record mandibular motion in actual time and dimensions, then compute and draw the motion as it occurred at any point in the mandible and teeth. This makes it possible to reconstruct accurately mandibular motion simultaneously at several points. Three of these points are particularly significant clinically – the incisor point, molar point and condyle point. The incisor point is located on the midline of the mandible at the junction of the facial surface of mandibular central incisors and the incisal edge. The molar point is the tip of the mesiofacial cusp of mandibular first molar on a specified side. The condyle point is the center of rotation of mandibular condyle on the specified side.

Capacity of motion of the mandible (Mandible drawings are not to scale with border diagrams)

Ans. 17 Ref: Sturdevant, 5th/250 – 252 Hybridization (Given by Nakabayachi in 1982) Hybridization is the process of formation of hybrid layer. Hybrid layer is phenomenon of formation of resin interlocking in the demin-eralized dentin surface. Hybrid layer is responsible for micromechanical bonding between tooth and the resin. When dentin is treated with a conditioner, it exposes collagen fibril network with interfibrillar microporosites. These spaces are filled with low viscosity monomers when primer is applied. This layer formed by demineralization of dentin and infiltration of monomer and subsequent polymerization is called hybrid layer. Zones of Hybrid Layer Hybrid layer has shown to have three different zones: 1. Top layer: It consists of loosely arranged collagen fibrils and interfibrillar spaces filled with resin. 2. Middle layer: It consists of interfibrillar spaces in which hydroxyapatite crystals have been replaced by resin monomer because
of hybridization process. 3. Bottom layer: It consists of almost unaffected dentin with partly demineralized zone of dentin.
Ans. 18 <b>Ref: Phillips, 11th/401; Sturdevant, 5th/141</b><br><br> Advantages of composites over unfilled resins: <br> • Lower coefficient of thermal expansion. <br> • Low polymerization shrinkage<br> • Low water absorption. <br> • High abrasive resistance. <br> Disadvantages of composites: <br> • Less color stability. <br> • Less smooth finish than unfilled resins.

Ans. 19 <b>Ref: Sturdevant, 5th/420 – 421</b><br><br> Remember the question is talking about occlusal cavity & not proximal cavity. Hence bitewing x-ray is not the answer here. <br> Only 2 choices cause confusion: a & d. But remember bite wing radiographs are more reliable for proximal lesions. Due to heavy su-perimposition of structures on occlusal surface, small lesions of occlusal surface are not readily visible on bitewings. Also radiographs are highly specific but lack sensitivity. Hence incipient (early) occlusal lesion cannot be usually detected on radiographs. As for option D : for proper clinical examination of teeth one needs an explorer & a dry field (but the tooth must not be desiccated) : using com-pressed air gives no advantage; only a dry field is needed as incipient lesion give a chalky surface appearance under such condition. It is also important to use explorer judiciously without applying too much pressure as that itself may cavitated an incipient lesion. As for small occlusal cavity it means a moderate lesion, which may not be visible on a radiograph. Current philosophy for diagnosis of such lesion requires a combined approach which includes the following: <br> 1. Clinical examination: using an explorer gently & judiciously in a clean, dry and well illuminated field<br> 2. Radiographs: Bite wing<br> 3. Transillumination: FOTI Ans. 20 Ref: Sturdevant, 5th/44, 46 Supporting Cusps: The lingual occlusal line of the maxillary teeth and the facial occlusal line of the mandibular teeth mark the locations of the supporting cusps (also termed stamp cusps, centric holding cusps and holding cusps). These cusps contact the opposing teeth in their correspond-ing facio linugal center on a marginal ridge or a fossa. Supporting cusp-central fossa contact has been compared to a mortar and pestle because the supporting cusp cuts, crushes and grinds fibrous food against the ridges forming the concavity of the fossa. Natural tooth form has multiple ridges and grooves ideally suited to aid in the reduction of the food bolus during chewing. During chewing, the highest forces and longest duration of contact occur at MI. Supporting cusps also serve to prevent drifting and passive eruption of the teeth – hence the term holding cusp. Supporting cusps can be identified by five characteristic features: 1. They contact the opposing tooth in MI. 2. They support the vertical dimension of face. 3. They are nearer the faciolingual center of the tooth than nonsupporting cusps. 4. Their outer incline has the potential for contact. 5. They have broader, more rounded cusp ridges than nonsupporting cusps. Because the maxillary arch is larger than the mandibular arch, the supporting cusps are located on the maxillary lingual occlusal line, whereas the mandibular supporting cusps are located on the mandibular facial occlusal line. The supporting cusps of both arches are more robust and better suited to crushing food than the nonsupporting cusps. The lingual tilt of the posterior teeth increases the relative height of the supporting cusps with respect to the nonsupporting cusps, and the central fossa contacts of the supporting cusps are ob-scured by overlapping nonsupporting cusps. Removal of the nonsupporting cusps allows the supporting cusp-central fossa contacts to be studied. During fabrication of restorations, it is important that supporting cusps are not contacting the opposing teeth in a manner that results in lateral deflection of teeth. Rather, the restoration should provide contacts on plateaus or smoothly concave fossae so that masticatory forces are directed approximately parallel to the long axes of teeth.

Supporting Cusps

Ans. 21 Ref: Phillips, 11th/424; Vimal Sikri, 2nd/422 ORMOCERS Organically modified ceramics CEROMER Ceramic optimized composites GIOMERS Pre-reacted glass ionomer with composites COMPOMER Poly acid modified composites
ORMOCER (Organically Modified Ceramic) ORMOCER is an organically modified non-metallic inorganic composite material. It is three dimensionally cross - linked copolymer. First time, it was introduced as dental restorative material in 1998. Composition Ormocers have both organic as well as inorganic networks. They are characterized by presence of three main units: • Organic molecule segments having methacrylate groups which form a highly cross-linked matrix. • Inorganic condensing molecules to make three dimensional networks which is formed by inorganic polycondensation. This
forms the backbone of ORMOCER molecules. • Fillers are further added to this complex. Properties 1. More biocompatible than conventional composites. 2. Higher bond strength. 3. Polymerization shrinkage is least among resin based filling material. 4. Highly aesthetic, comparable to natural tooth. 5. High compressive (410 MPa) and transverse strength (143 MPa). Indications 1. Restoration for all type of preparations 2. For aesthetic veneers. 3. As orthodontic bonding adhesive.

Ans. 22 Ref: Sturdevant, 5th/115 Antimicrobial Agents: • A variety of antimicrobial agents also are available to help prevent caries. In rare cases, antibiotics might be considered, but the
systemic effects must be considered. Fluoride has antimicrobial effects. Likewise, chlorhexidine use provides beneficial results. This material was first available in the United States as a rinse and was first used for periodontal therapy. It was prescribed as a 0.12% rinse for high-risk patients for short-term use. It is used in other countries as a varnish, and the most effective mode of varnish use is as a professionally applied material. Chlorhexidine varnish enhances remineralization and decreases MS presence. Emilson concluded that the chlorhexidine varnishes provide effective reduction in MS.
• Chlorhexidine is prescribed for home use at bedtime as a 30-second rinse. Used at this time, when the salivary flow rate is de-creased, the agent has a better opportunity to interact with MS organisms, while tenaciously adhering to oral structures. It is used for approximately 2 weeks and results in a reduction of MS counts to below caries-potential levels. This decrease is sustained for 12 to 26 weeks. The agent also can be applied professionally once a week for several weeks, monitoring the microbial counts to determine effectiveness. Chlorhexidine may be used in combination with other preventive measures for high-risk patients. A popular mouthwash (Listerine; Proctor & Gamble, Cincinnati, Ohio) has been reported to be effective in plaque reduction when used specifically as directed. Although this report has been challenged, it initially reported a plaque-reducing benefit equivalent to flossing.
Antimicrobial Agents
Mechanism of Action Spectrum of Anti-bacterial Activity
Persistence in Mouth
Side Effects
Antibiotics
Vancomycin Blocks cell-wall synthesis Narrow Short Increases gram-negative flora
Kanamycin Blocks protein synthesis Broad Short
Actinobolin Blocks protein synthesis Streptococci Long
Bis Biguanides
Alexidine Antiseptic; prevents bacterial adherence
Broad Long Bitter taste; stains teeth and tongue brown; mucosal irritation
Chlorhexidine Antiseptic; prevents bacterial adherence
Broad Long Bitter taste; stains teeth and tongue brown; mucosal irritation
Halogens
Iodine Bactericidal Broad Short Metallic taste
Fluoride 1–10 ppm reduces acid produc-tion; 250 ppm bacteriostatic; 1000 ppm bactericidal
Broad Long Increases enamel resistance to caries attack; fluorosis in devel-oping teeth with chronic high doses

Ans. 23 Ref: Sturdevant, 5th/796 – 801
Tooth preparation Location of retention grooves Class II Bucco axial and linguo axial line angles Class III Axiogingival line angle Class V Occluso axial and gingivo axial line angles
Class V tooth preparation for Amalgam Restoration: Class V lesion is present on the gingival third of facial and lingual surfaces of all teeth. Amalgam is not indicated for anterior teeth except when aesthetics is of no concern, for example in very aged patients. Initial Tooth Preparation: • The outline form of class V lesions is dictated by the extension of caries process. Like in others, prepare the tooth in normal
manner, i.e. breaking down the undermined enamel and extending the preparation to sound tooth structure. This is accomplished by using inverted cone bur held perpendicular to the long axis of tooth.
• Initial axial wall depth should be 0.5 mm into the dentin. Axial wall depth at the occlusal wall should be more than at the gingi-val wall. This will result in a curved axial wall which conforms to the contour of tooth.
• Prepare the mesial and distal wall surfaces perpendicular to the outer tooth surface, paralleling the direction of enamel rods. Final tooth preparation: • Remove any remaining caries using round bur. • Since preparation wall diverge towards the facial aspect, retention is mandatory in these preparations. Retention is made by giv-
ing grooves incisally and gingivally along axioincisal and axiogingival line angles using an inverted cone bur. • To prevent secondary caries, extend the preparation close to but not to axial angles of tooth. In young patients, it is extended
under free margins of gingiva and in older patients, it is determined by extent of the lesion. • Finally, hoes and chisels are used to finish the mesial, distal and gingival walls. • In the last, inspect the preparation using clean air and water spray followed by drying. Ans. 24 Ref: Sturdevant, 5th/306 – 308 Dovetail preparation provides retention form. PRIMARY RETENTION FORM: It is the shape or form of the prepared cavity that resists displacement or removal of the restoration from tipping or lifting forces.
RESTORATION PRIMARY RETENTION FORM Amalgam Class I & II Occlusally converging external walls and occlusal dovetail (Class II) Amalgam Class III & V As the external walls diverge outward, retention grooves or coves are the primary retention forms Composite Mechanical bond using acid etching and dentin bonding agents Cast metal inlay Parallel longitudinal walls (or) 2-5o degree of small angle of divergence.
Occlusal dovetail and secondary retention grooves aid in preventing the proximal displacement of restoration by the occlusal forces. Converging axial walls prevents the occlusal displacement of the restoration.

Ans. 25 Ref: Sturdevant, 5th/197 – 201 Macrofillers 10 -100 µm Midi fillers 1 – 10 µm Minifillers 0.1 – 1 µm Microfiller 0.01 – 0.1 µm Nanofillers 0.001 – 0.01 µm
Fillers The dispersed phase of composite resins is made up of an inorganic filler material. Since filler particles are added to improve the phys-ical and mechanical properties of organic matrix, the basic aim is always to incorporate high percentage of filler. Commonly used fill-ers are silicon dioxide, boron silicates and lithium aluminum silicates. The filler particles are silanted so that the hydrophilic filler can bond to the hydrophobic resin matrix. The wear of composite restoration depends on filler particle size, interparticle spacing and filler loading. Composites with smaller particles show decreased wear due to fewer voids and smaller interparticle spacing. Addition of filler causes following effects: • Reduces the thermal expansion coefficient • Reduces polymerization shrinkage • Increases abrasion resistance • Decreases water sorption • Increases tensile and compressive strengths • Increases fracture toughness • Increases flexure modulus • Provides radiopacity • Improves handling properties • Increases translucency In some composites, quartz is partly replaced with heavy metal particles like zinc, aluminum, barium, strontium or zirconium. Nowa-days calcium metaphosphate has also been tried. Since these are less hard than glass, so they cause less wear on the opposing tooth. Recently nanoparticles having the size of 25 nm and nanoaggregates of 75 nm, made up of zirconium / silica or Nano silica particles have also been introduced. The smaller size of filler particles results in better finish to the restoration. Ans. 26 <b>Ref: Sturdevant, 5th/705</b><br><br> • 1st premolar has a depression in cervical 3rd mesially (called as Canine fossa) therefore matrix band is difficult to adapt to this
surface. <br> • Matrix system consists of matrix band, retainer and wedge. <br> • Matrix is a device use to contour a restoration to simulate that of a tooth structure, which it is replacing. The thickness of a ma-
trix band is 0.002 inches (0.05 mm).

Ans. 27 Ref: Sturdevant, 5th/328 Hand instruments must be balanced to allow concentration of force This is achieved by proper angulation of shank so that cutting edge of blade lies within the projected diameter of handle. Foanti-rotational design the blade edge must be off ax Shank Shank connects the handle to blade. It tapers from the handle down to the blade and is normally smooth, round or tapered. Themay be straight or angled. Based on number of shank angles instruments can be classified as: 1. Straight: Shank having no angle 2. Monoangle: Shank having one angle 3. Binangle: Shank having two angles. 4. Triple – angle: Shank having three angles. The angulation of instrument is provided for access and stability. Closer the working point to the long axithe control on it. For better control, the working point should be preferably within 3 mm of the center of the long axis of h
A and B Balancing of instrument (A) Working end of instrument lies within 2ancing (B) Working end is away from long axis of handle this is not balanced Ans. 28 <b>Ref: Sturdevant, 5th/889</b><br><br> • The most common impression material used for the indirect casting technique is “addition
ration are sub gingival, a retraction cord is used to temporarily displace the free gingiva. • To control moisture and hemorrhage the cord may be impregnated with vasoconstrictor or 100% alum or 15% tannic acid. Zinc
chloride and silver nitrate cause ulceration and local necrosis if used in high concentrations. • Vasoconstrictors are contraindicated in patients with arrhythmias, hyperthyroidism, diabetes and in those receiving
etc. Ans. 29 <b>Ref: Sturdevant, 5th/108</b><br><br> • In a cross section through the enamel the gross appearance of a pit and fissure lesion is an inverted V wi
volvement at the dentinoenamel junction. • Conversely, a cross section of the enamel portion of a smooth surface lesion shows a V shape with a wide area of origin and t
apex of the V involving the dentinoenamel junction. • After caries extends to the dentinoenamel junction there is both lateral spread along the junction and extension pulpally. A cross
section of caries in dentin is always V shaped with its base at the dentinoenamel junction. Because root caries originates ontin, it is U shaped in cross section with its base on the surface of the root.
Hand instruments must be balanced to allow concentration of force on to the blade without causing rotation of instrument in the grasp. This is achieved by proper angulation of shank so that cutting edge of blade lies within the projected diameter of handle. Fo
rotational design the blade edge must be off axis by 1 to 2 mm.
Shank connects the handle to blade. It tapers from the handle down to the blade and is normally smooth, round or tapered. The
Based on number of shank angles instruments can be classified as:
angle: Shank having three angles.
The angulation of instrument is provided for access and stability. Closer the working point to the long axithe control on it. For better control, the working point should be preferably within 3 mm of the center of the long axis of h
A and B Balancing of instrument (A) Working end of instrument lies within 2-3 mm to long ancing (B) Working end is away from long axis of handle this is not balanced
The most common impression material used for the indirect casting technique is “addition silicone”. If the margins of the prepration are sub gingival, a retraction cord is used to temporarily displace the free gingiva. <br>To control moisture and hemorrhage the cord may be impregnated with vasoconstrictor or 100% alum or 15% tannic acid. Zinc chloride and silver nitrate cause ulceration and local necrosis if used in high concentrations. <br>
ted in patients with arrhythmias, hyperthyroidism, diabetes and in those receiving
In a cross section through the enamel the gross appearance of a pit and fissure lesion is an inverted V wivolvement at the dentinoenamel junction. <br> Conversely, a cross section of the enamel portion of a smooth surface lesion shows a V shape with a wide area of origin and tapex of the V involving the dentinoenamel junction. <br>
caries extends to the dentinoenamel junction there is both lateral spread along the junction and extension pulpally. A cross section of caries in dentin is always V shaped with its base at the dentinoenamel junction. Because root caries originates onin, it is U shaped in cross section with its base on the surface of the root.
on to the blade without causing rotation of instrument in the grasp. This is achieved by proper angulation of shank so that cutting edge of blade lies within the projected diameter of handle. For optimal
Shank connects the handle to blade. It tapers from the handle down to the blade and is normally smooth, round or tapered. The shank
The angulation of instrument is provided for access and stability. Closer the working point to the long axis of the handle, better will be the control on it. For better control, the working point should be preferably within 3 mm of the center of the long axis of handle.
3 mm to long axis of handle, this provides bal-
silicone”. If the margins of the prepa-<br>
To control moisture and hemorrhage the cord may be impregnated with vasoconstrictor or 100% alum or 15% tannic acid. Zinc <br>
ted in patients with arrhythmias, hyperthyroidism, diabetes and in those receiving β-blockers
In a cross section through the enamel the gross appearance of a pit and fissure lesion is an inverted V with a wide area of in-
Conversely, a cross section of the enamel portion of a smooth surface lesion shows a V shape with a wide area of origin and the
caries extends to the dentinoenamel junction there is both lateral spread along the junction and extension pulpally. A cross section of caries in dentin is always V shaped with its base at the dentinoenamel junction. Because root caries originates on den-

Ans. 30 Ref: Sturdevant, 5th/764 “PIGGY BACK” Wedging is indicated in proximal caries with gingival recession.
Piggy back wedging Is useful in patients with gingival recession. A second smaller wedge is placed on the first wedge to prevent gingival overhanging.
Double wedging Is useful in case of wide proximal box. Wedges are placed from both lingual and facial surface.
Wedge wedging In case of maxillary first premolar, due to the presence of mesial concavity, a second wedge is inserted between the first wedge and band.
Ans. 31 Ref: Sturdevant, 5th/156 – 157 Ag3Sn or original gamma phase is the strongest. Gamma 1 (Ag2Hg3) has intermediate strength and the weakest phase is gamma 2 (Sn7-
8Hg). Gamma 2 phase is largely eliminated in the high copper alloys (admixed and single composition).
Phases of silver amalgam Code Component (γ) gamma Ag3Sn (γ1) gamma – 1 Ag2HG3 (γ2) gamma – 2 Sn7-8HG3 (ε) epsilon Cu3Sn (η) eta Cu6Sn5
Ans. 32 <b>Ref: Phillips, 11th/495 – 496</b><br><br> Conventional or traditional amalgam alloys contain silver 65%, Tin 30%, Copper 5% and Zinc < 1%. <br> American Dental Association (ADA) Specification No. 1 requires that amalgam alloys be predominantly silver and tin. Unspecified amounts of other elements, such as copper, zinc, gold and mercury are allowed in concentrations less than the silver or tin content. <br>Alloys containing zinc in excess of 0.01% are required to be designated zinc containing. Those alloys containing 0.01% or less of zinc are designated as non-zinc. There is no specification for a low-copper or high copper alloy, per se.

Ans. 33 Ref: Sturdevant, 5th/746; Vimal Sikri, 2nd/235 The beveling or rounding off of the Axiopulpal line angle prevents fracture of the amalgam restoration by reducing stress contion and also by allowing increased bulk of amalgam in th10°-15° bevel is also indicated at the gingival cavosurface class II amalgam cavity preparation to remove the unsupported enamel rodswhich inclines apically. The marginal trimmers are used to bevel or round off of the axioof the unsupported angles are also kept rounded.
a. Finishing of axiopulpal line angle and gingival cavosurface margin. b. Finished axiopulpal line angle and gingival cavosurface margin. Primary resistance and retention form is achieved by the following features: • The gingival and pulpal floor is flat and perpendicular to long axis of the tooth. • All walls create 90° cavosurface angle for amalgam. • The extension of walls is in such a way that the cusps and ridges have sufficient dentin support. • The internal line angles are rounded off especially the axio pulpal line angle so as to have maximum bulk of silver amalgam a
the axio pulpal area and to avoid stress concentration in the tooth. • Pulpal floor is prepared adequately into the dentin so as t• Occlusal convergence of the walls provides primary retention form.
(a) (b)
/235
The beveling or rounding off of the Axiopulpal line angle prevents fracture of the amalgam restoration by reducing stress contion and also by allowing increased bulk of amalgam in the region i.e. increases resistance form of the restoration.
bevel is also indicated at the gingival cavosurface class II amalgam cavity preparation to remove the unsupported enamel rods
The marginal trimmers are used to bevel or round off of the axio-pulpal line angle. The gingival cavosurface margins are trimmed off of the unsupported angles are also kept rounded.
Finishing of axiopulpal line angle and gingival cavosurface margin. Finished axiopulpal line angle and gingival cavosurface margin.
Primary resistance and retention form is achieved by the following features:
The gingival and pulpal floor is flat and perpendicular to long axis of the tooth. cavosurface angle for amalgam.
The extension of walls is in such a way that the cusps and ridges have sufficient dentin support. The internal line angles are rounded off especially the axio pulpal line angle so as to have maximum bulk of silver amalgam athe axio pulpal area and to avoid stress concentration in the tooth. Pulpal floor is prepared adequately into the dentin so as to provide sufficient bulk of restorative materialOcclusal convergence of the walls provides primary retention form.
The beveling or rounding off of the Axiopulpal line angle prevents fracture of the amalgam restoration by reducing stress concentra-e region i.e. increases resistance form of the restoration.
bevel is also indicated at the gingival cavosurface class II amalgam cavity preparation to remove the unsupported enamel rods
pulpal line angle. The gingival cavosurface margins are trimmed off
The extension of walls is in such a way that the cusps and ridges have sufficient dentin support. The internal line angles are rounded off especially the axio pulpal line angle so as to have maximum bulk of silver amalgam at
o provide sufficient bulk of restorative material.
Ans. 34 <b>Ref: Sturdevant, 5th/162 – 168</b><br><br> 50 µg/m3 or 0.05 mg/m3. The primary risk to dental personnel is through inhalation. Risk can be minimized by proper ventilation, pre-capsulated alloys, amalgamator cover and mouth masks. High-vacuum suction units are also useful. <br> <b>Monitoring of mercury vapors: </b> The accepted threshold limit for exposure to mercury vapor for a 40 hour work per week is 50µg/m3 (given by OSHA) <br> Periodical monitoring of mercury vapor in dental office should be done and carefully recorded. <br> Dental Mercury Hygiene Recommendations in Dental office. <br> 1. Follow aseptic technique, i.e. wear protective clothing, protective masks, gloves and glasses to prevent exposure to mercury va-
pors. <br> 2. A dental personnel’s involved in handling of mercury and dental amalgam products should follow proper mercury hygiene prac-
tice. <br> 3. Dentists and dental assistants should have proper knowledge of amalgam disposal and their handling. <br> 4. Proper ventilation of the working space should be there, to reduce mercury levels in the atmosphere. <br> 5. Periodically check the working area to analyze the mercury vapor pressure using dosimeter badges. <br> 6. Avoid carpet/floor coverings in dental office; floor coverings should be easy to clean, nonabsorbent and seamless. <br> 7. Mercury should be stored in unbreakable closed container in isolated area. <br> 8. Use pre-capsulated alloy for mixing. <br> 9. Instead of manual/ hand mixing, use amalgamator with completely closed arm. <br> 10. Polish amalgam restoration under coolant to decrease mercury vapor pressure. <br> 11. Avoid direct contact of mercury with skin. <br> 12. Use high volume evacuation and rubber dam during insertion, condensation and polishing of restoration. <br> 13. Store scrap amalgam in water, glycerine and spent fixer solution in closed container. <br> 14. Pre-capsulated alloys, mercury contaminated cotton rolls should be disposed in closed plastic container. <br> 15. Clean the spilled mercury using trap bottles or freshly mixed amalgam. <br> 16. Remove professional clothing, gloves, masks before leaving operating area. Ans. 35 <b>Ref: Sturdevant, 5th/161</b><br><br> Electrochemical corrosion produces extrusion at margins (creep), during which mercury from Sn7-8 Hg reacts with Ag3Sn particles and produces further called Mercuroscopic expansion. <br> The basis for any discussion of electrochemical corrosion is the electromotive force (EMF) series. This classification is an arrange-ment of the elements in the order of their dissolution tendencies in water. The potential values are calculated for the elements in equi-librium with solutions containing one atomic weight, in grams, of ions in 1000 mL of water at 25° C. Ans. 36 <b>Ref: Vimal Sikri, 2nd/251 – 252</b><br><br> Amalgam alternatives comprise any materials (composites, GIC, cast gold alloys) that can be used to restore a tooth instead of using amalgam. Amalgam substitutes contain some components of amalgam (Ag – Sn alloy particles) but do not contain mercury. Gallium alloys contains Ag-Sn particles in Gallium -Indium liquid. <br> Disadvantages of Gallium alloys: <br> • Surface roughness <br> • Expansion leads to tooth fracture <br> • Marginal discoloration <br> • Difficult manipulation.

Ans. 37 Ref: Sturdevant, 5th/816 Pin size In general, increase in diameter of pin offers more retention but large sized pins can result in more stresses in dentin. Pins are available in four color coded sizes: Name Pin diameter Color code • Minuta 0.38 mm Pink • Minikin 0.48mm Red • Minim 0.61 mm Silver • Regular 0.78 mm Gold
Selection of pin size depends upon the following factors: • Amount of dentin present • Amount of retention required For most posterior restorations, Minikin size of pins is used because they provide maximum retention without causing crazing in den-tin. Ans. 38 Ref: Sturdevant, 5th/159 Amalgams undergo two kinds of corrosion, chemical (dry) and electrochemical corrosion (wet). Types of electrochemical corrosion: Galvanic corrosion Occurs between dissimilar metals in contact. Eg. Amalgam opposing cast gold restorations Stress corrosion Metal at the site of maximum stress becomes more reactive than the unstressed metal Crevice or concentration cell corrosion Corrosion occurring in cracks or crevices due to accumulation of plaque. Ans. 39 <b>Ref: Philips, 11th/511</b><br><br> • Amalgams have high compressive strength and low tensile strength. <br> • Compressive strength of amalgam should be minimum of 310 Mpa and the tensile strength should be in between 48-70 Mpa.
<br> • Strength of amalgam develops slowly. It takes 24 hours to reach maximum value. In first hour, only 40 to 60% of its maximum
compressive strength is achieved. <br> • According to ADA specification no.1 amalgam should have minimum 1 hour compressive strength of 11, 600 psi (80 MPa).
<br> • Amalgam has much higher compressive strength than tensile or shear strength making it a brittle material. <br> • Compressive strength of amalgam is seven times more than its tensile strength. Being a brittle material it is weak in thin sections,
thus unsupported edges of restoration fracture frequently. To avoid this, a 90° butt joint angle of amalgam is required at the mar-gins. <br>
• Spherical alloys are harder and stronger when compared to lathe cut alloys because they require less mercury during trituration, thus less of the weak matrix portion forms.

Ans. 40 Ref: Sturdevant, 5th/641 Non Vital bleaching procedures Thermocatalytic technique It is placement of 35% H2O2 liquid into debrided pulp chamber and the oxidation process is ac-
celerated by placing a heated instrument into the pulp chamber. Walking bleach The reaction between 35% H2O2 and sodium perborate accelerates the oxidation process. It is an
out of the office technique. The oxidation is continued over a longer period of time. Vital bleaching procedures In-office technique A solution containing ether, H2O2, HCl is used.
• Ether – For removal of surface debris. • HCl – Etches the enamel. • H2O2 – Bleaches the enamel
Night guard bleaching It is dentist prescribed home applied technique. It consists of using a whitening paste containing 10-15% carbamide peroxide.
Ans. 41 Ref: Phillips, 11th/502 – 503 Setting reaction of Amalgam: For Lathe-Cut Low copper Alloys On mixing amalgam alloy with mercury, the alloy particles get dissolved in mercury. In the initial reaction, mercury reacts with tin and silver without involving copper and zinc. Mercury reacts with alloy particles to form two products, i.e. the silver mercury phase and tin mercury phase. After this reaction, the unreacted particles are embedded in the matrix of reaction products with mercury. The reaction is as following. Ag3Sn + Hg → Ag2Hg3 + Sn7–8Hg3 + Ag3Sn (γ) (γ1) (γ2) (γ) In lathe cut low copper amalgams both γ1 and γ2 form a continuous network. Since γ2 phase is least corrosion resistant phase, its distri-bution in reaction product is important. Ans. 42 Ref: Phillips, 11th/400, 418; Vimal Sikri, 2nd/389 Core built up on a molar tooth should be preferably done with chemically cured as its lower viscosity allows free flow. Difference between chemically cured and light cured composites
Chemically cured Light cured • Polymerization initiated by chemical process • Polymerization is towards the source of light in the center
• Less color stability • More than chemically cured • Curing is done in single step, i.e. at one time • Placement of material is done in increments • Very less working time • Adequate working time for insertion and contouring • Setting time is long • Sets after activation by light • Less aesthetics • Aesthetically good • Economical • Expensive • More polymerization shrinkage • Less polymerization shrinkage • Less abrasion resistance • More abrasion resistance

Ans. 43 <b>Ref: Sturdevant, 5th/816 – 822</b><br><br> Self-threading pin<br> They were introduced by Going in 1966. Self-threading pins are 0.0015” to 0.004” larger than their pinholes. The pins are retained due to the mechanical grasp of threads into dentin. The elastic property of dentin allows insertion of a threaded pin into a hole of a smaller diameter. These are available in stainless steel or titanium but can be gold plated to increase their passivity. <br> Currently, threaded pins are most popular amongst the three pin systems because of their ease and rapidity of insertion and maximum retention offered. They are 3-6 times more retentive than the cemented pins. However, the amount of stresses induced in dentin in the form of cracks and craze lines are also more with the threaded pins. <br><br> Indications: <br> • In vital teeth <br> • When maximum retention is desired. <br> • When sufficient amount of dentin is available to surround the pins. <br><br> Advantages of self-threading pins: <br> • Ease of insertion <br> • Superior retention <br> • Require less depth for placement <br> • Require no cementing medium <br><br> Disadvantages of self-threaded pins: <br> • The pulpal stress is maximum when the pin is inserted perpendicular to the pulp <br> • Generate great stresses in dentin in form of craze or crack lines. <br> • Pins may fail to seat completely <br> • If pin is forced into the pinhole it may strip the sides of dentin resulting in a loose fit. <br> • Microleakage is higher than the cemented pins if the overlying restoration leaks. <br> • Pins may need to be bent, cut or contoured after placement which generates extra stress on the tooth or may loosen the pin. Ans. 44 <b>Ref: Phillips, 11th/680 – 687; Craig, 12th/451 – 454</b><br><br> Classification of all Ceramic systems<br> 1. Traditional powder slurry ceramic<br>
a. Alumina reinforced ceramic (Hi-ceram) <br> b. Leucite reinforced ceramic (Optec-HSP) <br>
2. Infiltrated ceramic<br> a. In ceram<br> b. In ceram spinel<br>
3. Castable ceramic<br> a. Dicor<br>
4. Pressable ceramic<br> a. IPS empress 1 & 2<br>
5. Machinable ceramic<br> a. Cerec vitablocks mark I & II<br> b. Dicor<br> c. Celay<br><br>
<b>Infiltrated Ceramic</b> <br> To overcome the disadvantages of aluminous porcelain, a new system is introduced known as infilterable ceramic in which alumina / spinal is used as the core material. <br><br> <b>In – ceram</b><br> Composition: This type of ceramic is available in two components: <br> 1. Powder: Aluminum oxide<br> 2. Low viscosity glass<br> In this, aluminum oxide is fabricated on a porous substrate in which low viscosity glass heated at high temperature, to be infiltrated in this matrix<br><br> <b>Procedure</b><br> 1. Alumina powder is mixed with water to form slurry known as ‘Slip’ which is painted on die. This procedure leaves a layer of
solid alumina on the surface. <br> 2. Sintering is done at 1120° C for 10 hours to form porous core. <br> 3. Glass is selected and applied on the porous core and firing is done at 1100°C for 3-5 hours. <br>

4. The molten glass infiltrates by capillary action into core<br> 5. This results in high strength composite structure, i.e. in ceram. <br><br> <b>In-ceram Spinel</b><br><br> In this spinel (aluminum and magnesium oxide) is used as the core material. It has better translucency than In-ceram (High opacity due to higher concentration of alumina crystals) <br> This type of ceramic can be used for crowns- both anterior and posterior crowns. Ans. 45 Ref: Sturdevant, 5th/834, 836 Automatrix : The automatrix is a retainerless matrix system designed for any tooth regardless of the circumference and height. The Automatrix bands are supplied in three widths: 3/16 inch, ¼ inch, and 5/16 inch (4.8 mm, 6.35 mm, and 7.79 mm). The medium band is available in two thicknesses (0.0015 inch and 0.002 inch [0.038 mm and 0.05 mm]. The 3/16 –inch and 5/16 –inch band widths are available in the 0.002-inch thickness only. Advantages of this system include: 1. Convenience 2. Improved visibility because of absence of a retainer 3. Ability to place the auto lock loop on the facial or lingual surface of the tooth, and 4. Decreased time for application compared with copper band matrix. Disadvantages of this system are that: 1. The band is flat and difficult to burnish and is sometimes unstable even when wedges are in place 2. Development of proper proximal contours and contacts can be difficult with the Automatrix bands. A. Automatrix retainerless matrix system. B. Automatrix band. C. Automate II tightening device. D. Shielded nippers.

Ans. 46 Ref: Phillips, 11th/470; Craig, 12th/449 Coloring Agents- Various coloring agents used to obtain proper hue and chroma. Their main objective is to obtain various shades needed to simulate natural teeth.
Metallic pigments Color Ferric oxide Grey Titanium oxide Yellowish brown Manganese oxide Lavender Cobalt oxide Blue Nickel oxide Brown Chromium-alumina Pink Copper oxide Green
Ans. 47 <b>Ref: Sturdevant, 5th/308</b><br><br> • A Faciolingual width of no more than 1 to 1.5 mm and depth of 1.5 to 2 mm are considered ideal. The pulpal floor, depending on
enamel thickness, usually in dentin. Faciolingual width is detrimental to tooth structure whereas pulpal depth is detrimental to pulp vitality / integrity. <br>
• For amalgam restorations, cavity preparation should not extend ¼ the intercuspal distance and for gold inlays it is 1/3rd. By crossing one marginal ridge at more than 1/3 the intercuspal distance there is 30% loss of resistance of tooth structure to occlusal forces. <br>
• Pulpal depth is more detrimental to pulp integrity. The desired pulpal depth is usually 1.5 mm to 2 mm (0.1 to 0.2 mm into den-tin).

Ans. 48 <b>Ref: Sturdevant, 5th/ 268 – 271</b><br><br> “In a clinical study using the primer of the primer of the original gluma adhesive system (an aqueous solution of 5% glutaraldehyde and 35% HEMA), currently marketed as gluma desensitizer [Heraeus Kulzer, South bend, Indiana]), the desensitizing solution was applied to crown preparations. The author concluded that gluma primer reduced dentin sensitivity through a protein denaturation process with concomitant changes in dentin permeability. <br> (Note that although one study claims no change in dentin permeability with use of gluma desensitizer, this still remains our answer as most authorities believe that dentin permeability decreases with these agents). <br> Uses of Dentin bonding agents: - <br> 1. To create a hybrid layer for micromechanical bonding of composites to tooth (dentin). <br> 2. For desensitization of hypersensitive dentin. <br>
− They reduce hypersensitivity by : <br> o Formation of resin tags & a hybrid layer<br> o Precipitation of proteins from dentinal fluid in the tubules<br> o Reduce dentin permeability <br>
− They do not interfere with crown retention, regardless of the type of luting agent used. Hence they can also be used to reduce post-operative sensitivity after FPD cementation. <br>
3. To bond amalgam restorations to tooth<br> − They reduce or prevent marginal leakage<br> − Reinforce amalgam restoration margins making the cavosurface angle less susceptible to acidic demineralization. <br> − Improve marginal integrity of restoration. <br> − However they are not superior to copal varnish in dentin desensitizing under amalgams. <br> − Mechanism of attachment : Micromechanical retention<br> − Strength of bond between : amalgam & dentin :- <br>
o With earlier systems : 3-5 MPa<br> o With newer system : 10-14 MPa<br>
Also spherical alloys have higher bond strengths than other types of amalgams<br> − Increased bond strengths mean decreased need for additional retentive features of cavity (e.g. pinholes, slots, etc,) however basic
retentive features of a traditional cavity design are retained. <br> − Some studies suggest dual cured liners may be superior for bonding<br> − They can also be used to bond amalgam restorations to another amalgam restorations<br>
4. As indirect adhesive systems<br> − Increase bond strength by 25% when used to bond porcelain restorations. <br> − Bond to porcelain micromechanically<br> − Fractured porcelain can be repaired with dentin bonding agents & composite. <br> − Most adhesive agents for such purposes are dual cured. <br> − They also increase bond strength of luted cast metal restoration. Here however, self-cure agents are used only.
Ans. 49 <b>Ref: Phillips, 11th/517 – 518</b><br><br> As age advances, Sn-Hg phase of lower copper alloys is oxidized to Sn-O and Sn-O-CI due to electrochemical corrosion. These products seal the interface between restoration and tooth margins and reduce microleakage. Ans. 50 <b>Ref: Phillips, 11th/459; Sturdevant, 5th/178</b><br><br> Application of cavity varnish to the prepared walls of amalgam: <br> � Improves the marginal seal of restoration. <br> � Prevents microleakage. <br> � Prevents discoloration by preventing the diffusion of silver ions into dentin. <br> � Reduces postoperative sensitivity by reducing the infiltration of fluids at margins. <br> Varnish applied to the dentinal surfaces of cast gold restoration reduces pulpal irritation from luting cement. <br> Cavity varnish is used to reduce the permeability of acid into dentinal tubules.

Ans. 51 <b>Ref: Vimal Sikri, 2nd/329</b><br><br> • Pulpal perforation is not very disastrous provided that healthy dentin is penetrated prior to perforation, sterile conditions are present
and can be maintained and a hermetic seal can be provided. <br> • The treatment of pulp exposure by pin is similar to any other direct pulp cap procedure. If the perforation is discovered while drill-
ing the pin channel, any resulting hemorrhage is first controlled and then the channel filled and sealed with calcium hydroxide. If the perforation is discovered after the pin has been inserted, it is wise to remove the pin, control any hemorrhage and then place calcium hydroxide. <br>
• The pin should be removed <br> a. For chances of post-operative sensitivity being developed and<br> b. Interference with subsequent root canal treatment. A new pin channel is then prepared 1.5 – 2.0 mm away from the first
hole<br> • An alternative treatment is to control any hemorrhage and insert a sterile pin coated with calcium hydroxide just to the level of
pulp. Radiographs and pulp testing should be performed after every 3-6 months for confirming the vitality status of pulp. Ans. 52 <b>Ref: Sturdevant, 5th/820</b><br><br> The drill is made of high speed tool steel swaged into aluminum shank. This is color coded for appropriate pin size. Hand pieces rotate at low speed (300-500 rpm). Never stop the drill rotating from insertion to removal from the pin hole to prevent its breakage. Discard the drill after cutting 20 pin holes. Ans. 53 <b>Ref: Sturdevant, 5th/787 – 792</b><br><br> Class III cavity: <br><br> � Walls present are facial, lingual, gingival and axial. <br> � Access to the proximal surface is usually taken from lingual surface. <br> � Facial margin is extended 0.2 to 0.3 mm into the facial embrasure (if necessary). <br> � The lingual margin blends with the incisal and gingival margins with little or no lingual wall. <br> � The facial, lingual and gingival walls should meet the axial wall at 90°.<br> � Retention groove is placed at axiogingival line angle. <br> � Retention cove is placed at the axio facio incisal point angle. <br> � Lingual dovetail is indicated if additional retention is needed for larger restoration. Ans. 54 <b>Ref: Sturdevant, 5th/822</b><br><br> In 1966 Goldstein described a technique for friction-locked pin in which the diameter of prepared pinhole is 0.001 inch (0.025 mm) smaller than the diameter of pin. The pins are tapped in place, retained by the resiliency of dentin, and are two to three times more retentive than cemented pins. Stresses are created in dentin when the pin is tapped perpendicular to the axis of pin.
Ans. 55 <b>Ref: Sturdevant, 5th/647 – 648</b><br><br> <b>Macroabrasion</b><br><br> • An alternative technique for the removal of localized superficial white spots (not subject to conservative, remineralization thera-
py) and other surface stains or defects is called “Macroabrasion”. <br> • Macroabrasion simply uses a 12-fluted composite finishing bur or a fine grit finishing diamond in a high-speed handpiece to
remove the defect. <br> • Care must be taken to use light, intermittent pressure and to monitor removal of tooth structure carefully to avoid irreversible
damage to the tooth. Air-water spray is recommended, not only as coolant, but also to maintain the tooth in a hydrated state to facilitate assessment of defect removal. <br>
• Teeth that have white spot defects are particularly susceptible to dehydration resulting in other apparent white spots that are not normally seen when the tooth is hydrated. <br>
• Dehydration exaggerates the appearance of white spots and makes defect removal difficult to assess. After removal of the defect or on termination of any further removal of the tooth structure, a 30-fluted, composite-finishing bur is used to remove any facets or striations created by the previous instruments. <br>
• Final polishing is accomplished with an abrasive rubber point. <br> • Comparable results can be achieved with either microabrasion or macroabrasion. Advantages and disadvantages exist with each,
however. <br> • Microabrasion has the advantage of ensuring better control of the removal of tooth structure. High-speed instrumentation as used
in macroabrasion is technique sensitive and needs extreme caution. <br> • Macroabrasion is considerably faster and does not require the use of a rubber dam or special instrumentation. Defect removal
also is easier with macroabrasion compared with microabrasion if an air-water spray is used during treatment to maintain hydra-tion of the teeth. <br>
• Nonetheless, microabrasion is recommended over macroabrasion for the treatment of superficial defects in children because of better operator control and superior patient acceptance. To accelerate the process, a combination of macroabrasion and microabrasion also may be considered. <br>
• Gross removal of the defect is accomplished with macroabrasion, followed by final treatment with microabrasion. Ans. 56 <b>Ref: Sturdevant, 5th/522</b><br><br> <b>White Line or Halo around the Enamel Margin: </b> <br> The following factors cause microfracture of marginal enamel: <br> • Traumatic contouring or finishing techniques<br> • Inadequate etching and bonding of that area<br> • High-intensity light curing, resulting in excessive polymerization stresses<br><br> <b>Potential solutions are as follows: </b> <br> • Re-etch, prime, and bond the area<br> • Conservatively remove the fault and re-restore<br> • Use atraumatic finishing techniques (e.g., light intermittent pressure) <br> • Use slow-start polymerization technique<br> • Leave as it is

Ans. 57 <b>Ref: Phillips, 11th/465 – 466</b><br><br> <b>Setting time</b><br><br> The setting time is 4 – 7 minutes. At 370C, the first 60 – 90 secs is consumed in mixing of powder and liquid. Several factors influence the rate of setting of zinc phosphate cement. They are as follows: <br> <b>Under the control of manufacturer: </b><br> • The composition and the sintering temperature of powder. <br> • The composition of liquid i.e. the water content and amount of buffering salts present. <br> • The particle size of powder: Smaller the particle size, greater the surface area in contact with liquid and hence rapid is the reac-
tion. <br> • Powder / liquid ratio: Working and setting times can be increased, by decreasing the powder / liquid ratio. The procedure is how-
ever not acceptable as with a reduction in powder / liquid ratio, there also occurs a decrease in strength and pH of the cement. <br><br>
<b>Under the control of operator</b><br><br> • Powder / liquid ratio: Working and setting times can be increased, by decreasing the powder / liquid ratio. The procedure is how-
ever not acceptable as with a reduction in powder / liquid ratio, there also occurs a decrease in strength and pH of the cement. <br>
• Rate of powder incorporation: If all the powder is added at one time, the reaction is very rapid. Introduction of a small quantity of powder into the liquid increases the setting time by reducing the amount of heat generated especially for first few increments. <br>
• Mixing temperature: This is the most effective method of controlling setting time. Decreasing the temperature by cooling the glass slab increases the setting time. <br>
• Spatulation time: Prolonging the spatulation time destroys the forming matrix. Fragmentation of the matrix needs extra time to rebuild the bulk of matrix. <br>
• Water contamination or loss of water: The addition of water decreases setting time and loss of water increases setting time. Ans. 58 <b>Ref: Sturdevant, SA/143</b><br><br> Fiber reinforced composites are basically glass fibers with high melting point which are reinforced using composite resin. <br> <b>Fiber reinforced materials</b><br> • Kevlar, carbon, glass, ultra-high-molecular-weight polyethylene (UHMWPE), and silane-treated glass have been used to provide
fiber reinforcement. <br> • Currently, the most popular fiber types are UHMPWPE and glass. <br> • All dental fiber-reinforcing materials provide similar levels of fiber reinforcement. <br> • Variations in dental composite reinforcement can be influenced by the type of veneering composite as well as the durability of
the clinical performance of the fiber-reinforcement composite<br> • UHMWPE is a linear homopolymer of ethylene; very low friction coefficient, high wear resistance, and high impact strength.
E.g. Ribbond<br> • Glass fiber splints; to provide for chemical integration with dental resins, the glass is silanated using the same principles used to
place glass filler particles into dental composites. Untreated (not silanated) glass fibers are weaker than treated glass fibers. <br> Indications for use of fiber reinforced composites: <br> • Splinting periodontally compromised teeth<br> • Temporary fixed partial dentures<br> • Single crowns <br> • Orthodontic retainers<br> • Occlusal appliances<br> • Space maintainers (as FPDs) <br> • Fiber endodontic posts Ans. 59 <b>Ref: Skinner’s, 8th/287</b><br><br> “One particularly famous silver-copper alloy, sometimes used for inlay purposes in deciduous teeth, is known as sterling silver. It is used extensively is fine silverware. It is 7.5 per cent copper and 92.5 percent silver.” – Skinner
Ans. 60 <b>Ref: Fraunhofer, 1975/105</b><br><br> “Perhaps the more important properties are viscosity, which facilitates penetration into occlusal fissure…”—Fraunhofer<br><br> Low viscosity is a fissure sealant is necessary so that it can flow into the fissures easily and thoroughly. <br> Ideal requirements of a pit and fissure sealant: <br> 1. Should have good adhesion to the fissure walls to prevent microleakage: most important property <br> 2. Should be cariostatic<br> 3. Have low viscosity but high resistance to wear<br> 4. Should be colored to differentiate it from tooth<br> 5. Should not be affected by presence of moisture especially during application Ans. 61 <b>Ref: Sturdevant, SA/206</b><br><br> Although the choice does not do justice to the exact nature of changes that are seen after use of office bleach, this is the best option here. The only option close here is option D but RM GIC is significantly affected by use of office bleach, hence the best answer here is option C<br> “A recent I situ study by Li and colleagues found a significant difference in the color of a conventional glass ionomer cement restora-tion after 4 weeks of bleaching with 15% CP, over that noted before the treatment….. Similarly, another study found alterations, such as cracks and pits, in the surface of the glass ionomer cement, which were explained by the ability of the bleaching agent to alter the surface properties of the material. <br> When using 15% CP and 35% HP on resin-modified glass ionomer cement restorations, Taher14 found a softening effect and a signif-icant decrease in their surface hardness. ….. For in-office bleaching with 35% HP, the percentage decrease was 23.1%.”<br> Consequently, because glass ionomer and resin-modified glass ionomer cement restorations are changed when bleached, they may need to be replaced. <br> Effect of office bleach on restorative materials: <br> 1. Amalgam: Minor effects on surface roughness and microhardness within clinically acceptable range. To avoid greening discol-
oration around amalgam, restorations with marginal discrepancies should be replaced. <br> 2. Porcelain: Surface microhardness reduced while surface roughness is increased,: avoid bleaching in cases with ceramic crowns
especially anterior crowns<br> 3. Ormocer (Organically Modified Ceramic): no effect on microhardness, alteration in color occurs<br> 4. GIC and RM-GIC: reduction in surface hardness: chemical softening, even cracks. They should be replaced after bleaching 5. Compomer (polyacid - Modified Composite resin): roughness, microhardness, color stability and stain susceptibility of
compomer restorations can be clinically affected by bleaching agents<br> Composites: although bleaching can alter hardness, surface roughness and color, the clinical significance of the results need to be stud-ied. Ans. 62 <b>Ref: Andreasean, 4th/286</b><br><br> “An isolated fracture of enamel does not appear to represent any hazard to pulp. However, in crown fractures with exposed dentin, therapeutic measures should be directed towards dentin coverage in order to avoid bacterial ingress and thereby permit the pulp to recover and elicit repair”

Ans. 63 Ref: Sturdevant, SA/54 Methods of caries treatment by the medical model
Method and indications Rationale Techniques or material a. Limit cariogenic substrate Indications Frequent sucrose exposure Poor-quality diet
Reduce number, duration, and intensity of acid attacks Reduce selection pressure for mutans Streptococci (MS)
Diet diary Eliminate sucrose from between meal snacks Substantially reduce or eliminate sucrose from meals
a. Modify microflora Indications Intensive antimicrobial treatment to eliminate
cariogenic bacteria from biofilm select against reinfection by MS
Bactericidal mouth rinse (chlorhexidine) Topical fluoride treatment
b. Disorganize plaque bio-film
Indications High plaque biofilm scores Puffy red gingiva High bleeding point score
Prevents plaque biofilm succession Decreases plaque biofilm mass Promotes buffering
Brushing, flossing, other oral hygiene aids as necessary (e,g. electric toothbrush)
c. Modify tooth surface Indications Noncavitated lesions
Increase resistance to demineralization Decrease plaque biofilm retention
Systemic fluorides Topical fluorides Smooth surface
d. Stimulate saliva flow Indications Dry mouth with little saliva Red mucosa Medication that reduces sali-vary flow
Increases clearance of substrate and acids Promotes buffering
Eat noncariogenic foods that require lots of chewing Sugarless chewing gum Medications to stimulate salivary flow Use dry mouth topical agents, oral lubricants, etc.
e. Seal susceptible surfaces Indications Moderate and high caries risk individuals Teeth with susceptible anat-omy (deep grooves) Initial noncavitated enamel lesions in high-risk patients (smooth-surface sealants)
Prevents colonization (infection) of pit-and-fissure system with cariogenic plaque biofilm Inhibits progression of smooth-surface lesion
Use pit-and-fissure and smooth-surface Resin sealants
f. Restore active cavitated surface
Indications Cavitated lesions Defective restorations
Eliminate nidus of MS and lactobacilli infec-tion Deny habitat for MS re-infection
Restore all cavitated lesions Correct all defects (e.g. marginal crevices, proximal overhangs)
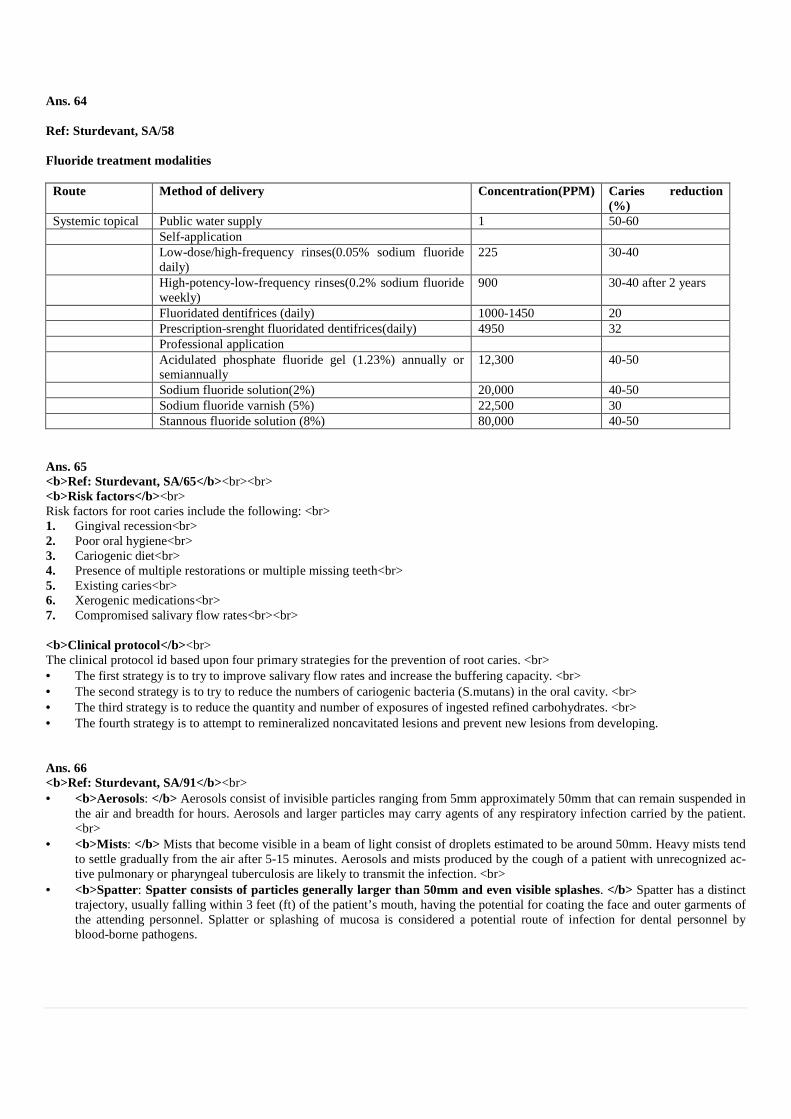
Ans. 64 Ref: Sturdevant, SA/58 Fluoride treatment modalities Route Method of delivery Concentration(PPM) Caries reduction
(%) Systemic topical Public water supply 1 50-60 Self-application Low-dose/high-frequency rinses(0.05% sodium fluoride
daily) 225 30-40
High-potency-low-frequency rinses(0.2% sodium fluoride weekly)
900 30-40 after 2 years
Fluoridated dentifrices (daily) 1000-1450 20 Prescription-srenght fluoridated dentifrices(daily) 4950 32 Professional application Acidulated phosphate fluoride gel (1.23%) annually or
semiannually 12,300 40-50
Sodium fluoride solution(2%) 20,000 40-50 Sodium fluoride varnish (5%) 22,500 30 Stannous fluoride solution (8%) 80,000 40-50
Ans. 65 <b>Ref: Sturdevant, SA/65</b><br><br> <b>Risk factors</b><br> Risk factors for root caries include the following: <br> 1. Gingival recession<br> 2. Poor oral hygiene<br> 3. Cariogenic diet<br> 4. Presence of multiple restorations or multiple missing teeth<br> 5. Existing caries<br> 6. Xerogenic medications<br> 7. Compromised salivary flow rates<br><br> <b>Clinical protocol</b><br> The clinical protocol id based upon four primary strategies for the prevention of root caries. <br> • The first strategy is to try to improve salivary flow rates and increase the buffering capacity. <br> • The second strategy is to try to reduce the numbers of cariogenic bacteria (S.mutans) in the oral cavity. <br> • The third strategy is to reduce the quantity and number of exposures of ingested refined carbohydrates. <br> • The fourth strategy is to attempt to remineralized noncavitated lesions and prevent new lesions from developing. Ans. 66 <b>Ref: Sturdevant, SA/91</b><br> • <b>Aerosols: </b> Aerosols consist of invisible particles ranging from 5mm approximately 50mm that can remain suspended in
the air and breadth for hours. Aerosols and larger particles may carry agents of any respiratory infection carried by the patient. <br>
• <b>Mists: </b> Mists that become visible in a beam of light consist of droplets estimated to be around 50mm. Heavy mists tend to settle gradually from the air after 5-15 minutes. Aerosols and mists produced by the cough of a patient with unrecognized ac-tive pulmonary or pharyngeal tuberculosis are likely to transmit the infection. <br>
• <b>Spatter: Spatter consists of particles generally larger than 50mm and even visible splashes. </b> Spatter has a distinct trajectory, usually falling within 3 feet (ft) of the patient’s mouth, having the potential for coating the face and outer garments of the attending personnel. Splatter or splashing of mucosa is considered a potential route of infection for dental personnel by blood-borne pathogens.

Ans. 67 <b>Ref: Sturdevant, SA/95</b><br><br> Sterilization is defined as killing all forms of life, including the most heat-resistant forms, that is, bacterial spores. Since most intruments contact mucosa or penetrate oral tissues, it is essential that contaminated reusable intruments be cleaned and sterlized thoroughly by using accepted methods that can be tested and monitored routinely.7,16,17<br>
The four accepted methods of sterilization are as follows: <br> 1. Steam pressure sterilization (autoclave) <br> 2. Chemical vapor pressure sterilization (chemiclave) <br> 3. Dry heat sterlization (dryclave) <br> 4. Ethylene oxide (ETCX) sterilization. <br> Each method and each commercial modification has specific requirements with regard to timing, temperature, suitable packaging of material, and kinds of items and materials that can be sterilized safely and effectively.34,35<br>
A sterilizer is used in every day of practice. Therefore, reliable sterilization equipment of proper size and cycle time compatible with needs of the practice should be chosen. Patient load, turnaround time for instrument reuse, size of instrument inventory, instrument variety, and instrument inventory, instrument quality all must be balanced against the type and size of sterilizer selected. Ans. 68 <b>Ref: Sturdevant, SA/99</b><br><br> <b>Biological Monitoring Strips</b> <br> • A biologic monitoring spores test strips is the accepted weekly monitor of adequate time and temperature exposure. <br> • Spores dried on absorbent paper strips are calibrated to be killed when sterilization conditions are reached and maintained for the
time necessary to kill all pathogenic microorganisms. <br> • By sending the strip to a licensed reference laboratory for testing, the dentist obtains independent documentation of monitoring
frequency and sterilization effectiveness. <br> • In the event of failure, such laboratory personnel provide immediate expert consultation to help resolve the problem. Ans. 69 <b>Ref: Sturdevant, SA/112</b><br><br> Shanks, which serve to connect the handles to the working ends of the instruments, are normally smooth, round, and tapered. They often have one or more bends to overcome the tendency of the instrument to twist while in use when force is applied. <br> <b>The functional orientation and length of the blade determine the number of angles in the shank.</b> Black classified in-struments on the basis of the number of shank angles as: <br> • Mono-angle (one) <br> • Bin-angle (two) <br> • Triple-angle (three) <br> Instruments with small, short blades may be easily designed in mono-angle form while confining the cutting edge within the required limit. Instruments with longer blades or more complex orientations may require two or three angles in the shank to bring the cutting edge close to the long axis of the handle. Such shanks are termed contra-angled.

Ans. 70 <b>Ref: Sturdevant, SA/113</b><br><br> The cutting instruments are used to cut the hard or soft tissues of the mouth. Excavators are used for removal of caries and refinement of the internal parts of the preparation. Chisels are used primarly for cutting enamel. <br> Excavators<br> The four subdivisions of excavators are: <br> 1. <b>Ordinary hatchets</b><br> An ordinary hatchet excavator has the cutting edge of the blade directed in the same plane as that of the long axis of the handle and is bi-beveled . <br> These instruments are used primarily on anterior teeth for preparing retentive areas and sharpening internal line angles, particularly in preparations for direct gold restorations. <br><br> 2. <b>Hoes</b><br> The hoe excavator has the primary cutting edge of the blade perpendicular to the axis of the handle. <br> This type of instrument is used for planning tooth preparation walls and for forming line angles. <br><br>
3. <b>Angle-formers</b><br> A special type of excavator is the angle-former . It is used primarily for sharpning line angels and creating retentive features in dentin in preparation for gold restorations. <br> It also may be used in placing a bevel on enamel margins. It is mon-angled and has the primary cutting adge at an angel (other than 90 degrees) to the blade. It may be described as a combination of a chisel and a gingival margin trimmer. It is available in pairs (right and left). <br><br>
4. <b>Spoon excavators</b><br> They are used for removing caries and carving amalgam or direct wax patterns<br> The blades are slightly curved, and the cutting edges are either circular or claw-like. The circular edge is known as a discoid, whereas the claw-like blade is termed cleoid. The shanks may be bin-angled or triple-angled to facilitate accessibility. Ans. 71 <b>Ref: O’ Brian, 3rd/180; McCabe, 8th/160; Manapallil, 2nd/372</b><br><br> “Amalgam in both high copper and traditional composition is a brittle material. Generally the tensile strength values are about one-seventh of the compressive strength values.” – O’Brian/180<br> “The tensile strength and transverse strength (331Mpa) and low tensile strength (34 MPa) due to surface defects like porosities and microscopic cracks.” Manapallil/ 372

Ans. 72 Ref: Fejerskov & Kidd, 2nd/398 – 402, 397, 398; Pediatric Dentistry by Koch, Poulsen,2009, Pg.130 “Simonsen (1977) was the first to describe the combination of a composite restoration and a sealant. He called this “preventive resin restoration” (PRR) and others called it “sealant restoration”. In the composite-fissure sealant technique, demineralized tissue is only removed from the cavitated part of the fissure. This is repaired by placing a composite restoration, after which the remaining fissure is covered and protected by sealant.-Fejerskow/398
Fissure sealing Preventive resin restorations • Applies to pits fissures that are either caries free or
only have initial caries lesions without cavity for-mation, and where the removal of soft carious tissue is not advocated.
• Indications: initial caries lesions without cavity formation (codes 1 and 2: active enamel lesions).
• Disadvantages : • Cost and time consumption • A “sealing-all-teeth” policy also increases the risk
of negative effects, i.e. the treatment initiates caries in sound fissures due to poor moisture control
Described by Simonsen,1980 Involves removal of soft carious tissue in parts of the fissure followed by the application of a restorative/sealant material covering all parts of the fissures. The main idea is minimal loss of sound tissue + prevention/arrest of caries in other parts of the fissures. Slow speed bur is used to remove caries. Three groups: Group A : suspicious pits and fissures Group B : more extensive caries than Gp A Group C : caries extend into dentin and involves a number of pits and fissures.
Materials used for both fissure sealing and PRR: • Resin: hydrophobic, well bonded resins prevent microleakage long lasting, resistance to abrasive wear. Contraindicated in erupt-
ing teeth due to problems in moisture control. • GICs: Sealing effect, also inhibit caries by releasing fluoride, low strength and short retention rate compared with resins, indicat-
ed for teeth where isolation is difficult. • A resin-reinforced light-polymerized GIC liner (Vitrebond) has been tested for fissure sealing and was found to be easy to han-
dle.
Indications for fissure sealing/preventive resin restorations Fissure caries status Individual caries risk
(child/tooth) Possibility for moisture control (Good or poor)
Treatment decision
Sound Code 0 High risk Good Poor
Resin sealant GIC sealant
Caries Code (grade) 1-2 Low or high Good Poor
Resin sealant GIC sealant
Caries Code (grade) 2-3 Low or High Good Poor
PRR Preventive GIC

Ans. 73 Ref: Sturdevant, 4th/203, 243, 479 “An important clinical consideration regarding the effects of polymerization shrinkage is the configuration factor (c-factor)”. C-factor: 1) Stands for configuration factor 2) It is the ration of bonded (flow-inactive) to the unbounded (flow-active) surfaces. 3) An increase in the number of bonded surfaces results in higher c-factor and greater contraction stresses on adhesive bond. 4) A higher ratio of bonded to free resin surfaces: less compensation for contraction stresses : increased chances of bond failure and
marginal leakage Cavity preparation Class I Class II Class III or MOD Class II Class IV Class V or Sealant C-factor 5/1 4/2 3/3 2/4 1/5
5) Polymerization shrinkage causes stresses in composite mass of value upto 7 PMa 6) Immediate bond strength of app. 17 MPa is required to resist marginal debonding due to polymerization shrinkage. Ans. 74 <b>Ref: Sturdevant, 4th/210; Preservation & Restoration of Tooth Surface by Mount & Hume 82</b><br><br> “Generally, fluoride ion release is relatively high during the first few days but that rate of release falls as fluoride concentration is de-pleted in the matrix”. Sturdevant/ 210<br> “Fluoride release from glass ionomer: the initial release is high but declines rapidly over the first 3 months. It will then continue at that level for many years – probably for the life of the restoration. A topical application of fluoride will increase the release for the short term, so a glass- ionomer restoration can be regarded as a fluoride reservoir.” – Mount-Hume/82<br> <b>Also know: </b><br> 1. For fluoride concentration to be effective in initiating remineralization, its concentration in saliva should be at least 10 ppm.
<br> A topical application of fluoride will increase the fluoride content of restoration and hence fluoride release from the restoration for the short term and this phenomenon is called fluoride recharge. Ans. 75 <b>Ref: Sturdevant, 4th/610 – 611</b><br><br> <b> “A 10-15% carbamide peroxide bleaching material generally is recommended for night guard vital bleaching technique.” Night bleach: </b><br><br> • Introduced by Haywood and Heymann in 1989<br> • Also known as matrix bleaching, home bleaching, dentist prescribed/home applied bleaching, and mouth guard bleaching. <br> • Custom fitted prosthesis filled with 10% carbamide peroxide is worn for few hours each day for a weeks. <br> • Carbamide peroxide is composed of approx. 3% H2O2 and 7% urea. H2O2 degrade into H2O2 and O2 while urea degrades into
ammonia and CO2. All these materials occur naturally in the body and are easily managed. <br> • Lesser concentration of carbamide peroxide (5% instead of 10 and 16%): take longer time to bleach but cause less sensitivity.
<br> • Carbopol is added in nightguard bleaching preparation as it makes the material more thixotropic for better retention in the
nightguard. <br> • Addition of carbopol reduces the rate of oxygen release, extending the duration of bleaching action<br><br> Also known: <br> 30-35% hydrogen peroxide is generally used for in-office vital bleaching (power bleaching). Superoxol contains 35% hydrogen perox-ide

Ans. 76 <b>Ref: Sturdevant, 4th/682 – 683</b><br><br> “Precarve burnishing is a form of condensation. To ensure that the marginal amalgam is well condensed before carving, the over packed amalgam should be burnished immediately with a large burnisher, using heavy strokes mesiodistally and faciolingually. Precarve burnishing produces denser amalgam at the margins of occlusal preparations restored with high copper amalgam alloys and initiates carving.” – Sturdevant/682<br><br> <b>Role of burnishing in amalgam restoration: </b><br> 1. Precarve burnish initiates carving<br> 2. Removes excess alloy at the top (which is usually mercury rich) <br> 3. Creates better marginal adaptation of amalgam<br> 4. Produces denser allow especially at the margins. <br><br> <b>Also know</b><br> • Burnishing is indicated only for copper alloys. <br> • Heat generation during burnishing should be avoided. Rise of temperature above 600causes mercury release making restoration
susceptible to corrosion. <br> • Spartleys burnisher” used for burnishing gingival margins of metallic restorations. Ans. 77 <b>Ref: Sturdevant, 5th/694</b><br> • Class I direct gold restorations are one option for the treatment of small carious lesions in pits and fissures of most posterior teeth
and lingual surface of anterior teeth. They are also indicated in small cavitated class V carious lesions. However, they are not in-dicated in areas of heavy occlusal loading. <br>
• Amalgam is a material with a high compressive strength and excellent resistance to abrasion. For situation like the one described in the question, amalgam is the best suited material. Ceramic is brittle and is contraindicated in high stress bearing areas. <br>
<b>Clinical indications for direct amalgam restorations: </b><br> 1) <b>Moderate to large Class I and II restorations (especially including restoration that involves heavy occlusion, that
cannot be isolated well, or that extends onto the root surface. </b><br> 2) Class V restorations (including restorations that are not esthetically critical, cannot be isolated or are located entirely on root sur-
face. <br> 3) Temporary caries control restorations

Ans. 78 Ref: Sturdevant, 5th/471; Rubber Dam in Clinical Practice by Reid/Kallis/Patterson/48 – 55 “In this method, the posterior retainer is applied first to verify a stable fit. The operator removes the retainer and with forces still holding the retainer, passes the bow through the proper hole from the underside of the dam.” – Sturdevant/471 Retainer and forcep are present on the underside of dam and is removed once the retainer is anchored on tooth. Dam is then stretched over the retainer through the interproximal contact. So the answer is clear i.e. wrong technique is option ‘D’ i.e. “Place the dam over the clamp and frame outside the oral cavity and then on tooth using a forcep over the dam.” Three techniques of rubber dam placement are commonly recommended: Technique 1 : Clamp placement prior
to rubber dam : Technique 2 : Clamp and rubber dam placed together:
Technique 3 : Clamp placed after the rubber dam :
1) Is this technique clamp is first placed on the tooth and then dam with the hole is stretched over it.
2) As the clamp is placed first, the tooth and gingival margin are clearly visi-ble during placement thus ensuring minimal risk of gingival trauma.
3) For a single tooth isolation with this technique winged clamps or wingless clamps with especially shipped jaws such as NW and PW patterns ( Uni-versity of Washington patterns 4 and 5 ) are preferred as wings or large jaws retain the dam more securely on a single tooth.
4) For multiple teeth isolation, wingless clamps are preferred as retention is enhanced by the other teeth.
5) As the dam has to be stretched over the clamp, a larger than usual hole has to be made while using this tech-nique. This is done by punching two or three overlapping holes.
6) Frame can be fitted to the dam at an earlier stage before it is inserted in mouth.
7) This is most suitable for isolation of posterior teeth in children and adults ( excepts third molars where clamp bow may impinge on the mucosa overlying the ramus)
1) When winger clamps are used, place the clamp in the hole punched for the anchor tooth by stretching the dam to engage these wings. The as-sembly is then placed on tooth.
2) With wingless clamp, pass the bow through the proper hole from under-side of dam. With the forcep still holding the retainer and dam at-tached to the bow, place the assem-bly on tooth remove forcep and then stretch the dam over the tooth to en-gage the jaws of retainer.
3) Frame can be fitted to the dam at an earlier stage before it is inserted in mouth.
4) The limited vision during clamp placement is a major drawback to this technique due to which clamp can be placed on gingival margin or even a wrong tooth can be clamped.
1) Difficult to use by a single operator and assistance is often required using this technique.
2) Difficult access towards the back of the mouth restricts its use to anterior teeth and possibly premolars.
3) Rubber dam with the hole is first stretched over the tooth through both interproximal contacts. The operator then places the clamp while the assis-tance holds the dam over anchor tooth.
4) Preferred technique when double bow or butterfly clamps are selected.
Also know about removal of rubber dam: • First remove any wedges, rubber strips or floss ligatures that have been used on non-anchor teeth. Remove the most distal liga-
ture first. • Then cut the interdental rubber dam using round ended scissors. • Clamps, wedges or other auxillary retention aids are finally removed from the anchor teeth and again it’s better to remove the
more distal first. • Dam is then removed with the frame • Carefully check rubber dam for any missing pieces.

Ans. 79 <b>Ref: Sturdevant, 5th/519</b><br><br> “Any contamination by saliva necessitates repeating the placement of etchant for minimum of 10 sec. followed again by appropriate primer and adhesive placement” – Sturdevant / 519 Ans. 80 <b>Ref: Phillips, 11th/61, 69</b><br><br> • “The effect of galvanic shock is well known in dentistry. For e.g. assume that a dental amalgam restoration is placed on the
occlusal surface of a lower tooth directly opposing a gold inlay in an upper tooth. Because both restoration are wet with saliva, an electric circuit exists, with a difference in potential between the dissimilar restorations. When the two restorations are brought in contact, there is sudden short circuit through the two alloys, which may result in patient experiencing a sharp pain. – Phil-lips/61<br>
• “Such postoperative pain due to galvanic shock occurs immediately after insertion of a new restoration and generally it gradually subsides and disappears in a few days. – Phillips/69. <br>
• Now, in the question, it is likely that the tooth opposing inlay contains an amalgam restoration. Galvanism occurs every time pa-tient bites in occlusion which brings the opposing amalgam restoration in contact with gold inlays. <br>
• Supraocclusion produces tooth pain, sensitivity to percussion and increased tooth mobility. Ans. 81 <b>Ref: Sturdevant, 4th/579 – 580; 5th/611 – 613</b><br><br> “The carbide bur or diamond used for tooth preparation should be a tapering instrument that creates occlusally divergent facial & lin-gual walls. This gingiva-occlusal divergence, allows for passive insertion & removal of restoration”. – Sturdevant/580<br><br> All the walls should be diverting for a cast inlay whether gold or porcelain in order to seat & remove the restoration & impression with distortion. <br><br> <b>Design characteristics of cast porcelain inlay: </b><br> • 90% butt joint cavosurface angle to ensure marginal strength of restoration (shoulder preparation) <br> • All internal / external line/ point angles should be rounded to avoid stress concentration in restoration & tooth. <br> • Gingivo-occlusal divergence. <br> • Divergence should be greater than 2-5o per wall recommended for cast metal inlays and onlays as porcelain restoration will be
adhesively bonded and very little pressure can be applied during try in and cementation (as porcelain is brittle ) <br> • Occlusal depth – 1.5-2.0 mm

Ans. 82 Ref: Sturdevant, 4th/528 – 531, 755 – 757 & 5th/557 – 559; 796 – 799 Let’s discuss all the aspects one by one: Criteria Composite Amalgam Mesial and distal walls “All the external preparation walls of a class V
conventional tooth preparation are visible when viewed from a facial position because of out-wardly divergent walls” – Sturdevant/529
“ Because the mesial, distal, gingival and incisal walls of tooth preparation are perpen-dicular to the external tooth surface, they usu-ally diverge facially” – Sturdevant/756
Clear from the above quotes that both amalgam & composite (conventional) class V cavity preparation have divergent mesial & distal walls. Hence, it cannot be the answer. Level of retention groove placement
“ If retention grooves are necessary they are pre-pared with a No,1/4 bur along the full length of the gingiva axial and inciso axial line angles. These grooves are prepared 0.25 mm in depth into the external walls and next to the axial wall at an angle that bisects the junction between the axial wall and the gingival or incisal/occlusal wall. This should leave, between the groove and margin. Sufficient remaining wall thickness of 0.25mm to prevent fracture”. – Sturdevant/529
Use a No. ¼ bur to prepare two retention grooves, one along the mesio axial line angle and other along the gingiva axial line angle. The handpiece is positioned so that the No, ¼ bur is directed generally to bisect the angle formed at the junction of axial and gingival or incisal/ occlusal wall” – Sturdevant/756
Above quotes again indicates that location of retention grooves for both amalgam & composite class V restoration is same. Depth of cavity “At this initial tooth preparation stage, the ex-
tension in every direction is to sound tooth struc-ture, except the axial depth should be only 0.75 mm”. – Sturdevant/528 “The axial depth into dentin is only 0.2 mm when groove retention is judged unnecessary and 0.5mm when a retention groove is planned and margins are still in enamel” Sturdevant/529 For preparation portions on the root surface, the depth of axial wall should be 0.75 mm.” – Sturdevant/529
“ Preparation of the axial wall depth 0.5 mm inside the DEJ results in a uniform depth for the entire preparation”. – Sturdevant/756
Above quotes again clarifies that both amalgam & composite class V preparation should be about 0.5 mm deep in dentin. Cavosurface margin “All margins on root surface should have 900
cavosurface margin” – Sturdevant/528 “All margins on enamel are beveled at approxi-mately 450 to the external tooth surface and pre-pared to a width of 0.25-0.5mm” – Sturdevant/530
“ All cavosurface margins for amalgam resto-ration in class V tooth preparation are 900 or butt joint, whether in enamel or on root.”
Above quotes clearly states the difference in cavosurface margin for amalgam & composite Class V tooth preparation. Hence the answer is “B” i.e, “Cavosurface margin”.

Ans. 83 Ref: Sturdevant, 4th/203 – 204 & 5th/210 – 212, 224: Summit, 3rd/262, 196 “Newer bonding systems are much better bonded, some newer dentin bonding systems are designed thicker to be stress relieving. Therefore, typical wall stress during curing may actually be only 1-2 MPa, well within acceptable ranges”. – Sturdevant / 204 “Volumetric shrinkage during polymerization can be as great as 7% and can generate contraction forces of 1-2 MPa, leading to crack-ing and crazing at the enamel margins.” – Summit/262 “Contraction stresses within resin of upto 7MPa have been reported” – Summit/196 So the answer can be 1-2 Mpa OR 5-MPa. If newer bonding resins are used with newer technique (thick layer), the stresses are 1-2 MPa. However, traditionally, contraction stresses are about 4-7MPa. Also know, 1. Shrinkage stresses that occur in pre gel phase of polymerization are effectively relieved by flexure and flow of material. Howev-
er, tresses occurring during post gel phase are not relieved by material flow and residual stresses may cause fatigue within the material or at the resin composite – tooth interface over time.
2. Resin composites have a coefficient of thermal expansion 2-6 times higher than that of tooth structure. 3. Incremental curing techniques, enamel bevels, flexible resin liners and slow setting resin modified glass ionomer liners have
been recommended for use to help offset the effects of polymerization shrinkage & stresses. 4. Very little shrinkage is shown by composites developed by latest technology :-
1. Ring opening reactions (siloranes) with spiroorthocarbonates 2. Oxirane & oxitane chemistry based composites.
5. C-factor first described by Feilzer is the ratio of surface area of bound to unbound walls in a cavity. C-factor for different dental situations is as under:
Cl I 5:1 = 5 CI II 4:2 = 2 CI III 3:3 = 1 Higher the C- factor higher will be the shrinkage stress. CI IV 2:4 = 0.5 CI V 1:5 = 0.2
6. LCTE of various materials :- Tooth → 9 -11 ppm/oC (dentin – 8.3 ppm/oC ; enamel- 11.4 ppm/oC ) Unfilled resin → 72 ppm/oC Composite → 28-45 ppm/oC Amalgam → 25 ppm/oC Gold alloys →14-18 ppm/oC Porcelain →6.6 ppm/oC

Ans. 84 <b>Ref: Sturdevant, 5th/82</b><br> “Pit and fissure caries has the highest prevalence of all dental caries,” – Sturdevant/80<br> “The proximal enamel surface immediately gingival to the contact area is the second most susceptible area for caries”. – Sturdevant/83<br><br> <b>Also know: </b><br> <b>Black suggested that it was necessary: </b><br> • To remove tooth structure to gain access and visibility. <br> • To remove all trace of affected dentin from floor of cavity. <br> • To make room for the insertion of the restorative material itself. <br> • To provide mechanical interlocking retentive designs. <br> • To extend the cavity to self-cleaning areas to avoid recurrent caries. <br> With modern understanding of adhesion and remineralization. It is no longer necessary to remove all unsupported demineralized enamel around the cavity margins. The concept of self-cleansing areas has been discarded and removal of all affected dentin from the axial walls of the cavity is strictly contraindicated because of the potential for remineralization and healing. <br><br> The new classification by Mount and Hume is designed to simplify the identification of lesion and to define their complexity: <br><br> Three sites of carious lesion: <br> Site 1: Pits, fissure and enamel defects on occlusal surface of posterior teeth or other smooth surfaces<br> Site 2: Approximal enamel immediately below areas in contact with adjacent teeth<br> Site 3: Cervical one – third of crown, or following gingival recession, the exposed root<br><br> <b>Four sizes lesion:</b><br> <b>Size 1: </b> Minimal involvement of dentin just beyond treatment by remineralization alone. <br> <b>Size 2: </b> Moderate involvement of dentin. Following cavity preparation, remaining enamel is sound, well supported by dentin and not likely to fail under normal occlusal load. The tooth is sufficiently strong to support the restoration. <br> <b>Size 3: </b> cavity is enlarged beyond moderate involvement. Remaining tooth structure is weakened to the extent that cusps or incisal edges are split, or are likely to fail if left exposed to occlusal load. The cavity needs to be further enlarged so that the restora-tion can be designed to provide support to the remaining tooth structure. <br> <b>Size 4: </b> Extensive caries and bulk loss of tooth structure has already occurred. <br><br> <b>Size 1 is a new lesion and adhesive restorative material is ideal for restoration</b>

Ans. 85 <b>Ref: Sturdevant, 5th/126 – 130</b><br><br> In such cases all soft caries should be excavated and if no frank exposure occurs during excavation, it is restored with a sedative dress-ing. Patient is followed further and if clinical and radiographic findings are normal, then it is followed by permanent restoration. If clinical symptoms or radiographic changes are evident, then root canal treatment is started. <br><br> <b>Caries Control Restorations: </b> <br> Actively rapidly progressing caries requires urgent clinical treatment when dentin softening has reached at least half the distance from DEJ to pulp<br><br> “The treatment objective for caries control is to remove the infected caries from all of the advanced carious lesions, place appropriate pulpal medication and restore the lesion in the most expedient measure. Temporary restorative materials ( IRM, GIC, and amalgam) are usually the treatment materials of choice. This treatment of acute caries removes gross infections lesion quickly, this not only gen-erate some time while many of other associated dental problems can be treated, but also provide a time period for pulpal assessment with more permanent restorations at a later date, when the factors promoting caries formation have been controlled and prognosis of tooth pulp has been determined.”- Sturdevant/126<br><br> <b>Indications for caries control restorations: </b><br> a) Teeth with questionable pulpal prognosis. <br> b) If a tooth is unexpectedly found to have extensive caries. <br> c) If the goal of treatment is to remove the nidus of caries infection from the patient’s mouth. <br><br> Some steps of initial tooth preparation are modified for carries control procedure. Retaining unsupported enamel is permissible be-cause this tooth structure even though undermined, assists in retention of temporary restoration. <br><br> For removing deep caries, high speed headpiece at full speed is contraindicated. Effective caries removal is accomplished with:- <br> a) Hand instrumentation using spoon excavators. <br> b) Slow speed headpiece with a large round bur. <br> c) High speed headpiece using round bur operated just above stall out speed (low speed). <br> Out of these, again rotary instruments are preferred to hand instruments. Ans. 86 <b>Ref: Sturdevant, 5th/69 & 4th/67</b><br><br> “MS and Lactobacillus can produce great amount of acid (acidogenic) and are tolerant of acidic environment (aciduric), are vigorously stimulated by sucrose, and appear to be primary organisms associated with caries in man”. – Sturdevant/67<br> <b>Also know: </b><br> 1) MS are present as pandemic infection in humans i.e. found in everyone regardless of race, ethnic background or geographic
origin. <br> 2) Normally MS is present as an insignificantly small component of oral flora. Its count increases in patients with multiple carious
lesions. <br> MS is strongly associated with onset of caries while lactobacilli are associated with active progression of cavitated lesion. Ans. 87 <b>Ref: Sturdevant, 4th/89 & 5th/91</b><br><br> It should need no reference, but still those who have doubt, read below: <br> “Benefit of buffering is to reduce the potential for acid formation”. – Sturdevant/89<br> Also know: <br> 1) Main buffer of saliva is bicarbonate ion. <br> 2) Saliva contains urea and sialin (contains lysine and arginine).Hydrolysis of either of these results in production of ammonia caus-
ing the pH to rise. <br> 3) Saliva contains statherin, a proline rich peptide capable of stabilizing calcium & phosphate ions and thus prevents excessive dep-
osition of these ions on the teeth.

Ans. 88 Ref: Sturdevant, SA/137/Pg. 137 Rubber dam retainer Parts of a retainer The rubber dam retainer consists of four prongs and two jaws connected by a bow.
Rubber dam retainer- Note four-point prong contact (arrows) with tooth Functions of a retainer The retainer is used to anchor the dam to the most posterior tooth to be isolated. When positioned on a tooth, a properly selected rtainer should contact the tooth in its four line angles. This four point contact prevents rocking or tilting of the retainer.Retainers also are used to retract gingival tissue. Ans. 89 Ref: Sturdevant, SA/138 Types of retainer • Many different sizes and shapes are available, with specific retainers designed for certain teeth.• Wingless and winged retainers are available. The winged retainer has anterior and lateral wings. The wings are designed to
provide extra retraction of the rubber dam from the operating field and to allow attachment of the dam to the retainer beforeconveying the retainer (with dam) to the
Suggested retainers for various anchor tooth applications
Retainer Application W56 Most molar anchor teeth W7 Mandibular molar anchor teethW8 Maxillary molar anchor teethW4 Most premolar anchor teethW2 Small Premolar anchor teethW27 Terminal mandibular molar anchor teeth requiring preparations invloving the distal surfaceanchor tooth, after which the dam is removed from the lateral wings. The anterior wings can be cut away if they are not neede
• The prongs of some retainers are gingivally directed (inverted) and are helpful when the anchor tooth is only partially eruptwhen additional soft tissue retraction is indicated
The rubber dam retainer consists of four prongs and two jaws connected by a bow.
point prong contact (arrows) with tooth
the dam to the most posterior tooth to be isolated. When positioned on a tooth, a properly selected rtainer should contact the tooth in its four line angles. This four point contact prevents rocking or tilting of the retainer.
etract gingival tissue.
Many different sizes and shapes are available, with specific retainers designed for certain teeth.Wingless and winged retainers are available. The winged retainer has anterior and lateral wings. The wings are designed to provide extra retraction of the rubber dam from the operating field and to allow attachment of the dam to the retainer before
ng the retainer (with dam) to the
Suggested retainers for various anchor tooth applications
Mandibular molar anchor teeth Maxillary molar anchor teeth
premolar anchor teeth Small Premolar anchor teeth Terminal mandibular molar anchor teeth requiring preparations invloving the distal surface
anchor tooth, after which the dam is removed from the lateral wings. The anterior wings can be cut away if they are not neede
The prongs of some retainers are gingivally directed (inverted) and are helpful when the anchor tooth is only partially eruptwhen additional soft tissue retraction is indicated
the dam to the most posterior tooth to be isolated. When positioned on a tooth, a properly selected re-tainer should contact the tooth in its four line angles. This four point contact prevents rocking or tilting of the retainer.
Many different sizes and shapes are available, with specific retainers designed for certain teeth. Wingless and winged retainers are available. The winged retainer has anterior and lateral wings. The wings are designed to provide extra retraction of the rubber dam from the operating field and to allow attachment of the dam to the retainer before
Terminal mandibular molar anchor teeth requiring preparations invloving the distal surface anchor tooth, after which the dam is removed from the lateral wings. The anterior wings can be cut away if they are not needed.
The prongs of some retainers are gingivally directed (inverted) and are helpful when the anchor tooth is only partially erupted or

Ans. 90 Ref: Sturdevant, SA/139/Pg. 139 – 140 Anchors (other than retainers):- Besides retainers, other anchors may also be used. To anchor the dam on any tooth where a retainer is contraindicated the following anchors may be employed: i. Waxed dental tape (or floss) ii. Small piece of rubber dam material (cut from a sheet of dam) iii. Rubber Wedjet (Hygenic, Akron, OH).
ii) • When dental tape is used, it should be passed through the contact, looped, and passed through a second time. • The cut piece of dem material is first stretched, passed through the contact, and then released. • When the anchor is in place, the tape, floss, dam material, or Wedjet should be trimmed to prevent interference with the
operating site.