computerized payroll accounting user’s guide
TRANSCRIPT

Upon completion of this appendix, you will be able to:
1. Identify the components and procedures of a computerized payroll system.2. Perform system start-up procedures.3. Add, change, and delete employees from the payroll.4. Enter and correct payroll transactions.5. Generate payroll and employer’s payroll taxes journal entries.6. Enter, correct, and find journal entries.7. Display payroll reports.8. Access the on-screen calculator and use Help information.
IntroductionPayroll is an application that lends itself well to the computer because of its repetitive proce-dures and calculations. Computerized payroll systems perform the same basic functions as those performed manually by payroll clerks. The important differences are the computer’s speed, accuracy, reliability, and ability to easily generate reports.
In a computerized payroll system, the computer stores data such as an employee’s name, address, social security number, marital status, number of withholding allowances, pay rate, and voluntary deductions. At the end of each pay period, the operator enters all payroll transactions data, such as regular and overtime hours for each employee, deduc-tions, etc., into the computer. The computer calculates all withholding taxes and other deductions and accumulates and updates the earnings and withholdings.
After entering payroll transaction data for the current pay period, a payroll report may be displayed to verify the earnings and withholdings for the month, quarter, and year. Next, the current payroll and employer’s payroll salary expense, payroll taxes expense, and withholding liabilities journal entries are automatically generated and posted to the general ledger. A general journal report and general ledger report are displayed. At the end of the quarter, and at the end of the year, the taxable earnings report is displayed, from which the appropriate reports (e.g., quarterly reports and W-2 statements) may be prepared.
The material that follows provides detailed operational information for running the enclosed software in the Windows 95, Windows 98, Windows ME, Windows NT, Windows 2000, Windows XP, and Vista environments. If you are familiar with any of these user interfaces, you may go directly to the payroll project beginning on page A-1 immediately after software installation.
Software Program OverviewTo complete the payroll project in this text-workbook, you will be using the Payroll software that is included in the Integrated Accounting Version 6.0 software (that has been renamed Payroll Accounting 2009). This software uses a standard user interface with pull-down menus, movable overlapping windows, mouse support, list windows, and help windows. This standard interface resembles the interface used in many other software
Computerized Payroll Accounting User’s GuideCOMPUTERIZED PAYROLL ACCOUNTING
CHE-BIEG-08-0702-UG.indd 1CHE-BIEG-08-0702-UG.indd 1 8/29/08 7:42:41 PM8/29/08 7:42:41 PM
Bei
g,Pa
yrol
lA
ccou
ntin
g ,�
2009
,So
uth-
Wes
ter n
,a
part
ofC
enga
geLe
arni
ng.
All
righ
tsre
serv
ed.
UG-2 Computerized Payroll Accounting User’s Guide
applications. Most of the techniques you will learn can be applied to many other software packages. The following material will cover only those features of the software that you will need to complete the payroll project.
Installation and Memory RequirementsThe Payroll Accounting 2009 software contained in this package comes complete on a standard CD (compact disk). To use the software, you need a processor running in the Windows 95, Windows 98, Windows Me, Windows NT, Windows 2000, Windows XP, or Vista environ-ment. In addition, a hard disk drive with at least 15 megabytes of available disk space and a CD drive is required for installation. A printer is optional but highly recommended.
The installation CD included in the software package contains compressed program files and the opening balance payroll accounting files required to complete the payroll project in this text-workbook. During the installation process, all of the compressed files are expanded into an executable format onto your computer’s hard disk. The installation is a common procedure. Detailed step-by-step instructions are provided on the installation CD’s label. Your instructor or computer center technician has probably already completed this one-time installation procedure.
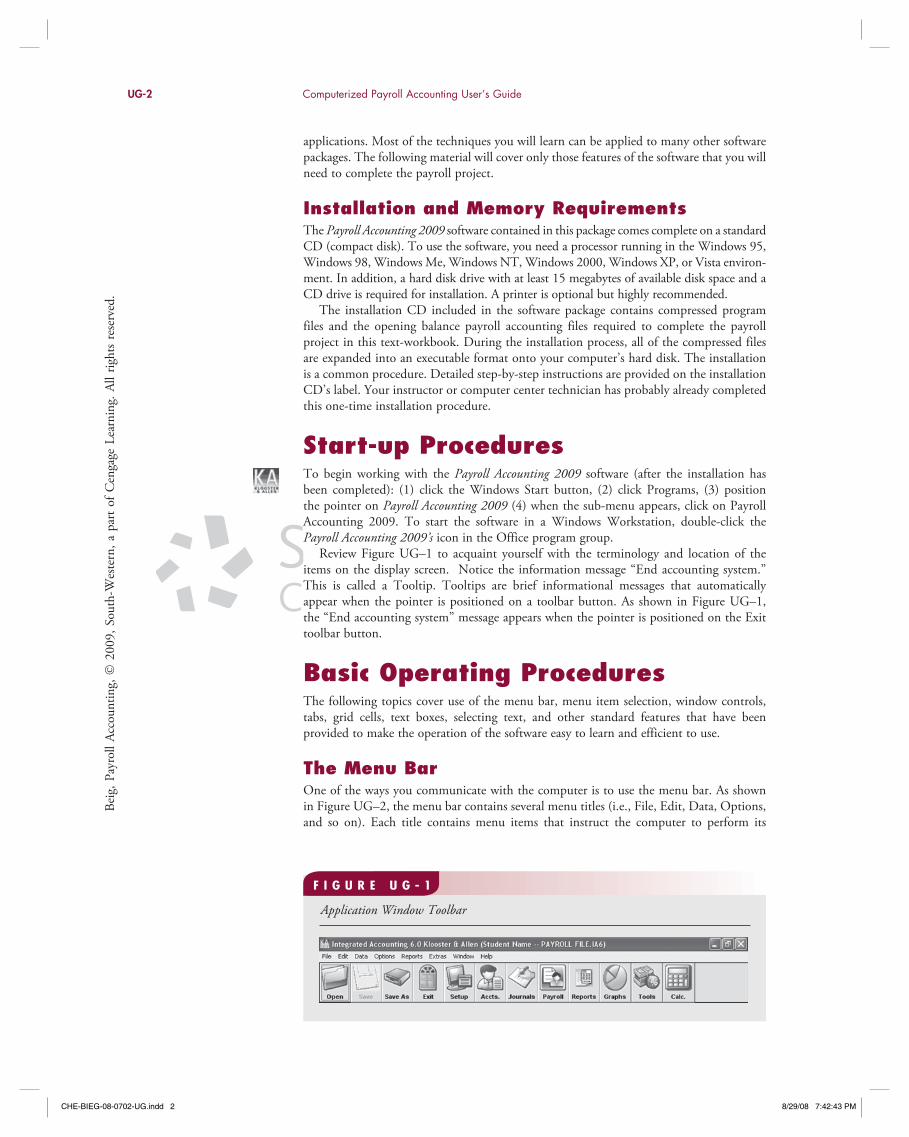
Start-up Procedures To begin working with the Payroll Accounting 2009 software (after the installation has been completed): (1) click the Windows Start button, (2) click Programs, (3) position the pointer on Payroll Accounting 2009 (4) when the sub-menu appears, click on Payroll Accounting 2009. To start the software in a Windows Workstation, double-click the Payroll Accounting 2009’s icon in the Office program group.
Review Figure UG–1 to acquaint yourself with the terminology and location of the items on the display screen. Notice the information message “End accounting system.” This is called a Tooltip. Tooltips are brief informational messages that automatically appear when the pointer is positioned on a toolbar button. As shown in Figure UG–1, the “End accounting system” message appears when the pointer is positioned on the Exit toolbar button.
Basic Operating ProceduresThe following topics cover use of the menu bar, menu item selection, window controls, tabs, grid cells, text boxes, selecting text, and other standard features that have been provided to make the operation of the software easy to learn and efficient to use.
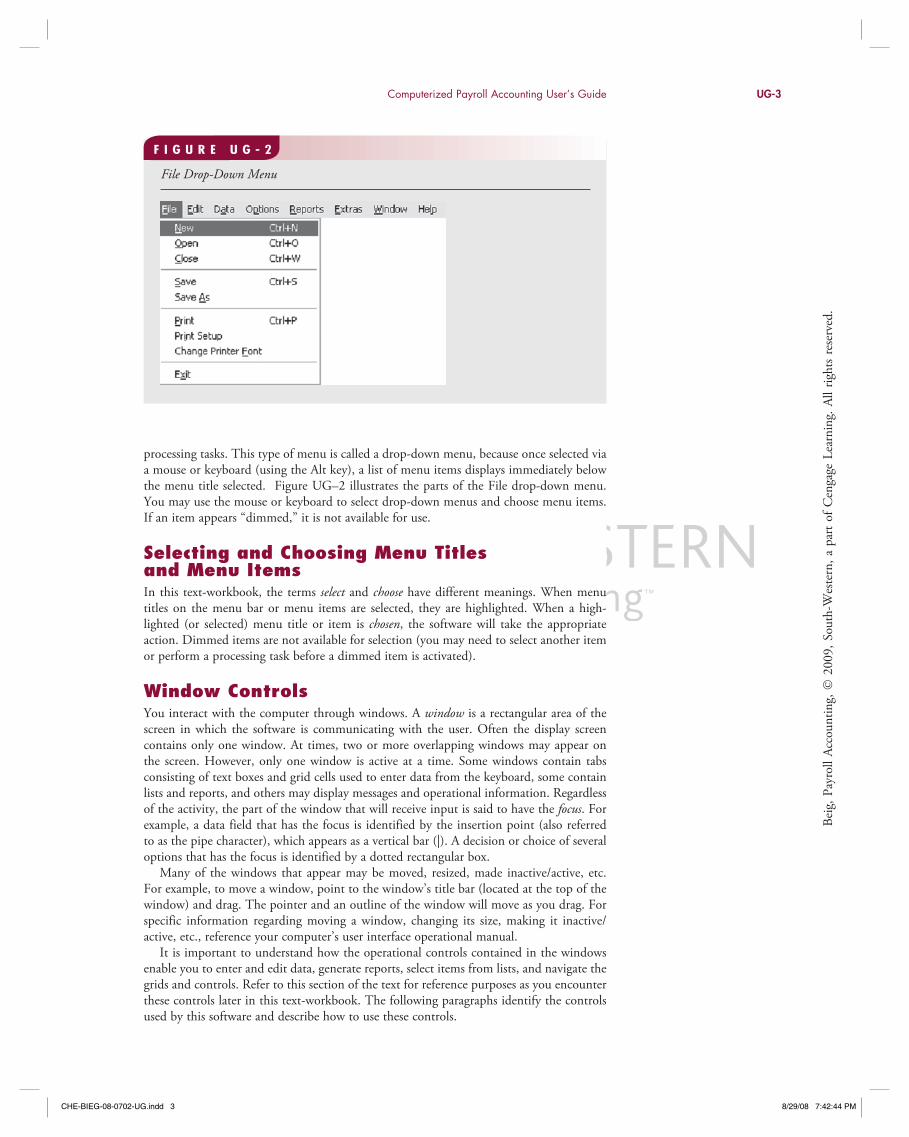
The Menu BarOne of the ways you communicate with the computer is to use the menu bar. As shown in Figure UG–2, the menu bar contains several menu titles (i.e., File, Edit, Data, Options, and so on). Each title contains menu items that instruct the computer to perform its
Application Window Toolbar
F I G U R E U G - 1
CHE-BIEG-08-0702-UG.indd 2CHE-BIEG-08-0702-UG.indd 2 8/29/08 7:42:43 PM8/29/08 7:42:43 PM
Bei
g,Pa
yrol
lA
ccou
ntin
g,�
2009
,So
uth-
Wes
tern
,a
part
ofC
enga
geLe
arni
ng.
All
righ
tsre
serv
ed.
Computerized Payroll Accounting User’s Guide UG-3
processing tasks. This type of menu is called a drop-down menu, because once selected via a mouse or keyboard (using the Alt key), a list of menu items displays immediately below the menu title selected. Figure UG–2 illustrates the parts of the File drop-down menu. You may use the mouse or keyboard to select drop-down menus and choose menu items. If an item appears “dimmed,” it is not available for use.
Selecting and Choosing Menu Titles and Menu ItemsIn this text-workbook, the terms select and choose have different meanings. When menu titles on the menu bar or menu items are selected, they are highlighted. When a high-lighted (or selected) menu title or item is chosen, the software will take the appropriate action. Dimmed items are not available for selection (you may need to select another item or perform a processing task before a dimmed item is activated).
Window ControlsYou interact with the computer through windows. A window is a rectangular area of the screen in which the software is communicating with the user. Often the display screen contains only one window. At times, two or more overlapping windows may appear on the screen. However, only one window is active at a time. Some windows contain tabs consisting of text boxes and grid cells used to enter data from the keyboard, some contain lists and reports, and others may display messages and operational information. Regardless of the activity, the part of the window that will receive input is said to have the focus. For example, a data field that has the focus is identified by the insertion point (also referred to as the pipe character), which appears as a vertical bar (|). A decision or choice of several options that has the focus is identified by a dotted rectangular box.
Many of the windows that appear may be moved, resized, made inactive/active, etc. For example, to move a window, point to the window’s title bar (located at the top of the window) and drag. The pointer and an outline of the window will move as you drag. For specific information regarding moving a window, changing its size, making it inactive/active, etc., reference your computer’s user interface operational manual.
It is important to understand how the operational controls contained in the windows enable you to enter and edit data, generate reports, select items from lists, and navigate the grids and controls. Refer to this section of the text for reference purposes as you encounter these controls later in this text-workbook. The following paragraphs identify the controls used by this software and describe how to use these controls.
File Drop-Down Menu
F I G U R E U G - 2
CHE-BIEG-08-0702-UG.indd 3CHE-BIEG-08-0702-UG.indd 3 8/29/08 7:42:44 PM8/29/08 7:42:44 PM
Bei
g,Pa
yrol
lA
ccou
ntin
g ,�
2009
,So
uth-
Wes
ter n
,a
part
ofC
enga
geLe
arni
ng.
All
righ
tsre
serv
ed.
UG-4 Computerized Payroll Accounting User’s Guide
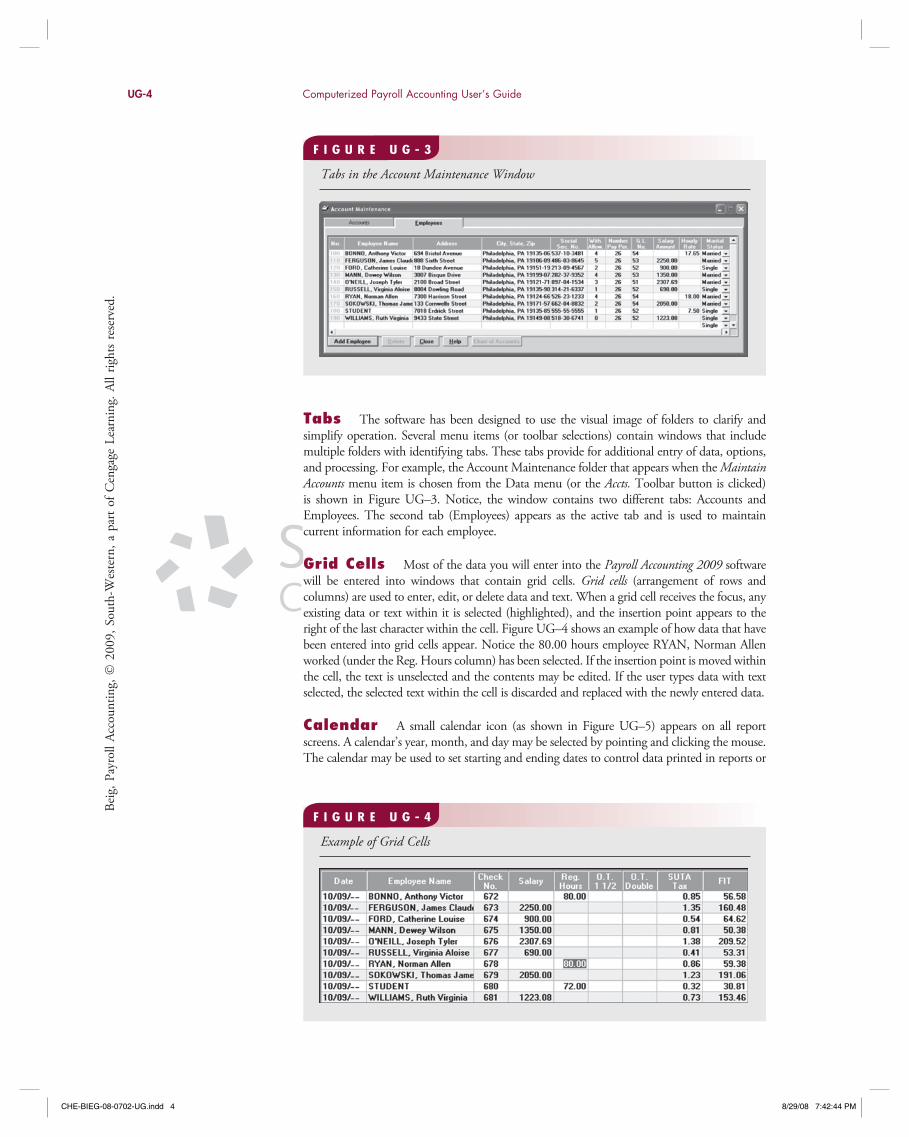
Tabs The software has been designed to use the visual image of folders to clarify and simplify operation. Several menu items (or toolbar selections) contain windows that include multiple folders with identifying tabs. These tabs provide for additional entry of data, options, and processing. For example, the Account Maintenance folder that appears when the Maintain Accounts menu item is chosen from the Data menu (or the Accts. Toolbar button is clicked) is shown in Figure UG–3. Notice, the window contains two different tabs: Accounts and Employees. The second tab (Employees) appears as the active tab and is used to maintain current information for each employee.
Grid Cells Most of the data you will enter into the Payroll Accounting 2009 software will be entered into windows that contain grid cells. Grid cells (arrangement of rows and columns) are used to enter, edit, or delete data and text. When a grid cell receives the focus, any existing data or text within it is selected (highlighted), and the insertion point appears to the right of the last character within the cell. Figure UG–4 shows an example of how data that have been entered into grid cells appear. Notice the 80.00 hours employee RYAN, Norman Allen worked (under the Reg. Hours column) has been selected. If the insertion point is moved within the cell, the text is unselected and the contents may be edited. If the user types data with text selected, the selected text within the cell is discarded and replaced with the newly entered data.
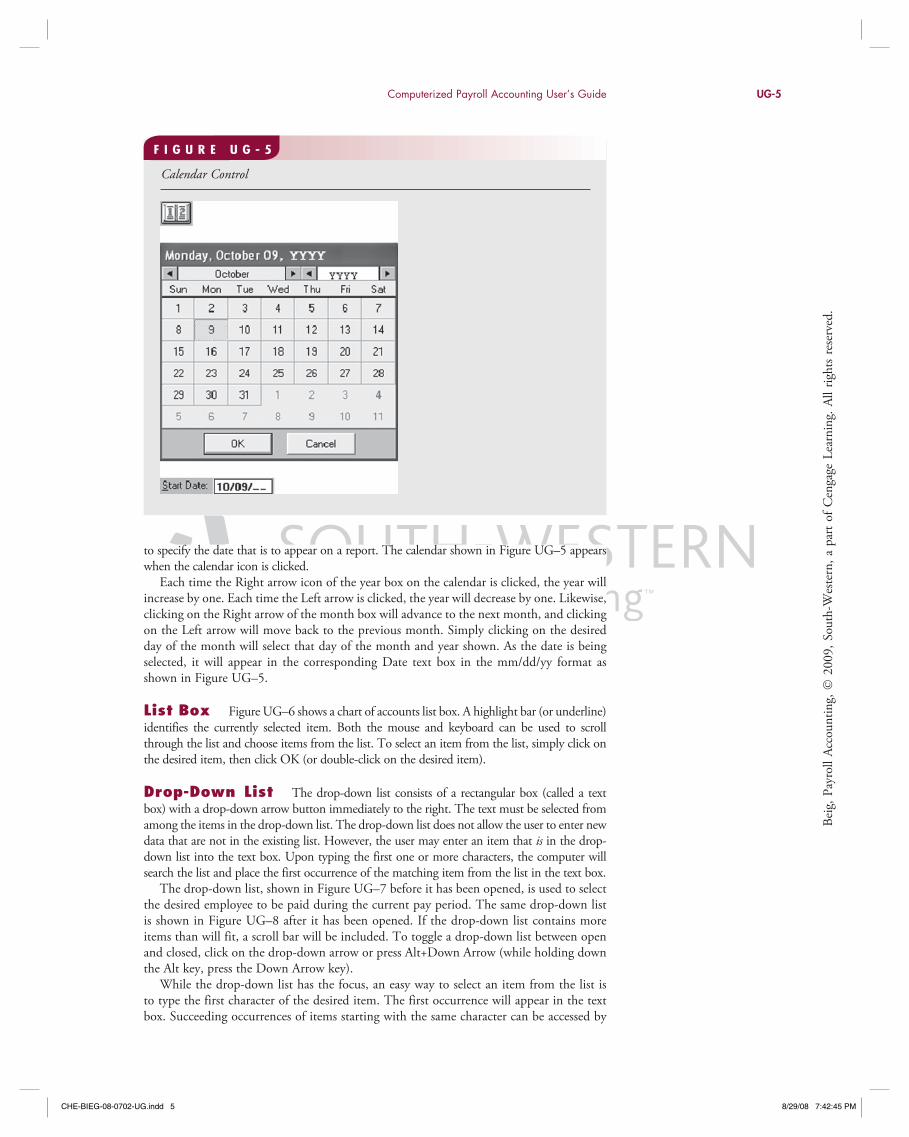
Calendar A small calendar icon (as shown in Figure UG–5) appears on all report screens. A calendar’s year, month, and day may be selected by pointing and clicking the mouse. The calendar may be used to set starting and ending dates to control data printed in reports or
Tabs in the Account Maintenance Window
F I G U R E U G - 3
Example of Grid Cells
F I G U R E U G - 4
CHE-BIEG-08-0702-UG.indd 4CHE-BIEG-08-0702-UG.indd 4 8/29/08 7:42:44 PM8/29/08 7:42:44 PM
Bei
g,Pa
yrol
lA
ccou
ntin
g,�
2009
,So
uth-
Wes
tern
,a
part
ofC
enga
geLe
arni
ng.
All
righ
tsre
serv
ed.
Computerized Payroll Accounting User’s Guide UG-5
to specify the date that is to appear on a report. The calendar shown in Figure UG–5 appears when the calendar icon is clicked.
Each time the Right arrow icon of the year box on the calendar is clicked, the year will increase by one. Each time the Left arrow is clicked, the year will decrease by one. Likewise, clicking on the Right arrow of the month box will advance to the next month, and clicking on the Left arrow will move back to the previous month. Simply clicking on the desired day of the month will select that day of the month and year shown. As the date is being selected, it will appear in the corresponding Date text box in the mm/dd/yy format as shown in Figure UG–5.
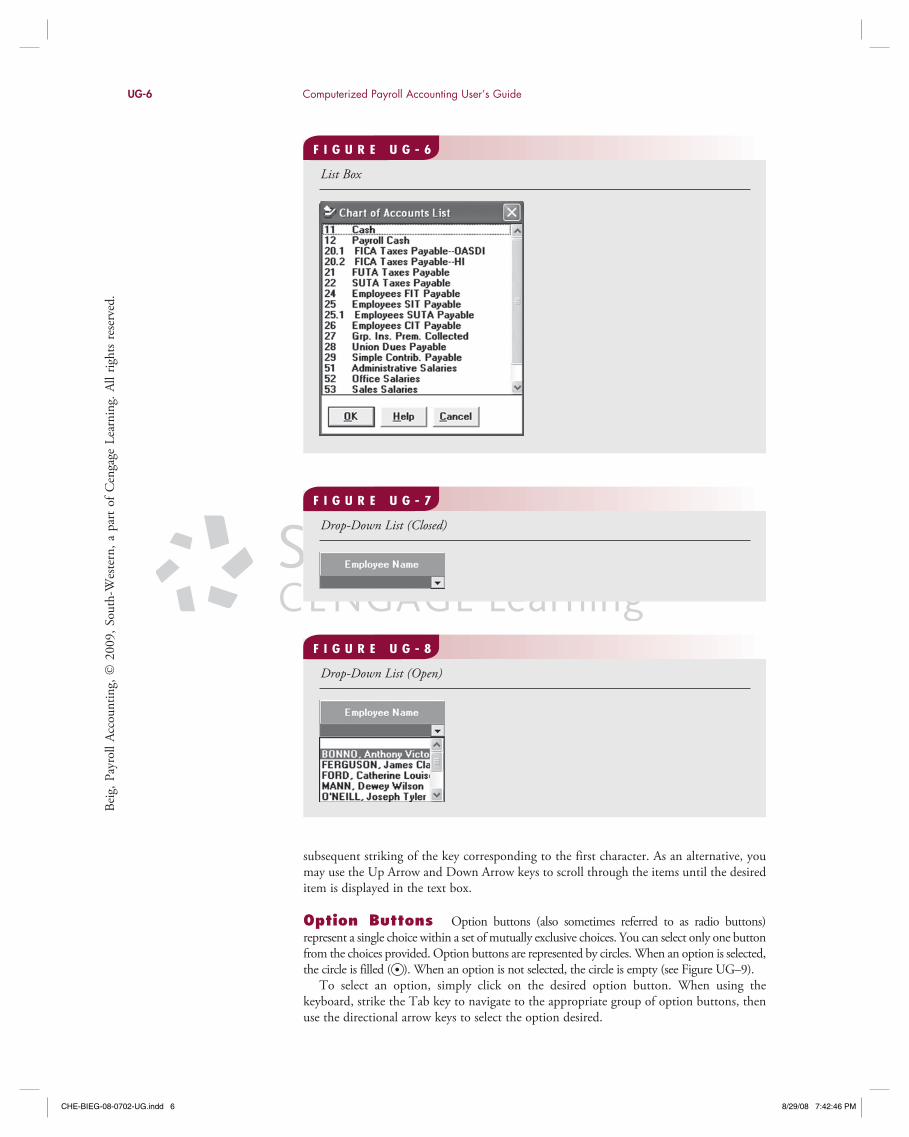
List Box Figure UG–6 shows a chart of accounts list box. A highlight bar (or underline) identifies the currently selected item. Both the mouse and keyboard can be used to scroll through the list and choose items from the list. To select an item from the list, simply click on the desired item, then click OK (or double-click on the desired item).
Drop-Down List The drop-down list consists of a rectangular box (called a text box) with a drop-down arrow button immediately to the right. The text must be selected from among the items in the drop-down list. The drop-down list does not allow the user to enter new data that are not in the existing list. However, the user may enter an item that is in the drop-down list into the text box. Upon typing the first one or more characters, the computer will search the list and place the first occurrence of the matching item from the list in the text box.
The drop-down list, shown in Figure UG–7 before it has been opened, is used to select the desired employee to be paid during the current pay period. The same drop-down list is shown in Figure UG–8 after it has been opened. If the drop-down list contains more items than will fit, a scroll bar will be included. To toggle a drop-down list between open and closed, click on the drop-down arrow or press Alt+Down Arrow (while holding down the Alt key, press the Down Arrow key).
While the drop-down list has the focus, an easy way to select an item from the list is to type the first character of the desired item. The first occurrence will appear in the text box. Succeeding occurrences of items starting with the same character can be accessed by
Calendar Control
F I G U R E U G - 5
CHE-BIEG-08-0702-UG.indd 5CHE-BIEG-08-0702-UG.indd 5 8/29/08 7:42:45 PM8/29/08 7:42:45 PM
Bei
g,Pa
yrol
lA
ccou
ntin
g ,�
2009
,So
uth-
Wes
ter n
,a
part
ofC
enga
geLe
arni
ng.
All
righ
tsre
serv
ed.
UG-6 Computerized Payroll Accounting User’s Guide
subsequent striking of the key corresponding to the first character. As an alternative, you may use the Up Arrow and Down Arrow keys to scroll through the items until the desired item is displayed in the text box.
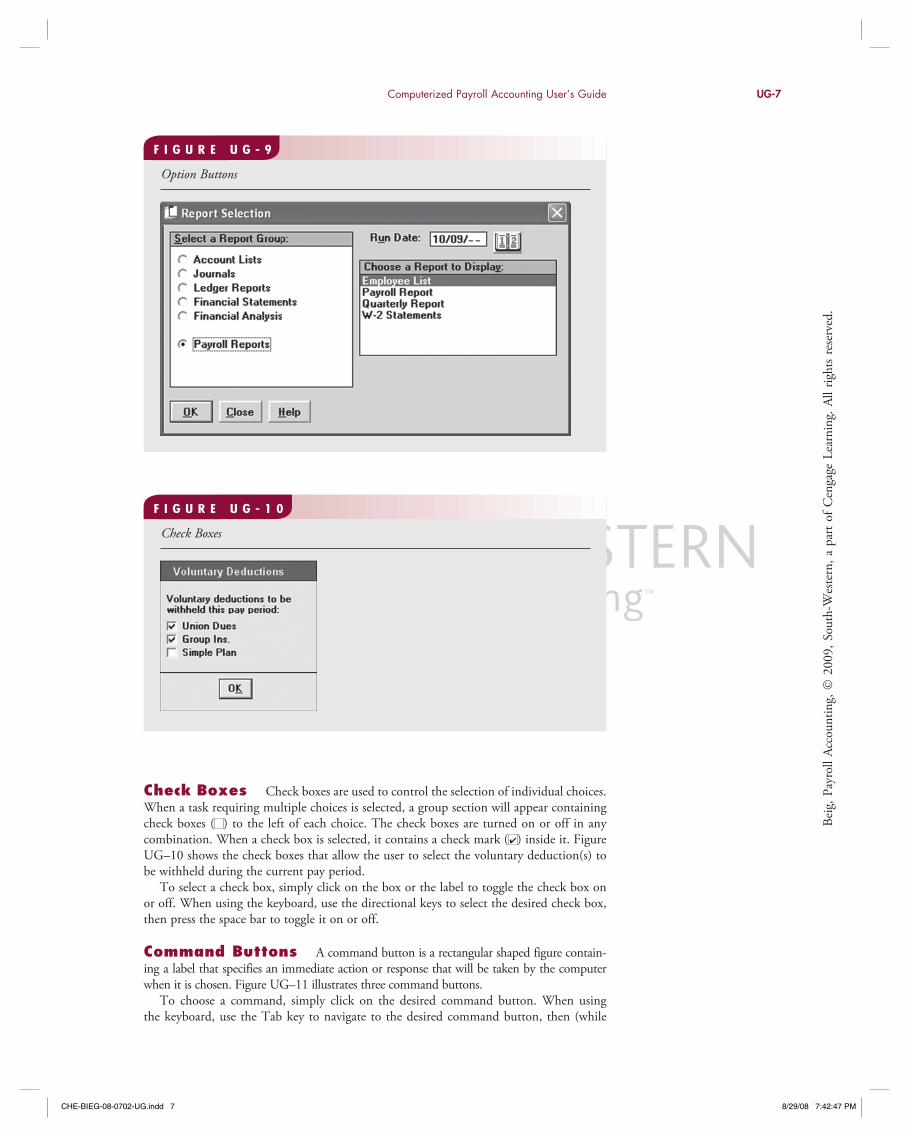
Option Buttons Option buttons (also sometimes referred to as radio buttons) represent a single choice within a set of mutually exclusive choices. You can select only one button from the choices provided. Option buttons are represented by circles. When an option is selected, the circle is filled ( • ). When an option is not selected, the circle is empty (see Figure UG–9).
To select an option, simply click on the desired option button. When using the keyboard, strike the Tab key to navigate to the appropriate group of option buttons, then use the directional arrow keys to select the option desired.
Drop-Down List (Closed)
F I G U R E U G - 7
Drop-Down List (Open)
F I G U R E U G - 8
List Box
F I G U R E U G - 6
CHE-BIEG-08-0702-UG.indd 6CHE-BIEG-08-0702-UG.indd 6 8/29/08 7:42:46 PM8/29/08 7:42:46 PM
Bei
g,Pa
yrol
lA
ccou
ntin
g,�
2009
,So
uth-
Wes
tern
,a
part
ofC
enga
geLe
arni
ng.
All
righ
tsre
serv
ed.
Computerized Payroll Accounting User’s Guide UG-7
Check Boxes Check boxes are used to control the selection of individual choices. When a task requiring multiple choices is selected, a group section will appear containing check boxes ( ) to the left of each choice. The check boxes are turned on or off in any combination. When a check box is selected, it contains a check mark (✔) inside it. Figure UG–10 shows the check boxes that allow the user to select the voluntary deduction(s) to be withheld during the current pay period.
To select a check box, simply click on the box or the label to toggle the check box on or off. When using the keyboard, use the directional keys to select the desired check box, then press the space bar to toggle it on or off.
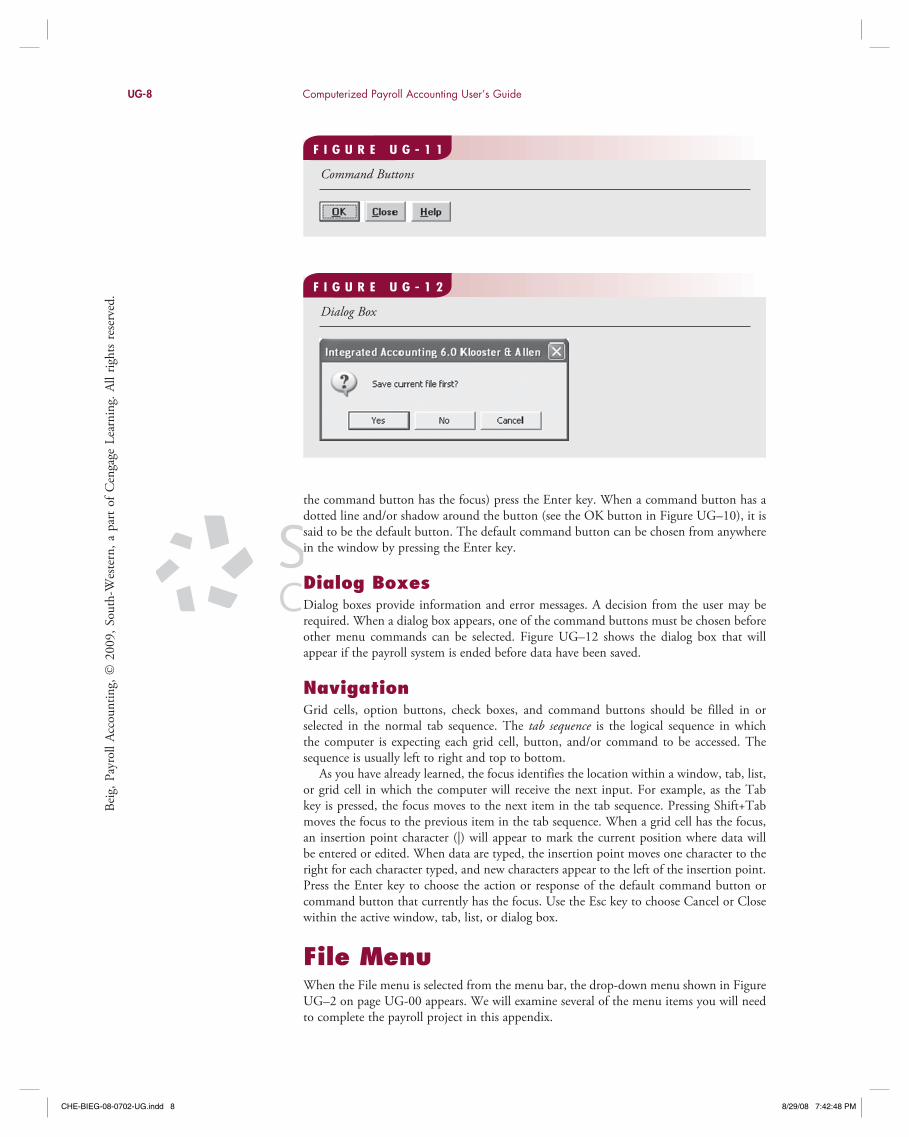
Command Buttons A command button is a rectangular shaped figure contain-ing a label that specifies an immediate action or response that will be taken by the computer when it is chosen. Figure UG–11 illustrates three command buttons.
To choose a command, simply click on the desired command button. When using the keyboard, use the Tab key to navigate to the desired command button, then (while
Check Boxes
F I G U R E U G - 1 0
Option Buttons
F I G U R E U G - 9
CHE-BIEG-08-0702-UG.indd 7CHE-BIEG-08-0702-UG.indd 7 8/29/08 7:42:47 PM8/29/08 7:42:47 PM
Bei
g,Pa
yrol
lA
ccou
ntin
g ,�
2009
,So
uth-
Wes
ter n
,a
part
ofC
enga
geLe
arni
ng.
All
righ
tsre
serv
ed.
UG-8 Computerized Payroll Accounting User’s Guide
the command button has the focus) press the Enter key. When a command button has a dotted line and/or shadow around the button (see the OK button in Figure UG–10), it is said to be the default button. The default command button can be chosen from anywhere in the window by pressing the Enter key.
Dialog BoxesDialog boxes provide information and error messages. A decision from the user may be required. When a dialog box appears, one of the command buttons must be chosen before other menu commands can be selected. Figure UG–12 shows the dialog box that will appear if the payroll system is ended before data have been saved.
NavigationGrid cells, option buttons, check boxes, and command buttons should be filled in or selected in the normal tab sequence. The tab sequence is the logical sequence in which the computer is expecting each grid cell, button, and/or command to be accessed. The sequence is usually left to right and top to bottom.
As you have already learned, the focus identifies the location within a window, tab, list, or grid cell in which the computer will receive the next input. For example, as the Tab key is pressed, the focus moves to the next item in the tab sequence. Pressing Shift+Tab moves the focus to the previous item in the tab sequence. When a grid cell has the focus, an insertion point character (|) will appear to mark the current position where data will be entered or edited. When data are typed, the insertion point moves one character to the right for each character typed, and new characters appear to the left of the insertion point. Press the Enter key to choose the action or response of the default command button or command button that currently has the focus. Use the Esc key to choose Cancel or Close within the active window, tab, list, or dialog box.
File MenuWhen the File menu is selected from the menu bar, the drop-down menu shown in Figure UG–2 on page UG-00 appears. We will examine several of the menu items you will need to complete the payroll project in this appendix.
Dialog Box
F I G U R E U G - 1 2
Command Buttons
F I G U R E U G - 1 1
CHE-BIEG-08-0702-UG.indd 8CHE-BIEG-08-0702-UG.indd 8 8/29/08 7:42:48 PM8/29/08 7:42:48 PM
Bei
g,Pa
yrol
lA
ccou
ntin
g,�
2009
,So
uth-
Wes
tern
,a
part
ofC
enga
geLe
arni
ng.
All
righ
tsre
serv
ed.
Computerized Payroll Accounting User’s Guide UG-9
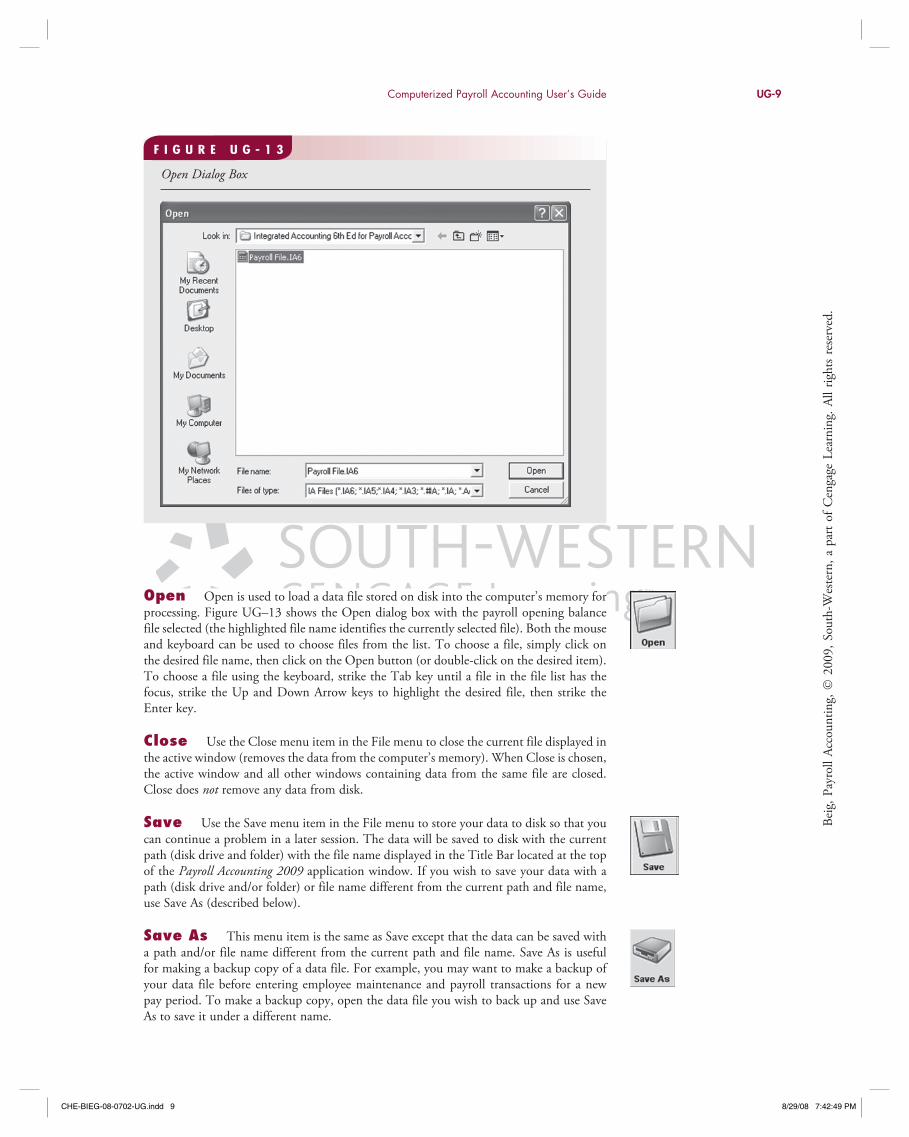
Open Open is used to load a data file stored on disk into the computer’s memory for processing. Figure UG–13 shows the Open dialog box with the payroll opening balance file selected (the highlighted file name identifies the currently selected file). Both the mouse and keyboard can be used to choose files from the list. To choose a file, simply click on the desired file name, then click on the Open button (or double-click on the desired item). To choose a file using the keyboard, strike the Tab key until a file in the file list has the focus, strike the Up and Down Arrow keys to highlight the desired file, then strike the Enter key.
Close Use the Close menu item in the File menu to close the current file displayed in the active window (removes the data from the computer’s memory). When Close is chosen, the active window and all other windows containing data from the same file are closed. Close does not remove any data from disk.
Save Use the Save menu item in the File menu to store your data to disk so that you can continue a problem in a later session. The data will be saved to disk with the current path (disk drive and folder) with the file name displayed in the Title Bar located at the top of the Payroll Accounting 2009 application window. If you wish to save your data with a path (disk drive and/or folder) or file name different from the current path and file name, use Save As (described below).
Save As This menu item is the same as Save except that the data can be saved with a path and/or file name different from the current path and file name. Save As is useful for making a backup copy of a data file. For example, you may want to make a backup of your data file before entering employee maintenance and payroll transactions for a new pay period. To make a backup copy, open the data file you wish to back up and use Save As to save it under a different name.
Open Dialog Box
F I G U R E U G - 1 3
CHE-BIEG-08-0702-UG.indd 9CHE-BIEG-08-0702-UG.indd 9 8/29/08 7:42:49 PM8/29/08 7:42:49 PM
Bei
g,Pa
yrol
lA
ccou
ntin
g ,�
2009
,So
uth-
Wes
ter n
,a
part
ofC
enga
geLe
arni
ng.
All
righ
tsre
serv
ed.
UG-10 Computerized Payroll Accounting User’s Guide
Print The purpose of Print is to create a printed version of any report or graphic currently displayed in a report or graphic window. The entire contents of the data in these windows will be printed when Print is chosen.
Print Setup When the Print button is clicked while a report is displayed, or the Print Setup menu item is chosen from the File menu, a Print Setup dialog box will appear. The Print Setup dialog box is used to provide choices about the printer(s) connected to your computer, the paper size, printing enhancements, etc. You will not need to use Print Setup unless you are having trouble printing. Check with your instructor for the proper information before making changes to your print setup. Payroll Accounting 2009 uses the current printer information specified in your computer’s user interface when processing a print command.
Change Printer Font When reports are printed to an attached printer, Payroll Accounting 2009 uses the font, font style, and size specified in the printer’s Font dialog box. You may want to change the printer font, style, and/or size to make reports more attractive or to make the size smaller if fields are overflowing or wrapping incorrectly. Also, changing the font to one that is native to the printer you are using (e.g., Courier) will often increase the print speed.
Exit This menu item is used to quit Payroll Accounting 2009. When Exit is chosen, the computer checks to see if the current data in its memory have been saved. If not, a dialog box will appear asking if you wish to save your data to disk.
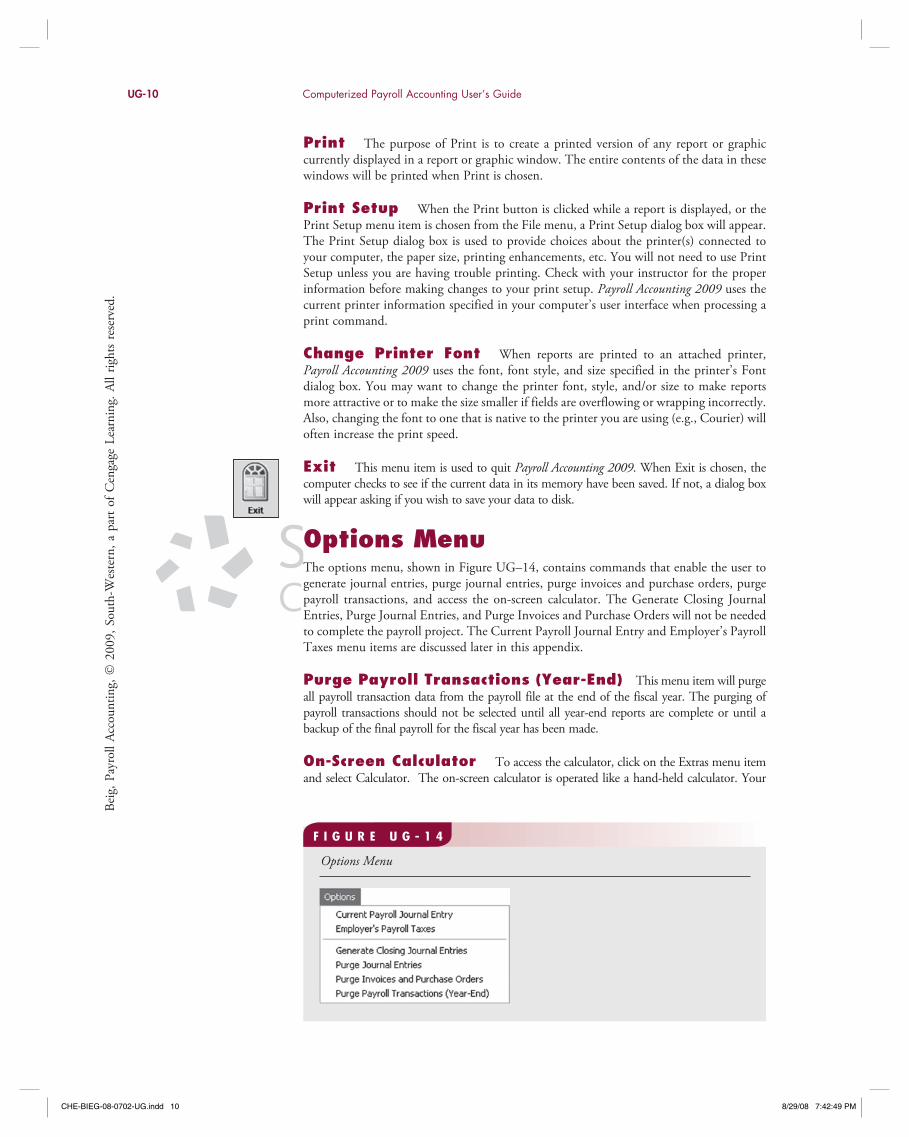
Options MenuThe options menu, shown in Figure UG–14, contains commands that enable the user to generate journal entries, purge journal entries, purge invoices and purchase orders, purge payroll transactions, and access the on-screen calculator. The Generate Closing Journal Entries, Purge Journal Entries, and Purge Invoices and Purchase Orders will not be needed to complete the payroll project. The Current Payroll Journal Entry and Employer’s Payroll Taxes menu items are discussed later in this appendix.
Purge Payroll Transactions (Year-End) This menu item will purge all payroll transaction data from the payroll file at the end of the fiscal year. The purging of payroll transactions should not be selected until all year-end reports are complete or until a backup of the final payroll for the fiscal year has been made.
On-Screen Calculator To access the calculator, click on the Extras menu item and select Calculator. The on-screen calculator is operated like a hand-held calculator. Your
Options Menu
F I G U R E U G - 1 4
CHE-BIEG-08-0702-UG.indd 10CHE-BIEG-08-0702-UG.indd 10 8/29/08 7:42:49 PM8/29/08 7:42:49 PM
Bei
g,Pa
yrol
lA
ccou
ntin
g,�
2009
,So
uth-
Wes
tern
,a
part
ofC
enga
geLe
arni
ng.
All
righ
tsre
serv
ed.

Computerized Payroll Accounting User’s Guide UG-11
computer’s standard calculator can perform all the calculations required in this text-workbook. The results can be pasted into the grid cell that has the focus. Once the Calculator appears (as shown in Figure UG–15), a Help menu is available from the calculator providing detailed explanation of the calculator operation.
Employee MaintenanceWhen Maintain Accounts is chosen from the Data menu or the Accts. toolbar button is clicked, the Account Maintenance window will appear. Click the Employees tab (if not already active), and enter the maintenance data. Figure UG–16 shows the Employees tab containing employee data with a description of each data field.
New employees may be added by keying the data fields in the grid cell boxes and choosing the employee’s marital status. When the focus moves to the marital status, choose Single or Married from the drop-down list or type the first letter of the desired marital status (S or M). The new employee will be inserted into the existing employee list in employee number sequence. Existing employee data may be changed by selecting the employee you wish to change, keying the correct data (or selecting a different marital
On-Screen Calculator
F I G U R E U G - 1 5
Employee Maintenance
F I G U R E U G - 1 6
CHE-BIEG-08-0702-UG.indd 11CHE-BIEG-08-0702-UG.indd 11 8/29/08 7:42:50 PM8/29/08 7:42:50 PM
Bei
g,Pa
yrol
lA
ccou
ntin
g ,�
2009
,So
uth-
Wes
ter n
,a
part
ofC
enga
geLe
arni
ng.
All
righ
tsre
serv
ed.
UG-12 Computerized Payroll Accounting User’s Guide
status), and then clicking the Change Employee button (the Add Employee button changes to Change Employee). An existing employee may be deleted by simply selecting the employee that you wish to delete, then clicking on the Delete button. Note: You will not be allowed to delete an employee with cumulative earnings for the current year until after the end of the calendar year.
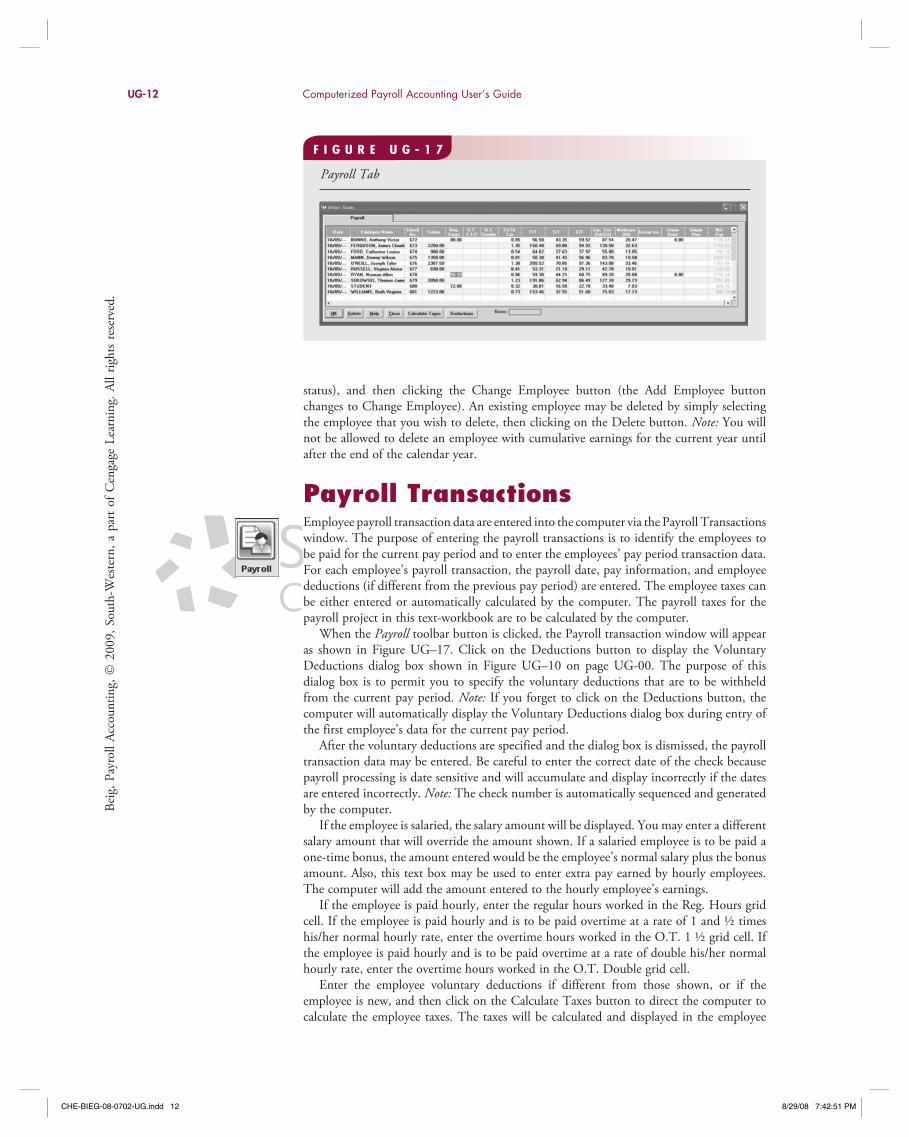
Payroll TransactionsEmployee payroll transaction data are entered into the computer via the Payroll Transactions window. The purpose of entering the payroll transactions is to identify the employees to be paid for the current pay period and to enter the employees’ pay period transaction data. For each employee’s payroll transaction, the payroll date, pay information, and employee deductions (if different from the previous pay period) are entered. The employee taxes can be either entered or automatically calculated by the computer. The payroll taxes for the payroll project in this text-workbook are to be calculated by the computer.
When the Payroll toolbar button is clicked, the Payroll transaction window will appear as shown in Figure UG–17. Click on the Deductions button to display the Voluntary Deductions dialog box shown in Figure UG–10 on page UG-00. The purpose of this dialog box is to permit you to specify the voluntary deductions that are to be withheld from the current pay period. Note: If you forget to click on the Deductions button, the computer will automatically display the Voluntary Deductions dialog box during entry of the first employee’s data for the current pay period.
After the voluntary deductions are specified and the dialog box is dismissed, the payroll transaction data may be entered. Be careful to enter the correct date of the check because payroll processing is date sensitive and will accumulate and display incorrectly if the dates are entered incorrectly. Note: The check number is automatically sequenced and generated by the computer.
If the employee is salaried, the salary amount will be displayed. You may enter a different salary amount that will override the amount shown. If a salaried employee is to be paid a one-time bonus, the amount entered would be the employee’s normal salary plus the bonus amount. Also, this text box may be used to enter extra pay earned by hourly employees. The computer will add the amount entered to the hourly employee’s earnings.
If the employee is paid hourly, enter the regular hours worked in the Reg. Hours grid cell. If the employee is paid hourly and is to be paid overtime at a rate of 1 and ½ times his/her normal hourly rate, enter the overtime hours worked in the O.T. 1 ½ grid cell. If the employee is paid hourly and is to be paid overtime at a rate of double his/her normal hourly rate, enter the overtime hours worked in the O.T. Double grid cell.
Enter the employee voluntary deductions if different from those shown, or if the employee is new, and then click on the Calculate Taxes button to direct the computer to calculate the employee taxes. The taxes will be calculated and displayed in the employee
Payroll Tab
F I G U R E U G - 1 7
CHE-BIEG-08-0702-UG.indd 12CHE-BIEG-08-0702-UG.indd 12 8/29/08 7:42:51 PM8/29/08 7:42:51 PM
Bei
g,Pa
yrol
lA
ccou
ntin
g,�
2009
,So
uth-
Wes
tern
,a
part
ofC
enga
geLe
arni
ng.
All
righ
tsre
serv
ed.
Computerized Payroll Accounting User’s Guide UG-13
taxes grid cells. (You could also enter the tax withholding amounts in the text boxes.) Finally, after all the employee’s data have been entered, and taxes calculated, click on OK.
A previously entered payroll transaction may be corrected by simply selecting the payroll transaction you wish to correct, keying the correction, and clicking on OK. The computer will update the employee’s record. Likewise, an existing payroll transaction may be deleted by selecting the payroll transaction you wish to delete and clicking on the Delete button.
Generate and Post Payroll Journal EntriesThe Payroll Accounting 2009 software can automatically generate the current payroll journal entry (salary expenses, employee federal tax payable, employee state tax payable, employee city tax payable, Social Security—OASDI, Medicare—HI, and voluntary deductions). It can also generate the employer’s payroll taxes (Social Security—OASDI, Medicare—HI, federal unemployment, and state unemployment) journal entry. As used in this text, OASDI stands for Old-Age, Survivors, and Disability Insurance, and HI stands for Hospital Insurance.
The journal entry to record the current payroll can be generated by choosing the Current Payroll Journal Entry menu item from the Options menu. The journal entry to record the employer’s payroll taxes can be generated by choosing the Employer’s Payroll Taxes menu item from the Options menu. The generated journal entry will appear in a dialog box for your verification. When it is posted to the general ledger, the general journal appears showing the posted entry.
If you must make a change or correction to a payroll transaction after the journal entry has been generated and posted, you must first delete the old journal entry and again generate the corrected journal entry.
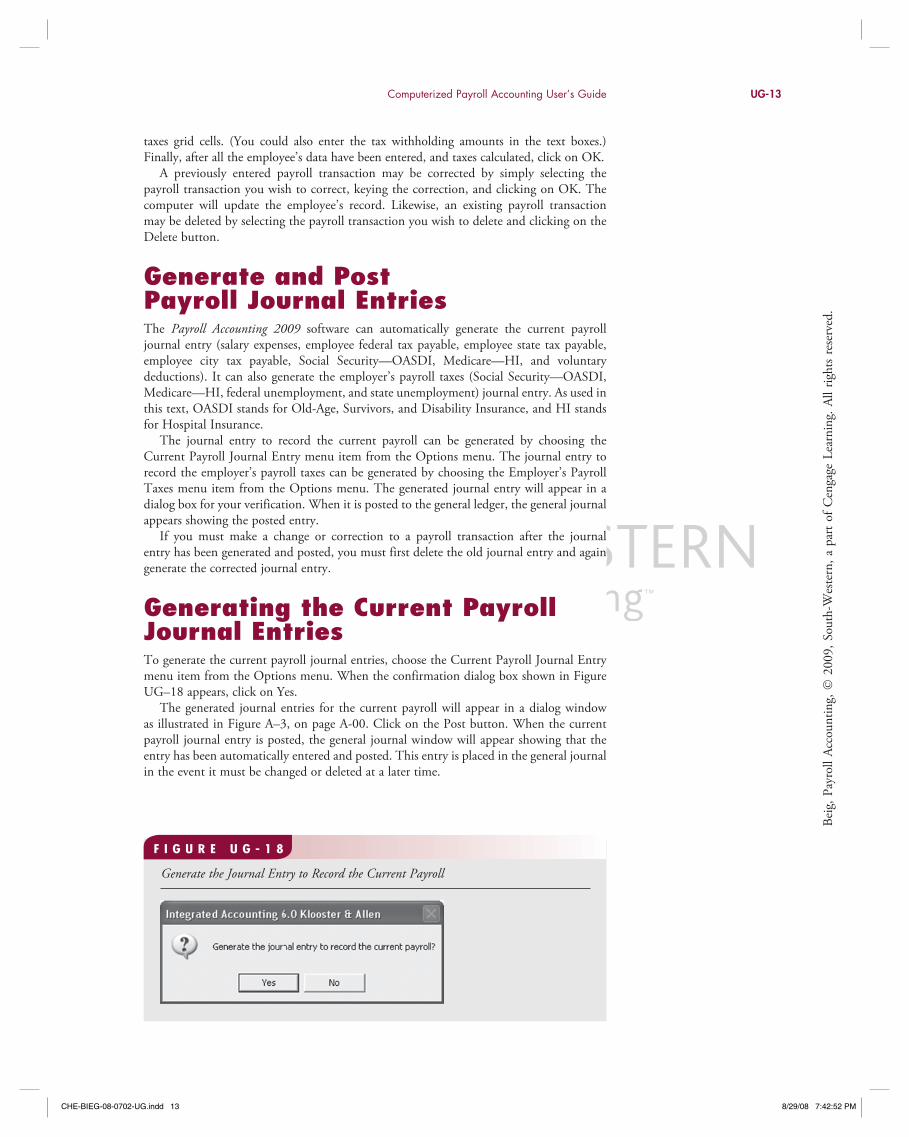
Generating the Current Payroll Journal EntriesTo generate the current payroll journal entries, choose the Current Payroll Journal Entry menu item from the Options menu. When the confirmation dialog box shown in Figure UG–18 appears, click on Yes.
The generated journal entries for the current payroll will appear in a dialog window as illustrated in Figure A–3, on page A-00. Click on the Post button. When the current payroll journal entry is posted, the general journal window will appear showing that the entry has been automatically entered and posted. This entry is placed in the general journal in the event it must be changed or deleted at a later time.
Generate the Journal Entry to Record the Current Payroll
F I G U R E U G - 1 8
CHE-BIEG-08-0702-UG.indd 13CHE-BIEG-08-0702-UG.indd 13 8/29/08 7:42:52 PM8/29/08 7:42:52 PM
Bei
g,Pa
yrol
lA
ccou
ntin
g ,�
2009
,So
uth-
Wes
ter n
,a
part
ofC
enga
geLe
arni
ng.
All
righ
tsre
serv
ed.
UG-14 Computerized Payroll Accounting User’s Guide
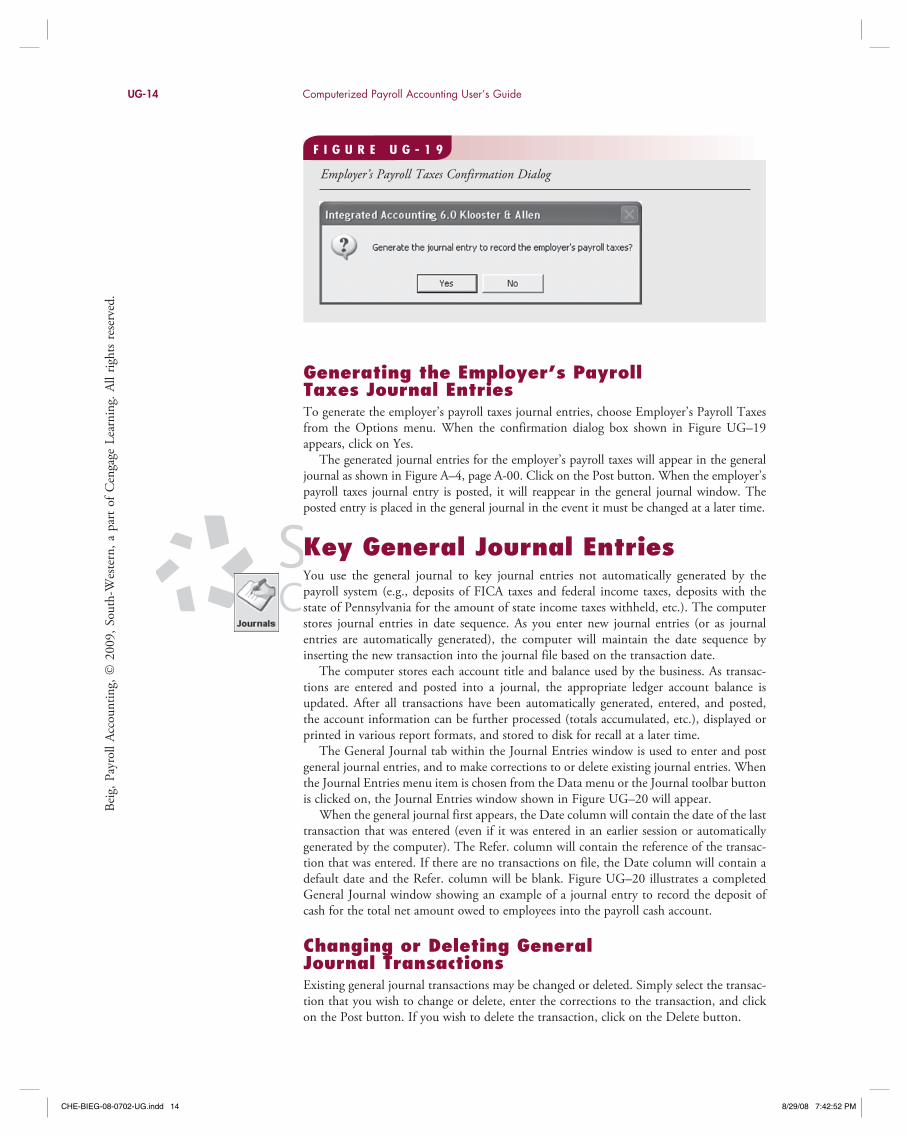
Generating the Employer’s Payroll Taxes Journal EntriesTo generate the employer’s payroll taxes journal entries, choose Employer’s Payroll Taxes from the Options menu. When the confirmation dialog box shown in Figure UG–19 appears, click on Yes.
The generated journal entries for the employer’s payroll taxes will appear in the general journal as shown in Figure A–4, page A-00. Click on the Post button. When the employer’s payroll taxes journal entry is posted, it will reappear in the general journal window. The posted entry is placed in the general journal in the event it must be changed at a later time.
Key General Journal EntriesYou use the general journal to key journal entries not automatically generated by the payroll system (e.g., deposits of FICA taxes and federal income taxes, deposits with the state of Pennsylvania for the amount of state income taxes withheld, etc.). The computer stores journal entries in date sequence. As you enter new journal entries (or as journal entries are automatically generated), the computer will maintain the date sequence by inserting the new transaction into the journal file based on the transaction date.
The computer stores each account title and balance used by the business. As transac-tions are entered and posted into a journal, the appropriate ledger account balance is updated. After all transactions have been automatically generated, entered, and posted, the account information can be further processed (totals accumulated, etc.), displayed or printed in various report formats, and stored to disk for recall at a later time.
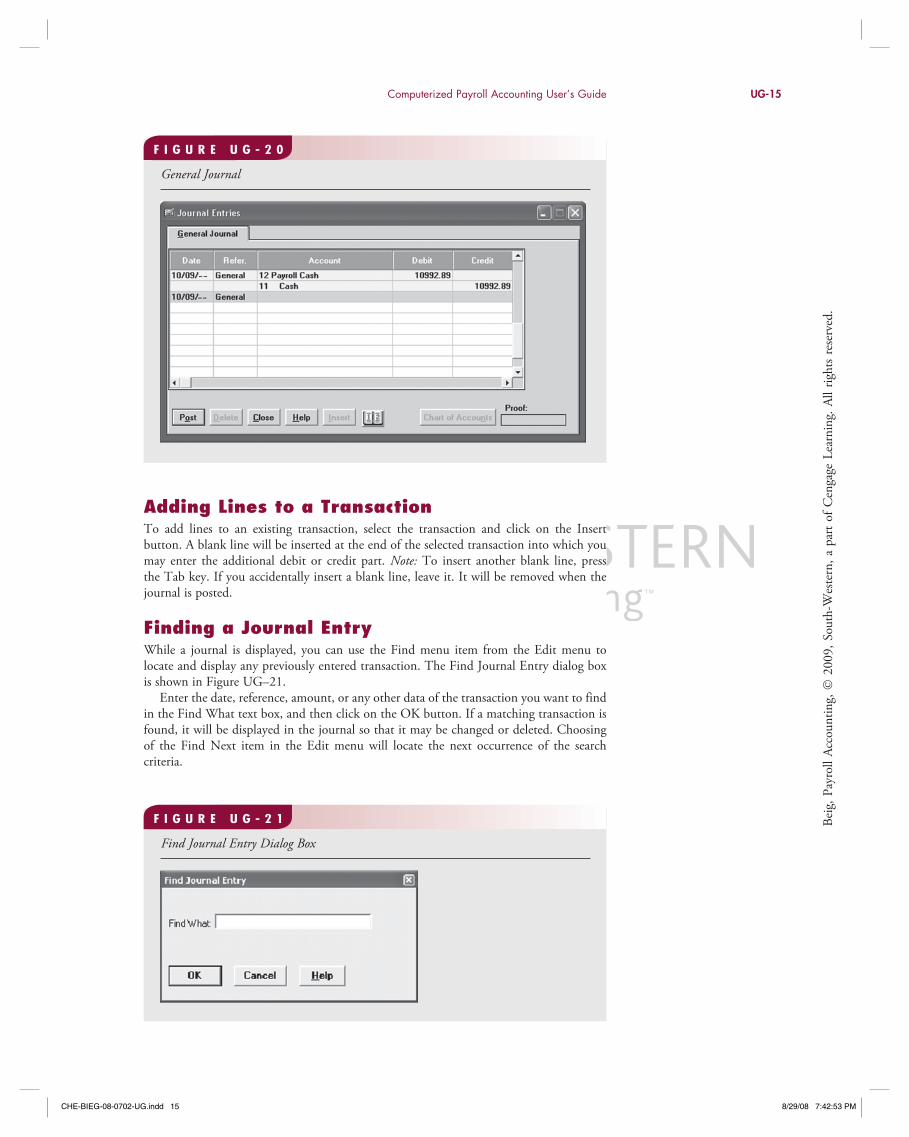
The General Journal tab within the Journal Entries window is used to enter and post general journal entries, and to make corrections to or delete existing journal entries. When the Journal Entries menu item is chosen from the Data menu or the Journal toolbar button is clicked on, the Journal Entries window shown in Figure UG–20 will appear.
When the general journal first appears, the Date column will contain the date of the last transaction that was entered (even if it was entered in an earlier session or automatically generated by the computer). The Refer. column will contain the reference of the transac-tion that was entered. If there are no transactions on file, the Date column will contain a default date and the Refer. column will be blank. Figure UG–20 illustrates a completed General Journal window showing an example of a journal entry to record the deposit of cash for the total net amount owed to employees into the payroll cash account.
Changing or Deleting General Journal TransactionsExisting general journal transactions may be changed or deleted. Simply select the transac-tion that you wish to change or delete, enter the corrections to the transaction, and click on the Post button. If you wish to delete the transaction, click on the Delete button.
Employer’s Payroll Taxes Confirmation Dialog
F I G U R E U G - 1 9
CHE-BIEG-08-0702-UG.indd 14CHE-BIEG-08-0702-UG.indd 14 8/29/08 7:42:52 PM8/29/08 7:42:52 PM
Bei
g,Pa
yrol
lA
ccou
ntin
g,�
2009
,So
uth-
Wes
tern
,a
part
ofC
enga
geLe
arni
ng.
All
righ
tsre
serv
ed.
Computerized Payroll Accounting User’s Guide UG-15
Adding Lines to a TransactionTo add lines to an existing transaction, select the transaction and click on the Insert button. A blank line will be inserted at the end of the selected transaction into which you may enter the additional debit or credit part. Note: To insert another blank line, press the Tab key. If you accidentally insert a blank line, leave it. It will be removed when the journal is posted.
Finding a Journal EntryWhile a journal is displayed, you can use the Find menu item from the Edit menu to locate and display any previously entered transaction. The Find Journal Entry dialog box is shown in Figure UG–21.
Enter the date, reference, amount, or any other data of the transaction you want to find in the Find What text box, and then click on the OK button. If a matching transaction is found, it will be displayed in the journal so that it may be changed or deleted. Choosing of the Find Next item in the Edit menu will locate the next occurrence of the search criteria.
General Journal
F I G U R E U G - 2 0
Find Journal Entry Dialog Box
F I G U R E U G - 2 1
CHE-BIEG-08-0702-UG.indd 15CHE-BIEG-08-0702-UG.indd 15 8/29/08 7:42:53 PM8/29/08 7:42:53 PM
Bei
g,Pa
yrol
lA
ccou
ntin
g ,�
2009
,So
uth-
Wes
ter n
,a
part
ofC
enga
geLe
arni
ng.
All
righ
tsre
serv
ed.
UG-16 Computerized Payroll Accounting User’s Guide
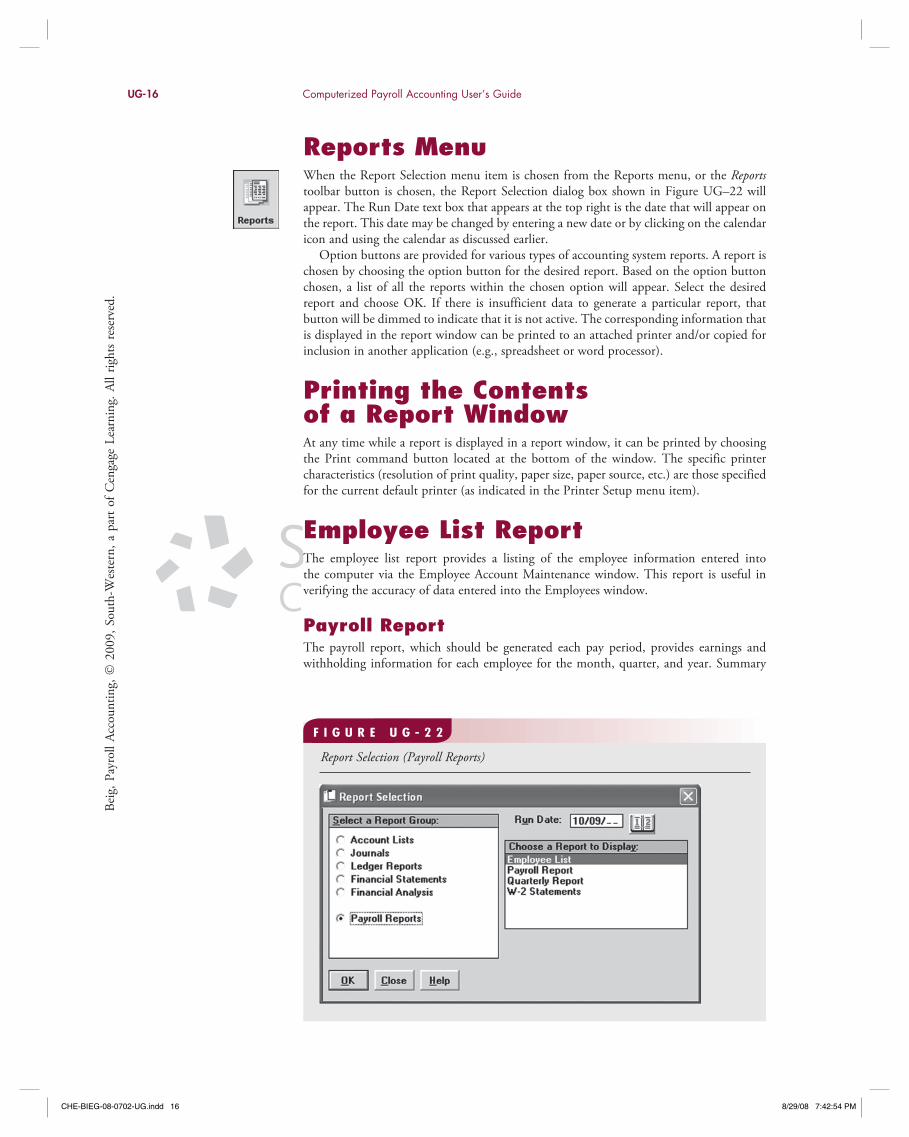
Reports MenuWhen the Report Selection menu item is chosen from the Reports menu, or the Reports toolbar button is chosen, the Report Selection dialog box shown in Figure UG–22 will appear. The Run Date text box that appears at the top right is the date that will appear on the report. This date may be changed by entering a new date or by clicking on the calendar icon and using the calendar as discussed earlier.
Option buttons are provided for various types of accounting system reports. A report is chosen by choosing the option button for the desired report. Based on the option button chosen, a list of all the reports within the chosen option will appear. Select the desired report and choose OK. If there is insufficient data to generate a particular report, that button will be dimmed to indicate that it is not active. The corresponding information that is displayed in the report window can be printed to an attached printer and/or copied for inclusion in another application (e.g., spreadsheet or word processor).
Printing the Contents of a Report WindowAt any time while a report is displayed in a report window, it can be printed by choosing the Print command button located at the bottom of the window. The specific printer characteristics (resolution of print quality, paper size, paper source, etc.) are those specified for the current default printer (as indicated in the Printer Setup menu item).
Employee List ReportThe employee list report provides a listing of the employee information entered into the computer via the Employee Account Maintenance window. This report is useful in verifying the accuracy of data entered into the Employees window.
Payroll ReportThe payroll report, which should be generated each pay period, provides earnings and withholding information for each employee for the month, quarter, and year. Summary
Report Selection (Payroll Reports)
F I G U R E U G - 2 2
CHE-BIEG-08-0702-UG.indd 16CHE-BIEG-08-0702-UG.indd 16 8/29/08 7:42:54 PM8/29/08 7:42:54 PM
Bei
g,Pa
yrol
lA
ccou
ntin
g,�
2009
,So
uth-
Wes
tern
,a
part
ofC
enga
geLe
arni
ng.
All
righ
tsre
serv
ed.
Computerized Payroll Accounting User’s Guide UG-17
information is included at the end of the report that provides information on earnings and withholdings for all employees.
General Journal Report The general journal report is useful in detecting errors and verifying the equality of debits and credits. This report becomes a permanent accounting document and provides an audit trail so that transactions may be traced to their original source document.
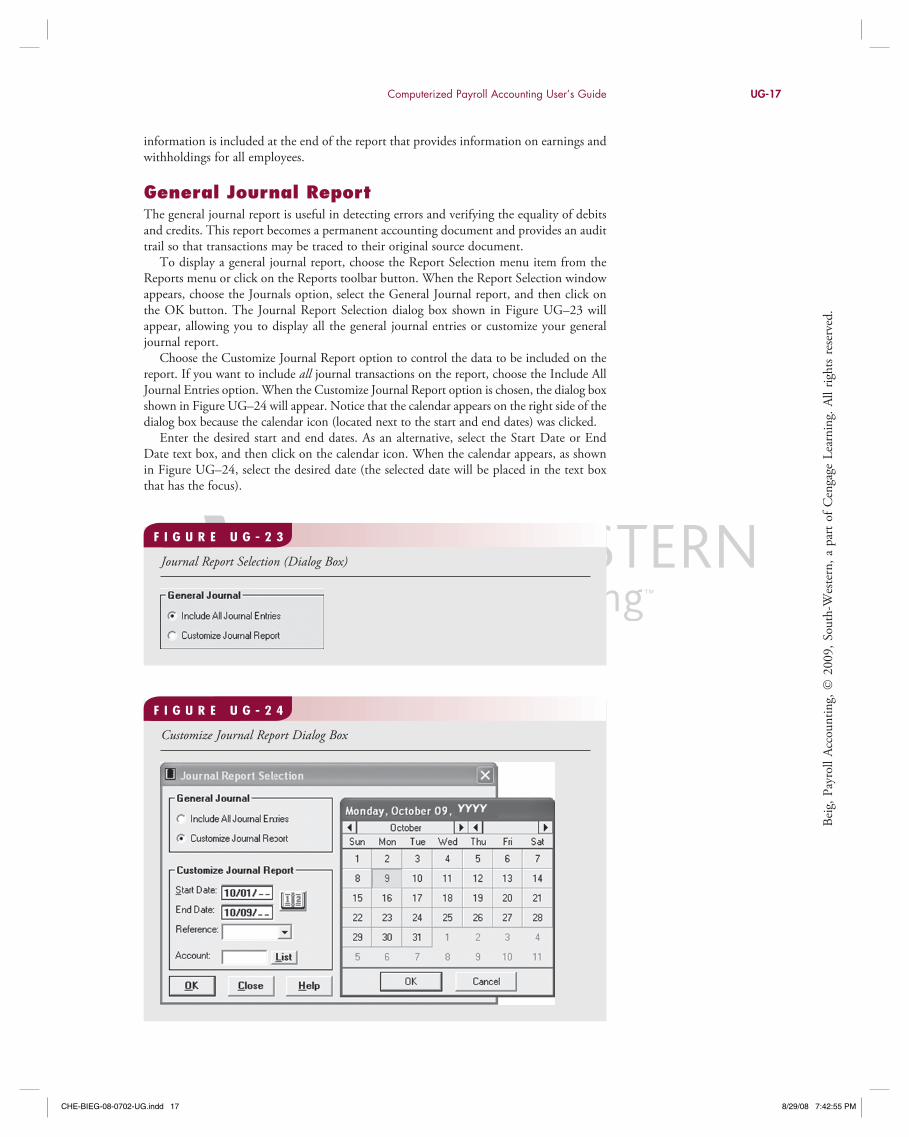
To display a general journal report, choose the Report Selection menu item from the Reports menu or click on the Reports toolbar button. When the Report Selection window appears, choose the Journals option, select the General Journal report, and then click on the OK button. The Journal Report Selection dialog box shown in Figure UG–23 will appear, allowing you to display all the general journal entries or customize your general journal report.
Choose the Customize Journal Report option to control the data to be included on the report. If you want to include all journal transactions on the report, choose the Include All Journal Entries option. When the Customize Journal Report option is chosen, the dialog box shown in Figure UG–24 will appear. Notice that the calendar appears on the right side of the dialog box because the calendar icon (located next to the start and end dates) was clicked.
Enter the desired start and end dates. As an alternative, select the Start Date or End Date text box, and then click on the calendar icon. When the calendar appears, as shown in Figure UG–24, select the desired date (the selected date will be placed in the text box that has the focus).
Journal Report Selection (Dialog Box)
F I G U R E U G - 2 3
Customize Journal Report Dialog Box
F I G U R E U G - 2 4
CHE-BIEG-08-0702-UG.indd 17CHE-BIEG-08-0702-UG.indd 17 8/29/08 7:42:55 PM8/29/08 7:42:55 PM
Bei
g,Pa
yrol
lA
ccou
ntin
g ,�
2009
,So
uth-
Wes
ter n
,a
part
ofC
enga
geLe
arni
ng.
All
righ
tsre
serv
ed.
UG-18 Computerized Payroll Accounting User’s Guide
Enter an identifying reference in the Reference text box if you wish to restrict the report to a particular reference by clicking on the drop-down arrow to obtain a list of all the references available from which you may choose. (For example, you might want to display only adjusting entries or only a certain invoice.) As an alternative, you can type the first character of the reference in the text box. The first entry that begins with that character will be displayed in the text box. Use the Up and Down Arrow keys to browse through the entries.
Enter an account number in the Account Number text box if you wish to restrict the report to a particular account by clicking on the List button to obtain a chart of accounts selection list window from which you may select the desired account number. An example of a general journal report is illustrated in Figure A–6, on page A-00 of Appendix A.
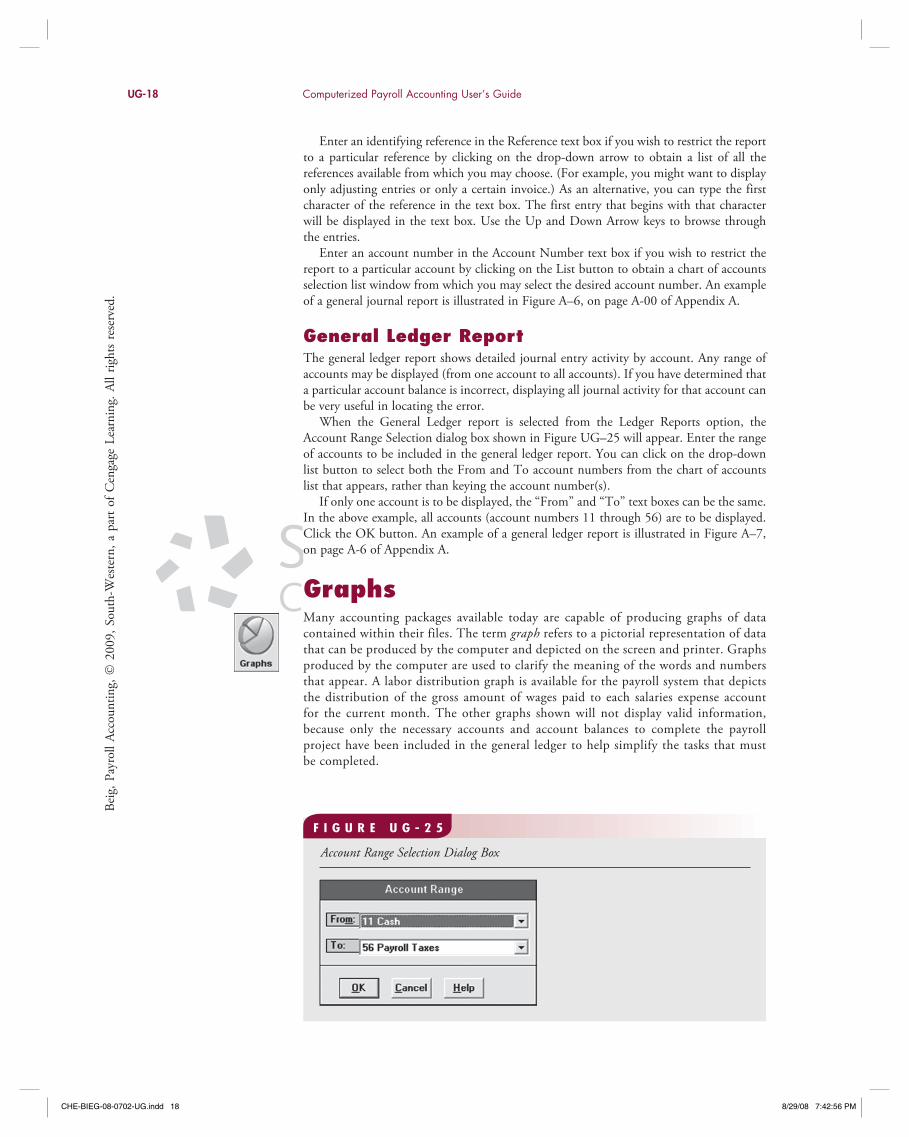
General Ledger ReportThe general ledger report shows detailed journal entry activity by account. Any range of accounts may be displayed (from one account to all accounts). If you have determined that a particular account balance is incorrect, displaying all journal activity for that account can be very useful in locating the error.
When the General Ledger report is selected from the Ledger Reports option, the Account Range Selection dialog box shown in Figure UG–25 will appear. Enter the range of accounts to be included in the general ledger report. You can click on the drop-down list button to select both the From and To account numbers from the chart of accounts list that appears, rather than keying the account number(s).
If only one account is to be displayed, the “From” and “To” text boxes can be the same. In the above example, all accounts (account numbers 11 through 56) are to be displayed. Click the OK button. An example of a general ledger report is illustrated in Figure A–7, on page A-6 of Appendix A.
GraphsMany accounting packages available today are capable of producing graphs of data contained within their files. The term graph refers to a pictorial representation of data that can be produced by the computer and depicted on the screen and printer. Graphs produced by the computer are used to clarify the meaning of the words and numbers that appear. A labor distribution graph is available for the payroll system that depicts the distribution of the gross amount of wages paid to each salaries expense account for the current month. The other graphs shown will not display valid information, because only the necessary accounts and account balances to complete the payroll project have been included in the general ledger to help simplify the tasks that must be completed.
Account Range Selection Dialog Box
F I G U R E U G - 2 5
CHE-BIEG-08-0702-UG.indd 18CHE-BIEG-08-0702-UG.indd 18 8/29/08 7:42:56 PM8/29/08 7:42:56 PM
Bei
g,Pa
yrol
lA
ccou
ntin
g,�
2009
,So
uth-
Wes
tern
,a
part
ofC
enga
geLe
arni
ng.
All
righ
tsre
serv
ed.
Computerized Payroll Accounting User’s Guide UG-19
Graph Selection Dialog Box
F I G U R E U G - 2 6
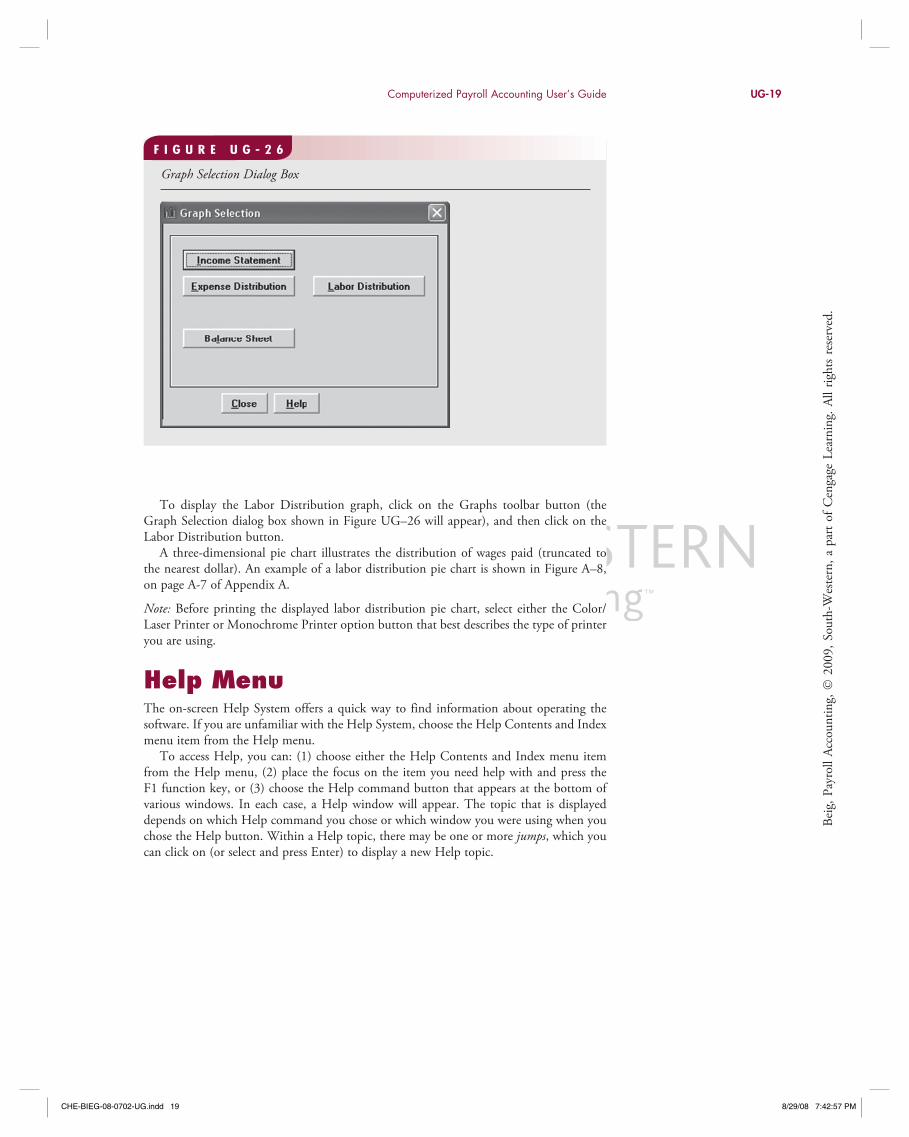
To display the Labor Distribution graph, click on the Graphs toolbar button (the Graph Selection dialog box shown in Figure UG–26 will appear), and then click on the Labor Distribution button.
A three-dimensional pie chart illustrates the distribution of wages paid (truncated to the nearest dollar). An example of a labor distribution pie chart is shown in Figure A–8, on page A-7 of Appendix A.
Note: Before printing the displayed labor distribution pie chart, select either the Color/Laser Printer or Monochrome Printer option button that best describes the type of printer you are using.
Help MenuThe on-screen Help System offers a quick way to find information about operating the software. If you are unfamiliar with the Help System, choose the Help Contents and Index menu item from the Help menu.
To access Help, you can: (1) choose either the Help Contents and Index menu item from the Help menu, (2) place the focus on the item you need help with and press the F1 function key, or (3) choose the Help command button that appears at the bottom of various windows. In each case, a Help window will appear. The topic that is displayed depends on which Help command you chose or which window you were using when you chose the Help button. Within a Help topic, there may be one or more jumps, which you can click on (or select and press Enter) to display a new Help topic.
CHE-BIEG-08-0702-UG.indd 19CHE-BIEG-08-0702-UG.indd 19 8/29/08 7:42:57 PM8/29/08 7:42:57 PM
Bei
g,Pa
yrol
lA
ccou
ntin
g ,�
2009
,So
uth-
Wes
ter n
,a
part
ofC
enga
geLe
arni
ng.
All
righ
tsre
serv
ed.

CHE-BIEG-08-0702-UG.indd 20CHE-BIEG-08-0702-UG.indd 20 8/29/08 7:42:57 PM8/29/08 7:42:57 PM
Bei
g,Pa
yrol
lA
ccou
ntin
g,�
2009
,So
uth-
Wes
tern
,a
part
ofC
enga
geLe
arni
ng.
All
righ
tsre
serv
ed.