chapter€¦ · · 2005-02-05accounting clerks need to know how to use modern mis computerized 2...
TRANSCRIPT

1ChapterIntroduction
KEY TERMS
LEARNING OBJECTIVES
ManagementInformation System(MIS)
User InterfaceTooltipsTitle BarCurrent User NameFile Name
Menu BarToolbar ButtonsMenu TitleShortcut KeyMenu ItemDrop-Down MenuAccess KeyFocus
Insertion PointGrid CellsClipboardTab SequenceHelp SystemPlanning ToolsExplore Accounting
System
Upon completion of this chapter, you will be able to:
1. Identify and define the features of the Automated Accounting8.0 software and textbook.
2. Perform startup procedures.
3. Make menu and toolbar selections.
4. Use window controls.
5. Perform file-handling tasks (e.g., loading data from disk andsaving data to disk).
6. Use Planning Tools.
7. Access Help System information.
8. Use the on-screen Calculator.
9. Apply basic principles of accounting concepts.
10. Use the Explorer feature of the software.
11. Use the Internet Web Browser feature of the software.
1

INTRODUCTIONEveryone uses accounting to some extent. For example, we use
accounting when we purchase or sell goods and services, pay our bills,balance our checkbooks, budget our money, and prepare our tax returns.Businesses also use accounting to prepare reports for individuals, otherbusinesses, and various government agencies regarding their financialactivities. Accounting is an informational system that plans, analyzes,records, and reports financial information. An accountant is someone whosummarizes detailed accounting information and then analyzes andinterprets that information to assist owners and managers in makingfinancial decisions. In many businesses, personnel called bookkeepers andaccounting clerks assist the accountant and do the general accounting workof recording, reporting, and filing that are required on a routine basis.
A business is an economic entity that endeavors to sell goods andservices to customers at prices that will pay all the costs of doingbusiness and return a profit to the owners. To help achieve this objective,many businesses have turned to the use of the computer as a tool to helpthem collect, organize, and report large amounts of information. Today’smodern businesses’ informational needs are stored and managed by whatis called a management information system (MIS). A typicalmanagement information system (MIS) consists of severalcomputer-integrated systems that supply all the informational needs ofthe business. The accounting system is one of the most important of allthese systems because it is used to manage the internal and external flowof the business’s financial data.
Business owners, managers, accountants, bookkeepers, andaccounting clerks need to know how to use modern MIS computerized
2 Chapter 1 Introduction
Using a computer to accessanother computer user’s data canactually be a criminal activity. Thisactivity is commonly referred to ashacking. The term hacking is oftenused by computer enthusiasts todescribe the challenge of breakingcodes or other protection schemesthat prohibit unauthorized access.Hackers who break codes to accessother users’ confidentialinformation, records, computer
time, and so on are committing acrime.
Critical Thinking
1. Do you think that most hackersrealize they are committing acriminal act?
2. What can be done to deterhacking?

accounting systems in order to efficiently perform accounting tasks. Thistext will teach you about computerized accounting, accountingspreadsheet applications, and word processing applications using ahands-on approach.You will learn to operate the software by enteringrealistic accounting transactions for a variety of business applications andby generating financial statements, spreadsheets, and other managementinformation reports.
In software, a user interface is the way the user communicates withthe software through images on the monitor. The Automated Accountingsoftware uses a standard Windows user interface that includes drop-downmenus, a toolbar, movable overlapping windows, on-screen help, andother operational conventions. Because this software uses the standardWindows interface, the techniques and terminology you learn from thistext and accompanying software can be applied to many other softwareapplication packages. This facilitates the learning process and greatlyreduces the need to retrain for each new application you use in thefuture.
The Automated Accounting software that accompanies this textbook isdesigned to handle general ledger, accounts payable, accounts receivable,financial statement analysis, bank reconciliation, plant assets, orderprocessing, inventory, and payroll. In addition, data from the AutomatedAccounting software may be passed into most spreadsheet programs, suchas Lotus 1-2-3, Quattro® Pro, and Excel, for further analysis. Reportcontents may be passed into most word processing programs, includingWord,Works, and WordPerfect®, for use in formal reporting orpresentations.You will learn several of these applications in the followingchapters.You are not required to have access to spreadsheet or wordprocessing software in order to use Automated Accounting. However, eachof the end-of-chapter problems in this textbook contains optional stepsfor further spreadsheet and word processing analysis and reporting. It isrecommended that you complete these optional applications if you havethe software available.
Opening Balances Data
The installation disks include files that contain opening balance datafor each problem in this textbook.When Automated Accounting is installedon your hard disk drive or network server, the opening balance files willautomatically be included in the same folder as the software. Before aproblem can be solved, the opening balances file must be loaded fromthis folder.
You may change the default folder from which opening balance files areloaded.The default folder should be changed only if the opening balanceproblems you need in order to complete your work have been stored in afolder other than the folder in which the software has been stored.Tochange the opening balance file default: (1) right-click on the Start button;(2) choose the Open menu item; (3) double-click Programs in the Startwindow; (4) double-click Automated Accounting 8 in the Programs window;
Chapter 1 Introduction 3

(5) right-click Automated Accounting 8.0; (6) when the menu appears, clickon the Properties menu item; (7) edit the pathname for the name of thedefault folder in the “Start in” text box; and (8) click OK.
User Data Files
Automated Accounting permits you to store data on a separate datadisk, hard disk, or network file server. This feature enables you to saveyour work for completion at a later time. If you are using a floppy disk tosave your data, make sure that it is properly formatted before use. Forinformation on formatting a disk, refer to your computer system’soperations manual or Help System.
INSTALLATION AND MEMORY REQUIREMENTSAutomated Accounting comes complete on a standard CD (compact
disk). To use the software you need a processor running in the Windows95,Windows 98,Windows NT,Windows 2000,Windows Me, orWindows XP, environment. In addition, a hard disk drive with at least 15megabytes of available disk space and a CD drive are required forinstallation. A printer is optional but highly recommended.
The installation CD included in the software package containscompressed Automated Accounting program files, opening balance files,and the optional spreadsheet and word processing files required tocomplete all of the problems in this textbook. During the installationprocess, all of these compressed files are expanded into an executableformat onto your computer’s hard disk. The installation is a commonprocedure. Detailed step-by-step instructions are provided on theinstallation disk’s label.Your instructor or computer center technician hasprobably already completed this one-time installation procedure.
Note: It is possible, in rare cases, that the colors chosen by the userwithin the computer’s color control panel may conflict with the colorsused by Automated Accounting in such a way that images and/or text mayappear invisible. If you experience any problems with colors, go to theControl Panel that controls the colors and change colors. Choose thedefault colors provided by your user interface system software to preventthis conflict.
AUTOMATED ACCOUNTING STARTUPTo begin working with Automated Accounting (after the installation
has been completed): (1) click the Windows Start button, (2) position thepointer on Programs, (3) position the pointer on Automated Accounting 8,and (4) when the sub-menu appears, click on Automated Accounting 8.0.
Automated Accounting contains several components that you will useto perform accounting tasks. Review Figure 1.1 to acquaint yourself with
4 Chapter 1 Introduction

terminology and location of the items on the toolbar. Notice theinformation message dialog “End the accounting program.” This is calleda Tooltip. Tooltips are brief informational messages that automaticallyappear when the pointer is positioned on a toolbar button. As shown inFigure 1.1, the “End accounting system” message appears when thepointer is positioned on the Exit toolbar button.
OPERATING PROCEDURESThe following topics cover the use of the menu bar, menu item
selection, window controls, text selection, and other special features thathave been provided to make the operation of the software easy to learnand efficient to use. Following the operating procedures, the HelpSystem, on-screen Calculator, Planning Tools, Accounting Review Drills,Explorer,Web Browser, and Internet FTP features of the software will becovered.
The Menu Bar
One of the ways in which you communicate with the computer is touse the menu bar. As shown in Figure 1.1, the menu bar used byAutomated Accounting contains eight menu titles—File, Edit, Data,
Chapter 1 Introduction 5
Figure 1.1Automated Accounting Application Window
Title Bar - Identifiescontents of the window.
Current User Name and File Name - When a file is opened and loaded into memory and the user name is entered, this information will appear in this area of the Title Bar.
Menu Bar - Shows titles of menus available.
Toolbar Buttons - Provide a shortcut method ofaccessing the most commonly used menu items.
This is a message dialog called a Tooltip. Tooltips are brief informational messages that automatically appear when the pointer is positioned on a toolbar button.
End the accounting program

Options, Reports, Internet,Window, and Help. Each title contains menuitems that instruct the computer to perform its processing tasks. The typeof menu used in Automated Accounting is called a drop-down menu,because once it is selected via a mouse or keyboard (using the Alt key), alist of menu items displays immediately below the menu title selected.Figure 1.2 illustrates the parts of the Automated Accounting File drop-down menu.You may use the mouse or keyboard to select drop-downmenus and choose menu items. If an item is “dimmed,” it is not availablefor selection.
Selecting and Choosing Menu Titles and Menu Items
In this textbook, the terms select and choose have different meanings.When menu titles on the menu bar or menu items are selected, they arehighlighted.When a highlighted (or selected) menu title or item is chosen,the software will take the appropriate action. Dimmed items are notavailable for selection; you may need to select another item or perform aprocessing task before a dimmed item is activated.
Window Controls
You interact with the computer to perform Automated Accountingprocedures through windows. A window is a rectangular area of the
6 Chapter 1 Introduction
Figure 1.2File Drop-Down Menu
Menu Title - The nameof the drop-down menu.
Menu Item - A command that directs the computer to execute a particular action.
Shortcut Key - Allows menu item to be selected directly without accessing the drop-down menu. Simply strike the key corresponding to the desired menu item while holding down the Ctrl key.
Menu Bar
Drop-Down Menu
Access Key - Allows quick access to the menu item. Strike the underlined key to select the menu item.

screen in which the software communicates with the user. Often thedisplay screen contains only one window. At times, two or moreoverlapping windows may appear on the screen. However, only onewindow is active at a time. Automated Accounting uses several differentwindows to perform its accounting activities. For example, somewindows contain tabs consisting of text boxes and grid cells used to enterdata from the keyboard, some contain lists and reports, and others maydisplay dialog box messages and operational information. Regardless ofthe activity, the part of the window that will receive input is said to havethe focus. For example, a data field that has the focus is identified by theinsertion point, which is a character that is positioned in a text box toindicate where data will be entered or edited. The insertion point usuallyappears as a vertical bar (|). A decision or choice of several options thathas the focus is identified by a dotted rectangular box.
Many of the windows that appear may be moved, resized, and madeinactive/active. For example, to move a window, point to the window’stitle bar (located at the top of the window) and drag the mouse. Thepointer and an outline of the window will move as you drag. For specificinformation regarding moving a window, changing its size, making itinactive/active, etc., reference your computer’s user interface operationalmanual.
It is important to understand how the operational controls containedin the windows and discussed below enable you to enter and edit data,select items from lists, and navigate the grids and controls. Refer to thissection of the text for reference purposes as you encounter these controlslater in this textbook. The following paragraphs identify the controls usedby this software and describe how to use these controls.
Tabs Automated Accounting has been designed to use the visual imageof folders to clarify and simplify operation. Several menu items (ortoolbar selections) contain windows that include multiple folders withidentifying tabs. These tabs provide for additional entry of data, options,and processing. For example, the Account Maintenance folder thatappears when the Maintain Accounts menu item is chosen from the Datamenu (or the Accts. Toolbar button is clicked) is shown in Figure 1.3.Notice that the window contains six different tabs: Accounts,Vendors,Customers, Plant Assets, Employees, and Inventory. The first tab(Accounts) appears as the active tab and is used to maintain accounts inthe chart of accounts. To switch to another account maintenance functionwithin the window, simply click on the desired tab. For example, toperform vendor maintenance, click on the tab labeled Vendors. Thenumber of tabs that appear may vary depending on options set in theproblem being worked.
Text Boxes A text box is an area into which the user typesinformation, as shown in Figure 1.4. The user can accept the currenttext, edit it, or delete it.When a text box receives the focus, existing text
Chapter 1 Introduction 7
Be sure you understandthe meaning of thefollowing terms thatrefer to the operationsof most Windowssoftware:
Check BoxesCommand ButtonsDimmed ItemsDouble-ClickDrop-Down ListDrop-Down MenuList BoxMenu BarMenu ItemOption ButtonsText BoxTitle BarToolbar

is selected and the insertion point appears to the right of the lastcharacter of text. Selected text is highlighted (indicated with light text ona dark background). An example of selected text is shown in Figure 1.5.If the insertion point is moved, the text is unselected. If the user typeswhen text is selected, the selected text is discarded and replaced with thenewly typed data.
8 Chapter 1 Introduction
Figure 1.3Tabs in the Account Maintenance Window
Active Tab Inactive Tabs
Figure 1.4A Text Box

Grid Cells Most of the data you will enter into the AutomatedAccounting software will be entered into windows that contain grid cells.Grid cells are arrangements of rows and columns that, like text boxes,are used to enter, edit, or delete data and text.When a grid cell receivesthe focus, any existing data or text within it is selected (highlighted) andthe insertion point appears to the right of the last character within thecell. Figure 1.6 shows an example of how data that has been entered intogrid cells appears. Notice that the amount of $10,000.00 under the JeanHolbrook, Capital column has been selected. If the insertion point ismoved within the cell, the text is unselected and the contents may beedited. If the user types data with text selected, the selected text withinthe cell is discarded and replaced with the newly entered data.
List Boxes A list box is used to display choices for the user. A list boxand a drop-down list are similar in that each allows the user to select asingle entry from a list of items. Figure 1.7 shows a chart of accounts listbox. A highlight bar (or underline) identifies the currently selected item.Both the mouse and keyboard can be used to scroll through the list andchoose items from the list. To select an item from the list, simply click onthe desired item and then click OK (or double-click on the desired item).
Chapter 1 Introduction 9
Figure 1.5Text Box with Selected Text
Figure 1.6Example of Grid Cells
Selected Grid Cell

Drop-Down List The drop-down list consists of a text box with adrop-down arrow button immediately to the right. The text must beselected from among the items in the drop-down list. The drop-down listdoes not allow the user to enter new data that is not in the existing listinto the text box. However, the user may enter an item that is in thedrop-down list into the text box. Upon typing the first one or morecharacters, the computer will search the list and place the firstoccurrence of the matching item from the list in the text box.
A drop-down list, shown in Figure 1.8 before it has been opened, isused to control the customizing of a report. The same drop-down list isshown in Figure 1.9 after it has been opened. If the drop-down listcontains more items than will fit, a scroll bar will be included. To toggle adrop-down list between open and closed, click on the drop-down arrowor press Alt+Down Arrow (while holding down the Alt key, press theDown Arrow key).
Note: While the drop-down list hasthe focus, an easy way to select an itemfrom the list is to type the first characterof the desired item. The first occurrencewill appear in the text box. Lateroccurrences of items starting with thesame character can be accessed bysubsequent striking of the keycorresponding to the first character. Asan alternative, you may use the UpArrow and Down Arrow keys to scrollthrough the items until the desired itemis displayed in the text box.
10 Chapter 1 Introduction
Figure 1.7List Box
Up Arrow
Scroll Box
Down Arrow
Scroll Bar
Figure 1.8Drop-Down List
(Closed)
Figure 1.9Drop-Down List (Open)

Option Buttons Option buttons (sometimes referred to as radio buttons)represent a single choice within a set of mutually exclusive choices.You canselect only one button from the choices provided. Empty circles representoption buttons.When an option is selected, the circle is filled (�).When anoption is not selected, the circle is empty. (See Figure 1.10.)
Check Boxes Check boxes are used to control the selection ofindividual choices.When a task requiring multiple choices is selected, agroup section will appear containing check boxes (�) to the left of eachchoice. The check boxes are turned On or Off in any combination.Whena check box is selected, it contains a check mark (�) inside it. Figure1.11 shows the check boxes that allow the user to select the Fixed Assetsand Inventory features of the software.
Command Buttons A command button is a rectangular shapedfigure containing a label that specifies an immediate action or responsethat will be taken by the computer when it is chosen.When a commandbutton has a dotted line and/or dark shadow around the button (see theOK button in Figure 1.12), it is said to be the default button. The default
Chapter 1 Introduction 11
Figure 1.10Option Buttons within a Group Box
Figure 1.11Check Boxes

command button can be chosen fromanywhere in the window by pressing theEnter key.
File Menu
When the File menu is selected from the menu bar, the drop-downmenu shown in Figure 1.2 appears.We will examine several of the menuitems you will need in order to complete the problems at the end of thischapter.
Open The Open menu item is used to load a data file stored on diskinto the computer’s memory for processing. Figure 1.13 shows the Opendialog box. The highlighted file name identifies the currently selected file.Either the mouse or the keyboard can be used to choose files from thelist. To choose a file, simply click on the desired file name and then clickon the Open button (or double-click on the desired item). To choose afile using the keyboard, press the Tab key until a file in the file list has thefocus, press the Up and Down Arrow keys to highlight the desired file,and then press the Enter key.
Close Use the Close menu item in the File menu to close the currentfile displayed in the active window (removes the data from thecomputer’s memory).When Close is chosen, the active window and allother windows containing data from the same file are closed. Close doesnot remove any data from disk.
12 Chapter 1 Introduction
Figure 1.12Command Buttons
SelectedFile
Figure 1.13Open Dialog Box

Save Use the Save menu item in the File menu to store your data todisk so that you can continue a problem in a later session. The data willbe saved to disk with the current path (disk drive and folder) with the filename displayed in the title bar located at the top of the AutomatedAccounting application window. If you wish to save your data with a path(disk drive and/or folder) or file name different from the current pathand file name, use Save As (described below).
Save As This menu item is the same as Save except that the data canbe saved with a path and/or file name different from the current path andfile name. Save As is useful for making a backup copy of a data file. Forexample, you may want to make a backup of your data file beforeentering adjusting entries or before generating period-end closing entries.To make a backup copy, open the data file you wish to back up and useSave As to save it under a different name.
Print The purpose of Print is to create a printed version of any reportor graphic currently displayed in a report or graphic window. The entirecontents of the displayed data windows will be printed when Print ischosen.
Print Setup When the Print button is clicked while a report isdisplayed or when the Print Setup menu item is chosen from the Filemenu, a Print Setup dialog box will appear. The Print Setup dialog box isused to provide choices about the printer(s) connected to yourcomputer, the paper size, the printing enhancements, etc.You will notneed to use Print Setup unless you are having trouble printing. Checkwith your instructor for the proper information before making changes toyour print setup. Automated Accounting uses the current printerinformation specified in your computer’s user interface when processinga print command.
Change Printer Font When reports are printed to an attachedprinter, Automated Accounting uses the font, font style, and size specifiedin the printer’s Font dialog box.You may want to change the printer font,style, and/or size to make reports more attractive or to make the sizesmaller if fields are overflowing or wrapping incorrectly. Also, changingthe font to one that is native to the printer you are using (e.g., Courier)will often increase the print speed.
Exit This menu item is used to quit Automated Accounting.When Exitis chosen, the computer checks to see if the current data in its memoryhas been saved. If not, a dialog box will appear asking if you wish to saveyour data to disk.
Chapter 1 Introduction 13
You cannot save a fileto disk with the samefile name as an openingbalance file.
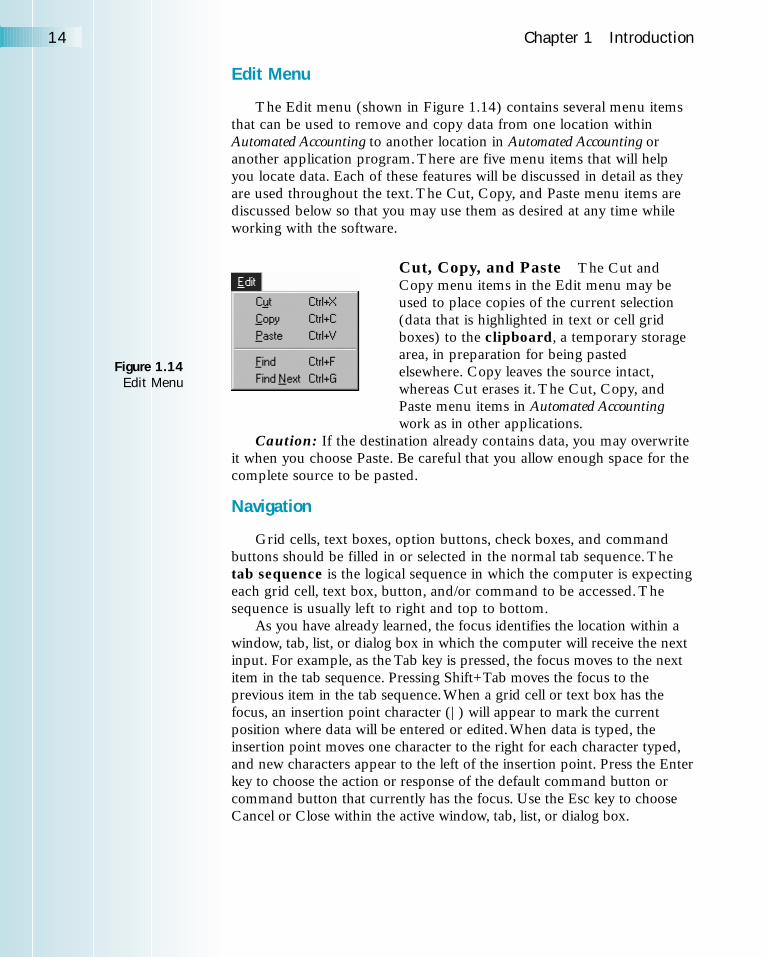
Edit Menu
The Edit menu (shown in Figure 1.14) contains several menu itemsthat can be used to remove and copy data from one location withinAutomated Accounting to another location in Automated Accounting oranother application program. There are five menu items that will helpyou locate data. Each of these features will be discussed in detail as theyare used throughout the text. The Cut, Copy, and Paste menu items arediscussed below so that you may use them as desired at any time whileworking with the software.
Cut, Copy, and Paste The Cut andCopy menu items in the Edit menu may beused to place copies of the current selection(data that is highlighted in text or cell gridboxes) to the clipboard, a temporary storagearea, in preparation for being pastedelsewhere. Copy leaves the source intact,whereas Cut erases it. The Cut, Copy, andPaste menu items in Automated Accountingwork as in other applications.
Caution: If the destination already contains data, you may overwriteit when you choose Paste. Be careful that you allow enough space for thecomplete source to be pasted.
Navigation
Grid cells, text boxes, option buttons, check boxes, and commandbuttons should be filled in or selected in the normal tab sequence. Thetab sequence is the logical sequence in which the computer is expectingeach grid cell, text box, button, and/or command to be accessed. Thesequence is usually left to right and top to bottom.
As you have already learned, the focus identifies the location within awindow, tab, list, or dialog box in which the computer will receive the nextinput. For example, as the Tab key is pressed, the focus moves to the nextitem in the tab sequence. Pressing Shift+Tab moves the focus to theprevious item in the tab sequence.When a grid cell or text box has thefocus, an insertion point character (|) will appear to mark the currentposition where data will be entered or edited.When data is typed, theinsertion point moves one character to the right for each character typed,and new characters appear to the left of the insertion point. Press the Enterkey to choose the action or response of the default command button orcommand button that currently has the focus. Use the Esc key to chooseCancel or Close within the active window, tab, list, or dialog box.
14 Chapter 1 Introduction
Figure 1.14Edit Menu
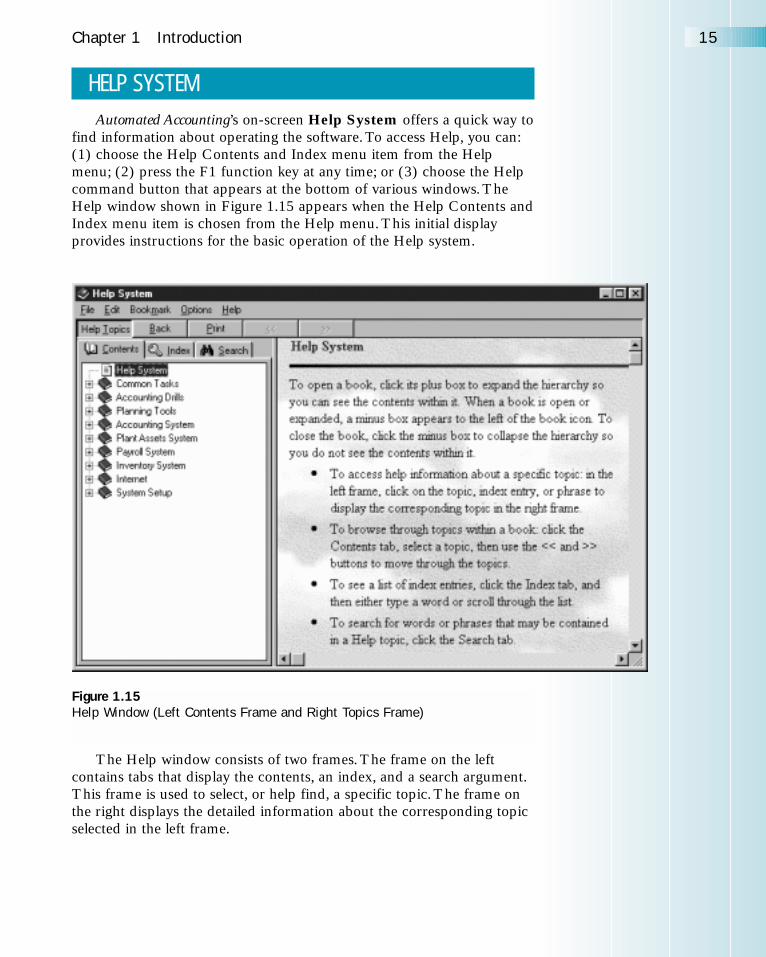
HELP SYSTEMAutomated Accounting’s on-screen Help System offers a quick way to
find information about operating the software. To access Help, you can:(1) choose the Help Contents and Index menu item from the Helpmenu; (2) press the F1 function key at any time; or (3) choose the Helpcommand button that appears at the bottom of various windows. TheHelp window shown in Figure 1.15 appears when the Help Contents andIndex menu item is chosen from the Help menu. This initial displayprovides instructions for the basic operation of the Help system.
The Help window consists of two frames. The frame on the leftcontains tabs that display the contents, an index, and a search argument.This frame is used to select, or help find, a specific topic. The frame onthe right displays the detailed information about the corresponding topicselected in the left frame.
Chapter 1 Introduction 15
Figure 1.15Help Window (Left Contents Frame and Right Topics Frame)

When using the F1 key or the Help command button, the topic thatis selected and displayed depends on which Help menu item you chooseor which window you were using when you chose the Help button.Within a Help topic, there may be one or more jumps, which you canclick on to display additional information about a term or a new Helptopic. The Help window shown in Figure 1.16 automatically wasdisplayed when the F1 key was pressed while the Save menu item in theFile menu was highlighted.
You can use the Index and Search tabs to find words or topicsquickly. The Help window shown in Figure 1.17 appeared when “save”was keyed into the text box at the top of the Index tab. The Search tabcan also be used to find information about “save.”
16 Chapter 1 Introduction
Figure 1.16Help Window (Saving a File)

ON-SCREEN CALCULATORThe on-screen Calculator is operated like a hand-held calculator.
Your computer’s standard Calculator can perform all the calculationsrequired in this textbook. The results can be pasted into the text box thathas the focus. Once the Calculator appears (as shown in Figure 1.18), aHelp menu is available from the Calculator, providing a detailedexplanation of the Calculator operation.
PLANNING TOOLSPlanning Tools are convenient, fast, easy-to-use ways of producing
results for commonly used applications. These applications may be foryour personal or business use. Five different planners are provided:college, savings, loan, retirement, and notes and interest. Each of theseplanners contains options that direct the computer to calculate different
Chapter 1 Introduction 17
Figure 1.17Help Window (Using Index Tab)

information. Select the tab identifying the desired planner, enter the datarequired, and click on Report to cause the computer to calculate thedesired result(s) and display a report.
Note: An accounting file does not have to be loaded into memory inorder to use any of the Planning Tools.
The College Planner is used in this chapter as an example to showyou how to select calculation options, enter data, and generate a reportshowing the results using any of the Planning Tools provided. Theoperational procedure for each planning tool is the same and will not becovered again in this text. The College Planner is used to calculate theamount of an annual contribution required to reach a particular savingsamount and calculate the amount saved for each year of college. Acompleted College Planner is illustrated in Figure 1.19. The figure showsthe Calculate option set to Annual Contribution and the data enteredinto the appropriate text boxes.
ACCOUNTING REVIEWA chart of accounts is a listing of all the accounts used by a business.
Each account consists of an account number and an account title. In amanual accounting system, each account is kept on a separate sheet ofpaper or on a legal-sized, cardboard-like card. Each of these sheets ofpaper, or cards, is placed together in a book or file drawer. Similarly, inmodern computerized accounting systems, the data for each account arekept in a separate record that is stored on disk or tape. Each of theserecords, stored together in a file, is referred to by accountants as thegeneral ledger.
18 Chapter 1 Introduction
Figure 1.18Standard On-Screen Calculator

In the following material, you will review basic accounting principlesand how the application of these principles affects the chart of accountsand general ledger. At the end of this chapter, you will use computer drillproblems to reinforce your knowledge of these basic accountingprinciples.
The Accounting Equation
Most accounting systems, whether computerized or manual, usesimilar accounting practices and procedures regardless of the size of anorganization, its type of business, or its complexity. All accountingsystems have assets, liabilities, and equity. Assets are things a businessowns, such as cash, supplies, insurance, buildings, and land. Liabilities areamounts owed by a business. The difference between the total amount ofassets minus the total amount of liabilities is the owner’s equity. Therelationship among assets, liabilities, and owner’s equity is shown in theaccounting equation, which is stated as follows:
Assets = Liabilities + Owner’s Equity
The accounting equation must always be equal. That is, the total of theamounts on the left side must equal the total of the amounts on the rightside.
Chapter 1 Introduction 19
Figure 1.19College Planner
Be sure you understandthe meaning of thefollowing accountingterms:
Account ClassificationAccountantAccountingAccounting ClerksAccounting EquationAssetsBookkeepersBusinessChart of AccountsCreditDebitExpense AccountsGeneral LedgerLiabilitiesOwner’s Equity

Transactions and the Accounting Equation
Transactions completed by an organization during a specific period oftime may number from a few to thousands, depending upon the size andcomplexity of the organization and its accounting system. Eachtransaction causes increases and/or decreases in assets, liabilities, and/orowner’s equity. Accountants must be careful to record transactions in asystematic manner so that the accounting equation is always in balanceafter each transaction is recorded. Increases and decreases that are causedby a transaction are recorded in specific accounts. Each account has anaccount balance and an account title. For example, the asset account Cashis used to record and store the amount of money available to the business.The computer stores each account title and balance used by the business.
As transactions are entered, the appropriate account balance isupdated. After all transactions have been entered, the accountinformation can be further processed and displayed or printed in variousreport formats and stored to disk for recall at a later time. To see how thisprocess works, consider the following transactions:
Sept. 1 Received cash from owner as an investment, $10,000.00.2 Paid cash for supplies, $220.00.3 Paid cash for insurance, $875.00.4 Bought supplies on account, $1,200.00.6 Paid cash on account, $625.00.
The transactions entered into the accounting equation are shown inFigure 1.20. Notice that each transaction affects at least two accounts
20 Chapter 1 Introduction
Figure 1.20Transactions Entered into the Accounting Equation
and has been entered on separate lines in the order in which it occurredby date. Also, notice how the equation at the bottom of the figure showsthat the last transaction entered is in balance.
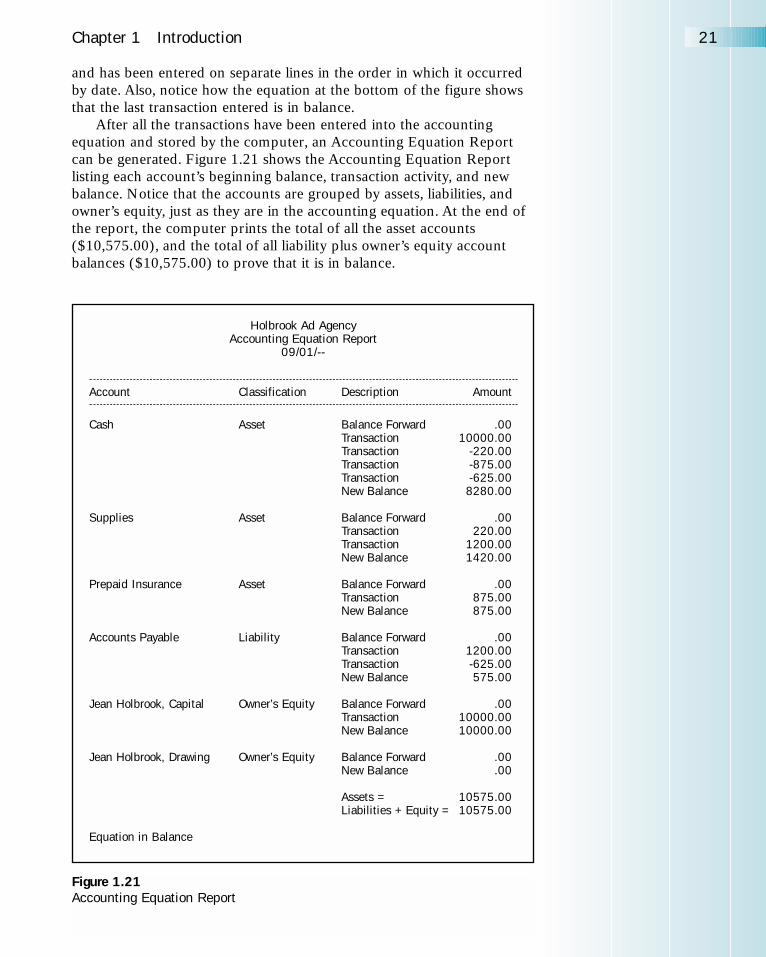
After all the transactions have been entered into the accountingequation and stored by the computer, an Accounting Equation Reportcan be generated. Figure 1.21 shows the Accounting Equation Reportlisting each account’s beginning balance, transaction activity, and newbalance. Notice that the accounts are grouped by assets, liabilities, andowner’s equity, just as they are in the accounting equation. At the end ofthe report, the computer prints the total of all the asset accounts($10,575.00), and the total of all liability plus owner’s equity accountbalances ($10,575.00) to prove that it is in balance.
Chapter 1 Introduction 21
Holbrook Ad AgencyAccounting Equation Report
09/01/--
Account Classification Description Amount
Cash Asset Balance Forward .00Transaction 10000.00Transaction -220.00Transaction -875.00Transaction -625.00New Balance 8280.00
Supplies Asset Balance Forward .00Transaction 220.00Transaction 1200.00New Balance 1420.00
Prepaid Insurance Asset Balance Forward .00Transaction 875.00New Balance 875.00
Accounts Payable Liability Balance Forward .00Transaction 1200.00Transaction -625.00New Balance 575.00
Jean Holbrook, Capital Owner’s Equity Balance Forward .00Transaction 10000.00New Balance 10000.00
Jean Holbrook, Drawing Owner’s Equity Balance Forward .00New Balance .00
Assets = 10575.00Liabilities + Equity = 10575.00
Equation in Balance
Figure 1.21Accounting Equation Report

Classifying Accounts and Analyzing Transactions
Transactions that occur as a result of a business’s operation must berecorded into the accounting system to update the appropriate accounts.But before transactions can be recorded, they must be analyzed andassigned to their appropriate accounts. For example, a transaction for thepurchase of supplies for cash affects the assets of the company. In thiscase, the Cash and Supplies accounts, which are classified as assetaccounts, are used to record this transaction in the accounting system.
All accounts that are used by a business and stored in the generalledger are grouped into categories. A category for similar accounts in ageneral ledger is called an account classification. As shown in Figure 1.22,each account is assigned an account number that is used to identify theaccount as well as the category or group to which it belongs. Notice thatthe business assigns a four-digit account number to each account. Thefirst digit of the account number is the account classification that is usedto identify the category within the general ledger. The remaining threedigits indicate the location of each account within the category and maybe used to further group the accounts. Holbrook Ad Agency assignsaccount numbers in increments of ten so that new accounts can be easilyadded between existing accounts.
In the chart of accounts in Figure 1.22, account numbers that beginwith the digit 1 are classified as Asset accounts. Account numbers thatbegin with the digit 2 are Liabilities, and those that begin with the digit 3are Owner’s Equity accounts. Notice that two additional accountclassifications have been added: Revenue and Expenses. The accountnumber that begins with the digit 4 is Revenue, and account numbersthat begin with the digit 5 are classified as Expense accounts. Revenueaccounts are used to record the sale of goods or services, have a normalcredit balance, and result in an increase in owner’s equity. Expenseaccounts are used to record transactions for goods or services needed tooperate the business, have normal debit balances, and result in a decreasein the asset account Cash (therefore, a decrease in owner’s equity).
The Double-Entry Accounting System The double-entryaccounting system is based on recording debit and credit parts of atransaction so that the total dollar amount of debits equals the total dollaramount of credits. Each transaction affects at least two general ledgeraccounts. At least one debit or credit is recorded in each of theseaccounts in such a way that the entire system is always in balance. Forexample, a transaction in which $220.00 in cash is paid for suppliesaffects the Cash and Supplies general ledger accounts. The Cash accountis decreased by $220.00, and the Supplies account is increased by$220.00, ensuring that the accounting system remains in balance. A Taccount is a useful tool to help analyze transactions and to visualize theireffect on accounts in the double-entry accounting system.
22 Chapter 1 Introduction

The T Account In its simplest form, each account in the generalledger can be portrayed as consisting of three parts: (1) an account title;(2) a debit side, located on the left side; and (3) a credit side, located onthe right side. This illustrative format of an account, shown in Figure1.23, is called a T account because it resembles the letter T.
An entry made on the left sideis called a debit (or debit entry),and an entry made on the rightside is called a credit (or creditentry). Accounts are increased anddecreased based upon their normalaccount balance. To illustrate how this works, note how the accountingequation you worked with earlier (which includes revenue and expenseclassifications) has been formatted into T accounts in Figure 1.24, withdebit and credit sides for each account classification.
Notice that accounts classified as assets and expenses have a normaldebit balance, but accounts classified as liabilities, owner’s equity, andrevenue have normal credit balances. The basic rule that regulatesincreases and decreases in account balances is: Account balances increaseon the normal balance side of an account and decrease on the side opposite the
Chapter 1 Introduction 23
Holbrook Ad AgencyChart of Accounts
09/01/—
Assets1110 Cash1120 Supplies1130 Prepaid Insurance
Liabilities2110 Accounts Payable
Owner’s Equity3110 Jean Holbrook, Capital3120 Jean Holbrook, Drawing
Revenue4110 Fees
Expenses5110 Advertising Expense5120 Insurance Expense5130 Legal Expense5140 Miscellaneous Expense5150 Rent Expense5160 Supplies Expense5170 Utilities Expense Figure 1.22
Chart of Accounts
Account Title
Debit Side Credit Side(Left Side) (Right Side) Figure 1.23
T Account

normal balance side. Therefore, a debit amount would increase an assetand expense account, and a credit would increase a liability, owner’sequity, and revenue account. Similarly, a credit amount would decreasean asset and expense account, and a debit amount would decrease aliability, owner’s equity, and revenue account. Stated another way: (1)Increases to accounts classified as assets and expenses are debited anddecreases are credited. (2) Increases to accounts classified as liabilities,owner’s equity, and revenue are credited and decreases are debited.
Three Analytical Questions When you record a transaction, it ishelpful to answer the following three questions in the order stated:
1. What general ledger accounts are affected? To obtain a list of the general ledger accounts, refer to the chart ofaccounts.
2. How is each of the affected accounts classified? Gilbert Advertising classifies its accounts as assets, liabilities,owner’s equity, revenue, and expenses.
3. How is each amount entered in the affected accounts? The amount is either debited or credited to increase or decreasethe affected accounts’ normal account balance.
Figure 1.25 illustrates the use of the above three questions, using theexample in which $220.00 in cash is paid for supplies. Notice that (1)the Cash and Supplies general ledger accounts are affected; (2) both theCash and Supplies accounts are classified as asset accounts; and (3) theSupplies account is debited $220.00 (increased since it has a normal
24 Chapter 1 Introduction
Figure 1.24Accounting Equation with T Accounts
Assets = Liabilities + Owner’s Equity
Debit Side Credit Side Debit Side Credit Side Debit Side Credit Side(Left Side) (Right Side) (Left Side) (Right Side) (Left Side) (Right Side)for increases for decreases for decreases for increases for decreases for increasesNormal Normal NormalBalance Balance Balance
Revenue
Debit Side Credit Side(Left Side) (Right Side)for decreases for increases
Normal Balance
Expenses
Debit Side Credit Side(Left Side) (Right Side)for increases for decreasesNormalBalance

debit balance) and the Cash account is credited $220.00 (decreased sinceit has a normal debit balance).
Notice that the total amount of debits equals the total amount ofcredits. Therefore, the accounting system remains in balance afterrecording this transaction.
EXPLORE ACCOUNTING SYSTEMWhen the Explore Accounting System menu item is chosen from the
Data menu or when the Explore toolbar button is clicked, the ExploreAccounting System window will appear. Explore Accounting Systemis used to access data stored by the software in order to perform auditchecks, check account activity, isolate errors, and perform other tasks thatare helpful to managing account information. An example of the ExploreAccounting System window, showing all the Cash account data activity,is shown in Figure 1.26.
Chapter 1 Introduction 25
Figure 1.25Transaction Analysis
Supplies Cash
Debit Side Credit Side Debit Side Credit SideNormal NormalBalance Balance
Increase Decrease$220.00 $220.00
Figure 1.26Explore Accounting System Window

To use the Explore Accounting System, select the plus box of thedesired accounting system in the left frame, and then click on the desiredaccount. A detailed report will appear in the right frame, showing theselected account’s activity.
INTERNET WEB BROWSERThe Internet Web browser used with Automated Accounting is your
computer system’s default browser. If your computer has been set up ona local area network (LAN), or an Internet service provider’s (ISP)program has been installed, then you’re most likely ready to connect tothe Internet. Even if you do not have Internet capability, you will be ableto use your browser to obtain check figures for all the computerproblems in this text. Figure 1.27 shows a Browser window that appearswhen the Browser toolbar button is clicked or when the Web Browsermenu item is chosen from the Internet menu (and an Internet connection
26 Chapter 1 Introduction
Figure 1.27Web Browser

has not been established). Notice that the Browser application windowhas been sized to fit within the Automated Accounting window for ease ofoperation. Also note that an Internet Web browser is not required tocomplete the problems in this textbook.
To learn how to use the basic operational features of your browser,click on the Browser toolbar button immediately after AutomatedAccounting loads and before you open an accounting problem file. Then,simply click on the desired Earth icon next to a topic in the left frame.Detailed instructional information about the selected topic will appear inthe right frame.
Chapter Review
1. Accounting can be defined as an informational system that plans,analyzes, records, and reports financial information.
2. A business is an economic entity that endeavors to sell goods andservices to customers at prices that will pay all the costs of doingbusiness and return a profit to the owners. Today’s modernbusinesses store and manage their informational needs by what iscalled a management information system (MIS).
3. A user interface uses drop-down menus, a toolbar, movableoverlapping windows, on-screen help, and other operationalconventions.
4. Automated Accounting contains integrated features designed tohandle general ledger, accounts payable, accounts receivable,financial statement analysis, bank reconciliation, plant assets, orderprocessing, inventory, and payroll. In addition, data may betransferred to spreadsheet and word processing applications for avariety of other accounting-related uses.
5. Opening balance files must be opened and loaded before the end-of-chapter problems can be solved.
6. Automated Accounting permits you to store data on a separate datadisk, hard disk, or network file server for future reference orcompletion.
7. One of the ways you communicate with the computer is to use themenu bar.When a menu is chosen from the menu bar, a list of
Chapter 1 Introduction 27

menu items that instruct the computer to perform its processingtasks displays immediately below the menu title.
8. A window is a rectangular area of the screen in which the softwarecommunicates with the user. At times, two or more overlappingwindows may appear on the screen. However, only one window isactive at a time. Automated Accounting uses several differentwindows to perform its accounting activities. Some windowscontain tabs consisting of text boxes and grid cells used to enterdata from the keyboard, some contain lists and reports, and othersmay display dialog box messages and operational information.
9. The File menu contains menu items used to handle files and printrelated input and output operations.
10. Navigation, or tab sequence, is the logical sequence in which thecomputer is expecting each grid cell, text box, button, and/orcommand to be accessed. The sequence is usually left to right andtop to bottom. The focus identifies the location within a window inwhich the computer will receive the next piece of input.
11. The Help System provides a quick way to find information aboutoperating the software. Information may be accessed by: (1)choosing either the Help Contents and Index menu item from theHelp menu; (2) pressing the F1 key at any time; or (3) choosing theHelp button that appears at the bottom of various windows.
12. The on-screen Calculator can be accessed at any time and isoperated like a hand-held calculator. Results from the Calculatorcan be copied and pasted into the text box that has the focus.
13. Planning Tools are convenient, fast, easy-to-use ways of producingresults for commonly used personal or business applications. Thefive Planning Tools provided in Automated Accounting are: college,savings, loan, retirement, and notes and interest planners.
14. The relationship among assets, liabilities, and owner’s equity isstated in the accounting equation: Assets = Liabilities + Owner’sEquity.
15. Each account used by a business and stored in the general ledger isassigned an account number that is used to identify the account aswell as the account classification to which it belongs.
28 Chapter 1 Introduction

16. The Explore Accounting System feature of the software is used toaccess data stored by the computer in order to perform auditchecks, check account activity, isolate errors, and perform othertasks that are helpful in managing account information.
17. The Web Browser enables you to connect to the Internet and accessinformation about problems in this text.
Chapter 1 Introduction 29
ACCOUNTING CAREERS IN DEPTHACCOUNTING CAREERS IN DEPTHJust what are the career options open tothose students who specialize in accounting?
Accounting education provides manycareer paths. Some accounting careers aremore challenging than others. It all dependson your interest, ambition, and perseverance.Ask yourself how you like spending yourworkday and what kind of lifestyle you wantto have.
There are different levels of educationand skill required of accountants. Forexample, you may want to become aCertified Public Accountant (C.P.A.). Toaccomplish this goal, you must receive yourhigh school diploma. Next, you will need toget a college education and then pass theC.P.A. examination.
Every type of business needsaccountants. Therefore, students have a
unique opportunity to combine otherinterests with accounting by findingemployment in a business area mostappealing to them.
Accounting Careers in Depth will presentyou with a view of different careers inaccounting and various industries that wouldallow you to use your skills. It is important toremember that if college is not a choice foryou, there are still many job opportunitiesavailable. In many cases, these accountingjobs provide career advancement andcontinuing education courses in areas relatedto your accounting position.
Accounting Careers in Depth may be yourwindow to a future in accounting.
30 Chapter 1 Introduction
T U T O R I A L P R O B L E M 1 - T
In this problem, you will practice what you have learned in this chapter.Follow the step-by-step instructions. Each step lists a task to becompleted at the computer. More detailed information on how tocomplete the task is provided immediately following the step. If you needadditional operating instructions in order to complete the task, refer backto the text material or access the Automated Accounting Help System.
Before starting this problem, be sure you have a properlyformatted data disk (or a folder established on a hard disk ornetwork) for saving your data.
STEP 1: Start up Automated Accounting. Click on the Automated Accounting icon.
STEP 2: Open the file named AA8 Problem 01-T.AA8. Choose Open from the File menu or click on the Opentoolbar button. When the Open file dialog box appears,select the drive and folder containing the opening balancefiles. Then choose the file named AA8 Problem 01-T.AA8from the list box.
STEP 3: When the User Name dialog box appears, enter your namein the User Name text box, and click OK. Check carefully that you have entered your name correctlybecause you will not be able to change it for the duration ofthe problem.
STEP 4: Save the file to your disk and directory. Enter a file name of01-T followed by Your Name. Choose Save As from the File menu or click the Save Astoolbar button and save the file to your disk and folder as01-T Your Name, where 01-T represents Chapter 1 TutorialProblem. The software will add an extension of .AA8 to thefilename.
STEP 5: Experiment with accessing the Help System. Select the Help Contents and Index menu item from theHelp menu or use the F1 function key to obtain informationabout Accounting Drills and Planning Tools.
STEP 6: Familiarize yourself with the use of the on-screen Calculatorby multiplying $5,890.00 by 2%. Choose Calculator from the Options menu or click theCalculator toolbar button. When the Calculator appears,type 5890, press the asterisk key (* for multiply), type 2,and then press the % key. As an alternative, use the
▼

Chapter 1 Introduction 31
T U T O R I A L P R O B L E M 1 - T
mouse to click on each of the appropriate keys to performthe calculation. The result should be 117.8.
STEP 7: Calculate the annual contribution toward the cost of collegeby using the College Planner.Choose Planning Tools from the Data menu or click theTools toolbar button. When the Planning Tools windowappears, click the College Planner tab (if not alreadyselected). Click the Annual Contribution option in theCalculate section. Then enter the information providedbelow:
Beginning College Savings . . . . . . . . . . . . . . . 4800.00Annual Yield (Percent) . . . . . . . . . . . . . . . . . 8.50Years Until College . . . . . . . . . . . . . . . . . . . . 8Number of Years of College . . . . . . . . . . . . . . 4Annual College Costs . . . . . . . . . . . . . . . . . . 15000.00
Press Tab after entering Annual College Costs and thecalculated Annual Contribution will appear.
The College Savings Plan Schedules (Annual Contribution)are shown in Figure 1.28. Click the Report button in theCollege Planner window to display the report in the Reportwindow.
The report consists of two schedules based on the data inthe college planner. The first schedule shows the annualcontribution, annual yield, and the total amount saved eachyear until college. The second schedule shows the effect ofthe $15,000.00 per year payments. Note that the amountof savings continues to generate interest. The calculatedannual contribution is $4,070.99, which is the annualamount of savings required to provide $15,000.00 per yearfor four years of college expenses (given the other dataprovided). When you are finished, close the Report andPlanning Tools windows.
STEP 8: Enter the following transactions into the accountingequation and display the Accounting Equation Report.
Sept.1 Received cash from owner as an investment,$10,000.00.
2 Paid cash for supplies, $220.00.3 Paid cash for insurance, $875.00.
▼

32 Chapter 1 Introduction
T U T O R I A L P R O B L E M 1 - T
4 Paid cash for a legal expense, $400.00.5 Bought supplies on account, $1,200.00.6 Owner withdrew cash for personal use,
$1,500.00.Jean Holbrook, Drawing is a Contra account.Contra accounts always reduce a related account.In this case, the Owner’s Drawing account is aContra account (with a normal debit balance) toits related Owner’s Capital account (with a normalcredit balance).
7 Paid cash on account, $625.00.
▼
Figure 1.28College Savings Plan Schedules for Annual Contribution
College Savings Plan10/23/--
Schedule of College Savings
Annual Annual CollegeYear Contribution Yield Savings
(Beginning Balance) 4800.001 4070.99 408.00 9278.992 4070.99 788.71 14138.693 4070.99 1201.79 19411.474 4070.99 1649.98 25132.445 4070.99 2136.26 31339.696 4070.99 2663.87 38074.557 4070.99 3236.34 45381.888 4070.99 3857.46 53310.33
Schedule of College Payments
College Annual Annual SavingsYear Payments Yield Balance
(College Savings) 53310.331 15000.00 3256.38 41566.712 15000.00 2258.17 28824.883 15000.00 1175.11 14999.994 14999.99 .00

Chapter 1 Introduction 33
T U T O R I A L P R O B L E M 1 - T
a. Choose Accounting Drills.b. Select the Accounting Equation tab.c. Enter the accounting transactions (your entered
transactions should match Figure 1.29).• Use the Tab key to move to the next grid cell or
reposition the insertion point using the mouse.• Press Enter when a line is complete to display a new
line of grid cells.• Use a minus sign to show a decrease in an account.
d. Click the Report button to obtain a display of your work(your report should match Figure 1.30). Click the CloseReport button.
▼
Figure 1.29Accounting Equation Tab
Holbrook Ad AgencyAccounting Equation Report
09/01/—
Account Classification Description Amount
Cash Asset Balance Forward .00Transaction 10000.00Transaction -220.00Transaction -875.00Transaction -400.00Transaction -1500.00Transaction -625.00New Balance 6380.00
continued

34 Chapter 1 Introduction
T U T O R I A L P R O B L E M 1 - T
▼
Figure 1.30Accounting Equation Report
Supplies Asset Balance Forward .00Transaction 220.00Transaction 1200.00New Balance 1420.00
Prepaid Insurance Asset Balance Forward .00Transaction 875.00New Balance 875.00
Accounts Payable Liability Balance Forward .00Transaction 1200.00Transaction -625.00New Balance 575.00
Jean Holbrook, Capital Owner’s Equity Balance Forward .00Transaction 10000.00New Balance 10000.00
Jean Holbrook, Drawing Owner’s Equity Balance Forward .00Transaction 1500.00New Balance 1500.00
Fees Revenue Balance Forward .00New Balance .00
Advertising Expense Expense Balance Forward .00New Balance .00
Insurance Expense Expense Balance Forward .00New Balance .00
Legal Expense Expense Balance Forward .00Transaction 400.00New Balance 400.00
Miscellaneous Expense Expense Balance Forward .00New Balance .00
Rent Expense Expense Balance Forward .00New Balance .00
Supplies Expense Expense Balance Forward .00New Balance .00
Utilities Expense Expense Balance Forward .00New Balance .00
Assets = 8675.00Liabilities + Equity = 8675.00
Equation in Balance

Chapter 1 Introduction 35
T U T O R I A L P R O B L E M 1 - T
STEP 9: Identify account classifications, normal account balances,and debit or credit increases for each account in thegeneral ledger.
a. Choose Accounting Drills by clicking the Drill toolbarbutton. Then click the Classify Accounts tab.
b. Select the desired account from the drop-down list byclicking the drop-down arrow button and selecting oneof the accounts listed above. Click the Next button toproceed.
c. Select the account classification by clicking the drop-down arrow button and selecting the appropriateaccount classification. Click the Next button toproceed.
d. Select the appropriate normal balance. Click the Nextbutton to proceed.
e. Select whether the account is increased with a debit orcredit. Click the Finish button.
f. Repeat Steps b-e for each of the remaining accountslisted above.
g. Click the Report button to obtain a display of your work(items that are incorrect are displayed in the color red).Click the Close Report button.
STEP 10: Use the Explorer to display the Cash account’s activity andcurrent balance.
a. Choose the Explorer by clicking the Explore AccountingSystem menu item in the Reports menu or by clickingthe Explore toolbar button.
b. Click the plus sign (+) in front of Chart of Accounts inthe left frame. (A listing of all accounts will appear.)Note that clicking the Chart of Accounts title will causethe software to display a list of all the accounts in thechart of accounts.
c. Click Cash. The Cash account’s activity and currentbalance will appear in the right frame. (It should matchFigure 1.25.)
d. Click the Close box (X) in the upper-right corner of thewindow to exit the Explorer.
▼

36 Chapter 1 Introduction
T U T O R I A L P R O B L E M 1 - T
STEP 11: Access the Web Browser to obtain information about how tofind information on the World Wide Web.
a. Choose the Browser by clicking the Web Browser menuitem in the Internet menu or by clicking the Browsertoolbar button.
b. Click the earth icon in front of Search in the left frame.The corresponding information will appear in the rightframe.
c. Click the Close box (X) in the upper-right corner of thewindow to exit the Browser.
STEP 12: Save the data file. Click the Save toolbar button. The file will be saved to diskwith the current path and file name (note the file name inthe Title Bar of the Automated Accounting applicationwindow).
STEP 13: End the Automated Accounting session. Click the Exit toolbar button.
w w ww w w
Evidence of the growth of e-mail is the great decline in messagespreviously sent through the U.S. Postal System. Yearly, over a trillion e-mail messages replace what otherwise would be paper correspondence.
An Internet address is a set of numbers or words that identifies a uniquecomputer user. Every user and computer on the Internet must have adifferent address so that the system knows where to send electronic mailand other data.
A host is a computer that is attached directly to the Internet and thatprovides services to users. Host computers are called servers.

Chapter 1 Introduction 37
Review and Practice:Applying Your Information Skills
I. MATCHING
Directions: In the Working Papers, write the letter of the appropriateterm next to each definition.
a. access keyb. clipboardc. Explore Accounting Systemd. focuse. grid cellsf. Help Systemg. insertion pointh. management information system (MIS)i. Planning Toolsj. shortcut keyk. tab sequencel. Tooltips
m. user interface
1. A temporary storage area in Windows software.
2. The part of a window identified by the insertion point that willreceive input.
3. Brief informational messages that automatically appear when thepointer is positioned on a toolbar button.
4. A character that is positioned in a text box to indicate where data willbe entered or edited.
5. Automated Accounting features that provide convenient, fast, easy-to-use ways of producing results for commonly used applications.
6. Arrangements of rows and columns that are used to enter, edit, ordelete data and text.
7. The logical sequence in which the computer is expecting each gridcell, text box, button, and/or command to be accessed.
8. A quick way to find information about operating the software.
9. Several computer-integrated systems that provide all theinformational needs of the business.

10. An Automated Accounting feature used to access data stored by thesoftware in order to perform audit checks, check account activity,isolate errors, and perform other tasks that are helpful to managingaccount information.
11. A key that is pressed while holding down the Ctrl key that allows amenu item to be selected directly without accessing the drop-downmenu.
12. The way the user communicates with the software through images onthe monitor.
13. An underlined letter in a menu item; the key may be pressed to selectthe menu item.
II. REVIEW QUESTIONS
Directions: Write the answers to each of the following questions in theWorking Papers.
1. What is the definition of accounting?
2. What is the name of the job occupation of a person who summarizesdetailed accounting information and then analyzes and interprets theinformation to assist owners and managers in making financialdecisions?
3. What is a business?
4. State the accounting equation.
5. What is an account classification?
6. What is a double-entry accounting system?
7. What is the purpose of the Web Browser?
8. Identify the five Planning Tools provided in Automated Accounting.
III. INTERNET ACTIVITY
Directions: If you have access to the Internet, use the Browser to findinformation about careers in the accounting field. Hint: Use a searchargument of accounting careers to narrow your search. Select one of thecareers and report your findings. Be sure to include the source and theURL (Internet address) of your search.
38 Chapter 1 Introduction
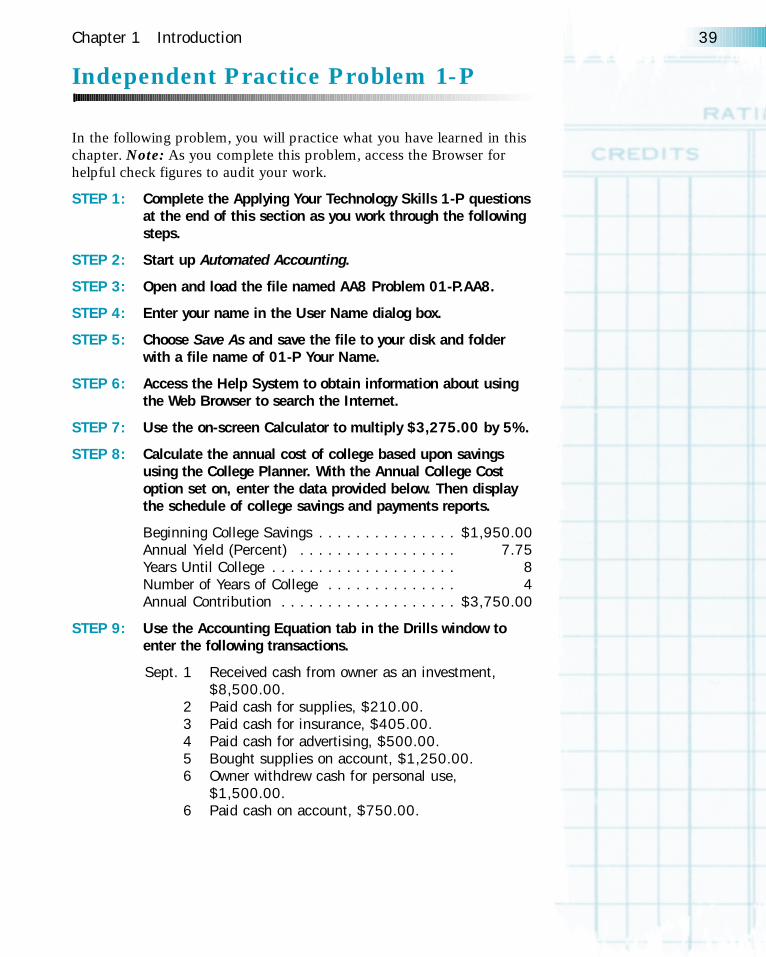
Independent Practice Problem 1-P
In the following problem, you will practice what you have learned in thischapter. Note: As you complete this problem, access the Browser forhelpful check figures to audit your work.
STEP 1: Complete the Applying Your Technology Skills 1-P questionsat the end of this section as you work through the followingsteps.
STEP 2: Start up Automated Accounting.
STEP 3: Open and load the file named AA8 Problem 01-P.AA8.
STEP 4: Enter your name in the User Name dialog box.
STEP 5: Choose Save As and save the file to your disk and folderwith a file name of 01-P Your Name.
STEP 6: Access the Help System to obtain information about usingthe Web Browser to search the Internet.
STEP 7: Use the on-screen Calculator to multiply $3,275.00 by 5%.
STEP 8: Calculate the annual cost of college based upon savingsusing the College Planner. With the Annual College Costoption set on, enter the data provided below. Then displaythe schedule of college savings and payments reports.
Beginning College Savings . . . . . . . . . . . . . . . $1,950.00 Annual Yield (Percent) . . . . . . . . . . . . . . . . . 7.75Years Until College . . . . . . . . . . . . . . . . . . . . 8Number of Years of College . . . . . . . . . . . . . . 4Annual Contribution . . . . . . . . . . . . . . . . . . . $3,750.00
STEP 9: Use the Accounting Equation tab in the Drills window toenter the following transactions.
Sept. 1 Received cash from owner as an investment,$8,500.00.
2 Paid cash for supplies, $210.00.3 Paid cash for insurance, $405.00.4 Paid cash for advertising, $500.00.5 Bought supplies on account, $1,250.00.6 Owner withdrew cash for personal use,
$1,500.00.6 Paid cash on account, $750.00.
Chapter 1 Introduction 39

STEP 10: Display the Accounting Equation Report.
STEP 11: Use the Classify Accounts tab in the Drill window to identifythe account classification, normal account balance, anddebit or credit increase for each of the following accounts:
CashRoger Browne, CapitalPrepaid InsuranceLegal ExpenseMiscellaneous ExpenseAccounts Payable
STEP 12: Display the Classify Accounts Report.
STEP 13: Use the Explorer to display the Supplies account activityand current balance.
STEP 14: Save the data file.
STEP 15: End the Automated Accounting session.
Applying Your Technology Skills 1-P
Directions: Write the answers to the following questions in the WorkingPapers.
1. From the Help System, note the procedure used in order to have thebrowser search the Internet.
2. What is the result of using the Calculator to find 5% of $3,275.00?
3. From the College Planner, what are the calculated annual collegepayments?
4. What is the total amount of assets shown on the accounting equationreport?
5. What account number is assigned to Fees?
6. From the Explorer, note the transaction activity for the Suppliesaccount.
40 Chapter 1 Introduction

Mastery Problem 1-M
In the following problem, you will practice what you have learned in thischapter.
STEP 1: Complete the Applying Your Technology Skills 1-M questionsat the end of this section as you work through the followingsteps.
STEP 2: Start up Automated Accounting.
STEP 3: Open and load the file named AA8 Problem 01-M.
STEP 4: Enter your name in the User Name dialog box.
STEP 5: Choose Save As and save the file to your disk and folderwith a file name of 01-M Your Name.
STEP 6: Access the Help System to obtain information about usingthe Internet feature of the software to download accountingfiles.
STEP 7: Use the on-screen Calculator to divide $42,360.00 by 12.
STEP 8: Calculate the annual cost of college based upon savings byusing the College Planner. With the Annual College Costoption set on, enter the data provided below. Then displaythe schedule of college savings and payments reports.
Beginning College Savings . . . . . . . . . . . . . . . $3,500.00Annual Yield (Percent) . . . . . . . . . . . . . . . . . 8.00Years Until College . . . . . . . . . . . . . . . . . . . . 12Number of Years of College . . . . . . . . . . . . . . 4Annual Contribution . . . . . . . . . . . . . . . . . . . $2,400.00
STEP 9: Use the Accounting Equation tab in the Drills window toenter the following transactions.
Sept. 1 Received cash from owner as an investment,$10,500.00.
2 Paid cash for supplies, $435.00.2 Paid cash for insurance, $750.00.3 Bought supplies on account, $2,550.00.4 Paid cash for utility bills, $176.32.5 Owner withdrew cash for personal use,
$2,000.00.6 Paid cash on account, $1,200.00.
Chapter 1 Introduction 41

STEP 10: Display the Accounting Equation Report.
STEP 11: Use the Classify Accounts tab in the Drills window toidentify the account classification, normal account balance,and debit or credit increase for each of the followingaccounts:
SuppliesAccounts PayableAdvertising ExpenseUtilities ExpenseHeather Payne, DrawingRent Expense
STEP 12: Display the Classify Accounts Report.
STEP 13: Use the Explorer to display the Accounts Payable accountactivity.
STEP 14: Save the data file.
STEP 15: End the Automated Accounting session.
Applying Your Technology Skills 1-M
Directions: Write the answers to the following questions in the WorkingPapers.
1. From the Help System, note the procedure to use the Internet todownload accounting files.
2. What is the result of using the Calculator to find the quotient of$42,360 divided by 12?
3. From the College Planner, what is the calculated annual collegepayment?
4. What is the total amount of assets shown on the accounting equationreport?
5. What account number is assigned to Utilities Expense?
6. From the Explorer, note the transaction activity for AccountsPayable.
42 Chapter 1 Introduction