computer directions directions vista office 2007.docx · web viewif things are not working...
TRANSCRIPT

Tuesday, May 09, 2023 version 20080421
COMPUTER DIRECTIONS TABLES OF CONTENT
Basic Computer Security...............................................................................................................................4
Updating Anti-Virus.......................................................................................................................................4
Update Windows XP....................................................................................................................................10
Firewall Operation.......................................................................................................................................11
Maintenance and Updates...........................................................................................................................14
Ad-Aware......................................................................................................................................................14
Getting your e-mail.......................................................................................................................................22
Replying to e-mail.........................................................................................................................................25
Creating a new e-mail..................................................................................................................................27
Sending a Picture Attachment.....................................................................................................................29
Changing how your Inbox e-mail is displayed...........................................................................................30
Creating Subfolder under the Inbox...........................................................................................................32
Moving e-mail from one folder to another.................................................................................................35
Cutting and Pasting......................................................................................................................................39
Surfing the Internet......................................................................................................................................41
If the Internet Explorer Toolbar Disappears.............................................................................................43
If things are not working right....................................................................................................................45
If things are not working right with DSL...................................................................................................45
If things are not working right with the printer........................................................................................46
To Clear the Print Queue.............................................................................................................................46
Adding Contacts to Outlook........................................................................................................................48
Getting photos from scanner.......................................................................................................................51
Getting photos from camera........................................................................................................................56
Printing pictures...........................................................................................................................................58
1

Creating and changing the computers password......................................................................................70
Receiving a Fax.............................................................................................................................................77
Sending a Fax................................................................................................................................................78
USB Memory Keyring..................................................................................................................................79
Copying CDs.................................................................................................................................................82
Burning CDs..................................................................................................................................................82
Backing Up My Documents Folder.............................................................................................................83
Changing the brightness and contrast of the monitor..............................................................................84
GOBACK Operation\l..................................................................................................................................86
ROLLBACK Operation\l............................................................................................................................87
TOC directions: References, then Table of Contents,
2

WEEKLY CHORES
Update Anti- Virus
Update Windows XPClick on the START buttonPut your mouse on ALL PROGRAMSSingle Click on WINDOWS UPDATE. This is near the top on the left.Follow the positive prompts, ie next, ok
Update Microsoft OfficeFrom OutlookSingle Click on HELPSingle Click on CHECK FOR UPDATESFrom the website, Single Click on CHECK FOR UPDATESFollow the positive prompts, ie next, ok
Run Ad-Aware
3

Basic Computer Security
Security=people + process + technology
I have installed the proper software to help secure your system. However, you are the final gate keeper.
If you download software, and then give it permission to access the internet, then it is you that have compromised your own security.
When in doubt, DENY access for any questionable software.
Do not download software unless you are absolutely sure that it will not harm you. If in doubt call David Levy at 215-843-2900.
Keep your Anti-Virus up to date
Outlook MUST BE CLOSED to successfully update the anti-virus program. Otherwise Commandcom will appear to “hang” during the update. Just Big X out of Outlook and the anti-virus update will proceed normally.
The Commandcom Anti-virus software should update itself once a day. However, you should occasionally perform a manual update:
1) Double click on the yellow C in the system tray. You will then see:
4

2) Single Click on UPDATE NOW
Single click OK to download and install the update.
If the drop down menu has a new version then please follow these directions:
5

Click OK
Click NEXT
6

Click in the circle to accept the agreement, then click NEXT
Click NEXT
7
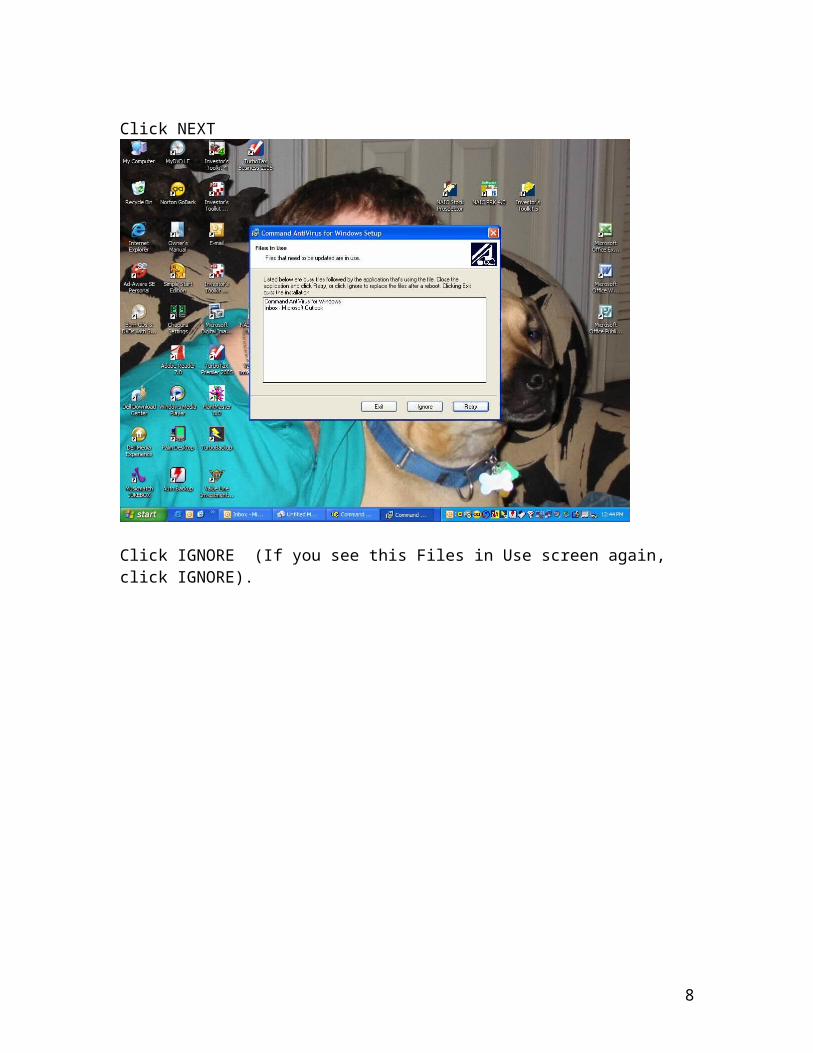
Click IGNORE (If you see this Files in Use screen again, click IGNORE).
Make sure all boxes are unchecked and click NEXT
8

If the Zone Alarm Firewall tells you that the Command Antivirus for Windows is trying to access the Internet ALWAYS click in the box that says Remember this setting then click on ALLOW.
Single click on FINISH.
9

Keep your Windows up to date
Windows Vista should update itself once a month. However, you should occasionally perform a manual update:
1) Single Click on that START ORB
2) Single Click on CONTROL PANEL
3) Double Click on Windows Update.
4) Single Click on CHECK FOR UPDATES. You will see a green bar go across the screen.
5) If Single Click on INSTALL. Follow any directions you see on the screen.
10

Firewall operation
Your system is protected by Zone Lab’s Zone Alarm Firewall.
This firewall prevents programs from accessing the internet without your approval.
It is like having a bouncer at your door, and every time the door bell rings he looks at you to ask if he should let this person into your house.
The Firewall will always tell you what program is trying to access the internet; you just have to read.
In the case below, Command Antivirus for Windows is trying to access the internet.
11

There are a handful of programs for which you should always check the box that says “Remember this setting” and then single click ALLOW. They are:
Microsoft OutlookMicrosoft WordInternet ExplorerCommand Anti-VirusWindows Genuine Advantage
All other programs have to be decided on a case by case basis. If you have any question please call David Levy at 215-843-2900
12

Be Very careful what you put into your computer
Several music CD and DVD manufacturers have contain software on that media that will install contains DRM (digital right management) protection scheme that uses rootkit-like cloaking technology. Rootkits are typically used to maintain a persistent and undetectable presence on a computer. These hidden Rootkits often have weakness that hackers can exploit to damage your computer. Sony has placed these Rootkits on their music CDs in the past. They claim that they have stopped this practice, but there maybe plenty of Sony CDs in people’s hands that still contain these Rootkits.
13

Maintenance and Updates
The purpose of this section is to show you how to perform the critical maintenance and update functions.
Run Ad-Aware at least once a week.
Ad-Aware 2007
Double Click on this icon.
You will then see:
14

Single Click on the Update button.
You will then see:
15

When the update is complete you will see:
Click OK.
Click the SCAN NOW button.
16

Click the SCAN button.
17

You can see that there are 73 Total infections detected so far.
18

When the scan is complete you will see:
There are 3 tabs; Critical Objects, Privacy Objects, and Log File.
You only need to worry about the Critical Objects and the Privacy Objects. In the above example there are 0 Critical Objects. But if there were any Critical Objects, you will deal with them the same way you will deal with the 73 Privacy Objects.
19

Click on the Privacy Objects tab and you will see:
Single click on the check box next to Tracking Cookie.
Then single click on REMOVE.
The number of Privacy Objects will then go to 0, indicating that they have been erased.
Single click on FINISH and you will see:
20

This screen provides you with a summary of the actions taken.
BIG X out to close the program.
21

To get your e-mail
Click on the START ORB on the lower left hand corner of your screen
Single Click on the E-Mail Microsoft Office Outlook icon.
22

Single Click on the Inbox.
23

List of emails Preview Pane\/ \/
You will now see a listing on all of you new e-mails. The Preview Pane will show you the contents of the e-mail that you have selected. To select an e-mail, move the mouse to that e-mail and Single Click on that line.
24

Reply Icon|
In the above example, we have the e-mail from David Levy is selected, (it is blue), and the contents of that e-mail is displayed in the Preview Pane (on the right).
You can use the scroll bar in the Preview Pane to move the e-mail up and down so that you can more easily read it.
To reply to this e-mail:
Single Click on the REPY icon
You will then see:
25

Send Button |
Now just begin typing in your response.
The Single Click on the Send Button.
The e-mail has now been sent. You can now Delete the e-mail, and/or select another e-mail for reading.
To Delete e-mail:
Place the mouse on the e-mail you want to delete.
Single click on the e-mail in the in-box.
Then Single RIGHT click on that e-mail. This will bring up a new menu list.
Single click on DELETE
26

(see below)
Sending a new e-mail:
Click on NEW. You will then see the below. This is a blank e-mail.
27

You need to fill in the To line. You can either:1) click on the word To. This will bring up your address book2) paste in the e-mail address (see below)3) type in the e-mail address
To flesh out the above three steps.
When you click on the TO icon you will see the address book
28

To select a name from your address book just move the mouse to the name that you want, and double click. Then click OK
You can also manually type in an e-mail address directly into the white line
Or you can paste the e-mail address in.
Once you have an e-mail address, you can then enter the SUBJECT and then begin typing in the body of the e-mail. Click SEND to send the e-mail.
Sending an attachment:
To send a pciture attachment via e-mail:
Make sure the OUTLOOK is active. If it is not running you will need to click the START ORB and then Outlook.
Click on START then MY PICTURES
29

Single click on the picture that you want to send. This will cause a blue frame to appear around the picture.
Then single click E-MAIL.
You will see:
30

The best image is provided when you select ORIGINAL SIZE.
31

You will then be taken into a blank e-mail. Click on TO and select to whom you want to send this e-mail.
Then click on SEND
32

Changing how your e-mail Inbox is displayed:
Go to the In Box
At the top of the Inbox, above all of the e-mails, you will see ARRANGE BY: and then NEWEST ON.
XXX-----look below the XXX to see Arrange By and Newest on
Single click on each of these words until you see ARRANGE BY: DATE and NEWEST ON BOX.
This will re-arrange your e-mail by date.
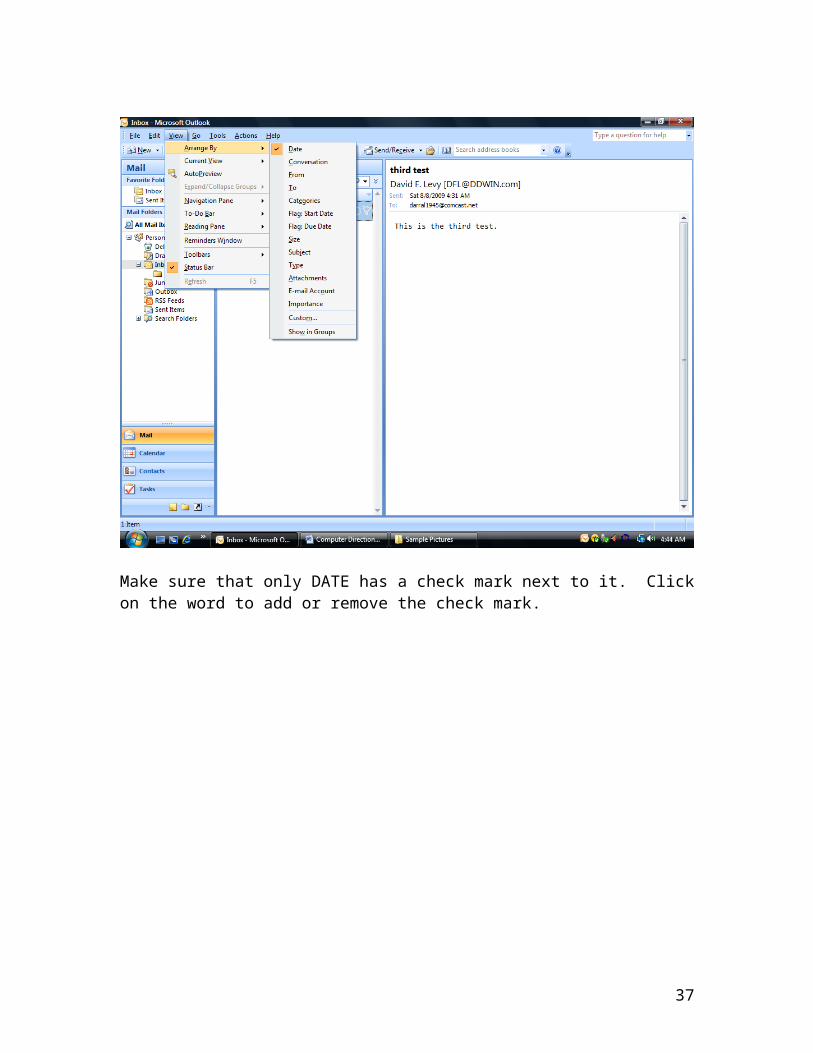
If this does not correct the problem, single click on VIEW. But your mouse on the word ARRANGE BY and you will see the below:
33

Make sure that only DATE has a check mark next to it. Click on the word to add or remove the check mark.
34

Creating Subfolders under the INBOX
To better manage your e-mail, you can create subfolders in your INBOX. These subfolders allow you to move e-mails from your general INBOX to a subfolder. Using subfolders makes managing your e-mail easier.
To create a subfolder:
Single Click on the INBOXRight Mouse Click
Single Click on New Folder
35

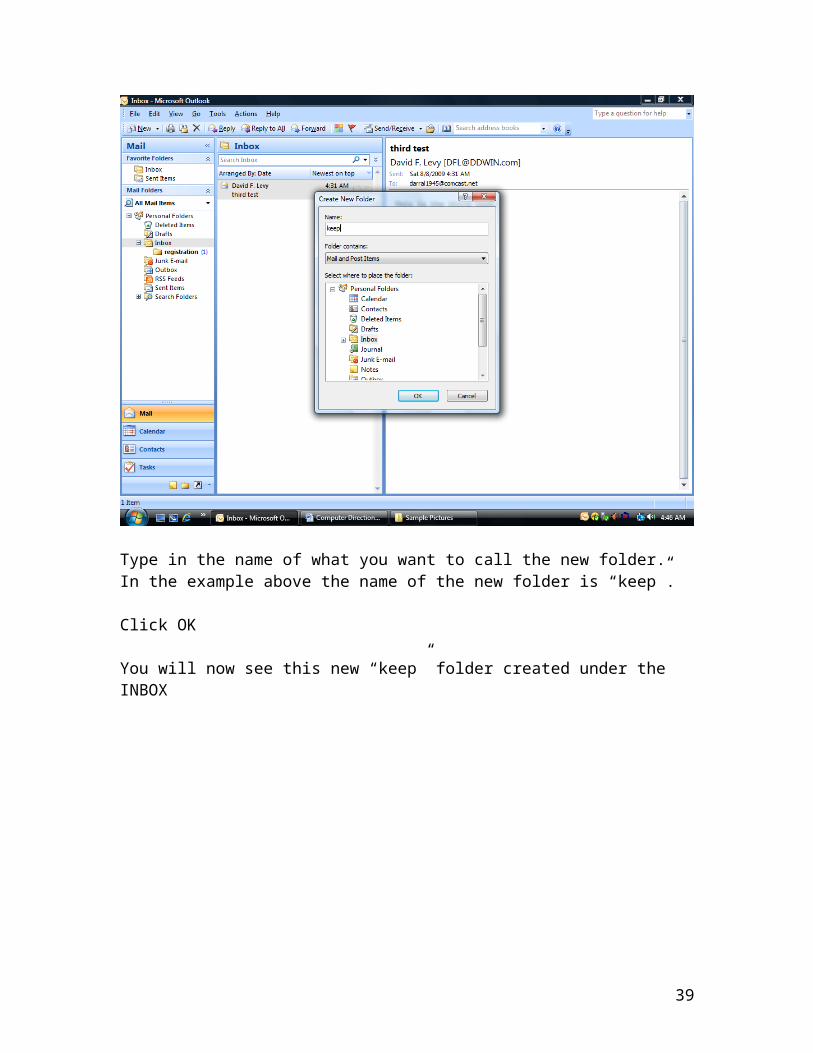
Type in the name of what you want to call the new folder. In the example above the name of the new folder is “keep”.
Click OK
You will now see this new “keep” folder created under the INBOX
36
Moving e-mail fro one folder to another:
Once you have a subfolder created, you can move e-mail from one folder to another.
Select the e-mail you want to move by single clicking on it. Then Right Mouse Click on that e-mail
37

Click on Move to Folder.
38
Click on the folder that you want to move the e-mail to, (in this example the KEEP folder). Click OK.
The e-mail has now been moved to the KEEP subfolder.
To see the e-mails in the KEEP subfolder, just single click on the KEEP subfolder, just like you single click on the INBOX to see the e-mails in the INBOX
Junk E-mail
Junk e-mail happens. You can reduce the amount of junk e-mail by being careful about what website you give your e-mail address to. Signing up for “free offers” is an excellent way to assure that you will get plenty of junk e-mail.
You can reduce the amount of junk e-mail in your in-box by labeling junk e-mail as junk e-mail. In your in-box, single click on the offending item. Then single right mouse click. You will then see:
39

Then single click on JUNK E-MAIL
Then single click on ADD SENDER TO BLOCK SENDERS LIST
40

The next time you receive an e-mail from this person, it will go to the Junk E-mail box.
41

Cutting/Pasting:
Move the mouse to the beginning (or end) of what you want to select.
Press and Hold the Left Mouse Button.
Move the mouse to capture what you want to select
Let go of the Left Clicker
IF YOU MAKE A MISTAKE just single left click and start again
After you have selected the text (it is high lighted in blue), then click on EDIT, and click on COPY. See the below example
| Edit \/
42

Then go to where you want to paste the selected text. For example a new e-mail. (Click NEW) Click EDIT and then PASTE. This will put the selected text where the cursor is located.
43

How to surf the internet
Click the START ORB
Click on Internet Mozilla Firefox.
44

You can type an address directly into the Address Bar. Single Click anywhere in the bar, and then just type in the address you want (ie www.usveteran.org). The press the Enter key on your keyboard.
To link to a story, move the mouse until it turns into a hand. Then single click.
To search the internet:
Single click within the Google search bar.
The type in what you are looking for.
I would recommend that you use a comma (,) to separate different search criteria. For example, if you are looking for 2nd of the 7th Bat, First Air Cav serving in Vietnam during 1969.
Vietnam, 1969, 2/7, 1st aircav
Each search criteria is separated by a comma.
45

If your Toolbar disappears
Make sure
Make sure Navigation and Bookmarks are checked.
46

If things are not working right:
This is kind of vague, but you will know if the computer is not working the way it normally does. For example, you cannot get e-mail, or you cannot surf the internet, or the computer Is slow…etc.
Click on START ORB on the lower left hand corner.Click On the arrow to the right of the lock icon.Click on RESTART
If you are using Verizon DSL and you are unable to surf the internet (you see the message Page Cannot be Displayed), you will need to choose TURN OFF (rather then RESTART). When the computer is off you will need to unplug the black power cord to the DSL modem, wait about 15 seconds, plug it back in, wait until the DSL light on the modem goes from slow blink, to fast blink, to steady on. Once the light is steady on you will turn the computer back on.
47

To clear out the print queue:
Click on START / CONTROL PANEL / PRINTERS & FAXES
You should see one printer icon with a check mark. If you place your cursor on the print icon you should see Status: Ready, with a number next to Documents.
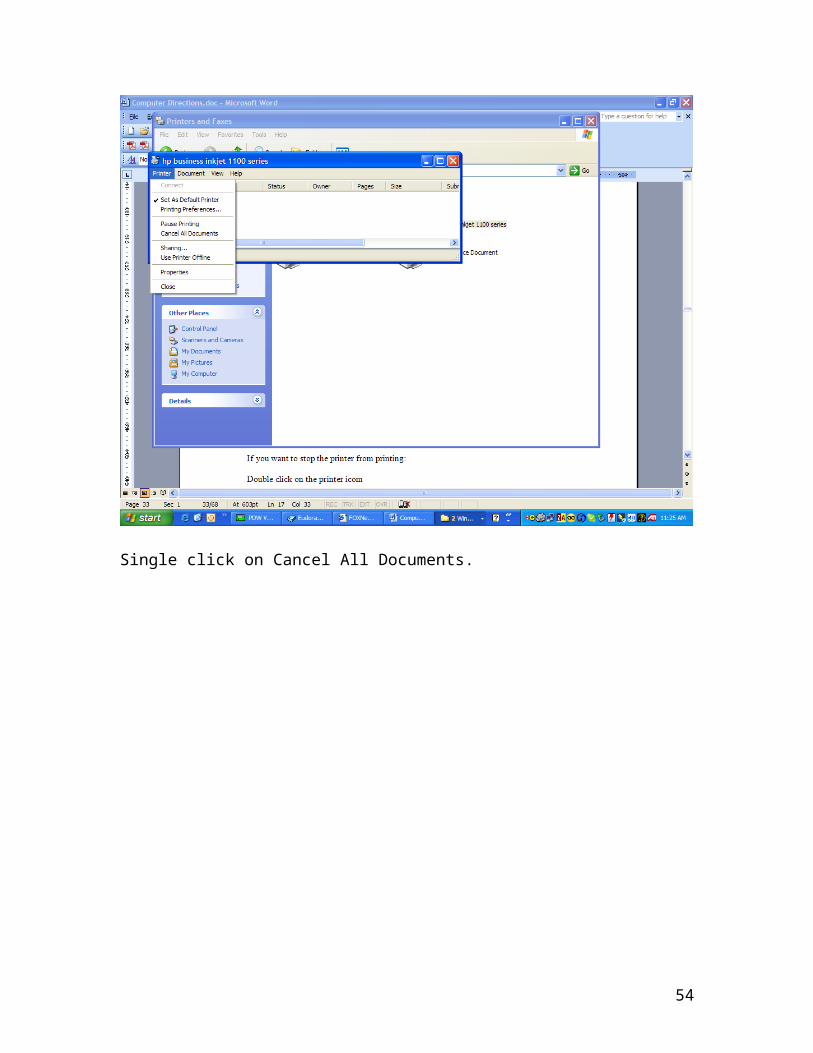
If you want to stop the printer from printing:
Double click on the printer icon.
48

Single click on Cancel All Documents.
49

Adding Contacts to Outlook
Your e-mail mailing lists reside in the Contacts area.
To add/change or delete a Contact
Click on the Contact box in the lower left hand corner
50

You will then see
Click on New to create a new Contact
51

Type in the full name ie David Levy
Then click on the e-mail box and type in their e-mail address. Remember, the SHIFT 2 key gives you the at sign @
After you enter in the information, Click on Save and Close
52

ADDING PHOTOS FROM SCANNER
Work in progress for Vista
53
PHOTOS FROM CAMERA
Work in progress for vista
54

Printing Pictures
Click START
Click MY PICTURES
Single Click on the picture you want to print. You will then see a blue border around that picture.
Along the top of the toolbar, Single Click on PRINT THIS PICTURE.
You will then see the Photo Printing Wizard
55

Single Click NEXT
56

Single Click NEXT
57

Your HP Printer should appear in below the line What Printer do you want to use? This is very important that the correct printer is displayed. If the HP printer is NOT displayed you must single click on the drop down list, and single click on the HP Printer.
DO NOT CLICK ON INSTALL PRINTER. IF YOU DO PLEASE CALL DAVID LEVY at 215-843-2900 immediately.
If you want to use HP photo paper you will then need to Single Click on PRINTING PREFERENCES.
You will need to put the photo paper on top of the other paper in the tray. Use one sheet of photo paper at a time. Place the photo paper in the tray so that the good (shiny) side is down.
58

If you Single Click on PRINTING PREFERENCES you will then see:
Drop down the listings in the TYPE IN box. It will say PLAIN PAPER before you drop down the list.
59

Single Click on the type of photo paper that you are using.
60

Single Click on OK
61

Single Click on NEXT
62

You now need to select the size and type of print out.
Move the scroll bar until you find the size/type that you want, then single click on it.
63

Single Click on NEXT
64

You will now hear your printer working.
65

Single Click on FINISH.
66

Creating and Changing your computers password
To create a password:
Single Click START ORB
Single Click CONTROL PANEL
Double Click USERS ACCOUNTS
Single Click on the user you want to change
Single Click on CREATE A PASSWORD FOR YOUR ACCOUNT
67

Follow the directions on the screen and Click on CREATE PASSWORD
You are now done. When the system reboots you will have to enter the password.
DO NOT FORGET YOUR PASSWORD. YOUR COMPUTER CANNOT BE UNLOCKED WITHOUT IT.
68

To Change your password:
Single Click START
Single Click CONTROL PANEL
Double Click USERS ACCOUNTS
Single Click on the user you want to change
Single Click on CHANGE MY PASSWORD
69

Follow the directions on the screen.
Your password has now been changed.
70

Receiving a Fax
These directions are for the HP5510 printer/copier/fax
To receive a fax:
1) Press the SETUP key2) Press the right ARROW key until you see BASIC FAX SETUP3) Press the OK KEY4) Press the right ARROW key until you see AUTO ANSWER5) Press the OK key6) Press the right ARROW key once, until you see ON7) Press the OK key
To adjust the number of rings to answer. You should only have to do this once. After you (or David Levy) have set this value, you will use the above auto answer on to receive faxes.
1) Press the SETUP key2) Press the right ARROW key until you see BASIC FAX SETUP3) Press the OK key4) Press the right ARROW key until you see RINGS TO ANSWER5) Press the OK key6) Press the 2 key from the keypad (unless you see the number 2 on the
screen)7) Press the OK key. If it already says 2, you can press the CANCEL key
IMPORTANT NOTE: If the fax machine is set to auto answer, nobody will be able to call you and leave a voice mail message; they will get the fax. So, as soon as you have gotten the fax you should turn off auto answer.
To turn off Auto Answer:
1) Press the SETUP key2) Press the right ARROW key until you see BASIC FAX SETUP3) Press the OK key4) Press the right ARROW key until you see AUTO ANSWER5) Press the OK key6) Press the right ARROW key until you see the word OFF appear.7) Press the OK key
71

Sending Fax
These directions are for the HP5510 printer/copier/fax
To send a fax:
Insert what you want to send face up (printing side up) into the automatic document feeder. When the paper is properly inserted you will see “Original Loaded” on the display window.
Press the FAX button
Use the keypad to enter the fax number, do not forget to use the 1 for long distance.
Press the BLACK button.
You should then hear a dial tone followed by tones as the fax dials. It will connect and the paper will be sucked into the fax machine.
72

Using the USB Memory Keyring
The USB memory keyring will store up to 128MB of data. This is the equivient of 128 floppy disks. You can also purchase USB keyrings that hold larger amounts of data from Staples or any other computer store.
Before you begin you must remove the top of the USB keyring. This will expose a metal end.
Insert this metal end into a USB port. All of the DELL systems have two USB ports at the bottom of the facing plate (when you are looking directly at the computer).
If the USB keyring does not go in, merely turn it over and try again. Very little force is required.
You will then hear two quick beeps.
Depending on how you system is configured, you will either see a new window appear with the words USB MEMORY on the upper left hand corner; or a list of options. If you see a list of options scroll down to the OPEN FOLDER option and click. You will now see the above mentioned window.
73

You should see something similar to the above.
The USB Memory is considered a hard drive.
To copy files to the USB keyring:
Select the file or folder you want to copy by single clicking on it.
Then single click on the copy function on the left hand side of the screen.
You will then see a window showing you where you can copy this file to
74

Click on the box next to my computer so that it shows the local disk C, local disk D and USB Memeory.
Single click on USB Memory, then click copy.
To delete files from the USB keyring is the same as deleting files elsewhere. Single click on the file or folder and hit the DELETE key on the keyboard.
When you are done, merely unplug the USB Memory Keyring.
75

Copying CDs
You are able to make exact copies of any CD.
You should see an icon on your desktop that looks similar to:
Double Click on the Icon.
You want to make an EXACT COPY.
Depending on the version of software you have, that option maybe in different locations.
Follow the directions that you see on the screen. You will need to insert the original CD first. When you are asked, you will need to insert a blank CD.
To copy files to CD:
First you will want to select the files you want to copy to the CD.
Once you have the files selected, you will then single click on COPY SELECTED FILES on the left hand frame. You will then select the D drive. Once the files have been copied, a balloon will appear in the system tray (lower right hand corner). Single click on the balloon and then follow the directions.
Burn CDs & DVDs with RecordNow!.lnk
76

Backing up your My Documents folder
There are a number important files on your system that you should backup on a regular basis.
Most of your important files should reside in the My Documents folder. This folder contains any word processing files, My Pcitures, and any other files that you save to this directory.
You can easily back the My Documents folder to a CD. However, the CD will only hold 750MB worth of data. For most of you, a single CD will be sufficient. However, if you are storing a ton of pictures or files you should contact me in order to provide you with an alternative backup solution.
Directions for backing up My Documents with one CD.
Place a CD into the tray.
Double click on My Computer on your desktop.
Single click on the folder with {your name} documents.
Right Mouse Click.
Put your mouse on SEND TO
You will then see another menu appear. Click on the CD drive
You will then see a balloon appear at the bottom right of your screen. Single click on the balloon.
Another Window will open. Single click on Write These Files to CD
When the backup is complete, the CD will reject.
77

Changing the Brightness and Contrast of the monitor.
1 In the System Tray (lower right hand corner of the screen, where the time is) double click on the icon of the flat panel
2. Single Click on Graphics Properties
3. Singe Click on Color Correction
78

Move the brightness and contrast slider until you find a setting you like. The default setting are Brightness = 0 and Contract= 50.
Then click OK
79

GOBACK Operation:
GOBACK is a program that will restore your entire computer to an earlier point in time. You must remember the exact period of time you can go back to is inexact; it couple be a week of just today.
To activate GOBACK you need to double click on the GOBACK icon on the desktop, or the arrow icon in the system tray (where the time is on the lower right hand corner of your screen).
You will then see a screen with options on the left side.
You want to single click on DISK DRIVE RECOVERY
The single click on DISK DRIVE RESTORE
You will then see a listing of dates and times. Single click on the date/time you want to restore the system to, so that the line is blue.
Then single click on the RESTORE NOW button at the bottom of the screen.
Single Click the OK button when you are asked if it is ok to restart your computer.
The computer will then restart and you will see a series of blue bars going across the screen.
When the system reboots, will see the Norton Post Restore File Rescue window, just big X out of that window.
You have now completed the restore process.
80

ROLLBACK Operation:
Rollback Pro RX allows us to store snapshots of your computer for up to 7 days.
This means that you have up to 5 days to contact me if you have a computer problem; we can then “rollback” your computer back to a time when it was working properly.
Rollback is configured to take a “snapshot” of your computer every 6-8 hours.
Rollback also allows you to take a “snapshot” before you install any software. I strongly recommend taking a “snapshot” before installing any software. This will allow you to more easily rollback your system to a point in time before you installed the software.
To Operate Rollback:
In the System Tray (where the time is on the lower right hand corner of the screen), you will see the circular icon consisting of three outer blue arrows with a red cross in the middle.
Single Right Mouse Click on this icon
81

A menu will then appear.
To take a Snapshop:
Single left click on TAKE SNAPSHOT.
You can then enter a snapshot name, ie b4 {the name of the software you are about to install}
Single Click OK.
You will be notified when the snapshot has been successfully completed.
To Rollback the computer:
Single click on ROLLABCK SYSTEM.
Single click on the date/time you want to restore the computer to. The entry line should be blue.
Single click NEXT
82