comodo manual 20151120 - wekids · don't apply and don't use any different mattress of...
TRANSCRIPT

ComodoIT Istruzioni d’usoEN Instructions for useFR Notice d’emploiDE GebrauchsanleitungES Instrucciones de usoBR-PT Instruções para usoNL GebruiksaanwijzingDK BrugsanvisningFI Käyttöohjeet
CZ Návod na použitíSK Návod na použitieHU Használati útmutatóSL Navodila za uporaboRU Инструкции по пользованиюTR Kullanim kilavuzuHR/SRB/MNE/BiH Upute za uporabu EL Οδηγιεσ χρησεωσ
EN1888-2012


! WARNING- IMPORTANT: Keep these instructions for future reference. Read and keep them for safety use. The child's safety could not be at risk if these instructions are not followed.- This product is designed for the transport for 1 child in the seat.- Do not use this product for a number of occupants greater than that intended by the manufacturer. - This product is approved for children from birth up to a weight of 15 kg in the seat.- When used in combination with the seat: For new born babies is recommended to use the backrest in the most reclined position.- This product is designed for use in combination with the products: Carry Cot SPAZIO is approved for children from birth up to 10 kg of weight/ Car Seat NIDO is approved for children from birth up to weight of 13 kg.- When used in combination with pram body: this product is suitable for a child who cannot sit up by itself, roll over and cannot push itself up n it's hands and knees. Maximum weight of the child: 9 kg. Don't apply and don't use any different mattress of that specified by the manufacturer in the Instruction Manual. Any carrying handle (if present) shall be left out of the pram body during use.- When used in combination with car seat (0+ group), this vehicle does not replace a cot or a bed. Should your child need to sleep, then it should be placed in a suitable pram body, cot or bed. - WARNING Check that the pram body or seat unit or car seat attachment devices are correctly engaged before use. Check that the products mentioned above are correctly fixed to the item.- WARNING The assembly and preparation of the product must be carried out by an adult.- Do not use this product if there are parts missing or signs of breakage.- WARNING Always use the restraint system. Always use the five point harness. Always use the harness crotch strap in combination with the waist strap.- WARNING Never leave your child unattended.- Always apply the brake when stationary.- WARNING Ensure that all the locking devices are engaged before use.- WARNING To avoid injury ensure that your child is kept away when unfolding and folding this product.- Do not insert fingers into the mechanisms.- Be careful not hurt the child when adjusting the mechanisms (handle bar, backrest...).- Any weights hanging on the handle bar or handles could make the item unstable; follow the manufacturer's instructions regards the maximum loads transportable.- The front bar (if present) is not designed to support the child's weight. It is not designed to keep the child in the seat and does not substitute for the waist belt.- Do not load the basket over 5 kg. Do not put weight in the cup holder (if present) in excess of those indicated on the cup holders themselves and never hot drinks. Do not put load of more than 0.2 kg in the hood pockets (if present).- Do not use the product neat to stairs or steps, heat sources, naked flames or dangerous objects within reach of the child.- Only replacement parts supplied or recommended by the manufacturer/ distributor shall be used.- WARNING Don't use the rain cover (if present) on a product without a hood or parasol that can hold it. Always use the rain cover only under adult supervision. Don't use the rain cover indoors and check to ensure the child is not to warm; do not park the vehicle close to heat source and keep well away from the lighted cigarettes. Ensure that the rain cover is not interfering with any moving parts of the carriage/stroller. Always remove the rain cover before folding your carriage/stroller.- WARNING This product is not suitable for running or skating.- Always apply the brake hen loading or unloading children.- Do not add any mattress.COMPONENT OF THE ITEM Check the contents of the packaging.-Comodo: basket, 2 rear wheels with brake gear, rear wheel bar, free standing for placement, 2 front wheels, solid handle.
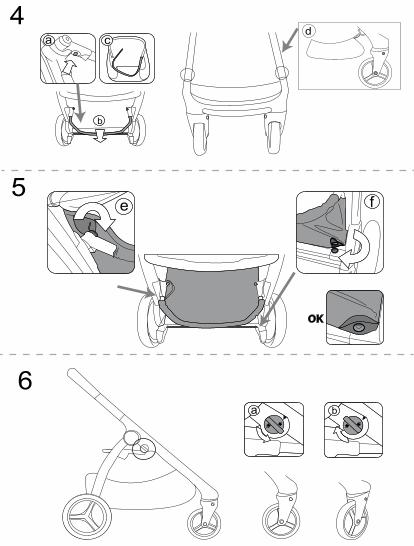
INSTRUCTIONS1 OPENING: Before opening the frame, remove (without using blades) any die-cut cardboard. Hold the upper section of the handle and click the handle until the frame is fully opened (fig_a). Open frame (fig_b).This frame is properly opened when the attachment on the base click into place, as shown. CAUTION: When placing the seat on the frame, press the seat downwards to ensure it engages securely onto the base.2 FITTING THE WHEELS: Slot the uprights into the rear wheel crosspiece (fig_a), ensuring that it is facing the right way, then push the rear wheels on and make sure that they click into place (fig_b). To mount the front wheels, fit them into the uprights until they lock into place (fig_c).3 ADJUSTING THE MAIN HANDLE: To compete the operation, press the button on the handle (fig_a) to ensure the handle pushes in the all way, until it clicks into place.4 FITTING THE BASKET: If lowered, lift the basket tube the horizontal position. Press the buttons under the basket tube (fig_a) and remove it (fig_b). Thread the spring facing down (fig_c), and click it back into place. Attach the basket to the two buttons at the front (fig_d).5 On the rear, slip the basket slots over the upper buttons (fig_e), slip the slots over the lower buttons (fig_f). WARNING: Ensure the rear loops of the basket bag are completely hooked onto the "buttons" on the rear bar. Otherwise, the basket will not to be able to hold the contents.6 FIXD OR SWIVEL FORNT WHEELS: To fix the front wheels, rotate the lever counter clockwise to the locked padlock (fig_a); to release the wheels, turn the lever clockwise to then unlocked padlock (fig_b). On difficult terrain, we recommended using fixed wheels.7 BRAKE: Press the lever down to apply the brake on the chassis and lift it to release the brake.8 FOLDING UP: The chassis can be folded up without the seat, with the seat facing the person pushing (recline the backrest before folding it) or with the seat facing forwards. To fold the stroller, it is best to set the front wheels to their fixed position and close the hood (if fixed). Click the handle as shown in the figure (fig_a) and lift the levers the slots click into the place.9. When the frame is closed, put down the free standing on the brake lever.10. For greater compactness, it is possible to remove the wheels.To remove the rear wheels: pull the pivot outwards and remove the wheels as shown in the figure (fig_a).To remove the front wheels: press the tab as shown, and remove the wheel (fig_b).TRANSPORT: The stroller can be carried comfortably locking the front wheels and grasping the main handle (fig_c).COMODO SYSTEM12 COMODO allows you to attach the seat unit, the car seat or the carry cot to the base of the chassis in one quick step.Place the item on the COMODO Base and press down with both hands until it click into place. Always apply the chassis or stroller brake before attaching and removing products (refer to the respective instruction manuals).Check that the child transport unit is properly attached.CLEANING AND MAINTENANCEPRODUCT MAINTENANCE: Protect from the weather: water, rain, or snow; prolonged and continuous exposure to bright sunlight may give rise to color changes of various different materials; store this product in a dry place.CLEANING THE CHASSIS: Periodically clean all plastic parts with a damp cloth. Do not use solvent or similar cleaning products; keep all metal parts dry to prevent rusting; keep moving parts clean (adjustment mechanisms, locking mechanisms, wheels...) and free of dust and sand and, if necessary, lubricate with light machine oil.CLEANING THE RAIN CANOPY: Wash with a sponge ad soapy water; do not use detergents.CLEANING FABRIC PARTS: Brush fabric parts to remove dust and wash by hand at a maximum temperature of 30°C; do not wring; do not use chlorine bleach, do not iron; do not dry clean; do not apply solvent- based stain removers and do not dry in tumble dryer.There are 5 symbols at the last in this manual.
! ATTENZIONE- IMPORTANTE: Conservare le istruzioni per riferimenti futuri. Leggere e conservarle per uso e sicurezza. La sicurezza del bambino può essere a rischio se queste istruzioni non vengono seguite.- Questo prodotto è progettato per il trasporto per 1 bambino nel seggiolino.- Non utilizzare il prodotto per un numero di occupanti superiore a quello previsto dal costruttore.- Questo prodotto è approvato per i bambini dalla nascita fino a un peso di 15 kg sul sedile.- Quando utilizzato in combinazione con il seggiolino: Per neonati si consiglia di utilizzare lo schienale nella posizione più reclinata.- Questo prodotto è progettato per l'uso in combinazione con i prodotti: la culla SPAZIO è omologato per i bambini dalla nascita fino a 10 kg di peso / Seggiolino Auto NIDO è approvato per i bambini dalla nascita fino a 13 kg di peso.- Quando utilizzato in combinazione con carrozzina: questo prodotto è adatto per un bambino che non riesce a stare seduto da solo, rotolare e non può spingersi fino in alto e mettersi in ginocchio. Peso massimo del bambino: 9 kg. Non applicare e non utilizzare un materasso differente da quello specificato dal costruttore nel manuale di istruzioni. Qualsiasi maniglia di trasporto (se presente) deve essere lasciata fuori dal corpo carrozzina durante l'uso.- Quando utilizzato in combinazione con seggiolino auto (0+ gruppo), questo veicolo non sostituisce una culla o un letto. Se il vostro bambino ha bisogno di dormire, dovrebbe essere collocato in un apposito corpo carrozzina, culla o letto.- ATTENZIONE Controllare che i dispositivi di corpo carrozzina o unità sede o sede di automobile di attacco siano inseriti correttamente prima dell'uso. Controllare che i prodotti di cui sopra sono fissati correttamente alla voce.- ATTENZIONE Il montaggio e preparazione del prodotto deve essere effettuata da un adulto.- Non usare questo prodotto se ci sono parti mancanti o segni di rottura.- ATTENZIONE Usare sempre il sistema di ritenuta. Usare sempre le cinture a cinque punti. Utilizzare sempre la cinghia imbracatura inguinale in combinazione con la cintura.- ATTENZIONE Non lasciare mai il bambino incustodito.- Inserire sempre il freno fermo.- ATTENZIONE Assicurarsi che tutti i dispositivi di bloccaggio sono impegnati prima dell'uso.- Per evitare infortuni, fate in modo che il vostro bambino sia tenuto lontano quando maneggiate e regolate questo prodotto.- Non inserire le dita nei meccanismi.- Fare attenzione a non ferire il bambino durante la regolazione dei meccanismi (manubrio, schienale ...).- Tutti i pesi appesi al manubrio o le maniglie potrebbero rendere instabilità; seguire le istruzioni del fabbricante riguardo i carichi massimi trasportabili.- La barra anteriore (se presente) non è progettato per sostenere il peso del bambino. Non è progettato per mantenere il bambino nel seggiolino e non sostituisce la cintura in vita.- Non caricare il cestello oltre 5 kg. Non mettere peso nel supporto di tazza (se presente) bevande calde o carichi superiori a quelli indicati. Non mettere carico maggiore di 0,2 kg nelle tasche cappuccio (se presente).- Tenere il prodotto lontano da scale o gradini, fonti di calore, fiamme libere o oggetti pericolosi alla portata del bambino.- Devono essere utilizzate solo parti di ricambio fornite o consigliate dal produttore / distributore.- AVVERTENZA Non utilizzare la copertura della pioggia (se presente) su un prodotto senza un cappuccio o parasole che può sostenere esso. Usare sempre il parapioggia solo sotto supervisione di un adulto. Non utilizzare il parapioggia in casa e controllare il bambino; non parcheggiare il veicolo vicino alla fonte di calore e tenere ben lontano dalle sigarette accese. Assicurarsi che il parapioggia non interferisca con le parti in movimento del carrello / passeggino. Rimuovere sempre il parapioggia prima di piegare il vostro carrozzino / passeggino.- ATTENZIONE Questo prodotto non è adatto per correre o pattinare.- Applicare sempre il freno quando si carico o scarica il bambino.- Non aggiungere altri materassi.
COMPONENTI DEL PRODOTTO Controllare il contenuto della confezione.-Comodo: Cestino, 2 ruote posteriori con freno ingranaggio, barra ruota posteriore, cavalletto per il posizionamento, 2 ruote anteriori, maniglia solida.
ISTRUZIONI1 APERTURA: Prima di aprire il telaio, rimuovere (senza l'utilizzo lame) qualsiasi oggetto d’imballo. Tenere la parte superiore del manico e fare clic sulla maniglia fino a quando il telaio è completa-mente aperto (fig_a). Telaio aperto (fig_b).Questo telaio è correttamente aperto quando l'attacco sulla base scatta in posizione, come mostrato. ATTENZIONE: Quando si colloca la sede sul telaio, premere la sella verso il basso per assicurarsi che si inneschi in modo sicuro sulla base.2 Montaggio delle ruote: Slot montanti nella traversa ruota posteriore (fig_a), assicurandosi che sia rivolta nella direzione giusta, quindi spingere le ruote posteriori e assicurarsi che non scattano in posizione (fig_b). Per montare le ruote anteriori, inserirle nei montanti fino a quando non si bloccano in posizione (fig_c).3 REGOLAZIONE DEL MANICO PRINCIPALE: Per competere l'operazione, premere il pulsante sulla maniglia (fig_a) per assicurare la maniglia spinge o tirare fino a quando non scatta in posizione.4 MONTAGGIO DEL CESTELLO: se abbassata, sollevare il tubo cestello la posizione orizzontale. Premere i pulsanti sotto il tubo cestello (fig_a) e rimuoverlo (fig_b). Infilare la molla rivolta verso il basso (fig_c), e fare clic in posizione. Fissare il carrello per i due pulsanti nella parte anteriore (fig_d).5 Sul retro, scivolare gli slot cestino sopra i tasti superiori (fig_e), scivolano le fessure sui pulsanti inferiori (fig_f). ATTENZIONE: Assicurarsi che gli occhielli posteriori della borsa cestellosono completamente agganciati i "bottoni" sulla barra posteriore. Altrimenti, il cestello non sarà in grado di contenere oggetti.6 RUOTE ANTERIORI FISSE O GIREVOLI: Per fermare la rotazione delle ruote anteriori, ruotare la leva in senso orario per il lucchetto chiuso (fig_a); per liberare le ruote, ruotare la leva in senso orario per lucchetto poi sbloccato (fig_b). Su terreni difficili, si consiglia di utilizzare ruote fisse.7 FRENO: premere la leva per azionare il freno sul telaio e sollevarlo per rilasciare il freno.8 CHIUSURA DEL TELAIO: Il telaio può essere piegato senza il sedile, con il sedile di fronte la persona che spinge (reclinare lo schienale prima di ripiegare) o con il sedile rivolto in avanti. Per piegare il passeggino, è preferibile impostare le ruote anteriori alla loro posizione fissa e chiudere la cappotta (se aperta). Clicca sul manico come mostrato in figura (fig_a) e sollevare le leve fino allo scatto.9. Quando il telaio è chiuso, porre i freni ed abbassare il cavalletto.10. Per una maggiore compattezza, è possibile rimuovere le ruote.Per rimuovere le ruote posteriori: tirare il perno verso l'esterno e rimuovere le ruote come mostrato in figura (fig_a).Per rimuovere le ruote anteriori: premere la scheda come mostrato, e rimuovere la ruota (fig_b).TRASPORTO: Il passeggino può essere trasportato comodamente bloccando le ruote anteriori e afferrando la maniglia principale (fig_c).
SISTEMA DI COMODO12 COMODO consente di collegare l'unità passeggino, il seggiolino auto o la navicella alla base del telaio in un unico passaggio rapido.Posizionare sulla base al punto di allineamento e premere con entrambe le mani fino a quando non scatta in posizione. Applicare sempre il freno telaio o passeggino prima di collegare e la rimozione dei prodotti (consultare i rispettivi manuali di istruzioni).Verificare che l'unità di trasporto bambino sia collegato correttamente.
PULIZIA E MANUTENZIONEMANUTENZIONE DEL PRODOTTO: Proteggere dagli agenti atmosferici: acqua, pioggia o neve; la prolungata esposizione continua alla luce solare può dare luogo a cambiamenti di colore di vari materiali diversi; conservare il prodotto in un luogo asciutto.
PULIZIA DEL TELAIO: periodicamente pulire tutte le parti in plastica con un panno umido. Non utilizzare prodotti di pulizia a solvente o simili; mantenere tutte le parti metalliche asciugare per prevenire la ruggine; tenere pulite le parti in movimento (meccanismi di adeguamento, i meccanismi di bloccaggio, ruote ...) e rimuovere polvere e sabbia e, se necessario, lubrificare con olio leggero per macchinari.PULIZIA DEL PARAPIOGGIA: Lavare con acqua tiepida, spugna e sapone; non utilizzare detergenti.PULIZIA PARTI IN TESSUTO: Spazzolare le parti in tessuto per rimuovere la polvere e lavare a mano, ad una temperatura massima di 30 ° C; non strizzare; non usare candeggina, non stirare; non lavare a secco; non applicare smacchiatori a base di solventi e non lavare a secco in asciugatrice.Ci sono 5 simboli alla fine di questo manuale.

! WARNING- IMPORTANT: Keep these instructions for future reference. Read and keep them for safety use. The child's safety could not be at risk if these instructions are not followed.- This product is designed for the transport for 1 child in the seat.- Do not use this product for a number of occupants greater than that intended by the manufacturer. - This product is approved for children from birth up to a weight of 15 kg in the seat.- When used in combination with the seat: For new born babies is recommended to use the backrest in the most reclined position.- This product is designed for use in combination with the products: Carry Cot SPAZIO is approved for children from birth up to 10 kg of weight/ Car Seat NIDO is approved for children from birth up to weight of 13 kg.- When used in combination with pram body: this product is suitable for a child who cannot sit up by itself, roll over and cannot push itself up n it's hands and knees. Maximum weight of the child: 9 kg. Don't apply and don't use any different mattress of that specified by the manufacturer in the Instruction Manual. Any carrying handle (if present) shall be left out of the pram body during use.- When used in combination with car seat (0+ group), this vehicle does not replace a cot or a bed. Should your child need to sleep, then it should be placed in a suitable pram body, cot or bed. - WARNING Check that the pram body or seat unit or car seat attachment devices are correctly engaged before use. Check that the products mentioned above are correctly fixed to the item.- WARNING The assembly and preparation of the product must be carried out by an adult.- Do not use this product if there are parts missing or signs of breakage.- WARNING Always use the restraint system. Always use the five point harness. Always use the harness crotch strap in combination with the waist strap.- WARNING Never leave your child unattended.- Always apply the brake when stationary.- WARNING Ensure that all the locking devices are engaged before use.- WARNING To avoid injury ensure that your child is kept away when unfolding and folding this product.- Do not insert fingers into the mechanisms.- Be careful not hurt the child when adjusting the mechanisms (handle bar, backrest...).- Any weights hanging on the handle bar or handles could make the item unstable; follow the manufacturer's instructions regards the maximum loads transportable.- The front bar (if present) is not designed to support the child's weight. It is not designed to keep the child in the seat and does not substitute for the waist belt.- Do not load the basket over 5 kg. Do not put weight in the cup holder (if present) in excess of those indicated on the cup holders themselves and never hot drinks. Do not put load of more than 0.2 kg in the hood pockets (if present).- Do not use the product neat to stairs or steps, heat sources, naked flames or dangerous objects within reach of the child.- Only replacement parts supplied or recommended by the manufacturer/ distributor shall be used.- WARNING Don't use the rain cover (if present) on a product without a hood or parasol that can hold it. Always use the rain cover only under adult supervision. Don't use the rain cover indoors and check to ensure the child is not to warm; do not park the vehicle close to heat source and keep well away from the lighted cigarettes. Ensure that the rain cover is not interfering with any moving parts of the carriage/stroller. Always remove the rain cover before folding your carriage/stroller.- WARNING This product is not suitable for running or skating.- Always apply the brake hen loading or unloading children.- Do not add any mattress.COMPONENT OF THE ITEM Check the contents of the packaging.-Comodo: basket, 2 rear wheels with brake gear, rear wheel bar, free standing for placement, 2 front wheels, solid handle.
INSTRUCTIONS1 OPENING: Before opening the frame, remove (without using blades) any die-cut cardboard. Hold the upper section of the handle and click the handle until the frame is fully opened (fig_a). Open frame (fig_b).This frame is properly opened when the attachment on the base click into place, as shown. CAUTION: When placing the seat on the frame, press the seat downwards to ensure it engages securely onto the base.2 FITTING THE WHEELS: Slot the uprights into the rear wheel crosspiece (fig_a), ensuring that it is facing the right way, then push the rear wheels on and make sure that they click into place (fig_b). To mount the front wheels, fit them into the uprights until they lock into place (fig_c).3 ADJUSTING THE MAIN HANDLE: To compete the operation, press the button on the handle (fig_a) to ensure the handle pushes in the all way, until it clicks into place.4 FITTING THE BASKET: If lowered, lift the basket tube the horizontal position. Press the buttons under the basket tube (fig_a) and remove it (fig_b). Thread the spring facing down (fig_c), and click it back into place. Attach the basket to the two buttons at the front (fig_d).5 On the rear, slip the basket slots over the upper buttons (fig_e), slip the slots over the lower buttons (fig_f). WARNING: Ensure the rear loops of the basket bag are completely hooked onto the "buttons" on the rear bar. Otherwise, the basket will not to be able to hold the contents.6 FIXD OR SWIVEL FORNT WHEELS: To fix the front wheels, rotate the lever counter clockwise to the locked padlock (fig_a); to release the wheels, turn the lever clockwise to then unlocked padlock (fig_b). On difficult terrain, we recommended using fixed wheels.7 BRAKE: Press the lever down to apply the brake on the chassis and lift it to release the brake.8 FOLDING UP: The chassis can be folded up without the seat, with the seat facing the person pushing (recline the backrest before folding it) or with the seat facing forwards. To fold the stroller, it is best to set the front wheels to their fixed position and close the hood (if fixed). Click the handle as shown in the figure (fig_a) and lift the levers the slots click into the place.9. When the frame is closed, put down the free standing on the brake lever.10. For greater compactness, it is possible to remove the wheels.To remove the rear wheels: pull the pivot outwards and remove the wheels as shown in the figure (fig_a).To remove the front wheels: press the tab as shown, and remove the wheel (fig_b).TRANSPORT: The stroller can be carried comfortably locking the front wheels and grasping the main handle (fig_c).COMODO SYSTEM12 COMODO allows you to attach the seat unit, the car seat or the carry cot to the base of the chassis in one quick step.Place the item on the COMODO Base and press down with both hands until it click into place. Always apply the chassis or stroller brake before attaching and removing products (refer to the respective instruction manuals).Check that the child transport unit is properly attached.CLEANING AND MAINTENANCEPRODUCT MAINTENANCE: Protect from the weather: water, rain, or snow; prolonged and continuous exposure to bright sunlight may give rise to color changes of various different materials; store this product in a dry place.CLEANING THE CHASSIS: Periodically clean all plastic parts with a damp cloth. Do not use solvent or similar cleaning products; keep all metal parts dry to prevent rusting; keep moving parts clean (adjustment mechanisms, locking mechanisms, wheels...) and free of dust and sand and, if necessary, lubricate with light machine oil.CLEANING THE RAIN CANOPY: Wash with a sponge ad soapy water; do not use detergents.CLEANING FABRIC PARTS: Brush fabric parts to remove dust and wash by hand at a maximum temperature of 30°C; do not wring; do not use chlorine bleach, do not iron; do not dry clean; do not apply solvent- based stain removers and do not dry in tumble dryer.There are 5 symbols at the last in this manual.
! ATTENZIONE- IMPORTANTE: Conservare le istruzioni per riferimenti futuri. Leggere e conservarle per uso e sicurezza. La sicurezza del bambino può essere a rischio se queste istruzioni non vengono seguite.- Questo prodotto è progettato per il trasporto per 1 bambino nel seggiolino.- Non utilizzare il prodotto per un numero di occupanti superiore a quello previsto dal costruttore.- Questo prodotto è approvato per i bambini dalla nascita fino a un peso di 15 kg sul sedile.- Quando utilizzato in combinazione con il seggiolino: Per neonati si consiglia di utilizzare lo schienale nella posizione più reclinata.- Questo prodotto è progettato per l'uso in combinazione con i prodotti: la culla SPAZIO è omologato per i bambini dalla nascita fino a 10 kg di peso / Seggiolino Auto NIDO è approvato per i bambini dalla nascita fino a 13 kg di peso.- Quando utilizzato in combinazione con carrozzina: questo prodotto è adatto per un bambino che non riesce a stare seduto da solo, rotolare e non può spingersi fino in alto e mettersi in ginocchio. Peso massimo del bambino: 9 kg. Non applicare e non utilizzare un materasso differente da quello specificato dal costruttore nel manuale di istruzioni. Qualsiasi maniglia di trasporto (se presente) deve essere lasciata fuori dal corpo carrozzina durante l'uso.- Quando utilizzato in combinazione con seggiolino auto (0+ gruppo), questo veicolo non sostituisce una culla o un letto. Se il vostro bambino ha bisogno di dormire, dovrebbe essere collocato in un apposito corpo carrozzina, culla o letto.- ATTENZIONE Controllare che i dispositivi di corpo carrozzina o unità sede o sede di automobile di attacco siano inseriti correttamente prima dell'uso. Controllare che i prodotti di cui sopra sono fissati correttamente alla voce.- ATTENZIONE Il montaggio e preparazione del prodotto deve essere effettuata da un adulto.- Non usare questo prodotto se ci sono parti mancanti o segni di rottura.- ATTENZIONE Usare sempre il sistema di ritenuta. Usare sempre le cinture a cinque punti. Utilizzare sempre la cinghia imbracatura inguinale in combinazione con la cintura.- ATTENZIONE Non lasciare mai il bambino incustodito.- Inserire sempre il freno fermo.- ATTENZIONE Assicurarsi che tutti i dispositivi di bloccaggio sono impegnati prima dell'uso.- Per evitare infortuni, fate in modo che il vostro bambino sia tenuto lontano quando maneggiate e regolate questo prodotto.- Non inserire le dita nei meccanismi.- Fare attenzione a non ferire il bambino durante la regolazione dei meccanismi (manubrio, schienale ...).- Tutti i pesi appesi al manubrio o le maniglie potrebbero rendere instabilità; seguire le istruzioni del fabbricante riguardo i carichi massimi trasportabili.- La barra anteriore (se presente) non è progettato per sostenere il peso del bambino. Non è progettato per mantenere il bambino nel seggiolino e non sostituisce la cintura in vita.- Non caricare il cestello oltre 5 kg. Non mettere peso nel supporto di tazza (se presente) bevande calde o carichi superiori a quelli indicati. Non mettere carico maggiore di 0,2 kg nelle tasche cappuccio (se presente).- Tenere il prodotto lontano da scale o gradini, fonti di calore, fiamme libere o oggetti pericolosi alla portata del bambino.- Devono essere utilizzate solo parti di ricambio fornite o consigliate dal produttore / distributore.- AVVERTENZA Non utilizzare la copertura della pioggia (se presente) su un prodotto senza un cappuccio o parasole che può sostenere esso. Usare sempre il parapioggia solo sotto supervisione di un adulto. Non utilizzare il parapioggia in casa e controllare il bambino; non parcheggiare il veicolo vicino alla fonte di calore e tenere ben lontano dalle sigarette accese. Assicurarsi che il parapioggia non interferisca con le parti in movimento del carrello / passeggino. Rimuovere sempre il parapioggia prima di piegare il vostro carrozzino / passeggino.- ATTENZIONE Questo prodotto non è adatto per correre o pattinare.- Applicare sempre il freno quando si carico o scarica il bambino.- Non aggiungere altri materassi.
COMPONENTI DEL PRODOTTO Controllare il contenuto della confezione.-Comodo: Cestino, 2 ruote posteriori con freno ingranaggio, barra ruota posteriore, cavalletto per il posizionamento, 2 ruote anteriori, maniglia solida.
ISTRUZIONI1 APERTURA: Prima di aprire il telaio, rimuovere (senza l'utilizzo lame) qualsiasi oggetto d’imballo. Tenere la parte superiore del manico e fare clic sulla maniglia fino a quando il telaio è completa-mente aperto (fig_a). Telaio aperto (fig_b).Questo telaio è correttamente aperto quando l'attacco sulla base scatta in posizione, come mostrato. ATTENZIONE: Quando si colloca la sede sul telaio, premere la sella verso il basso per assicurarsi che si inneschi in modo sicuro sulla base.2 Montaggio delle ruote: Slot montanti nella traversa ruota posteriore (fig_a), assicurandosi che sia rivolta nella direzione giusta, quindi spingere le ruote posteriori e assicurarsi che non scattano in posizione (fig_b). Per montare le ruote anteriori, inserirle nei montanti fino a quando non si bloccano in posizione (fig_c).3 REGOLAZIONE DEL MANICO PRINCIPALE: Per competere l'operazione, premere il pulsante sulla maniglia (fig_a) per assicurare la maniglia spinge o tirare fino a quando non scatta in posizione.4 MONTAGGIO DEL CESTELLO: se abbassata, sollevare il tubo cestello la posizione orizzontale. Premere i pulsanti sotto il tubo cestello (fig_a) e rimuoverlo (fig_b). Infilare la molla rivolta verso il basso (fig_c), e fare clic in posizione. Fissare il carrello per i due pulsanti nella parte anteriore (fig_d).5 Sul retro, scivolare gli slot cestino sopra i tasti superiori (fig_e), scivolano le fessure sui pulsanti inferiori (fig_f). ATTENZIONE: Assicurarsi che gli occhielli posteriori della borsa cestellosono completamente agganciati i "bottoni" sulla barra posteriore. Altrimenti, il cestello non sarà in grado di contenere oggetti.6 RUOTE ANTERIORI FISSE O GIREVOLI: Per fermare la rotazione delle ruote anteriori, ruotare la leva in senso orario per il lucchetto chiuso (fig_a); per liberare le ruote, ruotare la leva in senso orario per lucchetto poi sbloccato (fig_b). Su terreni difficili, si consiglia di utilizzare ruote fisse.7 FRENO: premere la leva per azionare il freno sul telaio e sollevarlo per rilasciare il freno.8 CHIUSURA DEL TELAIO: Il telaio può essere piegato senza il sedile, con il sedile di fronte la persona che spinge (reclinare lo schienale prima di ripiegare) o con il sedile rivolto in avanti. Per piegare il passeggino, è preferibile impostare le ruote anteriori alla loro posizione fissa e chiudere la cappotta (se aperta). Clicca sul manico come mostrato in figura (fig_a) e sollevare le leve fino allo scatto.9. Quando il telaio è chiuso, porre i freni ed abbassare il cavalletto.10. Per una maggiore compattezza, è possibile rimuovere le ruote.Per rimuovere le ruote posteriori: tirare il perno verso l'esterno e rimuovere le ruote come mostrato in figura (fig_a).Per rimuovere le ruote anteriori: premere la scheda come mostrato, e rimuovere la ruota (fig_b).TRASPORTO: Il passeggino può essere trasportato comodamente bloccando le ruote anteriori e afferrando la maniglia principale (fig_c).
SISTEMA DI COMODO12 COMODO consente di collegare l'unità passeggino, il seggiolino auto o la navicella alla base del telaio in un unico passaggio rapido.Posizionare sulla base al punto di allineamento e premere con entrambe le mani fino a quando non scatta in posizione. Applicare sempre il freno telaio o passeggino prima di collegare e la rimozione dei prodotti (consultare i rispettivi manuali di istruzioni).Verificare che l'unità di trasporto bambino sia collegato correttamente.
PULIZIA E MANUTENZIONEMANUTENZIONE DEL PRODOTTO: Proteggere dagli agenti atmosferici: acqua, pioggia o neve; la prolungata esposizione continua alla luce solare può dare luogo a cambiamenti di colore di vari materiali diversi; conservare il prodotto in un luogo asciutto.
PULIZIA DEL TELAIO: periodicamente pulire tutte le parti in plastica con un panno umido. Non utilizzare prodotti di pulizia a solvente o simili; mantenere tutte le parti metalliche asciugare per prevenire la ruggine; tenere pulite le parti in movimento (meccanismi di adeguamento, i meccanismi di bloccaggio, ruote ...) e rimuovere polvere e sabbia e, se necessario, lubrificare con olio leggero per macchinari.PULIZIA DEL PARAPIOGGIA: Lavare con acqua tiepida, spugna e sapone; non utilizzare detergenti.PULIZIA PARTI IN TESSUTO: Spazzolare le parti in tessuto per rimuovere la polvere e lavare a mano, ad una temperatura massima di 30 ° C; non strizzare; non usare candeggina, non stirare; non lavare a secco; non applicare smacchiatori a base di solventi e non lavare a secco in asciugatrice.Ci sono 5 simboli alla fine di questo manuale.
EN

! WARNING- IMPORTANT: Keep these instructions for future reference. Read and keep them for safety use. The child's safety could not be at risk if these instructions are not followed.- This product is designed for the transport for 1 child in the seat.- Do not use this product for a number of occupants greater than that intended by the manufacturer. - This product is approved for children from birth up to a weight of 15 kg in the seat.- When used in combination with the seat: For new born babies is recommended to use the backrest in the most reclined position.- This product is designed for use in combination with the products: Carry Cot SPAZIO is approved for children from birth up to 10 kg of weight/ Car Seat NIDO is approved for children from birth up to weight of 13 kg.- When used in combination with pram body: this product is suitable for a child who cannot sit up by itself, roll over and cannot push itself up n it's hands and knees. Maximum weight of the child: 9 kg. Don't apply and don't use any different mattress of that specified by the manufacturer in the Instruction Manual. Any carrying handle (if present) shall be left out of the pram body during use.- When used in combination with car seat (0+ group), this vehicle does not replace a cot or a bed. Should your child need to sleep, then it should be placed in a suitable pram body, cot or bed. - WARNING Check that the pram body or seat unit or car seat attachment devices are correctly engaged before use. Check that the products mentioned above are correctly fixed to the item.- WARNING The assembly and preparation of the product must be carried out by an adult.- Do not use this product if there are parts missing or signs of breakage.- WARNING Always use the restraint system. Always use the five point harness. Always use the harness crotch strap in combination with the waist strap.- WARNING Never leave your child unattended.- Always apply the brake when stationary.- WARNING Ensure that all the locking devices are engaged before use.- WARNING To avoid injury ensure that your child is kept away when unfolding and folding this product.- Do not insert fingers into the mechanisms.- Be careful not hurt the child when adjusting the mechanisms (handle bar, backrest...).- Any weights hanging on the handle bar or handles could make the item unstable; follow the manufacturer's instructions regards the maximum loads transportable.- The front bar (if present) is not designed to support the child's weight. It is not designed to keep the child in the seat and does not substitute for the waist belt.- Do not load the basket over 5 kg. Do not put weight in the cup holder (if present) in excess of those indicated on the cup holders themselves and never hot drinks. Do not put load of more than 0.2 kg in the hood pockets (if present).- Do not use the product neat to stairs or steps, heat sources, naked flames or dangerous objects within reach of the child.- Only replacement parts supplied or recommended by the manufacturer/ distributor shall be used.- WARNING Don't use the rain cover (if present) on a product without a hood or parasol that can hold it. Always use the rain cover only under adult supervision. Don't use the rain cover indoors and check to ensure the child is not to warm; do not park the vehicle close to heat source and keep well away from the lighted cigarettes. Ensure that the rain cover is not interfering with any moving parts of the carriage/stroller. Always remove the rain cover before folding your carriage/stroller.- WARNING This product is not suitable for running or skating.- Always apply the brake hen loading or unloading children.- Do not add any mattress.COMPONENT OF THE ITEM Check the contents of the packaging.-Comodo: basket, 2 rear wheels with brake gear, rear wheel bar, free standing for placement, 2 front wheels, solid handle.
INSTRUCTIONS1 OPENING: Before opening the frame, remove (without using blades) any die-cut cardboard. Hold the upper section of the handle and click the handle until the frame is fully opened (fig_a). Open frame (fig_b).This frame is properly opened when the attachment on the base click into place, as shown. CAUTION: When placing the seat on the frame, press the seat downwards to ensure it engages securely onto the base.2 FITTING THE WHEELS: Slot the uprights into the rear wheel crosspiece (fig_a), ensuring that it is facing the right way, then push the rear wheels on and make sure that they click into place (fig_b). To mount the front wheels, fit them into the uprights until they lock into place (fig_c).3 ADJUSTING THE MAIN HANDLE: To compete the operation, press the button on the handle (fig_a) to ensure the handle pushes in the all way, until it clicks into place.4 FITTING THE BASKET: If lowered, lift the basket tube the horizontal position. Press the buttons under the basket tube (fig_a) and remove it (fig_b). Thread the spring facing down (fig_c), and click it back into place. Attach the basket to the two buttons at the front (fig_d).5 On the rear, slip the basket slots over the upper buttons (fig_e), slip the slots over the lower buttons (fig_f). WARNING: Ensure the rear loops of the basket bag are completely hooked onto the "buttons" on the rear bar. Otherwise, the basket will not to be able to hold the contents.6 FIXD OR SWIVEL FORNT WHEELS: To fix the front wheels, rotate the lever counter clockwise to the locked padlock (fig_a); to release the wheels, turn the lever clockwise to then unlocked padlock (fig_b). On difficult terrain, we recommended using fixed wheels.7 BRAKE: Press the lever down to apply the brake on the chassis and lift it to release the brake.8 FOLDING UP: The chassis can be folded up without the seat, with the seat facing the person pushing (recline the backrest before folding it) or with the seat facing forwards. To fold the stroller, it is best to set the front wheels to their fixed position and close the hood (if fixed). Click the handle as shown in the figure (fig_a) and lift the levers the slots click into the place.9. When the frame is closed, put down the free standing on the brake lever.10. For greater compactness, it is possible to remove the wheels.To remove the rear wheels: pull the pivot outwards and remove the wheels as shown in the figure (fig_a).To remove the front wheels: press the tab as shown, and remove the wheel (fig_b).TRANSPORT: The stroller can be carried comfortably locking the front wheels and grasping the main handle (fig_c).COMODO SYSTEM12 COMODO allows you to attach the seat unit, the car seat or the carry cot to the base of the chassis in one quick step.Place the item on the COMODO Base and press down with both hands until it click into place. Always apply the chassis or stroller brake before attaching and removing products (refer to the respective instruction manuals).Check that the child transport unit is properly attached.CLEANING AND MAINTENANCEPRODUCT MAINTENANCE: Protect from the weather: water, rain, or snow; prolonged and continuous exposure to bright sunlight may give rise to color changes of various different materials; store this product in a dry place.CLEANING THE CHASSIS: Periodically clean all plastic parts with a damp cloth. Do not use solvent or similar cleaning products; keep all metal parts dry to prevent rusting; keep moving parts clean (adjustment mechanisms, locking mechanisms, wheels...) and free of dust and sand and, if necessary, lubricate with light machine oil.CLEANING THE RAIN CANOPY: Wash with a sponge ad soapy water; do not use detergents.CLEANING FABRIC PARTS: Brush fabric parts to remove dust and wash by hand at a maximum temperature of 30°C; do not wring; do not use chlorine bleach, do not iron; do not dry clean; do not apply solvent- based stain removers and do not dry in tumble dryer.There are 5 symbols at the last in this manual.
! ATTENZIONE- IMPORTANTE: Conservare le istruzioni per riferimenti futuri. Leggere e conservarle per uso e sicurezza. La sicurezza del bambino può essere a rischio se queste istruzioni non vengono seguite.- Questo prodotto è progettato per il trasporto per 1 bambino nel seggiolino.- Non utilizzare il prodotto per un numero di occupanti superiore a quello previsto dal costruttore.- Questo prodotto è approvato per i bambini dalla nascita fino a un peso di 15 kg sul sedile.- Quando utilizzato in combinazione con il seggiolino: Per neonati si consiglia di utilizzare lo schienale nella posizione più reclinata.- Questo prodotto è progettato per l'uso in combinazione con i prodotti: la culla SPAZIO è omologato per i bambini dalla nascita fino a 10 kg di peso / Seggiolino Auto NIDO è approvato per i bambini dalla nascita fino a 13 kg di peso.- Quando utilizzato in combinazione con carrozzina: questo prodotto è adatto per un bambino che non riesce a stare seduto da solo, rotolare e non può spingersi fino in alto e mettersi in ginocchio. Peso massimo del bambino: 9 kg. Non applicare e non utilizzare un materasso differente da quello specificato dal costruttore nel manuale di istruzioni. Qualsiasi maniglia di trasporto (se presente) deve essere lasciata fuori dal corpo carrozzina durante l'uso.- Quando utilizzato in combinazione con seggiolino auto (0+ gruppo), questo veicolo non sostituisce una culla o un letto. Se il vostro bambino ha bisogno di dormire, dovrebbe essere collocato in un apposito corpo carrozzina, culla o letto.- ATTENZIONE Controllare che i dispositivi di corpo carrozzina o unità sede o sede di automobile di attacco siano inseriti correttamente prima dell'uso. Controllare che i prodotti di cui sopra sono fissati correttamente alla voce.- ATTENZIONE Il montaggio e preparazione del prodotto deve essere effettuata da un adulto.- Non usare questo prodotto se ci sono parti mancanti o segni di rottura.- ATTENZIONE Usare sempre il sistema di ritenuta. Usare sempre le cinture a cinque punti. Utilizzare sempre la cinghia imbracatura inguinale in combinazione con la cintura.- ATTENZIONE Non lasciare mai il bambino incustodito.- Inserire sempre il freno fermo.- ATTENZIONE Assicurarsi che tutti i dispositivi di bloccaggio sono impegnati prima dell'uso.- Per evitare infortuni, fate in modo che il vostro bambino sia tenuto lontano quando maneggiate e regolate questo prodotto.- Non inserire le dita nei meccanismi.- Fare attenzione a non ferire il bambino durante la regolazione dei meccanismi (manubrio, schienale ...).- Tutti i pesi appesi al manubrio o le maniglie potrebbero rendere instabilità; seguire le istruzioni del fabbricante riguardo i carichi massimi trasportabili.- La barra anteriore (se presente) non è progettato per sostenere il peso del bambino. Non è progettato per mantenere il bambino nel seggiolino e non sostituisce la cintura in vita.- Non caricare il cestello oltre 5 kg. Non mettere peso nel supporto di tazza (se presente) bevande calde o carichi superiori a quelli indicati. Non mettere carico maggiore di 0,2 kg nelle tasche cappuccio (se presente).- Tenere il prodotto lontano da scale o gradini, fonti di calore, fiamme libere o oggetti pericolosi alla portata del bambino.- Devono essere utilizzate solo parti di ricambio fornite o consigliate dal produttore / distributore.- AVVERTENZA Non utilizzare la copertura della pioggia (se presente) su un prodotto senza un cappuccio o parasole che può sostenere esso. Usare sempre il parapioggia solo sotto supervisione di un adulto. Non utilizzare il parapioggia in casa e controllare il bambino; non parcheggiare il veicolo vicino alla fonte di calore e tenere ben lontano dalle sigarette accese. Assicurarsi che il parapioggia non interferisca con le parti in movimento del carrello / passeggino. Rimuovere sempre il parapioggia prima di piegare il vostro carrozzino / passeggino.- ATTENZIONE Questo prodotto non è adatto per correre o pattinare.- Applicare sempre il freno quando si carico o scarica il bambino.- Non aggiungere altri materassi.
COMPONENTI DEL PRODOTTO Controllare il contenuto della confezione.-Comodo: Cestino, 2 ruote posteriori con freno ingranaggio, barra ruota posteriore, cavalletto per il posizionamento, 2 ruote anteriori, maniglia solida.
ISTRUZIONI1 APERTURA: Prima di aprire il telaio, rimuovere (senza l'utilizzo lame) qualsiasi oggetto d’imballo. Tenere la parte superiore del manico e fare clic sulla maniglia fino a quando il telaio è completa-mente aperto (fig_a). Telaio aperto (fig_b).Questo telaio è correttamente aperto quando l'attacco sulla base scatta in posizione, come mostrato. ATTENZIONE: Quando si colloca la sede sul telaio, premere la sella verso il basso per assicurarsi che si inneschi in modo sicuro sulla base.2 Montaggio delle ruote: Slot montanti nella traversa ruota posteriore (fig_a), assicurandosi che sia rivolta nella direzione giusta, quindi spingere le ruote posteriori e assicurarsi che non scattano in posizione (fig_b). Per montare le ruote anteriori, inserirle nei montanti fino a quando non si bloccano in posizione (fig_c).3 REGOLAZIONE DEL MANICO PRINCIPALE: Per competere l'operazione, premere il pulsante sulla maniglia (fig_a) per assicurare la maniglia spinge o tirare fino a quando non scatta in posizione.4 MONTAGGIO DEL CESTELLO: se abbassata, sollevare il tubo cestello la posizione orizzontale. Premere i pulsanti sotto il tubo cestello (fig_a) e rimuoverlo (fig_b). Infilare la molla rivolta verso il basso (fig_c), e fare clic in posizione. Fissare il carrello per i due pulsanti nella parte anteriore (fig_d).5 Sul retro, scivolare gli slot cestino sopra i tasti superiori (fig_e), scivolano le fessure sui pulsanti inferiori (fig_f). ATTENZIONE: Assicurarsi che gli occhielli posteriori della borsa cestellosono completamente agganciati i "bottoni" sulla barra posteriore. Altrimenti, il cestello non sarà in grado di contenere oggetti.6 RUOTE ANTERIORI FISSE O GIREVOLI: Per fermare la rotazione delle ruote anteriori, ruotare la leva in senso orario per il lucchetto chiuso (fig_a); per liberare le ruote, ruotare la leva in senso orario per lucchetto poi sbloccato (fig_b). Su terreni difficili, si consiglia di utilizzare ruote fisse.7 FRENO: premere la leva per azionare il freno sul telaio e sollevarlo per rilasciare il freno.8 CHIUSURA DEL TELAIO: Il telaio può essere piegato senza il sedile, con il sedile di fronte la persona che spinge (reclinare lo schienale prima di ripiegare) o con il sedile rivolto in avanti. Per piegare il passeggino, è preferibile impostare le ruote anteriori alla loro posizione fissa e chiudere la cappotta (se aperta). Clicca sul manico come mostrato in figura (fig_a) e sollevare le leve fino allo scatto.9. Quando il telaio è chiuso, porre i freni ed abbassare il cavalletto.10. Per una maggiore compattezza, è possibile rimuovere le ruote.Per rimuovere le ruote posteriori: tirare il perno verso l'esterno e rimuovere le ruote come mostrato in figura (fig_a).Per rimuovere le ruote anteriori: premere la scheda come mostrato, e rimuovere la ruota (fig_b).TRASPORTO: Il passeggino può essere trasportato comodamente bloccando le ruote anteriori e afferrando la maniglia principale (fig_c).
SISTEMA DI COMODO12 COMODO consente di collegare l'unità passeggino, il seggiolino auto o la navicella alla base del telaio in un unico passaggio rapido.Posizionare sulla base al punto di allineamento e premere con entrambe le mani fino a quando non scatta in posizione. Applicare sempre il freno telaio o passeggino prima di collegare e la rimozione dei prodotti (consultare i rispettivi manuali di istruzioni).Verificare che l'unità di trasporto bambino sia collegato correttamente.
PULIZIA E MANUTENZIONEMANUTENZIONE DEL PRODOTTO: Proteggere dagli agenti atmosferici: acqua, pioggia o neve; la prolungata esposizione continua alla luce solare può dare luogo a cambiamenti di colore di vari materiali diversi; conservare il prodotto in un luogo asciutto.
PULIZIA DEL TELAIO: periodicamente pulire tutte le parti in plastica con un panno umido. Non utilizzare prodotti di pulizia a solvente o simili; mantenere tutte le parti metalliche asciugare per prevenire la ruggine; tenere pulite le parti in movimento (meccanismi di adeguamento, i meccanismi di bloccaggio, ruote ...) e rimuovere polvere e sabbia e, se necessario, lubrificare con olio leggero per macchinari.PULIZIA DEL PARAPIOGGIA: Lavare con acqua tiepida, spugna e sapone; non utilizzare detergenti.PULIZIA PARTI IN TESSUTO: Spazzolare le parti in tessuto per rimuovere la polvere e lavare a mano, ad una temperatura massima di 30 ° C; non strizzare; non usare candeggina, non stirare; non lavare a secco; non applicare smacchiatori a base di solventi e non lavare a secco in asciugatrice.Ci sono 5 simboli alla fine di questo manuale.
IT
Imported by or on behalf of:
Made in ChinaWincenzo & Partners S.r.l. Via Lazzaroni Giuseppina, 4, 20124 Milano, Italy IT09176670967 [email protected]

! WARNING- IMPORTANT: Keep these instructions for future reference. Read and keep them for safety use. The child's safety could not be at risk if these instructions are not followed.- This product is designed for the transport for 1 child in the seat.- Do not use this product for a number of occupants greater than that intended by the manufacturer. - This product is approved for children from birth up to a weight of 15 kg in the seat.- When used in combination with the seat: For new born babies is recommended to use the backrest in the most reclined position.- This product is designed for use in combination with the products: Carry Cot SPAZIO is approved for children from birth up to 10 kg of weight/ Car Seat NIDO is approved for children from birth up to weight of 13 kg.- When used in combination with pram body: this product is suitable for a child who cannot sit up by itself, roll over and cannot push itself up n it's hands and knees. Maximum weight of the child: 9 kg. Don't apply and don't use any different mattress of that specified by the manufacturer in the Instruction Manual. Any carrying handle (if present) shall be left out of the pram body during use.- When used in combination with car seat (0+ group), this vehicle does not replace a cot or a bed. Should your child need to sleep, then it should be placed in a suitable pram body, cot or bed. - WARNING Check that the pram body or seat unit or car seat attachment devices are correctly engaged before use. Check that the products mentioned above are correctly fixed to the item.- WARNING The assembly and preparation of the product must be carried out by an adult.- Do not use this product if there are parts missing or signs of breakage.- WARNING Always use the restraint system. Always use the five point harness. Always use the harness crotch strap in combination with the waist strap.- WARNING Never leave your child unattended.- Always apply the brake when stationary.- WARNING Ensure that all the locking devices are engaged before use.- WARNING To avoid injury ensure that your child is kept away when unfolding and folding this product.- Do not insert fingers into the mechanisms.- Be careful not hurt the child when adjusting the mechanisms (handle bar, backrest...).- Any weights hanging on the handle bar or handles could make the item unstable; follow the manufacturer's instructions regards the maximum loads transportable.- The front bar (if present) is not designed to support the child's weight. It is not designed to keep the child in the seat and does not substitute for the waist belt.- Do not load the basket over 5 kg. Do not put weight in the cup holder (if present) in excess of those indicated on the cup holders themselves and never hot drinks. Do not put load of more than 0.2 kg in the hood pockets (if present).- Do not use the product neat to stairs or steps, heat sources, naked flames or dangerous objects within reach of the child.- Only replacement parts supplied or recommended by the manufacturer/ distributor shall be used.- WARNING Don't use the rain cover (if present) on a product without a hood or parasol that can hold it. Always use the rain cover only under adult supervision. Don't use the rain cover indoors and check to ensure the child is not to warm; do not park the vehicle close to heat source and keep well away from the lighted cigarettes. Ensure that the rain cover is not interfering with any moving parts of the carriage/stroller. Always remove the rain cover before folding your carriage/stroller.- WARNING This product is not suitable for running or skating.- Always apply the brake hen loading or unloading children.- Do not add any mattress.COMPONENT OF THE ITEM Check the contents of the packaging.-Comodo: basket, 2 rear wheels with brake gear, rear wheel bar, free standing for placement, 2 front wheels, solid handle.
INSTRUCTIONS1 OPENING: Before opening the frame, remove (without using blades) any die-cut cardboard. Hold the upper section of the handle and click the handle until the frame is fully opened (fig_a). Open frame (fig_b).This frame is properly opened when the attachment on the base click into place, as shown. CAUTION: When placing the seat on the frame, press the seat downwards to ensure it engages securely onto the base.2 FITTING THE WHEELS: Slot the uprights into the rear wheel crosspiece (fig_a), ensuring that it is facing the right way, then push the rear wheels on and make sure that they click into place (fig_b). To mount the front wheels, fit them into the uprights until they lock into place (fig_c).3 ADJUSTING THE MAIN HANDLE: To compete the operation, press the button on the handle (fig_a) to ensure the handle pushes in the all way, until it clicks into place.4 FITTING THE BASKET: If lowered, lift the basket tube the horizontal position. Press the buttons under the basket tube (fig_a) and remove it (fig_b). Thread the spring facing down (fig_c), and click it back into place. Attach the basket to the two buttons at the front (fig_d).5 On the rear, slip the basket slots over the upper buttons (fig_e), slip the slots over the lower buttons (fig_f). WARNING: Ensure the rear loops of the basket bag are completely hooked onto the "buttons" on the rear bar. Otherwise, the basket will not to be able to hold the contents.6 FIXD OR SWIVEL FORNT WHEELS: To fix the front wheels, rotate the lever counter clockwise to the locked padlock (fig_a); to release the wheels, turn the lever clockwise to then unlocked padlock (fig_b). On difficult terrain, we recommended using fixed wheels.7 BRAKE: Press the lever down to apply the brake on the chassis and lift it to release the brake.8 FOLDING UP: The chassis can be folded up without the seat, with the seat facing the person pushing (recline the backrest before folding it) or with the seat facing forwards. To fold the stroller, it is best to set the front wheels to their fixed position and close the hood (if fixed). Click the handle as shown in the figure (fig_a) and lift the levers the slots click into the place.9. When the frame is closed, put down the free standing on the brake lever.10. For greater compactness, it is possible to remove the wheels.To remove the rear wheels: pull the pivot outwards and remove the wheels as shown in the figure (fig_a).To remove the front wheels: press the tab as shown, and remove the wheel (fig_b).TRANSPORT: The stroller can be carried comfortably locking the front wheels and grasping the main handle (fig_c).COMODO SYSTEM12 COMODO allows you to attach the seat unit, the car seat or the carry cot to the base of the chassis in one quick step.Place the item on the COMODO Base and press down with both hands until it click into place. Always apply the chassis or stroller brake before attaching and removing products (refer to the respective instruction manuals).Check that the child transport unit is properly attached.CLEANING AND MAINTENANCEPRODUCT MAINTENANCE: Protect from the weather: water, rain, or snow; prolonged and continuous exposure to bright sunlight may give rise to color changes of various different materials; store this product in a dry place.CLEANING THE CHASSIS: Periodically clean all plastic parts with a damp cloth. Do not use solvent or similar cleaning products; keep all metal parts dry to prevent rusting; keep moving parts clean (adjustment mechanisms, locking mechanisms, wheels...) and free of dust and sand and, if necessary, lubricate with light machine oil.CLEANING THE RAIN CANOPY: Wash with a sponge ad soapy water; do not use detergents.CLEANING FABRIC PARTS: Brush fabric parts to remove dust and wash by hand at a maximum temperature of 30°C; do not wring; do not use chlorine bleach, do not iron; do not dry clean; do not apply solvent- based stain removers and do not dry in tumble dryer.There are 5 symbols at the last in this manual.
! ATTENZIONE- IMPORTANTE: Conservare le istruzioni per riferimenti futuri. Leggere e conservarle per uso e sicurezza. La sicurezza del bambino può essere a rischio se queste istruzioni non vengono seguite.- Questo prodotto è progettato per il trasporto per 1 bambino nel seggiolino.- Non utilizzare il prodotto per un numero di occupanti superiore a quello previsto dal costruttore.- Questo prodotto è approvato per i bambini dalla nascita fino a un peso di 15 kg sul sedile.- Quando utilizzato in combinazione con il seggiolino: Per neonati si consiglia di utilizzare lo schienale nella posizione più reclinata.- Questo prodotto è progettato per l'uso in combinazione con i prodotti: la culla SPAZIO è omologato per i bambini dalla nascita fino a 10 kg di peso / Seggiolino Auto NIDO è approvato per i bambini dalla nascita fino a 13 kg di peso.- Quando utilizzato in combinazione con carrozzina: questo prodotto è adatto per un bambino che non riesce a stare seduto da solo, rotolare e non può spingersi fino in alto e mettersi in ginocchio. Peso massimo del bambino: 9 kg. Non applicare e non utilizzare un materasso differente da quello specificato dal costruttore nel manuale di istruzioni. Qualsiasi maniglia di trasporto (se presente) deve essere lasciata fuori dal corpo carrozzina durante l'uso.- Quando utilizzato in combinazione con seggiolino auto (0+ gruppo), questo veicolo non sostituisce una culla o un letto. Se il vostro bambino ha bisogno di dormire, dovrebbe essere collocato in un apposito corpo carrozzina, culla o letto.- ATTENZIONE Controllare che i dispositivi di corpo carrozzina o unità sede o sede di automobile di attacco siano inseriti correttamente prima dell'uso. Controllare che i prodotti di cui sopra sono fissati correttamente alla voce.- ATTENZIONE Il montaggio e preparazione del prodotto deve essere effettuata da un adulto.- Non usare questo prodotto se ci sono parti mancanti o segni di rottura.- ATTENZIONE Usare sempre il sistema di ritenuta. Usare sempre le cinture a cinque punti. Utilizzare sempre la cinghia imbracatura inguinale in combinazione con la cintura.- ATTENZIONE Non lasciare mai il bambino incustodito.- Inserire sempre il freno fermo.- ATTENZIONE Assicurarsi che tutti i dispositivi di bloccaggio sono impegnati prima dell'uso.- Per evitare infortuni, fate in modo che il vostro bambino sia tenuto lontano quando maneggiate e regolate questo prodotto.- Non inserire le dita nei meccanismi.- Fare attenzione a non ferire il bambino durante la regolazione dei meccanismi (manubrio, schienale ...).- Tutti i pesi appesi al manubrio o le maniglie potrebbero rendere instabilità; seguire le istruzioni del fabbricante riguardo i carichi massimi trasportabili.- La barra anteriore (se presente) non è progettato per sostenere il peso del bambino. Non è progettato per mantenere il bambino nel seggiolino e non sostituisce la cintura in vita.- Non caricare il cestello oltre 5 kg. Non mettere peso nel supporto di tazza (se presente) bevande calde o carichi superiori a quelli indicati. Non mettere carico maggiore di 0,2 kg nelle tasche cappuccio (se presente).- Tenere il prodotto lontano da scale o gradini, fonti di calore, fiamme libere o oggetti pericolosi alla portata del bambino.- Devono essere utilizzate solo parti di ricambio fornite o consigliate dal produttore / distributore.- AVVERTENZA Non utilizzare la copertura della pioggia (se presente) su un prodotto senza un cappuccio o parasole che può sostenere esso. Usare sempre il parapioggia solo sotto supervisione di un adulto. Non utilizzare il parapioggia in casa e controllare il bambino; non parcheggiare il veicolo vicino alla fonte di calore e tenere ben lontano dalle sigarette accese. Assicurarsi che il parapioggia non interferisca con le parti in movimento del carrello / passeggino. Rimuovere sempre il parapioggia prima di piegare il vostro carrozzino / passeggino.- ATTENZIONE Questo prodotto non è adatto per correre o pattinare.- Applicare sempre il freno quando si carico o scarica il bambino.- Non aggiungere altri materassi.
COMPONENTI DEL PRODOTTO Controllare il contenuto della confezione.-Comodo: Cestino, 2 ruote posteriori con freno ingranaggio, barra ruota posteriore, cavalletto per il posizionamento, 2 ruote anteriori, maniglia solida.
ISTRUZIONI1 APERTURA: Prima di aprire il telaio, rimuovere (senza l'utilizzo lame) qualsiasi oggetto d’imballo. Tenere la parte superiore del manico e fare clic sulla maniglia fino a quando il telaio è completa-mente aperto (fig_a). Telaio aperto (fig_b).Questo telaio è correttamente aperto quando l'attacco sulla base scatta in posizione, come mostrato. ATTENZIONE: Quando si colloca la sede sul telaio, premere la sella verso il basso per assicurarsi che si inneschi in modo sicuro sulla base.2 Montaggio delle ruote: Slot montanti nella traversa ruota posteriore (fig_a), assicurandosi che sia rivolta nella direzione giusta, quindi spingere le ruote posteriori e assicurarsi che non scattano in posizione (fig_b). Per montare le ruote anteriori, inserirle nei montanti fino a quando non si bloccano in posizione (fig_c).3 REGOLAZIONE DEL MANICO PRINCIPALE: Per competere l'operazione, premere il pulsante sulla maniglia (fig_a) per assicurare la maniglia spinge o tirare fino a quando non scatta in posizione.4 MONTAGGIO DEL CESTELLO: se abbassata, sollevare il tubo cestello la posizione orizzontale. Premere i pulsanti sotto il tubo cestello (fig_a) e rimuoverlo (fig_b). Infilare la molla rivolta verso il basso (fig_c), e fare clic in posizione. Fissare il carrello per i due pulsanti nella parte anteriore (fig_d).5 Sul retro, scivolare gli slot cestino sopra i tasti superiori (fig_e), scivolano le fessure sui pulsanti inferiori (fig_f). ATTENZIONE: Assicurarsi che gli occhielli posteriori della borsa cestellosono completamente agganciati i "bottoni" sulla barra posteriore. Altrimenti, il cestello non sarà in grado di contenere oggetti.6 RUOTE ANTERIORI FISSE O GIREVOLI: Per fermare la rotazione delle ruote anteriori, ruotare la leva in senso orario per il lucchetto chiuso (fig_a); per liberare le ruote, ruotare la leva in senso orario per lucchetto poi sbloccato (fig_b). Su terreni difficili, si consiglia di utilizzare ruote fisse.7 FRENO: premere la leva per azionare il freno sul telaio e sollevarlo per rilasciare il freno.8 CHIUSURA DEL TELAIO: Il telaio può essere piegato senza il sedile, con il sedile di fronte la persona che spinge (reclinare lo schienale prima di ripiegare) o con il sedile rivolto in avanti. Per piegare il passeggino, è preferibile impostare le ruote anteriori alla loro posizione fissa e chiudere la cappotta (se aperta). Clicca sul manico come mostrato in figura (fig_a) e sollevare le leve fino allo scatto.9. Quando il telaio è chiuso, porre i freni ed abbassare il cavalletto.10. Per una maggiore compattezza, è possibile rimuovere le ruote.Per rimuovere le ruote posteriori: tirare il perno verso l'esterno e rimuovere le ruote come mostrato in figura (fig_a).Per rimuovere le ruote anteriori: premere la scheda come mostrato, e rimuovere la ruota (fig_b).TRASPORTO: Il passeggino può essere trasportato comodamente bloccando le ruote anteriori e afferrando la maniglia principale (fig_c).
SISTEMA DI COMODO12 COMODO consente di collegare l'unità passeggino, il seggiolino auto o la navicella alla base del telaio in un unico passaggio rapido.Posizionare sulla base al punto di allineamento e premere con entrambe le mani fino a quando non scatta in posizione. Applicare sempre il freno telaio o passeggino prima di collegare e la rimozione dei prodotti (consultare i rispettivi manuali di istruzioni).Verificare che l'unità di trasporto bambino sia collegato correttamente.
PULIZIA E MANUTENZIONEMANUTENZIONE DEL PRODOTTO: Proteggere dagli agenti atmosferici: acqua, pioggia o neve; la prolungata esposizione continua alla luce solare può dare luogo a cambiamenti di colore di vari materiali diversi; conservare il prodotto in un luogo asciutto.
PULIZIA DEL TELAIO: periodicamente pulire tutte le parti in plastica con un panno umido. Non utilizzare prodotti di pulizia a solvente o simili; mantenere tutte le parti metalliche asciugare per prevenire la ruggine; tenere pulite le parti in movimento (meccanismi di adeguamento, i meccanismi di bloccaggio, ruote ...) e rimuovere polvere e sabbia e, se necessario, lubrificare con olio leggero per macchinari.PULIZIA DEL PARAPIOGGIA: Lavare con acqua tiepida, spugna e sapone; non utilizzare detergenti.PULIZIA PARTI IN TESSUTO: Spazzolare le parti in tessuto per rimuovere la polvere e lavare a mano, ad una temperatura massima di 30 ° C; non strizzare; non usare candeggina, non stirare; non lavare a secco; non applicare smacchiatori a base di solventi e non lavare a secco in asciugatrice.Ci sono 5 simboli alla fine di questo manuale.