command|8 guide - digidesignakarchive.digidesign.com/support/docs/command8_guide.pdf · command|8...
TRANSCRIPT
Command|8™
Version 7.0

Copyright
© 2006 Digidesign, a division of Avid Technology, Inc. All rights reserved. This guide may not be duplicated in whole or in part without the express written consent of Digidesign.
Avid, Command|8, Digidesign, PRE, Pro Tools, Pro Tools|HD, Pro Tools LE, and Pro Tools M-Powered are either trademarks or registered trademarks of Avid Technology, Inc. in the US and other countries. All other trademarks contained herein are the property of their respective owners.
Product features, specifications, system requirements, and availability are subject to change without notice.
PN 9320-17767-00 REV A 03/06
WarningThis product contains chemicals, including lead, known to the State of California to cause cancer and birth defects or other reproductive harm. Wash hands after handling.
DECLARATION OF CONFORMITY
We Digidesign,
2001 Junipero Serra Boulevard, Suite 200
Daly City, California 94014-3886, USA
650-731-6300
declare under our sole responsibility that the product
Command|8
complies with Part 15 of FCC Rules.
Operation is subject to the following two conditions: (1) this device may not cause harmful interference, and (2) this device must accept any interference received, including interference that may cause undesired operation.
NOTE: This equipment has been tested and found to comply with the limits for a Class B digital device, pursuant to Part 15 of the FCC Rules. These limits are designed to provide reasonable protection against harmful interference in a residential installation. This equipment generates, uses, and can radiate radio frequency energy and, if not installed and used in accordance with the instructions, may cause harmful interference to radio communications. However, there is no guarantee that interference will not occur in a particular installation. If this equipment does cause harmful interference to radio or television reception, which can be determined by turning the equipment off and on, the user is encouraged to try and correct the interference by one or more of the following measures:• Reorient or locate the receiving antenna.• Increase the separation between the equipment and
receiver.
• Connect the equipment into an outlet on a circuit different from that to which the receiver is connected.
• Consult the dealer or an experienced radio/TV technician for help.
FOR OFFICE AND HOME USE
Any modifications to the unit, unless expressly approved by Digidesign, could void the user's authority to operate the equipment.
Canadian Compliance Statement
This Class B digital apparatus complies with Canadian ICES-003
Cet appareil numérique de la classe B est conforme à la norme NMB-003 du Canada
Australian Compliance
European Compliance
Tested To Comply
With FCC Standards
Command|8
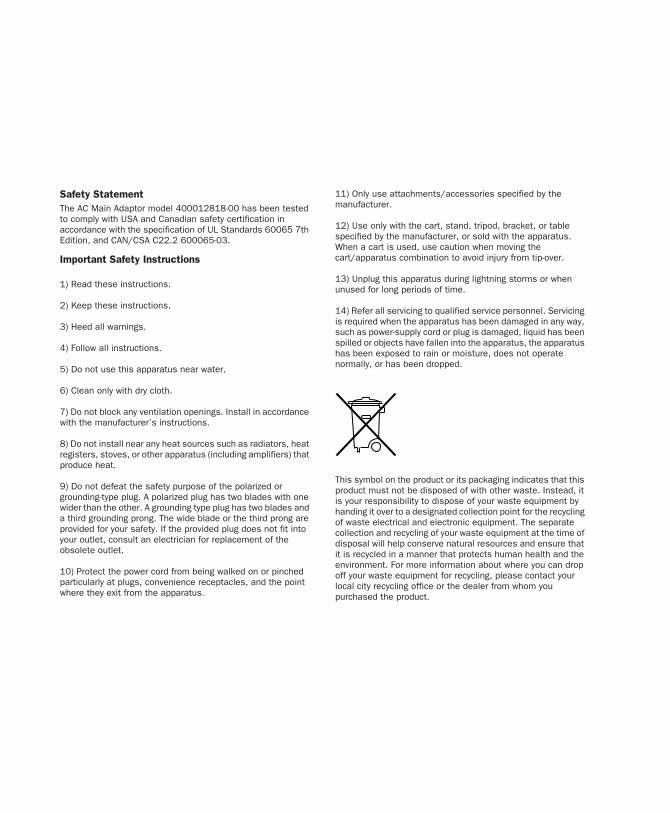
Safety StatementThe AC Main Adaptor model 400012818-00 has been tested to comply with USA and Canadian safety certification in accordance with the specification of UL Standards 60065 7th Edition, and CAN/CSA C22.2 600065-03.
Important Safety Instructions
1) Read these instructions.
2) Keep these instructions.
3) Heed all warnings.
4) Follow all instructions.
5) Do not use this apparatus near water.
6) Clean only with dry cloth.
7) Do not block any ventilation openings. Install in accordance with the manufacturer’s instructions.
8) Do not install near any heat sources such as radiators, heat registers, stoves, or other apparatus (including amplifiers) that produce heat.
9) Do not defeat the safety purpose of the polarized or grounding-type plug. A polarized plug has two blades with one wider than the other. A grounding type plug has two blades and a third grounding prong. The wide blade or the third prong are provided for your safety. If the provided plug does not fit into your outlet, consult an electrician for replacement of the obsolete outlet.
10) Protect the power cord from being walked on or pinched particularly at plugs, convenience receptacles, and the point where they exit from the apparatus.
11) Only use attachments/accessories specified by the manufacturer.
12) Use only with the cart, stand, tripod, bracket, or table specified by the manufacturer, or sold with the apparatus. When a cart is used, use caution when moving the cart/apparatus combination to avoid injury from tip-over.
13) Unplug this apparatus during lightning storms or when unused for long periods of time.
14) Refer all servicing to qualified service personnel. Servicing is required when the apparatus has been damaged in any way, such as power-supply cord or plug is damaged, liquid has been spilled or objects have fallen into the apparatus, the apparatus has been exposed to rain or moisture, does not operate normally, or has been dropped.
This symbol on the product or its packaging indicates that this product must not be disposed of with other waste. Instead, it is your responsibility to dispose of your waste equipment by handing it over to a designated collection point for the recycling of waste electrical and electronic equipment. The separate collection and recycling of your waste equipment at the time of disposal will help conserve natural resources and ensure that it is recycled in a manner that protects human health and the environment. For more information about where you can drop off your waste equipment for recycling, please contact your local city recycling office or the dealer from whom you purchased the product.


contents
Chapter 1. Introduction . . . . . . . . . . . . . . . . . . . . . . . . . . . . . . . . . . . . . . . . . . . . . . . . . . . . . . 1
Command|8 Features . . . . . . . . . . . . . . . . . . . . . . . . . . . . . . . . . . . . . . . . . . . . . . . . . . . . . 1
Command|8 Components . . . . . . . . . . . . . . . . . . . . . . . . . . . . . . . . . . . . . . . . . . . . . . . . . . 1
System Requirements and Compatibility . . . . . . . . . . . . . . . . . . . . . . . . . . . . . . . . . . . . . . . . 2
Digidesign Registration . . . . . . . . . . . . . . . . . . . . . . . . . . . . . . . . . . . . . . . . . . . . . . . . . . . . 2
About www.digidesign.com . . . . . . . . . . . . . . . . . . . . . . . . . . . . . . . . . . . . . . . . . . . . . . . . . 2
MIDI Control Surface Terms . . . . . . . . . . . . . . . . . . . . . . . . . . . . . . . . . . . . . . . . . . . . . . . . . 3
About This Guide. . . . . . . . . . . . . . . . . . . . . . . . . . . . . . . . . . . . . . . . . . . . . . . . . . . . . . . . . 3
Chapter 2. Installing and Configuring Command|8 . . . . . . . . . . . . . . . . . . . . . . . . . . . . . . 5
Before You Begin . . . . . . . . . . . . . . . . . . . . . . . . . . . . . . . . . . . . . . . . . . . . . . . . . . . . . . . . 5
Installation Guidelines . . . . . . . . . . . . . . . . . . . . . . . . . . . . . . . . . . . . . . . . . . . . . . . . . . . . . 5
Example Setups . . . . . . . . . . . . . . . . . . . . . . . . . . . . . . . . . . . . . . . . . . . . . . . . . . . . . . . . . 6
Command|8 Back Panel . . . . . . . . . . . . . . . . . . . . . . . . . . . . . . . . . . . . . . . . . . . . . . . . . . . 8
Connecting Command|8 to Pro Tools and Your Computer. . . . . . . . . . . . . . . . . . . . . . . . . . . . 8
Installing Software for Command|8 . . . . . . . . . . . . . . . . . . . . . . . . . . . . . . . . . . . . . . . . . . . 9
Connecting Analog Audio for Monitoring . . . . . . . . . . . . . . . . . . . . . . . . . . . . . . . . . . . . . . . 11
Connecting a Footswitch . . . . . . . . . . . . . . . . . . . . . . . . . . . . . . . . . . . . . . . . . . . . . . . . . . 12
Connecting MIDI Devices . . . . . . . . . . . . . . . . . . . . . . . . . . . . . . . . . . . . . . . . . . . . . . . . . . 12
Configuring MIDI . . . . . . . . . . . . . . . . . . . . . . . . . . . . . . . . . . . . . . . . . . . . . . . . . . . . . . . . 13
Enabling Command|8 in Pro Tools . . . . . . . . . . . . . . . . . . . . . . . . . . . . . . . . . . . . . . . . . . . 14
Communication Test . . . . . . . . . . . . . . . . . . . . . . . . . . . . . . . . . . . . . . . . . . . . . . . . . . . . . 16
Troubleshooting . . . . . . . . . . . . . . . . . . . . . . . . . . . . . . . . . . . . . . . . . . . . . . . . . . . . . . . . 17
Chapter 3. Command|8 Overview. . . . . . . . . . . . . . . . . . . . . . . . . . . . . . . . . . . . . . . . . . . . . 19
Command|8 Operating Modes . . . . . . . . . . . . . . . . . . . . . . . . . . . . . . . . . . . . . . . . . . . . . . 19
Command|8 Control Surface . . . . . . . . . . . . . . . . . . . . . . . . . . . . . . . . . . . . . . . . . . . . . . . 20
LCD Display . . . . . . . . . . . . . . . . . . . . . . . . . . . . . . . . . . . . . . . . . . . . . . . . . . . . . . . . . . . 21
Fader Strips . . . . . . . . . . . . . . . . . . . . . . . . . . . . . . . . . . . . . . . . . . . . . . . . . . . . . . . . . . . 22
Contents v
vi
Console and Channel View Controls for Pan, Sends, and Inserts . . . . . . . . . . . . . . . . . . . . . . 24
Transport, Navigation, and Zoom Controls. . . . . . . . . . . . . . . . . . . . . . . . . . . . . . . . . . . . . . 27
Control Room Monitor Controls . . . . . . . . . . . . . . . . . . . . . . . . . . . . . . . . . . . . . . . . . . . . . 29
Modifier Switches . . . . . . . . . . . . . . . . . . . . . . . . . . . . . . . . . . . . . . . . . . . . . . . . . . . . . . . 29
Stand-Alone Switch. . . . . . . . . . . . . . . . . . . . . . . . . . . . . . . . . . . . . . . . . . . . . . . . . . . . . . 29
USB and MIDI Activity LEDs . . . . . . . . . . . . . . . . . . . . . . . . . . . . . . . . . . . . . . . . . . . . . . . . 30
Chapter 4. Using Command|8 with Pro Tools . . . . . . . . . . . . . . . . . . . . . . . . . . . . . . . . . 31
Controlling the Transport. . . . . . . . . . . . . . . . . . . . . . . . . . . . . . . . . . . . . . . . . . . . . . . . . . 31
Undo and Redo . . . . . . . . . . . . . . . . . . . . . . . . . . . . . . . . . . . . . . . . . . . . . . . . . . . . . . . . 31
Navigating . . . . . . . . . . . . . . . . . . . . . . . . . . . . . . . . . . . . . . . . . . . . . . . . . . . . . . . . . . . . 32
Recording . . . . . . . . . . . . . . . . . . . . . . . . . . . . . . . . . . . . . . . . . . . . . . . . . . . . . . . . . . . . 33
Sends . . . . . . . . . . . . . . . . . . . . . . . . . . . . . . . . . . . . . . . . . . . . . . . . . . . . . . . . . . . . . . . 38
Plug-ins and Inserts . . . . . . . . . . . . . . . . . . . . . . . . . . . . . . . . . . . . . . . . . . . . . . . . . . . . . 39
Automation Functions. . . . . . . . . . . . . . . . . . . . . . . . . . . . . . . . . . . . . . . . . . . . . . . . . . . . 43
Software Synths and Rewire Applications . . . . . . . . . . . . . . . . . . . . . . . . . . . . . . . . . . . . . . 43
Chapter 5. Using Stand-Alone Mode. . . . . . . . . . . . . . . . . . . . . . . . . . . . . . . . . . . . . . . . . . 45
Overview of Stand-Alone Mode . . . . . . . . . . . . . . . . . . . . . . . . . . . . . . . . . . . . . . . . . . . . . 45
Stand-Alone Mode QuickStart . . . . . . . . . . . . . . . . . . . . . . . . . . . . . . . . . . . . . . . . . . . . . . 46
Selecting Stand-Alone Mode . . . . . . . . . . . . . . . . . . . . . . . . . . . . . . . . . . . . . . . . . . . . . . . 46
Mapping . . . . . . . . . . . . . . . . . . . . . . . . . . . . . . . . . . . . . . . . . . . . . . . . . . . . . . . . . . . . . 47
Editing MIDI Maps . . . . . . . . . . . . . . . . . . . . . . . . . . . . . . . . . . . . . . . . . . . . . . . . . . . . . . 49
Presets to Save and Recall Maps . . . . . . . . . . . . . . . . . . . . . . . . . . . . . . . . . . . . . . . . . . . . 51
Appendix A. Utility Functions. . . . . . . . . . . . . . . . . . . . . . . . . . . . . . . . . . . . . . . . . . . . . . . . 55
Accessing Utility Mode . . . . . . . . . . . . . . . . . . . . . . . . . . . . . . . . . . . . . . . . . . . . . . . . . . . 55
Fader Tests . . . . . . . . . . . . . . . . . . . . . . . . . . . . . . . . . . . . . . . . . . . . . . . . . . . . . . . . . . . 56
LED Tests . . . . . . . . . . . . . . . . . . . . . . . . . . . . . . . . . . . . . . . . . . . . . . . . . . . . . . . . . . . . 56
LCD Display Test . . . . . . . . . . . . . . . . . . . . . . . . . . . . . . . . . . . . . . . . . . . . . . . . . . . . . . . 57
Switch Test . . . . . . . . . . . . . . . . . . . . . . . . . . . . . . . . . . . . . . . . . . . . . . . . . . . . . . . . . . . 57
Encoder Test . . . . . . . . . . . . . . . . . . . . . . . . . . . . . . . . . . . . . . . . . . . . . . . . . . . . . . . . . . 57
Index . . . . . . . . . . . . . . . . . . . . . . . . . . . . . . . . . . . . . . . . . . . . . . . . . . . . . . . . . . . . . . . . . . . . . 59
Command|8 Guide

chapter 1
Introduction
Welcome to the Command|8™ control surface, developed in collaboration between Digide-sign® and Focusrite. Command|8 is a compact and flexible control surface for Pro Tools|HD®, Pro Tools LE™, or Pro Tools M-Powered™ sys-tems, and supported Avid® systems.
Command|8 FeaturesSome of the main features of Command|8 in-clude:
• Eight fader strips, each featuring a motorized, touch-sensitive fader, rotary encoder, LEDs, and Solo, Mute, and Channel Select switches
• Analog monitoring section with the following features:
• Output and level control for mains and headphones
• Two pairs of analog inputs, one for the main mix from Pro Tools, one for alternate sources
• One MIDI In port and two MIDI Out ports providing 16 channels of MIDI input, and 32 channels of MIDI output
• USB port for direct USB MIDI communication with Pro Tools
• Large, bright LCD for data display
• 1/4-inch Punch In port for footswitch control of recording
• Transport controls and mode switches
• Windows switches for Pro Tools display
• Navigation and Zoom controls
• Tactile control of track volume, pan, send level, send pan, and record status, as well as PRE™ (Digidesign mic preamplifier) gain
• Fast and convenient access to sends, inserts, plug-in pages, pan settings, and other track functions
• Five Function keys to access Utility, Fader Mute, and MIDI mapping functions
• AC power supply designed specifically for Command|8
• Stand-alone mode with save and recall of up to 8 snapshots
• Allows control of any device that supports MIDI Continuous Controller messages
• Allows use of custom MIDI mapping
Command|8 ComponentsItems included with Command|8 are:
• Command|8 control surface
• USB cable
• Power adapter
• Command|8 Guide
• Registration Information Card
Chapter 1: Introduction 1
2
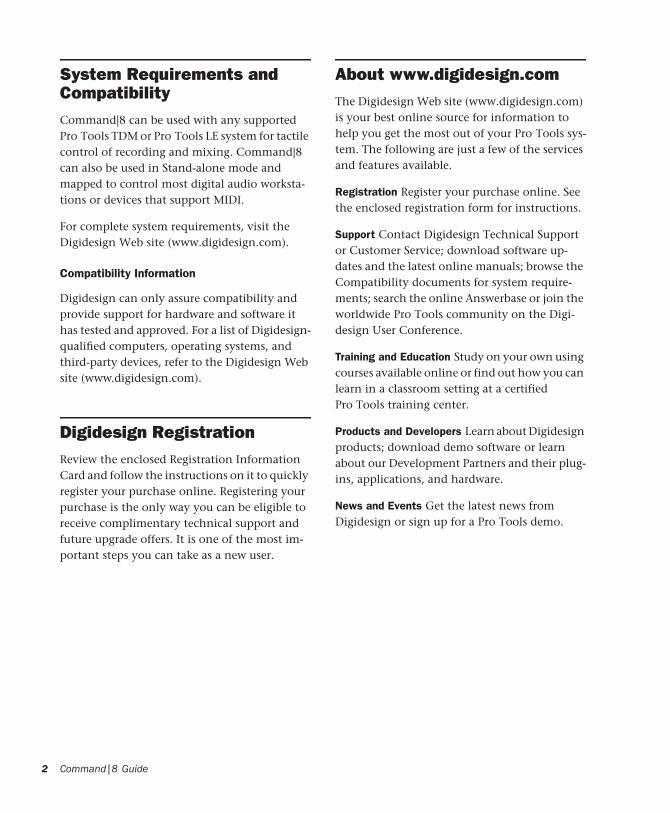
System Requirements and CompatibilityCommand|8 can be used with any supported Pro Tools TDM or Pro Tools LE system for tactile control of recording and mixing. Command|8 can also be used in Stand-alone mode and mapped to control most digital audio worksta-tions or devices that support MIDI.
For complete system requirements, visit the Digidesign Web site (www.digidesign.com).
Compatibility Information
Digidesign can only assure compatibility and provide support for hardware and software it has tested and approved. For a list of Digidesign-qualified computers, operating systems, and third-party devices, refer to the Digidesign Web site (www.digidesign.com).
Digidesign RegistrationReview the enclosed Registration Information Card and follow the instructions on it to quickly register your purchase online. Registering your purchase is the only way you can be eligible to receive complimentary technical support and future upgrade offers. It is one of the most im-portant steps you can take as a new user.
Command|8 Guide
About www.digidesign.comThe Digidesign Web site (www.digidesign.com) is your best online source for information to help you get the most out of your Pro Tools sys-tem. The following are just a few of the services and features available.
Registration Register your purchase online. See the enclosed registration form for instructions.
Support Contact Digidesign Technical Support or Customer Service; download software up-dates and the latest online manuals; browse the Compatibility documents for system require-ments; search the online Answerbase or join the worldwide Pro Tools community on the Digi-design User Conference.
Training and Education Study on your own using courses available online or find out how you can learn in a classroom setting at a certified Pro Tools training center.
Products and Developers Learn about Digidesign products; download demo software or learn about our Development Partners and their plug-ins, applications, and hardware.
News and Events Get the latest news from Digidesign or sign up for a Pro Tools demo.

MIDI Control Surface TermsHere are a few terms that apply to the use of a MIDI control surface with Pro Tools.
Bank A group of similar controls (such as faders, rotary controls, or switches) that are arranged in discrete channel strips. With Command|8, you can operate one bank of controls at a time.
Bank Size or Bank Width Corresponds to the number of fader strips on your MIDI control sur-face. Command|8 has eight fader strips.
Bank Swap The process by which you switch control from one on-screen bank of channel strip faders to another.
Global Controls Controls that perform single functions that never change. For example, the transport switches affect all tracks, and do not change when you switch banks.
Control Surface Focus When you select a track, send, plug-in, or output window for editing on a control surface, it becomes the control surface fo-cus. This is indicated by a colored outline sur-rounding the top panel of the window in Pro Tools.
About This GuideThis guide assumes you have already installed Pro Tools, and that you already have an under-standing of its features and operating conven-tions as explained in the Pro Tools Reference Guide.
Conventions Used in This Guide
This guide uses the following conventions to in-dicate Pro Tools on-screen menu choices and key commands::
Command|8 includes a Modifiers section that provides the following modifier key equiva-lents:
Convention Action
File > Save Choose Save from the File menu
Control+N Hold down the Control key and press the N key
Control-click Hold down the Control key and click the mouse button
Right-click (Windows) Click with the right mouse button
Command|8 Modifier Modifier Key Equivalents
Windows Mac
SHIFT/ADD Shift Shift
OPT(ALT)/ALL Alt Option
�/(CTL) Control Command
CTL/CLUTCH Start Control
Chapter 1: Introduction 3

4
The following symbols are used to highlight im-portant information:
User Tips are helpful hints for getting the most out of Command|8.
Important Notices include information that could affect the performance of Command|8 hardware or Pro Tools session data.
Shortcuts show you useful keyboard or mouse shortcuts.
Cross References point to other related sec-tions in Digidesign guides.
Command|8 Guide

chapter 2
Installing and Configuring Command|8
Before You Begin
Before installing Command|8 for use with Pro Tools:
■ Make sure Pro Tools is correctly installed and operating. Pro Tools software includes drivers for Command|8, installed by default.
Installation GuidelinesPlace Command|8 on a flat surface near your computer monitor. Make sure not to block the back, sides, or front of Command|8 to maintain proper ventilation. If mounting Command|8 in studio furniture, be sure to leave adequate space around the vents at the back and front.
When installing Command|8, be aware of the following guidelines and options:
• Pro Tools does not support the use of more than one Command|8 at a time. Two or more Command|8 units cannot be enabled simulta-neously in Pro Tools.
• Command|8 must be the only MIDI control surface enabled within Pro Tools.
• Command|8 can be used in combination with non-MIDI control surfaces with some limita-tions. See “Command|8 with Other Control Surfaces” on page 7 for more information.
• Command|8 can also be used as a stand-alone MIDI control surface to control software syn-thesizers and Rewire applications, supported Avid systems, and any device that supports MIDI Continuous Controller (CC) communi-cation. See Chapter 5, “Using Stand-Alone Mode” for installation and operational in-structions.
Chapter 2: Installing and Configuring Command|8 5

6
Example Setups
Command|8 with Pro Tools
Figure 1 shows Command|8 connected for use with Pro Tools, acting as a control surface, MIDI inter-face, and monitor controller.
Command|8 Guide
Figure 1. Connecting Command|8 as a Pro Tools control surface, MIDI interface, and monitor controller
Speaker OutputsMIDI
Pro Tools
CD, DAT,
to Main Monitor Inputs
to Ext Source Inputs
Mini-Disc or other
Mix output
MIDI sound module
MIDI synthUSB to computer
Audio outputs to Pro Tools
Headphones
Main Monitors
inputsource
USB Connection The Command|8 USB port is connected to the host computer. This provides the communication necessary for Command|8 faders, encoders, and switches to control Pro Tools sessions (as well as compatible Rewire applications running within the Pro Tools mix environment).
MIDI Connections A MIDI keyboard is connected to the Command|8 MIDI In and MIDI Out ports, and a sound module is connected to the second MIDI Out port. You can use the three MIDI ports to integrate a MIDI keyboard or other controller, sound module, or sampler into your Pro Tools system.
Audio Connections Analog audio from Pro Tools is sent from an audio interface (such as a Pro Tools|HD I/O, Digi 002 Rack, or Mbox 2) to the Command|8 Main Monitor inputs. The Command|8 Speaker Outputs are connected to powered monitors for control room monitoring. An additional stereo source is also connected to the Command|8 External Source Inputs. The Control Room and Headphone controls let you select between input sources (Main or External), with control room Level, Mono, and Mute con-trol. The Headphone output follows the control room input source selection, with its own sepa-rate level control that only affects the top panel Headphone port.

Command|8 with Other Control Surfaces
Digi 002 and Command|8
When used as a MIDI control surface with a supported Digi 002 system, Command|8 faders function as additional faders (9–16). Figure 2 shows fader mapping when Command|8 is used with a Digi 002. (Plug-ins cannot be edited on Command|8 when used with a Digi 002.) You can use Command|8 for expanded fader control, or for remote transport control and monitoring.
ProControl or Control|24 and Command|8
Command|8 can be used simultaneously with ProControl or Control|24 as a remote transport control for isolation rooms, drum booths, and other locations, or for remote control of play and record func-tions. When used with ProControl or Control|24, Command|8 faders overlap (duplicate) the left-most eight faders currently banked on the larger control surface.
Figure 3 shows basic connections when adding Command|8 to a Control|24 system (connections for ProControl are similar).
Figure 2. Digi 002 and Command|8 fader mapping
CHANNEL VIEW
INSERT PAN/SENDDYNAMICSEQ
SEL SEL SEL SEL SEL SEL SEL SEL
PAGE MASTER BYPASSCONSOLE VIEW
REC
PAN SEND INSERT
ESC
UNDO STANDALONE
DISPLAYA
B
C
D
E
1394
MIDI
IN OUT1 OUT2
L R METER
ENTER
SAMPLE RATE
44.1 48 88.2 96
RECPLAYFFW STOPREWRTZ
MUTE
SOLO
MUTE
SOLO
MUTE
SOLO
MUTE
SOLO
MUTE
SOLO
MUTE
SOLO
MUTE
SOLO
MUTE
SOLOBANK
NUDGEZOOM
(UTILITY) F1
(NAMING) F2
(SNAPSHOT) F3
(FADER MUTE) F4
(FOCUS) F5
FLIP
MASTER FADERS
WINDOWS
PLUG-IN MIX EDIT
PLAY/ REC MODE
LOOP PLAY LOOP REC QUICK PUNCH
MODIFIERS
SHIFT/ADD
COMM/CTL/CLUTCH
OPTION/ALL
z
+6
0
-10
-15
-20
-30
-90
-40
-60
-5
+3
+6
0
-10
-15
-20
-30
-90
-40
-60
-5
+3
+6
0
-10
-15
-20
-30
-90
-40
-60
-5
+3
+6
0
-10
-15
-20
-30
-90
-40
-60
-5
+3
+6
0
-10
-15
-20
-30
-90
-40
-60
-5
+3
+6
0
-10
-15
-20
-30
-90
-40
-60
-5
+3
+6
0
-10
-15
-20
-30
-90
-40
-60
-5
+3
L R
IN
OUT
1 GAIN 2 GAIN 3 GAIN 4 GAIN
HEADPHONE
MONOALT SRCTO IN 7-8
ALT SRCTO MON
MUTE
LINE/ INST
MIC
MONITORLEVEL LEVEL
Faders 1–8 Faders 9–16
Digi 002 Command|8
Figure 3. Control|24-based Pro Tools system with Command|8 as a remote transport and monitor controller
USB tocomputer
Mic input
Alt or
Command|8 in vocal booth or other location
Control|24monitor outputs
Control Room Monitors
Chapter 2: Installing and Configuring Command|8 7

8
Command|8 Back PanelFigure 4 shows the Command|8 back panel connectors and switches.
Command|8 Guide
Figure 4. Command|8 back panel
In
Audio
USB
Power
Punch In
switch
MIDI
Out 1 Out 2Main Ext
+4/–10 switches
Power Socket
Outputs
Source
Monitor Inputs
Connecting Command|8 to Pro Tools and Your ComputerThis section lists the basic steps required to con-nect Command|8 to Pro Tools. Instructions for each step can be found later in this chapter.
Installing Command|8 for Pro Tools involves the following:
1 “Connecting AC Power” on page 9.
2 “Connecting to Your Computer” on page 9.
3 “Installing Software for Command|8” on page 9.
4 “Connecting Analog Audio for Monitoring” on page 11.
5 “Connecting a Footswitch” on page 12 (op-tional).
6 “Connecting MIDI Devices” on page 12.
7 “Configuring MIDI” on page 13.
8 “Enabling Command|8 in Pro Tools” on page 14.
For complete instructions to use Command|8 in stand-alone mode, see Chapter 5, “Using Stand-Alone Mode.”
Connecting AC Power
Connect power using the included external power supply and cable. Command|8 is not powered through its USB connection.
To connect power to Command|8:
1 Make sure the power switch is in the Off posi-tion (down).
2 Connect the threaded end of the included power supply cable to the Power socket on the Command|8 back panel. Ensure that the ring threads smoothly and seats securely on the socket.
3 Plug the power supply into an available AC power outlet.
The Command|8 power supply is available in three configurations (90– 120V for Japan and USA, 220–230V for Europe, and 220V for UK). If travelling or ordering a replace-ment unit, be sure to specify the country in which you plan to use Command|8.
Only use the included power supply cable to connect Command|8 power. Use of any other cable or power supply may damage your unit. Additional power supplies are available from your Digidesign dealer.
The Command|8 analog output section automatically mutes when you turn the unit on or off.
Connecting to Your Computer
Command|8 communicates with Pro Tools through a USB connection to the host com-puter. Command|8 does not require a powered USB connection. All power is supplied through its AC connection.
To connect the Command|8 to your computer:
1 Start up your computer, logging in as Admin-istrator.
2
Make sure Command|8 is powered on.
3
Connect one end of the included USB cable to the USB port on the back panel of Command|8.
4
Connect the other end of the USB cable to an available USB port on your computer.
5
When prompted to install software, see the in-stallation instructions that follow for your com-puter platform (Windows or Mac).
Installing Software for Command|8
Command|8 software is included on your Pro Tools Installer disc. This software is required to use Command|8 with Pro Tools.
No software installation is required to use Command|8 in stand-alone mode with Mac systems.
Chapter 2: Installing and Configuring Command|8 9
10
Windows Software for Command|8
The Pro Tools Installer includes the option “Command8 Controller and Driver.”
If you selected the Command|8 driver option when installing Pro Tools, all software required by Command|8 was installed automatically.
If you installed Pro Tools and did not select this option, use your Pro Tools Installer disc to in-stall the required Command|8 software. (See the Getting Started Guide that came with your Pro Tools system for complete instructions.)
To install Command|8 software on Windows:
1 Make sure you have already installed Pro Tools, including the Command|8 options, and restarted your computer.
2 Start Windows with Administrator privileges.
3 When the Found New Hardware Wizard ap-pears, leave the Found New Hardware Wizard di-alog open on-screen. Do not click Next.
4 Insert the Pro Tools Installer disc into your CD/DVD drive.
5 Launch the Pro Tools Installer, and choose to Modify the installed components.
6 Select the Command8 Controller and Driver option.
7 When prompted about driver signing, click Continue.
8 Follow the on-screen instructions to complete the installation.
9 Restart your computer.
Command|8 Guide
USB Ports and Command|8 Software
If you move your Command|8 USB cable to a different USB port on your computer, you must reinstall the Command|8 software.
Mac Software for Command|8
To install Command|8 software on Mac:
1
Start up your computer using your Adminis-trator account.
2 Make sure the Command|8 personality file is installed (Applications/Digidesign /Pro Tools/Controllers/Command8).
3 If the Command|8 personality file is not in-stalled, do the following:
• Insert the Pro Tools Installer into your CD/DVD drive and launch the Install Pro Tools application.
• Choose Custom Install and select the Con-trollers option to install all controller per-sonality files.
Firmware for Command|8
Command|8 can be updated for new features and capabilities by updating its firmware. In-structions for updating Command|8 firmware can be found in the Read Me document that ac-companies each release of updated firmware.
Check the Digidesign Web site (www.digide-sign.com) for updated Command|8 firmware, as well as download and installation instructions.
The Pro Tools Installer creates a Command8 folder in your Digidesign direc-tory. This folder contains copies of all the software you need to reinstall Command|8. Use the contents of this folder if your Pro Tools Installer is not available.
Connecting Analog Audio for MonitoringAnalog audio connections let you use Com-mand|8 for control room and headphone mon-itoring. Analog audio connections are not re-quired for Command|8 to control Pro Tools mixing functions.
Monitoring Overview
Command|8 provides the following analog au-dio connectors.
Input
• Two pairs of balanced, TRS inputs, labeled Main and Ext Source on the back panel of Command|8. Each input pair is switchable be-tween –10 dBV or +4 dBu operation.
Output
• Two channels of balanced, TRS output to con-nect to powered speakers, a monitor amplifier or other monitor equipment. Outputs are switchable between –10 dBV or +4 dBu.
• One stereo Headphone output, which mirrors the currently selected monitor input source (see “Control Room Monitor Controls” on page 29).
Input Connections
To monitor Pro Tools through Command|8:
1 Connect your Pro Tools stereo mix outputs (usually Outputs 1–2) to the Command|8 Main Left and Right monitor inputs on the back panel. The Main inputs are balanced, TRS in-puts.
The Command|8 analog audio features are for monitoring only. Command|8 is not an audio interface for Pro Tools systems.
2 Configure the Main inputs for –10 dBV or +4 dBu operation using the –10/+4 switch be-tween the Left and Right inputs.
To be able to monitor another stereo device through Command|8:
1 Connect the analog outputs of a CD, DAT, or other device to the Ext Source Left and Right in-puts on the back panel.
2 Configure the Ext Source inputs for –10 dBV or +4 dBu operation using the –10/+4 switch be-tween the Left and Right inputs.
Output Connections
To connect Command|8 to your monitoring system:
1 Be sure to mute, turn down, or power off your monitors or monitoring system.
2 On the Command|8 top surface, turn the Control Room Level knob all the way down.
3 Configure the Command|8 Main outputs for –10 dBV or +4 dBu operation using the –10/+4 switch between the two output ports on the back panel.
4 Connect the Main Left and Right outputs on the Command|8 back panel to the inputs of powered monitors, a monitor amplifier, or other monitor equipment.
The Command|8 analog output section automatically mutes when you turn the unit on or off.
Chapter 2: Installing and Configuring Command|8 11

12
Headphones
To connect headphones:
■ Connect a pair of headphones to the Head-phones port, located next to the Control Room section.
The Headphones Level knob controls head-phone level only. This Headphone output is de-signed to power a single pair of standard-quality headphones, and is not designed to drive pow-ered speakers or headphone distribution ampli-fiers.
Connecting a Footswitch (Optional)
The Punch In connector on the Command|8 back panel supports footswitch control of Track-Punch and QuickPunch audio punch-in and punch-out recording features. Both continuous on/continuous off and instantaneous on/off pedals with a 1/4-inch TRS connector are sup-ported.
To connect a footswitch:
■ Connect the footswitch jack to the Punch In connector.
Command|8 Guide
Connecting MIDI DevicesCommand|8 provides 16 channels of MIDI in-put and 32 channels of MIDI output through the MIDI IN 1, MIDI OUT 1, and MIDI OUT 2 connectors on the back panel. The connectors accept standard 5-pin MIDI cables.
Command|8 driver software, installed when you install Pro Tools (or stand-alone) software, is re-quired for MIDI communication to function. These drivers are recognized by MSS (Windows), and by AMS (Mac).
To connect MIDI devices to Command|8 for Pro Tools:
1 Using standard 5-pin MIDI cables, connect the MIDI Out port of a MIDI keyboard or other MIDI device to the MIDI In 1 port of your Com-mand|8, and connect the MIDI In port of your MIDI device or controller to the MIDI Out 1 port of your Command|8.
2 Connect MIDI Out 2 of Command|8 to the MIDI In port of an additional MIDI device (such as a sound module).
3 To monitor or record the audio output of your MIDI devices within Pro Tools, connect the au-dio outputs of your devices to available audio inputs on your Pro Tools audio interface.
USB MIDI Communication and Command|8 Operating Modes
When connected to Pro Tools through USB, Command|8 is recognized as a MIDI Control Surface and MIDI interface (the Command|8 MIDI connectors are available as MIDI In and Out ports).

Configuring MIDIAfter connecting Command|8 and installing its software, you may want to update your MIDI system. This may be necessary when using Com-mand|8 as both a control surface and as a MIDI interface.
Configuring MIDI Studio Setup(Windows Only)
On Windows systems, use MIDI Studio Setup to configure MIDI communication with Com-mand|8.
MSS automatically finds the MIDI ports on Command|8, and lets you specify a custom name for each port on Command|8 within the MIDI Studio Setup document.
To define a MIDI port on Command|8 with MIDI Studio Setup:
1 Choose Setup > MIDI > MIDI Studio in Pro Tools.
2 Click Create.
3 In the Instrument Name field, type a name for the MIDI port and press Enter.
4 If the MIDI Out of the device is connected to the MIDI In port of Command|8, choose “C|8 MIDI In” from the Input Port pop-up menu.
5 From the Output pop-up menu, choose the name of the output port (“C|8 MIDI Out1” or “C|8 MIDI Out2”) connected to the MIDI In of the device.
Do not assign any devices to the “C|8 Surface” port. This port is reserved for Command|8-to-Pro Tools control surface communication.
6 Enable the appropriate MIDI channels (1–16) for the Send Channels and Receive Channels options (These determine which channels send and receive MIDI.)
Configuring Audio MIDI Setup(Mac Only)
On Mac systems, use Audio MIDI Setup to check MIDI communication with Command|8.
To update AMS for Command|8:
1 Launch Audio MIDI Setup (located in Applica-tions/Utilities) or choose Setup > MIDI > MIDI Studio in Pro Tools.
2 Make sure that Command|8 is recognized, is online, and that its three ports are available in AMS.
3 Configure AMS for any devices attached to the Command|8 MIDI In and Out ports by connect-ing their device icons to the appropriate Com-mand|8 ports.
See the Getting Started Guide that came with your system for more information about MIDI Studio Setup.
Do not connect any AMS devices to Command|8 Port 1. Port 1 is reserved for Command|8-to-Pro Tools control surface communication.
Chapter 2: Installing and Configuring Command|8 13

14
The following shows an example AMS Setup for Command|8 and Pro Tools, with two MIDI de-vices attached to the back panel MIDI ports of the Command|8. Note how Command|8 port 1 is not assigned to any external devices.
The following table shows how AMS lists Com-mand|8 MIDI ports:
4 Save and close your updated AMS setup.
Command|8 port equivalents in AMS
AMS (in/out) Command|8 back panel ports
Port 1 none (reserved for control surface communication via USB MIDI)
Port 2 MIDI In 1, MIDI Out 1
Port 3 MIDI Out 2
See the Getting Started Guide that came with your system for more information about Audio MIDI Setup.
Command|8 Guide
Enabling Command|8 in Pro Tools
To enable Command|8 in Pro Tools:
1 Make sure your computer, Pro Tools hardware, and Command|8 are powered on and operating correctly.
2 Launch Pro Tools.
3 Choose Setup > Peripherals and click the MIDI Controllers tab.
4 Choose “Command8” from the Type pop-up menu.
5 Choose C|8 Surface (Windows) or Port 1 (Mac) in the Receive From and Send To selectors.
Choosing the a port (Windows)
Choosing a port (Mac)
6 If Command|8 choices are not available, click Cancel, then check all USB, MIDI, and power connections to and from Command|8. Make sure all software is installed and try again.
7 Click OK.
Configuring Command|8 MIDI Interface Connections
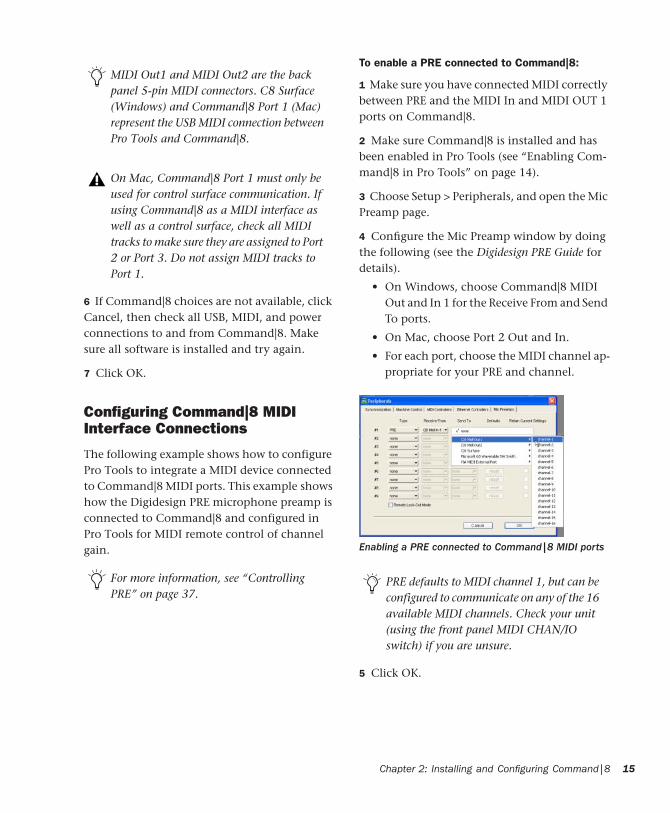
The following example shows how to configure Pro Tools to integrate a MIDI device connected to Command|8 MIDI ports. This example shows how the Digidesign PRE microphone preamp is connected to Command|8 and configured in Pro Tools for MIDI remote control of channel gain.
MIDI Out1 and MIDI Out2 are the back panel 5-pin MIDI connectors. C8 Surface (Windows) and Command|8 Port 1 (Mac) represent the USB MIDI connection between Pro Tools and Command|8.
On Mac, Command|8 Port 1 must only be used for control surface communication. If using Command|8 as a MIDI interface as well as a control surface, check all MIDI tracks to make sure they are assigned to Port 2 or Port 3. Do not assign MIDI tracks to Port 1.
For more information, see “Controlling PRE” on page 37.
To enable a PRE connected to Command|8:
1 Make sure you have connected MIDI correctly between PRE and the MIDI In and MIDI OUT 1 ports on Command|8.
2 Make sure Command|8 is installed and has been enabled in Pro Tools (see “Enabling Com-mand|8 in Pro Tools” on page 14).
3 Choose Setup > Peripherals, and open the Mic Preamp page.
4 Configure the Mic Preamp window by doing the following (see the Digidesign PRE Guide for details).
• On Windows, choose Command|8 MIDI Out and In 1 for the Receive From and Send To ports.
• On Mac, choose Port 2 Out and In.
• For each port, choose the MIDI channel ap-propriate for your PRE and channel.
5 Click OK.
Enabling a PRE connected to Command|8 MIDI ports
PRE defaults to MIDI channel 1, but can be configured to communicate on any of the 16 available MIDI channels. Check your unit (using the front panel MIDI CHAN/IO switch) if you are unsure.
Chapter 2: Installing and Configuring Command|8 15

16
Enabling Input Devices
You must enable the MIDI control surface as an input device in Pro Tools.
To enable an input device:
1 Choose Setup > MIDI > Input Devices.
2 Select the Command|8 MIDI control surface.
3 Click OK.
If you want to prevent control surface MIDI data from reaching Pro Tools, you can disable the control surface as an input device.
If Command|8 is not listed, check that it is still enabled (see “Enabling Command|8 in Pro Tools” on page 14).
For more information on recording MIDI and enabling input devices, see the Pro Tools Reference Guide.
Command|8 Guide
Communication Test
To test Command|8 communication with Pro Tools:
1 Make sure Command|8 is enabled and recog-nized by Pro Tools (see “Enabling Command|8 in Pro Tools” on page 14).
2 Open a Pro Tools session.
3 Make sure the Control Room LEVEL knob is turned all the way down.
4 Press PLAY on Command|8. Pro Tools starts playing.
5 Move a fader or knob on Command|8. The corresponding on-screen control should move.
To set basic Pro Tools monitoring levels:
1 While still playing back, make sure the Ext Sources switch is not lit (not enabled) in the Control Room monitor section.
2 Turn the Control Room LEVEL or Headphone LEVEL to a desirable listening level.
3 Continue adjusting levels, and press STOP to stop playback.

TroubleshootingIf your system does not seem to be responding correctly, check all MIDI connections and set-tings. If there is still a problem, repeat the instal-lation and configuration steps.
Once enabled in the Peripherals dialog, Com-mand|8 will be available every time you launch Pro Tools until you deselect it in the MIDI Con-trol Surfaces window, or communication is lost.
Lost Communication
To re-establish communication, repeat the in-structions in “Enabling Command|8 in Pro Tools” on page 14. If problems persist, check your MIDI configuration (see “Configur-ing MIDI” on page 13).
Lost Communication after Reconnecting Command|8
On Windows, you must reinstall the Com-mand|8 software if you move Command|8 to a different USB port. The software installation only installs software to the USB port to which the Command|8 is connected. If you move Command|8 to a different port and Pro Tools cannot communicate, reinstall software and try again (see “Installing Software for Command|8” on page 9).
Incomplete or Erratic Communication
If Command|8 seems to be communicating in-consistently, or incompletely, try the following.
To refresh and reinitialize Command|8 in Pro Tools:
1 Choose Setup > Peripherals and click the MIDI Controllers tab.
2 In the Device selector, choose None and click OK.
3 On Command|8, make sure the Standalone switch is completely off (not flashing or lit).
4 Choose Setup > Peripherals and click the MIDI Controllers tab, and repeat the steps to enable Command|8 in Pro Tools (see “Enabling Com-mand|8 in Pro Tools” on page 14).
Chapter 2: Installing and Configuring Command|8 17

18
Command|8 Guide
chapter 3
Command|8 Overview
This chapter introduces the Command|8 con-trol surface and its main control sections, and describes the Command|8 operating modes.
Command|8 Operating ModesWhen powered on, Command|8 enters Standby mode. Command|8 also has three operating modes: Pro Tools mode, Avid mode, and Stand-alone mode.
Standby Mode
Command|8 enters Standby mode when it is first powered on, waiting for you to either launch Pro Tools (or a supported Avid system) or enter Stand-alone mode.
Pro Tools Mode
When connected and powered on, Command|8 enters Pro Tools mode whenever you launch Pro Tools. With a session open while in Pro Tools mode, Command|8 faders, transport switches, rotary knobs, and switches control the corresponding elements in Pro Tools. Com-mand|8 MIDI ports can be used as you would those on a standard MIDI interface.
Avid Mode
When connected and powered on, Command|8 enters Avid mode whenever you launch a sup-ported version of Avid Symphony, Avid Media Composer, Avid Xpress, or Avid Xpress Pro. Faders automatically map to the Au-tomation Gain Tool channels 1–8; Mute switches map to Track On controls; Solo maps directly to solo (Automation Gain Tool); Chan-nel Select maps to track selection (Automation Gain Tool); and the Channel Mode switches map to track Snap Record. See your Avid docu-mentation for more information on these fea-tures.
Stand-Alone Mode
With Command|8 in Stand-alone mode, the unit becomes a MIDI control surface, MIDI in-terface, and analog monitoring controller that operates independently from Pro Tools.
Command|8 can be toggled between Pro Tools mode or Avid mode and Stand-alone modes at any time, providing tactile control of Pro Tools as well as software synthesizers, Rewire applica-tions, and other devices in use in your sessions.
For more information, see Chapter 5, “Us-ing Stand-Alone Mode.”
Chapter 3: Command|8 Overview 19
20
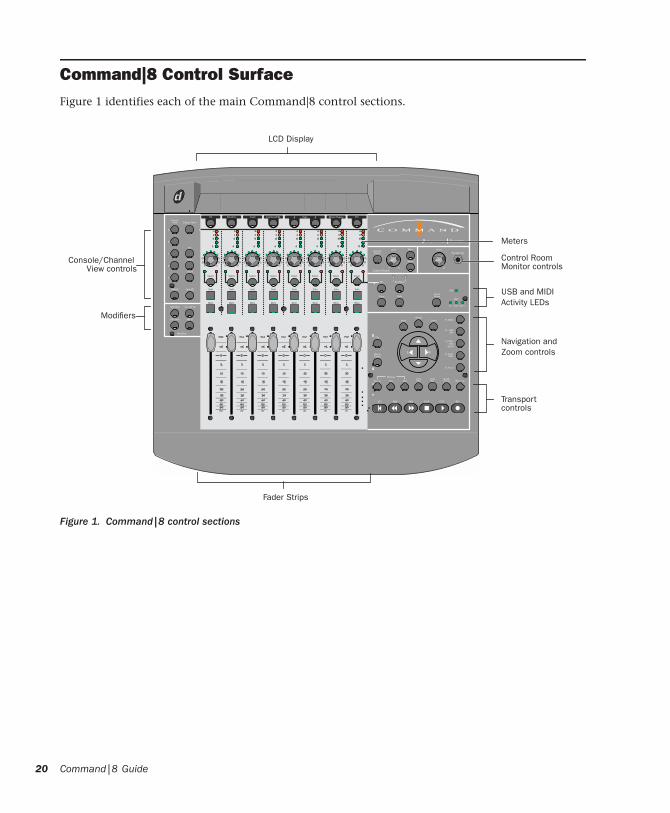
Command|8 Control SurfaceFigure 1 identifies each of the main Command|8 control sections.
Command|8 Guide
Figure 1. Command|8 control sections
Fader Strips
Transport
Navigation and
Control Room
USB and MIDIActivity LEDs
Console/Channel
Modifiers
Zoom controls
Meters
View controls
LCD Display
Monitor controls
controls

LCD DisplayThe LCD is a large, two-row display that shows up to six characters per fader strip. The LCD dis-plays track names, inserts, sends, parameter names, values, session time, and text messages.
The LCD displays track, insert, send, and other parameters depending on the current view, as se-lected by the Channel/Console switches.
Views in Pro Tools Mode
When Command|8 is used with Pro Tools, many of its controls perform more than one function, depending on which of three primary views you are in: Home View, Console View or Channel View.
Home View
Home View is the default view in Pro Tools that you see when you first open a session. Home view is functionally identical to Console View.
In Home view, track names are shown in the lower row of displays, and Pan controls are shown in the upper row of displays.
Console View
Command|8 is in Console View when any of the Console View selectors (Pan, Send, or Insert) is lit in the Console View area.
Console View lets you toggle Command|8 to show pan position, send assignments or insert assignments for all channels on the control sur-face. Think of Console View as a global view of a given control (pan, send, or insert) on each channel. (See “Console View Switches” on page 24.)
Channel View
Command|8 is in Channel View when any of the Channel View selectors (EQ, Dynamics, In-sert or Pan/Send/PRE) is lit in the Channel View area below the LED display.
Channel View lets you display all plug-in assign-ments, insert names, or send assignments at the same time. You can think of Channel View as a way to quickly see which channels have EQ, Dy-namics, Inserts, and sends. (See “Channel View Switches” on page 25.)
Channel Data in the LCD Display
When you move a fader or rotary encoder, the LCD display temporarily shows the value for that control.
You can temporarily display alternate data in the LCD to confirm track and insert selections or compare settings.
To display fader level and pan in the LCD:
1 Make sure the Pan switch is lit in the Console section so the LCD displays Pan L in the upper left.
2 Hold the Display Mode switch. The lower LCD row shows the fader level.
3 Hold the Display Mode switch and turn the rotary encoder to display Pan.
To display send level in the LCD:
1 Make sure the Send switch is lit in the Console section.
2 Hold the Display Mode switch. The lower row of the LCD displays send level for the currently selected send.
Chapter 3: Command|8 Overview 21
22
To display inserts or plug-in names in the LCD:
1 Make sure the Insert switch is lit in the Con-sole section.
2 Hold the Display Mode switch. The lower row of the LCD displays the insert or plug-in name.
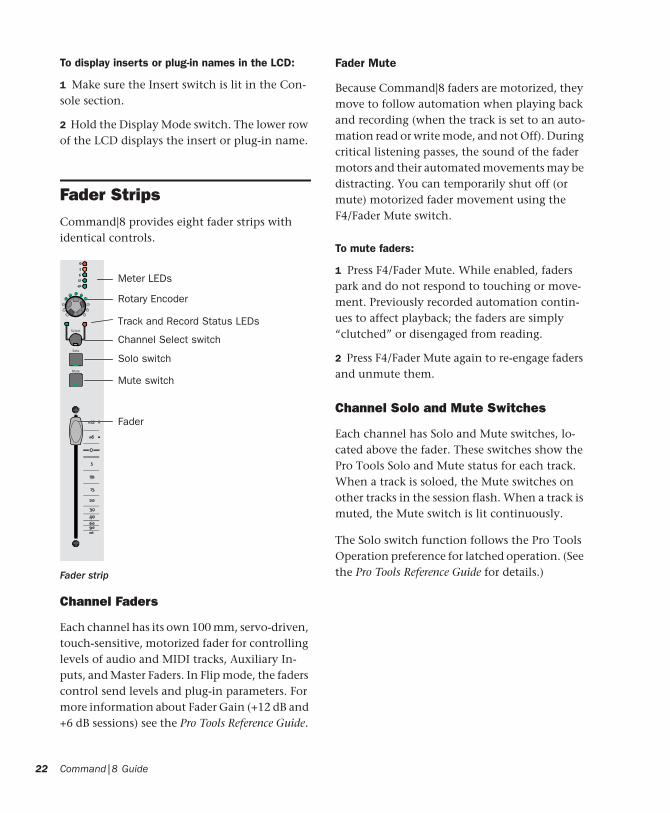
Fader StripsCommand|8 provides eight fader strips with identical controls.
Channel Faders
Each channel has its own 100 mm, servo-driven, touch-sensitive, motorized fader for controlling levels of audio and MIDI tracks, Auxiliary In-puts, and Master Faders. In Flip mode, the faders control send levels and plug-in parameters. For more information about Fader Gain (+12 dB and +6 dB sessions) see the Pro Tools Reference Guide.
Fader strip
Solo switch
Mute switch
Channel Select switch
Rotary Encoder
Meter LEDs
Track and Record Status LEDs
Fader
Command|8 Guide
Fader Mute
Because Command|8 faders are motorized, they move to follow automation when playing back and recording (when the track is set to an auto-mation read or write mode, and not Off). During critical listening passes, the sound of the fader motors and their automated movements may be distracting. You can temporarily shut off (or mute) motorized fader movement using the F4/Fader Mute switch.
To mute faders:
1 Press F4/Fader Mute. While enabled, faders park and do not respond to touching or move-ment. Previously recorded automation contin-ues to affect playback; the faders are simply “clutched” or disengaged from reading.
2 Press F4/Fader Mute again to re-engage faders and unmute them.
Channel Solo and Mute Switches
Each channel has Solo and Mute switches, lo-cated above the fader. These switches show the Pro Tools Solo and Mute status for each track. When a track is soloed, the Mute switches on other tracks in the session flash. When a track is muted, the Mute switch is lit continuously.
The Solo switch function follows the Pro Tools Operation preference for latched operation. (See the Pro Tools Reference Guide for details.)

Channel Select Switch
Each channel has a Channel Select switch that performs several functions, depending on the view:
Home View The Channel Select switches select the corresponding track (indicated on-screen by a highlighted track name) for record enabling, grouping, and other channel-related commands in Pro Tools.
Console View The Channel Select switches select inserts on a particular channel for editing, or se-lect sends between pre- or post-fader.
Channel View The Channel Select switches select and edit individual send or insert settings as dis-played across the LCD.
Channel Status LEDs
The Pan/Meter switch to the right of the en-coder row lets you choose between left and right sides of a stereo signal.
Rotary Encoder
These knobs control a variety of parameters, de-pending on the view:
Home View The rotary encoders control pan po-sition for each track, with the LED rings indicat-ing the pan position with a single LED.
Console View The rotary encoders control send levels for each track, with the LED rings indicat-ing the send levels with an expanding series of LEDs.
Channel View The rotary encoders control plug-in, pan/send, or insert settings, depending on the Channel View selection, with the LED rings showing corresponding states.
Channel Meter LEDs
Each channel includes a five-segment LED meter, scaled at 0, –3, –6, –12, and –42 dBFS.
Global Fader Controls
The following controls affect the assignment and operation of all the faders.
Flip Switch
The Flip switch (located to the left of the Navi-gation keys) invokes Flip mode. Flip mode trans-fers control assignments from the rotary encod-ers to the corresponding channel faders, allowing you to use the touch-sensitive faders to edit and automate send and plug-in values.
Send Flip Mode When in Home View or Console View, the Flip switch maps send level to the channel faders. The LCD displays the selected send for each channel.
Plug-in Flip Mode When in Channel View and working with a plug-in insert, the Flip switch moves any plug-in control assignments from the rotary encoders to the faders, letting you use the touch-sensitive faders to edit and automate plug-in control values.
Master Fader Switch
Pressing the Master Fader switch (to the left of the Navigation keys) arranges all Master Fader tracks in the current session on the right-hand side of the control surface. Pressing this switch a second time returns the control surface to the previous view.
Chapter 3: Command|8 Overview 23
24
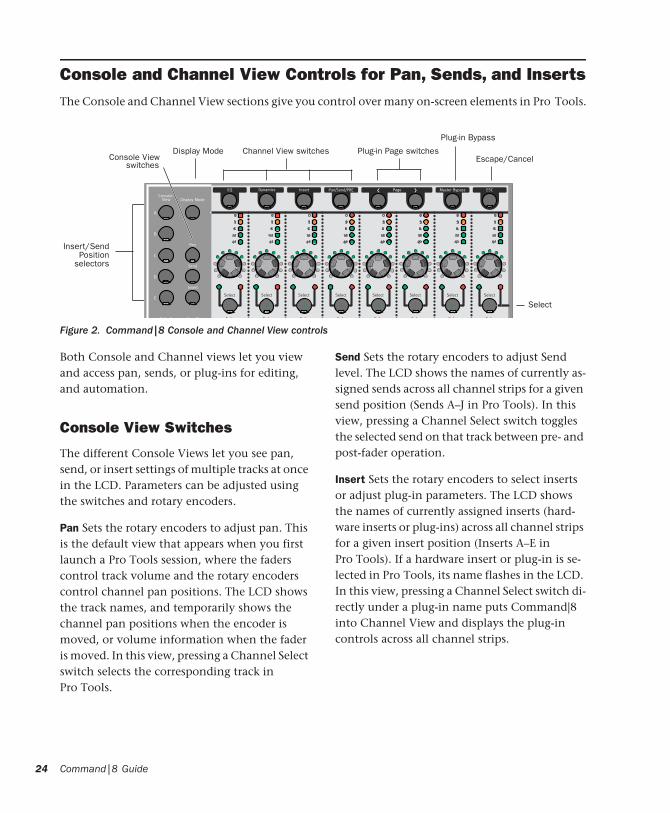
Console and Channel View Controls for Pan, Sends, and InsertsThe Console and Channel View sections give you control over many on-screen elements in Pro Tools.
Command|8 Guide
Figure 2. Command|8 Console and Channel View controls
Channel View switches
Insert/SendPosition
switchesConsole View
Plug-in Page switches
Plug-in Bypass
Escape/Cancel
selectors
Display Mode
Select
Both Console and Channel views let you view and access pan, sends, or plug-ins for editing, and automation.
Console View Switches
The different Console Views let you see pan, send, or insert settings of multiple tracks at once in the LCD. Parameters can be adjusted using the switches and rotary encoders.
Pan Sets the rotary encoders to adjust pan. This is the default view that appears when you first launch a Pro Tools session, where the faders control track volume and the rotary encoders control channel pan positions. The LCD shows the track names, and temporarily shows the channel pan positions when the encoder is moved, or volume information when the fader is moved. In this view, pressing a Channel Select switch selects the corresponding track in Pro Tools.
Send Sets the rotary encoders to adjust Send level. The LCD shows the names of currently as-signed sends across all channel strips for a given send position (Sends A–J in Pro Tools). In this view, pressing a Channel Select switch toggles the selected send on that track between pre- and post-fader operation.
Insert Sets the rotary encoders to select inserts or adjust plug-in parameters. The LCD shows the names of currently assigned inserts (hard-ware inserts or plug-ins) across all channel strips for a given insert position (Inserts A–E in Pro Tools). If a hardware insert or plug-in is se-lected in Pro Tools, its name flashes in the LCD. In this view, pressing a Channel Select switch di-rectly under a plug-in name puts Command|8 into Channel View and displays the plug-in controls across all channel strips.
Insert/Send Position Indicators A–E Select the send or insert position to display. These switches determine which of the ten available sends (A–J in Pro Tools) or five available insert positions (A–E in Pro Tools) are displayed in Console View.
The five Console View switches are dual-func-tion (A/F, B/G, C/H, D/I, E/J). Sends F–J are ac-cessed with the Shift key.
Default Resets a fader to its default setting (only applies to fader-mapped parameters).
Display Mode Selects display mode options.
Mon/Ø Toggles Auto Input and Input Only Monitor mode for record enabled tracks.
Channel View Switches
Channel View focuses on a single track (channel strip) and lets you display all plug-in, pan, send, or insert values horizontally across all LCD dis-plays, and adjust them with the channel rotary encoders and switches.
EQ Identifies channels with equalizer plug-ins assigned to them by illuminating their Channel Select switches. If no EQ plug-ins are present, no Channel Select switches will be lit.
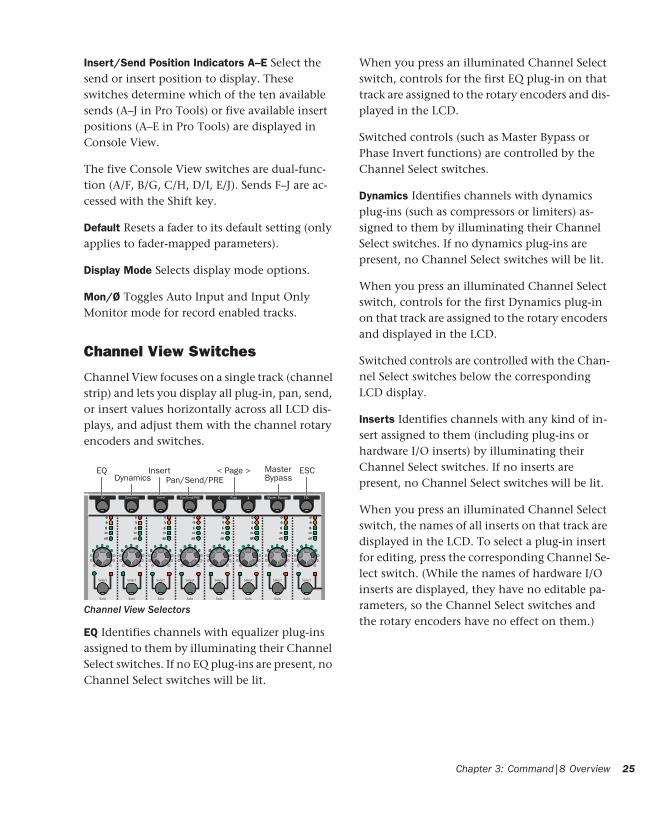
Channel View Selectors
EQ Dynamics
Insert Pan/Send/PRE
< Page > Master ESCBypass
When you press an illuminated Channel Select switch, controls for the first EQ plug-in on that track are assigned to the rotary encoders and dis-played in the LCD.
Switched controls (such as Master Bypass or Phase Invert functions) are controlled by the Channel Select switches.
Dynamics Identifies channels with dynamics plug-ins (such as compressors or limiters) as-signed to them by illuminating their Channel Select switches. If no dynamics plug-ins are present, no Channel Select switches will be lit.
When you press an illuminated Channel Select switch, controls for the first Dynamics plug-in on that track are assigned to the rotary encoders and displayed in the LCD.
Switched controls are controlled with the Chan-nel Select switches below the corresponding LCD display.
Inserts Identifies channels with any kind of in-sert assigned to them (including plug-ins or hardware I/O inserts) by illuminating their Channel Select switches. If no inserts are present, no Channel Select switches will be lit.
When you press an illuminated Channel Select switch, the names of all inserts on that track are displayed in the LCD. To select a plug-in insert for editing, press the corresponding Channel Se-lect switch. (While the names of hardware I/O inserts are displayed, they have no editable pa-rameters, so the Channel Select switches and the rotary encoders have no effect on them.)
Chapter 3: Command|8 Overview 25

26
Pan/Send/PRE Identifies channels with sends assigned to them by illuminating their Channel Select switches. If no sends are present, no Channel Select switches will be lit.
When you press an illuminated Channel Select switch, the LCD and the first rotary encoder show track pan position for that track. (If the track is a stereo track, you can toggle between left and right pan by pressing the Pan/Meter switch immediately to the right of the encod-ers.)
Channel Scribble Strips 3–7 show send names and the rotary encoders (3–7) control the levels for the first five sends on that track. In this mode, the Channel Select switches on channels 3–7 toggle pre- and post-fader metering for the corresponding send.
Command|8 Guide
Plug-in < Page > Switches Plug-in controls are organized in pages. In a process much like bank-ing of channel faders, when a plug-in has more controls than can fit on the LCD at one time, you can use these switches to page through the plug-in controls.
When a plug-in has multiple pages of controls, the current page (out of the total number) is dis-played next to the plug-in Name in the LCD. The Plug-in Page switches will flash to indicate a next or previous page.
Plug-in Master Bypass Switch This switch by-passes either a single plug-in or all plug-ins on a channel, depending on the current view. If the controls for only one plug-in are displayed, only that plug-in will be bypassed. If all the plug-ins on a channel are displayed, all of those plug-ins will be bypassed. If no plug-ins are displayed, the Master Bypass function is unavailable.
ESC (Escape) When flashing, this switch lets you cancel certain operations on the Com-mand|8, such as Channel View selections and many on-screen dialogs in Pro Tools.
Hardware I/O inserts cannot be bypassed in Pro Tools, so the Plug-in Master Bypass switch has no effect on them.

Transport, Navigation, and Zoom ControlsThese controls mirror the operation of on-screen transport and navigation controls in Pro Tools. In addition, the Function/Utility switches let you invoke special control surface commands.
Figure 3. Command|8 transport and navigation controls
Transport controls
Window Show/Hide
Navigation and Zoom keys
Master Fader switch
Fader Flip switch
Fader Bank, Nudge, and
Function/Utility switches
Display Zoom switches
Record/Playback Modeswitchesswitches
Transport Controls
The primary Transport controls match those in the Pro Tools Transport. The additional switches above the Transport controls let you se-lect playback and recording mode and open the Memory Locations window.
Command|8 Transport controls
PrimaryTransportcontrols
AdditionalTransportcontrols
Window Show/Hide Switches
Plug-in Opens or closes the window for the cur-rently selected plug-in
Mix Opens, brings forward, or closes the Pro Tools Mix window
Edit Opens, brings forward, or closes the Pro Tools Edit window
Chapter 3: Command|8 Overview 27

28
Navigation and Zoom Section
These multi-purpose switches control the dis-play of Pro Tools tracks on the Command|8 con-trol surface, on-screen zoom functions, and other Pro Tools navigation functions. See “Nav-igating” on page 32.
Bank, Nudge, and Zoom Switches
Bank When the Bank switch is enabled (lit), the Left and Right arrow keys move the Command|8 tracks across the Pro Tools mixer eight faders at a time.
Nudge When the Nudge switch is enabled (lit), the Left and Right arrow keys move the Com-mand|8 tracks across the Pro Tools mixer one track at a time.
Zoom When the Zoom switch is enabled (lit), the Left and Right arrow keys zoom the Pro Tools Edit window display horizontally, and the In and Out keys zoom the display vertically.
Arrow Keys
The Arrow keys are used to zoom in and out, navigate in text entry fields, and drop Selection In and Out markers on-the-fly.
Navigation and Zoom controls
Bank, Nudge, and Zoom switches
Arrow keys (Left, Right, Up, and Down)
Command|8 Guide
Function/Utility Switches
F1 Utility Enters Utility mode. This is where you set control surface and input preferences, as well as run pre-programmed diagnostic tests.
F2 MIDI Edit Lets you edit and name custom MIDI maps to use Command|8 in Stand-alone mode only. See Chapter 5, “Using Stand-Alone Mode.”
F3 PRE/MIDI Recall Enters PRE mode, and ac-cesses controls that let you recall and select pre-sets. For PRE information, see “Controlling PRE” on page 37. For MIDI recall information, see Chapter 5, “Using Stand-Alone Mode.”
F4 Fader Mute Temporarily disables Com-mand|8 fader movement while working with Pro Tools, allowing you to monitor audio play-back without fader noise. To disable fader move-ment, press F4 while in Pro Tools mode. To re-store fader movement, press F4 a second time. The Fader Mute feature has no effect on fader automation or audio levels during playback.
F5 Focus Toggles the LCD display between the current plug-in view and the previous Com-mand|8 view (Console or Channel view, or a multi-mono stream list). To return to the origi-nal view, press F5 a second time.

Control Room Monitor ControlsCommand|8 provides a Control Room section for control over monitor and headphone level.
To toggle input between Main and External Source:
■ Press the External Source switch to toggle in-put source. When enabled (lit), Command|8 will monitor the External Source input. When off (unlit), Command|8 monitors the Main input.
Command|8 lets you listen to either Main, or Ext Source, but not both simultaneously.
To adjust the volume of the monitor output:
■ Adjust the Main Level control.
To mute the monitor output:
■ Press Mute in the Control Room section.
To monitor output in mono:
■ Press the Mono switch.
Control Room and Headphone controls
Control Room Main/External
Level
Mute
Mono
Headphone
Level
OutputSource
Headphones
The Headphone Level adjusts only the output of the Headphone jack (located to the right of the headphone Level control).
To adjust headphone level:
■ Adjust the Headphone level control.
Headphone output is not affected by status of the monitor Mute switch, but does follow status of the Mono switch.
Modifier SwitchesThe Modifiers section is located to the left of the faders, below the Console switches. The Modi-fier switches provide the equivalent of Windows and Mac modifier keys for Pro Tools shortcuts. Use these switches as substitutes for those keys on your computer keyboard.
Stand-Alone SwitchThe Stand-alone switch, located between above and to the right of the Navigation keys, toggles Command|8 Stand-alone mode on and off. When lit, Command|8 is in Stand-alone mode. When unlit, Command|8 returns to its previous operating mode.
For more information, see Chapter 5, “Using Stand-Alone Mode.”
Modifier switches
Chapter 3: Command|8 Overview 29

30
USB and MIDI Activity LEDsThe USB and MIDI Activity LEDs indicate USB and MIDI communication status.
USB LED Stays lit when Command|8 is in Pro Tools mode. In other operating modes, the USB LED will flash when controls are moved
MIDI LED Indicates MIDI activity at each of the Command|8 MIDI ports.
Command|8 Guide
chapter 4
Using Command|8 with Pro Tools
This chapter explains how to use Command|8 in a Pro Tools session for recording and mixing.
Controlling the TransportUse the controls in the Transport section to play, stop, record, and cue Pro Tools.
RTZ (Return to Zero) Sets the playback cursor to the beginning of the session.
REW (Rewind) Rewinds through the session from the current cursor position.
FFW (Fast Forward) Fast-forwards through the session from the current cursor position.
STOP Stops playback or recording.
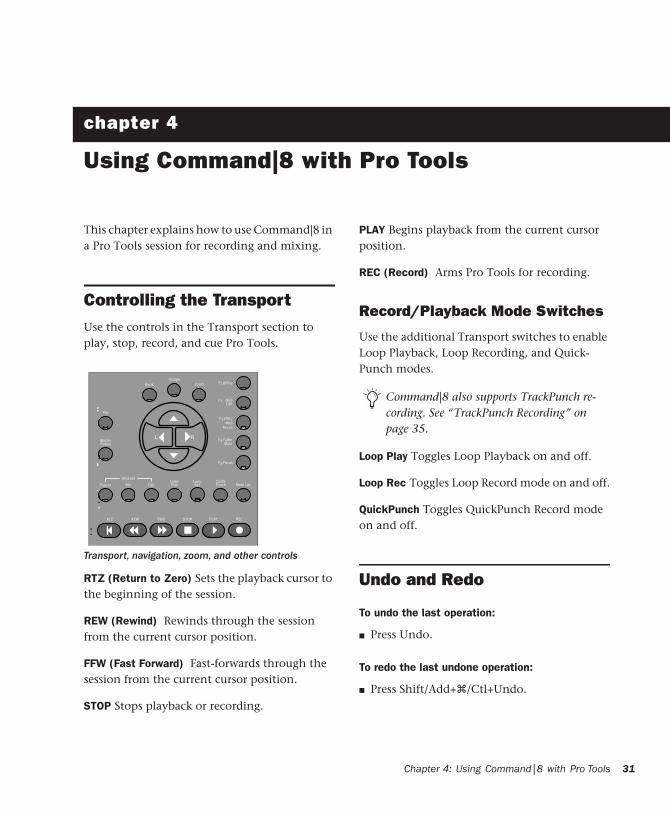
Transport, navigation, zoom, and other controls
PLAY Begins playback from the current cursor position.
REC (Record) Arms Pro Tools for recording.
Record/Playback Mode Switches
Use the additional Transport switches to enable Loop Playback, Loop Recording, and Quick-Punch modes.
Loop Play Toggles Loop Playback on and off.
Loop Rec Toggles Loop Record mode on and off.
QuickPunch Toggles QuickPunch Record mode on and off.
Undo and Redo
To undo the last operation:
■ Press Undo.
To redo the last undone operation:
■ Press Shift/Add+�/Ctl+Undo.
Command|8 also supports TrackPunch re-cording. See “TrackPunch Recording” on page 35.
Chapter 4: Using Command|8 with Pro Tools 31

32
NavigatingCommand|8 lets you select windows, bank other tracks to its faders, and zoom in and out using the controls in the Navigation/Zoom sec-tion.
Displaying Pro Tools Windows
The Plug-in, Mix, and Edit switches in the Win-dows section open and select their correspond-ing window in Pro Tools.
Plug-in Opens or closes the currently targeted plug-in window. If no plug-in windows are open, the switch opens the window for the first insert on the currently selected track will open.
Mix Opens or closes the Mix window.
Edit Opens or closes the Edit window.
Banking Tracks to the Faders
To bank eight tracks at a time to the faders:
1 Press Bank. When enabled, its LED is lit.
2 Press the Left or Right Arrow keys in the Nav-igation section to bank to the previous (left) or next (right) eight tracks in the session.
3 Repeat as necessary.
An open plug-in window is not necessarily the current target. See “Plug-ins and In-serts” on page 39 for details.
To show full track names in the LCD, press Display Mode plus the corresponding chan-nel Select switch. The selected track’s full name is displayed across the LCD for as long as you depress Display Mode and the Select switch. Release both to return to the previous view.
Command|8 Guide
To scroll tracks across the faders one at a time:
1 Press Nudge. When enabled, its LED is lit.
2 Press the Left or Right Arrow keys in the Nav-igation section to nudge one track to the left, or one track to the right.
Zooming
To zoom in using Command|8:
1 Press Zoom. When enabled, its switch is lit.
2 Press the appropriate Arrow key in the Naviga-tion section to zoom in or out: Press the Right arrow key to zoom in; Press the Left arrow key to zoom out.
To increase or decrease waveform or MIDI resolution:
1 Click with the mouse to place the Play cursor within the track you want to adjust.
2 Press Zoom.
3 Press the Up arrow key to increase Waveform or MIDI resolution, or press Down to decrease.
Navigating Text Entry Fields
When editing text and numeric values, the Left and Right Arrow keys let you navigate among editable fields. The Up and Down keys incre-ment or decrement the selected value.
Selection In/Out Points
In Bank and Nudge modes, the Navigation keys mirror the function of the Up and Down arrow keys on the computer keyboard. These let you mark selection in and out points on the fly, and to move a highlight (selection range) to neigh-boring tracks.
To manage banking, rearrange tracks in the Mix and Edit windows.

To mark a selection by dropping In and Out points:
1 Make sure the Edit cursor is in the track in which you want to select material, and begin playback.
2 At the desired in point, press the Down Arrow key.
3 At the desired out point, press the Up Arrow key.
To move a selection to the previous or next track:
1 Make a selection in a track.
2 Make sure the Pro Tools is stopped.
3 Do one of the following:
• Press the Up Arrow key to move the selec-tion range to the previous track (above in the Edit window, or to the left in the Mix window). Press the Down Arrow key to move the selection range to the next track (below in the Edit window, or to the right in the Mix window).
• Hold Shift/Add while pressing the Up or Down Arrow keys to extend the selection to the previous or next tracks.
• Hold Opt/Alt All while pressing Up or Down to remove a track from an already existing selection.
Memory Locations
Pro Tools Memory Locations (markers) can be created directly from Command|8 during play-back or while stopped.
To create a Memory Location:
1 Cue Pro Tools to the desired location, or begin playback.
2 At the desired location, press Enter (located among the switches above and to the left of the Navigation keys).
3 Use the mouse to configure the Memory Loca-tion dialog onscreen.
4 Press Enter again to save, or press Undo to cancel.
To open the Memory Locations window:
■ Press the Mem Loc switch. Press Mem Loc again to close the Memory Locations window.
RecordingCommand|8 lets you record audio and MIDI, with support for QuickPunch and TrackPunch recording modes, Loop Recording, and TrackIn-put monitor switching. Command|8 also di-rectly supports the Digidesign PRE remote con-trollable microphone preamp.
Enter, Undo and Mem Loc switches
Enter
Undo
Mem Loc
Chapter 4: Using Command|8 with Pro Tools 33

34
Basic Audio and MIDI Recording
Basic audio and MIDI recording involves record enabling tracks, arming the transport for record-ing, and recording.
Record Enabling Tracks
To enable tracks for recording:
1 Make sure the Transport is stopped.
2 Press the Rec switch located immediately to the right of the channel Select switch row. When Record Enable mode is activated, the lower row of the LCD shows track names, and the Rec switch flashes.
3 Press the Channel Select switch for the tracks you want to enable for recording. When a track is armed for recording, its Record Ready LED flashes.
4 Press the Rec switch a second time to exit Record Enable mode and return to the previous Command|8 view.
– or –
Leave Command|8 in Record Enable mode and use the Transport to begin recording (the Trans-port remains active in track Record Enable mode).
To take tracks out of record enable:
1 Press the Rec switch. When the Record Enable function is active, the Record Enable switch flashes.
2 Press the Channel Select switch on any track whose Record Ready indicator is flashing to dis-arm the track for recording. Press the Record En-able switch a second time to exit Record Enable mode and return to the previous Command|8 view.
Command|8 Guide
Arming the Transport and Recording
To record:
1 Make sure you have cued Pro Tools to the ap-propriate location, or selected the record range in a track. (See the Pro Tools Reference Guide for complete instructions.)
2 Record enable tracks as explained in “Record Enabling Tracks” on page 34.
3 Press the transport Record switch to arm Pro Tools for recording.
4 Configure input monitoring as needed (see “Monitoring while Recording” on page 36).
5 Press Play to begin recording. When finished recording, press Stop.
To undo a record pass:
■ Press Undo.
QuickPunch Recording
Command|8 supports QuickPunch recording. For more information, see the Pro Tools Reference Guide.
To record using QuickPunch:
1 Press the QuickPunch switch (above the pri-mary Transport switches). When enabled, its LED is lit.
2 Record enable tracks (see “Basic Audio and MIDI Recording” on page 34).
3 Configure input monitoring as needed (see “Monitoring while Recording” on page 36).
4 Begin playback.
5 Press the Command|8 master Record switch (in the Transport section) to punch all enabled tracks in and out.

TrackPunch Recording(Pro Tools|HD System Only)
Command|8 supports TrackPunch as well as TrackInput monitor switching. For more infor-mation, see the Pro Tools Reference Guide.
Enabling TrackPunch Mode
To enable TrackPunch mode:
■ Hold Ctl/Clutch and press the Transport Record switch repeatedly until the Pro Tools transport displays a “T” in the Record button on screen.
TrackPunch and Record Enabling Tracks
Before tracks can be punched in and out using TrackPunch, they must first be TrackPunch en-abled as well as record enabled. Command|8 fea-tures for TrackPunch provide convenient and flexible control of TrackPunch and record en-able status.
To TrackPunch enable and record enable tracks:
1 Make sure TrackPunch mode is enabled.
2 Press the Rec switch to enter Record Enable mode.
3 Press the channel Select switch for each track you want to TrackPunch enable. A single press TrackPunch enables and record enables the track as explained previously.
4 Press the channel Select switch again. This takes the track out of record enable but leaves it TrackPunch enabled. Onscreen the track Record button is lit blue
Hold Opt/Alt All+Shift/Add to TrackPunch enable all selected tracks.
To TrackPunch enable tracks without record enabling them:
1 Make sure TrackPunch mode is enabled and the Transport is stopped.
2 Press Ctl/Clutch+Channel Select to Track-Punch enable that track.
3 To TrackPunch enable additional tracks, press Ctl/Clutch+Channel Select for each desired track. Onscreen, the track record buttons flash blue and red indicating they are both Track-Punch enabled and record enabled.
To take tracks out of TrackPunch and record enable:
1 Press Ctl/Clutch+Select (Windows) or �/Ctl+Select (Mac) on each track. One press im-mediately places the track in Record Safe mode.
2 Repeat to take the track out of Record Safe and leave it not TrackPunch enabled or record en-abled. Use the standard Pro Tools modifiers to Apply to All (Opt/Alt All) or Apply to Selected (Shift+Opt/Alt All). If some tracks are already TrackPunch enabled, applying to all will first take all tracks out of TrackPunch enable. Repeat step 3 and all tracks will TrackPunch enable.
To take a track out of record enable but leave it TrackPunch enabled:
1 Press the Rec switch.
2 Press the corresponding Channel Select switch.
Chapter 4: Using Command|8 with Pro Tools 35

36
Punching In and Out using TrackPunch
To punch on individual tracks using TrackPunch:
1 Configure Pro Tools for TrackPunch recording as explained in the Pro Tools Reference Guide.
2 TrackPunch and record enable tracks as ex-plained previously.
3 Press the Transport Record switch to arm Pro Tools for recording.
4 Begin playback.
5 Use the channel Select switches to punch in and out on individual tracks.
To punch multiple tracks simultaneously using TrackPunch:
1 Enable TrackPunch mode.
2 Press the Rec switch, then press the channel Select switch to TrackPunch enable and record enable tracks.
3 Begin playback.
4 Press the Transport Record switch to punch all TrackPunch and record enabled tracks in and out simultaneously.
Command|8 Guide
Monitoring while Recording
Command|8 lets you toggle Pro Tools record monitor modes, as well as use TrackInput mon-itor switching.
Toggling the Record Monitor Mode
To toggle record enabled tracks between Auto Input and Input Only Monitoring modes:
1 Make sure the transport is stopped.
2 Press Mon/ø to toggle Monitor mode. The LCD displays Auto when Auto Input mode is en-abled, and Input when Input Only mode is en-abled.
TrackInput Monitor Switching
(Pro Tools|HD Systems Only)
To use TrackInput monitoring:
1 Press Opt/Alt All+Mon/ø (Windows) or Ctl/Clutch+Mon/ø (Mac). The upper left of the LCD displays Select Input Monitor, and the Mon/ø switch flashes.
2 Press the channel Select switches to toggle tracks between Input monitoring and disk mon-itoring. When Input is enabled, the LCD above the selected track displays Input. When moni-toring from disk, the LCD displays AutoIn.
To query Input status of all tracks:
1 Make sure no tracks are record enabled.
2 Press Mon/ø to temporarily display the input status (Input, or AutoIn) of all displayed tracks.
3 To query other tracks, bank those tracks to the faders and repeat.
Loop Recording
Command|8 supports Loop Record mode for au-dio and MIDI.
To enable Loop Record mode:
■ Press the Loop Rec switch in the Transport section. When enabled, the Loop Rec switch LED is lit. Press the Loop Rec switch again to take Pro Tools out of Loop Record mode.
MIDI Recording
MIDI tracks can be record enabled using the same techniques as with audio tracks. See “Basic Audio and MIDI Recording” on page 34.
Controlling PRE(Digidesign PRE Microphone Pre-Amp)
If you use one or more PRE units with your Pro Tools system, you can use Command|8 ro-tary encoders to adjust channel gain.
MIDI Connections for PRE with Command|8
PRE can be connected to Command|8 MIDI In and MIDI Out 1 ports, or to an available pair of ports on another MIDI interface being used with Pro Tools. PRE must be connected and enabled within Pro Tools before Command|8 can con-trol it (see the PRE Guide for more information).
On Mac systems using the Command|8 MIDI ports as a MIDI interface, make sure no MIDI tracks are assigned to “Port 1.” This port is reserved for Command|8 con-trol surface communication. Use Port 2, or Port 3, depending on which port is con-nected to your MIDI device as explained in “Configuring Command|8 MIDI Interface Connections” on page 15.
Adjusting PRE Gain
To adjust PRE gain from Command|8:
1 Make sure PRE is connected, and that it has been enabled in the Peripherals dialog (see the PRE Guide for details).
2 Make sure you have assigned PRE inputs to one or more tracks. (You cannot assign PRE in-puts to tracks from Command|8; you must use the mouse and onscreen controls in Pro Tools.)
3 Press F3 PRE/MIDI Recall. The LCD displays PRE unit number, channel number, and gain value in the LCD above each audio track. Be-cause multiple PREs can be in use, unit and channel number are indicated as follows.
• The first two numbers per channel indicate unit and channel number. Above, “1/1” in-dicates PRE unit #1, channel 1; “1/2” indi-cates unit #1, channel 2). If using two units, their channels (when banked) would be listed as “2/1”, “2/2” and so on.
• The two digit gain value for that unit and channel (PRE gain ranges from 0–69).
4 Rotate the encoder below the desired unit and channel shown to adjust PRE gain on that chan-nel.
5 Bank left or right to bank other PRE tracks to the channel strips.
PRE unit number (top row) per channel (lower row) as displayed in the LCD
1/1 10 1/2 21 1/3 54 cont.
(ch 1) (ch2) (ch3) (chs4–8)
Chapter 4: Using Command|8 with Pro Tools 37
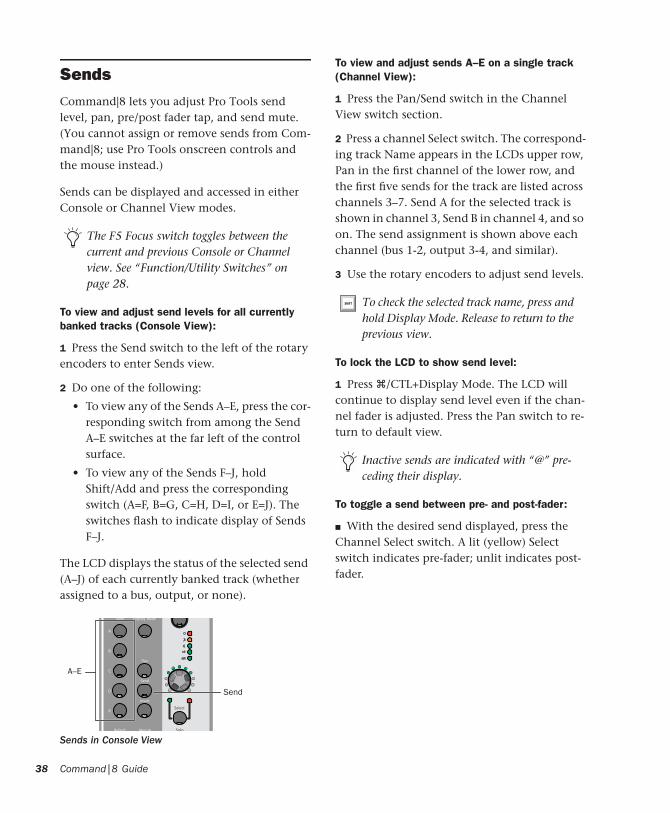
38
SendsCommand|8 lets you adjust Pro Tools send level, pan, pre/post fader tap, and send mute. (You cannot assign or remove sends from Com-mand|8; use Pro Tools onscreen controls and the mouse instead.)
Sends can be displayed and accessed in either Console or Channel View modes.
To view and adjust send levels for all currently banked tracks (Console View):
1 Press the Send switch to the left of the rotary encoders to enter Sends view.
2 Do one of the following:
• To view any of the Sends A–E, press the cor-responding switch from among the Send A–E switches at the far left of the control surface.
• To view any of the Sends F–J, hold Shift/Add and press the corresponding switch (A=F, B=G, C=H, D=I, or E=J). The switches flash to indicate display of Sends F–J.
The LCD displays the status of the selected send (A–J) of each currently banked track (whether assigned to a bus, output, or none).
The F5 Focus switch toggles between the current and previous Console or Channel view. See “Function/Utility Switches” on page 28.
Sends in Console View
A–E
Send
Command|8 Guide
To view and adjust sends A–E on a single track (Channel View):
1 Press the Pan/Send switch in the Channel View switch section.
2 Press a channel Select switch. The correspond-ing track Name appears in the LCDs upper row, Pan in the first channel of the lower row, and the first five sends for the track are listed across channels 3–7. Send A for the selected track is shown in channel 3, Send B in channel 4, and so on. The send assignment is shown above each channel (bus 1-2, output 3-4, and similar).
3 Use the rotary encoders to adjust send levels.
To lock the LCD to show send level:
1 Press �/CTL+Display Mode. The LCD will continue to display send level even if the chan-nel fader is adjusted. Press the Pan switch to re-turn to default view.
To toggle a send between pre- and post-fader:
■ With the desired send displayed, press the Channel Select switch. A lit (yellow) Select switch indicates pre-fader; unlit indicates post-fader.
To check the selected track name, press and hold Display Mode. Release to return to the previous view.
Inactive sends are indicated with “@” pre-ceding their display.
Muting Sends
To mute a send:
■ Press �/CTL+Select on the channel contain-ing the send you want to mute.
The switch LEDs light red to indicate bypassed, green to indicate in (not bypassed), and alter-nating red and green to indicate mixed states of muted and un-muted sends.
Send Flip Mode
Send Flip mode lets you flip control of send level to the touch-sensitive faders. Send Mute is mapped to the channel mute switch, the encod-ers control send pan (if a stereo send), and the channel Select switches toggle pre/post fader status.
To enter Send Flip mode:
1 Put Command|8 in Sends view, then select a send A-J as described above.
2 Press the Flip switch (to the left of the Naviga-tion keys).
3 Adjust send level using the channel faders, and adjust send pan using the rotary encoders.
To mute a send in Send Flip mode:
■ Press the channel Mute switch.
To toggle pre/post fader status in Send Flip mode:
■ Press the channel Select switch.
To show send level in the LCDs, press Dis-play Mode while in Flip mode. Release to re-turn to the previous view.
For stereo tracks with stereo sends, pressing the Pan/Meter switch immediately to the right of the encoders toggles between left and right sig-nals. Both the LCD and the LEDs above the Pan/Meter switch indicate whether the left or right pan position is displayed.
Plug-ins and InsertsCommand|8 lets you quickly access and adjust plug-ins using the Channel View switches, ro-tary encoders, and other controls. Command|8 supports Pro Tools target windows for control surface focus (see “Target Plug-ins and Plug-in Windows” on page 40).
The EQ and Dynamics switches provide direct access to EQ and Dynamics category plug-ins, respectively (see “EQ and Dynamics” on page 42).
Flip mode maps plug-in controls to the faders for finer control when editing or automating. Hardware inserts can be taken in and out of by-pass (see “Plug-in Flip Mode” on page 42).
You cannot edit plug-ins or inserts on Com-mand|8 when used in combination with Digi 002. Use the Digi 002 control surface, or Pro Tools onscreen controls.
The F5 Focus switch toggles between the current and previous Console or Channel view. See “Function/Utility Switches” on page 28.
Chapter 4: Using Command|8 with Pro Tools 39

40
Target Plug-ins and Plug-in Windows
Command|8 can select, target, and open the window of a plug-in. Whenever you open a plug-in using Command|8, that plug-in be-comes the control surface target window and is the focus of Command|8 faders, switches, and rotary encoders (as available).
Pro Tools 6.4 and higher supports multiple tar-get windows. While this adds flexibility for si-multaneously viewing and editing parameters from a control surface, it requires that you make sure you verify the target window whenever multiple plug-in windows are open, and when-ever you first open a session.
For example, support for multiple targets means that an open (onscreen) plug-in window may not necessarily be the current control surface target. In addition, a plug-in window does not necessarily have to be open to be the target. This can occur when opening sessions that were saved with windows and targets in certain states of focus.
Selecting and opening plug-ins from Com-mand|8 Console and Channel view controls au-tomatically target the selected plug-in.
For information on verifying the target, see “Ad-justing Plug-ins” on page 41.
Command|8 Guide
Opening Plug-ins
Plug-ins can selected in Console or Channel View modes. Selecting a plug-in for editing makes it the Command|8 target.
Console view lets you view, select, and bypass from among the current plug-in assignments of multiple tracks. Channel view lets you navigate among all plug-ins and inserts on a single track.
To view and select plug-ins of all currently banked tracks (Console view):
1 Press the Insert switch to the left of the rotary encoders. The upper row of the LCD displays the current insert A–E, and indicated Console view by displaying “All Channels.” The lower row shows the name of any plug-ins in that insert position (A–E) for each currently banked track.
2 To select a different insert (A–E), press the cor-responding A–E switch.
3 When the name of the desired plug-in is dis-played, press the corresponding channel Select switch (in the channel below the displayed in-sert name). The plug-in window opens on-screen, and Command|8 displays the first page of plug-in parameters across the LCD.
To view all inserts on a single track (Channel View):
1 Press the Insert switch in the Channel View row. Track names are shown in the lower row of the LCD. The name of the most recently edited track flashes.
Insert switch in Channel View
Insert
2 Press the channel Select switch for the track containing the plug-in you want to edit. The se-lected track name appears in the upper row of the LCD. The lower row shows the name of any plug-ins assigned in that track above channels 1–5 (channel 1 shows insert A, channel 2 shows insert B, and so on). Inserts with no plug-in or hardware insert assignments are indicated with a straight horizontal line.
3 Press the corresponding channel Select switch to select and open a plug-in.
Closing Plug-in Windows
To close all plug-in windows:
■ Press OPT/ALT ALL+Plug-in (in the Windows section).
Adjusting Plug-ins
A plug-in must be selected and targeted before you can adjust its parameters from Command|8.
To target a plug-in for editing from Command|8, do one of the following:
■ Select and open the plug-in using Com-mand|8 Channel or Console views (see “Open-ing Plug-ins” on page 40.
To target a plug-in window already open onscreen (making it the Command|8 focus);
■ Click in the header area of an open plug-in window (the blank gray area next to the stan-dard plug-in controls at the top of the window).
To check the selected track name, press and hold Display Mode. Release to return to the previous view.
Inactive inserts are indicated with “@” pre-ceding their name.
Once an insert is targeted for editing, you can adjust the displayed parameters, bank to other plug-in pages to access other controls, and use Flip mode to map plug-in parameters to the fad-ers.
To adjust a plug-in parameter:
1 Select an insert for editing as described in “Opening Plug-ins” on page 40.
2 Use the rotary encoder under each displayed parameter that maps to a variable control (slid-ers, knobs, and similar). Use the appropriate channel Select switch to toggle on/off switches.
Bypassing Plug-ins
Command|8 provides the following ways to by-pass inserts.
To bypass the currently focussed insert:
1 Select an insert for editing and display its con-trols in the LCD.
2 Press Master Bypass.
To bypass a plug-in from Console or Channel views:
1 Use the Console or Channel view switches to display all inserts (A–E) on all currently banked tracks (Console view), or to display all inserts on a single track (Channel view). See “Opening Plug-ins” on page 40.
2 Press �/Ctl+Select on the channel corre-sponding to the insert you want to bypass. Press again to disengage bypass.
The switch LEDs light red to indicate bypassed, green to indicate in (not bypassed), and alter-nating red and green to indicate mixed states of bypassed and un-bypassed plug-ins.
Chapter 4: Using Command|8 with Pro Tools 41
42
Navigating Plug-in Pages
To show other plug-in control pages:
■ Use the < Page > switches (in the Channel View row below the LCD) to bank to the previ-ous or next page of plug-in controls.
Multi-Mono Plug-ins
When working with a multi-mono plug-in, you can toggle the view between the left and right sides.
To select left or right sides of a multi-mono plug-in:
1 Select a track and display its inserts in Chan-nel view as described previously.
– or –
Select a multi-mono insert and press Display+F5 to display the available signals (left, center, or right).
The LCD displays the track and plug-in name, with each mono signal listed across an appropri-ate number of channels.
2 Press a channel Select switch to select the cor-responding left, center, or right signals of the plug-in.
3 Press the lit Select switch to the right to bypass the corresponding signal (L, C, or R).
Command|8 Guide
EQ and Dynamics
The EQ and Dynamics switches let you quickly access EQ and Dynamics plug-ins in your ses-sion. (Dynamics plug-ins include compressors, limiters, expanders, and gates.)
To access an EQ or Dynamics plug-in:
1 Press the EQ or Dynamics switch in the Chan-nel View section. Any currently banked tracks containing EQ or Dynamics plug-ins are indi-cated by their Select switches flashing.
2 Press a flashing Select switch to open the first EQ or Dynamics plug-in on that track, or the most recently edited EQ or Dynamics plug-in if more than one.
3 To cycle through multiple EQ or Dynamics plug-ins on the track, hold the EQ or Dynamics switch and press the Channel Select switch again.
4 To move to a different track, press a channel Select switch.
Plug-in Flip Mode
Plug-in Flip mode maps plug-in parameters to the faders, for greater control and touch-sensi-tive automation writing.
To use plug-in Flip mode:
1 Focus Command|8 on an active plug-in to dis-play its parameters across the LCD. (See “Open-ing Plug-ins” on page 40 for instructions.)
2 Press the Flip switch. The parameters that were displayed for the rotary encoders are mapped to the faders.

3 To exit Flip mode, press the Flip switch a sec-ond time.
Automation Functions
AutoMatch Function
During playback, you can stop writing of auto-mation on Write-enabled or Latch-enabled tracks and return automation to previously writ-ten levels by ramping up or down according to the AutoMatch time.
To end an automation pass on all tracks with AutoMatch:
■ During playback, at the point where you want to stop writing automation, hold Ctrl/Clutch and press the F4 switch on the Command|8.
All tracks in Write or Latch mode stop writing automation and ramp back to previous automa-tion levels. The length of the automation ramp is determined by the AutoMatch Time prefer-ence.
To temporarily show the full name of a plug-in parameter in the LCD, press Dis-play Mode+the corresponding channel Se-lect switch. Release to return to the previous view.
Snap Back Function
During playback, you can stop writing of auto-mation on Write-enabled or Latch-enabled tracks and return automation instantly to previ-ously written levels, ignoring any AutoMatch or AutoGlide settings.
To end an automation pass on all tracks with Snap Back:
■ During playback, at the point where you want to stop writing automation on all tracks, hold Ctrl/Clutch+Command+Alt (Windows) or Ctrl/Clutch+Command+Option (Mac) and press the F4 switch on the Command|8.
Software Synths and Rewire ApplicationsCommand|8 automatically supports any soft-ware synthesizers running as TDM or RTAS plug-ins in Pro Tools (see “Plug-ins and Inserts” on page 39).
Stand-alone software synths, samplers, effects, and Rewire-compatible applications (such as Reason, Live, and similar) can also be controlled by Command|8, letting you switch back and forth between environments while maintaining tactile control of session functions.
Doing so utilizes Command|8 Stand-alone mode, in which faders, encoders, and switches can be programmed to control virtually any software or hardware device parameter that sup-ports MIDI CC messages. Eight user presets can be stored and recalled in onboard memory, with support for SysEx dump and recall. For more in-formation, see Chapter 5, “Using Stand-Alone Mode.”
Chapter 4: Using Command|8 with Pro Tools 43

44
Command|8 Guide
chapter 5
Using Stand-Alone Mode
This chapter explains how to configure and op-erate Command|8 in stand-alone mode.
Overview of Stand-Alone ModeIn Stand-alone mode, Command|8 can be used with other (non-Pro Tools) software and hard-ware MIDI devices.
Each of the Command|8 faders, encoders, and switches in the fader strips (four per channel strip or 32 total) can be custom programmed to control any compatible parameter. For an over-view of programmable controls and their de-fault assignments, see “Mapping” on page 47.
As many as eight preset MIDI maps can be saved and recalled. Each preset can save custom maps of two pages of supported controls. Presets let you store maps for as many as eight unique de-vices.
Once stand-alone mode has been configured and your presets stored, you can be working with Command|8 in Pro Tools, then switch to stand-alone mode to refocus to a stand-alone software synth, or a ReWire-compatible applica-tion such as Reason or Live. (Because these are separate applications, and not plug-ins within the Pro Tools MIDI environment, stand-alone mode is required to control their faders, encod-ers, and switches.) Check to see if your software applications support USB MIDI communication and the Command|8 Personality protocol, or if 5-pin DIN MIDI connections are required to a compatible MIDI interface.
MIDI Compatibility
Command|8 supports any device that supports MIDI continuous controller (CC) and note data. SysEx dumping and loading is also supported in stand-alone mode. Drivers are provided that let Command|8 be used as a MIDI control surface on a supported Windows or Mac computer with virtually any compatible software.
Chapter 5: Using Stand-Alone Mode 45

46
Stand-Alone Mode QuickStartThis section lists the basic steps required use Command|8 in stand-alone mode. Detailed in-structions for each step can be found later in this chapter (as indicated below).
Configuring Stand-alone mode involves the following tasks:
1 Entering Stand-alone mode (see “Selecting Stand-Alone Mode” on page 46.
2 Navigating and selecting presets (see “Navi-gating Presets and Pages” on page 47.
3 Programming Command|8 faders, encoders, and switches for the device you are controlling, if necessary, with custom naming options (see “Editing MIDI Maps” on page 49.
4 Naming, saving, and recalling presets (see “Presets to Save and Recall Maps” on page 51).
Selecting Stand-Alone Mode
To place Command|8 in Stand-alone mode:
1 Press the Standalone switch, next to the Status LEDs.
When in stand-alone mode, the switch LED lights.
Standalone switch
Standaloneswitch
Command|8 Guide
The last saved (or default) MIDI map is recalled and its status is displayed in the LCD, similar to the following:
• The upper LCD row displays the fader name (Fader1, Fader2).
• The lower row shows the current value (level).
Move any fader to see its position displayed in the lower row of the LCD.
Example display of a preset in stand-alone mode
Fader1 Fader2 (3–6) Fader7 Fader8
0 0 0 0
Editing a preset does not automatically save the changes stored locally by Command|8. As you progress through the following pages and program your presets, be sure to use the Command|8 Save commands frequently to save your edits to flash memory. You can also save preset configurations with SysEx. See “Presets to Save and Recall Maps” on page 51.

Navigating Presets and Pages
In stand-alone mode, the F3 PRE/MIDI Recall switch enters a display mode that lets you navi-gate and select among the eight available Com-mand|8 presets.
To navigate to a different MIDI Map preset (1–8):
1 In Standalone mode, press F3 PRE/MIDI Re-call. The LCD shows the number and name of the current preset above channels 1 and 2, re-spectively. Cancel, Recall, and Save commands are provided in channels 6–8, similar to the fol-lowing.
2 Rotate the channel 1 encoder to scroll the Pre-set# through the eight available presets. If any custom names have been saved for presets, their names will also appear in the channel 2 LCD.
3 To cancel MIDI Recall and return to the previ-ously displayed preset, press the channel 6 Se-lect switch.
4 To select the currently displayed preset, select Recall by pressing the channel 7 Select switch. The LCD prompts you to confirm that you want to recall and load the selected preset from inter-nal flash memory.
5 To confirm, press the channel 7 Select switch (OK). The selected preset is loaded and displayed across the LCD.
To begin programming controls, see “Program-ming Controls” on page 49. To begin by naming and saving your presets, see “Presets to Save and Recall Maps” on page 51.
F3 PRE/MIDI Recall display
Preset Number
Name Cancel Recall Save
4 Edited
ch 1 ch 2 ch 6 ch 7 ch 8
About Preset Pages
Each Command|8 preset provides two pages, or banks, of programmable controls. In other words, the progammable faders, encoders, and switches can each be given two unique assign-ments per preset (one assignment, per control, per page).
To bank to the other page of a preset:
■ In Standalone mode, press the Bank switch.
By default, both pages of each preset share iden-tical values for programmable faders, encoders, and switches within the same preset. This pro-vides an efficient and practical starting point for complex custom mapping, as pages automati-cally share the most common and needed as-signments (such as faders always controlling volume).
By default, page 1 uses MIDI channels 1–8, and page 2 uses MIDI channels 9–16. You can cus-tomize MIDI channel assignment as needed (see “Programming Controls” on page 49).
MappingCommand|8 faders, encoders, and 24 of its switches can be programmed, or mapped, to CC values required to control other devices. As many as eight presets can store unique, custom MIDI maps, each with two pages (or banks) of programmable switch functionality.
In addition, the primary Transport switches, as well as the eight Channel Mode switches, are factory-assigned in all presets (and can not be customized).
Chapter 5: Using Stand-Alone Mode 47

48
Mapping is a simple process that involves the following tasks:
■ Edit MIDI Maps. Touch to select faders, en-coders, and switches, then assign custom MIDI Continuos Controller or switch values to match the target device, as needed. See “Editing MIDI Maps” on page 49.
– and –
■ Use Presets to Save and Recall Maps. Save and recall up to eight custom MIDI maps in Com-mand|8 Presets. See “Presets to Save and Recall Maps” on page 51 for more information.
Controls in Stand-Alone Mode
Faders Each fader can be mapped to any MIDI Continuous Controller (CC). Default is Volume (#07). Start and end MIDI values, as well as custom names, can be specified for each fader.
Encoders Each encoder can be mapped to any CC. Default is Pan (#10). Start and end MIDI val-ues, as well as custom names, can be specified for each encoder.
Switches In stand-alone mode, 32 of the Com-mand|8 switches are available in both pages of each preset.
The channel Mute and Solo switches are premapped to CC 14 (mute) and CC 15 (solo); Channel Select switches are not premapped.
Programmable switches in stand-alone mode
Programmable switch rows
Command|8 Guide
The Channel View selectors (EQ, Dyn, Insert, Pan/Send, < > Plug-in Page, Master Bypass, and Esc) are dedicated (pre-programmed) to CC 121–127 as follows (they retain these assign-ments even when switching pages or presets, and can not be changed.
Transport Switches The Transport switches are permanently mapped to standard MMC (MIDI Machine Control) messages. (The RTZ switch does not support MMC.)
The following controls are not programmable:
• Encoder mode selectors
• Display Mode
• Modifiers
• Master faders
• Flip
• Bank
• Nudge
• Arrows
• F1–F5
• Standalone
• Control Room switches.
Channel View switch CC assignments
Switch CC assignment
EQ 121
Dynamics 122
Insert 123
Pan/Send 124
< Page 125
Page > 127
Master Bypass toggle Latch/Momen
Esc Name (edit)

Editing MIDI MapsThis section provides instructions for program-ming (mapping) Command|8 faders, encoders, and switches.
To enter MIDI Edit mode:
1 Make sure Command|8 is in stand-alone mode.
2 Press F3 PRE MIDI Recall and select a preset to edit. (See “Selecting Presets” on page 51.)
3 Press F2/MIDI Edit. The F2 switch LED flashes, and the LCD display shows parameters similar to the following tables (which show default as-signments for Fader 1 as an example):
• The currently selected control (usually Fader1 or the last edited) is shown in the lower row of channel 1.
• Channel 3 shows the current MIDI Chan-nel in the lower row.
• Channel 4 shows the current CC value in the lower row.
Custom mapping can be saved as presets, and presets can be created, named, and saved before doing any mapping. See “Pre-sets to Save and Recall Maps” on page 51.
F2 MIDI Edit display, channels 1–4
Select control Chan CC
Fader1 1 7
ch 1 ch 2 ch 3 ch 4
• The upper row shows the available param-eter names for (MIDI) Lo and Hi Value, Mode, and Name.
• The lower row shows the current value (1–127) for Lo and Hi Value, the current Mode (single or double), and the current control name (for example, Fader1).
4 To select a different control, touch a fader, ad-just an encoder, or press one of the programma-ble switches. To select an encoder, rotate Encoder #1 to scroll through the list of a avail-able encoders. The selected control name ap-pears across controls as needed (see “Programming Controls” on page 49).
5 Press F2/MIDI Edit to exit MIDI Edit mode. If you have changed any settings, you will be prompted to save before exiting. Follow the in-structions onscreen. The F2 switch LED should stop flashing.
Programming Controls
Programming controls involves the following basic steps:
• Selecting (focusing) the control
• Configuring its MIDI channel, CC#, and other parameters
• Naming and saving the edited preset
To select a control to program:
1 Select a preset and enter MIDI Edit mode (see “Selecting Presets” on page 51 for instructions).
F2 MIDI Edit display, channels 5–8
Lo Val Hi Val Mode Name
0 127 Single Fader1
ch 5 ch 6 ch 7 ch 8
Chapter 5: Using Stand-Alone Mode 49
50
2 Select the fader, encoder, or switch you want to program by doing any of the following:
• To select a fader, move the fader. (See “Pro-gramming Faders” on page 50 for fader de-tails.)
• To select an encoder, rotate the channel 1 encoder and scroll through the list of pro-grammable switches until the Encdr (En-coder) names appear, then scroll to the desired encoder 1–8. (See “Programming Encoders” on page 50 for encoder details.)
• To select a switch, press any progammable switch (see “Programming Switches” on page 51 for switch details).
3 Make sure the name of the fader, encoder, or switch you want to program is displayed in the lower row of the LCD above channel 1.
To set the MIDI channel:
■ Rotate the channel 3 encoder for Chan until the desired channel is displayed (default is chan-nel 1).
To set the CC#:
■ Rotate the channel 4 encoder for CC# until the desired value is displayed.
To set a Lo or Hi MIDI Value:
1 Rotate the channel 5 encoder to set a MIDI Lo Value (0–127).
2 Rotate the channel 6 encoder to set a MIDI Hi Value (0–127).
To program a switch for momentary or latching:
1 Select the switch to edit.
2 Rotate the channel 7 encoder (Mode) to choose Latch or Momen (momentary).
Command|8 Guide
To set a fader or encoder for single or double precision:
1 Select the fader or encoder.
2 Rotate the channel 7 encoder (Mode) to choose Single or Double.
To name a control:
1 Select the MIDI preset and control you want to name.
2 Rotate the channel 8 encoder (Name). This displays the Name parameters in the LCD.
3 Rotate encoder 2 to scroll and select lower-case, upper-case, or numerics for the first charac-ter of the custom name.
4 When the desired character is displayed, ro-tate encoder 1 to move to the next character (its cursor flashes). Repeat for the remaining charac-ters to enter your custom name.
Programming Faders
Each fader can be mapped to any MIDI contin-uous controller. Each fader defaults to a unique MIDI CC number corresponding to Volume (#07). Assignment can be changed to any other CC number. Start and End MIDI values, as well as custom parameter names, can also be speci-fied for each control.
Programming Encoders
Each encoder can be mapped to any MIDI con-tinuous controller, and defaults to Volume (#07). Encoders support velocity sensitive edit-ing, and can be custom named.

Programming Switches
The 24 switches in the fader section that can be custom mapped in Standalone mode include the channel Select, Solo, and Mute switches.
The eight Channel View switches across the top of the channel strips are also available, but are permanently configured to CC 121–127 (left-to-right). In addition, the Transport switches are permanently configured to MMC (MIDI Ma-chine Control) transport command assign-ments.
Presets to Save and Recall MapsPresets are snapshots of MIDI mapping assign-ments that can be saved and recalled.
You can store up to eight presets to save custom mapping and MIDI channel assignment for a variety of devices, with custom names. Presets can be recalled at any time to instantly switch to a different device mapping.
Selecting Presets
To select a Comand|8 stand-alone mode preset:
1 In stand-alone mode, press F3 PRE MIDI Re-call.
2 Rotate the channel 1 encoder to scroll through available presets, and stop when the de-sired preset name is displayed.
3 To select the displayed preset, press the chan-nel 7 Select switch (Recall).
4 Press the channel 7 Select switch (Okay) again to confirm you want to load the preset from flash memory. (To cancel, press channel 6 Se-lect.) The select preset is loaded and displayed in Command|8.
5 When finished selecting a preset, press the channel 7 encoder (Okay), or press the channel 6 encoder (Cancel) if you need to cancel the naming.
Saving Command|8 Presets
Command|8 presets can be saved to flash mem-ory to save custom mapping of programmable controls, custom names, and all other parame-ters associated with all eight presets.
Command|8 presets can also be stored (dumped) to SysEx through USB or 5-pin DIN connections.
To save the current preset:
1 If not already opened and displayed, press F3 PRE MIDI Recall to select the desired preset.
2 Press the channel 8 Select switch (Save).
3 Press the channel 7 Select switch (OK) to save the preset to onboard Flash memory. (To save presets through MIDI, see “Loading and Saving Presets with SysEx” on page 52.)
4 Command|8 asks you to confirm that you want to save the currently displayed preset to flash memory (replacing and updating any pre-viously stored preset in flash memory).
5 To confirm and save, press the channel 7 Se-lect switch (Okay). To cancel without saving, press the channel 6 Select switch (Cancel).
Edited presets must be manually saved to flash memory to be able to be recalled later (Command|8 warns you to save any changed presets if you leave Stand-alone mode, but it does not automatically save presets as you edit them). See “Saving Com-mand|8 Presets” on page 51.
Chapter 5: Using Stand-Alone Mode 51

52
Loading and Saving Presets with SysEx
Command|8 supports SysEx to store and recall presets into and out of Pro Tools or any compat-ible device. SysEx provides a standard and reli-able way to quickly archive, and later retrieve entire sets of Command|8 presets.
To save the current presets to SysEx:
1 If not already opened and displayed, press F3 PRE MIDI Recall to select the desired preset.
2 If recording SysEx into Pro Tools MIDI track, do the following:
• Enable Wait for Note
• Create a new MIDI track (if necessary) and configure input and output as described in the Pro Tools Reference Guide.
• Configure the MIDI Input Filter dialog to enable SysEx recording.
• Record enable the MIDI track, and arm the Pro Tools Transport for recording (be sure you enabled Wait for Note so that record-ing will not begin until the SysEx transfer starts).
3 Press the channel 8 Select switch (Save).
4 Press the channel 2 Select switch to cycle through available destinations
• To save to a SysEx destination connected through USB (such as Pro Tools), choose MIDI/USB.
• To save to a SysEx destination connect through 5-pin DIN MIDI connections, choose MIDI/DIN.
5 When the desired destination is chosen, press the channel 7 Select switch (OK).
Command|8 Guide
6 When Command|8 prompts you to save the currently displayed preset to flash memory, do one of the following:
• To confirm and save, press the channel 7 Select switch (Okay). This replaces the pre-set previously stored in flash memory.
– or –
• To cancel without saving, press the chan-nel 6 Select switch (Cancel).
If you OK the SysEx dump, the LCD displays a status message until the transfer is completed, after which it returns to the previous preset view.
To load (recall) presets from SysEx:
1 Make sure the device from which you will be loading SysEx data is connected properly to Command|8 (either through a USB MIDI or a 5-pin DIN MIDI connection).
2 If loading from a Pro Tools track, cue Pro Tools to the appropriate location before the SysEx data.
3 Press F3 PRE MIDI Recall. Scroll to the Com-mand|8 preset where you want to load (over-write) the incoming preset being recalled.
4 Press the channel 7 Select switch (Recall).
5 Press the channel 2 Select switch to choose ei-ther USB MIDI or MIDI/DIN to recall from. If loading from a Pro Tools MIDI track, choose USB MIDI.
6 Press the channel 7 Select switch (Okay). Command|8 waits for SysEx data to begin arriv-ing.
7 Begin the SysEx source device (if using Pro Tools, begin playback). Command|8 dis-plays a status message while loading.

Naming Presets
You can save custom names for presets, making it easier to manage multiple presets for different devices.
To name a Command|8 preset:
1 Press the Standalone switch (located next to the USB and MIDI status LEDs), to enter stand-alone mode.
2 Press F3 PRE MIDI Recall.
3 Navigate to the preset you want to name by rotating the channel 1 encoder until its number (or previous name, if any) is displayed.
4 Press the channel 2 Select switch to enter Pre-set Name mode. The LCD displays a flashing cursor in the lower row of channel 1.
5 To name your preset, choose letters by rotat-ing the channel 2 encoder (Char) until the de-sired letter or number is shown. Scroll through the entire range of choices to access upper case letters.
6 Rotate the channel 1 encoder (Cursor) clock-wise to advance the flashing cursor to the next (or any) character space available for the preset name. Rotate the channel 2 encoder to choose a character, and repeat for additional characters.
7 When you have entered the desired name, press the channel 7 Select switch (Okay). Or, to cancel, press channel 6 Select (Cancel).
Naming Controller Assignments
You can give each programmable control its own custom name. Some people get by with the default controls and their own memory. Others will appreciate the ability to give parameters names that indicate the control to which they are mapped, such as whether a fader or encoder is mapped to a frequency slider in an EQ or a fil-ter resonance control in a soft synth.
To save names for programmed controls:
1 Select the preset containing the control you want to name.
2 Select the control for MIDI editing.
3 Rotate the channel 8 encoder (Name). The LCD now displays Cursor, Char, Cancel, and Okay in the upper row, with a flashing cursor in the lower row above channel 1.
4 To enter a name, rotate the channel 2 encoder (Char) until the desired letter or number is dis-played.
5 Rotate the channel 1 encoder (Cursor) to move the cursor to the next character space, and repeat until you have entered the desired name.
Chapter 5: Using Stand-Alone Mode 53

54
Command|8 Guide
appendix a
Utility Functions
Command|8 Utility functions include the fol-lowing:
• Software and firmware version display
• Fader calibration
• Tests for faders, encoders, LEDs, switches, and the LCD
Accessing Utility Mode
To access Command|8 Utility mode:
1 Press F1 Utility. The LCD displays the avail-able Utility functions across the upper row. The corresponding channel Select switch select each option.
2 Press a channel Select switch to choose a Util-ity function.
3 To cancel a Utility function or test at any time, press Select on channel 8 (the LCD displays ESC above channel 8), or press Utility again.
Viewing Command|8 Version Data
This Utility function lets you check the current firmware version and other statistics useful when upgrading, or when contacting technical support.
To display Command|8 version data:
1 Access Utility mode.
2 Select Vers by pressing the corresponding channel Select switch. The LCD shows version information about various components of Com-mand|8.
3 To exit, press channel eight Select (below the LCD display ESC).
Appendix A: Utility Functions 55

56
Fader TestsCommand|8 provides tests for fader and group performance.
Use this routine to return the motorized, touch-sensitive faders to their factory calibration set-ting.
Touch Circuit Test
To reset the faders:
1 Press F1 Utility, to enter Utility mode.
2 Select Fadcal by pressing the channel 1 Select switch. Do not touch the faders, as the fader routine begins immediately and moves the fad-ers through their range of travel. The lower row of the LCD shows fader resolution while the test is in process.
3 Faders park at the bottom of the fader paths when recalibration is complete.
4 Press the channel 8 Select switch (Esc) to exit.
Fader Tests
These functions test fader performance and fader group resolution. You can use these rou-tines to troubleshoot the mechanical elements of the Command|8 faders.
To test fader resolution:
1 Press F1 Utility, if necessary, to enter Utility mode.
2 Select Fader by pressing the channel 2 Select switch. The LCD displays the available fader Utility functions.
3 Select FadTst by pressing the channel 2 Select switch. Do not touch the faders.
Command|8 Guide
4 Press the channel 8 Select switch to stop the test.
To test fader group resolution:
1 Press F1 Utility, if necessary, to enter Utility mode.
2 Select Fader by pressing the channel 2 Select switch.
3 Select Group by pressing the channel 3 Select switch.
4 One by one, touch and move each fader. The other seven faders follow, and the LCD displays resolution for each fader as they move through their range so you can compare fader perfor-mance as both a group master and slave.
LED TestsUse this test to check all LEDs of similar color si-multaneously.
To test LEDs:
1 Press F1 Utility, if necessary, to enter Utility mode.
2 Select LED by pressing the channel 3 Select switch. The LCD displays tests for each color LED used in Command|8. Choices include Grn (green), Red, Yel (yellow), and All.
3 Select a test by pressing the channel Select switch corresponding to the desired color. To test all LEDs simultaneously, select All. The se-lected color (or all) LEDs light solid.
4 Select another color LED test by pressing its corresponding channel Select switch.
5 To exit LED test mode and remain in Utility mode, press channel 8 Select (Exit).
6 To exit Utility mode entirely, press F1 Utility.
LCD Display TestUse this test to assess the performance of the LCD.
To test the LCD:
1 Press F1 Utility, if necessary, to enter Utility mode.
2 Select Disp (Display) by pressing the channel 4 Select switch.
3 Press channel 1 Select to start the LCD test. All pixels in the LCD light solid, letting you quickly tell if any area of the display is damaged.
4 To turn to all black, press channel 3 Select.
5 To exit Display Test mode, press channel 8 Se-lect (Exit).
6 To exit Utility mode, press F1 Utility.
Switch TestUse this test to evaluate the performance of Command|8 switches.
To test switches:
1 Press F1 Utility, if necessary, to enter Utility mode.
2 Select the Switch test by pressing the channel 5Select switch.
3 Press any Command|8 switch to test it. The LCD displays the location and name of each switch as you test it.
4 To exit Switch test mode, press channel 8 Se-lect (Exit).
5 To exit Utility mode, press F1 Utilityl.
Encoder TestUse this test to evaulate the performance of the Command|8 rotary encoders.
To test the encoders:
1 Press F1 Utility, if necessary, to enter Utility mode.
2 Select Encodr (Encoder) by pressing the chan-nel 6 Select switch.
3 Rotate any encoder to test it. Encoder value is displayed in the LCD while testing.
4 To exit Encoder test mode, press channel 8 Se-lect (Exit).
5 To exit Utility mode, press F1 Utility.
Appendix A: Utility Functions 57

58
Command|8 Guide
Symbols@ (inactive send or insert) 38
AAC power 9Arrow keys
defining selections 33moving selections up and down 33
audio connectionsanalog 11
AutoMatch function 43automation
AutoMatch function 43Snap Back function 43
Avidmapping 19mode for Command|8 19supported applications 19
BBank switch 32banking tracks 32bypassing plug-ins 41
CCC# (Stand-alone mode) 50Chan (Stand-alone mode) 50channel controls
faders 22Mute switch 22Select 23solo switch 22
channel select switch 23Channel View 21
switches in stand-alone mode 48Command|8
system requirements 2top panel 20
Console View 21Control|24 7controls
programming for Stand-alone mode 50
DdBFS 23
EEdit switch (window display) 32encoders
Stand-alone mode 48Ext Source 11
index
Index 59

60
FF1 Utility 55F2 MIDI Edit 49F3 PRE/MIDI Recall 37F4 Fader Mute 22F5 Focus 28
plug-ins 39sends 38
Fader Flip 23Fader Mute 22faders 22
muting 22Stand-alone mode 48testing and resetting 56
firmware 10, 55Flip
plug-ins 42sends 39
focusplug-ins and targets 40
footswitch 12
Ggain (PRE)
Hheadphones 12Home View 21
IIn and Out points 33inactive
display of plug-in status 41display of send status 38
inserts 40
Kknobs (see rotary encoders)
Command|8 Guide
LLED
MIDI 30USB 30
Live 45Loop Record 37lost communication 17
MMain 11Master Faders 23meters
channel LEDs 23pre and post fader 26using the rotary LEDs 23
mic-pre (see PRE)MIDI
CC (Continuous Controller) 45connections 12continuous controller 45editing maps in stand-alone mode 49LED 30recording 37selecting ports 14Stand-alone CC assign 50Stand-alone channel assign 50start and end assignments 50SysEx 45USB 12
MIDI Machine Control (see MMC)Mix switch (window display) 32MMC 48, 51modes
Flip mode 23operational 19
Monitor Inputs 11monitoring
Auto Input and Input Only 36connections 11using TrackInput 36
moving selections 33multi-mono 42mute
faders 22sends 39
Mute switch 22

NNudge 32
Ooperating levels 11
Ppages 47pages (plug-ins) 42Pan/Meter 23Pan/Send/PRE 26Plug-in switch 32plug-ins 26
bypassing 41editing 39Flip 42in Channel View 26inactive 41multi-mono 42paging 42targets and focus 40viewing 40
PRE 37enabling MIDI for 15
pre and post fader metering 26presets 47
navigating Stand-alone 47ProControl 7
QQuickPunch 34
RReason
and Stand-alone mode 45recording
Loop mode 37MIDI 37monitor modes 36QuickPunch 34QuickPunch mode 34TrackPunch mode 35, 36
ReWire 45see Stand-alone mode
Sscrolling tracks (see Nudge) 32Select 23sends
Flip 39muting 39viewing and adjusting 38viewing level 21
Snap Back function 43software
and USB ports 10solo switch 22Stand-alone mode
and MMC 48assigning CC 50assigning control channel 50assigning Start and End values 50compatibility 45entering 46F2 MIDI Edit mode 49F3 PRE MIDI Recall 51navigating 47programmable controls and defaults 48programming and editing 49programming controls 50quickstart instructions 46
Standby mode 19Start and End (MIDI) 50switches
Stand-alone mode 48SysEx 45system requirements 2
Index 61
62
Ttarget
and control surfaces 3and plug-in windows 40
testingfaders 56LCDs 57LEDs 56rotary encoders 57switches 57
TrackInput monitoring 36TrackPunch 35, 36tracks
metering 23scrolling 32
Transport 31and MMC 48switches in stand-alone mode 48
troubleshooting 17
UUndo switch 31Up and Down 33USB 9
LED 30MIDI 12port limitations 10
Vviews
Channel View 21Console View 21F5 focus 39Home View 21
WWindows
Edit 32Mix 32Plug-in 32
ZZoom 32zoom controls 28
Command|8 Guide

DIGIDESIGN2001 Junipero Serra Boulevard
Daly City, CA 94014-3886 USA
Tel: 650.731.6300
Fax: 650.731.6399
TECHNICAL SUPPORT (USA)Tel: 650.731.6100
Fax: 650.731.6384
PRODUCT INFORMATION (USA)Tel: 650.731.6102
Fax: 800.333.2137
INTERNATIONAL OFFICESVisit our Digidesign Web sitefor contact information
www.digidesign.com