combination child seat · 2019-11-13 · the back seat is the safest place for children under 13....
TRANSCRIPT

1
Combination Child Seat
Harness Mode Booster Mode


Table Of ContentsPage
General Information ................4
Registration Information .........5
Warnings ................................6
Safe Practices ........................9
Height And Weight Limitations ........................... 11
Child Restraint Features .......12
Vehicle Information............... 14Features ....................................14Seat Requirements ....................16Airbag Warning ...........................17Reclining Child Restraint ........... 17LATCH Requirements ..................18Seat Belt Requirements .............20Unacceptable Seat Belt Systems ..20Acceptable Seat Belt Systems ....22
Harness Mode Installation ..........................24 With LATCH ............................26 With Lap-Shoulder Seat Belt ..32 With Lap Only Seat Belt .........39Headrest Removal/Installation ..46Harness Buckle Positioning ........48
Securing Child In Harness .....49
Proper Use Checklist ............55
PageBooster Mode .......................56
Converting to Booster Mode . 58
Installation ..........................60 Without LATCH .......................60 With LATCH ............................61
Securing Child in Booster ......64
Proper Use Checklist ............66
Additional InformationInstructions Storage ...................67Storing the Child Restraint .........67Aircraft Use ................................69Other Uses .................................69
Care And CleaningSeat Cover Care .........................70Cover Installation .......................72Buckle and Harness Care ...........75Inspect Buckle and Harness .......75Reinstall Harness .......................76
Replacement Parts ...............79
IMMI GO Service Life ............79
Warranty ..............................80
Keep this manual in the storage location provided on the IMMI GO.

4
General InformationCongratulations on your purchase of a IMMI GO,™ the premiere portable child restraint available today. The IMMI team truly cares about child passenger safety and is committed to providing innovative child restraints that offer the utmost in safety and ease of use. While no child restraint can prevent injury in every situation, proper installation and use of a child restraint can substantially reduce a child’s risk of serious injury or death.
It is critical to read and understand these instructions and the instructions in the vehicle owner’s manual BEFORE using this child restraint. Failure to properly use this child restraint may result in serious injury or death of your child. If you have any questions after reviewing the instructions, please contact us at:
IMMI Customer Service: www.imminet.com/go (or) 1-877-447-2305.
This child restraint conforms to all applicable Federal motor vehicle safety standards. This restraint is NOT certified for aircraft use.

5
Registration InformationPlease fill out the prepaid registration card attached to the child restraint and mail it today (or) register online at the website listed below.
Child restraints could be recalled for safety reasons. You must register this restraint to be reached in a recall. Send your name, address, and the restraint’s model number, manufacturing date, and serial number to IMMI, 18881 U.S. 31 North, Westfield, IN 46074 (or) call 1-877-447-2305 (or) register online at www.imminet.com/go.
For recall information, call the U.S. Government’s Vehicle Safety Hotline at 1-888-327-4236 (TTY: 1-800-424-9153), or go to www.NHTSA.gov.
For future reference, fill in the information below. The information can be found on the label on the bottom of the child restraint.
Model Number:
Serial Number:
Manufactured In: (Month/Day/Year)

6
WARNING
Warnings
FAILURE TO FOLLOW THESE WARNINGS CAN RESULT IN SERIOUS INJURY OR DEATH OF YOUR CHILD. PLEASE READ AND FOLLOW ALL CHILD RESTRAINT AND VEHICLE INSTRUCTIONS CAREFULLY.
• DO NOT INSTALL OR USE THIS CHILD RESTRAINT UNTIL YOU READ AND UNDERSTAND THE INSTRUCTIONS IN THIS MANUAL, ON THE LABELS OF THIS CHILD RESTRAINT, AND IN THE VEHICLE OWNER’S MANUAL. DO NOT let others install or use this child restraint unless they understand how to use it correctly.
• According to crash statistics, CHILDREN ARE SAFER WHEN PROPERLY RESTRAINED IN REAR VEHICLE SEATING POSITIONS, RATHER THAN FRONT SEATING POSITIONS.
• DO NOT PLACE ANY CHILD RESTRAINT IN THE FRONT SEAT OF A VEHICLE WITH AN ACTIVE PASSENGER AIR BAG UNLESS THE VEHICLE OWNER’S MANUAL SPECIFICALLY INDICATES IT IS ALLOWED. The back seat is the safest place for children under 13. FOR A VEHICLE WITH SIDE AIR BAGS, REFER TO THE VEHICLE OWNER’S MANUAL for child restraint installation instructions and precautions.
• INSTALL THIS CHILD RESTRAINT ONLY ON VEHICLE SEATS THAT FACE FORWARD. DO NOT install this child restraint on vehicle seats facing sideways or backwards.
• FOLLOW ALL THE INSTRUCTIONS on the child restraint and in this manual.
• ONLY USE THIS CHILD RESTRAINT FACING THE FRONT OF THE VEHICLE. DO NOT install rear-facing.

7
WARNING Warning cont’d.
FAILURE TO FOLLOW THESE WARNINGS CAN RESULT IN SERIOUS INJURY OR DEATH OF YOUR CHILD. PLEASE READ AND FOLLOW ALL CHILD RESTRAINT AND VEHICLE INSTRUCTIONS CAREFULLY.
• ALWAYS SECURE THIS CHILD RESTRAINT WITH THE VEHICLE’S CHILD RESTRAINT ANCHORAGE SYSTEM (LATCH) IF AVAILABLE OR WITH THE VEHICLE SEAT BELT. A child restraint should be properly secured even when unoccupied. An unsecured child restraint can be thrown around and may injure occupants in a sharp turn, sudden stop or crash.
• NEVER LEAVE A CHILD UNATTENDED in this child restraint.• REPLACE THIS CHILD RESTRAINT AFTER A CRASH. A crash can cause
damage to the child restraint that you cannot see. Contact IMMI Customer Service for more information.
• DISCONTINUE USE OF THIS CHILD RESTRAINT six years after manufacture date located on the bottom of the child restraint.
• DO NOT MODIFY THIS CHILD RESTRAINT or use any accessories or parts supplied by other manufacturers. DO NOT, except as allowed in this manual, attempt to disassemble any part of the child restraint or change the way the harness or vehicle seat belt are used.
• NEVER USE THIS CHILD RESTRAINT IF IT HAS DAMAGED OR MISSING PARTS. DO NOT use a cut, frayed or damaged harness, LATCH belt or vehicle seat belt.
• This restraint is NOT certified for aircraft use.

8
FAILURE TO FOLLOW THESE WARNINGS CAN RESULT IN SERIOUS INJURY OR DEATH OF YOUR CHILD. PLEASE READ AND FOLLOW ALL CHILD RESTRAINT AND VEHICLE INSTRUCTIONS CAREFULLY.
WARNING
• Top of child’s ears must be below the top of the vehicle seat cushion or vehicle headrest. If the top of the child’s ears are above the top of the vehicle seat cushion or vehicle headrest, do NOT use the child restraint in this seating position.
When used in the harness mode:• WEIGHT: SEE PAGE 11 OF THIS MANUAL• HEIGHT: BETWEEN 31 AND 52 INCHES (78.7 - 132.1 CM), AND OVER 1 YEAR OLD. • ALWAYS SECURE THE TOP TETHER STRAP provided with this child restraint.
If a top tether anchor is not available in your vehicle, do NOT use this restraint.
• SNUGLY ADJUST THE HARNESS provided with this child restraint around the child. An improperly adjusted harness may not sufficiently restrain the child in a crash resulting in serious injury or death.
• DO NOT RECLINE the vehicle seat beyond 30 degrees from vertical. Be sure the top tether strap is tightly secured after the vehicle seat is reclined.
When used in the belt-positioning booster mode (without the harness): • USE ONLY WITH CHILDREN WHO WEIGH BETWEEN 40 AND 100 POUNDS
(18.1 - 45.4 KG) AND WHOSE HEIGHT IS BETWEEN 43 AND 57 INCHES (110.1 - 144.8 CM), AND WHO ARE 4 YEARS OLD OR OLDER.
• USE ONLY THE VEHICLE LAP AND SHOULDER BELT SYSTEM when restraining the child in the booster seat. NEVER use a lap belt only.

9
Safe Practices
• Ensure all vehicle occupants are properly restrained before traveling. Unrestrained occupants can be thrown around and may be seriously injured or seriously injure other occupants in a sharp turn, sudden stop or crash.
• Before every trip, check that the child restraint is secure and that the harness is properly adjusted around the child.
• If the child is wearing cold weather clothing, give extra attention to adjusting the harness. Make sure the harness straps lie flat on the child’s shoulders and the chest clip is at armpit level. Check to be sure harness is snugly adjusted and the child cannot lean forward. Clothing that interferes with the proper placement or adjustment of the harness system should never be used.
• Cover the child restraint when the vehicle is parked in direct sunlight. Parts of a child restraint can become very hot if left in the sun. Contact with these parts can burn a child’s skin. Always check the surface of any metal or plastic parts before putting a child in the child restraint.
• Do not leave loose objects, such as books, bags, etc., in the back of the vehicle. In the event of a sharp turn, sudden stop, or crash, loose objects can be thrown around and possibly cause serious injury to vehicle occupants.
• Do not allow children to play with vehicle seat belts. If possible, move unused seat belts out of reach to avoid a strangulation hazard.
• Always tightly roll or fold any excess top tether strap and secure with the attachment strip to avoid a strangulation hazard.
• Do not leave folding vehicle seats unlatched. This can lead to serious injury in a sharp turn, sudden stop, or crash.

10
• Do not use anything to raise the child restraint off the vehicle seat. In a sharp turn, sudden stop, or crash, the child restraint could slide and potentially cause serious injury.
• Do not allow children to play with the child restraint.• Never give this child restraint to someone else without also giving
them this manual.• Never use a second-hand child restraint with an unknown history.
Safe Practices cont’d.
11
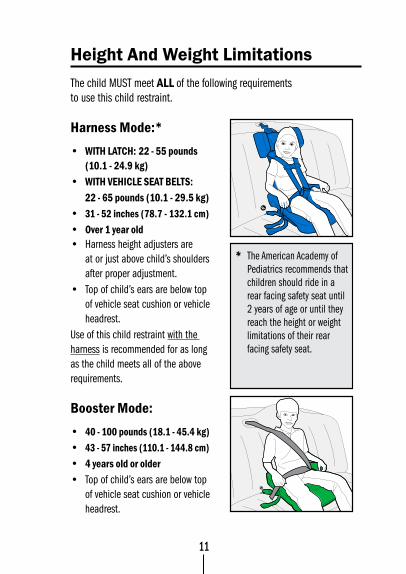
Height And Weight LimitationsThe child MUST meet ALL of the following requirements to use this child restraint.
Harness Mode:*• WITH LATCH: 22 - 55 pounds (10.1 - 24.9 kg)• WITH VEHICLE SEAT BELTS: 22 - 65 pounds (10.1 - 29.5 kg)• 31 - 52 inches (78.7 - 132.1 cm) • Over 1 year old • Harness height adjusters are
at or just above child’s shoulders after proper adjustment.
• Top of child’s ears are below top of vehicle seat cushion or vehicle headrest.
Use of this child restraint with the harness is recommended for as long as the child meets all of the above requirements.
Booster Mode:• 40 - 100 pounds (18.1 - 45.4 kg)• 43 - 57 inches (110.1 - 144.8 cm) • 4 years old or older• Top of child’s ears are below top
of vehicle seat cushion or vehicle headrest.
harness_child_iso_yellow_REV.ai
The American Academy of Pediatrics recommends that children should ride in a rear facing safety seat until 2 years of age or until they reach the height or weight limitations of their rear facing safety seat.

Harness Mode Features
Removable Headrest
Harness Height Adjuster
Chest Clip
Harness Buckle
Seat CoverLower LATCH Connector
5-Point Harness
Tether Adjuster
Top Tether (Gray Web)
Harness Adjuster
LATCH Adjuster
12
Harness ModeWEIGHT: SEE PAGE 11
HEIGHT: 31 - 52 inches (78.7 - 132.1 cm)Over 1 year old
MUST be used with top tether.Installation instructions begin on page 24.
Harness Cover
Vehicle Belt Attachment Loop
30° HARNESSMODE ONLYDo NOT recline
veh ic le seatbeyond 30°
from ver t i ca l .
Be sure the top tether strap is tightly secured after the
vehicle seat is reclined.
3 BucklePositions
LATCH AdjusterPull Loop
(Gray Web)Harness AdjusterPull Loop (Black Web)
LATCHConnectorStorage

MOD
E
Seat Cover
Lower LATCH Connector
13
Booster Mode Features
Booster ModeWEIGHT: 40 - 100 pounds (18.1 - 45.4 kg)HEIGHT: 43 - 57 inches (110.1 - 144.8 cm)
4 years old or olderMUST be used with lap-shoulder belt.Installation instructions begin on page 56.
LATCH Connector Storage
LATCH Connector Storage
LATCH Adjuster
LATCH AdjusterPull Loop (Gray Web)

14
Vehicle InformationFor use in passenger vehicles, light trucks, vans, and SUVs with forward facing seats and tether anchors.
Vehicle FeaturesImportant: Refer to your vehicle owner’s manual to identify your vehicle’s specific features and requirements for child restraint installation. Your vehicle’s features may be quite different from those shown below.
According to crash statistics, children are safer when
properly restrained in the rear seating positions than in the front seating positions.
Frontal Air Bag Do not place this child restraint in a vehicle seating position that has an active frontal air bag.
Top Tether Anchors
Rear Lap-Shoulder Belts
Rear Center Lap Belt
LATCH Lower Anchors
Seat Bight
Rear Seat Belt Buckles

15
Refer to your vehicle owner’s manual to identify top tether anchor locations and the type of vehicle headrest.The top tether strap is routed differently based on the type of vehicle headrest as shown below.
Movable Vehicle Headrest
Fixed Vehicle Headrest
vehicle_tether_fixed headrest.ai
PMS 285
Ceiling or frame around the rear door
Rear shelf of sedans
vehicle_tether_movable headrest.ai
PMS 285
Rear shelf of sedans
Back wall of pickups
Cargo floor of station wagons, hatchbacks, vans and SUV’s
Vehicles with reinforced seats
Ceiling or frame around the rear door
Never route top tether over top of movable vehicle headrest.

16
• According to crash statistics, children are safer when properly restrained in rear vehicle seating positions, rather than front seating positions.
• The child restraint should not hang over the edge of the vehicle seat. At least 80% of the bottom of the child restraint should be in contact with the vehicle seat cushion.
• Install this child restraint only on vehicle seats that face forward. DO NOT install this child restraint on vehicle seats facing sideways or backwards.
• Be sure the vehicle seat and vehicle seat back are properly locked into position before using this child restraint.
If you are not sure where to place the child restraint in your vehicle, consult your vehicle owner’s manual or call IMMI Customer Service at 1-877-447-2305.
WARNING
Vehicle Seat Requirements
FAILURE TO FOLLOW THESE VEHICLE SEAT REQUIREMENTS CAN RESULT IN SERIOUS INJURY OR DEATH.
SOME SEATING POSITIONS IN YOUR VEHICLE MAY NOT BE ACCEPTABLE FOR THIS CHILD RESTRAINT. Some vehicles do not have any seating positions that can be used safely with a child restraint.

17
FAILURE TO FOLLOW THESE WARNINGS CAN RESULT IN SERIOUS INJURY OR DEATH.
• DO NOT place a child restraint in a front seat of a vehicle with an active passenger air bag unless the vehicle owner’s manual specifically indicates it is allowed.
• For vehicles with side air bags, refer to the vehicle owner’s manual for child restraint installation instructions and precautions.
WARNING
Airbag Warning
Reclining Child Restraint
• Refer to vehicle owner’s manual for instructions to recline the vehicle seat back.
• Recline vehicle seat back to desired position. DO NOT recline vehicle seat beyond 30 degrees from vertical. DO NOT recline seat when using child restraint in booster mode.
• Install child restraint in vehicle per instructions (see page 24). BE SURE top tether strap is tightly secured after the vehicle seat is reclined (see pages 28-29 for top tether instructions).
30° HARNESSMODE ONLYDo NOT recline
veh ic le seatbeyond 30°
from ver t i ca l .
• According to crash statistics, children are safer when properly restrained in rear vehicle seating positions, rather than front seating positions.

18
If you are unsure about how to identify or use the LATCH system, contact the vehicle manufacturer or call IMMI Customer Service at 1-877-447-2305.
LATCH (Lower Anchors and Tethers for CHildren) can be found in newer vehicles. Most new vehicles have two or more seating positions with LATCH anchorage systems. When used properly, the system holds the child restraint securely in place.
This child restraint requires the use of a top tether anchor when using the harness mode. If a top tether anchor is not available, DO NOT USE this child restraint.
LATCH consists of two parts: Lower anchors and top tether anchors.
LATCH Requirements
Lower LATCH Anchors
Top Tether Anchors
WARNINGFAILURE TO FOLLOW THESE LATCH REQUIREMENTS CAN RESULT IN SERIOUS INJURY OR DEATH.
SEE THE VEHICLE OWNER’S MANUAL FOR EXACT LOCATIONS AND REQUIREMENTS FOR USING LATCH WITH THIS CHILD RESTRAINT.

19
• The vehicle lower anchors may be visible at the vehicle seat bight (seat crease). If not visible, they may be marked with one of these symbols.
• The vehicle’s top tether anchors may be visible. If not, they may be identified with this symbol.
• ONLY use LATCH on this child restraint in a seating position recommended by the vehicle manufacturer.
• LATCH and the center-rear seating position: Do not use the inner lower LATCH anchors to install the child restraint in the center-rear seating position, unless:
- the vehicle owner’s manual specifically indicates it is allowed, AND
- the inner anchors are spaced between 11 and 20 inches (280 and 500mm) apart.
When using the harness mode:•
• Never use both the lower LATCH anchors and the vehicle seat belt system at the same time to install this child restraint.
• Always use the top tether!
11 - 20 inches(280 - 500mm)
InnerLowerLATCH
anchors
OutboardLATCH
Position
OutboardLATCH
Position
Do not use the lower anchors of the child restraint anchorage system (LATCH system) to attach this child restraint when restraining a child weighing more than 55 lbs. (24.9 Kg) with the internal harnesses of the child restraint.
• Never attach two LATCH connectors to one LATCH anchor.

20
WARNING
Vehicle Seat Belt Requirements For Installation
Unacceptable Vehicle Seat Belt SystemsDO NOT USE ANY OF THE FOLLOWING SYSTEMS WITH THIS CHILD RESTRAINT.
• Lap belt with an emergency locking retractor (ELR) This type of lap belt stays loose and can move until it locks in a sudden stop or crash. This vehicle seat belt may NOT safely hold a child restraint in place. DO NOT USE this type of belt system unless the vehicle owner’s manual or label states the belt can be locked at all times.
NEVER use a lap belt only when using the child restraint in a belt positioning booster mode.
• Inflatable lap-shoulder belts.
Make sure you understand the seat belt systems in your vehicle. Carefully read this section on belt systems and also refer to the vehicle owner’s manual and any labels on the vehicle seat belts. If you are unsure whether the vehicle seat belts are acceptable to use, contact the vehicle manufacturer or call IMMI Customer Service at 1-877-447-2305.
FAILURE TO FOLLOW THESE VEHICLE SEAT BELT REQUIREMENTS CAN RESULT IN SERIOUS INJURY OR DEATH.
SOME VEHICLE SEAT BELT SYSTEMS ARE NOT ACCEPTABLE TO USE WITH THIS CHILD RESTRAINT.

21
• Lap or lap-shoulder belts forward of the seat bight (seat crease) Some vehicle seat belt systems’ lap or lap- shoulder belts are anchored forward of the seat bight and come up through the vehicle seat’s bottom cushion. This vehicle seat belt may NOT safely hold a child restraint in place. DO NOT USE this type of belt system unless it holds the child restraint securely and the lap belt portion stays locked at all times.
NEVER use a lap belt only when using the child restraint in a belt positioning booster mode.
• Belt systems attached to the vehicle door or on a motorized track. DO NOT USE vehicle seat belts that are attached to the door in any way or that move along a track to automatically surround the passenger when the door is closed. These vehicle seat belts WILL NOT safely hold a child restraint in place.
• Combination lap-shoulder belt with two retractors This type of belt system has a retractor for the shoulder portion and another retractor for the lap portion of the belt system. Both belt portions are sewn to the latch plate. This vehicle seat belt may NOT safely hold a child restraint in place. DO NOT USE this type of belt system with the harness unless the vehicle owner’s manual or label states the lap belt portion can be locked at all times.
NOTE: This belt system may be used when using the child restraint as a belt positioning booster.

22
Acceptable Vehicle Seat Belt Systems For InstallationTHE FOLLOWING VEHICLE SEAT BELT SYSTEMS CAN BE USED WITH THIS CHILD RESTRAINT IF the seat location meets all other requirements of these instructions and those in the vehicle owner’s manual. If available, the LATCH attachments on this child restraint and the LATCH anchor points in the vehicle may be an option to use in place of the vehicle seat belt system when using the harness mode. Refer to the vehicle owner’s manual for LATCH locations and page 18-19 of this manual for more information.
• Manually-adjusted lap belt This type of lap belt is tightened by pulling on the excess belt once it is buckled. When adjusted properly, this belt system should hold the child restraint securely in place. Always check to make sure the seat belt is holding the child restraint securely.
NEVER use a lap belt only when using the child restraint in a belt positioning booster mode.
• Lap belt with automatic locking retractor (ALR) This belt system’s retractor locks automatically and does not allow the lap belt to lengthen once it is buckled. When used properly, this belt system should hold the child restraint securely in place. The belt may need to be fed back into the retractor to remove the slack. Always check to make sure the seat belt is holding the child restraint securely.
NEVER use a lap belt only when using the child restraint in a belt positioning booster mode.
23
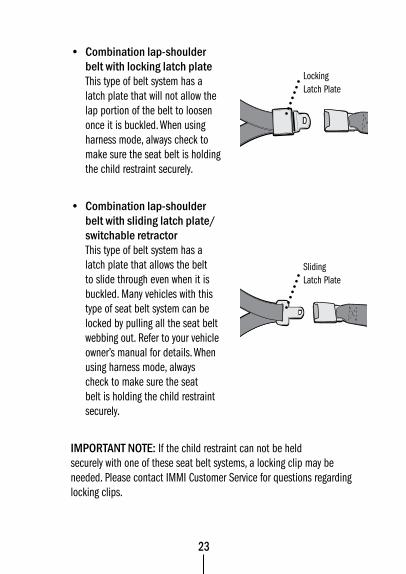
• Combination lap-shoulder belt with locking latch plate This type of belt system has a latch plate that will not allow the lap portion of the belt to loosen once it is buckled. When using harness mode, always check to make sure the seat belt is holding the child restraint securely.
• Combination lap-shoulder belt with sliding latch plate/switchable retractor This type of belt system has a latch plate that allows the belt to slide through even when it is buckled. Many vehicles with this type of seat belt system can be locked by pulling all the seat belt webbing out. Refer to your vehicle owner’s manual for details. When using harness mode, always check to make sure the seat belt is holding the child restraint securely.
IMPORTANT NOTE: If the child restraint can not be held securely with one of these seat belt systems, a locking clip may be needed. Please contact IMMI Customer Service for questions regarding locking clips.
LockingLatch Plate
SlidingLatch Plate

24
FAILURE TO USE THIS CHILD RESTRAINT IN A MANNER APPROPRIATE FOR THE CHILD’S SIZE CAN RESULT IN SERIOUS INJURY OR DEATH.
• Instructions for the use of this child restraint differ depending on the size of the child. Be sure you are using the child restraint properly.
• Top of child’s ears must be below the top of the vehicle seat cushion or vehicle headrest. If the top of the child’s ears are above the top of the vehicle seat cushion or vehicle headrest, do NOT use the child restraint in this seating position.
• USE ONLY WITH CHILDREN WHO WEIGH (SEE PAGE 11), HEIGHT IS BETWEEN 31 and 52 inches (78.7 - 132.1 cm), AND WHO ARE OVER 1 YEAR OLD.
• ALWAYS SECURE THE TOP TETHER STRAP provided with this child restraint. If a top tether anchor is not available in your vehicle, do NOT use this restraint.
• SNUGLY ADJUST THE HARNESS provided with this child restraint around your child. An improperly adjusted harness may not sufficiently restrain the child in a crash resulting in serious injury or death.
• DO NOT RECLINE the vehicle seat beyond 30 degrees from vertical. Be sure the top tether strap is tightly secured after the vehicle seat is reclined.
WARNING
Installation Of Harness Mode In Vehicle
24
HAR
NES
SMOD
E

MOD
E
harness_child_iso_yellow_REV.ai
HARNESS MODE
25
Use this child restraint FORWARD FACING ONLY.
Harness mode MUST be used with the top tether.
• WEIGHT WITH LATCH: 22 - 55 pounds (10.1 - 24.9 kg)
• WEIGHT WITH VEHICLE SEAT BELTS: 22 - 65 pounds (10.1 - 29.5 kg)
• HEIGHT: 31 - 52 inches (78.7 - 132.1 cm)
• Over 1 year old

26
FAILURE TO FOLLOW ALL INSTRUCTIONS MAY RESULT IN SERIOUS INJURY OR DEATH.
• Do not use the lower anchors of the child restraint anchorage system (LATCH system) to attach this child restraint when restraining a child weighing more than 55 lbs. (24.9 Kg) with the internal harnesses of the child restraint.• Use this child restraint FORWARD FACING ONLY.• ALWAYS USE THE TETHER. THE HARNESS MODE CAN NOT BE USED WITHOUT THE TETHER.• Never attach two LATCH connectors to one LATCH anchor.• Use LATCH only in seating positions approved by the vehicle manufacturer.• Read and follow all instructions in the child restraint instruction manual
and the vehicle owner’s manual. In the case of a discrepancy, follow the instructions in the vehicle owner’s manual.
• See pages 18-19 for important LATCH requirements.
Installation With LATCH (22-55 LBS., 31-52”, over 1 year old)
1. Choose an appropriate vehicle seat and verify a top tether anchor and lower LATCH anchors are available. A1
• Refer to vehicle owner’s manual to determine the exact LATCH anchor locations.
• If a top tether anchor is not available, DO NOT USE this child restraint. Use of the top tether is required with the harness mode.
• DO NOT RECLINE the vehicle seat beyond 30 degrees from vertical. See page 17 for recline instructions. A2
WARNING
A1
26
30°
A2
HAR
NES
SMOD
E

MOD
EInstallation With LATCH cont’d.
• If a top tether anchor is available but lower LATCH anchors are NOT available, the child restraint must be installed with a vehicle seat belt. (See page 32.)
2. Position the child restraint loosely against the vehicle seat facing forward. B
3. Remove one LATCH connector from its storage location on the side of the child restraint. Push LATCH adjuster button and pull strap to lengthen the lower LATCH strap. C
4. Attach LATCH connector to vehicle lower anchor. D Listen for a click when the connector is attached.
Check to be sure LATCH strap is not twisted and LATCH connector is attached properly.
5. Repeat steps 3 and 4 with the second LATCH connector.
harness_nochild_iso_unattached_REV.ai
B
C
D
27

6. Tightly secure the base of the child restraint:
• Pull one LATCH strap while firmly pushing child restraint down into vehicle seat as shown. E
• Repeat with the second LATCH strap.
7. Prepare the top tether:
Tether use is required. The harness can NOT be used without the top tether.
• To lengthen top tether, push top tether adjuster button and pull top tether strap as shown. F
• Movable Vehicle Headrest:
ALWAYS route the top tether straps UNDER the vehicle headrest. If the top tether straps cannot be routed UNDER the movable vehicle headrest, do NOT use the child restraint in this seating position. Route the top tether straps between the vehicle headrest posts if possible. G1
• Fixed Vehicle Headrest:
Route the top tether straps around or over the vehicle headrest. G2 or G3
E
F
28
G1
G2 G3
MOVABLE
FIXED FIXED
HAR
NES
SMOD
E

MOD
E 8. Secure the top tether:
• Secure the top tether clip to the vehicle top tether anchor. H
• Pull free end of top tether strap to tighten and remove any slack.
I
• Check to be sure top tether is tight and secure.
• Tightly roll or fold excess top tether strap, secure with the attachment strip, and place out of the child’s reach to avoid a strangulation hazard. J
H
I
tether_roll excess.ai
J
29
Installation With LATCH cont’d.

9. Check for a secure installation:
• Grasp child restraint at rear of arms as illustrated. Pull forward and side-to-side on the child restraint. K
• The installation is secure if the child restraint does not move more than 1 inch in any direction.
• If the child restraint does not remain securely attached, repeat steps 1-9 or move the child restraint to another seating location.
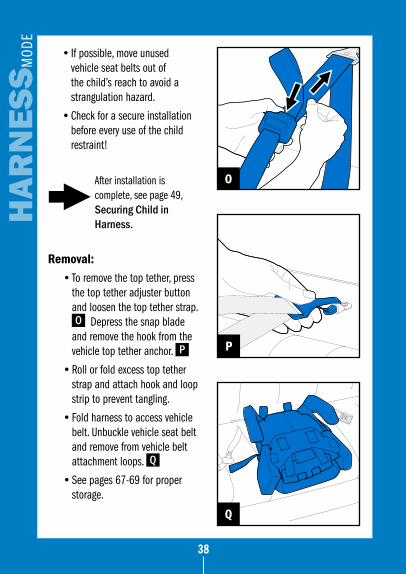
• If possible, move unused vehicle seat belts out of the child’s reach to avoid a strangulation hazard.
• Check for a secure installation before every use of the child restraint!
K
30
After installation is complete, see page 49, Securing Child in Harness.
HAR
NES
SMOD
E

MOD
E
ON
Removal: • To remove the top tether, press
the top tether adjuster button and loosen the top tether strap. L Depress the snap blade
and remove the hook from the vehicle top tether anchor. M
• Roll or fold excess top tether strap and attach hook and loop strip to prevent tangling.
• To detach LATCH connectors from the vehicle lower LATCH anchors, press the red button on each LATCH connector. N Return LATCH connectors to storage locations on side of child restraint.
• Fold harness for storage. O
• See pages 67-69 for proper storage. M
L
31
Installation With LATCH cont’d.
32
WARNING
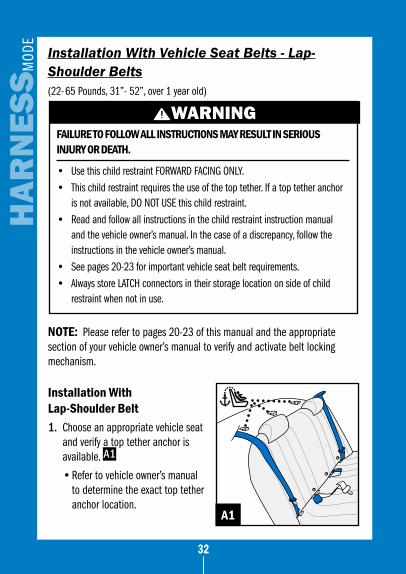
Installation With Vehicle Seat Belts - Lap-Shoulder Belts(22-65 Pounds, 31”- 52”, over 1 year old)
Installation With Lap-Shoulder Belt1. Choose an appropriate vehicle seat
and verify a top tether anchor is available. A1
• Refer to vehicle owner’s manual to determine the exact top tether anchor location.
A1
32
FAILURE TO FOLLOW ALL INSTRUCTIONS MAY RESULT IN SERIOUS INJURY OR DEATH.
• Use this child restraint FORWARD FACING ONLY.• This child restraint requires the use of the top tether. If a top tether anchor
is not available, DO NOT USE this child restraint.• Read and follow all instructions in the child restraint instruction manual
and the vehicle owner’s manual. In the case of a discrepancy, follow the instructions in the vehicle owner’s manual.
• See pages 20-23 for important vehicle seat belt requirements.• Always store LATCH connectors in their storage location on side of child
restraint when not in use.
NOTE: Please refer to pages 20-23 of this manual and the appropriate section of your vehicle owner’s manual to verify and activate belt locking mechanism.
HAR
NES
SMOD
E

33
MOD
E
thread_lapshoulder_1REV.ai
C
• If a top tether anchor is not available, do NOT use this child restraint.
• DO NOT RECLINE the vehicle seat beyond 30 degrees from vertical. See page 17 for recline instructions. A2
2. Position the folded child restraint on the vehicle seat facing forward.
Locate the two vehicle belt attachment loops on back of child restraint as shown. B
3. Route ONLY the lap portion of the vehicle seat belt forward of one armrest as shown. C
33
30°
A2
B
Vehicle Belt Attachment Loops
Lap-Shoulder Belt cont’d.

4. Thread lap-shoulder belt through both vehicle belt attachment loops. D1
Be sure vehicle belt is routed as shown. D2
5. Route lap-shoulder belt forward of second armrest as shown. E
Then buckle vehicle seat belt.
thread_lapshoulder_3REV.ai
EBuck
le.a
i34
thread_lapshoulder_2REV.ai
D2
thread_lapshoulder_2REV.ai
D1
HAR
NES
SMOD
E

35
MOD
E
harness_nochild_lapshoulder_unattached_REV.ai
H
35
install_lapbelt_1.ai
F
6. Tighten the vehicle seat belt:
• Remove any twists from the vehicle belt.
• Push child restraint firmly into vehicle seat.
• Grasp shoulder portion of belt near vehicle belt buckle and pull to tighten lap belt portion of belt. F
• Grasp shoulder portion of belt near center of vehicle seat back and pull up until child restraint is tightly secured. G
Important Note: If vehicle is equipped with a locking seat belt, pull all the webbing out to engage lock mechanism during this step. Refer to vehicle owner’s manual and any labels on the vehicle seat belts for details.
7. Position harness loosely against vehicle seat. H
tighten_seat_belt.ai
G
Lap-Shoulder Belt cont’d.

36
K
36
I
J1
J2 J3
MOVABLE
FIXED FIXED
8. Prepare the top tether:
Tether use is required. The harness can NOT be used without the top tether.
• To lengthen top tether, push top tether adjuster button and pull top tether strap as shown. I
• Movable Vehicle Headrest:
ALWAYS route the top tether straps UNDER the vehicle headrest. If the top tether straps cannot be routed UNDER the movable vehicle headrest, do NOT use the child restraint in this seating position. Route the top tether straps between the vehicle headrest posts if possible. J1
• Fixed Vehicle Headrest:
Route the top tether straps around or over the vehicle headrest. J2 or J3
9. Secure the top tether.
• Secure the top tether hook to the vehicle top tether anchor. K
HAR
NES
SMOD
E

MOD
E
37
N
L
tether_roll excess.ai
M
• Pull free end of top tether strap to tighten and remove any slack. L
• Check to be sure top tether is tight & secure.
• Tightly roll or fold excess top tether strap, secure with the attachment strip, and place out of the child’s reach to avoid a strangulation hazard. M
10. Check for secure installation.
• Grasp child restraint at rear of arms as illustrated. Pull forward and side-to-side on the child restraint. N
• The installation is secure if the child restraint does not move more than 1 inch in any direction.
• If the child restraint does not remain securely attached, repeat steps 1-10 or move the child restraint to another seating location.
Lap-Shoulder Belt cont’d.
MOD
E
38
P
O
Q
Removal: • To remove the top tether, press
the top tether adjuster button and loosen the top tether strap. O Depress the snap blade
and remove the hook from the vehicle top tether anchor. P
• Roll or fold excess top tether strap and attach hook and loop strip to prevent tangling.
• Fold harness to access vehicle belt. Unbuckle vehicle seat belt and remove from vehicle belt attachment loops. Q
• See pages 67-69 for proper storage.
After installation is complete, see page 49, Securing Child in Harness.
• If possible, move unused vehicle seat belts out of the child’s reach to avoid a strangulation hazard.
• Check for a secure installation before every use of the child restraint!
38
HAR
NES
SMOD
E

39
Installation With Vehicle Seat Belts - Lap Belt Only
Installation With Lap Only Belt1. Choose an appropriate vehicle seat
and verify a top tether anchor is available. A1
• Refer to vehicle owner’s manual to determine the exact top tether anchor location.
• If a top tether anchor is not available, do NOT use this child restraint.
A1
WARNINGFAILURE TO FOLLOW ALL INSTRUCTIONS MAY RESULT IN SERIOUS INJURY OR DEATH.
• Use this child restraint FORWARD FACING ONLY.• This child restraint requires the use of the top tether. If a top tether anchor
is not available, DO NOT USE this child restraint.• Read and follow all instructions in the child restraint instruction manual
and the vehicle owner’s manual. In the case of a discrepancy, follow the instructions in the vehicle owner’s manual.
• See pages 20-23 for important vehicle seat belt requirements.• Always store LATCH connectors in their storage location on side of child
restraint when not in use.

MOD
E
40
• DO NOT RECLINE the vehicle seat beyond 30 degrees from vertical. See page 17 for recline instructions. A2
2. Position the folded child restraint on the vehicle seat facing forward. Locate the two vehicle belt attachment loops on back of child restraint as shown. B
3. Route the lap belt forward of one armrest as shown. C
4. Thread lap belt through both vehicle belt attachment loops. D
30°
A2
40
place_seat_lap_only_REV.ai
B
thread_lap_1REV.ai
C
Vehicle Belt Attachment Loops
thread_lap_2REV.ai
D
HAR
NES
SMOD
E

MOD
E 5. Route lap belt forward of second armrest as shown. E Then buckle vehicle seat belt.
6. Tighten the vehicle seat belt:
• Remove any twists from the vehicle belt.
• Push child restraint firmly into vehicle seat.
• Manually adjusted: Pull the free end of the seat belt to tightly secure the child restraint. F
Automatic locking retractor (ALR): Pull seat belt to remove any slack and “feed” seat belt back into the retractor to tightly secure the child restraint. G
Important Note: Refer to pages 14-23 for additional vehicle seat belt information.
thread_lap_3REV.ai
E
automatic_locking_retractor.ai
G install_lap_1.ai
F
Buckle
.ai
41
Lap Only cont’d.

7. Position harness loosely against vehicle seat. H
8. Prepare the top tether:
Top tether use is required. The harness can NOT be used without the top tether.
• To lengthen top tether, push top tether adjuster button and pull top tether strap as shown.
I
• Movable Vehicle Headrest:
ALWAYS route the top tether straps UNDER the vehicle headrest. If the top tether straps cannot be routed UNDER the movable vehicle headrest, do NOT use the child restraint in this seating position. Route the top tether straps between the vehicle headrest posts if possible. J1
• Fixed Vehicle Headrest:
Route the top tether straps around or over the vehicle headrest. J2 or J3
harness_nochild_iso_unattached_REV.ai
H
I
42
J1
J2 J3
MOVABLE
FIXED FIXED
HAR
NES
SMOD
E
MOD
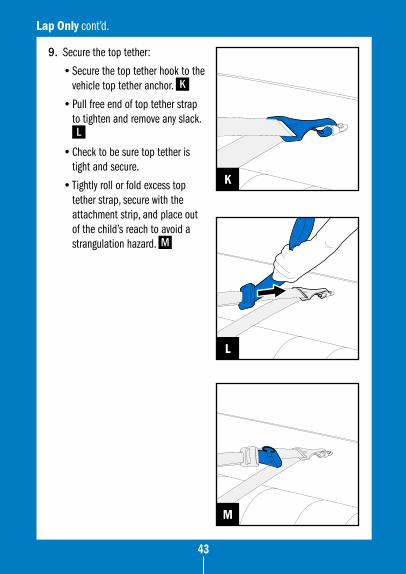
E 9. Secure the top tether:
• Secure the top tether hook to the vehicle top tether anchor. K
• Pull free end of top tether strap to tighten and remove any slack. L
• Check to be sure top tether is tight and secure.
• Tightly roll or fold excess top tether strap, secure with the attachment strip, and place out of the child’s reach to avoid a strangulation hazard. M
K
L
tether_roll excess.ai
M
43
Lap Only cont’d.

44
N
10. Check for a secure installation:
• Grasp child restraint at rear of arms as illustrated. Pull forward and side-to-side on the child restraint. N
• The installation is secure if the child restraint does not move more than 1 inch in any direction.
• If the child restraint does not remain securely attached, repeat steps 1-10 or move the child restraint to another seating location.
• If possible, move unused vehicle seat belts out of the child’s reach to avoid a strangulation hazard.
• Check for a secure installation before every use of the child restraint!
After installation is complete, see page 49, Securing Child in Harness.
HAR
NES
SMOD
E

MOD
E
P
O
Removal: • To remove the top tether, press
the top tether adjuster button and loosen the top tether strap. O Depress the snap blade and remove the hook from the vehicle top tether anchor. P
• Roll or fold excess top tether strap and attach hook and loop strip to prevent tangling.
• Fold harness to access vehicle belt. Unbuckle vehicle seat belt and remove from vehicle belt attachment loops. Q
• See pages 67-69 for proper storage.
Q
45
Lap Only cont’d.

Headrest Removal & Installation
46
headrest_removal.ai
A
cover_install_9.ai
B
Remove Headrest:• Fold child restraint so back of the
harness faces up. A
• Grasp webbing located on back of headrest and push down through I-shaped opening in headrest. B
• Repeat with second I-shaped opening.
• Remove headrest and store for future use.
HAR
NES
SMOD
E

cover_install_10.ai
E
place_seat_latch_unwebbed.ai
D
47
Reinstall Headrest:• Fold child restraint so back of the
harness faces up.
• With headrest facing down, thread top tether strap between headrest plastic panel and pillow as shown. C
• Position headrest such that I-shaped openings are centered on exposed harness webbing. D
• Grasp webbing and pull through I-shaped opening. E Be sure to pull both plies of webbing through opening.
• Repeat with second I-shaped opening.
• Check to be sure webbing lies flat against the back of the headrest. F
headrest_reinstall 1.ai
C
headrest_removal.ai
F
Headrest cont’d.

48
Harness Buckle Positioning
48
21
3B
21
3D
21
3
A
21
3C
1. Determine which of the three buckle positioning slots best fit child A :
• Select the slot closest to, but not under, child.
• Harness buckle should be snug and comfortable for child.
2. Adjust buckle to desired position:
• With bottom of child restraint facing up, grasp buckle bracket and turn sideways to push through seat base. B
• Re-install harness buckle bracket in desired position.
• Pull up on harness buckle to snap harness bracket in place. C
• Be sure bracket is securely attached to seat base. D
HAR
NES
SMOD
E

MOD
E Securing Child In Harness
1. Prepare harness:
• Move harness height adjuster to uppermost position by squeezing adjuster together as shown. A Repeat with second harness height adjuster.
• Loosen harness: Push left harness adjuster button and pull up on left shoulder strap. B Repeat with right shoulder
strap.
49securing_child_1REV.ai
A
B
WARNINGFAILURE TO FOLLOW ALL INSTRUCTIONS MAY RESULT IN SERIOUS INJURY OR DEATH.
• Make sure harness is adjusted snugly before every use of the child restraint.• Avoid bulky clothing that can interfere with harness fit.• Always secure the top tether strap. If a top tether anchor is not available,
do NOT use this child restraint.

• Open chest clip by squeezing middle tabs and pulling apart. C
• Release harness buckle by pressing down on red release button. D
2. Place child in restraint: E
• Place child in child restraint with child’s back flat against the back of the child restraint.
• Remove any twists from harness straps.
• Position harness shoulder straps over child’s shoulders.
• Verify harness buckle is positioned properly. (See page 48 for additional instructions.)
C
D
E
50
HAR
NES
SMOD
E

51
MOD
E 3. Adjust harness height:
• Position each harness height adjuster at or just above child’s shoulder. F
NOTE: To position adjuster, squeeze adjuster together and move up or down.
4. Buckle harness:
• Pull buckle away from child.
• Make sure harness straps are not twisted.
• Insert buckle tongues into harness buckle. Listen for a click when each buckle tongue is fastened. G
• Check buckle connection is secure by pulling on shoulder straps.
5. Tighten harness:
• Pull free end of harness strap, located on the outside of child’s leg, until harness is snug around the child. H
• Repeat with second harness strap.
51
_REV
F
G
H
Securing Child cont’d.

I
J
• A snug strap should not allow any slack. It lies in a relatively straight line without sagging. It does not press on the child’s flesh or push the child’s body into an unnatural position.
• Be sure the harness is snug and tight on both the thighs and chest before each use.
6. Fasten harness chest clip: I
• Fasten chest clip by pushing both sides together
• Position chest clip at middle of child’s chest, at armpit level.
7. If using removable headrest, slide headrest up or down to a comfortable position for the child.
J
8. Adjust vehicle headrest: K
• Adjust the vehicle headrest so the top of the headrest is closest to the top of the child’s head.
• Top of child’s ears must be below top of the vehicle headrest.
52
K
HAR
NES
SMOD
E

MOD
E
L
• If vehicle is not equipped with a headrest, the top of the child’s ears must be below the top of the vehicle seat cushion. L
To remove child from the child restraint: • Open chest clip by squeezing
middle tabs and pulling apart M
• Loosen harness: Pull shoulder strap up while pushing button on harness adjuster located on outside of child’s leg. Repeat with second harness strap. N
M
53
loosen harness_REV.ai
N
Securing Child cont’d.

54
• Pull buckle away from child. Release harness buckle by pressing down on red release button. O
• Remove child.
• Rebuckle harness to prevent twisting of the straps. P
O
P
HAR
NES
SMOD
E

MOD
E
55
Checklist for Proper Harness UseRead complete instructions prior to using the child restraint!
❑1 • Child is over 1 year old
• Child’s height is 31 - 52 inches (78.7 - 132.1 cm) tall
• Child weighs:
- 22 - 55 pounds (10.1 - 24.9 kg) and GO Seat is attached WITH LATCH
- 22 - 65 pounds (10.1 - 29.5 kg) and GO Seat is installed with vehicle seat belts
❑2 Top tether attachment is secure and tight. NEVER use the harness without the top tether.
❑3 Child restraint is securely installed and cannot move more than 1 inch in any direction at the base of the armrests. (If installed with vehicle seat belts and without LATCH, LATCH connectors are stored in storage location on side of child restraint.)
❑4 Tops of child’s ears are below top of vehicle seat cushion or vehicle headrest.
❑5 Harness height adjusters are positioned at or just above child’s shoulders.
❑6 Chest clip is securely fastened and adjusted to armpit level.
❑7 Harness buckle connection is secure.
❑8 Harness is snug and tight on child’s thighs and chest.
❑9 Harness buckle is positioned in slot closest to, but not under, child.
❑10 Vehicle seat is not reclined beyond 30 degrees from vertical.
Questions? Please contact IMMI Customer Service: www.imminet.com/go or 1-877-447-2305. For assistance locating the nearest child restraint inspection station, you may contact the National Highway Traffic Safety Administration: 1-888-327-4236 (TTY: 1-800-424-9153), or go to www.NHTSA.gov.
harness_child_iso_yellow_REV.ai
2
5
6
7
9
3

5656
Belt-Positioning Booster Mode40 -100 LBS., 43-57”, 4 years old or older
WARNINGFAILURE TO FOLLOW ALL INSTRUCTIONS MAY RESULT IN SERIOUS INJURY OR DEATH.
• USE ONLY WITH CHILDREN WHO WEIGH BETWEEN 40 AND 100 POUNDS (18.1 - 45.4 KG) AND WHOSE HEIGHT IS BETWEEN 43 AND 57 INCHES (110.1 - 144.8 CM), AND WHO ARE 4 YEARS OLD OR OLDER.
• Use only the vehicle lap and shoulder belt system when restraining the child in the booster seat. NEVER use a lap belt only.
• Secure this child restraint with the vehicle’s child restraint anchorage system (lower LATCH anchors) if available.
• Instructions for use of this child restraint differ depending on the size of the child. Be sure you are using the child restraint properly.
• Use of this child restraint with the harness is recommended for as long as the child meets all of the requirements listed on page 11 of this manual. When the child is over 65 lbs. (29.5 kg) OR 52” (132.1 cm), the harness must be removed and the child restraint converted to a belt-positioning booster.
• Top of child’s ears must be below the top of the vehicle seat cushion or vehicle headrest. If the top of the child’s ears are above the top of the vehicle seat cushion or vehicle headrest, do NOT use the child restraint in this seating position.
BOO
STER
MOD
E

MOD
E
57
Use this child restraint FORWARD FACING ONLY.
Booster mode must be used with lap-shoulder belt.
Belt-Positioning Booster Mode(40 -100 LBS., 43-57”, 4 years old or older)
40 - 100 pounds (18.1 - 45.4 kg)43 - 57 inches (110.1 - 144.8 cm)4 years old or older
BOOSTER MODE

12
3 5
4
A1
58
1. Buckle harness and fasten chest clip to prevent tangling.
2. There are 5 harness brackets that will need to be removed per the following steps with the bottom of the child restraint facing up. A1
IMPORTANT NOTE: NEVER remove LATCH brackets. (The brackets are labeled “LATCH” and are further recessed into the bottom of the child restraint.)
3. Use a flathead screwdriver to loosen each of the 5 brackets.
A2
4. Unthread two vehicle belt loops from two rear harness brackets as shown. B & C
1
B
1
C
Converting to Booster Mode
1
3
4
5
2A2
BOO
STER
MOD
E

5. Pull two vehicle belt loops up through top of seat cover as shown. D
6. With bottom of child restraint facing up, grasp harness bracket as shown and push through seat base. E
Repeat with four additional harness brackets including harness buckle bracket.
7. Remove harness including buckle.
8. Store harness and cover assembly together in clean, dry location.
pull_belt_loops.ai
D
_REV
21
34
5
E
59
Converting to Booster Mode cont’d.
After conversion is complete, see page 60, Installation of Booster Mode in Vehicle.

60
Installation of Booster Mode in Vehicle
BOO
STER
MOD
E
WARNING FAILURE TO FOLLOW ALL INSTRUCTIONS MAY RESULT IN SERIOUS INJURY OR DEATH.• Use this child restraint FORWARD FACING ONLY.• Never attach two LATCH connectors to one LATCH anchor.• Use LATCH only in seating positions approved by the vehicle manufacturer.• See pages 18-19 for important LATCH requirements.
Installation Without LATCH
1. Store LATCH connectors in their storage location on side of child restraint.
2. Choose an appropriate vehicle seat.
3. Position the child restraint facing forward on the vehicle seat with the back flat against the vehicle seat back. A
A
After installation is complete, see page 64, Securing Child in Booster.
61
MOD
E
61
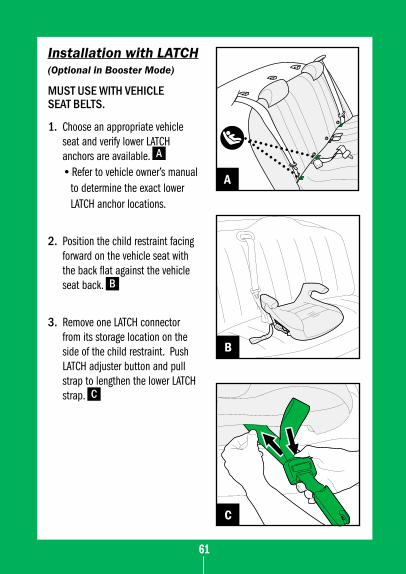
Installation with LATCH(Optional in Booster Mode)
MUST USE WITH VEHICLESEAT BELTS.
1. Choose an appropriate vehicle seat and verify lower LATCH anchors are available. A
• Refer to vehicle owner’s manual to determine the exact lower LATCH anchor locations.
2. Position the child restraint facing forward on the vehicle seat with the back flat against the vehicle seat back. B
3. Remove one LATCH connector from its storage location on the side of the child restraint. Push LATCH adjuster button and pull strap to lengthen the lower LATCH strap. C
B
remove_connector.ai
C
Latch Vehicle_latch only_booster.ai
A

62
4. Attach LATCH connector to vehicle lower anchor. D Listen for a click when the connector is attached.
Check to be sure LATCH strap is not twisted and LATCH connector is attached properly.
5. Repeat steps 3 and 4 for second LATCH connector.
6. Tightly secure the base of the child restraint:
• Pull one LATCH strap while firmly pushing child restraint down into vehicle seat as shown. E Repeat with the second LATCH strap.
7. Check for a secure installation:
• Grasp child restraint at rear of arms as illustrated. Pull forward and side-to-side. F
• The installation is secure if the child restraint does not move more than 1 inch in any direction.
• If the child restraint does not remain securely attached, repeat steps 1-7 or move the child restraint to another seating location.
tighten_latch_booster.ai
E
F
BOO
STER
MOD
E
D

63
MOD
E
63
connector_release.ai
G
Removal: • To detach LATCH connectors
from vehicle lower LATCH anchors, press the red button on each connector. G
• Return LATCH connectors to storage locations on side of child restraint.
After installation is complete, see page 64, Securing Child in Booster.
Installation With LATCH cont’d.

64
Securing Child in Booster
1. Place child in the restraint.
• Place child in booster with child’s back flat against the back of the vehicle seat.
• Do not allow child to slouch.
2. Make sure vehicle belt is not twisted.
3. Route lap portion of lap-shoulder belt under both child restraint armrests. Shoulder portion should go under armrest on buckle side only. A
WARNING
booster_child_iso_no positioner.ai
A
BOO
STER
MOD
E
FAILURE TO FOLLOW ALL INSTRUCTIONS MAY RESULT IN SERIOUS INJURY OR DEATH.
• Use only the vehicle lap and shoulder belt system when restraining the child in the booster seat.
• NEVER use a lap belt only.• Top of child’s ears must be below the top of the vehicle seat cushion or vehicle headrest. If the top of the child’s ears are above the top of the vehicle seat cushion or vehicle headrest, do NOT use the child restraint in this seating position.
booster_no_laponly.ai

65
4. Buckle vehicle seat belt.
5. Pull up on shoulder portion of vehicle belt to tighten lap portion. B
6. Make sure belts are snug and lie flat against child. Lap portion must be low and snug on thighs.
Shoulder portion must be snug and across the chest and middle of child’s shoulder.
B
Securing Child cont’d.

6666
Checklist for Proper Booster UseRead complete instructions prior to using the child restraint!
❑1 • Child is 4 years old or older.
• Child’s height is is 43-57 inches (110.1 - 144.8 cm) tall.
• Child weighs: 40 – 100 pounds (18.1 - 45.4 kg).
❑2 If used without LATCH: LATCH connectors are stored in storage locations on side of child restraint.
If installed with LATCH: Child restraint is securely installed and cannot move more than 1 inch in any direction at the base of the armrests.
❑3 Tops of child’s ears are below top of vehicle cushion or vehicle headrest.
❑4 Child is restrained with vehicle lap-shoulder belt. NEVER use lap belt only.
❑5 Lap portion of belt is routed under both armrests and shoulder portion is routed under armrest on buckle side.
❑6 Lap portion of belt is positioned on child’s thighs and shoulder portion is centered on child’s shoulder.
❑7 Vehicle buckle connection is secure.
❑8 Belts are snug on child’s thighs and chest.
Questions? Please contact IMMI Customer Service: www.imminet.com/go or 1-877-447-2305. For assistance locating the nearest child restraint inspection station, you may contact the National Highway Traffic Safety Administration: 1-888-327-4236 (TTY: 1-800-424-9153), or go to www.NHTSA.gov.
BOO
STER
MOD
E

67
Storing The Child Restraint• Store the child restraint in its travel bag and/or in the original box.
• Keep in a cool, dry area.
• Do not place any heavy objects on top of it.
Additional Information
A
B
Instructions Storage After carefully reading and following these instructions, store the instruction manual in one of its two storage locations.
• When using the harness, store the manual in the pocket located on the back of the harness cover. A
• When using the booster without the harness, store the manual in its storage location on the bottom of the child restraint. B

68
How to cover and uncover your IMMI GO seat.
1. Release elastic clip on bottom of base; then lay base flat.
2. Pull cover behind seat.
3. Fold sides toward the center.
4. Roll up cover until it is snug against back of seat.
A
B
C
D
A
B
C
D

69
5. Attach flap with loop strip A to seat back hook strip. B
To store IMMI GO seat: Do steps in reverse. NOTE: When pulling cover over seat, make sure to pull cover over arm rests first.
Aircraft UseThis child restraint system conforms to all applicable Federal Motor Vehicle Safety Standards. This restraint is NOT certified for use in aircraft.• Use of the harness requires a top tether anchor, which is
NOT available on aircraft.• Use of the booster (without the harness) requires a lap-
shoulder belt system, which is NOT available on aircraft.
Other Uses• This child restraint is certified only for use in motor vehicles.
• Do not use in recreational vehicles (RVs), school buses, boats, golf carts, airplanes, or any other non-approved application.
• Do not allow children to play with this child restraint.
EA
B
E

70
Care And Cleaning
Seat Cover CareTo clean the seat cover, first try to spot clean with mild soap and water. If spot cleaning is inadequate or the entire cover requires cleaning, follow the instructions below to remove the cover.
Headrest Cover Removal1. Detach two tabs on back of headrest and remove headrest
covers from plastic panel. A
Harness Cover Removal1. Open chest clip.2. Unbuckle harness.3. Open hook and loop
attachments on back of cover. B
4. Detach flaps from top and bottom of cover.
5. Remove the harness cover.
B
headrest tabs.ai
A

71
C
Seat Cover Removal1. Unbuckle harness.2. Detach elastic straps from seat
base as shown. C 3. Open hook and loop
attachments on each side of cover near base of armrests.
4. Remove cover from armrests.5. Remove the seat cover.
Cleaning the Cover
• For normal cleaning, wash vinyl upholstery with a soft cloth or soft-bristled brush lathered with mild, nonabrasive soap and lukewarm water. Before the surface dries, wipe with a clean, dry cloth to remove any residue. This procedure may be repeated to remove stubborn dirt or stains.• DO NOT use any cleaning method that is not listed above, as other methods may attack the vinyl and cause eventual degradation.• Air dry. DO NOT machine dry.• Foam seat pad can be hand washed and air dried ONLY.

72
cover_install_1.ai
A
cover_install_3.ai
B
Cover Installation
Reinstall Seat Cover1. Open hook and loop
attachments on each side of seat cover.
2. Position armrest covers over each armrest.
3. Position front of cover on front of seat base.
4. Thread buckle through cover position that corresponds with position on base.
5. Route harness adjusters through cover as shown. A
6. Position center rear portion of seat cover under the harness cross strap as shown. B
7. Close hook and loop attachments on sides of seat cover near base of armrests.
8. Secure elastic straps to seat base as shown. C
C

73
Reinstall Harness Cover1. Open chest clip.
2. Unbuckle harness.
3. Place harness buckle tongues under armrests to ease installation of cover.
4. Insert top flap of harness cover through bottom slot in top tether bracket from front to back and secure to hook and loop on back of cover. A
5. With back of harness cover facing you, insert bottom flap of harness cover under harness cross strap as shown. B
6. Open hook and loop closure on back of harness cover to locate inner loop strip.
7. Secure bottom flap of harness cover to hook and loop on inside of cover.
8. Position top three plies within harness cover. C
cover_install_4.ai
B
A
cover_install_6yellow.ai
C

74
cover_install_5.ai
D
9. Fasten hook and loop closure on back of harness cover.
10. With front of harness cover facing you, lift one height adjuster and place top of harness cover under adjuster. D
11. Repeat with second height adjuster.
12. Close chest clip.
13. Buckle harness.
14. See page 47 to install headrest.
DO NOT use the child restraint without the cover.

75
Buckle And Harness Care
Cleaning buckle and harness:• The harness buckle may be cleaned with a damp cloth and should
fasten with a “click”. If not, rinse under warm running water. NEVER LUBRICATE THE BUCKLE.
• The harness straps may be wiped clean with warm water and mild soap and then allowed to air dry. DO NOT immerse the harness in water.
• If harness straps cannot be wiped clean, please refer to page 79, REPLACEMENT PARTS.
• DO NOT use any harsh detergents, chemicals or bleach.
• DO NOT iron the harness straps.
Inspect Buckle And HarnessInspect your GO for the items below. Any concerns should be corrected by replacing your GO.
1. Inspect harness webbing on entire system for cuts, fraying, or extreme or unusual wear. Most common areas of belt wear include the buckle/ latch area and any place where the restraint makes contact with the vehicle or seat.
2. Inspect tongues and buckle for proper operation by inserting the tongues into the buckle. Tongues must insert smoothly, and you must hear a click. Verify proper latching by tugging on the belt. Tongues must not be worn, deformed or corroded. Buckle must not be damaged, cracked or broken.
3. Inspect the seat belt height adjuster for damage. Move adjuster up and down. It must move freely and should not be damaged, cracked or broken.

76
Reinstall Harness
reinstall_harness_1.ai
A
Re-Install Harness1. Remove buckled harness
assembly from its storage location. Orient harness so that buckle is facing up or toward you.
2. Install harness buckle bracket in desired position by pushing bracket completely through top of cover and seat base. A
Tip: Grasp bracket on bottom of child restraint to help pull through seat base.
3. Pull up on harness buckle to snap harness buckle bracket in place. Unbuckle harness and move buckle tongues aside.
WARNINGFAILURE TO FOLLOW THESE HARNESS REINSTALLATION INSTRUCTIONS MAY RESULT IN SERIOUS INJURY OR DEATH.
4. Inspect seat base for cracks, areas of stress, or other damage to the base structure.
5. Inspect chest clips for damage and operation. Chest clip halves should not be damaged, cracked or broken. Clips should engage and disengage smoothly with each other. Move clip halves up and down. They must move freely.
Inspection cont’d.

77
4. Install two rear harness brackets: B
• Open hook and loop attachments on each side of seat cover.
• Grasp bracket as shown and push completely through opening in top of seat base.
• Repeat with second rear bracket.
Tip: Grasp bracket on bottom of child restraint to help pull through seat base.
5. Route two vehicle belt attachment loops through opening in top of seat base. C Grasp each vehicle belt
attachment loop on bottom of child restraint and pull completely through seat base.
6. With bottom of child restraint facing up, route vehicle belt attachment loops through two rear harness brackets as shown. D
reinstall_harness_3.ai
21
B
hreinstall_harness_4.ai
21
C
reinstall_harness_2_REV.ai
12
D

78
7. Fasten harness buckle to ensure harness straps are not twisted. E
8. Install two forward harness brackets: F
• Grasp bracket and push completely through opening in top of seat base.
• Repeat with second bracket.
Tip: Grasp bracket on bottom of child restraint to help pull through seat base.
9. Snap all five harness brackets in place. G Be sure each bracket is securely attached.
Questions?Please contact IMMI Customer Service for assistance at www.imminet.com/go or 1-877-447-2305.
E
F
bottom of restraint_REV.ai
12
3 5
4
G

79
Replacement Parts
Replacement parts may be ordered online at www.imminet.com/go or by contacting IMMI Customer Service at 1-877-447-2305. The product model number and date of manufacture are required to order replacement parts. This information can be found on the label on the bottom of the child restraint. Use IMMI replacement parts only. Contact IMMI Customer Service for availability of parts.
Instruction Manual (free replacement)
GO Service Life
The IMMI GO restraint system is considered to have a finite life and must be frequently inspected and replaced as needed. The service life of a GO is six (6) years from the date of manufacture. The date of manufacture can be found on the label located on the bottom of the seat base.
The GO and its components must be inspected frequently (per instructions in this manual). If you have any doubts about the condition or function of the restraint, REPLACE IT, even if it is less than 6 years from the date of service expiration.
If any component or part of the GO restraint requires replacement (with the exception of the replaceable cover), the entire system must be replaced.

80
Warranty
GO LIMITED WARRANTYIndiana Mills & Manufacturing, Inc. (IMMI) provides the following limited warranty on its IMMI GO. Completing and mailing the owner registration card within thirty (30 days) of purchase will expedite the processing of any future warranty claim.
LIMITED WARRANTYIMMI warrants that the IMMI GO’s hardware components (buckles, adjusters, booster base, etc.) and the fabric will be free from defects in material and workmanship for one (1) year from the date of purchase. The exclusive remedy of this warranty shall be replacement of the IMMI GO. IMMI reserves the right to discontinue or change parts, fabrics, models, or products, or to substitute with a comparable model or product. IMMI will ship replacement product to you without charge.
WARRANTY LIMITATIONSThis warranty shall not apply to damages resulting from normal wear and tear, product misuse, misapplication, neglect (including but not limited to improper storage), modification, accident, improper installation or use not in accordance with product instructions.
LIMITATIONS OF WARRANTIES AND DAMAGESThe warranty and remedies as set forth above are exclusive and in lieu of all others, oral or written, express or implied. In no event will IMMI be liable for any damages, including incidental or consequential damages, arising out of the use or inability to use the IMMI GO. It is expressly agreed that the liability of IMMI for any damages arising out of or related to this transaction, or the

81
use of IMMI‘s products, whether in contract or in tort, is limited to the replacement of the IMMI GO by IMMI.
To the extent permitted by applicable law, IMMI MAKES NO WARRANTIES; E ITHER EXPRESS (EXCEPT AS PROVIDED HEREIN) OR IMPLIED, AND EXPRESSLY DISCLAIMS ANY IMPLIED WARRANTY OF MERCHANTABILITY OR FITNESS FOR A PARTICULAR PURPOSE. Some states do not allow exclusion of implied warranties, limitations on how long an implied warranty lasts, or the exclusion or limitation of incidental or consequential damages, so the above limitations may not apply to you. IMMI does not authorize any person to create for it any other warranty, obligation, or liability in connection with the IMMI GO.
MAKING A CLAIM UNDER THIS LIMITED WARRANTY All warranty claims and product returns must be made within the warranty period and must be submitted to IMMI within ten (10) days of discovery of the alleged defect or other problem, or the claim shall be deemed waived. To
make a claim under this warranty, please contact the IMMI Help Desk at 1-877-447-2305.
An IMMI representative will qualify your claim and upon confirmation will issue you a warranty identification number. Upon rece iv ing th is number, please ship the IMMI GO, clearly marked with the warranty identification number, to IMMI at the following address for inspection and evaluation:
IMMI Warranty
18881 US 31 North
Westfield, IN 46074
You have two options to consider:Option A) A replacement IMMI GO can be immediately sent to you. Your credit card will be charged for the replacement at a discounted price, plus freight. IMMI representatives will inspect and evaluate the returned IMMI GO within 14 days of receipt. Upon confirmation of warranty claim, your credit card will be credited for the amount previously charged for the replacement.
Warranty cont’d.

82
Warranty cont’d.
If the warranty claim is denied and the product is safe to use, the seat will be returned. You will not be able to return the replacement seat previously sent. If the warranty claim is denied and the seat is unsafe to use, it will not be returned. You will not be able to return the replacement seat previously sent.
Option B) You may request that we do not ship a replacement seat until you receive confirmation that warranty claim will be approved. IMMI representatives will inspect and evaluate the returned IMMI GO within 14 days of receipt. If the warranty claim is denied and the seat is safe to use, the seat will be returned. If the warranty claim is denied and the product is unsafe to use, it will not be returned. You may purchase a new IMMI GO at a discounted price, plus freight.
If thirty (30) days have elapsed after the receipt of warranty claim and we have not received the IMMI GO, the claim will be denied on the basis of non-receipt of the product in question and no refund will be given for the charge of the replacement.
PARTS INSPECTION Products supplied by IMMI are certified to applicable federal standards and must have every part returned to IMMI for inspection. Each IMMI GO must be clearly marked with the warranty identification number so that it can be matched up with the specific warranty claim involved.
REPLACEMENT POLICYThere are absolutely no provisions for field repairs or replacement(s) o f I MM I G O ’s c o m p o n e n t s . (Replacement fabric covers and inst ruct ion booklets may be purchased at www.imminet.com/go.) The complete IMMI GO must be returned to IMMI for evaluation, and a complete IMMI GO will be sent as a replacement.

83
NOTES:

©20
14 I
MM
I All
righ
ts re
serve
d. 4
801P
PN
9259
62 r
ev 0
3 1
0/14
imminet.com
18881 US 31 North • Westfield, Indiana 46074 USA
Phone: (317) 896-9531 • Fax: (317) 896-2142