clinimacs® user manual for the clinimacs® cd34 reagent system · clinimacs® user manual for the...
TRANSCRIPT

User Manual
for the CliniMACS® CD34 Reagent System
Miltenyi Biotec GmbHFriedrich-Ebert-Straße 6851429 Bergisch GladbachGermanyPhone +49 2204 8306-80Fax +49 2204 [email protected]
Miltenyi Biotec Inc.2303 Lindbergh StreetAuburn, CA 95602USAPhone 1-800-810-3135Fax [email protected] P/
N 3
7070
/01
| Is
sued
: 201
4-01


CliniMACS® User Manual for the CliniMACS® CD34 Reagent System
Issued: 2014-01P/N 37070/01
Humanitarian device: Authorized by U.S. Federal law for use in the treatment of patients with acute myeloid leukemia (AML) in first complete remission. The effectiveness of the device for this indication has not been demonstrated.
caution: Federal law restricts this device to sale by or on the order of a physician.
indications for use: The CliniMACS® CD34 Reagent System is indicated for processing hematopoietic progenitor cells collected by apheresis (HPC, Apheresis) from an allogeneic, HLA-identical, sibling donor to obtain a CD34+ cell-enriched population for hematopoietic reconstitution following a myeloablative preparative regimen without the need for additional graft versus host disease (GVHD) prophylaxis in patients with acute myeloid leukemia (AML) in first morphologic complete remission.
contraindications: Do not use CD34+ cells prepared with CliniMACS® CD34 Reagent System in patients with known hypersensitivity to murine (mouse) proteins or iron-dextran.
Software Version: 2.40
manufactured by:
Miltenyi Biotec GmbHFriedrich-Ebert-Straße 6851429 Bergisch GladbachGermanyPhone: +49 2204 8306-80
Customer Service:Phone: 1-800-810-3135Prompt 1: Technical Support, including Emergency SupportPrompt 2: Complaint RegistrationPrompt 3: Customer Service

CliniMACS® User Manual for the CliniMACS® CD34 Reagent System

CliniMACS® User Manual for the CliniMACS® CD34 Reagent System
1 Introduction to the CliniMACS® CD34 Reagent System 51.1 Description 5
1.2 Principles of Operation 5
1.3 Warnings 7
1.4 Precautions 8
2 CliniMACS® plus Instrument (Model CS2-CE/UL) 122.1 CliniMACS® plus Instrument Description (Model CS2-CE/UL) 12
2.2 Technical Specifications 14
2.3 Unpacking of the CliniMACS® plus Instrument 16
2.4 Cleaning and Maintenance of the CliniMACS® plus Instrument 20
2.5 Service and Technical Support Information 21
3 Instructions 223.1 Required Materials and Equipment 22
3.2 Labeling and Preparation of Transfer Bags 24
3.3 Preparation of the CliniMACS® PBS/EDTA Buffer 24
3.4 Preparation of the HPC, Apheresis 25
3.5 Labeling of the Cells 31
3.6 Operation of the CliniMACS® plus Instrument 36
3.7 Installation of the CliniMACS® Tubing Sets: TS or LS 42
3.8 Clean Room Installation Instructions for the CliniMACS® Tubing Sets 44
3.9 Alternative Installation Instructions for the CliniMACS® Tubing Sets for Non-Clean Room Settings 63
3.10 CliniMACS® CD34 Selection 67
4 Troubleshooting 754.1 Troubleshooting: Preparation of the HPC, Apheresis 75
4.2 Troubleshooting: CliniMACS® plus Instrument and CliniMACS® Tubing Sets 76
4.3 Troubleshooting: Automated Cell Selection 77
4.4 Troubleshooting: Emergency Program 82
4.5 Troubleshooting: Cell Selection Performance – Unexpected Events 84
Appendix 1: Glossary of Terms and Symbols 88
Appendix 2: Guidance and Manufacturer’s Declaration 95
table of contents

CliniMACS® User Manual for the CliniMACS® CD34 Reagent System

Introduction to the CliniMACS® CD34 Reagent System – 5
CliniMACS® User Manual for the CliniMACS® CD34 Reagent System
1 introduction to the clinimacs® cd34 reagent system
1.1 DescriptionThe CliniMACS® System is based on the magnetic cell separation technology (MACS® Technology) developed by Miltenyi Biotec GmbH.
The CliniMACS® CD34 Reagent System is a medical device system that consists of the following four components:
• CliniMACS® CD34 Reagent – a dark amber, non-viscous, colloidal solution containing an antibody conjugate in buffer. The conjugate consists of a murine IgG1 monoclonal antibody directed against the Class II epitope of the human CD34 antigen, which is chemically conjugated to dextran beads having an iron oxide/hydroxide core. (See the CliniMACS® CD34 Reagent Package Insert for more information.)
• CliniMACS® plus Instrument – a software controlled instrument that processes the HPC, Apheresis.
• CliniMACS® Tubing Set TS or Large Scale LS – a single-use, sterile, disposable tubing set with two proprietary cell separation columns. The CliniMACS® Tubing Set TS is for processing HPC, Apheresis preparations containing up to 0.6 × 10⁹ CD34+ cells out of a total cell number not exceeding 60 × 109 white blood cells (standard-scale). The CliniMACS® Tubing Set LS is for larger-scale preparations (up to 1.2 × 10⁹ CD34+ cells out of a total cell number not exceeding 120 × 109 white blood cells). (See the CliniMACS® Tubing Sets Package Insert for more information.)
• CliniMACS® PBS/EDTA Buffer – a sterile, isotonic phosphate-buffered, 1 mM EDTA, saline solution, used as external wash and transport fluid for the in vitro processing of HPC, Apheresis (See the CliniMACS® PBS/EDTA Buffer Package Insert for more information).
1.2 Principles of OperationThe CD34 antigen is a highly glycosylated 115 kD type 1 integral membrane protein of unknown function which is expressed on 1% to 4% of normal bone marrow cells and less than 0.2% of normal peripheral blood leukocytes, on subsets of bone marrow stromal cells, and on small vessel endothelium of various tissues.
The CliniMACS® CD34 Reagent System allows the operator to perform an in vitro enrichment of human CD34+ cells from heterogeneous hematological cell populations. The enrichment procedure involves two phases: cell labeling of antigen positive cells (Phase 1) and the automated cell selection process (Phase 2).
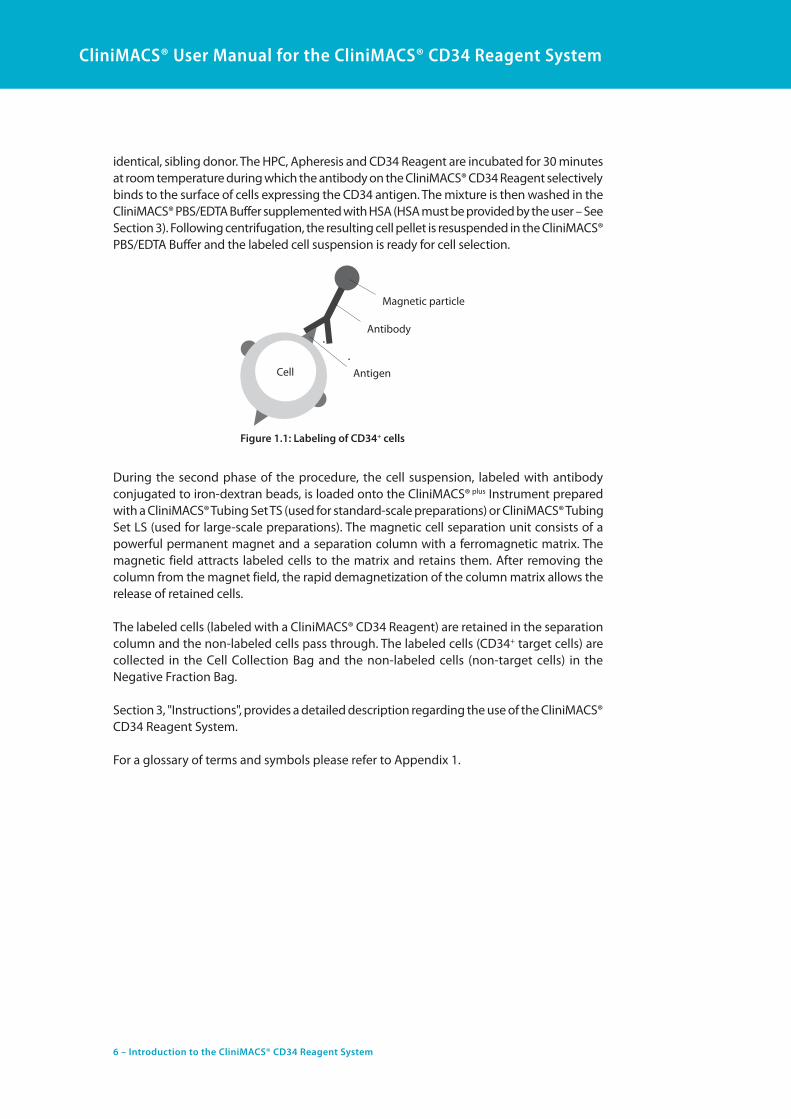
The first phase of the procedure is the cell labeling step where cells are directly labeled by antigen-specific antibodies conjugated to super-paramagnetic iron-dextran beads (see Fig. 1.1). Prior to labeling with the CliniMACS® CD34 Reagent, the HPC, Apheresis is washed with the CliniMACS® PBS/EDTA Buffer for platelet removal. After the platelet wash, the CliniMACS® CD34 Reagent is combined with the HPC, Apheresis from the patient’s allogeneic, HLA-
6 – Introduction to the CliniMACS® CD34 Reagent System
CliniMACS® User Manual for the CliniMACS® CD34 Reagent System
identical, sibling donor. The HPC, Apheresis and CD34 Reagent are incubated for 30 minutes at room temperature during which the antibody on the CliniMACS® CD34 Reagent selectively binds to the surface of cells expressing the CD34 antigen. The mixture is then washed in the CliniMACS® PBS/EDTA Buffer supplemented with HSA (HSA must be provided by the user – See Section 3). Following centrifugation, the resulting cell pellet is resuspended in the CliniMACS® PBS/EDTA Buffer and the labeled cell suspension is ready for cell selection.
Magnetic particle
Antibody
AntigenCell
Figure 1.1: Labeling of CD34+ cells
During the second phase of the procedure, the cell suspension, labeled with antibody conjugated to iron-dextran beads, is loaded onto the CliniMACS® plus Instrument prepared with a CliniMACS® Tubing Set TS (used for standard-scale preparations) or CliniMACS® Tubing Set LS (used for large-scale preparations). The magnetic cell separation unit consists of a powerful permanent magnet and a separation column with a ferromagnetic matrix. The magnetic field attracts labeled cells to the matrix and retains them. After removing the column from the magnet field, the rapid demagnetization of the column matrix allows the release of retained cells.
The labeled cells (labeled with a CliniMACS® CD34 Reagent) are retained in the separation column and the non-labeled cells pass through. The labeled cells (CD34+ target cells) are collected in the Cell Collection Bag and the non-labeled cells (non-target cells) in the Negative Fraction Bag.
Section 3, "Instructions", provides a detailed description regarding the use of the CliniMACS® CD34 Reagent System.
For a glossary of terms and symbols please refer to Appendix 1.

Introduction to the CliniMACS® CD34 Reagent System – 7
CliniMACS® User Manual for the CliniMACS® CD34 Reagent System
1.3 Warnings
cd34 reagent system
Do not infuse the CliniMACS® CD34 Reagent or the CliniMACS® PBS/EDTA Buffer into patients directly.
Hypersensitivity ReactionsHypersensitivity reactions, including anaphylaxis, have been observed during infusion of CD34+ cells from the CliniMACS® CD34 Reagent System. Monitor the patient for hypersensitivity reactions, including anaphylaxis, during infusion of CD34+ cells from the CliniMACS® CD34 Reagent System.
Engraftment failureFailure to infuse an adequate number of functioning CD34+ cells can result in engraftment failure. Collect sufficient HPC, Apheresis to yield at least 2.4 × 10⁶ CD34+ cells per kg of patient body weight after system processing. The clinical trial using the CliniMACS® CD34 Reagent System to process HPC, Apheresis did not test allografts with less than 2.4 × 10⁶ CD34+ cells per kg of recipient body weight. Monitor patients for laboratory evidence of hematopoietic recovery after transplantation. (See the Instructions for Use for the CliniMACS® CD34 Reagent System for information regarding Device Performance and Clinical Performance.)
Acute and chronic graft versus host disease (GVHD)GVHD can occur in patients who receive HPC, Apheresis processed using the CliniMACS® CD34 Reagent System. Use pharmacologic prophylaxis if more than 1 × 10⁵ CD3+ cells per kilogram of recipient body weight are infused.
Delayed immune reconstitution after transplantationRemoval of T cells from the HPC, Apheresis can delay immune reconstitution after transplantation. Patients who receive the CD34+ cell-enriched population prepared using the CliniMACS® CD34 Reagent System are at risk for serious opportunistic viral infections, including post-transplant lymphoproliferative disorder caused by Epstein-Barr virus (EBV) and cytomegalovirus (CMV). Monitor for EBV and CMV in the peripheral blood of patients after transplantation and initiate appropriate treatment promptly.
clinimacs® plus instrument
Risk of serious personal injury! Electronic equipment such as hearing aids, pacemakers, and cerebral/brain shunts may be damaged by the extremely powerful magnet in the CliniMACS® plus Instrument. Personnel wearing or implanted with such medical devices or equipment should keep a distance of at least 30 cm from the device.
clinimacs® cd34 reagent
For in vitro use only.
Do not infuse into patients.
Not for parenteral application.

8 – Introduction to the CliniMACS® CD34 Reagent System
CliniMACS® User Manual for the CliniMACS® CD34 Reagent System
clinimacs® PBs/edta Buffer
For in vitro use only.
Do not infuse into patients.
Not for parenteral application.
clinimacs® tubing set ts and clinimacs® tubing set Ls
Do not connect the tubing set directly to the patient.
1.4 Precautions
cd34 reagent system
Safety and probable benefit in children under the age of 17 years have not been established.
Drugs may be incompatible with the CliniMACS® PBS/EDTA Buffer. Do not add drugs to the buffer other than Human Serum Albumin as specified in Section 3, "Instructions".
Do not use cryopreserved and thawed HPC, Apheresis because cryopreservation promotes cell clumping, which may lead to device performance issues. Process HPC, Apheresis as soon as available, but not longer than 24 hours after collection.
Use only HPC, Apheresis from an allogeneic, HLA-identical sibling donor with the CliniMACS® CD34 Reagent System.
Collect HPC, Apheresis according to standard hospital or institutional leukapheresis procedures in standard leukapheresis collection bags. Do not include additional anticoagulants or blood additives, such as heparin, other than those normally used during leukapheresis. Keep the HPC, Apheresis at controlled room temperature +19 °C to +25 °C (+67 °F to +77 °F) if it has to be stored, e.g. overnight, before processing. Do not allow the concentration of leukocytes to exceed 0.2 × 10⁹ cells per mL.
Only trained operators should use the CliniMACS® CD34 Reagent System to prepare CD34+ cells for infusion. Operator training is provided by Miltenyi Biotec authorized personnel.
clinimacs® plus instrument
See Instructions for Use. Read and observe all operating instructions carefully to ensure safety of the operator and the equipment.
Contains a strong permanent magnet. Measuring and control instruments, computers, and watches and magnetic information carriers (such as credit cards, magnetic tapes and floppy disks) and magnetizable tools and objects may be
affected or damaged by the extremely powerful magnet in the CliniMACS® plus Instrument. Keep these tools and objects at a distance of at least 30 cm from the device. See EMC information provided as Appendix 2.

Introduction to the CliniMACS® CD34 Reagent System – 9
CliniMACS® User Manual for the CliniMACS® CD34 Reagent System
Install the CliniMACS® plus Instrument according to the electromagnetic compatibility (EMC) information (Warning Labeling, Guidance and Manufacturer’s Declaration) provided as Appendix 2. Portable and mobile RF communications equipment can affect medical electrical equipment.
Use an uninterruptible power supply or a battery that starts up within 10 minutes to supply power to the CliniMACS® plus Instrument. Based on technical limitations of the internal power supply voltage, interruptions on power supply input lines for longer than 10 minutes may lead to cessation of the selection process (power failure). The selection process cannot be resumed after a power failure.
Use only a grounded connection for the CliniMACS® plus Instrument. The CliniMACS® plus Instrument is a protection class I device.
Disconnect the power cable cord before cleaning or maintenance of the CliniMACS® plus Instrument.
Unplug the cord to disconnect the CliniMACS® plus Instrument from the power supply.
Use the originally supplied cord only.
Do not remove the back cover of the CliniMACS® plus Instrument to prevent the risk of an electric shock. The instrument may be opened and any spare parts may be exchanged by Miltenyi Biotec authorized personnel only. There are no internal components which can be serviced or calibrated by the operator.
Do not place the instrument next to any equipment that vibrates or can cause the instrument to move. Movement or vibration may affect the CliniMACS® plus Instrument.
Do not leave the CliniMACS® plus Instrument unattended during a run. If an error occurs, the cell selection will be interrupted at the current step and the operator will have 10 minutes to correct certain errors. If the instrument has not been restarted after this time period, the run will be aborted.
Do not leave the pump door open at any time during a run. If left open for more than 10 minutes, the run process will be aborted.
Do not open the door of the peristaltic pump when it is moving. Keep away from all moving parts.
Handle all fluid containers with caution when near the CliniMACS® plus Instrument. Avoid spills. Do not operate the instrument if it has been exposed to moisture. Avoid ingress of any liquid into the valves.
Treat the CliniMACS® plus Instrument as a biohazard after running a patient sample and prior to decontamination. Clean the instrument after each selection run with an aqueous biocidal detergent according to standard hospital or institutional requirements. For additional information regarding cleaning of the instrument refer to Section 2.4 of this User Manual.
10 – Introduction to the CliniMACS® CD34 Reagent System
CliniMACS® User Manual for the CliniMACS® CD34 Reagent System
The CliniMACS® plus Instrument may be used repeatedly. It is not intended for disposal after single use. It must be returned to Miltenyi Biotec for final disposal.
Use only supplies (e.g. CliniMACS® Tubing Sets) recommended by the manufacturer.
clinimacs® cd34 reagent
Use aseptic working procedures.
Do not use after the expiration date.
Do not use if package or vials are damaged or if vials are not sealed.
For single use only.
+2 °C
+8 °CStore upright at +2 to +8 °C (+35 °F to +46 °F) immediately after receipt. Avoid direct sunlight. Do not freeze or shake the reagent.
clinimacs® PBs/edta Buffer
Use universal precautions when handling all blood products and materials that have been in contact with such fluids. Treat used buffer as potentially biohazardous material according to standard hospital or institutional requirements.
Drugs may be incompatible with the buffer. Do not add drugs to the buffer other than Human Serum Albumin as specified in this User Manual. See Section 3 of this User Manual for information regarding the addition of Human Serum Albumin (HSA) to the CliniMACS® PBS/EDTA Buffer.
Do not use after the expiration date.
Do not use if package is damaged or unsealed.
For single use only.

Introduction to the CliniMACS® CD34 Reagent System – 11
CliniMACS® User Manual for the CliniMACS® CD34 Reagent System
clinimacs® tubing set ts or clinimacs® tubing set Ls
Choose either the CliniMACS® Tubing Set TS or the CliniMACS® Tubing Set LS based on the capacity for CD34 and total cell number. Exceeding the capacity for either total cell number or CD34+ cell number may impact the performance of the device:
• CliniMACS® Tubing Set TS: Standard-scale capacity for the enrichment of CD34+ cells using the CliniMACS® CD34 Reagent System with one vial of CD34 Reagent and the CliniMACS® Tubing Set TS is 0.6 × 10⁹ CD34+ cells out of a total cell number not exceeding 60 × 109 cells.
• CliniMACS® Tubing Set LS: Large-scale capacity for the enrichment of up to 1.2 × 10⁹ CD34+ cells out of a total cell number of 120 × 109 cells (large-scale application) requires two vials of the CliniMACS® CD34 Reagent and the CliniMACS® Tubing Set LS.
Use aseptic working procedures in unpacking, assembly and use of the tubing set.
Perform the integrity test as described in Section 3, "Integrity Test", of this User Manual. Replace tubing set if any leakage is observed during priming or integrity test.
Use universal precautions when handling all blood products and materials that have been in contact with such fluids. Treat used tubing sets as potentially biohazardous materials according to standard hospital or institutional requirements.
Do not store blood, blood fractions, or cell fractions in the tubing set.
Do not use after the expiration date.
Do not use if the package or tubing is damaged or unsealed.
For single use only. Reuse of tubing sets will decrease the performance of the device and risk biological contamination of the CD34+ cells processed by the device.
CliniMACS® User Manual for the CliniMACS® CD34 Reagent System
12 – CliniMACS® plus Instrument (Model CS2-CE/UL)
2 clinimacs® plus instrument (model cs2-ce/uL)
2.1 CliniMACS® plus Instrument Description (Model CS2-CE/UL) The CliniMACS® plus Instrument is an electromechanical device intended to separate human cells from heterogeneous hematologic cell populations in combination with the CliniMACS® CD34 Reagent, CliniMACS® Tubing Sets (TS or LS), and CliniMACS® PBS/EDTA Buffer.
The key components of the CliniMACS® plus Instrument include an integrated computer, a magnetic separation unit, a peristaltic pump, a liquid sensor, and pinch valves.
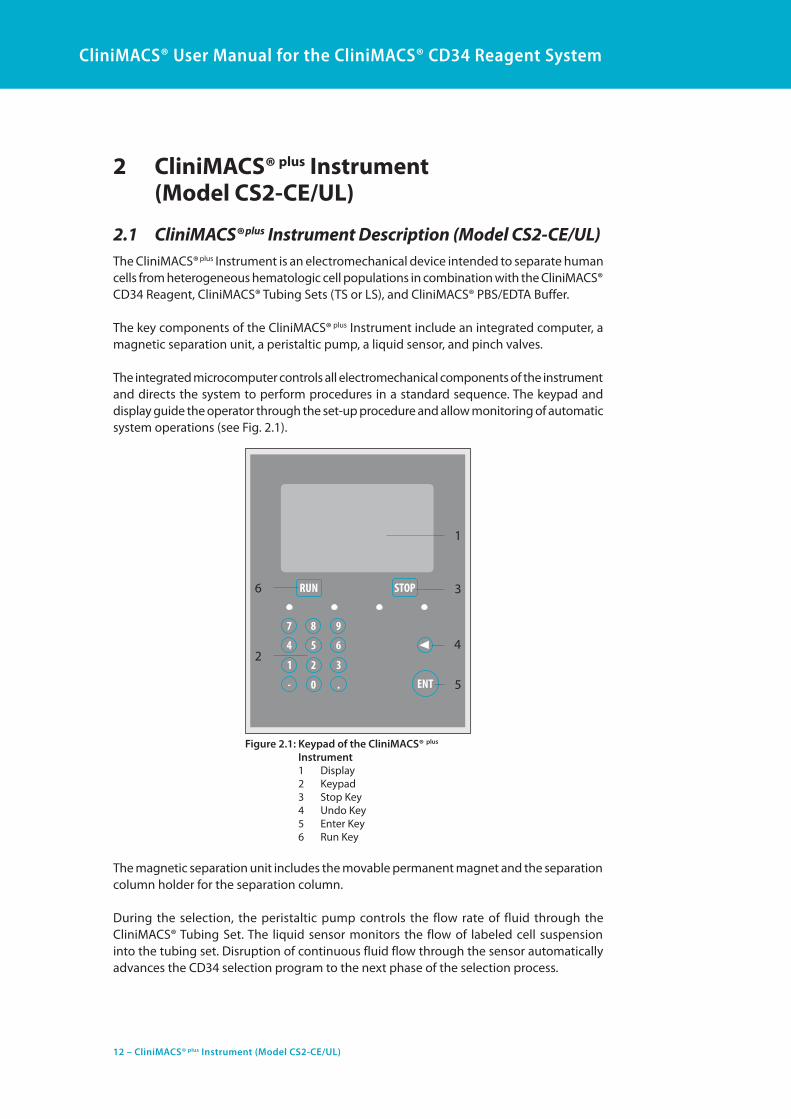
The integrated microcomputer controls all electromechanical components of the instrument and directs the system to perform procedures in a standard sequence. The keypad and display guide the operator through the set-up procedure and allow monitoring of automatic system operations (see Fig. 2.1).
Figure 2.1: Keypad of the CliniMACS® plus Instrument 1 Display 2 Keypad 3 Stop Key 4 Undo Key 5 Enter Key 6 Run Key
1
3
5
4
6
2
The magnetic separation unit includes the movable permanent magnet and the separation column holder for the separation column.
During the selection, the peristaltic pump controls the flow rate of fluid through the CliniMACS® Tubing Set. The liquid sensor monitors the flow of labeled cell suspension into the tubing set. Disruption of continuous fluid flow through the sensor automatically advances the CD34 selection program to the next phase of the selection process.

CliniMACS® User Manual for the CliniMACS® CD34 Reagent System
CliniMACS® plus Instrument (Model CS2-CE/UL) – 13
Eleven pinch valves ensure controlled flow of buffer and cell suspension throughout the procedure. Figure 2.2 depicts the CliniMACS® plus Instrument.
The CliniMACS® plus Instrument and CliniMACS® Tubing Sets allow the operator to perform cell separations in a closed and sterile system.
The CliniMACS® plus Instrument software offers the operator the choice between various separation programs. The CD34 SELECTION 1 or CD34 SELECTION 2 selection program will be used with the CliniMACS® CD34 Reagent System. Refer to Section 3 of this User Manual for additional details regarding the instructions.
Training by Miltenyi Biotec Technical Support team or authorized representative is required before using the CliniMACS® CD34 Reagent System.
1 Bag hanger clamp
2 Liquid sensor
3 Pre-column holder
4 Magnetic separation unit
5 Peristaltic pump
6 ON/OFF switch
7 Display
8 Keypad
9 Bag compartment
10 Pump door
11 Pinch valve
13 Bag hanger for Priming Waste Bag/ Reapplication Bag/Non-Target Cell Bag
14 Bag hanger for Cell Preparation Bag
15 Bag hanger for CliniMACS® PBS/EDTA Buffer
5
11
10
9 8
7
4
3
2
15
14
1
13
6
Figure 2.2: The CliniMACS® plus Instrument, Model CS2-CE/UL
CliniMACS® User Manual for the CliniMACS® CD34 Reagent System
14 – CliniMACS® plus Instrument (Model CS2-CE/UL)
2.2 Technical Specifications Model: CliniMACS® plus Instrument, Model CS2-CE/UL (REF 151-01)
Description: The CliniMACS® plus Instrument is an electromechanical device incorporating a permanent magnet, a peristaltic pump, pinch valves and electronics.
Dimensions: 70 cm (W), 90-140 cm (H), 60 cm (D)
Weight: 35 kg
Input voltage: 100-240 VAC (Single phase alternating current)
Power consumption: 180 VA
Power source: An uninterruptable power source is re commended (See Section 1.3, Precautions, CliniMACS® plus Instrument); UPS: APC Smart-UPS 1500VA USB & Serial 230V, manufactured by APC (American Power Conversion) or equivalent.
Frequency: 50/60 Hz
Fuses: 2× T4A/250V, 5×20 mmUse only fuses with UL and European approvals, acc. IEC 127-2/ III, EN 60127-2/III, DIN 41662.
Standards: The CliniMACS® plus Instrument, Model CS2-CE/UL, has been tested to and satisfies the requirements for EN 61010-1 for electrical safety and the requirements for EN 60601-1-2 and CISPR 22 for electromagnetic compatibility. Additionally, it has been tested to and satisfies the requirements for UL 3101-1 (File No. E188423) and for CAN/CSA-C22.2 No. 1010.1 (File No. 98SC02331). Therefore, it is listed as laboratory equipment. Conditions for operation (CliniMACS® plus Instrument only): +10 °C to +30 °C with 0% to 85% humidity
Conditions for storage (CliniMACS® plus Instrument only): –10 °C to +60 °C with 0% to 85% humidity, when contained and sealed in the outer packaging provided by the manufacturer. Instrument power inlet IEC-320-C13, power cords:A USA specific power cord is supplied with the CliniMACS® plus Instrument.

CliniMACS® User Manual for the CliniMACS® CD34 Reagent System
CliniMACS® plus Instrument (Model CS2-CE/UL) – 15
Power connection (see Fig. 2.3): The power connection module is located at the rear of the CliniMACS® plus Instrument. Viewed from behind, the connection consists of three sections. The left section is the recessed male 3-pin connector to which the power cord is attached. The center section is the main power ON/OFF switch. When positioned to the left, the switch is ‘OFF’ (0). When positioned to the right, the switch is ‘ON’ (I).
The right section is the fuse box. The CliniMACS® plus Instrument must be unplugged and switched off before opening the fuse box. To open it, a thin-bladed screwdriver is inserted into the slot and twisted to release the catch. To replace the fuses, remove the fuses from the rear, insert new fuses and slide the module back in until the latch clicks to the closed position. The module will only slide in one direction. Only fuses with UL and European approvals are to be used.
Figure 2.3: Rear view of the CliniMACS® plus Instrument 1 Power connection, recessed male 3-pin connector 2 Main power ON/OFF Switch 3 Fuse Box
1 2 3
Protection class: The CliniMACS® plus Instrument is a protection class I device (acc. to DIN 61140) and may only be plugged into an outlet with a grounded conductor. The protection category according to DIN EN 60529 is IPX 0.
Printer port: There is a printer port (see Fig. 2.4) situated at the rear of the CliniMACS® plus Instrument next to the power connection. However, a printer is currently not supported. Please do not connect any printer.
Figure 2.4: Parallel printer port, SUB D 25, female connector
LPT1

CliniMACS® User Manual for the CliniMACS® CD34 Reagent System
16 – CliniMACS® plus Instrument (Model CS2-CE/UL)
Interferences: This equipment has been tested and found to comply with the limits for a class B digital device, pursuant to part 15 of the FCC Rules. These limits are designed to provide reasonable protection against harmful interference in a residential installation. This equipment generates, uses and can radiate radio frequency energy and, if not installed and used in accordance with the instructions, may cause harmful interference to radio communications. However, there is no guarantee that interference will not occur in a particular installation. If this equipment does cause harmful interference to radio or television reception, which can be determined by turning the equipment off and on, the user is encouraged to try to correct the interference by one or more of the following measures:
• Redirectorrelocatethereceivingantenna.
• Increasethespacebetweentheequipmentandreceiver.
• Connecttheequipmenttoanoutletwhichisnotonthesamecircuitasthereceiver.
• Contactthedealeroranexperiencedradio/TVtechnicianforhelp.
2.3 Unpacking of the CliniMACS® plus InstrumentThe CliniMACS® plus Instrument should be unpacked according to the instructions below.
Note
Two people are required to safely unpack the CliniMACS® plus Instrument.
Visually inspect and note any significant damage to the instrument package before unpacking. Any observed damage may require inspection by a representative of the shipping company.
1. Wearing safety glasses, cut the plastic straps using a pair of scissors (see Fig. 2.5). It should be noted that the plastic straps are under tension.
Figure 2.5: Cut plastic straps

CliniMACS® User Manual for the CliniMACS® CD34 Reagent System
CliniMACS® plus Instrument (Model CS2-CE/UL) – 17
2. Open the top carton by cutting the adhesive tapes (see Fig. 2.6).
Figure 2.6: Open top carton
3. Open the carton and remove the parts (power cord, bag hangers) from the protective foam (see Fig. 2.7).
Figure 2.7: Remove parts and the protective foam
4. Remove the protective foam.

CliniMACS® User Manual for the CliniMACS® CD34 Reagent System
18 – CliniMACS® plus Instrument (Model CS2-CE/UL)
5. Lift the top carton vertically off the pallet (see Fig. 2.8).
Figure 2.8: Lift the top carton
6. Remove the inner carton (see Fig. 2.9).
Figure 2.9: Remove the inner carton

CliniMACS® User Manual for the CliniMACS® CD34 Reagent System
CliniMACS® plus Instrument (Model CS2-CE/UL) – 19
7. Unwrap the large shipping bag (see Fig. 2.10). Two people should carefully lift the CliniMACS® plus Instrument onto a flat stable surface which is capable of supporting 100 kg. The instrument should be lifted under each of the four corners at the base of the instrument.
Figure 2.10: Lift the CliniMACS® plus Instrument
8. Place the instrument at least 10 cm away from the wall to maintain ventilation. Additionally, do not place the instrument next to any vibrating equipment which might cause movement during operation.
9. Attach the bag hangers to the instrument and tighten the rods with clockwise twists until hand tight (see Fig. 2.11). The height of the bag hangers may be adjusted by pressing the bag hanger clamps (see 1, Fig. 2.11).
Figure 2.11: Attach bag hangers 1 Bag hanger clamp
1

CliniMACS® User Manual for the CliniMACS® CD34 Reagent System
20 – CliniMACS® plus Instrument (Model CS2-CE/UL)
10. A stabilization foot (see 1, Fig. 2.12) is included with the instrument and should be kept for installation by a member of Miltentyi Biotec’s Technical Support team or authorized personnel. The foot will be installed at the back of the instrument.
Figure 2.12: Rear of CliniMACS® plus Instrument with installed stabilization foot 12 Stabilization foot
12
2.4 Cleaning and Maintenance of the CliniMACS® plus Instrument
cleaning
The surface of the CliniMACS® plus Instrument should be cleaned at regular intervals and after each application with an antiseptic solution (according to your institution’s standard procedures for device decontamination).
Do not use other cleaning agents or an excessive amount of water. After cleaning, dry all excess liquid from the valves, pump head, etc.
Caution
Clean the CliniMACS® plus Instrument only when it is switched off and the power cord is unplugged.
Avoid ingress of any liquid into the valves.
maintenance
The CliniMACS® plus Instrument does not contain any parts that may be serviced by the operator. Routine and preventative maintenance should be conducted by the manufacturer’s authorized service personnel at least once per year (see Section 2.5 of this User Manual). Calibration of the instrument is not required.

CliniMACS® User Manual for the CliniMACS® CD34 Reagent System
CliniMACS® plus Instrument (Model CS2-CE/UL) – 21
2.5 Service and Technical Support Information
clinimacs® service and technical support
For any information regarding the CliniMACS® CD34 Reagent System, please contact CliniMACS® Customer Service:
Phone: 1-800-810-3135 Prompt 1: Technical Support, including Emergency Support Prompt 2: Complaint Registration Prompt 3: Customer Service
Distributed By:Miltenyi Biotec Inc.2303 Lindbergh StreetAuburn, CA 95602USA1 800 367 6227http://www.miltenyibiotec.com
clinimacs® plus instrument information
Please record below the model and serial number located on the back of the CliniMACS® plus Instrument. Refer to these numbers when calling to request information or service on the instrument.
Approved Model no: Model CS2-CE/UL
Serial no:
Software version: 2.40
The software version is displayed during the start-up phase of the CliniMACS® plus Instrument.
22 – Instructions: Cell Preparation and Magnetic Labeling
CliniMACS® User Manual for the CliniMACS® CD34 Reagent System
3 instructionsPlease read and observe the warnings and precautions described in Chapter 1.
The CliniMACS® CD34 Reagent System is for use by trained operators only.
All bag handling should be done in a sterile environment (e.g., laminar flow hood) using aseptic techniques. The connection of tubing using a sterile tubing connector may be performed outside the laminar flow hood.
Perform sample preparation and cell selection at room temperature +19 °C to +25 °C (+67 °F to +77 °F). Lower or higher ambient temperature will result in less purity and yield of the separated cells.
3.1 Required Materials and Equipment
clinimacs® materials required
CliniMACS® CD34 Reagent, REF 171-01
CliniMACS® Tubing Set TS, REF 161-01o rCliniMACS® Tubing Set LS, REF 162-01
CliniMACS® PBS/EDTA Buffer, REF 700-25CliniMACS® PBS/EDTA Buffer must be used for the cell preparation and the CliniMACS® selection. For magnetic labeling of the cells, two liters of buffer are required. For the selection, one liter of buffer is required. Before use, supplement the CliniMACS® PBS/EDTA Buffer with HSA to a final concentration of the 0.5% (w/v). HSA is not a component of the CliniMACS® CD34 Reagent System and must be provided by the user.
In addition to the CliniMACS® Products, further materials and equipment are required for the CliniMACS® CD34 selection and are supplied by the user.
additional materials required (supplied by the user)
Transfer bags, suitable for centrifugation:Transfer Bag 150 mLTransfer Bag 600 mL
Sampling Site Coupler.
Plasma Transfer Set Coupler/Coupler, Fenwal, 4C2405, or equivalent.
Luer/Spike Interconnector, Charter Medical, 03-220-92, or equivalent.
Pre-system filter, Blood Transfusion Filter, Pall, Ref. No. SQ40S, or equivalent.
Human serum albumin (HSA): Only FDA-licensed HSA should be used.

Instructions: Cell Preparation and Magnetic Labeling – 23
CliniMACS® User Manual for the CliniMACS® CD34 Reagent System
Locking forceps or slide clamps: Locking forceps, Qosina: Part No. 16093, or equivalent.
Syringes and needles: Appropriate syringes (1 mL, 10 mL, 20 mL, 50 mL) and hypodermic 20 gauge needles.
Sample tubes.
equipment required (supplied by the user)
Uninterruptable power supply, rated at a minimum of 180 VA (APC Smart-UPS 1500VA USB & Serial 230 V or equivalent).
Laminar flow hood.
Orbital rotator (Lab-Line, Model 4635, or equivalent).
Centrifuge (Sorvall, Model RC3, or equivalent) and buckets for centrifugation with aerosol containment caps.
Plasma extractor (Terumo Equipment, Plasma Separation Stand, Ref. No. 1ME*ACS201, or equivalent).
Table top balance (Mettler Toledo, Ref. No. 11274-998, or equivalent) with 1 kg capacity; resolution to 0.1 g.
Tubing heat sealer (Baxter, Hematron III, Ref. No. FDR4360, or equivalent).
Tubing stripper (Baxter, Ref. No. RAR4415, or equivalent).
Biohazard waste containers.
Optional materials and equipment may be used for the CliniMACS® CD34 selection and are supplied by the user.
optional materials (supplied by the user)
Human IgG: Only pharmaceutical grade Human IgG should be used.
200 µm in-line blood filter, Fenwal, Product Code 4C2160, or equivalent.
optional equipment (supplied by the user)
Sterile tubing connector (Terumo Sterile Connection Device, 1 TSCD® SC-201, or equivalent).
1 TSCD is a registered trademark of Terumo Corporation, Tokyo, Japan.

24 – Instructions: Cell Preparation and Magnetic Labeling
CliniMACS® User Manual for the CliniMACS® CD34 Reagent System
3.2 Labeling and Preparation of Transfer Bags1. Label one 150 mL transfer bag as: Cell Collection (Minimally, this should include patient
identification, date and time of run, and operator identification). Insert a Luer/Spike Interconnector into the port of the Cell Collection Bag. Place locking forceps on the tubing close to the bag and close the locking forceps. Weigh the empty Cell Collection Bag with locking forceps positioned close to the bag and the tubing hanging on the table next to the balance. Record the weight.
Important
Since the length of the tubing can vary during the preparation procedure, be careful when determining the weight of the Cell Preparation Bag. To acquire an accurate reading, confirm the locking forceps are always positioned close to the bag and are lying on the balance and the rest of the tubing is lying on the table next to the balance.
2. Label one 600 mL transfer bag as: Cell Preparation (Minimally, this should include patient identification, date and time of run, and operator identification). Insert a sampling site coupler into the outside port of the Cell Preparation bag. Place locking forceps on the tubing close to the bag and close the locking forceps. Weigh the empty Cell Preparation bag with locking forceps positioned close to the bag and the tubing hanging on the table next to the balance as instructed above. Record the weight of the bag.
3. Label one 600 mL transfer bag as: Plasma Waste (Minimally, this should include patient identification, date, time of run and operator identification).
4. Label two 600 mL transfer bag as: Wash Waste no. 1 and Wash Waste no. 2. (Minimally, this should include patient identification, date and time of run, operator identification.)
3.3 Preparation of the CliniMACS® PBS/EDTA Buffer1. Before use, CliniMACS® PBS/EDTA Buffer must be supplemented with HSA. Supplement
three liters of CliniMACS® PBS/EDTA Buffer with HSA to a final concentration of 0.5% (w/v), i.e., add 5 g HSA per liter buffer.
Important
HSA is not a component of the CliniMACS® CD34 Reagent System. HSA is provided by the user and must be used with the CliniMACS® CD34 Reagent System. Use only FDA licensed HSA. Carefully read the package insert of the HSA used.
Store the buffer for cell preparation at +20 °C to +25 °C (+68 °F to +77 °F). Lower or higher ambient temperature will result in less purity and yield of the target cells. CliniMACS® PBS/EDTA is for in vitro use only. After the selection, the CliniMACS® PBS/EDTA Buffer contained in the target cell fraction must be exchanged to a medium suitable for application in humans prior to target cell infusion.

Instructions: Cell Preparation and Magnetic Labeling – 25
CliniMACS® User Manual for the CliniMACS® CD34 Reagent System
3.4 Preparation of the HPC, Apheresis 1. Collect sufficient HPC, Apheresis to yield at least 2.4 × 10⁶ CD34+ cells per kg of patient
body weight after system processing.
2. Collect HPC, Apheresis according to standard hospital or institutional leukapheresis procedures in standard leukapheresis collection bags. Do not include additional anticoagulants or blood additives, such as heparin, other than those normally used during leukapheresis.
3. For transportation or storage, the HPC, Apheresis should be packed in insulated containers and should be kept at controlled room temperature +19 °C to +25 °C (+67 °F to +77 °F) according to standard hospital or institutional blood collection procedures approved for use with the clinical protocol. Do not refrigerate. Do not allow the cell concentration to exceed 0.2 × 10⁹ cells per mL during transportation or storage. If necessary, dilute the HPC, Apheresis with autologous plasma.
4. Begin labeling and selection of cells as soon as possible after the HPC, Apheresis has been collected but not longer than 24 hours after collection.
5. Perform all bag handling in a sterile environment (e.g., laminar flow hood) using aseptic techniques. The connection of tubing using a sterile tubing connector may be performed outside the laminar flow hood.
6. Avoid vigorous mixing of the HPC, Apheresis.
7. Ensure that all required supplies and equipment are available before starting the cell labeling and selection procedures.
Note
The following sections describe the recommended procedure for the preparation of the HPC, Apheresis using a sterile tubing connector. The operator should be familiar with the operation and use of a sterile tubing connector.

26 – Instructions: Cell Preparation and Magnetic Labeling
CliniMACS® User Manual for the CliniMACS® CD34 Reagent System
analysis of the HPc, apheresis
1. Insert a sampling site coupler into the port of the blood collection bag containing the HPC, Apheresis.
2. Disinfect the septum of the sampling site coupler. Insert a needle with an appropriate syringe into the sampling site coupler and remove a volume of 0.5 mL of the HPC, Apheresis. Transfer the sample into a sample tube. Label the tube as HPC, APHERESIS and include patient identification information and retain for cell analysis.
3. Determine the following parameters before starting the preparation of the HPC, Apheresis:
• Totalnumberofleukocytes• PercentageofCD34+ cells• TotalnumberofCD34+ cells • PercentageofCD3+ cells• TotalnumberofCD3+ cells• Viability
Other tests might be required according to individual laboratory practice. Record data.
Note
The standard-scale application capacity for the enrichment of CD34+ cells using the CliniMACS® CD34 Reagent System is 0.6 × 10⁹ CD34+ cells out of a total cell number not exceeding 60 × 109 cells. If either parameter is exceeded, a large-scale application must be performed.
For the enrichment of up to 1.2 × 10⁹ CD34+ cells out of a total cell number of 120 × 109 cells (large-scale application), two vials of the CliniMACS® CD34 Reagent are needed.
If the number of target cells is low in the HPC, Apheresis the mobilization may be insufficient. The user should review the flow analysis for accuracy.
Poor viability of cells in the HPC, Apheresis may indicate that the product was harvested, stored or transported inappropriately. Refer to Section 4, "Troubleshooting", of this User Manual.
transfer of HPc, apheresis into cell Preparation Bag
1. Record the date and the start time prior to preparing the HPC, Apheresis.
2. Determine the volume of the original HPC, Apheresis by estimating 1 mL of HPC, Apheresis as equivalent to 1 g (1 g = 1 mL).
3. Hold the HPC, Apheresis bag with both hands and mix the contents thoroughly by using a gentle rotating motion.
Instructions: Cell Preparation and Magnetic Labeling – 27
CliniMACS® User Manual for the CliniMACS® CD34 Reagent System
4. Connect the Cell Preparation Bag to the original HPC, Apheresis bag using the sterile tubing connector.
Note
If clumps are suspected or present in the HPC, Apheresis, a 200 µm in-line blood filter may be used to filter the HPC, Apheresis material; connect the Cell Preparation Bag to the original HPC, Apheresis Bag using the 200 µm in-line blood filter.
5. Open the locking forceps, or the roller clamp on the blood filter, to facilitate the transfer of the HPC, Apheresis material into the Cell Preparation Bag. Clear the tubing of any remaining product using a tubing stripper. Close the locking forceps next to the Cell Preparation Bag, or close the roller clamp.
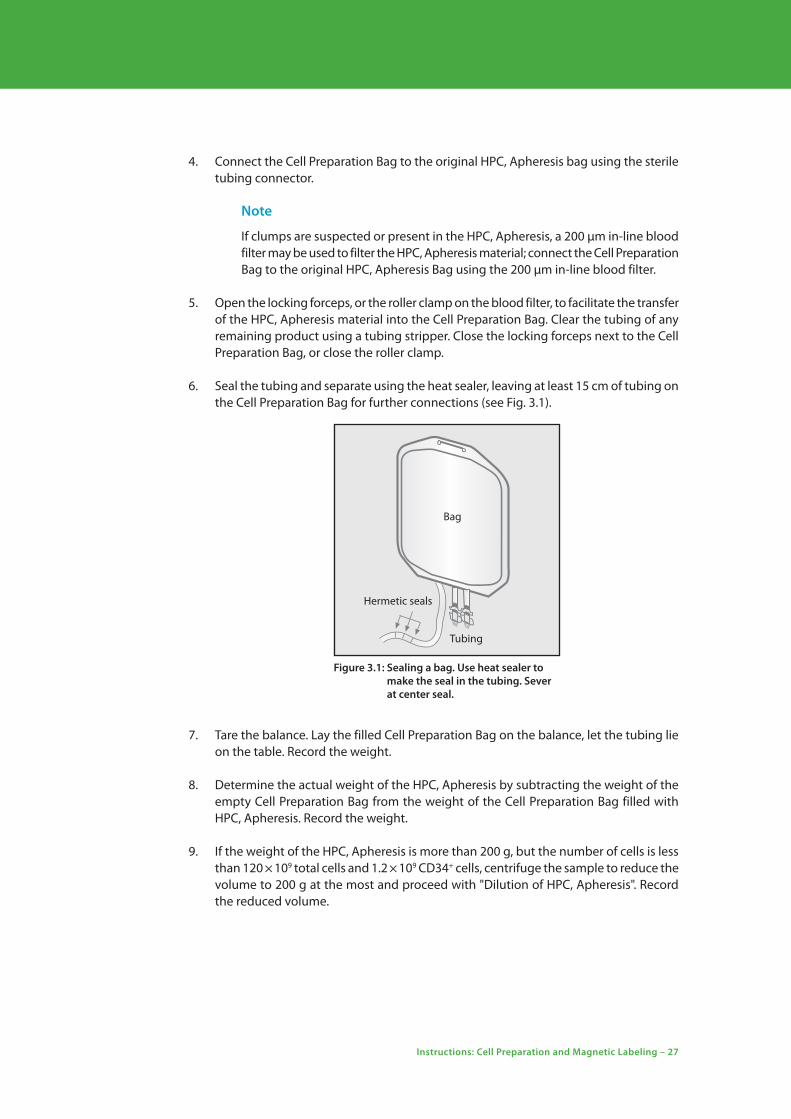
6. Seal the tubing and separate using the heat sealer, leaving at least 15 cm of tubing on the Cell Preparation Bag for further connections (see Fig. 3.1).
Figure 3.1: Sealing a bag. Use heat sealer to make the seal in the tubing. Sever at center seal.
Bag
Hermetic seals
Tubing
7. Tare the balance. Lay the filled Cell Preparation Bag on the balance, let the tubing lie on the table. Record the weight.
8. Determine the actual weight of the HPC, Apheresis by subtracting the weight of the empty Cell Preparation Bag from the weight of the Cell Preparation Bag filled with HPC, Apheresis. Record the weight.
9. If the weight of the HPC, Apheresis is more than 200 g, but the number of cells is less than 120 × 109 total cells and 1.2 × 10⁹ CD34+ cells, centrifuge the sample to reduce the volume to 200 g at the most and proceed with "Dilution of HPC, Apheresis". Record the reduced volume.

28 – Instructions: Cell Preparation and Magnetic Labeling
CliniMACS® User Manual for the CliniMACS® CD34 Reagent System
dilution of HPc, apheresis
Dilute the HPC, Apheresis with CliniMACS® PBS/EDTA Buffer (supplemented with HSA to a final concentration of 0.5% (w/v)) to remove platelets by centrifugation before magnetic labeling. Centrifuge as instructed below under "Centrifugation" at 200 × g for 15 min (without brake) at room temperature (+19 °C to +25 °C [+67 °F to +77 °F]) following the dilution steps. Calculate the amount of buffer to be added using the following equation and record the amount.
Weight of buffer Weight of HPC, to be added (g) = Apheresis product (g) × 2
1. Take a plasma transfer set and ensure the clamp is in the closed position. Insert the spike of the plasma transfer set into a port of the buffer bag.
2. Connect the buffer bag to the Cell Preparation Bag using the sterile tubing connector.
3. Place the Cell Preparation Bag on the balance and tare the balance. Hang the buffer bag on the bag hanger. Open the locking forceps next to the Cell Preparation Bag.
4. Move the clamp on the plasma transfer set to the open position. Transfer the calculated amount of buffer to the Cell Preparation Bag by visually monitoring the display on the balance.
5. Close the clamp on the plasma transfer set to stop the liquid flow when the appropriate amount of buffer has been transferred. Close the locking forceps next to the Cell Preparation Bag. Record the actual amount of buffer added.
6. Make three hermetic seals between both clamps using the heat sealer leaving at least 15 cm of tubing on the Cell Preparation Bag. Disconnect the buffer bag.
7. Hold the Cell Preparation Bag with both hands and mix the contents thoroughly by using a gentle rotating motion. Avoid vigorous mixing of the cells.
8. Tare the balance and weigh the Cell Preparation Bag. Record the weight.
9. Determine the weight of diluted HPC, Apheresis by subtracting the weight of the empty Cell Preparation Bag from the weight of the filled Cell Preparation Bag. Record the weight.
centrifugation
1. Connect the empty Plasma Waste Bag to the Cell Preparation Bag using the sterile tubing connector.
2. Fold any loose parts of the Cell Preparation Bag or tubing downwards. Place the two bags securely in the centrifuge bucket.
3. Balance the loaded bucket with a suitable weighted bucket. It is essential that the centrifuge is calibrated accurately.

Instructions: Cell Preparation and Magnetic Labeling – 29
CliniMACS® User Manual for the CliniMACS® CD34 Reagent System
4. Centrifuge the cells at 200 × g for 15 min (without brake) at room temperature (+19 °C to +25 °C [+67 °F to +77 °F]). Record centrifugation conditions.
5. Remove the bag from the centrifuge, taking care not to re-suspend the cell pellet. Load the Cell Preparation Bag onto the plasma extractor.
volume adjustment
1. For magnetic labeling of CD34+ cells, the optimal weight of the cell sample is:
a) 95 g (±5 g) for a standard-scale preparation, if one vial of CliniMACS® CD34 Reagent is sufficient, or,
b) 190 g (±5 g) for a large-scale preparation if two vials of reagent are needed (see Table 3.1).
Standard scale preparation
Large scale preparation
Labeled cells 0.6 × 10⁹ 0.6–1.2 × 10⁹
Total cells 60 × 109 WBC 60–120 × 109 WBC
Number of CD34 Reagent vials 1 2
Optimal labeling weight 95 g (±5 g) 190 g (±5 g)
Table 3.1: Optimal labeling weight for the enrichment of CD34+ cells
Calculate the amount of supernatant to be removed to adjust the sample to 95 g (or 190 g) using the equation below:
a) Amount of Weight of Supernatant = diluted HPC, – 95 g to be removed (g) Apheresis (g) b) Amount of Weight of Supernatant = diluted HPC, – 190 g to be removed (g) Apheresis (g)
Record the amount of supernatant removed.
Important
Ideally, magnetic labeling is performed on diluted HPC, Apheresis. Adjust the product to a final dilution of approximately 1:3. If the product received is diluted more than 1:3, or if the concentration of plasma in the sample is unknown, add immunoglobulin (IgG) to the product prior to the addition of the CliniMACS® CD34 Reagent. The recommended concentration of IgG in the labeling mixture is 1.5 mg/mL. It is important to include the appropriate amount of IgG in the sample during the labeling in order to minimize non-specific binding of the CliniMACS® CD34 Reagent. If a final concentration of about 30% autologous plasma in the sample during magnetic labeling cannot be guaranteed, add IgG to the sample. The volume of IgG added should be included in the final labeling weight; do not exceed 95 g or 190 g.

30 – Instructions: Cell Preparation and Magnetic Labeling
CliniMACS® User Manual for the CliniMACS® CD34 Reagent System
2. Place the empty Plasma Waste Bag on the balance and tare the balance.
3. Open the locking forceps next to the Cell Preparation Bag. Use the balance display to monitor the weight of the Plasma Waste Bag while removing the supernatant. Use the plasma extractor to carefully press out excess supernatant.
Continue until the calculated amount of supernatant has been transferred into the Plasma Waste Bag so that a) 95 g or b) 190 g remain in the Cell Preparation Bag.
Important
Maintain constant control of the plasma extractor release handle and ensure that the locking forceps next to the Cell Preparation Bag is in the open position before beginning the transfer. Release the extractor handle slowly. During removal of supernatant be careful not to lose cells.
4. When the appropriate amount of supernatant has been transferred, close the locking forceps next to the Cell Preparation Bag to stop the liquid flow. Record the actual weight of the supernatant removed.
5. Seal off the tubing to disconnect the Plasma Waste Bag using the heat sealer. Leave at least 15 cm of tubing on the Cell Preparation Bag for further connections.
6. Weigh the Cell Preparation Bag and record the weight.
7. Resuspend the cells in the Cell Preparation Bag carefully. Avoid vigorous mixing of the cells. Ensure that all cells are resuspended. Determine the weight of the HPC, Apheresis product after volume adjustment by subtracting the weight of the empty Cell Preparation Bag from the weight of the filled Cell Preparation Bag. Note the calculated weight.
8. Keep the Plasma Waste Bag until the selection and final analysis of all cells has been accomplished.
Important
If the CD34+ cell recovery is low following completion of the selection procedure, the content of the Plasma Waste Bag may be analyzed to determine whether cells were lost during the removal of the supernatant.

Instructions: Cell Preparation and Magnetic Labeling – 31
CliniMACS® User Manual for the CliniMACS® CD34 Reagent System
3.5 Labeling of the Cells
determination of the scale of the cd34 selection
Use the data (total number of leukocytes and total number of CD34+ cells) from "Analysis of the HPC, Apheresis" page 26, to determine the scale of enrichment to be performed. The standard-scale capacity for the enrichment of CD34+ cells using the CliniMACS® CD34 Reagent System with one vial of CliniMACS® CD34 Reagent and the CliniMACS® Tubing Set TS is 0.6 × 10⁹ CD34+ cells out of a total cell number not exceeding 60 × 109 cells. Large-scale capacity for the enrichment of up to 1.2 × 10⁹ CD34+ cells out of a total cell number of 120 × 109 cells (large-scale application) requires two vials of the CliniMACS® CD34 Reagent and the CliniMACS® Tubing Set LS.
Preparation of the clinimacs® cd34 reagent
The CliniMACS® CD34 Reagent should be used cold, directly from the refrigerator. DO NOT warm up before use. The use-by date and lot number of the reagent are printed on the vial. DO NOT use the reagent after the use-by date.
incubation with the clinimacs® cd34 reagent
1. Record the reference number (REF), lot number and use-by date of the CliniMACS® CD34 Reagent.
2. Disinfect the septum of the sampling site coupler. Use an appropriate sterile syringe and needle to remove the entire volume from one vial CliniMACS® CD34 Reagent (7.5 mL). A 10 mL syringe is sufficient to remove the contents of one vial for a standard-scale application, or respectively, a 20 mL syringe is sufficient to remove the contents of two vials of reagent for a large-scale application. Use a syringe with a 20 gauge needle.
3. Inject the entire volume of reagent into the Cell Preparation Bag using the injection port on the sampling site coupler. Take care not to puncture the Cell Preparation Bag. Immediately begin the 30 minute incubation.
4. Hold the Cell Preparation Bag with both hands and mix the contents thoroughly by using a gentle rotating motion. Record the incubation start time.
5. Partially inflate the Cell Preparation Bag to ensure that cells and reagent are thoroughly mixed. Use an appropriate sterile syringe and needle (i.e. a 50 mL syringe with 20 gauge needle) to inject 100 mL of sterile air from the laminar flow hood into the injection port of the sampling site coupler.
6. Place the Cell Preparation Bag flat on the orbital rotator at approximately 25 rpm and ensure that the bag is not creased or bent. Incubate the bag for a total of 30 minutes at controlled room temperature (+19 °C to +25 °C [+67 °F to +77 °F]). Record the incubation stop time.

32 – Instructions: Cell Preparation and Magnetic Labeling
CliniMACS® User Manual for the CliniMACS® CD34 Reagent System
removal of excess reagent
Wash no. 1
1. Insert the spike of a plasma transfer set to a port of a buffer bag containing at least one liter of buffer. Confirm that the clamp on the plasma transfer set is closed.
2. Connect the buffer bag to the Cell Preparation Bag using the sterile tubing connector.
3. Place the Cell Preparation Bag on the balance. Hang the buffer bag on the bag hanger. Tare the balance.
4. Open the locking forceps next to the Cell Preparation Bag. Then open the clamp on the plasma transfer set and completely fill the Cell Preparation Bag with buffer (i.e. add 400 g to 500 g of buffer). To stop the liquid flow, close the clamp on the plasma transfer set. Record the weight of buffer transferred into the Cell Preparation Bag.
5. Close the locking forceps next to the Cell Preparation Bag. Seal off the tubing between both clamps leaving at least 15 cm of tubing on the Cell Preparation Bag for further connections. Disconnect the buffer bag.
6. Hold the Cell Preparation Bag with both hands and mix the contents (HPC, Apheresis product and buffer) thoroughly by using a gentle rotating motion.
7. Connect the empty Wash Waste Bag no. 1 to the Cell Preparation Bag using the sterile tubing connector.
8. Fold any loose parts of the bags or tubing downwards. Transfer Cell Preparation Bag and Wash Waste Bag no. 1 securely to the centrifuge bucket.
9. Balance the loaded bucket with a suitable weighted bucket. It is essential that the centrifuge is calibrated accurately.
10. Centrifuge at 200 × g for 15 min (without brake) at room temperature (+19 °C to +25 °C [+67 °F to +77 °F]). Note the centrifugation conditions.
11. Remove the bags from the centrifuge without disturbing the cell pellet.
12. Hang the Cell Preparation Bag on the plasma extractor.
13. Place the Wash Waste Bag no. 1 on the balance. Tare the balance.
14. Open the locking forceps next to the Cell Preparation Bag. Remove as much excess supernatant as possible from the Cell Preparation Bag using the plasma extractor. Be careful not to remove cells. Note the amount of supernatant removed.
Instructions: Cell Preparation and Magnetic Labeling – 33
CliniMACS® User Manual for the CliniMACS® CD34 Reagent System
15. Close the locking forceps and heat seal off the tubing to disconnect the Wash Waste Bag no. 1 leaving at least 15 cm of tubing on the Cell Preparation Bag for further connections.
Important
For the standard-scale preparation (one vial of CliniMACS® CD34 Reagent), remove at least 500 mL of supernatant volume.
For the large-scale preparation (two vials of CliniMACS® CD34 Reagent), remove at least 450 mL of supernatant volume.
If the volume of supernatant removed is less than the amount listed above a total of three washing steps (instead of only two) is recommended. Otherwise the removal of unbound reagent may be insufficient. Unbound reagent may bind to the separation column and this may decrease the selection efficiency.
16. Keep the Wash Waste Bag no.1 until the selection and final analysis of all cells has been accomplished.
Important
If the CD34+ cell recovery is low following completion of the selection procedure, the content of the Wash Waste Bag no. 1 may be analyzed to determine whether cells were lost during the removal of the supernatant.
17. Resuspend the cell pellet in the Cell Preparation Bag. Avoid vigorous mixing of the cells. Ensure that all cells are resuspended.
Wash no. 2
1. Connect the plasma transfer set, inserted into a buffer bag containing at least 500 mL of buffer, to the Cell Preparation Bag using the sterile tubing connector. Confirm the clamp on the plasma transfer set is closed.
2. Place the Cell Preparation Bag on the balance. Hang the buffer bag on the bag hanger. Tare the balance.
3. Open the locking forceps next to the Cell Preparation Bag.
Next open the clamp on the plasma transfer set and completely fill the Cell Preparation Bag with buffer (i.e., add approximately 500 g of buffer). To stop the liquid flow, close the clamp on the plasma transfer set. Record the weight of buffer transferred into the Cell Preparation Bag.
4. Close the locking forceps next to the Cell Preparation Bag. Seal off the tubing between both clamps leaving at least 15 cm of tubing on the Cell Preparation Bag for further connections. Disconnect the buffer bag.
5. Hold the Cell Preparation Bag with both hands and mix the contents (HPC, Apheresis product and buffer) thoroughly by using a gentle rotating motion.

34 – Instructions: Cell Preparation and Magnetic Labeling
CliniMACS® User Manual for the CliniMACS® CD34 Reagent System
6. Connect the empty Wash Waste Bag no. 2 to the Cell Preparation Bag using the sterile tubing connector.
7. Fold any loose parts of the bags or tubing downwards. Transfer Cell Preparation Bag and Wash Waste Bag no. 2 to the centrifuge bucket securely.
8. Centrifuge at 200 × g for 15 min (without brake) at room temperature (+19 °C to +25 °C [+67 °F to +77 °F]). Record the centrifugation conditions.
9. Remove the bags from the centrifuge without disturbing the cell pellet. Carefully hang the Cell Preparation Bag on the plasma extractor.
10. Place the Wash Waste Bag no. 2 on the balance. Tare the balance.
11. Open the locking forceps next to the Cell Preparation Bag. Remove as much excess supernatant as possible from the Cell Preparation Bag using the plasma extractor. Record the amount of supernatant removed.
12. Close the locking forceps and heat seal off the tubing to disconnect the Wash Waste Bag no. 2.
13. Keep the Wash Waste Bag no. 2 until the selection and final analysis of all cells has been accomplished.
Important
If the CD34+ cell recovery is low following completion of the selection procedure, the content of the Wash Waste Bag no. 2 may be analyzed to determine whether cells were lost during the removal of the supernatant.
14. Resuspend the cell pellet in the Cell Preparation Bag. Avoid vigorous mixing of the cells. Ensure that all cells are resuspended.
15. Weigh the Cell Preparation Bag and record the weight. Determine the weight of the HPC, Apheresis after the washes by subtracting the weight of the empty Cell Preparation Bag from the weight of the filled Cell Preparation Bag. Record the weight.
16. Adjust sample loading volume: Calculate the amount of buffer necessary to adjust the weight of the cell suspension to approximately a) 150 g (standard-scale preparation) or b) 275 g (large-scale preparation).
17. Connect the buffer bag to the Cell Preparation Bag using the sterile tubing connector.
18. Place the Cell Preparation Bag on the balance and tare the balance. Hang the buffer bag on the bag hanger. Open the locking forceps next to the Cell Preparation Bag.
19. Move the clamp on the plasma transfer set to the open position. Transfer the calculated amount of buffer to the Cell Preparation Bag by visually monitoring the scale on the balance.

Instructions: Cell Preparation and Magnetic Labeling – 35
CliniMACS® User Manual for the CliniMACS® CD34 Reagent System
20. Close the clamp on the plasma transfer set to stop the liquid flow when the appropriate amount of buffer has been transferred. Close the locking forceps next to the Cell Preparation Bag.
21. Make three hermetic seals between both clamps using the heat sealer. Disconnect the buffer bag.
22. Insert a sampling site coupler into the port of the bag containing the HPC, Apheresis.
23. Disinfect the septum of the sampling site coupler. Insert a needle with an appropriate syringe into the sampling site coupler of the Cell Preparation Bag and remove a volume of 0.5 mL of the labeled product. Transfer the sample into a sample tube. Label the tube as ORIGINAL (This should include patient identification.) and retain for cell analysis. This sample will be used to calculate the CD34+ cell recovery based on the product actually loaded on the instrument. Determine the following parameters before starting the selection procedure:
• Totalnumberofleukocytes• PercentageofCD34+ cells• TotalnumberofCD34+ cells• PercentageofCD3+ cells• TotalnumberofCD3+ cells• Viability
Other tests might be required according to individual laboratory practice. Record data.
24. Weigh the Cell Preparation Bag and record the weight. Determine the weight of the HPC, Apheresis (sample loading volume) by subtracting the weight of the empty Cell Preparation Bag from the weight of the filled Cell Preparation Bag. Record the weight.
Continue to 3.6 Operation of the CliniMACS® plus Instrument.
DO NOT connect the Cell Preparation Bag to the tubing set until instructed to do so by the instrument display.

Instructions: Operation of the CliniMACS® plus Instrument – 36
CliniMACS® User Manual for the CliniMACS® CD34 Reagent System
3.6 Operation of the CliniMACS® plus Instrument
switching on the clinimacs® plus instrument
Switch on the CliniMACS® plus Instrument by using the ON/OFF switch located on the back panel of the instrument. Record the date and time detailing when the instrument run has been started.
The instrument performs self-check procedures and a screen indicating the name of the instrument and software version appears (see Screen no. 3.1).
Screen no. 3.1
The program will automatically load and a screen depicting the CliniMACS® plus Instrument appears (see Screen no. 3.2).
Screen no. 3.2

Instructions: Operation of the CliniMACS® plus Instrument – 37
CliniMACS® User Manual for the CliniMACS® CD34 Reagent System
Program menu, Language selection and service menu
From Screen no. 3.2 the operator may proceed to the Program Menu by pressing 'ENT', or access menus that facilitate language selection or a service menu.
Language Selection
To change the language selection, press 2 The window will display Screen no. 3.3 as shown.
Screen no. 3.3
To select a language, press the corresponding number. To save the language, press ENT Service Menu
To enter the Service Menu, press 5 The window will display Screen no. 3.4 as shown.
Screen no. 3.4
From the Service Menu the operator may change the date and time, call up the process codes of the last 15 runs, enter Access to Program Menu (as directed by a member of Miltenyi Biotec’s Technical Support team), or perform an instrument check.
Instructions: Operation of the CliniMACS® plus Instrument – 38
CliniMACS® User Manual for the CliniMACS® CD34 Reagent System
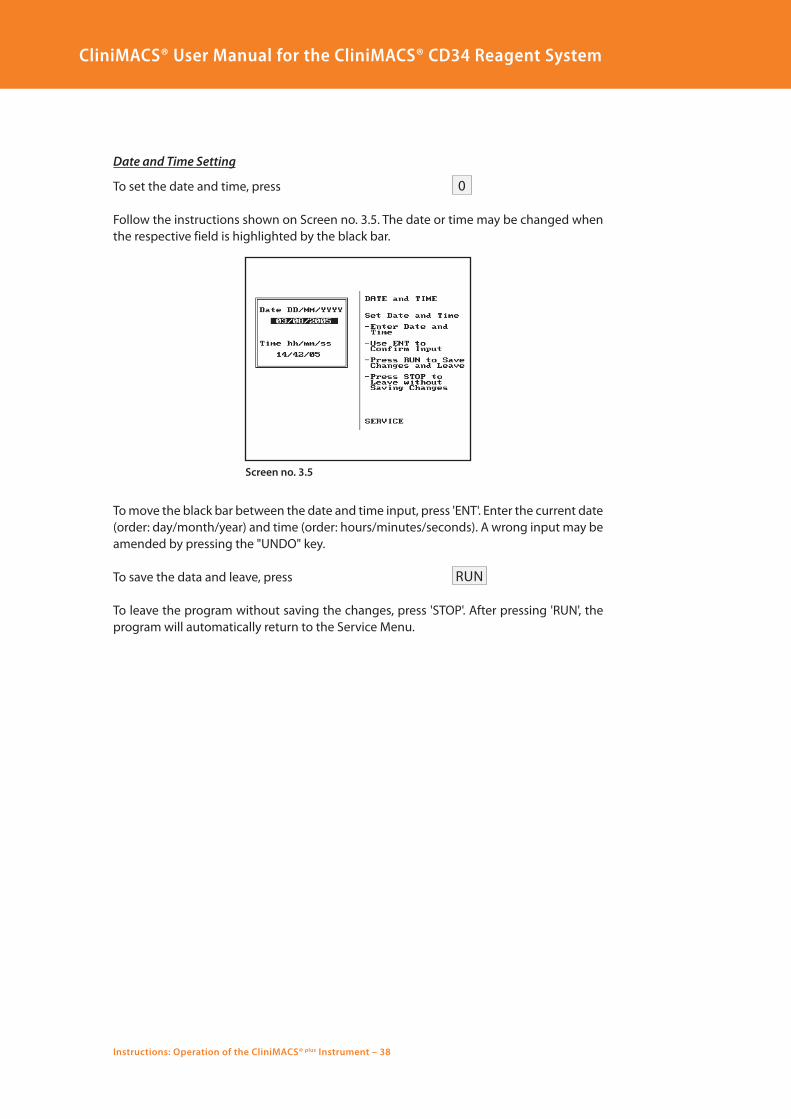
Date and Time Setting
To set the date and time, press 0 Follow the instructions shown on Screen no. 3.5. The date or time may be changed when the respective field is highlighted by the black bar.
Screen no. 3.5
To move the black bar between the date and time input, press 'ENT'. Enter the current date (order: day/month/year) and time (order: hours/minutes/seconds). A wrong input may be amended by pressing the "UNDO" key.
To save the data and leave, press RUN To leave the program without saving the changes, press 'STOP'. After pressing 'RUN', the program will automatically return to the Service Menu.

Instructions: Operation of the CliniMACS® plus Instrument – 39
CliniMACS® User Manual for the CliniMACS® CD34 Reagent System
Process Code Review
This menu permits the operator to view the process codes of the last 15 CliniMACS® operations. A process code is saved when the installation of a tubing set has begun, or when the Emergency Elute program has been used (see Section 4, Troubleshooting). Saving a process code is independent of whether a selection sequence was completed or interrupted.
To review the process codes, press 1 The process codes for the last 15 CliniMACS® operations are listed on the screen chronologically as depicted on Screen no. 3.6. The most recent operation is listed first.
Screen no. 3.6
To return to the Service Menu, press ENT Access to Programs
This menu should not be entered by the user unless instructed to do so by a member of Miltenyi Biotec’s Technical Support team. If the program is entered by mistake, press 'STOP' to leave the program and return to the Service Menu.
Check Instrument
This menu allows the operator to initiate an automated instrument check sequence.
To begin the instrument check, press 3
To leave the Service Menu, press 4 The program will return to Screen no 3.1 and Screen no 3.2.
To proceed to the Program Menu and choose a selection program, press ENT
Note
Screen prompts and diagrams serving as procedure guides will appear in the display window. Perform and check each step according to the manual instructions before proceeding to the next step.

Instructions: Operation of the CliniMACS® plus Instrument – 40
CliniMACS® User Manual for the CliniMACS® CD34 Reagent System
choice of selection Program: cd34 seLection 1 or cd34 seLection 2
The window will display Screen no. 3.7 as shown.
Screen no. 3.7
Choose either the CD34 SELECTION 1 (standard-scale applications) or CD34 SELECTION 2 (large-scale applications), as appropriate.
To choose the appropriate CD34 selection program, highlight the name of the program with the black bar. Move the bar up and down by using the keys '0' and '8'.
To proceed with the highlighted program, press ENT
confirmation of the Program choice
The window will display Screen no. 3.8 as shown. Confirm the correct program has been chosen.
Screen no. 3.8
If not, press the "UNDO" key on the instrument keypad to return to the previous step in order to amend the choice.
To confirm and proceed, press ENT

Instructions: Operation of the CliniMACS® plus Instrument – 41
CliniMACS® User Manual for the CliniMACS® CD34 Reagent System
material check
The window will show Screen no. 3.9 as shown.
Screen no. 3.9
CD34 SELECTION 1 and CD34 SELECTION 2 selection programs are optimized for the enrichment of CD34+ cells. To confirm the suitable tubing set is available and the proper reagent has been used for cell labeling, enter respective tubing set reference number (REF) in the query box. The instrument will check whether the materials can be used in combination with the chosen selection program.
Note
CD34 SELECTION 1 must only be used in combination with the CliniMACS® Tubing Set TS (REF 161-01), while CD34 SELECTION 2 must only be used in combination with the CliniMACS® Tubing Set LS (REF 162-01). Check that the tubing set chosen for installation matches the selection procedure before proceeding.
Press the "UNDO" key located on the instrument keypad to correct a mistake during data input.
1. Enter reference number of the tubing set to be used for the automated cell selection.
To confirm and proceed, press ENT
2. Enter reference number of the reagent that has been used for cell labeling.
To confirm and proceed, press ENT
If the reference number of a tubing set or a reagent not specified for the chosen selection program has been entered, a message appears. Press 'ENT' to confirm and enter the correct reference number again. If the reference number entered is still incorrect, the message will appear a second time. After pressing 'ENT' the program will return to the program menu (see Screen no. 3.7).
If the material check was successful, the program continues automatically with the instructions to install the tubing set.
Proceed to the Installation of the CliniMACS® Tubing Sets.

42 – Instructions: Installation of the CliniMACS® Tubing Sets
CliniMACS® User Manual for the CliniMACS® CD34 Reagent System
3.7 Installation of the CliniMACS® Tubing Sets: TS or LSThe installation of the CliniMACS® Tubing Set, TS or LS, may be performed using one of two sets of instructions. Section 3.8 describes the installation of the tubing set in a clean room environment (controlled laboratory environment) or, Section 3.9 describes the use of alternative installation instructions for use in a laminar air flow hood. Two sets of instructions are provided so the operator may select the appropriate set of installation instructions based on the location of the CliniMACS® plus Instrument and the design of the individual processing facility.
The CliniMACS® CD34 Reagent System itself is a functionally closed system which does not necessarily need to be operated in a clean room.
Aseptic technique must be followed when installing the tubing set regardless of the installation method chosen.
Preparation for tubing set installation (ts or Ls)
The window will display Screen no. 3.10 as shown.
Screen no. 3.10
The instruction is on the right, and a diagram corresponding to the instruction is displayed on the left. The blinking features on the screen indicate the areas of attention.
Note
The CliniMACS® plus Instrument shows the chosen program name, e.g. CD34 SELECTION 1, in the bottom line of the instrument screen.
At any step during the tubing set installation the "UNDO" key, located on the instrument keypad, can be pushed to return to the previous step.
The CliniMACS® Tubing Set TS (REF 161-01) and the CliniMACS® Tubing Set LS (REF 162-01) are each provided in sealed, sterilized packages. Each tubing set contains pre-assembled tubing and columns for one cell selection (see Fig. 3.2). When the packaging is intact, a sterile fluid path is provided.

Instructions: Installation of the CliniMACS® Tubing Sets – 43
CliniMACS® User Manual for the CliniMACS® CD34 Reagent System
23
24
25
26
27
28
29
30
31
32
36
35
34
33
33
23 Priming Waste Bag
24 Bubble trap spike
25 Bubble trap
26 Pre-column
27 Separation column
28 Upper retaining ring
29 Pump tubing
30 Lower retaining ring
31 Negative Fraction Bag
32 Buffer Waste Bag
33 Luer connector
34 T-fitting
35 4-way fitting
36 Buffer spike
Figure 3.2: General construction of a CliniMACS® Tubing Set (e.g. CliniMACS® Tubing Set TS, REF 161-01, note the construction of the CliniMACS® Tubing Set LS, REF 162-01 is identical)

44 – Instructions: Installation of the CliniMACS® Tubing Sets
CliniMACS® User Manual for the CliniMACS® CD34 Reagent System
Note that both the CliniMACS® Tubing Set TS and the CliniMACS® Tubing Set LS may be installed using the following instructions.
1. Record the lot number and use-by date of the tubing set on the worksheet. Unpack the sterile tubing set under sterile conditions (e.g. laminar flow hood).
2. Check luer lock connections to bags. Luer locks must be closed tightly.
attach cell collection Bag
1. Record the weight of the empty Cell Collection Bag. Remove caps and attach the sterile Cell Collection Bag to the luer connector on the tubing set in an aseptic environment before loading the tubing set onto the CliniMACS® plus Instrument.
2. Confirm that unrestricted flow to the Cell Collection Bag is possible.
3. Proceed with the installation of the tubing set using either the Clean Room Installation Instructions described in Section 3.8, or the Alternative Installation Instructions for the CliniMACS® Tubing Sets for Non-Clean Room Settings described in Section 3.9 of this User Manual.
3.8 Clean Room Installation Instructions for the CliniMACS® Tubing Sets
attach Priming Waste Bag and insert Pre-column
The window will display the INSTRUMENT SETUP Screen (see Screen no. 3.10).
Figure 3.3: Attach Priming Waste Bag (23) to Bag Hanger
1
2 3
23
1. Attach the Priming Waste Bag (23) to the right hand bag hanger on the instrument as shown (see Fig. 3.3).

Instructions: Installation of the CliniMACS® Tubing Sets – 45
CliniMACS® User Manual for the CliniMACS® CD34 Reagent System
2. Place the pre-column into the holder as instructed on the INSTRUMENT SETUP screen (see Screen no. 3.10).
3. Adjust the height of the buffer bag hanger. Raise or lower the hanger to accommodate the size of the Priming Waste Bag. Ensure that it is positioned high enough to prevent severe bending of the tubing that could restrict the flow of fluid, and that it is low enough to avoid the tubing or connections being stretched.
To proceed, press ENT
Note
The bag hangers are designed for a maximum load of 3 kg. Overloading the bag hangers can cause damage to the instrument.
Ensure that the plastic projections found at the bottom of the pre-column are facing the operator when the pre-column is placed into its holder.
insert separation column and Load valve no. 5
The window will display Screen no. 3.11 as shown.
Screen no. 3.11

46 – Instructions: Installation of the CliniMACS® Tubing Sets
CliniMACS® User Manual for the CliniMACS® CD34 Reagent System
1. Insert the separation column into the separation column holder as shown (see Fig. 3.4).
Figure 3.4: Separation column in separation column holder
Note
Insert the separation column as follows to avoid possible pinch injury: Hold the top and bottom of the column between thumb and index finger, then carefully insert the separation column into the separation column holder.
2. Load the tubing into valve no. 5.
Note
As each step is performed, check all tubing and attachments for any kinks or severe bending that could restrict the flow of liquid through the tubing. Check all valves to ensure the tubing fits snugly.
Tubing must only be inserted into open valves. The tubing will not fit correctly if inserted into a closed valve. Press buttons on valves to open.
If the tubing requires adjustment after a valve has been closed, press the valve button to open the valve before adjusting the tubing (see Fig. 3.5).
Figure 3.5: Correctly inserted tubing
11Press buttonto open valve.
Tubing
Inner endof slot
If any of the valves fail to open/close properly, confirm that the tubing has been placed in the valve correctly and that the valve is clean and has not been contaminated by fluid. Refer to Section 4, Troubleshooting, for additional information.
To proceed, press ENT

Instructions: Installation of the CliniMACS® Tubing Sets – 47
CliniMACS® User Manual for the CliniMACS® CD34 Reagent System
Load valves nos. 1, 2, 3, and 4
The window will display Screen no. 3.12 as shown.
Screen no. 3.12
1. Load the tubing into valve no. 4. Confirm that the tubing is placed securely in the valve opening (see Fig. 3.6). Pay particular attention to the area between valves nos. 4 and 5 (see B, Fig. 3.6).
Figure 3.6: Tubing in valves A Liquid sensor B Important areas between valves 4 and 5 and below valve no. 2
A
B
2. Insert the tubing into valve no. 1.
3. Position the 4-way fitting just below valve no. 2. Pay particular attention to the area below valve no. 2 (see B, Fig. 3.6 above) and avoid bends or kinks in the tubing.
4. Insert the tubing into valve nos. 2 and 3.
48 – Instructions: Installation of the CliniMACS® Tubing Sets
CliniMACS® User Manual for the CliniMACS® CD34 Reagent System
5. Mount the tubing between valve no. 2 and the bubble trap into the liquid sensor (see A, Fig. 3.6). Confirm that the tubing is placed correctly into the sensor fitting.
Note
To ensure proper operation, both the liquid sensor and the tubing being inserted MUST BE DRy. Inspect both and if any liquid is present, dry the area with a soft, lint-free cloth.
To proceed, press ENT
Load Pump tubing
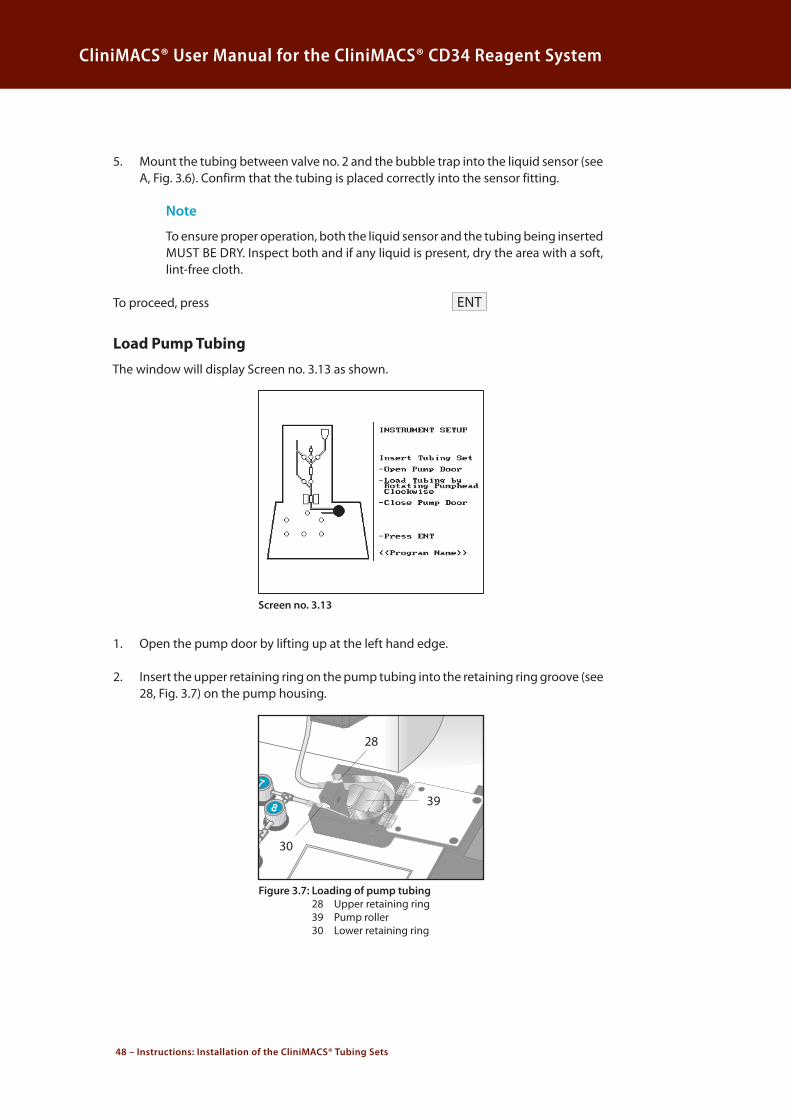
The window will display Screen no. 3.13 as shown.
Screen no. 3.13
1. Open the pump door by lifting up at the left hand edge.
2. Insert the upper retaining ring on the pump tubing into the retaining ring groove (see 28, Fig. 3.7) on the pump housing.
Figure 3.7: Loading of pump tubing 28 Upper retaining ring 39 Pump roller 30 Lower retaining ring
30
28
39

Instructions: Installation of the CliniMACS® Tubing Sets – 49
CliniMACS® User Manual for the CliniMACS® CD34 Reagent System
3. Rotate the pump roller clockwise (see 39, Fig. 3.7) until the tubing is threaded between both sets of the tubing guide pins and the tubing fits snugly around the pump roller. Ensure the tubing is not pinched at the end of the guide pins. If adjustment of the tubing inside the pump is necessary, the tubing can be unloaded by lifting the lower end and turning the pump roller anti-clockwise.
4. Insert the lower retaining ring on the pump tubing into the retaining ring groove (see 30, Fig. 3.7) on the pump housing.
5. Repeat clockwise rotation of the pump roller, to be certain that the pump roller moves freely.
6. Close the pump door.
Note
During the cell selection program the pump will immediately stop the run whenever the pump housing is opened. If left open for more than 10 minutes the instrument will abort the run in progress. The run may not be resumed.
To proceed, press ENT
Load valves nos. 7 and 8
The window will display Screen no. 3.14.
Screen no. 3.14
1. Load the tubing into valve no. 7.
2. Load the tubing into valve no. 8.
To proceed, press ENT

50 – Instructions: Installation of the CliniMACS® Tubing Sets
CliniMACS® User Manual for the CliniMACS® CD34 Reagent System
Load valves nos. 6, 9, 10, and 11
The window will display Screen no. 3.15.
Screen no. 3.15
1. Load the tubing into valves nos. 6, 9, 10, and 11.
2. Place the Negative Fraction Bag and the Buffer Waste Bag in the bag compartment. Confirm that the tubing is not compressed under the bag compartment lid.
To proceed, press ENT
recheck all tubing and attachments
The window will display Screen no. 3.16.
Screen no. 3.16
Before beginning the run, verify that all tubing and attachments are correctly placed.
Note
Check all valves for proper tubing insertion. Confirm that the tubing is spaced uniformly, and that there are no kinks or stretched areas in the tubing. Pay particular attention to the pre-column area, as well as the area between the pump and valves nos. 7 and 8 (see 41, Fig. 3.8), and between valves nos. 4 and 5 (see B, Fig. 3.6).

Instructions: Installation of the CliniMACS® Tubing Sets – 51
CliniMACS® User Manual for the CliniMACS® CD34 Reagent System
Figure 3.8: Tubing in valves 41 Critical area between valve nos. 7 and 8
41
If the tubing must be adjusted after a valve has been closed, do not pull the tubing without pressing the valve button to open the valve. If a section of tubing has been adjusted, it is absolutely necessary to press the corresponding valves firmly two times to properly seat the tubing.
To proceed, press ENT
seating of valves
The window will display Screen no. 3.17.
Screen no. 3.17
In order to ensure the proper fit of tubing in the valves, the CliniMACS® plus Instrument will operate all of the valves in sequence, twice. Watch and listen to confirm that all valves are working properly. Refer to Troubleshooting, Section 4 of this User Manual, if any of the valves do not operate correctly. This step can be repeated by using the "UNDO" key followed by the 'ENT' key. Both keys are located on the instrument keypad.
The magnet drive will also be tested during this check sequence.

52 – Instructions: Installation of the CliniMACS® Tubing Sets
CliniMACS® User Manual for the CliniMACS® CD34 Reagent System
attach clinimacs® PBs/edta Buffer
The window will display Screen no. 3.18.
Screen no. 3.18
The buffer required for CliniMACS® selection is CliniMACS® PBS/EDTA Buffer supplemented with HSA to a final concentration of 0.5% (w/v). The HSA is not a component of the CliniMACS® CD34 Reagent System and must be supplied by the user.
1. Remove the cap from the buffer spike on the tubing set using an aseptic technique (refer to #36, Fig. 3.2) and connect it to the buffer bag. Ensure that the septum is punctured, allowing free flow of liquid. Gently squeeze the bag to confirm that the spike has penetrated the bag.
2. Attach the buffer bag (43, see Fig. 3.9) to the buffer bag hook (42, see Fig. 3.9) on the bag hanger (15, see Fig. 3.9).
Figure 3.9: Attach CliniMACS® PBS/EDTA Buffer to bag hanger 15 Bag hanger for buffer bag 42 Buffer bag hook 43 CliniMACS® PBS/EDTA Buffer
4215
43
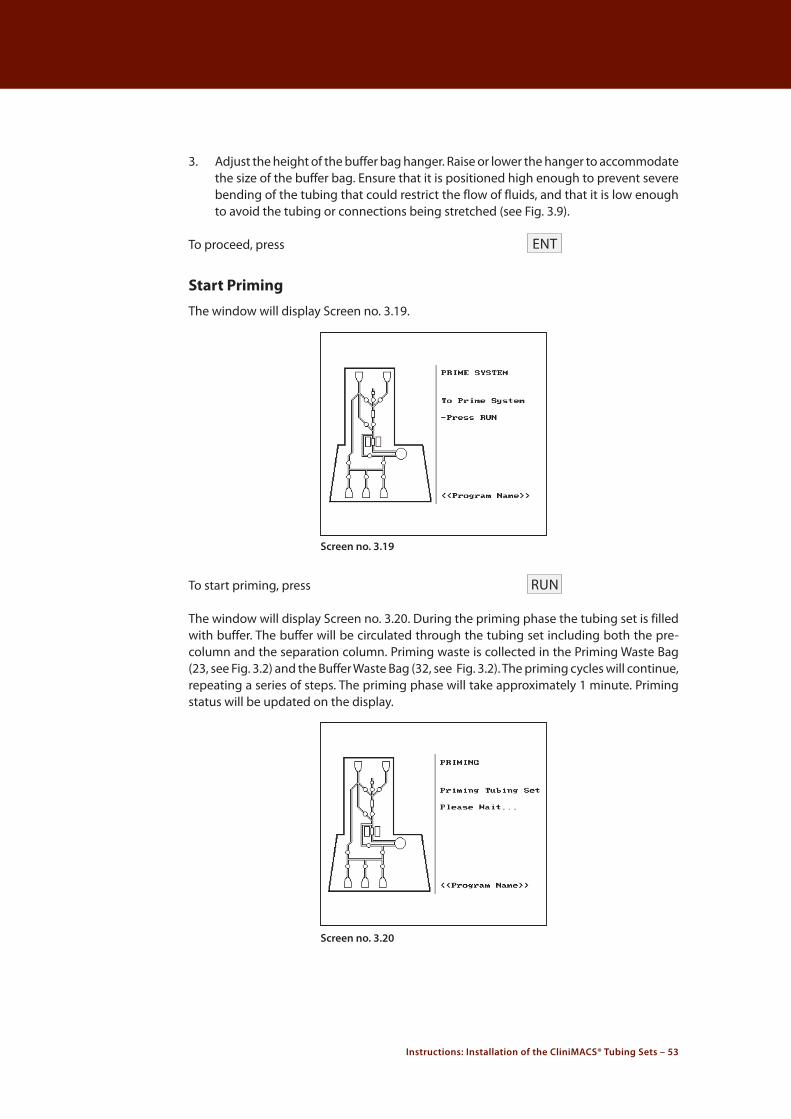
Instructions: Installation of the CliniMACS® Tubing Sets – 53
CliniMACS® User Manual for the CliniMACS® CD34 Reagent System
3. Adjust the height of the buffer bag hanger. Raise or lower the hanger to accommodate the size of the buffer bag. Ensure that it is positioned high enough to prevent severe bending of the tubing that could restrict the flow of fluids, and that it is low enough to avoid the tubing or connections being stretched (see Fig. 3.9).
To proceed, press ENT
start Priming
The window will display Screen no. 3.19.
Screen no. 3.19
To start priming, press RUN
The window will display Screen no. 3.20. During the priming phase the tubing set is filled with buffer. The buffer will be circulated through the tubing set including both the pre-column and the separation column. Priming waste is collected in the Priming Waste Bag (23, see Fig. 3.2) and the Buffer Waste Bag (32, see Fig. 3.2). The priming cycles will continue, repeating a series of steps. The priming phase will take approximately 1 minute. Priming status will be updated on the display.
Screen no. 3.20

54 – Instructions: Installation of the CliniMACS® Tubing Sets
CliniMACS® User Manual for the CliniMACS® CD34 Reagent System
check during the Priming
1. During the priming phase, check all tubing, fittings, valves, and columns for the appearance of any leaks or the presence of any folds that may block fluid flow.
2. If leaks or malfunctions are observed, stop run by pressing 'STOP'. The operator has 10 minutes to resolve the problem. Restart the process by pressing 'RUN'.
After 10 minutes, the selection will be aborted. However, if the operator requires additional time to assess the problem, 'STOP' may be pressed multiple times to acquire additional time; each time 'STOP' is pressed the 10 minute timer resets.
Note
If at any time the operator allows the entire 10 minutes (shown on the screen) to elapse without pressing 'STOP' again to acquire additional time, the selection sequence will be aborted and the procedure cannot be resumed.
If the operator successfully resolves the problem and the tubing set is not defective (i.e. no leaks or folds that restrict the flow of fluid) continue with the procedure.
If the operator cannot resolve the problem or if the tubing set is defective, the operator should shut down the instrument and remove the tubing set. Following the removal of the tubing set, the operator should obtain a new tubing set and return to Section 3.6 of this User Manual and follow the instructions to begin a new procedure.
It is not possible to return to the instrument set-up procedure once priming has begun.
final check of all tubing and attachments
The window will display Screen no. 3.21.
Screen no. 3.21

Instructions: Installation of the CliniMACS® Tubing Sets – 55
CliniMACS® User Manual for the CliniMACS® CD34 Reagent System
Check the following before beginning the run:
• Confirm there is fluid in all parts of tubing set.
• Confirm there is no excess air in tubing set.
• Confirm there is fluid in the Priming Waste Bag and the Buffer Waste Bag.
• Confirm there is no fluid in the Negative Fraction Bag or in the Cell Collection Bag.
Note
If leaking is observed during priming, the tubing set is defective and must be replaced. Remove the defective tubing set and replace it with a new tubing set and CliniMACS® PBS/EDTA Buffer bag.
Excessive air in the tubing set following priming indicates that the CliniMACS® PBS/EDTA Buffer bag was not properly spiked. Remove the tubing set, replace it with a new tubing set and CliniMACS® PBS/EDTA Buffer bag.
Only a small amount of buffer should be present in the Priming Waste Bag and Buffer Waste Bag following completion of priming. Excess buffer in the Priming Waste Bag or the Buffer Waste Bag, or buffer in other bags (i.e. Negative Fraction Bag or Cell Collection Bag) indicates that the tubing set was not mounted properly. Remove the tubing set, replace it with a new tubing set and CliniMACS® PBS/EDTA Buffer Bag.
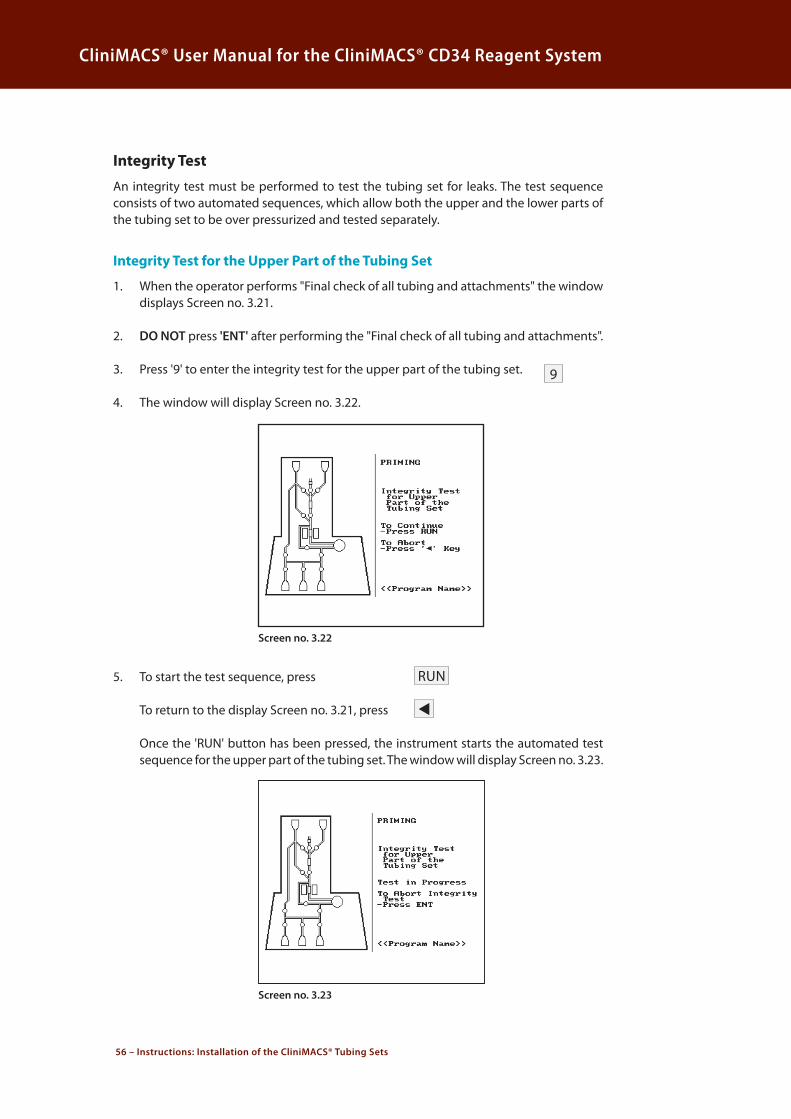
56 – Instructions: Installation of the CliniMACS® Tubing Sets
CliniMACS® User Manual for the CliniMACS® CD34 Reagent System
integrity test
An integrity test must be performed to test the tubing set for leaks. The test sequence consists of two automated sequences, which allow both the upper and the lower parts of the tubing set to be over pressurized and tested separately.
integrity test for the upper Part of the tubing set
1. When the operator performs "Final check of all tubing and attachments" the window displays Screen no. 3.21.
2. DO NOT press 'ENT' after performing the "Final check of all tubing and attachments".
3. Press '9' to enter the integrity test for the upper part of the tubing set. 9 4. The window will display Screen no. 3.22.
Screen no. 3.22
5. To start the test sequence, press RUN To return to the display Screen no. 3.21, press t Once the 'RUN' button has been pressed, the instrument starts the automated test
sequence for the upper part of the tubing set. The window will display Screen no. 3.23.
Screen no. 3.23

Instructions: Installation of the CliniMACS® Tubing Sets – 57
CliniMACS® User Manual for the CliniMACS® CD34 Reagent System
Overpressure will be created and held for 2 minutes. During this time the operator should watch for leaks in the connections above and under the pre-column and separation column, and the upper pump tube connection.
At each point the test sequence can be finished by pressing 'ENT'.
6. After 2 minutes the pressure is automatically released, and the window displays Screen no. 3.21.
Use a tissue to determine if any leaks have occurred during the test sequence by dabbing the tissue around the connections of the tubing set. If leakage is observed at any connection of the tubing set, the tubing set must be removed and be replaced by a new one. Keep the defective tubing set and contact Miltenyi Biotec’s Customer Service for further instructions.
Note
As previously described in Section 3.7, the installation of the CliniMACS® Tubing Set, TS or LS, may be performed using one of two sets of instructions. Section 3.8 describes the installation of the tubing set in a clean room environment or, Section 3.9 describes the use of alternative installation instructions (i.e. laminar air flow hood).
If the alternative installation instructions were used for the installation of the CliniMACS® Tubing Set (refer to Section 3.9), the Cell Preparation Bag was connected to the tubing set prior to priming or initiation of the Integrity test for the upper part of the tubing set.
If a leak was observed the operator should first use the heat sealer to seal the tubing below the Cell Preparation Bag and pre-system filter and disconnect them from the tubing set. The magnetically labeled and washed cells should be transferred a new transfer bag (Cell Preparation Bag) and retained. The operator must then remove the defective tubing set, install a new tubing set and start a new procedure.
7. Continue with the integrity test of the lower part of the tubing set if no leaks are observed.
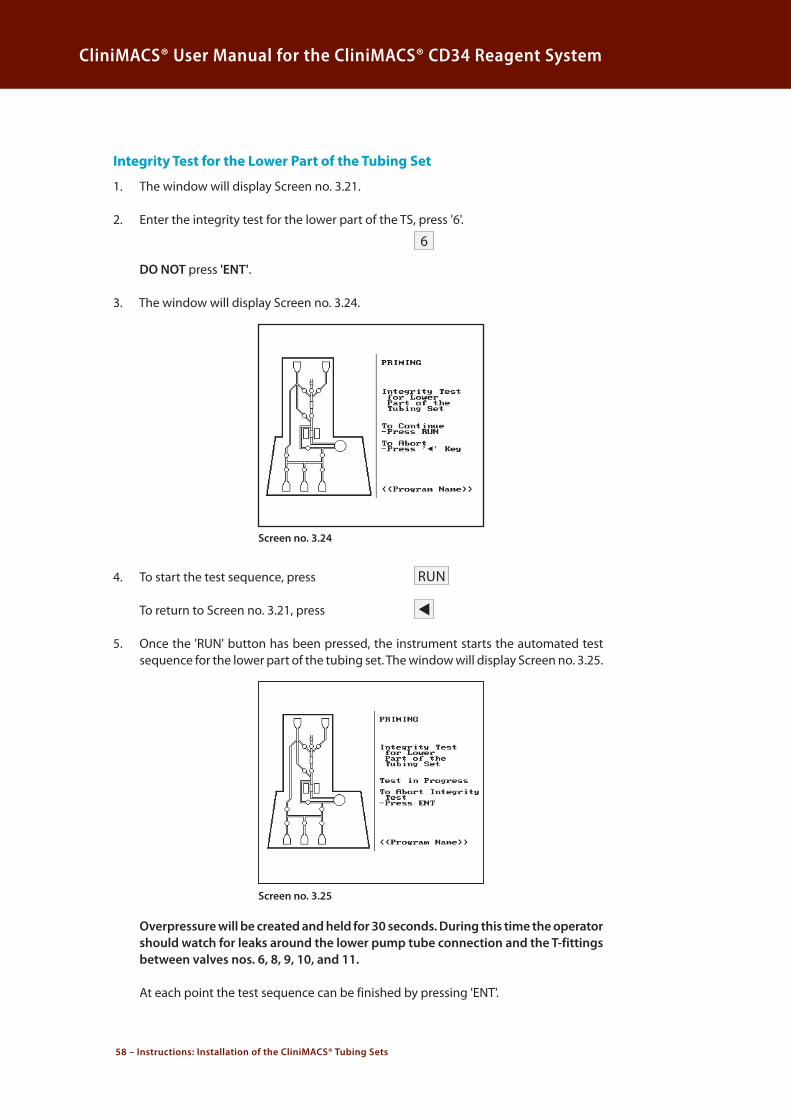
58 – Instructions: Installation of the CliniMACS® Tubing Sets
CliniMACS® User Manual for the CliniMACS® CD34 Reagent System
integrity test for the Lower Part of the tubing set
1. The window will display Screen no. 3.21.
2. Enter the integrity test for the lower part of the TS, press '6'. 6 DO NOT press 'ENT'.
3. The window will display Screen no. 3.24.
Screen no. 3.24
4. To start the test sequence, press RUN To return to Screen no. 3.21, press t 5. Once the 'RUN' button has been pressed, the instrument starts the automated test
sequence for the lower part of the tubing set. The window will display Screen no. 3.25.
Screen no. 3.25
Overpressure will be created and held for 30 seconds. During this time the operator should watch for leaks around the lower pump tube connection and the T-fittings between valves nos. 6, 8, 9, 10, and 11.
At each point the test sequence can be finished by pressing 'ENT'.

Instructions: Installation of the CliniMACS® Tubing Sets – 59
CliniMACS® User Manual for the CliniMACS® CD34 Reagent System
6. After 30 seconds the pressure is automatically released, and the window displays Screen no. 3.21.
Use a tissue to determine if any leaks have occurred during the test sequence by dabbing the tissue around the connections of the tubing set. If leakage is observed at any connection of the tubing set, the tubing set must be removed and be replaced by a new one. Keep the defective tubing set and contact Miltenyi Biotec’s Customer Service for further instructions.
Note
As previously described in Section 3.7, the installation of the CliniMACS® Tubing Set, TS or LS, may be performed using one of two sets of instructions. Section 3.8 describes the installation of the tubing set in a clean room environment or, Section 3.9 describes the use of alternative installation instructions (i.e. laminar air flow hood).
If the alternative installation instructions were used for the installation of the CliniMACS® Tubing Set (refer to Section 3.9), the Cell Preparation Bag was connected to the tubing set prior to priming or initiation of the Integrity test for the lower part of the tubing set.
If a leak was observed the operator should first use the heat sealer to seal the tubing below the Cell Preparation Bag and pre-system filter and disconnect them from the tubing set. The magnetically labeled and washed cells should be transferred a new transfer bag (Cell Preparation Bag) and retained. The operator must then remove the defective tubing set, install a new tubing set and start a new procedure.
7. If no leaks are observed the operator can now continue with the next step by pressing ENT
connect the cell Preparation Bag
The window will display Screen no. 3.26.
Screen no. 3.26

60 – Instructions: Installation of the CliniMACS® Tubing Sets
CliniMACS® User Manual for the CliniMACS® CD34 Reagent System
Attach the Cell Preparation Bag after the priming phase has been completed and no leaks or malfunctions are observed (see Fig. 3.10 [fully assembled CliniMACS® plus Instrument]). Use aseptic techniques for all steps.
Connect the Cell Preparation Bag containing the magnetically labeled and washed cells with the pre-system filter:
Note
If the alternative installation instructions were used for the installation of the CliniMACS® Tubing Set (refer to Section 3.9), the Cell Preparation Bag was connected to the tubing set prior to prime or initiation of the upper or lower Integrity test proceed to Step 7 below.
1. Remove the cap from the bubble trap spike (see 24, Fig. 3.2) of the bubble trap (see 25, Fig. 3.2).
2. Remove the cap from the lower opening of the pre-system filter (see 44, Fig. 3.10). Firmly insert the spike into the pre- system filter. DO NOT remove the top cap of the pre-system filter.
3. Remove the cap from the pre-system filter spike (see 47, Fig. 3.10).
4. Spike the Cell Preparation Bag (see 46, Fig. 3.10) with the pre-system filter (see 44, Fig. 3.10) ensuring that the septum is punctured, allowing the free flow of liquid. Gently squeeze the bag to confirm that the spike has penetrated the bag.
5. Check the connection between the pre-system filter and the tubing set to confirm that the connection is secure.
6. Hang the Cell Preparation Bag on the bag hanger (see 14, Fig. 3.10).
7. Adjust the bag hanger for the Cell Preparation Bag (see 14, Fig. 3.10) to hold the Cell Preparation Bag in an upright position.
To proceed, press ENT

Instructions: Installation of the CliniMACS® Tubing Sets – 61
CliniMACS® User Manual for the CliniMACS® CD34 Reagent System
final check of the Liquid sensor
The window will display Screen no. 3.27.
Screen no. 3.27
1. Check the liquid sensor tubing. Ensure the tubing has been properly inserted, that it is free of any external liquid and has not been dislodged during the loading procedure.
2. Confirm that unrestricted flow to the Cell Collection Bag is possible.
To proceed, press ENT
Proceed to the CliniMACS® CD34 Selection.
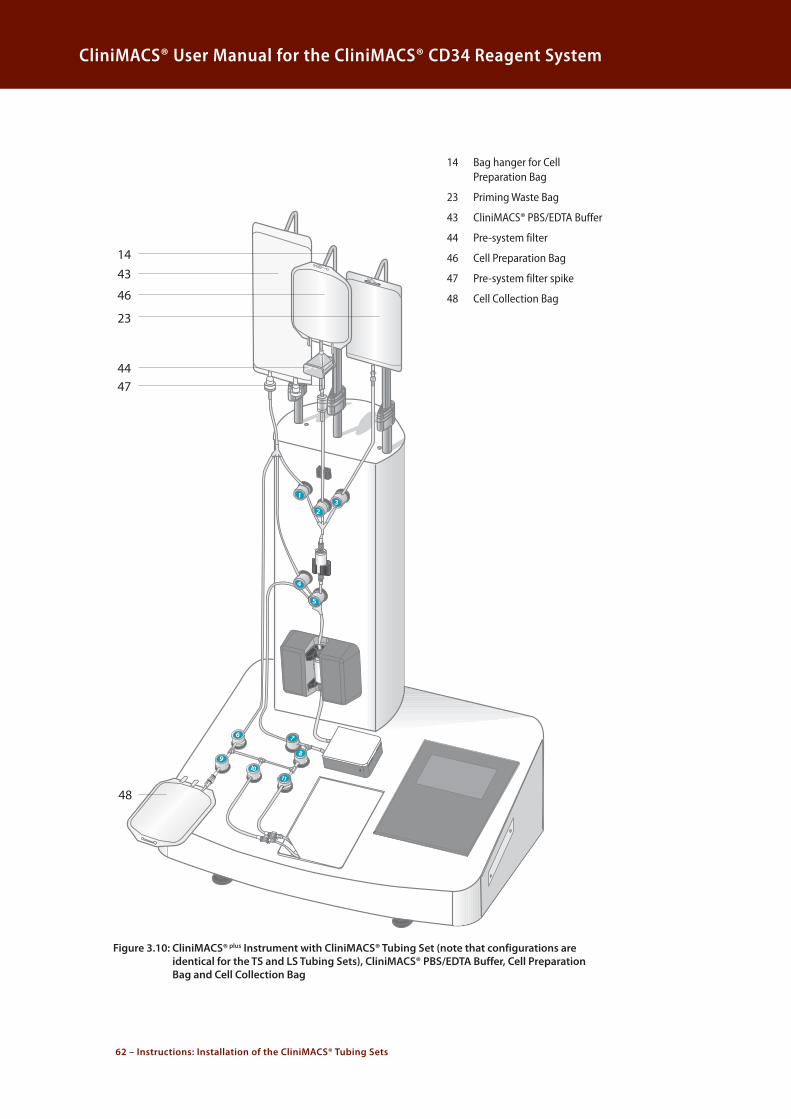
62 – Instructions: Installation of the CliniMACS® Tubing Sets
CliniMACS® User Manual for the CliniMACS® CD34 Reagent System
14 Bag hanger for Cell Preparation Bag
23 Priming Waste Bag
43 CliniMACS® PBS/EDTA Buffer
44 Pre-system filter
46 Cell Preparation Bag
47 Pre-system filter spike
48 Cell Collection Bag
4314
46
44
48
47
23
Figure 3.10: CliniMACS® plus Instrument with CliniMACS® Tubing Set (note that configurations are identical for the TS and LS Tubing Sets), CliniMACS® PBS/EDTA Buffer, Cell Preparation Bag and Cell Collection Bag

Instructions: Installation of the CliniMACS® Tubing Sets – 63
CliniMACS® User Manual for the CliniMACS® CD34 Reagent System
3.9 Alternative Installation Instructions for the CliniMACS® Tubing Sets for Non-Clean Room Settings
The previous instructions described in Section 3.8 and the screens displayed by the CliniMACS® plus Instrument describe the installation of the CliniMACS® Tubing Sets in a clean room. The CliniMACS® CD34 Reagent System itself is a functionally closed system which does not necessarily need to be operated in a clean room. However, if operated outside a clean room, the alternative installation instructions for the tubing set must be used since the sterility of the cell selection process may be compromised during the attachment of the Cell Collection Bag, the CliniMACS® PBS/EDTA Buffer, the pre-system filter, and the Cell Preparation Bag.
To ensure that the system remains sterile, these components must be attached to the tubing set under sterile conditions (e.g. laminar flow hood) using aseptic technique.
When operating the CliniMACS® plus Instrument outside a clean room, follow the instructions below.
Preparation for tubing set installation
The window will display Screen no. 3.10 as previously described.
1. Unpack the tubing set, the CliniMACS® PBS/EDTA Buffer, the pre-system filter and the Cell Preparation Bag under sterile conditions (e.g. laminar flow hood) using aseptic technique when outside of the clean room environment.
2. Attachment of the Cell Collection Bag Follow the instructions as previously described on page 44.
3. Attachment of the CliniMACS® PBS/EDTA Buffer Clamp the tubing just below the buffer spike with forceps in order to prevent the buffer
from flowing into the tubing set during its installation (see 1, Fig. 3.11). Using aseptic technique remove the cap from the buffer spike on the tubing set and connect it to the buffer bag. Ensure that the septum is punctured, allowing free flow of liquid. Gently squeeze the bag to ascertain that the spike has penetrated the bag.
4. Attachment of pre-system filter Remove the cap from the spike of the bubble trap. Remove the cap from the lower
opening of the pre-system filter. Firmly insert the spike into the pre-system filter. DO NOT remove the top cap of the pre-system filter. Close the tubing just below the bubble trap using forceps (see 2, Fig. 3.11). This prevents the prepared cell suspension in the Cell Preparation Bag from entering the pre-system filter.
5. Attachment of Cell Preparation Bag Connect the Cell Preparation Bag containing the magnetically labeled and washed cells
to the tubing set. Spike the Cell Preparation Bag with the pre-system filter ensuring that the septum is punctured, allowing free flow of liquid. Gently squeeze the bag to ascertain that the spike has penetrated the bag.

64 – Instructions: Installation of the CliniMACS® Tubing Sets
CliniMACS® User Manual for the CliniMACS® CD34 Reagent System
6. Installation on the CliniMACS® plus Instrument Hang the buffer bag on the left bag hanger, the Cell Preparation Bag on the middle
bag hanger and the Priming Waste Bag on the right bag hanger of the instrument.
To proceed, press ENT
Follow the instructions as described in the Clean Room Procedure for Installation of the CliniMACS® Tubing Sets:
■■ Attach Priming Waste Bag and insert pre-column
■■ Insert separation column and load valve no. 5
■■ Load valves nos. 1, 2, 3, and 4
■■ Load pump tubing
■■ Load valves nos. 7 and 8
■■ Load valves nos. 6, 9, 10, and 11
■■ Recheck all tubing and attachments
■■ Seating of valves
attach clinimacs® PBs/edta Buffer
The window will display Screen no. 3.28.
Screen no. 3.28
1. When using the alternative installation instructions for installation of the tubing set for non-clean room settings, the CliniMACS® PBS/EDTA Buffer bag was previously attached during "Preparation for tubing set installation". Therefore, the height of the buffer bag hanger may require adjustment. Raise or lower the hanger to accommodate the size of the buffer bag, ensuring that the height allotted is high enough to prevent the tubing from severe bending that could restrict the flow of buffer, and low enough to avoid stretching the tubing or connections.
2. Remove the forceps from the tubing just below the buffer spike.
To proceed, press ENT
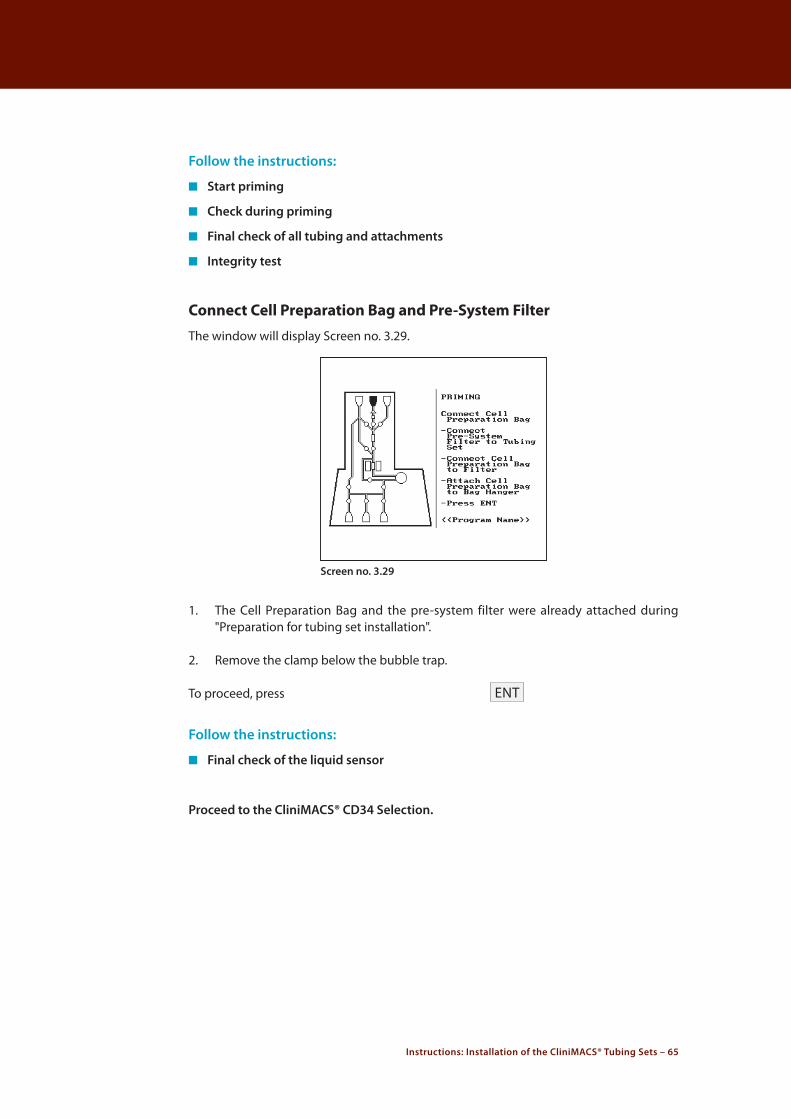
Instructions: Installation of the CliniMACS® Tubing Sets – 65
CliniMACS® User Manual for the CliniMACS® CD34 Reagent System
Follow the instructions:
■■ Start priming
■■ Check during priming
■■ Final check of all tubing and attachments
■■ Integrity test
connect cell Preparation Bag and Pre-system filter
The window will display Screen no. 3.29.
Screen no. 3.29
1. The Cell Preparation Bag and the pre-system filter were already attached during "Preparation for tubing set installation".
2. Remove the clamp below the bubble trap.
To proceed, press ENT
Follow the instructions:
■■ Final check of the liquid sensor
Proceed to the CliniMACS® CD34 Selection.
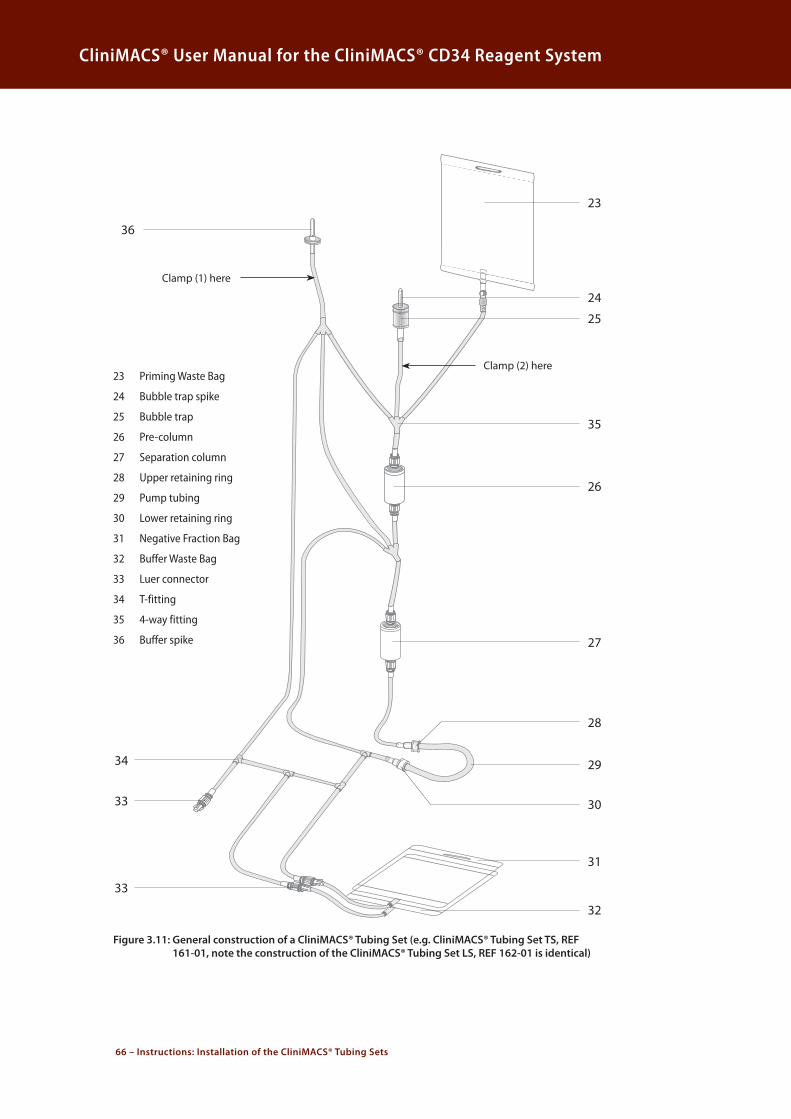
66 – Instructions: Installation of the CliniMACS® Tubing Sets
CliniMACS® User Manual for the CliniMACS® CD34 Reagent System
23
24
25
26
27
28
29
30
31
32
36
35
34
33
33
23 Priming Waste Bag
24 Bubble trap spike
25 Bubble trap
26 Pre-column
27 Separation column
28 Upper retaining ring
29 Pump tubing
30 Lower retaining ring
31 Negative Fraction Bag
32 Buffer Waste Bag
33 Luer connector
34 T-fitting
35 4-way fitting
36 Buffer spike
Figure 3.11: General construction of a CliniMACS® Tubing Set (e.g. CliniMACS® Tubing Set TS, REF 161-01, note the construction of the CliniMACS® Tubing Set LS, REF 162-01 is identical)
Clamp (1) here
Clamp (2) here

Instructions: CliniMACS® CD34 Selection – 67
CliniMACS® User Manual for the CliniMACS® CD34 Reagent System
3.10 CliniMACS® CD34 SelectionOnce the final check of the liquid sensor has been completed, the CliniMACS® plus Instrument is ready to begin the selection sequence, the window will display Screen no. 3.30 as shown.
Screen no. 3.30
To proceed, press RUN Once 'RUN' has been pressed, the instrument will automatically perform the CD34 selection procedure chosen.
Important
At the beginning of the selection sequence, buffer is pumped upwards towards the Cell Preparation Bag to fill the Pre-system Filter. Tap the side of the pre-system filter several times to remove any bubbles which might be trapped in the filter.
At each phase of the operation, a screen similar to Screen no. 3.31 is displayed to show the status of the selection.
Screen no. 3.31

68 – Instructions: CliniMACS® CD34 Selection
CliniMACS® User Manual for the CliniMACS® CD34 Reagent System
On the screen, the magnet position indicator is displayed as two black boxes next to the separation column when the magnet is "ON", i.e. it has been moved to the front to magnetize the separation column. If the magnet position indicator is transparent the magnet is "OFF", i.e. it has been moved to the rear of the instrument. With the magnet withdrawn the separation column is outside the magnetic field and is not magnetized.
selection Procedure
The general steps of the selection procedure are the same for both CD34 selection programs. CD34 SELECTION 1 is for use with standard-scale applications and CD34 SELECTION 2 is for use with large-scale applications. Fig. 3.12 depicts the CD34 enrichment strategy.
1. Loading cells
The selection procedure starts with the filling of the pre-system filter to complete the priming of the system. Selection of the labeled cells then begins. The pump draws the contents of the Cell Preparation Bag into the tubing set (see Screen no. 3.32). The magnetically labeled CD34+ cells are retained in the separation column, placed in the magnetic field, while the unlabeled cells (non-target cells) are passed through and collected in the Negative Fraction Bag. When the Cell Preparation Bag is empty (detected automatically by the liquid sensor) the pre-system filter is rinsed twice with buffer.
Screen no. 3.32
Note
At each phase of the operation, the status of the selection procedure is shown on the screen.

Instructions: CliniMACS® CD34 Selection – 69
CliniMACS® User Manual for the CliniMACS® CD34 Reagent System
2. column Wash i
The pre-column and separation column are washed extensively to remove all unlabeled cells. Wash buffer is collected in the Buffer Waste Bag. When 'Column Wash I' starts, the total remaining time until the end of the selection procedure is shown on the screen (see Screen no. 3.33).
Screen no. 3.33
3. release of cells i
The magnet is moved to the rear of the instrument ("OFF"position). The retained cells are released at a high speed flow, but the cells remain within an internal tubing cycle.
4. reloading of cells i
The magnet is moved into the "ON" position again to magnetize the separation column and the cells are reapplied on the separation column.
5. column wash ii
Reloading of the cells is followed by a second washing step to remove remaining unlabeled cells. Also all tubing is rinsed several times.
6. release of cells ii, reloading of cells ii, column Wash iii
The cells are released and reapplied on the separation column for a second time in order to remove any unlabeled cells that only stick to the column matrix. Afterwards the separation column is washed again.
7. release of cells iii, reloading of cells iii, column Wash iv
Additionally, the selection program CD34 SELECTION 2 includes a third release and reapplication step.
8. final elution of the cells
The magnet is moved into the "OFF" position and the magnetically labeled CD34+ cells are released from the separation column and collected in the attached Cell Collection Bag.
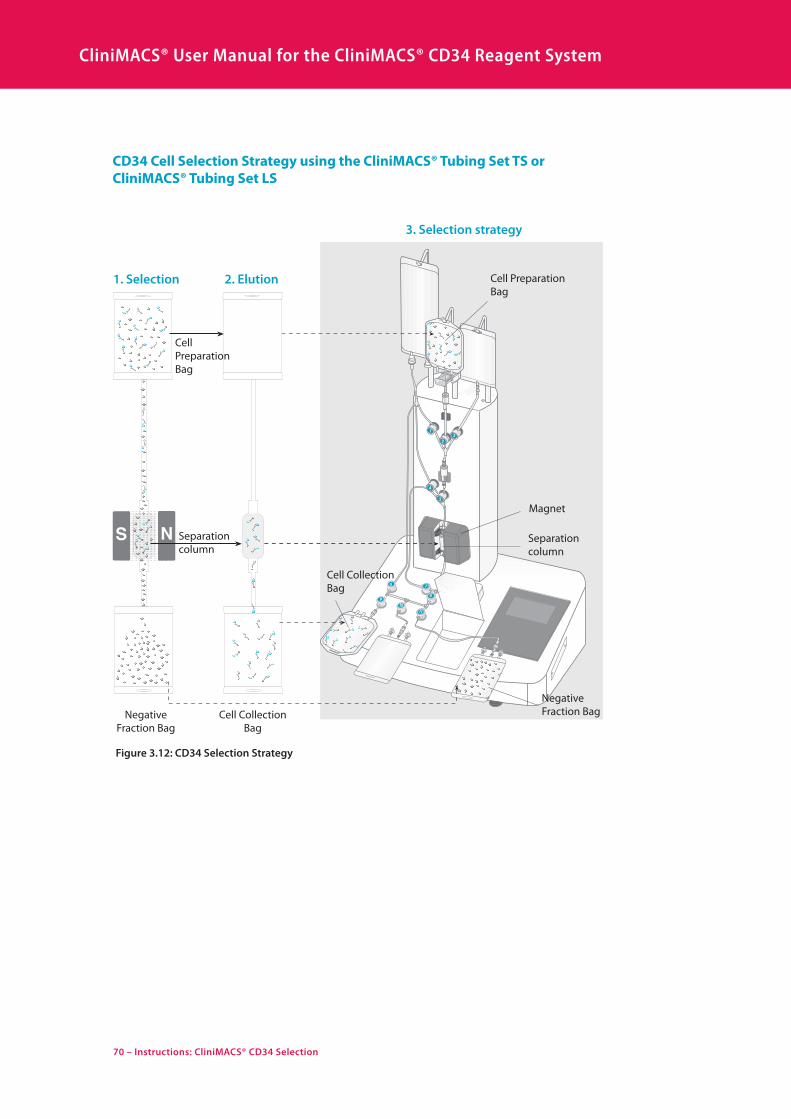
70 – Instructions: CliniMACS® CD34 Selection
CliniMACS® User Manual for the CliniMACS® CD34 Reagent System
cd34 cell selection strategy using the clinimacs® tubing set ts or clinimacs® tubing set Ls
S N
Cell Collection Bag
Negative Fraction Bag
Magnet
Separation column
1. Selection 2. Elution
3. Selection strategy
Cell Preparation Bag
Cell Preparation Bag
Negative Fraction Bag
Cell Collection Bag
Separation column
Figure 3.12: CD34 Selection Strategy
Instructions: CliniMACS® CD34 Selection – 71
CliniMACS® User Manual for the CliniMACS® CD34 Reagent System
1. The magnet is in the "ON"-position. The labeled CD34+ cells are held in the separation column, while other non-labeled cells (non-target cells) flow through the column and are collected in the Negative Fraction Bag.
2. The magnet is in the "OFF"-position. The labeled cells (CD34+ cells) are released from the separation column and collected in the Cell Collection Bag.
3. The CD34 SELECTION 1/2 enrichment programs retain the labeled CD34+ cells in the separation column, the non-labeled cells (non-target cells) flow through the column and are collected in the Negative Fraction Bag. When the magnet is moved into the "OFF"-position, the labeled cells (CD34+ cells) are released from the column and collected in the Cell Collection Bag.
Important
The CD34+ cell fraction is always collected in the Cell Collection Bag.
The CD34+ cell fraction collected after completion of the selection procedure should not be re-processed. The CliniMACS® CD34 Reagent System is not designed to reprocess HPC/Apheresis.
If for any reason, a run has irreversibly terminated prior to the CD34+ cell fraction being eluted from the separation column, the EMERGENCy PROGRAM can be run to elute the cells from the separation column. This program has been designed only for use with CD34 SELECTION 1 or CD34 SELECTION 2 together with either a CliniMACS® Tubing Set TS (REF 161-01) or a CliniMACS® Tubing Set LS (REF 162-01).

72 – Instructions: CliniMACS® CD34 Selection
CliniMACS® User Manual for the CliniMACS® CD34 Reagent System
disconnection of Bags and recording of Process code
When the run has been completed, the CliniMACS® plus Instrument will display Screen no. 3.34 as shown.
Screen no. 3.34
1. Record the process code displayed on the screen.
2. Clamp or seal the tubing above the luer lock connecting the Cell Collection Bag to the tubing set (see 49, Fig. 3.13). Make three hermetic seals in the tubing directly below valve no. 9 using the heat sealer. Sever the middle seal carefully to disconnect the Cell Collection Bag from the tubing set.
Figure 3.13: Where to disconnect the Tubing Set after the run has been completed. Seal off above luer lock 49 Seal off Cell Collection Bag 50 Seal off Negative Fraction Bag 51 Seal off Buffer Waste Bag
49
51 50
3. Weigh the filled Cell Collection Bag and record the weight. Determine the weight of the target cell fraction by subtracting the weight of the empty Cell Collection Bag from the weight of the Cell Collection Bag containing the target cells. Record the weight.

Instructions: CliniMACS® CD34 Selection – 73
CliniMACS® User Manual for the CliniMACS® CD34 Reagent System
4. Mix the CD34+ cells thoroughly by rotating the bag. Remove an aliquot of 0.5 mL and retain for analysis.
5. Heat seal the tubing above, the luer lock of the Negative Fraction Bag (see 50, Fig. 3.13). Make three hermetic seals in the tubing. Sever the center seal to disconnect the Negative Fraction Bag.
6. Disconnect the Buffer Waste Bag in the same manner (see 51, Fig. 3.13).
7. Remove the Negative Fraction Bag and Buffer Waste Bag. Keep both bags until analysis of the CD34+ cells has been completed. The CD34+ cells can now be prepared for infusion in accordance with clinical protocols.
Important
Prior to infusion of the CD34+ cells to the patient, the CliniMACS® PBS/EDTA Buffer contained in the target fraction must be exchanged to a medium suitable for applications in humans.
To proceed, press ENT
unload tubing set and shutdown
The window will display Screen no. 3.35.
Screen no. 3.35
1. Remove the Tubing Set: Beginning with valve nos. 6, 9, 10 and 11, and working upwards, release the tubing
from the liquid sensor and from the valves, by pressing on the valves. Release the columns from the column holders. Dispose the tubing set as a biohazard, according to standard hospital procedures.
2. Switch off the CliniMACS® plus Instrument.
3. Clean the instrument according to cleaning instructions provided in Section 2.4 of this User Manual. Follow the standard procedures for the treatment of infectious material.

74 – Instructions: CliniMACS® CD34 Selection
CliniMACS® User Manual for the CliniMACS® CD34 Reagent System
analysis of the cells
Establish the suitability of the target CD34+ cells before infusion. Examine the following parameters:
This must include the following parameters:
• Totalnumberofleukocytes• Viability• TotalnumberofCD34+ cells• TotalnumberandCD3+ cells• PurityandrecoveryofCD34+ cells• CD3logdepletion
Assessment of the non-target fraction for the total number and viability of leukocytes is recommended to assess the performance of the device and quality of the device output (CD34+ cells).
Other tests may be included based on individual laboratory practice.
Record the data analysis.
Note
If the yield of CD34+ cells is low:
• theCD34+ cell content may have been over-estimated in the starting HPC, Apheresis,
• CD34+ cells may have been poorly labeled with the CliniMACS® CD34 Reagent,
• cellsmayhavebeenlostduringthepreparationsteps,or,
• flowanalysismaybeincorrect.
Refer to Section 4, Troubleshooting, of this User Manual for additional information regarding a low yield of CD34+ cells.
Other factors may also result in a low purity of CD34+ cells. These factors include the following:
• incorrectstorageoftheHPC,Apheresis,
• failuretofollowthelabelingprocedurecorrectly,
• granulocytecontaminationinthestartingproduct,
• valvemalfunctions,
• incompleteelutionfromtheseparationcolumn,
• apumpfailure,or
• blockageofthetubingtotheCellCollectionBag.
Refer to Section 4, Troubleshooting, of this User Manual for additional information regarding a low yield of CD34+ cells. See the Instructions for Use for the CliniMACS® CD34 Reagent System for information regarding Device Performance.

Troubleshooting – 75
CliniMACS® User Manual for the CliniMACS® CD34 Reagent System
4 troubleshootingThis troubleshooting section is intended as a reference to provide information regarding possible unexpected events that might occur during the use of the CliniMACS® CD34 Reagent System and to suggest appropriate corrective action.
For information not covered in this manual or further technical assistance, please contact Miltenyi Biotec’s Customer Service at:
Phone: 1-800-810-3135
Select Prompt 1 for Technical Support, including Emergency SupportFor complaint registration regarding any of the components included in the CliniMACS® CD34 Reagent System, please contact Miltenyi Biotec’s Customer Service at the above referenced number and then:
Select Prompt 2 for Complaint Registration
Select Prompt 3 for Customer Service
4.1 Troubleshooting: Preparation of the HPC, Apheresis
The HPC, Apheresis received is diluted.
Ideally, magnetic labeling is performed in diluted HPC, Apheresis. Adjust the HPC, Apheresis to a final dilution of approximately 1:3. If the product received is diluted more than 1:3 or, if the concentration of plasma in the sample is unknown, add immunoglobulin (IgG) to the sample prior to the addition of the CliniMACS® CD34 Reagent (recommended concentration of IgG in the labeling volume: 1.5 mg/mL). It is important to include an appropriate amount of immunoglobulin in the sample during the labeling in order to minimize non-specific binding of the CliniMACS® CD34 Reagent.
The number of target cells is low in the HPC, Apheresis.
The mobilization of stem cells was insufficient. Check analysis of the HPC, Apheresis.
Poor viability of cells in the HPC, Apheresis.
The HPC, Apheresis may have been harvested, stored or transported inappropriately. To ensure better sample quality, the preparation and selection of the HPC, Apheresis should be performed immediately after leukapheresis. Keep the HPC, Apheresis at a leukocyte concentration of less than 0.2 × 10⁹ per mL. If necessary, dilute the HPC, Apheresis with autologous plasma. The HPC, Apheresis should not be older than 24 hours when starting the labeling and selection procedure. If the HPC, Apheresis has to be stored, e.g. overnight, it should be kept at controlled room temperature (+19 °C to +25 °C, [+67 °F to +77 °F]).

76 – Troubleshooting
CliniMACS® User Manual for the CliniMACS® CD34 Reagent System
4.2 Troubleshooting: CliniMACS® plus Instrument and CliniMACS® Tubing Sets
Error messages
Error message no. 1
1. There are a number of possible instrument or software malfunctions. These are marked as such and will be displayed on the screen. They refer to internal errors that cannot be corrected by the operator. Record the displayed error number and contact a member of Miltenyi Biotec‘s Technical Support team.
2. One possible error message is shown in the illustration opposite (Error message no. 1).
3. Other than error messages, malfunctions that can be corrected by the operator are marked "Warning messages". These are described under "Automated Cell Selection" below.
Loading and priming of the CliniMACS® Tubing Sets (TS and LS)
Valve does not open w h e n o p e r a t o r i s instructed to inser t tubing into a particular valve.
The valves are designed to work properly once the tubing has been inserted. Press the valve manually to open it. Watch the valve carefully during the valve exercise sequence. If the valve does not depress during the valve exercise sequence, refer to below to the topic "Valve does not depress during valve exercise sequence."
Valve does not depress during valve exercise sequence.
Confirm that tubing is correctly inserted. Check whether valves have been cleaned thoroughly. Any valve that has been contaminated by fluid must be exchanged. Contact a member of Miltenyi Biotec's Technical Support team.
Buffer is leaking from t u b i n g s e t d u r i n g priming.
Tubing set is defective. Turn off the CliniMACS® plus Instrument, install a new tubing set , and restart priming with sufficient new buffer.
Excessive air occurs in tubing set after priming.
Buffer bag is not properly spiked (punctured). Use a new tubing set and sufficient new buffer and restart the CliniMACS® run. Confirm that the septum of the buffer bag is properly punctured.

Troubleshooting – 77
CliniMACS® User Manual for the CliniMACS® CD34 Reagent System
Unexpected volume of buffer in bags after priming. After priming, liquid should only be present in the Priming Waste Bag and Buffer Waste Bag.
Tubing set is not mounted correctly. Liquid can leak behind the valves if the tubing set is not installed correctly or the valves are not functioning properly. Remove the tubing set and replace it with a new one. Restart the CliniMACS® priming procedure with sufficient new buffer. Poor CliniMACS® selection performance may result if the tubing set is not inserted properly.
Pu m p m o t o r s t a l l s during priming.
Pump tubing has not been inserted correctly. Press 'STOP' to interrupt the priming and turn the power "OFF" and then "ON" again. Clamp the buffer line with a hemostat during the installation procedure and remove the clamp before restarting the priming sequence.
4.3 Troubleshooting: Automated Cell Selection
Warning messages
Unlike error messages described above, warning messages are displayed on the screen when the internal control system of the CliniMACS® plus Instrument recognizes a malfunction which can be corrected by the operator. Usually, a warning message appears in combination with a sound ("beep"). If a warning message appears during the CliniMACS® run, follow the instructions on the screen to proceed with the cell selection. Generally speaking, warning messages appear when the 'STOP' key is pressed, when the pump door is opened, when the pump stalls or when the liquid sensor detects an error.
Unexpected events CD34 SELECTION 1/2
Error detected by the liquid sensor.
Warning message no. 1
Warning message no. 1 will appear during the starting phase of the cell loading process if the liquid sensor is not able to detect liquid in the tubing. As the pre-system filter is rinsed with buffer prior to the cell loading, there must be liquid in the tubing at this point.
Check the following points:
1. Has the tubing been inserted correctly? If not, do so.
2. Is the tubing filled with buffer? If not, inspect the tubing for kinks blocking the buffer flow upwards into the pre-system filter and Cell Preparation Bag. Adjust the position of the tubing set. If necessary, raise or lower the bag hangers using the bag hanger clamps. Adjust the position of the tubing in the valves. To alter the position of the tubing, open the valve by manually pressing the button. Make sure that the tubing is not kinked, twisted or taut.

78 – Troubleshooting
CliniMACS® User Manual for the CliniMACS® CD34 Reagent System
3. Is the Cell Preparation Bag spiked properly? Confirm the pre-system filter spike has penetrated the septum of the Cell Preparation Bag port.
4. If the tubing set has not been completely filled with buffer, has the buffer spike of the tubing set penetrated the buffer bag? For corrective action refer to CliniMACS® plus Instrument and CliniMACS® Tubing Set section, "Excessive air occurs in the tubing set after priming".
After the corrective action, continue with the selection in progress and press ‘5’.
If warning message no. 1 appears again after each of the possible causes listed above have been ruled out, the liquid sensor may be defective. Please contact Miltenyi Biotec’s Technical Support team.
Loading stopped before complete sample has been loaded onto the columns.
Liquid sensor defective or not filled correctly. Check liquid sensor by running the instrument check, taking care to insert the liquid filled tubing correctly into the liquid sensor. If the instrument check fails, contact Miltenyi Biotec’s Technical Support team.
Cells move to wrong part of tubing set. Liquid is leaking past valve(s).
1. Tubing set has not been properly inserted. If the run is ongoing, press the 'STOP' and clamp the line with a hemostat. Adjust the tubing by first depressing the appropriate valve. Remove the clamp and press 'RUN' to resume selection. The cell selection will be aborted if 'RUN' is not pressed within 10 minutes.
2. Valve is not functioning properly. Press 'STOP'. Clamp the line with a hemostat. Depress the valve manually several times to un-stick the stuck valve. Remove the clamp and press 'RUN' to continue. The cell selection will be aborted if the 'RUN' key is not pressed within 10 minutes. If the valve cannot be un-stuck, contact Miltenyi Biotec’s Technical Support team.
3. Wrong software program used. Check display for name of program currently used. Abort run by pressing the 'STOP' key and immediately contact Miltenyi Biotec’s Technical Support team.

Troubleshooting – 79
CliniMACS® User Manual for the CliniMACS® CD34 Reagent System
Magnet does not move. Magnet drive does not work.
1. Due to an ongoing power failure, the magnet cannot be moved by the magnet drive. The viability of the cells trapped in the tubing set may be compromised. Contact Miltenyi Biotec’s Technical Support team for assistance.
2. A magnet drive failure has occurred. An error message will be displayed (see section CliniMACS® plus Instrument and CliniMACS® Tubing Sets, "Error messages"). Record the number of the error message and contact Miltenyi Biotec’s Technical Support team.
Pu m p m o t o r s t a l l s during cell selection.
Warning message no. 2
Pump tubing has not been inserted correctly, therefore, the pump might be unable to rotate. In this case warning message no. 2 will appear on the screen window. The operator then has 10 minutes to correct the position of the pump tubing.
1. Carefully remove the pump tubing from the pump. 2. Confirm that the pump tubing has not been damaged
by the incorrect insertion. If the pump tubing is leaking, clamp the tubing above and below the separation column to save the cells retained on the column and contact Miltenyi Biotec’s Technical Support team.
3. If the pump tubing has not been damaged, it can be reinserted into the pump housing.
4. Press 'RUN' to restart the selection within 10 minutes or the selection will be aborted.
Sample loading does not stop although the Cell Preparation Bag and the pre-system filter are empty.
Liquid sensor is not working properly because the surface of the tubing in the liquid sensor is wet. Press'STOP' to interrupt the selection. Remove tubing from liquid sensor. Dry the tubing and the contact area using a paper towel or absorbent material. Replace the tubing in the liquid sensor and press 'RUN'. Do not interrupt the sequence for more than 10 minutes or the cell selection will be terminated.
If it is not possible to activate the liquid sensor following these steps, press 'STOP’, then '2' and confirm with 'ENT' to skip sample loading and to continue the selection.

80 – Troubleshooting
CliniMACS® User Manual for the CliniMACS® CD34 Reagent System
Loading stopped before complete sample has been loaded onto the columns.
1. Pre-system filter is clogged due to large amount of cell debris or due to incomplete filling of the filter. Due to continued pumping, a vacuum was created which led to the generation of air bubbles activating the liquid sensor. Therefore, the selection process proceeded with the column washes before all of the sample could be loaded. It is not possible to restart the sample loading once the loading sequence has stopped.
2. Allow the CliniMACS® plus Instrument to finish the selection program. Do not abort the current run, this may result in unnecessary cell loss. After the selection procedure has finished, filter the remaining sample in the Cell Preparation Bag with a 200 μm in-line blood filter and transfer it into a new transfer bag. Immediately perform a second selection with a new tubing set and sufficient new buffer. Do not reprocess the cells that completed the selection procedure.

Troubleshooting – 81
CliniMACS® User Manual for the CliniMACS® CD34 Reagent System
Pump tubing collapsed and/or excessive air appeared in tubing set below pre-column during cell loading.
Pre-column is clogged due to large amount of cell debris in the Cell Preparation Bag. It is necessary to skip the loading of the remaining sample manually and to continue the selection with the cells that have already been loaded onto the system.
1. Press 'STOP' to interrupt cell loading. Warning message no. 3 will appear.
Warning message no. 3
2. Press '2' to skip the cell loading process.
Warning message no. 4 will appear and will give the operator an opportunity to confirm or amend the decision made because skipping of sample loading is not reversible.
Warning message no. 4
3. Press 'ENT' and the selection program will stop the sample loading and continue with column washes. Clamp the tubing below the pre-system filter to prevent cells from leaking out of the Cell Preparation Bag into the tubing set. After the selection procedure has been finished, filter the remaining sample with a 200μm in-line blood filter and transfer it into a new transfer bag. Immediately perform a second selection using a new tubing set and sufficient new buffer.

82 – Troubleshooting
CliniMACS® User Manual for the CliniMACS® CD34 Reagent System
4.4 Troubleshooting: Emergency Program
If for any reason a run has irreversibly terminated prior to the CD34+ cells being eluted from the separation column, the EMERGENCy PROGRAM can be run to elute the cells from the separation column. This program has been designed only for use with CD34 SELECTION 1 (standard-scale applications ) or CD34 SELECTION 2 (large-scale applications) together with either a CliniMACS® Tubing Set TS (REF 161-01) or a CliniMACS® Tubing Set LS (REF 162-01), respectively.
The emergency program will elute approximately 75 mL of fluid. Confirm that a suitable Cell Collection Bag is attached to the tubing set. 1. To confirm that the separation column is not magnetized, turn the instrument off,
wait 5 seconds, then turn the instrument on again. The magnet will be withdrawn from the magnetic separation unit. Check this by holding a small magnetizable item to the magnetic separation unit. If the magnet has not been withdrawn, or if there is an ongoing power failure, please contact Miltenyi Biotec’s Technical Support team.
2. Wait until the following screen appears:
Screen no. 4.1
3. To call up the EMERGENCy PROGRAM, press '4'.
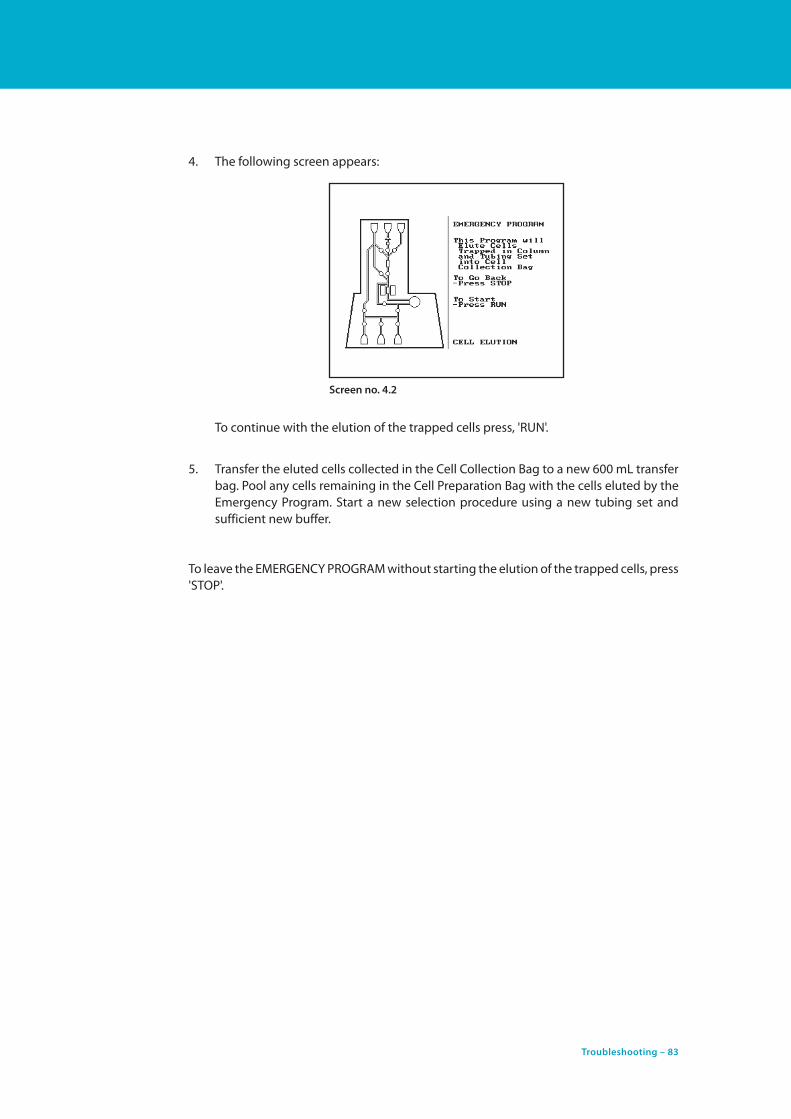
Troubleshooting – 83
CliniMACS® User Manual for the CliniMACS® CD34 Reagent System
4. The following screen appears:
Screen no. 4.2
To continue with the elution of the trapped cells press, 'RUN'.
5. Transfer the eluted cells collected in the Cell Collection Bag to a new 600 mL transfer bag. Pool any cells remaining in the Cell Preparation Bag with the cells eluted by the Emergency Program. Start a new selection procedure using a new tubing set and sufficient new buffer.
To leave the EMERGENCy PROGRAM without starting the elution of the trapped cells, press 'STOP'.

84 – Troubleshooting
CliniMACS® User Manual for the CliniMACS® CD34 Reagent System
4.5 Troubleshooting: Cell Selection Performance – Unexpected Events
The yield of target cells is low.
1. Target cell content was over-estimated in the HPC, Apheresis. During analysis, target cells were incorrectly counted or an error occurred during counting of leukocytes. Repeat the analysis of HPC, Apheresis for starting target cell content.
2. Target cells were poorly labeled with the reagent.
• CD34Reagentwasexpired.Checkuse-bydate.Donot use any CD34 Reagent after the use-by date.
• CD34Reagentwasnot storedproperly. Checkstorage temperature. Do not use any CD34 reagent that has been stored improperly (see reagent package insert).
• Recommendedcell labelingprocedurewasnotfollowed. Refer to sample preparation and labeling procedures in Section 3 of this User Manual.
3. Cells were lost during the preparation steps.
• Cellswere removedwith the supernatant intoPlasma Waste Bag and Wash Waste Bags due to incomplete sedimentation or too early resuspension of the cells, e.g. when the bag was removed from the centrifuge. Compare leukocyte content of the unlabeled HPC, Apheresis and the labeled HPC, Apheresis. Check centrifugation settings for proper centrifugation. Determine cell counts from all waste bags.
• BufferdidnotcontainHSA.Supplementthebufferwith HSA to a final concentration of 0.5 % (w/v), (refer to "Preparation of CliniMACS® PBS/EDTA Buffer", Section 3).
• Centrifuge settingswere suboptimal. Checkcentrifugation settings.
• Centrifugeimbalanceoruseofbrakeorasymmetricalloading of centrifuge.
4. Cell viability decreased during preparation. See section "Viability of the positive fraction is less than 90% or the color of the supernatant during the washing steps was red" below.

Troubleshooting – 85
CliniMACS® User Manual for the CliniMACS® CD34 Reagent System
The yield of target cells is low (continued).
5. Analysis was incorrect.
• Samplingerroroccurred.Checkcellsuspensionforclumped or settled cells. Confirm that representative samples have been taken and repeat analysis.
• Staining error occurred. Check flow cytometryreagents. Repeat staining.
• Flow cytometer settingswere improper. Checkinstrument settings.
The purity of target cells is low.
1. The HPC, Apheresis was stored inappropriately. Preparation and selection of the HPC, Apheresis should be performed immediately after leukapheresis. Keep the HPC, Apheresis at a leukocyte concentration of less than 0.2 × 10⁹ per mL. If necessary, dilute the HPC, Apheresis with autologous plasma. The HPC, Apheresis should not be older than 24 hours when starting the labeling and selection procedure. If the HPC, Apheresis has to be stored, e.g. overnight, it should be kept at controlled room temperature (+19 °C to +25 °C [+67 °F to +77 °F]).
2. The magnetic labeling protocol has not been followed (e.g., incorrect volumes during magnetic labeling). Please follow the instructions given for the magnetic labeling. For troubleshooting purposes determine the leukocyte subsets (B cells, T cells, monocytes, granulocytes as well as platelets) contaminating the target fraction and contact Miltenyi Biotec’s Technical Support team.
3. High numbers of granulocytes contaminated the starting HPC, Apheresis (suboptimal apheresis setting). Dying granulocytes will then bind the CliniMACS® CD34 Reagent non-specifically which may lead to decreased purity of the CD34+ target cells.

86 – Troubleshooting
CliniMACS® User Manual for the CliniMACS® CD34 Reagent System
The purity of target cells is low (continued).
4. Elution from the separation column was incomplete.
• Selectionprogramwas aborted.Checkdisplayscreen for error message. Continue with section "RUN" is aborted before completion of cell selection program".
• Pumpfailureorvalvefailureoccurred.Recovercellsfrom the tubing set following the EMERGENCy PROGRAM as previously described. Check volumes of all fractions. Assess target cell content of Buffer Waste Bag and Negative Fraction Bag.
• Tubing toCellCollectionBag isblocked.Checktubing set for closed clamps, occlusions or kinks.
• Tubingwasnotproperlyinserted.Checkallvalvesfor proper tubing insertion.
5. Non-target cells were retained.
• MobilizationofCD34+ target cells was poor. Very low number of CD34+ target cells was present in the HPC, Apheresis. Therefore, a low number of contaminating non-target cells (e.g. granylocytes, monocytes, platelets) may lead to decreased purity.
• Insufficientplasmaor IgGwerepresentduringmagnetic labeling. Please follow the instructions given for the magnetic labeling.
If a final concentration of about 30% autologous plasma in the sample during magnetic labeling cannot be guaranteed, add IgG to the sample. A final concentration of 1.5 mg/mL is recommended for the efficient blocking of non-specific reagent binding during magnetic labeling.
Viability of the positive fraction is less than 90% or the color of the supernatant during the washing steps was red.
Cell lysis occurred due to incorrect osmolarity of the buffer. Check buffer and use recommended buffer.

Troubleshooting – 87
CliniMACS® User Manual for the CliniMACS® CD34 Reagent System
Non-specific retention o f d e a d ce l l s f ro m H P C , A p h e r e s i s o r high non-specific cell losses throughout the procedure.
1. Buffer does not contain HSA. Supplement the buffer with HSA to a final concentration of 0.5 % (w/v), (see "Preparation of CliniMACS® PBS/EDTA Buffer").
2. The HPC, Apheresis may have been stored inappropriately. Preparation and selection of the HPC, Apheresis should be performed immediately after leukapheresis. Keep the HPC, Apheresis at a leukocyte concentration of less than 0.2 × 10⁹ per mL. If necessary, dilute the leukapheresis with autologous plasma. The HPC, Apheresis should not be older than 24 hours when starting the labeling and selection procedure. If the HPC, Apheresis has to be stored, e.g. overnight, it should be kept at controlled room temperature (+19 °C to +25 °C [+67 °F to +77 °F]).
3. Incomplete sample loading due to clogging of separation column, pre-system filter, or pre-column. Check total cell number and depletion efficiency of the remaining cells.

88 – Appendix
CliniMACS® User Manual for the CliniMACS® CD34 Reagent System APPENDIX
appendix 1: Glossary of terms and symbols
Symbols
European conformity approval with ID number 0123 (ID number of Notified Body: "TÜV SÜD Product Service GmbH, Munich"). Medical device according to MDD 93/42/EEC.
UL listing mark, listed as laboratory equipment.
See Instructions for Use. Read and observe all operating instructions carefully to ensure safety of the operator and the equipment.
Contains a strong permanent magnet. Measuring and control instruments, computers, and watches and magnetic information carriers (such as credit cards, magnetic tapes and floppy disks) and magnetizable tools and objects may be affected or damaged by the extremely powerful magnet in the CliniMACS® plus Instrument. Keep these tools and objects at a distance of at least 30 cm from the device. See EMC information provided as Appendix 2.
For single use only. Note: Reuse of tubing sets will decrease the performance of the device and risk biological contamination of the CD34+ cells processed by the device.
Do not use if package, vials or tubing are damaged; or if package, vials or tubing are not sealed.
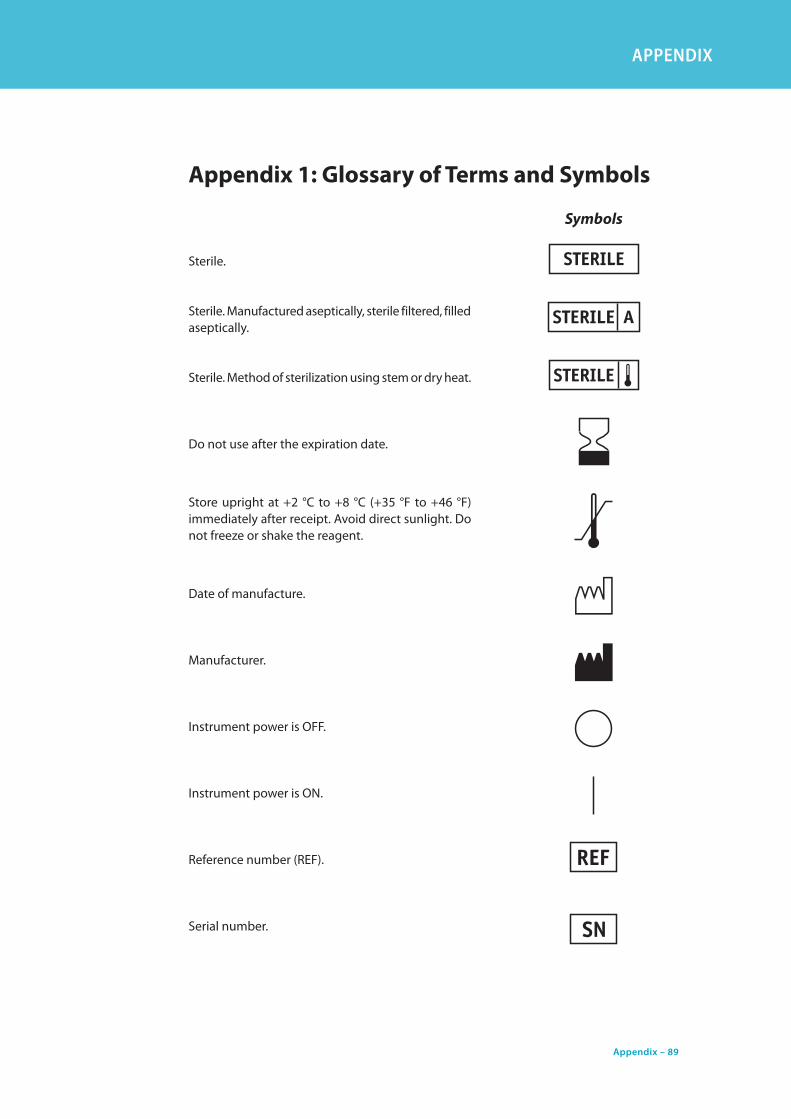
Appendix – 89
CliniMACS® User Manual for the CliniMACS® CD34 Reagent System APPENDIX
appendix 1: Glossary of terms and symbols
Symbols
Sterile.
Sterile. Manufactured aseptically, sterile filtered, filled aseptically.
Sterile. Method of sterilization using stem or dry heat.
Do not use after the expiration date.
Store upright at +2 °C to +8 °C (+35 °F to +46 °F) immediately after receipt. Avoid direct sunlight. Do not freeze or shake the reagent.
Date of manufacture.
Manufacturer.
Instrument power is OFF.
Instrument power is ON.
Reference number (REF).
Serial number.

90 – Appendix
CliniMACS® User Manual for the CliniMACS® CD34 Reagent System APPENDIX
appendix 1: Glossary of terms and symbols
Symbols
Part number.
Batch Code
Do not dispose; return to manufacture for proper disposal.
CliniMACS® PBS/EDTA Buffer is non-pyrogenic.
CliniMACS® PBS/EDTA Buffer packaging is PVC free.
The CliniMACS® Tubing Set provides a non-pyrogenic, sterile fluid path.
Caution, consult accompanying documents.

Appendix – 91
CliniMACS® User Manual for the CliniMACS® CD34 Reagent System APPENDIX
appendix 1: Glossary of terms and symbols
Glossary
Apheresis The method of collecting blood in which whole blood is withdrawn, a desired component selected and retained, and the remainder of the blood returned to the donor.
Bag Compartment Compartment of the CliniMACS® plus Instrument where the Negative Fraction Bag and Buffer Waste Bag are placed.
Bag Hanger Support on the CliniMACS® plus Instrument to mount the Cell Preparation Bag, Non-Target Cell Bag, Priming Waste Bag, and CliniMACS® PBS/EDTA Buffer.
Buffer Waste Bag Waste bag to collect buffer during cell selection using the CliniMACS® plus Instrument.
CD34 Antigen The CD34 antigen is a highly glycosylated 115 kD type 1 integral membrane protein of unknown function which is expressed on 1% to 4% of normal bone marrow cells and less than 0.2% of normal peripheral blood leukocytes, on subsets of bone marrow stromal cells, and on small vessel endothelium of various tissues.
Cell Collection Bag Bag in which the purified target cells (CD34+ cells) are accumulated after selection. This bag is provided by the user.
Cellular Starting Product
Cell-containing apheresis product used as starting material for the CliniMACS® CD34 selection process, e.g. HPC, Apheresis.
Clean room A room in which the concentration of airborne particles is controlled, and which is constructed and used in a manner to minimize the introduction, generation, and retention of particles inside the room and in which other relevant parameters, e.g. temperature, humidity, and pressure, are controlled as necessary (ISO 14664-1)
CliniMACS® CliniMACS® is a registered trademark of Miltenyi Biotec GmbH.
CliniMACS® CD34 Reagent
Reagent for magnetic labeling of cells expressing the CD34 antigen.

92 – Appendix
CliniMACS® User Manual for the CliniMACS® CD34 Reagent System APPENDIX
appendix 1: Glossary of terms and symbols
Glossary
CliniMACS® PBS/EDTA Buffer
Buffer used for cell preparation and cell selection with the CliniMACS® CD34 Reagent System: PBS (phosphate buffered saline), supplemented with 1 mM EDTA, pH 7.2. Before use, CliniMACS® PBS/EDTA Buffer must be supplemented with pharmaceutical grade HSA to a final concentration of 0.5% (weight/volume, i.e. 5 g HSA per liter buffer). HSA is not a component of the CliniMACS® CD34 Reagent System and is supplied by the user.
CliniMACS® plus Instrument
Magnetic cell separation instrument based on the MACS® Technology.
CliniMACS® Tubing Set TS or CliniMACS® Tubing Set LS
Set of tubes, connectors, columns, and bags through which the magnetically labeled cell suspension is processed and in which the magnetic cell selection takes place.
EDTA Ethylene-diamine-tetra-acetic acid.
Heat Sealer Heating device used to sterile seal PVC tubing. Additional equipment provided by the user.
Hematopoietic progenitor cells
Progenitor cells of lymphoid, myeloid, and erythroid lineages.
HPC, Apheresis Hematopoietic Progenitor Cells, Apheresis
Labeling Reaction of cells with magnetic labeling reagent, e.g. CliniMACS® CD34 Reagent to CD34+ cells.
Leukapheresis Apheresis collecting leukocytes. HPC, Apheresis
Liquid sensor Component of the CliniMACS® plus Instrument that detects liquid in the tubing.
Luer connector Screw coupling, part of the tubing set.

Appendix – 93
CliniMACS® User Manual for the CliniMACS® CD34 Reagent System APPENDIX
appendix 1: Glossary of terms and symbols
Glossary
Monoclonal antibodies A single type of antibody that is directed against a specific epitope (antigen, antigenic determinant) and is produced by a single clone of B cells or a single hybridoma cell line, which is formed by the fusion of a lymphocyte cell with a myeloma cell. Some myeloma cells synthesize single antibodies naturally.
Negative Fraction Bag Bag of the CliniMACS® Tubing Set TS and CliniMACS® Tubing Set LS containing the non-target cell fraction (e.g. CD34 negative cells).
Orbital rotator Device used to mix HPC, Apheresis during the reaction with CliniMACS® CD34 Reagent. Additional equipment provided by the user.
Peristaltic pump Tubing pump. Pump used in the CliniMACS® plus Instrument to control the flow rate of fluid in the tubing set.
Plasma extractor Device used to extract liquid from the Cell Preparation Bag after cell washing. Additional equipment provided by the user.
Pre-column First column in the CliniMACS® Tubing Set TS and the CliniMACS® Tubing Set LS, serves as filter to trap cells having non-specific interactions with column matrix.
Pre-column holder Support mounted on the CliniMACS® plus Instrument that holds the pre-column in place.
Pre-system filer 40 µm filter device between Cell Preparation Bag and pre-column used to trap clumps and cell debris. Additional material provided by the user.
Priming Step prior to cell selection in which buffer is flushed through the tubing set.
Priming Waste Bag Buffer used to flush the tubing set during the priming step is collected in this bag.
Pump safety switch Sensor that prevents pump operation when the pump door is open.

94 – Appendix
CliniMACS® User Manual for the CliniMACS® CD34 Reagent System APPENDIX
appendix 1: Glossary of terms and symbols
Glossary
Retaining ring Part of a tubing set that enables the pump tubing to remain in its proper location.
rpm Revolutions per minute.
Sampling Site Coupler Injection port, e.g. for removal of samples or addition of the CliniMACS® CD34 Reagent to the Cell Preparation Bag. Additional material provided by the user.
Selection program Software program designed for the enrichment of magnetically labeled cell subsets (e.g. CD34+ cells) from a mixed cell population. The operator can choose from a menu of selection programs depending on the intended procedure (e.g. CD34 SELECTION 1 for standard-scale applications or CD34 SELECTION 2 for large-scale applications).
Separation column Column where the magnetically labeled cells are separated when exposed to the magnetic field.
Separation column holder
Molded guides in the magnet housing that hold the separation column in place.
Sterile tubing connector
A device used to connect tubing aseptically outside a laminar flow hood. Additional equipment provided by the user.
T-fitting T-shaped fitting on a tubing set where three tubes meet.
Transfer bag Bag with a tubing and a spike at the end. Additional material provided by the user.
Wash Waste Bag Collection bag in which the wash supernatant is collected by separation from the sedimented cell suspension after centrifugation steps during sample preparation.
WBC White blood cells
× g Multiples of the earth’s gravitational acceleration.

Appendix – 95
CliniMACS® User Manual for the CliniMACS® CD34 Reagent System APPENDIX
appendix 2: Guidance and manufacturer’s declaration
Warning Labeling, Guidance and manufacturer's declaration in accompanying documents of medical elecrical equipment according to iec 60601-1-2:2007.
instructions for use
Medical electrical equipment needs special precautions regarding electromagnetic compatibility (EMC) and needs to be installed and put into service according to the EMC information provided in the accompanying documents. Portable and mobile RF communications equipment can affect medical electrical equipment.
technical description
EMC compliance with IEC 60601-1-2:2007 has been attested for the provided power cable. The use of other power cables may result in increased electromagnetic emissions or decreased immunity of the CliniMACS® plus Instrument. If the provided power cable is missing, please contact Miltenyi Biotec for information on a replacement part.
Guidance and manufacturer’s declaration – electromagnetic emissions
The CliniMACS® plus Instrument is intended for use in the electromagnetic environment specified below. The customer or the user of the CliniMACS® plus Instrument should assure that it is used in such an environment.
emissions test compliance electromagnetic environment Guidance
RF EmissionsCISPR 11
Group 1 The CliniMACS® plus Instrument uses RF energy only for its internal function. Therefore, its RF emissions are very low and are not likely to cause any interference in nearby electronic equipment.
RF EmissionsCISPR 11
Class B The CliniMACS® plus Instrument is suitable for use in all establishments, including domestic establishments and those directly connected to the public low voltage power supply network that supplies buildings used for domestic purposes.
Harmonic EmissionsIEC 61000-3-2
Class A
Voltage Fluctuations/Flicker EmissionsIEC 61000-3-3
Complies
Table 4.1: Guidance and Manufacturer’s Declaration – Electromagnetic Emissions
The CliniMACS® plus Instrument should not be used adjacent to or stacked with other equipment and that if adjacent or stacked use is necessary, the CliniMACS® plus Instrument should be observed to verify normal operation in the configuration in which it will be used.
Based on technical limitations of the internal power supply voltage, interruptions on power supply input lines for longer than 10 ms may lead to cessation of the separation process (power failure). The separation process cannot be resumed after a power failure. It is recommended that the CliniMACS® plus Instrument is powered from an uninterruptible power supply or a battery that starts up within 10 ms.
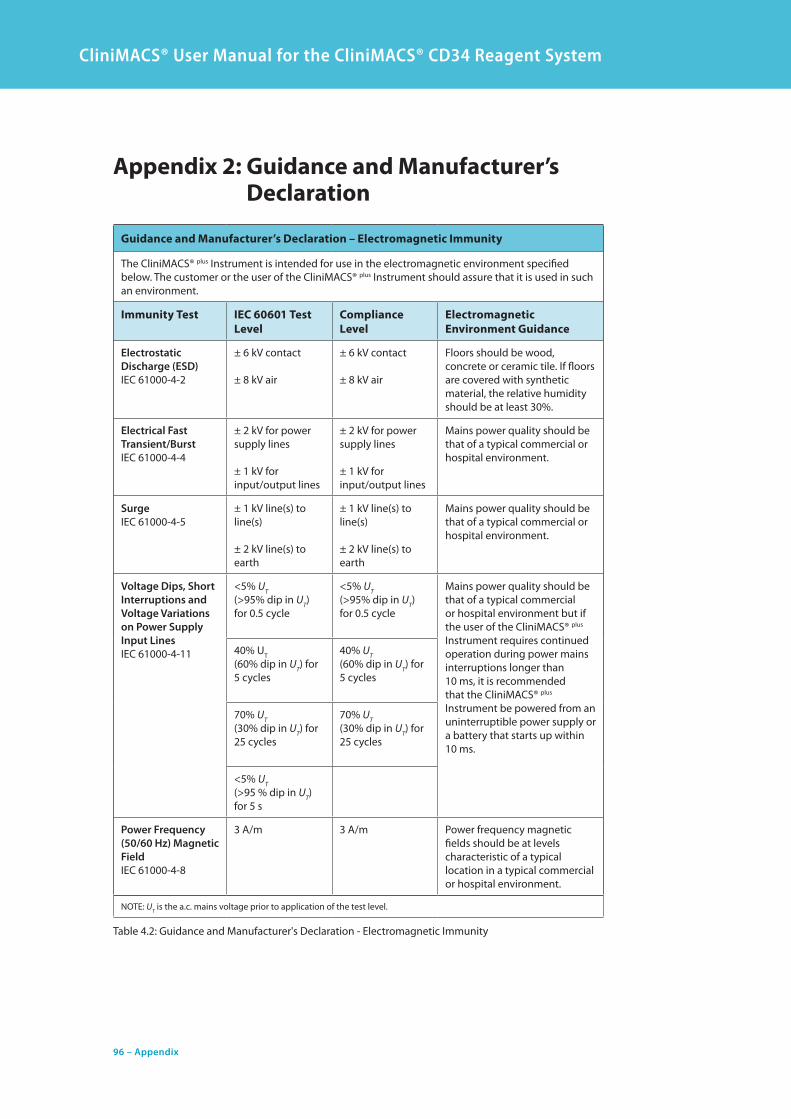
96 – Appendix
CliniMACS® User Manual for the CliniMACS® CD34 Reagent System APPENDIX
Guidance and manufacturer’s declaration – electromagnetic immunity
The CliniMACS® plus Instrument is intended for use in the electromagnetic environment specified below. The customer or the user of the CliniMACS® plus Instrument should assure that it is used in such an environment.
immunity test iec 60601 test Level
compliance Level
electromagnetic environment Guidance
Electrostatic Discharge (ESD)IEC 61000-4-2
± 6 kV contact
± 8 kV air
± 6 kV contact
± 8 kV air
Floors should be wood, concrete or ceramic tile. If floors are covered with synthetic material, the relative humidity should be at least 30%.
Electrical Fast Transient/BurstIEC 61000-4-4
± 2 kV for power supply lines
± 1 kV for input/output lines
± 2 kV for power supply lines
± 1 kV for input/output lines
Mains power quality should be that of a typical commercial or hospital environment.
SurgeIEC 61000-4-5
± 1 kV line(s) to line(s)
± 2 kV line(s) toearth
± 1 kV line(s) to line(s)
± 2 kV line(s) toearth
Mains power quality should be that of a typical commercial or hospital environment.
Voltage Dips, Short Interruptions and Voltage Variations on Power Supply Input LinesIEC 61000-4-11
<5% UT(>95% dip in UT) for 0.5 cycle
<5% UT(>95% dip in UT) for 0.5 cycle
Mains power quality should be that of a typical commercial or hospital environment but if the user of the CliniMACS® plus Instrument requires continued operation during power mains interruptions longer than 10 ms, it is recommended that the CliniMACS® plus Instrument be powered from an uninterruptible power supply or a battery that starts up within 10 ms.
40% UT (60% dip in UT) for 5 cycles
40% UT (60% dip in UT) for 5 cycles
70% UT(30% dip in UT) for 25 cycles
70% UT(30% dip in UT) for 25 cycles
<5% UT(>95 % dip in UT) for 5 s
Power Frequency (50/60 Hz) Magnetic FieldIEC 61000-4-8
3 A/m 3 A/m Power frequency magnetic fields should be at levels characteristic of a typical location in a typical commercial or hospital environment.
NOTE: UT is the a.c. mains voltage prior to application of the test level.
Table 4.2: Guidance and Manufacturer's Declaration - Electromagnetic Immunity
appendix 2: Guidance and manufacturer’s declaration
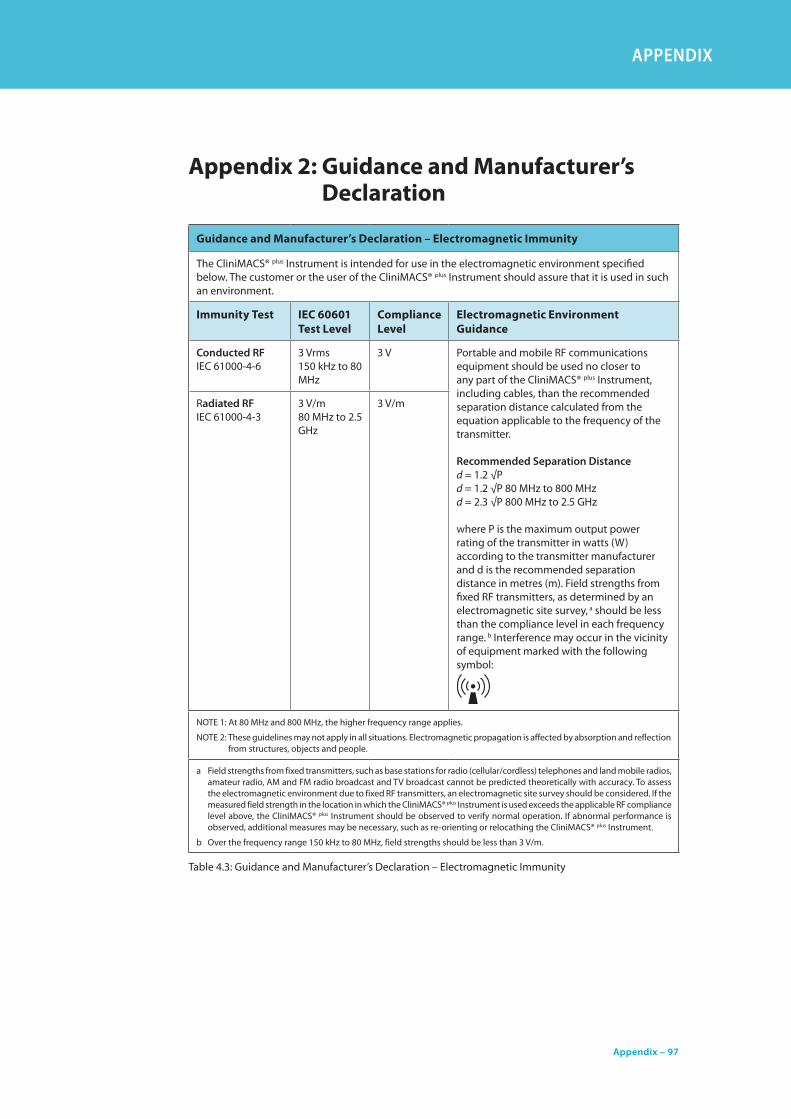
Appendix – 97
CliniMACS® User Manual for the CliniMACS® CD34 Reagent System APPENDIX
appendix 2: Guidance and manufacturer’s declaration
Guidance and manufacturer’s declaration – electromagnetic immunity
The CliniMACS® plus Instrument is intended for use in the electromagnetic environment specified below. The customer or the user of the CliniMACS® plus Instrument should assure that it is used in such an environment.
immunity test iec 60601 test Level
compliance Level
electromagnetic environment Guidance
Conducted RFIEC 61000-4-6
3 Vrms150 kHz to 80 MHz
3 V Portable and mobile RF communications equipment should be used no closer to any part of the CliniMACS® plus Instrument, including cables, than the recommended separation distance calculated from the equation applicable to the frequency of the transmitter.
Recommended Separation Distanced = 1.2 √Pd = 1.2 √P 80 MHz to 800 MHzd = 2.3 √P 800 MHz to 2.5 GHz
where P is the maximum output power rating of the transmitter in watts (W) according to the transmitter manufacturer and d is the recommended separation distance in metres (m). Field strengths from fixed RF transmitters, as determined by an electromagnetic site survey, a should be less than the compliance level in each frequency range. b Interference may occur in the vicinity of equipment marked with the following symbol:
Radiated RFIEC 61000-4-3
3 V/m80 MHz to 2.5 GHz
3 V/m
NOTE 1: At 80 MHz and 800 MHz, the higher frequency range applies.
NOTE 2: These guidelines may not apply in all situations. Electromagnetic propagation is affected by absorption and reflection from structures, objects and people.
a Field strengths from fixed transmitters, such as base stations for radio (cellular/cordless) telephones and land mobile radios, amateur radio, AM and FM radio broadcast and TV broadcast cannot be predicted theoretically with accuracy. To assess the electromagnetic environment due to fixed RF transmitters, an electromagnetic site survey should be considered. If the measured field strength in the location in which the CliniMACS® plus Instrument is used exceeds the applicable RF compliance level above, the CliniMACS® plus Instrument should be observed to verify normal operation. If abnormal performance is observed, additional measures may be necessary, such as re-orienting or relocathing the CliniMACS® plus Instrument.
b Over the frequency range 150 kHz to 80 MHz, field strengths should be less than 3 V/m.
Table 4.3: Guidance and Manufacturer’s Declaration – Electromagnetic Immunity

98 – Appendix
CliniMACS® User Manual for the CliniMACS® CD34 Reagent System APPENDIX
recommended separation distances Between Portable and mobile rf communications equipment and the clinimacs® plus instrument
The CliniMACS® plus Instrument is intended for use in an electromagnetic environment in which radiated RF disturbances are controlled. The customer or the user of the CliniMACS® plus Instrument can help prevent electromagnetic interference by maintaining a minimum distance between portable and mobile RF communications equipment (transmitters), including RFID readers, and the CliniMACS® plus Instrument – as recommended below, according to the maximum output power of the communications equipment.
rated maximum output Power of transmitter (W)
separation distance according to frequency of transmitter (m)
125 kHz to 80 MHzd = 1.2 √P
80 MHz to 800 MHzd = 1.2 √P
800 MHz to 2,5 GHzd = 2.3 √P
0.01 0.12 0.12 0.23
0.1 0.38 0.38 0.73
1 1.2 1.2 2.3
10 3.8 3.8 7.3
100 12 12 23
For transmitters rated at a maximum output power not listed above, the recommended separation distance d in metres (m) can be estimated using the equation applicable to the frequency of the transmitter, where P is the maximum output power rating of the transmitter in watts (W) according to the transmitter manufacturer.
NOTE 1: At 80 MHz and 800 MHz, the separation distance for the higher frequency range applies.
NOTE 2: These guidelines may not apply in all situations. Electromagnetic propagation is affected by absorption and reflection from structures, objects and people.
Table 4.4: Recommended Separation Distances Between Portable and Mobile RF Communications Equipment and the CliniMACS® plus Instrument
appendix 2: Guidance and manufacturer’s declaration


User Manual
for the CliniMACS® CD34 Reagent System
Miltenyi Biotec GmbHFriedrich-Ebert-Straße 6851429 Bergisch GladbachGermanyPhone +49 2204 8306-80Fax +49 2204 [email protected]
Miltenyi Biotec Inc.2303 Lindbergh StreetAuburn, CA 95602USAPhone 1-800-810-3135Fax [email protected] P/
N 3
7070
/01
| Is
sued
: 201
4-01