cisco imc supervisor installation and upgrade on …€¦ · cisco imc supervisor installation and...
TRANSCRIPT

Cisco IMC Supervisor Installation and Upgrade on VMware vSphere,Release 1.1First Published: August 26, 2015
Americas HeadquartersCisco Systems, Inc.170 West Tasman DriveSan Jose, CA 95134-1706USAhttp://www.cisco.comTel: 408 526-4000 800 553-NETS (6387)Fax: 408 527-0883

© 2015 Cisco Systems, Inc. All rights reserved.

C O N T E N T S
P r e f a c e Preface v
Audience v
Conventions v
Documentation Feedback vii
Obtaining Documentation and Submitting a Service Request vii
C H A P T E R 1 Overview 1
About Cisco IMC Supervisor 1
Minimum System Requirements 2
Supported Firewall Ports 3
About Licenses 4
Fulfilling the Product Access Key 4
C H A P T E R 2 Installing Cisco IMC Supervisor on VMware vSphere 7
Installing Cisco IMC Supervisor on VMware vSphere 7
Changing the Default Password 9
Updating the License 9
Reserving System Resources 10
C H A P T E R 3 Upgrading Cisco IMC Supervisor on VMware vSphere 11
Upgrading Cisco IMC Supervisor on VMware vSphere 11
Cisco IMC Supervisor Installation and Upgrade on VMware vSphere, Release 1.1 iii

Cisco IMC Supervisor Installation and Upgrade on VMware vSphere, Release 1.1iv
Contents
Preface
This preface contains the following sections:
• Audience, page v
• Conventions, page v
• Documentation Feedback, page vii
• Obtaining Documentation and Submitting a Service Request, page vii
AudienceThis guide is intended primarily for data center administrators who use and who have responsibilities andexpertise in one or more of the following:
• Server administration
• Storage administration
• Network administration
• Network security
• Virtualization and virtual machines
ConventionsIndicationText Type
GUI elements such as tab titles, area names, and field labels appear in this font.
Main titles such as window, dialog box, and wizard titles appear in this font.
GUI elements
Document titles appear in this font.Document titles
In a Text-based User Interface, text the system displays appears in this font.TUI elements
Cisco IMC Supervisor Installation and Upgrade on VMware vSphere, Release 1.1 v
IndicationText Type
Terminal sessions and information that the system displays appear in thisfont.
System output
CLI command keywords appear in this font.
Variables in a CLI command appear in this font.
CLI commands
Elements in square brackets are optional.[ ]
Required alternative keywords are grouped in braces and separated by verticalbars.
{x | y | z}
Optional alternative keywords are grouped in brackets and separated by verticalbars.
[x | y | z]
A nonquoted set of characters. Do not use quotation marks around the string orthe string will include the quotation marks.
string
Nonprinting characters such as passwords are in angle brackets.< >
Default responses to system prompts are in square brackets.[ ]
An exclamation point (!) or a pound sign (#) at the beginning of a line of codeindicates a comment line.
!, #
Means reader take note. Notes contain helpful suggestions or references to material not covered in thedocument.
Note
Means the following information will help you solve a problem. The tips information might not betroubleshooting or even an action, but could be useful information, similar to a Timesaver.
Tip
Means reader be careful. In this situation, you might perform an action that could result in equipmentdamage or loss of data.
Caution
Means the described action saves time. You can save time by performing the action described in theparagraph.
Timesaver
Cisco IMC Supervisor Installation and Upgrade on VMware vSphere, Release 1.1vi
PrefaceConventions

IMPORTANT SAFETY INSTRUCTIONS
This warning symbol means danger. You are in a situation that could cause bodily injury. Before youwork on any equipment, be aware of the hazards involved with electrical circuitry and be familiar withstandard practices for preventing accidents. Use the statement number provided at the end of each warningto locate its translation in the translated safety warnings that accompanied this device.
SAVE THESE INSTRUCTIONS
Warning
Documentation FeedbackTo provide technical feedback on this document, or to report an error or omission, please send your commentsto [email protected]. We appreciate your feedback.
Obtaining Documentation and Submitting a Service RequestFor information on obtaining documentation, submitting a service request, and gathering additional information,see the monthly What's New in Cisco Product Documentation, which also lists all new and revised Ciscotechnical documentation.
Subscribe to theWhat's New in Cisco Product Documentation as a Really Simple Syndication (RSS) feedand set content to be delivered directly to your desktop using a reader application. The RSS feeds are a freeservice and Cisco currently supports RSS version 2.0.
Cisco IMC Supervisor Installation and Upgrade on VMware vSphere, Release 1.1 vii
PrefaceDocumentation Feedback

Cisco IMC Supervisor Installation and Upgrade on VMware vSphere, Release 1.1viii
PrefaceObtaining Documentation and Submitting a Service Request

C H A P T E R 1Overview
This chapter contains the following topics:
• About Cisco IMC Supervisor, page 1
• Minimum System Requirements, page 2
• Supported Firewall Ports, page 3
• About Licenses, page 4
About Cisco IMC SupervisorCisco IMC Supervisor is a management system that allows you to manage rack mount servers on a large scale.It allows you to create groups of rack mount servers for monitoring and inventory purposes.
You can use Cisco IMC Supervisor to perform the following tasks for a rack mount server:
• Support for logical grouping of servers and summary views per group
• Collect inventory for the servers
• Provide monitoring capabilities for servers and groups
• Firmware management including firmware download, upgrade, and activation
• Manage standalone server actions including power control, LED control, log collection, KVM launch,CIMC UI launch and e-mail alerts
• Role Based Access Control (RBAC) to restrict access
• Email alerts
• Configure server properties using Policies and Profiles
Cisco IMC Supervisor Installation and Upgrade on VMware vSphere, Release 1.1 1

Minimum System RequirementsSupported Server Models
• UCS C-220 M3 and M4
• UCS C-240 M3 and M4
• UCS C-460 M4
• UCS C-22 M3
• UCS C-24 M3
• UCS C-420 M3
• UCS C3160
• UCS EN120E M2
• UCS EN120S M2
• UCS E-140S M2
• UCS E-160D M2
• UCS E-180D M2
• UCS E-140S M1
• UCS E-140D M1
• UCS E-160D M1
• UCS E-140DP M1
• UCS E-160DP M1
Cisco IMC Supervisor supports up to 1000 UCS C-Series and E-Series servers.
Minimum Firmware Versions
Minimum Firmware VersionServers
1.5(4)UCS C-series Servers
2.3.1UCS E-series Servers
Supported PCiE Cards
• Cisco UCS VIC 1225
• Cisco UCS VIC 1225T
• Cisco UCS VIC 1227
• Cisco UCS VIC 1227T
Cisco IMC Supervisor Installation and Upgrade on VMware vSphere, Release 1.12
OverviewMinimum System Requirements
• Cisco UCS VIC 1385
Supported Hypervisor versions
• ESXi 5.1
• ESXi 5.5
Minimum Hardware Requirements
The Cisco IMC Supervisor environment must meet at least the minimum system requirements listed in thefollowing table.
Minimum Supported RequirementElement
4vCPU
8 GBMemory
100 GBHard Disk
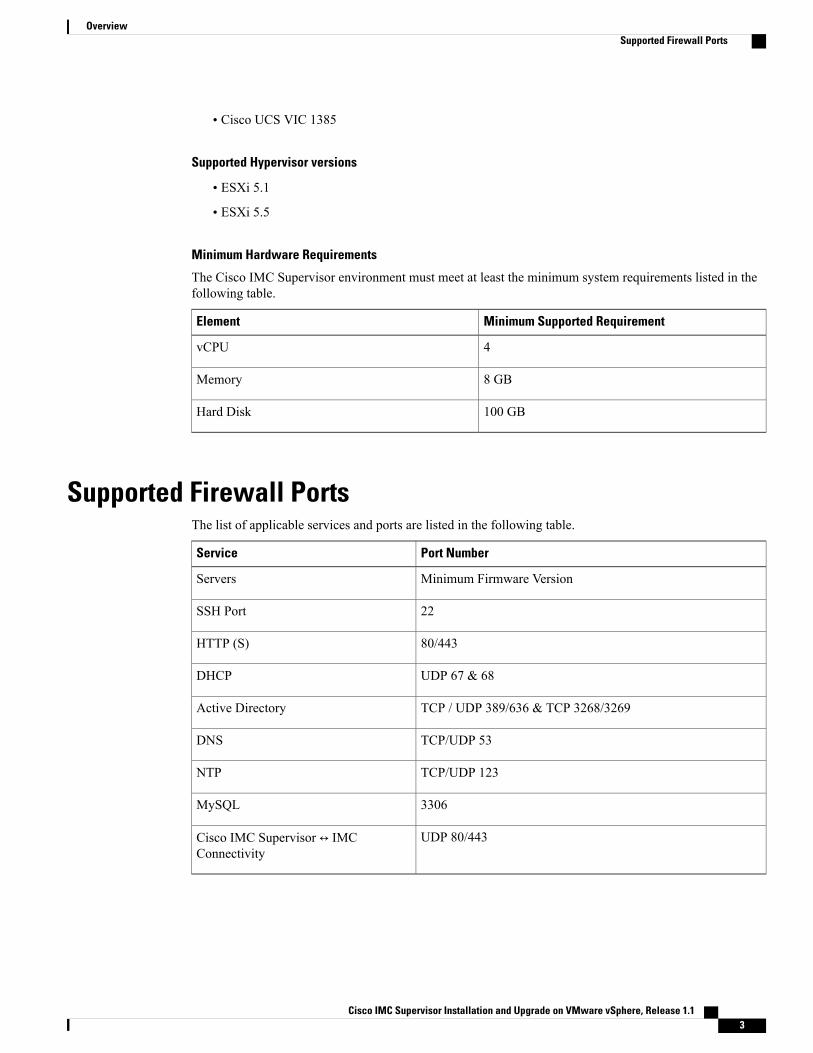
Supported Firewall PortsThe list of applicable services and ports are listed in the following table.
Port NumberService
Minimum Firmware VersionServers
22SSH Port
80/443HTTP (S)
UDP 67 & 68DHCP
TCP / UDP 389/636 & TCP 3268/3269Active Directory
TCP/UDP 53DNS
TCP/UDP 123NTP
3306MySQL
UDP 80/443Cisco IMC Supervisor ↔ IMCConnectivity
Cisco IMC Supervisor Installation and Upgrade on VMware vSphere, Release 1.1 3
OverviewSupported Firewall Ports

If these ports and protocols are blocked by a firewall, you may experience timeouts or internal error whenyou are upgrading Cisco IMC Supervisor.
Note
About LicensesCisco IMC Supervisor requires you to have the following valid licenses:
• A Cisco IMC Supervisor base license.
• ACisco IMC Supervisor bulk endpoint enablement license that you install after the Cisco IMC Supervisorbase license.
• A Cisco IMC Supervisor advanced license. You can add, edit, and delete policies and profiles with thebase license but you cannot apply a policy or a profile to a server without the advanced license. An erroroccurs if this license is unavailable when you apply a policy.
• A default embedded Cisco IMC Supervisor evaluation license. The evaluation license is generatedautomatically when the end user installs Cisco IMC Supervisor and all the services start for the firsttime. It is applicable for 50 servers.
If you are using an evaluation license for Cisco IMC Supervisor, note that when this license expires (60days from the date the license is generated), retrieving inventory and system health information, such asfaults, will not work. You will not be able to refresh system data, or even add new accounts. At that point,you must install a perpetual license to use all features of Cisco IMC Supervisor.
Important
The process for obtaining and installing the licenses is the same.
You must obtain a license to use Cisco IMC Supervisor, as follows:
1 Before you install Cisco IMC Supervisor, generate the Cisco IMC Supervisor license key and claim acertificate (Product Access Key).
2 Register the Product Access Key (PAK) on the Cisco software license site, as described in Fulfilling theProduct Access Key, on page 4.
3 After you install Cisco IMC Supervisor, update the license in Cisco IMC Supervisor as described inUpdating the License, on page 9.
4 After the license has been validated, you can start to use Cisco IMC Supervisor.
Fulfilling the Product Access Key
Before You Begin
You need the PAK number.
Cisco IMC Supervisor Installation and Upgrade on VMware vSphere, Release 1.14
OverviewAbout Licenses
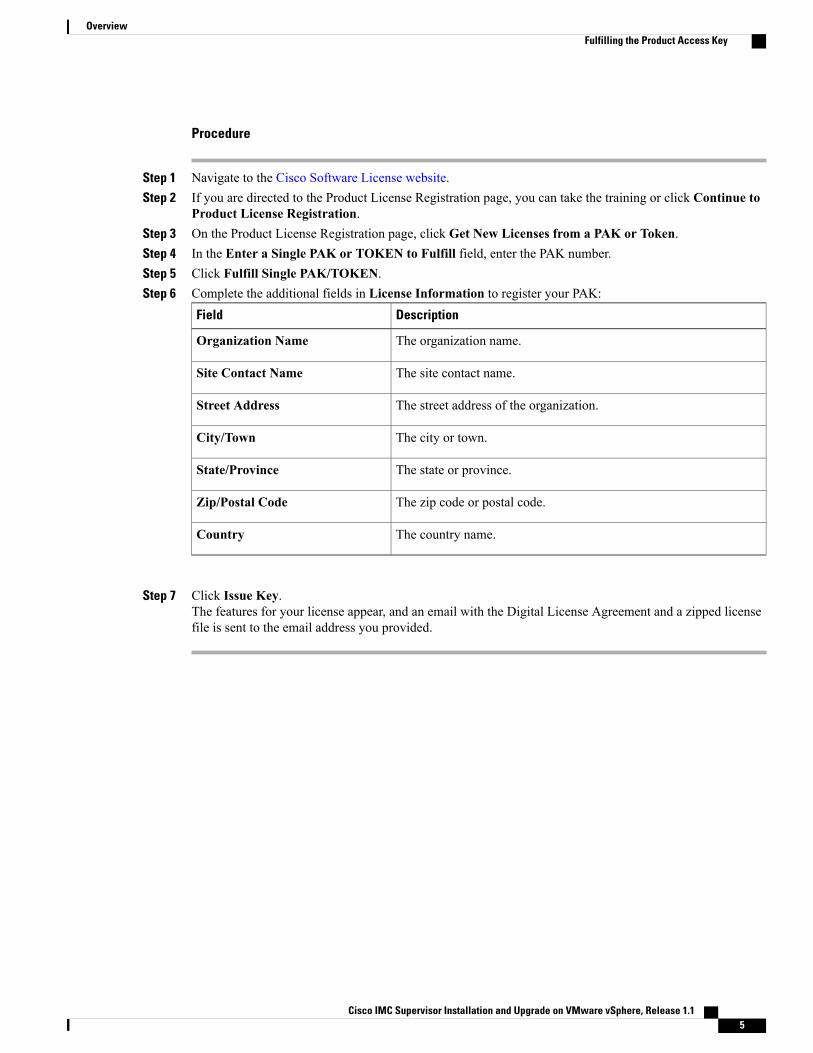
Procedure
Step 1 Navigate to the Cisco Software License website.Step 2 If you are directed to the Product License Registration page, you can take the training or click Continue to
Product License Registration.Step 3 On the Product License Registration page, click Get New Licenses from a PAK or Token.Step 4 In the Enter a Single PAK or TOKEN to Fulfill field, enter the PAK number.Step 5 Click Fulfill Single PAK/TOKEN.Step 6 Complete the additional fields in License Information to register your PAK:
DescriptionField
The organization name.Organization Name
The site contact name.Site Contact Name
The street address of the organization.Street Address
The city or town.City/Town
The state or province.State/Province
The zip code or postal code.Zip/Postal Code
The country name.Country
Step 7 Click Issue Key.The features for your license appear, and an email with the Digital License Agreement and a zipped licensefile is sent to the email address you provided.
Cisco IMC Supervisor Installation and Upgrade on VMware vSphere, Release 1.1 5
OverviewFulfilling the Product Access Key

Cisco IMC Supervisor Installation and Upgrade on VMware vSphere, Release 1.16
OverviewFulfilling the Product Access Key
C H A P T E R 2Installing Cisco IMC Supervisor on VMwarevSphere
This chapter contains the following topics:
• Installing Cisco IMC Supervisor on VMware vSphere, page 7
• Changing the Default Password, page 9
• Updating the License, page 9
• Reserving System Resources, page 10
Installing Cisco IMC Supervisor on VMware vSphereBefore You Begin
You need administrator privileges to connect to VMware vSphere or vCenter.
If you do not want to use DHCP, you need the following information: IP address, subnet mask, and defaultgateway.
Note
Procedure
Step 1 In the VMware vSphere Client login dialog box, enter your login credentials.Step 2 Click Login.Step 3 In the Navigation pane, choose Data Center for Cisco IMC Supervisor deployment.Step 4 Choose File > Deploy OVF Template.
The Deploy OVF Template window appears.
Step 5 In the Source pane, do one of the following to choose your OVF source location:
• Browse to the location, choose the file, and click Open.
Cisco IMC Supervisor Installation and Upgrade on VMware vSphere, Release 1.1 7

• Deploy from a URL on your local area network. Replace FQDN (Fully Qualified Domain Name) withthe IP address or domain name, and click Next.
Step 6 In the OVF Template Details pane, verify the details and click Next.Step 7 In the End User License Agreement pane, read the license agreement, and click Accept. Click Next.Step 8 In the Name and Location pane, do the following:
a) (Optional) In the Name field, edit the VM name.b) Choose the Data Center where Cisco IMC Supervisor is being deployed, and click Next.
If Data Center was chosen in a previous step, option b is not available.Note
Step 9 In the Host/Cluster pane, choose the required host, cluster, or resource pool, and click Next.Step 10 In the Datastore pane, choose the location to store Cisco IMC Supervisor VM files, and click Next.Step 11 In the Disk Format pane, choose one of the following radio buttons and click Next:
• Thin Provisioned format—To allocate storage on demand as data is written to disk.
• Thick Provisioned (Lazy Zeroed) format—To allocate storage immediately in thick format.
• Thick Provisioned (Eager Zeroed) format—To allocate storage in thick format. It might take longerto create disks using this option.
Step 12 In the Network Mapping pane, choose your network and click Next.Step 13 In the IP Address Allocation pane, click Next.
The DHCP check box is checked by default.
Step 14 In the Ready to Complete pane, verify the options selected, and click Finish.Step 15 Make sure you have sufficient vCPU and memory to power on the VM.Step 16 Power on the VM.Step 17 When the appliance starts up, do the following when you are prompted to configure a static IP:
• If you want to use DHCP, enter n to ensure that IP addresses are assigned automatically.
• Even though you are prompted to select IPV4 or IPV6, IPV6 is not yet supported by Cisco IMCSupervisor.
Note
If you want to use static IP address, enter y and then you will be prompted to select IPV4 or IPV6. EnterV4 to configure IPV4 and then enter the following information:
◦IP address
◦Gateway
◦Netmask
Currently, only IPv4 is supported for configuring static IP addresses.Note
Step 18 When you are prompted to continue with the configuration, enter y.Wait for the appliance to boot up before you continue.
Step 19 After the appliance has booted up, transfer the Cisco IMC Supervisor IP address (from the IP address that isshown) into a supported web browser to access the Login page.
Step 20 On the Login page, enter admin as the username and admin for the login password.
Cisco IMC Supervisor Installation and Upgrade on VMware vSphere, Release 1.18
Installing Cisco IMC Supervisor on VMware vSphereInstalling Cisco IMC Supervisor on VMware vSphere
Change your admin password after this initiallogin.
Note
What to Do Next
Update your license.
Changing the Default PasswordProcedure
Step 1 From the menu choose Administration > Users.Step 2 Click the Login Users tab.Step 3 Choose admin from the list of Login Users.Step 4 Click Change Password.Step 5 In the Change Password dialog box, enter the new password and confirm it.Step 6 Click Save.
Updating the LicenseBefore You Begin
If you received a zipped license file by email, extract and save the .lic file to your local machine.
Procedure
Step 1 From the menu bar, choose Administration > License.Step 2 Select the License Keys tab.Step 3 Click Update License.Step 4 In the Update License dialog box, do one of the following:
• To upload a .lic file, click Browse, navigate to and select the .lic file, then click Upload.
• For a license key, check the Enter License Text check box then copy and paste the license key onlyinto the License Text field. The license key is typically at the top of the file, after Key ->.
You can also copy and paste the full text of a license file into the License Text field.
Step 5 Click Submit.The license file is processed, and a message appears confirming the successful update.
Cisco IMC Supervisor Installation and Upgrade on VMware vSphere, Release 1.1 9
Installing Cisco IMC Supervisor on VMware vSphereChanging the Default Password
Reserving System ResourcesFor optimal performance, we recommend reserving extra system resources for Cisco IMC Supervisor beyondthe minimum system requirements.
For more information about how to reserve system resources, see the VMWare documentation.Note
Procedure
Step 1 Log into VMware vCenter.Step 2 Choose the VM for Cisco IMC Supervisor.Step 3 Shut down the VM.Step 4 In VMware vCenter, click the Resource Allocation tab to view the current resource allocations, and click
Edit.Step 5 In the Virtual Machine Properties pane, edit resource allocations by choosing a resource and entering the
new values.Step 6 Verify that the new resource allocations have been made.
Cisco IMC Supervisor Installation and Upgrade on VMware vSphere, Release 1.110
Installing Cisco IMC Supervisor on VMware vSphereReserving System Resources

C H A P T E R 3Upgrading Cisco IMC Supervisor on VMwarevSphere
This chapter contains the following topic:
• Upgrading Cisco IMC Supervisor on VMware vSphere, page 11
Upgrading Cisco IMC Supervisor on VMware vSphereFollow the procedure given below to upgrade Cisco IMC Supervisor.
Before You Begin
• Download Cisco IMC Supervisor, Release 1.1.0.0 from http://www.cisco.com.
• Place the software in the FTP or HTTP server that you plan to use to install the upgrade.
• If NFS mount is used for application storage, disable it before you apply a patch. If you do not, theupgrade will fail.
• Obtain access to a secure shell (SSH) application.
We recommend that you take a snapshot of the VM before you begin the upgrade. If you do this, you donot need to back up the existing configuration database through an FTP server.
Note
Procedure
Step 1 Open your SSH application and enter the Cisco IMC Supervisor appliance IP address and port number.Step 2 Login as shelladmin with password changeme.Step 3 From the Cisco IMC Supervisor Shell Menu, choose 3) Stop Services.Step 4 To verify that all services are stopped, choose 2) Display Services Status.Step 5 (Optional) If desired, you can choose 7) Backup Database to back up the Cisco IMC Supervisor
database.
Cisco IMC Supervisor Installation and Upgrade on VMware vSphere, Release 1.1 11
You do not need to back up the database if you took a snapshot of the VM before you started.
Step 6 To upgrade Cisco IMC Supervisor to Release 1.1.0.0, choose 16) Apply Patch.Step 7 When prompted, enter the location of the Release 1.1.0.0.
ftp://username:password@hostname|IP_address/software_location_and_name
Step 8 Wait for the download and installation to complete.Step 9 When prompted, choose 4) Start Services to start services and complete the upgrade process.
After you apply the upgrade patch and complete that installation, choose the Start Servicesoption of ShellAdmin to start/restart the Cisco IMC Supervisor services and complete the patchprocess. The patch process is not complete or successful until the Cisco IMC Supervisor serviceshave started, Cisco IMC Supervisor is available, the login screen is displayed, and the admin usercan log in to Cisco IMC Supervisor.
All Cisco IMC Supervisor services must be started before you attempt to perform other shelladminprocedures, such as apply additional patches, take a database backup, or restore a database from abackup.
Note
Step 10 When the upgrade is complete, choose Show Version in ShellAdmin to verify the current version of CiscoIMC Supervisor.
To view the status of services, choose2) Display Services Status.Note
What to Do Next
Once you upgrade Cisco IMC Supervisor to version 1.1, downloading a local firmware image using thefirmware profile created on 1.0 will not work and download fails. Youmust configure new firmware profile(s)to download images and delete the previously downloaded images.
Cisco IMC Supervisor Installation and Upgrade on VMware vSphere, Release 1.112
Upgrading Cisco IMC Supervisor on VMware vSphereUpgrading Cisco IMC Supervisor on VMware vSphere