chapter 6: materials tutorial -...
TRANSCRIPT

1
Chapter 6:
MaterialsTutorial
Materials display on the surfaces of objects in 3D views and can make a 3D view appear highly realistic. When applied to most objects, material quantities will also be calculated in the Materials List.
This tutorial continues from where the Interior Design Tutorial ended. You may want to save this tutorial using a new name to archive your previous work. In this tutorial you will learn about:• Setting Materials Defaults• Using the Materials Tab• Using the Material Painter• Using the Material Eyedropper• Using the Color Chooser
• Blending Colors with Materials• Using the Material Eyedropper• Custom Materials, Images, and Backdrops• Generating a Materials List
Setting Materials DefaultsMaterial default settings determine the materials used by different objects when they are initially created. Setting the correct material defaults before beginning a project may help you save time. For more information, see “Preferences & Default Settings” on page 63 of the Reference Manual.

2
Chief Architect X5 User’s Guide
To set material defaults
1. Select Edit> Default Settings to open the Default Settings dialog.
2. There are a two options. You can do either or both: • Select an item in the tree list and click the Edit button to open the defaults dialog for
that type of object. The default dialogs for architectural objects such as doors and windows have a Materials tab that allows you to set the material defaults for object components. See “Using the Materials Tab” on page 151.

Using the Materials Tab
3
• Select Materials and click the Edit button to open the Material Defaults dialog. Here you can set the material defaults for many different objects, including some that do not have default dialogs. See “Material Defaults” on page 806 of the Reference Manual.
3. When you are finished, click OK to close the defaults dialog, then click Done to close the Default Settings dialog.
Once an object has been placed in a plan, the materials applied to it can be changed in a number of ways.
Using the Materials TabMost objects’ materials can be assigned in their specification dialog in both 2D and 3D views. The materials used by a door, for example, can be edited on the Materials tab of the Door Specification dialog. For more information, see “Materials Tab” on page 787 of the Reference Manual.
To change material on an object using the Materials tab
1. Click the Select Objects button, then click on the double door leading from the master bedroom to the deck on Floor 2 to select it.
2. Click the Open Object edit button to open the Door Specification dialog.
4
Chief Architect X5 User’s Guide
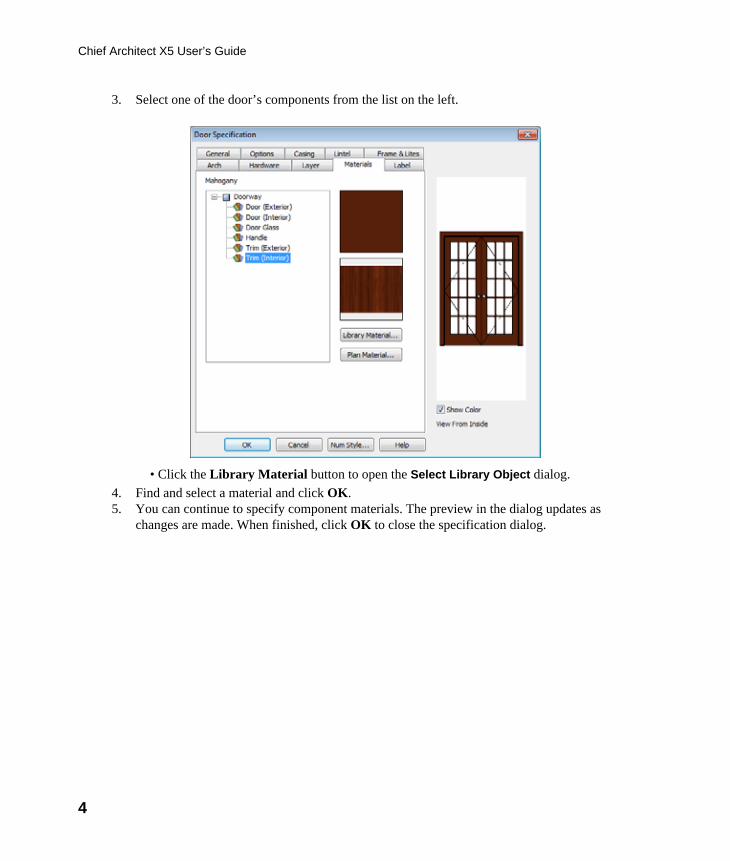
3. Select one of the door’s components from the list on the left.
• Click the Library Material button to open the Select Library Object dialog.4. Find and select a material and click OK.5. You can continue to specify component materials. The preview in the dialog updates as
changes are made. When finished, click OK to close the specification dialog.

Using the Materials Tab
5
6. Create a Full Camera view of the door.
The materials used in individual rooms can also be specified. Rooms can be selected in both floor plan and 3D views.
• In floor plan view, click in an empty space within a room. When selected, the whole room is highlighted. If you accidentally select an object other than the room, you can press the Tab key on the keyboard until the room is selected.
• In camera views and overviews, click on the floor of the room to select it.
To edit a room using the Materials tab
1. Select the master bedroom and click the Open Object to open the Room Specification dialog.
2. On the Materials tab, select Molding under the Crown Molding heading and click the Library Material button to open the Select Library Object dialog.

6
Chief Architect X5 User’s Guide
3. Find and select a material and click OK to close the dialog.
4. Click OK to close the Room Specification dialog.
5. The results can be seen in a Full Camera view.
Using the Material PainterThe Material Painter tool allows you to select a material and then apply it to an object in a 3D view.

Using the Material Painter
7
There are five Material Painter Modes which specify how broadly or narrowly the selected material will be applied to surfaces in your plan. In this tutorial, the Component Mode is used. For more information, see “The Material Painter” on page 784 of the Reference Manual.
To apply a material using the Material Painter
1. While still in the 3D view of the door, select 3D> Material Painter and confirm that
there is a checkmark next to Material Painter Component Mode .
2. Click the Material Painter button to open the Select Library Object dialog. Browse to Flooring> Carpeting, select a carpet material, and click OK.
3. Move your cursor into the 3D view and notice that it displays a spray can icon .
8
Chief Architect X5 User’s Guide
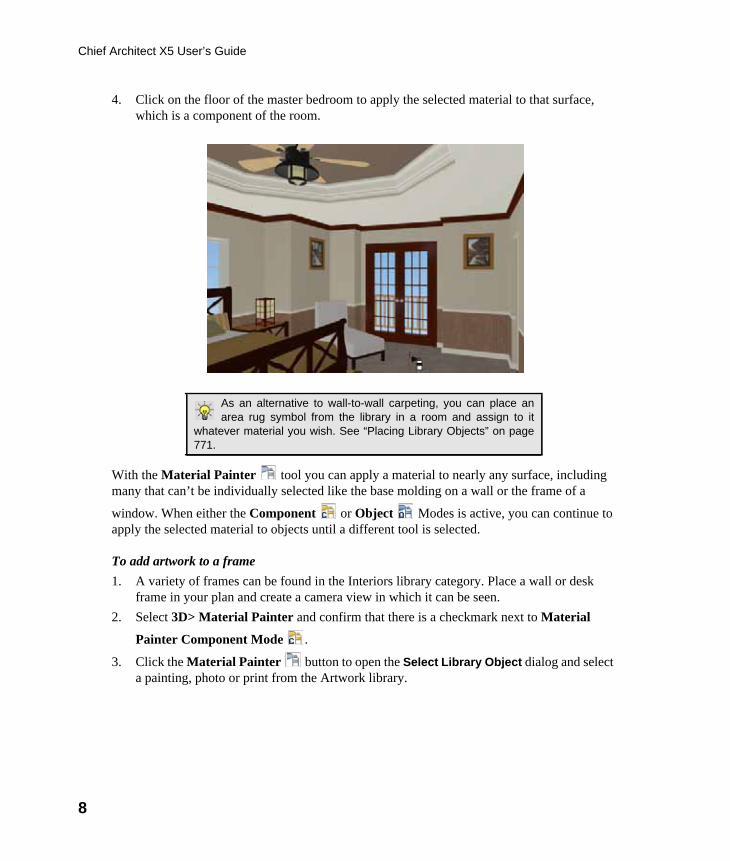
4. Click on the floor of the master bedroom to apply the selected material to that surface, which is a component of the room.
With the Material Painter tool you can apply a material to nearly any surface, including many that can’t be individually selected like the base molding on a wall or the frame of a
window. When either the Component or Object Modes is active, you can continue to apply the selected material to objects until a different tool is selected.
To add artwork to a frame1. A variety of frames can be found in the Interiors library category. Place a wall or desk
frame in your plan and create a camera view in which it can be seen.2. Select 3D> Material Painter and confirm that there is a checkmark next to Material
Painter Component Mode .
3. Click the Material Painter button to open the Select Library Object dialog and select a painting, photo or print from the Artwork library.
As an alternative to wall-to-wall carpeting, you can place anarea rug symbol from the library in a room and assign to it
whatever material you wish. See “Placing Library Objects” on page771.

Blending Colors with Materials
9
4. Move your cursor over the middle area of the frame and click to apply the selected artwork.
The artwork displayed in a frame can also be specified in the frame’s specification dialog. See “Symbol Object Specification Dialogs” on page 779 of the Reference Manual.
Blending Colors with MaterialsInstead of using the Material Painter to replace a material with a new one, we can use it
with the Blend Colors With Materials feature to blend a color with a textured material such as the carpet we selected for the master bedroom and create a new material. For more information, see “Blend Colors With Materials” on page 785 of the Reference Manual.
To blend a color with a texture
1. In a 3D view, select 3D> Material Painter> Material Painter . 2. In the Select Library Object dialog, select a solid color for the carpet from the Generic
Colors library, then click OK.
3. When you move your cursor into the view, it displays a paint roller icon .
• When Blend Colors with Materials is active and a solid color is loaded in the
Material Painter, your cursor displays the paint roller icon .
10
Chief Architect X5 User’s Guide
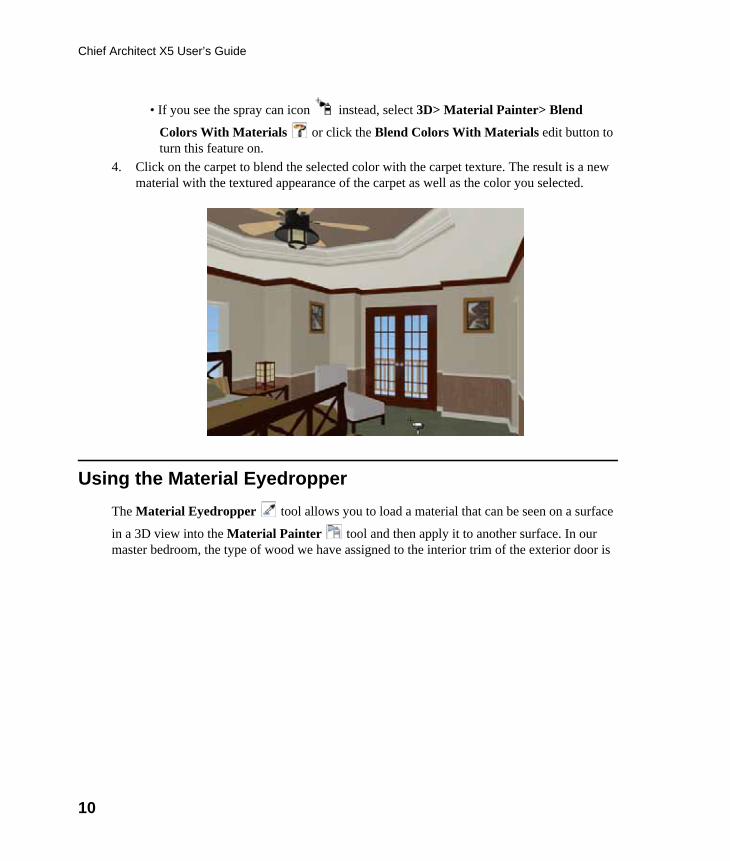
• If you see the spray can icon instead, select 3D> Material Painter> Blend
Colors With Materials or click the Blend Colors With Materials edit button to turn this feature on.
4. Click on the carpet to blend the selected color with the carpet texture. The result is a new material with the textured appearance of the carpet as well as the color you selected.
Using the Material EyedropperThe Material Eyedropper tool allows you to load a material that can be seen on a surface
in a 3D view into the Material Painter tool and then apply it to another surface. In our master bedroom, the type of wood we have assigned to the interior trim of the exterior door is

Using the Material Eyedropper
11
different than the material used on the trim of the interior doors.We can easily change this using
the Material Eyedropper .
1. Activate the camera view (or any 3D view).
2. Select 3D> Material Painter> Material Painter from the menu. If there is a check
beside Blend Color With Material , select this menu item to disable it; if not, simply click outside of the menu to close it again.
3. Select 3D> Material Painter> Material Eyedropper and notice that the pointer
displays an eyedropper icon .

12
Chief Architect X5 User’s Guide
4. Now just click to load that material. Notice that the pointer changes to a spray can , indicating that the loaded material is ready to apply to another object and replace the existing material.
5. Click on the moldings to apply the loaded material.
Using the Color ChooserWith the Color Chooser you can load any color that is displayed on your monitor and save it to the library for use in your plans.
To create a new material using the Color Chooser
1. Select Tools> Color Chooser to open the Color Chooser dialog.
Using the Color Chooser
13
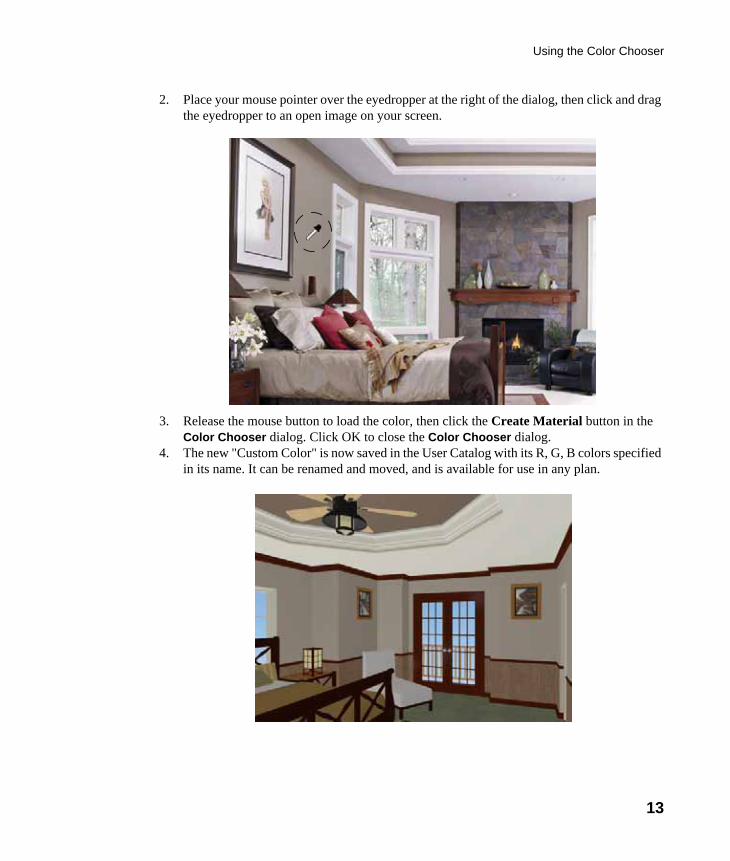
2. Place your mouse pointer over the eyedropper at the right of the dialog, then click and drag the eyedropper to an open image on your screen.
3. Release the mouse button to load the color, then click the Create Material button in the Color Chooser dialog. Click OK to close the Color Chooser dialog.
4. The new "Custom Color" is now saved in the User Catalog with its R, G, B colors specified in its name. It can be renamed and moved, and is available for use in any plan.

14
Chief Architect X5 User’s Guide
Custom Materials, Images, and BackdropsChief Architect allows you to customize your 3D views by importing your own materials, image objects, and backdrops that display in 3D views. For more information about images, see “Pictures, Images, & Walkthroughs” on page 1041 of the Reference Manual.
Creating MaterialsMaterials are special digital images that can be applied to the surfaces of objects. You can create your own custom materials and save them in the library. Bear in mind that materials typically cover a surface by tiling an image repeatedly and are specially edited so that they tile seamlessly: as a result, not all images will necessarily serve as effective materials.
Once a material is saved in the library, it can be applied to objects in any plan, either using the objects’ specification dialogs or the Material Painter tool.
To add a new material to the library
1. Select Library> Library Browser (or press Ctrl + L) to open the Library Browser.2. Right-click on the User Catalog ‘folder and select New> Material from the contextual
menu to open the Define Material dialog.
Note: The following steps make use of image files that are notincluded with the program. You can use image files that are alreadyon your computer or you can create new ones. You can even usethe same image file to create a material, an image, and a backdrop.Learning the tools and techniques described is more important thanthe appearance of the final product.
Custom Materials, Images, and Backdrops
15
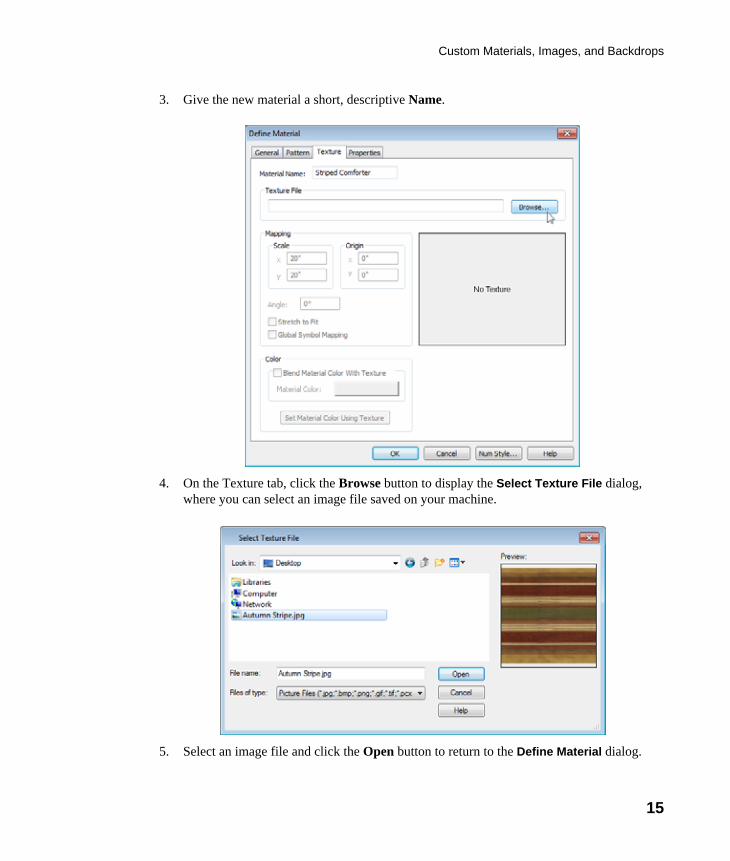
3. Give the new material a short, descriptive Name.
4. On the Texture tab, click the Browse button to display the Select Texture File dialog, where you can select an image file saved on your machine.
5. Select an image file and click the Open button to return to the Define Material dialog.

16
Chief Architect X5 User’s Guide
6. Specify the Scale of the texture, which controls how large the image will appear on the surfaces it is applied to.
7. On the Properties tab, specify the Material Class and attributes of the material. A Matte material will most closely resemble cloth, which is what this material will be used for.
8. Click OK to add the new material to the User Catalog folder.
For more information, see “Define Material Dialog” on page 796 of the Reference Manual.
Creating ImagesIn Chief Architect, image objects are more than just 2D pictures. Images have size and height attributes and can contain transparency information. In floor plan view, they display only as 2D symbols; but in 3D views, the visual information that images contain can be seen.
Images can be placed in a plan just as plants, furnishings and fixtures are: by selecting the image and clicking any floor plan view, camera view or overview.
To create an image and save it to the library
1. Right-click on the User Catalog folder, then select New> Image from the contextual menu to open the Image Specification dialog. For more information, see “Image Specification Dialog” on page 1045 of the Reference Manual.
2. On the Image tab, click the Browse button and browse to any image on your computer. In this tutorial we will use an image of a cat that has transparency data associated with it; however, you can use any image.
3. Click Open to return to the Image Specification dialog.4. On the Image tab, enter the Height or Width, adjusting one will adjust the other,
maintaining the correct proportion. Enter a Height Above Ground value to specify the

Custom Materials, Images, and Backdrops
17
elevation at which the image displays. A value of 24 inches works well in this case as we’ll be placing the image on a piece of furniture.
5. Specify the transparency settings on the Transparency tab. 6. Click OK to close the Image Specification dialog and add the new image to the My
Images category in the Images library.
Importing BackdropsBackdrops are images that display behind 3D views. In Chief Architect, you can take a photo of a site, save it to the library as a backdrop, and display it behind 3D views to create a realistic rendering of your model and its surrounding view.
To import a backdrop and save it to the library
1. Select File> Import> Backdrop and browse to an image on your computer.
2. Select the image and click Open to add it to User Catalog.
To apply a backdrop to 3D views
1. Select 3D> 3D View Defaults to open the 3D View Defaults dialog.2. On the Backdrop tab, click the Select Backdrop button to open the Select Library Object
dialog.

18
Chief Architect X5 User’s Guide
3. Click on the Select Backdrop button, find and select your backdrop from User Catalog and click OK.
4. Click OK to close the 3D View Defaults dialog.
You can see your custom material, image and backdrop by creating a Full Camera view.

Generating a Materials List
19
Generating a Materials ListTo conclude this tutorial, we’ll generate a materials list for the house. You can generate a materials list for a single room, an area of the plan on one floor, or the whole plan. For more information, see “Materials Lists” on page 1187 of the Reference Manual.
To generate a materials list for the whole plan
1. Select Tools> Materials List> Calculate From All Floors . A materials list is generated for all floors of the house.
2. Locate the an item, such as one under the Fixtures category. 3. Click in the “Price” column type in a value. Notice that the subtotal and Total both update
to reflect the pricing change. You can specify prices for every material in your plan, allowing you to generate a cost estimate.
4. If you wish, you can select File> Export Materials List and save the list as a Tab-delimited .txt file, which can be opened in a spreadsheet application.
5. Close the materials list by selecting File> Close Window from the menu. A dialog displays, asking if you want to save the materials list before closing.
6. Save or click No to close without saving. A new materials list can always be created later.
7. When you have finished, you may want to Save your work.
You can generate a materials list to estimate the cost of an entire plan or just a portion of a plan. For more information, see “Materials Lists” on page 1187 of the Reference Manual.
To calculate a materials list for an individual room
1. Click the Select Objects button, then click in a room to select it.
Note: The Materials List is only a rough cost estimate and should bedouble checked before being relied on.
Note: The Materials List is only a rough cost estimate and shouldalways be double checked before being relied on.

20
Chief Architect X5 User’s Guide
2. With the room selected, click the Calculate from Room edit button or select Tools>
Materials List> Calculate from Room . The program calculates a list of the objects and materials contained in the selected room.
To calculate a materials list for just the deck
1. In floor plan view, select Tools> Materials List> Calculate from Area .2. Click and drag a rectangle surrounding the an area to display a materials list for the area
within the rectangle. The resulting materials list only includes objects and materials located within the rectangle.