centrifugal pump type: dvmx - cpi technology · independently of the pump. never ru n the pump dry...
TRANSCRIPT

Centrifugal Pump Type: DVMX
API PROCESS PUMP
USER INSTRUCTION MANUAL:
INSTALLATION, ASSEMBLY, MAINTENANCE
Doc. Rev. 31/01/2006

CENTRIFUGAL PUMP: DVMX
Page 2
CONTENTS:
1. INTRODUCTION AND SAFETY .................... 3
1.1. General ................................................... 3 1.2. Disclaimer and Copyright ........................ 3 1.3. Marking and Directive’s Conformity......... 3 1.4. Duty Conditions ....................................... 3 1.5. Safety and Health.................................... 3 1.6. Label Description..................................... 6 1.7. Noise Level.............................................. 6
2. TRANSPORT AND STORAGE ...................... 6 2.1. Unpacking................................................ 6 2.2. Handling .................................................. 6 2.3. Storage .................................................... 6 2.4. Dismissing ............................................... 7
3. GENERAL INFORMATION ............................ 7 3.1. Pump Configurations............................... 7 3.2. Main Parts Description ............................ 7 3.3. Performance and Operating Limits.......... 8
4. INSTALLATION.............................................. 8 4.1. Positioning ............................................... 8 4.2. Support Base and Foundations............... 8 4.3. Alignment and Grouting........................... 8 4.4. Piping Assembly.................................... 10 4.5. Final Alignment Check .......................... 11 4.6. Electrical Connections........................... 11 4.7. Protection Devices ................................ 11
5. OPERATION ................................................. 11 5.1. Initial Procedures................................... 11 5.2. Lubrication ............................................. 12 5.3. Direction of rotation ............................... 12 5.4. Guarding................................................ 12 5.5. Priming and Auxiliary Supplies.............. 12 5.6. Start and Run Procedure....................... 13 5.7. Stop and Shutdown Procedure ............. 14
6. MAINTENANCE............................................14 6.1. General ..................................................14 6.2. Maintenance Schedule ..........................14 6.3. Lubrication Issue....................................15 6.4. Seal Maintenance ..................................15 6.5. Spare Parts............................................15 6.6. Fastener Torque Table ..........................16 6.7. Disassembly ..........................................16 6.8. Examination ..........................................17 6.9. Assembly ...............................................17
7. TROUBLESHOOTING..................................20 8. CROSS SECTIONAL AND DIMENSIONAL
TABLES ........................................................21 8.1. DVMX with Ball Bearings ......................21 8.2. DVMX with Sleeve Bearings .................22 8.3. Dimensional Table .................................23
9. CERTIFICATION...........................................24 10. ATTACHMENTS ...........................................24 11. NOTES AND INFORMATION.......................24

CENTRIFUGAL PUMP: DVMX
Page 3
1 INTRODUCTION AND SAFETY 1.1 General Marelli Bombas has a large experience in the development, design, and manufacturing of process pumps, for medium duty services of a high responsibility. A clear indication of the quality and reliability of our pumps is the large list of references and the wide range of services in which they are working satisfactorily. The manufacturing criteria are carefully chosen to guarantee the highest quality level, its design and construction are the result of an exhaustive analysis of market requirements. They are tailor made according to the particular specifications of every customer, being always respectful with the applicable environmental standard.
These instructions must always be kept close to the product. These instructions are intended to facilitate familiarization with the product and its permitted use. The product must operate in compliance with these instructions to ensure reliability in service and avoid risks. The instructions may not take into account local regulations; ensure such regulations are observed by all, including those installing the product. Repair activity must be always coordinated by operations personnel, and follow all plant safety requirements and applicable safety and health laws.
These instructions should be read prior to installing, operating, and maintaining the equipment. The equipment must not be put into service until all the conditions relating to safety noted in the instructions, have been met. 1.2 Disclaimer and Copyright Marelli Bombas manufactures products to exacting International Quality Management System Standards. Genuine parts and accessories have been designed, tested and incorporated into the products to ensure their continued product quality and performance in use. The use of parts and accessories sourced from other vendors may affect the performance and safety features of the products. The failure to properly select, install or use authorized parts and accessories is considered to be misuse. Damage or failure caused by misuse is not covered by warranty. In addition, any modification of the products or removal of original
components may impair the safety of these products in their use. All rights reserved. No part of these instructions may be reproduced, stored in a retrieval system or transmitted in any form or by any means without prior permission of Marelli Bombas. 1.3 Marking and Directive’s Conformity It is a legal requirement that machinery and equipment put into service within certain regions of the world shall conform with the applicable CE Marking Directives and, where applicable, conform to Equipment for Potentially Explosive Atmospheres (ATEX). Where applicable this document incorporates information relevant to these Directives. To establish approvals and if the product itself is CE marked, check the serial number plate and the Certification. (Refer to Section 3.3) 1.4 Duty Conditions This product has been selected to meet the specifications indicated in pump data sheet. A copy should be kept with these instructions.
The product must operated only according to the parameters indicated in pump data sheet. The conditions of service stated on pump data sheet (for example liquid pumped, temperature or duty) can not be changed without contact Marelli Bombas (Refer also to Section 3.3 ). 1.5 Safety and Health 1.5.1 Summary of safety markings The specific safety markings used in these User Instruction Manual are listed below. The non-observance of an instruction related to the markings would cause hazards.
This symbol indicates electrical safety instructions where non-compliance would affect personal safety.
This symbol indicates safety instructions where non-compliance would affect personal safety.
This symbol indicates safety instructions “for toxic and dangerous liquids”, where non-compliance would affect protection of a safe life environment.
This symbol indicates safety instructions where non-compliance would affect the

CENTRIFUGAL PUMP: DVMX
Page 4
safe operation or protection of the pump or pump unit.
This symbol indicates ATEX directive application. It is used in User Instruction Manual where non-compliance in the hazardous area would cause the risk of an explosion.
This sign indicates an important instruction that must be follow. 1.5.2 Safety Instructions All personnel involved in the installation, assembly , operation and maintenance of the unit must be qualified and correctly trained . To operate preventing the injury to personnel and the damage to the environment and equipment these following instructions must be applied. For products used in potentially explosive atmospheres refer to Section 1.5.3)
Prevent uncontrolled external pipe load. It is recommended that all the piping connected to the equipment be supported independently of the pump.
Never run the pump dry
Vent the pump. If the pump is not self venting type it is recommended to vent fully the pump casing before the start up in order to avoid pump and equipment damage. The appropriate safety precautions should be taken where the pumped liquids are hazardous.
Ensure correct lubrication
Start the pump with discharge valve not closed. It is recommended to install protection devices to avoid the risk of equipment overloading and damaging. (Refer to Section 5)
The pump must operate with fully open inlet valve. Running the pump below the recommended minimum continuous stable flow will cause damage to the pump and seal.
Never do maintenance when the unit is connected to power.
Hazardous liquids. Pumping hazardous liquids care must be taken to avoid exposure to the
liquid. Appropriate installation of the pump and special operators training must be considered. Also if the liquid is flammable and/or explosive, strict safety procedures must be applied. In any case gland packing must not be used with hazardous liquids.
Drain the pump and isolate pipes before dismantling the pump. The appropriate safety precautions should be taken where the pumped liquids are hazardous.
Handling components. Wearing of appropriate safety equipment is required when handling components with sharp corners. To lift heavy pieces above 20 kg (44 lb) use appropriate tools in accordance with current local regulations.
Guards must not be removed while the pump is running or connected to the power.
Hot and cold parts. When components or auxiliary heating supplies surface temperatures can be a danger to personnel entering the immediate equipment area action must be taken to avoid accidental contact. When complete protection is not possible, the equipment access must be limited to maintenance staff only, with clear visual warnings.
Bearing housings must not be insulated so they can be hot. 1.5.3 ATEX Compliance for Products Used in Potentially Explosive Atmospheres If the installation requires to be in compliance with European Directive 94/9/EC, the following instructions for pumps and pump units must be followed. Both electrical and non-electrical equipment must meet the requirements of European Directive 94/9/EC. The Ex rating applies only to scope of supply. The party responsible for assembling the accessories and all the parts not in scope of supply shall select any additional equipment, with the necessary CE Certificate/ Declaration of Conformity establishing it is suitable for the area in which it is to be installed.
Use equipment only in the zone for which it is appropriate and only if it is certified for the classification of the specific atmosphere in which it must to be installed.
Measures are required to:
CENTRIFUGAL PUMP: DVMX
Page 5
• Avoid excess temperature • Prevent sparks • Prevent leakage • Prevent the built up of explosive mixtures • Maintain the pump to avoid hazard 1.5.3.1 ATEX Marking The equipment in scope of supply is marked on the main part in a visible place or directly on the nameplate. An example of ATEX marking is shown below.
II 3 GD c 450 °C (T1) where: II = Equipment Group (I or II) 3 = Category (M1/M2 or 1,2,3) GD = Gas or Dust presence c = Constructional safety acc. to EN13463-5 T1 = Temperature Class (T1,T2,T3….) 450 °C = Max Surface Temperature 1.5.3.2 Excessive Surface Temperatures
Check if the equipment temperature class is suitable for the hazard zone required. The equipment temperature class is engraved on the nameplate. Ensure that ambient temperature doesn’t exceed –20 °C to 40 °C (-4 °F to 104 °F) according to ATEX directive. The surface temperature on the pump during normal operating conditions is influenced by the temperature of the liquid handled. Since the pumps are designed for operating temperatures up to 400 °C (752 °F) the equipment temperature class engraved on nameplate is the lowest (staring from T1 as lower) between the liquid handled (according to Table 1.1) and the permissible temperature class of all the auxiliaries in scope of supply.
Temperature Class Maximum Surface Temperature T1 T2 T3 T4 T5 T6
450 °C (842 °F) 300 °C (572 °F) 200 °C (392 °F) 135 °C (275 °F) 100 °C (212 °F) 85 °C (185 °F)
Table 1.1 – Maximum Surface Temperature according to EN13463-1 - The maximum surface temperature of the equipment must include the safety margin to the minimum ignition temperature of the potentially explosive atmosphere. For pumps and pump units it is taken into account the temperature rise at the seals and bearings due to the minimum permitted flow rate. As a result of the analysis the
temperature limit of liquid handled is 50 °C (122 °F) lower than T1 class limit (stated on table 1.1) for T1 only and 25 °C (77 °F) lower than T class limit (stated on table 1.1) for the other temperature classes. In any case the responsibility for compliance with the specified maximum liquid temperature is with the plant operator. Motor, mechanical seal and all the auxiliaries must be appropriate for the installation zone and Temperature class required. The oil quality and level must be checked periodically according to maintenance schedule. In case of high liquid temperature it’s suggested to use the proper bearing housing cooling device in order to keep the bearings at the optimum operating temperature. The equipment material must be properly selected according to the liquid handled and to the duty conditions stated on data sheet (see also maintenance routines on Section 6.4). Never check the direction of rotation by starting the pump unfilled this can cause a high temperature resulting from contact between rotating and stationary components. Never run the pump against a closed discharge valve. This can cause high surface temperatures. If this can occur it is recommended that user fits an external surface temperature protection device. Provide cleaning routines to avoid the presence of dangerous dust layers around hot parts. 1.5.3.3 Prevent Sparks
Provide an adequate earth contact for the equipment in order to avoid sparks generated form induced current. When a complete equipment (pump and motor on a common baseplate) is supplied use the proper earth connection provided. If only the bareshaft pump is in the scope of supply it is user responsibility to provide a proper earth contact. The coupling guard must be non-sparking. Use a coupling in compliance with 94/9/EC and provide maintenance routine to check the correct alignment.

CENTRIFUGAL PUMP: DVMX
Page 6
1.5.3.4 Prevent Leakage
If the liquid handled is dangerous and a leakage could cause a hazard it is recommended the installation of a liquid detection device. Where a loss of a seal barrier fluid or external flush can be a potential hazard it must be provided a flow control monitoring device. Ensure that the used construction materials have the correct corrosion resistance required by the liquid handled. 1.5.3.5 Prevent the Build Up of Explosive Mixtures
Before starting ensure the pump is properly filled and vented. Avoid dry run. Ensure the pump, suction and discharge pipeline system is totally filled with liquid at all times during the pump operation. Ensure that seal chamber, auxiliary shaft seal systems and any heating and cooling systems are properly filled. In case of risk provide a dry run protection device. 1.5.3.6 Maintain the pump to avoid the hazard
The responsibility for compliance with maintenance instructions is with the plant operator. The correct maintenance is required to avoid potential hazards. During maintenance operation the risk of spark generation must be reduced, if not possible the maintenance must be conducted in a safe area. It is recommended to adopt a maintenance plan and schedule. 1.6 Label Description Each machine is equipped with a label on which you find all the data requested by the Machine Directive CE 89/392 and other relevant applicable directives which facilitate the identification of the machine. For an eventual spare part order please cite the machine number of the pump. 1.7 Noise Level Pump noise level depend to the motor type, pump condition of service (flow and head …), and also to plant layout.
In case pump noise level exceeds 85 dBA attention must be given to limit the exposure of plant operating personnel to the noise. One solution is to control exposure time to the noise or to enclose the machine to reduce emitted sound. For the equipment noise level see relevant documents stored with the data sheet in the job technical book. 2 TRANSPORT AND STORAGE 2.1 Unpacking At the arrival of the machine has to be carried out an accurate inspection to make sure that during transport did not occur any damage. If this should be the case, please contact Marelli Bombas and cite the equipment serial number. Sometimes for safety reasons components and accessories are separately packed inside the main packing. After the removal of the pump please accurately check the contents of the packing. Marelli Bombas is free from any obligation to reply on every request of compensation for damages advanced by the customer or third persons. 2.2 Handling
The structure of the packing and the employed materials are chosen according to shape, dimensions and weight of the machine, which has to be shipped. Packing may be unloaded taking care of size and weights (weights are recorded on the nameplates fixed to the components). Select the proper lifting vehicles according to size and weights that have to be lifted. Always take care to avoid distortion during handling operations.
A crane must be used for all pump sets in excess of 20 kg (44 lb). Fully trained personnel must carry out lifting, in accordance with local regulations. 2.3 Storage
Store the equipment in a clean, dry location away from vibration. Leave piping connection covers in place to keep dirt and other foreign material out of pump casing. Turn pump at intervals to prevent bearings and seal damage. Normally the equipment is delivered for a short-term installation.
CENTRIFUGAL PUMP: DVMX
Page 7
For more than 6 months storing period consult Marelli Bombas. In any case, before installation on the plant, the pump should be carefully cleaned by eliminating eventual foreign bodies which could compromise the correct functioning. 2.4 Dismissing At the end of the service life of the, the relevant materials and parts should be recycled or disposed of using an environmentally acceptable method and in accordance with local regulations. If the product contains substances that are harmful to the environment, these should be removed and disposed of in accordance with current local regulations.
Make sure that hazardous substances are disposed of safely and that the correct personal protective equipment is used. The safety specifications must be in accordance with the current local regulations at all times. 3 GENERAL INFORMATION 3.1 Pump Centrifugal pump, near centreline construction, horizontally split casing, double volute. Both suction and discharge are on side position. Between Bearing pump multistage pumps equipped with double suction or single suction impellers. Perfect axial balancing due to the crossover and impellers installation. Oil lubricated bearing support. Designed in compliance with API 610. DVMX are the most suitable pumps for clean fluids, with a slight content of solid particles in suspension, corrosive or hot liquids up to 400 °C (752 °F). Most common applications are: Oil Industry Petrochemical/Chemical Pharmaceutical Industry Fertilisers Cellulose and Paper Mills Textile Industry Marine and Navy Power Stations Steel Mills General Industry Services 3.1.1 Nomenclature The pump size, engraved on the nameplate, will be typically as below:
DVMX 3x4x9
DVMX = pump type
8 = nominal discharge size (inches) 10 = nominal suction size (inches) 21 = nominal impeller diameter (inches) 3.2 Main Part Descriptions 3.2.1 Pump casing Near centerline construction, double volute horizontally split casing for single or double suction impellers. Side-Side configuration according to API 610. The casing is vented and drained by vent and drain connections. The pump has two horizontal split cover plates and is equipped with two bearing housings supported by a pair of brackets extending from the casing bottom half. The arrangement require to dismantle the suction and discharge pipe to allow the impeller dismantling. The pump casing is fitted with case wear rings. Pressure plugs are located on suction and delivery nozzles. The pump casing is equipped with a balancing line for packings and mechanical seals. 3.2.2 Impeller The impellers are single suction or a double suction both closed design equipped with wear rings. The opposed impellers design generate a perfect axial balance. The impellers are mounted as a sliding fit on the shaft retained by spacers and a lock nut. The impellers are fitted with interchangeable wear rings. They are carefully balanced after machining. 3.2.3 Shaft The shaft is designed to be in compliance with API 610 maximum deflection. Keyed cylindrical drive end and rigidity permit to operate safely. 3.2.4 Stuffing Box It is extra deep type design to allows standard assembly of conventional packing or mechanical seal (single or double type) supplied by the most important seal manufacturer. The seal chamber can be cooled or heated by a cooling/heating chamber provided if required. A seal case ring fitted between the packing performs the function of flushing out and internal cooling of packings, if necessary, with flushing oil. The gland flange is designed to provide external water cooling of the packing and shaft sleeve. 3.2.5 Bearing Housings This pump is a between bearing pump according to API definition. This means that there are two bearing housings located on each side of the impeller allowing the possibility of high suction pressure without extra loads on thrust bearings (shaft going through the pumps). The bearing housings are designed with cooling water jackets. This cooling jacket located apart from the bearings, is designed to avoid any thermal differential elongation that could misfit the motor

CENTRIFUGAL PUMP: DVMX
Page 8
alignment. Also the bearing housings are designed to collect the accidental leaks from the mechanical seals or from the packing which can be recovered through a threaded orifice. Oil splash type lubrication by ring facilitates the oil circulation within each bearing and ensure the correct bearing life. Other bearing lubrication systems such as forced feed lubrication are available if required. The bearing configuration is as follow: • type 6300 ball bearing on coupling end • type 7300 angular contact ball bearing type to
absorb the residual axial pump thrust. The bearing on all types of housings must be cooled when hot liquids are to be handled (temperature higher then 120 °C / 248 °F). The oil level is ensured by a sight oil gauge. The axial adjustment of the rotor is set by the sleeve holding the oil ring. 3.3 Performance and Operating Limits This product has been selected to meet the duty conditions stated on the data sheet (see also Section 1.4 and Table 3.1). Changes in the hydraulic system may affect the pump's performance and cause damage to the unit and to the personnel. In case the process require changing on: specific gravity, minimum continuous stable flow, viscosity, pump speed, NPSH available, temperature, suction pressure, flow and head required,
Marelli Bombas must be involved to evaluate the suitability of the installed equipment to operate at different duty conditions.
Technical Data
Capacity � xxxx m3/h for 50 Hz � xxxx m3/h for 60 Hz
Head � xxxx m for 50 Hz � xxxx m for 60 Hz
Suction Pressure Up to xxxx bar
Temperature - xxxx °C to + xxxx °C
Discharge Flanges Size 3 inch to 10 inch
Sealing Mechanical or Packing Seal
Direction of Rotation Clockwise - Counterclockwise
Table 3.1 – Operating Limits - 4 INSTALLATION 4.1 Positioning The pump has to be mounted in the best possible position to assure an easy installation of the suction
and the delivery tubes and enough space must be provided for handling and lifting during maintenance operations.
The pump/pump unit must be located taking care to guarantee an easy access for inspection during normal duty or for the maintenance operations. 4.2 Support Base and Foundations
The foundation should be sufficiently strong to absorb vibration and to form a permanent, rigid support for the base plate. This is important in maintaining the alignment for a flexibly coupled unit. Marine type pump units should be directly bolted to the engine bearers. Grout type pump units should be bolted to a concrete foundation block. In case of concrete foundation the foundation bolts must be embedded in the concrete, located by a drawing or template.
pump should not be considered as a fixed point to the plant. These motor-pump units are aligned at works, with base plates resting on ground level. After the base plate has been bolted and anchored to the foundation block, the alignment must be checked. 4.3 Alignment and Grouting • Prepare the foundation block for wedging the
pump set. To do this, level the parts of the concrete block where the wedges will be put (on each side of the anchor bolts).
• Slide the anchor bolts into the holes of the foundation block provided for this purpose.
• Place the pump unit on the foundation, with the coupling halves disconnected, in its final position as compared to the centre-line determined by the site (longitudinal centre-line, centre-line of the suction and delivery flanges, height of pump set).
Don’t reconnect the coupling until the alignment operations have been completed. • Support the base plate on metal wedges
having a small taper. Place the metal wedges close to the foundation bolts (one each side). Use metal wedges with thickness not less than 10 mm (0.39 inch.). Do not multiply metal wedges of slight thickness.
CENTRIFUGAL PUMP: DVMX
Page 9
The metal wedges will help to: o ensure a perfect shaft alignment o keep the pump unit in horizontal
position • Level the pump units as follow (see also fig.
4.1):
1. Adjust the metal wedges until the shafts of the pump and driver are levelled.
2. Check the coupling faces as well as the suction and discharge flanges of the pump for horizontal or vertical position by means of a level.
3. Make corrections if necessary by adjusting the supports or wedges under the base plate.
Figure 4.1 – Leveling and metal wedges location -
4. Grout the cement into the anchor bolt holes
of the foundation block and let it harden according to the quality of the mortar used.
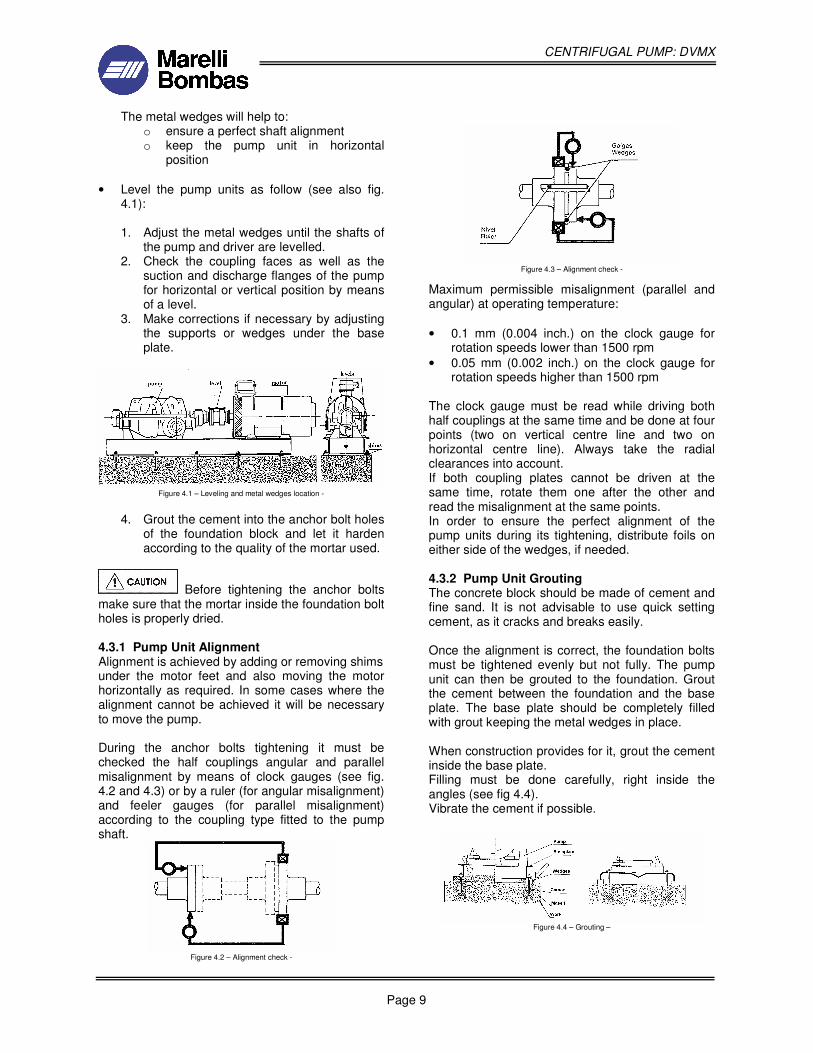
Before tightening the anchor bolts make sure that the mortar inside the foundation bolt holes is properly dried. 4.3.1 Pump Unit Alignment Alignment is achieved by adding or removing shims under the motor feet and also moving the motor horizontally as required. In some cases where the alignment cannot be achieved it will be necessary to move the pump. During the anchor bolts tightening it must be checked the half couplings angular and parallel misalignment by means of clock gauges (see fig. 4.2 and 4.3) or by a ruler (for angular misalignment) and feeler gauges (for parallel misalignment) according to the coupling type fitted to the pump shaft.
Figure 4.2 – Alignment check -
Figure 4.3 – Alignment check -
Maximum permissible misalignment (parallel and angular) at operating temperature: • 0.1 mm (0.004 inch.) on the clock gauge for
rotation speeds lower than 1500 rpm • 0.05 mm (0.002 inch.) on the clock gauge for
rotation speeds higher than 1500 rpm The clock gauge must be read while driving both half couplings at the same time and be done at four points (two on vertical centre line and two on horizontal centre line). Always take the radial clearances into account. If both coupling plates cannot be driven at the same time, rotate them one after the other and read the misalignment at the same points. In order to ensure the perfect alignment of the pump units during its tightening, distribute foils on either side of the wedges, if needed. 4.3.2 Pump Unit Grouting The concrete block should be made of cement and fine sand. It is not advisable to use quick setting cement, as it cracks and breaks easily. Once the alignment is correct, the foundation bolts must be tightened evenly but not fully. The pump unit can then be grouted to the foundation. Grout the cement between the foundation and the base plate. The base plate should be completely filled with grout keeping the metal wedges in place. When construction provides for it, grout the cement inside the base plate. Filling must be done carefully, right inside the angles (see fig 4.4). Vibrate the cement if possible.
Figure 4.4 – Grouting –
CENTRIFUGAL PUMP: DVMX
Page 10
For big industrial pump units, anchoring is facilitated by removing pump and motor and possibly the reduction gear. To avoid waiting for the cement drying, which fix the anchor bolts, the foundation block can be assembled as follow (see fig 4.5).
Figure 4.5 – Anchor Bolt Fixing -
Bedding the anchor bolts by means of the cement can be done at the same time as the grouting of the mortar in the base plate.
Foundation bolts should not be fully tightened until the grout is hardened, usually about 48 hours after pouring. 4.4 Piping Assembly
After the grout has set and the foundation bolts have been properly tightened, the pump unit must be checked for parallel and angular alignment and, if necessary, corrective action taken. After the piping of the unit has been connected and the system filled, the alignment must be checked again.
The pump can perform properly only if it is supplied with a steady flow of liquid at the suction flange with sufficient pressure to provide adequate NPSH to the pump and with a uniform, non-swirling velocity profile. The failure of the suction piping to deliver the liquid to the pump in this condition can lead to noisy operation, random axial load oscillations, premature bearing failure, and cavitation damage to the impeller and inlet portions of the casing and occasionally damage due to liquid separation on the discharge side.
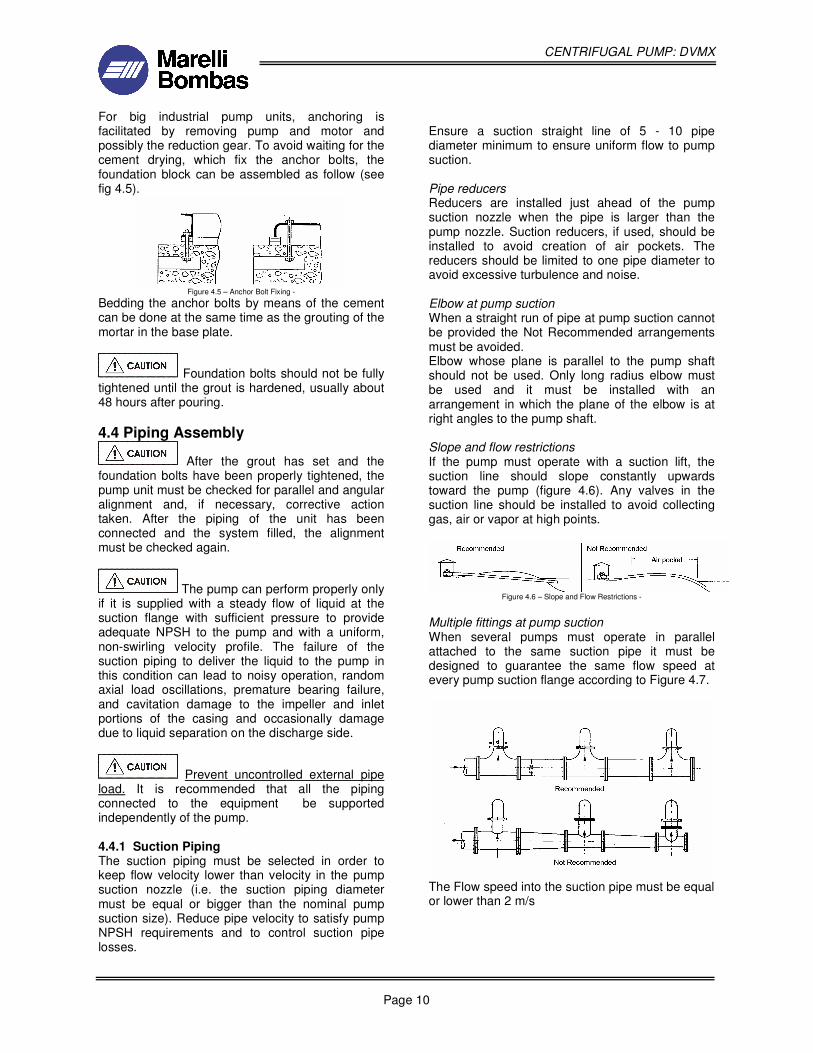
Prevent uncontrolled external pipe load. It is recommended that all the piping connected to the equipment be supported independently of the pump. 4.4.1 Suction Piping The suction piping must be selected in order to keep flow velocity lower than velocity in the pump suction nozzle (i.e. the suction piping diameter must be equal or bigger than the nominal pump suction size). Reduce pipe velocity to satisfy pump NPSH requirements and to control suction pipe losses.
Ensure a suction straight line of 5 - 10 pipe diameter minimum to ensure uniform flow to pump suction. Pipe reducers Reducers are installed just ahead of the pump suction nozzle when the pipe is larger than the pump nozzle. Suction reducers, if used, should be installed to avoid creation of air pockets. The reducers should be limited to one pipe diameter to avoid excessive turbulence and noise. Elbow at pump suction When a straight run of pipe at pump suction cannot be provided the Not Recommended arrangements must be avoided. Elbow whose plane is parallel to the pump shaft should not be used. Only long radius elbow must be used and it must be installed with an arrangement in which the plane of the elbow is at right angles to the pump shaft. Slope and flow restrictions If the pump must operate with a suction lift, the suction line should slope constantly upwards toward the pump (figure 4.6). Any valves in the suction line should be installed to avoid collecting gas, air or vapor at high points.
Figure 4.6 – Slope and Flow Restrictions -
Multiple fittings at pump suction When several pumps must operate in parallel attached to the same suction pipe it must be designed to guarantee the same flow speed at every pump suction flange according to Figure 4.7.
The Flow speed into the suction pipe must be equal or lower than 2 m/s

CENTRIFUGAL PUMP: DVMX
Page 11
4.4.2 Discharge Piping Install a non-return and a shut-off valve in the discharge piping. The check valve, placed between the pump and the shut-off valve, is to protect the pump from excessive back pressure and hence reverse rotation when the unit is stopped. The shut-off valve is used in priming and starting or stopping the pump for maintenance. Pipework reducers should have a maximum total angle of divergence of 15 degrees. Fitting an isolation valve will allow easier maintenance 4.4.3 Forces and Moments Steel and alloy steel DVMX pumps are designed to withstand external nozzle forces and moments according to API 610 limits, refer to API standard for values. 4.5 Final Alignment Check After connecting piping to the pump, rotate the shaft several times by hand to ensure there is no binding and all parts are free. Recheck the coupling alignment, the reading must give the same values as those previously noted. Ensure that the rotation direction is according to both motor and pump. 4.6 Electrical Connections
The motor must be wired up in accordance with the motor manufacturer's instructions.
Electrical connections must be made by a qualified Electrician in accordance with relevant local national and international regulations.
Check the Direction of rotation before connecting the motor to the electrical supply (see also Section 5.3). 4.7 Protection Devices
The following protection systems are recommended for the pump installed according to ATEX Directive. To avoid mechanical seal dry running or to check leakage product from the pump or its associated sealing system it is recommended to: • provide a leakage detector for single seals
• provide pressure gauges on inlet mechanical seal flushing line or on the reservoir for double pressurized seals
• provide level gauges on the reservoir for double unpressurized mechanical seals
Provide a maintenance routine that include the bearing support vibration or temperature monitoring to prevent excessive surface temperature at bearings. Install a protection device for high temperature prevention if is possible that the pump runs against a closed valve or below minimum continuous stable. Install a power monitor to stop the pump or prevent it from being started If there are any circumstances in which the system can allow the pump to run dry, or start up empty. 5 OPERATION
Recommended Safety Measures In the start as well as in the stop phase of the pump the operator should be adequately equipped for reasons of health preservation. This means proper gloves and boots, anti-acid overalls, helmet with protective visor for the face and the indispensable equipment for each operator, which excludes the risk of physical damages. It is absolutely forbidden to introduce the fingers or other parts of the body into the orifices and the various openings. The pump is equipped with movable parts. The mentioned operations have to be performed by skilled staff. 5.1 Initial Procedures At initial start up the following steps must be followed: • check that the piping assembling has not
altered the alignment, • flush new and old systems to eliminate foreign
matter, • close all the drain valves, • assure that the pump is vented and filled with
liquid, the pump must not run unless it is completely filled,
• check that bearings and bearing support are free of dirt and foreign substances which may have entered during shipment or installation,
• fill the bearing support with the appropriate lubricant to the correct level (see also Section 5.2 ),
• check the tightness of the joints an the suction piping to avoid air intake,

CENTRIFUGAL PUMP: DVMX
Page 12
• check that all cooling and flushing lines are well assembled and full of liquid with valves fully opened,
• before coupling installation start the motor and check the rotation, refer to electric motor manual and eventually change rotation (refer also to Section 5.3),
• assemble the coupling and check the alignment,
• install the coupling guard. 5.2 Lubrication
always fill the bearing support with correct grade of oil (see table 5.1) to the correct level and quantity (see table 5.2) looking oil level regulator DENCO® OILER (see fig. 5.3).
Viscosity Point of Service Temperature in
Bearing Zone °C
SAE grade ISO
VG Minimum INDEX
Ignition Open P. °C min
Freezing °C max
-5 / 30 30 / 70 70 / 100
10 20 30
32 68 100
90 90 90
180 200 210
-9 -9 -9
Table 5.1 – Oil Table –
Max. Working Temperature
Oil 85 °C (185 °F)
Ball Bearings 90 °C (195 °F)
Drain Periodicity 1st drain after 50 h
2nd drain after 500 h 3rd and after drain every 4000 h (*) Oil Quantity Thrust side
[ liters (pints) ] Line Side
[ liters (pints) ] Pump type: Line / Thrust
first filling year consumption first filling year
consumption
LB/TB 0.4 (0.85) 1.8 (3.8) 0.4 (0.85) 1.8 (3.8) 3x4x9 3x6x9 LJ/TB 0.7 (1.5) 2 (4.23) 0.4 (0.85) 1.8 (3.8)
LB/TB 0.7 (1.5) 2 (4.23) 0.7 (1.5) 2 (4.23) 4x6x10 LJ/TB 1.2 (2.54) 2.5 (5.28) 0.7 (1.5) 2 (4.23) LB/TB 1.4 2.9) 2.5 (5.28) 1.4 (2.9) 2.5 (5.28) 6x8x11 LJ/TB 1.9 (4) 2.8 (5.9) 1.4 (2.9) 2.5 (5.28) LB/TB 1.6 (3.38) 2.6 (5.5) 1.6 (3.38) 2.6 (5.5) 8x10x14½ LJ/TB 2.7 (5.7) 5 (10.6) 1.6 (3.38) 2.6 (5.5) LB/TB 1.6 (3.38) 2.6 (5.5) 1.6 (3.38) 2.6 (5.5) 10x12x14 LJ/TB 2.7 (5.7) 5 (10.6) 1.6 (3.38) 2.6 (5.5)
(*) according to situation and conditions of service Table 5.2– Oil Quantity -
Figure 5.3 – Oil Level Regulator
5.2.1 Lubrication Schedule The lubricating oil should be a high quality mineral oil having foam inhibitors. Provide maintenance routine to control Oil level and Bearings temperature. In case of sight oil level regulator option fill it backwards fill it up and close it (see fig. 5.3). The bearing temperature may to rise to 50 ºC (122 ºF) above ambient temperature, but should not exceed 80 ºC (176 ºF) of absolute value. • Drain the bearing support after approximately
50 hours running. • Change the lubricant after at least 6 months for
normal duty conditions. For hot application schedule a shorter time between oil changing.
5.3 Direction of Rotation
Ensure the pump is given the same rotation as the pump direction stated on data sheet or according to the casing discharge nozzle position. If an electric motor is used as a driver, the pump rotation must be checked the rotation should be checked with the coupling disconnected to avoid dry running. 5.4 Guarding
Guarding is supplied fitted to the pump unit. If guarding has been removed ensure that all the protective guards around the pump coupling and exposed parts of the shaft are securely fixed. 5.5 Priming and Auxiliary Supplies
Ensure the inlet pipe and pump casing are completely full of liquid before starting duty operation. Open vent connection on top of the pump casing to allow the trapped air to escape.
Ensure all electrical, hydraulic, pneumatic, sealant and lubrication systems (if applicable) are connected and operational.

CENTRIFUGAL PUMP: DVMX
Page 13
5.6 Start and Run Procedure After the activities indicated in Section 5.1 to 5.5 were performed proceed as follow. 5.6.1 Starting • Ensure that the discharge valve is closed • ensure that all inlet valves are opened • provide to turn on all flushing, cooling, heating
circuits before starting the pump • ensure that pump is fully primed • close all vent connections before start the
pump • start the motor checking the outlet pressure • after the discharge pressure reaches the right
value, slowly open the discharge valve • check that motor current consumption doesn’t
exceed the values stated on motor nameplate
• don’t start the pump with discharge valve closed for more than 20 seconds
• if no pressure, or low pressure, stop the pump. (see Section 7).
• by the discharge valve regulate the flow until the requested capacity
5.6.2 Running Once the pump unit is energised according to section 5.6.1, check: • duty conditions • vibration • mechanical or packing seal status • auxiliaries status • gasketed joints status • bearing temperature 5.6.2.1 Duty Condition Checking Ensure that operating speed, capacity, suction pressure, discharge pressure and power input are according to the data sheet and pump/motor nameplates. If not see Section 7 and refer to Marelli Bombas 5.6.2.2 Vibrations Checking Pumps are rigid support machines and fall under a classification within the international rotating machinery and the API standards where recommended maximum vibration levels are stated.
Alarm and trip values for installed pumps should be based on the actual measurements taken on the pump in the fully commissioned as new condition and maximum vibration level stated on the relevant standards.
Measuring vibrations at regular intervals will then show any deterioration in pump or system operating conditions. 5.6.2.3 Packed gland status
Figure 5.4 – Packing Seal
If packed gland is supplied it must be ensured that there must be some leakage from the gland. Initially Gland nuts should be finger-tight only. Leakage should take place soon after the stuffing box is pressurized. It is essential that the packing material is suitable to work with the pumped liquid. Care must be taken choosing the proper material according to the Pump Data Sheet.
To avoid excess temperature the gland must be adjusted evenly to give visible leakage and concentric alignment of the gland ring. If no leakage takes place the packing will begin to overheat. In case of overheating the pump must be stopped and allowed to cool before re-started. When the pump is re-started, check that leakage is taking place at the packed gland. The pump should be run for 30 minutes with steady leakage and the gland nuts tightened by 10 degrees at a time until leakage is reduced to an acceptable level, normally a minimum of 100 drops per minute is required. Bedding in of the packing may take another 30 minutes.
Care must be taken when adjusting the gland on an operating pump. Safety gloves are essential. Replace Shaft guards after the gland adjustment is complete.
Never run gland packing dry, even for a short time.

CENTRIFUGAL PUMP: DVMX
Page 14
5.6.2.4 Mechanical Seal Status
Never run a mechanical seal dry, even for a short time.
Start external flush or quench before the pump is run and allow to flow for a period after the pump has stopped. Refer to the Mechanical Seal Installation and Operating Manual for more detail. 5.6.2.5 Auxiliaries Status Ensure that all auxiliaries required are connected, filled and fully operating. Check for flow control devices, any fitted instruments, sight glass and valves that must be set according to their function. 5.6.2.6 Gasketed Joints Status Ensure that no leakage occur from gasketed joints. In case of leakage stop the pump units (in case of hot liquid wait till temperature is not dangerous) and fit the gaskets properly (see Section 6.9) 5.6.2.7 Bearing Temperature Checking
If the pumps are working in a potentially explosive atmosphere temperature or vibration monitoring at the bearings is recommended. The bearing temperature may to rise to 50 ºC (122 ºF) above ambient temperature, but should not exceed 80 ºC (176 ºF) of the absolute value. If Bearing temperatures are to be monitored it is essential that a benchmark temperature is recorded at the commissioning stage and after the bearing temperature has stabilized. After start up the temperature rise should be gradual, reaching a maximum after approximately 1.5 to 2 hours. This temperature rise should then remain constant. Set proper alarm and control devices taking into account the limits as previously stated. 5.7 Stop and Shut Down Procedure Pump sets are normally suitable for the number of equally spaced stop/starts per hour. Check actual capability of the motor and control/starting system on the relevant operating manuals. To Stop the pump proceed as follow:
• Close the outlet valve, but ensure that the pump runs in this condition for no more than a few seconds.
• Turn off the driver. • Switch off flushing, cooling, heating liquid
supplies at a time appropriate to the process.
• Drain the pump and any cooling and flushing arrangements in case of long shut-downs, especially when ambient temperatures are closer to liquid freezing point.
6 MAINTENANCE The functionality of the pump depends on the number of working hours, the service conditions, the materials used for construction and the care with which the pump is treated during its operative life. A proper check during operation helps to avoid complications and assures an immediate intervention in case of damages. 6.1 General Any work on the machine must be performed when it is disconnected an not operative. Follow the procedure for shutting down the machine, as in section 5.7 and take measures to prevent an uncontrolled start. At the end of the maintenance work all guards and safety devices must be correctly re-installed. Before restarting the machine perform follow the procedure listed on section 5.
Provide proper cleaning of maintenance area at the end of the maintenance work to avoid presence of lubricants on the floor or over the pump unit. 6.2 Maintenance Schedule
It is recommended that a maintenance schedule is adopted, in line with these User Instructions, to include as minimum the following: • ensure that the pump is working properly for
the selected duty conditions (see relevant data sheet),
• check if vibrations, noise level and bearings temperature are within the normal values,
• check bearing lubricant level and record the time after the last lubricant change,
• ensure that the area around the pump unit is safe and clean, free from obstruction to the normal monitoring and maintenance operations,
• check the correct pump-motor alignment and re-align if necessary,

CENTRIFUGAL PUMP: DVMX
Page 15
• check if any leakage from seal and gasket is present,
• check that any auxiliary systems installed is working properly.
If any problems are found follow these actions: • refer to section 7 for fault diagnosis, • ensure that the installation and the operation is
according to this manual, • contact Marelli Bombas if the problem persists. 6.2.1 Daily/Weekly Inspection • Ensure noise, vibration and bearing
temperatures are normal. • Check that there are no fluid or lubricant leaks
on static and dynamic seals and that any sealant systems are full and operating normally.
• Check any auxiliary supplies like heating/cooling are functioning correctly.
• Check the level and condition of oil lubricant and for greased bearings check running hours since last recharge.
• Refer to the manuals of any associated equipment for routine checks needed.
6.2.2 Six Monthly Inspection • Check foundation bolts status. • Check if bearing lubricant requires changing
(change the oil after 4000 operating hours, se section 6.3).
• Check the correct coupling alignment. • Refer to the manuals of any associated
equipment for periodic checks needed. 6.3 Lubrication Issue Lubricant and bearing temperature analysis can be useful in optimizing lubricant change intervals. In general the following is recommended. 6.3.1 Oil lubrication For pump supplied with an oil level regulator the level will be automatically maintained and there is no need to refill as long as oil is visible in the regulator. Refer to proper sections in this manual for methods of oil fill, oil grade recommendations and for the schedule and temperature limits. 6.4 Seal Maintenance 6.4.1 Mechanical seals Perform these routines: • Check the status after 4000 running hours
• Check the grain’s friction sides • Check the shaft sleeve’s state, it must be
perfectly smooth and grove less on the gasket bearing
After this check up, decide if the mechanical seal must be replaced. Refer to Mechanical Seal Operating Manual. 6.4.2 Gland packing The stuffing box split gland can be completely removed for re-packing or to enable the addition of extra rings of packing. The stuffing box is supplied with a lantern ring to enable a clean or pressurised flush to the center of the packing. Normally to lubricate and cool the packing is required a minimum leakage of 100 drops per minute to atmosphere. 6.5 Spare parts When ordering spares the following information should be quoted: 1) Pump serial number 2) Pump type 3) Part name – according to sectional drawing 4) Part number – according to sectional drawing 5) Number of parts required The pump size and serial number are shown on the pump nameplate. Spares must be stored in a clean dry area. 6.5.1 Recommended Spares Refer to sectional drawings for Ref. identification. For start-up operation: 1 - set of casing wear rings 1 - set of bearings (line and thrust) 1 - mechanical seal/packing 1 - shaft sleeves (if applicable) 1 - sets of gaskets, shims, O-rings and seals 1 - set of impeller wear rings (optional) For normal maintenance operation (2 years): 1 - rotor made of all rotating parts attached to the shaft, except the half coupling 1 - shaft (with key) 1 - impeller for each type 1 - set of casing wear rings 1 - set of bearings (line and thrust) 1 - mechanical seal/packing 1 - shaft sleeves (if applicable) 1 - sets of gaskets, shims, O-rings and seals 1 - set of impeller wear rings (optional)

CENTRIFUGAL PUMP: DVMX
Page 16
6.6 Fastener Torque Table
Tightening Couple Nm (lbft) Bolt 1st tightening 2nd tightening
M 12 (½ in.) M 16 (� in.) M 20 (¾ in.) M 22 (� in.) M 24 (1 in.)
M 27 (1� in.) M 30 (1¼ in.) M 33 (1� in.) M 39 (1½ in.)
16 (11.8) 39 (28.8) 95 (70)
149 (110) 191 (141) 280 (207) 380 (280) 485 (358) 625 (461)
25.5 (18.8) 59 (43.5)
136.5 (100.7) 186 (137) 235 (173) 350 (258) 475 (350) 600 (443) 775 (572)
Table 6.1 – Bolts Tightening Couple – Always tighten the pressure casing bolts according to table 6.1.
6.7 Disassembly
Disassembly must be carried out only by qualified and trained personnel. Refer to sectional drawings on section 8. Before start to disassemble anything close the isolating valves of the pump suction and discharge pipelines. 1. Unscrew the drain plug from the case and from
both the bearing supports in order to accomplish the case and bearing support drain. Take care of hot oil/liquids.
2. Drain properly the mechanical seals, cooling/flushing and auxiliary pipes.
3. Disconnect the auxiliary pipes if necessary. 4. Remove the coupling guard, the coupling
spacer the half coupling (pump side) and the key.
5. Loosing the nuts fixing the seal covers to free seals from spring pressure (if fitted with mechanical seal).
6. Loosing the gland cover of the packing seal (if applied).
7. Loosen all the fasten nuts on the upper half casing. Separate the two parts using pressure screws. Do not slide and wedge shaped tools between the two parts of the seal surface.
the central sleeve bearing is in two parts. It’s necessary to proceed as follow. 8. Lift up the upper half casing very carefully of 50
to 100 mm [2 to 4 inch]. 9. Remove the central bearing. 10. Remove completely the upper half casing
keeping it horizontal. At this point it’s possible to have the access to all hydraulic parts and to check them without any further dismantling.
11. Drain properly the two bearing housings. 12. Remove the pump/motor coupling spacer. 13. Unscrew the bearing housings from the bottom
half casing and remove the screws. 14. Remove the complete rotor, with the bearing
housings attached to the shaft, from the bottom half casing. Ensure to lift it horizontally and place it in horizontal position on “V” wood blocks.
15. Using a proper extraction tool remove the half coupling.
16. Proceed dismantling the bearing housings following the procedure showed in the related section.
6.7.1 Dismantling of Bearings on Drive Side (Roller Bearings). After unscrewing the nuts securing the bearing housing covers (internal and external): 1. Withdraw the external deflector, drive side held
by one screw. 2. Remove the external cover, drive side, with the
labyrinth ring. 3. Remove ring oiler. 4. Remove the Bearing nut and lock washer. 5. Remove the internal spacer. 6. Remove the bearing housing. 7. Remove the roller bearing. 8. Remove the internal cover with the labyrinth
ring. 9. Remove the internal deflector. 10. Remove the mechanical seal or the packing
seal. For a correct dismantling refer to any special instructions supplied with the mechanical seal.
6.7.2 Dismantling of Bearings on Thrust Bearing Side (Ball Bearing Housing). After unscrewing the nuts securing the bearing housing covers (internal and external): 1. Remove the external cover. 2. Remove ring oiler. 3. Remove the Bearings nut and lock washer. 4. Remove the internal spacer. 5. Remove the bearing housing. 6. Remove the roller bearings. 7. Remove the internal cover with the labyrinth
ring. 8. Remove the internal deflector. 9. Remove the mechanical seal or the packing
seal. For a correct dismantling refer to any special instructions supplied with the mechanical seal.
6.7.3 Dismantling of Sleeve Bearing Housing (Drive Side). After unscrewing the nuts securing the bearing housing covers (internal and external):

CENTRIFUGAL PUMP: DVMX
Page 17
1. Withdraw the external deflector, drive side held by one screw.
2. Remove the external cover, drive side, with the labyrinth ring.
3. Remove the bearing housing. 4. Remove the sleeve bearing (pay attention to
the ring oiler). 5. Remove the internal cover with the labyrinth
ring. 6. Remove the internal deflector. 7. Remove the mechanical seal or the packing
seal. For a correct dismantling refer to any special instructions supplied with the mechanical seal.
6.7.4 Dismantling of Sleeve/Ball Bearing Housing (Thrust Side). After unscrewing the nuts securing the bearing housing covers (internal and external): 1. Remove the external cover. 2. Remove ring oiler. 3. Remove the Bearings nut and lock washer. 4. Remove the internal spacer. 5. Remove the Thrust Bearing carrier. 6. Remove the bearing housing. 7. Remove the roller bearings. 8. Remove the ring oiler. 9. Remove the internal bearing housing. 10. Remove the sleeve bearing (pay attention to
the ring oiler). 8. Remove the internal cover with the labyrinth
ring. 11. Remove the internal deflector. 12. Remove the mechanical seal or the packing
seal. For a correct dismantling refer to any special instructions supplied with the mechanical seal.
6.7.5 Rotor Disassembly
Never apply heat to remove the impeller, trapped oil or lubricant may cause an explosion. 1. Remove both the stuffing boxes. 2. Remove both the balancing sleeves. 3. Remove the impeller locating screw (drive end
side). 4. Remove the spacer sleeve and the impeller
(drive side). 5. Remove the impeller complete of casing and
impeller wear rings. 6. Remove the impeller key. 7. Proceed with point 4,5,6 till the center sleeve is
reached. 8. Remove the center sleeve and bush and key. 9. Remove the impeller complete of casing and
impeller wear rings. 10. Remove the impeller key. 11. Remove the spacer sleeve.
12. Proceed with points 9,10,11 till the balancing sleeve is reached.
13. Remove the balancing sleeve and bushing. 14. Remove the key. 15. Remove the half locating rings. 6.8 Examination of parts
Used parts must be inspected before assembly to ensure the pump will subsequently run properly. In particular, fault diagnosis is essential to enhance pump and plant reliability. 1. Inspect Casing, seal housing and impeller for
excessive wear, pitting, corrosion, erosion or damage.
2. Replace as necessary. 3. Replace as necessary the case, impeller and
stuffing box wear rings. 4. Mechanical seal stationary and rotating faces
should be inspected for signs of wear or cracks and replaced as necessary.
5. Refer to manufacturers drawing for assembly of mechanical seal and details.
6. In case of Packing Seal replace the packing and inspect lantern ring for excessive wear, pitting, corrosion, erosion or damage.
7. Check the throat bush and replace if required. 8. Check the shaft between points or on two wee
supports. The maximum loss of roundness must not exceed 0.03 mm.
9. After dismantling, discard and replace gaskets and O-rings.
10. Labyrinth seals and bearing isolators (if applicable) must be inspected for damage but are normally non-wearing parts and can be re-used.
11. It is recommended that bearings are not re-used after any removal from the shaft.
6.9 Assembly All components should be cleaned thoroughly and all mounting surfaces should be checked for defects so that the original settings can be restored exactly without forcing. Don’t reuse bearings. The assembly is carried out in inverse sequence to the dismantling operation. 6.9.1 Rotor Assembly 1. Fit the half locating rings on the shaft (not drive
end side). 2. Place the balancing sleeve key. 3. Slide the balancing sleeve on the shaft and the
balancing bushing not drive end side). 4. Slide the spacer sleeve on the shaft. 5. Place the impeller key into the slot.

CENTRIFUGAL PUMP: DVMX
Page 18
6. Fit the impeller with impeller and casing wear rings fitted on it.
7. Proceed with points 4,5,6 till the center sleeve is required.
8. Place the center sleeve key. 9. Slide the center sleeve on the shaft and fit the
center bushing. 10. Place the impeller key. 11. Fit the impeller with impeller and casing wear
rings fitted on it. 12. Slide the spacer sleeve on the shaft. 13. Proceed with points 10,11,12 till the impeller
locating nut is required. 14. Place the impeller locating nut. 15. Slide both the balancing sleeves (drive and not
dive end). 6.9.2 Casing Assembly 1. Ensure that the central bushing is placed with
the proper pin. 2. Place the assembled rotor into the lower half
casing. 3. Check that all the casing wear rings are
installed. 4. Place a new casing gasket in the proper seat. 5. Assembly the upper half casing and tighten the
pump casing screws according the torque values listed into table.6.1 .
6. Proceed with the assembly of the stuffing boxes.
For Mechanical Seals • First check that contact faces of cup and fixed
bush are clean, free from dust; falling to take care such precautions will cause rapid deterioration of packing during operation.
• Smear faces with a film of oil. • Fit rotating parts of mechanical seal. • Do not tighten fixing nuts. For Packing Seals • Select the proper packing according to the
condition of service, Table.6.2 shows the most common packing type. Refer always to the packing manufacturer for details and proper selection.
Condition
Fluid Temperature Packing Type
water or non aggressive � 90°C (194 °F) Algodon + Graphite
medium aggressive > 90°C (194 °F) asbestos free
aggressive all PTFE + Graphite
Table 6.2 – Packing seal Selection –
• If the pressure inside the stuffing box is lower
than the atmospheric pressure it’s necessary to
flush the lantern ring with a barrier fluid with a pressure of 0.05 – 0.1 MPa (7.25-14.50 psi). If the pumping temperature is higher than 90°C (194°F) it is necessary to install a stuffing box forced cooling.
• Before placing another packing, carefully clean
the chamber and gland; at the same time check the shaft sleeve condition that must be absolutely smooth, if not change it in order to avoid an early damage of the packing.
• To accomplish the cutting use a two slide board of same dimension as packing, in which it will be placed then chamfer it with a sharp tool.
• Form the rings and slide them one after the
other without omitting to intercalate junctures and lantern ring (see figure 6.1).
Figure 6.1 – Packing Setting –
• Progressively tighten the gland as mentioned above for the first running hour.
6.9.3 Bearings Assembly on Drive Side (roller Bearings). 1. Place the internal deflector and slide it till it will
reach the shaft shoulder. 2. Slide the internal cover with the labyrinth ring
and the O-Ring in place. 3. Install the roller bearing using the proper
heater. 4. Slide the internal spacer on the shaft. 5. Secure the bearing in place by the proper lock
washer and nut. 6. Slide the bearing housing and secure it with the
internal cover tightening the proper screws. 7. Place the ring oiler. 8. Slide the external cover with the labyrinth ring
and the O-Ring in place and secure it with the bearing housing tightening the proper screws.

CENTRIFUGAL PUMP: DVMX
Page 19
9. Place the external deflector, drive side and secure it by one screw.
6.9.4 Bearings Assembly on Thrust Bearing Side (Ball Bearing Housing). 1. Place the internal deflector and slide it till it will
reach the shaft shoulder. 2. Slide the internal cover with the labyrinth ring
and the O-Ring in place. 3. Install the roller bearings using the proper
heater. 4. Slide the internal spacer on the shaft. 5. Secure the bearing in place by the proper lock
washer and nut. 6. Slide the bearing housing and secure it with the
internal cover tightening the proper screws. 7. Place the ring oiler. 8. Slide the external cover with the O-Ring in
place and secure it with the bearing housing tightening the proper screws.
6.9.5 Bearings Assembly on Drive Side (Sleeve Bearing). 1. Place the internal deflector and slide it till it will
reach the shaft shoulder. 2. Slide the internal cover with the labyrinth ring
and the O-Ring in place. 3. Install the sleeve bearing with the internal ring
oiler in place. 4. Slide the bearing housing and secure it with the
internal cover tightening the proper screws. 5. Place the external ring oiler. 6. Slide the external cover with the labyrinth ring
and the O-Ring in place and secure it with the bearing housing tightening the proper screws.
7. Place the external deflector, drive side and secure it by one screw.
6.9.6 Bearings Assembly on Thrust Bearing Side (Ball Bearing Housing). 1. Place the internal deflector and slide it till it will
reach the shaft shoulder. 2. Slide the internal cover with the labyrinth ring
and the O-Ring in place. 3. Install the sleeve bearing with the internal ring
oiler in place. 4. Slide the bearing housing and secure it with the
internal cover tightening the proper screws. 5. Place the external ring oiler. 6. Slide the external bearing housing and secure
it with the previous one using the proper screws.
7. Install the roller bearings using the proper heater.
8. Install the Thrust Bearing Carrier. 9. Slide the internal spacer on the shaft.
10. Secure the bearing in place by the proper lock washer and nut.
11. Slide the bearing housing and secure it with the internal cover tightening the proper screws.
12. Place the ring oiler. 13. Slide the external cover with the O-Ring in
place and secure it with the bearing housing tightening the proper screws.
6.9.7 Completion To complete the assembly proceed as follow: 1. Position coupling key and fit the coupling. 2. Fill the bearing housing with the oil. 3. Couple the pump to the motor. 4. Connect wiring.

CENTRIFUGAL PUMP: DVMX
Page 20
7 TROUBLESHOOTING
Motor Tripped Out X X X X X X
X X
General Erosion X X
Damaged Blades X X X X
Jammed Runner X X
X X X X X X
Worn Bushing X X X X X X
X X
Damaged Bearings
X X
X X X
X
X
X
X
X X
X
X
X
X
X X
X
X
X
Leaky Seals X X X X X X X X X X
X
Overheating Motors
X X X X X
X
Overheating Bearings
X
X
X X
X X X
X
X
X
Overheating Volute X
X
X X
Vibrations and Noise
X
X
X
X
X
X
X X
X
X X
X X
X
X X X X
X
X
X
X
X
X
X
X
X
X
Shocks X
X X X X
X
X
X
Poor Efficiency X
X
X X X
X X X X X
Wrong Discharge Pressure X
X X X X
X X X
High Discharge Pressure X
X
X
X X
Low Discharge Pressure X
X
X
X
X
X
X
X
X
X
X
X X
X
X
X X
X
Low output X X X
X
X
X
X
X
X
X
X
X
X
X
X
X
X
X
X
X
X
No output X
X
X
X
Sym
ptom
s P
ossi
ble
Cau
ses
Inad
equa
te E
quip
men
t Con
trol
Clo
sed
Suc
tion
or D
eliv
ery
Val
ve
Poo
r Suc
tion
Hea
d P
ump
Unp
rimed
To
o S
mal
l Suc
tion
Pip
e P
artly
Ope
n S
uctio
n V
alve
A
ir In
take
at S
uctio
n To
o H
igh
Suc
tion
Hea
d Lo
ss
Foot
Val
ve to
o H
eavy
B
ack
Slo
pes
(air
pock
ets)
N
o V
entin
g S
uctio
n Fi
lter
Clo
gged
In
tern
al L
eaks
due
to B
ack
Lash
Tu
rbul
ence
at S
uctio
n V
orte
x A
bnor
mal
Lea
ks in
the
Pla
nt
Too
Muc
h Fl
ow R
equi
red
Cav
itatio
n W
rong
Rot
atio
n D
irect
ion
Gas
Lad
en L
iqui
d Lo
w S
peed
D
eliv
ery
Val
ve P
artia
lly O
pen
Del
iver
y H
ead
Loss
(hi
gh)
Wro
ng P
ower
Sup
ply
Too
Hig
h R
otat
iona
l Spe
ed
Too
Hig
h S
uctio
n H
ead
Wro
ng B
earin
g A
ssem
bly
Res
onan
t Com
pone
nts
Cou
plin
g W
ear
Low
Out
put C
apac
ity
Hig
h O
utpu
t Cap
acity
R
unne
r U
nbal
ance
In
adeq
uate
Fou
ndat
ion
Pum
p S
et W
edge
d or
Anc
hore
d w
rong
P
ipin
g U
npro
perly
Sup
port
ed
Pum
p an
d M
otor
Mis
alig
n P
ipin
g S
trai
ning
the
Pum
p To
o H
igh
wei
ght o
r vis
cosi
ty
Poo
r Lub
ricat
ion
Poo
r Coo
ling
effic
ienc
y Lu
bric
ant Q
ualit
y C
onta
min
ated
Lub
rican
t To
o S
mal
l Mot
or S
ize
Abn
orm
ally
Low
Vol
tage
S
uspe
nded
Sol
id in
Pum
ped
Flui
d S
tuffi
ng B
raid
s In
adeq
uate
To
o C
lose
Inte
rnal
Cle
aran
ces
Pum
p Ja
mm
ed

CENTRIFUGAL PUMP: DVMX
Page 21
8 CROSS SECTIONAL AND DIMENSIONAL TABLES 8.1 DVMX with Ball Bearings
SP
AR
E
BE
AR
ING
HO
US
ING
O/D
RIV
E/S
IDE
SU
CTI
ON
FIR
ST
STA
GE
SLE
EV
E
EX
TE
RN
AL
CO
VE
R D
RIV
E S
IDE
3261
RE
F
2410
.1
INT
ER
NA
L TH
RO
WE
R D
RIV
E S
IDE
SH
AFT
X23
12
IMP
ELL
ER
WE
AR
RIN
G B
AC
K S
IDE
CE
NTR
AL
SE
AL
SLE
EV
E
IMP
ELL
ER
WE
AR
RIN
G E
YE
SID
E
INTE
RS
TAG
E S
LEE
VE
2420
2410
2320
X
IMP
ELL
ER
WE
AR
RIN
G F
IRS
T S
TG.
IMP
ELL
ER
DE
LIV
ER
Y S
IDE
IMP
ELL
ER
SU
CTI
ON
SID
E
IMP
ELL
ER
SU
CTI
ON
FIR
ST
STA
GE
2230
2311
2210
2220
X
2931
.2R
ETA
ININ
G R
IN C
AS
ING
RIN
G
RA
DIA
L B
ALL
BE
AR
ING
DR
IVE
SID
E
BE
AR
ING
HO
US
ING
DR
IVE
SID
E
AX
IAL
BA
LL B
EA
RIN
G O
/DR
IVE
/S.
3212
3211
3043
3041
INT
ER
NA
L TH
RO
WE
R O
/DR
IVE
/SID
E
IMP
ELL
ER
LO
CK
ING
NU
T
RE
TAIN
ING
RIN
BA
LAN
CIN
G B
US
HIN
G
RE
TA
ININ
G R
IN C
EN
TRA
L B
US
HIN
G29
31
2931
.1
2540
.2
2910
X15
12
CA
SIN
G W
EA
R R
ING
SID
E E
ND
CA
SIN
G W
EA
R R
ING
1ª
STG
CE
NTR
AL
BU
SH
ING
1610
2100
CA
SIN
G W
EA
R R
ING
1514
1513
XX
1213
UP
PE
R H
ALF
CA
SIN
G
LOW
ER
HA
LF C
AS
ING
1214
DE
NO
MIN
AT
ION
SP
AR
E
2491
OIL
RIN
G L
OC
AT
. CO
LLA
R O
/DR
/S
OIL
RIN
G L
OC
AT
. CO
LLA
R D
RIV
E S
.
EX
TE
RN
AL
THR
OW
ER
DR
IVE
SID
E
RE
TAIN
ING
RIN
G, S
PLI
T25
40
2540
.1
2531
2491
.1
FIN
AL
STA
GE
S S
LEE
VE
NE
CH
BU
SH
SLE
EE
VE
O/D
RIV
E/S
DE
NO
MIN
AT
ION
2430
2440
RE
F
O-R
ING
LOC
KIN
G N
UT
KE
Y46
10.3
O-R
ING
X67
42C
OU
PLI
NG
KE
Y
TA
CH
OM
ET
ER
CO
NN
EC
TIO
N P
LUG
BE
AR
ING
HO
US
. LO
CK
ING
SC
RE
W
BE
AR
ING
NU
T LO
CK
ING
WA
SH
ER
CO
VE
R B
EA
RIN
G L
OC
KIN
G S
CR
EW
RIN
G O
ILE
RD
RA
IN P
LUG
4330
.1
LAB
YR
INTH
RIN
G IN
T. O
/DR
IVE
/S.
LAB
YR
INTH
RIN
G IN
T. D
RIV
E S
IDE
O-R
ING
4610
.1
4610
.2XX
O-R
ING
4330
.2
4610
NE
CK
BU
SH
ST
UFF
ING
BO
X, S
UC
TIO
N S
IDE
ST
UFF
ING
BO
X, D
ELI
VE
RY
SID
E
LAB
YR
INTH
RIN
G E
XT.
DR
IVE
SID
E
4132
4330
4111
4112
6576
.1
X XX
6731
.1
6731
6710
6710
.1IM
PE
LLE
R K
EY
BA
LAN
CIN
G B
US
H K
EY
CE
NTR
AL
KE
Y
6573
.1
6576
6542
6515
.2
STU
D F
OR
STU
FFIN
G B
OX
OIL
LE
VE
L P
LUG
3266
OIL
FIL
LER
PLU
G
CO
NS
TAN
T LE
VE
L O
IL
EX
TER
NA
L C
OV
ER
OP
. DR
IVE
SID
E
RIN
G O
ILE
R38
71.1
3861
X38
54
3855
INTE
RN
AL
CO
VE
R D
RIV
E S
IDE
INTE
RN
AL
CO
VE
R O
P. D
RIV
E S
IDE
DE
NO
MIN
AT
ION
3262
3263
RE
F
4610
.6
X
6515
.1
6515
6231
6230
BA
LAN
CIN
G B
US
HIN
G
BA
LAN
CIN
G S
LEE
VE
O-R
ING
RE
F
46
10.4
4610
.5
SP
AR
E
O-R
ING
O-R
ING
DE
NO
MIN
AT
ION
XXX
SP
AR
E

CENTRIFUGAL PUMP: DVMX
Page 22
8.2 DVMX with Sleeve Bearings
INTE
RN
AL
CO
VE
R O
P. D
RIV
E S
IDE
INTE
RN
AL
CO
VE
R D
RIV
E S
IDE
EX
TER
NA
L C
OV
ER
OP
. DR
IVE
SID
E
LAB
YR
INTH
RIN
G E
XT.
DR
IVE
SID
E
STU
FFI
NG
BO
X, D
ELI
VE
RY
SID
E
STU
FFI
NG
BO
X, S
UC
TIO
N S
IDE
LAB
YR
INTH
RIN
G IN
T. D
RIV
E S
IDE
LAB
YR
INTH
RIN
G IN
T. O
/DR
IVE
/S.
IMP
ELL
ER
LO
CK
ING
NU
T
IMP
ELL
ER
DE
LIV
ER
Y S
IDE
DE
NO
MIN
ATI
ON
NE
CH
BU
SH
SLE
EE
VE
O/D
RIV
E/S
FIN
AL
STA
GE
S S
LEE
VE
RE
TAIN
ING
RIN
G, S
PLI
T
EX
TER
NA
L TH
RO
WE
R D
RIV
E S
IDE
OIL
RIN
G L
OC
AT.
CO
LLA
R
INTE
RN
AL
THR
OW
ER
O/D
RIV
E/S
IDE
INTE
RN
AL
THR
OW
ER
DR
IVE
SID
E
IMP
ELL
ER
SU
CTI
ON
FIR
ST
STA
GE
DE
NO
MIN
ATI
ON
LOW
ER
HA
LF C
AS
ING
UP
PE
R H
ALF
CA
SIN
G
CA
SIN
G W
EA
R R
ING
CE
NTR
AL
BU
SH
ING
CA
SIN
G W
EA
R R
ING
1ª
STG
CA
SIN
G W
EA
R R
ING
SID
E E
ND
1513
RE
F
1213
1214
1512
SH
AFT
1514
1610
2100
2220
2210
X
SP
AR
E
X X
RE
F
2440
2430
2491
2531
2540
.1
2540
2910
2540
.2
SP
AR
ED
EN
OM
INA
TIO
N
RIN
G O
ILE
R
CO
NS
TAN
T L
EV
EL
OIL
OIL
FIL
LER
PLU
G
RIN
G O
ILE
R
3854
RE
F
3262
3263
3266
3861
.1
3855
3861
4112
4111
RE
TAIN
ING
RIN
CE
NTR
AL
BU
SH
ING
RE
TAIN
ING
RIN
BA
LAN
CIN
G B
US
HIN
G
AX
IAL
BA
LL B
EA
RIN
G O
/DR
IVE
/S.
RE
TAIN
ING
RIN
CA
SIN
G R
ING
EX
TER
NA
L C
OV
ER
DR
IVE
SID
E
BE
AR
ING
HO
US
ING
O/D
RIV
E/S
IDE
IMP
ELL
ER
WE
AR
RIN
G F
IRS
T S
TG.
IMP
ELL
ER
WE
AR
RIN
G B
AC
K S
IDE
IMP
ELL
ER
SU
CT
ION
SID
E
INTE
RS
TAG
E S
LEE
VE
IMP
ELL
ER
WE
AR
RIN
G E
YE
SID
E
CE
NTR
AL
SE
AL
SLE
EV
E
SU
CTI
ON
FIR
ST
STA
GE
SLE
EV
E
2312
2311
2230
2320
2410
2420
2410
.1
XX X
2931
.1
2931
3043
2931
.2
3212
3261
NE
CK
BU
SH
O-R
ING
O-R
ING
O-R
ING
O-R
ING
4330
.1
4330
4132
4610
4330
.2
4610
.1
4610
.2
4610
.3
BE
AR
ING
NU
T LO
CK
ING
WA
SH
ER
RE
F
SP
AR
E62
30
X
6231
6515
6515
.1
6515
.2
6542
DE
NO
MIN
AT
ION
BA
LAN
CIN
G B
US
HIN
G
TAC
HO
ME
TER
CO
NN
EC
TIO
N P
LUG
BA
LAN
CIN
G S
LEE
VE
OIL
LE
VE
L P
LUG
DR
AIN
PLU
G
SP
AR
E
X
6576
.1
6576
6573
.1
6710
.1
6710
XX X
6731
6731
.1
6742
STU
D F
OR
STU
FFI
NG
BO
X
BA
LAN
CIN
G B
US
H K
EY
CO
VE
R B
EA
RIN
G L
OC
KIN
G S
CR
EW
BE
AR
ING
HO
US
. LO
CK
ING
SC
RE
W
IMP
ELL
ER
KE
Y
CE
NTR
AL
KE
Y
CO
UP
LIN
G K
EY
LOC
KIN
G N
UT
KE
Y32
44
3244
.1B
EA
RIN
G H
OU
SIN
G O
/DR
IVE
/SID
E
BE
AR
ING
HO
US
ING
DR
IVE
/SID
E
2461
BE
AR
ING
SP
AC
ER
SLE
EV
E
6515
.3C
OO
LIN
G W
AT
ER
CO
NN
EC
TIO
N P
LUG
X
3243
BE
AR
ING
CA
RR
IER
3300
SLE
EV
E B
EA
RIN
G37
12B
EA
RIN
G N
UT

CENTRIFUGAL PUMP: DVMX
Page 23
8.3 DVMX Dimensional Table
OUTLINE DIMENSIONS FASTENING CYLINDRICAL END CONICAL END SIZE
PB
-BB
PL-
BB
PL-
BL
B E F G H I J K L M O Q R S T U V Z h i j k l h i j k l m
3x4x9 x 536 280 280 290 290 140 155 165 354 254 394 330 50 32 100 75 25 23 55 59 16 117 70 3x4x9 x 536 280 280 290 290 140 155 165 354 402 394 330 50 32 100 75 25 23 55 54.4 14 102 65 40 3x4x9 3x6x9 x 543 280 280 320 280 140 155 165 347 255 394 330 50 32 100 75 25 23 65 69 18 136 100 3x6x9 x 543 280 280 320 280 140 155 165 347 402 394 330 50 32 100 75 25 23 65 63.75 16 125 82 50 3x6x9 3x6x9 ED-HD x 618 360 360 343 280 178 155 165 321 255 394 330 50 32 100 75 25 23 65 69 18 136 100 3x6x9 ED-HD x 618 360 360 343 280 178 155 165 321 402 394 330 50 32 100 75 25 23 65 63.75 16 125 82 50 3x6x9 ED-HD 4x6x10 x 709 400 400 360 360 190 190 215 398 271 445 380 64 32.5 128 100 32 30 75 79.5 20 140 120 4x6x10 x 709 400 400 360 360 190 190 215 398 431 445 380 64 32.5 128 100 32 30 75 73.75 18 125 82 60 4x6x10 x 709 400 400 360 360 190 190 215 398 521 445 380 64 32.5 128 100 32 30 75 73.75 18 125 82 60 6x8x11 x 764 475 475 510 460 267 216 240 433 295 540 450 65 45 130 130 40 36 90 96.5 24 150 130 6x8x11 x 764 475 475 510 460 267 216 240 433 455 540 450 65 45 130 130 40 36 90 88.5 22 147 100 70 6x8x11 x 764 475 475 510 460 267 216 240 433 547 540 450 65 45 130 130 40 36 90 88.5 22 147 100 70 8x10x14 ½ x 970 540 540 570 570 302 250 240 560 370 750 640 90 55 180 150 50 47 105 111 28 200 160 8x10x14 ½ x 995 540 540 570 570 302 250 240 585 565 750 640 90 55 180 150 50 47 110 106.75 25 190 130 85 8x10x14 ½ x 995 540 540 570 570 302 250 240 585 620 750 640 90 55 180 150 50 47 110 106.75 25 190 130 85 10x12x14 x 965 635 630 650 650 290 290 145 570 535 850 720 60 65 200 185 85 62 110 106.75 25 190 130 85 10x12x14 x 965 635 630 650 650 290 290 145 570 570 850 720 60 65 200 185 85 62 110 106.75 25 190 130 85
Table 8.4 – Dimensional Table –
3x4x9 3x6x9 3x6x9 ED-HD 4x6x10 Nr. of Stages A C D N P A C D N P A C D N P A C D N P
4 1460 220 657 853 753 1507 266 690 985 825 1601 285 674 1025 925 1901 318 874 1232 1104 5 1556 323 657 940 848 1602 361 690 1000 888 1656 380 674 1120 1020 2034 451 874 1365 1237 6 1651 323 792 1043 949 1697 361 703 1085 995 1781 380 793 1215 1115 2167 451 1007 1498 1370 7 1748 410 792 1138 1038 1792 456 703 1100 1099 1886 475 793 1310 1210 2300 584 1007 1630 1503 8 1841 410 887 1233 1133 1887 456 888 1285 1185 1901 475 880 1485 1385 2433 584 1140 1764 1638 9 1836 513 887 1328 1228 1952 551 888 1300 1288 2078 570 5880 1500 1400 2500 717 1140 1857 1700 10 2031 513 982 1423 1323 2077 551 983 1475 1375 2071 570 883 1585 1495 2690 717 1273 2030 1802 11 2126 608 982 1518 1410 2172 848 983 1578 1470 2268 665 883 1690 1590 12 2221 608 1077 1613 1513 2287 848 1070 1665 1545 2361 669 1070 1765 1685 13 2316 703 1077 1708 1600 14 2412 703 1172 1803 1703
PL.BB. (*) 148 148 147 147 147 147 160 PL.BL. (*) 250
6x8x11 8x10x14 1/2 10x12x14 Nr. of Stages A C D N P A C D N P A C D N P
4 2074 367 943 1348 1216 2560 405 1185 1630 1450 2973 610 1390 1868 1743 5 2228 519 943 1490 1368 2740 505 1185 1810 1630 3173 610 1588 2068 1340 6 2378 519 1085 1650 1520 2820 585 1365 1880 1810 3373 810 1790 2260 2148 7 2530 671 1085 1802 1672 3180 765 1365 2170 1990 8 2582 671 1247 1954 1824 3280 765 1545 2350 2170 9 2834 823 1247 2108 1976 10 2986 823 1390 2250 2120 11 12 13 14
PL.BB. (*) 160 220 195 PL.BL. (*) 252 275 250 35 35
(*) Length to add to the dimension A-D-M in case of sleeve bearings and thrust bearings PB.BB. : Line Ball Bearing and Thrust Ball Bearing PL.BB. : Line Sleeve Bearing and Thrust Ball Bearing PL.BL. : Line Sleeve Bearing and Thrust Pad Bearing

CENTRIFUGAL PUMP: DVMX
Page 24
9 CERTIFICATION Certificates, determined from the contract requirements will be provided with this manual. Examples are certificates for CE marking and ATEX marking.
10 ATTACHMENTS Supplementary instruction determined from the contract requirements for inclusion into User Instructions such as for a driver, instrumentation, controller, sub-driver, seals, sealing system, mounting component etc are part of job technical book.
11 NOTES AND INFORMATION If any changes, agreed with Bombas Ercole Marelli, are made to the product after its supply, a record of the details should be maintained with these User Instructions.

CENTRIFUGAL PUMP: DVMX
Page 25
Marelli Bombas S.R.L. Headquarter and Manufacturing Plant Ctra. Madrid-Toledo, km 30.8 Apartado, 32 45200 – ILLESCAS (TOLEDO) ESPAÑA - SPAIN Telephone: +34 925 51 12 00 Fax: +34 925 53 23 55 e-mail: [email protected] web site: http://www.marellipumps.com
LEVANTE Pintor Cabrera, 22 bajo 1a 03003 – ALICANTE SPAIN Telephone: +34 96 522 86 48 Fax: +34 96 522 86 49 e-mail: [email protected] ANDALUCÍA Monte Tabor, 6 41007 – SEVILLA SPAIN Telephone: +34 95 457 43 61 Fax: +34 95 457 76 06 e-mail: [email protected]
CATALUÑA Gran Via de les Corts Catalanes, 736 08013 – BARCELONA SPAIN Telephone: +34 93 232 72 61 Fax: +34 93 265 86 94 e-mail: [email protected] ARAGÓN New Direction Unceta, 85 50010 – ZARAGOZA SPAIN Telephone: +34 976 46 01 82 Fax: +34 976 46 01 81 e-mail: [email protected]
Local Dealer: