cbs manual eng 2010
TRANSCRIPT

User Guide
Autodesk® March 2009

© 2009 Autodesk, Inc. All Rights Reserved. Except as otherwise permitted by Autodesk, Inc., this publication, or parts thereof, may not be reproduced in any form, by any method, for any purpose. Certain materials included in this publication are reprinted with the permission of the copyright holder. Disclaimer THIS PUBLICATION AND THE INFORMATION CONTAINED HEREIN IS MADE AVAILABLE BY AUTODESK, INC. “AS IS.” AUTODESK, INC. DISCLAIMS ALL WARRANTIES, EITHER EXPRESS OR IMPLIED, INCLUDING BUT NOT LIMITED TO ANY IMPLIED WARRANTIES OF MERCHANTABILITY OR FITNESS FOR A PARTICULAR PURPOSE REGARDING THESE MATERIALS. Trademarks The following are registered trademarks of Autodesk, Inc., in the USA and/or other countries: Autodesk Robot Structural Analysis, Autodesk Concrete Building Structures, Spreadsheet Calculator, ATC, AutoCAD, Autodesk, Autodesk Inventor, Autodesk (logo), Buzzsaw, Design Web Format, DWF, ViewCube, SteeringWheels, and Autodesk Revit. All other brand names, product names or trademarks belong to their respective holders. Third Party Software Program Credits ACIS Copyright© 1989-2001 Spatial Corp. Portions Copyright© 2002 Autodesk, Inc. Copyright© 1997 Microsoft Corporation. All rights reserved. International CorrectSpell™ Spelling Correction System© 1995 by Lernout & Hauspie Speech Products, N.V. All rights reserved. InstallShield™ 3.0. Copyright© 1997 InstallShield Software Corporation. All rights reserved. PANTONE® and other Pantone, Inc. trademarks are the property of Pantone, Inc.© Pantone, Inc., 2002. Portions Copyright© 1991-1996 Arthur D. Applegate. All rights reserved. Portions relating to JPEG © Copyright 1991-1998 Thomas G. Lane. All rights reserved. Portions of this software are based on the work of the Independent JPEG Group. Portions relating to TIFF © Copyright 1997-1998 Sam Leffler. © Copyright 1991-1997 Silicon Graphics, Inc. All rights reserved. Government Use Use, duplication, or disclosure by the U.S. Government is subject to restrictions as set forth in FAR 12.212 (Commercial Computer Software-Restricte Rights) and DFAR 227.7202 (Rights in d Technical Data and Computer Software), as applicable.

Autodesk Concrete Building Structures 2010 - User Guide page: 1
TABLE OF CONTENTS
1. PROGRAM DESCRIPTION ........................................................................................... 4 1.1. GENERAL PROGRAM DESCRIPTION ............................................................................... 4 1.2. LIST OF SHORTCUTS ..................................................................................................... 4 1.3. STAGES OF WORK IN THE AUTODESK® CBS PROGRAM ............................................... 5
2. CONFIGURATION .......................................................................................................... 6 2.1. PREFERENCES ............................................................................................................... 6 2.2. LANGUAGE ................................................................................................................... 6 2.3. UNITS ........................................................................................................................... 8 2.4. COLORS ........................................................................................................................ 9 2.5. CONFIGURATION ........................................................................................................ 10 2.6. PROGRAM PERSONALIZATION .................................................................................... 11
3. STRUCTURE READING / SAVING ............................................................................ 12 3.1. READING AND SAVING OPTIONS ................................................................................ 12 3.2. SAVE OPTIONS ........................................................................................................... 13
4. EDIT OPTIONS / VISUALIZATION ........................................................................... 14 4.1. GRIDS/AXES ............................................................................................................... 14 4.2. HOW TO DEFINE A GRID AND AXES ............................................................................ 16 4.3. EDIT OPTIONS ............................................................................................................ 18 4.4. EDIT OPERATIONS (TRANSLATE, ROTATE, MIRROR, FIT, TRIM, EXTEND) .................. 21 4.5. GRAPHICAL MODIFICATION OF STRUCTURE ELEMENTS ............................................. 26 4.6. HOW TO FIT WALLS TO THE ROOF ............................................................................. 27 4.7. SELECTION CRITERIA ................................................................................................. 28 4.8. HOW TO DEFINE A SELECTION CRITERION ................................................................. 29 4.9. MODEL PRESENTATION ON SCREEN (VIEWS, ETC.) .................................................... 30 4.10. 3D VIEW ................................................................................................................ 32 4.11. COORDINATE SYSTEM ............................................................................................ 33 4.12. LOCAL COORDINATE SYSTEMS OF OBJECTS DEFINED IN AUTODESK® CBS .......... 33 4.13. DISPLAY ................................................................................................................. 36 4.14. 3D PERSPECTIVE DISPLAY ..................................................................................... 40
4.14.1. Perspective View Support .................................................................................. 40 4.14.2. Camera Location ............................................................................................... 40 4.14.3. Watching a Presentation .................................................................................... 41 4.14.4. Recording a Presentation .................................................................................. 41
5. DEFINITION OF A STRUCTURE MODEL ............................................................... 42 5.1. STORY ........................................................................................................................ 42 5.2. HOW TO COPY A STORY ............................................................................................. 42 5.3. STORY PARAMETERS .................................................................................................. 42 5.4. HOW TO MODIFY STORY PARAMETERS ...................................................................... 44 5.5. EDIT OPTIONS (STORY) .............................................................................................. 44 5.6. DIMENSION LINES ...................................................................................................... 45 5.7. HOW TO DEFINE DIMENSION LINES ............................................................................ 46 5.8. OBJECTS AVAILABLE IN THE PROGRAM ..................................................................... 47 5.9. HOW TO DEFINE A BEAM (HORIZONTAL AND INCLINED) ........................................... 50 5.10. HOW TO DEFINE A COLUMN ................................................................................... 50 5.11. HOW TO DEFINE A WALL ....................................................................................... 50 5.12. HOW TO DEFINE A SLAB ......................................................................................... 51 5.13. HOW TO DEFINE A SPREAD FOOTING ..................................................................... 51 5.14. DESCRIPTION OF THE LINTEL DEFINITION AND ASSUMPTIONS ADOPTED IN THE LINTEL CALCULATIONS .......................................................................................................... 52 5.15. ENTERING OF DATA FROM THE KEYBOARD ............................................................ 53 5.16. OBJECT PROPERTIES ............................................................................................... 54
© 2009 Autodesk, Inc. All rights reserved

page: 2 Autodesk Concrete Building Structures 2010 - User Guide
5.17. MAIN DIRECTION DEFINED FOR SLABS .................................................................. 58 5.18. GRAPHICAL OBJECT PROPERTIES ........................................................................... 59 5.19. SUMMARY TABLE ................................................................................................... 60 5.20. SUMMARY TABLE - OBJECTS .................................................................................. 62 5.21. SUMMARY TABLE - LOADS ..................................................................................... 63 5.22. SUMMARY TABLE - REACTIONS ............................................................................. 64 5.23. DEFAULT VALUES .................................................................................................. 64 5.24. DEFAULT OPTIONS ................................................................................................. 66 5.25. HOW DEFINITION OF THE COEFFICIENTS OF TRANSFER OF BENDING MOMENTS AFFECTS RESULTS AND SPREAD FOOTING AND GROUND BEAM DESIGN ............................... 69 5.26. HOW TO DEFINE DEFAULT VALUES (SECTIONS, MATERIALS, NAMES) .................. 70 5.27. FIX SECTION MODIFICATION .................................................................................. 71 5.28. SECTION DATABASE ............................................................................................... 72 5.29. WINDOW PARAMETERS .......................................................................................... 74 5.30. DOOR PARAMETERS ............................................................................................... 74 5.31. HOW TO ADD A NEW SECTION TO THE SECTION DATABASE .................................. 75 5.32. MATERIAL DATABASE ............................................................................................ 76 5.33. HOW TO ADD A NEW MATERIAL TO THE MATERIAL DATABASE ............................ 78 5.34. 3D OBJECT DATABASE ........................................................................................... 79 5.35. 2D OBJECT DATABASE ........................................................................................... 79 5.36. REPORTS ................................................................................................................ 80 5.37. STRUCTURE MODEL CORRECTION .......................................................................... 84 5.38. HOW TO VERIFY A STRUCTURE .............................................................................. 85
6. DEFINITION OF LOADS - DEFAULT LOADS ......................................................... 87 6.1. REFERENCE LEVEL ..................................................................................................... 87 6.2. DEFAULT LOADS ........................................................................................................ 87 6.3. DEFAULT LOADS - WIND ............................................................................................ 88
6.3.1. Default Loads - Wind ......................................................................................... 88 6.3.2. Default Loads - Wind (the French Code NV 65) ............................................... 89 6.3.3. Default Loads - Wind (British Code BS) ........................................................... 92 6.3.4. Default Loads - Wind (Polish Code PN) ........................................................... 93 6.3.5. Default Loads - Wind (American Code ASCE-7-02) ......................................... 95 6.3.6. Application of Wind Loads (Story '0' and the Last Story) .................................. 96
6.4. DEFAULT LOADS - SEISMIC ANALYSIS ....................................................................... 97 6.4.1. Default Loads - Seismic Analysis....................................................................... 97 6.4.2. Default Loads - Seismic Analysis (Simplified Method) ...................................... 98 6.4.3. Simplified Calculation of Structure Displacements due to Horizontal Forces .. 98 6.4.4. Default Loads - Simplified Method (PS92) ...................................................... 101 6.4.5. Default Loads - Simplified Method (RPA99_03) ............................................. 103 6.4.6. Default Loads - Simplified Method (RPS2000) ............................................... 104 6.4.7. Default Loads – Simplified Method (UBC 97) ................................................. 105 6.4.8. Default Loads - Simplified Method (IBC 2000/2006) ...................................... 106 6.4.9. Default Loads - Simplified Method (Italian Seismic Code) ............................. 108 6.4.10. Default Loads - Simplified Method (P100-1/2006) .......................................... 109 6.4.11. Default Loads - Seismic Analysis (Advanced Method) .................................... 110 6.4.12. Default Loads - Seismic Analysis (Modal Analysis) ........................................ 111 6.4.13. Default Loads - Seismic Analysis (PS92 or PS92 2008) .................................. 112 6.4.14. Default Loads - Seismic Analysis (RPA99_03) ................................................ 113 6.4.15. Default Loads - Seismic Analysis (RPS2000) .................................................. 113 6.4.16. Default loads - Seismic Analysis (UBC 97) ..................................................... 114 6.4.17. Default Loads - Seismic Analysis (IBC 2000) .................................................. 115 6.4.18. Default Loads - Seismic Analysis (IBC 2006) .................................................. 115 6.4.19. Default Loads - Seismic Analysis (P100-92) ................................................... 116 6.4.20. Default Loads - Seismic Analysis (P100-1/2006) ............................................ 117 6.4.21. Default Loads – Italian Seismic Code ............................................................. 117 6.4.22. Default Loads - Seismic Analysis (Spectral Analysis) ..................................... 118 6.4.23. Default Loads - Spectral Analysis (Simplified Method) ................................... 120 6.4.24. Seismic / Spectral Analysis Considering the Torsion Effect ............................ 121 6.4.25. Verification of a Necessary Wall Area ............................................................ 126
© 2009 Autodesk, Inc. All rights reserved

Autodesk Concrete Building Structures 2010 - User Guide page: 3
7. DEFINITION OF LOADS ............................................................................................ 127 7.1. RULES OF LOAD DEFINITION IN THE AUTODESK® CBS PROGRAM .......................... 127 7.2. TYPES OF LOADS IN THE AUTODESK® CBS PROGRAM ............................................ 127 7.3. DEFINITION OF LOADS .............................................................................................. 128 7.4. MODIFICATION OF LOADS ........................................................................................ 129 7.5. HOW TO APPLY LOAD TO A STRUCTURE .................................................................. 130 7.6. ADD LOAD PATTERN ................................................................................................ 131 7.7. LOAD PATTERNS ...................................................................................................... 131 7.8. AUTOMATIC GENERATION OF LOAD PATTERNS ....................................................... 132 7.9. HOW TO DEFINE AUTOMATICALLY LOAD PATTERNS ............................................... 132 7.10. LOAD CONVERSION DURING GENERATION OF A MODEL IN ROBOT ...................... 133 7.11. LOAD COMBINATIONS .......................................................................................... 134
8. STRUCTURE CALCULATIONS ............................................................................... 137 8.1. STRUCTURE CALCULATION ...................................................................................... 137 8.2. CALCULATION OPTIONS ........................................................................................... 137 8.3. OBJECT PROPERTIES - RESULTS AND CALCULATION OPTIONS ................................. 137 8.4. PRESENTATION OF RESULTS IN A 2D AND 3D VIEW ................................................. 142 8.5. DISPLAY OF INTERNAL FORCE DIAGRAMS FOR OBJECTS AVAILABLE IN PROGRAM . 143 8.6. USER-DEFINED MESH ............................................................................................... 145 8.7. CALCULATION - CALCULATION OPTIONS ................................................................. 145 8.8. CALCULATION - CALCULATION OPTIONS (TRAPEZOIDAL / TRIANGULAR METHOD) 146 8.9. CALCULATION - CALCULATION OPTIONS (SIMPLIFIED METHOD) ............................. 149 8.10. LOAD DISTRIBUTION IN WALLS TAKING ACCOUNT OF A DISTRIBUTION ANGLE .. 150 8.11. OPENINGS ............................................................................................................. 152 8.12. CALCULATION - CALCULATION OPTIONS (EXACT METHOD) ............................... 152 8.13. CODE PARAMETERS - REQUIRED REINFORCEMENT OF SLABS AND WALLS .......... 154 8.14. ASSUMPTIONS ADOPTED IN THE STRUCTURE CALCULATION AND THE ALGORITHM FOR CALCULATION OF MOMENTS......................................................................................... 155 8.15. REDUCED FORCES ................................................................................................ 157
9. DESIGN OF STRUCTURE ELEMENTS ................................................................... 158 9.1. DESIGN OF RC ELEMENTS OF A STRUCTURE ............................................................ 158 9.2. RC ELEMENT DESIGN - CALCULATION OPTIONS ...................................................... 158 9.3. RC ELEMENT DESIGN - GENERAL PARAMETERS ...................................................... 159 9.4. RC ELEMENT DESIGN - ESTIMATED CALCULATIONS................................................ 162 9.5. RC ELEMENT DESIGN - PROVIDED CALCULATIONS ................................................. 166 9.6. SOIL - CALCULATION OPTIONS ................................................................................. 168 9.7. ANALYSIS OF THE LOAD CAPACITY OF A FOUNDATION ............................................ 168
10. LINK WITH OTHER PROGRAMS ....................................................................... 171 10.1. LINK WITH AUTODESK ROBOT STRUCTURAL ANALYSIS ...................................... 171 10.2. LINK WITH REVIT STRUCTURE ............................................................................. 172 10.3. LINK WITH OTHER PROGRAMS ............................................................................. 172
11. PRINTOUTS .............................................................................................................. 174 11.1. PRINTOUT COMPOSITION ...................................................................................... 174 11.2. PRINT PREVIEW .................................................................................................... 175 11.3. PRINT PREVIEW - GO TO ...................................................................................... 176 11.4. ADD TO NOTE ....................................................................................................... 176 11.5. ADD TO NOTE - RESULTS ..................................................................................... 177 11.6. PRINT OPTIONS ..................................................................................................... 177
12. PROBLEMS ............................................................................................................... 179 12.1. LACK OF 3D VIEW WITH RENDERING ................................................................... 179
© 2009 Autodesk, Inc. All rights reserved

page: 4 Autodesk Concrete Building Structures 2010 - User Guide
1. PROGRAM DESCRIPTION 1.1. General Program Description
The Autodesk® Concrete Building Structures (Autodesk CBS) program is intended for initial generation of a structure model and estimation of structure costs. The current version of the program (due to sections available in the program) is applied mainly in the case of RC and timber structures. The program may be used as: • tool for preparing tender bids (quick modeling, cost assessment) • easy modeler generating automatically a calculation model in the Autodesk
Robot Structural Analysis program • program for approximated calculation of a structure and design of the structure’s
RC elements • program enabling import of ready-to-use models from architectural programs.
Basic functions of Autodesk® Concrete Building Structures include: a. structure definition with automatic generation of a calculation model in the Autodesk Robot Structural Analysis program b. architectural support - export / import - DXF 2D (with the possibility to restore a structure on the basis of layers), export / import - IFC 3D, architectural presentation of the loaded structure c. definition of structure loads d. approximated calculation of a structure and design of the structure’s RC elements.
1.2. List of Shortcuts In order to: Press: select all Ctrl + A copy a text or a drawing Ctrl + C open a new project Ctrl + N open an existing project Ctrl + O start printing Ctrl + P save the project Ctrl + S cut a text or a drawing Ctrl + X repeat the operation Ctrl + Y paste a text or a drawing Ctrl + V paste vertically Ctrl + W undo the operation Ctrl + Z delete selected elements Num Del display a structure axonometric view (3D XYZ) Ctrl + Alt + 0 project a structure on the XZ plane Ctrl + Alt + 1 project a structure on the XY plane Ctrl + Alt + 2 project a structure on the YZ plane Ctrl + Alt + 3 zoom in the structure view on the screen Ctrl + Alt + A display the initial view of a structure Ctrl + D zoom in the structure view using the window Ctrl + Q rotate the structure (selection mode) in the 3D view Shift + RMC (right mouse button
click) Alt (right) + LMC (left mouse button click)
copy contents of the current window to the clipboard Ctrl + Alt + Q open the Properties dialog box Alt + Enter zoom out the structure view on the screen Ctrl + Alt + R display the structure architectural view F10 display the structure structural view F9
© 2009 Autodesk, Inc. All rights reserved

Autodesk Concrete Building Structures 2010 - User Guide page: 5
display the structure computational view F8 display a structure model with rendering Ctrl + F10 display the structure skeleton model Ctrl + F9 open the Display dialog box Space open the Reports dialog box F7 select an offset while defining structure objects TAB start export of a structure to the Autodesk Robot Structural Analysis program
Ctrl + F7
1.3. Stages of Work in the Autodesk® CBS program
Autodesk® CBS is a program which allows defining a structure model and performing structure calculations (with the use of simplified methods or the advanced method) along with the possibility to design RC structure elements. Creation of the structure model, definition of loads and structure calculations / design may be split into the following stages: 1. model definition / model loading from other programs
definition consists in creating a building model, i.e. determining locations of structural elements of the building, such as: beams, columns, walls, slabs, foundations, etc. The basic options used for this purpose include: Loading a structure model from other programs Structural axis grid Story Objects available in the program (beams, columns, walls, slabs, etc.) Material database Section database
2. definition of loads
definition consists in specifying locations and values of forces applied to individual elements of the structure model; the method of load definition has been presented in the following topics: Rules of load definition Types of loads Definition of loads Default loads Load combinations
3. structure calculations
once loads are applied, structure calculations may be performed; selection of the method of calculation and result presentation have been presented in the following topics: Calculation options Calculation results
4. design of RC structure elements
once structure calculations are over, it is possible to design RC elements of a structure; the design method has been presented in the following topics: RC element design – calculation options RC element design – general parameters RC element design – estimated calculations RC element design – provided calculations
© 2009 Autodesk, Inc. All rights reserved

page: 6 Autodesk Concrete Building Structures 2010 - User Guide
2. CONFIGURATION 2.1. Preferences
The option enables adopting basic parameters applied in the Autodesk® CBS program. The option is available from the menu by selecting the Tools / Preferences option.
The Preferences dialog box consists of several tabs: Language Units Colors Configuration.
2.2. Language On the Language tab in the Preferences dialog box the user may select a language version of the Autodesk® CBS program.
In the current program version the following language versions are accessible:
English
French
Polish
Spanish
Italian.
© 2009 Autodesk, Inc. All rights reserved

Autodesk Concrete Building Structures 2010 - User Guide page: 7
Options in the lower part of the dialog box allow selection of RC codes that will be used in the program to perform structure calculations as well as design of RC elements and building foundations (the settings refer to advanced calculations and provided RC element design): - RC code (calculation of provided reinforcement) codes for calculation of the provided reinforcement of all types of RC structure elements available codes: American codes: ACI 318/99, ACI 318/99 (metric), ACI 318/02, ACI 318/02 (metric), ACI 318/02 (Thailand) British code BS 8110 Canadian code CSA A23.3-94 Eurocode2 (ENV 1992-1-1:1991) with several national application documents (Italian and Belgian NADs) French codes: BAEL 91 and BAEL 91 mod. 99 Dutch code NEN6720 (VBC 1995) Spanish code EHE 99 Polish codes: PN-B-03264 (2002) and PN-84/B-03264 Russian code SNiP 2.03.01-84 Norwegian code NS 3473: 2003 Italian code DM 9/1/96 Romanian code STAS 10107/0-90 Singaporean code CP65 Chinese code GB 50010-2002 - RC code (foundation design) geotechnical codes which are the basis for foundation design available codes: ACI BS 8004:1986 CSA DTU 13.12 Eurocode 7 (ENV 1997-1: 1994) Fascicule 64 Titre V PN-81/B-03020 SNiP 2.02.01-83. Note: There has been a change concerning the selection of an RC code; presently, you can only select a code for the required reinforcement design of panels and for the provided reinforcement design of all types of elements. While loading files saved using previous versions (in which you were able to select codes for provided and required reinforcement separately), the software the code you selected for the provided reinforcement design in previous versions sets as a current RC code, and deletes the required reinforcement areas you calculated. Code settings are important in the case of structure calculations with the use of the advanced method and provided RC element design; if the estimated design method is chosen, they have no effect on results. If the Set as default option is activated, a selected language and codes are saved as a default set.
© 2009 Autodesk, Inc. All rights reserved

page: 8 Autodesk Concrete Building Structures 2010 - User Guide
2.3. Units On the Units tab in the Preferences dialog box the user may select units applied in the Autodesk® CBS program:
The dialog box above enables the following operations on the units used in the program: • change of units of the quantities presented in the dialog box • change of the display accuracy for individual quantities • selection of the manner of presenting the values (decimal or exponential system) • change to the system of units used in the United States (inches, pounds, etc.) • saving the defined units as a default set • change of the currency and conversion of all the prices entered by the user (once
a new currency is chosen, the program displays a question asking about the conversion factor).
The units have been split into the following categories: • structure dimensions • cross-section dimensions • area • volume • mass unit • stress • force unit • force density (unit weight) • angle • moment • displacement • reinforcement area • reinforcing bar diameter • dimensionless quantity. Not all the units are presented on the tab simultaneously, therefore, the bottom left corner holds the buttons and , which are used to change the tab contents (after pressing one of the mentioned buttons, selection of other units becomes possible on the tab).
Units are chosen from the drop-down list available for each of the categories. For all the units, the method of presenting the number format for the quantities listed may be changed. In these fields the user may determine a number of decimal places for each of the quantities. To change the number of decimal places, the user should click with the left mouse button on the arrows (the number of decimal places increases or decreases, respectively). The unit precision will be reflected in reinforcement descriptions, dimensions, tables, etc. Switching on the e option enables representation of a number value in the exponential form; switching this option off restores the decimal form of a number.
© 2009 Autodesk, Inc. All rights reserved

Autodesk Concrete Building Structures 2010 - User Guide page: 9
To select a composed unit (e.g. a unit of stress or force density (unit weight)), the (…) button should be pressed; then a small dialog box opens, in which units of force and length may be chosen. Activating the Imperial units option results in setting the units for all the above-listed units in conformity with the ones used in the United States (feet, inches, pounds, etc.). If this option is switched off, SI units will be set. To change units in the program (e.g. to imperial ones), it is necessary to close the program and restart it. After switching on the Set as default option, selected units are saved as a default set.
2.4. Colors On the Colors tab in the Preferences dialog box all objects may be ascribed their own colors. It is also possible to select a library assisting in 3D presentation with shading.
The following two tabs are available in the above dialog box: Objects and Loads. Objects tab Colors may be ascribed separately to objects presented in: - 3D view - 2D view. Apart from changing a color for all object types available in Autodesk® CBS, it is possible to change a color of the background of a 2D view presented in the structure
viewer (the icon is used for that). NOTE: When changing the background color, colors of graphical objects are changed automatically (it refers to white and black colors); colors of the remaining structural and graphical objects need to be changed manually. Moreover, it is possible to determine colors used for elements selected in structure views and highlighted in structure views. For elements presented in the 2D architectural view, a color of filling of these elements can be determined. Loads tab Load colors may be modified; it is possible to select a load color in 2D and 3D views and a color of filling of a planar load in the 2D view. Pressing the Restore default button restores the standard set of colors for the available objects. At the bottom of the dialog box a library assisting in 3D presentation with shading may be selected; there are two libraries available:
- DirectX
- OpenGL.
© 2009 Autodesk, Inc. All rights reserved

page: 10 Autodesk Concrete Building Structures 2010 - User Guide
Users of Windows® 9x/Me/2000/XP systems may choose the DirectX® or OpenGL® library, whereas Windows® NT system users can only use the OpenGL® library. After switching on the Set as default option, selected colors are saved as a default set. Comments on application of the libraries assisting in 3D presentations:
• Prior to changing a 3D-assisting library, close all the viewers with 3D views of a structure; after selecting an appropriate option and pressing the OK button, each newly-opened 3D viewer will be applying the selected library assisting in 3D display
• It is not recommended to use at the same time viewers showing 3D views generated by means of DirectX® and OpenGL®
• 3D-assisting library should be adjusted to the graphic card of the computer on which the Autodesk® CBS program is used; the default 3D-assisting library is DirectX
• In case quality of presentation of a 3D view with shading is not satisfactory (in particular, for older types of cards), it may be helpful to switch off hardware acceleration of some graphic card options (available in the dialog box with advanced card properties in the display settings of the Windows® system). In some cases it may prove necessary to download the latest card drivers (available on the manufacturer’s site).
2.5. Configuration The Configuration tab in the Preferences dialog box enables selection of the work mode for the Autodesk® CBS program.
The options included in the above dialog box allow the Autodesk® CBS program to be run as:
• geometrical modeler
• geometrical modeler with the possibility to assign loads
• geometrical modeler with the possibility to assign loads and perform calculations for a defined structure along with design of RC elements in a structure.
NOTE: If the geometrical modeler option is chosen only, then all the options concerned with loads and calculations in the Autodesk® CBS program are unavailable; if the geometrical modeler option with the possibility to define loads is selected, all the options concerned with calculations are not accessible; selection of the program work mode requires restarting the program.
© 2009 Autodesk, Inc. All rights reserved

Autodesk Concrete Building Structures 2010 - User Guide page: 11
In the lower part of the dialog box there are options used to select the way that a story is presented in the architectural view:
- presents a slab positioned above the elements of a story; it displays a floor slab above the active story (as in the structural view)
- presents a slab positioned at the bottom of a story, belonging to the story positioned below; it displays a floor slab at the bottom of the story (architectural views of buildings); elements positioned above the section through the story (beams) are drawn with a dashed line. In the lower part of the dialog box there is also the Parallel processing option; it allows optimization of different operations (link with Autodesk Robot Structural Analysis, calculations, loading and display of calculation results) for computers with at least double-core processors; if this option is activated, it allows parallel processing of processors.
2.6. Program Personalization The Autodesk® CBS program may be adapted to the user’s needs by means of several options available in the program (settings of the below-listed options are remembered by the program and set automatically during next program start-up): • Working language – the Tools / Preferences / Language option • Units - the Tools / Preferences / Units option • Colors (3D display) - the Tools / Preferences / Colors option • Default values – the option refers to sections, materials, names, loads and texts • Window layout – this option is concerned with a number of windows available in
the program as well as their mutual position, defined grids, projections, display mode (structural, architectural, computational) and display of objects; these settings may be saved by means of the Window / Save window layout option accessible in the menu
• Print options – enables setting the printout scale and range • Ruler – enables switching on or off the ruler available on the screen.
© 2009 Autodesk, Inc. All rights reserved

page: 12 Autodesk Concrete Building Structures 2010 - User Guide
3. STRUCTURE READING / SAVING 3.1. Reading and Saving Options
Basic files of the Autodesk® CBS program are given the *.geo extension. In the program the following options allowing file reading or saving are available (the options are included in the File menu): New - opens a new project Open - opens an existing project (file) Close - closes the current project (file) Save - saves the current project (file)
Note should be taken that only the sections and materials used in an example are saved to a file.
Save as - saves the current project (file) under a selected name Import - opens a file saved in a different format; the following formats are
available: DXF (*.dxf) IFC v.1.5, 2.0, 2.x, 2x2 (*.ifc) and 2x3 (*.ifc) ROBOT CBS (*.rhg) Adcof (*.add)
Export - saves a file in a different format; the following formats are available: DXF (*.dxf)
When exporting to a DXF file, all the stories may be exported simultaneously; after selecting the DXF format, the additional DXF Export dialog box (see the drawing below) is displayed on the screen; there the user may choose whether the export concerns only the current story or all the stories at the same time (if the latter option is selected, then all the stories are placed in one drawing)
IFC v.1.5, 2.0, 2.x, 2x2 (*.ifc) and 2x3 (*.ifc)
Presently, export in the IFC format is possible: Consider selection: only for selected objects (only selected objects will be exported to IFC) Update file: to update a file when saving to an existing file (the existing file will be updated, not replaced).
ROBOT CBS (*.rhg) Adcof (*.add)
© 2009 Autodesk, Inc. All rights reserved

Autodesk Concrete Building Structures 2010 - User Guide page: 13
Screen capture - remembers contents of the active window in the clipboard Print - prints the window contents according to the settings in the
Print options dialog box Print options - sets printing parameters (see description of the Print
options dialog box) Print preview - displays a view of the printout before actually printing it Printer settings - printer parameter settings Exit - ends work in the program.
NOTE: The Autodesk® CBS program enables work in many projects at the same time. When using options allowing advanced structure display simultaneously in many projects, problems with the memory may occur in case of weaker graphic cards. Then it is recommended to close a few projects.
3.2. Save Options Options provided in the Save Options dialog box allow selection of elements to be saved in a file. The dialog box opens after selecting the menu command: File / Save Options. Then the dialog box shown in the drawing below appears on the screen.
In the current Autodesk® CBS version it is possible to save a file with the RTD extension; it is a file generated during advanced calculations using the Robot calculation engine or Autodesk Robot Structural Analysis, which allows calculation of the RC panel reinforcement from the level of Autodesk® CBS. The above dialog box holds the options as follows: • Without results - if this option is selected, a file with the GEO extension is saved
without calculation results • Save .rtd file - selecting this option results in saving a file with the GEO extension
and a file with the RTD extension of the same name as the file with the GEO extension; an RTD file may be used for calculation of a reinforcement area of RC panels
• Always display this dialog box before saving - if this option is selected, each time before saving the file the above dialog box will be displayed on the screen.
First two options have also been added to the Save As dialog box.
NOTE: In order to enable the design of RC slabs and walls (after closing the file with the GEO extension), the GEO file has to be saved together with the RTD file.
NOTE: 1. If calculations have not been performed in Autodesk® CBS, then the Without
results option is not available 2. If advanced calculations have not been performed in Autodesk® CBS, then the
Save .rtd file option is not available.
© 2009 Autodesk, Inc. All rights reserved

page: 14 Autodesk Concrete Building Structures 2010 - User Guide
4. EDIT OPTIONS / VISUALIZATION 4.1. Grids/Axes
The option enables defining Cartesian grids, cylindrical grids, straight axes and arc-shaped axes on the screen. The option is available from: • the menu, by selecting the Edit / Grid/Axes command
• the toolbar, after pressing the Grid/Axes icon.
There are the following icons provided in the top part of the dialog box:
• Add new grid – pressing this icon adds a new grid or new axes; a grid/axis type depends on the cursor position (i.e. on a selected grid/axis type) before pressing the icon; a grid / axes is/are added to the list of available grids or axes (a default name is assigned to them)
• Remove grid – pressing this icon deletes a selected (highlighted) grid or axis.
• Copy - pressing this icon copies a selected (highlighted) grid or axis
• Move up, Move down - pressing these icons moves a table row up /down; the options are available only then if a table includes at least 2 rows and if any row is highlighted in a table.
Cartesian grids The following data must be determined for a Cartesian grid: • Initial angle – an angle by which the grid is to be rotated with respect to the global
coordinate system • Position in the coordinate system – the bottom left apex of the grid in the global
coordinate system • Step – the distance between grid nodes correspondingly in the direction X and Y • Number - the number of grid ‘cells’ correspondingly in the direction X and Y.
If the Draw only nodes option is switched on, then the grid will be presented on the screen in a form of isolated points in the places of nodes. Once the option is switched off, the grid nodes are connected with lines. It is recommended to switch the option off for grids with large cells and to switch this option on for grids with small cells (e.g. 0.1m).
© 2009 Autodesk, Inc. All rights reserved

Autodesk Concrete Building Structures 2010 - User Guide page: 15
Cylindrical grids For cylindrical grids the same parameters as for Cartesian grids have to be determined and additionally, instead of the step, the angle value (in cylindrical distribution) is defined, in other words, these are the distances between grid nodes correspondingly in cylindrical and radial directions. Axes Axes have been split into groups. In each group straight and arc-shaped axes can be defined. The user may define axes individually or may generate a group of axes based on the existing grid.
For a given group the user may set generation of automatic name definition – independently for straight axes and arc-shaped axes. The following special characters are allowable: %a, %A - axis names will be successive alphabet letters (small or capital letters) %1 - axis names will be successive numbers. For example, to name Cartesian axes X1, X2, etc. and Y1, Y2, etc., the user should define 2 axis groups and set for straight axes in the first group the name X%1 and for straight axes in the second group the name Y%1. In the case of axis definition based on the grid, the user should choose a grid from the list of defined grids and next, press an appropriate button (e.g. Add X axes) depending on the direction of axis generation (e.g. generation of X or Y axes for a Cartesian grid or straight or arc-shaped axes for a cylindrical grid). Moreover, the user may specify a number of a node in a given direction from which axis generation should start (the a edit field) and a number of grid cells between the successively generated axes (the n edit field). Definition of a single axis When defining straight axes, coordinates of two points (x1, y1) and (x2, y2) should be specified. If only one axis is selected (e.g. the X axis option is switched on), then only one coordinate is determined. For definition of arc-shaped axes, the user should specify coordinates of the arc center (the xc and yc edit fields), value of arc radius, value of initial angle (with respect to the global coordinate system) as well as value of arc angle. To ensure better readability of final drawings, the user may - for each of the axes independently, switch on display of a name on the left or on the right side of the axis.
© 2009 Autodesk, Inc. All rights reserved

page: 16 Autodesk Concrete Building Structures 2010 - User Guide
Axis names may be changed by the user. They are not subjected then to the mechanism of automatic name definition, which results in refreshing all axis names after each change. If a name is changed in such a manner so that the relevant field is left empty, it causes a given axis to be included again in the algorithm of automatic name definition. There is an available mechanism of graphical definition of selected grid elements (e.g. grid translation with respect to the origin of the coordinate system, grid initial angle, straight axes). To define that, the user should set the cursor in the edit field and using the mouse define a value of a selected quantity on the screen.
NOTE: While defining axes, the (global or local) coordinate system is considered. As a result, axes defined in one system as parallel to X and Y may, in another system, be axes in an arbitrary direction (e.g. rotated by a given angle). The current program version allows optimization of structural axis definition (quick graphical definition). When defining axes graphically, sequential definition of axes is enabled; in this mode, after defining the last axis point on the screen by means of the mouse, the program accepts automatically the position of the defined axis. Once the axis position is accepted, the next axis can be defined.
4.2. How to Define a Grid and Axes NOTE:
The example below illustrates how to define a grid using the options provided in the Grids dialog box. The program also offers a mechanism for graphic definition of selected elements of grids (e.g. translation of a grid in relation to the origin of the coordinate system, initial angle of a grid, straight axes). To define e.g. an axis graphically on screen, set the cursor in the appropriate edit field (e.g. x1 or x2 for axes) and using the mouse define the position of an axis on screen. To define structural grids and axes, follow the steps below: Definition of Cartesian Grid
• select the menu command Edit / Grid/Axes or press the Grid/Axes icon • unfold the Cartesian grids list (by pressing the symbol), switch on the CAG
option (the symbol appears) – see the drawing below
• for the CAG grid enter the data as follows: Initial angle: 0.00 Position in the coordinate system - X axis: 0.00 Position in the coordinate system - Y axis: 0.00 X direction - see the drawing below
© 2009 Autodesk, Inc. All rights reserved

Autodesk Concrete Building Structures 2010 - User Guide page: 17
Y direction - see the drawing below
Definition of Cylindrical Grid
• switch on the Cylindrical grids option and press the Add icon in the top menu • switch on the CYG(1) option and enter the data as follows:
Initial angle: 90 Position in the coordinate system - X axis: 0.00 Position in the coordinate system - Y axis: 0.00 Cylindrical direction - see the drawing below
Radial direction - see the drawing below
Definition of Axes • switch on the Axes option and press the Add icon in the top menu • select the field A as in the drawing below
• enter the data as follows:
X axis: y1: 6.00 Description on the right:
• press the Add icon in the top menu and enter the data as follows: Y axis: y1: 0.00 Description on the right:
• press the Add icon in the top menu and enter the data as follows: Y axis: x1: 0.00 Description on the right:
• select the position on the Arc-shaped axes list and press the Add icon • select the field 1 and enter the data as follows:
xc: 0.00 yc: 0.00 Radius: 6.00 Initial angle: 90.00 Angle: 180.00 Description on the left: Description on the right:
• press the Apply button; the generated grid composed of the Cartesian and cylindrical grids as well as several axes is presented in the following drawing.
© 2009 Autodesk, Inc. All rights reserved

page: 18 Autodesk Concrete Building Structures 2010 - User Guide
4.3. Edit Options The Autodesk® CBS program enables the advanced method of work which allows executing certain commands while other commands are under way. In particular, in the course of defining any object, the user may modify the position of the coordinate system, move back to the previous phase of a given command (e.g. move back to the previous point in definition of a slab contour), change current section or material, complete its definition in a different dialog box, open dialog boxes needed. Apart from that, the user may combine modes of manual and graphical data definition. The are the following edit options available in the program (they are located in the Edit menu):
• Undo – the option allows the user to go back to the previous stage of structure modeling; last 10 stages are available (10 steps back)
• Redo – the option repeats the ‘undone’ operation; the option is associated with the Undo option
• Cut – deletes selected objects; the objects are stored in the clipboard so that the user may copy them by means of the Paste option to any place of a structure being modeled (on any story)
• Copy – copies selected elements to the clipboard; they may be copied to any place of a modeled structure by means of the Paste option (on any story); while copying to the clipboard, the program takes account of the selection mode (current story or whole structure); after copying a story, the last-defined story is set as a current one
• Paste – copies elements from the clipboard to any place of a modeled structure (on any story); the Paste option results in pasting a structure copied to the clipboard in the following way: the lowest story in the clipboard is ascribed to the current story in a structure; if the Paste vertically option is used, only the lowest story is pasted
• Paste Vertically – pastes a structure part from the Clipboard and places it in the vertical plane (see the drawings below); using the Insertion point option enables the user to determine the height at which it is inserted; the Insertion point option is accessible from the context menu of the Autodesk® CBS program (as soon as any structure element is copied to the Clipboard and the Paste Vertically option is selected)
before executing the operation after executing the operation
© 2009 Autodesk, Inc. All rights reserved

Autodesk Concrete Building Structures 2010 - User Guide page: 19
• Delete – deletes selected objects
• Grid/Axes – the option enabling definition of grids and structural axes; after activating this option, the Grids dialog box opens, in which the user may define Cartesian grids, cylindrical grids as well as straight axes and arc-shaped axes
• Ruler – switches on/off the ruler presented on the screen • Snap – the option allowing the user to steer the cursor position while defining
a structure model; if this option is switched on, the cursor is snapped to the object snap points
intersections in grid nodes
intersections of structural axes
object ends
object centers
axis intersections
architectural points (points at intersections of lines generated in an architectural view)
intersections of element axes with grid and structural axes
graphical objects (from import of an dxf file, but also graphical objects from import of an IFC file); characteristic points include: center, intersection of graphical objects, object ends; if the snap to DXF graphical objects option is switched off, then the cursor will not be snapped to these graphical objects
Snap to auxiliary lines - a set of options that allows using different work modes:
• Orthogonal to Point – an option for editing objects; if selected, it snaps (orthogonally with respect to the local coordinate system) to auxiliary lines with respect to a specified point
• Object Extension – an option for editing objects; if selected, it snaps to auxiliary lines on the extension of a specified object
• Parallel to Object – an option for editing objects; if selected, it snaps to auxiliary lines which are parallel to a specified object
• Perpendicular to Object – an option for editing objects; if selected, it snaps to auxiliary lines which are perpendicular to a specified object
While you are defining objects, a distance from the last-defined point to the cursor displays; you can also specify a new value of the distance). Use the Ctrl and Tab keys on the keyboard to: Ctrl – use it to define an auxiliary reference point in a specified distance, with respect to which you can define an object (point) Tab – use it to switch between the field displaying a distance value and the Snap toolbar, or to set a distance value and to define a direction.
Modes – a set of options that allows using different work modes:
• Drag - the option concerns edition of objects that require defining two points (beams, continuous footings, walls); if this option is switched on, then the program assumes by default the last point of the previously-defined element to be the first point of a new element; pressing the Esc button completes definition
• Keyboard – use of the keyboard in definition of beams, continuous footings, slabs, raft foundations or walls causes display of the dialog box which allows entering values from the keyboard
© 2009 Autodesk, Inc. All rights reserved

page: 20 Autodesk Concrete Building Structures 2010 - User Guide
• Snap to center - the option concerns edition of objects that require defining two points (beams, continuous footings, walls); while defining the second point of an object, the program locates automatically the center of an object positioned the closest to the cursor
• Snap – perpendicular - the option concerns edition of objects that require defining two points (beams, continuous footings, walls); while defining the second point of an object, the program generates automatically a segment perpendicular to an object positioned the closest to the cursor
• Snap - the option concerns edition of objects that require defining two points (beams, continuous footings, walls); while defining the second point of an object, the program trims automatically the element being defined to fit an object positioned the closest to the cursor
• Orthogonal – inserts individual points of a user-defined object in the orthogonal mode with respect to the active coordinate system
• Arcs - the option allows definition of arched elements; there are several methods of arc definition available:
1 - a straight segment
2 - an arc defined by 3 successive points belonging to an arc
3 - an arc defined by 3 points: arc beginning, arc center and arc end
4 - an arc defined by 2 points and the tangent to the segment defined previously (this option is available for slabs and linear elements, if the Drag option is on)
• Select – the option allows object selection; once the cursor moves closer to an object, it is singled out with a different color; there are 2 selection modes available: Point selection A left mouse button click on a chosen element stands for its selection (if additionally, the Shift key is pressed, then the element is added to the current selection); if a given element has been earlier selected (highlighted), then the left mouse button click on such an element with the Ctrl key pressed at the same time causes the element to be no longer selected. Window selection To perform window selection, the user should – holding the left mouse button pressed (the moment when the button is pressed determines the first point) – move the cursor to any point; the line connecting these two points is the diagonal of a selection window; if the selection window has been defined ‘from left to right’, then only these objects that are entirely contained in the selection window are selected; if the selection window has been defined ‘from right to left’, then the objects that have a common part with the selection window, are selected. During the window selection the Shift key operates in the same way as for point selection. Selection is possible in the 2D view and 3D view; it allows selecting objects using a point (indication with the mouse cursor) and using a window; work of the Shift and Ctrl keys: Selection with the Shift key pressed down results in adding an element to the selection (elements already selected earlier still remain selected) Selection with the Ctrl key pressed down changes the object selection status: if an object was selected earlier, it stops being selected.
• Select – current story, Select – whole structure Objects can be selected either on the current story or in the whole structure; NOTE: in the current program version the window selection operates on the current story; once the selection is made, the user may:
© 2009 Autodesk, Inc. All rights reserved

Autodesk Concrete Building Structures 2010 - User Guide page: 21
- change parameters of selected objects in the dialog boxes: Object properties and Fix section modification
- delete selected objects - design objects on a given story or in the whole structure, depending on the
selected option. If the Select – whole structure option is switched on, then in the Criterion of Selection dialog box the program makes accessible the Story filter option which enables the operations of selection on the defined stories.
NOTE: The operation of selection is ascribed to a selected view; after selecting objects in the whole structure and switching to other structure view, the selection option chosen for that view is applied.
NOTE: After opening a new project in Autodesk® CBS , the 4-function mode: rotation, 2D rotation, zoom and pan is active by default in the 3D view. To switch to the selection mode in this view, the Esc key should be pressed. There is also the Add Specially option available in the program (in the Objects menu
or the Add Specially icon on the toolbar). It enables quick definition of slabs in typical situations; if the user selects this option and then clicks with the left mouse button on the area limited by walls or beams, then the program generates a slab on this contour.
4.4. Edit Operations (Translate, Rotate, Mirror, Fit, Trim, Extend)
The Autodesk® CBS program is equipped with a great number of useful edit tools, which make the user’s work in the program easier while defining and/or modifying a designed structure. These options include: translation, rotation, horizontal mirror, vertical mirror, axial symmetry, trimming, extension. The Translate option is used to translate prior-selected nodes / elements of a generated structure. The option is available:
• after pressing the Translation icon • after selecting the Edit / Operations / Translate command from the menu.
The dialog box shown in the drawing below appears on the screen.
In the fields: x=, y= and z= coordinates of the translation vector should be defined. If the Copy option is turned off, then the elements selected will only be translated. If this option is turned on, then the elements selected will be copied the number of times specified in the Number of repetitions field. The Fit adjoining elements option is available only when the Copy option is turned off. If the Fit adjoining elements option is turned on, then dimensions and positions of all the objects adjoining the translated object will be fitted to a new position of the translated object. For example, translation of a structural wall results in automatic
© 2009 Autodesk, Inc. All rights reserved

page: 22 Autodesk Concrete Building Structures 2010 - User Guide
fitting of structural walls, partition walls, beams, columns adjoining it, to which in turn spread footings are adjusted. This option may also be used for generation of roof surfaces. To do that, the user should: • define roof surfaces in XY projection • model a rafter framing (NOTE: also in XY projection) – if the rafter framing is not
modeled, then temporary beams located in place of roof ridges should be modeled.
• translate roof ridges to a selected level with fitting of adjoining elements; the roof
obtained is illustrated in the drawing below.
The Rotation option is used to rotate prior-selected objects in a generated structure. The option is available:
• after pressing the Rotation icon • after selecting the Edit / Operations / Rotate command from the menu.
The dialog box shown in the drawing below appears on the screen.
In the fields: x= and y= coordinates of the center of rotation should be defined, whereas in the Rotation angle edit field a value of an angle by which the selected object will be rotated, should be specified. If the Copy option is turned off, then the elements selected will only be rotated. If this option is turned on, then the elements selected will be copied the number of times specified in the Number of repetitions field. The Fit adjoining elements option is available only when the Copy option is turned off. If the Fit adjoining elements option is turned on, then dimensions of all the objects adjoining the rotated object will be fitted to a new position of the rotated object. The logic of this operation is identical as in the case of the Translation operation.
© 2009 Autodesk, Inc. All rights reserved

Autodesk Concrete Building Structures 2010 - User Guide page: 23
The options: Vertical mirror, Horizontal mirror and Axial symmetry are used for copying a selected structure part with respect to a defined axis (vertical, horizontal or axis in any position).
The Trim option is applied to trim a defined element in such a manner so that it fits other currently selected elements. Once the Trim option is chosen, the element part to be removed should be indicated (with the mouse click).
The Extend option is used to extend a defined element in such a manner so that it fits other currently selected elements. Once the Extend option is chosen, the element to be extended should be indicated (with the mouse click).
NOTE: It is possible to extend and trim structure objects so that they fit graphic objects (objects resulting from import of a DXF file).
NOTE: If the Trim or Extend operation is carried out on objects (beam, continuous footing) positioned on different levels, i.e. on objects that do not intersect (objects are selected in an object projection), then besides trimming or extending an object, the program performs the operation of shifting the trimmed / extended object to the plane where the objects are positioned, with respect to which the given object is being trimmed / extended. The example of the Trim operation is illustrated in the drawings below – beam A is trimmed to fit beams 1 and 2.
© 2009 Autodesk, Inc. All rights reserved

page: 24 Autodesk Concrete Building Structures 2010 - User Guide
The Fit Vertically option is used to adjust vertically the elements so that they fit the intersections with the selected structure elements. Below are described possible ways of using this option for individual types of structure objects. 1. Walls, partition walls They may be trimmed to fit the planes formed by slabs and beams; as regards beams, each of them constitutes an independent plane made up of the beam itself and two horizontal straight lines, perpendicular to the beam, passing through its ends (see the drawings below).
before executing the operation after executing the operation
2. Columns, beams, continuous footings They may be trimmed to fit the planes formed by slabs and beams (see the drawings below).
before executing the operation after executing the operation
3. Slabs, raft foundations They may be projected onto the plane formed by the selected elements (see the drawings below).
before executing the operation after executing the operation
The Face option is used to fit an element to a structure element indicated earlier. NOTE: It is important on which element’s side the user clicks with the mouse on the element fitted to a structure element indicated earlier. For example, the drawing below illustrates the operation of facing a wall to a column.
before the facing operation after the facing operation
The facing operation causes translations of an object with respect to the axis; such a translation can be viewed in the architectural view, whereas in the real model, translations are not included, which can be seen in the structural and computational views.
© 2009 Autodesk, Inc. All rights reserved

Autodesk Concrete Building Structures 2010 - User Guide page: 25
NOTE: In the current program version, the facing operation does not cause changes in the position of objects in the structural and computational models; they are still positioned on their axes.
Facing has effect on the position of continuous footings under walls and spread footings under columns; if continuous footings and spread footings are defined in a structure model, then the position of continuous footings and spread footings changes automatically if the facing is modified. Translations can also be defined (or modified, as regards the existing ones) in the Object Properties dialog box on the Position tab.
NOTE: The edit operations: Trim, Extend, Fit Vertically and Face are available both in the 2D view and 3D view. If these options are switched on without selecting earlier objects in the structure view, then first the base object should be indicated (the one with respect to which objects should be modified), and next, an object to be modified. Other edit operations available in the program (the Edit / Operations menu) are the
Group and Ungroup options. They allow grouping / ungrouping selected structure objects of the same type (beams, continuous footings, walls); objects joined into groups must touch each other. Grouped objects may be displayed in the 2D and 3D views by means of the Display Object Groups option (the menu View / Display Object Groups). Grouped objects are displayed and selected as one object. To display results of static calculations in the Object Properties dialog box, the user should switch off display of element groups for beams, columns and continuous footings. How the option works for individual object types: • when beams are grouped, the program creates a multi-span beam (if there are
more than 2 supports) or a beam composed of several segments that may be ascribed different sections or materials. It is significant if a structure is calculated by means of simplified methods (method 1: trapezoidal and triangular method) and also makes selection of a beam easier.
• when grouping columns that are positioned on different stories (not adjoined to by floors or beams), grouped columns are treated as uniform objects as regards carrying of horizontal forces in simplified calculations ; NOTE: it is possible to calculate the provided reinforcement taking account of the buckling length and internal forces within a whole group of columns, instead of individual segments. A group of columns is presented as a whole in the 3D view of the entire model, while views of individual stories show individual columns belonging to the current story; a name of the column group does not include numbers of stories (it is presented if object groups are displayed in the 3D view), in the remaining cases the program displays names of individual columns included in a group, whose names comprise by default a story number
• when walls are grouped, it is possible to take account of rigidity of the wall group as regards carrying of horizontal forces; the program my display internal forces carried by the whole wall group or by individual component walls; NOTE: to keep continuity of the diagram of moments due to horizontal forces in the wall group, walls between stories should be grouped
• when continuous footings are grouped, it is possible to take account of grillage work of continuous footings; it contributes to reduction of dimensions of continuous footings as regards carrying of moments due to horizontal forces induced by seismic impact or a wind load.
If display of object groups is switched off, then forces in component walls are presented for simplified calculations.
© 2009 Autodesk, Inc. All rights reserved

page: 26 Autodesk Concrete Building Structures 2010 - User Guide
NOTE: The Group option creates a group of objects for purposes concerned with calculations and edition. The other type of grouping possible in the program refers to the design of RC elements and may be activated in the General Parameters dialog box for selected RC elements. Orientation of linear elements (beams, walls, partition walls and continuous footings) is defined by the beginning and end of an object; thus it depends on the order of defining individual nodes. The Change orientation option is used to change the direction of selected linear elements, which consequently may lead to the global uniforming of the direction for linear elements. After activating the option, the user should define a direction by indicating two points whose order determines the orientation. Coordinates of all selected linear objects are modified in such a way so that their projection on a defined axis is positive. A perpendicular object should be projected on the axis perpendicular to the defined axis (sense: to the left of the defined axis).
The Distance option is used to determine distances between indicated points. Once the option is switched on, the user should select two points between which the distance should be determined. The program draws a line between the selected points and displays a distance between them. Both ends of the segment connecting the beginning and end points are marked with lines perpendicular to the line connecting the two points. Moreover, a distance is presented on the status bar.
NOTE: It is possible to measure distances to characteristic points of objects: - center of a linear object / slab edge - perpendicularly to a linear object / slab edge - point of intersection with a linear object / slab edge after activating the relevant edit mode (snap to center, snap – perpendicular, snap). When determining a characteristic point, the user should follow the principles analogous to those applied when creating new objects with the use of a selected snap mode. Clicking with the left mouse button changes the beginning point; the size of fonts used to present distances may be changed by pressing the keys PgUp (to increase the font size) or PgDn (to decrease the font size) on the keyboard.
NOTE: The Distance option is active only in the 2D view.
4.5. Graphical Modification of Structure Elements
Clicking a selected element with the left mouse button selects it (pressing additionally the Shift key adds the element to the current selection); if a given element has already been selected (highlighted), then after the left mouse button click on that element with the Ctrl key pressed down simultaneously that element is no longer selected. After selecting an object, apex nodes and edge nodes of the element are additionally highlighted and there appear a mark that allows changes in the element geometry (NOTE: the option is active only in the 2D view).
© 2009 Autodesk, Inc. All rights reserved

Autodesk Concrete Building Structures 2010 - User Guide page: 27
There are two types of nodes allowing changes of the object geometry: • apex nodes (marked with the symbol) for changing positions of object apexes • edge nodes (marked with the symbol):
in linear objects (beams, walls, partition walls, raft foundations) they are used to draw an arc in planar objects (slabs, rooms, floor cuts/openings) they are used to draw an arc, add a point, shift an edge for stairs they are used to shift edges.
If after selecting an object and a node it is possible to perform more than one operation, then the toolbar shown below appears on the screen.
The successive icons included in that toolbar are used to: - move an apex / add another apex - draw an arc - stretch an element. In the case of multiselection of structure elements, only common marks for those objects are displayed on the screen.
4.6. How to Fit Walls to the Roof To fit walls to the roof structure (see the drawing below), follow the instructions presented below:
• press the right mouse button and choose the Select option from the context menu • holding the Ctrl key down, select two rafters (R1 and R2) • select the menu command Edit / Operations / Fit Vertically or press the Fit
Vertically icon • select the wall W1 to be fitted to the position of the rafter • press the right mouse button and choose the Select option from the context menu • select the tie beam B1 • select the menu command Edit / Operations / Fit Vertically or press the Fit
Vertically icon • select the wall W2 • repeat the action for the successive walls; the walls fitted to the roof structure are
presented in the drawing below.
© 2009 Autodesk, Inc. All rights reserved

page: 28 Autodesk Concrete Building Structures 2010 - User Guide
4.7. Selection Criteria The option is used to define criteria of selection. The option is available after choosing the following command from the menu: Edit / Selection criteria. Then the dialog box shown in the drawing below is displayed on the screen.
Clicking with the mouse cursor on the selection field next to a given filter (√ symbol appears) results in activating the selected criterion of selection. To define a detailed condition of selection, the user should expand a chosen filter and switch on the options in the selected fields (√ symbol appears again). For example, to select all the beams defined in a structure, the user should expand the Object filter option by clicking on the ‘+’ symbol and next, switch on the Beams option (√ symbol appears). Once the Name filter option is turned on, the user should enter a new filter name in the edit field that appears. The following special characters may be used: * - application of this character substitutes any character string ? - application of this character substitutes a single character. In the program the following selection modes are enabled (they are activated by pressing an appropriate button): • Selection – after pressing this button, elements that satisfy determined criteria
are selected • Selection(+) - after pressing this button, elements that satisfy determined criteria
are added to the current selection • Selection(-) - after pressing this button elements that satisfy determined criteria
are subtracted from the current selection
© 2009 Autodesk, Inc. All rights reserved

Autodesk Concrete Building Structures 2010 - User Guide page: 29
• Selection(*) - after pressing this button, elements that constitute a common part of the current selection and the elements satisfying determined criteria, are selected.
For example, to select all the objects whose material is different than concrete, the user should: • select objects, for which material can be defined (all the objects except for
dimension lines, rooms, etc.) and press the Selection button • switch off the previous criterion, set the Material filter criterion with the material
Concrete chosen and press the Selection(-) button.
4.8. How to Define a Selection Criterion To select the timber – pine beams of rectangular section 20x20 and all the concrete columns in the current story of a building by applying selection criteria, follow the steps below: • select the Edit / Select - Current Story command from the menu • select the menu command Edit / Selection Criteria • unfold the Object filter list (by pressing the symbol) and switch on the Beam
option • unfold the Material filter list, the Timber sublist and switch on the Pine option • unfold the Section filter list, the Rectangular sublist and switch on the R20*20
option
• press the Selection button; it has resulted in selection of the timber – pine beams of rectangular section 20x20
• select again the menu command Edit / Selection Criteria • unfold the Object filter list (by pressing the symbol) and switch on the Column
option • unfold the Material filter list and switch on the Concrete option
• press the Selection (+) button; all the concrete columns have been added to the timber beams already selected.
© 2009 Autodesk, Inc. All rights reserved

page: 30 Autodesk Concrete Building Structures 2010 - User Guide
4.9. Model Presentation on Screen (Views, etc.) The program offers access to the following options that enable changing presentation of structure model elements (the options are available in the View menu): • Synchronize views – if this option is switched on, then all the windows are
ascribed parameters concerned with the active window, i.e. story number, projection, display mode (structural view, architectural view) and settings with regard to grids and object visibility
• Structural view - if this option is switched on, then objects (beams, walls, slabs, etc.) are presented as in a calculation model (i.e. in axes); representation of a single object does not depend on its position with respect to other objects
• Architectural view - if this option is switched on, then architectural requirements are considered in the object presentation, in particular: - graphical representation of a given object depends on its position with respect to
other objects (e.g. intersection of walls) - drawing in the XY plane is generated automatically as a section, which results in
application of different line thicknesses for elements in view and in cross-section - descriptions needed are added automatically (e.g. descriptions of windows)
- rooms are described automatically (number, name, area, finishing layer) • Computational view – if this option is switched on, then computational
requirements are considered in the object presentation, in particular: - a 3D view presents data concerning the structure (e.g. loads) and calculation
results - a 2D view presents division of multi-span beams into spans of the beams
• Toolbars – the most frequently used options are available on toolbars; icons have been grouped on the following toolbars:
Standard - system options Story - options concerned with stories Objects - options enabling definition / modification of available objects 3D - options concerned with 3D presentation Edit - edit options Edit-modes - edit options connected with the available modes of element definition Properties - options concerned with sections and materials Conversion of lines - options that allow converting lines to selected objects (walls, beams, etc.) Dimension lines - options that allow defining structure dimension lines Coordinate system - options that enable performing operations on the coordinate system Snap - options that manage the cursor position during definition of a structure model Zoom - options that manage structure zoom Loads - options that enable definition of structure loads Calculations - options that enable calculation of the structure and design of the RC elements in the structure
• Status bar – if this option is switched on, then a line is displayed in the bottom part of the program window, where different information may be presented (coordinates of the cursor position, height of the current story, parameters of the object currently highlighted, etc.)
• Zoom - options managing structure zoom Zoom window - defines degree of structure window zoom Zoom in - zooms in a structure view Zoom out - zooms out a structure view Zoom all - returns to the initial view (fits the current zoom in such a
way so that the whole structure is shown in the program window)
NOTE: If the mouse has the wheel button, then it is possible to zoom in a structure view by means of the mouse wheel; a view can be zoomed in ‘to the point’ at which the mouse cursor is positioned (the mouse cursor is a "target positioner")
© 2009 Autodesk, Inc. All rights reserved

Autodesk Concrete Building Structures 2010 - User Guide page: 31
The options above may be also activated from the context menu or using shortcut keys.
• Projection – allows setting a required view (projection); the following projections are accessible in the current program version:
XY - standard work plane 3D (building) - 3D display of the entire structure without the possibility of edition 3D (story) - 3D display of the current story without the possibility of edition
• Display – selection of this option opens the dialog box in which display parameters may be set
• 3D View – options managing 3D view XY projection - projection onto XY plane XZ projection - projection onto XZ plane YZ projection - projection onto YZ plane 3D projection - display of a structure in any position Model with rendering - display of a structure with object rendering switched on Textures – quick activating / deactivating the display of textures without the necessity to activate / deactivate the option for displaying textures ascribed to individual materials
Skeleton model - objects are presented only by means of edges 3D view comprises 3 default structure projections: ZX, XY, YZ corresponding to the front view, top view and side view; the options are available in the menu View / 3D View / Projection, on the 3D View toolbar and in the context menu on the 3D layout / Projection (there are also keyboard shortcuts accessible: CTRL+ALT+1, CTRL+ALT+2, CTRL+ALT+3 as well as return to the initial projection CTRL+ALT+0)
Parallel projection – switches on the axonometric structure view (the option is only available for 3D view) – a view in parallel projection (a view without perspective compression)
Perspective projection - switches on the perspective structure view (the option is only available for 3D view); it is a structure view involving perspective compression; this compression is equivalent to the compression for wide-angle lenses in photo or video cameras (a perpective view enables ‘entering’ inside the object and recording a 3D movie presentation)
• Coordinate system – options for managing a position of the coordinate system
Translate – translates the origin of the coordinate system by means of the mouse, the origin of the coordinate system is translated to the point indicated by the user on the screen (the mouse-click point)
Rotate – rotates the coordinate system by means of the mouse; the rotation angle is calculated based on positions of two points defined with the mouse (the axis of the coordinate system is rotated in such a way so that the X’ axis creates with the X axis the angle defined by the user on the screen) NOTE: Calculation results for slabs, walls, raft foundations, that are available in the Properties dialog box, are presented in the current coordinate system (if the system is translated, the coordinates are translated as well, and if it is rotated, the slab is rotated in the graphical viewer).
Global system – restores the initial (default) position of the coordinate system
Define – option that enables defining a position of the coordinate system using the options provided in the Coordinate system dialog box; data determining translation or rotation of the coordinate system may be entered into appropriate edit fields located in the dialog box or defined graphically on the screen (to do so, the user should set the cursor in the edit field and enter data using the mouse)
© 2009 Autodesk, Inc. All rights reserved

page: 32 Autodesk Concrete Building Structures 2010 - User Guide
According to object – sets the coordinate system according to the local system of the selected object; an object should be selected with the mouse; position of the coordinate system depends on a mouse-click point - the system will be adopted on this object end that is positioned closer to the point selected with the mouse
• Previous / next story – options managing display of a story view When defining new elements (beam, column, etc.) it is possible to insert them at characteristic points (see options available in the Snap toolbar) indicated on elements from the previous / next story, analogously as for components from the current story; additionally, they may be snapped to intersections of objects from the current and previous / next story. Remarks on the options Previous / Next story: 1) after activating the option, the √ symbol appears next to the option’s name (these options cannot be activated simultaneously) 2) elements from these stories are shown in a different color (identical to the grid color) 3) these elements cannot be selected 4) elements are displayed together with descriptions (if descriptions are switched on). Characteristic points of elements from the previous and next stories are recognized by the program except when the Dimension Lines / Automatic option is active (according to remark no. 3, these elements cannot be selected; after selecting objects and moving to the adjacent story, the automatic dimensioning operation will be performed for the elements selected in the current story).
4.10. 3D View 3D view can work in one out of five modes: • four simple modes: rotation, 2D rotation, zoom and pan • one multi-functional mode.
NOTE: After opening a new project in Autodesk® CBS, the 4-function mode is a default work mode in the 3D view. To switch to the selection mode in this view, the Esc key should be pressed. The user may switch between the work modes by choosing an appropriate menu option View / 3D View and on the 3D View toolbar. Once the work mode is selected, a movement with the mouse (with its left button pressed) causes the relevant modification of the 3D view: • Rotate – structure rotation in all planes • Rotate 2D - structure rotation in the plane that is parallel to the plane of the screen • Zoom – movement ’deep down’ the view – structure zoom in / zoom out with
respect to the plane of the screen • Pan – movement in the plane of the view (structure pan with respect to the center
of the screen). The multi-functional mode (Rotate / Zoom / Pan) enables work with all the modes at the same time. The 3D view layout is split into quarters and to each of them one mode is ascribed:
• top left: rotation
top right: pan •
• bottom left: zoom
• bottom right: 2D rotation.
© 2009 Autodesk, Inc. All rights reserved

Autodesk Concrete Building Structures 2010 - User Guide page: 33
After positioning the cursor in an appropriate quarter, the cursor shape changes (see the icons above).
Moreover, it is possible to activate structure rotation in the 3D view using shortcut keys and the mouse: to do it, the user should press: - Alt (on the keyboard) and LMC (left mouse button click) - Shift (on the keyboard) and RMC (right mouse button click).
4.11. Coordinate System The option enables defining a position of the coordinate system. The option is available from:
• the menu after choosing one of the options included in View / Coordinate system / Define
• the toolbar after pressing the Define coordinate system icon.
Data determining translation or rotation of the coordinate system may be entered into appropriate edit fields located in the dialog box or defined graphically on the screen (to do so, the user should set the cursor in the edit field and enter data using the mouse). In the case of translation, the origin of the coordinate system is translated to the point indicated by the user (the mouse-click point); if rotation is performed, the axis of the coordinate system is rotated in such a way so that the X’ axis creates with the X axis the angle defined by the user. NOTE: Calculation results for slabs, walls, raft foundations, that are available in the Properties dialog box, are presented in the current coordinate system (if the system is translated, the coordinates are translated as well, and if it is rotated, the slab is rotated in the graphical viewer). There are also the following options available in the program:
Global system – restores the initial (default) position of the coordinate system
According to object – sets the coordinate system according to the local system of the selected object; an object should be selected with the mouse; position of the coordinate system depends on a mouse-click point - the system will be adopted on this object end that is positioned closer to the point selected with the mouse.
4.12. Local Coordinate Systems of Objects Defined in Autodesk® CBS
When defining an object in the Autodesk® CBS program, it is ascribed a local coordinate system. the local system depends on an object type and orientation: 1. Beam, continuous footing The local system is presented in the drawing below.
© 2009 Autodesk, Inc. All rights reserved

page: 34 Autodesk Concrete Building Structures 2010 - User Guide
2. Column The local system is presented in the drawing below.
NOTE: In the case of columns, orientation of local systems differs from that in Autodesk Robot Structural Analysis; the local system of a column defined in Autodesk Robot Structural Analysis is congruous with the local system of a column rotated by the GAMMA angle = 90 degrees in Autodesk® CBS. 3. Wall The axes x and y of the local system lie in the plane of a wall. The x axis is horizontal, while its sense is determined according to the orientation of the segment defining the wall: from the beginning point (point 1) to the end point (point 2). The z axis is a vertical axis with the sense compatible with the Z axis of the global system. The local system is dextrorotatory and the sense of the y axis results from positions of the x and z axes. The sense of the y axis is of importance when results of advanced calculations are presented: sectional forces, displacements and areas of required reinforcement (Ax-: bottom reinforcement, Ax+: top reinforcement). Examples of walls and definitions of local systems are presented below.
Definition of local systems in Autodesk Robot Structural Analysis: The axes x and y of the local system lie in the plane of a wall (x is a horizontal axis, while y is a vertical one). Orientation of the wall has no effect on the sense of the x axis (always in the positive direction of the X axis of the global system).
© 2009 Autodesk, Inc. All rights reserved

Autodesk Concrete Building Structures 2010 - User Guide page: 35
4. Slab The x axis of the local system is set by default according to the following criteria: a) as an axis compatible to the X axis of the global system, if a slab has at least 1 edge parallel to the X axis of the global system b) as an axis compatible to the Y axis of the global system, if the situation described in point a does not occur and a slab has at least 1 edge parallel to the Y axis of the global system c) as an axis compatible to the edge which is the closest to the X axis of the global system, if the situations described in points a and b do not occur. The x axis direction in Autodesk® CBS is denoted by a bold line.
NOTE: If the user selects the main direction of a slab or defines the direction of main reinforcement, the sense of the x axis of the local system is compatible with the defined direction. 5. Raft foundation Analogous principles as for a slab are applied here, however, the Z axis is pointed down (oppositely to the Z axis of the global system). 6. Stairs The local system as for slabs is adopted. 7. Spread footing The local system congruous with the global coordinate system is adopted. If a spread footing is rotated by a GAMMA angle, the local system is rotated too.
© 2009 Autodesk, Inc. All rights reserved

page: 36 Autodesk Concrete Building Structures 2010 - User Guide
4.13. Display The option enables setting display parameters. The option is available from the menu by selecting the option: View / Display.
In the above dialog box, the user may select model elements to be presented on the screen; these may include objects available in the program (among others, graphical objects such as line, broken line, 3D objects and reinforcing bars loaded from the Autodesk Robot Structural Analysis RC modules), sections assigned to them, materials, names, results or loads (they are selected independently for each object type). On the tabs: Objects, Names, Sections and Materials options were divided into the following groups: • structural objects (beam, column, wall, slab, spread footing, continuous footing,
etc.) • architectural objects (rooms, dimension lines, graphical objects and texts) • reinforcing bars that can be displayed only after loading results of RC element
design in the Autodesk Robot Structural Analysis RC modules. At the bottom of the dialog box there are two icons:
- pressing this icon results in displaying only selected elements in a chosen structure view (NOTE: at least 1 object has to be selected in a structure view); objects will be displayed in a structure view without being highlighted
– pressing this icon restores the visibility of all elements (not only selected ones) in a chosen structure view; this is an operation opposite to displaying selected elements. Moreover, the Layers tab allows defining layers to which graphical objects and reinforcing bars are assigned (after the import of reinforcing bars calculated in the Autodesk Robot Structural Analysis RC modules). The dialog box below opens as well after selecting the menu option Objects / Graphical Objects / Display Layers or
after pressing the icon. Layers may also be imported from a DXF file.
© 2009 Autodesk, Inc. All rights reserved

Autodesk Concrete Building Structures 2010 - User Guide page: 37
To create a new layer, the user should type its name in the Name column of the table on the Layers tab. The following parameters can be defined for each layer: • color • line style / type (there are several line types available: continuous, dashed, dotted,
etc.) • thickness (5 thicknesses are available). Apart from that, there are 2 columns in the layer table: • before the layer name is the selection field denoting an active (current) layer to
which defined drawing objects will be added • if the option after the layer name is activated, then that layer will be displayed. NOTES: 1. Graphical objects defined by the user are presented only in a 2D view (architectural and structural). 2. Reinforcing bars loaded from the Autodesk Robot Structural Analysis RC modules are presented only in a 3D view (architectural and structural). While reinforcing bars are being loaded, the program defines additional layers in which reinforcing bars are placed (the program adds layers for individual object types: beams, slabs, walls, etc. and for the reinforcement type: longitudinal, transversal). The tabs: Objects, Names, Sections and Materials are identical. Below are described the remaining two tabs. The Loads tab
The above dialog box makes possible selection of the loads to be presented on the screen; the following loads may be chosen for presentation: concentrated, linear or
© 2009 Autodesk, Inc. All rights reserved
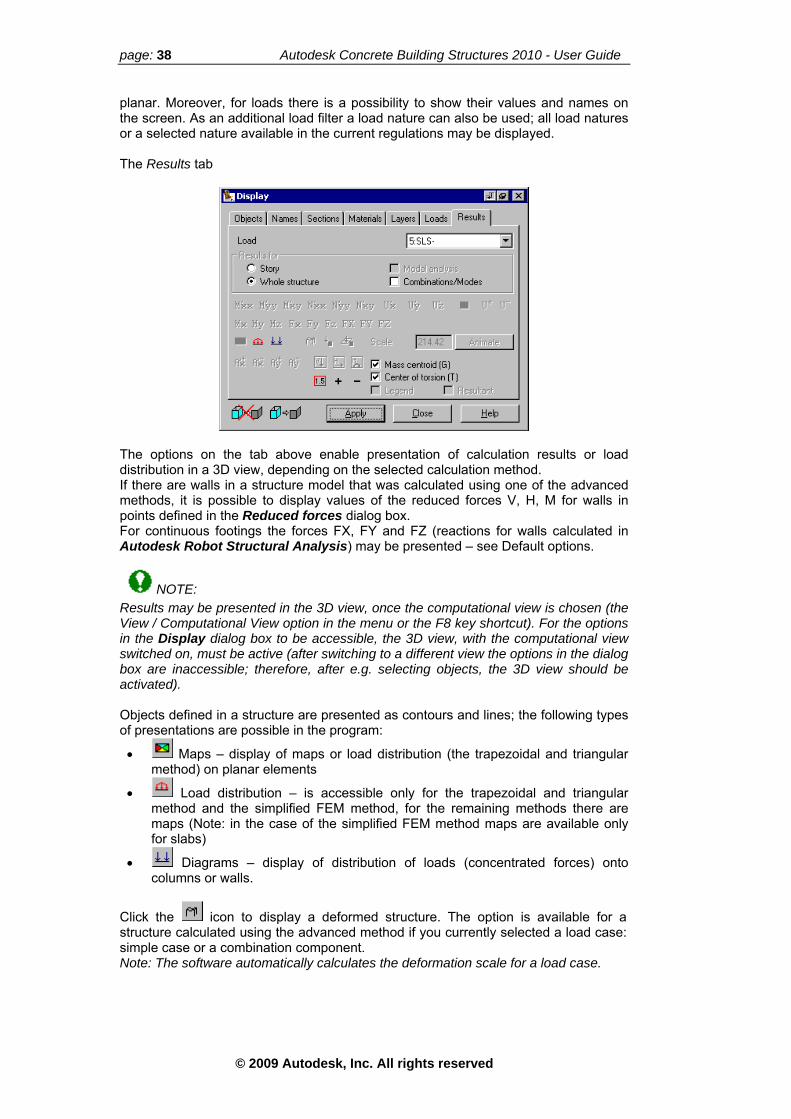
page: 38 Autodesk Concrete Building Structures 2010 - User Guide
planar. Moreover, for loads there is a possibility to show their values and names on the screen. As an additional load filter a load nature can also be used; all load natures or a selected nature available in the current regulations may be displayed. The Results tab
The options on the tab above enable presentation of calculation results or load distribution in a 3D view, depending on the selected calculation method. If there are walls in a structure model that was calculated using one of the advanced methods, it is possible to display values of the reduced forces V, H, M for walls in points defined in the Reduced forces dialog box. For continuous footings the forces FX, FY and FZ (reactions for walls calculated in Autodesk Robot Structural Analysis) may be presented – see Default options.
NOTE: Results may be presented in the 3D view, once the computational view is chosen (the View / Computational View option in the menu or the F8 key shortcut). For the options in the Display dialog box to be accessible, the 3D view, with the computational view switched on, must be active (after switching to a different view the options in the dialog box are inaccessible; therefore, after e.g. selecting objects, the 3D view should be activated). Objects defined in a structure are presented as contours and lines; the following types of presentations are possible in the program:
• Maps – display of maps or load distribution (the trapezoidal and triangular method) on planar elements
• Load distribution – is accessible only for the trapezoidal and triangular method and the simplified FEM method, for the remaining methods there are maps (Note: in the case of the simplified FEM method maps are available only for slabs)
• Diagrams – display of distribution of loads (concentrated forces) onto columns or walls.
Click the icon to display a deformed structure. The option is available for a structure calculated using the advanced method if you currently selected a load case: simple case or a combination component. Note: The software automatically calculates the deformation scale for a load case.
© 2009 Autodesk, Inc. All rights reserved

Autodesk Concrete Building Structures 2010 - User Guide page: 39
The Results tab also has options that you can use to display:
• – vertical loads (vertical load takedown) In the 3D computational view, all vertical elements (columns and walls), spread footings, continuous footings and raft foundations are represented using appropriate colors based on the vertical force that they carry. For columns it is the Fx force, while for walls these are: a sum of vertical forces for calculations using simplified methods or the N’yy reduced force at the top of the wall for advanced methods. If you select the Display values option, values in spread footings, continuous footings and raft foundations are displayed on the Results tab. You can read values for the remaining elements after you select an element with the mouse cursor. Select Animate to display an animation of the story by story load takedown with elements marked using appropriate colors. Select Resultant to display – for each story - the resultant of vertical forces on a specified story, fixed at the center of gravity of vertical forces. The resultant of vertical forces at the center of gravity of the foundation and the moment that results from shifting the center of gravity of forces to the center of gravity of the foundation are displayed for the lowest story
• – stresses that result from vertical forces in vertical elements Stresses are presented in a similar way as vertical forces previously mentioned. Stresses in elements are calculated using the following formula: vertical force / cross-sectional area of an element.
These options are active in the 3D computational view and are available for all load cases. The options for displaying loads or stresses in the Display dialog are available if the structure has been calculated (if current calculation results are available). Select Resultant to display the resultant of vertical forces at the reference level. If an animation of the vertical forces takedown is selected, it also displays resultant forces on individual stories. The above dialog box contains the Results for combinations option. If this option is switched off, the load case list includes, apart from simple cases, only extreme combinations (ULS+, ULS-, SLS+, SLS-, ALS+, ALS-). After activating the Results for combinations option the list of cases also comprises all components of code combinations and combinations defined manually which are marked as active in the Combinations dialog box. If the Display legend option is switched on, then a 3D structure view will present, apart from diagrams or maps, a scale for the displayed quantity. Switching on the options Mass centroid (G) or Center of torsion (T) allows presenting positions of points (with their coordinates) at which the mass centroid G or the center of torsion T (it is determined by means of the method described in the topic Seismic / spectral analysis considering the torsion effect) are located; the options are available in the dialog box in the computational views (2D and 3D) after performing seismic calculations (simplified or advanced). The 2D view presents the mass centroids and the centers of torsion with coordinates for the active story, while the 3D view displays the mass centroids and the centers of torsion for all stories (at the midpoint of the story height). The 2D view also enables presenting distribution of loads: concentrated forces and linear loads (loads parallel to the Z axis may be presented in the 2D view as well as in an axonometric view).
NOTE: Calculations performed in the Autodesk Robot Structural Analysis or the Robot calculation engine disable the option that presents results for a selected story. In the Autodesk® CBS program there is also the Display Selected Elements option provided. It is available from the context menu in a selected structure view. After switching on this option only selected elements are visible on the screen (after switching on the Display Selected Elements option objects are presented without being highlighted).
© 2009 Autodesk, Inc. All rights reserved

page: 40 Autodesk Concrete Building Structures 2010 - User Guide
NOTE: In a view in which the Display Selected Elements option is switched on, selection of objects is not possible (the mouse cursor changes – the cursor is presented in gray then ).
4.14. 3D Perspective Display 4.14.1. Perspective View Support
The perspective view is available from the menu after selecting the View / 3D View / Perspective Projection option or from the 3D View toolbar in every viewer with a 3D structure view. When using the perspective projection, the camera movement options linked with the mouse movements on screen refer to the camera’s local system (see drawing below).
4.14.2. Camera Location The Camera location option is accessible from the context menu in any 3D viewer. It enables preparing and recording animations. Once it is activated, the following dialog box appears on screen:
The top toolbar in the dialog box above contains options used for setting a camera location:
- copies a camera location
- cuts a camera location
- pastes a camera location
- deletes one camera location
- deletes all camera locations
© 2009 Autodesk, Inc. All rights reserved

Autodesk Concrete Building Structures 2010 - User Guide page: 41
- adds a new camera location
- adds a camera location based on the current view. The table presents settings of the current camera locations. Individual table columns show the following information: first column specifies a name of camera location, the next one determines a number of frames between the current location and the next one, the subsequent six columns defines a camera location. A camera location in the above dialog box is presented in the global system. The bottom part of the dialog box (the Animation field) includes options used to steer animation watching and recording .
4.14.3. Watching a Presentation Once the Play option is selected in the Animation field in the Camera dialog box, the program plays an animation in an active 3D viewer.
NOTE: If this is a 2D viewer or a 3D viewer without perspective projection switched on, that is active, an animation is not played.
For animation support there are the following options provided in the lower part of the Camera dialog box:
- plays / pauses an animation
- stops an animation (returns to the first frame)
- records an animation
- jumps to the previous location
- jumps to the previous frame
- jumps to the next frame
- jumps to the next location
- plays an animation continuously.
4.14.4. Recording a Presentation Once the Record option is selected in the Animation field in the Camera dialog box, the program activates animation saving to file. To record a presentation, the user should:
- indicate name of the file where to an animation will be compressed; NOTE: animation files may come in large sizes, particularly for not compressed formats or low-compression ones, thus, take note if the adequately large amount of free space is left on disk
- select video compression (a codec type); all the video compression codecs installed in the system are accessible in the dialog box.
NOTE: Some of the codecs installed in the system may not enable saving a file in a chosen format, they only allow reading (decoding). In such a case saving in a selected format is impossible and when trying to do so, an appropriate message appears.
NOTE: For some codecs there are compression options available in the dialog box for selection of compression. They depend on a codec type, a description of their application is provided on the manufacturer’s Internet sites. After selecting compression parameters, an animation is prepared for saving. Pressing the Play option saves the animation to a file. Stopping the animation ends recording. While saving all the options of presentation watching are available.
© 2009 Autodesk, Inc. All rights reserved

page: 42 Autodesk Concrete Building Structures 2010 - User Guide
5. DEFINITION OF A STRUCTURE MODEL 5.1. Story
The story is one of the basic terms in definition of a structure model. By standard, a structure is defined story by story (in the XY plane). For the user to be able to control a defined structure model, it is recommended to work in two windows with the XY projection set in one window and 3D projection (for a whole building or for the current story) set in the other. A number of the current story may be changed by means of the Story / Current story option (it is also presented in the Story toolbar as a selection list). In each window the user may set a different story number (e.g. while working using two windows, the user may set the first floor view in one of them and the second floor view in the other).
The program also enables definition of a new story (moving to a not-existing story) using the options provided in the Story toolbar. After pressing one of the following icons:
- Previous story
- Next story, the message: "Do you want to add a new story?" will appear on screen. If the ‘yes’ answer is given, the program will create a new story and will move to the new story; if the No button is pressed, the story will not be created (the program will not move to a different story).
5.2. How to Copy a Story To copy the current story e.g. five times, follow the steps below: • activate the 2D viewer • select the menu command Story / Copy • in the Copy Current Story dialog box, in the From: edit field enter the value 1, in
the to: field enter 4
• press the OK button; a building consisting of five identical stories has been
generated.
5.3. Story Parameters Story parameters may be changed in the dialog box available from: • the menu, by selecting the Story / Parameters option
• the toolbar, after pressing the Story parameters icon.
© 2009 Autodesk, Inc. All rights reserved

Autodesk Concrete Building Structures 2010 - User Guide page: 43
For each story a name may be defined; the user may also use the option of automatic name ascription to stories (the Auto option switched on). Apart from that, each story may be ascribed height independently.
Options in the lower part of the dialog box enable selection of a story parameter set (saved in a file available on the list or lists) used in calculation of the required and provided reinforcements of structure elements; to define new story parameters for a selected RC code, press the (...) button provided to the right of the selection list.
NOTE: If the same code is used for calculation of the required reinforcement and the provided reinforcement, then only one selection list will be available in the above dialog box. If different codes are used to calculate the required reinforcement and the provided reinforcement, the dialog box will include two selection lists. A list of story parameters that can be set in the Autodesk® CBS program is conditioned by a selected code of the required and provided reinforcement design. Pressing the (...) button located to the right of the selection list opens the Parameters of the story dialog box for a selected RC code. In the dialog box below the user may assign a name to a defined parameter set and change story parameters to the ones appropriate for the RC element design code.
After switching on the Save as default option, the current parameters are saved as a default parameter set.
© 2009 Autodesk, Inc. All rights reserved

page: 44 Autodesk Concrete Building Structures 2010 - User Guide
5.4. How to Modify Story Parameters To modify the name and the height of the third story, do as follows:
• select story no. 3 by pressing the buttons Previous story / Next story or by selecting story no. 3 from the Story no. drop-down list in the
toolbar
• select the menu command Story / Parameters or press the Story Parameters icon
• select the blank field and enter there Story 3 • in the h= edit field enter 2.5 • leave the parameters of RC element design unchanged • press the OK button.
5.5. Edit Options (Story) The following edit options are available for the story (they are located in the Story menu): • Copy – the option enables copying the current story; the user should define story
numbers (from, to) where to a given story should be copied; the user may copy all the elements from a given story as well as only selected elements (the Story / Copy / Copy only selected objects option); if the Copy only visible objects option is switched on, then only visible objects and loads will be copied; after copying a story, the last-defined story is set as a current one
• Insert - the option enables inserting any number of empty stories between the
existing stories
© 2009 Autodesk, Inc. All rights reserved

Autodesk Concrete Building Structures 2010 - User Guide page: 45
The program also enables definition of a new story (moving to a not-existing story) using the options provided in the Story toolbar. After pressing one of the following icons:
- Previous story
- Next story, the message: "Do you want to add a new story?" will appear on screen. If the ‘yes’ answer is given, the program will create a new story and will move to the new story; if the No button is pressed, the story will not be created (the program will not move to a different story).
• Delete – the option enables deleting defined stories; if there are any stories above
the stories currently deleted, the program may leave the empty stories or move the upper stories down (the Story / Delete / Move the remaining stories option).
5.6. Dimension Lines In the program definition of dimension lines for a generated structure is enabled. There are options available which allow selecting a dimension line type (in the Dimension lines menu or icons in the Dimension lines toolbar).
– dimension lines parallel to axes of the global coordinate system
- dimension lines parallel to the dimensioned object
– automatic generation of dimension lines; all the displayed points (architectural points or axis intersections) are being used
– dimension lines with arrowheads
- dimension lines in the form of reference marks. Moreover, the following options are available in the program:
– enables display of architectural points; points are displayed for the currently-selected elements. The option is used during automatic generation of dimension lines; if this option is turned on, then while defining dimension lines automatically, the architectural points displayed are used in generation of a dimension line.
- enables display of axis points; points are displayed for the currently-selected elements.
© 2009 Autodesk, Inc. All rights reserved

page: 46 Autodesk Concrete Building Structures 2010 - User Guide
The option is used during automatic generation of dimension lines; if this option is turned on, then while defining dimension lines automatically, the displayed points of axis intersections are used in generation of a dimension line.
If the Drag option is turned on, it enables placing successive structure dimensions on the same dimension line. All the points positioned on a dimension line are available in the Object properties dialog box on the Position tab; this dialog box enables modification of points (adding, deleting). If a point used in definition of a dimension line is simultaneously a point belonging to any other object (e.g. wall end), then translation of such an object will result in automatic update of points on a dimension line.
5.7. How to Define Dimension Lines To add a dimension line to outer contour edge for the wall (see the drawing below), do as follows:
• select the command Dimension Lines / Orthogonal or press the Orthogonal
icon
• activate the option Snap cursor to object architectural points by pressing the icon (other snap options may be active at the same time)
• in the 2D viewer click with the left mouse button on point 1, and next, on point 2 (see the drawing above)
• using the mouse determine the location of the dimension line and press the left mouse button.
To add a dimension line to axis for the wall, follow the instructions below:
• select the command Dimension Lines / Orthogonal or press the Orthogonal icon
• activate the option Snap cursor to intersections of object axes by pressing the icon (other snap options may be active at the same time)
• in the 2D viewer click with the left mouse button on point 1, and next, on point 2 (see the drawing above)
• using the mouse determine the location of the dimension line and press the left mouse button.
To add automatically dimension lines to outer contour edge for a wall with openings, do as follows: • switch on the option Display architectural points by selecting the menu command
Dimension Lines / Display Architectural Points or by pressing the icon on the Dimension Lines toolbar
• press the right mouse button and choose the Select option from the context menu • select the wall being dimensioned (the wall becomes highlighted)
• press the Automatic icon
© 2009 Autodesk, Inc. All rights reserved

Autodesk Concrete Building Structures 2010 - User Guide page: 47
• in the 2D viewer, using the mouse determine the location of the dimension line and press the left mouse button; the created dimension lines are presented in the drawing below.
5.8. Objects Available in the Program There are the following object types available in the Autodesk® CBS program: • beams – are defined by means of two points; beam section may be rectangular or
T-shaped (for RC sections) or it may be any section from the steel section database (for steel sections) if the option for beam definition is selected (particularly important when defining steel members), then the following options are available in the menu:
Horizontal Beam – if this option is chosen, then a beam is defined as horizontal on a selected story
Inclined Beam - Up - if this option is chosen, then a beam is defined as an inclined one between the stories (the beginning of a beam is positioned on the lower story, whereas the end - on the upper story)
Inclined Beam - Down - if this option is chosen, then a beam is defined as an inclined one between the stories (the beginning of a beam is positioned on the upper story, whereas the end - on the lower story)
Lintel - if this option is chosen, then a beam is defined as a lintel (the beam above window and door openings) – see the description of the lintel definition and assumptions adopted in the lintel calculations; the user should indicate windows or doors above which a lintel should be defined – a default lintel length is defined in the Default Options dialog box
Ground beam - if this option is chosen, then a beam is defined as a ground beam (a horizontal beam supporting objects located on the same story, such as columns, walls, partition walls, and transferring loads from a structure to foundations); a ground beam is faced (aligned) to the bottom of the current story - it may be presented in the architectural view or in the Object Properties dialog box. In the current program version reactions from ground beams are applied axially to centers of foundations (the eccentricity from the edge to the center of the spread footing is ignored). NOTE: In advanced calculations of a structure, an equivalent load resulting from a partition wall or finishing layers of a wall positioned on a ground beam is not applied to the beam and the equivalent load should be applied manually (there is a similar case with a continuous footing if a wall bottom is not supported on a slab).
• columns - are defined by means of one point – the other point (column end) is generated automatically based on the height of a given story; column section may be rectangular, T-shaped or round
• spread footings - are defined by means of one point; spread footing section may be rectangular (the rectangular footing object in the section database) or trapezoidal (the trapezoidal footing object in the section database)
© 2009 Autodesk, Inc. All rights reserved

page: 48 Autodesk Concrete Building Structures 2010 - User Guide
• continuous footings - are defined by means of two points; continuous footing section may be rectangular or T-shaped
• walls - are defined by means of two points; the user may assign thickness to them and define layered material (see the description of layered material in the material database); the program offers the possibility of assigning a shape other than rectangle to the wall (e.g. gable wall); to do that the user should open the Object properties dialog box (the Position tab), add a new point to the contour and modify its coordinates appropriately
• slabs - are defined by means of a broken line (polyline); the user may assign thickness to them and define layered material (see the description of layered material in the material database); by default they are positioned on the top level of the current story the Objects menu also contains the Add Specially option - it enables quick definition of slabs in typical situations; if the user selects this option and then clicks with the left mouse button on the area limited by walls, then the program generates a slab on this contour
• raft foundations - are defined in the same manner as slabs – the difference is that by default they are positioned on the bottom level of the current story
• partition walls - are defined in the same manner as walls – the difference is that the Structural element option is switched off automatically; if a structure is exported to the Autodesk Robot Structural Analysis program, it results in modeling this type of objects as linear load on a slab The following rules apply to non-structural elements in the program: - continuous footings / spread footings are generated under unsupported columns / non-structural walls - the weight of disregarded non-structural elements is not included in the structure self-weight - non-structural elements are disregarded during design of structure elements.
• windows – are defined by means of one point which determines a position of the window center; window section may be rectangular (the rectangular opening object type in the section database); NOTE: windows may not exist independently, they are always associated with the wall object type; it means that a window position is always defined in the local coordinate system of a wall and that a window is automatically deleted when the wall to which it belongs is deleted
• doors - are defined in the same manner as windows - the difference is that they are automatically positioned on the bottom level of the current story
• floor cuts/openings – are defined by means of a polyline (for any shape) or by means of one point (for a rectangular shape); floor cuts/openings may not exist independently, they are always associated with the slab object type; it means that a position of a floor cut/opening is always defined in the local coordinate system of a slab and that a floor cut/opening is automatically deleted when the slab to which it belongs is deleted
• stairs – are defined by means of a quadrangle (it should be remembered that edges at both ends of a flight of stairs must be parallel); in the current program version only straight stairs are available (the single-flight stairs object type in the section database); parameters of a flight of stairs (number of steps, their width and height) may be defined by the user or determined automatically by the program (to calculate the number of steps the following approximate formula is applied: 2*h + s = 63, where h – step height, s – step width); height of a flight of stairs is recognized automatically based on the slab positions with which the stairs have been connected NOTE: The self-weight and loads of stairs are taken into account during calculations of a structure by means of the advanced method; stairs are treated as a slab, while all stair loads as slab loads
© 2009 Autodesk, Inc. All rights reserved

Autodesk Concrete Building Structures 2010 - User Guide page: 49
NOTE: In the case of structure calculations by means of the triangular and trapezoidal method or the simplified method, the self-weight and loads of stairs will be taken into account if supports are defined for flights of stairs.
• rooms - are defined by means of polylines; their shape may be defined by the user or determined automatically by the program based on the analysis of geometry of a given story (detection of closed contours); rooms are auxiliary (non-structural) objects used for room description in the architectural presentation and when preparing summary tables of finishing materials
• graphical objects, visible in a defined story in a 2D view (architectural and structural); the following graphical objects can be created:
- point
- line (depending on a type of selected segment this may be a straight line or an arc segment)
- broken line (polyline) – composed of straight or arc segments; this is an equivalent of the AutoCAD © polyline; clicking again the last-defined point completes the definition of segments of a broken line
- contour (closed broken line)
- circle of a radius defined graphically on the screen
- rectangle – defined by means of 3 points
- text of parameters and contents defined by default; it is defined by means of a point; that point indicates the bottom left corner of the entered text; at the defined point the program enters a default text whose parameters are determined in the dialog box that opens after selecting the option Edit / Default Values / Dimension Lines and Texts
- 3D object - inserts a 3D object from the list of available objects saved in the 3D object database in a given project
- 2D object - inserts a 2D object from the list of available objects saved in the 2D object database in a given project.
NOTE: While defining structure objects the cursor changes its shape depending on a type of inserted object (an icon representing the type of inserted element, load or text appears on the screen); it allows easier orientation during definition of a structure model. After defining an object of a given type, the program expects – by default – definition of the next object of the same type. Pressing the Esc button switches on the selection mode. When defining structure objects it is possible to quickly set a selected offset using the Tab key. To do it, the user should press the Tab key before inserting a point / points defining a structure object; then a list of available offsets appears on the screen (analogously as in the Object Properties / Position dialog box). An offset can be selected from the list by multiple pressing of the Tab key (the list of available offsets is scrolled) or by indicating it on the list by means of the mouse.
© 2009 Autodesk, Inc. All rights reserved

page: 50 Autodesk Concrete Building Structures 2010 - User Guide
5.9. How to Define a Beam (Horizontal and Inclined)
To define a horizontal, concrete beam of section 20*20 cm, follow the steps presented below: • select the menu command Objects / Horizontal Beam or drop down the menu at
the Beam icon and select the Horizontal Beam option • on the toolbar choose the R20*20 section (if this section is not displayed on the
list, add it using the Default Sections command) and the Concrete material
• in the 2D viewer click with the left mouse button on the beginning point of the
beam, and next on the end point of the beam • the beam will be automatically generated on the upper level of a given story.
To define an inclined beam of timber – pine section of dimensions 20*20 cm, follow the instructions below: • select the menu command Objects / Inclined Beam - Down or drop down the
menu at the Beam icon and select the Inclined Beam - Down option • on the toolbar choose the R20*20 section (if this section is not displayed on the
list, add it using the Default Sections command) and the Pine material
• in the 2D viewer click with the left mouse button on the beginning point of the
beam (upper, outermost level of the story), and next on the end point of the beam (lower, outermost level of the story)
• the beam will be generated as an inclined one, with the beginning and end points positioned respectively, on the levels of the highest point and the lowest point of a given story.
5.10. How to Define a Column To define a concrete column of section 20*20 cm, follow the steps below:
• select the menu command Objects / Column or press the Column icon • on the toolbar choose the R20*20 section (if this section is not displayed on the
list, add it using the Default Sections command) and the Concrete material
• in the 2D viewer click with the left mouse button on the insertion point of the
column • the height of the inserted column is by default equal to the height of the story.
5.11. How to Define a Wall To define a 20cm-thick wall of solid brick, follow the steps listed below:
• select the menu command Objects / Wall or press the Wall icon • on the toolbar choose the TH20 section (if this section is not displayed on the list,
add it using the Default Sections command) and the Solid brick material
• in the 2D viewer click with the left mouse button on the beginning point of the wall,
and next, on the end point of the wall • the height of the inserted wall is by default equal to the height of the story.
© 2009 Autodesk, Inc. All rights reserved

Autodesk Concrete Building Structures 2010 - User Guide page: 51
5.12. How to Define a Slab To define a 20cm-thick concrete slab, follow the below-listed steps:
• select the menu command Objects / Slab or press the Slab icon • on the toolbar choose the TH20 section (if this section is not displayed on the list,
add it using the Default Sections command) and the Concrete material
• in the 2D viewer click with the left mouse button on points 1 to 9 one by one (see
the drawing below), given that the coordinates of point 9 are the same as for point 1 (thus the contour determining the shape of a slab closes).
NOTE: If a closed contour is already generated, a slab can also be defined in a very simple
way using the Add Specially option; selection of this option and the left-mouse-button click on the closed contour, limited with walls, results in automatic generation of a slab on this contour.
5.13. How to Define a Spread Footing To define a (concrete) spread footing, follow the instructions below: • select the menu command Objects / Spread Footing or press the Spread Footing
icon • on the toolbar choose the section FR – rectangular footing (if this section is not
displayed on the list, add it using the Default Sections command) and the Concrete material
• in the 2D viewer click with the left mouse button on the insertion point of the
spread footing • the inserted spread footing is positioned by default, on the level of the lowest point
of a given story.
© 2009 Autodesk, Inc. All rights reserved

page: 52 Autodesk Concrete Building Structures 2010 - User Guide
5.14. Description of the Lintel Definition and Assumptions Adopted in the Lintel Calculations
A lintel is an object of the beam type, yet it does not participate in general load distribution and is calculated independently. The following assumptions concerning the lintel definition have been adopted in the program:
• a lintel is always associated with an opening (window, door); after deleting the opening, the lintel is deleted as well
• the lintel is created automatically at the height equal to the half the height of the section above the upper edge of the opening
• the Object Properties dialog box enables modification of the x and y coordinates (when extending the lintel above the neighboring windows)
• the lintel length considered in calculations equals the width of the opening + half the lengths of overhangs on both sides
• in the architectural view the lintel is presented with the entire overhang • in the Properties / Calculation options dialog box the lintel overhang is
adopted as a support width • if the lintel is defined above two openings, then the width of the middle support
equals the distance between the openings (NOTE: if openings touch, then they are treated as one opening).
Calculations of the lintel in the Autodesk® CBS program are performed adopting the following assumptions:
• distribution of loads onto the lintel considers the manner of load transfer; the
icons and are used for that purpose – they are provided in the Calculation Options dialog box for distribution according to the triangular and trapezoidal method
• the weight of the wall above the opening should be assumed as a lintel load – in the form of:
- a triangle or a trapezoid formed by drawing straight lines at an angle of 45
degrees from the opening edge if the icon is selected; if the trapezoid is formed, it is also necessary to add loads from the upper surface of the wall from the length of the trapezoid side
- a rectangle above the lintel beam if the icon is selected. Schemes of the load distribution are presented in the drawings below. 1. Self-weight of the wall
© 2009 Autodesk, Inc. All rights reserved

Autodesk Concrete Building Structures 2010 - User Guide page: 53
2. Loads from the floor
The lintel design in the Autodesk® CBS program is carried out adopting the following assumptions: • width of the outermost supports equals the lintel overhang • width of intermediate supports equals the distances between openings (if
openings touch, they are treated then as one opening and the width equals zero).
5.15. Entering of Data from the Keyboard The Autodesk® CBS program enables definition of linear and planar elements through the keyboard. If the keyboard is used in definition of beam, continuous footing, slab, raft foundation or wall, the program displays the dialog box allowing definition of values from the keyboard.
The coordinates dx and dy, that can be defined in the above dialog box, are the relative coordinates referred to the last-defined point. The icons located in the left part of the dialog box indicate direction of value increment:
– to the left
– to the left-up
– up
– to the right-up
– to the right
– to the right-down
© 2009 Autodesk, Inc. All rights reserved

page: 54 Autodesk Concrete Building Structures 2010 - User Guide
– down
– to the left-down. The direction can be determined by pressing the arrows on the keyboard; pressing two arrows simultaneously allows definition of both increments: dx and dy. By pressing an arrow, as well as by pressing the Enter key, the value entered is accepted.
5.16. Object Properties The Object properties dialog box plays the following role: • is used to present and modify data concerning all objects already defined
(including defined graphical objects); this data is displayed for one or for several currently selected elements
• options on the Results tab are used to present internal forces, load distribution (for the trapezoidal and triangular distribution) as well as results of design for elements of a structure model defined in the Autodesk® CBS program
• options on the Calculation options tab are used to determine support conditions of individual structure elements as well as to define releases on beams, to change a support type or to change the local system for slabs in the case of structures calculated by the Autodesk Robot Structural Analysis program
• may be used to define a new object; in this mode the program changes the name of the dialog box to: Add object – object type.
The Object properties dialog box opens after: • selecting the menu command: Edit / Properties
• pressing the icon • pressing the Alt + Enter key combination • selecting the Properties command from the context menu.
The tabs: Results and Calculation options are displayed for the following objects:
- Results tab – all objects except spread footings - Calculation options tab – for beams, slabs and raft foundations.
The following information is presented on the Properties tab: • Section – a section from the section database ascribed to a selected object; there
is a list of all the defined sections of a given type available which enables changing a section; after pressing the (…) button located to the right of the field containing a section name, the Section database dialog box is opened
• Material - a material from the material database ascribed to a selected object; there is a list of all the defined materials available which enables changing a material; after pressing the (…) button located to the right of the field containing a material name, the Material database dialog box is opened In the case of a layered material, next to the button used for adding a new material there is an additional option for reversing the order of layers
© 2009 Autodesk, Inc. All rights reserved

Autodesk Concrete Building Structures 2010 - User Guide page: 55
• Name – a name ascribed to a selected object; a name may be ascribed automatically based on the default parameters set in the dialog box opened after selecting the option: Edit / Default values / Names (the Auto option is switched on then) or ascribed manually by the user (it should be entered to the edit field after switching off the Auto option)
• Structural element – the option which enables the user to determine if a given object is to be treated as a calculation element; if for a given object the option is switched on, then an equivalent of the object model (bar, support or panel) will be generated in the Autodesk Robot Structural Analysis program; if the option is switched off, then - in the Autodesk Robot Structural Analysis program, the object will be modeled as a load (e.g. for a partition wall, its weight will be changed to a linear load applied to the corresponding panel).
For the options: Section and Material, the Fixed option is also available. If this option is turned on, it ‘freezes’ a given parameter: e.g. if the user selects 2 beams of identical sections and for one of them the Section fixed option is turned on, then replacement of the section with a different one will not affect this particular beam. The above data is accessible for all the elements except for texts; for texts the Properties tab looks as shown in the figure below.
The following options are available on this tab: • Size – font size which is defined in structure units; it means that the text size is
correlated with the current zoom • Style – font style; the allowable styles include: regular, italic, bold and bold italic • Text – entered text • Angle – angle at which the text will be displayed; for horizontal texts the inclination
angle equals 0 degrees. In order to obtain a required text on the screen, first a text should be defined by means of the option: Edit / Objects / Text (a default text with parameters set in the dialog box opened after selecting the option: Edit / Default Values / Dimension Lines and Texts will be displayed on the screen) and afterwards it should be modified in the Object properties dialog box. The Position tab shown in the figure below presents the following information: • coordinates of the successive snap points of a given object (e.g. the beginning
and end point for beams, columns, continuous footings, coordinates of the successive apices for slab or opening of any shape); in the case of slabs and openings the user may change the number of apices by means of the options:
New row and Delete row • γ (gamma angle) – an angle by which a given object is rotated with respect to the
local x axis; this option is active in the case of columns, spread footings, beams as well as continuous footings.
For the γ (gamma angle) option there is the Fixed option is available. If this option is turned on, it ‘freezes’ a given parameter (just as in the case of the Section and Material options described above).
© 2009 Autodesk, Inc. All rights reserved
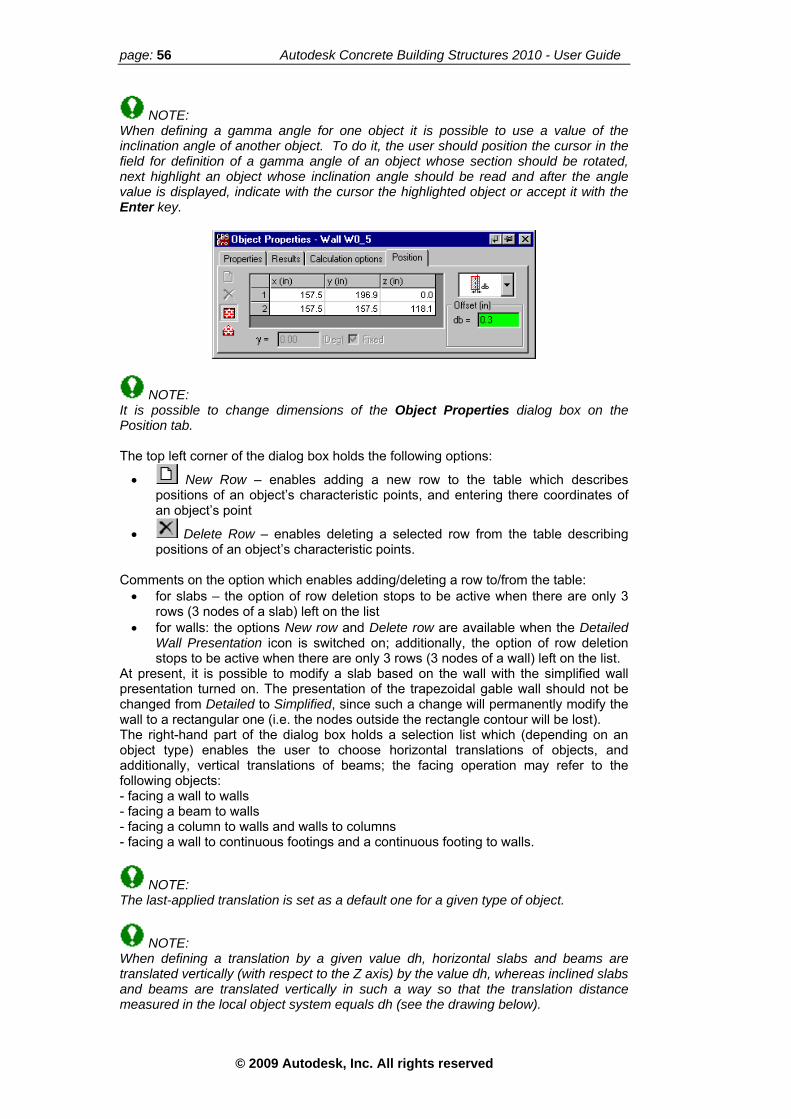
page: 56 Autodesk Concrete Building Structures 2010 - User Guide
NOTE: When defining a gamma angle for one object it is possible to use a value of the inclination angle of another object. To do it, the user should position the cursor in the field for definition of a gamma angle of an object whose section should be rotated, next highlight an object whose inclination angle should be read and after the angle value is displayed, indicate with the cursor the highlighted object or accept it with the Enter key.
NOTE: It is possible to change dimensions of the Object Properties dialog box on the Position tab. The top left corner of the dialog box holds the following options:
• New Row – enables adding a new row to the table which describes positions of an object’s characteristic points, and entering there coordinates of an object’s point
• Delete Row – enables deleting a selected row from the table describing positions of an object’s characteristic points.
Comments on the option which enables adding/deleting a row to/from the table: • for slabs – the option of row deletion stops to be active when there are only 3
rows (3 nodes of a slab) left on the list • for walls: the options New row and Delete row are available when the Detailed
Wall Presentation icon is switched on; additionally, the option of row deletion stops to be active when there are only 3 rows (3 nodes of a wall) left on the list.
At present, it is possible to modify a slab based on the wall with the simplified wall presentation turned on. The presentation of the trapezoidal gable wall should not be changed from Detailed to Simplified, since such a change will permanently modify the wall to a rectangular one (i.e. the nodes outside the rectangle contour will be lost). The right-hand part of the dialog box holds a selection list which (depending on an object type) enables the user to choose horizontal translations of objects, and additionally, vertical translations of beams; the facing operation may refer to the following objects: - facing a wall to walls - facing a beam to walls - facing a column to walls and walls to columns - facing a wall to continuous footings and a continuous footing to walls.
NOTE: The last-applied translation is set as a default one for a given type of object.
NOTE: When defining a translation by a given value dh, horizontal slabs and beams are translated vertically (with respect to the Z axis) by the value dh, whereas inclined slabs and beams are translated vertically in such a way so that the translation distance measured in the local object system equals dh (see the drawing below).
© 2009 Autodesk, Inc. All rights reserved

Autodesk Concrete Building Structures 2010 - User Guide page: 57
The following positions of translations are possible: STANDARD: - facing to the left / right - top / center / bottom (for beams and slabs) NON-STANDARD: - translation by the value db (horizontally) and dh (vertically - for beams and slabs). Facing has effect on the position of continuous footings under walls and spread footings under columns; if continuous footings and spread footings are defined in a structure model, then the position of continuous footings and spread footings changes automatically if the facing is modified. The Position tab also allows modifying positions of loads not assigned to an object (by changing coordinates of points where a load is applied). In case of walls, the program allows for two modes of presentation: • Simplified (refers to rectangular walls) – a wall is presented by means of two
points (bottom left corner and top right corner) • Detailed (refers to any type of walls) – all points of a wall contour are being
presented. To define e.g. a gable wall, the user should choose the detailed presentation, add point at the required location (it is added in the midpoint of the distance between the point currently highlighted and the previous point) and in the end, change the value of its z coordinate. For rectangle-shaped openings, the program enables defining the reference point at the following points (see the drawing below): • opening center • bottom left corner of an opening • bottom right corner of an opening • top left corner of an opening • top right corner of an opening • centers of individual sides of an opening.
© 2009 Autodesk, Inc. All rights reserved

page: 58 Autodesk Concrete Building Structures 2010 - User Guide
Coordinates of a new object may be defined manually or by using the combination of manual and graphical definition. For example, to define a 3 m-long wall attached at the point being the end a different wall and perpendicular to this wall, the user should: • open the Add object – Wall dialog box on the Position tab • translate the coordinate system to a required point using the option Coordinate
system – according to object (orthogonally with respect to the existing wall) • define first point with the mouse by clicking on the origin of the coordinate system • define second point manually entering the coordinates x = 0.0, y = 3.0.
When the Object properties dialog box presents properties of a window, the additional Options tab is available.
The above dialog box includes options which enable assigning a color to a window pane and selecting a degree of transparency for presentation in the 3D view (the options refer only to the architectural view). The lower part of the dialog box holds the options Open and Flip; they allow modifying the way a window is presented in the 3D architectural view: • Open - if this option is switched on, individual window panes are displayed as
opened (casement window), pivoted open, slid open (double-hung window) according to the definition of the window in the database (for a given window type)
• Flip - if this option is switched on, an opened window (after activating the Open option) will be reversed by 180 degrees (a window opened to the inside will be presented as opened to the outside).
5.17. Main Direction Defined for Slabs A slab support is presented on the Calculation Options tab in the Object Properties dialog box. Moreover, a symbol denoting directions of axes of the local system of a slab and the direction of main reinforcement are presented for a slab; the direction of the X axis and of the main reinforcement is denoted by the thicker line in the symbol
presented on a slab . The main direction is defined by indicating an edge or an arbitrary direction; NOTE: linear supports which are not perpendicular to the indicated line, with certain tolerance for inclination of supported edges (a value of the angle defined in the Default Options dialog box) are excluded from the support list. If the main direction is defined, the main direction of reinforcement (the direction of the X axis of the local system of a slab) is set as compatible with the main direction defined by the user. A symbol of load
distribution changes from bi-directional to bi-directional with a load symbol ( ). It indicates definition of the main direction of a slab, while the second perpendicular line in the symbol denotes calculation of the required reinforcement also for the direction perpendicular to the main direction. To ensure that reinforcement is calculated only for one direction, the option that allows one-way reinforcement should be switched on; the symbol of load distribution will
change to the symbol of a slab with one-way reinforcement .
© 2009 Autodesk, Inc. All rights reserved

Autodesk Concrete Building Structures 2010 - User Guide page: 59
NOTE: Definition of the main direction of reinforcement is not available if the main direction of a slab is set. A reinforcement direction can be defined by means of the following options provided on the Calculation Options tab in the Object Properties dialog box.
Change main direction of reinforcement - changes the main reinforcement direction by 90 degrees
Define main direction of reinforcement according to object - defines the main direction of reinforcement by indicating a linear object or its edge
One-way reinforcement - if this option is switched on, then the required reinforcement is calculated for one direction (during advanced calculations a type of slab reinforcement with the one-way reinforcement option set, is defined). Slabs in Autodesk® CBS may be denoted by the following symbols:
– the main direction of a slab is not defined, the direction of main reinforcement (the X axis of the local system of the slab) is denoted by the thicker line
- the main direction of a slab is defined, the main reinforcement direction is compatible with the main direction (direction of the X axis of the local system and of the main reinforcement is denoted by the thicker line, activated definition of the main direction of a slab is indicated by an additional support symbol)
- the main direction of a slab is not defined, the option of one-way reinforcement is switched on (direction of the X axis of the local system of a slab and of the main reinforcement is denoted by the thicker line) NOTE: Reinforcement will be evaluated only for one direction, while loads in calculations will be distributed also on supports parallel to that direction.
- the main direction of a slab is defined, the option of one-way reinforcement is switched on (direction of the X axis of the local system of a slab and of the main reinforcement is denoted by the thicker line, activated definition of the main direction of a slab is indicated by an additional support symbol).
5.18. Graphical Object Properties The Object Properties dialog box allows displaying features of graphical objects, texts, reinforcing bars and dimension lines as well as editing their properties.
The following parameters can be defined in the above dialog box: for texts - font (size and style) - text to be displayed - rotation angle of a text about the OX axis
© 2009 Autodesk, Inc. All rights reserved

page: 60 Autodesk Concrete Building Structures 2010 - User Guide
- list of defined layers; the icon to the right of the list is used to open the Display / Layers dialog box - color - the Preserve the layer color option for dimension lines - font (size and style) - line style (there are several styles of dimension lines and arrowheads available) - rotation angle of a text about the OX axis - position of a description of a dimension line Dy (above or under the dimension line) for graphical objects - line style (type); there are several line types available - layer thickness - list of defined layers; the icon to the right of the list is used to open the Display / Layers dialog box - color - the Preserve the layer color option for reinforcing bars - diameter of a selected bar (bars) - reinforcing bar type (longitudinal, transversal reinforcement).
5.19. Summary Table The Summary Table option enables presentation of data for a structure defined by the user. The option is available after:
- pressing the Summary Table icon - selecting the menu command: Edit / Summary Table. The dialog box shown in the drawing below appears on screen then.
NOTE: In the current program version it is possible to change the vertical and horizontal dimensions of the Summary Table dialog box. thus the length and height of the dialog box can be adapted to the user’s needs.
© 2009 Autodesk, Inc. All rights reserved

Autodesk Concrete Building Structures 2010 - User Guide page: 61
The upper part of the dialog box holds the following two options: • Display for story – if this option is switched off, the table presents all objects from
all stories; if this option is switched on, then the program makes accessible another edit field in which a story number may be specified (the table will be showing then only the objects from a selected story)
• Display selected elements - if this option is switched on, the table presents only the objects selected in the graphic viewer.
The upper part of the dialog box also holds two icons: • - if this icon is activated, then a volume and mass of objects will be
calculated, and displayed in the table, based on structural dimensions (axial dimensions of objects)
• - if this icon is activated, then a volume and mass of objects will be calculated, and displayed in the table, based on architectural dimensions (real dimensions useful in a cost estimate).
NOTE: In a summary table it is possible to select all elements by clicking on the top left corner of the first table column; individual objects can also be selected by means of the summary table. The program allows a possibility to delete objects and loads directly from the summary table. Selected objects can be deleted independently of that if selection of one story or of a whole structure is activated. An object or a load is deleted on pressing the Del button. If objects and loads are selected and the user wants to remove them through the summary table, then objects are deleted on the Objects tab, while loads - on the Loads tab.
The above dialog box consists of three tabs: - Objects - Loads - Reactions.
At the bottom of the dialog box there are the following buttons apart from the standard ones Close and Help: • Columns – pressing this button opens the Columns dialog box which shows the
list of available and currently selected columns of the summary table of objects or loads (√ symbol appears next to the selected options); the right part of the Columns dialog box holds the two buttons and for modification of a column position in the summary table
• Add to note - after pressing this button, the table located in the Summary table dialog box will be added to the list of note components (see the description of the Printout composition dialog box); a name of the table saved in the Printout composition dialog box is specified in the Add to Note dialog box that appears on pressing the Add to note button
• Print – the option allowing printout of the table.
© 2009 Autodesk, Inc. All rights reserved

page: 62 Autodesk Concrete Building Structures 2010 - User Guide
5.20. Summary Table - Objects The option enables presentation of data for structure objects (beams, columns, slabs, walls, etc.). The data has been grouped on two tabs: - Detailed - General.
The table on the Detailed tab presents a list of individual objects (structure elements, finishing) in compliance with the selection made in the left part of the dialog box (√ symbol beside the object name indicates that the selected object type will be presented in the summary table, no symbol - the selected object type will not be presented in the table). Pressing the All button results in selection of all the object types to be presented in the table; after pressing the None button, no object will be presented in the table. The columns presented in the table: • may be the columns defined in several templates available on the selection list at
the bottom of the dialog box (under the table) • may be freely selected and rearranged by the user after pressing the Columns
button. At present, the following templates are available in the program: Geometry, Cost – RC structure, Cost – timber structure, Cost – steel structure. The Geometry template comprises a set of columns needed for basic data about objects in a model, whereas the remaining templates include columns with information about the amount and the cost of individual structure elements. The table on the General tab presents individual types of objects used in a model. Similarly as on the Objects - Details tab, this tab also enables selection of a column set by applying a defined template (the list of available templates is analogous as that on the Objects - Details tab) or by pressing the Columns button. This tab may present the data as follows: structure self-weight, weight of partition walls and dead load resulting from the finishing (it is not presented on the tabs for loads, since thanks to selection, this type of information may be easily shown on the tabs for objects). The tabs Detailed and General (for the Cost - RC structure profile) include additionally the Use column. Steel use values are presented in the following units: • spread footings, continuous footings - (%) of the cross section • beams, columns – in the units chosen in the General Parameters /
Optimization criterion dialog box.
© 2009 Autodesk, Inc. All rights reserved

Autodesk Concrete Building Structures 2010 - User Guide page: 63
5.21. Summary Table - Loads The option enables presentation of data concerning the structure loads. The data has been grouped on the following two tabs: - Detailed - General.
The table on the Detailed tab may present the information as follows: • load type: concentrated, linear or planar (√ symbol next to the name of a load type
indicates that the selected type will be presented in the summary table, no symbol – a selected type will not be presented in the table); pressing the All button results in selection of all the load types to be presented in the table; after pressing the None button, no load type will be presented in the table
• load nature (also a subnature, in case there are several subnatures of a load) – the list includes all the load natures (subnatures) available in the regulations
• load direction: - vertical - X - 135 (horizontal, forming an angle of -135° with the X axis) sign convention of an angle: positive values for the counter-clockwise direction - perpendicular to an object to which it is applied (e.g. for a wind load) - projection (e.g. for a snow load)
• load value • total – total value of the applied load • story – a story on which the load is applied • name – load name • object / name and object / type – name and type of an object to which the load
has been applied (if the load is not assigned to an object, then a blank cell is presented in the table).
The table on the General tab comprises the columns as follows: direction, number and total. The main purpose of this table is to present loads for selected natures, types of loads and stories, therefore, all the selected loads are displayed for 3 directions: - Z direction (vertical) - directions X and Y (horizontal). By default the table consists of the columns: Direction and Total, but it is also possible to turn on display of the Number column; this column shows the number of all the components for a given direction (not the number of loads as objects).
© 2009 Autodesk, Inc. All rights reserved

page: 64 Autodesk Concrete Building Structures 2010 - User Guide
5.22. Summary Table - Reactions The option enables presentation of reactions for loads applied to structure elements. The data has been grouped on the following two tabs: - Detailed: presenting reaction forces in individual structure elements - General: check if the reaction sum is congruous with the sum of all loads applied a structure.
The left-hand part of the dialog box holds a list of all defined subnatures of structure loads (cases) for which reaction values may be presented. Below are three options (Spread footings, Continuous footings, Raft foundations) whose activation means that reaction values will be presented for selected support types. Pressing the All button activates all the support types (i.e. the options Spread footings, Continuous footings, Raft foundations will be switched on), while pressing the None button means that all the support types will be switched off. In the right-hand part of the dialog box there is a table with reaction values: • the Detailed tab shows rows with values of forces for individual supports • the General tab shows rows with sums of reaction forces for individual support
types (spread footings, continuous footings, raft foundations) which have been activated in the left-hand part of the dialog box, and the bottom line of the table displays the total sum of reactions; if all the support types are switched on in the left-hand part of the dialog box, then additionally, the table includes a row with a sum of loads and a value of the difference between the sum of loads and the sum of reactions (precision); if values of the sum of reactions and the sum of loads differ, a precision value is displayed in red, and in the Reports dialog box the message ‘Imbalance of reactions and loads’ is displayed.
5.23. Default Values The option enables setting default parameters of sections, materials, names and texts. The option is available from:
• the menu, by selecting one of the options contained in Edit / Default values
• the toolbar after pressing the icons: Default sections and Default materials.
© 2009 Autodesk, Inc. All rights reserved

Autodesk Concrete Building Structures 2010 - User Guide page: 65
The Default sections dialog box allows setting a default section for each of the objects (for beams, columns, slabs, etc.). The selection list for each object type contains all the sections defined hitherto, which may be attributed to a given object (e.g. rectangular and T-shaped sections for beams). Pressing the (…) button located to the right of the selection lists opens the Section database dialog box, in which section database can be edited (i.e. change of parameters of the existing sections, adding a new section). The Default materials dialog box enables setting a default material for each of the objects (for beams, columns, slabs, etc.). The selection list for each object type contains all the materials defined hitherto, which may be attributed to a given object. Pressing the (…) button located to the right of the selection lists opens the Material database dialog box, in which material database can be edited (i.e. change of parameters of the existing materials, adding a new material).
© 2009 Autodesk, Inc. All rights reserved

page: 66 Autodesk Concrete Building Structures 2010 - User Guide
In the Default names dialog box on the Objects tab the user may set a default name for each of the objects (for beams, columns, slabs, etc.); options on the Loads tab enable determining default names for natures of loads defined in a structure (dead, live, wind, snow, etc.). While defining a name, special characters may be used, which can make automatic numbering easier: • %p – if these characters are added, it means that in place of these characters a
number of the current story will be inserted automatically • %e - if these characters are added, it means that in place of these characters a
number of the successive element from a given group (of beams, columns) on a given story will be inserted automatically
Pressing the Restore default button restores default values of names proposed in the Autodesk® CBS program.
The Dimension Lines and Default Texts dialog box enables setting default parameters: for texts • Size – font size • Style – font style (there are four font styles available for the Arial font: Regular,
Italic, Bold, Bold Italic) • Text – a default text entered while defining a text • Angle – an angle at which the text will be displayed (an angle measured about the
OX axis) for dimension lines: • Size – the list including the font size • Style - font style (there are four font styles available for the Arial font: Regular,
Italic, Bold, Bold Italic) • Line style - the list including available styles of dimension lines and arrowheads • Dy - a position of the text describing a dimension line (above the line, under the
line). Parameters may be changed in the Object properties dialog box.
5.24. Default Options The option enables setting default parameters of the options used in the program while defining a structure and performing calculations. The option is accessible from the menu after selecting the Edit / Default values / Options option.
© 2009 Autodesk, Inc. All rights reserved

Autodesk Concrete Building Structures 2010 - User Guide page: 67
The following options may be selected in the above dialog box: • Beam field: after switching on the option, pinned supports are defined on the
beam ends (left, right) • Beam / Lintel field: for definition of a default length of the lintel overhang l; the
total length of the lintel L equals the sum of the opening (window, door) width B and the overhang length (L = B + 2*l/2) - see the drawing below
• Column field: after switching on the option Add spread footings under unsupported columns, spread footings are added to the structure in course of structure calculations
• Beam / Column field: during advanced calculations (using the exact method, that is the finite element method), you can take offsets defined for columns and horizontal offsets for beams into account, if you selected the Take account of offset in calculations (Finite Element Method) option
• Wall field: after switching on the option Add continuous footings under unsupported walls, continuous footings are added to the structure in course of structure calculations; the selection list contains defined types of reinforcement parameters and pressing the (...) button opens the Code parameters dialog box; the options provided in this dialog box depend on a selected RC design code
• Spread footing field: the options Pinned and Fixed determine the support type provided by a spread footing to the column; it may be modified in the Object properties dialog box (the Calculation options tab) it is also possible to define a value of the elastic factor of the soil Kz; it expresses the total reaction of the soil to the spread footing that would occur for the unit deformation of the soil if the Center if an offset occurs in the column option is switched on, then in the 2D and 3D architectural view, the axis of the spread footing will be positioned
© 2009 Autodesk, Inc. All rights reserved
page: 68 Autodesk Concrete Building Structures 2010 - User Guide
exactly on the column axis; when the option is switched off, the foundation position is not modified automatically if the facing operation is performed on columns if the Reduction of spread footing bending - participation of ground beams option is switched on, then it is possible to reduce bending moments in the spread
• long the entire length of the slab contour; the selection list contains
bs. If the reduction coefficient value equals zero,
ed.
or inclined to the line perpendicular to the indicated one at an
• and Raft foundation fields: it is possible to define a value of e elastic factor of the soil Kz; in the case of a continuous footing this value
selected calculation method:
r a wall supported on the continuous footing linear (pinned) supports are ransferred to Autodesk Robot Structural
pes of reinforcement arameters and pressing the (...) button opens the Code parameters dialog box;
the options provided in this dialog box depend on a selected RC design code
footing by taking account of the participation of ground beams; in the dialog box the user should define a value of the default coefficient of transfer of moments to the spread footing (denoted as M1 – a part of the total moment in the spread footing for the individual directions X and Y); while defining spread footings and ground beams, the program automatically distributes the moment onto individual directions, assigning the default coefficient to the spread footing, whereas the rest of the moment is divided among individual adjoining ground beams, for the directions X and Y correspondingly (the Object Properties dialog box for spread footings) Slab field: it is possible to select a default support of a slab (pinned or fixed support) adefined types of reinforcement parameters and pressing the (...) button opens the Code parameters dialog box; the options provided in this dialog box depend on a selected RC design code It is possible to define a default value of the reduction coefficient for partially supported slab edges for slathen supports that are not perpendicular to the direction of the transfer of loads from the slab, are excluded from the support list; if the reduction coefficient value differs from zero, then the supports are not excluded from the support list, however, they are assigned a reduced value of participation in the transfer of loads (example of application: grillages – extreme supports parallel to the grillage beams are partially loaded and transfer loads from the slab from half the brick width). In the Object Properties dialog box a value of the reduction coefficient for slabs can be modifiIf the main direction has been defined for a slab, then the linear supports which are perpendicular angle whose value is included in the given tolerance range are left as active supports. Continuous footing thexpresses the reaction of the soil to 1 m of the continuous footing that would occur for the unit deformation of the soil, whereas in the case of a slab – it expresses the reaction of the soil to 1 m2 of the slab that would occur for the unit deformation of the soil; NOTE: calculations of continuous footings for which the Kz option is not switched on, differ depending on a1) simplified structure calculations a wall is supported on the continuous footing 2) advanced structure calculations fogenerated; this information is tAnalysis or the Robot calculation engine (a continuous footing is loaded to Autodesk Robot Structural Analysis, but it is disregarded during calculations); once calculations are performed, reactions calculated in Autodesk Robot Structural Analysis are transferred to Autodesk® CBS; these reactions are applied to the wall and the continuous footing and may be presented in Autodesk® CBS (forces FX, FY and FZ - Result display) for raft foundations: the selection list contains defined typ
© 2009 Autodesk, Inc. All rights reserved

Autodesk Concrete Building Structures 2010 - User Guide page: 69
for continuous footings: if the option Center if an offset occurs in the column or wall is switched on, then in the 2D and 3D architectural view, the axis of the spread footing / continuous footing will be positioned exactly on the axis of the
The adva r
eams). In the case of a rigid link objects are defined at their actual position (position
column / wall; when the option is switched off, the foundation position is not modified automatically if the facing operation is performed on walls / columns.
Take account of offset in calculations (Finite Element Method) option – offsets in nced calculations are modeled by means of rigid links (for columns) or offsets (fo
bof the object axis), while an offset is modeled by means of a rigid link. In the case of an offset, objects are modeled at the position defined in Autodesk® CBS, while their actual position in the structure is modeled by means of an offset. For beams, a vertical offset is not taken into account in calculations. The Center if an offset occurs option (spread or continuous footing) – if an offset is defined in a column/wall, the spread (or continuous) footing will also be shifted only if the Center of an offset occurs option is active.
NOTE: In the current program version, the facing operation does not cause changes in the position of objects in the structural and computational models; they are still positioned on t .
ld) a default value of the distance between the lower edge of a window nd the lower edge of a wall.
ition of the Coefficients of Transfer of Bending Moments Affects
ent in the spread footing adjoined by ground beams, assigned to the fixed spread footing. In such a case, the results for ground beams
are partially transferred onto them.
n the list of loads the total moments in the spread footing are taken into account, Footing module the
er of the moment onto ground beams is set (the total coefficient for
Structural Analysis RC Beams odule.
se eams adjoin to the spread footing from orthogonal directions: moments from
le with planes determined by axes of the local system re transferred onto them
heir axes In the lower part of the dialog box there is an option which allows determining (in the Coordinate z fiea
5.25. How Defin
Results and Spread Footing and Ground Beam Design
1. Simplified and exact calculations: During calculations, the total momisdo not show bending moments which 2. RC element design (required and provided reinforcement): - spread footings owhile in the Autodesk Robot Structural Analysis Spreadcoefficient of transfthe directions X and Y correspondingly) - ground beams export of ground beams to the Autodesk Robot m Algorithm of moment division: Simple caBorthogonal directions (compatibof the spread footing) a
© 2009 Autodesk, Inc. All rights reserved

page: 70 Autodesk Concrete Building Structures 2010 - User Guide
Composed load case Beams adjoin to the spread footing from inclined directions: projections of Mx and My moments of the spread footing (conversion of moments to the local system of the ground beam according to the coefficient value) are transferred onto them. A value of the coefficient of transfer of moments is affected by: length and rigidity of a ground beam (in proportion for individual beams adjoining to the spread footing).
NOTE: Pinned ground beams are disregarded in the transfer of bending moments.
5.26. How to Define Default Values (Sections, Materials, Names)
To set a default section of the column as a round one of 50-cm diameter, do as follows: • select the menu command Edit / Default Values / Sections or press the Default
Sections icon • press the (...) button located to the right of the Columns drop-down list • select the Round list (it becomes highlighted in blue) and press the Add icon • in the d= edit field enter the value 50 • press the OK button • on the drop-down list for columns in the Default Sections dialog box select the
section C50 (as shown below) and press the OK button.
To set a default material of the column as the concrete, follow the steps below: • select the menu command Edit / Default Values / Materials or press the Default
Materials icon • on the list for selection of the default material for columns choose Concrete (see
the drawing below) and press the OK button. •
To change a default name of walls to ‘Level(story no.)_Wall(wall no.)’, follow the steps listed below: • select the menu command Edit / Default Values / Names
© 2009 Autodesk, Inc. All rights reserved

Autodesk Concrete Building Structures 2010 - User Guide page: 71
• on the Objects tab in the Walls edit fields enter: Level %p_Wall %e (see the drawing below)
• press the OK button.
5.27. Fix Section Modification The Fix section modification option is used for global definition of blocking (or unblocking) of sections of individual objects included in a structure. It is accessible by selecting the Structure / Fix Section Modification command from the menu.
In the upper part of the dialog box there is the Consider selection option; if this option is switched on, then all modifications (blocking/unblocking of sections) will refer only to the selected objects. Below is the list of all objects which can be defined in a structure (beams, columns, walls, slabs, spread footings, continuous footings, raft foundations, stairs). If the option next to a structure element is switched on (the √ symbol appears), the section is blocked (this is a standard setting); if the structure element is switched off, it means its dimensions may be modified in course of the design of RC elements.
NOTE: The objects, that are not included in a defined structure model, are inaccessible in the above dialog box. The right-hand part of the dialog box holds the following buttons (apart from the standard ones: Apply, Close and Help): • All - pressing this button switches on all the objects available in a structure model
in the Fix Section Modification dialog box • None - pressing this button switches off all the objects available in the structure
model in the Fix Section Modification dialog box.
NOTE: When using the Fix Section Modification option, take note of the status of the selection mode: select – current story or select – whole structure.
© 2009 Autodesk, Inc. All rights reserved

page: 72 Autodesk Concrete Building Structures 2010 - User Guide
5.28. Section Database The program provides the possibility to define databases of available materials and sections. The option enabling section definition is accessible from: • the menu, by selecting the Tools / Section database command
Section database icon. • the toolbar, by pressing the
The program allows definition of the following section types: • rectangular – section height and width are specified • T-section - section height and width as well as flange height and width are
specified • round – section diameter is specified • wall (slab) – wall/slab thickness is specified; if a model is generated in the
Autodesk Robot Structural Analysis program, the load resulting from a layered material that may be assigned to the wall, is automatically modeled there
• rectangular footings – length, width and height of a spread footing are specified • trapezoidal footings - length, width and height of a spread footing as well as
length, width and height of a pier are specified • rectangular openings – opening height and width are specified; moreover, an
opening type should be chosen (doors, windows); if a window is selected, the Parameters button is accessible in the dialog box; pressing this button opens the Window Parameters dialog box; when a door is chosen, the Parameters button is available in the dialog box, which when pressed opens the Door Parameters dialog box
• arbitrary openings - are used to define openings in walls as well as to define doors and windows. To define a new opening, follow the steps below: - select a floor cut defined in a slab or the entire slab - open the Section database dialog box and select the Arbitrary openings option in the tree
- press the Add icon; the opening will be added to the list. To make the section identification easier, its shape with dimensions of the rectangular contour is displayed. Moreover, it is necessary to choose the opening type (opening, door, window); when the window is chosen, the Parameters button is available in the dialog box, which when pressed, opens the Window Parameters dialog box; if a door is chosen, the Parameters button is available in the dialog box, which when pressed opens the Door Parameters dialog box Area and volume of openings / windows / doors created using the Arbitrary openings option may be presented in the summary table
• single-flight stairs – number of steps, step height and width and plate thickness are specified; first 3 parameters do not have to be defined (when the option at each of them is switched off) – then the program calculates the value of these parameters automatically while defining a certain element: e.g. if all the first 3
© 2009 Autodesk, Inc. All rights reserved

Autodesk Concrete Building Structures 2010 - User Guide page: 73
parameters are not determined, then the program calculates the following: height of the entire flight of stairs based on the positions of the adjoining floor slabs, number of steps based on the relation: 2h + s = 63cm (where h – step height, s – step width) and next, values of the remaining parameters missing will be calculated
• other sections – during the program installation the user may install optionally steel section databases (these are the databases used in the Autodesk Robot Structural Analysis program); the right-hand part of the dialog box presents available section databases (they are sorted alphabetically); the following information is displayed: name of the folder which contains steel section databases and the list of all available databases; the user may indicate which databases should be applied (limiting the number of databases may speed up the program operation in some situations, e.g. import of an IFC file). The order of section databases can be changed on the list of all databases; the Move up / Move down buttons are used for that purpose; it allows adapting the sorting order to the user’s needs. Once the Set as default option is activated, the defined database order will be adopted for new structure models made in Autodesk® CBS.
NOTE: There is a possibility to define the reduction of section stiffness due to cracking for rectangular, T-shaped, circular sections and wall (slab) sections. a value of this stiffness will be used in the exact calculations. To define a new section in the database, the user should: • select (set the mouse cursor) a section type e.g. T-section
• press the Add icon • define section dimensions (a section name will be proposed automatically based
on the defined dimension values).
After selecting at least one section database and pressing the Add button, the additional dialog box Section Selection (see the drawing below) is displayed on the screen. In the dialog box below, the user should first choose a section family from the list (e.g. C) and next, indicate sections belonging to this family. The family and the list of selected sections are being added on pressing the OK button.
After switching on the Set as Default option, selected sections will be saved as a default set.
© 2009 Autodesk, Inc. All rights reserved

page: 74 Autodesk Concrete Building Structures 2010 - User Guide
There are two buttons available in the Section database dialog box: Import and Export. Their pressing enables reading and saving, respectively, the section database in the program internal format. It allows e.g. transferring section databases from a program installed on other computer or copying a section database defined for a different language (by standard, there are separate section databases defined for different working languages). Pressing of the Restore Default button restores default sections proposed in the Autodesk® CBS program.
5.29. Window Parameters The Window Parameters dialog box presented in the drawing below opens on pressing the Parameters button in the Section Database dialog box. The options in this dialog box allow defining division of a window into panes, determining thicknesses of sections of the frame and the sash as well as a glass pane type (casement, pivoted).
The following parameters may be defined in the above dialog box: The Structure field - selection of the window division into panes (the Style list) - determining the values t, d, tv, th (thickness of the window frame section) - determining the values x1, y1,... (relative coordinates of the division into panes) The Panes field - selection of a number of the currently-defined pane (the Pane no. list) - selection of the pane type - casement, pivoted, casement/pivoted (the Pane type list) - determining of the values pt, pd (width and thickness of the window sash (pane) section).
5.30. Door Parameters The Door Parameters dialog box presented in the drawing below opens after pressing the Parameters button in the Section Database dialog box. The options in this dialog box allow selecting a door type (number of leaves, door: swinging, sliding, folding, revolving, etc.) and determining door parameters.
© 2009 Autodesk, Inc. All rights reserved

Autodesk Concrete Building Structures 2010 - User Guide page: 75
The following parameters may be defined in the above dialog box: The Structure field - select a number of door leaves and a door type (the Style list) - t, d: thickness of a doorframe section - ct, cd: width and thickness of adjustable doorframes - tt, y, rt, rd: additional dimensions defining door elements The Panel field: - pd, x: thickness and width of a leaf (for double-leaf doors).
5.31. How to Add a New Section to the Section Database
To add a new rectangular section of dimensions 30*80 cm to the section database, follow the steps listed below: • select the menu command Tools / Section Database or press the Section
Database icon on the toolbar • select the Rectangular list (it will be highlighted in blue) • press the Add icon • in the b= edit field enter 30, in the h= edit field enter 80
• to modify the section name - highlight the section R30*80 (it will be highlighted in blue) and click once with the left mouse button
• type: width30height80 • press the Enter button.
© 2009 Autodesk, Inc. All rights reserved
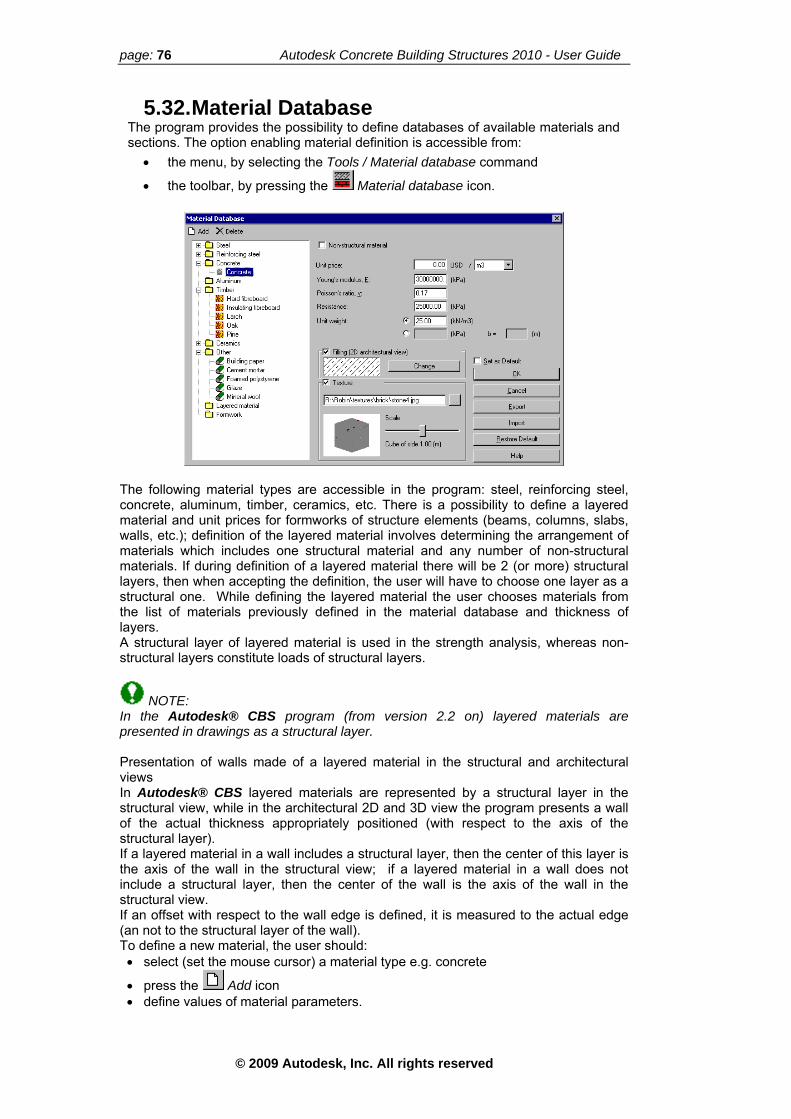
page: 76 Autodesk Concrete Building Structures 2010 - User Guide
5.32. Material Database The program provides the possibility to define databases of available materials and sections. The option enabling material definition is accessible from:
• the menu, by selecting the Tools / Material database command
• the toolbar, by pressing the Material database icon.
The following material types are accessible in the program: steel, reinforcing steel, concrete, aluminum, timber, ceramics, etc. There is a possibility to define a layered material and unit prices for formworks of structure elements (beams, columns, slabs, walls, etc.); definition of the layered material involves determining the arrangement of materials which includes one structural material and any number of non-structural materials. If during definition of a layered material there will be 2 (or more) structural layers, then when accepting the definition, the user will have to choose one layer as a structural one. While defining the layered material the user chooses materials from the list of materials previously defined in the material database and thickness of layers. A structural layer of layered material is used in the strength analysis, whereas non-structural layers constitute loads of structural layers.
NOTE: In the Autodesk® CBS program (from version 2.2 on) layered materials are presented in drawings as a structural layer. Presentation of walls made of a layered material in the structural and architectural views In Autodesk® CBS layered materials are represented by a structural layer in the structural view, while in the architectural 2D and 3D view the program presents a wall of the actual thickness appropriately positioned (with respect to the axis of the structural layer). If a layered material in a wall includes a structural layer, then the center of this layer is the axis of the wall in the structural view; if a layered material in a wall does not include a structural layer, then the center of the wall is the axis of the wall in the structural view. If an offset with respect to the wall edge is defined, it is measured to the actual edge (an not to the structural layer of the wall). To define a new material, the user should: • select (set the mouse cursor) a material type e.g. concrete
• press the Add icon • define values of material parameters.
© 2009 Autodesk, Inc. All rights reserved

Autodesk Concrete Building Structures 2010 - User Guide page: 77
NOTE: The material database allows defining a unit weight in two ways: - definition in the units: weight / volume - definition in the units: weight / area The latter possibility is available for objects like slab or wall. When using such definition of the material unit weight, it is necessary to determine an element thickness, since the program will not ascribe the section to it. This way of defining the unit weight is available for materials that have not been used in a structure, yet. For an object made of the material with thus-defined unit weight the program does not display the section in the dialog boxes Object properties and Summary table. A material being defined may be structural or non-structural (if the Non-structural material option is switched on). If it is a non-structural material, then two values are defined for it: unit weight and unit price. A value of unit weight is the quantity needed to calculate the load value when a structure is modeled in the Autodesk Robot Structural Analysis program. If it is a structural material, then additional parameters are defined (apart from unit weight and unit price): Young’s modulus E, Poisson’s ratio ν and resistance (these quantities are used in calculations in the Autodesk Robot Structural Analysis program). There is a possibility to choose a color and a filling pattern for each material; switching on the Filling (2D architectural view) option allows selection of a filling type which will be presented in the 2D architectural view. For each material (except layered materials) the user may choose a texture; a texture may be presented on objects when 3D view with shading is activated. The Texture option is provided in the bottom part of the dialog box; if it is switched on, it enables selection of a *.bmp or *.jpg extension file. Apart from that, the bitmap dimension should be adjusted (using the scale with the slider) to the actual dimensions. If texture is not ascribed to a material (the Texture option is switched off), then in a 3D view elements made of such a material are shown in a color determined on the Colors tab in the Preferences dialog box.
NOTE: While defining a texture, it should be noted that it is laid on textured elements analogously as wall tiles. To obtain a relatively uniform surface, creation of a graphic file with point symmetry retained, is required. A cost of a formwork is specified for individual elements of a structure (NOTE: stairs are treated as slabs). A formwork area is determined automatically by the program; results of the formwork estimation are presented along with the cost in the summary table on the Objects – Details tab after the Cost – RC structure option has been selected. Formwork areas for individual elements of a structure are calculated as follows: • beams and continuous footings: the product of the sum of 2 heights h and the
width b of a cross-section by the element length L (see the drawing below) = (2 h + b) * L
• columns: the product of a perimeter of a column and its length • spread footings:
- the product of a perimeter of a spread footing and its height (rectangular spread footings) - the sum of vertical and oblique faces (trapezoidal spread footings)
© 2009 Autodesk, Inc. All rights reserved

page: 78 Autodesk Concrete Building Structures 2010 - User Guide
• slabs: the slab area (in the case there are floor cuts/openings within a slab, the area of these cuts is subtracted)
• walls: the product of a height and a double length of a wall • stairs: the sum of an area of a slab (bottom and lateral slabs) and the product of a
width, a height and a number of stairs. After switching on the Set as Default option, selected materials will be saved as a default set. There are two buttons available in the Material database dialog box: Import and Export. Their pressing enables reading and saving, respectively, the material database in the program internal format. It allows e.g. transferring material databases from a program installed on other computer or copying a material database defined for a different language (by standard, there are separate material databases defined for different working languages). Pressing of the Restore Default button restores default materials proposed in the Autodesk® CBS program.
5.33. How to Add a New Material to the Material Database
To add a new material (e.g. concrete Co30) to the material database, follow the steps below: • select the menu command Tools / Material Database or press the Material
Database icon on the toolbar • select the Concrete list (it will be highlighted in blue) • press the Add icon • enter data as in the drawing below
• to modify the material name - highlight the material Co (it will be highlighted in blue) and click once with the left mouse button
• type: Concrete Co30 • press the Enter button.
© 2009 Autodesk, Inc. All rights reserved

Autodesk Concrete Building Structures 2010 - User Guide page: 79
5.34. 3D Object Database The program offers the database of 3D graphical objects imported from .obj. format files. The option for import/export of 3D graphical objects is available from the menu by selecting the Tools / 3D Object Database.
3D objects from the database are displayed in the skeleton model (2D and 3D) as a group of surfaces defining a solid (not as a solid). In the 3D view with rendering 3D objects are displayed as solids.
A symbol in a 2D view is inserted by selecting the 3D Object icon. The following buttons are available in the top part of the dialog box:
• Add - adds a new 3D object to the list of available objects • Delete - deletes a highlighted 3D object from the database • Import - imports an object from an .OBJ file • Export - exports an Autodesk® CBS model to the .OBJ format.
5.35. 2D Object Database The 2D object database enables support of graphic symbols useful in structural drawings (elevation marks, slope marks, etc.) and architectural ones (symbols of chimney ducts, elevators, elements of equipment). The option is available from the menu by selecting the Tools / 2D Object Database.
© 2009 Autodesk, Inc. All rights reserved

page: 80 Autodesk Concrete Building Structures 2010 - User Guide
The database offers a default group of 2D symbols; this group may be extended with arbitrary 2D objects created by the user. The option allows adding / deleting new symbols as well as folders for individual object groups. The 2D object database contains 3 parametrized symbols assigned to objects; If their position is changed, the program automatically updates symbols: a. element structural level – level of the calculation axis of a structure element (%SL parameter) b. top architectural level - the level of the top of a structure element (%TAL parameter) c. slope – designation of the element slope [%] (%S parameter). To add a parametrized symbol assigned to an object, the user should select the structure object before inserting the symbol.
A symbol in a 2D view is inserted by selecting the 2D Object icon. The following buttons are available in the top part of the dialog box: • Add - adds a new folder of 2D objects • Delete - deletes a highlighted 2D object or folder from the database • Add object - adds a 2D object to the list of available objects; NOTE: to add a 2D
object to the list, the user should first select a defined object in the structure view.
5.36. Reports The option enables the user to verify whether the properties of elements included in a defined structure are correct, to verify import of DXF and IFC format files as well as to verify the design performed in the RC modules of the Autodesk Robot Structural Analysis program (RC beams, RC columns, foundations). The option is accessible: • from the menu by selecting the Tools / Reports command • after pressing the F7 key.
NOTE: The dialog box below is activated automatically after opening *.dxf or *.ifc format files as well as after designing RC elements in the Autodesk Robot Structural Analysis program and returning to the Autodesk® CBS program.
NOTE: After selecting the Tools / Reports option the dialog box always displays the recently-generated report.
© 2009 Autodesk, Inc. All rights reserved

Autodesk Concrete Building Structures 2010 - User Guide page: 81
The left part of the above dialog box holds the list of possible reports: - Verification - Static analysis (for simplified calculations) - Calculations (for advanced calculations) - Design of RC elements - Importing IFC file.
The right part of the above dialog box includes a list of errors/warnings for selected reports, composed of: • code (icon) in the Type column; the following codes may be displayed:
- error (e.g. there is no calculated amount of the steel needed) - warning (e.g. the steel has been calculated, but there are warnings from the RC module of the Autodesk Robot Structural Analysis program) - modification of geometry - information - confirmation of correctness (OK)
- if in a structure there are conflicts concerning positions of structure nodes/elements, then after pressing this icon the list will be presenting lines with information about the conflict of two neighboring elements - if in a structure there are conflicts concerning positions of structure nodes/elements, then after pressing this icon the list will be presenting lines with information about the conflict of elements at the structure node The messages above may be filtered in the dialog box: pressing the icons shown above (switching on / off the option) results in presenting / hiding warnings of a given type on the list of all warnings; moreover, there is the Display selected elements option - if it is activated, then messages concerning a selected object / objects are displayed (e.g. it makes it easier for user to find out how many warnings about incorrect positions of nodes refers to selected objects)
• description in the Description column (for Design of RC elements and Importing IFC file) or error type for Structure Verification - error (display of the error cause) - warning (display of the warning list) - modification of geometry (e.g. display of modified sections for spans) - OK
• number of a structure element (for Design of RC elements and Structure Verification).
NOTE: After setting the cursor on a selected element in the right part of the Reports dialog box, a hint showing additional information (e.g. file path, display of modified sections, etc.). appears on screen.
NOTE: There is a possibility of sorting the items in the right part of the dialog box by clicking with the left mouse button on a column heading (e.g. on the heading of the Type column). For the Design of RC elements report: • selection of an element(s) in the dialog box results in selection of the
corresponding element in the structure view • if a selected element does not belong to the story currently presented on screen,
then the story view is changed automatically • if several elements belonging to different stories are selected, the program
selects the closest story.
© 2009 Autodesk, Inc. All rights reserved

page: 82 Autodesk Concrete Building Structures 2010 - User Guide
STRUCTURE VERIFICATION The right part of the dialog box, after selecting the Verification option, presents results of structure verification. The following buttons are provided in the top part of the dialog box: • Start – pressing this button starts verification of a defined structure • Criteria - pressing this button opens the Verification Criteria dialog box where
parameters of verification can be determined; the user may run verification assuming different levels of detail
• Model correction - pressing this button allows adjusting the height of ends of columns, walls and partition walls to axes of beams and slabs on individual stories; as a result, an axial model of a structure is created so that it is possible to perform calculations; the operation of snapping nodes is carried out for values of parameters defined in the Model Correction dialog box NOTE: in the current program version it may happen that not all problems related to object positions will be eliminated after performing the Model correction operation; this operation reduces the number of existing inconsistencies, however, once it is completed, it is necessary to run Verification to assess if a model is correct.
• Help - pressing this button opens the help for the dialog box. Below, the fields showing the current status of structure verification are located. • Status – shows the current verification status; the status valid verification results
means that since last verification the structure has not been modified, while verification results out of date indicates that since last verification the structure has undergone modifications.
• Number of errors – number of messages about errors in a structure; the user should remember that one incorrectly defined element is very often responsible for many error messages
• Number of warnings – number of warning messages; warnings do not necessarily lead to calculation errors, because the user may deliberately allow for situations that are reported as warnings (the verification takes note only of their occurrence).
If the option Run automatically if verification results are out of date is switched on, then automatic verification of a whole structure is run if the status changes to out of date. Below is the Verify only the last-modified element option; it allows removing errors that occur during structure modeling on an ongoing basis while working with a structure model. If the Verify only the last-modified element option is switched on, then after modifying an element (or after adding a new element) the program runs the structure verification concerning only that element and all the elements connected with it. Errors and warnings that result from the performed verification of a structure model will be displayed as messages on the screen and additionally, they will appear in the Reports dialog box. Switching on the Verify only the last-modified element option is recommended while working with a structure model. NOTE: If the Verify only the last-modified element option is switched on, then the Run automatically if verification results are out of date option is not available.
NOTE: For large structures verification (particularly, if the option of object verification named Position of nodes is switched on) may last very long.
© 2009 Autodesk, Inc. All rights reserved

Autodesk Concrete Building Structures 2010 - User Guide page: 83
The above dialog box consists of two tabs: Objects and Loads. Geometrical verification of objects (options provided on the Objects tab) enables searching elements that: • overlap (the Overlapping of elements option is switched on) – the option detects
automatically elements of the same type (beam, column, wall, etc.) or their parts that occupy the same space
• are not ascribed material (the Lack of material option is switched on) – the option detects elements to which no material has been assigned
• are not ascribed section (the Lack of section option is switched on) – the option detects elements to which no section has been assigned
• are positioned out of the story to which they are assigned (the Assignment of objects to stories option is switched on) – the option detects elements that after being defined on a given story have been moved above or below the story dimensions
• are in contact and at the same time have no common nodes (the Position of nodes option – switched on) – the option enables detection of these elements that have a common geometrical part and simultaneously for which there is no common point on the lines describing their axes (see the drawing below presenting such a situation for a beam-column connection); it means that these elements are actually integrated with each other, but the calculation model treats them as separate elements.
The option Tolerance of node position enables defining the size of an area in the vicinity of the node (element’s end) and if another element is positioned within this area, then the program treats them as touching elements. It is possible to define the maximum as well as the minimum tolerance value. For the maximum tolerance value, switching on the Auto option means that the tolerance dimensions are assumed as equal to geometrical dimensions of elements; such an assumption implies an actual contact of elements in a structure. Switching on the Position of openings option allows search for openings positioned out of elements to which they are assigned; this option detects openings whose geometry is not contained within an object in which they have been defined and openings which overlap with other openings. Additionally, the program verifies positions of door openings in walls; if a coordinate of the door bottom equals zero for individual stories (see the drawing below), then verification of positions of doors will be concerned with their distance from other objects (edges of walls or windows) in order to eliminate too small distances dx that might result in incorrect generation of an FE mesh - see the drawing below.
© 2009 Autodesk, Inc. All rights reserved

page: 84 Autodesk Concrete Building Structures 2010 - User Guide
Verification of defined structure loads (options located on the Loads tab) enables searching for the following loads: • loads whose geometry does not correspond to any of the objects; it means that
part of the load or entire load is not acting on the structure • loads that are not taken into account in any load pattern; it causes this load not to
be considered during generation of code combinations. Moreover, the program verifies the sum of loads applied to a structure and the sum of calculated reactions. If these sums are not congruous, the message Imbalance of reactions and loads appears (for details see the Summary table dialog box on the Reactions tab).
5.37. Structure Model Correction The option is used to determine parameters of the operation of correcting coordinates of structure nodes; the option may be particularly helpful when importing a model from architectural programs. The option is available from the menu by selecting the Tools / Model Correct command or from the Reports dialog box after pressing the Model correction button.
An architectural model usually includes elements whose axes lie on different levels; it means that they do not lie on the level of the story floor (inaccuracies of the structure definition between individual stories), e.g. if all beams are faced (aligned) to the top surface of the slab, then both their axes and ends of columns, walls and partition walls are positioned on a level different from the level of the slab axis. Thus elements of an architectural model may only touch each other, they may not intersect; for this type of a model, continuity of a model (calculation model) would not be achieved in the Autodesk® CBS program. All inconsistencies of this type are signaled with the ‘Position of nodes’ warnings in the Reports dialog box.
© 2009 Autodesk, Inc. All rights reserved

Autodesk Concrete Building Structures 2010 - User Guide page: 85
If the Consider selection option is switched on, then chosen operations will be performed only on selected objects. The Model correction option results in adjusting the height of ends of columns, walls and partition walls to axes of beams and slabs on individual stories; in consequence, an axial model of a structure is created so that it is possible to perform calculations. The the Model Correction dialog box contains the following options: • Create a calculation model - after selecting this option, the program will
automatically determines main levels of floors in a model and main lines on which structure elements are positioned, and next, individual model elements are snapped to main levels and lines; NOTE: the option is intended for structure models imported by means of an IFC file or structure models created in the AutoCAD © Structural Detailing - Formwork Drawings program
• Delete offsets - selecting this option ascribes coordinates that an object has in the architectural view and deletes offsets
• Snap: - automatically - to line after selecting this option, the program will automatically determines main lines on which structure elements are positioned, and next, snaps to them individual model elements whose nodes are positioned within a user-defined snap distance from main lines determined automatically
- to line after selecting this option, nodes positioned in a distance not greater than the snap distance, will be snapped to it; the snap distance may be defined as one used by default in the program or defined by the user
- to point after selecting this option, nodes positioned in a distance not greater than the defined snap distance from a selected point, will be snapped to it; the snap distance is defined by the user
• Use offsets - after switching this option on (available for the Snap to line option),
an object is snapped to the line with assigning an offset (in the computational model the object is snapped, while in the architectural view its current position will be kept - the offset will be set).
5.38. How to Verify a Structure To perform verification of the structure shown in the drawing below, follow the steps listed below:
• select the command Tools / Reports or press the F7 key • press the Criteria button
© 2009 Autodesk, Inc. All rights reserved
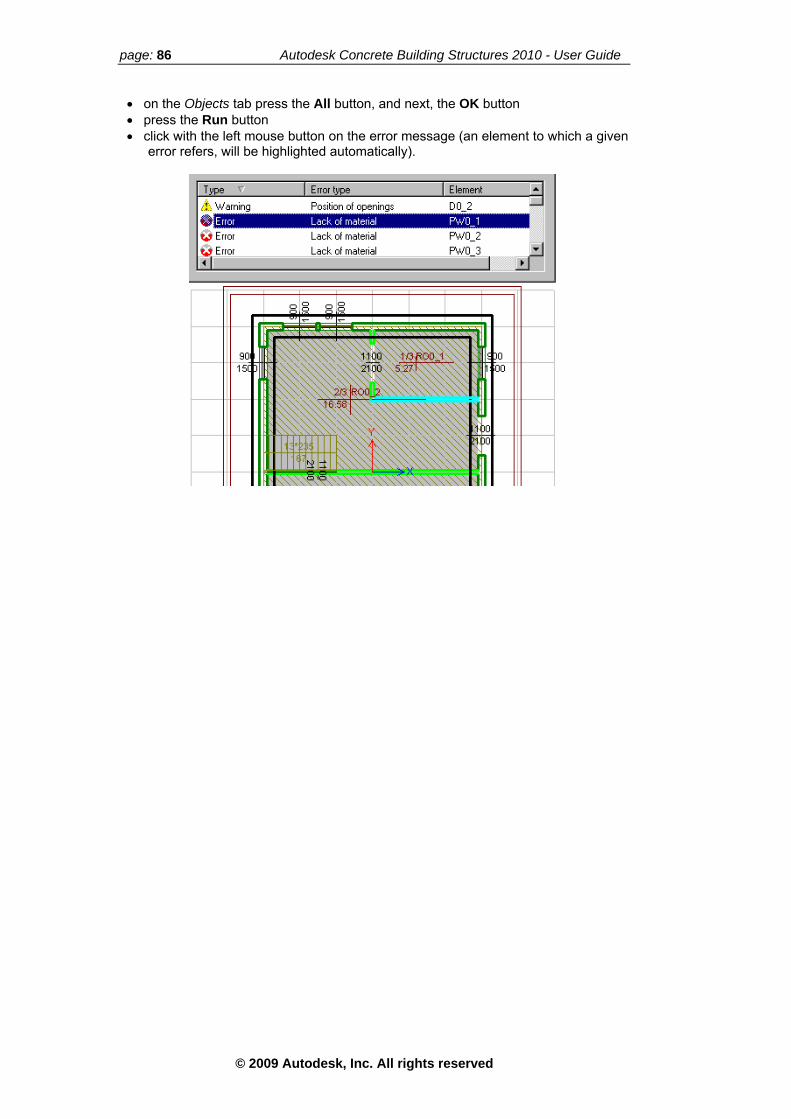
page: 86 Autodesk Concrete Building Structures 2010 - User Guide
• on the Objects tab press the All button, and next, the OK button • press the Run button • click with the left mouse button on the error message (an element to which a given
error refers, will be highlighted automatically).
© 2009 Autodesk, Inc. All rights reserved

Autodesk Concrete Building Structures 2010 - User Guide page: 87
6. DEFINITION OF LOADS - DEFAULT LOADS 6.1. Reference Level
The reference level dialog box is used to determine the height of the walking surface of the ground floor with respect to the structure model and the difference of the height between of the walking surface level and the soil level; it is of significance when defining a height of the soil layer loading the foundation, as well as when generating a wind load and performing the simplified seismic calculations. The option is accessible by selecting the Structure / Reference Level command from the menu.
In the case of the wind load, the part of a structure below the soil level is ignored in calculation of the wind pressure onto the building walls. For the simplified seismic analysis the soil level is significant when masses of individual stories are calculated; the masses of the stories (and their parts) located under the soil level are disregarded, whereas the masses of the parts of the stories situated above the soil level are included in the mass of the first story that is located entirely above the soil level. The above dialog box contains two edit fields that enable definition of: - P0: height of the walking surface of the ground floor - P0-P1: difference of the height between the walking surface of the ground floor and the soil level.
6.2. Default Loads The option enables assigning default values of load records connected with different load groups. The option is available:
- from the menu by selecting the option Edit / Default Values / Loads
- after pressing the icon .
© 2009 Autodesk, Inc. All rights reserved
page: 88 Autodesk Concrete Building Structures 2010 - User Guide
If the Consider torsion effect option is activated, then horizontal loads are distributed with torsion taken into account for all load cases. Calculating the center of torsion – see: Seismic / spectral analysis considering the torsion effect.. In the above dialog box the user may determine a default value of concentrated forces as well as linear and planar loads for groups generated manually. For semi-automatic groups there is a possibility to define parameters being the basis for generation of the loads. For groups generated automatically a value of load factor (partial safety factor) may be determined. Options in the dialog box allow adding or deleting a load group. Each group has to be assigned to one of load natures. There are seven load natures distinguished in the program: dead, live, snow load, wind load, accidental load, temperature load and seismic load, to which groups can be assigned. The basis for generation of a default set of load groups is a file with regulations of code combinations of the Autodesk Robot Structural Analysis program (*.rgl). In the Autodesk® CBS program the user may add or delete any group.
NOTE: In the Autodesk® CBS program two load natures (the wind load and the seismic load) have been extended by adding a possibility to generate loads according to the available snow/wind or seismic codes. After switching on the Set as default option, the selected loads are saved as a default set. The following buttons are located in the bottom part of the dialog box: • Import – enables saving load groups and their factors to a regulation file (*.rgl) • Export – enables opening any regulation file (*.rgl) • Restore Defaults – enables restoring default settings proposed in the
Autodesk® CBS program.
NOTE: In the dialog box the user may delete only such a group to which no load records are ascribed; records defined automatically cannot be deleted; new regulations may be read only then when no load records have been generated.
NOTE: Load records and load groups are generated according to the rules of defining loads in the Autodesk® CBS program.
NOTE: While exporting a structure model from the Autodesk® CBS program to the Autodesk Robot Structural Analysis program, a regulation file CBS_Pro_code_name.rgl is generated in the USER / CFG folder of the Autodesk Robot Structural Analysis program.
6.3. Default Loads - Wind 6.3.1. Default Loads - Wind
The Default Loads / Wind option available in the Default Loads dialog box is used to define a wind load according to the rules specified in a selected snow/wind code. There are three possibilities to generate the wind load: • if the options: Direction 1 and Direction 2 are switched off, then the wind load will
not be generated • if the options: Direction 1 or Direction 2 are switched on, then the wind load will be
generated on a selected direction (e.g. direction 1) • if the both options: Direction 1 and Direction 2 are switched on, then the wind load
will be generated on both directions.
© 2009 Autodesk, Inc. All rights reserved

Autodesk Concrete Building Structures 2010 - User Guide page: 89
NOTE: As a result of calculations performed for the determined directions of wind action (1 and 2), two load cases with the opposite senses will be generated for each direction, i.e. Wind 1+, Wind 1-, Wind 2+ and Wind 2-. The dialog box contains the following options: • regulation name – a name of the file with code combination regulations • snow/wind code – a list of available wind load codes • Direction 1 and 2: • Angle – a value of the angle between the direction of the wind action and the X
axis • parameters depending on the selected wind load code. The current version of the Autodesk® CBS program enables generation of wind loads for the following snow/wind codes: - American code ASCE-7-02 - British code BS6399 (part 2) - French code NV65 (modification 04/2000) - Polish code PN-77/B-02011 Wind loads will be generated automatically in the following range (depending on the calculation method): • simplified calculations: distribution of loads onto walls and columns of buildings
(loads onto the roof are disregarded) • advanced calculations: generation of linear loads onto panels and bars positioned
on the level of the story floors; generated forces applied to stories equal the forces obtained from simplified calculations.
On the floor level of each story pressure and suction forces are added up and depending on a selected method: • they are distributed onto individual structure elements (for simplified calculations) • they are applied as linear loads to panels (floor slabs) and beams that lie on the
story level (for advanced calculations). Once calculations are performed, data needed for defining a wind load and values of forces on individual stories are added to components of a calculation note.
6.3.2. Default Loads - Wind (the French Code NV 65)
Once the French wind load code is selected, the Default Loads / Wind option is used to define a wind load according to the rules of the French code NV65 (modification 04/2000).
© 2009 Autodesk, Inc. All rights reserved

page: 90 Autodesk Concrete Building Structures 2010 - User Guide
Wind loads according to the French code NV65 are calculated based on the simplified method for typical objects with a height h and a rectangular base (with sides a and b), fulfilling the following requirements (NV65 point 2.91): a) h<30m b) h/a>0.25 or
h/a<2.5 with the additional condition: b/a<0.4 if h/b>2.5 c) f<h/2 for roofs with 2 flat surfaces
f<2/3*h for vaulted roofs, where f is the roof height d) the roof cover is:
- a flat roof - a single roof with the height f, with one or two roof surfaces sloping at more than 40° - a vault with the plane tangent to the beginning of the lines creating the vault (slope more than 40° and less than 22°)
e) vertical walls have to: - be supported directly on the soil - be flat without offsets - show 5% permeability (NV65 R-III-1,241) at the most, or 35% permeability at the
least, for one of the walls f) the structure site should be a clearly horizontal terrain with a large area (NV65 R-III-1,241).
NOTE: If a building does not meet these requirements, it is possible to determine a value of the wind pressure or velocity or to define the wind load manually. The following data has to be determined when defining the wind load: - general data:
active wind directions angles between the wind directions and the X axis values of the Ce-Ci coefficients for individual directions
- detailed data for use in the calculation according to the simplified method from the NV65 code:
wind zone wind pressure (normal, extreme) terrain type (protected, normal, exposed) value of the increase coefficient
- when manual definition of the wind pressure is chosen: value of the wind pressure or value of the wind velocity.
© 2009 Autodesk, Inc. All rights reserved

Autodesk Concrete Building Structures 2010 - User Guide page: 91
Calculation of the wind pressure value By standard, the value of the wind pressure is determined as constant along the whole height (NV - point 2,991), where: h – building height kr – regional coefficient ks – localization coefficient q0 – wind pressure expressed in N/m*m. The pressure value calculated from the above formula is modified according to the formula below:
(NV - point 2,922-3), where: a – increase coefficient Ce-Ci - pressure coefficient δ - reduction factor according to point 2,922 (the factor δ can be calculated from fig. R-III-9 - page 129). If the wind pressure value is specified, the q0 value is already known and modified according to the formula: . If the wind velocity value is given, the following formula applies:
(NV - 1,21), where V is the wind velocity expressed in (m/s), and q0 is the wind pressure expressed in N/m*m. The thus-calculated wind pressure value is modified according to the formula:
. Calculation of the value of the wind pressure (force) acting on a story The wind pressure force acting on individual stories is calculated from the following formula:
where: bi – building width on the story i hi – height of story i The calculated pressure force is applied at the level of the floor above the story i. Distribution of the pressure force onto individual elements The total action of the wind pressure on a story is applied to the ceiling slab of this story, and then is distributed onto individual objects of the story (distribution of this action is illustrated schematically in the drawing below).
• columns and walls parallel to the direction of the wind action, or slanting walls (in this case, the equivalent stiffness of walls for the appropriate direction of the force action is calculated) for a frame or a mixed structure.
• walls parallel to the direction of the wind action, or slanting walls (in this case, the equivalent stiffness of walls for the appropriate direction of the force action is calculated) for a membrane or a mixed structure.
© 2009 Autodesk, Inc. All rights reserved

page: 92 Autodesk Concrete Building Structures 2010 - User Guide
NOTE: Individual structure objects (walls, columns) may be treated as elements that do not carry horizontal forces (resulting from the wind pressure, seismic loads).
Forces acting on the objects of the story i are recalculated to obtain the equivalent forces acting on the objects of the story i-1 together with a bending moment (the result of the action of these forces on the arm equal to the story height).
6.3.3. Default Loads - Wind (British Code BS) After selecting the British wind load code, the Default Loads / Wind option is used to define a wind load according to the guidelines of the British code BS6399 (part 2).
Wind loads are generated according to the British code BS 6399; loads are distributed onto walls and columns of buildings (disregarding the load applied to the roof). The following data has to be determined when defining a wind load: - general data:
active wind directions angles between wind directions and the X axis values of Cpe-Cpi coefficients for individual directions (pressure onto the windward wall + suction into the leeward wall)
- detailed data in the case of calculations according to the simplified method from the code BS6399:
coefficient Cr (dynamic augmentation coeff.) velocity Vb modification coefficient (Sd*Sb) - 4 values for directions: +1, -1, +2, -2 modification coefficient Ca - 4 values for directions: +1, -1, +2, -2
- in the case the manual definition of the wind pressure is chosen: value of the wind velocity Ve or the wind pressure qk.
Calculation of the wind pressure value Value of the wind pressure
(8-9) where: SS = 1.0 - seasonal coefficient
© 2009 Autodesk, Inc. All rights reserved

Autodesk Concrete Building Structures 2010 - User Guide page: 93
Sp = 1.0 - probability coefficient. Topography is not considered during calculations: the following formula is applied:
here ΔS is an altitude above the sea level.
simplification is adopted: the wind velocity is uniform for the entire height f a building
case a value of the wind velocity is defined manually, the code formula is
Sa = 1 + 0,001 * ΔS, w Calculation of coefficient values for individual directions: the following o The value qs - in the
applied : - in the case the wind pressure is defined manually, the value qs is adopted.
he value Cr is defined by the user
Value of the wind pressure
T
For the directions -1, -2 the program calculates a value opposite to 1 and 2, but modified by the coefficients for the directions -1, -2:
6.3.4. Default Loads - Wind (Polish Code PN) After selecting the Polish wind load code, the Default Loads / Wind option is used to
efine a wind load according to the guidelines of the Polish code PN-77/B-02011. d
© 2009 Autodesk, Inc. All rights reserved

page: 94 Autodesk Concrete Building Structures 2010 - User Guide
Wind loads are generated he Polish code PN-77/B-02011; loads are d applied to the
Th ning a wind load: - g
al directions (pressure onto the windward wall +
- dc
p area over 10 m)
- if zone III is selected – altitude above the sea level wind pressure is chosen:
wind pressure qk.
ion of the winlow for given code parameters
according to tdistributed onto walls and columns of buildings (disregarding the loaroof).
e following data has to be determined when defieneral data: active wind directions angles between wind directions and the X axis values of C coefficients for individusuction into the leeward wall)
alculations according to the code PN-77/ B-02011: etailed data in the case of coefficient β (actions of wind gusts) terrain type (A - opened, B - built-up area up to 10 m, C - built-uwind zone {I; II; IIa; IIb; III}
- in the case the manual definition of thevalue of the wind velocity Vk (and the value ρ for zone III) or the
Calculat d pressure value it is calculated from the formula be
(PN - point 2.2 formula 1) where: qk - a value of the wind pressure Ce - exposure coefficient (PN - point 4.1 - table 4)
The value qk is a value of the wind pressure; it depends on a selected zone according to table 3 (H is an altitude above the sea level available only for zone III)
e wind velocity is defined manually, the code formula is
app
C - aerodynamic coefficient β - coefficient related to actions of wind gusts
- in the case a value of th
lied (PN – 3.4, code 3): where: Vk - wind velocity
d by the user for zone III in the case the wind pressure is defined manually, the value qk is adopted.
ding on a terrain type ccording to table 4 of the code PN-77/B-02011)
2. for the remaining buildings – a constant value according to table 4 depending on a terrain type {A; B; C}; value of the coefficient Ce = Ce (z=H).
ρ - coefficient equal to 1.23 for zones I and II, and define- Values of the parameters C and β are defined by the user. The value Ce 1. for buildings for which H/L > 2 the program assumes a variable Ce value calculated for individual story levels and intermediate levels, depen(a
© 2009 Autodesk, Inc. All rights reserved

Autodesk Concrete Building Structures 2010 - User Guide page: 95
6.3.5. Default Loads - Wind (American Code
ASCE-7-02) After selecting the American wind load code, the Default Loads / Wind option is used to define a wind load according to the guidelines of the American code ASCE-7-02.
Wind loads are generated according to the American code ASCE-7-02. The following data has to be determined when defining a wind load: - general data:
active wind directions angles between wind directions and the X axis values of the Cp coefficients for pressure and suction (for pressure Cp = 0.8, but it can be modified)
- detailed data for calculations according to ASCE-02: exposure category building category V - wind velocity in (mph) values of coefficients defined by the user: Kd – wind direction coefficient Kzt - topography coefficient Gf - wind gust coefficient
Value of the wind pressure for pressure: qz = 0.00256 * Kz * Kzt * Kd * V2 * I for suction: qh = 0.00256 * Kh * Kzt * Kd * V2 * I where: Kz – exposure coefficient determined by the program for levels of individual stories of the building according to ASCE 7-02 Kh = Kz (for the value ‘z’ equal to the total height of the building) Kd - wind direction coefficient V - base wind velocity I - structure importance factor
© 2009 Autodesk, Inc. All rights reserved

page: 96 Autodesk Concrete Building Structures 2010 - User Guide
NOTE: As specified in ASCE 7-02, the value of pressure from the windward side (pressure) varies depending on the height (Kz); the value of pressure from the leeward side (suction) Kh is constant along the building height. Values of pressure and suction forces windward side: Pz(z) = qz * Gf * Cp leeward side: Pz = qh * Gf * Cp
6.3.6. Application of Wind Loads (Story '0' and the Last Story)
The basic wind load case of a building: Loads are applied to all stories above the reference level; application of loads to the story ‘0’ and the last story (see the drawing below): - the force on the story ‘0’ is acting on the area of the whole story ‘0’ and half the story ‘1’ - the force on the last story is acting on half the height of the last story.
If the reference level is positioned below the bottom floor of the level ‘0’ and there are underground stories in the building, then the wind load will be applied to the top floor of the story below the level ‘0’ which is positioned above the reference level (see the drawing below).
© 2009 Autodesk, Inc. All rights reserved
Autodesk Concrete Building Structures 2010 - User Guide page: 97
6.4. Default Loads - Seismic Analysis 6.4.1. Default Loads - Seismic Analysis
The Default Loads / Seismic option available in the Default Loads dialog box is used to define the parameters necessary to perform seismic calculations of a structure model according to a selected seismic code. In the present version of the Autodesk® CBS program it is possible to generate seismic loads for the following seismic codes: - PS92 / 92 2008 - RPA99_03 - RPS2000 - P100-92 - P100-1/2006 - UBC 97 - IBC 2000 - IBC 2006 - Italian seismic code - spectral analysis (analysis based on a spectrum defined by the user).
NOTE: If the Seismic code option is switched off, then seismic/spectral analysis of the structure will not be conducted. The programs makes available two methods of seismic analysis of the structure (the Seismic code option is switched on; in the analysis seismic cases on the directions X and Y are considered): • Simplified • Advanced – the seismic analysis is performed by means of the Finite Element
Method. Seismic or spectral analysis is performed for selected directions considering a value of the coordinate of the excitation vector for individual directions. The middle part of the dialog box contains options used for defining directions; each of the directions may be switched on (then it will be considered in calculations) or switched off (it will be ignored in seismic / spectral analysis). The edit fields are used to specify values of the coordinate of the excitation vector for individual directions.
Simplified method: 1. allowable directions: X, Y 2. values of the vector coordinates (coefficients for a direction) = 1.0
Advanced method: 1. allowable directions: X, Y, Z 2. possibility to change values of each coefficient.
While performing calculations of the structure with the activated option for generation of code combinations the program generates combinations of seismic directions: - for the simplified method: Newmark combinations - for the advanced method: Newmark combinations or quadratic combinations. At the bottom of the dialog box there are two buttons: • Seismic analysis (Spectral analysis) – opens the dialog box for definition of
seismic analysis parameters according to a selected seismic code or for definition of spectral analysis parameters
• Modal analysis - opens the dialog box for definition of modal analysis parameters. In the lower part of the dialog box there is the Verify necessary wall area option. It is available for the seismic code P100-1/2006 - see Verification of a necessary wall area (this condition is not given in other codes). In the upper part of the dialog box there is the Consider torsion effect option which is accessible in the case seismic loads generated automatically are activated (for spectral or seismic analysis, according to one of the codes available on the selection list). Once this option is switched on, the following options are available at the bottom of the dialog box:
© 2009 Autodesk, Inc. All rights reserved

page: 98 Autodesk Concrete Building Structures 2010 - User Guide
- normal (normal torsion is considered) - accidental (apart from normal torsion, accidental torsion is also considered) - value ea,x: eccentricity in the direction of the X axis, for seismic analysis – on the Y direction - value ea,y: eccentricity in the direction of the Y axis, for seismic analysis – on the X direction.
6.4.2. Default Loads - Seismic Analysis (Simplified Method)
To enable the use of the simplified method in the program, a designed building must satisfy general conditions determined by the individual codes. Below are presented the conditions for buildings as specified in the available seismic codes as well as the method of calculation of seismic forces: PS92 RPA99_03 RPS2000 UBC 97 P100-1/2006 Italian seismic code IBC 2000 / 2006. For a selected seismic code and structure type the program performs calculation of building displacements using the methods as follows: - Rayleigh method: for membrane and mixed buildings - equivalent frame method: for frame buildings.
NOTE: If the simplified method is selected for seismic calculations (selection in the Default Loads dialog box) and the advanced method for calculations of the entire structure model, then the program will perform advanced calculations in the static range during which seismic forces generated and applied to structure elements as for the simplified method will be used in seismic cases. If the advanced method is selected for seismic calculations (selection in the Default Loads dialog box) and the simplified method for calculations of the entire structure model, seismic calculations will be performed as for the simplified method.
6.4.3. Simplified Calculation of Structure Displacements due to Horizontal Forces
In the case calculation is performed with the use of the simplified method, for a selected seismic code and structure type the program performs simplified calculation of the building displacements. For the code PS92 for regular buildings (irrespective of the structure type) displacements are calculated from the formulas described in the pseudostatic method. For the remaining codes (RPA99_03, RPS2000, UBC97, IBC2000, Italian seismic code and for the code PS92 for medium-regular buildings), depending on the building type, displacements are evaluated using the following methods: - Rayleigh method: for membrane and mixed buildings - equivalent frame method: for frame buildings. A. Rayleigh method
a) for the code PS92 - medium-regular buildings: Step 1: calculation of displacements ui,x ui,y for individual directions X and Y Displacements are calculated with the use of the cantilever method adopting the following assumptions: - a building is represented by a cantilever bar - calculations should be performed separately for the directions X and Y
© 2009 Autodesk, Inc. All rights reserved

Autodesk Concrete Building Structures 2010 - User Guide page: 99
- every story has its stiffness being the sum of stiffnesses of individual structure elements that carry horizontal forces, which equals - according to the formula:
where: m – a number of structural elements on the story i E – Young modulus of the material which has been used to define the object k J – moment of inertia about the axis perpendicular to the direction of action of horizontal forces - horizontal forces Pi = mi*1m/s2 are applied to the ceiling level of each story - as a result of solving the cantilever, displacements of individual stories are obtained (on the story ceiling level)
Step 2: calculation of displacements from the formulas
where: Rx – spectral acceleration ρ0x – an increase coefficient (ignored modes are considered) ui,x – a displacement of the story i calculated in step 1 for the direction X Tx – a building vibration period for the direction X For the direction Y the procedure is analogous. b) for the remaining codes (RPA99_03, RPS2000, UBC97, IBC2000) step 1 subpoint (a) is carried out assuming as follows: - horizontal seismic forces Fi calculated by means of the simplified method are
applied to the ceiling level of each story.
NOTE: The method described should not be used to evaluate displacements for structures composed of columns and slabs, since displacements calculated for such a structure will be significantly overrated. B. Equivalent frame method
Scope of application: frame buildings Assumptions:
- it is assumed that there are rigid nodes connecting spandrel beams (beams) with the columns, whereas all pinned nodes (releases) defined on beam ends are disregarded
- the program takes account of the method of column –column base connection (fixed or pinned)
- displacements due to horizontal nodal forces have been included in considerations, whereas the influence of changes in column length has been ignored.
© 2009 Autodesk, Inc. All rights reserved

page: 100 Autodesk Concrete Building Structures 2010 - User Guide
Data for calculation: Qi – a transverse force on the story i (a sum of horizontal forces from the story n to i, the total force on a story and the total stiffness of frames are considered) hi – a height of the story i Si – stiffness of columns of the equivalent frame
where: k – a number of frame columns on the story i=1,...,n Ji,k - moment of inertia of the column k, on the story i For the ‘0’ story (connection with the foundation)
k – a number of frame columns with fixed column-column base connection l - a number of frame columns with pinned column-column base connection Ri – stiffness of the spandrel beam of the equivalent frame
where: m – a number of frame spandrel beams on the story i lm – a length of the spandrel beam m on the story i Calculations φi-1 – a rotation angle of the lower node in the frame of the story i φi - a rotation angle of the upper node in the frame of the story i ψi – an angle of the frame deviation from the vertical direction on the story i δi – a horizontal displacement on the story i (displacement with respect to the story i-1) ui – a total displacement of the story i
After the calculations, relative story displacements are obtained:
and the next step includes evaluation of absolute displacements of the story i with respect to the building base which are presented in a calculation note:
NOTE: In the case of selecting the frame structure type and creating a structure model without defined beams (spandrel beams of frames), displacements will not be calculated and the table will show displacement values equal to zero (since stiffness of spandrel beams equals zero).
© 2009 Autodesk, Inc. All rights reserved

Autodesk Concrete Building Structures 2010 - User Guide page: 101
6.4.4. Default Loads - Simplified Method (PS92) 1. The scope of application: buildings that fulfill the general conditions as specified in PS92/6.6.1:
a) regular buildings - the pseudostatic method is applied b) medium-regular buildings - Raileygh’s method is applied
The user performs the classification (criteria of regularity on the plane and in elevation according to PS 92/ 6.6.1.2.1.1; 6.6.1.3.1.1)
2. Design height of a building
the above-ground height of the building is adopted (the program takes no account of the underground stories)
3. Pseudostatic method - regular buildings
Calculations should be performed separately for each of the directions X and Y a) basic vibration periods (for the directions X and Y) – depending on the selected structure type: frame
membrane and mixed structure
b) Equivalent static forces fr and displacements of individual stories dr for the direction X
where: user-defined values: q – RC behavior factor (qx for the X direction, qy for the Y direction), modified by the program in compliance with the code in the following way:
- for T < TB - in the remaining cases: q’ = q (for regular buildings)
τ - topography coefficient values calculated by the program: ρ0x – increase coefficient (accounting for the ignored modes)
TC – the maximum period value for the horizontal spectrum segment mr – mass of the considered story r – here are adopted all dead and live loads applied to the floor slab (the top of a given story), multiplied by participation factors (determined in the dialog box), as well as the self-weight of horizontal
© 2009 Autodesk, Inc. All rights reserved

page: 102 Autodesk Concrete Building Structures 2010 - User Guide
elements and half the weight of the vertical elements of a given story and of the next story (r+1). In the case of the story 0, the whole weight of vertical elements of the story 0 is included. If the soil level is higher than the level of the base of the story 0, then the weight and the loads of the stories 0 and 1 are included in the story 2. zr – the quotient of the story height and the design height of the building Zr = hr / H, where H – the building height counted from the base of the story 0 to the level of the story n α - coefficient dependent on the bracing of the building (frames α = 1.0, walls α = 1.5)
spectral acceleration
aN – nominal acceleration as specified by the code
where ζ is a damping coefficient expressed in (%)- (ζx for the X direction and ζy for the Y direction) RD(Tx) – the ordinate of the normalized design spectrum
for the Y direction the procedure looks analogously as for the X direction
4. Rayleigh’s method – medium-regular buildings
a) Basic vibration periods
where:
mi – mass of the story i ui,x and ui,y – displacement of the story i.
- for membranes and mixed structures it is calculated from the solution of the cantilever that represents a building, loaded with the forces Pi=mi*1[m/s2] in the direction of X or Y axes - for frames it is calculated from the solution of a building model using the equivalent frame method (loading of the building as in the point above)
b) Equivalent static forces fr for the direction X:
where: user-defined values: q - RC behavior factor, modified by the program in compliance with the code in the following way:
- for T < TB - in the remaining cases: q’ = 0.85 q (for medium-regular buildings )
© 2009 Autodesk, Inc. All rights reserved

Autodesk Concrete Building Structures 2010 - User Guide page: 103
values calculated by the program: ρ0x - increase coefficient (accounting for the ignored modes)
for the Y direction the calculation proceeds analogously as for the X direction.
6.4.5. Default Loads - Simplified Method (RPA99_03)
1. The scope of application: buildings that fulfill the general conditions as specified in RPA99 point 4.1.2 2. Design height of a building
the above-ground height of the building is adopted (the program takes no account of the underground stories)
3. Simplified method
Calculations should be performed separately for each of the directions X and Y
a) basic vibration periods (for the directions X and Y) – depending on the selected structure type: frame
, where: T – period for the X and Y directions CT - for the X and Y directions CT = 0.075 – RC frames hN – height in (m) measured from the base to the last story membrane and mixed structure
, where: Dx, Dy – width of the building in the directions X and Y
b) the total force resulting from the seismic impact: Vx = A * D * Q / Rx * W Vy = A * D * Q / Ry * W where: user-defined values: Q – quality coefficient Rx, Ry – behavior factors for the X and Y directions values calculated by the program: A - nominal acceleration D – increase coefficient calculated from damping (RPA’99 formulas 4.2, 4.3), where ξ- damping (ξx for the X direction, ξy for the Y direction) W – total weight of the structure W = Σ Wi, Wi = WGi + β WQi dead loads and part of live loads, RPA’99 formula 4.5, where β - load factor
c) Distribution of the force V (Vx for the X direction, Vy for the Y direction) onto individual stories for Tx > 0.7 (s)
© 2009 Autodesk, Inc. All rights reserved

page: 104 Autodesk Concrete Building Structures 2010 - User Guide
- at the roof level, the following force is acting additionally:
analogously, the formula holds for the Y direction, where V is the total seismic force, but FT is not greater than 0.25 * V (RPA 4.2.5) - on individual stories – the forces:
where:
Fi – horizontal force on the story i hi – level of the slab to which the force Fi is applied hj – level of individual stories wi, wj – weights corresponding to the stories i, j
d) displacements of the story i for individual directions X and Y are evaluated based on the calculations of the cantilever loaded with forces Fi at the story levels - for membrane and mixed buildings, whereas for frame buildings – with the use of the equivalent frame method the displacements obtained will be multiplied by the factor Rx or Ry according to the formula 4-19 of the RPA99 code.
6.4.6. Default Loads - Simplified Method
(RPS2000) 1. The scope of application: buildings that fulfill the general conditions as specified in RPS2000 points 6.2.1.2 and 4.3.1 2. Design height of a building
the above-ground height of the building is adopted (the program takes no account of the underground stories)
3. Simplified method
Calculations should be performed separately for each of the directions X and Y
a) basic vibration periods (for the directions X and Y) – depending on the selected structure type:
frame Tx = Ty = 0.085 N, where N – number of stories in the building membrane and mixed structure
, where: Lx,y - widths of the building in the directions X or Y
b) the total force resulting from the seismic impact: Vx = A * S * D * I * W / Kx Vy = A * S * D * I * W / Ky where: user-defined values: I – structure class coefficient K – behavior factor (Kx for the X direction, Ky for the Y direction) values calculated by the program: A - nominal acceleration S – site coefficient D - increase coefficient calculated from the vibration period (RPS2000 table 5.5) W - total weight of the structure W = G + ψ Q dead loads and part of live loads, RPS2000 formula 6.2, where ψ - load factor
© 2009 Autodesk, Inc. All rights reserved

Autodesk Concrete Building Structures 2010 - User Guide page: 105
c) Distribution of the force V (Vx for the X direction, Vy for the Y direction) onto individual stories for Tx > 0.7 (s) - at the roof level, the following force is acting additionally:
analogously, the formula holds for the Y direction, where V (Vx for the X direction, Vy for the Y direction) is the total seismic force - on individual stories – the forces:
where: Fi - horizontal force on the story i hi - level of the slab to which the force Fi is applied hj - level of individual stories wi, wj - weights corresponding to the stories i, j
d) displacements of the story i for individual directions X and Y are determined based on the calculations of the cantilever loaded with forces Fi at the story levels - for membrane and mixed buildings, whereas for frame buildings – with the use of the equivalent frame method.
6.4.7. Default Loads – Simplified Method (UBC 97)
1. The scope of application of the simplified method of the static transverse force
all regular and non-regular structures for the zones: - seismic zone 1 - seismic zone 2: category 4 and 5
regular structures with the maximum height 240 feet (73.152 m), that have a system of transverse stiffeners according to table 16-N, except for the one listed in 1629.8.4-designation-4 non-regular – max. 5 stories or 65 feet of height (19.812 m) structures composed of a flexible upper part and a rigid lower part - both structure parts considered separately may be classified as regular - average story stiffness in the lower part is at least 10 times greater than the average story stiffness in the upper part the vibration period of the whole structure is 1.1 times greater than the vibration period of the upper part considered separately, with a fixed connection to the base
2. Design height of a building the above-ground height of the building is adopted (the program takes no account of the underground stories)
3. Description of the simplified method of the static transverse force
Calculations should be performed separately for each of the directions X and Y
a) Total horizontal (seismic) force
conditions for the force V:
and additionally for the zone 4
© 2009 Autodesk, Inc. All rights reserved

page: 106 Autodesk Concrete Building Structures 2010 - User Guide
where: V - Vx for the X direction, Vy for the Y direction Ca, Cv, Na, Nv – factors conditioned by a zone and a soil profile R – behavior factor (Rx for the X direction, Ry for the Y direction) calculations for the soil SF are not performed by the program
b) structure vibration period
where Ct – coefficient determined by the user (Ctx for the X direction, Cty for the Y direction):
0.035 (0.0853) for structures made from steel frames 0.030 (0.0731) for structures made from RC frames
0.020 (0.0488) for other structures a vibration period for the directions X and Y may be defined manually
c) Division of the horizontal seismic force into individual stories
If T > 0.7 second, then FT = 0.07 * T * V ≤ 0.25 * V FT – an additional force on the highest story level
where Fx – forces on the levels of individual stories d) Calculation of displacements of individual stories. Displacements of the story i for individual directions X and Y are calculated based on the solution of the cantilever loaded with Fi forces on the story levels for membrane and mixed buildings, whereas for frame buildings – with the use of the equivalent frame method. As a result, the user obtains values of static displacements ΔS which should be modified according to the formula (30-17) - see 1630.9.2
6.4.8. Default Loads - Simplified Method (IBC
2000/2006) 1. Scope of application
all regular structures with height up to 240 feet (73.152 m) 2. Design height of a building
the above-ground height of the building is adopted (the program takes no account of the underground stories)
3. Method of the equivalent transverse force - chapter 1617.4
Calculations should be performed separately for each of the directions X and Y Calculations are not performed for the soil F, and also for the soil E if Ss ≥ 1.25 or S1 ≥ 0.5
a) Maximum seismic acceleration factors
where Fa, Fv – location factors according to tables 1615.1.2(1-2)
b) Projected seismic acceleration factors
c) Total horizontal (seismic) force
V = Cs * W
© 2009 Autodesk, Inc. All rights reserved

Autodesk Concrete Building Structures 2010 - User Guide page: 107
where: V - Vx for the X direction, Vy for the Y direction W – total vertical (dead + live) load on a whole structure R – behavior factor (Rx for the X direction, Ry for the Y direction) CS – seismic response factor
conditions for CS for IBC 2006: the parameter value should not exceed:
yet it should not be less than CS = 00.1, while for buildings for which S1 ≤ 0.6 * g:
where T is a basic structure vibration period
d) Total vibration period of a structure for IBC 2000
where Ct - factor defined by the user (Ctx for the X direction, Cty for the Y direction):
0.035 (0.0853) for structures made from steel frames 0.030 (0.0731) for structures made from RC frames and eccentricity-braced steel frames
0.020 (0.0488) for other structures a vibration period for the directions X and Y may be defined manually for IBC 2006:
where: Ct - coefficient conditioned by a structure type (table 12.8-2 ASCE 7-05) x - coefficient adopted from table 12.8-2 (ASCE 7-05) - set by the program automatically for defined Ct and structure types: Steel frames Ct = 0.028 (0.0724) x=0.8 RC frames Ct = 0.016 (0.0466) x=0.9 Eccentricity-braced steel frames Ct = 0.03 (0.0731) x=0.75 Remaining buildings Ct=0.02 (0.0488) x=0.75
e) Division of the horizontal force into stories
where: Fx – a horizontal force applied to the story x Cvx – coefficient of force division into stories
© 2009 Autodesk, Inc. All rights reserved

page: 108 Autodesk Concrete Building Structures 2010 - User Guide
where: k – period-dependent power exponent: T ≤ 0.5 s k = 1.0 0.5s < T ≤ 2.5 s is a number interpolated linearly, from the interval <1, 2> 2.5 s ≤ T k = 2.0 hi, hx – height measured from the building base to the levels i, x V – a total horizontal force due to seismic load wi, wx – a part of the total vertical load W (dead + live) on a whole building applied to the stories i, x f) Calculation of displacements of individual stories. Displacements of the story i for individual directions X and Y are calculated based on the solution of the cantilever loaded with Fi forces on the story levels - for membrane and mixed buildings, whereas for frame buildings – with the use of the equivalent frame method. As a result, the user obtains values of static displacements Δ which should be modified according to IBC2000 / 1617.4.6.1. g) Division of a transversal force to elements of a story In proportion to rigidity
6.4.9. Default Loads - Simplified Method (Italian
Seismic Code) 1. Scope of application
The static - linear analysis may be performed for horizontally-projected, regular structures (point 4.3), considering two separate 2D models, as in point 4.4., on the condition that the first structure vibration period (T1) is not greater than 2.5TC.
2. Design height of a building
the above-ground height of the building is adopted (the program takes no account of the underground stories)
3. Method of the static - linear analysis
calculations should be performed separately for each of the directions (X and Y)
a) structure vibration period
(the code assumes that H ≤ 40m)
where: C1 - user-defined coefficient (C1x for the X direction, C1y for the Y direction): 0.085 for steel frame structures
0.075 for RC frame structures 0.050 for other structures H - total height of the building from the foundation level
b) Total horizontal (seismic) force
- for the elastic spectrum
- for the design spectrum where: Fh - Fhx for the X direction, Fhy for the Y direction Se (T1), Sd (T1) - coordinate of the elastic (design) response spectrum (see the formulas - points 3.2.3, 3.2.5) for individual directions W - total structure weight (calculated as for the remaining codes)
© 2009 Autodesk, Inc. All rights reserved

Autodesk Concrete Building Structures 2010 - User Guide page: 109
λ = 0.85, if the number of stories equals at least 3 and T1<2*TC 1.0 – for others
c) Division of the horizontal seismic force into individual stories
where: Fi - horizontal force acting on the story i Wi, Wj - values of the weight of the stories i and j zi, zj - values of the height of the stories i and j (from the foundation level)
d) Calculation of displacements of individual stories Displacements of the story i for individual directions X and Y are calculated based on the solution of the cantilever loaded with Fi forces on the story levels - for membrane and mixed buildings, whereas for frame buildings – with the use of the equivalent frame method.
e) Division of horizontal forces into individual constructional elements of a story Horizontal forces are divided in proportion to the stiffness (as for other seismic codes).
6.4.10. Default Loads - Simplified Method (P100-1/2006)
1. The scope of application of the simplified method: for buildings that satisfy code requirements 2. Description of the method:
a. evaluation of T1 (basic vibration period)
where: T1 - approximate vibration period for individual directions Ct - coefficient conditioned by a structure type (defined by the user) b. evaluation of the elastic spectrum for the defined quantities TB, TC, TD and the spectrum ordinate for T1
β(T) - normalized elastic spectrum β0 - maximal value of the dynamic amplification factor for the horizontal seismic acceleration T - basic structure vibration period
Values of periods [sec.] TB 0.07 0.1 0.16 TC 0.7 1.0 1.6 TD 3 3 2
© 2009 Autodesk, Inc. All rights reserved

page: 110 Autodesk Concrete Building Structures 2010 - User Guide
c. evaluation of the design spectrum
d. base shear force Fb = γ1 Sd(T1) m λ
where: Sd(T1) - spectrum ordinate for the basic period T1
m - total structure mass γ1 - structure factor λ - correction factor that equals:
0.85 for T1< Tc 1.0 in the remaining cases
e. division of forces onto individual stories
where: zi - height of the story i with reference to the base of the building mi - mass of the story i.
6.4.11. Default Loads - Seismic Analysis (Advanced Method)
When the advanced method is selected, the following options are available in the Default Loads / Seismic dialog box: - combination of vibration modes (CQC, SRSS)
The modal response is calculated from the formula below:
where: n – number of modes eij – coupling (correlational) coefficients Ri, Rj – spectral responses for the modes ‘i’ and ‘j’
The following types of quadratic combinations are accessible in the program:
SRSS method For the SRSS method the correlational coefficients equal: eij = 1 for i=j, eij = 0 for i≠j, therefore:
CQC method For the CQC method the correlational coefficients are calculated from the formula below:
© 2009 Autodesk, Inc. All rights reserved

Autodesk Concrete Building Structures 2010 - User Guide page: 111
where: ζi, ζj – damping coefficients for the modes ‘i’ and ‘j’ (relative values) r = Tj/Ti ≤ 1 Tj, Ti – vibration periods for the modes ‘i’ and ‘j’.
The formula above is used in the program for the PS92 code, if the Damping as for PS92 option is switched on in the dialog box with seismic analysis parameters (for the PS92 code). If this option is switched off, one damping value is applied to all modes and the above formula assumes the following form:
- combinations of seismic directions: quadratic according to the formula (the user defines Rx, Ry, Rz)
Newmark (according to PS 92 chapter 6.4)
where: Sx, Sy, Sz – are the results of the automatically generated cases on the directions X, Y, Z, respectively, calculated according to the combinations SRSS or CQC, whereas λ and μ are decrease coeficients (equal at most to 0.4). Newmark combinations are displayed in the Combinations dialog box, on the tab with accidental combinations (ALS).
6.4.12. Default Loads - Seismic Analysis (Modal Analysis)
The dialog box below opens on pressing the Modal analysis button in the Default Loads / Seismic dialog box.
The following options are available in the dialog box above: • Number of modes – a number of eigenmodes to be calculated by the program • Tolerance – a value that determines the precision (the criterion of stopping the
iterations)
© 2009 Autodesk, Inc. All rights reserved

page: 112 Autodesk Concrete Building Structures 2010 - User Guide
• Number of iterations – the maximum allowable number of iterations for each mode (the iteration process for each mode is stopped when the current value of the tolerance is less than the value provided in the Tolerance edit field or when the current number of iterations exceeds the specified number of iterations).
Pressing the Advanced >> button opens an additional part of the dialog box for definition of the following:
1. analysis mode - modal - seismic - seismic (Pseudomode)
2. Mass participation - the option is active for the seismic and the seismic (Pseudomode) modes; it allows implementing a limit of the percent mass participation
3. Basis reduction - the option is active for the modal mode of the analysis; the list of nodes includes all corner nodes of objects and the vibration directions set (UX, UY, UZ) apply to all nodes.
The consequences of selecting individual analysis modes are a follows; when the seismic or the seismic (Pseudomode) mode is selected, the following analysis options will be set: • calculation method - Lanczos method • ‘Sturm check" will be switched off • ‘Disregard density’ will be switched off • mass matrix will be switched to ‘Lumped with rotations’ instead of ‘Lumped without
rotations’.
6.4.13. Default Loads - Seismic Analysis (PS92 or PS92 2008)
The dialog box below opens on pressing the Seismic analysis button (if the seismic code PS92 or PS92 2008 is selected) in the Default Loads / Seismic dialog box.
The following options described in the selected seismic code are available in the dialog box above: • building type (regular, medium-regular) • seismic zone • structure • acceleration factor: the ratio A / g (the seismic acceleration to the acceleration of
gravity; the edit field shows the code-specified value of the acceleration factor for selected parameters)
• damping as for PS92 – the option is significant only for the advanced method
© 2009 Autodesk, Inc. All rights reserved

Autodesk Concrete Building Structures 2010 - User Guide page: 113
• damping – a value of the damping coefficient (for the simplified method: for the X and Y directions)
• site • spectrum type: design or elastic; if the elastic spectrum is chosen, the behavior
factor is disregarded (NOTE: for the simplified method only the design spectrum is accessible)
• topography • behavior factor for the X and Y directions (it accounts for the manner of the
material behavior).
6.4.14. Default Loads - Seismic Analysis (RPA99_03)
The dialog box below opens on pressing the Seismic analysis button (if the seismic code RPA99_03 is selected) in the Default Loads / Seismic dialog box.
The following options described in the selected seismic code are available in the dialog box above: • seismic zone • usage • acceleration factor: the ratio A / g (the seismic acceleration to the acceleration of
gravity; the edit field shows the code-specified value of the acceleration factor for selected parameters)
• damping – a value of the damping coefficient (for the simplified method: for the X and Y directions)
• site • quality coefficient Q • behavior factor for the X and Y directions (it accounts for the manner of the
material behavior).
6.4.15. Default Loads - Seismic Analysis (RPS2000) The dialog box below opens on pressing the Seismic analysis button (if the seismic code RPS2000 is selected) in the Default Loads / Seismic dialog box.
© 2009 Autodesk, Inc. All rights reserved

page: 114 Autodesk Concrete Building Structures 2010 - User Guide
The following options described in the selected seismic code are available in the dialog box above: • structure class • site • seismic zone • acceleration factor: the ratio A / g (the seismic acceleration to the acceleration of
gravity; the edit field shows the code-specified value of the acceleration factor for selected parameters)
• damping – a value of the damping coefficient • behavior factor for the X and Y directions (it accounts for the manner of the
material behavior).
6.4.16. Default loads - Seismic Analysis (UBC 97) The dialog box below opens on pressing the Seismic analysis button (if the seismic code UBC 97 is selected) in the Default Loads / Seismic dialog box.
The following options described in the selected seismic code are available in the dialog box above: • seismic zone • soil • seismic source type (active for zone 4) • the closest distance to the seismic source (active for zone 4) • importance factor • damping – a damping coefficient value (considered in advanced calculations) • behavior factor for the X, Y and Z directions (considers material behavior) • CT coefficient for the X and Y directions for calculation of the approximated period.
The code UBC97 assumes the following coefficient values: - 0.035 (0.0853 – in the metric system) – steel frames - 0.030 (0.0731) – RC frames and eccentricity-braced steel frames - 0.020 (0.0488) - other structures.
© 2009 Autodesk, Inc. All rights reserved
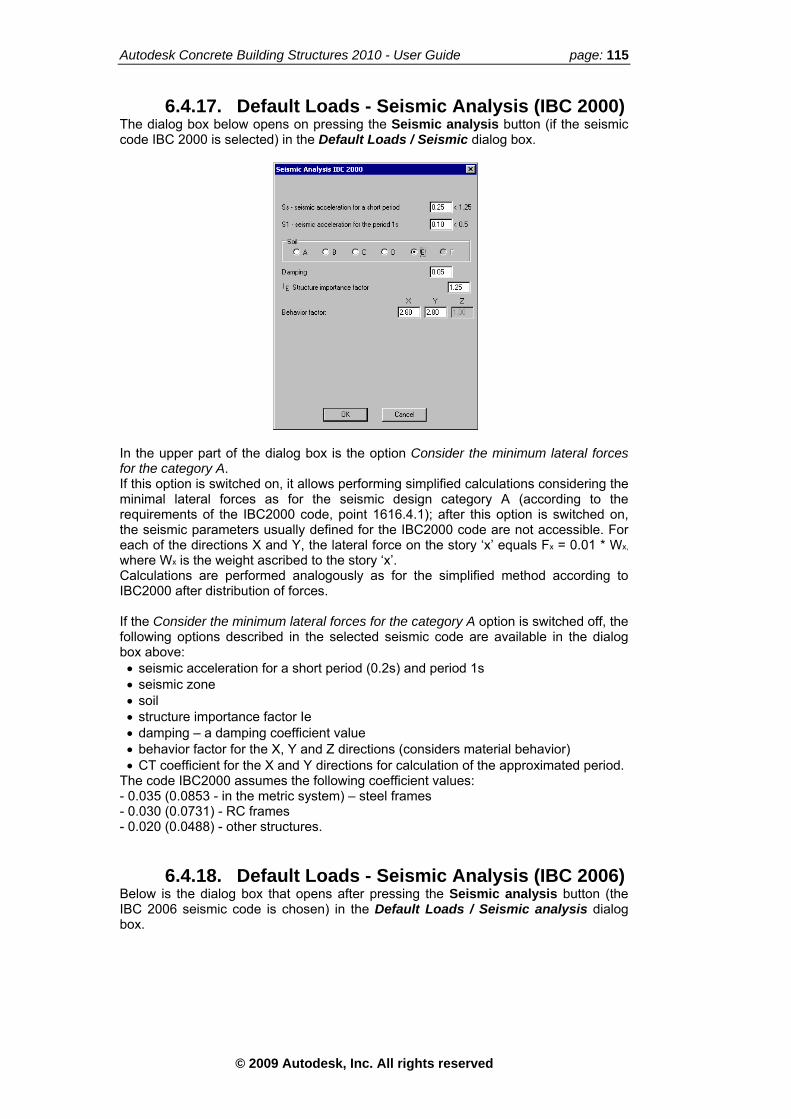
Autodesk Concrete Building Structures 2010 - User Guide page: 115
6.4.17. Default Loads - Seismic Analysis (IBC 2000) The dialog box below opens on pressing the Seismic analysis button (if the seismic code IBC 2000 is selected) in the Default Loads / Seismic dialog box.
In the upper part of the dialog box is the option Consider the minimum lateral forces for the category A. If this option is switched on, it allows performing simplified calculations considering the minimal lateral forces as for the seismic design category A (according to the requirements of the IBC2000 code, point 1616.4.1); after this option is switched on, the seismic parameters usually defined for the IBC2000 code are not accessible. For each of the directions X and Y, the lateral force on the story ‘x’ equals Fx = 0.01 * Wx, where Wx is the weight ascribed to the story ‘x’. Calculations are performed analogously as for the simplified method according to IBC2000 after distribution of forces. If the Consider the minimum lateral forces for the category A option is switched off, the following options described in the selected seismic code are available in the dialog box above: • seismic acceleration for a short period (0.2s) and period 1s • seismic zone • soil • structure importance factor Ie • damping – a damping coefficient value • behavior factor for the X, Y and Z directions (considers material behavior) • CT coefficient for the X and Y directions for calculation of the approximated period.
The code IBC2000 assumes the following coefficient values: - 0.035 (0.0853 - in the metric system) – steel frames - 0.030 (0.0731) - RC frames - 0.020 (0.0488) - other structures.
6.4.18. Default Loads - Seismic Analysis (IBC 2006) Below is the dialog box that opens after pressing the Seismic analysis button (the IBC 2006 seismic code is chosen) in the Default Loads / Seismic analysis dialog box.
© 2009 Autodesk, Inc. All rights reserved

page: 116 Autodesk Concrete Building Structures 2010 - User Guide
The above dialog box holds the following options described in the selected seismic code: • seismic acceleration for a short period (0.2s) and a period of 1s • seismic zone • soil type • structure importance factor Ie • damping - value of a damping coefficient • behavior factor for the directions X, Y and Z (takes into account how a material
behaves) • T - period defined by the user • TL - value of a long-term period • CT coefficient for the directions X and Y for calculations of an approximate period.
IBC 2006 assumes the following coefficient values: - 0.035 (0.0853 - in the metric system) - steel frames - 0.030 (0.0731) - RC frames - 0.020 (0.0488) - other structures.
6.4.19. Default Loads - Seismic Analysis (P100-92) The dialog box below opens on pressing the Seismic analysis button (if the seismic code P100-92 is selected) in the Default Loads / Seismic dialog box.
The following options described in the selected seismic code are available in the dialog box above: • seismic zone • importance class • values of the coefficients: Tc and Psi.
© 2009 Autodesk, Inc. All rights reserved

Autodesk Concrete Building Structures 2010 - User Guide page: 117
6.4.20. Default Loads - Seismic Analysis (P100-1/2006)
Below is the dialog box that opens after pressing the Seismic analysis button (the P100-1/2006 seismic code is chosen) in the Default Loads / Seismic analysis dialog box.
The above dialog box holds the following options described in the selected seismic code: • ag / g - quotient of spectral to gravitational acceleration for a given position • damping (the edit field is not available; the value 0.05 has been adopted) • values of the behavior factor q (the factor available for a design spectrum) and the
importance factor γI • spectrum type (design, elastic) • amplification factor β0 • values of individual periods characteristic of a spectrum: TB, TC, TD.
Moreover, the Ct coefficient (the coefficient for evaluation of a basic vibration period for the direction X and the direction Y) can be defined for the simplified method. Ct = 0.085 - steel frames Ct = 0.075 - RC frames Ct = 0.05 - remaining structures; H - building height (measured from the foundation or from the rigid ground).
6.4.21. Default Loads – Italian Seismic Code Below is the dialog box that opens after pressing the Seismic analysis button (Italian seismic code is chosen on the seismic code list) in the Default Loads / Seismic analysis dialog box.
© 2009 Autodesk, Inc. All rights reserved

page: 118 Autodesk Concrete Building Structures 2010 - User Guide
The above dialog box holds the following options described in the selected seismic code: • soil category • seismic zone • damping – value of the damping coefficient (accessible depending on the chosen
spectrum type) • structure factor q for the directions X and Y (accessible depending on the chosen
spectrum type) • C1 coefficient for the directions X and Y for calculation of an approximate structure
vibration period (user-defined value) 0.085 - steel frames 0.075 - RC frames 0.05 - other structures
• spectrum type: design or elastic.
6.4.22. Default Loads - Seismic Analysis (Spectral Analysis)
Below is the dialog box that opens after pressing the Spectral analysis button (spectral analysis must be chosen on the seismic code list) in the Default Loads / Seismic analysis dialog box.
© 2009 Autodesk, Inc. All rights reserved

Autodesk Concrete Building Structures 2010 - User Guide page: 119
The above dialog box is used to define parameters of spectral analysis for a new dynamic case. Depending on a selected calculation method in the program it is possible to generate spectral analysis cases for 2 directions (X, Y, if a structure is calculated with the use of simplified methods) or for 3 directions (if a structure is calculated using advanced methods). Spectra can be defined for individual directions; they may be defined as a function of velocity, acceleration or excitation, in relation to a period, pulsations or frequency. In the upper part of the dialog box there are options for selection of a direction of spectral/seismic excitation. The following situations are possible: • after pressing the Direction X button, the direction of spectral excitation will be
the direction of the X axis of the global coordinate system • after pressing the Direction Y button, the direction of spectral excitation will be
the direction of the Y axis of the global coordinate system • after pressing the Direction Z button, the direction of spectral excitation will be the
direction of the Z axis of the global coordinate system (available only for the advanced method)
• after switching on the Identical spectra for all directions option, spectral excitation will be defined for both directions (i.e. in the direction of the axes X and Y of the global coordinate system).
To define a spectrum, follow the steps below: • specify the spectrum name in the Spectrum name edit field • select quantities whose values will be used to define the spectrum; it is possible in
the respective fields: Abscissa (X-axis) and Ordinate (Y-axis): the abscissa axis is used to define values of a period, frequency or pulsations, whereas the ordinate axis - values of acceleration, velocity or excitation (values shown on both axes may be also presented in the logarithmic scale, i.e. the axes represent logarithms of selected quantities)
• specify successive points of the spectrum (enter values for selected quantities in the Point definition table)
• determine a damping value • determine a value of the increase coefficient Ci (available only for the simplified
method). In the middle part of the dialog box is the field with a coordinate system in which the defined or modified spectrum is presented. Spectra defined by the user can be saved to files; to do it, press the Export button and specify a file name (with the *.spe extension) and the file location on the disk. A spectrum can be also loaded from a *.spe extension file; to do it, press the Import button and indicate an appropriate file.
NOTE: When a spectrum is imported from a file created in the Autodesk Robot Structural Analysis program, an additional dialog box opens on the screen showing a list of spectra defined in the selected file. In the program, spectral analysis may be performed using the following methods: • simplified • advanced (the program assumes in calculations values determined in the dialog
boxes for defining parameters of seismic analysis according to a selected seismic code or in the dialog box for defining parameters of spectral analysis).
© 2009 Autodesk, Inc. All rights reserved

page: 120 Autodesk Concrete Building Structures 2010 - User Guide
6.4.23. Default Loads - Spectral Analysis (Simplified Method)
The pseudostatic method for regular buildings from the French seismic code PS 92 has been used for calculation of forces and displacements of stories. Calculations in the program are performed separately for individual directions X and Y. Individual calculation steps look analogously as for PS-92.
a) basic vibration periods (for the directions X and Y) – depending on a selected structure type: frame
membrane and mixed structure
b) Equivalent static forces fr and displacements of individual stories dr for the direction X
where: values calculated by the program: ρ0x - increase coefficient (taking account of the ignored modes)
TC - the maximum period value for the maximal value a(T), and in the case a spectrum is defined based on other values, this quantity is adopted in the program after being converted to the relation a(T) mr - mass of the considered story r – here are adopted all dead and live loads applied to the floor slab (the top of a given story), multiplied by participation factors (determined in the dialog box), as well as the self-weight of horizontal elements and half the weight of the vertical elements of a given story and of the next story (r+1). In the case of the story 0, the whole weight of vertical elements of the story 0 is included. If the soil level is higher than the level of the base of the story 0, then the weight and the loads of the stories 0 and 1 are included in the story 2. zr - quotient of the story height and the design height of the building Zr = hr / H, where H – building height counted from the base of the story 0 to the level of the story n α - coefficient dependent on the bracing of the building (frames α = 1,0, walls α = 1.5)
spectral acceleration
© 2009 Autodesk, Inc. All rights reserved

Autodesk Concrete Building Structures 2010 - User Guide page: 121
instead of the quantities aN and τ from the PS 92 code, the increase coefficient Ci has been introduced
where ζ is a damping coefficient expressed in (%) RD(Tx) - ordinate of the normalized design spectrum, defined earlier for the direction X, in the case a spectrum is defined using a relation other than a(T), in the stage of calculations the program converts the spectrum definition and takes account of the value a(Tx)
for the Y direction the procedure looks analogously as for the X direction
6.4.24. Seismic / Spectral Analysis Considering the Torsion Effect
SIMPLIFIED CALCULATIONS In the program simplified calculations may be performed in 3 ways: • without considering the torsion effect • considering normal torsion (considering of the theoretical eccentricity, i.e. the
distance between the mass centroid and the center of torsion for individual stories of a building)
• considering accidental torsion (additionally, the not-intended eccentricity of the mass centroid location is taken into account; code values, and in the case of spectral analysis – user-defined values, are adopted).
Simplified calculations - procedure The following assumptions have been adopted: • when calculating the mass centroid of a story, the story weight evaluated in such a
way as during seismic calculations is considered • loads are applied to the ceiling slab of a given story • walls do not carry loads perpendicular with respect to their plane (therefore, their
stiffness in the direction perpendicular to the axis equals zero). (1) Evaluation of the mass centroid G (xG,r, yG,r ) of the story r
where: xG,r – coordinate x of the mass centroid G
mr,i - mass of a structure element belonging to the story r; how to determine which elements belong to which stories: - horizontal elements: belong to current stories - vertical elements:
the last story: 1 of the mass the first story (0): mass of elements on the story 0 + 1 of the mass on the story 1 intermediate stories: 1 of the mass of the stories i and i+1 wr,j - dead load acting on a structure within the story r qr,k - variable load (live, wind, snow) acting on a structure within the story r
© 2009 Autodesk, Inc. All rights reserved
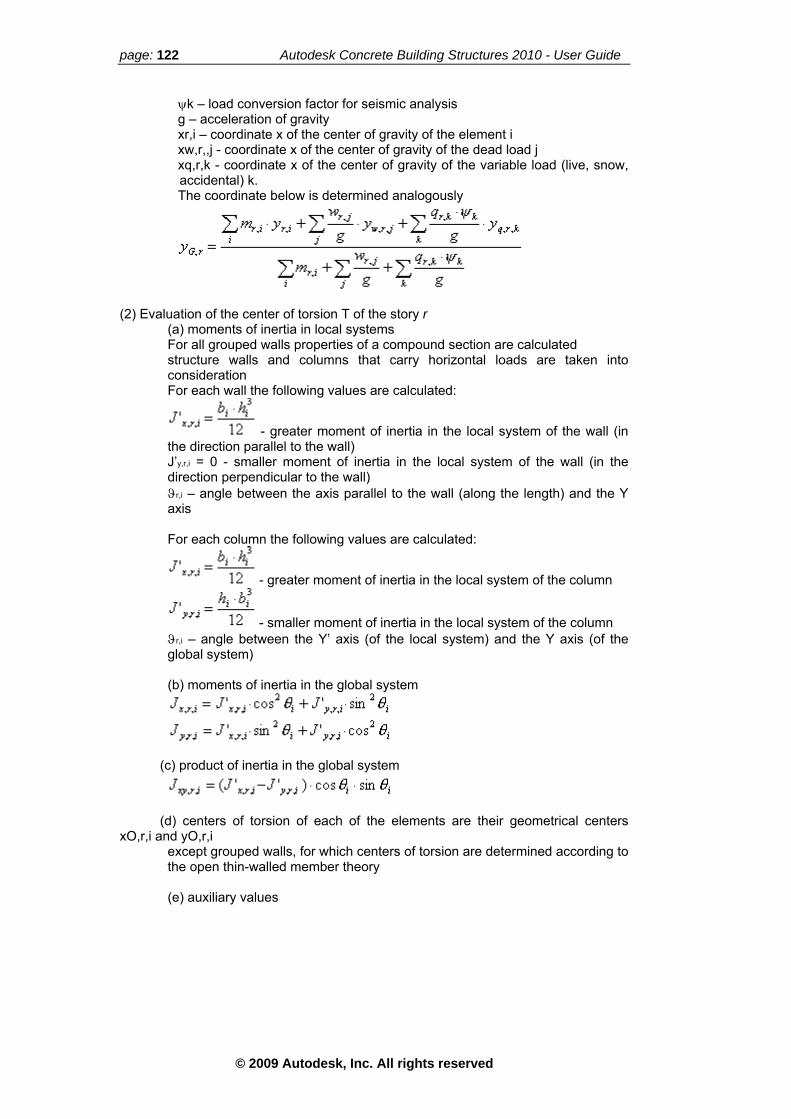
page: 122 Autodesk Concrete Building Structures 2010 - User Guide
ψk – load conversion factor for seismic analysis g – acceleration of gravity xr,i – coordinate x of the center of gravity of the element i xw,r,,j - coordinate x of the center of gravity of the dead load j xq,r,k - coordinate x of the center of gravity of the variable load (live, snow, accidental) k. The coordinate below is determined analogously
(2) Evaluation of the center of torsion T of the story r
(a) moments of inertia in local systems For all grouped walls properties of a compound section are calculated structure walls and columns that carry horizontal loads are taken into consideration For each wall the following values are calculated:
- greater moment of inertia in the local system of the wall (in the direction parallel to the wall) J’y,r,i = 0 - smaller moment of inertia in the local system of the wall (in the direction perpendicular to the wall) ϑr,i – angle between the axis parallel to the wall (along the length) and the Y axis
For each column the following values are calculated:
- greater moment of inertia in the local system of the column
- smaller moment of inertia in the local system of the column ϑr,i – angle between the Y’ axis (of the local system) and the Y axis (of the global system)
(b) moments of inertia in the global system
(c) product of inertia in the global system
(d) centers of torsion of each of the elements are their geometrical centers xO,r,i and yO,r,i
except grouped walls, for which centers of torsion are determined according to the open thin-walled member theory
(e) auxiliary values
© 2009 Autodesk, Inc. All rights reserved

Autodesk Concrete Building Structures 2010 - User Guide page: 123
(f) coordinates of the center of torsion - if:
- if:
where Ai is the wall (column) area
- if:
- if:
- in the remaining cases: x t,r = 0 , y t,r = 0
(2a) Evaluation of the theoretical eccentricity e0r (e0rx, e0ry ): distance between G (CM) and T (CR), where G(CM) – mass centroid, and T (CR) - center of torsion, respectively for individual stories .
(3) Value of the torsional moment for individual seismic directions
© 2009 Autodesk, Inc. All rights reserved

page: 124 Autodesk Concrete Building Structures 2010 - User Guide
(4) Evaluation of the accidental eccentricity • PS92 code (France)
• RPS2000 code
• RPA99_2003 code
• the remaining codes (UBC97, IBC2000, Italian seismic code)
• spectral analysis
where the values E_x, E_y are defined by the user
(5) Torsional moment for the direction X • RPA99_2003 code
• the remaining codes and spectral analysis
A value of the moment for the direction Y is determined analogously.
(5a) Adding up moments when passing to a lower story Values of torsional moments evaluated in the way presented above are the moments resulting from forces acting on individual stories; moments that equal as follows should be assumed for distribution:
(5b) Distance of the wall (column) centroid from the center of torsion in the wall (column) local system
- coordinates of the center of torsion in the local system of an object
- distance of the object centroid from the center of torsion of a story
© 2009 Autodesk, Inc. All rights reserved

Autodesk Concrete Building Structures 2010 - User Guide page: 125
(6) Polar moment of inertia of the story r
(7) Radius of torsion
(8) Distribution of forces due to torsion • due to normal torsion (normal torsion is selected – 2 seismic cases) – for individual
directions, respectively, MTrx or MTry are substituted - walls
- columns X component:
Y component:
• due to accidental torsion (accidental torsion is selected - 4 seismic cases)
Seismic analysis X-1: - walls
- columns X component:
Y component:
Seismic analysis X-2: M Tr,x,2 Seismic analysis Y-1: M Tr,y,1 Seismic analysis Y-2: M Tr,y,2
(9) Resultant distribution of forces Depending on the option selected (normal or accidental torsion), the normal or accidental R" forces are added to generated forces. In the case of normal torsion, forces are summed within seismic cases, whereas for calculations taking account of accidental torsion 2 cases per each declared direction are created (considering of eccentricities on both sides of the mass centroid). NOTE: If calculations are performed according to the RPA99_2003 code, the program ignores the influence of horizontal forces resulting from torsion which would decrease the forces obtained in the first distribution stage. Moments acting in columns / walls resulting from horizontal forces are also evaluated considering the forces due to torsion Rr,i" (for walls on one direction, and for columns on 2 directions).
© 2009 Autodesk, Inc. All rights reserved

page: 126 Autodesk Concrete Building Structures 2010 - User Guide
ADVANCED CALCULATIONS In the program advanced calculations may be performed in 2 ways: • without considering the accidental torsion effect • considering the accidental torsion effect (additionally, the not-intended eccentricity
of the mass centroid location is taken into account; user-defined values are adopted).
When calculations considering accidental torsion are performed, the modal analysis is conducted for the distributed mass matrix and the stiffness matrix taking account of a shift by a defined eccentricity.
NOTE: Since the real value of the eccentricity is assumed in advanced calculations, the sign is of importance (according to code regulations the eccentricity should be considered on both sides of the mass centroid, and in this case the user decides about it by entering a negative or positive value).
6.4.25. Verification of a Necessary Wall Area The verification is available for the seismic code P100-1/2006. Verification of a necessary wall area: - calculation method: simplified analysis - comparison of the area of walls that carry horizontal forces on the directions X and Y with the code condition. To verify the necessary area of walls, it is needed to define a value of the modification factor that equals I * ag / g, where I is a structure importance factor, while ag and g are seismic and gravitational accelerations, respectively. During verification of a necessary wall area the following condition is checked:
where: Ap - sum of the horizontal area of all walls that carry horizontal seismic forces Apl - area of a slab positioned on a considered story I * ag / g - product of a structure importance factor and a quotient of the seismic and gravitational acceleration (the value depends of the structure importance and a seismic zone) n - number of stories of a building above the considered section. If the condition above is not satisfied, an appropriate message appears on the screen. The check of the condition for individual directions X and Y on each story of a building is presented in a calculation note.
© 2009 Autodesk, Inc. All rights reserved

Autodesk Concrete Building Structures 2010 - User Guide page: 127
7. DEFINITION OF LOADS 7.1. Rules of Load Definition in the Autodesk®
CBS Program The following two terms have been introduced in the program: load group and load record. Load group Each load defined in the Autodesk® CBS program has to belong to a load group. A group of loads contains load records resulting from the same type of actions and showing the same load factor (partial safety factor). Groups may be generated automatically, semi-automatically and manually. Semi-automatic and automatic generation of load groups involves automatic generation of load records. Automatic generation concerns groups of loads resulting from non-structural elements (e.g. partition walls, layered walls, etc.). Load records are generated as soon as a model is being generated for the Autodesk Robot Structural Analysis program. Semi-automatic generation refers to seismic loads. After defining code parameters, the program generates by itself required load cases (due to specific character of the load, load records are not generated) – the option is not available in the current program version. There is also a possibility of semi-automatic generation of groups of live loads. The option enables assigning loads to earlier-defined rooms intended for the same purpose. In this case, load records are generated once an appropriate option is activated. Load record A load record is a single load applied to an object or its part. Several records may be grouped using the Loads / Live Load Patterns / Group option. Return to the original loads takes place once the Loads / Live Load Patterns / Ungroup option is used.
7.2. Types of Loads in the Autodesk® CBS Program
The following load types are available in the Autodesk® CBS program:
• concentrated load
A concentrated load occurs in two variants: as a vertical load or as a
horizontal load . The vertical load denotes a load compatible with the direction of z axis; the horizontal load is a load acting in the plane perpendicular to z axis. An angle for the horizontal load is measured from x axis in the direction of y axis. The concentrated load is assigned to quasi-point objects (column and spread footing) and that is interpreted as application of a load to their top part; this type of load may also be applied to any point of the structure.
• linear load
A linear load occurs in two variants: as a vertical load or as a horizontal load
. The vertical load denotes a load compatible with the direction of z axis; the horizontal load is a load acting in the plane perpendicular to z axis. An angle for the horizontal load is measured from x axis in the direction of y axis. The linear load may act in the direction perpendicular to an object or be a ‘projected’ load (then the load refers to the object length projected onto the plane normal to the direction of load). The linear load is assigned to linear objects (beam, continuous footing, top wall edge); it may also be applied to any point of the structure.
• planar load
© 2009 Autodesk, Inc. All rights reserved
page: 128 Autodesk Concrete Building Structures 2010 - User Guide
A planar load occurs in two variants: as a vertical load or as a horizontal load
. The vertical load denotes a load compatible with the direction of z axis; the horizontal load is a load acting in the plane perpendicular to z axis. An angle of the horizontal load is measured from x axis in the direction of y axis. The planar load may act in the direction perpendicular to an object or be a ‘projected’ load (then the load refers to the object length projected onto the plane normal to the direction of load). The planar load is assigned to planar objects (slab, wall, raft foundation); it may also be applied to any point of the structure.
7.3. Definition of Loads To define a load in the Autodesk® CBS program, the user should follow the steps below:
• choose load variant: vertical load or horizontal load
• select load type: concentrated load , linear load or planar load • determine a load value in the edit field that becomes accessible after selection of
a load type • choose a load nature from the drop-down list located to the right of the edit field
where the load value is defined • apply the defined load to an object; the user may assign a load only to this object
type which allows for application of a chosen load type. There is a certain difference in definition of vertical and horizontal loads. If the vertical load is selected, during definition the user determines point (or points) where a force is applied (for a load assigned to object, the user chooses an object). For the horizontal load there are two possibilities: • geometrical definition – a point (or points) to which a force is applied are defined;
after defining the last characteristic load point, the cursor switches to the mode which enables defining an angle – the distance of the mouse cursor to the snap point is unimportant then, only the angle value is significant. NOTE: There are ‘preferred directions’ set for the cursor, which results in that that if the angle differs negligibly from the direction of axes X or Y, the angle is ‘snapped’ to the direction of the axes mentioned.
• definition of a load assigned to object – the program waits for the user to indicate an element to which the load is to be applied. Objects are filtered, which means that it is possible to select only this element type to which a given type of load may be applied. Once an object is indicated, the cursor changes its mode to that which enables defining an angle (as described for the geometrical definition).
The program includes the option Load Assigned to Object . The option is available both in the 2D view and in the 3D view.
NOTE: When defining a load assigned to an object of the value and subnature identical as a load already existing, the program displays a message informing that such load has been applied to an object to avoid doubling the loads. It is possible to define simultaneously a planar load assigned to an object for more than one slab in the case of window selection in the 2D or 3D view. When defining a load the user should pay attention to: • load position (only for forces not assigned to object) – for a concentrated force, it
is one point where the force is applied, for a linear load – these are two values (beginning and end points of a load), for a planar load – these are contour coordinates
© 2009 Autodesk, Inc. All rights reserved

Autodesk Concrete Building Structures 2010 - User Guide page: 129
• load value – for a concentrated force and planar load, it is one value, whereas for a linear load – two values: value at the load beginning point and value at the load end point.
The load direction for individual load natures is adopted in the following way:
- dead load: vertical - live load: any - snow load: vertical - projected - wind load: normal to the plane - accidental load: any - temperature load: any - seismic load: any. While defining a load the user should keep in mind that loads assigned to objects should be of the same type as object: • for concentrated forces – spread footings, columns • for linear loads – beams, continuous footings, walls (top edge) • for planar loads – slabs and raft foundations (vertical and perpendicular to the
plane) and walls (horizontally and perpendicularly to the plane).
7.4. Modification of Loads For modification of loads the Properties dialog box is used (similarly as for modification of other objects in the Autodesk® CBS program).
In the above dialog box the options provided on the Properties tab allow modification of the following parameters of a selected load: • load value • load nature (dead, live, wind, snow, etc.) • the manner how the load is applied to object: - vertical load - horizontal load - load perpendicular to object
- load projected onto object. Options located on the Position tab enable modification of the place to which a load is applied.
© 2009 Autodesk, Inc. All rights reserved

page: 130 Autodesk Concrete Building Structures 2010 - User Guide
7.5. How to Apply Load to a Structure To apply a wind - planar load of value 0.4 kN/m2 to the building wall visible in the drawing below, follow the steps below:
• switch on the Load assigned to object option by selecting the menu command
Loads / Assigned to Object or by pressing the Load assigned to object icon on the Loads toolbar
• switch on the Planar Load option by selecting the menu command Loads / Planar
or by pressing the Planar load icon on the Loads toolbar • change the load nature by selecting the Wind option from the drop-down list
located in the Loads toolbar
• enter the value of load (0.4 kN/m2) into the edit field on the Loads toolbar
• switch on the Horizontal Load option by selecting the menu command Loads /
Horizontal or by pressing the Horizontal load icon on the Loads toolbar • in the 2D viewer select the wall to which the load is to be applied by positioning
the mouse cursor over it (the wall becomes highlighted in yellow) and clicking with the left mouse button
• by means of the mouse choose the direction of load application, next, click with the left mouse button; the defined load is presented in the drawing below.
In the following 3D drawing it can be seen that the defined load is a planar one.
© 2009 Autodesk, Inc. All rights reserved

Autodesk Concrete Building Structures 2010 - User Guide page: 131
7.6. Add Load Pattern The option enables manual definition of any load pattern. It is accessible from: • the menu after selecting the Loads / Live Load Patterns / Add command
• the toolbar after pressing the icon.
A load pattern is a set of live loads that may occur during operation of the structure. It consists of one or several live load records.
Definition of a load pattern is based on the current selection. In the dialog box above, the gray edit field presents the current selection; it shows names of selected loads. Selecting the following option from the menu (or the toolbar):
• Select - Whole Structure allows definition of patterns comprising loads from different stories
• Select - Current Story causes selected loads only from the current story to be taken into account.
7.7. Load Patterns The option enables viewing load patterns defined automatically or manually. It is accessible from: • the menu after selecting the Loads / Live Load Patterns / Display command
• the toolbar after pressing the icon.
© 2009 Autodesk, Inc. All rights reserved

page: 132 Autodesk Concrete Building Structures 2010 - User Guide
The above dialog box contains the list of all the defined load patterns. Once a load pattern is chosen in the dialog box, the 3D view presents the set of load records included in this pattern. In the dialog box load patterns can be also deleted (the buttons Delete pattern and Delete all located in the top part of the dialog box).
7.8. Automatic Generation of Load Patterns In the Autodesk® CBS program the automatic generation of live load patterns consists in performing permutations of all live loads on each story; apart from that, to thus-generated permutations the program adds a load case containing all the loads positioned above the given story. Such a method of load generation enables the user to generate a highly probable set of forces being the set of forces designing all the structural elements and at the same time – being the set limiting the number of generated combinations. To start automatic generation of load patterns the user should select the menu
command: Loads / Live Load Patterns / Generate or press the icon.
7.9. How to Define Automatically Load Patterns To generate automatically all load patterns for nine independent, live loads applied to the slab, presented in the drawing below (each slab is loaded by a separate planar load), follow the steps below:
• select the menu command Loads /Live Load Patterns / Generate or press the
Generate icon in the Loads toolbar
© 2009 Autodesk, Inc. All rights reserved

Autodesk Concrete Building Structures 2010 - User Guide page: 133
• select the menu command Loads /Live Load Patterns / Display or press the
Display icon in the Loads toolbar • in the Load Patterns dialog box click with the left mouse button on one of the
patterns (it becomes highlighted in blue) – a selected load pattern will be shown in the 3D viewer (see the drawing below).
7.10. Load Conversion during Generation of a Model in Autodesk Robot Structural Analysis
The following rules of conversion of loads defined in the Autodesk® CBS program apply during generation of a structure calculation model for the Autodesk Robot Structural Analysis program: • dead loads – all the groups of dead loads defined in the Autodesk® CBS
program belong to one nature of dead loads in the Autodesk Robot Structural Analysis program. Each group of dead loads is converted into a subnature of dead loads with the name compatible to the group’s name. Each of these subnatures contains exactly one load case (equivalent to the relevant group of loads from the Autodesk® CBS program). All the load records from a given group of dead loads from the Autodesk® CBS program are converted into load records in the corresponding case of the Autodesk Robot Structural Analysis program. Besides, the program generates dead loads resulting from self-weight, partition walls and finishing layers.
• live loads - all the groups of live loads defined in the Autodesk® CBS program belong to one nature of live loads in the Autodesk Robot Structural Analysis program. Each group of live loads is converted into a subnature of live loads with the name compatible to the group’s name. If no additional limitations (load patterns) are introduced, then each load record within a given group is converted into a separate calculation case. It means that the Autodesk Robot Structural Analysis program generates as many load cases as many load records have been defined in the Autodesk® CBS program. NOTE: Load generation without using the option Loads / Live Load Patterns / Add or Loads / Live Load Patterns / Group may only be performed for small structures because the growing number of code combinations may quickly exceed the maximal number of combinations allowed in the Autodesk Robot Structural Analysis program. The limit value of code combinations in the Autodesk Robot Structural Analysis program is reached after defining ten-odd live load records in the Autodesk® CBS program.
© 2009 Autodesk, Inc. All rights reserved

page: 134 Autodesk Concrete Building Structures 2010 - User Guide
Load patterns re the mo al way of reducing code combination cases. On
ads combined by means of the Loads / Live Load Patterns / Group
• he snow load are ascribed to one nature: Snow in
one nature: Wind in the
are ascribed to one nature:
re load are ascribed to one
ng to defined
ombinations according to a regulation
Load patterns a st naturtheir basis appropriate combinations are generated in the Autodesk Robot Structural Analysis program. After switching on the Loads / Live Load Patterns / Add option all the records from one load group within a story (or within the whole structure) are combined into several independent load patterns defined by the user. Group loLoad records option are treated as a single record. It means that they are included in code combinations simultaneously. snow load – all the groups of tthe Autodesk Robot Structural Analysis program. Each of the groups makes up a separate load case with the name compatible to the group’s name determined in the Autodesk® CBS program. Relations between load cases are set automatically to exclusive. All the load records in this load group of the Autodesk® CBS program are converted into load records in the corresponding load case in Autodesk Robot Structural Analysis.
• wind load - all the groups of the wind load are ascribed to Autodesk Robot Structural Analysis program. Each of the groups makes up a separate load case with the name compatible to the group’s name determined in the Autodesk® CBS program. Relations between load cases are set automatically to exclusive. All the load records in this load group of the Autodesk® CBS program are converted into load records in the corresponding load case in Autodesk Robot Structural Analysis.
• accidental load - all the groups of the accidental loadAccidental in the Autodesk Robot Structural Analysis program. Each of the groups makes up a separate load case with the name compatible to the group’s name determined in the Autodesk® CBS program. Relations between load cases are set automatically to exclusive. All the load records in this load group of the Autodesk® CBS program are converted into load records in the corresponding load case in Autodesk Robot Structural Analysis.
• temperature load - all the groups of the temperatunature: Temperature in the Autodesk Robot Structural Analysis program. Each of the groups makes up a separate load case with the name compatible to the group’s name determined in the Autodesk® CBS program. Relations between load cases are set automatically to exclusive. All the load records in this load group of the Autodesk® CBS program are converted into load records in the corresponding load case in Autodesk Robot Structural Analysis.
• seismic load – seismic loads are generated automatically accordiparameters – the option is not available in the current program version. Load groups are reflected in seismic load cases in Autodesk Robot Structural Analysis.
7.11. Load Combinations The option allows defining code and manual cselected in the Default loads dialog box. The option is available from: • the menu after choosing the Loads / Combinations command
• the toolbar, after pressing the icon.
© 2009 Autodesk, Inc. All rights reserved

Autodesk Concrete Building Structures 2010 - User Guide page: 135
The left-hand part of the dialog box includes a table containing a list of manual combinations or generated code combinations (components of code combinations are marked with a color background). Combinations are grouped on the relevant tabs (ULS, SLS, ALS) presenting combinations for individual limit states depending on a selected regulation of code combinations. The combination table is composed of the following columns: • name of a combination / component • list of cases (with factors for each case) that are included in a given combination.
Each combination or component of code combinations may be switched on / off. If a combination is switched off in the table, it will not be considered while presenting results (after recalculation of a structure). In the right-hand part of the dialog box there is a table which presents load cases (along with factors for each case) that can be used in definition of a new combination or modification of an existing one. In the column with factors it is possible to enter user-defined values of load factors for individual cases. The bottom right part of the dialog box holds the buttons as follows: • Generate code combinations – pressing this button results in defining code
combinations according to an adopted regulation; if load combinations have already been defined for a structure and this button is pressed, the following question will appear on the screen: ‘Do you want to delete existing combinations?’ After pressing the YES button, the existing load combinations will be deleted and code combinations will be generated. After pressing the NO button, a list of generated code combinations will b added to the list of defined combinations.
• Set default factors – after pressing this button default values of factors from selected regulations will be adopted.
At the bottom of the dialog box (under the combination table) are the following the buttons: • Delete - pressing this button deletes a combination or a component of a code
combination • Copy - pressing this button copies a combination or a component of a code
combination • New - pressing this button inserts an additional blank row in the combination
table; this row may be used to define a new combination – it is defined by
© 2009 Autodesk, Inc. All rights reserved

page: 136 Autodesk Concrete Building Structures 2010 - User Guide
selecting cases, located in the load case table (the right-hand side of the dialog box), included in the combination and editing load factors
• Apply - pressing this button accepts changes (the button is accessible if the
icon Enter is switched off)
• Enter – after activating this icon the changes made are automatically accepted.
NOTE: If the Combinations dialog box includes load combinations defined earlier and the Generate code combinations button is pressed, then all combinations existing so far will be deleted (even if combinations have been modified by the user) after pressing the YES button (see the description of the Generate code combinations option provided above).
NOTE: In the case code combinations are edited (a change of a load factor, deleting of a component), the program treats the remaining set of components of a combination as manual combinations.
© 2009 Autodesk, Inc. All rights reserved

Autodesk Concrete Building Structures 2010 - User Guide page: 137
8. STRUCTURE CALCULATIONS 8.1. Structure Calculation
The calculation of a structure in the Autodesk® CBS program can be performed: - for the whole structure - for each story separately. In the latter case the analysis takes account only of the vertical forces applied directly to the story in question. To start the calculation of the structure, follow the steps below: for calculation of the whole structure • select the Calculations / Calculations of Whole Structure command from the menu
• press the icon . for calculation of the current story • select the Calculations / Calculations of Current Story command from the menu
• press the icon .
NOTE: If calculations are to be performed for a selected story, then two simplified methods of structure analysis are available; the structure analysis using the exact method based on the finite element method (FEM) is impossible. If in the Calculations dialog box (for the whole structure or the current story) the option Always display this dialog box before calculations is switched on, then the Calculations dialog box containing the structure calculation options appears on the screen; to start the structure calculation, press the Calculate button.
8.2. Calculation Options The Calculation Options dialog box is used to determine parameters of the static calculation of a structure, the code calculation of RC elements of the structure as well as the analysis of the load capacity of the foundations (soil parameters). The option is accessible: • from the menu after selecting the Calculations / Calculation Options command
• after pressing the icon . The Calculation Options dialog box consists of the following three tabs: - Calculations - RC element design - Soil. In the dialog box it is also possible to save a set of selected options as default for new structure projects. It is enabled by the Set as Default option located at the bottom of the dialog box.
8.3. Object Properties - Results and Calculation Options
The tabs: Results and Calculation options in the Object Properties dialog box are displayed for the following objects:
- Results tab – all objects - Calculation options tab – all objects except continuous footings.
© 2009 Autodesk, Inc. All rights reserved

page: 138 Autodesk Concrete Building Structures 2010 - User Guide
NOTE: It is possible to change dimensions of the Object Properties dialog box on the Results tab (for all element types) and on the Calculation options tab (for slabs and beams). The Results tab includes: • Type of results selection list, which comprises the following options: Load
distribution, Internal forces, Design • Load selection list, which comprises load subnatures applied in a structure model
(they are visible once the calculations are performed) • object view presenting the results; for members the dialog box presents a static
scheme of a member, for spread footings - a view of a spread footing with designation of forces applied to it, for slabs - a slab with supports
• table of internal forces • at the bottom of the dialog box – controls that will be described further on,
depending on the type of calculations and object. Results may be presented for:
- whole structure
- current story.
NOTE:
If the option for presenting combinations is switched off (the icon is switched off), the load case list includes, apart from simple cases, only extreme combinations
(ULS+, ULS-, SLS+, SLS-, ALS+, ALS-). After activating this option (the icon is switched on) the list of cases also comprises all components of code combinations and combinations defined manually which are marked as active in the Combinations dialog box.
In the upper part of the dialog box is also the icon, which when pressed opens the Add to Note dialog box; the option allows adding components of calculation results (both results of simplified and advanced calculations) and design results for structure elements to a calculation note. The Load distribution option is available to calculations performed in the Autodesk® CBS program; the appearance of the dialog box changes with type of a selected object:
© 2009 Autodesk, Inc. All rights reserved

Autodesk Concrete Building Structures 2010 - User Guide page: 139
• slabs - the dialog box presents a view of load distribution zones as well as a table with a list of elements supporting the slab and the total of loads; below are accessible the options: Zoom Window and Zoom All
• beams, walls - the dialog box presents a view of loads resulting from slabs - according to a selected option (linear loads, concentrated loads or the total of all loads), together with a static scheme of a member and a table including elements corresponding to the selected options: values of a linear load at 10 points of the object, values of equivalent loads (for simplified methods), values of concentrated forces, totals of linear and concentrated loads applied to the element
• columns - the dialog box presents a view of internal forces (axial force, shear forces and moments) resulting from the elements supported by the column and a table with values of these forces; additionally, the static scheme of a column is displayed; the default column scheme is a column with fixed supports on both ends, however, the following column schemes may appear as well: - pinned support at the column base if this is a column with a spread footing - pinned supports on both ends of a column, if the column is disregarded for carrying of transversal forces.
The Internal forces option is available to calculations performed by the Autodesk Robot Structural Analysis program; the appearance of the dialog box changes with type of a selected object: • slabs, raft foundations, walls - the dialog box presents a map of a selected
quantity (internal forces: M’xx, M’yy, M’xy, N’xx, N’yy, N’xy, elastic displacements (without taking account of cracking of RC elements): U’x, U’y, Uz or reinforcement areas: A’x+, A’x-, A’y+, A’y-, quantities for cracked elements: values of cracking width (a’x+, a’x-, a’y+, a’y-), deflections in cracked elements (U+: positive deflection, U-: negative deflection) and a table with values and coordinates of nodes; the following options are available:
the activated icon means that values will be presented in a displayed map
pressing this icon increases the font size in descriptions of values on maps
pressing this icon reduces the font size in descriptions of values on maps
pressing this icon selects the graphical selection mode within the presented map
Zoom-window
Initial-zoom
switches on/off an FE mesh
allows defining a mesh for all maps of internal forces after calculations using the simplified and exact methods and maps of the required reinforcement; it opens the User-defined Mesh dialog box under the table the following options are provided:
values of a selected quantity at individual mesh nodes; after activating the
icon, maps will present values of a selected quantity NOTE: Quantities for presentation may be selected by (with the selection mode active): - activating options (the √ symbol appears) in the table with values for nodes / elements - indicating a point on the map with the mouse cursor; it results in displaying a value at the closest node / center of a finite element.
min./ max. values
values of a selected quantity at centers of individual finite elements; after
activating the icon, maps will present values of a selected quantity
© 2009 Autodesk, Inc. All rights reserved

page: 140 Autodesk Concrete Building Structures 2010 - User Guide
scale and two options for selection of the scale: automatic (non-editable)
and user-defined. In case of the automatic scale, 10 colors are generated (segments of equal length) by default; the scale includes colors from red to blue; if min./max. values differ, then the number of positive colors is different from the number of negative colors (e.g. 7 : 3), in such a case, the intensity of negative (positive) colors stays in proportion to their number (they are selected as if there are 7 of them, while only first 3 of them are displayed) The user-defined scale is global for different map types and includes only 4 lines with default values corresponding to individual quantities: M - M’xx, M’yy, M’xy – default intervals 20, 0, -20 [kNm] N - N’xx, N’yy, N’xy - default intervals 100, 0, -100 [kN] U - U’x, U’y, Uz - default intervals 0.03, 0, -0.03 [m] User-defined scales may be modified using the buttons: Insert, Delete; these scales are available globally within one project. For walls it is possible to perform calculations of reduced forces, which enable determining the equivalent set of internal forces: the horizontal force H, the vertical force V and the moment M. These forces may be used in the design of reinforcement of lintels or for the check of the shear capacity of a wall. The calculations of forces are based on the cut that passes through the point X’. To calculate the moment the point on the cut X’ with the coordinate Y’ is used. NOTE: The program calculates automatically values of reduced forces in sections defined in the Reduced Forces dialog box. To move between the characteristic points determined automatically, the buttons in the top right part of the frame are used. The user may specify arbitrary values of coordinates as well as change a cut type (horizontal / vertical).
Calculations of internal forces consists in integration of the appropriate internal forces of a wall:
NOTE: The boundaries of the integration regions are the closest edges of a wall and openings. It means that for a point above an opening the regions located below its lower edge are not considered.
• beams, continuous footings, columns – the dialog box presents diagrams of a selected quantity (Mx, My, Mz, Fx, Fy, Fz) and a table with values and the
© 2009 Autodesk, Inc. All rights reserved

Autodesk Concrete Building Structures 2010 - User Guide page: 141
coordinates of division points corresponding to these values; below are the options: values at division points, min./max. values NOTE: For continuous footings the forces FX, FY and FZ (reactions for walls calculated in Autodesk Robot Structural Analysis) may be presented – see Default options
• spread footing - the dialog box presents a view of the spread footing with designation of forces applied to it and a table with a list of forces showing values for a selected load subnature.
For individual types of objects it is set by default that diagrams are displayed below the following values: - for columns and spread footings: axial force Fx - for beams and continuous footings: bending moment My - for slabs, raft foundations and walls: Mxx moment.
The Calculation options tab comprises the following options: • in the left part of the dialog box:
for beams: switching on the options 1, 2 means that a release has been defined on a selected beam end for slabs, raft foundations:
Main direction allows defining a direction of transferring loads from a slab onto supports (in the case of simplified calculations) and determining the local direction of a panel. It may be done as follows:
- by selecting the option Define main direction according to an object and choosing the edge to which the X’ axis should be parallel - by selecting the option Define main direction by means of a line and indicating the direction of the X’ axis in the structure view
- by deleting the main direction and restoring default settings of support selection For spread and continuous footings: Select soil levels (backfills N1 and N2) and the arrangement of soil levels from the available list (see the image below) with respect to the local system of the spread and continuous footing Spread footing
Continuous footing
© 2009 Autodesk, Inc. All rights reserved

page: 142 Autodesk Concrete Building Structures 2010 - User Guide
Defining the backfills N1 and N2 lets you calculate a value of the Dmin parameter used in the calculations of the soil capacity.
• in the right part of the dialog box – a table with the list of objects that may act as a support for the object in question; it presents a selected static scheme of a support (pinned / fixed); there is a possibility to modify the program settings and to switch on/off options or to change a support scheme, and additionally for simplified calculations, it is possible to change the coefficient value in order to modify the structure work model
• switching on / off the option that allows disregarding objects which do not carry horizontal forces - it refers only to walls (in the simplified method) and columns (in all calculation methods) In the case of simplified calculations, disregarded objects do not participate in the distribution of horizontal forces in a model. In the case of advanced calculations, a static scheme of pinned supports on both ends is assumed for columns; as a result, columns carry only vertical loads.
NOTE: If a linear support of a slab (beam or wall) is switched off on the support list, then the directions Rx and Uz on this edge will be released in calculations using the exact method.
8.4. Presentation of Results in a 2D and 3D View
The option allows setting parameters of result presentation in a 2D / 3D view. The option is available from the menu after selecting the Calculations / Display Parameters command.
© 2009 Autodesk, Inc. All rights reserved

Autodesk Concrete Building Structures 2010 - User Guide page: 143
In a 2D view results (loads parallel to the Z axis) may be presented:
in a 2D projection
in an axonometric view
In the 3D view results may be presented: • Planar objects
transparent objects
filled objects
blank objects • Diagrams of internal forces:
filled
hatched. In the lower part of the dialog box there are options used to steer the object display in the view with rendering: • Always transparent – if this option is active, objects in the view with rendering will
be always presented as transparent • Transparent, if reinforcement exists – if this option is active, objects in the view with
rendering will be presented as transparent only then if reinforcement exists in these objects; if there is no reinforcement in an object, the object is not presented as transparent.
8.5. Display of Internal Force Diagrams for Objects Available in the Program
After structure calculations it is possible to present diagrams of internal forces for all objects defined in a structure model: - in the Object Properties dialog box (the Results tab) - by using options in the Display / Results dialog box (for the 3D view). SIMPLIFIED CALCULATIONS Diagrams of internal forces that can be presented by the program: 1. columns axial force Fx, horizontal forces Fy and Fz, bending moments Mz and My in local systems (note should be taken of a value of the gamma angle for columns) 2. walls axial force Fx, horizontal force Fz, bending moment My (in the plane of the wall) internal forces are presented as for a fictitious column, placed inside the wall, whose local system is oriented as shown in the drawing below
© 2009 Autodesk, Inc. All rights reserved

page: 144 Autodesk Concrete Building Structures 2010 - User Guide
My presentation
3. groups of walls axial force Fx, horizontal forces Fy and Fz, bending moments Mz and My internal forces are presented as for a fictitious column located at the geometrical center of the compound section of a group of walls; forces are presented in the global system of a model, not in local systems
My presentation
Mz presentation
4. beams distribution of vertical loads 5. spread footings axial force N, horizontal forces Fx and Fy, bending moments Mx and My 6. continuous footings distribution of vertical loads, horizontal force Fz, bending moment My (as for a wall) ADVANCED CALCULATIONS Diagrams of internal forces that can be presented by the program: 1. columns and beams axial force Fx, horizontal forces Fy and Fz, bending moments My and Mz, torsional moment Mx – force diagrams in local systems 2. walls no diagrams available; only reduced forces Fx, My, Fz (in the plane of the wall) are given
© 2009 Autodesk, Inc. All rights reserved

Autodesk Concrete Building Structures 2010 - User Guide page: 145
8.6. User-defined Mesh The dialog box opens after pressing the icon in the Properties - Results dialog box.
The options in the above dialog box allow defining a value of the cell in a mesh (in the Mesh step field) that will be generated on a considered panel. Individual mesh fields display the maximum value of required reinforcement. Once a base mesh is defined, it is possible to refine the mesh locally as well as to consolidate several mesh cells into larger, rectangle-shaped areas (the drawing below illustrates the operations of mesh consolidation and refinement - the lower mesh is the initial one).
CONSOLIDATION REFINEMENT
After switching on the user-defined mesh, the automatic scale is presented to the right of the dialog box; there is, however, a possibility to change the automatic scale to the user-defined one and to define the variability intervals for the scale. The user-defined mesh may be deleted by: 1. pressing the Delete button 2. changing the rotation angle of the panel local system. The arrows provided in the above dialog box enable increasing or decreasing a value of the mesh cell. Pressing the Consolidate button enables consolidation of the mesh cells into larger, rectangular areas. A view of required reinforcement with a user-defined mesh presented in the Properties - Results dialog box may be added to a calculation note.
NOTE: The defined mesh may be modified as follows: - select a mesh cell (or several cells) - in the dialog box specify a step value (size of the mesh cell). The dialog box provides a value of the mesh cell defined so far; if there are different values of the mesh cell, it displays the least of them.
8.7. Calculation - Calculation Options The calculation of a structure in the Autodesk® CBS program can be performed using one of the three available methods of analysis of the loads applied to the structure.
• simplified method, that employs the trapezoidal and triangular method for distribution of vertical loads and the simplified distribution of horizontal forces based on the model of the frame subjected to shear (the trapezoidal and triangular method)
© 2009 Autodesk, Inc. All rights reserved

page: 146 Autodesk Concrete Building Structures 2010 - User Guide
• simplified method, that employs the analysis of vertical forces based on the FEM calculations for the singled-out slabs and transfer of the reaction to supporting elements as well as simplified distribution of horizontal forces based on the model of the frame subjected to shear
• exact method based on the FEM analysis of the whole structure (NOTE: this method is not available for calculation of a single story).
In the upper part of the dialog box there is the Generation of code combinations option. If this option is switched on, it means that during calculations of a structure the program will generate code combinations according to a code selected in the Preferences dialog box. If load combinations have already been defined for the structure, and the next step is generation of code combinations, then the following question appears on the screen: ‘Do you want to delete existing combinations?’ After pressing the YES button the existing load combinations will be deleted and the program will generate code combinations; after pressing the NO button a list of generated code combinations will be added to the list of defined combinations. The Tolerance of reaction balance edit field allows defining an admissible value of the error of the load and reaction balance for a structure; the tolerance is specified in percent. If the tolerance value for a designed structure is exceeded, then the message about the imbalance of reactions and loads appears on the screen. NOTE: in the current program version, the reaction and load balance is checked only in the case of calculations with the use of simplified methods. After choosing one of the simplified methods, the upper part of the dialog box includes two selection lists (Structure type: Direction X and Direction Y) which allow a separate definition of the system carrying horizontal forces for individual directions (frame - horizontal forces are carried only by columns, membrane - horizontal forces are carried only by walls, mixed structure - horizontal forces are carried by columns and walls) – see the description of Default Loads (wind and seismic loads). Additionally, the Structure type field holds the Openings button; when pressed, it opens the Openings dialog box. If one of the simplified methods is chosen the Default support conditions option is also available in the dialog box. If the option is switched on, the following operations will be performed: - the program will automatically recognize the support system of individual structure elements - all slabs will be assigned 2 load-carrying directions - values of all reduction factors (distribution of a load onto a support) will equal 1.0. When running calculations of the structure, all manual settings defined earlier by the user will be deleted and replaced by the parameters mentioned above.
8.8. Calculation - Calculation Options (Trapezoidal and Triangular Method)
The method is applied after pressing the icon that represents the trapezoidal and triangular method of load distribution in the Calculation options dialog box.
© 2009 Autodesk, Inc. All rights reserved

Autodesk Concrete Building Structures 2010 - User Guide page: 147
The first analysis step consists in dividing a slab into regions from which the loads are distributed onto individual supports. The division is based on the analogy of the sloping surfaces of the roof. By default, the sloping surfaces are inclined at the 45O angle with respect to the slab plane (see the drawing below). This angle may be increased by modification of a value of the reduction factor available in the Properties / Calculation options dialog box. The lesser factor will increase the pitch of the surface, and in consequence, will result in a lesser value of the load onto the support (because it will decrease the slab area ascribed to it).
In simple cases, using this method the program generates triangular and trapezoidal regions, from which the loads are transferred onto the supports of the slab.
The division of the slab can be seen once maps of the triangular and trapezoidal regions are displayed in the Properties dialog box on the Results tab. They are available, as well, in the computational view of the structure, where it is possible to display them for all slabs or for any selection of them. The second step of the algorithm is to calculate the equivalent of the region of the loaded slab in terms of the forces applied to the supporting elements. The elements may be loaded with trapezoidal loads on the elements’ segments and concentrated forces. The following two icons available in the Calculation options dialog box are used to steer with this part of the algorithm:
– transforms the load region into the force applied to the supporting element, assuming that the extent of the region acted on by the force is limited with the 45o angle.
– converts the region to the force in such a way that the height of the region at a given point is directly projected and the value of the projected height is assumed to be the value of the force applied to the given point of a supporting element. It is presented schematically in the drawing below:
© 2009 Autodesk, Inc. All rights reserved

page: 148 Autodesk Concrete Building Structures 2010 - User Guide
If part of the projected region extends off the support, then this part is transformed into a concentrated force applied to the element end – see the drawing below.
Effects of the action of horizontal forces are calculated from the analysis of the frame with pliable columns (walls) and infinitely rigid spandrel beams (the slab-beams system). A detailed description of the method is included in the description of the algorithm for calculation of the moments in columns and walls caused by horizontal forces. Simplified calculations allow now taking account of a wall supported by supports at points (columns) or by walls in a calculation model. At present, such a wall is analyzed as deep-beam. Deep-beams carry loads from slabs positioned above them and underslung to them. Similarly as for other objects, diagrams of load distribution are presented in the 2D and 3D computational view: • in the 3D computational view results are presented at the top of the wall (from the
upper slab) and at the bottom of a wall (from the lower slab) • in the 2D view and in the Object properties dialog box, a diagram of load
distribution for a deep-beam includes a sum of loads applied to the upper and bottom levels of a wall
In the Object properties dialog box, the Results tab presents a static scheme of a deep-beam, while the Calculation options tab presents support conditions as for beams.
© 2009 Autodesk, Inc. All rights reserved

Autodesk Concrete Building Structures 2010 - User Guide page: 149
It is possible to load a deep-beam to the Autodesk Robot Structural Analysis RC module Deep-beams; loads are applied to the upper and/or lower level of a deep-beam.
NOTE: In the case of structure calculations by means of the triangular and trapezoidal method, the self-weight and loads of stairs will be taken into account if supports are defined for flights of stairs. A continuous footing is not considered by the program as a support of stairs; it is necessary to define a ground beam for stairs to be supported. The final result of this analysis are: - regions of the load distribution - forces applied to elements.
NOTE: In the current program version loads applied to walls are transferred to lower stories taking account of the angle of load distribution that is 45 degrees (irrespective of a wall material selected), while openings in walls (windows and doors) are ignored. Moreover, this simplified method allows calculation of the provided reinforcement for RC slabs; calculations of the provided reinforcement area of slabs are performed by the Autodesk Robot Structural Analysis RC modules. Before starting calculations of the provided reinforcement, the Meshing Options dialog box appears and the mesh cell should be defined there. A slab together with beams on which it is supported and supports in the places where columns and walls are defined is sent to the Autodesk Robot Structural Analysis RC module. There advanced static calculations and calculations of required and provided reinforcement are performed. Types of slab reinforcement are ascribed analogously as in the case of advanced calculations of a whole structure including calculations of required reinforcement of panels.
8.9. Calculation - Calculation Options (Simplified Method)
The method is applied after pressing the icon that represents the simplified calculation method in the Calculation options dialog box. The calculation in this method is performed story by story. Slabs together with the supporting elements (walls, columns, beams) and the vertical loads applied to these slabs are singled out from a story. The following step is solution of the singled out slabs by means of the FEM method, assuming fixed supports at the points of the supporting elements. The reactions obtained from the FEM solution are distributed onto the supporting elements as loads. This method allows steering the size of a mesh of finite elements generated on slabs using the Meshing option provided in the Calculation options dialog box. Coarse meshing results in generating a small number of elements (approx. 2-8 finite elements for a slab) thus enabling quick analysis of large structures. The Element size option is used to determine a preferred size of a finite element. Effects of the action of horizontal forces are calculated from the analysis of the frame with pliable columns (walls) and infinitely rigid spandrel beams (the slab-beams system). A detailed description of the method is included in the description of the algorithm for calculation of the moments in columns and walls caused by horizontal forces.
© 2009 Autodesk, Inc. All rights reserved

page: 150 Autodesk Concrete Building Structures 2010 - User Guide
Simplified calculations allow now taking account of a wall supported by supports at points (columns) or by walls in a calculation model. At present, such a wall is analyzed as deep-beam. Deep-beams carry loads from slabs positioned above them and underslung to them. Similarly as for other objects, diagrams of load distribution are presented in the 2D and 3D computational view: • in the 3D computational view results are presented at the top of the wall (from the
upper slab) and at the bottom of a wall (from the lower slab) • in the 2D view and in the Object properties dialog box, a diagram of load
distribution for a deep-beam includes a sum of loads applied to the upper and bottom levels of a wall
In the Object properties dialog box, the Results tab presents a static scheme of a deep-beam, while the Calculation options tab presents support conditions as for beams. It is possible to load a deep-beam to the Autodesk Robot Structural Analysis RC module Deep-beams; loads are applied to the upper and/or lower level of a deep-beam.
NOTE: In the case of structure calculations by means of the simplified method, the self-weight and loads of stairs will be taken into account if supports are defined for flights of stairs. A continuous footing is not considered by the program as a support of stairs; it is necessary to define a ground beam for stairs to be supported. The final result of this analysis are: - maps and values of moments for slabs - forces applied to elements.
NOTE: In the current program version loads applied to walls are transferred to lower stories taking account of the angle of load distribution that is 45 degrees (irrespective of a wall material selected), while openings in walls (windows and doors) are ignored. Moreover, this simplified method allows calculation of the provided reinforcement for RC slabs; calculations of the provided reinforcement area of slabs are performed by the Autodesk Robot Structural Analysis RC modules. For calculations, this method uses an element mesh. The local system of raft foundations is directed opposite to the axis Z of the global system when the provided reinforcement is calculated; this is done to ensure that punching is taken into account. Thus reinforcement layers are presented in the opposite way than in the case of regular slabs. A slab together with beams on which it is supported and supports in the places where columns and walls are defined, is transferred to the Autodesk Robot Structural Analysis RC module. There advanced static calculations and calculations of required and provided reinforcement are performed. Types of slab reinforcement are ascribed analogously as in the case of advanced calculations of a whole structure including calculations of required reinforcement of panels.
8.10. Distribution of Loads in Walls Taking Account of a Distribution Angle
Distribution of loads in walls taking account of a distribution angle is available for simplified calculations. Loads are distributed in the following way: • forces occurring at the top of the wall are reduced at the base to a trapezoidal
load + moment (resulting from the load eccentricity) - for details see below
© 2009 Autodesk, Inc. All rights reserved

Autodesk Concrete Building Structures 2010 - User Guide page: 151
• the range of the trapezoidal load at the base of the wall depends on the load area and the wall height; it equals the length of the load area + extension considering the angle of load distribution (if this area extends off the wall length, then it will be taken into account by increasing the load at the end of the wall)
• the self-weight of walls is reduced to uniform distribution with a load correction resulting from the moment (after taking account of openings).
The scheme of distribution of loads resulting from a concentrated force, applied in Autodesk® CBS, is illustrated in the drawing below (P - force, h - wall height).
The description of the method of distribution of loads in walls: The distribution angle is used to determine the range (segment) to which the load will be applied. A concentrated force, any uniform/trapezoidal load is distributed in 3 stages (it is possible to replace a segment of the trapezoidal load in a given range with a concentrated force at the center of gravity of the load):
1. load distribution preserving the distribution angle (the load part which is positioned outside the wall contour is considered in the second stage)
2. distribution of the load which is positioned outside the contour (analogously as for the 1st stage)
3. comparison of moments bending the wall; distribution of the difference of moments as a trapezoidal load with the height +/- 6*M/L^2 (M - moment, L – wall length).
NOTE: 1. In the current program version openings in walls are disregarded during distribution of a load different than the self-weight. 2. A wall load is uniform even if doors are defined (doors are ignored in the distribution).
© 2009 Autodesk, Inc. All rights reserved

page: 152 Autodesk Concrete Building Structures 2010 - User Guide
8.11. Openings The options in the dialog box below allow the user to take account of the reduction of rigidity of walls including openings (windows, doors) in the case of simplified calculations. The dialog box opens on pressing the Openings button in the Calculation Options dialog box.
If there are openings in a wall and in the above dialog box the option which allows considering openings in stiffness calculations is switched on, then the program checks if openings intersect the level defined in the options. If they do intersect, then the equivalent wall stiffness is calculated according to the formula below:
where: b - wall width H - wall length h_i - length of the i opening (segment on the level defined in the dialog box) l_i - distance between the center of the i opening (segment) and the center of the wall. If a wall belongs to a group, openings are taken into account in calculations of the center of gravity and the center of torsion (the center of torsion is calculated by means of the method described in the topic Seismic / spectral analysis considering the torsion effect). A wall with openings is treated as a solid wall of reduced thickness (the reduction of thickness is directly proportional to the reduction of rigidity).
8.12. Calculation - Calculation Options (Exact Method)
The method is applied after pressing the icon that represents the exact calculation method in the Calculation options dialog box. This option is not accessible for the analysis of a single story. In this case the FEM analysis comprises both vertical and horizontal forces. This method consists in generation of a full FEM model considering all the elements and loads. There is a possibility to steer with the mesh size by means of the Meshing option in the Calculation options dialog box. The coarse meshing results in generation of a fairly small number of the elements (approx. 2-8 finite elements per planar element), which enables quick analysis of large structures. The Element size option allows determining a preferred dimension of the finite element. If the Required reinforcement of slabs and walls option is switched on, then in course of structure static and dynamic analyses the program will calculate the required reinforcement area for all concrete slabs and walls (panels made of materials different than those from the concrete group in the material database will not be included in calculation of the required reinforcement). Switching on the Consider selection option
© 2009 Autodesk, Inc. All rights reserved

Autodesk Concrete Building Structures 2010 - User Guide page: 153
results in calculation of the required reinforcement of selected panels (slabs). Pressing the Code parameters button opens the Code parameters dialog box; the options provided in this dialog box depend on a selected RC design code. In the lower part is the Use load report of plates option. The option is used to perform advanced calculations after distributing loads applied to plates onto elements supporting them (walls, columns, beams); once supports and directions of load transfer are selected, simplified calculations are performed (then distribution of the loads applied to plates onto elements supporting them is obtained), for thus-assumed system exact calculations are carried out.
NOTE: The Use load report of plates option is available only after performing structure calculations by means of one of the simplified methods; if a structure has not been calculated using one of the simplified methods, the option is not available; the name of the option depends of the selected simplified method: - for the trapezoidal and triangular method: Use load report of plates according to the trapezoidal and triangular method - for the simplified method (finite element mesh): Use load report of plates according to the simplified FE method. All vertical loads (including the self-weight of structure elements) are distributed; NOTE: plates are treated as weightless and fulfill the role of stiffening membranes in the structure, on the levels of individual stories. Note should be taken that if a wall supported only on a plate (and not on a beam) is used in the structure, there may appear discrepancies between results of internal forces obtained in simplified and advanced calculations for individual elements (it refers mainly to columns and walls, since in that case a part of loads applied to the wall is distributed on the plate because there is no beam to carry it).
NOTE: The self-weight and loads of stairs are taken into account during calculations of a structure by means of the advanced method; stairs are treated as a slab, while all stair loads as slab loads.
NOTE: If a linear support of a slab (beam or wall) is switched off on the support list, then the directions Rx and Uz on this edge will be released in calculations using the exact method. If the option for automatic generation of wind is switched on (in the Default Loads dialog box), then for it to be taken into account in the advanced calculations of a structure, the Generate wind loads option needs to be activated in the Calculation Options dialog box (for the advanced method). In the lower part the user may also decide which program will be used during structure calculations by means of the exact method: Robot calculation engine or Autodesk Robot Structural Analysis. Differences in the use of these programs during calculations are concerned with: 1. method of performing calculations
Robot calculation engine: the Autodesk Robot Structural Analysis calculation kernel is used for calculations, however, without the possibility of graphical support of obtained results (it is impossible to check the results in Autodesk Robot Structural Analysis) Autodesk Robot Structural Analysis: if calculations are performed using this program, then after calculations are complete, it is possible to: - check the results obtained - mark the objects for which warnings were displayed in Autodesk Robot Structural Analysis - save them to an .rtd file - make modifications and carry out the analysis in Autodesk Robot Structural Analysis
© 2009 Autodesk, Inc. All rights reserved
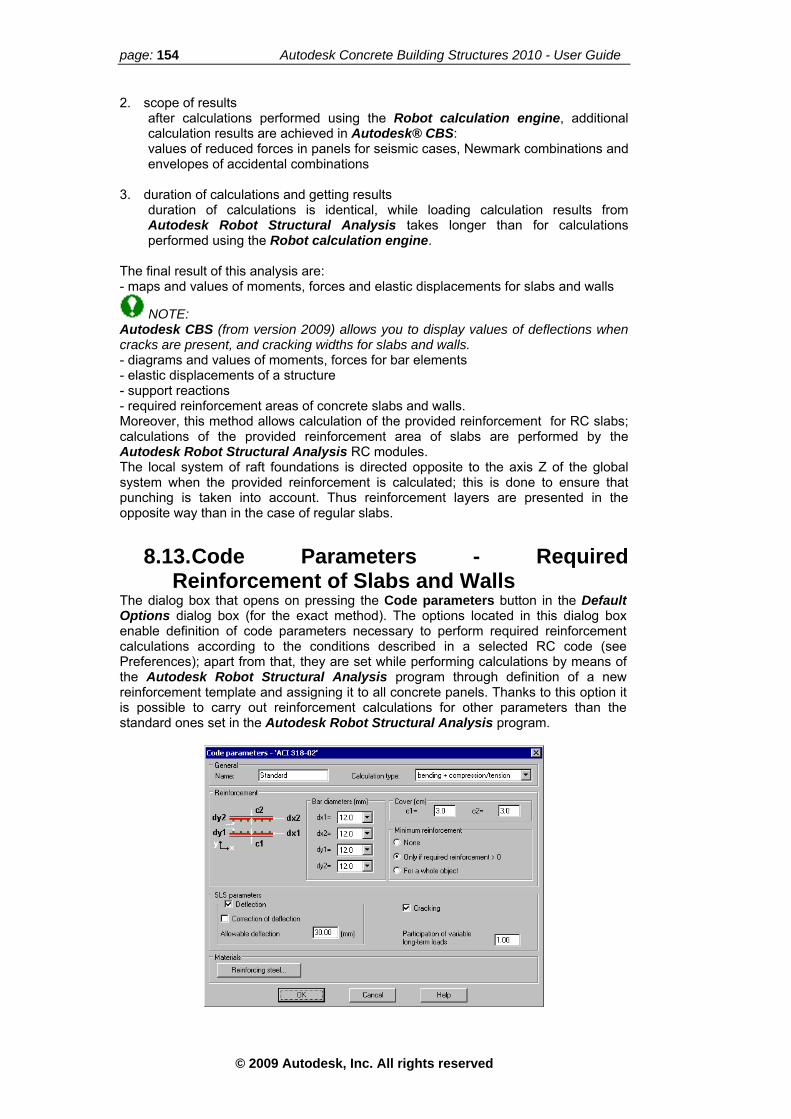
page: 154 Autodesk Concrete Building Structures 2010 - User Guide
2. scope of results after calculations performed using the Robot calculation engine, additional calculation results are achieved in Autodesk® CBS: values of reduced forces in panels for seismic cases, Newmark combinations and envelopes of accidental combinations
3. duration of calculations and getting results duration of calculations is identical, while loading calculation results from Autodesk Robot Structural Analysis takes longer than for calculations performed using the Robot calculation engine.
The final result of this analysis are: - maps and values of moments, forces and elastic displacements for slabs and walls
NOTE: Autodesk CBS (from version 2009) allows you to display values of deflections when cracks are present, and cracking widths for slabs and walls. - diagrams and values of moments, forces for bar elements - elastic displacements of a structure - support reactions - required reinforcement areas of concrete slabs and walls. Moreover, this method allows calculation of the provided reinforcement for RC slabs; calculations of the provided reinforcement area of slabs are performed by the Autodesk Robot Structural Analysis RC modules. The local system of raft foundations is directed opposite to the axis Z of the global system when the provided reinforcement is calculated; this is done to ensure that punching is taken into account. Thus reinforcement layers are presented in the opposite way than in the case of regular slabs.
8.13. Code Parameters - Required Reinforcement of Slabs and Walls
The dialog box that opens on pressing the Code parameters button in the Default Options dialog box (for the exact method). The options located in this dialog box enable definition of code parameters necessary to perform required reinforcement calculations according to the conditions described in a selected RC code (see Preferences); apart from that, they are set while performing calculations by means of the Autodesk Robot Structural Analysis program through definition of a new reinforcement template and assigning it to all concrete panels. Thanks to this option it is possible to carry out reinforcement calculations for other parameters than the standard ones set in the Autodesk Robot Structural Analysis program.
© 2009 Autodesk, Inc. All rights reserved

Autodesk Concrete Building Structures 2010 - User Guide page: 155
The above dialog allows determining basic parameters connected with calculation of
culation type list allows selecting one of the following options:
nsion.
he Minimum reinforcement field includes the options as follows:
mum reinforcement value will
ll) will be assigned at least the
he Deflection option is switched on, the program will calculate a value of deflection
g width is calculated, and switching
the required reinforcement area of structure slabs and walls. There is a possibility to select bar diameters for top and bottom reinforcements and to define a reinforcing bar cover. The Cal- bending + compression / tension - simple bending - compression / te T• none – the minimum reinforcement is not calculated • only if required reinforcement > 0 – at least the mini
be assigned to these finite elements for which it is necessary to use reinforcement (the required reinforcement is greater than zero)
• for a whole object – a whole object (slab or waminimum reinforcement value.
If tof an RC slab considering cracking, and switching on the Correction of deflection option allows automatic correction of deflections by increasing the reinforcement area (reducing deflection below the admissible value). After switching on the Cracking option the crackinon the Correction of cracking option makes possible automatic correction of the cracking width by increasing the reinforcement area (reducing cracking below the admissible value).
NOTE: Valu flections of cracked slabs as well as values of the crack width are not es of deloaded into Autodesk® CBS, but are verified during design of the required reinforcement of panels in the Autodesk Robot Structural Analysis program. If calculated values of deflections exceed allowable values, then a message for an appropriate object is displayed.
NOTE: If ca s by means of the exact method have been performed, then it is possible
ontal forces only in their plane
from non-structural materials do not carry
rel beams of the frame (floors of the stories) are infinitely rigid ess.
lculationto calculate the required reinforcement of slabs and walls without the necessity to carry our static calculations again.
8.14. Assumptions Adopted in the Structure Calculation and the Algorithm for Calculation of Moments
ASSUMPTIONS - Walls carry horiz- Columns carry loads in both directions - Non-structural elements or elements made loads - Spand- Moments on vertical elements are distributed in proportion to their stiffn
NOTE: If a structure model includes non-structural elements other than partition walls, then
lements is not included in the structure
ral elements are disregarded during design of structure elements.
after starting calculations, the following message appears: ‘Non-structural elements (list) will be disregarded in calculations’. The following rules apply to non-structural elements in the program: - spread footings / continuous footings are generated under unsupported columns / non-structural walls - the weight of disregarded non-structural eself-weight - non-structu
© 2009 Autodesk, Inc. All rights reserved

page: 156 Autodesk Concrete Building Structures 2010 - User Guide
ALGORITHM FOR CALCULATION OF MOMENTS 1. Calculation of the moments of inertia I’x, I’y, I’xy for every cross-section of vertical elements (columns + walls) 2. Transformation of the moments of inertia to the global system, in which the following forces are acting:
p the forces on each story from 1 to k and ca3. Summing u ulation of the total lc
moment acting on the story i
4. Summing up the stiffness moments B of all nodes (ends) of the considered columns
nt calculation
and walls w from the story i Li – height of a column or a wall hi – story height
tia in the direction of the curreIi - moment of inerEi - Young’s modulus XXX – fixed support
tOOO – pinned suppor
. Distribution of the moment Mi onto all nodes j, in proportion to their stiffness 5
© 2009 Autodesk, Inc. All rights reserved

Autodesk Concrete Building Structures 2010 - User Guide page: 157
8.15. Reduced Forces The Reduced Forced dialog box is used for defining cuts through walls (horizontal, vertical) and points at which the program will calculate the reduced forces V, H, M.
NOTE: These forces may be presented in the Object Properties dialog box or in the computational 3D view only after calculations by means of the exact method are performed. The option is available: • from the menu after choosing the Calculations / Reduced forces command
• after pressing the icon .
Each of defined cut types may be ascribed to all walls or only to selected walls. A list of wall cuts and points at which reduced forces are calculated constitutes a template; it may be saved as a default one, and next used in new projects. Presentation of reduced forces in the Object Properties dialog box is possible after the Reduced forces option is activated on the Results tab. A successive point is selected by means of arrows. It is also possible to evaluate values of reduced forces for any point in a wall; then coordinates of the point should be typed into the edit fields. Presentation of reduced forces in the 3D view is possible after selecting a reduced value. It displays values of forces at all predefined points. The above dialog box contains a table whose columns include: • first column is used to switch on/off a selected cut type • coordinates: selection of a type of position definition (Relative / Absolute) • x, y: coordinates of the cut point • Section: available cut directions (horizontal / vertical) • Position: available zones of definition of cuts (whole wall / above the window /
above the door) • Wall list: all / current selection; this column shows walls selected before the
dialog box is opened.
© 2009 Autodesk, Inc. All rights reserved

page: 158 Autodesk Concrete Building Structures 2010 - User Guide
9. DESIGN OF STRUCTURE ELEMENTS 9.1. Design of RC Elements of a Structure
The code calculation of structure elements in the Autodesk® CBS program can be performed for the RC elements of a structure. To start the code calculation of structure elements, the user should: • select the Calculations / RC Element Design command from the menu
• press the icon . If in the RC element design dialog box the option Always display this dialog box before calculations is switched on, then the RC element design dialog box that contains the options of the code calculation of the structure and the soil parameters, appears on the screen; to start the code calculation of the structure elements, press the Calculate button.
9.2. RC Element Design - Calculation Options The RC element design dialog box shown in the drawing below opens after selecting the Calculation Options option from the menu (and then moving to the RC element design tab) or after selecting the RC Element Design option from the menu (with the option Always display this dialog box before calculations switched on).
In the top part of the dialog box the following design method may be chosen: - estimated - provided (using Autodesk Robot Structural Analysis RC modules). Design parameters are selected in the General parameters dialog box, which opens on pressing the General parameters button in the top right part of the dialog box. The Consider selection option makes possible design of the elements selected in the graphic viewer or through the options provided in the Criterion of Selection dialog box. The Consider selection option is linked with the mode of selection of the whole structure or the current story accessible in the Edit menu or on the Objects toolbar
( or ).
© 2009 Autodesk, Inc. All rights reserved

Autodesk Concrete Building Structures 2010 - User Guide page: 159
The middle part of the dialog box holds a list of objects available in the program, for which the code calculation may be performed; the following types of RC structure elements can be designed in the Autodesk® CBS program: beams, columns, spread and continuous footings, walls, slabs and raft foundations. After switching on e.g. the Beams and the Columns options (with the remaining options switched off), the designed objects of an RC structure are only beams and columns. For beams two additional options are available: • Automatic recognition of T-sections - while calculating the provided reinforcement
of RC beams in Autodesk Robot Structural Analysis it is possible to detect the width of a slab that may be taken into account in the element design
• Use equivalent load - the option is active after structure calculations by means of one of simplified methods with the Provided (Autodesk Robot Structural Analysis) option switched on; if the option is active, then in the case of calculations by means of simplified methods for beams the equivalent load Z2 is evaluated for the linear load. This load is calculated for each span (a value and position of the load are determined based on the condition saying that the moment at the span center and the sum of linear loads are compatible with values obtained using the Cross’s method); an additional criterion is the compatibility of reactions and moments at span ends. Use this option to simplify a load pattern applied to the beam obtaining a slightly-modified distribution of a transversal force and moment.
NOTE: If calculations by means of the exact method have been performed, then it is possible to calculate the required reinforcement of slabs and walls without the necessity to carry our static calculations again.
9.3. RC Element Design - General Parameters Design parameters are selected in the General Parameters dialog box that opens on pressing the General parameters button in the RC element design dialog box. The left-hand part of the dialog box contains the tree of options available in the dialog box, presented in the drawing below.
After expanding each option in the tree it is possible to define the optimization criterion and the parameters of reinforcing steel for every type of the element of an RC structure. The Summary option at the top of the tree enables presenting basic, global information about the design options for individual structure objects. These parameters may not be modified on the Summary tab. The successive elements of the tree from the left-hand part of the General Parameters dialog box make it possible to determine optimization criteria and design parameters for individual types of objects. The following types of elements of RC structures are available: beams, columns, spread footings, continuous footings, walls, slabs and raft foundations. Below are discussed the options for individual elements of RC structures.
© 2009 Autodesk, Inc. All rights reserved

page: 160 Autodesk Concrete Building Structures 2010 - User Guide
Optimization Criteria Optimization criteria may be determined for every type of the element of the RC structure.
BEAMS, COLUMNS
The following parameters can be specified in the Dimensions field: • Change dimensions every – defines a value of the minimum geometry change in
course of section optimization • options switched on: h fixed, b fixed – optimization of the section dimensions is
impossible (the section retains dimensions adopted by the user) • options switched off: h fixed, b fixed – it is possible to modify the dimensions b
and/or h of the beam cross section and to determine the limit values of the both dimensions: bmin, hmin as well as bmax and hmax
• options switched off: h fixed, b fixed – it is possible to determine the dimension ratio b/h.
The following parameters can be specified in the Steel use field: • Minimum, Maximum – in the section optimization it allows determining the bottom
and the top values of the interval that represents either the minimal/maximal steel percentage per RC section, or the minimal/maximal mass of steel per one cubic meter of concrete (density)
• Preferred – the steel percentage per RC section or the mass of the steel per one cubic meter of concrete (density) preferred by the user and aimed at by the section optimization (if modification of at least one dimension is enabled).
The Grouping method field allows selection of the method of grouping RC beams: grouping within the elements of the same geometry and/or grouping within the elements on the same story. For RC beams it is possible to force uniform height and width of the optimized sections of the spans within one beam using the options: Uniform height / width of span sections. SPREAD FOOTINGS
The following parameters can be specified in the Dimensions field: • Change dimensions every – defines a value of the minimum geometry change in
course of the section optimization
© 2009 Autodesk, Inc. All rights reserved

Autodesk Concrete Building Structures 2010 - User Guide page: 161
• options switched on: A fixed, B fixed, ex fixed, ey fixed - optimization of the section dimensions is impossible (the section retains dimensions adopted by the user)
• options switched off: A fixed, B fixed, ex fixed, ey fixed - it is possible to modify dimensions of the cross section and to determine the limit values of the dimensions: Amin, Bmin as well as Amax and Bmax
• minimum steel use (the check of the amount of steel designed by the program and the minimum amount specified by the user only in the case of estimated design).
The Grouping method field allows selection of the method of grouping of spread footings (grouping within the elements of the same geometry). CONTINUOUS FOOTINGS The following parameters can be specified in the Dimensions field: • Change dimensions every - defines a value of the minimum geometry change in
course of the section optimization • activated options: B fixed, ex fixed - optimization of the section dimensions is
impossible (the section retains dimensions adopted by the user) • options B fixed, ex fixed switched off - it is possible to modify dimensions of the
cross section and to determine the limit values of the dimensions Bmin and Bmax. The Grouping method field allows selecting the method of grouping continuous footings (grouping refers to elements of the same geometry). NOTE: Additional calculation options are available for spread footings and raft foundations if the DTU or Fascicule code is selected for the foundation design. You can use one of the following options: • ST method – designs a spread footing or a raft foundation using the Strut&Tie
method • Moment method - designs a spread footing or a raft foundation using the method
that accounts for bending moments • Auto (based on loads) – uses the Strut&Tie method to design elements without
bending moments applied, and the moment method to design the remaining elements.
Reinforcing steel Reinforcement parameters may be determined for each type of the element of the RC structure.
For beams, columns, spread footings and continuous footings there is a possibility to select parameters of the longitudinal and transversal reinforcement. For walls, slabs and raft foundations it is possible to choose parameters of the main and structural reinforcement. The reinforcement available on the selection lists is the reinforcement defined in the Material Database dialog box.
© 2009 Autodesk, Inc. All rights reserved

page: 162 Autodesk Concrete Building Structures 2010 - User Guide
9.4. RC Element Design - Estimated Calculations
The calculations are performed according to the general rules of the design of RC elements in the Ultimate Limit State and the Serviceability Limit State. Based on the forces for these states as well as the resistance parameters of steel and concrete estimated areas of the element’s reinforcement at several characteristic points are obtained. They are the basis for estimation of the steel requirement of the whole element. These results are sufficient to estimate the steel requirement of the whole structure and allow quick optimization of the element dimensions. In spite of the simplified method of the calculation, an average value of the reinforcement in the element should not differ from the results for the provided reinforcement by more than 10%. BEAMS (BENDING) Due to positive and negative moments, the calculations are independent. The final reinforcement is an envelope of the reinforcement from the design for positive and negative moments. Calculation parameters are the section dimensions: b – section width h – section height a – average distance between the edge and the centroid of longitudinal bars of the reinforcement and material parameters fck – characteristic resistance of concrete fyk - characteristic resistance of steel γc - material coefficient for concrete in ULS γy - material coefficient for steel in ULS γc’ - material coefficient for concrete in SLS γy’ - material coefficient for steel in SLS. The first calculation step is to determine the limit moment for unilateral reinforcement. From the equations of the section equilibrium the following is obtained:
For ULS in the calculations the following coefficients are assumed: ξ lim = 0.5 α = 0.8 γc = 1.5 γy = 1.15.
© 2009 Autodesk, Inc. All rights reserved

Autodesk Concrete Building Structures 2010 - User Guide page: 163
In the case Mlim ≤ |M ULS|, an additional moment is calculated that has to be carried by the top reinforcement.
The final reinforcement can be expressed by the formulas below:
In the case Mlim ≥ |M ULS|, the quadratic equation of the following parameters is solved:
however, depending on the sign of the moment, Ay is the top or the bottom reinforcement. The calculation for ACC proceeds in the identical way as for ULS as described above. In the equations the following are only substituted: 1. moments from the envelope for SLS, acting on the section 2. material coefficients (γc’ = 1.0, γy’ = 1.0). COLUMNS (COMPRESSION) In the calculation it has been assumed that the load capacity of the section is a sum of the load capacity of the reinforcement and the reduced load capacity of the RC section for compressive forces
or the load capacity of steel for tensile forces:
In the case there occur both the tensile and the compressive forces, the calculation is performed independently for the both load types, and the final reinforcement is an envelope of the reinforcement resulting from these calculations. The element slenderness is accounted for by the additional reduction factor ϕ, that increases the action of the axial force:
© 2009 Autodesk, Inc. All rights reserved
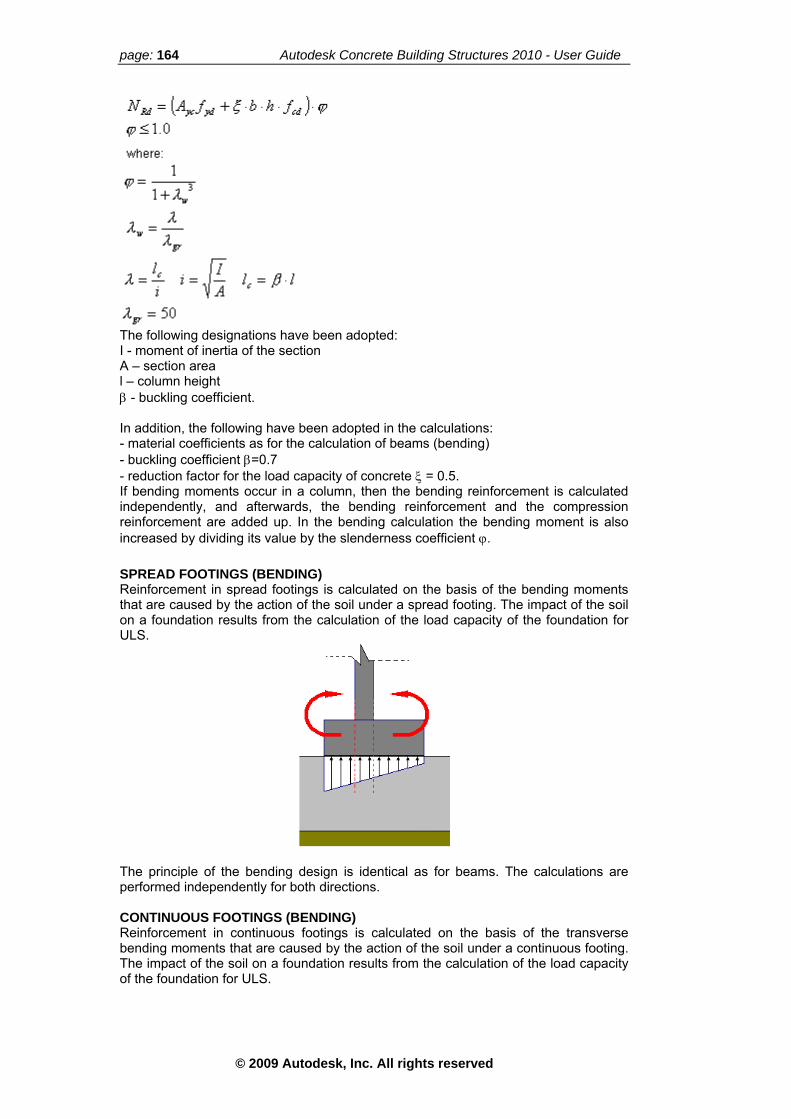
page: 164 Autodesk Concrete Building Structures 2010 - User Guide
The following designations have been adopted: I - moment of inertia of the section A – section area l – column height β - buckling coefficient. In addition, the following have been adopted in the calculations: - material coefficients as for the calculation of beams (bending) - buckling coefficient β=0.7 - reduction factor for the load capacity of concrete ξ = 0.5. If bending moments occur in a column, then the bending reinforcement is calculated independently, and afterwards, the bending reinforcement and the compression reinforcement are added up. In the bending calculation the bending moment is also increased by dividing its value by the slenderness coefficient ϕ. SPREAD FOOTINGS (BENDING) Reinforcement in spread footings is calculated on the basis of the bending moments that are caused by the action of the soil under a spread footing. The impact of the soil on a foundation results from the calculation of the load capacity of the foundation for ULS.
The principle of the bending design is identical as for beams. The calculations are performed independently for both directions. CONTINUOUS FOOTINGS (BENDING) Reinforcement in continuous footings is calculated on the basis of the transverse bending moments that are caused by the action of the soil under a continuous footing. The impact of the soil on a foundation results from the calculation of the load capacity of the foundation for ULS.
© 2009 Autodesk, Inc. All rights reserved

Autodesk Concrete Building Structures 2010 - User Guide page: 165
The principle of the bending design is identical as for beams.
NOTE: Longitudinal reinforcement design is not performed for continuous footings.
WALLS Wall reinforcement is calculated based on the ‘Complex bending’ method according to BAEL 99. The option allows selection of the wall cross-section as well as reinforcement design. Selection of the wall cross-section The program finds the minimal thickness of an unreinforced wall that must fall within the range determined by the user. The following 3 conditions are used to determine the minimal thickness: 1. a = 10cm, while for the seismic analysis 15cm
2. – where Lf is a wall height modified according to additional conditions as for an unreinforced wall
3. – where Nu/L is a linear load in the wall, d = 1m, while σulimNRF is the admissible stress for an unreinforced wall. Reinforcement design During the wall reinforcement design the following reinforcement areas are calculated by the program: a) vertical reinforcement As b) horizontal reinforcement Ah c) edge reinforcement Af. In the case of seismic calculations, the program also evaluates the sliding reinforcement which is added to the vertical reinforcement. If a wall is not reinforced, the minimal anti-shrinkage (or structural) reinforcement is adopted.
SLABS, RAFT FOUNDATIONS An analysis of these elements in a model calculated by means of simplified methods is not possible. However, when calculating required reinforcement areas of panels for advanced calculations, the reinforcement mass is determined through estimation - for individual panels the min./max. reinforcement areas are calculated in 1 meter large mesh cells. Thus calculated reinforcement does not take account of the unification of reinforcement zones and lengths of lap splices, therefore, it may diverge from the reinforcement evaluated in the Autodesk Robot Structural Analysis RC modules.
© 2009 Autodesk, Inc. All rights reserved

page: 166 Autodesk Concrete Building Structures 2010 - User Guide
9.5. RC Element Design - Provided Calculations
In the calculation of provided reinforcement the RC modules (calculation of the provided reinforcement area) of the Autodesk Robot Structural Analysis program are used. This calculation is based on the code requirements. The result of this calculation is a table of the reinforcing steel that satisfies the conditions of the load capacity and the code requirements, together with a reinforcement drawing and a calculation note. To the Autodesk Robot Structural Analysis RC modules the program transfers simple cases and manual load combinations. The calculation may be performed in the following modes: • activation of code modules - a module for design of an RC structure element will
be activated and code calculations of this element may be performed there; it is possible to modify parameters of optimization and reinforcement.
• automatic – the code calculation is performed automatically for the assumed parameters of optimization and reinforcement
• interactive – the code calculation is performed for the assumed parameters of optimization and reinforcement, with the possibility to modify these parameters
• with generation of drawings – the code calculation is performed automatically for the assumed parameters of optimization and reinforcement with additional generation of drawings of an RC structure’s elements.
Below the listed options is the Import reinforcing bars option; if activated, this option allows loading information about reinforcing bars used to generate reinforcement of structure elements (beams, columns, spread footings, etc.) in the Autodesk Robot Structural Analysis RC modules. After loading information about reinforcing bars Autodesk® CBS creates layers of graphical objects to which individual groups of reinforcing bars are assigned (the program creates layers for individual object types: beams, slabs, walls, etc. as well as for reinforcement type: longitudinal, transversal). Once the option for display of reinforcing bars is activated, bars are shown in the 3D view (architectural and structural) if the layer in which the bars are located is switched on (see the description of the Display / Layers dialog box). Bars may be presented in the skeleton model (then bars are displayed as lines) as well as in the view with rendering; to do this, it is necessary to set the object display in the view with rendering as transparent (see Calculations / Display Parameters). The Object Properties dialog box specifies a diameter and a reinforcement type (longitudinal / transversal) for a selected bar / group of bars. In the lower part of the dialog box there is also the Generate dowel bars option; if this option is switched on, then while transferring RC structure elements to the Autodesk Robot Structural Analysis design modules (RC column design module), the program will automatically detect sequences of columns positioned one over the other. Column chains are generated; in addition, in the Autodesk Robot Structural Analysis design modules in columns over which the upper column is positioned dowel bars are generated.
NOTE: When designing RC beams analyzed using the advanced method, relative elastic displacements of beams (reduced by displacements of their supports) are transferred to the Autodesk Robot Structural Analysis RC module; it ensures correct design of beams for SLS. While calculating the provided reinforcement of RC beams in the Autodesk Robot Structural Analysis program, it is possible to detect the width of a slab that may be taken into account in the element design (the Automatic recognition of T sections option). The following assumptions are adopted for the beam design considering the slab that works together with the beam: • the beam section is rectangular • the slab width is considered independently for all spans of the beam
© 2009 Autodesk, Inc. All rights reserved
Autodesk Concrete Building Structures 2010 - User Guide page: 167
• for each span, slabs connected to the span and the neighboring beams are found (only beams that form an angle less than 45 degrees with the span in question are considered)
• an overhang of the slab considered in calculations equals the half of the least distance between the neighboring beam and the span in question, and if there are no neighboring beams, this is the least slab overhang within a given span (not greater, however, than the 10-fold thickness of the slab)
• a section of the designed element is read in the Autodesk Robot Structural Analysis RC module and may have 2 different slab overhangs (on different levels)
• a slab overhang that may be considered in the Autodesk Robot Structural Analysis RC module is compared with requirements of individual RC codes and the overhang allowed by a code is considered in the calculations (the yellow line in a section drawing indicates the range of the slab overhang allowed by a code)
• if element dimensions are changed during its design, then only the dimensions b and h of the rectangular section are modified (and sent back to Autodesk® CBS), while (user-made) modifications of the slab that works together with the element are disregarded.
The calculation of provided reinforcement areas in the Autodesk® CBS program is performed according to the current settings made in the Autodesk Robot Structural Analysis program with respect to the code as well as the Standard preferences for the reinforcement parameters and the calculation parameters not defined in the Autodesk® CBS program. The user may select a template of calculation options or reinforcement different than the standard one, if it has been defined earlier in the Autodesk Robot Structural Analysis RC modules. It may be selected on the selection lists provided in the General Parameters dialog box for individual object groups. All the parameters defined in the RC element design /General Parameters dialog box are transferred to the RC modules of the Autodesk Robot Structural Analysis program. The provided reinforcement of walls is designed in the Autodesk Robot Structural Analysis RC module Walls. For structures calculated using simplified methods, loads applied to walls through distribution of loads are exported to the wall module, while in the case of structures calculated by means of the advanced method, forces reduced in walls for the horizontal section in the center of the wall base are exported to the wall module. The calculation of the provided reinforcement allows for the design of beams, columns, deep-beams, walls, spread and continuous footings and slabs, taking the requirements of the following codes into account:
Beams: ACI 318/99 and ACI 318/99 metric, ACI 318/02 and ACI 318/02 metric, ACI 318/02 Thailand, BAEL 91 and BAEL 91 mod. 99, BS 8110, EC2 (ENV 1992-1-1:1991), EC2 - Belgium NAD, EC2 - Italian NAD, PN-84/B-03264 and PN-B-03264 (2002), EHE 99, NS 3473E, CP 65, CSA A23.3-94, DM 9/1/96, SNiP 2.03.01-84, STAS 10107/0-90
Columns: ACI 318/99 and ACI 318/99 metric, ACI 318/02 and ACI 318/02
metric, ACI 318/02 Thailand, BAEL 91 and BAEL 91 mod. 99, BS 8110, EC2 (ENV 1992-1-1:1991), EC2 - Belgium NAD, EC2 - Italian NAD, EHE 99, PN-84/B-03264 and PN-B-03264 (2002), SNiP 2.03.01-84, NS 3473E, STAS 10107/0-90, DM 9/1/96, CP 65 and CSA A23.3-94
Continuous footings: ACI, BS 8004, CSA, EC7 (ENV 1997-1:1994), DTU 13.12,
Fascicule 64 Titre V, PN-81/B-03020, SNiP 2.02.01-83 Spread footings: ACI, BS 8004, CSA, DTU 13.12, EC7 (ENV 1997-1:1994),
Fascicule 64 Titre V, PN-81/B-03020, SNiP 2.02.01-83
© 2009 Autodesk, Inc. All rights reserved

page: 168 Autodesk Concrete Building Structures 2010 - User Guide
Slabs: ACI 318/99 and ACI 318/99 metric, ACI 318/02 and ACI 318/02
metric, ACI 318/02 Thailand, BAEL 91 and BAEL 91 mod. 99, BS 8110, EC2 (ENV 1992-1-1:1991), EC2 - Belgium NAD, EC2 - Italian NAD, EHE 99, PN-84/B-03264 and PN-B-03264 (2002), SNiP 2.03.01-84, NS 3473E, STAS 10107/0-90, DM 9/1/96, CP 65, CSA A23.3-94 and GB 50010-2002
Deep-beams: BAEL 91 and BAEL 91 mod. 99, PN-B-03264 (2002) Walls: ACI 318/99 and ACI 318/99 metric, ACI 318/02 and ACI 318/02
metric, ACI 318/02 Thailand, BAEL 91 and BAEL 91 mod. 99.
9.6. Soil - Calculation Options The Calculation Options dialog box also contains the Soil tab.
This tab is used to define parameters of the geotechnical calculations of foundations. A value of the allowable stress that is used in the geotechnical calculations of foundations may be determined in this dialog box: • after selecting the allowable option and specifying the value of the allowable
stress • after selecting the allowable option and specifying values of the basic parameters
of the soil (unit weight, internal friction angle and cohesion); the value of the allowable stress is calculated by the program.
NOTE: The actual foundation depth results from geometry of a model and a terrain level determined by the user (it is constant for the whole model). The minimum foundation depth is not provided on the list of soil parameters since it is not checked by the program if this condition is fulfilled. this condition should be checked by the user.
9.7. Analysis of the Load Capacity of a Foundation
The simplified analysis of the load capacity of foundations in Autodesk® CBS is based on comparing values of stresses in the soil or forces (for the codes EC7 (ENV 1997-1:1994), PN-81/B-03020, SNiP 2.02.01-83) for a selected code with the allowable value qult modified as in the table below. The allowable value qult may be determined by the user in the Calculation Options dialog box on the Soil tab or calculated on the basis of the soil properties given in the same dialog box.
© 2009 Autodesk, Inc. All rights reserved

Autodesk Concrete Building Structures 2010 - User Guide page: 169
To calculate the stresses under a spread footing caused by external loads, the weight of the foundation and the overlying soils, the program employs a linear model that does not allow for accounting for the occurrence of tensile stresses in the soil.
In the calculation an average value of the stresses is applied; this value is understood as the average value of the stresses, not including the zone where zero stresses occur. For some codes the average maximum value (see the table above) has been used.
© 2009 Autodesk, Inc. All rights reserved

page: 170 Autodesk Concrete Building Structures 2010 - User Guide
The allowable value qult can be determined by the user in the Calculation Options dialog box on the Soil tab, or calculated from the soil properties specified in this dialog box. For the calculation of allowable stresses based on the soil properties Hansen’s method has been adopted together with the guidelines for this method presented in ‘Foundation Analysis and Design’ Joseph E. Bowles, Fifth Edition, The McGraw-Hill Companies, Inc. 1996. The basic formula for the load capacity by Hansen has been limited to the following case: it has been assumed that the coefficients responsible for the inclination of the spread footing ‘b’ and the backfill slope ‘g’ equal 1.0. Since it is not allowed for in the Autodesk® CBS program to use soils with the friction angle φ = 0.0 degrees, only the first of the formulas by Hansen is applied. The final formula for calculation of the allowable stresses is presented below:
where the relevant factors equal:
and the effective area A’ = B’ * L’
where:
Whole general Hansen’s method presented above is applied for the following codes: ACI, BS 8004 and CSA. In the case of the remaining codes formulas determining some coefficients have been adapted so that they correspond to code regulations.
NOTE: The ground water impact is not accounted for in the calculations.
© 2009 Autodesk, Inc. All rights reserved

Autodesk Concrete Building Structures 2010 - User Guide page: 171
10. LINK WITH OTHER PROGRAMS 10.1. Link with Autodesk Robot Structural
Analysis The Autodesk® CBS program offers the possibility of automatic generation of a calculation model for the Autodesk Robot Structural Analysis program. In order to do that, after defining a model in the Autodesk® CBS program, the user should choose the option: Tools / Export to the ‘Robot’ program provided in the menu or
press the icon. Then the dialog box shown in the drawing below appears on the screen. The dialog box below allows exporting only selected elements of a structure model; with the Consider selection option active, chosen elements from a selected story / whole structure are taken into account during the export.
NOTE: If the Autodesk Robot Structural Analysis program is running, then a structure model will be generated in this program instance; if the Autodesk Robot Structural Analysis program has not been activated, then it will be run automatically and afterwards, a calculation model will generated. While a structure model is being generated in the Autodesk Robot Structural Analysis program, individual elements of a structure model of the Autodesk® CBS program are changed to:
• beams and columns to bars • spread footings to fixed supports • continuous footings to beams on elastic foundation with the default elastic
foundation coefficient K • walls, slabs and stairs to panels • windows and doors to panel openings • raft foundations to panels on elastic foundation • partition walls to dead linear loads on a panel • floor cut/openings to slab openings • layered materials to dead loads on an appropriate element.
While generating a structure model in the Autodesk Robot Structural Analysis program, beams and columns are ascribed default member types so that it is possible to design these elements in Autodesk Robot Structural Analysis (depending on an element type: design of RC, steel or timber members). A type of individual objects may be changed by selecting or deselecting the Structural element option; if this option is selected, such an element is modeled in the Autodesk Robot Structural Analysis program only as a load of the value resulting from this element’s weight. Non-structural walls (to which a load has been applied) as well as non-structural slabs (loaded with the self-weight) are modeled in Autodesk Robot Structural Analysis as claddings with loads applied to them.
© 2009 Autodesk, Inc. All rights reserved

page: 172 Autodesk Concrete Building Structures 2010 - User Guide
10.2. Link with Revit Structure The current program version offers a link between the Autodesk® CBS and Autodesk Revit ® Structure programs. This link allows correcting a structure model created in Autodesk Revit ® Structure and performing calculations of such a structure. The link between Autodesk® CBS and Autodesk Revit ® Structure concerns the following: - beams - columns - walls - spread footings - continuous footings and raft foundations - openings in walls and slabs - loads - load groups and combinations - 2D and 3D objects - materials and sections - releases of beam ends or slab edges - offsets.
The option is available in Autodesk Revit ® Structure if Autodesk® CBS is running or by indicating a geo format file.
10.3. Link with Other Programs The Autodesk® CBS program enables saving / reading a DXF, IFC, ADD and RHG format file. DXF format files For the DXF format, both saving and reading options (export and import) are available. In the case of export, successive layers corresponding to object types (layer of beams, columns, etc.) are generated in a file. Objects are represented in the form of blocks (i.e. a set of lines describing e.g. a wall is grouped in a block), which makes their further processing e.g. adding dimension lines, easier. When exporting to a DXF file, all the stories may be exported simultaneously; after selecting the DXF format, the additional DXF Export dialog box (see the drawing below) is displayed on the screen; there the user may choose whether the export concerns only the current story or all the stories at the same time (if the latter option is selected, then all the stories are placed in one drawing).
In the case of import, all objects are stored as single lines, block of lines (if they are grouped in a block in an original file) or as texts. Moreover, the program remembers layers to which these objects have been ascribed. These layers are available in the dialog box opened by selecting the menu option: View / Display / Layers; the standard mechanisms of filtering object display apply to layers. A drawing is inserted to the current story; therefore, the user may open simultaneously several projections for consecutive stories. Prior to opening a file, a question is displayed on the screen, about the units which were used in generation of the model
© 2009 Autodesk, Inc. All rights reserved

Autodesk Concrete Building Structures 2010 - User Guide page: 173
in a DXF file; selection of proper units enables them to be converted correctly to units currently applied in the Autodesk® CBS program. It is also possible to treat a read-in drawing as layers and to generate a 3D structure on its base. There is an advanced option available, which consists in selecting any number of drawing objects and attempting to change them automatically to 3D objects. After selecting a line, the options concerned with line conversion to object types such as beam, wall, etc. become accessible (the options are available on toolbars, as well). If the option allowing conversion of lines to walls or partition walls is chosen, then the dialog box opens on the screen, in which the following parameters should be determined: • maximum wall width • maximum width of wall opening.
Definition of these parameters is required due to the adopted algorithm of converting lines to walls and automatic recognition of openings (windows, doors) in walls.
NOTE: To the Autodesk® CBS program arcs and circles are imported and they may be converted to: - slabs - walls, beams, continuous footings (selection of 2 lines at the minimum).
IFC format files
NOTE: If there is no program reading IFC-format files installed on the computer (IFC files are not linked to any program), then during installation the Autodesk® CBS program is registered automatically in the Windows system as a default application for IFC files.
For the IFC format, the import option is available in version 1.5.1 (Autodesk Architectural Desktop, Allplan FT), 2.0 (ArchiCAD) and 2.x. The option enables automatic import of a three-dimensional geometry of a structure model from architectural programs. In the current version of the Autodesk® CBS program the following objects may be read in: beams, columns, slabs, walls (rectangular walls), windows, doors and slab openings.
NOTE: While opening a structure model saved in an IFC format there appears a dialog box where the user should ascribe materials imported from an IFC file to individual types included in the material database of Autodesk® CBS and determine which materials are structural.
NOTE: To the Autodesk® CBS program arched walls, beams continuous footings and slabs are imported.
RHG format files This format is used for data exchange with the ROBOT CBS program. Note: when the export option is being used, it may be the case that not all the elements are exported; it results from a fact that structure definition capabilities of the Autodesk® CBS program are more advanced than those of the ROBOT CBS program. ADD format files This format is used for data exchange with the Adcof program. Note: When using the export options, it may be the case that not all the elements will be exported; it results from the fact that the possibilities of structure definition in the Autodesk® CBS program are more advanced than those in the Adcof program.
© 2009 Autodesk, Inc. All rights reserved

page: 174 Autodesk Concrete Building Structures 2010 - User Guide
11. PRINTOUTS 11.1. Printout Composition
The Printout Composition dialog box is used for composing the documentation of the generated model of a structure. It is possible to select components of the calculation note in the dialog box. It opens after:
- pressing the Printout Composition icon - selecting the menu command: File / Printout Composition.
The following icons are located at the top of the dialog box:
- pressing this icon enables previewing a printout
- pressing this icon enables printing a calculation note
- pressing this icon enables saving a calculation note to a text file.
- pressing this icon enables moving a printout component up
- pressing this icon enables moving a printout component down
– activating this icon enables considering an object selection for a whole structure or a chosen story; calculation note components will be generated only for the model objects that have been selected in a structure model. In the middle part of the dialog box there is a list of components of the calculation note; switching on an option (the √ symbol appears) means that the option will be included in the calculation note. Switching off an option indicates that the option will not be provided in the calculation note. The following components of the note are available in the current version of the program: • structure characteristics – information about the lower (‘zero’) level of the story,
level of the soil (with respect to the zero story), number of stories in the building, list of the stories including their names and heights,
• materials – a list of materials used in the structure, including their parameters: resistance, unit weight and price
• sections – a list of sections used in the structure, including their drawings and dimensions
• objects – a list of objects defined in the structure, grouped by type (column, beam, slab, etc.), including their properties (material, section, position)
• loads – a list of loads defined in the structure, grouped by load type (concentrated, linear, planar)
• structure static calculations – short results • structure static calculations – detailed results (exact distribution of a uniform load
for walls, beams and the maximum values Mxx, Myy within each panel)
© 2009 Autodesk, Inc. All rights reserved

Autodesk Concrete Building Structures 2010 - User Guide page: 175
• structure static calculations – short results for a story • structure static calculations - detailed results for a story (exact distribution of a
uniform load for walls, beams and the maximum values Mxx, Myy within each panel)
• seismic simplified calculations (after selecting the simplified method for seismic analysis) – data adopted in the seismic calculations in the Loads – Default values / Seismic / Seismic analysis dialog box and results of the simplified calculations of the seismic analysis: vibration periods for individual directions and values of horizontal forces and displacements for directions and individual stories, respectively
• results of modal analysis (after selecting the advanced method) – values of frequency, mass participation expressed as percentage for the directions X and Y for each vibration mode
• simplified calculations of a wind load – data for calculation of the wind load according to the simplified method and values of width and height of individual stories for individual directions of action of the wind load, values of the forces applied to a story
• tables saved for printout compositions in the Summary table dialog box; NOTE: double-clicking a table name on the list of components in the Printout composition dialog box opens the Summary table dialog box where the selected table can be viewed and edited
• screen captures made in the Autodesk® CBS program. At the bottom of the dialog box there are the following buttons: • Selection criterion - possibility of selecting objects; the Selection criterion
dialog box opens on the screen • Filtering of results - possibility of selecting load cases, seismic cases or
combination envelopes for which results should be included in a note; the program opens the additional dialog box Filtering of results for selecting cases to be included in a note
• All – after pressing this button, all the components of the calculation note available in the dialog box will be switched on (all the options will be included in the calculation note)
• None - after pressing this button, all the components of the calculation note available in the dialog box will be switched off (none of the components will be included in the calculation note)
• Delete - after pressing this button a highlighted component of the calculation note will be deleted.
11.2. Print Preview Pressing the icon in the Printout composition dialog box opens a preview of a created printout. At the top of the screen there is the menu shown in the drawing below.
The presented menu includes the following buttons: • Print - pressing this button starts printing a created printout • << - pressing this button moves a created printout to the previous page • >> - pressing this button moves a created printout to the next page • GoTo ... - pressing this button opens the Go To ... dialog box • Two pages / One Page - pressing this button presents a print preview showing 2
pages or 1 page of the printout • Zoom in - pressing this button zooms in a preview of a created printout • Zoom out - pressing this button zooms out a preview of a created printout • Close - pressing this button closes a printout preview.
© 2009 Autodesk, Inc. All rights reserved

page: 176 Autodesk Concrete Building Structures 2010 - User Guide
11.3. Print Preview - Go To Pressing the Go To ... button in the printout preview menu opens the dialog box shown in the drawing below.
The above dialog box allows selecting the way how to go to a printout element: • by entering a number of a printout page the user wants to go to • by specifying a printout component (e.g. structure properties, materials,
sections, calculation results, etc.) the user wants to go to.
11.4. Add to Note The option is used to add components to a calculation note created by means of the Printout composition option. The option is available from the context menu (after pressing the right mouse button in any structure view) after choosing the Add to Note command.
The option allows making a screen capture of the current structure view and adding it to the list of attachments to the note which are available in the Printout Composition dialog box. The above dialog box makes it possible to: • assign a name to a generated screen capture (this name will be displayed on the
list with the calculation note components) in the Drawing name edit field • set a size of the drawing (screen capture)
h – size definition: determines the drawing height b – size definition: determines the drawing width
• remember the way of size definition for other projects after pressing the Set as default button
• select a building story which may be screen captured; options in the Story field are active for a view of one story (2D or 3D view); the following options are available: - current: a screen capture will be made only for the current story of a building - all: a screen capture will be made for all stories of a building - from, to: a screen capture will be made for successive stories (starting with the
specified story number no.1 to story no.2). If the All or From, to option is selected, then the variable %p, denoting a number(s) of a story for which a screen capture was made, will be added to the proposed name.
© 2009 Autodesk, Inc. All rights reserved

Autodesk Concrete Building Structures 2010 - User Guide page: 177
11.5. Add to Note - Results The option is used to add components of calculation and design results for structure elements to a calculation note created by means of the Printout composition option.
The option is available after pressing the icon located on the Results tab in the Object Properties dialog box
The option allows making a screen capture of the current structure view and adding it to the list of attachments to the note which are available in the Printout Composition dialog box. The above dialog box makes it possible to: • assign a name to a generated screen capture (this name will be displayed on the
list with the calculation note components) in the Drawing name edit field • set a size of the drawing (screen capture)
h – size definition: determines the drawing height b – size definition: determines the drawing width
• remember the way of size definition for other projects after pressing the Set as default button.
The lower part of the dialog box holds the option that allows adding a legend (color scale used for map presentation) to the screen capture.
11.6. Print Options The program enables generation of printouts. Printout settings may be defined in the Print options dialog box which becomes available after selecting the menu option: File / Print options.
© 2009 Autodesk, Inc. All rights reserved
page: 178 Autodesk Concrete Building Structures 2010 - User Guide
The following parameters may be defined in the above dialog box: • Automatic scale – after selecting this option, the program adjusts the size of a
drawing to the paper format currently set in the printer • User-defined scale – after selecting this option, the user defines a value of the
scale (e.g. 1:100) Range • whole working area - after selecting this option, a view of an entire structure will
be printed independently of the current zoom • current view - after selecting this option, a view of the screen part corresponding
to the current structure zoom will be printed.
NOTE: If a width of printout space is less than 18 cm (this is a default value for a new project), then before displaying the print preview and before starting printing, the program shows a message which suggest that margins should be reduced so that the printout width is at least 18 cm.
NOTE: There is a possibility to print from 3D view of a structure.
© 2009 Autodesk, Inc. All rights reserved

Autodesk Concrete Building Structures 2010 - User Guide page: 179
© 2009 Autodesk, Inc. All rights reserved
12. PROBLEMS 12.1. Lack of 3D View with Rendering
3D view with rendering is supported by DirectX library – version 8.1 or higher. Such a library is made available as a separate installation on the installation disk of the Autodesk® CBS program; its latest version is also provided on the Microsoft Internet pages.
If 3D view with rendering is not available in the program, it may be caused by the following:
• DirectX library has not been installed or has been installed incorrectly – in this case DirectX library should be installed again
• the user works in the system Windows NT – this system does not support DirectX libraries, thus work with 3D view with rendering is impossible
• a graphic card is not set correctly; to improve the 3D view, the user should: - reduce the color palette (it should be kept in mind that the ‘high color 24 bit’
color palette is not DirectX-supported) - reduce the size of the 3D window in the Autodesk® CBS program - change the screen resolution from 1024*768 to 800*600
• graphic card drivers are not appropriate (they do not support DirectX library); the user should install the latest card drivers available on the Internet pages of the card manufacturer.