caution attention · 2019-04-19 · a ( a 1 5 2 4 7 8 9 6 2 c b 1 3 en couching foot this presser...
TRANSCRIPT
a
a
1
5
7 8 92 4
6
2
c
b
1
3
EN Couching footThis presser foot can easily sew decorative stitching using yarn. Use couching foot “X” to give your projects a more beautiful finish.
CAUTIONSew test stitches on the fabric before sewing on your project. • If the yarn is extremely thin or thick or has an unusual shape (flat or furry), the best finishing results may not be achieved, or injuries or damage may result. We recommend using yarn of weight 4 (MEDIUM ).
NoteWe recommend using a stabilizer material when sewing stretch fabrics, lightweight • fabrics, fabrics with a coarse weave, or fabrics which cause fabric shrinkage.If your sewing machine does not include the optional spool stand (Fig. 5-• 1) used in the following procedure, purchase it separately.
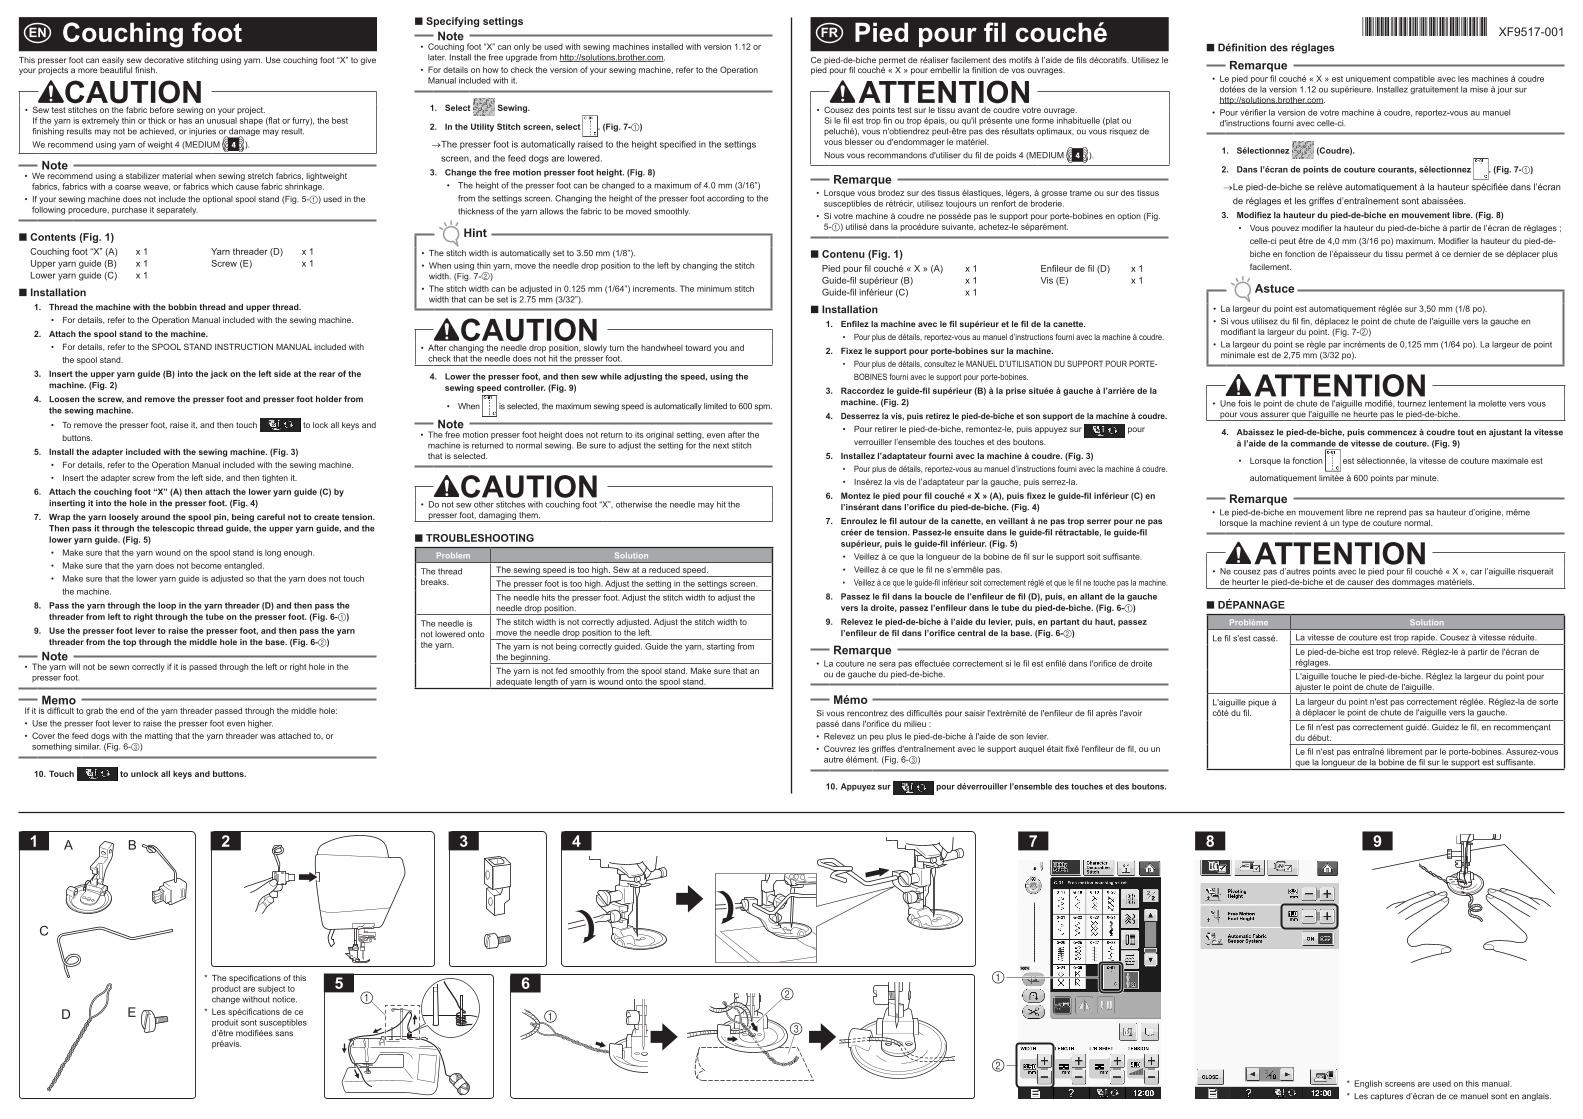
Contents (Fig. 1) ■
Couching foot “X” (A)Upper yarn guide (B)Lower yarn guide (C)
x 1x 1x 1
Yarn threader (D)Screw (E)
x 1x 1
Installation ■
Thread the machine with the bobbin thread and upper thread.1. For details, refer to the Operation Manual included with the sewing machine.•
Attach the spool stand to the machine.2. For details, refer to the SPOOL STAND INSTRUCTION MANUAL included with • the spool stand.
Insert the upper yarn guide (B) into the jack on the left side at the rear of the 3. machine. (Fig. 2)Loosen the screw, and remove the presser foot and presser foot holder from 4. the sewing machine.
To remove the presser foot, raise it, and then touch • to lock all keys and buttons.
Install the adapter included with the sewing machine. (Fig. 3)5. For details, refer to the Operation Manual included with the sewing machine.• Insert the adapter screw from the left side, and then tighten it.•
Attach the couching foot “X” (A) then attach the lower yarn guide (C) by 6. inserting it into the hole in the presser foot. (Fig. 4)Wrap the yarn loosely around the spool pin, being careful not to create tension. 7. Then pass it through the telescopic thread guide, the upper yarn guide, and the lower yarn guide. (Fig. 5)
Make sure that the yarn wound on the spool stand is long enough.• Make sure that the yarn does not become entangled.• Make sure that the lower yarn guide is adjusted so that the yarn does not touch • the machine.
Pass the yarn through the loop in the yarn threader (D) and then pass the 8. threader from left to right through the tube on the presser foot. (Fig. 6-1)Use the presser foot lever to raise the presser foot, and then pass the yarn 9. threader from the top through the middle hole in the base. (Fig. 6-2)
NoteThe yarn will not be sewn correctly if it is passed through the left or right hole in the • presser foot.
MemoIf it is difficult to grab the end of the yarn threader passed through the middle hole:
Use the presser foot lever to raise the presser foot even higher.• Cover the feed dogs with the matting that the yarn threader was attached to, or • something similar. (Fig. 6-3)
Touch 10. to unlock all keys and buttons.
Specifying settings ■
NoteCouching foot “X” can only be used with sewing machines installed with version 1.12 or • later. Install the free upgrade from http://solutions.brother.com.For details on how to check the version of your sewing machine, refer to the Operation • Manual included with it.
Select 1. Sewing.
In the Utility Stitch screen, select 2. . (Fig. 7-1)
The presser foot is automatically raised to the height specified in the settings →screen, and the feed dogs are lowered.Change the free motion presser foot height. (Fig. 8)3.
The height of the presser foot can be changed to a maximum of 4.0 mm (3/16”) • from the settings screen. Changing the height of the presser foot according to the thickness of the yarn allows the fabric to be moved smoothly.
HintThe stitch width is automatically set to 3.50 mm• (1/8”).When using thin yarn, move the needle drop position to the left by changing the stitch • width. (Fig. 7-2)The stitch width can be adjusted in 0.125 mm (1/64”) increments. The minimum stitch • width that can be set is 2.75 mm (3/32”).
CAUTIONAfter changing the needle drop position, slowly turn the handwheel toward you and • check that the needle does not hit the presser foot.
Lower the presser foot, and then sew while adjusting the speed, using the 4. sewing speed controller. (Fig. 9)
When • is selected, the maximum sewing speed is automatically limited to 600 spm.
NoteThe free motion presser foot height does not return to its original setting, even after the • machine is returned to normal sewing. Be sure to adjust the setting for the next stitch that is selected.
CAUTIONDo not sew other stitches with couching foot “X”, otherwise the needle may hit the • presser foot, damaging them.
TROUBLESHOOTING ■
Problem Solution
The thread breaks.
The sewing speed is too high. Sew at a reduced speed.The presser foot is too high. Adjust the setting in the settings screen.The needle hits the presser foot. Adjust the stitch width to adjust the needle drop position.
The needle is not lowered onto the yarn.
The stitch width is not correctly adjusted. Adjust the stitch width to move the needle drop position to the left.The yarn is not being correctly guided. Guide the yarn, starting from the beginning.The yarn is not fed smoothly from the spool stand. Make sure that an adequate length of yarn is wound onto the spool stand.
English screens are used on this manual.* Les captures d’écran de ce manuel sont en anglais.*
XF9517-001
The specifications of this * product are subject to change without notice.Les spécifications de ce * produit sont susceptibles d’être modifiées sans préavis.
FR Pied pour fil couchéCe pied-de-biche permet de réaliser facilement des motifs à l’aide de fils décoratifs. Utilisez le pied pour fil couché « X » pour embellir la finition de vos ouvrages.
ATTENTIONCousez des points test sur le tissu avant de coudre votre ouvrage. • Si le fil est trop fin ou trop épais, ou qu'il présente une forme inhabituelle (plat ou peluché), vous n'obtiendrez peut-être pas des résultats optimaux, ou vous risquez de vous blesser ou d'endommager le matériel. Nous vous recommandons d'utiliser du fil de poids 4 (MEDIUM ).
RemarqueLorsque vous brodez sur des tissus élastiques, légers, à grosse trame ou sur des tissus • susceptibles de rétrécir, utilisez toujours un renfort de broderie.Si votre machine à coudre ne possède pas le support pour porte-bobines en option (Fig. • 5-1) utilisé dans la procédure suivante, achetez-le séparément.
Contenu (Fig. 1) ■
Pied pour fil couché « X » (A)Guide-fil supérieur (B)Guide-fil inférieur (C)
x 1x 1x 1
Enfileur de fil (D)Vis (E)
x 1x 1
Installation ■
Enfilez la machine avec le fil supérieur et le fil de la canette.1. Pour plus de détails, reportez-vous au manuel d’instructions fourni avec la machine à coudre.•
Fixez le support pour porte-bobines sur la machine.2. Pour plus de détails, consultez le MANUEL D’UTILISATION DU SUPPORT POUR PORTE-• BOBINES fourni avec le support pour porte-bobines.
Raccordez le guide-fil supérieur (B) à la prise située à gauche à l’arrière de la 3. machine. (Fig. 2)Desserrez la vis, puis retirez le pied-de-biche et son support de la machine à coudre.4.
Pour retirer le pied-de-biche, remontez-le, puis appuyez sur • pour verrouiller l’ensemble des touches et des boutons.
Installez l’adaptateur fourni avec la machine à coudre. (Fig. 3)5. Pour plus de détails, reportez-vous au manuel d’instructions fourni avec la machine à coudre.• Insérez la vis de l’adaptateur par la gauche, puis serrez-la.•
Montez le pied pour fil couché « X » (A), puis fixez le guide-fil inférieur (C) en 6. l’insérant dans l’orifice du pied-de-biche. (Fig. 4)Enroulez le fil autour de la canette, en veillant à ne pas trop serrer pour ne pas 7. créer de tension. Passez-le ensuite dans le guide-fil rétractable, le guide-fil supérieur, puis le guide-fil inférieur. (Fig. 5)
Veillez à ce que la longueur de la bobine de fil sur le support soit suffisante.• Veillez à ce que le fil ne s’emmêle pas.• Veillez à ce que le guide-fil inférieur soit correctement réglé et que le fil ne touche pas la machine.•
Passez le fil dans la boucle de l’enfileur de fil (D), puis, en allant de la gauche 8. vers la droite, passez l’enfileur dans le tube du pied-de-biche. (Fig. 6-1)Relevez le pied-de-biche à l’aide du levier, puis, en partant du haut, passez 9. l’enfileur de fil dans l’orifice central de la base. (Fig. 6-2)
RemarqueLa couture ne sera pas effectuée correctement si le fil est enfilé dans l'orifice de droite • ou de gauche du pied-de-biche.
MémoSi vous rencontrez des difficultés pour saisir l'extrémité de l'enfileur de fil après l'avoir passé dans l'orifice du milieu :
Relevez un peu plus le pied-de-biche à l'aide de son levier.• Couvrez les griffes d'entraînement avec le support auquel était fixé l'enfileur de fil, ou un • autre élément. (Fig. 6-3)
Appuyez sur 10. pour déverrouiller l’ensemble des touches et des boutons.
Définition des réglages ■
RemarqueLe pied pour fil couché « X » est uniquement compatible avec les machines à coudre • dotées de la version 1.12 ou supérieure. Installez gratuitement la mise à jour sur http://solutions.brother.com.Pour vérifier la version de votre machine à coudre, reportez-vous au manuel • d'instructions fourni avec celle-ci.
Sélectionnez 1. (Coudre).
Dans l’écran de points de couture courants, sélectionnez 2. . (Fig. 7-1)
Le pied-de-biche se relève automatiquement à la hauteur spécifiée dans l’écran →de réglages et les griffes d’entraînement sont abaissées.Modifiez la hauteur du pied-de-biche en mouvement libre. (Fig. 8)3.
Vous pouvez modifier la hauteur du pied-de-biche à partir de l’écran de réglages ; • celle-ci peut être de 4,0 mm (3/16 po) maximum. Modifier la hauteur du pied-de-biche en fonction de l’épaisseur du tissu permet à ce dernier de se déplacer plus facilement.
AstuceLa largeur du point est automatiquement réglée sur 3,50 mm• (1/8 po).Si vous utilisez du fil fin, déplacez le point de chute de l'aiguille vers la gauche en • modifiant la largeur du point. (Fig. 7-2) La largeur du point se règle par incréments de 0,125 mm (1/64 po). La largeur de point • minimale est de 2,75 mm (3/32 po).
ATTENTIONUne fois le point de chute de l'aiguille modifié, tournez lentement la molette vers vous • pour vous assurer que l'aiguille ne heurte pas le pied-de-biche.
Abaissez le pied-de-biche, puis commencez à coudre tout en ajustant la vitesse 4. à l’aide de la commande de vitesse de couture. (Fig. 9)
Lorsque la fonction • est sélectionnée, la vitesse de couture maximale est
automatiquement limitée à 600 points par minute.
RemarqueLe pied-de-biche en mouvement libre ne reprend pas sa hauteur d’origine, même • lorsque la machine revient à un type de couture normal.
ATTENTIONNe cousez pas d’autres points avec le pied pour fil couché « X », car l’aiguille risquerait • de heurter le pied-de-biche et de causer des dommages matériels.
DÉPANNAGE ■
Problème Solution
Le fil s'est cassé. La vitesse de couture est trop rapide. Cousez à vitesse réduite.
Le pied-de-biche est trop relevé. Réglez-le à partir de l'écran de réglages.L'aiguille touche le pied-de-biche. Réglez la largeur du point pour ajuster le point de chute de l'aiguille.
L'aiguille pique à côté du fil.
La largeur du point n'est pas correctement réglée. Réglez-la de sorte à déplacer le point de chute de l'aiguille vers la gauche.
Le fil n'est pas correctement guidé. Guidez le fil, en recommençant du début.Le fil n'est pas entraîné librement par le porte-bobines. Assurez-vous que la longueur de la bobine de fil sur le support est suffisante.

a
a
1
5
7 8 92 4
6
2
c
b
1
3
En este manual se utilizan pantallas en inglés.* Telas em inglês são utilizadas neste manual.*
Las especificaciones de * este producto pueden sufrir cambios sin previo aviso.As especificações deste * produto estão sujeitas a alterações sem aviso prévio.
ES Pie para coser cordonesEste pie prensatela permite coser fácilmente puntadas decorativas usando hilo. Utilice el pie para coser cordones “X” para que el acabado de sus proyectos resulte más atractivo.
AVISOCosa unas cuantas puntadas de prueba en el tejido antes de empezar a coser el proyecto. • Si el hilo es demasiado delgado o grueso, o si tiene una forma inusual (plana o peluda), es posible que no se consigan los resultados deseados o que se produzcan lesiones o daños. Recomendamos utilizar hilo de calibre 4 (MEDIO ).
NotaRecomendamos utilizar un material estabilizador cuando se cosan tejidos elásticos, • ligeros, muy trenzados o que se encogen fácilmente.Si su máquina de coser no incluye el portaconos opcional (Fig. 5-• 1) utilizado en el procedimiento siguiente, adquiéralo por separado.
Contenido (Fig. 1) ■
Pie para coser cordones “X” (A)Guía de hilos superior (B)Guía de hilos inferior (C)
x 1x 1x 1
Enhebrador del hilo (D)Tornillo (E)
x 1x 1
Instalación ■
Enhebre la máquina con el hilo de la bobina y el hilo superior.1. Para más detalles, consulte el Manual de instrucciones incluido con la máquina de coser.•
Coloque el soporte de carretes en la máquina.2. Para más detalles, consulte el MANUAL DE INSTRUCCIONES DEL PORTACONOS • incluido con el portaconos.
Inserte la guía de hilos superior (B) en la toma del lado izquierdo posterior de la 3. máquina. (Fig. 2)Afloje el tornillo, y retire el pie prensatela y su soporte de la máquina de coser.4.
Para retirar el pie prensatela, levántelo y toque • para bloquear todas las teclas y botones.
Instale el adaptador incluido con la máquina de coser. (Fig. 3)5. Para más detalles, consulte el Manual de instrucciones incluido con la máquina de coser.• Inserte el tornillo del adaptador desde el lado izquierdo, y luego apriételo.•
Coloque el pie para coser cordones “X” (A) y luego coloque la guía de hilos 6. inferior (C) insertándola en el orificio del pie prensatela. (Fig. 4)Enrolle el hilo alrededor del portacarrete, procurando que no quede tenso. A 7. continuación, páselo a través de la guía del hilo telescópica, de la guía de hilos superior y de la guía de hilos inferior. (Fig. 5)
Compruebe que el hilo enrollado en el soporte de carretes sea lo suficientemente largo.• Procure que el hilo no se enrede.• Asegúrese de que la guía de hilos inferior quede situada de modo que el hilo no • toque la máquina.
Pase el hilo a través del lazo del enhebrador del hilo (D), y luego pase el enhebrador 8. de izquierda a derecha a través del tubo del pie prensatela. (Fig. 6-1)Utilice la palanca del pie prensatela para levantarlo, y luego pase el enhebrador del 9. hilo desde la parte superior a través del orificio central de la base. (Fig. 6-2)
NotaEl hilo no se coserá correctamente si se pasa a través del orificio izquierdo o derecho • del pie prensatela.
RecuerdeSi le resulta difícil sujetar el extremo del enhebrador del hilo pasado a través del orificio central:
Levante un poco más el pie prensatela utilizando la palanca.• Cubra los dientes de arrastre con el tapete donde se colocó el enhebrador del hilo, o • con un material similar. (Fig. 6-3)
Toque10. para desbloquear todas las teclas y botones.
Especificar los ajustes ■
NotaEl pie para coser cordones “X” sólo puede utilizarse con máquinas de coser que tengan • instalada la versión 1.12 o posterior. Instale la actualización gratuita desde http://solutions.brother.com.Para más detalles acerca de cómo comprobar la versión de su máquina de coser, • consulte el Manual de instrucciones que se entrega con ella.
Seleccione 1. Coser.
En la pantalla Puntada de utilidad, seleccione 2. . (Fig. 7-1)
El pie prensatela se levanta automáticamente hasta la altura especificada en la →pantalla de ajustes, y los dientes de arrastre se bajan.Cambie la altura del pie prensatela libre. (Fig. 8)3.
La altura del pie prensatela puede cambiarse hasta un máximo de 4,0 mm (3/16”) • desde la pantalla de ajustes. Si cambia la altura del pie prensatela según el grosor del hilo, el tejido podrá moverse sin problemas.
ConsejoLa anchura de la puntada se ajusta automáticamente a 3,50 mm• (1/8”).Si utiliza un hilo delgado, desplace la posición de entrada de la aguja hacia la izquierda • cambiando la anchura de la puntada. (Fig. 7-2) La anchura de la puntada puede ajustarse en incrementos de 0,125 mm (1/64”). La • anchura mínima de la puntada que puede establecerse es de 2,75 mm (3/32”).
AVISODespués de cambiar la posición de entrada de la aguja, gire lentamente la polea hacia • usted y compruebe que la aguja no choca con el pie prensatela.
Baje el pie prensatela y comience a coser ajustando la velocidad con el 4. controlador. (Fig. 9)
Si se selecciona • , la velocidad máxima de costura se limita automáticamente
a 600 ppm.
NotaLa altura del pie prensatela libre no vuelve a su configuración original, incluso después • de que la máquina haya vuelto a la costura normal.
AVISONo cosa otro tipo de puntadas con el pie para coser cordones “X”, ya que de lo contrario • la aguja podría golpear el pie prensatela y dañarlo.
SOLUCIÓN DE PROBLEMAS ■
Problema Solución
El hilo se rompe. La velocidad de costura es demasiado alta. Cosa a una velocidad reducida.El pie prensatela está demasiado elevado. Defina el ajuste en la pantalla de ajustes.La aguja golpea el pie prensatela. Defina la anchura de la puntada para ajustar la posición de entrada de la aguja.
La aguja no baja sobre el hilo.
La anchura de la puntada no está ajustada correctamente. Ajuste la anchura de la puntada para desplazar la posición de entrada de la aguja hacia la izquierda.El hilo no se orienta correctamente. Oriente el hilo, empezando por el principio.El hilo no avanza correctamente desde el soporte de carretes. Compruebe que se enrolla una cantidad adecuada de hilo en el soporte de carretes.
PT CalcadorEste calcador pode costurar pontos decorativos usando linha. Use o calcador "X" para dar um acabamento mais bonito a seus projetos.
AVISOFaça uma costura de teste no tecido antes de iniciar o projeto. • Se a linha for extremamente fina ou espessa, ou se apresentar uma forma irregular (plana ou em relevo), um bom acabamento pode não ser obtido e podem ocorrer danos ou ferimentos. Recomendamos a utilização de linhas de peso 4 (MÉDIO ).
ObservaçãoRecomendamos a utilização de uma entretela ao costurar tecidos que esticam, tecidos • leves, tecidos com uma trama grossa ou tecidos que podem encolher.Se a sua máquina de costura não tiver o suporte de carretel opcional (Fig. 5-• 1) usado no procedimento a seguir, compre-o separadamente.
Conteúdo (Fig. 1) ■
Calcador “X” (A)Guia de linha superior (B)Guia de linha inferior (C)
x 1x 1x 1
Enfiador de linha (D)Parafuso (E)
x 1x 1
Instalação ■
Coloque na máquina a linha da bobina e a linha de cima.1. Para obter mais informações, consulte o Manual de • Operação da máquina de costura.
Coloque o suporte de carretel na máquina.2. Para obter mais informações, consulte o MANUAL DE INSTRUÇÕES DO • SUPORTE DE CARRETEL que vem junto com o suporte de carretel.
Insira a guia de linha superior (B) no conector do lado esquerdo da parte 3. traseira da máquina. (Fig. 2)Solte o parafuso e remova o calcador e seu suporte da máquina de costura.4.
Para remover o calcador, levante-o e em seguida toque-o • para travar todas as chaves e botões.
Instale o adaptador que veio com a máquina de costura. (Fig. 3)5. Para obter mais informações, consulte o Manual de • Operação da máquina de costura.Insira o parafuso do adaptador do lado esquerdo e aperte-o.•
Prenda o calcador “X” (A) e em seguida a guia de linha inferior (C), inserindo-a 6. no orifício do calcador. (Fig. 4)Enrole frouxamente a linha em torno do pino do carretel, tomando cuidado para 7. não criar tensão. Em seguida, passe-a pela guia de linha telescópica e pelas guias de linha superior e inferior. (Fig. 5)
Verifique se a linha enrolada no carretel tem o comprimento suficiente.• Verifique se a linha não está enroscada.• Verifique se a guia de linha inferior está ajustada, de forma que a linha não • encoste na máquina.
Passe a linha pela abertura do enfiador de linha (D) e passe o enfiador da 8. esquerda para a direita através do tubo do calcador. (Fig. 6-1)Use a alavanca do calcador para levantá-lo e, em seguida, passe o enfiador de 9. linha do orifício superior para o orifício do meio na base. (Fig. 6-2)
ObservaçãoA linha não será costurada corretamente se for passada através do orifício esquerdo ou • direito do calcador.
LembreteÉ difícil pegar a extremidade do enfiador de linha que passou pelo orifício do meio:
Use a alavanca do calcador para levantá-lo um pouco mais.• Cubra os dentes de transporte com o revestimento no qual estava preso o enfiador de • linha ou algo semelhante. (Fig. 6-3)
Toque 10. para desbloquear todas as chaves e botões.
Especificações de configurações ■
ObservaçãoO calcador "X" pode ser usado somente com máquinas de costura instaladas com a • versão 1.12 ou posterior. Instale a atualização gratuita em http://solutions.brother.com.Para obter mais informações sobre como verificar a versão de sua máquina de costura, • consulte o Manual de Operação.
Selecione 1. Costura.
Na tela de pontos do utilitário, selecione 2. . (Fig. 7-1)
O calcador é levantado automaticamente até à altura especificada na tela de →configurações e os dentes de transporte são baixados.Altere a altura de movimento livre do calcador. (Fig. 8)3.
A altura do calcador pode ser alterada para um máximo de 4,0 mm (3/16") na tela • de configurações. A alteração da altura do calcador de acordo com a espessura da linha permite que o tecido seja movido facilmente.
DicasA largura do ponto é automaticamente ajustada para 3,50 mm• (1/8”).Ao usar linha fina, mova a posição de descida da agulha para a esquerda alterando a • largura do ponto. (Fig. 7-2)A largura do ponto pode ser ajustada em incrementos de 0,125 mm (1/64”). A largura • mínima do ponto que pode ser ajustada é de 2,75 mm (3/32”).
AVISOApós alterar a posição de descida da agulha, vire o volante lentamente em direção a • você e verifique se a agulha não encosta no calcador.
Baixe o calcador e costure enquanto ajusta a velocidade, usando o controlador 4. de velocidade de costura. (Fig. 9)
Quando • está selecionado, a velocidade máxima de costura é limitada
automaticamente a 600 spm.
ObservaçãoA altura do movimento livre do calcador não retorna à configuração original, mesmo • depois da máquina retornar à costura normal. Certifique-se de ajustar a configuração para o próximo ponto selecionado.
AVISONão costure outros pontos com o calcador "X", caso contrário, a agulha pode encostar • no calcador e danificá-lo.
SOLUÇÃO DE PROBLEMAS ■
Problema Solução
A linha quebra. A velocidade de costura está muito alta. Costure a uma velocidade mais baixa.O calcador está muito alto. Ajuste a configuração na tela de configurações.A agulha encosta no calcador. Ajuste a largura do ponto para ajustar a posição de descida da agulha.
A agulha não desce até à linha.
A largura do ponto não está ajustada corretamente. Ajuste a largura do ponto para mover a posição de descida da agulha para a esquerda.A linha não está sendo direcionada corretamente. Direcione a linha, começando do início.A linha não é alimentada corretamente a partir do suporte do carretel. Verifique se um comprimento de linha adequado foi enrolado no suporte do carretel.

a
a
1
5
7 8 92 4
6
2
c
b
1
3
In dieser Bedienungsanleitung werden englische * Bildschirme verwendet.In deze handleiding worden Engelse schermen * gebruikt.
XF9518-001
Änderungen an den * Produktspezifikationen vorbehalten.De specificaties van dit * product kunnen zonder kennisgeving worden gewijzigd.
NL KoordvoetMet deze persvoet kunt u gemakkelijk decoratieve steken naaien met garen. Met koordvoet “X” geeft u uw projecten een fraaiere afwerking.
VOORZICHTIGNaai enkele steken op een proeflapje voordat u aan het project begint. • Als het garen zeer dun of dik is of ongebruikelijk van vorm (plat of pluizig), is de afwerking mogelijk niet optimaal of kan beschadiging of letsel optreden. We adviseren u garen van dikte 4 te gebruiken (MEDIUM ).
OpmerkingWe adviseren u steunstof te gebruiken wanneer u werkt met stretchstof, lichte stof, grof • geweven stof of stof die gemakkelijk krimpt.Als bij uw naaimachine niet het optionele kloshouder (Fig. 5-• 1) is inbegrepen dat wordt gebruikt in onderstaande procedure, dient u dit afzonderlijk aan te schaffen.
Inhoudsopgave (Fig. 1) ■
Koordvoet “X” (A)Bovenste draadgeleider (B)Onderste draadgeleider (C)
x 1x 1x 1
Gareninrijger (D)Schroef (E)
x 1x 1
Installatie ■
Rijg de machine in met boven- en onderdraad.1. Meer bijzonderheden vindt u in de Bedieningshandleiding bij de naaimachine.•
Bevestig de kloshouder aan de machine.2. Meer bijzonderheden vindt u in de gids INSTRUCTIES KLOSREK die is • inbegrepen bij het kloshouder.
Plaats de bovendraadgeleider (B) in de aansluiting linksachter op de machine. 3. (Fig. 2) Draai de schroef los en verwijder de persvoet en de persvoethouder uit de 4. naaimachine.
Zet hiertoe de persvoet omhoog en raak vervolgens • aan om alle toetsen en knoppen te vergrendelen.
Installeer de adapter die is inbegrepen bij de naaimachine. (Fig. 3)5. Meer bijzonderheden vindt u in de Bedieningshandleiding bij de naaimachine.• Plaats de adapterschroef vanaf de linkerkant en draai deze vast.•
Bevestig koordvoet “X” (A) en vervolgens onderdraadgeleider (C) door deze in 6. het gat in de persvoet te steken. (Fig. 4) Wikkel het garen los rond de klospen. Pas op dat u geen spanning creëert. 7. Leid het garen vervolgens door de telescopische draadgeleider, de bovenste draadgeleider en de onderste draadgeleider. (Fig. 5)
Zorg dat het garen dat u rond de kloshouder wikkelt, lang genoeg is.• Zorg dat het garen niet verstrikt raakt.• Zorg dat de onderste draadgeleider zo is afgesteld dat het garen de machine niet • raakt.
Leid het garen door de lus in de gareninrijger (D) en leid vervolgens de 8. gareninrijger van rechts naar links door de buis op de persvoet. (Fig. 6-1)Zet de persvoet omhoog met de persvoethendel en leid de gareninrijger van 9. boven door het middelste gat in de basis. (Fig. 6-2)
OpmerkingHet garen naait niet goed als het door het linker- of rechtergat in de persvoet wordt geleid.•
MemoHet is moeilijk om het uiteinde van de gareninrijger te pakken die door het middelste gat is geleid:
Zet de persvoet nog hoger met de persvoethendel.• Bedek de transporteur met de mat waaraan de gareninrijger is bevestigd, of iets • dergelijks. (Fig. 6-3)
Raak 10. aan om alle toetsen en knoppen te ontgrendelen.
Instellingen opgeven ■
OpmerkingU kunt koordvoet “X” alleen gebruiken met naaimachines waarop versie 1.12 of later is • geïnstalleerd. Installeer de gratis upgrade van http://solutions.brother.com.Hoe u de versie van uw naaimachine controleert, leest u in de Bedieningshandleiding bij de machine.•
Selecteer 1. Naaien.
In het naaistekenscherm selecteert u 2. . (Fig. 7-1)
De persvoet wordt automatisch omhooggezet in de hoogte die is opgegeven in →het instellingenscherm. De transporteur wordt omlaaggezet.Wijzig de hoogte van de vrijehandpersvoet. (Fig. 8)3.
U kunt de hoogte van de persvoet wijzigen tot maximaal 4,0 mm (3/16 inch) in het • instellingenscherm. Door de hoogte van de persvoet aan te passen aan de dikte van het garen, zorgt u dat de stof vloeiend beweegt.
TipDe steekbreedte wordt automatisch ingesteld op 3,50 mm• (1/8 inch).Wanneer u dun garen gebruikt, verplaatst u de plek waar de naald neerkomt naar links • door de steekbreedte te wijzigen. (Fig. 7-2) U kunt de steekbreedte aanpassen in stappen van 0,125 mm (1/64 inch). De • minimumsteekbreedte die u kunt instellen is 2,75 mm (3/32 inch).
VOORZICHTIGNadat u de plek waar de naald neerkomt hebt gewijzigd, draait u het handwiel langzaam • naar u toe en controleert u dat de naald de persvoet niet raakt.
Zet de persvoet omlaag en naai terwijl u de snelheid aanpast met de schuifknop 4. voor snelheidsregeling. (Fig. 9)
Wanneer • is geselecteerd, wordt de maximumnaaisnelheid automatisch
beperkt tot 600 spm.
OpmerkingDe oorspronkelijke instelling van de vrije persvoethoogte wordt niet hersteld, zelfs als de • machine weer wordt ingesteld op normaal naaien.
VOORZICHTIGNaai geen andere steken met koordvoet “X”. Anders kan de naald de persvoet raken, • met beschadiging als gevolg.
PROBLEMEN OPLOSSEN ■
Probleem Oplossing
De draad breekt. De naaisnelheid is te hoog. Naai op een lagere snelheid.
De persvoet is te hoog. Pas de instelling aan in het instellingenscherm.De naald raakt de persvoet. Pas de steekbreedte aan om de plek waar de naald neerkomt te wijzigen.
De naald wordt niet omlaag gezet in het garen.
De steekbreedte is niet goed afgesteld. Pas de steekbreedte aan om de plek waar de naald neerkomt naar links te verplaatsen.
Het garen wordt niet goed geleid. Leid het garen vanaf het begin.
Het garen wordt niet soepel doorgevoerd vanaf de kloshouder. Zorg dat de juiste lengte garen op de kloshouder is gewonden.
DE KordelaufnähfußMit diesem Nähfuß können leicht Dekorstiche mit Garn genäht werden. Verwenden Sie den Kordelaufnähfuß „X“ mit Garn für eine noch schönere Ausführung Ihrer Projekte.
VORSICHTNähen Sie eine Probenaht auf dem Stoff, bevor Sie mit dem Nähprojekt beginnen. • Wenn das Garn sehr dünn oder dick ist oder eine ungewöhnliche Form hat (flach oder flauschig), werden möglicherweise nicht die besten Ergebnisse erreicht oder es kann zu Verletzungen oder Beschädigungen kommen. Wir empfehlen die Verwendung von Garn mit dem Gewicht 4 (MITTEL ).
HinweisDie Verwendung von Stickunterlegvlies wird beim Nähen von Stretchgeweben, dünnen • und grob gewebten Stoffen und solchen, die leicht schrumpfen, empfohlen.Wenn der in der folgenden Prozedur verwendete optionale Garnrollenständer (Abb. 5-• 1) nicht im Lieferumfang Ihrer Nähmaschine enthalten ist, kaufen Sie ihn separat.
Inhalt (Abb. 1) ■
Kordelaufnähfuß „X“ (A)Oberer Garneinfädler (B)Unterer Garneinfädler (C)
x 1x 1x 1
Garneinfädler (D)Schraube (E)
x 1x 1
Installation ■
Fädeln Sie den Unterfaden und den Oberfaden der Maschine ein.1. Weitere Informationen finden Sie in der mitgelieferten Bedienungsanleitung der Nähmaschine.•
Bringen Sie den Garnrollenständer an der Maschine an.2. Ausführliche Informationen finden Sie in der mit dem Garnrollenständer gelieferten • GARNROLLENSTÄNDER BEDIENUNGSANLEITUNG.
Setzen Sie den oberen Garneinfädler (B) in die Buchse hinten auf der linken 3. Seite der Maschine ein. (Abb. 2)Lösen Sie die Schraube und nehmen Sie den Nähfuß und den Nähfußhalter von 4. der Maschine ab.
Heben Sie den Nähfuß zum Entfernen an und berühren Sie dann • , um alle Tasten zu sperren.
Installieren Sie den mit der Maschine gelieferten Adapter. (Abb. 3)5. Weitere Informationen finden Sie in der mitgelieferten Bedienungsanleitung der Nähmaschine.• Setzen Sie die Adapterschraube von der linken Seite ein und ziehen Sie sie fest.•
Setzen Sie den Kordelaufnähfuß „X“ (A) ein und bringen Sie dann den unteren 6. Garneinfädler (C) durch Einsetzen in das Loch im Nähfuß an. (Abb. 4)Wickeln Sie das Garn lose um den Garnrollenstift und achten Sie dabei darauf, 7. keine Spannung zu erzeugen. Führen Sie das Garn dann durch die ausziehbare Fadenführung, den oberen Garneinfädler und den unteren Garneinfädler. (Abb. 5)
Stellen Sie sicher, dass das Garn, das auf dem Garnrollenständer aufgespult ist, lang genug ist.• Stellen Sie sicher, dass sich das Garn nicht verheddert.• Stellen Sie sicher, dass der untere Garneinfädler so eingestellt ist, dass das Garn • die Maschine nicht berührt.
Führen Sie das Garn durch die Schlinge im Garneinfädler (D) und führen Sie dann 8. den Einfädler von links nach rechts durch die Führung am Nähfuß. (Abb. 6-1)Heben Sie den Nähfuß mit dem Nähfußhebel an und führen Sie dann den 9. Garneinfädler von oben durch die mittlere Öffnung in der Platte. (Abb. 6-2)
HinweisDas Garn wird nicht korrekt genäht, wenn es durch die linke oder rechte Öffnung im • Nähfuß geführt wird.
AnmerkungWenn sich das Ende des Garneinfädlers, der durch die mittlere Öffnung geführt wurde, schwer fassen lässt:
Heben Sie den Nähfuß mit dem Nähfußhebel noch höher an.• Decken Sie den Transporteur mit dem Untersatz, auf dem der Garneinfädler befestigt war, ab. (Abb. 6-• 3)
Berühren Sie 10. , um alle Tasten zu entsperren.
Festlegen der Einstellungen ■
HinweisDer Kordelaufnähfuß „X“ kann nur mit Nähmaschinen verwendet werden, auf denen • Version 1.12 oder höher installiert ist. Installieren Sie die kostenlose Aktualisierung von http://solutions.brother.com.Informationen zum Überprüfen der Version Ihrer Nähmaschine finden Sie in der • mitgelieferten Bedienungsanleitung der Nähmaschine.
Wählen Sie 1. Nähen.
Wählen Sie im Nutzstich-Bildschirm 2. aus. (Abb. 7-1)
Der Nähfuß wird automatisch auf die im Einstellungsbildschirm angegebene →Höhe angehoben und der Transporteur wird abgesenkt.Ändern Sie die Höhe des Freihand-Nähfußes. (Abb. 8)3.
Die Höhe des Nähfußes kann im Einstellbildschirm auf maximal 4,0 mm (3/16”) • geändert werden. Wenn die Höhe des Nähfußes entsprechend der Dicke des Garns eingestellt wird, kann der Stoff reibungslos transportiert werden.
TippDie Stichbreite wird automatisch auf 3,50 mm• (1/8”) eingestellt.Bewegen Sie bei dünnem Garn die Nadeleinstichposition nach links, indem Sie die Stichbreite • ändern. (Abb. 7-2) Die Stichbreite kann in Schritten von 0,125 mm (1/64”) eingestellt werden. Die minimale • Stichbreite, die eingestellt werden kann, beträgt 2,75 mm (3/32”).
VORSICHTNachdem Sie die Nadeleinstichposition verändert haben, drehen Sie das Handrad in • Ihre Richtung und kontrollieren Sie, dass die Nadel den Nähfuß nicht berührt.
Senken Sie den Nähfuß ab und nähen Sie, während Sie die Geschwindigkeit mit 4. dem Nähgeschwindigkeitsregler einstellen. (Abb. 9)
Wenn • gewählt wird, ist die maximale Nähgeschwindigkeit automatisch auf 600 spm begrenzt.
HinweisDie Freihandfußhöhe wird auch nach der Rückkehr in den normalen Nähmodus nicht auf • den ursprünglichen Wert zurückgesetzt.
VORSICHTNähen Sie keine anderen Stiche mit dem Kordelaufnähfuß „X“, anderenfalls kann die • Nadel den Nähfuß berühren und beide beschädigen.
FEHLERDIAGNOSE ■
Problem Lösung
Der Faden reißt. Die Nähgeschwindigkeit ist zu hoch. Nähen Sie mit einer niedrigeren Geschwindigkeit.Der Nähfuß ist zu hoch. Passen Sie die Einstellung im Einstellbildschirm an.Die Nadel berührt den Nähfuß. Passen Sie die Stichbreite an die Nadeleinstichposition an.
Die Nadel wird nicht auf das Garn abgesenkt.
Die Stichbreite ist nicht richtig eingestellt. Passen Sie die Stichbreite entsprechend an, um die Nadeleinstichposition nach links zu verschieben.Das Garn wird nicht richtig eingefädelt. Fädeln Sie das Garn wieder von vorn ein.Das Garn wird nicht reibungslos vom Garnrollenständer transportiert. Stellen Sie sicher, dass eine ausreichende Länge von Garn auf dem Garnrollenständer aufgespult ist.
a
a
1
5
7 8 92 4
6
2
c
b
1
3
In questo manuale vengono utilizzate schermate in * Inglese.В данном документе в качестве иллюстраций * используются англоязычные экраны.
Le specifiche del prodotto * sono soggette a modifiche senza preavviso.Характеристики изделия * могут быть изменены без предварительного уведомления.
IT Piedino per applicare cordoncini a mano liberaQuesto piedino premistoffa può cucire facilmente punti decorativi utilizzando un filato. Utilizzare il piedino per applicare cordoncini a mano libera “X” per conferire ai progetti una finitura meravigliosa.
ATTENZIONECucire i punti di prova sul tessuto prima di cucirli sul progetto. • Se il filato è estremamente sottile o spesso oppure presenta una forma insolita (piatta o pelosa), si potrebbero non ottenere risultati di finitura ottimali oppure potrebbero verificarsi lesioni o danni. Si consiglia di utilizzare un filato di peso 4 (MEDIO ).
NotaSi consiglia di utilizzare un materiale stabilizzatore per la cucitura su tessuti elastici, • leggeri o con ordito grezzo, oppure su tessuti che provocano il restringimento del disegno.Se la base multirocchetto opzionale (Fig. 5-• 1) utilizzata nella procedura riportata di seguito non è in dotazione con la macchina da cucire, acquistarla separatamente.
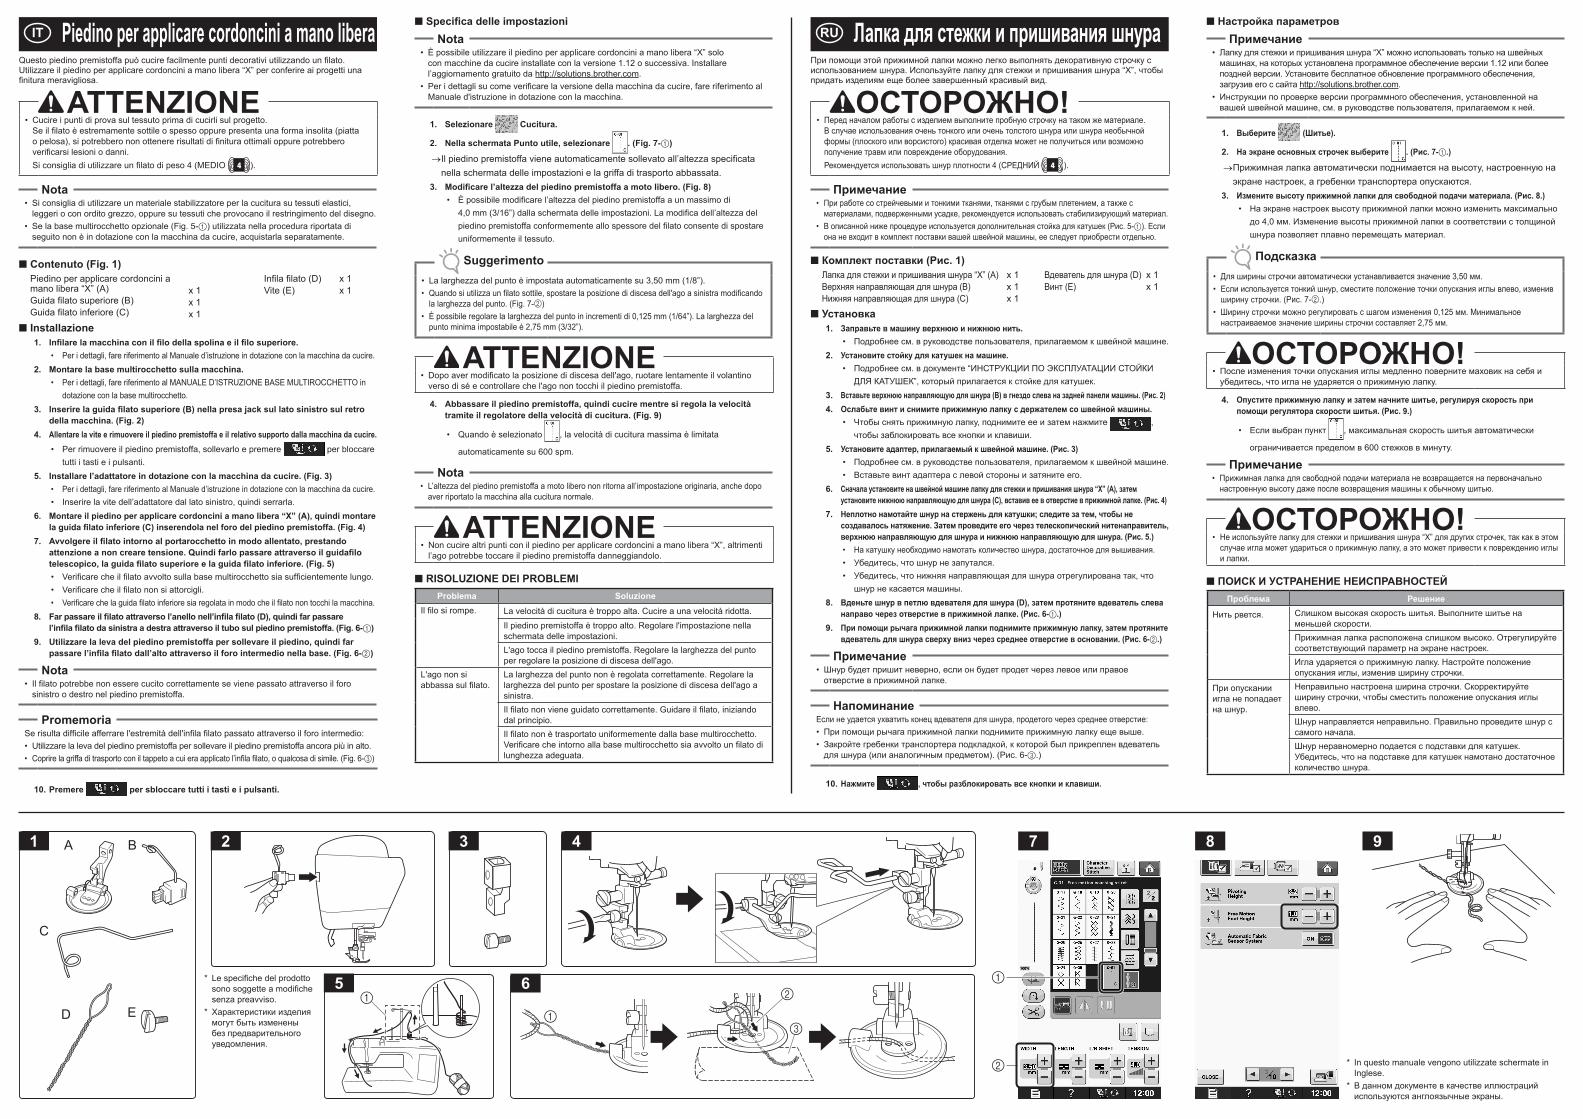
Contenuto (Fig. 1) ■
Piedino per applicare cordoncini a mano libera “X” (A)Guida filato superiore (B)Guida filato inferiore (C)
x 1x 1x 1
Infila filato (D)Vite (E)
x 1x 1
Installazione ■
Infilare la macchina con il filo della spolina e il filo superiore.1. Per i dettagli, fare riferimento al Manuale d’istruzione in dotazione con la macchina da cucire.•
Montare la base multirocchetto sulla macchina.2. Per i dettagli, fare riferimento al MANUALE D’ISTRUZIONE BASE MULTIROCCHETTO in • dotazione con la base multirocchetto.
Inserire la guida filato superiore (B) nella presa jack sul lato sinistro sul retro 3. della macchina. (Fig. 2) Allentare la vite e rimuovere il piedino premistoffa e il relativo supporto dalla macchina da cucire.4.
Per rimuovere il piedino premistoffa, sollevarlo e premere • per bloccare tutti i tasti e i pulsanti.
Installare l’adattatore in dotazione con la macchina da cucire. (Fig. 3)5. Per i dettagli, fare riferimento al Manuale d’istruzione in dotazione con la macchina da cucire.• Inserire la vite dell’adattatore dal lato sinistro, quindi serrarla.•
Montare il piedino per applicare cordoncini a mano libera “X” (A), quindi montare 6. la guida filato inferiore (C) inserendola nel foro del piedino premistoffa. (Fig. 4) Avvolgere il filato intorno al portarocchetto in modo allentato, prestando 7. attenzione a non creare tensione. Quindi farlo passare attraverso il guidafilo telescopico, la guida filato superiore e la guida filato inferiore. (Fig. 5)
Verificare che il filato avvolto sulla base multirocchetto sia sufficientemente lungo.• Verificare che il filato non si attorcigli.• Verificare che la guida filato inferiore sia regolata in modo che il filato non tocchi la macchina.•
Far passare il filato attraverso l’anello nell’infila filato (D), quindi far passare 8. l’infila filato da sinistra a destra attraverso il tubo sul piedino premistoffa. (Fig. 6-1)Utilizzare la leva del piedino premistoffa per sollevare il piedino, quindi far 9. passare l’infila filato dall’alto attraverso il foro intermedio nella base. (Fig. 6-2)
NotaIl filato potrebbe non essere cucito correttamente se viene passato attraverso il foro • sinistro o destro nel piedino premistoffa.
PromemoriaSe risulta difficile afferrare l'estremità dell'infila filato passato attraverso il foro intermedio:
Utilizzare la leva del piedino premistoffa per sollevare il piedino premistoffa ancora più in alto.• Coprire la griffa di trasporto con il tappeto a cui era applicato l’infila filato, o qualcosa di simile. (Fig. 6-• 3)
Premere10. per sbloccare tutti i tasti e i pulsanti.
RU Лапка для стежки и пришивания шнураПри помощи этой прижимной лапки можно легко выполнять декоративную строчку с использованием шнура. Используйте лапку для стежки и пришивания шнура “X”, чтобы придать изделиям еще более завершенный красивый вид.
ОСТОРОЖНО!Перед началом работы с изделием выполните пробную строчку на таком же материале. • В случае использования очень тонкого или очень толстого шнура или шнура необычной формы (плоского или ворсистого) красивая отделка может не получиться или возможно получение травм или повреждение оборудования. Рекомендуется использовать шнур плотности 4 (СРЕДНИЙ ).
ПримечаниеПри работе со стрейчевыми и тонкими тканями, тканями с грубым плетением, а также с • материалами, подверженными усадке, рекомендуется использовать стабилизирующий материал.В описанной ниже процедуре используется дополнительная стойка для катушек (Рис. 5-• 1). Если она не входит в комплект поставки вашей швейной машины, ее следует приобрести отдельно.
Комплект поставки (Рис. 1) ■
Лапка для стежки и пришивания шнура “X” (A)Верхняя направляющая для шнура (B)Нижняя направляющая для шнура (C)
x 1x 1x 1
Вдеватель для шнура (D)Винт (E)
x 1x 1
Установка ■
Заправьте в машину верхнюю и нижнюю нить.1. Подробнее см. в руководстве пользователя, прилагаемом к швейной машине.•
Установите стойку для катушек на машине.2. Подробнее см. в документе “ИНСТРУКЦИИ ПО ЭКСПЛУАТАЦИИ СТОЙКИ • ДЛЯ КАТУШЕК”, который прилагается к стойке для катушек.
Вставьте верхнюю направляющую для шнура (B) в гнездо слева на задней панели машины. (Рис. 2)3. Ослабьте винт и снимите прижимную лапку с держателем со швейной машины.4.
Чтобы снять прижимную лапку, поднимите ее и затем нажмите • , чтобы заблокировать все кнопки и клавиши.
Установите адаптер, прилагаемый к швейной машине. (Рис. 3)5. Подробнее см. в руководстве пользователя, прилагаемом к швейной машине.• Вставьте винт адаптера с левой стороны и затяните его.•
Сначала установите на швейной машине лапку для стежки и пришивания шнура “X” (A), затем 6. установите нижнюю направляющую для шнура (C), вставив ее в отверстие в прижимной лапке. (Рис. 4)Неплотно намотайте шнур на стержень для катушки; следите за тем, чтобы не 7. создавалось натяжение. Затем проведите его через телескопический нитенаправитель, верхнюю направляющую для шнура и нижнюю направляющую для шнура. (Рис. 5.)
На катушку необходимо намотать количество шнура, достаточное для вышивания.• Убедитесь, что шнур не запутался.• Убедитесь, что нижняя направляющая для шнура отрегулирована так, что • шнур не касается машины.
Вденьте шнур в петлю вдевателя для шнура (D), затем протяните вдеватель слева 8. направо через отверстие в прижимной лапке. (Рис. 6-1.)При помощи рычага прижимной лапки поднимите прижимную лапку, затем протяните 9. вдеватель для шнура сверху вниз через среднее отверстие в основании. (Рис. 6-2.)
ПримечаниеШнур будет пришит неверно, если он будет продет через левое или правое • отверстие в прижимной лапке.
НапоминаниеЕсли не удается ухватить конец вдевателя для шнура, продетого через среднее отверстие:
При помощи рычага прижимной лапки поднимите прижимную лапку еще выше.• Закройте гребенки транспортера подкладкой, к которой был прикреплен вдеватель • для шнура (или аналогичным предметом). (Рис. 6-3.)
Нажмите 10. , чтобы разблокировать все кнопки и клавиши.
Specifica delle impostazioni ■
NotaÈ possibile utilizzare il piedino per applicare cordoncini a mano libera “X” solo • con macchine da cucire installate con la versione 1.12 o successiva. Installare l’aggiornamento gratuito da http://solutions.brother.com.Per i dettagli su come verificare la versione della macchina da cucire, fare riferimento al • Manuale d'istruzione in dotazione con la macchina.
Selezionare 1. Cucitura.
Nella schermata Punto utile, selezionare 2. . (Fig. 7-1)
Il piedino premistoffa viene automaticamente sollevato all’altezza specificata →nella schermata delle impostazioni e la griffa di trasporto abbassata.Modificare l’altezza del piedino premistoffa a moto libero. (Fig. 8)3.
È possibile modificare l’altezza del piedino premistoffa a un massimo di • 4,0 mm (3/16”) dalla schermata delle impostazioni. La modifica dell’altezza del piedino premistoffa conformemente allo spessore del filato consente di spostare uniformemente il tessuto.
SuggerimentoLa larghezza del punto è impostata automaticamente su 3,50 mm• (1/8”).Quando si utilizza un filato sottile, spostare la posizione di discesa dell'ago a sinistra modificando • la larghezza del punto. (Fig. 7-2) È possibile regolare la larghezza del punto in incrementi di 0,125 mm (1/64”). La larghezza del • punto minima impostabile è 2,75 mm (3/32”).
ATTENZIONEDopo aver modificato la posizione di discesa dell'ago, ruotare lentamente il volantino • verso di sé e controllare che l'ago non tocchi il piedino premistoffa.
Abbassare il piedino premistoffa, quindi cucire mentre si regola la velocità 4. tramite il regolatore della velocità di cucitura. (Fig. 9)
Quando è selezionato • , la velocità di cucitura massima è limitata
automaticamente su 600 spm.
NotaL’altezza del piedino premistoffa a moto libero non ritorna all’impostazione originaria, anche dopo • aver riportato la macchina alla cucitura normale.
ATTENZIONENon cucire altri punti con il piedino per applicare cordoncini a mano libera “X”, altrimenti • l’ago potrebbe toccare il piedino premistoffa danneggiandolo.
RISOLUZIONE DEI PROBLEMI ■
Problema SoluzioneIl filo si rompe. La velocità di cucitura è troppo alta. Cucire a una velocità ridotta.
Il piedino premistoffa è troppo alto. Regolare l'impostazione nella schermata delle impostazioni.L'ago tocca il piedino premistoffa. Regolare la larghezza del punto per regolare la posizione di discesa dell'ago.
L'ago non si abbassa sul filato.
La larghezza del punto non è regolata correttamente. Regolare la larghezza del punto per spostare la posizione di discesa dell'ago a sinistra.Il filato non viene guidato correttamente. Guidare il filato, iniziando dal principio.Il filato non è trasportato uniformemente dalla base multirocchetto. Verificare che intorno alla base multirocchetto sia avvolto un filato di lunghezza adeguata.
Настройка параметров ■
ПримечаниеЛапку для стежки и пришивания шнура “X” можно использовать только на швейных • машинах, на которых установлена программное обеспечение версии 1.12 или более поздней версии. Установите бесплатное обновление программного обеспечения, загрузив его с сайта http://solutions.brother.com.Инструкции по проверке версии программного обеспечения, установленной на • вашей швейной машине, см. в руководстве пользователя, прилагаемом к ней.
Выберите1. (Шитье).
На экране основных строчек выберите 2. . (Рис. 7-1.)
Прижимная лапка автоматически поднимается на высоту, настроенную на →экране настроек, а гребенки транспортера опускаются.Измените высоту прижимной лапки для свободной подачи материала. (Рис. 8.)3.
На экране настроек высоту прижимной лапки можно изменить максимально • до 4,0 мм. Изменение высоты прижимной лапки в соответствии с толщиной шнура позволяет плавно перемещать материал.
ПодсказкаДля ширины строчки автоматически устанавливается значение 3,50 мм.• Если используется тонкий шнур, сместите положение точки опускания иглы влево, изменив • ширину строчки. (Рис. 7-2.) Ширину строчки можно регулировать с шагом изменения 0,125 мм. Минимальное • настраиваемое значение ширины строчки составляет 2,75 мм.
ОСТОРОЖНО!После изменения точки опускания иглы медленно поверните маховик на себя и • убедитесь, что игла не ударяется о прижимную лапку.
Опустите прижимную лапку и затем начните шитье, регулируя скорость при 4. помощи регулятора скорости шитья. (Рис. 9.)
Если выбран пункт • , максимальная скорость шитья автоматически
ограничивается пределом в 600 стежков в минуту.
ПримечаниеПрижимная лапка для свободной подачи материала не возвращается на первоначально • настроенную высоту даже после возвращения машины к обычному шитью.
ОСТОРОЖНО!Не используйте лапку для стежки и пришивания шнура “X” для других строчек, так как в этом • случае игла может удариться о прижимную лапку, а это может привести к повреждению иглы и лапки.
ПОИСК И УСТРАНЕНИЕ НЕИСПРАВНОСТЕЙ ■
Проблема Решение
Нить рвется. Слишком высокая скорость шитья. Выполните шитье на меньшей скорости.Прижимная лапка расположена слишком высоко. Отрегулируйте соответствующий параметр на экране настроек.Игла ударяется о прижимную лапку. Настройте положение опускания иглы, изменив ширину строчки.
При опускании игла не попадает на шнур.
Неправильно настроена ширина строчки. Скорректируйте ширину строчки, чтобы сместить положение опускания иглы влево.Шнур направляется неправильно. Правильно проведите шнур с самого начала.Шнур неравномерно подается с подставки для катушек. Убедитесь, что на подставке для катушек намотано достаточное количество шнура.