cast-tissue tiles · cast-tissue tiles a simple way to create embossed paper designs — with the...
TRANSCRIPT

Cast-Tissue TilesA simple way to create embossed paper designs — with the color built right in! (art + history)
The term papier mâché refers to a wide variety of processes, but just two main ingredients: paper and glue. Originating in ancient China, papier mâché is truly a global craft and has been used to make just about anything one could imagine and also things that defy the imagination — like papier mâché boats, airplanes, and buildings.
In the 18th century, English craftsmen John Baskerville and Henry Clay created a process that later became known as “japanning.” It imitated lacquerware from Japan and used heat to create a papier mâché that was as durable as wood. It launched an industry that dominated the decorative and home market until plastics took over in the 20th century.
This technique provides a relatively quick and tidy way to create cast papier mâché designs using a texture rubbing plate as a mold and colorful tissue paper. Use it to create tiles, ornaments, valentines, frames — all sorts of great projects that make great gifts, too!
GRADES 2-8 Note: Instructions and materials are based upon a class size of 24 students. Adjust as needed.
Preparation
1. Squeeze glue into a cup or, if larger quantities are needed, place glue in a plastic container with a tight-fitting lid. Add 50% water to the glue, and stir.
Process
1. Look at both sides of the rubbing plate to determine which side to use. The papier mâché casting will be flat on the back side and take its texture from the side of the plate it is pressed against.
2. Tear tissue paper into approximately 1" pieces. Brush glue onto the rubbing plate and place the tissue piece over the glue. Brush the back side with more glue and use the bristles of the brush to push it down as much as possible against the texture. It is best to use old brushes. Repeat, overlapping tissue paper pieces.
3. The design on the plate can serve as a guideline and colors of tissue can be filled according to it. Or, simply use the plate for texture and create your own shapes and designs.
Copyright © 2015Dick Blick Art Materials
All rights reserved
800-447-8192 DickBlick.com
1.
Materials (required)Elmer's® Washable Clear School Glue, 5 oz (23810-1600); share three bottles across class
Blick® Colored Tissue Assortment, 12" x 18", Package of 50 sheets (11308-1006); share one across class
Richeson® Rubbing Plates, Set of 6, size 7" x 7" (62108-); one per student
Optional Materials
Hygloss® Animal Skin Tissue Assortment of 20 sheets, 20" x 30" (11300-1003)
KolorFast® Luster Tissue Paper, 14-sheet package, 20" x 30" (11306-9106)
Roylco® Rubbing Plate Sets, assorted (61112-)
Shade-Tex™ Rubbing Plates, Set of 6, 8-1/2" x 11" (22809)-
Blickrylic®Student Acrylics, assorted colors (00711-)
Sargent Glitter Glaze, 16 oz (00704-1006
Process - continued
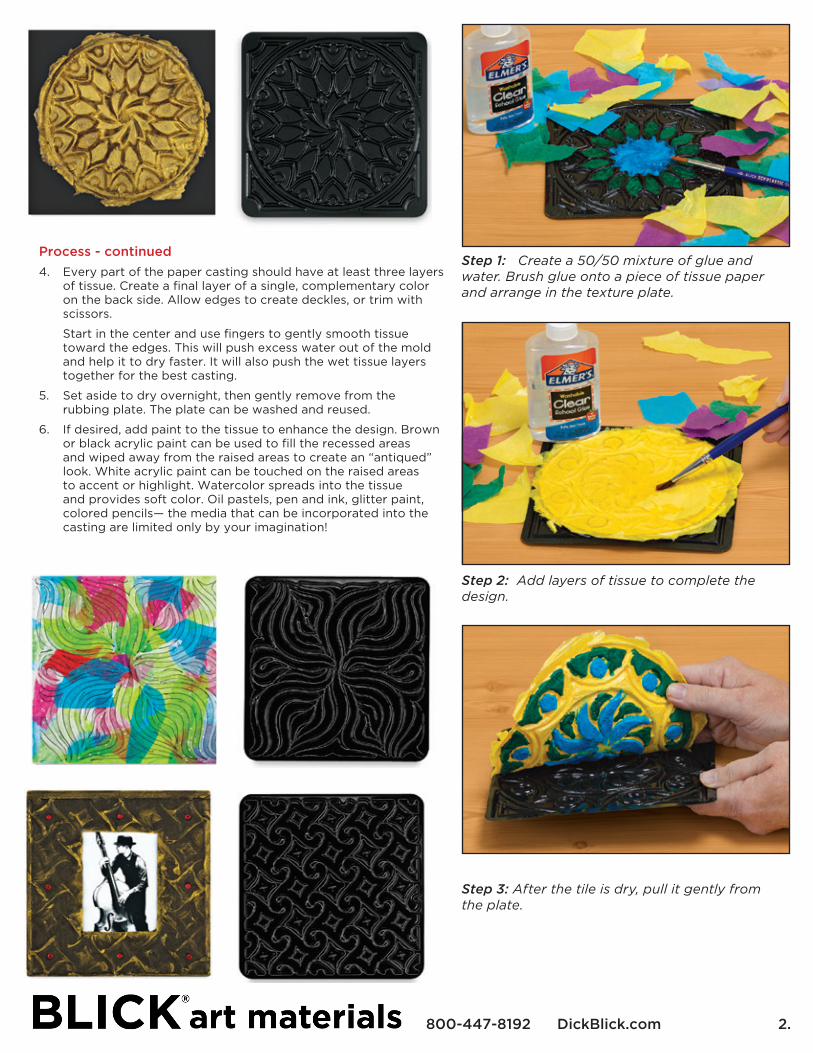
4. Every part of the paper casting should have at least three layers of tissue. Create a final layer of a single, complementary color on the back side. Allow edges to create deckles, or trim with scissors.
Start in the center and use fingers to gently smooth tissue toward the edges. This will push excess water out of the mold and help it to dry faster. It will also push the wet tissue layers together for the best casting.
5. Set aside to dry overnight, then gently remove from the rubbing plate. The plate can be washed and reused.
6. If desired, add paint to the tissue to enhance the design. Brown or black acrylic paint can be used to fill the recessed areas and wiped away from the raised areas to create an “antiqued” look. White acrylic paint can be touched on the raised areas to accent or highlight. Watercolor spreads into the tissue and provides soft color. Oil pastels, pen and ink, glitter paint, colored pencils— the media that can be incorporated into the casting are limited only by your imagination!
Step 1: Create a 50/50 mixture of glue and water. Brush glue onto a piece of tissue paper and arrange in the texture plate.
Step 2: Add layers of tissue to complete the design.
Step 3: After the tile is dry, pull it gently from the plate.
2.800-447-8192 DickBlick.com

National Core Arts Standards - Visual Arts
Creating
Anchor Standard 2: Organize and develop artistic ideas and
work.
Presenting
Anchor Standard 5: Develop and refine artistic techniques and
work for presentation.
Responding
Anchor Standard 7: Perceive and analyze artistic work.
Connecting
Anchor Standard 11: Relate artistic ideas and works with societal,
cultural, and historical context to deepen understanding.