cast landscape lighting training · pdf filecast landscape lighting training manual ... the...
TRANSCRIPT

www.cast- lighting.com
CAST Landscape Lighting Training ManualThe Professional's Guide to Landscape Lighting : by David Beausoleil
SIMPLE. D
URABLE. INNOVATIV
E.
®

Dear Landscape Professional,
When this manual was first published nearly 11 years ago, the landscape
lighting profession was still young. Hundreds of green industry professionals
were designing and installing systems for the first time. Since then, the
industry has matured.
CAST Lighting wishes to thank all the designers, contractors and architects
whose valuable knowledge and experience made the creation of this manual
possible. Our company was created in response to these professionals who
demanded fixtures and systems that matched the quality of their service. We
are extremely grateful to these people and are proud to support them.
The objective of this manual is to build a solid foundation for the Landscape
Lighting professional. With the knowledge and skills presented here, the
professional can move forward with the confidence that every lighting project
will be well designed and have superior system integrity.
This manual presents the fundamental design principals that are at the heart
of every lighting system. It illustrates the lighting techniques that allow the
designer to apply these principles, and it gives a step by step walk-through
of every stage of installation. In addition, the important stage of documenting
the job is covered in detail. Also presented are valuable marketing and
sales guidelines that are drawn from the combined experience of dozens of
successful Landscape Lighting installers.
CAST Lighting created this manual because we are committed to those
dedicated professionals who truly care about the quality of their work, and
who are willing to install professional quality fixtures and systems.
Once again, we thank you for your interest and encourage you to contact us
with any questions or comments.
Yours Truly,
David Beausoleil
President, CAST Lighting LLC.

CONTENTS
CAST LANDSCAPE LIGHTING TRAINING MANUALThe Professional’s Guide to Low Voltage Landscape Lighting
ContentsObjectives · · · · · · · · · · · · · · · · · · · · · · · · · · · · · · · · · · · · · · · · · · ·2Design · · · · · · · · · · · · · · · · · · · · · · · · · · · · · · · · · · · · · · · · · · · · 2-3Techniques · · · · · · · · · · · · · · · · · · · · · · · · · · · · · · · · · · · · · · · · 4–11Planning · · · · · · · · · · · · · · · · · · · · · · · · · · · · · · · · · · · · · · · · · 12–13Fixture Installation and Wiring · · · · · · · · · · · · · · · · · · · · · · · 14–15Spider Splice Connections · · · · · · · · · · · · · · · · · · · · · · · · · · · · · 16Transformer Stand · · · · · · · · · · · · · · · · · · · · · · · · · · · · · · · · · · · · 17Voltage Adjustment · · · · · · · · · · · · · · · · · · · · · · · · · · · · · · · · 18–22Documentation · · · · · · · · · · · · · · · · · · · · · · · · · · · · · · · · · · · · 23–24Technical Information · · · · · · · · · · · · · · · · · · · · · · · · · · · · · · · · · 25Marketing and Sales · · · · · · · · · · · · · · · · · · · · · · · · · · · · · · · · 26–27Appendix 1 – Sample Proposal · · · · · · · · · · · · · · · · · · · · · · · 28–31Appendix 2 – Sample Maintenance Agreement · · · · · · · · · · · 32–33Appendix 3 – Preliminary Systems Requirements Worksheet · · · 34Appendix 4 – Transformer and Wire Sizing Worksheet · · · · · · · · 35Appendix 5 – Field Voltage Adjustment Worksheet · · · · · · · · · · · 36Appendix 6 – Transformer Lid Form and Installation Record · · · 37Appendix 7 – Rough Sketch Design Sheet · · · · · · · · · · · · · · · 38–39Safety Notes and Warranty · · · · · · · · · · · · · · · · · · · · · · · · · · · · · 40
Visit www.cast-lighting.com © Copyright 2015, David Beausoleil. All rights reserved. 1
Contents of the ManualCreating a Landscape Lighting design is similar to the process of creating any kind of Landscape design. There are objectives in mind, techniques to achieve those objectives, and tools to perform the techniques. The fol-lowing manual presents all the basic skills and knowledge required for Landscape Lighting:
1. Objectives. Benefits for the client that can be realized with Landscape Lighting.
2. Design. Basic principals of visual qualities that define good Landscape Lighting.
3. Techniques. An illustrated approach to the techniques of lighting, fixture selection and how they are used in different scenarios.
4. Planning. Simple worksheets and formulas to correctly select wire and transformers.
5. Fixture Installation and Wiring. Simple steps for system installation.
6. Spider Splice Connections. Instructions for the use of this preferred CAST method of wire connections.
7. Transformer Stand. Assembly instructions for transformer mounts.
8. Voltage Adjustment. Steps for using CAST’s proven method of field testing and adjust-ments for delivering the right voltage.
10. Technical Information. Electrical formulas and lamp information.
11. Marketing and Sales. Proven methods for growing your business.
12. Appendix. Useful worksheets, sample proposal and maintenance contract.Advisory and Disclaimer: Before undertaking the installation, servicing, or maintenance of a low-voltage lighting system,
contractors should obey any applicable codes, guidelines, and restrictions that may apply in their regions. CAST Lighting is not liable for any consequence that may arise from the use of material in this manual.
UNDER REVISION

OBJECTIVES AND DESIGN
LIGHTING OBJECTIVESSecurity
Security from theft and trespassing is a primary concern for all homeowners and is usually addressed with high voltage floodlights. A better choice is strategically placed low voltage lights that provide low levels of illumination strategically distrib-uted around the property. This avoids the problem of glaring lights and unlit regions that allow intruders to remain unseen.
Safety
Low voltage lighting is an ideal choice for illuminating walkways and entrance ways. This ensures that residents and visitors can safely navigate through the property avoiding otherwise unseen obstacles.
Usability
Illuminating the public and private areas of a property allow the homeowner to enjoy decks, sitting areas and recreational spaces.
Beauty
Light defines textures, shapes and struc-tures while evoking a wide range of posi-tive emotional responses. A good lighting design can create moods that are soft and subtle or dynamic and dramatic. It can highlight features of the structure and property, while maintaining a cohesive scene. Good Landscape Lighting is a feast for the eyes.
The Power of LightNothing has a greater effect on the comfort of an individual than the quality of light. Think about how you feel when approaching a dark house compared to how you feel when entering the property of a beautifully illuminated home.The lighting designer recognizes this and creates a scene where the viewer is an active participant. This scene presents a cohesive panorama framed by the borders of the property. Lighting displays the beauty of the landscape and highlights the architectural fea-tures of the building.
Cohesion refers to the overall appearance of the scene as one continuous panorama. If there are unlit areas near illuminated ones, then the viewer’s visual experience is interrupted. These “black holes” detract from the beauty of the design and fatigue the eyes.Cohesion is achieved by illumi-nating borders, backgrounds, and intermediate areas with the cre-ative use of fixtures placed for that purpose.
Depth refers to the strategic placement of fixtures using dif-ferent light levels to achieve a three-dimensional scene. Depth requires lighting areas that are in the foreground, in the middle, and in the back of the scene. The proper use of high, medium, or low wattage lamps (with vary-ing beam spreads) helps estab-lish depth by allowing the design-er to create scenes that draw the eye from near to far.
Keep in mind that the designer is not only painting a picture with lights, he or she is also directing a scene. In this scene, the viewers eyes are first drawn to one focal point then to another and so on. These focal points may be unique fea-tures of the property such as, statuary or water features; or they may be functional points such as entrance ways, sitting areas or gathering places.
Fig. 1. A typical lighting design for the public space. This illustration shows how the careful choice and placement of fixtures creates a scene that is both welcoming and dramatic.
Cohesion Depth Focal Points
The Public Space (Front Yard)
2

DESIGN
Low voltage fixtures provide illu-mination that is highly control-lable. Instead of the harsh glare of bare bulbs, light is directed to the desired places. In a good lighting design, light sources are not seen, only the reflection of their light off a variety of surfaces.The quality of lighting is changed by uplighting (more dramatic), downlighting (more natural), side-lighting (emphasizes details), or backlighting (emphasizes form).
Perspective refers to the view-ers experience from various loca-tions both outside and inside the home. The designer needs to walk the property and ensure that the lighting scene works from all possible vantage points (includ-ing from the approaching road). Inside the home, the viewer should be able to look out the windows and enjoy the scene without being blinded from fix-tures illuminating the house.
A lighting designer needs to rec-ognize the features of a land-scape that define it s appearance. If there are repeating patterns such as a row of bushes, fencing or stone walls, then the designer needs to light those forms in a way to preserve that symmetry.The designer also needs to bal-ance the lighting so that one side of the property is not brighter than the other.
Fig. 2. A typical lighting design for the private space. This illustra-tion shows how good design can increase nighttime usability of recreational areas in the owner’s backyard.
Quality and Direction Perspective Balance and Symmetry
The Private Space (Back Yard) DESIGN STEPS
3
Step 1You and the client discuss what can be reasonably achieved with a lighting system within the constraints of the budget. Write down all the intended objectives.
Set Objectives
Step 4Make a rough sketch of the property, label-ing each of the important areas and features. Indicate the placement of fixtures and trans-formers. Measure or estimate the distance of each wire run. Check for availability of 120V power supply.Using the worksheets in this manual, calcu-late wire sizes and transformer requirements, then create a materials list.
Rough Sketch
Step 2Walk the property, viewing from every angle (including from the approaching road.) First, think about the visual composition of the entire scene. Note what is beautiful and distinctive about the property. Recognize fea-tures of the landscape and structures and note repeating patterns and interesting forms. Next, determine focal points and decide where you want the viewer’s attention to be directed. Pay attention to transition areas and apply the basic elements of design to create a scene that satisfies your objectives.
Walk the Property
Step 3
As you decide on the location of each fixture, place a colored flag at the spot. Use a differ-ent color for each fixture type and write lamp wattage and beam spread on each flag.
Flag the Job
A Relaxing Outdoor Environment is achieved by:
w Smooth transitions
w Varied light levels that direct the eye naturally from one area to another and create depth
w Balanced lighting across the scene
w Focal points
w Visual Direction

CROSS LIGHTINGMOON LIGHTINGUP LIGHTING
TECHNIQUES
Purpose To highlight trees, other plant materials or
architectural features; tends to be more dramatic than down-lighting, but can also look natural when applied with skill.
Fixtures Used Directional lights, well lightsConsiderations For pine trees and other dense foliage
plant material, place fixtures outside the drip line of the plant and limit spacing to 5 foot on center. Less dense trees usually require far fewer fixtures with 8 to 10 foot spacing. For tree trunks, use low intensity grazing technique to accentuate textures.
Purpose To provide soft natural lighting over large
areas, serves as an ideal transition con-necting different lighting scenes together and eliminating black holes from the project.
Fixtures Used Tree lightsConsiderations Fixtures must be at least 25 ft. high
(aimed minimum 45% from horizontal). At least two lights per tree is recommended. Fasten fixtures to tree with mounting canopy. Do not screw canopy directly to tree surface, allow space behind canopy to prevent tree rot.
Purpose Defines surface texture and shape
instead of flattening effect when using a single front light.
Fixtures Used Directional lights, well lightsConsiderations Often used to define focal points. Lamp
selection and fixture placement is critical. Lights can be mounted above or below subject. When two lights are used, use lower wattage lamp on one side for a more natural effect.
4

STEP LIGHTINGWALL LIGHTINGMIRROR LIGHTING
TECHNIQUES
Purpose To take advantage of the reflective sur-
face of water features to create a more compelling visual experience.
Fixtures Used Directional lights, well lightsConsiderations Consider the visual experience from all
likely viewing angles. Add illumination to various regions of the background to contribute to the overall impact. Check that bare lamps do not reflect off the water into the viewers' eyes.
Purpose To illuminate retaining and free-standing
walls and regions adjacent to them.Fixtures Used Engineered Wall LightsConsiderations Engineered wall lights are affixed with a
bracket extending from the back of the fixture body. This bracket slips under the capstone or between blocks. Fixtures should be spaced equidistant from each other.
Purpose To illuminate stepsFixtures Used Deck lights, Path LightsConsiderations Steps should receive fairly uniform illumi-
nation to prevent tripping hazards. Lights may be positioned on one side or both depending on the width of the stairs and the fixture mounting height.
5

GRAZINGPATH/AREA LIGHTING
TECHNIQUES
1'
Purpose To light planting beds and paths. And,
to provide seamless transition between lighting scenes.
Fixtures Used Path Lights
Considerations Space and position fixtures to provide a
visually appealing illumination along the path. Alternate placement from one side of the path to the other. Provide enough illumination to prevent tripping hazards, but space fixtures far enough apart to create distinct pools of light.
Purpose To provide a steeply angled light to
accentuate texture on walls and tree trunks by utilizing the irregular surface to create broken shadows and irregular patterns.
Fixtures Used Directional Lights, Well LightsConsiderations Position fixtures within 1 foot of walls or
tree trunks. Tilt fixture away from wall to minimize hot spot and provide a more even light distribution from top to bottom.
Purpose To provide a lit surface that acts as a
backdrop for unlit plant material or other features; the effect can be mysteri-ous and compelling.
Fixtures Used Directional Lights, Well LightsConsiderations This technique produces dramatic effects
and is best used for objects and fea-tures that have distinctive and interesting shapes.
6
SILHOUETTING
SHADOWINGBACKLIGHTINGWALL WASHING
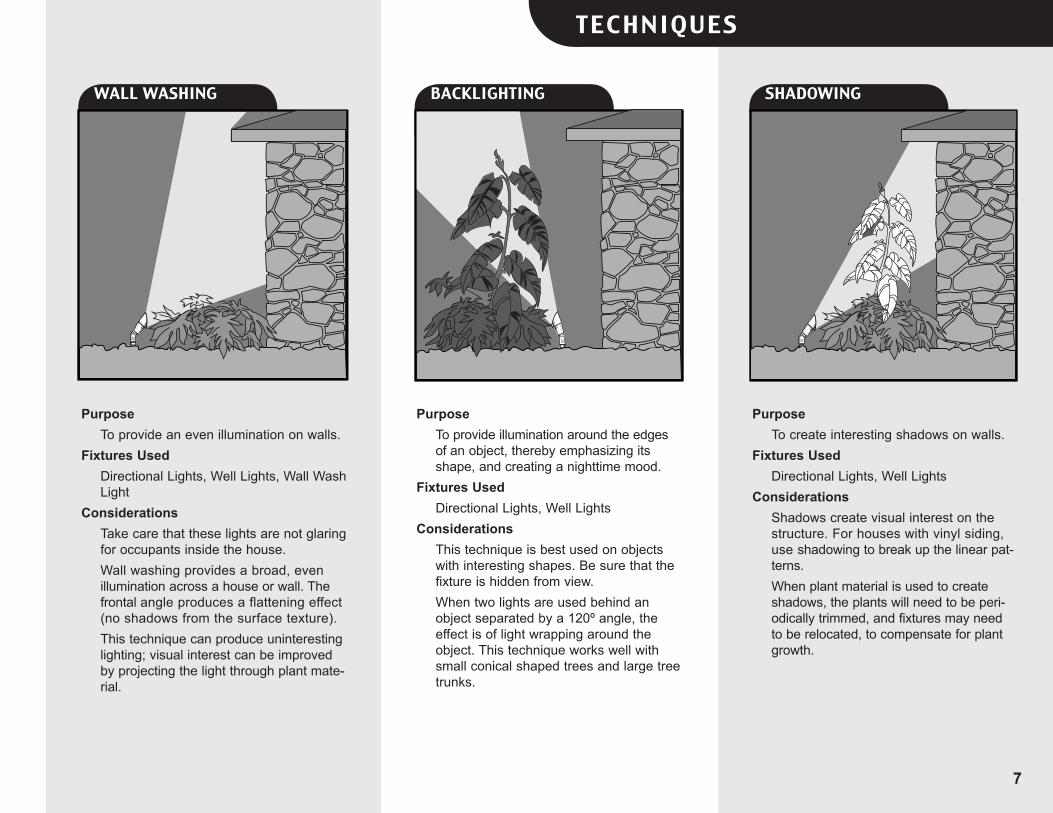
TECHNIQUES
Purpose To provide an even illumination on walls.Fixtures Used Directional Lights, Well Lights, Wall Wash
LightConsiderations Take care that these lights are not glaring
for occupants inside the house. Wall washing provides a broad, even
illumination across a house or wall. The frontal angle produces a flattening effect (no shadows from the surface texture).
This technique can produce uninteresting lighting; visual interest can be improved by projecting the light through plant mate-rial.
Purpose To create interesting shadows on walls.Fixtures Used Directional Lights, Well LightsConsiderations Shadows create visual interest on the
structure. For houses with vinyl siding, use shadowing to break up the linear pat-terns.
When plant material is used to create shadows, the plants will need to be peri-odically trimmed, and fixtures may need to be relocated, to compensate for plant growth.
Purpose To provide illumination around the edges
of an object, thereby emphasizing its shape, and creating a nighttime mood.
Fixtures Used Directional Lights, Well LightsConsiderations This technique is best used on objects
with interesting shapes. Be sure that the fixture is hidden from view.
When two lights are used behind an object separated by a 120º angle, the effect is of light wrapping around the object. This technique works well with small conical shaped trees and large tree trunks.
7
TECHNIQUES
8
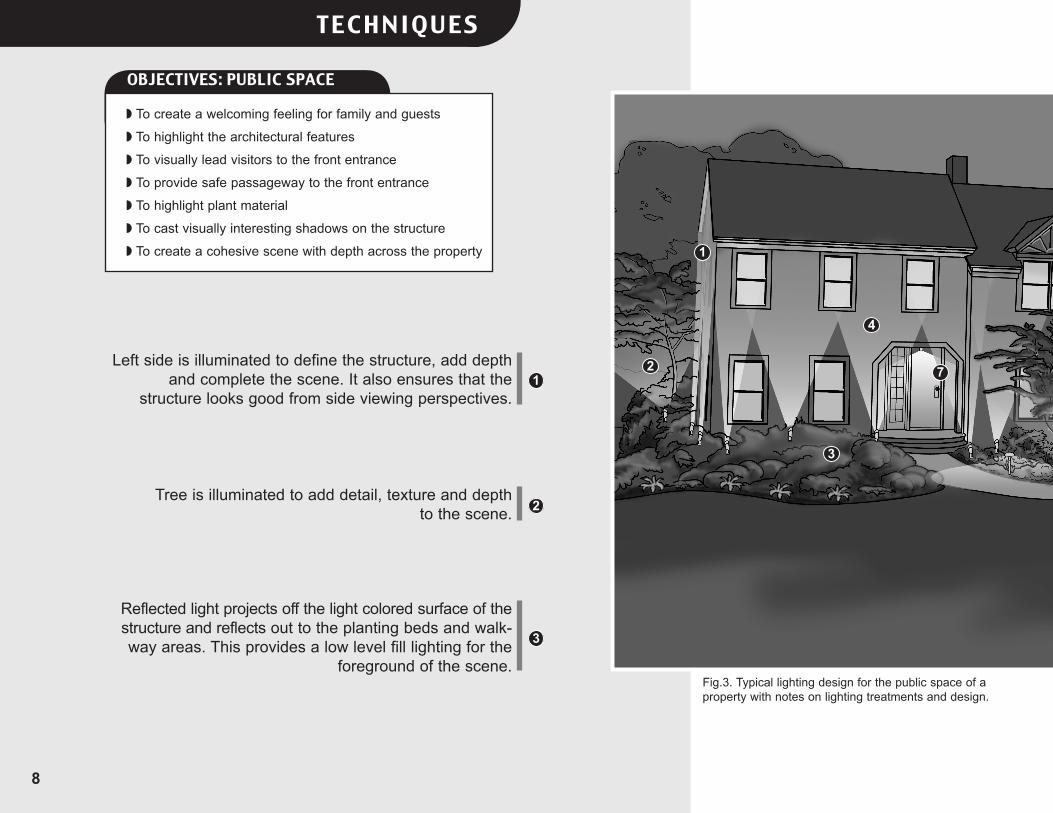
Fig.3. Typical lighting design for the public space of a property with notes on lighting treatments and design.
OBJECTIVES: PUBLIC SPACE
w To create a welcoming feeling for family and guests
w To highlight the architectural features
w To visually lead visitors to the front entrance
w To provide safe passageway to the front entrance
w To highlight plant material
w To cast visually interesting shadows on the structure
w To create a cohesive scene with depth across the property
Left side is illuminated to define the structure, add depth and complete the scene. It also ensures that the
structure looks good from side viewing perspectives.
Tree is illuminated to add detail, texture and depth to the scene.
Reflected light projects off the light colored surface of the structure and reflects out to the planting beds and walk-way areas. This provides a low level fill lighting for the
foreground of the scene.
1
2
3
1
2
3
4
7

TECHNIQUES
9
The entire house is selectively illuminated. This defines the structure. Lights are placed at the cor-ners and between the windows, grazing the facade of the house.
Area/Path Lights provide clear direction to the front door as well as providing pools of illumination to reveal regions adjacent to the path.
Trees are uplit to project shadows on the front facade of the house and provide depth and detail to the foreground.
Entrance area. The light level of the entrance is the brightest part of the scene. This will direct guests to the front door.
4
5
6
7
5
66

TECHNIQUES
10
Fig.4. Typical lighting design for the private space of a property with notes on lighting treatments and design.
OBJECTIVES: PRIVATE SPACEw To create usable evening spaces for recreation
w To highlight the landscaping features
w To draw attention to the vase and pedestal
w To highlight plant materials
w To raise the ceiling of the visual space
The illumination of objects in the foreground and background creates visual depth. The illumination of
objects from right to left creates a continuous and cohesive visual path.
Area/Path Lights are installed to illuminate the low ground cover and cast light onto the stone paver
patio. This fill lighting in the foreground provides a compelling and safe foundation for the lighting scene.
Designer uses CAST Small Mushroom Path Lights. Lights are spaced evenly apart.
The pool surface provides a perfect mirror to add depth and visual interest and to further enhance the scene.
(Pool light should be off to maximize this effect.)
1
2
3
1
2
3

TECHNIQUES
11
Larger background plant material is illuminated to the highest level in order to draw the viewers eye through the lighting scene and create depth.
The vase and pedestal create a focal point in the scene. Illuminating this feature using the high-est light level draws attention to it above all else. Crosslighting reveals the detail of the concrete’s surface.
The stone wall is illuminated to a medium light level using a grazing technique. Fixtures are even-ly spaced to maintain a balanced and symmetrical illumination.
Middle ground plant material is illuminated to a medium light level using an up lighting technique.
Large trees in the far background could be uplit to raise the ceiling of the backyard thereby adding vertical scale to the visual composition.
4
5
6
7
4
5
6
7
8
8

PLANNING
WIRERUN LOCATION FIXTURE TYPE QTY. X LAMP WATTAGE = TOTAL
WATTAGE
DISTANCE FROM SPIDERSPLICE TO TRANSFORMER
#12-2 WIREPER RUN
#10-2 WIREPER RUN
1 Grove Bullet 1 X 35w = 35w 50ʼ
1 Grove Small Mushroom 3 X 20w = 60w
2 Front Walkway Small Mushroom 5 X 20w = 100w 85ʼ
3 Side Garden Bullet 4 X 35w = 140w 120ʼ
4 Side Walkway Small Mushroom 5 X 20w = 100w 29ʼ
4 Side Walkway Bullet 1 X 35w = 35w
5 Back Garden Small Mushroom 4 X 35w = 140w 150ʼ
6 Pond Bullet 2 X 35w = 70w 200ʼ
6 Pond Small Mushroom 2 X 35w = 70w
TOTALS 750w 135ʼ 499'
PRELIMINARY SYSTEM REQUIREMENTS WORKSHEET
Model # Capacity(Watts)
75% Lamp Load (watts)
CAST “Journeymen Series” (12-15v taps)CJ300PSMT, CJ300SSMT 300 225CJ600PSMT, CJ600SSMT 600 450CJ900PSMT, CJ900SSMT 900 675
CAST “Master Series” (12-18v taps)CM900SSMT 900 675
CM1200SSMT 1200 900CM1500SSMT 1500 1125
QUICK TRANSFORMER SIZING GUIDE
Fig.7. Quick Transformer Sizing Guide. In this example the 1200 watt transformer is needed because the calculated 750 watt lamp load exceeds the capacity of the 900 watt transformer. It’s always a good idea to have a slightly larger transformer in case the job requires higher wattage lamps or extra fixtures.
Are there more than 100 watts lamp load
on the run? NoYes
Use #12-2Is the run longer than 100 feet? Yes
NoUse #10-2
Use #10-2
QUICK WIRE SIZING GUIDE
WIRE AMP RATINGSWire Size Recommended Maximum#12/2 100w/8.3A 192w/16A#10/2 140w/12.0A 288w/24A
Use this guide to select wire sizes for each run(from transformer to “Spider Splice”):
Well Light
Well Light
Step 1Working from the rough sketch, the con-tractor can use the “Preliminary System Requirements Worksheet” (Fig. 5) to record all the information needed to make the fol-lowing calculations.
Step 2Landscape Lighting requires either #10/2 or #12/2 direct burial wire to connect trans-formers to Spider Splices. The selection is based on wire run distances and wattage of fixtures on each run. This determination can be made using the “Quick Wire Sizing Guide” (Fig. 6).
PLANNING STEPS
Step 3Selecting the correct transformer(s) is a two-step process.
1. Determine total load on the system. This can be estimated by adding the total wattage of all lamps. Or, the load can be more precisely calculated using the “Transformer and Wire Sizing Calculations” worksheet (Fig. 8.)
2. Select the transformer(s) based on the total load using the “Quick Transformer Sizing Guide” (Fig. 7) If you are working with the total lamp wattage, compare that number with the “75% Lamp Load” column. If you calculate load using the longer worksheet then compare that value with the “Capacity” column. In both cases, select a trans-former with a capacity exceeding these numbers to allow for future additions to the system.
Requirements
Wire Sizing
Transformer Sizing
12
Fig.6. Quick Wire Sizing Guide. In this example wire run 1 and 2 require #12/2 while the others need #10/2.
Fig.5. Preliminary System Requirements Worksheet — used to initially record planned system details. Blank worksheet for copying on page 34.
The following worksheets and sketches on this and following pages depict a typical residential lighting installation from start to finish.
THE OLD HALOGEN WAY
CAST “Power Pro Series” (12-22v taps)CP900SSMT 900 675
CP1200SSMT 1200 900

PLANNING
13
THE OLD HALOGEN WAY
Optimal voltage for lamps is between 10.8v and 11.3v.
PLANNING
TRANSFORMER AND WIRE SIZING CALCULATIONS FOR LANDSCAPE LIGHTINGOPERATING VOLTAGE
Optimal voltage for halogen lamps
is between 10.8v and 11.5v.
Fig.8. “Transformer and Wire Sizing Calculations”. Blank form for copying can be found on p.35. *No change is required; use 12 volt tap. Operating range of lamp is within acceptable range. 13
Optimal voltage for lamps is between 10.8v and 11.3v.
TYPICAL WIRE RUN
FIXTURE INSTALLATION AND WIRING
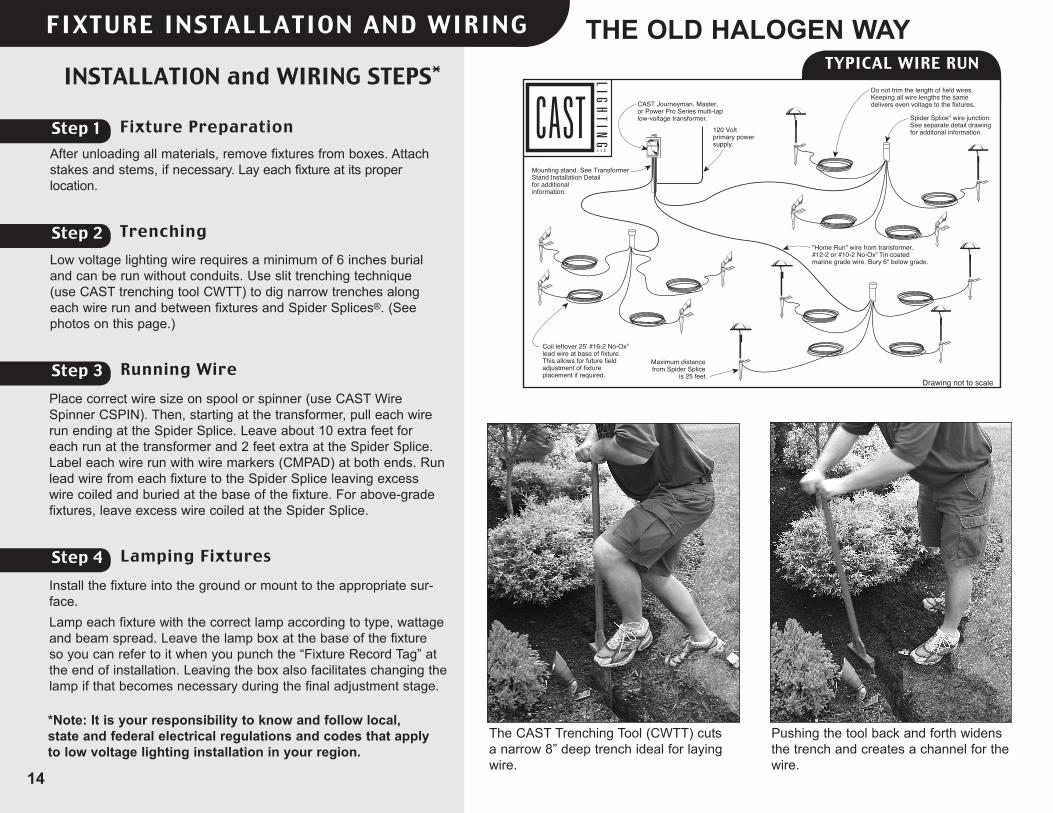
Step 1After unloading all materials, remove fixtures from boxes. Attach stakes and stems, if necessary. Lay each fixture at its proper location.
INSTALLATION and WIRING STEPS*
Fixture Preparation
Step 2Low voltage lighting wire requires a minimum of 6 inches burial and can be run without conduits. Use slit trenching technique (use CAST trenching tool CWTT) to dig narrow trenches along each wire run and between fixtures and Spider Splices®. (See photos on this page.)
Trenching
Step 3Place correct wire size on spool or spinner (use CAST Wire Spinner CSPIN). Then, starting at the transformer, pull each wire run ending at the Spider Splice. Leave about 10 extra feet for each run at the transformer and 2 feet extra at the Spider Splice. Label each wire run with wire markers (CMPAD) at both ends. Run lead wire from each fixture to the Spider Splice leaving excess wire coiled and buried at the base of the fixture. For above-grade fixtures, leave excess wire coiled at the Spider Splice.
Running Wire
14
Step 4Install the fixture into the ground or mount to the appropriate sur-face.Lamp each fixture with the correct lamp according to type, wattage and beam spread. Leave the lamp box at the base of the fixture so you can refer to it when you punch the “Fixture Record Tag” at the end of installation. Leaving the box also facilitates changing the lamp if that becomes necessary during the final adjustment stage.
Lamping Fixtures
*Note: It is your responsibility to know and follow local, state and federal electrical regulations and codes that apply to low voltage lighting installation in your region.
The CAST Trenching Tool (CWTT) cuts a narrow 8” deep trench ideal for laying wire.
Pushing the tool back and forth widens the trench and creates a channel for the wire.
THE OLD HALOGEN WAY

FIXTURE INSTALLATION
15
The Importance of Delivering the Right Voltage to the Lamps
TOOLS AND MATERIALS REQUIRED FOR INSTALLATION
w Digital Clamp-on Amp/Volt Multimeter (CMETER)w Wire Strippers (CASTRIP1)w Wire Labeling Pad (CMPAD)w Numbered Stamping Set and Hand Punch (CSTAMP &
CPUNCH)w CAST Black/White C61135 Wire Nutsw 4 3/4” Romex Strain Relief Connectorsw Phillips Screwdriver and Hammerw Time clock (CTTC, CTDC), Photo Cell (CTPC, CTRPC) (note–
don’t use Photo Cell alone), or X-10 Control System
THE OPTIMAL VOLTAGE IS 10.8 –11.3 VOLTS.
THIS IS THE PERFECT RANGE!!!
Wires are pushed firmly into the trench. In turf, the trench is easily closed by gently pushing in from both sides.
FIXTURE INSTALLATION
The Importance of Delivering the Right Voltage to the Lamps
Halogen lamps should operate between 10.8 and 11.3 volts. Lamps not operat-ing in this range may fail prematurely. To ensure that lamps receive the correct voltage, a high quality multi-tap trans-former is required. The multi-tap allows you to compensate for voltage loss in the cable by selecting higher voltage taps when needed.
THE IMPORTANCE OF DELIVERING THE RIGHT VOLTAGE TO THE LAMP
Here is a sampling of installation details for CAST fixtures. These illustrations are especially useful for designers and architects. They can be inserted into lighting plans and bids, specifying the desired CAST fixtures. All drawings are available on CD or can be downloaded from www.cast-lighting.com.
ATTENTION ARCHITECTS

The CAST Soldering Method
2"
SPIDER SPLICE CONNECTIONS
Step 1
SPIDER SPLICE STEPS
At each Spider Splice, pull wire leads through Spider Splice body and pack into hole with soil or gravel. Allow wires to extend 12”. outside the Spider Splice body (Fig. 9).
Fig. 9. CAST Spider Splice® connections.
Step 2Separate the two wires from each fixture lead and home run wire to a length of 12”. Strip the ends 1”, being careful not to cut or nick wire strands. Cut two additional pieces of #16-2 wire to 6” and 8” lengths for test leads. Strip both ends of these wires.
Step 3For connections that are fast, easy on the fingers and that never fail, follow the instructions for the CAST Soldering Method (Fig. 10). This method requires setting up a portable soldering station that you use in the field. Once your soldering pot is plugged in and ready, proceed to make the Spider Splice connections. Take one wire from each fixture lead, one wire from the home run, and one of the short test leads, twist them together into a silicon-filled wire nut. Repeat with the remaining wires, twist-ing them into the second wire nut. Cap off the two test leads with black/white wire nuts.
Step 4Gather all wires together and carefully fold them into the Spider Splice body. Be sure to position test leads for easy access.Using a stamping set, stamp the wire run number on the Spider Splice Cap.
Preparation
Wire Stripping
Wire Connections
Finishing and Stamping
16
SPIDER SPLICE ADVANTAGES
w Lightning fast installation.
w Reduces labor costs, saves money.
w Less field splices, reduces the chance of splice failures by 80% over other methods of wiring.
w Even voltage distribution to each fixture. Lamps operate at the same voltage — same light output.
w Lamps burn out at the same rate. Maintenance is more predictable.
w Adjustment of the fixtures in the field requires no additional wire splicing since the extra lead wire is placed at the base of the fixture.
w Individually troubleshoot each fixture at Spider Splice to eliminate guess-work.
w Reduces Repetitive Strain Injury (RSI) with employees installing wire splices.
w Spider Splice identifies the wire run # from the transformer.
w If a Spider Splices becomes buried, it can be located with a metal detector.
Fig. 10. Soldering Kit & Tote available from your CAST dis-tributor.
Strip wires 1 1/4”, twist each exposed wire, line up wires Twist wires together Dip into flux
Caution: Solder is extremely hot; wear eye protection and keep away from children.!
THE OLD HALOGEN WAY

Adjust width according to the number of transformers
TRANSFORMER STAND
Fig.11. Transformer Stand Assembly
Step 1
TRANSFORMER STAND STEPS
Determine width of stand according to the number of transformers (Fig. 11). Cut lumber to indicated lengths.
Step 2Pre-drill bolt holes and securely bolt cross pieces to legs.
120 VOLT PRIMARY POWER GUIDELINESw Install nothing smaller than a #10
gauge wire from the breaker panel to the outdoor transformer outlet loca-tions.
w Install either: A. #10-3 (with ground) direct burial wire to the outlet locations, or B. 1” Schedule 40 PVC conduit installed with five #10 stranded THHN wires. Green, Black, White, Yellow & Red to each transformer stand location.
w Install a 20 amp primary breaker (GFCI protected) in the breaker panel with a 20 amp outlet recep-tacle.
w Install waterproof exterior boxes.
w Install Tay-Mac or equal outlet covers that are approved “waterproof while in use”. UL Listed outlet covers.
w All primary 120 volt electric must be done by a licensed electrician.
w Follow all applicable local electric/building codes.
Fig.12. 120 Volt Primary Power Guidelines
Cut Lumber
Assemble Stand
Step 3Insert stand into holes. Use a level to ensure that the stand is both vertically and horizontally level. Pack legs tightly with soil or gravel.
Insert Stand
Step 4Using screws provided, mount transformer(s) onto stand.Note – transformers can also be mounted to existing structures, but should never be mounted to vinyl siding or in areas where a fire hazard exists.
Mount Transformer(s)
17
Dip into solder Dip into water Trim excess Twist until tight
This method is quick, easy, reduces finger strain and results in a connection that will never fail!
STILL RELEVANT WITH LEDs

Transformer Sizing for LED Lighting Systems
A. Count up all you LED fixtures and add up the total VOLT AMPS
B. In Addition to the Volt Amps you will also need to calculate the Resistance in the wire in order to size the transformer you will use as well as provide a buffer for additional l ights that might be required. Simple rule add 40%. So a system using 90.2 f ixture Volt Amps X 40% = 36 watts Add: 90.2 volt amps
Plus: 40% wire and Extra Space 36.00 watts
= 126.20 Watts or larger
Step 1
ADJUSTMENT STEPS
18
Qty: Part # Description : Watts Power Factor
Volt Amps Total VA
4 CCSL25036 Craftsman Spot Light Bronze 229 Lumen 34º
4.3 0.82 5.24 20.96
4 CCSL10536B Craftsman Spot Light Bronze 89 Lumen 31º
2.8 0.89 3.15 12.6
6 CCW270B Craftsman Wash Light 164 Lumen 87º
4.33 0.9 4.81 28.86
4 CCPL1 Craftsman Path Light 4.22 0.89 4.74 18.962 CTLED141 Classic Tree Moon
Light Low Setting 157 Lumen 30º
4.1 0.93 4.41 8.82
Total VA 90.2 NOTE : The WATTS to operate (or Consumed Wattage) is Different than the Volt Amps. Volt amps takes into account the inefficiency in the AC driver that runs the Light Emitting Diode. Because of this inefficiency you need a larger transformer to run the system even though the actual watts you consume is less. What you actually pay for is watts NOT Volt Amps:
Qty: Part # Description : Watts Power Factor
Volt Amps Watts
4 CCSL25036 Craftsman Spot Light Bronze 229
Lumen 34º
4.3 0.82 5.24 17.2
4 CCSL10536B Craftsman Spot Light Bronze 89
Lumen 31º
2.8 0.89 3.15 11.2
6 CCW270B Craftsman Wash Light 164 Lumen
87º
4.33 0.9 4.81 25.98
4 CCPL1 Craftsman Path Light
4.22 0.89 4.74 16.88
2 CTLED141 Classic Tree Moon Light Low Setting 157 Lumen 30º
4.1 0.93 4.41 8.2
Total Watts 79.46

Transformer Sizing for LED Lighting Systems
Step 2 & 3Maximum Wattage Capacity of
Step 2:If you plan on running all these lights on
one wire run you need to use a wire that can
handle greater than 79.46 watts PLUS the watts consumed by the wire. #14-2
seems good and #12-2 would also work.
Step 3:THE WIRE GAUGE YOU USE IS A FUNCTION
OF THE DISTANCE OF THE WIRE RUN (RESISTANCE) AND THE LOAD ON THE WIRE
RUN
Example #1: A Simple grouping of seven fixtures on a single wire run.
19
Wire
Siz
e
Wire
Am
pera
ge R
atin
g
80%
of A
MPE
RA
GE
capa
city
(A)
12 V
OLT
S
MA
X W
ATTA
GE
Wire
C
apac
ity @
12
Volts
REC
OM
MEN
D w
ire
WAT
TAG
E lo
ad N
O
MO
RE
THA
N 7
5% (B
)
#18-2 6 4.8 12 57.6 43.20#16-2 10 8 12 96 72.00#14-2 15 12 12 144 108.00#12-2 20 16 12 192 144.00#10-2 30 24 12 288 216.00(A) as per NEC do not load more than 80% any wire operating lon-ger than 3 hours.(B) Using 75% gives you room to add lights if needed
Wire Size Resistance per foot#18-2 0.006385#16-2 0.004016#14-2 0.002525#12-2 0.00162#10-2 0.00108#8-2 0.00064

20
Group A Wattage DISTANCE From Transformer to First GROUPING of Fixtures
DISTANCE 100
Lay
Out
S
yste
mFIXTURE # 1 Group A Wattage 4.3 FIXTURE # 2 Group A Wattage 4.3 FIXTURE # 3 Group A Wattage 4.3 FIXTURE # 4 Group A Wattage 4.3 FIXTURE # 5 Group A Wattage 4.1 FIXTURE # 6 Group A Wattage 4.1 FIXTURE # 7 Group A Wattage 10
Con
sum
ed
Wat
tage
TOTAL Wattage Group A 35.4 TOTAL SYSTEM WATTAGE 35.4 TOTAL DISTANCE 100watts / 12= AMPS 2.95
Amps x Distance x 2 x Resistance per foot = Voltage Drop
X
Sel
ect W
ire
gaug
e
100 X
2 Resistance per foot X #14-2 0.002525 #12-2 0.00162 #10-2 0.00108
Voltage Loss and Operating Volts
Voltage Loss # 14-2 1.48975
Voltage Loss # 12-2 0.9558 Voltage Loss # 10-2 0.6372 Total Distance 100 Enter Starting Voltage 16 First Grouping Voltage 14.51025 VOLTS AmpsTotal VOLTAGE Loss 1.48975 2.95
Total Wattage of all Fixtures
Divide the WATTS by 12 volts to calculate AMPS
Now we select the WIRE. Which in this case is #14-‐2. We need to determine the voltage loss. The formula is AMPS x distance to fixtures x 2 x Resistance per foot.
This is the RESISTANCE in the wire = Voltage loss. 1.48975 volts lost due to Resistance 4897 Volts
Take Voltage Tap at transformer 16 minus wire voltage loss of 1.48975 = the Voltage at the fixtures 100 feet away

21
Cable Loss 4.3947625Fixtures Consumed 35.4Total Watts Consumed 39.7947625
Now in this example our cable loss of 1.48975 x amps of 2.95 = 4.394 WATTS. We add that to ALL THE FIXTURES TOTAL WATTAGE OF 35.4 AND YOU HAVE THE TOTAL SYSTEMS WATTAGE THAT YOU WILL PAY MONEY FOR and YOU NEED A TRANSFORMER WITH THIS CAPACITY OR LARGER TO OERATE THIS SYSTEM .
Transformer
Fixture 1,2,3,4,5,6,7
100 foot #14-‐2 100 to here

22
Transformer
100 Ft # 10-‐2
75 Ft # 10-‐2
50 Ft # 14-‐2
50 Ft # 14-‐2
A B
C
D

23
Group A Wa*
age
DIS
TAN
CE F
rom
Tr
ansf
orm
er to
Firs
t G
ROU
PIN
G o
f Fix
ture
s
Group B Wa*
age
DIS
TAN
CE F
rom
Firs
t G
ROU
PIN
G o
f Fix
ture
s to
SEC
ON
D G
ROU
PIN
G
Group C Wa*
age
DIS
TAN
CE F
rom
Sec
ond
GRO
UPI
NG
of F
ixtu
res
to T
hird
GRO
UPI
NG
of
fixtu
res
Group D Wa*
age
DIS
TAN
CE F
rom
Thi
rd
GRO
UPI
NG
of F
ixtu
res
to F
ourt
h G
ROU
PIN
G o
f fix
ture
s
DISTANCE 100 75 50 50Fixtures on run 7 4 4 4FIXTURE # 1 Group A Wa*age 4.3 FIXTURE # 1 Group B Wa*age 2.8 FIXTURE # 1 Group C Wa*age 4.33 FIXTURE # 1 Group D Wa*age 4.22FIXTURE # 2 Group A Wa*age 4.3 FIXTURE # 2 Group B Wa*age 2.8 FIXTURE # 2 Group C Wa*age 4.33 FIXTURE # 2 Group D Wa*age 4.22FIXTURE # 3 Group A Wa*age 4.3 FIXTURE # 3 Group B Wa*age 2.8 FIXTURE # 3 Group C Wa*age 4.33 FIXTURE # 3 Group D Wa*age 4.22FIXTURE # 4 Group A Wa*age 4.3 FIXTURE # 4 Group B Wa*age 2.8 FIXTURE # 4 Group C Wa*age 4.33 FIXTURE # 4 Group D Wa*age 4.22FIXTURE # 5 Group A Wa*age 4.1 FIXTURE # 5 Group B Wa*age 0 FIXTURE # 5 Group C Wa*age 0 FIXTURE # 5 Group D Wa*age 0FIXTURE # 6 Group A Wa*age 4.1 FIXTURE # 6 Group B Wa*age 0 FIXTURE # 6 Group C Wa*age 0 FIXTURE # 6 Group D Wa*age 0FIXTURE # 7 Group A Wa*age 10 FIXTURE # 7 Group B Wa*age 0 FIXTURE #7 Group C Wa*age 0 FIXTURE #7 Group D Wa*age 0
Total Fixtures 19TOTAL Wa*age Group A 35.4 TOTAL Wa*age Group B 11.2 TOTAL Wa*age Group C 17.32 TOTAL Wa*age Group D 16.88TOTAL Wa*age Group B 11.2 TOTAL Wa*age Group C 17.32 TOTAL Wa*age Group D 16.88TOTAL Wa*age Group C 17.32 TOTAL Wa*age Group D 16.88 TOTAL Wa*age Group D 16.88TOTAL SYSTEM WATTAGE 80.8 45.4 34.2 16.88
TOTAL DISTANCE 100 75 50 50wa*s / 12= AMPS 6.733333333 wa*s / 12= AMPS 3.78333333 wa*s / 12= AMPS 2.85 wa*s / 12= AMPS 1.40666667
X X X X100 75 50 50
X X X X2 2 2 2
Resistance per foot X Resistance per foot X Resistance per foot X Resistance per foot X
#14-‐2 0.002525 #14-‐2 0.002525 #14-‐2 0.00253 #14-‐2 0.002525
#12-‐2 0.00162 #12-‐2 0.00162 #12-‐2 0.00162 #12-‐2 0.00162
#10-‐2 0.00108 #10-‐2 0.00108 #10-‐2 0.00108 #10-‐2 0.00108
Voltage Loss # 14-‐2 3.400333333 Voltage Loss # 14-‐2 1.4329375 Voltage Loss # 14-‐2 0.71963 Voltage Loss # 14-‐2 0.35518333
Voltage Loss # 12-‐2 2.1816 Voltage Loss # 12-‐2 0.91935 Voltage Loss # 12-‐2 0.4617 Voltage Loss # 12-‐2 0.22788
Voltage Loss # 10-‐2 1.4544 Voltage Loss # 10-‐2 0.6129 Voltage Loss # 10-‐2 0.3078 Voltage Loss # 10-‐2 0.15192
Total Distance 275Enter Star[ng Voltage 16
First Grouping Voltage 14.5456 Second Grouping Voltage 13.9327 Third Grouping Voltage 13.2131 Fourth Grouping Voltage 12.8578917
Amps Wa*s
Total VOLTAGE Loss 3.142108333 6.7333333 21.15686278
Last Fixture Voltage 12.85789167 Amps X Volts =Wa*s
Cable Loss 21.15686278
Fixtures Consumed 80.8
Total Wa*s Consumed 101.9568628
This Sheet is for determining the voltage loss in the wire
Sele
ct W
ire g
auge
Volta
ge L
oss
and
Ope
ra[n
g Vo
lts
Amps x Distance x 2 x Resistance per foot = Voltage Drop
Lay
Out
Sys
tem
Cons
umed
W
a*ag
e

24
At 10 feet At 20 feetDistance Sq. Distance Sq.
100 400
Spot Lights Dim
mer
Lev
el S
e<ng
in
BARS
Impr
essi
onis
t Ser
ies
Onl
y
% o
f tot
al o
utpu
t Im
pres
sion
ist
Seri
es
Volt
age
Rang
e A
C or
DC
Am
ps
WaG
s ( C
ost r
o op
erat
e)
Pow
er F
acto
r
Volt
Am
ps (
Use
Thi
s #
To S
ize
Tran
sfor
mer
)
Effica
cy (l
umen
s Pe
r W
aG
Cons
umed
)
CRI
L-‐70
Hrs
Colo
r Te
mp
Act
ual B
eam
(Ang
le a
t 50%
of
Can
dela
)
Tota
l Lum
ens
Cent
er B
eam
Can
dela
(C
BCP)
Beam
Lum
ens
Foot
Can
dles
in c
ente
r at
10'
Ft
. (I
llum
inan
ce)
Foot
Can
dles
in c
ente
r at
20'
Ft
(Illu
min
ance
)
10 WaG Halogen 36⁰ (DMB ) 11.5 0.76 8.75 1 8.75 5 100 NA 2697 31⁰ 48 168 30 1.68 0.42CCSL10536B or S 10-‐24 0.26 2.8 0.89 3.15 32 81 51,400 2736 28⁰ 89 358 54 3.58 0.895CID140 Series 40' Op?c Three 30% 10-‐24 0.122 1.309 0.871 1.50 60 80 51,400 2776 40⁰ 79 153 39 1.53 0.3825CID248 Series 48' Op?c Five 50% 10-‐24 0.069 1.59 0.804 0.85 62 80 51,400 2747 48⁰ 99 139 62 1.39 0.3475
CCW270 Wash / CWW1LED2 10-‐24 0.4 4.33 0.9 4.81 38 82 60,500 2758 87⁰ 164 94 118 0.9442 0.23605CCDL1 CraJsman Deck Light 10-‐24 0.27 2.88 0.88 3.27 31 82 60,500 2784 87⁰ 89 46 52 0.46 0.115CWL6LED1 Hi-‐Power Wall Wash W/Shroud 10-‐24 0.47 5.01 0.88 5.69 24 82 60,500 2801 81⁰x53⁰ 122 90 67 0.8981 0.224525CIWL6 Impressionist Wall Wash W/ Shroud Ten 100% 10-‐24 0.73 7.63 0.88 8.67 38 82 51,400 2710 85⁰x62⁰ 292 184 189 1.84 0.46
20 WaG Halogen 36⁰ ( BAB ) 11.5 1.67 19.19 1 19.19 6 100 NA 2780 32⁰ 121 387 85 3.8742 0.96855CCSL18336B or S 10-‐24 0.25 2.69 0.88 3.06 57 80 51,400 2794 34⁰ 153 417 85 4.17 1.0425CCSL18354B 10-‐24 0.26 2.68 0.87 3.08 57 79 51,400 2885 44⁰ 153 238 81 2.38 0.595CID140 Series 40' Op?c Seven 70% 10-‐24 0.283 3.22 0.929 3.47 61 80 51,400 2776 40⁰ 197 379 96 3.79 0.9475CID248 Series 48' Op?c Eight 80% 10-‐24 0.217 4.73 0.947 4.99 57 80 51,400 2747 48⁰ 269 378 169 3.78 0.945CTLED141 Low SeVng STD 10-‐24 0.37 4.1 0.93 4.41 38 81 60,500 2559 30⁰ 157 567 87 5.67 1.4175
35 WaG Halogen 36⁰ ( FMW ) 11.5 2.72 31.39 1 31.39 7 100 NA 2753 32⁰ 218 625 135 6.2511 1.562775CCSL25036B 10-‐24 0.42 4.3 0.82 5.24 53 79 51,400 2816 34⁰ 229 665 135 6.65 1.6625CBLED141 Low 10-‐24 0.52 5.86 0.93 6.30 46 80 60,500 2720 30⁰ 269 781 115 7.81 1.9525CID140 Series 40' Op?c Ten 100% 10-‐24 0.47 5.05 0.886 5.70 54 80 51,400 2776 40⁰ 273 526 134 5.26 1.315CID248 Series 48' Op?c Ten 100% 10-‐24 0.804 8.74 0.91 9.60 51 80 51,400 2747 48⁰ 449 630 281 6.3 1.575CTLED141 Hi SeVng 10-‐24 0.52 5.86 0.93 6.30 46 80 60,500 2720 30⁰ 269 781 115 7.81 1.9525
50 WaG Halogen 36⁰ ( EXN ) 11.5 3.76 43.44 1 43.44 7 100 NA 2778 28⁰ 296 1028 183 10.28 2.57CBLED141 High SeVng STD 10-‐24 0.82 9.25 0.94 9.84 35 80 60,500 2720 32⁰ 328 946 155 9.46 2.365CID140 Series 24' Op?c nine 90% 10-‐24 0.414 4.55 0.903 5.04 64 80 51,400 2777 25⁰ 289 1162 124 11.62 2.905CID248 Series 24' Op?c Eight 80% 10-‐24 0.401 4.73 0.964 4.91 62 80 51,400 2747 24⁰ 293 1114 106 11.14 2.785
75 WaG Halogen 36⁰ ( EYC ) 11.5 5.56 64.16 1 64.16 9 100 NA 2991 28⁰ 551 2123 267 21.23 5.3075CID248 Series 24' Op?c Ten 100% 10-‐24 0.804 8.74 0.91 9.60 56 80 51,400 2747 24⁰ 489 1856 177 18.56 4.64
Foot Candles = CBCP/ Distance Squared
Wall Wash Data Provided for Compara4ve Reference Purposes.
CAST Ligh?ng Independent LM-‐79 Test Results for Integrated LED Direc?onal SPOT Lights. Electrical and Photometric Test ResultsHalogen Equivalent LED Data Reference Sheet ( Feb 16, 2015)
Old World CraJsmanship…Tomorrow's Technology tm
All specifica?ons as per LM-‐79. Integrated LED fixtures tested @ 12 Volts AC. Halogen Reference tested at 11.5V AC in a CBL1CB Cast Spot Light.

25
Cast LM-‐79 Impressionist Technical Data
Page 3 of 5
At 10 Feet At 20 FeetDistance Sq. Distance Sq.
100 400
40⁰/48⁰ Wide Dimmer Level Se=
ng in
BARS
% of total outpu
t
Voltage Range AC or
DC
Amps
WaH
s
Power Factor
Volt Amps
Efficacy ( Lumens Per
WaH
Con
sumed)
CRI
L-‐70 Hrs
Color Temp
Actual Beam (A
ngle at
50% of Candela)
Total Lum
ens
Center Beam Candela
(CBC
P)
Beam
Lum
ens
Foot Candles in
Center at 1
0' Ft.
(Illuminance)
Foot Candles in
Center at 2
0' Ft.
(Illuminance)
CID140 Series 40⁰ OpCc (*) min. 0% 10-‐24 0.031 0.25 0.660 0.38 55 80 51,400 2776 40⁰ 14 26 7 0.26 0.07CID140 Series 40⁰ OpCc (*) one 10% 10-‐24 0.064 0.6 0.760 0.79 64 80 51,400 2776 40⁰ 38 74 19 0.74 0.18CID140 Series 40⁰ OpCc (*) two 20% 10-‐24 0.082 0.8 0.802 1.00 65 80 51,400 2776 40⁰ 52 100 25 1.00 0.25CID140 Series 40⁰ OpCc (*) three 30% 10-‐24 0.122 1.309 0.871 1.50 60 80 51,400 2776 40⁰ 79 153 39 1.53 0.38CID140 Series 40⁰ OpCc (*) four 40% 10-‐24 0.163 1.81 0.909 1.99 63 80 51,400 2776 40⁰ 115 221 56 2.21 0.55CID140 Series 40⁰ OpCc (*) five 50% 10-‐24 0.174 1.935 0.904 2.14 63 80 51,400 2776 40⁰ 123 237 60 2.37 0.59CID140 Series 40⁰ OpCc (*) six 60% 10-‐24 0.202 2.2 0.885 2.49 65 80 51,400 2776 40⁰ 142 274 70 2.74 0.68CID140 Series 40⁰ OpCc (*) seven 70% 10-‐24 0.283 3.22 0.929 3.47 61 80 51,400 2776 40⁰ 197 379 96 3.79 0.95CID140 Series 40⁰ OpCc (*) eight 80% 10-‐24 0.317 3.53 0.914 3.86 59 80 51,400 2776 40⁰ 207 400 102 4.00 1.00CID140 Series 40⁰ OpCc (*) nine 90% 10-‐24 0.414 4.55 0.903 5.04 55 80 51,400 2776 40⁰ 251 484 123 4.84 1.21CID140 Series 40⁰ OpCc (*) ten 100% 10-‐24 0.470 5.05 0.886 5.70 54 80 51,400 2776 40⁰ 273 526 134 5.26 1.32
0.00CID248 Series 48⁰ OpCc(*) min. 0% 10-‐24 0.026 0.22 0.694 0.32 49 80 51,400 2747 48⁰ 11 15 7 0.15 0.04CID248 Series 48⁰ OpCc(*) one 10% 10-‐24 0.06 0.58 0.786 0.74 62 80 51,400 2747 48⁰ 36 50 22 0.50 0.13CID248 Series 48⁰ OpCc(*) two 20% 10-‐24 0.069 0.68 0.804 0.85 66 80 51,400 2747 48⁰ 45 63 28 0.63 0.16CID248 Series 48⁰ OpCc(*) three 30% 10-‐24 0.109 1.17 0.880 1.33 58 80 51,400 2747 48⁰ 67 95 42 0.95 0.24CID248 Series 48⁰ OpCc(*) four 40% 10-‐24 0.125 1.35 0.883 1.53 60 80 51,400 2747 48⁰ 81 113 51 1.13 0.28CID248 Series 48⁰ OpCc(*) five 50% 10-‐24 0.146 1.59 0.896 1.77 62 80 51,400 2747 48⁰ 99 139 62 1.39 0.35CID248 Series 48⁰ OpCc(*) six 60% 10-‐24 0.217 2.5 0.947 2.64 61 80 51,400 2747 48⁰ 153 214 96 2.14 0.54CID248 Series 48⁰ OpCc(*) seven 70% 10-‐24 0.269 3.13 0.955 3.28 62 80 51,400 2747 48⁰ 193 271 121 2.71 0.68CID248 Series 48⁰ OpCc(*) eight 80% 10-‐24 0.401 4.73 0.964 4.91 57 80 51,400 2747 48⁰ 269 378 169 3.78 0.95CID248 Series 48⁰ OpCc(*) nine 90% 10-‐24 0.505 5.88 0.958 6.14 60 80 51,400 2747 48⁰ 350 491 219 4.91 1.23CID248 Series 48⁰ OpCc(*) ten 100% 10-‐24 0.804 8.74 0.910 9.60 51 80 51,400 2747 48⁰ 449 630 281 6.30 1.58
Technical SpecificaCons CAST LighCng Impressionist Series CID140 and CID248 Integrated LED DirecConal SPOT Light (02-‐2015)All specificaCons derived from LM-‐79 tesCng performed at full power @ 12 Volts AC. Higher drive current of 24V A/C Will increase below values by 10% (*)
Data is for model #, CID140 Spot, CIDA140 Area Light, CIT164 Tree Light Fi^ed with a model # CIDO40 Op[c
Data is for model #, CID248 Spot, CIDA248 Area Light, CIT265 Tree Light Fi^ed with a model # 2XCIDO48 Op[c
Foot Candles = CBCP / Distance Squared

26
Cast LM-‐79 Path Area Light Technical Data
Page 1of 1
Foot Candles = CBCP / Distance Squared
At 10 FeetDistance Sq.
100
Path / Area Lights Voltage Range AC or DC
Amps
WaCs
Power Factor
Volt Amps
Lumiere Efficacy RaHng
(LER) ( Total Lumens per
waC consumed)
CRI
L-‐70 Hrs
Color Temp
Total Lumens
Maximum Candela
45⁰ Candela
BUG RaHng
Foot Candles in Center
at 10' Ft. (Illuminance)
CMU1CB Small Mushroom (*)(A) 10-‐24 0.41 4.4 0.890 4.94 24.00 82 62,000 2769 104 37 28 0,0,0, 0.37CMU2CB Large Mushroom(*)(A) 10-‐24 0.39 4.22 0.910 4.64 31.04 83 62,000 2809 131 57 34 0,0,0 0.57CCH5LED1 Mini China Hat 10-‐24 0.27 2.71 0.840 3.23 21.48 81 62,000 2829 58 18 13 0,1,0 0.18
CCH1CB Small China Hat(*)(A) 10-‐24 0.41 4.42 0.890 4.97 18.55 82 62,000 2797 82 21 19 0,0,0 0.21CCH2CB Large China Hat(*)(A) 10-‐24 0.39 4.23 0.910 4.65 27.42 83 62,000 2804 116 39 29 0,0,0 0.39CNO1CB New Orleans(*)(A) 10-‐24 0.42 4.42 0.890 4.97 29.19 82 62,000 2808 129 43 35 0,1,0 0.43CSA1CB Savannah(*)(A) 10-‐24 0.4 4.41 0.910 4.85 45.35 82 62,000 2737 200 94 49 0,0,0 0.94CISX2CB Insignia(*)(A) 10-‐24 0.39 4.23 0.910 4.65 27.42 83 62,000 2804 116 39 29 0,0,0 0.39CCPL1 & 2 CraPsman(*) 10-‐24 0.4 4.22 0.890 4.74 27.01 82 62,000 2790 114 46 30 0,0,0 0.46
All specificaSons derived from LM-‐79 tesSng performed at full power @ 12 Volts AC. Higher drive current of 24V A/C Will increase below values by 10% (*)Fixtures Below fi_ed with CALED2 LED Retrofit Module (A)
Technical SpecificaSons CAST LighSng Path Area Lights (02-‐2015)

27
Cast Ligh*ng LM-‐79 LED Test Results For Deck, Engineered Wall and Wash Lights.
Page 1 of 1
Foot Candles = CBCP/ Distance
At 10 feetDistance Sq.
100
Deck, Engineered Wall & Wash Lights D
immer Level SeE
ng in
BARS Im
pressionist Series
Only
% of total output
Impressionist Series
Voltage Range AC or DC
Amps
WaN
s ( Cost ro operate)
Power Factor
Volt Amps ( Use This
# To Size Transformer)
Efficacy
(lum
ens Per WaN
Consum
ed)
CRI
L-‐70 Hrs
Color Temp
Horizontal Beam (A
ngle at
50% of Candela)
Ver[cal Beam (A
ngle at 5
0%
of Candela)
Total Lum
ens
Center Beam Candela
(CBC
P)
Beam
Lum
ens
Foot Candles in center at 10'
Ft. (Illuminance)
Deck Lights CCDL1B or S CraCsman Deck Light (*) 10-‐24 0.27 2.88 0.88 3.27 31 82 60,500 2787 88⁰ 88⁰ 89 46 52 0.46CDL1CBLED1 Round Classic Deck Light (*) 10-‐24 0.27 2.82 0.88 3.20 17 81 60,500 2759 97⁰ 69⁰ 49 29 36 0.294
Engineered Wall Lights CEWL5LED1 / CEWL6LED1 Engineered Wall Light (*) 10-‐24 0.24 2.5 0.88 2.84 30 81 60,500 2704 94⁰ 78⁰ 76.06 38 45 0.38CEWL6LED1 /CEWL6LED1 Minus Reflector (*) 10-‐24 0.24 2.5 0.88 2.84 14 80 60,500 2704 94⁰ 78⁰ 36 18 28 0.18
Wash LightsCCW270B or S CraCsman Wash (*) 10-‐24 0.4 4.33 0.9 4.81 38 82 60,500 2758 92⁰ 84⁰ 164 94 118 0.9442CWW1LED2 Classic Wash Light (*) 10-‐24 0.4 4.33 0.9 4.81 34 82 60,500 2758 84⁰ 84⁰ 147.6 85 106 0.84978CWL6LED1 Hi-‐Power Wall Wash W/Shroud (*) 10-‐24 0.47 5.01 0.9 5.57 24 82 60,500 2801 81⁰ 53⁰ 122 90 67 0.8981CIWL6 Impressionist Wall Wash W/ Shroud (*) Min. 0% 10-‐24 0.04 0.22 0.694 0.32 66 82 51,400 2710 85⁰ 62⁰ 14.6 9 9.45 0.092CIWL6 Impressionist Wall Wash W/ Shroud (*) One 10% 10-‐24 0.069 0.58 0.786 0.74 50 82 51,400 2710 85⁰ 62⁰ 29.2 18 18.9 0.184CIWL6 Impressionist Wall Wash W/ Shroud (*) Two 20% 10-‐24 0.07 0.6 0.804 0.75 97 82 51,400 2710 85⁰ 62⁰ 58.4 37 37.8 0.368CIWL6 Impressionist Wall Wash W/ Shroud (*) Three 30% 10-‐24 0.11 1.17 0.88 1.33 75 82 51,400 2710 85⁰ 62⁰ 87.6 55 56.7 0.552CIWL6 Impressionist Wall Wash W/ Shroud (*) Four 40% 10-‐24 0.125 1.35 0.883 1.53 87 82 51,400 2710 85⁰ 62⁰ 116.8 74 75.6 0.736CIWL6 Impressionist Wall Wash W/ Shroud (*) Five 50% 10-‐24 0.146 1.6 0.896 1.79 91 82 51,400 2710 85⁰ 62⁰ 146 92 94.5 0.92CIWL6 Impressionist Wall Wash W/ Shroud (*) Six 60% 10-‐24 0.217 2.5 0.947 2.64 70 82 51,400 2710 85⁰ 62⁰ 175.2 110 113 1.104CIWL6 Impressionist Wall Wash W/ Shroud (*) Seven 70% 10-‐24 0.269 3.13 0.955 3.28 65 82 51,400 2710 85⁰ 62⁰ 204.4 129 132 1.288CIWL6 Impressionist Wall Wash W/ Shroud (*) Eight 80% 10-‐24 0.401 4.73 0.964 4.91 49 82 51,400 2710 85⁰ 62⁰ 233.6 147 151 1.472CIWL6 Impressionist Wall Wash W/ Shroud (*) Nine 90% 10-‐24 0.505 5.88 0.958 6.14 45 82 51,400 2710 85⁰ 62⁰ 262.8 166 170 1.656CIWL6 Impressionist Wall Wash W/ Shroud (*) Ten 100% 10-‐24 0.73 7.63 0.88 8.67 38 82 51,400 2710 85⁰ 62⁰ 292 184 189 1.84
CAST Ligh*ng Independent LM-‐79 Test Results for Integrated LED Deck, Engineered Wall Lights & Wash Lights. Electrical and Photometric Test Results
Old World CraCsmanship…Tomorrow's Technology tm
All specifica*ons as per LM-‐79. Integrated LED fixtures tested @ 12 Volts AC. Higher drive current of 24V A/C Will increase below values by 10% (*)

28
8165 E Kaiser Blvd. Anaheim, CA 92808p. 714.282.2270f. 714.676.5558
Report No: L111407103Date: 12/9/2014
NVLAP LAB CODE 200927-0
Test:
12/4/14
12/8/14 - 12/9/14
Electrical and Photometric tests
Standards Used: Appropriate part or all test guidelines were used for test performed:IESNA LM79: 2008 Approved Methods for Electrical and Photometric Measurements of Solid-State Lighting ProductsANSI NEMA ANSLG C78.377: 2008 Specification of the Chromaticity of Solid State Lighting Products
Description of Sample:
Testing Condition:
Equipment UsedChroma Programmable AC Source 61604 PS-AC02
Fixture is tested with no special conditions.
Sample Arrival Date:
01/04/15
Yokogawa Digital Power Meter WT210 MT-EL06-S1
Report No: L111407103
Model Number:
Report Prepared For: Cast Lighting1120-A Goffle Rd., Hawthorne, NJ., 07506
CCSL18336
ANSI C82.77:2002: Harmonic Emission Limits-Related Quality Requirements for Lighting Equipment
Date of Tests:
Seasoning of Sample: No seasoning was performed in accordance with IESNA LM-79.
Equipment ListModel No Stock No Calibration Due Date
--
BK Precision DC Power Supply 1747 PSDC-04 01/08/15Fluke Digital Thermometer 52k/J MT-TP02-GC
Xitron Power Analysis System 2503AH MT-EL01 01/09/15
LLI Type C Goniophotometer System RMG-C-MKII CD-LL04-GC --LLI 2M Sphere 2MR97 CD-SN03-S2 --
Before Use
Client submitted the sample. Catalog number is CCSL18336. Received in working and undamaged condition. No modifications were necessary.
LLI Spectroradiometer SPR-3000 MT-SC01-S2
*All Results in accordance to IESNA LM-79-2008: Approved Method for the Electrical and Photometric Testing of Solid-State Lighting.
01/04/15
Page 1 of 4
8165 E Kaiser Blvd. Anaheim, CA 92808p. 714.282.2270f. 714.676.5558
Report No: L111407103Date: 12/9/2014
NVLAP LAB CODE 200927-0
CCSL18336
N/A
0.00
*All Results in accordance to IESNA LM-79-2008: Approved Method for the Electrical and Photometric Testing of Solid-State Lighting.
Off State Power(W):
0:35
Chromaticity Coordinate x: 0.4583Chromaticity Coordinate y: 0.4199
12.00
Cast LightingModel Number:
Total Lumens:Input Voltage (VAC/60Hz):
Driver Model Number: N/A
80
Total Operating Time (Hours): 1:50
Correlated Color Temperature (K): 2794
FIG. 1 LUMINAIRE
Current ATHD @ 277V(%):
Ambient Temperature (oF): 77.0Stabilization Time (Hours):
Current ATHD @ 12V(%): 53%
Manufacturer:
152.94
Input Power Factor: 0.88
Test Summary
Input Current (Amp): 0.25Input Power (W): 2.69
Efficacy: 57Color Rendering Index (CRI):
Page 2 of 4
See DefinitionSheet
Electrical/Color Section
Product MFG Model # Tested
A.
B.C.D.
E.F.G.
H.

29
8165 E Kaiser Blvd. Anaheim, CA 92808p. 714.282.2270f. 714.676.5558
Report No: L111407103Date: 12/9/2014
NVLAP LAB CODE 200927-0
Wavelength W/m2nm 440 0.3812 510 0.3408 580 0.8586 650 0.6303 720 0.0946380 0.0006 450 0.2254 520 0.4239 590 0.9377 660 0.5096 730 0.0694390 0.0009 460 0.1181 530 0.4909 600 0.9852 670 0.3997 740 0.0505400 0.0026 470 0.0729 540 0.5477 610 1.0000 680 0.3094 750 0.0367410 0.0130 480 0.0802 550 0.6071 620 0.9391 690 0.2360 760 0.0264420 0.0576 490 0.1353 560 0.6781 630 0.8544 700 0.1772 770 0.0195430 0.1637 500 0.2352 570 0.7525 640 0.7495 710 0.1320 780 0.0144
CRI & CCTx 0.4583y 0.4199u' 0.2574v' 0.5306
CRI 80.00CCT 2794Duv 0.00356
R ValuesR1 78.10R2 85.54R3 93.21R4 80.56R5 76.96R6 81.13R7 84.69R8 59.60R9 5.46
R10 66.92R11 79.43R12 62.25R13 79.07R14 95.56
*All Results in accordance to IESNA LM-79-2008: Approved Method for the Electrical and Photometric Testing of Solid-State Lighting.
430 440 460
470
480
490
500
510
520 530
540
550
560
570
580
590
600
610 620
630 640
650 700
380
0.4583, 0.4199
0
0.1
0.2
0.3
0.4
0.5
0.6
0.7
0.8
0.9
0 0.1 0.2 0.3 0.4 0.5 0.6 0.7 0.8 0.9
CIE 1931 Chromaticity Diagram
X
Y
0.0
0.2
0.4
0.6
0.8
1.0
380 430 480 530 580 630 680 730 780Wavelength(nm)
Spectral Power
Perc
ent O
utpu
t
Page 3 of 4
8165 E Kaiser Blvd. Anaheim, CA 92808p. 714.282.2270f. 714.676.5558
Report No: L111407103Date: 12/9/2014
NVLAP LAB CODE 200927-0
Report Prepared by : Keyur Patel
Test Report Released by:
A Sensing Spectroradiometer SPR-3000, in conjunction with Light Laboratory 2 meter integrating sphere was used to measure chromaticity coordinates, correlated color temperature(CCT) and the color rendering index(CRI) for each sample.
Ambient temperature is set to 25oC and is measured from the center of the fixture, within 1ft from the outside of the fixture. Temperature is maintained at 25oC throughout the testing process and the sample is stabilized for at least 30mins and longer as necessary for the sample to achieve stabilization.
Electrical measurements are measured using the listed equipment.
A Custom Light Laboratory Type C Rotating Mirror Goniophotometer was used to measure candelas(intensity) at each angle of distribution as defined by IESNA for the appropriate fixture type.
Ambient temperature is set to 25oC and is measured from the center of the fixture, within 1ft from the outside of the fixture. Temperature is maintained at 25oC throughout the testing process and the sample is stabilized for at least 30mins and longer as necessary for the sample to achieve stabilization.
Electrical measurements are measured using the listed equipment.
Spectral Measurements - Integrating Sphere
Photometric Measurements - GoniophotometerTest Methods
*All Results in accordance to IESNA LM-79-2008: Approved Method for the Electrical and Photometric Testing of Solid-State Lighting.
Jeff Ahn Steve KangEngineering Manager Quality Assurance
Test Report Reviewed by:
Disclaimers:This report must not be used by the customer to claim product certification, approval or endorsement by NVLAP, NIST or any agency of Federal Government.
*Attached are photometric data reports. Total number of pages: 8
Page 4 of 4
I.J.

30
IES FLOOD REPORTPHOTOMETRIC FILENAME : L111407103.IES
DESCRIPTIVE INFORMATION (From Photometric File)
IESNA:LM-63-2002[TEST] L111407103[TESTLAB] LIGHT LABORATORY, INC.[ISSUEDATE] 12/09/2014[MANUFAC] CAST LIGHTING[LUMCAT] CCSL18336[LUMINAIRE] 2"DIA. X 12-1/2"H. LED LUMINAIRE[MORE] CLEAR LENS[BALLASTCAT] N.A.[BALLAST] N.A.[LAMPPOSITION] 0,0[LAMPCAT] N/A[OTHER] INDICATING THE CANDELA VALUES ARE ABSOLUTE AND[MORE] SHOULD NOT BE FACTORED FOR DIFFERENT LAMP RATINGS.[INPUT] 12VAC, 2.69W[TEST PROCEDURE] IESNA:LM-79-08
Note: Candela values converted from Type-C to Type-B
CHARACTERISTICS
NEMA Type 4 H x 4 VMaximum Candela 417.99Maximum Candela Angle 0H 0VHorizontal Beam Angle (50%) 34.1Vertical Beam Angle (50%) 34.1Horizontal Field Angle (10%) 55.6Vertical Field Angle (10%) 55.1Lumens Per Lamp N.A. (absolute)Total Lamp Lumens N.A. (absolute)Beam Lumens 85Beam Efficiency N.A.Field Lumens 131Field Efficiency N.A.Spill Lumens 22Luminaire Lumens 153Total Efficiency N.A.Total Luminaire Watts 2.69Ballast Factor 1.00
Photometric Toolbox Professional Edition - Copyright 2002-2011 by Lighting Analysts, Inc.Calculations based on published IES Methods and recommendations, values rounded for display purposes.Results derived from content of manufacturers photometric file.
Page 1
IES FLOOD REPORTPHOTOMETRIC FILENAME : L111407103.IES
AXIAL CANDELA
DEG. HOR. DEG. VERT.
90 0 90 085 0 85 075 .08 75 065 1.17 65 055 3.44 55 .547.5 5.28 47.5 3.6942.5 6.54 42.5 6.0437.5 9.98 37.5 8.2233 17.95 33 13.7429 33.24 29 25.9425.5 57.81 25.5 47.5622.5 94.51 22.5 82.5219.5 155.08 19.5 142.5917 210.54 17 197.1915 254.95 15 239.5113 293.13 13 275.1711 326.14 11 307.779 354.42 9 337.777 378.29 7 365.215 398.02 5 389.633 409.49 3 405.231 415.74 1 414.450 417.99 0 417.99-1 415.74 -1 417.28-3 409.49 -3 414.53-5 398.02 -5 407.75-7 378.29 -7 391.81-9 354.42 -9 370.2-11 326.14 -11 343.06-13 293.13 -13 310.34-15 254.95 -15 271.72-17 210.54 -17 224.67-19.5 155.08 -19.5 167.06-22.5 94.51 -22.5 105.84-25.5 57.81 -25.5 65.3-29 33.24 -29 38.97-33 17.95 -33 21.56-37.5 9.98 -37.5 11.07-42.5 6.54 -42.5 6.88-47.5 5.28 -47.5 6.21-55 3.44 -55 4.03-65 1.17 -65 1.34-75 .08 -75 .5-85 0 -85 .17-90 0 -90 .17
Photometric Toolbox Professional Edition - Copyright 2002-2011 by Lighting Analysts, Inc.Calculations based on published IES Methods and recommendations, values rounded for display purposes.Results derived from content of manufacturers photometric file.
Page 2
The Lumen, Beam, Candela DATA
K.
K.
L.
M.417.99
Center Beam Candle Power
CBCP/CANDELA
L. L.Horizontal/Vertical 34.1
Field Lumens: 90% Field Lumens: 90% of Lm @ 55'
at 131 Lm
Beam Lumens 85
17.05'
Fixture
17.05'
M. M.
K.
L.
at 90% of Lumen Value= Field Lumens
at 90% of Lumen Value= Field Lumens
at 50% of Lumen Value= Beam Angle
at 50% of Lumen Value= Beam Angle
Center Beam Candle Power CBCP
M.
M.

31
IES FLOOD REPORTPHOTOMETRIC FILENAME : L111407103.IES
AXIAL CANDELA DISPLAY
-90 -60 -30 30 60 900
104
209
313
418
H
V
Maximum Candela = 417.99 Located At Horizontal Angle = 0, Vertical Angle = 0H - Horizontal Axial CandelaV - Vertical Axial Candela
Photometric Toolbox Professional Edition - Copyright 2002-2011 by Lighting Analysts, Inc.Calculations based on published IES Methods and recommendations, values rounded for display purposes.Results derived from content of manufacturers photometric file.
Page 3
IES FLOOD REPORTPHOTOMETRIC FILENAME : L111407103.IES
ISOCANDELA CURVES
0 10 20 30
Horizontal Angles
-30
-20
-10
0
10
20
30
VerticalAngles
41.799
208.995
Maximum Candela = 417.99 Located At Horizontal Angle = 0, Vertical Angle = 050% Maximum Candela = 208.99510% Maximum Candela = 41.799
Photometric Toolbox Professional Edition - Copyright 2002-2011 by Lighting Analysts, Inc.Calculations based on published IES Methods and recommendations, values rounded for display purposes.Results derived from content of manufacturers photometric file.
Page 4

32
Cast Lighting Te
rminolog
y
[AN
SWER
S
HEE
T O
CTO
BER
2014
]
1 Of 4
Illum
inat
ion
Engi
neer
ing
Soci
ety
(IES
) sta
ndar
ds fo
r te
stin
g.
LM-‐8
0: th
e testing of a LED
chip by
a m
anufacturer of th
e ch
ip to
extrapo
late la
mp life ex
pressed in
hours of ope
ratio
n.
L-‐70
: Lum
en M
aint
enan
ce. T
he point at w
hich
a LED
chip’s lig
ht outpu
t red
uces by 30
% in
hou
rs of
operation at w
hich
point th
e ch
ip is con
side
red de
ad. (Ev
en th
ough
the Le
d co
uld still be op
erating) This
was cho
sen be
caus
e yo
ur eye
can
only no
tice a 30
% dec
rease in lig h
t lev
el.
LM-‐7
9 Th
e testing of th
e elec
trical and
pho
tometric mea
suremen
t of s
olid state ligh
ting prod
ucts by a
third pa
rty labo
ratory to
determine pe
rforman
ce as sp
ecified
by the IES ( illu
mination En
gine
ering
Society)
Lum
ens= ( lm
) Is the mea
sure of the
total a
mou
nt of v
isible ligh
t emitted
by a so
urce
.
Cand
ela. (c
d) also referred
to as Ce
nter Bea
m Can
dela (C
andle) P
ower (C
BCP). T
his is th
e ba
se unit o
f luminou
s intens
ity; tha
t is, pow
er emitted
by a lig
ht sou
r ce at th
e de
ad cen
ter of th
e be
am ang
le.
Hig
h Po
wer
Lig
ht E
mit
ting
Dio
de. T
his is a high effic
ienc
y Ligh
t Sou
rce mad
e up
of two differen
t materials th
at w
hen stim
ulated
with
DC cu
rren
t emit ph
oton
s of blue lig
ht.
Phos
phor
Coa
ting
: A coa
ting placed
ove
r the LE
D to
create a sp
ecific co
lor (Kelvin Te
mpe
rature)
Colli
mat
ing
Opt
ic: A
molde
d uv
resistant plastic th
at fits ove
r an
LED
designe
d to fo
cus the lig
ht
prod
uced
by a LE
D in
to a spe
cific
bea
m pattern or co
ne of light.
Foot
Can
dle. Is equ
al to
one
lumen
per squ
are foot. O
r ap
prox
imately 10
.74 lux
Corr
elat
ed C
olor
Tem
pera
ture
(CCT
) Kel
vin. The
color outpu
t of a
sou
rce of ligh
t. (E
x. 270
0 to 280
0K
warm w
hite)
Colo
r Re
nder
ing
Inde
x. (C
RI) is a qu
antitative mea
sure of the
ability of a ligh
t sou
rce to rev
eal the
colors
of various
objec
ts fa
ithfully
in com
pariso
n with
an idea
l or na
tural light sou
rce. The
highe
r the CR
I the
be
tter th
e so
urce
in color critic
al app
lications
.
Colo
r Sh
ift: T
he cha
nge of th
e led ou
tput color ove
r tim
e us
ually
occurring
from
ove
rhea
ting an
d po
or
thermal m
anag
emen
t of the
led an
d po
or le
d material u
sed in in
itial produ
ction of th
e led. This is a
prob
lem w
hen a lamp fails after in
stallatio
n an
d a replacem
ent is installed the co
lor is vastly
differen
t an
d the cu
stom
er notices.
Opt
ical
per
form
ance
:
Beam
Ang
le: T
he ang
le from
90’ off cen
ter. 40’ bea
m is 20’ of c
enter bo
th right and
left side.
Stri
atio
ns: L
ines or scratche
s form
ed in
the op
tical pattern creating jagg
ed usu
ally black line
s throug
hout
the lig
ht pattern ty
pically
eman
ating from
cen
ter to edg
e.

33
Cast Lighting Te
rminolog
y
[AN
SWER
S
HEE
T O
CTO
BER
2014
]
2 Of 4
Hal
o: A glow or da
rk ring arou
nd th
e ed
ges of a ligh
t bea
m in
varying
widths an
d de
nsities interrupting
an otherwise clea
n blee
d off o
f light.
Colo
r Co
nsis
tenc
y: The
led’s ab
ility to
project a clean
uniform
color acros
s the en
tire su
rface of th
e be
am w
ithou
t stray
colum
ns of d
iffering lig
ht color app
earing
in th
e projec
ted lig
ht pattern.
Mac
Ada
m E
llips
e: This is th
e stud
y of color vision an
d refers to
the region
on a ch
romaticity
diagram
. Th
e led ch
ips that hav
e a tig
ht “Binn
ing” w
ill deliver a very co
nsistent color acros
s the led man
ufactured
to a tigh
t chip binn
ing sp
ecificatio
n. This insu
res that th
e first LED
produ
ced an
d the LE
D produ
ced fiv
e ye
ars from
now
to th
at spe
cific
ation will be the same an
d the cu
stom
er w
ill see
no differen
ce in
ligh
t co
lor. Low
qua
lity led’s will vary in color in
the same prod
uctio
n run be
caus
e of lo
ose binn
ing
requ
irem
ents. S
ince
you
r ey
e can de
tect a 3% variatio
n in color differen
ce tigh
t binning
is extremely
impo
rtan
t with
led man
ufacturing
.
Lum
ens
Per
Wat
t: The
amou
nt of light delivered
for do
llars paid pe
r ho
ur to
ope
rate a LED
. This is a
mea
sure of e
fficienc
y.
Dri
ve C
ircu
its:
Pow
er F
acto
r (p
f) /
Vol
t A
mps
: This is th
e ineffic
ienc
y of th
e DC driver to
con
vert th
e AC po
wer to
DC
power and
the ne
ed to
com
pens
ate for this by us
ing a larger tr
ansformer. E
xample CP
WP1
.82p
f inp
ut
power is 7.0 w
atts App
aren
t pow
er is 8.5 W
atts. T
he cus
tomer m
ust s
ize the tran
sformer using
8.5
watts. (no
te: the
cus
tomer only pa
ys fo
r the 7.0 watts of e
lectricity used)
Cost
to
Ope
rate
a S
yste
m: T
ake an
amp prob
e an
d mea
sure th
e prim
ary am
ps on the system
. Divide this
numbe
r by
100
0. M
ultip
ly th
is num
ber by
the elec
trical rate ex
pressed in KWH kilo
watt h
our. ( ie .1
5c
kwh) to
determine the co
st per hou
r to run
the system
. Multip
ly by ho
urs on
per night, w
eek, yea
r to
determ
ine op
erating co
st.
Surg
e Pr
otec
tion
: The
ability of a solid state circu
it to han
dle a prolon
ged increase in voltage
abo
ve
norm
al ope
ratin
g co
ndition
s. Surge
protectors can also
be installed on
the prim
ary side
of a
tran
sformer
to add
add
ition
al protection from
line
spike
problem
s.
Tran
sien
t Spi
ke P
rote
ctio
n: The
ability of a solid state circu
it to han
dle qu
ick spikes in
voltage
abo
ve
norm
al ope
ratin
g co
ndition
s.
Ope
rati
ng R
ange
: The
ran
ge in
inpu
t voltage
a solid state circu
it is designe
d to ope
rate on. Cast lighting
8-‐24
VAC or VDC
FCC
Clas
s A
& B
rad
iate
d em
issi
ons. The
design of a solid state circu
it an
d testing of th
e fin
al design by
an
accredited labo
ratory elim
inating an
y radio interferen
ce th
at th
e circuit c
ould emit which
cou
ld
interfere with
hou
seho
ld app
lianc
es suc
h as garag
e do
or ope
ners, w
i-‐fi, remote co
ntrols, life
safety
equipm
ent e
tc.

34
Cast Lighting Te
rminolog
y
[AN
SWER
S
HEE
T O
CTO
BER
2014
]
3 Of 4
Alu
min
um e
lect
roly
tic
capa
cito
rs: A
n inex
pens
ive low life electrical com
pone
nt used to store ene
rgy
and de
liver to
an LE
D a con
sisten
t DC po
wer sup
ply. W
ithou
t this the led wou
ld rap
idly blin
k.
Conf
orm
al C
oati
ngs: This is a sea
lant place
d ov
er a circu
it bo
ard to protect th
e so
lder jo
ints, resistors
etc from
moisture an
d intrus
ion by
the elem
ents.
Elec
tric
al C
ompo
nent
Sel
ecti
on: V
oltage ra
nge an
d op
erating temperature of the
solid state
compo
nents de
term
ine the long
evity
of the
circu
it an
d the ultim
ate co
st of the
produ
ct. Y
ou get w
hat
you pa
y for.
E-‐W
aste
: (Elec
tron
ic w
aste). Th
e ne
edless accum
ulation of fa
iled so
lid state circu
its in
land
fills, cau
sed
by irresp
onsible man
ufacturers produ
cing
produ
cts an
d distribu
tors sellin
g prod
ucts th
at w
ill fa
il so
oner
than
they
sho
uld. The
se produ
cts co
uld be
designe
d differen
tly but are not. T
his is don
e with
the go
al of
mak
ing a fast buc
k an
d fooling the us
ers into believing
the prod
ucts are better than
actua
lly designe
d.
Ther
mal
Man
agem
ent: The
ability to tr
ansfer hea
t gen
erated
from
the LE
D to
the ou
tside of th
e fix
ture
in order to
provide
an op
erating tempe
rature th
at doe
s no
t ove
rhea
t the
led a n
d achiev
e the L-‐70
life of
the LE
D.
Ove
rhea
ting
a L
ED: If a
led is drive
n too ha
rd w
ith DC cu
rren
t the
led will produ
ce brigh
t light in
itially
but the
ove
rhea
ting will cau
se th
e LE
D after a half h
our or so to dim
inish in ligh
t outpu
t and
dim
inish the
life of th
e led an
d the brightne
ss le
vel con
side
rably. This also
cau
ses co
lor sh
ift w
hich
cau
ses va
riations
in th
e co
lor ou
tput from
fixture to fixture on
a jo
b. This can also
lead
to catastrop
hic failu
re in
a sho
rt
time sp
an.
Ther
mal
Fol
d Ba
ck: T
he m
onito
ring
of a
n led’s op
erating tempe
rature to
mak
e su
re it doe
s no
t ove
rhea
t an
d da
mag
e the led. If th
e led do
es rea
ch ove
rhea
t con
ditio
ns th
e drive circuit p
owering the leds
redu
ces the cu
rren
t to a po
int w
here th
e op
erating tempe
rature is accep
tab le thus
elim
inating po
tential
heat dam
age to th
e led’s.
A L
ight
Eng
ine: The
integrated
com
bina
tion of both the drive circuit a
nd th
e led into one
com
pone
nt
usua
lly affixed
to a lu
minaire.
Junc
tion
Tem
pera
ture
: This is th
e high
est o
peratin
g tempe
rature of the
actua
l sem
icon
ductor (L
ED) in
an electronic de
vice
. This is highe
r than
the case te
mpe
rature and
the tempe
rature of the
parts exterior.
The mea
suremen
t of the
amou
nt of h
eat trans
ferred
from
the junc
tion multip
lied by
the junc
tion to
case th
ermal resistanc
e. Since
it is im
possible to
mea
sure beh
ind a led that is affixed
to a FR4
(green
fib
erglass elec
tron
ic boa
rd) o
r alum
inum
boa
rd a scien
tific fo
rmula is used to determine the
tempe
rature beh
ind the led. This is th
e tempe
rature th
at is used to determine the life of th
e led ov
er
time.
Ther
mal
Cou
ple:
This is a tw
o wire prob
e that is attache
d to a le
d bo
ard an
d elsewhe
re on the fix
ture to
de
term
ine op
erating tempe
rature during testing. This thermal cou
ple can also
be integrated
in a circu
it bo
ard for the pu
rpos
e of m
onito
ring
hea
t con
ditio
ns of a
solid state circu
it bo
ard.

35
Cast Lighting Te
rminolog
y
[AN
SWER
S
HEE
T O
CTO
BER
2014
]
4 Of 4
Ther
mal
Pat
h: The
ability to m
ove the LE
D hea
t from th
e led inside
the fix
ture to
the ou
tside air.
Gap
Pad
: This is a th
ermally con
ductive ga
sket like
material u
sually .0
10” thick us
ed to
bon
d a led bo
ard
to th
e un
derlying
fixture bo
dy or casting. The
purpo
se is to
dissipa
te hea
t gen
erated
by the LE
D.
Ther
mal
Gre
ase:
This is a th
ermally con
ductive grea
se m
aterial u
sed to bon
d a led bo
ard to th
e un
derlying
fixture bo
dy or casting. The
purpo
se is to
dissipa
te hea
t gen
erated
by the LE
D.
Ther
mal
Tra
p: A le
d lig
ht eng
ine that has no way
of d
issipa
ting the he
at gen
erated
by a led an
d driver to
the ex
terior surface
of a
fixture. This is m
ost c
ommon
with
Drop In M
r 16
LED
lamps
which
are enc
ased
in a poc
ket o
f air in
an old style ha
loge
n fix
ture w
ith little or no
thermal path to th
e ex
terior of the
fix
ture.
Puls
e-‐w
idth
mod
ulat
ion
(PW
M) d
imm
ing:
This is a w
ay to
con
trol th
e po
wer sup
plied to an elec
trical
device
by essentially
con
trollin
g the width ( nu
mbe
r) of w
ave form
s su
pplying a tran
sformer. T
his PW
M
dimming can be
used on
the prim
ary po
wer sup
ply feed
ing a cast to
roid tr
ansformer pow
ering an
y cast
led fix
ture to
allo
w dim
ming of th
e led’s man
ually
by a ho
meo
wne
r. The
PWM dim
mer m
ust b
e a MLV
( m
agne
tic Low
Voltage
dim
ming style on
ly NOT an
d elec
tron
ic PWM dim
mer
)
Toro
id: A
circu
lar mag
netic
winding
that ta
kes prim
ary po
wer and
dep
ending
on the nu
mbe
r of w
inding
s of cop
per wire crea
te a m
agne
tic field that in
ducts a po
wer on the seco
ndary to produ
ce a lo
w voltage
cu
rren
t which
can
be 12
,13,14
,15,16
…..e
tc. v
olts. A
toroid is a fa
r more effic
ient w
inding
than
a
compa
rable EI style tr
ansformer. T
oroid’s us
ually
ope
rate in
the 93
% efficienc
y rang
e. C
ast L
ighting will
not w
arranty an
y LE
D produ
ct ove
r on
e ye
ar th
at is not run
on a catst lighting tran
sformer bec
ause
poorly m
anufactured EI tr
ansformers crea
te une
ven po
wer th
at can
cau
se spike
s an
d da
mag
e LE
D drive
r circuitry.
Tran
sfor
mer
eff
icie
ncy:
The
efficient use of the
electrical current to
produ
ce a lo
w voltage
current. A
93
% efficient tran
sformer uses 7%
of the
pow
er con
sumed
to create the low voltage
pow
er.
A D
rive
r: This is a electrical circu
it bo
ard mad
e up
of c
ompo
nents that ta
ke th
e AC ( a
lternating Cu
rren
t po
wer) a
nd tu
rn th
e AC po
wer in
to DC po
wer w
hich
then
is used to drive
the LE
D. C
ast L
ighting ha
s the
driver place
d in th
e fix
ture nex
t to the LE
D.
Dro
p-‐In
LED
pro
duct
s. This term
defines a series of le
d lig
ht eng
ines (E
ngine is a drive
r an
d led toge
ther)
that fit into ex
istin
g lega
cy of o
ld halog
en produ
cts. Drop-‐Ins take
the place if MR1
6, M
R11, Par 36, S-‐8
and othe
r ha
loge
n lamp form
factors. The
se drop-‐in produ
cts for the first time in ligh
ting history ha
s the
fixture determined
the lamp form
factor. In the pa
st a la
mp was dev
elop
ed and
the fix
ture
man
ufacturers designed arou
nd th
e lamp.
Lega
cy F
ixtu
re. T
hese are fixtures using
old halog
en and
incand
esce
nt la
mp de
sign
s su
ch as MR-‐16
, MR-‐
11, P
ar-‐36, S-‐8, S
CB etc.

36
Why
Tak
e th
e R
ISK
?•
Hal
ogen
Fix
ture
s w
ere
NEV
ER d
esig
ned
for
LED
s
Am
bien
t Ta=
21º
C (7
0ºF)
Am
bien
t Ta=
21º
C (7
0ºF)
CA
ST L
ED F
ixtu
res.
.. D
esig
ned
for
the
Tech
nolo
gy.
CA
STIn
tegr
ated
43º
C (
109º
F) L
ower
Su
rfac
e Te
mpe
ratu
re
26º
C (
78ºF
) Low
er
Surf
ace
Tem
pera
ture
CA
STIn
tegr
ated
Dro
p-In
H
alog
en
Dro
p-In
H
alog
en
Hol
ds H
eat
Man
ages
Hea
t
87ºC
(189
ºF)
PCB
MR
16 L
ED7.
4W27
1 Lu
men
70ºC
(158
ºF)
PCB
MR
16 L
ED5.
7W30
3 Lu
men
44ºC
(111
ºF)
PCB
CA
ST L
ED4.
3W22
9 Lu
men
44ºC
(111
ºF)
PCB
CA
ST L
ED4.
3W22
9 Lu
men
• H
ot L
EDs
= H
ot D
rive
r =
Pre
dict
able
Fai
lure
Order # CLTM$19.95 USD