cars project administrators user guide
TRANSCRIPT

CARS Project
Administrators
User Guide

CARS Project Admin User Guide 2 of 36
Contents Version Control ................................................................................................................................. 3
About CARS ....................................................................................................................................... 4
Login ................................................................................................................................................. 5
CARS Menu ....................................................................................................................................... 5
Change your password ...................................................................................................................... 6
My Profile.......................................................................................................................................... 6
Service Registrations ......................................................................................................................... 7
Select your organisation ................................................................................................................ 9
Approve Registrations ..................................................................................................................... 10
Email Templates .............................................................................................................................. 13
Email Placeholders....................................................................................................................... 15
Email Footer ................................................................................................................................ 16
Creating a New User ........................................................................................................................ 16
Glossary .......................................................................................................................................... 17
Manage Projects.............................................................................................................................. 18
Manage Surveys .............................................................................................................................. 18
Adding New Surveys .................................................................................................................... 18
Editing Existing Surveys ............................................................................................................... 18
Assigning Survey Questions to Criteria ......................................................................................... 19
Setup a Review Day ......................................................................................................................... 21
Adding Surveys to Reviews .............................................................................................................. 26
Completing a Review ....................................................................................................................... 27
Service User................................................................................................................................. 27
Accessing your review .............................................................................................................. 27
Checklist .................................................................................................................................. 27
Action Plan .............................................................................................................................. 28
Standard Comments ................................................................................................................ 28
Summary and Signoff ............................................................................................................... 28
Reviewer ..................................................................................................................................... 29
Checklist .................................................................................................................................. 30
Standard Comments ................................................................................................................ 30
Summary and Signoff ............................................................................................................... 31
Populate Report....................................................................................................................... 31
Proof Reading .................................................................................................................................. 32
After Proof reader Complete ........................................................................................................... 33

CARS Project Admin User Guide 3 of 36
After Service Upload ................................................................................................................ 34
Reviewer Attendance Certificate ..................................................................................................... 36
Version Control
Version Date Author
Draft 1.0 13th June 2017 Pete Rogers

CARS Project Admin User Guide 4 of 36
About CARS
The Royal College of Psychiatrists College Centre for Quality Improvement collects data from
hundreds of health and social care organisations to support its accreditation and peer-review
processes.
The accuracy and availability of this confidential information is paramount and as a result the CCQI
has spent the last 3 years developing a centre wide information management system to support our
work.
The College Accreditation and Review System (CARS) will eventually manage the information from all
of the CCQI’s 19 accreditation and peer review projects.
Services will have their own dashboards, enabling them to access their current and previous cycle’s
reports. They will be able to directly compare their performance and the CCQI will be able to collate
information for services

CARS Project Admin User Guide 5 of 36
Login
You will be provided with a username and password to access CARS. You should receive an email
with your account details. The address of the live CARS site is
https://cars.rcpsych.ac.uk/
Figure 1 User Account Email
CARS Menu
Once you have logged you will see the Project Admin user’s menu across the top of the page. The
security on CARS is role based each role (for example Project Admin or Service User) will have access
to different functions on CARS these functions are accessed from the menu. Your user account will
be setup with access to just the project that you work on.
Figure 2CARS Menu
This manual describes the functions of each of these menu items in detail and in the order in which
you are most likely to use them on a daily basis.

CARS Project Admin User Guide 6 of 36
Change your password
When you login for the first time you may want to change your password to something you can
remember, you can do this by selecting change password from the My Profile menu. Following the
on-screen instructions to create a new password
Figure 3 Change Password
My Profile
You can use the My Profile page to update your contact details on CARS.

CARS Project Admin User Guide 7 of 36
Service Registrations For a new service to use CARS for the first time they must use the Registration form on the CARS
website. This can be found by clicking Join Us on the CARS home page. It is important that you
understand the registration process so that you can advise/help services when they are registering.
A service can save their registration and come back to it at a later date, if they do this then they will
need to the use the email and password they provided when they started their registration.
Figure 4Service Registration start new or continue existing registration
To start a new registration, they simply click the Start New Registration button.
Figure 5 Service Registration Part 1 – Select Project

CARS Project Admin User Guide 8 of 36
Figure 6 Service Registration Part 1 – Organisation Details
Part 1 of the registration screen has 3 sections that capture information about the organisation, the
service(s) and the contact who will be added as a user to CARS once the registration has been
approved.

CARS Project Admin User Guide 9 of 36
Select your organisation
This is a very important aspect of CARS each organisation and service must be uniquely identified on
the CARS system across all the projects that the service is working on. This identifier facilitates cross
project reporting on service progress. CARS is pre-populated with a large number of organisations
and service details but as new services come on board they must be added to CARS in a controlled
manner.
Figure 7 Service Registration Part 1 – Select your Organisation
The organisation field on the registration page has all the organisations currently working on CARS
projects. The list has an auto complete feature so the service can start typing in their organisation
name and the list will automatically filter based on what they type.
So as shown below if we start typing enf the organisation list is filtered to show matches, in this case
there is just one Barnet, Enfield.
Once they have gone through the rest of the application form and submitted it they will see the
following message and an email will be sent to the project admin users informing them of the new
registration.

CARS Project Admin User Guide 10 of 36
Approve Registrations
As a project administrator you need to approve each registration, to do this login to CARS and select
“View Registrations” from the Admin menu.
Figure 8 View Registrations
This page will list all the submitted registrations that have not yet been approved.
Figure 9 Submitted Registrations
Click the pencil icon to review the registration. You will notice on this registration because we
entered new organisation and service details the screen shows manually entered next to the
organisation and service name.
Figure 10 Manually entered organisation/service

CARS Project Admin User Guide 11 of 36
As project administrator, you need to approve the registration and also check and approve the new
service details. When you click the “Approve this registration” button at the bottom of the screen,
you will be shown the following page.
Figure 11 Approve registration
On this screen, you can double check that the new service details they have entered are not already
on CARS. It may be that they have for example miss spelt the name or just not noticed it in the list.
Once you approve the registration you will see the following.
Figure 12 Registration Approved

CARS Project Admin User Guide 12 of 36
The service user will have been sent an email similar to the one shown below
Figure 13 Confirmation email to service
CARS Project Admin User Guide 13 of 36
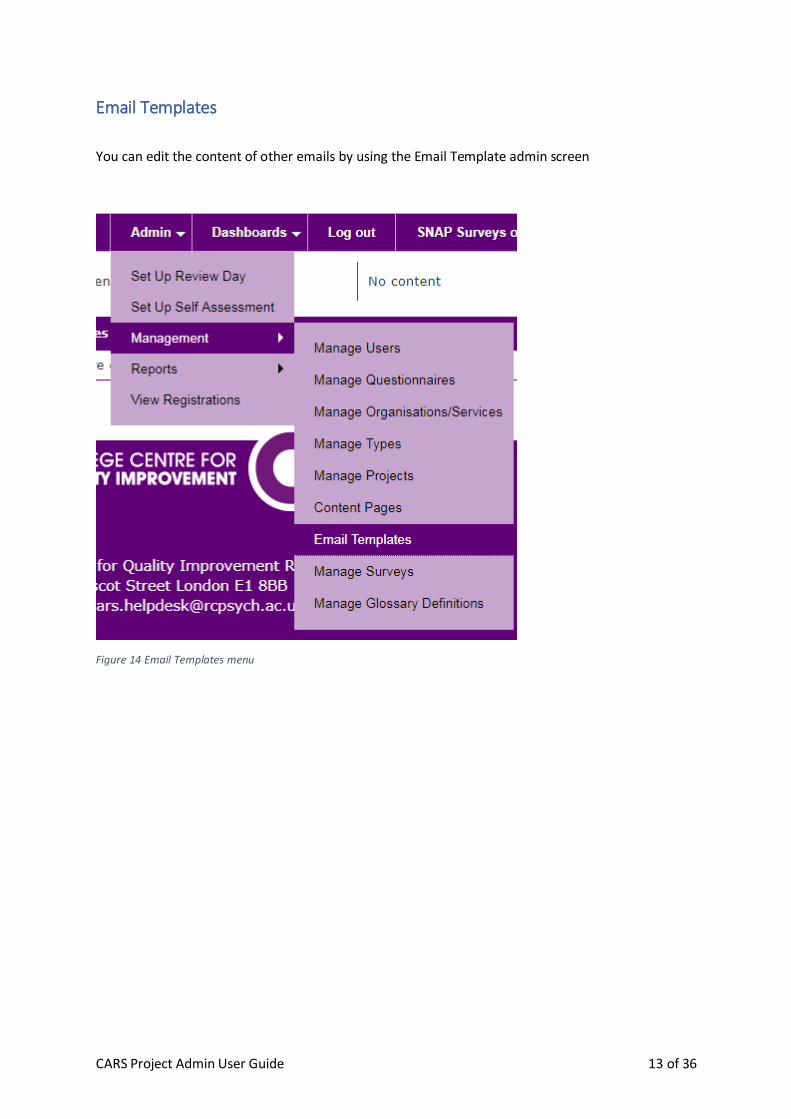
Email Templates
You can edit the content of other emails by using the Email Template admin screen
Figure 14 Email Templates menu

CARS Project Admin User Guide 14 of 36
Figure 15 Email Template Edit Screen
1. Select the template you want to edit from the Template dropdown
2. You can amend the Subject of the email
3. You can amend the text using the editor (see below for placeholder information)
4. If you want to attach a file to the email when it goes out click the choose file button and
upload the file. Note this is a fixed file the content of the file cannot be changed when the
email is sent.

CARS Project Admin User Guide 15 of 36
Email Placeholders Placeholders are used to insert data from CARS into the email template for example the Name of the
person or the SiteName etc..
Each email template will have specific placeholders that are available to it. To insert a placeholder,
click the placeholder icon on editor menu.
Figure 16 Email Placeholders
Then select the placeholder from the dropdown list and click OK button to insert it into the
template.

CARS Project Admin User Guide 16 of 36
Email Footer The email footer section allows you to change the content of the email footer that is sent for your
project. This is the footer that is sent with all emails for your project not just the one you are
currently editing.
Figure 17 Email Footer
Creating a New User You must be either a Project Worker or Project Admin to see these screens.
If Project Admin go to Admin > Management > Manage Users
If Project Worker go to Admin > Manage Users
From this page you can view all existing user (filtered to your specific project)
You can edit each user’s details if required along with resetting passwords.

CARS Project Admin User Guide 17 of 36
You may also create new users by clicking the ‘Create User’ button at the bottom of the page.
Here you can add the users details and assign a Role.
Glossary To view these pages you must be logged in as a Project Admin.
Go to Admin > Management > Manage Glossary Definitions
From here you can add “tooltip” text that will be displayed throughout the system, when a user
hovers over certain words. For example if one was to add the term “CARS” along with the definition
“College Accreditation and Review System” if that phrase appears anywhere in the system it will be
displayed like:

CARS Project Admin User Guide 18 of 36
Manage Projects To view these pages you must be logged in as a Project Admin.
Go to Admin > Management > Manage Projects
From here you can add Cycles, add Registration Information, and add Membership Payment Options
all of which must be set up before you ask for new registrations.
Manage Surveys
Adding New Surveys To view these pages you must be logged in as a Project Admin.
Go to Admin > Management Manage Surveys
Here you can create new surveys by adding details and uploading .SIF files to CARS. These surveys
can then be used on the reviews.
Editing Existing Surveys On the Survey Management screen if you scroll down you will see a list of any existing surveys.
Here you can view the questions from the survey along with deleting the survey.

CARS Project Admin User Guide 19 of 36
If you click the ‘View/Update’ link you will see the follwing options:
These must all be set for the survey to work correctly.
Assigning Survey Questions to Criteria On the Survey Management screen you can assign Specific Survey Questions to individual Criteria, to
do this you must click on the ‘View Questions’ link on the relevant Survey. Then towards the bottom
you will see a list of all the questions for this Survey.

CARS Project Admin User Guide 20 of 36
Clicking the ‘Assign Criteria’ link will then allow you to assign the questions:
You will need to search for the relevant Criteria in the list on the left and then add it to the selection
on the right using the “arrows”.
The question and the resulting responses will then be displayed on the Report/Workbook

CARS Project Admin User Guide 21 of 36
Setup a Review Day
Select Set Up Review Day from the admin menu
Figure 18 Setup Review Day menu
Figure 19 Review Day Details Screen

CARS Project Admin User Guide 22 of 36
The Review Details screen allows you to specify the information about the Review Day, namely:
1. Select the Project (If you only manage one project on CARS then this list will just have that
project in it)
2. Select the organisation that the service you want to set up the review day belongs to.
3. The Service list will filter to show all the services associated with the selected organisation, if
the service does not exist then you will need to exit this screen and go to the Manage
Organisations/Services screen and set up the service before you can continue to setup the
review day.
4. If the service has already had a review day on CARS then the date of this review will now be
shown. If not then it will display No Reviews Found.
5. Select the cycle number for this review
6. Select the review type (depending on your project setup some projects may only have the
one review type)
7. Select the date for the review, you can either use the date picker or type the date in as
dd/mm/yyyy
8. The workbook open date will default to 4 months prior to the review date. This is the date
when the workbook becomes available on CARS for the service to complete
9. Service deadline will default to 1 month before the review date. This is the date when the
work book will be closed for the service.
10. For contact name click the select button and choose from the list of users on CARS setup for
that service and project (simply click the select link next to the person’s name). This will then
populate the contact details for that person on the Review Details Screen. This is the person
who automated emails from the CARS system will be set to in relation to this Review Day.

CARS Project Admin User Guide 23 of 36
11. You now need to select the Reviewers for the Review Day. To do this click the Select button
beneath reviewers.
Figure 20 Select Reviewer

CARS Project Admin User Guide 24 of 36
Select the reviewer from the dropdown list (only reviewers not from this Service will be
visible, you cannot review your own service) and click Add Reviewer button. The selected
reviewer will appear in the table as shown below. Depending on your project setup you will
either see a screen like the one below with 3 peer slots available.
Figure 21 Select Reviewers Role
Or you will see one like the screen shot below, where you have; Lead, Deputy Lead,
Reviewer, Patient Reviewer and RCPsych.
Figure 22 Alternative Reviewer Roles

CARS Project Admin User Guide 25 of 36
Reviewer Roles
The roles are purely for record keeping, on the majority of reports/workbooks there will be a
print out of the ‘review team’ at this point it will be listed who was the Lead reviewer etc.
12. Select the Project Team Contact from the drop down list, this user will act as an admin for
this visit whilst also becoming the main contact for other users i.e. contact details appearing
on emails.
13. You can if you want to add any general comments about the review day these will be visible
to any user which has access to the edit review page.
14. If you wish to opt out of scheduled email notifications (this means any emails that would
normally be set at predetermined times relating to this specific review will not be sent, this
includes ‘Workbook Open Notifications’ and ‘Upcoming Review Survey Responses’) then
check this box
Once you have entered all the information about the review day click the Save button. This will
create the review on CARS, at this point CARS will email:
The user assigned as the ‘Contact’ telling them a review has been created, detailing dates
etc.
Every reviewer assigned to the review will receive an email with details of the upcoming
review.
You will be asked to check your survey numbers if you have any configured for this project.

CARS Project Admin User Guide 26 of 36
Adding Surveys to Reviews Once a Review has been created you will see these options:
These are all the current available Project Surveys. Here you can enter how many replies you wish to
receive for this particular Review.
On the Review Dashboard page you will see a link ‘Survey Dashboard’ (if any surveys have been
assigned)
Clicking this link will allow you to view the following screen:
On this page you can view the Survey Questions, the Response Times for each received survey
response. Clicking the ‘Survey’ link will take you to the SNAP survey. To the right is where you would
add the URL for your Survey.

CARS Project Admin User Guide 27 of 36
Completing a Review
Service User
Accessing your review
Once a workbook has been created and is “open” you will receive an email notifying you that the
checklist is available.
Log into the system, from the home page you will see the ‘My Services’ section displaying any active
reviews, you can click this link to go straight to the checklist.
Checklist
The checklist page will look like this:
1. This will display the percentage of completed standards
2. The majority of projects have a section for contextual questions, if yours does this is where it
will appear.
3. These are the different sections for this review
4. Here you will see the date of review along with review details
5. These are the different criteria for this specific standard
6. This is a list of the standards for this section
7. Here you can upload evidence for the review
8. This is where you enter a ‘score’ for each criteria
9. Here you can add a comment/upload specific evidence (if permitted) for this criteria

CARS Project Admin User Guide 28 of 36
Action Plan
If available to your project, you will have access to ‘Action plans’. If you select ‘Not Met’ as a
response for any criteria you will see a link below the score:
Clicking this link will allow you to enter an action plan for this specific criterion including Plan,
Outcome, Notes, Completed dates and Lead person.
At the bottom of the checklist page you will see a ‘Print Action Plans’ button, clicking this will
generate a document displaying all the action plans and their individual details.
Standard Comments
Towards the bottom of the checklist page there will be a section for adding comments, along with
selecting a comment type such as ‘Area of Achievement’ or ‘Area of Improvement’.
These will then be printed out onto the Report/Workbook.
Summary and Signoff
Once you have completed the checklist, you can click the button at the bottom of the page ‘View
Summary & Signoff’.
This page will display any missing responses or comments; if you have anything missing it will
prevent you from signing off the review.
Once you have no missing comments/responses you can click the button ‘Sign Off’ (you will
prompted letting you know after this stage you will no longer be able to make any changes to this
review).
Once signed off your role in this review is finished, you may close the website or continue with
another review.

CARS Project Admin User Guide 29 of 36
Reviewer Once logged into CARS you must go to the dashboards page to view any available Reviews.
From here you can filter all reviews by Service name, Cycle, Review Type and Review Status
If there is an available review you can click the ‘View Checklist’ link to carry on with the review
process.

CARS Project Admin User Guide 30 of 36
Checklist
The checklist page will look like this:
1. This will display the percentage of completed standards
2. The majority of projects have a section for contextual questions, if yours does this is where it
will appear.
3. These are the different sections for this review
4. Here you will see the date of review along with review details
5. This is a list of the standards for this section
6. These are the different criteria for this specific standard
7. Here you can see the Service’s responses
8. This is where you can view any evidence uploaded by the Service
9. Clicking this button will copy the Service’s scores
10. Here you can manually enter scores for each individual criteria
11. Here you can see comments made by the Service
Standard Comments
Towards the bottom of the checklist page there will be a section for adding comments, along with
selecting a comment type such as ‘Area of Achievement’ or ‘Area of Improvement’.
These will then be printed out onto the Report/Workbook.

CARS Project Admin User Guide 31 of 36
Summary and Signoff
Once you have completed the checklist, you can click the button at the bottom of the page ‘View
Summary & Signoff’.
This page will display any missing responses or comments; if you have anything missing it will
prevent you from signing off the review.
Once you have no missing comments/responses you can click the button ‘Populate Report’ to
progress the review.
Populate Report
On this page you can enter details into the report such as ‘Review Team Feedback’ or ‘Key Strengths
and Achievements’. Also here you can add ‘Interviewees’ if required by your project. This
information will then be displayed on the Report/Workbook.
As long as the Review has been signed off by the Service you may now send the review for proof
reading. To do this click the ‘Send for Proof reading’ button at the bottom of the page, once the
review has been sent your role in this review is complete, you may close the website or continue
with another review.

CARS Project Admin User Guide 32 of 36
Proof Reading To Proof Read a review you log into CARS using a Project Worker account (or Project Admin
account), then go to Dashboards > Proof Reader
The Proof Reader page will look like this:
From this page you can view any reviews available to Proof Read by clicking the ‘View’ link on the
right side. After clicking ‘View’ you will be given the option to download the report and make
amendments is necessary:
Once you have finalised your report you can re-upload it on the same page:

CARS Project Admin User Guide 33 of 36
Once you have uploaded the updated report you can then click the ‘Complete’ button at the bottom
of the page. The Review has now been Proof read.
After Proof reader Complete
Sign in as Project Team Contact
Then on the Dashboard screen find the relevant visit and click ‘Edit’
At this point you will see one of two buttons:
1, (“Sign Off Report”)
From this point you can either resend the report to the proof reader or by clicking ‘Sign Off report’ it
will finish this stage of the process. You can now go to the section ‘After Service Upload’ further
down the document
2, (“Send to Service”)
You will then see a screen with options similar to this:

CARS Project Admin User Guide 34 of 36
Here you can re-send for a second proof reading or clicking the ‘Send to Service’ will complete this
stage and return to the site user.
After that stage, the site user will need to log back in and find the relevant visit and click ‘View
Summary & Signoff’ at the bottom of the page, then click ‘Report Foreword’.
Here they can enter a foreword that will be placed into the report automatically.
They then need to download ‘File sent to service’ by clicking the ‘View File’ link
Make any changes they think are required and once happy they should then upload the updated
report.
Once the updated report has been uploaded this should then lock the visit for the site user.
After Service Upload
At this stage the Project contact will need to sign in, find the relevant visit in the dashboard and click
the ‘Edit’ link in the Report column.
At this point they can edit the report, send to service again if they are not happy with the current
report or clicking ‘Sign Off Report’ will finish this stage of the process.
After the report has been signed off, the project contact should then click ‘Edit Draft Report’
On this screen you will see a few options:

CARS Project Admin User Guide 35 of 36
First the user must download and make any changes to the report, once happy they can then upload
the report selecting the ‘Admin Draft’ option to store it in the audit trail.
Then upload the report selecting the ‘Admin SignOff’ option. At this point there should be only one
option left:
This means the report has been sent to the ‘Committee review’.
For this the project team contact/admin user must go to Dashboards > Committee Review
On this screen you should see all available visits awaiting review:
Click view next to the relevant visit, here you can give the site a status and add a comment.
Then Click ‘Update Review Status’
Then the project contact should go back to Dashboards find the relevant visit and click ‘Edit’ once
again. Once here you can upload the Final Report.

CARS Project Admin User Guide 36 of 36
The visit should now be set to which ever status you selected:
Reviewer Attendance Certificate After the review has been Proof Read on the Sign Off page at the bottom there will be a list of all
Reviewers associated with this review. From here you can send out the Attendance Certificates.
You can select which Reviewers should receive a certificate then clicking the ‘Send Certificate’
button will email each selected Reviewer the relevant document.
Reviewers can only receive one certificate per review and therefore once it has been sent that
Reviewer is then “locked” from receiving another