capture user - meridian - meridian credit union - personal 1 1. preparing cheques for deposit before...
TRANSCRIPT

Express Cheque Deposit Guide:
Capture User

Contents
1. Preparing Cheques for Deposit ...................................................................................................... 1
2. Creating a Deposit ........................................................................................................................... 2
3. Deleting an Item from a Deposit ..................................................................................................... 3
4. Correcting Deposit Errors ............................................................................................................... 3
5. Entering Item Reference Information (Optional) ............................................................................ 8
6. Editing Deposit Information ............................................................................................................ 9
7. Editing a Deposit Declared Amount ............................................................................................... 9
8. Deleting a Deposit ........................................................................................................................... 9
9. Adding Deposit Notes ................................................................................................................... 10
10. Viewing Deposit Notes .................................................................................................................. 10
11. Completing a Deposit .................................................................................................................... 10
12. Locating an Existing Deposit ........................................................................................................ 11
13. Reopening an Open-Balanced or Open-Disapproved Deposit ................................................... 11
14. Scanning Best Practices ............................................................................................................... 12
15. Generating an Online Deposit Summary Report ......................................................................... 13
16. Generating an Online Deposit Items Detail Report ..................................................................... 13
17. Generating an Online Deposit Details Report .............................................................................. 14
18. Appendix A – Canadian and US Item Examples for Item Type Reclassification ....................... 15
19. Appendix B – Deposit States ........................................................................................................ 21

PG 1
1. Preparing Cheques for Deposit
Before scanning the items, prepare the cheques for deposit. To deposit cheques through Express Cheque
Deposit, ensure:
Cheques are not stale or post-dated.
Cheques contain a full and complete Magnetic Ink Character Recognition (MICR) line. The MICR
line is located at the bottom of a cheque contains the cheque number, transit number, and account
number of the individual or entity the cheque is drawn on. See Figure 1.
Figure 1: Magnetic Ink Character Recognition (MICR)
Cheques are signed and any changes made are initialed by the person or entity whose account the
cheque is drawn on.
The body (handwritten) and figure (numeric) amounts match.
Cheques are of the following currency and item types that can be deposited using Express Cheque
Deposit:
Canadian dollar items acceptable for deposit: Canadian dollar cheques, drafts, money
orders, and Receiver General Warrants drawn on a Canadian Financial Institution
US dollar items acceptable for deposit: US dollar cheques, drafts, or money orders drawn
on a financial institution domiciled in Canada or the United States.
Canadian Cheques are endorsed by the payee, or ‘For Deposit Only’ and the Payee account
number noted on the back of the item.
US dollar cheques are endorsed by the payee.
The following items cannot be deposited through Express Cheque Deposit: Canada Savings Bonds, Canadian
or US dollar traveller’s cheques, US Domestic Postal Service Money orders, or cheques in other foreign
currencies.

PG 2
Separate cheques by currency (i.e. Canadian or US dollar). Canadian and US dollar cheques must be
deposited into the correct account for the item’s currency. Further separate any items that should be
returned to another financial institution if applicable.
Separate cheques by size.
Repair damaged items and remove staples and paperclips as these will cause the scanner to jam. If items
have amounts that are unclear or written in gel ink, write “taken as $XX.xx” on the top right corner of the
item. Do not modify the amount, the date, or Payee fields on the item.
Prepare a tape listing of the deposit items. The tape listing should have each item included in the deposit
as well as the grand total of the deposit amount.
Write the account number the cheque is to be deposited to on the back of each cheque or use a deposit
stamp if applicable.
2. Creating a Deposit
To create a new deposit on Express Cheque Deposit, Capture Users proceed as follows:
1. Log in to the Express Cheque Deposit application.
2. Enter the Secure Site user name and password when prompted.
3. Click the Create New Deposit ( ) tile on the home page.
4. Click the Location ( ) drop-down list and select the business location for the deposit if
applicable. If there is only one location available, that location will be the default.
The location selected will be the default location for any deposits created during the current session. To create
a deposit for a different location, the user can select a different location to create the new deposit.
5. Click the Account Number ( ) drop-down list and select the applicable account and currency
for the items in the deposit:
‘03’ + CAD-DB in the account number represent a Canadian Dollar account.
‘04’ + USD-DB in the account number represent a US dollar account.
If more than one account was configured for each currency, select the applicable account for the deposit.
For example:
03-XXXXXXXXX-001-CAD-DB = Canadian dollar account 1
03-XXXXXXXXX-002-CAD-DB = Canadian dollar account 2
PG 3
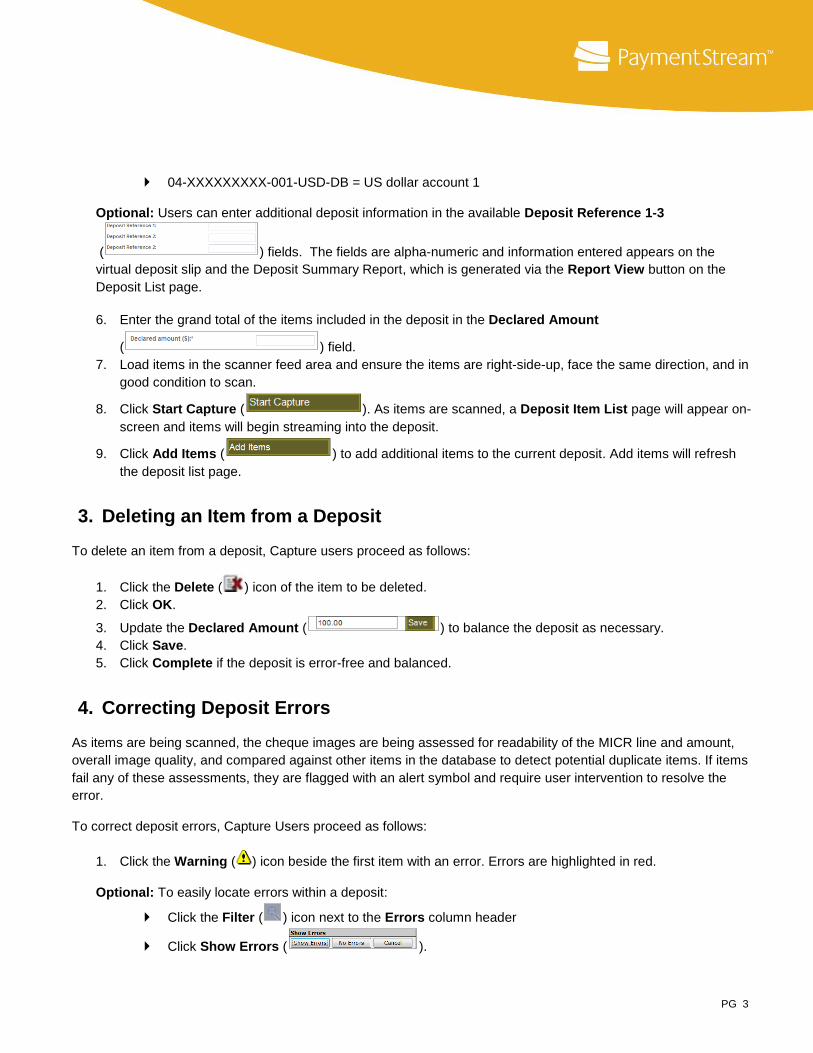
04-XXXXXXXXX-001-USD-DB = US dollar account 1
Optional: Users can enter additional deposit information in the available Deposit Reference 1-3
( ) fields. The fields are alpha-numeric and information entered appears on the
virtual deposit slip and the Deposit Summary Report, which is generated via the Report View button on the
Deposit List page.
6. Enter the grand total of the items included in the deposit in the Declared Amount
( ) field.
7. Load items in the scanner feed area and ensure the items are right-side-up, face the same direction, and in
good condition to scan.
8. Click Start Capture ( ). As items are scanned, a Deposit Item List page will appear on-
screen and items will begin streaming into the deposit.
9. Click Add Items ( ) to add additional items to the current deposit. Add items will refresh
the deposit list page.
3. Deleting an Item from a Deposit
To delete an item from a deposit, Capture users proceed as follows:
1. Click the Delete ( ) icon of the item to be deleted.
2. Click OK.
3. Update the Declared Amount ( ) to balance the deposit as necessary.
4. Click Save.
5. Click Complete if the deposit is error-free and balanced.
4. Correcting Deposit Errors
As items are being scanned, the cheque images are being assessed for readability of the MICR line and amount,
overall image quality, and compared against other items in the database to detect potential duplicate items. If items
fail any of these assessments, they are flagged with an alert symbol and require user intervention to resolve the
error.
To correct deposit errors, Capture Users proceed as follows:
1. Click the Warning ( ) icon beside the first item with an error. Errors are highlighted in red.
Optional: To easily locate errors within a deposit:
Click the Filter ( ) icon next to the Errors column header
Click Show Errors ( ).

PG 4
To return to the full list of deposit items, click the Clear Filter ( ) button.
2. Refer to the message displayed in the top upper-left of the Edit Item ( ) page to determine the
item’s error.
3. Correct the error.
4. Click Next Error ( ) or use the navigation arrows ( ) on the bottom left of the
screen to move to the next item that has an error, if applicable.
5. Click Save ( ) to save your changes.
Moving to the next item automatically saves changes made to the current item. However, the user cannot
navigate to the next item without correcting any applicable errors on the current item. More than one error may
apply to a single item.
Steps to Resolve Common Errors:
(a) Missing or incomplete amount errors: If an image is flagged with a missing or incomplete amount, the
amount box will be highlighted in red. Ensure the item’s image quality is acceptable. If the image is
unacceptable (e.g. skewed, piggyback, etc.), delete the item and rescan it. If the image is acceptable,
update or confirm the item’s amount in the Amount ( ) field on the Edit Item screen pop-up.
Refer to the item image or the original item to obtain the correct amount.
(b) Suspected duplicate item: If an image is flagged as a potential duplicate item, click the Duplicate
( ) link at the top left of the Edit Item screen pop-up and review the information provided.
If the images and deposit details for both items are visible, the item was already scanned either in the current or
a previous deposit. If scanned twice in error, ensure duplicate item(s) are deleted from the deposit or delete the
entire deposit as necessary. Failure to do so will result in items being cleared twice in error and will result in a
returned item. Follow your credit union’s specific policies and procedures pertaining to suspected duplicate
items.
Carefully review both the item image and the deposit information provided in the duplicate link to determine the
action required.
If the user determines the item to be a duplicate:
Click Return to Edit Item ( ).
Click Delete ( ) to remove the item from the deposit.

PG 5
Deleting duplicate items from a deposit will require the Declared Amount to be updated and saved before the
deposit will balance. Ensure that the deposit is error-free and balanced before completing it.
If the user chooses to accept the item for deposit:
Click Return to Edit Item ( ).
Click the Override Duplicate ( ) check-box.
(c) Image and Cheque Data Quality Errors: Ensure that good quality images and complete cheque data are
captured and transmitted for processing to avoid an item being dishonoured for poor image quality. If the
image is reversed, upside down, bent, folded, piggyback, askew, or an otherwise poor image, the item
must be deleted from the deposit and rescanned. Financial institutions have up to 90 days to dishonour an
item for poor image quality. Items with poor image quality can fail image quality and/or MICR line tests as
well as amount tests.
The following are some examples of poor images:
Skewed Images
Skewed images are considered poor images because the item’s full MICR line was not captured and/or the
item’s image is on an angle. See Figure 2.
Figure 2: Poor Image – Image Captured Askew
Piggyback Images
If two or more items are imaged together through the scanner at the same time, it is called a piggyback.
See Figure 3. Piggybacks contain the front of one item with either the front or back of another behind it in a
single scanned image.
Piggybacks must not be included in a deposit as the front and back of each individual cheque in the deposit is
required. In addition there is a risk that private and confidential account information can be viewed by a third
party if a piggyback image remains in the deposit. While the application attempts to detect piggybacks, they
PG 6
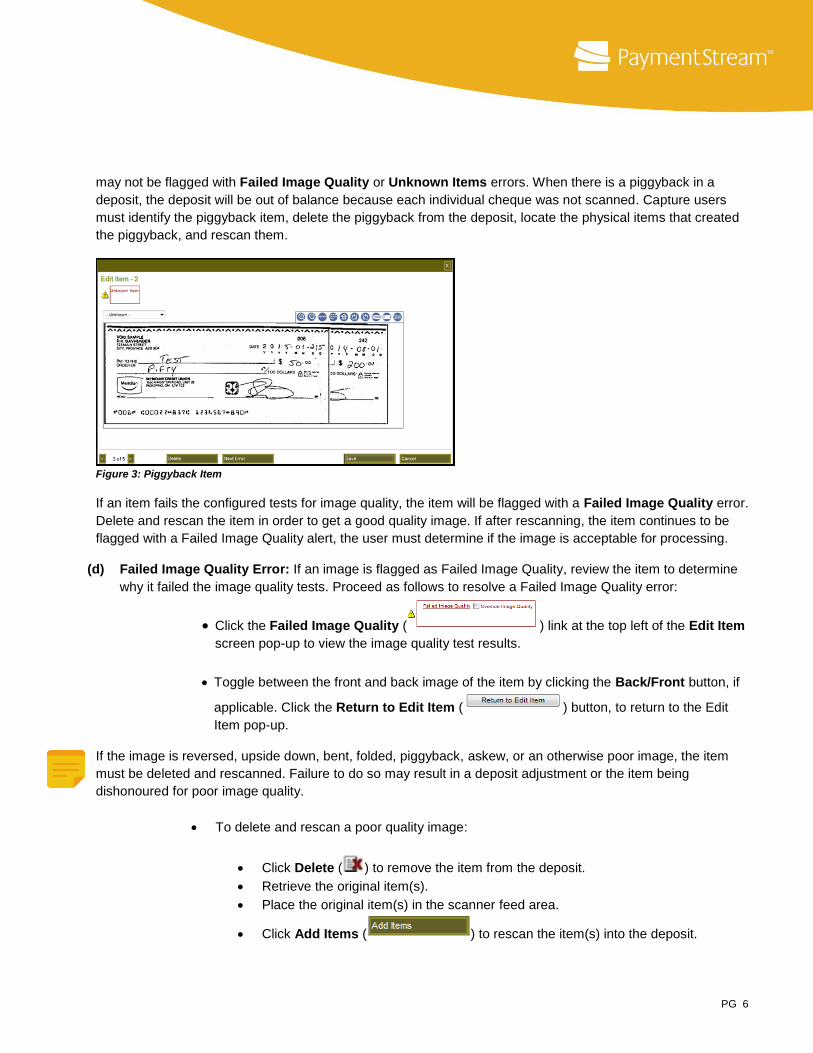
may not be flagged with Failed Image Quality or Unknown Items errors. When there is a piggyback in a
deposit, the deposit will be out of balance because each individual cheque was not scanned. Capture users
must identify the piggyback item, delete the piggyback from the deposit, locate the physical items that created
the piggyback, and rescan them.
Figure 3: Piggyback Item
If an item fails the configured tests for image quality, the item will be flagged with a Failed Image Quality error.
Delete and rescan the item in order to get a good quality image. If after rescanning, the item continues to be
flagged with a Failed Image Quality alert, the user must determine if the image is acceptable for processing.
(d) Failed Image Quality Error: If an image is flagged as Failed Image Quality, review the item to determine
why it failed the image quality tests. Proceed as follows to resolve a Failed Image Quality error:
Click the Failed Image Quality ( ) link at the top left of the Edit Item
screen pop-up to view the image quality test results.
Toggle between the front and back image of the item by clicking the Back/Front button, if
applicable. Click the Return to Edit Item ( ) button, to return to the Edit
Item pop-up.
If the image is reversed, upside down, bent, folded, piggyback, askew, or an otherwise poor image, the item
must be deleted and rescanned. Failure to do so may result in a deposit adjustment or the item being
dishonoured for poor image quality.
To delete and rescan a poor quality image:
Click Delete ( ) to remove the item from the deposit.
Retrieve the original item(s).
Place the original item(s) in the scanner feed area.
Click Add Items ( ) to rescan the item(s) into the deposit.

PG 7
If the item continues to be flagged for poor image quality and the user determines the image quality is
acceptable for processing, the Failed Image Quality alert can be overridden.
To override the image quality alert:
Click the Override Image Quality ( ) check box to
override the image quality error alert.
(e) Unknown Item Error: If the Express Cheque Deposit application is unable to automatically assign an Item
Type due to a poor MICR read or an item with a non-standard MICR format, an item will be flagged with an
Unknown Item error.
Items must be carefully reviewed to determine why an item type could not be automatically assigned. Users
must delete the unknown item and rescan it in order to get a full and complete MICR read.
If the item continues to be flagged as an unknown item, it can be reclassified by selecting the appropriate
Item Type to correct the error. Sample images are provided in an appendix in this document to assist in
selecting the applicable Item Type. See Section 18, Appendix A – Canadian and US Item Examples for
Item Type Reclassification.
If an image is flagged with Unknown Item, review the image to determine why an item type could not be
automatically assigned.
If after rescanning the item, the item continues to be flagged with an Unknown Item Type error and the user
determines the image is acceptable for processing, the appropriate item type must be selected to reclassify
the item. To reclassify an Unknown Item:
Click the Item Type ( ) dropdown list on the Edit Item page.
Select the appropriate Item Type for the item. See Section 18, Appendix A –
Canadian and US Item Examples for Item Type Reclassification, for
information identifying Item Types.
Correct any remaining error conditions on the item, otherwise the Item Type
selected will not be saved. Click Next Error ( ) or use the
navigation arrows ( ) on the bottom left of the screen to move to the next
item that has an error, if applicable, or click Save ( ) to save
your changes.

PG 8
If an incorrect Item Type was selected, do not save the change to the item (click Cancel) and reselect the
applicable Item type. Once the Item Type has been saved, it can no longer be edited.
To manipulate an image for better viewing and/or editing, click on Image View bar to proceed with the following
actions:
Icon Action Icon Action
Zoom in. Magnifies the
image. Rotate image right. Rotates the
image clockwise.
Zoom out. Shrinks the
image. Rotate the image left. Rotates the
image counter-clockwise.
Zoom to signature.
Magnifies the image’s
signature area.
View front. Displays the front
image of the item.
Zoom to endorsement.
Magnifies the image’s
endorsement area.
View back. Displays the back
image of the item.
Zoom to bank of first
deposit. Magnifies the
image’s bank of first deposit
area.
Reverse video. Toggles between
the regular and white on black
version of image (a negative
image).
5. Entering Item Reference Information (Optional)
An alpha-numeric Item Reference field is available on the Edit Item page for users to enter optional item
information (e.g. an invoice number). See Figure 4. The information entered will appear on the Deposit Item
Detail Report, which is generated via the Report View button on the Deposit Item List page.
The remaining fields on the Edit Item page, with the exception of the amount (if required), should not be
completed.
1. Create a new deposit. See Section 2, Creating a New Deposit.
2. Click the Edit ( ) icon of the first cheque in the deposit.
3. Enter the required information in the Item Reference field.

PG 9
Figure 4: Item Reference Field
4. Click the navigation arrows ( ) to move to the next item in the deposit, if required.
Navigating to the next item automatically saves changes made to the item; however, the information in the Item
Reference field can be edited once saved.
5. Click Save ( ) to save the changes.
6. Editing Deposit Information
To edit deposit information, Capture Users proceed as follows:
1. Click Edit Deposit ( ) on the Deposit Item List screen.
2. Update the Location, Account or Declared Amount field(s) as required on the Edit Deposit page.
3. Click Save Changes ( ).
Only deposits that have not been transmitted can be edited.
7. Editing a Deposit Declared Amount
To edit a deposit declared amount, Capture Users proceed as follows:
1. Enter the updated deposit value in the Declared Amount ( ) field on the Deposit Item List
page.
2. Click Save ( ) to update the total.
8. Deleting a Deposit
To delete a deposit, Capture Users proceed as follows:
1. Log in to the Express Cheque Deposit application.
2. Locate the applicable deposit if not deleting a current deposit. See Section 12, Locating an Existing
Deposit, for procedures on locating an existing deposit.

PG 10
3. Click the Delete ( ) icon of the deposit.
Alternatively, from the Deposit Item List page, click Delete Deposit ( ).
4. Click OK.
9. Adding Deposit Notes
To add a deposit note to a deposit, Capture Users proceed as follows:
1. Click Notes ( ) and type the note in the space provided.
2. Click Add Note ( ) to save. A note symbol will appear beside Notes ( ).
3. Click Return to Deposit List to exit the deposit, if required.
A deposit note cannot be deleted or edited once it has been added. Deposit notes cannot be added to a deposit
after it has been transmitted, but existing notes can be read.
10. Viewing Deposit Notes
To view a deposit note, Capture Users proceed as follows:
1. Locate the applicable deposit. See Section 12, Locating an Existing Deposit, for procedures on locating
an existing deposit. If there is a deposit note, the note symbol ( ) will be present.
2. Click Notes to view the notes.
11. Completing a Deposit
When a deposit is error-free and balanced, the Capture User must click the Complete button. Clicking
Complete places a deposit in an Open-Balanced state. When deposits are in an Open-Balanced state, the
Corporate Supervisor can review and transmit the deposit.
To complete a deposit, Capture Users proceed as follows:
1. Review the deposit to ensure it is error-free and balanced.
Review the Item Type column and ensure the recognized item type assigned to each item is
appropriate for the deposit. For instance, if the deposit was created in Canadian dollars, the item
type for each item should be ‘Canadian Check’. If the deposit contains an item in the wrong
currency (e.g. a US cheque scanned in a Canadian deposit), delete the item, adjust the balance,
and put the physical item in the correct deposit according to its currency.

PG 11
If an item in a USD deposit is assigned a Canadian item type, view the cheque image to determine if the
cheque was made payable in US dollars. If so, the item can be accepted in a US dollar deposit.
Ensure any poor image quality items have been rescanned, the deposit is error-free, and balanced.
If the deposit is error-free and balanced, the Complete button will be green and the balancing
difference on the Deposit Item List page will display as 0.00.
2. Click Complete ( ).
3. Review the account and currency for the deposit on the confirmation pop-up to ensure they are correct, if
not click Cancel and make any necessary corrections.
4. If correct Click OK to confirm.
12. Locating an Existing Deposit
To locate an existing deposit, Capture Users proceed as follows:
1. Log in to the Express Cheque Deposit application.
2. Click either the Deposits ( ) tab or the Deposit List ( ) tile to navigate to the Deposit
List page.
The Deposit List filter is set to ‘For Today’ by default as most users will be reviewing current day’s deposits. To
locate a previous day’s deposit modify the Deposit List filter:
Click the List of Deposits ( ) drop-down list and select the deposits you want to view
(e.g. For this session, For today, For the last 10 days, All Open-Incomplete Deposits, etc.).
3. Click the Edit ( ) icon of the appropriate deposit to view the deposit.
13. Reopening an Open-Balanced or Open-Disapproved Deposit
To edit an Open-Balanced or Open-Disapproved deposit, the deposit must be reopened. Deposits that have been
transmitted cannot be edited. Once a deposit has been transmitted it, it cannot be recalled.
Capture Users proceed as follows to re-open a deposit:
1. Locate the applicable deposit. See Section 12, Locating an Existing Deposit, for procedures on locating
an existing deposit.
2. Click Re-Open Deposit ( ) to return the deposit to an editable state.
3. Edit, correct, and re-balance the deposit.

PG 12
4. Click Complete. The deposit will be in an Open-Balanced state and sent to the Corporate Supervisor
User’s queue.
14. Scanning Best Practices
To prevent the likelihood of capturing items twice in error, it is very important to ensure that scanned cheques are
clearly marked and kept separate from cheques that have not been scanned. Some best practices to consider are
as follows:
Prepare your bundles in advance and have a tape listing available.
Bundle scanned cheques and record ‘scanned’, the Express Cheque Deposit deposit number, and
deposit date on the deposit’s tape listing. Also, consider printing a Deposit Item Detail Report to store
with the scanned deposit items:
Click Report View ( ) on the Deposit Item List page
Click Print Report ( ) on the Image Deposit Item Detail Report pop-
up.
Wrap the cheque bundle with the Report Details section facing out.
To include information pertaining to the deposit date, time and received status on the report, the Deposit Item
detail report must be printed by the Capture User after the deposit has been transmitted by a Supervisor.
Ensure that scanned cheques are stored separately from un-scanned items.
Consolidate all scanned deposits at the end of each business day and store the deposits securely and
in date order. Sorting deposits by date order assists in retrieving and/or destroying items by the
required date. Refer to your credit union’s storage and destruction policy for more information.

PG 13
15. Generating an Online Deposit Summary Report
The Deposit Summary report summarizes all deposits displayed on the Deposit List page and can be created by
any user from the Deposits tab. Capture Users can generate a summary report for deposits they processed on
Express Cheque Deposit. Users assigned the Analyst user type combined with the Capture User can generate
reports created by all users at their assigned locations.
The deposit information used to generate the reports can be modified using the List of Deposit drop-down and/or by
filtering the individual columns. The report includes the sum amount and sum item totals of all deposits in the
report, and a 2 line summary of each deposit. This report is in HTML format and contains different information than
the reports created via the Reports tab.
To generate an online deposit summary report, proceed as follows:
1. Log in to the Express Cheque Deposit application.
2. Click the ( ) tab on to navigate to the Deposit List page. Users assigned the Supervisor or Analyst
roles will be redirected to the Location Select page. Click the Location ID to access a specific location’s
Deposit List page or click the All Deposits ( ) button to access deposits at all assigned
locations.
3. Click the List of Deposits ( ) drop-down list and select deposits you want to see from the
drop-down list (e.g. For this session, For today, For the last 10 days, All Open-Incomplete Deposits, etc.).
4. Click the Set Filter ( ) icon on any column(s) and enter applicable text to filter the list results, if required.
For example, to display US dollar deposits only in the Deposit List, click the Account Description filter icon
and type ‘USD’ in the box and then enter (or click Apply). Click the Clear Filter ( ) icon to remove the
filtered results.
5. Click the title of any column to display the Deposit List in descending order. Click the title again to sort by
ascending order.
6. Click the Report View ( ) button to display the report.
7. Click Print to print the report, if required.
8. Click Close to return to the Deposit List page.
The report may appear overlapped in the browser window if using Internet Explorer. This is a result of pop-up
window resizing restrictions. When you print the report, it will be formatted correctly.
16. Generating an Online Deposit Items Detail Report
The Deposit Items Detail report lists each item in the deposit, the total number of items in the deposit and the total
value of the deposit. This report is in HTML format and contains different information than the reports created via
the Reports tab. The report can be created by any user from the Deposits tab. Capture Users can generate reports

PG 14
for deposits they processed on Express Cheque Deposit. Users assigned the Analyst user type combined with the
Capture User can generate reports created by all users at their assigned locations
To generate an online deposit items detail report, proceed as follows:
1. Log in to the Express Cheque Deposit application.
2. Click the Deposits ( ) tab to navigate to the Deposit List page. Users assigned Supervisor or
Analyst roles will be redirected to the Location Select page. Click the Location ID to access a specific
location’s Deposit List page or click All Deposits ( ) to access deposits at all assigned
locations.
3. Click the Edit ( ) icon beside the appropriate deposit
4. Click Report View ( ) to display the report. Click close to return to the Deposit List.
5. Click Print to print the report, if required.
6. Click Close to return to the Deposit List page.
17. Generating an Online Deposit Details Report
The online deposit details report contains summary information for individual deposits.This report is in HTML format
and contains different information than the reports created via the Reports tab. The report can be created by any
user through the Deposits tab. Capture Users can generate reports for deposits they processed on Express
Cheque Deposit. Users assigned the Analyst user type combined with the Capture User can generate reports
created by all users at their assigned locations
To generate an online deposit details report, proceed as follows:
1. Log in to the Express Cheque Deposit application.
2. Click the Deposits ( ) tab on any page to navigate to the Deposit List page. Users assigned
Supervisor or Analyst roles will be redirected to the Location Select page. Click the Location ID to access a
specific location’s Deposit List page, or click the All Deposits ( ) button to access deposits at
all assigned locations.
3. Click the View ( ) icon beside the appropriate deposit.
4. Click Print to print the report if required.
5. Click Return to Deposit List to return to the Deposit List page.
PG 15
18. Appendix A – Canadian and US Item Examples for Item Type
Reclassification
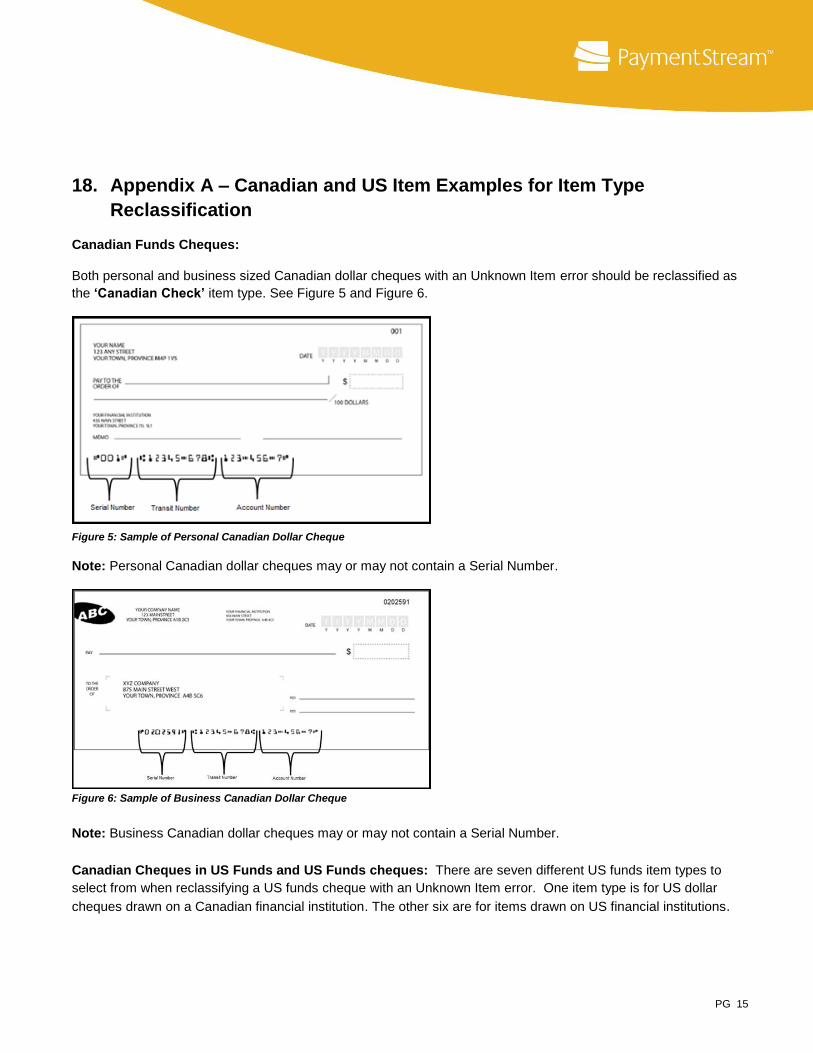
Canadian Funds Cheques:
Both personal and business sized Canadian dollar cheques with an Unknown Item error should be reclassified as
the ‘Canadian Check’ item type. See Figure 5 and Figure 6.
Figure 5: Sample of Personal Canadian Dollar Cheque
Note: Personal Canadian dollar cheques may or may not contain a Serial Number.
Figure 6: Sample of Business Canadian Dollar Cheque
Note: Business Canadian dollar cheques may or may not contain a Serial Number.
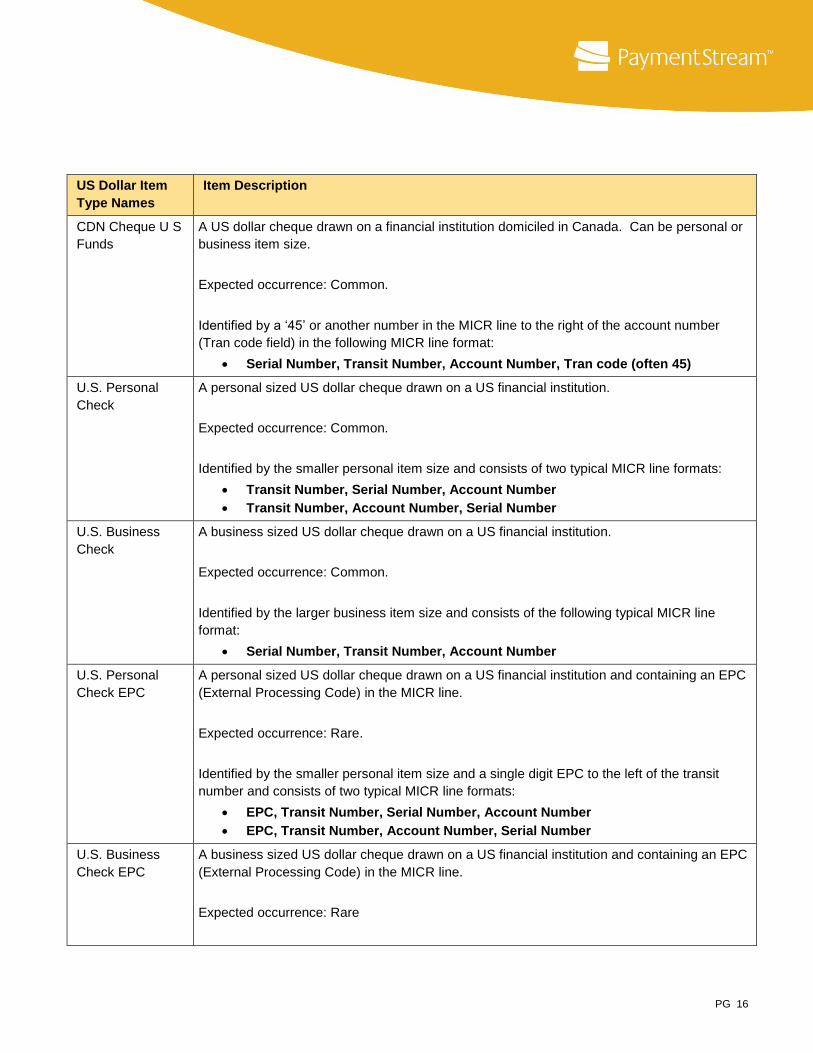
Canadian Cheques in US Funds and US Funds cheques: There are seven different US funds item types to
select from when reclassifying a US funds cheque with an Unknown Item error. One item type is for US dollar
cheques drawn on a Canadian financial institution. The other six are for items drawn on US financial institutions.
PG 16
US Dollar Item
Type Names
Item Description
CDN Cheque U S
Funds
A US dollar cheque drawn on a financial institution domiciled in Canada. Can be personal or
business item size.
Expected occurrence: Common.
Identified by a ‘45’ or another number in the MICR line to the right of the account number
(Tran code field) in the following MICR line format:
Serial Number, Transit Number, Account Number, Tran code (often 45)
U.S. Personal
Check
A personal sized US dollar cheque drawn on a US financial institution.
Expected occurrence: Common.
Identified by the smaller personal item size and consists of two typical MICR line formats:
Transit Number, Serial Number, Account Number
Transit Number, Account Number, Serial Number
U.S. Business
Check
A business sized US dollar cheque drawn on a US financial institution.
Expected occurrence: Common.
Identified by the larger business item size and consists of the following typical MICR line
format:
Serial Number, Transit Number, Account Number
U.S. Personal
Check EPC
A personal sized US dollar cheque drawn on a US financial institution and containing an EPC
(External Processing Code) in the MICR line.
Expected occurrence: Rare.
Identified by the smaller personal item size and a single digit EPC to the left of the transit
number and consists of two typical MICR line formats:
EPC, Transit Number, Serial Number, Account Number
EPC, Transit Number, Account Number, Serial Number
U.S. Business
Check EPC
A business sized US dollar cheque drawn on a US financial institution and containing an EPC
(External Processing Code) in the MICR line.
Expected occurrence: Rare

PG 17
US Dollar Item
Type Names
Item Description
Identified by the larger business item size and a single digit EPC to the left of the transit
number and consists of the following typical MICR line format:
Serial Number, EPC, Transit Number, Account Number
U.S. Multidash
Account
No Sample
provided
A US dollar cheque drawn on a US financial institution and containing multiple dashes in the
account number field. This practice is now discouraged in the U.S. and is not typically used.
Expected occurrence: Extremely unlikely
U.S. Personal
Check Navy Fed
No Sample
Provided
A personal sized US dollar cheque drawn on a US financial institution issued by the US Navy
Fed and containing a specific Navy Fed transit number in the MICR line.
Expected occurrence: Extremely Rare
Identified by the smaller personal item size and the fixed transit consists of two typical MICR
line formats
256074974, Serial Number, Account Number
256074974, Account Number, Serial Number
The three most common US Dollar item types that will be used are ‘CDN Cheque US funds’, ‘U.S. Personal Check’
and ‘U.S. Business Check’. The Item types are differentiated by MICR variables and format.
Canadian Cheques in U.S. Funds – Both personal and business sized Canadian Cheques in U.S. Funds with an
Unknown Item error should be reclassified as the ‘CDN Cheque US Funds’ item type. See Figure 7 and 8.
Figure 7: Sample of Personal Canadian Cheque US Funds
PG 18
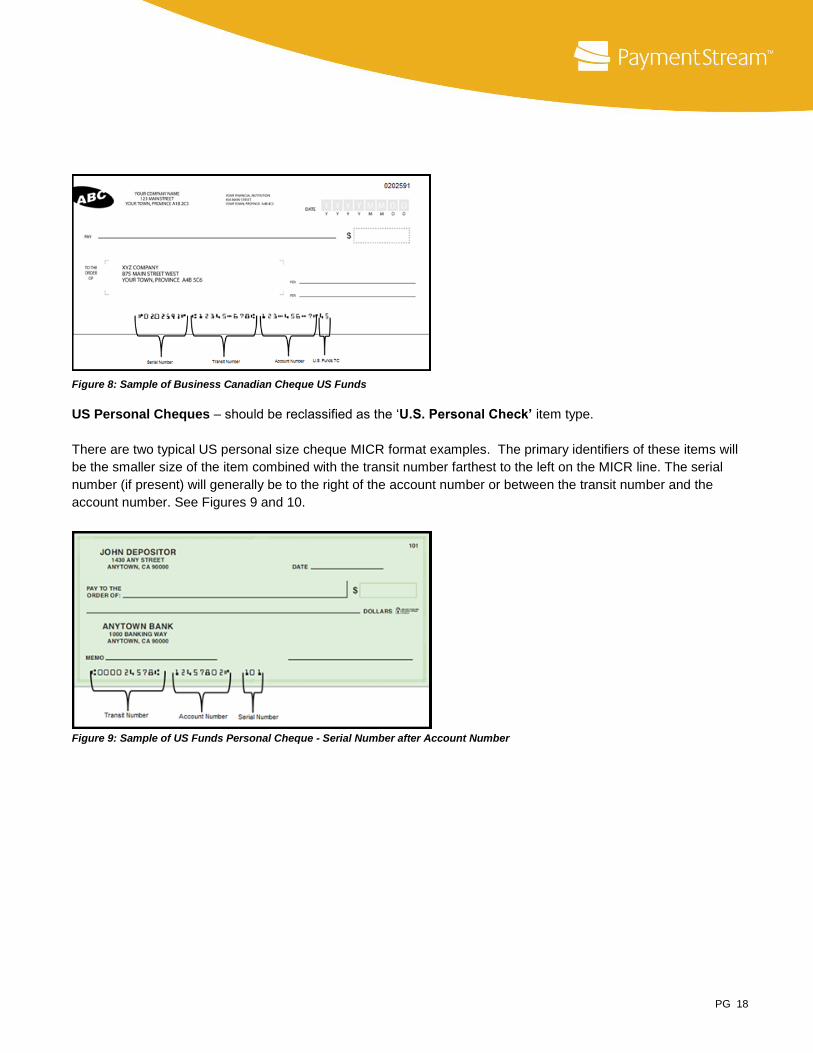
Figure 8: Sample of Business Canadian Cheque US Funds
US Personal Cheques – should be reclassified as the ‘U.S. Personal Check’ item type.
There are two typical US personal size cheque MICR format examples. The primary identifiers of these items will
be the smaller size of the item combined with the transit number farthest to the left on the MICR line. The serial
number (if present) will generally be to the right of the account number or between the transit number and the
account number. See Figures 9 and 10.
Figure 9: Sample of US Funds Personal Cheque - Serial Number after Account Number

PG 19
Figure 10: Sample of US Funds Personal Cheque- Serial Number between Transit and Account Number
US Business Cheques – Should be reclassified as the ‘U.S. Business Check’ Item Type. The primary identifiers
will be the larger size of the item combined with the serial number to the left of the transit number in the MICR line.
Standard US business cheque MICR typically contains a serial number, transit number, and account number in that
order. See Figure 11.
Figure 11: Sample US Business Check
US Personal Cheque EPC – Should be reclassified as the ‘U.S. Personal Check EPC’ Item Type. The primary
identifiers will be the smaller size of the item and a single digit EPC (External Processing Code) to the left of the
transit number. See Figure 12.

PG 20
Figure 12: Sample of US Personal Cheque EPC
US Business Cheque EPC – Should be reclassified as the ‘U.S. Business Check EPC’ Item Type. The primary
identifiers will be the larger size of the item and a single digit EPC (External Processing Code) to the left of the
transit number. If an EPC is present, the Serial number will be placed on the left of the transit number in the MICR
line. See Figure 13.
Figure 13: Sample of US Business Cheque EPC

PG 21
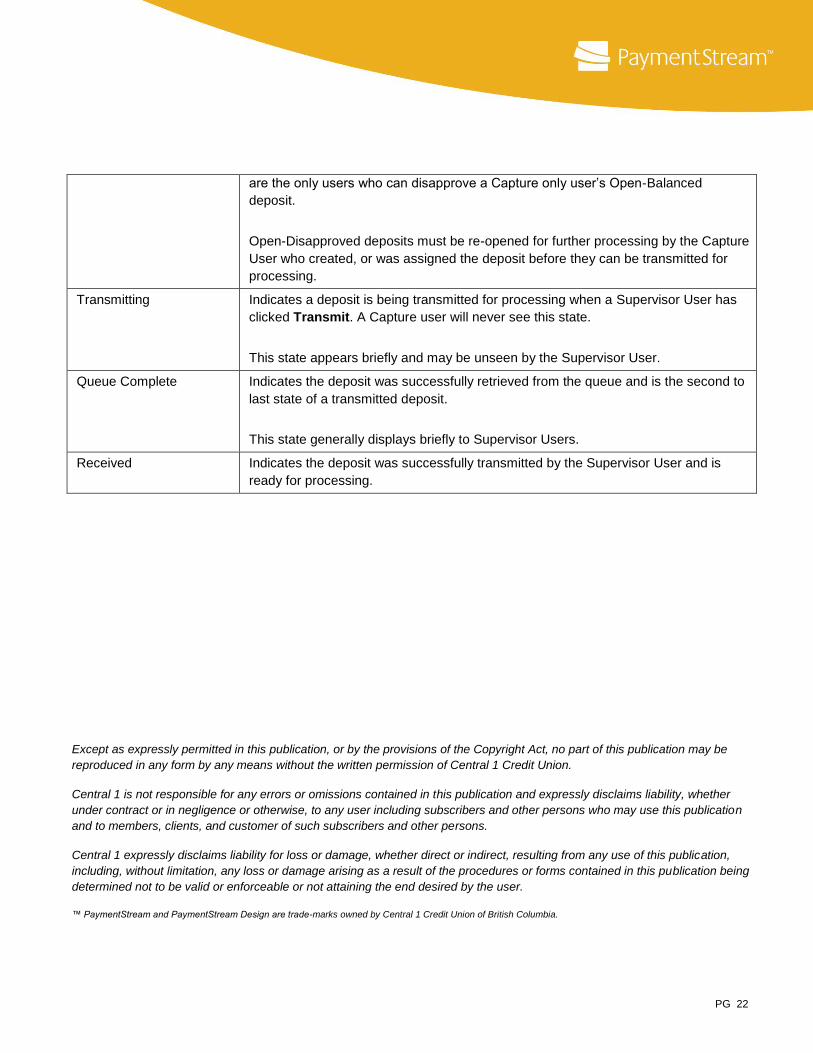
19. Appendix B – Deposit States
State Description
Open-Processing The initial deposit state
This state is set when a Capture User clicks Start Capture.
A deposit remains in this state while deposit items are scanned and added to the
deposit. The state changes when the scanned jams or the user clicks Complete.
A deposit returns to this state after a user resolves an Open-Jammed state, or when
a user clicks Add Items to add additional items to an Open-Incomplete or Open-
Balanced Deposit.
Open-Jammed Indicates an exception state.
This state is set if a jam occurs as deposit items are scanned.
The deposit remains in this state until a user successfully resolves the jam.
Open-Incomplete Indicates the deposit is in progress.
This state is set when a user clicks Complete but the deposit is out of balance or
contains errors.
The deposit remains in this state until a Capture user balances and corrects the
deposit and clicks Complete.
A deposit returns to this state from Open-Balanced when a user reopens the deposit
and clicks Add Items to add deposit items.
Open-Balanced Indicates the deposit created by a Capture User is balanced, deposit errors have
been resolved, and ready for review and transmission.
This state is set when a Capture User clicks Complete and the deposit is balanced
and free from errors.
The deposit remains in this state until the deposit is disapproved or transmitted by a
Supervisor User.
Open-Disapproved Indicates that a deposit was disapproved by a Supervisor User who clicked
Disapprove. Only Open-Balanced deposits can be disapproved. Supervisor Users
PG 22
are the only users who can disapprove a Capture only user’s Open-Balanced
deposit.
Open-Disapproved deposits must be re-opened for further processing by the Capture
User who created, or was assigned the deposit before they can be transmitted for
processing.
Transmitting Indicates a deposit is being transmitted for processing when a Supervisor User has
clicked Transmit. A Capture user will never see this state.
This state appears briefly and may be unseen by the Supervisor User.
Queue Complete Indicates the deposit was successfully retrieved from the queue and is the second to
last state of a transmitted deposit.
This state generally displays briefly to Supervisor Users.
Received Indicates the deposit was successfully transmitted by the Supervisor User and is
ready for processing.
Except as expressly permitted in this publication, or by the provisions of the Copyright Act, no part of this publication may be
reproduced in any form by any means without the written permission of Central 1 Credit Union.
Central 1 is not responsible for any errors or omissions contained in this publication and expressly disclaims liability, whether
under contract or in negligence or otherwise, to any user including subscribers and other persons who may use this publication
and to members, clients, and customer of such subscribers and other persons.
Central 1 expressly disclaims liability for loss or damage, whether direct or indirect, resulting from any use of this publication,
including, without limitation, any loss or damage arising as a result of the procedures or forms contained in this publication being
determined not to be valid or enforceable or not attaining the end desired by the user.
™ PaymentStream and PaymentStream Design are trade-marks owned by Central 1 Credit Union of British Columbia.