cheques paid report - horizon
TRANSCRIPT
MYOB EXO Business User Guide
490
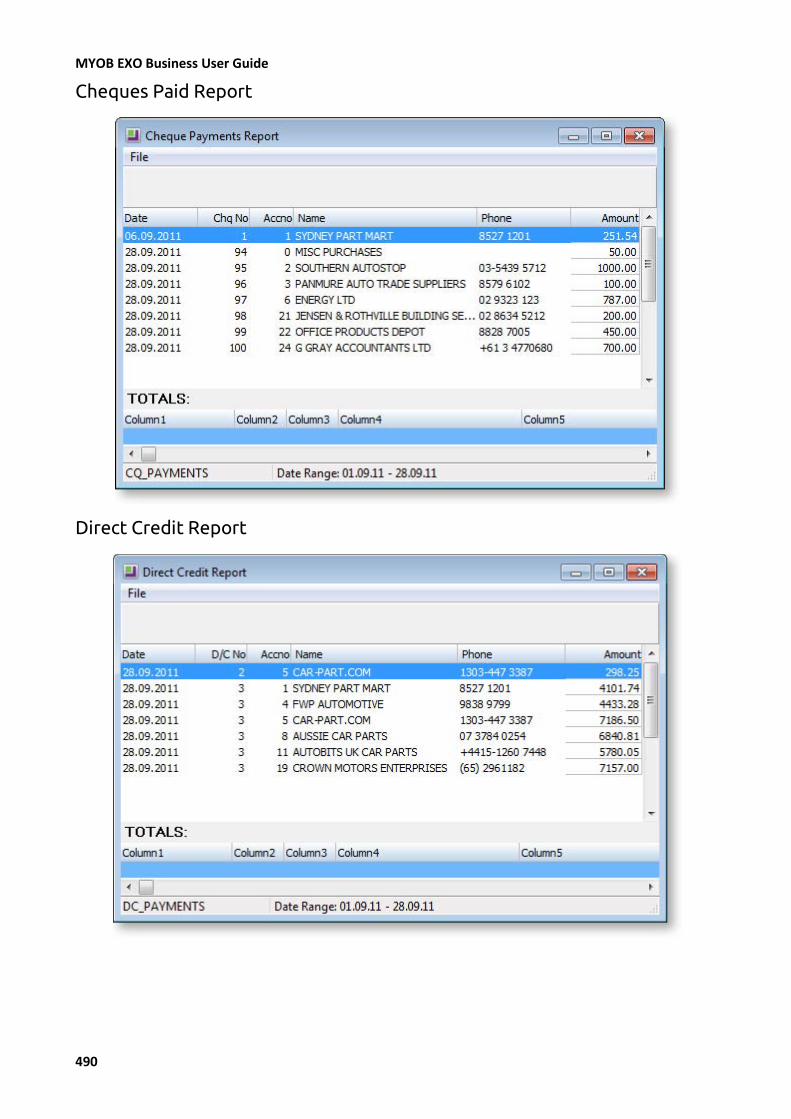
Cheques Paid Report
Direct Credit Report

MYOB EXO Finance
491
Other Reports
The remaining reports open in a standard Print Preview window:
View All Outstanding Payments (Released)
View Cheque Details
View D/C Details
Invoices Flagged as “Do Not Pay”
Proposed Payment Run
Direct Debits
Direct Debits are used where the organisation has authority from Debtors to deduct funds from their bank account to settle their debt with the organisation. The organisation will also need to have a direct debit facility available on their desk bank software with their respective banking institution.
To open the Direct Debit window, select Direct Debits from the Account menu of the EXO Finance module.
Direct Debits are handled in batches. A new batch can be saved as an “Open” batch, which can be edited at any point until it is “Confirmed”. When a batch is saved, there is an option to print an audit report. Confirmed batches can be consolidated to a single batch if required.

MYOB EXO Business User Guide
492
Setting up Direct Debits
Setting up Debtors
For each Debtor account that you want to deduct funds from via Direct Debit:
1. Go to the Details 2 tab of the Debtor Account Details window (see page 94).
2. Change the Default Payment Type to “D/DEBIT”.
3. Enter the Debtor’s Bank Account Number and Bank Account Name. The Bank Account Name is the name the customer has that bank account under; this will go into the bank file.
4. Choose an Advice Notification type: Fax, Email and/or Print. An advice notification type must be chosen, even if you are not going to print or distribute the advice.
General Setup
Select General Setup from the Setup menu of the Direct Debits window.
The following configuration options are available on this window:
Field Description
General Ledger Account
Select the default General Ledger bank account for the Direct Debits to post into.
No. of notification days
Enter the number of days of notification required.
Print D/D advice Tick this box if you want to print Direct Debit advice.
Consolidate D/D to General Ledger
Tick this box if you want to consolidate Direct Debits to the General Ledger. This enables the Consolidate button on the Batches tab of the Direct Debits window.
Allow selection of GL Acc for D/D
Tick this box to allow the selection of the General Ledger bank account for each Direct Debit run. If this box is not ticked, the default account specified by the General Ledger Account will be used.
Show email before sending
Tick this box to show advice emails before sending them, if email has been set as an advice type.

MYOB EXO Finance
493
Direct Debit Password
A password is required to process Direct Debits. To set this password, use EXO Business Config to enter a value for the Password for consolidating and processing direct debits Company-level profile setting. By default, the password is blank.
Note: The password is case-sensitive.
Bank File Format
Before processing Direct Debits, bank file formats must be set up for Debtors in EXO Business Config (see page 477).
Processing Direct Debits
The Batches tab on the Direct Debit window shows all Direct Debit batches. Several options are available to filter the list of batches.
Note: If the Consolidate D/D to General Ledger option has been enabled on the Direct Debits General Setup window (see page 491), you can consolidate multiple batches into a single batch by selecting multiple Confirmed batches with the CTRL key and clicking the Consolidate button.

MYOB EXO Business User Guide
494
Creating Direct Debit Batches
To create a new batch:
1. Click New. The view changes to the Debtor Accounts tab:
2. Set any filter options and click Search to display Debtor accounts with outstanding invoices whose Default Payment Type is set to “D/DEBIT”.
3. Click All to release all invoices for all Debtors listed or double-click on a Debtor to go to Transactions tab:

MYOB EXO Finance
495
a. Click All to release invoices for receipt or select an invoice and click Part Allocate to set a part payment for the selected invoice. You can pay by an amount or a percentage. This opens the following window:
Depending on whether the user selected to part pay by an amount or percentage, the Amount field displays the total amount of the invoice or 100.00 (i.e. 100% of the invoice). Enter the amount/percentage to be paid and click OK. The invoice now shows that it has been released and the Amount to Pay column displays the payment amount selected by the user.
Invoices can also be selected/unselected manually by selecting them and pressing the space bar.
b. Once all invoices have been selected, return to the Debtor Accounts tab.
4. Specify a Payment Date and enter Ref1 and Ref2 information if necessary.
Note: You can also specify the General Ledger bank account for the Direct Debits to post into, if the Allow selection of GL Acc for D/D option has been ticked on the Direct Debits General Setup window (see page 491); otherwise this field is read-only, and displays the default General Ledger account entered on the Direct Debits General Setup window.
5. Save the Direct Debit Batch by one of the following methods:
If you will want to make further changes to the batch, click Save to save the current changes. The status of the batch will remain “Open”.
If you are finished making changes to the batch and are ready to process it, click Confirm. The status of the batch will change to “Confirmed” and it will no longer be possible to edit it.
Processing Direct Debit Batches
To confirm that a batch is ready to be converted into a bank file, double-click on the batch to go to the Debtor Accounts tab, then click Confirm. Once a batch is confirmed, no further changes can be made.
A confirmed batch can be converted to a Direct Debit file ready for transfer to the Banking software. Remittances can be printed for the batch if required.
To process a Direct Debit batch:
1. Double-click on the batch to go the Debtor Accounts tab.
2. Click Direct Debit. You must enter the Direct Debit password (see page 493) to proceed.
Note: The password is case-sensitive.

MYOB EXO Business User Guide
496
The following window is displayed:
3. Modify the File Name if required. If a different bank to the default bank is required, uncheck the Use Default Bank box, then select a new Bank from the drop-down-list. Click OK to continue. A message window appears, giving the user an opportunity to view the file.
4. Click Yes, then Open to see the contents of the file.
The next message prompts the user to confirm that the process should be completed:
5. Click Yes to continue; this will perform accounting updates.
6. The final step is to import the newly created Direct Debits file into the desktop banking software to be subsequently processed.
Sending Remittance Advice
Once a batch is confirmed, you can send remittance advice to the affected Debtors. Open the confirmed batch and use one of the following methods from the Debtor Accounts tab:
Click the Remittance toolbar button to print the Direct Debit Remittance Advice report. This report can then be sent to Debtors.
Click the Mailshot toolbar button to open the Mailshot window (see page 528), which allows you to bulk send remittance advice to Debtors.

497
Taxation
The MYOB EXO Business taxation features centres around the ability to have multiple tax rate definitions (optionally with separate tax control accounts) and being able to assign a tax rate to a transaction. The default tax rate on a transaction can be configured in the system through a hierarchical rate selection process. If the user has been granted permission, they can override the suggested default rate with a manually selected tax rate.
Generic Tax by tax rate reports can be run regardless of the country of origin. Alternatively, tax rates can be used in conjunction with tax return key points to generate specialised tax reports such as the Australian BAS, the New Zealand Tax Return, and the Singapore Tax Return. Using the integrated reports also marks source transactions with the tax return they were reported on to assist with prior period postings.
Automatic Tax Rate Hierarchy
When a transaction is entered, the tax rate used is automatically determined by a hierarchical structure. The user can then accept this setting, or optionally manually override it.
The following diagram depicts the hierarchy for automatically selecting a transaction’s tax rate:
For example, when performing a Debtor’s Invoice function, the tax rate is automatically selected by using the hierarchy as follows:
1. Account - the tax rate of the Debtor account is used if explicitly specified on the Debtor account.
2. Stock - if no tax rate has been set at the Debtor account level, then the rate applicable to the stock item is selected, if explicitly set on the stock item.
3. Default Rate - if no tax rate has been set on the account or the stock item, then the default Debtors rate from the MYOB EXO Configurator is used.

MYOB EXO Business User Guide
498
In the case of a Creditor’s Invoice that uses General Ledger (GL) codes instead of stock items, if the Creditor’s account default rate is not set, the rate from the GL account is used, and if a rate is not set on the GL account, the default creditor tax rate in the Configurator is used.
Once the tax rate is chosen, the user can also manually override this rate and specifically set the tax rate number and tax rate, using the periscope function.
Overriding Function
The following options are available on many transaction entry windows (if enabled for the user), to allow manual overriding of the automatically selected transaction tax rate and amounts:
Line periscope – to view line detail, and also to explicitly set the tax rate and amount.
Tax Toggle – to change amount to inclusive or exclusive of tax.
Tax Rates button – to compare calculated tax against default hierarchical tax rate.
Tax Setup
During the implementation phase, relevant tax rates are selected and assigned to their matching tax return key point. The base Debtor and Creditor tax rates are also assigned, which form the default.
During operation, “automatic overrides” on the accounts and stock items are then configured as new accounts or stock items are set up.
Company Defaults
The tax system in MYOB EXO Business is customised based on the country selected in the main Company setup screen of EXO Business Config.
This setting determines settings such as the available Tax Return Key Points, as well as cosmetic display information such as the local tax system name (e.g. GST, VAT).
To select the country for the system:
1. Go to EXO Business Config > Company > Company Details.
2. Select the appropriate country in the Country field.
Note: If the country of operation is changed, the default tax rates, and the tax rate settings must also be reviewed and set to the appropriate country settings. Changing the country also alters the available tax return key points, used to configure the integrated tax returns - see the following sections for more detail.
Essential Defaults
Tax Basis
Invoice- or payments-based tax determines how taxation reports are run, and also if extra tax rate functions must be enabled (e.g. whether an overriding tax rate is required on a payment with payments-based tax systems).
The tax basis is set at EXO Business Config > Essential > General Settings.
Note: MYOB EXO Business recommends and supports Invoice-based tax only.
MYOB EXO Business allows for a variety of tax rates to be recorded on each line of an invoice. When a payment is made it is only possible to record a single tax rate. Many functions that are controlled by profile settings (such as tax rate overrides at invoice line level) are suited only for invoice line based taxes.

Taxation
499
While it is possible to operate EXO Business and report tax on a payment basis, there are certain logical paradoxes that can occur related to the fact that, by default, EXO Business allows tax to be recorded at a finer level of detail than on a payment basis. For example, care should be taken to disable functionality that promotes individual invoice line level control over tax rates. If multiple tax rates do occur on the same invoice (or in fact to the same customer or supplier), then the only logical method of reconciling tax on a payment basis is to ensure that payments received or made are consistently allocated against invoices, and to produce estimates of tax by reports that calculate the tax content of invoices that are paid during the period.
Note: Some features, such as the Australian BAS Return, cannot support payment-based tax, because fundamental linking is done at an invoice line level.
Debtor Pricing
A setting is available to determine whether the sell pricing of stock is entered as tax inclusive or tax exclusive.
To set the tax inclusive/exclusive setting for Debtor pricing:
1. Go to EXO Business Config > Essential > General Settings.
2. Tick the Tax inclusive pricing for debtors box to state that the sell prices of stock items are entered as tax inclusive; leave the box unticked to state that stock prices are entered as tax exclusive.
Tax Rates
The tax rates are used to ‘group’ the purpose of the tax on an invoice or payment. It is these tax rates that can be reported on for tax returns, and when linked with tax return key points form the basis of the Tax Return systems.
To set up tax rates:
1. Open the tax rates table from EXO Business Config > Essential > Tax Rates.
2. Create a new tax rate by clicking New, or double-click on an existing rate to view and edit.
3. Enter the following information, and press Save to save the tax rate.
Field Description
Tax rate name Tax rate short name
User-friendly names used to reference the tax rate.
Tax rate % The percentage rate of tax to be recorded.
Tax return key point Used to identify the corresponding field on the Tax Return, using this tax rate as part of the calculation. See Tax Return Key Points below.
GL control account Leave the Use Default box ticked to use the GL control account specified in Configuration Assistant > Business Essentials > GL Control Accounts for the debtors and/or creditors tax account; otherwise, untick the box and select a specific GL account for the rate.
To verify that the tax rates have valid key points, and to also check that only valid tax rates exist on debtor, creditor, stock and GL accounts, click the Check Rates button on the toolbar. This will perform a check, and report errors and warnings.

MYOB EXO Business User Guide
500
In a new implementation, the suggested default rates for the selected country can be loaded by clicking the
Load Rates toolbar button. This button will only be available if the tax rate table is empty, and therefore can only be used if no transactions containing tax rates have been entered in the system.
Troubleshooting
The most common reason for the Check Rates function reporting “null key point values” is because there is no Tax return key point setting for a tax rate. A blank tax rate description will also make a tax rate invalid – if the rate number is shown in the table, it is expected to have a matching tax key point. It is suggested that blank description tax rates be avoided (or deleted), and that all tax rates point to a key point to confirm they have not been ‘mis-configured’. The tax return point “NA – Not recorded on return” could be used if the rate is not to be entered on a tax return.
Other common causes of invalid tax rates include incorrect initial setting of default tax rates, or data imported directly to the database that has not set the tax rate fields. The following fields must be set when importing data:
dr_accs.taxstatus
cr_accs.taxstatus
stock_items.salestaxrate
stock_items.purchtaxrate
glaccs.taxstatus
Default Tax Rates
Default tax rates are the lowest level in the hierarchy of tax rate defaults (see page 497), and will be used on transactions unless specifically set by rates on the account or the stock item, or manually overridden. These default rates could be thought of as the “fall-back” rate if there are no other overrides on the transaction.
To set the default tax rates:
1. Go to EXO Business Config > Essential > General Settings.
2. Select one of the pre-defined Tax Rates for the Base debtor tax rate and Base creditor tax rate.
It is critical that the default tax rates be set correctly. Invalid tax rates may also prevent transaction from being entered.
Tax Return Key Points
Tax Return Key Points are the references to the key points on the country’s tax return system. Tax return key points are pre-defined, relevant to each country, and are viewable but not user-editable. It is the assigning of the key point to a tax rate that controls what will appear on the tax return. More than one tax rate may be added to the same tax return key point.
To view the pre-defined Tax Return Key Points, go to EXO Business Config > Administration > Finance > Tax Return Key Points.
You can double-click on a key point to show more information on the item, such as the full description.
Tax Return Key Points are listed as Creditor and/or Debtor. These properties carry through when assigned to tax rates, and therefore help prevent incorrect tax rates being entered on the wrong transaction types.
“DIS” and “N/A” are special key points that can be used to “disable” a tax rate to prevent data entry, or not display the rate on a tax return.

Taxation
501
Tax Rate Hierarchy Setup
Once the tax rates have been linked to the tax return key points, and the default rates setup, optional tax rate overrides by debtor/ creditor account and stock item can be set up. These settings will override the default tax rates (see page 500) specified at Configuration Assistant > Business Essentials > General Settings.
Existing Transactions
Databases with existing transactions will need to be checked before using the automatic tax return features if they have not been configured previously. For new transactions entered going forward, this should not be an issue as long as the settings are correct.
Historical information should be marked so that this information will not be picked up when the Include previous option is selected on a new tax return, (i.e. when the intention is to include transactions added to a prior period that has already had a Tax Return created, in whatever format was used previously). This historical information could be captured by creating a “dummy” tax return to mark all the transactions in the historic data’s date range.
Tax Rate on Debtors/ Creditors
The automatic tax rate used on a transaction can be determined by a rate set on a Debtor or Creditor account. This is useful, for example, if the tax rate charged to a foreign Debtor is different to local accounts, or if the tax rate paid to a foreign creditor is different. Setting the tax rate on an account will set the tax rate on a transaction line to this account’s default rate.
The Debtor/Creditor default rate is the “highest” overriding level in the automatic hierarchy (see page 497) (with the exception of manually overriding the rate during transaction entry).
To override the tax rate on an account:
1. Select the Debtor or Creditor from the Account > Debtor or Account > Creditor screen.
2. Select a rate for the Override Tax Rate field on the Details 2 tab. Leaving this field set to “-1. AUTO SELECT RATE” will disable any overriding of the tax rate by the account, so the next level down the hierarchy will be used (which is the tax rate on the stock item).
Tax Rate on Stock Items
The automatic tax rate used on a transaction can also be determined at a stock item level, e.g. to accommodate various tax rates are applied specifically by stock item. A tax rate set on a stock item will be not be used if a tax rate is also set on the Debtor/Creditor account, or if one is manually set during transaction entry, as they have higher priority.
To set the tax rate on a specific stock item:
1. Select the stock item from the Stock > Account screen.
2. Select rates for the Sales Tax and Purch Tax fields on the Details 2 tab. Leaving these fields set to “-1. AUTO SELECT RATE” will disable any automatic overriding of the tax rate by the stock item, so the next level down the tax rate hierarchy will be used (which is the default tax rate of the system).

MYOB EXO Business User Guide
502
Manually Overriding Transactions
When entering lines on an invoice, the tax rate hierarchy is used to automatically select the tax rate on the line. This automatic selection may then be optionally overridden by the user, if they are set up with permission to do so.
On invoices where a rate other than the automatic rate is needed, the periscope button can be used on that line manually enter the rates and value. (Use with caution when using a payment-based tax system). The button next to the periscope allows price options to be changed between tax inclusive and tax exclusive.
To compare the tax calculated by the default tax rate hierarchy with the rate manually overridden, click the Tax Rates button on the toolbar.
Note: The ability to override the rates on invoices is controlled by the user profile setting Allow override of tax amount for invoice lines.
Overriding the tax value on Debtors transactions is not recommended. If the client manually overrides the Tax value field, this will result in a discrepancy between the Gross on the invoice and the Gross on the Tax Return. Instead of changing the tax value, clients should change the tax rate.
Changing the Tax Rate
In some circumstances clients may want to change the tax, e.g. from 15% to 0%, because the tax on a transaction is for a “Zero Rated” supply such as exported goods.
In this case, clients should change the Tax rate using the drop down of available rates to a rate that is set to 0%, and let the system recalculate the tax amount to $0.00. Do not simply override the Tax value to $0.00.
This way MYOB EXO Business will correctly calculate the Gross to be shown on the Tax Return.
Changing the Tax Value (Creditors Invoices)
In some rare circumstances, clients may want to change the Tax value on a Creditors transaction, e.g. when entering a Creditors Invoice, the tax as calculated by EXO Business may differ slightly to that as charged by the Supplier.
In this circumstance it is acceptable to override the Tax value to agree with the supplier’s documentation.

Taxation
503
Tax Reports
The main Tax Return functions under Tax Reports on the Reports menu are used to generate the tax return (specific to the country), and are complimented with Tax By Rate Type and Tax Rate Exceptions reports. You can also use the Tax Rate Exception Report menu item to highlight invoices where the tax rate is not relevant to the transaction type.
Tax Returns
The following Tax Return reports are available:
New Zealand GST Return BAS Tax Return Singapore GST Return VAT Return
Each report is accompanied by an Edit Return option, which lets you select and edit previous returns.
Tax by Rate Type Report
Reports > Tax Reports > Tax Report by Rate Type
The Tax by Rate Type report can be used to create “manual” tax returns, or to allow auditing of data. Two reports exist: a tax rate report for payment transactions and a tax rate report for invoice transactions.
Note: The Clarity report for payment transactions is TAXByRateType_Payment.CLR, and invoice transactions is TAXByRateType.CLR.
Tax Rate Exceptions
A Tax Rate Exceptions report can be run to help identify incorrect coding, or invalid codes. This report is available from the Tax Return reports by selecting Utilities > Tax Rate Exceptions. (You can also add the report to the main EXO Business menu for direct access.)
This report can help identify tax rates set up or used on the incorrect ledger if changes are made to the tax rate settings.

504
Manufacturing
About Manufacturing
This section describes the Bill of Materials and Time Billing modules. It explains how a Bill of Materials (BOM) is set up and processed. It also details the processing of a Works Order and explains the handling of Time Billing.
Bills of Materials can be classified into three different types:
Kit – individual components are sold, and the code is a shortcut code to the collection of components
Build – all components are consumed in a transformation to make an output stock item.
Order Template – a simple product list for use with Sales Orders only. The BOM code becomes a shortcut to the product list, to save keying each product into the order.
Note: See the MYOB EXO Business White Paper “BOMs and Stock Code Enhancements” for technical details on Bills of Materials, including information on the database tables and fields they use.

Manufacturing
505
Setting up Bills of Materials
Types of Bills of Materials
There are three main ways of using the Bill of Materials module: kits, manufactured items and order templates.
Kits
A kit item is an item that is made up of a list of other stock items that are assembled at the time of sale. It is a quick and easy way to sell something that consists of a number of different stock items. The kit may also be priced separately allowing the selling price to be different from the sum of the selling prices of the components.
In a kit Bill of Materials, the components are sold and the header is a shortcut code to a collection of components.
Kits can be used with the EXO Job Costing module, but not with Sales Orders or Works Orders.
Manufactured Items
Manufactured Items, or “builds”, are produced from other stock items. When you manufacture an output item you deduct the component items from stock and build the new manufactured output item, which is then placed in stock. This item is then sold in the usual method with pricing specified on the output stock items.
In a build Bill of Materials, the output item is sold.
Note: A bill without an output item cannot be a manufactured item. A bill with an output item is usually a manufactured item but can also be a kit. When manufactured items are sold as kits, the rules applicable to kits should be used.
Builds can be used with Sales Orders and Works Orders, but not with the EXO Job Costing module.
Order Templates
An order template is not a true Bill of Materials but a simple “shopping list” for use with Sales Orders only. The Bill of Materials code becomes a shortcut to the product list, to save entering each product into the order. No header line is included.
Note: The Auto Order Template on the Details2 tab of Debtor accounts (see page 95) only displays order template Bills of Materials.

MYOB EXO Business User Guide
506
Creating a Bill of Materials
Account > Bill of Materials
The same interface is used to create Bills of Materials of all types.
To create a Bill of Materials:
1. Select Bill of Materials from the Accounts or Transactions > Manufacturing menu. The following window is displayed:
2. Click the New button. The following window is displayed:

Manufacturing
507
3. Complete the fields on the Details tab:
Field Description
Bill code Enter the bill code for this Bill of Materials. This is the code that you need to type to bring up your kit during invoicing. This code will also be displayed in the Bill of Materials (search) window.
Note: The bill code can be changed by clicking on the Change Bill Codes button. This changes all references to the bill code.
Description Enter the description for this kit as you would like it to appear on the invoice. This description is also displayed on the Bill of Materials (search) window.
Type Select the type of Bill of Materials:
Kit
Build
Order Template
Active Select this option if the Bill of Materials is no longer active, i.e. no longer available for use.
Hide lines on reports Select this option if you want to hide components that make up this Bill of Materials on the invoice/sales order. If this tick box is not checked, the components are displayed on the invoice/sales order lines (at zero price).
Output item/ Template item
For builds and kits, enter the stock code of the finished product (the final output item). This field is optional for kits.
For order templates, if you wish to price the template as a single item, enter the stock code for the template item.
Batch quantity Specify the quantity (number of output items) that is produced from the selected components. This defaults to 1 when you create a new kit.
MYOB EXO Business User Guide
508
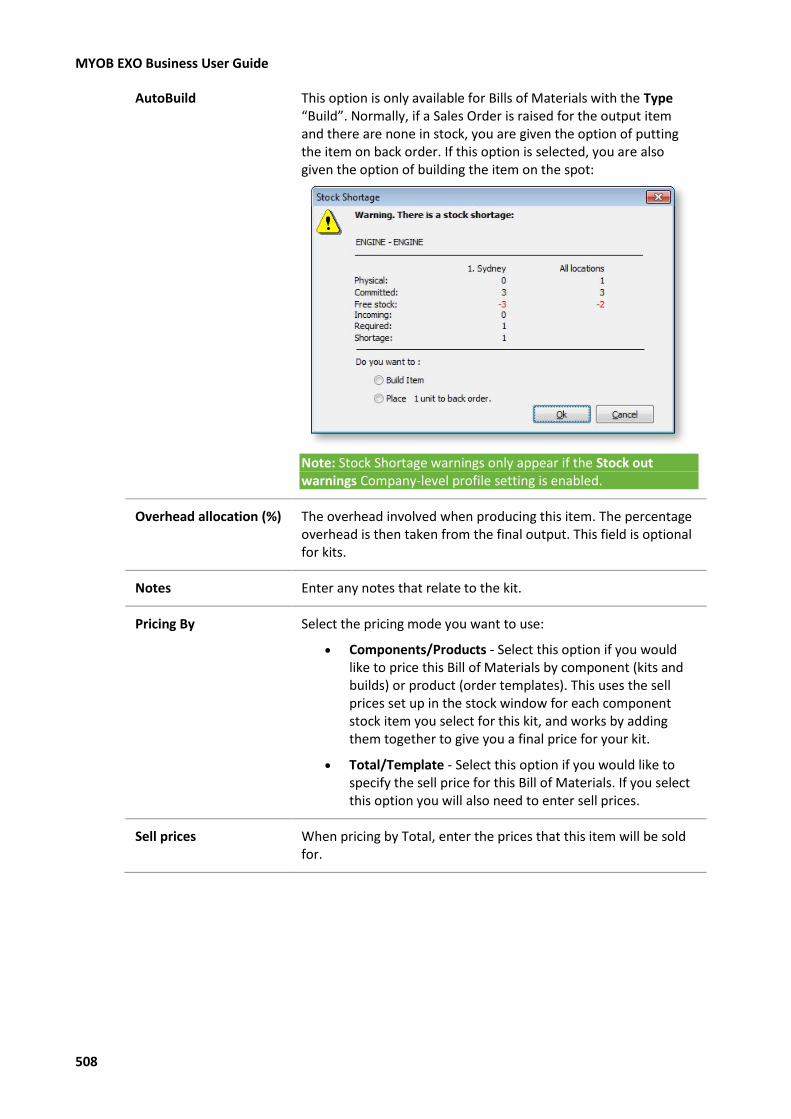
AutoBuild This option is only available for Bills of Materials with the Type “Build”. Normally, if a Sales Order is raised for the output item and there are none in stock, you are given the option of putting the item on back order. If this option is selected, you are also given the option of building the item on the spot:
Note: Stock Shortage warnings only appear if the Stock out warnings Company-level profile setting is enabled.
Overhead allocation (%) The overhead involved when producing this item. The percentage overhead is then taken from the final output. This field is optional for kits.
Notes Enter any notes that relate to the kit.
Pricing By Select the pricing mode you want to use:
Components/Products - Select this option if you would like to price this Bill of Materials by component (kits and builds) or product (order templates). This uses the sell prices set up in the stock window for each component stock item you select for this kit, and works by adding them together to give you a final price for your kit.
Total/Template - Select this option if you would like to specify the sell price for this Bill of Materials. If you select this option you will also need to enter sell prices.
Sell prices When pricing by Total, enter the prices that this item will be sold for.
Manufacturing
509
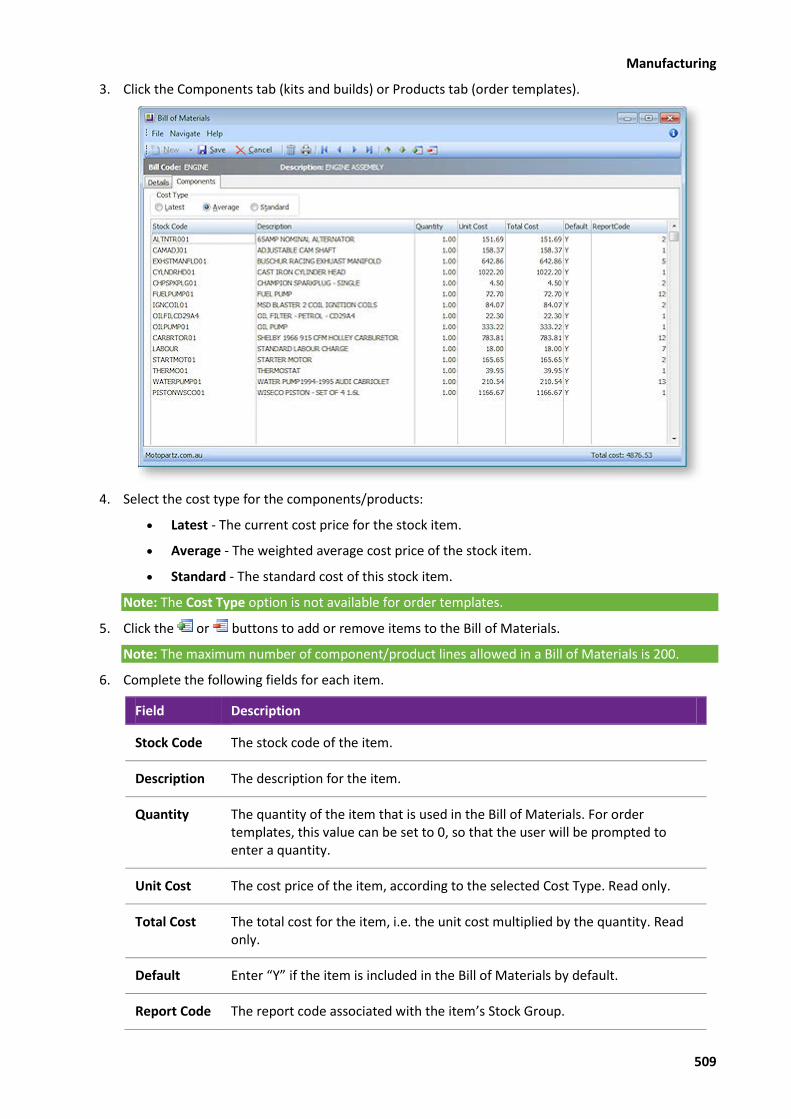
3. Click the Components tab (kits and builds) or Products tab (order templates).
4. Select the cost type for the components/products:
Latest - The current cost price for the stock item.
Average - The weighted average cost price of the stock item.
Standard - The standard cost of this stock item.
Note: The Cost Type option is not available for order templates.
5. Click the or buttons to add or remove items to the Bill of Materials.
Note: The maximum number of component/product lines allowed in a Bill of Materials is 200.
6. Complete the following fields for each item.
Field Description
Stock Code The stock code of the item.
Description The description for the item.
Quantity The quantity of the item that is used in the Bill of Materials. For order templates, this value can be set to 0, so that the user will be prompted to enter a quantity.
Unit Cost The cost price of the item, according to the selected Cost Type. Read only.
Total Cost The total cost for the item, i.e. the unit cost multiplied by the quantity. Read only.
Default Enter “Y” if the item is included in the Bill of Materials by default.
Report Code The report code associated with the item’s Stock Group.

MYOB EXO Business User Guide
510
7. The total cost of all items is displayed at the bottom of the window.
8. You can double-click on an item to drill down to the Stock window for that item.
9. Click Save.
Tip: You can also create a Bill of Materials by making a copy of an existing Bill of Materials (see page 510).
Copying a Bill of Materials
Account > Bill of Materials
One way of creating a new Bill of Materials is to create a copy of an existing Bill of Materials and then editing it as required.
To copy a Bill of Materials:
1. Select Bill of Materials option from the Accounts or Transactions > Manufacturing menu. The following window is displayed:
2. Select an existing Bill of Materials and click the Copy Bill button. This displays the Copy Bill of Materials window:
3. Enter a New Bill Code and Description, then click OK.
A new Bill of Materials is created with the same details as the original. You can edit the details of the new Bill of Materials if necessary.

Manufacturing
511
Invoicing a Bill of Materials
When invoicing a Bill of Materials, enter the Debtors Invoice (see page 384) in the usual method. In the Stock Code field enter the Bill of Material’s Bill Code preceded by a full stop. e.g. .CARCARE03. Depending on whether you enabled the Hide lines on reports option during setup, you may or may not be able to view the components that make up this Bill of Materials. Continue to enter any other required details and click Save to save the invoice.
Supplying a manufactured item in a Sales Order is entered exactly the same way as above. Enter the Output Code you created into the stock code field. Manufactured items can also be transferred between locations as a standard stock item.
Editing Bills of Materials on Invoices
By default, the quantities and prices of Bill of Material header and component lines are locked from editing to ensure the header/lines relationship. (Order templates are not true Bills of Materials, but simply “shopping lists”, so this constraint does not apply to them.)
If you want to be able to edit the lines independently, you must disable the Enforce bill of materials header and line constraints Company-level profile setting. Disabling this setting means that Bill of Material lines are treated as individual lines.
General Ledger Postings for Bills of Materials
The General Ledger postings generated when a Bill of Materials is sold vary depending on the Bill of Material’s type.
Postings for Kits
For kits, the component lines are equivalent to ordinary sales lines. The header line does not post to the General Ledger and the output code is not referenced.
The General Ledger accounts for Sales and Cost of Sales arise from the component stock item as per the rules for ordinary sales lines.
Postings for Builds
Postings for builds are as follows:
Component lines that are stocked items are not posted to the General Ledger (they don’t affect the value of stock).
Component lines that are lookup items are posted to the General Ledger as adjusting the value of stock (i.e. are value-add). These are posted with the General Ledger code for the Stock On Hand account from the GL Control Account setup (see page 237).
The Bill of Materials header generates two entries:
o For inwards goods - to the General Ledger purchases account set on the Output item, (i.e. receipt the manufactured item into stock). The cost and sell of the stock transaction is the sum of the costs of the components (including lookups) and therefore incorporates the contra-entry for added value represented by the lookup item posting.
o For the sale of the output item - with General Ledger accounts for the sales and cost of sales being taken from the Output item.
Postings for Order Templates
For General Ledger posting, the system treats lines of an order template identically to ordinary lines - the fact that they were derived from a Bill of Materials does not make a difference.

MYOB EXO Business User Guide
512
Processing Builds
Build type Bills of Materials must be processed to consume the component items and create the output item. You can either process a bill of materials (manufactured item) individually or in a batch from inside the Bill of Materials screen. This process for a Bill of Materials is a one-step process, immediately consuming components and producing an output item, as opposed to a production process that moves through many production stages. If you wish to process a bill through a production process, you can use the Works Orders (see page 515) module.
Notes
Batch processing is designed to quickly create simple manufactured items. It does not handle batch numbers or serialised stock items. To manufacture items for batch-numbered components or output items, use the more sophisticated Works Order functionality (see page 515).
Processing a Bill of Materials produces the following stock transactions:
o Adjust Out transactions for the components
o Adjust In transaction for the Bill of Materials output item
Processing a Single Build
Account > Bill of Materials
Once you have created a Bill of Materials with the type “build”, it must be processed in order to consume the component items and create the output item.
To process a single build-type Bill of Materials:
1. Select Bill of Materials from the Accounts or Transactions > Manufacturing menu.
2. Select a Bill of Materials with a Type of “Build”. Double-click to open the Bill of Materials.
3. Click the Process button. The following screen is displayed:

Manufacturing
513
4. Complete the fields on the screen.
Field Description
Bill code The bill code of the Bill of Materials being produced.
Produce quantity The quantity of output items you want to produce. The default is 1.
Reference An optional reference code. May be left blank.
Component location
The number of the location that components will be taken from to produce this item.
Product Location The number of the location that you want the output item receipted to.
Process date The date that this item is to be processed. The default is today’s date.
5. Click the Check Stock button. The system checks the stock and provides a status report on the current availability of component stock compared to requirement, to produce the desired quantity of output items.
6. If there are no stock shortages, click the Process button.
7. A confirmation message appears to verify that you want to process the stock. Click Yes.
8. The bill is processed and a success message is displayed at the end of the status report. Click the Print button for a printed copy of the Status Report.
Once the process is complete, the stock ledger will contain negative movements for the components that made up this bill code. The output item will show a positive stock movement for the produce quantity.

MYOB EXO Business User Guide
514
Processing a Build Batch
Transactions > Manufacturing > Bill of Materials Batch Entry
Once you have created Bills of Materials with the type “build”, they must be processed in order to consume the component items and create the output item. Multiple builds can be processed in a single batch.
To process a batch of build-type Bills of Materials:
1. Click the Batch Process button on the Bill of Materials window (see page 505), or select Bill of Materials Batch Entry from the Transactions > Manufacturing menu. The following screen is displayed:
Tip: You can also access this screen by clicking the Batch Process button on the Bill of Materials screen (see page 505).
2. Click the New button and complete the fields on the screen.
Field Description
Transaction Date The date of the transaction. Defaults to today’s date.
Component Location
The number of the location that components are being supplied from.
Reference Code An optional reference code for the batch. May be left blank.
Product Location The number of the location to which the final product(s) should be transferred.

Manufacturing
515
3. Enter the details of all Bills of Materials that you want to include in the batch.
Field Description
Bill Code The bill code of the item being processed.
Description The description related to the bill code.
Quantity The quantity to be produced.
Analysis Codes
Any Analysis Codes (see page 82) you want to associate with the Bill of Materials.
4. Once all details are entered, click the Process button.
5. A confirmation message appears to verify that you want to process the stock. Click Yes.
6. When the processing is complete, a success message is displayed:
Works Orders
Using Works Orders
A Work Order is essentially a more complex processing version of a build-type Bill of Materials, allowing you to move through the production status for each stage of component assembly until the final product is produced.
You still need to set up your build-type Bills of Materials (see page 505) before you can use Works Orders.
The Works Order processing function supports batch codes and serialised stock items.
Note: Works Orders are only available if the Use works orders Company-level profile setting is enabled.

MYOB EXO Business User Guide
516
Creating a Works Order
Transactions > Manufacturing > Works Order Entry
A Works Order is a more complex version of a build-type Bill of Materials.
To create a Works Order:
1. Select Works Order Entry from the Transactions > Manufacturing menu. The following window is displayed:
2. Click the New button. The following window is displayed:

Manufacturing
517
3. Complete the fields on the Details tab.
Field Description
Works order no The number of the selected works order. This number is assigned when the Works Order is first saved.
Entered by The name of the staff member entering the works order. Click the button to select the staff member’s name.
Billomat code The Bill of Materials code. Click the button to select a Bill of Materials. Only build-type Bills of Materials are available, as these are the only BOMs that undergo a manufacturing transformation.
Product code The code of the Bill of Materials’ output item.
Qty. required The quantity to be produced.
Batch code The production batch code. You can add this Works Order to an existing batch.
Status The production status:
Uncommitted
Committed
In Production
Completed
Reference An optional reference code. May be left blank.
Entry date The start date for the Works Order.
Production date The production date for the Works Order.
Due date The date the Works Order is to be completed.
Expiry date The date the Works Order expires.
Product Loc The location to which the final product should be transferred.
Component Loc The location that components are being supplied from.
Linked sales order The number of the Sales Order (see page 351) that the works order is
linked to. Click the button to select a Sales Order. This field is optional.
Production notes Any notes that you may need to make in relation to this works order.

MYOB EXO Business User Guide
518
3. Click the Components tab.
4. Complete the fields at the top of the Components tab.
Field Description
Qty Required The total quantity to be produced.
Qty produced The quantity to be produced in this operation.
Date produced The date the works order is completed.
Product Loc The location to which the final product should be transferred.
Batch code The production batch code.
Expiry date The date the Works Order expires.
Component Loc The location that components are being supplied from.
5. Use the buttons on the toolbar to add or remove components:
Button Function
Load all components from the Bill of Materials.
Add a component.
Remove a component.
Replace a component.

Manufacturing
519
6. The following fields are displayed for each component:
Field Description
Stock Code The stock code of the item.
Description The description for the item. Read only.
Qty Reqd The quantity of the component required to fulfil the entire Works Order. Read only.
Qty Used The quantity of the component to be consumed in this operation.
BatchCode The production batch code.
Req. Cost The total cost of the required number of the component. Read only.
Used Cost The cost of the components consumed in this operation. Read only.
Analysis Codes Any Analysis Codes (see page 82) you want to associate with the Works Order.
7. Clicking the button sets the Qty Used value for all components to the Qty Reqd value.
8. You can double-click on an item to drill down to the Stock screen for that item.
9. Click Save. You are given the opportunity to print the Works Order.
Note: The Works Order will appear on the Works Order tab (see page 173) of any Stock item that is involved in it, either as a component or as an output item.
Processing a Works Order
Transactions > Manufacturing > Works Order Entry
Once a Works Order is created, it must be processed to consume the component items and create the output item.
Unlike Bills of Materials, that are either processed or not processed, Works Orders allow you to specify the production status of the order.
To set the production status of a Works Order:
1. Select Works Order Entry from the Transactions > Manufacturing menu.
2. Double-click on the Works Order whose status you want to change.
3. On the Details tab, set a value for the Status property. Choose from:
Uncommitted
Committed
In Production
Completed
Works Orders do not generate stock movement transactions until they are fully processed, i.e. Completed.

MYOB EXO Business User Guide
520
To process a Works Order:
1. Select Works Order Entry from the Transactions > Manufacturing menu.
2. Double-click on the Works Order whose status you want to change.
3. Select the Components tab.
4. Click the Process button on the Components tab toolbar. Click Yes to confirm.
This posts the Works Order to the Stock Ledger. The posting consists of negative stock movements to component items and a positive stock movement to the output item.
The production status of the Works Order is automatically set to “Completed”.
Printing Works Orders
Works Orders can be printed out individually or in batches. To print the currently selected Works Order, select Print Works Order from the Print drop-down menu on the Works Order window’s toolbar.
A preview of the Works Order is displayed. Click Print on the preview window to print the Works Order.
To print a batch of Works Orders, select Print batch of works orders from the Print drop-down menu on the Works Order window’s toolbar. The following window appears:
Enter options to specify the Works Orders that you want to include in the printing operation, then click OK. Click Yes to confirm.
Each Works Order is previewed one at a time. Click Print on each preview window to print each Works Order.

Manufacturing
521
Time Billing
Handling Time Billing
Utilities > Debtor Utilities > Time Billing
The time billing module allows you to charge an account for time-related work. You can add multiple time charges to an account and then produce a single, itemised invoice at any time.
To create a time bill:
1. Select the Time Billing option from the Utilities > Debtors Utilities menu. The Time Billing window is displayed:
2. Click the New button. The following window is displayed:

MYOB EXO Business User Guide
522
3. Complete the fields on the Details tab.
Field Description
Account The name and number of the debtor account.
Staff The name of the staff member. You can type the name or select from the list.
Date The date the job was done.
Start Time The start time of the job.
Stop Time The end time of the job.
Hours The total number of hours being billed. This is automatically calculated based on the start and stop times you have entered.
Code The code of the stock lookup item related to this job.
Details The description of the selected code. This is automatically entered based on the code.
Hourly Rate The hourly rate for this code. This is the rate specified in the Stock Item Details Sell Prices and is automatically entered here.
Total Charge The total charge for the job. This is automatically calculated based on the hours and the rate.
4. Click Save. A time bill for the specified account is created.

Manufacturing
523
Invoicing a Time Bill
Utilities > Debtor Utilities > Time Billing
To invoice a time bill:
1. Select the Time Billing option from the Utilities > Debtors Utilities menu.
2. Select the Invoicing tab.
3. Complete the fields on this tab.
Field Description
Account The name and number of the debtor account.
Order No The order number.
Reference The reference number.
Print Invoice Tick this option if you want to print the invoice.
Invoice Date The date the invoice is created.
4. Click the Invoice button.

MYOB EXO Business User Guide
524
Viewing Time Billing Reports
Utilities > Debtor Utilities > Time Billing
To view a time bill report:
1. Select the Time Billing option from the Utilities > Debtors Utilities menu.
2. Select Time to bill by Customer from the Report menu.
3. Set the date range and select the status of the invoices you want to view, then click OK. The Time To Bill by Customer report is displayed.
Note: If you need to change any details such as the number of hours being billed or the code, select the account from the Time Billing search page and double-click it. Make the necessary changes on the Details tab and save these changes.