capacity management tools v. 1.0 installation guide€¦ · · 2012-09-21for the current patch...
TRANSCRIPT
Capacity Management Tools
Release Notes & Installation Guide
Version 3.0
September 2012
Department of Veterans Affairs (VA) Testing Services (TS)
Capacity Planning (CP) Service

September 2012 Capacity Management (CM) Tools iii Installation Guide Version 3.0
Revision History Documentation Revisions The following table displays the revision history for this document. Revisions to the documentation are based on patches and new versions released to the field.
Table i: Documentation revision history
Date Revision Description Author
08/08/2012 1.0 Initial Capacity Management (CM) Tools software and documentation release.
Software: CM Tools 3.0
Capacity Planning Development Team
• Development Manager— Thomas Grohowski
• Developer—Robert Kamarowski
• Software Quality Assurance (SQA)—Gurbir Singh
• Technical Writer—Thom Blom
Patch Revisions For the current patch history related to this software, see the Patch Module on FORUM.

Revision History
iv Capacity Management (CM) Tools September 2012 Installation Guide Version 3.0
September 2012 Capacity Management (CM) Tools v Installation Guide Version 3.0
Contents
Revision History .......................................................................................................................................... iii
Figures and Tables ...................................................................................................................................... vii
Orientation ................................................................................................................................................... ix
1 Release Notes ......................................................................................................................................... 1
1.1 GUI Front-end .............................................................................................................................. 1
1.2 GUI Options Added ...................................................................................................................... 2
1.3 Files Added ................................................................................................................................... 2
2 Preliminary Consideration .................................................................................................................. 3
2.1 Purpose ......................................................................................................................................... 3
2.2 About the Installation Procedures ................................................................................................. 3
2.3 Distribution Files .......................................................................................................................... 4
2.4 VistA M Server Requirements...................................................................................................... 5
2.5 Client Workstation Requirements ................................................................................................. 7
2.6 Skills Needed for Installation ....................................................................................................... 7
3 VistA M Server Installation Instructions ........................................................................................... 9
3.1 Version 3.0 Installation ............................................................................................................... 10
3.1.1 Retrieve the CM Tools VistA M Server Distribution File (required) ........................... 10
3.1.2 Verify KIDS Install Platform (required) ....................................................................... 10
3.1.3 Load KMPD3_0.KID File (required) ............................................................................ 11
3.1.4 Install Capacity Management Tools 3.0 Software (required) ....................................... 12
3.1.4.1 CM Tools 3.0 Software Installation Sample ................................................. 13
3.1.5 Post Installation Routine (required) .............................................................................. 15
3.1.6 Install All Released Patches (required) ......................................................................... 15
3.1.7 Review Capacity Management Tools Settings (recommended) .................................... 16
3.2 Version 3.0 Virgin Installation ................................................................................................... 18
3.2.1 Review Translation Table Settings (required) .............................................................. 18
3.2.2 Follow Steps 3.1.1- 3.1.7 Under "Version 3.0 Installation" (required) ......................... 18
4 (Optional) Client Workstation Installation Instructions ................................................................ 19
4.1 Retrieve the CM Tools GUI Software Distribution File (required) ........................................... 19
Contents
vi Capacity Management (CM) Tools September 2012 Installation Guide Version 3.0
4.2 Uninstall Previous Version of CM Tools GUI Software (required)........................................... 19
4.3 Shut Down Microsoft Windows Applications (required) .......................................................... 20
4.4 Run the Installation Program (required) ..................................................................................... 20
4.5 Set Up Server IP and Port Connections (required)..................................................................... 21
4.5.1 Review, Add, or Edit Servers in the Workstation Registry ........................................... 21
4.5.1.1 Locate and Run the RPC Broker ServerList.exe File .................................... 21
4.5.1.2 Edit the Broker Servers ................................................................................. 22
4.5.2 Create Shortcut to CM Tools Executable with Predefined Server Information ............ 23
4.5.2.1 Locate kmpdTools.exe File ........................................................................... 23
4.5.2.2 Create kmpdTools.exe Desktop Shortcut ...................................................... 23
4.5.2.3 Edit Shortcut Properties ................................................................................ 23
4.6 Add CM Tools RPC Broker "B"-type Option to the User's Secondary Menu (required) .......... 24
September 2012 Capacity Management (CM) Tools vii Installation Guide Version 3.0
Figures and Tables Figures
Figure 1: Sample CM Tools 3.0 distribution load ...................................................................................... 11
Figure 2: Sample CM Tools 3.0 installation (test) ...................................................................................... 13
Figure 3: Post installation informational message—Existing KMPD BACKGROUND DRIVER installed ............................................................................................................................................... 15
Figure 4: Post installation informational message—No KMPD BACKGROUND DRIVER installed ..... 15
Figure 5. "Connect To" dialogue— Sample server connection register entries .......................................... 21
Figure 6. Edit Broker Servers application—Sample entries ....................................................................... 22 Tables
Table 1: CM Tools-related software distribution files .................................................................................. 4
Table 2. VistA M Server minimum software/network tools/utilities required for CM Tools 3.0................. 5
Table 3. Client workstation minimum software/network tools/utilities required for CM Tools 3.0 ............ 7

Figures and Tables
viii Capacity Management (CM) Tools September 2012 Installation Guide Version 3.0
September 2012 Capacity Management (CM) Tools ix Installation Guide Version 3.0
Orientation How to Use this Manual Throughout this manual, advice and instructions are offered regarding the use of Capacity Management (CM) Tools software and the functionality it provides for Veterans Health Information Systems and Technology Architecture (VistA) software products. Intended Audience The intended audience of this manual is all key stakeholders. The stakeholders include the following:
• Information Resource Management (IRM) is the primary stakeholder who is responsible for the management of VistA M software.
• VistA M application developers who develop VistA software and patches.
• Product Support (PS). Legal Requirements There are no special legal requirements involved in the use of Capacity Management (CM) Tools. Disclaimers This manual provides an overall explanation of how to install and configure the Capacity Management (CM) Tools interface and the changes contained in Capacity Management Tools Version 3.0; however, no attempt is made to explain how the overall VistA programming system is integrated and maintained. Such methods and procedures are documented elsewhere. We suggest you look at the various VA Websites on the Internet and VA Intranet for a general orientation to HealtheVet. For example, visit the Office of Information & Technology (OIT) VistA Development VA Intranet Website: http://vaww.vista.med.va.gov
DISCLAIMER: The appearance of any external hyperlink references in this manual does not constitute endorsement by the Department of Veterans Affairs (VA) of this Website or the information, products, or services contained therein. The VA does not exercise any editorial control over the information you may find at these locations. Such links are provided and are consistent with the stated purpose of this VA Intranet Service.
Orientation
x Capacity Management (CM) Tools September 2012 Installation Guide Version 3.0
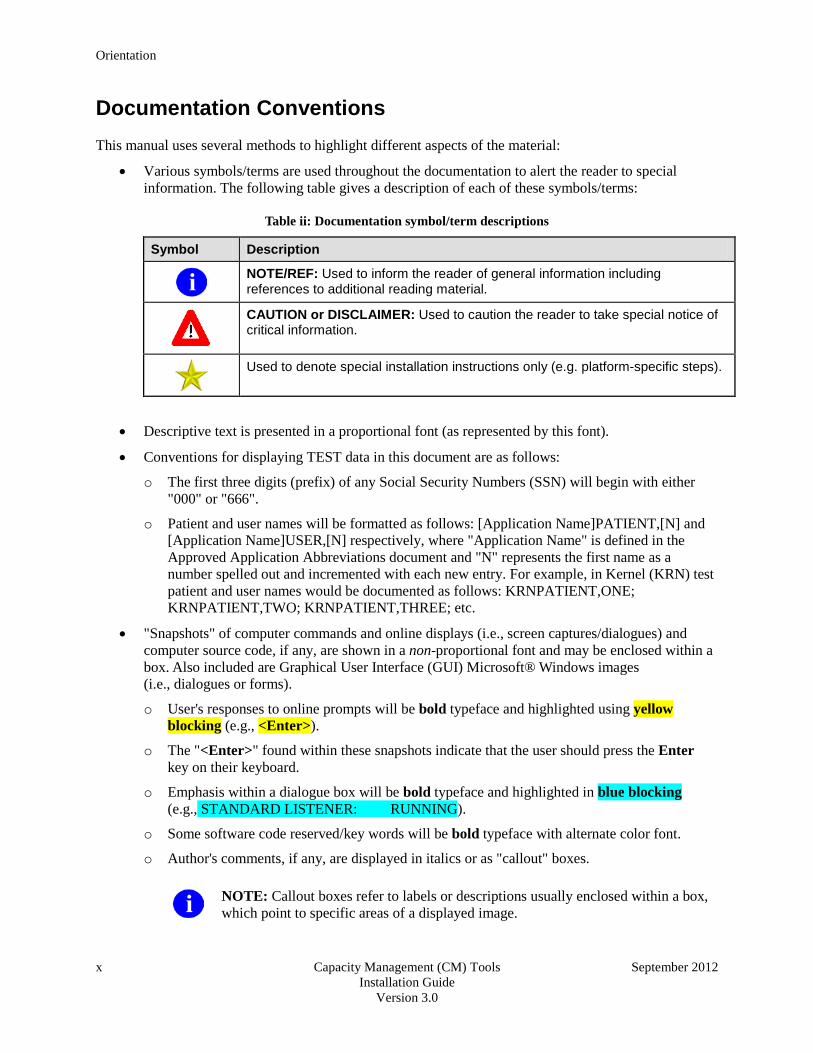
Documentation Conventions This manual uses several methods to highlight different aspects of the material:
• Various symbols/terms are used throughout the documentation to alert the reader to special information. The following table gives a description of each of these symbols/terms:
Table ii: Documentation symbol/term descriptions
Symbol Description
NOTE/REF: Used to inform the reader of general information including references to additional reading material.
CAUTION or DISCLAIMER: Used to caution the reader to take special notice of critical information.
Used to denote special installation instructions only (e.g. platform-specific steps).
• Descriptive text is presented in a proportional font (as represented by this font).
• Conventions for displaying TEST data in this document are as follows:
o The first three digits (prefix) of any Social Security Numbers (SSN) will begin with either "000" or "666".
o Patient and user names will be formatted as follows: [Application Name]PATIENT,[N] and [Application Name]USER,[N] respectively, where "Application Name" is defined in the Approved Application Abbreviations document and "N" represents the first name as a number spelled out and incremented with each new entry. For example, in Kernel (KRN) test patient and user names would be documented as follows: KRNPATIENT,ONE; KRNPATIENT,TWO; KRNPATIENT,THREE; etc.
• "Snapshots" of computer commands and online displays (i.e., screen captures/dialogues) and computer source code, if any, are shown in a non-proportional font and may be enclosed within a box. Also included are Graphical User Interface (GUI) Microsoft® Windows images (i.e., dialogues or forms).
o User's responses to online prompts will be bold typeface and highlighted using yellow blocking (e.g., <Enter>).
o The "<Enter>" found within these snapshots indicate that the user should press the Enter key on their keyboard.
o Emphasis within a dialogue box will be bold typeface and highlighted in blue blocking (e.g., STANDARD LISTENER: RUNNING).
o Some software code reserved/key words will be bold typeface with alternate color font.
o Author's comments, if any, are displayed in italics or as "callout" boxes.
NOTE: Callout boxes refer to labels or descriptions usually enclosed within a box, which point to specific areas of a displayed image.
Orientation
September 2012 Capacity Management (CM) Tools Installation Guide Version 3.0
xi
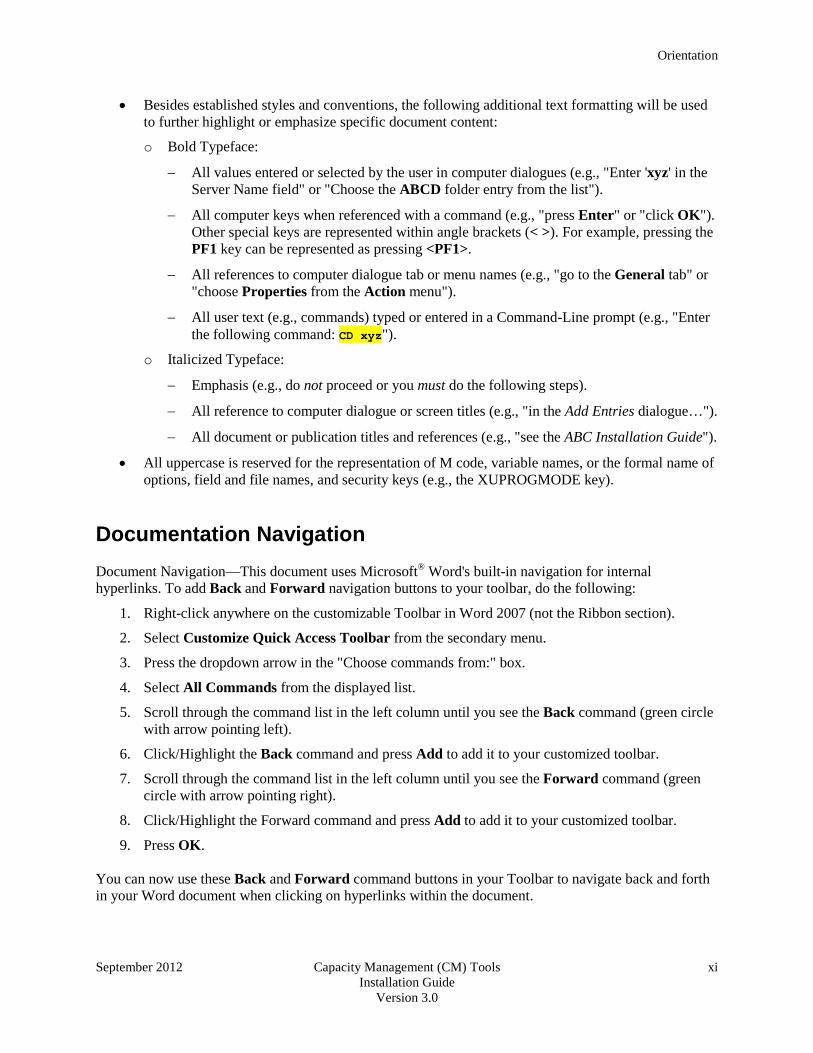
• Besides established styles and conventions, the following additional text formatting will be used to further highlight or emphasize specific document content:
o Bold Typeface:
− All values entered or selected by the user in computer dialogues (e.g., "Enter 'xyz' in the Server Name field" or "Choose the ABCD folder entry from the list").
− All computer keys when referenced with a command (e.g., "press Enter" or "click OK"). Other special keys are represented within angle brackets (< >). For example, pressing the PF1 key can be represented as pressing <PF1>.
− All references to computer dialogue tab or menu names (e.g., "go to the General tab" or "choose Properties from the Action menu").
− All user text (e.g., commands) typed or entered in a Command-Line prompt (e.g., "Enter the following command: CD xyz").
o Italicized Typeface:
− Emphasis (e.g., do not proceed or you must do the following steps).
− All reference to computer dialogue or screen titles (e.g., "in the Add Entries dialogue…").
− All document or publication titles and references (e.g., "see the ABC Installation Guide").
• All uppercase is reserved for the representation of M code, variable names, or the formal name of options, field and file names, and security keys (e.g., the XUPROGMODE key).
Documentation Navigation Document Navigation—This document uses Microsoft® Word's built-in navigation for internal hyperlinks. To add Back and Forward navigation buttons to your toolbar, do the following:
1. Right-click anywhere on the customizable Toolbar in Word 2007 (not the Ribbon section).
2. Select Customize Quick Access Toolbar from the secondary menu.
3. Press the dropdown arrow in the "Choose commands from:" box.
4. Select All Commands from the displayed list.
5. Scroll through the command list in the left column until you see the Back command (green circle with arrow pointing left).
6. Click/Highlight the Back command and press Add to add it to your customized toolbar.
7. Scroll through the command list in the left column until you see the Forward command (green circle with arrow pointing right).
8. Click/Highlight the Forward command and press Add to add it to your customized toolbar.
9. Press OK. You can now use these Back and Forward command buttons in your Toolbar to navigate back and forth in your Word document when clicking on hyperlinks within the document.
Orientation
xii Capacity Management (CM) Tools September 2012 Installation Guide Version 3.0
NOTE: This is a one-time setup and will automatically be available in any other Word document once you install it on the Toolbar.
How to Obtain Technical Information Online Exported file, routine, and global documentation can be generated through the use of Kernel, MailMan, and VA FileMan utilities.
NOTE: Methods of obtaining specific technical information online will be indicated where applicable under the appropriate topic.
REF: See the Capacity Management Tools Technical Manual for further information. Help at Prompts VistA M-based software provides online help and commonly used system default prompts. Users are encouraged to enter question marks at any response prompt. At the end of the help display, you are immediately returned to the point from which you started. This is an easy way to learn about any aspect of VistA M-based software. Obtaining Data Dictionary Listings Technical information about VistA M-based files and the fields in files is stored in data dictionaries (DD). You can use the List File Attributes option on the Data Dictionary Utilities submenu in VA FileMan to print formatted data dictionaries.
REF: For details about obtaining data dictionaries and about the formats available, see the "List File Attributes" chapter in the "File Management" section of the VA FileMan Advanced User Manual.
Assumptions This manual is written with the assumption that the reader is familiar with the following:
• VistA computing environment
o Kernel—VistA M Server software
o VA FileMan data structures and terminology—VistA M Server software
• Microsoft® Windows
• M programming language
Orientation
September 2012 Capacity Management (CM) Tools Installation Guide Version 3.0
xiii
Reference Materials Readers who wish to learn more about the Capacity Management Tools software should consult the following:
• Capacity Management Tools Installation Guide (this manual)
• Capacity Management Tools User Manual
• Capacity Management Tools Technical Manual
• Capacity Management (CM) Tools Online Help file (i.e., CM_Tools_3_0.chm)
• The Capacity Planning (CP) Service's Intranet Website: http://vaww.vista.med.va.gov/capman/default.asp This site contains additional information and documentation.
VistA documentation is made available online in Microsoft Word format and Adobe® Acrobat Portable Document Format (PDF). The PDF documents must be read using the Adobe® Acrobat Reader (i.e., ACROREAD.EXE), which is freely distributed by Adobe® Systems Incorporated at the following Website: http://www.adobe.com/ VistA documentation can be downloaded from the VHA Software Document Library (VDL) Website: http://www4.va.gov/vdl/ VistA documentation and software can also be downloaded from the Product Support (PS) anonymous directories:
• Preferred Method download.vista.med.va.gov
NOTE: This method transmits the files from the first available File Transfer Protocol (FTP) server.
• Albany OIFO ftp.fo-albany.med.va.gov
• Hines OIFO ftp.fo-hines.med.va.gov
• Salt Lake City OIFO ftp.fo-slc.med.va.gov

Orientation
xiv Capacity Management (CM) Tools September 2012 Installation Guide Version 3.0

September 2012 Capacity Management (CM) Tools 1 Installation Guide Version 3.0
1 Release Notes The Capacity Management (CM) Tools software is a fully automated support tool developed by Capacity Planning (CP) Service. CM Tools are designed for Information Resource Management (IRM) and system administrators responsible for the capacity planning functions at their site, as well as Veterans Health Information Systems and Technology Architecture (VistA) software developers. The CM Tools are used to measure system performance, data growth, Computerized Patient Record System (CPRS) coversheet load times, option and protocol execution, and provide various data reports. There are also tools for developers: Global Lister, Error Lister, Routine Search, and an M Code Evaluator. The Veterans Health Information Systems and Technology Architecture (VistA) Capacity Management (CM) Tools Version 3.0 software is now available. The enhanced software has the following features. 1.1 GUI Front-end A Delphi-based Graphical User Interface (GUI) front-end has been added to provide access to the various functions available with the following Capacity Planning (CP) Services software:
• Capacity Management (CM) Tools 3.0
• Resource Usage Monitor (RUM) 2.0
• Statistical Analysis of global Growth (SAGG) 2.0 The GUI front-end specifically provides access to the following functionality via tab selection:
• Timing Monitor
• Environment Check
• CM Tools Parameters
• Code Evaluator
• Code Stats
• Error Lister
• Global Lister
• Routine Search
• Reports:
o TMG—Timing Reports
DISCLAIMER: The CM Tools 3.0 GUI software, including the CM_Tools_3_0.chm help file, has only been tested on Microsoft® Windows XP. It is not currently supported on Windows 7.

Release Notes
2 Capacity Management (CM) Tools September 2012 Installation Guide Version 3.0
1.2 GUI Options Added The following GUI options were added to the CM Tools 3.0 software:
• Code Evaluator
• Code Stats
• Error Lister
• Global Lister
• Routine Search
REF: These are GUI client-only options added with CM Tools 3.0; there are no equivalent CM Tools VistA M server options. For a list of CM Tools VistA M server options, see Chapter 3, "CM Tools Options," in the Capacity Management Tools User Manual.
1.3 Files Added The CP REPORTS file (#8973.3) file was added in the CM Tools 3.0 software:
REF: For more information on these files, see Chapter 3, "Files," in the Capacity Management Tools Technical Manual.
September 2012 Capacity Management (CM) Tools 3 Installation Guide Version 3.0
2 Preliminary Consideration 2.1 Purpose The purpose of this guide is to provide instructions for installing the Veterans Health Information Systems and Technology Architecture (VistA) Capacity Planning (CP) Service's Capacity Management Tools software, Version 3.0. 2.2 About the Installation Procedures Separate installation procedures are provided in this guide based on the installation type:
• VistA M Server Installation Instructions
o Version 3.0 Installation—Previous version of software installed.
o Version 3.0 Virgin Installation—Software never installed.
• (Optional) Client Workstation Installation Instructions—GUI front-end software installation.
DISCLAIMER: The CM Tools 3.0 GUI software, including the CM_Tools_3_0.chm help file, has only been tested on Microsoft® Windows XP. It is not currently supported on Windows 7.
We recommend sites take the following approach to installing the CM Tools software:
1. Obtain the CM Tools 3.0 documentation.
REF: For more information on the CM Tools documentation, see the "Reference Materials" topic in the "Orientation" section in this manual.
2. Install the CM Tools 3.0 server software in a Test account prior to installing it in a Production account.
3. Obtain and install all released patches for the CM Tools 3.0 software.
REF: For the current patch history related to this software, see the Patch Module on FORUM.
There are no special legal requirements involved in the use of the CM Tools' interface.

Preliminary Considerations
4 Capacity Management (CM) Tools September 2012 Installation Guide Version 3.0
2.3 Distribution Files The CM Tools 3.0 software distribution includes the following files:
Table 1: CM Tools-related software distribution files
File Name Type Description
KMPD3_0README.TXT ASCII Readme File. This file provides any pre-installation instructions, last minute changes, new instructions, and additional information to supplement the manuals.
Read all sections of this file prior to following the installation instructions in the Capacity Management (CM) Tools Installation Guide (i.e., KMPD3_0IG.PDF).
KMPD3_0IG.PDF Binary Installation Guide. Use this manual in conjunction with the Readme text file (i.e., KMPD3_0README.TXT) to install the CM Tools 3.0 software.
KMPD3_0UM.PDF Binary User Manual. Use this manual
KMPD3_0TM.PDF Binary Technical Manual. Use this manual
KMPD3_0.KID ASCII KIDS Distribution—VistA M Server Software. Required for all VistA M Server installations. Contains the Capacity Management (CM) Tools 3.0 VistA M Server software:
• Global (^KMPD) and VA FileMan files
• Server Routines
• Capacity Management Tools Options
Follow normal procedures to obtain and install all CM Tools VistA M Server software (see FORUM).
CM_Tools_3_0.zip Binary Client Workstation Software Distribution. Required for all installations of the CM Tools GUI software. This is a zip distribution file that contains the following installation files:
• CMToolsSetup.exe—Self-installing executable to install the CM Tools software.
• 0x0409.ini—Software initialization and configuration file.
• CM Tools 3.0.msi—Microsoft® Windows installer that is the engine for the installation, maintenance, and removal of software on Microsoft® Windows systems.
• Data1.cab—Zip distribution containing the CM Tools 3.0 report framework.
• Setup.ini
After running the CMToolsSetup.exe, the following files and folders will be installed on the client workstation:
• kmpdTools.exe—CM Tools 3.0 software executable.
• CM_Tools_3_0.CHM—CM Tools 3.0 client GUI HTML Help file.
Preliminary Considerations
September 2012 Capacity Management (CM) Tools Installation Guide Version 3.0
5
File Name Type Description
• ServerList.exe & ServerList.hlp—RPC Broker Edit Broker Servers application and associated help file.
NOTE: These files are owned and maintained by the RPC Broker development team. CM Tools has included these files in its distribution as a convenience when updating servers in the Microsoft® Windows registry.
• Reports— CM Tools 3.0 report framework.
NOTE: CM Tools uses the FastReports® software to display reports in a separate browser window, which allows users to save or print the report
CAUTION: Users should not modify, add, or delete files in this folder.
DISCLAIMER: The CM Tools 3.0 GUI software, including the CM_Tools_3_0.chm help file, has only been tested on Microsoft® Windows XP. It is not currently supported on Windows 7.
2.4 VistA M Server Requirements The following minimum software tools and network configuration are required on the VistA M Server in order to install and use the Capacity Management Tools software:
Table 2. VistA M Server minimum software/network tools/utilities required for CM Tools 3.0
Minimum Software/Hardware Configuration Description
Operating System Software InterSystems Caché operating system.
NOTE: The VistA M Server need not be an NT system.
Fully Patched M Accounts You should have both a development Test account and a Production account for the CM Tools software.
The accounts must contain the fully patched versions of the following software (listed alphabetically):
• Resource Usage Monitor (RUM)—KMPR*2.0*1
• Statistical analysis of Global Growth (SAGG)—KMPS*1.8*3
• Computerized Patient Record System (CPRS)

Preliminary Considerations
6 Capacity Management (CM) Tools September 2012 Installation Guide Version 3.0
Minimum Software/Hardware Configuration Description GUI 23.0 (or higher) and Order Entry/Results Reporting (OE/RR) 3.0 (or higher)
CAUTION: The CM Tools software loads without CPRS GUI 23 and OE/RR 3.0; however, in order to start collecting timing data and enable the data collection and report-related CM Tools software options, Patch OR*3.0*209 must also be installed.
• Health Level Seven (HL7) 1.6
CAUTION: The CM Tools software loads without HL7 Patch #79 (i.e., HL*1.6*79); however, in order to start collecting HL7 statistics, HL7 Patch #79 must also be installed. HL*1.6*79 installs the $$CM^HLUCM API. The $$CM^HLUCM API contains code that enables the collection of HL7 usage information from the VistA environment.
• Kernel 8.0
• Kernel Toolkit 7.3
• MailMan 8.0
• RPC Broker 1.1
• VA FileMan 22.0
NOTE: These software applications must be properly installed and fully patched prior to installing CM Tools 3.0. You can obtain all released GUI and VistA M server software via the Product Support (PS) Anonymous Directories. VistA M server patches (including patch description and installation instructions) are available from the Patch module on FORUM or through normal procedures. Patches must be installed in published sequence.
Network Communications Software The VistA M Server needs to have TCP/IP running.
Preliminary Considerations
September 2012 Capacity Management (CM) Tools Installation Guide Version 3.0
7
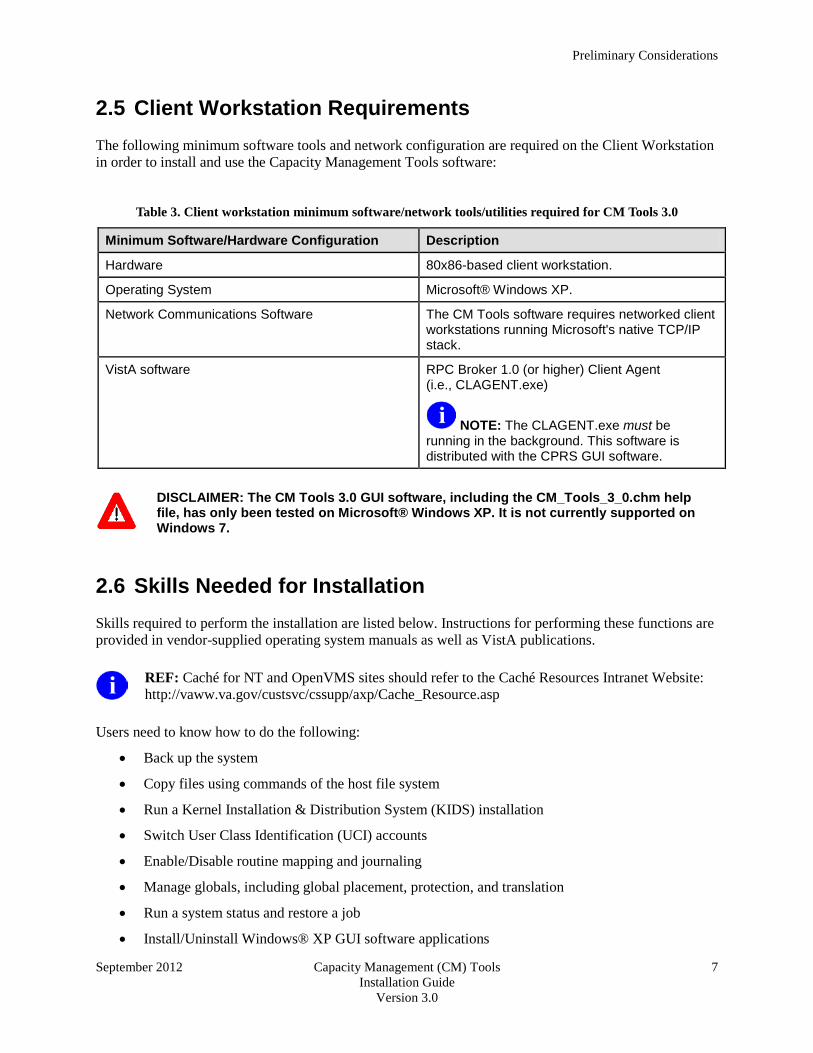
2.5 Client Workstation Requirements The following minimum software tools and network configuration are required on the Client Workstation in order to install and use the Capacity Management Tools software:
Table 3. Client workstation minimum software/network tools/utilities required for CM Tools 3.0
Minimum Software/Hardware Configuration Description
Hardware 80x86-based client workstation.
Operating System Microsoft® Windows XP.
Network Communications Software The CM Tools software requires networked client workstations running Microsoft's native TCP/IP stack.
VistA software RPC Broker 1.0 (or higher) Client Agent (i.e., CLAGENT.exe)
NOTE: The CLAGENT.exe must be running in the background. This software is distributed with the CPRS GUI software.
DISCLAIMER: The CM Tools 3.0 GUI software, including the CM_Tools_3_0.chm help file, has only been tested on Microsoft® Windows XP. It is not currently supported on Windows 7.
2.6 Skills Needed for Installation Skills required to perform the installation are listed below. Instructions for performing these functions are provided in vendor-supplied operating system manuals as well as VistA publications.
REF: Caché for NT and OpenVMS sites should refer to the Caché Resources Intranet Website: http://vaww.va.gov/custsvc/cssupp/axp/Cache_Resource.asp
Users need to know how to do the following:
• Back up the system
• Copy files using commands of the host file system
• Run a Kernel Installation & Distribution System (KIDS) installation
• Switch User Class Identification (UCI) accounts
• Enable/Disable routine mapping and journaling
• Manage globals, including global placement, protection, and translation
• Run a system status and restore a job
• Install/Uninstall Windows® XP GUI software applications

Preliminary Considerations
8 Capacity Management (CM) Tools September 2012 Installation Guide Version 3.0

September 2012 Capacity Management (CM) Tools 9 Installation Guide Version 3.0
3 VistA M Server Installation Instructions The installation of Capacity Management Tools Version 3.0 only affects the CM Tools options. Therefore, this installation can be performed at any time of the day with minimal disruption. Aside from implementing any of the applicable items that are listed below, installation should not take longer than 10-15 minutes. The instructions in this section are applicable for the Test/Production accounts in the Caché environment. Any unique instructions for a specific environment will be notated within the procedure.
NOTE: All Caché for Microsoft® Windows NT or Caché for OpenVMS sites should install this software.
The Capacity Management Tools 3.0 software installation creates the ^KMPD global to store the CM HL7 DATA (#8973.1) and CP TIMING (#8973.2) files. This global will automatically be trimmed (records deleted) by the CM Tools Background Driver option to contain the maximum amount of data as prescribed by the CP parameters.
REF: For more information on the CM Tools Background Driver option and CP parameters, see Chapter 3, "CM Tools: Options," in the Capacity Management Tools User Manual.
This installation will automatically set up the CM Tools Background Driver [KMPD BACKGROUND DRIVER] option within the OPTION SCHEDULING file (#19.2). This option will be scheduled to run tomorrow at 1:30 a.m. with a reschedule frequency of every day (i.e., 1D).
CAUTION: All sites should ensure that the CM Tools Background Driver [KMPD BACKGROUND DRIVER] option is not currently running during the installation.
VistA M Server Installation Instructions
10 Capacity Management (CM) Tools September 2012 Installation Guide Version 3.0
3.1 Version 3.0 Installation 3.1.1 Retrieve the CM Tools VistA M Server Distribution File (required) Obtain the Capacity Management (CM) Tools 3.0 VistA M Server software distribution file (i.e., KMPD3_0.KID) from the Product Support (PS) ANONYMOUS.SOFTWARE directory located at:
• Preferred Method download.vista.med.va.gov This method transmits the files from the first available FTP server.
• Albany OIFO ftp.fo-albany.med.va.gov
• Hines OIFO ftp.fo-hines.med.va.gov
• Salt Lake City OIFO ftp.fo-slc.med.va.gov 3.1.2 Verify KIDS Install Platform (required) Verify that the Kernel Installation and Distribution System (KIDS) platform on your system is ready to install VistA M Server patches.
REF: For more information on KIDS, see the KIDS section in the Kernel Systems Management Guide located on the VDL at the following Website: http://www4.va.gov/vdl/application.asp?appid=10
1. Verify Host File Server (HFS) Device in the DEVICE File (#3.5)—Verify that you have a Host File Server (HFS) device in the DEVICE file (#3.5) named "HFS". If you have performed KIDS installations on the VistA M Server before, you probably already have an appropriate HFS device set up. If you don't have an entry for this device, you must create one.
REF: For information on how to create an HFS device, see Chapter 18, "Host Files," in the Kernel Systems Management Guide.
2. Verify Null Device in the DEVICE File (#3.5)—Verify that you have a Null device in the DEVICE file (#3.5) named "NULL" (or whose mnemonic is named "NULL"). You can have other devices with similar names, but one device is needed whose name or mnemonic is "NULL." The subtype should be a "P-" subtype (e.g., P-OTHER), the margin should be a minimum of 80, and the page length should be a minimum of 60.
REF: For sample device setups, see Chapter 15, "Device Handler: System Management," in the Kernel Systems Management Guide.
VistA M Server Installation Instructions
September 2012 Capacity Management (CM) Tools Installation Guide Version 3.0
11
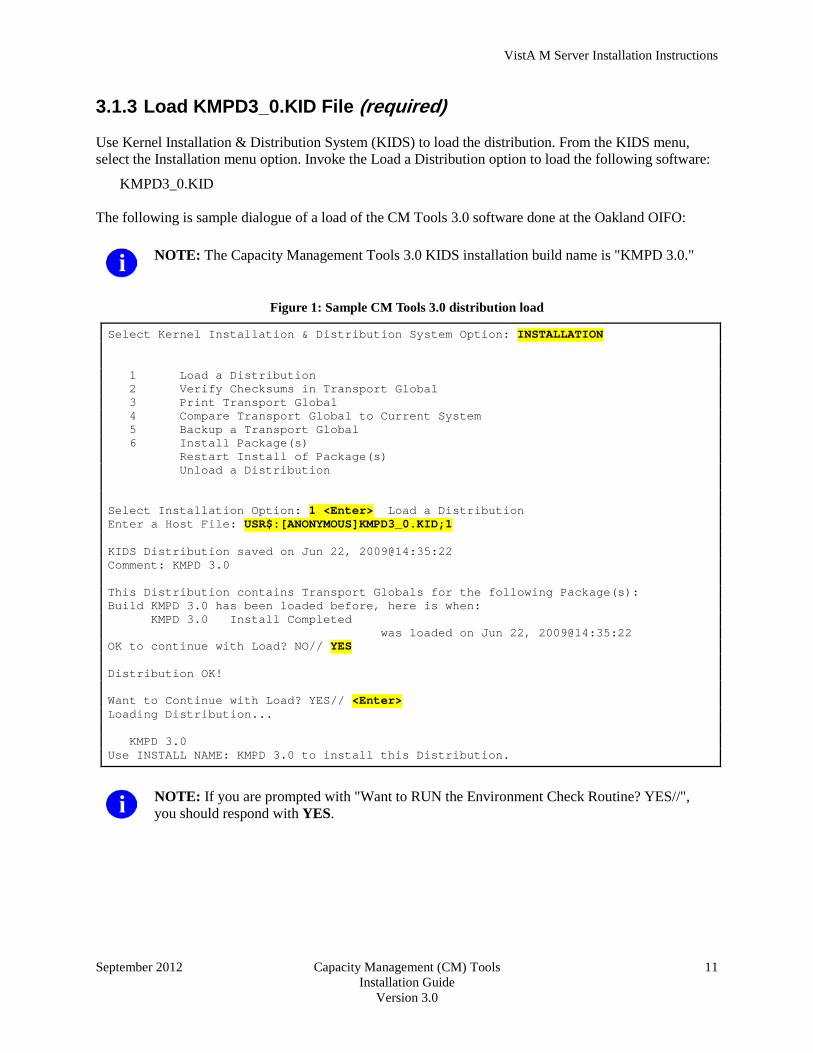
3.1.3 Load KMPD3_0.KID File (required) Use Kernel Installation & Distribution System (KIDS) to load the distribution. From the KIDS menu, select the Installation menu option. Invoke the Load a Distribution option to load the following software:
KMPD3_0.KID The following is sample dialogue of a load of the CM Tools 3.0 software done at the Oakland OIFO:
NOTE: The Capacity Management Tools 3.0 KIDS installation build name is "KMPD 3.0."
Figure 1: Sample CM Tools 3.0 distribution load
Select Kernel Installation & Distribution System Option: INSTALLATION 1 Load a Distribution 2 Verify Checksums in Transport Global 3 Print Transport Global 4 Compare Transport Global to Current System 5 Backup a Transport Global 6 Install Package(s) Restart Install of Package(s) Unload a Distribution Select Installation Option: 1 <Enter> Load a Distribution Enter a Host File: USR$:[ANONYMOUS]KMPD3_0.KID;1 KIDS Distribution saved on Jun 22, 2009@14:35:22 Comment: KMPD 3.0 This Distribution contains Transport Globals for the following Package(s): Build KMPD 3.0 has been loaded before, here is when: KMPD 3.0 Install Completed was loaded on Jun 22, 2009@14:35:22 OK to continue with Load? NO// YES Distribution OK! Want to Continue with Load? YES// <Enter> Loading Distribution... KMPD 3.0 Use INSTALL NAME: KMPD 3.0 to install this Distribution.
NOTE: If you are prompted with "Want to RUN the Environment Check Routine? YES//", you should respond with YES.
VistA M Server Installation Instructions
12 Capacity Management (CM) Tools September 2012 Installation Guide Version 3.0
3.1.4 Install Capacity Management Tools 3.0 Software (required) Use KIDS to Install the CM Tools 3.0 software. Follow the KIDS installation prompts as you would any other KIDS installation. Specific prompts and suggested responses are notated below:
1. Users may be on the system during installation of this patch and software. However, this software should be installed during off-hours, when a minimal number of users are on the system.
2. You do not need to stop TaskMan.
3. You may elect to use any of the following options within the KIDS Installation menu:
• Verify Checksums in Transport Global—This option allows you to ensure the integrity of the routines that are in the transport global.
• Print Transport Global.
• Compare Transport Global to Current System—This option allows you to view all changes that will be made when the release is installed. It compares all components of the release (routines, DDs, templates, etc.).
• Backup a Transport Global—This option creates a backup message of any routines exported with this release. It will not back up any other changes such as DDs or templates.
• Install Package(s).
4. When prompted for the INSTALL NAME, enter the following: KMPD 3.0
5. When prompted to rebuild menu trees: Want KIDS to Rebuild Menu Trees Upon Completion of Install? YES//
You can respond with NO and not rebuild the menus until the normal scheduled menu rebuild takes place or YES to rebuild the menus immediately after the installation.
6. When prompted to inhibit logons: Want KIDS to INHIBIT LOGONs during the install? YES//
You can respond with NO.
7. When prompted to disable options and protocols: Want to DISABLE Scheduled Options, Menu Options, and Protocols? YES//
You can respond with NO.
8. If the Timing Collection background job is not turned on, you will get the following prompt: I will start the Timing Collection background job when the install is complete? Yes// YES
You should respond with YES.
VistA M Server Installation Instructions
September 2012 Capacity Management (CM) Tools Installation Guide Version 3.0
13
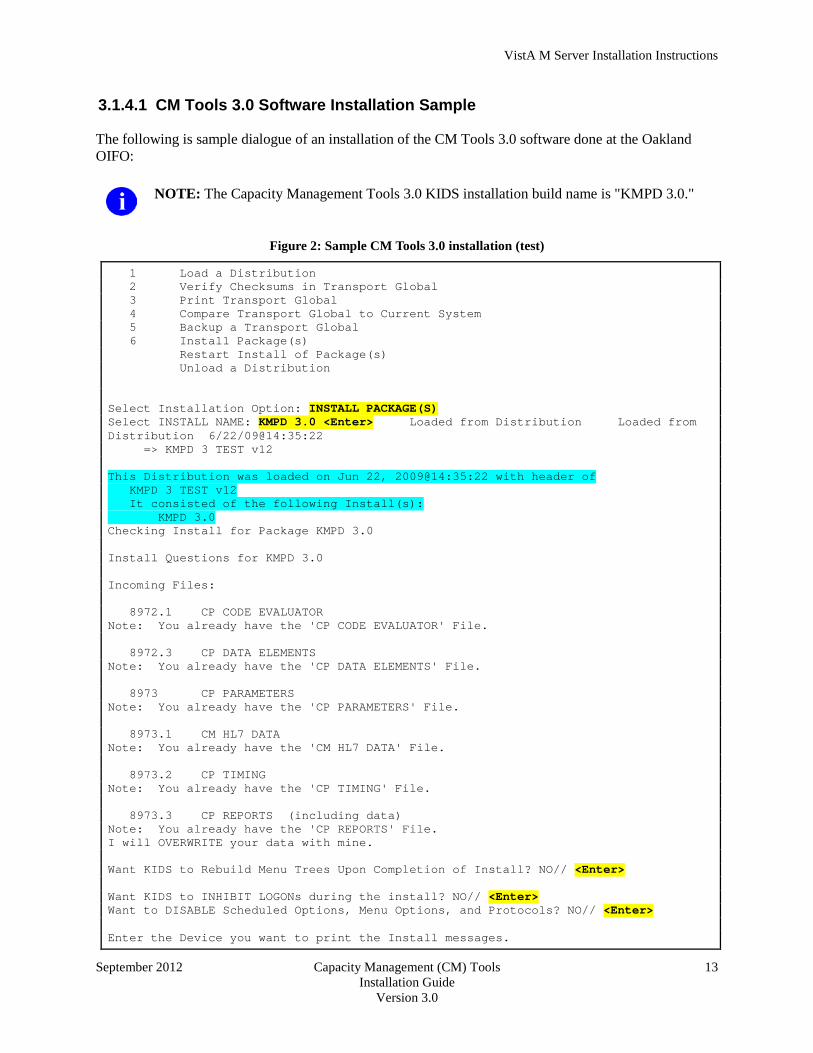
3.1.4.1 CM Tools 3.0 Software Installation Sample The following is sample dialogue of an installation of the CM Tools 3.0 software done at the Oakland OIFO:
NOTE: The Capacity Management Tools 3.0 KIDS installation build name is "KMPD 3.0."
Figure 2: Sample CM Tools 3.0 installation (test)
1 Load a Distribution 2 Verify Checksums in Transport Global 3 Print Transport Global 4 Compare Transport Global to Current System 5 Backup a Transport Global 6 Install Package(s) Restart Install of Package(s) Unload a Distribution Select Installation Option: INSTALL PACKAGE(S) Select INSTALL NAME: KMPD 3.0 <Enter> Loaded from Distribution Loaded from Distribution 6/22/09@14:35:22 => KMPD 3 TEST v12 This Distribution was loaded on Jun 22, 2009@14:35:22 with header of KMPD 3 TEST v12 It consisted of the following Install(s): KMPD 3.0 Checking Install for Package KMPD 3.0 Install Questions for KMPD 3.0 Incoming Files: 8972.1 CP CODE EVALUATOR Note: You already have the 'CP CODE EVALUATOR' File. 8972.3 CP DATA ELEMENTS Note: You already have the 'CP DATA ELEMENTS' File. 8973 CP PARAMETERS Note: You already have the 'CP PARAMETERS' File. 8973.1 CM HL7 DATA Note: You already have the 'CM HL7 DATA' File. 8973.2 CP TIMING Note: You already have the 'CP TIMING' File. 8973.3 CP REPORTS (including data) Note: You already have the 'CP REPORTS' File. I will OVERWRITE your data with mine. Want KIDS to Rebuild Menu Trees Upon Completion of Install? NO// <Enter> Want KIDS to INHIBIT LOGONs during the install? NO// <Enter> Want to DISABLE Scheduled Options, Menu Options, and Protocols? NO// <Enter> Enter the Device you want to print the Install messages.
VistA M Server Installation Instructions
14 Capacity Management (CM) Tools September 2012 Installation Guide Version 3.0
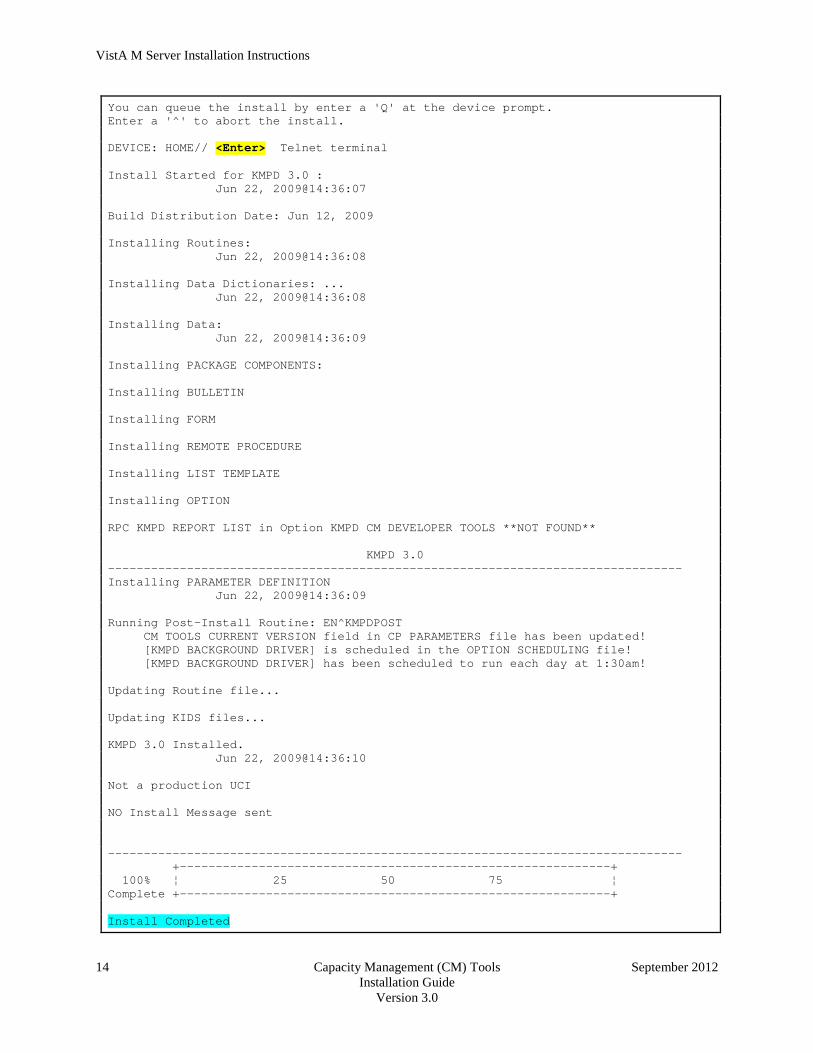
You can queue the install by enter a 'Q' at the device prompt. Enter a '^' to abort the install. DEVICE: HOME// <Enter> Telnet terminal Install Started for KMPD 3.0 : Jun 22, 2009@14:36:07 Build Distribution Date: Jun 12, 2009 Installing Routines: Jun 22, 2009@14:36:08 Installing Data Dictionaries: ... Jun 22, 2009@14:36:08 Installing Data: Jun 22, 2009@14:36:09 Installing PACKAGE COMPONENTS: Installing BULLETIN Installing FORM Installing REMOTE PROCEDURE Installing LIST TEMPLATE Installing OPTION RPC KMPD REPORT LIST in Option KMPD CM DEVELOPER TOOLS **NOT FOUND** KMPD 3.0 -------------------------------------------------------------------------------- Installing PARAMETER DEFINITION Jun 22, 2009@14:36:09 Running Post-Install Routine: EN^KMPDPOST CM TOOLS CURRENT VERSION field in CP PARAMETERS file has been updated! [KMPD BACKGROUND DRIVER] is scheduled in the OPTION SCHEDULING file! [KMPD BACKGROUND DRIVER] has been scheduled to run each day at 1:30am! Updating Routine file... Updating KIDS files... KMPD 3.0 Installed. Jun 22, 2009@14:36:10 Not a production UCI NO Install Message sent -------------------------------------------------------------------------------- +------------------------------------------------------------+ 100% ¦ 25 50 75 ¦ Complete +------------------------------------------------------------+ Install Completed

VistA M Server Installation Instructions
September 2012 Capacity Management (CM) Tools Installation Guide Version 3.0
15
3.1.5 Post Installation Routine (required) The following is an example of the informational message that you may receive while the post-installation routine is running:
Figure 3: Post installation informational message—Existing KMPD BACKGROUND DRIVER installed
Running Post-Install Routine: ^KMPDPOST CM TOOLS CURRENT VERSION field in CP PARAMETERS file has been updated! [KMPD BACKGROUND DRIVER] is scheduled in the OPTION SCHEDULING file! Complete!
Figure 4: Post installation informational message—No KMPD BACKGROUND DRIVER installed
Running Post-Install Routine: ^KMPDPOST CM TOOLS CURRENT VERSION field in CP PARAMETERS file has been updated! [KMPD BACKGROUND DRIVER] has been scheduled to run each day at 1:30am! Complete!
An informational message indicates that the post-installation routine is updating the schedule frequency of the KMPD BACKGROUND DRIVER background task to run nightly at 1:30 a.m. 3.1.6 Install All Released Patches (required) At the time of publication of this manual, several VistA M Server-side patches have been released with the CM Tools 3.0 software.
1. Obtain all released CM Tool patches. Follow the normal procedures to obtain released patches from the Patch Module on FORUM.
2. All VistA M Server patches are distributed in Kernel 8.0 KIDS format. Using KIDS, load and install the CM Tools-related VistA M Server patches.
3. Follow the instructions under the "Installation Instructions" section in the patch description in order to install each patch.
VistA M Server Installation Instructions
16 Capacity Management (CM) Tools September 2012 Installation Guide Version 3.0
3.1.7 Review Capacity Management Tools Settings (recommended) Use the CP Tools Manager Menu [KMPD CM TOOLS MANAGER MENU] under the Capacity Planning menu [XTCM MAIN] located on the Operations Management menu [XUSITEMGR] on Kernel's Systems Manager Menu [Eve] to review CM HL7 data collection. Invoke the CP Environment Check option [KMPD STATUS] and select either the HL7 or Timing report options to ensure that the CM Tools Background Driver [KMPD BACKGROUND DRIVER] is scheduled to run daily at 1:30 a.m. Review the other items in the status display for information regarding the CM HL7 DATA (#8973.1) and CP TIMING (#8973.2) files. Specifically:
• QUEUED TO RUN AT = 01:30 a.m. (or the appropriate time for your site)
• CM TOOLS BACKGROUND DRIVER = KMPD BACKGROUND DRIVER
• RESCHEDULING FREQUENCY = 1D
• TASK ID = TaskMan ID number is present
• QUEUED BY = An active user
• CM Tools routines displays no problems
REF: For more information on the CP Environment Check option [KMPD STATUS] and the CM Tools Background Driver [KMPD BACKGROUND DRIVER], see "CM Tools Options" chapter in the Capacity Management Tools User Manual.
If the CM Tools Background Driver [KMPD BACKGROUND DRIVER] is not shown as being scheduled to run in the future, use the Schedule/Unschedule Options option [XUTM SCHEDULE] located under the Taskman Management menu [XUTM MGR] to schedule the KMPD BACKGROUND DRIVER option [KMPR BACKGROUND DRIVER] to run daily at 1:30 a.m.
CAUTION: Capacity Planning Service strongly recommends that the CM Tools Background Driver option [KMPD BACKGROUND DRIVER] be scheduled to run daily at 1:30 a.m., because this background driver is the main mechanism by which the following sub-globals are purged nightly:
• ^KMPD(8973.1)—CM HL7 DATA file (#8973.1): Records are purged as prescribed by the Purge HL7 Data After CP parameter, which is stored in the HL7 WEEKS TO KEEP DATA field (#3.11) in the CP PARAMETERS file (#8973). This parameter is edited via the Edit CP Parameters File option [KMPD PARAM EDIT].
• ^KMPD(8973.2)—CP TIMING file (#8973.2): Records are purged as prescribed by the Purge Timing Data After CP parameter, which is stored in the TIMING WEEKS TO KEEP DATA field (#4.11) in the CP PARAMETERS file (#8973). This parameter is edited via the Edit CP Parameters File option [KMPD PARAM EDIT].
Modification of the frequency and time may have adverse effects on the size of the temporary ^KMPD(8973.1) and ^KMPD(8973.2) sub-globals and on the number of entries within the CM HL7 DATA file (#8973.1) and CP TIMING (#8973.2) files.
REF: For more information on the CP parameters, see the "Edit CP Parameters File" topic in Chapter 3, "CM Tools: Options," in the Capacity Management Tools User Manual.

VistA M Server Installation Instructions
September 2012 Capacity Management (CM) Tools Installation Guide Version 3.0
17
CONGRATULATIONS: You have now completed the installation of the CM Tools software on the VistA M Server.
VistA M Server Installation Instructions
18 Capacity Management (CM) Tools September 2012 Installation Guide Version 3.0
3.2 Version 3.0 Virgin Installation 3.2.1 Review Translation Table Settings (required) Capacity Planning (CP) Service has been given the KMP* namespace for both routines and globals. Therefore, you should review your translation table settings to determine the proper placement for the KMP* global namespace. Capacity Planning Service advises that sites should locate this global on a volume set that has a lesser overall level of activity. There are a couple of approaches by which the degree of activity can be ascertained by monitoring:
• Global Growth—Review the output of the Statistical Analysis of Global Growth (SAGG) Top Globals Display option [KMP1 ISC SITE TOP GBL TREND]. This option displays the top 10 globals in terms of growth over a selected time period. There is a very high correlation between the activity rate of a global and the corresponding rate of growth. This approach will yield many of the usual highly accessed globals. These highly accessed globals include: ^OR, ^TIU, ^XMB, ^ECX, ^LRO, ^PSB, ^PSRX, ^HL, ^LR, ^PRCA, and DIA.
REF: The KMP1 ISC SITE TOP GBL TREND option can be found in the following menu tree on FORUM: |-SAGG Menu at Albany CIOFO ... [KMP99 SAGG FORUM ACCESS] | |-Trending Statistics Menu ... [A1B9 ISC TRENDING MENU] | |- Site Trending Menu ... [A1B9 ISC SITE TRENDING MENU] | |- Top Globals Display [KMP1 ISC SITE TOP GBL TREND]
• Global Accesses—Review the number of global accesses for all globals across all volume sets. When considering global placements, in addition to global growth potential, sites should also avoid co-locating highly accessed globals on the same volume set (e.g., ^DIC and ^DD).
3.2.2 Follow Steps 3.1.1- 3.1.7 Under "Version 3.0 Installation"
(required)
CONGRATULATIONS: You have now completed the installation of the CM Tools software on the VistA M Server.

September 2012 Capacity Management (CM) Tools 19 Installation Guide Version 3.0
4 (Optional) Client Workstation Installation Instructions 4.1 Retrieve the CM Tools GUI Software Distribution File
(required) Obtain the Capacity Management (CM) Tools 3.0 GUI software distribution file (i.e., CM_Tools_3_0.zip) from the Product Support (PS) ANONYMOUS.SOFTWARE directory located at:
• Preferred Method download.vista.med.va.gov This method transmits the files from the first available File Transfer Protocol (FTP) server.
• Albany OIFO ftp.fo-albany.med.va.gov
• Hines OIFO ftp.fo-hines.med.va.gov
• Salt Lake City OIFO ftp.fo-slc.med.va.gov Download the zip distribution file and extract the contents to your client workstation in a temporary directory/folder of your choice; this will be referred to as the <STAGING_DIRECTORY> in this document.
DISCLAIMER: The CM Tools 3.0 GUI software, including the CM_Tools_3_0.chm help file, has only been tested on Microsoft® Windows XP. It is not currently supported on Windows 7.
4.2 Uninstall Previous Version of CM Tools GUI Software
(required)
CAUTION: For sites that have previously installed the CM Tools GUI software (e.g., test sites), before installing a later version of the CM Tools GUI software, you must first uninstall/remove any existing/previous version of the CM Tools GUI software.
For example, to uninstall the CM Tools GUI software from a Microsoft® Windows XP system, do the following:
1. Go to the Start menu.
2. Select the All Programs (or Programs) menu option.
3. Select the VistA option.
4. Select the CM Tools 3.0 option.
5. Select the Uninstall CM Tools 3.0 option.
6. Answer Yes when prompted to confirm the uninstall.

Client Workstation Installation Instructions
20 Capacity Management (CM) Tools September 2012 Installation Guide Version 3.0
Or:
1. Go to the Start menu.
2. Select the Settings option.
3. Select Control Panel option.
4. Select the Add or Remove Programs option.
5. Look through the list and highlight "CM Tools 3.x".
6. Press Remove to uninstall the CM Tools 3.x software. 4.3 Shut Down Microsoft Windows Applications (required) We recommend shutting down all other Microsoft® Windows-based applications running on the client workstation upon which you are installing the CM Tools GUI software. In particular, you must not be running the CM Tools GUI software. 4.4 Run the Installation Program (required) Run the CMToolsSetup.exe located in the <STAGING_FOLDER> on the client workstation (see Section 4.1). This will start the interactive client workstation installation wizard. For example, on a Microsoft® Windows XP system:
1. Go to the Start menu.
2. Select the Run option.
3. Press Browse to locate the CM Tools 3.0 CMToolsSetup.exe file.
4. Press OK to run the CM Tools 3.0 CMToolsSetup.exe Follow the online instructions provided when you run the installation program. We strongly recommend that you accept the default installation directory.

Client Workstation Installation Instructions
September 2012 Capacity Management (CM) Tools Installation Guide Version 3.0
21
4.5 Set Up Server IP and Port Connections (required) Prior to running the CM Tools client application, you need to populate the server IP and port connection information for any severs to which the workstation can connect. To do this, use either of the following methods:
• Review, Add, or Edit Servers in the Workstation Registry
• Create Shortcut to CM Tools Executable with Predefined Server Information 4.5.1 Review, Add, or Edit Servers in the Workstation Registry Use the RPC Broker Edit Broker Servers application (i.e., ServerList.exe) to review, add, or edit server IPs and listener ports in your client workstation registry. By updating your registry, you can run the CM Tools application directly by double clicking on the kmpdTools.exe file and choosing the desired server connection from the registry list, as shown below:
Figure 5. "Connect To" dialogue— Sample server connection register entries
REF: For more detailed information on the RPC Broker "Connect To" dialogue, see the RPC Broker Systems Management Guide.
4.5.1.1 Locate and Run the RPC Broker ServerList.exe File The RPC Broker 1.1 Edit Broker Servers application (i.e., ServerList.exe and ServerList.hlp) is distributed with the CM Tools 3.0 software or available for download on the "RPC Broker Archive Downloads: BDK Software and Documentation" Intranet Website: http://vaww.vista.med.va.gov/broker/archive/internal/v_1_1/ServerList.exe
Client Workstation Installation Instructions
22 Capacity Management (CM) Tools September 2012 Installation Guide Version 3.0
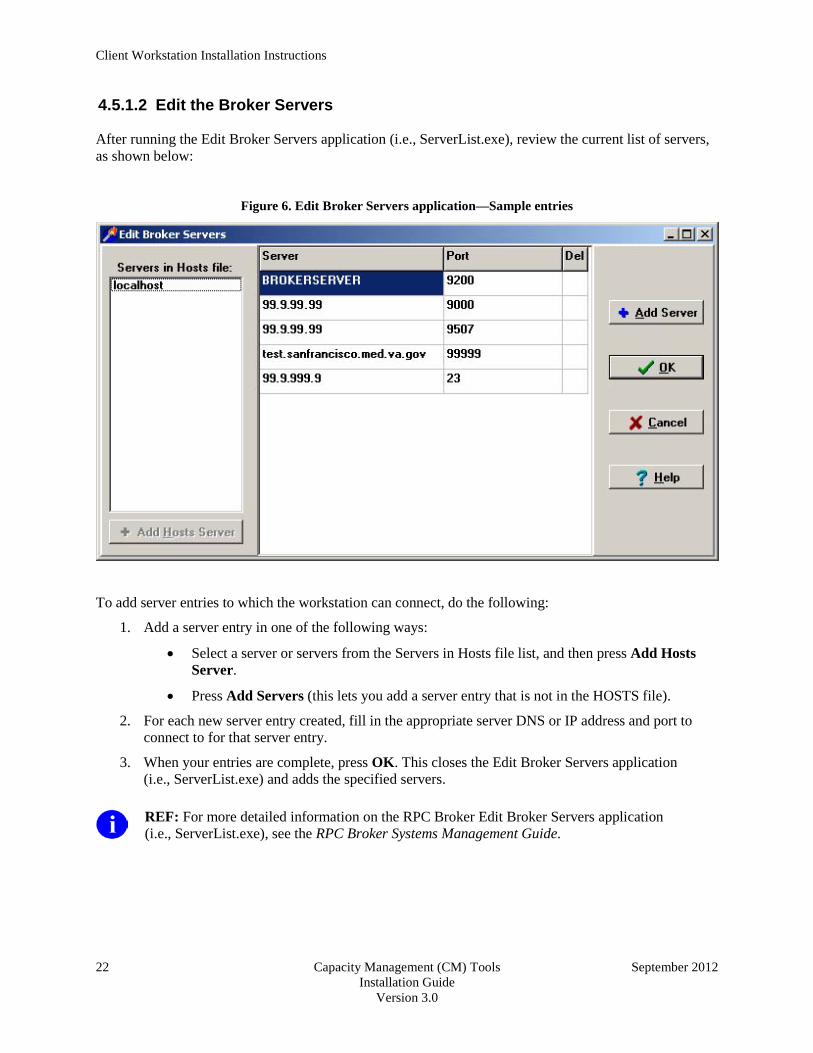
4.5.1.2 Edit the Broker Servers After running the Edit Broker Servers application (i.e., ServerList.exe), review the current list of servers, as shown below:
Figure 6. Edit Broker Servers application—Sample entries
To add server entries to which the workstation can connect, do the following:
1. Add a server entry in one of the following ways:
• Select a server or servers from the Servers in Hosts file list, and then press Add Hosts Server.
• Press Add Servers (this lets you add a server entry that is not in the HOSTS file).
2. For each new server entry created, fill in the appropriate server DNS or IP address and port to connect to for that server entry.
3. When your entries are complete, press OK. This closes the Edit Broker Servers application (i.e., ServerList.exe) and adds the specified servers.
REF: For more detailed information on the RPC Broker Edit Broker Servers application (i.e., ServerList.exe), see the RPC Broker Systems Management Guide.
Client Workstation Installation Instructions
September 2012 Capacity Management (CM) Tools Installation Guide Version 3.0
23
4.5.2 Create Shortcut to CM Tools Executable with Predefined Server Information
Create a shortcut to the CM Tools executable file (i.e., kmpdTools.exe) on your client workstation desktop. This allows you to run the CM Tools application indirectly by double clicking on the shortcut to the kmpdTools.exe file with a pre-defined server connection identifier. You should create shortcuts for each server IP and port combination. 4.5.2.1 Locate kmpdTools.exe File If you accepted the default directory during the installation (see Section 4.3) the kmpdTools.exe file will be located in the following directory:
C:\Program Files\vista\CM_Tools\3_0 Otherwise, navigate to the directory where you installed the kmpdTools.exe file. 4.5.2.2 Create kmpdTools.exe Desktop Shortcut Create a shortcut to the CM Tools executable file (i.e., kmpdTools.exe) on the client workstation desktop. For example, on a Microsoft® Windows XP system:
1. In the directory folder (see Section 4.5.2.1), highlight and right click (secondary menu) on the kmpdTools.exe file.
2. Select the Send To option.
3. Select Desktop (create shortcut) option. 4.5.2.3 Edit Shortcut Properties Edit the shortcut properties to point to the appropriate VistA M Server.
1. On the desktop, highlight and right click (secondary menu) on the kmpdTools.exe shortcut
icon:
2. Select the Properties option; if not already there, go to the Shortcut tab.
3. In the Target field, after the full directory path (in quotes) ending with kmpdTools.exe, do the following:
a. Enter one space.
b. Enter the IP address or Domain Name Service (DNS; e.g., test.oakland.med.va.gov).
c. Enter one space.
d. Enter the port (e.g., 9999).
e. Press Apply and then OK. For example, when completed the Target field entry will look like the following:
"C:\Program Files\vista\CM_Tools\3_0\kmpdTools.exe" test.oakland.med.va.gov 9999
Client Workstation Installation Instructions
24 Capacity Management (CM) Tools September 2012 Installation Guide Version 3.0
4.6 Add CM Tools RPC Broker "B"-type Option to the User's
Secondary Menu (required) Information Resource Management (IRM) must add the CM Tools KMPD CM DEVELOPER TOOLS RPC Broker "B"-type option to the user's Secondary Menu.
CONGRATULATIONS: You have now completed the installation of the CM Tools GUI software on the client workstation.
Upon completing the installation of the CM Tools software on the VistA M Server (required) and client workstations (optional), you are now ready to work with the CM Tools software.