canon image browser ex: a novice tutorial for creating a ... · canon image browser ex: a novice...
TRANSCRIPT
Canon Image Browser EX: A Novice
Tutorial for Creating a Vacation
Slideshow
Eric Morlang
2
Table of Contents
Introduction ...................................................................................... 3
What is this tutorial about? ................................................................. 3
Who is this tutorial for? ...................................................................... 3
What should I expect in this tutorial? ................................................... 3
What skills will I learn from this tutorial? .............................................. 3
Getting Started .................................................................................. 4
Opening the Movie Edit window ........................................................... 4
Step 1: Inserting Images ................................................................... 5
Insert images in the slideshow ............................................................ 5
Remove images from the slideshow ..................................................... 6
Step 1 Summary ............................................................................... 6
Exercise............................................................................................ 6
Step 2: Arranging Images .................................................................. 7
Arrange images with buttons ............................................................... 7
Arrange images by dragging them ....................................................... 7
Step 2 Summary ............................................................................... 8
Exercise............................................................................................ 8
Step 3: Saving Your Video Slideshow ................................................ 9
Save your slideshow .......................................................................... 9
Step 3 Summary ............................................................................. 11
Exercise.......................................................................................... 11
Conclusion ....................................................................................... 12
3
Introduction
What is this tutorial about?
Canon Image Browser EX has built in Movie Edit feature for creating a video slideshow of pictures taken on your vacation. The benefit of creating a slideshow with this system is that you can share organized photos with your friends through the computer. You can show them the slideshow yourself, or you can send the file to your friends and family. Once you know how to create a slideshow of your vacation, you will have the skills to get creative and make any number of slideshows to show off your beautiful pictures!
Who is this tutorial for?
This tutorial is intended for novice users at home. You should already understand the basics of how to use a computer and import your pictures into the Canon Image Browser EX. This tutorial is designed to enhance your skills in the program by teaching you the basics of the Movie Edit feature.
What should I expect in this tutorial?
This tutorial guides you through step-by-step instructions to create a vacation slideshow. It provides figures to show you what the interfaces look like as you go through the steps. Exercises are provided at the end of every major step to ensure you are comfortable with the material. This tutorial takes 20 to 30 minutes to complete.
Note: Blue circles in the figures will denote areas of importance
What skills will I learn from this tutorial?
This tutorial will teach you how to: Insert images into your video slideshow
Arrange the images in your video slideshow
Save your video slideshow
Let’s get started!

4
Getting Started
Before you can create a slideshow with the Canon Image Browser EX, you need to enter the Movie Edit Task window. This window gives you access to the specific features in the Canon Image Browser EX to create a video slideshow.
Opening the Movie Edit window
1. Open Canon Image Browser EX
2. Select a picture in the picture menu at the bottom of the window
3. Left click the Edit menu at the top of the window
4. Select Edit Movies (see Figure 1)
Note: The picture you selected will be in the first image slot for your slideshow
Figure 1 Opening the Movie Edit window in Canon Image Browser EX
Great job! You have opened the Movie Edit window. You’re now ready to put your video slideshow together.
Move on to step 1!

5
Step 1: Inserting Images
Now that you have opened the Movie Edit window, you must insert images into the slideshow map. In step 1, you will learn how to:
Insert images in the slideshow
Remove images from the slideshow
Don’t worry about the order you gather your images in because you will learn how to arrange them in step 2.
Insert images in the slideshow
1. Click the Add Images tab to open the image folder
2. Select a picture you would like to include in your slideshow
3. Click Open (see Figure 2)
Note: You will automatically be returned to the 2. Arrange tab with the picture inserted into the next available slot
Figure 2 Inserting images into the slideshow
4. Repeat steps 2-3 until all desired photos are included in the slideshow

6
Remove images from the slideshow
1. Select the image you want to delete in the slideshow map at the bottom
2. Click the Trash Can icon above the slideshow map
Note: The program will ask you if you would like to continue.
3. Click OK (see Figure 3)
Figure 3 Removing an image from the slideshow
Step 1 Summary
In this step, you learned how to insert and remove images from the slideshow map. This provides the bare essentials for you to construct your vacation slideshow. It can be a slideshow of just landscapes, monuments, food, or the entire vacation: it’s up to you!
Exercise
Using the skills you learned in step 1, add an image that is not from your vacation to your slideshow. Because this image does not belong in your slideshow, remove the image from the slideshow map. Were you able to add and remove an image from your slideshow? If so, then move on to step 2!

7
Step 2: Arranging Images
Arranging your images organizes and streamlines your video slideshow. In step 2, you will learn two ways to arrange your pictures: Arrange images with buttons
Arrange images by dragging them
It is good to know both methods to be comfortable with this feature. Once you’ve mastered both, then you can decide which is right for you.
Arrange images with buttons
1. Select the image you want to move in the slideshow map
2. Click the Move Left or Move Right buttons until the image reaches the slot you want (see Figure 4)
Figure 4 Arranging images with buttons
3. Repeat steps 1-2 until all images are in the order you want
Arrange images by dragging them
1. Click and hold down on the image you want to move

8
2. Drag your cursor to where you want to place the image
Important: Hold the image on the left or right edge of the slideshow map to scroll in that direction.
3. Release the click to drop the image (see Figure 5)
Note: A blue bar denotes where the image will be placed if you release your click
Figure 5 Dragging an image
4. Repeat steps 1-3 until all images are in the order you want
Step 2 Summary
In this step, you learned how to arrange images by using the buttons and by dragging them. Arranging images lets you tell a picture-story with your slideshow. It can be organized by city, chronologically, or you can get creative with it!
Exercise
Using the skills you learned in step 2, move an image from the 2nd slot to the 5th slot using the buttons. Then move the same image back to the 2nd slot by dragging it. Try to decide which method you prefer. Were you able to move the image with both methods? If so, then move on to step 3!
9
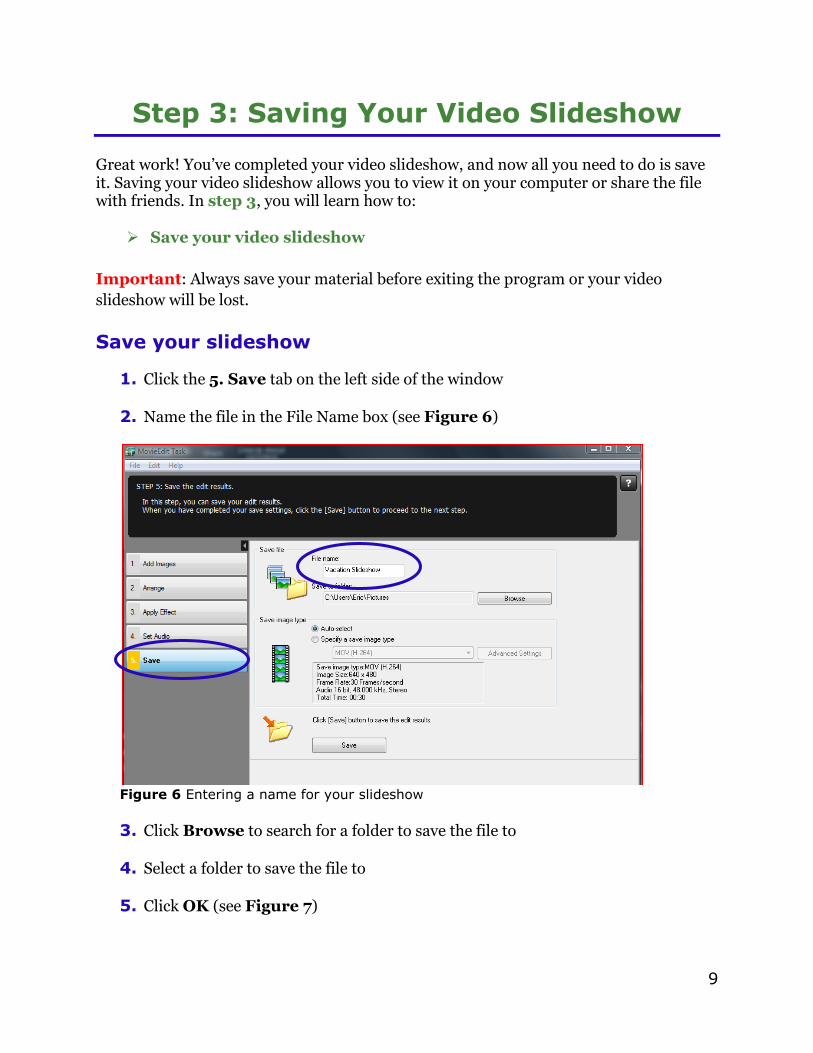
Step 3: Saving Your Video Slideshow
Great work! You’ve completed your video slideshow, and now all you need to do is save it. Saving your video slideshow allows you to view it on your computer or share the file with friends. In step 3, you will learn how to:
Save your video slideshow
Important: Always save your material before exiting the program or your video
slideshow will be lost.
Save your slideshow
1. Click the 5. Save tab on the left side of the window
2. Name the file in the File Name box (see Figure 6)
Figure 6 Entering a name for your slideshow
3. Click Browse to search for a folder to save the file to
4. Select a folder to save the file to
5. Click OK (see Figure 7)

10
Figure 7 Selecting a folder for your video slideshow to be saved in
6. Click Save
Note: A notice window will tell you the process will take a couple of minutes
7. Click OK in the pop-up and wait for the loading bar to complete
8. Click OK when the loading bar is complete (see Figure 8) Note: You may now exit the Movie Edit window. The file will be available in both the folder you saved it to and in Canon Image Browser EX.
Figure 8 Saving your video

11
Step 3 Summary
In this step, you learned how to save your video slideshow. It is now available as a file on your computer. You can view it yourself or e-mail the file to share with friends!
Exercise
Using the skills learned in step 3, name your video slideshow in this format: The location of your vacation_Slideshow. Save the file to your Pictures folder. Check the folder to see if the video slideshow is there. Was your video slideshow in the correct folder? If so, then your video slideshow is ready to be shared and viewed!

12
Conclusion
Congratulations, you have completed the tutorial! You can now create a video slideshow of your vacation using the Canon Image Browser EX Movie Edit feature. Keep in mind the skills you have learned in this tutorial. You now know how to: Insert images into your slideshow
Arrange the images in your slideshow
Save your slideshow
These skills provide the basics for creating any video slideshow! That’s right! With these skills, you can organize and preserve any group of pictures you want. So get creative, start telling stories with your pictures, and make your photo memories come alive on video! This concludes the Canon Image Browser EX tutorial for novice users. If you would like to continue learning about this program, please try the other available tutorials. You can advance your skills with the Movie Edit feature, learning how to:
Set the play time for your images
Apply transitions
Apply effects
Overlay text
And much more!
You can make your video slideshows even more creative!