cannon check-scanner troubleshooting guide
TRANSCRIPT

Cannon Check-Scanner Troubleshooting Guide

USING THIS MANUAL ......................................................................................................................... 1 Summary................................................................................................................................................. 1
SETUP ................................................................................................................................................ 1 Overview ................................................................................................................................................. 1 Setting Up Your System .......................................................................................................................... 1
System Requirements ...................................................................................................................... 1 Supported Scanners ......................................................................................................................... 2 Scan Best Practice ............................................................................................................................ 2 Canon Scanner – Download Latest Driver ....................................................................................... 2 Test Installation (if needed) ............................................................................................................. 7
TROUBLESHOOTING ......................................................................................................................... 10 Check Scanner Issue ............................................................................................................................. 10
Uninstall and Re-Install the Ranger API/Driver .............................................................................. 11 Active X/JavaScript Issue ...................................................................................................................... 12
Internet Explorer Configuration ..................................................................................................... 13 Run Internet Explorer in Desktop Mode (Windows 8 Only) .................................................... 13 Validate Internet Explorer 32-bit is being used ....................................................................... 16 Add Business Online Deposit as a Trusted Site ....................................................................... 17 Run Internet Explorer as Administrator .................................................................................. 20 Run Internet Explorer in Compatibility Mode ......................................................................... 21
Group Policy ................................................................................................................................... 22 Endorsements……………………………………………………………………………………………………………………….….23 Upgrading your operating system with Canon scanners……………………………………………………………23
MISC ................................................................................................................................................................... 24 Data Execution Prevention (DEP) ................................................................................................................. 24
Escalation Procedure .................................................................................................................................... 29 APPENDIX B: INSTALLATION QUICK SHEET ........................................................................................................... 29

1
Using This Manual
Important information regarding Cannon scanners! If purchasing a new scanner, we recommend that you look at our Panini and Digital check scanner options. This manual was created for Cannon scanners and unfortunately, they have been discontinued. However, we still support them currently. Please note that there are also browser limitations with the Cannon scanners. Summary
This is a guide for installing a check scanner to function with Business Online Deposit. After reading this document, you will know how to:
Install the check scanner
Validate the check scanner is installed properly
Troubleshoot issues related to Active X/Java Script and Security Settings.
Setup
Overview
Business Online Deposit is a service provided by Redwood Credit Union that allows you to
scan checks via a check-scanner and submit the check images for deposit.
Setting Up Your System
Before you start using the service, you will need to setup your Windows PC with the correct driver
so that your check scanner can access the web application.
System Requirements
Make sure that your computer meets the minimum following system requirements:
• Operating System: Windows 7 or newer
• Ram: Minimum 1 GB. Recommended: 2 GB
• CPU: 2.0 GHz or greater
• Internet: Broadband connection. Recommended: 1.5Mbps or greater

2
• JavaScript and Active X must be allowable on your computer.
3
• Browser/Applications:
o Internet Explorer 10 or greater (32-bit version of Internet Explorer)
• Internet Explorer is the only browser supported by Cannon scanners.
Note: If using Windows 8, only the Desktop Version of Internet Explorer is
supported. For additional details, see Section 4.2.1.1 Run Internet Explorer
in Desktop Mode (Windows 8 Only).
o Ranger API. For additional details, see Section 2.2.4.1 Silver Bullet Ranger
Driver.
Supported Scanners
The following scanners are supported by Business Online Deposit but have been discontinued by Cannon:
• Canon CR-25
• Canon CR-50
• Canon CR-55
• Canon CR-80
• Canon CR-135i
• Canon CR-180 (Windows 7 only)
• Canon CR-190i
Note: You can only have one check scanner set up on your PC. If you have a driver for
another check scanner installed on your computer, a driver conflict will prevent the
scanner from working. A driver for a document scanner may be installed on the same
machine.
Scan Best Practice
When scanning a batch of checks, the optimal number of checks is between 25-50 checks.
Note: The optimal number for a deposit may vary based on your internet connection.
Canon Scanner – Download Latest Driver
While you may have a CD that came with your scanner that includes the Ranger
Transport API, it is recommended that you download the latest driver (Silver

4
Bullet Ranger Driver) directly from Canon’s website: https://www.usa.canon.com

5
Step 1:
Select “Drivers & Downloads”
Step 2:
Enter the Cannon product number and click “Go”

6
Step 3:
Select the scanner and then click download
Step 4:
Installing the Driver Process

7
Step 5:
Once the Driver is Downloaded the Installation Wizard Appears.
Click Install and then Next
Step 6: Click “Finish”
After Selecting the CR-50/80 Ranger Driver
look to the bottom of the browser window.
Select Run to begin the download.

8
Step 7: Your Scanner is ready to use. Please log into online banking click “Deposit Checks”
and make a deposit.
Step 8: Prepare the scanner
• Plug the scanner into a USB port on your computer.
• After you have endorsed the checks, load the checks into your scanner and turn it on.
• All checks must be oriented in the same direction, facing to the right
and the MICR lines parallel to the desk.
• Prior to loading, ensure that all checks are aligned on the end that goes
into the scanner to reduce the chance of possible jams.
• Align checks so that the bottom right corner of each check touch.

9
• Depending on the scanner you are using, either pull the loading tray or
unloading tray out and put the checks into place.
• You may need to adjust the tension on the scanner to pull the checks through
the feeder.
Step 9: Make a deposit
You are now ready to make a deposit in online banking. Click on “Deposit Checks” tab and
follow the prompts. If you need assistance please refer to the Business Online Deposit User
guide.
Test Installation (if needed)
Prior to running Business Online Deposit, you may test that the Ranger API and scanner driver installed correctly.
Prepare the scanner:
a. Plug the scanner into a USB port on your computer.
b. Load the checks into your scanner and turn it on.
• All checks must be oriented in the same direction, face out and the
MICR lines parallel to the desk.
• Prior to loading, ensure that all checks are aligned on the end that goes
into the scanner to reduce the chance of possible jams.
• Align checks so that the bottom right corner of each check touch.

10
• Depending on the scanner you are using, either pull the loading
tray or unloading tray out and put the checks into place.
• Open Windows File Explorer and Navigate to the following
directory:
a. Windows 32-bit: C:\Program Files\Silver Bullet Technology\Ranger\
b. Windows 64-bit: C:\Program Files (x86)\Silver Bullet Technology\Ranger\
Locate and open the Ranger Flex application which is used to test that the check
scanner is working. Depending on which version of the Ranger Driver was
installed (v2 or v4+), the name or location can be slightly different:
• Ranger v2:
• Ranger v4:
When you open the Ranger Flex test application, if you receive an error that
indicates that “The transport is dead”, validate that the scanner is plugged into
the computer and the power is turned on. If you continue to receive this
message, see Section 4.1 Check Scanner Issue.

11
a. Ranger v2:
b. Ranger v4+:
If there are no issues with the scanner, you can proceed with making a test scan.
Depending on which version of the Ranger Driver was installed (v2 or v4+), the
steps to start scanning are slightly different:
a. Ranger v2:
• Click Scan at the top of the application and select Begin Batch… from
the drop down
• Click the Begin Scan button
• Close the application once you have successfully scanned a check

12
b. Ranger v4+:
• Click the Start Feeding button
• Once you have successfully scanned a check, click the Stop Feeding
button and then close the application
If you are unable to scan a check within the Flex application, please see
Troubleshooting Section: Check Scanner Issue (page 12).
If you are successfully able to scan the checks within the Ranger Flex
application, the installation of the check scanner is complete and can proceed
with attempting a deposit through Business Online Deposit.
If you are successfully able to scan the checks within the Ranger Flex
application, but unable to scan a check within Business Online Deposit, please
review Troubleshooting Section: Active X/JavaScript Issue (page 14).
Troubleshooting
Check Scanner Issue
If your scanner fails to work within the Ranger Flex application, here are some items you
will want to verify:
Confirm the scanner is plugged in and turned on. The switch is usually on the
back of the scanner, turn it on. You should see a power light indicator.
Validate USB Port on Computer
a. If your scanner fails to work within the Ranger Flex application, you may
want to validate that the USB port that you have the scanner plugged to
is functioning by plugging in another USB device or try using another USB
port.

13
The issue may be the USB cable itself. Verify that the USB cable is fully plugged
into the scanner and into the USB port on the computer. If you have a spare
cable from another USB device that you know works, try using that cable
instead.
Uninstall and Re-Install the Ranger API/Driver
If your scanner fails to work within the Ranger Flex application, uninstall and re-
install the Ranger API/Driver:
Navigate to Control Panel:
a. Windows 7: While in your Start Menu, click Control Panel.
b. Windows 8: While on the Desktop, right click on the Windows button and select
Control Panel.
Click the Add or Remove Programs link.
Depending on which version of the Ranger Driver was installed (v2 or v4+), you
may have to one or two items to uninstall:
a. Ranger v2:
• Click on the entry named Ranger For (Scanner Model)
• Click the Change/Remove button
b. Ranger v4+:
• Click on the entry named Ranger and click the Change/Remove button
• Click on the entry named Ranger plug-in: (Scanner Model) and click the
Change/Remove button

14
Re-Install the Ranger Transport API™ (See Page 9) and follow the Test Installation
process again.
If your scanner continues to fail after having un-installed and re-installed the
Ranger Transport API™, contact your scanner manufacture’s support center.
Active X/JavaScript Issue
If you are successfully able to scan checks through the Ranger Flex application, but unable
to within Business Online Deposit, the issue is likely due to Active X and/or JavaScript being
blocked on the computer.
The following sections below should be reviewed for troubleshooting Active X/JavaScript issues:
Internet Explorer Configuration
a. Run Internet Explorer in Desktop Mode (Windows 8 Only)
b. Validate Internet Explorer 32-bit is being used
c. Add Business Online Deposit as a Trusted Site
d. Run Internet Explorer as administrator
e. Run Internet Explorer in Compatibility Mode
Group Policy
Internet Explorer Configuration
Internet Explorer needs to be configured to allow Active X and JavaScript. Default
settings for Web Browsers allow access to Active X and JavaScript, sometimes you
may have inadvertently changed the security settings. Also, there could be
additional security settings in Internet Explorer that will block Active X from

15
communicating to the scanner driver. Here are some of the main items you will
want to review:
Run Internet Explorer in Desktop Mode (Windows 8 Only)
On a brand new PC running Windows 8, the Internet Explorer Icon on the Start
screen may by default launch the Internet Explorer App rather than launching
Internet Explorer in the Desktop Mode. Business Online Deposit is only supported
in the Desktop version of Internet Explorer, so you will need to know how to run
Internet Explorer in Desktop Mode.
Note: The Internet Explorer App does not work with Business Online Deposit
because it does support ActiveX.
The following screenshots show what the Internet Explorer App looks like compared
to Desktop Mode so you can more easily identify which is currently being used by the
Account Holder:
Internet
Explorer running
as the App:

16
Internet
Explorer running
in Desktop
Mode:
If you are unsure how to run Internet Explorer in Desktop Mode, you may follow these
steps:
On the Start screen, right click on the Internet Explorer icon
Select Pin to taskbar

17
Navigate to your desktop by either:
a. Clicking on the Desktop icon from the Start screen
b. Press the Windows key on your keyboard
On the bottom left of your task bar, click on the Internet Explorer icon to open Internet
Explorer in Desktop Mode
If you want to configure the Internet Explorer icon from the Start screen to launch
Internet Explorer in Desktop Mode rather than the Internet Explorer App:
a. Open Internet Explorer in Desktop Mode as described in the steps above
b. Click on the Gear icon on the top right of the screen
c. Select Internet Options from the drop down
d. Navigate to the Programs tab at the top of the Internet Options screen:
• In the “Choose how you open links” dropdown, select Always in Internet
Explorer on the desktop
• Check the Open Internet Explorer tiles on the desktop option
• Click the Apply button

18
• Click the OK button
Validate Internet Explorer 32-bit is being used
If you are using a 64-bit version of windows, ensure that you are using the 32-bit
version of Internet Explorer.
Both Internet Explorer 32-bit and Internet Explorer 64-bit are installed on 64-bit
versions of Windows, but Internet Explorer 32-bit is the default application. Verify that
the-user is using the 32-bit version for troubleshooting any issues
Internet Explorer 10 and 11:
Internet Explorer (IE) 10 and 11 have a setting in Internet Options under the Advanced
tab called “Enable Enhanced Protected Mode”. By default, this option is turned off and
the browser runs in 32-bit mode. When this option is checked the browser runs in 64-bit
mode. To validate Internet Explorer is running in 32-bit mode:
a. Open Internet Explorer
a. Click the Tools option or Gear icon

19
a. Select Internet Options from the drop down
Navigate to the Advanced tab at the top of the Internet Options screen
• Validate that the Enable Enhanced Protected Mode* option is not checked
• If the Enable Enhanced Protected Mode* option is checked, for Business Online
Deposit to work, the Account Holder will need to un-check it, press the Apply
button, and then press the OK button.

20
Add Business Online Deposit as a Trusted Site
If experiencing issues with the scanner displaying in the scanner dropdown and
custom security settings are being used in Internet Explorer or if you are unsure if
security settings have been customized, try adding Business Online Deposit to trusted
sites within Internet Explorer:
b. Open Internet Explorer
c. Click the Tools option or Gear icon
Select Internet Options from the drop down
Navigate to the Security tab at the top of the Internet Options screen
a. Click on the Trusted sites icon

21
In the “Add this website to the zone:” field, enter https://rdc.ensenta.com and click
the Add button
b. Click the Close button

22
c. Click the OK button
Run Internet Explorer as Administrator
Windows systems can have a User setup as the administrator or not. Business
Online Deposit will require you to be an Administrator or have the ability to run
Internet Explorer as an administrator (you would need to have the
administrator login information). On most personal computers, the account is
set as administrator.
Business computers range quite drastically in terms of how the accounts are setup.
If experiencing issues with the check scanner displaying in the scanner
dropdown and it appears Active X and JavaScript are both enabled, the
Windows User account being utilized by you may not be the administrator or
the administrator rights are restricted by Windows User Access Controls. To
resolve User level restrictions within Internet Explorer, try running Internet
Explorer as administrator:
Windows 7:
a. Right click on the Internet Explorer icon and select Run as administrator
Windows 8:
a. Right click on the Internet Explorer icon on the bottom left of the task bar
23
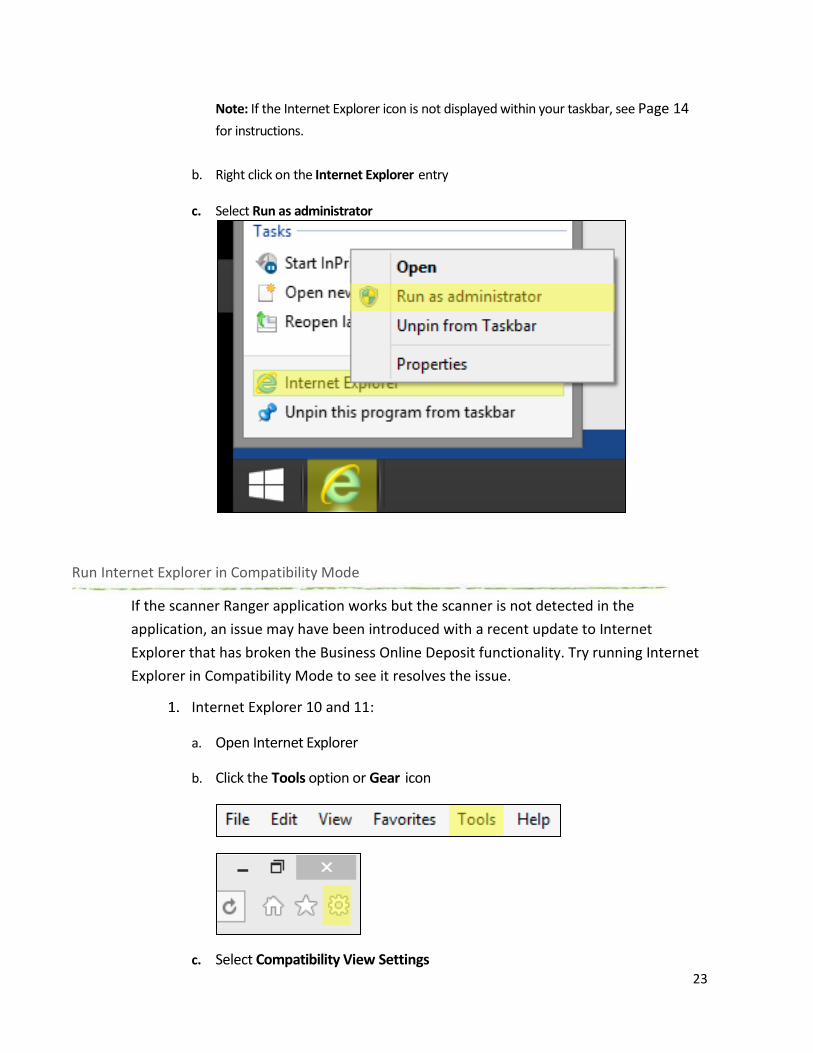
Note: If the Internet Explorer icon is not displayed within your taskbar, see Page 14
for instructions.
b. Right click on the Internet Explorer entry
c. Select Run as administrator
Run Internet Explorer in Compatibility Mode
If the scanner Ranger application works but the scanner is not detected in the
application, an issue may have been introduced with a recent update to Internet
Explorer that has broken the Business Online Deposit functionality. Try running Internet
Explorer in Compatibility Mode to see it resolves the issue.
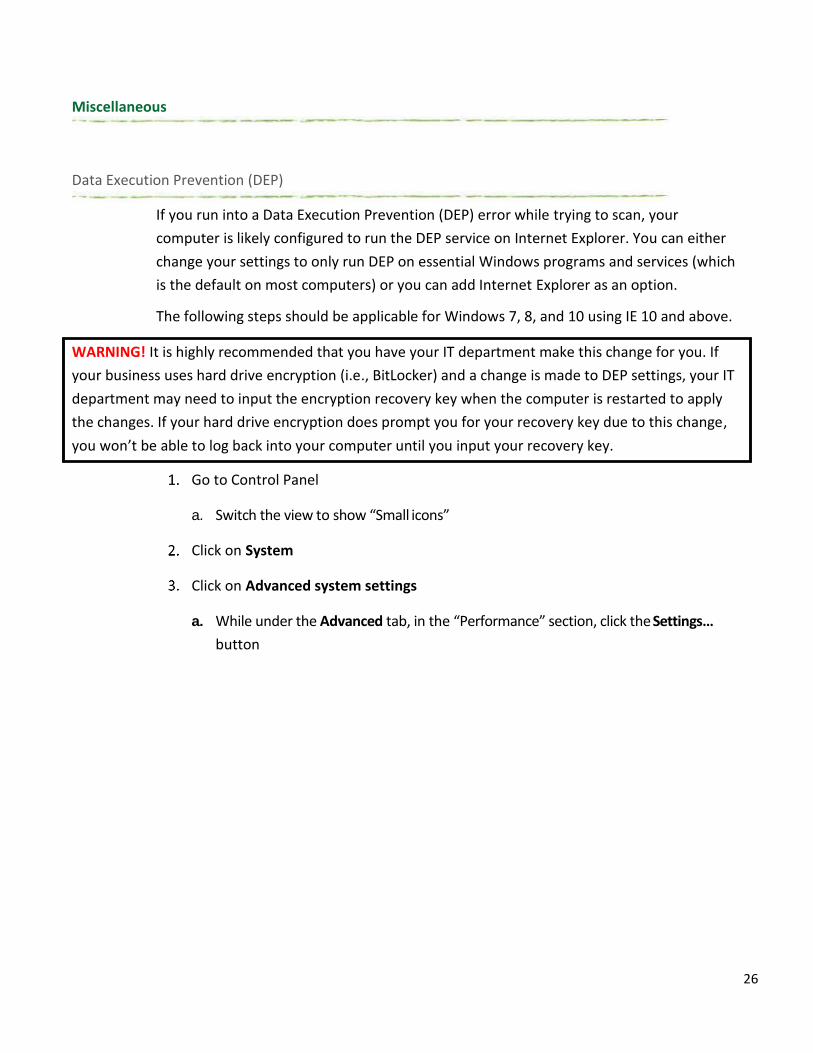
Internet Explorer 10 and 11:
a. Open Internet Explorer
b. Click the Tools option or Gear icon
c. Select Compatibility View Settings

24
In the “Add this website” field, add ensenta.com
NOTE: If Business Online Deposit is displayed within an iFrame through online
banking, you likely will need to add the online banking website url as well.
Endorsements
Please sign or stamp your checks prior to making the deposit. The ink/virtual endorsement is not functional at this time. Please do not purchase the cartridge as it will not work with the service.
Upgrading your operating system with Cannon scanners
If you upgrade your operating system the PC may no longer be able to connect to the scanner.
25
Try rebooting the system to see if that helps. If not, you may need to un-install the driver, reboot the system and re-install the driver.
If you did not un-install the drivers then you will need to overwrite the file by doing the following:
1. Download the file. Make sure it’s unzipped. Then close the unzip window. 2. Locate the file folder in your C drive for the Canon scanner and open the folder marked “Driver”. 3. Click on Setup.exe. 4. Select yes to overwrite duplicate files. 5. Once the setup process is done, please restart the PC and make a deposit.
Group Policy
This is specifically for business computers. IT departments typically will configure computers to disable
Active X, JavaScript, and other plug-ins for browsers by enforcing a Group Policy; the Group Policy will
override any settings on a computer. For instance, you could have a business computer that shows Active
X and JavaScript as enabled in Internet Explorer’s configuration settings, but the Group Policy overrides
that configuration and has both disabled. From a troubleshooting perspective, you will not be able to
know if Active X or JavaScript is being disabled through the Group Policy (there is a command to view the
settings, but this is typically blocked as well). To resolve, you must inquire with your IT department.
26
Miscellaneous
Data Execution Prevention (DEP)
If you run into a Data Execution Prevention (DEP) error while trying to scan, your
computer is likely configured to run the DEP service on Internet Explorer. You can either
change your settings to only run DEP on essential Windows programs and services (which
is the default on most computers) or you can add Internet Explorer as an option.
The following steps should be applicable for Windows 7, 8, and 10 using IE 10 and above.
Go to Control Panel
a. Switch the view to show “Small icons”
Click on System
Click on Advanced system settings
a. While under the Advanced tab, in the “Performance” section, click the Settings…
button
WARNING! It is highly recommended that you have your IT department make this change for you. If
your business uses hard drive encryption (i.e., BitLocker) and a change is made to DEP settings, your IT
department may need to input the encryption recovery key when the computer is restarted to apply
the changes. If your hard drive encryption does prompt you for your recovery key due to this change,
you won’t be able to log back into your computer until you input your recovery key.

27
b. Go to the Data Execution Prevention tab
• You will see a message at the bottom of the window that will indicate if your
computer supports DEP; default setting is to have the option “Turn on DEP for
essential Windows programs and services only” and should not cause errors with
the service, but please report it if this option is selected and you are getting a
DEP error when scanning.

28
c. If the option “Turn on DEP for all programs and services except those I select:” is
selected on your computer, you can add Internet Explorer as exception by doing the
following:
• Click the Add… button
29
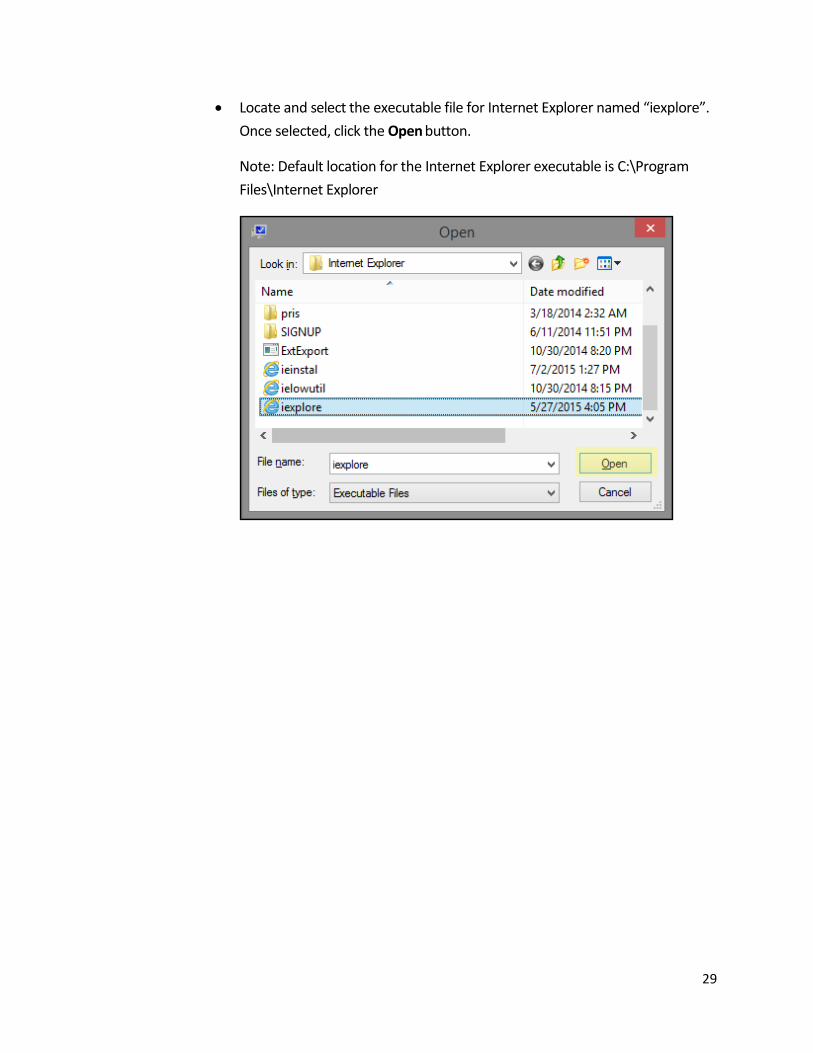
• Locate and select the executable file for Internet Explorer named “iexplore”.
Once selected, click the Open button.
Note: Default location for the Internet Explorer executable is C:\Program
Files\Internet Explorer

30
• You should now see Internet Explorer shown in the list and it should be selected.
To apply the changes, click the Apply button and the OK button. You will need to
restart your computer for the changes to be applied.
WARNING! It is highly recommended that you have your IT department make this change for you. If
your business uses hard drive encryption (i.e., BitLocker) and a change is made to DEP settings, your IT
department may need to input the encryption recovery key when the computer is restarted to apply
the changes. If your hard drive encryption does prompt you for your recovery key due to this change,
you won’t be able to log back into your computer until you input your recovery key.

31
Escalation Procedure
If you are unable to resolve a hardware issue, please reach out to your hardware scanner vendor.
Appendix B: Installation Quick Sheet
While this document does provide all steps to install a check scanner, the sequence is geared towards a
computer that has been setup with standard PC settings. If after the installation the check scanner is
not working, this document provides a list of common items to review to troubleshoot.
To minimize the need for troubleshooting at the end of the installation, the following table is a
recommended sequence of steps to follow when installing a check scanner which promotes gathering
system information and validating the system configuration during the installation process:
Steps Page
1. Install Ranger Driver 4 Installing Ranger Transport API™
2. Validate Scanner Works by doing a test scan
9 Test Installation
a. If Scanner didn’t work during the test scan:
i. Make sure the scanner is plugged in and powered on
12 Check Scanner Issue
ii. Uninstall and Re-install the Ranger Driver
12 Uninstall and Re-Install the Ranger
API/Driver
3. Configure Internet Explorer (IE):
a. If using Windows 8, make sure IE for Desktop Mode is setup
14 Run Internet Explorer in Desktop Mode
(Windows 8 Only)
b. If using 64-bit Windows, make sure to use IE 32-bit
14 Validate Internet Explorer 32-bit is being
used
4. Log into Business Online Deposit and try to make a scan
a. If Scanner does not appear in the dropdown or has issues:
i. Add Ensenta as a Trusted Site
19 Add Business Online Deposit as a Trusted
Site

32
ii. Run IE as Administrator 21 Run Internet Explorer as Administrator
iii. Configure IE to run in Compatibility Mode
22 Run Internet Explorer in Compatibility Mode
iv. User to ask their IT department if ActiveX and/or JavaScript are blocked via Group Policy
23 Group Policy