bx test script executor for sap business...
TRANSCRIPT

1
BX Test Script Executor for SAP Business One Version 20110630
Table of Contents 1 Overview .................................................................................................................................................... 2 2 Writing Test Scripts ................................................................................................................................... 2
2.1 Common Attributes for Commands .................................................................................................... 3
2.1.1 AutoMsgBox ................................................................................................................................ 3 2.1.2 Comments .................................................................................................................................... 3 2.1.3 IgnoreError ................................................................................................................................... 3 2.1.4 TraceEvents.................................................................................................................................. 3 2.1.5 FormType ..................................................................................................................................... 3
2.1.6 Instance ........................................................................................................................................ 4 2.1.7 ItemID .......................................................................................................................................... 4 2.1.8 Column ......................................................................................................................................... 4 2.1.9 Row .............................................................................................................................................. 4
2.2 Test Script Commands ........................................................................................................................ 5 2.2.1 ActivateMenu ............................................................................................................................... 5 2.2.2 BreakPoint.................................................................................................................................... 5
2.2.3 Call, CallEnd, DeclareVariable, DefineScriplet, RunScriplet ..................................................... 5 2.2.4 CallModule .................................................................................................................................. 5
2.2.5 CheckDBValue ............................................................................................................................ 5 2.2.6 ClickField ..................................................................................................................................... 5
2.2.7 CheckForm ................................................................................................................................... 6 2.2.8 Comment ...................................................................................................................................... 6 2.2.9 GetFieldValue .............................................................................................................................. 7
2.2.10 LocateRow ................................................................................................................................... 7 2.2.11 ReportScreenshot ......................................................................................................................... 7
2.2.12 Screenshot .................................................................................................................................... 8
2.2.13 SendText ...................................................................................................................................... 8
2.2.14 SetField ........................................................................................................................................ 8 2.2.15 SetFormPosition ........................................................................................................................... 9
2.2.16 SetTestUserDataSource ............................................................................................................... 9 2.2.17 SetVariable ................................................................................................................................... 9 2.2.18 Sleep ........................................................................................................................................... 10
2.2.19 UserConfirmation ...................................................................................................................... 10 2.2.20 WaitEvent .................................................................................................................................. 10
2.3 Test Script Samples ........................................................................................................................... 10 2.3.1 Add a New Inventory Item with the IMD Form ........................................................................ 10 2.3.2 Sample to Create a New Sales Order Document ....................................................................... 11
3 Executing Test Scripts ............................................................................................................................. 11
3.1 Using the Command Line Version (BXTestScriptExecutor4SBO.exe) ........................................... 11 3.2 Using the GUI Version (TxTestRunner) ........................................................................................... 12 3.3 Analyzing Execution Log.................................................................................................................. 13
4 Using Test Scripts for Performing Repetitive Tasks ............................................................................... 14 4.1 Automating Repetitive Jobs in SAP Business One ........................................................................... 14 4.2 Example to Load Hundreds of Bill of Material Data ........................................................................ 14 4.3 Generating Test Scripts with the TxTestScriptCreator ..................................................................... 15
5 Creating Animated Presentations with Test Scripts ................................................................................. 18
6 Modification History ................................................................................................................................ 18
2
1 Overview A major challenge in software development is to maintain the quality of a piece of software while parts of
the software are being extended or improved (bug-fixed). A very common situation is when a bug has been
fixed, at the same time two new bugs have been created along with the bug-fixing job. The only way to
reduce these cases is to fully retest the application again and again after each, even after the slightest,
modifications or rebuild. This repetitive job is cumbersome and a hard job to solve in every software
development project.
Writing an add-on for SAP Business One belongs exactly to this category. SAP Business One add-ons may
be quite complex. The BX add-ons are complex to maintain their quality up to a consistent level. Each BX
add-on is accompanied by a set of test scripts that may be automatically executed by the BX Test Script
Executor with a single button press whenever needed. The results of the test runs are written into a log file.
In case of a failure during the running of the test scripts, the test script executor stops with an error message.
The test scripts for a BX add-on are executed before a new version/build is released of the add-on. A test
script set may contain hundreds of specific test scripts, the execution of which taking hours.
Here are the main distinguishing characteristics of the BX Test Script Executor:
Simple XML syntax supported with XSD: with only 12 of the total 19 commands practically all
testing jobs can be implemented.
Runtime variable definitions and substitution: variables can be defined with the GetFieldValue
(containing the value a form field or matrix/grid cell value) and SetVariable (containing a value of an
SQL query, for example) commands, and the values can be reused in commands like SetField,
CheckField, CheckDBValue, LocateRow, SendText.
Validation commands to make sure data consistency: CheckField, CheckForm, CheckDBValue
Dynamic date expressions: {NOW} = today, {NOW + 10} = today + 10 calendar days,
“NOWEEKEND{NOW + @NumberOfDaysVariable@}” = today + a number of days coming from
a runtime variable skipping weekend days.
Referencing the last row in a matrix/grid: -1 refers the last row, -2 the row before the last row in a
matrix/grid
Searching a value in the rows of matrix/grid based on some (dynamic) criteria: LocateRow.
Referencing a row in a matrix/grid found with the LocateRow command: row 0 is the last most
recently referenced row in a matrix/grid.
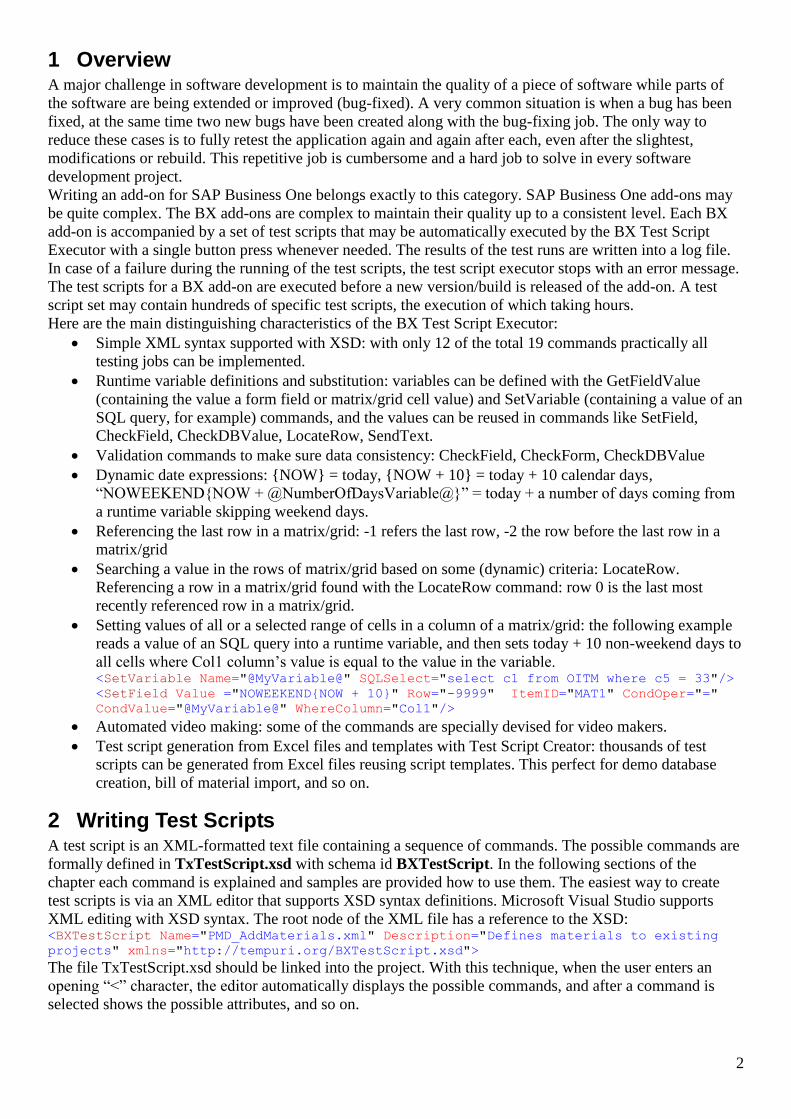
Setting values of all or a selected range of cells in a column of a matrix/grid: the following example
reads a value of an SQL query into a runtime variable, and then sets today + 10 non-weekend days to
all cells where Col1 column’s value is equal to the value in the variable. <SetVariable Name="@MyVariable@" SQLSelect="select c1 from OITM where c5 = 33"/>
<SetField Value ="NOWEEKEND{NOW + 10}" Row="-9999" ItemID="MAT1" CondOper="="
CondValue="@MyVariable@" WhereColumn="Col1"/>
Automated video making: some of the commands are specially devised for video makers.
Test script generation from Excel files and templates with Test Script Creator: thousands of test
scripts can be generated from Excel files reusing script templates. This perfect for demo database
creation, bill of material import, and so on.
2 Writing Test Scripts A test script is an XML-formatted text file containing a sequence of commands. The possible commands are
formally defined in TxTestScript.xsd with schema id BXTestScript. In the following sections of the
chapter each command is explained and samples are provided how to use them. The easiest way to create
test scripts is via an XML editor that supports XSD syntax definitions. Microsoft Visual Studio supports
XML editing with XSD syntax. The root node of the XML file has a reference to the XSD: <BXTestScript Name="PMD_AddMaterials.xml" Description="Defines materials to existing
projects" xmlns="http://tempuri.org/BXTestScript.xsd">
The file TxTestScript.xsd should be linked into the project. With this technique, when the user enters an
opening “<” character, the editor automatically displays the possible commands, and after a command is
selected shows the possible attributes, and so on.

3
2.1 Common Attributes for Commands
2.1.1 AutoMsgBox
It may happen that when a command is executed a (modal) Message Box is going to be opened as a result of
the command. With the AutoMsgBox attribute you can define which button to press on the message box
form. AutoMsgBox=”1” means, press the button with ID 1 (normally the OK button) on the message box, in
case a message box were opened. <ClickField FormType="150" ItemID="1" AutoMsgBox="1" Comments="Press Add button"/>
Executor is capable to press successive buttons. Example:
Message Box has been opened, the user pressed some button. Usually this window has the „0” ID.
Subsequent upon this selection a successive Message Box has been opened, optionally additional
radio buttons or checkboxes on it. Theoretically this message window has unique identifier.
Executor have to select from one of this button set.
In this case AutoMsgBox have pairs of window-button identifiers in the following form:
<window id>,<button id>;<window id2>,<button id2>...
where window id and button id are seperated by comma and the pairs are separated by semicolon. If one of
window-button identifier omitted, executor will apply 0 as window ID and the given parameter as button ID.
The sky is the only limit of pairs.
AutoMsgBox="0,1;1540000000,2" will press the 1st button on window 0 by ID then will press 2nd button
on window 1540000000 by ID.
AutoMsgBox="1;1540000000,2;1" will press the 1st button on first window then will press 2nd button on
window 1540000000 by ID and then will press 3rd button on next window.
If no window exists with the given ID, executor will wait for 10 seconds and after that it will continue script.
2.1.2 Comments
The script author may add comments to a command.
2.1.3 IgnoreError
If there is an exception or any kinds of error (form, field does not exist, for example) during the execution of
the command, the error is ignored. <ClickField FormType="169" ItemID="PRJGRD" Column="PRJTYPE" Row="1" IgnoreError="true"
Comments="Click first project if any"/>
2.1.4 TraceEvents
Enables or disables SAP Business One event logging for debugging purposes. <ClickField FormType="BXPPSShP" ItemID="BtnANY" TraceEvents="true" Comments="Add New
Year"/>
2.1.5 FormType
The form type ID string. In the example below, it is 150.
If the form type attribute is omitted from a command the executor assumes that the command is for the form
referenced previously in a command:

4
<ActivateMenu MenuID="TRI_PRJSHT" Comments="Project Master Data"/>
<CheckForm FormMode="Find" Comments="If form mode is not Find, something went has
changed"/>
<ClickField FormType="TRI_F_PROJCT" ItemID="T_Details" Comments="Details Folder"/>
<SetField ItemID="E_ProjNum" Value="${item.Code}" Comments="Project Number"/>
<ClickField ItemID="1" Comments="Click Find"/>
In the example above the form type is omitted from the last two commands and implied the TRI_F_PROJCT
form type.
2.1.6 Instance
The form instance ID. Multiple instances of the same form can be opened. For example, the user can open
the item master data form twice, three times or any number of times. This information is not shown in the
system information area. Usually, this attribute can be safely omitted. <SetFormPosition FormType="142" Instance="0" X="10" Y="10"/>
<SetFormPosition FormType="142" Instance="1" X="30" Y="30"/>
<Comment Text="Two purchase orders have been prepared, we can now add them"
Position="Bottom"/>
<ClickField FormType="142" Instance="0" ItemID="1" Comments="Press Add button"/>
<ClickField FormType="142" Instance="0" ItemID="2" Comments="Press Close"/>
<ClickField FormType="142" Instance="1" ItemID="1" Comments="Press Add button"/>
<ClickField FormType="142" Instance="1" ItemID="2" Comments="Press Close"/>
2.1.7 ItemID
The identifier of the form user interface element: Item=28 in the example above.
2.1.8 Column
The identifier of the matrix/grid column: Column=1 in the example above.
2.1.9 Row
Row is the row number of a matrix/grid component. The first row’s number is 1 in both grids and matrixes.
Internally, row numbers start with 0 in grids, but for consistency, the executor uses 1 for the first row in
grids as well. The last row is -1, the row before the last is -2, and so on. Row -9999 means all rows. <SetField FormType="BXPWSLC" ItemID="BXPWGLCCRD" Column="CorID" Row="-1" Value="101"
Comments="Coord Name"/>
<ClickField FormType="139" ItemID="38" Column="11" Row="-2" Comments="Quantity column
in items matrix"/>
<SetField FormType="81" ItemID="10" Column="1" Row="-9999" Value="Y"/>
In the example above all the checkboxes are checked in the matrix/grid in column 1.
Row 0 is a reference to the currently active row. <SetField FormType="BXPWSLC" ItemID="BXPWGLCCRD" Column="CorID" Row="-1" Value="1"
Comments="Coord Name"/>
<ClickField FormType="BXPWSLC" ItemID="BXPWGLCCRD" Column="Desc" Row="0"
Comments="Description"/>
In the example above the SetField command referenced the last row, and the subsequent ClickField
command’s Row=”0” references the active row, which is the last row in this situation.
2.1.10 Skip
You can skip commands based on a condition. It will skip the line if the condition is true. As string delimiter
you have to use ` or ". It is also possible to use C# expressions in the skip condition like
"{SBOVersion}.StartsWith(`90`)" or "`{HANA}`.Equals(`Y`)". <SetVariable Name="{AdditionalCurrency1}" Value="DKK" Skip="`{Country}` != `DE`"/>
Some system variables are set automatically when the test runner starts running a script:
{HANA}=Y
{SBOCompanyName}=TESTBXPPS_01
{SBODatabaseName}=TESTBXPPS_01
{SBOVersion}=902230

5
These can also be used in skip conditions. <ActivateMenu MenuID="4369" Comments="Production Order" Skip="`{HANA}`==`Y`"/>
2.2 Test Script Commands
Each command has an optional Comments attribute, which can be used to give short documentation for a
command line. Extensive use of the Comments makes even complex scripts comprehendible.
2.2.1 ActivateMenu
This command simulates a user action as if the required menu has been clicked. This command is the only
way to open SAP Business One forms, for example. <ActivateMenu MenuID="4361" Comments="MRP Wizard"/>
2.2.2 BreakPoint
Stops the execution of the test script, displays a message and waits for a user confirmation to proceed. <BreakPoint/>
2.2.3 Call, CallEnd, DeclareVariable, DefineScriplet, RunScriplet <Call Path="<path to script>" ExecutionStatus=”” IgnoreError=”” Comments=”” />
2.2.4 CallModule
Executes a module with the specified name:
QuitAcrobat
HideAcrobat
ResizeSBO
ResizeAcrobat
InstallBXAddOn – automatically presses the “Next” buttons on the Windows forms of the installer.
Examples: <CallModule ModuleName="ResizeSBO">
<Parameter Name="Width" Value="950"/>
<Parameter Name="Height" Value="730"/>
</CallModule>
<CallModule ModuleName="HideAcrobat"/>
<CallModule ModuleName="ResizeAcrobat">
<Parameter Name="SAMEASSBO" Value="TRUE"/>
</CallModule>
<CallModule ModuleName="InstallBXAddOn"/>
2.2.5 CheckDBValues
Executes an SQL query and fails if not found, unless ErrorIfFound defined. The query must be written in
MS SQL format. If the database is a HANA database, testrunner will convert the query to hana format. Do
not use MS SQL specific commands which don’t work on hana (like for example isnull). These are not
converted and trigger errors on hana. If from DUMMY is needed in HANA, it is automatically added. The
query must be written correctly regarding case sensitivity to run on HANA (i.e. ItemCode and not itemcode,
tables are capitalized, etc). For SBO user table names you must use [@], they are also converted to HANA.
You don’t have to use “” for field names, they are automatically added. <SetVariable Name="${DocEntry}" SQLSelect="SELECT AutoKey-1 FROM ONNM WHERE (ObjectCode
= 22)" />
<CheckDBValues ErrorIfFound="true" Query="SELECT 1 FROM [@BXPWHQUEHD] WHERE Code = '1'
AND NOT (U_BXPQueSt = '60')" Comments="Check if queue has been processed"/>
<CheckDBValues ErrorIfFound="true" Query="SELECT 1 FROM [OPOR] WHERE DocEntry =
${DocEntry} AND NOT (DocStatus = 'C')" Comments="Check if purchase order is closed"/>
2.2.5.1 ErrorIfFound
If it is set to „false” and the SQL query result returns 0 records, test will exit with failure. This means ’Error
if not found’ instead. In case more than 0 records are found test is going to be continued.
6
If it is set to „true” and the SQL query returns more than 0 records, test will stop with error. When no
records found, test will be continued.
2.2.6 CheckField
Check field value pointed by ItemID, or Row/Column coordinates and compares it with Value using
operator shown in Op. Depending on comparation and IgnoreError script is going to continue or halts with
failure. <CheckField FormType="150" ItemID="5" Column="1" Row="5" Op="<operator>" Value="5"
Comments=""/>
Where operator should be Equal, Greather, Less, GreatherOrEqual, LessOrEqual and Different
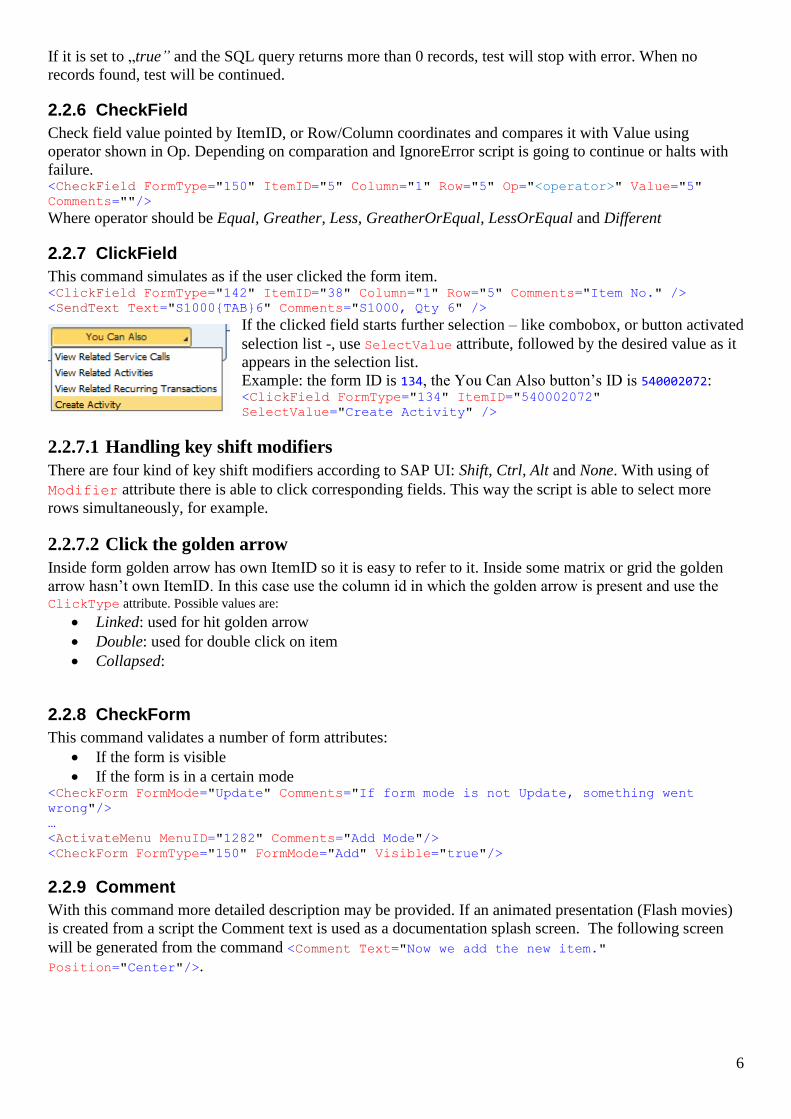
2.2.7 ClickField
This command simulates as if the user clicked the form item. <ClickField FormType="142" ItemID="38" Column="1" Row="5" Comments="Item No." />
<SendText Text="S1000{TAB}6" Comments="S1000, Qty 6" />
If the clicked field starts further selection – like combobox, or button activated
selection list -, use SelectValue attribute, followed by the desired value as it
appears in the selection list.
Example: the form ID is 134, the You Can Also button’s ID is 540002072: <ClickField FormType="134" ItemID="540002072"
SelectValue="Create Activity" />
2.2.7.1 Handling key shift modifiers
There are four kind of key shift modifiers according to SAP UI: Shift, Ctrl, Alt and None. With using of
Modifier attribute there is able to click corresponding fields. This way the script is able to select more
rows simultaneously, for example.
2.2.7.2 Click the golden arrow
Inside form golden arrow has own ItemID so it is easy to refer to it. Inside some matrix or grid the golden
arrow hasn’t own ItemID. In this case use the column id in which the golden arrow is present and use the ClickType attribute. Possible values are:
Linked: used for hit golden arrow
Double: used for double click on item
Collapsed:
2.2.8 CheckForm
This command validates a number of form attributes:
If the form is visible
If the form is in a certain mode <CheckForm FormMode="Update" Comments="If form mode is not Update, something went
wrong"/>
…
<ActivateMenu MenuID="1282" Comments="Add Mode"/>
<CheckForm FormType="150" FormMode="Add" Visible="true"/>
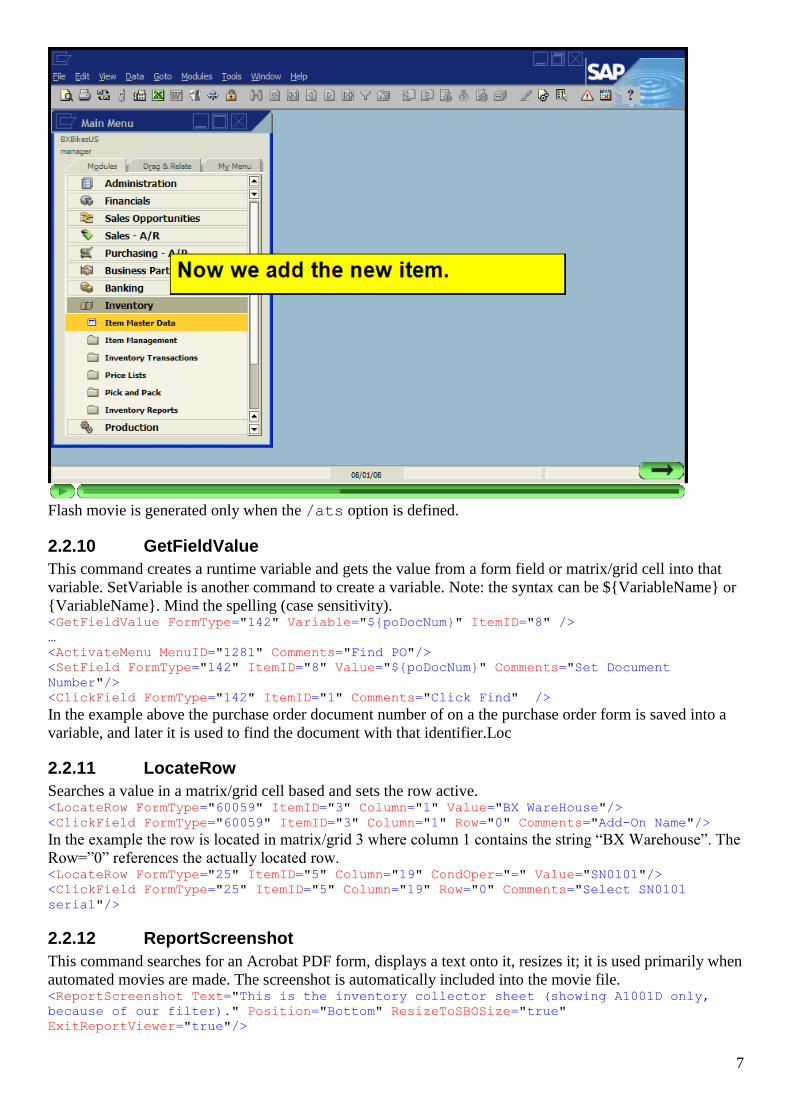
2.2.9 Comment
With this command more detailed description may be provided. If an animated presentation (Flash movies)
is created from a script the Comment text is used as a documentation splash screen. The following screen
will be generated from the command <Comment Text="Now we add the new item."
Position="Center"/>.
7
Flash movie is generated only when the /ats option is defined.
2.2.10 GetFieldValue
This command creates a runtime variable and gets the value from a form field or matrix/grid cell into that
variable. SetVariable is another command to create a variable. Note: the syntax can be ${VariableName} or
{VariableName}. Mind the spelling (case sensitivity). <GetFieldValue FormType="142" Variable="${poDocNum}" ItemID="8" />
…
<ActivateMenu MenuID="1281" Comments="Find PO"/>
<SetField FormType="142" ItemID="8" Value="${poDocNum}" Comments="Set Document
Number"/>
<ClickField FormType="142" ItemID="1" Comments="Click Find" />
In the example above the purchase order document number of on a the purchase order form is saved into a
variable, and later it is used to find the document with that identifier.Loc
2.2.11 LocateRow
Searches a value in a matrix/grid cell based and sets the row active. <LocateRow FormType="60059" ItemID="3" Column="1" Value="BX WareHouse"/>
<ClickField FormType="60059" ItemID="3" Column="1" Row="0" Comments="Add-On Name"/>
In the example the row is located in matrix/grid 3 where column 1 contains the string “BX Warehouse”. The
Row=”0” references the actually located row. <LocateRow FormType="25" ItemID="5" Column="19" CondOper="=" Value="SN0101"/>
<ClickField FormType="25" ItemID="5" Column="19" Row="0" Comments="Select SN0101
serial"/>
2.2.12 ReportScreenshot
This command searches for an Acrobat PDF form, displays a text onto it, resizes it; it is used primarily when
automated movies are made. The screenshot is automatically included into the movie file. <ReportScreenshot Text="This is the inventory collector sheet (showing A1001D only,
because of our filter)." Position="Bottom" ResizeToSBOSize="true"
ExitReportViewer="true"/>
8
<ReportScreenshot MinimizeAfter="true" ResizeToSBOSize="true" Text="We can see the
Delivery Note, which is based on the Issue for Production document."/>
2.2.13 Screenshot
This command creates a screenshot into a file defined. <Screenshot FormType="134" IgnoreError="true" File="134.jpg"/>
2.2.14 SendText
This command sends a string of characters to the active and focused user interface element (usually a form
field or matrix/grid cell). <ClickField FormType="169" ItemID="PRJSETUP" Comments="Project Setup"/>
<SendText Text="{TAB}" Comments="Jump onto the next column"/>
The SAP Business One add-on registration form, unfortunately, can only be controlled as if it were a
Windows window and requires special handling; this is where the WindowsClick and ToWinForm attributes
are used. <ClickField FormType="60058" ItemID="16" WindowsClick="true" Comments="Register addon
button"/>
<Sleep TimeOut="2000"/>
<ClickField FormType="60057" ItemID="7" WindowsClick="true" Comments="Browse button"/>
<Sleep TimeOut="2000"/>
<SendText Text="c:\temp\ARD\BxPPSSetup.ard{ENTER}" ToWinForm="true"/>
<Sleep TimeOut="2000"/>
<ClickField FormType="60057" ItemID="5" WindowsClick="true" Comments="Update button"/>
2.2.14.1 Available keys
Text attribute can contains key tokens to send to. Available tokens are as follows
DOWN ARROW {DOWN}
END {END}
ENTER {ENTER}
ESC {ESC}
HOME {HOME}
INS or INSERT {INSERT} or {INS}
LEFT ARROW {LEFT}
PAGE DOWN {PGDN}
PAGE UP {PGUP}
RIGHT ARROW {RIGHT}
TAB {TAB}
UP ARROW {UP}
To add key modifier, before the leading bracket add caret for Control key.

9
2.2.15 SetField
Set the value of a form item to a specific text. The value can have reference to a runtime variable as well as
the special expression {NOW}. <SetField ItemID="M_Particle" Column="CP_Quan" Row="-2" Value="32"
Comments="Quantity"/>
<SetField ItemID="E_ProjNum" Value="${MyCode}" Comments="Project Number"/>
<SetField FormType="139" ItemID="12" Value="{NOW + 22}" Comments="Delivery Date"/>
<SetVariable Name="${date1}" Expression="now.date"/>
<SetVariable Name="${date2}" Expression="now.AddMonths(3).date"/>
In the example above the expression {NOW + 22} is set the value of the date field to today + 22 days. For
the expression NOW C# code can also be used.
2.2.16 SetFormPosition
This command moves a form to a new XY position. This command is primarily used for movie making. <SetFormPosition FormType="BXPWSLCS" X="20" Y="20"/>
<SetFormPosition FormType="BXPWSLS" AutoPositionStrategy="Center"/>
<SetFormPosition FormType="65211" AutoPositionStrategy="Cascade"/>
2.2.17 SetTestUserDataSource
This command sets a value of the data source “BxTSTDS” on the specified form. This user data source is
used by a number of BX add-on forms to make ActiveX controls testable in custom forms. It’s always the
job of the programmer of the custom form implement the testability logic.
In the following examples, the test script simulates on the BxPPSPJVF form, as if the user selected the
“Sales Opportunities” element in the tree-view ActiveX components, then sends a single click ($SC) event
to the BxBewDoc subelement in the tree. <SetTestUserDataSource FormType="BxPPSPJVF" Value="Sales Opportunities" Comments="Sales
Opportunities"/>
<ClickField FormType="BxPPSPJVF" ItemID="CLSBTN" Comments="Close"/>
<SetTestUserDataSource FormType="BxPPSPJVF" Value="BxNewDoc$SC" Comments="NewItem"/>
<ClickField FormType="BxPPSPJVF" ItemID="CLSBTN" Comments="Close"/>
2.2.18 SetVariable
This command creates a variable at runtime and stores the value of an expression, an SQL (SELECT)
statement, or a static literal. This is very similar to the command GetVariable. The name of the variable can
be any string; make sure however that when the variable is referenced the string substitution should be
unambiguous.
Examples of defining variables: <SetVariable Name ="@@@MYVARIABLE1@@@" Value="564"/>
<SetVariable Name="${DocEntry}" SQLSelect="SELECT AutoKey - 1 FROM ONNM WHERE
ObjectCode = 22" />
<SetVariable Name="${LocQuantity1}" SQLSelect="SELECT count(*) FROM OPRJ"/>
The variable can be used in a number of subsequent commands: CheckField, SetField, SendText,
SetVariable; practically in every Value, Expression, SQLStatement, Text, and so on, XML attributes of any
commands.
Examples for referencing variables: <SetField Column ="1" FormType ="456" ItemID ="56" Row ="-1" Value
="@@@MYVARIABLE1@@@"/>
<SetVariable Name="${dummy}" SQLSelect="INSERT INTO [@BXPWHQUEHD] (Code, Name,
U_BXPDocTy, U_BXPPuOEn, U_BXPIsInc, U_BXPIsRes, U_BXPQueSt, U_BXPExDcN, U_BXPExDcD)
VALUES ('1','1',-9988,${DocEntry},'Y','N',40,'1234567890',getdate())" />
In the example above, the SetVariable command is used to perform an SQL INSERT statement. <SetVariable Name="${nowAndThreeMonthsDate}" Value="{NOW + 90}"/>
The value can contain a reference to a runtime variable and the special date syntax {NOW}. <SetVariable Name="${DateFrom}" Value="NOWEEKEND{NOW+10}" Comments="Date From"/>
<SetVariable Name="${TimeFrom}" Value="1300" Comments="Time From"/>
In this example, the NOWEEKEND keyword is used to calculate the date of today + 10 days with skipping
the weekend days.
10
2.2.19 Sleep
This command stops the execution for the specified number of milliseconds. <Sleep TimeOut="5000" Comments="Wait until the add-on has been loaded"/>
The above example stops the execution for 5 seconds.
2.2.20 UserConfirmation
This command stops the execution, displays a Yes/No message box with the specified text. If the user
selects No, the execution stops as if an error occurred. <UserConfirmation Message="Was the test successful?"/>
This command should not be used when the goal is to create unattended testing processes.
2.2.21 WaitEvent
This command stops the execution until a specific event occurs. In the example below the executor waits
maximum 90 seconds for a FORM_ACTIVATE event of a form BXPPSMRPR, then it saves a screenshot of
the form. <WaitEvent FormType="BXPPSMRPR" EventType="FORM_ACTIVATE" BeforeAction="false"
TimeOut="90000" Comments="Wait max 90 seconds for form"/>
<Screenshot FormType="BXPPSMRPR" IgnoreError="true" File="BXPPSMRPR-110.jpg"/>
In this other example the execution stops until the form BXRPTF is opened and then sets a field value in the
form. <WaitEvent FormType="BXRPTF" EventType="FORM_ACTIVATE" BeforeAction="false"
TimeOut="30000" Comments="Wait max 30 seconds for form"/>
<SetField FormType="BXRPTF" ItemID="UPCKB" Value="Y" Comments="Preview before print"/>
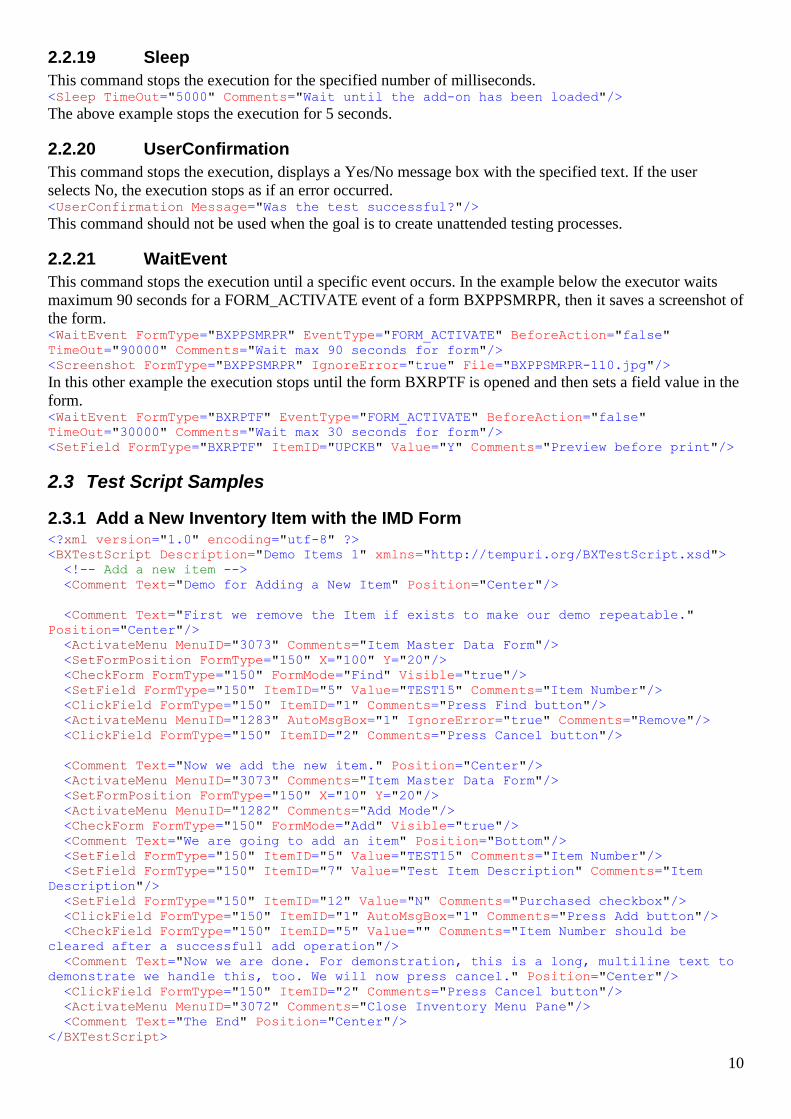
2.3 Test Script Samples
2.3.1 Add a New Inventory Item with the IMD Form <?xml version="1.0" encoding="utf-8" ?>
<BXTestScript Description="Demo Items 1" xmlns="http://tempuri.org/BXTestScript.xsd">
<!-- Add a new item -->
<Comment Text="Demo for Adding a New Item" Position="Center"/>
<Comment Text="First we remove the Item if exists to make our demo repeatable."
Position="Center"/>
<ActivateMenu MenuID="3073" Comments="Item Master Data Form"/>
<SetFormPosition FormType="150" X="100" Y="20"/>
<CheckForm FormType="150" FormMode="Find" Visible="true"/>
<SetField FormType="150" ItemID="5" Value="TEST15" Comments="Item Number"/>
<ClickField FormType="150" ItemID="1" Comments="Press Find button"/>
<ActivateMenu MenuID="1283" AutoMsgBox="1" IgnoreError="true" Comments="Remove"/>
<ClickField FormType="150" ItemID="2" Comments="Press Cancel button"/>
<Comment Text="Now we add the new item." Position="Center"/>
<ActivateMenu MenuID="3073" Comments="Item Master Data Form"/>
<SetFormPosition FormType="150" X="10" Y="20"/>
<ActivateMenu MenuID="1282" Comments="Add Mode"/>
<CheckForm FormType="150" FormMode="Add" Visible="true"/>
<Comment Text="We are going to add an item" Position="Bottom"/>
<SetField FormType="150" ItemID="5" Value="TEST15" Comments="Item Number"/>
<SetField FormType="150" ItemID="7" Value="Test Item Description" Comments="Item
Description"/>
<SetField FormType="150" ItemID="12" Value="N" Comments="Purchased checkbox"/>
<ClickField FormType="150" ItemID="1" AutoMsgBox="1" Comments="Press Add button"/>
<CheckField FormType="150" ItemID="5" Value="" Comments="Item Number should be
cleared after a successfull add operation"/>
<Comment Text="Now we are done. For demonstration, this is a long, multiline text to
demonstrate we handle this, too. We will now press cancel." Position="Center"/>
<ClickField FormType="150" ItemID="2" Comments="Press Cancel button"/>
<ActivateMenu MenuID="3072" Comments="Close Inventory Menu Pane"/>
<Comment Text="The End" Position="Center"/>
</BXTestScript>
11
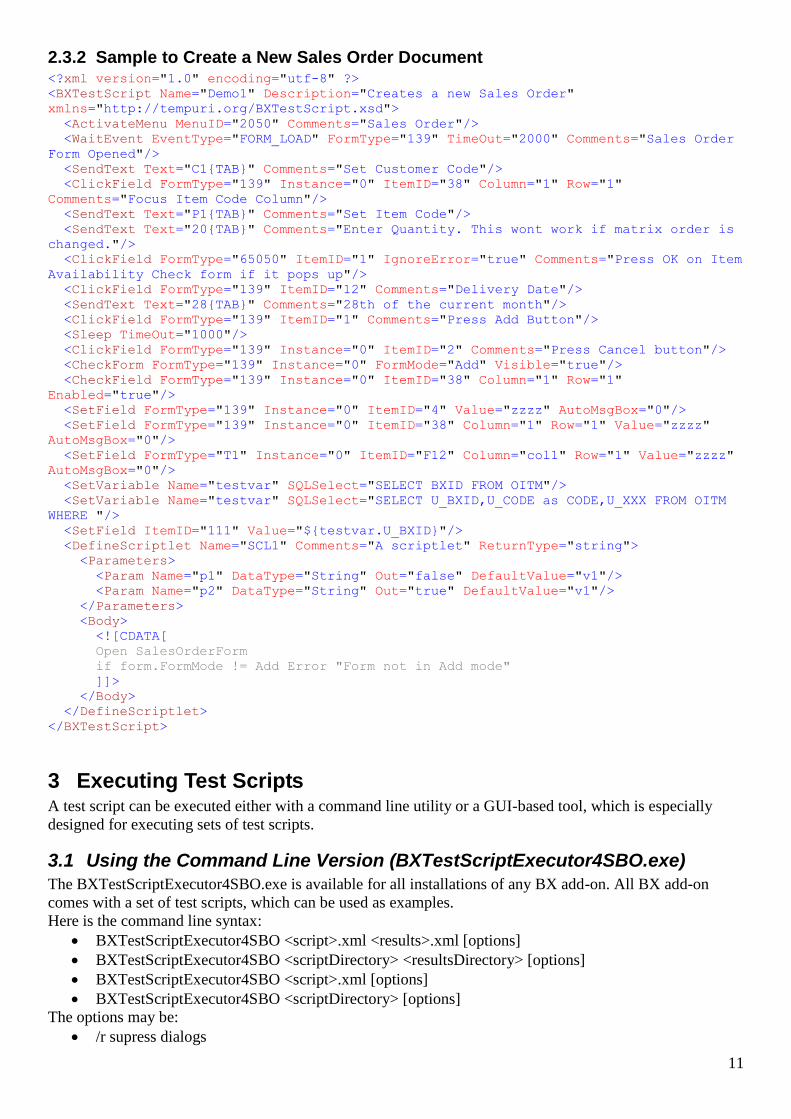
2.3.2 Sample to Create a New Sales Order Document <?xml version="1.0" encoding="utf-8" ?>
<BXTestScript Name="Demo1" Description="Creates a new Sales Order"
xmlns="http://tempuri.org/BXTestScript.xsd">
<ActivateMenu MenuID="2050" Comments="Sales Order"/>
<WaitEvent EventType="FORM_LOAD" FormType="139" TimeOut="2000" Comments="Sales Order
Form Opened"/>
<SendText Text="C1{TAB}" Comments="Set Customer Code"/>
<ClickField FormType="139" Instance="0" ItemID="38" Column="1" Row="1"
Comments="Focus Item Code Column"/>
<SendText Text="P1{TAB}" Comments="Set Item Code"/>
<SendText Text="20{TAB}" Comments="Enter Quantity. This wont work if matrix order is
changed."/>
<ClickField FormType="65050" ItemID="1" IgnoreError="true" Comments="Press OK on Item
Availability Check form if it pops up"/>
<ClickField FormType="139" ItemID="12" Comments="Delivery Date"/>
<SendText Text="28{TAB}" Comments="28th of the current month"/>
<ClickField FormType="139" ItemID="1" Comments="Press Add Button"/>
<Sleep TimeOut="1000"/>
<ClickField FormType="139" Instance="0" ItemID="2" Comments="Press Cancel button"/>
<CheckForm FormType="139" Instance="0" FormMode="Add" Visible="true"/>
<CheckField FormType="139" Instance="0" ItemID="38" Column="1" Row="1"
Enabled="true"/>
<SetField FormType="139" Instance="0" ItemID="4" Value="zzzz" AutoMsgBox="0"/>
<SetField FormType="139" Instance="0" ItemID="38" Column="1" Row="1" Value="zzzz"
AutoMsgBox="0"/>
<SetField FormType="T1" Instance="0" ItemID="F12" Column="col1" Row="1" Value="zzzz"
AutoMsgBox="0"/>
<SetVariable Name="testvar" SQLSelect="SELECT BXID FROM OITM"/>
<SetVariable Name="testvar" SQLSelect="SELECT U_BXID,U_CODE as CODE,U_XXX FROM OITM
WHERE "/>
<SetField ItemID="111" Value="${testvar.U_BXID}"/>
<DefineScriptlet Name="SCL1" Comments="A scriptlet" ReturnType="string">
<Parameters>
<Param Name="p1" DataType="String" Out="false" DefaultValue="v1"/>
<Param Name="p2" DataType="String" Out="true" DefaultValue="v1"/>
</Parameters>
<Body>
<![CDATA[
Open SalesOrderForm
if form.FormMode != Add Error "Form not in Add mode"
]]>
</Body>
</DefineScriptlet>
</BXTestScript>
3 Executing Test Scripts A test script can be executed either with a command line utility or a GUI-based tool, which is especially
designed for executing sets of test scripts.
3.1 Using the Command Line Version (BXTestScriptExecutor4SBO.exe)
The BXTestScriptExecutor4SBO.exe is available for all installations of any BX add-on. All BX add-on
comes with a set of test scripts, which can be used as examples.
Here is the command line syntax:
BXTestScriptExecutor4SBO <script>.xml <results>.xml [options]
BXTestScriptExecutor4SBO <scriptDirectory> <resultsDirectory> [options]
BXTestScriptExecutor4SBO <script>.xml [options]
BXTestScriptExecutor4SBO <scriptDirectory> [options]
The options may be:
/r supress dialogs

12
/m250 /m500 /m1000 /m2000 movie speed
/ns disable screen captures
/ats always take screenshots (generate Flash movie)
/movie - create movie (alias for /ats)
/voice - add voice to movie with TTS
/voice:<VOICESUBSTRING> - add voice, select the voice containing SUBSTRING
/im use interactive menu opening algorithm
3.2 Using the GUI Version (TxTestRunner)
The TxTestRunner.exe is available in the installation directory of all BX add-ons: "C:\Program
Files\SAP\SAP Business One\AddOns\BXPPS\BX Production and Planning\BxTest", for example.
The GUI version of the test script executor requires a batch job definition XML file:
TxTestRunner.exe Xml\BxPPSTest.series.xml.
Here is a simple test job batch XML: <?xml version="1.0" encoding="utf-8" ?>
<TestSuite xmlns="http://tempuri.org/TxTestSuite.xsd" Name="Full test">
<TestGroup Name="Demo Test Scripts">
<Test Filename="DemoItems1.xml" Video="true"/>
<Test Filename="DemoItems2.xml"/>
<Test Filename="DemoItems3.xml" Video="true"/>
<Test Filename="TestTMP.xml" Video="true"/>
<Test Filename="TestMovieRFQ.xml"/>
</TestGroup>
</TestSuite> The test runner opens the list of available test scripts from the job batch XML file and the user may select a
complete test group or individual scripts.
Before running a set of scripts a couple of option may be defined:
The database may be made automatically backed-up before executing a test script. The backups are
differential backups and are performed very quickly. In case of an error the user may restore the backup
made prior to a script, correct the script or the cause of the error, and the testing may be continued from the
erroneous script. Eventually, even if there were no errors, a complete set of backups are available for further
analysis. The video options are fully explained in another document.

13
The database connection options are needed for the backup commands.
3.3 Analyzing Execution Log
When a test script is executed a log file is automatically written with the same name suffixed with .log.xml.
The log file is exactly the same as the original test script XML file but each commend has a sub-tag:
ExecutionStatus. The ExecutionStatus shows
if the execution of the test command was OK (Status),
when was it executed (ExecutedOn),
and how long was the execution in milliseconds (ExecutionMillis)
See an example here: <?xml version="1.0" encoding="utf-8"?>
<BXTestScript xmlns:xsi="http://www.w3.org/2001/XMLSchema-instance"
xmlns:xsd="http://www.w3.org/2001/XMLSchema" Description="Demo Items 1"
xmlns="http://tempuri.org/BXTestScript.xsd">
<ExecutionStatus Status="OK" ExecutedOn="2008-02-19T14:40:07.4295358+01:00"
ExecutionMillis="16156" />
<ActivateMenu MenuID="3081" Comments="Initial Quantities, Inventory Tracking, and
Stock Posting">
<ExecutionStatus Status="OK" ExecutedOn="2008-02-19T14:40:07.4295358+01:00"
ExecutionMillis="859" />
</ActivateMenu>
<ClickField FormType="907" ItemID="44" Comments="Stock posting tab">
<ExecutionStatus Status="OK" ExecutedOn="2008-02-19T14:40:08.2889108+01:00"
ExecutionMillis="140" />
</ClickField>
<SetField FormType="907" ItemID="8" Value="" Comments="Code">
<ExecutionStatus Status="OK" ExecutedOn="2008-02-19T14:40:08.4451608+01:00"
ExecutionMillis="46" />
</SetField>
<SetField FormType="907" ItemID="10" Value="" Comments="To">
<ExecutionStatus Status="OK" ExecutedOn="2008-02-19T14:40:08.4920358+01:00"
ExecutionMillis="78" />
</SetField>
<ClickField FormType="902" ItemID="1" Comments="Reconcile 2nd step" AutoMsgBox="1">
<ExecutionStatus Status="OK" ExecutedOn="2008-02-19T14:40:19.4607858+01:00"
ExecutionMillis="4125" />
</ClickField>
</BXTestScript> In case of an exception the execution of the test script is stopped (unless the IgnoreError attribute is set to
true for the command). The exception message is logged <?xml version="1.0" encoding="utf-8"?>
<BXTestScript xmlns:xsi="http://www.w3.org/2001/XMLSchema-instance"
xmlns:xsd="http://www.w3.org/2001/XMLSchema" Description="Check if BxWH AddOn is
running" xmlns="http://tempuri.org/BXTestScript.xsd">
<ExecutionStatus ScriptError="true" Status="ScriptError" ExecutedOn="2008-08-
05T12:11:47.40625+02:00" ExecutionMillis="62" />
<ActivateMenu MenuID="BXPWAct" Comments="Open a BxWH Form - Activate Add-On">
<ExecutionStatus ScriptError="true" Status="ScriptError" ExecutedOn="2008-08-
05T12:11:47.421875+02:00" ExecutionMillis="31">
<Text>Menu - Not found [66000-27]</Text>
</ExecutionStatus>
</ActivateMenu>
</BXTestScript>

14
4 Using Test Scripts for Performing Repetitive Tasks
4.1 Automating Repetitive Jobs in SAP Business One
The commands in a test scripts may be used to perform generic tasks in SAP Business One, not only testing
jobs. For example, the initial item master and inventory data of a company may be entirely loaded by a set of
test scripts. These types of scripts, normally, do their jobs via the SAP Business One user interface. Loading
huge amount of data via the user interface is much slower, however, than loading directly into the company
database via SQL. On the other hand, when data are loaded via the user interface while all the add-ons that
are needed by the company running, the data will be verified and the risk of getting an inconsistent database
is significantly reduced this way. There are a number of jobs in SAP Business One that may be done safely
only via the user interface.
A typical data loading script is huge and should not be written by hand. These scripts should be generated
from a primary data source, from an Excel sheet. Therefore, the most common scenario of using the test
script execution engine consists of the following steps:
Exporting the data from a legacy system into one or more Excel files
Design a script template for loading a single set (row) of data and write the script template manually.
Test the template, if possible and meaningful, with some demo data.
Use TxTestScriptCreator to create the actual scripts from the Excel files using the template script.
Execute the generated scripts.
Repeat the jobs above for each type (items, business partners, inventory, accounts, etc) of data
needed
In case any modifications are needed in the template, the whole job can be redone; this is a major advantage
of this technology.
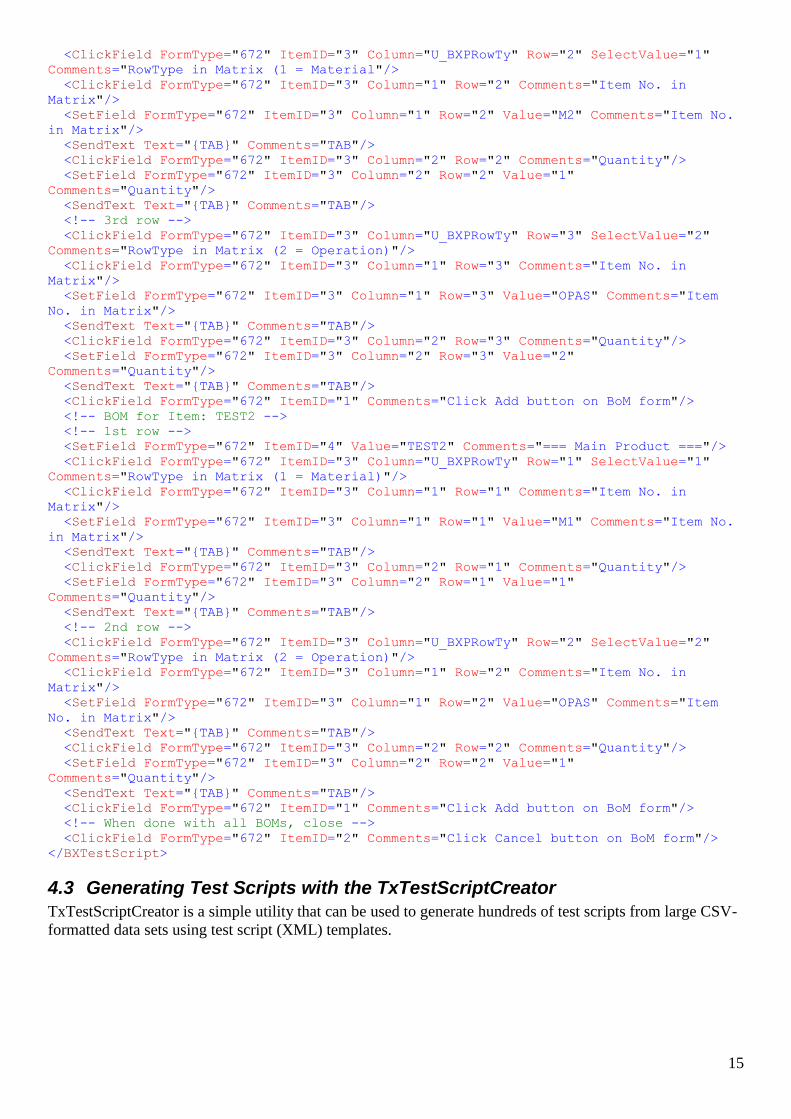
4.2 Example to Load Hundreds of Bill of Material Data
Here are the steps required:
Create a test containing Bill of Materials data. The example test (bomcreator.xml) will create two
Bill of Materials. It is important to have the materials, main product and operations already in the
database. You have to generate an XML "test" script like the example below.
Start SAP Business One, login to the company and then run the "test", which will drive the user
interface, and it will create the specified Bill of Materials. To run it, open cmd.exe (command line),
go to directory where you have the test script executor engine, e.g.: "c:\Program Files\SAP\SAP
Business One\AddOns\BXPPS\BX Production and Planning\BxTest\" Then run the tester with the
test xml as a parameter: BXTestScriptExecutor4SBO.exe bomcreator.xml
<?xml version="1.0" encoding="utf-8" ?>
<BXTestScript Name="BoM.xml" Description="Creates a new Bill of Materials"
xmlns="http://tempuri.org/BXTestScript.xsd">
<ActivateMenu MenuID="4353" Comments="BoM"/>
<ActivateMenu MenuID="1282" Comments="Add Mode"/>
<CheckForm FormType="672" FormMode="Add" Visible="true"/>
<!-- BOM for Item: TEST1 -->
<!-- 1st row -->
<SetField FormType="672" ItemID="4" Value="TEST1" Comments="=== Main Product ==="/>
<ClickField FormType="672" ItemID="3" Column="U_BXPRowTy" Row="1" SelectValue="1"
Comments="RowType in Matrix (1 = Material)"/>
<ClickField FormType="672" ItemID="3" Column="1" Row="1" Comments="Item No. in
Matrix"/>
<SetField FormType="672" ItemID="3" Column="1" Row="1" Value="M1" Comments="Item No.
in Matrix"/>
<SendText Text="{TAB}" Comments="TAB"/>
<ClickField FormType="672" ItemID="3" Column="2" Row="1" Comments="Quantity"/>
<SetField FormType="672" ItemID="3" Column="2" Row="1" Value="2"
Comments="Quantity"/>
<SendText Text="{TAB}" Comments="TAB"/>
<!-- 2nd row -->
15
<ClickField FormType="672" ItemID="3" Column="U_BXPRowTy" Row="2" SelectValue="1"
Comments="RowType in Matrix (1 = Material"/>
<ClickField FormType="672" ItemID="3" Column="1" Row="2" Comments="Item No. in
Matrix"/>
<SetField FormType="672" ItemID="3" Column="1" Row="2" Value="M2" Comments="Item No.
in Matrix"/>
<SendText Text="{TAB}" Comments="TAB"/>
<ClickField FormType="672" ItemID="3" Column="2" Row="2" Comments="Quantity"/>
<SetField FormType="672" ItemID="3" Column="2" Row="2" Value="1"
Comments="Quantity"/>
<SendText Text="{TAB}" Comments="TAB"/>
<!-- 3rd row -->
<ClickField FormType="672" ItemID="3" Column="U_BXPRowTy" Row="3" SelectValue="2"
Comments="RowType in Matrix (2 = Operation)"/>
<ClickField FormType="672" ItemID="3" Column="1" Row="3" Comments="Item No. in
Matrix"/>
<SetField FormType="672" ItemID="3" Column="1" Row="3" Value="OPAS" Comments="Item
No. in Matrix"/>
<SendText Text="{TAB}" Comments="TAB"/>
<ClickField FormType="672" ItemID="3" Column="2" Row="3" Comments="Quantity"/>
<SetField FormType="672" ItemID="3" Column="2" Row="3" Value="2"
Comments="Quantity"/>
<SendText Text="{TAB}" Comments="TAB"/>
<ClickField FormType="672" ItemID="1" Comments="Click Add button on BoM form"/>
<!-- BOM for Item: TEST2 -->
<!-- 1st row -->
<SetField FormType="672" ItemID="4" Value="TEST2" Comments="=== Main Product ==="/>
<ClickField FormType="672" ItemID="3" Column="U_BXPRowTy" Row="1" SelectValue="1"
Comments="RowType in Matrix (1 = Material)"/>
<ClickField FormType="672" ItemID="3" Column="1" Row="1" Comments="Item No. in
Matrix"/>
<SetField FormType="672" ItemID="3" Column="1" Row="1" Value="M1" Comments="Item No.
in Matrix"/>
<SendText Text="{TAB}" Comments="TAB"/>
<ClickField FormType="672" ItemID="3" Column="2" Row="1" Comments="Quantity"/>
<SetField FormType="672" ItemID="3" Column="2" Row="1" Value="1"
Comments="Quantity"/>
<SendText Text="{TAB}" Comments="TAB"/>
<!-- 2nd row -->
<ClickField FormType="672" ItemID="3" Column="U_BXPRowTy" Row="2" SelectValue="2"
Comments="RowType in Matrix (2 = Operation)"/>
<ClickField FormType="672" ItemID="3" Column="1" Row="2" Comments="Item No. in
Matrix"/>
<SetField FormType="672" ItemID="3" Column="1" Row="2" Value="OPAS" Comments="Item
No. in Matrix"/>
<SendText Text="{TAB}" Comments="TAB"/>
<ClickField FormType="672" ItemID="3" Column="2" Row="2" Comments="Quantity"/>
<SetField FormType="672" ItemID="3" Column="2" Row="2" Value="1"
Comments="Quantity"/>
<SendText Text="{TAB}" Comments="TAB"/>
<ClickField FormType="672" ItemID="1" Comments="Click Add button on BoM form"/>
<!-- When done with all BOMs, close -->
<ClickField FormType="672" ItemID="2" Comments="Click Cancel button on BoM form"/>
</BXTestScript>
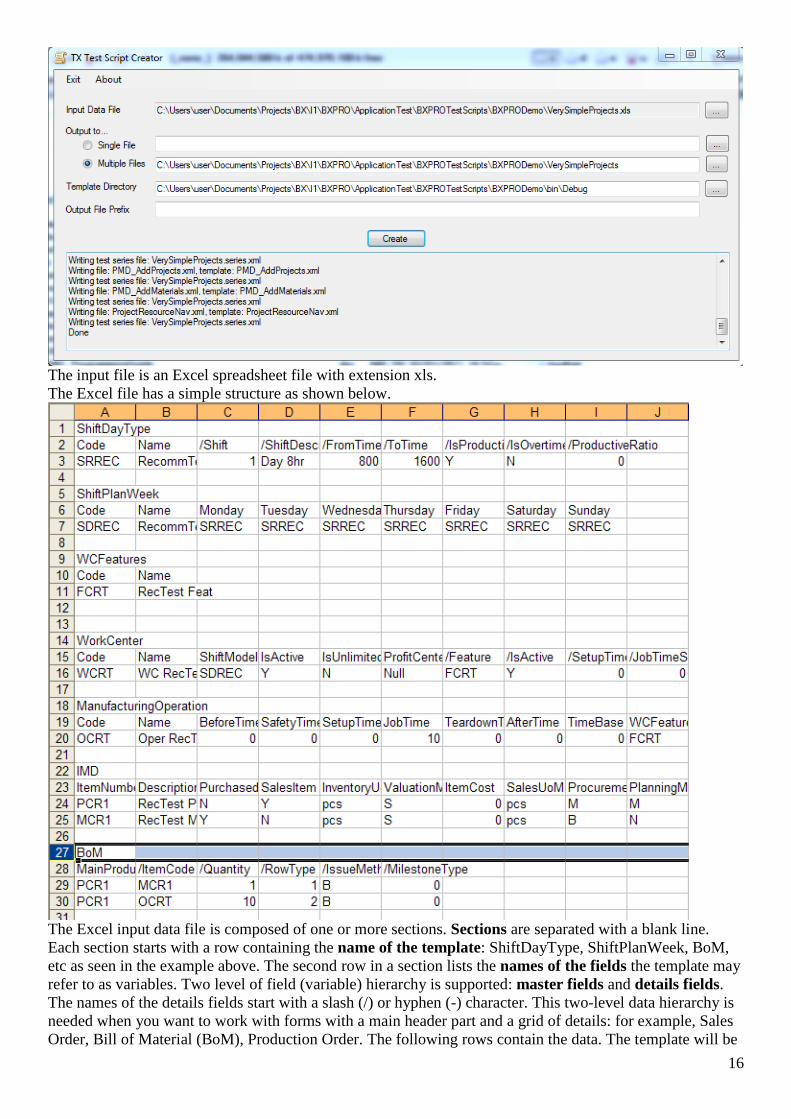
4.3 Generating Test Scripts with the TxTestScriptCreator
TxTestScriptCreator is a simple utility that can be used to generate hundreds of test scripts from large CSV-
formatted data sets using test script (XML) templates.
16
The input file is an Excel spreadsheet file with extension xls.
The Excel file has a simple structure as shown below.
The Excel input data file is composed of one or more sections. Sections are separated with a blank line.
Each section starts with a row containing the name of the template: ShiftDayType, ShiftPlanWeek, BoM,
etc as seen in the example above. The second row in a section lists the names of the fields the template may
refer to as variables. Two level of field (variable) hierarchy is supported: master fields and details fields.
The names of the details fields start with a slash (/) or hyphen (-) character. This two-level data hierarchy is
needed when you want to work with forms with a main header part and a grid of details: for example, Sales
Order, Bill of Material (BoM), Production Order. The following rows contain the data. The template will be

17
applied for each data row. If the section has two levels of fields, the data in the master columns should be
repeated for each detail values. For example, the BoM section has a MainProduct master column and a
number of detail columns: ItemCode, Quantity, etc. The MainProduct values are repeated as many times as
many detail rows are there. A separate test script will be generated for each section in the output directory
defined, if the option “Multiple files” is checked.
The utility comes with a number of templates. The templates are regular test-script XML files extended
with some template language constructs: looping and variable references. The templates should be stored in
the Templates folder defined. Here is a sample template to generate Bill of Materials: <?xml version="1.0" encoding="utf-8" ?>
<BXTestScript Name="BoM.xml" Description="Creates a new Bill of Materials"
xmlns="http://tempuri.org/BXTestScript.xsd">
<ActivateMenu MenuID="4353" Comments="BoM"/>
<ActivateMenu MenuID="1282" Comments="Add Mode"/>
#foreach($item in $Items)
<!-- BOM for Item: ${item.MainProduct} -->
<SetField FormType="672" ItemID="4" Value="${item.MainProduct}"
Comments="============= Product No. ============="/>
<CheckForm FormType="672" FormMode="Add" Visible="true"/>
#set($counter = 1)
#foreach($row in $item.Rows)
<ClickField FormType="672" ItemID="3" Column="U_BXPRowTy"
Row="${counter}" SelectValue="${row.RowType}" Comments="RowType in
Matrix"/>
<ClickField FormType="672" ItemID="3" Column="1" Row="${counter}"
Comments="Item No. in Matrix"/>
<SetField FormType="672" ItemID="3" Column="1" Row="${counter}"
Value="${row.ItemCode}" Comments="Item No. in Matrix"/>
<SendText Text="{TAB}" Comments="TAB"/>
#if ( $row.Quantity != "" )
<ClickField FormType="672" ItemID="3" Column="2" Row="${counter}"
Comments="Quantity"/>
<SetField FormType="672" ItemID="3" Column="2" Row="${counter}"
Value="${row.Quantity}" Comments="Quantity"/>
<SendText Text="{TAB}" Comments="TAB"/>
#end
<ClickField FormType="672" ItemID="3" Column="46" Row="${counter}"
SelectValue="${row.IssueMethod}" Comments="IssueMethod"/>
<ClickField FormType="672" ItemID="3" Column="U_BXPMSTyp"
Row="${counter}" SelectValue="${row.MilestoneType}"
Comments="MilestoneType"/>
#set($counter = $counter + 1)
#end
<ClickField FormType="672" ItemID="1" Comments="Click Add button on BoM form"/>
#end
<ClickField FormType="672" ItemID="2" Comments="Click Cancel button on BoM form"/>
</BXTestScript>
A template is basically a regular test script XML with its commands. The lines starting with the # character
are special template processing commands. For the technical minded the Velocity Engine syntax is used
here.
#foreach($item in $Items) is a looping statement where $Items is a predefined collection variable
containing all the rows from a CSV section grouped by the master values. Using the CSV example
above the $Items has two objects for the IMD section and only one for the BoM section. The $item is
technical variable referring only the current object from $Items during the enumeration loops. A
#foreach statement should be closed with an #end statement.
${item.MainProduct} is the syntax to use the variables. The template processing engine will
substitute the variable references with the actual values. The MainProduct is a field defined in the
CSV section. A CSV section can use any name, it’s the job of the template to reference them.
#set($counter = 1) is to define a local variable with an initial value. Later this variable is used with
the syntax ${counter}
#foreach($row in $item.Rows) is an inner loop where $item.Rows is a collection object for the
detail columns (with names starting with – or /) . The Rows variable is meaningful only for sections
18
when there are detail columns defined for the CSV section. Detail fields are used with the syntax
${row.ItemCode}
#if ( $row.Quantity != "" ) can be used for conditional script generation. The #if block should be
closed with a #end statement.
The overall process is then the following:
Create an Excel file with the sections and data.
Create the templates for the sections in the Excel file. Reuse the predefined templates as much as
possible to make life easier.
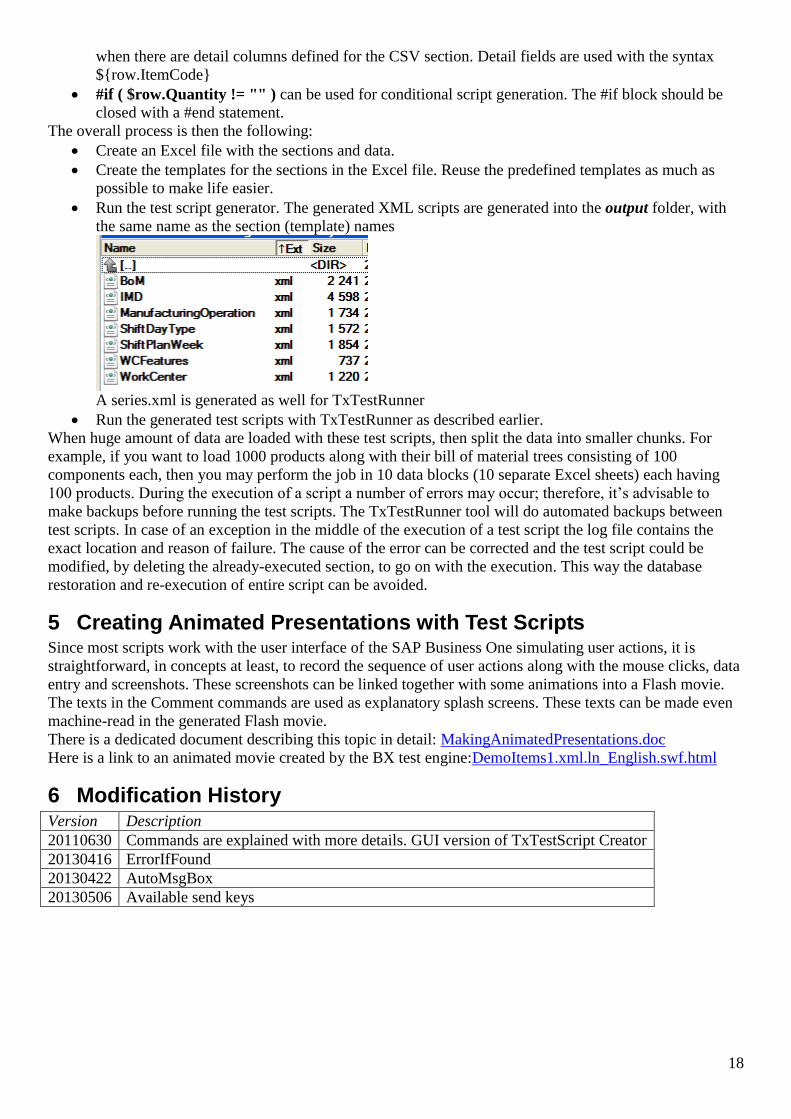
Run the test script generator. The generated XML scripts are generated into the output folder, with
the same name as the section (template) names
A series.xml is generated as well for TxTestRunner
Run the generated test scripts with TxTestRunner as described earlier.
When huge amount of data are loaded with these test scripts, then split the data into smaller chunks. For
example, if you want to load 1000 products along with their bill of material trees consisting of 100
components each, then you may perform the job in 10 data blocks (10 separate Excel sheets) each having
100 products. During the execution of a script a number of errors may occur; therefore, it’s advisable to
make backups before running the test scripts. The TxTestRunner tool will do automated backups between
test scripts. In case of an exception in the middle of the execution of a test script the log file contains the
exact location and reason of failure. The cause of the error can be corrected and the test script could be
modified, by deleting the already-executed section, to go on with the execution. This way the database
restoration and re-execution of entire script can be avoided.
5 Creating Animated Presentations with Test Scripts Since most scripts work with the user interface of the SAP Business One simulating user actions, it is
straightforward, in concepts at least, to record the sequence of user actions along with the mouse clicks, data
entry and screenshots. These screenshots can be linked together with some animations into a Flash movie.
The texts in the Comment commands are used as explanatory splash screens. These texts can be made even
machine-read in the generated Flash movie.
There is a dedicated document describing this topic in detail: MakingAnimatedPresentations.doc
Here is a link to an animated movie created by the BX test engine:DemoItems1.xml.ln_English.swf.html
6 Modification History Version Description
20110630 Commands are explained with more details. GUI version of TxTestScript Creator
20130416 ErrorIfFound
20130422 AutoMsgBox
20130506 Available send keys