businessworks™ plug-in for tibco activematrix odata user's
TRANSCRIPT
TIBCO ActiveMatrixBusinessWorks™ Plug-in forOData
User's GuideVersion 6.3
November 2020
Copyright © 2015-2020. TIBCO Software Inc. All Rights Reserved.
Contents
TIBCO Documentation and Support Services . . . . . . . . . . . . . . . . . . . . . . . . . . . . . . . . . . . . . . . . . . . . . . . . . . . . . . . . . . . . 4
Overview . . . . . . . . . . . . . . . . . . . . . . . . . . . . . . . . . . . . . . . . . . . . . . . . . . . . . . . . . . . . . . . . . . . . . . . . . . . . . . . . . . . . . . . . . . . . . . 5
Getting Started . . . . . . . . . . . . . . . . . . . . . . . . . . . . . . . . . . . . . . . . . . . . . . . . . . . . . . . . . . . . . . . . . . . . . . . . . . . . . . . . . . . . . . . . 6
Creating a Project . . . . . . . . . . . . . . . . . . . . . . . . . . . . . . . . . . . . . . . . . . . . . . . . . . . . . . . . . . . . . . . . . . . . . . . . . . . . . . . . . . . . . . . . . . . . . . . . . . . . . . . . . . 6
Creating an OData Connection . . . . . . . . . . . . . . . . . . . . . . . . . . . . . . . . . . . . . . . . . . . . . . . . . . . . . . . . . . . . . . . . . . . . . . . . . . . . . . . . . . . . . . . . . . . . . 7
Configuring a Process . . . . . . . . . . . . . . . . . . . . . . . . . . . . . . . . . . . . . . . . . . . . . . . . . . . . . . . . . . . . . . . . . . . . . . . . . . . . . . . . . . . . . . . . . . . . . . . . . . . . . .8
Testing a Process . . . . . . . . . . . . . . . . . . . . . . . . . . . . . . . . . . . . . . . . . . . . . . . . . . . . . . . . . . . . . . . . . . . . . . . . . . . . . . . . . . . . . . . . . . . . . . . . . . . . . . . . . . 9
Deploying an Application . . . . . . . . . . . . . . . . . . . . . . . . . . . . . . . . . . . . . . . . . . . . . . . . . . . . . . . . . . . . . . . . . . . . . . . . . . . . . . . . . . . . . . . . . . . . . . . . . . . 9
TIBCO Business Studio Overview . . . . . . . . . . . . . . . . . . . . . . . . . . . . . . . . . . . . . . . . . . . . . . . . . . . . . . . . . . . . . . . . . . . . . . . . . . . . . . . . . . . . . . . . . 10
OData Connection . . . . . . . . . . . . . . . . . . . . . . . . . . . . . . . . . . . . . . . . . . . . . . . . . . . . . . . . . . . . . . . . . . . . . . . . . . . . . . . . . . . . 12
Proxy Configuration . . . . . . . . . . . . . . . . . . . . . . . . . . . . . . . . . . . . . . . . . . . . . . . . . . . . . . . . . . . . . . . . . . . . . . . . . . . . . . . . . . . . . . . . . . . . . . . . . . . . . . . 14
OData Palette . . . . . . . . . . . . . . . . . . . . . . . . . . . . . . . . . . . . . . . . . . . . . . . . . . . . . . . . . . . . . . . . . . . . . . . . . . . . . . . . . . . . . . . . .15
OData Query Activity . . . . . . . . . . . . . . . . . . . . . . . . . . . . . . . . . . . . . . . . . . . . . . . . . . . . . . . . . . . . . . . . . . . . . . . . . . . . . . . . . . . . . . . . . . . . . . . . . . . . . .15
OData Modify Activity . . . . . . . . . . . . . . . . . . . . . . . . . . . . . . . . . . . . . . . . . . . . . . . . . . . . . . . . . . . . . . . . . . . . . . . . . . . . . . . . . . . . . . . . . . . . . . . . . . . . . 18
OData Service . . . . . . . . . . . . . . . . . . . . . . . . . . . . . . . . . . . . . . . . . . . . . . . . . . . . . . . . . . . . . . . . . . . . . . . . . . . . . . . . . . . . . . . . 23
OData Service Binding . . . . . . . . . . . . . . . . . . . . . . . . . . . . . . . . . . . . . . . . . . . . . . . . . . . . . . . . . . . . . . . . . . . . . . . . . . . . . . . . . . . . . . . . . . . . . . . . . . . .23
Enforcing Basic Authentication . . . . . . . . . . . . . . . . . . . . . . . . . . . . . . . . . . . . . . . . . . . . . . . . . . . . . . . . . . . . . . . . . . . . . . . . . . . . . . . . . . . . . . . 27
Creating a OData Service . . . . . . . . . . . . . . . . . . . . . . . . . . . . . . . . . . . . . . . . . . . . . . . . . . . . . . . . . . . . . . . . . . . . . . . . . . . . . . . . . . . . . . . . . . . . . . . . . 29
Using CSDL to create an OData Service . . . . . . . . . . . . . . . . . . . . . . . . . . . . . . . . . . . . . . . . . . . . . . . . . . . . . . . . . . . . . . . . . . . . . . . . . . . . . . 29
OData Primitive types to XSD Primitive types . . . . . . . . . . . . . . . . . . . . . . . . . . . . . . . . . . . . . . . . . . . . . . . . . . . . . . . . . . . . . . . . . . . . . 30
Using the Wizard to Create a OData Service . . . . . . . . . . . . . . . . . . . . . . . . . . . . . . . . . . . . . . . . . . . . . . . . . . . . . . . . . . . . . . . . . . . . . . . . . . 31
Testing the OData Service . . . . . . . . . . . . . . . . . . . . . . . . . . . . . . . . . . . . . . . . . . . . . . . . . . . . . . . . . . . . . . . . . . . . . . . . . . . . . . . . . . . . . . . . . . . . . . . . 34
Using Postman Client . . . . . . . . . . . . . . . . . . . . . . . . . . . . . . . . . . . . . . . . . . . . . . . . . . . . . . . . . . . . . . . . . . . . . . . . . . . . . . . . . . . . . . . . . . . . . . . . .34
Using OData Palette Activities . . . . . . . . . . . . . . . . . . . . . . . . . . . . . . . . . . . . . . . . . . . . . . . . . . . . . . . . . . . . . . . . . . . . . . . . . . . . . . . . . . . . . . . . 35
Query URI Builder . . . . . . . . . . . . . . . . . . . . . . . . . . . . . . . . . . . . . . . . . . . . . . . . . . . . . . . . . . . . . . . . . . . . . . . . . . . . . . . . . . . . 36
Object Tab . . . . . . . . . . . . . . . . . . . . . . . . . . . . . . . . . . . . . . . . . . . . . . . . . . . . . . . . . . . . . . . . . . . . . . . . . . . . . . . . . . . . . . . . . . . . . . . . . . . . . . . . . . . . . . . . 37
Resource Tree . . . . . . . . . . . . . . . . . . . . . . . . . . . . . . . . . . . . . . . . . . . . . . . . . . . . . . . . . . . . . . . . . . . . . . . . . . . . . . . . . . . . . . . . . . . . . . . . . . . . . . . .37
Query Option and Output Preview . . . . . . . . . . . . . . . . . . . . . . . . . . . . . . . . . . . . . . . . . . . . . . . . . . . . . . . . . . . . . . . . . . . . . . . . . . . . . . . . . . . . 39
Filters Tab . . . . . . . . . . . . . . . . . . . . . . . . . . . . . . . . . . . . . . . . . . . . . . . . . . . . . . . . . . . . . . . . . . . . . . . . . . . . . . . . . . . . . . . . . . . . . . . . . . . . . . . . . . . . . . . . 40
Columns Tab . . . . . . . . . . . . . . . . . . . . . . . . . . . . . . . . . . . . . . . . . . . . . . . . . . . . . . . . . . . . . . . . . . . . . . . . . . . . . . . . . . . . . . . . . . . . . . . . . . . . . . . . . . . . . .42
Orders Tab . . . . . . . . . . . . . . . . . . . . . . . . . . . . . . . . . . . . . . . . . . . . . . . . . . . . . . . . . . . . . . . . . . . . . . . . . . . . . . . . . . . . . . . . . . . . . . . . . . . . . . . . . . . . . . . .42
Expands Tab . . . . . . . . . . . . . . . . . . . . . . . . . . . . . . . . . . . . . . . . . . . . . . . . . . . . . . . . . . . . . . . . . . . . . . . . . . . . . . . . . . . . . . . . . . . . . . . . . . . . . . . . . . . . . .43
Pagination Tab . . . . . . . . . . . . . . . . . . . . . . . . . . . . . . . . . . . . . . . . . . . . . . . . . . . . . . . . . . . . . . . . . . . . . . . . . . . . . . . . . . . . . . . . . . . . . . . . . . . . . . . . . . . . 44
Modify URI Builder . . . . . . . . . . . . . . . . . . . . . . . . . . . . . . . . . . . . . . . . . . . . . . . . . . . . . . . . . . . . . . . . . . . . . . . . . . . . . . . . . . . .46
Working with the Sample Project . . . . . . . . . . . . . . . . . . . . . . . . . . . . . . . . . . . . . . . . . . . . . . . . . . . . . . . . . . . . . . . . . . . . . . .48
Importing the Sample Project . . . . . . . . . . . . . . . . . . . . . . . . . . . . . . . . . . . . . . . . . . . . . . . . . . . . . . . . . . . . . . . . . . . . . . . . . . . . . . . . . . . . . . . . . . . . . .48
2
TIBCO ActiveMatrix BusinessWorks™ Plug-in for OData User's Guide

Running the Sample Project . . . . . . . . . . . . . . . . . . . . . . . . . . . . . . . . . . . . . . . . . . . . . . . . . . . . . . . . . . . . . . . . . . . . . . . . . . . . . . . . . . . . . . . . . . . . . . .49
Managing Logs . . . . . . . . . . . . . . . . . . . . . . . . . . . . . . . . . . . . . . . . . . . . . . . . . . . . . . . . . . . . . . . . . . . . . . . . . . . . . . . . . . . . . . . 51
Log Levels . . . . . . . . . . . . . . . . . . . . . . . . . . . . . . . . . . . . . . . . . . . . . . . . . . . . . . . . . . . . . . . . . . . . . . . . . . . . . . . . . . . . . . . . . . . . . . . . . . . . . . . . . . . . . . . . 51
Setting Up Log Levels . . . . . . . . . . . . . . . . . . . . . . . . . . . . . . . . . . . . . . . . . . . . . . . . . . . . . . . . . . . . . . . . . . . . . . . . . . . . . . . . . . . . . . . . . . . . . . . . . . . . .51
Exporting Logs to a File . . . . . . . . . . . . . . . . . . . . . . . . . . . . . . . . . . . . . . . . . . . . . . . . . . . . . . . . . . . . . . . . . . . . . . . . . . . . . . . . . . . . . . . . . . . . . . . . . . . 52
Legal and Third-Party Notices . . . . . . . . . . . . . . . . . . . . . . . . . . . . . . . . . . . . . . . . . . . . . . . . . . . . . . . . . . . . . . . . . . . . . . . . . 53
3
TIBCO ActiveMatrix BusinessWorks™ Plug-in for OData User's Guide
TIBCO Documentation and Support Services
How to Access TIBCO Documentation
Documentation for TIBCO products is available on the TIBCO Product Documentation website, mainly inHTML and PDF formats.
The TIBCO Product Documentation website is updated frequently and is more current than any otherdocumentation included with the product. To access the latest documentation, visit https://docs.tibco.com.
Product-Specific Documentation
Documentation for TIBCO products is not bundled with the software. Instead, it is available on the TIBCODocumentation site at https://docs.tibco.com/products/tibco-activematrix-businessworks-plug-in-for-odata.To directly access documentation for this product from the file system, open the following file:
TIBCO_HOME/release_notes/TIB_bwpluginodata_version_docinfo.html
where TIBCO_HOME is the top-level directory in which TIBCO products are installed. On Windows, thedefault TIBCO_HOME is C:\Program Files\tibco\bw6. On UNIX systems, the default TIBCO_HOMEis /opt/tibco.
The following documents for this product can be found on the TIBCO Documentation site:
● TIBCO ActiveMatrix BusinessWorks Plug-in for OData Installation
● TIBCO ActiveMatrix BusinessWorks Plug-in for OData User's Guide
● TIBCO ActiveMatrix BusinessWorks Plug-in for OData Release Notes
How to Contact TIBCO Support
You can contact TIBCO Support in the following ways:
● For an overview of TIBCO Support, visit http://www.tibco.com/services/support.
● For accessing the Support Knowledge Base and getting personalized content about products you areinterested in, visit the TIBCO Support portal at https://support.tibco.com.
● For creating a Support case, you must have a valid maintenance or support contract with TIBCO. Youalso need a user name and password to log in to https://support.tibco.com. If you do not have a username, you can request one by clicking Register on the website.
How to Join TIBCO Community
TIBCO Community is the official channel for TIBCO customers, partners, and employee subject matterexperts to share and access their collective experience. TIBCO Community offers access to Q&A forums,product wikis, and best practices. It also offers access to extensions, adapters, solution accelerators, andtools that extend and enable customers to gain full value from TIBCO products. In addition, users cansubmit and vote on feature requests from within the TIBCO Ideas Portal. For a free registration, go to https://community.tibco.com.
4
TIBCO ActiveMatrix BusinessWorks™ Plug-in for OData User's Guide
Overview
With TIBCO ActiveMatrix BusinessWorks™ Plug-in for OData, you can configure a connection to an ODataserver, and then use the activities to query, create, update and delete from OData services.
OData (Open Data Protocol) is an OASIS standard that defines the best practice for building andconsuming RESTful APIs. You can visit the OData website http://www.odata.org/ for more information.
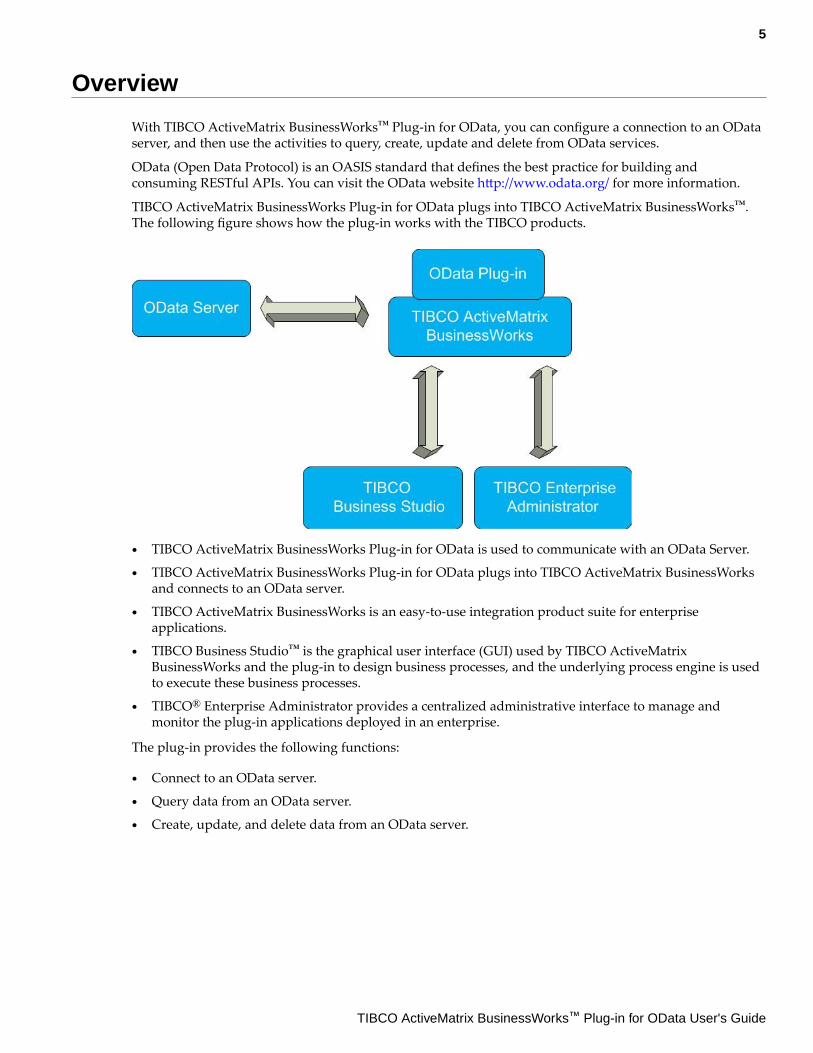
TIBCO ActiveMatrix BusinessWorks Plug-in for OData plugs into TIBCO ActiveMatrix BusinessWorks™.The following figure shows how the plug-in works with the TIBCO products.
● TIBCO ActiveMatrix BusinessWorks Plug-in for OData is used to communicate with an OData Server.
● TIBCO ActiveMatrix BusinessWorks Plug-in for OData plugs into TIBCO ActiveMatrix BusinessWorksand connects to an OData server.
● TIBCO ActiveMatrix BusinessWorks is an easy-to-use integration product suite for enterpriseapplications.
● TIBCO Business Studio™ is the graphical user interface (GUI) used by TIBCO ActiveMatrixBusinessWorks and the plug-in to design business processes, and the underlying process engine is usedto execute these business processes.
● TIBCO® Enterprise Administrator provides a centralized administrative interface to manage andmonitor the plug-in applications deployed in an enterprise.
The plug-in provides the following functions:
● Connect to an OData server.
● Query data from an OData server.
● Create, update, and delete data from an OData server.
5
TIBCO ActiveMatrix BusinessWorks™ Plug-in for OData User's Guide
Getting Started
This tutorial is designed for the beginners who want to use TIBCO ActiveMatrix BusinessWorks Plug-in forOData in TIBCO Business Studio.
All the operations are performed in TIBCO Business Studio. See TIBCO Business Studio Overview to getfamiliar with TIBCO Business Studio.
A basic procedure of using TIBCO ActiveMatrix BusinessWorks Plug-in for OData includes:
1. TIBCO Business Studio Overview
2. Creating a Project
3. Creating an OData Connection
4. Configuring a Process
5. Testing a Process
6. Deploying an Application
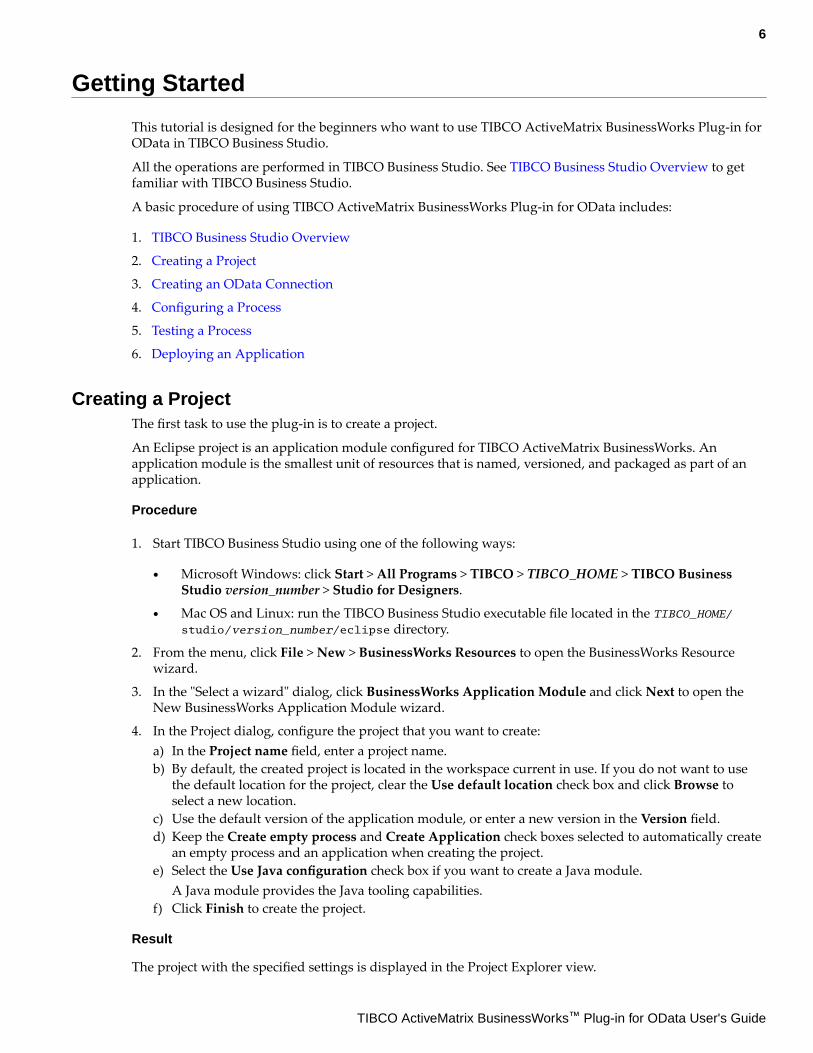
Creating a ProjectThe first task to use the plug-in is to create a project.
An Eclipse project is an application module configured for TIBCO ActiveMatrix BusinessWorks. Anapplication module is the smallest unit of resources that is named, versioned, and packaged as part of anapplication.
Procedure
1. Start TIBCO Business Studio using one of the following ways:
● Microsoft Windows: click Start > All Programs > TIBCO > TIBCO_HOME > TIBCO BusinessStudio version_number > Studio for Designers.
● Mac OS and Linux: run the TIBCO Business Studio executable file located in the TIBCO_HOME/studio/version_number/eclipse directory.
2. From the menu, click File > New > BusinessWorks Resources to open the BusinessWorks Resourcewizard.
3. In the "Select a wizard" dialog, click BusinessWorks Application Module and click Next to open theNew BusinessWorks Application Module wizard.
4. In the Project dialog, configure the project that you want to create:a) In the Project name field, enter a project name.b) By default, the created project is located in the workspace current in use. If you do not want to use
the default location for the project, clear the Use default location check box and click Browse toselect a new location.
c) Use the default version of the application module, or enter a new version in the Version field.d) Keep the Create empty process and Create Application check boxes selected to automatically create
an empty process and an application when creating the project.e) Select the Use Java configuration check box if you want to create a Java module.
A Java module provides the Java tooling capabilities.f) Click Finish to create the project.
Result
The project with the specified settings is displayed in the Project Explorer view.
6
TIBCO ActiveMatrix BusinessWorks™ Plug-in for OData User's Guide
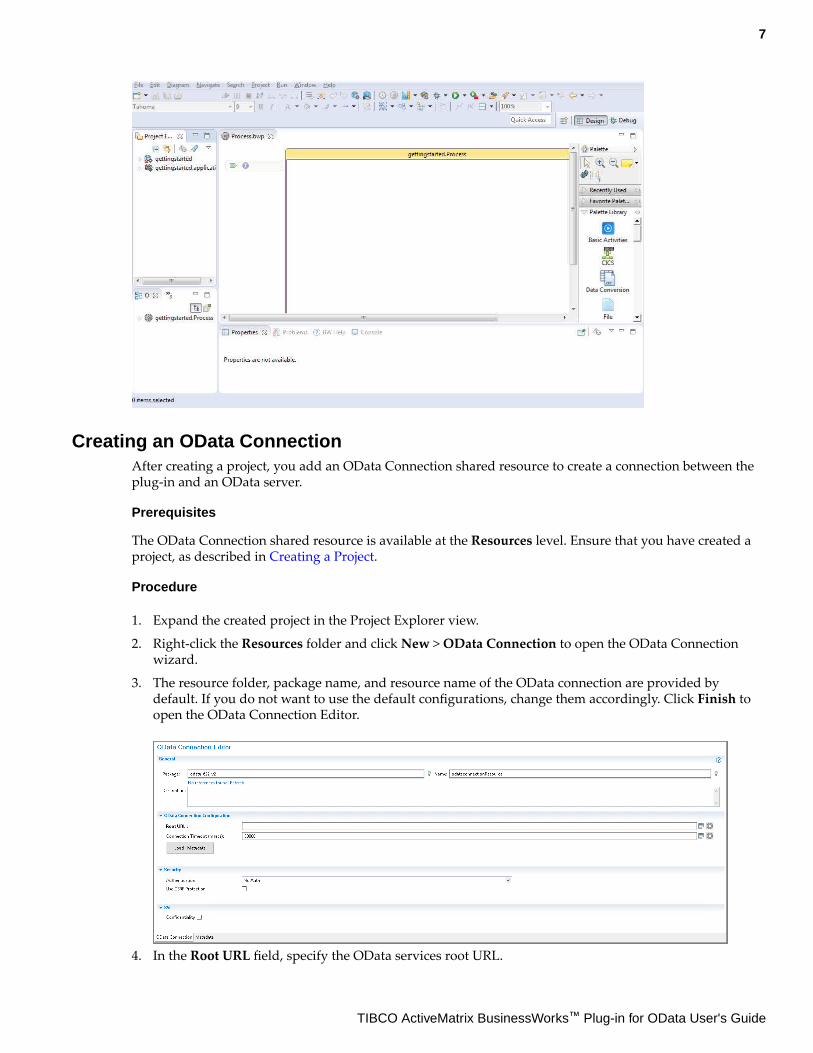
Creating an OData ConnectionAfter creating a project, you add an OData Connection shared resource to create a connection between theplug-in and an OData server.
Prerequisites
The OData Connection shared resource is available at the Resources level. Ensure that you have created aproject, as described in Creating a Project.
Procedure
1. Expand the created project in the Project Explorer view.
2. Right-click the Resources folder and click New > OData Connection to open the OData Connectionwizard.
3. The resource folder, package name, and resource name of the OData connection are provided bydefault. If you do not want to use the default configurations, change them accordingly. Click Finish toopen the OData Connection Editor.
4. In the Root URL field, specify the OData services root URL.
7
TIBCO ActiveMatrix BusinessWorks™ Plug-in for OData User's Guide
5. In the Connection Timeout (msec) field, specify the maximum response time of OData request.
If you do not provide timeout value in this field, no response time limit is set on the ODatarequest.
6. Click Load Metadata to load the metadata from the OData server.
7. In the Security panel, specify the authentication type of the OData server. See Security for more details.
8. If SSL is used in the server you want to connect to, you are required to configure SSL. Select theConfidentiality check box for configuration. See the TIBCO ActiveMatrix BusinessWorksdocumentation for more details.
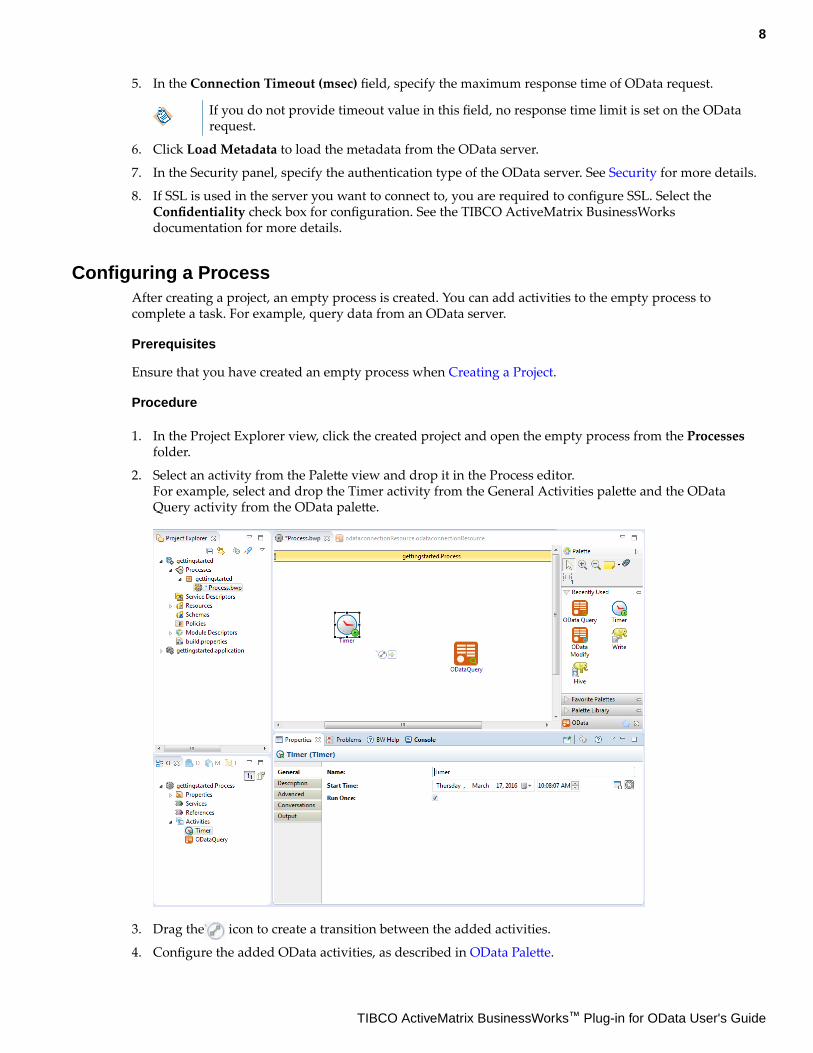
Configuring a ProcessAfter creating a project, an empty process is created. You can add activities to the empty process tocomplete a task. For example, query data from an OData server.
Prerequisites
Ensure that you have created an empty process when Creating a Project.
Procedure
1. In the Project Explorer view, click the created project and open the empty process from the Processesfolder.
2. Select an activity from the Palette view and drop it in the Process editor.For example, select and drop the Timer activity from the General Activities palette and the ODataQuery activity from the OData palette.
3. Drag the icon to create a transition between the added activities.
4. Configure the added OData activities, as described in OData Palette.
8
TIBCO ActiveMatrix BusinessWorks™ Plug-in for OData User's Guide

An OData connection is required when configuring the OData activities. See Creating anOData Connection for more details about how to create an OData connection.
5. Click File > Save to save the project.
Testing a ProcessAfter configuring a process, you can test the process to check if the process completes your task.
Prerequisites
Ensure that you have configured a process, as described in Configuring a Process.
Procedure
1. On the toolbar, click Debug > Debug Configurations.
2. Click BusinessWorks Application > BWApplication in the left panel.By default, all the applications in the current workspace are selected in the Applications tab. Ensurethat only the application you want to debug is selected in the Applications tab in the right panel.
3. Click Debug to test the process in the selected application.TIBCO Business Studio changes to the Debug perspective. The debug information is displayed in theConsole view.
4. In the Debug tab, expand the running process and click an activity.
5. In the upper-right corner, click the Job Data tab, and then click the Output tab to check the activityoutput.
Deploying an ApplicationAfter testing, if the configured process works as expected, you can deploy the application that contains theconfigured process into a runtime environment, and then use the bwadmin utility to manage the deployedapplication.
Before deploying an application, you must generate an application archive, which is an enterprise archive(EAR) file that is created in TIBCO Business Studio. For more information about TIBCO Business Studio,see TIBCO Business Studio Overview.
9
TIBCO ActiveMatrix BusinessWorks™ Plug-in for OData User's Guide
Deploying an application involves the following tasks:
1. Uploading an application archive
2. Deploying an application archive
3. Starting an applicationSee TIBCO ActiveMatrix BusinessWorks Administration for more details about how to deploy an application.
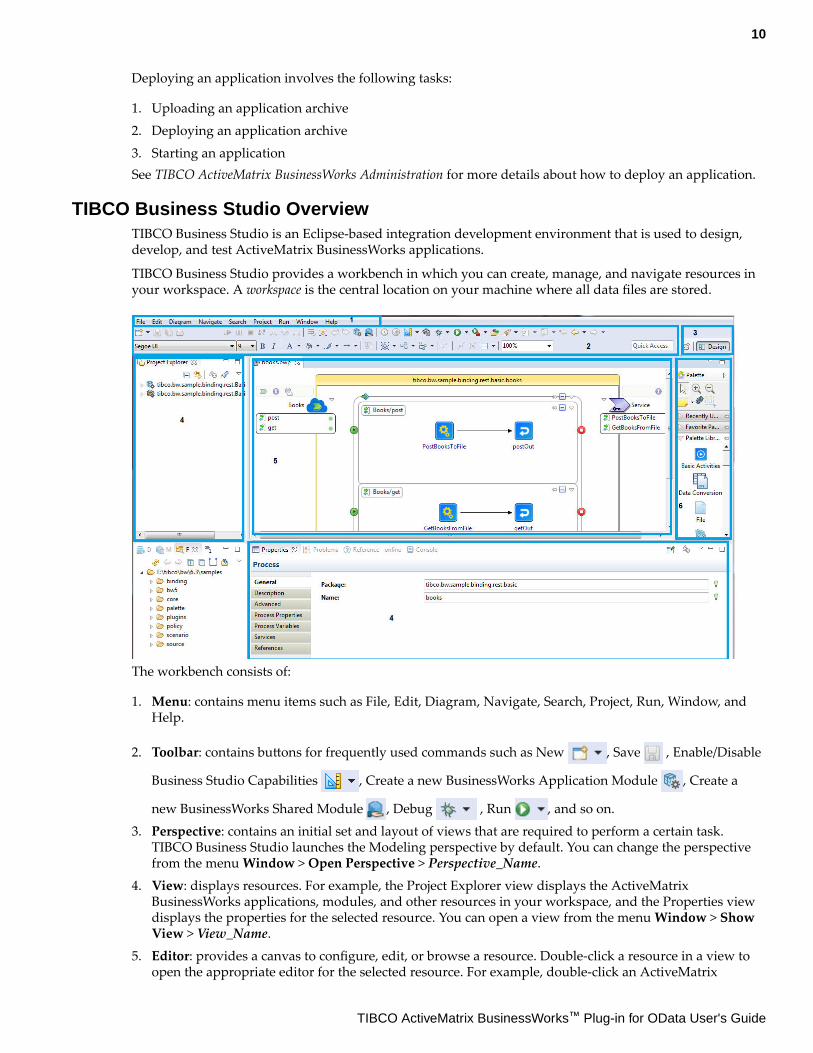
TIBCO Business Studio OverviewTIBCO Business Studio is an Eclipse-based integration development environment that is used to design,develop, and test ActiveMatrix BusinessWorks applications.
TIBCO Business Studio provides a workbench in which you can create, manage, and navigate resources inyour workspace. A workspace is the central location on your machine where all data files are stored.
The workbench consists of:
1. Menu: contains menu items such as File, Edit, Diagram, Navigate, Search, Project, Run, Window, andHelp.
2. Toolbar: contains buttons for frequently used commands such as New , Save , Enable/Disable
Business Studio Capabilities , Create a new BusinessWorks Application Module , Create a
new BusinessWorks Shared Module , Debug , Run , and so on.
3. Perspective: contains an initial set and layout of views that are required to perform a certain task.TIBCO Business Studio launches the Modeling perspective by default. You can change the perspectivefrom the menu Window > Open Perspective > Perspective_Name.
4. View: displays resources. For example, the Project Explorer view displays the ActiveMatrixBusinessWorks applications, modules, and other resources in your workspace, and the Properties viewdisplays the properties for the selected resource. You can open a view from the menu Window > ShowView > View_Name.
5. Editor: provides a canvas to configure, edit, or browse a resource. Double-click a resource in a view toopen the appropriate editor for the selected resource. For example, double-click an ActiveMatrix
10
TIBCO ActiveMatrix BusinessWorks™ Plug-in for OData User's Guide

BusinessWorks process (MortgageAppConsumer.bwp) in the Project Explorer view to open the process inthe editor.
6. Palette: contains a set of widgets and a palette library. A palette groups activities that perform similartasks, and provides quick access to activities when configuring a process.
11
TIBCO ActiveMatrix BusinessWorks™ Plug-in for OData User's Guide
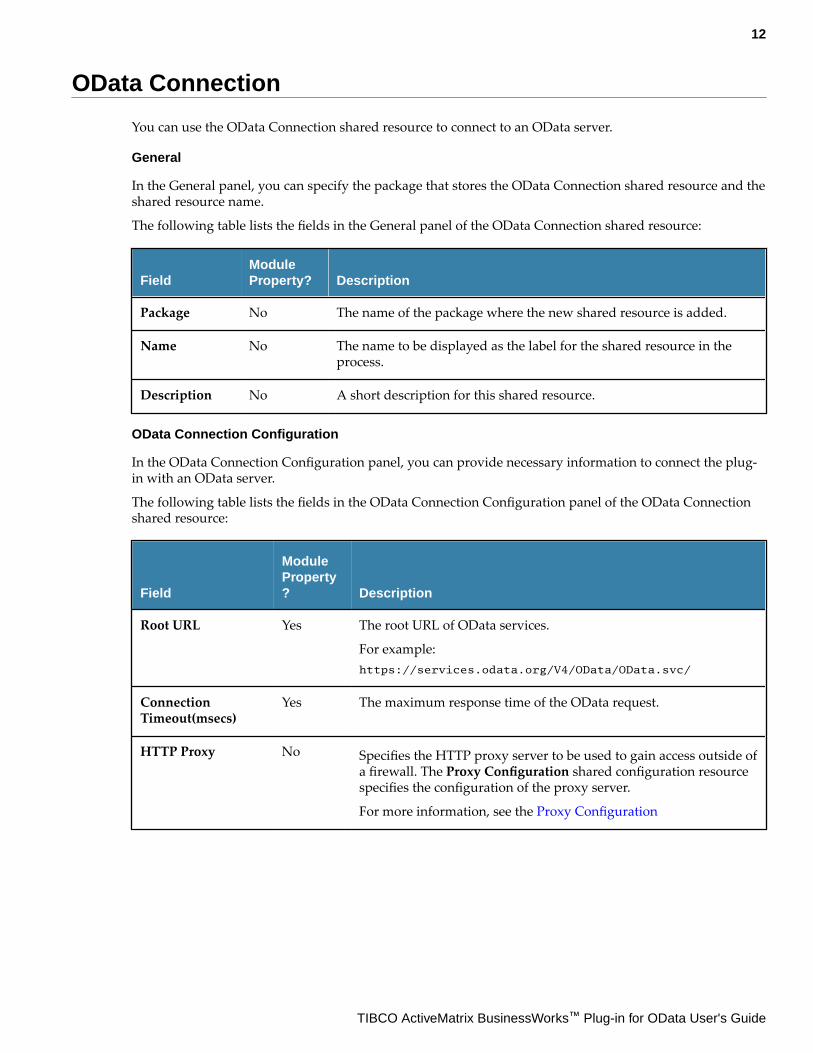
OData Connection
You can use the OData Connection shared resource to connect to an OData server.
General
In the General panel, you can specify the package that stores the OData Connection shared resource and theshared resource name.
The following table lists the fields in the General panel of the OData Connection shared resource:
FieldModuleProperty? Description
Package No The name of the package where the new shared resource is added.
Name No The name to be displayed as the label for the shared resource in theprocess.
Description No A short description for this shared resource.
OData Connection Configuration
In the OData Connection Configuration panel, you can provide necessary information to connect the plug-in with an OData server.
The following table lists the fields in the OData Connection Configuration panel of the OData Connectionshared resource:
Field
ModuleProperty? Description
Root URL Yes The root URL of OData services.
For example:https://services.odata.org/V4/OData/OData.svc/
ConnectionTimeout(msecs)
Yes The maximum response time of the OData request.
HTTP Proxy No Specifies the HTTP proxy server to be used to gain access outside ofa firewall. The Proxy Configuration shared configuration resourcespecifies the configuration of the proxy server.
For more information, see the Proxy Configuration
12
TIBCO ActiveMatrix BusinessWorks™ Plug-in for OData User's Guide
Field
ModuleProperty? Description
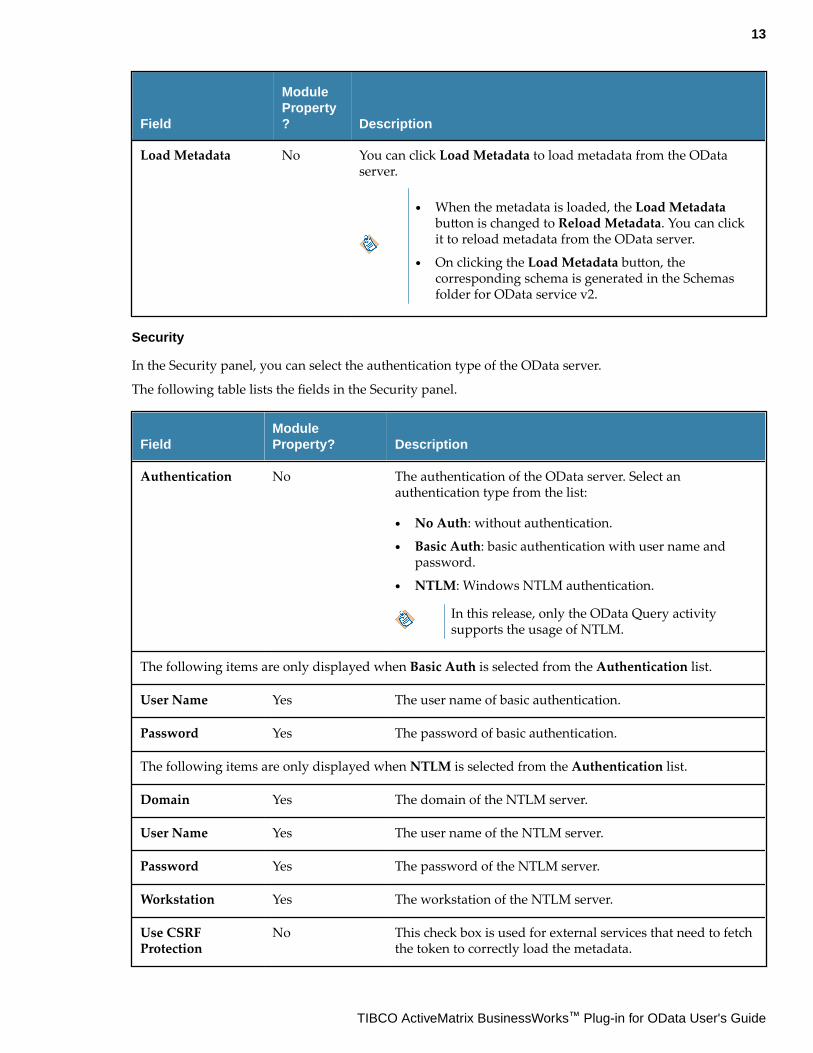
Load Metadata No You can click Load Metadata to load metadata from the ODataserver.
● When the metadata is loaded, the Load Metadatabutton is changed to Reload Metadata. You can clickit to reload metadata from the OData server.
● On clicking the Load Metadata button, thecorresponding schema is generated in the Schemasfolder for OData service v2.
Security
In the Security panel, you can select the authentication type of the OData server.
The following table lists the fields in the Security panel.
FieldModuleProperty? Description
Authentication No The authentication of the OData server. Select anauthentication type from the list:
● No Auth: without authentication.
● Basic Auth: basic authentication with user name andpassword.
● NTLM: Windows NTLM authentication.
In this release, only the OData Query activitysupports the usage of NTLM.
The following items are only displayed when Basic Auth is selected from the Authentication list.
User Name Yes The user name of basic authentication.
Password Yes The password of basic authentication.
The following items are only displayed when NTLM is selected from the Authentication list.
Domain Yes The domain of the NTLM server.
User Name Yes The user name of the NTLM server.
Password Yes The password of the NTLM server.
Workstation Yes The workstation of the NTLM server.
Use CSRFProtection
No This check box is used for external services that need to fetchthe token to correctly load the metadata.
13
TIBCO ActiveMatrix BusinessWorks™ Plug-in for OData User's Guide
SSL
In the SSL panel, you can configure SSL after selecting the Confidentiality check box. See the TIBCOActiveMatrix BusinessWorks documentation for more details.
Metadata
In the Metadata tab, you can see all the metadata of the OData service after clicking Load Metadata orReload Metadata.
To update metadata dynamically after changing the URL in the Root URL field, you are required to clickReload Metadata, and then save the OData Connection share resource.
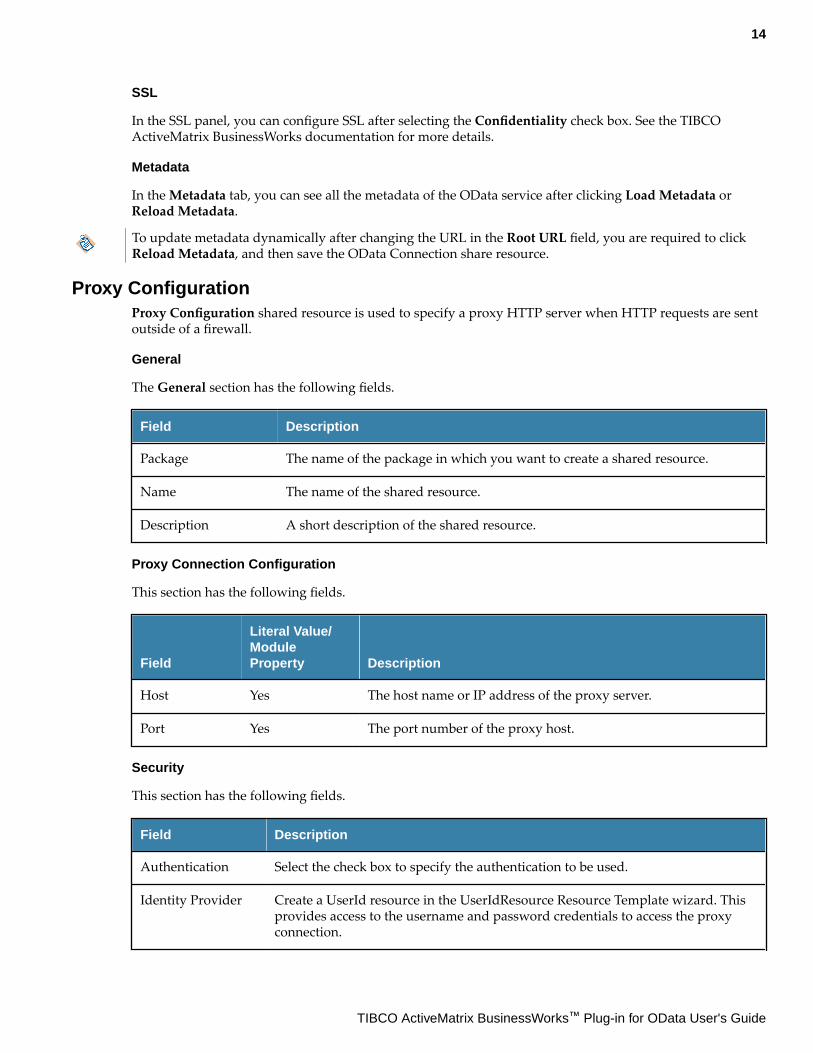
Proxy ConfigurationProxy Configuration shared resource is used to specify a proxy HTTP server when HTTP requests are sentoutside of a firewall.
General
The General section has the following fields.
Field Description
Package The name of the package in which you want to create a shared resource.
Name The name of the shared resource.
Description A short description of the shared resource.
Proxy Connection Configuration
This section has the following fields.
Field
Literal Value/ModuleProperty Description
Host Yes The host name or IP address of the proxy server.
Port Yes The port number of the proxy host.
Security
This section has the following fields.
Field Description
Authentication Select the check box to specify the authentication to be used.
Identity Provider Create a UserId resource in the UserIdResource Resource Template wizard. Thisprovides access to the username and password credentials to access the proxyconnection.
14
TIBCO ActiveMatrix BusinessWorks™ Plug-in for OData User's Guide
OData Palette
The OData palette is added to TIBCO Business Studio after installing TIBCO ActiveMatrix BusinessWorksPlug-in for OData.
The OData palette contains the following activities to query and modify data from an OData server.
● OData Query Activity
● OData Modify Activity
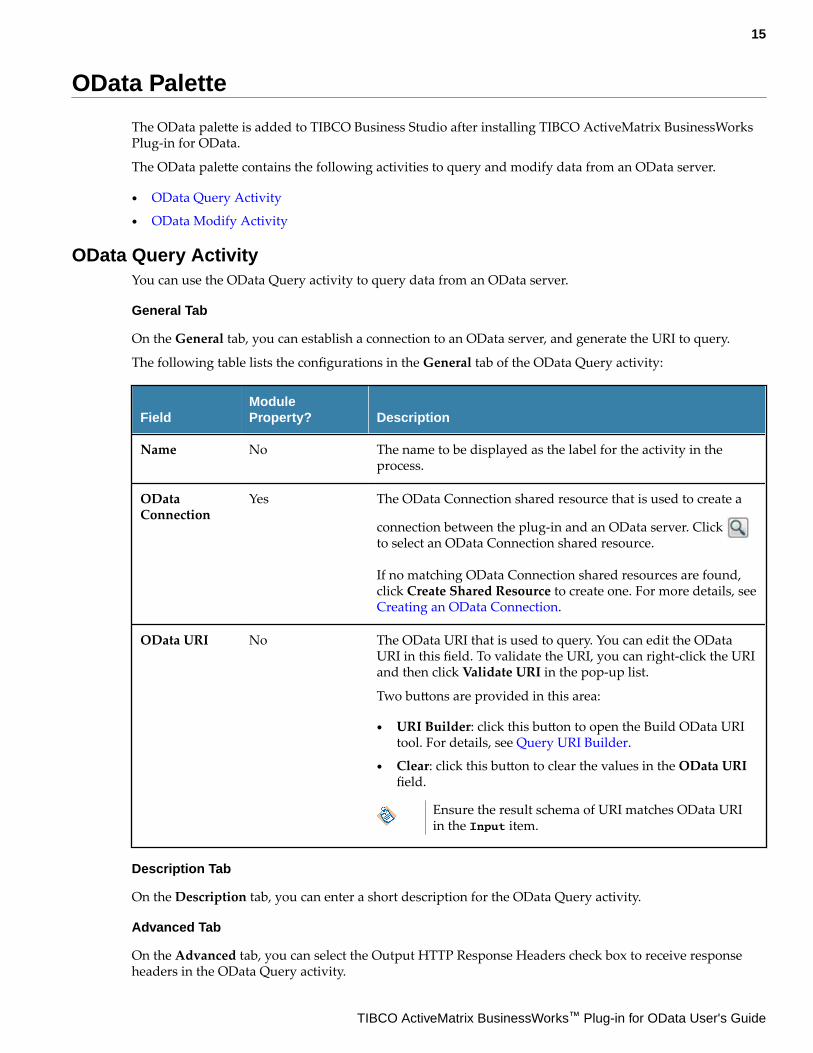
OData Query ActivityYou can use the OData Query activity to query data from an OData server.
General Tab
On the General tab, you can establish a connection to an OData server, and generate the URI to query.
The following table lists the configurations in the General tab of the OData Query activity:
FieldModuleProperty? Description
Name No The name to be displayed as the label for the activity in theprocess.
ODataConnection
Yes The OData Connection shared resource that is used to create a
connection between the plug-in and an OData server. Click to select an OData Connection shared resource.
If no matching OData Connection shared resources are found,click Create Shared Resource to create one. For more details, see Creating an OData Connection.
OData URI No The OData URI that is used to query. You can edit the ODataURI in this field. To validate the URI, you can right-click the URIand then click Validate URI in the pop-up list.
Two buttons are provided in this area:
● URI Builder: click this button to open the Build OData URItool. For details, see Query URI Builder.
● Clear: click this button to clear the values in the OData URIfield.
Ensure the result schema of URI matches OData URIin the Input item.
Description Tab
On the Description tab, you can enter a short description for the OData Query activity.
Advanced Tab
On the Advanced tab, you can select the Output HTTP Response Headers check box to receive responseheaders in the OData Query activity.
15
TIBCO ActiveMatrix BusinessWorks™ Plug-in for OData User's Guide
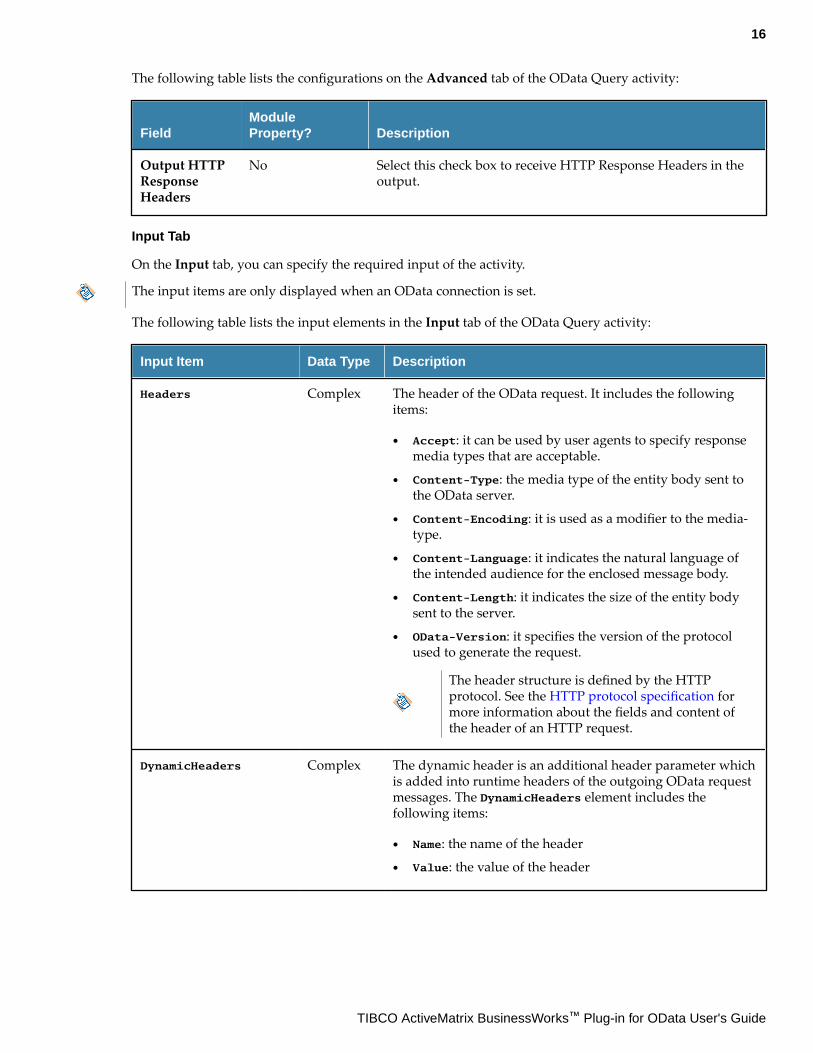
The following table lists the configurations on the Advanced tab of the OData Query activity:
FieldModuleProperty? Description
Output HTTPResponseHeaders
No Select this check box to receive HTTP Response Headers in theoutput.
Input Tab
On the Input tab, you can specify the required input of the activity.
The input items are only displayed when an OData connection is set.
The following table lists the input elements in the Input tab of the OData Query activity:
Input Item Data Type Description
Headers Complex The header of the OData request. It includes the followingitems:
● Accept: it can be used by user agents to specify responsemedia types that are acceptable.
● Content-Type: the media type of the entity body sent tothe OData server.
● Content-Encoding: it is used as a modifier to the media-type.
● Content-Language: it indicates the natural language ofthe intended audience for the enclosed message body.
● Content-Length: it indicates the size of the entity bodysent to the server.
● OData-Version: it specifies the version of the protocolused to generate the request.
The header structure is defined by the HTTPprotocol. See the HTTP protocol specification formore information about the fields and content ofthe header of an HTTP request.
DynamicHeaders Complex The dynamic header is an additional header parameter whichis added into runtime headers of the outgoing OData requestmessages. The DynamicHeaders element includes thefollowing items:
● Name: the name of the header
● Value: the value of the header
16
TIBCO ActiveMatrix BusinessWorks™ Plug-in for OData User's Guide
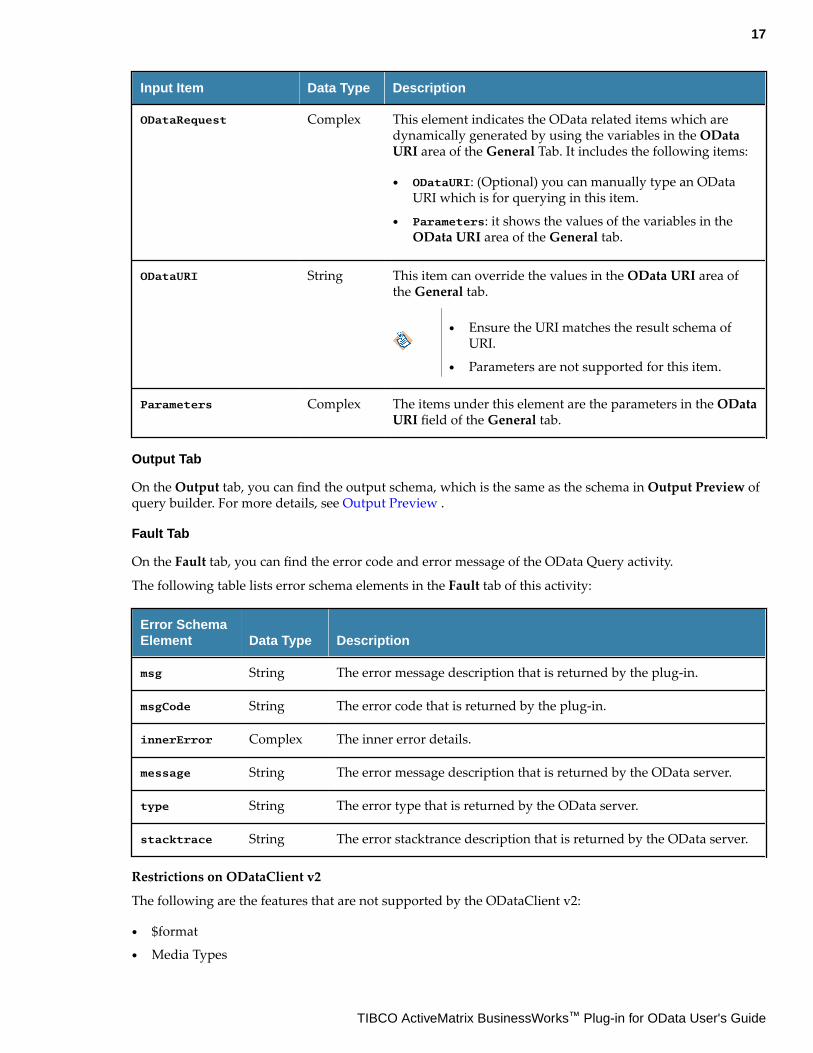
Input Item Data Type Description
ODataRequest Complex This element indicates the OData related items which aredynamically generated by using the variables in the ODataURI area of the General Tab. It includes the following items:
● ODataURI: (Optional) you can manually type an ODataURI which is for querying in this item.
● Parameters: it shows the values of the variables in theOData URI area of the General tab.
ODataURI String This item can override the values in the OData URI area ofthe General tab.
● Ensure the URI matches the result schema ofURI.
● Parameters are not supported for this item.
Parameters Complex The items under this element are the parameters in the ODataURI field of the General tab.
Output Tab
On the Output tab, you can find the output schema, which is the same as the schema in Output Preview ofquery builder. For more details, see Output Preview .
Fault Tab
On the Fault tab, you can find the error code and error message of the OData Query activity.
The following table lists error schema elements in the Fault tab of this activity:
Error SchemaElement Data Type Description
msg String The error message description that is returned by the plug-in.
msgCode String The error code that is returned by the plug-in.
innerError Complex The inner error details.
message String The error message description that is returned by the OData server.
type String The error type that is returned by the OData server.
stacktrace String The error stacktrance description that is returned by the OData server.
Restrictions on ODataClient v2
The following are the features that are not supported by the ODataClient v2:
● $format
● Media Types
17
TIBCO ActiveMatrix BusinessWorks™ Plug-in for OData User's Guide
● Geometric or Geography
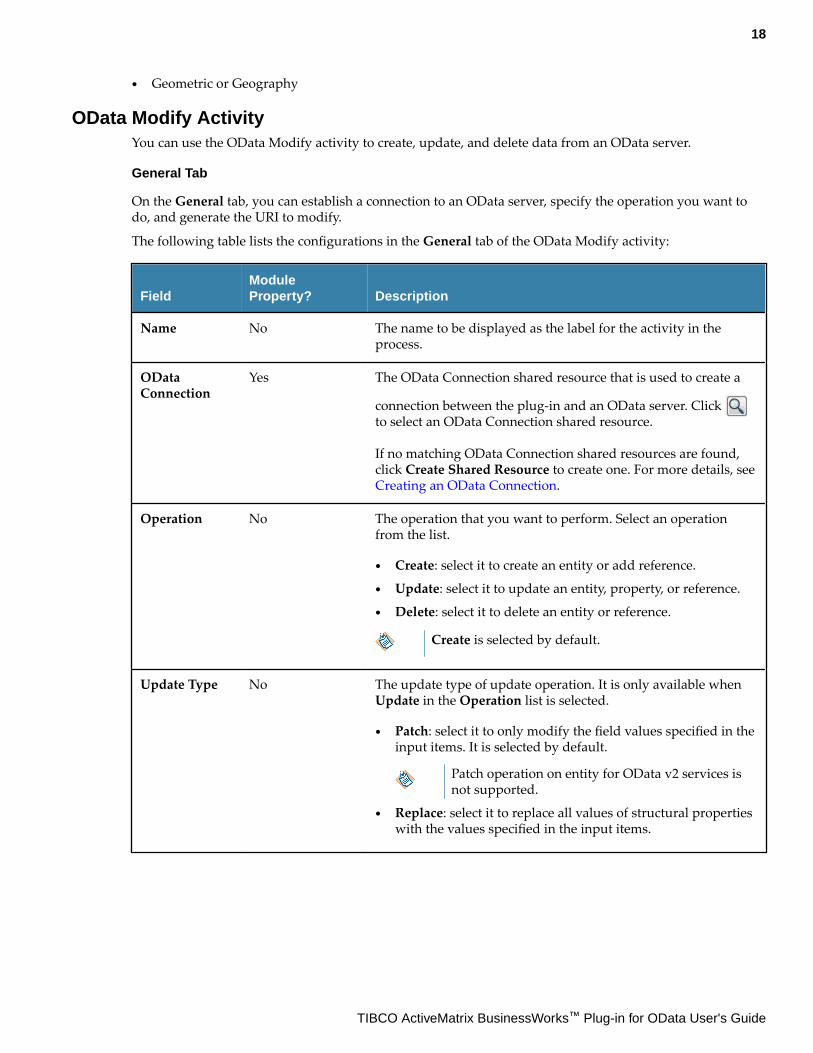
OData Modify ActivityYou can use the OData Modify activity to create, update, and delete data from an OData server.
General Tab
On the General tab, you can establish a connection to an OData server, specify the operation you want todo, and generate the URI to modify.
The following table lists the configurations in the General tab of the OData Modify activity:
FieldModuleProperty? Description
Name No The name to be displayed as the label for the activity in theprocess.
ODataConnection
Yes The OData Connection shared resource that is used to create a
connection between the plug-in and an OData server. Click to select an OData Connection shared resource.
If no matching OData Connection shared resources are found,click Create Shared Resource to create one. For more details, see Creating an OData Connection.
Operation No The operation that you want to perform. Select an operationfrom the list.
● Create: select it to create an entity or add reference.
● Update: select it to update an entity, property, or reference.
● Delete: select it to delete an entity or reference.
Create is selected by default.
Update Type No The update type of update operation. It is only available whenUpdate in the Operation list is selected.
● Patch: select it to only modify the field values specified in theinput items. It is selected by default.
Patch operation on entity for OData v2 services isnot supported.
● Replace: select it to replace all values of structural propertieswith the values specified in the input items.
18
TIBCO ActiveMatrix BusinessWorks™ Plug-in for OData User's Guide
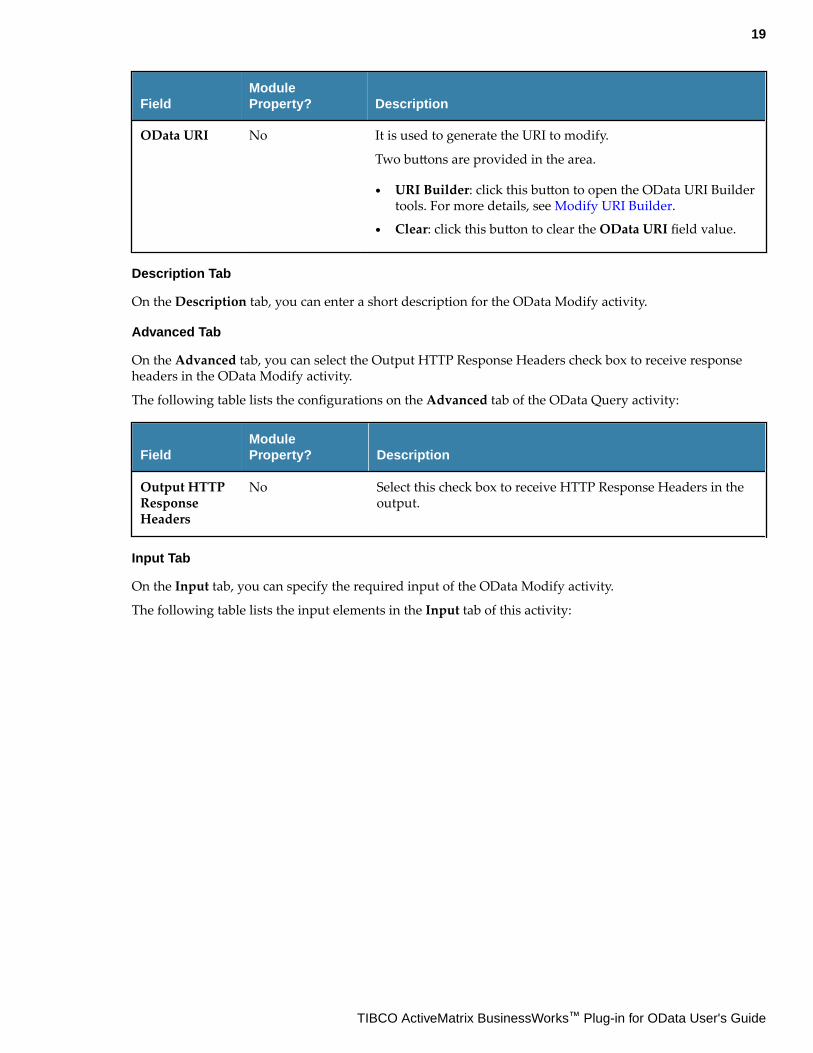
FieldModuleProperty? Description
OData URI No It is used to generate the URI to modify.
Two buttons are provided in the area.
● URI Builder: click this button to open the OData URI Buildertools. For more details, see Modify URI Builder.
● Clear: click this button to clear the OData URI field value.
Description Tab
On the Description tab, you can enter a short description for the OData Modify activity.
Advanced Tab
On the Advanced tab, you can select the Output HTTP Response Headers check box to receive responseheaders in the OData Modify activity.
The following table lists the configurations on the Advanced tab of the OData Query activity:
FieldModuleProperty? Description
Output HTTPResponseHeaders
No Select this check box to receive HTTP Response Headers in theoutput.
Input Tab
On the Input tab, you can specify the required input of the OData Modify activity.
The following table lists the input elements in the Input tab of this activity:
19
TIBCO ActiveMatrix BusinessWorks™ Plug-in for OData User's Guide
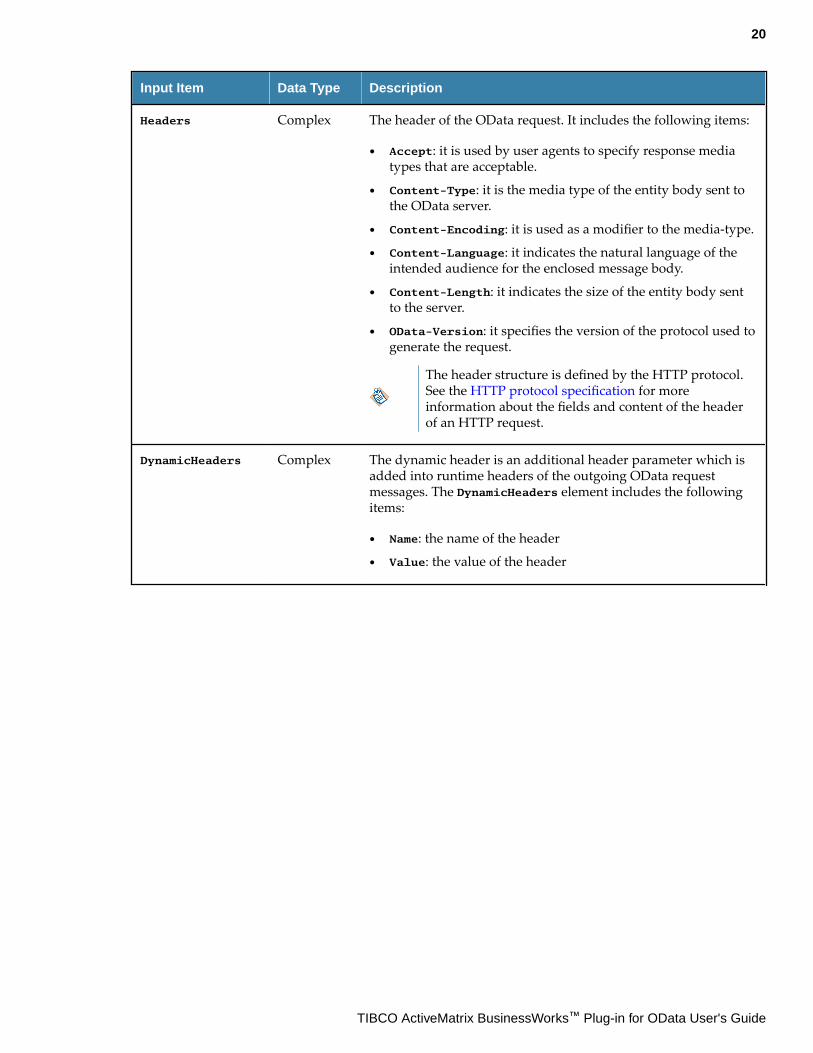
Input Item Data Type Description
Headers Complex The header of the OData request. It includes the following items:
● Accept: it is used by user agents to specify response mediatypes that are acceptable.
● Content-Type: it is the media type of the entity body sent tothe OData server.
● Content-Encoding: it is used as a modifier to the media-type.
● Content-Language: it indicates the natural language of theintended audience for the enclosed message body.
● Content-Length: it indicates the size of the entity body sentto the server.
● OData-Version: it specifies the version of the protocol used togenerate the request.
The header structure is defined by the HTTP protocol.See the HTTP protocol specification for moreinformation about the fields and content of the headerof an HTTP request.
DynamicHeaders Complex The dynamic header is an additional header parameter which isadded into runtime headers of the outgoing OData requestmessages. The DynamicHeaders element includes the followingitems:
● Name: the name of the header
● Value: the value of the header
20
TIBCO ActiveMatrix BusinessWorks™ Plug-in for OData User's Guide
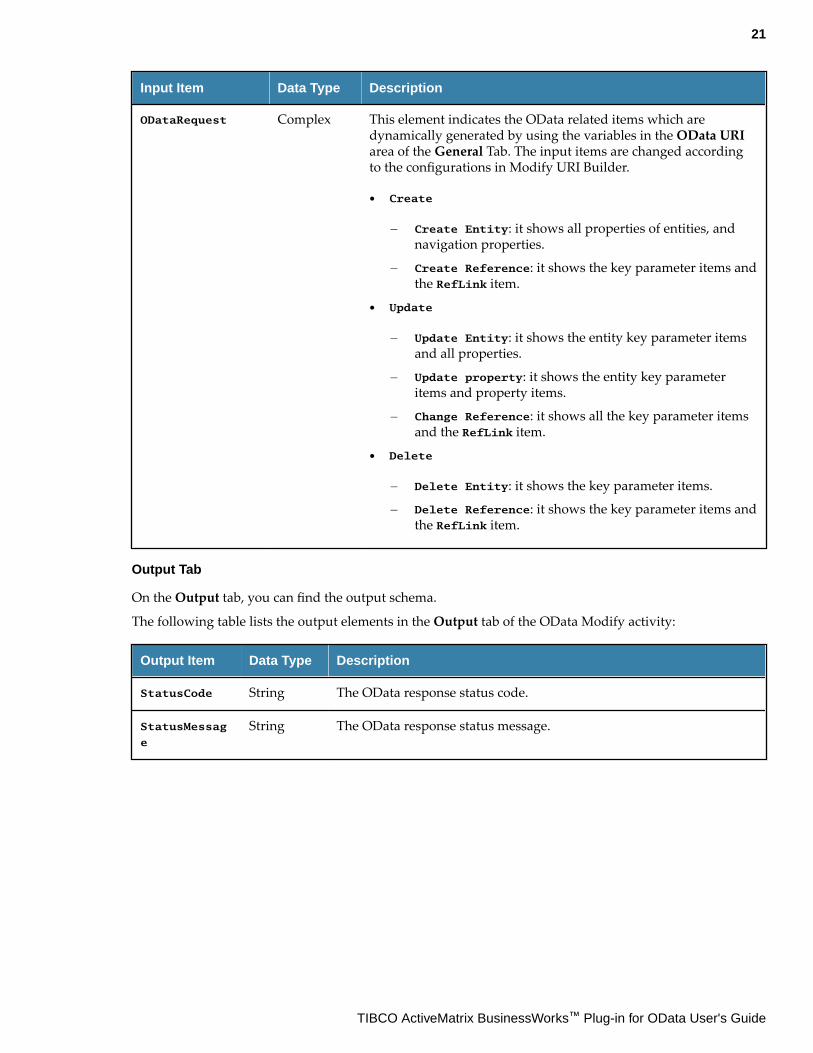
Input Item Data Type Description
ODataRequest Complex This element indicates the OData related items which aredynamically generated by using the variables in the OData URIarea of the General Tab. The input items are changed accordingto the configurations in Modify URI Builder.
● Create
— Create Entity: it shows all properties of entities, andnavigation properties.
— Create Reference: it shows the key parameter items andthe RefLink item.
● Update
— Update Entity: it shows the entity key parameter itemsand all properties.
— Update property: it shows the entity key parameteritems and property items.
— Change Reference: it shows all the key parameter itemsand the RefLink item.
● Delete
— Delete Entity: it shows the key parameter items.
— Delete Reference: it shows the key parameter items andthe RefLink item.
Output Tab
On the Output tab, you can find the output schema.
The following table lists the output elements in the Output tab of the OData Modify activity:
Output Item Data Type Description
StatusCode String The OData response status code.
StatusMessag
e
String The OData response status message.
21
TIBCO ActiveMatrix BusinessWorks™ Plug-in for OData User's Guide
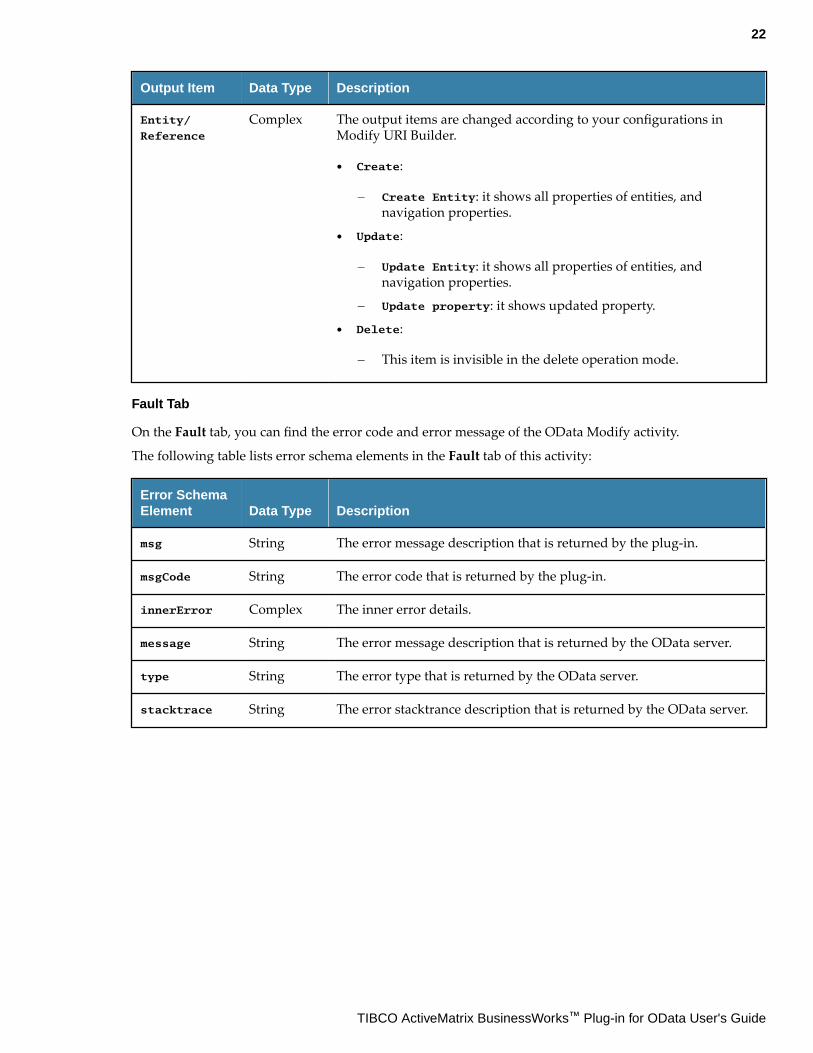
Output Item Data Type Description
Entity/
Reference
Complex The output items are changed according to your configurations inModify URI Builder.
● Create:
— Create Entity: it shows all properties of entities, andnavigation properties.
● Update:
— Update Entity: it shows all properties of entities, andnavigation properties.
— Update property: it shows updated property.
● Delete:
— This item is invisible in the delete operation mode.
Fault Tab
On the Fault tab, you can find the error code and error message of the OData Modify activity.
The following table lists error schema elements in the Fault tab of this activity:
Error SchemaElement Data Type Description
msg String The error message description that is returned by the plug-in.
msgCode String The error code that is returned by the plug-in.
innerError Complex The inner error details.
message String The error message description that is returned by the OData server.
type String The error type that is returned by the OData server.
stacktrace String The error stacktrance description that is returned by the OData server.
22
TIBCO ActiveMatrix BusinessWorks™ Plug-in for OData User's Guide

OData Service
The OData service is a server process. When running, it can be invoked by a OData client.
OData Services only support v4 version.
OData Service BindingOData Service Binding provides external connectivity for OData over HTTP. It supports QUERY, READ,CREATE, UPDATE and DELETE operations. It also supports JSON and XML message types.
Binding
This section has the following fields.
Field Description
ResourceName
The name of the resource.
ResourcePath
This field is used to customize the OData URL.
The default Resource Path is '/' when a new OData Service is created. The Resource Pathshould end with a '/'.
On providing the Resource Path, it is reflected in between the application name andresource name of the endpoint URL. For example,
http://<hostname>:<port_name>/<application_name>/<Resource_Path>/
<Resource_name>
EntityContainerSchema
Value for the schema namespace of the entity container.
Entity SetName
The name of the entity set.
Include inServiceDocument
Indicates that the boolean value of the entity set is advertised in the service document. Ifthe value is set to false, then the Entity Set is not present in the metadata file. By default,the check-box is selected.
HTTPConnectorName
The name of the HTTP Connector.
Click on the HTTP Connector Name field to display details about the HTTPConnector resource.
By default, a new HTTP Connector Shared Resource is created when you create a newOData Service binding. Change the field value type to Module Property to specify amodule property that has been defined as an HTTP Connector Shared Resource.
ResponseClientFormat
The type of response message format.
The supported response message formats are JSON or XML.
ResourceSchema
Displays the schema selected.
23
TIBCO ActiveMatrix BusinessWorks™ Plug-in for OData User's Guide
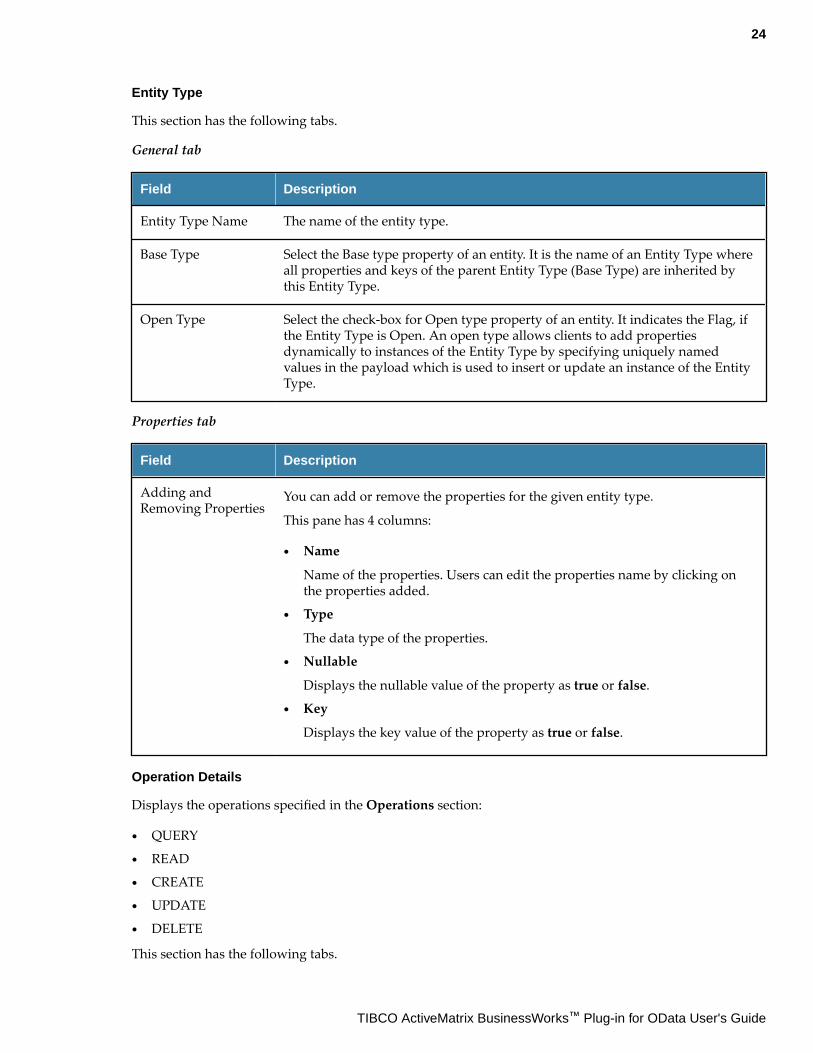
Entity Type
This section has the following tabs.
General tab
Field Description
Entity Type Name The name of the entity type.
Base Type Select the Base type property of an entity. It is the name of an Entity Type whereall properties and keys of the parent Entity Type (Base Type) are inherited bythis Entity Type.
Open Type Select the check-box for Open type property of an entity. It indicates the Flag, ifthe Entity Type is Open. An open type allows clients to add propertiesdynamically to instances of the Entity Type by specifying uniquely namedvalues in the payload which is used to insert or update an instance of the EntityType.
Properties tab
Field Description
Adding andRemoving Properties
You can add or remove the properties for the given entity type.
This pane has 4 columns:
● Name
Name of the properties. Users can edit the properties name by clicking onthe properties added.
● Type
The data type of the properties.
● Nullable
Displays the nullable value of the property as true or false.
● Key
Displays the key value of the property as true or false.
Operation Details
Displays the operations specified in the Operations section:
● QUERY
● READ
● CREATE
● UPDATE
● DELETE
This section has the following tabs.
24
TIBCO ActiveMatrix BusinessWorks™ Plug-in for OData User's Guide
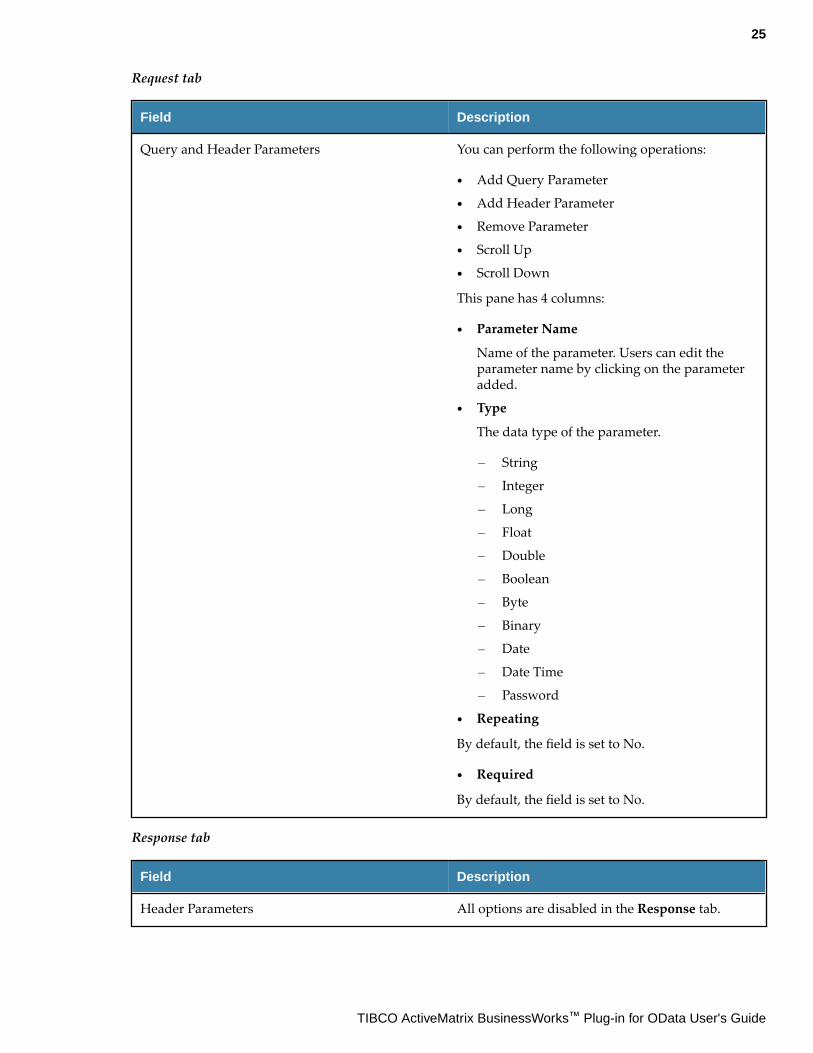
Request tab
Field Description
Query and Header Parameters You can perform the following operations:
● Add Query Parameter
● Add Header Parameter
● Remove Parameter
● Scroll Up
● Scroll Down
This pane has 4 columns:
● Parameter Name
Name of the parameter. Users can edit theparameter name by clicking on the parameteradded.
● Type
The data type of the parameter.
— String
— Integer
— Long
— Float
— Double
— Boolean
— Byte
— Binary
— Date
— Date Time
— Password
● Repeating
By default, the field is set to No.
● Required
By default, the field is set to No.
Response tab
Field Description
Header Parameters All options are disabled in the Response tab.
25
TIBCO ActiveMatrix BusinessWorks™ Plug-in for OData User's Guide
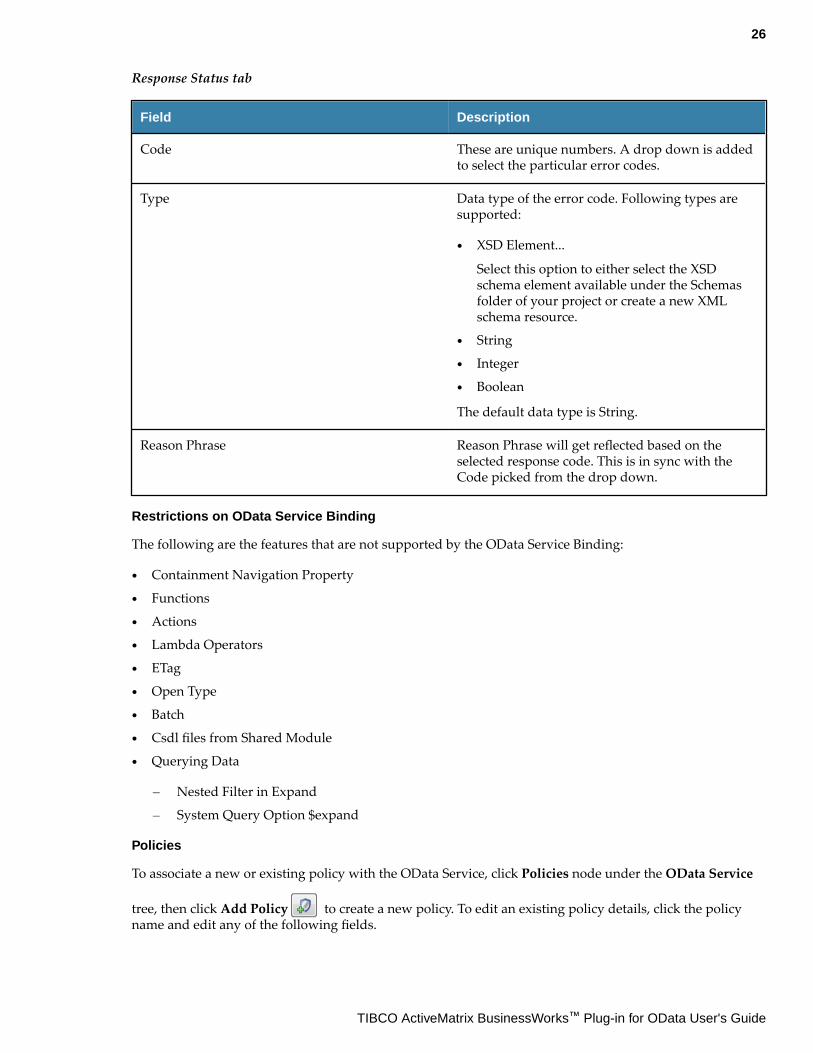
Response Status tab
Field Description
Code These are unique numbers. A drop down is addedto select the particular error codes.
Type Data type of the error code. Following types aresupported:
● XSD Element...
Select this option to either select the XSDschema element available under the Schemasfolder of your project or create a new XMLschema resource.
● String
● Integer
● Boolean
The default data type is String.
Reason Phrase Reason Phrase will get reflected based on theselected response code. This is in sync with theCode picked from the drop down.
Restrictions on OData Service Binding
The following are the features that are not supported by the OData Service Binding:
● Containment Navigation Property
● Functions
● Actions
● Lambda Operators
● ETag
● Open Type
● Batch
● Csdl files from Shared Module
● Querying Data
— Nested Filter in Expand
— System Query Option $expand
Policies
To associate a new or existing policy with the OData Service, click Policies node under the OData Service
tree, then click Add Policy to create a new policy. To edit an existing policy details, click the policyname and edit any of the following fields.
26
TIBCO ActiveMatrix BusinessWorks™ Plug-in for OData User's Guide
Field Description
Policy Name The name of the policy.
Policy Type The type of policy associated with the binding. The OData Service bindingsupports the Basic Authentication policy. For more information, see EnforcingBasic Authentication.
Description A description of the policy.
Enforcing Basic AuthenticationImplement the Basic Authentication policy to ensure user credentials in request messages are authenticated.
First, set up a new Basic Authentication policy by creating and configuring the policy and its resources.Next, associate the policy with an activity or binding in your application.
Setting Up a Policy with Resources
Follow these steps to set a new Basic Authentication policy with resources:
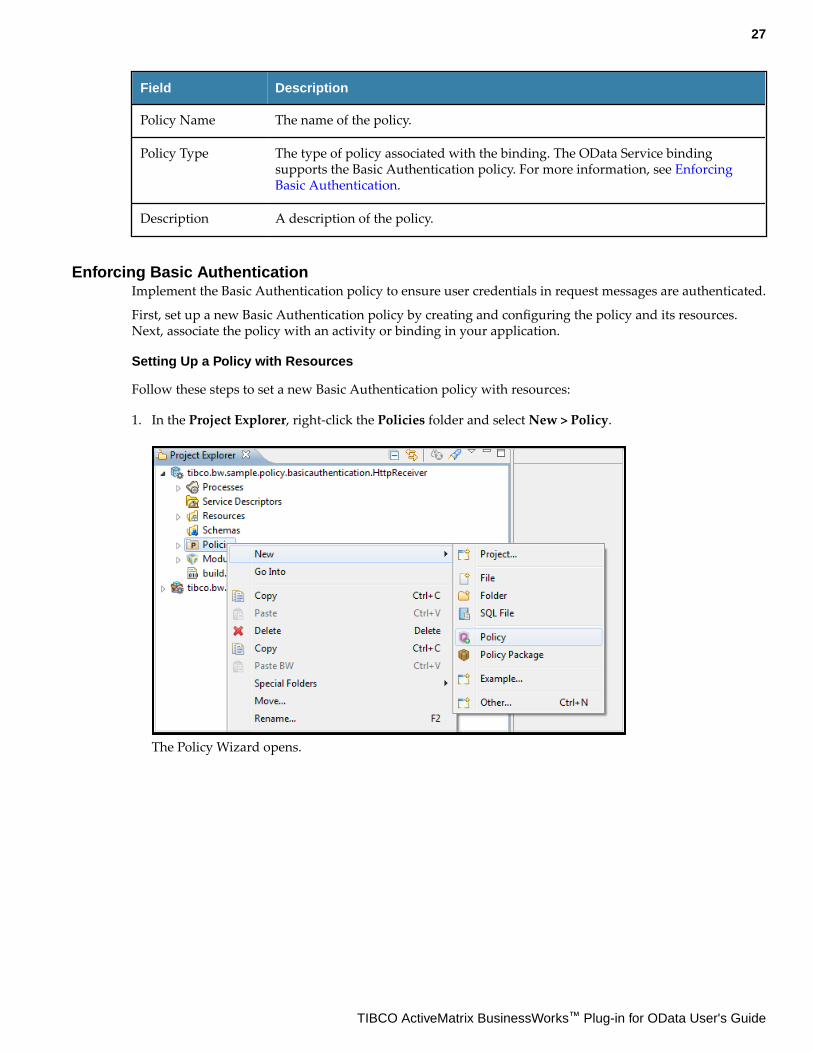
1. In the Project Explorer, right-click the Policies folder and select New > Policy.
The Policy Wizard opens.
27
TIBCO ActiveMatrix BusinessWorks™ Plug-in for OData User's Guide
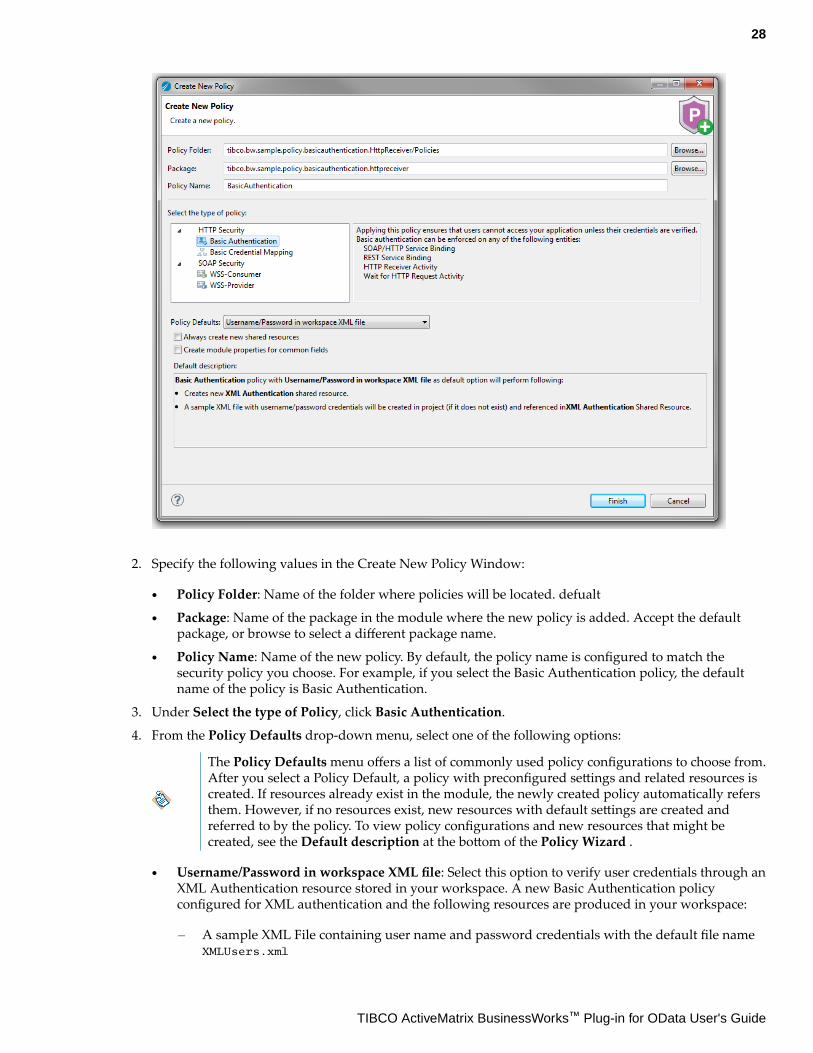
2. Specify the following values in the Create New Policy Window:
● Policy Folder: Name of the folder where policies will be located. defualt
● Package: Name of the package in the module where the new policy is added. Accept the defaultpackage, or browse to select a different package name.
● Policy Name: Name of the new policy. By default, the policy name is configured to match thesecurity policy you choose. For example, if you select the Basic Authentication policy, the defaultname of the policy is Basic Authentication.
3. Under Select the type of Policy, click Basic Authentication.
4. From the Policy Defaults drop-down menu, select one of the following options:
The Policy Defaults menu offers a list of commonly used policy configurations to choose from.After you select a Policy Default, a policy with preconfigured settings and related resources iscreated. If resources already exist in the module, the newly created policy automatically refersthem. However, if no resources exist, new resources with default settings are created andreferred to by the policy. To view policy configurations and new resources that might becreated, see the Default description at the bottom of the Policy Wizard .
● Username/Password in workspace XML file: Select this option to verify user credentials through anXML Authentication resource stored in your workspace. A new Basic Authentication policyconfigured for XML authentication and the following resources are produced in your workspace:
— A sample XML File containing user name and password credentials with the default file nameXMLUsers.xml
28
TIBCO ActiveMatrix BusinessWorks™ Plug-in for OData User's Guide
— A new XML Authentication resource with the default file nameBasicAuthentication_AuthenticationProvider.authxml
● Username/Password in filesystem XML file: Select this option to verify user credentials through anXML Authentication resource stored in your local file system. A new Basic Authentication policyconfigured for XML authentication is produced in your workspace:
— A sample filesystem XML File the default file nameBasicAuthentication_AuthenticationProvider.authxml
● Username/Password in LDAP: Select this option to verify user credentials through an LDAPAuthentication resource. A new Basic Authentication policy configured for LDAP authenticationand the following resource is produced in your workspace:
— A new LDAP Authentication resource with the default file nameBasicAuthentication_AuthenticationProvider.ldapResource.
● Empty Policy (No Default) : Select this option to create a new Basic Authentication policy with nopreselected options and no resources.
5. Optional. Select Always create new shared resources to ensure new resources are generated for thepolicy and referred to by the policy.
6. Optional. Select Create module properties for common fields to override default properties in newlycreated resources with module properties. Resources with module properties for common fields aregenerated after you select this option.
7. Select Finish to create the policy.
Creating a OData ServiceA service is created from a process. You can expose the process and describe the content that is sent andreceived by the process in an XSD. The XSD defines the data that you send and receive. The process is theactual implementation of what you do with the data.The key abstraction of information in OData is a resource. TIBCO Business Studio™ supports the followingoperations: QUERY, READ, CREATE, UPDATE, and DELETE. Both XML and JSON are supported as dataserialization formats.
You can create a OData service in TIBCO Business Studio in one of the following ways:
● Using CSDL to create an OData Service
● Using the Wizard to create an OData Service
Using CSDL to create an OData ServiceCommon Schema Definition Language (CSDL) is a representation of the entity data model exposed by anOData service using XML (Extensible Markup Language). This CSDL file contains the metadata of theentity container. You can drag and drop a EntitySet from the CSDL file on to the left boundary of theProcess Editor to create a OData service or drag it to the center.
When you create a OData service, make sure to edit the Default Host field in the HTTP ConnectionResource to reflect the actual host name. By default, the Default Host field is set to localhost using theBW.HOST.NAME module property.
When you use CSDL to create a OData service, the fields in the Bindings tab of the service propertiesdisplay as read-only. CSDL is like a contract that must be followed exactly, so the service you create withthe CSDL file cannot be modified.
To create a OData service from a CSDL file, do the following:
29
TIBCO ActiveMatrix BusinessWorks™ Plug-in for OData User's Guide
Procedure
1. Create an empty project or you can use an existing project.
2. Import the CSDL file into the Service Descriptors folder of your project by dragging and dropping itfrom the File Explorer view (if the CSDL file resides on your local drive).
3. Expand the CSDL file that you just created under the Service Descriptors > Entity Container folder toview the available paths for entity sets.
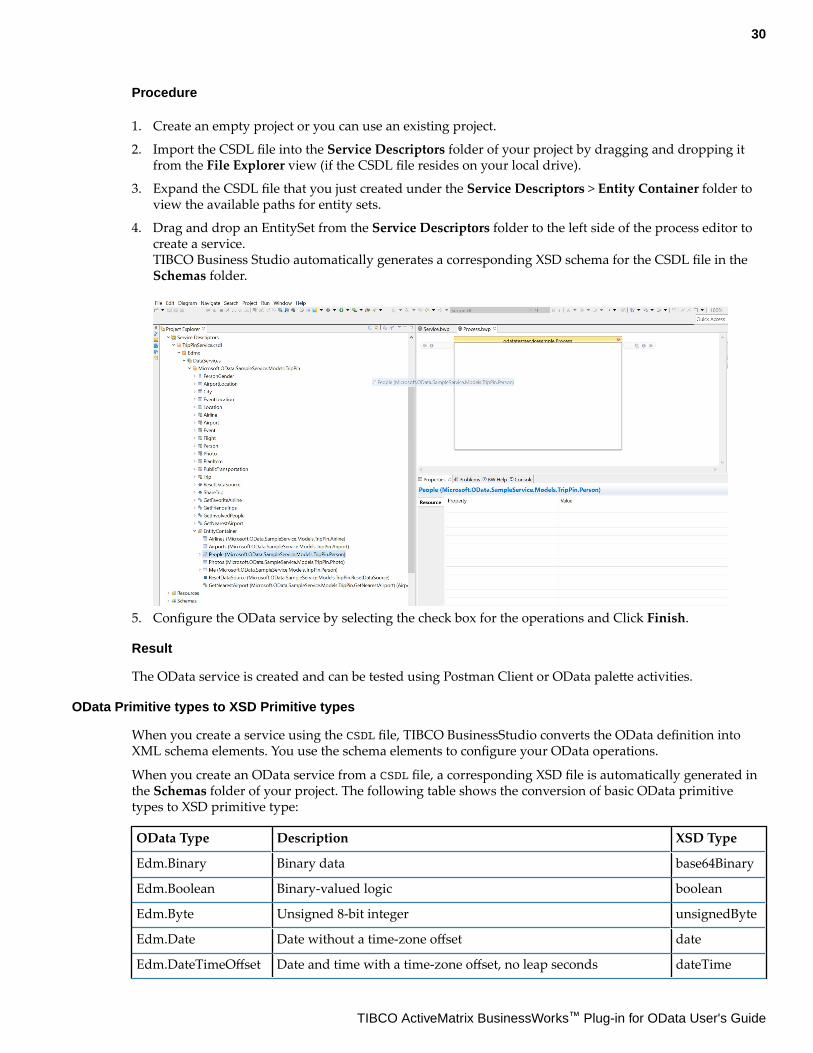
4. Drag and drop an EntitySet from the Service Descriptors folder to the left side of the process editor tocreate a service.TIBCO Business Studio automatically generates a corresponding XSD schema for the CSDL file in theSchemas folder.
5. Configure the OData service by selecting the check box for the operations and Click Finish.
Result
The OData service is created and can be tested using Postman Client or OData palette activities.
OData Primitive types to XSD Primitive types
When you create a service using the CSDL file, TIBCO BusinessStudio converts the OData definition intoXML schema elements. You use the schema elements to configure your OData operations.
When you create an OData service from a CSDL file, a corresponding XSD file is automatically generated inthe Schemas folder of your project. The following table shows the conversion of basic OData primitivetypes to XSD primitive type:
OData Type Description XSD Type
Edm.Binary Binary data base64Binary
Edm.Boolean Binary-valued logic boolean
Edm.Byte Unsigned 8-bit integer unsignedByte
Edm.Date Date without a time-zone offset date
Edm.DateTimeOffset Date and time with a time-zone offset, no leap seconds dateTime
30
TIBCO ActiveMatrix BusinessWorks™ Plug-in for OData User's Guide
OData Type Description XSD Type
Edm.Decimal Numeric values with fixed precision and scale decimal
Edm.Double IEEE 754 binary64 floating-point number (15-17 decimal digits) double
Edm.Duration Signed duration in days, hours, minutes, and (sub)seconds duration
Edm.Guid 16-byte (128-bit) unique identifier string
Edm.Int16 Signed 16-bit integer short
Edm.Int32 Signed 32-bit integer int
Edm.Int64 Signed 64-bit integer long
Edm.SByte Signed 8-bit integer byte
Edm.Single IEEE 754 binary32 floating-point number (6-9 decimal digits) float
Edm.Stream Binary data stream base64Binary
Edm.String Sequence of UTF-8 characters string
Edm.TimeOfDay Clock time 00:00-23:59:59.999999999999 time
Using the Wizard to Create a OData ServiceA OData service provider exposes the resources in a process definition that can be invoked by clients usingone of the operations as QUERY, READ, CREATE, UPDATE, and DELETE.
Prerequisites
If a schema definition does not exist, create (or import) a schema definition in the process to which youwant to add the OData service. To import an existing XSD file, drag and drop the .xsd file from the FileExplorer to the Schemas folder of your project.
To create a new schema file in TIBCO Business Studio™, do the following:
1. In Project Explorer, right-click the Schemas folder.
2. Select New > XML Schema File.
3. In the Schema Editor, right-click in the respective box to add a directive, element, type, attribute, orgroup.
When you create a OData service, make sure to edit the Default Host field in the HTTP ConnectionResource to reflect the actual host name. By default, the Default Host field is set to localhost.
Procedure
1. In the Project Explorer, select the process to which you want to add the OData service. There aremultiple ways to invoke the wizard to create a OData service.
● From the main menu, select File > New > BusinessWorks Resources > BusinessWorks ODataResource.
● Right-click the menu, select New > BusinessWorks OData Resource.
● Click on Create OData Service in the process editor area. (Note that OData services can only becreated in stateless ActiveMatrix BusinessWorks™ processes.)
31
TIBCO ActiveMatrix BusinessWorks™ Plug-in for OData User's Guide
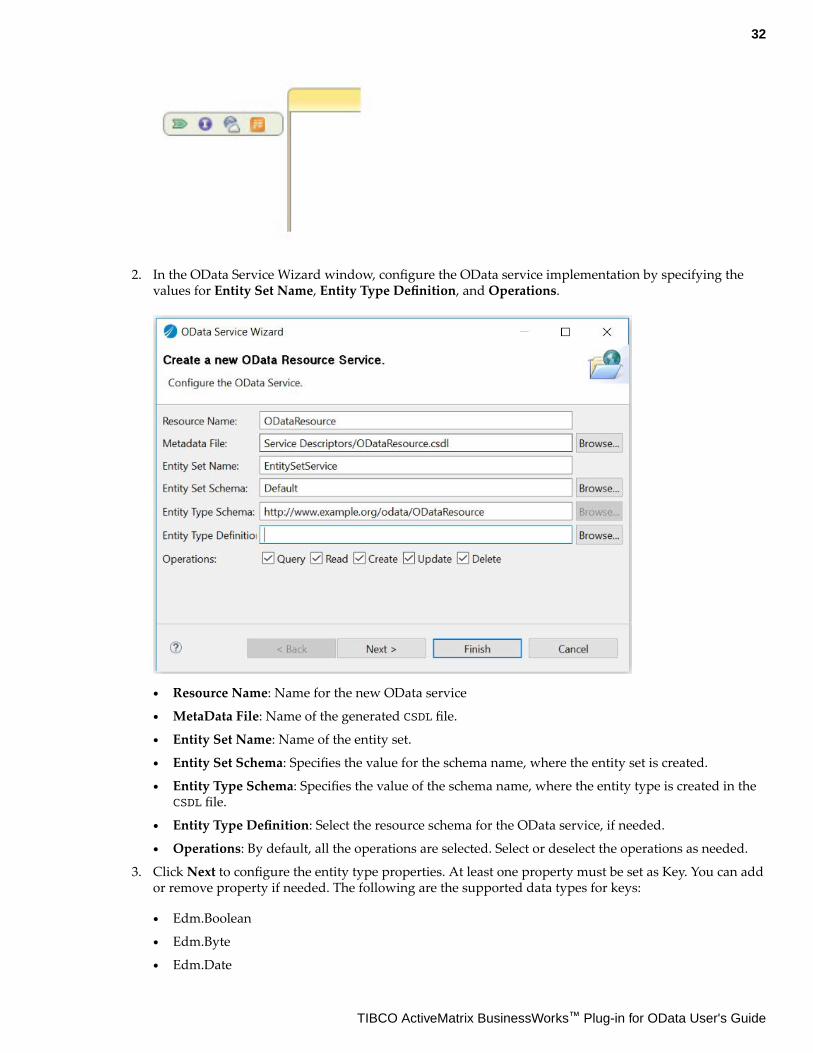
2. In the OData Service Wizard window, configure the OData service implementation by specifying thevalues for Entity Set Name, Entity Type Definition, and Operations.
● Resource Name: Name for the new OData service
● MetaData File: Name of the generated CSDL file.
● Entity Set Name: Name of the entity set.
● Entity Set Schema: Specifies the value for the schema name, where the entity set is created.
● Entity Type Schema: Specifies the value of the schema name, where the entity type is created in theCSDL file.
● Entity Type Definition: Select the resource schema for the OData service, if needed.
● Operations: By default, all the operations are selected. Select or deselect the operations as needed.
3. Click Next to configure the entity type properties. At least one property must be set as Key. You can addor remove property if needed. The following are the supported data types for keys:
● Edm.Boolean
● Edm.Byte
● Edm.Date
32
TIBCO ActiveMatrix BusinessWorks™ Plug-in for OData User's Guide
● Edm.DateTimeOffset
● Edm.Decimal
● Edm.Duration
● Edm.Guid
● Edm.Int16
● Edm.Int32
● Edm.Int64
● Edm.SByte
● Edm.String
● Edm.TimeOfDay
4. Click Finish.The wizard adds the OData service and the selected operations and also creates a process definitionwith the multiple operations. It generates a .csdl file in the Service Descriptors folder of your projectwhen it creates the service. The OData service always implements the constructor operator.
For a property of Decimal data type, we must add precision and scale to the property in thegenerated CSDL file.
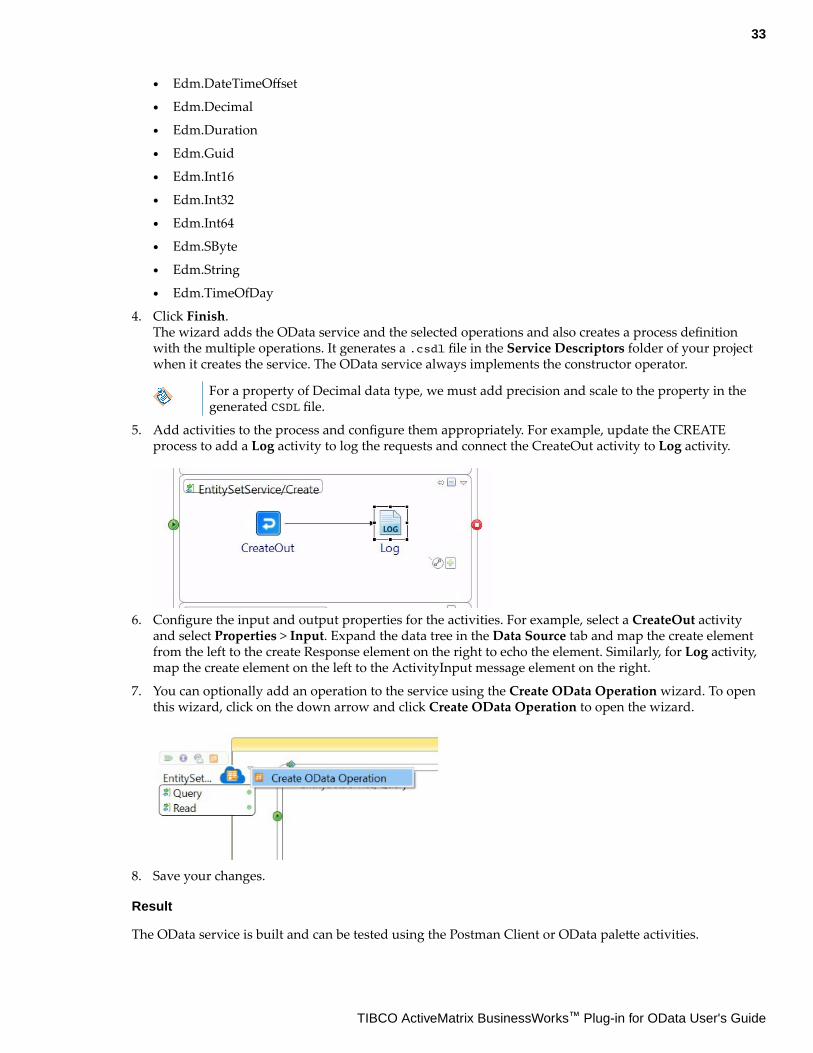
5. Add activities to the process and configure them appropriately. For example, update the CREATEprocess to add a Log activity to log the requests and connect the CreateOut activity to Log activity.
6. Configure the input and output properties for the activities. For example, select a CreateOut activityand select Properties > Input. Expand the data tree in the Data Source tab and map the create elementfrom the left to the create Response element on the right to echo the element. Similarly, for Log activity,map the create element on the left to the ActivityInput message element on the right.
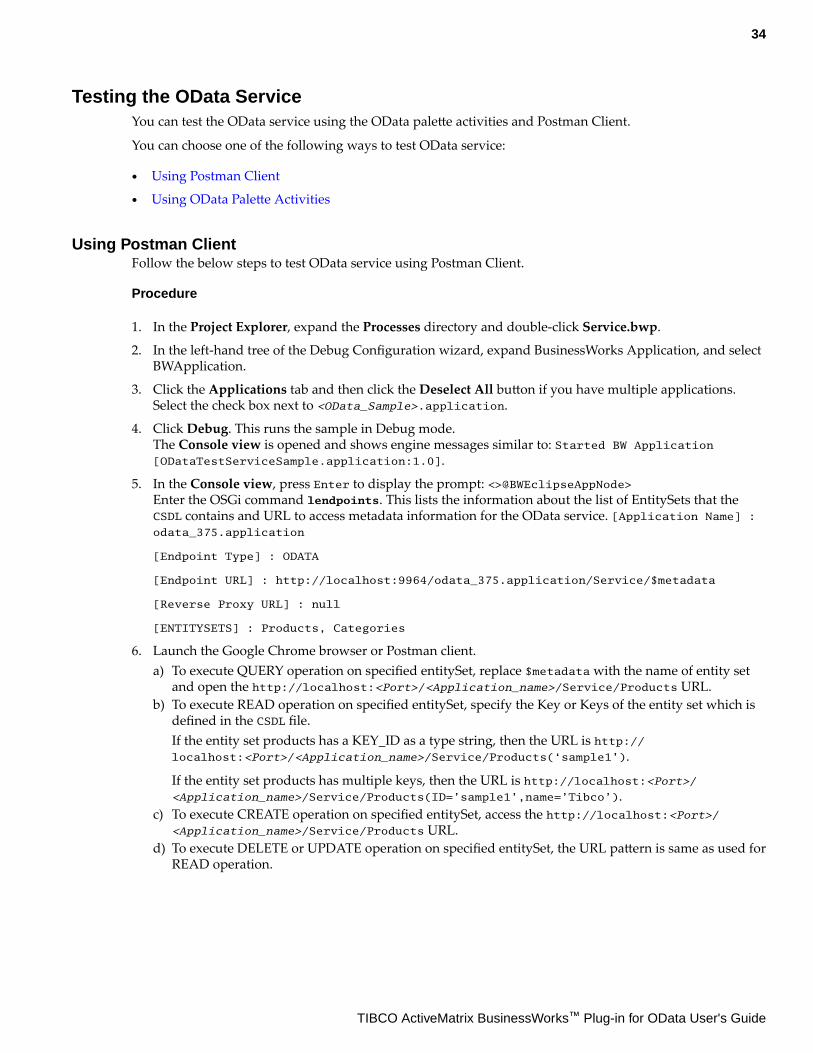
7. You can optionally add an operation to the service using the Create OData Operation wizard. To openthis wizard, click on the down arrow and click Create OData Operation to open the wizard.
8. Save your changes.
Result
The OData service is built and can be tested using the Postman Client or OData palette activities.
33
TIBCO ActiveMatrix BusinessWorks™ Plug-in for OData User's Guide
Testing the OData ServiceYou can test the OData service using the OData palette activities and Postman Client.
You can choose one of the following ways to test OData service:
● Using Postman Client
● Using OData Palette Activities
Using Postman ClientFollow the below steps to test OData service using Postman Client.
Procedure
1. In the Project Explorer, expand the Processes directory and double-click Service.bwp.
2. In the left-hand tree of the Debug Configuration wizard, expand BusinessWorks Application, and selectBWApplication.
3. Click the Applications tab and then click the Deselect All button if you have multiple applications.Select the check box next to <OData_Sample>.application.
4. Click Debug. This runs the sample in Debug mode.The Console view is opened and shows engine messages similar to: Started BW Application[ODataTestServiceSample.application:1.0].
5. In the Console view, press Enter to display the prompt: <>@BWEclipseAppNode>Enter the OSGi command lendpoints. This lists the information about the list of EntitySets that theCSDL contains and URL to access metadata information for the OData service. [Application Name] :odata_375.application
[Endpoint Type] : ODATA
[Endpoint URL] : http://localhost:9964/odata_375.application/Service/$metadata
[Reverse Proxy URL] : null
[ENTITYSETS] : Products, Categories
6. Launch the Google Chrome browser or Postman client.a) To execute QUERY operation on specified entitySet, replace $metadata with the name of entity set
and open the http://localhost:<Port>/<Application_name>/Service/Products URL.b) To execute READ operation on specified entitySet, specify the Key or Keys of the entity set which isdefined in the CSDL file.If the entity set products has a KEY_ID as a type string, then the URL is http://localhost:<Port>/<Application_name>/Service/Products(‘sample1’).
If the entity set products has multiple keys, then the URL is http://localhost:<Port>/<Application_name>/Service/Products(ID=’sample1’,name=’Tibco’).
c) To execute CREATE operation on specified entitySet, access the http://localhost:<Port>/<Application_name>/Service/Products URL.
d) To execute DELETE or UPDATE operation on specified entitySet, the URL pattern is same as used forREAD operation.
34
TIBCO ActiveMatrix BusinessWorks™ Plug-in for OData User's Guide
Using OData Palette ActivitiesFollow the below steps to test OData service using OData Palette activities:
Procedure
1. In the Project Explorer, expand the Processes directory and double-click Service.bwp.
2. In the left-hand tree of the Debug Configuration wizard, expand BusinessWorks Application, and selectBWApplication.
3. Click the Applications tab and then click the Deselect All button if you have multiple applications.Select the check box next to <OData_Sample>.application.
4. Click Debug. This runs the sample in Debug mode.The Console view is opened and shows engine messages similar to: Started BW Application[ODataTestServiceSample.application:1.0].
5. In the Console view, press Enter to display the prompt: <>@BWEclipseAppNode>Enter the OSGi command lendpoints. This lists the information about the list of EntitySets that theCSDL contains and URL to access metadata information for the OData service. [Application Name] :odata_375.application
[Endpoint Type] : ODATA
[Endpoint URL] : http://localhost:9964/odata_375.application/Service/$metadata
[Reverse Proxy URL] : null
[ENTITYSETS] : Products, Categories
6. Create OData connection shared resource and copy the endpoint URL http://localhost:9964/odata_375.application/Service in the Root URL field.
7. While the service is running, click Load Metadata to load the metadata of the service.
8. To test the service, stop the application and create a new process with OData palette activities.
Set the Accept Headers in the Input tab of activity as application/json orapplication/xml as per Response Client Format field of the OData service.
Result
You can now test the operations implemented in the OData service.
35
TIBCO ActiveMatrix BusinessWorks™ Plug-in for OData User's Guide
Query URI Builder
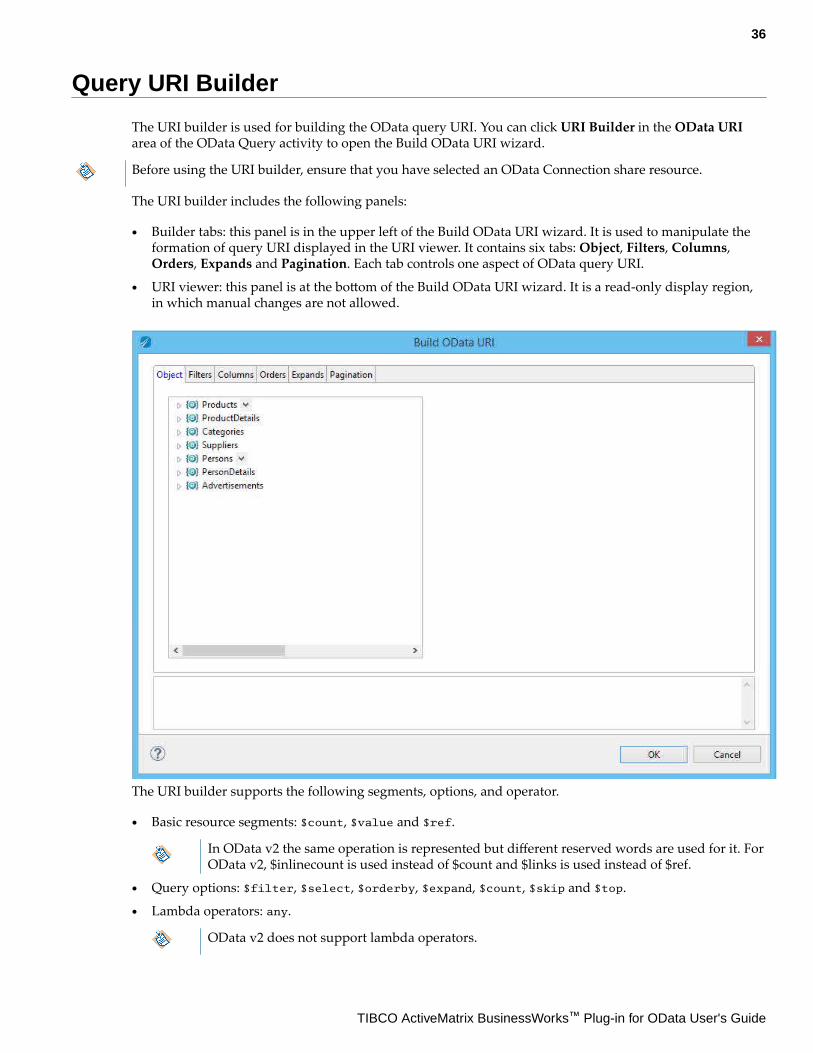
The URI builder is used for building the OData query URI. You can click URI Builder in the OData URIarea of the OData Query activity to open the Build OData URI wizard.
Before using the URI builder, ensure that you have selected an OData Connection share resource.
The URI builder includes the following panels:
● Builder tabs: this panel is in the upper left of the Build OData URI wizard. It is used to manipulate theformation of query URI displayed in the URI viewer. It contains six tabs: Object, Filters, Columns,Orders, Expands and Pagination. Each tab controls one aspect of OData query URI.
● URI viewer: this panel is at the bottom of the Build OData URI wizard. It is a read-only display region,in which manual changes are not allowed.
The URI builder supports the following segments, options, and operator.
● Basic resource segments: $count, $value and $ref.
In OData v2 the same operation is represented but different reserved words are used for it. ForOData v2, $inlinecount is used instead of $count and $links is used instead of $ref.
● Query options: $filter, $select, $orderby, $expand, $count, $skip and $top.
● Lambda operators: any.
OData v2 does not support lambda operators.
36
TIBCO ActiveMatrix BusinessWorks™ Plug-in for OData User's Guide
The URI builder does not support $all, $crossjoin, $search, $batch, $entity, $root, $id, $levels and$format. You cannot get these options directly through the clicking or picking operations.
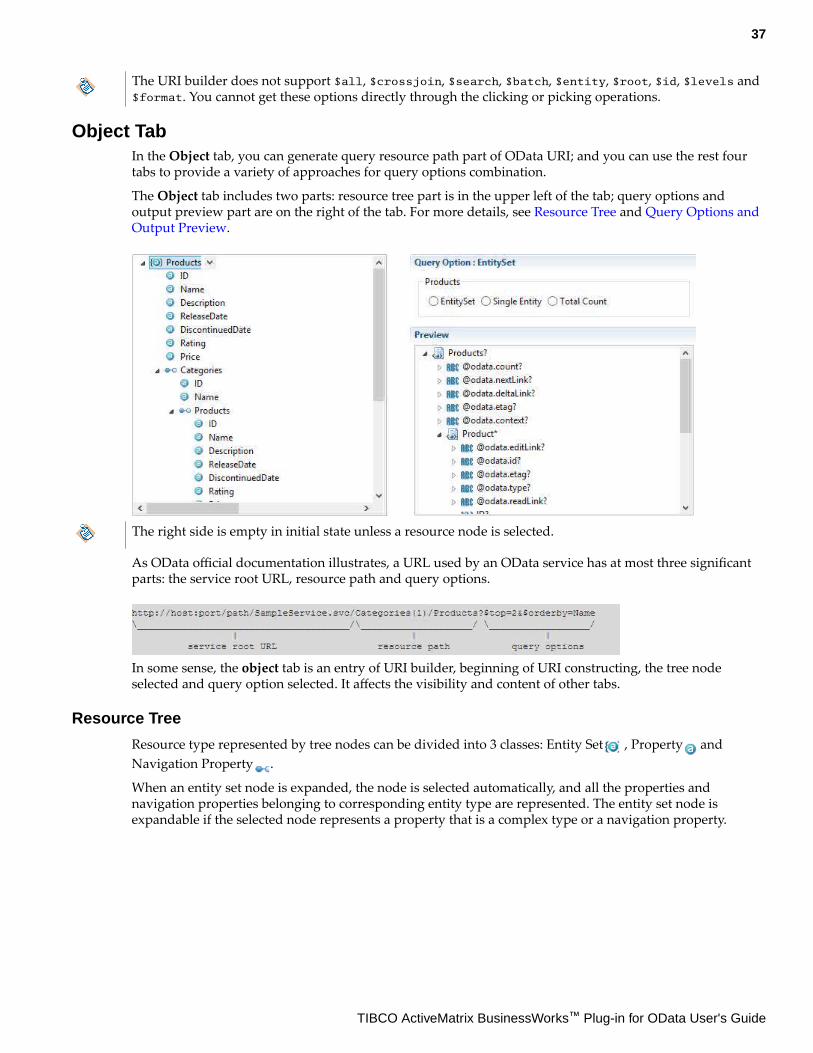
Object TabIn the Object tab, you can generate query resource path part of OData URI; and you can use the rest fourtabs to provide a variety of approaches for query options combination.
The Object tab includes two parts: resource tree part is in the upper left of the tab; query options andoutput preview part are on the right of the tab. For more details, see Resource Tree and Query Options andOutput Preview.
The right side is empty in initial state unless a resource node is selected.
As OData official documentation illustrates, a URL used by an OData service has at most three significantparts: the service root URL, resource path and query options.
In some sense, the object tab is an entry of URI builder, beginning of URI constructing, the tree nodeselected and query option selected. It affects the visibility and content of other tabs.
Resource Tree
Resource type represented by tree nodes can be divided into 3 classes: Entity Set , Property andNavigation Property .
When an entity set node is expanded, the node is selected automatically, and all the properties andnavigation properties belonging to corresponding entity type are represented. The entity set node isexpandable if the selected node represents a property that is a complex type or a navigation property.
37
TIBCO ActiveMatrix BusinessWorks™ Plug-in for OData User's Guide
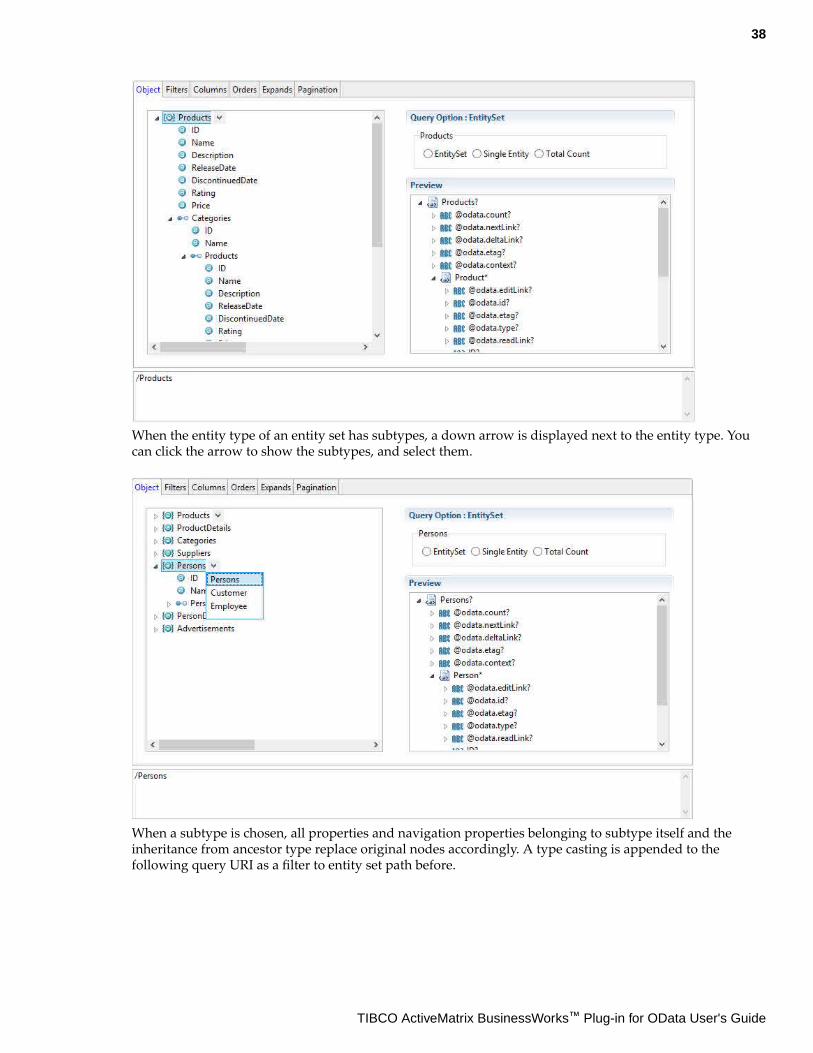
When the entity type of an entity set has subtypes, a down arrow is displayed next to the entity type. Youcan click the arrow to show the subtypes, and select them.
When a subtype is chosen, all properties and navigation properties belonging to subtype itself and theinheritance from ancestor type replace original nodes accordingly. A type casting is appended to thefollowing query URI as a filter to entity set path before.
38
TIBCO ActiveMatrix BusinessWorks™ Plug-in for OData User's Guide
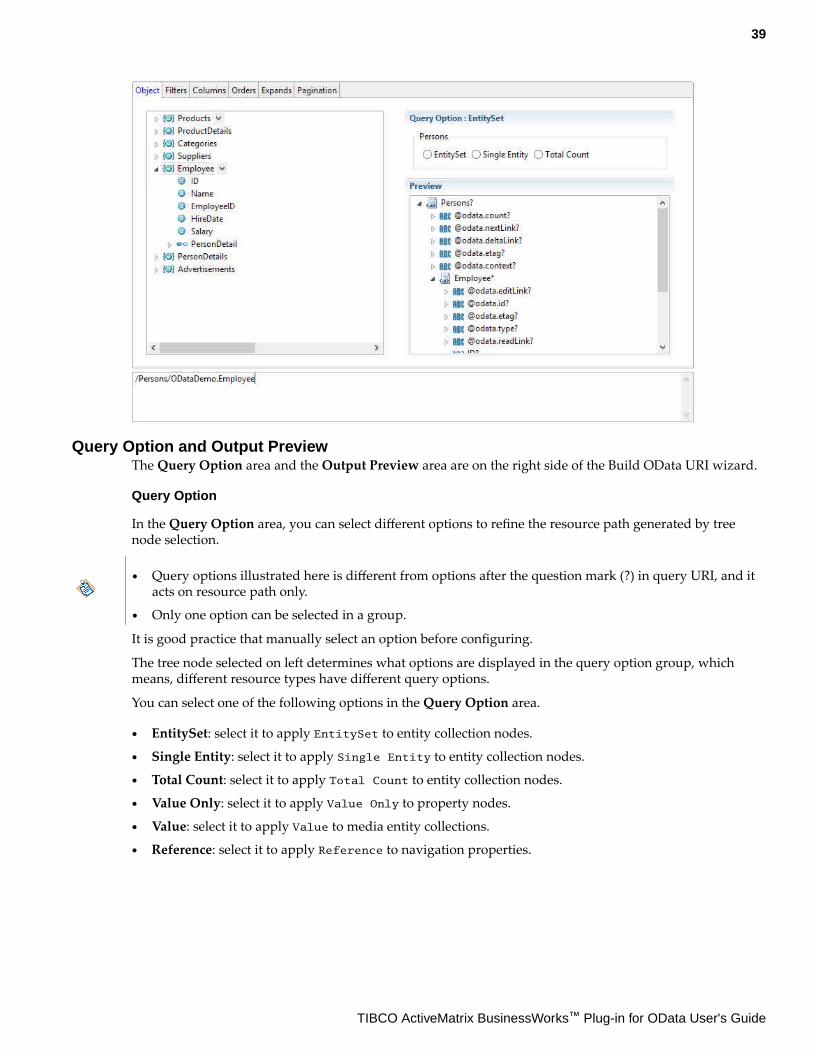
Query Option and Output PreviewThe Query Option area and the Output Preview area are on the right side of the Build OData URI wizard.
Query Option
In the Query Option area, you can select different options to refine the resource path generated by treenode selection.
● Query options illustrated here is different from options after the question mark (?) in query URI, and itacts on resource path only.
● Only one option can be selected in a group.
It is good practice that manually select an option before configuring.
The tree node selected on left determines what options are displayed in the query option group, whichmeans, different resource types have different query options.
You can select one of the following options in the Query Option area.
● EntitySet: select it to apply EntitySet to entity collection nodes.
● Single Entity: select it to apply Single Entity to entity collection nodes.
● Total Count: select it to apply Total Count to entity collection nodes.
● Value Only: select it to apply Value Only to property nodes.
● Value: select it to apply Value to media entity collections.
● Reference: select it to apply Reference to navigation properties.
39
TIBCO ActiveMatrix BusinessWorks™ Plug-in for OData User's Guide
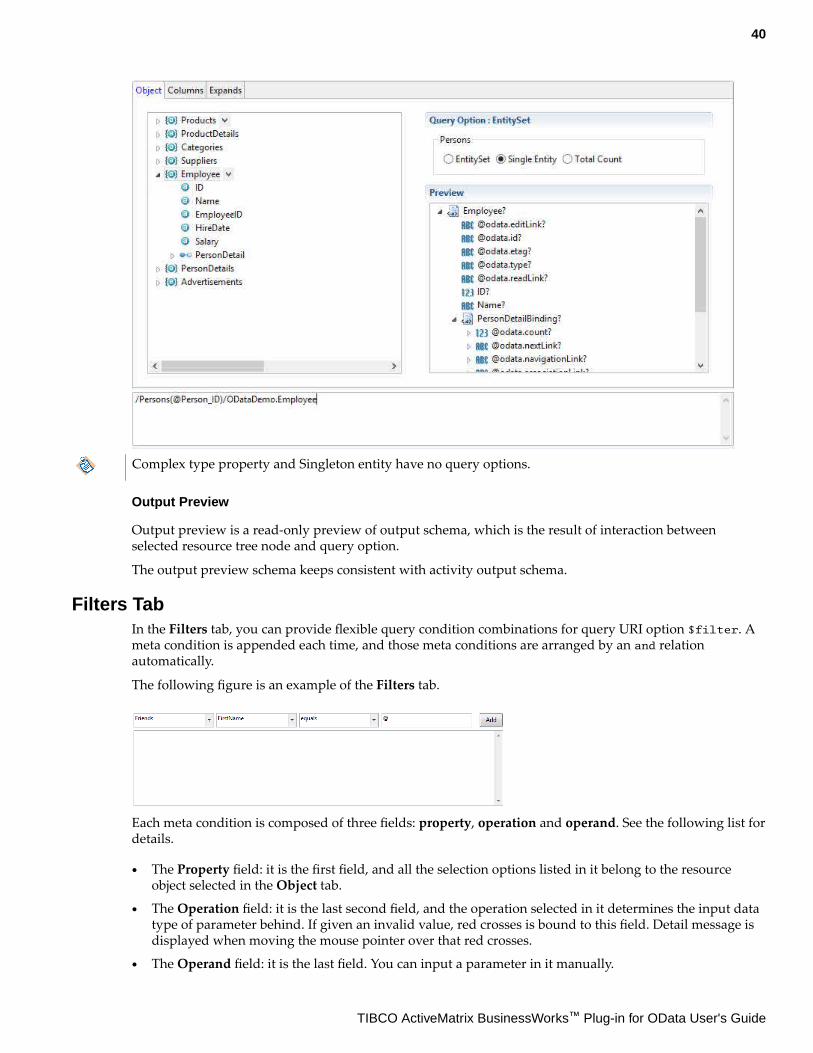
Complex type property and Singleton entity have no query options.
Output Preview
Output preview is a read-only preview of output schema, which is the result of interaction betweenselected resource tree node and query option.
The output preview schema keeps consistent with activity output schema.
Filters TabIn the Filters tab, you can provide flexible query condition combinations for query URI option $filter. Ameta condition is appended each time, and those meta conditions are arranged by an and relationautomatically.
The following figure is an example of the Filters tab.
Each meta condition is composed of three fields: property, operation and operand. See the following list fordetails.
● The Property field: it is the first field, and all the selection options listed in it belong to the resourceobject selected in the Object tab.
● The Operation field: it is the last second field, and the operation selected in it determines the input datatype of parameter behind. If given an invalid value, red crosses is bound to this field. Detail message isdisplayed when moving the mouse pointer over that red crosses.
● The Operand field: it is the last field. You can input a parameter in it manually.
40
TIBCO ActiveMatrix BusinessWorks™ Plug-in for OData User's Guide
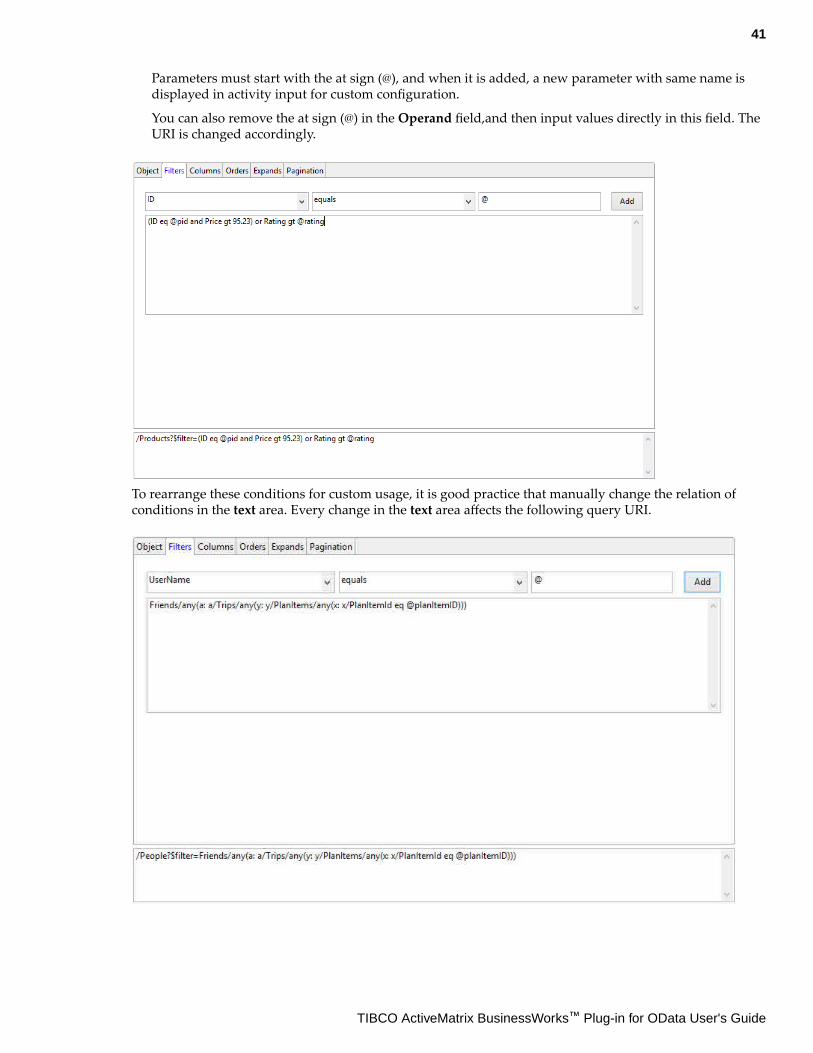
Parameters must start with the at sign (@), and when it is added, a new parameter with same name isdisplayed in activity input for custom configuration.
You can also remove the at sign (@) in the Operand field,and then input values directly in this field. TheURI is changed accordingly.
To rearrange these conditions for custom usage, it is good practice that manually change the relation ofconditions in the text area. Every change in the text area affects the following query URI.
41
TIBCO ActiveMatrix BusinessWorks™ Plug-in for OData User's Guide
● If the property is a collection, lambda expression $it is supported in the meta condition for iteration.
● If the property selected before is a complex type or a navigation, sub properties is represented behind.The filter is capable of handling 3 levels expanding.
● The multiple hierarchy query is supported in the Filter tab, which means, nested properties ofnavigation type use lambda operators in meta condition.
● Any lambda operator is supported by default, and it can be changed to all manually if needed.
● Stream, Geography, Binary and Duration type properties do not support query in the Filter tab.
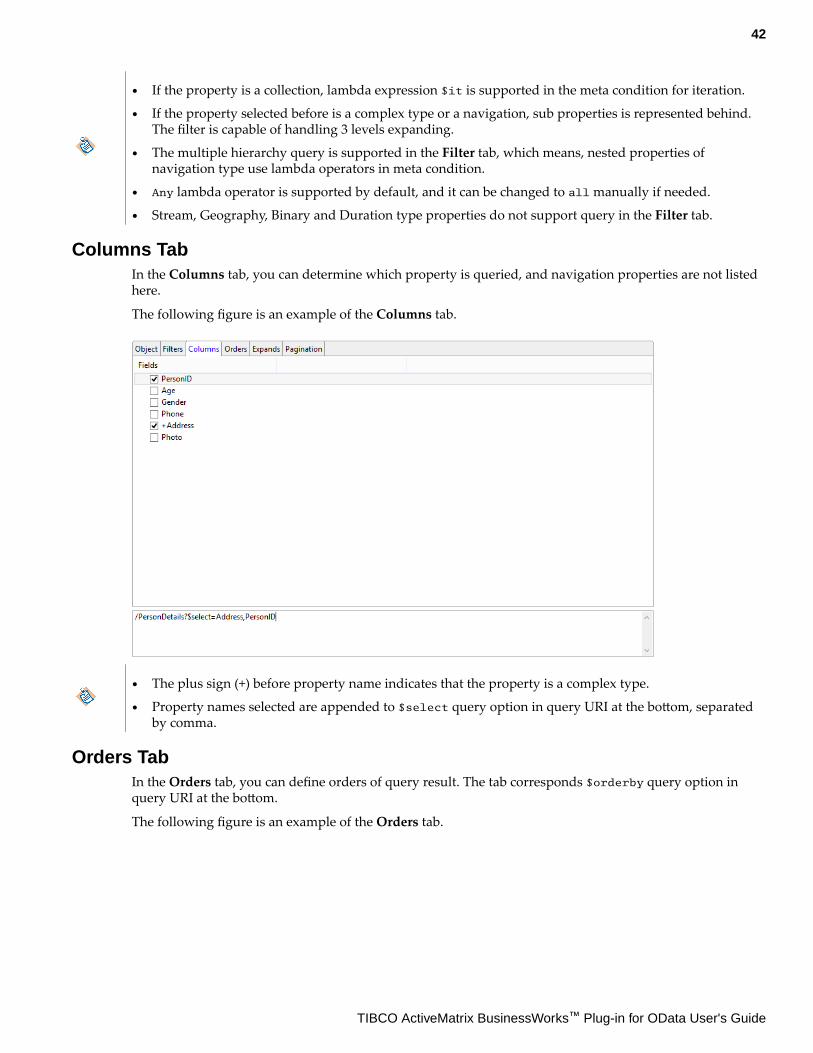
Columns TabIn the Columns tab, you can determine which property is queried, and navigation properties are not listedhere.
The following figure is an example of the Columns tab.
● The plus sign (+) before property name indicates that the property is a complex type.
● Property names selected are appended to $select query option in query URI at the bottom, separatedby comma.
Orders TabIn the Orders tab, you can define orders of query result. The tab corresponds $orderby query option inquery URI at the bottom.
The following figure is an example of the Orders tab.
42
TIBCO ActiveMatrix BusinessWorks™ Plug-in for OData User's Guide
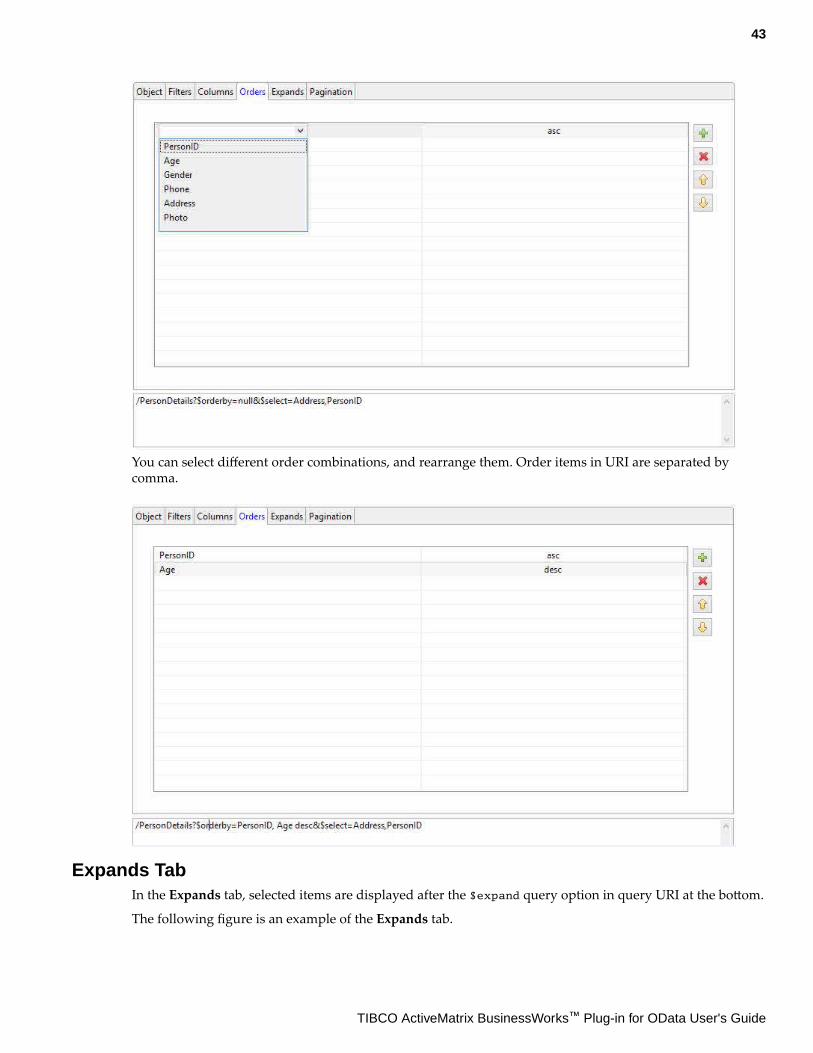
You can select different order combinations, and rearrange them. Order items in URI are separated bycomma.
Expands TabIn the Expands tab, selected items are displayed after the $expand query option in query URI at the bottom.
The following figure is an example of the Expands tab.
43
TIBCO ActiveMatrix BusinessWorks™ Plug-in for OData User's Guide
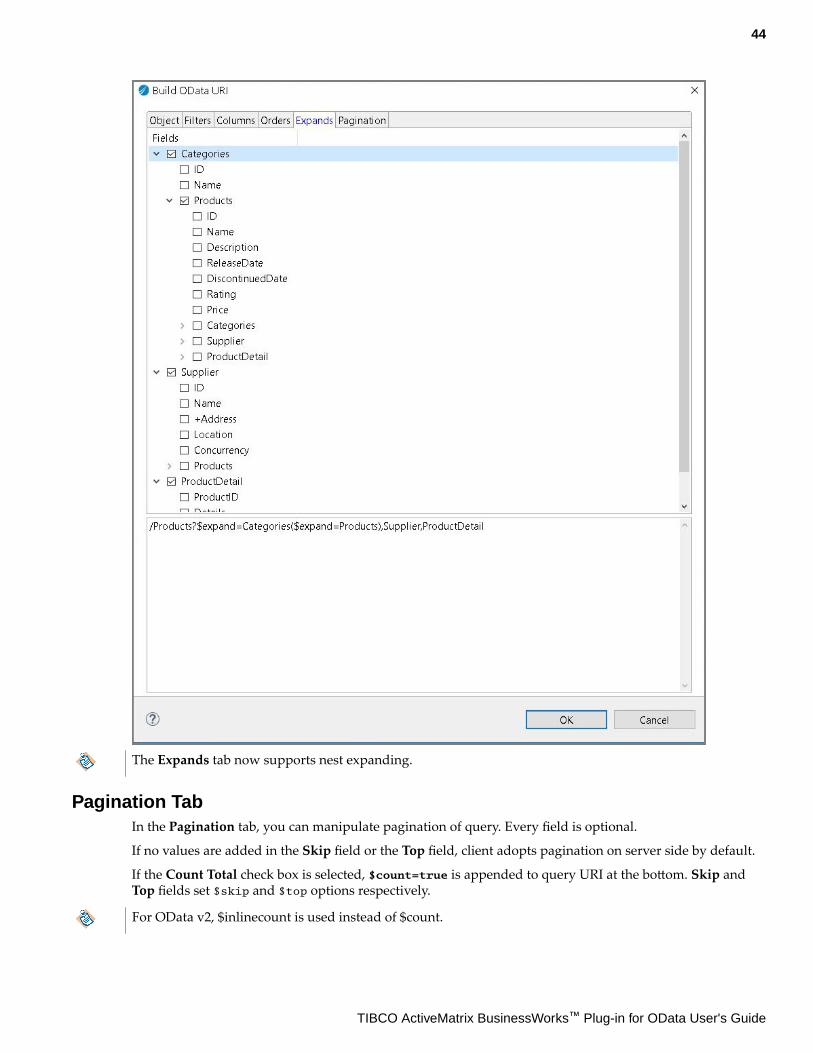
The Expands tab now supports nest expanding.
Pagination TabIn the Pagination tab, you can manipulate pagination of query. Every field is optional.
If no values are added in the Skip field or the Top field, client adopts pagination on server side by default.
If the Count Total check box is selected, $count=true is appended to query URI at the bottom. Skip andTop fields set $skip and $top options respectively.
For OData v2, $inlinecount is used instead of $count.
44
TIBCO ActiveMatrix BusinessWorks™ Plug-in for OData User's Guide
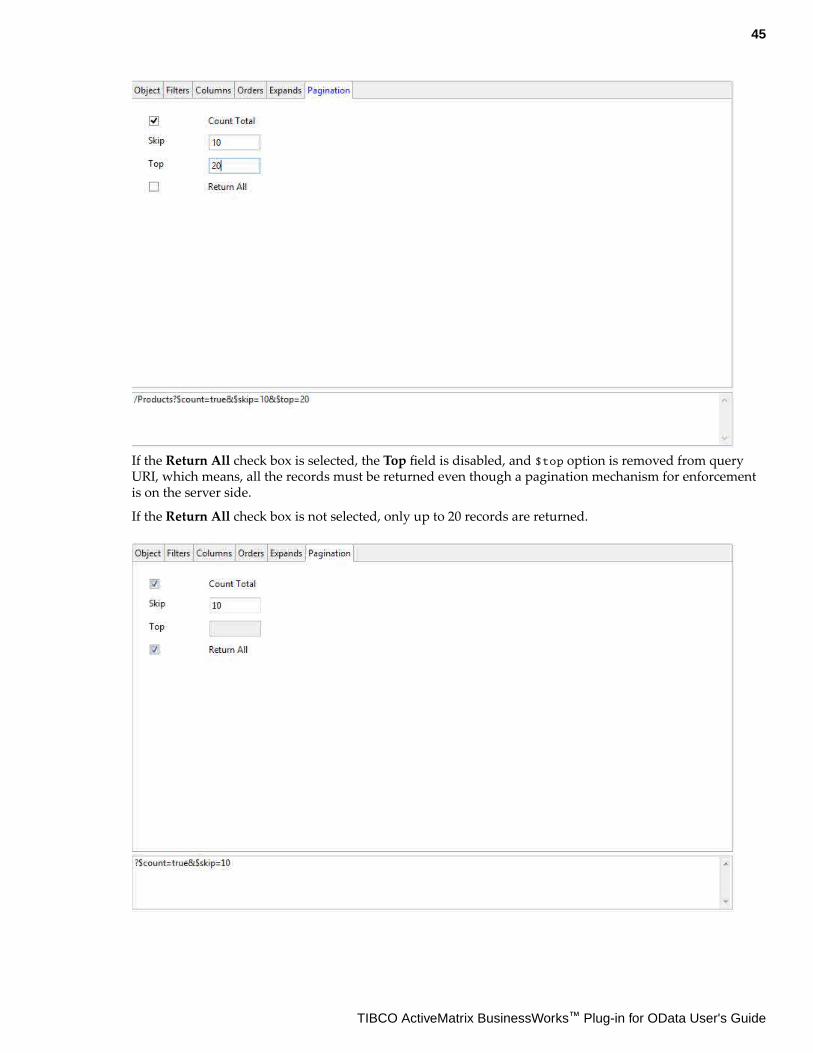
If the Return All check box is selected, the Top field is disabled, and $top option is removed from queryURI, which means, all the records must be returned even though a pagination mechanism for enforcementis on the server side.
If the Return All check box is not selected, only up to 20 records are returned.
45
TIBCO ActiveMatrix BusinessWorks™ Plug-in for OData User's Guide
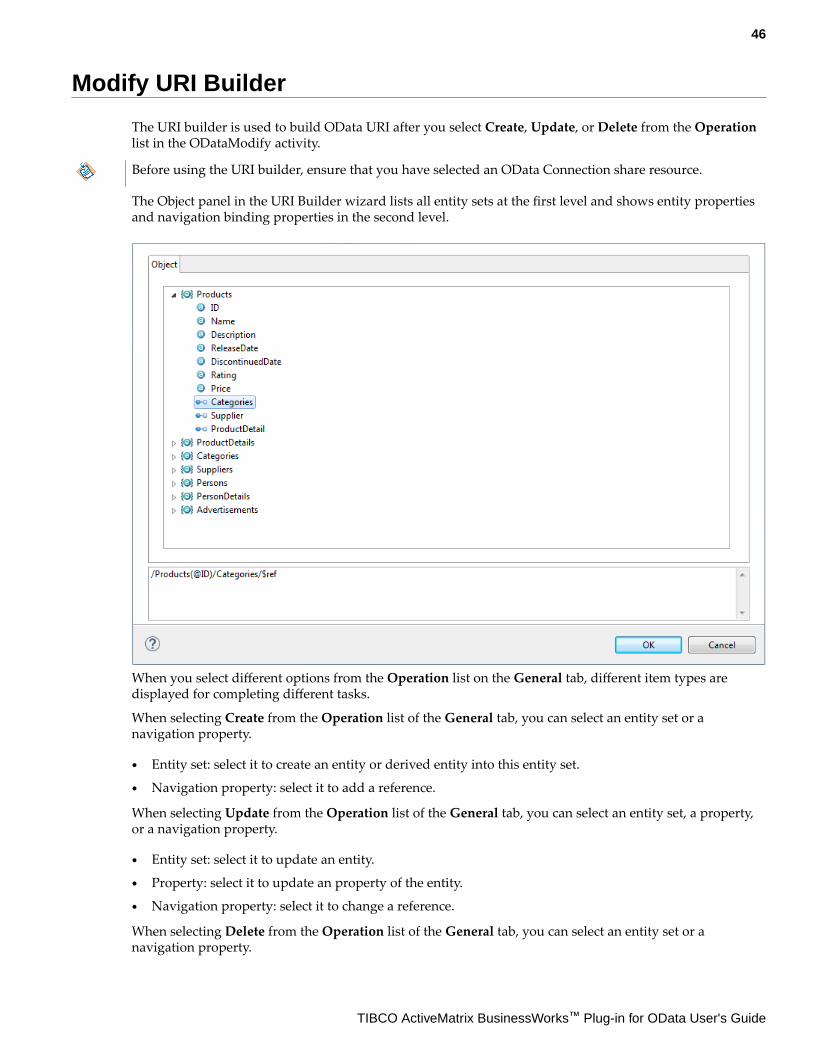
Modify URI Builder
The URI builder is used to build OData URI after you select Create, Update, or Delete from the Operationlist in the ODataModify activity.
Before using the URI builder, ensure that you have selected an OData Connection share resource.
The Object panel in the URI Builder wizard lists all entity sets at the first level and shows entity propertiesand navigation binding properties in the second level.
When you select different options from the Operation list on the General tab, different item types aredisplayed for completing different tasks.
When selecting Create from the Operation list of the General tab, you can select an entity set or anavigation property.
● Entity set: select it to create an entity or derived entity into this entity set.
● Navigation property: select it to add a reference.
When selecting Update from the Operation list of the General tab, you can select an entity set, a property,or a navigation property.
● Entity set: select it to update an entity.
● Property: select it to update an property of the entity.
● Navigation property: select it to change a reference.
When selecting Delete from the Operation list of the General tab, you can select an entity set or anavigation property.
46
TIBCO ActiveMatrix BusinessWorks™ Plug-in for OData User's Guide

● Entity set: select it to delete an entity.
● Navigation property: select it to delete a reference.
OData URI is generated automatically when you select tree node from the Object panel.
47
TIBCO ActiveMatrix BusinessWorks™ Plug-in for OData User's Guide
Working with the Sample Project
The plug-in packages sample projects with the installer. The sample projects show how TIBCOActiveMatrix BusinessWorks Plug-in for OData works.
After installing the plug-in, the samples are available in the TIBCO_HOME/bw/palettes/odata/version_number/samples directory.
These samples run on different container platform. The available platform options are Docker mode orCloud Foundry mode.
By default, the Cloud Foundry mode is selected.
To select the mode, go to Windows > Preferences > BusinessWorks Container Edition > ContainerPlatform > Select Platform. Select the appropriate platform from the drop-down list.
For more information, refer to Switching the Container Platform in TIBCO BusinessWorks™ Container EditionUser's Guide.
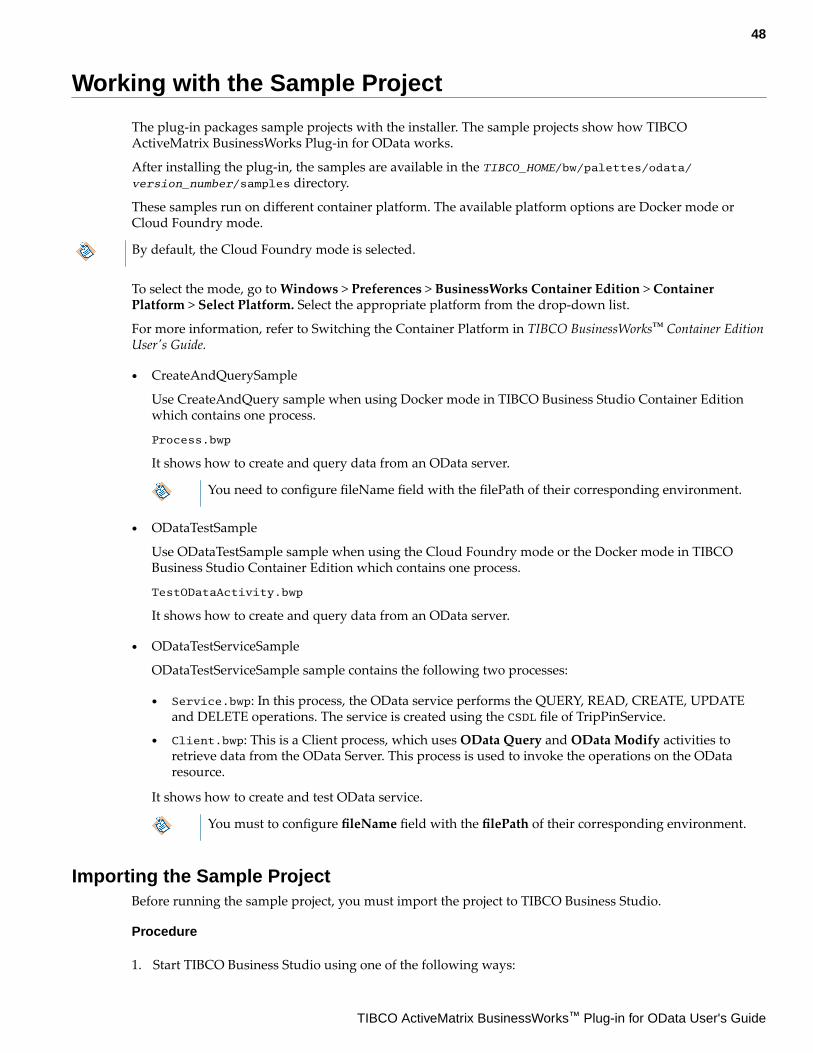
● CreateAndQuerySample
Use CreateAndQuery sample when using Docker mode in TIBCO Business Studio Container Editionwhich contains one process.
Process.bwp
It shows how to create and query data from an OData server.
You need to configure fileName field with the filePath of their corresponding environment.
● ODataTestSample
Use ODataTestSample sample when using the Cloud Foundry mode or the Docker mode in TIBCOBusiness Studio Container Edition which contains one process.
TestODataActivity.bwp
It shows how to create and query data from an OData server.
● ODataTestServiceSample
ODataTestServiceSample sample contains the following two processes:
● Service.bwp: In this process, the OData service performs the QUERY, READ, CREATE, UPDATEand DELETE operations. The service is created using the CSDL file of TripPinService.
● Client.bwp: This is a Client process, which uses OData Query and OData Modify activities toretrieve data from the OData Server. This process is used to invoke the operations on the ODataresource.
It shows how to create and test OData service.
You must to configure fileName field with the filePath of their corresponding environment.
Importing the Sample ProjectBefore running the sample project, you must import the project to TIBCO Business Studio.
Procedure
1. Start TIBCO Business Studio using one of the following ways:
48
TIBCO ActiveMatrix BusinessWorks™ Plug-in for OData User's Guide
● Microsoft Windows: click Start > All Programs > TIBCO > TIBCO_HOME > TIBCO BusinessStudio version_number > Studio for Designers.
● Mac OS and Linux: run the TIBCO Business Studio executable file located in the TIBCO_HOME/studio/version_number/eclipse directory.
2. From the menu, click File > Import.
3. In the Import dialog, expand the General folder and select the Existing Studio Projects into Workspaceitem. Click Next.
4. Click Browse next to the Select archive file field to locate the sample. Click Finish.The sample project is located in the TIBCO_HOME/bw/palettes/odata/version_number/samplesdirectory.
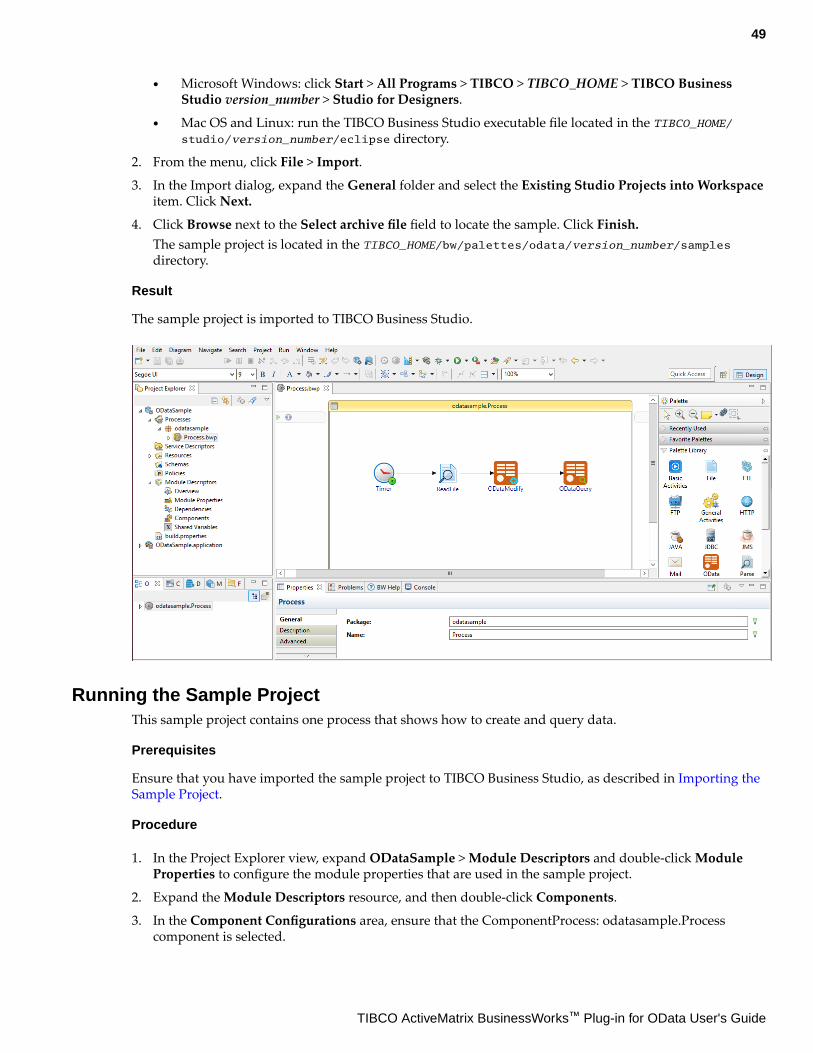
Result
The sample project is imported to TIBCO Business Studio.
Running the Sample ProjectThis sample project contains one process that shows how to create and query data.
Prerequisites
Ensure that you have imported the sample project to TIBCO Business Studio, as described in Importing theSample Project.
Procedure
1. In the Project Explorer view, expand ODataSample > Module Descriptors and double-click ModuleProperties to configure the module properties that are used in the sample project.
2. Expand the Module Descriptors resource, and then double-click Components.
3. In the Component Configurations area, ensure that the ComponentProcess: odatasample.Processcomponent is selected.
49
TIBCO ActiveMatrix BusinessWorks™ Plug-in for OData User's Guide
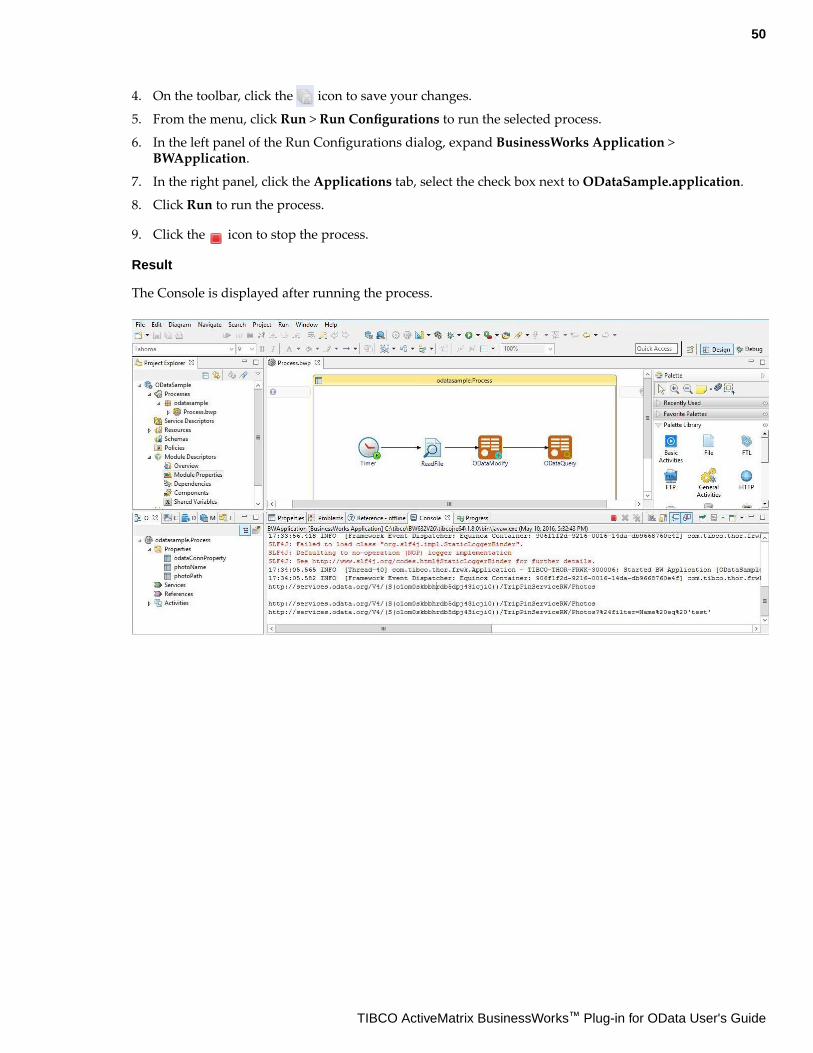
4. On the toolbar, click the icon to save your changes.
5. From the menu, click Run > Run Configurations to run the selected process.
6. In the left panel of the Run Configurations dialog, expand BusinessWorks Application >BWApplication.
7. In the right panel, click the Applications tab, select the check box next to ODataSample.application.
8. Click Run to run the process.
9. Click the icon to stop the process.
Result
The Console is displayed after running the process.
50
TIBCO ActiveMatrix BusinessWorks™ Plug-in for OData User's Guide
Managing Logs
When an error occurs, you can check logs to trace and troubleshoot the plug-in exceptions.
By default, error logs are displayed in the Console view when you run a process. You can change the loglevel of the plug-in to trace different messages and export logs to a file. Different log levels correspond todifferent messages, as described in Log Levels.
Log LevelsDifferent log levels include different information.
The plug-in supports the following log levels:
Log Level Description
Info Indicates normal plug-in operations. No action is required. A tracing messagetagged with Info indicates that a significant processing step is reached, andlogged for tracking or auditing purposes. Only info messages preceding atracking identifier are considered as significant steps.
Error Indicates that an unrecoverable error occurred. Depending on the severity of theerror, the plug-in might continue with the next operation or might stop.
Debug Indicates a developer-defined tracing message.
Setting Up Log LevelsYou can configure a different log level for the plug-in and plug-in activities to trace different messages.
By default, the plug-in uses the log level configured for TIBCO ActiveMatrix BusinessWorks. The defaultlog level value of TIBCO ActiveMatrix BusinessWorks is ERROR.
Procedure
1. Navigate to the TIBCO_HOME/bw/version_number/config/design/logback directory and open thelogback.xml file.
2. Add the following node in the BusinessWorks Palette and Activity loggers area to specify a log levelfor the plug-in:<logger name="com.tibco.bw.palette.odata.runtime"> <level value="DEBUG"/> </logger>
The value of the level element can be ERROR, INFO, or DEBUG.
If you set the log level to Debug, the input and output for the plug-in activities are alsodisplayed in the Console view. See Log Levels for more details regarding each log level.
3. Optional: Add the following node in the BusinessWorks Palette and Activity loggers area to specify alog level for an activity. The node varies according to the activity and the palette that it belongs to.<logger name="com.tibco.bw.palette.odata.runtime.ActivityNameActivity"> <level value="DEBUG"/></logger>
For example, you can add the following node to set the log level of the OData Modify activity to DEBUG:<logger name="com.tibco.bw.palette.odata.runtime.ModifyActivity"> <level value="DEBUG"/></logger>
51
TIBCO ActiveMatrix BusinessWorks™ Plug-in for OData User's Guide
The activities that are not configured with specific log levels use the log level configured forthe plug-in.
4. Save the file.
Exporting Logs to a FileYou can update the logback.xml file to export plug-in logs to a file.
Procedure
1. Navigate to the TIBCO_HOME/bw/version_number/config/design/logback directory and open thelogback.xml file.
After deploying an application in TIBCO Enterprise Administrator, navigate to theTIBCO_HOME/bw/version_number/domains/domain_name/appnodes/space_name/
node_name directory to find the logback.xml file.
2. Add the following node to specify the file where the log is exported:<appender name="FILE" class="ch.qos.logback.core.FileAppender"> <file>c:/bw6-OData.log</file> <encoder> <pattern>%d{HH:mm:ss.SSS} [%thread] %-5level %logger{36}-%msg%n</pattern> </encoder> </appender>
The value of the file element is the absolute path of the file that stores the exported log.
3. Add the following node to the root node at the bottom of the logback.xml file:<root level="DEBUG"> <appender-ref ref="STDOUT" /> <appender-ref ref="FILE" /></root>
4. Save the file.
52
TIBCO ActiveMatrix BusinessWorks™ Plug-in for OData User's Guide
Legal and Third-Party Notices
SOME TIBCO SOFTWARE EMBEDS OR BUNDLES OTHER TIBCO SOFTWARE. USE OF SUCHEMBEDDED OR BUNDLED TIBCO SOFTWARE IS SOLELY TO ENABLE THE FUNCTIONALITY (ORPROVIDE LIMITED ADD-ON FUNCTIONALITY) OF THE LICENSED TIBCO SOFTWARE. THEEMBEDDED OR BUNDLED SOFTWARE IS NOT LICENSED TO BE USED OR ACCESSED BY ANYOTHER TIBCO SOFTWARE OR FOR ANY OTHER PURPOSE.
USE OF TIBCO SOFTWARE AND THIS DOCUMENT IS SUBJECT TO THE TERMS AND CONDITIONSOF A LICENSE AGREEMENT FOUND IN EITHER A SEPARATELY EXECUTED SOFTWARE LICENSEAGREEMENT, OR, IF THERE IS NO SUCH SEPARATE AGREEMENT, THE CLICKWRAP END USERLICENSE AGREEMENT WHICH IS DISPLAYED DURING DOWNLOAD OR INSTALLATION OF THESOFTWARE (AND WHICH IS DUPLICATED IN THE LICENSE FILE) OR IF THERE IS NO SUCHSOFTWARE LICENSE AGREEMENT OR CLICKWRAP END USER LICENSE AGREEMENT, THELICENSE(S) LOCATED IN THE “LICENSE” FILE(S) OF THE SOFTWARE. USE OF THIS DOCUMENT ISSUBJECT TO THOSE TERMS AND CONDITIONS, AND YOUR USE HEREOF SHALL CONSTITUTEACCEPTANCE OF AND AN AGREEMENT TO BE BOUND BY THE SAME.
This document is subject to U.S. and international copyright laws and treaties. No part of this documentmay be reproduced in any form without the written authorization of TIBCO Software Inc.
TIBCO, the TIBCO logo, the TIBCO O logo, TIBCO ActiveMatrix BusinessWorks™, TIBCO ActiveMatrixBusinessWorks™ Plug-in for OData, TIBCO Business Studio™ for BusinessWorks™, and TIBCO® EnterpriseAdministrator are either registered trademarks or trademarks of TIBCO Software Inc. in the United Statesand/or other countries.
Java and all Java based trademarks and logos are trademarks or registered trademarks of OracleCorporation and/or its affiliates.
All other product and company names and marks mentioned in this document are the property of theirrespective owners and are mentioned for identification purposes only.
This software may be available on multiple operating systems. However, not all operating system platformsfor a specific software version are released at the same time. Please see the readme.txt file for the availabilityof this software version on a specific operating system platform.
THIS DOCUMENT IS PROVIDED “AS IS” WITHOUT WARRANTY OF ANY KIND, EITHER EXPRESS ORIMPLIED, INCLUDING, BUT NOT LIMITED TO, THE IMPLIED WARRANTIES OF MERCHANTABILITY,FITNESS FOR A PARTICULAR PURPOSE, OR NON-INFRINGEMENT.
THIS DOCUMENT COULD INCLUDE TECHNICAL INACCURACIES OR TYPOGRAPHICAL ERRORS.CHANGES ARE PERIODICALLY ADDED TO THE INFORMATION HEREIN; THESE CHANGES WILLBE INCORPORATED IN NEW EDITIONS OF THIS DOCUMENT. TIBCO SOFTWARE INC. MAY MAKEIMPROVEMENTS AND/OR CHANGES IN THE PRODUCT(S) AND/OR THE PROGRAM(S) DESCRIBEDIN THIS DOCUMENT AT ANY TIME.
THE CONTENTS OF THIS DOCUMENT MAY BE MODIFIED AND/OR QUALIFIED, DIRECTLY ORINDIRECTLY, BY OTHER DOCUMENTATION WHICH ACCOMPANIES THIS SOFTWARE, INCLUDINGBUT NOT LIMITED TO ANY RELEASE NOTES AND "READ ME" FILES.
This and other products of TIBCO Software Inc. may be covered by registered patents. Please refer toTIBCO's Virtual Patent Marking document (https://www.tibco.com/patents) for details.
Copyright © 2015-2020. TIBCO Software Inc. All Rights Reserved.
53
TIBCO ActiveMatrix BusinessWorks™ Plug-in for OData User's Guide