tibco activematrix businessworks™ installation
TRANSCRIPT
TIBCO ActiveMatrix BusinessWorks™
InstallationSoftware Release 6.3.3August 2016
Two-Second Advantage®
Important Information
SOME TIBCO SOFTWARE EMBEDS OR BUNDLES OTHER TIBCO SOFTWARE. USE OF SUCHEMBEDDED OR BUNDLED TIBCO SOFTWARE IS SOLELY TO ENABLE THE FUNCTIONALITY (ORPROVIDE LIMITED ADD-ON FUNCTIONALITY) OF THE LICENSED TIBCO SOFTWARE. THEEMBEDDED OR BUNDLED SOFTWARE IS NOT LICENSED TO BE USED OR ACCESSED BY ANYOTHER TIBCO SOFTWARE OR FOR ANY OTHER PURPOSE.
USE OF TIBCO SOFTWARE AND THIS DOCUMENT IS SUBJECT TO THE TERMS ANDCONDITIONS OF A LICENSE AGREEMENT FOUND IN EITHER A SEPARATELY EXECUTEDSOFTWARE LICENSE AGREEMENT, OR, IF THERE IS NO SUCH SEPARATE AGREEMENT, THECLICKWRAP END USER LICENSE AGREEMENT WHICH IS DISPLAYED DURING DOWNLOADOR INSTALLATION OF THE SOFTWARE (AND WHICH IS DUPLICATED IN THE LICENSE FILE)OR IF THERE IS NO SUCH SOFTWARE LICENSE AGREEMENT OR CLICKWRAP END USERLICENSE AGREEMENT, THE LICENSE(S) LOCATED IN THE “LICENSE” FILE(S) OF THESOFTWARE. USE OF THIS DOCUMENT IS SUBJECT TO THOSE TERMS AND CONDITIONS, ANDYOUR USE HEREOF SHALL CONSTITUTE ACCEPTANCE OF AND AN AGREEMENT TO BEBOUND BY THE SAME.
This document contains confidential information that is subject to U.S. and international copyright lawsand treaties. No part of this document may be reproduced in any form without the writtenauthorization of TIBCO Software Inc.
TIBCO, TIBCO ActiveMatrix BusinessWorks, TIBCO Rendezvous, TIBCO Enterprise Message Service,TIBCO Business Studio, TIBCO Enterprise Administrator, TIBCO ActiveSpaces, TIBCO Runtime Agent,TIBCO Designer, and Two-Second Advantage are either registered trademarks or trademarks of TIBCOSoftware Inc. in the United States and/or other countries.
Enterprise Java Beans (EJB), Java Platform Enterprise Edition (Java EE), Java 2 Platform EnterpriseEdition (J2EE), and all Java-based trademarks and logos are trademarks or registered trademarks ofOracle Corporation in the U.S. and other countries.
All other product and company names and marks mentioned in this document are the property of theirrespective owners and are mentioned for identification purposes only.
THIS SOFTWARE MAY BE AVAILABLE ON MULTIPLE OPERATING SYSTEMS. HOWEVER, NOTALL OPERATING SYSTEM PLATFORMS FOR A SPECIFIC SOFTWARE VERSION ARE RELEASEDAT THE SAME TIME. SEE THE README FILE FOR THE AVAILABILITY OF THIS SOFTWAREVERSION ON A SPECIFIC OPERATING SYSTEM PLATFORM.
THIS DOCUMENT IS PROVIDED “AS IS” WITHOUT WARRANTY OF ANY KIND, EITHER EXPRESSOR IMPLIED, INCLUDING, BUT NOT LIMITED TO, THE IMPLIED WARRANTIES OFMERCHANTABILITY, FITNESS FOR A PARTICULAR PURPOSE, OR NON-INFRINGEMENT.
THIS DOCUMENT COULD INCLUDE TECHNICAL INACCURACIES OR TYPOGRAPHICALERRORS. CHANGES ARE PERIODICALLY ADDED TO THE INFORMATION HEREIN; THESECHANGES WILL BE INCORPORATED IN NEW EDITIONS OF THIS DOCUMENT. TIBCOSOFTWARE INC. MAY MAKE IMPROVEMENTS AND/OR CHANGES IN THE PRODUCT(S)AND/OR THE PROGRAM(S) DESCRIBED IN THIS DOCUMENT AT ANY TIME.
THE CONTENTS OF THIS DOCUMENT MAY BE MODIFIED AND/OR QUALIFIED, DIRECTLY ORINDIRECTLY, BY OTHER DOCUMENTATION WHICH ACCOMPANIES THIS SOFTWARE,INCLUDING BUT NOT LIMITED TO ANY RELEASE NOTES AND "READ ME" FILES.
Copyright © 2001-2016 TIBCO Software Inc. All rights reserved.
TIBCO Software Inc. Confidential Information
2
TIBCO ActiveMatrix BusinessWorks™ Installation
Contents
TIBCO Documentation and Support Services . . . . . . . . . . . . . . . . . . . . . . . . . . . . . . . . . . . . . . . . . . . . . . . . . . . . . . . . .4
Installation Requirements . . . . . . . . . . . . . . . . . . . . . . . . . . . . . . . . . . . . . . . . . . . . . . . . . . . . . . . . . . . . . . . . . . . . . . . . . . .5
Preinstallation Tasks . . . . . . . . . . . . . . . . . . . . . . . . . . . . . . . . . . . . . . . . . . . . . . . . . . . . . . . . . . . . . . . . . . . . . . . . . . . . . . . . . . . . . . . . . . . . . . . . . . . 5
Hardware and Software Requirements . . . . . . . . . . . . . . . . . . . . . . . . . . . . . . . . . . . . . . . . . . . . . . . . . . . . . . . . . . . . . . . . . . . . . . . . . . . . . . . . . 6
Compatibility Chart for TIBCO ActiveMatrix BusinessWorks and TIBCO Enterprise Administrator . . . . . . . . . . . . . . . . . . . . . . . . 6
Installation . . . . . . . . . . . . . . . . . . . . . . . . . . . . . . . . . . . . . . . . . . . . . . . . . . . . . . . . . . . . . . . . . . . . . . . . . . . . . . . . . . . . . . . . .9
Installation Modes . . . . . . . . . . . . . . . . . . . . . . . . . . . . . . . . . . . . . . . . . . . . . . . . . . . . . . . . . . . . . . . . . . . . . . . . . . . . . . . . . . . . . . . . . . . . . . . . . . . . . 9
Installing in GUI Mode . . . . . . . . . . . . . . . . . . . . . . . . . . . . . . . . . . . . . . . . . . . . . . . . . . . . . . . . . . . . . . . . . . . . . . . . . . . . . . . . . . . . . . . . . . . . . . . . . 9
Installing in Console Mode . . . . . . . . . . . . . . . . . . . . . . . . . . . . . . . . . . . . . . . . . . . . . . . . . . . . . . . . . . . . . . . . . . . . . . . . . . . . . . . . . . . . . . . . . . . .11
Installing in Silent Mode . . . . . . . . . . . . . . . . . . . . . . . . . . . . . . . . . . . . . . . . . . . . . . . . . . . . . . . . . . . . . . . . . . . . . . . . . . . . . . . . . . . . . . . . . . . . . . 12
Postinstallation Tasks . . . . . . . . . . . . . . . . . . . . . . . . . . . . . . . . . . . . . . . . . . . . . . . . . . . . . . . . . . . . . . . . . . . . . . . . . . . . . 13
Upgrading the Software . . . . . . . . . . . . . . . . . . . . . . . . . . . . . . . . . . . . . . . . . . . . . . . . . . . . . . . . . . . . . . . . . . . . . . . . . . . 14
Installing TIBCO ActiveMatrix BusinessWorks Plug-ins . . . . . . . . . . . . . . . . . . . . . . . . . . . . . . . . . . . . . . . . . . . . . .16
Installing Plug-ins Using Eclipse Update Site . . . . . . . . . . . . . . . . . . . . . . . . . . . . . . . . . . . . . . . . . . . . . . . . . . . . . . . . . . . . . . . . . . . . . . . . . . 16
Installing Plug-ins Using a Local Update Site or Directory . . . . . . . . . . . . . . . . . . . . . . . . . . . . . . . . . . . . . . . . . . . . . . . . . . . . . . . . . . . . . .17
Troubleshooting Installation . . . . . . . . . . . . . . . . . . . . . . . . . . . . . . . . . . . . . . . . . . . . . . . . . . . . . . . . . . . . . . . . . . . . . . . 18
Uninstalling the Software . . . . . . . . . . . . . . . . . . . . . . . . . . . . . . . . . . . . . . . . . . . . . . . . . . . . . . . . . . . . . . . . . . . . . . . . . . 19
3
TIBCO ActiveMatrix BusinessWorks™ Installation
TIBCO Documentation and Support Services
Documentation for this and other TIBCO products is available on the TIBCO Documentation site. Thissite is updated more frequently than any documentation that might be included with the product. Toensure that you are accessing the latest available help topics, please visit:
https://docs.tibco.com
Product-Specific Documentation
Documentation for TIBCO products is not bundled with the software. Instead, it is available on theTIBCO Documentation site. To directly access documentation for this product, double-click thefollowing file:
TIBCO_HOME/release_notes/TIB_BW_version_docinfo.html
The following documents for this product can be found on the TIBCO Documentation site:
● Concepts
● Installation
● Getting Started
● Application Development
● Administration
● Bindings and Palettes Reference
● Samples
● Error Codes
● API Reference
● Migration
How to Contact TIBCO Support
For comments or problems with this manual or the software it addresses, contact TIBCO Support:
● For an overview of TIBCO Support, and information about getting started with TIBCO Support,visit this site:
http://www.tibco.com/services/support
● If you already have a valid maintenance or support contract, visit this site:
https://support.tibco.com
Entry to this site requires a user name and password. If you do not have a user name, you canrequest one.
How to Join TIBCO Community
TIBCO Community is an online destination for TIBCO customers, partners, and resident experts. It is aplace to share and access the collective experience of the TIBCO community. TIBCO Community offersforums, blogs, and access to a variety of resources. To register, go to the following web address:
https://community.tibco.com
4
TIBCO ActiveMatrix BusinessWorks™ Installation
Installation Requirements
Before installing the product on your system, ensure that you can log in to the system with appropriatepermissions, and your system meets the hardware and software requirements.
If you plan to install in an existing installation environment, stop all running processes inTIBCO_HOME.
Installation Account
The privileges required to install the product differ for Windows and UNIX platforms. Ensure that youhave the appropriate privileges to install on the target platform.
Microsoft Windows
You must have administrator privileges for the machine on which you want to install the software. Ifyou do not have administrator privileges, the installer exits. If you want to install the product on anetwork drive, ensure that the account used for installation has permission to access the network drive.
Mac and UNIX
Any user, regular user (non-root) or super-user (root), can perform the installation. Use the sameinstaller account to install all TIBCO products.
On Unix systems, a graphic environment such as CDE or X Windows is required to run the installer inGUI mode.
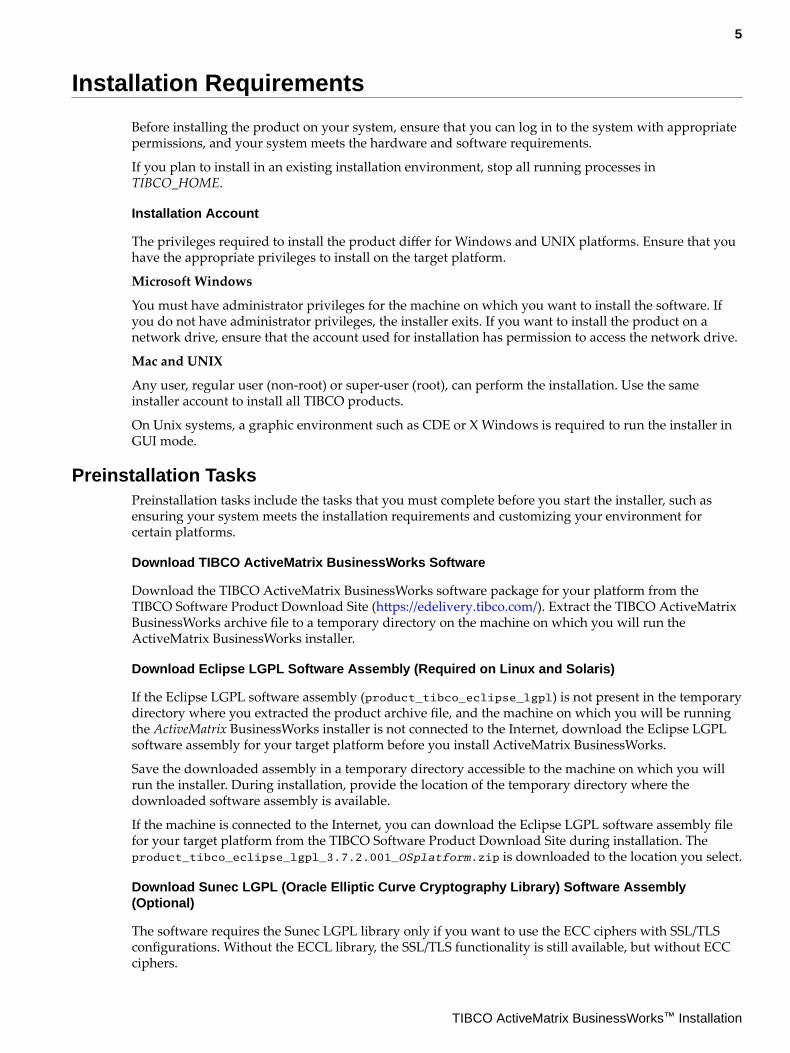
Preinstallation TasksPreinstallation tasks include the tasks that you must complete before you start the installer, such asensuring your system meets the installation requirements and customizing your environment forcertain platforms.
Download TIBCO ActiveMatrix BusinessWorks Software
Download the TIBCO ActiveMatrix BusinessWorks software package for your platform from theTIBCO Software Product Download Site (https://edelivery.tibco.com/). Extract the TIBCO ActiveMatrixBusinessWorks archive file to a temporary directory on the machine on which you will run theActiveMatrix BusinessWorks installer.
Download Eclipse LGPL Software Assembly (Required on Linux and Solaris)
If the Eclipse LGPL software assembly (product_tibco_eclipse_lgpl) is not present in the temporarydirectory where you extracted the product archive file, and the machine on which you will be runningthe ActiveMatrix BusinessWorks installer is not connected to the Internet, download the Eclipse LGPLsoftware assembly for your target platform before you install ActiveMatrix BusinessWorks.
Save the downloaded assembly in a temporary directory accessible to the machine on which you willrun the installer. During installation, provide the location of the temporary directory where thedownloaded software assembly is available.
If the machine is connected to the Internet, you can download the Eclipse LGPL software assembly filefor your target platform from the TIBCO Software Product Download Site during installation. Theproduct_tibco_eclipse_lgpl_3.7.2.001_OSplatform.zip is downloaded to the location you select.
Download Sunec LGPL (Oracle Elliptic Curve Cryptography Library) Software Assembly(Optional)
The software requires the Sunec LGPL library only if you want to use the ECC ciphers with SSL/TLSconfigurations. Without the ECCL library, the SSL/TLS functionality is still available, but without ECCciphers.
5
TIBCO ActiveMatrix BusinessWorks™ Installation
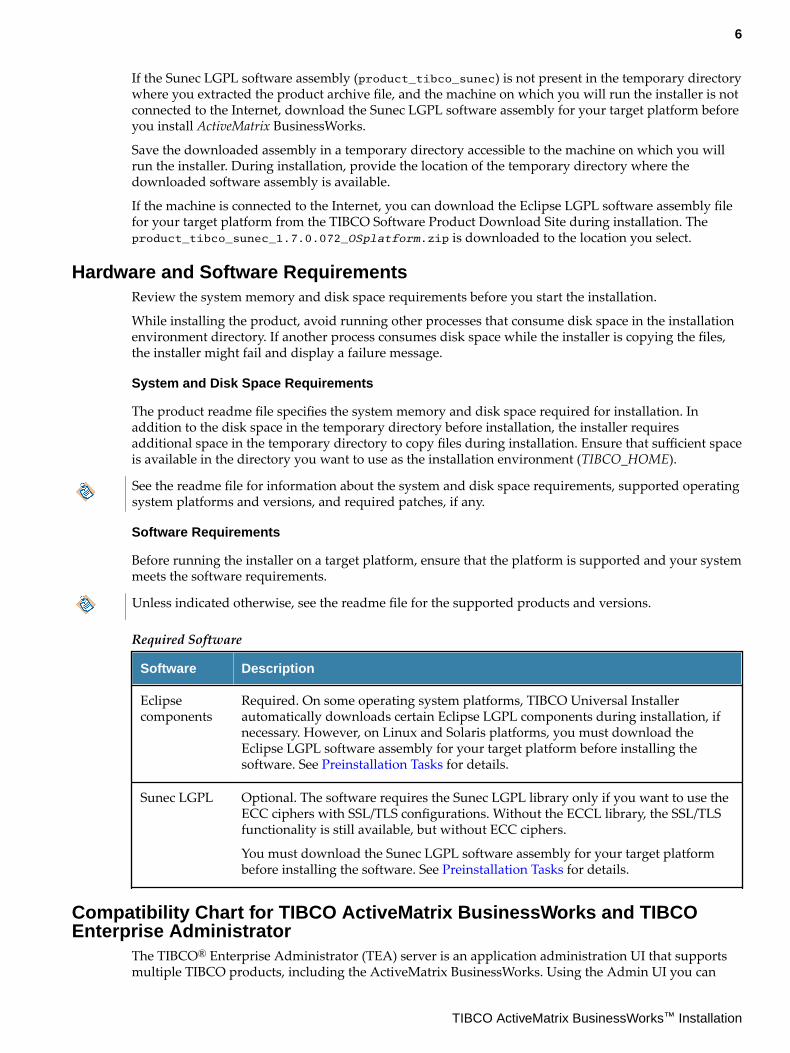
If the Sunec LGPL software assembly (product_tibco_sunec) is not present in the temporary directorywhere you extracted the product archive file, and the machine on which you will run the installer is notconnected to the Internet, download the Sunec LGPL software assembly for your target platform beforeyou install ActiveMatrix BusinessWorks.
Save the downloaded assembly in a temporary directory accessible to the machine on which you willrun the installer. During installation, provide the location of the temporary directory where thedownloaded software assembly is available.
If the machine is connected to the Internet, you can download the Eclipse LGPL software assembly filefor your target platform from the TIBCO Software Product Download Site during installation. Theproduct_tibco_sunec_1.7.0.072_OSplatform.zip is downloaded to the location you select.
Hardware and Software RequirementsReview the system memory and disk space requirements before you start the installation.
While installing the product, avoid running other processes that consume disk space in the installationenvironment directory. If another process consumes disk space while the installer is copying the files,the installer might fail and display a failure message.
System and Disk Space Requirements
The product readme file specifies the system memory and disk space required for installation. Inaddition to the disk space in the temporary directory before installation, the installer requiresadditional space in the temporary directory to copy files during installation. Ensure that sufficient spaceis available in the directory you want to use as the installation environment (TIBCO_HOME).
See the readme file for information about the system and disk space requirements, supported operatingsystem platforms and versions, and required patches, if any.
Software Requirements
Before running the installer on a target platform, ensure that the platform is supported and your systemmeets the software requirements.
Unless indicated otherwise, see the readme file for the supported products and versions.
Required Software
Software Description
Eclipsecomponents
Required. On some operating system platforms, TIBCO Universal Installerautomatically downloads certain Eclipse LGPL components during installation, ifnecessary. However, on Linux and Solaris platforms, you must download theEclipse LGPL software assembly for your target platform before installing thesoftware. See Preinstallation Tasks for details.
Sunec LGPL Optional. The software requires the Sunec LGPL library only if you want to use theECC ciphers with SSL/TLS configurations. Without the ECCL library, the SSL/TLSfunctionality is still available, but without ECC ciphers.
You must download the Sunec LGPL software assembly for your target platformbefore installing the software. See Preinstallation Tasks for details.
Compatibility Chart for TIBCO ActiveMatrix BusinessWorks and TIBCOEnterprise Administrator
The TIBCO® Enterprise Administrator (TEA) server is an application administration UI that supportsmultiple TIBCO products, including the ActiveMatrix BusinessWorks. Using the Admin UI you can
6
TIBCO ActiveMatrix BusinessWorks™ Installation
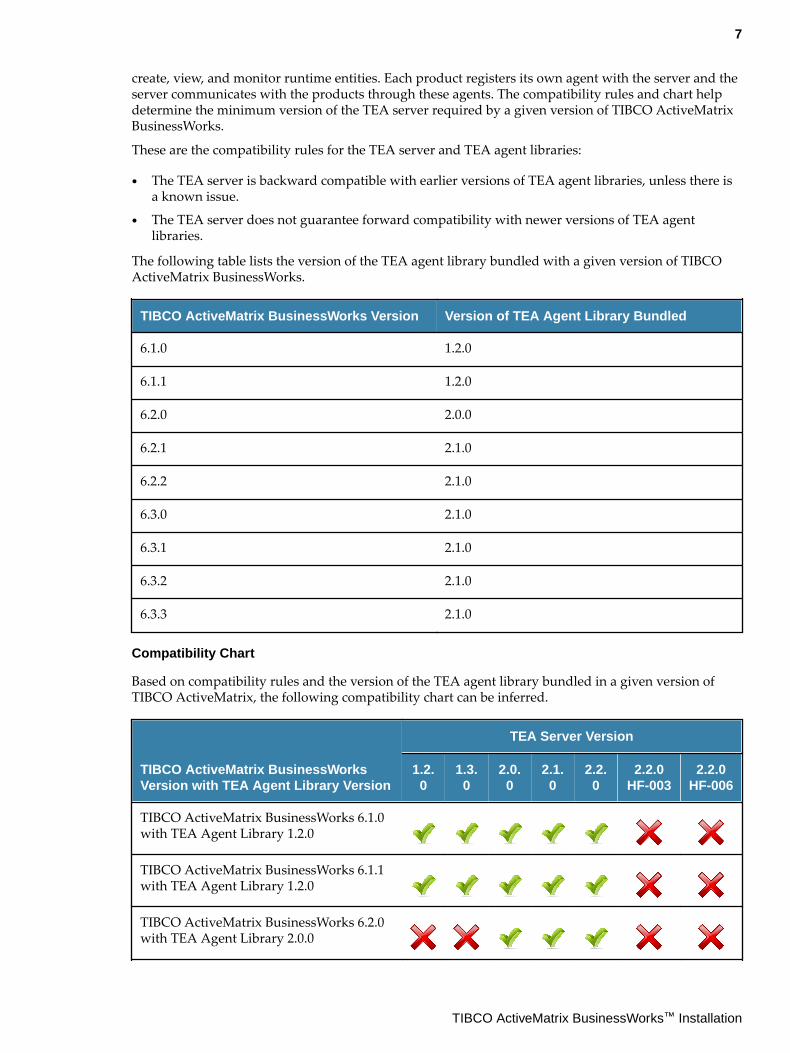
create, view, and monitor runtime entities. Each product registers its own agent with the server and theserver communicates with the products through these agents. The compatibility rules and chart helpdetermine the minimum version of the TEA server required by a given version of TIBCO ActiveMatrixBusinessWorks.
These are the compatibility rules for the TEA server and TEA agent libraries:
● The TEA server is backward compatible with earlier versions of TEA agent libraries, unless there isa known issue.
● The TEA server does not guarantee forward compatibility with newer versions of TEA agentlibraries.
The following table lists the version of the TEA agent library bundled with a given version of TIBCOActiveMatrix BusinessWorks.
TIBCO ActiveMatrix BusinessWorks Version Version of TEA Agent Library Bundled
6.1.0 1.2.0
6.1.1 1.2.0
6.2.0 2.0.0
6.2.1 2.1.0
6.2.2 2.1.0
6.3.0 2.1.0
6.3.1 2.1.0
6.3.2 2.1.0
6.3.3 2.1.0
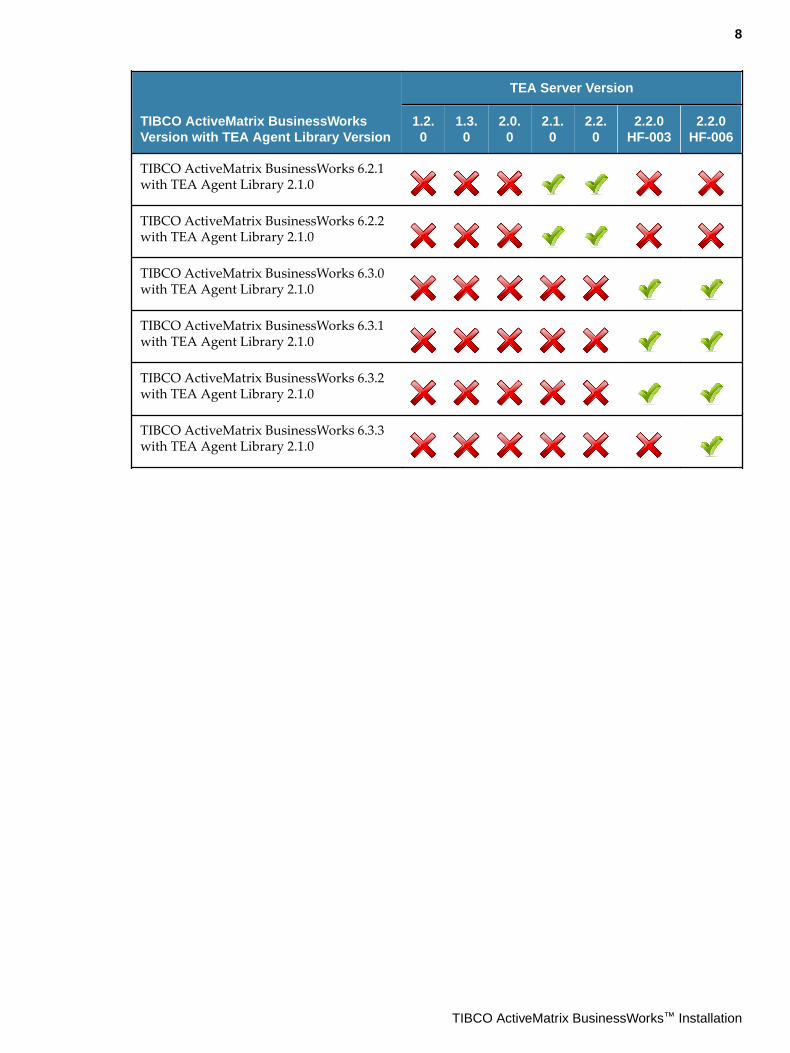
Compatibility Chart
Based on compatibility rules and the version of the TEA agent library bundled in a given version ofTIBCO ActiveMatrix, the following compatibility chart can be inferred.
TIBCO ActiveMatrix BusinessWorksVersion with TEA Agent Library Version
TEA Server Version
1.2.0
1.3.0
2.0.0
2.1.0
2.2.0
2.2.0HF-003
2.2.0HF-006
TIBCO ActiveMatrix BusinessWorks 6.1.0with TEA Agent Library 1.2.0
TIBCO ActiveMatrix BusinessWorks 6.1.1with TEA Agent Library 1.2.0
TIBCO ActiveMatrix BusinessWorks 6.2.0with TEA Agent Library 2.0.0
7
TIBCO ActiveMatrix BusinessWorks™ Installation
TIBCO ActiveMatrix BusinessWorksVersion with TEA Agent Library Version
TEA Server Version
1.2.0
1.3.0
2.0.0
2.1.0
2.2.0
2.2.0HF-003
2.2.0HF-006
TIBCO ActiveMatrix BusinessWorks 6.2.1with TEA Agent Library 2.1.0
TIBCO ActiveMatrix BusinessWorks 6.2.2with TEA Agent Library 2.1.0
TIBCO ActiveMatrix BusinessWorks 6.3.0with TEA Agent Library 2.1.0
TIBCO ActiveMatrix BusinessWorks 6.3.1with TEA Agent Library 2.1.0
TIBCO ActiveMatrix BusinessWorks 6.3.2with TEA Agent Library 2.1.0
TIBCO ActiveMatrix BusinessWorks 6.3.3with TEA Agent Library 2.1.0
8
TIBCO ActiveMatrix BusinessWorks™ Installation
Installation
TIBCO provides downloadable product archive files and the products can be installed using TIBCOUniversal Installer.
Extract the downloaded product archive file to a temporary directory, and then run the TIBCOUniversal Installer executable from that directory.
If installing more than one product, you can extract multiple product archive files to the sametemporary directory and then run TIBCO Universal Installer.
Installation ModesYou can run the installer in one of the following modes: GUI, console, or silent. Each mode is supportedon all platforms.
GUI Mode
In GUI mode, invoke the installer by double-clicking the executable file TIBCOUniversalInstaller.The installer presents windows that you can use to select the product components, its location, and soon. Proceed through the installation process by providing your input.
Console Mode
In console mode, you invoke the installer from a command prompt or a terminal window, and theinstaller prompts for values on the console. You can move through the installation process byresponding to the prompts. This mode is useful if your machine does not have a Windowsenvironment.
Silent Mode
In silent mode, the installer installs without prompting you for information. Silent mode either installsusing the default settings or uses a response file that was saved during an earlier installation. In thismode:
● If no response file has been recorded earlier, invoke the installer with the -silent argument to usethe default installation parameters.
● If a response file exists, invoke the installer with the arguments -silent -VresponseFile="<responseFileName>" to use the values specified in the response file.
Installing in GUI ModeWhen you run the installer in GUI mode, the installer presents panels that you can use to choose theinstallation environment and customize your installation.
Procedure
1. Run the TIBCOUniversalInstaller executable.
● On Microsoft Windows: TIBCOUniversalInstaller.exe
● On Unix: TIBCOUniversalInstaller.bin
● On Mac OS: TIBCOUniversalInstaller-mac.command
2. On the Welcome screen, click Next.
3. Read through the license agreement, select I accept the terms of the license agreement if you agreeto the terms, and click Next.
4. Choose to create a new installation environment (TIBCO_HOME) and specify the directory andname for the new environment. Then click Next.
9
TIBCO ActiveMatrix BusinessWorks™ Installation
Option Procedure
Create a newTIBCO_HOME
Specify properties:
● Directory The directory into which the product is installed. Thedirectory cannot be the same as the directory of an existing installationenvironment.
The directory path cannot contain the following special characters:
# $ % & * < > ? ` |
● Name Identifies the installation environment. The name cannot containthe following special characters:
" * / : < > ? \ |
Use an existingTIBCO_HOME
Select an existing installation environment from the drop-down menu.
If you are upgrading to the latest version of the software from anearlier version, it is good practice to install the latest version in anew installation environment. See Upgrading the Software fordetails.
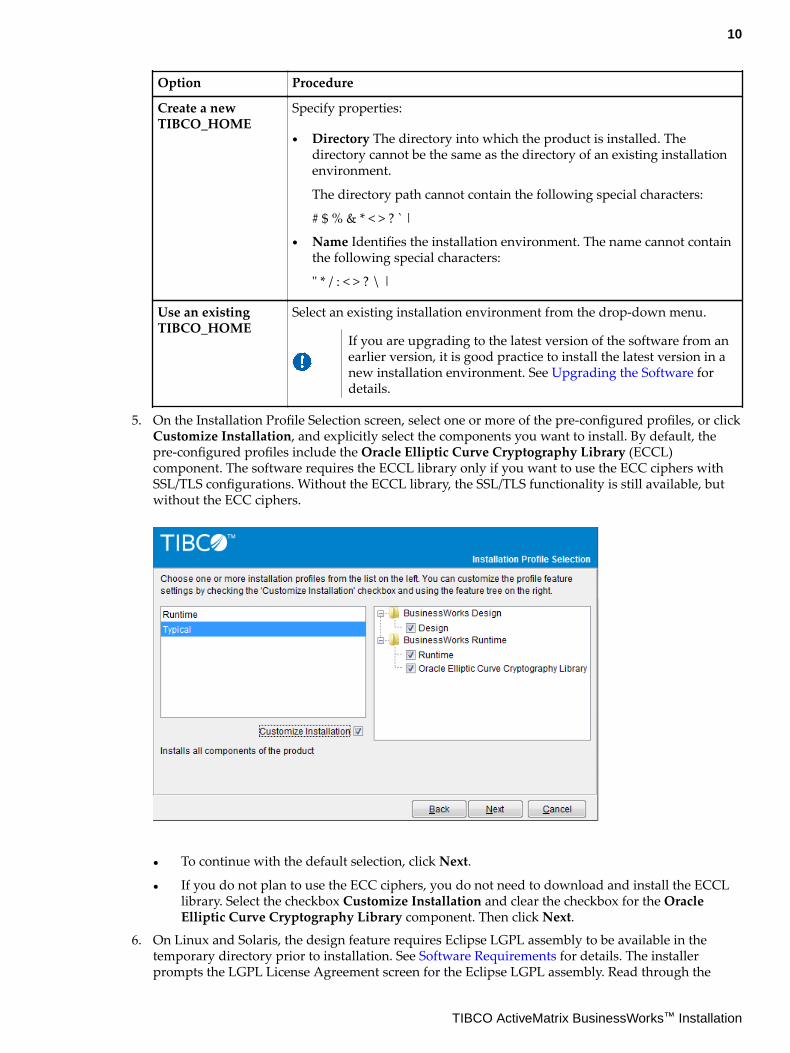
5. On the Installation Profile Selection screen, select one or more of the pre-configured profiles, or clickCustomize Installation, and explicitly select the components you want to install. By default, thepre-configured profiles include the Oracle Elliptic Curve Cryptography Library (ECCL)component. The software requires the ECCL library only if you want to use the ECC ciphers withSSL/TLS configurations. Without the ECCL library, the SSL/TLS functionality is still available, butwithout the ECC ciphers.
● To continue with the default selection, click Next.
● If you do not plan to use the ECC ciphers, you do not need to download and install the ECCLlibrary. Select the checkbox Customize Installation and clear the checkbox for the OracleElliptic Curve Cryptography Library component. Then click Next.
6. On Linux and Solaris, the design feature requires Eclipse LGPL assembly to be available in thetemporary directory prior to installation. See Software Requirements for details. The installerprompts the LGPL License Agreement screen for the Eclipse LGPL assembly. Read through the
10
TIBCO ActiveMatrix BusinessWorks™ Installation
license agreement, select I accept the terms of the license agreement if you agree to the terms, andclick Next to proceed.
7. On the LGPL Assembly Download screen, select one of the following download options and clickNext.
● Download Gnome Binding assembly from TIBCO: Select this option if you are connected tothe Internet or do not want to use a previously downloaded assembly. The assembly isautomatically downloaded and stored in the assemblies subdirectory of the directory whereyou extracted the installer.
● Provide the location for the assembly previously downloaded from TIBCO: Select this optionif you are not connected to the Internet. Click Browse to navigate to the directory where thepreviously downloaded LGPL assembly is stored. Select the directory, and click Open.
8. Skip this step if the Oracle Elliptic Curve Cryptography Library component was notselected in the Installation Profile Selection screen.
If you choose to install the Oracle Elliptic Curve Cryptography Library component, the designfeature requires the Sunec LGPL assembly to be available in the temporary directory prior toinstallation. See Software Requirements for details. The installer prompts the LGPL LicenseAgreement screen for the Sunec LGPL assembly. To download the Oracle Elliptic CurveCryptography Library, select I accept the terms of the license agreement, and click Next. If you donot want to download the Oracle Elliptic Curve Cryptography Library, click Cancel to exit.
9. On the LGPL Assembly Download screen, select one of the following download options and clickNext.
● Download Oracle Elliptic Curve Cryptography Library assembly from TIBCO: Select thisoption if you are connected to the Internet or do not want to use a previously downloadedassembly. The assembly is automatically downloaded and stored in the assembliessubdirectory of the directory where you extracted the installer.
● Provide the location for the assembly previously downloaded from TIBCO: Select this optionif you are not connected to the Internet. Click Browse to navigate to the directory where thepreviously downloaded LGPL assembly is stored. Select the directory, and click Open.
10. On the Pre-Install Summary screen, verify the list of products and components selected forinstallation, and click Install.
11. Verify the Post-Install Summary, click Finish to complete the installation process, and close theinstaller window.
Installing in Console ModeWhen you run the installer in console mode, the installer prompts for values on a console window andyou can move through the installation by responding to the prompts. Console mode can be used toinstall the software in a non-Windows environment.
Prerequisites
Prepare your system and the installation media before running the installer in console mode.
Procedure
1. Open a console window and navigate to the temporary directory where you extracted the productarchive file.
2. Run TIBCOUniversalInstaller -console.The installer launches a second console window.
11
TIBCO ActiveMatrix BusinessWorks™ Installation
3. Complete the installation by responding to the console window prompts, which are similar to thosedescribed in the section Installing in GUI Mode. The console also provides an option to return to aprevious selection periodically.
4. When the installation is completed, press Enter to exit the installer.
Installing in Silent ModeWhen you run the installer in silent mode, the installer does not prompt for your input. Instead, thevalues specified in a response file are used to complete the installation. You can use a default pre-configured response file or create your own response file.
By default, the installer uses the TIBCOUniversalInstaller_BW_<version>.silent file, which isincluded in the directory that contains the universal installer.
To customize the silent installer:
● Make a backup copy of the TIBCOUniversalInstaller_BW_<version>.silent file and edit the fileitself. You can then run the silent installer with or without the response file argument.
Procedure
1. Make a copy of TIBCOUniversalInstaller_BW_<version>.silent file and rename the file, forexample, newfile.silent.
2. Using a text editor, open the copied file and update the installation location and features to install.
3. Open a console window, and navigate to the temporary directory where you extracted the productarchive file. Run the silent installer using one of the following commands:
● On Windows:TIBCOUniversalInstaller.cmd -silent [-V responseFile="newfile.silent" ]
● On UNIX:TIBCOUniversalInstaller.bin -silent [-V responseFile='newfile.silent']
● On Mac OS:TIBCOUniversalInstaller-mac.command -silent [-V responseFile='newfile.silent']
12
TIBCO ActiveMatrix BusinessWorks™ Installation
Postinstallation Tasks
Postinstallation tasks are additional tasks that you might have to perform after installation. These tasksmight be required for certain scenarios and must be performed before you develop your applications orcreate and configure the runtime objects.
Prerequisites
Complete the installation before running the postinstallation tasks.
Set Environment Variable RV_HOME
You must install TIBCO Rendezvous® if you want to use the Rendezvous palette activities, or TIBCOHawk® micro agents features. Refer to the product readme file for the supported versions.
Ensure that the environment variable RV_HOME is set and refers to the TIBCO Rendezvous installed.For example, on Windows platform, set "RV_HOME=TIBCO_HOME/tibrv/8.4".
On AIX Platform: Configure the Environment
On AIX platform, follow the steps to configure the environment:
1. Remove TIBCO_JRE_HOME/1.8.0/lib/xml.jar.
2. Copy BW_HOME/system/shared/com.tibco.tpcl.javax.system.exports_5.10.0.001/xml-apis.jar into TIBCO_JRE_HOME/1.8.0/lib/ext
3. Copy BW_HOME/system/shared/com.tibco.tpcl.com.ctc.wstx_3.2.300.002/wstx-asl-3.2.9.jar into TIBCO_JRE_HOME/1.8.0/lib/ext
4. To resolve localhost on AIX platform, add the property [hosts = local, bind4] to /etc/netsvc.conf if applicable.
On Windows Platform: Support bwagent Using TIBCO ActiveSpaces®
On Windows platform, download and install Microsoft Visual C++ 2010 Redistributable Package (x64)to ensure bwagent can use TIBCO ActiveSpaces for transport and data persistence.
13
TIBCO ActiveMatrix BusinessWorks™ Installation
Upgrading the Software
You can upgrade the software when new features are available or when problems in the software havebeen fixed. A typical upgrade involves downloading and installing the newer version, either a seconddigit (6.x) or a third digit change (6.2.x), of the software and some manual tasks to complete theupgrade.The manual tasks consist of generic tasks required for all versions and some additional tasksthat depend on the version you are upgrading to.
Prerequisites
1. If you are upgrading to TIBCO ActiveMatrix BusinessWorks 6.3.1, or to previous versions of thesoftware, the configuration of any of the runtime entities has been manually updated, back up thephysical directory structure for the domain.
The bwadmin backup command exports the current state of the specified runtime entity toa bwadmin command file. However, any manual changes made to the configuration filesof the runtime entities are not tracked and will be lost.
2. To back up a domain, open a console window and navigate to the TIBCO_HOME/bw/<older_version>/bin directory. Then run the following command:bwadmin backup -s <destination_file>.cmd domain <domain_name>
The bwadmin command file <destination_file>.cmd is generated. See the Administration guidefor details on backing up and restoring runtime entities.
Procedure
1. If you are upgrading to a second digit (6.x) version, install the new software in a newTIBCO_HOME directory. If you are upgrading to a third digit (6.2.x) version, install the software ina new TIBCO_HOME directory.Follow the instructions in Installation to install the software in a new TIBCO_HOME directory usingGUI, console, or silent mode.
If you are upgrading from TIBCO ActiveMatrix BusinessWorks 6.3.0 to TIBCOActiveMatrix BusinessWorks 6.3.1, install the software in a new TIBCO_HOME to ensure ituses JRE 8. If you are upgrading from TIBCO ActiveMatrix BusinessWorks 6.3.1 to laterversions of the software, for example TIBCO ActiveMatrix BusinessWorks 6.3.2, you caninstall the software in the same TIBCO_HOME directory.
2. Applicable to service pack (third digit) upgrade only.
This step provides details about the files and folders that are backed up by installer when youinstall a service pack.
If you are installing TIBCO ActiveMatrix BusinessWorks 6.3.1, or earlier versions of the software,the installer creates a backup folder under <TIBCO_HOME>/bw/backup/<timestamp>/ where thefollowing files and folders are saved.
● config/bwagent_as.json● config/bwagent_db.json● <BW_HOME>/domains
● <BW_HOME>/ext
After upgrading, you can copy the configuration and .tra files from the backup folder to retrieveyour settings before the upgrade.
If you are installing TIBCO ActiveMatrix BusinessWorks 6.3.2, or later versions of the software, theinstaller performs a complete backup of your BW_HOME, and stores the files at <TIBCO_HOME>/
14
TIBCO ActiveMatrix BusinessWorks™ Installation
_installInfo/.spbackup/bw_6.3. After the service pack is installed, the installer restores thefollowing files and folders to their former locations:
● config/bwagent_as.json
● config/bwagent_db.json
● <BW_HOME>/domains
● <BW_HOME>/ext
After you have completed testing applications and confirmed they run properly, you candelete the backup folder.
3. Import the TIBCO Business Studio™ projects to a new workspace.After installing the latest version of the software, use a new TIBCO Business Studio workspacewhen developing applications or modules. To use projects created in the older version, import theprojects to the new workspace using the File > Import... menu in TIBCO Business Studio.
Reusing an existing workspace with the newer version of the software makes thatworkspace unusable with the older version of the software.
Applicable to second digit (6.x) upgrade only.
4. This step is only applicable if you are upgrading to TIBCO ActiveMatrix BusinessWorks6.3.1, or to previous versions of the software.
Import the runtime artifacts to the new environment.By default, the runtime components are installed under the TIBCO_HOME/bw/<new_version>directory and the runtime artifacts such as domains, AppSpaces, and AppNodes are created underthe TIBCO_HOME/bw/<new_version>/domains directory. If you want to use the runtime artifactscreated using the older version of the software, you must recreate the runtime artifacts for thenewer version of the software. Complete the following tasks to import the runtime artifacts to thenew environment:a) Before recreating the domain, edit the <destination_file>.cmd as described:
● In the create -agent command, update the argument domainHome to provide theTIBCO_HOME/bw/<new_version>/domains directory.
● In the upload -domain command, update the location of the archive file to provide theabsolute path to the archive file. For example, update the upload -domain command to thefollowing:upload -domain BookStore-Domain <TIBCO_HOME>/bw/<old_version>/bin/archives/BookStore-Domain/tibco.bw.sample.binding.rest.BookStore.application_1.0.0.ear
If the agent name is specified as localhost in the command file, update it to specifythe bwagent name. The bwagent name (bw.agent.memberName) is the specified in thebwagent.ini file.
b) To recreate the domain (or other runtime entities) in the new TIBCO_HOME environment,navigate to the TIBCO_HOME/bw/<new_version>/bin on the console, and run the followingcommand:bwadmin -f <destination_file>.cmd
c) Optionally, if the runtime entities were updated manually in the older environment, reapply themanual changes to recreate the exact state of the runtime artifacts.
Unregister and reregister the bwagent if the newly installed version of ActiveMatrixBusinessWorks is running in enterprise mode and is using the same TEA server thepreviously installed version used. If you encounter issues with the TEA web client UI aftercompleting this step, stop the TEA server, clean up the data folder under$TEA_ConfigHome/tibco/cfgmgmt/tea/data, and restart the TEA server.
15
TIBCO ActiveMatrix BusinessWorks™ Installation
Installing TIBCO ActiveMatrix BusinessWorks Plug-ins
There are multiple ways to install the TIBCO ActiveMatrix BusinessWorks Plug-ins.
● Install using the public Update Site: The plug-ins can be installed from within TIBCO BusinessStudio using the public Update Site http://update.tibco.com/eclipse/bw/version, where the versionat the end of the address reflects the version of BusinessWorks you are using, maintained by TIBCO.See Installing Plug-ins Using Eclipse Update Site for instructions.
● Install from a local Update Site or directory: The plug-ins can be installed from within TIBCOBusiness Studio using a local update site or a shared directory managed by your organization. See Installing Plugins Using a Local Update Site or Directory for instructions.
● Install using the TIBCO Universal Installer package: To install using the traditional approach, seethe Installation guide provided with the plug-in.
Installing Plug-ins Using Eclipse Update SiteTIBCO ActiveMatrix BusinessWorks Plug-ins can be installed from within TIBCO Business Studio usingthe public update site maintained by TIBCO.
Prerequisites
The software package must be available on the update site, http://update.tibco.com/eclipse/bw/version (where the version at the end of the address reflects the version of BusinessWorks you areusing). Typically, the package name has the format <plugin_name>_<version>_p2installer.zip.
Procedure
1. Start TIBCO Business Studio if it has not already been started.
● On Microsoft Windows, click Start > All Programs > TIBCO > TIBCO_HOME > TIBCOBusiness Studio version_number > Studio for Designers.
● On Linux or Mac OS, run the TIBCO Business Studio executable located in the TIBCO_HOME/studio/version_number/eclipse directory.
2. From the menu, select Help > Install New Software to open Eclipse Update Manager.
3. In the Install dialog, enter the URL of the public update site, http://update.tibco.com/eclipse/bw/version, in the Work with field.You can save the URL by adding it to the list of available software sites using the TIBCO BusinessStudio menu Window > Preferences > Install/Update > Available Software Sites.
4. From the list of available plug-ins, select the plug-in you want to install. Click Next.
You can select more than one plug-in from the list to install multiple plug-ins at the sametime.
5. In the Install Details dialog, review the components you want to install. Click Next.
6. In the Review Licenses dialog, review the licenses, and click I accept the terms of the licenseagreement.
7. Click Finish to start the installation.
What to do next
After installing the software, restart TIBCO Business Studio. This restart is necessary for the software toinstall completely.
16
TIBCO ActiveMatrix BusinessWorks™ Installation
Installing Plug-ins Using a Local Update Site or DirectoryTIBCO ActiveMatrix BusinessWorks Plug-ins can be installed from within TIBCO Business Studio usinga local site or directory maintained by your organization.
Prerequisites
Ensure that the software package is downloaded from the TIBCO download site and stored in anappropriate location, such as a local update site or a directory. Typically, the package name has theformat <plugin_name>_<version>_p2installer.zip.
Procedure
1. Start TIBCO Business Studio if it has not already been started.
● On Microsoft Windows, click Start > All Programs > TIBCO > TIBCO_HOME > TIBCOBusiness Studio version_number > Studio for Designers.
● On Linux or Mac OS, run the TIBCO Business Studio executable located in the TIBCO_HOME/studio/version_number/eclipse directory.
2. From the menu, select Help > Install New Software to open Eclipse Update Manager.
3. In the Install dialog, click Add to add a new update site you want to work with.
Only one update site can be added at a time. Repeat the following steps to add multiplerepositories that contain the downloaded software packages.
You can manage the list of software sites using the TIBCO Business Studio menu Window >Preferences > Install/Update > Available Software Sites.a) In the Add Repository dialog, click Archive and locate the Eclipse plug-in installation package
you want to install, and then click Open.The selected plug-in installation package is added to the Location field.
b) Provide a name for the repository. For example, specify the name as TIBCO Plugin UpdateSite for <plug-in>. Click OK.The plug-in installation package is added to the list of available software in the Install dialog.
4. In the Install dialog, select the plug-in you want to install. Click Next.
If there is more than one plug-in in the dialog, you can select multiple plug-ins to install atthe same time.
5. In the Install Details dialog, review the components you want to install. Click Next.
6. In the Review Licenses dialog, review the licenses, and click I accept the terms of the licenseagreement.
7. Click Finish to start the installation.
What to do next
After installing the software, restart TIBCO Business Studio. This restart is necessary for the software toinstall completely.
17
TIBCO ActiveMatrix BusinessWorks™ Installation
Troubleshooting Installation
If you encounter problems during installation, ensure that your system meets all prerequisites, andthen check the installer log for potential problems.
Installer Log FileThe installer log file captures information such as:
● Environment details such as the user that invoked the installer, host name, operating systemdetails, and so on.
● List of assemblies installed.
● Information related to the Ant scripts executed by the installer.
The installer log file, tibco_universal_installer.username_install.log is available in thefollowing locations.
● Windows: C:\Users\username\.TIBCO\install_timestamp
● Linux: user_home_dir/.TIBCO/install_timestamp
To change the location of the installer log file, specify the option -V logFile="myLogFile" when runningthe installer.
18
TIBCO ActiveMatrix BusinessWorks™ Installation
Uninstalling the Software
TIBCO Universal Installer can be used to uninstall the software. Using the Universal Installer, you canchoose to uninstall either all products installed in the TIBCO_HOME directory or just the selectedproducts.
Prerequisites
Before uninstalling the product, stop all running appnodes, the ActiveMatrix BusinessWorks engine,and the bwagents on the machine on which you want to uninstall the product. Also, close TIBCOBusiness Studio.
Procedure
1. To uninstall the product, run the TIBCO Universal Installer (TIBCOUniversalInstaller) from theTIBCO_HOME/tools/universal_installer/ directory.
2. In the TIBCOInstallationManager screen, select Uninstall Products from a TIBCO Home Location,and select the TIBCO_HOME location from the drop-down. Then click Next.
3. Click Next on the Welcome screen.
4. On the Uninstallation Type screen, choose the type of uninstall from the following options and thenclick Next.
● Custom Uninstall: Select the products to be removed.
● Typical Uninstall: Removes all the products in the selected TIBCO_HOME folder.
5. If you selected Custom Uninstall, select the products you want to uninstall on the Product UninstallSelection screen. Then click Next.
6. Review the product to be uninstalled in the Pre-Uninstall Summary screen, and click Uninstall toproceed.
7. The installer uninstalls the selected products. When prompted to clean up the /tools directory,click Yes, clean it up.
8. Click Finish in the Post Uninstall Summary screen to exit the uninstall wizard.
9. If you have uninstalled all the software under TIBCO_HOME, delete the folders under theTIBCO_HOME directory.
19
TIBCO ActiveMatrix BusinessWorks™ Installation