building the scrummage: part 3 – the adult scrum. · 1 building the scrummage: part 3 – the...
TRANSCRIPT
1
BUILDING THE SCRUMMAGE: PART 3 – THE ADULT SCRUM.
By Steve Peters.
Steve Peters is a former North of England tight-head prop and is now an RFU Level 3
Coach Educator and RFU RDO for Cheshire. This is the final article on the building of the scrum. The three pieces have been written to encourage any coach to appreciate that the coaching of the scrummage can be undertaken with confidence, built upon the acquisition of an understanding of basic principles and some examples of how to apply them. The focus of this article is on the building of the adult eight player scrum. The underlying principles developed in the earlier articles are equally applicable to coaching adult players to scrummage in the fifteen a side game. With adult players, the major difference is the increase in forces due to the increase in strength and experience of the players. It is vitally important to stress that safety must be the overriding factor to all rugby coaching. This is particularly important when coaching the scrummage. The adult players may have a level of technique developed by their experience, but may not have had detailed technical coaching in order to fine tune these techniques. As a coach, you must use your ability to break down their technique and use your analytical skills to help your players to improve their technique. The basic equipment you will need to get you going is a whistle to attract immediate attention when ears are muffled in the heart of the scrum, a few cones to mark your working area, an open mind and some willing players to work with. If you have access to a scrummage machine, ensure that you are confident and competent enough to use it. There are two basic types of scrum machine, the roller and the sled. The use of both will be discussed later in this article. The warm-up discussed in the previous articles is equally applicable to older players. These warm up exercises, as well as highlighting key principles, prepare the body for scrummaging. The next section expands on these principles and puts them into the context of the scrummage. Scrummage Foot Position The start point for all scrummaging is a good, balanced foot position as demonstrated in the previous article. Here, just to remind you, are the key points of the Athletic Position:
Feet placed just wider than shoulder width apart. Outside foot slightly in front of the inside foot. Knees slightly bent. Weight evenly distributed on both feet.
2
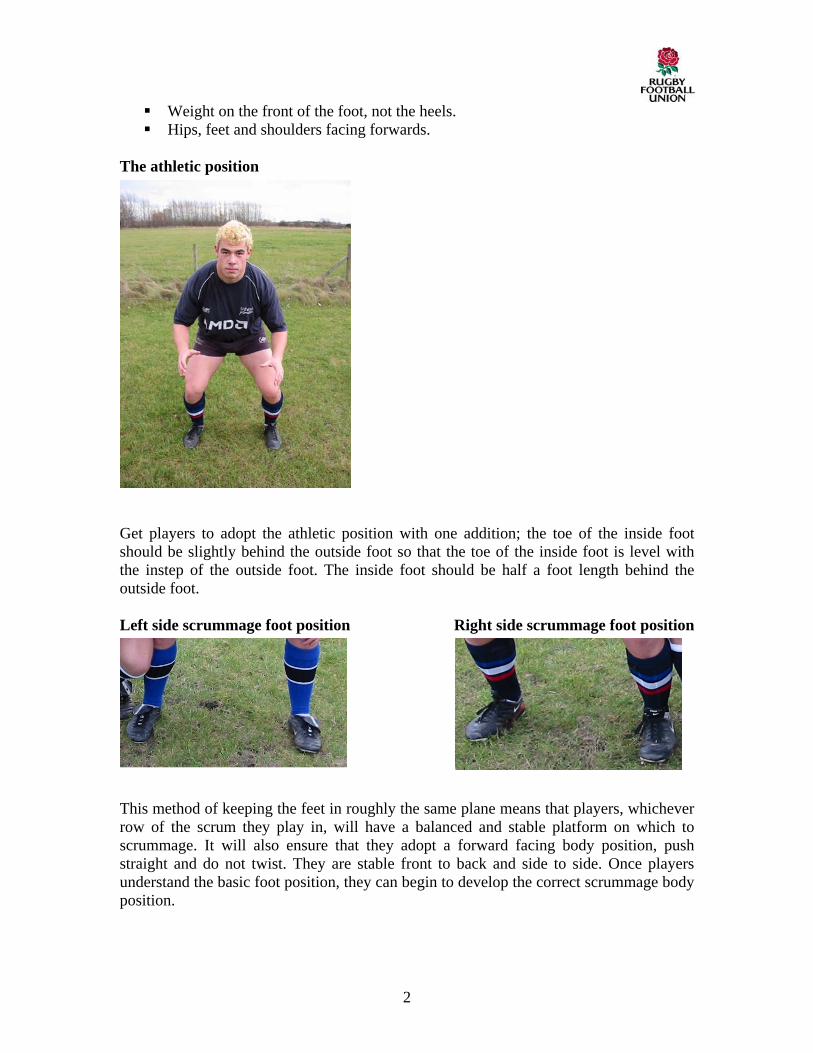
Weight on the front of the foot, not the heels. Hips, feet and shoulders facing forwards.
The athletic position Get players to adopt the athletic position with one addition; the toe of the inside foot should be slightly behind the outside foot so that the toe of the inside foot is level with the instep of the outside foot. The inside foot should be half a foot length behind the outside foot. Left side scrummage foot position Right side scrummage foot position This method of keeping the feet in roughly the same plane means that players, whichever row of the scrum they play in, will have a balanced and stable platform on which to scrummage. It will also ensure that they adopt a forward facing body position, push straight and do not twist. They are stable front to back and side to side. Once players understand the basic foot position, they can begin to develop the correct scrummage body position.
3
Scrummage Body Position The human spine is designed to resist force; however, it must be in correct alignment to do this. The spine is an elongated ‘S’ shape and these curves allow the force to dissipate as the load is spread by the curves of the spine. Think of the example of an Olympic weight lifter who is in the ‘get set’ position when he is about to start a lift. He will be looking up through the eyebrows as his chin is off the chest, the feet are just over shoulder width apart with the spine set strongly in its natural curve. This strong back position is the same basic position players should adopt in the scrummage, though the angle of the back and legs would be slightly different.
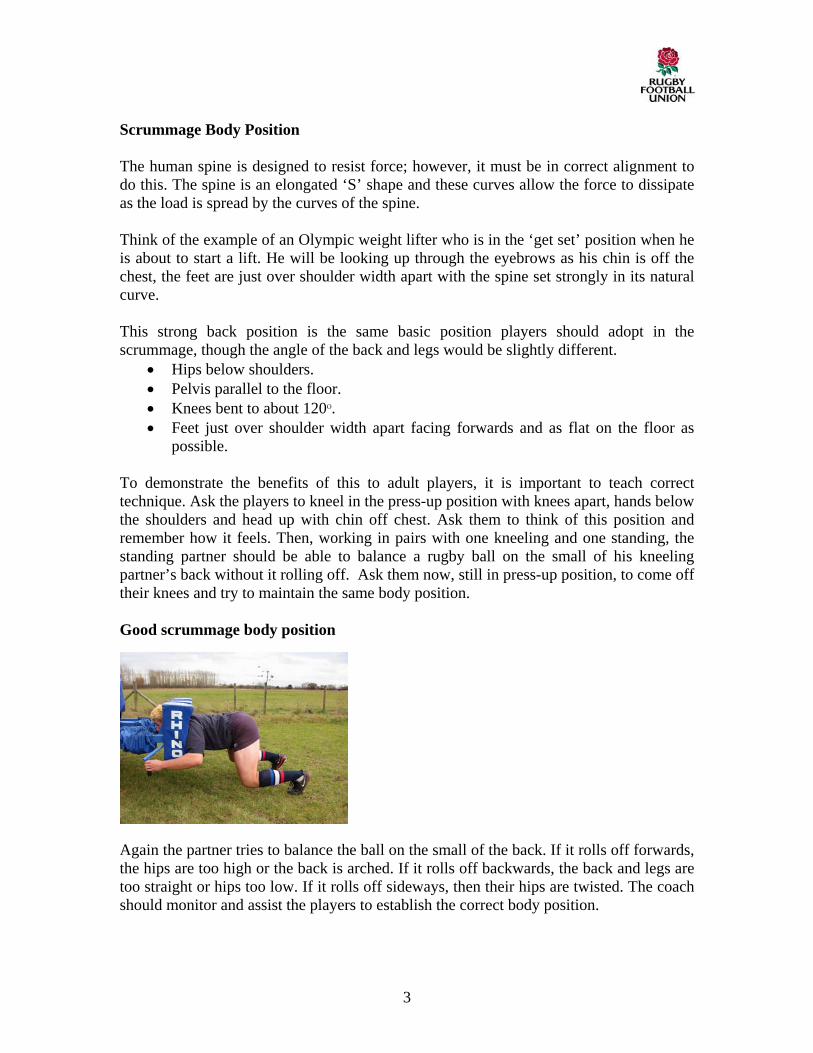
• Hips below shoulders. • Pelvis parallel to the floor. • Knees bent to about 120O. • Feet just over shoulder width apart facing forwards and as flat on the floor as
possible. To demonstrate the benefits of this to adult players, it is important to teach correct technique. Ask the players to kneel in the press-up position with knees apart, hands below the shoulders and head up with chin off chest. Ask them to think of this position and remember how it feels. Then, working in pairs with one kneeling and one standing, the standing partner should be able to balance a rugby ball on the small of his kneeling partner’s back without it rolling off. Ask them now, still in press-up position, to come off their knees and try to maintain the same body position. Good scrummage body position Again the partner tries to balance the ball on the small of the back. If it rolls off forwards, the hips are too high or the back is arched. If it rolls off backwards, the back and legs are too straight or hips too low. If it rolls off sideways, then their hips are twisted. The coach should monitor and assist the players to establish the correct body position.

4
The basic body shape and foot position are relevant to all players in the scrum, with only a slight modification to binds in different rows and the hooker’s feet. These two aspects will be discussed later in the article. N.B. AS THE FORCES IN THE SCRUM INCREASE, THE ADOPTION OF THE CORRECT BODY POSITION IS A KEY SAFETY FACTOR. Once players are aware of and familiar with these basic individual foot and body positions, it is possible to move on to binding of individual players together to form the front row. Remember that the most important factor, when joining players together, is the binding. Front Row Bind In order to ensure that the players are tight across the row, it is necessary that the bind is tight and strong without causing the arm muscles to fatigue too quickly. The ‘walk around’ bind, where the length of the bind taken determines the tightness of the bind, should be used. The walk around bind The hooker stands with hands on head in the scrummage foot position with his right foot forward. The loose head prop (LHP) stands behind the hooker and makes a bind with the right hand on the front of the hooker’s jersey between arm pit and sternum (breast bone) depending on the length of arm or build of hooker. Then he walks around the hooker to the left to stand next to the hooker in the left scrummage foot position making sure that feet are not overlapping with the hooker’s, when they are hip to hip with feet facing forwards. He should then drop the left arm across the body and point at the hooker’s right foot. This will enable the hooker to bind on the LHP under the left armpit. Once the hooker has a tight grip, the LHP stands straight whilst pushing the right shoulder forward under the hooker’s left arm pit so that there are four shoulders in line facing forward. This action will tighten the bind but only a firm grip is required to maintain it. The tight head prop (THP) stands behind the hooker and makes a bind with the left hand on the waist band of the hooker’s shorts between drawstring and pocket, depending on the length of arm or build of hooker. Then he walks around the hooker to the right to stand next to the hooker in the right scrummage foot position, making sure that their feet are not overlapping. When they are hip to hip with feet facing forwards, he drops the right arm across the body and points at the hooker’s left foot. This will enable the hooker to bind on the THP under the right armpit.

5
The front row bind rear view The front row bind front view
Once the hooker has a tight grip, the THP stands straight whilst pushing the left shoulder forward under the hooker’s right arm pit so that there are six shoulders in line facing forward. This action again will tighten the bind but only requires a firm grip to maintain it. It is important to make sure that the shoulders, hips and feet of all three players are facing forward and not overlapping. As players become used to the technique they will know how far round to grip a given player to make the bind tight. It is important that both the LHP and THP only turn their upper body, not their whole stance, and push their shoulders through after the hooker has bound. This will ensure that their spines end up parallel to the touch line, in line with the direction of push. Role of the hooker The role of the hooker in the eight player scrum is to strike the ball from the throw in, through the legs of the LHP for the scrum half to gather and start the game again. The ball is always put in from the left on the loose-head side and is struck with the right foot. This enables the hooker to protect the ball from the opposing hooker with the right leg. During the strike, the hooker’s weight is supported by the hooker’s left leg and both the props. It is important that the hooker has a solid base from which to strike. To facilitate this, the hooker’s left foot should be placed next to the right foot of the LHP, making sure that the hooker’s and prop’s legs are not crossed over. This enables them to support the hooker using the LHP’s right leg and the hooker’s left leg. Front row feet position

6
The hooker’s right foot, prior to engagement, is placed slightly in front of the left to give a stable platform at the engagement. After the scrum has engaged, the hooker places the right foot next to the left with a slight inward turn of the ankle to enable the hooker to strike, regardless of the height of the scrum. To see why, try crouching down with your chest on your knees and then try to lift your right foot when it is flat on the floor. This is not possible without a turn of the ankle. Once the hooker is ready, the scrum-half approaches the tunnel. From there the hooker will signal for the ball to be put in. Standing one metre away, the scrum half rolls the ball along the floor immediately beyond the LHP’s right shoulder and down the middle of the tunnel. As the ball arrives, the hooker drives the right foot forward and towards the ball to close the channel and then sweeps the ball with the sole of the foot between the legs of the LHP and back to the feet of the left-hand second row, where it is gathered by the scrum half. Once players are bound , they should crouch in preparation for the scrummage to engage. The engagement sequence is as follows: “CROUCH, AND HOLD………..ENGAGE.”
N.B. IT IS IMPORTANT TO MAINTAIN CONTROL THROUGHOUT AND PLAYERS MUST REACT TO YOUR COMMANDS ACCURATELY AND QUICKLY. THIS WILL ENSURE THAT THE PLAYERS ARE SAFE THROUGHOUT. Engagement of the Scrummage The sequence of engagement is the same as for the mini-midi scrum. The key coaching points are to ensure that the players adopt the correct foot and body positions prior to engagement and engage in a safe and controlled manner, with the coach using the correct sequence of instructions once the opposing front rows are the correct distance apart: “CROUCH” - The front row bend at the hips, knees and ankles, looking up through the eyebrows with chin off chest and back set, making sure that they stay balanced and don’t topple forwards. “AND HOLD” - LHP and THP ensure that they are the correct distance apart. The coach pauses so that players can see where they are putting their heads. “………..ENGAGE” - heads enter to the left with shoulder to shoulder contact, making sure that they bind correctly to their opponent, with the THP taking the outside bind. Unbind and get ready to go again and repeat. Practising the engagement Engagement of the front row can be practised against opponents to ensure that players get the correct bind on their opponent’s back. The outside arm is an important part of the prop’s armoury. The outside arm should be bound as quickly as possible. Props must
7
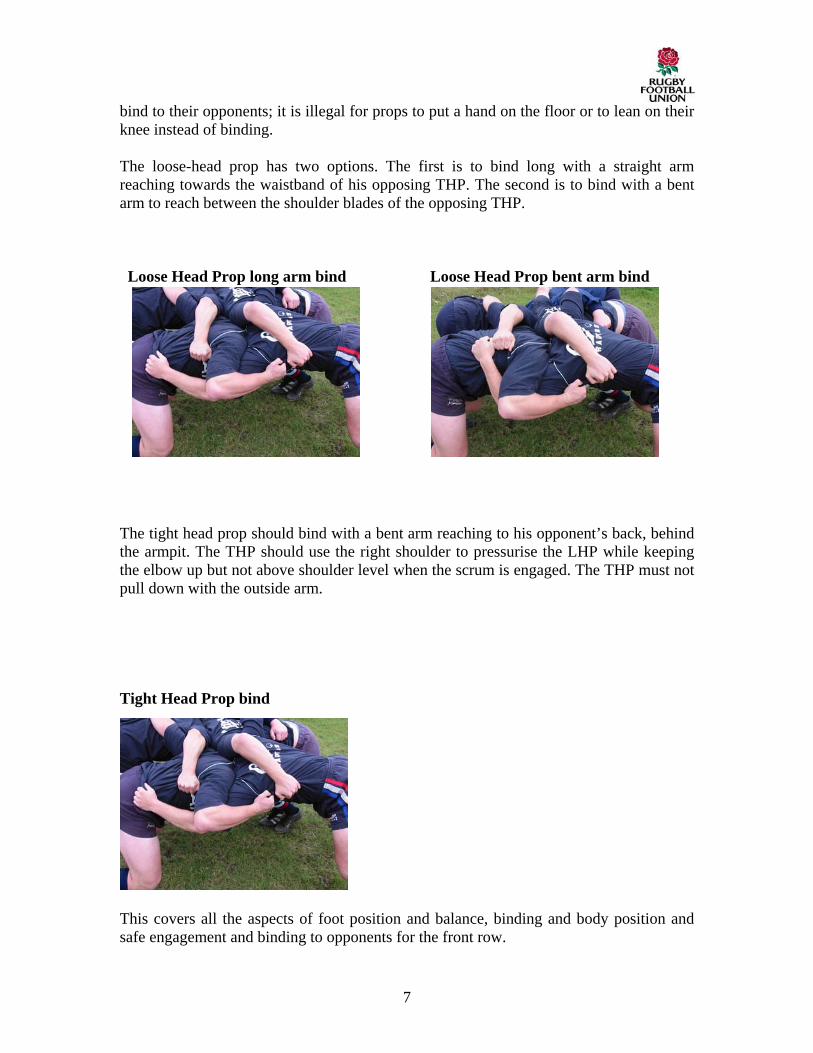
bind to their opponents; it is illegal for props to put a hand on the floor or to lean on their knee instead of binding. The loose-head prop has two options. The first is to bind long with a straight arm reaching towards the waistband of his opposing THP. The second is to bind with a bent arm to reach between the shoulder blades of the opposing THP. Loose Head Prop long arm bind Loose Head Prop bent arm bind The tight head prop should bind with a bent arm reaching to his opponent’s back, behind the armpit. The THP should use the right shoulder to pressurise the LHP while keeping the elbow up but not above shoulder level when the scrum is engaged. The THP must not pull down with the outside arm. Tight Head Prop bind This covers all the aspects of foot position and balance, binding and body position and safe engagement and binding to opponents for the front row.

8
The next section includes the addition of a second- row to the scrum. The addition of these players should not cause problems providing their basic technique is sound. The key areas to address are those of foot position and binding for the second row. Second row binding As explained earlier, the technique of binding is important to maintain a tight scrum. However, for the second row (lock forward), the most important bind is not across the row to their second row partner, but through the rows to the prop. Locks have traditionally bound together tight across the row and put less emphasis on the bind to the prop. This would be like building two brick walls without fixing wall ties between them! It is important for the stability of the scrummage that the bind through the rows is seen as the most important. To ensure that the locks bind correctly, the ‘Power’ bind through the legs of the props is used. N.B. THE POWER BIND THROUGH THE LEGS OF THE PROP MAY ONLY BE USED BY PLAYERS IN THE SECOND ROW OF THE SCRUM. In order to maintain a tight bind without undue fatigue, it is possible to use a walk- around bind for the second row. Start by forming the front row correctly as previously detailed. Once formed, the locks crouch to the outside of their respective props and reach as far through their prop’s legs as they can to grip the waistband of the prop’s shorts and makes a bind with the outside hand on the waist band of the prop’s shorts as close as possible to the prop’s inside hip pocket, depending on the length of arm or build of the prop. Each lock should work to get his hand as close to his ear as he can. The arm should follow the angle of the inguinal crease (the fold in the groin where the leg and abdomen bend). The hand grip used can be either “knuckles in” or “knuckles out”. The “knuckle in” grip is where the fingers are tucked into the waistband with the grip palm in and pulling towards the shoulder. The “knuckle out” grip is where the lock grips the waistband of the shorts from the outside of the shorts and turns the waistband over the top of the fingers with the palm facing out. This bind enables a pushing rather than pulling action by the second row. Either bind can be equally effective; the choice is down to the lock’s personal preference. Second row power bind - knuckles in
9
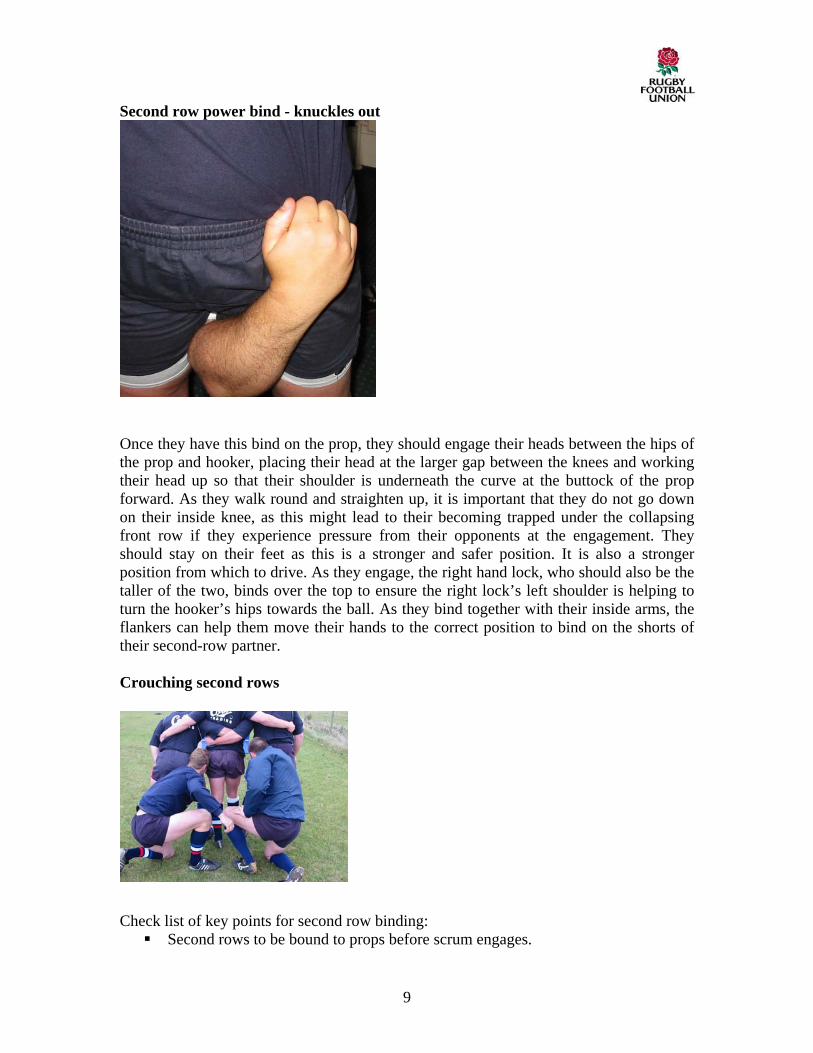
Second row power bind - knuckles out
Once they have this bind on the prop, they should engage their heads between the hips of the prop and hooker, placing their head at the larger gap between the knees and working their head up so that their shoulder is underneath the curve at the buttock of the prop forward. As they walk round and straighten up, it is important that they do not go down on their inside knee, as this might lead to their becoming trapped under the collapsing front row if they experience pressure from their opponents at the engagement. They should stay on their feet as this is a stronger and safer position. It is also a stronger position from which to drive. As they engage, the right hand lock, who should also be the taller of the two, binds over the top to ensure the right lock’s left shoulder is helping to turn the hooker’s hips towards the ball. As they bind together with their inside arms, the flankers can help them move their hands to the correct position to bind on the shorts of their second-row partner. Crouching second rows Check list of key points for second row binding:
Second rows to be bound to props before scrum engages.

10
In the crouch position prior to engagement. Do not start on their knees. Bind through the legs of the props first, using walk around bind. Shoulders under the prop’s buttocks. Right hand second-row binds over the left hand second-row. Bind to partner’s waistband to keep hips together.
Adding the back row The flankers are an important part of the second-row at the scrummage. The flankers should help the second rows to bind by guiding their inside hands to the correct position. Once the second-rows are bound, the flankers bind with their inside arm, binding across the back of the adjacent second-row and pushing with their shoulder against the outside buttock of the prop as part of the second-row. The flanker’s outside hand should bind to the shorts of the prop. N.B. IT IS IMPORTANT THAT THEY DO NOT BIND ONTO OR PUSH THE PROP’S LEG AS THIS CAN UNBALANCE THE PROP AND CAUSE A DANGEROUS COLLAPSE. They should be off their knees in a pushing position with hips facing forwards and feet in the scrummaging position described earlier so that they are pushing parallel to the touch line. There is no need to push inwards to drive the prop’s hips inwards as the foot, hip and shoulder position of the props ensures that they will be driving straight. As with the second-row, the most important bind for the flanker is to the prop to ensure that the drive is transmitted through the front row to the opposition. The flankers should be down and bound before the scrum engages. The flanker’s bind Check list of key points for flanker’s binding:
Help locks to bind. Bind inside arm across the back of the locks gripping the waistband of their
partner’s shorts. Shoulder under the prop’s buttocks.

11
Outside hand binds to the prop’s shorts. Flankers to be bound to prop and second-row before scrum engages.
Number 8 binding The number 8 would be the last player to bind and should bind with his head between the two locks, though he does not have to bind this way in the adult game, and arms around the hips of the locks. The number 8 should adopt the scrummaging foot position and must bind with a full arm bind. The number 8 should keep off his knees and be down and pushing at the engagement. Number 8 Bind It is important that the body position explored earlier is reinforced to second rows, flankers and number 8. The addition of the flankers and number 8 should not cause any problems if the underlying principles of binding and foot position are adhered to:
Feet placed just wider than shoulder width apart. One foot slightly in front of the other. Knees slightly bent. Weight evenly distributed on both feet. Weight on the front of the feet, not the heels. Hips, feet and shoulders facing forwards. Shoulders above hips. Look up with chin off chest.
Using a Scrum Machine As mentioned earlier there are two basic types of scrum machines
1. The Roller Machine. • Weighted rollers. • Mobile - can be moved quickly to realistic field position. • Can be driven straight but less useful to practise the wheel.
2. The Sled Machine • Skids or runners make the machine lighter. • It is more manoeuvrable than the roller.

12
• It can be weighted by ballast or spare players and is better for practising the wheel.
The Hit The hit at the engagement is essential to the outcome of the scrum. The team who gets the best hit will have the advantage, either by winning the ball going forward or the opposition winning ball whilst on the back foot. The coordination of your pack at the engagement can be improved with practice. It is most important during the engagement to hit and maintain the drive. The coordination of this is best practised by multiple engagements and hits. Using either a scrum machine or two packs, you can practise the engagement. The following sequence can be used.
Set up to engage. Engage & maintain the drive. Break up and run to touch cones/bag. Return to mark. Reform and engage again to repeat sequence.
It is important that the players are able to identify when their technique is correct. The best way you as a coach can help this is by the use of questions. Ask them how a particular hit felt. Ask them what they felt with their feet in a particular position. This kinesthetic or ‘what they felt’ type question is a very powerful coaching tool. They will remember this more than any information you simply give them. The hit can also be used to create a slight wheel after the engagement to assist the back row in attack or defence. This can be created by adapting the second row’s foot positions. Left side hit
• Left flanker & left hand lock adopt normal foot position with left foot slightly forward.
• Right hand lock & right flanker also use left foot up - i.e. opposite foot position to normal. This will focus the pressure of the hit to the left hand side through the loose-head prop.
Right side hit • Right hand lock & right flanker adopt normal foot position with right foot slightly
forward. • Left flanker & left hand lock also use right foot up - i.e. opposite foot position to
normal. This will focus the pressure of the hit to the right hand side through the tight head prop.
These techniques require coordination and practice to make them effective. The advantage in attack is that you can send your back row in the direction of the play or move while disadvantaging the opposition back row by moving them away. On the opposition ball, a wheel followed by a drive can put the back row on the back foot in a

13
poor position when they might be trying to run a back row move. Alternatively it could be used to disrupt the scrum-half as the ball is at the number 8’s feet. The uses of these techniques, and when and where to use them, are only limited by your imagination as a coach. This concludes the series on Building the Scrummage. Hopefully you will have found these articles enlightening and you will see that any coach with the appropriate knowledge and confidence can, and should, be able to teach players the basic safe techniques of the eight player scrummage.