building a system - uf/ifas oci | homeconference.ifas.ufl.edu/aitc/presentations/session 2/hooked...
TRANSCRIPT

Building a SystemYour teacher has already germinated seeds for you.
Bergerson's Handi-Wipe System
Perlite, Nutri-Leaf, Handi-Wipe Material Safety Data SheetsUsing the Directions below you are going to create a passive hydroponics system. Your teacher will have supplies ready for you, but make sure you check the materials list before you get started with construction.
Soda Bottle Passive Hydroponics SystemIntroduction:
These bottle systems are: *Passive (no pumps or electricity)
*Closed (the nutrient solution remains in the system)
*Liquid/Aggregate
(Roots can grow initially in the aggregate then directly into the solution)
Materials:
*2 liter soda bottles*Scissors*rubber Bands*Duct Tape*Cotton wick Material such as yarn, kite string, etc. about 16 inches per bottle. Handi Wipes cut into one inch strips are excellent as well.*Perlite to fill the cup or inverted bottle*Water and hydroponic specific fertilizer – premixed powder of liquid to fill bottle *Lettuce Heads or seeds
Method:
Wick System: Nutrient is wicked up the roots from the bottle below.
1) Cut the soda bottle using the scissors eight inches from the bottom and use the inverted top as a holder for the Perlite and roots. You can cover the cut edges with duct tape that will also help keep the top from slipping down into the bottle.
2) Leave the cap on the top
3) Thread the wick material through the hole so that half of the wick is on each side of the cap.
4) Invert the bottle top and fill with Perlite (weaving the wick material through the Perlite.) Plant cuttings or seeds in the Perlite.
6) Mix nutrient solution in bottle
Nutrient Solution Recipe:Fill the bottle four inches deep with waterPlace ½ teaspoon of NutraLeaf 20-20-20 fertilizer in the water….mix thoroughly…(this will give you an electroconductivity reading of ~1120ppm)
7) Fit the inverted top with the Perlite into the soda bottle letting the wick material hang into the solution
Optional:Your teacher may ask you to record the growth of your plants. If that is the case this page will

walk you through creating an Excel Spreadsheet to do that. Here is an example of a Plant Growth data sheet. Once all of your data is collected you will complete a Plant data summary. After you have completed your work you need to either print it out and turn it in, or email it to your teacher. Your teacher will tell you which method they prefer.

Assemble the Hydroponic ApparatusThis type of hydroponic apparatus, known as a wick system, is one of the easiest ways to grow things hydroponically. It does not require a pump; it draws the nutrient solution up to the plants' roots by capillary action in strips of felt. You will need to build at least one hydroponic apparatus for every different type of nutrient solution you are using.
Materials needed per hydroponic apparatus:one plastic container, about 12 x 7 x 5 in.two little pots, about 4-4.5 in. diameterfour strips of white felt, about 3 x 6 in.two thin boards, about 2 x 8 in.shrink wrap, plastic wrap, or other waterproof coveringsharp knifePerlite
First, prepare the platforms on which the pots will sit. Wrap each of the thin boards with the shrink wrap or waterproof covering. Seal it with tape if necessary; the board needs to be as waterproof as possible. If you do not do this, the nutrient solution will soak into the board and soften the wood, causing the board to bend, lower the pot deeper into the solution than
it should go, and possibly break.
After the boards have been waterproofed, you should thoroughly wash the boards, plastic container, and pots with soap and water. Then disinfect them by rubbing them down with rubbing alcohol or another chemical cleaner such as Lysol. This kills any microorganisms living in your equipment that could infect your plants.
Cut two long, narrow slits near the outer edge of the bottom of each pot as shown in this diagram. Pull the strips of felt through each slit so that they are about half in the pot and half underneath the pot. Place each pot on a shrink-wrapped platform so that one strip of felt hangs down on one side and the other strip hangs down on the other. Then place both platforms on top of the container so that they hang across the container. Fill each of the pots about 2/3 full with Perlite; be aware that some may leak out through the slits in the bottom of the pots. Label each hydroponic apparatus
with the type of nutrient solution it will contain.
Step Two: Create Appropriate Growing ConditionsPlants will grow best when they are subject to certain conditions. While it is best to keep conditions consistent throughout the experiment, certain conditions are hard to control and may fluctuate. The

important thing is that the conditions must be the same for all the plants at any given time, regardless of how they change over time, because they are controlled variables in the experiment. The easiest way to keep the controlled variables under control is to put all the plants next to each other in the same location. Note that you can do an experiment by varying one of these conditions. However, if you do that, you must use the same nutrient solution for all the plants and keep all the other conditions the same. This keeps your experiment from having more than one independent variable.
Light:You should make sure your plants get around twelve hours of light. This is not exact; a few hours more or less will probably work fine. Since plants get their energy from light, they must have exposure to the sun. However, they should probably not get light 24 hours a day because such unnatural conditions may disrupt the normal growth of the plant. You may also substitute a grow light for natural sunlight; be sure to put it on a timer to simulate day and night for your plants.
Temperature:Ideally, the temperature should be somewhere between 55° F and 85° F. The optimum temperature may be different for different kinds of plants. A temperature-controlled environment would provide the most stable conditions, but if your plants are in a less stable environment, a heater would help to keep the temperature under control. If the environment gets too hot, you might want to shade your plants and/or put ice cubes in their nutrient solution to keep them from dying in the heat.
Humidity:The relative humidity must be at least 45%, and ideally it should be between 60-75%. This can be hard to control, but if you know your air is dry, your plants will benefit from some artificial humidity. This can be done with a hoochie-coochie machine (a silly word that means a vaporizer). The hoochie-coochie machine will make water vapor more slowly when the air is relatively humid already, so it would not be a bad idea to leave it on all the time. Another way to raise the humidity is to spray water all over the place with a hose or spray bottle. However, this has the undesirable side effect of soaking everything around your experiment which you may not want to get wet.
(Note: The term "hoochie-coochie machine" was coined by Miss L, our AP Biology teacher who could not think of the word "vaporizer." No members of S.H.A.R.P. were responsible for this. We used it on our web site because we think it's kind of funny to say.)
Other conditions:Factors such as ambient noise, air quality, etc. can also influence the growth of plants. Be sure to keep all other such variables controlled for all your plants. Source for this section: Casana, Maritza. [email protected]. "Práctica de producción de hortalizas bajo la técnica de hidroponía en agua y perlita." 7 Jan 2001. Personal e-mail. (14 Jan 2001).
Step Three: Germinate the SeedsBefore you germinate the seeds, you must choose what kind of plant you want to grow. If you already have a plant growing in soil and you want to simply transfer it to a hydroponic medium, you can skip this step. If you are growing from seeds, you need to choose what kind; we recommend lettuce, beets,

tomatoes, celery, and obviously radishes. Other kinds of plants would probably work well too. Note the growing time listed on the package of seeds you use; it determines the length of your experiment. Ideally, you should use seeds with the shortest growing time possible. You should also allow lots of extra time in your experiment in case the plants grow slowly or something else goes wrong. Source: Casana, Maritza. [email protected]. "Práctica de producción de hortalizas bajo la técnica de hidroponía en agua y perlita." 7 Jan 2001. Personal e-mail. (14 Jan 2001).
Materials needed:seedsclean petri platespaper towels or cotton ballsspray bottle
You will need to use enough petri plates to hold the amount of seeds you want to germinate. You should germinate at least twice as many seeds as you want to actually grow because some of the seeds might not germinate and some of the plants might die.
Instructions for each petri plate:Line the petri plate with a layer of cotton balls or paper towels. Place the seeds on the cotton or paper towels in the petri plate, leaving about 1 cm of space between them. You may want to leave even more space for larger seeds. Spray the petri plate with water using the spray bottle until the cotton balls or paper towels are throughly soaked. Put the lid on the petri plate and leave it in the sun for the seeds to germinate.
Put a rubber band around the petri plate to hold the lid on tightly. This keeps the petri plate from falling apart if someone knocks it over by accident. It also keeps the petri plate from opening when the seeds germinate and the little plants get so big that they push on the lid. If the lid opens, the water will leave the petri plate and the little plants will dry out and die.
(The members of S.H.A.R.P. learned this lesson the hard way.)
Step Four: Plant the seeds in PerliteWhen the seeds have germinated and the little plants are about 1.5 inches long, you should remove them from the petri plates and plant them in the Perlite in your hydroponic apparatus. Before you do this, you should prepare the nutrient solutions in your hydroponic apparatus. Do this as described in Lesson Three: Add the appropriate amount of each concentrated part to the 2-Liter mixing bottle and fill the bottle to the top with deionized water. Then pour the contents of the mixing bottle into the plastic container in your hydroponic apparatus. You will probably need to mix more than one bottle of each solution to fill the container; the container should be filled as high as possible without spilling the nutrient solution.
Before you finish filling the container, pour some of the solution in each pot with Perlite on each of the felt strips. This "primes" the felt strips so their capillary action is more effective. You may also want to save some nutrient solution to pour on your plants after you plant them in the Perlite.
When the nutrient solution is ready in the containers and has been poured through the Perlite and the felt strips, you are ready to plant the little plants. Plant four plants in each little pot with the roots

submerged in the Perlite and the shoots poking up toward the light. Plant the plants fairly close to the felt strips so they have easy access to nutrient solution, but do not plant them closer together than about one inch. You may want to save any extra plants you have by growing them in soil or in more Perlite somewhere else in case something goes wrong with the plants you have planted.
Check the environmental conditions to make sure they are appropriate: Make sure the plants are getting about twelve hours of light (give or take a few) from the grow light or the sun. Make sure the temperature is between 55-85° F. Make sure the relative humidity is at least 45% and ideally between 60-75%. Your experiment is now set up and going! Source: Casana, Maritza. [email protected]. "Práctica de producción de hortalizas bajo la técnica de hidroponía en agua y perlita." 7 Jan 2001. Personal e-mail. (14 Jan 2001).
Focus Questions• How does the nutrient solution get from the container to the roots of the plants? • Why must you wrap the supporting boards in something waterproof? • Why must you disinfect all your equipment with rubbing alcohol or a chemical cleaner? • Describe the hydroponic apparatus. • Why must the environmental conditions stay the same for all the plants? • What light conditions do plants like best? How do you control this? • What temperature conditions do plants like best? How do you control this? • What humidity conditions do plants like best? How do you control this? • What is a hoochie-coochie machine? Why might you need one? • Describe the process of germinating seeds. • Why is it a good idea to rubber-band the petri plates shut? • Why should you pour nutrient solution on each of the felt strips?

HOW TO BUILD A SMALL LETTUCE RAFT SYSTEM
This is a lettuce growing machine! If you start some new seeds every 30 days, and replace each head of lettuce as you harvest with a new baby seedling, you can have a perpetual supply of crisp, healthy salad greens. The setup we provide here can grow six heads of lettuce at a time, and the whole unit costs less than $50 in early 2009 (not including a lamp and food).
Most of the materials are available from Home Depot or Walmart. A few items must come from a hydroponics supplier (but we give you a good cheap source).
SUPPLY LIST:Shallow reservoir pan (Sterilite 34 qt Latch Box tote works well) this bin is about 23½ X 14½ X 6” deep on the inside [Walmart]Can of cheap flat back spray paint [Walmart]Aquarium air pump, 6 feet of airline tubing, “T” connector & 5” airstone [Walmart]Rigid styrofoam sheet, 1-1/2 to 2” thick; cut a piece to fit inside the reservoir pan. You can buy a 4X8 foot sheet at Home Depot for about $15. It seems a shame to buy a huge sheet of it for one little piece, but you can always save it for use later when you are ready to build your big 2X4 foot lettuce raft! An alternative is to cut a slab from an old styrofoam ice chest of the right thickness.6- 2” net cups: http://www.hydroponics-simplified.com/cheap-hydroponics-supplies.html#raft Small bag of LECA (Hydroton or clay balls), [hydroponics supply or ebay]
© 2009 http://www.hydroponics-simplified.com All rights reserved. Page 1

Styrofoam building insulation, 2” thick
TOOLS NEEDED:
Power drill; 1-3/4” or 1-7/8” hole saw & a 2” hole saw(Borrow a hole saw kit or buy one, you will definitely use it again).Jigsaw, coping saw, or table saw to cut the styrofoam
Here's how to build the system:
1. First cut the styrofoam raft to fit inside the reservoir bin; use a jigsaw, cutoff saw, table saw or even a handsaw. The piece needs to be just a tad smaller than the inside of the bin so it will easily ride up and down a couple of inches without binding (when the water level drops). This is important for the raft to work right. But, you do want it to cover the top of the water as light-tight as possible. In our case, for this Sterilite bin, we cut the styro piece 14-1/4” X 23”.
© 2009 http://www.hydroponics-simplified.com All rights reserved. Page 2

Warning: Cut the styrofoam outside in the yard. You can thank me for this tip right now...
2. You will likely need to round off the corners so the raft will ride up and down freely in the bin. Take care with your block of styro, treat gently, as it is easy to bust it.
3. Mark off the styrofoam block for six holes, evenly spaced, so that there is six inches between each hole, both ways. It doesn't matter if plants ride over the sides a little, just so they don't crowd each other. So for our 14 ¼ X 23” block this is how we centered the holes:
© 2009 http://www.hydroponics-simplified.com All rights reserved. Page 3

4. Now cut the pot holes in the styro block. Start with the 2” hole saw first. From the UP side of the raft, cut a shallow 2” hole, centered over the marked center holes. Cut all 6 holes just to a depth of about 1/4”, then switch to the 1 7/8” hole saw to finish up. (Our set did not have 1 7/8” so we used 1 3/4”). Using the center hole as a guide, now cut down as deep as the hole saw will let you go. Do all six from the UP side of the raft. Then use a nail to go down thru the center holes and pierce the back side of each hole. This is so you will know where to drill next from the back side. Then cut with the same size hole saw from the backside of the stryro block all the way flush.
5. Then carefully pull out the cut plugs and clean up the holes a little. Try out the net pots. You want them to sit in nicely and bottom out at the bottom of the styro, but not fall through.
6. Next, spray paint the outside only of the clear reservoir bin, to make it light proof (prevents algae). Spray several coats and use the entire can. Do not spray the inside of the bin.
© 2009 http://www.hydroponics-simplified.com All rights reserved. Page 4
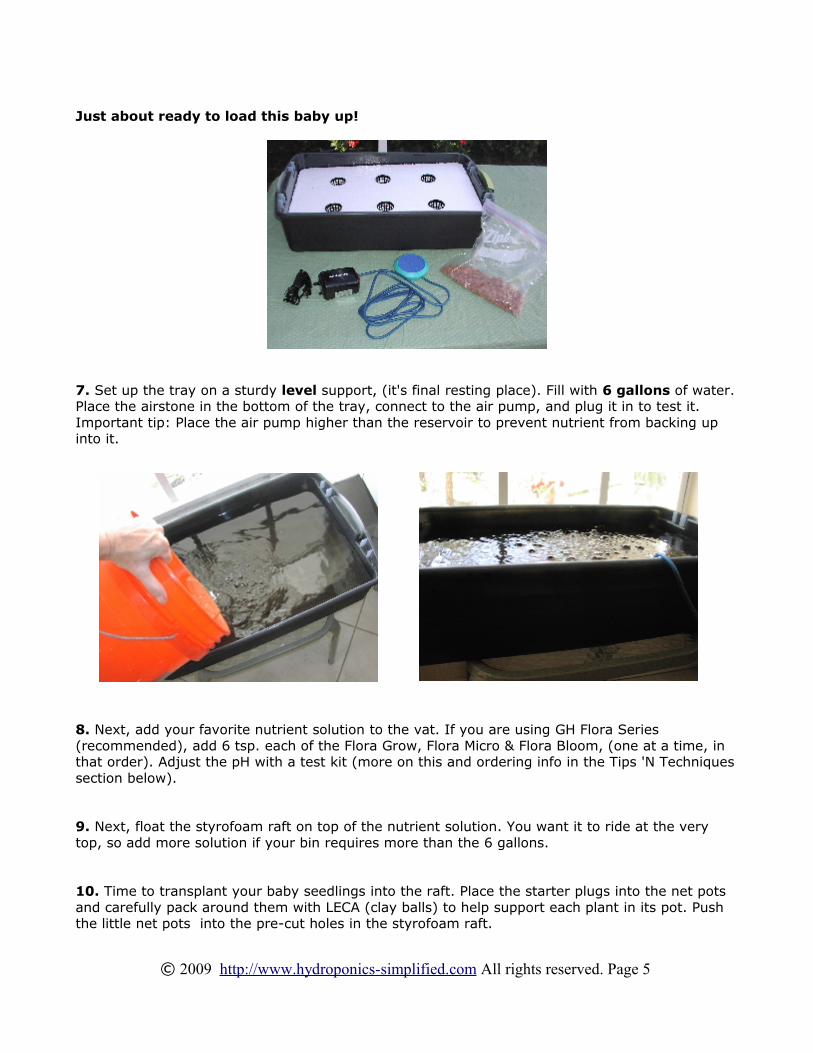
Just about ready to load this baby up!
7. Set up the tray on a sturdy level support, (it's final resting place). Fill with 6 gallons of water. Place the airstone in the bottom of the tray, connect to the air pump, and plug it in to test it. Important tip: Place the air pump higher than the reservoir to prevent nutrient from backing up into it.
8. Next, add your favorite nutrient solution to the vat. If you are using GH Flora Series (recommended), add 6 tsp. each of the Flora Grow, Flora Micro & Flora Bloom, (one at a time, in that order). Adjust the pH with a test kit (more on this and ordering info in the Tips 'N Techniques section below).
9. Next, float the styrofoam raft on top of the nutrient solution. You want it to ride at the very top, so add more solution if your bin requires more than the 6 gallons.
10. Time to transplant your baby seedlings into the raft. Place the starter plugs into the net pots and carefully pack around them with LECA (clay balls) to help support each plant in its pot. Push the little net pots into the pre-cut holes in the styrofoam raft.
© 2009 http://www.hydroponics-simplified.com All rights reserved. Page 5

11. Plug in the airstone bubbler and watch 'em grow!
This is about 14 days after transplanting:
© 2009 http://www.hydroponics-simplified.com All rights reserved. Page 6
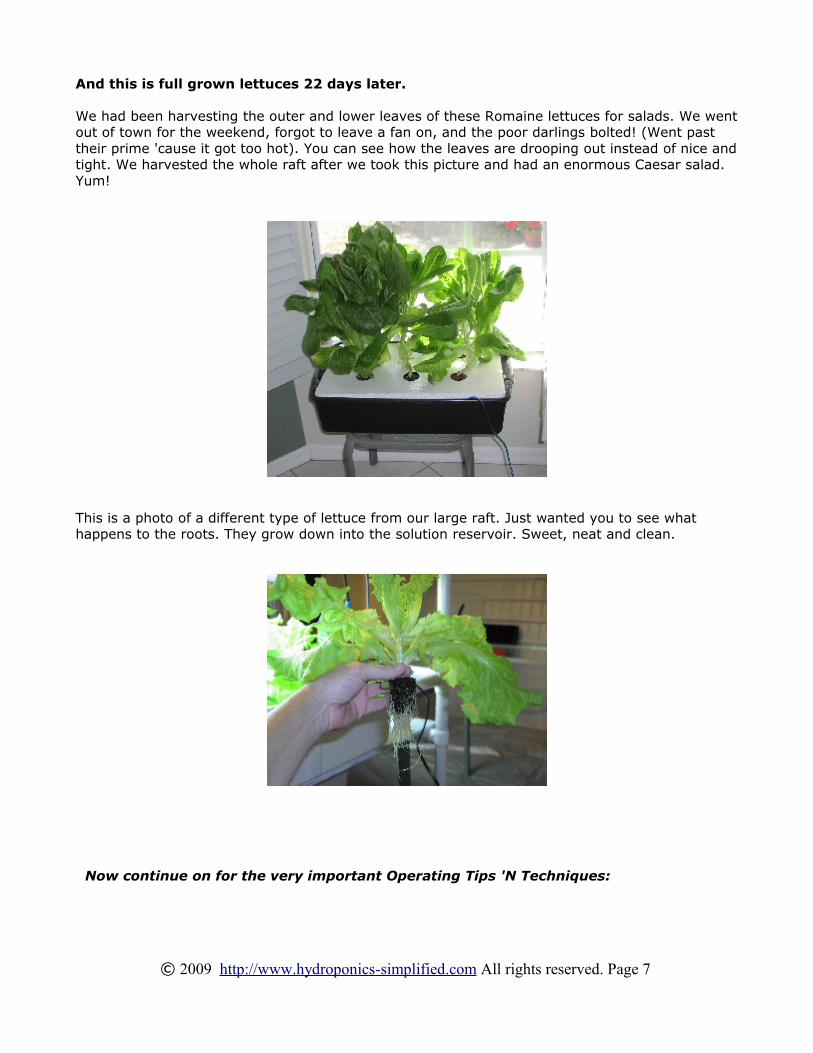
And this is full grown lettuces 22 days later.
We had been harvesting the outer and lower leaves of these Romaine lettuces for salads. We went out of town for the weekend, forgot to leave a fan on, and the poor darlings bolted! (Went past their prime 'cause it got too hot). You can see how the leaves are drooping out instead of nice and tight. We harvested the whole raft after we took this picture and had an enormous Caesar salad. Yum!
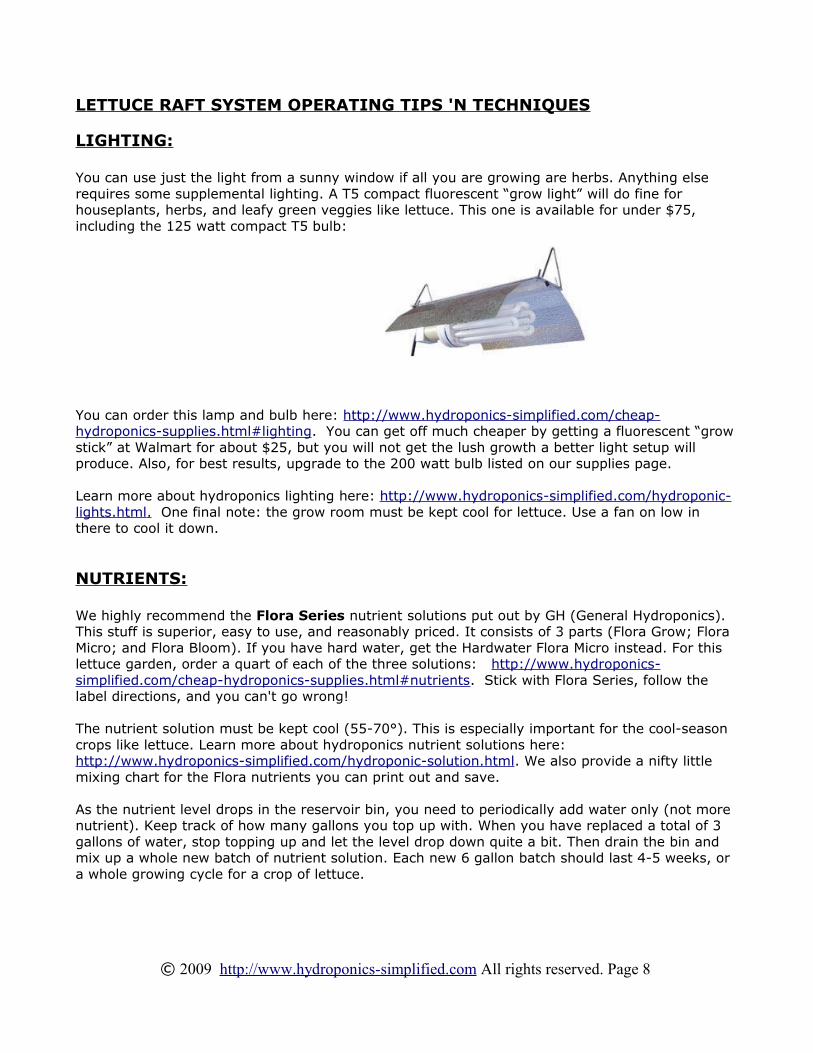
This is a photo of a different type of lettuce from our large raft. Just wanted you to see what happens to the roots. They grow down into the solution reservoir. Sweet, neat and clean.
Now continue on for the very important Operating Tips 'N Techniques:
© 2009 http://www.hydroponics-simplified.com All rights reserved. Page 7
LETTUCE RAFT SYSTEM OPERATING TIPS 'N TECHNIQUES
LIGHTING:
You can use just the light from a sunny window if all you are growing are herbs. Anything else requires some supplemental lighting. A T5 compact fluorescent “grow light” will do fine for houseplants, herbs, and leafy green veggies like lettuce. This one is available for under $75, including the 125 watt compact T5 bulb:
You can order this lamp and bulb here: http://www.hydroponics-simplified.com/cheap-hydroponics-supplies.html#lighting. You can get off much cheaper by getting a fluorescent “grow stick” at Walmart for about $25, but you will not get the lush growth a better light setup will produce. Also, for best results, upgrade to the 200 watt bulb listed on our supplies page.
Learn more about hydroponics lighting here: http://www.hydroponics-simplified.com/hydroponic-lights.html . One final note: the grow room must be kept cool for lettuce. Use a fan on low in there to cool it down.
NUTRIENTS:
We highly recommend the Flora Series nutrient solutions put out by GH (General Hydroponics). This stuff is superior, easy to use, and reasonably priced. It consists of 3 parts (Flora Grow; Flora Micro; and Flora Bloom). If you have hard water, get the Hardwater Flora Micro instead. For this lettuce garden, order a quart of each of the three solutions: http://www.hydroponics-simplified.com/cheap-hydroponics-supplies.html#nutrients. Stick with Flora Series, follow the label directions, and you can't go wrong!
The nutrient solution must be kept cool (55-70°). This is especially important for the cool-season crops like lettuce. Learn more about hydroponics nutrient solutions here: http://www.hydroponics-simplified.com/hydroponic-solution.html. We also provide a nifty little mixing chart for the Flora nutrients you can print out and save.
As the nutrient level drops in the reservoir bin, you need to periodically add water only (not more nutrient). Keep track of how many gallons you top up with. When you have replaced a total of 3 gallons of water, stop topping up and let the level drop down quite a bit. Then drain the bin and mix up a whole new batch of nutrient solution. Each new 6 gallon batch should last 4-5 weeks, or a whole growing cycle for a crop of lettuce.
© 2009 http://www.hydroponics-simplified.com All rights reserved. Page 8
pH- It is a very good idea for any serious hydroponics project to keep the pH of the water in the proper range, which is 5.5 to 6.5 (6.0 is ideal). If the pH is out of range, some of the nutrients get “locked out” and the plants suffer. GH puts out a simple test kit with pH up & down solutions cheap. It will last you through many gardens: http://www.hydroponics-simplified.com/cheap-hydroponics-supplies.html#nutrients.
GROWING MEDIA:
The growing medium for a lettuce raft is actually the grow sponge or cube the seedlings started in. Then the Hydroton balls are jammed in around the seedlings to help support them in the little net pots. Large pots are not needed because the roots quickly outgrow the pots and extend down into the solution.
This is a handful of Hydroton clay balls:
Here is a cheap source for your hydroponics media: http://www.hydroponics-simplified.com/cheap-hydroponics-supplies.html#media.
Hydroton balls must be ordered from a hydroponics supplier. For the tiny bit needed for this small raft, try ebay for a small bag of it. Learn more about hydroponic growing media here: http://www.hydroponics-simplified.com/hydroponic-growing-medium.html.
© 2009 http://www.hydroponics-simplified.com All rights reserved. Page 9

We hope you will try out our plans for a cool little lettuce raft system. You will be amazed at the quantity of produce you can reap from this unit. It provides a great introduction to hydroponics for adults and children alike, and it's just plain FUN.
The lettuce raft makes a classic science fair project. Use a 10 gallon fish tank instead of the black tray we use here. Cover the glass sides of the tank by taping thick paper or cardboard to block out the light (this prevents algae). Then remove the paper covering when you are ready to display the lovely roots for all to see!
Our guess is that once you get a taste of hydro in this way, you will go on to bigger and better things. This field of horticulture is wide open! There are many different methods for you to try, and you'll just get more knowledgeable and skilled at it as time goes on.
You might try growing heirloom tomatoes, medical herbs or even orchids. Or you might just enjoy munching on your own healthy, homegrown salad micro-greens! No matter which way your interests take you, you are sure to enjoy this clean, healthy, prolific, earth-friendly gardening method. We just love hydroponics and know you will too.
Visit our website: http://www.hydroponics-simplified.com often for updates on equipment, lighting, nutrition, plants and seeds, pests, grow-closets, and plans for several other different growing systems. We provide simple information, insider secrets, and easy-to-follow instructions to get you up and growing in no time...
Enjoy! Simon & Stella
Disclaimer: Many of the clickable links in this ebook are affiliate links, meaning thatif you buy through one of those links, we receive a very small commission (just about enough to keep the website up and growing!).
Rest assured, however, that we use these products often and highly recommendthem. If you see it here, rest assured that it has our personal stamp of approval!If you do choose to order supplies through our links, please accept our thanks foryour valued patronage.
© 2009 http://www.hydroponics-simplified.com All rights reserved. Page 10

HOW TO BUILD A SMALL WICK SYSTEM
We recommend a “store-bought” module for this super-easy hydroponic project, the AutoPot®.AutoPots® are patented kits which are essentially “self-feeders”. They can be used for hydroponic setups (no soil) or can be planted with traditional potting soil. The heart of the unit is the special “Smart Valve”, which regulates the flow of nutrient solution into the holding tray.
When connected to a simple gravity-fed reservoir, the Autopots® automatically provide irrigation to plants on-demand, then remain closed until the medium dries somewhat. This simulates the wet/dry cycle of natural rainfall, and makes for a very productive system.
We have included this system in our free hydroponic plans not so much as a “build it yourself” project, but because we wanted to introduce you to this amazing system. Some very successful commercial greenhouses are set up with nothing but rows and rows of AutoPots®.
© 2009 http://www.hydroponics-simplified.com All rights reserved. Page 1

Our instructions here provide two large pots, and the total cost is about $60 (not including a lamp and food). You can easily add more modules later to make a whole “AutoPot® farm” if you would like.
SUPPLY LIST:
AutoPot® basic module (comes with grommet and 1/4” tubing): http://www.hydroponics-simplified.com/cheap-hydroponics-supplies.html#closet*Please note the new generation Autopots® are square, they look different from our photos here, but it's the same product.
Extra 1/4” black irrigation tubing if a longer length is needed [Home Depot]
2 gallon bucket [Walmart]
Growing medium: 50/50 Coco coir & perlite: http://www.hydroponics-simplified.com/cheap-hydroponics-supplies.html#media
TOOLS NEEDED:
Power drill; 1/4” drill bit
Here's how to build the system:
1. Using the power drill, drill a 1/4” hole near the bottom of the bucket. Carefully seat the provided grommet into the hole, making sure it flares out evenly inside and outside the bucket.
Push one end of the 1/4” tubing into the grommet so it extends only about 1/4” inside the bucket.
2. The bucket is going to be the nutrient reservoir, so it must sit up higher than where the
© 2009 http://www.hydroponics-simplified.com All rights reserved. Page 2

AutoPot module will reside. The fluid is gravity fed into the AutoPot trays. No pumps, no timers, no aerators! Now insert the other end of the tubing to the inlet port on the AutoPot. Just follow the instructions provided. Guess what? You just built an AutoPot® hydroponic system!
3. Now test the pot for proper operation of the Smart Valve. Pour some water into the holding bucket. Water should slowly fill the holding tray below until it reaches a level of about 1”. Then it should cut off.
4. Filling the pots- Each kit comes with a round “root mat” which sits in the bottom of each plant pot. It keeps the medium in and helps wick up the nutrient solution to the plant roots. The growing medium is actually the “wick” for this hydroponic system.
The recommended growing medium is:50/50 Coco Coir and perlite. You cannot use LECA (clay balls) in the wick action AutoPots. More on growing medium and ordering info in the Tips 'N Techniques section below.
© 2009 http://www.hydroponics-simplified.com All rights reserved. Page 3

5. Plant your young seedlings in the pots and place the pots in the holding tray. You are ready to rock 'n roll now, time to add food.
6. Nutrient solution is a pretty care-free chore in this system. Because the fluid is not re-used, once mixed, you don't have to worry about strength or pH. Mix it and forget it! A 2 gallon bucketful will last several days, depending on the size of the plants and the climate.
So mix up a 2 gallon batch of your favorite nutrient formula, then adjust the pH (read our recommendations below). That's it... watch it grow!
WICK SYSTEM OPERATING TIPS 'N TECHNIQUES
LIGHTING:
You can use just the light from a sunny window if all you are growing are houseplants. Anything else requires some supplemental lighting. A T5 compact fluorescent “grow light” will do fine for houseplants, herbs, and leafy green veggies like lettuce. This one is available for under $75, including the 125 watt compact T5 bulb:
You can order this lamp and bulb here: http://www.hydroponics-simplified.com/cheap-hydroponics-supplies.html#lighting. You can get off much cheaper by getting a fluorescent “grow stick” at Walmart for about $25, but you will not get the lush growth a better light setup will produce. For best results, upgrade to the 200 watt bulb listed on our supplies page.
If you are interested in fruiting veggies like tomatoes, or serious herbs, you will have to upgrade to an HID lamp. Learn more about HID lighting and see our special combo lamp deal here: http://www.hydroponics-simplified.com/hydroponic-lights.html . One final note: the grow room must be kept cool. Use a fan on low in there to cool it down. HID lamps will really add some heat.
NUTRIENTS:
We highly recommend the Flora Series nutrient solutions put out by GH (General Hydroponics). This stuff is superior, easy to use, and reasonably priced. It consists of 3 parts (Flora Grow; Flora Micro; and Flora Bloom). If you have hard water, get the Hardwater Flora Micro instead. For this small garden, order a quart of each of the three solutions: http://www.hydroponics-simplified.com/cheap-hydroponics-supplies.html#nutrients . Stick with Flora Series, follow the label directions, and you can't go wrong!
The growing area (and therefore nutrient bucket) should be kept cool (55-70°). This is especially important for the cool-season crops like lettuce and broccoli. Learn more about hydroponics nutrient solutions here: http://www.hydroponics-simplified.com/hydroponic-solution.html. We also provide a nifty little mixing chart there for the Flora nutrients that you can print out and save.
© 2009 http://www.hydroponics-simplified.com All rights reserved. Page 4

For each 2-gallon batch of nutrient solution, add 2 tsp. of each of the 3 parts, separately. Never mix the nutrient solutions together, only add to the water. As the plants mature, change the ratio of the nutrient solution as directed on the bottles, or in Stella's mixing chart.
pH- It is a very good idea for any serious hydroponics project to keep the pH of the water in the proper range, which is 5.5 to 6.5 (6.0 is ideal). If the pH is out of range, some of the nutrients get “locked out” and the plants suffer. GH puts out a simple test kit with pH up & down solutions cheap. It will last you through many gardens: http://www.hydroponics-simplified.com/cheap-hydroponics-supplies.html#nutrients.
GROWING MEDIA:
We recommend a 50/50 Coco Coir and perlite mixture for the AutoPots. Line the bottom of the pots first with the provided root mats. You cannot use LECA (Hydroton or clay balls) in this system.
This is a brick of Coco-Coir, you can order one here: http://www.hydroponics-simplified.com/cheap-hydroponics-supplies.html#media
Perlite can be bought at any garden center. Coco Tek must be ordered from a hydroponics supplier. Learn more about hydroponic growing media here: http://www.hydroponics-simplified.com/hydroponic-growing-medium.html.
© 2009 http://www.hydroponics-simplified.com All rights reserved. Page 5

EXPANDING THE SYSTEM:
This modular growing system is very easy to expand. You just buy more modules and “t” into the irrigation tubing to provide nutrient solution to each grow tray. Of course, after about 2 modules, it will be necessary to provide a larger reservoir for the solution. But as we said earlier, you can create an entire greenhouse filled with nothing but Autopots... the hydroponics “no brainer”.
© 2009 http://www.hydroponics-simplified.com All rights reserved. Page 6

We hope you will try out our plans for this cool little wick hydoponics system. You will be amazed at the size and quality of produce you can reap from this one unit. It provides a great introduction to hydroponics for adults and children alike, and it's just plain FUN.
Our guess is that once you get a taste of hydro in this way, you will go on to bigger and better things. This field of horticulture is wide open! There are many different methods for you to try, and you'll just get more knowledgeable and skilled at it as time goes on.
You might try growing heirloom tomatoes, medical herbs or even orchids. Or you might just enjoy munching on your own healthy, homegrown salad micro-greens! No matter which way your interests take you, you are sure to enjoy this clean, healthy, prolific, earth-friendly gardening method. We just love hydroponics and know you will too.
Visit our website: http://www.hydroponics-simplified.com often for updates on equipment, lighting, nutrition, plants and seeds, pests, grow-closets, and plans for several other different growing systems. We provide simple information, insider secrets, and easy-to-follow instructions to get you up and growing in no time...
Enjoy! Simon & Stella
Disclaimer: Many of the clickable links in this ebook are affiliate links, meaning thatif you buy through one of those links, we receive a very small commission (just about enough to keep the website up and growing!).
Rest assured, however, that we use these products often and highly recommendthem. If you see it here, rest assured that it has our personal stamp of approval!If you do choose to order supplies through our links, please accept our thanks foryour valued patronage.
© 2009 http://www.hydroponics-simplified.com All rights reserved. Page 7

Educational LinksAccess Excellence Access Excellence is a national educational program that provides high school biology and life science teachers access to sources of new scientific information via the World Wide Web. This lesson plan, "Building and Using a Hydroponic/Aquaculture System in the Classroom," is a great unit for teaching hydroponics. Stop by and see the details!
Aeroponics InternationalThis site has a great section called "Student and Teacher Science Projects." Stop by and get some ideas!
Bergen Academy Students and teachers from Bergen Academy have been learning all about hydroponics and aquaponics--even farming in space! And, lucky for you, they've posted many of their findings on their amazing Web site. Teachers: Make sure you take a look at the many lesson plans provided for your perusal on this site. You could spend days here . . .
Bradley HydroponicsLearn all about hydroponic projects going on around the world, hydroponic games, nutrition, and much more. Great resources for educators and kids alike!
Carbon QuestProjects from all over the world--including hydroponics--are illustrated at this great Web site. Participating organizations include NASA and the United Nations.
The Conservation Fund's Freshwater Institute Education and Outreach explains a bit about how the Conservation Fund's Freshwater Institute has become involved with education and aquaponics. Click on the links to see their work in action.
Foothill Hydroponics Every educator involved with hydroponics--or even anyone who has ever thought about the possibilities of a hydroponic unit--must stop by this site. The Foothill Hydroponics Library of Brochures is an amazing database of information.
General Hydroponics General Hydroponics will donate hydroponic products to schools with teachers who use hydroponics in their classrooms or who are considering doing so.
Hawai'i Department of Education "Simply Hydroponics"--An E-School Project--a section of the Hawai'i Department of Education Web site--provides guidelines and general lesson plans for an entire hydroponic unit.
Homegrown Hydroponics This hydroponic merchant has responded to the many requests they receive for science project ideas by providing educators and students with the Science Projects page. Once you have a growing system and are ready to go, stop by for some hints and tips.
Hydroponic UniversityBeginning students of hydroponics will find some great resources at this site, including tips, a forum for asking questions, and free system plans.
Konawaena High & Intermediate School Stop by the bizjournals.com news site and read the article, "Teacher Bets Hydroponic Projects Grow Profits," which describes how teacher Bill Woerner got involved with hydroponics in Hawaii.
National Gardening Association

"Sowing and Growing Sans Soil", "What . . . No Soil?", "Hooked on Hydroponics"Kidsgardening.com--sponsored by the National Gardening Association (NGA)--has tons of great ideas to get kids growing. Take a look at these hydroponic articles written by NGA staff members and get some ideas for your classroom. This information includes some great lesson plan material.
National Gardening AssociationThe electronic home of the NGA has several great resources for teachers. Take a look at their free e-mail newsletter.
Nelson/Pade MultimediaHere you can learn more about aquaponics--the fascinating combination of aquaculture and hydroponics. The site features information about the Aquaponics Journal and has some resources for educators.
The Super Hydroponic Awesome Radish Project (S.H.A.R.P.) Lesson Plans for HydroponicsThe Super Hydroponic Awesome Radish Project (S.H.A.R.P.) Lesson Plans for Hydroponics is a great spot to bone up on the basics of hydroponics and then get down to some soilless growing. The pages include information on how to set up a passive wicking system, suggested environmental conditions for growing radishes, mixing the nutrient solution, and much more. S.H.A.R.P. is part of the extensive ThinkQuest educational database.
The STELLAR Program at NASA AMES Research Center The STELLAR Hydroponics Module features lesson plans galore for students from kindergarten all the way through 12th grade! Bookmark this "stellar" page and regularly return to glean innovative educational ideas.
Stratford Northwestern Secondary School This Canadian school has a great hydroponic lab. This page features pictures, ideas, and more--stop by and see what they've done. "The hydroponics lab is a great hands-on experience. Not only did I learn lots, but I had fun." --L. Bell, Grade 12
The Teaching Parent Guide to Resources & Services The Hydroponic Reference Center is an excellent, intelligent, and expansive collection of Web pages. Browse through the seemingly endless series of interconnected pages and store these gems for use in your own classroom or at home. Follow the tortoise!
Tunstall High School Aquaponics Project Teachers at Tunstall High became involved with aquaponics in order to guide their students along the cutting edge of technology as it relates to agriculture and science. Stop by and see some pictures of their operation.
The University of Florida Cooperative Extension Service The Grow Your Own Vegetables Without Soil page features some valuable hobbyist hydroponic information. Learn about water vs. aggregate culture and get some recipes for nutrient solutions and growing media.
Virginia Hydroponics Teacher Resource CenterGreat resources and teaching ideas. The Basic Hydroponic Information page is loaded with vital data.
Yale-New Haven Teachers Institute--Solar GreenhousesLearn more about solar energy and greenhouses at this site. It includes plans for how to build a model greenhouse and classroom activities.

HYDRO JUICE Plant nutrient is available from the hydro shop (hydroponics supplier). These concentrated nutrient solutions are diluted in water to make the hydro juice to feed the plants. Simple nutrient concentrates are easier and cheaper (from $8 for 750 ml.). But some of the nutrient chemicals precipitate out as flakes before use and are lost. Two part nutrient concentrates (from $20 for 2L.) don't have this problem. By separating nutrient chemicals they allow more nutrients to be added same amount of water.
Mixing the two part hydro juice. Half fill the nutrient tank, mix the required amount of concentrate Part A in the water. Fill the tank and mix required amount of concentrate Part B. Check the instructions on the containers before buying or using either type of nutrient concentrate. List of the 16 elements all plants need to grow and concentrations in solution. NAME ELEMENT PPMNitrogen N 96Phosphorous P 48Potassium K 246Calcium Ca 123Magnesium Mg 48Sulfate SO 412Iron Fe 3Manganese Mn 0.5Zinc Zn 0.08Copper Cu 0.06Boron B 0.5Molybdenum Mo 0.1 I have only used per mixed nutrient solution and am yet to try the formulation below, so if you have any info could you please let me know about it, thanx. The 16 elements in the table above are derived by plants from the atmosphere or from minerals in the soil, Dr. Alan Cooper proposed this formulation for his NFT hydroponic system, a typical nutrient solution.
The table below contains the ingredients to be added to 1000 liters of water, in practice the solution is concentrated in to 2 parts, preventing loses from chemical reactions. Fill two 10 liter plastic bottles with water mark that part "A" and part "B". Dissolve calcium nitrate and EDTA iron in part "A" and the rest of the ingredients in part "B". Concentrates are used by adding 100mls.(cc's.) of each part per 10 liters of water. The concentration of the final solution can be measured with a EC meter (electrical conductivity meter), this reads the conductivity of the nutrient solution.

Nutrient Chemicals Weight in grams
Potassium dihydrogen phosphate 263.00Potassium nitrate 583.00Calcium nitrate 1003.00Magnesium sulphate 513.00EDTA iron 79.00Manganous sulphate 6.10Boric acid 1.70Copper sulphate 0.39Ammonium molybdate 0.37Zinc sulphate 0.44

Hydroponics and the Scientific Method
Step One: Ask a QuestionThe first step in an experiment is to ask a question about whatever you want to find out from hydroponics. This could be as simple as "Can I grow radish plants without soil?" For a more ambitious experiment, you might ask a question about plant nutrition such as "How much magnesium do radish plants need to grow?" or "How do radish plants react to concentrated nitric acid?"
For a question to be answered scientifically, it must be clear and testable, and the phenomenon that you question must be measurable and controllable. For instance, you could not ask "Is hydroponics superior to soil for growing plants?" because whether something is "superior" is a matter of opinion.
Step Two: Form a HypothesisThe next step in an experiment is to come up with a hypothesis, a tentative explanation for a scientific phenomenon. For instance, you might hypothesize:Radish plants can grow in a nutrient solution without soil. Magnesium is essential for normal radish plant growth.Concentrated nitric acid is harmful to radish plants.
Make sure your hypothesis can be proven wrong. If it cannot be proven wrong, it is useless to conduct an experiment to test it.
Along with a hypothesis comes a prediction. A prediction is what you think will happen in the experiment. It takes the form of an if/then statement: IF the hypothesis is true, THEN these are the results I expect.
Examples:IF radishes can grow in a nutrient solution without soil, THEN these plants will grow.IF magnesium is essential to radish growth, THEN radishes without magnesium in their solution will develop chlorosis.IF concentrated nitric acid is harmful to radish plants, THEN plants fed concentrated nitric acid will drop dead within one hour.
Step Three: Determine VariablesThere are three kinds of variables that you must account for in an experiment. The independent variable is what you change in the experiment. For instance, if you are trying to find out how much magnesium radish plants need to grow, your independent variable might be concentration of magnesium in the nutrient solution. It is important that you have only one independent variable in your experiment. For example, you cannot vary both the magnesium concentration and the temperature conditions of your radish plants. You would not be able to draw reliable conclusions from the experiment if you altered more than one experimental condition.
The dependent variable is what you measure in the experiment. Unlike the independent variable, an experiment can have several dependent variables because variations in the independent variable can have many different effects. For example, you might measure length of leaves and weight of roots to assess the growth of radish plants. Dependent variables can include qualitative as well as quantitative
data: you might also examine the color of the radish leaves and eat the roots to see how they taste. Such data cannot be measured but is still useful when you describe and compare it.
Any other conditions in the experiment are called controlled variables. You must keep these conditions constant for all plants in the experiment. Controlled variables might include light exposure, humidity, pH of solution, ambient noise, etc. If you change these variables, they become independent variables, and remember that you cannot have more than one independent variable in a scientific experiment.
Step Four: Design a ProcedureThe procedure is the exact steps you take to carry out your experiment. This may change during the experiment if you discover a better way to do something than your original procedure. Be sure to note all changes in your procedure.
One important thing to include in your procedure is an appropriate level of treatment. The level of treatment is the extent to which you change your independent variable. For example, if you are testing the effects of magnesium concentration on radish growth, your levels of treatment might include no magnesium (0%), normal magnesium (100%), and double magnesium (200%). Note that these values are relative to the "normal" value, which is given in the recipe for the nutrient solution. Make sure you note the numeric value of "normal" (i.e. concentration in moles per liter). More extreme levels of treatment usually get more visible results, but less extreme levels of treatment usually simulate real-world conditions better.
Replication is the number of times you repeat a specific procedure. This is important to ensure that your experimental data is reliable and less subject to chance variation. For example, in the magnesium experiment, you might have two pots of radish plants in each nutrient solution and three plants in each pot. This way, some plants may grow tall and others may not grow much at all, but you can compare the general growth pattern of all the plants with the general growth pattern of the plants in the other nutrient solutions.
The control group is the group of plants in which the independent variable is held at a "normal" level. The purpose of a control group is to show what would normally happen and compare it with what happens when you change the independent variable. This shows if the independent variable is really responsible for your observations. For example, in the magnesium experiment, the control group would be the radishes with 100% of normal magnesium concentration in their nutrient solution.
Be careful not to confuse the control group with the controlled variables. Remember, the control group is the group in which the independent variable isn't changed, and the controlled variables are the variables that never change in any group. Source for entire lesson: Campbell, Neil A. "Lab Topic 1: Scientific Investigation." Lab Manual for Campbell, Fifth Edition. Ed. Dan Wivagg. Menlo Park, California: Benjamin/Cummings, 2000, pp. 1-27.

Let it Grow and See What Happens
Step One: Maintaining the ExperimentDuring the course of the experiment, the nutrient solution will have to be replenished frequently due to water evaporation. When the level of solution is low, add deionized water until the level of solution is up to where it should be. This may seem like you are diluting the solution, but it actually maintains the concentration of the solution at about where it
should be. The reason for this is that when water evaporates, it leaves behind any chemicals that are dissolved in it, so the solution becomes more concentrated after evaporation. Be sure to refill all the nutrient solution containers at the same time.
Although evaporation is the primary reason the level of nutrient solution decreases in the container, the plants use up nutrients too. Also, algae tends to grow in a nutrient solution that is left out for a while. Because of this, you should replace the nutrient solution in each hydroponic apparatus about once every two weeks or so. When you replace the nutrient solution, first remove the pots from the hydroponic apparatus. If the felt strips are covered with green algae, rub off as much as possible with your fingers. We are not sure if the algae is harmful to the experiment, but it may use up nutrients, making them unavailable to your plants, and it makes the experiment look ugly. Place the pots in bowls of water so that the roots and the felt do not dry out.
Remove the support boards and clean them thoroughly with soap and water. Then pour the nutrient solution out of its container, wash the container with soap and water, and disinfect it with rubbing alcohol or a chemical cleaner to discourage algae growth. Make new nutrient solution in the mixing bottle according to the recipe you calculated in Lesson Three, and pour it into the nutrient solution container. When you do this, you should also pour some through the felt and the Perlite in the pots to feed the plants directly and encourage capillary action in the felt. When you have made enough nutrient solution to fill the container, replace the boards and the pots the way they were before. Your hydroponic apparatus is now ready to go again. Be sure to replace all the nutrient solutions in the entire experiment at the same time. Note in your observations each time you do this.
You should also make sure the controlled variables are staying as consistent as possible. The most important thing is that the controlled variables are the same for all the plants at any given time, but it is also important that they stay within reasonable limits to keep the plants healthy. Make sure the plants are getting about twelve hours of light (give or take a few) from the grow light or the sun. Make sure the temperature is between 55-85° F. Make sure the relative humidity is at least 45% and ideally between 60-75%. Source: Casana, Maritza. [email protected]. "Práctica de producción de hortalizas bajo la técnica de hidroponía en agua y perlita." 7 Jan 2001. Personal e-mail. (14 Jan 2001).
Step Two: Changes in the ExperimentDuring your experiment, the plants may grow large enough that they are overcrowding their pots and
competing with each other. When this happens, you may need to remove some plants to alleviate the overcrowding. If you do this, be sure to remove the same number of plants from all the pots in the experiment at the same time. Select for removal the plants that look the least healthy. Note in your observations when you do this.
You also may need to switch to different nutrient solutions if you begin your experiment with a starter solution for all the plants. Do this in the same way that you would replace the nutrient solutions as in Step One, but make different nutrient solutions for each hydroponic apparatus. Be sure to mix the correct volumes of each concentrated part as you calculated in Lesson Three. Note in your observations when you do this.
Step Three: Handling EmergenciesIf the plants are not looking healthy, here are some things to check:
• Are the strips of felt moist? If not, the nutrient solution is not coming into the pots by capillary action. Make sure the level of nutrient solution in the container is high, and make sure the felt is as far immersed in the solution as it will go. Also, if you are refilling the nutrient solution tub, pour some on the felt strips to "prime" them for capillary action. If you are not making more nutrient solution, you should do the same with deionized water.
• Are the light conditions appropriate? If the plants are getting significantly more or less than twelve hours of light per day, you may need to adjust the lighting conditions.
• Is the air humid enough? If not, use a hoochie-coochie machine to raise the humidity or spray water all over with a spray bottle or hose.
• Is the temperature appropriate? If things are too cold, you may need to get a heater. If things are too hot, you may need to shade the plants, put ice in the nutrient solution, or use an air conditioner. The temperature of the water in the hoochie-coochie machine can also influence temperature conditions.
Spraying water with a spray bottle, though not a substitute for fixing what is wrong with the experiment, is generally good as a temporary remedy to alleviate some of these common problems.
Step Four: Making ObservationsDuring the experiment, you may want to measure and record data on the following dependent variables:
• Length of plant leaves • Color of plant leaves • Anything unusual you observe
You also may want to take pictures of each hydroponic apparatus to document the growth of the plants subject to different treatments.
At the end of the experiment, you may want to measure and record data on the following dependent variables:
• Length of plant leaves • Color of plant leaves • Length of plant roots • Color of plant roots

• Weight of entire plant • Weight of edible parts (if there are edible parts) • Color of edible parts • Taste of edible parts • Anything unusual you observe
Note that you cannot make any observations on the roots of the plants during the experiment. If you pull the plants out of the pots to observe the roots, you may break off the roots, which is bad for the plants. This is especially true if your plant has "super roots" that grow out of the bottom of the pot and down the strips of felt.
You should end your experiment after a predetermined number of days or after your plants are full-grown or have developed edible parts.
Step Five: Organizing Data and Drawing ConclusionsThe goal of data tables and graphs is to present data in a way that is as easy to understand as possible. Because of this, you may not want to include all the measurements you made of every plant; rather, you may only want to include the average measurements of the plants as well as perhaps the highest and lowest measurements to indicate the range.
Graphs are helpful to show visually what happened in your experiment. To show progress throughout the experiment, you may want to use a line graph of, for example, average leaf length vs. time. You might make multiple lines on the graph to indicate the average leaf lengths for plants in different nutrient solutions. You could show the same thing in a data table as well. Be sure to give titles to all your data tables and graphs, and make sure the titles clearly summarize the purpose of the data table or graph.
To show the results at the end of the experiment, a bar graph is a good choice. For example, you might make a bar graph of average plant weight for plants growing in different nutrient solutions. The independent variable (in this case, which nutrient solution) should be graphed on the x-axis, and the dependent variable (in this case, average plant weight) should be graphed on the y-axis. You could show the same thing in a data table as well.
You can then use these graphs and data tables to draw conclusions. Which nutrient solution produced the healthiest plants in your experiment? You could conclude that the nutrient solution that produced the healthiest plants had the closest-to-ideal concentration of the chemical that was your independent variable. Note any sources of error in your experiment that could cause you to draw mistaken conclusions. Source: Campbell, Neil A. "Lab Topic 1: Scientific Investigation." Lab Manual for Campbell, Fifth Edition. Ed. Dan Wivagg. Menlo Park, California: Benjamin/Cummings, 2000, pp. 1-27.
Focus Questions• Why is it okay to add deionized water to your nutrient solution when it is running low? • Why might algae be a problem in a hydroponic experiment? • Why should you pour nutrient solution through the felt when you replenish the nutrient
solution? • What conditions should you check if your plants do not look healthy? What can you do to
change each of these conditions?

• What dependent variables can you measure during the experiment? • What dependent variables can you measure after the experiment is over? • Why can't you measure the plants' roots during the experiment? • How do you know when to end your experiment? • How do you summarize your data to make it easier to understand? • What is a bar graph good for showing? What is a line graph good for showing? • How can you draw conclusions based on your data tables and graphs?

Oregon Agriculture in the Classroom Foundation • http://AITC.oregonstate.edu �
Agriculture in theClassroom Foundation
Oregon
Summer Ag Institute Lesson Plans
Lisa ModeeDeveloped By:
Title of Lesson: Hydroponic Plant Investigations
Academic Subject: Science and Math
Theme: Compare the growth rate of hydroponically grown plants to those grown in soil.
Grade Level: 4/5
CIM/CAM Standards:
Science, 5th grade—Describe the basic plant and animal structures and their functions.
Science, 5th grade—Ask questions and make predictions that are based on observations and can be explored through simple investigations.
Science, 5th grade—Design an investigation to answer questions or check predictions.
Science, 5th grade—Collect, organize, and summarize data from investigations.
Science, 5th grade—Summarize, analyze, and interpret data from an investigation.
Math, 5th grade—Select the appropriate units to measure length.
Math, 5th grade—Measure length, ….using standard and nonstandard units of measure.
Math, 5th grade—Collect, organize, display and analyze data using number lines, bar graphs, line graphs, circle graphs, stem and leaf plots, and histograms.
�.
�.
�.
4.
5.
6.
7.
8.

Oregon Agriculture in the Classroom Foundation • http://AITC.oregonstate.edu �
Learner Objective: (The student will)
Identify the stages of seed germination.
Define the related vocabulary words and identify the location and functions of the major plant parts.
Understand the need to add nutrients to the water when growing plants hydroponically.
Write a scientific inquiry investigation to determine the effect that growing plants hydroponically has on their growth rate.
Identify questions that can be answered by their scientific investigation and write a hypothesis.
Recognize reasons for controlling variables.
Measure and record plant growth over a period of several weeks.
Create a line or bar graph showing the comparison data of the hydroponically and soil grown plants’ growth rates.
Draw conclusions about their hypothesis based on the data they have collected and recorded.
Present their graphs and conclusions to the class.
�.
�.
�.
4.
5.
6.
7.
8.
9.
�0.
Vocabulary:
Hydroponics—the science of growing plants without soil.
Seed—the part of a plant that is responsible for starting a new plant.
Root—the underground part of a plant that anchors the plant, absorbs water and minerals, and stores food.
Stem—the part of the plant that holds it upright supporting flowers and leaves.
Leaf—an extension of the stem that turns sunlight into food through a process called photosynthesis.
Flower—The part of the plant that is responsible for producing seeds.
Fruit—the fleshy part of plants that holds seeds. The fruit is responsible for protecting and scattering the plants seeds.
Germinate—when a seed takes in water and begins to grow.
�.
�.
�.
4.
5.
6.
7.
8.

Oregon Agriculture in the Classroom Foundation • http://AITC.oregonstate.edu �
Phloem—plant tissue that transports food in the plant.
Nutrients—substances used by plants to make their food and make plant growth possible, made up of carbon dioxide, water and minerals.
Hypothesis—something not proved but assumed to be true until further investigation.
9.
�0.
��.
Anticipatory Set:
Ask students, “What do plants need to grow?” and list their responses on the board. Ask students if they think plants can grow without soil. Explain that we will be learning about the science of growing plants without soil (hydroponics) and comparing them to plants grown in soil.
Instructional Outline(Teaching Content)
�. Introduce students to vocabulary.
�. Review seed germination.
�. Explain hydroponic growing set up and identify the need for, content of, and process of adding nutrients for the plants.
Strategies(What to do, explain or have students do)
*Distribute vocabulary handout and read through it together. *Have each student make a “flip book” study guide using the definitions from the handout. *Flip books will be used throughout the following �-� weeks for independent study, partner quizzes, and class games to help students learn their vocabulary. *At the end of the second week an independent vocabulary quiz will be given.
*Divide students into three groups and distribute/read the lesson worksheet on making a living necklace from the Oregon Agriculture in The Classroom Foundation. *Have each group gather their supplies from the table and complete a necklace using a bean seed. *Students may take turns wearing their group necklace or set it in a window. *Necklaces will be checked in 4 or 5 days at which time the plant parts and germination will be discussed and then labeled on the germination worksheet.
*Show students the hydroponic system and discuss its parts and their functions. *Present information on the nutrients needed for successful hydroponic plant growth, using the Virginia Hydroponics article. *Inform students that we will use fertilizer to provide complete nutrients for the plants since they will not be getting any nutrients from soil.
�.
�.
�.
Oregon Agriculture in the Classroom Foundation • http://AITC.oregonstate.edu 4
Distribute seeds to each of the three groups, giving one group lettuce seeds, the second group basic seeds, and the third group tomato seeds. Have each group plant �-4 of their seeds in soil containers and �-4 of their seeds in their group’s section of the hydroponic garden system.
*Distribute the plan forms, which students should already be somewhat familiar with from previous science investigations. *Complete the first two sections together discussing the questions we wish to answer in our investigation, the variables we will keep the same in order to conduct a “fair” investigation and the variables we will change. *Have each group discuss and agree upon a hypothesis to write on the final section of the plan form.
After insuring that the only differences in the growing circumstances of the plants is soil vs. hydroponic system, have each group assist in the care of, and watch for progress in their plants’ growth.
*During this period of waiting for plant growth use lessons from the math text to practice collecting, recording, graphing and interpreting data. *Also have students practice making accurate length measurements on various objects in inches and centimeters.
As plants begin to show above soil level have groups choose the one healthiest of each of their soil and hydroponic plants to use for data collection. *Explain that these two plants for each group will be the same plants they measure each time in order to be collecting reliable data. *Have each group measure their two plants and record the measurements and date, and label with soil and hydroponic in their science notebooks. *These measurements and recordings will continue twice a week over the next several weeks.
Have each group create a poster size line or bar graph to show their comparison data on the rate of growth for their soil grown vs. hydroponically grown plants.
4.
5.
6.
7.
8.
9.
4. Planting seeds.
5. Introduce and facilitate the completion of the scientific inquiry investigation plan form.
6. Plant care.
7. Data collection and recording.
8. Plant measurement and data collection.
9. Display data in a graph.

Oregon Agriculture in the Classroom Foundation • http://AITC.oregonstate.edu 5
*Have each group use their data and graph to discuss and evaluate the accuracy of their original hypothesis concerning the soil grown vs. hydroponically grown plants. *Have each student put his/her conclusions in writing on the final page of their investigation plan forms.
Have each group plan, practice and present their original hypothesis, graph and conclusions to the class.
�0.
��.
�0. Evaluate hypothesis.
��. Group presentations.
Extensions:
Read about and discuss the possible benefits of and uses of hydroponic farming in U.S. agriculture. This could even piggy-back into a research assignment or creative writing project related to hydroponic farming.
Closure:
*Display group graphs and conclusions.*As a class determine which of the plant types showed the greatest differences in growth.*If possible, take a field trip to the Davis Farm in Corvallis to see a hydroponic operation first hand.
Resources:
Growing Edge Web Site: http://www.growingedge.com/basics/start.html
“Grow Your Own Vegetables Without Soil �; University of Florida Extension article.
Virginia Hydroponics: http://www.hydro4u.com/resource_center/faq.htm
“History of Hydroponics”: http://archimedes.galilei.com/raiar/histhydr.htm
Davis Farm, Corvallis OR
“Living Necklace” lesson from Oregon Agriculture in the Classroom Foundation
“Seeds Stems And Such” lesson from Oregon 4-Hagriculture in the Classroom Curriculum Handbook for Grades 4-5, �00�
Hydroponic kit from SAI
Hydroponic supplies from: www.americanag.com
kidsgardening.com
�.
�.
�.
4.
5.
6.
7.
8.
9.
�0.

Oregon Agriculture in the Classroom Foundation • http://AITC.oregonstate.edu 6
Evaluation:
Evaluate student notebooks for accuracy in recording plant measurements and growth records.
Evaluate student made comparison graphs of plant growth data.
Evaluate student science inquiry packets for their accuracy and completeness using the state scoring guide.
Evaluate student accuracy on vocabulary and plant part quiz.
�.
�.
�.
4.

Hydroponic orchids Lights! Hydroponics!Twentieth Century Fox Film Corporation on the increase! purchased many of the newest HID Monterey County, California, grew and Horticultural lighting systems, as well as shipped 12.5 million dollars worth of complete Hydroponic growing systems orchids in 1998. and living Hydroponic plants, for an The final totals are not yet in for the upcoming movie that will be set about 50 year 2000, but it could exceed 25 million years in the future. dollars!
Some of our advanced Hydromax Andy Matus is the largest California Aeroponic systems are also being used as orchid grower and has found cultural props for the project. methods to ensure that blooming orchids
are available 12 months out of the year. Hydroponics and tissue culture methods
are combined with intensive breeding to create new hybrids that have the outstanding characteristics of small plants with huge, long-lasting blossoms.
Source: Growing Edge magazine Volume 12 #3 January/February 2001, pages 54-55
Dedicated to: Education • Research • Fun! Issue #12 • Spring 2001
Hydromax 2000 aeroponic system The photo at right shows healthy white roots when the top cover is lifted. The lower parts of the roots dangle into the pool of nutrient solution. The upper roots are constantly sprayed with nutrient water by a submersible pump.
The special nozzles break the water into a flat circular pattern of droplets. These droplets fly through the air and become charged with dissolved oxygen on their way to the plant roots.

San Miguel High
School, in South Gate,
ordered Oasis
propagation blocks and
Xtra-Edge
Hydroponic nutrients
as part of its new
science education
program. Mount Vernon
Middle School, in Los Angeles, ordered special full-spectrum
several hundred small seedlings, making it horticultural lights for the part of its new possible to share one Hydroponic science education program that uses Laboratory with more than one classroom. Hydroponics as a learning tool.
The photo above shows our resident �Hydroponic Handyman,” �Mr. Julio Bonillia, a Foothill Hydroponics technician, helping teachers assemble self-contained Hydroponic Laboratories on wheels.
The special garden carts have two tiers of full-spectrum lighting, with four 48-inch fluorescent tubes on each tier.
This size cart is capable of supporting
“
LAUSD orders more Xtra-Edge Hydroponic nutrients
Hydromax Mini Ebb & Flow/NFT Hydroponic system
This photo shows lettuce growing in 3-inch rockwool cubes.
A very small submersible pump raises water from the lower reservoir to the growing tray.
The growing tray fits inside the reservoir, making a small self contained system. The water drains by gravity back to the lower tank.
chives, and flowers. This will provide us Our New Hobby with fresh salads and flowers during the by Ken Suarez winter months.
We will use Paul’s tiny science project My wife Robin and I had been interested farm to start plants from seeds and move in Hydroponics for years, so when our them to the Hydromax when they’re son, Paul, asked us to help him put ready to transplant. together a small Hydroponic garden for
The whole family is enjoying the new his middle-school science fair, we were hobby. Besides providing food and ready to try it. beauty, the plants add oxygen to the air, We helped him design the little garden and there have been several, unexpected and went to Foothill Hydroponics, where bonuses. The metal halide lamp in our Mr. Mohsen Daha was very
helpful to Paul. He gave Paul technical advice, lots of literature, and was generous with discount prices.
Paul’s tiny garden, made from a recycled soap tub, was a great success. But after the fair, its four tiny one-inch rockwool pots couldn’t contain the tomato and pepper plants to maturity, so we let the project go and put the empty tub in the garage, where it sat for over a year.
But our interest persisted, and this year we decided to experiment with a slightly larger setup. After much consideration, we decided on a Hydromax 2000 ebb and flow system, which holds twelve plants. Since it’s indoors, we light it with a 250-watt metal halide lamp.
Setting up the system was easy. Foothill Hydroponics staff explained big family room cheers us up on cold, wet, everything and were available by phone gloomy days. It makes our family room for further help. such a cheerful place to be in, that we
By using starter plant sets already in wish we had bought a metal halide lamp four-inch rock wool containers, we were years ago, even if we didn’t intend to able to have an instant” indoor salad grow hydroponic vegetables. Paul says farm, which is approximately two feet that the light is great for drawing and wide by four feet long, in which we are drafting for school projects because he can growing tomatoes, lettuce, green peppers, see fine detail with it much better than
“

with the regular house lights. Our pre-existing indoor plants, growing in soil, get the double benefit of the indoor sunlight” and the recycled
nutrient solution.The nutrient solution recirculating
ads moisture to the air and sounds like we have a small waterfall in the house.
So, if you’re looking for a new hobby, starting a Hydroponic garden is fun, it’s educational, it will provide you with vegetables and flowers, and it will cheer you up on cold winter days.
“
which fosters hands-on learning and allows On November 18, 2000, the Los students to use the scientific method to Angeles County Office of Education perform their own experiments. hosted a “New Teacher Fall
Teachers who attended the session were Symposium,” for new math and inspired, and Dean C. Gilbert, the L.A. science teachers, at the Sheraton County Science Consultant, stated that the Hotel in Cerritos, California. workshop received very positive comments, Foothill Hydroponics participated disseminated a great deal of information, and by displaying hydroponic supplies and made a definite impact on these teachers.” by highlighting the new aeroponic
The workshop was well-attended, and all spray system in a booth. participants received starter kits provided by Foothill Hydroponics also presented Foothill Hydroponics. a breakout session titled
An aeroponic starter kit was raffled off at “Hydroponics in the Classroom.” the end of the session, and was eagerly The workshop, presented by Pat received by a 7th-grade science teacher. Brown and Ginger Krelle,
demonstrated easy and inexpensive ways for teachers to energize their curricula, while meeting California science standards, by growing plants in the classroom hydroponically.
Teachers also learned how to utilize Hydroponics to create en environment
“
Foothill Hydroponics supports Symposium
Past newsletters available Online! at www.foothillhydroponics.com

As for the growing media, I have tried My Hydroponic pea gravel but have found that using the 4” Greenhouse x 4” x 3” rockwool cube best suited my By Cal Singman needs.
I have been growing all types of lettuce, The greenhouse that I built was based on tomatoes, sugar peas, Japanese cucumbers, the location and size that suited my need. peppers and a variety of herbs. Since I had no room in my backyard, the
When my crop is ripe, my wife enjoys only available site was my driveway. picking the fresh vegetables every day for Searching for suitable plans, I chose one our nightly salads. This is a wonderful in the “Popular Science Woodworking fulfilling hobby and also great fun! Projects” of 1987. The plans called for an
8’ x 10’ greenhouse. I decreased the size to 8’ x 8’.
I also used 2” x 4” redwood for the mudsill, and screws instead of nails. This way the greenhouse can be dismantled and moved if necessary.
The 8’ x 8’ size is a perfect size to have two 26-gallon capacity reservoirs, one on each side, each holding two HydroTrays or any combination to fit.
“Thank you,
Foothill Hydroponics,
for helping me!”

Gardening Resources, Cornell University
Cornell University
Search Cornell
Gardening resources > Houseplants > Horizontal hydroponic unit plans
Horizontal hydroponic unit plans
Search Gardening:
Get local help At your county's Cornell Cooperative Extension office.
Topics on this page:
General Information
Tools You Will Need
Materials You Will Need
Assembly
Adding the feed line and feed tubes
Preparing the catchment tank
Printer-friendly .pdf file
Excerpted and adapted from Grow with the Flow, by Philson A.A. Warner, Donald A. Rakow and Charles Mazza. David Hillman, Robert McBride and Wayne Torgenson helped write this section.
Click for larger view Photos courtesy Jim Grefig
Jim Grefig, a Master Gardener involved with the School Gardening Mentor Program in Westchester County, coupled a PVC grow-light stand with a horizontal hydroponic system (pictured left) from the Cornell Cooperative Extension publication Grow with the Flow. Below is an excerpt from the publication detailing how to build the unit. General Information The horizontal hydroponic unit (Figure 1) is constructed of 1 1/2-inch PVC pipe connectors, 1 1/2-inch PVC fittings (T sections and 90° elbows), 1/2-inch ABS feed line, spaghetti (feed) tubing, and emitters.
Figure 1 (click for larger view) The T sections and two 90° elbows are connected with short lengths of PVC pipe to construct a U-shaped unit that lies horizontally on a surface. The openings of each T section (a) are positioned vertically (upward) to become the grow ports in which plants will be set to grow. Two 90° elbows (b) attached to each end of the U-shaped unit and positioned vertically (downward) connect the unit to a catchment
http://www.gardening.cornell.edu/factsheets/growflow/index.html (1 of 7)4/10/2008 3:37:30 PM

Gardening Resources, Cornell University
tank. The feed line (c) is fastened to one leg of the U-shaped unit. Spaghetti tubes (d) run from the feed line to the grow ports. The unit is suspended from a simple plant light stand (e) using light chain and S hooks and attached to a pump (t), which sits on the covered catchment tank (g). [Note: Grefig's variation uses a light stand constructed from PVC pipe.] Liquid is pumped from the catchment tank through the feed line and feeder tubes to each plant. Liquid returns through the unit to the tank by gravity. Before beginning, read all the directions thoroughly to understand fully the construction approach. Tools You Will Need
● a miter box, to make straight cuts ● a hack saw, with a 24- or 32-teeth-per-inch blade ● a pen or utility knife ● a commercial hole punch, a #20 nail, or an ice pick ● an electric drill with a 3/8-inch bit ● two 3-inch or 4-inch C-clamps ● a ruler or a tape measure
Materials You Will Need For U-shaped unit:
● a 75-inch length of 1 l/2-inch PVC pipe, cut to the following dimensions:
❍ one 9-inch connector ❍ one 3-inch connector ❍ one 2 l/2-inch connector ❍ ten 6-inch connectors
● the following 1 1/2-inch PVC fittings: ❍ ten T sections ❍ four 90° elbows
● one small can of PVC pipe cleaner ● one small can of PVC solvent-cement
For feed line and pumping system:
● 6 feet of 1/2-inch ABS pipe ● fine sandpaper (120 to 150 grit) ● ten barb connectors (small plastic fittings to connect the
spaghetti feed tubes to the ABS pipe) ● ten 18-inch lengths of spaghetti tubing ● one 5/8-inch x 1 l/2-inch bolt or dowel (to plug one end of
the ABS feed line)
http://www.gardening.cornell.edu/factsheets/growflow/index.html (2 of 7)4/10/2008 3:37:30 PM

Gardening Resources, Cornell University
● one tube of general purpose silicone glue and seal ● one mini hose clamp (to fasten bolt or dowel in place) ● one roll of electrical tape ● twenty l/2-gallon-per-hour emitters (ten for unit assembly
and ten for future replacement) ● ten plastic stabilizer pegs or paper clips ● one catchment tank -- 16 inches long, ll inches wide, 7 inches
deep -- with cover (Rubbermaid Rough Tote Keeper, 3 gallon, model no, 2213, or equivalent)
● one pump, rated 200 gallons per hour, preferably nonsubmersible, such as a fish tank pump (Supreme Aquamaster Power Filter Pump, model PLSW, or equivalent)
To attach unit to the plant light stand:
● four 18-inch lengths of light chain ● eight 1/2-inch S hooks ● two 3/8-inch x 2-inch threaded eye bolts, each with 2 nuts
and 2 flat washers
Assembly
1. Cut the 75-inch length of PVC pipe into the lengths specified in the list of materials as follows: Fasten the miter box to the work surface with a C-clamp. Using a second C-clamp, secure the PVC pipe in the miter box to ensure a square cut. Using the hack saw and the 90° cutting guides on the miter box, cut all connectors and lengths to the dimensions specified. Other cutting methods may be employed. Miter boxes with attached tubular saws that have replaceable blades can be used if a fine-tooth blade (like that of a hack saw) can be obtained. Powers saws, such as a radial arm saw, should be used only by adults knowledgeable in tool operation and blade selection. Once cutting is complete, carefully use a pen knife to remove burrs on the inside and outside edges of the cut pipe.
2. Referring to Figure 2, lay out the elbows, T sections, and PVC pipe connectors on a flat surface.
Figure 2 (click for larger view)
http://www.gardening.cornell.edu/factsheets/growflow/index.html (3 of 7)4/10/2008 3:37:30 PM

Gardening Resources, Cornell University
3. Assemble the unit without cement to make sure all the parts
fit correctly and to establish the proper orientation of all the fittings. When inserting a connector into a fitting, the connector should fit inside about onethird to halfway. Note: Be sure that the openings of the T sections are perfectly upright; these will be the grow ports for the plants. The two elbow fittings that attach the ends of the U-shaped unit to the catchment tank must be oriented downward.
4. When the unit is assembled without cement and all the fittings are properly oriented, draw alignment marks on the pipe connector pieces and their adjoining fittings and number (or letter) each fitting and pipe connector joint. These marks will ensure the proper placement and realignment of all components when the unit is reassembled with PVC solvent-cement.
5. Disassemble the unit, then begin to reassemble it permanently using the PVC pipe cleaner and PVC solvent-cement as follows:
a. Work on one joint at a time. You'll need to work quickly, as PVC solvent-cement sets in about 30 seconds.
b. Apply PVC pipe cleaner to the outside surface of the pipe connector and the inside surface of the fitting. Allow the surfaces to dry.
c. Apply PVC solvent-cement to the outside surface of the pipe connector and the inside surface of the fitting. With the alignment marks on the pipe connector and the fitting oriented 90° apart, insert the connector into the fitting until it is snug (as in assembling the joints without cement), simultaneously twisting the pipe 90° until the two alignment marks match. Do this quickly, as you have only about 30 seconds before the solvent-cement sets.
6. When the unit has been permanently cemented together, allow the PVC solvent?cement to cure for about 3 hours.
http://www.gardening.cornell.edu/factsheets/growflow/index.html (4 of 7)4/10/2008 3:37:30 PM

Gardening Resources, Cornell University
Note: Caution must be exercised when working with PVC pipe cleaner and PVC solvent-cement. Wear eye protection and appropriate clothing to prevent contact with eyes and skin. These chemicals are volatile and noxious and must be used in a well-ventilated area. Return the covers/applicators of these substances to their respective containers and seal them after each use to keep fumes to a minimum. Read and observe all manufacturer's warnings and directions for use.
Adding the feed line and feed tubes
1. Place the U-shaped unit on a flat surface in its proper horizontal position. Place the 1/2-inch ABS feed line parallel to one side of the hydroponic unit (Figure 3) so that one end of the feed line is even with the base of the U and the other extends beyond the two open ends of the unit.
Figure 3 (click for larger view)
2. Mark the feed line at intervals that align with the grow ports in the unit. These locations are where the barb connectors (and then the spaghetti feed tubes) will be inserted. It is not critical to measure the intervals exactly -- the flexibility of the spaghetti feed tubes allows for a great deal of tolerance (Figure 4).
Figure 4 (click for larger view)
3. Lay the ABS feed line on a solid, flat surface. Using either a commercial hole punch, a #20 nail, or an ice pick, puncture holes at the locations marked on the pipe. (Do not drill holes. A rough, punctured hole holds the barb connector more firmly in place.) Using fine sandpaper, sand and clean the area around each hole. This will ensure proper bonding and sealing with silicone glue in later steps.
4. Insert a barb connector into each hole and attach an 18-inch
http://www.gardening.cornell.edu/factsheets/growflow/index.html (5 of 7)4/10/2008 3:37:30 PM
Gardening Resources, Cornell University
length of spaghetti tube to each barb connector.
5. Plug the end of the ABS feed line that is aligned with the base of the U-shaped unit with the 5/8-inch bolt or dowel. To ensure a watertight seal, apply a coating of the silicone glue and seal around the bolt or dowel, insert it into the end of the pipe, and clamp it in place using the mini hose clamp. Note: To ensure a proper seal, be sure to use a silicone glue and seal product, not just silicone.
6. Attach the ABS feed line to the outside of the U-shaped unit using electrical tape at several locations.
7. Seal each barb connector using the silicone glue and seal. (To ensure a proper seal, be sure to use a silicone glue and seal product, not just silicone.) Allow the glue and seal to cure for 24 hours.
8. After the glue and seal has cured, trim each spaghetti tube to an appropriate length to reach a grow port. Attach an emitter to the end of each tube. Note: Do not cut the tubes too short. As the unit is maintained throughout the growing cycle, it will be necessary to remove and replace the emitters. The ends of the tubes will become stretched, making it necessary to trim the tubes.
9. Use a plastic stabilizer peg or a clip fashioned from a paper clip to hold each emitter in place. Secure the peg or clip to the spaghetti tube just above the emitter and insert it into the rock wool plug in the grow port.
10. Attach the completed unit to the plant light stand using the light chain and S-hooks. See Low-Cost Grow-Light Frame Plans.
Preparing the catchment tank
1. Your catchment tank should hold approximately 3 gallons. (A Rubbermaid Rough Tote Keeper works well. It also comes with a cover, which supports the pump and reduces evaporation. If the container available does not have a cover, you can construct one from 1/4-inch plywood.)
2. Place the catchment tank at the open ends of the U-shaped unit (where the elbow fittings point vertically downward for
http://www.gardening.cornell.edu/factsheets/growflow/index.html (6 of 7)4/10/2008 3:37:30 PM

Gardening Resources, Cornell University
drainage) outside the upright of the plant light stand.
3. Position the elbow fittings on top of the catchment tank cover and trace around each fitting. Remove the tank cover and carefully cut along the traced lines using a utility knife, creating two holes for the elbow outlets. Place the tank and cover in place so that the elbow fittings fit through the cover.
4. With the catchment tank in place, align the open end of the ABS feed line so it extends over the tank cover. At the outside edge of the cover aligned with the feed line, trace a 2 1/2-inch hole. This opening will accommodate the intake of the pump, which will sit on the tank cover. Remove the tank cover and carefully cut along the traced line using a utility knife. Note: The placement and size of the hole in the catchment tank cover may vary depending on the size and configuration of the pump used. If a submersible pump is used, the hole in the cover will need to be just large enough for the ABS feed line to connect to the pump outlet. A 3-gallon catchment tank, however, will accommodate only a very small submersible pump.
5. Replace the tank cover and insert the pump intake through the cover. Trim the end of the ABS feed line so it fits into the pump outlet. Connect the pump to the feed line. If a straight connection is not possible, use a short length of flexible tubing and two mini clamps to complete the connection.
Last updated 09/18/2006 13:41:40 © Copyright, Department of Horticulture, Cornell University. Website design: Craig Cramer [email protected] Mention of trade names and commercial products is for educational purposes; no discrimination is intended and no endorsement by Cornell Cooperative Extension or Cornell University is implied. Pesticide recommendations are for informational purposes only and manufacturers' recommendations change. Read the manufacturers' instructions carefully before use. Cornell Cooperative Extension and Cornell University assumes no responsibility for the use of any pesticide or chemicals. Some of the links provided are not maintained by Cornell Cooperative Extension and Cornell University. Cornell Cooperative Extension and Cornell University are not responsible for information on these websites. They are included for information purposes only and no endorsement by Cornell Cooperative Extension or Cornell University is implied. Cornell Cooperative Extension provides equal program and employment opportunities.
http://www.gardening.cornell.edu/factsheets/growflow/index.html (7 of 7)4/10/2008 3:37:30 PM

Introduction to Hydroponics
Hydroponics is the growing of plants in water instead of soil. To do this successfully, the water must be enriched with nutrients and sometimes oxygenated. Also, the plants must be placed in some type of inert medium like sand or Perlite (like we used) to anchor the roots.
Hydroponics has been around for over 70 years. One of the first scientists to experiment with hydroponic culture was Jean Boussingault, who grew plants in containers with sand and coal, feeding them with chemical solutions of known makeup. Around the beginning of the 1930's, Professor W. F. Gericke saw commercial potential in Boussingault's techniques and began to use them to grow vegetables, flowers, and other types of plants. Since then, hydroponically grown vegetables have been very important in America's history. For example, in 1939 the American army and British Air Force installed hydroponic units in their military bases, and Allied troops ate hydroponically grown vegetables during World War II.
Scientists can use hydroponics to test how different nutrients affect a plant. With hydroponics, a scientist can measure exactly how much nutrient the plant is getting and can give the plant a deficiency or overabundance of a certain macro or micronutrient and determine precisely how it affects the plant's growth.
Hydroponics can be very important to farmers and gardeners who want complete control over their plants. Many factors can affect plants that are grown in soil out in the fields. For a plant to receive a well balanced diet, everything in the soil must be in perfect balance. Rarely, if ever, can you find such ideal conditions in soil due to contamination and biological imbalances. But with hydroponics, water is enriched with these very same nutrient salts, creating a hydroponic nutrient solution that is perfectly balanced. And since this hydroponic nutrient solution is contained, it does not harm our environment as does runoff from fertilized soil. Also, very little water is lost to evaporation in a hydroponic system, making hydroponics very useful in drought stricken areas. Additionally, plants can be grown hydroponically inside greenhouses to protect them from pests; this makes harmful pesticides unnecessary.
Even if you are neither a scientist nor a gardener, hydroponics can be important to you. There are so many benefits to hydroponics that it will probably become the agriculture of the future. Each day, more facts are learned about this type of farming, and soon we will know enough to make it the most efficient and effective way to grow plants. You, too, can benefit from the knowledge of hydroponics and could even start an amateur flower garden or vegetable garden.

Mix the Nutrient Solution
Step One: What nutrients do plants need?All plants require certain chemical elements to live. These elements are known as essential nutrients, and they are divided into two categories: macronutrients, or nutrients plants need in large amounts; and micronutrients; nutrients plants need in small amounts. Macronutrients include carbon, hydrogen, oxygen, sulfur, phosphorus, nitrogen, potassium, calcium, and magnesium. Micronutrients include iron, copper, zinc, nickel, manganese, molybdenum, boron, and chlorine. These elements are used by plants in building biological molecules, as cofactors in enzymatic reactions, and in many other ways.
Plants obtain carbon and oxygen via the stomata in their leaves. However, they must absorb the other nutrients through their roots. This is where the hydroponic nutrient solution comes in: it supplies the plant with the nutrients it needs in the proper amounts. Sources:Campbell, Neil A., Jane B. Reece, and Lawrence G. Mitchell. "Plant Nutrition." Biology, Fifth Edition. Menlo Park, California: Benjamin/Cummings, 1999, pp. 714-717.Poli, Dorothy Belle. "BSCI 442: Plant Physiology Lecture Outlines, Fall 99." http://www.life.umd.edu/classroom/BSCI442/lec6.html. Last visited: August, 2001.
Step Two: Figure out how much to makeOne way to make a nutrient solution for hydroponics is to use the recipe proposed by Dr. Alan Cooper for a typical hydroponic system. This recipe makes 1000 liters of solution and consists of two parts concentrated in 10-Liter bottles. 10-Liter bottles may be hard to find, but you can alter the recipe to fit in 2-Liter soda bottles by dividing all the ingredients by five. Since this uses one-fifth the chemicals of the original, it only makes 200 L of solution. This may be more solution than you need. To figure out how much solution you need, multiply the number of plants you are going to grow by the number of days over which you are going to grow them. For example:
18 plants x 60 days = 1080 plant-days
Once you have the number of plant-days, divide 200 L by that amount to find liters of solution per plant per day:
200 L / 1080 plant-days = 0.185 L/plant/day = 185 mL/plant/day
While this may not seem like a lot, it is probably more than the plants need. It is hard to say how quickly plants actually use nutrients since the solution usually disappears from evaporation, but it is reasonable to expect that the plants use very little, especially if they are small plants. At this point you must make an educated guess based on the size of the plants. For instance, you might guess that radish plants will use no more than about 100 mL of solution per day. Accordingly, you would divide all the chemicals in the recipe by two in order to make about 92.6 mL/plant/day. It is not necessary to make exactly 100 mL since you guessed at that amount anyway.
The original mixing directions call for 100 mL of each of the two concentrated parts to be added for each 10 L of water. As with the concentrated chemicals, you can alter the mixing directions so the entire mixture fits in a 2-Liter bottle by dividing all the amounts by five. You would then use 20 mL of
each concentrated part for each 2-Liter bottle of water. Note that if you scale the recipe for the concentrated solution to avoid making too much, you must scale the mixing directions accordingly. For example, since you used half as much chemical in the above example to make solution that is half as concentrated, you must use double the volume of each concentrated part per 2-Liter bottle of water so that the final concentration of nutrients is the same. In this example, you would use 40 mL of each part for each 2-Liter bottle of water.
Since the volume of each concentrated part used (40 mL) is of a much lesser magnitude than the volume of the water used (2 L = 2000 mL), one can make things easier by using 40 mL of each concentrated part and adding enough water to make 2 L of solution instead of adding 40 mL of each part to 2 L of water. Though this slightly alters the final concentration of the nutrient solution, it makes the entire mixture fit into a 2-Liter bottle, and the error is tolerable because this is not an exact science anyway.
For an experiment that involves changes in nutrient concentration, you will need to make more than one bottle of the concentrated part that contains the chemical that is your independent variable. To avoid wasting chemicals, you should recalculate the amount of chemical needed in each bottle if you are using the different solutions for different lengths of time or different numbers of plants. For example, if you make three bottles with different concentrations of magnesium sulfate and one bottle of EDTA iron and calcium nitrate for all the plants in your experiment, you will need one-third the amount of chemicals that you would otherwise need in each of the three bottles, but you will need the same amount of EDTA iron and calcium nitrate that you would otherwise need. It may be good to put some solutions in 1-Liter bottles if you don't need as much; be sure to calculate the correct volumes of those solutions to mix.
Source: "Hydro Juice." http://members.tripod.com/~busiweb/hydro/juice.htm. Last visited: August, 2001.
Step Three: Mixing the Chemicals
Materials needed:all chemicals listed in recipe abovebalancefilter paper or container to hold chemicals while measuringtwo or more 2-Liter soda bottles, or other bottles with the recipe adjusted appropriatelychemical scoopdeionized watersmall funnel
If you have all the chemicals in the recipe at hand in your chemistry lab, you should mix the concentrated solution in two parts: one with the calcium nitrate and EDTA iron, and one with all the rest of the chemicals.
Source: "Hydro Juice." http://members.tripod.com/~busiweb/hydro/juice.htm. Last visited: August, 2001.
Measure out the amount of each chemical you need on a balance with filter paper or a container to hold the chemicals, and mix the chemicals in clean 2-Liter soda bottles partially filled with deionized water. Be sure to use deionized water; tap water often contains ions that can mess up your solutions. You may need to use a small funnel to get the chemicals into the bottles without spilling them. Fill the bottles to the top with deionized water when all the chemicals have been added.
However, if you are missing any of the chemicals, you may have to make them yourself by reacting

other chemicals. In that case it may be more practical to divide the concentrated solution into more than two parts.
Acid-Base ReactionsUse these directions to make some of the simpler compounds in the nutrient solution recipe using acids and bases.
EDTA IronUse these directions to make EDTA iron. EDTA iron is expensive to buy, but this recipe you can cook up in a chemistry lab seems to work pretty well. Do not try to substitute a simple iron compound in place of the EDTA iron. If you put a simple iron compound such as iron nitrate in your solution, it will form a precipitate with other chemicals in the solution such as phosphate. To avoid this, you must use chelated iron. A chelating agent is a molecule that grabs onto an ion such as iron and holds it tightly so that it cannot precipitate. However, plants still have ways of extracting the iron they need from these compounds. EDTA iron is one type of chelated iron that you can use in a nutrient solution.
Mixing Directions
Materials needed:2-Liter clean empty mixing bottlesmall funnelgraduated cylinder
Use the volume that you calculated before for each bottle of concentrated solution. Measure that volume of solution into the graduated cylinder using the funnel, and pour it into the mixing bottle, again using the funnel. Do this for each bottle in your recipe, and fill the mixing bottle to the top with deionized water when you are done. Again, be sure to use deionized water so that you do not introduce more chemicals into your nutrient solution. You now have a bottle of nutrient solution that is ready to feed to your plants!
Focus Questions• What essential nutrients do plants need to live? • What are macronutrients and micronutrients? Which essential nutrients are macro? Which are
micro? • How do plants obtain their nutrients? • How do you figure out how much nutrient solution you need? How do you scale your recipe
accordingly? • When you scale down the concentration of your nutrient solution, what must you do with the
volume of nutrient solution you mix? • Why must you always use deionized water when you are mixing chemicals? What is wrong
with tap water? • Why must you use EDTA iron in your nutrient solution? Why won't a simple iron compound
work?
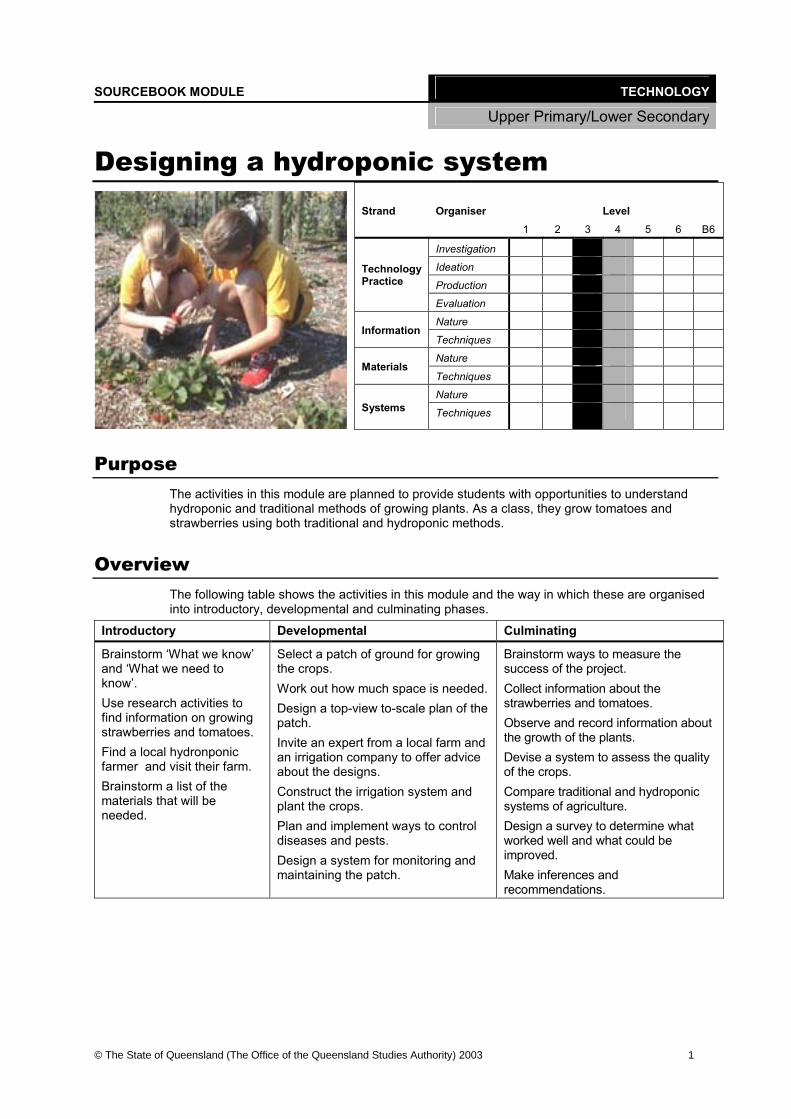
© The State of Queensland (The Office of the Queensland Studies Authority) 2003 1
SOURCEBOOK MODULE TECHNOLOGY
Upper Primary/Lower Secondary
Designing a hydroponic system Strand Organiser Level 1 2 3 4 5 6 B6
Investigation Ideation Production
Technology Practice
Evaluation Nature
Information Techniques Nature
Materials Techniques Nature
Systems Techniques
Purpose The activities in this module are planned to provide students with opportunities to understand hydroponic and traditional methods of growing plants. As a class, they grow tomatoes and strawberries using both traditional and hydroponic methods.
Overview The following table shows the activities in this module and the way in which these are organised into introductory, developmental and culminating phases.
Introductory Developmental Culminating
Brainstorm ‘What we know’ and ‘What we need to know’. Use research activities to find information on growing strawberries and tomatoes. Find a local hydronponic farmer and visit their farm. Brainstorm a list of the materials that will be needed.
Select a patch of ground for growing the crops. Work out how much space is needed. Design a top-view to-scale plan of the patch. Invite an expert from a local farm and an irrigation company to offer advice about the designs. Construct the irrigation system and plant the crops. Plan and implement ways to control diseases and pests. Design a system for monitoring and maintaining the patch.
Brainstorm ways to measure the success of the project. Collect information about the strawberries and tomatoes. Observe and record information about the growth of the plants. Devise a system to assess the quality of the crops. Compare traditional and hydroponic systems of agriculture. Design a survey to determine what worked well and what could be improved. Make inferences and recommendations.
Technology Designing a hydroponic system
2 © The State of Queensland (The Office of the Queensland Studies Authority) 2003
Core learning outcomes This module focuses on the following core learning outcomes from the Years 1 to 10 Technology Syllabus:
Technology Practice
TP 3.1 Students examine knowledge, ideas and data from a range of sources and establish the relevance of this information when meeting design challenges. TP 3.2 Students collaboratively generate design ideas and communicate these using presentations, models and technical terms. TP 3.3 Students cooperatively develop and follow production procedures to make products that reflect their design ideas. TP 3.4 Students test and judge how effectively their own and others’ processes and products meet the design challenge.
Information INF 3.1 Students describe advantages and disadvantages of different sources and forms of information. INF 3.2 Students select and use techniques for generating, modifying and presenting information for different purposes.
Materials MAT 3.1 Students choose materials according to various characteristics that best suit the product and user. MAT 3.2 Students select and use suitable equipment and techniques to combine materials accurately in order to meet design requirements.
Systems SYS 3.1 Students identify and describe relationships between inputs, processes and outputs in systems. SYS 3.2 Students assemble and trial systems they design by considering inputs, processes and outputs.
Core content The core learning outcomes are the focus for planning learning activities and assessment tasks. Students will engage with core content (see pp. 37-40 of the syllabus) when they are provided with opportunities to demonstrate core learning outcomes. While the content is listed in strands for organisational convenience, no one part of that content is to be viewed as discretely associated with a single strand.
The organisation of content within a strand should not be considered hierarchical. Any of the content can be addressed at any appropriate level; not all of the content need be addressed at every level. Core content should be selected to suit students' needs, interests and abilities and to take account of their prior knowledge and experiences.
The core content should be studied in a range of contexts. These could include personal and global contexts, as well as contexts of agriculture, business, communities, home and family, industry, leisure and recreation, and school.
Using this module The activities in this module are designed to provide opportunities for students to demonstrate Level 3 learning outcomes from the Technology Practice, Materials and Systems strands. These activities can also provide opportunities for students to develop and demonstrate the related learning outcomes at other levels. In order to do this, teachers will need to develop additional sets of anticipated evidence derived from the related learning outcomes at different levels. They may also need to modify aspects of the activities.
This module includes a variety of sequenced activities requiring varying amounts of time. Teachers can modify the design brief and related activities depending on the local contexts, particular needs and prior knowledge of students and the availability of materials and resources.
The project needs to be started at the beginning of the year due to growing conditions for strawberries. Cost, depending upon support from the local community, is likely to range from $500 to $1000.
This activity is designed around growing 100 strawberries and 20 tomato plants traditionally and 100 strawberries and 20 tomato plants hydroponically.

Technology Designing a hydroponic system
© The State of Queensland (The Office of the Queensland Studies Authority) 2003 3
Advice to teachers This module could provide: • opportunities for community involvement and support • opportunities for the integrated use of computers for research (Internet), graphing and
multimedia presentations.
Resources Students’ creativity in demonstrating core learning outcomes in this module should not be limited by the range and scope of resources and equipment provided by the teacher. A variety of resources should be collected over time and should be safely stored and made available to students as required.
A variety of materials and equipment are needed in this module. Most of the materials will be supplied if a prefabricated hydroponic kit is used. If you are making your own system, its construction will need to be investigated. Equipment for construction of the system may vary, but a supply of gardening and building equipment is recommended.
Evaluation of a unit of work After completion of a unit or units of work developed from this module, teachers collect information and make judgments about: • teaching strategies and activities planned or selected to allow students to demonstrate the
core learning outcomes • future learning opportunities for students who have not yet demonstrated the core learning
outcomes and to challenge and extend those students who have already demonstrated the core learning outcomes
• the extent to which activities matched needs of particular groups of students and reflected equity considerations
• the appropriateness of time allocations for particular activities • the appropriateness of resources used.
Information from this evaluation process can be used to plan subsequent units of work so that they build on, and support, student learning. The evaluated units of work may also be adapted prior to their reuse. For further information, refer to the ‘Curriculum evaluation’ section of the sourcebook guidelines.
Technology Designing a hydroponic system
4 © The State of Queensland (The Office of the Queensland Studies Authority) 2003
Links Links to other key learning areas
Activities from this module can be used as part of an integrated unit that makes links to other key learning areas. When incorporating this module into an integrated unit of work, teachers can select activities that provide opportunities for students to demonstrate learning outcomes from other key learning areas and identify anticipated evidence of students' demonstrations of these learning outcomes. It is important, however, that the integrity of the processes and concepts within key learning areas is maintained. This module could link to the following key learning areas: • English • Mathematics • Science
Contributions to the cross-curricular priorities
This module contributes to students’ development of the cross-curricular priorities: • literacy as students keep a journal of what is happening in the plot each week,publish
updates in a class newsletter,give oral presentations and compile written presentations • numeracy as students collect information,use a spreadsheet to construct graphs, use
formulas in spreadsheets, investigate money concepts and calculate areas • lifeskills as students development personal, social and self-management skills • a futures perspective as students envision and work towards preferred futures by using the
knowledge,practices and dispositions of ‘working technologically’. The valued attributes of a lifelong learner
The overall learning outcomes of the Queensland Years 1 to 10 curriculum contain elements common to all key learning areas and collectively describe the valued attributes of a lifelong learner. The following points indicate how various activities in this module might contribute towards the development of these attributes. Knowledgeable person with deep understanding • draws together knowledge from a range of areas (including mathematics, science, history
and the arts) to design and develop creative solutions • explores issues behind challenges and predict the impacts of the products of technology on
people and environments • develops understandings about investigation, ideation, production and evaluation. Complex thinker • uses inductive and deductive thinking to make predictions about the impacts of the
processes and products of technology • predicts and identify possible sources of error and bias in research and test results • judges the relevance, reliability and validity of data and information.
Active investigator • examines and cause-and-effect relationships within systems, and refine systems by finding
and rectifying faults or design flaws • generates and access information from a variety of sources.
Responsive creator • uses imagination, originality, intuition, enterprise and aesthetic judgment • envisions and generate a range of potential solutions.
Effective communicator • uses a variety of methods to communicate design ideas effectively to a range of audiences • uses accepted standards and forms for measurement, calculation, and written and visual
representations. Participant in an interdependent world • works individually and collaboratively on a variety of design challenges with confidence and
initiative • negotiates with others and resolve conflict in appropriate ways as they work towards
common goals and share equipment and resources. Reflective and self-directed learner • critically evaluates processes and products of technology • displays self-motivation and perseverance in seeing projects through to completion.
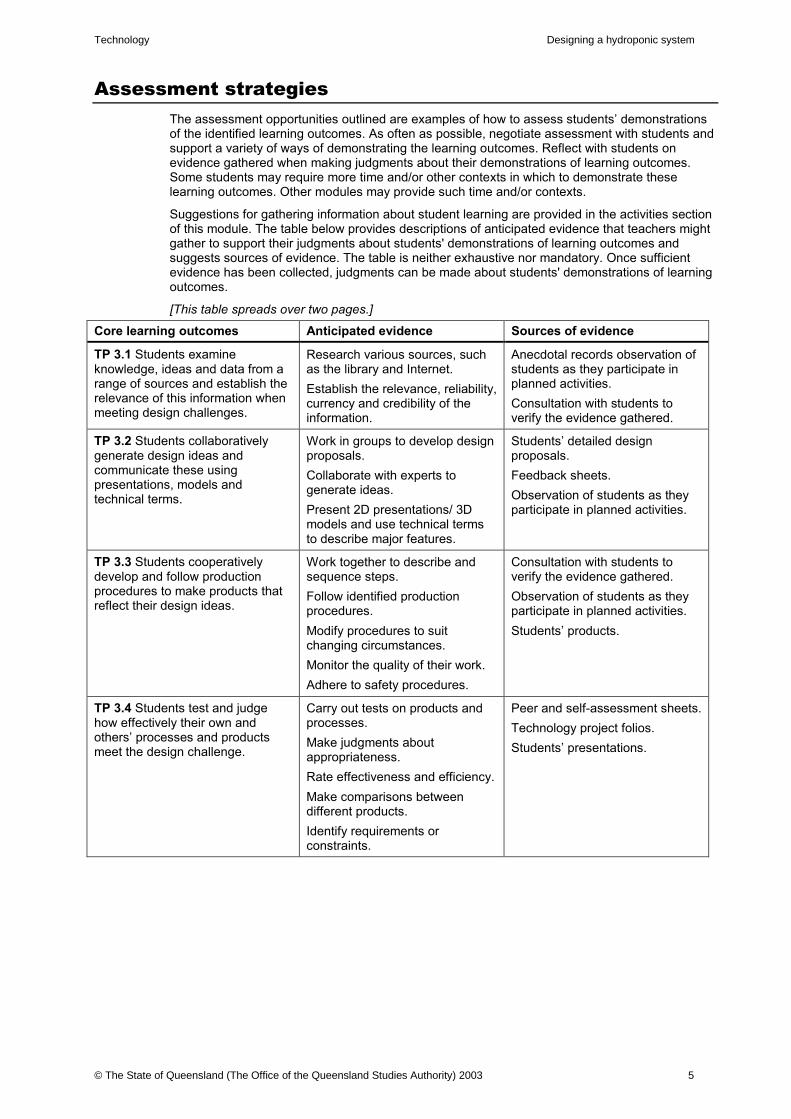
Technology Designing a hydroponic system
© The State of Queensland (The Office of the Queensland Studies Authority) 2003 5
Assessment strategies The assessment opportunities outlined are examples of how to assess students’ demonstrations of the identified learning outcomes. As often as possible, negotiate assessment with students and support a variety of ways of demonstrating the learning outcomes. Reflect with students on evidence gathered when making judgments about their demonstrations of learning outcomes. Some students may require more time and/or other contexts in which to demonstrate these learning outcomes. Other modules may provide such time and/or contexts.
Suggestions for gathering information about student learning are provided in the activities section of this module. The table below provides descriptions of anticipated evidence that teachers might gather to support their judgments about students' demonstrations of learning outcomes and suggests sources of evidence. The table is neither exhaustive nor mandatory. Once sufficient evidence has been collected, judgments can be made about students' demonstrations of learning outcomes.
[This table spreads over two pages.]
Core learning outcomes Anticipated evidence Sources of evidence
TP 3.1 Students examine knowledge, ideas and data from a range of sources and establish the relevance of this information when meeting design challenges.
Research various sources, such as the library and Internet. Establish the relevance, reliability, currency and credibility of the information.
Anecdotal records observation of students as they participate in planned activities. Consultation with students to verify the evidence gathered.
TP 3.2 Students collaboratively generate design ideas and communicate these using presentations, models and technical terms.
Work in groups to develop design proposals. Collaborate with experts to generate ideas. Present 2D presentations/ 3D models and use technical terms to describe major features.
Students’ detailed design proposals. Feedback sheets. Observation of students as they participate in planned activities.
TP 3.3 Students cooperatively develop and follow production procedures to make products that reflect their design ideas.
Work together to describe and sequence steps. Follow identified production procedures. Modify procedures to suit changing circumstances. Monitor the quality of their work. Adhere to safety procedures.
Consultation with students to verify the evidence gathered. Observation of students as they participate in planned activities. Students’ products.
TP 3.4 Students test and judge how effectively their own and others’ processes and products meet the design challenge.
Carry out tests on products and processes. Make judgments about appropriateness. Rate effectiveness and efficiency. Make comparisons between different products. Identify requirements or constraints.
Peer and self-assessment sheets. Technology project folios. Students’ presentations.

Technology Designing a hydroponic system
6 © The State of Queensland (The Office of the Queensland Studies Authority) 2003
INF 3.1 Students describe advantages and disadvantages of different sources and forms of information.
Identify different sources of information that are appropriate to their needs. Compare information to determine appropriateness. Consider how different forms of information achieve different effects.
Observation of students as they participate in planned activities. Technology project folios.
INF 3.2 Students select and use techniques for generating, modifying and presenting information for different purposes.
Organise information and record data using tables they have designed. Use equipment such as scanners, digital cameras and computers to present information.
Technology project folios. Students’ work samples.
MAT 3.1 Students choose materials according to various characteristics that best suit the product and user.
Identify a number of characteristics that make a material suitable. Identify purposes of products and describe how some materials support these purposes.
Observation of students as they participate in planned activities. Technology project folios. Students’ work samples.
MAT 3.2 Students select and use suitable equipment and techniques to combine materials accurately in order to meet design requirements.
Combine materials accurately in order to meet design challenges. Select and use appropriate equipment for the task.
Observation of students as they participate in planned activities. Students’ work samples. Students’ products.
SYS 3.1 Students identify and describe relationships between inputs, processes and outputs in systems.
Identify inputs, processes and outputs in systems. Use simple flow charts, diagrams and drawings to record information. Describe the effects that may arise if an input or process is changed.
Technology project folios. Students’ work samples.
SYS 3.2 Students assemble and trial systems they design by considering inputs, processes and outputs.
Design and assemble systems. Develop a system to achieve a specific output. Describe the function of components in a simple system. Trial systems they have designed.
Students’ work samples. Peer and self-assessment.
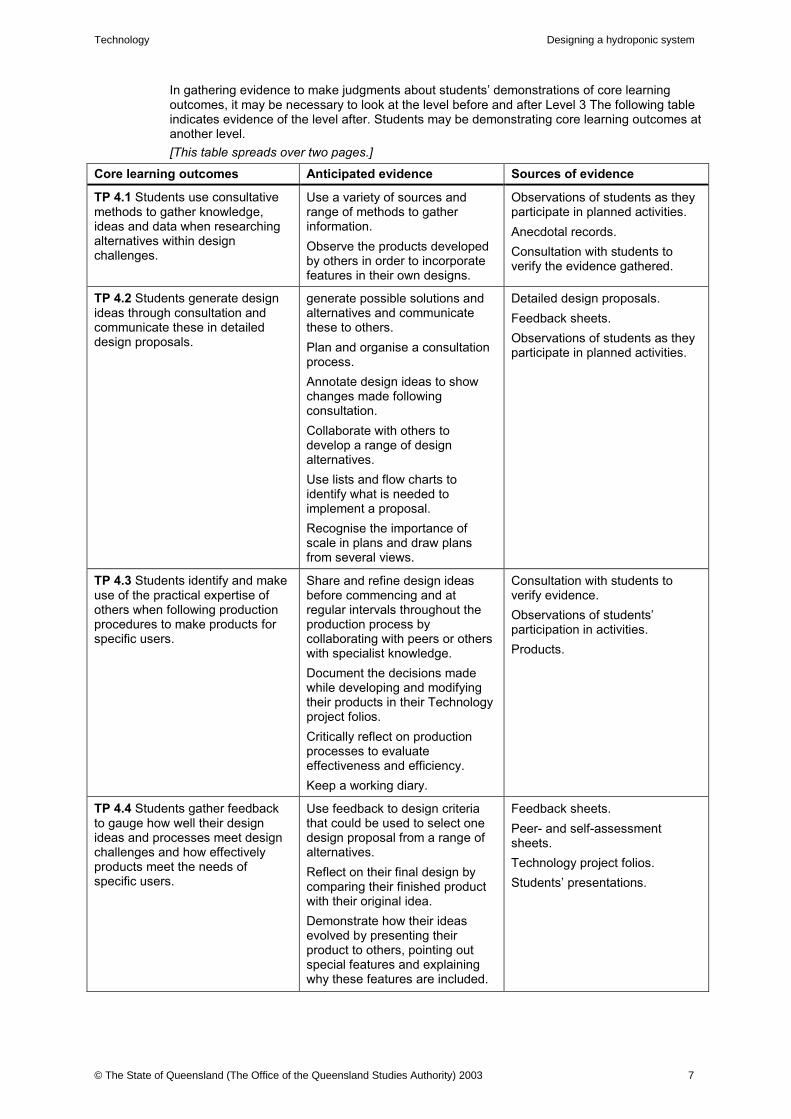
Technology Designing a hydroponic system
© The State of Queensland (The Office of the Queensland Studies Authority) 2003 7
In gathering evidence to make judgments about students’ demonstrations of core learning outcomes, it may be necessary to look at the level before and after Level 3 The following table indicates evidence of the level after. Students may be demonstrating core learning outcomes at another level. [This table spreads over two pages.]
Core learning outcomes Anticipated evidence Sources of evidence
TP 4.1 Students use consultative methods to gather knowledge, ideas and data when researching alternatives within design challenges.
Use a variety of sources and range of methods to gather information. Observe the products developed by others in order to incorporate features in their own designs.
Observations of students as they participate in planned activities. Anecdotal records. Consultation with students to verify the evidence gathered.
TP 4.2 Students generate design ideas through consultation and communicate these in detailed design proposals.
generate possible solutions and alternatives and communicate these to others. Plan and organise a consultation process. Annotate design ideas to show changes made following consultation. Collaborate with others to develop a range of design alternatives. Use lists and flow charts to identify what is needed to implement a proposal. Recognise the importance of scale in plans and draw plans from several views.
Detailed design proposals. Feedback sheets. Observations of students as they participate in planned activities.
TP 4.3 Students identify and make use of the practical expertise of others when following production procedures to make products for specific users.
Share and refine design ideas before commencing and at regular intervals throughout the production process by collaborating with peers or others with specialist knowledge. Document the decisions made while developing and modifying their products in their Technology project folios. Critically reflect on production processes to evaluate effectiveness and efficiency. Keep a working diary.
Consultation with students to verify evidence. Observations of students’ participation in activities. Products.
TP 4.4 Students gather feedback to gauge how well their design ideas and processes meet design challenges and how effectively products meet the needs of specific users.
Use feedback to design criteria that could be used to select one design proposal from a range of alternatives. Reflect on their final design by comparing their finished product with their original idea. Demonstrate how their ideas evolved by presenting their product to others, pointing out special features and explaining why these features are included.
Feedback sheets. Peer- and self-assessment sheets. Technology project folios. Students’ presentations.

Technology Designing a hydroponic system
8 © The State of Queensland (The Office of the Queensland Studies Authority) 2003
Core learning outcomes Anticipated evidence Sources of evidence
INF 4.1 Students analyse sources and forms of information and match these to the requirements of design challenges.
Recount ways in which they have accessed and used information purposefully. Communicate ideas using clearly labelled diagrams and charts.
Observations of students as they participate in planned activities. Technology project folios.
INF 4.2 Students apply techniques for transforming and transmitting information for different audiences.
Record class ideas on how to translate one source of information into another. Convert data to graphical/ pictorial presentations. Consider which information is needed for special audiences when generating presentations or charts.
Technology project folios. Work samples.
MAT 4.1 Students explain how characteristics of materials affect ways they can be manipulated.
Conduct basic testing and comparison of materials. Compare the performance, function and cost of similar and different materials. Match characteristics and properties of materials to requirements.
Observations of students as they participate in planned activities. Technology project folios. Work samples.
MAT 4.2 Students employ their own and others’ practical knowledge about equipment and techniques for manipulating and processing materials in order to enhance their products.
Select tools and materials to achieve their design purposes. Identify and discuss the effects that various materials have on: • cost • techniques used to manipulate
the material • equipment used.
Observation of students as they participate in planned activities. Work samples. Students’ products.
SYS 4.1 Students identify and explain the logic of systems and subsystems.
Identify and explain parts within a whole system. Identify how systems and subsystems work together. Alter subsystems to change the operation of a more complex system. Draw charts explaining the operation of systems and subsystems.
Technology project folios. Work samples.
SYS 4.2 Students incorporate feedback to refine and modify systems and/or subsystems.
creating flow charts and diagrams to devise and explain systems. Monitor and test system: • reliability • durability • efficiency • stability.
Work samples. Students’ products. Peer- and self-assessment.

Technology Designing a hydroponic system
© The State of Queensland (The Office of the Queensland Studies Authority) 2003 9
Background information
Terminology In this module students have opportunities to become familiar with and use the following terminology:
hydroponics inputs irrigation
monitor outputs processes
reservoir solenoid timer
School authority policies Teachers need to be aware of and observe school authority policies that may be relevant to this module.
Safety policies will be of particular relevance to some of the activities that follow. It is essential that teacher demonstrations and student activities are conducted according to procedures developed through appropriate risk assessments at the school.
In this module, teachers may need to consider safety issues relating to: • chemical fertilisers • equipment and materials • sun safety.
Equity considerations This module provides opportunities for students to increase their understanding and appreciation of equity and diversity within a supportive environment. It includes activities that encourage students to: • be involved • work individually or in groups • value diversity of ability, opinion and experience • value diversity of language and cultural beliefs • support one another in their efforts • become empowered to communicate freely • negotiate • accept change.
Some students with disabilities may need assistance with some activities. Advice should be sought from their support teachers. It is important that these equity considerations inform decision making about teaching strategies, classroom organisation and assessment.

Technology Designing a hydroponic system
10 © The State of Queensland (The Office of the Queensland Studies Authority) 2003
Activities
Introductory activities: Traditional growing of plants Focus TP 3.1 Students examine knowledge, ideas and data from a range of sources and establish the
relevance of this information when meeting design challenges. INF 3.1 Students describe advantages and disadvantages of different sources and forms of information. INF 3.2 Students select and use techniques for generating, modifying and presenting information for different purposes.
Activities Start the activity by discussing where the food we eat comes from. Narrow the discussion to strawberries and tomatoes. ‘How could we grow our own?’ Brainstorm ‘What we know’ and ‘What we need to know’. List ways to verify ‘what we know’ and find answers to ‘what we need to know’ — for example, by accessing encyclopaedias and the Internet and contacting local experts. Use research activities to find information on growing strawberries and tomatoes. Collect written facts and clippings and present them on a display board. Conduct a formal lesson on plants. Look at how plants grow and discuss root systems and leaves. Refine ‘what we need to know’. This may have increased after the initial research if students discovered areas where they didn’t have much knowledge or the information they found presented them with more questions. Arrange the information into questions. Find a local farmer preferrably one who grows tomatoes or strawberries and visit their farm.If feasible or invite the farmer to your classroom. Encourage students to present their questions to the expert and gain as much information they can. Stress that talking to experts is a good way of obtaining knowledge gained by someone else. From the information gathered, draw up a large table with two columns headed ‘What strawberries need’ and ‘What tomatoes need’. Brainstorm a list of the materials you will need to grow these plants.
Assessment Sources of evidence could include:
• observation of students’ participation in planned activities • anecdotal records • consultation with students to verify the evidence gathered.

Technology Designing a hydroponic system
© The State of Queensland (The Office of the Queensland Studies Authority) 2003 11
Introductory activities: Hydroponics Focus TP 3.1 Students examine knowledge, ideas and data from a range of sources and establish the
relevance of this information when meeting design challenges. INF 3.1 Students describe advantages and disadvantages of different sources and forms of information. INF 3.2 Students select and use techniques for generating, modifying and presenting information for different purposes.
Activities Introduce the activity by conducting a brainstorming session to find out what the students know about hydroponics. Ask how we could learn more. Search for information on hydronponics using the library and internet.Record this information in Technology project folios. Divide the students into small groups and give each group an article on hydroponics. Ask the students to select facts from their article and write them on a slip of paper and place them in a pile. Sort out all the facts and group them under subheadings. Display all the information around the classroom for reference during the design challenge. Visit a hydroponics farm if feasible to obtain information.Alternatively, invite someone with knowlegde and expertise in hydroponics to visit the class and work with the students. Look for similarities and differences between the traditional and hydroponic methods of growing strawberries and tomatoes. Take note of the different methods of growing strawberries hydroponically.Discuss the positive and negative impacts and consequences of both systems. Use the Internet to email hydroponic farmers to gather more information. Ask students to use the knowledge they have gained to design a hydroponic system for tomatoes and strawberries.
Assessment Sources of evidence could include:
• anecdotal records • consultation with students to verify the evidence gathered • observation of students’ participation in planned activities • Technology project folios.

Technology Designing a hydroponic system
12 © The State of Queensland (The Office of the Queensland Studies Authority) 2003
Developmental activities: Traditional growing of plants
Design challenge 1 Design and create a hydroponic system for growing strawberries and tomatoes.
Design challenge 2 Design and create an irrigation system for watering ground strawberries and tomatoes.
Focus TP 3.2 Students collaboratively generate design ideas and communicate these using
presentations, models and technical terms. TP 3.3 Students cooperatively develop and follow production procedures to make products that reflect their design ideas. TP 3.4 Students test and judge how effectively their own and others’ processes and products meet the design challenge.
Select a patch of ground for growing the strawberries and tomatoes. Obtain seedlings (strawberries and tomatoes). Assist students to work out how much ground they will need. They should know from their research that strawberries need to be more than 30 cm apart. Pose a range of questions — for example, How many rows will you need? Should the rows be raised and why? How deep should you plant the seedlings? Students should compile a written report that includes as much of the information they have gathered as possible. Repeat this investigation process for the irrigation system.Collect and record as much information as possible. The design of the irrigation system needs to be incorporated into the design of the garden bed.The irrigation system will need to be established before planting the seedlings. Collect and discuss the written reports. Ask each student to use all the information they have to design a landscaping plan. Include a top-view to-scale plan of the patch that shows the layout of the plants and the irrigation system. As a class, design a system for growing tomatoes and strawberries. Invite an expert from a local farm and an irrigation company (if available) to look at the system and offer advice. Stress to the students that advice from experts will help them in any project. Once the design process is complete, construct the irrigation system and prepare and plant the strawberries and tomatoes. Discuss any information the students discovered about disease and pests. Discuss and design a plan to combat these problems. Consider whether or not to use pesticides. Discuss the positive and negative impacts and consequences and invite the class to decide what would be best to use. Present the findings to the local farmer and ask for advice. Establish and implement a plan to solve the problem of diseases and pests. Design a system for monitoring the patch that includes watering and weeding and picking the strawberries and tomatoes. Discuss what to do with the strawberries and tomatoes — for example, eat them or sell them.
Assessment Sources of evidence could include:
• detailed design proposals • feedback sheets • observation of students’ participation in planned activities • consultation with students to verify the evidence gathered • students’ products.

Technology Designing a hydroponic system
© The State of Queensland (The Office of the Queensland Studies Authority) 2003 13
Developmental activities: Hydroponics Focus SYS 3.1 Students identify and describe relationships between inputs, processes and outputs in
systems. SYS 3.2 Students assemble and trial systems they design by considering inputs, processes and outputs. MAT 3.1 Students choose materials according to various characteristics that best suit the product and user. MAT 3.2 Students select and use suitable equipment and techniques to combine materials accurately in order to meet design requirements.
Activities Ask students to present their the hydoponic system design ideas, as an oral report and justify each decision they have made. Discuss the ideas and look for good points or potential problems. As a class, design a hydroponic system for growing strawberries and tomatoes. Invite local hydroponic farmers (if available) to examine the designs and make comments or suggestions. Students need to draw up a cross-section view of the design. Label all the parts and describe how the system will work. Small groups of students should be involved in the construction of the strawberry and tomato systems. Involve the students in as much of the construction as possible. Design a watering system. Over the first week, work out how long to set the digital timer for and how often.(if one is included in the plan) The plants should not be too dry, but too much water is a waste of valuable (and expensive) nutrients. Check that the potting medium is constantly moist and that the leaves are not yellow or curling, which indicates a lack of water or nutrients. As the plants get bigger, they will require more water and nutrients. If you are not sure how much they need, consult an expert. Discuss any information the students discovered about disease and pests. Discuss and design a plan to combat these problems. Consider whether or not to use pesticides. Discuss the positive and negative impacts and consequences and invite the class to decide what would be best to use. Present the findings to the local farmer and ask for advice. If a local expert is not available, consider contacting an expert using the Internet. Establish and implement a plan to solve the problem of diseases and pests. Design a system for monitoring the patch that includes watering and weeding and picking the strawberries and tomatoes.
Assessment Sources of evidence could include:
• observation of students’ participation in planned activities • Technology project folios • students’ work samples and products • peer and self-assessment.

Technology Designing a hydroponic system
14 © The State of Queensland (The Office of the Queensland Studies Authority) 2003
Culminating activities Focus In this phase students test and judge how effectively their own and others’ processes and
products meet the design challenge. Activities Brainstorm ways in which the success of the project can be measured.
Collect information about the strawberries and tomatoes. Once a week, count the flowers and green strawberries and record the data (Student resource 1). Graph this information using a comparative line graph and a spreadsheet. Grade the tomatoes and strawberries by mass and record how many are picked and how many are lost to pests or disease. Assess the quality of the strawberries and tomatoes. Students can be encouraged to assess taste, appearance, size and weight. For example, mass all the strawberries and tomatoes that are picked and work out the mean, medium and mode. Record any disease and pest problems. Outline the action that was taken and the results of the action. Design and construct a survey to give to the people who eat the strawberries and tomatoes. Arrange the questions so that they allow a comparison of the traditional and hydroponic systems. Once all the strawberries and tomatoes have been harvested, discuss ways in which the success of the various projects can be assessed. Consider comparing numbers and weight of fruit harvested, taste of fruit, length of harvest time, loss of fruit and to what pests and disease. Look at sales of fruit and when the fruit was most popular. Encourage students to design a survey for customers to determine what worked well and what could be improved — for example, packaging and presentation. Ask students to make inferences and recommendations for future projects.
Assessment Sources of evidence could include:
• peer and self-assessment sheets • student presentations • Technology project folios.

Technology Designing a hydroponic system
© The State of Queensland (The Office of the Queensland Studies Authority) 2003 15
Data collection sheet Student resource 1 F — flowers G — green fruit P — picked fruit
Hydroponic Ground
Strawberries Tomatoes Strawberries Tomatoes
Week F G P F G P F G P F G P
1
2
3
4
5
6
7
8

Technology Designing a hydroponic system
16 © The State of Queensland (The Office of the Queensland Studies Authority) 2003
Acknowledgments and support materials
Acknowledgments Grateful acknowledgment is made to the following organisations and/or people for granting permission to use copyright material and for assistance in preparation of this module: Teachers, students and staff of the Kallangur State School Andrew Swales, teacher Linda McGill, teacher Laurie Henneberg, groundsman John Bench, traditional strawberry farmer Brian Biddell, hydroponics strawberry farmer David Bray, hydroponics tomato farmer SA Hydroponics, Lawnton
References Goss, J The Simplified Hydroponics Workbook (A Simplified Guide to Soilless Gardening), Rocky Top Publishing, Canada. Jones L 1990 Home Hydroponics and How to Do It!, Crown Publishing, United Kingdom. James Sholto Douglas 1986 Beginner's Guide to Hydroponics: Soilless Gardening, Pelham Publishing, United Kingdom. Resh, H. 1990, Hydroponic Home Food Gardens, Woodbridge Press Santa Barbara, California. Resh, H. 1989, Hydroponic Food Production, 4th edn, Woodbridge Press Santa Barbara, California. Resh, H. 1993, Hydroponic Tomatoes for the Home Gardener, Woodbridge Press Santa Barbara, California. Taylor, J.D. 1983, Grow More Nutritious Vegetables Without Soil, Parkside Press Publishing, Santa Anna, California.
Websites (All websites listed were accessed in September 2002.) Ask an Expert, www.cln.org/int_expert.html/ Links to ‘expert’ websites. Homegrown Hydroponics Inc, www.hydroponics.com/ General hydroponics information and resources. Home Hydroponics, www.ext.vt.edu/pubs/envirohort/426-084/426-084.html/ Detailed information on hydroponics. Pipe Dreams Hydroponics www.hydroponicsonline.com/ General information and hydroponics links.
Contacts Dave Nebauer, Hydroponics Industry Support Officer, Central Coast Regional Development Corp., Phone: (02) 4323 9587 Hydroponics Association of Australia, Phone: (07) 5496 7529 Hydroponics Industry Support Officer, Central Coast Regional Development Corporation, Phone: (02) 4323 9587 John Kennedy, Hydroponics Association of Australia, Phone: (07) 5496 7529 Paul and Darren Borg, Borg’s Hydroponics - Lettuce Growers, Warnervale, Phone: (02) 4392 7726 Rick Slennett, Simply Hydroponics - Gold Coast, Phone: (07) 5537 4433 Simply Hydroponics — Gold Coast, Phone: (07) 5537 4433 Steven Carruthers, Publisher — “Practical Hydroponics”, Phone: (02) 9905 9933
This sourcebook module should be read in conjunction with the following Queensland Studies Authority materials:
Years 1 to 10 Technology Syllabus Years 1 to 10 Technology Sourcebook Guidelines Technology Initial In-service Materials Technology CD-ROM

Technology Designing a hydroponic system
© The State of Queensland (The Office of the Queensland Studies Authority) 2003 17
Copyright notice © The State of Queensland (The Office of the Queensland Studies Authority) 2002 Every reasonable effort has been made to obtain permission to use copyright material in all sourcebook modules. We would be pleased to hear from any copyright holder who has been omitted. Copyright material owned by the Queensland Studies Authority may be copied, without written permission, only by: • individual students, for private use and research • schools and entities possessing a CAL education licence, but within the limits of that licence*
and, if they are copying from an electronic source, within the limits† of the Copyright Amendment (Digital Agenda) Act 2000
• libraries, educational institutions, and institutions helping people with a disability, within all the limits† of the Copyright Amendment (Digital Agenda) Act 2000.
*Except that a Queensland school, accredited by Education Queensland, may reproduce the whole of a work for use by teachers, parents and educational administrators (for non-commercial, personal or educational purposes only). †An example of a limit is the amount you may download and copy, as specified in s.10(2A). No other copying may be done without the permission of the Queensland Studies Authority, PO Box 307, Spring Hill, Queensland Australia 4004, email: [email protected].
Guidance in connection with the Copyright Amendment (Digital Agenda) Act Libraries, educational institutions, and institutions helping people with a disability may have the right to: • supply another library with digital copies of a work, or parts of a work that they hold, if the
other library cannot get the work in a reasonable time at an ordinary price • display digital works within their premises (e.g. on an intranet) • make a digital copy for research or study • for administrative purposes, make a digital copy of a work held in printed format • make a copy of an artistic work to display on their premises if the original is lost or in danger. To comply with subsection 49(5A) of the Copyright Amendment (Digital Agenda) Act 2000, anything that a library makes available on their computer system must be so arranged that it can be accessed only through a computer that cannot itself make a copy, or print out the copy displayed. This is made clear in subsection 49(5).
Direct quotation of subsection 49(5A), Copyright Amendment (Digital Agenda) Act If an article contained in a periodical publication, or a published work (other than an article contained in a periodical publication) is acquired, in electronic form, as part of a library or archives collection, the officer in charge of the library or archives may make it available online within the premises of the library or archives in such a manner that users cannot, by using any equipment supplied by the library or archives: (a) make an electronic reproduction of the article or work; or (b) communicate the article or work.
The State of Queensland and the Queensland Studies Authority make no statements, representations, or warranties about the accuracy, quality, adequacy or completeness of, and users should not rely on, any information contained in this module.
The State of Queensland and the Queensland Studies Authority disclaim all responsibility and liability (including without limitation, liability in negligence) for all expenses, losses, damages and costs whatsoever (including consequential loss) users might incur to person or property as a result of use of the information or the information being inaccurate, inadequate, or incomplete.
Any inquiries should be addressed to: Queensland Studies Authority, PO Box 307, Spring Hill Q 4004 Australia Phone: (07) 3864 0299. Fax: (07) 3221 2553 Website: www.qsa.qld.edu.au Email: [email protected]

The History of HydroponicsAs seen in Growing Edge Magazine
Hydroponics basically means working water ("hydro" means "water" and "ponos" means"labor"). Many different civilizations have utilized hydroponic growing techniques throughouthistory. As noted in Hydroponic Food Production (Fifth Edition, Woodbridge Press, 1997, page23) by Howard M. Resh: "The hanging gardens of Babylon, the floating gardens of the Aztecsof Mexico and those of the Chinese are examples of 'Hydroponic' culture. Egyptian hieroglyphicrecords dating back several hundred years B.C. describe the growing of plants in water."Hydroponics is hardly a new method of growing plants. However, giant strides have beenmade over the years in this innovative area of agriculture.
Throughout the last century, scientists and horticulturists experimented with different methodsof hydroponics. One of the potential applications of hydroponics that drove research was forgrowing fresh produce in nonarable areas of the world. It is a simple fact that some peoplecannot grow in the soil in their area (if there is even any soil at all). This application ofhydroponics was tested during World War II. Troops stationed on nonarable islands in thePacific were supplied with fresh produce grown in locally established hydroponic systems.Later in the century, hydroponics was integrated into the space program. As NASA consideredthe practicalities of locating a society on another plant or the Earth's moon, hydroponics easilyfit into their sustainability plans. This research is ongoing.
But by the 1970s, it wasn't just scientists and analysts who were involved in hydroponics.Traditional farmers and eager hobbyists began to be attracted to the virtues of hydroponicgrowing. A few of the positive aspects of hydroponics include: • The ability to produce higher yields than traditional, soil-based agriculture • Allowing food to be grown and consumed in areas of the world that cannot supportcrops in the soil • Eliminating the need for massive pesticide use (considering most pests live in thesoil), effectively making our air, water, soil, and food cleaner
Commercial growers are flocking to hydroponics like never before. The ideals surroundingthese growing techniques touch on subjects that most people care about, such as helping endworld hunger and making the world cleaner. In addition to the extensive research that is goingon, everyday people from all over the world have been building (or purchasing) their ownsystems to grow great-tasting, fresh food for their family and friends. Educators are realizingthe amazing applications that hydroponics can have in the classroom. And ambitiousindividuals are striving to make their dreams come true by making their living in theirbackyard greenhouse, selling their produce to local markets and restaurants.
And now that so many people from so many different walks of life are involved in hydroponicsand its associated disciplines (such as aeroponics and aquaponics), progress is coming fasterthan ever before.

Title: Where is the Dirt? A Lesson in Hydroponics Overview/Annotation: This lesson will be developed around hydroponic gardening, the growing of plants without soil. Using the Internet, students will research hydroponics and share their knowledge with the class. A classroom hydroponic garden will be constructed for observation.
Content Standard(s): SC(4) 5. Describe the interdependence of plants and animals.TC2(3-5) 8. Collect information from a variety of digital sources.
Local/National Standards: Primary Learning Objective(s): Students will explain how plants can grow without soil. Additional Learning Objective(s): Students will apply knowledge of hydroponic gardening to create a classroom garden. Approximate Duration of the Lesson: Greater than 120 Minutes Materials and Equipment: Aquarium, aerator, polystyrene (foam board)- one inch thick, fertilize (such as Rapid-Grow or Miracle-Grow), Jiffy pellets, seeds (small vegetable seeds, such as lettuce, spinach, basil, tomatoes etc.), plastic tray(approximately the same area as the aquarium)
Technology Resources Needed: Computers with Internet access, digital camera
Background/Preparation: The teacher should become familiar with the instructions for building a hydroponic garden. Read all instructions for nutrients and fertilizers carefully.
Procedures/Activities: 1.)Pose the following question to students: "Can plants grow without soil?" Tally student responses and display results. Tell students that they will be conducting research on the computer to answer this question.
2.)Ask students how they could use the computer to answer the question, "Can plants grow without soil?" Direct them towards the understanding that the Internet can be used to answer questions and find information.
3.)Brainstorm key words that may be used to find the answer to the question, "Can plants grow without soil?" List some words and phrases on the board for students to refer to when conducting their searches. Group students in pairs at computer stations. (It may be helpful to bookmark approved search engines for student use prior to beginning this lesson.) Give students approximately 10 minutes to search the Internet and record their findings.
4.)Have students return to the group to share what they have found regarding growing plants without soil. At a basic level all students should have discovered that plants can grow without soil. Ask students if they learned anything else about this topic and allow students to discuss findings.

5.)If students have not already discovered the scientific term hydroponics, introduce it. Direct students to the website below. Pass out the handout "Understanding Hydroponics" (see attached) for students to complete once they have read the information on the website. (Alternatively, teacher may want to create a slideshow presentation to introduce students to hydroponics.)(Introduction to Hydroponics)
6.)Ask students what the advantages might be to using hydroponics. Record student ideas then have them return to computer stations to research the advantages of hydroponics. (Again, if necessary brainstorm key words to use in the Internet search.) Students will share what they have learned and compare their findings with their original ideas.
7.)Tell students that the class will be starting a hydroponic garden. Students will record information concerning the garden in a class journal. See attached instructions to construct the hydroponic garden.
8.)In the class journal students should record the amount of water placed in the aquarium at the beginning and throughout the growth cycle. Plant growth should be observed weekly. Record plant size, color and any other changes. Students can use a digital camera to take pictures of the garden on a weekly basis and include the pictures in the class journal.
Attachments:**Some files will display in a new window. Others will prompt you to download. Instructions for classroom hydroponic garden.docUNDERSTANDING HYDROPONICS.docAssessment Strategies: Teacher observation of classroom participation, "Understanding Hydroponics" Internet search document, and checklist to ensure that all students participate in class journal of plant observations will be used for assessment.Extension: 1) Create several different kinds of hydroponic gardens to determine which are most effective. 2) Experiment with different nutrient solutions to determine which are best for plants.