building a printed circuit board - 4pcb.com · © 2009 advanced circuits inc 3 single & double...
TRANSCRIPT

© 2009 Advanced Circuits Inc
1
Building a Printed Circuit Building a Printed Circuit BoardBoard

© 2009 Advanced Circuits Inc
2
This presentation is a work in progress. As methods and processes change it will be
updated accordingly. It is intended only as an introduction to the production processes
used in building a circuit board and as a training aid for employees, customers and friends of Advanced Circuits. Many of the
process descriptions used here are very generic in nature. Some depict specific
processes used by Advanced Circuits and may not reflect practices used by other
manufacturers.

© 2009 Advanced Circuits Inc
3
Single & Double Sided Circuit Boards
A single sided board is made from rigid laminate consisting of a woven glass epoxy base material clad with copper onone side of varying thickness.
Double sided boards are made from the same type of base material clad with copper on two sides of varying thickness.
Copper Foil
Laminate

© 2009 Advanced Circuits Inc
4
Multi-Layer BoardMulti-layer boards are
made from the same base material with copper foil on the top & bottom and one or more “inner layer”cores. The number of “layers”corresponds to the number of copper foil layers.
Copper Foil
LaminateInner Layer Core Copper Foil

© 2009 Advanced Circuits Inc
5
Multi-Layer Board Fabrication
Multi-layer fabrication begins with the selection of an inner layer core –or thin laminate material of the proper thickness. Cores can vary from 0.038”to 0.005”thick and the number of cores used will depend upon the board’s design.
Copper Foil
Laminate

© 2009 Advanced Circuits Inc
6
Dry-film Resist Coating Inner Layer Core Material
A light sensitive film or photo image-able “resist”is then applied by heat and pressure to the metal surfaces of the core. The film is sensitive to ultraviolet light. You will find “yellow light”used in most Image processing areas to prevent inadvertent exposure of the resist. The filters remove the wave length of light that would affect the resist coating.
Resist Coating
© 2009 Advanced Circuits Inc
7
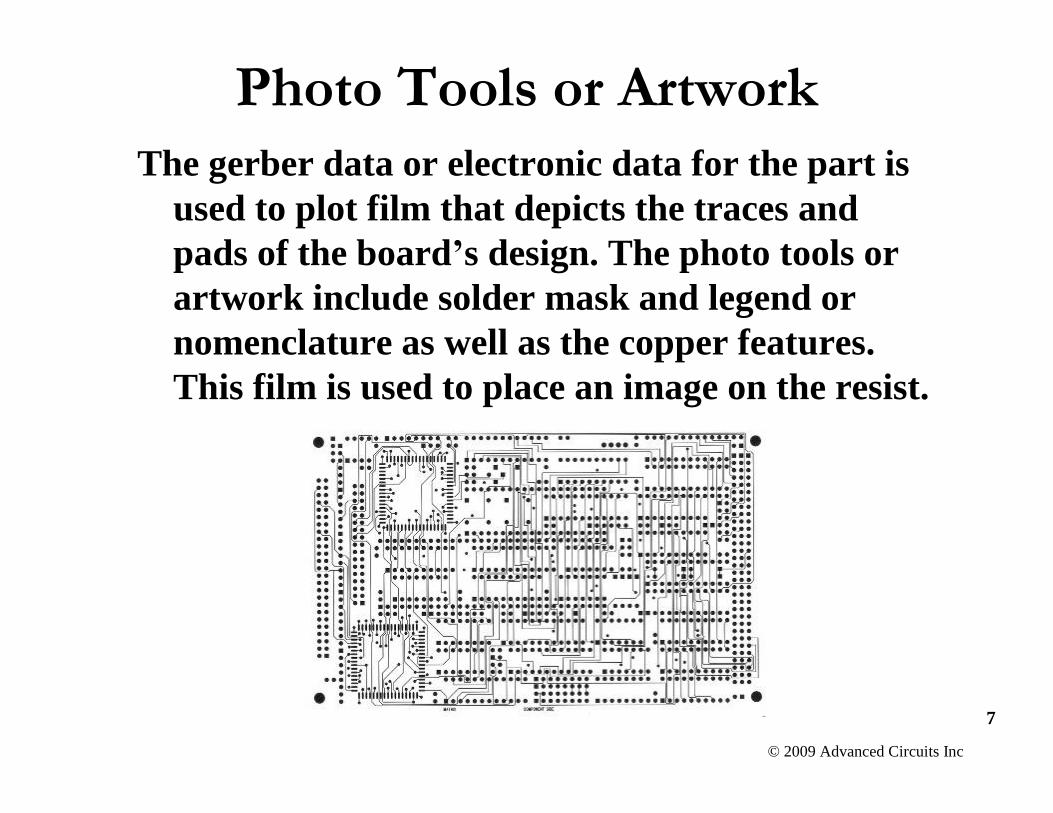
Photo Tools or ArtworkThe gerber data or electronic data for the part is
used to plot film that depicts the traces and pads of the board’s design. The photo tools or artwork include solder mask and legend or nomenclature as well as the copper features. This film is used to place an image on the resist.

© 2009 Advanced Circuits Inc
8
Each of the circuit and land patterns are unique to that part number and each layer has its own artwork pattern or piece of film. Inner layer film is negative and outer layer film is positive.
Internal Signal Layer Internal Ground Layer External Signal Layer

© 2009 Advanced Circuits Inc
9
Inner layer film is “negative”. That means that the copper patterns left behind after processing the core are the “clear”areas on the film.
Outer layer film is “positive”. The traces and pads that are “opaque”on the film are copper on the outside of the board and the clear areas will be clear of copper.

© 2009 Advanced Circuits Inc
10
Image Expose
Panels are then exposed to a high intensity ultraviolet light source coming through the film. Clear areas allow light to pass through and polymerize (harden) the film resist thus creating an image of the circuit pattern –similar to a negative and a photograph.
Film
Resist

© 2009 Advanced Circuits Inc
11
Image Develop
The exposed core is processed through a chemical solution or developer that removes the resist from areas that were not polymerized by the light. Resist
Exposed Copper

© 2009 Advanced Circuits Inc
12
Inner Layer Etch
Then the copper is chemically removed from the core in all areas not covered by the dry-film resist. This creates the copper pattern that matches the film pattern.The core laminate surface is exposed in areas where copper was etched away.

© 2009 Advanced Circuits Inc
13
Resist StripAfter etch, the developed dry-
film resist is chemically removed from the panel leaving the copper on the panel. Traces, pads, ground plane and other design features are now exposed.

© 2009 Advanced Circuits Inc
14
Automated Optical Inspection or AOI
Inner layers are then inspected against design rules using data from the gerber files.
If allowed and practical, some repairs can be made at this point. Information on defects is shared with the appropriate departments to correct any process problems.

© 2009 Advanced Circuits Inc
15
Oxide Coating
After inspection the panels are chemically treated to improve adhesion of the copper surface. Advanced Circuits uses organic chemistry that leaves the copper a dark brown. Other types of chemistry or mechanical methods can be used and colors vary widely.

© 2009 Advanced Circuits Inc
16
Multi-Layer ConstructionThe basic materials needed to
build a multi-layer board are copper foil, prepreg and inner-layer cores.
Foil
PrepregCore
PrepregFoil

© 2009 Advanced Circuits Inc
17
Copper FoilThe copper foil used in circuit boards is typically in
sheets of ½ oz. and 1 oz. per square foot in weight or 0.0007 and 0.00134 inches nominal thickness. In other words - one ounce of copper will cover one square foot when it is rolled out to a thickness of 0.00134”or 1.34 mils.
1 oz. =1 square foot
1.34 mils thick

© 2009 Advanced Circuits Inc
18
PrePreg or Preimpregnated Bonding Sheet
It’s the “glue”that holds the cores together. There are many types of materials, we use FR4 –a woven fiberglass cloth pre-impregnated with epoxy resin -known in the industry as B-stage.
The resin is activated and “melts”during the lamination process from pressure and heat. It flows across copper features and exposed laminate on the core and as it cools bonds the layers of foil and core together.

© 2009 Advanced Circuits Inc
19
Laminated PanelsInner layer core, copper foil and prepreg are
bonded together under heat and pressure, in a vacuum, during the lamination process. The result is a panel with several layers of copper inside as well as the foil on the outside.
Core
FoilPrepreg

© 2009 Advanced Circuits Inc
20
Theproduction process for both multi-
layer and double sided panels is generally the same after lamination of
the multi-layer panels.
© 2009 Advanced Circuits Inc
21
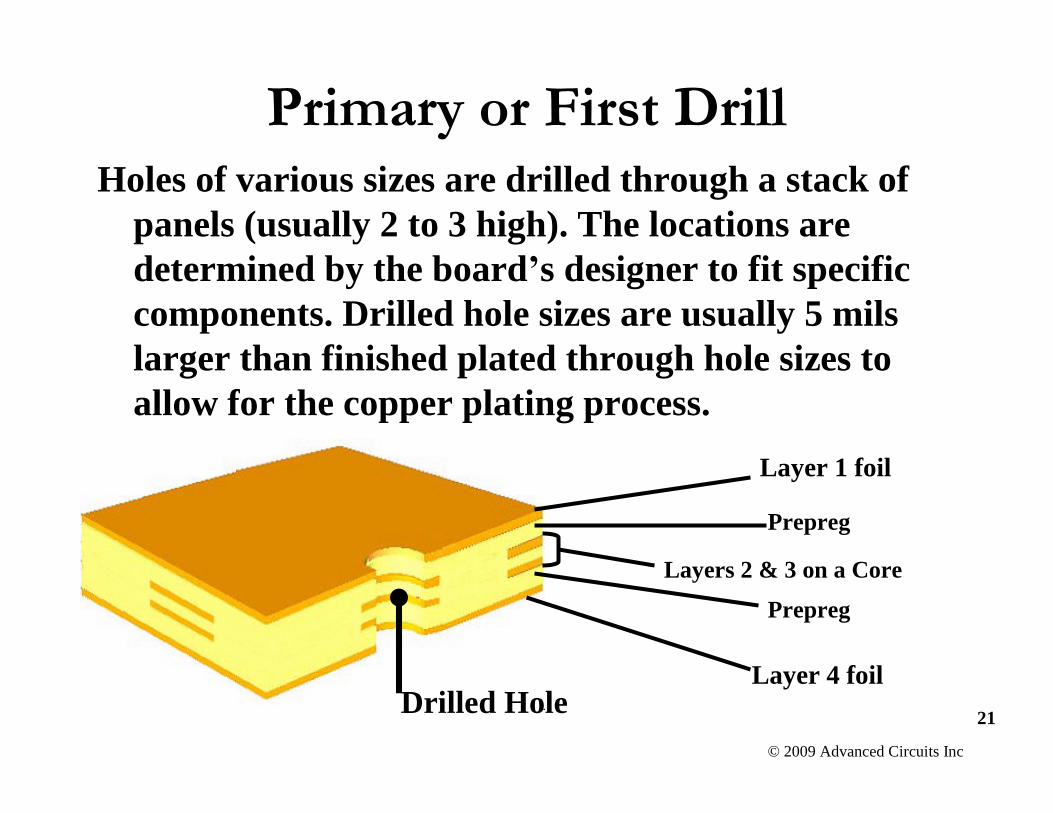
Primary or First DrillHoles of various sizes are drilled through a stack of
panels (usually 2 to 3 high). The locations are determined by the board’s designer to fit specific components. Drilled hole sizes are usually 5 mils larger than finished plated through hole sizes to allow for the copper plating process.
Layer 1 foil
Layer 4 foil
Layers 2 & 3 on a Core
Prepreg
Prepreg
Drilled Hole

© 2009 Advanced Circuits Inc
22
DeburrDeburr is an abrasive mechanical process that
removes the raised edges of the metal or burrs surrounding the holes that occur during the drilling process. Any debris that may be left in the holes is also removed at this time.

© 2009 Advanced Circuits Inc
23
Desmear -Multi-layer Boards Only
Desmear generally applies only to multilayer boards.
It is a chemical process that removes the thin coating of resin from the inner layer connections that is produced by the heat and motion of the drill bits as they create the holes. Removing the resin smear improves the electrical connectivity.
Desmear Areas
© 2009 Advanced Circuits Inc
24
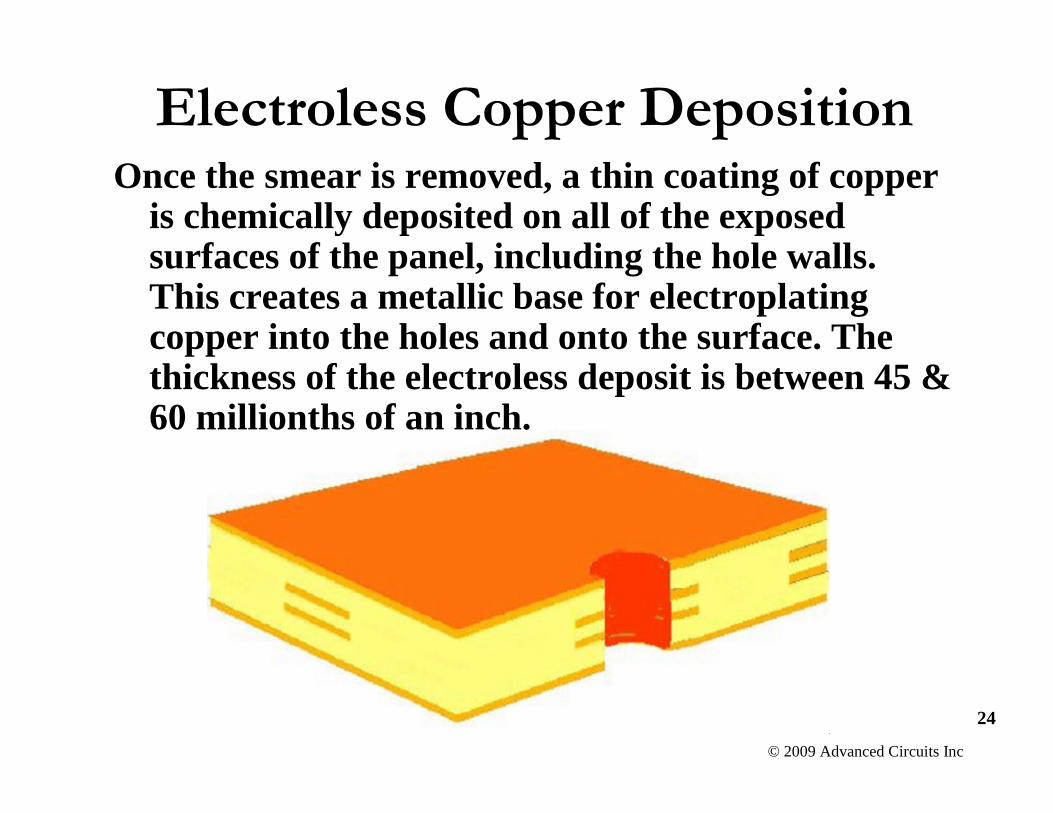
Electroless Copper DepositionOnce the smear is removed, a thin coating of copper
is chemically deposited on all of the exposed surfaces of the panel, including the hole walls. This creates a metallic base for electroplating copper into the holes and onto the surface. The thickness of the electroless deposit is between 45 & 60 millionths of an inch.

© 2009 Advanced Circuits Inc
25
Dry-film Resist Coating Outer Layer Panels
The same resist or light sensitive film used on the inner layers is used for the outer layers. The film covers the entire surface including the drilled holes.
Resist Coating

© 2009 Advanced Circuits Inc
26
Outer Layer Expose & DevelopAfter dry film lamination the panel is exposed and
developed using the same procedure used for the inner layer cores. Clear areas in the film allow light to pass through and harden the resist creating an image of the circuit pattern All of the drilled holes that are exposed will be plated through.
Copper exposed after develop
Exposed Hole

© 2009 Advanced Circuits Inc
27
Copper “Pattern”PlateThe electroplating processes that electrically plates
copper onto the exposed metal surfaces is next. The copper will be plated up to a thickness of approximately 1 mil (0.001”), depending on the required final finish for the panel.
Copper Plated onto the exposed surface and
into the holes

© 2009 Advanced Circuits Inc
28
Tin PlatingThe copper plating step is followed by plating tin
onto all the exposed copper surfaces. The tin will be used as an etch resist to maintain the copper traces, hole pads and walls during the outer layer etch process.
Tin Plated over the Copper
© 2009 Advanced Circuits Inc
29
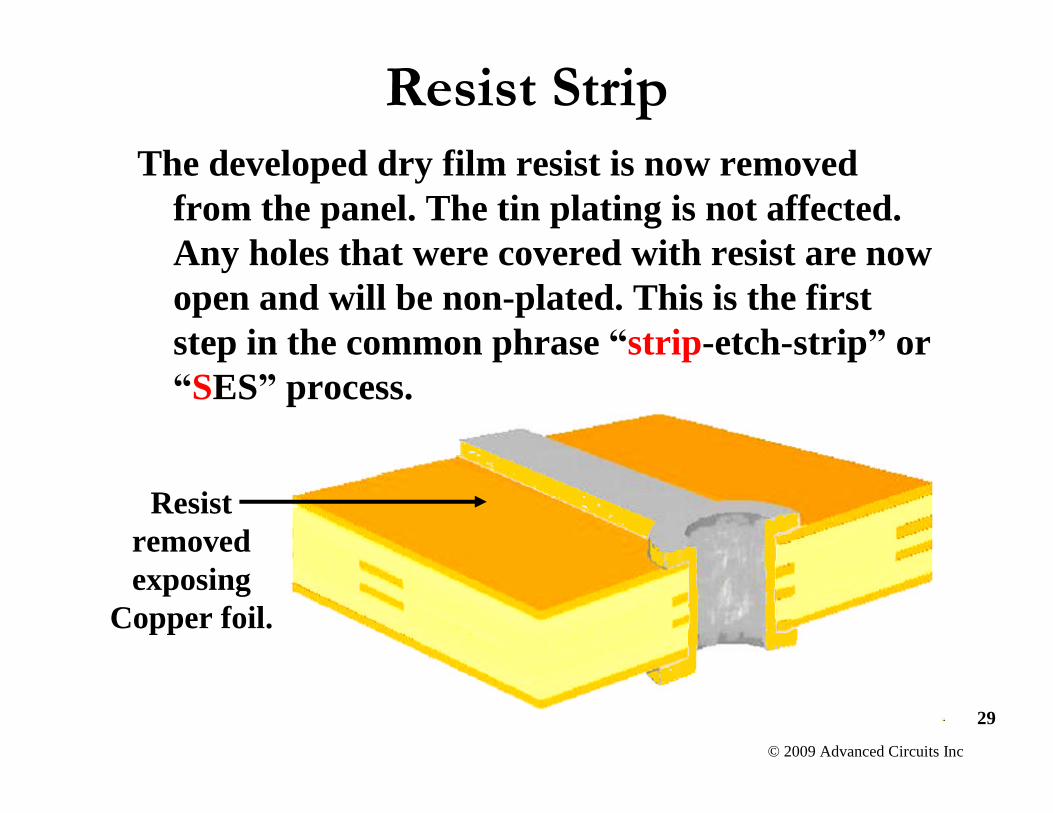
Resist StripThe developed dry film resist is now removed
from the panel. The tin plating is not affected. Any holes that were covered with resist are now open and will be non-plated. This is the first step in the common phrase “strip-etch-strip”or “SES”process.
Resist removed exposing
Copper foil.

© 2009 Advanced Circuits Inc
30
EtchCopper is now removed from all parts of the panel that
are not covered by tin. The tin resists the chemicals used to etch away the copper. Only the pads and traces from the artwork are left behind on the panel surface. The “E”of SES.

© 2009 Advanced Circuits Inc
31
Tin StripThen the tin is chemically removed leaving behind a
bare copper and laminate panel. The surface pads, traces and plated through holes are the exposed copper. This is the last step in strip-etch-strip.

© 2009 Advanced Circuits Inc
32
Clean and Prep for Solder MaskThe exposed copper surface pads, traces and plated
through holes must be clean and free of oxidation prior to applying solder mask. During the cleaning process the surface is scrubbed with pumice to improve adhesion of the mask as well as to remove any surface contamination.

© 2009 Advanced Circuits Inc
33
LPI Solder Mask ApplicationA photo-sensitive epoxy based ink is applied, completely
coating the panel. It is then dried to the touch but not final cured. Using a method identical to image, the panels are exposed to a light source through a film tool. Then the panel is developed exposing the copper pads and hole defined by the artwork.

© 2009 Advanced Circuits Inc
34
Solder mask is normally cured by baking in an oven; however, some fabricators are using infrared heat sources. The primary purpose of the mask is to restrict the areas that will be covered with solder. It also protects panels from contamination, handling damage and possible electrical shorting during assembly and installation.
At Advanced Circuits, whenever possible, legend or nomenclature would be screened on the panels before further processing. Also, at Advanced the nickel and gold plating for edge connectors occurs immediately after final cure of the solder mask and legend.
Solder Mask Cure
© 2009 Advanced Circuits Inc
35
There are a number of processing options that can occur depending upon the desired final finish. Currently at Advanced Circuits we can provide our customers with a SnPb or lead free solder finish, hard gold, Electro less Nickel Immersion Gold (ENIG), immersion tin or immersion silver. Other finishes include Organic Solderable Preservative (OSP), soft or bondable gold and a number of other “exotic”finishes like palladium.
“Normal”processing would continue with the application of solder.

© 2009 Advanced Circuits Inc
36
Legend, Silkscreen, Nomenclature,Component Designator
Ink is silkscreened onto one or both sides of the panel depending on the requirements of the customer. The printing usually dictates component placement, part number or name, date code, logo or other specified information. Panels are then baked to cure the ink.

© 2009 Advanced Circuits Inc
37
Hot Air Solder Leveling (HASL)
The panels are coated with flux –a viscous compound that promotes even coating of the copper. Then the panels are dipped completely into a bath of molten solder. The solder covers all exposed metal surfaces. As the panel is removed from the solder, high pressure hot air is directed at both sides of the panel. The “blast”of air removes excess solder from the holes and smoothes the surface of the pads.

© 2009 Advanced Circuits Inc
38
Rout, Fabrication, Score, BevelAfter HASL the boards are cut to size on a CNC machine
or router. Most panels have the individual parts routed out into single pieces or arrays of varying sizes. Boards or arrays can also be scored so that they can be easily broken apart after assembly.
Score lines

© 2009 Advanced Circuits Inc
39
Then the boards are generally checked for cleanliness, sharp edges, burrs and other fabrication requirements. Chamfers, slots, countersinks and bevels are added during the rout & fabrication processes.
ChamferSlot
Bevel

© 2009 Advanced Circuits Inc
40
Bare Board Electrical TestBoards are tested for opens and shorts in the circuitry, in
one of the last steps of production. Test programs can be loaded directly onto various types of test machines or used to create specific fixtures and test programs.
Flying Probe test machine.

© 2009 Advanced Circuits Inc
41
Shorts are repaired when possible and retested for verification. At Advanced Circuits we test 100% of the networks on the board for continuity and isolation (opens and shorts) using test programs generated from the Gerber data.
Dedicated fixture on a
universal grid test machine.

© 2009 Advanced Circuits Inc
42
Final Inspection
Boards are visually inspected to assure they meet our customers’requirements, industry specifications and Advanced Circuits’standards, as well as having the physical dimensions and hole sizes verified.

© 2009 Advanced Circuits Inc
43
Packaging and Ship
Circuit boards meeting the acceptability standards are counted, shrink wrapped and readied for shipment along with all the required certificates, samples, cross sections, etc. All of these are packaged for shipment using products made from renewable resource materials.

© 2009 Advanced Circuits Inc
44
The End
This presentation is intended only as an introduction to the processes used in building a circuit board
and as a training aid for employees, customers and friends of Advanced Circuits.
All of the artwork, photography and text is the property of Advanced Circuits Inc and may not be
used without permission. Please Contact Tony Garramone, Corporate Training Manager at
1-800-979-4pcb x1344 for information.