build your dream house (all ages)
TRANSCRIPT

EAA welcomes feedback on its projects in order to improve, please use this link:
https://forms.gle/LGAP9k17fMyJrKJN7
1
BUILD YOUR DREAM HOUSE (ALL AGES)
Ages 4 to 7 (Level 1)
Description: Learners will create a model of their dream house or room and
learn about geometry and operations!
Leading question: How can we use shapes to build our dream house?
Age group: 4-7 Subjects: Math (geometry and operations), engineering
Total time required: ~ 3.5 hours in total over 4 days
Self-guided / Supervised activity: High supervision Resources required: Paper/cardboard, ruler/measuring tape, color pens, scissors,
glue/tape/stapler
Day Time Activity and Description 1 10
minutes 20 minutes
Introduction: we are going to learn how to create a model of our dream house and practice some math! First, let’s learn about some shapes that we can use to build our house. Option 1: the learner will complete the Beauty in Shapes project before starting Build Your Dream Home to get a more detailed introduction to 2-dimensional shapes OR Option 2: the learner can complete these brief activities to get a quick introduction to 2D shapes. First, show the learner these shapes and ask her or him to identify them Introduce the learner to 2 dimensional shapes:
• A triangle has three sides and three corners
• A square has four sides of equal length, and all its angles are right
• A rectangle has four sides. Opposite sides are of equal length, and all its angles are right.
• A circle is a round shape. All its points are of equal distance from the Center point.
Let’s draw each shape! Bring out your paper, pen or pencil and a ruler or any flat object with a straight side like a phone/bookmark/cardboard or fortified paper:
• Use a ruler to draw a square with 4 equal sides and right angles, and a rectangle with equal opposite sides and right angles. Use the corner of a mobile phone or a notebook to make sure your angle is right.
EAA welcomes feedback on its projects in order to improve, please use this link:
https://forms.gle/LGAP9k17fMyJrKJN7
2
• Plot three points that are not on a straight line and join each point to the next one to draw a triangle
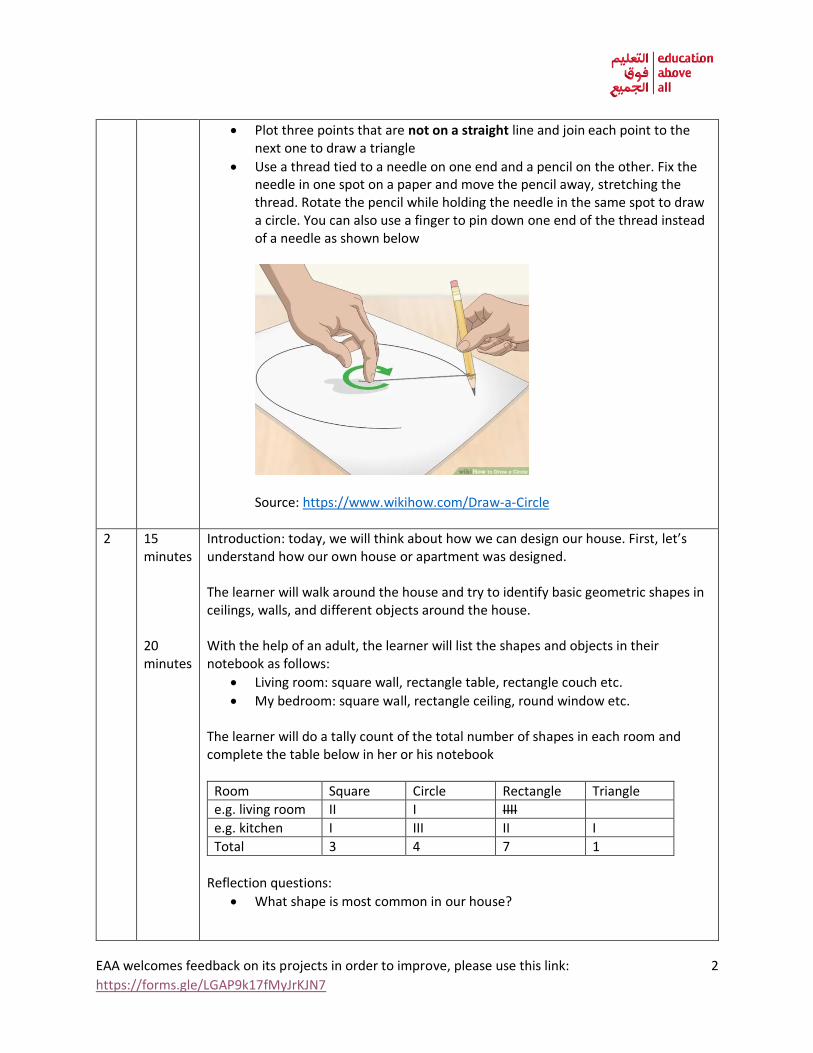
• Use a thread tied to a needle on one end and a pencil on the other. Fix the needle in one spot on a paper and move the pencil away, stretching the thread. Rotate the pencil while holding the needle in the same spot to draw a circle. You can also use a finger to pin down one end of the thread instead of a needle as shown below
Source: https://www.wikihow.com/Draw-a-Circle
2 15 minutes 20 minutes
Introduction: today, we will think about how we can design our house. First, let’s understand how our own house or apartment was designed. The learner will walk around the house and try to identify basic geometric shapes in ceilings, walls, and different objects around the house. With the help of an adult, the learner will list the shapes and objects in their notebook as follows:
• Living room: square wall, rectangle table, rectangle couch etc.
• My bedroom: square wall, rectangle ceiling, round window etc. The learner will do a tally count of the total number of shapes in each room and complete the table below in her or his notebook
Room Square Circle Rectangle Triangle e.g. living room II I IIII
e.g. kitchen I III II I
Total 3 4 7 1 Reflection questions:
• What shape is most common in our house?

EAA welcomes feedback on its projects in order to improve, please use this link:
https://forms.gle/LGAP9k17fMyJrKJN7
3
30 minutes
The learner will try to draw the design of the house on a piece of paper. Instead of a top view of the room, the learner can draw the wall of one or more rooms or spaces on separate pieces of paper/pages of his or her notebook. The help of an adult might be needed. Some examples:
3 20 minutes 10 minutes 30 minutes
Today, the learner will come up with ideas for their house or room blueprint. Prompts:
• How do I want my house or room to look? Will the walls be square or rectangular? Can they be triangular?
• What other objects do you want there that you can draw?
• How many square, circle, rectangle, and triangle shaped objects have we listed?
The learner will recreate the tally table from day 2 in their notebook or piece of paper and count the total for each shape The learner will draw and color all the shapes according to the total shown in the table. E.g. 4 rectangles of different sizes, two circles, one triangle etc. Each shape will represent part of the room – one rectangle is the wall; a circle can be glued on to the wall to represent a mirror. Another rectangle can be glued to represent a photo frame etc.
4 30-60 minutes
Today, the learner will continue decorating different walls, cutting out shapes and gluing objects on to walls, and finally putting the different parts together. An adult will help with gluing the different parts together. The wall and floor can be glued as follows: Tips:
• The learner should color walls and floors before gluing or stapling them together
Paper 1 – wall
with tv, table, and
mirror glued on or
drawn
Paper 2 – floor
Fold the part below
the dotted line and
glue it underneath
the floor

EAA welcomes feedback on its projects in order to improve, please use this link:
https://forms.gle/LGAP9k17fMyJrKJN7
4
10 minutes
• The bottom part of the wall can be folded by an adult to go under the floor
• The learner can also, with the help of an adult, draw different objects onto walls instead of gluing and pasting them
Optional: Learners can make several rooms and arrange them side by side to create a house. The learner will present the finished house to his or her family and describe how she or he designed each wall and the shapes of different objects and what they represent.
Assessment Criteria:
Completed house or room with walls and floors comprised of 2D shapes
Learning outcomes:
2 dimensional shapes and their properties Addition within 10
Required previous learning:
Numbers 1-10
Additional enrichment activities:
Learners can be taught the properties of some 3-dimensional shapes such as cuboids, cylinders, cones and spheres and asked to create some of these to build their house

EAA welcomes feedback on its projects in order to improve, please use this link:
https://forms.gle/LGAP9k17fMyJrKJN7
5
Ages 8 to 10 (Level 2)
Description: Learners will create a model of their dream house or room and learn about geometry and operations!
Leading question: How can we use shapes to build our dream house?
Age group: 8-10
Subjects: Math (geometry and operations), engineering
Total time required: ~ 4.5 hours in total over 5 days
Self-guided / Supervised activity: Medium supervision
Resources required: Paper/cardboard, ruler/measuring tape, color pens, scissors, glue/tape/stapler
Day
Time Activity and Description
1 20 minutes
Suggestion: it is recommended that the learner completes the Draw and Calculate Like an Architect project project prior to starting this project to get an introduction to scaling models. Introduction: we are going to learn how to create a model of our dream house and practice some math! First, let’s learn about some shapes that we can use to build our house. Show the learner these shapes and ask her or him to identify them. Prompt: do these shapes look familiar? What 2-dimensional shape does each one look like? (e.g. a cube looks like a square, a pyramid looks like a triangle etc.)
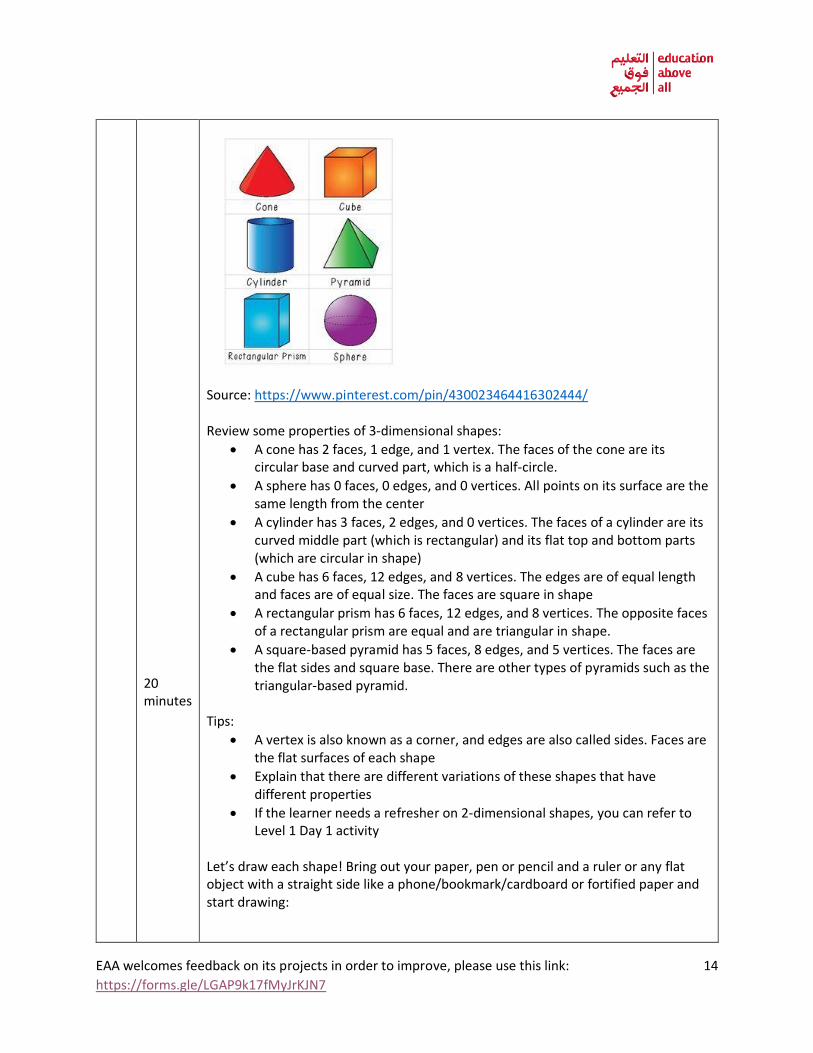
Source: https://www.pinterest.com/pin/430023464416302444/ Introduce the learner to some 3 dimensional shapes:

EAA welcomes feedback on its projects in order to improve, please use this link:
https://forms.gle/LGAP9k17fMyJrKJN7
6
20 minutes
• A cone has 2 faces, 1 edge, and 1 vertex. The faces of the cone are its circular base and curved part, which is a half-circle.
• A sphere has 0 faces, 0 edges, and 0 vertices. All points on its surface are the same length from the center
• A cylinder has 3 faces, 2 edges, and 0 vertices. The faces of a cylinder are its curved middle part (which is rectangular) and its flat top and bottom parts (which are circular in shape)
• A cube has 6 faces, 12 edges, and 8 vertices. The edges are of equal length and faces are of equal size. The faces are square in shape
• A rectangular prism has 6 faces, 12 edges, and 8 vertices. The opposite faces of a rectangular prism are equal and are triangular in shape.
• A square-based pyramid has 5 faces, 8 edges, and 5 vertices. The faces are the flat sides and square base. There are other types of pyramids such as the triangular-based pyramid.
Tips:
• A vertex is also known as a corner, and edges are also called sides. Faces are the flat surfaces of each shape
• Explain that there are different variations of these shapes that have different properties
• If the learner needs a refresher on 2-dimensional shapes, you can refer to Level 1 Day 1 activity
Let’s draw each shape! Bring out your paper, pen or pencil and a ruler or any flat object with a straight side like a phone/bookmark/cardboard or fortified paper and start drawing:
• A cube or rectangular prism: to get a cube, draw overlapping squares, then join the vertices (corners) using straight lines as shown in figure A to get the shape in figure B. if you start with overlapping rectangles and join the vertices, you will get a rectangular prism. Figure A Figure B
• A cone: since a cone has a circular base, start with a flat circle as shown in figure A, then draw two lines connecting at the top to get figure B. Another way would be to draw a triangle, then draw two half circles above and below the base.

EAA welcomes feedback on its projects in order to improve, please use this link:
https://forms.gle/LGAP9k17fMyJrKJN7
7
Figure A Figure B
• A cylinder: since a cylinder has two circular parts, start with two circles stacked on top of each other with some distance in between, then join the from both sides as shown below
Figure A Figure B
• A pyramid: since a square-based pyramid has a square base, start with a flat square (that looks like a diamond) as shown in figure A, then join all the vertices at the top to get figure B as shown below: Figure A Figure B
• A sphere: start with a circle, then draw two curved lines across the middle part to show that a sphere is not flat like a circle Figure A Figure B
2 10 minutes 20 minutes
Introduction: today, we will think about how we can design our house. First, let’s understand how our own house or apartment was designed. The learner will walk around the house and try to identify basic and 3 dimensional geometric shapes in ceilings, walls, and different objects around the house. With the help of an adult, the learner will list the shapes and objects in their notebook as follows:
• Living room: a rectangular prism with squared walls, cubed table, rectangular TV screen etc.
• Bedroom: a cubed room with rectangular window, round mirror etc.

EAA welcomes feedback on its projects in order to improve, please use this link:
https://forms.gle/LGAP9k17fMyJrKJN7
8
30-40 minutes
The learner will do a tally count of the total number of shapes in each room and complete the table below in her or his notebook. The learner can mix 2D and 3D shapes as shown below
Room Cube Rectangular prism
Rectangle Triangle
e.g. living room II I IIII
e.g. kitchen I III II I
Total 3 4 7 1
Reflection questions:
• What 2D shape is most common?
• What 3D shape is most common? The learner will try to draw the design of the house on a piece of paper to create a floor plan for his or her current home: Let’s start with your bedroom. Think of what your bedroom would look like if we could remove the ceiling and look at it from the top. Example of rooms with a top view:
Source link
Tip: if this is too difficult, instead of a top view, the learner can draw the walls of one or more rooms or spaces on separate pieces of paper/pages of his or her notebook with the help of an adult if needed. The learner will draw a plan for his or her current home, apartment, or room:
• Draw the entire space first either from a top view or side/cross-section
• Section the different rooms or spaces with lines representing walls. Where will you place the kitchen? Bathroom?

EAA welcomes feedback on its projects in order to improve, please use this link:
https://forms.gle/LGAP9k17fMyJrKJN7
9
• Draw the beds, tables, rugs etc. that you find in each space
3 10 minutes 20 minutes 30 minutes
Today, the learner will come up with the ideas and design for their dream house or room floor plan. Prompts:
• How do you want your house or room to look? Will the walls be square or rectangular? Can they be triangular?
• What other objects do you want there that you can draw or make? The learner will recreate and complete this table in his or her notebook:
Room Object 1
Shape 1
Object 2
Shape 2 Object 3
Shape 3
Object 4
Shape 4
Bedroom
Wall Square
Bed Rectangular prism
Table
Cube
Pillow
Rectangle
Living room
Wall Square
Couch
Rectangular prism + rectangle
Table
Cube
The learner will draw a plan for his or her dream home, apartment, or room based on the table above:
• Draw the entire space first either from a top view or side/cross-section
• Section the different rooms or spaces with lines representing walls. Where will you place the kitchen? Bathroom?
• Draw the beds, tables, rugs etc. that you want in each space
• Decorate and color your floor plan The plan can be basic following the plan the learner made yesterday or the template below, but it must contain all the items the learner wants in each room Tip: allow the learner to be creative, but make sure that the designs are realistic and can be done with minimal resources and supervision
4 40-60 minutes
Today, the learner will create the shapes from the table he or she completed yesterday and finalize the design of the house.
Bathroom Bedroom 1
Kitchen
Bedroom 2
Living room

EAA welcomes feedback on its projects in order to improve, please use this link:
https://forms.gle/LGAP9k17fMyJrKJN7
10
The learner will make all the shapes using paper. The learner will draw 2D shapes on paper and cut them out using scissors. For 3D shapes, paper will be cut in the following ways:
1. To make a cube: we know that a cube has equal or square sides. First, draw six squares in this shape on a piece of paper then cut out the entire shape:
Instructions:
• Keep square 1 down and bring up squares 2, 3, 4, and 5
• Tape or glue all of them together to create an open cube
• Bring up square 6 to close the cube. You can cut out square 6 if you want an open cube for your house.
• You can use this cube as a table or other object to place in your rooms!
2. To make a rectangular prism: we know that a rectangular prism has rectangular sides. First, draw six rectangles in the shape shown below and cut out the entire shape. Then repeat the instructions from the cube, keeping rectangle 1 down and raising the other sides:
2 1 3
4
5
6
1

EAA welcomes feedback on its projects in order to improve, please use this link:
https://forms.gle/LGAP9k17fMyJrKJN7
11
3. To make a cylinder:
• Cut out the piece of paper you want to use to make a cylinder for your furniture
• Roll the paper so both ends meet as shown below:
• Tape the line where both ends meet to make a cylinder
• If you want to close the cylinder, you can take the shape you have made and draw two circles on a separate piece of paper using one of its ends. Cut out the circles and tape or glue them on to the top and bottom parts of the cylinder (the faces of the cylinder)
4. To make a cone: we know that a cone has a circular base, so first, draw a circle, then follow the instructions below:
1. Cut out a circle 2. Cut it in half
Glue/tape the cutout circles at
the top and bottom to close
the cylinder

EAA welcomes feedback on its projects in order to improve, please use this link:
https://forms.gle/LGAP9k17fMyJrKJN7
12
3. take one half-circle 4. Join both ends and mark the vertex C
5. Apply glue and mark point D at 6. Bring one tip to the bottom, mark the bottom that point AD
7. bring point B down to the curved edge to make a cone! Tip: make sure you color the papers before you make the shapes!
5 30 minutes 20 minutes 10 minutes
Today, the learner will finalize the design of his or her house and present it to the family! First, the learner will create a big cube or rectangular prism for his or her dream house, room, or apartment. Make sure the shape is big enough to fit all the objects your created yesterday! The learner will assemble all the objects inside the larger rectangular prism and finalize the design of the house. He or she can draw any additional decoration such as mirrors, paintings, photo frames etc. if he or she does not want to create more shapes The learner will present the finalized design to the family and describe:
• How she or he decided on the shape of the house and rooms
• How she or he created the objects and the shapes used
• Overall thoughts about the process
Assessment Criteria:
- Completed house or room with walls, floors, and furniture objects comprised of 2D and 3D shapes - Final presentation of design process

EAA welcomes feedback on its projects in order to improve, please use this link:
https://forms.gle/LGAP9k17fMyJrKJN7
13
Learning outcomes:
Geometry (grades 2-3): 3D shapes
Required previous learning:
- Addition within 10 - Some knowledge of 2D shapes
Inspiration: n/a
Additional enrichment activities:
The learner can journal his or her process of designing the house and provide the dimensions of the rooms and spaces, calculate the perimeter (sum of sides or diameter in 2D shapes)
Ages 11 to 14 (Level 3)
Description: Learners will create a model of their dream house or room and learn about geometry and operations!
Leading question: How can we use shapes to build our dream house?
Age group: 11-14
Subjects: Math (geometry and operations), engineering
Total time required: ~ 6 hours in total over 5 days
Self-guided / Supervised activity: Medium supervision
Resources required: Paper/cardboard, ruler/measuring tape, color pens, scissors, glue/tape/stapler
Day Time Activity and Description
1 20 minutes
Introduction: we are going to learn how to create a model of our dream house and practice some math! First, let’s learn about some shapes that we can use to build our house. Show the learner these shapes and ask her or him to identify them. Prompt: do these shapes look familiar? What 2-dimensional shape does each one look like? (e.g. a cube looks like a square, a pyramid looks like a triangle etc.)
EAA welcomes feedback on its projects in order to improve, please use this link:
https://forms.gle/LGAP9k17fMyJrKJN7
14
20 minutes
Source: https://www.pinterest.com/pin/430023464416302444/ Review some properties of 3-dimensional shapes:
• A cone has 2 faces, 1 edge, and 1 vertex. The faces of the cone are its circular base and curved part, which is a half-circle.
• A sphere has 0 faces, 0 edges, and 0 vertices. All points on its surface are the same length from the center
• A cylinder has 3 faces, 2 edges, and 0 vertices. The faces of a cylinder are its curved middle part (which is rectangular) and its flat top and bottom parts (which are circular in shape)
• A cube has 6 faces, 12 edges, and 8 vertices. The edges are of equal length and faces are of equal size. The faces are square in shape
• A rectangular prism has 6 faces, 12 edges, and 8 vertices. The opposite faces of a rectangular prism are equal and are triangular in shape.
• A square-based pyramid has 5 faces, 8 edges, and 5 vertices. The faces are the flat sides and square base. There are other types of pyramids such as the triangular-based pyramid.
Tips:
• A vertex is also known as a corner, and edges are also called sides. Faces are the flat surfaces of each shape
• Explain that there are different variations of these shapes that have different properties
• If the learner needs a refresher on 2-dimensional shapes, you can refer to Level 1 Day 1 activity
Let’s draw each shape! Bring out your paper, pen or pencil and a ruler or any flat object with a straight side like a phone/bookmark/cardboard or fortified paper and start drawing:

EAA welcomes feedback on its projects in order to improve, please use this link:
https://forms.gle/LGAP9k17fMyJrKJN7
15
20 minutes
• A cube or rectangular prism: to get a cube, draw overlapping squares, then join the vertices (corners) using straight lines as shown in figure A to get the shape in figure B. if you start with overlapping rectangles and join the vertices, you will get a rectangular prism. Figure A Figure B
• A cone: since a cone has a circular base, start with a flat circle as shown in figure A, then draw two lines connecting at the top to get figure B. Another way would be to drae a triangle, then draw two half circles above and below the base. Figure A Figure B
• A cylinder: since a cylinder has two circular parts, start with two circles stacked on top of each other with some distance in between, then join the from both sides as shown below
Figure A Figure B
• A pyramid: since a square-based pyramid has a square base, start with a flat square (that looks like a diamond) as shown in figure A, then join all the vertices at the top to get figure B as shown below: Figure A Figure B

EAA welcomes feedback on its projects in order to improve, please use this link:
https://forms.gle/LGAP9k17fMyJrKJN7
16
10 minutes
• A sphere: start with a circle, then draw two curved lines across the middle part to show that a sphere is not flat like a circle Figure A Figure B
Learners will calculate the area of a square and surface area of a cube that they have drawn:
• Explain that the area of a shape is the total space covered by that shape
• Draw a rectangle with length 5cm and width 3cm. how many 1cm squares can you fit in the rectangle? You should be able to fit 15 such squares as shown below. This is the area of the rectangle, which we also get by multiplying the length by the width or 5 x 3 = 15. 5cm
3cm
• Remind the learner that a square is a type of rectangle, but the only difference is that all of its sides are the same length
• Draw a square with 4cm sides. Since the square is a rectangle, it has similar properties. The formula for area of a square is side x side or side2 instead of length x width because all sides are the same length. You can visually see how many 1cm squares you can fit into the larger 4cm square and count them to find the area.
• Now, let’s see how we can figure out the area of a cube. we know that a cube has 6 faces. Since each face of a cube is a square, the area for each face is side2. To get the total area of the cube, we multiply 6 x side2.
Optional: learners who have completed areas and surface areas units can do the following activity for practice: Now let’s learn about the areas of these shapes. Look at the formulas below:
2D Shape Area Terms
Circle π × r2 r = radius of the circle
Triangle ½ × b × h b = base h = height
Square a2 a = length of side
Rectangle l × w l = length w = width

EAA welcomes feedback on its projects in order to improve, please use this link:
https://forms.gle/LGAP9k17fMyJrKJN7
17
10-20 minutes
3D Shape Area Terms
Cube 6a2 a = length of the edge
Rectangular prism 2 w l + 2 h l + 2 h w l = length w = width h = height
Cylinder 2 π r2 + 2 π r h
r = radius of circular base h = height of the cylinder
Cone π r l + π r2 r = radius of circular base l = slant height
Sphere 4 π r2 r = radius of sphere
Source: https://byjus.com/maths/area-of-shapes/ We know that:
• π = 3.14
• The radius is the distance from the midpoint of the circle or sphere to any point on the surface
• The base and height of a triangle can be found by drawing a straight line from the top vertex to the opposite side. The base is the side at the bottom where the height line forms a 90-degree angle. The height is the length of the line drawn from the top vertex to the base
• The lengths of a rectangle are the two long sides and the widths are the shorter sides
• The slant of a cone is the length from the edge of the circle to the tip of the cone
• The height of a cylinder is its length (distance from top surface to the bottom)
• The length, width and height of a rectangular prism are represented below height width length The learner will calculate the areas and surface areas of some of the shapes he or she has drawn
2 10 minutes
Introduction: today, we will think about how we can design our house. First, let’s understand how our own house or apartment was designed.

EAA welcomes feedback on its projects in order to improve, please use this link:
https://forms.gle/LGAP9k17fMyJrKJN7
18
20 minutes 30-40 minutes
The learner will walk around the house and try to identify basic and 3-dimensional geometric shapes in ceilings, walls, and different objects around the house. The learner will list the shapes and objects in their notebook as follows:
• Living room: a rectangular prism with squared walls, cubed table, rectangular TV screen etc.
• Bedroom: a cubed room with rectangular window, round mirror etc. The learner will count of the total number of shapes in each room and complete the table below in her or his notebook. The learner can mix 2D and 3D shapes as shown below
Room Cube Rectangular prism
Rectangle Triangle
e.g. living room 2 1 5
e.g. kitchen 1 3 2 1
Total 3 4 7 1 Reflection questions:
• What 2D shape is most common?
• What 3D shape is most common? The learner will draw the design of the house on a piece of paper to create a floor plan for his or her current home: Let’s start with your bedroom. Think of what your bedroom would look like if we could remove the ceiling and look at it from the top. Example of rooms with a top view:
Source link

EAA welcomes feedback on its projects in order to improve, please use this link:
https://forms.gle/LGAP9k17fMyJrKJN7
19
10-20 minutes
Tip: if this is too difficult, instead of a top view, the learner can draw the walls of one or more rooms or spaces on separate pieces of paper/pages of his or her notebook if needed. The learner will draw a plan for his or her current home, apartment, or room:
• Draw the entire space first either from a top view or side/cross-section
• Section the different rooms or spaces with lines representing walls. Where will you place the kitchen? Bathroom?
• Draw the beds, tables, rugs etc. that you find in each space The learner will calculate the perimeter of the 2D shapes. The perimeter is the distance around 2D shapes. Calculate the perimeter of the shapes he or she just drew using the formulas below:
Source: https://www.mathsisfun.com/geometry/perimeter.html
3 10 minutes 20 minutes
Today, the learner will come up with the ideas and design for their dream house or room floor plan. Prompts:
• How do you want your house or room to look? Will the walls be square or rectangular? Can they be triangular?
• What other objects do you want there that you can draw or make? The learner will recreate and complete this table in his or her notebook:
Room Object 1
Shape 1
Object 2
Shape 2 Object 3
Shape 3
Object 4
Shape 4
Bedroom
Wall Square
Bed Rectangular prism
Table
Cube
Pillow
Rectangle

EAA welcomes feedback on its projects in order to improve, please use this link:
https://forms.gle/LGAP9k17fMyJrKJN7
20
30 minutes
Living room
Wall Square
Couch
Rectangular prism + rectangle
Table
Cube
The learner will draw a plan for his or her dream home, apartment, or room based on the table above:
• Draw the entire space first either from a top view or side/cross-section
• Section the different rooms or spaces with lines representing walls. Where will you place the kitchen? Bathroom?
• Draw the beds, tables, rugs etc. that you want in each space
• Decorate and color your floor plan The plan can be basic following the plan the learner made yesterday or the template below, but it must contain all the items the learner wants in each room
4 40-60 minutes
Today, the learner will create the shapes from the table he or she completed yesterday and finalize the design of the house. The learner will make all the shapes using paper. The learner will draw 2D shapes on paper and cut them out using scissors. For 3D shapes, paper will be cut in the following ways:
5. To make a cube: we know that a cube has equal or square sides. First, draw six squares in this shape on a piece of paper then cut out the entire shape. Before cutting the shape, measure and record the length of each side to verify that this is a cube (with equal sides):
Bathroom Bedroom 1
Kitchen
Bedroom 2
Living room
5

EAA welcomes feedback on its projects in order to improve, please use this link:
https://forms.gle/LGAP9k17fMyJrKJN7
21
Instructions:
• Keep square 1 down and bring up squares 2, 3, 4, and 5
• Tape or glue all of them together to create an open cube
• Bring up square 6 to close the cube. You can cut out square 6 if you want an open cube for your house.
• You can use this cube as a table or other object to place in your rooms!
6. To make a rectangular prism: we know that a rectangular prism has rectangular sides. First, draw six rectangles in the shape shown below and cut out the entire shape. Measure and record the length and width of each rectangle. Then repeat the instructions from the cube, keeping rectangle 1 down and raising the other sides:
7. To make a cylinder:
• Cut out the piece of paper you want to use to make a cylinder for your furniture
• Measure and record the length and width of the paper.
• Roll the paper so both ends meet as shown below:
2 1 3
4
6
1
Glue/tape the cutout circles at
the top and bottom to close
the cylinder

EAA welcomes feedback on its projects in order to improve, please use this link:
https://forms.gle/LGAP9k17fMyJrKJN7
22
• Tape the line where both ends meet to make a cylinder
• If you want to close the cylinder, you can take the shape you have made and draw two circles on a separate piece of paper using one of its ends. Measure and record the radius of the circles. Cut out the circles and tape or glue them on to the top and bottom parts of the cylinder (the faces of the cylinder)
8. To make a cone: we know that a cone has a circular base, so first, draw a circle, then follow the instructions below:
1. Cut out a circle 2. Cut it in half
3. take one half-circle 4. Join both ends and mark the vertex C
5. Apply glue and mark point D at 6. Bring one tip to the bottom, mark the bottom that point AD
EAA welcomes feedback on its projects in order to improve, please use this link:
https://forms.gle/LGAP9k17fMyJrKJN7
23
30 minutes
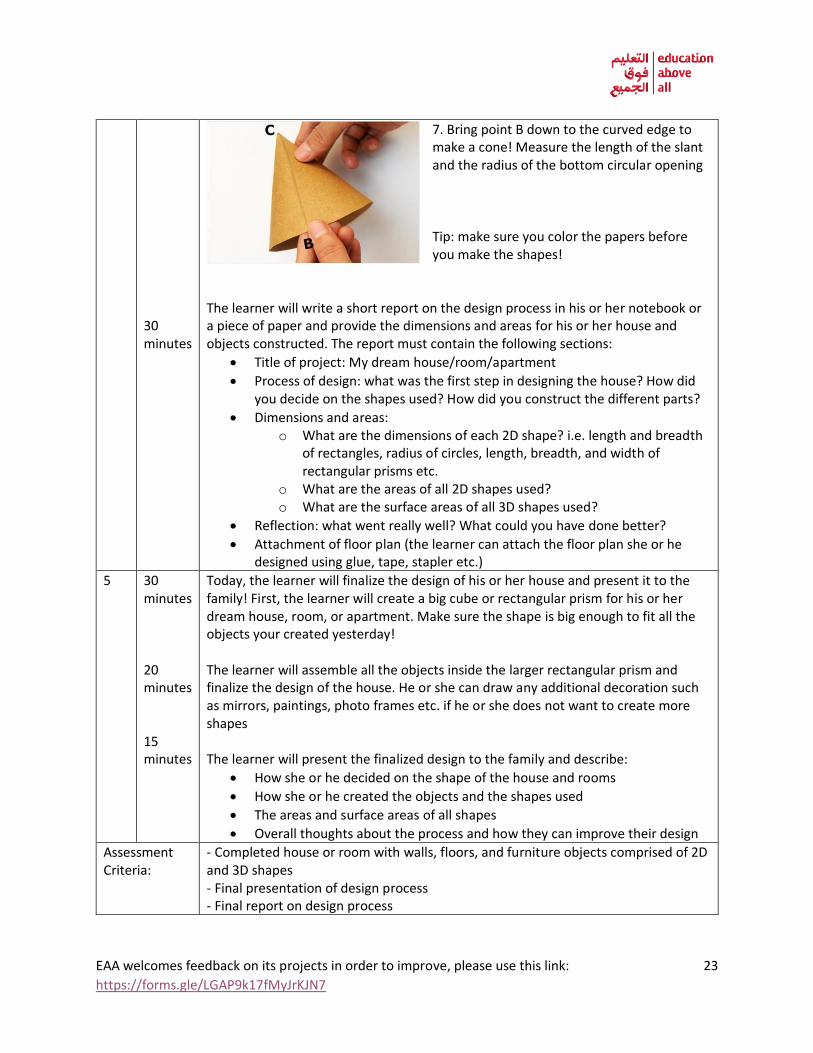
7. Bring point B down to the curved edge to make a cone! Measure the length of the slant and the radius of the bottom circular opening Tip: make sure you color the papers before you make the shapes!
The learner will write a short report on the design process in his or her notebook or a piece of paper and provide the dimensions and areas for his or her house and objects constructed. The report must contain the following sections:
• Title of project: My dream house/room/apartment
• Process of design: what was the first step in designing the house? How did you decide on the shapes used? How did you construct the different parts?
• Dimensions and areas: o What are the dimensions of each 2D shape? i.e. length and breadth
of rectangles, radius of circles, length, breadth, and width of rectangular prisms etc.
o What are the areas of all 2D shapes used? o What are the surface areas of all 3D shapes used?
• Reflection: what went really well? What could you have done better?
• Attachment of floor plan (the learner can attach the floor plan she or he designed using glue, tape, stapler etc.)
5 30 minutes 20 minutes 15 minutes
Today, the learner will finalize the design of his or her house and present it to the family! First, the learner will create a big cube or rectangular prism for his or her dream house, room, or apartment. Make sure the shape is big enough to fit all the objects your created yesterday! The learner will assemble all the objects inside the larger rectangular prism and finalize the design of the house. He or she can draw any additional decoration such as mirrors, paintings, photo frames etc. if he or she does not want to create more shapes The learner will present the finalized design to the family and describe:
• How she or he decided on the shape of the house and rooms
• How she or he created the objects and the shapes used
• The areas and surface areas of all shapes
• Overall thoughts about the process and how they can improve their design
Assessment Criteria:
- Completed house or room with walls, floors, and furniture objects comprised of 2D and 3D shapes - Final presentation of design process - Final report on design process

EAA welcomes feedback on its projects in order to improve, please use this link:
https://forms.gle/LGAP9k17fMyJrKJN7
24
Learning outcomes:
- Geometry 2D shapes perimeter and areas and 3D shapes surface areas (grade 7) - Report writing
Required previous learning:
Multiplication within 20
Inspiration: n/a
Additional enrichment activities:
- More complex 3D shapes can be added to the activity such as pyramid and prism variations - Learners can be asked to find the volumes of 3D shapes