btbc incubator lab phase iii project manual
TRANSCRIPT

BTBC – Incubator Lab Phase III
Project Funded by the Economic Development Administration
EDA Project Number #05-79-06036
Project Manual Volume 2 of 3 October 26, 2020
Owner: Bioscience & Technology Business Center
2029 Becker Drive
Lawrence, KS 66047
785.832.2110
Architect: MEP Consultant: Gould Evans, Inc. Smith & Boucher, Inc.
706 Massachusetts
Lawrence, KS 66044
Phone: 785.842.3800
www.gouldevans.com
25501 Valley Parkway, Suite 200
Olathe, KS 66061
918.345.2127
www.smithboucher.com
Structural Consultant: Civil Engineers: Bob D. Campbell Grob Engineering Services, LLC
4338 Belleview
Kansas City, MO 64111
Phone: 816.531.4144
www.bdc-engrs.com
3210 Mesa Way, Suite A
Lawrence, KS 66049
785.856.1900
www.grobengineering,com

BLANK PAGE

BTBC Phase III October 26, 2020
GE Project No. 0119-0010
Gould Evans
TABLE OF CONTENTS 000110 - 1
TABLE OF CONTENTS - VOLUME 1 OF 3
DIVISION 00 - PROCUREMENT AND CONTRACTING REQUIREMENTS
000000 COVER SHEET
000001 PROJECT DIRECTORY
000002-1 CERTIFICATION – CIVIL
000002-2 CERTIFICATION – STRUCTURAL
000002-3 CERTIFICATION – ARCHITECTURAL
000002-4 CERTIFICATION – MEP
000003 EDA CONTRACTING PROVISIONS CONSTRUCTION
000004 EDA SITE SIGN WRITTEN SPECIFICATIONS
000005 FORM CD-512_CERTIFICATION REGARDING LOBBYING
000006 REQUIREMENTS FOR AFFIRMATIVE ACTION (EEO)
000007 GOALS FOR EEO DOCUMENT_INDEX OF COUNTIES
000110 TABLE OF CONTENTS
001116 INVITATION TO BID
002113 INSTRUCTIONS TO BIDDERS
002213 SUPPLEMENTARY INSTRUCTIONS TO BIDDERS
003132 GEOTECHNICAL DATA
BTBC GEOTECHNICAL REPORT DATED JUNE 1, 2020
004113 BID FORM - STIPULATED SUM (SINGLE-PRIME CONTRACT)
004313 BID SECURITY FORMS
004373 SCHEDULE OF VALUES FORM
004400 WAGE DETERMINATIONS DAVIS-BACON ACT WD # KS20200048
006001 A101-2017 STANDARD FORM OF AGREEMENT BETWEEN OWNER AND CONTRACTOR
(REFERENCE CONTRACT)
006002 A201-GENERAL CONDITIONS OF THE CONTRACT OF CONSTRUCTION (REFERENCE
CONDITIONS)
006003 A701-2018 INSTRUCTIONS TO BIDDERS
DIVISION 01 - GENERAL REQUIREMENTS
011000 SUMMARY
012300 ALTERNATES
012500 SUBSTITUTION PROCEDURES
012600 CONTRACT MODIFICATION PROCEDURES
012900 PAYMENT PROCEDURES
013100 PROJECT MANAGEMENT AND COORDINATION
013200 CONSTRUCTION PROGRESS DOCUMENTATION
013300 SUBMITTAL PROCEDURES
013516 ALTERATION PROJECT PROCEDURES
014000 QUALITY REQUIREMENTS
014200 REFERENCES
015000 TEMPORARY FACILITIES AND CONTROLS
016000 PRODUCT REQUIREMENTS
017300 EXECUTION
017419 CONSTRUCTION WASTE MANAGEMENT AND DISPOSAL
017700 CLOSEOUT PROCEDURES

BTBC Phase III October 26, 2020
GE Project No. 0119-0010
Gould Evans
TABLE OF CONTENTS 000110 - 2
017823 OPERATION AND MAINTENANCE DATA
017839 PROJECT RECORD DOCUMENTS
019113 GENERAL COMMISSIONING REQUIREMENTS
TABLE OF CONTENTS - VOLUME 2 OF 3
DIVISION 02 - EXISTING CONDITIONS
NOT APPLICABLE
DIVISION 03 - CONCRETE
033000 CAST-IN-PLACE CONCRETE
033543 POLISHED CONCRETE FINISHING
034500 PRECAST ARCHITECTURAL CONCRETE (TO BE ISSUED BY ADDENDUM)
DIVISION 04 - MASONRY
NOT APPLICABLE
DIVISION 05 - METALS
051200 STRUCTURAL STEEL
051213 ARCHITECTURALLY EXPOSED STRUCTURAL STEEL FRAMING
052100 STEEL JOISTS
053100 STEEL DECKING
054000 COLD FORMED METAL FRAMING
055000 METAL FABRICATIONS
055113 METAL STAIRS
055213 PIPE AND TUBE RAILINGS (TO BE ISSUED BY ADDENDUM)
DIVISION 06 - WOOD, PLASTICS, AND COMPOSITES
061000 ROUGH CARPENTRY
061600 SHEATHING
064116 PLASTIC-LAMINATE-FACED ARCHITECTURAL CABINETS
064216 FLUSH WOOD PANELING
DIVISION 07 - THERMAL AND MOISTURE PROTECTION
071326 SELF-ADHERING SHEET WATERPROOFING
072100 THERMAL INSULATION
072419 WATER-DRAINAGE EXTERIOR INSULATION AND FINISH SYSTEM (EIFS)
072726 FLUID-APPLIED MEMBRANE AIR BARRIERS
074213 FORMED METAL WALL PANELS
075423 THERMOPLASTIC POLYOLEFIN (TPO) ROOFING
076200 SHEET METAL FLASHING AND TRIM
078413 PENETRATION FIRESTOPPING
079200 JOINT SEALANTS
DIVISION 08 - OPENINGS
081113 HOLLOW METAL DOORS AND FRAMES

BTBC Phase III October 26, 2020
GE Project No. 0119-0010
Gould Evans
TABLE OF CONTENTS 000110 - 3
081416 FLUSH WOOD DOORS
083113 ACCESS DOORS AND FRAMES
083213 SLIDING ALUMINUM-FRAMED GLASS DOORS
083323 OVERHEAD COILING DOORS
084113 ALUMINUM FRAMED ENTRANCES AND STOREFRONT
084123 ALUMINUM FRAMED FIRE RATED GLAZING - ENTRANCES AND STOREFRONTS
084413 GLAZED ALUMINUM CURTAIN WALLS
087100 DOOR HARDWARE
088000 GLAZING
088300 MIRRORS
DIVISION 09 - FINISHES
092116 GYPSUM BOARD SHAFT WALL ASSEMBLIES
092216 NON-STRUCTURAL METAL FRAMING
092423 SYNTHETIC STUCCO SYSTEM
092900 GYPSUM BOARD
093013 CERAMIC TILING
095113 ACOUSTICAL PANEL CEILINGS
096513 RESILIENT BASE AND ACCESSORIES
096723 RESINOUS FLOORING
096813 TILE CARPETING
098436 SOUND-ABSORBING CEILING UNITS
099123 INTERIOR PAINTING
DIVISION 10 - SPECIALTIES
101419 INTERIOR SIGNAGE
102113 TOILET PARTITIONS
102800 TOILET, BATH, AND LAUNDRY ACCESSORIES
104413 FIRE EXTINGUISHER CABINETS
104416 FIRE EXTINGUISHERS
105113 METAL LOCKERS
105116 WOOD LOCKERS
105210 CYLINDER BRACKET SUPPORT
107113 EXTERIOR SUN SHADE ASSEMBLY
DIVISION 11 - EQUIPMENT
114000 FOODSERVICE EQUIPMENT
115313 LABORATORY FUME HOODS
DIVISION 12 - FURNISHINGS
122413 ROLLER WINDOW SHADES
123553 WOOD LABORATORY CASEWORK
123662 SOLID SURFACING COUNTERTOPS
DIVISION 13 - SPECIAL CONSTRUCTION
NOT APPLICABLE
DIVISION 14 - CONVEYING EQUIPMENT
142124 MACHINE-ROOM-LESS ELECTRIC TRACTION PASSENGER ELEVATORS

BTBC Phase III October 26, 2020
GE Project No. 0119-0010
Gould Evans
TABLE OF CONTENTS 000110 - 4
TABLE OF CONTENTS - VOLUME 3 OF 3
DIVISION 21 - FIRE SUPPRESSION
210500 COMMON WORK RESULTS FOR FIRE SUPPRESSION
211100 FACILITY FIRE-SUPPRESSION WATER-SERVICE PIPING
211313 WET-PIPE SPRINLER SYSTEMS
DIVISION 22 - PLUMBING
220500 COMMON WORK RESULTS FOR PLUMBING
220513 COMMON MOTOR REQUIREMENTS FOR PLUMBING EQUIPMENT
220516 EXPANSION FITTINGS AND LOOPS FOR PLUMBING PIPING
220519 METERS AND GAGES FOR PLUMBING PIPING
220523 GENERAL-DUTY VALVES FOR PLUMBING PIPING
220529 HANGERS AND SUPPORTS FOR PLUMBING PIPING AND EQUIPMENT
220548 VIBRATION CONTROLS FOR PLUMBING PIPING AND EQUIPMENT
220553 IDENTIFICATION FOR PLUMBING PIPING AND EQUIPMENT
220719 PLUMBING PIPING INSULATION
221113 FACILITY WATER DISTRIBUTION PIPING
221116 DOMESTIC WATER PIPING
221119 DOMESTIC WATER PIPING SPECIALTIES
221123 DOMESTIC WATER PUMPS
221313 FACILITY SANITARY SEWERS
221316 SANITARY WASTE AND VENT PIPING
221319 SANITARY WASTE PIPING SPECIALTIES
221413 FACILITY STORM DRAINAGE PIPING
221423 STORM DRAINAGE PIPING SPECIALTIES
221429 SUMP PUMPS
221513 GENERAL-SERVICE COMPRESSED-AIR PIPING
221519 GENERAL-SERVICE PACKAGED AIR COMPRESSORS AND RECEIVERS
223100 DOMESTIC WATER SOFTENERS
223200 DOMESTIC WATER FILTRATION EQUIPMENT
223400 FUEL-FIRED, DOMESTIC-WATER HEATERS
224000 PLUMBING FIXTURES
224700 DRINKING FOUNTAINS AND WATER COOLERS
226313 GAS PIPING FOR LABORATORY AND HEALTHCARE FACILITIES
226400 MEDICAL GAS ALARMS
226700 PROCESSED WATER SYSTEMS FOR LABORATORY AND HEALTHCARE FACILITIES
226719 PROCESSED WATER EQUIPMENT FOR LABORATORY AND HEALTHCARE FACILITIES
DIVISION 23 - HEATING, VENTILATING, AND AIR CONDITIONING (HVAC)
230500 COMMON WORK RESULTS FOR HVAC
230516 EXPANSION FITTINGS AND LOOPS FOR HVAC PIPING
230519 METERS AND GAGES FOR HVAC PIPING
230523 GENERAL-DUTY VALVES FOR HVAC PIPING
230529 HANGERS AND SUPPORTS FOR HVAC PIPING AND EQUIPMENT
230533 HEAT TRACING FOR HVAC PIPING
230548 VIBRATION CONTROLS FOR HVAC PIPING AND EQUIPMENT
230553 HVAC SYSTEM IDENTIFICATION
230593 TESTING, ADJUSTING, AND BALANCING FOR HVAC

BTBC Phase III October 26, 2020
GE Project No. 0119-0010
Gould Evans
TABLE OF CONTENTS 000110 - 5
230713 DUCT INSULATION
230719 HVAC PIPING INSULATION
230900 INSTRUMENTATION AND CONTROL FOR HVAC
231123 FACILITY NATURAL-GAS PIPING
232113 HYDRONIC PIPING
232116 HYDRONIC PIPING SPECIALTIES
232123 HYDRONIC PUMPS
232300 REFRIGERANT PIPING
232500 HVAC WATER TREATMENT
232513 WATER TREATMENT FOR CLOSED-LOOP HYDRONIC SYSTEMS
233113 METAL DUCTS
233300 DUCT ACCESSORIES
233416 CENTRIFUGAL HVAC FANS
233423.01 HVAC DUCT COLLECTOR
233600 AIR TERMINAL UNITS
233713 DIFFUSERS, REGISTERS, AND GRILLES
235216 CONDENSING BOILERS
236200 PACKAGED COMPRESSOR AND CONDENSOR UNITS
237313 MODULAR CENTRAL-STATION AIR-HANDLING UNITS
238126 SPLIT-SYSTEM AIR-CONDITIONERS
238233 CONVECTORS
238239.16 PROPELLER UNIT HEATERSDIVISION
DIVISION 26 - ELECTRICAL
260500 COMMON WORK RESULTS FOR ELECTRICAL
260519 LOW-VOLTAGE ELECTRICAL POWER CONDUCTORS AND CABLES
260526 GROUNDING AND BONDING FOR ELECTRICAL SYSTEMS
260529 HANGERS AND SUPPORTS FOR ELECTRICAL SYSTEMS
260533 RACEWAYS AND BOXES FOR ELECTRICAL SYSTEMS
260553 IDENTIFICATION FOR ELECTRICAL SYSTEMS
260573 OCERCURRENT PROTECTIVE DEVICE COORDINATION STUDY
260574 OVERCURRENT PROTECTIVE DEVICE ARC-FLASH STUDY
260923 LIGHTING CONTROL DEVICES
260943 RELAY-BASED LIGHTING CONTROLS
262200 LOW-VOLTAGE TRANSFORMERS
262413 SWITCHBOARDS
262416 PANELBOARDS
262726 WIRING DEVICES
262813 FUSES
262816 ENCLOSED SWITCHES AND CIRCUIT BREAKERS
262913 ENCLOSED CONTROLLERS
262923 VARIABLE-FREQUENCY MOTOR CONTROLLERS
263213 ENGINE GENERATORS
263600 TRANSFER SWITCHES
264113 LIGHTNING PROTECTION FOR STRUCTURES
264313 SURGE PROTECTION FOR LOW-VOLTAGE ELECTRICAL POWER CIRCUITS
265119 LED INTERIOR LIGHTING
265219 EMERGENCY AND EXIT LIGHTING
265600 EXTERIOR LIGHTING

BTBC Phase III October 26, 2020
GE Project No. 0119-0010
Gould Evans
TABLE OF CONTENTS 000110 - 6
DIVISION 27 - COMMUNICATIONS
NOT APPLICABLE
DIVISION 28 - ELECTRONIC SAFETY AND SECURITY
280500 COMMON WORK RESULTS FOR ELECTRONIC SAFETY AND SECURITY
280513 CONDUCTORS AND CABLES FOR ELECTRONIC SAFETY AND SECURITY
283111 DIGITAL, ADDRESSABLE FIRE-ALARM SYSTEM
DIVISION 31 - EARTHWORK
311000 SITE CLEARING
312000 EARTH MOVING
315000 EXCAVATION SUPPORT AND PROTECTION
DIVISION 32 - EXTERIOR IMPROVEMENTS
321216 ASPHALT PAVING
321313 CONCRETE PAVING
321373 CONCRETE PAVING JOINT SEALANTS
329200 TURF AND GRASSES
329300 EXTERIOR PLANTS
DIVISION 33 - UTILITIES
334100 STORM UTILITY DRAINAGE PIPING
334600 SUBGRADE DRAINAGE
END OF TABLE OF CONTENTS

BTBC Phase III October 26, 2020
GE Project No. 0119-0010
Gould Evans
CAST-IN-PLACE CONCRETE 033000 - 1
SECTION 033000 - CAST-IN-PLACE CONCRETE
PART 1 - GENERAL
1.1 RELATED DOCUMENTS
A. Drawings and general provisions of the Contract, including General and Supplementary Conditions and Division 01 Specification Sections, apply to this Section.
1.2 SUMMARY
A. This Section specifies cast-in place concrete, including formwork, reinforcement, concrete materials, mixture design, placement procedures, and finishes, for the following:
1. Footings. 2. Foundation walls. 3. Slabs-on-grade.
B. Related Sections include the following:
1. Division 31 Section "Earth Moving" for drainage fill under slabs-on-grade. 2. Division 32 Section "Concrete Paving" for concrete pavement and walks.
1.3 DEFINITIONS
A. Cementitious Materials: Portland cement alone or in combination with one or more of the following: blended hydraulic cement, fly ash and other pozzolans, ground granulated blast-furnace slag, and silica fume; subject to compliance with requirements.
1.4 SUBMITTALS
A. Product Data: For each type of product indicated.
B. Design Mixtures: For each concrete mixture. Submit alternate design mixtures when characteristics of materials, Project conditions, weather, test results, or other circumstances warrant adjustments.
1. Indicate amounts of mixing water to be withheld for later addition at Project site.
C. Steel Reinforcement Shop Drawings: Placing drawings that detail fabrication, bending, and placement. Include bar sizes, lengths, material, grade, bar schedules, stirrup spacing, bent bar diagrams, bar arrangement, splices and laps, mechanical connections, tie spacing, hoop spacing, and supports for concrete reinforcement.
D. Welding certificates.
E. Material Test Reports: For the following, from a qualified testing agency, indicating compliance with requirements:

BTBC Phase III October 26, 2020
GE Project No. 0119-0010
Gould Evans
CAST-IN-PLACE CONCRETE 033000 - 2
1. Aggregates
F. Material Certificates: For each of the following, signed by manufacturers:
1. Cementitious materials. 2. Admixtures. 3. Form materials and form-release agents. 4. Steel reinforcement and accessories. 5. Blended steel / synthetic fiber reinforcement. 6. Waterstops. 7. Curing compounds. 8. Floor and slab treatments. 9. Bonding agents. 10. Adhesives. 11. Vapor retarders. 12. Semirigid joint filler. 13. Joint-filler strips. 14. Repair materials.
G. Floor surface flatness and levelness measurements to determine compliance with specified tolerances.
H. Field quality-control test and inspection reports.
I. Minutes of preinstallation conference.
1.5 QUALITY ASSURANCE
A. Installer Qualifications: A qualified installer who employs on Project personnel qualified as ACI-certified Flatwork Technician and Finisher and a supervisor who is an ACI-certified Concrete Flatwork Technician.
B. Manufacturer Qualifications: A firm experienced in manufacturing ready-mixed concrete products and that complies with ASTM C 94/C 94M requirements for production facilities and equipment.
1. Manufacturer certified according to NRMCA's "Certification of Ready Mixed Concrete Production Facilities."
C. Testing Agency Qualifications: An independent agency, acceptable to authorities having jurisdiction, qualified according to ASTM C 1077 and ASTM E 329 for testing indicated, as documented according to ASTM E 548.
1. Personnel conducting field tests shall be qualified as ACI Concrete Field Testing Technician, Grade 1, according to ACI CP-01 or an equivalent certification program.
2. Personnel performing laboratory tests shall be ACI-certified Concrete Strength Testing Technician and Concrete Laboratory Testing Technician - Grade I. Testing Agency laboratory supervisor shall be an ACI-certified Concrete Laboratory Testing Technician - Grade II.
D. Source Limitations: Obtain each type or class of cementitious material of the same brand from the same manufacturer's plant, obtain aggregate from one source, and obtain admixtures through one source from a single manufacturer.
BTBC Phase III October 26, 2020
GE Project No. 0119-0010
Gould Evans
CAST-IN-PLACE CONCRETE 033000 - 3
E. Welding: Qualify procedures and personnel according to AWS D1.4, "Structural Welding Code--Reinforcing Steel."
F. ACI Publications: Comply with the following unless modified by requirements in the Contract Documents:
1. ACI 301, "Specification for Structural Concrete." Sections 1 through 5 and Section 7 “Lightweight Concrete”.
2. ACI 117, "Specifications for Tolerances for Concrete Construction and Materials."
G. Concrete Testing Service: Engage a qualified independent testing agency to perform material evaluation tests and to design concrete mixtures.
H. Preinstallation Conference: Conduct conference at Project site to comply with requirements in Division 1 Section "Project Management and Coordination."
1. Before submitting design mixtures, review concrete design mixture and examine procedures for ensuring quality of concrete materials. Require representatives of each entity directly concerned with cast-in-place concrete to attend, including the following:
a. Contractor's superintendent. b. Independent testing agency responsible for concrete design mixtures. c. Ready-mix concrete manufacturer. d. Concrete subcontractor.
2. Review special inspection and testing and inspecting agency procedures for field quality control, concrete finishes and finishing, cold- and hot-weather concreting procedures, curing procedures, construction contraction and isolation joints, and joint-filler strips, semirigid joint fillers, forms and form removal limitations, vapor-retarder installation, anchor rod and anchorage device installation tolerances, steel reinforcement installation, floor and slab flatness and levelness measurement, concrete repair procedures, and concrete protection.
1.6 DELIVERY, STORAGE, AND HANDLING
A. Steel Reinforcement: Deliver, store, and handle steel reinforcement to prevent bending and damage.
B. Waterstops: Store waterstops under cover to protect from moisture, sunlight, dirt, oil, and other contaminants.
PART 2 - PRODUCTS
2.1 MANUFACTURERS
A. In other Part 2 articles where titles below introduce lists, the following requirements apply to product selection:
1. Available Products: Subject to compliance with requirements, products that may be incorporated into the Work include, but are not limited to, products specified.

BTBC Phase III October 26, 2020
GE Project No. 0119-0010
Gould Evans
CAST-IN-PLACE CONCRETE 033000 - 4
2. Products: Subject to compliance with requirements, provide one of the products specified.
3. Available Manufacturers: Subject to compliance with requirements, manufacturers offering products that may be incorporated into the Work include, but are not limited to, manufacturers specified.
4. Manufacturers: Subject to compliance with requirements, provide products by one of the manufacturers specified.
2.2 FORM-FACING MATERIALS
A. Smooth-Formed Finished Concrete: Form-facing panels that will provide continuous, true, and smooth concrete surfaces. Furnish in largest practicable sizes to minimize number of joints.
1. Plywood, metal, or other approved panel materials. 2. Exterior-grade plywood panels, suitable for concrete forms, complying with DOC PS 1.
B. Rough-Formed Finished Concrete: Plywood, lumber, metal, or another approved material. Provide lumber dressed on at least two edges and one side for tight fit.
C. Forms for Cylindrical Columns, Pedestals, and Supports: Metal, glass-fiber-reinforced plastic, paper, or fiber tubes that will produce surfaces with gradual or abrupt irregularities not exceeding specified formwork surface class. Provide units with sufficient wall thickness to resist plastic concrete loads without detrimental deformation.
D. Chamfer Strips: Wood, metal, PVC, or rubber strips, 3/4 by 3/4 inch (19 by 19 mm), minimum.
E. Rustication Strips: Wood, metal, PVC, or rubber strips, kerfed for ease of form removal.
F. Form-Release Agent: Commercially formulated form-release agent that will not bond with, stain, or adversely affect concrete surfaces and will not impair subsequent treatments of concrete surfaces.
1. Formulate form-release agent with rust inhibitor for steel form-facing materials.
G. Form Ties: Factory-fabricated, removable or snap-off metal or glass-fiber-reinforced plastic form ties designed to resist lateral pressure of fresh concrete on forms and to prevent spalling of concrete on removal.
1. Furnish units that will leave no corrodible metal closer than 1 inch (25 mm) to the plane of exposed concrete surface.
2. Furnish ties that, when removed, will leave holes no larger than 1 inch (25 mm) in diameter in concrete surface.
3. Furnish ties with integral water-barrier plates to walls indicated to receive dampproofing or waterproofing.
2.3 STEEL REINFORCEMENT
A. Reinforcing Bars: ASTM A 615/A 615M, Grade 60 (Grade 420), deformed.
B. Recycled Content of Steel Products: Postconsumer recycled content plus one-half of pre-consumer recycled content not less than 25 percent.

BTBC Phase III October 26, 2020
GE Project No. 0119-0010
Gould Evans
CAST-IN-PLACE CONCRETE 033000 - 5
C. Plain-Steel Wire: ASTM A 82, as drawn.
D. Plain-Steel Welded Wire Reinforcement: ASTM A 185, plain, fabricated from as-drawn steel wire into flat sheets.
E. Fiberglass Reinforcing Bars: Minimum tensile strength of 100ksi, a Barcol Hardness of 60 per ASTM D 2583, and 70% minimum glass fiber content by weight per ASTM D 2584.
2.4 REINFORCEMENT ACCESSORIES
A. Joint Dowel Bars: ASTM A 615/A 615M, Grade 60 (Grade 420), plain-steel bars, cut bars true to length with ends square and free of burrs.
B. Zinc Repair Material: ASTM A 780, zinc-based solder, paint containing zinc dust, or sprayed zinc.
C. Bar Supports: Bolsters, chairs, spacers, and other devices for spacing, supporting, and fastening reinforcing bars and welded wire reinforcement in place. Manufacture bar supports from steel wire, plastic, or precast concrete according to CRSI's "Manual of Standard Practice," of greater compressive strength than concrete and as follows:
1. For concrete surfaces exposed to view where legs of wire bar supports contact forms, use CRSI Class 1 plastic-protected steel wire or CRSI Class 2 stainless-steel bar supports.
2. For epoxy-coated reinforcement, use epoxy-coated or other dielectric-polymer-coated wire bar supports.
3. For zinc-coated reinforcement, use galvanized wire or dielectric-polymer-coated wire bar supports.
4. Support wire mesh using premanufactured metal systems designed to carry loads applied to them during concrete placement
2.5 CONCRETE MATERIALS
A. Cementitious Material: Use the following cementitious materials, of the same type, brand, and source, throughout Project:
1. Portland Cement: ASTM C 150, Type II, gray. Supplement with the following:
a. Fly Ash: ASTM C 618, Class F.
2. Blended Hydraulic Cement: ASTM C 595, Type IS, portland blast-furnace slag IP, portland-pozzolan I (PM), pozzolan-modified portland I (SM), slag-modified portland cement.
B. Normal-Weight Aggregates: ASTM C 33, Class 3M coarse aggregate or better, graded. Provide aggregates from a single source.
1. Maximum Coarse-Aggregate Size: 1 1/2 inch (25 mm), (¾" for slabs on grade or slabs on deck).
2. Fine Aggregate: Free of materials with deleterious reactivity to alkali in cement.
C. Lightweight Aggregate: ASTM C 330, 3/4-inch (19-mm) nominal maximum aggregate size.

BTBC Phase III October 26, 2020
GE Project No. 0119-0010
Gould Evans
CAST-IN-PLACE CONCRETE 033000 - 6
D. Water: ASTM C 94/C 94M and potable.
2.6 ADMIXTURES
A. Air-Entraining Admixture: ASTM C 260.
B. Chemical Admixtures: Provide admixtures certified by manufacturer to be compatible with other admixtures and that will not contribute water-soluble chloride ions exceeding those permitted in hardened concrete. Do not use calcium chloride or admixtures containing calcium chloride.
1. Water-Reducing Admixture: ASTM C 494/C 494M, Type A. 2. Retarding Admixture: ASTM C 494/C 494M, Type B. 3. Water-Reducing and Retarding Admixture: ASTM C 494/C 494M, Type D. 4. High-Range, Water-Reducing Admixture: ASTM C 494/C 494M, Type F. 5. High-Range, Water-Reducing and Retarding Admixture: ASTM C 494/C 494M, Type G. 6. Plasticizing and Retarding Admixture: ASTM C 1017/C 1017M, Type II.
C. Concrete Waterproofing Admixture: Provide Admixture per manufacturer’s recommended dosage rates to concrete mix designs for all interior slab slabs on grade and elevated decks (excluding roof top RTU slabs). Admixture shall comply with ASTM D-5084 or ASTM 4263.
1. Concure Systems. 2. Barrier One. 3. Vapor-Lock 20/20.
2.7 WATERSTOPS
A. Flexible Rubber Waterstops: CE CRD-C 513, for embedding in concrete to prevent passage of fluids through joints. Factory fabricate corners, intersections, and directional changes.
1. Manufacturers:
a. Greenstreak.
2. Profile: As indicated.
2.8 VAPOR RETARDERS
A. Plastic Vapor Retarder: ASTM E 1745, Class A, with a maximum permeance of 0.01 perms. Include manufacturer's recommended adhesive or pressure-sensitive tape.
1. Available Products: a. Stego Industries, LLC; Stego Wrap 15 mil installed in full compliance with
manufacturer’s requirements.
B. Granular Fill: Clean mixture of crushed stone or crushed or uncrushed gravel; ASTM D 448, Size 57, with 100 percent passing a 1-1/2-inch (37.5-mm) sieve and 0 to 5 percent passing a No. 8 (2.36-mm) sieve.

BTBC Phase III October 26, 2020
GE Project No. 0119-0010
Gould Evans
CAST-IN-PLACE CONCRETE 033000 - 7
C. Fine-Graded Granular Material: Clean mixture of crushed stone, crushed gravel, and manufactured or natural sand; ASTM D 448, Size 10, with 100 percent passing a 3/8-inch (9.5-mm) sieve, 10 to 30 percent passing a No. 100 (0.15-mm) sieve, and at least 5 percent passing No. 200 (0.075-mm) sieve; complying with deleterious substance limits of ASTM C 33 for fine aggregates.
2.9 CURING MATERIALS
A. Evaporation Retarder: Waterborne, monomolecular film forming, manufactured for application to fresh concrete.
1. Products:
a. Burke by Edoco; Titan Hard. b. ChemMasters; Chemisil Plus. c. ChemTec International; ChemTec One. d. Conspec Marketing & Manufacturing Co., Inc., a Dayton Superior Company;
Intraseal. e. Curecrete Distribution Inc.; Ashford Formula. f. Dayton Superior Corporation; Day-Chem Sure Hard. g. Euclid Chemical Company (The); Euco Diamond Hard. h. Kaufman Products, Inc.; SureHard. i. L&M Construction Chemicals, Inc.; Seal Hard. j. Meadows, W. R., Inc.; Liqui-Hard. k. Metalcrete Industries; Floorsaver. l. Nox-Crete Products Group, Kinsman Corporation; Duranox. m. Symons Corporation, a Dayton Superior Company; Buff Hard. n. US Mix Products Company; US Spec Industraseal. o. Vexcon Chemicals, Inc.; Vexcon StarSeal PS.
B. Absorptive Cover: AASHTO M 182, Class 2, burlap cloth made from jute or kenaf, weighing approximately 9 oz./sq. yd. (305 g/sq. m) when dry.
C. Moisture-Retaining Cover: ASTM C 171, polyethylene film or white burlap-polyethylene sheet.
D. Water: Potable.
E. Clear, Waterborne, Membrane-Forming Curing Compound: ASTM C 309, Type 1, Class B, dissipating.
1. Products:
a. Anti-Hydro International, Inc.; AH Curing Compound #2 DR WB. b. Burke by Edoco; Aqua Resin Cure. c. ChemMasters; Safe-Cure Clear. d. Conspec Marketing & Manufacturing Co., Inc., a Dayton Superior Company; W.B.
Resin Cure. e. Dayton Superior Corporation; Day Chem Rez Cure (J-11-W). f. Euclid Chemical Company (The); Kurez DR VOX. g. Kaufman Products, Inc.; Thinfilm 420. h. Lambert Corporation; Aqua Kure-Clear. i. L&M Construction Chemicals, Inc.; L&M Cure R.

BTBC Phase III October 26, 2020
GE Project No. 0119-0010
Gould Evans
CAST-IN-PLACE CONCRETE 033000 - 8
j. Meadows, W. R., Inc.; 1100 Clear. k. Nox-Crete Products Group, Kinsman Corporation; Resin Cure E. l. Symons Corporation, a Dayton Superior Company; Resi-Chem Clear Cure. m. Tamms Industries, Inc.; Horncure WB 30. n. Unitex; Hydro Cure 309. o. US Mix Products Company; US Spec Maxcure Resin Clear. p. Vexcon Chemicals, Inc.; Certi-Vex Enviocure 100.
F. Clear, Solvent-Borne, Membrane-Forming Curing and Sealing Compound: ASTM C 1315, Type 1, Class A.
1. Products:
a. Burke by Edoco; Cureseal 1315. b. ChemMasters; Spray-Cure & Seal Plus. c. Conspec Marketing & Manufacturing Co., Inc., a Dayton Superior Company;
Sealcure 1315. d. Dayton Superior Corporation; Day-Chem Cure and Seal (J-22UV). e. Euclid Chemical Company (The); Super Diamond Clear. f. Kaufman Products, Inc.; Sure Cure 25. g. Lambert Corporation; UV Super Seal. h. L&M Construction Chemicals, Inc.; Lumiseal Plus. i. Meadows, W. R., Inc.; CS-309/30. j. Metalcrete Industries; Seal N Kure 0. k. Sonneborn, Div. of ChemRex; Kure-N-Seal 5. l. Tamms Industries, Inc.; LusterSeal 300. m. Unitex; Solvent Seal 1315. n. US Mix Products Company; US Spec CS-25 o. Vexcon Chemicals, Inc.; Certi-Vex AC 1315
2.10 RELATED MATERIALS
A. Expansion- and Isolation-Joint-Filler Strips: ASTM D 1751, asphalt-saturated cellulosic fiber or ASTM D 1752, cork or self-expanding cork.
B. Semirigid Joint Filler: Two-component, semirigid, 100 percent solids, epoxy resin with a Type A shore durometer hardness of 80 per ASTM D 2240.
C. Bonding Agent: ASTM C 1059, Type II, non-redispersible, acrylic emulsion or styrene butadiene.
D. Epoxy Bonding Adhesive: ASTM C 881, two-component epoxy resin, capable of humid curing and bonding to damp surfaces, of class suitable for application temperature and of grade to suit requirements.
E. Reglets: Fabricate reglets of not less than 0.0217-inch- (0.55-mm-) thick, galvanized steel sheet. Temporarily fill or cover face opening of reglet to prevent intrusion of concrete or debris.
F. Dovetail Anchor Slots: Hot-dip galvanized steel sheet, not less than 0.0336 inch (0.85 mm) thick, with bent tab anchors. Temporarily fill or cover face opening of slots to prevent intrusion of concrete or debris.

BTBC Phase III October 26, 2020
GE Project No. 0119-0010
Gould Evans
CAST-IN-PLACE CONCRETE 033000 - 9
2.11 REPAIR MATERIALS
A. Repair Underlayment: Cement-based, polymer-modified, self-leveling product that can be applied in thicknesses from 1/8 inch (3.2 mm) and that can be feathered at edges to match adjacent floor elevations.
1. Cement Binder: ASTM C 150, portland cement or hydraulic or blended hydraulic cement as defined in ASTM C 219.
2. Primer: Product of underlayment manufacturer recommended for substrate, conditions, and application.
3. Aggregate: Well-graded, washed gravel, 1/8 to 1/4 inch (3.2 to 6 mm) or coarse sand as recommended by underlayment manufacturer.
4. Compressive Strength: Not less than 4100 psi (29 MPa) at 28 days when tested according to ASTM C 109/C 109M.
B. Repair Overlayment: Cement-based, polymer-modified, self-leveling product that can be applied in thicknesses from 1/8 inch (3.2 mm) and that can be feathered at edges to match adjacent floor elevations.
1. Cement Binder: ASTM C 150, portland cement or hydraulic or blended hydraulic cement as defined in ASTM C 219.
2. Primer: Product of topping manufacturer recommended for substrate, conditions, and application.
3. Aggregate: Well-graded, washed gravel, 1/8 to 1/4 inch (3.2 to 6 mm) or coarse sand as recommended by topping manufacturer.
4. Compressive Strength: Not less than 5000 psi (34.5 MPa) at 28 days when tested according to ASTM C 109/C 109M.
2.12 CONCRETE MIXTURES, GENERAL
A. Prepare design mixtures for each type and strength of concrete, proportioned on the basis of laboratory trial mixture or field test data, or both, according to ACI 301.
1. Use a qualified independent testing agency for preparing and reporting proposed mixture designs based on laboratory trial mixtures.
B. Cementitious Materials: Limit percentage, by weight, of cementitious materials other than portland cement in concrete as follows:
1. Fly Ash: 15 percent.
C. Limit water-soluble, chloride-ion content in hardened concrete to 0.15 percent by weight of cement.
D. Admixtures: Use admixtures according to manufacturer's written instructions.
1. Use water-reducing admixture in concrete, as required, for placement and workability. 2. Use water-reducing and retarding admixture when required by high temperatures, low
humidity, or other adverse placement conditions. 3. Use water-reducing admixture in pumped concrete, concrete for heavy-use industrial
slabs and parking structure slabs, concrete required to be watertight, and concrete with a water-cementitious materials ratio below 0.50.
4. Use corrosion-inhibiting admixture in concrete mixtures where indicated.

BTBC Phase III October 26, 2020
GE Project No. 0119-0010
Gould Evans
CAST-IN-PLACE CONCRETE 033000 - 10
2.13 CONCRETE MIXTURES FOR BUILDING ELEMENTS
A. Footings, Retaining Walls and Grade Beams: Proportion normal-weight concrete mixture as follows:
1. Minimum Compressive Strength: 3500 psi at 28 days. 2. Minimum Cementitious Materials Content: 500 lb/cu. yd. 3. Maximum Water-Cementitious Materials Ratio: 0.50. 4. Slump Limit: 5 inches (100 mm), plus or minus 1 inch (25 mm). 5. Air Content: Do not allow air content to exceed 3 percent at point of delivery for ¾" (18
mm) nominal maximum aggregate size.
B. Interior Slab-On Grade (use at all other areas not otherwise specified herein): Proportion normal-weight concrete mixture as follows:
1. Minimum Compressive Strength: 4000 psi at 28 days. 2. Minimum Cementitious Materials Content: 560 lb/cu. yd. 3. Maximum Water-Cementitious Materials Ratio: 0.46. 4. Slump Limit: 4 inches (100 mm), plus or minus 1 inch (25 mm). 5. Air Content: Do not allow air content to exceed 3 percent at point of delivery for ¾" (18
mm) nominal maximum aggregate size.
C. Slabs on Metal Deck: Proportion normal-weight concrete mixture as follows:
1. Minimum Compressive Strength: 4000 psi at 28 days. 2. Minimum Cementitious Materials Content: 560 lb/cu. yd. 3. Maximum Water-Cementitious Materials Ratio: 0.46. 4. Slump Limit: 4 inches (100 mm), plus or minus 1 inch (25 mm).
D. Exterior Slab on Grade: Proportion normal-weight concrete mixture as follows:
1. Minimum Compressive Strength: 4500 psi at 28 days. 2. Minimum Cementitious Materials Content: 560 lb/cu. yd. 3. Maximum Water-Cementitious Materials Ratio: 0.42. 4. Slump Limit: 4 inches (100 mm) plus or minus 1 inch (25 mm). 5. Air Content: 6% ± 1% at point of delivery for ¾" (18 mm) nominal maximum aggregate
size.
2.14 FABRICATING REINFORCEMENT
A. Fabricate steel reinforcement according to CRSI's "Manual of Standard Practice."
2.15 CONCRETE MIXING
A. Ready-Mixed Concrete: Measure, batch, mix, and deliver concrete according to ASTM C 94/C 94M, and furnish batch ticket information.
1. When air temperature is between 85 and 90 deg F (30 and 32 deg C), reduce mixing and delivery time from 1-1/2 hours to 75 minutes; when air temperature is above 90 deg F (32 deg C), reduce mixing and delivery time to 60 minutes.

BTBC Phase III October 26, 2020
GE Project No. 0119-0010
Gould Evans
CAST-IN-PLACE CONCRETE 033000 - 11
PART 3 - EXECUTION
3.1 General
A. General Contractor shall notify Owner’s Representative at least 24 hours in advance for mandatory review of the following:
1. Specification-mandated inspections of rebar placement or specialized formwork, prior to pouring concrete.
2. Code-required special inspections of rebar placement or specialized formwork, prior to pouring concrete.
3. Rebar tie-ins of exterior flatwork to all doors or other openings, or exterior stoops.
B. Failure of the General Contractor to secure inspection and approval for any of the above condi tions prior to pouring concrete is grounds for Owner to require installed material be removed for inspection and reinstalled at Contractor’s expense.
C. Isolate all slabs from exterior walls.
D. Sidewalk, and other similar site flatwork, edges/joints shall be tooled, broom finished and edges
re-tooled to a “picture-frame” finish.
E. Where there is existing flatwork, new work shall be finished similarly.
F. Contractor shall be responsible for rinse water run-off.
3.2 FORMWORK
A. Design, erect, shore, brace, and maintain formwork, according to ACI 301, to support vertical, lateral, static, and dynamic loads, and construction loads that might be applied, until structure can support such loads.
B. Construct formwork so concrete members and structures are of size, shape, alignment, elevation, and position indicated, within tolerance limits of ACI 117.
C. Limit concrete surface irregularities, designated by ACI 347R as abrupt or gradual, as follows:
1. Class B, 1/4 inch (6 mm) for rough-formed finished surfaces.
D. Construct forms tight enough to prevent loss of concrete mortar.
E. Fabricate forms for easy removal without hammering or prying against concrete surfaces. Provide crush or wrecking plates where stripping may damage cast concrete surfaces. Provide top forms for inclined surfaces steeper than 1.5 horizontal to 1 vertical.
1. Install keyways, reglets, recesses, and the like, for easy removal. 2. Do not use rust-stained steel form-facing material.

BTBC Phase III October 26, 2020
GE Project No. 0119-0010
Gould Evans
CAST-IN-PLACE CONCRETE 033000 - 12
F. Set edge forms, bulkheads, and intermediate screed strips for slabs to achieve required elevations and slopes in finished concrete surfaces. Provide and secure units to support screed strips; use strike-off templates or compacting-type screeds.
G. Provide temporary openings for cleanouts and inspection ports where interior area of formwork is inaccessible. Close openings with panels tightly fitted to forms and securely braced to prevent loss of concrete mortar. Locate temporary openings in forms at inconspicuous locations.
H. Form openings, chases, offsets, sinkages, keyways, reglets, blocking, screeds, and bulkheads required in the Work. Determine sizes and locations from trades providing such items.
I. Chamfer exterior corners and edges of permanently exposed concrete.
J. Form openings, chases, offsets, sinkages, keyways, reglets, blocking, screeds, and bulkheads required in the Work. Determine sizes and locations from trades providing such items.
K. Clean forms and adjacent surfaces to receive concrete. Remove chips, wood, sawdust, dirt, and other debris just before placing concrete.
L. Retighten forms and bracing before placing concrete, as required, to prevent mortar leaks and maintain proper alignment.
M. Coat contact surfaces of forms with form-release agent, according to manufacturer's written instructions, before placing reinforcement.
3.3 EMBEDDED ITEMS
A. Place and secure anchorage devices and other embedded items required for adjoining work that is attached to or supported by cast-in-place concrete. Use setting drawings, templates, diagrams, instructions, and directions furnished with items to be embedded.
1. Install anchor rods, accurately located, to elevations required and complying with tolerances in Section 7.5 of AISC's "Code of Standard Practice for Steel Buildings and Bridges."
2. Install reglets to receive waterproofing and to receive through-wall flashings in outer face of concrete frame at exterior walls, where flashing is shown at lintels, shelf angles, and other conditions.
3. Install dovetail anchor slots in concrete structures as indicated.
3.4 REMOVING AND REUSING FORMS
A. General: Formwork for sides of beams, walls, columns, and similar parts of the Work that does not support weight of concrete may be removed after cumulatively curing at not less than 50 deg F (10 deg C) for 24 hours after placing concrete, if concrete is hard enough to not be damaged by form-removal operations and curing and protection operations are maintained.
B. Clean and repair surfaces of forms to be reused in the Work. Split, frayed, delaminated, or otherwise damaged form-facing material will not be acceptable for exposed surfaces. Apply new form-release agent.

BTBC Phase III October 26, 2020
GE Project No. 0119-0010
Gould Evans
CAST-IN-PLACE CONCRETE 033000 - 13
C. When forms are reused, clean surfaces, remove fins and laitance, and tighten to close joints. Align and secure joints to avoid offsets. Do not use patched forms for exposed concrete surfaces unless approved by Architect.
3.5 VAPOR RETARDERS
A. Plastic Vapor Retarders: Place, protect, and repair vapor retarders according to ASTM E 1643 and manufacturer's written instructions.
1. Lap joints 6 inches (150 mm) and seal with manufacturer's recommended tape.
3.6 STEEL REINFORCEMENT
A. General: Comply with CRSI's "Manual of Standard Practice" for placing reinforcement.
1. Do not cut or puncture vapor retarder. Repair damage and reseal vapor retarder before placing concrete.
B. Clean reinforcement of loose rust and mill scale, earth, ice, and other foreign materials that would reduce bond to concrete.
C. Accurately position, support, and secure reinforcement against displacement. Locate and support reinforcement with bar supports to maintain minimum concrete cover. Do not tack weld crossing reinforcing bars.
D. Set wire ties with ends directed into concrete, not toward exposed concrete surfaces.
E. Install welded wire reinforcement in longest practicable lengths on bar supports spaced to minimize sagging. Lap edges and ends of adjoining sheets at least one mesh spacing. Offset laps of adjoining sheet widths to prevent continuous laps in either direction. Lace overlaps with wire.
3.7 JOINTS
A. General: Construct joints true to line with faces perpendicular to surface plane of concrete.
B. Construction Joints: Install so strength and appearance of concrete are not impaired, at locations indicated or as approved by Architect.
1. Place joints perpendicular to main reinforcement. Continue reinforcement across construction joints, unless otherwise indicated. Do not continue reinforcement through sides of strip placements of floors and slabs.
2. Form keyed joints as indicated. Embed keys at least 1-1/2 inches (38 mm) into concrete. 3. Locate joints for beams, slabs, joists, and girders in the middle third of spans. Offset
joints in girders a minimum distance of twice the beam width from a beam-girder intersection.
4. Locate horizontal joints in walls and columns at underside of floors, slabs, beams, and girders and at the top of footings or floor slabs.
5. Space vertical joints in walls as indicated. Locate joints beside piers integral with walls, near corners, and in concealed locations where possible.

BTBC Phase III October 26, 2020
GE Project No. 0119-0010
Gould Evans
CAST-IN-PLACE CONCRETE 033000 - 14
6. Use a bonding agent at locations where fresh concrete is placed against hardened or partially hardened concrete surfaces.
7. Use epoxy-bonding adhesive at locations where fresh concrete is placed against hardened or partially hardened concrete surfaces.
C. Contraction Joints in Slabs-on-Grade: Form weakened-plane contraction joints, sectioning concrete into areas as indicated. Construct contraction joints for a depth equal to at least one-third of concrete thickness as follows:
1. Grooved Joints: Form contraction joints after initial floating by grooving and finishing each edge of joint to a radius of 1/8 inch (3.2 mm). Repeat grooving of contraction joints after applying surface finishes. Eliminate groover tool marks on concrete surfaces.
2. Sawed Joints: Form contraction joints with power saws equipped with shatterproof abrasive or diamond-rimmed blades. Cut 1/8-inch- (3.2-mm-) wide joints into concrete when cutting action will not tear, abrade, or otherwise damage surface and before concrete develops random contraction cracks.
D. Isolation Joints in Slabs-on-Grade: After removing formwork, install joint-filler strips at slab junctions with vertical surfaces, such as column pedestals, foundation walls, grade beams, and other locations, as indicated.
1. Extend joint-filler strips full width and depth of joint, terminating flush with finished concrete surface, unless otherwise indicated.
2. Terminate full-width joint-filler strips not less than 1/2 inch (13 mm) or more than 1 inch (25 mm) below finished concrete surface where joint sealants, specified in Division 7 Section "Joint Sealants," are indicated.
3. Install joint-filler strips in lengths as long as practicable. Where more than one length is required, lace or clip sections together.
E. Doweled Joints: Install dowel bars and support assemblies at joints where indicated. Lubricate or asphalt coat one-half of dowel length to prevent concrete bonding to one side of joint.
3.8 WATERSTOPS
A. Flexible Waterstops: Install in construction joints and at other joints indicated to form a continuous diaphragm. Install in longest lengths practicable. Support and protect exposed waterstops during progress of the Work. Field fabricate joints in waterstops according to manufacturer's written instructions.
3.9 CONCRETE PLACEMENT
A. Before placing concrete, verify that installation of formwork, reinforcement, and embedded items is complete and that required inspections have been performed.
B. Do not add water to concrete during delivery, at Project site, or during placement unless approved by Architect.
C. Before test sampling and placing concrete, water may be added at Project site, subject to limitations of ACI 301.
1. Do not add water to concrete after adding high-range water-reducing admixtures to mixture.
BTBC Phase III October 26, 2020
GE Project No. 0119-0010
Gould Evans
CAST-IN-PLACE CONCRETE 033000 - 15
D. Deposit concrete continuously in one layer or in horizontal layers of such thickness that no new concrete will be placed on concrete that has hardened enough to cause seams or planes of weakness. If a section cannot be placed continuously, provide construction joints as indicated. Deposit concrete to avoid segregation.
1. Deposit concrete in horizontal layers of depth to not exceed formwork design pressures and in a manner to avoid inclined construction joints.
2. Consolidate placed concrete with mechanical vibrating equipment according to ACI 301. 3. Do not use vibrators to transport concrete inside forms. Insert and withdraw vibrators
vertically at uniformly spaced locations to rapidly penetrate placed layer and at least 6 inches (150 mm) into preceding layer. Do not insert vibrators into lower layers of concrete that have begun to lose plasticity. At each insertion, limit duration of vibration to time necessary to consolidate concrete and complete embedment of reinforcement and other embedded items without causing mixture constituents to segregate.
E. Deposit and consolidate concrete for floors and slabs in a continuous operation, within limits of construction joints, until placement of a panel or section is complete.
1. Consolidate concrete during placement operations so concrete is thoroughly worked around reinforcement and other embedded items and into corners.
2. Maintain reinforcement in position on chairs during concrete placement. 3. Screed slab surfaces with a straightedge and strike off to correct elevations. 4. Slope surfaces uniformly to drains where required. 5. Begin initial floating using bull floats or darbies to form a uniform and open-textured
surface plane, before excess bleedwater appears on the surface. Do not further disturb slab surfaces before starting finishing operations.
F. Cold-Weather Placement: Comply with ACI 306.1 and as follows. Protect concrete work from physical damage or reduced strength that could be caused by frost, freezing actions, or low temperatures.
1. When average high and low temperature is expected to fall below 40 deg F (4.4 deg C) for three successive days, maintain delivered concrete mixture temperature within the temperature range required by ACI 301.
2. Do not use frozen materials or materials containing ice or snow. Do not place concrete on frozen subgrade or on subgrade containing frozen materials.
3. Do not use calcium chloride, salt, or other materials containing antifreeze agents or chemical accelerators unless otherwise specified and approved in mixture designs.
G. Hot-Weather Placement: Comply with ACI 301 and as follows:
1. Maintain concrete temperature below 90 deg F (32 deg C) at time of placement. Chilled mixing water or chopped ice may be used to control temperature, provided water equivalent of ice is calculated to total amount of mixing water. Using liquid nitrogen to cool concrete is Contractor's option.
2. Fog-spray forms, steel reinforcement, and subgrade just before placing concrete. Keep subgrade uniformly moist without standing water, soft spots, or dry areas.
3.10 FINISHING FORMED SURFACES
A. Rough-Formed Finish: As-cast concrete texture imparted by form-facing material with tie holes and defects repaired and patched. Remove fins and other projections that exceed specified limits on formed-surface irregularities.

BTBC Phase III October 26, 2020
GE Project No. 0119-0010
Gould Evans
CAST-IN-PLACE CONCRETE 033000 - 16
1. Apply to concrete surfaces not exposed to public view.
B. Smooth-Formed Finish: As-cast concrete texture imparted by form-facing material, arranged in an orderly and symmetrical manner with a minimum of seams. Repair and patch tie holes and defects. Remove fins and other projections that exceed specified limits on formed-surface irregularities.
1. Apply to concrete surfaces exposed to public view.
C. Related Unformed Surfaces: At tops of walls, horizontal offsets, and similar unformed surfaces adjacent to formed surfaces, strike off smooth and finish with a texture matching adjacent formed surfaces. Continue final surface treatment of formed surfaces uniformly across adjacent unformed surfaces, unless otherwise indicated.
3.11 FINISHING FLOORS AND SLABS
A. General: Comply with ACI 302.1R recommendations for screeding, restraightening, and finishing operations for concrete surfaces. Do not wet concrete surfaces.
B. Float Finish: Consolidate surface with power-driven floats or by hand floating if area is small or inaccessible to power driven floats. Restraighten, cut down high spots, and fill low spots. Repeat float passes and restraightening until surface is left with a uniform, smooth, granular texture.
1. Apply float finish to surfaces to receive trowel finish.
C. Trowel Finish: After applying float finish, apply first troweling and consolidate concrete by hand or power-driven trowel. Continue troweling passes and restraighten until surface is free of trowel marks and uniform in texture and appearance. Grind smooth any surface defects that would telegraph through applied coatings or floor coverings.
1. Apply a trowel finish to surfaces exposed to view or to be covered with resilient flooring, carpet, ceramic or quarry tile set over a cleavage membrane, paint, or another thin-film-finish coating system.
2. Finish surfaces to the following tolerances according to ASTM E 1155, for a randomly trafficked floor surface:
a. Specified overall values of flatness, F(F) 25; and of levelness, F(L) 20; with minimum local values of flatness, F(F) 17; and levelness F(L) 15.
3. Finish and measure surface so gap at any point between concrete surface and an unleveled, freestanding, 10-foot- (3.05-m-) long straightedge resting on 2 high spots and placed anywhere on the surface does not exceed 1/4 inch (6 mm).
D. Trowel and Fine-Broom Finish: Apply a first trowel finish to surfaces indicated where ceramic or quarry tile is to be installed by either thickset or thin-set method. While concrete is still plastic, slightly scarify surface with a fine broom.
1. Comply with flatness and levelness tolerances for trowel finished floor surfaces.
E. Broom Finish: Apply a broom finish to exterior concrete platforms, steps, and ramps, and elsewhere as indicated.

BTBC Phase III October 26, 2020
GE Project No. 0119-0010
Gould Evans
CAST-IN-PLACE CONCRETE 033000 - 17
1. Immediately after float finishing, slightly roughen trafficked surface by brooming with fiber-bristle broom perpendicular to main traffic route. Coordinate required final finish with Architect before application.
3.12 MISCELLANEOUS CONCRETE ITEMS
A. Filling In: Fill in holes and openings left in concrete structures, unless otherwise indicated, after work of other trades is in place. Mix, place, and cure concrete, as specified, to blend with in-place construction. Provide other miscellaneous concrete filling indicated or required to complete the Work.
B. Curbs: Provide monolithic finish to interior curbs by stripping forms while concrete is still green and by steel-troweling surfaces to a hard, dense finish with corners, intersections, and terminations slightly rounded.
C. Equipment Bases and Foundations: Provide machine and equipment bases and foundations as shown on Drawings. Set anchor bolts for machines and equipment at correct elevations, complying with diagrams or templates from manufacturer furnishing machines and equipment.
D. Steel Pan Stairs: Provide concrete fill for steel pan stair treads, landings, and associated items. Cast-in inserts and accessories as shown on Drawings. Screed, tamp, and trowel-finish concrete surfaces.
3.13 CONCRETE PROTECTING AND CURING
A. General: Protect freshly placed concrete from premature drying and excessive cold or hot temperatures. Comply with ACI 306.1 for cold-weather protection and ACI 301 for hot-weather protection during curing.
B. Evaporation Retarder: Apply evaporation retarder to unformed concrete surfaces if hot, dry, or windy conditions cause moisture loss approaching 0.2 lb/sq. ft. x h (1 kg/sq. m x h) before and during finishing operations. Apply according to manufacturer's written instructions after placing, screeding, and bull floating or darbying concrete, but before float finishing.
C. Formed Surfaces: Cure formed concrete surfaces, including underside of beams, supported slabs, and other similar surfaces. If forms remain during curing period, moist cure after loosening forms. If removing forms before end of curing period, continue curing for the remainder of the curing period.
D. Unformed Surfaces: Begin curing immediately after finishing concrete. Cure unformed surfaces, including floors and slabs, concrete floor toppings, and other surfaces.
E. Cure concrete according to ACI 308.1, by one or a combination of the following methods:
1. Moisture Curing: Keep surfaces continuously moist for not less than seven days with the following materials:
a. Water. b. Continuous water-fog spray. c. Absorptive cover, water saturated, and kept continuously wet. Cover concrete
surfaces and edges with 12-inch (300-mm) lap over adjacent absorptive covers.

BTBC Phase III October 26, 2020
GE Project No. 0119-0010
Gould Evans
CAST-IN-PLACE CONCRETE 033000 - 18
2. Moisture-Retaining-Cover Curing: Cover concrete surfaces with moisture-retaining cover for curing concrete, placed in widest practicable width, with sides and ends lapped at least 12 inches (300 mm), and sealed by waterproof tape or adhesive. Cure for not less than seven days. Immediately repair any holes or tears during curing period using cover material and waterproof tape.
a. Moisture cure or use moisture-retaining covers to cure concrete surfaces to receive floor coverings.
b. Moisture cure or use moisture-retaining covers to cure concrete surfaces to receive penetrating liquid floor treatments.
c. Cure concrete surfaces to receive floor coverings with either a moisture-retaining cover or a curing compound that the manufacturer certifies will not interfere with bonding of floor covering used on Project.
3. Curing Compound: Apply uniformly in continuous operation by power spray or roller according to manufacturer's written instructions. Recoat areas subjected to heavy rainfall within three hours after initial application. Maintain continuity of coating and repair damage during curing period.
a. After curing period has elapsed, remove curing compound without damaging concrete surfaces by method recommended by curing compound manufacturer unless manufacturer certifies curing compound will not interfere with bonding of floor covering used on Project.
4. Curing and Sealing Compound: Apply uniformly to floors and slabs indicated in a continuous operation by power spray or roller according to manufacturer's written instructions. Recoat areas subjected to heavy rainfall within three hours after initial application. Repeat process 24 hours later and apply a second coat. Maintain continuity of coating and repair damage during curing period.
3.14 JOINT FILLING
A. Prepare, clean, and install joint filler according to manufacturer's written instructions.
1. Defer joint filling until concrete has aged at least one and six month(s). Do not fill joints until construction traffic has permanently ceased.
B. Remove dirt, debris, saw cuttings, curing compounds, and sealers from joints; leave contact faces of joint clean and dry.
C. Install semirigid joint filler full depth in saw-cut joints and at least 2 inches (50 mm) deep in formed joints. Overfill joint and trim joint filler flush with top of joint after hardening.
3.15 CONCRETE SURFACE REPAIRS
A. Defective Concrete: Repair and patch defective areas when approved by Architect. Remove and replace concrete that cannot be repaired and patched to Architect's approval.
B. Patching Mortar: Mix dry-pack patching mortar, consisting of one part portland cement to two and one-half parts fine aggregate passing a No. 16 (1.18-mm) sieve, using only enough water for handling and placing.

BTBC Phase III October 26, 2020
GE Project No. 0119-0010
Gould Evans
CAST-IN-PLACE CONCRETE 033000 - 19
C. Repairing Formed Surfaces: Surface defects include color and texture irregularities, cracks, spalls, air bubbles, honeycombs, rock pockets, fins and other projections on the surface, and stains and other discolorations that cannot be removed by cleaning.
1. Immediately after form removal, cut out honeycombs, rock pockets, and voids more than 1/2 inch (13 mm) in any dimension in solid concrete, but not less than 1 inch (25 mm) in depth. Make edges of cuts perpendicular to concrete surface. Clean, dampen with water, and brush-coat holes and voids with bonding agent. Fill and compact with patching mortar before bonding agent has dried. Fill form-tie voids with patching mortar or cone plugs secured in place with bonding agent.
2. Repair defects on surfaces exposed to view by blending white portland cement and standard portland cement so that, when dry, patching mortar will match surrounding color. Patch a test area at inconspicuous locations to verify mixture and color match before proceeding with patching. Compact mortar in place and strike off slightly higher than surrounding surface.
3. Repair defects on concealed formed surfaces that affect concrete's durability and structural performance as determined by Architect.
D. Repairing Unformed Surfaces: Test unformed surfaces, such as floors and slabs, for finish and verify surface tolerances specified for each surface. Correct low and high areas. Test surfaces sloped to drain for trueness of slope and smoothness; use a sloped template.
1. Repair finished surfaces containing defects. Surface defects include spalls, popouts, honeycombs, rock pockets, crazing and cracks in excess of 0.01 inch (0.25 mm) wide or that penetrate to reinforcement or completely through unreinforced sections regardless of width, and other objectionable conditions.
2. After concrete has cured at least 14 days, correct high areas by grinding. 3. Correct localized low areas during or immediately after completing surface finishing
operations by cutting out low areas and replacing with patching mortar. Finish repaired areas to blend into adjacent concrete.
4. Correct other low areas scheduled to receive floor coverings with a repair underlayment. Prepare, mix, and apply repair underlayment and primer according to manufacturer's written instructions to produce a smooth, uniform, plane, and level surface. Feather edges to match adjacent floor elevations.
5. Correct other low areas scheduled to remain exposed with a repair topping. Cut out low areas to ensure a minimum repair topping depth of 1/4 inch (6 mm) to match adjacent floor elevations. Prepare, mix, and apply repair topping and primer according to manufacturer's written instructions to produce a smooth, uniform, plane, and level surface.
6. Repair defective areas, except random cracks and single holes 1 inch (25 mm) or less in diameter, by cutting out and replacing with fresh concrete. Remove defective areas with clean, square cuts and expose steel reinforcement with at least a 3/4-inch (19-mm) clearance all around. Dampen concrete surfaces in contact with patching concrete and apply bonding agent. Mix patching concrete of same materials and mixture as original concrete except without coarse aggregate. Place, compact, and finish to blend with adjacent finished concrete. Cure in same manner as adjacent concrete.
7. Repair random cracks and single holes 1 inch (25 mm) or less in diameter with patching mortar. Groove top of cracks and cut out holes to sound concrete and clean off dust, dirt, and loose particles. Dampen cleaned concrete surfaces and apply bonding agent. Place patching mortar before bonding agent has dried. Compact patching mortar and finish to match adjacent concrete. Keep patched area continuously moist for at least 72 hours.
E. Perform structural repairs of concrete, subject to Architect's approval, using epoxy adhesive and patching mortar.

BTBC Phase III October 26, 2020
GE Project No. 0119-0010
Gould Evans
CAST-IN-PLACE CONCRETE 033000 - 20
F. Repair materials and installation not specified above may be used, subject to Architect's approval.
3.16 FIELD QUALITY CONTROL
A. Testing and Inspecting: Property Owner will engage a special inspector and qualified testing and inspecting agency to perform field tests and inspections and prepare test reports.
B. Inspections:
1. Steel reinforcement placement. 2. Headed bolts and studs. 3. Concrete placement, including conveying and depositing.
C. Concrete Tests: Testing of composite samples of fresh concrete obtained according to ASTM C 172 shall be performed according to the following requirements:
1. Testing Frequency: Obtain one composite sample for each day's pour of each concrete mixture exceeding 5 cu. yd. (4 cu. m), but less than 25 cu. yd. (19 cu. m), plus one set for each additional 50 cu. yd. (38 cu. m) or fraction thereof.
2. Slump: ASTM C 143/C 143M; one test at point of placement for each composite sample, but not less than one test for each day's pour of each concrete mixture. Perform additional tests when concrete consistency appears to change.
3. Air Content: ASTM C 231, pressure method, for normal-weight concrete; one test for each composite sample, but not less than one test for each day's pour of each concrete mixture.
4. Concrete Temperature: ASTM C 1064/C 1064M; one test hourly when air temperature is 40 deg F (4.4 deg C) and below and when 80 deg F (27 deg C) and above, and one test for each composite sample.
5. Unit Weight: ASTM C 567, fresh unit weight of structural lightweight concrete; one test for each composite sample, but not less than one test for each day's pour of each concrete mixture.
6. Compression Test Specimens: ASTM C 31/C 31M.
a. Cast and laboratory cure one set of two standard cylinder specimens for each composite sample.
b. Cast and field cure two sets of two plus one additional standard cylinder specimens for each composite sample.
7. Compressive-Strength Tests: ASTM C 39/C 39M; test one set of two laboratory-cured specimens at 28 days.
a. Test one set of two field-cured specimens at 7 days and hold the one remaining field cured cylinder for future testing if required by the EOR.
b. A compressive-strength test shall be the average compressive strength from a set of two specimens obtained from same composite sample and tested at age indicated.
8. When strength of field-cured cylinders is less than 85 percent of companion laboratory-cured cylinders, Contractor shall evaluate operations and provide corrective procedures for protecting and curing in-place concrete.
9. Strength of each concrete mixture will be satisfactory if every average of any three consecutive compressive-strength tests equals or exceeds specified compressive

BTBC Phase III October 26, 2020
GE Project No. 0119-0010
Gould Evans
CAST-IN-PLACE CONCRETE 033000 - 21
strength and no compressive-strength test value falls below specified compressive strength by more than 500 psi (3.4 MPa).
10. Test results shall be reported in writing to Architect, concrete manufacturer, and Contractor within 48 hours of testing. Reports of compressive-strength tests shall contain Project identification name and number, date of concrete placement, name of concrete testing and inspecting agency, location of concrete batch in Work, design compressive strength at 28 days, concrete mixture proportions and materials, compressive breaking strength, and type of break for both 7- and 28-day tests.
11. Nondestructive Testing: Impact hammer, sonoscope, or other nondestructive device may be permitted by Architect but will not be used as sole basis for approval or rejection of concrete.
12. Additional Tests: Testing and inspecting agency shall make additional tests of concrete when test results indicate that slump, air entrainment, compressive strengths, or other requirements have not been met, as directed by Architect. Testing and inspecting agency may conduct tests to determine adequacy of concrete by cored cylinders complying with ASTM C 42/C 42M or by other methods as directed by Architect.
13. Additional testing and inspecting, at Contractor's expense, will be performed to determine compliance of replaced or additional work with specified requirements.
14. Correct deficiencies in the Work that test reports and inspections indicate dos not comply with the Contract Documents.
D. Measure floor and slab flatness and levelness according to ASTM E 1155 (ASTM E 1155M) within 24 hours of finishing.
END OF SECTION 033000


BTBC Phase III October 26, 2020
GE Project No. 0119-0010
Gould Evans
POLISHED CONCRETE FINISHING 033543 - 1
SECTION 033543 - POLISHED CONCRETE FINISHING
PART 1 - GENERAL
1.1 RELATED DOCUMENTS
A. Drawings and general provisions of the Contract, including General and Supplementary
Conditions and Division 01 Specification Sections, apply to this Section.
1.2 SUMMARY
A. Section Includes:
1. Polished concrete finishing[, including staining] [and scoring].
2. Concrete for polished concrete, including concrete materials, mixture design, placement
procedures, initial finishing, and curing is specified in Section 033000 "Cast-in-Place
Concrete."
B. Related Requirements:
1. Section 033000 "Cast-in-Place Concrete" for concrete not designated as polished
concrete.
1.3 DEFINITIONS
A. Design Reference Sample: Sample designated by Architect in the Contract Documents that
reflects acceptable surface quality and appearance of polished concrete.
1.4 PREINSTALLATION MEETINGS
A. Preinstallation Conference: Conduct conference at Project site
1. Before submitting design mixtures, review concrete design mixture and examine
procedures for ensuring quality of concrete materials. Require representatives of each
entity directly concerned with polished concrete to attend, including the following:
a. Contractor's superintendent.
b. Independent testing agency responsible for concrete design mixtures.
c. Ready-mix concrete manufacturer.
d. Cast-in-place concrete subcontractor.
e. Polished concrete finishing Subcontractor.
2. Review cold- and hot-weather concreting procedures, curing procedures, construction
joints, concrete repair procedures, concrete finishing, and protection of polished concrete.

BTBC Phase III October 26, 2020
GE Project No. 0119-0010
Gould Evans
POLISHED CONCRETE FINISHING 033543 - 2
1.5 ACTION SUBMITTALS
A. Product Data: For each type of product.
B. Polishing Schedule: Submit plan showing polished concrete surfaces and schedule of polishing
operations for each area of polished concrete before start of polishing operations. Include
locations of all joints, including construction joints.
C. Samples for Initial Selection: For each type of product requiring color selection.
D. Samples for Verification: For each type of exposed color.
1.6 INFORMATIONAL SUBMITTALS
A. Qualification Data: For Installer.
B. Material Certificates: For each of the following, signed by manufacturers:
1. Repair materials.
2. Stain materials.
3. Liquid floor treatments.
1.7 QUALITY ASSURANCE
A. Field Sample Panels: After approval of verification sample and before casting concrete, produce
field sample panels to demonstrate the approved range of selections made under Sample
submittals. Produce a minimum of three sets of full-scale panels, approximately 48 by 48 inches
(1200 by 1200 mm) minimum, to demonstrate the expected range of finish, color, and
appearance variations.
1. Locate panels as indicated or, if not indicated, as directed by Architect.
2. Maintain field sample panels during construction in an undisturbed condition as a
standard for judging the completed Work.
3. Demolish and remove field sample panels when directed.
B. Mockups: Before casting concrete, build mockups to verify selections made under Sample
submittals and to demonstrate typical joints, surface finish, tolerances, and standard of
workmanship. Build mockups to comply with the following requirements, using materials
indicated for the completed Work:
1. Build mockups in the location and of the size indicated or, if not indicated, as directed by
Architect.
2. Demonstrate curing, finishing, and protecting of polished concrete.
3. Subject to compliance with requirements, approved mockups may become part of the
completed Work if undisturbed at time of Substantial Completion.

BTBC Phase III October 26, 2020
GE Project No. 0119-0010
Gould Evans
POLISHED CONCRETE FINISHING 033543 - 3
1.8 FIELD CONDITIONS
A. Traffic Control: Maintain access for vehicular and pedestrian traffic as required for other
construction activities.
PART 2 - PRODUCTS
2.1 STAIN MATERIALS
A. Reactive Stain: Acidic-based stain with wetting agents and high-grade, UV-stable metallic salts
that react with calcium hydroxide in cured concrete to produce permanent, variegated, or
translucent color effects.
1. <Double click here to find, evaluate, and insert list of manufacturers and products.>
2. <Double click to insert sustainable design text for floor treatment products.>
B. Penetrating Stain: Water-based, acrylic latex, penetrating stain with colorfast pigments.
1. <Double click here to find, evaluate, and insert list of manufacturers and products.>
2. <Double click to insert sustainable design text for floor treatment products.>
2.2 LIQUID FLOOR TREATMENTS
A. Penetrating Liquid Floor Treatments for Polished Concrete Finish: Clear, waterborne solution of
inorganic silicate or siliconate materials and proprietary components; odorless; that penetrates,
hardens, and is suitable for polished concrete surfaces.
1. <Double click here to find, evaluate, and insert list of manufacturers and products.>
2. <Double click to insert sustainable design text for floor treatment products.>
PART 3 - EXECUTION
3.1 POLISHING
A. Polish: [Level 1: Matte finish, 100 grit] [Level 2: Low sheen, 400 grit] [Level 3: High sheen,
800 grit] [Level 4: Gloss shine, 3000 grit] [Match design reference sample].
B. Apply polished concrete finish system to cured and prepared slabs to match accepted mockup.
1. Machine grind floor surfaces to receive polished finishes level and smooth [and to depth
required to reveal aggregate to match approved mockup].
2. Apply reactive stain for polished concrete in polishing sequence and according to
manufacturer's written instructions.
3. Apply penetrating liquid floor treatment for polished concrete in polishing sequence and
according to manufacturer's written instructions, allowing recommended drying time
between successive coats.

BTBC Phase III October 26, 2020
GE Project No. 0119-0010
Gould Evans
POLISHED CONCRETE FINISHING 033543 - 4
4. Apply penetrating stain for polished concrete in polishing sequence and according to
manufacturer's written instructions.
5. Continue polishing with progressively finer-grit diamond polishing pads to gloss level, to
match approved mockup.
6. Control and dispose of waste products produced by grinding and polishing operations.
7. Neutralize and clean polished floor surfaces.
3.2 STAINING
A. Newly placed concrete shall be at least [14] [30] <Insert number> days old before staining.
B. Prepare surfaces according to manufacturer's written instructions and as follows:
1. Clean concrete thoroughly by scraping, applying solvents or stripping agents, sweeping
and pressure washing, or scrubbing with a rotary floor machine and detergents
recommended by stain manufacturer. Rinse until water is clear and allow surface to dry.
a. Do not use acidic solutions to clean surfaces.
2. Test surfaces with droplets of water. If water beads and does not penetrate surface, or
penetrates only in some areas, profile surfaces by [acid etching] [grinding, sanding, or
abrasive blasting]. Retest and continue profiling surface until water droplets
immediately darken and uniformly penetrate concrete surfaces.
3. Apply acidic solution to dampened concrete surfaces, scrubbing with uncolored, acid-
resistant nylon-bristle brushes until bubbling stops and concrete surface has texture of
120-grit sandpaper. Do not allow solution to dry on concrete surfaces. Rinse until water is
clear. Control, collect, and legally dispose of runoff.
4. Neutralize concrete surfaces and rinse until water is clear. Test surface for residue with
clean white cloth. Test surface according to ASTM F710 to ensure pH is between [7 and
8] <Insert values>.
C. Scoring: Score decorative jointing in concrete surfaces 1/16 inch (1.6 mm) deep with diamond
blades to match pattern indicated. Rinse until water is clear. Score [after] [before] staining.
1. Joint Width: [3/8 inch (10 mm)] <Insert dimension>.
D. Allow concrete surface to dry before applying stain. Verify readiness of concrete to receive
stain according to ASTM D4263 by tightly taping 18-by-18-inch (450-by-450-mm), 4-mil- (0.1-
mm-) thick polyethylene sheet to a representative area of concrete surface. Apply stain only if
no evidence of moisture has accumulated under sheet after 16 hours.
E. Reactive Stain: Apply reactive stain to concrete surfaces according to manufacturer's written
instructions and as follows:
1. Apply stain by uncolored bristle brush, roller, or high-volume, low-pressure sprayer and
immediately scrub into concrete surface with uncolored, acid-resistant nylon-bristle
brushes in continuous, circular motion. Do not spread stain after fizzing stops. Allow to
dry four hours and repeat application of stain in sufficient quantity to obtain color
consistent with approved mockup.

BTBC Phase III October 26, 2020
GE Project No. 0119-0010
Gould Evans
POLISHED CONCRETE FINISHING 033543 - 5
2. Remove stain residue after four hours by wet scrubbing with commercial-grade detergent
recommended by stain manufacturer. Rinse until water is clear. Control, collect, and
legally dispose of runoff.
F. Penetrating Stain: Apply penetrating stain to concrete surfaces according to manufacturer's
written instructions and as follows:
1. Apply first coat of stain to dry, clean surfaces by airless sprayer or by high-volume, low-
pressure sprayer.
2. Allow to dry four hours and repeat application of stain in sufficient quantity to obtain
color consistent with approved mockup.
3. Rinse until water is clear. Control, collect, and legally dispose of runoff.
END OF SECTION 033543


BTBC Phase III October 26, 2020
GE Project No. 0119-0010
Gould Evans
PRECAST ARCHITECTURAL CONCRETE 034500 - 1
SECTION 034500 - PRECAST ARCHITECTURAL CONCRETE
PART 1 - GENERAL
1.1 RELATED DOCUMENTS
A. Drawings and general provisions of the Contract, including General and Supplementary Conditions and
Division 01 Specification Sections, apply to this Section.
1.2 SUMMARY
A. Section Includes:
1. Non-insulated, Architectural precast concrete cladding units.
B. Related Requirements:
1. Section 033000 "Cast-in-Place Concrete" for installing connection anchors in concrete.
2. Section 051200 "Structural Steel Framing" for furnishing and installing connections attached to
structural-steel framing.
3. Section 055000 "Metal Fabrications" for kickers and other miscellaneous steel shapes.
1.3 DEFINITIONS
A. Design Reference Sample: Sample of approved architectural precast concrete color, finish and texture,
preapproved by Architect.
1.4 PREINSTALLATION MEETINGS
A. Preinstallation Conference: Conduct conference at Project site.
1.5 ACTION SUBMITTALS
A. Product Data: For each type of product.
B. Sustainable Design Submittals:
1. <Double click to insert sustainable design text for recycled content.>
2. <Double click to insert sustainable design text for regional materials.>
C. Design Mixtures: For each precast concrete mixture. Include compressive strength and water-absorption
tests.
D. Shop Drawings:

BTBC Phase III October 26, 2020
GE Project No. 0119-0010
Gould Evans
PRECAST ARCHITECTURAL CONCRETE 034500 - 2
1. Detail fabrication and installation of architectural precast concrete units.
2. Indicate locations, plans, elevations, dimensions, shapes, and cross sections of each unit.
3. Indicate joints, reveals, drips, chamfers, and extent and location of each surface finish.
4. Indicate details at building corners.
5. Indicate separate face and backup mixture locations and thicknesses.
6. Indicate type, size, and length of welded connections by AWS standard symbols. Detail loose and
cast-in hardware and connections.
7. Indicate locations, tolerances, and details of anchorage devices to be embedded in or attached to
structure or other construction.
8. Indicate locations, extent, and treatment of dry joints if two-stage casting is proposed.
9. Include plans and elevations showing unit location and sequence of erection for special conditions.
10. Indicate location of each architectural precast concrete unit by same identification mark placed on
panel.
11. Indicate relationship of architectural precast concrete units to adjacent materials.
12. Indicate locations, dimensions, and details of anchors, and joint widths.
13. If design modifications are proposed to meet performance requirements and field conditions,
submit design calculations and Shop Drawings. Do not adversely affect the appearance, durability,
or strength of units when modifying details or materials and maintain the general design concept.
E. Samples: Design reference samples for initial verification of design intent, for each type of finish
indicated on exposed surfaces of architectural precast concrete units, in sets of three, representative of
finish, color, and texture variations expected; approximately 12 by 12 by 2 inches (300 by 300 by 50
mm).
1. When other faces of precast concrete unit are exposed, include Samples illustrating workmanship,
color, and texture of backup concrete as well as facing concrete.
2. Samples for each thin-brick unit required, showing full range of color and texture expected.
Include Sample showing color and texture of joint treatment.
a. Grout Samples for Initial Selection: Color charts consisting of actual sections of grout
showing manufacturer's full range of colors.
b. Grout Samples for Verification: Showing color and texture of joint treatment.
F. Delegated-Design Submittal: For architectural precast concrete indicated to comply with performance
requirements and design criteria, including analysis data signed and sealed by the qualified professional
engineer responsible for their preparation.
1. Show governing panel types, connections, types of reinforcement, including special reinforcement,
and concrete cover on reinforcement. Indicate location, type, magnitude, and direction of loads
imposed on the building structural frame from architectural precast concrete.
1.6 INFORMATIONAL SUBMITTALS
A. Qualification Data: For Installer, fabricator and testing agency.
B. Welding certificates.
C. Material Certificates: For the following items:
1. Cementitious materials.
2. Reinforcing materials and prestressing tendons.
3. Admixtures.
4. Bearing pads.
5. Structural-steel shapes and hollow structural sections.

BTBC Phase III October 26, 2020
GE Project No. 0119-0010
Gould Evans
PRECAST ARCHITECTURAL CONCRETE 034500 - 3
6. Thin-brick units and accessories.
7. Stone anchors.
8. Insulation.
D. Material Test Reports: For aggregates.
E. Preconstruction test reports.
F. Source quality-control test reports.
G. Field quality-control and special inspection reports.
1.7 QUALITY ASSURANCE
A. Installer Qualifications: A precast concrete erector qualified and designated by PCI's Certificate of
Compliance to erect Category S2 (Complex Structural Systems) for load-bearing members.
B. Installer Qualifications: A precast concrete erector who has retained a "PCI-Certified Field Auditor" to
conduct a field audit of a project in same category as this Project and who can produce an Erectors' Post-
Audit Declaration.
C. Fabricator Qualifications: A firm that assumes responsibility for engineering architectural precast
concrete units to comply with performance requirements. This responsibility includes preparation of Shop
Drawings and comprehensive engineering analysis by a qualified professional engineer.
1. Designated as a PCI-certified plant for Group A, Category A1 - Architectural Cladding and Load
Bearing Units at time of bidding or designated as an APA-certified plant for production of
architectural precast concrete products.
D. Testing Agency Qualifications: An independent testing agency, acceptable to authorities having
jurisdiction, qualified according to ASTM C1077 and ASTM E329 for testing indicated.
E. Quality-Control Standard: For manufacturing procedures and testing requirements, quality-control
recommendations, and dimensional tolerances for types of units required, comply with PCI MNL 117,
"Manual for Quality Control for Plants and Production of Architectural Precast Concrete Products."
F. Welding Qualifications: Qualify procedures and personnel according to AWS D1.1/D.1.1M, "Structural
Welding Code - Steel"; and AWS D1.4/D1.4M, "Structural Welding Code - Reinforcing Steel."
G. Sample Panels: After sample approval and before fabricating architectural precast concrete units, produce
a minimum of two sample panels approximately 16 sq. ft. (1.5 sq. m) in area for review by Architect.
Incorporate full-scale details of architectural features, finishes, textures, and transitions in sample panels.
1. Locate panels where indicated or, if not indicated, as directed by Architect.
2. Damage part of an exposed-face surface for each finish, color, and texture, and demonstrate
adequacy of repair techniques proposed for repair of surface blemishes.
3. After acceptance of repair technique, maintain one sample panel at manufacturer's plant and one at
Project site in an undisturbed condition as a standard for judging the completed Work.
4. Demolish and remove sample panels when directed.
H. Range Samples: After sample panel approval and before fabricating architectural precast concrete units,
produce a minimum of three sets of samples, approximately 16 sq. ft. (1.5 sq. m) in area, representing

BTBC Phase III October 26, 2020
GE Project No. 0119-0010
Gould Evans
PRECAST ARCHITECTURAL CONCRETE 034500 - 4
anticipated range of each color and texture on Project's units. Maintain one set of range samples at Project
site and remaining range sample sets at manufacturer's plant as color and texture approval reference.
I. Mockups: After sample panel and range sample approval but before production of architectural precast
concrete units, construct full-sized mockups to verify selections made under Sample submittals and to
demonstrate aesthetic effects and to set quality standards for materials and execution.
1. Build mockup as indicated on Drawings including aluminum framing, glass, sealants, and
architectural precast concrete complete with anchors, connections, flashings, and joint fillers.
2. Approval of mockups does not constitute approval of deviations from the Contract Documents
contained in mockups unless Architect specifically approves such deviations in writing.
3. Subject to compliance with requirements, approved mockups may become part of the completed
Work if undamaged at time of Substantial Completion.
J. Preconstruction Testing Mockup: Provide a full-size mockup of architectural precast concrete indicated
on Drawings for preconstruction testing.
1. Build preconstruction testing mockup as indicated on Drawings including aluminum framing,
glass, sealants, and architectural precast concrete complete with anchors, connections, flashings,
and joint fillers.
2. Build preconstruction testing mockup at testing agency facility.
1.8 PRECONSTRUCTION TESTING
A. Preconstruction Stone Anchor Testing: Engage a qualified testing agency to perform preconstruction
testing according to ASTM C1354/C1354M or ASTM E488, modified as follows:
1. Furnish test specimens, including stone anchors, that are representative of materials proposed for
incorporation into the Work.
2. Anchorage Tests: Test 12 inches (300 mm) square samples for each combination of stone variety,
orientation of cut, finish, and anchor type proposed for use on Project. Test for shear and tensile
strength of anchorage system.
1.9 COORDINATION
A. Furnish loose connection hardware and anchorage items to be embedded in or attached to other
construction without delaying the Work. Provide locations, setting diagrams, templates, instructions, and
directions, as required, for installation.
1.10 DELIVERY, STORAGE, AND HANDLING
A. Deliver architectural precast concrete units in such quantities and at such times to limit unloading units
temporarily on the ground or other rehandling.
B. Support units during shipment on nonstaining shock-absorbing material.
C. Store units with adequate dunnage and bracing and protect units to prevent contact with soil, to prevent
staining, and to prevent cracking, distortion, warping or other physical damage.
D. Place stored units so identification marks are clearly visible, and units can be inspected.
BTBC Phase III October 26, 2020
GE Project No. 0119-0010
Gould Evans
PRECAST ARCHITECTURAL CONCRETE 034500 - 5
E. Handle and transport units in a manner that avoids excessive stresses that cause cracking or damage.
F. Lift and support units only at designated points indicated on Shop Drawings.
PART 2 - PRODUCTS
2.1 MANUFACTURERS
A. Fabricators: Subject to compliance with requirements, provide products by one of the following:
1. Coreslab Structures
2. Enterprise Precast Concrete
3. Omega Concrete
2.2 PERFORMANCE REQUIREMENTS
A. Delegated Design: Engage a qualified professional engineer, as defined in Section 014000 "Quality
Requirements," to design architectural precast concrete units.
B. Design Standards: Comply with ACI 318 (ACI 318M) and design recommendations of PCI MNL 120,
"PCI Design Handbook - Precast and Prestressed Concrete," applicable to types of architectural precast
concrete units indicated.
C. Calculated Fire-Test-Response Characteristics: Provide architectural precast concrete units with fire-
resistance rating indicated as calculated according to ACI 216.1 (ACI 216.1M) and PCI MNL 124,
"Design for Fire Resistance of Precast Prestressed Concrete," and acceptable to authorities having
jurisdiction.
D. Structural Performance: Provide architectural precast concrete units and connections capable of
withstanding the following design loads within limits and under conditions indicated:
1. Loads: As indicated.
2. Dead Loads: as indicated on drawings.
3. Live Loads: as indicated on drawings.
4. Wind Loads: As indicated on drawings
5. Seismic Loads: as indicated on drawings.
6. Project-Specific Loads: as indicated on drawings.
7. Design precast concrete units and connections to maintain clearances at openings, to allow for
fabrication and construction tolerances, to accommodate live-load deflection, shrinkage and creep
of primary building structure, and other building movements as follows:
a. Upward and downward movement of 1/2 inch (13 mm).
8. Thermal Movements: Provide for in-plane thermal movements resulting from annual ambient
temperature changes of 80 deg F (26 deg C).
9. Fire-Resistance Rating: Select material and minimum thicknesses to provide [1] [2] <Insert
number>-hour fire rating.

BTBC Phase III October 26, 2020
GE Project No. 0119-0010
Gould Evans
PRECAST ARCHITECTURAL CONCRETE 034500 - 6
2.3 MOLD AND FORMLINER MATERIALS
A. Molds: Rigid, dimensionally stable, non-absorptive material, warp and buckle free, that provides
continuous and true precast concrete surfaces within fabrication tolerances indicated; nonreactive with
concrete and suitable for producing required finishes.
1. Elastomeric Urethane Extended-use Formliner: Subject to compliance with requirements, products
that may be incorporated into the Work include, but are not limited to, products specified.
a. Fitzgerald Formliners, Pattern 16938
2. Mold-Release Agent: Commercially produced form-release agent that does not bond with, stain or
adversely affect precast concrete surfaces and does not impair subsequent surface or joint
treatments of precast concrete.
B. Surface Retarder: Chemical set retarder, capable of temporarily delaying final hardening of newly placed
concrete mixture to depth of reveal specified.
2.4 REINFORCING MATERIALS
A. <Double click to insert sustainable design text for recycled content of steel products.>
B. Reinforcing Bars: ASTM A615/A615M, Grade 60 (Grade 420), deformed.
C. Low-Alloy-Steel Reinforcing Bars: ASTM A706/A706M, deformed.
D. Galvanized Reinforcing Bars: ASTM A615/A615M, Grade 60 (Grade 420) ASTM A706/A706M,
deformed bars, with ASTM A767/A767M, Class II zinc coating and chromate treatment. Galvanize after
fabrication and bending.
E. Epoxy-Coated Reinforcing Bars: ASTM A615/A615M, Grade 60 (Grade 420) ASTM A706/A706M,
deformed bars, ASTM A775/A775M or ASTM A934/A934M epoxy coated.
F. Steel Bar Mats: ASTM A184/A184M, fabricated from ASTM A615/A615M, Grade 60 (Grade 420)
ASTM A706/A706M, deformed bars, assembled with clips.
G. Plain-Steel Welded Wire Reinforcement: ASTM A185/A185M, fabricated from galvanized-steel wire
into flat sheets.
H. Deformed-Steel Welded Wire Reinforcement: ASTM A497/A497M, flat sheet.
I. Epoxy-Coated-Steel Wire: ASTM A884/A884M, Class A coated, plain, flat sheet, Type 1 bendable
coating.
J. Supports: Suspend reinforcement from back of mold or use bolsters, chairs, spacers, and other devices for
spacing, supporting, and fastening reinforcing bars and welded wire reinforcement in place according to
PCI MNL 117.
2.5 PRESTRESSING TENDONS
A. Prestressing Strand: ASTM A416/A416M, Grade 270 (Grade 1860), uncoated, seven-wire, low-
relaxation strand.

BTBC Phase III October 26, 2020
GE Project No. 0119-0010
Gould Evans
PRECAST ARCHITECTURAL CONCRETE 034500 - 7
1. Coat unbonded post-tensioning strand with post-tensioning coating complying with ACI 423.7 and
sheath with polypropylene tendon sheathing complying with ACI 423.7. Include anchorage
devices and coupler assemblies.
2.6 CONCRETE MATERIALS
A. <Double click to insert sustainable design text for regional materials (concrete).>
B. Portland Cement: ASTM C150/C150M, Type I or Type III, gray, unless otherwise indicated.
1. For surfaces exposed to view in finished structure, use gray or white cement, of same type, brand,
and mill source.
C. Supplementary Cementitious Materials:
1. Fly Ash: ASTM C618, Class C or F, with maximum loss on ignition of 3 percent.
2. Metakaolin: ASTM C618, Class N.
3. Silica Fume: ASTM C1240, with optional chemical and physical requirement.
4. Ground Granulated Blast-Furnace Slag: ASTM C989, Grade 100 or 120.
5. Blended Hydraulic Cement: ASTM C595, Type IS, portland blast-furnace slag cement.
D. Normal-Weight Aggregates: Except as modified by PCI MNL 117, ASTM C33/C33M, with coarse
aggregates complying with Class 5S. Stockpile fine and coarse aggregates for each type of exposed finish
from a single source (pit or quarry) for Project.
1. Face-Mixture-Coarse Aggregates: Selected, hard, and durable; free of material that reacts with
cement or causes staining; to match selected finish sample.
a. Gradation: To match design reference sample.
2. Face-Mixture-Fine Aggregates: Selected, natural or manufactured sand compatible with coarse
aggregate; to match approved finish sample.
E. Lightweight Aggregates: Except as modified by PCI MNL 117, ASTM C330/C330M, with absorption
less than 11 percent.
F. Water: Potable; free from deleterious material that may affect color stability, setting, or strength of
concrete and complying with chemical limits of PCI MNL 117.
G. Air-Entraining Admixture: ASTM C260, certified by manufacturer to be compatible with other required
admixtures.
H. Chemical Admixtures: Certified by manufacturer to be compatible with other admixtures and to not
contain calcium chloride, or more than 0.15 percent chloride ions or other salts by weight of admixture.
1. Water-Reducing Admixtures: ASTM C494/C494M, Type A.
2. Retarding Admixture: ASTM C494/C494M, Type B.
3. Water-Reducing and Retarding Admixture: ASTM C494/C494M, Type D.
4. Water-Reducing and Accelerating Admixture: ASTM C494/C494M, Type E.
5. High-Range, Water-Reducing Admixture: ASTM C494/C494M, Type F.
6. High-Range, Water-Reducing and Retarding Admixture: ASTM C494/C494M, Type G.
7. Plasticizing Admixture: ASTM C1017/C1017M, Type I.
8. Plasticizing and Retarding Admixture: ASTM C1017/C1017M, Type II.

BTBC Phase III October 26, 2020
GE Project No. 0119-0010
Gould Evans
PRECAST ARCHITECTURAL CONCRETE 034500 - 8
9. Corrosion Inhibiting Admixture: ASTM C1582/C1582M.
2.7 STEEL CONNECTION MATERIALS
A. Carbon-Steel Shapes and Plates: ASTM A36/A36M.
B. Carbon-Steel-Headed Studs: ASTM A108, AISI 1018 through AISI 1020, cold finished,
AWS D1.1/D1.1M, Type A or Type B, with arc shields and with minimum mechanical properties of
PCI MNL 117, Table 3.2.3.
C. Carbon-Steel Plate: ASTM A283/A283M, Grade C.
D. Malleable Iron Castings: ASTM A47/A47M, Grade 32510 or Grade 35028.
E. Carbon-Steel Castings: ASTM A27/A27M, Grade 60-30 (Grade 415-205).
F. High-Strength, Low-Alloy Structural Steel: ASTM A572/A572M.
G. Carbon-Steel Structural Tubing: ASTM A500/A500M, Grade B or Grade C.
H. Wrought Carbon-Steel Bars: ASTM A675/A675M, Grade 65 (Grade 450).
I. Deformed-Steel Wire or Bar Anchors: ASTM A496/A496M or ASTM A706/A706M.
J. Carbon-Steel Bolts and Studs: ASTM A307, Grade A or ASTM F1554, Grade 36 (ASTM F568M,
Property Class 4.6); carbon-steel, hex-head bolts and studs; carbon-steel nuts, ASTM A563
(ASTM A563M); and flat, unhardened steel washers, ASTM F844.
K. High-Strength Bolts, Nuts, and Washers: ASTM F3125/F3125M,Grade A325 (Grade A325M), Type 1,
heavy-hex steel structural bolts; ASTM A563, Grade DH, (ASTM A563M, Class 10S) heavy-hex carbon-
steel nuts; and ASTM F436/F436M, Type 1, hardened carbon-steel washers.
L. Zinc-Coated Finish: For exterior steel items, steel in exterior walls, and items indicated for galvanizing,
apply zinc coating by hot-dip process according to ASTM A123/A123M or ASTM A153/A153M.
1. For steel shapes, plates, and tubing to be galvanized, limit silicon content of steel to less than 0.03
percent or to between 0.15 and 0.25 percent or limit sum of silicon and 2.5 times phosphorous
content to 0.09 percent.
2. Galvanizing Repair Paint: High-zinc-dust-content paint with dry film containing not less than 94
percent zinc dust by weight, and complying with DOD-P-21035B or SSPC-Paint 20.
M. Shop-Primed Finish: Prepare surfaces of nongalvanized steel items, except those surfaces to be embedded
in concrete, according to requirements in SSPC-SP 3 and shop-apply lead- and chromate-free, rust-
inhibitive primer, complying with performance requirements in MPI 79 according to SSPC-PA 1.
N. Welding Electrodes: Comply with AWS standards.
2.8 STAINLESS STEEL CONNECTION MATERIALS
A. Stainless Steel Plate: ASTM A240/A240M or ASTM A666, Type 304, Type 316, or Type 201.

BTBC Phase III October 26, 2020
GE Project No. 0119-0010
Gould Evans
PRECAST ARCHITECTURAL CONCRETE 034500 - 9
B. Stainless Steel Bolts and Studs: ASTM F593, Alloy Group 1 or 2 (ASTM F738M, Grade A1 or A4) hex-
head bolts and studs; ASTM F594, Alloy Group 1 or 2 (ASTM F836M, Grade A1 or A4) stainless steel
nuts; and flat, stainless steel washers.
1. Lubricate threaded parts of stainless steel bolts with an antiseize thread lubricant during assembly.
C. Stainless Steel-Headed Studs: ASTM A276, Alloy 304 or Alloy 316, with minimum mechanical
properties of PCI MNL 117, Table 3.2.3.
2.9 BEARING PADS
A. Provide one of the following bearing pads for architectural precast concrete units as recommended by
precast fabricator for application:
1. Elastomeric Pads: AASHTO M 251, plain, vulcanized, 100 percent polychloroprene (neoprene)
elastomer, molded to size or cut from a molded sheet, Type A durometer hardness of 50 to 70,
ASTM D2240, minimum tensile strength 2250 psi (15.5 MPa), ASTM D412.
2. Random-Oriented-Fiber-Reinforced Elastomeric Pads: Preformed, randomly oriented synthetic
fibers set in elastomer. Type A durometer hardness of 70 to 90, ASTM D2240; capable of
supporting a compressive stress of 3000 psi (20.7 MPa) with no cracking, splitting, or
delaminating in the internal portions of pad. Test one specimen for every 200 pads used in Project.
3. Cotton-Duck-Fabric-Reinforced Elastomeric Pads: Preformed, horizontally layered cotton-duck
fabric bonded to an elastomer; Type A durometer hardness of 80 to 100, ASTM D2240;
complying with AASHTO's "AASHTO LRFD Bridge Design Specifications," Division II,
Section 18.10.2; or with MIL-C-882E.
4. Frictionless Pads: PTFE, glass-fiber reinforced, bonded to stainless or mild-steel plate, or random-
oriented-fiber-reinforced elastomeric pads; of type required for in-service stress.
5. High-Density Plastic: Multimonomer, nonleaching, plastic strip.
2.10 ACCESSORIES
A. Precast Accessories: Provide clips, hangers, high-density plastic or steel shims, and other accessories
required to install architectural precast concrete units.
2.11 GROUT MATERIALS
A. Sand-Cement Grout: Portland cement, ASTM C150/C150M, Type I, and clean, natural sand,
ASTM C144 or ASTM C404. Mix at ratio of 1 part cement to 2-1/2 to 3 parts sand, by volume, with
minimum water required for placement and hydration. Water-soluble chloride ion content less than 0.06
percent by weight of cement when tested according to ASTM C1218/C1218M.
B. Nonmetallic, Nonshrink Grout: Packaged, nonmetallic, noncorrosive, nonstaining grout containing
selected silica sands, portland cement, shrinkage-compensating agents, plasticizing and water-reducing
agents, complying with ASTM C1107/C1107M, Grade A for drypack and Grades B and C for flowable
grout and of consistency suitable for application within a 30-minute working time. Water-soluble chloride
ion content less than 0.06 percent by weight of cement when tested according to ASTM C1218/C1218M.
C. Epoxy-Resin Grout: Two-component, mineral-filled epoxy resin; ASTM C881/C881M, of type, grade,
and class to suit requirements.

BTBC Phase III October 26, 2020
GE Project No. 0119-0010
Gould Evans
PRECAST ARCHITECTURAL CONCRETE 034500 - 10
2.12 CONCRETE MIXTURES
A. Prepare design mixtures for each type of precast concrete required.
1. Use a single design mixture for units with more than one major face or edge exposed.
2. Where only one face of unit is exposed use either a single design mixture or separate mixtures for
face and backup.
B. Limit use of fly ash and ground granulated blast-furnace slag to 20 percent of portland cement by weight;
limit metakaolin and silica fume to 10 percent of portland cement by weight.
C. Design mixtures may be prepared by a qualified independent testing agency or by qualified precast plant
personnel at architectural precast concrete fabricator's option.
D. Limit water-soluble chloride ions to maximum percentage by weight of cement permitted by ACI 318
(ACI 318M) or PCI MNL 117 when tested according to ASTM C1218/C1218M.
E. Normal-Weight Concrete Mixtures: Proportion face and backup mixtures by either laboratory trial batch
or field test data methods according to ACI 211.1, with materials to be used on Project, to provide
normal-weight concrete with the following properties:
1. Compressive Strength (28 Days): 5000 psi (34.5 MPa) minimum.
2. Maximum Water-Cementitious Materials Ratio: 0.45.
F. Water Absorption: 6 percent by weight or 14 percent by volume, tested according to ASTM C642, except
for boiling requirement.
G. Lightweight Concrete Backup Mixtures: Proportion mixtures by either laboratory trial batch or field test
data methods according to ACI 211.2, with materials to be used on Project, to provide lightweight
concrete with the following properties:
1. Compressive Strength (28 Days): 5000 psi (34.5 MPa).
2. Unit Weight: Calculated equilibrium unit weight of 115 lb/cu. ft. (1842 kg/cu. m), plus or minus 3
lb/cu. ft. (48 kg/cu. m), according to ASTM C567.
H. Add air-entraining admixture at manufacturer's prescribed rate to result in concrete at point of placement
having an air content complying with PCI MNL 117.
I. When included in design mixtures, add other admixtures to concrete mixtures according to manufacturer's
written instructions.
2.13 MOLD FABRICATION
A. Molds: Accurately construct molds, mortar tight, of sufficient strength to withstand pressures due to
concrete-placement operations and temperature changes and for prestressing and detensioning operations.
Coat contact surfaces of molds with release agent before reinforcement is placed. Avoid contamination of
reinforcement and prestressing tendons by release agent.
1. Place form liners accurately to provide finished surface texture indicated. Provide solid backing
and supports to maintain stability of liners during concrete placement. Coat form liner with form-
release agent.

BTBC Phase III October 26, 2020
GE Project No. 0119-0010
Gould Evans
PRECAST ARCHITECTURAL CONCRETE 034500 - 11
B. Maintain molds to provide completed architectural precast concrete units of shapes, lines, and dimensions
indicated, within fabrication tolerances specified.
1. Form joints are not permitted on faces exposed to view in the finished work.
2. Edge and Corner Treatment: Uniformly chamfered.
2.14 FABRICATION
A. Cast-in Anchors, Inserts, Plates, Angles, and Other Anchorage Hardware: Fabricate anchorage hardware
with sufficient anchorage and embedment to comply with design requirements. Accurately position for
attachment of loose hardware, and secure in place during precasting operations. Locate anchorage
hardware where it does not affect position of main reinforcement or concrete placement.
1. Weld-headed studs and deformed bar anchors used for anchorage according to AWS D1.1/D1.1M
and AWS C5.4, "Recommended Practices for Stud Welding."
B. Furnish loose hardware items including steel plates, clip angles, seat angles, anchors, dowels, cramps,
hangers, and other hardware shapes for securing architectural precast concrete units to supporting and
adjacent construction.
C. Cast-in reglets, slots, holes, and other accessories in architectural precast concrete units as indicated on
the Contract Drawings.
D. Cast-in openings larger than 10 inches (250 mm) in any dimension. Do not drill or cut openings or
prestressing strand without Architect's approval.
E. Reinforcement: Comply with recommendations in PCI MNL 117 for fabricating, placing, and supporting
reinforcement.
1. Clean reinforcement of loose rust and mill scale, earth, and other materials that reduce or destroy
the bond with concrete. When damage to epoxy-coated reinforcing exceeds limits specified in
ASTM A775/A775M, repair with patching material compatible with coating material and epoxy
coat bar ends after cutting.
2. Accurately position, support, and secure reinforcement against displacement during concrete-
placement and consolidation operations. Completely conceal support devices to prevent exposure
on finished surfaces.
3. Place reinforcing steel and prestressing strands to maintain at least 3/4-inch (19-mm) minimum
concrete cover. Increase cover requirements for reinforcing steel to 1-1/2 inches (38 mm) when
units are exposed to corrosive environment or severe exposure conditions. Arrange, space, and
securely tie bars and bar supports to hold reinforcement in position while placing concrete. Direct
wire tie ends away from finished, exposed concrete surfaces.
4. Install welded wire reinforcement in lengths as long as practicable. Lap adjoining pieces at least
one full mesh spacing and wire tie laps, where required by design. Offset laps of adjoining widths
to prevent continuous laps in either direction.
F. Reinforce architectural precast concrete units to resist handling, transportation, and erection stresses and
specified in-place loads.
G. Prestress tendons for architectural precast concrete units by either pretensioning or post-tensioning
methods. Comply with PCI MNL 117.

BTBC Phase III October 26, 2020
GE Project No. 0119-0010
Gould Evans
PRECAST ARCHITECTURAL CONCRETE 034500 - 12
1. Delay detensioning or post-tensioning of precast, prestressed architectural concrete units until
concrete has reached its indicated minimum design release compressive strength as established by
test cylinders cured under same conditions as concrete unit.
2. Detension pretensioned tendons either by gradually releasing tensioning jacks or by heat-cutting
tendons, using a sequence and pattern to prevent shock or unbalanced loading.
3. If concrete has been heat cured, detension while concrete is still warm and moist to avoid
dimensional changes that may cause cracking or undesirable stresses.
4. Protect strand ends and anchorages with bituminous, zinc-rich, or epoxy paint to avoid corrosion
and possible rust spots.
H. Comply with requirements in PCI MNL 117 and requirements in this Section for measuring, mixing,
transporting, and placing concrete. After concrete batching, no additional water may be added.
I. Place face mixture to a minimum thickness after consolidation of the greater of 1 inch (25 mm) or 1.5
times the maximum aggregate size, but not less than the minimum reinforcing cover specified.
J. Place concrete in a continuous operation to prevent cold joints or planes of weakness from forming in
precast concrete units.
1. Place backup concrete mixture to ensure bond with face-mixture concrete.
K. Thoroughly consolidate placed concrete by internal and external vibration without dislocating or
damaging reinforcement and built-in items, and minimize pour lines, honeycombing, or entrapped air
voids on surfaces. Use equipment and procedures complying with PCI MNL 117.
1. Place self-consolidating concrete without vibration according to PCI TR-6, "Interim Guidelines
for the Use of Self-Consolidating Concrete in Precast/Prestressed Concrete Institute Member
Plants." Ensure adequate bond between face and backup concrete, if used.
L. Comply with PCI MNL 117 for hot- and cold-weather concrete placement.
M. Identify pickup points of architectural precast concrete units and orientation in structure with permanent
markings, complying with markings indicated on Shop Drawings. Imprint or permanently mark casting
date on each architectural precast concrete unit on a surface that does not show in finished structure.
N. Cure concrete, according to requirements in PCI MNL 117, by moisture retention without heat or by
accelerated heat curing using low-pressure live steam or radiant heat and moisture. Cure units until
compressive strength is high enough to ensure that stripping does not have an effect on performance or
appearance of final product.
O. Discard and replace architectural precast concrete units that do not comply with requirements, including
structural, manufacturing tolerance, and appearance, unless repairs meet requirements in PCI MNL 117
and Architect's approval.
2.15 INSULATED PANEL CASTING
A. Cast, screed, and consolidate bottom concrete wythe supported by mold.
B. Place insulation boards abutting edges and ends of adjacent boards. Insert wythe connectors through
insulation holes, and consolidate concrete around connectors according to connector manufacturer's
written instructions.
C. Ensure bottom wythe and insulation layer are not disturbed after bottom wythe reaches initial set.

BTBC Phase III October 26, 2020
GE Project No. 0119-0010
Gould Evans
PRECAST ARCHITECTURAL CONCRETE 034500 - 13
D. Cast, screed, and consolidate top wythe to meet required finish.
E. Maintain temperature below 150 deg F (65 deg C) in bottom concrete wythe.
2.16 FABRICATION TOLERANCES
A. Fabricate architectural precast concrete units to shapes, lines, and dimensions indicated so each finished
unit complies with PCI MNL 117 product tolerances as well as position tolerances for cast-in items.
B. Fabricate architectural precast concrete units to shapes, lines, and dimensions indicated so each finished
unit complies with the following product tolerances:
1. Overall Height and Width of Units, Measured at the Face Exposed to View: As follows:
a. 10 feet (3 m) or under, plus or minus 1/8 inch (3 mm).
b. 10 to 20 feet (3 to 6 m), plus 1/8 inch (3 mm), minus 3/16 inch (5 mm).
c. 20 to 40 feet (6 to 12 m), plus or minus 1/4 inch (6 mm).
d. Each additional 10 feet (3 m), plus or minus 1/16 inch (1.5 mm).
2. Overall Height and Width of Units, Measured at the Face Not Exposed to View: As follows:
a. 10 feet (3 m) or under, plus or minus 1/4 inch (6 mm).
b. 10 to 20 feet (3 to 6 m), plus 1/4 inch (6 mm), minus 3/8 inch (10 mm).
c. 20 to 40 feet (6 to 12 m), plus or minus 3/8 inch (10 mm).
d. Each additional 10 feet (3 m), plus or minus 1/8 inch (3 mm).
3. Total Thickness or Flange Thickness: Plus 1/4 inch (6 mm), minus 1/8 inch (3 mm).
4. Rib Thickness: Plus or minus 1/8 inch (3 mm).
5. Rib to Edge of Flange: Plus or minus 1/8 inch (3 mm).
6. Distance between Ribs: Plus or minus 1/8 inch (3 mm).
7. Variation from Square or Designated Skew (Difference in Length of the Two Diagonal
Measurements): Plus or minus 1/8 inch/72 inches (3 mm/1830 mm) or 1/2 inch (13 mm) total,
whichever is greater.
8. Length and Width of Block-outs and Openings within One Unit: Plus or minus 1/4 inch (6 mm).
9. Location and Dimension of Block-outs Hidden from View and Used for HVAC and Utility
Penetrations: Plus or minus 3/4 inch (19 mm).
10. Dimensions of Haunches: Plus or minus 1/4 inch (6 mm).
11. Haunch Bearing Surface Deviation from Specified Plane: Plus or minus 1/8 inch (3 mm).
12. Difference in Relative Position of Adjacent Haunch Bearing Surfaces from Specified Relative
Position: Plus or minus 1/4 inch (6 mm).
13. Bowing: Plus or minus L/360, maximum 1 inch (25 mm).
14. Local Smoothness: 1/4 inch/10 feet (6 mm/3 m).
15. Warping: 1/16 inch/12 inches (1.5 mm/300 mm) of distance from nearest adjacent corner.
16. Tipping and Flushness of Plates: Plus or minus 1/4 inch (6 mm).
17. Dimensions of Architectural Features and Rustications: Plus or minus 1/8 inch (3 mm).
C. Position Tolerances: For cast-in items measured from datum line location, as indicated on Shop
Drawings.
1. Weld Plates: Plus or minus 1 inch (25 mm).
2. Inserts: Plus or minus 1/2 inch (13 mm).
3. Handling Devices: Plus or minus 3 inches (75 mm).

BTBC Phase III October 26, 2020
GE Project No. 0119-0010
Gould Evans
PRECAST ARCHITECTURAL CONCRETE 034500 - 14
4. Reinforcing Steel and Welded Wire Reinforcement: Plus or minus 1/4 inch (6 mm) where position
has structural implications or affects concrete cover; otherwise, plus or minus 1/2 inch (13 mm).
5. Reinforcing Steel Extending out of Member: Plus or minus 1/2 inch (13 mm) of plan dimensions.
6. Tendons: Plus or minus 1/4 inch (6 mm), vertical; plus or minus 1 inch (25 mm), horizontal.
7. Location of Rustication Joints: Plus or minus 1/8 inch (3 mm).
8. Location of Opening within Panel: Plus or minus 1/4 inch (6 mm).
9. Location of Flashing Reglets: Plus or minus 1/4 inch (6 mm).
10. Location of Flashing Reglets at Edge of Panel: Plus or minus 1/8 inch (3 mm).
11. Reglets for Glazing Gaskets: Plus or minus 1/8 inch (3 mm).
12. Electrical Outlets, Hose Bibs: Plus or minus 1/2 inch (13 mm).
13. Location of Bearing Surface from End of Member: Plus or minus 1/4 inch (6 mm).
14. Allowable Rotation of Plate, Channel Inserts, and Electrical Boxes: 2-degree rotation or 1/4 inch
(6 mm) maximum over the full dimension of unit.
15. Position of Sleeve: Plus or minus 1/2 inch (13 mm).
16. Location of Window Washer Track or Buttons: Plus or minus 1/8 inch (3 mm).
2.17 FINISHES
A. Exposed faces shall be free of joint marks, grain, and other obvious defects. Corners, including false
joints shall be uniform, straight, and sharp. Finish exposed-face surfaces of architectural precast concrete
units to match approved design reference sample, sample panels, mockups and as follows:
1. Design Reference Sample: coordinate with Architect.
2. PCI's "Architectural Precast Concrete - Color and Texture Selection Guide," of plate numbers
indicated.
3. Abrasive-Blast Finish: Use abrasive grit, equipment, application techniques, and cleaning
procedures to expose aggregate and surrounding matrix surfaces.
B. Finish exposed interior surfaces of architectural precast concrete units to Class B troweled finish, ready to
receive paint finish.
C. Finish unexposed surfaces of architectural precast concrete units with as cast finish.
2.18 SOURCE QUALITY CONTROL
A. Quality-Control Testing: Test and inspect precast concrete according to PCI MNL 117 requirements. If
using self-consolidating concrete, also test and inspect according to PCI TR-6, ASTM C1610/C1610M,
ASTM C1611/C1611M, ASTM C1621/C1621M, and ASTM C1712.
B. Owner will employ an independent testing agency to evaluate architectural precast concrete fabricator's
quality-control and testing methods.
1. Allow Owner's testing agency access to material storage areas, concrete production equipment,
concrete placement, and curing facilities. Cooperate with Owner's testing agency and provide
samples of materials and concrete mixtures as may be requested for additional testing and
evaluation.
C. Strength of precast concrete units is considered deficient if units fail to comply with ACI 318
(ACI 318M) requirements for concrete strength.
D. Testing: If there is evidence that strength of precast concrete units may be deficient or may not comply
with ACI 318 (ACI 318M) requirements, precaster will employ an independent testing agency to obtain,

BTBC Phase III October 26, 2020
GE Project No. 0119-0010
Gould Evans
PRECAST ARCHITECTURAL CONCRETE 034500 - 15
prepare, and test cores drilled from hardened concrete to determine compressive strength according to
ASTM C42/C42M and ACI 318 (ACI 318M).
1. A minimum of three representative cores shall be taken from units of suspect strength, from
locations directed by Architect.
2. Test cores in an air-dry condition.
3. Strength of concrete for each series of three cores is considered satisfactory if average
compressive strength is equal to at least 85 percent of 28-day design compressive strength and no
single core is less than 75 percent of 28-day design compressive strength.
4. Report test results in writing on same day that tests are performed, with copies to Architect,
Contractor, and precast concrete fabricator. Test reports include the following:
a. Project identification name and number.
b. Date when tests were performed.
c. Name of precast concrete fabricator.
d. Name of concrete testing agency.
e. Identification letter, name, and type of precast concrete unit(s) represented by core tests;
design compressive strength; type of break; compressive strength at breaks, corrected for
length-diameter ratio; and direction of applied load to core in relation to horizontal plane of
concrete as placed.
E. Patching: If core test results are satisfactory and precast concrete units comply with requirements, clean
and dampen core holes and solidly fill with precast concrete mixture that has no coarse aggregate, and
finish to match adjacent precast concrete surfaces.
F. Defective Units: Discard and replace recast architectural concrete units that do not comply with
acceptability requirements in PCI MNL 117, including concrete strength, manufacturing tolerances, and
color and texture range. Chipped, spalled, or cracked units may be repaired, subject to Architect's
approval. Architect reserves the right to reject precast units that do not match approved samples, sample
panels, and mockups. Replace unacceptable units with precast concrete units that comply with
requirements.
PART 3 - EXECUTION
3.1 EXAMINATION
A. Examine supporting structural frame or foundation and conditions for compliance with requirements for
installation tolerances, bearing surface tolerances, and other conditions affecting performance of the
Work.
B. Do not install precast concrete units until supporting cast-in-place concrete has attained minimum
allowable design compressive strength and supporting steel or other structure is structurally ready to
receive loads from precast concrete units.
C. Proceed with installation only after unsatisfactory conditions have been corrected.
3.2 INSTALLATION
A. Install clips, hangers, bearing pads, and other accessories required for connecting architectural precast
concrete units to supporting members and backup materials.

BTBC Phase III October 26, 2020
GE Project No. 0119-0010
Gould Evans
PRECAST ARCHITECTURAL CONCRETE 034500 - 16
B. Erect architectural precast concrete level, plumb, and square within specified allowable tolerances.
Provide temporary supports and bracing as required to maintain position, stability, and alignment of units
until permanent connections are completed.
1. Install temporary steel or plastic spacing shims as precast concrete units are being erected. Tack
weld steel shims to each other to prevent shims from separating.
2. Maintain horizontal and vertical joint alignment and uniform joint width as erection progresses.
3. Remove projecting lifting devices and grout fill voids within recessed lifting devices flush with
surface of adjacent precast surfaces when recess is exposed.
4. Unless otherwise indicated, maintain uniform joint widths of 3/4 inch (19 mm).
C. Connect architectural precast concrete units in position by bolting, welding, grouting, or as otherwise
indicated on Shop Drawings. Remove temporary shims, wedges, and spacers as soon as practical after
connecting and grouting are completed.
1. Do not permit connections to disrupt continuity of roof flashing.
D. Welding: Comply with applicable requirements in AWS D1.1/D1.1M and AWS D1.4/D1.4M for
welding, welding electrodes, appearance, quality of welds, and methods used in correcting welding work.
1. Protect architectural precast concrete units and bearing pads from damage by field welding or
cutting operations, and provide noncombustible shields as required.
2. Welds not specified shall be continuous fillet welds, using no less than the minimum fillet as
specified by AWS.
3. Clean weld-affected metal surfaces with chipping hammer followed by brushing, and apply a
minimum 4.0-mil- (0.1-mm-) thick coat of galvanized repair paint to galvanized surfaces
according to ASTM A780/A780M.
4. Clean weld-affected metal surfaces with chipping hammer followed by brushing, and reprime
damaged painted surfaces.
5. Visually inspect welds and remove, reweld, or repair incomplete and defective welds.
E. At bolted connections, use lock washers, tack welding, or other approved means to prevent loosening of
nuts after final adjustment.
1. Where slotted connections are used, verify bolt position and tightness. For sliding connections,
properly secure bolt but allow bolt to move within connection slot.
2. For slip-critical connections, use one of the following methods to assure proper bolt pretension:
a. Turn-of-Nut: According to RCSC's "Specification for Structural Joints Using ASTM A325
or A 490 Bolts."
b. Calibrated Wrench: According to RCSC's "Specification for Structural Joints Using
ASTM A325 or A 490 Bolts."
c. Twist-off Tension Control Bolt: ASTM F3125/F3125M, Grade 1852.
d. Direct-Tension Control Bolt: ASTM F3125/F3125M, Grade 1852.
3. For slip-critical connections, use method and inspection procedure approved by Architect and
coordinated with inspection agency.
F. Grouting or Dry-Packing Connections and Joints: Grout connections where required or indicated. Retain
flowable grout in place until hard enough to support itself. Alternatively, pack spaces with stiff dry-pack
grout material, tamping until voids are completely filled. Place grout and finish smooth, level, and plumb
with adjacent concrete surfaces. Promptly remove grout material from exposed surfaces before it affects
finishes or hardens. Keep grouted joints damp for not less than 24 hours after initial set.

BTBC Phase III October 26, 2020
GE Project No. 0119-0010
Gould Evans
PRECAST ARCHITECTURAL CONCRETE 034500 - 17
3.3 ERECTION TOLERANCES
A. Erect architectural precast concrete units level, plumb, square, and in alignment without exceeding the
noncumulative erection tolerances of PCI MNL 117, Appendix I.
B. Erect architectural precast concrete units level, plumb, square, and in alignment, without exceeding the
following noncumulative erection tolerances:
1. Plan Location from Building Grid Datum: Plus or minus 1/2 inch (13 mm).
2. Plan Location from Centerline of Steel: Plus or minus 1/2 inch (13 mm).
3. Top Elevation from Nominal Top Elevation: As follows:
a. Exposed Individual Panel: Plus or minus 1/4 inch (6 mm).
b. Non-Exposed Individual Panel: Plus or minus 1/2 inch (13 mm).
c. Exposed Panel Relative to Adjacent Panel: 1/4 inch (6 mm).
d. Non-Exposed Panel Relative to Adjacent Panel: 1/2 inch (13 mm).
4. Support Elevation from Nominal Support Elevation: As follows:
a. Maximum Low: 1/2 inch (13 mm).
b. Maximum High: 1/4 inch (6 mm).
5. Maximum Plumb Variation over the Lesser of Height of Structure or 100 Feet (30 m): 1 inch (25
mm).
6. Plumb in Any 10 Feet (3 m) of Element Height: 1/4 inch (6 mm).
7. Maximum Jog in Alignment of Matching Edges: 1/4 inch (6 mm).
8. Joint Width (Governs over Joint Taper): Plus or minus 1/4 inch (6 mm).
9. Maximum Joint Taper: 3/8 inch (10 mm).
10. Joint Taper in 10 Feet (3 m): 1/4 inch (6 mm).
11. Maximum Jog in Alignment of Matching Faces: 1/4 inch (6 mm).
12. Differential Bowing or Camber, as Erected, between Adjacent Members of Same Design: 1/4 inch
(6 mm).
13. Opening Height between Spandrels: Plus or minus 1/4 inch (6 mm).
3.4 FIELD QUALITY CONTROL
A. Special Inspections: Owner will engage a qualified special inspector to perform the following special
inspections and prepare reports:
1. Erection of loadbearing precast concrete members.
B. Testing Agency: Owner will engage a qualified testing agency to perform tests and inspections and
prepare test reports.
C. Visually inspect field welds and test according to ASTM E165 or to ASTM E709 and ASTM E1444.
High-strength bolted connections are subject to inspections.
D. Testing agency will report test results promptly and in writing to Contractor and Architect.
E. Repair or remove and replace work where tests and inspections indicate that it does not comply with
specified requirements.

BTBC Phase III October 26, 2020
GE Project No. 0119-0010
Gould Evans
PRECAST ARCHITECTURAL CONCRETE 034500 - 18
F. Additional testing and inspecting, at Contractor's expense, shall be performed to determine compliance of
replaced or additional work with specified requirements.
3.5 REPAIRS
A. Repair architectural precast concrete units if permitted by Architect. Architect reserves the right to reject
repaired units that do not comply with requirements.
B. Mix patching materials and repair units so cured patches blend with color, texture, and uniformity of
adjacent exposed surfaces and show no apparent line of demarcation between original and repaired work,
when viewed in typical daylight illumination from a distance of 20 feet (6 m).
C. Prepare and repair damaged galvanized coatings with galvanizing repair paint according to
ASTM A780/A780M.
D. Wire brush, clean, and paint damaged prime-painted components with same type of shop primer.
E. Remove and replace damaged architectural precast concrete units when repairs do not comply with
requirements.
3.6 CLEANING
A. Clean surfaces of precast concrete units exposed to view.
B. Clean mortar, plaster, fireproofing, weld slag, and other deleterious material from concrete surfaces and
adjacent materials immediately.
C. Clean exposed surfaces of precast concrete units after erection and completion of joint treatment to
remove weld marks, other markings, dirt, and stains.
1. Perform cleaning procedures, if necessary, according to precast concrete fabricator's
recommendations. Protect other work from staining or damage due to cleaning operations.
2. Do not use cleaning materials or processes that could change the appearance of exposed concrete
finishes or damage adjacent materials.
END OF SECTION 034500

BTBC Phase III October 26, 2020
GE Project No. 0119-0010
Gould Evans
STRUCTURAL STEEL FRAMING 051200 - 1
SECTION 051200 - STRUCTURAL STEEL FRAMING
PART 1 - GENERAL
1.1 RELATED DOCUMENTS
A. Drawings and general provisions of the Contract, including General and Supplementary Conditions and Division 01 Specification Sections, apply to this Section.
1.2 SUMMARY
A. This Section includes the following: 1. Structural steel. 2. Shelf angles 3. Grout.
B. Related Sections include the following:
1. Division 01 Section "Quality Requirements" for independent testing agency procedures and administrative requirements.
2. Division 05 Section "Steel Decking" for field installation of shear connectors. 3. Division 05 Section "Metal Fabrications" for steel lintels or shelf angles not attached to
structural-steel frame, miscellaneous steel fabrications and other metal items not defined as structural steel.
4. Division 09 painting Sections for surface preparation and priming requirements.
1.3 DEFINITIONS
A. Structural Steel: Elements of structural-steel frame, as classified by AISC's "Code of Standard Practice for Steel Buildings and Bridges," that support design loads.
1.4 PERFORMANCE REQUIREMENTS
A. Connections: Provide details of simple shear connections required by the Contract Documents to be selected or completed by structural-steel fabricator to withstand ASD-service loads indicated and comply with other information and restrictions indicated.
1. Select and complete connections using schematic details indicated and AISC's "Manual of Steel Construction, Allowable Stress Design," Part 4.
2. Engineering Responsibility: Fabricator's responsibilities include using a qualified professional engineer to prepare structural analysis data for structural-steel connections.
B. Construction: Type 2, simple framing.
1.5 SUBMITTALS
A. Product Data: For each type of product indicated.

BTBC Phase III October 26, 2020
GE Project No. 0119-0010
Gould Evans
STRUCTURAL STEEL FRAMING 051200 - 2
B. Shop Drawings: Show fabrication of structural-steel components.
1. Include details of cuts, connections, splices, camber, holes, and other pertinent data. 2. Include embedment drawings. 3. Indicate welds by standard AWS symbols, distinguishing between shop and field welds,
and show size, length, and type of each weld. 4. Indicate type, size, and length of bolts, distinguishing between shop and field bolts.
Identify pretensioned and slip-critical high-strength bolted connections. 5. For structural-steel connections indicated to comply with design loads, include structural
analysis data signed and sealed by the qualified professional engineer responsible for their preparation.
C. Mill Test Reports: Signed by manufacturers certifying that the following products comply with requirements:
1. Structural steel including chemical and physical properties. 2. Bolts, nuts, and washers including mechanical properties and chemical analysis. 3. Direct-tension indicators. 4. Tension-control, high-strength bolt-nut-washer assemblies. 5. Shear stud connectors.
D. Source quality-control test reports.
1.6 QUALITY ASSURANCE
A. Fabricator Qualifications: A qualified fabricator who participates in the AISC Quality Certification Program and is designated an AISC-Certified Plant, Category STD.
B. Shop-Painting Applicators: Qualified according to AISC's Sophisticated Paint Endorsement P3 or SSPC-QP 3, "Standard Procedure for Evaluating Qualifications of Shop Painting Applicators."
C. Welding: Qualify procedures and personnel according to AWS D1.1, "Structural Welding Code--Steel."
D. Comply with applicable provisions of the following specifications and documents:
1. AISC's "Code of Standard Practice for Steel Buildings and Bridges." 2. AISC's "Seismic Provisions for Structural Steel Buildings" and "Supplement No. 2." 3. AISC's "Specification for Structural Steel Buildings--Allowable Stress Design and Plastic
Design." 4. AISC's "Specification for the Design of Steel Hollow Structural Sections." 5. AISC's "Specification for Allowable Stress Design of Single-Angle Members." 6. RCSC's "Specification for Structural Joints Using ASTM A 325 or A 490 Bolts."
E. Preinstallation Conference: Conduct conference at Project site to comply with requirements in Division 1 Section "Project Management and Coordination."
1.7 DELIVERY, STORAGE, AND HANDLING

BTBC Phase III October 26, 2020
GE Project No. 0119-0010
Gould Evans
STRUCTURAL STEEL FRAMING 051200 - 3
A. Store materials to permit easy access for inspection and identification. Keep steel members off ground and spaced by using pallets, dunnage, or other supports and spacers. Protect steel members and packaged materials from erosion and deterioration.
1. Store fasteners in a protected place. Clean and relubricate bolts and nuts that become dry or rusty before use.
2. Do not store materials on structure in a manner that might cause distortion, damage, or overload to members or supporting structures. Repair or replace damaged materials or structures as directed.
1.8 COORDINATION
A. Furnish anchorage items to be embedded in or attached to other construction without delaying the Work. Provide setting diagrams, sheet metal templates, instructions, and directions for installation.
PART 2 - PRODUCTS
2.1 STRUCTURAL-STEEL MATERIALS
A. W-Shapes: ASTM A 992/A 992M, Grade 50 (345).
B. Channels, Angles, M , S-Shapes: ASTM A 36/A 36M
C. Plate and Bar: ASTM A 36/A 36M.
D. Corrosion-Resisting Structural Steel: ASTM A 588/A 588M, Grade 50 (345).
E. Cold-Formed Hollow Structural Sections: ASTM A 500, Grade B, structural tubing.
F. Corrosion-Resisting Cold-Formed Hollow Structural Sections: ASTM A 847, structural tubing.
G. Steel Pipe: ASTM A 53/A 53M, Type E or S, Grade B.
1. Weight Class: Standard. 2. Finish: Black, except where indicated to be galvanized.
H. Medium-Strength Steel Castings: ASTM A 27/A 27M, Grade 65-35 (Grade 450-240), carbon steel.
I. High-Strength Steel Castings: ASTM A 148/A 148M,Grade 80-50 (Grade 550-345), carbon or alloy steel.
J. Welding Electrodes: Comply with AWS requirements.
2.2 BOLTS, CONNECTORS, AND ANCHORS
A. High-Strength Bolts, Nuts, and Washers: ASTM A 325 (ASTM A 325M), Type 1, heavy hex steel structural bolts; ASTM A 563 (ASTM A 563M) heavy hex carbon-steel nuts; and ASTM F 436 (ASTM F 436M) hardened carbon-steel washers.

BTBC Phase III October 26, 2020
GE Project No. 0119-0010
Gould Evans
STRUCTURAL STEEL FRAMING 051200 - 4
1. Finish: Plain. 2. Direct-Tension Indicators: ASTM F 959, Type 325 (ASTM F 959M, Type 8.8,)
compressible-washer type.
a. Finish: Plain.
B. High-Strength Bolts, Nuts, and Washers: ASTM A 490 (ASTM A 490M), Type 1, heavy hex steel structural bolts or tension-control, bolt-nut-washer assemblies with splined ends; ASTM A 563 (ASTM A 563M) heavy hex carbon-steel nuts; and ASTM F 436 (ASTM F 436M) hardened carbon-steel washers, plain.
1. Direct-Tension Indicators: ASTM F 959, Type 490 (ASTM F 959M,) Type 10.9, compressible-washer type, plain.
C. Tension-Control, High-Strength Bolt-Nut-Washer Assemblies: ASTM F 1852, Type 1, heavy hex head steel structural bolts with splined ends; ASTM A 563 (ASTM A 563M) heavy hex carbon-steel nuts; and ASTM F 436 (ASTM F 436M) hardened carbon-steel washers.
1. Finish: Plain.
D. Shear Connectors: ASTM A 108, Grades 1015 through 1020, headed-stud type, cold-finished carbon steel; AWS D1.1, Type B.
E. Unheaded Anchor Rods: ASTM F 1554, Grade 36.
1. Configuration: Hooked. 2. Nuts: ASTM A 563 (ASTM A 563M) heavy hex carbon steel. 3. Plate Washers: ASTM A 36/A 36M carbon steel. 4. Washers: ASTM F 436 (ASTM F 436M) hardened carbon steel. 5. Finish: Plain.
F. Headed Anchor Rods: ASTM F 1554, Grade 36, straight.
1. Nuts: ASTM A 563 (ASTM A 563M) heavy hex carbon steel. 2. Plate Washers: ASTM A 36/A 36M carbon steel. 3. Washers: ASTM F 436 (ASTM F 436M) hardened carbon steel. 4. Finish: Plain.
G. Threaded Rods: ASTM F 1554, Grade 36.
1. Nuts: ASTM A 563 (ASTM A 563M) heavy hex carbon steel. 2. Washers: ASTM F 436 (ASTM F 436M) hardened carbon steel. 3. Finish: Plain.
2.3 PRIMER
A. Primer: Fabricator's standard lead- and chromate-free, nonasphaltic, rust-inhibiting primer.
B. Galvanizing Repair Paint: MPI#18, MPI#19, or SSPC-Paint 20.
2.4 GROUT

BTBC Phase III October 26, 2020
GE Project No. 0119-0010
Gould Evans
STRUCTURAL STEEL FRAMING 051200 - 5
A. Nonmetallic, Shrinkage-Resistant Grout: ASTM C 1107, factory-packaged, nonmetallic aggregate grout, noncorrosive, nonstaining, mixed with water to consistency suitable for application and a 30-minute working time.
2.5 FABRICATION
A. Structural Steel: Fabricate and assemble in shop to greatest extent possible. Fabricate according to AISC's "Code of Standard Practice for Steel Buildings and Bridges" and AISC's "Specification for Structural Steel Buildings--Allowable Stress Design and Plastic Design."
1. Camber structural-steel members where indicated. 2. Identify high-strength structural steel according to ASTM A 6/ A 6M and maintain
markings until structural steel has been erected. 3. Mark and match-mark materials for field assembly. 4. Complete structural-steel assemblies, including welding of units, before starting shop-
priming operations.
B. Thermal Cutting: Perform thermal cutting by machine to greatest extent possible.
1. Plane thermally cut edges to be welded to comply with requirements in AWS D1.1.
C. Bolt Holes: Cut, drill, or punch standard bolt holes perpendicular to metal surfaces.
D. Finishing: Accurately finish ends of columns and other members transmitting bearing loads.
E. Cleaning: Clean and prepare steel surfaces that are to remain unpainted according to SSPC-SP 2, "Hand Tool Cleaning."
F. Shear Connectors: Prepare steel surfaces as recommended by manufacturer of shear connectors. Use automatic end welding of headed-stud shear connectors according to AWS D1.1 and manufacturer's written instructions.
G. Steel Wall-Opening Framing: Select true and straight members for fabricating steel wall-opening framing to be attached to structural steel. Straighten as required to provide uniform, square, and true members in completed wall framing.
H. Welded Door Frames: Built up welded door frames attached to structural steel. Weld exposed joints continuously and grind smooth. Plug-weld fixed steel bar stops to frames. Secure removable stops to frames with countersunk, cross-recessed head machine screws, uniformly spaced not more than 10 inches (250 mm) o.c., unless otherwise indicated.
I. Holes: Provide holes required for securing other work to structural steel and for passage of other work through steel framing members.
1. Cut, drill, or punch holes perpendicular to steel surfaces. Do not thermally cut bolt holes or enlarge holes by burning.
2. Base-Plate Holes: Cut, drill, mechanically thermal cut, or punch holes perpendicular to steel surfaces.
3. Weld threaded nuts to framing and other specialty items indicated to receive other work.
2.6 SHOP CONNECTIONS

BTBC Phase III October 26, 2020
GE Project No. 0119-0010
Gould Evans
STRUCTURAL STEEL FRAMING 051200 - 6
A. High-Strength Bolts: Shop install high-strength bolts according to RCSC's "Specification for Structural Joints Using ASTM A 325 or A 490 Bolts" for type of bolt and type of joint specified.
1. Joint Type: Pretensioned or Slip critical.
B. Weld Connections: Comply with AWS D1.1 for welding procedure specifications, tolerances, appearance, and quality of welds and for methods used in correcting welding work.
1. Remove backing bars or runoff tabs, back gouge, and grind steel smooth. 2. Assemble and weld built-up sections by methods that will maintain true alignment of axes
without exceeding tolerances of AISC's "Code of Standard Practice for Steel Buildings and Bridges" for mill material.
3. Verify that weld sizes, fabrication sequence, and equipment used for architecturally exposed structural steel will limit distortions to allowable tolerances. Prevent weld show-through on exposed steel surfaces.
a. Grind butt welds flush. b. Grind or fill exposed fillet welds to smooth profile. Dress exposed welds.
2.7 SHOP PRIMING
A. Shop prime steel surfaces except the following:
1. Surfaces embedded in concrete or mortar. Extend priming of partially embedded members to a depth of 2 inches (50 mm).
2. Surfaces to be field welded. 3. Surfaces to be high-strength bolted with slip-critical connections. 4. Surfaces to receive sprayed fire-resistive materials. 5. Galvanized surfaces.
B. Surface Preparation: Clean surfaces to be painted. Remove loose rust and mill scale and spatter, slag, or flux deposits. Prepare surfaces according to the following specifications and standards:
1. SSPC-SP 2, "Hand Tool Cleaning."
C. Priming: Immediately after surface preparation, apply primer according to manufacturer's written instructions and at rate recommended by SSPC to provide a dry film thickness of not less than 1.5 mils (0.038 mm). Use priming methods that result in full coverage of joints, corners, edges, and exposed surfaces.
1. Stripe paint corners, crevices, bolts, welds, and sharp edges. 2. Apply two coats of shop paint to inaccessible surfaces after assembly or erection.
Change color of second coat to distinguish it from first.
D. Painting: Apply a 1-coat, nonasphaltic primer complying with SSPC-PS Guide 7.00, "Painting System Guide 7.00: Guide for Selecting One-Coat Shop Painting Systems," to provide a dry film thickness of not less than 1.5 mils (0.038 mm).
2.8 GALVANIZING
BTBC Phase III October 26, 2020
GE Project No. 0119-0010
Gould Evans
STRUCTURAL STEEL FRAMING 051200 - 7
A. Hot-Dip Galvanized Finish: Apply zinc coating by the hot-dip process to structural steel according to ASTM A 123/ A 123M.
1. Fill vent holes and grind smooth after galvanizing. 2. Galvanize lintels shelf angles attached to structural-steel frame and located in exterior
walls.
PART 3 - EXECUTION
3.1 EXAMINATION
A. Verify elevations of concrete- and masonry-bearing surfaces and locations of anchor rods, bearing plates, and other embedments, with steel erector present, for compliance with requirements.
B. Proceed with installation only after unsatisfactory conditions have been corrected.
C. All steel must have proper finish to accept applied finishes (fire proofing, special coatings, paint, etc.) by others
D. GC/Sub/Fabricator must coordinate finish requirements of others with their work prior to order/fabrication
3.2 PREPARATION
A. Provide temporary shores, guys, braces, and other supports during erection to keep structural steel secure, plumb, and in alignment against temporary construction loads and loads equal in intensity to design loads. Remove temporary supports when permanent structural steel, connections, and bracing are in place, unless otherwise indicated.
3.3 ERECTION
A. Set structural steel accurately in locations and to elevations indicated and according to AISC's "Code of Standard Practice for Steel Buildings and Bridges" and "Specification for Structural Steel Buildings--Allowable Stress Design and Plastic Design."
B. Base and Bearing Plates: Clean concrete- and masonry-bearing surfaces of bond-reducing materials, and roughen surfaces prior to setting base and bearing plates. Clean bottom surface of base and bearing plates.
1. Set base and bearing plates for structural members on wedges, shims, or setting nuts as required.
2. Weld plate washers to top of base plate. 3. Pretension anchor rods after supported members have been positioned and plumbed.
Do not remove wedges or shims but, if protruding, cut off flush with edge of base or bearing plate before packing with grout.
4. Promptly pack grout solidly between bearing surfaces and base or bearing plates so no voids remain. Neatly finish exposed surfaces; protect grout and allow to cure. Comply with manufacturer's written installation instructions for shrinkage-resistant grouts.

BTBC Phase III October 26, 2020
GE Project No. 0119-0010
Gould Evans
STRUCTURAL STEEL FRAMING 051200 - 8
C. Maintain erection tolerances of structural steel within AISC's "Code of Standard Practice for Steel Buildings and Bridges", except at exterior masonry veneer comply with the following: 1. Shelf angles at Gym
a. Locate toe of angle by surveying face of veneer prior to veneer installation. b. Use full depth shims to adjust toe of angle horizontally outward when angle is more
than 1 inch behind the face of brick. c. Saw cut off toe of shelf angle to adjust toe of angle horizontally where steel is
beyond face of veneer. d. Apply three coats of cold galvanizing repair paint to repair galvanizing at sawn
edges. e. Horizontal lines of alignment (elevation): Locate shelf angles so that the top of the
angle is just below the bottom of the brick course directly above the angle. f. Tolerances:
1) Vertical: Do not vary from plumb more than: a) 1/8 inch in 10 feet. b) 1/4 inch in 20 feet. c) 1/2 inch maximum.
2) Horizontal: Do not vary from elevation more than: a) 1/8 inch in 10 feet. b) 1/4 inch in 20 feet. c) 1/2 inch maximum.
g. Offset: Do not exceed 1/8 inch offset between angles at butt joints. 2. Veneer lintels attached to structural-steel frames.
a. Locate toe of angle by surveying face of veneer prior to veneer installation. b. Use full depth shims to adjust toe of angle horizontally outward when angle is more
than 1 inch behind the face of brick. c. Saw cut off toe of shelf angle to adjust toe of angle horizontally where steel is less
than 3/8 inch behind face of veneer. 1) Apply three coats of cold galvanizing repair paint to repair galvanizing at
sawn edges. d. Horizontal lines of alignment (elevation): Locate shelf angles so that the top of the
angle is just below the bottom of the brick course directly above the angle. e. Tolerances:
1) Vertical: Do not vary from plumb more than: a) 1/8 inch in 10 feet. b) 1/4 inch in 20 feet.
2) Horizontal: Do not vary from elevation more than: a) 1/8 inch in 10 feet. b) 1/4 inch in 20 feet.
D. Align and adjust various members forming part of complete frame or structure before permanently fastening. Before assembly, clean bearing surfaces and other surfaces that will be in permanent contact with members. Perform necessary adjustments to compensate for discrepancies in elevations and alignment.
1. Level and plumb individual members of structure. 2. Make allowances for difference between temperature at time of erection and mean
temperature when structure is completed and in service.
E. Splice members only where indicated.
F. Remove erection bolts on welded, architecturally exposed structural steel; fill holes with plug welds; and grind smooth at exposed surfaces.

BTBC Phase III October 26, 2020
GE Project No. 0119-0010
Gould Evans
STRUCTURAL STEEL FRAMING 051200 - 9
G. Do not use thermal cutting during erection unless approved by Architect. Finish thermally cut sections within smoothness limits in AWS D1.1.
H. Do not enlarge unfair holes in members by burning or using drift pins. Ream holes that must be enlarged to admit bolts.
I. Shear Connectors: Prepare steel surfaces as recommended by manufacturer of shear connectors. Use automatic end welding of headed-stud shear connectors according to AWS D1.1 and manufacturer's written instructions.
3.4 FIELD CONNECTIONS
A. High-Strength Bolts: Shop install high-strength bolts according to RCSC's "Specification for Structural Joints Using ASTM A 325 or A 490 Bolts" for type of bolt and type of joint specified.
1. Joint Type: Pretensioned or Slip critical.
B. Weld Connections: Comply with AWS D1.1 for welding procedure specifications, tolerances, appearance, and quality of welds and for methods used in correcting welding work.
1. Comply with AISC's "Code of Standard Practice for Steel Buildings and Bridges" and "Specification for Structural Steel Buildings--Allowable Stress Design and Plastic Design" for bearing, adequacy of temporary connections, alignment, and removal of paint on surfaces adjacent to field welds.
2. Remove backing bars or runoff tabs, back gouge, and grind steel smooth. 3. Assemble and weld built-up sections by methods that will maintain true alignment of axes
without exceeding tolerances of AISC's "Code of Standard Practice for Steel Buildings and Bridges" for mill material.
4. Verify that weld sizes, fabrication sequence, and equipment used for architecturally exposed structural steel will limit distortions to allowable tolerances. Prevent weld show-through on exposed steel surfaces.
a. Grind butt welds flush. b. Grind or fill exposed fillet welds to smooth profile. Dress exposed welds.
3.5 FIELD QUALITY CONTROL
A. Testing Agency: Design Builder will engage a qualified independent testing and inspecting agency to inspect field welds and high-strength bolted connections.
B. Bolted Connections: Shop-bolted connections will be inspected according to RCSC's "Specification for Structural Joints Using ASTM A 325 or A 490 Bolts."
C. Welded Connections: Field welds will be visually inspected according to AWS D1.1.
1. In addition to visual inspection, field welds at moment connections or as indicated on the drawings will be tested according to AWS D1.1 and the following inspection procedures, at testing agency's option:
a. Liquid Penetrant Inspection: ASTM E 165.

BTBC Phase III October 26, 2020
GE Project No. 0119-0010
Gould Evans
STRUCTURAL STEEL FRAMING 051200 - 10
b. Magnetic Particle Inspection: ASTM E 709; performed on root pass and on finished weld. Cracks or zones of incomplete fusion or penetration will not be accepted.
c. Ultrasonic Inspection: ASTM E 164. d. Radiographic Inspection: ASTM E 94.
D. In addition to visual inspection, test and inspect field-welded shear connectors according to requirements in AWS D1.1 for stud welding and as follows:
1. Perform bend tests if visual inspections reveal either a less-than- continuous 360-degree flash or welding repairs to any shear connector.
2. Conduct tests on additional shear connectors if weld fracture occurs on shear connectors already tested, according to requirements in AWS D1.1.
E. Correct deficiencies in Work that test reports and inspections indicate does not comply with the Contract Documents.
3.6 REPAIRS AND PROTECTION
A. Repair damaged galvanized coatings on galvanized items with galvanized repair paint according to ASTM A 780 and manufacturer's written instructions.
B. Touchup Painting: After installation, promptly clean, prepare, and prime or reprime field connections, rust spots, and abraded surfaces of prime-painted joists and accessories, bearing plates, and abutting structural steel.
1. Clean and prepare surfaces by SSPC-SP 2 hand-tool cleaning or SSPC-SP 3 power-tool cleaning.
2. Apply a compatible primer of same type as shop primer used on adjacent surfaces.
C. Touchup Painting: Cleaning and touchup painting are specified in Division 9 painting Sections.
END OF SECTION 051200

BTBC Phase III October 26, 2020
GE Project No. 0119-0010
Gould Evans
ARCHITECTURALLY EXPOSED STRUCTURAL STEEL FRAMING 051213 - 1
SECTION 051213 - ARCHITECTURALLY EXPOSED STRUCTURAL STEEL FRAMING
PART 1 - GENERAL
1.1 RELATED DOCUMENTS
A. Drawings and general provisions of the Contract, including General and Supplementary
Conditions and Division 01 Specification Sections, apply to this Section.
1.2 SUMMARY
A. Section Includes:
1. Architecturally exposed structural steel (AESS).
2. Section 051200 "Structural Steel Framing" requirements that also apply to AESS.
B. Related Requirements:
1. Section 055000 "Metal Fabrications" for [steel lintels and shelf angles not attached to
structural-steel frame] [miscellaneous steel fabrications] [and] [other metal items]
not defined as structural steel.
2. [Section 099113 "Exterior Painting"] [Section 099123 "Interior Painting"] [and]
[Section 099600 "High-Performance Coatings"] for surface preparation and priming
requirements.
1.3 DEFINITIONS
A. AESS: Architecturally exposed structural steel.
B. Category AESS 1: Structural steel that is categorized by ANSI/AISC 303, Section 10, as
AESS 1 and may be designated AESS 1 or Category AESS 1 in the Contract Documents.
C. Category AESS 2: Structural steel that is categorized by ANSI/AISC 303, Section 10, as
AESS 2 and is designated as AESS 2 or Category AESS 2 in the Contract Documents.
D. Category AESS 3: Structural steel that is categorized by ANSI/AISC 303, Section 10, as
AESS 3 and is designated as AESS 3 or Category AESS 3in the Contract Documents.
E. Category AESS 4: Structural steel that is categorized by ANSI/AISC 303, Section 10, as
AESS 4 and is designated as AESS 4 or Category AESS 4 in the Contract Documents.
F. Category AESS C: Structural steel with custom characteristics that is categorized by
ANSI/AISC 303, Section 10, as AESS C and is designated as AESS C or Category AESS C in
the Contract Documents.

BTBC Phase III October 26, 2020
GE Project No. 0119-0010
Gould Evans
ARCHITECTURALLY EXPOSED STRUCTURAL STEEL FRAMING 051213 - 2
G. SEAC/RMSCA Guide Specification: SEAC/RMSCA's "Sample Specification, Section 05 02
13: Architecturally Exposed Structural Steel."
1.4 COORDINATION
A. Coordinate surface preparation requirements for shop-primed items.
B. Coordinate selection of shop primers with topcoats to be applied over them. Comply with paint
and coating manufacturers' written recommendations to ensure that shop primers and topcoats
are compatible with one another.
1.5 PREINSTALLATION MEETINGS
A. Preinstallation Conference: Conduct conference at Project site
1.6 ACTION SUBMITTALS
A. Product Data:
1. Tension-control, high-strength, bolt-nut-washer assemblies.
2. Corrosion-resisting (weathering steel), tension-control, high-strength, bolt-nut-washer
assemblies.
3. Filler.
4. Primer.
5. Galvanized-steel primer.
6. Etching cleaner.
7. Galvanized repair paint.
B. Shop Drawings: Show fabrication of AESS components.[ Shop Drawings for structural steel
may be used for AESS.]
1. Identify AESS category for each steel member and connection, including transitions
between AESS categories and between AESS and non-AESS.
2. Include details of cuts, connections, splices, camber, holes, and other pertinent data.
3. Include embedment Drawings.
4. Indicate orientation of mill marks and HSS seams.
5. Indicate welds by standard AWS symbols, distinguishing between shop and field welds,
and show size, length, and type of each weld. Show backing bars that are to be removed
and supplemental fillet welds where backing bars are to remain.[ Indicate grinding,
finish, and profile of welds.]
6. Indicate type, size, and length of bolts, distinguishing between shop and field bolts.
Identify pretensioned and slip-critical, high-strength bolted connections. Indicate
orientation and location of bolt heads.
7. Indicate exposed surfaces and edges and surface preparation being used.
8. Indicate special tolerances and erection requirements.
9. Indicate weep holes for HSS [and vent holes for galvanized HSS].

BTBC Phase III October 26, 2020
GE Project No. 0119-0010
Gould Evans
ARCHITECTURALLY EXPOSED STRUCTURAL STEEL FRAMING 051213 - 3
10. Indicate surface preparation, primer, and coating requirements, including systems
specified in other Sections.
C. Samples: Submit Samples to set quality standards for AESS.
1. Two steel plates, 3/8 by 8 by 4 inches (9.5 by 200 by 100 mm), with long edges joined by
a groove weld[ and with weld ground smooth].
2. Steel plate, 3/8 by 8 by 8 inches (9.5 by 200 by 200 mm), with one end of a short length
of rectangular steel tube, 4 by 6 by 3/8 inches (100 by 150 by 9.5 mm), welded to plate
with a continuous fillet weld[ and with weld ground smooth and blended].
3. Round steel tube or pipe, minimum 8 inches (200 mm) in diameter, with end of another
round steel tube or pipe, approximately 4 inches (100 mm) in diameter, welded to its side
at a 45-degree angle with a continuous fillet weld[ and with weld ground smooth and
blended].
1.7 INFORMATIONAL SUBMITTALS
A. Qualification Data: For Installer, fabricator [shop-painting applicator].
B. Paint Compatibility Certificates: From manufacturers of topcoats applied over shop primers,
certifying that shop primers are compatible with topcoats.
1.8 QUALITY ASSURANCE
A. Fabricator Qualifications: A qualified fabricator that participates in the AISC Quality
Certification Program and is designated an AISC-Certified Plant, Category BU, or is accredited
by the IAS Fabricator Inspection Program for Structural Steel (AC 172) and is experienced in
fabricating AESS similar to that indicated on this Project.
B. Installer Qualifications: A qualified Installer who participates in the AISC Quality Certification
Program, is designated an AISC-Certified Erector, Category ACSE, and is experienced in
erecting AESS similar to that indicated on this Project.
C. Shop-Painting Applicators: Qualified according to AISC's Sophisticated Paint
[Endorsement P1] [Endorsement P2] [Endorsement P3] or SSPC-QP 3.
D. Mockups: Build mockups of AESS to set quality standards for fabrication and installation.
1. Build mockup of typical portion of AESS as shown on Drawings.
2. Coordinate painting requirements with [Section 099113 "Exterior Painting."]
[Section 099123 "Interior Painting."]
3. Coordinate high-performance coatings requirements with Section 099600 "High-
Performance Coatings."
4. Subject to compliance with requirements, approved mockups may become part of the
completed Work if undisturbed at time of Substantial Completion.

BTBC Phase III October 26, 2020
GE Project No. 0119-0010
Gould Evans
ARCHITECTURALLY EXPOSED STRUCTURAL STEEL FRAMING 051213 - 4
1.9 DELIVERY, STORAGE, AND HANDLING
A. Use special care in handling AESS to prevent twisting, warping, nicking, and other damage
during fabrication, delivery, and erection. Store materials to permit easy access for inspection
and identification. Keep AESS members off ground and spaced by using pallets, dunnage, or
other supports and spacers. Protect AESS members and packaged materials from corrosion and
deterioration.
1. Do not store AESS materials on structure in a manner that might cause distortion,
damage, or overload to members or supporting structures. Repair or replace damaged
materials or structures as directed.
1.10 FIELD CONDITIONS
A. Field Measurements: Where AESS is indicated to fit against other construction, verify actual
dimensions by field measurements before fabrication.
PART 2 - PRODUCTS
2.1 PERFORMANCE REQUIREMENTS
A. Comply with requirements of ANSI/AISC 303, Sections 1 through 9 and as modified in Section
10, "Architecturally Exposed Structural Steel."
2.2 BOLTS, CONNECTORS, AND ANCHORS
A. Tension-Control, High-Strength, Bolt-Nut-Washer Assemblies: ASTM F3125/F3125M,
Grade F1852, Type 1, round-head assemblies consisting of steel structural bolts with splined
ends; ASTM A563, Grade DH, (ASTMA563M, Class 10S) heavy-hex carbon-steel nuts; and
ASTM F436/F436M, Type 1, hardened carbon-steel washers.
1. Finish: Mechanically deposited zinc coating.
2.3 FILLER
A. Polyester filler intended for use in repairing dents in automobile bodies.
2.4 PRIMER
A. Steel Primer:
1. Comply with [Section 099113 "Exterior Painting" and Section 099123 "Interior
Painting."] [Section 099600 "High-Performance Coatings."] [Section 099113
"Exterior Painting," Section 099123 "Interior Painting," and Section 099600
"High-Performance Coatings."]

BTBC Phase III October 26, 2020
GE Project No. 0119-0010
Gould Evans
ARCHITECTURALLY EXPOSED STRUCTURAL STEEL FRAMING 051213 - 5
2. SSPC-Paint 23, latex primer.
3. Fabricator's standard lead- and chromate-free, nonasphaltic, rust-inhibiting primer
complying with MPI#79 and compatible with topcoat.
B. Galvanized-Steel Primer: [MPI#26] [MPI#80] [MPI#134].
1. Etching Cleaner: MPI#25, for galvanized steel.
2. Galvanizing Repair Paint: [MPI#18, MPI#19, or SSPC-Paint 20]
[ASTM A780/A780M].
2.5 FABRICATION
A. Shop fabricate and assemble AESS to the maximum extent possible. Locate field joints at
concealed locations if possible. Detail assemblies to minimize handling and to expedite
erection.
1. Use special care handling and fabricating AESS before and after shop painting to
minimize damage to shop finish.
B. Category AESS 1:
1. Comply with overall profile dimensions of AWS D1.1/D1.1M for welded built-up
members. Keep appearance and quality of welds consistent. Maintain true alignment of
members without warp exceeding specified tolerances.
2. Prepare surfaces according to Part 2 "Shop Priming" Article and SSPC-
SP 6 (WAB)/NACE WAB-3.
3. Grind sheared, punched, and flame-cut edges to remove burrs and provide smooth
surfaces and eased edges.
4. Make intermittent welds appear continuous, using filler or additional welding.
5. Seal weld open ends of hollow structural sections with 3/8-inch (9.5-mm) closure plates.
6. Limit butt and plug weld projections to 1/16 inch (1.6 mm).
7. Install bolt heads on the same side of each connection and maintain orientation
consistently from one connection to another.
8. Remove weld spatter, slivers, and similar surface discontinuities.
9. Remove blemishes and surface irregularities resulting from temporary braces or fixtures
by filling or grinding, before cleaning, treating, and shop priming.
10. Grind tack welds smooth unless incorporated into final welds.
11. Remove backing and runoff tabs, and grind welds smooth.
C. Category AESS 2:
1. Comply with overall profile dimensions of AWS D1.1/D1.1M for welded built-up
members. Keep appearance and quality of welds consistent. Maintain true alignment of
members without warp exceeding specified tolerances.
2. Prepare surfaces according to Part 2 "Shop Priming" Article and SSPC-
SP 6 (WAB)/NACE WAB-3.
3. Grind sheared, punched, and flame-cut edges to remove burrs and provide smooth
surfaces and eased edges.
4. Make intermittent welds appear continuous, using filler or additional welding.

BTBC Phase III October 26, 2020
GE Project No. 0119-0010
Gould Evans
ARCHITECTURALLY EXPOSED STRUCTURAL STEEL FRAMING 051213 - 6
5. Seal weld open ends of hollow structural sections with 3/8-inch (9.5-mm) closure plates.
6. Limit butt and plug weld projections to 1/16 inch (1.6 mm).
7. Install bolt heads on the same side of each connection and maintain orientation
consistently from one connection to another.
8. Remove weld spatter, slivers, and similar surface discontinuities.
9. Remove blemishes and surface irregularities resulting from temporary braces or fixtures
by filling or grinding, before cleaning, treating, and shop priming.
10. Grind tack welds smooth unless incorporated into final welds.
11. Remove backing and runoff tabs, and grind welds smooth.
12. Limit as-fabricated straightness tolerance to one-half that permitted for structural-steel
materials in ANSI/AISC 303.
13. Limit as-fabricated curved structural steel tolerance to that permitted for structural-steel
materials in ANSI/AISC 303.
14. Limit as-fabricated straightness tolerance of welded built-up members to one-half that
permitted by AWS D1.1/D1.1M.
15. Conceal fabrication and erection markings from view in the completed structure.
16. Make welds uniform and smooth.
D. Category AESS 3:
1. Comply with overall profile dimensions of AWS D1.1/D1.1M for welded built-up
members. Keep appearance and quality of welds consistent. Maintain true alignment of
members without warp exceeding specified tolerances.
2. Prepare surfaces according to Part 2 "Shop Priming" Article and SSPC-
SP 6 (WAB)/NACE WAB-3.
3. Grind sheared, punched, and flame-cut edges to remove burrs and provide smooth
surfaces and eased edges.
4. Make intermittent welds appear continuous, using filler or additional welding.
5. Seal weld open ends of hollow structural sections with 3/8-inch (9.5-mm) closure plates.
6. Limit butt and plug weld projections to 1/16 inch (1.6 mm).
7. Install bolt heads on the same side of each connection and maintain orientation
consistently from one connection to another.
8. Remove weld spatter, slivers, and similar surface discontinuities.
9. Remove blemishes and surface irregularities resulting from temporary braces or fixtures
by filling or grinding, before cleaning, treating, and shop priming.
10. Grind tack welds smooth unless incorporated into final welds.
11. Remove backing and runoff tabs, and grind welds smooth.
12. Limit as-fabricated straightness tolerance to one-half that permitted for structural-steel
materials in ANSI/AISC 303.
13. Limit as-fabricated curved structural steel tolerance to that permitted for structural-steel
materials in ANSI/AISC 303.
14. Limit as-fabricated straightness tolerance of welded built-up members to one-half that
permitted by AWS D1.1/D1.1M.
15. Conceal fabrication and erection markings from view in the completed structure.
16. Make welds uniform and smooth.
17. Cut out mill marks from mill material or hide these markings from view in the completed
structure. Where neither method is possible, remove mill marks by grinding and filling
surfaces as approved by Architect.
18. Grind butt and plug welds smooth or fill, removing weld splatter exposed to view.
19. Orient HSS seams as indicated or away from view.

BTBC Phase III October 26, 2020
GE Project No. 0119-0010
Gould Evans
ARCHITECTURALLY EXPOSED STRUCTURAL STEEL FRAMING 051213 - 7
20. Align and match abutting member cross sections.
21. At visible open joints of copes, miters, and cuts, maintain uniform clear gaps of 1/8 inch
(3.2 mm). At closed joints, maintain uniform contact within 1/16 inch (1.6 mm).
22. Fabricate with exposed surfaces smooth, square, and of surface quality approved by
Architect.
E. Category AESS 4:
1. Comply with overall profile dimensions of AWS D1.1/D1.1M for welded built-up
members. Keep appearance and quality of welds consistent. Maintain true alignment of
members without warp exceeding specified tolerances.
2. Prepare surfaces according to Part 2 "Shop Priming" Article and SSPC-
SP 6 (WAB)/NACE WAB-3.
3. Grind sheared, punched, and flame-cut edges to remove burrs and provide smooth
surfaces and eased edges.
4. Make intermittent welds appear continuous, using filler or additional welding.
5. Seal weld open ends of hollow structural sections with 3/8-inch (9.5-mm) closure plates.
6. Limit butt and plug weld projections to 1/16 inch (1.6 mm).
7. Install bolt heads on the same side of each connection and maintain orientation
consistently from one connection to another.
8. Remove weld spatter, slivers, and similar surface discontinuities.
9. Remove blemishes and surface irregularities resulting from temporary braces or fixtures
by filling or grinding, before cleaning, treating, and shop priming.
10. Grind tack welds smooth unless incorporated into final welds.
11. Remove backing and runoff tabs, and grind welds smooth.
12. Limit as-fabricated straightness tolerance to one-half that permitted for structural-steel
materials in ANSI/AISC 303.
13. Limit as-fabricated curved structural steel tolerance to that permitted for structural-steel
materials in ANSI/AISC 303.
14. Limit as-fabricated straightness tolerance of welded built-up members to one-half that
permitted by AWS D1.1/D1.1M.
15. Conceal fabrication and erection markings from view in the completed structure.
16. Make welds uniform and smooth.
17. Cut out mill marks from mill material or hide these markings from view in the completed
structure. Where neither method is possible, remove mill marks by grinding and filling
surfaces as approved by Architect.
18. Grind butt and plug welds smooth or fill, removing weld splatter exposed to view.
19. Orient HSS seams as indicated or away from view.
20. Align and match abutting member cross sections.
21. At visible open joints of copes, miters, and cuts, maintain uniform clear gaps of 1/8 inch
(3.2 mm). At closed joints, maintain uniform contact within 1/16 inch (1.6 mm).
22. Fabricate with exposed surfaces smooth, square, and of surface quality approved by
Architect.
23. Treat HSS seams to appear seamless.
24. Contour and blend welds and weld transitions between members, removing splatter
exposed to view.
25. Fill surface imperfections with filler and sand smooth to achieve surface quality approved
by Architect.
26. Minimize weld show-through and distortion on the opposite side of exposed connections
by grinding to a smooth profile aligned with adjacent material.

BTBC Phase III October 26, 2020
GE Project No. 0119-0010
Gould Evans
ARCHITECTURALLY EXPOSED STRUCTURAL STEEL FRAMING 051213 - 8
F. Erection marks, painted marks, and other marks are permitted on [galvanized-] [corrosion-
resisting (weathering)] steel surfaces of completed structure.
G. Cleaning Corrosion-Resisting (Weathering) AESS: Clean and prepare steel surfaces that are to
remain unpainted according to SSPC-SP 6 (WAB)/NACE WAB-3.
2.6 SHOP CONNECTIONS
A. High-Strength Bolts: Shop install high-strength bolts according to RCSC's "Specification for
Structural Joints Using High-Strength Bolts" for type of bolt and type of joint specified.
1. Joint Type: Pretensioned
2.7 GALVANIZING
A. Hot-Dip Galvanized Finish: Apply zinc coating by the hot-dip process to structural steel
according to ASTM A123/A123M.
1. Do not quench or apply post-galvanizing treatments that might interfere with paint
adhesion.
2. Fill vent and drain holes that are exposed in the finished Work, unless indicated to remain
as weep holes, by plugging with zinc solder and filing off smooth.
3. Galvanize AESS [lintels] <Insert description> attached to structural-steel frame and
located in exterior walls.
2.8 SHOP PRIMING
A. Shop prime steel surfaces, except the following:
1. Surfaces embedded in concrete or mortar. Extend priming of partially embedded
members to a depth of 2 inches (50 mm).
2. Surfaces to be field welded.
3. Surfaces to be high-strength bolted with slip-critical connections.
4. Corrosion-resisting (weathering) steel surfaces.
5. Galvanized surfaces [unless indicated to be painted].
B. Surface Preparation: Clean nongalvanized surfaces to be painted. Remove loose rust and mill
scale and spatter, slag, or flux deposits. Prepare surfaces according to the following
specifications and standards:
1. SSPC-SP 2.
2. SSPC-SP 3.
3. SSPC-SP 7 (WAB)/NACE WAB-4.
4. SSPC-SP 14 (WAB)/NACE WAB-8.
5. SSPC-SP 11.
6. SSPC-SP 6 (WAB)/NACE WAB-3.
7. SSPC-SP 10 (WAB)/NACE WAB-2.
BTBC Phase III October 26, 2020
GE Project No. 0119-0010
Gould Evans
ARCHITECTURALLY EXPOSED STRUCTURAL STEEL FRAMING 051213 - 9
8. SSPC-SP 5 (WAB)/NACE WAB-1.
9. SSPC-SP 8.
C. Preparing Galvanized Steel for Shop Priming: After galvanizing, thoroughly clean steel of
grease, dirt, oil, flux, and other foreign matter, and treat with etching cleaner [or according to
SSPC-SP 16].
D. Priming: Immediately after surface preparation, apply primer according to manufacturer's
written instructions and at rate recommended by SSPC to provide a minimum dry film thickness
of 1.5 mils (0.038 mm). Use priming methods that result in full coverage of joints, corners,
edges, and exposed surfaces.
1. Stripe paint corners, crevices, bolts, welds, and eased edges.
2. Apply two coats of shop paint to surfaces that are inaccessible after assembly or erection.
Change color of second coat to distinguish it from first.
PART 3 - EXECUTION
3.1 EXAMINATION
A. Verify, with steel erector present, elevations of concrete- and masonry-bearing surfaces and
locations of anchor rods, bearing plates, and other embedments for compliance with
requirements.
1. Prepare a certified survey of bearing surfaces, anchor rods, bearing plates, and other
embedments, showing dimensions, locations, angles, and elevations.
B. Examine AESS for twists, kinks, warping, gouges, and other imperfections before erecting.
C. Proceed with installation only after unsatisfactory conditions have been corrected.
3.2 PREPARATION
A. Provide temporary shores, guys, braces, and other supports during erection to keep AESS
secure, plumb, and in alignment against temporary construction loads and loads equal in
intensity to design loads. Remove temporary supports when permanent structural steel,
connections, and bracing are in place unless otherwise indicated.
3.3 ERECTION
A. Take special care during erection to avoid marking or distorting the AESS and to minimize
damage to shop painting. Set AESS accurately in locations and to elevations indicated and
according to ANSI/AISC 303 and ANSI/AISC 360.

BTBC Phase III October 26, 2020
GE Project No. 0119-0010
Gould Evans
ARCHITECTURALLY EXPOSED STRUCTURAL STEEL FRAMING 051213 - 10
1. Remove welded tabs that were used for attaching temporary bracing and safety cabling
and that are exposed to view in the completed Work. Take care to avoid any blemishes,
holes, or unsightly surfaces resulting from the use or removal of temporary elements.
2. Grind tack welds smooth.
3. Remove backing and runoff tabs, and grind welds smooth.
4. Orient bolt heads on the same side of each connection and maintain orientation
consistently from one connection to another.
5. Remove erection bolts in [Category AESS 4] <Insert category> AESS, fill holes with
weld metal or filler, and grind or sand smooth to achieve surface quality approved by
Architect.
6. Fill weld access holes in [Category AESS 4] <Insert category> AESS with weld metal
or filler and grind, or sand smooth to achieve surface quality as approved by Architect.
7. Conceal fabrication and erection markings from view in the completed structure.
B. In addition to ANSI/AISC 303, Section 10 requirements, comply with the following.
1. Erection of [Category AESS 1] [and Category AESS 2]:
a. Erect AESS to the standard frame tolerances specified in ANSI/AISC 303 for non-
AESS.
b. Comply with AWS D1.1/D1.1M. Keep appearance and quality of welds consistent.
Maintain true alignment of members without warp exceeding specified tolerances.
c. Remove weld spatter, slivers, and similar surface discontinuities.
d. Grind off butt and plug weld projections larger than 1/16 inch (1.6 mm).
e. Continuous welds shall be of uniform size and profile.
f. Ream holes that must be enlarged. Use of drift pins or burning is not permitted.
Replace misaligned connection plates where holes cannot be aligned with
acceptable appearance.
g. Splice members only where indicated on Drawings.
h. No torch cutting or field fabrication is permitted.
2. Erection of Category AESS 3:
a. Erect AESS to the standard frame tolerances specified in ANSI/AISC 303 for non-
AESS.
b. Comply with AWS D1.1/D1.1M. Keep appearance and quality of welds consistent.
Maintain true alignment of members without warp exceeding specified tolerances.
c. Remove weld spatter, slivers, and similar surface discontinuities.
d. Grind off butt and plug weld projections larger than 1/16 inch (1.6 mm).
e. Continuous welds shall be of uniform size and profile.
f. Ream holes that must be enlarged. Use of drift pins or burning is not permitted.
Replace misaligned connection plates where holes cannot be aligned with
acceptable appearance.
g. Splice members only where indicated on Drawings.
h. No torch cutting or field fabrication is permitted.
i. Weld profiles, quality, and finish shall be as approved by Architect.
j. Make joint welds, including tack welds, appear continuous by filling intermittent
welds.
3. Erection of Category AESS 4:
BTBC Phase III October 26, 2020
GE Project No. 0119-0010
Gould Evans
ARCHITECTURALLY EXPOSED STRUCTURAL STEEL FRAMING 051213 - 11
a. Erect AESS to the standard frame tolerances specified in ANSI/AISC 303 for non-
AESS.
b. Comply with AWS D1.1/D1.1M. Keep appearance and quality of welds consistent.
Maintain true alignment of members without warp exceeding specified tolerances.
c. Remove weld spatter, slivers, and similar surface discontinuities.
d. Grind off butt and plug weld projections larger than 1/16 inch (1.6 mm).
e. Continuous welds shall be of uniform size and profile.
f. Ream holes that must be enlarged. Use of drift pins or burning is not permitted.
Replace misaligned connection plates where holes cannot be aligned with
acceptable appearance.
g. Splice members only where indicated on Drawings.
h. No torch cutting or field fabrication is permitted.
i. Weld profiles, quality, and finish shall be as approved by Architect.
j. Make joint welds, including tack welds, appear continuous by filling intermittent
welds.
k. Grind welds smooth.
l. Minimize weld show-through and distortion on the opposite side of exposed
connections by grinding to a smooth profile aligned with adjacent material.
m. Oversize welds where ground, contoured, or blended, and grind to provide a
smooth transition, matching profile approved by Architect.
4. Erection of Category AESS C:
a. <Insert requirements>.
3.4 FIELD CONNECTIONS
A. High-Strength Bolts: Install high-strength bolts according to RCSC's "Specification for
Structural Joints Using High-Strength Bolts" for type of bolt and type of joint specified.
1. Joint Type: Pretensioned
3.5 REPAIR
A. Galvanized Surfaces: Clean field welds, bolted connections, and abraded areas, and touchup
galvanizing to comply with ASTM A780/A780M.
B. Touchup Painting:
1. Immediately after erection, clean field welds, bolted connections, and abraded areas of
shop paint, and paint exposed areas with the same material as used for shop painting, to
comply with SSPC-PA 1 for touching up shop-painted surfaces.
a. Clean and prepare surfaces by SSPC-SP 2 hand-tool cleaning or SSPC-SP 3
power-tool cleaning.

BTBC Phase III October 26, 2020
GE Project No. 0119-0010
Gould Evans
ARCHITECTURALLY EXPOSED STRUCTURAL STEEL FRAMING 051213 - 12
2. Cleaning and touchup painting are specified in [Section 099113 "Exterior Painting."]
[Section 099123 "Interior Painting."] [Section 099600 "High-Performance
Coatings."]
C. Touchup Priming: Cleaning and touchup priming are specified in Section 099600 "High-
Performance Coatings."
3.6 FIELD QUALITY CONTROL
A. Testing Agency: Owner will engage a qualified testing agency to inspect AESS as specified in
Section 051200 "Structural Steel Framing." The testing agency is not responsible for enforcing
requirements relating to aesthetic effect.
B. Architect will observe AESS in place to determine acceptability relating to aesthetic effect.
END OF SECTION 051213

BTBC Phase III October 26, 2020
GE Project No. 0119-0010
Gould Evans
STEEL JOIST FRAMING 052100 - 1
SECTION 052100 - STEEL JOIST FRAMING
PART 1 - GENERAL
1.1 RELATED DOCUMENTS
A. Drawings and general provisions of the Contract, including General and Supplementary Conditions and Division 01 Specification Sections, apply to this Section.
1.2 SUMMARY
A. This Section includes the following:
1. K-series steel joists. 2. KCS-type K-series steel joists. 3. K-series steel joist substitutes. 4. Joist accessories.
B. Related Sections include the following:
1. Division 03 Section "Cast-in-Place Concrete" for installing bearing plates in concrete. 2. Division 04 Section "Unit Masonry" for installing bearing plates in unit masonry.
1.3 DEFINITIONS
A. SJI "Specifications": Steel Joist Institute's "Standard Specifications, Load Tables and Weight Tables for Steel Joists and Joist Girders."
B. Special Joists: Joists requiring modification by the manufacturer to support nonuniform, unequal, or special loading conditions that invalidate SJI's "Standard Specifications Load Tables and Weight Tables for Steel Joists and Joist Girders."
1.4 PERFORMANCE REQUIREMENTS
A. Structural Performance: Provide special joists and connections capable of withstanding design loads within limits and under conditions indicated.
B. Design joists to withstand design loads with live load deflections no greater than the following:
1. Floor Joists: Vertical deflection of 1/360 of the span. 2. Roof Joists: Vertical deflection of 1/360 of the span.
1.5 SUBMITTALS
A. Product Data: For each type of joist, accessory, and product indicated.

BTBC Phase III October 26, 2020
GE Project No. 0119-0010
Gould Evans
STEEL JOIST FRAMING 052100 - 2
B. Shop Drawings: Show layout, mark, number, type, location, and spacings of joists. Include joining and anchorage details, bracing, bridging, accessories; splice and connection locations and details; and attachments to other construction.
1. Indicate locations and details of anchorage devices and bearing plates to be embedded in other construction.
2. Comprehensive engineering analysis signed and sealed certified by the qualified professional engineer responsible for its preparation.
C. Qualification Data: For firms and persons specified in "Quality Assurance" Article to demonstrate their capabilities and experience. Include lists of completed projects with project names and addresses, names and addresses of architects and owners, and other information specified.
1.6 QUALITY ASSURANCE
A. Manufacturer Qualifications: A firm experienced in manufacturing joists similar to those indicated for this Project and with a record of successful in-service performance.
1. Manufacturer must be certified by SJI to manufacture joists complying with SJI standard specifications and load tables.
2. Assumes responsibility for engineering special joists to comply with performance requirements. This responsibility includes preparation of Shop Drawings and comprehensive engineering analysis by a qualified professional engineer.
3. Professional Engineer Qualifications: A professional engineer who is legally authorized to practice in jurisdiction where Project is located and who is experienced in providing engineering services of the kind indicated. Engineering services are defined as those performed for installations of joists that are similar to those indicated for this Project in material, design, and extent.
B. SJI Specifications: Comply with SJI's "Standard Specifications Load Tables and Weight Tables for Steel Joists and Joist Girders" (hereafter, "Specifications"), applicable to types of joists indicated.
C. Welding: Qualify procedures and personnel according to AWS D1.1, "Structural Welding Code--Steel"; and AWS D1.3 "Structural Welding Code--Sheet Steel."
1.7 DELIVERY, STORAGE, AND HANDLING
A. Deliver, store, and handle joists as recommended in SJI's "Specifications."
B. Protect joists from corrosion, deformation, and other damage during delivery, storage, and handling.
1.8 SEQUENCING
A. Deliver steel bearing plates and other devices to be built into concrete and masonry construction.
PART 2 - PRODUCTS

BTBC Phase III October 26, 2020
GE Project No. 0119-0010
Gould Evans
STEEL JOIST FRAMING 052100 - 3
2.1 MATERIALS
A. Steel: Comply with SJI's "Specifications" for chord and web members.
B. Steel Bearing Plates: ASTM A 36/A 36M.
C. Carbon-Steel Bolts and Threaded Fasteners: ASTM A 307, Grade A (ASTM F 568M, Property Class 4.6), carbon-steel, hex-head bolts and threaded fasteners; carbon-steel nuts; and flat, unhardened steel washers.
1. Finish: Plain, uncoated.
D. High-Strength Bolts and Nuts: ASTM A 325 (ASTM A 325M), Type 1, heavy hex steel structural bolts, heavy hex carbon-steel nuts, and hardened carbon-steel washers.
1. Finish: Plain, uncoated.
E. Welding Electrodes: Comply with AWS standards.
F. Galvanizing Repair Paint: SSPC-Paint 20 or DOD-P-21035.
2.2 PRIMERS
A. Primer: SSPC-Paint 15, Type I, red oxide; FS TT-P-636, red oxide; or manufacturer's standard shop primer complying with performance requirements of either of these red-oxide primers.
2.3 OPEN-WEB K-SERIES STEEL JOISTS
A. Manufacture steel joists according to "Standard Specifications for Open Web Steel Joists, K-Series," in SJI's "Specifications," with steel-angle top- and bottom-chord members, underslung ends, and parallel top chord; of joist type indicated.
1. Joist Type: K-series steel joists and KCS-type K-series steel joists.
B. Comply with AWS requirements and procedures for shop welding, appearance, quality of welds, and methods used in correcting welding work.
C. Provide holes in chord members for connecting and securing other construction to joists.
D. Top-Chord Extensions: Extend top chords of joists with SJI's Type S top-chord extensions where indicated, complying with SJI's "Specifications."
E. Extended Ends: Extend bearing ends of joists with SJI's Type R extended ends where indicated, complying with SJI's "Specifications."
F. Camber joists according to SJI's "Specifications."
G. Equip bearing ends of joists with manufacturer's standard beveled ends or sloped shoes if joist slope exceeds 1/4 inch per 12 inches (1:48).
2.4 JOIST ACCESSORIES

BTBC Phase III October 26, 2020
GE Project No. 0119-0010
Gould Evans
STEEL JOIST FRAMING 052100 - 4
A. Bridging: Provide bridging anchors and number of rows of horizontal or diagonal bridging of material, size, and type required by SJI's "Specifications" for type of joist, chord size, spacing, and span.
B. Fabricate steel bearing plates with integral anchorages of sizes and thicknesses indicated. Shop prime paint
C. Steel bearing plates with integral anchorages are specified in Division 5 Section "Metal Fabrications."
D. Supply ceiling extensions, either extended bottom-chord elements or a separate extension unit of enough strength to support ceiling construction. Extend ends to within 1/2 inch (13 mm) of finished wall surface, unless otherwise indicated.
E. Supply miscellaneous accessories, including splice plates and bolts required by joist manufacturer to complete joist installation.
2.5 CLEANING AND SHOP PAINTING
A. Clean and remove loose scale, heavy rust, and other foreign materials from fabricated joists and accessories to be primed by hand-tool cleaning, SSPC-SP 2 or power-tool cleaning, SSPC-SP 3.
B. Do not prime paint joists and accessories to receive sprayed fire-resistive materials.
C. Apply one shop coat of primer to joists and joist accessories to be primed to provide a continuous, dry paint film not less than 1 mil (0.025 mm) thick.
D. Painting of joists and joist accessories is specified in Division 9 Section "Painting."
PART 3 - EXECUTION
3.1 EXAMINATION
A. Examine supporting substrates, embedded bearing plates, and abutting structural framing, with Installer present, for compliance with requirements for installation tolerances and other conditions affecting performance.
B. Proceed with installation only after unsatisfactory conditions have been corrected.
3.2 INSTALLATION
A. Do not install joists until supporting construction is in place and secured.
B. Install joists and accessories plumb, square, and true to line; securely fasten to supporting construction according to SJI's "Specifications," joist manufacturer's written recommendations, and requirements in this Section.
1. Before installation, splice joists delivered to Project site in more than one piece. 2. Space, adjust, and align joists accurately in location before permanently fastening.

BTBC Phase III October 26, 2020
GE Project No. 0119-0010
Gould Evans
STEEL JOIST FRAMING 052100 - 5
3. Install temporary bracing and erection bridging, connections, and anchors to ensure that joists are stabilized during construction.
4. Delay rigidly connecting bottom-chord extensions to columns or supports until dead loads have been applied.
C. Field weld joists to supporting steel bearing plates and framework. Coordinate welding sequence and procedure with placement of joists. Comply with AWS requirements and procedures for welding, appearance and quality of welds, and methods used in correcting welding work.
D. Bolt joists to supporting steel framework using carbon-steel bolts, unless otherwise indicated.
E. Bolt joists to supporting steel framework using high-strength structural bolts, unless otherwise indicated. Comply with RCSC's "Allowable Stress Design Specification for Structural Joints Using ASTM A 325 or ASTM A 490 Bolts" for high-strength structural bolt installation and tightening requirements.
F. Install and connect bridging concurrently with joist erection, before construction loads are applied. Anchor ends of bridging lines at top and bottom chords if terminating at walls or beams.
3.3 FIELD QUALITY CONTROL
A. Testing Agency: Owner will engage a qualified independent testing and inspecting agency to inspect field welds and high-strength bolted connections.
B. Field welds will be visually inspected according to AWS D1.1/D1.1M.
C. In addition to visual inspection, field welds for moment connections or as indicated on the drawings will be tested according to AWS D1.1 and the following procedures, as applicable:
1. Radiographic Testing: ASTM E 94 and ASTM E 142. 2. Magnetic Particle Inspection: ASTM E 709. 3. Ultrasonic Testing: ASTM E 164. 4. Liquid Penetrant Inspection: ASTM E 165.
D. Bolted connections will be visually inspected.
1. High-strength, field-bolted connections will be tested and verified according to procedures in RCSC's "Allowable Stress Design Specification for Structural Joints Using ASTM A 325 or ASTM A 490 Bolts."
E. Correct deficiencies in Work that inspections and test reports have indicated are not in compliance with specified requirements.
F. Additional testing will be performed to determine compliance of corrected Work with specified requirements.
3.4 REPAIRS AND PROTECTION
A. Repair damaged galvanized coatings on galvanized items with galvanized repair paint according to ASTM A 780 and manufacturer's written instructions.

BTBC Phase III October 26, 2020
GE Project No. 0119-0010
Gould Evans
STEEL JOIST FRAMING 052100 - 6
B. Touchup Painting: After installation, promptly clean, prepare, and prime or reprime field connections, rust spots, and abraded surfaces of prime-painted joists and accessories, bearing plates and abutting structural steel.
1. Clean and prepare surfaces by hand-tool cleaning, SSPC-SP 2, or power-tool cleaning, SSPC-SP 3.
2. Apply a compatible primer of the same type as the shop primer used on adjacent surfaces.
C. Touchup Painting: Cleaning and touchup painting are specified in Division 9 Section "Painting."
D. Provide final protection and maintain conditions, in a manner acceptable to manufacturer and Installer, that ensure joists and accessories are without damage or deterioration at time of Substantial Completion.
END OF SECTION 052100

BTBC Phase III October 26, 2020
GE Project No. 0119-0010
Gould Evans
STEEL DECKING 053100 - 1
SECTION 053100 - STEEL DECKING
PART 1 - GENERAL
1.1 RELATED DOCUMENTS
A. Drawings and general provisions of the Contract, including General and Supplementary Conditions and Division 01 Specification Sections, apply to this Section.
1.2 SUMMARY
A. This Section includes the following:
1. Roof deck. 2. Composite floor deck. 3. Non-composite floor deck.
B. Related Sections include the following:
1. Division 03 Section "Cast-in-Place Concrete" for concrete fill. 2. Division 05 Section "Structural Steel Framing" for shop- and field-welded shear
connectors. 3. Division 05 Section "Metal Fabrications" for framing deck openings with miscellaneous
steel shapes. 4. Division 09 painting Sections for repair painting of primed deck.
1.3 SUBMITTALS
A. Product Data: For each type of deck, accessory, and product indicated.
B. Shop Drawings: Show layout and types of deck panels, anchorage details, reinforcing channels, pans, deck openings, special jointing, accessories, and attachments to other construction.
C. Product Certificates: Signed by steel deck manufacturers certifying that products furnished comply with requirements.
D. Welding certificates.
E. Field quality-control test and inspection reports.
F. Product Test Reports: Based on evaluation of comprehensive tests performed by a qualified testing agency, indicating that each of the following complies with requirements:
1. Power-actuated mechanical fasteners.
1.4 QUALITY ASSURANCE

BTBC Phase III October 26, 2020
GE Project No. 0119-0010
Gould Evans
STEEL DECKING 053100 - 2
A. Installer Qualifications: An experienced installer who has completed steel deck similar in material, design, and extent to that indicated for this Project and whose work has resulted in construction with a record of successful in-service performance.
B. Manufacturer/Fabricator: certified and compliant with AISC, SJI, or other applicable governing authority to ensure no delays are encountered in fabrication or delivery due to lack of proper certification.
C. Testing Agency Qualifications: An independent testing agency, acceptable to authorities having jurisdiction, qualified according to ASTM E 329 to conduct the testing indicated, as documented according to ASTM E 548.
D. Welding: Qualify procedures and personnel according to AWS D1.1, "Structural Welding Code--Steel," and AWS D1.3, "Structural Welding Code--Sheet Steel."
E. Fire-Test-Response Characteristics: Where indicated, provide steel deck units identical to those steel deck units tested for fire resistance per ASTM E 119 by a testing and inspection agency acceptable to authorities having jurisdiction.
1. Fire-Resistance Ratings: Indicated by design designations from UL's "Fire Resistance Directory" or from the listings of another testing and inspecting agency.
2. Steel deck units shall be identified with appropriate markings of applicable testing and inspecting agency.
F. AISI Specifications: Calculate structural characteristics of steel deck according to AISI's "Specification for the Design of Cold-Formed Steel Structural Members."
G. FM Listing: Provide steel roof deck evaluated by FM and listed in FM's "Approval Guide, Building Materials" for Class 1 fire rating and Class 1-90 windstorm ratings.
1.5 DELIVERY, STORAGE, AND HANDLING
A. Protect steel deck from corrosion, deformation, and other damage during delivery, storage, and handling.
B. Stack steel deck on platforms or pallets and slope to provide drainage. Protect with a waterproof covering and ventilate to avoid condensation.
PART 2 - PRODUCTS
2.1 MANUFACTURERS
A. Available Manufacturers: Subject to compliance with requirements, manufacturers offering products that may be incorporated into the Work include, but are not limited to, the following:
B. Manufacturers: Subject to compliance with requirements, provide products by one of the following:
1. Steel Deck:
a. ASC Profiles, Inc.

BTBC Phase III October 26, 2020
GE Project No. 0119-0010
Gould Evans
STEEL DECKING 053100 - 3
b. Canam Steel Corp.;The Canam Manac Group. c. Consolidated Systems, Inc. d. DACS, Inc. e. D-Mac Industries Inc. f. Epic Metals Corporation. g. Marlyn Steel Decks, Inc. h. New Millennium Building Systems, LLC. i. Nucor Corp.; Vulcraft Division. j. Roof Deck, Inc. k. United Steel Deck, Inc. l. Valley Joist; Division of EBSCO Industries, Inc. m. Verco Manufacturing Co. n. Wheeling Corrugating Company; Div. of Wheeling-Pittsburgh Steel Corporation.
2.2 ROOF DECK
A. Steel Roof Deck: Fabricate panels, without top-flange stiffening grooves, to comply with "SDI Specifications and Commentary for Steel Roof Deck," in SDI Publication No. 30, and with the following:
1. Galvanized Steel Sheet: ASTM A 653/A 653M, Structural Steel (SS), Grade 33 (230, G60 (Z180) zinc coating.
2. Deck Profile: as indicated on the drawings. 3. Profile Depth: as indicated on the drawings. 4. Design Uncoated-Steel Thickness: as indicated on the drawings. 5. Span Condition: Triple span or more. 6. Side Laps: Overlapped or interlocking seam at Contractor's option with fastener spacing
as indicated on the drawings.
2.3 COMPOSITE FLOOR DECK
A. Composite Steel Floor Deck: Fabricate panels, with integrally embossed or raised pattern ribs and interlocking side laps, to comply with "SDI Specifications and Commentary for Composite Steel Floor Deck," in SDI Publication No. 30, with the minimum section properties indicated, and with the following:
1. Galvanized Steel Sheet: ASTM A 653/A 653M, Structural Steel (SS), Grade 50, G60 (Z180) zinc coating.
2. Profile Depth: 3 inches (51 mm). 3. Design Uncoated-Steel Thickness: As indicated. 4. Span Condition: Triple span or more.
2.4 NONCOMPOSITE FORM DECK
A. Noncomposite Form Deck: Fabricate ribbed-steel sheet noncomposite deck panels used as a form to comply with SDI NC, with the minimum section properties indicated, and with the following:
1. Galvanized-Steel Sheet: ASTM A653/A653M, Structural Steel (SS), Grade 33 (230), G60 (Z180)

BTBC Phase III October 26, 2020
GE Project No. 0119-0010
Gould Evans
STEEL DECKING 053100 - 4
2. Profile Depth: As indicated. 3. Design Uncoated-Steel Thickness: As indicated. 4. Span Condition: Triple span or more 5. Side Laps: Overlapped
2.5 ACCESSORIES
A. General: Provide manufacturer's standard accessory materials for deck that comply with requirements indicated.
B. Side-Lap Fasteners: Corrosion-resistant, hexagonal washer head; self-drilling, carbon-steel screws, No. 10 (4.8 mm) minimum diameter.
C. Flexible Closure Strips: Vulcanized, closed-cell, synthetic rubber.
D. Miscellaneous Sheet Metal Deck Accessories: Steel sheet, minimum yield strength of 33,000 psi (230 MPa), not less than 0.0359-inch (0.91-mm) design uncoated thickness, of same material and finish as deck; of profile indicated or required for application.
E. Steel Sheet Accessories: Steel sheet, of same material, finish, and thickness as deck, unless otherwise indicated.
F. Pour Stops and Girder Fillers: Steel sheet, minimum yield strength of 33,000 psi (230 MPa), of same material and finish as deck, and of thickness and profile recommended by SDI Publication No. 29 for overhang and slab depth.
G. Column Closures, End Closures, Z-Closures, and Cover Plates: Steel sheet, of same material, finish, and thickness as deck, unless otherwise indicated.
H. Weld Washers: Uncoated steel sheet, shaped to fit deck rib, 0.0598 inch (1.52 mm) thick, with factory-punched hole of 3/8-inch (9.5-mm) minimum diameter.
I. Recessed Sump Pans: Single-piece steel sheet, 0.0747 inch (1.90 mm) thick, of same material and finish as deck, with 3-inch- (76-mm-) wide flanges and level recessed pans of 1-1/2- inch (38-mm) minimum depth. For drains, cut holes in the field.
J. Flat Sump Plate: Single-piece steel sheet, 0.0747 inch (1.90 mm) thick, of same material and finish as deck. For drains, cut holes in the field.
K. Shear Connectors: ASTM A 108, Grades 1010 through 1020 headed stud type, cold-finished carbon steel, AWS D1.1, Type B, with arc shields.
L. Galvanizing Repair Paint: ASTM A 780.
M. Repair Paint: Lead- and chromate-free rust-inhibitive primer complying with performance requirements of FS TT-P-664.
PART 3 - EXECUTION
3.1 EXAMINATION

BTBC Phase III October 26, 2020
GE Project No. 0119-0010
Gould Evans
STEEL DECKING 053100 - 5
A. Examine supporting frame and field conditions for compliance with requirements for installation tolerances and other conditions affecting performance.
3.2 INSTALLATION, GENERAL
A. Install deck panels and accessories according to applicable specifications and commentary in SDI Publication No. 29, manufacturer's written instructions, and requirements in this Section.
B. Install temporary shoring before placing deck panels, if required to meet deflection limitations.
C. Locate decking bundles to prevent overloading of supporting members.
D. Place deck panels on supporting frame and adjust to final position with ends accurately aligned and bearing on supporting frame before being permanently fastened. Do not stretch or contract side-lap interlocks.
E. Place deck panels flat and square and fasten to supporting frame without warp or deflection.
F. Cut and neatly fit deck panels and accessories around openings and other work projecting through or adjacent to decking.
G. Provide additional reinforcement and closure pieces at openings as required for strength, continuity of decking, and support of other work.
H. Comply with AWS requirements and procedures for manual shielded metal arc welding, appearance and quality of welds, and methods used for correcting welding work.
I. Mechanical fasteners may be used in lieu of welding to fasten deck. Locate mechanical fasteners and install according to deck manufacturer's written instructions.
3.3 ROOF DECK INSTALLATION
A. Fasten roof deck panels to steel supporting members by arc spot (puddle) welds of the surface diameter indicated or arc seam welds with an equal perimeter, but not less than 1-1/2 inches (38 mm) long, and as follows:
1. Weld Diameter: 5/8 inch (16 mm), nominal. 2. Weld Spacing: Weld edge and interior ribs of deck units with a minimum of five welds per
deck unit at each support and as required to attain the diaphragm shear capacity requirement shown on the drawing. Space welds 12 inches (305 mm) apart in the field of the roof and 6 inches (150 mm) apart in roof corners and perimeter.
3. Weld Washers: Install weld washers at each weld location.
B. Side-Lap and Perimeter Edge Fastening: Fasten side laps and perimeter edges of panels between supports, at intervals not exceeding the lesser of 1/2 of the span or 18 inches (450 mm), and as follows:
1. Mechanically fasten with self-drilling No. 10 (4.8-mm-) diameter or larger carbon-steel screws.
C. End Bearing: Install deck ends over supporting frame with a minimum end bearing of 1-1/2 inches (38 mm), with end joints as follows:

BTBC Phase III October 26, 2020
GE Project No. 0119-0010
Gould Evans
STEEL DECKING 053100 - 6
1. Lapped 2 inches (51 mm) minimum or butted at Contractor's option.
D. Roof Sump Pans and Sump Plates: Install over openings provided in roof decking and weld flanges to top of deck. Space welds not more than 12 inches (305 mm) apart with at least 1 weld at each corner.
E. Miscellaneous Roof Deck Accessories: Install ridge and valley plates, finish strips, cover plates, end closures, and reinforcing channels according to deck manufacturer's written instructions. Weld to substrate to provide a complete deck installation.
F. Flexible Closure Strips: Install flexible closure strips over partitions, walls, and where indicated. Install with adhesive according to manufacturer's written instructions to ensure complete closure.
G. Sound-Absorbing Insulation: Installation into topside ribs of deck as specified.
3.4 FLOOR DECK INSTALLATION
A. Fasten floor deck panels to steel supporting members by arc spot (puddle) welds of the surface diameter indicated and as follows:
1. Weld Diameter: 5/8 inch (16 mm) nominal. 2. Weld Spacing: Weld edge ribs of panels at each support. Space additional welds an
average of 12 inches (305 mm) apart, but not more than 18 inches (457 mm) apart. 3. Weld Washers: Install weld washers at each weld location.
B. Side-Lap and Perimeter Edge Fastening: Fasten side laps and perimeter edges of panels between supports, at intervals not exceeding the lesser of 1/2 of the span or 36 inches (910 mm), and as follows:
1. Mechanically fasten with self-drilling No. 10 (4.8-mm-) diameter or larger carbon-steel screws.
C. End Bearing: Install deck ends over supporting frame with a minimum end bearing of 2 inches (38 mm), with end joints as follows:
1. Lapped or butted at Contractor's option.
D. Shear Connectors: Weld shear connectors through deck to supporting frame according to AWS D1.1 and manufacturer's written instructions. Butt end joints of deck panels; do not overlap. Remove and discard arc shields after welding shear connectors.
E. Pour Stops and Girder Fillers: Weld steel sheet pour stops and girder fillers to supporting structure according to SDI recommendations, unless otherwise indicated.
F. Floor Deck Closures: Weld steel sheet column closures, cell closures, and Z-closures to deck, according to SDI recommendations, to provide tight-fitting closures at open ends of ribs and sides of decking. Weld cover plates at changes in direction of floor deck panels, unless otherwise indicated.
3.5 FIELD QUALITY CONTROL

BTBC Phase III October 26, 2020
GE Project No. 0119-0010
Gould Evans
STEEL DECKING 053100 - 7
A. Testing: Design Builder will engage a qualified independent testing agency to perform field quality-control testing.
B. Field welds will be subject to inspection.
C. Shear connector stud welds will be inspected and tested according to AWS D1.1 for stud welding and as follows:
1. Shear connector stud welds will be visually inspected. 2. Bend tests will be performed if visual inspections reveal less than a full 360-degree flash
or welding repairs to any shear connector stud. 3. Tests will be conducted on additional shear connector studs if weld fracture occurs on
shear connector studs already tested according to AWS D1.1.
D. Testing agency will report test results promptly and in writing to Contractor and Architect.
E. Remove and replace work that does not comply with specified requirements.
F. Additional testing and inspecting, at Contractor's expense, will be performed to determine compliance of corrected work with specified requirements.
3.6 REPAIRS AND PROTECTION
A. Galvanizing Repairs: Prepare and repair damaged galvanized coatings on both surfaces of deck with galvanized repair paint according to ASTM A 780 and manufacturer's written instructions.
B. Repair Painting: Wire brush and clean rust spots, welds, and abraded areas on both surfaces of prime-painted deck immediately after installation, and apply repair paint.
1. Apply repair paint, of same color as adjacent shop-primed deck, to bottom surfaces of deck exposed to view.
2. Wire brushing, cleaning, and repair painting of bottom deck surfaces are included in Division 09.
C. Provide final protection and maintain conditions to ensure that steel deck is without damage or deterioration at time of Substantial Completion.
END OF SECTION 053100


BTBC Phase III October 26, 2020
GE Project No. 0119-0010
Gould Evans
COLD FORMED METAL FRAMING 054000 - 1
SECTION 054000 - COLD-FORMED METAL FRAMING
PART 1 - GENERAL
1.1 RELATED DOCUMENTS
A. Drawings and general provisions of the Contract, including General and Supplementary Conditions and Division 01 Specification Sections, apply to this Section.
1.2 SUMMARY
A. This Section includes the following: 1. Exterior non-load-bearing wall framing, including strapping for masonry flashing
termination bar. 2. Ceiling joist framing.
B. Related Sections include the following:
1. Division 05 Section "Metal Fabrications" for masonry shelf angles and connections. 2. Division 09 Section "Non-Structural Metal Framing" for interior non-load-bearing, metal-
stud framing and ceiling-suspension assemblies. 3. Division 09 Section "Gypsum Board Shaft Wall Assemblies" for interior non-load-bearing,
metal-stud-framed, shaft-wall assemblies.
1.3 PERFORMANCE REQUIREMENTS
A. Structural Performance: Provide cold-formed metal framing capable of withstanding design loads within limits and under conditions indicated.
1. Design Loads: As indicated on structural frames. 2. Deflection Limits: Design framing systems to withstand design loads without deflections
greater than the following: a. Exterior Non-Load-Bearing Framing: Horizontal deflection of 1/360 except where
clad with masonry veneer, limit shall be 1/600. 3. Design framing systems to provide for movement of framing members without damage or
overstressing, sheathing failure, connection failure, undue strain on fasteners and anchors, or other detrimental effects when subject to a maximum ambient temperature change of 120 deg F (67 deg C).
4. Design framing system to maintain clearances at openings, to allow for construction tolerances, and to accommodate live load deflection of primary building structure as follows: a. Upward and downward movement of 3/4 inch (19 mm).
B. Cold-Formed Steel Framing, General: Design according to AISI's "Standard for Cold-Formed Steel Framing - General Provisions."
1. Headers: Design according to AISI's "Standard for Cold-Formed Steel Framing - Header Design."

BTBC Phase III October 26, 2020
GE Project No. 0119-0010
Gould Evans
COLD FORMED METAL FRAMING 054000 - 2
2. Design exterior non-load-bearing wall framing to accommodate horizontal deflection without regard for contribution of sheathing materials.
1.4 SUBMITTALS
A. Product Data: For each type of cold-formed metal framing product and accessory indicated.
B. Shop Drawings: Show layout, spacings, sizes, thicknesses, and types of cold-formed metal framing; fabrication; and fastening and anchorage details, including mechanical fasteners. Show reinforcing channels, opening framing, supplemental framing, strapping, bracing, bridging, splices, accessories, connection details, and attachment to adjoining work.
1. For cold-formed metal framing indicated to comply with design loads, include structural analysis data signed and sealed by the qualified professional engineer responsible for their preparation.
2. Review stud layout with Masonry Consultant for studs at exterior masonry veneer walls.
C. Welding certificates.
D. Qualification Data: For professional engineer.
E. Product Test Reports: From a qualified testing agency, unless otherwise stated, indicating that each of the following complies with requirements, based on evaluation of comprehensive tests for current products:
1. Steel sheet. 2. Expansion anchors. 3. Power-actuated anchors. 4. Mechanical fasteners. 5. Vertical deflection clips. 6. Horizontal drift deflection clips 7. Miscellaneous structural clips and accessories.
F. Research/Evaluation Reports: For cold-formed metal framing.
1.5 QUALITY ASSURANCE
A. Engineering Responsibility: Preparation of Shop Drawings, design calculations, and other structural data by a qualified professional engineer.
B. Testing Agency Qualifications: An independent testing agency, acceptable to authorities having jurisdiction, qualified according to ASTM E 329 to conduct the testing indicated.
C. Product Tests: Mill certificates or data from a qualified independent testing agency indicating steel sheet complies with requirements, including base-metal thickness, yield strength, tensile strength, total elongation, chemical requirements and metallic-coating thickness.
D. Welding: Qualify procedures and personnel according to AWS D1.1/D1.1M, "Structural Welding Code--Steel," and AWS D1.3, "Structural Welding Code--Sheet Steel."

BTBC Phase III October 26, 2020
GE Project No. 0119-0010
Gould Evans
COLD FORMED METAL FRAMING 054000 - 3
E. Fire-Test-Response Characteristics: Where indicated, provide cold-formed metal framing identical to that of assemblies tested for fire resistance per ASTM E 119 by a testing and inspecting agency acceptable to authorities having jurisdiction.
F. AISI Specifications and Standards: Comply with AISI's "North American Specification for the Design of Cold-Formed Steel Structural Members" and its "Standard for Cold-Formed Steel Framing - General Provisions." 1. Comply with AISI's "Standard for Cold-Formed Steel Framing - Header Design."
G. Preinstallation Conference: Conduct conference at Project site to comply with requirements in Division 01 Section "Project Management and Coordination."
1.6 DELIVERY, STORAGE, AND HANDLING
A. Protect cold-formed metal framing from corrosion, deformation, and other damage during delivery, storage, and handling.
B. Store cold-formed metal framing, protect with a waterproof covering, and ventilate to avoid condensation.
PART 2 - PRODUCTS
2.1 MANUFACTURERS
A. Available Manufacturers: Subject to compliance with requirements, manufacturers offering cold-formed metal framing that may be incorporated into the Work include, but are not limited to, the following:
B. Manufacturers: Subject to compliance with requirements, provide cold-formed metal framing by one of the following:
1. Allied Studco. 2. AllSteel Products, Inc. 3. California Expanded Metal Products Company. 4. Clark Steel Framing. 5. Consolidated Fabricators Corp.; Building Products Division. 6. Craco Metals Manufacturing, LLC. 7. Custom Stud, Inc. 8. Dale/Incor. 9. Design Shapes in Steel. 10. Dietrich Metal Framing; a Worthington Industries Company. 11. Formetal Co. Inc. (The). 12. Innovative Steel Systems. 13. MarinoWare; a division of Ware Industries. 14. Quail Run Building Materials, Inc. 15. SCAFCO Corporation. 16. Southeastern Stud & Components, Inc. 17. Steel Construction Systems. 18. Steeler, Inc. 19. Super Stud Building Products, Inc. 20. United Metal Products, Inc.

BTBC Phase III October 26, 2020
GE Project No. 0119-0010
Gould Evans
COLD FORMED METAL FRAMING 054000 - 4
2.2 MATERIALS
A. Steel Sheet: ASTM A 1003/A 1003M, Structural Grade, Type H, metallic coated, of grade and coating weight as follows:
1. Grade: As required by structural performance. 2. Coating: G60 (Z180.
B. Steel Sheet for Vertical Deflection, Drift Clips: ASTM A 653/A 653M, structural steel, zinc coated, of grade and coating as follows:
1. Grade: As required by structural performance. 2. Coating: G90 (Z275).
2.3 EXTERIOR NON-LOAD-BEARING WALL FRAMING
A. Steel Studs: Manufacturer's standard C-shaped steel studs, of web depths indicated, punched, with stiffened flanges, and as follows (unless otherwise noted on the drawings):
1. Minimum Base-Metal Thickness: 0.0428 inch (1.09 mm). 2. Flange Width: 1-5/8 inches (41 mm).
B. Steel Track: Manufacturer's standard U-shaped steel track, of web depths indicated, unpunched, with unstiffened flanges, and as follows:
1. Minimum Base-Metal Thickness: Matching steel studs. 2. Flange Width: 1-1/4 inches (32 mm).
C. Vertical Deflection Clips: Manufacturer's standard clips, capable of accommodating upward and downward vertical displacement of primary structure through positive mechanical attachment to stud web.
1. Available Manufacturers: Subject to compliance with requirements, manufacturers offering products that may be incorporated into the Work include, but are not limited to, the following:
2. Manufacturers: Subject to compliance with requirements, provide products by one of the following:
a. Dietrich Metal Framing; a Worthington Industries Company. b. MarinoWare, a division of Ware Industries. c. SCAFCO Corporation d. The Steel Network, Inc.
D. Single Deflection Track: Manufacturer's single, deep-leg, U-shaped steel track; unpunched, with unstiffened flanges, of web depth to contain studs while allowing free vertical movement, with flanges designed to support horizontal and lateral loads and transfer them to the primary structure, and as follows:
1. Minimum Base-Metal Thickness: Matching connected studs. 2. Flange Width: 1 inch (25 mm) plus the design gap noted on drawings (3/4” min).
E. Double Deflection Tracks: Manufacturer's double, deep-leg, U-shaped steel tracks, consisting of nested inner and outer tracks; unpunched, with unstiffened flanges.

BTBC Phase III October 26, 2020
GE Project No. 0119-0010
Gould Evans
COLD FORMED METAL FRAMING 054000 - 5
1. Outer Track: Of web depth to allow free vertical movement of inner track, with flanges designed to support horizontal and lateral loads and transfer them to the primary structure, and as follows: a. Minimum Base-Metal Thickness: Matching connecting studs. b. Flange Width: 1 inch (25 mm) plus the design gap noted on drawings (3/4” min).
2. Inner Track: Of web depth indicated, and as follows: a. Minimum Base-Metal Thickness: 0.0428 inch (1.09 mm).
F. Drift Clips: Manufacturer's standard bypass or head clips, capable of isolating wall stud from upward and downward vertical displacement and lateral drift of primary structure.
G. Horizontal Strapping: Manufacturer's standard flat strapping on exterior face of steel studs at masonry termination bars and as follows (unless otherwise noted on the drawings):
1. Minimum Base-Metal Thickness: 0.0428 inch (1.09 mm). 2. Width: 4 inches.
2.4 SOFFIT FRAMING
A. Exterior Soffit Frame: Manufacturer's standard C-shaped steel sections, of web depths indicated, with stiffened flanges, and as follows:
1. Minimum Base-Metal Thickness:0.0428 inch (1.09 mm). 2. Flange Width: 1-5/8 inches (41 mm), minimum.
2.5 FRAMING ACCESSORIES
A. Fabricate steel-framing accessories from steel sheet, ASTM A 1003/A 1003M, Structural Grade, Type H, metallic coated, of same grade and coating weight used for framing members.
B. Provide accessories of manufacturer's standard thickness and configuration, unless otherwise indicated, as follows:
1. Supplementary framing. 2. Bracing, bridging, and solid blocking. 3. Web stiffeners. 4. Anchor clips. 5. End clips. 6. Foundation clips. 7. Gusset plates. 8. Stud kickers, knee braces, and girts. 9. Joist hangers and end closures. 10. Hole reinforcing plates. 11. Backer plates.
2.6 ANCHORS, CLIPS, AND FASTENERS
A. Steel Shapes and Clips: ASTM A 36/A 36M, zinc coated by hot-dip process according to ASTM A 123/A 123M.

BTBC Phase III October 26, 2020
GE Project No. 0119-0010
Gould Evans
COLD FORMED METAL FRAMING 054000 - 6
B. Expansion Anchors: Fabricated from corrosion-resistant materials, with capability to sustain, without failure, a load equal to 5 times design load, as determined by testing per ASTM E 488 conducted by a qualified independent testing agency.
C. Power-Actuated Anchors: Fastener system of type suitable for application indicated, fabricated from corrosion-resistant materials, with capability to sustain, without failure, a load equal to 10 times design load, as determined by testing per ASTM E 1190 conducted by a qualified independent testing agency.
D. Mechanical Fasteners: ASTM C 1513, corrosion-resistant-coated, self-drilling, self-tapping steel drill screws.
1. Head Type: Low-profile head beneath sheathing, manufacturer's standard elsewhere.
E. Welding Electrodes: Comply with AWS standards.
2.7 MISCELLANEOUS MATERIALS
A. Galvanizing Repair Paint: SSPC-Paint 20.
B. Cement Grout: Portland cement, ASTM C 150, Type I; and clean, natural sand, ASTM C 404. Mix at ratio of 1 part cement to 2-1/2 parts sand, by volume, with minimum water required for placement and hydration.
C. Nonmetallic, Nonshrink Grout: Premixed, nonmetallic, noncorrosive, nonstaining grout containing selected silica sands, portland cement, shrinkage-compensating agents, and plasticizing and water-reducing agents, complying with ASTM C 1107, with fluid consistency and 30-minute working time.
D. Shims: Load bearing, high-density multimonomer plastic, nonleaching.
E. Sealer Gaskets: Closed-cell neoprene foam, 1/4 inch (6.4 mm) thick, selected from manufacturer's standard widths to match width of bottom track or rim track members.
2.8 FABRICATION
A. Fabricate cold-formed metal framing and accessories plumb, square, and true to line, and with connections securely fastened, according to referenced AISI's specifications and standards, manufacturer's written instructions, and requirements in this Section.
1. Fabricate framing assemblies using jigs or templates. 2. Cut framing members by sawing or shearing; do not torch cut. 3. Fasten cold-formed metal framing members by welding, screw fastening, clinch
fastening, or riveting as standard with fabricator. Wire tying of framing members is not permitted.
a. Comply with AWS D1.3 requirements and procedures for welding, appearance and quality of welds, and methods used in correcting welding work.
b. Locate mechanical fasteners and install according to Shop Drawings, with screw penetrating joined members by not less than three exposed screw threads.

BTBC Phase III October 26, 2020
GE Project No. 0119-0010
Gould Evans
COLD FORMED METAL FRAMING 054000 - 7
4. Fasten other materials to cold-formed metal framing by welding, bolting, or screw fastening, according to Shop Drawings.
B. Reinforce, stiffen, and brace framing assemblies to withstand handling, delivery, and erection stresses. Lift fabricated assemblies to prevent damage or permanent distortion.
C. Fabrication Tolerances: Fabricate assemblies level, plumb, and true to line to a maximum allowable tolerance variation of 1/8 inch in 10 feet (1:960) and as follows:
1. Spacing: Space individual framing members no more than plus or minus 1/8 inch (3 mm) from plan location. Cumulative error shall not exceed minimum fastening requirements of sheathing or other finishing materials.
2. Squareness: Fabricate each cold-formed metal framing assembly to a maximum out-of-square tolerance of 1/8 inch (3 mm).
PART 3 - EXECUTION
3.1 EXAMINATION
A. Examine supporting substrates and abutting structural framing for compliance with requirements for installation tolerances and other conditions affecting performance.
1. Proceed with installation only after unsatisfactory conditions have been corrected.
3.2 PREPARATION
A. Before sprayed fire-resistive materials are applied, attach continuous angles, supplementary framing, or tracks to structural members indicated to receive sprayed fire-resistive materials.
B. After applying sprayed fire-resistive materials, remove only as much of these materials as needed to complete installation of cold-formed framing without reducing thickness of fire-resistive materials below that are required to obtain fire-resistance rating indicated. Protect remaining fire-resistive materials from damage.
C. Install load bearing shims or grout between the underside of wall bottom track or rim track and the top of foundation wall or slab at stud or joist locations to ensure a uniform bearing surface on supporting concrete or masonry construction.
D. Install sealer gaskets to isolate the underside of wall bottom track or rim track and the top of foundation wall or slab at stud or joist locations.
3.3 INSTALLATION, GENERAL
A. Cold-formed metal framing may be shop or field fabricated for installation, or it may be field assembled.
B. Install cold-formed metal framing according to AISI's "Standard for Cold-Formed Steel Framing - General Provisions" and to manufacturer's written instructions unless more stringent requirements are indicated.

BTBC Phase III October 26, 2020
GE Project No. 0119-0010
Gould Evans
COLD FORMED METAL FRAMING 054000 - 8
C. Install shop- or field-fabricated, cold-formed framing and securely anchor to supporting structure.
1. Screw, bolt, or weld wall panels at horizontal and vertical junctures to produce flush, even, true-to-line joints with maximum variation in plane and true position between fabricated panels not exceeding 1/16 inch (1.6 mm).
D. Install cold-formed metal framing and accessories plumb, square, and true to line, and with connections securely fastened.
1. Cut framing members by sawing or shearing; do not torch cut. 2. Fasten cold-formed metal framing members by welding, screw fastening, clinch
fastening, or riveting. Wire tying of framing members is not permitted.
a. Comply with AWS D1.3 requirements and procedures for welding, appearance and quality of welds, and methods used in correcting welding work.
b. Locate mechanical fasteners and install according to Shop Drawings, and complying with requirements for spacing, edge distances, and screw penetration.
E. Install framing members in one-piece lengths unless splice connections are indicated for track or tension members.
F. Install temporary bracing and supports to secure framing and support loads comparable in intensity to those for which structure was designed. Maintain braces and supports in place, undisturbed, until entire integrated supporting structure has been completed and permanent connections to framing are secured.
G. Do not bridge building expansion and control joints with cold-formed metal framing. Independently frame both sides of joints.
H. Install insulation, specified in Division 07 Section "Thermal Insulation," in built-up exterior framing members, such as headers, sills, boxed joists, and multiple studs at openings, that are inaccessible on completion of framing work.
I. Fasten hole reinforcing plate over web penetrations that exceed size of manufacturer's standard punched openings.
J. Erection Tolerances: Install cold-formed metal framing level, plumb, and true to line to a maximum allowable tolerance variation of 1/8 inch in 10 feet (1:960) and as follows:
1. Space individual framing members no more than plus or minus 1/8 inch (3 mm) from plan location. Cumulative error shall not exceed minimum fastening requirements of sheathing or other finishing materials.
3.4 EXTERIOR NON-LOAD-BEARING WALL INSTALLATION
A. Install continuous tracks sized to match studs. Align tracks accurately and securely anchor to supporting structure as indicated.
B. Fasten both flanges of studs to top and bottom track, unless otherwise indicated. Space studs as follows:
1. Stud Gage: As indicated on structural plans.

BTBC Phase III October 26, 2020
GE Project No. 0119-0010
Gould Evans
COLD FORMED METAL FRAMING 054000 - 9
2. Stud Spacing: As indicated on structural plans.
C. Set studs plumb, except as needed for diagonal bracing or required for nonplumb walls or warped surfaces and similar requirements.
D. Isolate non-load-bearing steel framing from building structure to prevent transfer of vertical loads while providing lateral support.
1. Install single-leg deflection tracks and anchor to building structure. 2. Install double deep-leg deflection tracks and anchor outer track to building structure. 3. Connect vertical deflection clips to studs and anchor to building structure. 4. Connect drift clips to cold formed metal framing and anchor to building structure.
E. Install horizontal bridging in wall studs, spaced in rows indicated on Shop Drawings but not more than 48 inches (1220 mm) apart. Fasten at each stud intersection.
1. Top Bridging for Single Deflection Track: Install row of horizontal bridging within 12 inches (305 mm) of single deflection track. Install a combination of flat, taut, steel sheet straps of width and thickness indicated and stud or stud-track solid blocking of width and thickness matching studs. Fasten flat straps to stud flanges and secure solid blocking to stud webs or flanges.
a. Install solid blocking at centers indicated on Shop Drawings.
2. Bridging: Cold-rolled steel channel, welded or mechanically fastened to webs of punched studs.
3. Bridging: Combination of flat, taut, steel sheet straps of width and thickness indicated and stud-track solid blocking of width and thickness to match studs. Fasten flat straps to stud flanges and secure solid blocking to stud webs or flanges.
4. Bridging: Proprietary bridging bars installed according to manufacturer's written instructions.
F. Install miscellaneous framing and connections, including stud kickers, web stiffeners, clip angles, continuous angles, anchors, fasteners, and stud girts, to provide a complete and stable wall-framing system.
G. Install horizontal strapping at center line of masonry flashing termination bar. Coordinate locations with mason.
3.5 FIELD QUALITY CONTROL
A. Testing: Owner will engage a qualified independent testing and inspecting agency to perform field tests and inspections and prepare test reports.
B. Field and shop welds will be subject to testing and inspecting.
C. Testing agency will report test results promptly and in writing to Contractor and Architect.
D. Remove and replace work where test results indicate that it does not comply with specified requirements.
E. Additional testing and inspecting, at Contractor's expense, will be performed to determine compliance of replaced or additional work with specified requirements.

BTBC Phase III October 26, 2020
GE Project No. 0119-0010
Gould Evans
COLD FORMED METAL FRAMING 054000 - 10
3.6 REPAIRS AND PROTECTION
A. Galvanizing Repairs: Prepare and repair damaged galvanized coatings on fabricated and installed cold-formed metal framing with galvanized repair paint according to ASTM A 780 and manufacturer's written instructions.
B. Provide final protection and maintain conditions, in a manner acceptable to manufacturer and Installer, that ensure that cold-formed metal framing is without damage or deterioration at time of Substantial Completion.
END OF SECTION 054000

BTBC Phase III October 26, 2020
GE Project No. 0119-0010
Gould Evans
METAL FABRICATIONS 055000 - 1
SECTION 055000 - METAL FABRICATIONS
PART 1 - GENERAL
1.1 RELATED DOCUMENTS
A. Drawings and general provisions of the Contract, including General and Supplementary Conditions and
Division 01 Specification Sections, apply to this Section.
1.2 SUMMARY
A. Section Includes:
1. Steel framing and supports for overhead doors and grilles.
2. Steel framing and supports for countertops.
3. Steel framing and supports for mechanical and electrical equipment.
4. Steel framing and supports for applications where framing and supports are not specified in other
Sections.
5. Miscellaneous steel trim including steel edgings.
6. Framing and supports for countertops.
7. Metal bollards.
8. Alternating tread devices.
B. Products furnished, but not installed, under this Section:
1. Loose steel lintels.
2. Anchor bolts, steel pipe sleeves, slotted-channel inserts, and wedge-type inserts indicated to be cast
into concrete or built into unit masonry.
3. Steel weld plates and angles for casting into concrete for applications where they are not specified
in other Sections.
C. Related Sections:
1. Section 033000 "Cast-in-Place Concrete" for installing anchor bolts, steel pipe sleeves, slotted-
channel inserts, wedge-type inserts, and other items cast into concrete.
2. Section 051200 "Structural Steel Framing."
1.3 ACTION SUBMITTALS
A. Product Data: For the following:
1. Paint products.
2. Grout.
B. Shop Drawings: Show fabrication and installation details for metal fabrications.
1. Include plans, elevations, sections, and details of metal fabrications and their connections. Show
anchorage and accessory items.
2. Shop Drawings provided shall include, but are not limited to, the following:
a. Steel framing and supports for overhead doors.
b. Steel framing and supports for countertops.
c. Steel framing and supports for mechanical and electrical equipment.
d. Steel framing and supports for applications where framing and supports are not specified in
other Sections.

BTBC Phase III October 26, 2020
GE Project No. 0119-0010
Gould Evans
METAL FABRICATIONS 055000 - 2
e. Miscellaneous steel trim including steel edgings.
f. Metal bollards.
g. Alternating tread devices.
C. Delegated-Design Submittal: For installed products indicated to comply with performance requirements
and design criteria, including analysis data signed and sealed by the qualified professional engineer
responsible for their preparation.
1.4 INFORMATIONAL SUBMITTALS
A. Qualification Data: For qualified professional engineer.
B. Welding certificates.
C. Paint Compatibility Certificates: From manufacturers of topcoats applied over shop primers certifying that
shop primers are compatible with topcoats.
1.5 QUALITY ASSURANCE
A. Welding Qualifications: Qualify procedures and personnel according to AWS D1.1/D1.1M, "Structural
Welding Code - Steel."
1.6 PROJECT CONDITIONS
A. Field Measurements: Verify actual locations of walls and other construction contiguous with metal
fabrications by field measurements before fabrication.
1.7 COORDINATION
A. Coordinate selection of shop primers with topcoats to be applied over them. Comply with paint and coating
manufacturers' written recommendations to ensure that shop primers and topcoats are compatible with one
another.
B. Coordinate installation of anchorages and steel weld plates and angles for casting into concrete. Furnish
setting drawings, templates, and directions for installing anchorages, including sleeves, concrete inserts,
anchor bolts, and items with integral anchors, that are to be embedded in concrete or masonry. Deliver
such items to Project site in time for installation.
PART 2 - PRODUCTS
2.1 PERFORMANCE REQUIREMENTS
A. Delegated Design: Engage a qualified professional engineer, as defined in Section 014000 "Quality
Requirements," to design alternating tread devices.
B. Structural Performance of Alternating Tread Devices: Alternating tread devices shall withstand the effects
of gravity loads and the following loads and stresses within limits and under conditions indicated.
1. Uniform Load: 100 lbf/sq. ft.

BTBC Phase III October 26, 2020
GE Project No. 0119-0010
Gould Evans
METAL FABRICATIONS 055000 - 3
2. Concentrated Load: 300 lbf applied on an area of 4 sq. in.
3. Uniform and concentrated loads need not be assumed to act concurrently.
4. Alternating Tread Device Framing: Capable of withstanding stresses resulting from railing loads in
addition to loads specified above.
C. Thermal Movements: Allow for thermal movements from ambient and surface temperature changes acting
on exterior metal fabrications by preventing buckling, opening of joints, overstressing of components,
failure of connections, and other detrimental effects.
1. Temperature Change: 120 deg F, ambient; 180 deg F, material surfaces.
2.2 METALS, GENERAL
A. Metal Surfaces, General: Provide materials with smooth, flat surfaces unless otherwise indicated. For
metal fabrications exposed to view in the completed Work, provide materials without seam marks, roller
marks, rolled trade names, or blemishes.
2.3 FERROUS METALS
A. Steel Plates, Shapes, and Bars: ASTM A 36/A 36M.
B. Stainless-Steel Sheet, Strip, and Plate: ASTM A 240/A 240M or ASTM A 666, Type 304.
C. Stainless-Steel Bars and Shapes: ASTM A 276, Type 304.
D. Steel Tubing: ASTM A 500, cold-formed steel tubing.
E. Steel Pipe: ASTM A 53/A 53M, standard weight (Schedule 40) unless otherwise indicated.
2.4 NONFERROUS METALS
A. Aluminum Castings: ASTM B 26/B 26M, Alloy 443.0-F.
2.5 FASTENERS
A. General: Unless otherwise indicated, provide Type 304 stainless-steel fasteners for exterior use and zinc-
plated fasteners with coating complying with ASTM B 633 or ASTM F 1941, Class Fe/Zn 5, at exterior
walls. Select fasteners for type, grade, and class required.
1. Provide stainless-steel fasteners for fastening aluminum.
2. Provide stainless-steel fasteners for fastening stainless steel.
3. Provide stainless-steel fasteners for fastening nickel silver.
B. Steel Bolts and Nuts: Regular hexagon-head bolts, ASTM A 307, Grade A; with hex nuts, ASTM A 563;
and, where indicated, flat washers.
C. Steel Bolts and Nuts: Regular hexagon-head bolts, ASTM A 325, Type 3; with hex nuts, ASTM A 563,
Grade C3; and, where indicated, flat washers.
D. Stainless-Steel Bolts and Nuts: Regular hexagon-head annealed stainless-steel bolts, ASTM F 593; with
hex nuts, ASTM F 594; and, where indicated, flat washers; Alloy Group 1.

BTBC Phase III October 26, 2020
GE Project No. 0119-0010
Gould Evans
METAL FABRICATIONS 055000 - 4
E. Anchor Bolts: ASTM F 1554, Grade 36, of dimensions indicated; with nuts, ASTM A 563; and, where
indicated, flat washers.
1. Hot-dip galvanize or provide mechanically deposited, zinc coating where item being fastened is
indicated to be galvanized.
F. Eyebolts: ASTM A 489.
G. Machine Screws: ASME B18.6.3.
H. Lag Screws: ASME B18.2.1.
I. Wood Screws: Flat head, ASME B18.6.1.
J. Plain Washers: Round, ASME B18.22.1.
K. Lock Washers: Helical, spring type, ASME B18.21.1.
L. Anchors, General: Anchors capable of sustaining, without failure, a load equal to six times the load
imposed when installed in unit masonry and four times the load imposed when installed in concrete, as
determined by testing according to ASTM E 488, conducted by a qualified independent testing agency.
M. Cast-in-Place Anchors in Concrete: Either threaded type or wedge type unless otherwise indicated;
galvanized ferrous castings, either ASTM A 47/A 47M malleable iron or ASTM A 27/A 27M cast steel.
Provide bolts, washers, and shims as needed, all hot-dip galvanized per ASTM F 2329.
N. Post-Installed Anchors: Torque-controlled expansion anchors.
1. Material for Exterior Locations and Where Stainless Steel is Indicated: Alloy Group 1 stainless-
steel bolts, ASTM F 593, and nuts, ASTM F 594.
2. Material for Interior Locations: Carbon-steel components zinc plated to comply with ASTM B 633
or ASTM F 1941, Class Fe/Zn 5, unless otherwise indicated.
O. Slotted-Channel Inserts: Cold-formed, hot-dip galvanized-steel box channels (struts) complying with
MFMA-4, 1-5/8 by 7/8 inches by length indicated with anchor straps or studs not less than 3 inches long at
not more than 8 inches o.c. Provide with temporary filler and tee-head bolts, complete with washers and
nuts, all zinc-plated to comply with ASTM B 633, Class Fe/Zn 5, as needed for fastening to inserts.
2.6 MISCELLANEOUS MATERIALS
A. Welding Rods and Bare Electrodes: Select according to AWS specifications for metal alloy welded.
B. Universal Shop Primer: Fast-curing, lead- and chromate-free, universal modified-alkyd primer and
compatible with topcoat.
1. Basis of Design: Sherwin-Williams Alkyd Universal Metal Primer, Kem Kromik B-50 Series or a
comparable product of an approved manufacturer.
C. Shop Primer For Exterior Metal Fabrications: Refer to Section 099113 “Exterior Painting” for exterior
steel primer type to be applied to exterior miscellaneous steel that is not indicated to be galvanized.
D. Galvanizing Repair Paint: High-zinc-dust-content paint complying with SSPC-Paint 20 and compatible
with paints specified to be used over it.
1. Basis of Design Product: ZRC Galvilite Galvanizing Repair Compound cold galvanizing compound
of 95% metallic zinc or a comparable product of an approved manufacturer.

BTBC Phase III October 26, 2020
GE Project No. 0119-0010
Gould Evans
METAL FABRICATIONS 055000 - 5
E. Bituminous Paint: Cold-applied asphalt emulsion complying with ASTM D 1187.
F. Nonshrink, Nonmetallic Grout: Factory-packaged, nonstaining, noncorrosive, nongaseous grout
complying with ASTM C 1107. Provide grout specifically recommended by manufacturer for interior and
exterior applications.
G. Concrete for Bollards: Comply with requirements in Section 033000"Cast-in-Place Concrete" for normal-
weight, air-entrained, concrete with a minimum 28-day compressive strength of 3000 psi.
2.7 FABRICATION, GENERAL
A. Shop Assembly: Preassemble items in the shop to greatest extent possible. Disassemble units only as
necessary for shipping and handling limitations. Use connections that maintain structural value of joined
pieces. Clearly mark units for reassembly and coordinated installation.
B. Cut, drill, and punch metals cleanly and accurately. Remove burrs and ease edges to a radius of
approximately 1/32 inch unless otherwise indicated. Remove sharp or rough areas on exposed surfaces.
C. Form bent-metal corners to smallest radius possible without causing grain separation or otherwise
impairing work.
D. Form exposed work with accurate angles and surfaces and straight edges.
E. Weld corners and seams continuously to comply with the following:
1. Use materials and methods that minimize distortion and develop strength and corrosion resistance
of base metals.
2. Obtain fusion without undercut or overlap.
3. Remove welding flux immediately.
4. At exposed connections, finish exposed welds and surfaces smooth and blended so no roughness
shows after finishing and contour of welded surface matches that of adjacent surface.
F. Form exposed connections with hairline joints, flush and smooth, using concealed fasteners or welds where
possible. Where exposed fasteners are required, use Phillips flat-head (countersunk) fasteners unless
otherwise indicated. Locate joints where least conspicuous.
G. Fabricate seams and other connections that will be exposed to weather in a manner to exclude water.
Provide weep holes where water may accumulate.
H. Cut, reinforce, drill, and tap metal fabrications as indicated to receive finish hardware, screws, and similar
items.
I. Provide for anchorage of type indicated; coordinate with supporting structure. Space anchoring devices to
secure metal fabrications rigidly in place and to support indicated loads.
1. Where units are indicated to be cast into concrete or built into masonry, equip with integrally welded
steel strap anchors, 1/8 by 1-1/2 inches, with a minimum 6-inch embedment and 2-inch hook, not
less than 8 inches from ends and corners of units and 24 inches o.c., unless otherwise indicated.
J. After fabrication, clearly mark components to identify their locations in Project according to Shop
Drawings.

BTBC Phase III October 26, 2020
GE Project No. 0119-0010
Gould Evans
METAL FABRICATIONS 055000 - 6
2.8 FRAMING AND SUPPORTS FOR COUNTERTOPS
A. General: Provide steel frame supports below countertops where indicated on the Drawings.
B. Fabricate units from steel tubes of welded construction unless otherwise indicated. Fabricate to sizes,
shapes, and profiles indicated, or if not indicated, as follows:
1. Tube Steel: Galvanized, 1-1/2-inch-square by 1/4-inch-thick.
2. Provide continuous tube steel frame around entire perimeter of countertop, as well as intermediate
supports at mid-span or at 36 inches on center, whichever is less.
3. Weld 1-inch-square by 1/4-inch thick steel tabs with 1/4-inch-diameter hole pre-drilled in center,
welded flush with top of frame at corners of frame and at 12 inches on center, for attachment to
countertop.
4. Drill back and side frame supports for 3/8-inch-diameter anchors. Provide not less than two on each
side, and at 12 inches on center on back.
C. Prime miscellaneous framing and supports with primer specified in Section 099123 "Interior Painting"
where indicated.
2.9 MISCELLANEOUS FRAMING AND SUPPORTS
A. General: Provide steel framing and supports not specified in other Sections as needed to complete the
Work.
B. Fabricate units from steel shapes, plates, and bars of welded construction unless otherwise indicated.
Fabricate to sizes, shapes, and profiles indicated and as necessary to receive adjacent construction.
1. Fabricate units from slotted channel framing where indicated.
2. Furnish inserts for units installed after concrete is placed.
C. Fabricate supports for operable partitions from continuous steel beams of sizes indicated with attached
bearing plates, anchors, and braces as indicated. Drill or punch bottom flanges of beams to receive partition
track hanger rods; locate holes where indicated on operable partition Shop Drawings.
D. Galvanize miscellaneous framing and supports where indicated.
1. Exterior applications and otherwise indicated for interior applications.
2.10 SHELF ANGLES
A. Fabricate shelf angles from steel angles of sizes indicated and for attachment to concrete framing. Provide
horizontally slotted holes to receive 3/4-inch bolts, spaced not more than 6 inches from ends and 24 inches
o.c., unless otherwise indicated.
1. Provide mitered and welded units at corners.
2. Provide open joints in shelf angles at expansion and control joints. Make open joint approximately
2 inches larger than expansion or control joint.
B. For cavity walls, provide vertical channel brackets to support angles from backup masonry and concrete.
C. Galvanize shelf angles located in exterior walls.
D. Furnish wedge-type concrete inserts, complete with fasteners, to attach shelf angles to cast-in-place
concrete.

BTBC Phase III October 26, 2020
GE Project No. 0119-0010
Gould Evans
METAL FABRICATIONS 055000 - 7
2.11 MISCELLANEOUS STEEL TRIM
A. Unless otherwise indicated, fabricate units from steel shapes, plates, and bars of profiles shown with
continuously welded joints and smooth exposed edges. Miter corners and use concealed field splices where
possible.
B. Provide cutouts, fittings, and anchorages as needed to coordinate assembly and installation with other work.
1. Provide with integrally welded steel strap anchors for embedding in concrete or masonry
construction.
C. Galvanize exterior miscellaneous steel trim.
2.12 FIXED CONCRETE-FILLED METAL BOLLARDS
A. Fabricate metal bollards from 6-inch-diameter Schedule 40 steel pipe, unless other size is indicated on the
Drawings.
B. Exterior Bollard Construction: Weld four 3-inch-long No. 4 deformed reinforcing bars at tangent point
located at each quadrant of bollard, 18 inches above bottom of bollard and set at 30-degrees from horizontal
position of bollard, sloping in the same direction from right-to-left when facing any quadrant of the bollard.
Bars to create additional bond with concrete, as well as assist in setting bollard initially by “threading” into
concrete base.
1. Height: 48 inches above final grade, unless other height is indicated on the Drawings
2. Where bollards are indicated to receive controls for door operators, provide necessary cutouts for
controls and holes for wire.
C. Galvanize bollards after fabrication.
2.13 ALTERNATING TREAD DEVICES
A. Alternating Tread Devices: Fabricate alternating tread devices of open-type construction with channel or
plate stringers and pipe and tube railings unless otherwise indicated. Provide brackets and fittings for
installation.
1. Manufacturers: Subject to compliance with requirements, provide products by the following or
approved equal:
a. Lapeyre Stair Inc.
2. Tread depth shall be not less than 8-1/2 inches exclusive of nosing or less than 10-1/2 inches
including the nosing, tread width shall be not less than 7 inches, and riser height shall be not more
than 8 inches.
3. Fabricate from steel and assemble by welding or with stainless-steel fasteners.
4. Comply with applicable railing requirements in Section 055213 "Pipe and Tube Railings."
B. Galvanize steel alternating tread devices, including treads, railings, brackets, and fasteners.
2.14 FINISHES, GENERAL
A. Comply with NAAMM's "Metal Finishes Manual for Architectural and Metal Products" for
recommendations for applying and designating finishes.
B. Finish metal fabrications after assembly.

BTBC Phase III October 26, 2020
GE Project No. 0119-0010
Gould Evans
METAL FABRICATIONS 055000 - 8
C. Finish exposed surfaces to remove tool and die marks and stretch lines, and to blend into surrounding
surface.
2.15 STEEL AND IRON FINISHES
A. Galvanizing: Hot-dip galvanize items as indicated to comply with ASTM A 153/A 153M for steel and iron
hardware and with ASTM A 123/A 123M for other steel and iron products.
1. Do not quench or apply post galvanizing treatments that might interfere with paint adhesion.
B. Shop prime iron and steel items not indicated to be galvanized unless they are to be embedded in concrete,
sprayed-on fireproofing, or masonry, or unless otherwise indicated.
C. Preparation for Shop Priming: Prepare surfaces to comply with SSPC-SP 3, "Power Tool Cleaning."
D. Shop Priming: Apply shop primer to comply with SSPC-PA 1, "Paint Application Specification No. 1:
Shop, Field, and Maintenance Painting of Steel," for shop painting.
1. Stripe paint corners, crevices, bolts, welds, and sharp edges.
E. Powder-Coat Finish: After cleaning and pretreating, apply manufacturer's standard thermosetting polyester
or acrylic urethane powder coating with cured-film thickness not less than 1.5 mils. Prepare, treat, and coat
metal to comply with resin manufacturer's written instructions.
PART 3 - EXECUTION
3.1 EXAMINATION
A. Examine areas and conditions, with installer(s) present, for compliance with requirements for installation
tolerances and other conditions affecting performance of the Work.
B. Verify that substrate surfaces are ready to receive Work.
C. Beginning of installation indicates acceptance of substrates and conditions.
3.2 PREPARATION
A. Field Measurements: Field measure construction to assure the metal fabrications, including slotted-channel
ceiling-hung equipment supports, can be installed according to the Drawings and without interference with
structural framing, mechanical, electrical, and fire protection systems, or other obstructions.
1. Report any interference discovered in writing to the Architect.
B. Sequencing: Install metal fabrications in a timely and practical sequence, ahead of any extensive fire
protection, mechanical or electrical Work in the immediate or adjacent areas, and prior to installation of
any ceiling suspension systems or room finishes.
3.3 INSTALLATION, GENERAL
A. Cutting, Fitting, and Placement: Perform cutting, drilling, and fitting required for installing metal
fabrications. Set metal fabrications accurately in location, alignment, and elevation; with edges and
surfaces level, plumb, true, and free of rack; and measured from established lines and levels.

BTBC Phase III October 26, 2020
GE Project No. 0119-0010
Gould Evans
METAL FABRICATIONS 055000 - 9
B. Fit exposed connections accurately together to form hairline joints. Weld connections that are not to be
left as exposed joints but cannot be shop welded because of shipping size limitations. Do not weld, cut, or
abrade surfaces of exterior units that have been hot-dip galvanized after fabrication and are for bolted or
screwed field connections.
C. Field Welding: Comply with the following requirements:
1. Use materials and methods that minimize distortion and develop strength and corrosion resistance
of base metals.
2. Obtain fusion without undercut or overlap.
3. Remove welding flux immediately.
4. At exposed connections, finish exposed welds and surfaces smooth and blended so no roughness
shows after finishing and contour of welded surface matches that of adjacent surface.
D. Fastening to In-Place Construction: Provide anchorage devices and fasteners where metal fabrications are
required to be fastened to in-place construction. Provide threaded fasteners for use with concrete and
masonry inserts, toggle bolts, through bolts, lag screws, wood screws, and other connectors.
E. Provide temporary bracing or anchors in formwork for items that are to be built into concrete, masonry, or
similar construction.
3.4 INSTALLING COUNTERTOP FRAMING AND SUPPORTS
A. General: Install framing and supports to comply with requirements of items being supported.
B. Provide solid blocking within wall to support countertop framing.
C. Anchor framing through every pre-drilled hole in perimeter with 3/8-inch-diamter lag screws with washer.
3.5 INSTALLING MISCELLANEOUS FRAMING AND SUPPORTS
A. General: Install framing and supports to comply with requirements of items being supported, including
manufacturers' written instructions and requirements indicated on Shop Drawings.
B. Anchor supports for operable partitions securely to and rigidly brace from building structure.
3.6 INSTALLING FIXED CONCRETE-FILLED EXTERIOR METAL BOLLARDS
A. Set fixed steel bollard directly in minimum 16-inch-diameter drilled concrete footing, center in footing and
embedded minimum 36 inches below grade with minimum 6 inches of concrete coverage below base of
bollard, unless specifically indicated otherwise on the Drawings. Twist bollard into position, using angled
rebars. Adjust bollard to ensure it is plumb and vertical, and provide temporary support as necessary to
maintain bollard in that position until concrete is permanently set. Finish top of concrete footing to
positively slope away from edge of bollard approximately 1 inch.
1. After concrete has adequately cured (not less than 7 days), install fillet bead of silicone sealant
around entire perimeter base of bollard at junction with concrete footing.
B. Fill bollards solidly with concrete and vibrate or tamp for consolidation, mounding top surface to shed
water.

BTBC Phase III October 26, 2020
GE Project No. 0119-0010
Gould Evans
METAL FABRICATIONS 055000 - 10
3.7 INSTALLING STEEL PLATE TRIM
A. Ensure wall surfaces to receive steel plate trim are finished straight, flush, and smooth, with a surface
deviation not more than 1/8 inch per 10 feet.
B. Apply continuous bead of sealant along each side of back surface of plate.
C. Align sides of steel plate trim with corners of wall and set bead of sealant on to wall. Tool sealant flush
with face of wall and edge of steel plate.
D. Install flat-head screw fasteners in each pre-drilled hole.
3.8 ADJUSTING AND CLEANING
A. Touchup Painting: Immediately after erection, clean field welds, bolted connections, and abraded areas.
Paint uncoated and abraded areas with the same material as used for shop painting to comply with SSPC-
PA 1 for touching up shop-painted surfaces.
1. Apply by brush or spray to provide a minimum 2.0-mil dry film thickness.
B. Galvanized Surfaces: Clean field welds, bolted connections, and abraded areas and repair galvanizing to
comply with ASTM A 780.
END OF SECTION 055000

BTBC Phase III October 26, 2020
GE Project No. 0119-0010
Gould Evans
METAL STAIRS 055113 - 1
SECTION 055113 - METAL STAIRS
PART 1 - GENERAL
1.1 RELATED DOCUMENTS
A. Drawings and general provisions of the Contract, including General and Supplementary
Conditions and Division 01 Specification Sections, apply to this Section.
1.2 SUMMARY
A. Section Includes:
1. Preassembled steel stairs with concrete-filled treads (E-Wing).
B. Related Sections:
1. Section 033000 "Cast-in-Place Concrete" for concrete fill for stair treads and platforms.
2. Section 055213 "Pipe and Tube Railings" for pipe and tube railings associated with Metal
Stairs.
1.3 PERFORMANCE REQUIREMENTS
A. Delegated Design: Design metal stairs, including comprehensive engineering analysis by a
qualified professional engineer, using performance requirements and design criteria indicated.
B. Structural Performance of Stairs: Metal stairs shall withstand the effects of gravity loads and
the following loads and stresses within limits and under conditions indicated.
1. Uniform Load: 100 lbf/sq. ft..
2. Concentrated Load: 300 lbf applied on an area of 4 sq. in..
3. Uniform and concentrated loads need not be assumed to act concurrently.
4. Stair Framing: Capable of withstanding stresses resulting from railing loads in addition
to loads specified above. Refer to Section 055213 for railing loads.
5. Limit deflection of treads, platforms, and framing members as follows:
a. Industrial-type stairs: L/240 or 1/4 inch, whichever is less.
b. All other stairs: L/360 or 1/4 inch, whichever is less.
1.4 ACTION SUBMITTALS
A. Product Data: For metal stairs and the following:
1. Paint products.
B. Shop Drawings: Include plans, elevations, sections, details, and attachments to other work.
C. Samples for Initial Selection: For products involving selection of color, texture, or design.
D. Delegated-Design Submittal: For installed products indicated to comply with performance
requirements and design criteria, including analysis data signed and sealed by the qualified
professional engineer responsible for their preparation.

BTBC Phase III October 26, 2020
GE Project No. 0119-0010
Gould Evans
METAL STAIRS 055113 - 2
1.5 INFORMATIONAL SUBMITTALS
A. Qualification Data: For qualified professional engineer.
B. Welding certificates.
C. Paint Compatibility Certificates: From manufacturers of topcoats applied over shop primers
certifying that shop primers are compatible with topcoats.
1.6 QUALITY ASSURANCE
A. Installer Qualifications: Fabricator of products.
B. NAAMM Stair Standard: Comply with "Recommended Voluntary Minimum Standards for
Fixed Metal Stairs" in NAAMM AMP 510, "Metal Stairs Manual," for class of stair designated,
unless more stringent requirements are indicated.
1. Preassembled Stairs: Architectural class.
2. Industrial-Type Stairs: Industrial class.
C. Welding Qualifications: Qualify procedures and personnel according to the following:
1. AWS D1.1/D1.1M, "Structural Welding Code - Steel."
2. AWS D1.3, "Structural Welding Code - Sheet Steel."
1.7 COORDINATION
A. Coordinate selection of shop primers with topcoats to be applied over them. Comply with paint
and coating manufacturers' written recommendations to ensure that shop primers and topcoats
are compatible with one another.
B. Coordinate installation of anchorages for metal stairs. Furnish setting drawings, templates, and
directions for installing anchorages, including sleeves, concrete inserts, anchor bolts, and items
with integral anchors, that are to be embedded in concrete or masonry. Deliver such items to
Project site in time for installation.
C. Coordinate locations of hanger rods and struts with other work so that they will not encroach on
required stair width and will be within the fire-resistance-rated stair enclosure.
PART 2 - PRODUCTS
2.1 METALS, GENERAL
A. Metal Surfaces, General: Provide materials with smooth, flat surfaces unless otherwise
indicated. For components exposed to view in the completed Work, provide materials without
seam marks, roller marks, rolled trade names, or blemishes.
2.2 FERROUS METALS
A. Steel Plates, Shapes, and Bars: ASTM A 36/A 36M.
B. Steel Tubing: ASTM A 500 (cold formed) or ASTM A 513.

BTBC Phase III October 26, 2020
GE Project No. 0119-0010
Gould Evans
METAL STAIRS 055113 - 3
C. Rolled-Steel Floor Plate: ASTM A 786/A 786M, rolled from plate complying with
ASTM A 36/A 36M or ASTM A 283/A 283M, Grade C or D.
D. Steel Bars for Grating Treads: ASTM A 36/A 36M or steel strip, ASTM A 1011/A 1011M or
ASTM A 1018/A 1018M.
E. Uncoated, Cold-Rolled Steel Sheet: ASTM A 1008/A 1008M, either commercial steel, Type B,
or structural steel, Grade 25, unless another grade is required by design loads; exposed.
F. Uncoated, Hot-Rolled Steel Sheet: ASTM A 1011/A 1011M, either commercial steel, Type B,
or structural steel, Grade 30, unless another grade is required by design loads.
G. Galvanized-Steel Sheet: ASTM A 653/A 653M, G90 coating, either commercial steel, Type B,
or structural steel, Grade 33, unless another grade is required by design loads.
2.3 FASTENERS
A. General: Provide zinc-plated fasteners with coating complying with ASTM B 633 or
ASTM F 1941, Class Fe/Zn 12 for exterior use, and Class Fe/Zn 5 where built into exterior
walls. Select fasteners for type, grade, and class required.
B. Bolts and Nuts: Regular hexagon-head bolts, ASTM A 307, Grade A; with hex nuts,
ASTM A 563; and, where indicated, flat washers.
C. Anchor Bolts: ASTM F 1554, Grade 36, of dimensions indicated; with nuts, ASTM A 563;
and, where indicated, flat washers.
1. Provide mechanically deposited or hot-dip, zinc-coated anchor bolts for exterior stairs,
stairs indicated to be galvanized or stairs indicated to be shop primed with zinc-rich
primer.
D. Machine Screws: ASME B18.6.3.
E. Lag Screws: ASME B18.2.1.
F. Plain Washers: Round, ASME B18.22.1.
G. Lock Washers: Helical, spring type, ASME B18.21.1.
H. Post-Installed Anchors: Torque-controlled expansion anchors or chemical anchors capable of
sustaining, without failure, a load equal to six times the load imposed when installed in unit
masonry and four times the load imposed when installed in concrete, as determined by testing
according to ASTM E 488, conducted by a qualified independent testing agency.
1. Material for Interior Locations: Carbon-steel components zinc plated to comply with
ASTM B 633 or ASTM F 1941, Class Fe/Zn 5, unless otherwise indicated.
2. Material for Exterior Locations and Where Stainless Steel is Indicated: Alloy Group 1
stainless-steel bolts, ASTM F 593, and nuts, ASTM F 594.
2.4 MISCELLANEOUS MATERIALS
A. Welding Rods and Bare Electrodes: Select according to AWS specifications for metal alloy
welded.

BTBC Phase III October 26, 2020
GE Project No. 0119-0010
Gould Evans
METAL STAIRS 055113 - 4
B. Universal Shop Primer: Fast-curing, lead- and chromate-free, universal modified-alkyd primer
complying with MPI#79 and compatible with topcoat.
1. Use primer containing pigments that make it easily distinguishable from zinc-rich primer.
C. Bituminous Paint: Cold-applied asphalt emulsion complying with ASTM D 1187.
D. Nonshrink, Nonmetallic Grout: Factory-packaged, nonstaining, noncorrosive, nongaseous grout
complying with ASTM C 1107. Provide grout specifically recommended by manufacturer for
interior and exterior applications.
E. Concrete Materials and Properties: Comply with requirements in Section 033000 "Cast-in-
Place Concrete" for normal-weight, air-entrained, ready-mix concrete with a minimum 28-day
compressive strength of 3000 psi unless otherwise indicated.
F. Welded Wire Fabric: ASTM A 185/A 185M, 6 by 6 inches, W1.4 by W1.4, unless otherwise
indicated.
2.5 FABRICATION, GENERAL
A. Provide complete stair assemblies, including metal framing, hangers, struts, clips, brackets,
bearing plates, and other components necessary to support and anchor stairs and platforms on
supporting structure.
1. Join components by welding unless otherwise indicated.
2. Use connections that maintain structural value of joined pieces.
3. Fabricate treads and platforms of exterior stairs so finished walking surfaces slope to
drain.
B. Preassembled Stairs: Assemble stairs in shop to greatest extent possible. Disassemble units
only as necessary for shipping and handling limitations. Clearly mark units for reassembly and
coordinated installation.
C. Cut, drill, and punch metals cleanly and accurately. Remove burrs and ease edges to a radius of
approximately 1/32 inch unless otherwise indicated. Remove sharp or rough areas on exposed
surfaces.
D. Form bent-metal corners to smallest radius possible without causing grain separation or
otherwise impairing work.
E. Form exposed work with accurate angles and surfaces and straight edges.
F. Weld connections to comply with the following:
1. Use materials and methods that minimize distortion and develop strength and corrosion
resistance of base metals.
2. Obtain fusion without undercut or overlap.
3. Remove welding flux immediately.
4. Weld exposed corners and seams continuously unless otherwise indicated.
5. At exposed connections, finish exposed welds to comply with NOMMA's "Voluntary
Joint Finish Standards" for Type 2 welds: completely sanded joint, some undercutting
and pinholes okay.

BTBC Phase III October 26, 2020
GE Project No. 0119-0010
Gould Evans
METAL STAIRS 055113 - 5
G. Form exposed connections with hairline joints, flush and smooth, using concealed fasteners
where possible. Where exposed fasteners are required, use Phillips flat-head (countersunk)
screws or bolts unless otherwise indicated. Locate joints where least conspicuous.
H. Fabricate joints that will be exposed to weather in a manner to exclude water. Provide weep
holes where water may accumulate.
2.6 STEEL-FRAMED STAIRS
A. Stair Framing:
1. Fabricate stringers of steel sizing shown on plan.
a. Provide closures for exposed ends of channel stringers.
2. Construct platforms of steel channel headers and miscellaneous framing members as
needed to comply with performance requirements.
3. Weld or bolt stringers to headers; weld or bolt framing members to stringers and
headers. If using bolts, fabricate and join so bolts are not exposed on finished surfaces.
4. Where stairs are enclosed by gypsum board assemblies, provide hanger rods or struts to
support landings from floor construction above or below. Locate hanger rods and struts
where they will not encroach on required stair width and will be concealed within the
gypsum board assembly.
B. Metal-Pan Stairs: Form risers, subtread pans, and subplatforms to configurations shown from
steel sheet of thickness needed to comply with performance requirements but not less than
0.067 inch.
1. Steel Sheet: Uncoated cold-rolled steel sheet unless otherwise indicated.
2. Steel Sheet: Galvanized-steel sheet, where indicated.
3. Directly weld metal pans to stringers; locate welds on top of subtreads where they will be
concealed by concrete fill. Do not weld risers to stringers.
4. Provide subplatforms of configuration indicated or, if not indicated, the same as
subtreads. Weld subplatforms to platform framing.
2.7 FINISHES
A. Comply with NAAMM's "Metal Finishes Manual for Architectural and Metal Products" for
recommendations for applying and designating finishes.
B. Finish metal stairs after assembly.
C. Preparation for Shop Priming: Prepare uncoated ferrous-metal surfaces to comply with
minimum requirements indicated below for SSPC surface preparation specifications and
environmental exposure conditions of installed products:
1. Exterior Stairs: SSPC-SP 6/NACE No. 3, "Commercial Blast Cleaning."
2. Galvanized Interior Stairs: SSPC-SP 6/NACE No. 3, "Commercial Blast Cleaning."
3. Interior Stairs: SSPC-SP 3, "Power Tool Cleaning."
D. Apply shop primer to uncoated surfaces of metal stair components, except those with
galvanized finishes and those to be embedded in concrete or masonry unless otherwise
indicated. Comply with SSPC-PA 1, "Paint Application Specification No. 1: Shop, Field, and
Maintenance Painting of Steel," for shop painting.
1. Stripe paint corners, crevices, bolts, welds, and sharp edges.
BTBC Phase III October 26, 2020
GE Project No. 0119-0010
Gould Evans
METAL STAIRS 055113 - 6
PART 3 - EXECUTION
3.1 INSTALLATION, GENERAL
A. Fastening to In-Place Construction: Provide anchorage devices and fasteners where necessary
for securing metal stairs to in-place construction. Include threaded fasteners for concrete and
masonry inserts, through-bolts, lag bolts, and other connectors.
B. Cutting, Fitting, and Placement: Perform cutting, drilling, and fitting required for installing
metal stairs. Set units accurately in location, alignment, and elevation, measured from
established lines and levels and free of rack.
C. Install metal stairs by welding stair framing to steel structure or to weld plates cast into concrete
unless otherwise indicated.
D. Provide temporary bracing or anchors in formwork for items that are to be built into concrete,
masonry, or similar construction.
E. Fit exposed connections accurately together to form hairline joints. Weld connections that are
not to be left as exposed joints but cannot be shop welded because of shipping size limitations.
Do not weld, cut, or abrade surfaces of exterior units that have been hot-dip galvanized after
fabrication and are for bolted or screwed field connections.
F. Field Welding: Comply with requirements for welding in "Fabrication, General" Article.
G. Place and finish concrete fill for treads and platforms to comply with Section 033000 "Cast-in-
Place Concrete."
3.2 ADJUSTING AND CLEANING
A. Touchup Painting: Immediately after erection, clean field welds, bolted connections, and
abraded areas of shop paint, and paint exposed areas with same material as used for shop
painting to comply with SSPC-PA 1 for touching up shop-painted surfaces.
1. Apply by brush or spray to provide a minimum 2.0-mil dry film thickness.
B. Touchup Painting: Cleaning and touchup painting of field welds, bolted connections, and
abraded areas of shop paint are specified in Section 099113 "Exterior Painting" and
Section 099123 "Interior Painting."
C. Galvanized Surfaces: Clean field welds, bolted connections, and abraded areas and repair
galvanizing to comply with ASTM A 780.
END OF SECTION 055113

BTBC Phase III October 26, 2020
GE Project No. 0119-0010
Gould Evans
ROUGH CARPENTRY 061000 - 1
SECTION 061000 – ROUGH CARPENTRY
PART 1 - GENERAL
1.1 RELATED DOCUMENTS
A. Drawings and general provisions of the Contract, including General and Supplementary Conditions and
Division 01 Specification Sections, apply to this Section.
1.2 SUMMARY
A. Section Includes:
1. Rooftop equipment bases and support curbs.
2. Wood blocking and nailers.
3. Plywood backing panels.
B. Related Requirements:
1. Section 061600 "Sheathing."
1.3 DEFINITIONS
A. Boards or Strips: Lumber of less than 2 inches nominal size in least dimension.
B. Dimension Lumber: Lumber of 2 inches nominal size or greater but less than 5 inches nominal size in least
dimension.
1.4 ACTION SUBMITTALS
A. Product Data: For each type of process and factory-fabricated product. Indicate component materials and
dimensions and include construction and application details.
1. Include data for wood-preservative treatment from chemical treatment manufacturer and certification by
treating plant that treated materials comply with requirements. Indicate type of preservative used and net
amount of preservative retained.
2. Include data for fire-retardant treatment from chemical treatment manufacturer and certification by treating
plant that treated materials comply with requirements. Include physical properties of treated materials
based on testing by a qualified independent testing agency.
3. For fire-retardant treatments, include physical properties of treated lumber both before and after exposure
to elevated temperatures, based on testing by a qualified independent testing agency according to
ASTM D5664.
4. For products receiving a waterborne treatment, include statement that moisture content of treated materials
was reduced to levels specified before shipment to Project site.

BTBC Phase III October 26, 2020
GE Project No. 0119-0010
Gould Evans
ROUGH CARPENTRY 061000 - 2
1.5 INFORMATIONAL SUBMITTALS
1.6 QUALITY ASSURANCE
A. Manufacturer Qualifications: A qualified manufacturer that is certified for chain of custody by an FSC-accredited
certification body.
B. Vendor Qualifications: A vendor that is certified for chain of custody by an FSC-accredited certification body.
1.7 DELIVERY, STORAGE, AND HANDLING
A. Stack wood products flat with spacers beneath and between each bundle to provide air circulation. Protect wood
products from weather by covering with waterproof sheeting, securely anchored. Provide for air circulation around
stacks and under coverings.
PART 2 - PRODUCTS
2.1 WOOD PRODUCTS, GENERAL
A. Certified Wood: The following wood products shall be certified as "FSC Pure" or "FSC Mixed Credit" according
to FSC STD-01-001 and FSC STD-40-004.
1. Dimension lumber .
B. Lumber: DOC PS 20 and applicable rules of grading agencies indicated. If no grading agency is indicated, comply
with the applicable rules of any rules-writing agency certified by the ALSC Board of Review. Grade lumber by an
agency certified by the ALSC Board of Review to inspect and grade lumber under the rules indicated.
1. Factory mark each piece of lumber with grade stamp of grading agency.
2. Dress lumber, S4S, unless otherwise indicated.
C. Maximum Moisture Content of Lumber: 15 percent unless otherwise indicated.
D. Engineered Wood Products: Acceptable to authorities having jurisdiction and for which current model code
research or evaluation reports exist that show compliance with building code in effect for Project.
1. Allowable design stresses, as published by manufacturer, shall meet or exceed those indicated.
Manufacturer's published values shall be determined from empirical data or by rational engineering
analysis and demonstrated by comprehensive testing performed by a qualified independent testing agency.
2.2 WOOD-PRESERVATIVE-TREATED LUMBER
A. Preservative Treatment by Pressure Process: AWPA U1; Use Category UC2 for interior construction not in contact
with ground, Use Category UC3b for exterior construction not in contact with ground, and Use Category UC4a for
items in contact with ground.
1. Preservative Chemicals: Acceptable to authorities having jurisdiction and containing no arsenic or
chromium.
2. For exposed items indicated to receive a stained or natural finish, chemical formulations shall not require
incising, contain colorants, bleed through, or otherwise adversely affect finishes.

BTBC Phase III October 26, 2020
GE Project No. 0119-0010
Gould Evans
ROUGH CARPENTRY 061000 - 3
B. Kiln-dry lumber after treatment to a maximum moisture content of 19 percent. Do not use material that is warped
or that does not comply with requirements for untreated material.
C. Mark lumber with treatment quality mark of an inspection agency approved by the ALSC Board of Review.
D. Application: Treat all rough carpentry unless otherwise indicated.
2.3 FIRE-RETARDANT-TREATED MATERIALS
A. General: Where fire-retardant-treated materials are indicated, materials shall comply with requirements in this
article, that are acceptable to authorities having jurisdiction, and with fire-test-response characteristics specified as
determined by testing identical products per test method indicated by a qualified testing agency.
B. Fire-Retardant-Treated Lumber and Plywood by Pressure Process: Products with a flame-spread index of 25 or
less when tested according to ASTM E84, and with no evidence of significant progressive combustion when the
test is extended an additional 20 minutes, and with the flame front not extending more than 10.5 feet beyond the
centerline of the burners at any time during the test.
1. Treatment shall not promote corrosion of metal fasteners.
2. Exterior Type: Treated materials shall comply with requirements specified above for fire-retardant-treated
lumber and plywood by pressure process after being subjected to accelerated weathering according to
ASTM D2898. Use for exterior locations and where indicated.
3. Interior Type A: Treated materials shall have a moisture content of 28 percent or less when tested
according to ASTM D3201 at 92 percent relative humidity. Use where exterior type is not indicated.
C. Kiln-dry plywood after treatment to maximum moisture content of 15 percent.
D. Identify fire-retardant-treated wood with appropriate classification marking of qualified testing agency.
E. Application: Treat items indicated on Drawings, and the following:
1. Concealed blocking.
2. Plywood backing panels.
2.4 MISCELLANEOUS LUMBER
A. General: Provide miscellaneous lumber indicated and lumber for support or attachment of other construction,
including the following:
1. Blocking.
2. Nailers.
3. Rooftop equipment bases and support curbs.
B. Dimension Lumber Items: Construction or No. 2 grade lumber of any of the following species:
1. Hem-fir (north); NLGA.
2. Mixed southern pine or southern pine; SPIB.
3. Spruce-pine-fir; NLGA.
4. Hem-fir; WCLIB or WWPA.
5. Spruce-pine-fir (south); NeLMA, WCLIB, or WWPA.
C. For blocking not used for attachment of other construction, Utility, Stud, or No. 3 grade lumber of any species may
be used provided that it is cut and selected to eliminate defects that will interfere with its attachment and purpose.

BTBC Phase III October 26, 2020
GE Project No. 0119-0010
Gould Evans
ROUGH CARPENTRY 061000 - 4
D. For blocking and nailers used for attachment of other construction, select and cut lumber to eliminate knots and
other defects that will interfere with attachment of other work.
E. For furring strips for installing plywood or hardboard paneling, select boards with no knots capable of producing
bent-over nails and damage to paneling.
2.5 PLYWOOD BACKING PANELS
A. Equipment Backing Panels: Plywood, DOC PS 1, Exterior, A-C, fire-retardant treated, in thickness indicated or, if
not indicated, not less than 3/4-inch nominal thickness.
2.6 FASTENERS
A. General: Fasteners shall be of size and type indicated and shall comply with requirements specified in this article
for material and manufacture.
1. Where rough carpentry is exposed to weather, in ground contact, pressure-preservative treated, or in area of
high relative humidity, provide fasteners with hot-dip zinc coating complying with ASTM A153/A153M .
B. Nails, Brads, and Staples: ASTM F1667.
C. Power-Driven Fasteners: Fastener systems with an evaluation report acceptable to authorities having jurisdiction,
based on ICC-ES AC70.
2.7 MISCELLANEOUS MATERIALS
A. Flexible Flashing: Composite, self-adhesive, flashing product consisting of a pliable, butyl rubber or rubberized-
asphalt compound, bonded to a high-density polyethylene film, aluminum foil, or spunbonded polyolefin to
produce an overall thickness of not less than 0.025 inch.
B. Water-Repellent Preservative: NWWDA-tested and -accepted formulation containing 3-iodo-2-propynyl butyl
carbamate, combined with an insecticide containing chloropyrifos as its active ingredient.
PART 3 - EXECUTION
3.1 INSTALLATION, GENERAL
A. Set rough carpentry to required levels and lines, with members plumb, true to line, cut, and fitted. Fit rough
carpentry accurately to other construction. Locate nailers, blocking, and similar supports to comply with
requirements for attaching other construction.
B. Install plywood backing panels by fastening to studs; coordinate locations with utilities requiring backing panels.
Install fire-retardant-treated plywood backing panels with classification marking of testing agency exposed to
view.
C. Provide blocking and framing as indicated and as required to support facing materials, fixtures, specialty items,
and trim.
D. Sort and select lumber so that natural characteristics do not interfere with installation or with fastening other
materials to lumber. Do not use materials with defects that interfere with function of member or pieces that are too
small to use with minimum number of joints or optimum joint arrangement.

BTBC Phase III October 26, 2020
GE Project No. 0119-0010
Gould Evans
ROUGH CARPENTRY 061000 - 5
E. Comply with AWPA M4 for applying field treatment to cut surfaces of preservative-treated lumber.
1. Use inorganic boron for items that are continuously protected from liquid water.
2. Use copper naphthenate for items not continuously protected from liquid water.
F. Where wood-preservative-treated lumber is installed adjacent to metal decking, install continuous flexible flashing
separator between wood and metal decking.
G. Securely attach rough carpentry work to substrate by anchoring and fastening as indicated, complying with the
following:
1. Table 2304.9.1, "Fastening Schedule," in ICC's International Building Code (IBC).
2. ICC-ES evaluation report for fastener.
H. Use steel common nails unless otherwise indicated. Select fasteners of size that will not fully penetrate members
where opposite side will be exposed to view or will receive finish materials. Make tight connections between
members. Install fasteners without splitting wood. Drive nails snug but do not countersink nail heads unless
otherwise indicated.
3.2 INSTALLATION OF WOOD BLOCKING AND NAILERS
A. Install where indicated and where required for attaching other work. Form to shapes indicated and cut as required
for true line and level of attached work. Coordinate locations with other work involved.
B. Attach items to substrates to support applied loading. Recess bolts and nuts flush with surfaces unless otherwise
indicated.
C. Provide permanent grounds of dressed, pressure-preservative-treated, key-beveled lumber not less than 1-1/2
inches wide and of thickness required to bring face of ground to exact thickness of finish material. Remove
temporary grounds when no longer required.
END OF SECTION 061000

BTBC Phase III October 26, 2020
GE Project No. 0119-0010
Gould Evans
ROUGH CARPENTRY 061000 - 6
[ THIS PAGE IS INTENTIONALLY LEFT BLANK ]

BTBC Phase III October 26, 2020
GE Project No. 0119-0010
Gould Evans
SHEATHING 061600 - 1
SECTION 061600 – SHEATHING
PART 1 - GENERAL
1.1 RELATED DOCUMENTS
A. Drawings and general provisions of the Contract, including General and Supplementary Conditions and
Division 01 Specification Sections, apply to this Section.
1.2 SUMMARY
A. Section Includes:
1. Exterior Wall sheathing.
2. Interior Wall plywood sheathing
3. Interior plywood for backing
4. Sheathing joint and penetration treatment.
B. Related Requirements:
1. Division 061000 Section "Rough Carpentry" for plywood backing panels.
2. Division 064023 Section “Interior Architectural Woodwork” for plywood furring for wood
cladding.
3. Division 072100 Section "Thermal Insulation”
4. Division 072726 Section “Fluid-Applied Membrane Air Barriers
1.3 ACTION SUBMITTALS
A. Product Data: For each type of process and factory-fabricated product. Indicate component materials
and dimensions and include construction and application details.
1. For products receiving a waterborne treatment, include statement that moisture content of treated
materials was reduced to levels specified before shipment to Project site.
1.4 INFORMATIONAL SUBMITTALS
A. Evaluation Reports: For following products, from ICC-ES:
1. Foam-plastic sheathing.
1.5 DELIVERY, STORAGE, AND HANDLING
A. Stack panels flat with spacers beneath and between each bundle to provide air circulation. Protect
sheathing from weather by covering with waterproof sheeting, securely anchored. Provide for air
circulation around stacks and under coverings.
BTBC Phase III October 26, 2020
GE Project No. 0119-0010
Gould Evans
SHEATHING 061600 - 2
PART 2 - PRODUCTS
2.1 WOOD PANEL PRODUCTS
A. Plywood: DOC PS 1.
B. Thickness: As needed to comply with requirements specified, but not less than thickness indicated.
C. Factory mark panels to indicate compliance with applicable standard.
2.2 EXTERIOR WALL SHEATHING
A. Glass-Mat Gypsum Wall Sheathing: ASTM C 1177/1177M.
1. Products: Subject to compliance with requirements, provide one of the following:
a. CertainTeed Corporation; GlasRoc.
b. G-P Gypsum Corporation; Dens-Glass Gold.
c. Temple-Inland Inc.; GreenGlass
d. United States Gypsum Co.; Securock.
2. Type and Thickness:
a. Regular, 1/2 inch thick, at non-rated conditions
b. Regular, 5/8” Type X, at 1 Hour fire rated conditions
2.3 INTERIOR WALL SHEATHING AND BACKING PANELS
A. Plywood Wall Sheathing: Exposure 1, Structural I sheathing.
1. Span Rating: Not less than 24/0.
2. Nominal Thickness: Not less than 1/2 inch.
2.4 FASTENERS
A. General: Provide fasteners of size and type indicated that comply with requirements specified in this
article for material and manufacture.
1. For wall sheathing, provide fasteners with hot-dip zinc coating complying with
ASTM A 153/A 153M.
B. Nails, Brads, and Staples: ASTM F 1667.
C. Power-Driven Fasteners: NES NER-272.
D. Wood Screws: ASME B18.6.1.
E. Screws for Fastening Wood Structural Panels to Cold-Formed Metal Framing: ASTM C 954, except with
wafer heads and reamer wings, length as recommended by screw manufacturer for material being
fastened.
1. For wall sheathing panels, provide screws with organic-polymer or other corrosion-protective
coating having a salt-spray resistance of more than 800 hours according to ASTM B 117.
F. Screws for Fastening Gypsum Sheathing to Cold-Formed Metal Framing: Steel drill screws, in length
recommended by sheathing manufacturer for thickness of sheathing to be attached, with organic-polymer

BTBC Phase III October 26, 2020
GE Project No. 0119-0010
Gould Evans
SHEATHING 061600 - 3
or other corrosion-protective coating having a salt-spray resistance of more than 800 hours according to
ASTM B 117.
1. For steel framing less than 0.0329 inch thick, use screws that comply with ASTM C 1002.
2.5 SHEATHING JOINT-AND-PENETRATION TREATMENT MATERIALS
A. Sealant for Glass-Mat Gypsum Sheathing: Silicone emulsion sealant complying with ASTM C 834,
compatible with sheathing tape and sheathing and recommended by tape and sheathing manufacturers for
use with glass-fiber sheathing tape and for covering exposed fasteners.
1. Sheathing Tape: Self-adhering glass-fiber tape, minimum 2 inches wide, 10 by 10 or 10 by 20
threads/inch, of type recommended by sheathing and tape manufacturers for use with silicone
emulsion sealant in sealing joints in glass-mat gypsum sheathing and with a history of successful
in-service use.
PART 3 - EXECUTION
3.1 INSTALLATION, GENERAL
A. Do not use materials with defects that impair quality of sheathing or pieces that are too small to use with
minimum number of joints or optimum joint arrangement. Arrange joints so that pieces do not span
between fewer than three support members.
B. Cut panels at penetrations, edges, and other obstructions of work; fit tightly against abutting construction
unless otherwise indicated.
C. Securely attach to substrate by fastening as indicated, complying with the following:
1. Table 2304.9.1, "Fastening Schedule," in ICC's "International Building Code."
D. Do not bridge building expansion joints; cut and space edges of panels to match spacing of structural
support elements.
E. Coordinate sheathing installation with installation of materials installed over sheathing so sheathing is not
exposed to precipitation or left exposed at end of the workday when rain is forecast.
3.2 PLYWOOD SHEATHING INSTALLATION
A. General: Comply with applicable recommendations in APA Form No. E30, "Engineered Wood
Construction Guide," for types of structural-use panels and applications indicated.
B. Fastening Methods: Fasten panels as indicated below:
1. Wall Sheathing and Backing:
a. Screw to cold-formed metal framing.
b. Space panels 1/8 inch apart at edges and ends.
3.3 GYPSUM SHEATHING INSTALLATION
A. Comply with GA-253 and with manufacturer's written instructions.
1. Fasten gypsum sheathing to cold-formed metal framing with screws.
2. Install boards with a 3/8-inch gap where non-load-bearing construction abuts structural elements.

BTBC Phase III October 26, 2020
GE Project No. 0119-0010
Gould Evans
SHEATHING 061600 - 4
3. Install boards with a 1/4-inch gap where they abut masonry or similar materials that might retain
moisture, to prevent wicking.
B. Apply fasteners so heads bear tightly against face of sheathing, but do not cut into facing.
C. Horizontal Installation: Install sheathing with V-grooved edge down and tongue edge up. Interlock
tongue with groove to bring long edges in contact with edges of adjacent boards without forcing. Abut
ends of boards over centers of studs, and stagger end joints of adjacent boards not less than one stud
spacing. Attach boards at perimeter and within field of board to each steel stud.
1. Space fasteners approximately 8 inches o.c. and set back a minimum of 3/8 inch from edges and
ends of boards.
D. Vertical Installation: Install board vertical edges centered over studs. Abut ends and edges of each board
with those of adjacent boards. Attach boards at perimeter and within field of board to each stud.
1. Space fasteners approximately 8 inches o.c. and set back a minimum of 3/8 inch from edges and
ends of boards.
E. Seal sheathing joints according to sheathing manufacturer's written instructions.
1. Apply glass-fiber sheathing tape to glass-mat gypsum sheathing joints and apply and trowel
silicone emulsion sealant to embed entire face of tape in sealant. Apply sealant to exposed
fasteners with a trowel so fasteners are completely covered. Seal other penetrations and openings.
END OF SECTION 061600

BTBC Phase III October 26, 2020
GE Project No. 0119-0010
Gould Evans
PLASTIC-LAMINATE-FACED ARCHITECTURAL CABINETS 064116 - 1
SECTION 064116 - PLASTIC-LAMINATE-FACED ARCHITECTURAL CABINETS
PART 1 - GENERAL
1.1 RELATED DOCUMENTS
A. Drawings and general provisions of the Contract, including General and Supplementary Conditions and
Division 01 Specification Sections, apply to this Section.
1.2 SUMMARY
A. Section Includes:
1. Plastic-laminate-faced architectural cabinets.
2. Wood furring, blocking, shims, and hanging strips for installing plastic-laminate-faced architectural
cabinets unless concealed within other construction before cabinet installation.
B. Related Requirements:
1. Section 061000 "Rough Carpentry" for wood furring, blocking, shims, and hanging strips required
for installing cabinets and concealed within other construction before cabinet installation.
2. Section 123662 "Solid Surfacing Countertops."
1.3 PREINSTALLATION MEETINGS
A. Preinstallation Conference: Conduct conference at Project site.
1.4 ACTION SUBMITTALS
A. Product Data: For each type of product, including, panel products, high-pressure decorative laminate,
adhesive for bonding plastic laminate, fire-retardant-treated materials and cabinet hardware and
accessories.
B. Sustainable Design Submittals:
1. Product Data: For adhesives, indicating that product contains no urea formaldehyde.
2. Product Data: For composite wood products, indicating that product contains no urea formaldehyde.
C. Shop Drawings: Show location of each item, dimensioned plans and elevations, large-scale details,
attachment devices, and other components.
1. Show details full size.
2. Show locations and sizes of furring, blocking, and hanging strips, including concealed blocking and
reinforcement specified in other Sections.
3. Show locations and sizes of cutouts and holes for electrical switches and outlets and other items
installed in architectural plastic-laminate cabinets.
4. Apply WI Certified Compliance Program label to Shop Drawings.
D. Samples for Verification:
1. Plastic laminates, 12 by 12 inches, for each color, pattern, and surface finish, with one sample
applied to core material and specified edge material applied to one edge.

BTBC Phase III October 26, 2020
GE Project No. 0119-0010
Gould Evans
PLASTIC-LAMINATE-FACED ARCHITECTURAL CABINETS 064116 - 2
2. Exposed cabinet hardware and accessories, one unit for each type and finish.
1.5 INFORMATIONAL SUBMITTALS
A. Qualification Data: For Installer and fabricator.
B. Product Certificates: For the following:
1. Composite wood and agrifiber products.
2. Thermoset decorative panels.
3. Adhesives.
C. Woodwork Quality Standard Compliance Certificates: WI Certified Compliance Program certificates.
D. Evaluation Reports: For fire-retardant-treated materials, from ICC-ES.
1.6 QUALITY ASSURANCE
A. Fabricator Qualifications: Shop that employs skilled workers who custom fabricate products similar to
those required for this Project and whose products have a record of successful in-service performance.
Fabricator shall comply with the following:
1. Shop Certification: WI's Certified Compliance Program licensee.
2. Inspection: Contracted with WI for this Project for inspections as certified by WI Certified
Compliance Program.
B. Installer Qualifications: Fabricator of products.
1.7 DELIVERY, STORAGE, AND HANDLING
A. Do not deliver cabinets until painting and similar operations that could damage woodwork have been
completed in installation areas. If cabinets must be stored in other than installation areas, store only in areas
where environmental conditions comply with requirements specified in "Field Conditions" Article.
1.8 FIELD CONDITIONS
A. Environmental Limitations: Do not deliver or install cabinets until building is enclosed, wet work is
complete, and HVAC system is operating and maintaining temperature and relative humidity at occupancy
levels during the remainder of the construction period.
B. Environmental Limitations: Do not deliver or install cabinets until building is enclosed, wet work is
complete, and HVAC system is operating and maintaining temperature between 60 and 90 deg F and
relative humidity between 25 and 55 percent during the remainder of the construction period.
C. Field Measurements: Where cabinets are indicated to fit to other construction, verify dimensions of other
construction by field measurements before fabrication, and indicate measurements on Shop Drawings.
Coordinate fabrication schedule with construction progress to avoid delaying the Work.
1. Locate concealed framing, blocking, and reinforcements that support cabinets by field
measurements before being enclosed, and indicate measurements on Shop Drawings.

BTBC Phase III October 26, 2020
GE Project No. 0119-0010
Gould Evans
PLASTIC-LAMINATE-FACED ARCHITECTURAL CABINETS 064116 - 3
1.9 COORDINATION
A. Coordinate sizes and locations of framing, blocking, furring, reinforcements, and other related units of
Work specified in other Sections to ensure that cabinets can be supported and installed as indicated.
PART 2 - PRODUCTS
2.1 PLASTIC-LAMINATE-FACED ARCHITECTURAL CABINETS
A. Quality Standard: Unless otherwise indicated, comply with the "Architectural Woodwork Standards" for
grades of architectural plastic-laminate cabinets indicated for construction, finishes, installation, and other
requirements.
1. Provide certificates from WI certification program indicating that woodwork, including installation,
complies with requirements of grades specified.
2. The Contract Documents contain selections chosen from options in the quality standard and
additional requirements beyond those of the quality standard. Comply with those selections and
requirements in addition to the quality standard.
B. Grade: Custom.
C. Type of Construction: Frameless.
D. Cabinet, Door, and Drawer Front Interface Style: Flush overlay.
E. High-Pressure Decorative Laminate: NEMA LD 3, grades as indicated or if not indicated, as required by
woodwork quality standard.
1. Manufacturers: Provide products indicated on the Drawing “FINISH LEGEND” or comparable
products of one the following:
a. Abet Laminati, Inc.
b. Formica Corporation.
c. Lamin-Art, Inc.
d. Pionite; Panolam Industries International, Inc.
e. Wilsonart LLC.
F. Laminate Cladding for Exposed Surfaces:
1. Horizontal Surfaces: Grade HGS.
2. Vertical Surfaces: Grade VGS.
3. Edges: PVC edge banding, 0.12 inch thick, matching laminate in color, pattern, and finish.
4. Pattern Direction: Vertically for drawer fronts, doors, and fixed panels, unless otherwise indicated.
G. Materials for Semiexposed Surfaces:
1. Surfaces Other Than Drawer Bodies: High-pressure decorative laminate, NEMA LD 3, Grade CLS.
a. Edges of Plastic-Laminate Shelves: PVC edge banding, 0.12 inch thick, matching laminate
in color, pattern, and finish.
b. For semiexposed backs of panels with exposed plastic-laminate surfaces, provide surface of
high-pressure decorative laminate, NEMA LD 3, Grade CLS.
2. Drawer Sides and Backs: Thermoset decorative panels with PVC or polyester edge banding.
3. Drawer Bottoms: Thermoset decorative panels.
H. Dust Panels: 1/4-inch plywood or tempered hardboard above compartments and drawers unless located
directly under tops.

BTBC Phase III October 26, 2020
GE Project No. 0119-0010
Gould Evans
PLASTIC-LAMINATE-FACED ARCHITECTURAL CABINETS 064116 - 4
I. Concealed Backs of Panels with Exposed Plastic-Laminate Surfaces: High-pressure decorative laminate,
NEMA LD 3, Grade BKL.
J. Drawer Construction: Fabricate with exposed fronts fastened to subfront with mounting screws from
interior of body.
1. Join subfronts, backs, and sides with glued rabbeted joints supplemented by mechanical fasteners
or glued dovetail joints.
K. Colors, Patterns, and Finishes: Provide materials and products that result in colors and textures of exposed
laminate surfaces complying with the following requirements:
1. As indicated in the drawings.
2.2 WOOD MATERIALS
A. Wood Products: Provide materials that comply with requirements of referenced quality standard for each
type of woodwork and quality grade specified unless otherwise indicated.
1. Wood Moisture Content: 5 to 10 percent.
B. Composite Wood and Agrifiber Products: Provide materials that comply with requirements of referenced
quality standard for each type of woodwork and quality grade specified unless otherwise indicated.
1. Composite Wood Products: Products shall be made without urea formaldehyde, but in no case shall
formaldehyde emission rates be greater than the following when tested according to ASTM D 6007
or ASTM E 1333:
a. Hardwood Plywood: 0.05 ppm.
b. MDF More Than 5/16 Inch Thick: 0.11 ppm.
c. MDF 5/16 Inch or Less in Thickness: 0.13 ppm.
2. Medium-Density Fiberboard: ANSI A208.2, Grade 130.
3. Softwood Plywood: DOC PS 1, medium-density overlay.
a. Wet Areas: Marine grade plywood; APA A-B Marine Grade, medium density overlay.
4. Thermoset Decorative Panels: Medium-density fiberboard finished with thermally fused, melamine-
impregnated decorative paper and complying with requirements of NEMA LD 3, Grade VGL, for
test methods 3.3, 3.4, 3.6, 3.8, and 3.10.
2.3 FIRE-RETARDANT-TREATED MATERIALS
A. Fire-Retardant-Treated Materials, General: Where fire-retardant-treated materials are indicated, use
materials complying with requirements in this article that are acceptable to authorities having jurisdiction
and with fire-test-response characteristics specified as determined by testing identical products per test
method indicated by a qualified testing agency.
1. Use treated materials that comply with requirements of referenced woodworking standard. Do not
use materials that are warped, discolored, or otherwise defective.
2. Use fire-retardant-treatment formulations that do not bleed through or otherwise adversely affect
finishes. Do not use colorants to distinguish treated materials from untreated materials.
3. Identify fire-retardant-treated materials with appropriate classification marking of qualified testing
agency in the form of removable paper label or imprint on surfaces that will be concealed from view
after installation.
B. Fire-Retardant-Treated Lumber and Plywood: Products with a flame-spread index of 25 or less when tested
according to ASTM E 84, with no evidence of significant progressive combustion when the test is extended
an additional 20 minutes, and with the flame front not extending more than 10.5 feet beyond the centerline
of the burners at any time during the test.

BTBC Phase III October 26, 2020
GE Project No. 0119-0010
Gould Evans
PLASTIC-LAMINATE-FACED ARCHITECTURAL CABINETS 064116 - 5
1. Kiln dry lumber and plywood after treatment to a maximum moisture content of 19 and 15 percent,
respectively.
2. For items indicated to receive a stained or natural finish, use organic resin chemical formulation.
3. Mill lumber after treatment within limits set for wood removal that do not affect listed fire-test-
response characteristics, using a woodworking shop certified by testing and inspecting agency.
4. Mill lumber before treatment and implement special procedures during treatment and drying
processes that prevent lumber from warping and developing discolorations from drying sticks or
other causes, marring, and other defects affecting appearance of treated woodwork.
C. Fire-Retardant Fiberboard: Medium-density fiberboard panels complying with ANSI A208.2, made from
softwood fibers, synthetic resins, and fire-retardant chemicals mixed together at time of panel manufacture
to achieve flame-spread index of 25 or less and smoke-developed index of 200 or less per ASTM E 84.
1. Basis-of-Design Product: Subject to compliance with requirements, provide “Medite FR” as
manufactured by Roseburg Forest Products Co. or a comparable product by one of the following:
a. Panel Source International, Inc.
2.4 CABINET HARDWARE AND ACCESSORIES
A. General: Provide cabinet hardware and accessory materials associated with architectural cabinets.
B. Frameless Concealed Hinges (European Type): ANSI/BHMA A156.9, B01602, 100 degrees of opening.
C. Wire Pulls: Back mounted, solid metal, 5 inches long, 2-1/2 inches deep, and 5/16 inch in diameter.
D. Catches: Magnetic catches, BHMA A156.9, B03141.
E. Shelf Rests: BHMA A156.9, B04013; plastic, two-pin type with shelf hold-down clip.
F. Drawer Slides: BHMA A156.9.
1. Grade 1HD-100 and Grade 1HD-200: Side mounted; full-extension type; zinc-plated-steel ball-
bearing slides.
2. For drawers more than 3 inches high but not more than 6 inches high and not more than 24 inches
wide, provide Grade 1HD-100.
3. For drawers more than 6 inches high or more than 24 inches wide, provide Grade 1HD-200.
4. For trash bins not more than 20 inches high and 16 inches wide, provide Grade 1HD-200.
G. Door Locks: BHMA A156.11, E07121.
H. Drawer Locks: BHMA A156.11, E07041.
I. Door and Drawer Silencers: BHMA A156.16, L03011.
J. Exposed Hardware Finishes: For exposed hardware, provide finish that complies with BHMA A156.18 for
BHMA finish number indicated.
1. Satin Chromium Plated: BHMA 626 for brass or bronze base; BHMA 652 for steel base, unless
other finish is indicated.
K. For concealed hardware, provide manufacturer's standard finish that complies with product class
requirements in BHMA A156.9.

BTBC Phase III October 26, 2020
GE Project No. 0119-0010
Gould Evans
PLASTIC-LAMINATE-FACED ARCHITECTURAL CABINETS 064116 - 6
2.5 MISCELLANEOUS MATERIALS
A. Furring, Blocking, Shims, and Hanging Strips: Fire-retardant-treated softwood lumber, kiln dried to less
than 15 percent moisture content.
B. Anchors: Select material, type, size, and finish required for each substrate for secure anchorage. Provide
metal expansion sleeves or expansion bolts for post-installed anchors. Use nonferrous-metal or hot-dip
galvanized anchors and inserts at inside face of exterior walls and at floors.
C. Adhesives: Do not use adhesives that contain urea formaldehyde.
D. Adhesive for Bonding Plastic Laminate: Contact cement.
1. Adhesive for Bonding Edges: Hot-melt adhesive or adhesive specified above for faces.
2.6 FABRICATION
A. Fabricate cabinets to dimensions, profiles, and details indicated.
B. Complete fabrication, including assembly and hardware application, to maximum extent possible before
shipment to Project site. Disassemble components only as necessary for shipment and installation. Where
necessary for fitting at site, provide ample allowance for scribing, trimming, and fitting.
1. Trial fit assemblies at fabrication shop that cannot be shipped completely assembled. Install dowels,
screws, bolted connectors, and other fastening devices that can be removed after trial fitting. Verify
that various parts fit as intended and check measurements of assemblies against field measurements
before disassembling for shipment.
C. Shop-cut openings to maximum extent possible to receive hardware, appliances, electrical work, and
similar items. Locate openings accurately and use templates or roughing-in diagrams to produce accurately
sized and shaped openings. Sand edges of cutouts to remove splinters and burrs.
PART 3 - EXECUTION
3.1 PREPARATION
A. Before installation, condition cabinets to average prevailing humidity conditions in installation areas.
B. Before installing cabinets, examine shop-fabricated work for completion and complete work as required.
3.2 INSTALLATION
A. Grade: Install cabinets to comply with same grade as item to be installed.
B. Assemble cabinets and complete fabrication at Project site to the extent that it was not completed in the
shop.
C. Install cabinets level, plumb, true, and straight. Shim as required with concealed shims. Install level and
plumb to a tolerance of 1/8 inch in 96 inches.
D. Scribe and cut cabinets to fit adjoining work, refinish cut surfaces, and repair damaged finish at cuts.

BTBC Phase III October 26, 2020
GE Project No. 0119-0010
Gould Evans
PLASTIC-LAMINATE-FACED ARCHITECTURAL CABINETS 064116 - 7
E. Anchor cabinets to anchors or blocking built in or directly attached to substrates. Secure with countersunk,
concealed fasteners and blind nailing. Use fine finishing nails or finishing screws for exposed fastening,
countersunk and filled flush with woodwork.
1. Use filler matching finish of items being installed.
F. Cabinets: Install without distortion so doors and drawers fit openings properly and are accurately aligned.
Adjust hardware to center doors and drawers in openings and to provide unencumbered operation.
Complete installation of hardware and accessory items as indicated.
1. Install cabinets with no more than 1/8 inch in 96-inch sag, bow, or other variation from a straight
line.
2. Fasten wall cabinets with continuous hanging cleats near top and bottom.
3.3 ADJUSTING AND CLEANING
A. Repair damaged and defective cabinets, where possible, to eliminate functional and visual defects; where
not possible to repair, replace woodwork. Adjust joinery for uniform appearance.
B. Remove adhesives, sealants, and other stains.
C. Clean, lubricate, and adjust hardware.
D. Clean cabinets on exposed and semiexposed surfaces. Touch up shop-applied finishes to restore damaged
or soiled areas.
END OF SECTION 064116

BTBC Phase III October 26, 2020
GE Project No. 0119-0010
Gould Evans
PLASTIC-LAMINATE-FACED ARCHITECTURAL CABINETS 064116 - 8
THIS PAGE INTENTIONALLY LEFT BLANK

BTBC Phase III October 26, 2020
GE Project No. 0119-0010
Gould Evans
FLUSH WOOD PANELING 064216 - 1
SECTION 064216 - FLUSH WOOD PANELING
PART 1 - GENERAL
1.1 SUMMARY
A. Section Includes:
1. Wood plank wall cladding.
2. Fire-retardant-treated plywood sheathing, wood furring, blocking, shims, and hanging strips for
installing flush wood paneling unless concealed within other construction before paneling
installation.
3. Shop finishing of flush wood paneling.
1.2 ACTION SUBMITTALS
A. Product Data: For each type of product, including panel products and finishing materials and processes.
B. Shop Drawings: Show location of paneling, large-scale details, attachment devices, and other
components. Include dimensioned plans and elevations. Show dimensions, grain direction, exposed face,
and identification numbers.
C. Sustainable Design Submittals:
1. Product Data: For composite wood products, indicating that product contains no urea formaldehyde.
2. Product Data: For adhesives, indicating VOC content and that product contains no urea
formaldehyde.
D. Samples for Verification:
1. For each species and cut of panel products with non-factory-applied finish, with 1/2 of exposed
surface finished, 8 by 10 inches in size.
1.3 INFORMATIONAL SUBMITTALS
A. Qualification Data: For Fabricator.
B. Woodwork Quality Standard Compliance Certificates: AWI Certified Compliance Program certificates.
1.4 QUALITY ASSURANCE
A. Fabricator Qualifications: Shop that employs skilled workers who custom-fabricate products similar to
those required for this Project and whose products have a record of successful in-service
performance. Fabricator shall comply with one of the following:
1. Shop Certification: WI's Certified Compliance Program licensee.
2. Inspection: Contracted with WI for this Project for inspections as certified by WI Certified
Compliance Program.
B. Installer Qualifications: Fabricator of products.

BTBC Phase III October 26, 2020
GE Project No. 0119-0010
Gould Evans
FLUSH WOOD PANELING 064216 - 2
C. Quality Standard: Unless otherwise indicated, comply with WI's "Architectural Woodwork Quality
Standards" for grades of interior architectural woodwork indicated for construction, finishes, installation,
and other requirements.
D. Mockups: Build mockup of wall panels to verify selections made under Sample submittals, to
demonstrate aesthetic effects, and to set quality standards for materials and execution.
1. To set quality standards for sanding and application of field finishes, prepare finish mockups of the
following in locations determined by the Architect:
a. Plank Wall Cladding: 14’-0” (full height) by nominally 72 inches wide.
1) Mockup shall include substrate consisting of fire-retardant-treated horizontal furring,
acoustical batt, and acoustic fabric.
2. Approval of mockups does not constitute approval of deviations from the Contract Documents
contained in mockups unless Architect specifically approves such deviations in writing.
3. Subject to compliance with requirements, approved mockups may become part of the completed
Work if undisturbed at time of Substantial Completion.
1.5 DELIVERY, STORAGE, AND HANDLING
A. Stack lumber, plywood, and other panels flat with spacers between each bundle to provide air circulation.
Protect materials from weather by covering with waterproof sheeting, securely anchored. Provide for air
circulation around stacks and under coverings.
B. Deliver interior finish carpentry materials only when environmental conditions meet requirements
specified for installation areas. If interior finish carpentry materials must be stored in other than
installation areas, store only where environmental conditions meet requirements specified for installation
areas.
1.6 FIELD CONDITIONS
A. Environmental Limitations: Do not deliver or install paneling until building is enclosed, wet work is
complete, and HVAC system is operating and will maintain temperature and relative humidity at
occupancy levels during the remainder of the construction period.
B. Field Measurements: Where paneling is indicated to fit to other construction, verify dimensions of other
construction by field measurements before fabrication and indicate measurements on Shop Drawings.
Coordinate fabrication schedule with construction progress to avoid delaying the Work.
1. Locate concealed framing, blocking, and reinforcements that support paneling by field
measurements before being enclosed and indicate measurements on Shop Drawings.
C. Do not install finish carpentry materials that are wet, moisture damaged, or mold damaged.
1. Indications that materials are wet or moisture damaged include, but are not limited to, discoloration,
sagging, or irregular shape.
2. Indications that materials are mold damaged include, but are not limited to, fuzzy or splotchy surface
contamination and discoloration.

BTBC Phase III October 26, 2020
GE Project No. 0119-0010
Gould Evans
FLUSH WOOD PANELING 064216 - 3
PART 2 - PRODUCTS
2.1 PANELING, GENERAL
A. Quality Standard: Unless otherwise indicated, comply with the "Architectural Woodwork Standards" for
grades of flush wood paneling (wood-veneer wall surfacing) indicated for construction, finishes,
installation, and other requirements.
1. Provide certificates from WI certification program indicating that paneling complies with
requirements of grades specified.
2. The Contract Documents contain selections chosen from options in the quality standard and
additional requirements beyond those of the quality standard. Comply with those selections and
requirements in addition to the quality standard.
2.2 WOOD PLANK CLADDING (WD-1)
A. Grade: Premium.
B. Wood Plank Wall Cladding: Interior hardwood lumber board planks.
1. Species: White Oak, rift cut.
a. Milled Profile: Tongue and groove.
b. Thickness: 3/4 inch.
c. Face Width: 5 inches.
d. Lengths: Random lengths, varying from 48 inches to 144 inches, as required to form pattern
indicated.
2.3 MATERIALS
A. Materials, General: Provide materials that comply with requirements of referenced quality standard for
each quality grade specified unless otherwise indicated.
B. Wood Moisture Content: 5 to 10 percent.
2.4 FIRE-RETARDANT-TREATED MATERIALS
A. Fire-Retardant-Treated Materials, General: Where fire-retardant-treated materials are indicated, use
materials complying with requirements in this article, that are acceptable to authorities having
jurisdiction, and with fire-test-response characteristics specified as determined by testing identical
products per test method indicated by a qualified testing agency.
1. Use treated materials that comply with requirements of referenced woodworking standard. Do not
use materials that are warped, discolored, or otherwise defective.
2. Use fire-retardant-treatment formulations that do not bleed through or otherwise adversely affect
finishes. Do not use colorants to distinguish treated materials from untreated materials.
3. Identify fire-retardant-treated materials with appropriate classification marking of qualified testing
agency in the form of removable paper label or imprint on surfaces that will be concealed from view
after installation.
B. Fire-Retardant-Treated Lumber and Plywood: Products with a flame-spread index of 25 or less when
tested according to ASTM E 84, with no evidence of significant progressive combustion when the test is

BTBC Phase III October 26, 2020
GE Project No. 0119-0010
Gould Evans
FLUSH WOOD PANELING 064216 - 4
extended an additional 20 minutes, and with the flame front not extending more than 10.5 feet beyond the
centerline of the burners at any time during the test.
1. Kiln dry lumber and plywood after treatment to a maximum moisture content of 19 and 15 percent,
respectively.
2. Mill lumber after treatment within limits set for wood removal that do not affect listed fire-test-
response characteristics, using a woodworking shop certified by testing and inspecting agency.
3. Mill lumber before treatment and implement special procedures during treatment and drying
processes that prevent lumber from warping and developing discolorations from drying sticks or
other causes, marring, and other defects affecting appearance of treated woodwork.
2.5 INSTALLATION MATERIALS
A. Furring, Blocking, Shims, and Hanging Strips: Softwood or hardwood lumber, kiln dried to less than 15
percent moisture content.
1. Rip wood furring to depth indicated on the Drawings for installation behind Type FWP01 wood
paneling.
B. Anchors: Select material, type, size, and finish required for each substrate for secure anchorage. Provide
metal expansion sleeves or expansion bolts for post-installed anchors. Use nonferrous-metal or hot-dip
galvanized anchors and inserts at inside face of exterior walls.
2.6 FABRICATION
A. Complete fabrication, including assembly and finishing, to maximum extent possible, before shipment to
Project site. Where necessary for fitting at site, provide ample allowance for scribing, trimming, and
fitting.
B. Shop cut openings, to maximum extent possible, to receive hardware, appliances, plumbing fixtures,
electrical work, and similar items. Locate openings accurately and use templates or roughing-in diagrams
to produce accurately sized and shaped openings. Sand edges of cutouts to remove splinters and burrs.
2.7 SHOP FINISHING
A. General: Finish paneling at fabrication shop as specified in Section 099300 “Staining and Transparent
Finishing.” Defer only final touchup, cleaning, and polishing until after installation.
PART 3 - EXECUTION
3.1 PREPARATION
A. Before installation, condition paneling to average prevailing humidity conditions in installation areas.
3.2 INSTALLATION
A. Grade: Install paneling to comply with same grade as paneling to be installed.
B. General: Install paneling level, plumb, true, and straight with no distortions. Shim as required with
concealed shims. Install level and plumb to a tolerance of 1/8 inch in 96 inches. Install with no more than
1/16 inch in 96-inch vertical cup or bow and 1/8 inch in 96-inch horizontal variation from a true plane.

BTBC Phase III October 26, 2020
GE Project No. 0119-0010
Gould Evans
FLUSH WOOD PANELING 064216 - 5
1. For paneling with revealed joints, install with variations in reveal width, alignment of top and bottom
edges, and flushness between adjacent panels not exceeding 1/32 inch.
C. Plywood Sheathing Backing Panel Installation: Install fire-retardant-treated plywood sheathing where
indicated as continuous substrates for plank wall cladding installations.
D. Board Cladding Installation:
1. Stagger end joints in random pattern to uniformly distribute joints on each wall, and as indicated on
the Drawings.
2. Attach wall cladding planks with adhesive to plywood substrate. Additionally, blind nail through
tongue-and-groove edges of planks.
END OF SECTION 064216

BTBC Phase III October 26, 2020
GE Project No. 0119-0010
Gould Evans
FLUSH WOOD PANELING 064216 - 6
THIS PAGE INTENTIONALLY LEFT BLANK

BTBC Phase III October 26, 2020
GE Project No. 0119-0010
Gould Evans
SELF-ADHERING SHEET WATERPROOFING 071326 - 1
SECTION 071326 - SELF-ADHERING SHEET WATERPROOFING
PART 1 - GENERAL
1.1 RELATED DOCUMENTS
A. Drawings and general provisions of the Contract, including General and Supplementary
Conditions and Division 01 Specification Sections, apply to this Section.
1.2 SUMMARY
A. Section Includes:
1. Modified bituminous sheet waterproofing, fabric reinforced.
1.3 ACTION SUBMITTALS
A. Product Data: For each type of product.
1. Include construction details, material descriptions, and tested physical and performance
properties of waterproofing.
2. Include manufacturer's written instructions for evaluating, preparing, and treating
substrate.
B. Shop Drawings: Show locations and extent of waterproofing and details of substrate joints and
cracks, sheet flashings, penetrations, inside and outside corners, tie-ins with adjoining
waterproofing, and other termination conditions.
1. Include setting drawings showing layout, sizes, sections, profiles, and joint details of
pedestal-supported concrete pavers.
1.4 INFORMATIONAL SUBMITTALS
A. Qualification Data: For Installer.
B. Field quality-control reports.
C. Sample Warranties: For special warranties.
1.5 QUALITY ASSURANCE
A. Installer Qualifications: An entity that employs installers and supervisors who are trained and
approved by waterproofing manufacturer.
B. Mockups: Build mockups to verify selections made under Sample submittals and to set quality
standards for installation.
1. Build for each typical waterproofing installation including accessories to demonstrate
surface preparation, crack and joint treatment, corner treatment, and protection.
a. Size: 100 sq. ft. in area.
b. Description: Each type of wall installation.
2. Approval of mockups does not constitute approval of deviations from the Contract
Documents contained in mockups unless Architect specifically approves such deviations
in writing.

BTBC Phase III October 26, 2020
GE Project No. 0119-0010
Gould Evans
SELF-ADHERING SHEET WATERPROOFING 071326 - 2
3. Subject to compliance with requirements, approved mockups may become part of the
completed Work if undisturbed at time of Substantial Completion.
1.6 FIELD CONDITIONS
A. Environmental Limitations: Apply waterproofing within the range of ambient and substrate
temperatures recommended by waterproofing manufacturer. Do not apply waterproofing to a
damp or wet substrate.
1. Do not apply waterproofing in snow, rain, fog, or mist.
B. Maintain adequate ventilation during preparation and application of waterproofing materials.
1.7 WARRANTY
A. Manufacturer's Warranty: Manufacturer's standard materials-only warranty in which
manufacturer agrees to furnish replacement waterproofing material for waterproofing that does
not comply with requirements or that fails to remain watertight within specified warranty
period.
1. Warranty Period: Five years from date of Substantial Completion.
PART 2 - PRODUCTS
2.1 MATERIALS, GENERAL
A. Source Limitations for Waterproofing System: Obtain waterproofing materials and molded-
sheet drainage panels from single source from single manufacturer.
2.2 MODIFIED BITUMINOUS SHEET WATERPROOFING
A. Modified Bituminous Sheet: Minimum 60-mil nominal thickness, self-adhering sheet
consisting of 56 mils of rubberized asphalt laminated on one side to a 4-mil- thick,
polyethylene-film reinforcement, and with release liner on adhesive side.
1. Products: Subject to compliance with requirements, provide one of the following:
a. Carlisle Coatings & Waterproofing Inc.; CCW MiraDRI 860/861.
b. Grace, W. R., & Co. - Conn.; Bituthene 3000/Low Temperature or Bituthene 4000.
c. Henry Company; Blueskin WP 100/200.
2. Physical Properties:
a. Tensile Strength, Membrane: 250 psi minimum; ASTM D 412, Die C, modified.
b. Ultimate Elongation: 300 percent minimum; ASTM D 412, Die C, modified.
c. Low-Temperature Flexibility: Pass at minus 20 deg F; ASTM D 1970.
d. Crack Cycling: Unaffected after 100 cycles of 1/8-inch movement; ASTM C 836.
e. Puncture Resistance: 40 lbf minimum; ASTM E 154.
f. Water Absorption: 0.2 percent weight-gain maximum after 48-hour immersion at
70 deg F; ASTM D 570.
g. Water Vapor Permeance: 0.05 perms maximum; ASTM E 96/E 96M, Water
Method.
h. Hydrostatic-Head Resistance: 200 feet minimum; ASTM D 5385.
3. Sheet Strips: Self-adhering, rubberized-asphalt strips of same material and thickness as
sheet waterproofing.

BTBC Phase III October 26, 2020
GE Project No. 0119-0010
Gould Evans
SELF-ADHERING SHEET WATERPROOFING 071326 - 3
2.3 AUXILIARY MATERIALS
A. General: Furnish auxiliary materials recommended by waterproofing manufacturer for intended
use and compatible with sheet waterproofing.
1. Furnish liquid-type auxiliary materials that comply with VOC limits of authorities having
jurisdiction.
B. Primer: Liquid primer recommended for substrate by sheet-waterproofing material
manufacturer.
C. Surface Conditioner: Liquid, waterborne surface conditioner recommended for substrate by
sheet-waterproofing material manufacturer.
D. Liquid Membrane: Elastomeric, two-component liquid, cold fluid applied, of trowel grade or
low viscosity.
E. Substrate Patching Membrane: Low-viscosity, two-component, modified asphalt coating.
F. Metal Termination Bars: Aluminum bars, approximately 1 by 1/8 inch thick, predrilled at 9-
inch centers.
2.4 MOLDED-SHEET DRAINAGE PANELS
A. Nonwoven-Geotextile-Faced, Molded-Sheet Drainage Panel: Composite subsurface drainage
panel consisting of a studded, nonbiodegradable, molded-plastic-sheet drainage core; with a
nonwoven, needle-punched geotextile facing with an apparent opening size not exceeding
No. 70 sieve laminated to one side of the core and a polymeric film bonded to the other side;
and with a vertical flow rate of 9 to 15 gpm per ft..
1. Products: Subject to compliance with requirements, provide one of the following:
a. American Hydrotech, Inc.; Hydrodrain 420.
b. Carlisle Coatings & Waterproofing Inc.; CCW MiraDRAIN 6000XL or CCW
MiraDRAIN 6200XL.
c. Grace, W. R., & Co. - Conn.; Hydroduct 220 or Hydroduct 660.
PART 3 - EXECUTION
3.1 EXAMINATION
A. Examine substrates, areas, and conditions, with Installer present, for compliance with
requirements and other conditions affecting performance of the waterproofing.
1. Verify that concrete has cured and aged for minimum time period recommended in
writing by waterproofing manufacturer.
2. Verify that substrate is visibly dry and within the moisture limits recommended in writing
by manufacturer. Test for capillary moisture by plastic sheet method according to
ASTM D 4263.
B. Proceed with installation only after unsatisfactory conditions have been corrected.

BTBC Phase III October 26, 2020
GE Project No. 0119-0010
Gould Evans
SELF-ADHERING SHEET WATERPROOFING 071326 - 4
3.2 SURFACE PREPARATION
A. Clean, prepare, and treat substrates according to manufacturer's written instructions. Provide
clean, dust-free, and dry substrates for waterproofing application.
B. Mask off adjoining surfaces not receiving waterproofing to prevent spillage and overspray
affecting other construction.
C. Remove grease, oil, bitumen, form-release agents, paints, curing compounds, and other
penetrating contaminants or film-forming coatings from concrete.
D. Remove fins, ridges, mortar, and other projections and fill honeycomb, aggregate pockets,
holes, and other voids.
E. Prepare, fill, prime, and treat joints and cracks in substrates. Remove dust and dirt from joints
and cracks according to ASTM D 4258.
1. Install sheet strips of width according to manufacturer's written instructions and center
over treated construction and contraction joints and cracks exceeding a width of 1/16
inch.
F. Corners: Prepare, prime, and treat inside and outside corners according to ASTM D 6135.
1. Install membrane strips centered over vertical inside corners. Install 3/4-inch fillets of
liquid membrane on horizontal inside corners and as follows:
a. At footing-to-wall intersections, extend liquid membrane in each direction from
corner or install membrane strip centered over corner.
G. Prepare, treat, and seal vertical and horizontal surfaces at terminations and penetrations through
waterproofing and at drains and protrusions according to ASTM D 6135.
3.3 MODIFIED BITUMINOUS SHEET-WATERPROOFING APPLICATION
A. Install modified bituminous sheets according to waterproofing manufacturer's written
instructions and recommendations in ASTM D 6135.
B. Apply primer to substrates at required rate and allow it to dry. Limit priming to areas that will
be covered by sheet waterproofing in same day. Reprime areas exposed for more than 24 hours.
C. Apply and firmly adhere sheets over area to receive waterproofing. Accurately align sheets and
maintain uniform 2-1/2-inch- minimum lap widths and end laps. Overlap and seal seams, and
stagger end laps to ensure watertight installation.
1. When ambient and substrate temperatures range between 25 and 40 deg F, install self-
adhering, modified bituminous sheets produced for low-temperature application. Do not
use low-temperature sheets if ambient or substrate temperature is higher than 60 deg F.
D. Apply continuous sheets over already-installed sheet strips, bridging substrate cracks,
construction, and contraction joints.
E. Seal edges of sheet-waterproofing terminations with mastic.
F. Install sheet-waterproofing and auxiliary materials to tie into adjacent waterproofing.

BTBC Phase III October 26, 2020
GE Project No. 0119-0010
Gould Evans
SELF-ADHERING SHEET WATERPROOFING 071326 - 5
G. Repair tears, voids, and lapped seams in waterproofing not complying with requirements. Slit
and flatten fishmouths and blisters. Patch with sheet waterproofing extending 6 inches beyond
repaired areas in all directions.
H. Immediately install protection course with butted joints over waterproofing membrane.
1. Molded-sheet drainage panels may be used in place of a separate protection course to
vertical applications when approved by waterproofing manufacturer and installed
immediately.
3.4 MOLDED-SHEET DRAINAGE-PANEL INSTALLATION
A. Place and secure molded-sheet drainage panels, with geotextile facing away from wall or deck
substrate, according to manufacturer's written instructions. Use adhesives or other methods that
do not penetrate waterproofing. Lap edges and ends of geotextile to maintain continuity.
Protect installed molded-sheet drainage panels during subsequent construction.
3.5 FIELD QUALITY CONTROL
A. Engage a site representative qualified by waterproofing membrane manufacturer to inspect
substrate conditions, surface preparation, membrane application, flashings, protection, and
drainage components, and to furnish daily reports to Architect.
B. Prepare test and inspection reports.
3.6 PROTECTION, REPAIR, AND CLEANING
A. Protect waterproofing from damage and wear during remainder of construction period.
B. Correct deficiencies in or remove waterproofing that does not comply with requirements; repair
substrates, reapply waterproofing, and repair sheet flashings.
C. Clean spillage and soiling from adjacent construction using cleaning agents and procedures
recommended by manufacturer of affected construction.
END OF SECTION 071326

BTBC Phase III October 26, 2020
GE Project No. 0119-0010
Gould Evans
SELF-ADHERING SHEET WATERPROOFING 071326 - 6
[ THIS PAGE IS INTENTIONALLY LEFT BLANK ]

BTBC Phase III October 26, 2020
GE Project No. 0119-0010
Gould Evans
BUILDING INSULATION 07210 - 1
SECTION 072100 - THERMAL INSULATION
PART 1 - GENERAL
1.1 SUMMARY
A. Section Includes:
1. Foam-plastic board insulation.
2. Spray polyurethane foam insulation.
3. Mineral-wool board insulation.
4. Glass-fiber blanket insulation.
5. Sound attenuating batts
1.2 SUBMITTALS
A. Product Data: For each type of product indicated.
B. Product test reports.
C. Research/evaluation reports.
PART 2 - PRODUCTS
2.1 FOAM-PLASTIC BOARD INSULATION
A. Extruded-Polystyrene Board Insulation: ASTM C 578, with maximum flame-spread and smoke-
developed indexes of 75 and 450, respectively, per ASTM E 84.
1. Manufacturers: Subject to compliance with requirements, provide products by one of the
following:
a. DiversiFoam Products.
b. Dow Chemical Company (The).
c. Owens Corning.
2. Type IV, 25 psi
2.2 SPRAY POLYURETHANE FOAM INSULATION
A. Closed-Cell Polyurethane Foam Insulation: ASTM C 1029, Type II, with maximum flame-spread and
smoke-developed indexes of 75 and 450, respectively, per ASTM E 84.
1. Manufacturers: Subject to compliance with requirements, provide products by one of the
following:
a. BASF Corporation.

BTBC Phase III October 26, 2020
GE Project No. 0119-0010
Gould Evans
BUILDING INSULATION 07210 - 2
b. Dow Chemical Company (The).
c. ERSystems, Inc.
d. Gaco Western Inc.
e. Henry Company.
f. NCFI; Division of Barnhardt Mfg. Co.
g. SWD Urethane Company.
h. Volatile Free, Inc.
2. Minimum density of 1.5 lb/cu. ft., thermal resistivity of 6.2 deg F x h x sq. ft./Btu x in. at 75
deg F.
2.3 MINERAL-WOOL BOARD INSULATION
A. Manufacturers: Subject to compliance with requirements, provide products by one of the following:
1. Fibrex Insulations Inc.
2. Isolatek International.
3. Owens Corning.
4. Roxul Inc.
5. Thermafiber.
B. Unfaced, Mineral-Wool Board Insulation: ASTM C 612; with maximum flame-spread and smoke-
developed indexes of 15 and zero, respectively, per ASTM E 84; passing ASTM E 136 for combustion
characteristics.
1. Nominal density of 4 lb/cu. ft., Types IA and IB, thermal resistivity of 4 deg F x h x sq. ft./Btu x
in. at 75 deg F.
2. Fiber Color: Darkened, where used in rainscreen application.
3. Thickness: 3.5 inches typical, unless otherwise indicated (minimum aged r-value of 15 at 40 deg
F).
2.4 GLASS-FIBER BLANKET INSULATION
A. Manufacturers: Subject to compliance with requirements, provide products by one of the following:
1. CertainTeed Corporation.
2. Guardian Building Products, Inc.
3. Johns Manville.
4. Knauf Insulation.
5. Owens Corning.
B. Unfaced, Glass-Fiber Blanket Insulation: ASTM C 665, Type I; with maximum flame-spread and
smoke-developed indexes of 25 and 50, respectively, per ASTM E 84; passing ASTM E 136 for
combustion characteristics.
C. Insulating Value: Batt insulation shall achieve the following minimum r-values based on the listed
nominal thickness:
1. 6 Inches: 6-1/2 inches actual thickness; R-value of 19.
2.5 SOUND ATTENUATION BATTS

BTBC Phase III October 26, 2020
GE Project No. 0119-0010
Gould Evans
BUILDING INSULATION 07210 - 3
A. Sound Attenuation Blankets: Unfaced mineral-fiber blanket insulation produced by combining
mineral fibers of type described below with thermosetting resins to comply with ASTM C 665
for Type I (blankets without membrane facing):
1. Thickness: As required for stud wall cavity depths, 3 inch minimum at 3-5/8” walls.
2. Length: 17 inches, or 1 inch greater than horizontal spacing between studs.
3. Density: 2.5 pounds per cubic foot, minimum.
4. Product: Subject to compliance with requirements, provide one of the following
PART 3 - EXECUTION
3.1 INSTALLATION, GENERAL
A. Comply with insulation manufacturer's written instructions applicable to products and applications
indicated.
B. Install insulation that is undamaged, dry, and unsoiled and that has not been left exposed to ice, rain, or
snow at any time.
C. Extend insulation to envelop entire area to be insulated. Cut and fit tightly around obstructions and fill
voids with insulation. Remove projections that interfere with placement.
D. Provide sizes to fit applications indicated and selected from manufacturer's standard thicknesses, widths,
and lengths. Apply single layer of insulation units to produce thickness indicated unless multiple layers
are otherwise shown or required to make up total thickness.
3.2 INSTALLATION OF BELOW-GRADE INSULATION
A. On vertical footing and foundation wall surfaces, set insulation units using manufacturer's recommended
adhesive according to manufacturer's written instructions.
1. If not otherwise indicated, extend insulation to top of footing below.
B. On horizontal surfaces under slabs, loosely lay insulation units according to manufacturer's written
instructions. Stagger end joints and tightly abut insulation units.
1. If not otherwise indicated, extend insulation a minimum of 48 inchesin from exterior walls.
3.3 INSTALLATION OF FOAM-PLASTIC BOARD INSULATION
A. Foam-Plastic Board Insulation: Install pads of adhesive spaced approximately 24 inches o.c. both ways
on inside face, and as recommended by manufacturer. Fit courses of insulation between framing
members and other obstructions, with edges butted tightly in both directions. Press units firmly against
substrate.

BTBC Phase III October 26, 2020
GE Project No. 0119-0010
Gould Evans
BUILDING INSULATION 07210 - 4
3.4 INSTALLATION OF INSULATION FOR FRAMED CONSTRUCTION
A. Apply insulation to substrates by method indicated, complying with manufacturer's written instructions.
B. Spray-Applied Insulation: Apply spray-applied insulation according to manufacturer's written
instructions, in thickness indicated. Do not apply insulation until installation of pipes, ducts, conduits,
wiring, and electrical outlets in walls is completed and windows, electrical boxes, and other items not
indicated to receive insulation are masked.
C. Glass-Fiber Blanket Insulation: Install in cavities formed by framing members according to the following
requirements:
1. Use insulation widths and lengths that fill the cavities formed by framing members. If more than
one length is required to fill the cavities, provide lengths that will produce a snug fit between ends.
2. Place insulation in cavities formed by framing members to produce a friction fit between edges of
insulation and adjoining framing members.
3. Maintain 3-inch clearance of insulation around recessed lighting fixtures not rated for or protected
from contact with insulation.
D. Miscellaneous Voids: Install insulation in miscellaneous voids and cavity spaces where required to
prevent gaps in insulation using the following materials:
1. Loose-Fill Insulation: Compact to approximately 40 percent of normal maximum volume
equaling a density of approximately 2.5 lb/cu. ft.
END OF SECTION 072100

BTBC Phase III October 26, 2020
GE Project No. 0119-0010
Gould Evans
WATER-DRAINAGE EXTERIOR INSULATION AND FINISH SYSTEM (EIFS) 072419 - 1
SECTION 072419 - WATER-DRAINAGE EXTERIOR INSULATION AND FINISH SYSTEM (EIFS)
PART 1 - GENERAL
1.1 RELATED DOCUMENTS
A. Drawings and general provisions of the Contract, including General and Supplementary Conditions and
Division 01 Specification Sections, apply to this Section.
1.2 SUMMARY
A. Section Includes:
1. EIFS-clad soffit assemblies that are field applied over substrate.
2. Membrane air- and water-barriers.
B. Related Requirements:
1. Section 079200 "Joint Sealants" for sealing joints in EIFS with elastomeric joint sealants and for
perimeter joints between system and other materials.
1.3 DEFINITIONS
A. Definitions in ASTM E 2110 apply to Work of this Section.
B. EIFS: Exterior insulation and finish system(s).
C. IBC: International Building Code.
1.4 PREINSTALLATION MEETINGS
A. Preinstallation Conference: Conduct conference at Project site.
1.5 ACTION SUBMITTALS
A. Product Data: For each EIFS component, trim, and accessory, including air- and water-barrier
membranes.
B. Samples: For each exposed product and for each color and texture specified, 8 inches square in size.
1.6 INFORMATIONAL SUBMITTALS
A. Qualification Data: For Installer.
B. Manufacturer Certificates: Signed by EIFS manufacturer certifying the following:

BTBC Phase III October 26, 2020
GE Project No. 0119-0010
Gould Evans
WATER-DRAINAGE EXTERIOR INSULATION AND FINISH SYSTEM (EIFS) 072419 - 2
1. EIFS complies with requirements.
2. Substrates to which EIFS is indicated to be attached are acceptable to EIFS manufacturer.
3. Accessory products installed with EIFS, including joint sealants, flashing, air- and water-barrier
membranes, and trim, whether or not furnished by EIFS manufacturer and whether or not specified
in this Section, are acceptable to EIFS manufacturer.
C. Product Certificates: For insulation and joint sealant, from manufacturer.
D. Product Test Reports: For each EIFS assembly and component, and for water-resistive coatings, for tests
performed by a qualified testing agency.
E. Field quality-control reports.
F. Evaluation Reports: For EIFS, including insulation fasteners, water-resistive coatings,and flexible
membrane flashing, from ICC-ES.
G. Sample Warranty: For manufacturer's special warranty.
1.7 CLOSEOUT SUBMITTALS
A. Maintenance Data: For EIFS to include in maintenance manuals.
1.8 QUALITY ASSURANCE
A. Installer Qualifications: An installer who is certified in writing by EIFS manufacturer as qualified to
install manufacturer's system using trained workers.
B. Mockups: Build mockups to verify selections made under Sample submittals, to demonstrate aesthetic
effects, to set quality standards for materials and execution, and to set quality standards for fabrication
and installation.
1. Subject to compliance with requirements, approved mockups may become part of the completed
Work if undisturbed at time of Substantial Completion.
1.9 DELIVERY, STORAGE, AND HANDLING
A. Deliver materials in original, unopened packages with manufacturers' labels intact and clearly identifying
products.
B. Store materials inside and under cover; keep them dry and protected from weather, direct sunlight,
surface contamination, aging, corrosion, damaging temperatures, construction traffic, and other causes.
1. Stack insulation board flat and off the ground.
2. Protect plastic insulation against ignition at all times. Do not deliver plastic insulating materials to
Project site before installation time.
3. Complete installation and concealment of plastic materials as rapidly as possible in each area of
construction.

BTBC Phase III October 26, 2020
GE Project No. 0119-0010
Gould Evans
WATER-DRAINAGE EXTERIOR INSULATION AND FINISH SYSTEM (EIFS) 072419 - 3
1.10 FIELD CONDITIONS
A. Weather Limitations: Maintain ambient temperatures above 40 deg F for a minimum of 24 hours before,
during, and after adhesives or coatings are applied. Do not apply EIFS adhesives or coatings during
rainfall. Proceed with installation only when existing and forecasted weather conditions and ambient
outdoor air, humidity, and substrate temperatures permit EIFS to be applied, dried, and cured according to
manufacturers' written instructions and warranty requirements.
1.11 WARRANTY
A. Manufacturer's Special Warranty: Manufacturer agrees to repair or replace components of EIFS-clad
drainage assemblies that fail in materials or workmanship within specified warranty period.
1. Failures include, but are not limited to, the following:
a. Bond integrity and weathertightness.
b. Deterioration of EIFS finishes and other EIFS materials beyond normal weathering.
2. Warranty coverage includes the following components of EIFS-clad drainage assemblies:
a. EIFS finish, including base coats, finish coats, and reinforcing mesh.
b. Insulation installed as part of EIFS.
c. Insulation adhesive.
d. EIFS accessories, including trim components and flashing.
e. Water-resistive coatings.
f. EIFS drainage components.
3. Warranty Period: 10 years from date of Substantial Completion.
PART 2 - PRODUCTS
2.1 MANUFACTURERS
A. Basis-of-Design Product: Subject to compliance with requirements, provide “StoTherm ci Essence” as
manufactured by Sto Corp. or comparable product of one of the following:
1. Dryvit Systems, Inc.
2. Parex USA, Inc.
B. Source Limitations: Obtain EIFS from single source from single EIFS manufacturer and from sources
approved by EIFS manufacturer as compatible with EIFS components.
2.2 PERFORMANCE REQUIREMENTS
A. EIFS Performance: Comply with ASTM E 2568 and ICC-ES AC219 and with the following:
1. Weathertightness: Resistant to uncontrolled water penetration from exterior, with a means to drain
water entering EIFS to the exterior.
2. Fire Resistance: Assembly passes NFPA 285 for resistance to vertical spread of flame within core
of panel, over exterior surface, and significant lateral spread of flame.
a. Surface Burning Characteristics: ASTM E 84:
1) Flame Spread index: Less than 25.

BTBC Phase III October 26, 2020
GE Project No. 0119-0010
Gould Evans
WATER-DRAINAGE EXTERIOR INSULATION AND FINISH SYSTEM (EIFS) 072419 - 4
2) Smoke Developed Index: Less than 450.
3. Structural Performance: EIFS assembly and components shall comply with ICC-ES AC219 when
tested according to ASTM E 2568.
a. Wind Loads: Uniform pressure as indicated on Drawings.
4. Impact Performance: ASTM E 2568: Standard (Level 1).
5. Bond Integrity: Free from bond failure within EIFS components or between EIFS and substrates,
resulting from exposure to fire, wind loads, weather, or other in-service conditions.
6. Abrasion Resistance of Finish Coat: Sample consisting of 1-inch-thick EIFS mounted on 1/2-inch-
thick gypsum board; cured for a minimum of 28 days and shows no cracking, checking, or loss of
film integrity after exposure to 528 quarts of sand when tested according to ASTM D 968,
Method A.
7. Mildew Resistance of Finish Coat: Sample applied to 2-by-2-inch clean glass substrate; cured for
28 days and shows no growth when tested according to ASTM D 3273 and evaluated according to
ASTM D 3274.
2.3 EIFS MATERIALS
A. Primer/Sealer: EIFS manufacturer's standard substrate conditioner designed to protect substrates from
moisture penetration and to improve the bond between substrate and insulation adhesive.
B. Air and Water Barrier: EIFS manufacturer’s standard fluid-applied vapor permeable membrane air barrier
and weather barrier; elastomeric or synthetic polymer as standard with manufacturer for compatibility
with EIFS system; compatible with substrate and complying with physical and performance criteria
listed:
1. Physical and Performance Properties:
a. Air Permeance: Maximum 0.004 cfm/sq. ft. of surface area at 1.57-lbf/sq. ft. pressure
difference; ASTM E 2178.
b. Air Leakage: 0.0002 cfm/sq. ft.; ASTM E 2357.
c. Vapor Permeance: Minimum 5.5 perms; ASTM E 96/E 96M.
d. Water Penetration Resistance: No leakage; ASTM E 331.
e. Resistance to Mold Growth: No mold growth after 28 day exposure; ASTM D 3273.
f. Tensile Adhesion: Not less than 15 psi or exceeds strength of substrate, whichever is
greater; ASTM C 297.
g. Fire Propagation Characteristics: Passes NFPA 285 testing as part of an approved
assembly.
C. Flexible-Membrane Flashing: Cold-applied, self-adhering, self-healing, rubberized-asphalt and
polyethylene-film composite sheet or tape and primer; EIFS manufacturer's standard or product
recommended in writing by EIFS manufacturer.
D. Insulation Adhesive: EIFS manufacturer's standard formulation designed for indicated use;specifically
formulated to be applied to back side of insulation in a manner that creates open vertical channels
designed to serve as an integral part of the water-drainage system of the EIFS-clad drainage assembly;
compatible with substrate; and complying with one of the following:
1. Job-mixed formulation of portland cement complying with ASTM C 150/C 150M, Type I, and
polymer-based adhesive specified for base coat.
2. Factory-blended dry formulation of portland cement, dry polymer admixture, and fillers specified
for base coat.

BTBC Phase III October 26, 2020
GE Project No. 0119-0010
Gould Evans
WATER-DRAINAGE EXTERIOR INSULATION AND FINISH SYSTEM (EIFS) 072419 - 5
3. Factory-mixed noncementitious formulation designed for adhesive attachment of insulation to
substrates of type indicated, as recommended by EIFS manufacturer.
E. Molded, Rigid Cellular Polystyrene Board Insulation: Comply with ASTM C 578, Type I; and EIFS
manufacturer's requirements for most stringent requirements for material performance and qualities of
insulation, including dimensions and permissible variations, and the following:
1. Aging: Before cutting and shipping, age insulation in block form by air drying for not less than six
weeks.
2. Flame-Spread and Smoke-Developed Indexes: 25 and 450 or less, respectively, according to
ASTM E 84.
3. Thermal Resistance (R-Value): Minimum 3.6 per inch thickness long-term thermal resistance;
ASTM C 518.
a. Minimum Thickness: 3 inches, unless otherwise indicated.
4. Dimensions: Provide insulation boards of not more than 24 by 48 inches and in thickness
indicated, but not more than 4 inches thick or less than the thickness allowed by ASTM C 1397.
F. Reinforcing Mesh: Balanced, alkali-resistant, open-weave, glass-fiber mesh treated for compatibility with
other EIFS materials, made from continuous multiend strands with retained mesh tensile strength of not
less than 120 lbf/in. according to ASTM E 2098 and the following:
1. Reinforcing Mesh for EIFS, General: Not less than weight required to meet impact-performance
level specified in "Performance Requirements" Article.
a. Standard (Level 1) Reinforcing Mesh: Nominal 4.5 oz./sq. yd., symmetrical, interlaced
mesh.
2. Strip Reinforcing Mesh: Not less than 3.75 oz./sq. yd..
3. Detail Reinforcing Mesh: Not less than 4.0 oz./sq. yd..
4. Corner Reinforcing Mesh: Not less than 7.2 oz./sq. yd..
G. Base-Coat Materials: EIFS manufacturer's standard mixture complying with the following:
1. Factory-blended dry formulation of portland cement, dry polymer admixture, and inert fillers to
which only water is added at Project site.
H. Waterproof Adhesive/Base-Coat Materials: EIFS manufacturer's standard waterproof formulation, where
recommended by the manufacturer for areas of anticipated high moisture, complying with one of the
following:
1. Job-mixed formulation of portland cement complying with ASTM C 150/C 150M, Type I, white
or natural color; and manufacturer's standard polymer-emulsion adhesive designed for use with
portland cement.
2. Job-combined formulation of manufacturer's standard polymer-emulsion adhesive and
manufacturer's standard dry mix containing portland cement.
I. Primer: EIFS manufacturer's standard factory-mixed, elastomeric-polymer primer for preparing base-coat
surface for application of finish coat.
J. Finish-Coat Materials: EIFS manufacturer's standard acrylic-based coating complying with the following:
1. Factory-mixed formulation of polymer-emulsion binder, colorfast mineral pigments, sound stone
particles, and fillers.
a. Aggregate: Marble chips of size and color as indicated by manufacturer's designations.

BTBC Phase III October 26, 2020
GE Project No. 0119-0010
Gould Evans
WATER-DRAINAGE EXTERIOR INSULATION AND FINISH SYSTEM (EIFS) 072419 - 6
2. Colors and Texture: Sto Corp.; “Stolit Milano Ultra-Smooth.”
K. Water: Potable.
L. Trim Accessories: Type as designated or required to suit conditions indicated and to comply with EIFS
manufacturer's written instructions; manufactured from UV-stabilized PVC; and complying with
ASTM D 1784, manufacturer's standard cell class for use intended, and ASTM C 1063.
1. Casing Bead: Prefabricated, one-piece type for attachment behind insulation, of depth required to
suit thickness of coating and insulation, with face leg perforated for bonding to coating and back
leg.
2. Weep Screed/Track: Prefabricated, one-piece type for attachment behind insulation with
perforated face leg and weep holes in track bottom, of depth required to suit thickness of coating
and insulation, with face leg perforated for bonding to coating and back leg; designed to drain
incidental moisture that gets into substrate construction to the exterior at terminations of EIFS
with drainage.
3. Expansion Joint: Prefabricated, one-piece V profile; designed to relieve stress of movement.
2.4 MIXING
A. Comply with EIFS manufacturer's requirements for combining and mixing materials. Do not introduce
admixtures, water, or other materials except as recommended by EIFS manufacturer. Mix materials in
clean containers. Use materials within time period specified by EIFS manufacturer or discard.
PART 3 - EXECUTION
3.1 EXAMINATION
A. Examine substrates, areas, and conditions, including sheathing and structural framing installation, with
Installer present, for compliance with requirements specified in this Section that affect EIFS installation
and with requirements for installation tolerances and other conditions affecting performance of the Work.
B. Examine framing, flashings, openings, substrates, and junctures at other construction for suitable
conditions where EIFS will be installed.
C. Proceed with installation only after unsatisfactory conditions have been corrected.
1. Begin coating application only after surfaces are dry.
2. Application of coating indicates acceptance of surfaces and conditions.
3.2 PREPARATION
A. Protect contiguous work from moisture deterioration and soiling caused by application of EIFS. Provide
temporary covering and other protection needed to prevent spattering of exterior finish coats on other
work.

BTBC Phase III October 26, 2020
GE Project No. 0119-0010
Gould Evans
WATER-DRAINAGE EXTERIOR INSULATION AND FINISH SYSTEM (EIFS) 072419 - 7
B. Protect EIFS, substrates, and substrate construction behind them from inclement weather during
installation. Prevent penetration of moisture behind drainage plane of EIFS and deterioration of
substrates.
C. Prepare and clean substrates to comply with EIFS manufacturer's written instructions to obtain optimum
bond between substrate and adhesive for insulation.
3.3 EIFS INSTALLATION, GENERAL
A. Comply with ASTM C 1397, ASTM E 2511, and EIFS manufacturer's written instructions for installation
of EIFS as applicable to each type of substrate indicated.
3.4 SUBSTRATE PROTECTION APPLICATION
A. Primer/Sealer: As required by the EIFS manufacturer, apply over sheathing substrates and as required for
improving adhesion of membrane air-/water-barrier and/or insulation to substrate.
B. Membrane Air- and Water-Barrier: Install membrane air- and water-barrier over entire surface of
sheathing, apply over sheathing to provide a air- and water-barrier.
1. Tape and seal joints, exposed edges, terminations, and inside and outside corners of sheathing
unless otherwise indicated by EIFS manufacturer's written instructions.
2. Connect air- and water-barrier material with transition strips and accessory materials bedded in air
barrier material to adjacent structures, sealed continuously to concrete below-grade structures,
exterior openings, and other construction at perimeters of installation, using accessory materials.
Repair punctures, voids, and deficient lapped seams in transition strips. Slit and flatten fishmouths
and blisters. Patch with transition strips extending 6 inches beyond repaired areas in strip
direction.
3. Apply air- and water-barrier material to form a continuous unbroken air- and water-barrier
membrane to substrates, sealed to transition strips according to air- and water-barrier
manufacturer's written instructions. Apply air- and water-barrier material within manufacturer's
recommended application temperature ranges.
3.5 TRIM INSTALLATION
A. Trim: Apply trim accessories at perimeter of EIFS, at expansion joints, at windowsills, and elsewhere as
indicated. Coordinate with installation of insulation.
1. Weep Screed/Track: Use at bottom termination edges, at window and door heads, and at floor line
expansion joints of water-drainage EIFS unless otherwise indicated.
2. Windowsill Flashing: Use at windows unless otherwise indicated.
3. Expansion Joint: Use where indicated on Drawings.
4. Casing Bead: Use at other locations.
5. Parapet Cap Flashing: Use where indicated on Drawings.

BTBC Phase III October 26, 2020
GE Project No. 0119-0010
Gould Evans
WATER-DRAINAGE EXTERIOR INSULATION AND FINISH SYSTEM (EIFS) 072419 - 8
3.6 INSULATION INSTALLATION
A. Backwrapping: Apply a strip of detail mesh to air moisture barrier membrane at all system terminations,
except where the Starter Track is installed, adhered approximately 4 inches onto the substrate, with
adequate additional width to wrap around the insulation board edge and cover a minimum of 2 ½ inches
on the outside surface of the insulation board.
B. Board Insulation: Adhesively attach insulation to substrate in compliance with ASTM C 1397 and the
following:
1. Apply adhesive to insulation by notched-trowel method, with notches oriented vertically to
produce drainage channels that remain functional after the insulation is adhered to substrate.
2. Press and slide insulation into place. Apply pressure over the entire surface of insulation to
accomplish uniform contact, high initial grab, and overall level surface.
3. Allow adhered insulation to remain undisturbed for not less than 24 hours, before beginning
rasping and sanding insulation or applying base coat and reinforcing mesh.
4. Apply insulation over substrates in courses with long edges of boards oriented horizontally.
5. Begin first course of insulation from screed/track and work upward. Work from perimeter casing
beads toward interior of panels if possible.
6. Stagger joints of insulation boards in successive courses to produce running bond pattern. Locate
joints so no piece of insulation is less than 12 inches wide or 6 inches high. Offset joints not less
than 6 inches from corners of openings.
a. Adhesive Attachment: Offset joints of insulation not less than 6 inches from joints in
sheathing.
7. Interlock ends at internal and external corners.
8. Abut insulation tightly at joints within and between each course to produce flush, continuously
even surfaces without gaps or raised edges between boards. If gaps greater than 1/16 inch occur,
fill with insulation cut to fit gaps exactly; insert insulation without using adhesive or other
material.
9. Cut insulation to fit openings, corners, and projections precisely and to produce edges and shapes
complying with details indicated.
10. Rasp or sand flush entire surface of insulation to remove irregularities projecting more than 1/16
inch from surface of insulation and to remove yellowed areas due to sun exposure; do not create
depressions deeper than 1/16 inch. Prevent airborne dispersal and immediately collect insulation
raspings or sandings.
11. Where indicated, cut aesthetic reveals in outside face of insulation with high-speed router and bit
configured to produce grooves, rabbets, and other features that comply with profiles and locations
indicated. Do not reduce insulation thickness at aesthetic reveals to less than 3/4 inch.
12. Interrupt insulation for expansion joints where indicated.
13. Form joints for sealant application by leaving gaps between adjoining insulation edges and
between insulation edges and dissimilar adjoining surfaces. Make gaps wide enough to produce
joint widths indicated after encapsulating joint substrates with base coat and reinforcing mesh.
14. Form joints for sealant application with back-to-back casing beads for joints within EIFS and with
perimeter casing beads at dissimilar adjoining surfaces. Make gaps between casing beads and
between perimeter casing beads and adjoining surfaces of width indicated.

BTBC Phase III October 26, 2020
GE Project No. 0119-0010
Gould Evans
WATER-DRAINAGE EXTERIOR INSULATION AND FINISH SYSTEM (EIFS) 072419 - 9
15. Apply backwrapped detail mesh over face of insulation, fully wrapping all board edges, covering
edges of board and extend encapsulating mesh not less than 2-1/2 inches over front and back face
unless otherwise indicated on Drawings.
16. Treat exposed edges of insulation as follows:
a. Except for edges forming substrates of sealant joints, encapsulate with base coat,
reinforcing mesh, and finish coat.
b. Encapsulate edges forming substrates of sealant joints within EIFS or between EIFS and
other work with base coat and reinforcing mesh.
c. At edges trimmed by accessories, extend base coat, reinforcing mesh, and finish coat over
face leg of accessories.
17. Coordinate installation of flashing and insulation to produce assembly that does not allow water to
penetrate behind flashing and water-resistive barrier.
C. Expansion Joints: Install at locations indicated, where required by EIFS manufacturer, and as follows:
1. At expansion joints in substrates behind EIFS.
2. Where EIFS adjoin dissimilar substrates, materials, and construction, including other EIFS.
3. Where building shape changes.
4. Where EIFS manufacturer requires joints in long continuous expanses.
3.7 BASE-COAT INSTALLATION
A. Waterproof Adhesive/Base Coat: To exposed surfaces of insulation, apply in minimum thickness
recommended in writing by EIFS manufacturer over sloped surfaces, windowsills, parapets, and where
indicated on Drawings.
B. Base Coat: Apply to exposed surfaces of insulationin minimum thickness recommended in writing by
EIFS manufacturer, but not less than 1/8-inch dry-coat thickness.
C. Reinforcing Mesh: Embed reinforcing mesh in wet base coat to produce wrinkle-free installation with
mesh continuous at corners, overlapped not less than 2-1/2 inches or otherwise treated at joints to comply
with ASTM C 1397 and EIFS manufacturer's written instructions. Do not lap reinforcing mesh within 8
inches of corners. Completely embed mesh, applying additional base-coat material if necessary, so
reinforcing-mesh color and pattern are invisible.
1. Standard Mesh Application: Apply base coat over the insulation board, including areas with ultra-
high impact mesh, with a stainless steel trowel to a uniform thickness of approximately 1/8 inch.
Work horizontally or vertically in strips of 40 inches, immediately embedding mesh into the wet
base coat by troweling from the center to the edge of the mesh. Overlap mesh not less than 2-½
inches at mesh seams and at overlaps of detail mesh. Feather seams and edges. Double wrap all
inside and outside corners with minimum 6 inch overlap in each direction. Prevent wrinkles in the
mesh. The mesh must be fully embedded so that no mesh color shows through the base coat when
it is dry. Re-skim with additional base coat if mesh color is visible.
D. Double-Layer Reinforcing-Mesh Application: Where indicated or required, apply second base coat and
second layer of reinforcing mesh, overlapped not less than 2-1/2 inches or otherwise treated at joints to
comply with ASTM C 1397 and EIFS manufacturer's written instructions in same manner as first
application. Do not apply until first base coat has cured.
E. Additional Reinforcing Mesh: Apply strip reinforcing mesh around openings, extending 4 inches beyond
perimeter. Apply additional 9-by-12-inch strip reinforcing mesh diagonally at corners of openings (re-
BTBC Phase III October 26, 2020
GE Project No. 0119-0010
Gould Evans
WATER-DRAINAGE EXTERIOR INSULATION AND FINISH SYSTEM (EIFS) 072419 - 10
entrant corners). Apply 8-inch-wide, strip reinforcing mesh at both inside and outside corners unless base
layer of mesh is lapped not less than 4 inches on each side of corners.
1. At aesthetic reveals, apply strip reinforcing mesh not less than 8 inches wide.
2. Embed strip reinforcing mesh in base coat before applying first layer of reinforcing mesh.
3.8 FINISH-COAT INSTALLATION
A. Finish Coat: Apply over dry primed base coat, maintaining a wet edge at all times for uniform
appearance, in thickness required by EIFS manufacturer to produce a uniform finish of color and texture
matching approved sample and free of cold joints, shadow lines, and texture variations.
3.9 FIELD QUALITY CONTROL
A. Special Inspections: Owner will engage a qualified special inspector to perform the following special
inspections:
1. As stipulated in Ch. 17 of the IBC.
B. Testing Agency: Owner will engage a qualified testing agency to perform tests and inspections.
C. EIFS Tests and Inspections: According to ICC-ES AC24 and ICC-ES AC219.
D. EIFS will be considered defective if it does not pass tests and inspections.
E. Prepare test and inspection reports.
3.10 CLEANING AND PROTECTION
A. Remove temporary covering and protection of other work. Promptly remove coating materials from
window and door frames and other surfaces outside areas indicated to receive EIFS coatings.
END OF SECTION 072419

BTBC Phase III October 26, 2020
GE Project No. 0119-0010
Gould Evans
FLUID-APPLIED MEMBRANE AIR BARRIERS 072726 - 1
SECTION 072726 - FLUID-APPLIED MEMBRANE AIR BARRIERS
PART 1 - GENERAL
1.1 RELATED DOCUMENTS
A. Drawings and general provisions of the Contract, including General and Supplementary Conditions and
Division 01 Specification Sections, apply to this Section.
1.2 SUMMARY
A. Section Includes:
1. Vapor-retarding, fluid-applied air barriers.
B. Related Requirements:
1. Section 061600 "Sheathing" for wall sheathings and wall sheathing joint-and-penetration
treatments.
1.3 DEFINITIONS
A. Air-Barrier Material: A primary element that provides a continuous barrier to the movement of air.
B. Air-Barrier Accessory: A transitional component of the air barrier that provides continuity.
C. Air-Barrier Assembly: The collection of air-barrier materials and accessories applied to an opaque wall,
including joints and junctions to abutting construction, to control air movement through the wall.
1.4 PREINSTALLATION MEETINGS
A. Preinstallation Conference: Conduct conference at Project site.
1. Review air-barrier requirements and installation, special details, mockups, air-leakage and bond
testing, air-barrier protection, and work scheduling that covers air barriers.
1.5 ACTION SUBMITTALS
A. Product Data: For each type of product.
1. Include manufacturer's written instructions for evaluating, preparing, and treating each substrate;
technical data; dry film thickness; and tested physical and performance properties of products.
B. Sustainable Design Submittals:
1. <Double click to insert sustainable design text for coatings.>

BTBC Phase III October 26, 2020
GE Project No. 0119-0010
Gould Evans
FLUID-APPLIED MEMBRANE AIR BARRIERS 072726 - 2
C. Shop Drawings: For air-barrier assemblies.
1. Show locations and extent of air-barrier materials, accessories, and assemblies specific to Project
conditions.
2. Include details for substrate joints and cracks, counterflashing strips, penetrations, inside and
outside corners, terminations, and tie-ins with adjoining construction.
3. Include details of interfaces with other materials that form part of air barrier.
1.6 INFORMATIONAL SUBMITTALS
A. Qualification Data: For Installer. Include list of ABAA-certified installers and supervisors employed by
Installer, who work on Project.
B. Product Certificates: From air-barrier manufacturer, certifying compatibility of air barriers and accessory
materials with Project materials that connect to or that come in contact with the barrier.
C. Product Test Reports: For each air-barrier assembly, for tests performed by a qualified testing agency.
D. Field quality-control reports.
1.7 QUALITY ASSURANCE
A. Installer Qualifications: An entity that employs installers and supervisors who are trained and approved
by manufacturer.
1. Installer shall be licensed by ABAA according to ABAA's Quality Assurance Program and shall
employ ABAA-certified installers and supervisors on Project.
B. Mockups: Build mockups to set quality standards for materials and execution.
1. Build integrated mockups of exterior wall assembly per Section 04200 Unit Masonry,
incorporating backup wall construction, external cladding, window, storefront, door frame and sill,
insulation, ties and other penetrations, and flashing to demonstrate surface preparation, crack and
joint treatment, application of air barriers, and sealing of gaps, terminations, and penetrations of
air-barrier assembly.
a. Coordinate construction of mockups to permit inspection and testing of air barrier before
external insulation and cladding are installed.
b. Include junction with roofing membrane, building corner condition, and foundation wall
intersection.
c. If Architect determines mockups do not comply with requirements, reconstruct mockups
and apply air barrier until mockups are approved.
2. Approval of mockups does not constitute approval of deviations from the Contract Documents
contained in mockups unless Architect specifically approves such deviations in writing.
3. Subject to compliance with requirements, approved mockups may become part of the completed
Work if undisturbed at time of Substantial Completion.

BTBC Phase III October 26, 2020
GE Project No. 0119-0010
Gould Evans
FLUID-APPLIED MEMBRANE AIR BARRIERS 072726 - 3
1.8 PRECONSTRUCTION TESTING
A. Preconstruction Testing Service: Owner will engage a qualified testing agency to perform preconstruction
testing on field mockups.
B. Mockup Testing: Air-barrier assemblies shall comply with performance requirements indicated, as
evidenced by reports based on mockup testing by a qualified testing agency.
1. Air-Leakage-Location Testing: Mockups will be tested for evidence of air leakage according to
ASTM E1186, chamber pressurization or depressurization with smoke tracers .
2. Air-Leakage-Volume Testing: Mockups will be tested for air-leakage rate according to
ASTM E783.
3. Adhesion Testing: Mockups will be tested for required air-barrier adhesion to substrate according
to ASTM D4541.
4. Notify Architect seven days in advance of the dates and times when mockups will be tested.
1.9 DELIVERY, STORAGE, AND HANDLING
A. Remove and replace liquid materials that cannot be applied within their stated shelf life.
B. Protect stored materials from direct sunlight.
1.10 FIELD CONDITIONS
A. Environmental Limitations: Apply air barrier within the range of ambient and substrate temperatures
recommended in writing by air-barrier manufacturer.
1. Protect substrates from environmental conditions that affect air-barrier performance.
2. Do not apply air barrier to a damp or wet substrate or during snow, rain, fog, or mist.
PART 2 - PRODUCTS
2.1 MATERIALS
A. Source Limitations: Obtain primary air-barrier materials and air-barrier accessories from single source
from single manufacturer.
B. <Double click to insert sustainable design text for low-emitting materials.>
2.2 PERFORMANCE REQUIREMENTS
A. Air-Barrier Performance: Air-barrier assembly and seals with adjacent construction shall be capable of
performing as a continuous air barrier and as a liquid-water drainage plane flashed to discharge to the
exterior incidental condensation or water penetration. Air-barrier assemblies shall be capable of
accommodating substrate movement and of sealing substrate expansion and control joints, construction
material changes, penetrations, tie-ins to installed waterproofing, and transitions at perimeter conditions
without deterioration and air leakage exceeding specified limits.

BTBC Phase III October 26, 2020
GE Project No. 0119-0010
Gould Evans
FLUID-APPLIED MEMBRANE AIR BARRIERS 072726 - 4
2.3 HIGH-BUILD AIR BARRIERS, VAPOR RETARDING
A. High-Build, Vapor-Retarding Air Barrier: Synthetic polymer membrane with an installed dry film
thickness, according to manufacturer's written instructions, of 35 mils or thicker over smooth, void-free
substrates.
1. Synthetic Polymer Type:
a. Manufacturers: Subject to compliance with requirements, available manufacturers offering
products that may be incorporated into the Work include, but are not limited to the
following:
1) GCP Applied Technologies Inc.
2) Henry Company.
3) Sto Corp., Sto Guard
4) Tremco
2. Physical and Performance Properties:
a. Air Permeance: Maximum 0.004 cfm/sq. ft. of surface area at 1.57-lbf/sq. ft. pressure
difference; ASTM E2178.
b. Vapor Permeance: Maximum 0.1 perm; ASTM E96/E96M, Desiccant Method.
c. Ultimate Elongation: Minimum 500 percent; ASTM D412, Die C.
d. Adhesion to Substrate: Minimum 30 lbf/sq. in. when tested according to ASTM D4541.
e. Fire Propagation Characteristics: Passes NFPA 285 testing as part of an approved
assembly.
f. UV Resistance: Can be exposed to sunlight for 90 days according to manufacturer's written
instructions.
2.4 ACCESSORY MATERIALS
A. Requirement: Provide primers, transition strips, termination strips, joint reinforcing fabric and strips, joint
sealants, counterflashing strips, flashing sheets and metal termination bars, termination mastic, substrate
patching materials, adhesives, tapes, foam sealants, lap sealants, and other accessory materials that are
recommended in writing by air-barrier manufacturer to produce a complete air-barrier assembly and that
are compatible with primary air-barrier material and adjacent construction to which they may seal.
B. Primer: Liquid waterborne primer recommended for substrate by air-barrier material manufacturer.
C. Stainless-Steel Sheet: ASTM A240/A240M, Type 304, 0.0250 inch thick, and Series 300 stainless-steel
fasteners.
D. Preformed Silicone Extrusion: Manufacturer's standard system consisting of cured low-modulus silicone
extrusion, sized to fit opening widths, with a single-component, neutral-curing, Class 100/50 (low-
modulus) silicone sealant for bonding extrusions to substrates.
1. Manufacturers: Subject to compliance with requirements, provide products by one of the
following:
a. Dow Corning Corporation.
b. Pecora Corporation.
c. Tremco Incorporated.

BTBC Phase III October 26, 2020
GE Project No. 0119-0010
Gould Evans
FLUID-APPLIED MEMBRANE AIR BARRIERS 072726 - 5
PART 3 - EXECUTION
3.1 EXAMINATION
A. Examine substrates, areas, and conditions, with Installer present, for compliance with requirements and
other conditions affecting performance of the Work.
1. Verify that substrates are sound and free of oil, grease, dirt, excess mortar, or other contaminants.
2. Verify that substrates have cured and aged for minimum time recommended in writing by air-
barrier manufacturer.
3. Verify that substrates are visibly dry and free of moisture. Test concrete substrates for capillary
moisture by plastic sheet method according to ASTM D4263.
4. Verify that masonry joints are flush and completely filled with mortar.
B. Proceed with installation only after unsatisfactory conditions have been corrected.
3.2 SURFACE PREPARATION
A. Clean, prepare, treat, fill, and seal substrate and joints and cracks in substrate according to manufacturer's
written instructions and details. Provide clean, dust-free, and dry substrate for air-barrier application.
B. Mask off adjoining surfaces not covered by air barrier to prevent spillage and overspray affecting other
construction.
C. Remove grease, oil, bitumen, form-release agents, paints, curing compounds, and other penetrating
contaminants or film-forming coatings from concrete.
D. Remove fins, ridges, mortar, and other projections and fill honeycomb, aggregate pockets, holes, and
other voids in concrete with substrate-patching material.
E. Remove excess mortar from masonry ties, shelf angles, and other obstructions.
F. At changes in substrate plane, apply sealant or termination mastic beads at sharp corners and edges to
form a smooth transition from one plane to another.
G. Cover gaps in substrate plane and form a smooth transition from one substrate plane to another with
stainless-steel sheet mechanically fastened to structural framing to provide continuous support for air
barrier.
H. Bridge [solation joints, expansion joints and discontinuous wall-to-wall, deck-to-wall, and deck-to-deck
joints with air-barrier accessory material that accommodates joint movement according to manufacturer's
written instructions and details.
3.3 ACCESSORIES INSTALLATION
A. Install accessory materials according to air-barrier manufacturer's written instructions and details to form
a seal with adjacent construction and ensure continuity of air and water barrier.
1. Coordinate the installation of air barrier with installation of roofing membrane and base flashing
to ensure continuity of air barrier with roofing membrane.

BTBC Phase III October 26, 2020
GE Project No. 0119-0010
Gould Evans
FLUID-APPLIED MEMBRANE AIR BARRIERS 072726 - 6
2. Install transition strip on roofing membrane or base flashing so that a minimum of 3 inches of
coverage is achieved over each substrate.
3. Unless manufacturer recommends in writing against priming, apply primer to substrates at
required rate and allow it to dry.
4. Apply primer to substrates at required rate and allow it to dry. Limit priming to areas that will be
covered by air-barrier material on same day. Reprime areas exposed for more than 24 hours.
B. Connect and seal exterior wall air-barrier material continuously to roofing-membrane air barrier, concrete
below-grade structures, floor-to-floor construction, exterior glazing and window systems, glazed curtain-
wall systems, storefront systems, exterior louvers, exterior door framing, and other construction used in
exterior wall openings, using accessory materials.
C. At end of each working day, seal top edge of strips and transition strips to substrate with termination
mastic.
D. Apply joint sealants forming part of air-barrier assembly within manufacturer's recommended application
temperature ranges. Consult manufacturer when sealant cannot be applied within these temperature
ranges.
E. Wall Openings: Prime concealed, perimeter frame surfaces of windows, curtain walls, storefronts, and
doors. Apply [transition strip] [preformed silicone extrusion] so that a minimum of 3 inches of coverage
is achieved over each substrate. Maintain 3 inches of full contact over firm bearing to perimeter frames,
with not less than 1 inch of full contact.
1. Transition Strip: Roll firmly to enhance adhesion.
2. Preformed Silicone Extrusion: Set in full bed of silicone sealant applied to walls, frame, and air-
barrier material.
F. Fill gaps in perimeter frame surfaces of windows, curtain walls, storefronts, and doors, and miscellaneous
penetrations of air-barrier material with foam sealant.
G. Seal strips and transition strips around masonry reinforcing or ties and penetrations with termination
mastic.
H. Seal top of through-wall flashings to air barrier with an additional 6-inch- wide, transition strip.
I. Seal exposed edges of strips at seams, cuts, penetrations, and terminations not concealed by metal
counterflashings or ending in reglets with termination mastic.
J. Repair punctures, voids, and deficient lapped seams in strips and transition strips. Slit and flatten
fishmouths and blisters. Patch with transition strips extending 6 inches beyond repaired areas in strip
direction.
3.4 PRIMARY AIR-BARRIER MATERIAL INSTALLATION
A. Apply air-barrier material to form a seal with strips and transition strips and to achieve a continuous air
barrier according to air-barrier manufacturer's written instructions and details. Apply air-barrier material
within manufacturer's recommended application temperature ranges.
1. Unless manufacturer recommends in writing against priming, apply primer to substrates at
required rate and allow it to dry.
2. Limit priming to areas that will be covered by air-barrier material on same day. Reprime areas
exposed for more than 24 hours.

BTBC Phase III October 26, 2020
GE Project No. 0119-0010
Gould Evans
FLUID-APPLIED MEMBRANE AIR BARRIERS 072726 - 7
3. Where multiple prime coats are needed to achieve required bond, allow adequate drying time
between coats.
B. High-Build Air Barriers: Apply continuous unbroken air-barrier material to substrates according to the
following thickness. Apply air-barrier material in full contact around protrusions such as masonry ties.
1. Vapor-Retarding, High-Build Air Barrier: Total dry film thickness as recommended in writing by
manufacturer to comply with performance requirements, but not less than not less than 40 mils,
applied in one or more equal coats.
C. Do not cover air barrier until it has been tested and inspected by testing agency.
D. Correct deficiencies in or remove air barrier that does not comply with requirements; repair substrates and
reapply air-barrier components.
3.5 FIELD QUALITY CONTROL
A. ABAA Quality Assurance Program: Perform examinations, preparation, installation, testing, and
inspections under ABAA's Quality Assurance Program.
B. Testing Agency: Owner will engage a qualified testing agency to perform tests and inspections.
C. Inspections: Air-barrier materials, accessories, and installation are subject to inspection for compliance
with requirements. Inspections may include the following:
1. Continuity of air-barrier system has been achieved throughout the building envelope with no gaps
or holes.
2. Air-barrier dry film thickness.
3. Continuous structural support of air-barrier system has been provided.
4. Masonry and concrete surfaces are smooth, clean, and free of cavities, protrusions, and mortar
droppings.
5. Site conditions for application temperature and dryness of substrates have been maintained.
6. Maximum exposure time of materials to UV deterioration has not been exceeded.
7. Surfaces have been primed, if applicable.
8. Laps in strips and transition strips have complied with minimum requirements and have been
shingled in the correct direction (or mastic has been applied on exposed edges), with no
fishmouths.
9. Termination mastic has been applied on cut edges.
10. Strips and transition strips have been firmly adhered to substrate.
11. Compatible materials have been used.
12. Transitions at changes in direction and structural support at gaps have been provided.
13. Connections between assemblies (air-barrier and sealants) have complied with requirements for
cleanliness, surface preparation and priming, structural support, integrity, and continuity of seal.
14. All penetrations have been sealed.
D. Tests: As determined by testing agency from among the following tests:
1. Air-Leakage-Location Testing: Air-barrier assemblies will be tested for evidence of air leakage
according to ASTM E1186, chamber pressurization or depressurization with smoke tracers .
2. Air-Leakage-Volume Testing: Air-barrier assemblies will be tested for air-leakage rate according
to ASTM E783.
3. Adhesion Testing: Air-barrier assemblies will be tested for required adhesion to substrate
according to ASTM D4541 for each 600 sq. ft. of installed air barrier or part thereof.

BTBC Phase III October 26, 2020
GE Project No. 0119-0010
Gould Evans
FLUID-APPLIED MEMBRANE AIR BARRIERS 072726 - 8
E. Air barriers will be considered defective if they do not pass tests and inspections.
1. Apply additional air-barrier material, according to manufacturer's written instructions, where
inspection results indicate insufficient thickness.
2. Remove and replace deficient air-barrier components for retesting as specified above.
F. Repair damage to air barriers caused by testing; follow manufacturer's written instructions.
G. Prepare test and inspection reports.
3.6 CLEANING AND PROTECTION
A. Protect air-barrier system from damage during application and remainder of construction period,
according to manufacturer's written instructions.
1. Protect air barrier from exposure to UV light and harmful weather exposure as recommended in
writing by manufacturer. If exposed to these conditions for longer than recommended, remove and
replace air barrier or install additional, full-thickness, air-barrier application after repairing and
preparing the overexposed materials according to air-barrier manufacturer's written instructions.
2. Protect air barrier from contact with incompatible materials and sealants not approved by air-
barrier manufacturer.
B. Clean spills, stains, and soiling from construction that would be exposed in the completed work using
cleaning agents and procedures recommended in writing by manufacturer of affected construction.
C. Remove masking materials after installation.
END OF SECTION 072726

BTBC Phase III October 26, 2020
GE Project No. 0119-0010
Gould Evans
FORMED METAL WALL PANELS 074213 - 1
SECTION 074213 - FORMED METAL WALL PANELS
PART 1 - GENERAL
1.1 RELATED DOCUMENTS
A. Drawings and general provisions of the Contract, including General and Supplementary Conditions and
Division 01 Specification Sections, apply to this Section.
1.2 SUMMARY
A. Section Includes:
1. Concealed-fastener, lap-seam metal wall panels (MP-01 and MP-02).
2. Metal deck profile, roof screen panels (MP-03).
B. Related Sections:
1. Section 076200 "Sheet Metal Flashing and Trim" for transitions to adjacent materials such as
masonry, roofing and glazing.
1.3 PREINSTALLATION MEETINGS
A. Preinstallation Conference: Conduct conference at Project site.
1. Meet with Owner, Architect, Owner's insurer if applicable, metal panel Installer, metal panel
manufacturer's representative, structural-support Installer, and installers whose work interfaces
with or affects metal panels, including installers of doors, windows, and louvers.
2. Review and finalize construction schedule and verify availability of materials, Installer's
personnel, equipment, and facilities needed to make progress and avoid delays.
3. Review methods and procedures related to metal panel installation, including manufacturer's
written instructions.
4. Examine support conditions for compliance with requirements, including alignment between and
attachment to structural members.
5. Review flashings, special siding details, wall penetrations, openings, and condition of other
construction that affect metal panels.
6. Review governing regulations and requirements for insurance, certificates, and tests and
inspections if applicable.
7. Review temporary protection requirements for metal panel assembly during and after installation.
8. Review of procedures for repair of metal panels damaged after installation.
9. Document proceedings, including corrective measures and actions required, and furnish copy of
record to each participant.
1.4 ACTION SUBMITTALS
A. Product Data: For each type of product.
1. Include construction details, material descriptions, dimensions of individual components and
profiles, and finishes for each type of panel and accessory.
BTBC Phase III October 26, 2020
GE Project No. 0119-0010
Gould Evans
FORMED METAL WALL PANELS 074213 - 2
B. Sustainable Design Submittals:
1. <Double click to insert sustainable design text for recycled content.>
C. Shop Drawings:
1. Include fabrication and installation layouts of metal panels; details of edge conditions, joints,
panel profiles, corners, anchorages, attachment system, trim, flashings, closures, and accessories;
and special details.
2. Accessories: Include details of the flashing, trim, and anchorage systems, at a scale of not less than
1-1/2 inches per 12 inches.
D. Samples for Initial Selection: For each type of metal panel indicated with factory-applied finishes.
1. Include Samples of trim and accessories involving color selection.
E. Samples for Verification: For each type of exposed finish, prepared on Samples of size indicated below:
1. Metal Panels: 12 inches long by actual panel width. Include fasteners, closures, and other metal
panel accessories.
1.5 INFORMATIONAL SUBMITTALS
A. Qualification Data: For Installer.
B. Product Test Reports: For each product, for tests performed by a qualified testing agency.
C. Field quality-control reports.
D. Sample Warranties: For special warranties.
1.6 CLOSEOUT SUBMITTALS
A. Maintenance Data: For metal panels to include in maintenance manuals.
1.7 QUALITY ASSURANCE
A. Installer Qualifications: An entity that employs installers and supervisors who are trained and approved
by manufacturer.
B. Mockups: Build mockups to verify selections made under Sample submittals and to demonstrate aesthetic
effects and set quality standards for fabrication and installation.
1. Build mockup of typical metal panel assembly as shown on Drawings, including corner, soffits,
supports, attachments, and accessories.
2. Water-Spray Test: Conduct water-spray test of metal panel assembly mockup, testing for water
penetration according to AAMA 501.2.
3. Approval of mockups does not constitute approval of deviations from the Contract Documents
contained in mockups unless Architect specifically approves such deviations in writing.
4. Subject to compliance with requirements, approved mockups may become part of the completed
Work if undisturbed at time of Substantial Completion.

BTBC Phase III October 26, 2020
GE Project No. 0119-0010
Gould Evans
FORMED METAL WALL PANELS 074213 - 3
1.8 DELIVERY, STORAGE, AND HANDLING
A. Deliver components, metal panels, and other manufactured items so as not to be damaged or deformed.
Package metal panels for protection during transportation and handling.
B. Unload, store, and erect metal panels in a manner to prevent bending, warping, twisting, and surface
damage.
C. Stack metal panels horizontally on platforms or pallets, covered with suitable weathertight and ventilated
covering. Store metal panels to ensure dryness, with positive slope for drainage of water. Do not store
metal panels in contact with other materials that might cause staining, denting, or other surface damage.
D. Retain strippable protective covering on metal panels during installation.
1.9 FIELD CONDITIONS
A. Weather Limitations: Proceed with installation only when existing and forecasted weather conditions
permit assembly of metal panels to be performed according to manufacturers' written instructions and
warranty requirements.
1.10 COORDINATION
A. Coordinate metal panel installation with rain drainage work, flashing, trim, construction of soffits, and
other adjoining work to provide a leakproof, secure, and noncorrosive installation.
1.11 WARRANTY
A. Special Warranty: Manufacturer's standard form in which manufacturer agrees to repair or replace
components of metal panel systems that fail in materials or workmanship within specified warranty
period.
1. Failures include, but are not limited to, the following:
a. Structural failures including rupturing, cracking, or puncturing.
b. Deterioration of metals and other materials beyond normal weathering.
2. Warranty Period: Two years from date of Substantial Completion.
B. Special Warranty on Panel Finishes: Manufacturer's standard form in which manufacturer agrees to repair
finish or replace metal panels that show evidence of deterioration of factory-applied finishes within
specified warranty period.
1. Exposed Panel Finish: Deterioration includes, but is not limited to, the following:
a. Color fading more than 5 Delta E units when tested according to ASTM D2244.
b. Chalking in excess of a No. 8 rating when tested according to ASTM D4214.
c. Cracking, checking, peeling, or failure of paint to adhere to bare metal.
2. Finish Warranty Period: 20 years from date of Substantial Completion.

BTBC Phase III October 26, 2020
GE Project No. 0119-0010
Gould Evans
FORMED METAL WALL PANELS 074213 - 4
PART 2 - PRODUCTS
2.1 PERFORMANCE REQUIREMENTS
A. <Double click to insert sustainable design text for recycled content.>
B. Structural Performance: Provide metal panel systems capable of withstanding the effects of the following
loads, based on testing according to ASTM E1592:
1. Wind Loads: As indicated on Drawings.
2. Deflection Limits: For wind loads, no greater than 1/240 of the span.
C. Air Infiltration: Air leakage of not more than 0.06 cfm/sq. ft. when tested according to ASTM E283 at the
following test-pressure difference:
1. Test-Pressure Difference: 6.24 lbf/sq. ft..
D. Water Penetration under Static Pressure: No water penetration when tested according to ASTM E331 at
the following test-pressure difference:
1. Test-Pressure Difference: 6.24 lbf/sq. ft..
E. Thermal Movements: Allow for thermal movements from ambient and surface temperature changes by
preventing buckling, opening of joints, overstressing of components, failure of joint sealants, failure of
connections, and other detrimental effects. Base calculations on surface temperatures of materials due to
both solar heat gain and nighttime-sky heat loss.
1. Temperature Change (Range): 120 deg F, ambient; 180 deg F, material surfaces .
F. Fire-Resistance Ratings: Comply with ASTM E119; testing by a qualified testing agency. Identify
products with appropriate markings of applicable testing agency.
1. Indicate design designations from UL's "Fire Resistance Directory" or from the listings of another
qualified testing agency.
2.2 CONCEALED-FASTENER, LAP-SEAM METAL WALL PANELS
A. Provide factory-formed metal panels designed to be field assembled by lapping and interconnecting side
edges of adjacent panels and mechanically attaching through panel to supports using concealed fasteners
in side laps. Include accessories required for weathertight installation.
B. Flush-Reveal-Profile, Concealed-Fastener Metal Wall Panels (MP-01): Formed with vertical panel edges
and a flat pan between panel edges; with reveal joint between panels.
1. Manufacturers: Subject to compliance with requirements, available manufacturers offering
products that may be incorporated into the Work include, but are not limited to the following:
a. ATAS International, Inc.
b. Berridge Manufacturing Company.
c. CENTRIA Architectural Systems.
d. MBCI.

BTBC Phase III October 26, 2020
GE Project No. 0119-0010
Gould Evans
FORMED METAL WALL PANELS 074213 - 5
2. Metallic-Coated Steel Sheet: Zinc-coated (galvanized) steel sheet complying with
ASTM A653/A653M, G90 coating designation, or aluminum-zinc alloy-coated steel sheet
complying with ASTM A792/A792M, Class AZ50 coating designation; structural quality.
Prepainted by the coil-coating process to comply with ASTM A755/A755M.
a. Nominal Thickness: 0.028 inch or 0.034 inch, as required to meet performance
requirements.
b. Exterior Finish: Two-coat fluoropolymer.
c. Color: Match Architect's samples (See Existing Phase 1 and 2 BTBC Buildings) .
3. Panel Coverage: 12 inches.
4. Panel Height: 1.0 inch.
C. Flush-Reveal-Profile, Concealed-Fastener Metal Wall Panels (MP-02): Formed with vertical panel edges
and a flat pan between panel edges; with reveal joint between panels.
1. Manufacturers: Subject to compliance with requirements, available manufacturers offering
products that may be incorporated into the Work include, but are not limited to the following:
a. ATAS International, Inc.
b. Berridge Manufacturing Company.
c. CENTRIA Architectural Systems.
d. MBCI.
2. Metallic-Coated Steel Sheet: Zinc-coated (galvanized) steel sheet complying with
ASTM A653/A653M, G90 coating designation, or aluminum-zinc alloy-coated steel sheet
complying with ASTM A792/A792M, Class AZ50 coating designation; structural quality.
Prepainted by the coil-coating process to comply with ASTM A755/A755M.
a. Nominal Thickness: 0.028 inch or 0.034 inch, as required to meet performance
requirements.
b. Exterior Finish: Two-coat fluoropolymer.
c. Color: Match Architect's samples
3. Panel Coverage: 12 inches.
4. Panel Height: 1.0 inch.
D. Metal Floor Deck Profile - Roof Screen Wall Panels (MP-03): Formed with vertical panel edges, lapped
at vertical supports provided by Division 05.
1. Manufacturers: Subject to compliance with requirements, available manufacturers offering
products that may be incorporated into the Work include, but are not limited to the following:
a. EPIC Deck
1) Basis of Design: XXXXXXXXX
2. Metallic-Coated Steel Sheet: Zinc-coated (galvanized) steel sheet complying with
ASTM A653/A653M, G90 coating designation, or aluminum-zinc alloy-coated steel sheet
complying with ASTM A792/A792M, Class AZ50 coating designation; structural quality.
Prepainted by the coil-coating process to comply with ASTM A755/A755M.
a. Nominal Thickness: 0.028 inch or 0.034 inch, as required to meet performance
requirements.
b. Exterior Finish: Two-coat fluoropolymer.
c. Color: Match Architect's samples
3. Panel Coverage: 12 inches.
4. Panel Height: 1.0 inch.

BTBC Phase III October 26, 2020
GE Project No. 0119-0010
Gould Evans
FORMED METAL WALL PANELS 074213 - 6
E. Metal Panel Support and Subgirts Components (A. Thermal Spacer, B. Spacer Fasteners, C. Sub framing
– metal)
1. Sub-framing Thermal Spacer: 100 % Pultruded glass fibre and thermoset polyester resin insulation
clip.
a. Thermal Spacer thickness for top, base and web: 3/16 inches nominal.
b. Thermal spacer depth: 4 and 8 inches nominal.
1) Depth tolerance: ± 0.005 inches.
c. Basis of Design: Cascadia Windows Inc., Cascadia Clip
2. Spacer Fasteners: High hex head washer head with sharp twin threaded design of heat treated
corrosion resistant coated steel.
a. Fastener for steel framing: 1/4 - 14 x design length required, with hex head.
b. Acceptable material: Leland Industries Inc., Master Driller™ No. 2 Mini Drill Point with
NZF3000 coating or approved equivalent.
F. Cladding support sub-framing:
1. Material basis-of-design: Minimum 18-gauge, 33 ksi, factory-punched sheet steel with fastener
holes to match fiberglass thermal spacers.
2. Corrosion resistant coating on sub-framing: Galvalume AZM 150 (AZ 50)
3. Sub-framing profiles: As shown on design drawings. Typically, Z-profile for vertically oriented
sub-framing and hat-profile for horizontally oriented sub-framing, and additionally as required by
cladding manufacturer or cladding structural engineer.
a. Typical sub-framing depth: 1” (25mm)
G. Panel Accessories: Provide components required for a complete, weathertight panel system including
trim, copings, fasciae, mullions, sills, corner units, clips, flashings, sealants, gaskets, fillers, closure strips,
and similar items. Match material and finish of metal panels unless otherwise indicated.
1. Closures: Provide closures at eaves and rakes, fabricated of same metal as metal panels.
2. Backing Plates: Provide metal backing plates at panel end splices, fabricated from material
recommended by manufacturer.
3. Closure Strips: Closed-cell, expanded, cellular, rubber or crosslinked, polyolefin-foam or closed-
cell laminated polyethylene; minimum 1-inch- thick, flexible closure strips; cut or premolded to
match metal panel profile. Provide closure strips where indicated or necessary to ensure
weathertight construction.
H. Flashing and Trim: Provide flashing and trim formed from same material as metal panels as required to
seal against weather and to provide finished appearance. Locations include, but are not limited to, bases,
drips, sills, jambs, corners, endwalls, framed openings, rakes, fasciae, parapet caps, soffits, reveals, and
fillers. Finish flashing and trim with same finish system as adjacent metal panels.
I. Panel Fasteners: Self-tapping stainless steel screws designed to withstand design loads.
J. Panel Sealants: Provide sealant type recommended by manufacturer that are compatible with panel
materials, are nonstaining, and do not damage panel finish.
1. Sealant Tape: Pressure-sensitive, 100 percent solids, gray polyisobutylene compound sealant tape
with release-paper backing. Provide permanently elastic, nonsag, nontoxic, nonstaining tape 1/2
inch wide and 1/8 inch thick.
2. Joint Sealant: ASTM C920; elastomeric polyurethane or silicone sealant; of type, grade, class, and
use classifications required to seal joints in metal panels and remain weathertight; and as
recommended in writing by metal panel manufacturer.

BTBC Phase III October 26, 2020
GE Project No. 0119-0010
Gould Evans
FORMED METAL WALL PANELS 074213 - 7
2.3 FABRICATION
A. Fabricate and finish metal panels and accessories at the factory, by manufacturer's standard procedures
and processes, as necessary to fulfill indicated performance requirements demonstrated by laboratory
testing. Comply with indicated profiles and with dimensional and structural requirements.
B. Provide panel profile, including major ribs and intermediate stiffening ribs, if any, for full length of panel.
C. Fabricate metal panel joints with factory-installed captive gaskets or separator strips that provide a
weathertight seal and prevent metal-to-metal contact, and that minimize noise from movements.
D. Sheet Metal Flashing and Trim: Fabricate flashing and trim to comply with manufacturer's
recommendations and recommendations in SMACNA's "Architectural Sheet Metal Manual" that apply to
design, dimensions, metal, and other characteristics of item indicated.
1. Form exposed sheet metal accessories that are without excessive oil canning, buckling, and tool
marks and that are true to line and levels indicated, with exposed edges folded back to form hems.
2. Seams for Aluminum: Fabricate nonmoving seams with flat-lock seams. Form seams and seal
with epoxy seam sealer. Rivet joints for additional strength.
3. Seams for Other Than Aluminum: Fabricate nonmoving seams in accessories with flat-lock seams.
Tin edges to be seamed, form seams, and solder.
4. Sealed Joints: Form nonexpansion, but movable, joints in metal to accommodate sealant and to
comply with SMACNA standards.
5. Conceal fasteners and expansion provisions where possible. Exposed fasteners are not allowed on
faces of accessories exposed to view.
6. Fabricate cleats and attachment devices from same material as accessory being anchored or from
compatible, noncorrosive metal recommended in writing by metal panel manufacturer.
a. Size: As recommended by SMACNA's "Architectural Sheet Metal Manual" or metal wall
panel manufacturer for application but not less than thickness of metal being secured.
2.4 FINISHES
A. Protect mechanical and painted finishes on exposed surfaces from damage by applying a strippable,
temporary protective covering before shipping.
B. Appearance of Finished Work: Variations in appearance of abutting or adjacent pieces are acceptable if
they are within one-half of the range of approved Samples. Noticeable variations in same piece are not
acceptable. Variations in appearance of other components are acceptable if they are within the range of
approved Samples and are assembled or installed to minimize contrast.
C. Steel Panels and Accessories:
1. Two-Coat Fluoropolymer: AAMA 621. Fluoropolymer finish containing not less than 70 percent
polyvinylidene fluoride (PVDF) resin by weight in color coat. Prepare, pretreat, and apply coating
to exposed metal surfaces to comply with coating and resin manufacturers' written instructions.
2. Concealed Finish: Apply pretreatment and manufacturer's standard white or light-colored acrylic
or polyester backer finish consisting of prime coat and wash coat with a minimum total dry film
thickness of 0.5 mil.

BTBC Phase III October 26, 2020
GE Project No. 0119-0010
Gould Evans
FORMED METAL WALL PANELS 074213 - 8
PART 3 - EXECUTION
3.1 EXAMINATION
A. Examine substrates, areas, and conditions, with Installer present, for compliance with requirements for
installation tolerances, metal panel supports, and other conditions affecting performance of the Work.
1. Examine wall framing to verify that girts, angles, channels, studs, and other structural panel
support members and anchorage have been installed within alignment tolerances required by metal
wall panel manufacturer.
2. Examine wall sheathing to verify that sheathing joints are supported by framing or blocking and
that installation is within flatness tolerances required by metal wall panel manufacturer.
a. Verify that air- water-resistive barriers have been installed over sheathing or backing
substrate to prevent air infiltration or water penetration.
B. Examine roughing-in for components and systems penetrating metal panels to verify actual locations of
penetrations relative to seam locations of metal panels before installation.
C. Proceed with installation only after unsatisfactory conditions have been corrected.
3.2 PREPARATION
A. Miscellaneous Supports: Install subframing, furring, and other miscellaneous panel support members and
anchorages according to ASTM C754 and metal panel manufacturer's written recommendations.
B. Sub-framing: Ensure thermal spacer type is selected to accommodate orientation of vertical and
horizontal sub-framing.
C. Sub-framing Thermal Spacer Installation: Install thermal spacers in accordance with spacer
manufacturer’s written recommendations.
1. Thermal Spacer Installation: Clip thermal spacer to Z-girt and fasten girt directly to substrate at
framing centers to be determined using the Cascadia Clip Calculator or as directed by Cladding
Engineer.
2. Installation sequence for spacers, sub-framing, and insulation - Option 1:
a. Pre-punch holes or pre-drill holes in Z-girts and tracks to accommodate fasteners.
b. Position Z-girts directly over thermal spacer before installation of fasteners.
c. Completely install thermal spacers and screws for first Z-girt / track. For subsequent girts:
1) Fasten top spacer with single screw through Z-girt and spacer into substrate ensuring
spacer can pivot for accurate alignment.
2) Friction fit insulation in place before completing installation of remaining screws to
secure Z-girt and thermal spacers.
a) Ensure insulation is tightly fitted with sides of insulation slightly compressed at
each insulation spacer.
b) Ensure insulation pieces are in contact with no linear gaps between spacers.
3. Installation sequence for spacers, sub-framing, and insulation - Option 2:
a. Pre-punch or pre-drill holes in Z-girts and tracks to accommodate fasteners.
b. Position Z-girts directly over thermal spacer before installation of fasteners.
c. Completely install spacers, screws and sub-framing, prior to installing insulation.
d. Friction fit insulation in place as follows:
1) For semi-rigid insulation batts or boards, notch the batts at the location of the clip to
match the top and bottom of the Clip.

BTBC Phase III October 26, 2020
GE Project No. 0119-0010
Gould Evans
FORMED METAL WALL PANELS 074213 - 9
2) Push insulation into place, compressing it at the Clip location, and ensuring no
linear gaps in the adjacent insulation boards on either side of the Clip.
3) Flatten board against substrate if necessary, with corrosion resistant stick pins or
other mechanical insulation retention devices 400 mm maximum on centre along
centreline of insulation batts or boards and in accordance with insulation
manufacturer’s written recommendations.
3.3 INSTALLATION
A. Install metal panels according to manufacturer's written instructions in orientation, sizes, and locations
indicated. Install panels perpendicular to supports unless otherwise indicated. Anchor metal panels and
other components of the Work securely in place, with provisions for thermal and structural movement.
1. Shim or otherwise plumb substrates receiving metal panels.
2. Flash and seal metal panels at perimeter of all openings. Fasten with self-tapping screws. Do not
begin installation until air- or water-resistive barriers and flashings that will be concealed by metal
panels are installed.
3. Install screw fasteners in predrilled holes.
4. Locate and space fastenings in uniform vertical and horizontal alignment.
5. Install flashing and trim as metal panel work proceeds.
6. Locate panel splices over, but not attached to, structural supports. Stagger panel splices and end
laps to avoid a four-panel lap splice condition.
7. Align bottoms of metal panels and fasten with blind rivets, bolts, or self-tapping screws. Fasten
flashings and trim around openings and similar elements with self-tapping screws.
8. Provide weathertight escutcheons for pipe- and conduit-penetrating panels.
B. Fasteners:
1. Steel Panels: Use stainless steel fasteners..
C. Metal Protection: Where dissimilar metals contact each other or corrosive substrates, protect against
galvanic action as recommended in writing by metal panel manufacturer.
D. Lap-Seam Metal Panels: Fasten metal panels to supports with fasteners at each lapped joint at location
and spacing recommended by manufacturer.
1. Lap ribbed or fluted sheets one full rib. Apply panels and associated items true to line for neat and
weathertight enclosure.
2. Provide metal-backed washers under heads of exposed fasteners bearing on weather side of metal
panels.
3. Locate and space exposed fasteners in uniform vertical and horizontal alignment. Use proper tools
to obtain controlled uniform compression for positive seal without rupture of washer.
4. Install screw fasteners with power tools having controlled torque adjusted to compress washer
tightly without damage to washer, screw threads, or panels. Install screws in predrilled holes.
5. Flash and seal panels with weather closures at perimeter of all openings.
E. Watertight Installation:
1. Apply a continuous ribbon of sealant or tape to seal lapped joints of metal panels, using sealant or
tape as recommend by manufacturer on side laps of nesting-type panels; and elsewhere as needed
to make panels watertight.
2. Provide sealant or tape between panels and protruding equipment, vents, and accessories.
3. As indicated at typical panel joints, provide break metal closure trim prior to panel installation to
complete rainscreen wall assembly drainage plane.

BTBC Phase III October 26, 2020
GE Project No. 0119-0010
Gould Evans
FORMED METAL WALL PANELS 074213 - 10
F. Accessory Installation: Install accessories with positive anchorage to building and weathertight mounting,
and provide for thermal expansion. Coordinate installation with flashings and other components.
1. Install components required for a complete metal panel system including trim, copings, corners,
seam covers, flashings, sealants, gaskets, fillers, closure strips, and similar items. Provide types
indicated by metal wall panel manufacturer; or, if not indicated, provide types recommended by
metal panel manufacturer.
G. Flashing and Trim: Comply with performance requirements, manufacturer's written installation
instructions, and SMACNA's "Architectural Sheet Metal Manual." Provide concealed fasteners where
possible, and set units true to line and level as indicated. Install work with laps, joints, and seams that are
permanently watertight.
1. Install exposed flashing and trim that is without buckling and tool marks, and that is true to line
and levels indicated, with exposed edges folded back to form hems. Install sheet metal flashing
and trim to fit substrates and achieve waterproof performance.
2. Expansion Provisions: Provide for thermal expansion of exposed flashing and trim. Space
movement joints at a maximum of 10 feet with no joints allowed within 24 inches of corner or
intersection. Where lapped expansion provisions cannot be used or would not be sufficiently
waterproof, form expansion joints of intermeshing hooked flanges, not less than 1 inch deep, filled
with mastic sealant (concealed within joints).
3.4 FIELD QUALITY CONTROL
A. Testing Agency: Owner will engage a qualified testing agency to perform tests and inspections.
B. Water-Spray Test: After installation, test area of assembly as directed by Architect for water penetration
according to AAMA 501.2.
C. Manufacturer's Field Service: Engage a factory-authorized service representative to test and inspect
completed metal wall panel installation, including accessories.
D. Remove and replace metal wall panels where tests and inspections indicate that they do not comply with
specified requirements.
E. Additional tests and inspections, at Contractor's expense, are performed to determine compliance of
replaced or additional work with specified requirements.
F. Prepare test and inspection reports.
3.5 CLEANING AND PROTECTION
A. Remove temporary protective coverings and strippable films, if any, as metal panels are installed, unless
otherwise indicated in manufacturer's written installation instructions. On completion of metal panel
installation, clean finished surfaces as recommended by metal panel manufacturer. Maintain in a clean
condition during construction.
B. After metal panel installation, clear weep holes and drainage channels of obstructions, dirt, and sealant.
C. Replace metal panels that have been damaged or have deteriorated beyond successful repair by finish
touchup or similar minor repair procedures.

BTBC Phase III October 26, 2020
GE Project No. 0119-0010
Gould Evans
FORMED METAL WALL PANELS 074213 - 11
END OF SECTION 074213


BTBC Phase III October 26, 2020
GE Project No. 0119-0010
Gould Evans
THERMOPLASTIC POLYOLEFIN (TPO) ROOFING 075423 - 1
SECTION 075423 - THERMOPLASTIC POLYOLEFIN (TPO) ROOFING
PART 1 - GENERAL
1.1 RELATED DOCUMENTS
A. Drawings and general provisions of the Contract, including General and Supplementary Conditions and
Division 01 Specification Sections, apply to this Section.
1.2 SUMMARY
A. Section Includes:
1. Mechanically fastened, fully adhered thermoplastic polyolefin (TPO) roofing system.
2. Roof insulation and cover board
3. Substrate board with vapor barrier
B. Section includes the installation of insulation strips in ribs of roof deck. Insulation strips are furnished
under Section 053100 "Steel Decking."
C. Related Requirements:
1. Section 061000 "Rough Carpentry" for wood nailers, curbs, and blocking; and for wood-based,
structural-use roof deck panels.
2. Section 077100 "Roof Specialties" for paver and pedestal system indicated on the roof.
3. Section 079200 "Joint Sealants" for joint sealants, joint fillers, and joint preparation.
4. Section 221423 "Storm Drainage Piping Specialties" for roof drains.
1.3 DEFINITIONS
A. Roofing Terminology: Definitions in ASTM D 1079 and glossary in NRCA's "The NRCA Roofing and
Waterproofing Manual" apply to work of this Section.
1.4 PREINSTALLATION MEETINGS
A. Preliminary Roofing Conference: Before starting roof deck construction, conduct conference at Project
site.
1. Meet with Owner, Architect, Owner's insurer if applicable, testing and inspecting agency
representative, roofing Installer, roofing system manufacturer's representative, deck Installer, and
installers whose work interfaces with or affects roofing, including installers of roof accessories
and roof-mounted equipment.
2. Review methods and procedures related to roofing installation, including manufacturer's written
instructions.
3. Review and finalize construction schedule, and verify availability of materials, Installer's
personnel, equipment, and facilities needed to make progress and avoid delays.
4. Review deck substrate requirements for conditions and finishes, including flatness and fastening.
5. Review structural loading limitations of roof deck during and after roofing.
6. Review base flashings, special roofing details, roof drainage, roof penetrations, equipment curbs,
and condition of other construction that affects roofing system.
7. Review governing regulations and requirements for insurance and certificates if applicable.

BTBC Phase III October 26, 2020
GE Project No. 0119-0010
Gould Evans
THERMOPLASTIC POLYOLEFIN (TPO) ROOFING 075423 - 2
8. Review temporary protection requirements for roofing system during and after installation.
9. Review roof observation and repair procedures after roofing installation.
B. Preinstallation Roofing Conference: Conduct conference at Project site.
1. Meet with Owner, Architect, Owner's insurer if applicable, testing and inspecting agency
representative, roofing Installer, roofing system manufacturer's representative, deck Installer, and
installers whose work interfaces with or affects roofing, including installers of roof accessories
and roof-mounted equipment.
2. Review methods and procedures related to roofing installation, including manufacturer's written
instructions.
3. Review and finalize construction schedule, and verify availability of materials, Installer's
personnel, equipment, and facilities needed to make progress and avoid delays.
4. Examine deck substrate conditions and finishes for compliance with requirements, including
flatness and fastening.
5. Review structural loading limitations of roof deck during and after roofing.
6. Review base flashings, special roofing details, roof drainage, roof penetrations, equipment curbs,
and condition of other construction that affects roofing system.
7. Review governing regulations and requirements for insurance and certificates if applicable.
8. Review temporary protection requirements for roofing system during and after installation.
9. Review roof observation and repair procedures after roofing installation.
1.5 ACTION SUBMITTALS
A. Product Data: For each type of product.
B. Shop Drawings: For roofing system. Include plans, elevations, sections, details, and attachments to other
work, including:
1. Base flashings and membrane terminations.
2. Tapered insulation, including slopes.
3. Roof plan showing orientation of steel roof deck and orientation of roofing, fastening spacings,
and patterns for mechanically fastened roofing.
4. Insulation fastening patterns for corner, perimeter, and field-of-roof locations.
C. Samples for Verification: For the following products:
1. Sheet roofing, of color required.
2. Walkway pads or rolls, of color required.
1.6 INFORMATIONAL SUBMITTALS
A. Qualification Data: For Installer and manufacturer.
B. Manufacturer Certificates: Signed by roofing manufacturer certifying that roofing system complies with
requirements specified in "Performance Requirements" Article.
1. Submit evidence of compliance with performance requirements.
C. Product Test Reports: For components of roofing system, tests performed by manufacturer and witnessed
by a qualified testing agency.
D. Research/Evaluation Reports: For components of roofing system, from ICC-ES.
E. Field quality-control reports.

BTBC Phase III October 26, 2020
GE Project No. 0119-0010
Gould Evans
THERMOPLASTIC POLYOLEFIN (TPO) ROOFING 075423 - 3
F. Sample Warranties: For manufacturer's special warranties.
1.7 CLOSEOUT SUBMITTALS
A. Maintenance Data: For roofing system to include in maintenance manuals.
1.8 QUALITY ASSURANCE
A. Manufacturer Qualifications: A qualified manufacturer that is UL listed for roofing system identical to
that used for this Project.
B. Installer Qualifications: A qualified firm that is approved, authorized, or licensed by roofing system
manufacturer to install manufacturer's product and that is eligible to receive manufacturer's special
warranty.
1.9 DELIVERY, STORAGE, AND HANDLING
A. Deliver roofing materials to Project site in original containers with seals unbroken and labeled with
manufacturer's name, product brand name and type, date of manufacture, approval or listing agency
markings, and directions for storing and mixing with other components.
B. Store liquid materials in their original undamaged containers in a clean, dry, protected location and within
the temperature range required by roofing system manufacturer. Protect stored liquid material from direct
sunlight.
1. Discard and legally dispose of liquid material that cannot be applied within its stated shelf life.
C. Protect roof insulation materials from physical damage and from deterioration by sunlight, moisture,
soiling, and other sources. Store in a dry location. Comply with insulation manufacturer's written
instructions for handling, storing, and protecting during installation.
D. Handle and store roofing materials, and place equipment in a manner to avoid permanent deflection of
deck.
1.10 FIELD CONDITIONS
A. Weather Limitations: Proceed with installation only when existing and forecasted weather conditions
permit roofing system to be installed according to manufacturer's written instructions and warranty
requirements.
1.11 WARRANTY
A. Special Warranty: Manufacturer agrees to repair or replace components of roofing system that fail in
materials or workmanship within specified warranty period.
1. Special warranty includes roofing, base flashings, [roof insulation,] [fasteners,] [cover boards,]
[substrate board,] [roofing accessories,] [roof pavers,] and other components of roofing system.
2. Warranty Period: 15 years from date of Substantial Completion.
B. Special Project Warranty: Submit roofing Installer's warranty, on warranty form at end of this Section,
signed by Installer, covering the Work of this Section, including all components of roofing system such

BTBC Phase III October 26, 2020
GE Project No. 0119-0010
Gould Evans
THERMOPLASTIC POLYOLEFIN (TPO) ROOFING 075423 - 4
as roofing, base flashing, roof insulation, fasteners, cover boards, substrate boards, vapor retarders, roof
pavers, and walkway products, for the following warranty period:
1. Warranty Period: Two years from date of Substantial Completion.
PART 2 - PRODUCTS
2.1 MANUFACTURERS
A. Manufacturers: Subject to compliance with requirements, provide products by one of the following:
1. Carlisle SynTec Incorporated.
2. Firestone Building Products.
3. GAF Materials Corporation.
4. Johns Manville; a Berkshire Hathaway company.
B. Source Limitations: Obtain components including roof insulation and fastenersfor roofing system from
same manufacturer as membrane roofingormanufacturer approved by membrane roofing manufacturer.
2.2 PERFORMANCE REQUIREMENTS
A. General Performance: Installed roofing and base flashings shall withstand specified uplift pressures,
thermally induced movement, and exposure to weather without failure due to defective manufacture,
fabrication, installation, or other defects in construction. Roofing and base flashings shall remain
watertight.
1. Accelerated Weathering: Roofing system shall withstand 2000 hours of exposure when tested
according to ASTM G 152, ASTM G 154, or ASTM G 155.
2. Impact Resistance: Roofing system shall resist impact damage when tested according to
ASTM D 3746 or ASTM D 4272.
B. Material Compatibility: Roofing materials shall be compatible with one another and adjacent materials
under conditions of service and application required, as demonstrated by roofing manufacturer based on
testing and field experience.
C. Roofing System Design: Tested by a qualified testing agency to resist the following uplift pressures:
1. Corner Uplift Pressure: As indicated
2. Perimeter Uplift Pressure: As indicated
3. Field-of-Roof Uplift Pressure: As indicated
D. FM Global Listing: Roofing, base flashings, and component materials shall comply with requirements in
FM Global 4450 or FM Global 4470 as part of a built-up roofing system, and shall be listed in FM
Global's "RoofNav" for Class 1 or noncombustible construction, as applicable. Identify materials with
FM Global markings.
1. Fire/Windstorm Classification: Class 1A-90.
2. Hail-Resistance Rating: SH.
E. Energy Performance: Roofing system shall have an initial solar reflectance of not less than 0.70 and an
emissivity of not less than 0.75 when tested according to CRRC-1.
F. Exterior Fire-Test Exposure: ASTM E 108 or UL 790, Class A; for application and roof slopes indicated;
testing by a qualified testing agency. Identify products with appropriate markings of applicable testing
agency.

BTBC Phase III October 26, 2020
GE Project No. 0119-0010
Gould Evans
THERMOPLASTIC POLYOLEFIN (TPO) ROOFING 075423 - 5
G. Fire-Resistance Ratings: Comply with fire-resistance-rated assembly designs indicated. Identify products
with appropriate markings of applicable testing agency.
2.3 TPO ROOFING
A. Fabric-Reinforced TPO Sheet: ASTM D 6878, internally fabric- or scrim-reinforced, uniform,
flexible[ fabric-backed] TPO sheet.
1. Thickness: 60 mils (1.5 mm), nominal.
2. Exposed Face Color: White.
2.4 AUXILIARY ROOFING MATERIALS
A. General: Auxiliary materials recommended by roofing system manufacturer for intended use and
compatible with roofing.
1. Liquid-type auxiliary materials shall comply with VOC limits of authorities having jurisdiction.
B. Sheet Flashing: Manufacturer's standard unreinforced TPO sheet flashing, 55 mils (1.4 mm)thick,
minimum, of same color as TPO sheet.
C. Bonding Adhesive: Manufacturer's standard, water based.
D. Slip Sheet: Manufacturer's standard, of thickness required for application.
E. Metal Termination Bars: Manufacturer's standard, predrilled stainless-steel bars, approximately 1 by 1/8
inch (25 by 3 mm) thick; with anchors.
F. Metal Battens: Manufacturer's standard, aluminum-zinc-alloy-coated or zinc-coated steel sheet,
approximately 1 inch wide by 0.05 inch thick (25 mm wide by 1.3 mm thick), prepunched.
G. Fasteners: Factory-coated steel fasteners and metal or plastic plates complying with corrosion-resistance
provisions in FM Global 4470, designed for fastening roofing to substrate, and acceptable to roofing
system manufacturer.
H. Miscellaneous Accessories: Provide pourable sealers, preformed cone and vent sheet flashings, preformed
inside and outside corner sheet flashings, T-joint covers, lap sealants, termination reglets, and other
accessories.
2.5 SUBSTRATE BOARDS
A. Substrate Board: ASTM C 1177/C 1177M, glass-mat, water-resistant gypsum substrate, Type X, 5/8 inch
(16 mm) thick.
1. Manufacturers: Subject to compliance with requirements, provide products by the following:
a. Georgia Pacific, Dens Deck Prime
2.6 VAPOR RETARDER
A. Self-Adhering-Sheet Vapor Retarder: Polyethylene film laminated to layer of butyl rubber adhesive,
minimum 30-mil- (0.76-mm-) total thickness; maximum permeance rating of 0.1 perm (6 ng/Pa x s x
sq. m); cold applied, with slip-resisting surface and release paper backing. Provide primer when
recommended by vapor-retarder manufacturer.

BTBC Phase III October 26, 2020
GE Project No. 0119-0010
Gould Evans
THERMOPLASTIC POLYOLEFIN (TPO) ROOFING 075423 - 6
2.7 ROOF INSULATION
A. General: Preformed roof insulation boards manufactured or approved by TPO roofing manufacturer,
selected from manufacturer's standard sizes suitable for application, of thicknesses indicated and that
produce FM Global-approved roof insulation.
B. Polyisocyanurate Board Insulation: ASTM C 1289, Type II, Class 1, Grade 2, felt or glass-fiber mat facer
on both major surfaces.
1. Manufacturers: Subject to compliance with requirements, provide products by one of the
following:
a. Atlas Roofing Corporation.
b. Carlisle SynTec Incorporated.
c. Firestone Building Products.
d. GAF Materials Corporation.
e. Johns Manville; a Berkshire Hathaway company.
C. Perlite Board Insulation: ASTM C 728, rigid, mineral-aggregate thermal insulation board composed of
expanded perlite, cellulosic fibers, binders, and waterproofing agents with top surface seal coated.
D. Tapered Insulation: Provide factory-tapered insulation boards fabricated to slope of 1/4 inch per 12 inches
(1:48)unless otherwise indicated.
E. Provide preformed saddles, crickets, tapered edge strips, and other insulation shapes where indicated for
sloping to drain. Fabricate to slopes indicated.
2.8 INSULATION ACCESSORIES
A. General: Roof insulation accessories recommended by insulation manufacturer for intended use and
compatibility with roofing.
B. Fasteners: Factory-coated steel fasteners and metal or plastic plates complying with corrosion-resistance
provisions in FM Global 4470, designed for fastening roof insulation[ and cover boards] to substrate, and
acceptable to roofing system manufacturer.
C. Insulation Adhesive: Insulation manufacturer's recommended adhesive formulated to attach roof
insulation to substrate or to another insulation layer as follows:
1. Modified asphaltic, asbestos-free, cold-applied adhesive.
2. Bead-applied, low-rise, one-component or multicomponent urethane adhesive.
3. Full-spread spray-applied, low-rise, two-component urethane adhesive.
D. Cover Board: ASTM C 1177/C 1177M, glass-mat, water-resistant gypsum substrate,1/2 inch (13 mm)
thick, factory primed.
E. Cover Board: ASTM C 1278/C 1278M, cellulosic-fiber-reinforced, water-resistant gypsum substrate1/2
inch (13 mm) thick.
2.9 ASPHALT MATERIALS
A. Roofing Asphalt: [ASTM D 312, Type III or Type IV] [ASTM D 6152, SEBS modified].
B. Asphalt Primer: ASTM D 41/D 41M.

BTBC Phase III October 26, 2020
GE Project No. 0119-0010
Gould Evans
THERMOPLASTIC POLYOLEFIN (TPO) ROOFING 075423 - 7
2.10 WALKWAYS
A. Flexible Walkways: Factory-formed, nonporous, heavy-duty, slip-resisting, surface-textured walkway
pads, approximately 3/16 inch (5 mm) thick and acceptable to roofing system manufacturer. Adhere to
roof with manufacturer’s approved adhesive.
PART 3 - EXECUTION
3.1 EXAMINATION
A. Examine substrates, areas, and conditions, with Installer present, for compliance with requirements and
other conditions affecting performance of the Work:
1. Verify that roof openings and penetrations are in place, curbs are set and braced, and roof-drain
bodies are securely clamped in place.
2. Verify that wood blocking, curbs, and nailers are securely anchored to roof deck at penetrations
and terminations and that nailers match thicknesses of insulation.
3. Verify that surface plane flatness and fastening of steel roof deck complies with requirements in
Section 053100 "Steel Decking."
4. Verify that minimum concrete drying period recommended by roofing system manufacturer has
passed.
5. Verify that concrete substrate is visibly dry and free of moisture. Test for capillary moisture by
plastic sheet method according to ASTM D 4263.
6. Verify that concrete-curing compounds that will impair adhesion of roofing components to roof
deck have been removed.
B. Proceed with installation only after unsatisfactory conditions have been corrected.
3.2 PREPARATION
A. Clean substrate of dust, debris, moisture, and other substances detrimental to roofing installation
according to roofing system manufacturer's written instructions. Remove sharp projections.
B. Prevent materials from entering and clogging roof drains and conductors and from spilling or migrating
onto surfaces of other construction. Remove roof-drain plugs when no work is taking place or when rain
is forecast.
3.3 ROOFING INSTALLATION, GENERAL
A. Install roofing system according to roofing system manufacturer's written instructions.
B. Complete terminations and base flashings and provide temporary seals to prevent water from entering
completed sections of roofing system at the end of the workday or when rain is forecast. Remove and
discard temporary seals before beginning work on adjoining roofing.
3.4 INSULATION INSTALLATION
A. Coordinate installing roofing system components so insulation is not exposed to precipitation or left
exposed at the end of the workday.

BTBC Phase III October 26, 2020
GE Project No. 0119-0010
Gould Evans
THERMOPLASTIC POLYOLEFIN (TPO) ROOFING 075423 - 8
B. Comply with roofing system and insulation manufacturer's written instructions for installing roof
insulation.
C. Install tapered insulation under area of roofing to conform to slopes indicated.
D. Install insulation under area of roofing to achieve required thickness. Where overall insulation thickness
is 2.7 inches (68 mm) or greater, install two or more layers with joints of each succeeding layer staggered
from joints of previous layer a minimum of 6 inches (150 mm) in each direction.
E. Trim surface of insulation where necessary at roof drains so completed surface is flush and does not
restrict flow of water.
F. Install insulation with long joints of insulation in a continuous straight line with end joints staggered
between rows, abutting edges and ends between boards. Fill gaps exceeding 1/4 inch (6 mm) with
insulation.
1. Cut and fit insulation within 1/4 inch (6 mm) of nailers, projections, and penetrations.
G. Mechanically Fastened and Adhered Insulation (at steel decks): Install each layer of insulation to deck
using mechanical fasteners specifically designed and sized for fastening specified board-type roof
insulation to deck type.
1. Fasten first layer of insulation according to requirements in FM Global's "RoofNav" for specified
Windstorm Resistance Classification.
2. Fasten first layer of insulation to resist uplift pressure at corners, perimeter, and field of roof.
3. Set each subsequent layer of insulation in a solid mopping of hot roofing asphalt, applied within
plus or minus 25 deg F (14 deg C) of equiviscous temperature.
4. Set each subsequent layer of insulation in ribbons of bead-applied insulation adhesive, firmly
pressing and maintaining insulation in place.
5. Set each subsequent layer of insulation in a uniform coverage of full-spread insulation adhesive,
firmly pressing and maintaining insulation in place.
H. Install cover boards over insulation with long joints in continuous straight lines with end joints staggered
between rows. Offset joints of insulation below a minimum of 6 inches (150 mm) in each direction.
Loosely butt cover boards together and fasten to roof deck.
1. Fasten cover boards according to requirements in FM Global's "RoofNav" for specified
Windstorm Resistance Classification.
2. Fasten cover boards to resist uplift pressure at corners, perimeter, and field of roof.
I. Install slip sheet over cover board and immediately beneath roofing.
3.5 ADHERED ROOFING INSTALLATION
A. Adhere roofing over area to receive roofing according to roofing system manufacturer's written
instructions. Unroll roofing and allow to relax before retaining.
B. Start installation of roofing in presence of roofing system manufacturer's technical personnel.
C. Accurately align roofing, and maintain uniform side and end laps of minimum dimensions required by
manufacturer. Stagger end laps.
D. Bonding Adhesive: Apply to substrate and underside of roofing at rate required by manufacturer, and
allow to partially dry before installing roofing. Do not apply to splice area of roofing.

BTBC Phase III October 26, 2020
GE Project No. 0119-0010
Gould Evans
THERMOPLASTIC POLYOLEFIN (TPO) ROOFING 075423 - 9
E. In addition to adhering, mechanically fasten roofing securely at terminations, penetrations, and perimeter
of roofing.
F. Apply roofing with side laps shingled with slope of roof deck where possible.
G. Seams: Clean seam areas, overlap roofing, and hot-air weld side and end laps of roofing and sheet
flashings according to manufacturer's written instructions, to ensure a watertight seam installation.
1. Test lap edges with probe to verify seam weld continuity. Apply lap sealant to seal cut edges of
sheet.
2. Verify field strength of seams a minimum of twice daily, and repair seam sample areas.
3. Repair tears, voids, and lapped seams in roofing that do not comply with requirements.
H. Spread sealant bed over deck-drain flange at roof drains, and securely seal roofing in place with clamping
ring.
3.6 BASE FLASHING INSTALLATION
A. Install sheet flashings and preformed flashing accessories, and adhere to substrates according to roofing
system manufacturer's written instructions.
B. Apply bonding adhesive to substrate and underside of sheet flashing at required rate, and allow to
partially dry. Do not apply to seam area of flashing.
C. Flash penetrations and field-formed inside and outside corners with cured or uncured sheet flashing.
D. Clean seam areas, overlap, and firmly roll sheet flashings into the adhesive. Hot-air weld side and end
laps to ensure a watertight seam installation.
E. Terminate and seal top of sheet flashings and mechanically anchor to substrate through termination bars.
3.7 WALKWAY INSTALLATION
A. Flexible Walkways: Install walkway products in locations indicated. Heat weld to substrate or adhere
walkway products to substrate with compatible adhesive according to roofing system manufacturer's
written instructions.
3.8 FIELD QUALITY CONTROL
A. Testing Agency:Engage a qualified testing agency to inspect substrate conditions, surface preparation,
membrane application, flashings, protection, and drainage components, and to furnish reports to
Architect.
B. Final Roof Inspection: Arrange for roofing system manufacturer's technical personnel to inspect roofing
installation on completion.
C. Repair or remove and replace components of roofing system where inspections indicate that they do not
comply with specified requirements.
D. Additional testing and inspecting, at Contractor's expense, will be performed to determine if replaced or
additional work complies with specified requirements.

BTBC Phase III October 26, 2020
GE Project No. 0119-0010
Gould Evans
THERMOPLASTIC POLYOLEFIN (TPO) ROOFING 075423 - 10
3.9 PROTECTING AND CLEANING
A. Protect roofing system from damage and wear during remainder of construction period. When remaining
construction does not affect or endanger roofing, inspect roofing for deterioration and damage, describing
its nature and extent in a written report, with copies to Architect and Owner.
B. Correct deficiencies in or remove roofing system that does not comply with requirements, repair
substrates, and repair or reinstall roofing system to a condition free of damage and deterioration at time of
Substantial Completion and according to warranty requirements.
C. Clean overspray and spillage from adjacent construction using cleaning agents and procedures
recommended by manufacturer of affected construction.
3.10 ROOFING INSTALLER'S WARRANTY
A. WHEREAS _______________________________ of ___________________________, herein called
the "Roofing Installer," has performed roofing and associated work ("work") on the following project:
1. Owner: Bioscience and Business Technology Center
2. Address:
3. Building Name/Type: BTBC Phase III
4. Area of Work: <Insert information>.
5. Acceptance Date: _________________.
6. Warranty Period: <Insert time>.
7. Expiration Date: __________________.
B. AND WHEREAS Roofing Installer has contracted (either directly with Owner or indirectly as a
subcontractor) to warrant said work against leaks and faulty or defective materials and workmanship for
designated Warranty Period,
C. NOW THEREFORE Roofing Installer hereby warrants, subject to terms and conditions herein set forth,
that during Warranty Period he will, at his own cost and expense, make or cause to be made such repairs
to or replacements of said work as are necessary to correct faulty and defective work and as are necessary
to maintain said work in a watertight condition.
D. This Warranty is made subject to the following terms and conditions:
1. Specifically excluded from this Warranty are damages to work and other parts of the building, and
to building contents, caused by:
a. lightning;
b. peak gust wind speed exceeding 90 mph;
c. fire;
d. failure of roofing system substrate, including cracking, settlement, excessive deflection,
deterioration, and decomposition;
e. faulty construction of parapet walls, copings, chimneys, skylights, vents, equipment
supports, and other edge conditions and penetrations of the work;
f. vapor condensation on bottom of roofing; and
g. activity on roofing by others, including construction contractors, maintenance personnel,
other persons, and animals, whether authorized or unauthorized by Owner.
2. When work has been damaged by any of foregoing causes, Warranty shall be null and void until
such damage has been repaired by Roofing Installer and until cost and expense thereof have been
paid by Owner or by another responsible party so designated.
3. Roofing Installer is responsible for damage to work covered by this Warranty but is not liable for
consequential damages to building or building contents resulting from leaks or faults or defects of
work.

BTBC Phase III October 26, 2020
GE Project No. 0119-0010
Gould Evans
THERMOPLASTIC POLYOLEFIN (TPO) ROOFING 075423 - 11
4. During Warranty Period, if Owner allows alteration of work by anyone other than Roofing
Installer, including cutting, patching, and maintenance in connection with penetrations, attachment
of other work, and positioning of anything on roof, this Warranty shall become null and void on
date of said alterations, but only to the extent said alterations affect work covered by this
Warranty. If Owner engages Roofing Installer to perform said alterations, Warranty shall not
become null and void unless Roofing Installer, before starting said work, shall have notified
Owner in writing, showing reasonable cause for claim, that said alterations would likely damage
or deteriorate work, thereby reasonably justifying a limitation or termination of this Warranty.
5. During Warranty Period, if original use of roof is changed and it becomes used for, but was not
originally specified for, a promenade, work deck, spray-cooled surface, flooded basin, or other use
or service more severe than originally specified, this Warranty shall become null and void on date
of said change, but only to the extent said change affects work covered by this Warranty.
6. Owner shall promptly notify Roofing Installer of observed, known, or suspected leaks, defects, or
deterioration and shall afford reasonable opportunity for Roofing Installer to inspect work and to
examine evidence of such leaks, defects, or deterioration.
7. This Warranty is recognized to be the only warranty of Roofing Installer on said work and shall
not operate to restrict or cut off Owner from other remedies and resources lawfully available to
Owner in cases of roofing failure. Specifically, this Warranty shall not operate to relieve Roofing
Installer of responsibility for performance of original work according to requirements of the
Contract Documents, regardless of whether Contract was a contract directly with Owner or a
subcontract with Owner's General Contractor.
E. IN WITNESS THEREOF, this instrument has been duly executed this ___________ day of
___________________, ________________.
1. Authorized Signature: _______________________________________.
2. Name: ______________________________________.
3. Title: _______________________________________.
END OF SECTION 075423

BTBC Phase III October 26, 2020
GE Project No. 0119-0010
Gould Evans
THERMOPLASTIC POLYOLEFIN (TPO) ROOFING 075423 - 12
THIS PAGE IS INTENTIONALLY LEFT BLANK

BTBC Phase III October 26, 2020
GE Project No. 0119-0010
Gould Evans
SHEET METAL FLASHING AND TRIM 076200 - 1
SECTION 076200 - SHEET METAL FLASHING AND TRIM
PART 1 - GENERAL
1.1 RELATED DOCUMENTS
A. Drawings and general provisions of the Contract, including General and Supplementary Conditions and
Division 1 Specification Sections, apply to this Section.
1.2 SUMMARY
A. This Section includes the following sheet metal flashing and trim:
1. Formed roof drainage sheet metal fabrications.
2. Formed low-slope roof flashing and trim.
3. Formed wall flashing and trim.
4. Formed equipment support flashing.
B. Related Sections include the following:
1. Division 6 Section "Rough Carpentry” for wood nailers, curbs, and blocking.
2. Division 7 Section “Thermoplastic Polyolefin (TPO) Roofing” for installing sheet metal flashing and
trim integral with roofing membrane.
3. Division 07 Section "Metal Wall Panels" for sheet metal flashing and trim integral with metal wall
panels.
4. Division 7 Section "Roof Accessories" for roof hatches, pipe penetrations, conduit penetrations and
other manufactured roof accessory units.
5. Division 7 Section "Joint Sealants" for field-applied sheet metal flashing and trim sealants.
1.3 PERFORMANCE REQUIREMENTS
A. General: Install sheet metal flashing and trim to withstand wind loads, structural movement, thermally
induced movement, and exposure to weather without failing, rattling, leaking, and fastener disengagement.
B. SPRI Wind Design Standard: Manufacture and install copings and roof-edge flashings tested according to
SPRI ES-1 and capable of resisting the following design pressures:
1. Design Pressure: 22 psf horizontal and 36 psf vertical.
C. Thermal Movements: Provide sheet metal flashing and trim that allow for thermal movements resulting from
the following maximum change (range) in ambient and surface temperatures by preventing buckling, opening
of joints, hole elongation, overstressing of components, failure of joint sealants, failure of connections, and
other detrimental effects. Provide clips that resist rotation and avoid shear stress as a result of sheet metal
and trim thermal movements. Base engineering calculation on surface temperatures of materials due to both
solar heat gain and nighttime-sky heat loss.
1. Temperature Change (Range): 120 deg F, ambient; 180 deg F, material surfaces.
D. Water Infiltration: Provide sheet metal flashing and trim that do not allow water infiltration to building
interior.
1.4 SUBMITTALS
A. Product Data: For each type of product indicated. Include construction details, material descriptions,
dimensions of individual components and profiles, and finishes.

BTBC Phase III October 26, 2020
GE Project No. 0119-0010
Gould Evans
SHEET METAL FLASHING AND TRIM 076200 - 2
B. Shop Drawings: Show layouts of sheet metal flashing and trim, including plans and elevations. Distinguish
between shop- and field-assembled work. Include the following:
1. Identify material, thickness, weight, and finish for each item and location in Project.
2. Details for forming sheet metal flashing and trim, including profiles, shapes, seams, and dimensions.
3. Details for fastening, joining, supporting, and anchoring sheet metal flashing and trim, including
fasteners, clips, cleats, and attachments to adjoining work.
4. Details of expansion-joint covers, including showing direction of expansion and contraction.
5. Details of splice joints, corner conditions, and other changes in flashing direction.
C. Samples for Verification: For each type of exposed finish required, prepared on Samples of size indicated
below:
1. Sheet Metal Flashing: 12 inches long. Include fasteners, cleats, closures, and other attachments.
2. Trim: 12 inches long. Include fasteners and other exposed accessories.
3. Accessories: Full-size Sample.
1.5 QUALITY ASSURANCE
A. Fabricator Qualifications: Shop that employs skilled workers who custom fabricate sheet metal flashing and
trim similar to that required for this Project and whose products have a record of successful in-service
performance.
B. Sheet Metal Flashing and Trim Standard: Comply with SMACNA's "Architectural Sheet Metal Manual."
Conform to dimensions and profiles shown unless more stringent requirements are indicated.
C. Mockups: Build mockups to verify selections made under sample submittals and to demonstrate aesthetic
effects and set quality standards for fabrication and installation.
1. Approved mockups may become part of the completed Work if undisturbed at time of Substantial
Completion.
D. Preinstallation Conference: Conduct conference at Project site to comply with requirements in Division 1
Section "Project Management and Coordination."
1. Meet with Owner, Architect, Owner's insurer if applicable, Installer, and installers whose work
interfaces with or affects sheet metal flashing and trim including installers of roofing materials, roof
accessories, and roof-mounted equipment.
2. Review methods and procedures related to sheet metal flashing and trim.
3. Examine substrate conditions for compliance with requirements, including flatness and attachment to
structural members.
4. Document proceedings, including corrective measures and actions required, and furnish copy of record
to each participant.
1.6 DELIVERY, STORAGE, AND HANDLING
A. Deliver sheet metal flashing materials and fabrications undamaged. Protect sheet metal flashing and trim
materials and fabrications during transportation and handling.
B. Unload, store, and install sheet metal flashing materials and fabrications in a manner to prevent bending,
warping, twisting, and surface damage.
C. Stack materials on platforms or pallets, covered with suitable weathertight and ventilated covering. Do not
store sheet metal flashing and trim materials in contact with other materials that might cause staining, denting,
or other surface damage.
1.7 COORDINATION

BTBC Phase III October 26, 2020
GE Project No. 0119-0010
Gould Evans
SHEET METAL FLASHING AND TRIM 076200 - 3
A. Coordinate installation of sheet metal flashing and trim with interfacing and adjoining construction to provide
a leakproof, secure, and noncorrosive installation.
PART 2 - PRODUCTS
2.1 MATERIALS
A. Aluminum Sheet: ASTM B 209, alloy as standard with manufacturer for finish required, with temper as
required to suit forming operations and performance required.
1. As-Milled Finish: Mill finish.
B. Aluminum: ASTM B209, alloy 3003-H14, Clear Anodized, gage 040:
C. Stainless Steel: Type 302, Mill Rolled No. 2D or 2B, gage per details
D. Pre-finished Metal: 70% Kynar Coated finish, Zinc-coated Steel, ASTM A 527, 22 gauge, except as otherwise
indicated, with 1.0 mil thickness coating. The Architect to select color from the manufacturer’s full range of
colors, to include all metallic finishes. Two different colors will be selected: one in the Metallic Silver range
and one in the Bronze range to match existing.
E. Zinc-Coated Steel: (galvanized) ASTM A 526, with 0.20% copper, G90 hot-dip galvanized, 20 gauge as
recommended by SMACNA, except as otherwise indicated
F. Solder for Sheet Metal: Except as otherwise indicated or recommended by metal manufacturer, provide 50/50
tin/lead type (ASTM B 32) for tinning and soldering joints; use rosin flux
G. Lead Sheet: ASTM B 749, Type L51121, Copper-bearing lead sheet.
2.2 FABRICATED SHEET METAL
A. Metal work to be shop fabricated to configurations and forms in accordance with recognized sheet metal
practices.
B. All accessories or items essential to completeness of sheet metal installation, whether specifically indicated
or not, are to be provided and of same material as item to which being applied.
C. Prefabricated units, as indicated, or standard manufactured units complying with requirements. Fabricate
from sheet metal indicated.
2.3 UNDERLAYMENT MATERIALS
A. Sheet Membrane Liner/Flexible Vapor Retarder: .045 mil EPDM, seam tape.
2.4 MISCELLANEOUS MATERIALS
A. General: Provide materials and types of fasteners, solder, welding rods, protective coatings, separators,
sealants, and other miscellaneous items as required for complete sheet metal flashing and trim installation.
B. Fasteners: Wood screws, annular threaded nails, self-tapping screws, self-locking rivets and bolts, and other
suitable fasteners designed to withstand design loads.
1. Exposed Fasteners: Heads matching color of sheet metal by means of plastic caps or factory-applied
coating.
2. Fasteners for Flashing and Trim: Blind fasteners or self-drilling screws, gasketed, with hex washer
head.

BTBC Phase III October 26, 2020
GE Project No. 0119-0010
Gould Evans
SHEET METAL FLASHING AND TRIM 076200 - 4
3. Blind Fasteners: High-strength aluminum or stainless-steel rivets.
C. Solder for Stainless Steel: ASTM B 32, Grade Sn60, with acid flux of type recommended by stainless-steel
sheet manufacturer.
D. Sealing Tape: Pressure-sensitive, 100 percent solids, polyisobutylene compound sealing tape with release-
paper backing. Provide permanently elastic, nonsag, nontoxic, nonstaining tape.
E. Elastomeric Sealant: ASTM C 920, elastomeric polyurethane and silicone polymer sealants; of type, grade,
class, and use classifications required to seal joints in sheet metal flashing and trim and remain watertight.
F. Butyl Sealant: ASTM C 1311, single-component, solvent-release butyl rubber sealant, polyisobutylene
plasticized, heavy bodied for hooked-type expansion joints with limited movement.
G. Epoxy Seam Sealer: Two-part, noncorrosive, aluminum seam-cementing compound, recommended by
aluminum manufacturer for exterior nonmoving joints, including riveted joints.
H. Bituminous Coating: Cold-applied asphalt mastic, SSPC-Paint 12, compounded for 15-mildry film thickness
per coat. Provide inert-type noncorrosive compound free of asbestos fibers, sulfur components, and other
deleterious impurities.
I. Asphalt Roofing Cement: ASTM D 4586, asbestos free, of consistency required for application.
J. Self-Adhering, Polyethylene-Faced Sheet (Ice and Water Shield): ASTM D 1970, 40 milsthick minimum,
consisting of slip-resisting polyethylene-film reinforcing and top surface laminated to SBS-modified asphalt
adhesive, with release-paper backing; cold applied.
1. Available Products:
a. Carlisle Coatings & Waterproofing, Div. of Carlisle Companies Inc.; Dri-Start "A."
b. Grace, W. R. & Co.; Grace Ice and Water Shield.
c. Henry Company; Perma-Seal PE.
d. Johns Manville International, Inc.; Roof Defender.
e. NEI Advanced Composite Technology; AC Poly Ice and StormSeal.
f. Owens Corning; WeatherLock.
g. Polyguard Products, Inc.; Polyguard Deck Guard.
h. Protecto Wrap Company; Rainproof TM.
2.5 FABRICATION, GENERAL
A. General: Custom fabricate sheet metal flashing and trim to comply with recommendations in SMACNA's
"Architectural Sheet Metal Manual" that apply to design, dimensions, metal, and other characteristics of item
indicated. Shop fabricate items where practicable. Obtain field measurements for accurate fit before shop
fabrication.
B. Fabricate sheet metal flashing and trim in thickness or weight needed to comply with performance
requirements, but not less than that specified for each application and metal.
C. Fabricate sheet metal flashing and trim without excessive oil canning, buckling, and tool marks and true to
line and levels indicated, with exposed edges folded back to form hems.
D. Sealed Joints: Form nonexpansion but movable joints in metal to accommodate elastomeric sealant to comply
with SMACNA recommendations.

BTBC Phase III October 26, 2020
GE Project No. 0119-0010
Gould Evans
SHEET METAL FLASHING AND TRIM 076200 - 5
E. Expansion Provisions: Where lapped or bayonet-type expansion provisions in the Work cannot be used, form
expansion joints of intermeshing hooked flanges, not less than 1 inch deep, filled with elastomeric sealant
concealed within joints.
F. Conceal fasteners and expansion provisions where possible on exposed-to-view sheet metal flashing and trim,
unless otherwise indicated.
G. Fabricate cleats and attachment devices from same material as accessory being anchored or from compatible,
noncorrosive metal.
1. Thickness: As recommended by SMACNA's "Architectural Sheet Metal Manual" and FMG Loss
Prevention Data Sheet 1-49 for application but not less than thickness of metal being secured.
2.6 LOW-SLOPE ROOF SHEET METAL FABRICATIONS
A. Counterflashing: Fabricate from the following material:
1. Stainless Steel: 0.0219 inch thick.
B. Flashing Receivers: Fabricate from the following material:
1. Stainless Steel: 0.0219 inch thick.
C. Roof Edge Flashing and Gravel Stops:
1. Aluminum: .050 inches
D. Roof-Penetration Flashing: Fabricate from the following materials:
1. Galvanized Steel: 24 gage.
2.7 VERTICAL SHEET METAL COMPONENTS
A. Parapet Wall Coping: Fabricate from the following material:
1. Continuous Sheet Membrane Liner: 45 mil. EPDM to be extended over coping and extend 2” down
outside face.
2. Continuous cleat: Aluminum: .050 inches.
3. Non-exposed fastener: annular ring or barbed shank roofing nail.
4. Coping: Aluminum: .050 inches.
5. Exposed metal fastener: stainless steel screw with neoprene washer.
B. Curb: Fabricate from the following material:
1. Aluminum: .050 inches.
2. Non-exposed fastener: annular ring or barbed shank roofing nail.
3. Exposed fastener: stainless steel screw with neoprene washer.
C. Pre-fabricated curb: Fabricate from the following material:
1. Rigid roof insulation.
2. Aluminum: .050 inches.
3. Exposed fastener: stainless steel screw with neoprene washer.
2.8 HORIZONTAL SHEET METAL COMPONENTS
A. Raised metal edge: Fabricate from the following material:
1. 20 gauge continuous cleat.
2. Non-exposed fasteners annular ring or barbed shank roofing nail.
3. 22 gauge pre-finished metal.
4. Exposed fasteners stainless steel screw with neoprene washer.

BTBC Phase III October 26, 2020
GE Project No. 0119-0010
Gould Evans
SHEET METAL FLASHING AND TRIM 076200 - 6
B. Metal edge: Fabricate from the following material:
1. 20 gauge continuous cleat.
2. 22 gauge pre-finished metal.
3. Non-exposed fasteners annular ring or barbed shank roofing nail.
C. Vent: Fabricate from the following material:
1. Lead: 4.0 lb / sq.
2.9 DRAINAGE SHEET METAL COMPONENTS
A. Roof Drain: Fabricate from the following material:
1. Lead: 4.0 lb / sq., hard tempered
B. Gutter: Fabricate from the following material:
1. Aluminum: .032 inches
2. Non-exposed fastener: annular ring or barbed shank roofing nail.
3. 22 gage pre-finished metal apron and edge.
4. 1/4 inch by one inch galvanized gutter brackets.
5. Hanging Gutters: Fabricate to cross section indicated, complete with end pieces, outlet tubes, and other
accessories as required. Fabricate in minimum 96-inch- long sections. Furnish flat-stock gutter spacers
and gutter brackets fabricated from same metal as gutters, of size recommended by SMACNA but not
less than twice the gutter thickness. Fabricate expansion joints, expansion-joint covers, and gutter
accessories from same metal as gutters.
C. Downspouts: Fabricate from the following material:
1. Aluminum: .024 inches.
D. Splashpans: Fabricate from the following material:
1. Aluminum: .040 inches, per SMACNA, Figure 1-36.
2.10 MISCELLANEOUS SHEET METAL FABRICATIONS
A. Metal Flashing: Provide metal flashing, where flashing is exposed or partly exposed and where indicated,
complying with SMACNA's "Architectural Sheet Metal Manual" and as follows:
B. Equipment Support Flashing: Fabricate from the following material:
1. Stainless Steel: 0.0281 inch thick.
C. Stainless steel wall flashing termination edges. Fabricate per the following:
1. Stainless Steel: ASTM A 240/A 240M, Type 304, 0.016 inch thick.
2. Fabricate flashing terminations with “S-fold” receiver on exterior face where indicated to receive
counterflashing. (Installed by Mason)
3. Fabricate flashing terminations with sealant stop at relieving angles, stone copings, and where
indicated. Fabricate by bending metal back on itself 3/4 inch at exterior face of wall and down into
joint 5/16” inch to form a stop for retaining sealant backer rod.
4. Fabricate flashing terminations with drip edge, where indicated on the drawings. Fabricate by
extending flashing 1/2 inch past steel angle, with outer edge bent down 90 degrees and hemmed.
5. Prepare surfaces of flashing terminations as follows:
a. Back paint metal flashing terminations with epoxy paint to separate dissimilar material from
galvanized steel angle.
b. Shop prime concealed portion of flashing termination to receive self-adhered flashing
membrane.
c. Joints in flashing terminations shall be butt-jointed with splice plate.
6. Joints:
a. Provide conforming slip plate to match profile at butt joints min. 3” overlap each way.

BTBC Phase III October 26, 2020
GE Project No. 0119-0010
Gould Evans
SHEET METAL FLASHING AND TRIM 076200 - 7
b. At corners – provide soldered seams for water tight condition.
c. Fabricate continuous flashings in sections 96 inches long minimum, but not exceeding 12 feet.
Provide splice plates at joints of formed, smooth metal flashing.
2.11 FINISHES
A. Comply with NAAMM's "Metal Finishes Manual for Architectural and Metal Products" for recommendations
for applying and designating finishes. Match finish application of the abutting or adjacent metal.
B. Protect mechanical and painted finishes on exposed surfaces from damage by applying a strippable, temporary
protective covering before shipping.
C. Appearance of Finished Work: Variations in appearance of abutting or adjacent pieces are not acceptable.
Noticeable variations in the same piece are not acceptable. Variations in appearance of other components are
acceptable if they are within the range of approved Samples and are assembled or installed to minimize
contrast.
PART 3 - EXECUTION
3.1 EXAMINATION
A. Examine substrates, areas, and conditions, with Installer present, to verify actual locations, dimensions and
other conditions affecting performance of work.
1. Verify that substrate is sound, dry, smooth, clean, sloped for drainage, and securely anchored.
2. Proceed with installation only after unsatisfactory conditions have been corrected.
3.2 UNDERLAYMENT INSTALLATION
A. General: Install underlayment as indicated on Drawings.
B. Coping: Refer to Section 072726 for elastomeric tape application over top of back up wall substrate. Refer
to Section 075552 for extension of roof flashing directly onto the substrate under the coping.
3.3 INSTALLATION, GENERAL
A. General: Anchor sheet metal flashing and trim and other components of the Work securely in place, with
provisions for thermal and structural movement. Use fasteners, solder, welding rods, protective coatings,
separators, sealants, and other miscellaneous items as required to complete sheet metal flashing and trim
system.
1. Torch cutting of sheet metal flashing and trim is not permitted.
B. Metal Protection: Where dissimilar metals will contact each other or corrosive substrates, protect against
galvanic action by painting contact surfaces with bituminous coating or by other permanent separation as
recommended by fabricator or manufacturers of dissimilar metals.
1. Coat side of stainless-steel sheet metal flashing and trim with bituminous or epoxy coating where
flashing and trim will contact wood, ferrous metal, or cementitious construction.
2. Underlayment: Where installing metal flashing directly on cementitious or wood substrates, install a
course of felt underlayment and cover with a slip sheet or install a course of polyethylene underlayment.
3. Bed flanges in thick coat of asphalt roofing cement where required for waterproof performance.
C. Install exposed sheet metal flashing and trim without excessive oil canning, buckling, and tool marks.
D. Install sheet metal flashing and trim true to line and levels indicated. Provide uniform, neat seams with
minimum exposure of solder, welds, and elastomeric sealant.

BTBC Phase III October 26, 2020
GE Project No. 0119-0010
Gould Evans
SHEET METAL FLASHING AND TRIM 076200 - 8
E. Install sheet metal flashing and trim to fit substrates and to result in watertight performance. Verify shapes
and dimensions of surfaces to be covered before fabricating sheet metal.
1. Space cleats not more than 12 inches apart. Anchor each cleat with two fasteners. Bend tabs over
fasteners.
F. Expansion Provisions: Provide for thermal expansion of exposed flashing and trim. Space movement joints
at a maximum of 10 feet with no joints allowed within 24 inches of corner or intersection. Where lapped or
bayonet-type expansion provisions cannot be used or would not be sufficiently watertight, form expansion
joints of intermeshing hooked flanges, not less than 1 inch deep, filled with elastomeric sealant concealed
within joints.
G. Fasteners: Use fasteners of sizes that will penetrate substrate not less than 1-1/4 inches for nails and not less
than 3/4 inch for wood screws.
1. Galvanized or Prepainted, Metallic-Coated Steel: Use stainless-steel fasteners.
2. Stainless Steel: Use stainless-steel fasteners.
H. Seal joints with elastomeric sealant as required for watertight construction.
1. Where sealant-filled joints are used, embed hooked flanges of joint members not less than 1 inch into
sealant. Form joints to completely conceal sealant. When ambient temperature at time of installation
is moderate, between 40 and 70 deg F, set joint members for 50 percent movement either way. Adjust
setting proportionately for installation at higher ambient temperatures. Do not install sealant-type
joints at temperatures below 40 deg F.
2. Prepare joints and apply sealants to comply with requirements in Division 7 Section "Joint Sealants."
I. Soldered Joints: Clean surfaces to be soldered, removing oils and foreign matter. Pretin edges of sheets to
be soldered to a width of 1-1/2 inches except where pretinned surface would show in finished Work.
1. Stainless-Steel Soldering: Pretin edges of uncoated sheets to be soldered using solder recommended
for stainless steel and phosphoric acid flux. Promptly wash off acid flux residue from metal after
soldering.
2. Do not use open-flame torches for soldering. Heat surfaces to receive solder and flow solder into joints.
Fill joints completely. Completely remove flux and spatter from exposed surfaces.
J. Ice and Water Shield: Install self-adhering, polyethylene-faced sheet flashing under metal flashings and trim
where indicated.
3.4 ROOF DRAINAGE SYSTEM INSTALLATION
A. General: Install sheet metal roof drainage items to produce complete roof drainage system according to
SMACNA recommendations and as indicated. Coordinate installation of roof perimeter flashing with
installation of roof drainage system.
B. Hanging Gutters: Join sections with riveted and soldered joints or with lapped joints sealed with elastomeric
sealant. Provide for thermal expansion. Attach gutters at eave or fascia to firmly anchored gutter brackets
spaced not more than 36 inches apart. Provide end closures and seal watertight with sealant. Slope to
downspouts.
C. Downspouts: Join sections with 1 ½ telescoping joints. Provide fasteners designed to hold downspouts
securely 1 inch away from walls; locate fasteners at top and bottom and at approximately 60 inches o.c. in
between.
D. Splash Pans: Install where downspouts discharge on low-sloped roofs. Set in asphalt roofing cement or
elastomeric sealant compatible with roofing membrane per roofing manufacturer recommendations.
3.5 ROOF FLASHING INSTALLATION

BTBC Phase III October 26, 2020
GE Project No. 0119-0010
Gould Evans
SHEET METAL FLASHING AND TRIM 076200 - 9
A. General: Install sheet metal roof flashing and trim to comply with performance requirements, sheet metal
manufacturer's written installation instructions, and SMACNA's "Architectural Sheet Metal Manual."
Provide concealed fasteners where possible, set units true to line, and level as indicated. Install work with
laps, joints, and seams that will be permanently watertight.
B. Roof Edge Flashing: Anchor to resist uplift and outward forces according to recommendations in SMACNA's
"Architectural Sheet Metal Manual" and as indicated. Interlock bottom edge of roof edge flashing with
continuous cleat anchored to substrate at staggered 3-inch centers.
C. Copings: Anchor to resist uplift and outward forces according to recommendations in SMACNA's
"Architectural Sheet Metal Manual" and as indicated.
1. Interlock exterior bottom edge of coping with continuous cleat anchored to substrate at 16-inch centers.
2. Anchor interior leg of coping with washers and screw fasteners through slotted holes at 24-inch centers.
D. Pipe or Post Counter flashing: Install counter flashing umbrella with close-fitting collar with top edge flared
for elastomeric sealant, extending a minimum of 4 inches over base flashing. Install stainless-steel draw band
and tighten.
E. Counterflashing: Coordinate installation of counterflashing with installation of base flashing. Insert
counterflashing in reglets or receivers and fit tightly to base flashing. Extend counterflashing 4 inches over
base flashing. Lap counterflashing joints a minimum of 4 inches and bed with elastomeric sealant.
1. Secure in a waterproof manner by means of interlocking folded seam or blind rivets and sealant.
F. Roof-Penetration Flashing: Coordinate installation of roof-penetration flashing with installation of roofing
and other items penetrating roof. Install flashing as follows:
1. Turn lead flashing down inside vent piping, being careful not to block vent piping with flashing.
2. Seal with elastomeric sealant and clamp flashing to pipes penetrating roof except for lead flashing on
vent piping.
3.6 MISCELLANEOUS FLASHING INSTALLATION
A. Equipment Support Flashing: Coordinate installation of equipment support flashing with installation of
roofing and equipment. Weld or seal flashing with elastomeric sealant to equipment support member.
3.7 ERECTION TOLERANCES
A. Installation Tolerances: Shim and align sheet metal flashing and trim within installed tolerance of 1/4 inch
in 20 feet on slope and location lines as indicated and within 1/8-inch offset of adjoining faces and of
alignment of matching profiles.
B. Installation Tolerances: Shim and align sheet metal flashing and trim within installed tolerances specified in
MCA's "Guide Specification for Residential Metal Roofing."
3.8 CLEANING AND PROTECTION
A. Clean exposed metal surfaces of substances that interfere with uniform oxidation and weathering.
B. Clean and neutralize flux materials. Clean off excess solder and sealants.
C. Clean off excess sealants.

BTBC Phase III October 26, 2020
GE Project No. 0119-0010
Gould Evans
SHEET METAL FLASHING AND TRIM 076200 - 10
D. Remove temporary protective coverings and strippable films as sheet metal flashing and trim are installed.
On completion of installation, clean finished surfaces, including removing unused fasteners, metal filings,
pop rivet stems, and pieces of flashing. Maintain in a clean condition during construction.
E. Replace sheet metal flashing and trim that have been damaged or that have deteriorated beyond successful
repair by finish touchup or similar minor repair procedures.
END OF SECTION 076200
[THIS PAGE INTENTIONALLY LEFT BLANK]

BTBC Phase III October 26, 2020
GE Project No. 0119-0010
Gould Evans
PENETRATION FIRESTOPPING 078413 - 1
SECTION 078413 - PENETRATION FIRESTOPPING
PART 1 - GENERAL
1.1 RELATED DOCUMENTS
A. Drawings and general provisions of the Contract, including General and Supplementary Conditions and
Division 01 Specification Sections, apply to this Section.
1.2 SUMMARY
A. Section Includes:
1. Penetration firestopping systems for the following applications:
a. Penetrations in fire-resistance-rated walls.
b. Penetrations in horizontal assemblies, floors and roofs
B. Related Requirements:
1. Section 078443 "Joint Firestopping" for joints in or between fire-resistance-rated construction, at
exterior curtain-wall/floor intersections, and in smoke barriers.
2. Division 23-24 Sections specifying duct and piping penetrations.
3. Division 26-28 Sections specifying cable and conduit penetrations.
1.3 PREINSTALLATION MEETINGS
A. Preinstallation Conference: Conduct conference at Project site.
1.4 ACTION SUBMITTALS
A. Product Data: For each type of product.
B. Sustainable Design Submittals:
1. <Double click to insert sustainable design text for sealants.>
C. Product Schedule: For each penetration firestopping system. Include location, illustration of firestopping
system, and design designation of qualified testing and inspecting agency.
1. Engineering Judgments: Where Project conditions require modification to a qualified testing and
inspecting agency's illustration for a particular penetration firestopping system, submit illustration,
with modifications marked, approved by penetration firestopping system manufacturer's fire-
protection engineer as an engineering judgment or equivalent fire-resistance-rated assembly.
Obtain approval of authorities having jurisdiction prior to submittal.

BTBC Phase III October 26, 2020
GE Project No. 0119-0010
Gould Evans
PENETRATION FIRESTOPPING 078413 - 2
1.5 INFORMATIONAL SUBMITTALS
A. Qualification Data: For Installer.
B. Product Test Reports: For each penetration firestopping system, for tests performed by a qualified testing
agency.
1.6 CLOSEOUT SUBMITTALS
A. Installer Certificates: From Installer indicating that penetration firestopping systems have been installed
in compliance with requirements and manufacturer's written instructions.
1.7 QUALITY ASSURANCE
A. Installer Qualifications: A firm that has been approved by FM Approval according to FM Approval 4991,
"Approval Standard for Firestop Contractors," or been evaluated by UL and found to comply with its
"Qualified Firestop Contractor Program Requirements."
B. Source Limitations: Obtain through-penetration firestop systems, for each kind of penetration and
construction condition indicated, from a single manufacturer.
C. Fire-Test-Response Characteristics: Provide through-penetration firestop systems that comply with the
following requirements and those specified in "Performance Requirements" Article:
1. Through-penetration firestop systems are identical to those tested per ASTM E 814. Provide rated
systems complying with the following requirements:.
a. Through-penetration firestop system products bear classification marking of qualified
testing and inspecting agency.
b. Through-penetration firestop systems correspond to those indicated by reference to
through-penetration firestop system designations listed by the following:
1) UL in "Fire Resistance Directory."
D. Provide firestopping products containing no detectable asbestos as determined by the method specified in
40 CFR Part 763, Subpart F, Appendix A, Section 1, “Polarized Light Microscopy."
1.8 PROJECT CONDITIONS
A. Environmental Limitations: Do not install penetration firestopping system when ambient or substrate
temperatures are outside limits permitted by penetration firestopping system manufacturers or when
substrates are wet because of rain, frost, condensation, or other causes.
B. Install and cure penetration firestopping materials per manufacturer's written instructions using natural
means of ventilations or, where this is inadequate, forced-air circulation.
1.9 DELIVERY, STORAGE, AND HANDLING
A. Deliver through-penetration firestop system products to Project site in original, unopened containers or
packages with intact and legible manufacturers' labels identifying product and manufacturer; date of

BTBC Phase III October 26, 2020
GE Project No. 0119-0010
Gould Evans
PENETRATION FIRESTOPPING 078413 - 3
manufacture; lot number; shelf life, if applicable; qualified testing and inspecting agency's classification
marking applicable to Project; curing time; and mixing instructions for multicomponent materials.
B. Store and handle materials for through-penetration firestop systems to prevent their deterioration or
damage due to moisture, temperature changes, contaminants, or other causes.
1.10 COORDINATION
A. Coordinate construction of openings and penetrating items to ensure that penetration firestopping systems
can be installed according to specified firestopping system design.
B. Coordinate sizing of sleeves, openings, core-drilled holes, or cut openings to accommodate penetration
firestopping systems.
PART 2 - PRODUCTS
2.1 PERFORMANCE REQUIREMENTS
A. Fire-Test-Response Characteristics:
1. Perform penetration firestopping system tests by a qualified testing agency acceptable to
authorities having jurisdiction.
2. Test per testing standards referenced in "Penetration Firestopping Systems" Article. Provide rated
systems complying with the following requirements:
a. Penetration firestopping systems shall bear classification marking of a qualified testing
agency.
1) UL in its "Fire Resistance Directory."
2.2 PENETRATION FIRESTOPPING SYSTEMS
A. Penetration Firestopping Systems: Systems that resist spread of fire, passage of smoke and other gases,
and maintain original fire-resistance rating of construction penetrated. Penetration firestopping systems
shall be compatible with one another, with the substrates forming openings, and with penetrating items if
any.
1. Manufacturers: Subject to compliance with requirements, provide products by one of the
following:
a. 3M Fire Protection Products.
b. Hilti, Inc.
c. Tremco, Inc.
B. Penetrations in Fire-Resistance-Rated Walls: Penetration firestopping systems with ratings determined
per ASTM E814 or UL 1479, based on testing at a positive pressure differential of 0.01-inch wg (2.49
Pa).
1. F-Rating: Not less than the fire-resistance rating of constructions penetrated.

BTBC Phase III October 26, 2020
GE Project No. 0119-0010
Gould Evans
PENETRATION FIRESTOPPING 078413 - 4
C. Penetrations in Horizontal Assemblies: Penetration firestopping systems with ratings determined per
ASTM E814 or UL 1479, based on testing at a positive pressure differential of 0.01-inch wg (2.49 Pa).
1. F-Rating: At least one hour, but not less than the fire-resistance rating of constructions penetrated.
2. T-Rating: At least one hour, but not less than the fire-resistance rating of constructions penetrated
except for floor penetrations within the cavity of a wall.
3. W-Rating: Provide penetration firestopping systems showing no evidence of water leakage when
tested according to UL 1479.
D. Penetrations in Smoke Barriers: Penetration firestopping systems with ratings determined per UL 1479,
based on testing at a positive pressure differential of 0.30-inch wg (74.7 Pa).
1. L-Rating: Not exceeding 5.0 cfm/sq. ft. (0.025 cu. m/s per sq. m) of penetration opening at and no
more than 50-cfm (0.024-cu. m/s) cumulative total for any 100 sq. ft. (9.3 sq. m) at both ambient
and elevated temperatures.
E. Exposed Penetration Firestopping Systems: Flame-spread and smoke-developed indexes of less than 25
and 450, respectively, per ASTM E84.
1. <Double click to insert sustainable design text for sealants.>
2. <Double click to insert sustainable design text for sealants.>
F. Accessories: Provide components for each penetration firestopping system that are needed to install fill
materials and to maintain ratings required. Use only those components specified by penetration
firestopping system manufacturer and approved by qualified testing and inspecting agency for conditions
indicated.
1. Permanent forming/damming/backing materials.
a. Slag-/rock-wool-fiber insulation
b. Sealants used in combination with other forming/damming/backing materials to prevent
leakage of fill materials in liquid state
c. Fire-rated form board
d. Fillers for sealants
e. Ceramic fiber
2. Temporary forming materials.
3. Substrate primers.
4. Collars.
5. Steel sleeves.
2.3 FILL MATERIALS
A. General: Provide through-penetration firestop systems containing the types of fill materials indicated in
the Through-Penetration Firestop System Schedule at the end of Part 3 by reference to the types of
materials described in this Article. Fill materials are those referred to in directories of the referenced
testing and inspecting agencies as fill, void, or cavity materials.
B. Cast-in-Place Firestop Devices: Factory-assembled devices for use in cast-in-place concrete floors and
consisting of an outer sleeve lined with an intumescent strip, a flange attached to one end of the sleeve for
fastening to concrete formwork, and a neoprene gasket.

BTBC Phase III October 26, 2020
GE Project No. 0119-0010
Gould Evans
PENETRATION FIRESTOPPING 078413 - 5
C. Intumescent Latex Sealants: Single-component latex formulations that do not re-emulsify after cure
during exposure to moisture.
D. Firestop Devices: Factory-assembled collars formed from galvanized steel and lined with intumescent
material sized to fit specific diameter of penetrant.
E. Intumescent Putties: Nonhardening, water-resistant, intumescent putties containing no solvents or
inorganic fibers.
F. Intumescent Wrap Strips: Single-component intumescent elastomeric sheets with aluminum foil on one
side.
G. Mortars: Prepackaged dry mixes consisting of a blend of inorganic binders, hydraulic cement, fillers and
lightweight aggregate formulated for mixing with water at Project site to form a nonshrinking,
homogeneous mortar.
H. Pillows/Bags: Reusable heat-expanding pillows/bags consisting of glass-fiber cloth cases filled with a
combination of mineral-fiber, water-insoluble expansion agents, and fire-retardant additives. Where
exposed, cover openings with steel-reinforcing wire mesh to protect pillows/bags from being easily
removed.
I. Silicone Foams: Multicomponent, silicone-based liquid elastomers that, when mixed, expand and cure in
place to produce a flexible, nonshrinking foam.
J. Silicone Sealants: Single-component, silicone-based, neutral-curing elastomeric sealants.
2.4 MIXING
A. Penetration Firestopping Materials: For those products requiring mixing before application, comply with
penetration firestopping system manufacturer's written instructions for accurate proportioning of
materials, water (if required), type of mixing equipment, selection of mixer speeds, mixing containers,
mixing time, and other items or procedures needed to produce products of uniform quality with optimum
performance characteristics for application indicated.
PART 3 - EXECUTION
3.1 EXAMINATION
A. Examine substrates and conditions, with Installer present, for compliance with requirements for opening
configurations, penetrating items, substrates, and other conditions affecting performance of the Work.
B. Proceed with installation only after unsatisfactory conditions have been corrected.
3.2 PREPARATION
A. Surface Cleaning: Before installing penetration firestopping systems, clean out openings immediately to
comply with manufacturer's written instructions and with the following requirements:
1. Remove from surfaces of opening substrates and from penetrating items foreign materials that
could interfere with adhesion of penetration firestopping materials.

BTBC Phase III October 26, 2020
GE Project No. 0119-0010
Gould Evans
PENETRATION FIRESTOPPING 078413 - 6
2. Clean opening substrates and penetrating items to produce clean, sound surfaces capable of
developing optimum bond with penetration firestopping materials. Remove loose particles
remaining from cleaning operation.
3. Remove laitance and form-release agents from concrete.
B. Prime substrates where recommended in writing by manufacturer using that manufacturer's recommended
products and methods. Confine primers to areas of bond; do not allow spillage and migration onto
exposed surfaces.
C. Masking Tape: Use masking tape to prevent through-penetration firestop systems from contacting adjoining
surfaces that will remain exposed on completion of Work and that would otherwise be permanently stained
or damaged by such contact or by cleaning methods used to remove smears from firestop system materials.
Remove tape as soon as possible without disturbing firestop system's seal with substrates.
3.3 PREPARATION
A. Surface Cleaning: Clean out openings immediately before installing through-penetration firestop systems
to comply with written recommendations of firestop system manufacturer and the following
requirements:
1. Remove from surfaces of opening substrates and from penetrating items foreign materials that
could interfere with adhesion of through-penetration firestop systems.
2. Clean opening substrates and penetrating items to produce clean, sound surfaces capable of
developing optimum bond with through-penetration firestop systems. Remove loose particles
remaining from cleaning operation.
3. Remove laitance and form-release agents from concrete.
B. Priming: Prime substrates where recommended in writing by through-penetration firestop system
manufacturer using that manufacturer's recommended products and methods. Confine primers to areas of
bond; do not allow spillage and migration onto exposed surfaces.
C. Masking Tape: Use masking tape to prevent through-penetration firestop systems from contacting adjoining
surfaces that will remain exposed on completion of Work and that would otherwise be permanently stained
or damaged by such contact or by cleaning methods used to remove smears from firestop system materials.
Remove tape as soon as possible without disturbing firestop system's seal with substrates.
3.4 INSTALLATION
A. General: Install penetration firestopping systems to comply with "Performance Requirements" Article and
manufacturer's written installation instructions and published drawings for products and applications.
B. Install forming materials and other accessories of types required to support fill materials during their
application and in the position needed to produce cross-sectional shapes and depths required to achieve
fire ratings.
1. After installing fill materials and allowing them to fully cure, remove combustible forming
materials and other accessories not forming permanent components of firestopping.
C. Install fill materials by proven techniques to produce the following results:

BTBC Phase III October 26, 2020
GE Project No. 0119-0010
Gould Evans
PENETRATION FIRESTOPPING 078413 - 7
1. Fill voids and cavities formed by openings, forming materials, accessories and penetrating items to
achieve required fire-resistance ratings.
2. Apply materials so they contact and adhere to substrates formed by openings and penetrating
items.
3. For fill materials that will remain exposed after completing the Work, finish to produce smooth,
uniform surfaces that are flush with adjoining finishes.
3.5 IDENTIFICATION
A. Wall Identification: Permanently label walls containing penetration firestopping systems with the words
"FIRE AND/OR SMOKE BARRIER - PROTECT ALL OPENINGS," using lettering not less than 3
inches (76 mm) high and with minimum 0.375-inch (9.5-mm) strokes.
1. Locate in accessible concealed floor, floor-ceiling, or attic space at 15 feet (4.57 m) from end of
wall and at intervals not exceeding 30 feet (9.14 m).
B. Penetration Identification: Identify each penetration firestopping system with legible metal or plastic
labels. Attach labels permanently to surfaces adjacent to and within 6 inches (150 mm) of penetration
firestopping system edge so labels are visible to anyone seeking to remove penetrating items or
firestopping systems. Use mechanical fasteners or self-adhering-type labels with adhesives capable of
permanently bonding labels to surfaces on which labels are placed. Include the following information on
labels:
1. The words "Warning - Penetration Firestopping - Do Not Disturb. Notify Building Management of
Any Damage."
2. Contractor's name, address, and phone number.
3. Designation of applicable testing and inspecting agency.
4. Date of installation.
5. Manufacturer's name.
6. Installer's name.
3.6 FIELD QUALITY CONTROL
A. Inspecting Agency: Owner will engage a qualified independent inspecting agency to inspect through-
penetration firestop systems and to prepare test reports.
1. Inspecting agency will state in each report whether inspected through-penetration firestop systems
comply with or deviate from requirements.
B. Where deficiencies are found or penetration firestopping system is damaged or removed because of
testing, repair or replace penetration firestopping system to comply with requirements.
C. Proceed with enclosing penetration firestopping systems with other construction only after inspection
reports are issued and installations comply with requirements.
3.7 CLEANING AND PROTECTION
A. Clean off excess fill materials adjacent to openings as the Work progresses by methods and with cleaning
materials that are approved in writing by penetration firestopping system manufacturers and that do not
damage materials in which openings occur.

BTBC Phase III October 26, 2020
GE Project No. 0119-0010
Gould Evans
PENETRATION FIRESTOPPING 078413 - 8
B. Provide final protection and maintain conditions during and after installation that ensure that penetration
firestopping systems are without damage or deterioration at time of Substantial Completion. If, despite
such protection, damage or deterioration occurs, immediately cut out and remove damaged or deteriorated
penetration firestopping material and install new materials to produce systems complying with specified
requirements.
3.8 PENETRATION FIRESTOPPING SYSTEM SCHEDULE
A. Where UL-classified systems are indicated, they refer to system numbers in UL's "Fire Resistance
Directory" under product Category XHEZ.
B. Firestop Systems for Metallic Pipes, Conduit, or Tubing FS-01: Comply with the following:
1. UL-Classified Systems: CAJ-WL--1001-1999.
2. Type of Fill Materials: One or more of the following:
a. Latex sealant.
1. SpecSeal Series ‘SSS’
2. 3M, CP-25WB Caulk
3. Tremco, Tremstop IA
4. Rectorseal, Metacaulk 950
5. IPC, FlameSafe FS 1900
b. Intumescent putty/mastic.
1. SpecSeal Series ‘SSP’
2. 3M, ‘Fire Barrier Moldable Putty +’
3. USG, FIRECODE Compuound w/ THERMAFIBER
4. Tremco, Tremstop WBM
5. IPC, FlameSafe Mortar Seal
C. Firestop Systems for Nonmetallic Pipe, Conduit, or Tubing FS-02: Comply with the following:
1. UL-Classified Systems: CAJ-WL-2001-2999.
2. Type of Fill Materials: One or more of the following:
a. Latex sealant.
1. Hilti, ‘FS – ONE’
2. SpecSeal ‘Series SSS’
3. Rectorseal, Meatcaulk 1000
4. IPC, FlameSafe FS 1900
b. Intumescent putty/mastic.
1. 3M, ‘Fire Barrier Moldable Putty +’
2. Tremco, Tremstop WBM
3. USG, FIRECODE Compound w/ intumescent wrap strips
c. Intumescent wrap strips.
1. 3M, ‘Fire Barrier FS-195 + Wrap/Strip’
2. SpecSeal, ‘Series SSW’
3. Tremco, Tremstop WS
d. Firestop device.
1. 3M, ‘PSS 7904 – 10 Penetration sealing System w/ CP-25NS Caulk
2. SpecSeal, Series ‘SSC Collars’
3. Hilti, ‘CP 642’
4. Tremco, Tremstop MCR
5. IPC, FlameSafe Firestop Device
D. Firestop Systems for Electrical Cables FS-03: Comply with the following:

BTBC Phase III October 26, 2020
GE Project No. 0119-0010
Gould Evans
PENETRATION FIRESTOPPING 078413 - 9
1. UL-Classified Systems: CAJ-WL-3001-3999.
2. Type of Fill Materials: One or more of the following:
a. Latex sealant.
1. Hilti, ‘FS-ONE’
2. SpecSeal, ‘Series SSS’
b. Intumescent putty/mastic.
1. Specseal, ‘Series SSP’
2. 3M, MP Moldable Putty
3. Tremco, Tremstop WBM
4. USG, FIRECODE Compound
5. IPC, FlameSafe FSP 1000
c. Firestop Device
1. 3M, ‘PSS 7904 Sealing System w/ CP-25NS Caulk.
E. Firestop Systems for Insulated Pipes FS-04: Comply with the following:
1. UL-Classified Systems: CAJ-WL-5001-5999.
2. Type of Fill Materials: One or more of the following:
a. Latex sealant
1. 3M, CP-25WB Caulk
2. IPC, FlameSafe FS 1900
b. Silicone foam.
1. SpecSeal, ‘Series PEN200’
c. Intumescent wrap strips.
1. SpecSeal, ‘Series SSW
2. 3M, ‘FS-195 Wrap strip w/ 25-CP Caulk
3. Rectorseal, Metacaulk ‘Wrap Strip’
d. Mortars.
1. SpecSeal, ‘Series SSM’
2. Rectoseal, Metacaulk ‘Fire Rated Mortar’
e. Mastic.
1. Tremco, Tremstop WBM
F. Firestop Systems for Miscellaneous Electrical Penetrations (electrical boxes) FS-05: Comply with the
following:
3. UL-Classified Systems: CAJ-WL-5001-5999.
4. Type of Fill Materials: One or more of the following:
a. Intumescent Putty Pads
1. SpecSeal, ‘Series SSP (putty pads)’
2. Rectoseal, Metacaulk ‘Putty Pad’
3. IPC, FlameSafe FSP 1077
G. Systems for Miscellaneous Mechanical Penetrations FS-06: Comply with the following:
1. UL-Classified Systems: CAJ-WL-7001-7999.
2. Type of Fill Materials:
a. Firestop System I (Concrete Floor Assemblies)
1. 1 ½” thick, 3M, ‘Fire Master Duct Wrap’
2. 3 ½” thick bulk ceramic fiber, 3M, ‘Fire Master Bulk’
3. 1’ thick putty, 3M, ‘Fire Master Putty’

BTBC Phase III October 26, 2020
GE Project No. 0119-0010
Gould Evans
PENETRATION FIRESTOPPING 078413 - 10
END OF SECTION 078413
[THIS PAGE HAS BEEN LEFT BLANK INTENTIONALLY]

BTBC Phase III October 26, 2020
GE Project No. 0119-0010
Gould Evans
JOINT SEALANTS 079200 - 1
SECTION 079200 - JOINT SEALANTS
PART 1 - GENERAL
1.1 RELATED DOCUMENTS
A. Drawings and general provisions of the Contract, including General and Supplementary Conditions and
Division 01 Specification Sections, apply to this Section.
1.2 SUMMARY
A. Section Includes:
1. Silicone joint sealants.
2.
3. Urethane joint sealants.
4. Latex joint sealants.
B. Related Requirements:
1. Division 4, Section 04200: "Unit Masonry Assemblies"
2. Division 7, Section 074213: “Metal Wall Panels”
3. Division 7, Section 076200: “Sheet Metal Flashing and Trim”
4. Division 7, Section 07841: " Penetration Firestopping"
5. Section 079100 "Preformed Joint Seals" for preformed compressible foam and precured joint
seals.
6. Division 8, Section 084413: “Glazed Aluminum Curtain Walls”
7. Division 8, Section 088000: "Glazing" for glazing sealants.
8. Section 321373 "Concrete Paving Joint Sealants" for sealing joints in paved roads, parking lots,
walkways, and curbing.
1.3 PREINSTALLATION MEETINGS
A. Preinstallation Conference: Conduct conference at Project site.
1.4 ACTION SUBMITTALS
A. Product Data: For each joint-sealant product.
B. Sustainable Design Submittals:
1. <Double click to insert sustainable design text for sealants.>
C. Samples for Initial Selection: Manufacturer's color charts consisting of strips of cured sealants showing
the full range of colors available for each product exposed to view.

BTBC Phase III October 26, 2020
GE Project No. 0119-0010
Gould Evans
JOINT SEALANTS 079200 - 2
D. Samples for Verification: For each kind and color of joint sealant required, provide Samples with joint
sealants in 1/2-inch- (13-mm-) wide joints formed between two 6-inch- (150-mm-) long strips of material
matching the appearance of exposed surfaces adjacent to joint sealants.
E. Joint-Sealant Schedule: Include the following information:
1. Joint-sealant application, joint location, and designation.
2. Joint-sealant manufacturer and product name.
3. Joint-sealant formulation.
4. Joint-sealant color.
1.5 INFORMATIONAL SUBMITTALS
A. Qualification Data: For qualified testing agency.
B. Product Test Reports: For each kind of joint sealant, for tests performed by a qualified testing agency.
C. Preconstruction Laboratory Test Schedule: Include the following information for each joint sealant and
substrate material to be tested:
1. Joint-sealant location and designation.
2. Manufacturer and product name.
3. Type of substrate material.
4. Proposed test.
5. Number of samples required.
D. Preconstruction Laboratory Test Reports: From sealant manufacturer, indicating the following:
1. Materials forming joint substrates and joint-sealant backings have been tested for compatibility
and adhesion with joint sealants.
2. Interpretation of test results and written recommendations for primers and substrate preparation
are needed for adhesion.
E. Preconstruction Field-Adhesion-Test Reports: Indicate which sealants and joint preparation methods
resulted in optimum adhesion to joint substrates based on testing specified in "Preconstruction Testing"
Article.
F. Field-Adhesion-Test Reports: For each sealant application tested.
G. Sample Warranties: For special warranties.
H. Environmental Information:
1. Low-emitting materials, adhesives and sealant
1.6 QUALITY ASSURANCE
A. Installer Qualifications: An authorized representative who is trained and approved by manufacturer.
B. Product Testing: Test joint sealants using a qualified testing agency.

BTBC Phase III October 26, 2020
GE Project No. 0119-0010
Gould Evans
JOINT SEALANTS 079200 - 3
1. Testing Agency Qualifications: Qualified according to ASTM C1021 to conduct the testing
indicated.
C. Mockups: Install sealant in mockups of assemblies specified in other Sections that are indicated to receive
joint sealants specified in this Section. Use materials and installation methods specified in this Section.
1.7 PRECONSTRUCTION TESTING
A. Preconstruction Laboratory Testing: Submit to joint-sealant manufacturers, for testing indicated below,
samples of materials that will contact or affect joint sealants.
1. Adhesion Testing: Use ASTM C794 to determine whether priming and other specific joint
preparation techniques are required to obtain rapid, optimum adhesion of joint sealants to joint
substrates.
2. Compatibility Testing: Use ASTM C1087 to determine sealant compatibility when in contact with
glazing and gasket materials.
3. Stain Testing: Use ASTM C1248 to determine stain potential of sealant when in contact with
[stone] [masonry] <Insert substrate> substrates.
4. Submit manufacturer's recommended number of pieces of each type of material, including joint
substrates, joint-sealant backings, and miscellaneous materials.
5. Schedule sufficient time for testing and analyzing results to prevent delaying the Work.
6. For materials failing tests, obtain joint-sealant manufacturer's written instructions for corrective
measures, including use of specially formulated primers.
7. Testing will not be required if joint-sealant manufacturers submit data that are based on previous
testing, not older than 24 months, of sealant products for adhesion to, staining of, and
compatibility with joint substrates and other materials matching those submitted.
B. Preconstruction Field-Adhesion Testing: Before installing sealants, field test their adhesion to Project
joint substrates as follows:
1. Locate test joints where indicated on Project or, if not indicated, as directed by Architect.
2. Conduct field tests for each kind of sealant and joint substrate.
3. Notify Architect seven days in advance of dates and times when test joints will be erected.
4. Arrange for tests to take place with joint-sealant manufacturer's technical representative present.
a. Test Method: Test joint sealants according to Method A, Field-Applied Sealant Joint Hand
Pull Tab, in Appendix X1.1 in ASTM C1193 or Method A, Tail Procedure, in
ASTM C1521.
1) For joints with dissimilar substrates, verify adhesion to each substrate separately;
extend cut along one side, verifying adhesion to opposite side. Repeat procedure for
opposite side.
5. Report whether sealant failed to adhere to joint substrates or tore cohesively. Include data on pull
distance used to test each kind of product and joint substrate. For sealants that fail adhesively,
retest until satisfactory adhesion is obtained.
6. Evaluation of Preconstruction Field-Adhesion-Test Results: Sealants not evidencing adhesive
failure from testing, in absence of other indications of noncompliance with requirements, will be
considered satisfactory. Do not use sealants that fail to adhere to joint substrates during testing.

BTBC Phase III October 26, 2020
GE Project No. 0119-0010
Gould Evans
JOINT SEALANTS 079200 - 4
1.8 FIELD CONDITIONS
A. Do not proceed with installation of joint sealants under the following conditions:
1. When ambient and substrate temperature conditions are outside limits permitted by joint-sealant
manufacturer or are below 40 deg F (5 deg C).
2. When joint substrates are wet.
3. Where joint widths are less than those allowed by joint-sealant manufacturer for applications
indicated.
4. Where contaminants capable of interfering with adhesion have not yet been removed from joint
substrates.
1.9 WARRANTY
A. Special Installer's Warranty: Installer agrees to repair or replace joint sealants that do not comply with
performance and other requirements specified in this Section within specified warranty period.
1. Warranty Period: Two years from date of Substantial Completion.
B. Special Manufacturer's Warranty: Manufacturer agrees to furnish joint sealants to repair or replace those
joint sealants that do not comply with performance and other requirements specified in this Section within
specified warranty period.
1. Warranty Period: All sealant products specified herein shall carry manufacturer’s standard product
warranty which shall commence upon date of Substantial Completion.
C. Special warranties specified in this article exclude deterioration or failure of joint sealants from the
following:
1. Movement of the structure caused by stresses on the sealant exceeding sealant manufacturer's
written specifications for sealant elongation and compression.
2. Disintegration of joint substrates from causes exceeding design specifications.
3. Mechanical damage caused by individuals, tools, or other outside agents.
4. Changes in sealant appearance caused by accumulation of dirt or other atmospheric contaminants.
PART 2 - PRODUCTS
2.1 JOINT SEALANTS, GENERAL
A. Compatibility: Provide joint sealants, backings, and other related materials that are compatible with one
another and with joint substrates under conditions of service and application, as demonstrated by joint-
sealant manufacturer, based on testing and field experience.
B. VOC Content of Interior Sealants: Provide sealants and sealant primers for use inside the
weatherproofing system that comply with the following limits for VOC content when calculated
according to 40 CFR 59, Part 59, Subpart D (EPA Method 24):
1. Architectural Sealants: 250 g/L.
2. Sealant Primers for Nonporous Substrates: 250 g/L.
3. Sealant Primers for Porous Substrates: 775 g/L.

BTBC Phase III October 26, 2020
GE Project No. 0119-0010
Gould Evans
JOINT SEALANTS 079200 - 5
C.
D. <Double click to insert sustainable design text for sealants and primers.>
1. <Double click to insert sustainable design text for sealants.>
E. Colors of Exposed Joint Sealants: As selected by Architect from manufacturer's full range.
2.2 URETHANE JOINT SEALANTS
A. Multi-component, Pourable, Traffic-Grade, Urethane Joint Sealant: ASTM C 920, Type M, Grade NS,
Class 50, for Use T.
1. Products: Subject to compliance with requirements, available products that may be incorporated
into the Work include, but are not limited to, the following:
a. Meadows, W. R., Inc.; POURTHANE.
b. Pecora Corporation; Urexpan NR-200.
c. Tremco; THC-901 or 900 or Vulkem 245
d. Or approved equal.
2. Type and Grade: M (multicomponent) and P (pourable).
3. Class: 25.
4. Use Related to Exposure: T (traffic).
5. Uses Related to Joint Substrates: M, A, and, as applicable to joint substrates indicated, O.
B. Multi-component, Non-sag, Traffic-Grade, Urethane Joint Sealant: ASTM C 920, Type M, Grade NS,
Class 25, for Use T.
1. Products: Subject to compliance with requirements, available products that may be incorporated
into the Work include, but are not limited to, the following:
a. Sika Corporation, Inc.; Sikaflex - 1a.
b. Sonneborn, Division of ChemRex Inc.; NP 1.
c. Tremco; Vulkem 116 DyMonic or DyMonic FC.
d. Or approved equal.
2. Type and Grade: S (single component) and NS (nonsag).
3. Class: 25.
4. Uses Related to Exposure: T (traffic) and NT (nontraffic).
5. Uses Related to Joint Substrates: M, G, A, and, as applicable to joint substrates indicated, O.
2.3 SILICONE JOINT SEALANTS
A. Single-Component, Non-sag, Acid-Curing Silicone Joint Sealant: ASTM C 920, Type S, Grade NS,
Class 25, for Use NT.
1. Products: Subject to compliance with requirements, available products that may be incorporated
into the Work include, but are not limited to, the following:
a. Dow Corning Corporation; 999-A.
b. Pecora Corporation; 860.
c. Tremco Incorporated; Tremsil 200.
d. Or approved equal.
B. Single-Component, Nonsag, Neutral-Curing Silicone Joint Sealant: ASTM C 920, Type S, Grade NS,
Class 50, for Use M.

BTBC Phase III October 26, 2020
GE Project No. 0119-0010
Gould Evans
JOINT SEALANTS 079200 - 6
1. Products: Subject to compliance with requirements, available products that may be incorporated
into the Work include, but are not limited to, the following:
a. Silpruf, NST 9000.
b. Pecora Corporation, NST 864
c. Tremco, Spectrum 3
d. Or approved equal.
C. Mildew-Resistant, Single-Component, Acid-Curing Silicone Joint Sealant: ASTM C 920, Type S,
Grade NS, Class 25, for Use NT.
1. Products: Subject to compliance with requirements, available products that may be incorporated
into the Work include, but are not limited to, the following:
a. BASF Building Systems; Omniplus.
b. Dow Corning Corporation; 786 Mildew Resistant.
c. Tremco Incorporated; Tremsil 200 Sanitary.
d. Or approved equal.
2.4 LATEX JOINT SEALANTS
A. Latex Joint Sealant: Acrylic latex or siliconized acrylic latex, ASTM C 834, Type OP, Grade NF.
1. Products: Subject to compliance with requirements, available products that may be incorporated
into the Work include, but are not limited to, the following:
a. BASF Building Systems; Sonolac.
b. Pecora Corporation; AC-20+.
c. Tremco Incorporated; Tremflex 834.
d. Or approved equal.
2.5 JOINT-SEALANT BACKING
A. Sealant Backing Material, General: Nonstaining; compatible with joint substrates, sealants, primers, and
other joint fillers; and approved for applications indicated by sealant manufacturer based on field
experience and laboratory testing.
B. Cylindrical Sealant Backings: ASTM C1330, Type C (closed-cell material with a surface skin) Type O
(open-cell material) or any of the preceding types, as approved in writing by joint-sealant
manufacturer for joint application indicated, and of size and density to control sealant depth and
otherwise contribute to producing optimum sealant performance.
C. Bond-Breaker Tape: Polyethylene tape or other plastic tape recommended by sealant manufacturer for
preventing sealant from adhering to rigid, inflexible joint-filler materials or joint surfaces at back of joint.
Provide self-adhesive tape where applicable.
2.6 MISCELLANEOUS MATERIALS
A. Primer: Material recommended by joint-sealant manufacturer where required for adhesion of sealant to
joint substrates indicated, as determined from preconstruction joint-sealant-substrate tests and field tests.

BTBC Phase III October 26, 2020
GE Project No. 0119-0010
Gould Evans
JOINT SEALANTS 079200 - 7
B. Cleaners for Nonporous Surfaces: Chemical cleaners acceptable to manufacturers of sealants and sealant
backing materials, free of oily residues or other substances capable of staining or harming joint substrates
and adjacent nonporous surfaces in any way, and formulated to promote optimum adhesion of sealants to
joint substrates.
C. Masking Tape: Nonstaining, nonabsorbent material compatible with joint sealants and surfaces adjacent
to joints.
PART 3 - EXECUTION
3.1 EXAMINATION
A. Examine joints indicated to receive joint sealants, with Installer present, for compliance with
requirements for joint configuration, installation tolerances, and other conditions affecting performance of
the Work.
B. Proceed with installation only after unsatisfactory conditions have been corrected.
3.2 PREPARATION
A. Surface Cleaning of Joints: Clean out joints immediately before installing joint sealants to comply with
joint-sealant manufacturer's written instructions and the following requirements:
1. Remove all foreign material from joint substrates that could interfere with adhesion of joint
sealant, including dust, paints (except for permanent, protective coatings tested and approved for
sealant adhesion and compatibility by sealant manufacturer), old joint sealants, oil, grease,
waterproofing, water repellents, water, surface dirt, and frost.
2. Clean porous joint substrate surfaces by brushing, grinding, mechanical abrading, or a
combination of these methods to produce a clean, sound substrate capable of developing optimum
bond with joint sealants. Remove loose particles remaining after cleaning operations above by
vacuuming or blowing out joints with oil-free compressed air. Porous joint substrates include the
following:
a. Concrete.
b. Masonry.
3. Remove laitance and form-release agents from concrete.
4. Clean nonporous joint substrate surfaces with chemical cleaners or other means that do not stain,
harm substrates, or leave residues capable of interfering with adhesion of joint sealants.
Nonporous joint substrates include the following:
a. Metal.
b. Glass.
c. Porcelain enamel.
d. Glazed surfaces of ceramic tile.
e. Simulated Stone
B. Joint Priming: Prime joint substrates where recommended by joint-sealant manufacturer or as indicated
by preconstruction joint-sealant-substrate tests or prior experience. Apply primer to comply with joint-
sealant manufacturer's written instructions. Confine primers to areas of joint-sealant bond; do not allow
spillage or migration onto adjoining surfaces.

BTBC Phase III October 26, 2020
GE Project No. 0119-0010
Gould Evans
JOINT SEALANTS 079200 - 8
C. Masking Tape: Use masking tape where required to prevent contact of sealant or primer with adjoining
surfaces that otherwise would be permanently stained or damaged by such contact or by cleaning methods
required to remove sealant smears. Remove tape immediately after tooling without disturbing joint seal.
3.3 INSTALLATION OF JOINT SEALANTS
A. General: Comply with joint-sealant manufacturer's written installation instructions for products and
applications indicated, unless more stringent requirements apply.
B. Sealant Installation Standard: Comply with recommendations in ASTM C1193 for use of joint sealants as
applicable to materials, applications, and conditions indicated.
C. Install sealant backings of kind indicated to support sealants during application and at position required to
produce cross-sectional shapes and depths of installed sealants relative to joint widths that allow optimum
sealant movement capability.
1. Do not leave gaps between ends of sealant backings.
2. Do not stretch, twist, puncture, or tear sealant backings.
3. Remove absorbent sealant backings that have become wet before sealant application, and replace
them with dry materials.
D. Install bond-breaker tape behind sealants where sealant backings are not used between sealants and backs
of joints.
E. Install sealants using proven techniques that comply with the following and at the same time backings are
installed:
1. Place sealants so they directly contact and fully wet joint substrates.
2. Completely fill recesses in each joint configuration.
3. Produce uniform, cross-sectional shapes and depths relative to joint widths that allow optimum
sealant movement capability.
F. Tooling of Nonsag Sealants: Immediately after sealant application and before skinning or curing begins,
tool sealants according to requirements specified in subparagraphs below to form smooth, uniform beads
of configuration indicated; to eliminate air pockets; and to ensure contact and adhesion of sealant with
sides of joint.
1. Remove excess sealant from surfaces adjacent to joints.
2. Use tooling agents that are approved in writing by sealant manufacturer and that do not discolor
sealants or adjacent surfaces.
3. Provide concave joint profile per Figure 8A in ASTM C1193 unless otherwise indicated.
4. Provide flush joint profile at locations indicated on Drawings according to Figure 8B in
ASTM C1193.
5. Provide recessed joint configuration of recess depth and at locations indicated on Drawings
according to Figure 8C in ASTM C1193.
a. Use masking tape to protect surfaces adjacent to recessed tooled joints.
3.4 FIELD QUALITY CONTROL
A. Field-Adhesion Testing: Field test joint-sealant adhesion to joint substrates as follows:

BTBC Phase III October 26, 2020
GE Project No. 0119-0010
Gould Evans
JOINT SEALANTS 079200 - 9
1. Extent of Testing: Test completed and cured sealant joints as follows:
a. Perform one test for each 1000 feet (300 m) of joint length thereafter or one test per each
floor per elevation.
2. Test Method: Test joint sealants according to Method A, Field-Applied Sealant Joint Hand Pull
Tab, in Appendix X1 in ASTM C1193 or Method A, Tail Procedure, in ASTM C1521.
a. For joints with dissimilar substrates, verify adhesion to each substrate separately; extend
cut along one side, verifying adhesion to opposite side. Repeat procedure for opposite side.
3. Inspect tested joints and report on the following:
a. Whether sealants filled joint cavities and are free of voids.
b. Whether sealant dimensions and configurations comply with specified requirements.
c. Whether sealants in joints connected to pulled-out portion failed to adhere to joint
substrates or tore cohesively. Include data on pull distance used to test each kind of product
and joint substrate. Compare these results to determine if adhesion complies with sealant
manufacturer's field-adhesion hand-pull test criteria.
4. Record test results in a field-adhesion-test log. Include dates when sealants were installed, names
of persons who installed sealants, test dates, test locations, whether joints were primed, adhesion
results and percent elongations, sealant material, sealant configuration, and sealant dimensions.
5. Repair sealants pulled from test area by applying new sealants following same procedures used
originally to seal joints. Ensure that original sealant surfaces are clean and that new sealant
contacts original sealant.
B. Evaluation of Field-Adhesion-Test Results: Sealants not evidencing adhesive failure from testing or
noncompliance with other indicated requirements will be considered satisfactory. Remove sealants that
fail to adhere to joint substrates during testing or to comply with other requirements. Retest failed
applications until test results prove sealants comply with indicated requirements.
3.5 CLEANING
A. Clean off excess sealant or sealant smears adjacent to joints as the Work progresses by methods and with
cleaning materials approved in writing by manufacturers of joint sealants and of products in which joints
occur.
3.6 PROTECTION
A. Protect joint sealants during and after curing period from contact with contaminating substances and from
damage resulting from construction operations or other causes so sealants are without deterioration or
damage at time of Substantial Completion. If, despite such protection, damage or deterioration occurs, cut
out, remove, and repair damaged or deteriorated joint sealants immediately so installations with repaired
areas are indistinguishable from original work.
3.7 JOINT-SEALANT SCHEDULE
JOINT SEALANT APPLICATION
Single-Component Acid Curing Silicone
Sealant • Exterior vertical and horizontal nontraffic joints in
cast-in-place concrete
• Exterior vertical and horizontal nontraffic joints
between plant-precast architectural concrete units

BTBC Phase III October 26, 2020
GE Project No. 0119-0010
Gould Evans
JOINT SEALANTS 079200 - 10
• Exterior joints between flashing materials and unit
masonry
• Exterior butt joints between metal panels
• Exterior perimeter joints at frames of doors, win-
dows and louvers
• Exterior control and expansion joints in ceilings and
other overhead surfaces
• Exterior vertical joints between different materials
listed above
• All other exterior vertical and horizontal nontraffic
joints unless noted otherwise
• Exposed joints within glazed curtain wall framing
system, skylight framing system and aluminum en-
trance framing system.
Single-Component Neutral-Curing Sili-
cone Sealant • Exterior joints in dimension stone cladding
• Exterior vertical control and expansion joints in unit
masonry
• Exterior horizontal pressure-relieving joints in unit
masonry
Single-Component Mildew-Resistant Acid-
Curing Silicone Sealant • Interior joints between plumbing fixtures and ad-
joining walls, floors, and counters
• Joints between counters and adjoining walls and
floors at bathrooms, kitchens and other wet areas
Multi-component Pourable Urethane Sealant • Exterior horizontal nontraffic and traffic isolation
and contraction joints in cast-in-place concrete slabs
• Exterior control and expansion joints in horizontal
traffic surfaces of brick pavers, ceramic tile, stone
paving units and similar materials unless otherwise
specified in individual specification sections.
• Interior expansion, control, contraction, and isola-
tion joints in horizontal traffic surfaces in ceramic
tile, dimension stone, dimension stone tile and
brick, unless otherwise specified in individual speci-
fication sections.
Multi-component Non-sag Urethane Sealant • Exterior horizontal nontraffic and traffic isolation
and contraction joints in cast-in-place concrete slabs
• Exterior control and expansion joints in horizontal
traffic surfaces of brick pavers, ceramic tile, stone
paving units and similar materials unless otherwise
specified in individual specification sections.
• Interior expansion, control, contraction, and isola-
tion joints in horizontal traffic surfaces in ceramic
tile, dimension stone, dimension stone tile and
brick, unless otherwise specified in individual speci-
fication sections
• Exterior vertical and horizontal joints subject to
12.5% to 25% movement including expansion
joints, control joints in masonry or concrete..
Latex Sealant • Interior joints in filed-painted vertical and overhead
surfaces at perimeter of elevator door frames and
hollow metal door frames; and gypsum drywall,
plaster and concrete or concrete masonry; and all
other joint not subject to movement.

BTBC Phase III October 26, 2020
GE Project No. 0119-0010
Gould Evans
JOINT SEALANTS 079200 - 11
END OF SECTION 079200

BTBC Phase III October 26, 2020
GE Project No. 0119-0010
Gould Evans
JOINT SEALANTS 079200 - 12
THIS PAGE IS INTENTIONALLY LEFT BLANK

BTBC Phase III October 26, 2020
GE Project No. 0119-0010
Gould Evans
HOLLOW METAL DOORS AND FRAMES 081113 - 1
SECTION 081113 - HOLLOW METAL DOORS AND FRAMES
PART 1 - GENERAL
1.1 RELATED DOCUMENTS
A. Drawings and general provisions of the Contract, including General and Supplementary Conditions and
Division 01 Specification Sections, apply to this Section.
1.2 SUMMARY
1. Interior standard steel doors and frames.
2. Exterior standard steel doors and frames.
B. Related Requirements:
1. Section 087100 "Door Hardware" for door hardware for hollow metal doors.
2. Sections 099113 and 099123 "Exterior Painting" and "Interior Painting" for field painting hollow
metal doors and frames.
3. Division 26 Sections for electrical connections including conduit and wiring for door controls and
operators.
1.3 DEFINITIONS
A. Minimum Thickness: Minimum thickness of base metal without coatings according to NAAMM-
HMMA 803 or SDI A250.8.
B. Standard Hollow Metal Work: Hollow metal work fabricated according to ANSI/SDI A250.8.
1.4 COORDINATION
A. Coordinate anchorage installation for hollow-metal frames. Furnish setting drawings, templates, and
directions for installing anchorages, including sleeves, concrete inserts, anchor bolts, and items with
integral anchors. Deliver such items to Project site in time for installation.
1.5 PREINSTALLATION MEETINGS
A. Preinstallation Conference: Conduct conference at Project site.
1.6 ACTION SUBMITTALS
A. Product Data: For each type of product.
1. Include construction details, material descriptions, core descriptions, fire-resistance ratings,
temperature-rise ratings, and finishes.
B. Shop Drawings: Include the following:
1. Elevations of each door type.

BTBC Phase III October 26, 2020
GE Project No. 0119-0010
Gould Evans
HOLLOW METAL DOORS AND FRAMES 081113 - 2
2. Details of doors, including vertical- and horizontal-edge details and metal thicknesses.
3. Frame details for each frame type, including dimensioned profiles and metal thicknesses.
4. Locations of reinforcement and preparations for hardware.
5. Details of each different wall opening condition.
6. Details of anchorages, joints, field splices, and connections.
7. Details of accessories.
8. Details of moldings, removable stops, and glazing.
9. Details of conduit and preparations for power, signal, and control systems.
C. Samples for Verification:
1. For each type of exposed finish required, prepared on Samples of not less than 3 by 5 inches.
D. Schedule: Provide a schedule of hollow-metal work prepared by or under the supervision of supplier,
using same reference numbers for details and openings as those on Drawings. Coordinate with final Door
Hardware Schedule.
1.7 INFORMATIONAL SUBMITTALS
A. Product Test Reports: For each type of hollow-metal door and frame assembly, for tests performed by a
qualified testing agency.
1.8 DELIVERY, STORAGE, AND HANDLING
A. Deliver hollow-metal work palletized, packaged, or crated to provide protection during transit and
Project-site storage. Do not use non-vented plastic.
1. Provide additional protection to prevent damage to factory-finished units.
B. Deliver welded frames with two removable spreader bars across bottom of frames, tack welded to jambs
and mullions.
C. Store hollow-metal work vertically under cover at Project site with head up. Place on minimum 4-inch-
high wood blocking. Provide minimum 1/4-inch space between each stacked door to permit air
circulation.
1.9 COORDINATION
A. Coordinate installation of anchorages for hollow metal frames. Furnish setting drawings, templates, and
directions for installing anchorages, including sleeves, concrete inserts, anchor bolts, and items with
integral anchors. Deliver such items to Project site in time for installation.
PART 2 - PRODUCTS
2.1 MANUFACTURERS
A. Manufacturers: Subject to compliance with requirements, provide products by one of the following:
1. Amweld Building Products, LLC.
2. Ceco Door Products; an Assa Abloy Group company.
3. Curries Company; an Assa Abloy Group company.
4. Steelcraft; an Ingersoll-Rand company.

BTBC Phase III October 26, 2020
GE Project No. 0119-0010
Gould Evans
HOLLOW METAL DOORS AND FRAMES 081113 - 3
B. Source Limitations: Obtain hollow-metal work from single source from single manufacturer.
2.2 REGULATORY REQUIREMENTS
A. Fire-Rated Assemblies: Complying with NFPA 80 and listed and labeled by a qualified testing agency
acceptable to authorities having jurisdiction for fire-protection ratings and temperature-rise limits
indicated, based on testing at positive pressure according to NFPA 252 or UL 10C.
B. Fire-Rated, Borrowed-Light Assemblies: Complying with NFPA 80 and listed and labeled by a testing
and inspecting agency acceptable to authorities having jurisdiction for fire-protection ratings indicated,
based on testing according to NFPA 257 or UL 9.
2.3 INTERIOR HOLLOW-METAL DOORS AND FRAMES
A. Construct interior doors and frames to comply with the standards indicated for materials, fabrication,
hardware locations, hardware reinforcement, tolerances, and clearances, and as specified.
B. Heavy-Duty Doors and Frames: SDI A250.8, Level 2.
1. Physical Performance: Level B according to SDI A250.4.
2. Doors:
a. Type: As indicated in the Door and Frame Schedule.
b. Thickness: 1-3/4 inches.
c. Face: Uncoated, cold-rolled steel sheet, minimum thickness of 0.042 inch.
d. Edge Construction: Model 2, Seamless.
e. Core: Manufacturer's standard kraft-paper honeycomb, polystyrene, polyurethane,
polyisocyanurate, mineral-board, or vertical steel-stiffener core at manufacturer's
discretion.
1) Fire-Rated Doors: Mineral core.
3. Frames:
a. Materials: Uncoated, steel sheet, minimum thickness of 0.053 inch.
b. Construction: Full profile welded.
4. Exposed Finish: Prime for field-painting.
2.4 EXTERIOR HOLLOW-METAL DOORS AND FRAMES
A. Construct exterior doors and frames to comply with the standards indicated for materials, fabrication,
hardware locations, hardware reinforcement, tolerances, and clearances, and as specified.
B. Extra-Heavy-Duty Doors and Frames: SDI A250.8, Level 3.
1. Physical Performance: Level A according to SDI A250.4.
2. Doors:
a. Type: As indicated in the Door and Frame Schedule.
b. Thickness: 1-3/4 inches
c. Face: Metallic-coated steel sheet, minimum thickness of 0.053 inch, with minimum A60
coating.
d. Edge Construction: Model 2, Seamless.
e. Core: Foamed-in-place polyurethane.
1) Thermal-Rated Doors: All exterior doors to be fabricated with thermal-resistance
value of not less than U-Factor of 0.38 (R-Value of 2.6) when tested according to
ASTM C 1363.

BTBC Phase III October 26, 2020
GE Project No. 0119-0010
Gould Evans
HOLLOW METAL DOORS AND FRAMES 081113 - 4
f. Fire-Rated Core: Manufacturer's standard vertical steel stiffener with insulation or
laminated mineral board core for fire-rated doors.
3. Frames:
a. Materials: Metallic-coated steel sheet, minimum thickness of 0.053 inch, with minimum
A60 coating.
b. Construction: Full profile welded.
4. Exposed Finish: Prime for field-painting.
2.5 FRAME ANCHORS
A. Jamb Anchors:
1. Masonry Type: Adjustable strap-and-stirrup or T-shaped anchors to suit frame size, not less than
0.042 inch thick, with corrugated or perforated straps not less than 2 inches wide by 10 inches
long; or wire anchors not less than 0.177 inch thick.
2. Stud-Wall Type: Designed to engage stud, welded to back of frames; not less than 0.042 inch
thick.
3. Post-Installed Expansion Type for In-Place Concrete or Masonry: Minimum 3/8-inch-diameter
bolts with expansion shields or inserts. Provide pipe spacer from frame to wall, with throat
reinforcement plate, welded to frame at each anchor location.
B. Floor Anchors: Formed from same material as frames, minimum thickness of 0.042 inch, and as follows:
1. Monolithic Concrete Slabs: Clip-type anchors, with two holes to receive fasteners.
2. Separate Topping Concrete Slabs: Adjustable-type anchors with extension clips, allowing not less
than 2-inch height adjustment. Terminate bottom of frames at finish floor surface.
2.6 MATERIALS
A. Cold-Rolled Steel Sheet: ASTM A 1008/A 1008M, Commercial Steel (CS), Type B; suitable for exposed
applications.
B. Hot-Rolled Steel Sheet: ASTM A 1011/A 1011M, Commercial Steel (CS), Type B; free of scale, pitting,
or surface defects; pickled and oiled.
C. Metallic-Coated Steel Sheet: ASTM A 653/A 653M, Commercial Steel (CS), Type B; with minimum
G60 or A60metallic coating.
D. Frame Anchors: ASTM A 879/A 879M, Commercial Steel (CS), 04Z coating designation; mill
phosphatized.
1. For anchors built into exterior walls, steel sheet complying with ASTM A 1008/A 1008M or
ASTM A 1011/A 1011M, hot-dip galvanized according to ASTM A 153/A 153M, Class B.
E. Inserts, Bolts, and Fasteners: Hot-dip galvanized according to ASTM A 153/A 153M.
F. Power-Actuated Fasteners in Concrete: Fastener system of type suitable for application indicated,
fabricated from corrosion-resistant materials, with clips or other accessory devices for attaching hollow-
metal frames of type indicated.
G. Grout: ASTM C 476, except with a maximum slump of 4 inches, as measured according to
ASTM C 143/C 143M.

BTBC Phase III October 26, 2020
GE Project No. 0119-0010
Gould Evans
HOLLOW METAL DOORS AND FRAMES 081113 - 5
H. Mineral-Fiber Insulation: ASTM C 665, Type I (blankets without membrane facing); consisting of fibers
manufactured from slag or rock wool; with maximum flame-spread and smoke-developed indexes of 25
and 50, respectively; passing ASTM E 136 for combustion characteristics.
I. Glazing: Comply with requirements in Section 088000 "Glazing."
J. Bituminous Coating: Cold-applied asphalt mastic, compounded for 15-mil dry film thickness per coat.
Provide inert-type noncorrosive compound free of asbestos fibers, sulfur components, and other
deleterious impurities.
2.7 FABRICATION
A. Fabricate hollow-metal work to be rigid and free of defects, warp, or buckle. Accurately form metal to
required sizes and profiles, with minimum radius for metal thickness. Where practical, fit and assemble
units in manufacturer's plant. To ensure proper assembly at Project site, clearly identify work that cannot
be permanently factory assembled before shipment.
B. Hollow-Metal Doors:
1. Steel-Stiffened Door Cores: Provide minimum thickness 0.026 inch, steel vertical stiffeners of
same material as face sheets extending full-door height, with vertical webs spaced not more than 6
inches apart. Spot weld to face sheets no more than 5 inches o.c. Fill spaces between stiffeners
with glass- or mineral-fiber insulation.
2. Fire Door Cores: As required to provide fire-protection and temperature-rise ratings indicated.
3. Vertical Edges for Single-Acting Doors: Bevel edges 1/8 inch in 2 inches.
4. Top Edge Closures: Close top edges of doors with flush closures of same material as face sheets.
5. Bottom Edge Closures: Close bottom edges of doors where required for attachment of weather
stripping] with end closures or channels of same material as face sheets.
6. Exterior Doors: Provide weep-hole openings in bottoms of exterior doors to permit moisture to
escape. Seal joints in top edges of doors against water penetration.
7. Astragals: Provide overlapping astragal on one leaf of pairs of doors where required by NFPA 80
for fire-performance rating or where indicated. Extend minimum 3/4 inch beyond edge of door on
which astragal is mounted or as required to comply with published listing of qualified testing
agency.
C. Hollow-Metal Frames: Where frames are fabricated in sections due to shipping or handling limitations,
provide alignment plates or angles at each joint, fabricated of same thickness metal as frames.
1. Sidelight and Transom Bar Frames: Provide closed tubular members with no visible face seams or
joints, fabricated from same material as door frame. Fasten members at crossings and to jambs by
butt welding.
2. Provide countersunk, flat- or oval-head exposed screws and bolts for exposed fasteners unless
otherwise indicated.
3. Grout Guards: Weld guards to frame at back of hardware mortises in frames to be grouted.
4. Floor Anchors: Weld anchors to bottoms of jambs with at least four spot welds per anchor;
however, for slip-on drywall frames, provide anchor clips or countersunk holes at bottoms of
jambs.
5. Jamb Anchors: Provide number and spacing of anchors as follows:
a. Stud-Wall Type: Locate anchors not more than 18 inches from top and bottom of frame.
Space anchors not more than 32 inches o.c. and as follows:
1) Four anchors per jamb upto 90 inches high.
2) Five anchors per jamb from 90 to 96 inches high.
3) Five anchors per jamb plus one additional anchor per jamb for each 24 inches or
fraction thereof above 96 inches high.
b. Postinstalled Expansion Type: Locate anchors not more than 6 inches from top and bottom
of frame. Space anchors not more than 26 inches o.c.

BTBC Phase III October 26, 2020
GE Project No. 0119-0010
Gould Evans
HOLLOW METAL DOORS AND FRAMES 081113 - 6
1) Storm-Resistant Doors: Space anchors as determined by door manufacturer to
comply with FEMA 361 and ANSI ICC 500 standards.
6. Door Silencers: Except on weather-stripped frames, drill stops to receive door silencers as
follows. Keep holes clear during construction.
a. Single-Door Frames: Drill stop in strike jamb to receive three door silencers.
b. Double-Door Frames: Drill stop in head jamb to receive two door silencers.
D. Fabricate concealed stiffeners and edge channels from either cold- or hot-rolled steel sheet.
E. Hardware Preparation: Factory prepare hollow-metal work to receive templated mortised hardware;
include cutouts, reinforcement, mortising, drilling, and tapping according to SDI A250.6, the Door
Hardware Schedule, and templates.
1. Reinforce doors and frames to receive nontemplated, mortised, and surface-mounted door
hardware.
2. Comply with applicable requirements in SDI A250.6 and BHMA A156.115 for preparation of
hollow-metal work for hardware.
3. Coordinate locations of conduit and wiring boxes for electrical and security connections with
Division 26 and Division 27 Sections.
F. Stops and Moldings: Provide stops and moldings around glazed lites and louvers where indicated. Form
corners of stops and moldings with butted hairline joints.
1. Single Glazed Lites: Provide fixed stops and moldings welded on secure side of hollow-metal
work.
2. Multiple Glazed Lites: Provide fixed and removable stops and moldings so that each glazed lite is
capable of being removed independently.
3. Provide fixed frame moldings on outside of exterior and on secure side of interior doors and
frames.
4. Provide loose stops and moldings on inside of hollow-metal work.
5. Coordinate rabbet width between fixed and removable stops with glazing and installation types
indicated.
2.8 STEEL FINISHES
A. Prime Finish: Clean, pretreat, and apply manufacturer's standard primer.
1. Shop Primer: Manufacturer's standard, fast-curing, lead- and chromate-free primer complying
with SDI A250.10; recommended by primer manufacturer for substrate; compatible with substrate
and field-applied coatings despite prolonged exposure.
2.9 ACCESSORIES
A. Mullions and Transom Bars: Join to adjacent members by welding or rigid mechanical anchors.
B. Grout Guards: Formed from same material as frames, not less than 0.016 inch thick.
PART 3 - EXECUTION
3.1 EXAMINATION
A. Examine substrates, areas, and conditions, with Installer present, for compliance with requirements for
installation tolerances and other conditions affecting performance of the Work.

BTBC Phase III October 26, 2020
GE Project No. 0119-0010
Gould Evans
HOLLOW METAL DOORS AND FRAMES 081113 - 7
B. Examine roughing-in for embedded and built-in anchors to verify actual locations before frame
installation.
C. Proceed with installation only after unsatisfactory conditions have been corrected.
3.2 PREPARATION
A. Remove welded-in shipping spreaders installed at factory. Restore exposed finish by grinding, filling,
and dressing, as required to make repaired area smooth, flush, and invisible on exposed faces.
B. Drill and tap doors and frames to receive nontemplated, mortised, and surface-mounted door hardware.
3.3 INSTALLATION
A. General: Install hollow-metal work plumb, rigid, properly aligned, and securely fastened in place.
Comply with Drawings and manufacturer's written instructions.
B. Hollow-Metal Frames: Install hollow-metal frames of size and profile indicated. Comply with
SDI A250.11 or NAAMM-HMMA 840 as required by standards specified.
1. Set frames accurately in position; plumbed, aligned, and braced securely until permanent anchors
are set. After wall construction is complete, remove temporary braces, leaving surfaces smooth
and undamaged.
a. At fire-rated openings, install frames according to NFPA 80.
b. Where frames are fabricated in sections because of shipping or handling limitations, field
splice at approved locations by welding face joint continuously; grind, fill, dress, and make
splice smooth, flush, and invisible on exposed faces.
c. Install frames with removable stops located on secure side of opening.
d. Install door silencers in frames before grouting.
e. Remove temporary braces necessary for installation only after frames have been properly
set and secured.
f. Check plumb, square, and twist of frames as walls are constructed. Shim as necessary to
comply with installation tolerances.
g. Field apply bituminous coating to backs of frames that will be filled with grout containing
antifreezing agents.
2. Floor Anchors: Provide floor anchors for each jamb and mullion that extends to floor, and secure
with postinstalled expansion anchors.
a. Floor anchors may be set with power-actuated fasteners instead of postinstalled expansion
anchors if so indicated and approved on Shop Drawings.
3. Metal-Stud Partitions: Solidly pack mineral-fiber insulation inside frames.
4. Masonry Walls: Coordinate installation of frames to allow for solidly filling space between
frames and masonry with [grout][mineral-fiber insulation].
5. Concrete Walls: Solidly fill space between frames and concrete with mineral-fiber insulation.
6. In-Place Concrete or Masonry Construction: Secure frames in place with postinstalled expansion
anchors. Countersink anchors, and fill and make smooth, flush, and invisible on exposed faces.
7. Ceiling Struts: Extend struts vertically from top of frame at each jamb to overhead structural
supports or substrates above frame unless frame is anchored to masonry or to other structural
support at each jamb. Bend top of struts to provide flush contact for securing to supporting
construction. Provide adjustable wedged or bolted anchorage to frame jamb members.
8. Installation Tolerances: Adjust hollow-metal door frames for squareness, alignment, twist, and
plumb to the following tolerances:
a. Squareness: Plus or minus 1/16 inch, measured at door rabbet on a line 90 degrees from
jamb perpendicular to frame head.

BTBC Phase III October 26, 2020
GE Project No. 0119-0010
Gould Evans
HOLLOW METAL DOORS AND FRAMES 081113 - 8
b. Alignment: Plus or minus 1/16 inch, measured at jambs on a horizontal line parallel to
plane of wall.
c. Twist: Plus or minus 1/16 inch, measured at opposite face corners of jambs on parallel
lines, and perpendicular to plane of wall.
d. Plumbness: Plus or minus 1/16 inch, measured at jambs at floor.
C. Hollow-Metal Doors: Fit hollow-metal doors accurately in frames, within clearances specified below.
Shim as necessary.
1. Non-Fire-Rated Steel Doors:
a. Between Door and Frame Jambs and Head: 1/8 inch plus or minus 1/32 inch.
b. Between Edges of Pairs of Doors: 1/8 inch to 1/4 inch plus or minus 1/32 inch.
c. At Bottom of Door and Top of Threshold: 3/4 inch plus or minus 1/32 inch.
d. At Bottom of Door and Top of Carpet: 3/8 inchplus or minus 1/32 inch.
e. At Bottom of Door and Top of Smooth Finish Floor or Concrete: 3/8 inchplus or minus
1/32 inch.
f. Between Door Face and Stop: 1/16 inch to 1/8 inch plus or minus 1/32 inch.
2. Fire-Rated Doors: Install doors with clearances according to NFPA 80.
3. Smoke-Control Doors: Install doors and gaskets according to NFPA 105.
D. Glazing: Comply with installation requirements in Section 088000 "Glazing" and with hollow-metal
manufacturer's written instructions.
1. Secure stops with countersunk flat- or oval-head machine screws spaced uniformly not more than
9 inches o.c. and not more than 2 inches o.c. from each corner.
3.4 ADJUSTING AND CLEANING
A. Final Adjustments: Check and readjust operating hardware items immediately before final inspection.
Leave work in complete and proper operating condition. Remove and replace defective work, including
hollow-metal work that is warped, bowed, or otherwise unacceptable.
B. Remove grout and other bonding material from hollow-metal work immediately after installation.
C. Prime-Coat Touchup: Immediately after erection, sand smooth rusted or damaged areas of prime coat
and apply touchup of compatible air-drying, rust-inhibitive primer.
D. Metallic-Coated Surface Touchup: Clean abraded areas and repair with galvanizing repair paint
according to manufacturer's written instructions.
END OF SECTION 081113

BTBC Phase III October 26, 2020 GE Project No. 0119-0010 Gould Evans
FLUSH WOOD DOORS 081416 - 1
SECTION 081416 - FLUSH WOOD DOORS
PART 1 - GENERAL
1.1 RELATED DOCUMENTS
A. Drawings and general provisions of the Contract, including General and Supplementary
Conditions and Division 01 Specification Sections, apply to this Section.
1.2 SUMMARY
A. Section Includes:
1. Solid-core doors with wood-veneer faces.
2. Solid-core doors with hardboard or high-density fiberboard faces for factory-applied
opaque finish.
3. Factory finishing flush wood doors.
4. Factory fitting flush wood doors to frames and factory machining for hardware.
B. Related Requirements:
1. Section 088000 "Glazing" for glass view panels in flush wood doors.
1.3 ACTION SUBMITTALS
A. Product Data: For each type of door. Include details of core and edge construction and trim for
openings. Include factory-finishing specifications.
B. Sustainable Design Submittals:
1. Product Certificates: For regional materials, indicating location of material manufacturer.
Include distance to Project and cost for each regional material.
2. Chain-of-Custody Certificates: For certified wood products. Include statement of costs.
3. Chain-of-Custody Qualification Data: For manufacturer and vendor.
4. Product Data: For adhesives, indicating that product contains no urea formaldehyde.
5. Product Data: For composite wood products, indicating that product contains no urea
formaldehyde.
C. Shop Drawings: Indicate location, size, and hand of each door; elevation of each kind of door;
construction details not covered in Product Data; and the following:
1. Dimensions and locations of blocking.
2. Dimensions and locations of mortises and holes for hardware.
3. Dimensions and locations of cutouts.
4. Undercuts.
5. Requirements for veneer matching.

BTBC Phase III October 26, 2020 GE Project No. 0119-0010 Gould Evans
FLUSH WOOD DOORS 081416 - 2
6. Doors to be factory finished and finish requirements.
7. Fire-protection ratings for fire-rated doors.
D. Samples for Initial Selection: For factory-finished doors.
E. Samples for Verification:
1. Factory finishes applied to actual door face materials, approximately 8 by 10 inches, for
each material and finish. For each wood species and transparent finish, provide set of
three Samples showing typical range of color and grain to be expected in finished Work.
2. Frames for light openings, 6 inches long, for each material, type, and finish required.
1.4 INFORMATIONAL SUBMITTALS
A. Sample Warranty: For special warranty.
B. Quality Standard Compliance Certificates: AWI Quality Certification Program certificates.
1.5 QUALITY ASSURANCE
A. Manufacturer Qualifications: A qualified manufacturer that is certified for chain of custody by
an FSC-accredited certification body.
B. Vendor Qualifications: A vendor that is certified for chain of custody by an FSC-accredited
certification body.
1.6 DELIVERY, STORAGE, AND HANDLING
A. Comply with requirements of referenced standard and manufacturer's written instructions.
B. Package doors individually in plastic bags or cardboard cartons.
C. Mark each door on bottom rail with opening number used on Shop Drawings.
1.7 FIELD CONDITIONS
A. Environmental Limitations: Do not deliver or install doors until spaces are enclosed and
weathertight, wet work in spaces is complete and dry, and HVAC system is operating and
maintaining ambient temperature and humidity conditions at occupancy levels during remainder
of construction period.
1.8 WARRANTY
A. Special Warranty: Manufacturer agrees to repair or replace doors that fail in materials or
workmanship within specified warranty period.

BTBC Phase III October 26, 2020 GE Project No. 0119-0010 Gould Evans
FLUSH WOOD DOORS 081416 - 3
1. Failures include, but are not limited to, the following:
a. Warping (bow, cup, or twist) more than 1/4 inch in a 42-by-84-inch section.
b. Telegraphing of core construction in face veneers exceeding 0.01 inch in a 3-inch
span.
2. Warranty shall also include installation and finishing that may be required due to repair
or replacement of defective doors.
3. Warranty Period for Solid-Core Interior Doors: Life of installation.
PART 2 - PRODUCTS
2.1 MANUFACTURERS
A. Manufacturers: Subject to compliance with requirements, provide products by one of the
following:
1. Algoma Hardwoods, Inc.
2. Eggers Industries.
3. Graham Wood Doors; an Assa Abloy Group company.
4. Marshfield Door Systems, Inc.
5. VT Industries Inc.
2.2 FLUSH WOOD DOORS, GENERAL
A. Quality Standard: In addition to requirements specified, comply with AWI's, AWMAC's, and
WI's "Architectural Woodwork Standards."
1. Provide AWI Quality Certification Labels indicating that doors comply with
requirements of grades specified.
B. Regional Materials: Wood doors shall be manufactured within 500 miles of Project site.
C. Certified Wood: Wood doors shall be certified as "FSC Pure" or "FSC Mixed Credit" according
to FSC STD-01-00 and FSC STD-40-004.
D. Adhesives: Do not use adhesives that contain urea formaldehyde.
E. Composite Wood Products: Products shall be made without urea formaldehyde.
F. WDMA I.S.1-A Performance Grade: Extra Heavy Duty.
G. Fire-Rated Wood Doors: Doors complying with NFPA 80 that are listed and labeled by a
qualified testing agency, for fire-protection ratings indicated, based on testing at positive
pressure according to NFPA 252.

BTBC Phase III October 26, 2020 GE Project No. 0119-0010 Gould Evans
FLUSH WOOD DOORS 081416 - 4
1. Cores: Provide mineral core as needed to provide fire-protection rating indicated.
2. Edge Construction: Provide edge construction with intumescent seals concealed by outer
stile. Comply with specified requirements for exposed edges.
3. Pairs: Provide fire-retardant stiles that are listed and labeled for applications indicated
without formed-steel edges and astragals. Provide stiles with concealed intumescent
seals. Comply with specified requirements for exposed edges.
H. Structural-Composite-Lumber-Core Doors:
1. Structural Composite Lumber: WDMA I.S.10.
a. Screw Withdrawal, Face: 700 lbf.
b. Screw Withdrawal, Edge: 400 lbf.
I. Mineral-Core Doors:
1. Core: Noncombustible mineral product complying with requirements of referenced
quality standard and testing and inspecting agency for fire-protection rating indicated.
2. Blocking: Provide composite blocking with improved screw-holding capability approved
for use in doors of fire-protection ratings indicated asfollows:
a. 5-inch top-rail blocking.
b. 5-inch bottom-rail blocking, in doors indicated to have protection plates.
c. 5-inch midrail blocking, in doors indicated to have armor plates.
d. 4-1/2-by-10-inch lock blocks and 5-inch midrail blocking, in doors indicated to
have exit devices.
3. Edge Construction: At hinge stiles, provide laminated-edge construction with improved
screw-holding capability and split resistance. Comply with specified requirements for
exposed edges.
a. Screw-Holding Capability: 475 lbf per WDMA T.M.-10.
2.3 VENEER-FACED DOORS FOR TRANSPARENT FINISH (CUSTOM VENEER
ORIENTATION)
A. Interior Solid-Core Doors:
1. Grade: Premium, with Grade AA faces.
2. Species: White oak, with veneer rotated 90 degrees to horizontal
3. Cut: Rift cut.
4. Match between Veneer Leaves: Book match.
5. Assembly of Veneer Leaves on Door Faces: Balance match.
6. Pair and Set Match: Provide for doors hung in same opening or separated only by
mullions.
7. Room Match: Provide door faces of compatible color and grain within each separate
room or area of building.
8. Exposed Vertical and Top Edges: Same species as faces - edge Type A.
9. Core: Structural composite lumber.

BTBC Phase III October 26, 2020 GE Project No. 0119-0010 Gould Evans
FLUSH WOOD DOORS 081416 - 5
10. Construction: Five plies. Stiles and rails are bonded to core, then entire unit is abrasive
planed before veneering. Faces are bonded to core using a hot press.
2.4 DOORS FOR OPAQUE FINISH
A. Interior Solid-Core Doors:
1. Grade: Premium.
2. Species: High Density Fiberboard.
3. Exposed Vertical and Top Edges: Any closed-grain hardwood.
4. Core: Structural composite lumber.
5. Construction: Five plies. Stiles and rails are bonded to core, then entire unit is abrasive
planed before veneering. Faces are bonded to core using a hot press.
2.5 LIGHT FRAMES
A. Wood Beads for Light Openings in Wood Doors: Provide manufacturer's standard wood beads
unless otherwise indicated.
1. Wood Species: Same species as door faces.
2. Profile: Flush rectangular beads.
B. Metal Frames for Light Openings in Fire-Rated Doors: Manufacturer's standard frame formed
of 0.048-inch-thick, cold-rolled steel sheet; factory primed for paint finish; and approved for use
in doors of fire-protection rating indicated.
2.6 FABRICATION
A. Factory fit doors to suit frame-opening sizes indicated. Comply with clearance requirements of
referenced quality standard for fitting unless otherwise indicated.
1. Comply with NFPA 80 requirements for fire-rated doors.
B. Factory machine doors for hardware that is not surface applied. Locate hardware to comply with
DHI-WDHS-3. Comply with final hardware schedules, door frame Shop Drawings, BHMA-
156.115-W, and hardware templates.
1. Coordinate with hardware mortises in metal frames to verify dimensions and alignment
before factory machining.
2. Metal Astragals: Factory machine astragals and formed-steel edges for hardware for pairs
of fire-rated doors.
3. Factory Pre-Drilled Pilot Holes: Pre-drill pilot holes for hinge screws at factory to
eliminate splitting of stiles.
C. Openings: Factory cut and trim openings through doors.
1. Light Openings: Trim openings with moldings of material and profile indicated.

BTBC Phase III October 26, 2020 GE Project No. 0119-0010 Gould Evans
FLUSH WOOD DOORS 081416 - 6
2. Glazing: Factory install glazing in doors indicated to be factory finished. Comply with
applicable requirements in Section 088000 "Glazing."
2.7 FACTORY FINISHING
A. General: Comply with referenced quality standard for factory finishing. Complete fabrication,
including fitting doors for openings and machining for hardware that is not surface applied,
before finishing.
1. Finish faces, all four edges, edges of cutouts, and mortises. Stains and fillers may be
omitted on bottom edges, edges of cutouts, and mortises.
B. Factory finish doors.
C. Transparent Finish:
1. Grade: Premium.
2. Finish: AWI's, AWMAC's, and WI's "Architectural Woodwork Standards" System 9, UV
curable, acrylated epoxy, polyester, or System 11, catalyzed polyurethane.
3. Staining: Match Architect's sample.
4. Effect: Filled finish.
5. Sheen: Satin.
D. Opaque Finish:
1. Grade: Premium.
2. Finish: AWI's, AWMAC's, and WI's "Architectural Woodwork Standards" System 9, UV
curable, acrylated epoxy, polyester, or urethane or System 11, catalyzed polyurethane.
3. Color: As indicated on the Drawing “DOOR SCHEDULE.”
4. Sheen: Gloss.
PART 3 - EXECUTION
3.1 EXAMINATION
A. Examine doors and installed door frames, with Installer present, before hanging doors.
1. Verify that installed frames comply with indicated requirements for type, size, location,
and swing characteristics and have been installed with level heads and plumb jambs.
2. Reject doors with defects.
B. Proceed with installation only after unsatisfactory conditions have been corrected.
3.2 INSTALLATION
A. Hardware: For installation, see Section 087100 "Door Hardware."

BTBC Phase III October 26, 2020 GE Project No. 0119-0010 Gould Evans
FLUSH WOOD DOORS 081416 - 7
B. Installation Instructions: Install doors to comply with manufacturer's written instructions and
referenced quality standard, and as indicated.
1. Install fire-rated doors according to NFPA 80.
2. Install smoke- and draft-control doors according to NFPA 105.
C. Factory-Fitted Doors: Align in frames for uniform clearance at each edge.
D. Factory-Finished Doors: Restore finish before installation if fitting or machining is required at
Project site.
3.3 ADJUSTING
A. Operation: Rehang or replace doors that do not swing or operate freely.
B. Finished Doors: Replace doors that are damaged or that do not comply with requirements.
Doors may be repaired or refinished if Work complies with requirements and shows no
evidence of repair or refinishing.
END OF SECTION 081416


BTBC Phase III October 26, 2020
GE Project No. 0119-0010
Gould Evans
ACCESS DOORS AND FRAMES 083113 - 1
SECTION 083113 - ACCESS DOORS AND FRAMES
PART 1 - GENERAL
1.1 RELATED DOCUMENTS
A. Drawings and general provisions of the Contract, including General and Supplementary Conditions and
Division 01 Specification Sections, apply to this Section.
1.2 SUMMARY
A. Section Includes:
1. Access doors and frames for walls and ceilings.
B. Related Requirements:
1. Division 23 Section "Air Duct Accessories" for heating and air-conditioning duct access doors.
1.3 ACTION SUBMITTALS
A. Product Data: For each type of product.
1. Include construction details, fire ratings, materials, individual components and profiles, and
finishes.
B. Shop Drawings:
1. Include plans, elevations, sections, details, and attachments to other work.
2. Detail fabrication and installation of access doors and frames for each type of substrate.
C. Samples: For each door face material, at least 3 by 5 inches in size, in specified finish.
D. Product Schedule: Provide complete access door and frame schedule, including types, locations, sizes,
latching or locking provisions, and other data pertinent to installation.
1.4 COORDINATION
A. Verification: Provide access doors of types, specific locations, and sizes required to gain access to
concealed work or equipment, where indicated on the Drawings. Where not indicated on the Drawings,
determine types, sizes, and locations for access doors required to gain access to concealed plumbing,
mechanical, or other concealed work or equipment specified under Divisions 21, 22, 23, 27, and 28 sections.
All access doors shall be indicated in the shop drawings, ceiling coordination drawings, and schedule
specified in "Submittals" Article.
1. Locations of access doors as submitted by the Contractor must be reviewed and approved of the
Architect prior to installation. Locations of access doors are subject to modification based on
Architect’s review, without additional cost to the Owner.

BTBC Phase III October 26, 2020
GE Project No. 0119-0010
Gould Evans
ACCESS DOORS AND FRAMES 083113 - 2
PART 2 - PRODUCTS
2.1 PERFORMANCE REQUIREMENTS
A. Fire-Rated Access Doors and Frames: Units complying with NFPA 80 that are identical to access door and
frame assemblies tested for fire-test-response characteristics according to the following test method and
that are listed and labeled by UL or another testing and inspecting agency acceptable to authorities having
jurisdiction:
1. NFPA 252 or UL 10B for fire-rated access door assemblies installed vertically.
2. NFPA 288 for fire-rated access door assemblies installed horizontally.
2.2 ACCESS DOORS AND FRAMES FOR WALLS AND CEILINGS
A. Manufacturers: Subject to compliance with requirements, provide products by one of the following:
1. Acudor Products, Inc.
2. J. L. Industries, Inc.
3. Karp Associates, Inc.
4. Larsen’s Manufacturing Company.
5. Milcor Inc.
B. Source Limitations: Obtain each type of access door and frame from single source from single
manufacturer.
C. Flush Access Doors with Exposed Flanges:
1. Basis of Design: Model L-MPG series as manufactured by Larsen’s.
2. Assembly Description: Fabricate door to fit flush to frame. Provide manufacturer's standard-width
exposed flange, proportional to door size.
3. Locations: Wall.
4. Door Size: 24-inch square unless otherwise required or indicated.
5. Metallic-Coated Steel Sheet for Door: Nominal 0.064 inch, 16 gage.
a. Finish: Factory prime.
b. Provide metallic-coated doors with exposed flanges for general access doors except as
indicated.
c. Locations: At concrete masonry wall construction.
1) Color: Paint exposed doors and frames (refer to Drawing “FINISH LEGEND.”).
6. Stainless-Steel Sheet for Door: Nominal 0.062 inch, 16 gage.
a. Basis of Design: Model L-MPSS series as manufactured by Larsen’s
b. Finish: No. 4.
c. Locations:
1) Provide stainless steel doors and frames in wet areas and areas requiring sanitation
such as toilet facilities and related spaces.
2) Provide stainless steel doors and frames at all walls with porcelain or ceramic tiling.
7. Frame Material: Same material, thickness, and finish as door.
8. Hinges: Manufacturer's standard.
9. Latch: Cam latch operated by screwdriver with interior release.
D. Recessed Access Doors and Trimless Frames: Fabricated from metallic-coated steel sheet.
1. Basis of Design: Model L-DWR series as manufactured by Larsen’s for drywall applications.
2. Basis of Design: Model L-CPA series as manufactured by Larsen’s for acoustical ceiling panel
applications.

BTBC Phase III October 26, 2020
GE Project No. 0119-0010
Gould Evans
ACCESS DOORS AND FRAMES 083113 - 3
3. Assembly Description: Fabricate door in the form of a pan recessed 5/8 inch for gypsum board
infill. Provide frame with gypsum board bead for concealed flange installation.
4. Locations: Ceiling surfaces.
5. Uncoated Steel Sheet for Door: Nominal 0.064 inch, 16 gage.
a. Finish: Factory prime.
b. Provide metallic-coated doors with exposed flanges for general access doors except as
indicated.
c. Locations: At painted gypsum board and metal framed walls and ceilings.
1) Color: Paint exposed doors and frames to match adjacent wall or ceiling surface, as
indicated on the Drawing “FINISH LEGEND.”
6. Hinges: Manufacturer’s standard
7. Latch: Cam latch operated by screwdriver with interior release
E. Fire-Rated, Flush Access Doors with Exposed Flanges:
1. Basis of Design: Model LFRAP Series as manufactured by Larsen’s.
2. Assembly Description: Fabricate door to fit flush to frame, with a core of mineral-fiber insulation
enclosed in sheet metal. Provide self-latching door with automatic closer and interior latch release.
Provide frame with gypsum board beads for concealed flange installation.
3. Locations: Wall and ceiling surfaces.
4. Fire-Resistance Rating: Not less than that of adjacent construction.
5. Metallic-Coated Steel Sheet for Door: Nominal 0.040 inch, 20 gage.
a. Finish: Factory prime.
b. Provide metallic-coated doors with exposed flanges for general access fire-rated doors except
as indicated.
c. Locations: At fire-rated concrete masonry wall construction.
1) Color: Paint exposed doors and frames PT2 (refer to Drawing “FINISH LEGEND.”).
6. Stainless-Steel Sheet for Door: Nominal 0.038 inch, 20 gage.
a. Basis of Design: Model LFRAPSS Series as manufactured by Larsen’s.
b. Finish: No. 4.
c. Locations: At construction at the following locations:
1) Provide stainless steel doors and frames in wet areas and areas requiring sanitation
such as toilet facilities and related spaces.
2) Provide stainless steel doors and frames at all walls with porcelain or ceramic tiling.
7. Frame Material: Same material, thickness, and finish as door.
8. Hinges: Manufacturer's standard.
9. Latch: Self-latching device operated by flush key with interior release.
2.3 MATERIALS
A. Metallic-Coated Steel Sheet: ASTM A 653/A 653M, Commercial Steel (CS), Type B; with minimum G60
or A60 metallic coating.
B. Stainless-Steel Sheet, Strip, Plate, and Flat Bars: ASTM A 666, Type 304. Remove tool and die marks
and stretch lines or blend into finish.
C. Frame Anchors: Same type as door face.
D. Inserts, Bolts, and Anchor Fasteners: Hot-dip galvanized steel according to ASTM A 153/A 153M or
ASTM F 2329.
BTBC Phase III October 26, 2020
GE Project No. 0119-0010
Gould Evans
ACCESS DOORS AND FRAMES 083113 - 4
2.4 FABRICATION
A. General: Provide access door and frame assemblies manufactured as integral units ready for installation.
B. Metal Surfaces: For metal surfaces exposed to view in the completed Work, provide materials with smooth,
flat surfaces without blemishes. Do not use materials with exposed pitting, seam marks, roller marks, rolled
trade names, or roughness.
C. Doors and Frames: Grind exposed welds smooth and flush with adjacent surfaces. Furnish attachment
devices and fasteners of type required to secure access doors to types of supports indicated.
1. For concealed flanges with drywall bead, provide edge trim for gypsum board securely attached to
perimeter of frames.
2. Provide mounting holes in frames for attachment of units to metal framing.
3. Provide mounting holes in frame for attachment of masonry anchors.
D. Recessed Access Doors: Form face of panel to provide recess for application of applied finish. Reinforce
panel as required to prevent buckling.
E. Latching Mechanisms: Furnish number required to hold doors in flush, smooth plane when closed.
1. For recessed panel doors, provide access sleeves for each locking device. Furnish plastic grommets
and install in holes cut through finish.
2.5 FINISHES
A. Comply with NAAMM's "Metal Finishes Manual for Architectural and Metal Products" for
recommendations for applying and designating finishes.
B. Protect mechanical finishes on exposed surfaces from damage by applying a strippable, temporary
protective covering before shipping.
C. Appearance of Finished Work: Noticeable variations in same piece are not acceptable. Variations in
appearance of adjoining components are acceptable if they are within the range of approved Samples and
are assembled or installed to minimize contrast.
D. Steel and Metallic-Coated-Steel Finishes:
1. Factory Prime: Apply manufacturer's standard, fast-curing, lead- and chromate-free, universal
primer immediately after surface preparation and pretreatment.
E. Stainless-Steel Finishes:
1. Surface Preparation: Remove tool and die marks and stretch lines, or blend into finish.
2. Polished Finishes: Grind and polish surfaces to produce uniform finish, free of cross scratches.
a. Run grain of directional finishes with long dimension of each piece.
b. When polishing is completed, passivate and rinse surfaces. Remove embedded foreign
matter and leave surfaces chemically clean.
c. Directional Satin Finish: No. 4.

BTBC Phase III October 26, 2020
GE Project No. 0119-0010
Gould Evans
ACCESS DOORS AND FRAMES 083113 - 5
PART 3 - EXECUTION
3.1 EXAMINATION
A. Examine substrates for compliance with requirements for installation tolerances and other conditions
affecting performance of the Work.
B. Proceed with installation only after unsatisfactory conditions have been corrected.
3.2 INSTALLATION
A. Comply with manufacturer's written instructions for installing access doors and frames.
B. Install doors flush with adjacent finish surfaces or recessed to receive finish material.
3.3 ADJUSTING
A. Adjust doors and hardware, after installation, for proper operation.
B. Remove and replace doors and frames that are warped, bowed, or otherwise damaged.
END OF SECTION 083113

BTBC Phase III October 26, 2020
GE Project No. 0119-0010
Gould Evans
ACCESS DOORS AND FRAMES 083113 - 6
[ THIS PAGE IS INTENTIONALLY LEFT BLANK ]

BTBC Phase III October 26, 2020
GE Project No. 0119-0010
Gould Evans
SLIDING ALUMINUM-FRAMED GLASS DOORS 083213 - 1
SECTION 083213 - SLIDING ALUMINUM-FRAMED GLASS DOORS
PART 1 - GENERAL
1.1 RELATED DOCUMENTS
A. Drawings and general provisions of the Contract, including General and Supplementary Conditions and
Division 01 Specification Sections, apply to this Section.
1.2 SUMMARY
A. Section includes sliding aluminum-framed glass door assemblies for interior locations.
B. Related Requirements:
1. Section 084423 "Structural-Sealant-Glazed Curtain Walls" for installation of sliding aluminum-
framed glass doors within interior curtain wall framing.
1.3 PREINSTALLATION MEETINGS
A. Preinstallation Conference: Conduct conference at Project site.
1.4 ACTION SUBMITTALS
A. Product Data: For each type of product.
1. Include construction details, material descriptions, fabrication methods, dimensions of individual
components and profiles, hardware, finishes, and operating instructions.
B. Shop Drawings: For sliding aluminum-framed glass doors.
1. Include plans, elevations, sections, and details.
2. Detail attachments to other work, and between units, if any. Indicate sealants between materials.
3. Include hardware and required clearances.
C. Samples for Verification: For sliding aluminum-framed glass doors and components required, prepared
on Samples of size indicated below:
1. Main Framing Member: 12-inch-long section with weather stripping, glazing bead, and factory-
applied color finish.
D. Product Schedule: For sliding aluminum-framed glass doors. Use same designations indicated on
Drawings.
1.5 INFORMATIONAL SUBMITTALS
A. Qualification Data: For Installer.
B. Sample Warranty: For manufacturer's special warranty.

BTBC Phase III October 26, 2020
GE Project No. 0119-0010
Gould Evans
SLIDING ALUMINUM-FRAMED GLASS DOORS 083213 - 2
1.6 CLOSEOUT SUBMITTALS
A. Maintenance Data: For finishes, weather stripping, operable panels, and operating hardware to include in
maintenance manuals.
1.7 QUALITY ASSURANCE
A. Installer Qualifications: An installer acceptable to sliding aluminum-framed glass door manufacturer for
installation of units required for this Project.
1.8 WARRANTY
A. Manufacturer's Special Warranty: Manufacturer agrees to repair or replace components of sliding
aluminum-framed glass doors that fail in materials or workmanship within specified warranty period.
1. Failures include, but are not limited to, the following:
a. Failure to meet performance requirements.
b. Structural failures including excessive deflection.
c. Faulty operation of movable panels and hardware.
d. Deterioration of metals, metal finishes, and other materials beyond normal weathering.
e. Failure of laminated insulating glass.
2. Warranty Period:
a. Sliding Door: Three years from date of Substantial Completion.
b. Insulating-Glass Units: 10 years from date of Substantial Completion.
c. Laminated Glass: Five years from date of Substantial Completion.
d. Aluminum Finish: 20 years from date of Substantial Completion.
PART 2 - PRODUCTS
A. Source Limitations: Obtain sliding aluminum-framed glass doors from single source from single
manufacturer.
2.2 PERFORMANCE REQUIREMENTS
A. Product Standard: Comply with GANA “Glazing Manual” and AAMA/WDMA/CSA 101/I.S.2/A440 for
minimum standards of performance, materials, components, accessories, and fabrication unless more
stringent requirements are indicated.
1. Product Certification: AAMA certified with label attached to each door.
B. Sound Transmission Class (STC): With glazing rated for not less than 40 STC when tested for laboratory
sound transmission loss according to ASTM E90 and determined by ASTM E413.
C. Outside-Inside Transmission Class (OITC): With glazing rated for not less than 35 OITC when tested for
laboratory sound transmission loss according to ASTM E90 and determined by ASTM E1332.

BTBC Phase III October 26, 2020
GE Project No. 0119-0010
Gould Evans
SLIDING ALUMINUM-FRAMED GLASS DOORS 083213 - 3
2.3 SLIDING ALUMINUM-FRAMED GLASS DOORS
A. Basis-of-Design Product: Subject to compliance with requirements, provide “Series 1010 Sliding Mall
Front” as manufactured by Kawneer; an Arconic Company. or comparable products of one of the
following:
1. Alumicor Limited; an Apogee company.
2. Laurence, C. R. Co., Inc.
3. Oldcastle Building Envelope.
4. PRL Glass Systems, Inc.
5. Wausau Window and Wall Systems.
6. YKK AP America Inc.
B. Frames and Door Panels: Fabricated from aluminum extrusions complying with
AAMA/WDMA/CSA 101/I.S.2/A440.
C. Door Stile and Rail Construction: Constructed of 6063-T6 extruded aluminum frame and glazing stop,
minimum 0.070 inch wall thickness, ASTM B 221.
1. Construction: Non-thermal.
2. Aluminum Finish: Clear anodic to match finish specified in Section 084423 “Structural-Sealant-
Glazed Curtain Walls.”
3. Frame Stile and Rail Sizes:
a. Lock and Meeting Stiles: Nominally 5 inches wide.
b. Fixed Side Stiles: Nominally 1 inch wide.
c. Interlock Stiles: Nominally 1-3/4 inches wide.
d. Bottom Rail: Nominally 3-1/2 inches high.
e. Top Rail: 1 inch high.
4. Reinforcement: Manufacturer’s standard aluminum, stainless steel, or nickel/chrom-plated steel
concealed reinforcement to supplement framing as required to accommodate sliding door loads and
sizes.
D. Threshold Track: Provide extruded-aluminum threshold and track of thickness, dimensions, and profile
indicated; designed to comply with performance requirements indicated; with manufacturer's standard
finish.
1. Low-Profile Floor Track: ADA-ABA compliant, recessed on one or both sides flush with flooring
where indicated on the Drawings.
E. Sill Header Track: Multiple interlocking tracks; designed to align sliding doors during operation; with
aluminum finish to match frame member finish.
F. By-Passing Frame Vertical Interlock: Provide manufacturer’s aluminum interlocks integrally extruded
with by-passing stiles, consisting of mated U-shaped extrusion mounted on parallel surfaces of vertical
frame stiles that engage into gasketed seals when door is extended to the closed position.
G. Trim and Glazing Stops: Material and finish to match frame member finish.
2.4 GLAZING
A. Glass and Glazing: Manufacturer's standard glazing system that produces weathertight seal.
1. Glass: ASTM C1036, Type 1, q3, Category II safety glass complying with testing requirements in
16 CFR 1201.
2. Safety Glazing Labeling: Permanently mark safety glazing with certification label of the SGCC or
another certification agency acceptable to authorities having jurisdiction. Label shall indicate

BTBC Phase III October 26, 2020
GE Project No. 0119-0010
Gould Evans
SLIDING ALUMINUM-FRAMED GLASS DOORS 083213 - 4
manufacturer's name, type of glass, thickness, and safety glazing standard with which glass
complies.
3. Tint: Clear.
4. Insulating-Glass Units: ASTM E2190, certified through IGCC as complying with requirements of
IGCC.
a. Overall Unit Thickness: 25 mm.
b. Inboard Laminated Lite: Class 1 (clear) float safety glass, 4.0 mm.
1) Kind FT (fully-tempered).
2) Plastic Interlayer: Clear, 1.50 mm thick.
3) Thickness: Approximately 9.5 mm.
c. Outboard Lite: Class 1 (clear) float safety glass.
1) Kind FT (fully-tempered).
2) Thickness: 6.0 mm.
d. Provide safety glazing complying with CPSC 16CFR 1201.
e. Interspace Content: Air.
1) Provide nominal 10.0 mm spacer as required to accommodate overall insulated
glazing unit thickness and allowable glazing depth of framing.
f. Acoustical Performance: As follows:
1) Sound Transmission Class (STC): Not less than 40 STC.
2) Outside-Inside Transmission Class (OITC): Not less than 35 OITC.
2.5 HARDWARE
A. General: Provide manufacturer's standard hardware, fabricated from a corrosion-resistant material
compatible with aluminum complying with AAMA 907 and designed to smoothly operate, tightly close,
and securely lock sliding aluminum-framed glass doors.
B. Wheel Carriage: Synthetic nylon covered casters with encased stainless steel ball bearings and double
sliding rollers, with corrosion resistant treatment, capable of supporting load of each operable glass door
panel.
C. Lock: Install manufacturer's keyed cylinder hook bolt locking device on meeting stiles and lock jamb
stiles, lockable from the one side. Adjust locking device to allow unobstructed movement of the panel
across adjacent panel in the direction indicated.
1. Keying System: All cylinders keyed alike.
2.6 ACCESSORIES
A. Fasteners: Noncorrosive and compatible with door members, trim, hardware, anchors, and other
components.
1. Exposed Fasteners: Do not use exposed fasteners.
B. Anchors, Clips, and Accessories: Provide anchors, clips, and accessories of aluminumor nonmagnetic
stainless steel for sliding aluminum-framed glass doors, complying with ASTM B456 or ASTM B633 for
SC 3 severe service conditions; provide sufficient strength to withstand design pressure indicated.
2.7 FABRICATION
A. Fabricate sliding aluminum-framed glass doors in sizes indicated. Include a complete system for
assembling components and anchoring doors.

BTBC Phase III October 26, 2020
GE Project No. 0119-0010
Gould Evans
SLIDING ALUMINUM-FRAMED GLASS DOORS 083213 - 5
B. Fabricate sliding aluminum-framed glass doors that are reglazable without dismantling panel framing.
C. Acoustical Trim/Weather Stripping: Provide full-perimeter weather stripping for each door panel to
improve acoustical performance.
D. Complete fabrication, assembly, finishing, hardware application, and other work in the factory to greatest
extent possible. Disassemble components only as necessary for shipment and installation.
E. Factory-Glazed Fabrication: Glaze sliding aluminum-framed glass doors in the factory. Comply with
requirements in GANA “Glass Manual” and with AAMA/WDMA/CSA 101/I.S.2/A440.
2.8 GENERAL FINISH REQUIREMENTS
A. Comply with NAAMM's "Metal Finishes Manual for Architectural and Metal Products" for
recommendations for applying and designating finishes.
B. Protect mechanical finishes on exposed surfaces from damage by applying a strippable, temporary
protective covering before shipping.
C. Appearance of Finished Work: Variations in appearance of abutting or adjacent pieces are acceptable if
they are within one-half of the range of approved Samples. Noticeable variations in the same piece are
not acceptable. Variations in appearance of other components are acceptable if they are within the range
of approved Samples and are assembled or installed to minimize contrast.
2.9 ALUMINUM FINISHES
A. Clear Anodic Finish: AAMA 611, AA-M12C22A41, Class I, 0.018 mm or thicker.
PART 3 - EXECUTION
3.1 EXAMINATION
A. Examine openings, substrates, structural support, anchorage, and conditions, with Installer present, for
compliance with requirements for installation tolerances and other conditions affecting performance of
the Work.
B. Verify rough opening dimensions, levelness of threshold substrate, and operational clearances.
C. Verify supporting structure and substrate are adequate to support sliding aluminum-famed glass door
assembly.
D. Examine wall flashings, vapor retarders, water and weather barriers, and other built-in components to
ensure a coordinated, weathertight sliding aluminum-framed glass door installation.
E. Proceed with installation only after unsatisfactory conditions have been corrected.

BTBC Phase III October 26, 2020
GE Project No. 0119-0010
Gould Evans
SLIDING ALUMINUM-FRAMED GLASS DOORS 083213 - 6
3.2 INSTALLATION
A. Comply with Drawings, Shop Drawings, and manufacturer's written instructions for installing doors,
hardware, accessories, and other components.
B. Install sliding aluminum-framed glass doors level, plumb, square, true to line, without distortion, without
warp or rack of frames and panels, and without impeding thermal movement; anchored securely in place
to structural support; and in proper relation to wall flashing, vapor retarders, air barriers, water/weather
barriers, and other adjacent construction.
C. Set and level sill members in bed of sealant or with gaskets to provide improved acoustical construction.
D. Separate aluminum and other corrodible surfaces from sources of corrosion or electrolytic action at points
of contact with other materials according to ASTM E 2112, Section 5.12, "Dissimilar Materials."
3.3 ADJUSTING, CLEANING, AND PROTECTION
A. Lubricate hardware and moving parts.
B. Adjust operating panels and screens to provide a tight fit at contact points and weather stripping for
smooth operation, without binding. Adjust hardware for proper alignment, smooth operation, and proper
latching without unnecessary force or excessive clearance.
1. Provide closure that reduces sound transmission to greatest extent possible.
C. Clean exposed surfaces immediately after installing sliding aluminum-framed glass doors. Avoid
damaging protective coatings and finishes. Remove nonpermanent labels, excess sealants, glazing
materials, dirt, and other substances.
D. Remove and replace glass that has been broken, chipped, cracked, abraded, or damaged during
construction period.
E. Protect sliding aluminum-framed glass door surfaces from contact with contaminating substances
resulting from construction operations. If contaminating substances contact sliding aluminum-framed
glass door surfaces, remove contaminants immediately according to manufacturer's written instructions.
F. Refinish or replace sliding aluminum-framed glass doors with damaged finishes.
G. Replace damaged components.
3.4 TRAINING
A. Instruct Owner or designated representative in operation, adjustment, and care of sliding aluminum-
framed glass door assemblies.
B. Videotape instruction and provide copy of training session to the Owner in digital media.
END OF SECTION 083213

BTBC Phase III October 26, 2020
GE Project No. 0119-0010
Gould Evans
OVERHEAD COILING DOORS 083323 - 1
SECTION 083323 - OVERHEAD COILING DOORS
PART 1 - GENERAL
1.1 RELATED DOCUMENTS
A. Drawings and general provisions of the Contract, including General and Supplementary Conditions and
Division 01 Specification Sections, apply to this Section.
1.2 SUMMARY
A. Section Includes:
1. Insulated service doors.
2. Fire-rated, insulated service doors.
B. Related Requirements:
1. Section 033000 "Cast in Place Concrete" for miscellaneous steel supports.
2. Section 055000 "Metal Fabrications" for miscellaneous steel supports.
1.3 ACTION SUBMITTALS
A. Product Data: For each type and size of overhead coiling door and accessory.
1. Include construction details, material descriptions, dimensions of individual components, profiles
for slats, and finishes.
2. Include rated capacities, operating characteristics, electrical characteristics, and furnished
accessories.
3. Include description of automatic closing device and testing and resetting instructions.
B. Shop Drawings: For each installation and for special components not dimensioned or detailed in
manufacturer's product data.
1. Include plans, elevations, sections, and mounting details.
2. Include details of equipment assemblies, and indicate dimensions, required clearances, method of
field assembly, components, and location and size of each field connection.
3. Include points of attachment and their corresponding static and dynamic loads imposed on structure.
4. For exterior components, include details of provisions for assembly expansion and contraction and
for excluding and draining moisture to the exterior.
5. Show locations of controls, locking devices, detectors or replaceable fusible links, and other
accessories.
6. Include diagrams for power, signal, and control wiring.
1.4 INFORMATIONAL SUBMITTALS
A. Qualification Data: For Installer.
B. Oversize Construction Certification: For door assemblies required to be fire-rated and that exceed size
limitations of labeled assemblies.

BTBC Phase III October 26, 2020
GE Project No. 0119-0010
Gould Evans
OVERHEAD COILING DOORS 083323 - 2
1.5 CLOSEOUT SUBMITTALS
A. Maintenance Data: For overhead coiling doors to include in maintenance manuals.
1.6 QUALITY ASSURANCE
A. Installer Qualifications: An entity that employs installers and supervisors who are trained and approved by
manufacturer for both installation and maintenance of units required for this Project.
1. Maintenance Proximity: Not more than two hours' normal travel time from Installer's place of
business to Project site.
B. Fire-Rated Door Assemblies: Assemblies complying with NFPA 80 that are listed and labeled by a
qualified testing agency, for fire-protection ratings indicated, based on testing at as close to neutral pressure
as possible according to NFPA 252 or UL 10B.
C. Regulatory Requirements: Comply with applicable provisions in the U.S. Architectural & Transportation
Barriers Compliance Board's ADA-ABA Accessibility Guidelines and ICC A117.1.
PART 2 - PRODUCTS
2.1 MANUFACTURERS, GENERAL
A. Source Limitations: Obtain overhead coiling doors from single source from single manufacturer.
1. Obtain operators and controls from overhead coiling door manufacturer.
2.2 PERFORMANCE REQUIREMENTS
A. Structural Performance, Exterior Doors: Capable of withstanding the design wind loads.
1. Design Wind Load: As indicated on Drawings, acting inward and outward.
2. Testing: According to ASTM E 330 or DASMA 108 for garage doors and meeting the acceptance
criteria of DASMA 108.
3. Deflection Limits: Design overhead coiling doors to withstand design wind load without evidencing
permanent deformation or disengagement of door components.
4. Operability under Wind Load: Design overhead coiling doors to remain operable under design wind
load, acting inward and outward.
2.3 FIRE RATED AND NO-RATED DOOR ASSEMBLIES
A. Insulated Service Doors: Overhead coiling door formed with curtain of interlocking metal slats.
1. Manufacturers: Subject to compliance with requirements, provide products by one of the following:
a. Cookson Company.
b. Cornell Iron Works, Inc.
c. McKeon Rolling Steel Door Company, Inc.
d. Overhead Door Corporation.
B. Operation Cycles: Door components and operators capable of operating for not less than 100,000 . One
operation cycle is complete when a door is opened from the closed position to the fully open position and
returned to the closed position.
1. Include tamperproof cycle counter.

BTBC Phase III October 26, 2020
GE Project No. 0119-0010
Gould Evans
OVERHEAD COILING DOORS 083323 - 3
2. Fire Rating: 1-1/2 hours, where required.
C. Air Infiltration: Maximum rate of 1.0 cfm/sq. ft. (5.1 L/s per sq. m) at 15 and 25 mph (24.1 and 40.2 km/h)
when tested according to ASTM E 283orDASMA 105.
D. STC Rating: 26.
E. Curtain R-Value: 7 or greater.
F. Door Curtain Material: Galvanized steel.
G. Door Curtain Slats: Flat profile slats of 2-5/8-inch (67-mm) center-to-center height.
1. Insulated-Slat Interior Facing: Metal.
2. Gasket Seal. Manufacturer's standard continuous gaskets between slats.
H. Bottom Bar: Two angles, each not less than 1-1/2 by 1-1/2 by 1/8 inch (38 by 38 by 3 mm) thick; fabricated
from stainless steel.
I. Curtain Jamb Guides: Stainless steel with exposed No. 3 finish.
J. Hood: Galvanized steel.
1. Shape: Square.
2. Mounting: Face of wall.
K. Electric Door Operator:
1. Usage Classification: Heavy duty.
2. Operator Location: Front of hood.
3. Safety: Listed according to UL 325 by a qualified testing agency for commercial or industrial
use; moving parts of operator enclosed or guarded if exposed and mounted at 8 feet (2.44 m) or
lower.
4. Motor Exposure: Interior.
5. Emergency Manual Operation: Chain type.
6. Obstruction-Detection Device: pneumatic sensor edge on bottom bar.
a. Sensor Edge Bulb Color: Black.
7. Control Station(s): Interior mounted.
L. Curtain Accessories: Equip door with weatherseals.
M. Door Finish:
1. Baked-Enamel or Powder-Coated Finish: Color as selected by Architect from manufacturer's full
range.
2. Factory Prime Finish: Manufacturer's standard color.
3. Interior Curtain-Slat Facing: Match finish of exterior curtain-slat face.
2.4 MATERIALS, GENERAL
A. Electrical Components, Devices, and Accessories: Listed and labeled as defined in NFPA 70, by a qualified
testing agency, and marked for intended location and application.

BTBC Phase III October 26, 2020
GE Project No. 0119-0010
Gould Evans
OVERHEAD COILING DOORS 083323 - 4
2.5 DOOR CURTAIN MATERIALS AND CONSTRUCTION
A. Door Curtains: Fabricate overhead coiling-door curtain of interlocking metal slats, designed to withstand
wind loading indicated, in a continuous length for width of door without splices. Unless otherwise
indicated, provide slats of thickness and mechanical properties recommended by door manufacturer for
performance, size, and type of door indicated, and as follows:
1. Steel Door Curtain Slats: Zinc-coated (galvanized), cold-rolled structural steel sheet; complying
with ASTM A 653/A 653M, with G90 (Z275) zinc coating; nominal sheet thickness (coated) of
0.028 inch (0.71 mm); and as required.
2. Insulation: Fill slats for insulated doors with manufacturer's standard thermal insulation complying
with maximum flame-spread and smoke-developed indexes of 75 and 450, respectively, according
to ASTM E 84 or UL 723. Enclose insulation completely within slat faces.
3. Metal Interior Curtain-Slat Facing: Match metal of exterior curtain-slat face.
B. Curtain Face of Wall Guides: Manufacturer's angles or channels and angles of stainless steel, with sufficient
depth and strength to retain curtain, to allow curtain to operate smoothly, and to withstand loading. Slot
bolt holes for guide adjustment. Provide removable stops on guides to prevent overtravel of curtain, and a
continuous bar for holding windlocks.
2.6 HOODS
A. General: Form sheet metal hood to entirely enclose coiled curtain and operating mechanism at opening
head. Contour to fit end brackets to which hood is attached. Roll and reinforce top and bottom edges for
stiffness. Form closed ends for surface-mounted hoods and fascia for any portion of between-jamb
mounting that projects beyond wall face. Equip hood with intermediate support brackets as required to
prevent sagging.
1. Galvanized Steel: Nominal 0.028-inch- (0.71-mm-) thick, hot-dip galvanized steel sheet with G90
(Z275) zinc coating, complying with ASTM A 653/A 653M.
2. Include automatic drop baffle on fire-rated doors to guard against passage of smoke or flame.
2.7 LOCKING DEVICES
A. Locking Device Assembly: Fabricate with cylinder lock, spring-loaded dead bolt, operating handle, cam
plate, and adjustable locking bars to engage through slots in tracks.
1. Lock Cylinders: Cylinders specified and provided under Section 087100 "Door Hardware".
2. Cylinder Body required for Medeco Cylinders
B. Chain Lock Keeper: Suitable for padlock.
C. Safety Interlock Switch: Equip power-operated doors with safety interlock switch to disengage power
supply when door is locked.
2.8 CURTAIN ACCESSORIES
A. Smoke Seals: Equip each fire-rated door with replaceable smoke-seal perimeter gaskets or brushes for
smoke and draft control as required for door listing and labeling by a qualified testing agency.
B. Weatherseals for Exterior Doors: Equip each exterior door with weather-stripping gaskets fitted to entire
exterior perimeter of door for a weather-resistant installation unless otherwise indicated.
1. At door head, use 1/8-inch- (3-mm-) thick, replaceable, continuous-sheet baffle secured to inside of
hood or field- installed on the header.

BTBC Phase III October 26, 2020
GE Project No. 0119-0010
Gould Evans
OVERHEAD COILING DOORS 083323 - 5
2. At door jambs, use replaceable, adjustable, continuous, flexible, 1/8-inch- (3-mm-) thick seals of
flexible vinyl, rubber, or neoprene.
C. Push/Pull Handles: Equip each push-up-operated or emergency-operated door with lifting handles on each
side of door, finished to match door.
D. Pull-Down Strap: Provide pull-down straps for doors more than 84 inches (2130 mm) high.
E. Automatic-Closing Device for Fire-Rated Doors: Equip each fire-rated door with an automatic-closing
device or holder-release mechanism and governor unit complying with NFPA 80 and an easily tested and
reset release mechanism. Release mechanism for motor- operated doors shall allow testing without
mechanical release of the door. Automatic-closing device shall be designed for activation by the following:
1. Replaceable fusible links with temperature rise and melting point of 165 deg F (74 deg C)
interconnected and mounted on both sides of door opening.
2. Building fire-detection, smoke-detection, and -alarm systems.
2.9 COUNTERBALANCING MECHANISM
A. General: Counterbalance doors by means of manufacturer's standard mechanism with an adjustable-tension,
steel helical torsion spring mounted around a steel shaft and contained in a spring barrel connected to top
of curtain with barrel rings. Use grease-sealed bearings or self-lubricating graphite bearings for rotating
members.
B. Counterbalance Barrel: Fabricate spring barrel of manufacturer's standard hot-formed, structural-quality,
seamless carbon-steel pipe, of sufficient diameter and wall thickness to support rolled-up curtain without
distortion of slats and to limit barrel deflection to not more than 0.03 in./ft. (2.5 mm/m) of span under full
load.
C. Counterbalance Spring: One or more oil-tempered, heat-treated steel helical torsion springs. Size springs
to counterbalance weight of curtain, with uniform adjustment accessible from outside barrel. Secure ends
of springs to barrel and shaft with cast-steel barrel plugs.
1. Fire-Rated Doors: Equip with auxiliary counterbalance spring and prevent tension release from main
counterbalance spring when automatic closing device operates.
D. Torsion Rod for Counterbalance Shaft: Fabricate of manufacturer's standard cold-rolled steel, sized to hold
fixed spring ends and carry torsional load.
E. Brackets: Stainless steel sections as required for door size and face mounted jamb mounted condition.
2.10 ELECTRIC DOOR OPERATORS
A. General: Electric door operator assembly of size and capacity recommended and provided by door
manufacturer for door and operation-cycles requirement specified, with electric motor and factory-prewired
motor controls, starter, gear-reduction unit, solenoid-operated brake, clutch, control stations, control
devices, integral gearing for locking door, and accessories required for proper operation.
1. Comply with NFPA 70.
2. Control equipment complying with NEMA ICS 1, NEMA ICS 2, and NEMA ICS 6, with NFPA 70
Class 2 control circuit, maximum 24-V ac or dc.
B. Usage Classification: Electric operator and components capable of operating for not less than number of
cycles per hour indicated for each door.

BTBC Phase III October 26, 2020
GE Project No. 0119-0010
Gould Evans
OVERHEAD COILING DOORS 083323 - 6
C. Door Operator Location(s): Operator location indicated for each door.
1. Front-of-Hood Mounted: Operator is mounted to the right or left door head plate with the operator
on coil side of the door-hood assembly and connected to the door drive shaft with drive chain and
sprockets. Front clearance is required for this type of mounting.
D. Motors: Reversible-type motor with controller (disconnect switch) for motor exposure indicated.
1. Electrical Characteristics:
a. Phase: Polyphase.
b. Volts: 208V.
c. Hertz: 60.
2. Motor Size: Minimum size as indicated. If not indicated, large enough to start, accelerate, and
operate door in either direction from any position, at a speed not less than 8 in./sec. (203 mm/s) and
not more than 12 in./sec. (305 mm/s), without exceeding nameplate ratings or service factor.
3. Operating Controls, Controllers, Disconnect Switches, Wiring Devices, and Wiring: Manufacturer's
standard unless otherwise indicated.
4. Coordinate wiring requirements and electrical characteristics of motors and other electrical devices
with building electrical system and each location where installed.
E. Limit Switches: Equip each motorized door with adjustable switches interlocked with motor controls and
set to automatically stop door at fully opened and fully closed positions.
F. Obstruction Detection Devices: External entrapment protection consisting of indicated automatic safety
sensor capable of protecting full width of door opening. For non-fire-rated doors, activation of device
immediately stops and reverses downward door travel. For fire-rated doors, activation delays closing.
1. Pneumatic Sensor Edge: Automatic safety sensor edge, located within astragal or weather stripping
mounted to bottom bar. Contact with sensor activates device.
G. Control Station: Three-button control station in fixed location with momentary-contact push-button
controls labeled "Open" and "Stop" and sustained- or constant-pressure push-button control labeled
"Close."
1. Interior-Mounted Units: Full-guarded, surface-mounted, heavy-duty type, with general-purpose
NEMA ICS 6, Type 1 enclosure.
H. Emergency Manual Operation: Equip each electrically powered door with capability for emergency manual
operation. Design manual mechanism so required force for door operation does not exceed 25 lbf (111 N).
I. Emergency Operation Disconnect Device: Equip operator with hand-operated disconnect mechanism for
automatically engaging manual operator and releasing brake for emergency manual operation while
disconnecting motor without affecting timing of limit switch. Mount mechanism so it is accessible from
floor level. Include interlock device to automatically prevent motor from operating when emergency
operator is engaged.
J. Motor Removal: Design operator so motor may be removed without disturbing limit-switch adjustment and
without affecting emergency manual operation.
2.11 GENERAL FINISH REQUIREMENTS
A. Comply with NAAMM/NOMMA's "Metal Finishes Manual for Architectural and Metal Products
(AMP 500-06)" for recommendations for applying and designating finishes.
B. Appearance of Finished Work: Noticeable variations in same piece are not acceptable. Variations in
appearance of adjoining components are acceptable if they are within the range of approved Samples and
are assembled or installed to minimize contrast.

BTBC Phase III October 26, 2020
GE Project No. 0119-0010
Gould Evans
OVERHEAD COILING DOORS 083323 - 7
2.12 STEEL AND GALVANIZED-STEEL FINISHES
A. Factory Prime Finish: Manufacturer's standard primer, compatible with field-applied finish. Comply with
coating manufacturer's written instructions for cleaning, pretreatment, application, and minimum dry film
thickness.
B. Baked-Enamel or Powder-Coat Finish: Manufacturer's standard baked-on finish consisting of prime coat
and thermosetting topcoat. Comply with coating manufacturer's written instructions for cleaning,
pretreatment, application, and minimum dry film thickness.
PART 3 - EXECUTION
3.1 EXAMINATION
A. Examine substrates areas and conditions, with Installer present, for compliance with requirements for
substrate construction and other conditions affecting performance of the Work.
B. Examine locations of electrical connections.
C. Proceed with installation only after unsatisfactory conditions have been corrected.
3.2 INSTALLATION
A. Install overhead coiling doors and operating equipment complete with necessary hardware, anchors, inserts,
hangers, and equipment supports; according to manufacturer's written instructions and as specified.
B. Install overhead coiling doors, hoods, controls, and operators at the mounting locations indicated for each
door.
C. Accessibility: Install overhead coiling doors, switches, and controls along accessible routes in compliance
with regulatory requirements for accessibility.
D. Fire-Rated Doors: Install according to NFPA 80.
E. Smoke-Control Doors: Install according to NFPA 80 and NFPA 105.
F. Power-Operated Doors: Install automatic garage doors openers according to UL 325.
3.3 STARTUP SERVICE
A. Engage a factory-authorized service representative to perform startup service.
1. Perform installation and startup checks according to manufacturer's written instructions.
2. Test and adjust controls and safety devices. Replace damaged and malfunctioning controls and
equipment.
3. Test door closing when activated by detector or alarm-connected fire-release system. Reset door-
closing mechanism after successful test.

BTBC Phase III October 26, 2020
GE Project No. 0119-0010
Gould Evans
OVERHEAD COILING DOORS 083323 - 8
3.4 ADJUSTING
A. Adjust hardware and moving parts to function smoothly so that doors operate easily, free of warp, twist, or
distortion.
1. Adjust exterior doors and components to be weather-resistant.
B. Lubricate bearings and sliding parts as recommended by manufacturer.
C. Adjust seals to provide tight fit around entire perimeter.
3.5 MAINTENANCE SERVICE
A. Initial Maintenance Service: Beginning at Substantial Completion, maintenance service shall include 12
months' full maintenance by skilled employees of coiling-door Installer. Include quarterly preventive
maintenance, repair or replacement of worn or defective components, lubrication, cleaning, and adjusting
as required for door operation. Parts and supplies shall be manufacturer's authorized replacement parts and
supplies.
1. Perform maintenance, including emergency callback service, during normal working hours.
2. Include 24-hour-per-day, seven-day-per-week, emergency callback service.
3.6 DEMONSTRATION
A. Engage a factory-authorized service representative to train Owner's maintenance personnel to adjust,
operate, and maintain overhead coiling doors.
END OF SECTION 083323

BTBC Phase III October 26, 2020
GE Project No. 0119-0010
Gould Evans
84113 - 1
PART 1 - GENERAL
1.1 RELATED DOCUMENTS
A. Drawings and general provisions of the Contract, including General and Supplementary Conditions and
Division 1 Specification Sections, apply to this Section.
1.2 SUMMARY
A. This Section includes:
1. Exterior storefront framing.
2. Exterior and interior automatic and manual-swing entrance doors and door-frame units.
3. Interior storefront framing.
B. Related Sections include the following:
1. Division 5, Section 055000: "Metal Fabrications"
2. Division 7, Section 072726: “Fluid Applied Membrane Air Barriers”
3. Division 7, Section 074213: “Formed Metal Wall Panels”
4. Division 7, Section 079200: “Joint Sealants”
5. Division 8, Section 084413: “Glazed Aluminum Curtain Walls”
6. Division 8, Section 088000: “Glazing”
1.3 PERFORMANCE REQUIREMENTS
A. General: Provide aluminum-framed systems, including anchorage, capable of withstanding, without
failure, the effects of the following:
1. Structural loads.
2. Thermal movements.
3. Movements of supporting structure indicated on Drawings including, but not limited to, story drift
and deflection from uniformly distributed and concentrated live loads.
4. Dimensional tolerances of building frame and other adjacent construction.
5. Failure includes the following:
a. Deflection exceeding specified limits.
b. Thermal stresses transferred to building structure.
c. Framing members transferring stresses, including those caused by thermal and structural
movements, to glazing.
d. Noise or vibration created by wind and thermal and structural movements.
e. Loosening or weakening of fasteners, attachments, and other components.
f. Sealant failure.
g. Failure of operating units to function properly.
B. Structural Loads:
1. Wind Loads: As required by local Codes.
2. Seismic Loads: As required by local Codes.
C. Deflection of Framing Members:

BTBC Phase III October 26, 2020
GE Project No. 0119-0010
Gould Evans
84113 - 2
1. Deflection Normal to Wall Plane: Limited to 1/175 of clear span for spans up to 13 feet 6 inches
and to 1/240 of clear span plus 1/4 inch for spans greater than 13 feet 6 inches or an amount that
restricts edge deflection of individual glazing lites to 3/4 inch, whichever is less.
2. Deflection Parallel to Glazing Plane: Limited to 1/360 of clear span or 1/8 inch, whichever is
smaller.
D. Structural-Test Performance: Provide aluminum-framed systems tested according to ASTM E 330 as
follows:
1. When tested at positive and negative wind-load design pressures, systems do not evidence deflection
exceeding specified limits.
2. When tested at 150 percent of positive and negative wind-load design pressures, systems, including
anchorage, do not evidence material failures, structural distress, and permanent deformation of main
framing members exceeding 0.2 percent of span.
3. Test Durations: As required by design wind velocity but not less than 10 seconds.
E. Thermal Movements: Provide aluminum-framed systems that allow for thermal movements resulting from
the following maximum change (range) in ambient and surface temperatures. Base engineering calculation
on surface temperatures of materials due to both solar heat gain and nighttime-sky heat loss.
1. Temperature Change (Range): 120 deg F, ambient; 180 deg F, material surfaces.
F. Air Infiltration: Provide aluminum-framed systems with maximum air leakage through fixed glazing and
framing areas of 0.06 cfm/sq. ft. of fixed wall area when tested according to ASTM E 283 at a minimum
static-air-pressure difference of 6.24 lbf/sq. ft..
G. Water Penetration Under Static Pressure: Provide aluminum-framed systems that do not evidence water
penetration through fixed glazing and framing areas when tested according to ASTM E 331 at a minimum
static-air-pressure difference of 20 percent of positive wind-load design pressure, but not less than 6.24
lbf/sq. ft..
H. Condensation Resistance: Provide aluminum-framed systems with fixed glazing and framing areas having
condensation-resistance factor (CRF) of not less than 53 when tested according to AAMA 1503.
I. Average Thermal Conductance: Provide aluminum-framed systems with fixed glazing and framing areas
having average U-factor of not more than 0.63 Btu/sq. ft. x h x deg F when tested according to AAMA 1503.
1.4 QUALITY ASSURANCE
A. Installer Qualifications: Manufacturer's authorized representative who is trained and approved for
installation of units required for this Project.
B. Testing Agency Qualifications: Qualified according to ASTM E 699 for testing indicated.
C. Engineering Responsibility: Prepare data for aluminum-framed systems, including Shop Drawings, based
on testing and engineering analysis of manufacturer's standard units in systems similar to those indicated
for this Project.
D. Product Options: Information on Drawings and in Specifications establishes requirements for systems'
aesthetic effects and performance characteristics. Aesthetic effects are indicated by dimensions,
arrangements, alignment, and profiles of components and assemblies as they relate to sightlines, to one
another, and to adjoining construction. Performance characteristics are indicated by criteria subject to
verification by one or more methods including preconstruction testing, field testing, and in-service
performance.

BTBC Phase III October 26, 2020
GE Project No. 0119-0010
Gould Evans
84113 - 3
E. Accessible Entrances: Comply with applicable provisions in the U.S. Architectural & Transportation
Barriers Compliance Board's ADA-ABA Accessibility Guidelines and ICC/ANSI A117.1.
F. Source Limitations for Aluminum-Framed Systems: Obtain from single source from single manufacturer.
G. Pre-installation Conference: Conduct conference at Project site.
1.5 SUBMITTALS
A. Product Data: For each type of product indicated.
B. Shop Drawings: For aluminum-framed systems. Include plans, elevations, sections, details, and
attachments to other work.
1. Include details of provisions for system expansion and contraction and for drainage of moisture in
the system to the exterior.
C. Samples: For each type of exposed finish required.
D. Other Action Submittals:
1. Entrance Door Hardware Schedule: Prepared by or under the supervision of supplier, detailing
fabrication and assembly of entrance door hardware, as well as procedures and diagrams.
E. Delegated-Design Submittal: For aluminum-framed systems indicated to comply with performance
requirements and design criteria, including analysis data signed and sealed by the qualified professional
engineer responsible for their preparation.
F. Product test reports.
G. Field quality-control reports.
H. Maintenance data.
I. Warranties: Sample of special warranties.
1.6 WARRANTY
A. Special Warranty: Manufacturer's standard form in which manufacturer agrees to repair or replace
components of aluminum-framed systems that do not comply with requirements or that fail in materials or
workmanship within specified warranty period.
1. Warranty Period: Five (5) years from date of Substantial Completion.
B. Special Finish Warranty: Manufacturer's standard form in which manufacturer agrees to repair or replace
components on which finishes do not comply with requirements or that fail in materials or workmanship
within specified warranty period. Warranty does not include normal weathering.
1. Warranty Period: Ten (10) years from date of Substantial Completion.
1.7 MAINTENANCE SERVICE
A. Entrance Door Hardware: Six (6) months.

BTBC Phase III October 26, 2020
GE Project No. 0119-0010
Gould Evans
84113 - 4
PART 2 - MANUFACTURERS
2.1 ALUMINUM FRAMED ENTRANCE SYSTEM
A. Materials: For each type of material required for the work of this Section, provide primary materials which
are the products of one manufacturer. Provide secondary materials which are acceptable to the
manufacturers of the primary materials.
B. Subject to compliance with requirements, manufacturers offering products that may be incorporated into
the Work include, but are not limited to, the following:
1. Exterior Storefront
a. Basis-Of-Design: Manko Window Systems Inc. 2450 FS Series
1) Front glazed
2) Clear anodized finish
3) 1100 Project Out / Awning Vent – operable windows as indicated in the drawings.
4) Sill receiver – Model #2439
2. Interior Storefront
a. Basis-Of-Design: Manko Window Systems Inc. 1450 Series
1) Front glazed
2) ¼” glazing
3) Clear anodized finish
2.2 MATERIALS
A. Aluminum: Alloy and temper recommended by manufacturer for type of use and finish indicated.
1. Sheet and Plate: ASTM B 209.
2. Extruded Bars, Rods, Profiles, and Tubes: ASTM B 221.
3. Extruded Structural Pipe and Tubes: ASTM B 429.
4. Structural Profiles: ASTM B 308.
5. Welding Rods and Bare Electrodes: AWS A5.10.
B. Steel Reinforcement: Manufacturer's standard zinc-rich, corrosion-resistant primer, complying with SSPC-
PS Guide No. 12.00; applied immediately after surface preparation and pretreatment. Select surface
preparation methods according to recommendations in SSPC-SP COM and prepare surfaces according to
applicable SSPC standard.
1. Structural Shapes, Plates, and Bars: ASTM A 36.
2. Cold-Rolled Sheet and Strip: ASTM A 1008.
3. Hot-Rolled Sheet and Strip: ASTM A 1011.
2.3 FRAMING SYSTEMS
A. Exterior Framing Members: Manufacturer's standard extruded-aluminum framing members of thickness
required and reinforced as required to support imposed loads all as noted herein.
1. Construction: Thermally broken.
2. Glazing System: Retained mechanically with gaskets on four sides.
3. Glazing Plane: Front Glazed.
B. Brackets and Reinforcements: Manufacturer's standard high-strength aluminum with non-staining,
nonferrous shims for aligning system components.
C. Fasteners and Accessories: Manufacturer's standard corrosion-resistant, non-staining, non-bleeding
fasteners and accessories compatible with adjacent materials.

BTBC Phase III October 26, 2020
GE Project No. 0119-0010
Gould Evans
84113 - 5
1. Use self-locking devices where fasteners are subject to loosening or turning out from thermal and
structural movements, wind loads, or vibration.
2. Reinforce members as required to receive fastener threads.
3. Use exposed fasteners with countersunk Phillips screw heads, fabricated from stainless steel.
D. Concrete and Masonry Inserts: Hot-dip galvanized cast-iron, malleable-iron, or steel inserts, complying
with ASTM A 123 or ASTM A 153.
E. Concealed Flashing: Manufacturer's standard corrosion-resistant, non-staining, non-bleeding flashing
compatible with adjacent materials.
F. Framing System Gaskets and Sealants: Manufacturer's standard, recommended by manufacturer for joint
type.
G. Provide sealants for use inside of the weatherproofing system that have a VOC content of 250 g/L or less
when calculated according to 40 CFR 59, Subpart D (EPA Method 24).
2.4 GLAZING SYSTEMS
A. Glazing: As specified in Division 8, Section 088000: "Glazing."
B. Glazing Gaskets: Manufacturer's standard compression types; replaceable, molded or extruded, of profile
and hardness required to maintain watertight seal.
C. Spacers and Setting Blocks: Manufacturer's standard elastomeric type.
2.5 ENTRANCE DOOR SYSTEMS
A. Exterior Entrance Doors: Standard glazed entrance doors for manual-swing operation.
1. Door Construction: 1-3/4-inch overall thickness, with minimum 0.125-inch- extruded-aluminum
tubular rail and stile members. Mechanically fasten corners with reinforcing brackets that are deeply
penetrated and fillet welded or that incorporate concealed tie rods.
a. Thermal Construction: High-performance plastic connectors separate aluminum members
exposed to the exterior from members exposed to the interior.
2. Door Design:
a. Basis of Design: Manko Window Systems, Inc. 150H Wide Stile Aluminum Heavy Wall
Storefront Swing glazed entrance doors to be compatible with storefront system specified..
b. Accessible Doors: Smooth surfaced for width of door in area within 10 inches above floor
or ground plane.
c. The door stile and rail face dimensions entrance door will be 5-inch vertical stile, 5 inch top
rail and 10 inch bottom rail.
3. Glazing Stops and Gaskets: Square, snap-on, extruded-aluminum stops and preformed gaskets.
a. Provide non-removable glazing stops on outside of door.
B. Entrance Door Hardware: As specified herein.

BTBC Phase III October 26, 2020
GE Project No. 0119-0010
Gould Evans
84113 - 6
2.6 ENTRANCE DOOR HARDWARE
A. General: Provide entrance door hardware and entrance door hardware sets indicated in door and frame
schedule and entrance door hardware sets indicated in Specification Section 087100 Door Hardware for
each entrance door to comply with requirements in this Section.
1. Entrance Door Hardware Sets: Provide quantity, item, size, finish or color indicated, and products
equivalent in function and comparable in quality to named products and complying with BHMA
standard referenced.
2. Sequence of Operation: Provide electrified door hardware function, sequence of operation, and
interface with other building control systems indicated.
3. Opening-Force Requirements:
a. Egress Doors: Not more than 15 lbf to release the latch and not more than 30 lbf to set the
door in motion and not more than 15 lbf to open the door to its minimum required width.
B. Opening-Force Requirements:
1. Latches and Exit Devices: Not more than 15 lbf required to release latch.
C. Weather Stripping: Manufacturer's standard replaceable components, US26D
D. Weather Sweeps: Manufacturer's standard exterior-door bottom sweep with concealed fasteners on
mounting strip.
E. Thresholds: BHMA A156.21, raised thresholds beveled with a slope of not more than 1:2, with maximum
height of 1/2 inch.
F. Finger Guards: Manufacturer's standard collapsible neoprene or PVC gasket anchored to frame hinge-jamb
at center-pivoted doors.
G. Pulls: Standard pull trim by exit device, US26D,
2.7 ACCESSORY MATERIALS
A. Bituminous Paint: Cold-applied, asphalt-mastic paint complying with SSPC-Paint 12 requirements except
containing no asbestos; formulated for 30-mil thickness per coat.
2.8 FABRICATION
A. Form or extrude aluminum shapes before finishing.
B. Weld in concealed locations to greatest extent possible to minimize distortion or discoloration of finish.
Remove weld spatter and welding oxides from exposed surfaces by descaling or grinding.
C. Framing Members, General: Fabricate components that, when assembled, have the following
characteristics:
1. Profiles that are sharp, straight, and free of defects or deformations.
2. Accurately fitted joints with ends coped or mitered.
3. Means to drain water passing joints, condensation within framing members, and moisture migrating
within the system to exterior.

BTBC Phase III October 26, 2020
GE Project No. 0119-0010
Gould Evans
84113 - 7
4. Physical and thermal isolation of glazing from framing members.
5. Accommodations for thermal and mechanical movements of glazing and framing to maintain
required glazing edge clearances.
6. Provisions for field replacement of glazing from exterior.
7. Fasteners, anchors, and connection devices that are concealed from view to greatest extent possible.
D. Mechanically Glazed Framing Members: Fabricate for flush glazing without projecting stops.
E. Entrance Door Frames: Reinforce as required to support loads imposed by door operation and for installing
entrance door hardware.
F. Entrance Doors: Reinforce doors as required for installing entrance door hardware.
G. Entrance Door Hardware Installation: Factory install entrance door hardware to the greatest extent possible.
Cut, drill, and tap for factory-installed entrance door hardware before applying finishes.
H. After fabrication, clearly mark components to identify their locations in Project according to Shop
Drawings.
2.9 ALUMINUM FINISHES
A. Clear Anodic Finish: AAMA 611, AA-M12C22A31, Architectural Class II.
PART 3 - EXECUTION
3.1 INSTALLATION
A. General:
1. Comply with manufacturer's written instructions.
2. Do not install damaged components.
3. Fit joints to produce hairline joints free of burrs and distortion.
4. Rigidly secure non-movement joints.
5. Install anchors with separators and isolators to prevent metal corrosion and electrolytic deterioration.
6. Seal joints watertight unless otherwise indicated.
B. Metal Protection:
1. Where aluminum will contact dissimilar metals, protect against galvanic action by painting contact
surfaces with primer or applying sealant or tape, or by installing nonconductive spacers as
recommended by manufacturer for this purpose.
2. Where aluminum will contact concrete or masonry, protect against corrosion by painting contact
surfaces with bituminous paint.
C. Install components to drain water passing joints, condensation occurring within framing members, and
moisture migrating within the system to exterior.
D. Set continuous sill members and flashing in full sealant bed as specified in Division 07 Section "Joint
Sealants" to produce weather-tight installation.
E. Install components plumb and true in alignment with established lines and grades, and without warp or
rack.

BTBC Phase III October 26, 2020
GE Project No. 0119-0010
Gould Evans
84113 - 8
F. Install glazing as specified in Division 08 Section 08800: "Glazing."
G. Entrance Doors: Install doors to produce smooth operation and tight fit at contact points.
1. Exterior Doors: Install to produce weather-tight enclosure and tight fit at weather stripping.
2. Field-Installed Entrance Door Hardware: Install surface-mounted entrance door hardware
according to entrance door hardware manufacturers' written instructions using concealed fasteners
to greatest extent possible.
END OF SECTION 084113

BTBC Phase III October 26, 2020
GE Project No. 0119-0010
Gould Evans
ALUMINUM FRAMED FIRE-RATED GLAZING 084123 - 1
SECTION 084123 - ALUMINUM FRAMED FIRE RATED GLAZING - ENTRANCES AND STOREFRONTS
PART 1 - GENERAL
1.1 SUMMARY
A. Section includes:
1. Fire rated glazing and framing systems for installation as sidelights, windows, transoms and
swinging doors in fire rated interior openings
B. Related Sections:
1. Section 07 84 00 “Firestopping:” Firestops between work of this section and other fire resistive
assemblies.
2. Section 07 92 00 – “Joint Sealants” for installation of joint sealants installed with steel fire-rated
glazed curtain-wall systems and for sealants to the extent not specified in this Section.
3. Section 08 71 00 “Door Hardware:” Door hardware other than that provided by the work of this
section
4. Section 08 41 23 – “Fire Rated Steel Framed Entrances – Fireframes Heat Barrier Series” for fire-
rated doors.
1.2 REFERENCES
A. American Architectural Manufacturers Association (AAMA)
1. AAMA 2603-2002 Voluntary Specification, Performance Requirements and Test Procedures for
Pigmented Organic Coatings on Aluminum Extrusions and Panels.
2. AAMA 2604 -2005 Voluntary Specification, Performance Requirements and Test Procedures for
High Performance Organic Coatings on Aluminum Extrusions and Panels.
3. AAMA 2605 -2005 Voluntary Specification, Performance Requirements and Test Procedures for
Superior Performing Organic Coatings on Aluminum Extrusions and Panels.
B. American Society for Testing and Materials (ASTM):
1. Fire safety related:
a. ASTM E119: Methods for Fire Tests of Building Construction and Materials.
2. Material related
a. ASTM A 1008/A 1008M - Standard Specification for Steel, Sheet, Cold-Rolled, Carbon,
Structural, High-Strength, Low Alloy, and High-Strength Low-Alloy with Improved
Formability, Solution Hardened, and Bake Hardenable; 2007.
b. ASTM A 1011/A 1011M - Standard Specification for Steel, Sheet and Strip, Hot-Rolled,
Carbon, Structural, High-Strength Low-Alloy and High-Strength Low-Alloy with
Improved Formability, and Ultra-High Strength; 2006b.
3. Exterior-related:
a. ASTM E 283-04: Test Method for Determining the Rate of Air Leakage through Exterior
Windows, Curtain Walls, and Doors under Specified Pressure Differences across the
Specimen
b. ASTM E 330-02: Test Method for Structural Performance of Exterior Windows, Doors,
Skylights and Curtain Walls by Uniform Static Air Pressure Difference Procedure A
c. ASTM E 331-04: Test Method for Water Penetration of Exterior Windows, Skylights,
Doors, and Curtain Walls by Uniform Static Air Pressure Difference

BTBC Phase III October 26, 2020
GE Project No. 0119-0010
Gould Evans
ALUMINUM FRAMED FIRE-RATED GLAZING 084123 - 2
d. ASTM E 783-02: Test Method for Field Measurement of Air Leakage through Installed
Exterior Windows and Doors
e. ASTM E 1105-00: Test Method for Field Determination of Water Penetration of Installed
Exterior Windows, Skylights, Doors, and Curtain Walls by Uniform or Cyclic Static Air
Pressure Difference
C. American Welding Society (AWS)
1. AWS D1.3 - Structural Welding Code - Sheet Steel; 2007
D. Builders Hardware Manufacturers Association, Inc.
1. BHMA A156 - American National Standards for door hardware; 2006 (ANSI/BHMA A156).
E. Canadian Standards
1. CAN-S101 Fire Endurance Tests of Building Construction and Materials
2. CAN4-S104-M, “Fire Tests of Door Assemblies”
3. CAN4-S106-M, “Standard Method for Fire Tests of Window and Glass Block Assemblies”
F. National Fire Protection Association (NFPA):
1. NFPA 80: Fire Doors and Windows.
2. NFPA 251: Fire Tests of Building Construction & Materials
3. NFPA 252: Fire Tests of Door Assemblies
4. NFPA 257: Fire Test of Window Assemblies
G. Underwriters Laboratories, Inc. (UL):
1. UL 9: Fire Tests of Window Assemblies.
1. UL 10 B: Fire Tests of Door Assemblies
2. UL 10 C: Positive Pressure Fire Tests of Window & Door Assemblies
3. UL 263: Fire tests of Building Construction and Materials
4. UL-752 Ratings of Bullet-Resistant Materials
H. American National Standards Institute (ANSI):
1. ANSI Z97.1: Standard for Safety Glazing Materials Used in Buildings
I. Consumer Product Safety Commission (CPSC):
1. CPSC 16 CFR 1201: Safety Standard for Architectural Glazing Materials
J. American Society of Civil Engineers (ASCE)
1. ASCE 7 – Minimum Design Loads for Buildings and Other Structures; 2005
1.3 DEFINITIONS
A. Manufacturer: A firm that produces primary glass, fabricated glass or framing as defined in
referenced glazing publications.
1.4 SUBMITTALS
A. Submit in accordance with Section 013300 Submittal Procedures.
B. Product Data:
1. Technical Information: Submit latest edition of manufacturer’s product data providing product
descriptions, technical data, Underwriters Laboratories, Inc. listings and installation instructions.
C. Shop Drawings:

BTBC Phase III October 26, 2020
GE Project No. 0119-0010
Gould Evans
ALUMINUM FRAMED FIRE-RATED GLAZING 084123 - 3
1. Include plans, elevations and details of product showing component dimensions; framing opening
requirements, dimensions, tolerances, and attachment to structure
D. Structural Calculations (optional):
1. Provide structural calculations sealed by a licensed professional engineer in the State in which the
project is located; prepared in compliance with referenced documents and these specifications.
E. Samples (optional). For following products:
1. Glass sample-as provided by manufacturer
2. Sample of frame
3. Verification of sample of selected finish
F. Glazing Schedule: Use same designations indicated on drawings for glazed openings in preparing a
schedule listing glass types and thicknesses for each size opening and location.
G. Warranties: Submit manufacturer’s warranty.
H. Certificates of compliance from glass and glazing materials manufacturers attesting that glass and
glazing materials furnished for project comply with requirements.
1. Separate certification will not be required for glazing materials bearing manufacturer’s permanent
label designating type and thickness of glass, provided labels represent a quality control program
involving a recognized certification agency or independent testing laboratory acceptable to
authority having jurisdiction
1.5 QUALITY ASSURANCE
A. Testing Agency Qualifications: Qualifications according to
1. International Accreditation Service for a Type A Third-Party Inspection Body (Field Services
ICC-ES Third-Party Inspections Standard Operating Procedures, 00-BL-S0400 and S0401)
2. International Accreditation Service for Testing Body-Building Materials and Systems
a. Fire Testing
1) ASTM Standards E 119
2) CPSC Standards 16 CFR 1201
3) NFPA Standards 251, 252, 257
4) UL Standards 9, 10B, 10C, 1784, UL Subject 63
5) BS 476; Part 22: 1987
6) EN 1634-1
7) CAN Standards S 101, S 104, S 106
B. Fire-Rated Window Assemblies: Assemblies complying with NFPA 80 that are classified and
labeled by UL, for fire ratings indicated, based on testing according to NFPA 257 and UL 9.
C. Fire-Rated Wall Assemblies: Assemblies complying with ASTM E119 that are classified and labeled
by UL, for fire ratings indicated, based on testing in accordance with UL 263, ASTM E119.
D. Listings and Labels - Fire Rated Assemblies: Under current follow-up service by Underwriters
Laboratories® maintaining a current listing or certification. Label assemblies accordance with limits
of manufacturer’s listing.
1.6 DELIVERY, STORAGE AND HANDLING
A. Deliver, store and handle under provisions specified by manufacturer.

BTBC Phase III October 26, 2020
GE Project No. 0119-0010
Gould Evans
ALUMINUM FRAMED FIRE-RATED GLAZING 084123 - 4
1.7 PROJECT CONDITIONS
A. Obtain field measurements prior to fabrication of frame units. If field measurements will not be
available in a timely manner coordinate planned measurements with the work of other sections.
1. Note whether field or planned dimensions were used in the creation of the shop drawings.
B. Coordinate the work of this section with others effected including but not limited to: other interior
and/or exterior envelope components and door hardware beyond that provided by this section.
1.8 WARRANTY
A. Provide the manufacturer’s standard five (5) year manufacturer warranty.
PART 2 – PRODUCTS
2.1 MANUFACTURERS -]
A. Manufacturer Glazing Material (Basis of Design): “Pilkington Pyrostop®” fire-rated glazing as
manufactured by the Pilkington Group and distributed by Technical Glass Products, 8107 Bracken
Place SE, Snoqualmie, WA 98065 phone (800.426.0279) fax (425.396.8300) e-mail
[email protected], web site http://www.fireglass.com
B. Frame System (Basis of Design): “Fireframes® Aluminum Series” fire-rated frame system as
manufactured and supplied by Technical Glass Products, 8107 Bracken Place SE, Snoqualmie, WA
98065 phone (800.426.0279) fax (425.396.8300 e-mail [email protected] web site
http://www.fireglass.com
C. Substitutions: Substitutions for Glazing Material and Frame System must meet performance and
quality standards of the basis of design. Refer to Section 012500 Substitution Procedures.
2.2 PERFORMANCE REQUIREMENTS
A. System Description:
1. Steel fire-rated glazed wall and/or window system, dual aluminum cover cap format
a. Face widths available:
1) 2”
2) Custom extruded aluminum cover caps
b. Duration – Windows Capable of providing a fire rating for 45 minutes.
c. Duration – Walls: Capable of providing a fire rating for 60 minutes.
B. Structural Performance
1. Design and size the system to withstand structural forces placed upon it without damage or
permanent set when tested in accordance with ASTM E330 using load 1.5 times the design
wind loads and of 10 seconds in duration.
2. Member deflection: Limit deflection of the edge of the glass normal to the plane of the glass
to flexure limit of glass.
3. Accommodate movement between storefront and adjoining systems
C. Air Infiltration: ASTM E 283; Air infiltration rate shall not exceed 0.06 cfm/ft2 at a static air
pressure differential of 6.24 psf.

BTBC Phase III October 26, 2020
GE Project No. 0119-0010
Gould Evans
ALUMINUM FRAMED FIRE-RATED GLAZING 084123 - 5
2.3 MATERIALS - GLASS
A. Fire Rated Glazing: Composed of multiple sheets of Pilkington Optiwhite™ high visible light
transmission glass laminated with an intumescent interlayer.
B. Impact Safety Resistance: ANSI Z97.1 and CPSC 16CFR1201(Cat. I and II).
C. Properties Interior Glazing
Fire-Rating 45 minute
Manufacturer’s designation 45-200
Glazing type single
Nominal Thickness 3/4” (19mm)
Weight in lbs/sf 9.2
Daylight Transmission 86
Sound Transmission
Coefficient
40dB
D. Logo: Each piece of fire-rated glazing shall be labeled with a permanent logo including name of
product, manufacture, testing laboratory (UL), fire rating period, safety glazing standards, and date of
manufacture.
E. Glazing Accessories: Manufacturer’s standard compression gaskets, standoff, spacers, setting blocks
and other accessories necessary for a complete installation.
2.4 MATERIALS –ALUMINUM FRAMES
A. Aluminum Framing System (45 min.)
1. Steel Frame — The steel framing members are made of two halves, nom. 1.9 in. wide (48.3 mm)
with a nom. minimum depth of 1.38 in. (35 mm) with lengths cut according to glazing size.
2. Aluminum Trim — Supplied with the steel framing members. Nom. 2 in. (50.8 mm) wide with a
nom. depth of 1.54 in. (39 mm) with lengths cut according to glazing size.
3. Stainless Steel Standoffs — Supplied with the steel framing members. Nom 5/16 in. (8 mm)
diameter with a nom. minimum depth of 1 1/8 in. (28 mm) with depth adjusted to match
Pilkington Pyrostop® Panel thickness.
4. Stainless Steel Moment and Connecting Braces: — Supplied with the steel framing members.
Nom 3/8 in. (10 mm) thick with a nom. minimum depth of 1 1/8 in. (28 mm) with depth adjusted
to match Pilkington Pyrostop® Panel thickness.
5. Framing Member Fasteners — Supplied with the steel framing members. Screws are M6 x16mm
Button Head Socket Cap Screws for frame assembly and #6 x 1” Pan Head Sheet Metal Screws for
door installation.
6. Glazing Gasket —
a. Interior Gasketing-Supplied with the steel framing members. Nom. 3/4 in. (19 mm) x 3/16 (4.5
mm) black applied to the steel framing members to cushion and seal the glazing material when
installed.
B. Aluminum: Alloy and temper recommended by manufacturer for type of use and finish indicated.
1. Extruded Bars, Rods, Shapes, and Tubes: ASTM B 221 (ASTM B 221M).
C. Steel Reinforcement: With manufacturer's standard corrosion-resistant primer complying with
SSPC-PS Guide No. 12.00 applied immediately after surface preparation and pretreatment. Select
surface preparation methods according to recommendations in SSPC-SP COM and prepare surfaces
according to applicable SSPC standard.
1. Structural Shapes, Plates, and Bars: ASTM A 36/A 36M.

BTBC Phase III October 26, 2020
GE Project No. 0119-0010
Gould Evans
ALUMINUM FRAMED FIRE-RATED GLAZING 084123 - 6
2. Cold-Rolled Sheet and Strip: ASTM A 611.
3. Hot-Rolled Sheet and Strip: ASTM A 570/A 570M.
D. Fasteners and Accessories: Manufacturer's standard corrosion-resistant, nonstaining, nonbleeding
fasteners and accessories compatible with adjacent materials.
1. Where fasteners are subject to loosening or turn out from thermal and structural movements, wind
loads, or vibration, use self-locking devices.
2. Reinforce members as required to receive fastener threads.
2.5 ACCESSORIES
A. Fasteners: Use fasteners fabricated from Type 304 stainless steel.
B. Glazing Gaskets:
1. Glazing gaskets for interior or exterior applications: ASTM C 864 (extruded EPDM rubber
that provides for silicone adhesion) or ASTM C1115 Standard Specification for Dense
Elastomeric Silicone Rubber Gaskets and Accessories (extruded silicone).
C. Intumescent Tape: As supplied by frame manufacturer.
D. Setting Blocks: ¼” Calcium silicate.
E. Perimeter Anchors: Steel.
F. Flashings: As recommended by manufacturer; same material and finish as cover caps.
G. Silicone Sealant: One-Part Low Modulus, neutral cure High Movement-Capable Sealant: Type S;
Grade NS; Class 25 with additional movement capability of 100 percent in extension and 50 percent
in compression (total 150 percent); Use (Exposure) NT; Uses (Substrates) M, G, A, and O as
applicable. (Use-O joint substrates include: Metal factory-coated with a high-performance coating;
galvanized steel; ceramic tile.)
1. Available Products:
a. Dow Corning 790, 795 - Dow Corning Corp.
b. Momentive
c. Tremco
H. Intumescent Caulk: Single component, latex-based, intumescent caulk designed to stop passage of
fire, smoke, and fumes through fire-rated separations; permanently flexible after cure; will not
support mold growth; flame spread/smoke developed 10/10.
1. Available Products:
a. 3M CP-25 WP+
2.6 SLAG-WOOL-FIBER/ROCK-WOOL-FIBER INSULATION
A. Available Manufacturers:
1. Fibrex Insulations Inc.
2. Owens Corning
3. Thermafiber.
4. Rockwool
B. Unfaced, Slag-Wool-Fiber/Rock-Wool-Fiber Board Insulation: ASTM C 612, maximum flame-
spread and smoke-developed indexes of 15 and 0, respectively; passing ASTM E 136 for combustion
characteristics; and of the following nominal density and thermal resistivity:

BTBC Phase III October 26, 2020
GE Project No. 0119-0010
Gould Evans
ALUMINUM FRAMED FIRE-RATED GLAZING 084123 - 7
1. Nominal density of 4 lb/cu. ft. (64 kg/cu. m), Types IA and IB, thermal resistivity of 4 deg F x h x
sq. ft./Btu x in. at 75 deg F (27.7 K x m/W at 24 deg C).
2. Fiber Color: Regular color, unless otherwise indicated.
2.7 FABRICATION
A. Obtain reviewed shop drawings prior to fabrication.
B. Fabrication Dimensions: Fabricate fire-rated assembly to field dimensions.
C. Factory prepared, fire-rated steel door assemblies by manufacturer to be prehung, prefinished with
hardware preinstalled for field mounting.
D. Field glaze door and frame assemblies.
2.8 FINISHES, GENERAL
A. Comply with NAAMM's "Metal Finishes Manual for Architectural and Metal Products" for
recommendations for applying and designating finishes.
B. Finish frames after assembly.
C. Appearance of Finished Work: Variations in appearance of abutting or adjacent pieces are
acceptable. Noticeable variations in the same piece are not acceptable.
D. Aluminum Finishes
1. Finish designations prefixed by AA comply with the system established by the Aluminum
Association for designating aluminum finishes.
2. Class I, Clear Anodic Finish: AA-M12C22A41 (Mechanical Finish: nonspecular as fabricated;
Chemical Finish: etched, medium matte; Anodic Coating: Architectural Class I, clear coating
0.018 mm or thicker) complying with AAMA 611.
3. Class I, Color Anodic Finish: AA-M12C22A42/A44 (Mechanical Finish: nonspecular as
fabricated; Chemical Finish: etched, medium matte; Anodic Coating: Architectural Class I,
integrally colored or electrolytically deposited color coating 0.018 mm or thicker) complying with
AAMA 611.
PART 3 - EXECUTION
3.1 EXAMINATION
A. Site Verification of Conditions: Verify substrate conditions (which have been previously installed
under other sections) are acceptable for product installation in accordance with manufacturer’s
instructions. Verify openings are sized to receive curtain wall system and sill plate is level in
accordance with manufacturer’s acceptable tolerances.
B. Notify Architect of any conditions which jeopardize the integrity of the proposed fire wall / door
system.
C. Do not proceed until such conditions are corrected.

BTBC Phase III October 26, 2020
GE Project No. 0119-0010
Gould Evans
ALUMINUM FRAMED FIRE-RATED GLAZING 084123 - 8
3.2 INSTALLATION
A. See Fireframes Aluminum Series Installation Manual
3.3 REPAIR AND TOUCH UP
A. Anodized Finishes
1. Protect the anodized finish from harsh chemicals such as concrete/mortar or muriatic acid/brick
wash. If reasonable care is taken during handling and high and low pH chemicals can be avoided,
repair and/or touch-up of an anodize finish will not be needed.
2. Some rub marks on an anodized surface can be removed with a mild abrasive pad such as a
Scotch-Brite pad prior to touch up painting.
3. Touch-up paint should be used even more sparingly over anodize. Only the visible raw aluminum
in the scratch or gouge should be touched up with a matching paint.
B. Remove and replace glass that is broken, chipped, cracked, abraded, or damaged.
3.4 PROTECTION AND CLEANING
A. Protect glass from damage immediately after installation by attaching crossed streamers to framing
held away from glass. Do not apply markers to glass surface. Remove nonpermanent labels, and
clean surfaces.
1. Do not clean with astringent cleaners. Use a clean “grit free” cloth and a small amount of mild
soap and water or mild detergent.
2. Do not use any of the following:
a. Steam jets
b. Abrasives
c. Strong acidic or alkaline detergents, or surface-reactive agents
d. Detergents not recommended in writing by the manufacturer
e. Do not use any detergent above 77 degrees F
f. Organic solvents including but not limited to those containing ester, ketones, alcohols,
aromatic compounds, glycol ether, or halogenated hydrocarbons.
g. Metal or hard parts of cleaning equipment must not touch the glass surface
B. Protect glass from contact with contaminating substances resulting from construction operations,
including weld splatter. If, despite such protection, contaminating substances do come into contact
with glass, remove them immediately as recommended by glass manufacturer.
C. Wash glass on both exposed surfaces in each area of Project not more than four days before date
scheduled for inspections that establish date of Substantial Completion. Wash glass as recommended
by glass manufacturer.
END OF SECTION

BTBC Phase III October 26, 2020
GE Project No. 0119-0010
Gould Evans
GLAZED ALUMINUM CURTAIN WALLS 084413 - 1
SECTION 084413 - GLAZED ALUMINUM CURTAIN WALLS
PART 1 - GENERAL
1.1 RELATED DOCUMENTS
A. Drawings and general provisions of the Contract, including General and Supplementary Conditions and
Division 01 Specification Sections, apply to this Section.
1.2 SUMMARY
A. Section Includes:
1. Glazed aluminum curtain wall systems:
a. Conventionally glazed.
B. Related Requirements:
1. Section 079200 "Joint Sealants" for installation of joint sealants installed with glazed aluminum
curtain walls and for sealants to the extent not specified in this Section.
2. Section 088000 "Glazing" for curtain wall glazing.
1.3 PREINSTALLATION MEETINGS
A. Preinstallation Conference: Conduct conference at Project site.
1.4 ACTION SUBMITTALS
A. Product Data: For each type of product.
1. Include construction details, material descriptions, dimensions of individual components and
profiles, and finishes.
B. Sustainable Design Submittals:
1. <Double click to insert sustainable design text for recycled content.>
2. <Double click to insert sustainable design text for regional materials.>
C. Shop Drawings: For glazed aluminum curtain walls. Include plans, elevations, sections, full-size details,
and attachments to other work.
1. Include details of provisions for assembly expansion and contraction and for draining moisture
occurring within the assembly to the exterior.
2. Include full-size isometric details of each type of vertical-to-horizontal intersection of glazed
aluminum curtain walls, showing the following:
a. Joinery, including concealed welds.
b. Anchorage.
c. Expansion provisions.

BTBC Phase III October 26, 2020
GE Project No. 0119-0010
Gould Evans
GLAZED ALUMINUM CURTAIN WALLS 084413 - 2
d. Glazing.
e. Flashing and drainage.
3. Show connection to and continuity with adjacent thermal, weather, air, and vapor barriers.
D. Samples for Verification: For each type of exposed finish required, in manufacturer's standard sizes.
E. Fabrication Sample: Of each vertical-to-horizontal intersection of assemblies, made from 12-inch (300-
mm) lengths of full-size components and showing details of the following:
1. Joinery, including concealed welds.
2. Anchorage.
3. Expansion provisions.
4. Glazing.
5. Flashing and drainage.
F. Delegated-Design Submittal: For glazed aluminum curtain walls, including analysis data signed and
sealed by the qualified professional engineer responsible for their preparation.
1.5 INFORMATIONAL SUBMITTALS
A. Mockup Testing Submittals:
1. Testing Program: Developed specifically for Project.
2. Test Reports: Prepared by a qualified preconstruction testing agency for each mockup test.
3. Record Drawings: As-built drawings of preconstruction laboratory mockups showing changes
made during preconstruction laboratory mockup testing.
B. Qualification Data:
1. For Installer and field testing agency.
2. For professional engineer's experience with providing delegated-design engineering services of the
kind indicated, including documentation that engineer is licensed in the jurisdiction in which
Project is located.
C. Energy Performance Certificates: For glazed aluminum curtain walls, accessories, and components from
manufacturer.
1. Basis for Certification: NFRC-certified energy performance values for each glazed aluminum
curtain wall.
D. Product Test Reports: For glazed aluminum curtain walls, for tests performed by manufacturer and
witnessed by a qualified testing agency.
E. Quality-Control Program: Developed specifically for Project, including fabrication and installation, in
accordance with recommendations in ASTM C1401. Include periodic quality-control reports.
F. Source quality-control reports.
G. Field quality-control reports.
H. Sample Warranties: For special warranties.

BTBC Phase III October 26, 2020
GE Project No. 0119-0010
Gould Evans
GLAZED ALUMINUM CURTAIN WALLS 084413 - 3
1.6 CLOSEOUT SUBMITTALS
A. Maintenance Data: For glazed aluminum curtain walls to include in maintenance manuals.
1.7 QUALITY ASSURANCE
A. Installer Qualifications: An entity that employs installers and supervisors who are trained and approved
by manufacturer and that employs a qualified glazing contractor for this Project who is certified under the
North American Contractor Certification Program (NACC) for Architectural Glass & Metal (AGM)
contractors and that employs glazing technicians certified under the Architectural Glass and Metal
Technician (AGMT) certification program.
B. Product Options: Information on Drawings and in Specifications establishes requirements for aesthetic
effects and performance characteristics of assemblies. Aesthetic effects are indicated by dimensions,
arrangements, alignment, and profiles of components and assemblies as they relate to sightlines, to one
another, and to adjoining construction.
1. Do not change intended aesthetic effects, as judged solely by Architect, except with Architect's
approval. If changes are proposed, submit comprehensive explanatory data to Architect for review.
1.8 MOCKUPS
A. Build mockups to verify selections made under Sample submittals and to demonstrate aesthetic effects
and set quality standards for fabrication and installation.
1. Build mockup of typical wall area as shown on Drawings.
2. Testing shall be performed on mockups in accordance with requirements in "Field Quality
Control" Article.
3. Approval of mockups does not constitute approval of deviations from the Contract Documents
contained in mockups unless Architect specifically approves such deviations in writing.
4. Subject to compliance with requirements, approved mockups may become part of the completed
Work if undisturbed at time of Substantial Completion.
1.9 WARRANTY
A. Special Assembly Warranty: Installer agrees to repair or replace components of glazed aluminum curtain
wall that do not comply with requirements or that fail in materials or workmanship within specified
warranty period.
1. Failures include, but are not limited to, the following:
a. Structural failures including, but not limited to, excessive deflection.
b. Noise or vibration created by wind and thermal and structural movements.
c. Deterioration of metals, metal finishes, and other materials beyond normal weathering.
d. Water penetration through fixed glazing and framing areas.
e. Failure of operating components.
2. Warranty Period: Five years from date of Substantial Completion.

BTBC Phase III October 26, 2020
GE Project No. 0119-0010
Gould Evans
GLAZED ALUMINUM CURTAIN WALLS 084413 - 4
B. Special Finish Warranty, Anodized Finishes: Standard form in which manufacturer agrees to repair
finishes or replace aluminum that shows evidence of deterioration of anodized finishes within specified
warranty period.
1. Deterioration includes, but is not limited to, the following:
a. Color fading more than 5 Delta E units when tested in accordance with ASTM D2244.
b. Chalking in excess of a No. 8 rating when tested in accordance with ASTM D4214.
c. Cracking, peeling, or chipping.
2. Warranty Period: 10 years from date of Substantial Completion.
PART 2 - PRODUCTS
2.1 PERFORMANCE REQUIREMENTS
A. Delegated Design: Engage a qualified professional engineer, as defined in Section 014000 "Quality
Requirements," to design glazed aluminum curtain walls.
B. General Performance: Comply with performance requirements specified, as determined by testing of
glazed aluminum curtain walls representing those indicated for this Project without failure due to
defective manufacture, fabrication, installation, or other defects in construction.
1. Glazed aluminum curtain walls shall withstand movements of supporting structure, including, but
not limited to, story drift, twist, column shortening, long-term creep, and deflection from
uniformly distributed and concentrated live loads.
2. Failure also includes the following:
a. Thermal stresses transferring to building structure.
b. Glass breakage.
c. Noise or vibration created by wind and thermal and structural movements.
d. Loosening or weakening of fasteners, attachments, and other components.
e. Failure of operating units.
C. Structural Loads:
1. Wind Loads: As indicated on Drawings.
2. Other Design Loads: As indicated on Drawings.
D. Deflection of Framing Members Supporting Glass: At design wind load, as follows:
1. Deflection Normal to Wall Plane: Limited to 1/175 of clear span for spans of up to 13 feet 6
inches (4.1 m) and to 1/240 of clear span plus 1/4 inch (6.35 mm) for spans of greater than 13 feet
6 inches (4.1 m).
2. Deflection Parallel to Glazing Plane: Limited to amount not exceeding that which reduces glazing
bite to less than 75 percent of design dimension and that which reduces edge clearance between
framing members and glazing or other fixed components to less than 1/8 inch (3.2 mm).
3. Cantilever Deflection: Limited to 2l/175 at unsupported cantilevers.
E. Structural: Test in accordance with ASTM E330/E330M as follows:

BTBC Phase III October 26, 2020
GE Project No. 0119-0010
Gould Evans
GLAZED ALUMINUM CURTAIN WALLS 084413 - 5
1. When tested at positive and negative wind-load design pressures, assemblies do not evidence
deflection exceeding specified limits.
2. When tested at 150 percent of positive and negative wind-load design pressures, assemblies,
including anchorage, do not evidence material failures, structural distress, or permanent
deformation of main framing members exceeding 0.2 percent of span.
3. Test Durations: As required by design wind velocity, but not less than 10 seconds.
F. Water Penetration under Static Pressure: Test in accordance with ASTM E331 as follows:
1. No evidence of water penetration through fixed glazing and framing areas when tested in
accordance with a minimum static-air-pressure differential of 20 percent of positive wind-load
design pressure, but not less than 10 lbf/sq. ft. (480 Pa).
G. Water Penetration under Dynamic Pressure: Test in accordance with AAMA 501.1 as follows:
1. No evidence of water penetration through fixed glazing and framing areas when tested at dynamic
pressure equal to 20 percent of positive wind-load design pressure, but not less than 10 lbf/sq. ft.
(480 Pa).
2. Maximum Water Leakage: In accordance with AAMA 501.1 and no uncontrolled water
penetrating assemblies or water appearing on assemblies' normally exposed interior surfaces from
sources other than condensation. Water leakage does not include water controlled by flashing and
gutters or water that is drained to exterior.
H. Interstory Drift: Accommodate design displacement of adjacent stories indicated.
1. Design Displacement: As indicated on Drawings.
2. Test Performance: Complying with criteria for passing based on building occupancy type when
tested in accordance with AAMA 501.4 at design displacement and 1.5 times the design
displacement.
I. Energy Performance: Certified and labelled by manufacturer for energy performance as follows:
1. Thermal Transmittance (U-factor):
a. Fixed Glazing and Framing Areas: U-factor for the system of not more than 0.36 Btu/sq. ft.
x h x deg F (2.04 W/sq. m x K) as determined in accordance with NFRC 100.
2. Solar Heat Gain Coefficient (SHGC):
a. Fixed Glazing and Framing Areas: SHGC for the system of not more than 0.35 as
determined in accordance with NFRC 200.
3. Air Leakage:
a. Fixed Glazing and Framing Areas: Air leakage for the system of not more than 0.06
cfm/sq. ft. (0.30 L/s per sq. m) at a static-air-pressure differential of 6.24 lbf/sq. ft. (300 Pa)
when tested in accordance with ASTM E283.
4. Condensation Resistance Factor (CRF):
a. Fixed Glazing and Framing Areas: CRF for the system of not less than 45 as determined in
accordance with AAMA 1503.

BTBC Phase III October 26, 2020
GE Project No. 0119-0010
Gould Evans
GLAZED ALUMINUM CURTAIN WALLS 084413 - 6
J. Thermal Movements: Allow for thermal movements resulting from ambient and surface temperature
changes:
1. Temperature Change: 120 deg F (67 deg C), ambient; 180 deg F (100 deg C), material surfaces.
2.2 SOURCE LIMITATIONS
A. Obtain all components of curtain-wall system and storefront system, including framing entrances and
accessories, from single manufacturer.
2.3 GLAZED ALUMINUM CURTAIN WALL SYSTEMS
A. Manufacturers: Subject to compliance with requirements, provide products by one of the following:
1. Kawneer North America, an Arconic company.
a. Basis of Design: 1600 Wall System 1
b. Profile: 2-1/2” x 7-1/2” Heavywall Mullion
2. Tubelite Inc.
3. YKK AP America Inc.
4. Manko Window Systems, Inc.
B. Framing Members: Manufacturer's extruded- or formed-aluminum framing members of thickness
required and reinforced as required to support imposed loads.
1. Construction: Thermally broken.
2. Glazing System: Retained mechanically with gaskets on four sides.
3. Glazing Plane: Front.
4. Finish: Clear anodic finish.
5. System: Either stick or unitized system.
6. Aluminum: Alloy and temper recommended by manufacturer for type of use and finish indicated.
7. Steel Reinforcement: As required by manufacturer.
C. Pressure Caps: Manufacturer's standard aluminum components that mechanically retain glazing.
1. Include snap-on aluminum trim that conceals fasteners.
D. Brackets and Reinforcements: Manufacturer's standard high-strength aluminum with nonstaining,
nonferrous shims for aligning system components.
2.4 GLAZING
A. Glazing: Comply with Section 088000 "Glazing."
B. Glazing Gaskets: ASTM C509 or ASTM C864. Manufacturer's standard.
1. Color: Black.
C. Glazing Sealants: As recommended by manufacturer.

BTBC Phase III October 26, 2020
GE Project No. 0119-0010
Gould Evans
GLAZED ALUMINUM CURTAIN WALLS 084413 - 7
2.5 MATERIALS
A. Sheet and Plate: ASTM B209 (ASTM B209M).
B. Extruded Bars, Rods, Profiles, and Tubes: ASTM B221 (ASTM B221M).
C. Structural Profiles: ASTM B308/B308M.
D. Steel Reinforcement:
1. Structural Shapes, Plates, and Bars: ASTM A36/A36M.
2. Cold-Rolled Sheet and Strip: ASTM A1008/A1008M.
3. Hot-Rolled Sheet and Strip: ASTM A1011/A1011M.
E. Steel Reinforcement Primer: Manufacturer's standard zinc-rich, corrosion-resistant primer complying
with SSPC-PS Guide No. 12.00; applied immediately after surface preparation and pretreatment. Select
surface preparation methods in accordance with recommendations in SSPC-SP COM, and prepare
surfaces in accordance with applicable SSPC standard.
2.6 ACCESSORIES
A. Fasteners and Accessories: Manufacturer's standard corrosion-resistant, nonstaining, nonbleeding
fasteners and accessories compatible with adjacent materials.
1. Use self-locking devices where fasteners are subject to loosening or turning out from thermal and
structural movements, wind loads, or vibration.
2. Reinforce members as required to receive fastener threads.
3. Use exposed fasteners with countersunk Phillips screw heads, fabricated from 300 series stainless
steel.
B. Anchors: Three-way adjustable anchors with minimum adjustment of 1 inch (25.4 mm) that
accommodate fabrication and installation tolerances in material and finish compatible with adjoining
materials and recommended by manufacturer.
1. Concrete and Masonry Inserts: Hot-dip galvanized cast-iron, malleable-iron, or steel inserts
complying with ASTM A123/A123M or ASTM A153/A153M requirements.
C. Concealed Flashing: Dead-soft, 0.018-inch- (0.457-mm-) thick stainless steel, ASTM A240/A240M of
type recommended by manufacturer.
D. Bituminous Paint: Cold-applied asphalt-mastic paint containing no asbestos, formulated for 30-mil
(0.762-mm) thickness per coat.
2.7 FABRICATION
A. Form or extrude aluminum shapes before finishing.
B. Fabricate components that, when assembled, have the following characteristics:
1. Profiles that are sharp, straight, and free of defects or deformations.
2. Accurately fitted joints with ends coped or mitered.
3. Physical and thermal isolation of glazing from framing members.

BTBC Phase III October 26, 2020
GE Project No. 0119-0010
Gould Evans
GLAZED ALUMINUM CURTAIN WALLS 084413 - 8
4. Accommodations for thermal and mechanical movements of glazing and framing to maintain
required glazing edge clearances.
5. Provisions for field replacement of glazing from exterior.
C. Fabricate components to resist water penetration as follows:
1. Internal guttering system or other means to drain water passing joints, condensation occurring
within framing members, and moisture migrating within glazed aluminum curtain wall to exterior.
D. Curtain-Wall Framing: Fabricate components for assembly using manufacturer's standard assembly
method.
E. Factory-Assembled Frame Units:
1. Rigidly secure nonmovement joints.
2. Prepare surfaces that are in contact with structural sealant in accordance with sealant
manufacturer's written instructions, to ensure compatibility and adhesion. Preparation includes, but
is not limited to, cleaning and priming surfaces.
3. Seal joints watertight unless otherwise indicated.
4. Install glazing to comply with requirements in Section 088000 "Glazing."
F. After fabrication, clearly mark components to identify their locations in Project in accordance with Shop
Drawings.
2.8 ALUMINUM FINISHES
A. Clear Anodic Finish: AAMA 611, AA-M12C22A41, Class I, 0.018 mm or thicker.
PART 3 - EXECUTION
3.1 EXAMINATION
A. Examine areas, with Installer present, for compliance with requirements for installation tolerances and
other conditions affecting performance of the Work.
B. Proceed with installation only after unsatisfactory conditions have been corrected.
3.2 INSTALLATION, GENERAL
A. Comply with manufacturer's written instructions.
B. Do not install damaged components.
C. Fit joints to produce hairline joints free of burrs and distortion.
D. Rigidly secure nonmovement joints.
E. Install anchors with separators and isolators to prevent metal corrosion and electrolytic deterioration and
to prevent impeding movement of moving joints.

BTBC Phase III October 26, 2020
GE Project No. 0119-0010
Gould Evans
GLAZED ALUMINUM CURTAIN WALLS 084413 - 9
F. Where welding is required, weld components in concealed locations to minimize distortion or
discoloration of finish. Protect glazing surfaces from welding.
G. Seal joints watertight unless otherwise indicated.
H. Metal Protection:
1. Where aluminum is in contact with dissimilar metals, protect against galvanic action by painting
contact surfaces with primer, applying sealant or tape, or installing nonconductive spacers as
recommended by manufacturer for this purpose.
2. Where aluminum is in contact with concrete or masonry, protect against corrosion by painting
contact surfaces with bituminous paint.
I. Install components to drain water passing joints, condensation occurring within framing members, and
moisture migrating within glazed aluminum curtain wall to exterior.
J. Install components plumb and true in alignment with established lines and grades.
3.3 INSTALLATION OF GLAZING
A. Install glazing as specified in Section 088000 "Glazing."
3.4 ERECTION TOLERANCES
A. Install glazed aluminum curtain walls to comply with the following maximum tolerances:
1. Plumb: 1/8 inch in 10 feet (3.2 mm in 3 m); 1/4 inch in 40 feet (6.35 mm in 12.2 m).
2. Level: 1/8 inch in 20 feet (3.2 mm in 6 m); 1/4 inch in 40 feet (6.35 mm in 12.2 m).
3. Alignment:
a. Where surfaces abut in line or are separated by reveal or protruding element up to 1/2 inch
(12.7 mm) wide, limit offset from true alignment to 1/16 inch (1.6 mm).
b. Where surfaces are separated by reveal or protruding element from 1/2 to 1 inch (12.7 to
25.4 mm) wide, limit offset from true alignment to 1/8 inch (3.2 mm).
c. Where surfaces are separated by reveal or protruding element of 1 inch (25.4 mm) wide or
more, limit offset from true alignment to 1/4 inch (6 mm).
4. Location: Limit variation from plane to 1/8 inch in 12 feet (3.2 mm in 3.6 m); 1/2 inch (12.7 mm)
over total length.
3.5 FIELD QUALITY CONTROL
A. Testing Agency: Owner will engage a qualified testing agency to perform tests and inspections.
B. Test Area: Perform tests on one bay at least 30 feet (9.1 m), by two stories.
C. Field Quality-Control Testing: Perform the following test on representative areas of glazed aluminum
curtain walls.
1. Water-Spray Test: Before installation of interior finishes has begun, areas designated by Architect
shall be tested in accordance with AAMA 501.2 and shall not evidence water penetration.

BTBC Phase III October 26, 2020
GE Project No. 0119-0010
Gould Evans
GLAZED ALUMINUM CURTAIN WALLS 084413 - 10
a. Perform a minimum of two tests in areas as directed by Architect.
2. Air Leakage: ASTM E783 at 1.5 times the rate specified for laboratory testing in "Performance
Requirements" Article but not more than 0.09 cfm/sq. ft. (0.45 L/s per sq. m) at a static-air-
pressure differential of 1.57 lbf/sq. ft. (75 Pa).
a. Perform a minimum of two tests in areas as directed by Architect.
3. Water Penetration: ASTM E1105 at a minimum uniform and cyclic static-air-pressure differential
of 0.67 times the static-air-pressure differential specified for laboratory testing in "Performance
Requirements" Article, but not less than 6.24 lbf/sq. ft. (300 Pa), and shall not evidence water
penetration.
D. Glazed aluminum curtain walls will be considered defective if they do not pass tests and inspections.
E. Prepare test and inspection reports.
END OF SECTION 084413

BTBC Phase III October 26, 2020
GE Project No. 0119-0010
Gould Evans
DOOR HARDWARE 087100-1
SECTION 08 71 00 – DOOR HARDWARE
GENERAL
1.01 RELATED DOCUMENTS
A. Drawings and general provisions of the Contract, including General and Supplementary Conditions and Division 01 Specification Sections, apply to this Section.
1.02 SUMMARY
A. Section includes:
1. Mechanical and electrified door hardware for:
a. Swinging doors.
2. Electronic access control system components, including:
a. Electronic access control devices.
3. Field verification, preparation and modification of existing doors and frames to receive new door hardware.
4. The intent of the hardware specification is to specify the hardware for interior and exterior doors, and to establish a type, continuity, and standard of quality. However, it is the door hardware supplier’s responsibility to thoroughly review existing conditions, schedules, specifications, drawings, and other Contract Documents to verify the suitability of the hardware specified.
B. Exclusions: Unless specifically listed in hardware sets, hardware is not specified in this section for:
1. Windows 2. Cabinets (casework), including locks in cabinets 3. Signage 4. Toilet accessories 5. Overhead doors
C. Related Sections:
1. Division 01 Section “Alternates” for alternates affecting this section. 2. Division 07 Section “Joint Sealants” for sealant requirements applicable to threshold
installation specified in this section. 3. Division 09 sections for touchup, finishing or refinishing of existing openings modified by
this section. 4. Division 13 Section “Radiation Protection” for requirements for lead-lining for door
hardware at openings indicated to receive radiation protection. 5. Division 26 sections for connections to electrical power system and for low-voltage wiring.

BTBC Phase III October 26, 2020
GE Project No. 0119-0010
Gould Evans
DOOR HARDWARE 087100-2
6. Division 28 sections for coordination with other components of electronic access control system.
1.03 REFERENCES
A. UL - Underwriters Laboratories
1. UL 10B - Fire Test of Door Assemblies 2. UL 10C - Positive Pressure Test of Fire Door Assemblies 3. UL 1784 - Air Leakage Tests of Door Assemblies 4. UL 305 - Panic Hardware
B. DHI - Door and Hardware Institute
1. Sequence and Format for the Hardware Schedule 2. Recommended Locations for Builders Hardware 3. Key Systems and Nomenclature
C. ANSI - American National Standards Institute
1. ANSI/BHMA A156.1 - A156.29, and ANSI/BHMA A156.31 - Standards for Hardware and Specialties
1.04 SUBMITTALS
A. General:
1. Submit in accordance with Conditions of Contract and Division 01 requirements. 2. Highlight, encircle, or otherwise specifically identify on submittals deviations from
Contract Documents, issues of incompatibility or other issues which may detrimentally affect the Work.
3. Prior to forwarding submittal, comply with procedures for verifying existing door and frame compatibility for new hardware, as specified in PART 3, “EXAMINATION” article, herein.
B. Action Submittals:
1. Product Data: Technical product data for each item of door hardware, installation instructions, maintenance of operating parts and finish, and other information necessary to show compliance with requirements.
2. Riser and Wiring Diagrams: After final approval of hardware schedule, submit details of electrified door hardware, indicating:
a. Wiring Diagrams: For power, signal, and control wiring and including: 1) Details of interface of electrified door hardware and building safety and security
systems. 2) Schematic diagram of systems that interface with electrified door hardware. 3) Point-to-point wiring. 4) Risers.
3. Samples for Verification: If requested by Architect, submit production sample of requested door hardware unit in finish indicated, and tagged with full description for coordination with schedule.

BTBC Phase III October 26, 2020
GE Project No. 0119-0010
Gould Evans
DOOR HARDWARE 087100-3
a. Samples will be returned to supplier. Units that are acceptable to Architect may, after final check of operations, be incorporated into Work, within limitations of key coordination requirements.
4. Door Hardware Schedule: Submit schedule with hardware sets in vertical format as illustrated by Sequence of Format for the Hardware Schedule as published by the Door and Hardware Institute. Indicate complete designations of each item required for each door or opening, include:
a. Door Index; include door number, heading number, and Architects hardware set number.
b. Opening Lock Function Spreadsheet: List locking device and function for each opening.
c. Quantity, type, style, function, size, and finish of each hardware item. d. Name and manufacturer of each item. e. Fastenings and other pertinent information. f. Location of each hardware set cross-referenced to indications on Drawings. g. Explanation of all abbreviations, symbols, and codes contained in schedule. h. Mounting locations for hardware. i. Door and frame sizes and materials. j. Name and phone number for local manufacturer's representative for each product. k. Operational Description of openings with any electrified hardware (locks, exits,
electromagnetic locks, electric strikes, automatic operators, door position switches, magnetic holders or closer/holder units, and access control components). Operational description should include operational descriptions for: egress, ingress (access), and fire/smoke alarm connections. 1) Submittal Sequence: Submit door hardware schedule concurrent with
submissions of Product Data, Samples, and Shop Drawings. Coordinate submission of door hardware schedule with scheduling requirements of other work to facilitate fabrication of other work that is critical in Project construction schedule.
5. Key Schedule:
a. After Keying Conference, provide keying schedule listing levels of keying as well as explanation of key system's function, key symbols used and door numbers controlled.
b. Use ANSI/BHMA A156.28 “Recommended Practices for Keying Systems” as guideline for nomenclature, definitions, and approach for selecting optimal keying system.
c. Provide 3 copies of keying schedule for review prepared and detailed in accordance with referenced DHI publication. Include schematic keying diagram and index each key to unique door designations.
d. Index keying schedule by door number, keyset, hardware heading number, cross keying instructions, and special key stamping instructions.
e. Provide one complete bitting list of key cuts and one key system schematic illustrating system usage and expansion. 1) Forward bitting list, key cuts and key system schematic directly to Owner, by
means as directed by Owner.
f. Prepare key schedule by or under supervision of supplier, detailing Owner’s final keying instructions for locks.
6. Templates: After final approval of hardware schedule, provide templates for doors, frames and other work specified to be factory or shop prepared for door hardware installation.

BTBC Phase III October 26, 2020
GE Project No. 0119-0010
Gould Evans
DOOR HARDWARE 087100-4
C. Informational Submittals:
1. Qualification Data: For Supplier, Installer and Architectural Hardware Consultant. 2. Product data for electrified door hardware:
a. Certify that door hardware approved for use on types and sizes of labeled fire-rated doors complies with listed fire-rated door assemblies.
3. Warranty: Special warranty specified in this Section.
D. Closeout Submittals:
1. Operations and Maintenance Data: Provide in accordance with Division 01 and include:
a. Complete information on care, maintenance, and adjustment; data on repair and replacement parts, and information on preservation of finishes.
b. Catalog pages for each product. c. Factory order acknowledgement numbers (for warranty and service) d. Name, address, and phone number of local representative for each manufacturer. e. Parts list for each product. f. Final approved hardware schedule, edited to reflect conditions as-installed. g. Final keying schedule h. Copies of floor plans with keying nomenclature i. As-installed wiring diagrams for each opening connected to power, both low voltage
and 110 volts. j. Copy of warranties including appropriate reference numbers for manufacturers to
identify project.
1.05 QUALITY ASSURANCE
A. Supplier Qualifications and Responsibilities: Recognized architectural hardware supplier with record of successful in-service performance for supplying door hardware similar in quantity, type, and quality to that indicated for this Project and that provides certified Architectural Hardware Consultant (AHC) or Door Hardware Consultant (DHC) available to Owner, Architect, and Contractor, at reasonable times during the Work for consultation.
1. Warehousing Facilities: In Project's vicinity. 2. Scheduling Responsibility: Preparation of door hardware and keying schedules. 3. Engineering Responsibility: Preparation of data for electrified door hardware, including
Shop Drawings, based on testing and engineering analysis of manufacturer's standard units in assemblies similar to those indicated for this Project.
4. Coordination Responsibility: Assist in coordinating installation of electronic security hardware with Architect and electrical engineers and provide installation and technical data to Architect and other related subcontractors.
a. Upon completion of electronic security hardware installation, inspect and verify that all components are working properly.
B. Architectural Hardware Consultant Qualifications: Person who is experienced in providing consulting services for door hardware installations that are comparable in material, design, and extent to that indicated for this Project and meets these requirements:
1. For door hardware, DHI-certified, Architectural Hardware Consultant (AHC) or Door Hardware Technician (DHT).

BTBC Phase III October 26, 2020
GE Project No. 0119-0010
Gould Evans
DOOR HARDWARE 087100-5
2. Can provide installation and technical data to Architect and other related subcontractors. 3. Can inspect and verify components are in working order upon completion of installation. 4. Capable of producing wiring diagrams. 5. Capable of coordinating installation of electrified hardware with Architect and electrical
engineers.
C. Single Source Responsibility: Obtain each type of door hardware from single manufacturer.
D. Fire-Rated Door Openings: Provide door hardware for fire-rated openings that complies with NFPA 80 and requirements of authorities having jurisdiction. Provide only items of door hardware that are listed products tested by Underwriters Laboratories, Intertek Testing Services, or other testing and inspecting organizations acceptable to authorities having jurisdiction for use on types and sizes of doors indicated, based on testing at positive pressure and according to NFPA 252 or UL 10C and in compliance with requirements of fire-rated door and door frame labels.
E. Electrified Door Hardware: Listed and labeled as defined in NFPA 70, Article 100, by testing agency acceptable to authorities having jurisdiction.
F. Accessibility Requirements: For door hardware on doors in an accessible route, comply with governing accessibility regulations cited in “REFERENCES” article, herein.
G. Keying Conference
1. Incorporate keying conference decisions into final keying schedule after reviewing door hardware keying system including:
a. Function of building, flow of traffic, purpose of each area, degree of security required, and plans for future expansion.
b. Preliminary key system schematic diagram. c. Requirements for key control system. d. Requirements for access control. e. Address for delivery of keys.
H. Pre-installation Conference
1. Review and finalize construction schedule and verify availability of materials, Installer's personnel, equipment, and facilities needed to make progress and avoid delays.
2. Inspect and discuss preparatory work performed by other trades. 3. Inspect and discuss electrical roughing-in for electrified door hardware. 4. Review sequence of operation for each type of electrified door hardware. 5. Review required testing, inspecting, and certifying procedures.
I. Coordination Conferences:
1. Installation Coordination Conference: Prior to hardware installation, schedule and hold meeting to review questions or concerns related to proper installation and adjustment of door hardware.
2. Electrified Hardware Coordination Conference: Prior to ordering electrified hardware, schedule and hold meeting to coordinate door hardware with security, electrical, doors and frames, and other related suppliers.

BTBC Phase III October 26, 2020
GE Project No. 0119-0010
Gould Evans
DOOR HARDWARE 087100-6
1.06 DELIVERY, STORAGE, AND HANDLING
A. Inventory door hardware on receipt and provide secure lock-up for hardware delivered to Project site.
B. Tag each item or package separately with identification coordinated with final door hardware schedule, and include installation instructions, templates, and necessary fasteners with each item or package.
1. Deliver each article of hardware in manufacturer’s original packaging.
C. Project Conditions:
1. Maintain manufacturer-recommended environmental conditions throughout storage and installation periods.
2. Provide secure lock-up for door hardware delivered to Project. Control handling and installation of hardware items so that completion of Work will not be delayed by hardware losses both before and after installation.
D. Protection and Damage:
1. Promptly replace products damaged during shipping. 2. Handle hardware in manner to avoid damage, marring, or scratching. Correct, replace or
repair products damaged during Work. 3. Protect products against malfunction due to paint, solvent, cleanser, or any chemical
agent.
E. Deliver keys directly to the University locksmith, along with a typed schedule of keys, before substantial Completion of the project. Keys shall be sent via certified mail or personal delivery, with a copy of the receipt that has been signed by FO Lock shop personnel given to the DCM Construction Manager. Refer to Division One for criteria regarding temporary keys for access to existing spaces.
1.07 COORDINATION
A. Coordinate layout and installation of floor-recessed door hardware with floor construction. Cast anchoring inserts into concrete.
B. Installation Templates: Distribute for doors, frames, and other work specified to be factory or shop prepared. Check Shop Drawings of other work to confirm that adequate provisions are made for locating and installing door hardware to comply with indicated requirements.
C. Security: Coordinate installation of door hardware, keying, and access control with Owner's security consultant.
D. Electrical System Roughing-In: Coordinate layout and installation of electrified door hardware with connections to power supplies and building safety and security systems.
E. Existing Openings: Where existing doors, frames and/or hardware are to remain, field verify existing functions, conditions and preparations and coordinate to suit opening conditions and to provide proper door operation.

BTBC Phase III October 26, 2020
GE Project No. 0119-0010
Gould Evans
DOOR HARDWARE 087100-7
1.08 WARRANTY
A. Warranty: Manufacturer's standard form in which manufacturer agrees to repair or replace components of door hardware that fail in materials or workmanship within specified warranty period.
1. Warranty Period: Beginning from date of Substantial Completion, for durations indicated.
a. Closers: 1) Mechanical: 30 Years 2) Electrified: 2 years.
b. Automatic Operators: 2 Years c. Exit Devices:
1) Mechanical: 3 years. 2) Electrified: 1 year.
d. Locksets: 1) Mechanical: 3 years. 2) Electrified: 1 year.
e. Continuous Hinges: Lifetime warranty. f. Key Blanks: Lifetime
2. Warranty does not cover damage or faulty operation due to improper installation, improper use or abuse.
1.09 MAINTENANCE
A. Maintenance Tools: Furnish complete set of special tools required for maintenance and adjustment of hardware, including changing of cylinders.
PRODUCTS
2.01 MANUFACTURERS
A. The Owner requires use of certain products for their unique characteristics and project suitability to insure continuity of existing and future performance and maintenance standards. After investigating available product offerings, the Awarding Authority has elected to prepare proprietary specifications. These products are specified with the notation: “No Substitute.”
1. Where “No Substitute” is noted, submittals and substitution requests for other products will not be considered.
B. Approval of manufacturers and/or products other than those listed as “Scheduled Manufacturer” or “Acceptable Manufacturers” in the individual article for the product category shall be in accordance with QUALITY ASSURANCE article, herein.
C. Approval of products from manufacturers indicated in “Acceptable Manufacturers” is contingent upon those products providing all functions and features and meeting all requirements of scheduled manufacturer’s product.

BTBC Phase III October 26, 2020
GE Project No. 0119-0010
Gould Evans
DOOR HARDWARE 087100-8
D. Where specified hardware is not adaptable to finished shape or size of members requiring hardware, furnish suitable types having same operation and quality as type specified, subject to Architect's approval.
2.02 MATERIALS
A. Fasteners
1. Provide hardware manufactured to conform to published templates, generally prepared for machine screw installation.
2. Furnish screws for installation with each hardware item. Finish exposed (exposed under any condition) screws to match hardware finish, or, if exposed in surfaces of other work, to match finish of this other work including prepared for paint surfaces to receive painted finish.
3. Provide concealed fasteners for hardware units exposed when door is closed except when no standard units of type specified are available with concealed fasteners. Do not use thru-bolts for installation where bolt head or nut on opposite face is exposed in other work unless thru-bolts are required to fasten hardware securely. Review door specification and advise Architect if thru-bolts are required.
4. Install hardware with fasteners provided by hardware manufacturer.
B. Modification and Preparation of Existing Doors: Where existing door hardware is indicated to be removed and reinstalled.
1. Provide necessary fillers, Dutchmen, reinforcements, and fasteners, compatible with existing materials, as required for mounting new opening hardware and to cover existing door and frame preparations.
2. Use materials which match materials of adjacent modified areas. 3. When modifying existing fire-rated openings, provide materials permitted by NFPA 80 as
required to maintain fire-rating.
C. Provide screws, bolts, expansion shields, drop plates and other devices necessary for hardware installation.
1. Where fasteners are exposed to view: Finish to match adjacent door hardware material.
2.03 HINGES
A. Manufacturers and Products:
1. Scheduled Manufacturer and Product: Ives 5BB series. 2. Acceptable Manufacturers and Products: Hager BB series, Stanley FBB Series.
B. Requirements:
1. Provide hinges conforming to ANSI/BHMA A156.1. 2. 1-3/4 inch (44 mm) thick doors, up to and including 36 inches (914 mm) wide:
a. Exterior: Standard weight, bronze or stainless steel, 4-1/2 inches (114 mm) high b. Interior: Standard weight, steel, 4-1/2 inches (114 mm) high
3. 1-3/4 inch (44 mm) thick doors over 36 inches (914 mm) wide:

BTBC Phase III October 26, 2020
GE Project No. 0119-0010
Gould Evans
DOOR HARDWARE 087100-9
a. Exterior: Heavy weight, bronze/stainless steel, 5 inches (127 mm) high b. Interior: Heavy weight, steel, 5 inches (127 mm) high
4. 2 inches or thicker doors:
a. Exterior: Heavy weight, bronze or stainless steel, 5 inches (127 mm) high b. Interior: Heavy weight, steel, 5 inches (127 mm) high
5. Provide three hinges per door leaf for doors 90 inches (2286 mm) or less in height, and one additional hinge for each 30 inches (762 mm) of additional door height.
6. Where new hinges are specified for existing doors or existing frames, provide new hinges of identical size to hinge preparation present in existing door or existing frame.
7. Hinge Pins: Except as otherwise indicated, provide hinge pins as follows:
a. Steel Hinges: Steel pins b. Non-Ferrous Hinges: Stainless steel pins c. Out-Swinging Exterior Doors: Non-removable pins d. Out-Swinging Interior Lockable Doors: Non-removable pins e. Interior Non-lockable Doors: Non-rising pins
8. Width of hinges: 4-1/2 inches (114 mm) at 1-3/4 inch (44 mm) thick doors, and 5 inches (127 mm) at 2 inches (51 mm) or thicker doors. Adjust hinge width as required for door, frame, and wall conditions to allow proper degree of opening.
9. Provide hinges with electrified options as scheduled in the hardware sets. Provide with sufficient number and wire gage to accommodate electric function of specified hardware. Locate electric hinge at second hinge from bottom or nearest to electrified locking component.
10. Provide mortar guard for each electrified hinge specified. 11. Provide spring hinges where specified. Provide two spring hinges and one bearing hinge
per door leaf for doors 90 inches (2286 mm) or less in height. Provide one additional bearing hinge for each 30 inches (762 mm) of additional door height.
2.04 CONTINUOUS HINGES
A. Aluminum Geared
1. Manufacturers:
a. Scheduled Manufacturer: Ives. b. Acceptable Manufacturers: Baldwin, Bommer.
2. Requirements:
a. Provide aluminum geared continuous hinges conforming to ANSI/BHMA A156.26, Grade 1.
b. Provide aluminum geared continuous hinges, where specified in the hardware sets, fabricated from 6063-T6 aluminum.
c. Provide split nylon bearings at each hinge knuckle for quiet, smooth, self-lubricating operation.
d. Provide hinges capable of supporting door weights up to 450 pounds, and successfully tested for 1,500,000 cycles.
e. On fire-rated doors, provide aluminum geared continuous hinges that are classified for use on rated doors by testing agency acceptable to authority having jurisdiction.
BTBC Phase III October 26, 2020
GE Project No. 0119-0010
Gould Evans
DOOR HARDWARE 087100-10
f. Provide aluminum geared continuous hinges with electrified option scheduled in the hardware sets. Provide with sufficient number and wire gage to accommodate electric function of specified hardware.
g. Install hinges with fasteners supplied by manufacturer. h. Provide hinges 1 inch (25 mm) shorter in length than nominal height of door, unless
otherwise noted or door details require shorter length and with symmetrical hole pattern.
2.05 ELECTRIC POWER TRANSFER
A. Manufacturers:
a. Scheduled Manufacturer: Von Duprin EPT-10. b. Acceptable Manufacturers: Securitron CEPT-10.
B. Provide power transfer with electrified options as scheduled in the hardware sets. Provide with number and gage of wires sufficient to accommodate electric function of specified hardware.
C. Locate electric power transfer per manufacturer’s template and UL requirements, unless interference with operation of door or other hardware items.
2.06 FLUSH BOLTS
A. Manufacturers:
1. Scheduled Manufacturer: Ives. 2. Acceptable Manufacturers: Burns, Rockwood.
B. Requirements:
1. Provide automatic, constant latching, and manual flush bolts with forged bronze or stainless-steel face plates, extruded brass levers, and with wrought brass guides and strikes. Provide 12 inch (305 mm) steel or brass rods at doors up to 90 inches (2286 mm) in height. For doors over 90 inches (2286 mm) in height increase top rods by 6 inches (152 mm) for each additional 6 inches (152 mm) of door height. Provide dust-proof strikes at each bottom flush bolt.
2.07 COORDINATORS
A. Manufacturers:
1. Scheduled Manufacturer: Ives. 2. Acceptable Manufacturers: Burns, Rockwood.
B. Requirements:
1. Where pairs of doors are equipped with automatic flush bolts, an astragal, or other hardware that requires synchronized closing of the doors, provide bar-type coordinating device, surface applied to underside of stop at frame head.

BTBC Phase III October 26, 2020
GE Project No. 0119-0010
Gould Evans
DOOR HARDWARE 087100-11
2. Provide filler bar of correct length for unit to span entire width of opening, and appropriate brackets for parallel arm door closers, surface vertical rod exit device strikes or other stop mounted hardware. Factory-prepared coordinators for vertical rod devices as specified.
2.08 CYLINDRICAL LOCKS – GRADE 1
A. Manufacturers and Products:
1. Scheduled Manufacturer and Product: Schlage ND Series. (No Substitution)
B. Requirements:
1. Provide cylindrical locks conforming to ANSI/BHMA A156.2 Series 4000, Grade 1. Cylinders: Refer to “KEYING” article, herein.
2. Provide cylindrical locks with classroom security function with an inside indicator that provides clear direction for users to safely and quickly secure the room.
3. Provide locksets able to withstand 3100 inch pounds of torque applied to locked outside lever without gaining access per ANSI/BHMA A156.2 Abusive Locked Lever Torque Test and cycle tested to 3 million cycles per ANSI/BHMA A156.2 Cycle Test.
4. Provide levers with vandal resistant technology for use at heavy traffic or abusive applications. Levers feature internal lock components that prevent damage caused by excessive force from persons kicking, hitting or standing on lever to gain access.
5. Provide solid steel rotational stops to control excessive rotation of lever. 6. Provide completely refunctionable lockset that allows lock function to be changed to over
twenty other common functions by swapping easily accessible parts. 7. Provide locks with standard 2-3/4 inches (70 mm) backset, unless noted otherwise, with
1/2 inch latch throw. Provide proper latch throw for UL listing at pairs. 8. Provide locksets with separate anti-rotation thru-bolts, and no exposed screws. 9. Provide independently operating levers with two external return spring cassettes mounted
under roses to prevent lever sag. 10. Provide standard ASA strikes unless extended lip strikes are necessary to protect trim. 11. Provide electrified options as scheduled in the hardware sets. 12. Lever Trim: Solid cast levers without plastic inserts, and wrought roses on both sides.
a. Lever Design: Schlage Sparta.
2.09 EXIT DEVICES
A. Manufacturers and Products:
1. Scheduled Manufacturer and Product: Von Duprin 99/33A series. (No Substitution)
B. Requirements:
1. Provide exit devices tested to ANSI/BHMA A156.3 Grade 1 and UL listed for Panic Exit or Fire Exit Hardware.
2. Cylinders: Refer to “KEYING” article, herein. 3. Provide touchpad type exit devices, fabricated of brass, bronze, stainless steel, or
aluminum, plated to standard architectural finishes to match balance of door hardware. 4. Touchpad must extend a minimum of one half of door width. No plastic inserts are
allowed in touchpads. 5. Provide exit devices with deadlatching feature for security and for future addition of alarm
kits and/or other electrified requirements.

BTBC Phase III October 26, 2020
GE Project No. 0119-0010
Gould Evans
DOOR HARDWARE 087100-12
6. Provide flush end caps for exit devices. 7. Provide exit devices with manufacturer’s approved strikes. 8. Provide exit devices cut to door width and height. Install exit devices at height
recommended by exit device manufacturer, allowable by governing building codes, and approved by Architect.
9. Mount mechanism case flush on face of doors, or provide spacers to fill gaps behind devices. Where glass trim or molding projects off face of door, provide glass bead kits.
10. Provide cylinder or hex-key dogging as specified at non fire-rated openings. 11. Removable Mullions: 2 inches (51 mm) x 3 inches (76 mm) steel tube. Where scheduled
as keyed removable mullion, provide type that can be removed by use of a keyed cylinder, which is self-locking when re-installed.
12. Provide factory drilled weep holes for exit devices used in full exterior application, highly corrosive areas, and where noted in hardware sets.
13. Provide electrified options as scheduled. 14. Top latch mounting: double or single tab mount for steel doors, face mount for
aluminum doors eliminating requirement of tabs, and double tab mount for wood doors. 15. Provide exit devices with optional trim designs to match other lever and pull designs used
on the project.
2.10 ELECTRONIC ACCESS CONTROL LOCKSETS AND EXIT DEVICE TRIM
A. Manufacturers:
1. Scheduled Manufacturer and Product: Schlage AD Series. (No Substitution)
B. Product: Adaptable bored-type standalone electronic lockset.
1. Provide bored cylindrical locks conforming to ANSI/BHMA A156.2 Series 4000, Grade 1, non-handed, field-reversible.
2. Latchbolt Throw: 1/2-inch (13 mm) unless noted otherwise. Provide 3/4-inch (19 mm) throw for UL listing at pairs.
3. Chassis: Standard 161 cylindrical lock prep for 1-3/4-inch (44 mm) doors
2.11 ELECTRIC STRIKES
A. Manufacturers and Products:
1. Scheduled Manufacturer and Product: Von Duprin 6000 Series. 2. Acceptable Manufacturers and Products: Folger Adam 300 Series, HES 1006 Series.
B. Requirements:
1. Provide electric strikes designed for use with type of locks shown at each opening. 2. Provide electric strikes UL Listed as burglary-resistant. 3. Where required, provide electric strikes UL Listed for fire doors and frames. 4. Provide transformers and rectifiers for each strike as required. Verify voltage with
electrical contractor.
2.12 PASSIVE INFRARED MOTION SENSORS
A. Manufacturers and Products:

BTBC Phase III October 26, 2020
GE Project No. 0119-0010
Gould Evans
DOOR HARDWARE 087100-13
1. Scheduled Manufacturer and Product: Schlage SCAN II Series. 2. Acceptable Manufacturers and Products: RCI 915 Series, Securitron XMS Series,
B. Requirements:
1. Provide motion sensors as specified in hardware groups.
2.13 POWER SUPPLIES
A. Manufacturers and Products:
1. Scheduled Manufacturer and Product: Schlage/Von Duprin PS900 series.
B. Requirements:
1. Provide power supplies approved by manufacturer of supplied electrified hardware. 2. Provide appropriate quantity of power supplies necessary for proper operation of
electrified locking components as recommended by manufacturer of electrified locking components with consideration for each electrified component using power supply, location of power supply, and approved wiring diagrams. Locate power supplies as directed by Architect.
3. Provide regulated and filtered 24 VDC power supply, and UL class 2 listed. 4. Provide power supplies with the following features:
a. 12/24 VDC Output, field selectable. b. Class 2 Rated power limited output. c. Universal 120-240 VAC input. d. Low voltage DC, regulated and filtered. e. Polarized connector for distribution boards. f. Fused primary input. g. AC input and DC output monitoring circuit w/LED indicators. h. Cover mounted AC Input indication. i. Tested and certified to meet UL294. j. NEMA 1 enclosure. k. Hinged cover w/lock down screws. l. High voltage protective cover.
2.14 CYLINDERS
A. Manufacturers:
1. Scheduled Manufacturer: Medeco (No Substitution)
B. Requirements:
1. Provide cylinders/cores to match Owner’s existing key system, compliant with ANSI/BHMA A156.5; latest revision; cylinder face finished to match lockset, manufacturer’s series as indicated. Refer to “KEYING” article, herein.
C. Construction Keying:
1. Construction Master Keys: Provide cylinders with feature that permits voiding of construction keys without cylinder removal. Provide 10 construction master keys.

BTBC Phase III October 26, 2020
GE Project No. 0119-0010
Gould Evans
DOOR HARDWARE 087100-14
2. Construction Cores: Provide construction cores that are replaceable by permanent cores. Provide 10 construction master keys.
2.15 KEYING
A. Provide a factory registered keying system, complying with guidelines in ANSI/BHMA A156.28, incorporating decisions made at keying conference.
B. Provide cylinders/cores keyed into Owner’s existing factory registered keying system.
C. Comply with guidelines in ANSI/BHMA A156.28, incorporating decisions made at keying conference.
D. Requirements:
1. Provide permanent cylinders/cores keyed by the manufacturer according to the following key system.
a. Master Keying system as directed by the Owner.
2. Keying of locks and cylinders throughout project shall be scheduled through a key meeting with Architect, Owner, and hardware supplier. Key schedule shall be prepared and submitted to the Owner for approval. Copies of final key schedule with the bitting instructions shall be submitted as part of the Project Record Documents.
3. Supplier shall provide temporary construction keying for all keyed locksets and cylinders, for use by contractor during construction.
4. All keyed locksets/cylinders shall be keyed to existing Medeco key system, as directed by Owner. Supplier to confirm required keyway with campus locksmith. Keying Schedule must be approved by the Owner prior to ordering any locks/cylinders.
5. Key all locks/cylinders separately, or alike as directed by the Owner’s Representative and Architect.
6. Provide keys as follows:
a. Change Keys: 2 per lock/cylinder b. Master Keys: 6 required (per system) c. Blank Keys: 1 per lock/cylinder.
7. Identification: Stamp all (master-type) keys with the following:
a. Do Not Duplicate. b. Key change number (all keys).
2.16 KEY CONTROL SYSTEM
A. Manufacturers:
1. Scheduled Manufacturer: Telkee. 2. Acceptable Manufacturers: HPC, Lund.
B. Requirements:
1. Key Control Cabinet: BHMA A156.5; metal cabinet with baked-enamel finish; containing key-holding hooks, labels, 2 sets of key tags with self-locking key holders, key-gathering

BTBC Phase III October 26, 2020
GE Project No. 0119-0010
Gould Evans
DOOR HARDWARE 087100-15
envelopes, and temporary and permanent markers; with key capacity of 150 percent of the number of locks.
2. Wall-Mounted Cabinet: Cabinet with hinged-panel door equipped with key-holding panels and pin-tumbler cylinder door lock.
2.17 DOOR CLOSERS
A. Manufacturers and Products:
1. Scheduled Manufacturer and Product: LCN 4040XP series. (No Substitute)
B. Requirements:
1. Provide door closers conforming to ANSI/BHMA A156.4 Grade 1 requirements by BHMA certified independent testing laboratory. ISO 9000 certify closers. Stamp units with date of manufacture code.
2. Provide door closers with fully hydraulic, full rack and pinion action with high strength cast iron cylinder, and full complement bearings at shaft.
3. Cylinder Body: 1-1/2 inch (38 mm) diameter with 5/8 inch (16 mm) diameter double heat-treated pinion journal.
4. Hydraulic Fluid: Fireproof, passing requirements of UL10C, and requiring no seasonal closer adjustment for temperatures ranging from 120 degrees F to -30 degrees F.
5. Spring Power: Continuously adjustable over full range of closer sizes, and providing reduced opening force as required by accessibility codes and standards.
6. Hydraulic Regulation: By tamper-proof, non-critical valves, with separate adjustment for latch speed, general speed, and backcheck.
7. Provide closers with solid forged steel main arms and factory assembled heavy-duty forged forearms for parallel arm closers.
8. Pressure Relief Valve (PRV) Technology: Not permitted. 9. Finish for Closer Cylinders, Arms, Adapter Plates, and Metal Covers: Powder coating
finish which has been certified to exceed 100 hours salt spray testing as described in ANSI Standard A156.4 and ASTM B117, or has special rust inhibitor (SRI).
10. Provide special templates, drop plates, mounting brackets, or adapters for arms as required for details, overhead stops, and other door hardware items interfering with closer mounting.
2.18 ELECTRO-HYDRAULIC AUTOMATIC OPERATORS
A. Manufacturers and Products:
1. Scheduled Manufacturer and Product: LCN 4600 series. 2. Acceptable Manufacturers and Products: Besam Power Swing.
B. Requirements:
1. Provide low energy automatic operator units with hydraulic closer complying with ANSI/BHMA A156.19.
2. Hydraulic Fluid: Fireproof, passing requirements of UL10C, and requiring no seasonal closer adjustment for temperatures ranging from 120 degrees F to -30 degrees F.

BTBC Phase III October 26, 2020
GE Project No. 0119-0010
Gould Evans
DOOR HARDWARE 087100-16
3. Provide units with conventional door closer opening and closing forces unless power operator motor is activated. Provide door closer assembly with adjustable spring size, back-check, and opening and closing speed adjustment valves to control door
4. Provide units with on/off switch for manual operation, motor start up delay, vestibule interface delay, electric lock delay, and door hold open delay.
5. Provide units with conventional door closer opening and closing forces unless power operator motor is activated. Provide door closer assembly with adjustable spring size, back-check valve, sweep valve, latch valve to control door.
6. Provide drop plates, brackets, or adapters for arms as required for details. 7. Provide hard-wired actuator switches for operation as specified. 8. Provide weather-resistant actuators at exterior applications. 9. Provide key switches with LED’s, recommended and approved by manufacturer of
automatic operator as required for function described in operation description of hardware group below. Cylinders: Refer to “KEYING” article, herein.
10. Provide complete assemblies of controls, switches, power supplies, relays, and parts/material recommended and approved by manufacturer of automatic operator for each individual leaf. Actuators control both doors simultaneously at pairs. Sequence operation of exterior and vestibule doors with automatic operators to allow ingress or egress through both sets of openings as directed by Architect. Locate actuators, key switches, and other controls as directed by Architect.
11. Provide units with vestibule inputs that allow sequencing operation of two units, and SPDT relay for interfacing with latching or locking devices.
2.19 DOOR TRIM
A. Manufacturers:
1. Scheduled Manufacturer: Ives. 2. Acceptable Manufacturers: Burns, Rockwood.
B. Requirements:
1. Provide push plates 4 inches (102 mm) wide by 16 inches (406 mm) high by 0.050 inch (1 mm) thick and beveled 4 edges. Where width of door stile prevents use of 4 inches (102 mm) wide plate, adjust width to fit.
2. Provide push bars of solid bar stock, diameter and length as scheduled. Provide push bars of sufficient length to span from center to center of each stile. Where required, mount back to back with pull.
3. Provide offset pulls of solid bar stock, diameter and length as scheduled. Where required, mount back to back with push bar.
4. Provide flush pulls as scheduled. Where required, provide back-to-back mounted model. 5. Provide pulls of solid bar stock, diameter and length as scheduled. Where required,
mount back to back with push bar. 6. Provide pull plates 4 inches (102 mm) wide by 16 inches (406 mm) high by 0.050 inch (1
mm) thick, beveled 4 edges, and prepped for pull. Where width of door stile prevents use of 4 inches (102 mm) wide plate, adjust width to fit.
7. Provide wire pulls of solid bar stock, diameter and length as scheduled. 8. Provide decorative pulls as scheduled. Where required, mount back to back with pull.
2.20 PROTECTION PLATES
A. Manufacturers:

BTBC Phase III October 26, 2020
GE Project No. 0119-0010
Gould Evans
DOOR HARDWARE 087100-17
1. Scheduled Manufacturer: Ives. 2. Acceptable Manufacturers: Burns, Rockwood.
B. Requirements:
1. Provide kick plates, mop plates, and armor plates minimum of 0.050 inch (1 mm) thick, beveled four edges as scheduled. Furnish with sheet metal or wood screws, finished to match plates.
2. Sizes of plates:
a. Kick Plates: 10 inches (254 mm) high by 2 inches (51 mm) less width of door on single doors, 1 inch (25 mm) less width of door on pairs
b. Mop Plates: 4 inches (102 mm) high by 2 inches (51 mm) less width of door on single doors, 1 inch (25 mm) less width of door on pairs
c. Armor Plates: 36 inches (914 mm) high by 2 inches (51 mm) less width of door on single doors, 1 inch (25 mm) less width of door on pairs
2.21 OVERHEAD STOPS AND OVERHEAD STOP/HOLDERS
A. Manufacturers:
1. Scheduled Manufacturers: Glynn-Johnson. 2. Acceptable Manufacturers: Rixson, Sargent.
B. Requirements:
1. Provide heavy duty concealed mounted overhead stop or holder as specified for exterior and interior vestibule single acting doors.
2. Provide heavy duty concealed mounted overhead stop or holder as specified for double acting doors.
3. Provide heavy or medium duty and concealed or surface mounted overhead stop or holder for interior doors as specified. Provide medium duty surface mounted overhead stop for interior doors and at any door that swings more than 140 degrees before striking wall, open against equipment, casework, sidelights, and where conditions do not allow wall stop or floor stop presents tripping hazard.
4. Where overhead holders are specified provide friction type at doors without closer and positive type at doors with closer.
2.22 DOOR STOPS AND HOLDERS
A. Manufacturers:
1. Scheduled Manufacturer: Ives. 2. Acceptable Manufacturers: Burns, Rockwood.
B. Provide door stops at each door leaf:
1. Provide wall stops wherever possible. Provide convex type where mortise type locks are used and concave type where cylindrical type locks are used.
2. Where a wall stop cannot be used, provide universal floor stops for low or high rise options.
3. Where wall or floor stop cannot be used, provide medium duty surface mounted overhead stop.

BTBC Phase III October 26, 2020
GE Project No. 0119-0010
Gould Evans
DOOR HARDWARE 087100-18
2.23 THRESHOLDS, SEALS, DOOR SWEEPS, AUTOMATIC DOOR BOTTOMS, AND GASKETING
A. Manufacturers:
1. Scheduled Manufacturer: Zero International. 2. Acceptable Manufacturers: National Guard, Reese.
B. Requirements:
1. Provide thresholds, weather-stripping (including door sweeps, seals, and astragals) and gasketing systems (including smoke, sound, and light) as specified and per architectural details. Match finish of other items.
2. Smoke- and Draft-Control Door Assemblies: Where smoke- and draft-control door assemblies are required, provide door hardware that meets requirements of assemblies tested according to UL 1784 and installed in compliance with NFPA 105.
3. Size of thresholds:
a. Saddle Thresholds: 1/2 inch (13 mm) high by jamb width by door width b. Bumper Seal Thresholds: 1/2 inch (13 mm) high by 5 inches (127 mm) wide by door
width
4. Provide door sweeps, seals, astragals, and auto door bottoms only of type where resilient or flexible seal strip is easily replaceable and readily available.
2.24 SILENCERS
A. Manufacturers:
1. Scheduled Manufacturer: Ives. 2. Acceptable Manufacturers: Burns, Rockwood.
B. Requirements:
1. Provide "push-in" type silencers for hollow metal or wood frames. 2. Provide one silencer per 30 inches (762 mm) of height on each single frame, and two for
each pair frame. 3. Omit where gasketing is specified.
2.25 DOOR POSITION SWITCHES
A. Manufacturers:
1. Scheduled Manufacturer: Schlage. 2. Acceptable Manufacturers: GE-Interlogix, Sargent.
B. Requirements:
1. Provide recessed or surface mounted type door position switches as specified.

BTBC Phase III October 26, 2020
GE Project No. 0119-0010
Gould Evans
DOOR HARDWARE 087100-19
2. Coordinate door and frame preparations with door and frame suppliers. If switches are being used with magnetic locking device, provide minimum of 4 inches (102 mm) between switch and magnetic locking device.
2.26 FINISHES
A. Finish: BHMA 626/652 (US26D); except:
1. Hinges at Exterior Doors: BHMA 630 (US32D) 2. Continuous Hinges: BHMA 630 (US32D) 3. Continuous Hinges: BHMA 628 (US28) 4. Push Plates, Pulls, and Push Bars: BHMA 630 (US32D) 5. Protection Plates: BHMA 630 (US32D) 6. Overhead Stops and Holders: BHMA 630 (US32D) 7. Door Closers: Powder Coat to Match 8. Wall Stops: BHMA 630 (US32D) 9. Latch Protectors: BHMA 630 (US32D) 10. Weatherstripping: Clear Anodized Aluminum 11. Thresholds: Mill Finish Aluminum
B. Finish: BHMA 643e/613/640 (US10B); except:
1. Continuous Hinges: US32D (BHMA 630). 2. Continuous Hinges: BHMA 710 (US10B) 3. Door Closers: Powder Coat to Match. 4. Latch Protectors: US32D (BHMA 630). 5. Weatherstripping: Dark Bronze Anodized Aluminum. 6. Thresholds: Extruded Architectural Bronze, Oil-Rubbed
EXECUTION
3.01 EXAMINATION
A. Prior to installation of hardware, examine doors and frames, with Installer present, for compliance with requirements for installation tolerances, labeled fire-rated door assembly construction, wall and floor construction, and other conditions affecting performance.
B. Field verify existing doors and frames receiving new hardware and existing conditions receiving new openings. Verify that new hardware is compatible with existing door and frame preparation and existing conditions.
C. Examine roughing-in for electrical power systems to verify actual locations of wiring connections before electrified door hardware installation.
D. Proceed with installation only after unsatisfactory conditions have been corrected.
3.02 PREPARATION
A. Where on-site modification of doors and frames is required:

BTBC Phase III October 26, 2020
GE Project No. 0119-0010
Gould Evans
DOOR HARDWARE 087100-20
1. Carefully remove existing door hardware and components being reused. Clean, protect, tag, and store in accordance with storage and handling requirements specified herein.
2. Field modify and prepare existing door and frame for new hardware being installed. 3. When modifications are exposed to view, use concealed fasteners, when possible. 4. Prepare hardware locations and reinstall in accordance with installation requirements for
new door hardware and with:
a. Steel Doors and Frames: For surface applied door hardware, drill and tap doors and frames according to ANSI/SDI A250.6.
b. Wood Doors: DHI WDHS.5 "Recommended Hardware Reinforcement Locations for Mineral Core Wood Flush Doors."
c. Doors in rated assemblies: NFPA 80 for restrictions on on-site door hardware preparation.
3.03 INSTALLATION
A. Mount door hardware units at heights to comply with the following, unless otherwise indicated or required to comply with governing regulations.
1. Standard Steel Doors and Frames: ANSI/SDI A250.8. 2. Custom Steel Doors and Frames: HMMA 831. 3. Wood Doors: DHI WDHS.3, "Recommended Locations for Architectural Hardware for
Wood Flush Doors."
B. Install each hardware item in compliance with manufacturer’s instructions and recommendations, using only fasteners provided by manufacturer.
C. Do not install surface mounted items until finishes have been completed on substrate. Protect all installed hardware during painting.
D. Set units level, plumb and true to line and location. Adjust and reinforce attachment substrate as necessary for proper installation and operation.
E. Drill and countersink units that are not factory prepared for anchorage fasteners. Space fasteners and anchors according to industry standards.
F. Install operating parts so they move freely and smoothly without binding, sticking, or excessive clearance.
G. Hinges: Install types and in quantities indicated in door hardware schedule but not fewer than quantity recommended by manufacturer for application indicated or one hinge for every 30 inches (750 mm) of door height, whichever is more stringent, unless other equivalent means of support for door, such as spring hinges or pivots, are provided.
H. Lock Cylinders: Install construction cores to secure building and areas during construction period.
1. Replace construction cores with permanent cores as indicated in keying section. 2. Furnish permanent cores to Owner for installation.
I. Wiring: Coordinate with Division 26, ELECTRICAL sections for:
1. Conduit, junction boxes and wire pulls.

BTBC Phase III October 26, 2020
GE Project No. 0119-0010
Gould Evans
DOOR HARDWARE 087100-21
2. Connections to and from power supplies to electrified hardware. 3. Connections to fire/smoke alarm system and smoke evacuation system. 4. Connection of wire to door position switches and wire runs to central room or area, as
directed by Architect. 5. Testing and labeling wires with Architect’s opening number.
J. Key Control System: Tag keys and place them on markers and hooks in key control system cabinet, as determined by final keying schedule.
K. Door Closers: Mount closers on room side of corridor doors, inside of exterior doors, and stair side of stairway doors from corridors. Mount closers so they are not visible in corridors, lobbies and other public spaces unless approved by Architect.
L. Closer/Holders: Mount closer/holders on room side of corridor doors, inside of exterior doors, and stair side of stairway doors.
M. Power Supplies: Locate power supplies as indicated or, if not indicated, above accessible ceilings or in equipment room, or alternate location as directed by Architect.
N. Thresholds: Set thresholds in full bed of sealant complying with requirements specified in Division 07 Section "Joint Sealants."
O. Stops: Provide floor stops for doors unless wall or other type stops are indicated in door hardware schedule. Do not mount floor stops where they may impede traffic or present tripping hazard.
P. Perimeter Gasketing: Apply to head and jamb, forming seal between door and frame.
Q. Meeting Stile Gasketing: Fasten to meeting stiles, forming seal when doors are closed.
R. Door Bottoms: Apply to bottom of door, forming seal with threshold when door is closed.
3.04 FIELD QUALITY CONTROL
A. Engage qualified manufacturer trained representative to perform inspections and to prepare inspection reports.
1. Representative will inspect door hardware and state in each report whether installed work complies with or deviates from requirements, including whether door hardware is properly installed and adjusted.
3.05 ADJUSTING
A. Initial Adjustment: Adjust and check each operating item of door hardware and each door to ensure proper operation or function of every unit. Replace units that cannot be adjusted to operate as intended. Adjust door control devices to compensate for final operation of heating and ventilating equipment and to comply with referenced accessibility requirements.
1. Electric Strikes: Adjust horizontal and vertical alignment of keeper to properly engage lock bolt.
2. Door Closers: Adjust sweep period to comply with accessibility requirements and requirements of authorities having jurisdiction.

BTBC Phase III October 26, 2020
GE Project No. 0119-0010
Gould Evans
DOOR HARDWARE 087100-22
B. Occupancy Adjustment: Approximately three to six months after date of Substantial Completion, Installer's Architectural Hardware Consultant must examine and readjust each item of door hardware, including adjusting operating forces, as necessary to ensure function of doors and door hardware.
3.06 CLEANING AND PROTECTION
A. Clean adjacent surfaces soiled by door hardware installation.
B. Clean operating items as necessary to restore proper function and finish.
C. Provide final protection and maintain conditions that ensure door hardware is without damage or deterioration at time of Substantial Completion.
3.07 DOOR HARDWARE SCHEDULE
A. Hardware items are referenced in the following hardware. Refer to the above-specifications for special features, options, cylinders/keying, and other requirements.
B. Hardware Sets: Hardware Group No. 1 For use on Door #(s):
1E1/2 Provide each SGL door(s) with the following:
QTY DESCRIPTION CATALOG NUMBER FINISH MFR
1 EA CONT. HINGE 112XY EPT 628 IVE
1 EA POWER TRANSFER EPT10 689 VON
1 EA ELEC PANIC HARDWARE RX-LC-QEL-99-NL-OP-110MD 24 VDC
626 VON
1 EA RIM CYLINDER 10-0400H 626 MED
1 EA 90 DEG OFFSET PULL 8190HD 12" O 630 IVE
1 EA OH STOP 100S 630 GLY
1 EA SURF. AUTO OPERATOR 4642 TBWMS 689 LCN
1 EA ACTUATOR, JAMB MOUNT 8310-818T 630 LCN
1 EA ACTUATOR, WALL MOUNT
8310-853T 630 LCN
1 EA RAIN DRIP 142AA AA ZER
1 EA DOOR SWEEP 8197AA AA ZER
1 EA THRESHOLD 655A A ZER
1 EA MULTITECH READER MT15 - WORK OF DIV. 28 BLK SCE
1 EA DOOR CONTACT 7764 628 SCE
1 EA POWER SUPPLY PS902 900-4RL 120/240 VAC LGR SCE
1 EA WIRING DIAGRAMS BY SECURITY CONTRACTOR
1 EA WEATHERSTRIP BY DOOR MANUFACTURER B/O OPERATION: DOOR PROGRAMMED IN LOCKED OR UNLOCKED POSITION VIA ACCESS CONTROL SYSTEM. WHEN LOCKED ENTRY VIA VALID CARD READ, CARD READ ENABLES OUTSIDE ACTUATOR TO BE PUSHED TO OPEN DOOR. WHEN UNLOCKED ACTUATORS ALWAYS ENABLED. ALWAYS FREE EGRESS.
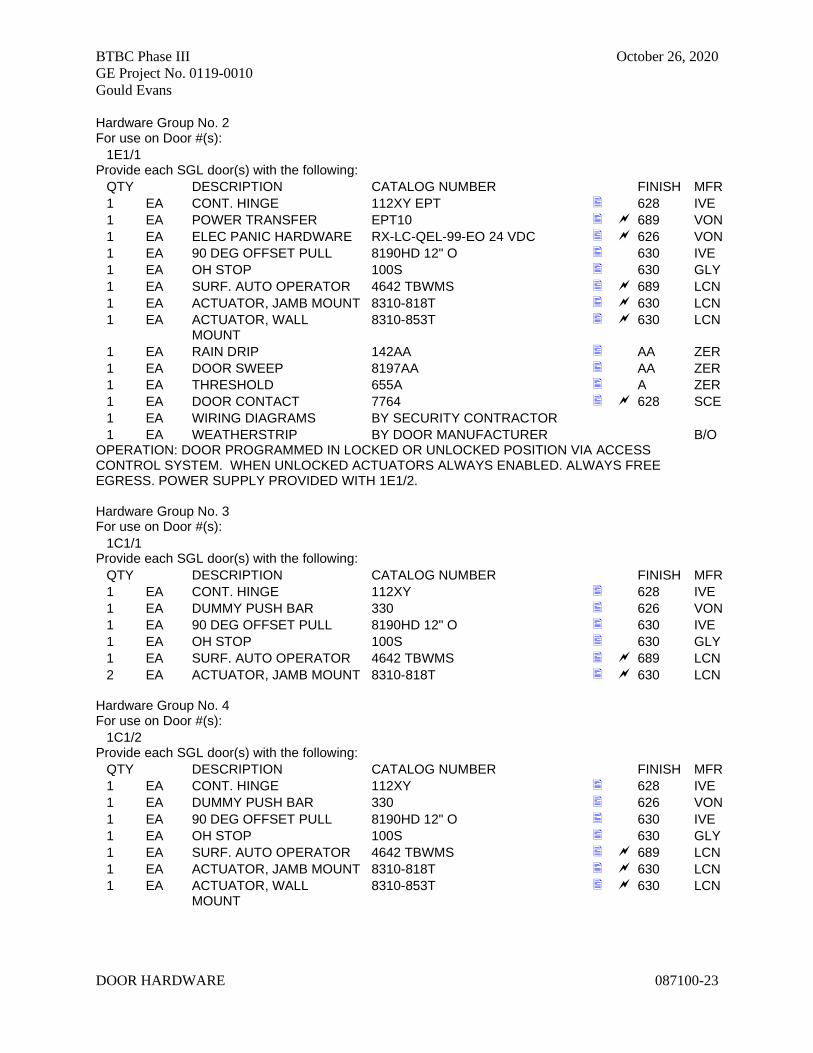
BTBC Phase III October 26, 2020
GE Project No. 0119-0010
Gould Evans
DOOR HARDWARE 087100-23
Hardware Group No. 2 For use on Door #(s):
1E1/1 Provide each SGL door(s) with the following:
QTY DESCRIPTION CATALOG NUMBER FINISH MFR
1 EA CONT. HINGE 112XY EPT 628 IVE
1 EA POWER TRANSFER EPT10 689 VON
1 EA ELEC PANIC HARDWARE RX-LC-QEL-99-EO 24 VDC 626 VON
1 EA 90 DEG OFFSET PULL 8190HD 12" O 630 IVE
1 EA OH STOP 100S 630 GLY
1 EA SURF. AUTO OPERATOR 4642 TBWMS 689 LCN
1 EA ACTUATOR, JAMB MOUNT 8310-818T 630 LCN
1 EA ACTUATOR, WALL MOUNT
8310-853T 630 LCN
1 EA RAIN DRIP 142AA AA ZER
1 EA DOOR SWEEP 8197AA AA ZER
1 EA THRESHOLD 655A A ZER
1 EA DOOR CONTACT 7764 628 SCE
1 EA WIRING DIAGRAMS BY SECURITY CONTRACTOR
1 EA WEATHERSTRIP BY DOOR MANUFACTURER B/O OPERATION: DOOR PROGRAMMED IN LOCKED OR UNLOCKED POSITION VIA ACCESS CONTROL SYSTEM. WHEN UNLOCKED ACTUATORS ALWAYS ENABLED. ALWAYS FREE EGRESS. POWER SUPPLY PROVIDED WITH 1E1/2. Hardware Group No. 3 For use on Door #(s):
1C1/1 Provide each SGL door(s) with the following:
QTY DESCRIPTION CATALOG NUMBER FINISH MFR
1 EA CONT. HINGE 112XY 628 IVE
1 EA DUMMY PUSH BAR 330 626 VON
1 EA 90 DEG OFFSET PULL 8190HD 12" O 630 IVE
1 EA OH STOP 100S 630 GLY
1 EA SURF. AUTO OPERATOR 4642 TBWMS 689 LCN
2 EA ACTUATOR, JAMB MOUNT 8310-818T 630 LCN Hardware Group No. 4 For use on Door #(s):
1C1/2 Provide each SGL door(s) with the following:
QTY DESCRIPTION CATALOG NUMBER FINISH MFR
1 EA CONT. HINGE 112XY 628 IVE
1 EA DUMMY PUSH BAR 330 626 VON
1 EA 90 DEG OFFSET PULL 8190HD 12" O 630 IVE
1 EA OH STOP 100S 630 GLY
1 EA SURF. AUTO OPERATOR 4642 TBWMS 689 LCN
1 EA ACTUATOR, JAMB MOUNT 8310-818T 630 LCN
1 EA ACTUATOR, WALL MOUNT
8310-853T 630 LCN

BTBC Phase III October 26, 2020
GE Project No. 0119-0010
Gould Evans
DOOR HARDWARE 087100-24
Hardware Group No. 5 For use on Door #(s):
1S1/2 1S2/2 123/3 Provide each SGL door(s) with the following:
QTY DESCRIPTION CATALOG NUMBER FINISH MFR
1 EA CONT. HINGE 224XY EPT 628 IVE
1 EA POWER TRANSFER EPT10 689 VON
1 EA PANIC HARDWARE 99-EO 626 VON
1 EA ELEC EXIT DEVICE TRIM AD-300-993R-70-MT-SPA-L 12/24 VDC
626 SCE
1 EA CYLINDER 20-20073 626 MED
1 EA SURFACE CLOSER 4040XP SCUSH 689 LCN
1 EA KICK PLATE 8400 10" X 2" LDW B-CS 630 IVE
1 EA RAIN DRIP 142AA AA ZER
1 SET GASKETING 429A AA ZER
1 EA DOOR SWEEP 8197AA AA ZER
1 EA THRESHOLD 655A A ZER
1 EA WIRING DIAGRAMS BY SECURITY CONTRACTOR NOTE: INSTALL SEALS PRIOR TO ANY SOFFIT MOUNTED HARDWARE. OPERATION: DOOR PROGRAMMED IN LOCKED OR UNLOCKED POSITION VIA ACCESS CONTROL SYSTEM. WHEN LOCKED ENTRY VIA VALID CARD READ. ALWAYS FREE EGRESS. DOOR PROP ALARM: IF DOOR REMAINS OPEN FOR DESIGNATED AMOUNT OF TIME ALARM TO ALERT LOCAL ACCESS CONTROL SYSTEM UNTIL DOOR IS CLOSED. Hardware Group No. 6 For use on Door #(s):
123C/2 Provide each SGL door(s) with the following:
QTY DESCRIPTION CATALOG NUMBER FINISH MFR
1 EA CONT. HINGE 224XY 628 IVE
1 EA PANIC HARDWARE 99-L-NL-17 626 VON
1 EA RIM CYLINDER 10-0400H 626 MED
1 EA SURFACE CLOSER 4040XP SCUSH 689 LCN
1 EA KICK PLATE 8400 10" X 2" LDW B-CS 630 IVE
1 EA RAIN DRIP 142AA AA ZER
1 SET GASKETING 429A AA ZER
1 EA DOOR SWEEP 8197AA AA ZER
1 EA THRESHOLD 655A A ZER
1 EA DOOR CONTACT 679-05 BLK SCE NOTE: INSTALL SEALS PRIOR TO ANY SOFFIT MOUNTED HARDWARE. DOOR PROP ALARM: IF DOOR REMAINS OPEN FOR DESIGNATED AMOUNT OF TIME ALARM TO ALERT LOCAL ACCESS CONTROL SYSTEM UNTIL DOOR IS CLOSED.

BTBC Phase III October 26, 2020
GE Project No. 0119-0010
Gould Evans
DOOR HARDWARE 087100-25
Hardware Group No. 7 For use on Door #(s):
1S1/1 1S2/1 Provide each SGL door(s) with the following:
QTY DESCRIPTION CATALOG NUMBER FINISH MFR
4 EA HINGE 5BB1HW 4.5 X 4.5 652 IVE
1 EA FIRE EXIT HARDWARE 99-L-BE-F-17 626 VON
1 EA OH STOP 90S 630 GLY
1 EA SURFACE CLOSER 4040XP RW/PA 689 LCN
1 EA KICK PLATE 8400 10" X 2" LDW B-CS 630 IVE
1 EA GASKETING 188FSBK PSA BK ZER Hardware Group No. 8 For use on Door #(s):
2S1/1 2S2/1 3S1/1 3S2/1 Provide each SGL door(s) with the following:
QTY DESCRIPTION CATALOG NUMBER FINISH MFR
4 EA HINGE 5BB1HW 4.5 X 4.5 652 IVE
1 EA POWER TRANSFER EPT10 689 VON
1 EA ELEC FIRE EXIT HARDWARE
RX-LC-99-L-BE-F-M996-17-FS 626 VON
1 EA OH STOP 90S 630 GLY
1 EA SURFACE CLOSER 4040XP RW/PA 689 LCN
1 EA KICK PLATE 8400 10" X 2" LDW B-CS 630 IVE
1 EA GASKETING 188FSBK PSA BK ZER
1 EA MULTITECH READER MT15 - WORK OF DIV. 28 BLK SCE
1 EA DOOR CONTACT 679-05 BLK SCE
1 EA POWER SUPPLY PS902 900-2RS 120/240 VAC LGR SCE
1 EA WIRING DIAGRAMS BY SECURITY CONTRACTOR Hardware Group No. 9 For use on Door #(s):
101/1 Provide each SGL door(s) with the following:
QTY DESCRIPTION CATALOG NUMBER FINISH MFR
4 EA HINGE 5BB1HW 4.5 X 4.5 652 IVE
1 EA PANIC HARDWARE 99-L-17 626 VON
1 EA RIM CYLINDER 10-0400H 626 MED
1 EA SURFACE CLOSER 4040XP HEDA 689 LCN
1 EA KICK PLATE 8400 10" X 2" LDW B-CS 630 IVE
1 EA WALL STOP WS406/407CCV 626 IVE
1 EA GASKETING 188FSBK PSA BK ZER

BTBC Phase III October 26, 2020
GE Project No. 0119-0010
Gould Evans
DOOR HARDWARE 087100-26
Hardware Group No. 10 For use on Door #(s):
101/4 Provide each SGL door(s) with the following:
QTY DESCRIPTION CATALOG NUMBER FINISH MFR
4 EA HINGE 5BB1HW 4.5 X 4.5 652 IVE
1 EA PANIC HARDWARE 99-L-17 626 VON
1 EA RIM CYLINDER 10-0400H 626 MED
1 EA SURFACE CLOSER 4040XP HCUSH 689 LCN
1 EA GASKETING 188FSBK PSA BK ZER Hardware Group No. 11 For use on Door #(s):
101/5 Provide each SGL door(s) with the following:
QTY DESCRIPTION CATALOG NUMBER FINISH MFR
3 EA HINGE 5BB1HW 4.5 X 4.5 652 IVE
1 EA PANIC HARDWARE 99-L-17 626 VON
1 EA RIM CYLINDER 10-0400H 626 MED
1 EA SURFACE CLOSER 4040XP HEDA 689 LCN
1 EA KICK PLATE 8400 10" X 2" LDW B-CS 630 IVE
1 EA WALL STOP WS406/407CCV 626 IVE
1 EA GASKETING 188FSBK PSA BK ZER Hardware Group No. 12 For use on Door #(s):
102A/1 104/A 201/1 202D/1 202E/1 203A/1
204A/1 301/E 304A/1 Provide each SGL door(s) with the following:
QTY DESCRIPTION CATALOG NUMBER FINISH MFR
3 EA HINGE 5BB1HW 4.5 X 4.5 652 IVE
1 EA PUSH PLATE 8200 4" X 16" 630 IVE
1 EA LONG DOOR PULL 9264 36" 20" O 630-316
IVE
1 EA SURFACE CLOSER 4040XP RW/PA 689 LCN
1 EA FLOOR STOP FS444 626 IVE
1 SET GASKETING 429A AA ZER NOTE: PROVIDE ONE LESS HINGE @ 7'0" OPENINGS Hardware Group No. 13 For use on Door #(s):
121A/1 Provide each SGL door(s) with the following:
QTY DESCRIPTION CATALOG NUMBER FINISH MFR
3 EA HINGE 5BB1HW 4.5 X 4.5 652 IVE
1 EA PUSH PLATE 8200 4" X 16" 630 IVE
1 EA LONG DOOR PULL 9264 36" 20" O 630-316
IVE
1 EA SURFACE CLOSER 4040XP CUSH 689 LCN
1 SET GASKETING 429A AA ZER NOTE: PROVIDE ONE LESS HINGE @ 7'0" OPENINGS

BTBC Phase III October 26, 2020
GE Project No. 0119-0010
Gould Evans
DOOR HARDWARE 087100-27
Hardware Group No. 14 For use on Door #(s):
107/1 117/1 205/1 207/1 305/1 307/1 Provide each SGL door(s) with the following:
QTY DESCRIPTION CATALOG NUMBER FINISH MFR
4 EA HINGE 5BB1HW 4.5 X 4.5 652 IVE
1 EA PUSH PLATE 8200 4" X 16" 630 IVE
1 EA PULL PLATE 8302 10" 4" X 16" 630 IVE
1 EA FOOT PULL FP100 626 IVE
1 EA SURFACE CLOSER 4040XP RW/PA 689 LCN
1 EA KICK PLATE 8400 10" X 2" LDW B-CS 630 IVE
1 EA WALL STOP WS406/407CCV 626 IVE
3 EA SILENCER SR64/65/66 AS REQ'D GRY IVE Hardware Group No. 15 For use on Door #(s):
109A/1 109B/1 115A/1 115B/1 Provide each SGL door(s) with the following:
QTY DESCRIPTION CATALOG NUMBER FINISH MFR
4 EA HINGE 5BB1HW 4.5 X 4.5 652 IVE
1 EA PRIVACY W/COIN TURN L9044 17A L583-363 L283-722 626 SCH
1 EA SURFACE CLOSER 1250 CUSH 689 LCN
1 EA KICK PLATE 8400 10" X 2" LDW B-CS 630 IVE
1 EA SILENCER SR64/65/66 AS REQ'D GRY IVE Hardware Group No. 16 For use on Door #(s):
111/1 113/1 Provide each SGL door(s) with the following:
QTY DESCRIPTION CATALOG NUMBER FINISH MFR
4 EA HINGE 5BB1HW 4.5 X 4.5 652 IVE
1 EA PRIVACY W/COIN TURN L9044 17A L583-363 L283-722 626 SCH
1 EA SURFACE CLOSER 4040XP RW/PA 689 LCN
1 EA KICK PLATE 8400 10" X 2" LDW B-CS 630 IVE
1 EA WALL STOP WS406/407CCV 626 IVE
1 EA SILENCER SR64/65/66 AS REQ'D GRY IVE Hardware Group No. 17 For use on Door #(s):
211C/1 301/C 301/G 301D/1 301H/1 Provide each SGL door(s) with the following:
QTY DESCRIPTION CATALOG NUMBER FINISH MFR
4 EA HINGE 5BB1HW 4.5 X 4.5 652 IVE
1 EA ENTRANCE LOCK ND53LD SPA 626 SCH
1 EA CYLINDER 20-20073 626 MED
1 EA WALL STOP WS406/407CCV 626 IVE
1 EA SILENCER SR64/65/66 AS REQ'D GRY IVE NOTE: PROVIDE ONE LESS HINGE @ 7'0" OPENINGS

BTBC Phase III October 26, 2020
GE Project No. 0119-0010
Gould Evans
DOOR HARDWARE 087100-28
Hardware Group No. 18 For use on Door #(s):
301P/1 Provide each PR door(s) with the following:
QTY DESCRIPTION CATALOG NUMBER FINISH MFR
6 EA HINGE 5BB1HW 4.5 X 4.5 652 IVE
2 EA MANUAL FLUSH BOLT FB358/FB458 AS REQ'D 626 IVE
1 EA ENTRANCE LOCK ND53LD SPA 626 SCH
1 EA CYLINDER 20-20073 626 MED
2 EA OH STOP 90S / 90S J AS REQ'D 630 GLY
2 EA KICK PLATE 8400 10" X 2" LDW B-CS 630 IVE
2 EA SILENCER SR64/65/66 AS REQ'D GRY IVE Hardware Group No. 19 For use on Door #(s):
104C/1 300E/1 301F/1 301J/1 Provide each SGL door(s) with the following:
QTY DESCRIPTION CATALOG NUMBER FINISH MFR
4 EA HINGE 5BB1HW 4.5 X 4.5 652 IVE
1 EA CLASSROOM LOCK ND70LD SPA 626 SCH
1 EA CYLINDER 20-20073 626 MED
1 EA WALL STOP WS406/407CCV 626 IVE
3 EA SILENCER SR64/65/66 AS REQ'D GRY IVE NOTE: PROVIDE ONE LESS HINGE @ 7'0" OPENINGS Hardware Group No. 20 For use on Door #(s):
102/3 202A/1 202F/1 211B/1 Provide each SGL door(s) with the following:
QTY DESCRIPTION CATALOG NUMBER FINISH MFR
4 EA HINGE 5BB1HW 4.5 X 4.5 652 IVE
1 EA CLASSROOM LOCK ND70LD SPA 626 SCH
1 EA CYLINDER 20-20073 626 MED
1 EA OH STOP 90S / 90S J AS REQ'D 630 GLY
3 EA SILENCER SR64/65/66 AS REQ'D GRY IVE NOTE: PROVIDE ONE LESS HINGE @ 7'0" OPENINGS Hardware Group No. 21 For use on Door #(s):
300B/1 Provide each SGL door(s) with the following:
QTY DESCRIPTION CATALOG NUMBER FINISH MFR
3 EA HINGE 5BB1HW 4.5 X 4.5 652 IVE
1 EA CLASSROOM LOCK ND70LD SPA 626 SCH
1 EA CYLINDER 20-20073 626 MED
1 EA SURFACE CLOSER 4040XP CUSH 689 LCN
1 EA KICK PLATE 8400 10" X 2" LDW B-CS 630 IVE
3 EA SILENCER SR64/65/66 AS REQ'D GRY IVE

BTBC Phase III October 26, 2020
GE Project No. 0119-0010
Gould Evans
DOOR HARDWARE 087100-29
Hardware Group No. 22 For use on Door #(s):
309/1 Provide each SGL door(s) with the following:
QTY DESCRIPTION CATALOG NUMBER FINISH MFR
4 EA HINGE 5BB1HW 4.5 X 4.5 652 IVE
1 EA CLASSROOM LOCK ND70LD SPA 626 SCH
1 EA CYLINDER 20-20073 626 MED
1 EA SURFACE CLOSER 4040XP RW/PA 689 LCN
1 EA KICK PLATE 8400 10" X 2" LDW B-CS 630 IVE
1 EA WALL STOP WS406/407CCV 626 IVE
3 EA SILENCER SR64/65/66 AS REQ'D GRY IVE Hardware Group No. 23 For use on Door #(s):
121/3 123/1 Provide each PR door(s) with the following:
QTY DESCRIPTION CATALOG NUMBER FINISH MFR
8 EA HINGE 5BB1HW 4.5 X 4.5 652 IVE
2 EA AUTO FLUSH BOLT FB31T/FB41T 630 IVE
1 EA CLASSROOM LOCK ND70LD SPA 626 SCH
1 EA CYLINDER 20-20073 626 MED
1 EA COORDINATOR COR X FL 628 IVE
2 EA MOUNTING BRACKET MB 689 IVE
2 EA OH STOP 90S 630 GLY
2 EA SURFACE CLOSER 4040XP RW/PA 689 LCN
2 EA KICK PLATE 8400 10" X 2" LDW B-CS 630 IVE
1 EA GASKETING 188FSBK PSA BK ZER
1 EA MEETING STILE 8195AA AA ZER Hardware Group No. 24 For use on Door #(s):
301K/1 301L/1 301L/2 301M/1 Provide each PR door(s) with the following:
QTY DESCRIPTION CATALOG NUMBER FINISH MFR
8 EA HINGE 5BB1HW 4.5 X 4.5 652 IVE
2 EA MANUAL FLUSH BOLT FB358/FB458 AS REQ'D 626 IVE
1 EA CLASSROOM LOCK ND70LD SPA 626 SCH
1 EA CYLINDER 20-20073 626 MED
2 EA OH STOP 90S 630 GLY
2 EA KICK PLATE 8400 10" X 2" LDW B-CS 630 IVE
2 EA SILENCER SR64/65/66 AS REQ'D GRY IVE NOTE: PROVIDE TWO LESS HINGES @ 7'0" OPENINGS.

BTBC Phase III October 26, 2020
GE Project No. 0119-0010
Gould Evans
DOOR HARDWARE 087100-30
Hardware Group No. 25 For use on Door #(s):
491 Provide each PR door(s) with the following:
QTY DESCRIPTION CATALOG NUMBER FINISH MFR
8 EA HINGE 5BB1HW 4.5 X 4.5 NRP 630 IVE
2 EA AUTO FLUSH BOLT FB31T/FB41T 630 IVE
1 EA CLASSROOM LOCK ND70LD SPA 626 SCH
1 EA CYLINDER 20-20073 626 MED
1 EA COORDINATOR COR X FL 628 IVE
2 EA MOUNTING BRACKET MB 689 IVE
2 EA SURFACE CLOSER 4040XP SCUSH 689 LCN
2 EA KICK PLATE 8400 10" X 2" LDW B-CS 630 IVE
1 EA RAIN DRIP 142AA AA ZER
1 SET GASKETING 429A AA ZER
1 EA MEETING STILE 8195AA AA ZER
2 EA DOOR SWEEP 8197AA AA ZER Hardware Group No. 26 For use on Door #(s):
105/1 119/1 123C/1 123D/1 200/1 209/1
216/1 306/1 311/1 Provide each SGL door(s) with the following:
QTY DESCRIPTION CATALOG NUMBER FINISH MFR
4 EA HINGE 5BB1HW 4.5 X 4.5 652 IVE
1 EA STOREROOM LOCK ND80LD SPA 626 SCH
1 EA CYLINDER 20-20073 626 MED
1 EA SURFACE CLOSER 4040XP RW/PA 689 LCN
1 EA KICK PLATE 8400 10" X 2" LDW B-CS 630 IVE
1 EA WALL STOP WS406/407CCV 626 IVE
3 EA SILENCER SR64/65/66 AS REQ'D GRY IVE Hardware Group No. 27 For use on Door #(s):
211D/1 303/1 Provide each SGL door(s) with the following:
QTY DESCRIPTION CATALOG NUMBER FINISH MFR
4 EA HINGE 5BB1HW 4.5 X 4.5 652 IVE
1 EA STOREROOM LOCK ND80LD SPA 626 SCH
1 EA CYLINDER 20-20073 626 MED
1 EA OH STOP 90S 630 GLY
1 EA SURFACE CLOSER 4040XP RW/PA 689 LCN
1 EA KICK PLATE 8400 10" X 2" LDW B-CS 630 IVE
3 EA SILENCER SR64/65/66 AS REQ'D GRY IVE

BTBC Phase III October 26, 2020
GE Project No. 0119-0010
Gould Evans
DOOR HARDWARE 087100-31
Hardware Group No. 28 For use on Door #(s):
121C/2 123/2 Provide each SGL door(s) with the following:
QTY DESCRIPTION CATALOG NUMBER FINISH MFR
4 EA HINGE 5BB1HW 4.5 X 4.5 652 IVE
1 EA STOREROOM LOCK ND80LD SPA 626 SCH
1 EA CYLINDER 20-20073 626 MED
1 EA SURFACE CLOSER 4040XP CUSH 689 LCN
1 EA KICK PLATE 8400 10" X 2" LDW B-CS 630 IVE
3 EA SILENCER SR64/65/66 AS REQ'D GRY IVE Hardware Group No. 29 For use on Door #(s):
123D/2 Provide each SGL door(s) with the following:
QTY DESCRIPTION CATALOG NUMBER FINISH MFR
1 EA CONT. HINGE 224XY 628 IVE
1 EA STOREROOM LOCK ND80LD SPA 626 SCH
1 EA CYLINDER 20-20073 626 MED
1 EA SURFACE CLOSER 4040XP SCUSH 689 LCN
1 EA KICK PLATE 8400 10" X 2" LDW B-CS 630 IVE
1 EA RAIN DRIP 142AA AA ZER
1 SET GASKETING 429A AA ZER
1 EA DOOR SWEEP 8197AA AA ZER
1 EA THRESHOLD 655A A ZER
1 EA DOOR CONTACT 679-05 BLK SCE NOTE: INSTALL SEALS PRIOR TO ANY SOFFIT MOUNTED HARDWARE. DOOR PROP ALARM: IF DOOR REMAINS OPEN FOR DESIGNATED AMOUNT OF TIME ALARM TO ALERT LOCAL ACCESS CONTROL SYSTEM UNTIL DOOR IS CLOSED. Hardware Group No. 30 For use on Door #(s):
123B/1 302/1 Provide each PR door(s) with the following:
QTY DESCRIPTION CATALOG NUMBER FINISH MFR
8 EA HINGE 5BB1HW 4.5 X 4.5 652 IVE
2 EA AUTO FLUSH BOLT FB31T/FB41T 630 IVE
1 EA STOREROOM LOCK ND80LD SPA 626 SCH
1 EA CYLINDER 20-20073 626 MED
1 EA COORDINATOR COR X FL 628 IVE
2 EA MOUNTING BRACKET MB 689 IVE
2 EA SURFACE CLOSER 4040XP CUSH 689 LCN
2 EA KICK PLATE 8400 10" X 2" LDW B-CS 630 IVE
2 EA SILENCER SR64/65/66 AS REQ'D GRY IVE NOTE: PROVIDE ONE LESS HINGE @ < 7'0" OPENINGS

BTBC Phase III October 26, 2020
GE Project No. 0119-0010
Gould Evans
DOOR HARDWARE 087100-32
Hardware Group No. 31 For use on Door #(s):
104B/1 Provide each PR door(s) with the following:
QTY DESCRIPTION CATALOG NUMBER FINISH MFR
6 EA HINGE 5BB1HW 4.5 X 4.5 652 IVE
2 EA MANUAL FLUSH BOLT FB358/FB458 AS REQ'D 626 IVE
1 EA DBL CYL STORE LOCK ND66LD SPA 626 SCH
2 EA CYLINDER 20-20073 626 MED
2 EA OH STOP 90S 630 GLY
2 EA KICK PLATE 8400 10" X 2" LDW B-CS 630 IVE
1 SET GASKETING 429A AA ZER
1 EA MEETING STILE 8195AA AA ZER Hardware Group No. 32 For use on Door #(s):
300F/1 Provide each SGL door(s) with the following:
QTY DESCRIPTION CATALOG NUMBER FINISH MFR
3 EA HINGE 5BB1HW 4.5 X 4.5 652 IVE
1 EA CLASSROOM X STORERM ND70X80LDLD SPA XN12-006 626 SCH
2 EA CYLINDER 20-20073 626 MED
1 EA SURFACE CLOSER 4040XP RW/PA 689 LCN
1 EA KICK PLATE 8400 10" X 2" LDW B-CS 630 IVE
1 EA WALL STOP WS406/407CCV 626 IVE
3 EA SILENCER SR64/65/66 AS REQ'D GRY IVE NOTE: STOREROOM LOCK ON TANK STORAGE SIDE, CLASSROOM LOCK ON LAB SIDE. Hardware Group No. 33 For use on Door #(s):
3S3/1 102/1 102/2 104/1 104/2 104B/2
109/1 115/1 121/1 202/3 203/1 203/2
211A/2 300F/2 301/1 Provide each SGL door(s) with the following:
QTY DESCRIPTION CATALOG NUMBER FINISH MFR
3 EA HINGE 5BB1HW 4.5 X 4.5 652 IVE
1 EA ELECTRIC HW HINGE 5BB1HW 4.5 X 4.5 TW8 652 IVE
1 EA ELEC CLASSROOM LOCK AD-300-CY-70-MT-SPA-L 12/24 VDC
626 SCE
1 EA CYLINDER 20-20073 626 MED
1 EA SURFACE CLOSER 4040XP RW/PA 689 LCN
1 EA KICK PLATE 8400 10" X 2" LDW B-CS 630 IVE
1 EA WALL STOP WS406/407CCV 626 IVE
1 EA GASKETING 188SBK PSA @ 104B/2
BK ZER
1 EA SILENCER SR64/65/66 AS REQ'D GRY IVE NOTE: PROVIDE ONE LESS HINGE @ 7'0" OPENINGS

BTBC Phase III October 26, 2020
GE Project No. 0119-0010
Gould Evans
DOOR HARDWARE 087100-33
Hardware Group No. 34 For use on Door #(s):
202/1 202/2 204/1 204/2 211/1 300/1
304/1 304/2 Provide each SGL door(s) with the following:
QTY DESCRIPTION CATALOG NUMBER FINISH MFR
3 EA HINGE 5BB1HW 4.5 X 4.5 652 IVE
1 EA ELECTRIC HW HINGE 5BB1HW 4.5 X 4.5 TW8 652 IVE
1 EA ELEC CLASSROOM LOCK AD-300-CY-70-MT-SPA-L 12/24 VDC
626 SCE
1 EA CYLINDER 20-20073 626 MED
1 EA SURFACE CLOSER 4040XP CUSH 689 LCN
1 EA KICK PLATE 8400 10" X 2" LDW B-CS 630 IVE
1 EA SILENCER SR64/65/66 AS REQ'D GRY IVE NOTE: PROVIDE ONE LESS HINGE @ 7'0" OPENINGS Hardware Group No. 35 For use on Door #(s):
300B/2 301B/2 Provide each PR door(s) with the following:
QTY DESCRIPTION CATALOG NUMBER FINISH MFR
7 EA HINGE 5BB1HW 4.5 X 4.5 652 IVE
1 EA ELECTRIC HW HINGE 5BB1HW 4.5 X 4.5 TW8 652 IVE
2 EA AUTO FLUSH BOLT FB31T/FB41T 630 IVE
1 EA ELEC CLASSROOM LOCK AD-300-CY-70-MT-SPA-L 12/24 VDC
626 SCE
1 EA CYLINDER 20-20073 626 MED
1 EA COORDINATOR COR X FL 628 IVE
2 EA MOUNTING BRACKET MB 689 IVE
2 EA SURFACE CLOSER 4040XP CUSH 689 LCN
2 EA KICK PLATE 8400 10" X 2" LDW B-CS 630 IVE
2 EA SILENCER SR64/65/66 AS REQ'D GRY IVE NOTE: PROVIDE 2 LESS HINGES @ OPENING 301B/2 Hardware Group No. 36 For use on Door #(s):
121/2 Provide each SGL door(s) with the following:
QTY DESCRIPTION CATALOG NUMBER FINISH MFR
3 EA HINGE 5BB1HW 4.5 X 4.5 652 IVE
1 EA ELECTRIC HW HINGE 5BB1HW 4.5 X 4.5 TW8 652 IVE
1 EA ELEC CLASSROOM LOCK AD-300-CY-70-MT-SPA-L 12/24 VDC
626 SCE
1 EA CYLINDER 20-20073 626 MED
1 EA SURFACE CLOSER 4040XP RW/PA 689 LCN
1 EA KICK PLATE 8400 10" X 2" LDW B-CS 630 IVE
1 EA WALL STOP WS406/407CCV 626 IVE
1 SET GASKETING 429A AA ZER
1 EA DOOR BOTTOM 362AA AA ZER

BTBC Phase III October 26, 2020
GE Project No. 0119-0010
Gould Evans
DOOR HARDWARE 087100-34
Hardware Group No. 37 For use on Door #(s):
104B/3 121C/1 123/4 Provide each RU door(s) with the following:
QTY DESCRIPTION CATALOG NUMBER FINISH MFR HARDWARE BY DOOR MFR. Hardware Group No. 38 For use on Door #(s):
301M/2 Provide each SGL door(s) with the following:
QTY DESCRIPTION CATALOG NUMBER FINISH MFR HARDWARE BY DOOR MFR. Hardware Group No. 39 For use on Door #(s):
101/2 101/3 Provide each SL door(s) with the following:
QTY DESCRIPTION CATALOG NUMBER FINISH MFR HARDWARE BY DOOR MFR. PROVIDE CYLINDER WHERE REQUIRED. END OF SECTION

BTBC Phase III October 26, 2020
GE Project No. 0119-0010
Gould Evans
GLAZING 088000 - 1
SECTION 088000 - GLAZING
PART 1 - GENERAL
1.1 RELATED DOCUMENTS
A. Drawings and general provisions of the Contract, including General and Supplementary Conditions and
Division 01 Specification Sections, apply to this Section.
1.2 SUMMARY
A. Section includes glazing for the following products and applications, including those specified in other
Sections where glazing requirements are specified by reference to this Section:
1. Windows
2. Doors.
3. Glazed curtain walls.
4. Glazed entrances
5. Interior borrowed lites
B. Related Sections:
1. Division 08 Section "All-Glass Entrances and Storefronts."
2. Division 08 Section "Mirrors" for all mirrors.
1.3 DEFINITIONS
A. Glass Manufacturers: Firms that produce primary glass, fabricated glass, or both, as defined in referenced
glazing publications.
B. Glass Thicknesses: Indicated by thickness designations in millimeters according to ASTM C 1036.
C. Interspace: Space between lites of an insulating-glass unit.
1.4 PERFORMANCE REQUIREMENTS
A. General: Installed glazing systems shall withstand normal thermal movement and wind and impact loads
(where applicable) without failure, including loss or glass breakage attributable to the following: defective
manufacture, fabrication, or installation; failure of sealants or gaskets to remain watertight and airtight;
deterioration of glazing materials; or other defects in construction.
B. Thermal Movements: Allow for thermal movements from ambient and surface temperature changes acting
on glass framing members and glazing components.
1. Temperature Change: 120 deg F, ambient; 180 deg F, material surfaces.

BTBC Phase III October 26, 2020
GE Project No. 0119-0010
Gould Evans
GLAZING 088000 - 2
1.5 ACTION SUBMITTALS
A. Product Data: For each glass product and glazing material indicated.
B. Glass Samples: For each type of glass product other than clear monolithic vision glass; 12 inches square.
Architect shall review color of all insulated glass to determine if color is acceptable. A second submittal
may be required if color is not acceptable.
C. Glazing Schedule: List glass types and thicknesses for each size opening and location. Use same
designations indicated on Drawings.
1.6 INFORMATIONAL SUBMITTALS
A. Qualification Data: For installers.
B. Product Certificates: For glass and glazing products, from manufacturer.
C. Product Test Reports: Based on evaluation of comprehensive tests performed by a qualified testing agency,
for insulating glass.
D. Warranties: Sample of special warranties.
1.7 QUALITY ASSURANCE
A. Manufacturer Qualifications for Insulating-Glass Units with Sputter-Coated, Low-E Coatings: A qualified
insulating-glass manufacturer who is approved by coated-glass manufacturer.
B. Installer Qualifications: A qualified installer who employs glass installers for this Project who are certified
under the National Glass Association's Certified Glass Installer Program.
C. Source Limitations for Glass: Obtain insulating glass from single source from single manufacturer for each
glass type.
D. Source Limitations for Glazing Accessories: Obtain from single source from single manufacturer for each
product and installation method.
E. Glazing Publications: Comply with published recommendations of glass product manufacturers and
organizations below, unless more stringent requirements are indicated. Refer to these publications for
glazing terms not otherwise defined in this Section or in referenced standards.
1. IGMA Publication for Insulating Glass: SIGMA TM-3000, "North American Glazing Guidelines
for Sealed Insulating Glass Units for Commercial and Residential Use."
F. Safety Glazing Labeling: Where safety glazing labeling is indicated, permanently mark glazing with
certification label of the SGCC. Label shall indicate manufacturer's name, type of glass, thickness, and
safety glazing standard with which glass complies.
G. Insulating-Glass Certification Program: Permanently marked either on spacers or on at least one
component lite of units with appropriate certification label of IGCC.
H. Mockups: Build mockups to verify selections made under sample submittals and to demonstrate aesthetic
effects and set quality standards for fabrication and installation.

BTBC Phase III October 26, 2020
GE Project No. 0119-0010
Gould Evans
GLAZING 088000 - 3
1. Build mockup of typical wall area as shown on Drawings. This mock-up shall be part of the complete
wall system mock-ups specified in the Pre Cast Concrete and Brick Masonry sections.
2. Approval of mockups does not constitute approval of deviations from the Contract Documents
contained in mockups unless Architect specifically approves such deviations in writing.
I. Preinstallation Conference: Conduct conference at Project site.
1. Review and finalize construction schedule and verify availability of materials, Installer's personnel,
equipment, and facilities needed to make progress and avoid delays.
2. Review temporary protection requirements for glazing during and after installation.
1.8 DELIVERY, STORAGE, AND HANDLING
A. Protect glazing materials according to manufacturer's written instructions. Prevent damage to glass and
glazing materials from condensation, temperature changes, direct exposure to sun, or other causes.
B. Comply with insulating-glass manufacturer's written recommendations for venting and sealing units to
avoid hermetic seal ruptures due to altitude change.
1.9 PROJECT CONDITIONS
A. Environmental Limitations: Do not proceed with glazing when ambient and substrate temperature
conditions are outside limits permitted by glazing material manufacturers and when glazing channel
substrates are wet from rain, frost, condensation, or other causes.
1. Do not install glazing sealants when ambient and substrate temperature conditions are outside limits
permitted by sealant manufacturer or below 40 deg F.
1.10 WARRANTY
A. Manufacturer's Special Warranty for Coated-Glass Products: Manufacturer's standard form in which
coated-glass manufacturer agrees to replace coated-glass units that deteriorate within specified warranty
period. Deterioration of coated glass is defined as defects developed from normal use that are not attributed
to glass breakage or to maintaining and cleaning coated glass contrary to manufacturer's written
instructions. Defects include peeling, cracking, and other indications of deterioration in coating.
1. Warranty Period: 10 years from date of Substantial Completion.
B. Manufacturer's Special Warranty on Insulating Glass: Manufacturer's standard form in which insulating-
glass manufacturer agrees to replace insulating-glass units that deteriorate within specified warranty period.
Deterioration of insulating glass is defined as failure of hermetic seal under normal use that is not attributed
to glass breakage or to maintaining and cleaning insulating glass contrary to manufacturer's written
instructions. Evidence of failure is the obstruction of vision by dust, moisture, or film on interior surfaces
of glass.
1. Warranty Period: 10 years from date of Substantial Completion.

BTBC Phase III October 26, 2020
GE Project No. 0119-0010
Gould Evans
GLAZING 088000 - 4
PART 2 - PRODUCTS
2.1 GLASS PRODUCTS, GENERAL
A. Thickness: Where glass thickness is indicated, it is a minimum. Provide glass lites in thicknesses as needed
to comply with requirements indicated.
B. Strength: Where float glass is indicated, provide annealed float glass, Kind HS heat-treated float glass, or
Kind FT heat-treated float glass. Where heat-strengthened glass is indicated, provide Kind HS heat-treated
float glass or Kind FT heat-treated float glass. Where fully tempered glass is indicated, provide Kind FT
heat-treated float glass.
C. Windborne-Debris-Impact Resistance: Provide exterior glazing that passes basic-protection testing
requirements in ASTM E 1996 for Wind Zone 2 when tested according to ASTM E 1886. Test specimens
shall be no smaller in width and length than glazing indicated for use on the Project and shall be installed
in same manner as glazing indicated for use on the Project.
1. Large-Missile Test: For glazing located within 30 feet of grade.
2. Small-Missile Test: For glazing located more than 30 feet above grade.
D. Thermal and Optical Performance Properties: Provide glass with performance properties specified, as
indicated in manufacturer's published test data, based on procedures indicated below:
1. For insulating-glass units, properties are based on units of thickness indicated for overall unit and
for each lite.
2. U-Factors: Center-of-glazing values, according to NFRC 100 and based on LBL's WINDOW 5.2
computer program, expressed as Btu/sq. ft. x h x deg F.
3. Solar Heat-Gain Coefficient and Visible Transmittance: Center-of-glazing values, according to
NFRC 200 and based on LBL's WINDOW 5.2 computer program.
4. Visible Reflectance: Center-of-glazing values, according to NFRC 300.
2.2 GLASS PRODUCTS
A. Float Glass: ASTM C 1036, Type I, Quality-Q3, Class I (clear) unless otherwise indicated.
B. Acid Etched Float Glass: ASTM C 1036, Type I, Quality-Q3, Class I (clear) with acid etch on one side..
C. Polished Wired Glass: ASTM C 1036, Type II, Class 1 (clear), Form 1, Quality-Q6, complying with
ANSI Z97.1, Class C.
1. Mesh: M2 (square).
D. Heat-Treated Float Glass: ASTM C 1048; Type I; Quality-Q3; Class I (clear) unless otherwise indicated;
of kind and condition indicated.
1. Fabrication Process: By horizontal (roller-hearth) process with roll-wave distortion parallel to
bottom edge of glass as installed unless otherwise indicated.
2. For uncoated glass, comply with requirements for Condition A.
E. Ceramic-Coated Spandrel Glass: ASTM C 1048, Condition B, Type I, Quality-Q3, and complying with
other requirements specified.

BTBC Phase III October 26, 2020
GE Project No. 0119-0010
Gould Evans
GLAZING 088000 - 5
2.3 INSULATING GLASS
A. Insulating-Glass Units: Factory-assembled units consisting of sealed lites of glass separated by a
dehydrated interspace, qualified according to ASTM E 2190, and complying with other requirements
specified.
1. Sealing System: Dual seal, with manufacturer's standard primary and secondary.
2. Spacer: Metal or any conductive spacers will not be allowed. Provide Warm Edge Spacer Systems
such as Edgetech “Tri-seal” Foam Super Spacer.
3. Desiccant: Molecular sieve or silica gel, or blend of both.
B. Glass: Comply with applicable requirements in "Glass Products" Article as indicated by designations in
"Insulating-Glass Types" Article.
2.4 GLAZING GASKETS
A. Dense Compression Gaskets: Molded or extruded gaskets of profile and hardness required to maintain
watertight seal, made from one of the following:
1. EPDM complying with ASTM C 864.
2. Silicone complying with ASTM C 1115.
3. Thermoplastic polyolefin rubber complying with ASTM C 1115.
B. Soft Compression Gaskets: Extruded or molded, closed-cell, integral-skinned EPDM silicone or
thermoplastic polyolefin rubber gaskets complying with ASTM C 509, Type II, black; of profile and
hardness required to maintain watertight seal.
1. Application: Use where soft compression gaskets will be compressed by inserting dense
compression gaskets on opposite side of glazing or pressure applied by means of pressure-glazing
stops on opposite side of glazing.
2.5 GLAZING SEALANTS
A. General:
1. Compatibility: Provide glazing sealants that are compatible with one another and with other
materials they will contact, including glass products, seals of insulating-glass units, and glazing
channel substrates, under conditions of service and application, as demonstrated by sealant
manufacturer based on testing and field experience.
2. Suitability: Comply with sealant and glass manufacturers' written instructions for selecting glazing
sealants suitable for applications indicated and for conditions existing at time of installation.
3. Colors of Exposed Glazing Sealants: As selected by Architect from manufacturer's full range.
B. Glazing Sealant: Neutral-curing silicone glazing sealant complying with ASTM C 920, Type S, Grade NS,
Class 100/50, Use NT.
1. Products: Subject to compliance with requirements, provide one of the following:
a. Dow Corning Corporation; 790.
b. GE Advanced Materials - Silicones; SilPruf LM SCS2700.
c. May National Associates, Inc.; Bondaflex Sil 290.
d. Pecora Corporation; 890.

BTBC Phase III October 26, 2020
GE Project No. 0119-0010
Gould Evans
GLAZING 088000 - 6
e. Sika Corporation, Construction Products Division; SikaSil-C990.
f. Tremco Incorporated; Spectrem 1.
2.6 GLAZING TAPES
A. Back-Bedding Mastic Glazing Tapes: Preformed, butyl-based, 100 percent solids elastomeric tape;
nonstaining and nonmigrating in contact with nonporous surfaces; with or without spacer rod as
recommended in writing by tape and glass manufacturers for application indicated; and complying with
ASTM C 1281 and AAMA 800 for products indicated below:
1. AAMA 806.3 tape, for glazing applications in which tape is subject to continuous pressure.
2. AAMA 807.3 tape, for glazing applications in which tape is not subject to continuous pressure.
B. Expanded Cellular Glazing Tapes: Closed-cell, PVC foam tapes; factory coated with adhesive on both
surfaces; and complying with AAMA 800 for the following types:
1. AAMA 810.1, Type 1, for glazing applications in which tape acts as the primary sealant.
2. AAMA 810.1, Type 2, for glazing applications in which tape is used in combination with a full bead
of liquid sealant.
2.7 MISCELLANEOUS GLAZING MATERIALS
A. General: Provide products of material, size, and shape complying with referenced glazing standard,
requirements of manufacturers of glass and other glazing materials for application indicated, and with a
proven record of compatibility with surfaces contacted in installation.
B. Cleaners, Primers, and Sealers: Types recommended by sealant or gasket manufacturer.
C. Setting Blocks: Elastomeric material with a Shore, Type A durometer hardness of 85, plus or minus 5.
D. Spacers: Elastomeric blocks or continuous extrusions of hardness required by glass manufacturer to
maintain glass lites in place for installation indicated.
E. Edge Blocks: Elastomeric material of hardness needed to limit glass lateral movement (side walking).
F. Cylindrical Glazing Sealant Backing: ASTM C 1330, Type O (open-cell material), of size and density to
control glazing sealant depth and otherwise produce optimum glazing sealant performance.
2.8 FABRICATION OF GLAZING UNITS
A. Fabricate glazing units in sizes required to fit openings indicated for Project, with edge and face clearances,
edge and surface conditions, and bite complying with written instructions of product manufacturer and
referenced glazing publications, to comply with system performance requirements.
B. Clean-cut or flat-grind vertical edges of butt-glazed monolithic lites to produce square edges with slight
chamfers at junctions of edges and faces.
C. Grind smooth and polish exposed glass edges and corners.

BTBC Phase III October 26, 2020
GE Project No. 0119-0010
Gould Evans
GLAZING 088000 - 7
2.9 MONOLITHIC-GLASS TYPES
A. Glass Type GL-01: Clear float glass.
1. Thickness: 6.0 mm.(1/4”)
2. Provide safety glazing labeling.
B. Glass Type GL-02 : Tempered.
1. Thickness: 12.0 mm.(1/2”)
2. Provide safety glazing labeling.
2.10 INSULATING-GLASS TYPES
A. Glass Type IGU-01: Solar Control Low-e-coated, clear insulating glass.
1. Basis-of-Design Product: Solarban 70-XL Solar control Low-e by PPG, or a comparable product by
one of the following:
a. Oldcastle
b. Interpane
c. Viracon
d. Guardian
2. Performance Requirements:
a. Overall Unit Thickness: 1 inch.
b. Outdoor Lite: Class 1 (Clear) float glass, heat-strengthened float glass or fully tempered
float glass.
c. Thickness of Each Glass Lite: 6.0 mm.
d. Interspace Content: Air.
e. Indoor Lite: Class 1 (Clear) float glass, heat-strengthened float glass or fully tempered float
glass
f. Low-E Coating: Pyrolytic on third surface.
g. Visible Light Transmittance: 70 percent minimum.
h. Winter Nighttime U-Factor: 0.29 maximum.
i. Summer Daytime U-Factor: 0.27 maximum.
j. Solar Heat Gain Coefficient: 0.38 maximum.
k. Retain subparagraph below if required for fully tempered glass.
l. Provide safety glazing labeling at tempered glass locations.
B. Glass Type IGU-02: Low-e-coated, translucent insulating glass.
1. Basis-of-Design Product: Solarban 70-XL Solar control Low-e by PPG, or a comparable product by
one of the following:
a. Oldcastle
b. Interpane
c. Viracon
d. Guardian
2. Performance Requirements:

BTBC Phase III October 26, 2020
GE Project No. 0119-0010
Gould Evans
GLAZING 088000 - 8
a. Overall Unit Thickness: 1 inch.
b. Thickness of Each Glass Lite: 6.0 mm.
c. Outdoor Lite: Class 1 (Clear) float glass, heat-strengthened float glass or fully tempered
float glass.
d. Interspace Content: Air.
e. Indoor Lite: Class 1 (Clear) float glass, heat-strengthened float glass or fully tempered float
glass
f. Low-E Coating: Pyrolytic on third surface.
g. Translucent finish: Acid etched or simulated sand blast on 2nd surface
h. Visible Light Transmittance: 70 percent minimum.
i. Winter Nighttime U-Factor: 0.29 maximum.
j. Summer Daytime U-Factor: 0.27 maximum.
k. Solar Heat Gain Coefficient: 0.38 maximum
l. Retain subparagraph below if required for fully tempered glass.
m. Provide safety glazing labeling at tempered glass locations.
C. Glass Type IGU-03: Ceramic-coated, low-e, insulating spandrel glass.
1. Basis-of-Design Product: Solarban 70-XL Solar control Low-e by PPG, or a comparable product by
one of the following:
a. Oldcastle
b. Interpane
c. Viracon
d. Guardian
2. Performance Requirements:
a. Overall Unit Thickness: 1 inch.
b. Thickness of Each Glass Lite: 6.0 mm.
c. Outdoor Lite: Class 1 (Clear) float glass, heat-strengthened float glass or fully tempered
float glass.
d. Interspace Content: Air.
e. Indoor Lite: Class 1 (Clear) float glass, heat-strengthened float glass or fully tempered float
glass
f. Low-E Coating: Pyrolytic on third surface.
g. Opaque Coating Location: 933 warm grey on surface #4.
h. Winter Nighttime U-Factor: 0.29 maximum.
i. Summer Daytime U-Factor: 0.27 maximum.
D. Glass Type IGU-04: Interior acoustical insulating glass.
1. Basis-of-Design Product: by PPG, or a comparable product by one of the following:
a. Oldcastle
b. Interpane
c. Viracon
d. Guardian
2. Performance Requirements:
a. Overall Unit Thickness: 1 inch.
b. Thickness of Each Glass Lite: 6.0 mm.
c. Outdoor Lite: Class 1 (Clear) float glass, heat-strengthened float glass or fully tempered
float glass.

BTBC Phase III October 26, 2020
GE Project No. 0119-0010
Gould Evans
GLAZING 088000 - 9
d. Interspace Content: Air.
e. Indoor Lite: Class 1 (Clear) float glass, heat-strengthened float glass or fully tempered float
glass
f. Provide safety glazing labeling at tempered glass locations.
PART 3 - EXECUTION
3.1 EXAMINATION
A. Examine framing, glazing channels, and stops, with Installer present, for compliance with the following:
1. Manufacturing and installation tolerances, including those for size, squareness, and offsets at
corners.
2. Presence and functioning of weep systems.
3. Minimum required face and edge clearances.
4. Effective sealing between joints of glass-framing members.
B. Proceed with installation only after unsatisfactory conditions have been corrected.
3.2 PREPARATION
A. Clean glazing channels and other framing members receiving glass immediately before glazing. Remove
coatings not firmly bonded to substrates.
B. Examine glazing units to locate exterior and interior surfaces. Label or mark units as needed so that exterior
and interior surfaces are readily identifiable. Do not use materials that will leave visible marks in the
completed work.
3.3 GLAZING, GENERAL
A. Comply with combined written instructions of manufacturers of glass, sealants, gaskets, and other glazing
materials, unless more stringent requirements are indicated, including those in referenced glazing
publications.
B. Adjust glazing channel dimensions as required by Project conditions during installation to provide
necessary bite on glass, minimum edge and face clearances, and adequate sealant thicknesses, with
reasonable tolerances.
C. Protect glass edges from damage during handling and installation. Remove damaged glass from Project
site and legally dispose of off Project site. Damaged glass is glass with edge damage or other imperfections
that, when installed, could weaken glass and impair performance and appearance.
D. Apply primers to joint surfaces where required for adhesion of sealants, as determined by preconstruction
testing.
E. Install setting blocks in sill rabbets, sized and located to comply with referenced glazing publications, unless
otherwise required by glass manufacturer. Set blocks in thin course of compatible sealant suitable for heel
bead.
F. Do not exceed edge pressures stipulated by glass manufacturers for installing glass lites.

BTBC Phase III October 26, 2020
GE Project No. 0119-0010
Gould Evans
GLAZING 088000 - 10
G. Provide spacers for glass lites where length plus width is larger than 50 inches.
1. Locate spacers directly opposite each other on both inside and outside faces of glass. Install correct
size and spacing to preserve required face clearances, unless gaskets and glazing tapes are used that
have demonstrated ability to maintain required face clearances and to comply with system
performance requirements.
2. Provide 1/8-inch minimum bite of spacers on glass and use thickness equal to sealant width. With
glazing tape, use thickness slightly less than final compressed thickness of tape.
H. Provide edge blocking where indicated or needed to prevent glass lites from moving sideways in glazing
channel, as recommended in writing by glass manufacturer and according to requirements in referenced
glazing publications.
I. Set glass lites in each series with uniform pattern, draw, bow, and similar characteristics.
J. Set glass lites with proper orientation so that coatings face exterior or interior as specified.
K. Where wedge-shaped gaskets are driven into one side of channel to pressurize sealant or gasket on opposite
side, provide adequate anchorage so gasket cannot walk out when installation is subjected to movement.
L. Square cut wedge-shaped gaskets at corners and install gaskets in a manner recommended by gasket
manufacturer to prevent corners from pulling away; seal corner joints and butt joints with sealant
recommended by gasket manufacturer.
3.4 TAPE GLAZING
A. Position tapes on fixed stops so that, when compressed by glass, their exposed edges are flush with or
protrude slightly above sightline of stops.
B. Install tapes continuously, but not necessarily in one continuous length. Do not stretch tapes to make them
fit opening.
C. Cover vertical framing joints by applying tapes to heads and sills first and then to jambs. Cover horizontal
framing joints by applying tapes to jambs and then to heads and sills.
D. Place joints in tapes at corners of opening with adjoining lengths butted together, not lapped. Seal joints in
tapes with compatible sealant approved by tape manufacturer.
E. Do not remove release paper from tape until right before each glazing unit is installed.
F. Apply heel bead of elastomeric sealant.
G. Center glass lites in openings on setting blocks and press firmly against tape by inserting dense compression
gaskets formed and installed to lock in place against faces of removable stops. Start gasket applications at
corners and work toward centers of openings.
H. Apply cap bead of elastomeric sealant over exposed edge of tape.
3.5 GASKET GLAZING (DRY)
A. Cut compression gaskets to lengths recommended by gasket manufacturer to fit openings exactly, with
allowance for stretch during installation.

BTBC Phase III October 26, 2020
GE Project No. 0119-0010
Gould Evans
GLAZING 088000 - 11
B. Insert soft compression gasket between glass and frame or fixed stop so it is securely in place with joints
miter cut and bonded together at corners.
C. Installation with Drive-in Wedge Gaskets: Center glass lites in openings on setting blocks and press firmly
against soft compression gasket by inserting dense compression gaskets formed and installed to lock in
place against faces of removable stops. Start gasket applications at corners and work toward centers of
openings. Compress gaskets to produce a weathertight seal without developing bending stresses in glass.
Seal gasket joints with sealant recommended by gasket manufacturer.
D. Installation with Pressure-Glazing Stops: Center glass lites in openings on setting blocks and press firmly
against soft compression gasket. Install dense compression gaskets and pressure-glazing stops, applying
pressure uniformly to compression gaskets. Compress gaskets to produce a weathertight seal without
developing bending stresses in glass. Seal gasket joints with sealant recommended by gasket manufacturer.
E. Install gaskets so they protrude past face of glazing stops.
3.6 SEALANT GLAZING (WET)
A. Install continuous spacers, or spacers combined with cylindrical sealant backing, between glass lites and
glazing stops to maintain glass face clearances and to prevent sealant from extruding into glass channel and
blocking weep systems until sealants cure. Secure spacers or spacers and backings in place and in position
to control depth of installed sealant relative to edge clearance for optimum sealant performance.
B. Force sealants into glazing channels to eliminate voids and to ensure complete wetting or bond of sealant
to glass and channel surfaces.
C. Tool exposed surfaces of sealants to provide a substantial wash away from glass.
3.7 CLEANING AND PROTECTION
A. Protect exterior glass from damage immediately after installation by attaching crossed streamers to framing
held away from glass. Do not apply markers to glass surface. Remove nonpermanent labels and clean
surfaces.
B. Protect glass from contact with contaminating substances resulting from construction operations. If, despite
such protection, contaminating substances do come into contact with glass, remove substances immediately
as recommended in writing by glass manufacturer.
C. Examine glass surfaces adjacent to or below exterior concrete and other masonry surfaces at frequent
intervals during construction, but not less than once a month, for buildup of dirt, scum, alkaline deposits,
or stains; remove as recommended in writing by glass manufacturer.
D. Remove and replace glass that is broken, chipped, cracked, or abraded or that is damaged from natural
causes, accidents, and vandalism, during construction period.
E. Wash glass on both exposed surfaces in each area of Project not more than four days before date scheduled
for inspections that establish date of Substantial Completion. Wash glass as recommended in writing by
glass manufacturer.
END OF SECTION 088000

BTBC Phase III October 26, 2020
GE Project No. 0119-0010
Gould Evans
GLAZING 088000 - 12
THIS PAGE IS INTENTIONALLY LEFT BLANK

BTBC Phase III October 26, 2020
GE Project No. 0119-0010
Gould Evans
MIRRORS 088300 - 1
SECTION 088300 - MIRRORS
PART 1 - GENERAL
1.1 RELATED DOCUMENTS
A. Drawings and general provisions of the Contract, including General and Supplementary Conditions and
Division 01 Specification Sections, apply to this Section.
1.2 SUMMARY
A. Section includes the following types of silvered flat glass mirrors:
1. Annealed monolithic glass mirrors.
1.3 SUBMITTALS
A. Product Data: For each type of product indicated.
1. Mirrors. Include description of materials and process used to produce each type of silvered flat
glass mirror specified that indicates sources of glass, glass coating components, edge sealer, and
quality-control provisions.
B. Shop Drawings: Include mirror elevations, edge details, mirror hardware, and attachments to other work.
C. Product Certificates: For each type of mirror and mirror mastic, from manufacturer.
D. Maintenance Data: For mirrors to include in maintenance manuals.
E. Warranty: Sample of special warranty.
1.4 QUALITY ASSURANCE
A. Source Limitations for Mirrors: Obtain mirrors from single source from single manufacturer.
B. Source Limitations for Mirror Accessories: Obtain mirror glazing accessories from single source.
C. Glazing Publications: Comply with the following published recommendations:
1. GANA's "Glazing Manual" unless more stringent requirements are indicated. Refer to this
publication for definitions of glass and glazing terms not otherwise defined in this Section or in
referenced standards.
2. GANA Mirror Division's "Mirrors, Handle with Extreme Care: Tips for the Professional on the
Care and Handling of Mirrors."

BTBC Phase III October 26, 2020
GE Project No. 0119-0010
Gould Evans
MIRRORS 088300 - 2
1.5 DELIVERY, STORAGE, AND HANDLING
A. Protect mirrors according to mirror manufacturer's written instructions and as needed to prevent damage to
mirrors from moisture, condensation, temperature changes, direct exposure to sun, or other causes.
B. Comply with mirror manufacturer's written instructions for shipping, storing, and handling mirrors as
needed to prevent deterioration of silvering, damage to edges, and abrasion of glass surfaces and applied
coatings. Store indoors.
1.6 PROJECT CONDITIONS
A. Environmental Limitations: Do not install mirrors until ambient temperature and humidity conditions are
maintained at levels indicated for final occupancy.
1.7 WARRANTY
A. Special Warranty: Manufacturer's standard form in which mirror manufacturer agrees to replace mirrors
that deteriorate within specified warranty period. Deterioration of mirrors is defined as defects developed
from normal use that are not attributed to mirror breakage or to maintaining and cleaning mirrors contrary
to manufacturer's written instructions. Defects include discoloration, black spots, and clouding of the silver
film.
1. Warranty Period: Five years from date of Substantial Completion.
PART 2 - PRODUCTS
2.1 SILVERED FLAT GLASS MIRRORS
A. Glass Mirrors, General: ASTM C 1503.
1. Manufacturers: Subject to compliance with requirements, provide products by one of the following:
a. Arch Aluminum & Glass Co., Inc.
b. Binswanger Mirror; a division of Vitro America, Inc.
c. D & W Incorporated
d. Gardner Glass, Inc.
e. Gilded Mirrors, Inc.
f. Guardian Industries.
g. Independent Mirror Industries, Inc.
h. National Glass Industries.
i. Sunshine Mirror; Westshore Glass Corp.
j. Walker Glass Co., Ltd.
B. Clear Glass: Mirror Glazing Quality; ultraclear (low-iron) float glass with a minimum 91 percent visible
light transmission.
1. Nominal Thickness: 4.0 mm.

BTBC Phase III October 26, 2020
GE Project No. 0119-0010
Gould Evans
MIRRORS 088300 - 3
2.2 MISCELLANEOUS MATERIALS
A. Setting Blocks: Elastomeric material with a Shore, Type A durometer hardness of 85, plus or minus 5.
B. Edge Sealer: Coating compatible with glass coating and approved by mirror manufacturer for use in
protecting against silver deterioration at mirrored glass edges.
C. Mirror Mastic: An adhesive setting compound, asbestos-free, produced specifically for setting mirrors and
certified by both mirror manufacturer and mastic manufacturer as compatible with glass coating and
substrates on which mirrors will be installed.
2.3 MIRROR HARDWARE
A. Top, Bottom and Side Aluminum J-Channels: Aluminum extrusions with a return deep enough to produce
a glazing channel to accommodate mirrors of thickness indicated and in lengths required to cover bottom
and top edges of each mirror in a single piece.
1. Trim: J-channels formed with front leg and back leg not less than 5/8 inch in height, respectively,
and a thickness of not less than 0.04 inch (1.0 mm).
2. Finish: Clear bright anodized.
B. Fasteners: Fabricated of same basic metal and alloy as fastened metal and matching it in finished color and
texture where fasteners are exposed.
C. Anchors and Inserts: Provide devices as required for mirror hardware installation. Provide toothed or lead-
shield expansion-bolt devices for drilled-in-place anchors. Provide galvanized anchors and inserts for
applications on inside face of exterior walls and where indicated.
2.4 FABRICATION
A. Mirror Sizes: To suit Project conditions, cut mirrors to final sizes and shapes.
B. Mirror Edge Treatment: Flat polished.
1. Seal edges of mirrors with edge sealer after edge treatment to prevent chemical or atmospheric
penetration of glass coating.
2. Require mirror manufacturer to perform edge treatment and sealing in factory immediately after
cutting to final sizes.
C. Film-Backed Safety Mirrors: Apply film backing with adhesive coating over mirror backing paint as
recommended in writing by film-backing manufacturer to produce a surface free of bubbles, blisters, and
other imperfections.
PART 3 - EXECUTION
3.1 EXAMINATION
A. Examine substrates, over which mirrors are to be mounted, with Installer present, for compliance with
installation tolerances, substrate preparation, and other conditions affecting performance of the Work.

BTBC Phase III October 26, 2020
GE Project No. 0119-0010
Gould Evans
MIRRORS 088300 - 4
B. Verify compatibility with and suitability of substrates, including compatibility of mirror mastic with
existing finishes or primers.
C. Proceed with installation only after unsatisfactory conditions have been corrected and surfaces are dry.
3.2 PREPARATION
A. Comply with mastic manufacturer's written installation instructions for preparation of substrates, including
coating substrates with mastic manufacturer's special bond coating where applicable.
3.3 INSTALLATION
A. General: Install mirrors to comply with mirror manufacturer's written instructions and with referenced
GANA publications. Mount mirrors accurately in place in a manner that avoids distorting reflected images.
B. Provide a minimum air space of 1/8 inch (3 mm) between back of mirrors and mounting surface for air
circulation between back of mirrors and face of mounting surface.
C. Wall-Mounted Mirrors: Install mirrors with mastic and mirror hardware. Attach mirror hardware securely
to mounting surfaces with mechanical fasteners installed with anchors or inserts as applicable. Install
fasteners so heads do not impose point loads on backs of mirrors.
1. Top and Bottom Aluminum J-Channels: Provide setting blocks 1/8 inch (3 mm) thick by 4 inches
(100 mm) long at quarter points. To prevent trapping water, provide, between setting blocks, two
slotted weeps not less than 1/4 inch (6.4 mm) wide by 3/8 inch (9.5 mm) long at bottom channel.
2. Install mastic as follows:
a. Apply barrier coat to mirror backing where approved in writing by manufacturers of mirrors
and backing material.
b. Apply mastic to comply with mastic manufacturer's written instructions for coverage and to
allow air circulation between back of mirrors and face of mounting surface.
c. After mastic is applied, align mirrors and press into place while maintaining a minimum air
space of 1/8 inch (3 mm) between back of mirrors and mounting surface.
3.4 CLEANING AND PROTECTION
A. Protect mirrors from breakage and contaminating substances resulting from construction operations.
B. Do not permit edges of mirrors to be exposed to standing water.
C. Maintain environmental conditions that will prevent mirrors from being exposed to moisture from
condensation or other sources for continuous periods of time.
D. Wash exposed surface of mirrors not more than four days before date scheduled for inspections that
establish date of Substantial Completion. Wash mirrors as recommended in writing by mirror
manufacturer.
END OF SECTION 088300

BTBC Phase III October 26, 2020 GE Project No. 0119-0010 Gould Evans
GYPSUM BOARD SHAFT WALL ASSEMBLIES 092116 - 1
SECTION 092116 - GYPSUM BOARD SHAFT WALL ASSEMBLIES
PART 1 - GENERAL
1.1 RELATED DOCUMENTS
A. Drawings and general provisions of the Contract, including General and Supplementary Conditions and
Division 01 Specification Sections, apply to this Section.
1.2 SUMMARY
A. Section Includes:
1. Gypsum board shaft wall assemblies.
2. Horizontal shaft wall assemblies
B. Related Sections:
1. Section 092900 "Gypsum Board" for sound-attenuating batt insulation.
1.3 ACTION SUBMITTALS
A. Product Data: For each component of gypsum board shaft wall assembly.
B. LEED Submittals:
1. Product Data for Credit MR 4: For products having recycled content, documentation indicating
percentages by weight of postconsumer and preconsumer recycled content. Include statement
indicating cost for each product having recycled content.
2. Product Certificates for Credit MR 5: For products and materials required to comply with
requirements for regional materials, certificates indicating location of material manufacturer and
point of extraction, harvest, or recovery for each raw material. Include statement indicating distance
to Project, cost for each regional material, and fraction by weight that is considered regional.
1.4 INFORMATIONAL SUBMITTALS
A. Evaluation Reports: For shaft wall assemblies and firestop tracks, from ICC-ES.
1.5 DELIVERY, STORAGE, AND HANDLING
A. Store materials inside under cover and keep them dry and protected against weather, condensation, direct
sunlight, construction traffic, and other potential causes of damage. Stack panels flat and supported on risers
on a flat platform to prevent sagging.

BTBC Phase III October 26, 2020 GE Project No. 0119-0010 Gould Evans
GYPSUM BOARD SHAFT WALL ASSEMBLIES 092116 - 2
1.6 FIELD CONDITIONS
A. Environmental Limitations: Comply with ASTM C 840 requirements or with gypsum board manufacturer's
written recommendations, whichever are more stringent.
B. Do not install interior products until installation areas are enclosed and conditioned.
C. Do not install panels that are wet, moisture damaged, or mold damaged.
1. Indications that panels are wet or moisture damaged include, but are not limited to, discoloration,
sagging, and irregular shape.
2. Indications that panels are mold damaged include, but are not limited to, fuzzy or splotchy surface
contamination and discoloration.
PART 2 - PRODUCTS
2.1 PERFORMANCE REQUIREMENTS
A. Structural Performance: Provide metal shaft wall and horizontal shaft wall framing complying with the
height limitations in accordance with ASTM C 754, capable of withstanding design loads and deflection
limits within limits and under conditions indicated, including but not limited to, finishes requiring higher
deflection or applying greater loads as indicated in the Documents.
1. Design Live Loads: 5.0 pounds per square foot, applied laterally (horizontally) to the vertical wall
surface.
2. Design Live Loads for Horizontal Shaft Wall: Dead load of materials and any surface-mounted
products.
3. Seismic Loads: As indicated on the Drawings.
4. Deflection Limits: Horizontal deflection of 1/240 of the wall height, unless more stringent limit is
required for finish materials.
5. Design framing system to maintain clearances at openings, to allow for construction tolerances,
and to accommodate live load deflection of primary building structure.
B. Fire-Resistance-Rated Assemblies: For fire-resistance-rated assemblies, provide materials and construction
identical to those tested in assembly indicated according to ASTM E 119 by an independent testing agency.
C. STC-Rated Assemblies: Provide materials and construction identical to those of assemblies tested
according to ASTM E 90 and classified according to ASTM E 413 by a testing and inspecting agency.
2.2 GYPSUM BOARD SHAFT WALL ASSEMBLIES
A. Fire-Resistance Rating: As indicated.
B. STC Rating: As indicated.
C. Studs: Manufacturer's standard profile for repetitive members, corner and end members, and fire-resistance-
rated assembly indicated.

BTBC Phase III October 26, 2020 GE Project No. 0119-0010 Gould Evans
GYPSUM BOARD SHAFT WALL ASSEMBLIES 092116 - 3
1. Depth: 4 inches, unless otherwise indicated on the Drawings “PARTITION TYPES” schedule or
required to accommodate applied loads.
a. Horizontal Shaft Wall Framing: 2-1/2 inches, unless otherwise required to accommodate
applied loads for given span.
2. Minimum Base-Metal Thickness: 0.033 inch.
D. Runner Tracks: Manufacturer's standard J-profile track with manufacturer's standard long-leg length, but
at least 2 inches long and matching studs in depth.
1. Minimum Base-Metal Thickness: Matching steel studs.
E. Firestop Tracks: Provide firestop track at head of shaft wall on each floor level.
F. Elevator Hoistway Entrances: Manufacturer's standard J-profile jamb strut with long-leg length of 3 inches,
matching studs in depth, and not less than 0.033 inch thick.
G. Room-Side Finish: Gypsum board.
H. Shaft-Side Finish: Gypsum shaftliner board, Type X. Provide moisture- and mold-resistant shaftliner board
in wet locations.
I. Insulation: Sound attenuation blankets.
2.3 PANEL PRODUCTS
A. Recycled Content of Gypsum Panel Products: Postconsumer recycled content plus one-half of preconsumer
recycled content not less than 40 percent by weight.
B. Regional Materials: Gypsum panel products shall be manufactured within 500 miles of Project site from
materials that have been extracted, harvested, or recovered, as well as manufactured, within 500 miles of
Project site.
C. Regional Materials: Gypsum panel products shall be manufactured within 500 miles of Project site.
D. Panel Size: Provide in maximum lengths and widths available that will minimize joints in each area and
that correspond with support system indicated.
E. Gypsum Shaftliner Board, Type X: ASTM C 1396/C 1396M; manufacturer's proprietary fire-resistive liner
panels with paper faces.
1. Products: Subject to compliance with requirements, provide one of the following:
a. CertainTeed Corp.; ProRoc Shaftliner.
b. Lafarge North America, Inc.; Firecheck Type X Shaftliner.
c. National Gypsum Company; Gold Bond Brand Fire-Shield Shaftliner.
d. USG Corporation; Sheetrock Brand Gypsum Liner Panel.
2. Thickness: 1 inch.
3. Long Edges: Double bevel.
F. Gypsum Board: As specified in Section 092900 "Gypsum Board."

BTBC Phase III October 26, 2020 GE Project No. 0119-0010 Gould Evans
GYPSUM BOARD SHAFT WALL ASSEMBLIES 092116 - 4
G. Cementitious Backer Units: As specified in Section 092900 "Gypsum Board."
2.4 NON-LOAD-BEARING STEEL FRAMING
A. Recycled Content of Steel: Postconsumer recycled content plus one-half of preconsumer recycled content
not less than 25 percent.
B. Steel Framing Members: Comply with ASTM C 645 requirements for metal unless otherwise indicated.
1. Protective Coating: Coating with equivalent corrosion resistance of ASTM A 653/A 653M, G40
unless otherwise indicated.
C. Firestop Tracks: Top runner manufactured to allow partition heads to expand and contract with movement
of the structure while maintaining continuity of fire-resistance-rated assembly indicated; in thickness not
less than indicated for studs and in width to accommodate depth of studs.
1. Products: Subject to compliance with requirements, provide one of the following:
a. Fire Trak Corp.; Fire Trak System attached to studs with Fire Trak Posi Klip.
b. Grace Construction Products; FlameSafe FlowTrak System.
c. Metal-Lite, Inc.; The System.
d. Steel Network Inc. (The); VertiClip SLD Series.
2.5 AUXILIARY MATERIALS
A. General: Provide auxiliary materials that comply with manufacturer's written recommendations.
B. Trim Accessories: Cornerbead, edge trim, and control joints of material and shapes as specified in
Section 09 29 00 "Gypsum Board" that comply with gypsum board shaft wall assembly manufacturer's
written recommendations for application indicated.
C. Steel Drill Screws: ASTM C 1002 unless otherwise indicated.
D. Track Fasteners: Power-driven fasteners of size and material required to withstand loading conditions
imposed on shaft wall assemblies without exceeding allowable design stress of track, fasteners, or structural
substrates in which anchors are embedded.
1. Expansion Anchors: Fabricated from corrosion-resistant materials, with capability to sustain,
without failure, a load equal to 5 times design load, as determined by testing according to
ASTM E 488 conducted by a qualified testing agency.
2. Power-Actuated Anchors: Fastener system of type suitable for application indicated, fabricated from
corrosion-resistant materials, with capability to sustain, without failure, a load equal to 10 times
design load, as determined by testing according to ASTM E 1190 conducted by a qualified testing
agency.
E. Sound Attenuation Blankets: As specified in Section 09 29 00 "Gypsum Board."
F. Acoustical Sealant: As specified in Section 09 29 00 "Gypsum Board."

BTBC Phase III October 26, 2020 GE Project No. 0119-0010 Gould Evans
GYPSUM BOARD SHAFT WALL ASSEMBLIES 092116 - 5
PART 3 - EXECUTION
3.1 EXAMINATION
A. Examine substrates to which gypsum board shaft wall assemblies attach or abut, with Installer present,
including hollow-metal frames, elevator hoistway door frames, cast-in anchors, and structural framing.
Examine for compliance with requirements for installation tolerances and other conditions affecting
performance.
B. Examine panels before installation. Reject panels that are wet, moisture damaged, or mold damaged.
C. Proceed with installation only after unsatisfactory conditions have been corrected.
3.2 PREPARATION
A. Sprayed Fire-Resistive Materials: Coordinate with gypsum board shaft wall assemblies so both elements
of Work remain complete and undamaged. Patch or replace sprayed fire-resistive materials removed or
damaged during installation of shaft wall assemblies to comply with requirements specified in
Section 07 81 00 "Applied Fireproofing."
B. After sprayed fire-resistive materials are applied, remove only to extent necessary for installation of gypsum
board shaft wall assemblies and without reducing the fire-resistive material thickness below that which is
required to obtain fire-resistance rating indicated. Protect remaining fire-resistive materials from damage.
3.3 INSTALLATION
A. General: Install gypsum board shaft wall assemblies to comply with requirements of fire-resistance-rated
assemblies indicated, manufacturer's written installation instructions, and ASTM C 754 other than stud-
spacing requirements.
1. Horizontal Shaft Wall Framing Installation: Comply with ICC-ES NER-258. Install “J”-style tracks
along entire perimeter of horizontal assembly, with long-leg installed toward ceiling/plenum, with
mechanical fasteners spaced at 16 inches on center, with capacity of 200 lbs. in shear or pullout.
a. Install continuous horizontal stud framing spanning between perimeter tracks. Fasten to
tracks with not less than two 1/2-inch-long steel screws to top and bottom leg of perimeter
track.
2. Panel Installation:
a. Shaftliner Panels: Install shaftliner panel into slots or receiver channel of studs.
b. Install sound attenuation blanket insulation where indicated on the Drawing or as required to
achieve fire rating indicated.
c. Gypsum Board Panels: Install and finish gypsum board in accordance with Section 092900
“Gypsum Board.”
B. Do not bridge building expansion joints with shaft wall assemblies; frame both sides of expansion joints
with furring and other support.
C. Install supplementary framing in gypsum board shaft wall assemblies around openings and as required for
blocking, bracing, and support of gravity and pullout loads of fixtures, equipment, services, heavy trim,

BTBC Phase III October 26, 2020 GE Project No. 0119-0010 Gould Evans
GYPSUM BOARD SHAFT WALL ASSEMBLIES 092116 - 6
furnishings, wall-mounted door stops, and similar items that cannot be supported directly by shaft wall
assembly framing.
1. Elevator Hoistway: At elevator hoistway-entrance door frames, provide jamb struts on each side of
door frame.
2. Reinforcing: Where handrails directly attach to gypsum board shaft wall assemblies, provide
galvanized steel reinforcing strip with 0.053-inch minimum thickness of base metal (uncoated) by
8 inches wide, accurately positioned and secured behind at least one layer of face panel.
D. Penetrations: At penetrations in shaft wall, maintain fire-resistance rating of shaft wall assembly by
installing supplementary steel framing around perimeter of penetration and fire protection behind boxes
containing wiring devices, elevator call buttons, elevator floor indicators, and similar items.
E. Isolate perimeter of gypsum panels from building structure to prevent cracking of panels, while maintaining
continuity of fire-rated construction.
F. Firestop Tracks: Where indicated, install to maintain continuity of fire-resistance-rated assembly indicated.
G. Control Joints: Install control joints according to ASTM C 840 and in specific locations approved by
Architect while maintaining fire-resistance rating of gypsum board shaft wall assemblies.
H. Sound-Rated Shaft Wall Assemblies: Seal gypsum board shaft walls with acoustical sealant at perimeter of
each assembly where it abuts other work and at joints and penetrations within each assembly.
I. Cant Panels: At projections into shaft exceeding 4 inches or where indicated, install 5/8-inch-thick gypsum
board cants covering tops of projections.
1. Slope cant panels at least 75 degrees from horizontal. Set base edge of panels in adhesive and secure
top edges to shaft walls at 24 inches o.c. with screws fastened to shaft wall framing.
2. Where steel framing is required to support gypsum board cants, install framing at 24 inches o.c. and
extend studs from the projection to shaft wall framing.
J. Installation Tolerance: Install each framing member so fastening surfaces vary not more than 1/8 inch from
the plane formed by faces of adjacent framing.
3.4 PROTECTION
A. Protect installed products from damage from weather, condensation, direct sunlight, construction, and other
causes during remainder of the construction period.
B. Remove and replace panels that are wet, moisture damaged, or mold damaged.
1. Indications that panels are wet or moisture damaged include, but are not limited to, discoloration,
sagging, and irregular shape.
2. Indications that panels are mold damaged include, but are not limited to, fuzzy or splotchy surface
contamination and discoloration.
END OF SECTION 092116

BTBC Phase III October 26, 2020
GE Project No. 0119-0010
Gould Evans
NON-STRUCTURAL METAL FRAMING 092216 - 1
SECTION 092216 - NON-STRUCTURAL METAL FRAMING
PART 1 - GENERAL
1.1 SUMMARY
A. Section Includes:
1. Non-load-bearing steel framing systems for interior gypsum board assemblies.
2. Suspension systems for interior gypsum ceilings, soffits, and grid systems.
B. Related Sections include the following:
1. Division 5 Section "Cold-Formed Metal Framing" for exterior and interior load-bearing and exterior
non-load-bearing wall studs; floor joists; roof rafters and ceiling joists; and roof trusses.
2. Division 7 Section "Building Insulation" for insulation installed in rainscreen cladding assemblies,
exterior wall furring and interior acoustical partitions.
3. Division 7 Section "Fire-Resistive Joint Systems" for head-of-wall joint systems installed with non-
load-bearing steel framing.
4. Division 9 Section "Gypsum Board Shaft-Wall Assemblies" for non-load-bearing metal shaft-wall
framing, gypsum panels, and other components of shaft-wall assemblies.
5.
1.2 ACTION SUBMITTALS
A. Product Data: For each type of product.
B.
PART 2 - PRODUCTS
2.1 GENERAL PRODUCT REQUIREMENTS
A. Fire-Test-Response Characteristics: For fire-resistance-rated assemblies that incorporate non-load-bearing
steel framing, provide materials and construction identical to those tested in assembly indicated, according
to ASTM E119 by an independent testing agency.
B. STC-Rated Assemblies: For STC-rated assemblies, provide materials and construction identical to those
tested in assembly indicated, according to ASTM E90 and classified according to ASTM E413 by an
independent testing agency.
C.
2.2 FRAMING SYSTEMS
A. Recycled Content of Steel Products: Postconsumer recycled content plus one-half of preconsumer recycled
content not less than 25 percent.
B. Framing Members, General: Comply with ASTM C754 for conditions indicated.
1. Steel Sheet Components: Comply with ASTM C645 requirements for metal unless otherwise
indicated.
2. Protective Coating: ASTM A653, G40 or equivalent. All furring members between the vapor barrier
and the exterior skin provide G60 Galvanized.
C. Steel Studs and Runners: ASTM C 645.

BTBC Phase III October 26, 2020
GE Project No. 0119-0010
Gould Evans
NON-STRUCTURAL METAL FRAMING 092216 - 2
1. Minimum Base-Metal Thickness: 20 gauge minimum or as indicated on drawings, whichever is
more stringent.
2. Spacing: 16 inches on center minimum.
3. Depth: As indicated on Drawings.
D. Deflection Track: Steel sheet top runner manufactured to prevent cracking of finishes applied to interior
partition framing resulting from deflection of structure above; in thickness not less than indicated for studs
and in width to accommodate depth of studs.
1. Products: Subject to compliance with requirements, available products that may be incorporated
into the Work include, but are not limited to, the following:
a. Blazeframe Industries; Bare Slotted Track (BST/BST 2).
b. ClarkDietrich Building Systems; SLP-TRK Slotted Deflection Track.
c. Fire Trak Corp.
d. MBA Building Supplies; Slotted Deflecto Track
e. Metal-Lite
f. Steel Network, Inc. (The); VertiClip SLD and VertiTrack VTD.
g. Telling Industries; Vertical Slip Track and Vertical Slip Track II.
E. Firestop Tracks: Top runner manufactured to allow partition heads to expand and contract with movement
of the structure while maintaining continuity of fire-resistance-rated assembly indicated; in thickness not
less than indicated for studs and in width to accommodate depth of studs.
1. Products: Subject to compliance with requirements, provide one of the following:
a. Fire Trak Corp.; Fire Trak attached to studs with Fire Trak Slip Clip.
b. Metal-Lite, Inc.; The System.
F. Flat Strap and Backing Plate: Steel sheet for blocking and bracing in length and width indicated.
1. Minimum Base-Metal Thickness: 0.027 inch.
G. Cold-Rolled Channel Bridging: Steel, 0.053-inch minimum base-metal thickness, with minimum 1/2-inch-
wide flanges.
1. Depth: As indicated on Drawings.
2. Clip Angle: Not less than 1-1/2 by 1-1/2 inches, 0.068-inch-thick, galvanized steel.
H. Hat-Shaped, Rigid Furring Channels: ASTM C645.
1. Minimum Base-Metal Thickness: 0.033 inch.
2. Depth: As indicated on Drawings.
I. Resilient Furring Channels: 1/2-inch-deep, steel sheet members designed to reduce sound transmission.
1. Configuration: Asymmetrical or hat shaped.
J. Furring Channels: Cold-Rolled, 0.053-inch uncoated-steel thickness, with minimum 1/2-inch-wide flanges.
1. Depth: As indicated on Drawings.
2. Furring Brackets: Adjustable, corrugated-edge type of steel sheet with minimum uncoated-steel
thickness of 0.033 inch.
3. Tie Wire: ASTM A641, Class 1 zinc coating, soft temper, 0.062-inch-diameter wire, or double
strand of 0.048-inch-diameter wire.
K. Z-Shaped Furring: With slotted or nonslotted web, face flange of 1-1/4 inches, wall attachment flange of
7/8 inch, minimum uncoated-metal thickness of 0.018 inch, and depth required to fit insulation thickness
indicated.
L.

BTBC Phase III October 26, 2020
GE Project No. 0119-0010
Gould Evans
NON-STRUCTURAL METAL FRAMING 092216 - 3
2.3 SUSPENSION SYSTEM
A. Components, General: Comply with ASTM C 754 for conditions indicated
B. Tie Wire: ASTM A 641/A 641M, Class 1 zinc coating, soft temper, 0.0625-inch- diameter wire, or double
strand of 0.0475-inch- diameter wire.
C. Hanger Attachments to Concrete:
1. Powder-Actuated Fasteners: Suitable for application indicated, fabricated from corrosion-resistant
materials with clips or other devices for attaching hangers of type indicated, and capable of
sustaining, without failure, a load equal to 10 times that imposed by construction as determined by
testing according to ASTM E 1190 by an independent testing agency.
D. Wire Hangers: ASTM A 641/A 641M, Class 1 zinc coating, soft temper, 0.162-inch diameter.
E. Carrying Channels: Cold-rolled, commercial-steel sheet with a base-metal thickness of 0.0538 inch and
minimum 1/2-inch- wide flanges.
1. Depth: As indicated on Drawings.
F. Furring Channels (Furring Members):
1. Cold-Rolled Channels: 0.0538-inch bare-steel thickness, with minimum 1/2-inch- wide flanges, 3/4
inch deep.
2. Steel Studs: ASTM C 645.
a. Minimum Base-Metal Thickness: 0.0170 inch.
b. Depth: As indicated on Drawings.
3. Hat-Shaped, Rigid Furring Channels: ASTM C 645, 7/8 inch deep.
a. Minimum Base Metal Thickness: 0.0179 inch.
4. Resilient Furring Channels: 1/2-inch- deep members designed to reduce sound transmission.
a. Configuration: Asymmetrical or hat shaped.
G. Grid Suspension System for Gypsum Board Ceilings: ASTM C645, direct-hung system composed of main
beams and cross-furring members that interlock.
1. Products: Subject to compliance with requirements, available products that may be incorporated
into the Work include, but are not limited to, the following:
a. Armstrong World Industries, Inc.; Drywall Grid Systems.
b. Chicago Metallic Corporation; Drywall Grid System.
c. United States Gypsum Company; Drywall Suspension System.
d.
2.4 ACCESSORIES
A. General: Provide auxiliary materials that comply with referenced installation standards.
1. Fasteners for Metal Framing: Of type, material, size, corrosion resistance, holding power, and other
properties required to fasten steel members to substrates.
B. Isolation Strip at Exterior Walls: Provide the following:
1. Foam Gasket: Adhesive-backed, closed-cell vinyl foam strips that allow fastener penetration
without foam displacement, 1/8 inch thick, in width to suit steel stud size.
2.

BTBC Phase III October 26, 2020
GE Project No. 0119-0010
Gould Evans
NON-STRUCTURAL METAL FRAMING 092216 - 4
PART 3 - EXECUTION
3.1 PRE-INSTALLATION
A. Field Examination: Examine areas and substrates, with Installer present, and including welded hollow-
metal frames, cast-in anchors, and structural framing, for compliance with requirements and other
conditions affecting performance of the Work. Proceed with installation only after unsatisfactory conditions
have been corrected.
B. Suspended Assemblies: Coordinate installation of suspension systems with installation of overhead
structure to ensure that inserts and other provisions for anchorages to building structure have been installed
to receive hangers at spacing required to support the Work and that hangers will develop their full strength.
1. Furnish concrete inserts and other devices indicated to other trades for installation in advance of
time needed for coordination and construction.
2.
3.2 INSTALLATION
A. Installation Standard: ASTM C754.
1. Gypsum Board Assemblies: Also comply with requirements in ASTM C840 that apply to framing
installation.
B. Install supplementary framing, and blocking to support fixtures, equipment services, heavy trim, grab bars,
toilet accessories, furnishings, or similar construction.
C. Install bracing at terminations in assemblies.
D. Do not bridge building control and expansion joints with non-load-bearing steel framing members. Frame
both sides of joints independently.
E. Install framing system components according to spacings indicated, but not greater than spacings required
by referenced installation standards for assembly types.
1. Single-Layer Application: 16 inches o.c. unless otherwise indicated.
2. Multilayer Application: 16 inches o.c. unless otherwise indicated.
3. Tile Backing Panels: 16 inches o.c. unless otherwise indicated.
F. Where studs are installed directly against exterior masonry walls or dissimilar metals at exterior walls,
install isolation strip between studs and exterior wall.
G. Install studs so flanges within framing system point in same direction.
H. Install tracks (runners) at floors and overhead supports. Extend framing full height to structural supports or
substrates above suspended ceilings except where partitions are indicated to terminate at suspended
ceilings. Continue framing around ducts penetrating partitions above ceiling.
1. Slip-Type Head Joints: Where framing extends to overhead structural supports, install to produce
joints at tops of framing systems that prevent axial loading of finished assemblies.
2. Door Openings: Screw vertical studs at jambs to jamb anchor clips on door frames; install runner
track section (for cripple studs) at head and secure to jamb studs.
a. Install two studs at each jamb unless otherwise indicated.
b. Install cripple studs at head adjacent to each jamb stud, with a minimum 1/2-inch clearance
from jamb stud to allow for installation of control joint in finished assembly.
c. Extend jamb studs through suspended ceilings and attach to underside of overhead structure.

BTBC Phase III October 26, 2020
GE Project No. 0119-0010
Gould Evans
NON-STRUCTURAL METAL FRAMING 092216 - 5
3. Other Framed Openings: Frame openings other than door openings the same as required for door
openings unless otherwise indicated. Install framing below sills of openings to match framing
required above door heads.
4. Fire-Resistance-Rated Partitions: Install framing to comply with fire-resistance-rated assembly
indicated and support closures and to make partitions continuous from floor to underside of solid
structure.
5. Sound-Rated Partitions: Install framing to comply with sound-rated assembly indicated.
I. Direct Furring:
1. Screw to wood framing.
2. Attach to concrete or masonry with stub nails, screws designed for masonry attachment, or powder-
driven fasteners spaced 24 inches o.c.
J. Z-Furring Members:
1. Erect insulation, specified in Section 072100 "Thermal Insulation," vertically and hold in place with
Z-furring members spaced 24 inches o.c.
2. Except at exterior corners, securely attach narrow flanges of furring members to wall with concrete
stub nails, screws designed for masonry attachment, or powder-driven fasteners spaced 24 inches
o.c.
3. At exterior corners, attach wide flange of furring members to wall with short flange extending
beyond corner; on adjacent wall surface, screw-attach short flange of furring channel to web of
attached channel. At interior corners, space second member no more than 12 inches from corner and
cut insulation to fit.
K. Installation Tolerance: Install each framing member so fastening surfaces vary not more than 1/8 inch from
the plane formed by faces of adjacent framing.
L. Install suspension system components according to spacings indicated, but not greater than spacings
required by referenced installation standards for assembly types.
1. Hangers: 48 inches o.c.
2. Carrying Channels (Main Runners): 48 inches o.c.
3. Furring Channels (Furring Members): 24 inches o.c.
M. Isolate suspension systems from building structure where they abut or are penetrated by building structure
to prevent transfer of loading imposed by structural movement.
N. Suspend hangers from building structure as follows:
1. Install hangers plumb and free from contact with insulation or other objects within ceiling plenum
that are not part of supporting structural or suspension system.
a. Splay hangers only where required to miss obstructions and offset resulting horizontal forces
by bracing, countersplaying, or other equally effective means.
2. Where width of ducts and other construction within ceiling plenum produces hanger spacings that
interfere with locations of hangers required to support standard suspension system members, install
supplemental suspension members and hangers in the form of trapezes or equivalent devices.
a. Size supplemental suspension members and hangers to support ceiling loads within
performance limits established by referenced installation standards.
3. Wire Hangers: Secure by looping and wire tying, either directly to structures or to inserts, eye
screws, or other devices and fasteners that are secure and appropriate for substrate, and in a manner
that will not cause hangers to deteriorate or otherwise fail.
4. Flat Hangers: Secure to structure, including intermediate framing members, by attaching to inserts,
eye screws, or other devices and fasteners that are secure and appropriate for structure and hanger,
and in a manner that will not cause hangers to deteriorate or otherwise fail.
5. Do not attach hangers to steel roof deck.
6. Do not attach hangers to permanent metal forms. Furnish cast-in-place hanger inserts that extend
through forms.

BTBC Phase III October 26, 2020
GE Project No. 0119-0010
Gould Evans
NON-STRUCTURAL METAL FRAMING 092216 - 6
7. Do not attach hangers to rolled-in hanger tabs of composite steel floor deck.
8. Do not connect or suspend steel framing from ducts, pipes, or conduit.
O. Fire-Resistance-Rated Assemblies: Wire tie furring channels to supports.
P. Grid Suspension Systems: Attach perimeter wall track or angle where grid suspension systems meet vertical
surfaces. Mechanically join main beam and cross-furring members to each other and butt-cut to fit into wall
track.
Q. Installation Tolerances: Install suspension systems that are level to within 1/8 inch in 12 feet measured
lengthwise on each member that will receive finishes and transversely between parallel members that will
receive finishes.
END OF SECTION 092216

BTBC Phase III October 26, 2020
GE Project No. 0119-0010
Gould Evans
SYNTHETIC STUCCO SYSTEM 092423 - 1
SECTION 092423 SYNTHETIC STUCCO SYSTEM
PART 1 GENERAL
1.1 SECTION INCLUDES
A. System description: This section includes labor, materials and equipment necessary to install a
complete soffit and ceiling direct finish system consisting of Base Coat, Reinforcing Mesh and Finish
Coat.
B. RELATED SECTIONS:
1. Section 061600 Sheathing
2. Section 072726 Fluid Applied Membrane Air Barrier
3. Section 074229 Terracotta Panel Rainscreen Wall System
4. Section 076200 Sheet Metal Flashing and Trim
5. Section 079200 Joint Sealants
6. Section 084113 Aluminum-Framed Entrances and Storefront
1.2 REFERENCES
A. American Society for Testing and Materials (ASTM):
1. ASTM C 150 – Specification for Portland Cement.
2. ASTM D 1682 – Test for Break Load and Elongation of Textile Fabrics.
3. ASTM E 84 (UL 723) – Tests for Surface Burning Characteristics of Building
Materials.
4. ASTM G23 Operating Light and Water Exposure Apparatus (Carbon-Arc Type) for Exposure
of Non-metallic Materials
5. ASTM G53 Operating Light and Water Exposure Apparatus (Fluorescent UV-
Condensation Type) for Exposure of Nonmetallic Materials.
6. ASTM C67 Sampling and Testing Brick and Structural Clay Tile.
7. ASTM B117 Standard Method of Salt Spray (Fog) Testing.
8. ASTM D968 Abrasion Resistance of Organic Coatings by Falling Abrasive
9. ASTM E96 Water Vapor Transmission (Method B).
B. Others:
1. FS TT-C-555B Coating Textured for Interior and Exterior Masonry Surfaces.
2. MIL-Y-114OG Yarn, Cord, Sleeving, Cloth and Tape-Glass.
3. Mil. Std. 810B Mildew Resistance (Method 508)
4. Sto Corp. Addendum to Sto Stucco Specifications
1.3 SYSTEM DESCRIPTION
A. Furnished and install direct applied finish system to exterior building soffits.
B. Structural Requirements:
1. Work included within this section shall be performed in such a manner as to achieve the
desired results with regard to structural integrity of the renovated area.
2. Any and all structural damage to existing building components caused or brough about by the
performance of this work shall be replaced and repaired to the satisfaction of the General

BTBC Phase III October 26, 2020
GE Project No. 0119-0010
Gould Evans
SYNTHETIC STUCCO SYSTEM 092423 - 2
Contractor at no additional expense.\
C. Primary materials shall be provided from one manufacturer. Secondary materials shall be required or
recommended by primary materials manufacturer.
D. All work shall conform to applicable Federal, State and local laws and regulations.
1.4 ACTION SUBMITTALS
A. See Section 01 33 00, Submittal Procedures.
B. Product Data:
1. Three copies of product manufacturer’s specifications, recommendations, and installation
instructions for the system.
2. Manufacturer’s published data, letter of certification, or certified test laboratory report that
each material complies with requirements and is intended for application shown.
C. Samples:
1. Submit two (2) samples, 12 x 12 inch in size illustrating entire system with finish coat color
and texture. Proved sequenced process on sample to indicate each layer within the finished
sample.
D. Manufacturer’s Shop Drawings:
1. If required by the Engineer, provide supplementary details as may be necessary for special
conditions at this project as provided by the manufacturer.
E. Manufacturer's specifications, details, installation instructions and product data
F. Warranty: Manufacturer's standard warranty
1.5 INFORMATIONAL SUBMITTALS
A. Manufacturer’s code compliance report for air barrier and water-resistive barrier
B. Manufacturer’s code compliance report for stucco where ICC listed one coat stucco is used
C. Manufacturer’s NFPA 285 assembly report or ICC ESR indicating compliance of air/moisture barrier
and drainage mat with requirements of NFPA 285 for use on Types I, II, III, and IV construction
D. Fastener manufacturer’s pull-out or withdrawal capacity testing for frame and solid substrates
1.6 QUALITY ASSURANCE
A. Manufacturer requirements
1. Stucco and air barrier products manufacturer for a minimum of twenty (20) years.
2. Stucco finish products and air barrier products manufactured under ISO 9001:2008 Quality
System and 14001:2004 Environmental Management System.
B. Contractor requirements
1. Licensed, insured and engaged in application of portland cement stucco for a minimum of
three (3) years.
2. Knowledgeable in the proper use and handling of Sto materials.
3. Employ skilled mechanics who are experienced and knowledgeable in portland cement stucco

BTBC Phase III October 26, 2020
GE Project No. 0119-0010
Gould Evans
SYNTHETIC STUCCO SYSTEM 092423 - 3
application, and familiar with the requirements of the specified work.
4. Successful completion of minimum of three (3) projects of similar size and complexity to the
specified project.
5. Provide the proper equipment, manpower and supervision on the job site to install the system
in compliance with Sto's published specifications and details and the project plans and
specifications.
C. Testing
1. Construct full-scale mock-up of typical stucco/window wall assembly with specified tools and
materials and test air and water infiltration and structural performance in accordance with
ASTM E 283, ASTM E 331 and ASTM E 330, respectively, through independent laboratory.
Mock-up shall comply with requirements of project specifications. Where mock-up is tested at
job site maintain approved mock-up at site as reference standard. If tested off-site accurately
record construction detailing and sequencing of approved mock-up for replication during
construction.
2. Conduct air barrier adhesion testing in accordance with ASTM D 4541.
3. Conduct air barrier assembly testing in accordance with ASTM E 783.
4. Conduct pull-out or withdrawal capacity testing of proposed fasteners for lath attachment into
concrete or masonry and verify adequacy with respect to negative design wind pressure.
Conduct sufficient tests such that reliable and predictable pull-out values are obtained. Verify
adequacy of pull-out or withdrawal capacity of fasteners used for frame construction with
manufacturer in relation to negative design wind pressures.
5. Conduct pH testing to check stucco surface alkalinity before application of primer or finish
materials. Where alkaline resistant primer is used pH testing may be waived.
6. Conduct wet sealant adhesion testing in accordance with sealant manufacturer’s field quality
control test procedure.
7. Notify design professional minimum 7 days prior to testing.
D. Inspections
1. Provide independent third party inspection where required by code or contract documents.
E. Conduct inspections in accordance with code requirements and contract documents
1.7 DELIVERY, STORAGE AND HANDLING
A. Deliver to the job site all materials in unopened, undamaged containers, clearly marked and identified
with the system manufacturer's name, description of contents, and batch identification number.
B. Store materials inside, or under cover and off the ground and keep them dry, protected from the
weather, direct sun light, surface contamination, damaging temperatures, damage from construction
traffic and other causes.
C. Store pail materials in temperatures not less than 40°F or more than 90°
D. Protect EPS insulation materials from prolonged UV exposure, keep away from sources of heat,
sparks, flame, flammable or volatile materials. Store on a clean, flat surface, off the ground in a dry
area.
E. Protect coatings (pail products) from freezing and temperatures in excess of 90 F (32 C). Store
away from direct sunlight.
F. Protect portland cement based materials (bag products) from moisture and humidity. Store under

BTBC Phase III October 26, 2020
GE Project No. 0119-0010
Gould Evans
SYNTHETIC STUCCO SYSTEM 092423 - 4
cover off the ground in a dry location.
G. Handle all products as directed on labeling.
1.8 SITE CONDITIONS
A. Environmental Requirements:
1. Do not proceed with installation of new material under threatening or during unfavorable
weather conditions. If work is interrupted by weather, provide the necessary protection for new
materials.
2. Maintain ambient and surface temperatures above 40 F (4 C) during application and for 24
hours after set of stucco, and after application of air/moisture barrier and finish materials.
3. Provide supplementary heat for installation in temperatures less than 40 F (4 C) such that
material temperatures are maintained as in 1.09A. Prevent concentration of heat on uncured
stucco and vent fumes and other products of combustion to the outside to prevent contact with
stucco.
4. Prevent uneven or excessive evaporation of moisture from stucco during hot, dry or windy
weather. For installation under any of these conditions provide special measures to properly
moist cure the stucco. Do not install stucco if ambient temperatures are expected to rise above
100ºF (38ºC) within a 24 hour period.
5. Provide protection of surrounding areas and adjacent surfaces from application of materials
B. Existing Conditions
1. Sub-Contractor shall accept the conditions of the job site as they exist and perform his work
accordingly.
2. Any adverse condition which might affect the performance of the work described in these
specifications must be brought to the attention of the General Contractor in writing
immediately upon its discovery.
3. Sub-Contractor shall be held responsible for protecting all adjacent construction from damage.
Existing structures or installations which are destroyed or damaged by operations connected
with this work shall be replaced and/or repaired by the Sub-Contractor to the satisfaction of the
General Contractor at no additional expense.
4. Sub-Contractor shall secure field measurements required for proper installation of work
covered by this Section. Exact measurements are Sub-Contractor’s responsibility.
5. Provide protection of surrounding areas and adjacent surfaces from application of materials.
1.9 SEQUENCING AND SCHEDULING
A. Coordinate each portion of this work with related work of other sections, and the General Contractor.
B. Coordinate and schedule installation of trim, flashing, and joint sealers to prevent water infiltration
behind the system.
C. Placement of materials, scaffolding and other equipment must be coordinated and approved by
the General Contractor prior to the commencement of any work, and also during the various phases of
the construction.
D. Sub-Contractor shall coordinate each portion of this work related to mechanical or electrical
equipment with skilled trades capable of disconnecting and re-connecting equipment and cables
as required for proper installation, or in case of accidental damage.
E. Protect sheathing from climatic conditions to prevent weather damage until the installation of the

BTBC Phase III October 26, 2020
GE Project No. 0119-0010
Gould Evans
SYNTHETIC STUCCO SYSTEM 092423 - 5
waterproof air barrier.
F. Install diverter flashings wherever water can enter the wall assembly to direct water to the exterior.
G. Coordinate installation of foundation waterproofing, roofing membrane, windows, doors and other
wall penetrations to provide a continuous air barrier and continuous moisture protection. Provide
protection of rough openings before installing windows, doors, and other penetrations through the
wall and provide sill flashing. Coordinate installation of waterproof air barrier components with
window and door installation to provide weather proofing of the structure and to prevent moisture
infiltration and excess air infiltration.
H. Install window and door head flashing immediately after windows and doors are installed.
I. Protect air/moisture barrier with stucco cladding within 180 days of installation.
J. Protect drainage mat with stucco cladding within 30 days of installation.
K. Commence the stucco installation after completion of all floor, roof construction and other
construction that imposes dead loads on the walls to prevent excessive deflection (and potential
cracking) of the stucco.
L. Sequence interior work such as drywall installation prior to stucco installation to prevent stud
distortion (and potential cracking) of the stucco.
M. Provide site grading such that the stucco terminates above earth grade minimum 4 inches (100 mm)
and above finished grade (pavers/sidewalk) minimum 2 inches (51 mm). Provide increased clearance
in freeze/thaw climate zones.
N. Install copings and sealant immediately after installation of the stucco and when finish coatings are
dry.
O. Attach penetrations through stucco to structural support and provide air tight and water tight seals at
penetrations
1.10 WARRANTY
A. Provide manufacturer’s ten (10) year warranty against defective materials and that covers material and
labor required to correct any defective material.
B. Provide two (2) year Sub-Contractor’s Workmanship warranty. Warranty shall cover material and
labor required to correct any defective work.
1.11 GENERAL REQUIREMENTS
A. Joints and Accessories
1. Provide two piece expansion joints in the stucco assembly where building movement is
anticipated: at joints in the substrate or supporting construction, where the system is to be
installed over dissimilar construction or substrates, at changes in building height, at floor lines,
at columns and cantilevered areas.
2. Provide one piece expansion joints every 144 ft2 (13 m2). Cut and wire tie lath to the
expansion joint accessory so lath is discontinuous at or beneath the accessory. Do not exceed
length to width ratio of 2-1/2:1 in expansion joint layout and do not exceed more than 18 feet
(5.5 m) in any direction without an expansion joint. Where casing bead is used back-to-back as

BTBC Phase III October 26, 2020
GE Project No. 0119-0010
Gould Evans
SYNTHETIC STUCCO SYSTEM 092423 - 6
the expansion joint, back the joint with StoGuard Transition Membrane.
3. Provide one piece expansion joints at through wall penetrations, for example, above and below
doors or windows.
4. Provide minimum 3/8 inch (9 mm) wide joints where the system abuts windows, doors and
other through wall penetrations.
5. Provide appropriate accessories at stucco terminations and joints.
6. Provide appropriate sealant at stucco terminations and at stucco accessory butt joints.
7. Refer to drawings for location of joints, but in no case provide less joints than recommended
by the manufacturer.
B. Stucco Thickness (does not include primer or textured finish coat)
1. Application to Metal Plaster Bases: stucco thickness shall be uniform ¾ inch or 7/8 inch (19 or
22 mm). Stucco thickness shall not exceed 7/8 inch (22 mm).
2. Stucco shall be applied in 2 coats, scratch and brown coat, to achieve the prescribed thickness.
3. Thickness shall be uniform throughout the wall area
1.12 PERFORMANCE REQUIREMENTS
A. Air/Moisture Barrier
1. Compliant with ICC ES Acceptance Criteria AC 212 (ICC ESR 1233)
2. Material Air Leakage Resistance, ASTM E 2178: less than 0.02 L/s·m2 at 75 Pa (0.004 cfm/ft2
at 1.57 psf)
3. Assembly Air Leakage Resistance, ASTM E 2357: less than 0.2 L/s·m2 (0.04 cfm/ft2 at 1.57
psf)
4. Water Vapor Permeance, ASTM E 96, Method B: greater than 10 perms [573 ng/(Pa·s·m2)]
5. Surface Burning, ASTM E 84: Flame Spread less than 25, Smoke Developed less than 450,
Class A Building Material
6. Tensile Adhesion, ASTM C 297:
a. Gypsum Sheathing, exceeds strength of substrate
b. Plywood, > 85 psi (590 kPa)
c. OSB, > 30 psi (206 kPa)
7. VOC, calculation:
a. Less than 100 g/L
b. Compliant with US EPA 40 CFR 59 for waterproofing/sealer
c. Compliant with South Coast AQMD Rule 1113 for waterproofing/sealer
B. Drainage Mat
1. Surface Burning, ASTM E 84: Flame Spread less than 25, Smoke Developed less than 450,
Class A Building Material
2. Flame Propagation, NFPA 285: meets requirements for use on noncombustible (Types I,II,III,
and IV) construction.
C. Stucco Base
1. Stucco scratch and brown coat material in compliance with ASTM C 926 and manufactured or
listed by Sto Corp. (see Addendum)
D. Primers
1. Alkaline Resistant Primer for freshly placed (minimum 4 day old) stucco surfaces:
2. Resistant to alkaline surfaces with pH of 13 or less
3. Surface Burning, ASTM E 84: Flame Spread less than 25, Smoke Developed less than 450,
Class A building material
4. VOC: less than 50 g/L, compliant with South Coast AQMD Rule 1113 for architectural
BTBC Phase III October 26, 2020
GE Project No. 0119-0010
Gould Evans
SYNTHETIC STUCCO SYSTEM 092423 - 7
coatingsAcrylic Primer for fully cured (minimum 28 day old or pH less than 10) stucco
surfaces:
5. Surface Burning, ASTM E 84: Flame Spread less than 25, Smoke Developed less than 450,
Class A building material
6. VOC: less than 50 g/L, compliant with South Coast AQMD Rule 1113 for architectural
coatings
E. Flexible Acrylic Finish (Sto Powerwall)
1. Accelerated Weathering, ASTM G 154: 2000 hours, no blistering, checking cracking, crazing,
or other deleterious effects
2. Water Vapor Permeability, ASTM E 96, Method B: > 15 perms [(861 ng/(Pa·s·m2)]
3. Surface Burning, ASTM E 84: Flame Spread less than 25, Smoke Developed less than 450,
Class A building material
4. VOC: less than 50 g/L, compliant with South Coast AQMD Rule 1113 for architectural
coatings
PART 2 PRODUCTS
2.1 MANUFACTURERS
A. Subject to compliance with requirements, provide products from one of the following manufacturers:
1. Air/Moisture Barrier, Drainage Mat, Portland Cement Stucco, Stucco Primers, and Stucco
Finishes
a. Sto Corp., 3800 Camp Creek Parkway, Building 1400, Suite 120. Atlanta, GA 30331
2. Product: StoPowerwall Drainscreen
B. All primary materials shall be from a single manufacturer. To assure system compatibility, mixing
and matching of various products from different manufacturers is prohibited.
C. All secondary materials shall be in accordance with primary materials manufacturer’s
recommendations or requirements.
2.2 AIR/MOISTURE BARRIER
A. StoGuard -- fluid applied air/moisture barrier for sheathing substrates consisting of multiple
compatible components:
1. Sto Gold Fill -- ready mixed acrylic based flexible joint treatment for rough opening
protection, joint treatment of wall sheathing, and detail component for shiplap connections
with flashing, weep screed, and similar ship lap details.
2. Sto EmeraldCoat – ready mixed flexible waterproof coating for wall sheathing wall surfaces
3. StoGuard Mesh-- nominal 4.2 oz/yd2 (142 g/m2), self-adhesive, flexible, symmetrical,
interlaced glass fiber mesh, with alkaline resistant coating for compatibility with Sto materials,
used with Sto Gold Fill to reinforce rough openings, inside and outside corners, sheathing
joints, and detail component for shiplap connections with flashing, weep screed, and similar
ship lap details
4. StoGuard Fabric – nonwoven cloth reinforcement used with Sto EmeraldCoat for rough
opening protection, joint treatment of wall sheathing, and detail component for shiplap
connections with flashing, weep screed, and similar ship lap details
5. StoGuard RediCorner – a preformed fabric piece used in the corners of rough openings in
tandem with StoGuard Fabric for quicker installation
6. StoGuard Tape – self adhering rubberized asphalt tape for rough opening protection in wood or
metal frame construction
BTBC Phase III October 26, 2020
GE Project No. 0119-0010
Gould Evans
SYNTHETIC STUCCO SYSTEM 092423 - 8
7. StoGuard Primer – primer for use with StoGuard Tape
8. StoGuard Transition Membrane – flexible air barrier membrane for continuity at transitions:
sheathing to perimeter dissimilar materials, wall to or soffit, flashing shingle lap transitions,
floor line deflection joints, masonry control joints, and through wall joints in masonry or frame
construction.
9. StoGuard RapidSeal – one component quick drying waterproof air barrier material for rough
opening protection, sheathing joints (with StoGuard Mesh), and for sealing fish mouths,
wrinkles, seams, gaps, holes, or other voids in StoGuard air barrier materials
2.3 WATER RESISTIVE BARRIER
A. Minimum No. 15 asphalt saturated felt complying with ASTM D 226, Type 1, or one layer of Grade
D kraft building paper, or paper-backed stucco lath conforming to 2.05.
2.4 DRAINAGE MAT
A. Sto DrainScreen – nominal ¼” (6 mm) tangled filament nylon core drainage mat with fabric facing.
2.5 LATH
A. Minimum 2.5 lb./yd2 (1.4 kg/m2) self furred galvanized steel diamond mesh metal lath in compliance
with ASTM C 847
2.6 MECHANICAL FASTENERS
A. Non-corroding fasteners in compliance with AISI S200 – 2007 and ASTM C 1513:
1. Steel Framing – minimum #8 Type S or S-12 wafer head fully threaded corrosion resistant
screws with minimum 3/8 inch (10 mm) and three thread penetration into studs.
2. Tie Wire – 18 gauge galvanized and annealed low-carbon steel in compliance with ASTM A
641 with Class I coating.
2.7 ACCESSORIES
A. Weep screed, casing bead, corner bead, corner lath, expansion and control joint accessories. All
accessories shall meet the requirements of ASTM C 1063 and its referenced documents
1. PVC plastic in compliance with ASTM D 1784, cell classification 13244C.
2. Zinc in compliance with ASTM B 69.
3. Galvanized metal in compliance with ASTM A 653 with G60 coating.
B. All accessories shall have perforated or expanded flanges and shall be designed with grounds for the
specified thickness of stucco.
2.8 JOB MIXED INGREDIENTS
A. Water: clean and potable.
B. Sand: in compliance with ASTM C 897 or ASTM C 144, for use with one coat and ASTM C 926
stucco concentrates
2.9 STUCCO
A. 102 StoPowerwall Stucco Pre-Blended: fiber reinforced one coat portland cement stucco pre-blended
with graded sand, and in compliance with ICC AC 11. See ICC ESR 2323.

BTBC Phase III October 26, 2020
GE Project No. 0119-0010
Gould Evans
SYNTHETIC STUCCO SYSTEM 092423 - 9
B. 103 StoPowerwall Stucco: fiber reinforced one coat portland cement stucco concentrate in compliance
with ICC AC 11. See ICC ESR 2323.
C. 104 Powerwall Scratch & Brown: portland cement-based stucco concentrate in compliance with
ASTM C 926.
D. Other code compliant portland cement stucco as listed by Sto Corp. (refer to Addendum)
2.10 ARMOR GUARD
A. Base Coat
1. Sto Primer/Adhesive – two component acrylic based base coat material field mixed with
portland cement
B. Reinforcing Mesh
1. Sto Mesh – nominal 4.5 oz./yd2 (153 g/m2), symmetrical, interlaced open-weave glass fiber
mesh made with alkaline resistant coating for compatibility with Sto materials
2.11 PRIMER
A. Sto Hot Prime – acrylic based primer/sealer for freshly placed (minimum 4 day old) and high pH
stucco surfaces.
2.12 FINISH COAT
A. Sto Limestone (Stolit) Finish – integrally colored, factory blended, flexible acrylic textured wall
finish with graded marble aggregate.
2.13 MIXING
A. StoGuard
1. Sto Gold Fill – mix with a clean, rust-free electric drill and paddle to a uniform consistency.
Do not thin, or dilute with water.
2. Sto EmeraldCoat – mix with a clean, rust-free electric drill and paddle to a uniform
consistency. Do not thin, or dilute with water.
B. StoPowerwall Stucco
1. Refer to mix instructions on packaging. USE ONLY THE AMOUNT OF WATER
NECESSARY FOR A WORKABLE MIX. Use of excess water is detrimental to performance.
C. Adhesive and Base Coats for Sto Armor Guard:
1. Refer to applicable Sto Product Bulletin for selected adhesive/base coat material(s).
D. Primer--mix with a clean, rust-free high speed mixer to a uniform consistency.
E. Finish--mix with a clean, rust-free high speed mixer to a uniform consistency. A small amount of
water (up to 12 ounces [0.4 L]) may be added to adjust workability. Limit addition of water to amount
needed to achieve the finish texture.
F. Mix only as much material as can readily be used.
G. Do not add lime, anti-freeze compounds, or other additives to any of the materials

BTBC Phase III October 26, 2020
GE Project No. 0119-0010
Gould Evans
SYNTHETIC STUCCO SYSTEM 092423 - 10
PART 3 EXECUTION
3.1 ACCEPTABLE INSTALLERS
A. Pre-qualify under Quality Assurance requirements of this specification (section 1.07.B).
3.2 EXAMINATION
A. Inspect surfaces for:
B. Contamination – algae, chalkiness, dirt, dust, efflorescence, form oil, fungus, grease, laitance, mildew
or other foreign substances.
C. Surface absorption and chalkiness.
D. Crack – measure crack width and record location of cracks.
E. Damage and deterioration.
F. Moisture damage – record any areas of moisture damage.
G. Inspect sheathing application for compliance with applicable requirement:
H. Glass Mat Faced Gypsum Sheathing in compliance with ASTM C 1177 – refer to manufacturer’s
instructions and/or ICC evaluation report
I. Exterior Grade and Exposure 1 wood based sheathing – APA Engineered Wood Association E 30.
J. Report deviations from the requirements of project specifications or other conditions that might
adversely affect the air/moisture barrier or stucco installation to the General Contractor. Do not
proceed with air/moisture barrier or stucco installation until deviations are corrected
3.3 SURFACE PREPARATION
A. Sheathing
1. Remove surface contaminants and replace damaged sheathing.
2. All sheathing must be handled and installed in compliance with applicable building code
and/or manufacturer requirements. Installed sheathing must be clean, dry and free from
damage, frost, and all bond-inhibiting materials. Abut gypsum sheathing joints. Gap wood
sheathing 1/8 inch (3 mm) at joints. Should gaps exceed ⅛ inch (3 mm) up to 1/2 inch (13 mm)
wide, use StoGuard RapidFill to fill joints, or apply low expanding urethane foam into joints
and rasp or shave flush with sheathing surface in preparation for installation of StoGuard joint
treatment.
3. Spot surface defects in sheathing with joint treatment (Sto Gold Fill, StoGuard RapidSeal,
StoGuard RapidFill, or Sto EmeraldCoat).
3.4 AIR/MOISTURE BARRIER INSTALLATION
A. The following instructions are applicable to:
1. Glass Mat Faced Gypsum Sheathing in compliance with ASTM C 1177
B. Transition Detailing with StoGuard Transition Membrane

BTBC Phase III October 26, 2020
GE Project No. 0119-0010
Gould Evans
SYNTHETIC STUCCO SYSTEM 092423 - 11
1. At floor line deflection joints up to 1 inch (25 mm) wide, stucco expansion joints formed with
back-to-back casing beads, and static joints and transitions such as: sheathing to foundation,
dissimilar materials (i.e., CMU to frame wall), flashing shingle-lap transitions, and wall to
balcony floor slab or ceiling:
a. Apply waterproof coating (Sto EmeraldCoat) liberally to properly prepared surfaces
with brush, roller, or spray.
b. Place pre-cut lengths of StoGuard Transition Membrane centered over the transition in
the wet coating. At changes in plane crease the membrane and similarly place the
membrane material in the wet coating. At floor line deflection joints achieve a slightly
concave profile (recessed into the joint) of the membrane.
c. Immediately top coat the membrane with additional coating and apply pressure with
brush or roller to fully embed the membrane in the coating and achieve a smooth and
wrinkle-free surface without gaps or voids.
d. Apply coating liberally along all top horizontal edges on walls and along all edges on
balcony floor slabs to fully seal the edges.
e. Overlap minimum 2 inches (51 mm) at ends and adhere lap seams together with
coating. Shingle lap vertical seams and vertical to horizontal intersections with
minimum 2 inch (51 mm) overlap.
2. At movement joints up to 1 inch (25 mm) wide with up to + 50% movement such as masonry
control joints, and through wall joints in masonry or frame construction:
a. Insert backer rod sized to friction fit in the joint (diameter 25% greater than joint
width).
b. Recess the backer rod ½ inch (13 mm).
c. Apply the waterproof coating liberally to properly prepared surfaces with brush, roller,
or spray along the outer surface on each side of the joint (not in the joint).
d. Immediately place the membrane by looping it into the joint against the backer rod
surface to provide slack.
e. Embed the membrane in the wet coating along the outer surface on the sides of the joint
by top coating with additional coating material and applying pressure with a brush or
roller.
3. For all applications, after the membrane installation is complete and the waterproof coating is
dry:
a. Apply a final liberal coat of the waterproof coating to all top horizontal edges on walls
to ensure waterproofing integrity. Similarly apply coating at all edges on balcony floor
slabs.
b. Inspect the installed membrane for fish mouths, wrinkles, gaps, holes or other
deficiencies. Correct fish mouths or wrinkles by cutting, then embedding the area with
additional coating applied under and over the membrane.
c. Seal gaps, holes, and complex geometries at three dimensional corners with StoGuard
RapidFill or StoGuard RapidSeal.
C. Transition Detailing with StoGuard RapidFill
1. At flashing shingle laps, and through wall penetrations such as pipes, electrical boxes, and
scupper penetrations:
a. Flashing leg or penetration flange must be seated flat against the wall surface without
gaps. Apply StoGuard RapidFill liberally with a caulking gun in a zig-zag pattern
across the flashing leg or flange/wall surface seam and spread to a thickness that covers
the flange and fastener penetrations and directs water away from the wall. Extend
application minimum 1 inch (25 mm) onto both surfaces (flashing leg/flange and wall
surface).
b. At through wall penetrations without flanges ensure the penetrating element (i.e., pipe

BTBC Phase III October 26, 2020
GE Project No. 0119-0010
Gould Evans
SYNTHETIC STUCCO SYSTEM 092423 - 12
or scupper) is fitted snug against abutting wall surfaces. Apply a fillet bead with a
caulking gun around the penetration and tool against both surfaces (penetration and
wall surface) to create a bead profile that directs water away from the penetration.
Extend application minimum 1 inch (25 mm) onto both surfaces.
D. Rough Opening Protection:
1. Sto Gold Fill with StoGuard Mesh: apply 9 inch (229 mm) wide StoGuard Mesh at rough
openings. Immediately apply Sto Gold Fill by spray or trowel over the mesh and spread with a
trowel to create a smooth surface that completely covers the mesh (refer to Sto Detail 20.20M).
E. Sheathing Joint Treatment
1. Sto Gold Fill with StoGuard Mesh: place 4 inch (102 mm) wide mesh centered along sheathing
joints and minimum 9 inch (229 mm) wide mesh centered and folded at inside and outside
corners. Immediately apply Sto Gold Fill by spray or trowel and spread with a trowel to create
a smooth surface that completely covers the mesh.
F. Air/Moisture Barrier Coating Installation
1. Gypsum Sheathing: apply waterproof coating by spray or roller over sheathing surface,
including the dry joint treatment, rough opening protection, and transition areas, to a uniform
wet mil thickness of 10 mils in one coat. Use ½ inch (13 mm) nap roller for plywood. Use ¾
inch (19 mm) nap roller for glass mat faced gypsum sheathing. Protect from weather until dry.
G. Air /Moisture Barrier Connections and Shingle Laps
1. Coordinate installation of connecting air barrier components with other trades to provide a
continuous air tight membrane.
2. Coordinate installation of flashing and other moisture protection components with other trades
to achieve complete moisture protection such that water is directed to the exterior, not into the
wall assembly, and drained to the exterior at sources of leaks (windows, doors and similar
penetrations through the wall assembly).
3. Splice-in head flashings above windows, doors, floor lines, roof/sidewall step flashing, and
similar locations with StoGuard detail component to achieve shingle lap of the air/moisture
barrier such that water is directed to the exterior.
3.5 SHEET WATER-RESISTIVE BARRIER INSTALLATION
A. Install in compliance with the applicable building code requirements for building paper. Lap paper
over foundation weep screed attachment flange, floor line flashing, and window/door head flashings.
Refer to Sto Guide Details at www.stocorp.com
3.6 DRAINAGE MAT INSTALLATION
A. Place drainage mat against the wall surface over the insulation and unroll horizontally with the fabric
facing out. Hammer-tack or staple into sheathing with corrosion-resistant fasteners. Use as few
fasteners as needed to hold the mat in place, starting from the bottom of the wall at base flashing or
weep screed and working up. Do not fasten through flashing. Shingle lap fabric at horizontal courses.
Shingle lap drainage mat over flashing at floor lines, decks, roof lines, window heads, and other areas
where flashing is required, to direct water to the exterior. Butt ends of rolls and vertical seams. Trim
around windows, doors, vents, or other penetrations through the wall. Do not install behind window
nail flanges. Immediately follow installation of drainage mat with stucco lath installation. Where
stucco lath installation will not immediately follow installation of drainage mat, use corrosion-
resistant cap nails, cap staples, or cap screws every 16 inches (406 mm) on center along framing for
more secure attachment. Cover drainage mat with stucco within 30 days of installation.

BTBC Phase III October 26, 2020
GE Project No. 0119-0010
Gould Evans
SYNTHETIC STUCCO SYSTEM 092423 - 13
3.7 STUCCO INSTALLATION
A. General:
1. Apply the stucco in discrete panels without interruption to avoid cold joints and differences in
appearance. Abut wet stucco to set stucco at natural or architectural breaks in the wall such as
expansion joints, pilasters, terminations, or changes in plane. Hot or dry conditions accelerate
drying and moisture loss from stucco which can diminish strength and resistance to cracking.
Under these conditions adjustments in the application, scheduling and curing of stucco to
prevent rapid loss of moisture are necessary to achieve a satisfactory stucco installation. Cold
temperatures retard drying and strength gain and adjustments may have to be made in the
application, scheduling and curing of stucco to prevent damage from frost and other trades. Do
not install stucco during extremely hot, dry and/or windy conditions. Do not install stucco
during freezing conditions or on frozen substrates. Do not install stucco onto grounds of
accessories. Completely embed lath and flanges of accessories and completely cover fastener
attachments with stucco. Moist cure stucco minimum 48 hours for optimum strength gain and
resistance to cracking. Allow final stucco application to completely dry (28 days) before
applying primer or finish (except in the case of Sto Hot Prime which can be applied 48 hours
after completing moist cure of stucco). The finished installation must be true, plumb and
square. Should stucco get into control or expansion joints, remove the stucco from within the
joint before the stucco sets.
2. After satisfactory inspection of surfaces and correction of any deviations from specification
requirements commence the stucco installation as described below:
B. Installation over StoGuard/Sto DrainScreen
1. Weep Screed Installation
a. Install foundation weep screed at the base of the wall securely to solid substrate or
framing with the appropriate fastener. Locate foundation weep screed so that it overlaps
the joint between the foundation and framing by a minimum of 1 inch (25 mm). Locate
the foundation weep screed nosing minimum 4 inches (100 mm) above earth grade, 2
inches (51 mm) above finished grade (paved surfaces, for example). Lap waterproof air
barrier, sheet water-resistive barrier, and drainage mat over the weep screed attachment
flange.
2. Casing Bead and Two Piece Expansion Joint Installation
a. Install casing beads at stucco terminations – doors, windows and other through wall
penetrations. Install two piece expansion joints (or back-to-back casing beads) at
building expansion joints, thru-wall joints in concrete or CMU, where the stucco is to
be installed over dissimilar construction or substrates, at changes in building height, at
floor lines, columns, and cantilevered areas. Install full accessory pieces where possible
and avoid small pieces. Seal adjoining pieces by embedding ends in sealant. Abut
horizontal into vertical joint accessories (except where horizontal movement joints exist
that prevent continuous vertical runs of accessories). Attach at no more than 7 inches
(178 mm) into solid substrate/framing with appropriate fasteners.
3. Lath Installation
a. Diamond Mesh Metal Lath – conform to ASTM C 1063
1) General – install metal lath with the long dimension at right angles to structural
framing (horizontally on solid substrates). Terminate lath at expansion joints. Do
not install continuously at joints.
2) Seams/Overlaps--overlap side seams minimum 1/2 inch (13 mm) and end seams
minimum 1 inch (25 mm). Stagger end seams. Overlap casing beads and
expansion joints minimum 1 inch (25 mm) over narrow wing accessories,
minimum 2 inches (51 mm) over expanded flange accessories. Do not install

BTBC Phase III October 26, 2020
GE Project No. 0119-0010
Gould Evans
SYNTHETIC STUCCO SYSTEM 092423 - 14
lath continuously beneath expansion joints.
3) Attachment--fasten securely into solid substrates or through sheathing into
structural framing at 7 inches (178 mm) on center maximum vertically and 16
inches (406 mm) on center horizontally*. Wire tie at no more than 9 inches (225
mm) on center at: side laps, accessory overlaps, and where end laps occur
between supports.
b. Paper-backed lath – follow installation as for diamond mesh metal lath. Lap lath over
lath, not paper to lath overlap. For horizontal overlaps the paper backing must lap
shingle style behind the lath to lath overlap.
4. One Piece Expansion Joint Installation
a. Install one piece expansion joints at through wall penetrations, for example, above and
below doors and windows. Install one piece expansion joints at every 144 ft2 (13 m2).
Wire tie one piece expansion joints to lath at no more than 7 inches (178 mm) on
center. Seal adjoining pieces by embedding ends in sealant. Make certain lath is
DISCONTINUOUS at or beneath joints.
5. Inside and Outside Corners
a. Install corner lath at inside corners and corner bead at outside corners over lath. Attach
through lath into solid substrate or framing at no more than 7 inches (178 mm) on
center with appropriate fasteners.
6. Stucco Installation
a. Scratch Coat: apply stucco with sufficient pressure to key into and embed the metal
lath. Apply sufficient material, 3/8 or ½ inch (9 or 12 mm), to cover the metal lath and
to permit scoring the surface. Score the stucco upon completion of each panel in
preparation for a second coat. Score horizontally.
b. Brown Coat: as soon as the first coat is firm enough to receive the second coat without
damage, apply the second coat. Alternatively, moist cure the first coat up to 48 hours
and dampen the scratched surface with water immediately before applying the second
coat. Apply the second coat with sufficient pressure to ensure intimate contact with the
first coat and as needed to bring the stucco to a uniform thickness that matches the
grounds of the accessories. Use a rod or straight edge to bring the surface to a true, even
plane. Fill depressions in plane with stucco. Final thickness of stucco shall be uniform
throughout the wall area and shall be either 3/4 inch or 7/8 inch (19 or 22 mm), and
shall not exceed 7/8 inch (22 mm).
c. After the stucco has become slightly firm float the surface lightly with a darby or wood
float to densify the surface and to provide a smooth, even surface. The proper time to
float is when the wood float no longer sticks to the surface of the stucco.
d. Moist cure after the stucco has set by lightly fogging for at least 48 hours. Fog as
frequently as required during the 48 hour period to prevent loss of moisture from the
stucco. Avoid eroding the stucco surface with excess moisture. If relative humidity
exceeds 75% the frequency of moist curing can be diminished.
C. Armor Guard
1. Apply base coat over the moist cured stucco with appropriate spray equipment or a stainless
steel trowel to a uniform thickness of approximately ⅛ inch (3 mm). Work horizontally or
vertically in strips of 40 inches (1016mm), and immediately embed the mesh into the wet base
coat by troweling from the center to the edge of the mesh. Overlap mesh not less than 2-½
inches (64 mm) at mesh seams and at overlaps of detail mesh. Feather seams and edges. Avoid
wrinkles in the mesh. The mesh must be fully embedded so that no mesh color shows through
the base coat when it is dry. Re-skim with additional base coat if mesh color is visible. Do not
install base coat or mesh over joints or accessories in the stucco wall assembly.

BTBC Phase III October 26, 2020
GE Project No. 0119-0010
Gould Evans
SYNTHETIC STUCCO SYSTEM 092423 - 15
D. Primer Installation
1. Sto Hot Prime – Moist cure stucco for a minimum of 48 hours. Allow stucco to dry an
additional 48 hours, then apply primer evenly with brush, roller or proper spray equipment
over the clean, dry stucco and foam build-outs, and allow to dry. Final age of primed stucco
application must be minimum 7 days before application of finish.
E. Finish Installation
1. Apply finish to minimum 28 day old stucco or primed stucco, or apply when pH of stucco
surface is less than 10. If Sto Hot Prime is used as the primer the primed stucco surfaces need
only be minimum 7 days old. Apply finish by spraying or troweling with a stainless steel
trowel, depending on the finish specified. Follow these general rules for application of finish:
a. Avoid application in direct sunlight.
b. Apply finish in a continuous application, and work a wet edge towards the unfinished
wall area. Work to an architectural break in the wall before stopping to avoid cold
joints.
c. Weather conditions affect application and drying time. Hot or dry conditions limit
working time and accelerate drying. Adjustments in the scheduling of work may be
required to achieve desired results; cool or damp conditions extend working time and
retard drying and may require added measures of protection against wind, dust, dirt,
rain and freezing. Adjust work schedule and provide protection.
d. Float “R” (rilled or swirl texture) finishes with a plastic float to achieve their rilled
texture
e. Do not install separate batches of finish side-by-side.
f. Do not apply finish into or over sealant joints. Apply finish to outside face of wall only.
g. Do not apply finish over irregular or unprepared surfaces, or surfaces not in compliance
with the requirements of the project specifications.
h. Do not install finish over high pH (> 10) stucco surfaces or surfaces that have not been
fully cured.
3.8 PROTECTION
A. Provide protection of installed materials from water infiltration into or behind them.
B. Provide protection of installed stucco from dust, dirt, precipitation, and freezing.
C. Provide protection of installed primer and finish from dust, dirt, precipitation, freezing and continuous
high humidity until fully dry.
D. Provide sealant and backer material at stucco terminations and at fixture penetrations through the
stucco to protect against air, water and insect infiltration. Provide weeps at floor lines, window and
door heads, and other areas to conduct water to the exterior.
3.9 CLEANING REPAIR AND MAINTENANCE
A. Clean and maintain the stucco finish for a fresh appearance and to prevent water entry into and behind
the stucco. Repair cracks, impact damage, spalls or delamination promptly.
B. Maintain adjacent components of construction such as sealants, windows, doors, and flashing, to
prevent water entry into the wall assembly.
END OF SECTION 092423

BTBC Phase III October 26, 2020
GE Project No. 0119-0010
Gould Evans
SYNTHETIC STUCCO SYSTEM 092423 - 16

BTBC Phase III October 26, 2020
GE Project No. 0119-0010
Gould Evans
GYPSUM BOARD 092900 - 1
SECTION 092900 - GYPSUM BOARD
PART 1 - GENERAL
1.1 SUMMARY
A. Section Includes:
1. Interior gypsum board.
2. Tile backing panels.
1.2 ACTION SUBMITTALS
A. Product Data: For each type of product.
1.3 DELIVERY, STORAGE AND HANDLING
A. Store materials inside under cover and keep them dry and protected against weather, condensation, direct
sunlight, construction traffic, and other potential causes of damage. Stack panels flat and supported on
risers on a flat platform to prevent sagging.
1.4 FIELD CONDITIONS
A. Environmental Limitations: Comply with ASTM C840 requirements or gypsum board manufacturer's
written instructions, whichever are more stringent.
PART 2 - PRODUCTS
2.1 GENERAL PRODUCT REQUIREMENTS
A. STC-Rated Assemblies: For STC-rated assemblies, provide materials and construction identical to those
tested in assembly indicated according to ASTM E90 and classified according to ASTM E413 by an
independent testing agency.
2.2 INTERIOR GYPSUM BOARD
A. Manufacturers: Subject to compliance with requirements, provide products by one of the following:
1. USG Corporation (Basis-of-Design products indicated below).
2. National Gypsum Company.
3. CertainTeed Corporation.
4. Georgia-Pacific Gypsum LLC.
B. Panel Size: Provide maximum lengths and widths available that will minimize joints in each area and that
correspond with support system indicated.
C. Gypsum Board, Type X: ASTM C1396/C1396M
1. Basis-of-Design Product: Subject to compliance with requirements, provide USG Sheetrock
Brand, EcoSmart Panels, Firecode X, as manufactured by USG Corporation or comparable
product of one of the approved manufacturers.
2. Core: 5/8 inch, Type X.
3. Long Edges: Tapered
D. Gypsum Board – Abuse-Resistant: ASTM C1396 gypsum board.

BTBC Phase III October 26, 2020
GE Project No. 0119-0010
Gould Evans
GYPSUM BOARD 092900 - 2
1. Application: As indicated on GYPSUM BOARD LOCATION SCHEDULE on the Drawings.
2. Thickness and Core Type: 5/8, Type X
3. Surface Abrasion:
a. Test Method: ASTM C1629.
b. Result: Meets or exceeds Level 1 requirements.
4. Indentation:
a. Test Method: ASTM C1629.
b. Result: Meets or exceeds Level 1 requirements.
5. Soft-Body Impact:
a. Test Method: ASTM C1629,
b. Result: Meets or exceeds Level 1 requirements.
6. Long Edges: Tapered.
E. Gypsum Board – Impact-Resistant: ASTM C1396 gypsum board.
1. Application: As indicated on GYPSUM BOARD LOCATION SCHEDULE on the Drawings.
2. Thickness and Core Type: 5/8, Type X
3. Surface Abrasion:
a. Test Method: ASTM C1629.
b. Result: Meets or exceeds Level 2 requirements.
4. Indentation:
a. Test Method: ASTM C1629.
b. Result: Meets or exceeds Level 1 requirements.
5. Hard-Body Impact:
a. Test Method: ASTM C1629.
b. Result: Meets or exceeds Level 2 requirements according to test in Annex A1.
6. Long Edges: Tapered.
7. Mold Resistance:
a. Test Method: ASTM D3273.
b. Result: Score of 10 as rated according to ASTM D3274.
F. Mold-Resistant Gypsum Board: ASTM C1396. With moisture- and mold-resistant core and paper
surfaces.
1. Basis-of-Design Product: Subject to compliance with requirements, provide USG Sheetrock
Brand, EcoSmart Panels, Mold Tough Firecode X, as manufactured by USG Corporation or
comparable product from one of the approved manufacturers.
2. Core: 5/8 inch.
3. Long Edges: Tapered.
4. Mold Resistance: ASTM D3273, score of 10 as rated according to ASTM D3274.
5. Application: Restrooms, kitchens, and interior finish of exterior walls.
2.3 TILE BACKING PANELS
A. Glass-Mat, Water-Resistant Backing Board: ASTM C1178/C1178M, with manufacturer's standard edges.
1. Products: Subject to compliance with requirements, provide one of the following:
a. USG Corporation; USG Durock Glass-Mat Tile Backerboard.
b. CertainTeed Corporation; GlasRoc Tile Backer.
c. Georgia-Pacific Gypsum LLC; DensShield Tile Backer.
d. National Gypsum Company; Gold Bond eXP Tile Backer.
2. Core: 5/8 inch, Type X.
3. Mold Resistance: ASTM D3273, score of 10 as rated according to ASTM D3274.

BTBC Phase III October 26, 2020
GE Project No. 0119-0010
Gould Evans
GYPSUM BOARD 092900 - 3
2.4 JOINT TREATMENT MATERIALS
A. General: Comply with ASTM C475.
B. Joint Tape:
1. Interior Gypsum Board: Paper.
2. Tile Backing Panels: As recommended by panel manufacturer.
C. Joint Compound for Interior Gypsum Board: For each coat, use formulation that is compatible with other
compounds applied on previous or for successive coats.
1. Prefilling: At open joints, rounded or beveled panel edges, and damaged surface areas, use setting-
type taping compound.
2. Embedding and First Coat: For embedding tape and first coat on joints, fasteners, and trim flanges,
use drying-type, all-purpose compound.
3. Fill Coat: For second coat, use drying-type, all-purpose compound.
4. Finish Coat: For third coat, use drying-type, all-purpose compound.
D. Joint Compound for Tile Backing Panels: As recommended by backer unit manufacturer.
2.5 ACCESSORIES
A. General: Provide auxiliary materials that comply with referenced installation standards and
manufacturer's written instructions.
B. Partition Closure: Adjustable partition closure that creates and end-of-wall transition between gypsum-
clad partition-walls and aluminum window mullions.
1. Basis-of-Design Product: Provide Gordon Inc.; “Mullion Mate”, or comparable product submitted
to and approved by Architect prior to bidding.
2. Size: As required to interface with adjacent mullion.
3. Finish: As selected by Architect from manufacturer’s full range.
C. Interior Trim: ASTM C 1047.
1. Cornerbead: Galvanized-steel sheet.
2. LC-Bead: J-shaped; exposed long flange receives joint compound; plastic.
3. L-Bead: L-shaped; exposed long flange receives joint compound; plastic.
4. U-Bead: J-shaped; exposed short flange does not receive joint compound; plastic.
5. Expansion (Control) Joint: Galvanized-steel sheet.
D. Laminating Adhesive: Adhesive or joint compound recommended for directly adhering gypsum panels to
continuous substrate.
E. Steel Drill Screws: ASTM C1002 unless otherwise indicated.
1. Metal Framing: Use screws complying with ASTM C954 for fastening panels to steel members
from 0.033 to 0.112 inch thick.
2. Cementitious Backer Units: Use screws of type and size recommended by panel manufacturer.
F. Sound-Attenuation Blankets: ASTM C665, Type I (blankets without membrane facing) produced by
combining thermosetting resins with mineral fibers manufactured from glass, slag wool, or rock wool.
G. Acoustical Sealant: Manufacturer's standard nonsag, paintable, nonstaining latex sealant complying with
ASTM C834. Product effectively reduces airborne sound transmission through perimeter joints and
openings in building construction as demonstrated by testing representative assemblies according to
ASTM E90.
BTBC Phase III October 26, 2020
GE Project No. 0119-0010
Gould Evans
GYPSUM BOARD 092900 - 4
PART 3 - EXECUTION
3.1 PRE-INSTALLATION
A. Examine areas and substrates including welded hollow-metal frames and support framing, with Installer
present, for compliance with requirements and other conditions affecting performance of the Work.
3.2 INSTALLATION
A. Comply with ASTM C840.
B. Install ceiling panels across framing to minimize the number of abutting end joints and to avoid abutting
end joints in central area of each ceiling. Stagger abutting end joints of adjacent panels not less than one
framing member.
C. Install panels with face side out. Butt panels together for a light contact at edges and ends with not more
than 1/16 inch of open space between panels. Do not force into place.
D. Locate edge and end joints over supports, except in ceiling applications where intermediate supports or
gypsum board back-blocking is provided behind end joints. Do not place tapered edges against cut edges
or ends. Stagger vertical joints on opposite sides of partitions. Do not make joints other than control joints
at corners of framed openings.
E. Form control and expansion joints with space between edges of adjoining gypsum panels.
F. Cover both faces of support framing with gypsum panels in concealed spaces (above ceilings, etc.),
except in chases braced internally.
1. Unless concealed application is indicated or required for sound, fire, air, or smoke ratings,
coverage may be accomplished with scraps of not less than 8 sq. ft. in area.
2. Fit gypsum panels around ducts, pipes, and conduits.
3. Where partitions intersect structural members projecting below underside of floor/roof slabs and
decks, cut gypsum panels to fit profile formed by structural members; allow 1/4- to 3/8-inch-wide
joints to install sealant.
G. Isolate perimeter of gypsum board applied to non-load-bearing partitions at structural abutments. Provide
1/4- to 1/2-inch-wide spaces at these locations and trim edges with edge trim where edges of panels are
exposed. Seal joints between edges and abutting structural surfaces with acoustical sealant.
H. Attachment to Steel Framing: Attach panels so leading edge or end of each panel is attached to open
(unsupported) edges of stud flanges first.
I. Wood Framing: Install gypsum panels over wood framing, with floating internal corner construction. Do
not attach gypsum panels across the flat grain of wide-dimension lumber, including floor joists and
headers. Float gypsum panels over these members or provide control joints to counteract wood shrinkage.
J. STC-Rated Assemblies: Seal construction at perimeters, behind control joints, and at openings and
penetrations with a continuous bead of acoustical sealant. Install acoustical sealant at both faces of
partitions at perimeters and through penetrations. Comply with ASTM C919 and with manufacturer's
written instructions for locating edge trim and closing off sound-flanking paths around or through
assemblies, including sealing partitions above acoustical ceilings.
K. Install sound attenuation blankets before installing gypsum panels unless blankets are readily installed
after panels have been installed on one side.

BTBC Phase III October 26, 2020
GE Project No. 0119-0010
Gould Evans
GYPSUM BOARD 092900 - 5
L. Single-Layer Gypsum Board Application:
1. On ceilings, apply gypsum panels before wall/partition board application to greatest extent
possible and at right angles to framing unless otherwise indicated.
2. On partitions/walls, apply gypsum panels vertically (parallel to framing) unless otherwise
indicated or required by fire-resistance-rated assembly, and minimize end joints.
a. Stagger abutting end joints not less than one framing member in alternate courses of
panels.
b. At stairwells and other high walls, install panels horizontally unless otherwise indicated or
required by fire-resistance-rated assembly.
3. On Z-shaped furring members, apply gypsum panels vertically (parallel to framing) with no end
joints. Locate edge joints over furring members.
4. Fastening Methods: Apply gypsum panels to supports with steel drill screws.
M. Multilayer Gypsum Board Application:
1. On ceilings, apply gypsum board indicated for base layers before applying base layers on
walls/partitions; apply face layers in same sequence. Apply base layers at right angles to framing
members and offset face-layer joints one framing member, 16 inches minimum, from parallel
base-layer joints, unless otherwise indicated or required by fire-resistance-rated assembly.
2. On partitions/walls, apply gypsum board indicated for base layers and face layers vertically
(parallel to framing) with joints of base layers located over stud or furring member and face-layer
joints offset at least one stud or furring member with base-layer joints unless otherwise indicated
or required by fire-resistance-rated assembly. Stagger joints on opposite sides of partitions.
3. On Z-shaped furring members, apply base layer vertically (parallel to framing) and face layer
either vertically (parallel to framing) or horizontally (perpendicular to framing) with vertical joints
offset at least one furring member. Locate edge joints of base layer over furring members.
4. Fastening Methods: Fasten base layers and face layers separately to supports with screws.
N. Laminating to Substrate: Where gypsum panels are indicated as directly adhered to a substrate (other than
studs, joists, furring members, or base layer of gypsum board), comply with gypsum board manufacturer's
written instructions and temporarily brace or fasten gypsum panels until fastening adhesive has set.
O. Cementitious Backer Units: ANSI A108.11, at locations indicated to receive tile.
1. Where tile backing panels abut other types of panels in same plane, shim surfaces to produce a
uniform plane across panel surfaces.
P. Trim: For trim with back flanges intended for fasteners, attach to framing with same fasteners used for
panels. Otherwise, attach trim according to manufacturer's written instructions.
Q. Control Joints: Install control joints according to ASTM C840 and in specific locations approved by
Architect for visual effect.
1. Interior Trim: Install in the following locations:
a. Cornerbead: Use at outside corners unless otherwise indicated.
b. LC-Bead: Use at exposed panel edges.
c. L-Bead: Use where indicated.
d. U-Bead: Use where indicated.
R. Finishing Gypsum Board: Treat gypsum board joints, interior angles, edge trim, control joints,
penetrations, fastener heads, surface defects, and elsewhere as required to prepare gypsum board surfaces
for decoration. Promptly remove residual joint compound from adjacent surfaces.
1. Prefill open joints, rounded or beveled edges, and damaged surface areas.
2. Apply joint tape over gypsum board joints, except for trim products specifically indicated as not
intended to receive tape.
3. Gypsum Board Finish Levels: Finish panels to levels indicated below and according to
ASTM C840:
a. Level 1: Ceiling plenum areas, concealed areas, and where indicated.

BTBC Phase III October 26, 2020
GE Project No. 0119-0010
Gould Evans
GYPSUM BOARD 092900 - 6
b. Level 4: At panel surfaces that will be exposed to view unless otherwise indicated.
c. Level 5: Where indicated on Drawings.
4. Cementitious Backer Units: Finish according to manufacturer's written instructions.
3.3 POST-INSTALLATION
A. Protect adjacent surfaces from drywall compound and promptly remove from floors and other non-
drywall surfaces. Repair surfaces stained, marred, or otherwise damaged during drywall application.
B. Protect installed products from damage from weather, condensation, direct sunlight, construction, and
other causes during remainder of the construction period.
C. Remove and replace panels that are wet, moisture damaged, and mold damaged.
1. Indications that panels are wet or moisture damaged include, but are not limited to, discoloration,
sagging, or irregular shape.
2. Indications that panels are mold damaged include, but are not limited to, fuzzy or splotchy surface
contamination and discoloration.
END OF SECTION 092900

BTBC Phase III October 26, 2020
GE Project No. 0119-0010
Gould Evans
CERAMIC TILING 093013 - 1
SECTION 093013 - TILING
PART 1 - GENERAL
1.1 RELATED DOCUMENTS
A. Drawings and general provisions of the Contract, including General and Supplementary Conditions and
Division 01 Specification Sections, apply to this Section.
1.2 SUMMARY
A. Section Includes:
1. Ceramic tile.
2. Tile backing panels.
B. Related Sections:
1. Division 07 Section "Joint Sealants" for sealing of expansion, contraction, control, and isolation
joints in tile surfaces.
2. Division 09 Section "Gypsum Board" for cementitious backer units
1.3 DEFINITIONS
A. General: Definitions in the ANSI A108 series of tile installation standards and in ANSI A137.1 apply to
Work of this Section unless otherwise specified.
B. ANSI A108 Series: ANSI A108.01, ANSI A108.02, ANSI A108.1A, ANSI A108.1B, ANSI A108.1C,
ANSI A108.4, ANSI A108.5, ANSI A108.6, ANSI A108.8, ANSI A108.9, ANSI A108.10,
ANSI A108.11, ANSI A108.12, ANSI A108.13, ANSI A108.14, ANSI A108.15, ANSI A108.16, and
ANSI A108.17, which are contained in "American National Standard Specifications for Installation of
Ceramic Tile."
C. Module Size: Actual tile size plus joint width indicated.
D. Face Size: Actual tile size, excluding spacer lugs.
1.4 PREINSTALLATION MEETINGS
A. Preinstallation Conference: Conduct conference at Project site.
1. Review requirements in ANSI A108.01 for substrates and for preparation by other trades.

BTBC Phase III October 26, 2020
GE Project No. 0119-0010
Gould Evans
CERAMIC TILING 093013 - 2
1.5 ACTION SUBMITTALS
A. Product Data: For each type of product indicated.
B. Shop Drawings: Show locations of each type of tile and tile pattern. Show widths, details, and locations
of expansion, contraction, control, and isolation joints in tile substrates and finished tile surfaces.
C. Samples for Initial Selection: For each type of tile and grout indicated. Include Samples of accessories
involving color selection.
D. Samples for Verification:
1. Full-size units of each type and composition of tile and for each color and finish required.
2. Full-size units of each type of trim and accessory.
1.6 INFORMATIONAL SUBMITTALS
A. Qualification Data: For qualified Installer.
B. Master Grade Certificates: For each shipment, type, and composition of tile, signed by tile manufacturer
and Installer.
C. Product Certificates: For each type of product, signed by product manufacturer.
1.7 QUALITY ASSURANCE
A. Source Limitations for Tile: Obtain tile of each type and color or finish from one source or producer.
1. Obtain tile of each type and color or finish from same production run and of consistent quality in
appearance and physical properties for each contiguous area.
B. Source Limitations for Setting and Grouting Materials: Obtain ingredients of a uniform quality for each
mortar, adhesive, and grout component from one manufacturer and each aggregate from one source or
producer.
1.8 DELIVERY, STORAGE, AND HANDLING
A. Deliver and store packaged materials in original containers with seals unbroken and labels intact until time
of use. Comply with requirements in ANSI A137.1 for labeling tile packages.
B. Store tile and cementitious materials on elevated platforms, under cover, and in a dry location.
C. Store aggregates where grading and other required characteristics can be maintained and contamination can
be avoided.
D. Store liquid materials in unopened containers and protected from freezing.

BTBC Phase III October 26, 2020
GE Project No. 0119-0010
Gould Evans
CERAMIC TILING 093013 - 3
E. Handle tile that has temporary protective coating on exposed surfaces to prevent coated surfaces from
contacting backs or edges of other units. If coating does contact bonding surfaces of tile, remove coating
from bonding surfaces before setting tile.
1.9 PROJECT CONDITIONS
A. Environmental Limitations: Do not install tile until construction in spaces is complete and ambient
temperature and humidity conditions are maintained at the levels indicated in referenced standards and
manufacturer's written instructions.
1.10 EXTRA MATERIALS
A. Furnish extra materials that match and are from same production runs as products installed and that are
packaged with protective covering for storage and identified with labels describing contents.
1. Tile and Trim Units: Furnish quantity of full-size units equal to 3 percent of amount installed for
each type, composition, color, pattern, and size indicated.
2. Grout: Furnish quantity of grout equal to 3 percent of amount installed for each type, composition,
and color indicated.
PART 2 - PRODUCTS
2.1 PRODUCTS, GENERAL
A. ANSI Ceramic Tile Standard: Provide tile that complies with ANSI A137.1 for types, compositions, and
other characteristics indicated.
1. Provide tile complying with Standard grade requirements unless otherwise indicated.
B. ANSI Standards for Tile Installation Materials: Provide materials complying with ANSI A108.02, ANSI
standards referenced in other Part 2 articles, ANSI standards referenced by TCA installation methods
specified in tile installation schedules, and other requirements specified.
C. Factory Blending: For tile exhibiting color variations within ranges, blend tile in factory and package so
tile units taken from one package show same range in colors as those taken from other packages and match
approved Samples.
D. Mounting: For factory-mounted tile, provide back- or edge-mounted tile assemblies as standard with
manufacturer unless otherwise indicated.
1. Where tile is indicated for installation in wet areas, do not use back- or edge-mounted tile assemblies
unless tile manufacturer specifies in writing that this type of mounting is suitable for installation
indicated and has a record of successful in-service performance.

BTBC Phase III October 26, 2020
GE Project No. 0119-0010
Gould Evans
CERAMIC TILING 093013 - 4
E. Factory-Applied Temporary Protective Coating: Where indicated under tile type, protect exposed surfaces
of tile against adherence of mortar and grout by precoating with continuous film of petroleum paraffin wax,
applied hot. Do not coat unexposed tile surfaces.
2.2 TILE PRODUCTS
A. Ceramic Tile Type CT-1: Porcelain tile.
1. Manufacturers: Subject to compliance with requirements, provide products by the following.
2. Basis-of-Design Product: Subject to compliance with requirements, provide:
a. Dal-Tile corporation: Fabrique
3. Composition: Color body Porcelain.
4. Certification: Porcelain tile certified by the Porcelain Tile Certification Agency.
5. Module Size: 12 by 24 inches.
6. Thickness: 1/4 inch (6.4 mm).
7. Face: brick pattern installation.
8. Surface: unpolished.
9. Dynamic Coefficient of Friction: Not less than 0.42.
10. Finish: unpolished glaze.
11. Tile Color and Pattern: Fabrique; Gris Linen P690.
12. Grout Color: As selected by Architect from manufacturer's full range.
B. Ceramic Tile Type CTB-1: Porcelain tile bullnose base.
1. Manufacturers: Subject to compliance with requirements, provide products by the following.
2. Basis-of-Design Product: Subject to compliance with requirements, provide:
a. Dal-Tile corporation: Fabrique
3. Composition: Color body Porcelain.
4. Certification: Porcelain tile certified by the Porcelain Tile Certification Agency.
5. Module Size: 3 by 12 inches.
6. Thickness: 1/4 inch (6.4 mm).
7. Face: brick pattern installation.
8. Surface: unpolished.
9. Dynamic Coefficient of Friction: Not less than 0.42.
10. Finish: unpolished glaze.
11. Tile Color and Pattern: Fabrique; Gris Linen P690.
12. Grout Color: As selected by Architect from manufacturer's full range.
2.3 TILE BACKING PANELS
A. Cementitious Backer Units: ANSI A118.9 or ASTM C 1325, in maximum lengths available to minimize
end-to-end butt joints.
1. Products: Subject to compliance with requirements available products that may be incorporated
into the Work include, but are not limited to, the following:
BTBC Phase III October 26, 2020
GE Project No. 0119-0010
Gould Evans
CERAMIC TILING 093013 - 5
a. C-Cure; C-Cure Board 990.
b. Custom Building Products; Wonderboard.
c. FinPan, Inc.; Util-A-Crete Concrete Backer Board.
d. USG Corporation; DUROCK Cement Board.
2. Thickness: 1/2 inch (12.7 mm)
2.4 SETTING MATERIALS
A. Dry-Set Portland Cement Mortar (Thin Set): ANSI A118.1.
1. Manufacturers: Subject to compliance with requirements, available manufacturers offering
products that may be incorporated into the Work include, but are not limited to, the following:
a. Boiardi Products; a QEP company.
b. Bonsal American; an Oldcastle company.
c. Bostik, Inc.
d. C-Cure.
e. Custom Building Products.
f. Jamo Inc.
g. Laticrete International, Inc.
h. MAPEI Corporation.
i. Southern Grouts & Mortars, Inc.
j. Summitville Tiles, Inc.
k. TEC; a subsidiary of H. B. Fuller Company.
2. For wall applications, provide mortar that complies with requirements for nonsagging mortar in
addition to the other requirements in ANSI A118.1.
B. Latex-Portland Cement Mortar (Thin Set): ANSI A118.4.
1. Manufacturers: Subject to compliance with requirements, available manufacturers offering
products that may be incorporated into the Work include, but are not limited to, the following:
a. Bonsal American; an Oldcastle company.
b. Bostik, Inc.
c. C-Cure.
d. Custom Building Products.
e. Laticrete International, Inc.
f. MAPEI Corporation.
g. Mer-Kote Products, Inc.
h. Southern Grouts & Mortars, Inc.
i. Summitville Tiles, Inc.
j. TEC; a subsidiary of H. B. Fuller Company.
2. Provide prepackaged, dry-mortar mix containing dry, redispersible, vinyl acetate or acrylic additive
to which only water must be added at Project site.
3. Provide prepackaged, dry-mortar mix combined with acrylic resin or styrene-butadiene-rubber
liquid-latex additive at Project site.
4. For wall applications, provide mortar that complies with requirements for nonsagging mortar in
addition to the other requirements in ANSI A118.4.

BTBC Phase III October 26, 2020
GE Project No. 0119-0010
Gould Evans
CERAMIC TILING 093013 - 6
2.5 GROUT MATERIALS
A. Sand-Portland Cement Grout: ANSI A108.10, composed of white or gray cement and white or colored
aggregate as required to produce color indicated.
B. Standard Cement Grout: ANSI A118.6.
1. Manufacturers: Subject to compliance with requirements, provide products by one of the following.
a. Bonsal American; an Oldcastle company.
b. Bostik, Inc.
c. C-Cure.
d. Custom Building Products.
e. Laticrete International, Inc.
f. MAPEI Corporation.
g. Southern Grouts & Mortars, Inc.
h. Summitville Tiles, Inc.
i. TEC; a subsidiary of H. B. Fuller Company.
C. Polymer-Modified Tile Grout: ANSI A118.7.
1. Manufacturers: Subject to compliance with requirements, provide products by one of the following.
a. Bonsal American; an Oldcastle company.
b. Bostik, Inc.
c. C-Cure.
d. Custom Building Products.
e. Laticrete International, Inc.
f. MAPEI Corporation.
g. Southern Grouts & Mortars, Inc.
h. Summitville Tiles, Inc.
i. TEC; a subsidiary of H. B. Fuller Company.
2.6 ELASTOMERIC SEALANTS
A. General: Provide sealants, primers, backer rods, and other sealant accessories that comply with the
following requirements and with the applicable requirements in Division 07 Section "Joint Sealants."
1. Use sealants that have a VOC content of 250g/L or less when calculated according to 40 CFR 59,
Subpart D (EPA Method 24).
2. Use primers, backer rods, and sealant accessories recommended by sealant manufacturer.
B. Colors: Provide colors of exposed sealants to match colors of grout in tile adjoining sealed joints unless
otherwise indicated.
C. One-Part, Mildew-Resistant Silicone Sealant: ASTM C 920; Type S; Grade NS; Class 25; Uses NT, G, A,
and, as applicable to nonporous joint substrates indicated, O; formulated with fungicide, intended for
sealing interior ceramic tile joints and other nonporous substrates that are subject to in-service exposures
of high humidity and extreme temperatures.
1. Products: Subject to compliance with requirements, provide one of the following.
a. Dow Corning Corporation; Dow Corning 786.

BTBC Phase III October 26, 2020
GE Project No. 0119-0010
Gould Evans
CERAMIC TILING 093013 - 7
b. GE Silicones; a division of GE Specialty Materials; Sanitary 1700.
c. Laticrete International, Inc.; Latasil Tile & Stone Sealant.
d. Pecora Corporation; Pecora 898 Sanitary Silicone Sealant.
e. Tremco Incorporated; Tremsil 600 White.
D. Multipart, Pourable Urethane Sealant for Use T: ASTM C 920; Type M; Grade P; Class 25; Uses T, M, A,
and, as applicable to joint substrates indicated, O.
1. Products: Subject to compliance with requirements, provide one of the following:
a. Bostik, Inc.; Chem-Calk 550.
b. Degussa Building Systems; Sonneborn Sonolastic SL 2.
c. Pecora Corporation; Dynatrol II-SG
d. Sika Corporation; Sikaflex-2c SL.
e. Tremco Incorporated.;
2.7 MISCELLANEOUS MATERIALS
A. Trowelable Underlayments and Patching Compounds: Latex-modified, portland cement-based formulation
provided or approved by manufacturer of tile-setting materials for installations indicated.
B. Temporary Protective Coating: Either product indicated below that is formulated to protect exposed
surfaces of tile against adherence of mortar and grout; compatible with tile, mortar, and grout products; and
easily removable after grouting is completed without damaging grout or tile.
1. Petroleum paraffin wax, fully refined and odorless, containing at least 0.5 percent oil with a melting
point of 120 to 140 deg F (49 to 60 deg C) per ASTM D 87.
2. Grout release in form of manufacturer's standard proprietary liquid coating that is specially
formulated and recommended for use as temporary protective coating for tile.
C. Tile Cleaner: A neutral cleaner capable of removing soil and residue without harming tile and grout
surfaces, specifically approved for materials and installations indicated by tile and grout manufacturers.
D. Grout Sealer: Manufacturer's standard product for sealing grout joints and that does not change color or
appearance of grout.
2.8 MIXING MORTARS AND GROUT
A. Mix mortars and grouts to comply with referenced standards and mortar and grout manufacturers' written
instructions.
B. Add materials, water, and additives in accurate proportions.
C. Obtain and use type of mixing equipment, mixer speeds, mixing containers, mixing time, and other
procedures to produce mortars and grouts of uniform quality with optimum performance characteristics for
installations indicated.

BTBC Phase III October 26, 2020
GE Project No. 0119-0010
Gould Evans
CERAMIC TILING 093013 - 8
PART 3 - EXECUTION
3.1 EXAMINATION
A. Examine substrates, areas, and conditions where tile will be installed, with Installer present, for compliance
with requirements for installation tolerances and other conditions affecting performance of installed tile.
1. Verify that substrates for setting tile are firm, dry, clean, free of coatings that are incompatible with
tile-setting materials including curing compounds and other substances that contain soap, wax, oil,
or silicone; and comply with flatness tolerances required by ANSI A108.01 for installations
indicated.
2. Verify that concrete substrates for tile floors installed with thin-set mortar comply with surface
finish requirements in ANSI A108.01 for installations indicated.
a. Verify that surfaces that received a steel trowel finish have been mechanically scarified.
b. Verify that protrusions, bumps, and ridges have been removed by sanding or grinding.
3. Verify that installation of grounds, anchors, recessed frames, electrical and mechanical units of
work, and similar items located in or behind tile has been completed.
4. Verify that joints and cracks in tile substrates are coordinated with tile joint locations; if not
coordinated, adjust joint locations in consultation with Architect.
B. Proceed with installation only after unsatisfactory conditions have been corrected.
3.2 PREPARATION
A. Fill cracks, holes, and depressions in concrete substrates for tile floors installed with thin-set mortar with
trowelable leveling and patching compound specifically recommended by tile-setting material
manufacturer.
B. Where indicated, prepare substrates to receive waterproofing by applying a reinforced mortar bed that
complies with ANSI A108.1A and is sloped 1/4 inch per foot (1:50) toward drains.
C. Blending: For tile exhibiting color variations, verify that tile has been factory blended and packaged so tile
units taken from one package show same range of colors as those taken from other packages and match
approved Samples. If not factory blended, either return to manufacturer or blend tiles at Project site before
installing.
D. Field-Applied Temporary Protective Coating: If indicated under tile type or needed to prevent grout from
staining or adhering to exposed tile surfaces, precoat them with continuous film of temporary protective
coating, taking care not to coat unexposed tile surfaces.
3.3 TILE INSTALLATION
A. Comply with TCA's "Handbook for Ceramic Tile Installation" for TCA installation methods specified in
tile installation schedules. Comply with parts of the ANSI A108 Series "Specifications for Installation of
BTBC Phase III October 26, 2020
GE Project No. 0119-0010
Gould Evans
CERAMIC TILING 093013 - 9
Ceramic Tile" that are referenced in TCA installation methods, specified in tile installation schedules, and
apply to types of setting and grouting materials used.
1. For the following installations, follow procedures in the ANSI A108 Series of tile installation
standards for providing 95 percent mortar coverage:
a. Exterior tile floors.
b. Tile floors in wet areas.
c. Tile swimming pool decks.
d. Tile floors in laundries.
e. Tile floors composed of tiles 8 by 8 inches (200 by 200 mm) or larger.
f. Tile floors composed of rib-backed tiles.
B. Extend tile work into recesses and under or behind equipment and fixtures to form complete covering
without interruptions unless otherwise indicated. Terminate work neatly at obstructions, edges, and corners
without disrupting pattern or joint alignments.
C. Accurately form intersections and returns. Perform cutting and drilling of tile without marring visible
surfaces. Carefully grind cut edges of tile abutting trim, finish, or built-in items for straight aligned joints.
Fit tile closely to electrical outlets, piping, fixtures, and other penetrations so plates, collars, or covers
overlap tile.
D. Jointing Pattern: Lay tile in grid pattern unless otherwise indicated. Lay out tile work and center tile fields
in both directions in each space or on each wall area. Lay out tile work to minimize the use of pieces that
are less than half of a tile. Provide uniform joint widths unless otherwise indicated.
1. For tile mounted in sheets, make joints between tile sheets same width as joints within tile sheets so
joints between sheets are not apparent in finished work.
2. Where adjoining tiles on floor, base, walls, or trim are specified or indicated to be same size, align
joints.
3. Where tiles are specified or indicated to be whole integer multiples of adjoining tiles on floor, base,
walls, or trim, align joints unless otherwise indicated.
E. Grout Sealer: Apply grout sealer to cementitious grout joints in tile floors according to grout-sealer
manufacturer's written instructions. As soon as grout sealer has penetrated grout joints, remove excess
sealer and sealer from tile faces by wiping with soft cloth.
3.4 TILE BACKING PANEL INSTALLATION
A. Install cementitious backer units and treat joints according to ANSI A108.11 and manufacturer's written
instructions for type of application indicated.
3.5 CLEANING AND PROTECTING
A. Cleaning: On completion of placement and grouting, clean all ceramic tile surfaces so they are free of
foreign matter.
1. Remove grout residue from tile as soon as possible.

BTBC Phase III October 26, 2020
GE Project No. 0119-0010
Gould Evans
CERAMIC TILING 093013 - 10
2. Clean grout smears and haze from tile according to tile and grout manufacturer's written instructions
but no sooner than 10 days after installation. Use only cleaners recommended by tile and grout
manufacturers and only after determining that cleaners are safe to use by testing on samples of tile
and other surfaces to be cleaned. Protect metal surfaces and plumbing fixtures from effects of
cleaning. Flush surfaces with clean water before and after cleaning.
3. Remove temporary protective coating by method recommended by coating manufacturer and that
is acceptable to tile and grout manufacturer. Trap and remove coating to prevent drain clogging.
B. Protect installed tile work with kraft paper or other heavy covering during construction period to prevent
staining, damage, and wear. If recommended by tile manufacturer, apply coat of neutral protective cleaner
to completed tile walls and floors.
C. Prohibit foot and wheel traffic from tiled floors for at least seven days after grouting is completed.
D. Before final inspection, remove protective coverings and rinse neutral protective cleaner from tile surfaces.
3.6 INTERIOR TILE INSTALLATION SCHEDULE
A. Interior Wall Installations, Metal Studs or Furring:
1. Tile Installation W244: Thin-set mortar on cementitious backer units or fiber cement underlayment
TCA W244.
a. Thin-Set Mortar: Latex-portland cement mortar.
b. Grout: Polymer-modified unsanded grout.
END OF SECTION 093013

BTBC Phase III October 26, 2020
GE Project No. 0119-0010
Gould Evans
ACOUSTICAL PANEL CEILINGS 095113 - 1
SECTION 095113 - ACOUSTICAL PANEL CEILINGS
PART 1 - GENERAL
1.1 RELATED DOCUMENTS
A. Drawings and general provisions of the Contract, including General and Supplementary Conditions and
Division 01 Specification Sections, apply to this Section.
1.2 SUMMARY
A. Section includes acoustical panels and exposed suspension systems for ceilings.
1.3 ACTION SUBMITTALS
A. Product Data: For each type of product.
B. Samples: For each exposed product and for each color and texture specified, 6 inches (150 mm) in size.
C. Samples for Verification: For each component indicated and for each exposed finish required, prepared on
Samples of size indicated below.
1. Acoustical Panel: Set of 6-inch- (150-mm-) square Samples of each type, color, pattern, and texture.
2. Exposed Suspension-System Members, Moldings, and Trim: Set of 6-inch- (150-mm-) long
Samples of each type, finish, and color.
1.4 CLOSEOUT SUBMITTALS
A. Maintenance Data: For finishes to include in maintenance manuals.
1.5 MAINTENANCE MATERIAL SUBMITTALS
A. Furnish extra materials that match products installed and that are packaged with protective covering for
storage and identified with labels describing contents.
1. Acoustical Ceiling Panels: Full-size panels equal to 2 percent of quantity installed.
2. Suspension-System Components: Quantity of each exposed component equal to 2 percent of
quantity installed.
1.6 DELIVERY, STORAGE, AND HANDLING
A. Deliver acoustical panels, suspension-system components, and accessories to Project site in original,
unopened packages and store them in a fully enclosed, conditioned space where they will be protected
against damage from moisture, humidity, temperature extremes, direct sunlight, surface contamination, and
other causes.

BTBC Phase III October 26, 2020
GE Project No. 0119-0010
Gould Evans
ACOUSTICAL PANEL CEILINGS 095113 - 2
B. Before installing acoustical panels, permit them to reach room temperature and a stabilized moisture
content.
C. Handle acoustical panels carefully to avoid chipping edges or damaging units in any way.
1.7 FIELD CONDITIONS
A. Environmental Limitations: Do not install acoustical panel ceilings until spaces are enclosed and
weatherproof, wet work in spaces is complete and dry, work above ceilings is complete, and ambient
temperature and humidity conditions are maintained at the levels indicated for Project when occupied for
its intended use.
1. Pressurized Plenums: Operate ventilation system for not less than 48 hours before beginning
acoustical panel ceiling installation.
PART 2 - PRODUCTS
2.1 PERFORMANCE REQUIREMENTS
A. Surface-Burning Characteristics: Comply with ASTM E 84; testing by a qualified testing agency. Identify
products with appropriate markings of applicable testing agency.
1. Flame-Spread Index: Comply with ASTM E 1264 for Class A materials.
2. Smoke-Developed Index: 50 or less.
2.2 ACOUSTICAL PANELS, GENERAL
A. Source Limitations:
1. Acoustical Ceiling Panel: Obtain each type from single source from single manufacturer.
2. Suspension System: Obtain each type from single source from single manufacturer.
B. Glass-Fiber-Based Panels: Made with binder containing no urea formaldehyde.
C. Acoustical Panel Standard: Provide manufacturer's standard panels of configuration indicated that comply
with ASTM E 1264 classifications as designated by types, patterns, acoustical ratings, and light
reflectances unless otherwise indicated.
D. Acoustical Panel Colors and Patterns: Match appearance characteristics indicated for each product type.
1. Where appearance characteristics of acoustical panels are indicated by referencing pattern
designations in ASTM E 1264 and not manufacturers' proprietary product designations, provide
products selected by Architect from each manufacturer's full range that comply with requirements
indicated for type, pattern, color, light reflectance, acoustical performance, edge detail, and size.
2.3 ACOUSTICAL PANELS (ACT-1)
A. Basis-of-Design Product: Subject to compliance with requirements, provide; Armstrong World Industries,
Inc.; Optima (verify to match existing Phase 1 and 2) or comparable product by one of the following:

BTBC Phase III October 26, 2020
GE Project No. 0119-0010
Gould Evans
ACOUSTICAL PANEL CEILINGS 095113 - 3
1. USG Interiors, Inc. 2. CertainTeed Corp.
3. Chicago Metallic Corporation.
B. Classification: Provide panels complying with ASTM E 1264 for type, form, and pattern as follows:
1. Type and Form: Type III, mineral base with painted finish; Form 1, nodular.
2. Pattern: E (lightly textured).
C. Color: Flat white.
D. LR: Not less than 0.85.
E. NRC: Not less than 0.70.
F. CAC: Not less than 35.
G. Edge/Joint Detail: SLT (shadowline, tapered).
H. Thickness: 3/4 inch (19 mm).
I. Modular Size: 24 by 24 inches (610 by 610 mm) as indicated on Drawings.
J. Broad Spectrum Antimicrobial Fungicide and Bactericide Treatment: Provide acoustical panels treated
with manufacturer's standard antimicrobial formulation that inhibits fungus, mold, mildew, and gram-
positive and gram-negative bacteria and showing no mold, mildew, or bacterial growth when tested
according to ASTM D 3273 and evaluated according to ASTM D 3274 or ASTM G 21.
2.4 ACOUSTICAL PANELS (ACT-2)
A. Basis-of-Design Product: Subject to compliance with requirements, provide; Armstrong World Industries,
Inc.; Cleanroom VL or comparable product by one of the following:
1. USG Interiors, Inc. 2. CertainTeed Corp.
3. Chicago Metallic Corporation.
B. Color: White.
C. Edge/Joint Detail: Square.
D. Thickness: 5/8 inch.
E. CAC: 40 CAC
F. Modular Size: 24 by 24 inches (610 by 610 mm) as indicated on Drawings.
2.5 METAL SUSPENSION SYSTEMS, GENERAL
A. Metal Suspension-System Standard: Provide manufacturer's standard direct-hung metal suspension systems
of types, structural classifications, and finishes indicated that comply with applicable requirements in
ASTM C 635/C 635M.

BTBC Phase III October 26, 2020
GE Project No. 0119-0010
Gould Evans
ACOUSTICAL PANEL CEILINGS 095113 - 4
B. Attachment Devices: Size for five times the design load indicated in ASTM C 635/C 635M, Table 1,
"Direct Hung," unless otherwise indicated. Comply with seismic design requirements.
1. Power-Actuated Fasteners in Concrete: Fastener system of type suitable for application indicated,
fabricated from corrosion-resistant materials, with clips or other accessory devices for attaching
hangers of type indicated and with capability to sustain, without failure, a load equal to 10 times
that imposed by ceiling construction, as determined by testing according to ASTM E 1190,
conducted by a qualified testing and inspecting agency.
C. Wire Hangers, Braces, and Ties: Provide wires complying with the following requirements:
1. Zinc-Coated, Carbon-Steel Wire: ASTM A 641/A 641M, Class 1 zinc coating, soft temper.
2. Size: Select wire diameter so its stress at three times hanger design load (ASTM C 635/C 635M,
Table 1, "Direct Hung") will be less than yield stress of wire, but provide not less than 0.135-inch-
(3.5-mm-) diameter wire.
2.6 METAL SUSPENSION SYSTEM
A. Basis-of-Design Product: Subject to compliance with requirements, provide USG Interiors, Inc.; Subsidiary
of USG Corporation; Donn DX grid (verify to match existing Phase 1) or comparable product by one of
the following:
1. Armstrong World Industries, Inc.
2. CertainTeed Corp.
3. Chicago Metallic Corporation.
B. Narrow-Face, Capped, Double-Web, Steel Suspension System: Main and cross runners roll formed from
cold-rolled steel sheet; prepainted, electrolytically zinc coated, or hot-dip galvanized according to
ASTM A 653/A 653M, not less than G30 (Z90) coating designation; with prefinished 9/16-inch- (15-mm-
) wide metal caps on flanges.
1. Structural Classification: Heavy-duty system.
2. End Condition of Cross Runners: Override (stepped) or butt-edge type.
3. Face Design: Flat, flush.
4. Cap Material: Steel cold-rolled sheet.
5. Cap Finish: Painted white.
2.7 METAL EDGE MOLDINGS AND TRIM
A. Basis-of-Design Product: Subject to compliance with requirements, provide USG Interiors, Inc.; Subsidiary
of USG Corporation, product indicated on Drawings or comparable product by one of the following:
1. Armstrong World Industries, Inc.
2. CertainTeed Corp.
3. Chicago Metallic Corporation.
4. Fry Reglet Corporation.
5. Gordon, Inc.
B. Roll-Formed, Sheet-Metal Edge Moldings and Trim: Type and profile indicated or, if not indicated,
manufacturer's standard moldings for edges and penetrations that comply with seismic design requirements;
formed from sheet metal of same material, finish, and color as that used for exposed flanges of suspension-
system runners.

BTBC Phase III October 26, 2020
GE Project No. 0119-0010
Gould Evans
ACOUSTICAL PANEL CEILINGS 095113 - 5
1. Provide manufacturer's standard edge moldings that fit acoustical panel edge details and suspension
systems indicated and that match width and configuration of exposed runners unless otherwise
indicated.
2. For lay-in panels with reveal edge details, provide stepped edge molding that forms reveal of same
depth and width as that formed between edge of panel and flange at exposed suspension member.
3. For circular penetrations of ceiling, provide edge moldings fabricated to diameter required to fit
penetration exactly.
PART 3 - EXECUTION
3.1 EXAMINATION
A. Examine substrates, areas, and conditions, including structural framing to which acoustical panel ceilings
attach or abut, with Installer present, for compliance with requirements specified in this and other Sections
that affect ceiling installation and anchorage and with requirements for installation tolerances and other
conditions affecting performance of acoustical panel ceilings.
B. Examine acoustical panels before installation. Reject acoustical panels that are wet, moisture damaged, or
mold damaged.
C. Proceed with installation only after unsatisfactory conditions have been corrected.
3.2 PREPARATION
A. Measure each ceiling area and establish layout of acoustical panels to balance border widths at opposite
edges of each ceiling. Avoid using less-than-half-width panels at borders, and comply with layout shown
on reflected ceiling plans.
3.3 INSTALLATION
A. General: Install acoustical panel ceilings to comply with ASTM C 636/C 636M and seismic design
requirements indicated, according to manufacturer's written instructions and CISCA's "Ceiling Systems
Handbook."
B. Suspend ceiling hangers from building's structural members and as follows:
1. Install hangers plumb and free from contact with insulation or other objects within ceiling plenum
that are not part of supporting structure or of ceiling suspension system.
2. Where width of ducts and other construction within ceiling plenum produces hanger spacings that
interfere with location of hangers at spacings required to support standard suspension-system
members, install supplemental suspension members and hangers in form of trapezes or equivalent
devices.
3. Secure wire hangers to ceiling-suspension members and to supports above with a minimum of three
tight turns. Connect hangers directly either to structures or to inserts, eye screws, or other devices
that are secure and appropriate for substrate and that will not deteriorate or otherwise fail due to age,
corrosion, or elevated temperatures.
4. Do not support ceilings directly from permanent metal forms or floor deck. Fasten hangers to cast-
in-place hanger inserts, postinstalled mechanical or adhesive anchors, or power-actuated fasteners
that extend through forms into concrete.
BTBC Phase III October 26, 2020
GE Project No. 0119-0010
Gould Evans
ACOUSTICAL PANEL CEILINGS 095113 - 6
5. When steel framing does not permit installation of hanger wires at spacing required, install carrying
channels or other supplemental support for attachment of hanger wires.
6. Do not attach hangers to steel deck tabs.
7. Do not attach hangers to steel roof deck. Attach hangers to structural members.
8. Space hangers not more than 48 inches (1200 mm) o.c. along each member supported directly from
hangers unless otherwise indicated; provide hangers not more than 8 inches (200 mm) from ends of
each member.
9. Size supplemental suspension members and hangers to support ceiling loads within performance
limits established by referenced standards and publications.
C. Secure bracing wires to ceiling suspension members and to supports with a minimum of four tight turns.
Suspend bracing from building's structural members as required for hangers, without attaching to
permanent metal forms, steel deck, or steel deck tabs. Fasten bracing wires into concrete with cast-in-place
or postinstalled anchors.
D. Install edge moldings and trim of type indicated at perimeter of acoustical ceiling area and where necessary
to conceal edges of acoustical panels.
1. Screw attach moldings to substrate at intervals not more than 16 inches (400 mm) o.c. and not more
than 3 inches (75 mm) from ends, leveling with ceiling suspension system to a tolerance of 1/8 inch
in 12 feet (3.2 mm in 3.6 m). Miter corners accurately and connect securely.
2. Do not use exposed fasteners, including pop rivets, on moldings and trim.
E. Install suspension-system runners so they are square and securely interlocked with one another. Remove
and replace dented, bent, or kinked members.
F. Install acoustical panels with undamaged edges and fit accurately into suspension-system runners and edge
moldings. Scribe and cut panels at borders and penetrations to provide a neat, precise fit.
1. Arrange directionally patterned acoustical panels as follows:
a. As indicated on reflected ceiling plans.
2. For reveal-edged panels on suspension-system runners, install panels with bottom of reveal in firm
contact with top surface of runner flanges.
3. Paint cut edges of panel remaining exposed after installation; match color of exposed panel surfaces
using coating recommended in writing for this purpose by acoustical panel manufacturer.
3.4 CLEANING
A. Clean exposed surfaces of acoustical panel ceilings, including trim, edge moldings, and suspension-system
members. Comply with manufacturer's written instructions for cleaning and touchup of minor finish
damage. Remove and replace ceiling components that cannot be successfully cleaned and repaired to
permanently eliminate evidence of damage.
END OF SECTION 095113

BTBC Phase III October 26, 2020
GE Project No. 0119-0010
Gould Evans
RESILIENT BASE AND ACCESSORIES 096513 - 1
SECTION 096513 - RESILIENT BASE AND ACCESSORIES
PART 1 - GENERAL
1.1 RELATED DOCUMENTS
A. Drawings and general provisions of the Contract, including General and Supplementary Conditions and
Division 01 Specification Sections, apply to this Section.
1.2 SUMMARY
A. Section Includes:
1. Resilient base.
2. Resilient molding accessories.
1.3 ACTION SUBMITTALS
A. Product Data: For each type of product.
B. Samples: For each exposed product and for each color and texture specified, not less than 12 inches long.
C. Samples for Verification: For each type of product indicated and for each color, texture, and pattern
required in manufacturer's standard-size Samples, but not less than 12 inches long.
D. Product Schedule: For resilient base and accessory products. Use same designations indicated on
Drawings.
1.4 MAINTENANCE MATERIAL SUBMITTALS
A. Furnish extra materials that match products installed and that are packaged with protective covering for
storage and identified with labels describing contents.
1. Furnish not less than 10 linear feet for every 500 linear feet or fraction thereof, of each type, color,
pattern, and size of resilient product installed.
1.5 QUALITY ASSURANCE
A. Mockups: Build mockups to verify selections made under Sample submittals and to demonstrate aesthetic
effects and set quality standards for materials and execution.
1. Coordinate mockups in this Section with mockups specified in other Sections.

BTBC Phase III October 26, 2020
GE Project No. 0119-0010
Gould Evans
RESILIENT BASE AND ACCESSORIES 096513 - 2
1.6 DELIVERY, STORAGE, AND HANDLING
A. Store resilient products and installation materials in dry spaces protected from the weather, with ambient
temperatures maintained within range recommended by manufacturer, but not less than 50 deg F or more
than 90 deg F.
1.7 FIELD CONDITIONS
A. Maintain ambient temperatures within range recommended by manufacturer, but not less than 70 deg F or
more than 95 deg F, in spaces to receive resilient products during the following time periods:
1. 48 hours before installation.
2. During installation.
3. 48 hours after installation.
B. After installation and until Substantial Completion, maintain ambient temperatures within range
recommended by manufacturer, but not less than 55 deg F or more than 95 deg F.
C. Install resilient products after other finishing operations, including painting, have been completed.
PART 2 - PRODUCTS
2.1 PERFORMANCE REQUIREMENTS
A. FloorScore Compliance: Resilient base and stair accessories shall comply with requirements of
FloorScore certification.
B. Low-Emitting Materials: Flooring system shall comply with the testing and product requirements of the
California Department of Public Health's "Standard Method for the Testing and Evaluation of Volatile
Organic Chemical Emissions from Indoor Sources Using Environmental Chambers."
2.2 THERMOSET-RUBBER BASE
A. Manufacturers: Subject to compliance with requirements, provide products by one of the following:
1. Burke Mercer Flooring Products; a division of Burke Industries Inc.
2. Nora Rubber Flooring.
3. Roppe Corporation, USA.
4. Mondo Rubber International, Inc.
5. Johnsonite
B. Product Standard: ASTM F 1861, Type TS (rubber, vulcanized thermoset), Group I (solid,
homogeneous).
1. Style and Location:
a. Style A, Straight.
C. Thickness: 0.125 inch.

BTBC Phase III October 26, 2020
GE Project No. 0119-0010
Gould Evans
RESILIENT BASE AND ACCESSORIES 096513 - 3
D. Height:
1. 4 inches RB01
2. 6 inches (152 mm) RB02
E. Lengths: Coils in manufacturer's standard length.
F. Outside Corners: Job formed.
G. Inside Corners: Job formed.
H. Colors: As indicated on Finish Legend.
2.3 RUBBER MOLDING ACCESSORY
A. Manufacturers: Subject to compliance with requirements, provide products by the following:
1. Burke Mercer Flooring Products.
2. Johnsonite.
3. Roppe Corporation, USA.
4. Flexco, Inc.
B. Description: Rubber transition details as indicated.
C. Profile and Dimensions: As indicated.
D. Locations: Provide rubber molding accessories in areas indicated.
E. Colors and Patterns: As selected by Architect from full range of industry colors.
2.4 INSTALLATION MATERIALS
A. Trowelable Leveling and Patching Compounds: Latex-modified, portland cement based or blended
hydraulic-cement-based formulation provided or approved by resilient-product manufacturer for
applications indicated.
B. Adhesives: Water-resistant type recommended by resilient-product manufacturer for resilient products
and substrate conditions indicated.
1. Adhesives shall have a VOC content of 50 g/L or less
2. Adhesives shall comply with the testing and product requirements of the California Department of
Public Health's "Standard Method for the Testing and Evaluation of Volatile Organic Chemical
Emissions from Indoor Sources Using Environmental Chambers."
C. Metal Edge Strips: Extruded aluminum with mill finish of width shown, of height required to protect
exposed edges of flooring, and in maximum available lengths to minimize running joints.
D. Floor Polish: Provide protective, liquid floor-polish products recommended by resilient stair-tread
manufacturer.

BTBC Phase III October 26, 2020
GE Project No. 0119-0010
Gould Evans
RESILIENT BASE AND ACCESSORIES 096513 - 4
PART 3 - EXECUTION
3.1 EXAMINATION
A. Examine substrates, with Installer present, for compliance with requirements for maximum moisture
content and other conditions affecting performance of the Work.
1. Verify that finishes of substrates comply with tolerances and other requirements specified in other
Sections and that substrates are free of cracks, ridges, depressions, scale, and foreign deposits that
might interfere with adhesion of resilient products.
B. Proceed with installation only after unsatisfactory conditions have been corrected.
1. Installation of resilient products indicates acceptance of surfaces and conditions.
3.2 PREPARATION
A. Prepare substrates according to manufacturer's written instructions to ensure adhesion of resilient
products.
B. Fill cracks, holes, and depressions in substrates with trowelable leveling and patching compound; remove
bumps and ridges to produce a uniform and smooth substrate.
C. Do not install resilient products until they are the same temperature as the space where they are to be
installed.
1. At least 48 hours in advance of installation, move resilient products and installation materials into
spaces where they will be installed.
D. Immediately before installation, sweep and vacuum clean substrates to be covered by resilient products.
3.3 RESILIENT BASE INSTALLATION
A. Comply with manufacturer's written instructions for installing resilient base.
B. Apply resilient base to walls, columns, pilasters, casework and cabinets in toe spaces, and other
permanent fixtures in rooms and areas where base is required.
C. Install resilient base in lengths as long as practical without gaps at seams and with tops of adjacent pieces
aligned.
D. Tightly adhere resilient base to substrate throughout length of each piece, with base in continuous contact
with horizontal and vertical substrates.
E. Do not stretch resilient base during installation.
F. On masonry surfaces or other similar irregular substrates, fill voids along top edge of resilient base with
manufacturer's recommended adhesive filler material.
G. Preformed Corners: Install preformed corners before installing straight pieces.

BTBC Phase III October 26, 2020
GE Project No. 0119-0010
Gould Evans
RESILIENT BASE AND ACCESSORIES 096513 - 5
H. Job-Formed Corners:
1. Outside Corners: Use straight pieces of maximum lengths possible.
a. Form without producing discoloration (whitening) at bends.
2. Inside Corners: Use straight pieces of maximum lengths.
3.4 RESILIENT ACCESSORY INSTALLATION
A. Comply with manufacturer's written instructions for installing resilient accessories.
B. Resilient Molding Accessories: Butt to adjacent materials and tightly adhere to substrates throughout
length of each piece. Install reducer strips at edges of floor covering that would otherwise be exposed.
3.5 CLEANING AND PROTECTION
A. Comply with manufacturer's written instructions for cleaning and protecting resilient products.
B. Perform the following operations immediately after completing resilient-product installation:
1. Remove adhesive and other blemishes from exposed surfaces.
2. Sweep and vacuum horizontal surfaces thoroughly.
3. Damp-mop horizontal surfaces to remove marks and soil.
C. Protect resilient products from mars, marks, indentations, and other damage from construction operations
and placement of equipment and fixtures during remainder of construction period.
D. Floor Polish: Remove soil, visible adhesive, and surface blemishes from resilient stair treads before
applying liquid floor polish.
1. Apply two coat(s).
E. Cover resilient products subject to wear and foot traffic until Substantial Completion.
END OF SECTION 096513

BTBC Phase III October 26, 2020
GE Project No. 0119-0010
Gould Evans
RESILIENT BASE AND ACCESSORIES 096513 - 6
THIS PAGE INTENTIONALLY LEFT BLANK

BTBC Phase III October 26, 2020
GE Project No. 0119-0010
Gould Evans
RESINOUS FLOORING 096723 - 1
SECTION 096723 - RESINOUS FLOORING
PART 1 - GENERAL
1.1 RELATED DOCUMENTS
A. Drawings and general provisions of the Contract, including General and Supplementary Conditions and
Division 01 Specification Sections, apply to this Section.
1.2 SUMMARY
A. Section includes resinous flooring and cove base systems.
1.3 PREINSTALLATION MEETINGS
A. Preinstallation Conference: Conduct conference at Project site.
1.4 ACTION SUBMITTALS
A. Product Data: For each type of product. Include manufacturer's technical data, application instructions,
and recommendations for each resinous flooring component required.
B. Samples for Initial Selection: For each type of exposed finish required.
C. Samples for Verification: For each resinous flooring system required, 6 inches square, applied to a rigid
backing by Installer for this Project.
1.5 INFORMATIONAL SUBMITTALS
A. Installer Certificates: Signed by manufacturer certifying that installers comply with specified
requirements.
B. Material Certificates: For each resinous flooring component, from manufacturer.
C. Material Test Reports: For each resinous flooring system, by a qualified testing agency.
1.6 CLOSEOUT SUBMITTALS
A. Maintenance Data: For resinous flooring to include in maintenance manuals.
1.7 QUALITY ASSURANCE
A. Installer Qualifications: An authorized representative who is trained and approved by manufacturer.

BTBC Phase III October 26, 2020
GE Project No. 0119-0010
Gould Evans
RESINOUS FLOORING 096723 - 2
B. Engage an installer who is certified in writing by resinous flooring manufacturer as qualified to apply
resinous flooring systems indicated.
C. Mockups: Build mockups to verify selections made under Sample submittals and to demonstrate aesthetic
effects and set quality standards for materials and execution.
1. Apply full-thickness mockups on 96-inch- square floor area selected by Architect.
a. Include 96-inch length of integral cove base with inside and outside corner.
2. Simulate finished lighting conditions for Architect's review of mockups.
3. Approval of mockups does not constitute approval of deviations from the Contract Documents
contained in mockups unless Architect specifically approves such deviations in writing.
4. Subject to compliance with requirements, approved mockups may become part of the completed
Work if undisturbed at time of Substantial Completion.
1.8 DELIVERY, STORAGE, AND HANDLING
A. Deliver materials in original packages and containers, with seals unbroken, bearing manufacturer's labels
indicating brand name and directions for storage and mixing with other components.
1.9 1.8 WARRANTY
A. Applicator shall notify manufacturer of project requirements before bidding. Manufacturer shall provide
written statement before bidding to the Architect that they accept single source warranty for entire
installation including labor for one year. Warranty shall include removal and replacement if proven
defective. Defective items are, but not limited to debonding, regionalized discoloration, excessive wear
and staining by bodily fluids. Non-acceptance in writing by manufacturer is grounds for rejection of
product
1.10 FIELD CONDITIONS
A. Environmental Limitations: Comply with resinous flooring manufacturer's written instructions for
substrate temperature, ambient temperature, moisture, ventilation, and other conditions affecting resinous
flooring application.
B. Lighting: Provide permanent lighting or, if permanent lighting is not in place, simulate permanent
lighting conditions during resinous flooring application.
C. Close spaces to traffic during resinous flooring application and for 24 hours after application unless
manufacturer recommends a longer period.
PART 2 - PRODUCTS
2.1 PERORMANCE REQUIREMENTS
A. VOC Content of Liquid-Applied Flooring Components: Not more than 100 g/L when calculated
according to 40 CFR 59, Subpart D (EPA Method 24).

BTBC Phase III October 26, 2020
GE Project No. 0119-0010
Gould Evans
RESINOUS FLOORING 096723 - 3
B. Flammability: Self-extinguishing according to ASTM D 635.
2.2 MANUFACTURERS
A. Source Limitations: Obtain primary resinous flooring materials, including primers, resins, hardening
agents, grouting coats, and topcoats, from single source from single manufacturer. Obtain secondary
materials, including patching and fill material, joint sealant, and repair materials, of type and from
manufacturer recommended in writing by manufacturer of primary materials.
2.3 RESINOUS FLOORING
A. Resinous Flooring System: Abrasion-, impact-, and chemical-resistant, aggregate-filled, and resin-based
monolithic floor surfacing designed to produce a seamless floor and integral cove base.
1. Basis of Design: Provide the following system or better as determined by Owner.
a. Desco, Quartz Cremona TG, color 401, with urethane topcoat 467-180-Mesh with Desco
Hydrabond moisture barrier.
2. System shall be trowel-applied. Broadcast of aggregate is not acceptable.
3. If concrete slab relative humidity level exceeds maximum allowable as determined by Relative
Humidity Test required by this specification, installer shall install manufacturer’s moisture barrier
warranted for 100% relative humidity installation.
B. System Characteristics:
1. Color and Pattern: As selected by Architect from manufacturer's full range.
2. Wearing Surface: Selected from manufacturer's standard wearing surfaces.
PART 3 - EXECUTION
3.1 PREPARATION
A. Prepare and clean substrates according to resinous flooring manufacturer's written instructions for
substrate indicated. Provide clean, dry substrate for resinous flooring application.
B. Concrete Substrates: Provide sound concrete surfaces free of laitance, glaze, efflorescence, curing
compounds, form-release agents, dust, dirt, grease, oil, and other contaminants incompatible with
resinous flooring.
1. Roughen concrete substrates as follows:
a. Shot-blast surfaces with an apparatus that abrades the concrete surface, contains the
dispensed shot within the apparatus, and recirculates the shot by vacuum pickup.
b. Comply with ASTM C 811 requirements unless manufacturer's written instructions are
more stringent.
2. Repair damaged and deteriorated concrete according to resinous flooring manufacturer's written
instructions.

BTBC Phase III October 26, 2020
GE Project No. 0119-0010
Gould Evans
RESINOUS FLOORING 096723 - 4
3. Verify that concrete substrates are dry and moisture-vapor emissions are within acceptable levels
for manufacturer’s moisture barrier system.
a. Relative Humidity Test: Use in situ probes, ASTM F 2170. Proceed with installation only
after substrates have a maximum 80 percent relative humidity level measurement.
4. Alkalinity and Adhesion Testing: Verify that concrete substrates have pH within acceptable range.
Perform tests recommended by manufacturer. Proceed with application only after substrates pass
testing.
C. Patching and Filling: Use patching and fill material to fill holes and depressions in substrates according to
manufacturer's written instructions.
1. Control Joint Treatment: Treat control joints and other nonmoving substrate cracks to prevent
cracks from reflecting through resinous flooring according to manufacturer's written instructions.
D. Resinous Materials: Mix components and prepare materials according to resinous flooring manufacturer's
written instructions.
3.2 APPLICATION
A. Apply components of resinous flooring system according to manufacturer's written instructions to
produce a uniform, monolithic wearing surface of thickness indicated.
1. Coordinate application of components to provide optimum adhesion of resinous flooring system to
substrate, and optimum intercoat adhesion.
2. Cure resinous flooring components according to manufacturer's written instructions. Prevent
contamination during application and curing processes.
3. Expansion and Isolation Joint Treatment: At substrate expansion and isolation joints, comply with
resinous flooring manufacturer's written instructions.
B. Primer: Apply primer over prepared substrate at manufacturer's recommended spreading rate.
C. Reinforcing Membrane: Apply reinforcing membrane to substrate cracks.
D. Integral Cove Base: Apply cove base mix to wall surfaces before applying flooring. Apply according to
manufacturer's written instructions and details, including those for taping, mixing, priming, troweling,
sanding, and top coating of cove base. Round internal and external corners.
1. Integral Cove Base: 4 inches high minimum. Flooring system shall extend up walls above integral
cove base as indicated on drawings.
2. Cove Base Wall Trim: Provide manufacturer’s standard clear anodized aluminum trim / screed.
E. Troweled Body Coats: Apply troweled body coats in thickness indicated for flooring system. Hand or
power trowel and grout to fill voids. When body coats are cured, remove trowel marks and roughness
using method recommended by manufacturer.
F. Grout Coat: Apply grout coat, of type recommended by resinous flooring manufacturer, to fill voids in
surface of final body coat.
G. Topcoats: Apply topcoats in number indicated for flooring system and at spreading rates recommended in
writing by manufacturer and to produce wearing surface indicated.

BTBC Phase III October 26, 2020
GE Project No. 0119-0010
Gould Evans
RESINOUS FLOORING 096723 - 5
3.3 FIELD QUALITY CONTROL
A. Material Sampling: Owner may, at any time and any number of times during resinous flooring
application, require material samples for testing for compliance with requirements.
1. Owner will engage an independent testing agency to take samples of materials being used.
Material samples will be taken, identified, sealed, and certified in presence of Contractor.
2. Testing agency will test samples for compliance with requirements, using applicable referenced
testing procedures or, if not referenced, using testing procedures listed in manufacturer's product
data.
3. If test results show applied materials do not comply with specified requirements, pay for testing,
remove noncomplying materials, prepare surfaces coated with unacceptable materials, and reapply
flooring materials to comply with requirements.
B. Core Sampling: At the direction of Owner and at locations designated by Owner, take one core sample
per 1000 sq. ft. of resinous flooring, or portion of, to verify thickness. For each sample that fails to
comply with requirements, take two additional samples. Repair damage caused by coring. Correct
deficiencies in installed flooring as indicated by testing.
3.4 PROTECTION
A. Protect resinous flooring from damage and wear during the remainder of construction period. Use
protective methods and materials, including temporary covering, recommended in writing by resinous
flooring manufacturer.
END OF SECTION 096723

BTBC Phase III October 26, 2020
GE Project No. 0119-0010
Gould Evans
RESINOUS FLOORING 096723 - 6
THIS PAGE IS INTENTIONALLY LEFT BLANK

BTBC Phase III October 26, 2020
GE Project No. 0119-0010
Gould Evans
TILE CARPETING 096813 - 1
SECTION 096813 - TILE CARPETING
PART 1 - GENERAL
1.1 RELATED DOCUMENTS
A. Drawings and general provisions of the Contract, including General and Supplementary Conditions and
Division 01 Specification Sections, apply to this Section.
1.2 SUMMARY
A. Section includes modular carpet tile.
B. Section includes entrance walk off carpet tile.
C. Related Requirements:
1. Division 02 Section "Selective Demolition" for removing existing floor coverings.
2. Division 09 Section "Resilient Base and Accessories Resilient Tile Flooring" for resilient wall base
and accessories installed with carpet tile.
1.3 ACTION SUBMITTALS
A. Product Data: For each type of product.
1. Include manufacturer's written data on physical characteristics, durability, and fade resistance.
2. Include installation recommendations for each type of substrate.
B. Samples: For each of the following products and for each color and texture required. Label each Sample
with manufacturer's name, material description, color, pattern, and designation indicated on Drawings and
in schedules.
1. Carpet Tile: Full-size Sample.
2. Exposed Edge, Transition, and Other Accessory Stripping: 12-inch- long Samples.
1.4 MAINTENANCE MATERIAL SUBMITTALS
A. Furnish extra materials, from the same product run, that match products installed and that are packaged
with protective covering for storage and identified with labels describing contents.
1. Carpet Tile: Full-size units equal to 5 percent of amount installed for each type indicated, but not
less than 10 sq. yd..
1.5 DELIVERY, STORAGE, AND HANDLING
A. Comply with CRI 104.

BTBC Phase III October 26, 2020
GE Project No. 0119-0010
Gould Evans
TILE CARPETING 096813 - 2
1.6 FIELD CONDITIONS
A. Comply with CRI 104 for temperature, humidity, and ventilation limitations.
B. Environmental Limitations: Do not deliver or install carpet tiles until spaces are enclosed and weathertight,
wet work in spaces is complete and dry, and ambient temperature and humidity conditions are maintained
at occupancy levels during the remainder of the construction period.
C. Do not install carpet tiles over concrete slabs until slabs have cured and are sufficiently dry to bond with
adhesive and concrete slabs have pH range recommended by carpet tile manufacturer.
D. Where demountable partitions or other items are indicated for installation on top of carpet tiles, install
carpet tiles before installing these items.
1.7 WARRANTY
A. Special Warranty for Carpet Tiles: Manufacturer agrees to repair or replace components of carpet tile
installation that fail in materials or workmanship within specified warranty period.
1. Warranty does not include deterioration or failure of carpet tile due to unusual traffic, failure of
substrate, vandalism, or abuse.
2. Failures include, but are not limited to, more than 10 percent edge raveling, snags, runs, dimensional
stability, excess static discharge, loss of tuft bind strength, loss of face fiber, and delamination.
3. Warranty Period: 10 years from date of Substantial Completion.
PART 2 - PRODUCTS
2.1 CARPET TILE (CPT-1, CPT-2)
A. Color: As indicated in Finish Legend
B. Pattern: As indicated in Finish Legend
2.2 INSTALLATION ACCESSORIES
A. Trowelable Leveling and Patching Compounds: Latex-modified, hydraulic-cement-based formulation
provided or recommended by carpet tile manufacturer.
B. Metal Edge/Transition Strips: Extruded aluminum with mill finish of profile and width shown, of height
required to protect exposed edge of carpet, and of maximum lengths to minimize running joints.
PART 3 - EXECUTION
3.1 EXAMINATION
A. Examine substrates, areas, and conditions, with Installer present, for compliance with requirements for
maximum moisture content, alkalinity range, installation tolerances, and other conditions affecting carpet
tile performance. Examine carpet tile for type, color, pattern, and potential defects.

BTBC Phase III October 26, 2020
GE Project No. 0119-0010
Gould Evans
TILE CARPETING 096813 - 3
B. Concrete Subfloors: Verify that concrete slabs comply with ASTM F 710 and the following:
1. Slab substrates are dry and free of curing compounds, sealers, hardeners, and other materials that
may interfere with adhesive bond. Determine adhesion and dryness characteristics by performing
bond and moisture tests recommended by carpet tile manufacturer.
2. Subfloor finishes comply with requirements specified in Division 03 Section "Cast-in-Place
Concrete" for slabs receiving carpet tile.
3. Subfloors are free of cracks, ridges, depressions, scale, and foreign deposits.
C. Proceed with installation only after unsatisfactory conditions have been corrected.
3.2 PREPARATION
A. General: Comply with CRI 104, Section 6.2, "Site Conditions; Floor Preparation," and with carpet tile
manufacturer's written installation instructions for preparing substrates indicated to receive carpet tile
installation.
B. Use trowelable leveling and patching compounds, according to manufacturer's written instructions, to fill
cracks, holes, depressions, and protrusions in substrates. Fill or level cracks, holes and depressions 1/8
inch wide or wider and protrusions more than 1/32 inch unless more stringent requirements are required by
manufacturer's written instructions.
C. Remove coatings, including curing compounds, and other substances that are incompatible with adhesives
and that contain soap, wax, oil, or silicone, without using solvents. Use mechanical methods recommended
in writing by carpet tile manufacturer.
D. Clean metal substrates of grease, oil, soil and rust, and prime if directed by adhesive manufacturer. Rough
sand painted metal surfaces and remove loose paint. Sand aluminum surfaces, to remove metal oxides,
immediately before applying adhesive.
E. Broom and vacuum clean substrates to be covered immediately before installing carpet tile.
3.3 INSTALLATION
A. General: Comply with CRI 104, Section 14, "Carpet Modules," and with carpet tile manufacturer's written
installation instructions.
B. Installation Method: As recommended in writing by carpet tile manufacturer.
C. Maintain dye lot integrity. Do not mix dye lots in same area.
D. Cut and fit carpet tile to butt tightly to vertical surfaces, permanent fixtures, and built-in furniture including
cabinets, pipes, outlets, edgings, thresholds, and nosings. Bind or seal cut edges as recommended by carpet
tile manufacturer.
E. Extend carpet tile into toe spaces, door reveals, closets, open-bottomed obstructions, removable flanges,
alcoves, and similar openings.
F. Maintain reference markers, holes, and openings that are in place or marked for future cutting by repeating
on finish flooring as marked on subfloor. Use nonpermanent, nonstaining marking device.
G. Install pattern parallel to walls and borders.

BTBC Phase III October 26, 2020
GE Project No. 0119-0010
Gould Evans
TILE CARPETING 096813 - 4
3.4 CLEANING AND PROTECTION
A. Perform the following operations immediately after installing carpet tile:
1. Remove yarns that protrude from carpet tile surface.
2. Vacuum carpet tile using commercial machine with face-beater element.
B. Protect installed carpet tile to comply with CRI 104, Section 16, "Protecting Indoor Installations."
C. Protect carpet tile against damage from construction operations and placement of equipment and fixtures
during the remainder of construction period. Use protection methods indicated or recommended in writing
by carpet tile manufacturer.
END OF SECTION 096813

BTBC Phase III October 26, 2020
GE Project No. 0119-0010
Gould Evans
SOUND-ABSORBING CEILING UNITS 098436 - 1
SECTION 098436 - SOUND-ABSORBING CEILING UNITS
PART 1 - GENERAL
1.1 RELATED DOCUMENTS
A. Drawings and general provisions of the Contract, including General and Supplementary Conditions and
Division 01 Specification Sections, apply to this Section.
1.2 SUMMARY
A. Section includes shop-fabricated, acoustical panel units tested for acoustical performance, including the
following:
1. Sound-absorbing ceiling panels (duct liner).
1.3 DEFINITIONS
A. NRC: Noise Reduction Coefficient.
B. SAA: Sound Absorption Average.
1.4 ACTION SUBMITTALS
A. Product Data: For each type of product.
B. Shop Drawings: For unit assembly and installation.
1. Include reflected ceiling plans, elevations, sections, and mounting devices and details.
2. Include details at joints and corners; and details at ceiling intersections and intersections with
walls. Indicate panel edge profile and core materials.
3. Include direction of fabric weave and pattern matching.
C. Samples for Verification: For the following products:
1. Duct Liner: 12 inches square in color selected.
2. Mounting Devices: Full-size Samples.
1.5 INFORMATIONAL SUBMITTALS
A. Coordination Drawings: Reflected ceiling plans and other details, drawn to scale, on which the following
items are shown and coordinated with each other, using input from installers of the items involved:
1. Electrical outlets.
2. Suspended ceiling components above ceiling units.
3. Structural members to which suspension devices will be attached.
4. Items penetrating or covered by units including the following:
a. Lighting fixtures.
b. Air outlets and inlets.
c. Speakers.
d. Alarms.

BTBC Phase III October 26, 2020
GE Project No. 0119-0010
Gould Evans
SOUND-ABSORBING CEILING UNITS 098436 - 2
e. Sprinklers.
5. Show operation of hinged and sliding components covered by or adjacent to units.
B. Product Certificates: For each type of unit.
C. Sample Warranty: For manufacturer's special warranty.
1.6 CLOSEOUT SUBMITTALS
A. Maintenance Data: For each type of unit to include in maintenance manuals. Include fabric
manufacturer's written cleaning and stain-removal instructions.
1.7 QUALITY ASSURANCE
A. Mockups: Build mockups to verify selections made under Sample submittals, to demonstrate aesthetic
effects, and to set quality standards for materials, fabrication, and installation.
1. Build mockup of typical area consisting of not less than six panels installed on structural deck.
2. Approval of mockups does not constitute approval of deviations from the Contract Documents
contained in mockups unless Architect specifically approves such deviations in writing.
3. Subject to compliance with requirements, approved mockups may become part of the completed
Work if undisturbed at time of Substantial Completion.
1.8 DELIVERY, STORAGE, AND HANDLING
A. Comply with fabric and unit manufacturers' written instructions for minimum and maximum temperature
and humidity requirements for shipment, storage, and handling.
B. Deliver materials and units in unopened bundles and store in a temperature-controlled dry place with
adequate air circulation.
1.9 FIELD CONDITIONS
A. Environmental Limitations: Do not install units until spaces are enclosed and weathertight, wet-work in
spaces is complete and dry, work at and above ceilings is complete, and ambient temperature and
humidity conditions are maintained at the levels indicated for Project when occupied for its intended use.
B. Air-Quality Limitations: Protect units from exposure to airborne odors, such as tobacco smoke, and
install units under conditions free from odor contamination of ambient air.
C. Field Measurements: Verify unit locations and actual dimensions of openings and penetrations by field
measurements before fabrication, and indicate them on Shop Drawings.
PART 2 - PRODUCTS
2.1 MANUFACTURERS
A. Source Limitations: Obtain ceiling units specified in this Section from single source from single
manufacturer.

BTBC Phase III October 26, 2020
GE Project No. 0119-0010
Gould Evans
SOUND-ABSORBING CEILING UNITS 098436 - 3
2.2 PERFORMANCE REQUIREMENTS
A. Fire-Test-Response Characteristics: Units shall comply with "Surface-Burning Characteristics" or "Fire
Growth Contribution" Subparagraph below, or both, as determined by testing identical products by UL or
another testing and inspecting agency acceptable to authorities having jurisdiction:
1. Surface-Burning Characteristics: Comply with ASTM E 84 or UL 723; testing by a qualified
testing agency. Identify products with appropriate markings of applicable testing agency.
a. Flame-Spread Index: 25 or less.
b. Smoke-Developed Index: 450 or less.
2. Fire Growth Contribution: Comply with acceptance criteria of local code and authorities having
jurisdiction when tested according to NFPA 286.
2.3 SOUND-ABSORBING CEILING UNITS
A. Sound-Absorbing Ceiling Panel: Standard rigid board duct liner material formed into standard panel sizes
consisting of facing material on exposed surfaces.
1. Panel Shape: Flat.
2. Mounting: Clips with surface anchor washer sections piercing sound-absorbing panel units,
secured to substrate.
3. Core: Manufacturer's standard mineral-fiber board.
4. Edge Profile: Square.
5. Corner Detail in Elevation: Square.
6. Nominal Overall Panel Thickness: 2 inches.
7. Panel Size: 24 inches by 48 inches.
8. Color: Black, unless otherwise indicated on the Drawing “FINISH LEGEND.”
2.4 MATERIALS
A. Core Materials: Manufacturer's standard.
2.5 PANEL FASTENERS
A. Panel Retaining Washers and Fasteners: Washers formed from 0.016-inch-thick galvanized-steel sheet,
with beveled edge for increased stiffness, sized as required to hold insulation securely in place, but not
less than 1-1/2 inches square or in diameter; with hot-dipped galvanized screw fastener of length required
to extend through insulation and engage cold-formed metal stud not less than 1 inch.
1. Manufacturers: Subject to compliance with requirements, provide products by one of the
following:
a. AGM Industries, Inc.
b. Gemco.
c. Roxul Inc.
2. Adhesive: Provide metal-to-metal adhesive recommended for permanent adhesion of fastener to
metal roof decking.
a. Perform pull test on not less than 20 fasteners after installation.
3. Finish: Matte black.
BTBC Phase III October 26, 2020
GE Project No. 0119-0010
Gould Evans
SOUND-ABSORBING CEILING UNITS 098436 - 4
2.6 FABRICATION
A. Standard Construction: Use manufacturer's standard construction unless otherwise indicated, with facing
material applied to face, edges, and back border of dimensionally stable core and with rigid edges to
reinforce panel perimeter against warpage and damage.
PART 3 - EXECUTION
3.1 EXAMINATION
A. Examine fabric, fabricated units, substrates, areas, and conditions for compliance with requirements,
installation tolerances, and other conditions affecting unit performance.
B. Proceed with installation only after unsatisfactory conditions have been corrected.
3.2 INSTALLATION
A. Install units in locations indicated. Unless otherwise indicated, install units with edges in alignment with
walls and other units, faces flush, and scribed to fit adjoining work accurately at borders and at
penetrations.
B. Comply with manufacturer's written instructions for installation of units using type of mounting devices
indicated. Mount units securely to supporting substrate.
3.3 CLEANING
A. Clean panels on completion of installation to remove dust and other foreign materials according to
manufacturer's written instructions.
END OF SECTION 098436

BTBC Phase III October 26, 2020
GE Project No. 0119-0010
Gould Evans
INTERIOR PAINTING 099123 - 1
SECTION 099123 - INTERIOR PAINTING
PART 1 - GENERAL
1.1 SUMMARY
A. Section includes surface preparation and the application of paint systems on the following interior
substrates:
1. Concrete.
2. Steel.
3. Galvanized metal.
4. Wood.
5. Gypsum board.
6. Cotton or canvas insulation covering.
1.2 DEFINITIONS
A. Gloss Level 1: Not more than 5 units at 60 degrees and 10 units at 85 degrees, according to
ASTM D 523.
B. Gloss Level 2: Not more than 10 units at 60 degrees and 10 to 35 units at 85 degrees, according to
ASTM D 523.
C. Gloss Level 3: 10 to 25 units at 60 degrees and 10 to 35 units at 85 degrees, according to ASTM D 523.
D. Gloss Level 4: 20 to 35 units at 60 degrees and not less than 35 units at 85 degrees, according to
ASTM D 523.
E. Gloss Level 5: 35 to 70 units at 60 degrees, according to ASTM D 523.
F. Gloss Level 6: 70 to 85 units at 60 degrees, according to ASTM D 523.
G. Gloss Level 7: More than 85 units at 60 degrees, according to ASTM D 523.
H. Basis-of-Design Product Specification: Where a specific manufacturer's product is named and
accompanied by the words "basis of design," including product number or other designation, to establish
the significant qualities related to type, function, dimension, in-service performance, physical properties,
appearance, and other characteristics for purposes of evaluating comparable products of other named
manufacturers.
I. Comparable Product: Product that is demonstrated and approved through submittal process, or where
indicated as a product substitution, to have the indicated qualities related to type, function, dimension, in-
service performance, physical properties, appearance, and other characteristics that equal or exceed those
of specified product.
1.3 ACTION SUBMITTALS
A. Product Data: For each type of product. Include preparation requirements and application instructions.
B. Samples for Verification: For each type of paint system and in each color and gloss of topcoat.

BTBC Phase III October 26, 2020
GE Project No. 0119-0010
Gould Evans
INTERIOR PAINTING 099123 - 2
1. Submit Samples on rigid backing, 8 inches square.
2. Step coats on Samples to show each coat required for system.
3. Label each coat of each Sample.
4. Label each Sample for location and application area.
C. Product List: For each product indicated, include the following:
1. Cross-reference to paint system and locations of application areas. Use same designations
indicated on Drawings and in schedules.
2. VOC content.
1.4 MAINTENANCE MATERIAL SUBMITTALS
A. Furnish extra materials, from the same product run, that match products installed and that are packaged
with protective covering for storage and identified with labels describing contents.
1. Paint: 1 gal. of each material and color applied.
1.5 DELIVERY, STORAGE, AND HANDLING
A. Store materials not in use in tightly covered containers in well-ventilated areas with ambient temperatures
continuously maintained at not less than 45 deg F.
1. Maintain containers in clean condition, free of foreign materials and residue.
2. Remove rags and waste from storage areas daily.
1.6 FIELD CONDITIONS
A. Apply paints only when temperature of surfaces to be painted and ambient air temperatures are between
50 and 95 deg F.
B. Do not apply paints when relative humidity exceeds 85 percent; at temperatures less than 5 deg F above
the dew point; or to damp or wet surfaces.
PART 2 - PRODUCTS
2.1 MANUFACTURERS
A. Basis of Design Product: Subject to compliance with the requirements provide the product named in Part
3 Interior Painting Schedule or a comparable product from one of the following:
1. Sherwin Williams (SW)
2. Porter Paints. (PP)
PAINT, GENERAL
B. Material Compatibility:
1. Provide materials for use within each paint system that are compatible with one another and
substrates indicated, under conditions of service and application as demonstrated by manufacturer,
based on testing and field experience.
2. For each coat in a paint system, provide products recommended in writing by manufacturers of
topcoat for use in paint system and on substrate indicated.

BTBC Phase III October 26, 2020
GE Project No. 0119-0010
Gould Evans
INTERIOR PAINTING 099123 - 3
C. VOC Content: Products shall comply with VOC limits of authorities having jurisdiction and, for interior
paints and coatings applied at Project site, the following VOC limits, exclusive of colorants added to a
tint base, when calculated according to 40 CFR 59, Subpart D (EPA Method 24).
1. Flat Paints and Coatings: 0 g/L.
2. Nonflat Paints and Coatings: 0 g/L.
3. Industrial Maintenance Coatings: 250 g/L.
4. Dry-Fog Coatings: 150 g/L.
5. Primers, Sealers, and Undercoaters: 100 g/L.
6. Anticorrosive and Antirust Paints Applied to Ferrous Metals: 100 g/L.
7. Zinc-Rich Industrial Maintenance Primers: 340 g/L.
8. Pretreatment Wash Primers: 420 g/L.
9. Floor Coatings: 50 g/L.
10. Shellacs Clear: 730 g/L.
11. Shellacs, Pigmented: 550 g/L.
D. Colors: As indicated in the Drawing Finish Legend.
2.2 PRIMERS/SEALERS
A. Concrete Primer
1. Basis of Design: SW-Loxon Concrete and Masonry Primer A24W300.
2. Comparable product of an approved manufacturer.
B. Metal Primer
1. Basis of Design: SW-Pro-Industrial Pro-Cryl Universal Waterbased Primer.
2. Comparable product of an approved manufacturer.
C. Quick-Drying Metal Primer
1. Basis of Design: SW- Pro-Industrial Pro-Cryl Universal Waterbased Primer.
2. Comparable product of an approved manufacturer.
D. Galvanized Metal Primer:
1. Basis of Design: SW- Pro-Industrial Pro-Cryl Universal Waterbased Primer.
2. Comparable product of an approved manufacturer.
E. Latex Wall Primer:
1. Basis of Design: SW- ProMar 200 Zero VOC Primer B28 Series
2. Comparable product of an approved manufacturer.
F. Wood Primer:
1. Basis of Design: SW- Premium Wall and Wood Primer B28W8111.
2. Comparable product of an approved manufacturer.
2.3 LATEX PAINTS
A. Latex Enamel:
1. Basis of Design: SW-ProMar 200 Zero VOC Latex.
2. Comparable product of an approved manufacturer.

BTBC Phase III October 26, 2020
GE Project No. 0119-0010
Gould Evans
INTERIOR PAINTING 099123 - 4
2.4 WATERBASED EPOXY PAINTS
A. 0 VOC Epoxy Coating:
1. Basis of Design: SW - Pro Industrial Zero VOC Waterbased Catalyzed Epoxy B73 Series.
2. Comparable product of an approved manufacturer.
2.5 ACRYLIC PAINTS
A. Acrylic Enamel:
1. Basis of Design: SW-Pro Industrial Zero VOC Acrylic Enamel B66 Series.
2. Comparable product of an approved manufacturer.
B. Acrylic Dry Fall:
1. Basis of Design: SW-Waterborne Acrylic Dryfall.
2. Comparable product of an approved manufacturer.
2.6 SOURCE QUALITY CONTROL
A. Testing of Paint Materials: Owner reserves the right to invoke the following procedure:
1. Owner will engage the services of a qualified testing agency to sample paint materials. Contractor
will be notified in advance and may be present when samples are taken. If paint materials have
already been delivered to Project site, samples may be taken at Project site. Samples will be
identified, sealed, and certified by testing agency.
2. Testing agency will perform tests for compliance with product requirements.
3. Owner may direct Contractor to stop applying coatings if test results show materials being used do
not comply with product requirements. Contractor shall remove non-complying paint materials
from Project site, pay for testing, and repaint surfaces painted with rejected materials. Contractor
will be required to remove rejected materials from previously painted surfaces if, on repainting
with complying materials, the two paints are incompatible.
PART 3 - EXECUTION
3.1 EXAMINATION
A. Examine substrates and conditions, with Applicator present, for compliance with requirements for
maximum moisture content and other conditions affecting performance of the Work.
B. Maximum Moisture Content of Substrates: When measured with an electronic moisture meter as follows:
1. Concrete: 12 percent.
2. Wood: 15 percent.
3. Gypsum Board: 12 percent.
C. Gypsum Board Substrates: Verify that finishing compound is sanded smooth.
D. Verify suitability of substrates, including surface conditions and compatibility with existing finishes and
primers.
E. Proceed with coating application only after unsatisfactory conditions have been corrected.
1. Application of coating indicates acceptance of surfaces and conditions.

BTBC Phase III October 26, 2020
GE Project No. 0119-0010
Gould Evans
INTERIOR PAINTING 099123 - 5
3.2 PREPARATION
A. Comply with manufacturer's written instructions and recommendations applicable to substrates indicated.
B. Remove hardware, covers, plates, and similar items already in place that are removable and are not to be
painted. If removal is impractical or impossible because of size or weight of item, provide surface-
applied protection before surface preparation and painting.
1. After completing painting operations, use workers skilled in the trades involved to reinstall items
that were removed. Remove surface-applied protection if any.
C. Clean substrates of substances that could impair bond of paints, including dust, dirt, oil, grease, and
incompatible paints and encapsulants.
1. Remove incompatible primers and reprime substrate with compatible primers or apply tie coat as
required to produce paint systems indicated.
D. Concrete Substrates: Remove release agents, curing compounds, efflorescence, and chalk. Do not paint
surfaces if moisture content or alkalinity of surfaces to be painted exceeds that permitted in
manufacturer's written instructions.
E. Steel Substrates: Remove rust, loose mill scale, and shop primer, if any. Clean using methods
recommended in writing by paint manufacturer.
F. Shop-Primed Steel Substrates: Clean field welds, bolted connections, and abraded areas of shop paint,
and paint exposed areas with the same material as used for shop priming to comply with SSPC-PA 1 for
touching up shop-primed surfaces.
G. Galvanized-Metal Substrates: Remove grease and oil residue from galvanized sheet metal fabricated
from coil stock by mechanical methods to produce clean, lightly etched surfaces that promote adhesion of
subsequently applied paints.
H. Galvanized-Metal Deck Substrates: Remove grease and oil residue from galvanized sheet metal
fabricated from coil stock by SSPC-SP1 to remove all soluble contamination by mechanical methods to
produce clean, lightly etched surfaces that promote adhesion of subsequently applied coatings.
1. Field Test for Contamination of Galvanized Deck Surfaces to Receive Finish Coatings:
a. Test shall be conducted to test for surface contamination, presence of chromate passivation
or passivation film.
b. Field test galvanized decking surfaces to receive finish coatings by using the following test
method:
1) Place a drop of 5% copper sulfate on the surface of galvanizing. If the copper
sulfate solution, which is a clear, light blue color, changes to black instantly, the
surface is considered bare with no soluble contamination. If there is any delay in
color change, the surface is contaminated and shall be cleaned. Perform the test at
the rate of one test per 1000sf to be painted.
2. Surface Preparation by Mechanical Means: ASTM D6386, Method A, Section 5.4.2 for use with
exterior exposures and interior moderate-severe exposures to produce a uniform anchor profile
1.0-2.0 mils.
I. Wood Substrates:
1. Scrape and clean knots, and apply coat of knot sealer before applying primer.
2. Sand surfaces that will be exposed to view, and dust off.

BTBC Phase III October 26, 2020
GE Project No. 0119-0010
Gould Evans
INTERIOR PAINTING 099123 - 6
3. Prime edges, ends, faces, undersides, and backsides of wood.
4. After priming, fill holes and imperfections in the finish surfaces with putty or plastic wood filler.
Sand smooth when dried.
J. Cementitious Board Ceilings and Walls (Showers): Refer to Section 092900 “Gypsum Board” for
preparation of cementitious board ceilings and shower ceilings to receive high performance epoxy
coatings in this Section.
K. Cotton or Canvas Insulation Covering Substrates: Remove dust, dirt, and other foreign material that
might impair bond of paints to substrates.
3.3 APPLICATION
A. Apply paints according to manufacturer's written instructions.
1. Use applicators and techniques suited for paint and substrate indicated.
2. Paint surfaces behind movable equipment and furniture same as similar exposed surfaces. Before
final installation, paint surfaces behind permanently fixed equipment or furniture with prime coat
only.
3. Paint front and backsides of access panels, removable or hinged covers, and similar hinged items
to match exposed surfaces.
4. Do not paint over labels of independent testing agencies or equipment name, identification,
performance rating, or nomenclature plates.
5. Primers specified in painting schedules may be omitted on items that are factory primed or factory
finished if acceptable to topcoat manufacturers.
B. Tint each undercoat a lighter shade to facilitate identification of each coat if multiple coats of same
material are to be applied. Tint undercoats to match color of topcoat, but provide sufficient difference in
shade of undercoats to distinguish each separate coat.
C. If undercoats or other conditions show through topcoat, apply additional coats until cured film has a
uniform paint finish, color, and appearance.
D. Apply paints to produce surface films without cloudiness, spotting, holidays, laps, brush marks, roller
tracking, runs, sags, ropiness, or other surface imperfections. Cut in sharp lines and color breaks.
E. Painting Fire Suppression, Plumbing, HVAC, Electrical, Communication, and Electronic Safety and
Security Work:
1. Refer to Divisions 21, 22, 23, and 26 for painting requirements where indicated.
2. Paint the following work where exposed in occupied spaces. Coordinate with the Drawing Finish
Legend and reflected ceiling plans:
a. Shop primed diffusers, grills and related HVAC accessories located in grey acoustical
ceiling panel ceilings. Coordinate with Drawing Finish Legend, and reflected ceiling plans.
b. Duscts and related grilles and diffusers.
c. Equipment, including panelboards.
d. Uninsulated metal piping.
e. Uninsulated plastic piping.
f. Pipe hangers and supports.
g. Metal conduit.
h. Plastic conduit.
i. Duct, equipment, and pipe insulation having cotton or canvas insulation covering or other
paintable jacket material.

BTBC Phase III October 26, 2020
GE Project No. 0119-0010
Gould Evans
INTERIOR PAINTING 099123 - 7
j. Other items as directed by Architect.
3. Paint portions of internal surfaces of metal ducts, without liner, behind air inlets and outlets that
are visible from occupied spaces.
F. Identification of Fire-Rated Partitions: Provide the following identification message stenciled
permanently on all fire walls, fire barriers, fire partitions, smoke barriers, smoke partitions, and any other
partition required to have protected openings or penetrations as defined by the Building Code:
1. Identification Message: FIRE AND/OR SMOKE BARRIER – PROTECT ALL OPENINGS.
2. Font: Not less than 1/2-inch-high block (sans serif) lettering.
3. Spacing: Locate identification message within 15 feet of end of each wall or partition and at
intervals not exceeding 30 feet measured horizontally along the wall or partition.
4. Locations: Provide message in the following accessible concealed locations:
a. Floor-ceiling plenum.
b. Attics.
5. Signage or other graphic marking that is acceptable to the Authority Having Jurisdiction, that
complies with the other requirements for such identification signage listed above, and that can be
permanently affixed to the wall or partition may be installed in lieu of painted stencil, at the
Contractor’s option.
6. Paint: Latex enamel, as applicable for wall substrate. Refer to PART 3 “INTERIOR PAINTING
SCHEDULE.”
3.4 FIELD QUALITY CONTROL
A. Dry Film Thickness Testing: Owner may engage the services of a qualified testing and inspecting agency
to inspect and test paint for dry film thickness.
1. Contractor shall touch up and restore painted surfaces damaged by testing.
2. If test results show that dry film thickness of applied paint does not comply with paint
manufacturer's written recommendations, Contractor shall pay for testing and apply additional
coats as needed to provide dry film thickness that complies with paint manufacturer's written
recommendations.
3.5 CLEANING AND PROTECTION
A. At end of each workday, remove rubbish, empty cans, rags, and other discarded materials from Project
site. After completing paint application, clean spattered surfaces. Remove spattered paints by washing,
scraping, or other methods.
B. Protect work of other trades against damage from paint application. Correct damage to work of other
trades by cleaning, repairing, replacing, and refinishing, as approved by Architect, and leave in an
undamaged condition.
C. At completion of construction activities of other trades, touch up and restore damaged or defaced painted
surfaces.
3.6 INTERIOR PAINTING SCHEDULE
A. Concrete Substrates, Non-traffic Surfaces: Latex Enamel (Eggshell).
1. Prime Coat: Masonry Primer, 3.0 mils DFT.
2. Intermediate Coat: Latex Enamel, 1.7 mils DFT.

BTBC Phase III October 26, 2020
GE Project No. 0119-0010
Gould Evans
INTERIOR PAINTING 099123 - 8
3. Topcoat: Latex Enamel, 1.7 mils DFT.
B. Steel Substrates, Acrylic Enamel (Semi-gloss):
1. Prime Coat: Metal Primer, 3.0 mils DFT.
2. Intermediate Coat: Acrylic Enamel, 1.4 mils DFT.
3. Topcoat: Acrylic Enamel, 1.4 mils DFT.
C. Steel Substrates, Acrylic-Based Dry-Fall System (Exposed Overhead Steel) (Flat):
1. Prime Coat: Quick-drying acrylic metal primer, 3.0 mils DFT.
2. Intermediate Coat: Interior acrylic dry fall, 2.0-4.0 mils DFT.
3. Topcoat: Interior acrylic dry fall, 2.0-4.0 mils DFT.
D. Galvanized-Metal Substrates, Acrylic System (Semi-gloss):
1. Prime Coat: Galvanized-metal primer, 3.0 mils DFT.
2. Intermediate Coat: Acrylic Enamel, 1.4 mils DFT.
3. Topcoat: Acrylic Enamel, 1.4 mils DFT.
E. Galvanized-Metal Substrates, Acrylic Dry-Fall System (Exposed Interior Metal Deck) (Flat):
1. Prime Coat: Galvanized-metal primer, 3.0 mils DFT.
2. Intermediate Coat: Interior acrylic dry fall, 2.0 mils DFT.
3. Topcoat: Interior acrylic dry fall, 2.0 mils DFT.
F. Gypsum Board Substrates, Latex Enamel (Ceilings-flat; Walls-eggshell):
1. Prime Coat: Latex Wall Primer, 1.4 mils DFT.
2. Intermediate Coat: Latex Enamel, 1.6 mils DFT.
3. Topcoat: Latex Enamel, 1.6 mils DFT.
G. Gypsum Board Substrates, Epoxy System (Semi-gloss):
1. Prime Coat: Interior latex primer/sealer, 1.4 mils DFT
2. Intermediate Coat: Waterbased Epoxy Gypsum Board Coating, 5.0 mils DFT.
3. Topcoat: Waterbased Epoxy Gypsum Board Coating, 5.0 mils DFT.
H. Cotton or Canvas Insulation-Covering Substrates Including Pipe and Duct Coverings: Latex Enamel
(Flat).
1. Prime Coat: Interior latex primer/sealer: 1.4 mils DFT.
2. Intermediate Coat: Latex Enamel, 1.6 mils DFT.
3. Topcoat: Latex Enamel, 1.6 mils DFT.
END OF SECTION 099123

BTBC Phase III October 26, 2020
GE Project No. 0119-0010
Gould Evans
INTERIOR SIGNAGE 101419 - 1
SECTION 101419 - INTERIOR SIGNAGE
PART 1 - GENERAL
1.1 RELATED DOCUMENTS
A. Drawings and general provisions of the Contract, including General and Supplementary Conditions and
Division 01 Specification Sections, apply to this Section.
1.2 SUMMARY
A. This Section includes the following:
1. Room Name signs
2. Tactile exits signs
3. Stair identification signs
4. Toilet Room signs
5. Braille on Room number signs if provided
6. Room maximum occupancy signs
1.3 COORDINATION
A. Furnish templates for placement of electrical service embedded in permanent construction by other
installers.
1.4 ACTION SUBMITTALS
A. Product Data: For each type of product.
B. Shop Drawings: For dimensional letter signs.
1. Include fabrication and installation details and attachments to other work.
2. Show sign mounting heights, locations of supplementary supports to be provided by others, and
accessories.
3. Show message list, typestyles, graphic elements, and layout for each sign at least half size.
4. Owner will provide names and maximum occupancies, etc. for the signs during the show drawing
review process
C. Samples for Verification: For each type of sign assembly showing all components and with the required
finish(es), in manufacturer's standard size unless otherwise indicated and as follows:
1. Dimensional Characters: Full-size Sample of dimensional character.
D. Sign Schedule: Owner to determine room names and numbers.

BTBC Phase III October 26, 2020
GE Project No. 0119-0010
Gould Evans
INTERIOR SIGNAGE 101419 - 2
1.5 INFORMATIONAL SUBMITTALS
A. Qualification Data: For Installer and manufacturer.
B. Sample Warranty: For special warranty.
1.6 CLOSEOUT SUBMITTALS
A. Maintenance Data: For signs to include in maintenance manuals.
1.7 QUALITY ASSURANCE
A. Installer Qualifications: Manufacturer of products.
1.8 FIELD CONDITIONS
A. Field Measurements: Verify locations of electrical service embedded in permanent construction by other
installers by field measurements before fabrication, and indicate measurements on Shop Drawings.
1.9 WARRANTY
A. Special Warranty: Manufacturer agrees to repair or replace components of signs that fail in materials or
workmanship within specified warranty period.
1. Failures include, but are not limited to, the following:
a. Deterioration of finishes beyond normal weathering.
b. Separation or delamination of sheet materials and components.
2. Warranty Period: Five years from date of Substantial Completion.
PART 2 - PRODUCTS
2.1 PANEL SIGNS
A. Laminated Interior Signs: Acrylic with graphic image applied to surface to layer, to create both raised relief
letters and Braille.
1. Material: 1/8” photopolymer, painted to match Pantone 408M Taupe, UNO.
2. Corner Condition: Rounded to 3/8” radius.
3. Locations: Per Drawings.
4. Font: To match Phase I and II
5. Typical Colors: Colors to be selected by the Architect from the manufacturers full line of colors
6. Typical Mounting Locations: Mount per ADA & other code requirements as indicated. Typically
mount 2" clear off the door frame's strike jamb, 60” AFF to centerline of sign.
7. Typical Mounting Methods: Either of the following methods are acceptable:

BTBC Phase III October 26, 2020
GE Project No. 0119-0010
Gould Evans
INTERIOR SIGNAGE 101419 - 3
a. Not less than 80% coverage double-sided tape over entire back of sign.
b. Double-sided tape to temporarily hold in position, with continuous perimeter coverage of
silicone sealant/adhesive.
c. If mounted on glass install 1/8” thick back plate painted to match face of panel.
8. Edges of signs to match face.
B. Tactile and Braille Sign: Manufacturer's standard process for producing text and symbols complying with
ADA-ABA Accessibility Guidelines and with ICC/ANSI A117.1. Text shall be accompanied by Grade 2
Braille. Produce precisely formed characters with square-cut edges free from burrs and cut marks; Braille
dots with domed or rounded shape.
C. Panel Sign Schedule:
1. Tactile Exit Sign: On the approach side of ALL exterior exit doors, Horizontal exit doors and
stairwell doors, locate on the latch side at 60” AFF to centerline of sign. Signs for stairwells should
include stairwell designation as indicated. Provide large text- 1 ½” with Braille on signs without
stair designations.
2. Stairwell Identification Signs: On corridor side mounted on the latch side at 60” AFF to centerline
of sign. Provide one sign with ‘EXIT’ then the stair name text with Braille below text.
3. Toilet Rooms: Provide sign with ADA pictogram and 1” text below pictogram which reads ‘Men’,
‘Women’ or ‘ Family Restroom’ (if shared restroom).
4. Elevator Signage: Provide per code. Text to read ‘Do Not Use in Case of Fire’ and include standard
pictogram.
5. Elevator Emergency Egress Sign: Provide size as indicated. Locate sign at every elevator call
station.
6. Room number signs: Provide one for each door in building as indicated
7. Room Maximum Occupancy Signs: Provide a sign installed in ALL assembly occupancies (over 40
occupants) with loose or fixed seating. Locate sign on the latch side of the entrance door, top of sign
even with the top of door frame.
8. Room Numbers with Descriptive Room Names: Provide where indicated in standardized module
widths and heights as appropriate for each project.
2.2 FABRICATION
A. General: Provide manufacturer's standard signs of configurations indicated.
1. Mill joints to tight, hairline fit. Form joints exposed to weather to exclude water penetration.
2. Preassemble signs in the shop to greatest extent possible. Disassemble signs only as necessary for
shipping and handling limitations. Clearly mark units for reassembly and installation, in location
not exposed to view after final assembly.
PART 3 - EXECUTION
3.1 EXAMINATION
A. Examine substrates, areas, and conditions, with Installer present, for compliance with requirements for
installation tolerances and other conditions affecting performance of work.
B. Verify that items are sized and located to accommodate signs.
C. Proceed with installation only after unsatisfactory conditions have been corrected.

BTBC Phase III October 26, 2020
GE Project No. 0119-0010
Gould Evans
INTERIOR SIGNAGE 101419 - 4
3.2 INSTALLATION
A. Locate signs and accessories where indicated, using mounting methods of types described and complying
with manufacturer's written instructions.
1. Install signs level, plumb, and at heights indicated, with sign surfaces free of distortion and other
defects in appearance.
2. Interior Wall Signs: Install signs on walls adjacent to latch side of door where applicable. Where
not indicated or possible, such as double doors, install signs on nearest adjacent walls. Locate to
allow approach within 3 inches (75 mm) of sign without encountering protruding objects or standing
within swing of door.
B. Wall-Mounted Signs: Comply with sign manufacturer's written instructions except where more stringent
requirements apply.
1. Two-Face Tape: Mount signs to smooth, nonporous surfaces. Do not use this method for vinyl-
covered or rough surfaces.
2. Magnetic Tape: Mount signs to smooth, nonporous surfaces.
3. Signs Mounted on Glass: Provide matching opaque plate on opposite side of glass to conceal
mounting materials.
3.3 CLEANING AND PROTECTION
A. After installation, clean soiled sign surfaces according to manufacturer's written instructions. Protect signs
from damage until acceptance by Owner.
END OF SECTION 101419

BTBC Phase III October 26, 2020
GE Project No. 0119-0010
Gould Evans
TOILET COMPARTMENTS 102113 - 1
SECTION 102113 - TOILET COMPARTMENTS
PART 1 - GENERAL
1.1 RELATED DOCUMENTS
A. Drawings and general provisions of the Contract, including General and Supplementary Conditions and
Division 01 Specification Sections, apply to this Section.
1.2 SUMMARY
A. Section Includes:
1. Solid-polymer toilet compartments configured as toilet enclosures and urinal screens.
B. Related Sections:
1. Division 10 Section "Toilet, Bath, and Laundry Accessories" for toilet tissue dispensers, grab bars,
purse shelves, and similar accessories.
1.3 SUBMITTALS
A. Product Data: For each type of product indicated. Include construction details, material descriptions,
dimensions of individual components and profiles, and finishes.
B. Shop Drawings: For toilet compartments. Include plans, elevations, sections, details, and attachments to
other work.
1. Show locations of cutouts for compartment-mounted toilet accessories.
2. Show locations of reinforcements for compartment-mounted grab bars.
3. Show locations of centerlines of toilet fixtures.
4. Show overhead support or bracing locations.
C. Product Certificates: For each type of toilet compartment, from manufacturer.
D. Maintenance Data: For toilet compartments to include in maintenance manuals.
1.4 QUALITY ASSURANCE
A. Comply with requirements in GSA's CID-A-A-60003, "Partitions, Toilets, Complete."
B. Surface-Burning Characteristics: As determined by testing identical products according to ASTM E 84, or
another standard acceptable to authorities having jurisdiction, by a qualified testing agency. Identify
products with appropriate markings of applicable testing agency.
1. Flame-Spread Index: 25 or less.
2. Smoke-Developed Index: 450 or less.

BTBC Phase III October 26, 2020
GE Project No. 0119-0010
Gould Evans
TOILET COMPARTMENTS 102113 - 2
C. Regulatory Requirements: Comply with applicable provisions in the U.S. Architectural & Transportation
Barriers Compliance Board's "Americans with Disabilities Act (ADA) and Architectural Barriers Act
(ABA) Accessibility Guidelines for Buildings and Facilities" for toilet compartments designated as
accessible.
1.5 PROJECT CONDITIONS
A. Field Measurements: Verify actual locations of toilet fixtures, walls, columns, ceilings, and other
construction contiguous with toilet compartments by field measurements before fabrication.
PART 2 - PRODUCTS
2.1 MATERIALS
A. Steel Sheet: Commercial steel sheet for exposed applications; mill phosphatized and selected for
smoothness.
1. Electrolytically Zinc Coated: ASTM A 879/A 879M, 01Z (03G).
2. Hot-Dip Galvanized: ASTM A 653/A 653M, either hot-dip galvanized or galvannealed.
B. Stainless-Steel Sheet: ASTM A 666, Type 304, stretcher-leveled standard of flatness.
C. Stainless-Steel Castings: ASTM A 743/A 743M.
2.2 PHENOLIC-CORE UNITS
A. Manufacturers: Subject to compliance with requirements, provide products by one of the following
1. American Sanitary Partition Corporation.
2. Ampco, Inc.
3. ASI Accurate Partitions Corporation.
4. Bobrick Washroom Equipment, Inc.
5. Bradley Corporation; Mills Partitions.
6. Metpar Corp.
B. Toilet-Enclosure Style: Floor and ceiling anchored.
C. Urinal-Screen Style: Wall hung.
D. Door, Panel, and Pilaster Construction: Solid phenolic-core panel material with melamine facing on both
sides fused to substrate during panel manufacture (not separately laminated), and with eased and polished
edges. Provide minimum 3/4-inch- (19-mm-) thick doors and pilasters and minimum 1/2-inch- (13-mm-)
thick panels.
E. Pilaster Shoes and Sleeves Caps: Fabricated from stainless-steel sheet, not less than 0.031-inch (0.79-mm)
nominal thickness and 3 inches (76 mm) high, finished to match hardware.
F. Brackets (Fittings):
1. Full-Height (Continuous) Type: Manufacturer's standard design; stainless steel.

BTBC Phase III October 26, 2020
GE Project No. 0119-0010
Gould Evans
TOILET COMPARTMENTS 102113 - 3
G. Phenolic-Panel Finish:
1. Facing Sheet Finish: one color and pattern in each room.
2. Color and Pattern: As selected by Architect from manufacturer's full range.
2.3 FABRICATION
A. Overhead-Braced Units: Provide manufacturer's standard corrosion-resistant supports, leveling
mechanism, and anchors at pilasters to suit floor conditions. Provide shoes at pilasters to conceal supports
and leveling mechanism.
B. Floor-Anchored Units: Provide manufacturer's standard corrosion-resistant anchoring assemblies with
leveling adjustment nuts at pilasters for structural connection to floor. Provide shoes at pilasters to conceal
anchorage.
C. Door Size and Swings: Unless otherwise indicated, provide 24-inch- (610-mm-) wide, in-swinging doors
for standard toilet compartments and 36-inch- (914-mm-) wide, out-swinging doors with a minimum 32-
inch- (813-mm-) wide, clear opening for compartments designated as accessible.
PART 3 - EXECUTION
3.1 INSTALLATION
A. General: Comply with manufacturer's written installation instructions. Install units rigid, straight, level,
and plumb. Secure units in position with manufacturer's recommended anchoring devices.
1. Maximum Clearances:
a. Pilasters and Panels: 1/2 inch (13 mm).
b. Panels and Walls: 1 inch (25 mm).
2. Stirrup Brackets: Secure panels to walls and to pilasters with no fewer than three brackets attached
at midpoint and near top and bottom of panel.
a. Locate wall brackets so holes for wall anchors occur in masonry or tile joints.
b. Align brackets at pilasters with brackets at walls.
B. Overhead-Braced Units: Secure pilasters to floor and level, plumb, and tighten. Set pilasters with anchors
penetrating not less than 1-3/4 inches (44 mm) into structural floor unless otherwise indicated in
manufacturer's written instructions. Secure continuous head rail to each pilaster with no fewer than two
fasteners. Hang doors to align tops of doors with tops of panels, and adjust so tops of doors are parallel
with overhead brace when doors are in closed position.
C. Floor-Anchored Units: Set pilasters with anchors penetrating not less than 2 inches (51 mm) into structural
floor unless otherwise indicated in manufacturer's written instructions. Level, plumb, and tighten pilasters.
Hang doors and adjust so tops of doors are level with tops of pilasters when doors are in closed position.
D. Urinal Screens: Attach with anchoring devices to suit supporting structure. Set units level and plumb,
rigid, and secured to resist lateral impact.

BTBC Phase III October 26, 2020
GE Project No. 0119-0010
Gould Evans
TOILET COMPARTMENTS 102113 - 4
3.2 ADJUSTING
A. Hardware Adjustment: Adjust and lubricate hardware according to hardware manufacturer's written
instructions for proper operation. Set hinges on in-swinging doors to hold doors open approximately 30
degrees from closed position when unlatched. Set hinges on out-swinging doors to return doors to fully
closed position.
END OF SECTION 102113

BTBC Phase III October 26, 2020
GE Project No. 0119-0010
Gould Evans
TOILET, BATH, AND LAUNDRY ACCESSORIES 102800 - 1
SECTION 102800 – TOILET, BATH, AND LAUNDRY ACCESSORIES
PART 1 - GENERAL
1.1 RELATED DOCUMENTS
A. Drawings and general provisions of the Contract, including General and Supplementary Conditions and
Division 01 Specification Sections, apply to this Section.
1.2 SUMMARY
A. Section Includes:
1. Public-use bathroom accessories.
2. Underlavatory guards.
3. Custodial accessories.
4. Lab Coat Hooks
5. Lab Paper Towel Dispenser
B. Related Sections:
1. Division 08 Section "Mirrors" for frameless mirrors.
2. Division 09 Section "Tiling" for ceramic toilet and bath accessories.
1.3 SUBMITTALS
A. Product Data: For each type of product indicated. Include the following:
1. Construction details and dimensions.
2. Anchoring and mounting requirements, including requirements for cutouts in other work and
substrate preparation.
3. Material and finish descriptions.
4. Features that will be included for Project.
5. Manufacturer's warranty.
B. Samples: Full size, for each accessory item to verify design, operation, and finish requirements.
1. Approved full-size Samples will be returned and may be used in the Work.
C. Product Schedule: Indicating types, quantities, sizes, and installation locations by room of each accessory
required.
1. Identify locations using room designations indicated.
2. Identify products using designations indicated.
D. Maintenance Data: For toilet and bath accessories to include in maintenance manuals.
E. Warranty: Sample of special warranty.
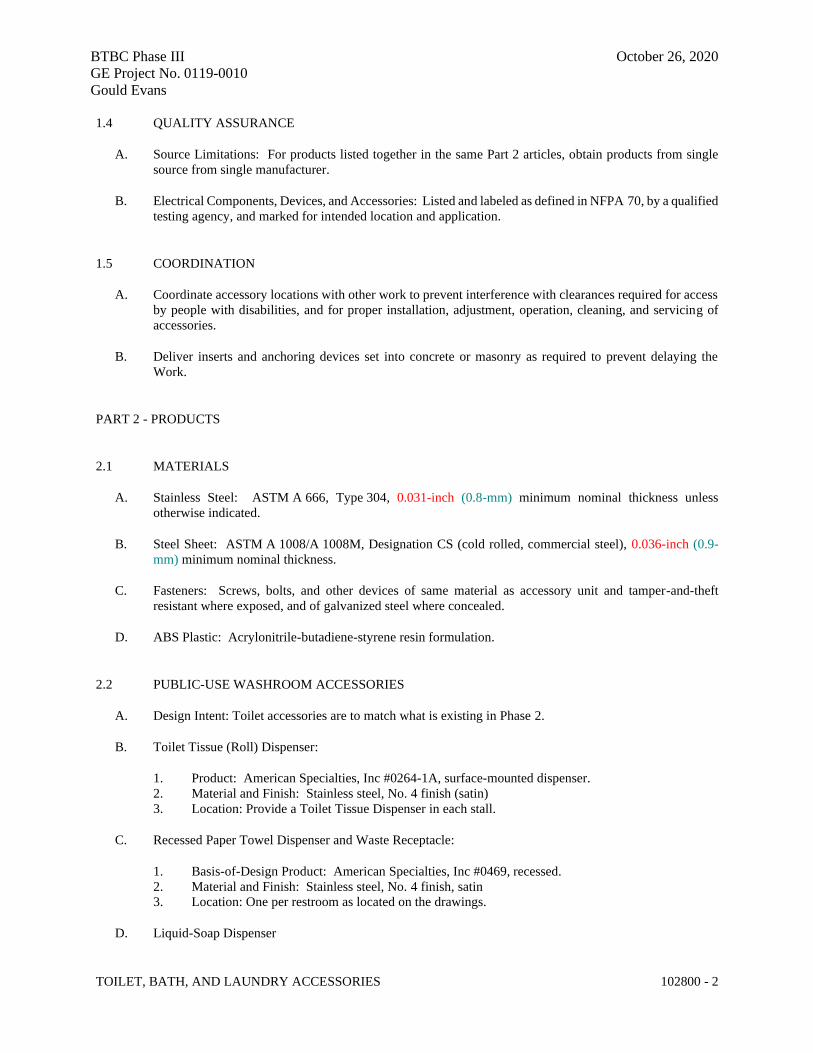
BTBC Phase III October 26, 2020
GE Project No. 0119-0010
Gould Evans
TOILET, BATH, AND LAUNDRY ACCESSORIES 102800 - 2
1.4 QUALITY ASSURANCE
A. Source Limitations: For products listed together in the same Part 2 articles, obtain products from single
source from single manufacturer.
B. Electrical Components, Devices, and Accessories: Listed and labeled as defined in NFPA 70, by a qualified
testing agency, and marked for intended location and application.
1.5 COORDINATION
A. Coordinate accessory locations with other work to prevent interference with clearances required for access
by people with disabilities, and for proper installation, adjustment, operation, cleaning, and servicing of
accessories.
B. Deliver inserts and anchoring devices set into concrete or masonry as required to prevent delaying the
Work.
PART 2 - PRODUCTS
2.1 MATERIALS
A. Stainless Steel: ASTM A 666, Type 304, 0.031-inch (0.8-mm) minimum nominal thickness unless
otherwise indicated.
B. Steel Sheet: ASTM A 1008/A 1008M, Designation CS (cold rolled, commercial steel), 0.036-inch (0.9-
mm) minimum nominal thickness.
C. Fasteners: Screws, bolts, and other devices of same material as accessory unit and tamper-and-theft
resistant where exposed, and of galvanized steel where concealed.
D. ABS Plastic: Acrylonitrile-butadiene-styrene resin formulation.
2.2 PUBLIC-USE WASHROOM ACCESSORIES
A. Design Intent: Toilet accessories are to match what is existing in Phase 2.
B. Toilet Tissue (Roll) Dispenser:
1. Product: American Specialties, Inc #0264-1A, surface-mounted dispenser.
2. Material and Finish: Stainless steel, No. 4 finish (satin)
3. Location: Provide a Toilet Tissue Dispenser in each stall.
C. Recessed Paper Towel Dispenser and Waste Receptacle:
1. Basis-of-Design Product: American Specialties, Inc #0469, recessed.
2. Material and Finish: Stainless steel, No. 4 finish, satin
3. Location: One per restroom as located on the drawings.
D. Liquid-Soap Dispenser

BTBC Phase III October 26, 2020
GE Project No. 0119-0010
Gould Evans
TOILET, BATH, AND LAUNDRY ACCESSORIES 102800 - 3
1. Basis of Design Product: American Specialties, Inc #0332-CD, Lavatory mounted soap dispenser.
2. Material and Finish: Stainless steel, No. 4 finish, satin
3. Location: Provide one per restroom sink.
E. Grab Bars
1. Basis-of-Design Product: American Specialties, Inc #3700
2. Mounting: Flanges with concealed fasteners.
3. Material: Finish: Smooth, No. 4, satin finish on ends and slip-resistant texture in grip area.
4. Configuration and Length: As indicated on Drawings.
F. Sanitary-Napkin Disposal Unit
1. Basis-of-Design Product: Bobrick Model #270.
2. Receptacle: Removable.
3. Material and Finish: Stainless steel, No. 4 finish (satin)
4. Location: In each Women’s Restroom toilet stall.
2.3 UNDERLAVATORY GUARDS
A. Product: Truebro, Lav Guard
B. Underlavatory Guard:
1. Description: Insulating pipe covering for supply and drain piping assemblies, that prevent direct
contact with and burns from piping, and allow service access without removing coverings.
2. Material and Finish: Antimicrobial, molded-plastic, black.
2.4 CUSTODIAL ACCESSORIES
A. Product: American Specialties, Inc. #1308, Shelf Utility Hooks and Mop Strip.
B. Length: 44”
C. Location: In each Custodial Room.
2.5 LAB COAT HOOKS
A. Product: Americas Specialties, Inc. #129
B. Length: 18”
C. Location: Per Lab drawings.
2.6 LAB PAPER TOWEL DISPENSER
A. Product: Americas Specialties, Inc. #45224A
B. Location: Per Lab drawings.

BTBC Phase III October 26, 2020
GE Project No. 0119-0010
Gould Evans
TOILET, BATH, AND LAUNDRY ACCESSORIES 102800 - 4
2.7 FABRICATION
A. General: Fabricate units with tight seams and joints, and exposed edges rolled. Hang doors and access
panels with full-length, continuous hinges. Equip units for concealed anchorage and with corrosion-
resistant backing plates.
B. Keys: Provide universal keys for internal access to accessories for servicing and resupplying. Provide
minimum of six keys to Owner's representative.
PART 3 - EXECUTION
3.1 INSTALLATION
A. Install accessories according to manufacturers' written instructions, using fasteners appropriate to substrate
indicated and recommended by unit manufacturer. Install units level, plumb, and firmly anchored in
locations and at heights indicated.
B. Grab Bars: Install to withstand a downward load of at least 250 lbf (1112 N), when tested according to
ASTM F 446.
3.2 ADJUSTING AND CLEANING
A. Adjust accessories for unencumbered, smooth operation. Replace damaged or defective items.
B. Remove temporary labels and protective coatings.
C. Clean and polish exposed surfaces according to manufacturer's written recommendations.
END OF SECTION 102800

BTBC Phase III October 26, 2020
GE Project No. 0119-0010
Gould Evans
FIRE EXTINGUISHER CABINETS 104413 - 1
SECTION 104413 - FIRE EXTINGUISHER CABINETS
PART 1 - GENERAL
1.1 RELATED DOCUMENTS
A. Drawings and general provisions of the Contract, including General and Supplementary Conditions and
Division 01 Specification Sections, apply to this Section.
B. Related Sections include the following:
1. Division 10 Section “Fire Extinguishers”
1.2 SUMMARY
A. Section Includes:
1. Fire protection cabinets for the following:
a. Portable fire extinguishers.
1.3 SUBMITTALS
A. Product Data: For each type of product indicated. Include construction details, material descriptions,
dimensions of individual components and profiles, and finishes for fire protection cabinets.
1. Fire Protection Cabinets: Include roughing-in dimensions, details showing mounting methods,
relationships of box and trim to surrounding construction, door hardware, cabinet type, trim style,
and panel style.
B. Maintenance Data: For fire protection cabinets to include in maintenance manuals.
1.4 COORDINATION
A. Coordinate size of fire protection cabinets to ensure that type and capacity of fire extinguishers indicated
are accommodated.
B. Coordinate sizes and locations of fire protection cabinets with wall depths.
PART 2 - PRODUCTS
2.1 MATERIALS
A. Cold-Rolled Steel Sheet: ASTM A 1008/A 1008M, Commercial Steel (CS), Type B.
B. Aluminum: Alloy and temper recommended by aluminum producer and manufacturer for type of use and
finish indicated, and as follows:
1. Sheet: ASTM B 209.
2. Extruded Shapes: ASTM B 221.

BTBC Phase III October 26, 2020
GE Project No. 0119-0010
Gould Evans
FIRE EXTINGUISHER CABINETS 104413 - 2
C. Clear Float Glass: ASTM C 1036, Type I, Class 1, Quality q3, 3 mm thick.
2.2 FIRE PROTECTION CABINET
A. Cabinet Type: Suitable for fire extinguisher.
1. Products: Subject to compliance with requirements, provide one of the following:
a. J. L. Industries, Inc., a division of Activar Construction Products Group;.
b. Larsen's Manufacturing Company;.
c. Potter Roemer LLC;.
B. Cabinet Construction: Nonrated.
C. Cabinet Material: Steel sheet.
D. Semirecessed Cabinet (where indicated): Cabinet box partially recessed in walls of sufficient depth to suit
style of trim indicated; with one-piece combination trim and perimeter door frame overlapping surrounding
wall surface with exposed trim face and wall return at outer edge (backbend). Provide where walls are of
insufficient depth for recessed cabinets but are of sufficient depth to accommodate semirecessed cabinet
installation.
1. Rolled-Edge Trim: 2-1/2-inch backbend depth.
E. Cabinet Trim Material: Steel sheet.
F. Door Material: Steel sheet.
G. Door Style: Center glass panel with frame.
H. Door Glazing: Clear float glass.
I. Door Hardware: Manufacturer's standard door-operating hardware of proper type for cabinet type, trim
style, and door material and style indicated.
1. Provide projecting door pull and friction latch.
2. Provide continuous hinge, of same material and finish as trim, permitting door to open 180 degrees.
J. Accessories:
1. Mounting Bracket: Manufacturer's standard steel, designed to secure fire extinguisher to fire
protection cabinet, of sizes required for types and capacities of fire extinguishers indicated, with
plated or baked-enamel finish.
2. Identification: Lettering complying with authorities having jurisdiction for letter style, size,
spacing, and location. Locate as indicated.
a. Identify fire extinguisher in fire protection cabinet with the words "FIRE EXTINGUISHER."
1) Location: Applied to cabinet door.
2) Application Process: Silk-screened.
3) Lettering Color: Red.
4) Orientation: Vertical.
K. Finishes:
1. Manufacturer's standard baked-enamel paint for the following:
a. Exterior of cabinet, door, and trim except for those surfaces indicated to receive another
finish.
b. Interior of cabinet and door.
2. Steel: Baked enamel or powder coat.

BTBC Phase III October 26, 2020
GE Project No. 0119-0010
Gould Evans
FIRE EXTINGUISHER CABINETS 104413 - 3
2.3 FABRICATION
A. Fire Protection Cabinets: Provide manufacturer's standard box (tub) with trim, frame, door, and hardware
to suit cabinet type, trim style, and door style indicated.
1. Weld joints and grind smooth.
2. Provide factory-drilled mounting holes.
3. Prepare doors and frames to receive locks.
B. Cabinet Doors: Fabricate doors according to manufacturer's standards, from materials indicated and
coordinated with cabinet types and trim styles selected.
1. Fabricate door frames with tubular stiles and rails and hollow-metal design, minimum 1/2 inch thick.
2. Miter and weld perimeter door frames.
C. Cabinet Trim: Fabricate cabinet trim in one piece with corners mitered, welded, and ground smooth.
2.4 GENERAL FINISH REQUIREMENTS
A. Comply with NAAMM's "Metal Finishes Manual for Architectural and Metal Products" for
recommendations for applying and designating finishes.
B. Protect mechanical finishes on exposed surfaces of fire protection cabinets from damage by applying a
strippable, temporary protective covering before shipping.
C. Finish fire protection cabinets after assembly.
D. Appearance of Finished Work: Noticeable variations in same piece are not acceptable. Variations in
appearance of adjoining components are acceptable if they are within the range of approved Samples and
are assembled or installed to minimize contrast.
2.5 STEEL FINISHES
A. Surface Preparation: Remove mill scale and rust, if present, from uncoated steel, complying with SSPC-
SP 5/NACE No. 1, "White Metal Blast Cleaning".
B. Baked-Enamel or Powder-Coat Finish: Immediately after cleaning and pretreating, apply manufacturer's
standard two-coat, baked-on finish consisting of prime coat and thermosetting topcoat. Comply with
coating manufacturer's written instructions for applying and baking to achieve a minimum dry film
thickness of 2 mils.
1. Color and Gloss: Red, semi-gloss.
PART 3 - EXECUTION
3.1 EXAMINATION
A. Examine walls and partitions for suitable framing depth and blocking where semirecessed cabinets will be
installed.
B. Proceed with installation only after unsatisfactory conditions have been corrected.

BTBC Phase III October 26, 2020
GE Project No. 0119-0010
Gould Evans
FIRE EXTINGUISHER CABINETS 104413 - 4
3.2 PREPARATION
A. Prepare recesses for semirecessed fire protection cabinets as required by type and size of cabinet and trim
style.
3.3 INSTALLATION
A. General: Install fire protection cabinets in locations and at mounting heights indicated
B. Fire Protection Cabinets: Fasten cabinets to structure, square and plumb.
1. Unless otherwise indicated, provide recessed fire protection cabinets. If wall thickness is not
adequate for recessed cabinets, provide semirecessed fire protection cabinets.
2. Provide inside latch and lock for break-glass panels.
3. Fasten mounting brackets to inside surface of fire protection cabinets, square and plumb.
3.4 ADJUSTING AND CLEANING
A. Remove temporary protective coverings and strippable films, if any, as fire protection cabinets are installed
unless otherwise indicated in manufacturer's written installation instructions.
B. Adjust fire protection cabinet doors to operate easily without binding.
C. On completion of fire protection cabinet installation, clean interior and exterior surfaces as recommended
by manufacturer.
D. Touch up marred finishes, or replace fire protection cabinets that cannot be restored to factory-finished
appearance. Use only materials and procedures recommended or furnished by fire protection cabinet and
mounting bracket manufacturers.
E. Replace fire protection cabinets that have been damaged or have deteriorated beyond successful repair by
finish touchup or similar minor repair procedures.
END OF SECTION 104413
BTBC Phase III October 26, 2020
GE Project No. 0119-0010
Gould Evans
FIRE EXTINGUISHERS 104416 - 1
SECTION 104416 - FIRE EXTINGUISHERS
PART 1 - GENERAL
1.1 SUMMARY
A. Section includes portable, hand-carried fire extinguishers and mounting brackets for fire extinguishers.
B. Related sections include the following:
1. Division 10 Section “Fire Extinguisher Cabinets”
1.2 SUBMITTALS
A. Product Data: For each type of product indicated.
B. Operation and maintenance data.
C. Warranty: Sample of special warranty.
1.3 QUALITY ASSURANCE
A. NFPA Compliance: Fabricate and label fire extinguishers to comply with NFPA 10, "Portable Fire
Extinguishers."
B. Fire Extinguishers: Listed and labeled for type, rating, and classification by an independent testing agency
acceptable to authorities having jurisdiction.
C. Coordinate type and capacity of fire extinguishers with fire protection cabinets to ensure fit and function.
1.4 WARRANTY
A. Special Warranty: Manufacturer's standard form in which manufacturer agrees to repair or replace fire
extinguishers that fail in materials or workmanship within specified warranty period.
1. Failures include, but are not limited to, the following:
a. Failure of hydrostatic test according to NFPA 10.
b. Faulty operation of valves or release levers.
2. Warranty Period: Six years from date of Substantial Completion.

BTBC Phase III October 26, 2020
GE Project No. 0119-0010
Gould Evans
FIRE EXTINGUISHERS 104416 - 2
PART 2 - PRODUCTS
2.1 PORTABLE, HAND-CARRIED FIRE EXTINGUISHERS
A. Fire Extinguishers: Type, size, and capacity for each fire protection cabinet and mounting bracket
indicated.
1. Manufacturers: Subject to compliance with requirements, provide products by one of the following:
a. J. L. Industries, Inc.; a division of Activar Construction Products Group.
b. Larsen's Manufacturing Company.
c. Potter Roemer LLC.
2. Instruction Labels: Include pictorial marking system complying with NFPA 10, Appendix B and
bar coding for documenting fire extinguisher location, inspections, maintenance, and recharging.
A. Multipurpose Dry-Chemical Type in Steel Container: UL-rated 1-A: 10-B: C, 10-lb (4.5-kg) nominal
capacity, with monoammonium phosphate-based dry chemical in enameled-steel container.
B. Purple-K Dry-Chemical Type in Aluminum Container: UL-rated 80-B: C, 10-lb (9.1-kg) nominal capacity,
with potassium bicarbonate-based dry chemical in enameled-aluminum container (to be provided in Foods
Classroom).
PART 3 - EXECUTION
3.1 INSTALLATION
A. Examine fire extinguishers for proper charging and tagging.
1. Remove and replace damaged, defective, or undercharged fire extinguishers.
B. Install fire extinguishers in locations indicated and in compliance with requirements of authorities having
jurisdiction.
END OF SECTION 104416

BTBC Phase III October 26, 2020
GE Project No. 0119-0010
Gould Evans
METAL LOCKERS 105113 - 1
SECTION 105113 - METAL LOCKERS
PART 1 - GENERAL
1.1 SUMMARY
A. Section Includes:
1. Knocked-down corridor lockers.
2. Mailboxes, front loading
1.2 PREINSTALLATION MEETINGS
A. Preinstallation Conference: Conduct conference at Project site.
1.3 ACTION SUBMITTALS
A. Product Data: For each type of product.
B. Sustainable Design Submittals:
1. <Double click to insert sustainable design text for recycled content.>
2. <Double click to insert sustainable design text for EPDs and HPDs.>
C. Shop Drawings: For metal lockers.
1. Include plans, elevations, sections, and attachment details.
2. Include locker identification system and numbering sequence.
D. Samples: For each color specified.
1.4 INFORMATIONAL SUBMITTALS
A. Sample warranty.
1.5 CLOSEOUT SUBMITTALS
A. Maintenance data.
1.6 WARRANTY
A. Special Warranty: Manufacturer agrees to repair or replace components of metal lockers that fail
in materials or workmanship, excluding finish, within specified warranty period.

BTBC Phase III October 26, 2020
GE Project No. 0119-0010
Gould Evans
METAL LOCKERS 105113 - 2
1. Warranty Period for Knocked-Down Metal Lockers: Two years from date of Substantial
Completion.
PART 2 - PRODUCTS
2.1 PERFORMANCE REQUIREMENTS
A. Accessibility Standard: For lockers indicated to be accessible, comply with applicable provisions
in the USDOJ's "2010 ADA Standards for Accessible Design".
2.2 KNOCKED-DOWN CORRIDOR LOCKERS
A. Manufacturers: Subject to compliance with requirements, provide products by one of the
following:
1. Art Metal Products.
2. ASI Storage Solutions; ASI Group.
3. Hadrian Manufacturing Inc.
4. Olympus Lockers & Storage Products, Inc.
5. Penco Products, Inc.
B. Doors: One piece; fabricated from 0.060-inch (1.52-mm) nominal-thickness steel sheet; formed
into channel shape with double bend at vertical edges and with right-angle single bend at
horizontal edges.
1. Stiffeners: Manufacturer's standard full-height stiffener fabricated from 0.048-inch (1.21-
mm) nominal-thickness steel sheet; welded to inner face of doors.
2. Door Style: Unperforated panel.
C. Body: Assembled by riveting or bolting body components together. Fabricate from unperforated
steel sheet with thicknesses as follows:
1. Tops, Bottoms, and Intermediate Dividers: 0.024-inch (0.61-mm) nominal thickness, with
single bend at sides.
2. Backs and Sides: 0.024-inch (0.61-mm) nominal thickness, with full-height, double-
flanged connections.
3. Shelves: 0.024-inch (0.61-mm) nominal thickness, with double bend at front and single
bend at sides and back.
D. Frames: Channel formed; fabricated from 0.060-inch (1.52-mm) nominal-thickness steel sheet;
lapped and factory welded at corners; with top and bottom main frames factory welded into
vertical main frames. Form continuous, integral, full-height door strikes on vertical main frames.
E. Hinges:
1. Continuous Hinges: Manufacturer's standard, steel, full height.
F. Projecting Door Handle and Latch: Finger-lift latch control designed for use with padlocks;
positive automatic latching, chromium plated; pry and vandal resistant.

BTBC Phase III October 26, 2020
GE Project No. 0119-0010
Gould Evans
METAL LOCKERS 105113 - 3
1. Latch Hooks: Equip doors 48 inches (1219 mm) and higher with three latch hooks and
doors less than 48 inches (1219 mm) high with two latch hooks; fabricated from 0.105-
inch (2.66-mm) nominal-thickness steel sheet; welded or riveted to full-height door strikes;
with resilient silencer on each latch hook.
2. Latching Mechanism: Manufacturer's standard, rattle-free latching mechanism and moving
components isolated to prevent metal-to-metal contact, and incorporating a prelocking
device that allows locker door to be locked while door is open and then closed without
unlocking or damaging lock or latching mechanism.
G. Identification Plates: Manufacturer's standard, etched, embossed, or stamped aluminum plates,
with numbers and letters at least 3/8 inch (9 mm) high.
H. Hooks: Manufacturer's standard ball-pointed hooks, aluminum or steel; zinc plated.
I. Coat Rods: Manufacturer's standard.
J. Legs: [6 inches (152 mm)] <Insert dimension> high; formed by extending vertical frame
members, or fabricated from 0.075-inch (1.90-mm) nominal-thickness steel sheet; welded to
bottom of locker.
1. Provide closed front bases.
K. Recess Trim: Fabricated from 0.048-inch (1.21-mm) nominal-thickness steel sheet.
L. Filler Panels: Fabricated from manufacturer's standard thickness, but not less than 0.036-inch
(0.91-mm) nominal-thickness steel sheet.
M. Materials:
1. Cold-Rolled Steel Sheet: ASTM A1008/A1008M, Commercial Steel (CS), Type B,
suitable for exposed applications.
N. Finish: Baked enamel or powder coat.
1. Color: As selected by Architect from manufacturer's full range.
2.3 LOCKS
A. Combination Padlock: Provided by Owner.
2.4 FABRICATION
A. Fabricate metal lockers square, rigid, without warp, and with metal faces flat and free of dents or
distortion. Make exposed metal edges safe to touch and free of sharp edges and burrs.
B. Fabricate each metal locker with an individual door and frame; individual top, bottom, and back;
and common intermediate uprights separating compartments.
C. Equipment: Provide each locker with an identification plate and the following equipment:

BTBC Phase III October 26, 2020
GE Project No. 0119-0010
Gould Evans
METAL LOCKERS 105113 - 4
1. Double-Tier Units: One double-prong ceiling hook and two single-prong wall hooks.
D. Knocked-Down Construction: Fabricate metal lockers by assembling at Project site or
preassembling at plant prior to shipping, using manufacturer's nuts, bolts, screws, or rivets.
E. Accessible Lockers: Fabricate as follows:
1. Locate bottom shelf no lower than 15 inches (381 mm) above the floor.
2. Where hooks, coat rods, or additional shelves are provided, locate no higher than 48 inches
(1219 mm) above the floor.
F. Continuous Zee Base: Fabricated in lengths as long as practical to enclose base and base ends;
finished to match lockers.
G. Recess Trim: Fabricated with minimum 2-1/2-inch (64-mm) face width and in lengths as long as
practical; finished to match lockers.
H. Filler Panels: Fabricated in an unequal leg angle shape; finished to match lockers. Provide slip-
joint filler angle formed to receive filler panel.
PART 3 - EXECUTION
3.1 INSTALLATION
A. Install lockers level, plumb, and true; shim as required, using concealed shims.
1. Anchor locker runs at ends and at intervals recommended by manufacturer, but not more
than 36 inches (910 mm) o.c. Using concealed fasteners, install anchors through backup
reinforcing plates, channels, or blocking as required to prevent metal distortion.
2. Anchor single rows of metal lockers to walls near top and bottom of lockers.
3. Anchor back-to-back metal lockers to floor.
B. Knocked-Down Lockers: Assemble with manufacturer's standard fasteners, with no exposed
fasteners on door faces or face frames.
C. Trim: Fit exposed connections of trim, fillers, and closures accurately together to form tight,
hairline joints, with concealed fasteners and splice plates.
1. Attach recess trim to recessed metal lockers with concealed clips.
2. Attach filler panels with concealed fasteners.
END OF SECTION 105113

BTBC Phase III October 26, 2020
GE Project No. 0119-0010
Gould Evans
WOOD LOCKERS 105116 - 1
SECTION 105116 - WOOD LOCKERS
PART 1 - GENERAL
1.1 SUMMARY
A. Section includes wood-faced wood lockers.
1.2 ACTION SUBMITTALS
A. Product Data: For each type of product.
B. Shop Drawings: For wood lockers.
1. Include plans, elevations, sections, and attachment details.
2. Show locker identification system and numbering sequence.
C. Samples: For each exposed product and for each color and texture specified.
1.3 INFORMATIONAL SUBMITTALS
A. Sample warranty.
1.4 CLOSEOUT SUBMITTALS
A. Maintenance data.
1.5 FIELD CONDITIONS
A. Environmental Limitations: Do not deliver or install wood lockers until building is enclosed, wet-work is
complete, and HVAC system is operating and maintaining temperature at operating levels during the
remainder of the construction period.
1.6 WARRANTY
A. Special Warranty: Manufacturer agrees to repair or replace components of lockers that fail in materials or
workmanship within specified warranty period.
1. Warranty Period: Three years from date of Substantial Completion.
BTBC Phase III October 26, 2020
GE Project No. 0119-0010
Gould Evans
WOOD LOCKERS 105116 - 2
PART 2 - PRODUCTS
2.1 PERFORMANCE REQUIREMENTS
A. Accessibility Standard: For lockers indicated to be accessible, comply with applicable provisions in the
USDOJ's "2010 ADA Standards for Accessible Design".
2.2 WOOD-FACED WOOD LOCKERS
A. Manufacturers: Subject to compliance with requirements, provide products by one of the following:
1. Classic Woodworking, LLC.
2. Club Resource Group.
3. Hollman, Inc.
B. Construction Style: Flush overlay.
C. Locker Body: Fabricated from particleboard-core panels covered on both sides with thermoset decorative
overlay.
1. Side, Top, and Bottom Panels: Manufacturer's standard 3/4 or 5/8 inch (19 or 16 mm) thick.
2. Back Panel: Manufacturer's standard 1/2 or 3/8 inch (13 or 9.5 mm) thick.
3. Exposed Panel Edges: Solid wood to match doors.
D. Flush, Wood-Faced Doors: Wood veneer applied over 3/4-inch- (19-mm-) thick, medium-density-
fiberboard core.
1. Wood Veneer: White oak, rift cut.
2. Wood Edges: 1/4-inch- (6-mm-) thick, solid wood of same wood species as face veneer.
E. Shelves: Fabricated from particleboard-core panels covered on both sides with thermoset decorative
overlay; fixed.
1. Thickness: 3/4 inch (19 mm).
2. Exposed Edges: 1.5-mm-thick PVC.
F. Continuous Finish Base: Wood-faced, 3/4-inch- (19-mm-) thick panel that matches door faces; fabricated
in lengths as long as practical to enclose base and base ends of lockers.
G. Transparent Finish: Manufacturer's standard two-coat, clear, catalyzed lacquer finish with sanding between
coats. Seal with moisture-resistant topcoat.
1. Stain: None required.
2.3 MATERIALS
A. Solid Wood: Clear hardwood lumber, selected for compatible grain and color.
B. Composite Wood: Provide materials that comply with requirements of referenced quality standard for each
type of woodwork and quality grade specified unless otherwise indicated.

BTBC Phase III October 26, 2020
GE Project No. 0119-0010
Gould Evans
WOOD LOCKERS 105116 - 3
1. Thermoset Decorative Panels: Particleboard or medium-density fiberboard finished with thermally
fused, melamine-impregnated decorative paper and complying with requirements of NEMA LD 3,
Grade VGL, for Test Methods 3.3, 3.4, 3.6, 3.8, and 3.10.
2. Medium-Density Fiberboard: ANSI A208.2, Grade 130.
3. Particleboard: ANSI A208.1, Grade M-2-Exterior Glue.
4. Softwood Plywood: DOC PS 1, medium-density overlay.
5. Veneer-Faced Panel Products (Hardwood Plywood): HPVA HP-1.
C. <Double click to insert sustainable design text for adhesives.>
D. Anchors: Material, type, size, and finish as required for each substrate for secure anchorage. Provide metal
expansion sleeves or expansion bolts for post-installed anchors. Use nonferrous-metal or hot-dip galvanized
anchors and inserts at inside face of exterior walls and at floors.
E. Wood Support Base: 2-by-4-inch nominal-size (51-by-102-mm actual-size) lumber treated with
manufacturer's standard preservative-treatment, pressure process.
2.4 HARDWARE
A. Digital Keypad Lock: Battery-powered electronic keypad with reprogrammable manager and owner codes
that override access. Three consecutive incorrect code entries shall disable lock for three minutes.
1. Designed for permanently assigned access via entry of user's four-digit code.
2. Designed for shared or temporary access by multiple users, with user-defined code to lock and
unlock. Provide LED indicator to show when lock is in use.
B. Frameless Hinges (European Type): Fully concealed, self-closing, nickel-plated steel, with not less than
110 degrees of opening.
1. Provide four hinges.
C. Hooks: Manufacturer's standard, ball-pointed aluminum or steel; chrome finished. Attach hooks with at
least two fasteners.
1. Provide hooks as indicated on Drawings.
2. Provide one double-prong ceiling hook and two single-prong wall hooks for each compartment of
single-tier lockers.
D. Exposed Hardware Finish: Satin chrome unless otherwise indicated.
2.5 ACCESSORIES
A. Number Identification Plates: 1-1/2-inch- (38-mm-) diameter, etched, embossed, or stamped, stainless-steel
plates with black numbers and letters at least 1/2 inch (13 mm) high. Identify lockers in sequence indicated
on Drawings.
2.6 FABRICATION
A. Fabricate lockers square, rigid, without warp, and with finished faces flat and free of dents, scratches, and
chips. Accurately factory machine components for attachments. Make joints tight and true.
B. Accessible Lockers: Fabricate as follows:

BTBC Phase III October 26, 2020
GE Project No. 0119-0010
Gould Evans
WOOD LOCKERS 105116 - 4
1. Locate bottom shelf no lower than 15 inches (381 mm) above the floor.
2. Where hooks, coat rods, or additional shelves are provided, locate no higher than 48 inches (1219
mm) above the floor.
C. Complete fabrication, including assembly, finishing, and hardware application, to maximum extent
possible, before shipment to Project site. Disassemble components only as necessary for shipment and
installation. Where necessary for fitting at site, provide ample allowance for scribing, trimming, and fitting.
D. Shop cut openings, to maximum extent possible, to receive hardware, electrical work, and similar items.
Locate openings accurately and use templates or roughing-in diagrams to produce accurately sized and
shaped openings. Sand edges of cutouts to remove splinters and burrs.
PART 3 - EXECUTION
3.1 INSTALLATION
A. Install lockers level, plumb, and true; use concealed shims.
B. Connect groups of lockers together with manufacturer's standard fasteners, through predrilled holes, with
no exposed fasteners on face frames. Fit lockers accurately together to form flush, tight, hairline joints.
C. Install lockers without distortion so doors and drawers fit openings properly and are accurately aligned.
Adjust hardware to center doors and drawers in openings, providing unencumbered operation. Complete
installation of hardware and accessory items as indicated.
1. Installation Tolerance: No more than 1/8 inch in 96-inch (3 mm in 2400-mm) sag, bow, or other
variation from a straight line. Shim as required with concealed shims.
D. Locker Anchorage: Fasten lockers through back, near top and bottom, at ends with No. 8 flush-head wood
screws sized for 1-inch (25-mm) penetration into wood framing, blocking, or furring and spaced not more
than 16 inches (400 mm) o.c.
E. Scribe and cut filler panels to fit adjoining work using fasteners concealed where practical. Repair damaged
finish at cuts.
F. Attach sloping-top units to lockers, with end panels covering exposed ends.
G. Install number identification plates after lockers are in place.
END OF SECTION 105116

MARCH 18, 2016 A-012674 Bid Package E Earth, Energy and Environment Center
105210-1 CYLINDER BRACKETS
SECTION 105210 - CYLINDER BRACKET SUPPORT
PART 1 - GENERAL
1.1 SUMMARY
A. Section Includes: 1. Furnishing and Installation of cylinder bracket support as drawn and specified.
1.2 SUBMITTALS
A. Product Data: Submit complete printed data and installation recommendations identifying items and features to be provided, demonstrating compliance with specifications.
1.3 QUALITY ASSURANCE
A. Qualification 1. Installer Qualifications: A party experienced in the installation of the Work required as a
primary business for a minimum of five (5) years and acceptable to the product producer.
B. Regulatory Requirements 1. Conform to the requirements of authorities having jurisdiction including OSHA and NFPA.
1.4 DELIVERY, STORAGE, HANDLING
A. Deliver in manufacturer’s original unopened, undamaged packing containers bearing content labels.
B. Unload, handle, and store in exact accordance with manufacturer’s/producer’s recommendations in a manner to avoid loss, damage and contamination.
1.5 PROJECT/SITE CONDITIONS
A. Environmental Requirements 1. Work only under environmental conditions acceptable to the product/materials
manufacturer/producer.
B. Existing Conditions 1. Examine the substrate and conditions under which the work is to be performed and report
conditions detrimental to a successful installation to the Contractor. Start of work will evidence acceptance.
PART 2 - PRODUCTS
2.1 MANUFACTURERS
A. Subject to compliance with Contract Documents including these specifications provide materials by one of the following: 1. Unistrut Corp. 2. Or approved equal by the Architect.
2.2 MATERIALS

MARCH 18, 2016 A-012674 Bid Package E Earth, Energy and Environment Center
105210-2 CYLINDER BRACKETS
A. Upright supports are to be 12 gauge steel channels as manufactured by Unistrut Corporation. Model Number P1000, P1001, or P1001 C41 as required by configuration shown on drawings. Uprights shall be bolted to the floor with steel angles or post bases. Uprights shall be secured to base cabinet and fitted snugly through hole in cabinet top. Secure top of uprights to metal deck above, as indicated on the Drawings. Open channels shall be plugged with a plastic closure strip extending from the top of the backsplash to the bottom of the first shelf bracket. Open channels shall be plugged where they penetrate countertop with black painted, wood or resin inserts.
2.3 FABRICATION
A. Fabricate in the shop to the extent possible. De-assemble and properly mark components as required for shipment.
PART 3 - EXECUTION
3.1 INSTALLATION
A. Install in exact accordance with manufacturer’s/producer’s recommendations and submittals.
B. Install secure, plumb, level and true to line and location free of restoration and rack in a permanent manner
3.2 CLEANING/ADJUSTING
A. Clean inside and out in accordance with product manufacturer’s recommendations.
END OF SECTION 10 5210

BTBC Phase III October 26, 2020
GE Project No. 0119-0010
Gould Evans
EXTERIOR SUN SHADE ASSEMBLY 107113 - 1
SECTION 107113 - EXTERIOR SUN SHADE ASSEMBLY
PART 1 - GENERAL
1.1 RELATED DOCUMENTS
A. Drawings and general provisions of the Contract, including General and Supplementary Conditions and
Division 01 Specification Sections, apply to this Section.
1.2 SUMMARY
A. Section includes all materials and Work required to provide a complete sun shade and canopy assembly,
including the following:
1. Formed aluminum sun shade fins with aluminum tube support framing.
2. Architecturally exposed structural steel (AESS), with shop-applied coatings.
3. Custom-fabricated metal suspended aluminum fin and suspension system to be provided as part of
Add Alternate No. 3. Provide all secondary cold-formed and miscellaneous steel sub-framing
required for attachment of aluminum fin panel carrying suspension system.
4. Coordination of lighting raceway management and exterior lighting to be installed integrally with
the Work of this Section by other trades.
B. Related Requirements:
1. Section 012300 “Alternates” for Alternate No.3 related to providing and installing aluminum fin
panel soffit below the alternate canopy assembly.
2. Requirements in Section 051200 "Structural Steel Framing" also apply to architecturally exposed
structural steel.
3. Requirements in Section 076200 “Sheet metal Flashing and Trim” also apply to sheet metal and
drainage fabrications to be installed as part of the Work of this Section.
4. Requirements in Section 099113 “Exterior Painting” for paint coating(s) to be shop and field-applied
to architecturally exposed structural steel and other sun shade and canopy assembly substrates
indicated on the Drawings.
5. Division 26 Sections for exterior lighting, wiring, electrical devices, conduit and other wiring
pathways, and other electrical Work provided under a separate Package to be installed integrally
with the sun shade and canopy assembly. Coordinate installation of all electrical work with the Work
of this Section.
1.3 PREINSTALLATION MEETINGS
A. Preinstallation Conference: Conduct conference at Project site.
1.4 ACTION SUBMITTALS
A. Product Data: For each type of product.
1. Include construction details, material descriptions, dimensions of individual components and
profiles, and finishes for sun shade fins and support framing, AESS, soffit panels, and metal decking.
2. Provide product data for all shop-applied paint coatings, complying with requirements of Section
099113 “Exterior Painting.”

BTBC Phase III October 26, 2020
GE Project No. 0119-0010
Gould Evans
EXTERIOR SUN SHADE ASSEMBLY 107113 - 2
B. Shop Drawings:
1. Include plans, elevations, sections, and attachment details.
2. Include details of equipment assemblies. Indicate dimensions, weights, loads, required clearances,
method of field assembly, components, and location and size of each field connection.
3. Detail fabrication and assembly of the following:
a. Formed Metal Sun Shade Fins and Support Framing: Show fabrication and installation
details for decorative formed metal.
1) Include plans, elevations, component details, and attachment details.
2) Include connection details to AESS framing members.
3) Indicate materials and profiles of each decorative formed metal member, fittings,
joinery, finishes, fasteners, anchorages, and accessory items.
b. AESS: Show fabrication of AESS components. Shop Drawings for structural steel may be
used for AESS provided items of AESS are specifically identified and requirements below
are met for AESS.
1) Include details of cuts, connections, splices, camber, holes, and other pertinent data.
2) Include embedment Drawings.
3) Indicated Drawings indicating connections to main building structural system.
4) Indicate welds by standard AWS symbols, showing size, length, and type of each
weld. Show backing bars that are to be removed and supplemental fillet welds where
backing bars are to remain. Indicate grinding, finish, and profile of welds.
5) Indicate all welds are shop-welded complying with NOMMA “Voluntary Joint Finish
Standards” for Type 2 welds, unless more restrictive requirements are indicated.
6) Indicate type, size, and length of bolts, distinguishing between shop and field bolts.
Identify pretensioned and slip-critical, high-strength bolted connections. Indicate
orientation of bolt heads.
7) Indicate exposed surfaces and edges and surface preparation being used.
8) Indicate special tolerances and erection requirements.
9) Indicate shop-application of all exposed steel.
4. Add Alternate 3. Indicate electrical lighting, conduit, and other electrical systems to be installed
integrally with canopy assembly, including the following:
a. Installation of conduit concealed in steel decking.
b. Installation of lighting mounted direct to exposed metal decking in Alternate No. 3, in metal
panel soffits.
c. Locations of all electrical devices, junction boxes, and similar devices that are exposed in
the sun shade and canopy assembly.
C. Samples for Verification: For the following products, in manufacturer's standard sizes:
1. Full-size sample of sun shade fin mounted to 12 inch long full-size section of tubular aluminum
framing.
2. Full-size sample of soffit panel, including exposed suspension system.
3. Color sample of exposed metal decking.
4. AESS column, 8 inches high, welded to AESS base-plate.
D. Delegated-Design Submittal: For integrated sun shade and canopy assembly, consisting of sun shade fins
and support framing, AESS framing and connections to building structural framing and foundations,
canopy decking, and all other portions of the assembly subject to dead and live loads, as well as varying
weather conditions.
1.5 INFORMATIONAL SUBMITTALS
A. Coordination Drawings: Plans, reflected ceiling plans, and details, drawn to scale, on which the following
items are shown and coordinated with each other, using input from installers of the items involved:

BTBC Phase III October 26, 2020
GE Project No. 0119-0010
Gould Evans
EXTERIOR SUN SHADE ASSEMBLY 107113 - 3
1. Building structural members, including steel framing and foundations, on/from which AESS will be
attached and supported.
2. Integration of structural supports with the building envelope comprised of metal wall panels over a
rainscreen cladding assembly.
3. Lighting fixtures.
4. Conduit and wiring devices integrated and concealed into assembly structure and decking. Exposed
conduit is not permitted unless specifically approved on approved coordination and Shop Drawings.
5. Structural members to which suspension systems will be attached.
6. Size and location of initial access modules for soffit panels.
B. Qualification Data: For Installer.
C. Welding certificates.
D. Product Test Reports: For each, for tests performed by a qualified testing agency.
E. Sample Warranty: For special warranty.
1.6 CLOSEOUT SUBMITTALS
A. Maintenance Data: For metal sun shade fins and support system to include in maintenance manuals.
1.7 MAINTENANCE MATERIAL SUBMITTALS
A. Furnish extra materials, from the same product run, that match products installed and that are packaged
with protective covering for storage and identified with labels describing contents.
1. Sun Shade Fins: Full-size units , equal to 1 percent of scope.
1.8 QUALITY ASSURANCE
A. Installer Qualifications: Fabricator of products.
B. Mockups: Build mockups to verify selections made under Sample submittals, to demonstrate aesthetic
effects, and to set quality standards for fabrication and installation.
1. Build mockup of typical sun shade fin assembly on structural aluminum framing system, not less
than 10 feet high by 10 feet wide, unless otherwise indicated on the Drawings.
2. Approval of mockups does not constitute approval of deviations from the Contract Documents
contained in mockups unless Architect specifically approves such deviations in writing.
3. Subject to compliance with requirements, approved mockups may become part of the completed
Work if undisturbed at time of Substantial Completion.
1.9 DELIVERY, STORAGE, AND HANDLING
A. Deliver components and other manufactured items so as not to be damaged or deformed. Package items
for protection during transportation and handling.
B. Unload, store, and erect components in a manner to prevent bending, warping, twisting, and surface
damage.

BTBC Phase III October 26, 2020
GE Project No. 0119-0010
Gould Evans
EXTERIOR SUN SHADE ASSEMBLY 107113 - 4
C. Stack components horizontally on platforms or pallets, covered with suitable weathertight and ventilated
covering. Store metal panels to ensure dryness, with positive slope for drainage of water. Do not store
components in contact with other materials that might cause staining, denting, or other surface damage.
D. Retain strippable protective covering on applicable items during installation.
1.10 FIELD CONDITIONS
A. Field Measurements: Where AESS is indicated to fit against other construction, verify actual dimensions
by field measurements before fabrication.
1.11 WARRANTY
A. Special Warranty on Anodic Finishes: Manufacturer's standard form in which manufacturer agrees to
repair finish or replace components with anodic coatings that show evidence of deterioration of factory-
applied finishes within specified warranty period.
1. Finish Warranty Period: 10 years from date of Substantial Completion.
PART 2 - PRODUCTS
2.1 FABRICATOR
A. Fabricator: Exterior sun shade assemblies shall be the sole responsibility of a single fabricator for
fabrication, assembly, construction, coordination, and all portions of the Work, including that of
subcontractors or sub-suppliers contracted by the Fabricator for portions of the Work.
1. Standard Sheet Metal; 405 North Olive Street; Kansas City, MO 64120; Telephone: 816-221-5434.
2. Approved Equal(s). Refer to Invitation to Bidders for contractor qualifications.
2.2 PERFORMANCE REQUIREMENTS
A. Delegated Design: Engage a qualified professional engineer, as defined in Section 014000 "Quality
Requirements," to design exterior sun shade and canopy assembly, including architecturally exposed
structural steel, metal roof decking, formed metal sun shade fins and aluminum tube support framing,
soffit panels, and single-ply membrane roofing and associated sheet metal flashing.
B. Structural Performance: Provide metal panel systems capable of withstanding the effects of the following
loads, based on testing according to ASTM E 1592:
1. Wind Loads: As indicated on Drawings.
2. Other Design Loads: As indicated on Drawings.
3. Deflection Limits: For wind loads, no greater than 1/240 of the span.
4. Wind Uplift: Design soffit panels and support sub-framing to accommodate wind uplift loads as
determined by Delegated Design, based on indicated loads.
C. Seismic Performance: Exterior sun shade assembly shall withstand the effects of earthquake motions
determined according to ASCE/SEI 7.
D. Thermal Movements: Allow for thermal movements from ambient and surface temperature changes.
1. Temperature Change: 120 deg F, ambient; 180 deg F.

BTBC Phase III October 26, 2020
GE Project No. 0119-0010
Gould Evans
EXTERIOR SUN SHADE ASSEMBLY 107113 - 5
E. Connections: Provide details of simple shear connections required by the Contract Documents to be
selected or completed by architectural exposed structural-steel fabricator, including comprehensive
engineering analysis by a qualified professional engineer, to withstand loads indicated and comply with
other information and restrictions indicated.
1. Select and complete connections using schematic details indicated and AISC 360.
2. Use Allowable Stress Design; data are given at service-load level.
F. Moment Connections: Type FR, fully restrained.
G. Construction: Moment frame.
H. Membrane Roofing Performance Requirements: Installed roofing and base flashings shall withstand
specified uplift pressures, thermally induced movement, and exposure to weather without failure due to
defective manufacture, fabrication, installation, or other defects in construction. Roofing and base
flashings shall remain watertight. Refer to Section 075423 “Thermoplastic Polyolefin (TPO) Roofing” for
additional performance requirements that apply to the roof system to be installed in this assembly.
I. Metal Flashing Performance Requirements: Sheet metal flashing and trim assemblies as indicated shall
withstand wind loads, structural movement, thermally induced movement, and exposure to weather
without failure due to defective manufacture, fabrication, installation, or other defects in construction,
including those required to resist SPRI Wind Design Standards. Completed sheet metal flashing and trim
shall not rattle, leak, or loosen, and shall remain watertight. Refer to Section 076200 “Sheet Metal
Flashing and Trim” for additional performance requirements that apply to the flashing and roof drainage
to be installed in this assembly.
J. Steel Decking Performance Requirements: Comply with calculated structural characteristics of steel deck
according to AISI's "North American Specification for the Design of Cold-Formed Steel Structural
Members." Refer to Section 053100 “Steel Decking” for additional performance requirements that apply
to the steel decking to be installed in this assembly.
2.3 ARCHITECTURALLY EXPOSED STRUCTURAL-STEEL (AESS)
A. Bolts, Connectors, and Anchors:
1. Tension-Control, High-Strength Bolt-Nut-Washer Assemblies: ASTM F 1852, Type 1, round-head
assemblies, consisting of stainless steel structural bolts with splined ends, heavy-hex stainless steel
nuts, and hardened stainless steel washers.
a. Finish: Type 304.
2. Shop-Applied Coatings: Comply with Section 099113 "Exterior Painting" for primer, intermediate
coats, and topcoat for architecturally exposed structural steel.
B. Fabrication: Shop fabricate, fully pre-finish, and assemble AESS to the maximum extent possible. Locate
field joints at concealed locations. Exposed joints will only be permitted if indicated and noted on the
Shop Drawings for approval, and specifically approved on the Shop Drawings by the Architect. Detail
assemblies to minimize handling and to expedite erection.
1. In addition to special care used to handle and fabricate AESS, comply with the following:
a. Fabricate with exposed surfaces smooth, square, and free of surface blemishes including
pitting, rust, scale, and roughness.
b. Grind sheared, punched, and flame-cut edges of AESS to remove burrs and provide smooth
surfaces and edges.
c. Fabricate AESS with exposed surfaces free of mill marks, including rolled trade names and
stamped or raised identification.
d. Fabricate AESS with exposed surfaces free of seams to maximum extent possible.

BTBC Phase III October 26, 2020
GE Project No. 0119-0010
Gould Evans
EXTERIOR SUN SHADE ASSEMBLY 107113 - 6
e. Remove blemishes by filling or grinding or by welding and grinding, before cleaning,
treating, and shop priming.
f. Fabricate with piece marks fully hidden in the completed structure or made with media that
permits full removal after erection.
g. Fabricate AESS to the tolerances specified in AISC 303 for steel that is designated AESS.
h. Fabricate AESS to the tolerances specified in AISC 303 for steel that is not designated AESS.
i. Seal-weld open ends of hollow structural sections with 3/8-inch closure plates for AESS.
2. Coping, Blocking, and Joint Gaps: Maintain uniform gaps of 1/8 inch with a tolerance of 1/32 inch
for AESS.
3. Bolt Holes: Cut, drill, or punch standard bolt holes perpendicular to metal surfaces.
4. Holes: Provide holes required for securing other work to structural steel and for other work to pass
through steel members.
a. Cut, drill, or punch holes perpendicular to steel surfaces. Do not thermally cut bolt holes or
enlarge holes by burning.
b. Baseplate Holes: Cut, drill, mechanically thermal cut, or punch holes perpendicular to steel
surfaces.
c. Weld threaded nuts to framing and other specialty items indicated to receive other work.
C. Shop Connections:
1. High-Strength Bolts: Shop install high-strength bolts according to RCSC's "Specification for
Structural Joints Using ASTM A 325 or A 490 Bolts" for type of bolt and type of joint specified.
a. Joint Type: Pretensioned slip critical.
2. Weld Connections: All welded connections shall be performed in the shop. Field connections shall
be mechanical fasteners only. Field welding is not permitted, unless specifically approved on the
Shop Drawings for particularly instances requested by the fabricator. Comply with
AWS D1.1/D1.1M for tolerances, appearances, welding procedure specifications, weld quality, and
methods used in correcting welding work, and comply with the following:
a. Assemble and weld built-up sections by methods that will maintain true alignment of axes
without exceeding specified tolerances.
b. Use weld sizes, fabrication sequence, and equipment for AESS that limit distortions to
allowable tolerances.
c. Provide continuous, sealed welds at angle to gusset-plate connections and similar locations
where AESS is exposed to weather.
d. Provide continuous welds of uniform size and profile where AESS is welded.
e. Make butt and groove welds flush to adjacent surfaces within tolerance of plus 1/16 inch,
minus zero inch for AESS. Do not grind unless required for clearances or for fitting other
components, or unless directed to correct unacceptable work.
f. Remove backing bars or runoff tabs; back-gouge and grind steel smooth for AESS.
g. At locations where welding on the far side of an exposed connection of AESS occurs, grind
distortions and marking of the steel to a smooth profile aligned with adjacent material.
h. Make fillet welds for AESS of uniform size and profile with exposed face smooth and
slightly concave. Do not grind unless directed to correct unacceptable work.
i. Finish exposed welded connections to comply with NOMMA's "Voluntary Joint Finish
Standards" for Type 2 welds (completely sanded joint, some undercutting and pinholes
acceptable).
D. Priming: If AESS is to be shop prime, steel surfaces shall only be primed in accordance with Section
099113 “Exterior Painting.” Do not prime the following:
1. Surfaces embedded in concrete or mortar. Extend priming of partially embedded members to a depth
of 2 inches.
2. Surfaces to be high-strength bolted with slip-critical connections.
3. Galvanized surfaces.

BTBC Phase III October 26, 2020
GE Project No. 0119-0010
Gould Evans
EXTERIOR SUN SHADE ASSEMBLY 107113 - 7
E. Surface Preparation: Clean and prepare steel substrates in accordance with Section 099113 “Exterior
Painting.”
2.4 FORMED METAL SUN SHADE
A. Metal Surfaces, General: Provide materials with smooth surfaces, without seam marks, roller marks,
rolled trade names, stains, discolorations, or blemishes.
B. Aluminum, General: Provide alloy and temper recommended by aluminum producer and finisher for type
of use and finish indicated, and with strength and durability properties for each aluminum form required
not less than that of alloy and temper designated below.
1. Sheet: ASTM B 209, alloy and temper recommended by aluminum producer and finisher for type
of use and finish indicated, and with at least the strength and durability properties of Alloy 5005-
H32.
2. Extruded Structural Tubing: ASTM B 221, Alloy 6063-T5/T52.
3. Plate: ASTM B 209, Alloy 6061-T6.
C. Stainless-Steel Sheet, Strip, and Plate: ASTM A 240/A 240M or ASTM A 666, Type 304.
D. Sun Shade Assembly: Consisting of bent metal plate “fins”, fastened to vertical aluminum tube framing,
as indicated on the Drawings. Aluminum tube framing to be through-bolt anchored to architecturally
exposed structural steel with stainless steel bent plate bracket supports.
1. Fins: Aluminum bent plates.
a. Thickness: 1/8 inch.
b. Size: As indicated on the Drawings.
c. Finishes:
1) Type 1: Aluminum; clear anodized.
2. Vertical Sun Shade Framing: Extruded aluminum tubes, pre-drilled on opposite faces for bolted
connection aligned with bracket supports:
a. Size: 2 inches x depth x thickness required by Delegated Design analysis to accommodate
loads.
b. Spacing: As indicated on the Drawings.
c. Finishes:
1) Type 1: Aluminum; clear anodized.
3. Bracket Supports: Bent stainless steel plate, pre-drilled for bolted connection through vertical
aluminum tube sun shade framing.
a. Thickness: 1/4 inch.
b. Size: As indicated on the Drawings, or if not indicated, 4-1/2 inches high by width bent to
fit tightly around square tube framing members.
c. Mechanically connect bracket supports with fasteners to AESS horizontal tube steel framing,
centered on tube steel, and aligned to maintain horizontal alignment of sun shade framing.
2.5 ALUMINUM SOFFIT PANELS AT CANOPY (ADD ALTERNATE NO. 3)
A. General: Provide custom metal soffit panels and carrying grid designed for exterior soffit application,
fabricated into custom profile and installed on aluminum tube supports similar to the base bid vertical
sunshade system.
B. Soffit Assembly: Consisting of bent metal plate “fins”, fastened to horizontal aluminum tube framing, as
indicated on the Drawings. Aluminum tube framing to be through-bolt anchored to architecturally
exposed structural steel with stainless steel bent plate bracket supports.
1. Fins: Aluminum bent plates.

BTBC Phase III October 26, 2020
GE Project No. 0119-0010
Gould Evans
EXTERIOR SUN SHADE ASSEMBLY 107113 - 8
a. Thickness: 1/8 inch.
b. Size: As indicated on the Drawings.
c. Finishes:
1) Type 1: Aluminum; clear anodized.
2. Horizontal Sun Shade Framing: Extruded aluminum tubes, pre-drilled on opposite faces for bolted
connection aligned with bracket supports:
a. Size: 2 inches x depth x thickness required by Delegated Design analysis to accommodate
loads.
b. Spacing: As indicated on the Drawings.
c. Finishes:
1) Type 1: Aluminum; clear anodized.
3. Bracket Supports: Bent stainless steel plate, pre-drilled for bolted connection through horizontal
aluminum tube sun shade framing.
a. Thickness: 1/4 inch.
b. Size: As indicated on the Drawings, or if not indicated, 4-1/2 inches high by width bent to
fit tightly around square tube framing members.
c. Mechanically connect bracket supports with fasteners to AESS horizontal tube steel framing,
centered on tube steel, and aligned to maintain horizontal alignment of sun shade framing.
2.6 GENERAL FINISH REQUIREMENTS
A. Protect mechanical finishes on exposed surfaces from damage by applying a strippable, temporary
protective covering before shipping.
B. Finish products after assembly.
C. Aluminum Finishes:
1. Clear Anodic Finish: AAMA 611, AA-M12C22A41, Class I, 0.018 mm or thicker.
2. Two-Coat Fluoropolymer: AAMA 2605. Fluoropolymer finish containing not less than 70 percent
PVDF resin by weight in color coat. Prepare, pretreat, and apply coating to exposed metal surfaces
to comply with coating and resin manufacturers' written instructions.
a. Color: Match Architect’s Sample.
D. Stainless Steel Finishes:
1. Surface Preparation: Remove tool and die marks and stretch lines, or blend into finish.
2. Directional Satin Finish: No. 4.
2.7 SOURCE QUALITY CONTROL
A. Testing Agency: Owner will engage a qualified testing agency to evaluate AESS.
PART 3 - EXECUTION
3.1 EXAMINATION
A. Examine substrates, areas, and conditions, with Fabricator/Installer present, for compliance with
requirements for installation tolerances and other conditions affecting performance of the Work.
1. AESS:

BTBC Phase III October 26, 2020
GE Project No. 0119-0010
Gould Evans
EXTERIOR SUN SHADE ASSEMBLY 107113 - 9
a. Verify, with steel erector present, elevations of concrete-bearing surfaces and locations of
anchor rods, bearing plates, and other embedments for compliance with requirements.
b. Verify steel-bearing surfaces location and connections for compliance with requirements.
c. Examine AESS for twists, kinks, warping, gouges, and other imperfections before erecting.
2. Formed Metal Sun Shade:
a. Examine AESS substrates and conditions for compliance with requirements for installation
tolerances and other conditions affecting performance of formed metal sun shade framing
and fins.
3. Metal Soffit Panels: Examine substrates, areas, and conditions, with Installer present, for
compliance with requirements for installation tolerances, metal panel supports, and other conditions
affecting performance of the Work:
a. Examine framing to verify that girts, angles, channels, studs, and other structural panel
support members and anchorage have been installed within alignment tolerances required by
metal panel manufacturer.
b. Examine roughing-in for components and systems penetrating metal panels to verify actual
locations of penetrations relative to seam locations of metal panels before installation.
B. Proceed with installation only after unsatisfactory conditions have been corrected.
3.2 PREPARATION
A. AESS:
1. Provide temporary shores, guys, braces, and other supports during erection to keep AESS secure,
plumb, and in alignment against temporary construction loads and loads equal in intensity to design
loads. Remove temporary supports when permanent structural steel, connections, and bracing are in
place unless otherwise indicated.
a. If possible, locate welded tabs for attaching temporary bracing and safety cabling where they
will be concealed from view in the completed Work.
b. Do not remove temporary shoring supporting composite deck construction until cast-in-place
concrete has attained its design compressive strength.
3.3 ERECTION OF ARCHITECTURALLY EXPOSED STRUCTURAL-STEEL
A. Set AESS accurately in locations and to elevations indicated and according to AISC 303 and AISC 360.
1. Erect AESS (Category 2 and Category 3) to the tolerances specified in AISC 303 for steel that is
not designated AESS.
B. Do not use thermal cutting during erection.
C. High-Strength Bolts: Install high-strength bolts according to RCSC's "Specification for Structural Joints
Using ASTM A 325 or A 490 Bolts" for type of bolt and type of joint specified.
1. Joint Type: Pretensioned slip critical.
2. Orient bolt heads as indicated on Drawings or, if not indicated, in same direction for each connection
and to maximum extent possible in same direction for similar connections.
D. Weld Connections: Comply with requirements in "Weld Connections" Paragraph in "Shop Connections"
Article.
1. Remove backing bars or runoff tabs; back-gouge and grind steel smooth for AESS.
2. Remove erection bolts in AESS, fill holes, and grind smooth.
3. Fill weld access holes in AESS and grind smooth.

BTBC Phase III October 26, 2020
GE Project No. 0119-0010
Gould Evans
EXTERIOR SUN SHADE ASSEMBLY 107113 - 10
3.4 ERECTION OF FORMED METAL SUN SHADE
A. Install stainless steel bracket supports on AESS horizontal steel framing members, aligned vertically and
horizontally to maintain sun shade framing members vertical and true and in horizontal alignment across
top and bottom of framing members, and to maintain alignment of sun shade fins.
1. Attachment of bracket supports to horizontal steel framing members shall be in accordance with
Delegated Design and approved Shop Drawings.
B. Install sun shade framing and fins by through-bolting framing member to bracket support using pre-
drilled holes in both. Use Type 304 stainless steel through bolt, nut, and split ring washer on both sides,
and snug tighten bolt to bracket.
3.5 METAL PANEL SOFFIT INSTALLATION
A. General: Install suspension system and metal panels according to manufacturer's written instructions in
orientation, sizes, and locations indicated. Install panels perpendicular to supports unless otherwise
indicated. Anchor metal panels and other components of the Work securely in place, with provisions for
thermal and structural movement.
1. Shim or otherwise plumb substrates receiving metal panels.
2. Provide escutcheons for pipe- and conduit-penetrating panels.
B. Fasteners: Install panels with concealed torsion spring connectors and secure with retainer clips, spaced
as required by Delegated Design Shop Drawings.
C. Metal Protection: Where dissimilar metals contact each other or corrosive substrates, protect against
galvanic action as recommended in writing by metal panel manufacturer.
D. Scribe and cut acoustical metal panel units for accurate fit at penetrations by, other work through soffit
panels. Stiffen edges of cut units as required to eliminate evidence of buckling or variations in flatness
exceeding referenced standards for stretcher-leveled metal sheet
E. Accessory Installation: Install accessories with positive anchorage as required for a complete metal panel
soffit assembly.
F. Flashing and Trim: Comply with performance requirements, manufacturer's written installation
instructions, and SMACNA's "Architectural Sheet Metal Manual." Provide concealed fasteners where
possible, and set units true to line and level as indicated. Install work with laps, joints, and seams that are
permanently watertight.
1. Install exposed flashing and trim only where indicated, that is without buckling, and tool marks, and
that is true to line and levels indicated, with exposed edges folded back to form hems. Install sheet
metal flashing and trim to fit substrates and to achieve waterproof performance.
2. Expansion Provisions: Provide for thermal expansion of exposed flashing and trim. Space
movement joints at a maximum of 10 feet with no joints allowed within 24 inches of corner or
intersection. Where lapped expansion provisions cannot be used or would not be waterproof, form
expansion joints of intermeshing hooked flanges, not less than 1 inch deep, filled with mastic sealant
(concealed within joints).
3.6 FIELD QUALITY CONTROL
A. Testing Agency: Owner will engage a qualified independent testing and inspecting agency to inspect
AESS as specified in Section 051200 "Structural Steel Framing" and steel decking as specified in Section

BTBC Phase III October 26, 2020
GE Project No. 0119-0010
Gould Evans
EXTERIOR SUN SHADE ASSEMBLY 107113 - 11
053100 “Steel Decking.” The testing agency is not responsible for enforcing requirements relating to
aesthetic effect.
B. Architect will observe AESS and steel decking in place to determine acceptability relating to aesthetic
effect.
C. Roofing Manufacturer's Field Service: Arrange for roofing system manufacturer's technical personnel to
inspect roofing installation on completion.
1. Repair or remove and replace components of roofing system where inspections indicate that they
do not comply with specified requirements.
2. Additional testing and inspecting, at Contractor's expense, will be performed to determine if
replaced or additional work complies with specified requirements.
D. Prepare test and inspection reports.
3.7 REPAIRS AND PROTECTION
A. Protect finishes of sun shade assemblies from damage during construction period. Remove temporary
protective coverings at time of Substantial Completion.
B. AESS: Remove welded tabs that were used for attaching temporary bracing and safety cabling and that
are exposed to view in the completed Work. Grind steel smooth.
1. Touchup Painting: Immediately after erection, clean field welds, bolted connections, and abraded
areas of shop paint, and paint exposed areas with the same material as used for shop painting to
comply with SSPC-PA 1 for touching up shop-painted surfaces.
a. Clean and prepare surfaces by SSPC-SP 2 hand-tool cleaning or SSPC-SP 3 power-tool
cleaning.
C. Roofing: Protect roofing system from damage and wear during remainder of construction period. When
remaining construction does not affect or endanger roofing, inspect roofing for deterioration and damage,
describing its nature and extent in a written report, with copies to Architect and Owner.
1. Correct deficiencies in or remove roofing system that does not comply with requirements, repair
substrates, and repair or reinstall roofing system to a condition free of damage and deterioration at
time of Substantial Completion and according to warranty requirements.
2. Clean overspray and spillage from adjacent construction using cleaning agents and procedures
recommended by manufacturer of affected construction.
D. Restore finishes damaged during installation and construction period so no evidence remains of
correction work. Return items that cannot be refinished in the field to the shop; make required alterations
and refinish entire unit or provide new units.
END OF SECTION 107113

BTBC Phase III October 26, 2020
GE Project No. 0119-0010
Gould Evans
EXTERIOR SUN SHADE ASSEMBLY 107113 - 12
[THIS PAGE INTENTIONALLY LEFT BLANK]
BTBC Phase III October 26, 2020
GE Project No. 0119-0010
Gould Evans
FOODSERVICE EQUIPMENT 114000 - 1
SECTION 114000 - FOODSERVICE EQUIPMENT
PART 1 - GENERAL
1.1 RELATED DOCUMENTS
A. Drawings and general provisions of the Contract, including General and Supplementary
Conditions and Division 01 Specification Sections, apply to this Section.
1.2 SUMMARY
A. Section Includes:
1. Walk-in refrigeration equipment.
B. Related Requirements:
1. Section 233813 "Commercial-Kitchen Hoods" for ventilation hoods.
1.3 COORDINATION
A. Coordinate foodservice equipment layout and installation with other work, including layout and
installation of lighting fixtures, HVAC equipment, and fire-suppression system components.
B. Coordinate locations and requirements of utility service connections.
C. Coordinate sizes, locations, and requirements of the following:
1. Overhead equipment supports.
2. Insulated floors.
3. Floor areas with positive slopes to drains.
4. Floor sinks and drains serving foodservice equipment.
5. Penetrations.
1.4 PREINSTALLATION MEETINGS
A. Preinstallation Conference: Conduct conference at [Project site] <Insert location>.
1.5 ACTION SUBMITTALS
A. Product Data: For each type of product. Include the following:
1. Manufacturer's model number.
2. Accessories and components that will be included for Project.
3. Clearance requirements for access and maintenance.

BTBC Phase III October 26, 2020
GE Project No. 0119-0010
Gould Evans
FOODSERVICE EQUIPMENT 114000 - 2
4. Utility service connections for water, drainage, power, and fuel; include roughing-in
dimensions.
B. Shop Drawings: For fabricated equipment. Include plans, elevations, sections, roughing-in
dimensions, fabrication details, utility service requirements, and attachments to other work.
C. Samples for Initial Selection: For units with factory-applied color finishes.
D. Samples for Verification: For each factory-applied color finish required, in manufacturer's
standard sizes.
1.6 INFORMATIONAL SUBMITTALS
A. Coordination Drawings: For foodservice facilities.
1. Indicate locations of foodservice equipment and connections to utilities.
2. Key equipment using same designations as indicated on Drawings.
3. Include plans and elevations; clearance requirements for equipment access and
maintenance; details of equipment supports; and utility service characteristics.
4. Include details of seismic bracing for equipment.
B. Sample Warranty: For special warranty.
1.7 CLOSEOUT SUBMITTALS
A. Operation and Maintenance Data: For foodservice equipment to include in emergency, operation,
and maintenance manuals.
1. In addition to items specified in Section 017823 "Operation and Maintenance Data,"
include the following:
a. Product Schedule: For each foodservice equipment item, include the following:
1) Designation indicated on Drawings.
2) Manufacturer's name and model number.
3) List of factory-authorized service agencies including addresses and telephone
numbers.
1.8 FIELD CONDITIONS
A. Field Measurements: Verify actual dimensions of construction contiguous with foodservice
equipment by field measurements before fabrication. Indicate measurements on Coordination
Drawings.

BTBC Phase III October 26, 2020
GE Project No. 0119-0010
Gould Evans
FOODSERVICE EQUIPMENT 114000 - 3
1.9 WARRANTY
A. Refrigeration Compressor Warranty: Manufacturer agrees to repair or replace compressors that
fail in materials or workmanship within specified warranty period.
1. Failure includes, but is not limited to, inability to maintain set temperature.
2. Warranty Period: [Five] <Insert number> years from date of Substantial Completion.
PART 2 - PRODUCTS
2.1 PERFORMANCE REQUIREMENTS
A. NSF Standards: Provide equipment that bears NSF Certification Mark or UL Classification Mark
certifying compliance with applicable NSF standards.
B. BISSC Standards: Provide bakery equipment that complies with BISSC/Z50.2.
1. Provide BISSC-certified equipment[, with certification verified by a third-party
agency].
C. UL Certification: Provide electric and fuel-burning equipment and components that are evaluated
by UL for fire, electric shock, and casualty hazards according to applicable safety standards, and
that are UL certified for compliance and labeled for intended use.
D. Steam Equipment: Provide steam-generating and direct-steam heating equipment that is
fabricated and labeled to comply with 2013 ASME Boiler and Pressure Vessel Code.
E. Regulatory Requirements: Install equipment to comply with the following:
1. ASHRAE 15, "Safety Code for Mechanical Refrigeration."
2. NFPA 54, "National Fuel Gas Code."
3. NFPA 70, "National Electrical Code."
4. NFPA 96, "Ventilation Control and Fire Protection of Commercial Cooking Operations."
F. Seismic Restraints: Comply with SMACNA's "Kitchen Ventilation Systems and Food Service
Equipment Fabrication and Installation Guidelines," Appendix A, "Seismic Restraint Details,"
unless otherwise indicated.
2.2 WALK-IN REFRIGERATION EQUIPMENT
A. Walk-in Refrigeration Units <Insert drawing designation>:
1. <Double click here to find, evaluate, and insert list of manufacturers and products.>
2. Description: [Cooler] [Freezer] [Two-compartment unit, with cooler and freezer
compartments] <Insert description>.
a. Wall and Ceiling Panels: Interlocking insulating panels.

BTBC Phase III October 26, 2020
GE Project No. 0119-0010
Gould Evans
FOODSERVICE EQUIPMENT 114000 - 4
b. Floors: [Insulated floor panels] [Field installed; provide manufacturer's
standard insulated floor screed] <Insert requirements>.
c. Doors:
1) Hinges: [Two per door] [Self-closing and spring loaded; three per door]
<Insert requirements>.
2) Latch: [Edge-mounted, positive-type latch with cylinder lock] <Insert
requirements>.
3) Include safety-release handle that opens door from inside when door is
locked.
d. Door Accessories:
1) Vision port.
2) Pressure relief port.
3) Threshold: Stainless steel, factory installed.
4) Anticondensate heater at freezer doors.
e. Vaporproof Lighting Fixtures: <Insert requirements>.
1) Control: Neon pilot light and toggle switch located on exterior of door panel.
2) Quantity: [One per compartment, located on door panel] <Insert
quantity>.
f. Refrigeration System: [Self-contained, mounted on unit] [Remote system with
preassembled condensing unit and evaporator assemblies] <Insert
requirements or manufacturer's refrigeration assembly designation>.
1) Exterior Condensing Units: Include winter control, crankcase heater, and
enclosed weatherproof housing.
2) Operating Temperature: <Insert value(s)>.
g. Temperature Monitoring System: [Electronic monitoring and remote audible
alarm system that warns when temperatures register 10 deg F (6 deg C) above
or below set temperature] <Insert requirements>.
h. Closure Panels and Trim: [Include closure panels and trim] <Insert
requirements>.
i. Electrical Service: Equip unit for connection to [service indicated on Drawings]
<Insert requirements>.
3. Finishes:
a. Exposed Exterior Finish: [Stucco-patterned aluminum] [Smooth, mill-finished
aluminum] [White-painted aluminum] <Insert requirements>.
b. Unexposed Exterior Finish: [Stucco-patterned, metallic-coated steel] <Insert
requirements>.
c. Interior Finish: [Stucco-patterned aluminum] [Smooth, mill-finished aluminum]
[White-painted aluminum] <Insert requirements>.
d. Closure Panels and Trim: [Matched to exposed exterior finish of panels] <Insert
requirements>.

BTBC Phase III October 26, 2020
GE Project No. 0119-0010
Gould Evans
FOODSERVICE EQUIPMENT 114000 - 5
2.3 MISCELLANEOUS MATERIALS
A. Installation Accessories, General: NSF certified for end-use application indicated.
B. Elastomeric Joint Sealant: ASTM C920; silicone. Type S (single component), Grade NS
(nonsag), Class 25, Use NT (nontraffic) related to exposure, and Use M, G, A, or O as applicable
to joint substrates indicated.
1. Public Health and Safety Requirements:
a. Sealant is certified for compliance with NSF standards for end-use application
indicated.
b. Washed and cured sealant complies with the FDA's regulations for use in areas that
come in contact with food.
2. Cylindrical Sealant Backing: ASTM C1330, Type C, closed-cell polyethylene, in diameter
greater than joint width.
2.4 FINISHES
A. Stainless Steel Finishes:
1. Surface Preparation: Remove tool and die marks and stretch lines, or blend into finish.
2. Polished Finishes: Grind and polish surfaces to produce uniform finish, free of cross
scratches.
a. Run grain of directional finishes with long dimension of each piece.
b. When polishing is completed, passivate and rinse surfaces. Remove embedded
foreign matter and leave surfaces chemically clean.
B. Powder-Coat Finishes: Immediately after cleaning and pretreating, electrostatically apply
manufacturer's standard, baked-polymer, thermosetting powder finish. Comply with resin
manufacturer's written instructions for application, baking, and minimum dry film thickness.
PART 3 - EXECUTION
3.1 INSTALLATION
A. Install foodservice equipment level and plumb, according to manufacturer's written instructions.
1. Connect equipment to utilities.
2. Provide cutouts in equipment, neatly formed, where required to run service lines through
equipment to make final connections.
B. Complete equipment assembly where field assembly is required.
1. Provide closed butt and contact joints that do not require a filler.

BTBC Phase III October 26, 2020
GE Project No. 0119-0010
Gould Evans
FOODSERVICE EQUIPMENT 114000 - 6
2. Grind field welds on stainless steel equipment until smooth and polish to match adjacent
finish.
C. Install equipment with access and maintenance clearances that comply with manufacturer's
written installation instructions and with requirements of authorities having jurisdiction.
D. Install cabinets and similar equipment on bases in a bed of sealant.
E. Install closure-trim strips and similar items requiring fasteners in a bed of sealant.
F. Install joint sealant in joints between equipment and abutting surfaces with continuous joint
backing unless otherwise indicated. Produce airtight, watertight, vermin-proof, sanitary joints.
3.2 CLEANING AND PROTECTING
A. After completing installation of equipment, repair damaged finishes.
B. Clean and adjust equipment as required to produce ready-for-use condition.
C. Protect equipment from damage during remainder of the construction period.
3.3 DEMONSTRATION
A. [Engage a factory-authorized service representative to train] [Train] Owner's maintenance
personnel to adjust, operate, and maintain foodservice equipment.
END OF SECTION 114000

BTBC Phase III October 26, 2020GE Project No. 0119-0010Gould Evans
LABORATORY FUME HOOD 115313 - 1
SECTION 115313 - LABORATORY FUME HOOD
PART 1 - GENERAL
1.1 GENERAL
A. This document sets forth the standards & specifications for high performance fume hoods. Any deviations or exceptions must be reviewed and approved by the engineer/owner.
1.2 SUMMARY
A. Section Includes:1. Bench-top High-Performance Laboratory Fume Hoods.2. Service fixtures (i.e. water, gas, etc.) and electrical service fittings in fume hoods.3. Piping and wiring within service fittings, light fixtures, switches, and other electrical
devices.4. Fume hood base support.5. Work Surfaces within fume hoods.6. Laboratory sinks and cup sinks in fume hoods.7. Filler panels and ceiling enclosures for fume hoods.
B. Related Sections:1. Section 220000: Furnish and installation of plumbing utilities and final connections to
fume hoods.2. Section 230000: Furnishing and installation of exhaust duct work and equipment, and
final connection of hoods.3. Section 260000: Furnishing and installation of electrical utilities and final connections to
hoods.
1.3 SCOPE AND CLASSIFICATION
A. This specification covers the requirements for the purchase and installation of bench/cabinet mounted high performance laboratory fume hoods for remote exhaust blower systems (CAV or VAV). It is written to cover the airflow design, by-pass design and service fixture configurations that are available on these hoods.
B. Bench-mounted laboratory fume hoods in 6-foot widths, internal depth of 27.2" and external depth of 37.7" are required.
C. This specification sets the intent for quality, performance and appearance.
1.4 REFERENCES
A. The laboratory hoods must conform to the following regulations and standards.1. SEFA 1-2010, Scientific Equipment and Furniture Association , Recommended Practices
for Laboratory Fume Hoods2. SEFA 8-2010, Recommended Practices for Laboratory Grade Metal Casework, 8.0
Cabinet Surface Finish Tests3. NFPA 45-2011, National Fire Protection Association, Fire Protection for
Laboratories Using Chemicals

BTBC Phase III October 26, 2020GE Project No. 0119-0010Gould Evans
LABORATORY FUME HOOD 115313 - 2
4. ASTM E84-09C, ANSI 2.5, NFPA 255, UL 723, UBC 8-1 (42-1), Standard Test method for Surface Burning Characteristics of Building Materials
5. ASHRAE 110-16, American Society of Heating, Refrigerating, and Air-Conditioning Engineers, Method of Testing Performance of Laboratory Fume Hoods
6. ANSI/AIHA Z9.5-2011, American Industrial Hygiene Association, Laboratory Ventilation
7. OSHA, Federal Register 29 CFR Part 1910, Occupational Safety & Health Administration, U.S. Department of Labor, Occupational exposures to hazardous chemicals in laboratories.
B. The laboratory fume hoods must carry the ETL listed mark for the following.1. UL 61010-1 (formerly 3101-1), Underwriters Laboratories Inc., Electrical Equipment for
Laboratory Use2. CAN/CSA C22.2 No. 61010-1, Canadian Standards Association, Safety Requirements
for Electrical Equipment for Measurement, Control and Laboratory Use3. UL 1805, Underwriters Laboratories Inc., Standard for Laboratory Hoods and Cabinets
1.5 PERFORMANCE REQUIREMENTS
A. General Design Requirements (See Part 2 for details)1. Fume hoods shall function as ventilated, enclosed workspaces, designed to capture,
contain and exhaust fumes, vapors and particulate matter produced or generated within the enclosure.
2. Fume hood shall be factory designed to function as a by-pass fume hood or as a variable air volume fume hood without modification.
3. Structure and Materials of constructiona. Hoods are of double-wall constructionb. Epoxy-coated, cold rolled steel exterior c. Galvanized steel support membersd. Sheet molded composite board internal liner
4. Bafflesa. Perforated primary baffle designed to pull air in horizontal streams to minimize the
air roll pattern associated with traditional fume hoods.b. Baffle slot pattern designed to optimize face velocity profile.c. A secondary baffle is located behind the primary perforated baffle to
counteract upward air streams that produce roll.d. Moving or adjustable baffles are not acceptable
5. Sasha. Maximum opening is 28” sash may not extend above exterior sheet metal of hood. b. Unobstructed viewing height is 37.5".c. Hood incorporates a perforated sash handle to bleed air into the hood
chamber directing fume concentrations away from the user's breathing zone.6. Airfoil:
a. Hoods are provided with an air foil across the bottom of the sash area to allow airflow into the hood regardless of user's position.
7. Hoods are provided with an upper dilution air supply for by-pass air to bathe the sash interior and upper interior and to provide 5-10% of the hood's air volume requirements.
8. Besides the exhaust blower, no additional blowers are required for specified containment.9. Access for maintenance is from both the front, interior, and exterior sides of the hood.

BTBC Phase III October 26, 2020GE Project No. 0119-0010Gould Evans
LABORATORY FUME HOOD 115313 - 3
10. Services:a. Furnishing and delivering all service outlets, accessory fittings, electrical
receptacles and switches, as listed in these specifications, equipment schedules or as shown on drawings.
b. Plumbing fittings mounted on the fume hood superstructures shall be pre-plumbed per section 2.03.
c. Final plumbing and electrical connections are the responsibility of those contractors fulfilling requirements of Divisions 22 and 26.
d. All electrical services are pre-wired to a single point internal junction box at the top right of the hood.
11. Hoods without service fixtures pass through a 38" opening without disassembly.
B. Containment (as manufactured)1. The purpose of this section is to set a standard of performance for the bidder’s laboratory
fume hood before award of contract, and may not necessarily represent the operating conditions of the hoods after installation. Before or after award of contract, owners may require representative witness to said testing at their option, with failure to meet passing criteria as grounds for rejection of the bidder. Test data shall be provided at no cost to the owner.
2. Evaluation of manufacturer’s standard product shall take place in manufacturer’s test facility meeting the following criteria.a. Lab to be located at manufacturer’s place of business for the testing of
bench- mounted laboratory hoods in accordance with ASHRAE Standard 110.b. Room shall accommodate hoods up to 16’ wide, while maintaining sufficient area
so that a minimum of 15 feet of clear space is available in front of and 5’ on both sides of hoods for viewing tests.
c. The facility's ventilation system shall have adequate heating and air conditioning so that room air temperatures can be maintained within the desired ranges.
d. One hundred percent non-recirculated air to be both carbon and HEPA filtered to ensure removal of contaminants that could interfere with containment testing before entering the lab.
e. Make-up air to the test room shall be ceiling-supplied through any combination of multiple diffusers to either minimize adverse airflow, or increase it depending on test objectives.
f. Exhaust volumes shall be computer controlled and measured via AMCA calibrated orifices and flow station at each exhaust trunk.
g. Room pressurization must be digitally monitored, and variable depending on test objectives.
h. All equipment must be properly calibrated.i. Qualified personnel familiar with the laboratory and its operation shall be available
to perform the test.j. Include the following instrumentation and test equipment:
1) Properly calibrated hot wire thermal anemometer capable of measuring air velocities from 10 to 600 ft/minute; correlate with computer data acquisition format to provide simultaneous readings at all points.
2) Theatrical smoke generator or other source of high volume smoke.3) Smoke tubes or other source of localized smoke.4) Leak meter with traceable calibration, calibrated just before test, to indicated
concentration of sulfur hexafluoride.

BTBC Phase III October 26, 2020GE Project No. 0119-0010Gould Evans
LABORATORY FUME HOOD 115313 - 4
5) Tracer gas: Sulfur hexafluoride supplied from a cylinder with two stage regulator.
6) Adjustable mannequin, 5' 0' to 5'8" in height, with reasonable human proportions, clothed in a smock
7) Inclined manometer with graduations no greater than 0.2 inch of water.8) Ejector system: Tracer gas ejector built to specific ASHRAE-
110 requirements.9) Critical orifice: Sized to provide tracer gas at four or eight liters per minute
at an upstream pressure sufficient to maintain release rate.10) Data acquisition software to include HoodPro™ and LabMeasurePro™
from Exposure Control Technologies, Inc. 3. Hood shall be tested to ASHRAE 110 modified test method as detailed below.4. Some fume hoods may use face velocity controls, motorized baffles, integral auxiliary
make up, or supply fans. Because all of these devices are subject to failure, containment testing shall show both operational containment and product containment with these systems off.
5. Fume hood sashes shall be placed in their full open position, at least 28” from the work surface, unless noted otherwise.
6. Ambient Temperature: 68 to 74 degrees F7. Average Face Velocity: Face velocity average shall be 40 and 50fpm, as noted below in
subsection 8.d, parts 1 and 2 respectively, plus or minus 5%.a. An imaginary grid is formed comprised of equal 12” by 12” squares, or smaller,
across the face opening of the laboratory hood. Airflow velocity readings are taken at the intersections of these grids with calibrated hot wire anemometer over a twenty second period of time. Probes shall communicate readings to a computer data acquisition package, which will provide an average of each reading over the one-minute period and also an overall average upon completion of data acquisition. Face velocity shall be determined by averaging readings at the hood face.
b. Average face velocity must be achieved without exceeding the CFM noted in part C.
8. Tracer Gas Detection: Hood shall achieve a rating of 4.0AM0.00 maximum average and 4.0AM0.01 maximum spike (unless specifically otherwise noted), wherein:a. 4.0 = tracer gas release in liters/minute, AM = as manufactured, 0.01 = tracer gas
in parts per million (PPM)b. With the ejector body 6" from the rear of the sash plane, the test shall be conducted
for each ejector position noted.1) Left position with ejector 12" from the left interior wall.2) Center position with ejector equidistant from the sidewalls.3) Right position with ejector 12" from the right interior wall.
c. Install mannequin positioned in front of the hood, centered on the ejector.d. Detector probes shall be placed 3” in front of the sash plane. The test
shall be conducted for each detector probe position and corresponding face velocity.1) Detector probe in the region of the nose and mouth of the mannequin. Test
with average face velocity of 40 fpm.2) With the mannequin height reduced 4”, place detector probe in the chest of
the mannequin, and even with the height of the ejector. Test with average face velocity of 50 fpm.

BTBC Phase III October 26, 2020GE Project No. 0119-0010Gould Evans
LABORATORY FUME HOOD 115313 - 5
e. Open tracer gas valve, and collect readings with a computer data acquisition package, which is capable of monitoring and visually recording a minimum of one reading per second for a minimal five minute time period for each position.
f. The single control rating of the fume hood shall be the results of the test position yielding the highest average levels of tracer gas in any of the six mannequin/ejector configurations.
g. With the ejector and mannequin in the center position, detector probe in the region of the nose and mouth of the mannequin, average face velocity of 40 fpm, tracer gas released, and concentration recorded, open and close the sash in a smooth motion. Test to be repeated three times, with peak values of 0.01 PPM or less.
h. With the mannequin removed, the periphery of the hood is traversed by the probe at 1” in front of the hood opening at a rate of 3 inches per second. The hood shall have a maximum perimeter reading of 0.01 PPM or less.
9. Flow Visualization:a. Test the operation of the lower air bypass airflow opening and hood periphery by
introducing light smoke under the air foil, and around the perimeter of the sash opening. If any smoke that enters the hood reverses directions and escapes from any of these locations, the hood fails this portion of the test and receives no rating.
b. Introduce smoke along both walls and the hood floor in a line parallel to the hood face and 6 inches back into the hood. Define air movement toward the face of the hood as reverse airflow and define lack of movement as dead air space. All smoke should be carried to the back of the hood and out.
c. Introduce a large volume of smoke at the work surface in the center of the hood, and 6” inside the plane of the sash. The smoke shall not get entrained in an interior vortex, and shall clear in a single pass.
10. All data on the above, including instrumentation and equipment, and test conditions shall be provided on a report, including the average face velocities, and a separate graph-type performance curve on all tracer gas tests for all required fume hood widths. Performance test data for a 6’ representative hood shall be conducted by an independent testing agency and by a specific individual certified to perform such tests by the National Environmental Balancing Bureau (NEBB).
C. Efficiencies1. The fume hood shall maintain constant volumetric rate (+/- 5 CFM) and static pressure
losses (+/- 0.01” H2O) across all sash positions. Without any modifications, the hood shall also maintain a sufficiently restricted by-pass for use with a variable air volume (VAV) system.
2. The fume hood shall demonstrate a minimization of the volumetric rate of air (CFM) requirement at any given face velocity. Required CFM to achieve desired face velocity shall not exceed that which is noted in the chart below.
3. The fume hood shall demonstrate a minimization of static pressure loss (inches of H2O) at any given CFM. Static pressure loss at desired face velocity, and corresponding CFM, shall not exceed that which is noted in the chart below.
Face Velocity (fpm) Sash at 28" openAirflow Volumetric Rate (CFM) @ Static Pressure (inches of water)
4' Hood 5' Hood 6' Hood 8' Hood

BTBC Phase III October 26, 2020GE Project No. 0119-0010Gould Evans
LABORATORY FUME HOOD 115313 - 6
100 705, 0.26" 930, 0.32" 1150, 0.41" 1600, 0.29"80 565, 0.17" 745, 0.20" 920, 0.25" 1280, 0.19"60 425, 0.09" 560, 0.12" 690, 0.15" 960, 0.10"50* 350, 0.06" 465, 0.08" 575, 0.10" 800, 0.07"40* 280, 0.04" 370, 0.05" 460, 0.07" 640, 0.05"
*There is not a written standard that would suggest a design face velocity below 60 fpm. This data is for informational purposes only.
Face Velocity (fpm) Sash at 18" openAirflow Volumetric Rate (CFM) @ Static Pressure (inches of water)
4' Hood 5' Hood 6' Hood 8' Hood100 440, 0.10" 580, 0.12" 720, 0.16" 1000, 0.11"80 350, 0.06" 465, 0.08" 575, 0.10" 800, 0.07"60 265, 0.04" 350, 0.05" 430, 0.06" 600, 0.04"
D. Noise Criterion: The hood shall have a Noise Criterion (NC) rating of less than 50; measured 36” in front of the hood with full open sash, at 100 fpm face velocity. NC is a factor of sound pressure level (dB) and frequency.
E. Illumination: Shall be a minimum average of 80 foot-candles inside the work area. Work area is defined as the area inside the lined portion of the fume hood, from the face of baffle to sash plane, from interior left to interior right, and from the work surface to a height of 28 inches.
F. Materials of Construction: Interior and Exterior materials of construction and finishes shall meet the requirements in Part 2 of this specification.
1.6 QUALITY ASSURANCE
A. Fume hoods shall be designed, including comprehensive engineering analysis, by a qualified, licensed Professional Engineer.
B. Manufacturer’s Qualifications1. ISO 9001 Certified manufacturing plant and processes.2. Ten installations of equal or larger size and requirements. Provide contact at each.3. Only hood manufacturers who have had fume hoods as a principal product for 75 years
are considered.
C. Fume hoods shall be Made in America1. 95% or more of raw material and component suppliers shall be United States based.2. Stainless and cold rolled steel used in manufacturing shall be sourced from United States
steel mills.3. Final product must be fabricated and assembled within the United States of America.4. Owner reserves the right to evaluate Made in America claims for compliance with
the Bureau of Consumer Protection.
D. Supply all equipment in accordance with this specification. Offering a product differing in materials, construction, or performance from this specification requires written approval by engineer and owner obtained seven days or more before the proposal deadline.

BTBC Phase III October 26, 2020GE Project No. 0119-0010Gould Evans
LABORATORY FUME HOOD 115313 - 7
E. The owner/architect reserves the right to reject qualified or alternate proposals and to award based on product value where such action assures the owner greater integrity of product.
F. Manufacturer's warranty against defects in material or workmanship on its fume hoods will be for 1 year from date of installation or 2 years from date of purchase, whichever is sooner, and includes replacement of parts (except lamps) and labor. Owner warranty requirement is 5 years from date of installation.
1.7 SUBMITTALS
A. Action Submittals1. Laboratory hood specification sheets and product manuals shall be submitted by the hood
manufacturer upon request, and include safe and proper operation and maintenance information.
2. Shop Drawings: Include plans, elevations, sections, and details.a. Indicate details for anchoring fume hoods to permanent building construction
including locations of blocking and other supports.b. Indicate locations and types of service fittings together with associated
service supply connection required.c. Indicate duct connections, electrical connections, and locations of access panels.d. Include rough-in information for mechanical, plumbing, and electrical connections.e. Provide face opening, volumetric rates, and static pressure drop data.
3. Submit a document detailing the information supplied on the Hood Safety Practices Label to verify compliance to specifications.
B. Informational Submittals1. Product Test Reports: Showing compliance with specified performance
requirements, including NEBB representative test report as defined previously.2. Independent validation:
a. Written verification that the laboratory fume hoods carry the ETL listed mark for the following.1) UL 61010-1 (formerly 3101-1), Underwriters Laboratories Inc.,
Electrical Equipment for Laboratory Use2) CAN/CSA C22.2 No. 61010-1, Canadian Standards Association, Safety
Requirements for Electrical Equipment for Measurement, Control and Laboratory Use
3) UL 1805, Underwriters Laboratories Inc., Standard for Laboratory Hoods and Cabinets
b. Written verification that 230 volt model fume hoods carry the CE conformity marking as required by the Council of European Communities.
c. Written verification from an outside testing agency confirming coating compliance to SEFA 8-2010, Recommended Practices for Laboratory Grade Metal Casework, 8.0 Cabinet Surface Finish Tests
3. Documentation of ISO 9001 Certified manufacturing plant and processes.4. List of five installations (of equal or larger size and requirements) is available upon
request. Provide contact at each.5. Declaration of Made in America, Owner reserves the right to evaluate Made in America
claims for compliance with the Bureau of Consumer Protection.
C. Material Submittals

BTBC Phase III October 26, 2020GE Project No. 0119-0010Gould Evans
LABORATORY FUME HOOD 115313 - 8
1. Samples for Verification: of the hood exterior wall material, interior liner and baffle material, epoxy work surface material, and color selection chips are available from the hood manufacturer upon request.
1.8 DELIVERY, STORAGE, AND HANDLING
A. Protect finished surfaces during handling and installation with protective covering of polyethylene film or another suitable material.
B. Schedule delivery of equipment so that spaces are sufficiently complete that equipment can be installed immediately following delivery.
1.9 PROJECT CONDITIONS
A. Environmental Limitations: Do not deliver or install fume hoods until building is enclosed, wet work and utility rough-in are complete, and HVAC system is operating and maintaining temperature and relative humidity at occupancy levels during the remainder of the construction period.
PART 2 - PRODUCTS
2.1 MANUFACTURERS
A. Basis-of-Design Product: Labconco Protector PVC Acid Digestion
2.2 MATERIALS
A. Hood Interior Liner and Baffle1. Liner: Type 1 Unplasticized polyvinyl chloride.2. General Material Properties
a. Resistant to strong acid.b. Nonflammable, corrosion and chemical-resistant c. Sheet molded homogenous polyester panelsd. Minimum thickness is 3/16" d. Smooth, white finish
3. Flame and Smoke Characteristicsa. Flame retardant, self-extinguishing, with a flame spread rating of 25 or less
in accordance with ASTM-E844. Chemical Resistance
a. Splash and Spill Resistance:1) Suspend sample panel in a vertical plane2) Apply five drops of each reagent listed with an eyedropper3) Apply liquid reagents at top of panel and allow to flow down full panel
height b. Fume Resistance:
1) Place 25 milliliters of reagent into 100 milliliters beakers and position panel over beaker tops in the proper sequence. Ensure beaker pouring lip permits air to enter the interior atmosphere.
2) After 24 hours remove panel, flush with water, clean with detergent, rinse, wipe dry and evaluate

BTBC Phase III October 26, 2020GE Project No. 0119-0010Gould Evans
LABORATORY FUME HOOD 115313 - 9
c. Evaluation ratings: Change in surface finish and function shall be described by the following numerical ratings1) No Effect: No change in color or gloss2) Excellent: Slight detectable change in color or gloss, but no change to the
function or life of the work surface material3) Good: Clearly discernible change in color or gloss, but no significant
impairment of function or life4) Fair: Objectionable change in appearance due to surface discoloration or
etch, possibly resulting in deterioration of function over an extended period5) Failure: Pitting, cratering or erosion of work surface material; obvious and
significant deterioration
B. Sheet Steel1. Side panels and access panels 20-gauge (or heavier) sheet steel.2. Hood corner posts are 18-gauge sheet steel.3. Ceiling enclosure panels are 18-gauge sheet steel.4. Cold-rolled, commercial steel (CS) sheet, complying with ASTM A 1008/A 1008M.
C. Chemical Resistant Finish1. General: Prepare, treat, and finish welded assemblies after welding. Prepare, treat, and
finish components that are to be assembled with mechanical fasteners before assembling.2. Chemical and Physical Resistance of Finish System: Finish complies with
acceptance levels of cabinet surface finish tests in SEFA 8. Third party validation required.
3. Powder-coat process required. Paint processes that release Volatile Organic Compounds (VOC) are not acceptable
4. Color for Fume Hood Finish:a. Glacier White
D. Safety Glass1. Tempered
a. Clarity and temper test to be as specified in latest edition of Glass Tempering Association, Engineering Standards Manual, Section 8.1.
b. Surface and interior visible quality to be as specified per ASTM C 1036, Standard Specification for Flat Glass, Table 4, Quality level Q3.
2.3 CONSTRUCTION
A. Superstructure:1. Self-supporting, rigid structural assembly, to support inner wall consisting of fume hood
liner and outer wall of sheet metal exterior.2. Fabricated from galvanized steel.3. Space shall accommodate fume hood wiring and plumbing components for service
fixtures.4. Access to fixture valves concealed in wall provided by exterior removable access panels,
gasket access panels on the inside liner walls, or through removable access panels on the front posts.
B. Exterior1. Fabricate from steel sheet with component parts screwed together.

BTBC Phase III October 26, 2020GE Project No. 0119-0010Gould Evans
LABORATORY FUME HOOD 115313 - 10
2. Apply chemical-resistant finish to interior and exterior surfaces of component parts before assembly.
3. Interchangeable side panels shall lift off without the use of tools to allow access to plumbing lines, service fittings, electrical wiring, counterbalance sash weights, and light fixtures. Exposed fasteners or hardware, and Velcro type fasteners, are not acceptable.
4. Corner postsa. Pre-punched and plugged to accommodate up to 4 service fixtures per side b. All services are accessible from the front of the hood.c. Aerodynamic shaped. Accommodate two electrical duplexes per side.e. Right hand corner post includes electrical switches and pre-cut for Airflow monitor
installation.f. Un-used penetrations shall be plugged.
5. Top and sides of face opening to provide an aerodynamic shape to ensure smooth, even flow of air into fume hood.
6. Panel above header shall be removable without the use of tools to allow access to mechanical connection, electrical wiring, counterbalance sash weights, and light fixtures. Exposed fasteners or hardware, and Velcro type fasteners, are not acceptable.
C. Dimensions1. Overall exterior dimensions are as follows:
a. 6 foot nominal width: 72” w x 59” h x 37.7” d
D. Hood Liner1. Heat-welded unplasticized PVC liner with integral work surface, drainage trough and
pre-set baffles. 2. Stainless steel fasteners shall be used on the interior ceiling for structural integrity.3. Fasteners exposed to chemical environment are not acceptable.4. Punch fume hood lining side panels to receive four service fittings, for use with remote
controls, per side. Provide removable plug buttons for holes not used for indicated fittings.
5. Each side wall shall include an oval interior access panel to provide access to the side wall of the fume hood for plumbing service access. Access panel material shall be that of the liner, and gasketed to form a vapor proof seal.
E. Hood Baffle1. Baffle system shall be designed to optimize the face velocity profile, and to capture a
wide range of gaseous densities without adjustment or moving components.2. The baffle system shall be constructed with the same material as the fume hood liner.3. The baffles shall be removable for cleaning. The primary baffles shall be two pieces to
allow removal without the use of tools.4. Exposed components to be non-metallic. Metal components exposed to chemical
environment are not acceptable.5. Moving parts or adjustment of any kind is not acceptable.
F. Exhaust Connection1. Material: PVC.2. 12.75" OD to accommodate a 12” PVC duct connection. One exhaust connection.

BTBC Phase III October 26, 2020GE Project No. 0119-0010Gould Evans
LABORATORY FUME HOOD 115313 - 11
3. Ducting shall go inside the duct collar to ensure condensate travels into the hood and evaporates. Duct collars that allow duct connection over the collar are not acceptable.
G. Sash Assembly1. Glass: 1/4" Lexan polycarbonate vertical-rising sash.2. Dimensions: The full sash opening height is 28", the total unobstructed viewing height is
37.5" measured from the work surface.3. Sash Tracks: Steel with Chemical Resistant Finish. Shall include bump stops for opening
and closing.4. Sash Handle: extruded aluminum with Chemical Resistant Finish. Sash handle includes a
perforated air passage directly atop the handle to bleed air into the hood chamber and direct chemical fumes away from the user's breathing zone. The handle is ergonomic in design and is easy to grasp when operating
5. Sash guides: Corrosion resistant extruded poly-vinyl chloride.6. Sash System
a. Intelli-Sense Automatic Sash Position System1) Settings for automatic open/close, or automatic close with manual open2) System shall have time delay settings3) Design system to hold sash at any position without creep and to prevent sash
drop in the event of chain failure.4) Operator presence sensor shall be adjustable
i. Sensor shall have a range up to 4 feet5) System shall have a sash interference sensor
i. Sash interference sensor shall range entire fume hood width
H. Electrical Components1. Lighting
a. Provide UL Listed, high-efficiency, quick-start lighting systems, including bulbs.1) 6 Foot Hoods – pre-wired T8 flourescent lighting with
b. Vapor-Proof: all electrical components shall be outside of the contaminated air space. Lighting shall be located behind a laminated safety glass shield, sealed to the top of the hood liner.
c. Light switch to be included on the lower right corner post, at heights compliant with the Americans with Disabilities Act (ADA).
2. Blower Switcha. Hoods shall be provided without a blower switch, as they will share a
single mechanical system with other hoods for VAV systems, or for CAV installations will be required to stay on 24/7.
3. Electrical Receptaclesa. The hoods shall accommodate a duplex electrical receptacles as indicted in
schedule or drawings. 1) 115 volt, 60 Hz, three-wire polarized and grounded electrical duplex, with
Ground Fault Circuit Interruption (GFCI)b. Cover plates shall be acid resistant thermoplastic.
4. Wiringa. Every electrical component shall be individually wired to a single point internal
field wiring box (including individual duplexes/receptacles).b. Field wiring box to be 7” x 4” x 2.5”, grounded, and have (12) 7/8” diameter
knock out penetrations.

BTBC Phase III October 26, 2020GE Project No. 0119-0010Gould Evans
LABORATORY FUME HOOD 115313 - 12
c. Final wiring and circuit dedication is to be by others.5. Fume hood to have third party validation of compliance to UL 1805 and UL 61010-1 by a
Nationally Recognized Testing Laboratory (NRTL)
I. Hood Safety Practices Label: Corrosion resistant plate attached to the left corner post of the fume hood with the following Hood Safety Practices:1. For use with substances that produce hazardous levels of airborne chemicals: gas, fumes,
vapors, dust2. Do not put your head in the hood.3. Minimize drafts and sudden movements in front of the hood.4. Work a minimum of six inches inside the hood.5. Elevate equipment above the work surface.6. Keep sill and baffle unobstructed.7. Do not use the hood for storage.8. Adjust the sash to smallest opening possible when in use.9. Close sash when unattended.10. Do not remove any of the hood components.11. Do not place flammable solvents near heat, flame or sparks.12. Do not evaporate large amounts of flammable liquids.13. Wipe up spills immediately.14. Routinely validate airflow.15. If the ventilation system malfunctions, or airflow alarm indicates unsafe condition, close
sash and discontinue hood operation immediately-call for help.16. Do not use with Perchloric Acid
J. Fume Hood Accessories1. Service Fixtures: Color-coded hose nozzle outlets and valves mounted inside the fume
hood and controlled from the exterior with color-coded index handlesa. The hoods are equipped without service fixtures or will be provided with a total of
up to 8 service fixtures as indicated in schedule.b. Hose connectors located inside the fume hood cavity are chemically-resistant,
glass- filled polypropylene with 6 serrations.c. Service lines shall be factory installed from valve to outlet
1) Copper tubing unless otherwise noted2) Brass service lines for gas3) Connections shall be made with quick-connect compression fittings on the
inlet and outlet of the valve body, soldered and brazed connections not easily disassembled are not acceptable.
4) Services pre-piped to the top of the hoodd. Valves
1) Extruded brass valve and rotating seat, TFE-coated silicone bronze stem and TFE packing.
2) Fixture handles are plastic and color coded as well as labeled for the designated type of service.
3) Fixtures are rated at maximum pressure of 200 psi.4) Coefficient of flow for the valve, Cv=0.43.5) Valves are front loaded, located on the fume hood corner post for remote
use, and include:i. Hot and cold tap water (flow rate 3.5 GPM or 13.25 LPM at 67 psi at
full open

BTBC Phase III October 26, 2020GE Project No. 0119-0010Gould Evans
LABORATORY FUME HOOD 115313 - 13
ii. Natural gas (theoretical flow rate of 71CFM at 100 psi, provides 1095 BTU/Sec at a density of .667 Lbs/CU. FT.)
iii. Air (theoretical flow rate of 59 CFM at 100psi)2. Tissue Screen: Provide epoxy-coated, stainless-steel screen at bottom baffle
opening to prevent paper from being drawn into the exhaust plenum behind baffles.3. Rear Finish Panel: Shall be the same materials and coating as the hood exterior. 4. Face Velocity Monitor/Alarm
a. Shall not be included on Explosion Proof hoodsb. For CAV Installations - Labconco Guardian 1000 Digital Airflow Monitor
1) Provide audible and visual alarm in the event of an unsafe face velocity.2) Alarm must sit flush with the fume hood corner post.3) Based on a thermally compensated thermistor in the alarm module, and air
passing through a separate airstream into the hood interior.4) Velocity shall be displayed digitally on the user facing LCD in fpm or m/s.5) LED lights display red for alarm, yellow for caution, and green for normal
operation.6) Must include external alarm and night setback functions.7) Alarm mute shall be accessible from the front of the monitor; visual alarm
must remain activated until alarm condition is corrected.8) UL Listed electrical components9) Calibration shall be through a menu driven step by step procedure.10) Calibration is the responsibility of the owner, following a complete
balancing of the mechanical system, and concurrently with As-Installed testing.
c. Sash Stop at 18” above dished working surface.5. Washdown Fitting
a. Located on top of hood to facilitate connection to external wash rings.6. Cupsinks shall be as follows (Verify with AHJ prior to ordering):
a. 3 x 6” dimension, polypropylene constructionb. Provide with strainers and tailpieces, NPS 1-1/2 (DN 40)c. To sit flush with dished area of work surfaced. Cupsink(s) to be located
1) Left rear – verify with users during submittals
K. Hood Work Surfacea. Work surface: Heat welded unplasticized PVC liner Work Surface. b. 1.25” thick, molded from solid modified epoxy resin, with smooth, non-specular,
black finish.c. One inch radius front edge for optimal fume hood performance.d. 3/8” dished area to match the fume hood interior work space and form a water tight
pan for spill containment.e. Include a 2.5” diameter hole on each side for service pass-through and piping.
Hole to be covered by hood superstructure upon installation.f. Include two 1.5” diameter penetrations to accommodate base cabinet venting.
Holes to be located outside of dished area and under the fume hood baffles. Include plugs.
g. Physical Properties:1) Flame-Spread Index: 25 or less per ASTM E 84.
L. Supporting Base Cabinets

BTBC Phase III October 26, 2020GE Project No. 0119-0010Gould Evans
LABORATORY FUME HOOD 115313 - 14
1. Normal owner preference is to have Labconco base cabinets underneath Labconco fume hoods. All base cabinets must be reviewed and approved by AHJ.
2. Base cabinets shall be in depths of 22", widths, quantities, and types called out in the equipment schedule and/or drawings, and meet the requirements of this specification.
3. Construction requirements for all hood base cabinetsa. Exterior construction is 18 gauge (or heavier) cold rolled sheet steel with Chemical
Resistant Finish.b. Hinges are 10 gauge (or heavier) plate with self-clinching pilot pin. Knuckle,
bullet, or piano type hinges are not accepted.c. The rear panel will feature a 12" x 8" removable plumbing access panel. d. Units 24" wide or less have only one door.e. Each cabinet includes four leveling feet. f. Capable of supporting up to 800 pounds.g. A 14" filler panel is required to increases the cabinet depth to 36".
4. Standard Storagea. Overall exterior dimensions:
1) 24" 24" w x 22" d x 35.5"-32" h for ADA cabinetb. Flush pull handles are ABS, low gloss black.
5. Acid Storagea. Overall exterior dimensions:
1) 24" 24" w x 22" d x 35.5"-32" h for ADA cabinetb. Completely lined with a polyethylene corrosion resistant liner. The liner is 3/16"
thick, with a vacuum formed PVC liner pan at the bottom to contain spills. Each door has a 3/16" sheet polyethylene liner.
c. The cabinet is labeled: "ACID".d. Flush pull handles are ABS, low gloss black.e. Each cabinet is vented into the fume hood with a 1-1/2" vent pipe. It should
provide a positive airflow directly into the fume hood exhaust system.f. Supply an epoxy coated steel shelf with PVC liner pan if indicated in the schedule.g. Acid cabinets with louvers are not acceptable
6. Solvent Storagea. Overall exterior dimensions:
1) 24" 24" w x 22" d x 35.5"-32" h for ADA cabinet b. Solvent storage cabinets are specifically designed for the storage of flammable and
combustible liquids.c. Solvent Storage Cabinet must be compliant with NFPA 30 “Flammability
and Combustible Liquids Code.”d. Cabinets 30" wide and greater shall be tested and approved by Factory Mutual to
meet Factory Mutual Approval Standard 6050.e. The bottoms, top, sides, and doors are fabricated of 18 gauge steel and are all
double panel construction with a 1-1/2" air space between panels.f. All joints are welded or screwed to provide a rigid enclosure. A 2" deep liquid
tight pan that covers the entire bottom of the cabinet is furnished to contain liquid leaks and spills.
g. A full-depth, 18 gauge steel, adjustable shelf is also provided. Shelves are sealed leak tight.
h. Two diametrically opposed flame arrestor vents with spark screens are provided in the back of the cabinet, as well as a grounding screw.
i. The cabinet has an interior finish same as the exterior.j. The cabinet is labeled: "FLAMMABLE - KEEP FIRE AWAY".

BTBC Phase III October 26, 2020GE Project No. 0119-0010Gould Evans
LABORATORY FUME HOOD 115313 - 15
k. The right hand door shall have a three point latching device.l. Door handles include a key lock. Solvent storage handles are locking lever handles
with bright chrome finish.m. If noted on the schedule, self-closing/self-latching models shall be provided with a
fusible-link feature to ensure the doors will close if the temperature outside the cabinet exceeds 165 degrees Fahrenheit. The doors are synchronized so that both doors will fully close.
PART 3 - EXECUTION
3.1 EXAMINATION
A. Examine areas, with installer present, for compliance with requirements for installation tolerances and other conditions affecting performance of fume hoods.
B. Coordinate with other trades for the proper and correct installation of plumbing and electrical rough-in and for rough opening dimensions required for the installation of the hood.
C. Proceed with installation only after unsatisfactory conditions have been corrected.
3.2 INSTALLATION
A. Installer shall have verifiable record of Labconco fume hood installations, or a certificate of installation training by Labconco factory representative. Contact Labconco, Scott Ward, 800-821-6699 ext. 112, for arrangements.
B. General: Install fume hoods according to shop drawings and manufacturer's written instructions.
C. Install level, plumb, and true; shim as required, using concealed shims, and securely anchor to building and adjacent laboratory casework.
D. Securely attach access panels, but provide for easy removal and secure reattachment. Where fume hoods abut other finished work, apply filler strips and scribe for accurate fit, with fasteners concealed where practical.
E. Neighboring splash blocks shall not be attached directly to the hood.
F. Install according to standards required by authority having jurisdiction.
G. Sequence installations to ensure utility connections are achieved in an orderly and expeditious manner.
H. Touch up minor damaged surfaces caused by installation. Replace damaged components as directed by Architect.
I. Complete hood installation, connections and initiate hood operation according to standards required by authority having jurisdiction.1. Initial high performance hood exhaust flow is to be designed for and based on achieving
80 - 100 fpm at a 60% sash opening (approx 18” open). Hoods may not be designed/set at lower face velocities.

BTBC Phase III October 26, 2020GE Project No. 0119-0010Gould Evans
LABORATORY FUME HOOD 115313 - 16
2. Each fume hood being attached to a CAV system shall have a manual damper installed by exhaust system contractor and/or hood installer. Manual damper shall be located in an appropriate, readily accessible location in the exhaust ductwork within close proximity to the fume hood it serves.
3. Each fume hood being attached to a VAV system shall be connected in accordance with hood manufacturer’s requirements, exhaust control valve manufacturer’s requirements and per the Engineer’s design.
3.3 ADJUSTING AND CLEANING
A. Adjust moving parts for smooth, near silent, accurate sash operation with one hand. Adjust sashes for uniform contact of rubber bumpers. Verify that counterbalances operate without interference.
B. Clean finished surfaces, including both sides of glass; touch up as required; and remove or refinish damaged or soiled areas to match original factory finish, as approved by Architect.
C. Clean adjacent construction and surfaces that may have been soiled in the course of installation of work in this section.
D. Provide all necessary protective measures to prevent exposure of equipment and surfaces from exposure to other construction activity.
E. Advise contractor of procedures and precautions for protection of material and installed equipment and casework from damage by work of other trades.
3.4 PROTECTION OF FINISHED WORK
A. Provide all necessary protective measures to prevent exposure of equipment and surfaces from exposure to other construction activity.
B. Advise contractor of procedures and precautions for protection of material and installed equipment and casework from damage by work of other trades.
3.5 DEMONSTRATION
A. Trained Labconco representative shall provide systems demonstration and demonstrate all equipment operations and functions on an as needed basis, as determined owner with responsibility for supporting the individual project.
3.6 FINAL SETUP, INSPECTION & APPROVAL
A. Final inspection and approval for each fume hood installation shall be made by staff from engineer and owner.
B. Project Contractor or Project Manager shall notify EHS Dept. when they are ready for hood system testing and final inspection.
C. Acceptable fume hood exhaust flow shall be based on achieving 80-100 fpm at a 50-60% sash opening (approx. 18” open).

BTBC Phase III October 26, 2020GE Project No. 0119-0010Gould Evans
LABORATORY FUME HOOD 115313 - 17
D. Airflow velocity alarm monitors1. Calibrate per hood manufacturers’ instructions.
E. Fume hood installation problems or incomplete installation items shall be documented and provided in writing to KSU Project Manager.
F. Acceptable “as installed” fume hood performance will be determined by KSU-EHS Dept. utilizing procedures outlined in Section 3.7.
G. Installation Contractor/Hood manufacturer will be required to provide “installed performance” hood testing per Section 3.7.
H. Final approval for acceptance of any/all fume hoods will be provided in writing from KSU Project Manager
3.7 TESTING
A. ASHRAE 110-16 Qualitative Testing1. TAB Contractor will use ASHRAE 110-16 Qualitative Testing protocol to assess fume
hood “as installed” performance. This includes:a. Visual assessment of airflow and exhaust capacity utilizing appropriate test
substance per ASHRAE protocolb. Face velocity testing utilizing a hot-wire anemometer per ASHRAE protocol.
B. ASHRAE 110-16 Quantitative Testing1. TAB Contractor will perform ASHRAE 110-16 Quantitative Testing to assess fume hood
“as installed” performance. This includes:a. Visual assessment of airflow and exhaust capacity utilizing appropriate test
substance per ASHRAE protocolb. Face velocity testing utilizing a hot-wire anemometer per ASHRAE protocol. c. Containment testing via tracer gas assessment per ASHRAE protocol
C. Failure to pass ASHRAE requirements and performance objectives will require contractor and hood manufacturer to correct situation to achieve satisfactory safety results.
END OF SECTION 115313


BTBC Phase III October 26, 2020
GE Project No. 0119-0010
Gould Evans
ROLLER WINDOW SHADES 122413 - 1
SECTION 122413 - ROLLER WINDOW SHADES
PART 1 - GENERAL
1.1 RELATED DOCUMENTS
A. Drawings and general provisions of the Contract, including General and Supplementary Conditions and
Division 01 Specification Sections, apply to this Section.
1.2 SUMMARY
A. Section Includes:
1. Manual roller shades with single rollers.
B. Related Requirements:
1. Division 06 Section "Miscellaneous Rough Carpentry" for wood blocking and grounds for
mounting roller shades and accessories.
2. Division 07 Section "Joint Sealants" for sealing the perimeters of installation accessories for light-
blocking shades with a sealant.
1.3 ACTION SUBMITTALS
A. Product Data: For each type of product.
B. Shop Drawings: Show fabrication and installation details for roller shades, including shadeband
materials, their orientation to rollers, and their seam and batten locations.
C. Samples: For each exposed product and for each color and texture specified, 10 inches long.
D. Roller-Shade Schedule: Use same designations indicated on Drawings.
1.4 INFORMATIONAL SUBMITTALS
A. Qualification Data: For Installer.
B. Product Certificates: For each type of shadeband material, signed by product manufacturer.
C. Product Test Reports: For each type of shadeband material, for tests performed by manufacturer and
witnessed by a qualified testing agency.
1.5 CLOSEOUT SUBMITTALS
A. Maintenance Data: For roller shades to include in maintenance manuals.

BTBC Phase III October 26, 2020
GE Project No. 0119-0010
Gould Evans
ROLLER WINDOW SHADES 122413 - 2
1.6 MAINTENANCE MATERIAL SUBMITTALS
A. Furnish extra materials that match products installed and that are packaged with protective covering for
storage and identified with labels describing contents.
1. Roller Shades: Full-size units equal to 5 percent of quantity installed for each size, color, and
shadeband material indicated, but no fewer than two units.
1.7 QUALITY ASSURANCE
A. Installer Qualifications: Fabricator of products.
B. Fire-Test-Response Characteristics: Provide roller window shades meeting the following as determined
by testing identical products by UL or another testing and inspecting agency acceptable to authorities
having jurisdiction:
1. Surface-Burning Characteristics: As determined by testing per ASTM E 84.
a. Flame-Spread Index: 25 or less.
b. Smoke-Developed Index: 450 or less.
C. Anti-Microbial Characteristics: 'No Growth' per ASTM G 21 results for fungi ATCC9642, ATCC
9644,ATCC9645.
1.8 DELIVERY, STORAGE, AND HANDLING
A. Deliver roller shades in factory packages, marked with manufacturer, product name, and location of
installation using same designations indicated on Drawings.
1.9 FIELD CONDITIONS
A. Environmental Limitations: Do not install roller shades until construction and finish work in spaces,
including painting, is complete and dry and ambient temperature and humidity conditions are maintained
at the levels indicated for Project when occupied for its intended use.
B. Field Measurements: Where roller shades are indicated to fit to other construction, verify dimensions of
other construction by field measurements before fabrication and indicate measurements on Shop
Drawings. Allow clearances for operating hardware of operable glazed units through entire operating
range. Notify Architect of installation conditions that vary from Drawings. Coordinate fabrication
schedule with construction progress to avoid delaying the Work.
1.10 WARRANTY
A. Roller Shade Hardware, Chain and Shadecloth Manufacturer's standard non-depreciating twenty-five year
limited warranty.
B. Roller Shade Installation: One year from date of Substantial Completion, not including scaffolding, lifts
or other means to reach inaccessible areas.

BTBC Phase III October 26, 2020
GE Project No. 0119-0010
Gould Evans
ROLLER WINDOW SHADES 122413 - 3
PART 2 - PRODUCTS
2.1 MANUFACTURERS
A. Basis-of-Design Product: Subject to compliance with requirements, provide Manual FlexShade by
Draper or comparable product by one of the following:
1. Draper Inc.
2. Hunter Douglas Contract.
3. Mecho Shade Systems
4. SWFcontract
B. Source Limitations: Obtain roller shades from single source from single manufacturer.
2.2 OPERATING SYSTEM
A. Manual, chain-and clutch operating mechanism.
1. Bead Chain Clutch Operating System
a. Bi-directional clutch. Mounted right or left. Shades stop when chain is released.
b. Stainless steel (standard).
c. Up and down stops.
d. Spring-loaded idler and universal brackets.
e. Optional spring assist (large units)
2.3 SHADE CLOTH
A. Materials:
1. Comply with NFPA 701.
2. Light-filtering fabric: Woven PVC-coated fiberglass and PVC-coated polyester
3. Basis-of-Design: “E Screen 7501 by Draper FlexShade”, less than 3% open area.
4. Product Type: Transparent.
2.4 SHADE BAND
A. Shade Bands: Construction of shade band includes the fabric, the hem weight, hem-pocket, shade roller
tube, and the attachment of the shade band to the roller tube. Sewn hems and open hem pockets are not
acceptable.
1. Hem Pockets and Hem Weights: Fabric hem pocket with RF-welded seams (including welded
ends) and concealed hem weights. Hem weights shall be of appropriate size and weight for shade
band. Hem weight shall be continuous inside a sealed hem pocket. Hem pocket construction and
hem weights shall be similar, for all shades within one room.
2. Shade band and Shade Roller Attachment:
a. Use extruded aluminum shade roller tube of a diameter and wall thickness required to
support shade fabric without excessive deflection. Roller tubes less than 1.55 inch (39.37
mm) in diameter for manual shades, and less than 2.55 inches (64.77 mm) for motorized
shades are not acceptable.
b. Any method of attaching shade band to roller tube that requires the use of: adhesive,
adhesive tapes, staples, and/or rivets are not acceptable.

BTBC Phase III October 26, 2020
GE Project No. 0119-0010
Gould Evans
ROLLER WINDOW SHADES 122413 - 4
2.5 SHADE FABRICATION
A. Fabricate units to completely fill existing openings from head to sill and jamb-to-jamb, unless specifically
indicated otherwise.
B. Fabricate shadecloth to hang flat without buckling or distortion. Fabricate with heat-sealed trimmed edges
to hang straight without curling or raveling. Fabricate unguided shadecloth to roll true and straight
without shifting sideways more than 1/8 inch (3.18 mm) in either direction per 8 feet (2438 mm) of shade
height due to warp distortion or weave design.
C. Provide battens in standard shades as required to assure proper tracking and uniform rolling of the
shadebands. Contractor shall be responsible for assuring the width-to-height (W:H) ratios shall not
exceed manufacturer's standards or, in absence of such standards, shall be responsible for establishing
appropriate standards to assure proper tracking and rolling of the shadecloth within specified standards.
Battens shall be roll-formed stainless steel or tempered steel, as required.
D. For railroaded shadebands, provide seams in railroaded multi-width shadebands as required to meet size
requirements and in accordance with seam alignment as acceptable to Architect. Seams shall be properly
located. Furnish battens in place of plain seams when the width, height, or weight of the shade exceeds
manufacturer's standards. In absence of such standards, assure proper use of seams or battens as required
to, and assure the proper tracking of the railroaded multi-width shadebands.
E. Provide battens for railroaded shades when width-to-height (W:H) ratios meet or exceed manufacturer's
standards. In absence of manufacturer's standards, be responsible for proper use and placement of battens
to assure proper tracking and roll of shadebands.
F. When used, battens shall be concealed in a integrally-colored fabric to match the inside and outside colors
of the shadeband, in accordance with manufacturer's published standards for spacing and requirements.
1. Battens shall be roll formed of stainless steel or tempered steel and concave to match the contour
of the roller tube.
2. Batten pockets shall be self-colored fabric front and back RF welded into the shadecloth. A self-
color opaque liner shall be provided front and back to eliminate any see through of the batten
pocket that shall not exceed 1-1/2 inches (38.1 mm) high and be totally opaque. A see-through
moiré effect, which occurs with multiple layers of transparent fabrics, shall not be acceptable.
2.6 COMPONENTS
A. Access and Material Requirements:
1. Provide shade hardware allowing for the removal of shade roller tube from brackets without
removing hardware from opening and without requiring end or center supports to be removed.
2. Provide shade hardware that allows for removal and re-mounting of the shade bands without
having to remove the shade tube, drive or operating support brackets.
B. Installation Accessories
1. Standard universal wall clip.
2.7 ACCESSORIES
A. Roller Shade Pocket for recessed mounting in drywall ceilings as indicated on the Drawings

BTBC Phase III October 26, 2020
GE Project No. 0119-0010
Gould Evans
ROLLER WINDOW SHADES 122413 - 5
1. Provide either extruded aluminum shade pocket, model 4133 sized to accommodate roller shades,
with exposed extruded aluminum closure mount and removable 3” closure panel to provide access
to shades.
PART 3 - EXECUTION
3.1 EXAMINATION
A. Examine substrates, areas, and conditions, with Installer present, for compliance with requirements for
installation tolerances, operational clearances, accurate locations of connections to building electrical
system, and other conditions affecting performance of the Work.
B. Proceed with installation only after unsatisfactory conditions have been corrected.
3.2 ROLLER-SHADE INSTALLATION
A. Install roller shades level, plumb, square, and true according to manufacturer's written instructions, and
located so shade band is not closer than 2 inches (50 mm) to interior face of glass. Allow proper
clearances for window operation hardware.
B. Installation of wood blocking and 4133 Pockets and Closure, by others. Wood blocking must be level.
C. Adjust and balance roller shades to operate smoothly, easily, safely, and free from binding or malfunction
throughout entire operational range.
D. Clean roller shade surfaces after installation, according to manufacturer's written instructions.
E. Engage Installer to train Owner's maintenance personnel to adjust, operate and maintain roller shade
systems.
F. Install roller shades level, plumb, and aligned with adjacent units according to manufacturer's written
instructions.
G. Outside of jamb installation.
3.3 ADJUSTING
A. Adjust and balance roller shades to operate smoothly, easily, safely, and free from binding or malfunction
throughout entire operational range.
3.4 CLEANING AND PROTECTION
A. Clean roller-shade surfaces after installation, according to manufacturer's written instructions.
B. Provide final protection and maintain conditions, in a manner acceptable to manufacturer and Installer,
that ensure that roller shades are without damage or deterioration at time of Substantial Completion.
C. Replace damaged roller shades that cannot be repaired, in a manner approved by Architect, before time of
Substantial Completion.

BTBC Phase III October 26, 2020
GE Project No. 0119-0010
Gould Evans
ROLLER WINDOW SHADES 122413 - 6
3.5 DEMONSTRATION
A. Engage a factory-authorized service representative to train Owner's maintenance personnel to adjust,
operate, and maintain motor-operated roller shades.
3.6 INSTALLATION
A. Factory-authorized representative to provide demonstration services for motorized operating system.
END OF SECTION 122413

BTBC Phase III October 26, 2020
GE Project No. 0119-0010
Gould Evans
WOOD LABORATORY CASEWORK 123553 - 1
SECTION 123553 – WOOD LABORATORY CASEWORK
PART 1 - GENERAL
1.1 RELATED DOCUMENTS
A. Drawings and general provisions of the Contract, including General and Supplementary Conditions and
Division 1 Specification Sections, apply to this Section.
1.2 SUMMARY
A. Section Includes:
1. Wood laboratory casework, fixed and mobile.
2. Utility-space framing at backs of base cabinets and between backs of base cabinets.
3. Filler and closure panels.
4. Laboratory casework system that includes support and utility-space framing, filler and closure
panels, wall panels, and modular countertops.
5. Laboratory countertops.
6. Shelves.
7. Laboratory sinks.
8. Laboratory accessories.
B. Related Sections:
1. Division 6 Section "Rough Carpentry" for wood blocking for anchoring laboratory casework.
2. Division 9 Section "Resilient Wall Base and Accessories" for resilient base applied to wood
laboratory casework.
3. Section 115313 "Laboratory Fume Hoods" for fume hood, including base cabinets and countertops
under fume hoods.
4. Divisions 22 and 26 Sections for selection and installation of service fittings, including connecting
service utilities.
1.3 DEFINITIONS
A. MDF: Medium-density fiberboard.
B. Exposed Surfaces of Casework: Surfaces visible when doors and drawers are closed, including bottoms
of cabinets more than 48” above floor, and visible surfaces in open cabinets or behind glass doors.
C. Semi exposed Surfaces of Casework: Surfaces behind opaque doors, such as cabinet interiors, shelves,
and dividers; interiors and sides of drawers; and interior faces of doors. Tops of cabinets 78” or more
above floor are defined as "semi exposed."
D. Concealed Surfaces of Casework: Include sleepers, web frames, dust panels, and other surfaces not
usually visible after installation.
E. Hardwood Plywood: A panel product composed of layers or plies of veneer, or of veneers in
combination with lumber core, hardboard core, MDF core, or particleboard core, joined with adhesive
and faced both front and back with hardwood veneers.

BTBC Phase III October 26, 2020
GE Project No. 0119-0010
Gould Evans
WOOD LABORATORY CASEWORK 123553 - 2
1.4 PERFORMANCE REQUIREMENTS
A. System Structural Performance: Laboratory casework and support framing system shall withstand the
effects of the following gravity loads and stresses without permanent deformation, excessive deflection,
or binding of drawers and doors:
1. Support Framing System: 2,820 lbs. total
2. Suspended Base Cabinets (Internal Load): 300 lbs. total
3. Work Surfaces (Including Tops of Suspended Base Cabinets): 600 lbs. total
4. Wall Cabinets (Upper Cabinets): 160 lbs. total
5. Shelves: 8”dp – 12”dp = 180 lbs total, 18” dp = 120 lbs. total, 24” dp = 100 lbs. total
6. A 6’ long core – max. 3,600 lbs.
7. Provide full frame construction at aquarium locations called out on casework elevations.
1.5 SUBMITTALS
A. Product Data: For each type of product indicated.
B. Shop Drawings: For laboratory casework. Include plans, elevations, sections, details, and attachments to
other work.
1. Indicate locations of hardware and keying of locks.
2. Indicate locations and types of service fittings.
3. Indicate locations of blocking and reinforcements required for installing laboratory casework.
4. Include details of utility spaces showing supports for conduits and piping.
5. Include details of support framing system.
6. Include details of exposed conduits, if required, for service fittings.
7. Indicate locations of and clearances from adjacent walls, doors, windows, other building
components, and other laboratory equipment.
8. Include coordinated dimensions for laboratory equipment specified in other Sections.
C. Samples for Initial Selection: For factory-applied finishes and other materials requiring color selection.
D. Samples for Verification: For each type of cabinet finish and each type of countertop material indicated,
in manufacturer's standard sizes.
E. Samples for Verification: Unless otherwise directed, approved full-size Samples may become part of the
completed Work, if in an undisturbed condition at time of Substantial Completion. Notify Architect of
their exact locations. If not incorporated into the Work, retain acceptable full-size Samples at Project site
and remove when directed by Architect.
1. One Sample each of hinged and sliding doors.
2. 6” square Samples for each type of countertop material.
3. One of each service fitting specified, complete with accessories and specified finish.
4. One of each type of hardware item specified.
F. Qualification Data: For qualified manufacturer.
G. Product Test Reports for Countertop Surface Material: Based on evaluation of comprehensive tests
performed by a qualified testing agency, indicating compliance of laboratory countertop surface materials
with requirements specified for chemical and physical resistance.
1.6 QUALITY ASSURANCE
A. Manufacturer Qualifications: A qualified manufacturer that produces casework of types indicated for this
Project that has been tested for compliance with SEFA 8.

BTBC Phase III October 26, 2020
GE Project No. 0119-0010
Gould Evans
WOOD LABORATORY CASEWORK 123553 - 3
B. Source Limitations: Obtain laboratory casework from single source from single manufacturer unless
otherwise indicated.
C. Product Designations: Drawings indicate sizes and configurations of laboratory casework by referencing
designated manufacturer's catalog numbers. Other manufacturers' laboratory casework of similar sizes
and similar door and drawer configurations and complying with the Specifications may be considered.
Refer to Division 1 Section "Product Requirements."
D. Casework Product Standard: Comply with SEFA 8, "Laboratory Furniture - Casework, Shelving and
Tables - Recommended Practices." Additionally, casework shall meet AWI standards for “Premium
Grade”.
E. Electrical Components, Devices, and Accessories: Listed and labeled as defined in NFPA 70, by a
qualified testing agency, and marked for intended location and application.
F. Keying Conference: Conduct conference at a location to be determined. Incorporate keying conference
decisions into final keying requirements.
G. Preinstallation Conference: Conduct conference at Project site.
1.7 DELIVERY, STORAGE, AND HANDLING
A. Protect finished surfaces during handling and installation with protective covering of polyethylene film or
other suitable material.
1.8 PROJECT CONDITIONS
A. Environmental Limitations: Do not deliver or install laboratory casework until building is enclosed,
utility roughing-in and wet work are complete and dry, and temporary HVAC system is operating and
maintaining temperature and relative humidity recommended by manufacturer or AWI.
1.9 COORDINATION
A. Coordinate layout and installation of framing and reinforcements for support of laboratory casework.
B. Coordinate installation of laboratory casework with installation of fume hoods and other laboratory
equipment.
C. Field verification: Verify field dimensions and conditions after interior walls are sheet rocked, mudded
and sanded.
1.10 EXTRA MATERIALS
A. Furnish complete touchup kit for each type and color of wood laboratory casework provided. Include
scratch fillers, stains, finishes, and other materials necessary to perform permanent repairs to damaged
laboratory casework finish.
PART 2 - PRODUCTS
2.1 WOOD CABINET AND TABLE MATERIALS
A. General:

BTBC Phase III October 26, 2020
GE Project No. 0119-0010
Gould Evans
WOOD LABORATORY CASEWORK 123553 - 4
1. Certified Wood Materials: Provide cabinets with not less than 70 percent of wood products
obtained from forests certified by an FSC-accredited certification body to comply with FSC STD-
01-001, "FSC Principles and Criteria for Forest Stewardship."
2. Adhesives: Do not use adhesives that contain urea formaldehyde.
3. Maximum Moisture Content for Lumber: 7 percent for hardwood and 12 percent for softwood.
4. MDF: ANSI A208.2, Grade 130, made with binder containing no urea formaldehyde.
5. Hardboard: AHA A135.4, Class 1 Tempered.
6. Edge banding for Wood-Veneered Construction: Minimum 1/8”3mm thick, solid wood of same
species as face veneer.
a. Colors: As selected by Architect from manufacturer's full range.
B. Exposed Materials:
1. General: Provide materials that are selected and arranged for compatible grain and color. Do not
use materials adjacent to one another that are noticeably dissimilar in color, grain, figure, or natural
character markings.
2. Wood Species: White Ash.
3. Plywood: Hardwood plywood with face veneer of species indicated, selected for compatible color
and grain. Grade A exposed faces at least 1/50” thick, and Grade J crossbands. For balanced
construction, provide backs of same species as faces.
a. Face Veneer Cut: Rift Cut.
4. Solid Wood: Clear hardwood lumber of species indicated and selected for grain and color
compatible with exposed hardwood plywood.
C. Semi exposed Materials:
1. Solid Wood: Sound hardwood lumber, selected to eliminate appearance defects, of same species as
exposed solid wood.
2. Plywood: Hardwood plywood of same species as exposed plywood. Grade B faces and Grade J
crossbands. For balanced construction, provide backs of same species as faces.
3. Provide solid wood or hardwood plywood for semi exposed surfaces unless otherwise indicated.
D. Concealed Materials:
1. Solid Wood: Any species, with no defects affecting strength or utility.
2. Plywood: Hardwood plywood. For balanced construction, provide backs of same species as faces.
2.2 COUNTERTOP, TABLE TOP AND SINK MATERIALS:
A. Epoxy: Factory-molded, modified epoxy-resin formulation with smooth, nonspecular finish.
1. Manufacturers: Subject to compliance with requirements, provide products by one of the following
available manufacturers:
a. Durcon Company (The).
b. Epoxyn Products.
c. Laboratory Tops, Inc.
2. Physical Properties:
a. Flexural Strength: Not less than 10,000 psi.
b. Modulus of Elasticity: Not less than 2,000,000 psi.
c. Hardness (Rockwell M): Not less than 100.
d. Water Absorption (24 Hours): Not more than 0.02 percent.
e. Heat Distortion Point: Not less than 260 deg F.
3. Chemical Resistance: Epoxy-resin material has the following ratings when tested with indicated
reagents according to NEMA LD 3, Test Procedure 3.4.5:
a. No Effect: Acetic acid (98 percent), acetone, ammonium hydroxide (28 percent), benzene,
carbon tetrachloride, dimethyl formamide, ethyl acetate, ethyl alcohol, ethyl ether, methyl
alcohol, nitric acid (70 percent), phenol, sulfuric acid (60 percent), and toluene.

BTBC Phase III October 26, 2020
GE Project No. 0119-0010
Gould Evans
WOOD LABORATORY CASEWORK 123553 - 5
b. Slight Effect: Chromic acid (60 percent) and sodium hydroxide (50 percent).
4. Color: Black
B. Stainless-Steel Sheet: ASTM A 240/A 240M, Type 304..
2.3 WOOD CABINETS
A. Manufacturers: Subject to compliance with requirements, provide products by one of the following:
B. Basis-of-Design Product: Subject to compliance with requirements, provide product by one of the
following:
1. Kewaunee Scientific Corporation; Laboratory Products Group. (Contemporary)
2. Sheldon Laboratory Systems. (Series 100)
3. Mott Manufacturing Ltd. (Elevation Series)
4. CiF Lab Solutions
5. ICI Scientific
C. Design: Reveal overlay with radiused edges.
1. Provide 1/8” reveals between doors and drawers that are adjacent.
D. Grain Direction:
1. Vertical on both doors and drawer fronts, with continuous vertical matching.
2. Lengthwise on face frame members.
3. Vertical on end panels.
4. Side to side on bottoms and tops of units.
5. Vertical on knee-space panels – 48” width and less.
6. Horizontal on aprons.
E. Veneer Matching:
1. Provide veneers for each cabinet from a single flitch, book and running matched.
a. Provide continuous matching of adjacent drawer fronts within each cabinet.
F. Construction: Provide wood-faced laboratory casework of the following minimum construction:
1. Bottoms of Base Cabinets and Tall Cabinets: ¾” thick veneer-core hardwood plywood.
2. Tops and Bottoms of Wall Cabinets and Tops of Tall Cabinets: 1” thick veneer-core hardwood
plywood.
3. Ends of Cabinets: 3/4” thick hardwood plywood.
4. Shelves: 1” thick veneer-core hardwood plywood. No shelf should be wider than 34.5”.
5. Base Cabinet Top Frames: ¾” by 2” solid wood on all four sides, with mortise and tenon or
doweled connections, glued and pinned or screwed.
6. Base Cabinet Subtops: 1” thick panel product glued and pinned or screwed.
7. Backs of Cabinets: ¾” thick, particleboard or MDF-core hardwood plywood where exposed, 1/4”
thick, hardwood plywood dadoed into sides, bottoms, and tops where not exposed.
8. Base Cabinets: 48” wide without a sink installed are to have a center support at the mid-point to
break the adjustable shelves into 24” sections. No shelves are to span more than 36” without
support.
9. Drawer Fronts: ¾” thick, hardwood plywood or solid hardwood.
10. Drawer Sides and Backs: ½” thick, solid hardwood with glued dovetail joints only.
11. Drawer Bottoms: ¼” thick, veneer-core hardwood plywood or melamine on ¼” hardboard, glued
and dadoed into front, back, and sides of drawers. Use ½” thick material for drawer cabinets more
than 24” wide.
12. Doors More Than 48” High: 1-1/16” thick, with particleboard or MDF cores, solid hardwood stiles
and rails, and hardwood face veneers and crossbands.

BTBC Phase III October 26, 2020
GE Project No. 0119-0010
Gould Evans
WOOD LABORATORY CASEWORK 123553 - 6
13. Doors More Than 48” High: 1-1/8” thick, with particleboard cores and hardwood face veneers and
crossbands.
G. Filler and Closure Panels: Provide where indicated and as needed to close spaces between cabinets and
walls, ceilings, and indicated equipment. Fabricate from same material and with same finish as adjacent
exposed cabinet surfaces unless otherwise indicated.
1. Provide utility-space closure panels at spaces between base cabinets where utility space would
otherwise be exposed, including spaces below countertops.
2. Provide extended ends or closure panels at ends of utility spaces where utility space would
otherwise be exposed. Extend ends on door cabinets with accessible backs.
3. Provide knee-space panels (modesty panels) at spaces between base cabinets, where cabinets are not
installed against a wall or where space is not otherwise closed. Fabricate from same material and
with same finish as exposed cabinet backs. Panels greater than 48” wide to be split in half with
support behind where panels meet. Edge both side and top of each panel.
4. Provide corner filler panel at top of upper cabinets outside corner where two sections of cabinets
come together.
2.4 WOOD FINISH
A. Preparation: Sand lumber and plywood before assembling. Sand edges of doors, drawer fronts, and
molded shapes with profile-edge sander. Sand after assembling for uniform smoothness at least
equivalent to that produced by 220-grit sanding and without machine marks, cross sanding, or other
surface blemishes.
B. Staining: Remove fibers and dust and apply stain to exposed and semi exposed surfaces as necessary to
match approved Samples. Apply stain in a manner that will produce a consistent appearance. Apply
wash-coat sealer before applying stain to closed-grain wood species.
1. Stain Color: Manufacturer’s standard.
C. Chemical-Resistant Finish: Apply laboratory casework manufacturer's standard three-coat, chemical-
resistant, transparent finish or two pass U.V. flat line system. Sand and wipe clean between coats.
Topcoat(s) may be omitted on concealed surfaces.
1. Chemical and Physical Resistance of Finish System: Finish complies with acceptance levels of
cabinet surface finish tests in SEFA 8. Acceptance level for chemical spot test shall be no more
than four Level 3 conditions.
2.5 HARDWARE
A. General: Provide laboratory casework manufacturer's standard, commercial-quality, heavy-duty
hardware complying with requirements indicated for each type.
B. Hinges: Stainless-steel, 5-knuckle hinges complying with BHMA A156.9, Grade 1, with antifriction
bearings and rounded tips. Provide 2 for doors 48” high or less and 3 for doors more than 48” high.
C. Hinged Door and Drawer Pulls: Stainless steel, back-mounted pulls. Provide 2 pulls for drawers more
than 24” wide.
1. Design: Wire rectangular loop pulls with rounded corners.
2. Overall Size: 1” by 4”.
D. Sliding Door Pulls: Stainless-steel or chrome-plated recessed flush pulls.
1. Design and Size: As selected from manufacturer's full range.
E. Door Catches: Nylon roller spring catches. Provide 2 catches on doors more than 48” high.

BTBC Phase III October 26, 2020
GE Project No. 0119-0010
Gould Evans
WOOD LABORATORY CASEWORK 123553 - 7
F. Drawer Slides: Side mounted, epoxy-coated steel, self-closing; designed to prevent rebound when
drawers are closed; complying with BHMA A156.9, Type B05091.
1. Provide Grade 1HD-100; for drawers not more than 6” high and 24” wide.
2. Provide Grade 1HD-150; for drawers more than 6” high or 24” wide.
G. Label Holders: Stainless steel, aluminum, or chrome plated; sized to receive standard label cards
approximately 1” by 2”, attached with screws or rivets. Provide on all drawers.
H. Locks for Wood Cabinets: Cam type with 5-pin tumbler, brass with chrome-plated finish; complying
with BHMA A156.11, Type E07281 or E07261.
1. Provide a minimum of three keys per lock and three master keys.
2. Provide on all drawers and doors.
3. Keying: Key locks the same for each room.
4. Master Key System: Key all locks to be operable by master key.
I. Sliding-Door Hardware Sets: Laboratory casework manufacturer's standard, to suit type and size of
sliding-door units.
J. Adjustable Wall Shelf Supports: Surface-type steel standards and steel shelf brackets, with epoxy
powder-coated finish, complying with BHMA A156.9, Types B04013.
2.6 COUNTERTOPS AND SINKS
A. Countertops, General: Provide units with smooth surfaces in uniform plane free of defects. Make
exposed edges and corners straight and uniformly beveled. Provide front and end overhang of 1” with
continuous drip groove on underside ½” from edge.
B. Sinks, General: Provide sizes indicated or laboratory casework manufacturer's closest standard size of
equal or greater volume, as approved by Architect.
1. Outlets: Poly or Epoxy matching color of sink. See Mechanical and Plumbing Drawings.
2. Overflows: For each sink except cup sinks provide overflow of standard beehive or open-top design
with separate strainer. Height 2” less than sink depth. Provide in same material as strainer.
C. Epoxy Countertops and Sinks:
1. Countertop Fabrication: Fabricate with factory cutouts for sinks, holes for service fittings and
accessories, and with butt joints assembled with epoxy adhesive.
a. Typical Countertop Configuration: Flat, 1” thick, with beveled edge and corners, and with
drip groove and applied backsplash.
b. Countertop Construction: Uniform throughout full thickness.
c. Sinks shall be Durcon Model U52E (under mount), 23.6” L x 17.6” W x 10.8” D unless
noted otherwise.
d. Sinks labeled “ADA” shall be Durcon Model A55 (drop-in), 25” L x 15” W x 5” D
2. Sink Fabrication: Molded in 1 piece with smooth surfaces, coved corners, and bottom sloped to
outlet; ½” minimum thickness.
a. Provide integral sinks in epoxy countertops, bonded to countertops with two part epoxy to
match color and appearance of countertops and sinks.
b. Provide sinks for drop-in installation with 1/4-inch- thick lip around perimeter of sink.
c. Provide integral sinks in epoxy countertops, bonded to countertops with invisible joint line.
3. Table-Top Fabrication:
a. Table-Top Configuration: Flat, 1” thick, with beveled edge and corners, and with drip
groove at perimeter.

BTBC Phase III October 26, 2020
GE Project No. 0119-0010
Gould Evans
WOOD LABORATORY CASEWORK 123553 - 8
2.7 LABORATORY ACCESSORIES
A. Pegboards: Epoxy pegboards with removable polypropylene pegs and stainless-steel or epoxy drip
troughs 4 ½” deep by 22 ½” wide with drain outlet and include hose.
1. Size 20” wide by 30” height, 32 pegs.
PART 3 - EXECUTION
3.1 EXAMINATION
A. Examine areas, with Installer present, for compliance with requirements for environmental limitations per
1.8.A and installation tolerances, location of reinforcements, and other conditions affecting performance
of laboratory casework.
B. Proceed with delivery and installation only after unsatisfactory conditions have been corrected. Do not
store product on site if site is not in compliance per 3.1.A.
3.2 INSTALLATION OF CABINETS
A. Comply with installation requirements in SEFA 2.3. Install level, plumb, and true; shim as required,
using concealed shims. Where laboratory casework abuts other finished work, apply filler strips and
scribe for accurate fit, with fasteners concealed where practical. Do not exceed the following tolerances:
1. Variation of Tops of Base Cabinets from Level: 1/16” in 10’.
2. Variation of Bottoms of Upper Cabinets from Level: 1/8” in 10’.
3. Variation of Faces of Cabinets from a True Plane: 1/8” in 10’.
4. Variation of Adjacent Surfaces from a True Plane (Lippage): 1/32”.
5. Variation in Alignment of Adjacent Door and Drawer Edges: 1/16”.
B. Base Cabinets: Fasten cabinets to partition framing, wood blocking, or reinforcements in partitions with
fasteners spaced not more than 24” o.c. Bolt adjacent cabinets together with joints flush, tight, and
uniform.
1. Where base cabinets are installed away from walls, fasten to floor at toe space at not more than 24”
o.c. and at sides of cabinets with not less than 2 fasteners per side.
C. Wall Cabinets: Fasten using countersink hardware to hanging strips, masonry, partition framing,
blocking, or reinforcements in partitions. Fasten each cabinet through back, near top, at not less than 24”
o.c.
D. Install hardware uniformly and precisely. Set hinges snug and flat in mortises.
E. Adjust laboratory casework and hardware so doors and drawers align and operate smoothly without warp
or bind and contact points meet accurately. Lubricate operating hardware as recommended by
manufacturer.
3.3 INSTALLATION OF COUNTERTOPS
A. Comply with installation requirements in SEFA 2.3. Abut top and edge surfaces in one true plane with
flush hairline joints and with internal supports placed to prevent deflection. Locate joints only where
shown on Shop Drawings.
B. Field Jointing: Where possible, make in same manner as shop-made joints using, adhesives, and sealants
recommended by manufacturer. Prepare edges in shop for field-made joints.

BTBC Phase III October 26, 2020
GE Project No. 0119-0010
Gould Evans
WOOD LABORATORY CASEWORK 123553 - 9
C. Fastening:
1. Secure epoxy countertops to cabinets with epoxy cement, applied at each corner and along perimeter
edges at not more than 48” o.c.
2. Where necessary to penetrate countertops with fasteners, countersink heads approximately 1/8” and
plug hole flush with two part epoxy equal to countertop in chemical resistance, hardness, and
appearance.
D. Provide required holes and cutouts for service fittings.
E. Provide scribe moldings for closures at junctures of countertop, curb, and splash with walls as
recommended by manufacturer for materials involved. Match materials and finish to adjacent laboratory
casework. Use chemical-resistant, permanently elastic sealing compound where recommended by
manufacturer.
F. Carefully dress joints smooth, remove surface scratches, and clean entire surface.
3.4 INSTALLATION OF SINKS
A. Comply with installation requirements in SEFA 2.3.
B. Underside Installation of Epoxy Sinks: Use laboratory casework manufacturer's recommended adjustable
support system for table- and cabinet-type installations. Set top edge of sink unit in sink and countertop
manufacturers' recommended two part epoxy and firmly secure to produce a tight and fully leakproof
joint. Adjust sink and securely support to prevent movement. Remove excess two part epoxy while still
wet and finish joint for neat appearance.
C. Drop-in Installation of Epoxy Sinks and Cup Sinks: Rout groove in countertop to receive sink rim if not
prepared in shop. Set sink in two part epoxy and fill remainder of groove with two part epoxy adhesive.
Use procedures and products recommended by sink and countertop manufacturers. Remove excess
adhesive and sealant while still wet and finish joint for neat appearance.
3.5 INSTALLATION OF LABORATORY ACCESSORIES
A. Install accessories according to Shop Drawings, installation requirements in SEFA 2.3, and
manufacturer's written instructions.
B. Install shelf standards plumb and at heights to align shelf brackets for level shelves. Install shelving level
and straight, closely fitted to other work where indicated.
C. Securely fasten pegboards to partition framing, wood blocking, or reinforcements in partitions.
3.6 INSTALLATION OF SERVICE FITTINGS (By Mechanical and Electrical Contractors)
A. Comply with requirements in Divisions 15 and 16 Sections for installing water and laboratory gas service
fittings and electrical devices.
B. Fixtures to be turned over loose and unassembled to mechanical and Electrical contractors for installation
by same.
C. Install fittings according to Shop Drawings, installation requirements in SEFA 2.3, and manufacturer's
written instructions. Set bases and flanges of sink- and countertop-mounted fittings in sealant
recommended by manufacturer of sink or countertop material. Securely anchor fittings to laboratory
casework unless otherwise indicated.

BTBC Phase III October 26, 2020
GE Project No. 0119-0010
Gould Evans
WOOD LABORATORY CASEWORK 123553 - 10
3.7 CLEANING AND PROTECTING
A. Clean finished surfaces, touch up as required, and remove or refinish damaged or soiled areas to match
original factory finish, as approved by Architect.
B. Protect countertop surfaces during construction with 6-mil plastic or other suitable water-resistant
covering. Tape to underside of countertop at a minimum of 48” o.c.
3.8 SERVICE-FITTING SCHEDULE
A. Water Service Fitting, Refer to Mechanical and Plumbing Specifications and drawings for water service
fittings.
B. Laboratory Gas Service Fitting, Refer to Mechanical and Plumbing Specifications and drawings for gas
service fittings
C. Electrical Service Fitting, Refer to Electrical Specifications and drawings for Electrical Service and
fittings.
END OF SECTION 123553
BTBC Phase III October 26, 2020
GE Project No. 0119-0010
Gould Evans
SOLID SURFACING COUNTERTOPS 123662 - 1
SECTION 123662 - SOLID SURFACING COUNTERTOPS
PART 1 - GENERAL
1.1 SUMMARY
A. Section Includes:
1. Solid surface material countertops.
2. Solid surface material window sills.
3. Solid surface material sinks.
1.2 ACTION SUBMITTALS
A. Product Data: For countertop materials and sinks.
B. Sustainable Design Submittals:
1. <Double click to insert sustainable design text for adhesives.>
C. Shop Drawings: For countertops. Show materials, finishes, edge and backsplash profiles, methods of
joining, and cutouts for plumbing fixtures.
D. Samples: For each type of material exposed to view.
PART 2 - PRODUCTS
2.1 SOLID SURFACE COUNTERTOP MATERIALS
A. Solid Surface Material: Homogeneous-filled plastic resin complying with ICPA SS-1.
1. Manufacturers: Subject to compliance with requirements, provide products by one of the
following:
a. Avonite Surfaces.
b. E. I. du Pont de Nemours and Company.
c. Formica Corporation.
d. Wilsonart LLC.
2. Type: Provide Standard type unless Special Purpose type is indicated.
3. Colors and Patterns: Refer to Sheet A900 Finish Legend and Details.
2.2 COUNTERTOP FABRICATION
A. Fabricate countertops according to solid surface material manufacturer's written instructions and to the
AWI/AWMAC/WI's "Architectural Woodwork Standards."
1. Grade: Premium.

BTBC Phase III October 26, 2020
GE Project No. 0119-0010
Gould Evans
SOLID SURFACING COUNTERTOPS 123662 - 2
B. Configuration:
1. Front: Straight, slightly eased at top
2. Backsplash: Straight, slightly eased at corner.
3. End Splash: Matching backsplash.
C. Countertops: 1/2-inch-with front edge built up with same material.
D. Backsplashes: 1/2-inch- thick, solid surface material
E. Joints: Fabricate countertops without joints.
F. Cutouts and Holes:
1. Undercounter Plumbing Fixtures: Make cutouts for fixtures in shop using template or pattern
furnished by fixture manufacturer. Form cutouts to smooth, even curves.
2.3 INSTALLATION MATERIALS
A. Adhesive: Product recommended by solid surface material manufacturer.
1. <Double click to insert sustainable design text for low emitting adhesives.>
B. Sealant for Countertops: Comply with applicable requirements in Section 079200 "Joint Sealants."
PART 3 - EXECUTION
3.1 INSTALLATION
A. Fasten countertops by screwing through corner blocks of base units into underside of countertop. Predrill
holes for screws as recommended by manufacturer.
B. Fasten subtops to cabinets by screwing through subtops into cornerblocks of base cabinets. Shim as
needed to align subtops in a level plane.
C. Secure countertops to subtops with adhesive according to solid surface material manufacturer's written
instructions.
D. Bond joints with adhesive and draw tight as countertops are set. Mask areas of countertops adjacent to
joints to prevent adhesive smears.
E. Install backsplashes and end splashes by adhering to wall and countertops with adhesive.
F. Install aprons to backing and countertops with adhesive.
G. Complete cutouts not finished in shop. Mask areas of countertops adjacent to cutouts to prevent damage
while cutting. Make cutouts to accurately fit items to be installed, and at right angles to finished surfaces
unless beveling is required for clearance. Ease edges slightly to prevent snipping.
H. Apply sealant to gaps at walls; comply with Section 079200 "Joint Sealants."

BTBC Phase III October 26, 2020
GE Project No. 0119-0010
Gould Evans
SOLID SURFACING COUNTERTOPS 123662 - 3
END OF SECTION 123662


BTBC Phase III October 26, 2020
GE Project No. 0119-0010
Gould Evans
MACHINE-ROOM-LESS ELECTRIC TRACTION PASSENGER ELEVATORS 142124 - 1
SECTION 142124 - MACHINE-ROOM-LESS ELECTRIC TRACTION PASSENGER ELEVATORS
PART 1 - GENERAL
1.1 RELATED DOCUMENTS
A. Drawings and general provisions of the Contract, including General and Supplementary Conditions and
Division 01 Specification Sections, apply to this Section.
B. All elevators are to comply with KU Design & Construction Standards. Reference:
http://www.fpd.ku.edu/ku-design-construction-standards/division 14 conveying equipment
1.2 SUMMARY
A. Section includes machine-room-less electric traction passenger and service elevators.
B. Related Requirements:
1. Section 011000 "Summary" for purchase contract for elevators negotiated by Owner and assigned
to Contractor.
2. Section 015000 "Temporary Facilities and Controls" for temporary use of elevators for construction
purposes.
3. Section 033000 "Cast-in-Place Concrete" for setting sleeves, inserts, and anchoring devices in
concrete.
4. Section 051200 "Structural Steel Framing" for the following:
a. Attachment plates, angle brackets, and other preparation of structural steel for fastening
guide-rail brackets.
b. Divider beams.
c. Hoist beams.
d. Structural-steel shapes for subsills.
5. Section 055000 "Metal Fabrications" for the following:
a. Attachment plates and angle brackets for supporting guide-rail brackets.
b. Divider beams.
c. Hoist beams.
d. Structural-steel shapes for subsills.
e. Pit ladders.
f. Cants made from steel sheet in hoistways.
6. Section “Carpet” for finish flooring in passage elevator cars.
7. Section 221429 "Sump Pumps" for sump pumps, sumps, and sump covers in elevator pits.
8. Section 271500 "Communications Horizontal Cabling" for telephone service for elevators and for
connection to elevator controllers for remote monitoring of elevator performance.
9. Section 283111 "Digital, Addressable Fire-Alarm System" and Section 283112 "Zoned (DC Loop)
Fire-Alarm System" for smoke detectors in elevator lobbies to initiate emergency recall
operation[, for heat detectors in shafts and machine rooms to disconnect power from elevator
equipment before or on sprinkler activation, and for connection to elevator controllers.
1.3 DEFINITIONS
A. Definitions in ASME A17.1/CSA B44 apply to work of this Section.

BTBC Phase III October 26, 2020
GE Project No. 0119-0010
Gould Evans
MACHINE-ROOM-LESS ELECTRIC TRACTION PASSENGER ELEVATORS 142124 - 2
B. Service Elevator: A passenger elevator that is also used to carry freight.
1.4 ACTION SUBMITTALS
A. Product Data: For each type of product.
1. Include capacities, sizes, performances, operations, safety features, finishes, and similar
information.
2. Include Product Data for car enclosures, hoistway entrances, and operation, control, and signal
systems.
B. Shop Drawings:
1. Include plans, elevations, sections, and large-scale details indicating service at each landing,
coordination with building structure, relationships with other construction, and locations of
equipment.
2. Include large-scale layout of car-control station and standby power operation control panel.
3. Indicate maximum dynamic and static loads imposed on building structure at points of support, and
maximum and average power demands.
C. Samples for Initial Selection: For each type of exposed finish involving color selection.
D. Samples for Verification: For exposed car, hoistway door and frame, and signal equipment finishes; 3-inch-
(75-mm-) square Samples of sheet materials; and 4-inch (100-mm) lengths of running trim members.
1.5 INFORMATIONAL SUBMITTALS
A. Qualification Data: For Installer.
B. Seismic Qualification Certificates: For elevator equipment, accessories, and components, from
manufacturer.
1. Basis for Certification: Indicate whether withstand certification is based on actual test of assembled
components or on calculation.
2. Dimensioned Outline Drawings of Equipment Unit: Identify center of gravity and locate and
describe mounting and anchorage provisions.
3. Detailed description of equipment anchorage devices on which the certification is based and their
installation requirements.
C. Manufacturer Certificates: Signed by elevator manufacturer certifying that hoistway and pit layout and
dimensions, as indicated on Drawings, and electrical service including standby power generator, as shown
and specified, are adequate for elevator system being provided.
D. Sample Warranty: For special warranty.
1.6 CLOSEOUT SUBMITTALS
A. Operation and Maintenance Data: For elevators to include in emergency, operation, and maintenance
manuals.
1. Submit manufacturer's or Installer's standard operation and maintenance manual, according to
ASME A17.1/CSA B44 including diagnostic and repair information available to manufacturer's and
Installer's maintenance personnel.

BTBC Phase III October 26, 2020
GE Project No. 0119-0010
Gould Evans
MACHINE-ROOM-LESS ELECTRIC TRACTION PASSENGER ELEVATORS 142124 - 3
B. Inspection and Acceptance Certificates and Operating Permits: As required by authorities having
jurisdiction for normal, unrestricted elevator use.
C. Continuing Maintenance Proposal: Submit a continuing maintenance proposal from Installer to Owner, in
the form of a five-year maintenance agreement. See KU DCM Standards for details.
1.7 QUALITY ASSURANCE
A. Installer Qualifications: Elevator manufacturer or an authorized representative who is trained and approved
by manufacturer.
1.8 DELIVERY, STORAGE, AND HANDLING
A. Deliver, store, and handle materials, components, and equipment in manufacturer's protective packaging.
Store materials, components, and equipment off of ground, under cover, and in a dry location.
1.9 COORDINATION
A. Coordinate installation of inserts, sleeves, block outs, elevator equipment with integral anchors, and other
items that are embedded in concrete or masonry for elevator equipment. Furnish templates, inserts, sleeves,
elevator equipment with integral anchors, and installation instructions and deliver to Project site in time for
installation.
B. Coordinate locations and dimensions of work specified in other Sections that relates to electric traction
elevators including pit ladders; sumps and floor drains in pits; entrance subsills; electrical service; and
electrical outlets, lights, and switches in hoistways and pits.
1.10 WARRANTY
A. Warranty: Submit manufacturer / installer’s standard warranty
B. Special Warranty: The Elevator Contractor shall be required to provide a special project warranty that
includes complete maintenance and call-back service of the equipment for a period of twelve (12) months,
twenty-four hours a day, seven days per week, after the established Date of Substantial Completion of the
elevator work.
1. It shall also include all necessary adjustments, greasing, oiling, cleaning, supplies and parts to keep
the equipment in good operation, except such parts made necessary by misuse, accidents or
negligence not caused by the Contractor.
2. Service personnel must advise the Department of Facilities Services of their presence on campus
prior to servicing equipment. Failure to do so is sufficient grounds for the University to deny any
claims for additional compensation.
3. The Elevator Contractor shall provide monthly service inspections during the warranty period and
shall perform monthly testing of the Fire Service, alarm bell and emergency communication devices.
Advance notification of each site visit/inspection shall be sent to the University Fire Marshal, the
DCM PM and to the designated Facilities Services contact person.
a. Copies of the monthly inspection results shall be issued to those same individuals.
4.
5. The Elevator Contractor shall notify the Director of Facilities Services in writing 60 days prior to
expiration of the maintenance warranty.
6.

BTBC Phase III October 26, 2020
GE Project No. 0119-0010
Gould Evans
MACHINE-ROOM-LESS ELECTRIC TRACTION PASSENGER ELEVATORS 142124 - 4
7. During the 10th month warranty inspection, an inspection of the elevator equipment shall be
coordinated by the DCM PM to verify that all major component parts are operating as designed.
Any deficiencies found shall be corrected prior to the warranty expiration, or the warranty will be
extended until such deficiencies are corrected and the elevator re-inspected.
H. KU Submittal: The Contractor shall provide a certified statement that the elevator manufacturer will pro-
vide all detailed electrical schematics for maintenance and service of equipment. Shop drawings are not to
be approved until after this information is provided.
1. All special tools normally required for programming and service shall be included. This shall include
all connection wiring diagrams and circuit board diagrams, including all normal voltages, compo-
nent ratings, wave forms and similar information required for full service/repair of all parts.
PART 2 - PRODUCTS
2.1 MANUFACTURERS
A. Manufacturers: Subject to compliance with requirements, available manufacturers offering products that
may be incorporated into the Work include, but are not limited to the following:
1. Otis Elevator Co.
2. Schindler Elevator Corp.
3. ThyssenKrupp Elevator.
a. Basis of Design: Evolution 200
B. Elevators shall by installed by the elevator manufacturer
1. Major elevator components, including driving machines, controllers, signal fixtures, door operators,
car frames, cars, and entrances, shall be manufactured by single manufacturer.
2.2 PERFORMANCE REQUIREMENTS
A. Regulatory Requirements: Comply with ASME A17.1/CSA B44.
B. Accessibility Requirements: Comply with requirements for accessible elevators in the United States Access
Board's ADA-ABA Accessibility Guidelines and with ICC A117.1.
2.3 MACHINE ROOM LESS ELECTRIC TRACTION ELEVATORS
A. Elevator System, General: Manufacturer's standard elevator systems. Unless otherwise indicated,
manufacturer's standard components shall be used, as included in standard elevator systems and as required
for complete system.
B. Elevator Description:
1. Service Elevator: EL-1
a. Rated Load: 5000 lb
2. Passenger Elevator: EL-2 (ADD ALTERNATE No. 1)
a. Rated Load: 3500 lb
3. Freight Loading Class for Service Elevator(s): Class A.
4. Rated Speed: 200 fpm (0.75 m/s).

BTBC Phase III October 26, 2020
GE Project No. 0119-0010
Gould Evans
MACHINE-ROOM-LESS ELECTRIC TRACTION PASSENGER ELEVATORS 142124 - 5
5. Simples Operation System: Using microprocessor based controller, operation shall be automatic by
means of the car and hall buttons. When all calls have been answered, the car shall park at the last
landing served
a. Door Light Curtain Protection
b. Static AC Drive
c. Phase Monitor Relay
d. Cab Overload with indicator
e. Load-weighing
f. Central Alarm
g. Remote Monitoring
h. Firefighter’s Operation
i. Independent Service
6. Auxiliary Operations:
a. Standby power operation.
b. Automatic dispatching of loaded car.
c. Nuisance-call cancel.
d. Loaded-car bypass.
e. Automatic operation of lights and ventilation fans.
7. Security Features: Keyswitch operation.
8. Dual Car-Control Stations: Provide two car-control stations in the service elevator; equip only one
with required keyswitches if any.
9. Car Enclosures:
a. Inside Width (EL-1): Not less than 68 inches (1676 mm) from side wall to side wall.
b. Inside Depth (EL-1): Not less than 101 (2451 mm) from back wall to front wall (return
panels).
c. Inside Width (EL-2): Not less than 80 inches (1981 mm) from side wall to side wall.
d. Inside Depth (EL-2): Not less than 65 inches (1524 mm) from back wall to front wall (return
panels).
e. Inside Height: Not less than 88 inches (2362 mm) to underside of ceiling.
f. Front Walls (Return Panels): Satin stainless steel, No. 4 finish.
g. Car Fixtures: Satin stainless steel, No. 4 finish.
h. Side and Rear Wall Panels: Satin stainless steel, No. 4 finish.
i. Reveals: Satin stainless steel, No. 4 finish.
j. Door Faces (Interior): Satin stainless steel, No. 4 finish.
k. Door Sills: Nickel silver.
l. Ceiling: Satin stainless steel, No. 4 finish with integral LED lighting.
m. Handrails: 1-1/2 inches (38 mm) round satin stainless steel, No. 4 finish, at sides and rear of
car.
n. Floor (EL-1): Aluminum diamond plate – brushed finish
o. Floor (EL-2): Floor prepared to receive carpet by others.
p. Floors recessed and prepared to receive carpet or diamond plate
10. Hoistway Entrances:
a. Width (EL-1): 48 inches (1219 mm).
b. Width (EL-2): 42 inches (1067 mm).
c. Height: 84 inches (2134 mm).
d. Type: Two-speed side sliding (EL-1) and Two-speed center opening (EL-2).
e. Frames: Satin stainless steel, No. 4 finish.
f. Doors and Transoms: Satin stainless steel, No. 4 finish.
g. Sills: Nickel silver.
11. Hall Fixtures: Satin stainless steel, No. 4 finish.
12. Additional Requirements:
a. Provide inspection certificate in each car, mounted under acrylic cover with frame made from
satin stainless steel, No. 4 finish.

BTBC Phase III October 26, 2020
GE Project No. 0119-0010
Gould Evans
MACHINE-ROOM-LESS ELECTRIC TRACTION PASSENGER ELEVATORS 142124 - 6
b. Provide hooks for protective pads in all cars and one complete set(s) of full-height protective
pads for each car.
2.4 TRACTION SYSTEMS
A. Elevator Machines: Permanent magnet, variable-voltage, variable-frequency, ac-type hoisting machines
and solid-state power converters.
1. Provide regenerative system.
2. Provide regenerative system that complies with the IgCC.
3. Limit total harmonic distortion of regenerated power to 5 percent per IEEE 519.
4. Provide means for absorbing regenerated power when elevator system is operating on standby
power.
5. Provide line filters or chokes to prevent electrical peaks or spikes from feeding back into building
power system.
B. Inserts: Furnish required concrete and masonry inserts and similar anchorage devices for installing guide
rails, machinery, and other components of elevator work. Device installation is specified in another Section.
C. Machine Beams: Provide steel framing to support elevator hoisting machine and deflector sheaves from the
building structure. Comply with Section 055000 "Metal Fabrications" for materials and fabrication.
D. Car Frame and Platform: Bolted- or welded-steel units.
E. Guides: Roller guides or polymer-coated, nonlubricated sliding guides. Provide guides at top and bottom
of car and counterweight frames.
2.5 OPERATION SYSTEMS
A. General: Provide manufacturer's standard microprocessor operation systems as required to provide type of
operation indicated.
B. Auxiliary Operations:
1. Single-Car Standby Power Operation: On activation of standby power, car is returned to a
designated floor and parked with doors open. Car can be manually put in service on standby power,
either for return operation or for regular operation, by switches in control panel located at main
lobby fire-command station. Manual operation causes automatic operation to cease.
2. Automatic Dispatching of Loaded Car: When car load exceeds 80 percent of rated capacity, doors
begin closing.
3. Nuisance-Call Cancel: When car calls exceed a preset number while car load is less than a
predetermined weight, all car calls are canceled. Preset number of calls and predetermined weight
can be adjusted.
4. Loaded-Car Bypass: When car load exceeds 80 percent of rated capacity, car responds only to car
calls, not to hall calls.
5. Automatic Operation of Lights and Fan: When elevator is stopped and unoccupied with doors
closed, lighting, ventilation fan, and cab displays are de-energized after five minutes and are re-
energized before car doors open.
C. Security features shall not affect emergency firefighters' service.
1. Keyswitch Operation: Push buttons are activated and deactivated by security keyswitches at car-
control stations and hall push-button stations. Key is removable in either position.

BTBC Phase III October 26, 2020
GE Project No. 0119-0010
Gould Evans
MACHINE-ROOM-LESS ELECTRIC TRACTION PASSENGER ELEVATORS 142124 - 7
2. Car-to-Lobby Feature: Feature, activated by keyswitch at main lobby, that causes car to return
immediately to lobby and open doors for inspection. On deactivation by keyswitch, calls registered
before keyswitch activation are completed and normal operation is resumed.
2.6 DOOR REOPENING DEVICES
A. Infrared Array: Provide door reopening device with uniform array of 36 or more microprocessor-controlled,
infrared light beams projecting across car entrance. Interruption of one or more light beams shall cause
doors to stop and reopen.
B. Nudging Feature: After car doors are prevented from closing for predetermined adjustable time, through
activating door reopening device, a loud buzzer shall sound and doors shall begin to close at reduced kinetic
energy.
2.7 CAR ENCLOSURES
A. General: Provide [enameled or powder-coated steel car enclosures to receive removable] [steel-framed car
enclosures with nonremovable] wall panels, with [removable ]car roof, access doors, power door operators,
and ventilation.
1. Provide standard railings complying with ASME A17.1/CSA B44 on car tops where required by
ASME A17.1/CSA B44.
B. Materials and Finishes: Manufacturer's standards, but not less than the following:
1. Subfloor: Exterior, C-C Plugged grade plywood, not less than 7/8-inch (22.2-mm) nominal
thickness.
2. Floor Finish: EL-2, Aluminum diamond plate
3. Stainless-Steel Wall Panels: Flush, formed-metal construction; fabricated from stainless-steel sheet.
4. Fabricate car with recesses and cutouts for signal equipment.
5. Fabricate car door frame integrally with front wall of car.
6. Stainless-Steel Doors: Flush, hollow-metal construction; fabricated from stainless-steel sheet.
7. Sight Guards: Provide sight guards on car doors.
8. Sills: Extruded or machined metal, with grooved surface, 1/4 inch (6.4 mm) thick.
9. Luminous Ceiling: LED light fixtures and ceiling panels of stainless steel.
10. Light Fixture Efficiency: Not less than 35 lumens/W.
11. Ventilation Fan Efficiency: Not less than 3.0 cfm/W (1.4 L/s per W).
2.8 HOISTWAY ENTRANCES
A. Hoistway Entrance Assemblies: Manufacturer's standard horizontal-sliding, door-and-frame hoistway
entrances complete with track systems, hardware, sills, and accessories. Frame size and profile shall
accommodate hoistway wall construction.
1. Where gypsum board wall construction is indicated, frames shall be self-supporting with reinforced
head sections.
B. Fire-Rated Hoistway Entrance Assemblies: Door and frame assemblies shall comply with NFPA 80 and be
listed and labeled by a testing and inspecting agency acceptable to authorities having jurisdiction based on
testing at as close-to-neutral pressure as possible according to NFPA 252 or UL 10B.
1. Fire-Protection Rating: 1-1/2 hours with 30-minute temperature rise of 450 deg F (250 deg C).
C. Materials and Fabrication: Manufacturer's standards, but not less than the following:
1. Stainless-Steel Frames: Formed from stainless-steel sheet.

BTBC Phase III October 26, 2020
GE Project No. 0119-0010
Gould Evans
MACHINE-ROOM-LESS ELECTRIC TRACTION PASSENGER ELEVATORS 142124 - 8
2. Star of Life Symbol: Identify emergency elevators with star of life symbol, not less than 3 inches
(76 mm) high, on both jambs of hoistway door frames.
3. Stainless-Steel Doors and Transoms: Flush, hollow-metal construction; fabricated [from stainless-
steel sheet.
4. Sight Guards: Provide sight guards on doors matching door edges.
5. Sills: Extruded or machined metal, with grooved surface, 1/4 inch (6.4 mm) thick.
6. Nonshrink, Nonmetallic Grout: Factory-packaged, nonstaining, noncorrosive, nongaseous grout
complying with ASTM C 1107/C 1107M.
2.9 SIGNAL EQUIPMENT
A. General: Provide hall-call and car-call buttons that light when activated and remain lit until call has been
fulfilled. Provide vandal-resistant buttons and lighted elements illuminated with LEDs.
B. Car-Control Stations: Provide manufacturer's standard recessed car-control stations. Mount in return panel
adjacent to car door unless otherwise indicated.
1. Mark buttons and switches for required use or function. Use both tactile symbols and Braille.
2. Provide "No Smoking" sign matching car-control station, either integral with car-control station or
mounted adjacent to it, with text and graphics as required by authorities having jurisdiction.
C. Swing-Return Car-Control Stations: Provide car-control stations mounted on rear of hinged return panel
adjacent to car door and with buttons, switches, controls, and indicator lights projecting through return
panel but substantially flush with face of return panel.
1. Mark buttons and switches for function. Use both tactile symbols and Braille.
2. Provide "No Smoking" sign matching car-control station, either integral with car-control station or
mounted adjacent to it, with text and graphics as required by authorities having jurisdiction.
D. Emergency Communication System: Two-way voice communication system, with visible signal, which
dials preprogrammed number of monitoring station and does not require handset use. System is contained
in flush-mounted cabinet, with identification, instructions for use, and battery backup power supply.
Comply and provide per KU DCM Standards Division 14.
E. Firefighters' Two-Way Telephone Communication Service: Provide flush-mounted cabinet in each car and
required conductors in traveling cable for firefighters' two-way telephone communication service specified
in KU DCM Standards.
F. Car Position Indicator: Provide illuminated, digital-type car position indicator, located above car door or
above car-control station. Also, provide audible signal to indicate to passengers that car is either stopping
at or passing each of the floors served. Include travel direction arrows if not provided in car-control station.
G. Hall Push-Button Stations: Provide one hall push-button station at each landing.
1. Provide units with flat faceplate for mounting with body of unit recessed in wall.
2. Equip units with buttons for calling elevator and for indicating desired direction of travel.
3. Provide telephone jack in each unit for firefighters' two-way telephone communication service
specified in [Section 283111 "Digital, Addressable Fire-Alarm System."] [Section 283112 "Zoned
(DC Loop) Fire-Alarm System."]
H. Hall Lanterns: Units with illuminated arrows; but provide single arrow at terminal landings. Provide one
of the following:
1. Units mounted in one jamb of entrance frame for each elevator.
I. Hall Annunciator: With each hall lantern, provide audible signals indicating car arrival and direction of
travel. Signals sound once for up and twice for down.
1. At manufacturer's option, audible signals may be placed on cars.

BTBC Phase III October 26, 2020
GE Project No. 0119-0010
Gould Evans
MACHINE-ROOM-LESS ELECTRIC TRACTION PASSENGER ELEVATORS 142124 - 9
J. Standby Power Elevator Selector Switches: Provide switches, as required by ASME A17.1/CSA B44,
where indicated. Adjacent to switches, provide illuminated signal that indicates when normal power supply
has failed. For each elevator, provide illuminated signals that indicate when they are operational and when
they are at the designated emergency return level with doors open.
K. Fire-Command-Center Annunciator Panel: Provide panel containing illuminated position indicators for
each elevator, clearly labeled with elevator designation; include illuminated signal that indicates when
elevator is operational and when it is at the designated emergency return level with doors open. Provide
standby power elevator selector switch(es), as required by ASME A17.1/CSA B44, adjacent to position
indicators. Provide illuminated signal that indicates when normal power supply has failed.
L. Emergency Pictorial Signs: Fabricate from materials matching hall push-button stations, with text and
graphics as required by authorities having jurisdiction, indicating that in case of fire, elevators are out of
service and exits should be used instead. Provide one sign at each hall push-button station unless otherwise
indicated.
2.10 FINISH MATERIALS
A. Cold-Rolled Steel Sheet: ASTM A 1008/A 1008M, commercial steel, Type B, exposed, matte finish.
B. Hot-Rolled Steel Sheet: ASTM A 1011/A 1011M, commercial steel, Type B, pickled.
C. Stainless-Steel Sheet: ASTM A 240/A 240M, Type 304.
D. Stainless-Steel Bars: ASTM A 276, Type 304.
E. Stainless-Steel Tubing: ASTM A 554, Grade MT 304.
F.
G. Nickel Silver Extrusions: ASTM B 151/B 151M, Alloy UNS No. C74500 or UNS No. C77600.
PART 3 - EXECUTION
3.1 EXAMINATION
A. Examine elevator areas, with Installer present, for compliance with requirements for installation tolerances
and other conditions affecting performance of the Work. Examine hoistways, hoistway openings, and pits
as constructed; verify critical dimensions; and examine supporting structure and other conditions under
which elevator work is to be installed.
B. Prepare written report, endorsed by Installer, listing conditions detrimental to performance of the Work.
C. Proceed with installation only after unsatisfactory conditions have been corrected.
3.2 INSTALLATION
A. Comply with manufacturer's written instructions.

BTBC Phase III October 26, 2020
GE Project No. 0119-0010
Gould Evans
MACHINE-ROOM-LESS ELECTRIC TRACTION PASSENGER ELEVATORS 142124 - 10
B. Welded Construction: Provide welded connections for installing elevator work where bolted connections
are not required for subsequent removal or for normal operation, adjustment, inspection, maintenance, and
replacement of worn parts. Comply with AWS standards for workmanship and for qualifications of welding
operators.
C. Sound Isolation: Mount rotating and vibrating equipment on vibration-isolating mounts to minimize
vibration transmission to structure and structure-borne noise due to elevator system.
D. Lubricate operating parts of systems, including ropes, as recommended by manufacturers.
E. Alignment: Coordinate installation of hoistway entrances with installation of elevator guide rails for
accurate alignment of entrances with car. Where possible, delay final adjustment of sills and doors until car
is operable in shaft. Reduce clearances to minimum, safe, workable dimension at each landing.
F. Leveling Tolerance: 1/8 inch (3 mm), up or down, regardless of load and travel direction.
G. Set sills flush with finished floor surface at landing. Fill space under sill solidly with nonshrink, nonmetallic
grout.
H. Locate hall signal equipment for elevators as follows unless otherwise indicated:
1. For groups of elevators, locate hall push-button stations between two elevators at center of group or
at location most convenient for approaching passengers.
2. Mount hall lanterns at a minimum of 72 inches (1829 mm) above finished floor.
3.3 FIELD QUALITY CONTROL
A. Acceptance Testing: On completion of elevator installation and before permitting elevator use (either
temporary or permanent), perform acceptance tests as required and recommended by
ASME A17.1/CSA B44 and by governing regulations and agencies.
B. Operating Test: Load each elevator to rated capacity and operate continuously for 30 minutes over full
travel distance, stopping at each level and proceeding immediately to the next. Record temperature rise of
elevator machine during 30-minute test period. Record failure to perform as required.
C. Advise Owner, Architect, and authorities having jurisdiction in advance of dates and times that tests are to
be performed on elevators.
3.4 PROTECTION
A. Temporary Use: Limit temporary use for construction purposes to one elevator. Comply with the following
requirements for each elevator used for construction purposes:
1. Provide car with temporary enclosure, either within finished car or in place of finished car, to protect
finishes from damage.
2. Provide strippable protective film on entrance and car doors and frames.
3. Provide padded wood bumpers on entrance door frames covering jambs and frame faces.
4. Provide other protective coverings, barriers, devices, signs, and procedures as needed to protect
elevator and elevator equipment.
5. Do not load elevators beyond their rated weight capacity.
6. Engage elevator Installer to provide full maintenance service. Include preventive maintenance,
repair or replacement of worn or defective components, lubrication, cleanup, and adjustment as
necessary for proper elevator operation at rated speed and capacity. Provide parts and supplies same
as those used in the manufacture and installation of original equipment.

BTBC Phase III October 26, 2020
GE Project No. 0119-0010
Gould Evans
MACHINE-ROOM-LESS ELECTRIC TRACTION PASSENGER ELEVATORS 142124 - 11
7. Engage elevator Installer to restore damaged work, if any, so no evidence remains of correction.
Return items that cannot be refinished in the field to the shop, make required repairs and refinish
entire unit, or provide new units as required.
3.5 DEMONSTRATION
A. Engage a factory-authorized service representative to train Owner's maintenance personnel to
operate, adjust, and maintain elevator(s).
B. Check operation of each elevator with Owner's personnel present before date of Substantial Completion and
again not more than one month before end of warranty period. Determine that operation systems and
devices are functioning properly.
3.6 MAINTENANCE SERVICE
A. Initial Maintenance Service: Beginning at Substantial Completion, maintenance service shall include 60
months' full maintenance by skilled employees of elevator Installer. Include monthly preventive
maintenance, repair or replacement of worn or defective components, lubrication, cleaning, and adjusting
as required for proper elevator operation at rated speed and capacity. Parts and supplies shall be
manufacturer's authorized replacement parts and supplies.
1. Perform maintenance during normal working hours.
2. Provide monthly service inspections during warranty / maintenance period.
a. Testing: Fire Service, alarm bell and emergency communication devices.
3. Include 24-hour-per-day, 7-day-per-week emergency callback service with response time of two
hours or less.
END OF SECTION 142124

BTBC Phase III October 26, 2020
GE Project No. 0119-0010
Gould Evans
MACHINE-ROOM-LESS ELECTRIC TRACTION PASSENGER ELEVATORS 142124 - 12
THIS PAGE INTENTIONALLY LEFT BLANK