border embroidery frame cadre de broderie … · broderie de bord pour broder des motifs répétés...
TRANSCRIPT

EN
GL
ISH
FR
AN
ÇA
ISD
EU
TS
CH
ES
PAÑ
OL
NEDERLANDSITA
LIA
NO
BORDER EMBROIDERY FRAMECADRE DE BRODERIE D’ENCADREMENTRAND STICKRAHMENBASTIDOR DE BORDADO DE BORDESRANDBORDUURRAAMTELAIO DA RICAMO PER BORDI
Operation ManualManuel d’instructionsBedieningshandleidingManual de instruccionesBedieningshandleidingManuale d’istruzione


1
EN
GL
ISH
CONTENTSAccessories............................................................................................................................... 2Embroidering with the Border Embroidery Frame...................................................................... 2
Sample Projects Using the Border Embroidery Frame .......................................................... 2Selecting a Pattern .............................................................................................................. 3Hooping the Fabric in the Border Embroidery Frame .......................................................... 5Attaching the Border Embroidery Frame to the Embroidery Unit ......................................... 6Embroidering the First Pattern ............................................................................................. 7Removing the Border Embroidery Frame ............................................................................. 8Embroidering the Next Pattern ............................................................................................ 8

2
Accessories
Check that the following items are provided. If anything is missing or damaged, contact your authorized dealer or Brother Customer Service.
• Border embroidery frameSince the sewing area can easily be changed when the border embroidery frame is used, repeated patterns can be sewn simply by sliding the fabric. An area of 10 cm × 18 cm (approx. 4 inches × 7 inches) can be embroidered.
• Embroidery sheetThis embroidery sheet is for the border embroidery frame. It is used to position the fabric after the embroidering location is determined.
• Operation manual (this guide)
Embroidering with the Border Embroidery Frame
Since the fabric can easily be repositioned and rehooped if the border embroidery frame is used, this frame is useful for embroidering repeated patterns while sliding the fabric. An added feature of this frame is that the pressure applied by the upper and lower frames does not leave an indentation in the fabric. An area of 10 cm × 18 cm (approx. 4 inches × 7 inches) can be embroidered.
■ Sample Projects Using the Border Embroidery FrameWe recommend using the border embroidery frame when embroidery repeated patterns at the edges of items such as curtains, chair covers, bed covers, tablecloths and blankets.
CAUTION• Do not leave the border embroidery frame within
the reach of children, otherwise injuries may result.
Note• When the border embroidery frame is not being
used, unlock it before storing it.

3
■ Selecting a Pattern
a Select and select a pattern.
b Combine the patterns and use the border function to repeat the pattern.
c Press .
d From the embroidery frame display settings, select one of the embroidery frame displays for the border embroidery frame.* Of the 14 settings available, there are two for border
embroidery frames.
a Border embroidery frame embroidering area (18 cm × 10 cm)
b Center line
Memo• For details on the border function, refer to
“Designing Repeated Patterns” in chapter 6 of the Operation Manual for the sewing machine.
a
b

4
e If necessary, add the thread mark. Since the pattern will be repeatedly embroidered from the top to the bottom, add the thread mark at the lower center of the pattern. When you are finished, press .
→ Touch and , or and to highlight the design for inserting thread marks.
Note• Do not add thread marks to character patterns.
• Add the thread mark to patterns that do not have a point of alignment, such as rotated patterns or patterns that are spaced apart. Patterns that can be aligned visually can be embroidered cleanly without the thread mark.
Memo• Select the location where the thread mark is to be
added according to the direction that the embroidery is repeated.
If the design direction is rotated, use the following suggestions.
a First Patternb Second Patternc Thread mark

5
f Press .
■ Hooping the Fabric in the Border Embroidery Frame
a With a chalk pen, mark the fabric with a line drawn down the center of the area to be embroidered.
a Patternb Mark (line)
b Affix stabilizer material to the fabric to be embroidered.
c If the upper frame is locked down against the lower frame, press the left and right lock release buttons to unlock the upper frame.
a Lock release buttons
d Lay the fabric between the upper and lower frames.
Note• When embroidering the edges of the fabric, affix
stabilizer material larger than the fabric, and then firmly secure the fabric and excess part of the stabilizer material within the border embroidery frame (in the same way as when the normal embroidery frame is used). Otherwise, misaligned patterns may result.
a Fabricb Stabilizer

6
e Place the embroidery sheet in the upper frame, align the guide line on the embroidery sheet with the mark (line) on the fabric, and then press down on the left and right locking levers until they click into place.
a Locking levers
f Remove the embroidery sheet, and then pull the four sides of the fabric to remove any slack. Finally, check that the fabric is firmly stretched.
■ Attaching the Border Embroidery Frame to the Embroidery Unit
a Make sure that the needle and presser foot have been raised. If the needle has not been raised, press the "Needle Position" button to raise it. If the presser foot has not been raised, press the "Presser Foot Lifter" button to raise it.
b Make sure that the embroidery unit carriage has moved to its initial position.
c Align the guide on the border embroidery frame with the right edge of the embroidery frame holder.
a Embroidery frame holderb Guide on border embroidery frame
Memo• The fabric can also be positioned in the border
embroidery frame by aligning the edge of the fabric with the inner markings on the upper frame.
Note• If there is excess fabric after the center of the
embroidering area is aligned with the center of the border embroidery frame, fold over the excess fabric, place it on top of the upper frame, and then press down on the levers. Be careful that the folded excess fabric is not caught in the embroidering area.
CAUTION• After firmly hooping the fabric in the border
embroidery frame, attach the frame to the embroidery unit. Otherwise, the needle may break and cause injuries.
• Before attaching the border embroidery frame to the embroidery unit, make sure that the needle and presser foot have been raised. Otherwise, the needle may break and cause injuries.
Note• Before attaching the border embroidery frame, wind
the bobbin with thread and install it.
a
b

7
d Slide the border embroidery frame into the embroidery frame holder, making sure to align the border embroidery frame's arrow mark ( ) with the embroidery frame holder's arrow mark ( ).
a Arrow marks
e Lower the frame-securing lever so that it is level with the border embroidery frame to secure the border embroidery frame in the embroidery frame holder.
a Frame-securing lever
■ Embroidering the First Pattern
a To check the embroidering area, press .
b Thread the machine, and then start embroidering.
→ When embroidering is finished, the thread mark is sewn with the last thread color.
CAUTION• If the frame-securing lever is not lowered, the
pattern may not embroider correctly or the presser foot may strike the border embroidery frame and cause injuries.
a
a
Note• When the border embroidery frame is used, the
embroidering time may be slightly longer than the time that appears in the screen, depending on the type of fabric and pattern that is used.
CAUTION• Do not touch the border embroidery frame while
embroidering.

8
■ Removing the Border Embroidery Frame
a Raise the frame-securing lever and pull the border embroidery frame toward you.
■ Embroidering the Next Pattern
a Press both lock release buttons and slide the fabric to align the embroidering area of the next pattern, and rehoop the fabric in the border embroidery frame.
a Pattern embroidered firstb Position of pattern to be embroidered nextc Embroidering area of embroidery sheet
b Attach the border embroidery frame to the embroidery unit, and then press .
Note• Before removing the border embroidery frame from
the embroidery unit, make sure that the embroidery unit carriage has moved to its initial position.
CAUTION• If the thread has become tangled and the
embroidery unit carriage does not move to its initial position, even after the thread is cut, turn off the machine, manually move the carriage, and then remove the border embroidery frame.
• Only move the embroidery unit carriage when the machine is turned off.
OFF
Note• Adjust the position of the fabric so that the
embroidering area for the next pattern is within the embroidering area of the embroidery sheet.

9
c Use to select the needle position that
will align with the thread mark at the end of previous embroidery. For this example, align the needle position with the upper center of the next pattern. When you are finished, press
.
d Use to align the needle position with
the point of the thread mark.
a Needle position
Note• After turning the handwheel to check the needle
position, press the "Needle Position" button to raise the needle.
a

10
e After aligning the needle position for the beginning of embroidering, remove the thread mark.
f Embroider the next pattern. To continue embroidering a repeating pattern, repeat the procedure starting with “Removing the Border Embroidery Frame”.
Note• Remove the thread mark before starting to
embroider. Otherwise, the thread mark stitching may be combined with the pattern stitching and become difficult to remove.
CAUTION• If the sewing machine is turned off, then turned on
again with the border embroidery frame attached or if you try to select a stitch from the Utility Stitch screen or the Character/Decorative Stitch screen while the border embroidery frame is attached, the following message appears. If the border embroidery frame is not fully removed from the embroidery unit at this time, the border embroidery frame may be hit by the presser foot when the carriage of the embroidery unit is moved. When the following message appears, fully remove the border embroidery frame.

11
FR
AN
ÇA
IS
TABLE DES MATIÈRESAccessoires............................................................................................................................. 12Broderie à l'aide du cadre de broderie de bord....................................................................... 12
Exemples de projets avec le cadre de broderie de bord ..................................................... 12Sélection d’un motif .......................................................................................................... 13Mise en place du tissu dans le cadre de broderie de bord ................................................. 15Fixation du cadre de broderie de bord à l'unité de broderie .............................................. 16Broderie du premier motif ................................................................................................. 17Retrait du cadre de broderie de bord ................................................................................ 18Broderie du motif suivant .................................................................................................. 18

12
Accessoires
Vérifiez que les éléments suivants sont fournis. Si un élément est manquant ou endommagé, contactez votre revendeur agréé ou le service client Brother.
• Cadre de broderie de bordEtant donné que la zone de couture peut aisément être modifiée lorsque vous utilisez le cadre de bordure, il est possible de coudre un même motif en faisant simplement glisser le tissu. Vous pouvez broder une zone de 10 cm × 18 cm.
• Feuille de broderieCette feuille de broderie est destinée au cadre de broderie de bord. Elle est utilisée pour placer le tissu une fois que la zone à broder est déterminée.
• Manuel d'instructions (ce guide)
Broderie à l'aide du cadre de broderie de bord
Etant donné que le tissu peut être facilement replacé si le cadre de broderie de bord est utilisé, ce cadre est utile pour broder des motifs répétés en faisant glisser le tissu. Une fonction ajoutée de ce cadre est que la pression appliquée par les cadres supérieur et inférieur ne laisse pas de trace sur le tissu. Vous pouvez broder une zone de 10 cm × 18 cm.
■ Exemples de projets avec le cadre de broderie de bordNous vous recommandons d'utiliser le cadre de broderie de bord pour broder des motifs répétés sur les bords des tissus comme les rideaux, les recouvrements de chaise, les couvertures, les nappes et les draps.
ATTENTION• Ne laissez pas le cadre de broderie de bord à portée
des enfants pour éviter tout risque de blessure.
Remarque• Si le cadre de broderie de bord n'est pas utilisé,
déverrouillez-le avant de le ranger.

13
■ Sélection d’un motif
a Sélectionnez et choisissez un motif.
b Combinez les motifs et utilisez la fonction de bordure pour répéter le motif.
c Appuyez sur .
d Dans les réglages de l'affichage du cadre de broderie, sélectionnez un des affichages du cadre de broderie de bord.* Deux des 14 paramètres disponibles concernent les cadres
de broderie de bordure.
a Zone de broderie du cadre de broderie de bord (18 cm × 10 cm)
b Ligne centrale
Mémo• Pour plus de détails sur la fonction de bordure,
reportez-vous à la section "Conception de motifs répétés" du chapitre 6 du Manuel d'instructions de la machine à coudre.
a
b
14
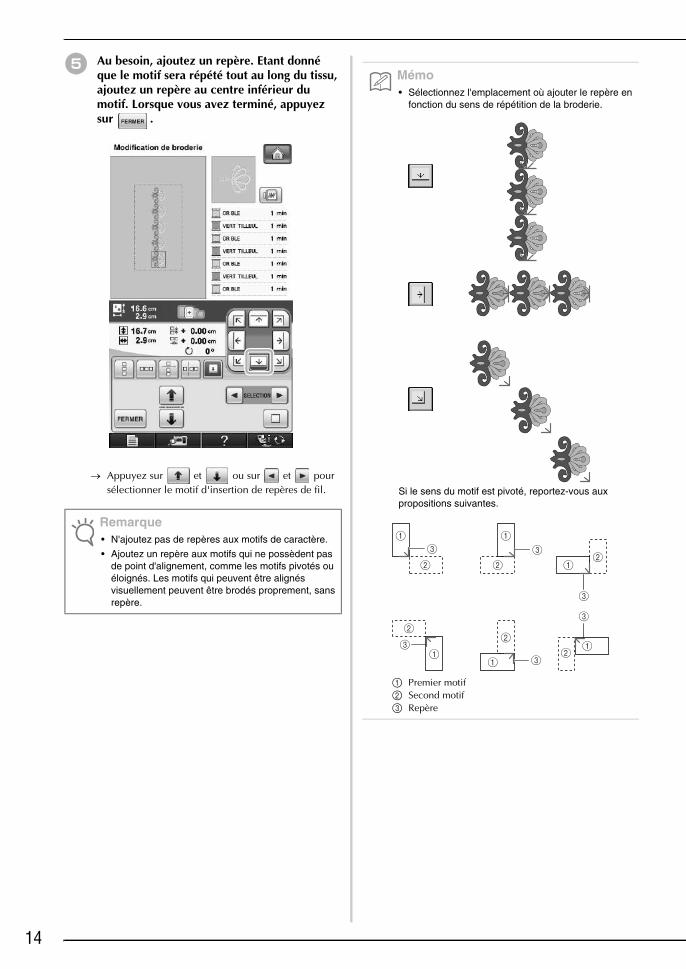
e Au besoin, ajoutez un repère. Etant donné que le motif sera répété tout au long du tissu, ajoutez un repère au centre inférieur du motif. Lorsque vous avez terminé, appuyez sur .
→ Appuyez sur et ou sur et pour sélectionner le motif d'insertion de repères de fil.
Remarque• N'ajoutez pas de repères aux motifs de caractère.
• Ajoutez un repère aux motifs qui ne possèdent pas de point d'alignement, comme les motifs pivotés ou éloignés. Les motifs qui peuvent être alignés visuellement peuvent être brodés proprement, sans repère.
Mémo• Sélectionnez l'emplacement où ajouter le repère en
fonction du sens de répétition de la broderie.
Si le sens du motif est pivoté, reportez-vous aux propositions suivantes.
a Premier motifb Second motifc Repère

15
f Appuyez sur .
■ Mise en place du tissu dans le cadre de broderie de bord
a A l'aide d'une craie, tracez une ligne sur le tissu jusqu'au centre de la zone de broderie.
a Motifb Repère (ligne)
b Fixez le renfort de broderie au tissu à broder.
c Si le cadre supérieur est verrouillé contre le cadre inférieur, appuyez sur les boutons de dégagement de gauche et de droite pour déverrouiller le cadre supérieur.
a Boutons de dégagement
d Posez le tissu entre les cadres supérieur et inférieur.
Remarque• Lorsque vous brodez les bords du tissu, fixez un
renfort de broderie plus large que le tissu, fixez fermement le tissu et le surplus de renfort dans le cadre de broderie de bord (de la même manière que lorsque vous utilisez le cadre de broderie normal). Sinon, un décalage de motifs peut apparaître.
a Tissub Renfort

16
e Placez la feuille de broderie dans le cadre supérieur, alignez les lignes de guidage de la feuille de broderie avec le repère sur le tissu et appuyez sur les leviers de verrouillage de gauche et de droite jusqu'à ce qu'ils se clipsent.
a Leviers de verrouillage
f Retirez la feuille de broderie et tirez sur les quatre côtés du tissu pour tendre les fils. Ensuite, vérifiez que le tissu est fermement tendu.
■ Fixation du cadre de broderie de bord à l'unité de broderie
a Veillez à ce que l'aiguille et le pied-de-biche soient remontés. Si l'aiguille n'est pas relevée, appuyez sur la touche “Positionnement aiguille”pour la relever. Si le pied-de-biche n'est pas relevé, appuyez sur la touche “Releveur du pied-de-biche” pour le relever.
b Veillez à ce que le chariot de l'unité de broderie soit revenu en position initiale.
c Alignez le guide sur le cadre de broderie de bord et le côté droit du support du cadre de broderie.
a Support du cadre de broderieb Guide sur le cadre de broderie de bord
Mémo• Le tissu peut également être placé dans le cadre de
broderie de bord si vous alignez le bord du tissu et les repères intérieurs du cadre supérieur.
Remarque• S'il y a un surplus de tissu après que vous avez
aligné le centre de la zone de broderie avec le centre du cadre de broderie de bord, repliez le surplus, placez-le au dessus du cadre supérieur et appuyez sur les leviers. Veillez à ce que le surplus de tissu replié ne se trouve pas dans la zone de broderie.
ATTENTION• Une fois le tissu mis en place dans le cadre de
broderie de bord, fixez le cadre à l'unité de broderie. Sinon, l'aiguille risque de casser et de vous blesser.
• Avant de fixer le cadre de broderie de bord à l'unité de broderie, assurez-vous que l'aiguille et le pied-de-biche soient relevés. Sinon, l'aiguille risque de casser et de vous blesser.
Remarque• Avant de fixer le cadre de broderie de bord, bobinez
la canette avec le fil et installez-la.
a
b

17
d Faites glisser le cadre de broderie de bord sur le support du cadre de broderie pour aligner le repère fléché du cadre ( ) avec celui du support ( ).
a Repères fléchés
e Abaissez le levier de sécurité du cadre au même niveau que le cadre de broderie de bord pour fixer le cadre au support.
a Levier de sécurité du cadre
■ Broderie du premier motif
a Pour contrôler la zone de broderie, appuyez sur .
b Enfilez le fil dans la machine et démarrez la broderie.
→ Lorsque la machine a terminé de broder, elle coud le repère à l'aide de la dernière couleur de fil.
ATTENTION• Si le levier n'est pas abaissé, le motif risque de ne
pas être brodé correctement ou le pied-de-biche risque de heurter le cadre de broderie de bord et vous pourriez vous blesser.
a
a
Remarque• Lorsque vous utilisez le cadre de broderie de bord,
le temps de broderie peut être légèrement plus long que le temps qui s'affiche à l'écran en fonction du type de tissu et du motif utilisés.
ATTENTION• Ne touchez pas le cadre pendant que la machine
brode.

18
■ Retrait du cadre de broderie de bord
a Levez le levier de sécurité du cadre et tirez le cadre vers vous.
■ Broderie du motif suivant
a Verrouillez les boutons de dégagement et faites glisser le tissu pour aligner la zone de broderie du motif suivant et replacez le tissu dans le cadre de broderie de bord.
a Premier motif brodéb Position du motif à broder ensuitec Zone de broderie de la feuille de broderie
b Fixez le cadre à l'unité de broderie et appuyez sur .
Remarque• Avant de retirer le cadre de la machine, assurez-
vous que le chariot de l'unité de broderie soit revenu à sa position initiale.
ATTENTION• Si le fil est emmêlé et que la machine ne revient pas
à sa position initiale, même après que le fil est coupé, mettez la machine hors tension, déplacez manuellement le chariot et retirez le cadre de broderie de bord.
• Ne déplacez le chariot que lorsque la machine est hors tension.
ARRET
Remarque• Ajustez la position du tissu afin que la zone de
broderie pour le motif suivant se trouve dans la zone de broderie de la feuille de broderie.

19
c permet de sélectionner le
positionnement de l'aiguille à aligner avec le repère à la fin de la broderie précédente. Pour cet exemple, alignez la position de l'aiguille et le centre supérieur du motif suivant. Lorsque vous avez terminé, appuyez sur .
d permet d'aligner le positionnement de
l'aiguille et le point du repère.
a Position de l'aiguille
Remarque• Après avoir tourné le volant pour vérifier la position
de l'aiguille, appuyez sur la touche "Positionnement aiguille" pour lever l'aiguille.
a

20
e Après avoir aligné la position de l'aiguille pour commencer la broderie, retirez le repère.
f Brodez le motif suivant. Pour continuer à broder un motif répété, répétez la procédure en commençant par “Retrait du cadre de broderie de bord”.
Remarque• Retirez le repère de fil avant de commencer à
broder. Sinon, la couture du repère de fil risque de se combiner à la couture du motif et être difficile à retirer.
ATTENTION• Si la machine à coudre est mise hors tension, puis
mise sous tension avec un cadre fixé ou si vous essayez de sélectionner un point sur l'écran Point de couture courant ou Point décoratif/de caractère lorsque le cadre est fixé, le message suivant s'affiche. Si le cadre n'est pas totalement retiré de l'unité à ce moment-là, le pied-de-biche peut heurter le cadre lorsque le chariot de l'unité de broderie se déplace. Si le message suivant apparaît, retirez complètement le cadre de broderie de bord.

21
DE
UT
SC
H
INHALTZubehör.................................................................................................................................. 22Sticken mit dem Bordüren-Stickrahmen .................................................................................. 22
Beispiele für Stickereien mit dem Bordüren-Stickrahmen .................................................. 22Auswahl eines Musters ..................................................................................................... 23Einspannen des Stoffes in den Bordüren-Stickrahmen ....................................................... 25Einsetzen des Bordüren-Stickrahmens in die Stickeinheit .................................................. 26Sticken des ersten Musters ................................................................................................ 27Abnehmen des Bordüren-Stickrahmens ............................................................................ 28Sticken des nächsten Musters ............................................................................................ 28
22
Zubehör
Überprüfen Sie, ob folgende Bauteile vorhanden sind. Sollte etwas fehlen oder beschädigt sein, wenden Sie sich bitte an Ihren Brother-Fachhändler oder den Brother-Kundenservice.
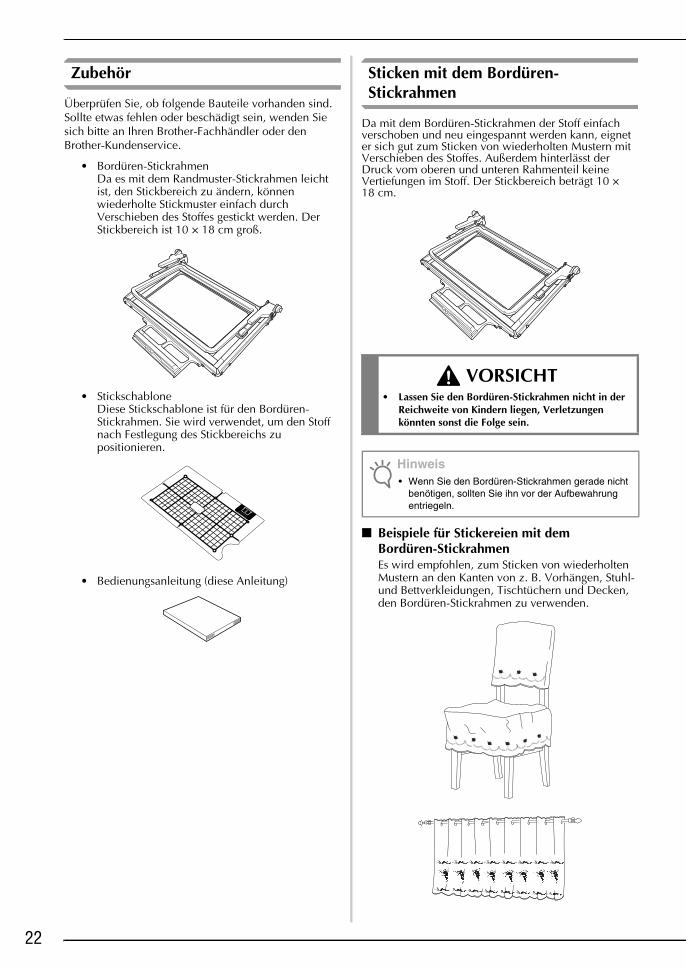
• Bordüren-StickrahmenDa es mit dem Randmuster-Stickrahmen leicht ist, den Stickbereich zu ändern, können wiederholte Stickmuster einfach durch Verschieben des Stoffes gestickt werden. Der Stickbereich ist 10 × 18 cm groß.
• StickschabloneDiese Stickschablone ist für den Bordüren-Stickrahmen. Sie wird verwendet, um den Stoff nach Festlegung des Stickbereichs zu positionieren.
• Bedienungsanleitung (diese Anleitung)
Sticken mit dem Bordüren-Stickrahmen
Da mit dem Bordüren-Stickrahmen der Stoff einfach verschoben und neu eingespannt werden kann, eignet er sich gut zum Sticken von wiederholten Mustern mit Verschieben des Stoffes. Außerdem hinterlässt der Druck vom oberen und unteren Rahmenteil keine Vertiefungen im Stoff. Der Stickbereich beträgt 10 × 18 cm.
■ Beispiele für Stickereien mit dem Bordüren-StickrahmenEs wird empfohlen, zum Sticken von wiederholten Mustern an den Kanten von z. B. Vorhängen, Stuhl- und Bettverkleidungen, Tischtüchern und Decken, den Bordüren-Stickrahmen zu verwenden.
VORSICHT• Lassen Sie den Bordüren-Stickrahmen nicht in der
Reichweite von Kindern liegen, Verletzungen könnten sonst die Folge sein.
Hinweis• Wenn Sie den Bordüren-Stickrahmen gerade nicht
benötigen, sollten Sie ihn vor der Aufbewahrung entriegeln.

23
■ Auswahl eines Musters
a Wählen Sie und anschließend ein Muster.
b Kombinieren Sie die Muster und verwenden Sie die Randfunktion, um das Muster zu wiederholen.
c Drücken Sie .
d Wählen Sie aus den Einstellungen in der Stickrahmen-Anzeige eine Einstellung für den Bordüren-Stickrahmen.* Von den 14 verfügbaren Einstellungen sind zwei für den
Bordüren-Stickrahmen.
a Stickbereich des Bordüren-Stickrahmens(18 cm x 10 cm)
b Mittelpunkt
Anmerkung• Weitere Informationen zur Randfunktion, siehe
„Entwerfen von wiederholten Mustern“ in Kapitel 6 der Nähmaschinen-Bedienungsanleitung.
a
b

24
e Fügen Sie bei Bedarf eine Garnmarkierung hinzu. Da das Muster wiederholt von oben nach unten gestickt wird, fügen Sie die Garnmarkierung unten in der Mitte des Musters hinzu. Wenn Sie fertig sind, drücken Sie .
→ Markieren Sie mit und , oder mit und
das Design zum Einfügen von Garnmarkierungen.
Hinweis• Fügen Sie Buchstaben keine Garnmarkierungen
hinzu.
• Fügen Sie die Garnmarkierung bei Mustern hinzu, die keinen Ausrichtungspunkt haben, wie gedrehte oder auseinanderstehende Muster. Visuell ausrichtbare Muster können auch sauber ohne Garnmarkierung gestickt werden.
Anmerkung• Wählen Sie den Punkt, wo die Garnmarkierung
hinzugefügt werden soll, entsprechend der Richtung des Wiederholungsmusters.
Wenn Sie das Design drehen möchten, gehen Sie folgendermaßen vor.
a Erstes Musterb Zweites Musterc Garnmarkierung

25
f Drücken Sie .
■ Einspannen des Stoffes in den Bordüren-Stickrahmen
a Ziehen Sie mit Kreide eine Markierungslinie in der Mitte des Stickbereiches.
a Stickmusterb Markierungslinie
b Befestigen Sie auf dem zu bestickenden Stoff ein Stickunterlegvlies.
c Wenn der obere Rahmen am unteren Rahmen verriegelt ist, drücken Sie den linken und rechten Freigabehebel, um den oberen Rahmen zu entriegeln.
a Freigabehebel
d Legen Sie den Stoff zwischen den oberen und unteren Rahmen.
Hinweis• Befestigen Sie beim Sticken von Stoffkanten ein
Stickunterlegvlies, das größer ist als der Stoff, und spannen Sie dann den Stoff und überstehendes Stickunterlegvlies fest in den Bordüren-Stickrahmen ein (genauso wie beim normalen Stickrahmen). Andernfalls könnten die Stickmuster nicht ausgerichtet sein.
a Stoffb Unterlegmaterial

26
e Legen Sie die Stickschablone in den oberen Rahmen, richten die Hilfslinie auf der Stickschablone mit der Markierungslinie auf dem Stoff aus und drücken Sie dann auf den linken und rechten Verriegelungshebel, bis diese mit einem Klick einrasten.
a Verriegelungshebel
f Nehmen Sie die Stickschablone heraus und ziehen Sie dann an den vier Stoffseiten um den Stoff zu straffen. Prüfen Sie zuletzt, dass der Stoff fest gespannt ist.
■ Einsetzen des Bordüren-Stickrahmens in die Stickeinheit
a Achten Sie darauf, dass Nadel und Nähfuß angehoben sind. Wenn die Nadel nicht angehoben ist, drücken Sie die Taste „Nadelposition“, um sie anzuheben. Steht der Nähfuß in der abgesenkten Position, drücken Sie die Taste „Nähfußhebel“, um ihn anzuheben.
b Achten Sie darauf, dass der Stickarm der Stickeinheit in seine Ausgangsposition gefahren ist.
c Richten Sie die Führung am Bordüren-Stickrahmen mit der rechten Kante des Stickrahmenhalters aus.
a Stickrahmenhalterb Führung am Bordüren-Stickrahmen
Anmerkung• Der Stoff kann im Bordüren-Stickrahmen auch durch
Ausrichten der Stoffkante mit den Innenmarkierungen des oberen Rahmens positioniert werden.
Hinweis• Wenn nach dem Ausrichten der Stickbereichmitte
mit der Mitte des Bordüren-Stickrahmens noch Stoff übersteht, falten Sie den überstehenden Stoff zusammen, legen Sie ihn auf den oberen Rahmen und drücken Sie auf den Verriegelungshebel. Achten Sie darauf, dass der überschüssige Stoff nicht in den Stickbereich hineinragt.
VORSICHT• Wenn der Stoff fest in den Bordüren-Stickrahmen
eingespannt ist, setzen Sie den Rahmen in die Stickeinheit ein. Andernfalls könnte die Nadel abbrechen und Verletzungen verursachen.
• Achten Sie vor dem Einsetzen des Bordüren-Stickrahmens in die Stickeinheit darauf, dass Nadel und Nähfuß angehoben sind. Andernfalls könnte die Nadel abbrechen und Verletzungen verursachen.
Hinweis• Wickeln Sie vor dem Einsetzen des Bordüren-
Stickrahmens die Unterfadenspule auf und setzen Sie diese ein.
a
b

27
d Schieben Sie den Bordüren-Stickrahmen in den Stickrahmenhalter und richten Sie dabei die Pfeilmarkierung am Bordüren-Stickrahmen ( ) mit der Pfeilmarkierung am Stickrahmenhalter ( ) aus.
a Pfeilmarkierungen
e Senken Sie den Rahmensicherungshebel auf Bordüren-Stickrahmenhöhe ab, um den Bordüren-Stickrahmen im Stickrahmenhalter zu sichern.
a Rahmensicherungshebel
■ Sticken des ersten Musters
a Drücken Sie zur Prüfung des Stickbereichs.
b Fädeln Sie die Maschine ein und beginnen Sie mit dem Sticken.
→ Wenn das Sticken abgeschlossen ist, wird mit der letzten Garnfarbe die Garnmarkierung genäht.
VORSICHT• Bleibt der Rahmensicherungshebel oben, wird das
Muster möglicherweise nicht einwandfrei gestickt oder der Stickfuß trifft auf den Bordüren-Stickrahmen und verursacht Verletzungen.
a
a
Hinweis• Wenn Sie den Bordüren-Stickrahmen
verwenden, kann die Stickzeit je nach Stoff und Muster etwas länger sein als die Zeit, die im Bildschirm angezeigt wird.
VORSICHT• Den Bordüren-Stickrahmen während des Stickens
nicht berühren.

28
■ Abnehmen des Bordüren-Stickrahmens
a Heben Sie den Rahmensicherungshebel an und ziehen Sie den Bordüren-Stickrahmen in Ihre Richtung.
■ Sticken des nächsten Musters
a Drücken Sie beide Freigabehebel und richten Sie den Stickbereich des nächsten Musters durch Verschieben des Stoffes aus, und spannen Sie den Stoff wieder in den Bordüren-Stickrahmen ein.
a Zuerst gesticktes Musterb Position des nächsten Stickmustersc Stickbereich der Stickschablone
b Setzen Sie den Bordüren-Stickrahmen in die Stickeinheit ein und drücken Sie dann
.
Hinweis• Achten Sie vor dem Abnehmen des Bordüren-
Stickrahmens von der Stickeinheit darauf, dass der Stickarm der Stickeinheit in seine Ausgangsposition gefahren ist.
VORSICHT• Hat sich der Faden verhaspelt und der Stickarm der
Stickeinheit fährt auch nach dem Abschneiden des Fadens nicht in seine Ausgangsposition, schalten Sie die Maschine aus, verschieben den Stickarm mit der Hand und nehmen dann den Bordüren-Stickrahmen heraus.
• Bewegen Sie den Stickarm der Stickeinheit nur bei ausgeschalteter Maschine.
AUS
Hinweis• Stellen Sie die Stoffposition so ein, dass der
Stickbereich des nächsten Musters innerhalb des Stickbereichs der Stickschablone liegt.

29
c Richten Sie mit die Nadelposition auf
die Garnmarkierung der vorhergehenen Stickerei aus. Stellen Sie in diesem Beispiel die Nadelposition auf die obere Mitte des nächsten Musters. Wenn Sie fertig sind, drücken Sie .
d Richten Sie die Nadelposition mit auf
die Garnmarkierung aus.
a Nadelposition
Hinweis• Prüfen Sie durch Drehen des Handrades die
Nadelposition und drücken Sie dann die Taste „Nadelposition“, um die Nadel anzuheben.
a

30
e Entfernen Sie die Garnmarkierung, wenn die Nadelposition auf den Beginn der Stickerei eingestellt ist.
f Sticken Sie das nächste Muster. Um das Sticken mit Musterwiederholungen fortzusetzen, wiederholen Sie die Schritte ab „Abnehmen des Bordüren-Stickrahmens“.
Hinweis• Entfernen Sie die Garnmarkierung bevor Sie mit
dem Sticken beginnen. Die Garnmarkierungsstiche können sich sonst mit den Musterstichen vermischen und sind dann nicht mehr so leicht zu entfernen.
VORSICHT• Ist der Bordüren-Stickrahmen eingesetzt und Sie
schalten die Nähmaschine aus- und wieder ein, oder Sie versuchen, einen Stich aus dem Nutzstiche- oder Buchstaben/Dekorstiche-Bildschirm auszuwählen, erscheint die folgende Meldung. Wird der Bordüren-Stickrahmen dann nicht vollständig aus der Stickeinheit herausgenommen, kann der Nähfuß auf den Bordüren-Stickrahmen treffen, wenn sich der Stickarm der Stickeinheit bewegt. Nehmen Sie daher den Bordüren-Stickrahmen ganz heraus, wenn die folgende Meldung angezeigt wird.

31
ES
PAÑ
OL
CONTENIDOAccesorios .............................................................................................................................. 32Bordado con el bastidor de bordado de bordes....................................................................... 32
Ejemplos de labores con el bastidor de bordado de bordes ............................................... 32Selección de un patrón ..................................................................................................... 33Colocación de la tela en el bastidor de bordado de bordes ............................................... 35Colocación del bastidor de bordado de bordes en la unidad de bordado .......................... 36Bordado del primer patrón ................................................................................................ 37Extracción del bastidor de bordado de bordes .................................................................. 38Bordado del siguiente patrón ............................................................................................ 38

32
Accesorios
Compruebe que se proporcionan los siguientes componentes. Si falta o está dañado alguno, póngase en contacto con su distribuidor autorizado o con el Servicio de atención al cliente de Brother.
• Bastidor de bordado para bordesDado que la zona de costura se puede cambiar fácilmente cuando se utiliza el bastidor de bordado para bordes, es posible coser patrones repetidos con sólo deslizar la tela. Puede bordarse una zona de 10 cm × 18 cm.
• Hoja de bordadoEsta hoja de bordado es para el bastidor de bordado para bordes. Sirve para colocar la tela una vez determinada la ubicación del bordado.
• Manual de instrucciones (esta guía)
Bordado con el bastidor de bordado de bordes
Dado que es posible volver a colocar la tela fácilmente con el bastidor de bordado de bordes, este bastidor resulta útil para bordar patrones repetidos mientras se desliza la tela. Una función añadida de este bastidor es que la presión ejercida por los bastidores superior e inferior no deja marcas en la tela. Se puede bordar un área de 10 cm × 18 cm.
■ Ejemplos de labores con el bastidor de bordado de bordesSe recomienda utilizar el bastidor de bordado de bordes cuando se borden patrones repetidos, por ejemplo, en los bordes de cortinas, protectores para sillas, colchas, manteles y mantas.
PRECAUCIÓN• Mantenga el bastidor de bordado de bordes fuera
del alcance de los niños, pues podrían hacerse daño.
Nota• Cuando no vaya a utilizar el bastidor de bordado de
bordes, desbloquéelo antes de guardarlo.

33
■ Selección de un patrón
a Seleccione y seleccione un patrón.
b Combine los patrones y utilice la función de borde para repetir el patrón.
c Pulse .
d Seleccione uno de los ajustes de pantalla de bastidor de bordado para el bastidor de bordado de bordes.* Dos de los 14 ajustes disponibles son para bastidores de
bordado de bordes.
a Área de bordado con bastidor de bordado de bordes (18 cm × 10 cm)
b Línea central
Recuerde• Para obtener más información sobre la función de
borde, consulte “Diseño de patrones repetidos” en el capítulo 6 del Manual de instrucciones de la máquina.
a
b

34
e Si es necesario, añada la marca de hilo. Puesto que el patrón se va a bordar repetidas veces desde la parte superior a la parte inferior, añada la marca de hilo en la parte central inferior del patrón. Cuando haya terminado, pulse .
→ Toque y , o y para resaltar el diseño para insertar marcas de hilo.
Nota• No añada marcas de hilo en patrones de caracteres.
• Añada la marca de hilo en patrones que no tengan un punto de alineación, como patrones girados o patrones espaciados. Los patrones que se pueden alinear a la vista se pueden bordar perfectamente sin la marca de hilo.
Recuerde• Seleccione la ubicación para la marca de hilo según
la dirección en que se va a repetir el bordado.
Si se gira la dirección del diseño, aplique las sugerencias que se indican a continuación.
a Primer patrónb Segundo patrónc Marca de hilo

35
f Pulse .
■ Colocación de la tela en el bastidor de bordado de bordes
a Con una tiza, marque en la tela una línea hacia abajo desde el centro del área que se va a bordar.
a Patrónb Marca (línea)
b Aplique material estabilizador a la tela que desea bordar.
c Si el bastidor superior está bloqueado respecto al bastidor inferior, pulse los botones de liberación izquierdo y derecho para desbloquearlo.
a Botones de liberación
d Coloque la tela entre los bastidores superior e inferior.
Nota• Al bordar los bordes de la tela, utilice material
estabilizador con un tamaño superior al de la tela y, a continuación, sujete firmemente la tela y el material estabilizador sobrante en el bastidor de bordado de bordes (de la misma manera que cuando se utiliza el bastidor de bordado normal). De lo contrario, los patrones podrían no quedar alineados.
a Telab Estabilizador

36
e Coloque la hoja de bordado en el bastidor superior, alinee la línea de guía de la hoja de bordado con la marca (línea) de la tela y, a continuación, empuje las palancas de bloqueo izquierda y derecha hasta que queden ajustadas en su posición.
a Palancas de bloqueo
f Retire la hoja de bordado y, después, tire de los cuatro lados de la tela para que no queden hilos flojos. Por último, compruebe que la tela esté bien estirada.
■ Colocación del bastidor de bordado de bordes en la unidad de bordado
a Asegúrese de que la aguja y el pie prensatela estén elevados. Si la aguja no está levantada, pulse el botón de “Posición de la aguja” para levantarla. Si el pie prensatela no está levantado, pulse el botón del “elevador del pie prensatela” para levantarlo.
b Compruebe que el carro de la unidad de bordado se ha movido a su posición inicial.
c Haga coincidir la guía del bastidor de bordado de bordes con el lado derecho del soporte del bastidor.
a Soporte del bastidor de bordadob Guía del bastidor de bordado de bordes
Recuerde• También se puede colocar la tela en el bastidor de
bordado de bordes alineando el borde de la misma con las marcas interiores del bastidor superior.
Nota• Si, una vez alineado el centro del área de bordado
con el centro del bastidor de bordado de bordes, hay tela sobrante, dóblela y colóquela encima del bastidor superior y, a continuación, empuje las palancas. Tenga cuidado de que la tela sobrante doblada no quede atrapada en el área de bordado.
PRECAUCIÓN• Después de colocar firmemente la tela en el
bastidor de bordado de bordes, coloque el bastidor en la unidad de bordado. De otra manera, la aguja podría romperse y causar lesiones.
• Antes de colocar el bastidor de bordado de bordes en la unidad de bordado, asegúrese de que la aguja y el pie prensatela estén elevados. De lo contrario, la aguja podría romperse y causar lesiones.
Nota• Antes de colocar el bastidor de bordado de bordes,
devane la bobina con hilo y colóquela.
a
b

37
d Deslice el bastidor de bordado de bordes en el soporte, asegurándose de alinear la marca de dirección del bastidor ( ) con la marca de dirección del soporte ( ).
a Marcas de dirección
e Baje la palanca de fijación del bastidor de modo que quede al mismo nivel que el bastidor de bordado de bordes para sujetar el bastidor en el soporte.
a Palanca de fijación del bastidor
■ Bordado del primer patrón
a Para comprobar el área de bordado, pulse .
b Enhebre la máquina y comience a bordar.
→ Una vez finalizado el bordado, la marca de hilo se cose con el último color de hilo.
PRECAUCIÓN• Si no se hace descender la palanca de fijación del
bastidor, puede que el patrón no se borde correctamente o que el pie prensatela golpee el bastidor de bordado de bordes y cause daños.
a
a
Nota• Si se usa el bastidor de bordado de bordes, es
posible que el tiempo de bordado sea ligeramente superior al indicado en la pantalla, según el tipo de tela y el patrón que se utilice.
PRECAUCIÓN• No toque el bastidor de bordado de bordes durante
el bordado.

38
■ Extracción del bastidor de bordado de bordes
a Levante la palanca de fijación del bastidor y tire del bastidor de bordado de bordes hacia usted.
■ Bordado del siguiente patrón
a Pulse ambos botones de liberación y deslice la tela para alinear el área de bordado del siguiente patrón, y vuelva a colocar la tela en el bastidor de bordado de bordes.
a Patrón bordado primerob Posición del siguiente patrón para bordarc Área de bordado de la hoja de bordado
b Coloque el bastidor de bordado de bordes en la unidad de bordado y, a continuación, pulse
.
Nota• Antes de extraer el bastidor de bordado de bordes
de la unidad de bordado, compruebe que el carro de la unidad de bordado se ha movido a su posición inicial.
PRECAUCIÓN• Si el hilo se ha enredado y el carro de la unidad de
bordado no se mueve a su posición inicial incluso después de haber cortado el hilo, apague la máquina, mueva manualmente el carro y, a continuación, retire el bastidor de bordado de bordes.
• Mueva el carro de la unidad de bordado sólo cuando la máquina esté apagada.
APAGADO
Nota• Ajuste la posición de la tela de modo que el área de
bordado del siguiente patrón se encuentre dentro del área de bordado de la hoja de bordado.

39
c Utilice para seleccionar la posición de
la aguja que se alineará con la marca de hilo al final del bordado anterior. Para este ejemplo, alinee la posición de la aguja con la parte central superior del siguiente patrón. Cuando haya terminado, pulse .
d Utilice para alinear la posición de la
aguja con el punto de la marca de hilo.
a Posición de la aguja
Nota• Después de girar la polea para comprobar la
posición de la aguja, pulse el botón de “Posición de la aguja” para levantarla.
a

40
e Después de alinear la posición de la aguja para el inicio del bordado, retire la marca de hilo.
f Borde el siguiente patrón. Para seguir bordando un patrón repetido, repita el procedimiento comenzando desde “Extracción del bastidor de bordado de bordes”.
Nota• Retire la marca de hilo antes de comenzar a bordar.
De lo contrario, la puntada de la marca de hilo se podría combinar con la puntada del patrón y resultar difícil de retirar.
PRECAUCIÓN• Si la máquina de coser está apagada y, a
continuación, vuelve a encenderse con el bastidor de bordado de bordes colocado, o si intenta seleccionar un tipo de puntada de la pantalla de costuras de utilidad o la pantalla de puntadas decorativas o de caracteres con este bastidor colocado, aparecerá el siguiente mensaje. Si en este momento no se extraído totalmente el bastidor de bordado de bordes de la unidad de bordado, es posible que el pie prensatela choque contra el bastidor cuando el carro de la unidad de bordado se mueva. Si aparece el siguiente mensaje, extraiga totalmente el bastidor de bordado de bordes.

41
NEDERLANDS
INHOUDSOPGAVEAccessoires............................................................................................................................. 42Borduren met het randenborduurraam.................................................................................... 42
Voorbeeldprojecten met het randenborduurraam ............................................................. 42Patroon kiezen .................................................................................................................. 43Stof in het randenborduurraam plaatsen ........................................................................... 45Randenborduurraam aan de borduurtafel bevestigen ........................................................ 46Eerste patroon borduren .................................................................................................... 47Randenborduurraam verwijderen ..................................................................................... 48Volgende patroon borduren .............................................................................................. 48

42
Accessoires
Controleer of de volgende artikelen aanwezig zijn. Als er iets ontbreekt of beschadigd is, neem dan contact op met de officiële dealer of de klantenservice van Brother.
• RandborduurraamAangezien het naaigebied gemakkelijk kan worden gewijzigd wanneer u het randborduurraam gebruikt, kunt u herhaalde patronen naaien door de stof gewoon te schuiven. U kunt een gebied van 10 cm × 18 cm borduren.
• BorduurvelDit borduurvel is bestemd voor het randborduurraam. Hiermee plaatst u de stof nadat u de borduurlocatie hebt vastgesteld.
• Bedieningshandleiding (deze gids)
Borduren met het randenborduurraam
Wanneer u het randenborduurraam gebruikt, kunt u de stof eenvoudig opnieuw plaatsen, waardoor dit raam handig is voor het borduren van herhaalpatronen terwijl u de stof schuift. Een extra functie van dit raam is dat de druk die wordt uitgeoefend door het boven- en onderraam geen indruk in de stof achterlaat. U kunt een gebied van 10 cm × 18 cm borduren.
■ Voorbeeldprojecten met het randenborduurraamHet randenborduurraam wordt aangeraden wanneer u herhaalpatronen borduurt aan de rand van voorwerpen als gordijnen, stoelovertrekken, bedovertrekken, tafelkleden en dekens.
VOORZICHTIG• Houd het randenborduurraam buiten bereik van
kinderen, anders kan letsel worden opgelopen.
Opmerking• Wanneer u het randenborduurraam niet gebruikt,
moet u dit losmaken voordat u het opbergt.

43
■ Patroon kiezen
a Selecteer en selecteer vervolgens een patroon.
b Combineer de patronen en gebruik de randfunctie om het patroon te herhalen.
c Druk op .
d Selecteer uit de instellingen voor borduurraamdisplays een van de borduurraamdisplays voor het randenborduurraam.* Van de 14 beschikbare instellingen zijn er twee voor
randenborduurramen.
a Borduurgebied van randenborduurraam (18 cm × 10 cm)
b Middenlijn
Memo• Zie “Herhaalpatronen ontwerpen” in hoofdstuk 6 van
de Bedieningshandleiding voor de naaimachine voor meer informatie over de randfunctie. a
b

44
e Voeg zo nodig de draadmarkering toe. Aangezien het borduurpatroon van boven naar beneden wordt herhaald, moet u de draadmarkering midden onder aan het patroon toevoegen. Wanneer u klaar bent, drukt u op .
→ Druk op en op , of op en op om het ontwerp te markeren om draadmarkeringen in te voegen.
Opmerking• Voeg geen draadmarkeringen toe aan
letterpatronen.
• Voeg de draadmarkering toe aan patronen die geen uitlijnpunt hebben, zoals gedraaide patronen of patronen met tussenruimte. Patronen die visueel kunnen worden uitgelijnd, kunt u goed borduren zonder draadmarkering.
Memo• Selecteer de plaats waar u de draadmarkering wilt
toevoegen overeenkomend met de richting waarin het borduurpatroon wordt herhaald.
Als de ontwerprichting is geroteerd, volg dan onderstaande suggesties op.
a Eerste patroonb Tweede patroonc Draadmarkering

45
f Druk op .
■ Stof in het randenborduurraam plaatsen
a Markeer de stof door met een krijtje een lijn te trekken door het midden van het gebied dat u wilt borduren.
a Patroonb Markering (lijn)
b Bevestig steunstof aan de stof die u wilt borduren.
c Wanneer het bovenraam op het onderraam is vergrendeld, drukt u de linker- en rechterontgrendelingsknop om het bovenraam te ontgrendelen.
a Ontgrendelingsknoppen
d Leg de stof tussen het boven- en onderraam.
Opmerking• Wanneer u de randen van een stof borduurt, moet u
steunstof bevestigen die groter is dan de stof. Zet vervolgens de stof en het overtollige deel van de steunstof stevig vast in het randenborduurraam (op dezelfde manier als u het normale borduurraam gebruikt). Wanneer u dit niet doet, wordt het patroon mogelijk niet goed uitgelijnd.
a Stofb Steunstof

46
e Plaats het borduurvel in het bovenraam. Plaats de lijn op het borduurvel op één lijn met de markering (lijn) op de stof en druk vervolgens de linker- en rechtervergrendelingshendel omlaag totdat deze vastklikken.
a Vergrendelingshendels
f Verwijder het borduurvel en trek aan de vier zijden van de stof om deze glad te trekken. Controleer ten slotte of de stof strak is gespannen.
■ Randenborduurraam aan de borduurtafel bevestigen
a Controleer of de naald en persvoet omhoog staan. Druk op de “naaldstandtoets” om de naald omhoog te zetten wanneer deze niet omhoog staat. Druk op de “Persvoettoets” om de persvoet omhoog te zetten wanneer deze niet omhoog staat.
b Controleer of de wagen van de borduurtafel naar de beginstand is gegaan.
c Laat de geleider op het randenborduurraam langs de rechterrand van de borduurraamhouder vallen.
a Borduurraamhouderb Geleider op randenborduurraam
Memo• U kunt de stof ook in het randenborduurraam
plaatsen door de rand van de stof op één lijn te plaatsen met de binnenmarkeringen op het bovenraam.
Opmerking• Wanneer er overtollige stof is nadat u het midden
van het borduurgebied op één lijn hebt geplaatst met het midden van het randenborduurraam, vouwt u de overtollige stof, plaatst u deze bovenop het bovenraam en drukt u vervolgens de hendels naar beneden. Zorg ervoor dat de gevouwen overtollige stof niet in het borduurgebied terechtkomt.
VOORZICHTIG• Nadat u de stof goed in het randenborduurraam
hebt geplaatst, bevestigt u het raam aan de borduurtafel. Anders kan de naald breken en hierdoor kunt u letsel oplopen.
• Controleer of de naald en persvoet omhoog staan voordat u het randenborduurraam aan de borduurtafel bevestigt. Anders kan de naald breken en hierdoor kunt u letsel oplopen.
Opmerking• Wind draad op de spoel en plaats deze voordat u
het randenborduurraam bevestigt.
a
b

47
d Schuif het randenborduurraam in de borduurraamhouder en zorg ervoor dat de pijl ( ) op het randenborduurraam in één lijn ligt met de pijl ( ) op de borduurraamhouder.
a Pijlen
e Zet de raambevestigingshendel omlaag, op gelijk niveau met het randenborduurraam. Zo zet u het randenborduurraam vast in de borduurraamhouder.
a Raambevestigingshendel
■ Eerste patroon borduren
a Druk op om het borduurgebied te controleren.
b Rijg de machine in en begin met borduren.
→ Wanneer u klaar bent met borduren, wordt de draadmarkering genaaid met de laatste garenkleur.
VOORZICHTIG• Als u de raambevestigingshendel niet omlaag zet,
wordt het patroon mogelijk niet goed geborduurd, of kan de persvoet het randenborduurraam raken, waardoor u mogelijk letsel oploopt.
a
a
Opmerking• Wanneer u het randenborduurraam gebruikt, kan de
borduurtijd wat langer zijn dan de tijd die in het scherm wordt weergegeven, afhankelijk van het soort stof en het patroon dat u gebruikt.
VOORZICHTIG• Raak het randenborduurraam niet aan tijdens het
borduren.

48
■ Randenborduurraam verwijderen
a Zet de raambevestigingshendel omhoog en trek het randenborduurraam naar u toe.
■ Volgende patroon borduren
a Druk op beide ontgrendelingsknoppen, schuif de stof om het borduurgebied aan te passen aan het volgende patroon en plaats de stof weer in het randenborduurraam.
a Eerste geborduurde patroonb Positie van volgende borduurpatroonc Borduurgebied van borduurvel
b Bevestig het randenborduurraam aan de borduurtafel en druk vervolgens op .
Opmerking• Controleer of de wagen van de borduurtafel naar de
beginstand is gegaan voordat u het randenborduurraam van de borduurtafel verwijdert.
VOORZICHTIG• Als de draad verstrikt is geraakt en de wagen van de
borduurtafel niet naar de beginstand is gegaan, ook niet nadat de draad is afgeknipt, zet u de machine uit. Verplaats de wagen handmatig en verwijder vervolgens het randenborduurraam.
• Verplaats de wagen van de borduurtafel alleen wanneer de machine uit staat.
UIT
Opmerking• Pas de positie van de stof zo aan dat het
borduurgebied voor het volgende patroon binnen het borduurgebied van het borduurvel valt.

49
c Selecteer met de naaldstand die
samenvalt met de draadmarkering aan het einde van het vorige borduurwerk. In dit voorbeeld brengt u de naaldstand in één lijn midden boven het volgende patroon. Wanneer u klaar bent, drukt u op .
d Breng met de naaldstand in één lijn
met het punt van de draadmarkering.
a Naaldstand
Opmerking• Nadat u het handwiel hebt gedraaid om de
naaldstand te controleren, drukt u op de naaldstandtoets om de naald omhoog te zetten.
a

50
e Verwijder de draadmarkering nadat u de naaldstand voor het begin van het borduren hebt aangepast.
f Borduur het volgende patroon. Herhaal de procedure die begint met “Randenborduurraam verwijderen” om verder te gaan met het borduren van een herhaalpatroon.
Opmerking• Verwijder de draadmarkering voordat u gaat
borduren. Anders wordt het stiksel van de draadmarkering mogelijk gecombineerd het het patroonstiksel. Dan is het moeilijk te verwijderen.
VOORZICHTIG• De volgende melding wordt weergegeven wanneer
u de naaimachine uitzet en vervolgens weer aanzet terwijl het randenborduurraam is bevestigd of wanneer u probeert een steek te selecteren uit het scherm met naaisteken of het scherm met lettersteken en decoratieve steken terwijl het randenborduurraam is bevestigd. Wanneer het randenborduurraam op dit moment niet volledig wordt verwijderd van de borduurtafel, kan het randenborduurraam worden geraakt door de persvoet wanneer de wagen van de borduurtafel wordt verplaatst. Wanneer de volgende melding wordt weergegeven, moet u het randenborduurraam volledig verwijderen.

51
ITAL
IAN
O
SOMMARIOAccessori ................................................................................................................................ 52Ricamo con il telaio da ricamo per bordi................................................................................ 52
Progetti campione utilizzando il telaio da ricamo per bordi .............................................. 52Selezione di un disegno .................................................................................................... 53Inserimento del tessuto nel telaio da ricamo per bordi ...................................................... 55Montaggio del telaio da ricamo per bordi all'unità da ricamo ........................................... 56Ricamo del primo disegno ................................................................................................ 57Rimozione del telaio da ricamo per bordi ......................................................................... 58Ricamo del disegno successivo ......................................................................................... 58

52
Accessori
Controllare che i seguenti componenti siano presenti nella fornitura. In caso di componenti mancanti o danneggiati, contattare il rivenditore o il Servizio di assistenza clienti Brother autorizzato.
• Telaio da ricamo per bordiPoiché è possibile modificare agevolmente l'area di cucitura quando si utilizza il telaio da ricamo per bordi, si possono cucire disegni ripetuti facendo semplicemente scorrere il tessuto. È possibile ricamare un'area di 10 cm × 18 cm.
• Foglio per ricamoIl foglio per ricamo si utilizza con il telaio da ricamo per bordi. Serve per posizionare il tessuto dopo aver determinato la posizione di ricamo.
• Manuale d'istruzione (la presente guida)
Ricamo con il telaio da ricamo per bordi
Poiché è possibile riposizionare e reinserire facilmente il tessuto quando si utilizza il telaio da ricamo per bordi, tale telaio è utile per il ricamo di disegni ripetuti durante l'avanzamento del tessuto. Una funzione aggiuntiva del telaio è rappresentata dal fatto che la pressione applicata dai telai superiore e inferiore non lascia rientranze nel tessuto. È possibile ricamare un'area di 10 cm x 18 cm.
■ Progetti campione utilizzando il telaio da ricamo per bordiSi consiglia di utilizzare il telaio da ricamo per bordi per il ricamo di disegni ripetuti lungo i bordi di tessuti, quali tende, coprisedie, copriletti, tovaglie e coperte.
ATTENZIONE• Non lasciare il telaio da ricamo per bordi alla
portata dei bambini, perché potrebbe provocare lesioni.
Nota• Quando non si utilizza il telaio da ricamo per bordi,
sbloccarlo prima di riporlo.

53
■ Selezione di un disegno
a Selezionare e selezionare un disegno.
b Unire i disegni e utilizzare la funzione di bordo per ripetere il disegno.
c Premere .
d Dalle impostazioni di visualizzazione del telaio da ricamo, selezionare una delle visualizzazioni del telaio da ricamo per il telaio da ricamo per bordi.* Tra le 14 impostazioni disponibili, due sono destinate ai
telai da ricamo per bordi.
a Area di ricamo del telaio da ricamo per bordi (18 cm × 10 cm)
b Linea centrale
Promemoria• Per i dettagli sulla funzione di bordo, fare riferimento
a "Realizzazione di disegni ripetuti" nel capitolo 6 del Manuale d'istruzioni della macchina da cucire. a
b

54
e Se necessario, aggiungere un segno di filo. Poiché il disegno sarà ricamato ripetutamente dalla parte superiore a quella inferiore, aggiungere il segno di filo sulla linea centrale del disegno. Al termine, premere .
→ Premere e , oppure e per selezionare il disegno per l'inserimento di segni di filo.
Nota• Non aggiungere segni di filo ai disegni a caratteri.
• Aggiungere il segno di filo a disegni che non hanno un punto di allineamento, ad esempio disegni ruotati o disegni distanziati. I disegni che possono essere allineati visivamente possono essere ricamati facilmente senza il segno di filo.
Promemoria• Selezionare il punto in cui aggiungere il segno di filo
in base alla direzione di ripetizione del ricamo.
Se la direzione del disegno è ruotata, utilizzare i suggerimenti indicati di seguito.
a Primo disegnob Secondo disegnoc Segno di filo

55
f Premere .
■ Inserimento del tessuto nel telaio da ricamo per bordi
a Con un gesso a penna segnare il tessuto con una linea disegnata dal centro dell'area da ricamare.
a Disegnob Segno (linea)
b Applicare al tessuto da ricamare del materiale stabilizzatore.
c Se il telaio superiore è agganciato al telaio inferiore, premere i pulsanti di rilascio blocco destro e sinistro per sbloccare il telaio superiore.
a Pulsanti di rilascio blocco
d Stendere il tessuto tra i telai superiore e inferiore.
Nota• Quando si ricamano i bordi del tessuto, applicare
materiale stabilizzatore di dimensioni maggiori rispetto a quelle del tessuto, quindi unire saldamente il tessuto e la parte di materiale stabilizzatore in eccesso al telaio da ricamo per bordi (esattamente come quando si utilizza il telaio da ricamo normale). In caso contrario si potrebbero realizzare disegni non allineati.
a Tessutob Stabilizzatore
56
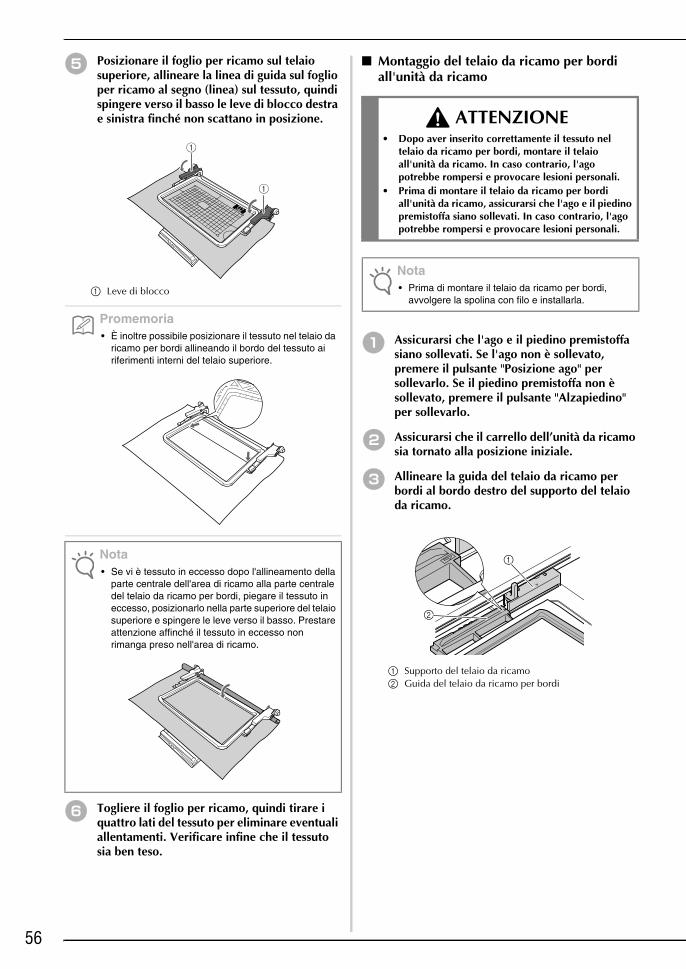
e Posizionare il foglio per ricamo sul telaio superiore, allineare la linea di guida sul foglio per ricamo al segno (linea) sul tessuto, quindi spingere verso il basso le leve di blocco destra e sinistra finché non scattano in posizione.
a Leve di blocco
f Togliere il foglio per ricamo, quindi tirare i quattro lati del tessuto per eliminare eventuali allentamenti. Verificare infine che il tessuto sia ben teso.
■ Montaggio del telaio da ricamo per bordi all'unità da ricamo
a Assicurarsi che l'ago e il piedino premistoffa siano sollevati. Se l'ago non è sollevato, premere il pulsante "Posizione ago" per sollevarlo. Se il piedino premistoffa non è sollevato, premere il pulsante "Alzapiedino" per sollevarlo.
b Assicurarsi che il carrello dell’unità da ricamo sia tornato alla posizione iniziale.
c Allineare la guida del telaio da ricamo per bordi al bordo destro del supporto del telaio da ricamo.
a Supporto del telaio da ricamob Guida del telaio da ricamo per bordi
Promemoria• È inoltre possibile posizionare il tessuto nel telaio da
ricamo per bordi allineando il bordo del tessuto ai riferimenti interni del telaio superiore.
Nota• Se vi è tessuto in eccesso dopo l'allineamento della
parte centrale dell'area di ricamo alla parte centrale del telaio da ricamo per bordi, piegare il tessuto in eccesso, posizionarlo nella parte superiore del telaio superiore e spingere le leve verso il basso. Prestare attenzione affinché il tessuto in eccesso non rimanga preso nell'area di ricamo.
ATTENZIONE• Dopo aver inserito correttamente il tessuto nel
telaio da ricamo per bordi, montare il telaio all'unità da ricamo. In caso contrario, l'ago potrebbe rompersi e provocare lesioni personali.
• Prima di montare il telaio da ricamo per bordi all'unità da ricamo, assicurarsi che l'ago e il piedino premistoffa siano sollevati. In caso contrario, l'ago potrebbe rompersi e provocare lesioni personali.
Nota• Prima di montare il telaio da ricamo per bordi,
avvolgere la spolina con filo e installarla.
a
b

57
d Far scorrere il telaio da ricamo per bordi nel supporto del telaio da ricamo, assicurandosi di allineare il segno freccia del telaio da ricamo per bordi ( ) con il segno freccia del supporto del telaio da ricamo ( ).
a Segni freccia
e Abbassare la leva di fissaggio del telaio fino al livello del telaio da ricamo per bordi per fissare quest'ultimo nel supporto del telaio da ricamo.
a Leva di fissaggio del telaio
■ Ricamo del primo disegno
a Per controllare l'area di ricamo, premere .
b Eseguire l'infilatura della macchina e iniziare il ricamo.
→ Al termine del ricamo, il segno di filo è cucito con l'ultimo colore di filo utilizzato.
ATTENZIONE• Se non si abbassa la leva di fissaggio del telaio, il
disegno potrebbe non essere ricamato correttamente oppure il piedino premistoffa potrebbe colpire il telaio da ricamo per bordi, causando lesioni.
a
a
Nota• Quando si utilizza il telaio da ricamo per bordi, il
tempo necessario per l'esecuzione del ricamo potrebbe essere leggermente maggiore del tempo visualizzato sullo schermo, a seconda del tipo di tessuto e del disegno utilizzati.
ATTENZIONE• Non toccare il telaio da ricamo per bordi durante
l'esecuzione del ricamo.

58
■ Rimozione del telaio da ricamo per bordi
a Sollevare la leva di fissaggio del telaio e tirare il telaio da ricamo per bordi verso di sé.
■ Ricamo del disegno successivo
a Premere i pulsanti di rilascio blocco e far scorrere il tessuto per allinearlo all'area di ricamo del disegno successivo e reinserire il tessuto nel telaio da ricamo per bordi.
a Primo disegno ricamatob Posizione del disegno successivo da ricamarec Area di ricamo del foglio per ricamo
b Fissare il telaio da ricamo per bordi all'unità da ricamo, quindi premere .
Nota• Prima di rimuovere il telaio da ricamo per bordi
dall'unità da ricamo, assicurarsi che il carrello dell'unità da ricamo torni alla posizione iniziale.
ATTENZIONE• Se il filo si blocca e il carrello dell'unità da ricamo
non torna alla posizione iniziale, anche dopo aver tagliato il filo, spegnere la macchina, spostare manualmente il carrello e rimuovere il telaio da ricamo per bordi.
• Spostare il carrello dell'unità da ricamo solo quando la macchina è spenta.
SPENTO
Nota• Regolare la posizione del tessuto in modo che l'area
di ricamo del disegno successivo si trovi nell'area di ricamo del foglio per ricamo.

59
c Utilizzare per selezionare la posizione
dell'ago da allineare al segno di filo alla fine del ricamo precedente. Per questo esempio, allineare la posizione dell'ago alla parte centrale superiore del disegno successivo. Al termine, premere .
d Utilizzare per allineare la posizione
dell'ago al punto del segno di filo.
a Posizione ago
Nota• Dopo aver ruotato il volantino per verificare la
posizione dell'ago, premere il pulsante "Posizione ago" per sollevare l'ago.

60
e Dopo aver allineato la posizione dell'ago all'inizio del ricamo, rimuovere il segno di filo.
f Ricamare il disegno successivo. Per continuare a ricamare un disegno ripetuto, ripetere la procedura iniziando da “Rimozione del telaio da ricamo per bordi”.
Nota• Rimuovere il segno di filo prima di iniziare a
ricamare. In caso contrario i punti del segno di filo potrebbero combinarsi con i punti del disegno rendendone difficile la rimozione.
ATTENZIONE• Se si spegne e si riaccende la macchina da cucire
con il telaio da ricamo per bordi montato o se si cerca di selezionare un punto dalla schermata Punto utile o dalla schermata Caratteri/Punto decorativo con il telaio da ricamo per bordi, viene visualizzato il seguente messaggio. Se il telaio da ricamo per bordi non è ancora stato rimosso completamente dall'unità da ricamo, il telaio da ricamo per bordi potrebbe colpire il piedino premistoffa quando si sposta il carrello dell'unità da ricamo. Quando viene visualizzato il seguente messaggio, rimuovere completamente il telaio da ricamo per bordi.


XE5086-001Printed in Taiwan