board of regents of the university system of georgia etime · 2019-02-06 · board of regents of...
TRANSCRIPT

Board of Regents of the
University System of Georgia
eTIME® Employee User Guide
Project View Time Card for
Benefited BiWeekly Employees
Manager or Supervisor
Updated 08/01/2009

2 of 97
Contents
REGISTERING FOR SELF SERVICE........................................................................................................ 4
ADDING ETIME........................................................................................................................................... 9
LOG ON ...................................................................................................................................................... 11
YOUR TIME CARD AND ACCRUALS .................................................................................................... 13
PROJECT VIEW TIME CARD ........................................................................................................................ 13 Entering Time in a Project View Timecard............................................................................................ 14 Recording Comp Time in a Timecard.................................................................................................... 15 Transferring Time in a Timecard .......................................................................................................... 16 Adding Comments ................................................................................................................................ 18 Deleting Comments .............................................................................................................................. 19
SAVING THE TIME CARD ............................................................................................................................ 20 APPROVING THE TIMECARD ....................................................................................................................... 20 VIEWING ACCRUALS IN ETIME ................................................................................................................... 20
From Timecard View Accruals.............................................................................................................. 20 My Reports to View Accruals................................................................................................................ 21
HOLIDAYS IN ETIME .................................................................................................................................. 23 OTHER REPORTS AVAILABLE IN ETIME....................................................................................................... 24 REQUESTING LEAVE TIME OFF................................................................................................................... 24 CANCELLING LEAVE TIME OFF REQUEST.................................................................................................... 26 EXTENDED LENGTHS OF LEAVE TIME OFF REQUEST ................................................................................... 28 CANCELLING EXTENDED LENGTHS OF LEAVE TIME OFF REQUEST............................................................... 31 YOUR INBOX ............................................................................................................................................. 34
YOUR EMPLOYEE’S TIME CARD AND ACCRUALS .......................................................................... 36
REVIEW YOUR EMPLOYEE’S TIME CARD .................................................................................................... 36 QuickFind ............................................................................................................................................ 36 Reconcile Timecard.............................................................................................................................. 39 Pay Period Close.................................................................................................................................. 41
EDIT YOUR EMPLOYEE’S TIMECARD .......................................................................................................... 43 Hourly View Timecard.......................................................................................................................... 43
Schedules in an Hourly View Timecard.............................................................................................................43 Rounding in an Hourly View Timecard .............................................................................................................44 Edit the Punch..................................................................................................................................................45 Cancel Meal Deduction ....................................................................................................................................45 Entering Time Off in an Hourly View Timecard................................................................................................47
Adding a Pay Code......................................................................................................................................47 Updating a Pay Code ...................................................................................................................................48 Deleting a Pay Code ....................................................................................................................................48 Editing Incorrect Time Off Request (TOR) Hours ........................................................................................49 Deleting Incorrect Time Off Request (TOR) Hours.......................................................................................51
Add Comp Time...............................................................................................................................................53 Transferring Time in a Timecard.......................................................................................................................54
To perform a timecard transfer between Position or Account Code:...............................................................54 To perform a timecard transfer between Position/Approver:..........................................................................56 To perform a timecard transfer for Call In Pay..............................................................................................60
Adding Comments............................................................................................................................................62 Deleting Comments..........................................................................................................................................63
Project View Timecard ......................................................................................................................... 63 Schedules in a Project View Timecard ..............................................................................................................63 Edit the Punch..................................................................................................................................................64

3 of 97
Entering Time Off in a Project View Timecard..................................................................................................65 Adding a Pay Code......................................................................................................................................65 Updating a Pay Code ...................................................................................................................................66 Deleting a Pay Code ....................................................................................................................................66 Editing Incorrect Time Off Request (TOR) Hours ........................................................................................66 Deleting Incorrect Time Off Request (TOR) Hours.......................................................................................69
Add Comp Time...............................................................................................................................................71 Transferring Time in a Timecard.......................................................................................................................71
To perform a timecard transfer between Position or Account Code:...............................................................71 To perform a timecard transfer for Call In Pay..............................................................................................74
Adding Comments............................................................................................................................................75 Deleting Comments..........................................................................................................................................77
SAVING THE TIME CARD ............................................................................................................................ 78 APPROVING THE TIMECARD ....................................................................................................................... 78 REVIEWING TOTALS OF A TIMECARD .......................................................................................................... 79 REVIEWING THE AUDIT OF A TIMECARD ..................................................................................................... 80 RETURNING TO LIST OF EMPLOYEES ........................................................................................................... 82 REPORTS ON YOUR EMPLOYEES ................................................................................................................. 82 OTHER MY QUICK NAVS ........................................................................................................................... 87 ADJUSTMENTS ........................................................................................................................................... 87 ASSIGNING YOUR APPROVAL AUTHORITY TO ANOTHER ............................................................................. 87
Reviewing your Enterprise eTIME functions ......................................................................................... 88 Delegating your Tasks to Another Manager .......................................................................................... 88 Manually Cancelling Assignment Tasks to Another Manager ................................................................ 91 Accepting or Declining A Manager’s Delegation Request ..................................................................... 93 Changing to Another Manager’s Access................................................................................................ 94 Switching Back to Your Access ............................................................................................................. 96
LOGGING OFF ETIME............................................................................................................................. 97

4 of 97
Registering for Self Service
1. Click the Employee Self Service link on your institution’s webpage.
2. Click the First Time Users Register Here link on the Self Service Login page.
3. Click Register Now.

5 of 97
4. Enter your Registration Pass Code and click Next.
Note: Your Self Service Registration Pass Code was provided to you by your Human Resources Department.
5. Select to verify with either your SSN or TIN, using the full number of digits.

6 of 97
6. Enter your data in the fields with the �. After completing these fields, click Next.
Please Note – you must enter your name as it appears in the HR/Payroll system of
record.
7. In rare circumstances, a second page (below) of Verify Your Identity may appear. This
may be due to incorrect data being entered in the previous screen. If this occurs, click
Cancel and verify your entered information. Note – you must enter your name as it
appears in the HR/Payroll system of record. If all data is correct and you are still
seeing this form, please contact the SS Help Desk for more information.
8. Complete the fields on your Contact Information and click Next.

7 of 97
9. Complete all the fields on your Security Information and click Next.
10. The View Your Userid & Create Your Password will appear. Your user ID is
displayed.
Note: The security questions and answers are used if you forget your logon credentials. Be sure to choose information that you can readily remember.
11. Enter your password in the Create Password field.
Note: Your password must be a minimum of 8 characters and contain at least one alpha and either one numeric or special character. Your password is case-sensitive.

8 of 97
12. Re-enter your password in the Confirm Password field and click Submit.
13. The Confirmation page will appear. You are now registered for Self-Service. Click
Close.
The next step is to add Additional Services, so you have access to eTIME.

9 of 97
Adding eTime
1. Go back to the Portal main login page: http://portal.adp.com and select “First Time
Users Register Here”
2. Click Add a Service.

10 of 97
3. On the Enterprise eTIME line, choose Add.
4. Enter your Employee ID number and click Submit.
5. Upon successful completion, you will see the following screen:

11 of 97
Log On
Access the eTime Timesheets link from the Employee Self Service Portal.
1. Click the Employee Self Service link on your institution’s webpage.
2. Click ‘User Login’ button.
3. Enter User Name and Password and click OK.
4. The Netsecure Portal will appear. The application links allow you to enter into each
application.

12 of 97
5. Click the Time application link
6. Click the Here link for Managers/Approvers since you are a manager or approver of
time cards.
7. Now you are in the eTime application
8. You will see four tabs – General, My Quicknavs, Timekeeping, and My Information
9. The My Information section applies to you as an employee. You will click the
various links –
a. My Timecard will take you into your time card
b. My Reports allows you to view you leave accruals and time card for printing
c. My Actions allows you to request time off if you are eligible for time off
Application links

13 of 97
Your Time Card and Accruals
Project View Time Card
The Project View timecard records the total number of hours worked displayed for each day per pay period the employee is scheduled to work, along with the pay code associated with those hours. This view also displays the total number of hours for the week.
Benefited Employees Only
If you are a benefited employee, on the 28th of each month the accrual process will be generated automatically by eTime. It will add to the Accrual buckets the amount of monthly accrual that your leave enrollment permits.
The recording of the Exception Time to be taken will only be allowed if you have the amount within the Accrual bucket. If you do not have the time in the bucket, a message will be displayed to you when you try to enter the time on the time sheet.
For example, you need to take 16 hours of Vacation leave but you only have 10 hours in your Vacation Accrual. eTime will only allow you to use the 10 hours. eTime will display that you only have 10 hours and it will not allow you to save your timecard until you only enter the 10.
You must still adhere to the Board of Regents Policy (802.07.02 SICK LEAVE WITH
PAY) regarding Sick Leave. This policy can be viewed at this website. http://www.usg.edu/regents/policymanual/800.phtml.
Hours are entered manually by an employee or automatically populated based on the employee’s schedule (Georgia State University only).

14 of 97
Entering Time in a Project View Timecard
Click in the cell for Hours Worked on the day that has been worked. Type the number of hours worked. Because a schedule is applied to this type of time card for the University System of Georgia, the total hours for the day must equal that which the schedule states is the daily hours for the employee. If the total physically worked does not equal the schedule, then a pay code(s) with its time must be entered to balance the day to the schedule or the day will be considered to have a missed punch.
To enter your punches:
1. Click the cell in the column for the appropriate date and enter the total time that you worked.
2. If Exception Time (vacation, sick, comp) needs to be recorded for a full day, insert a row by clicking the icon. A new row will appear below the hours worked.
1
2
3
4
5

15 of 97
3. The actual hours worked will be entered on the day of the Exception Time. In the example above the whole day was used for Exception Time so 0:00 no hours must be entered in the Hours Worked row.
4. On the new row from the drop down in the Pay Code column, select the Pay Code that applies to the Exception Time (vacation, sick, comp) taken.
If a combination of Exception Time is used, insert another row to be able to select the second Pay Code.
5. Click ‘Save’ .
Recording Comp Time in a Timecard
The University System of Georgia will now track Comp Time earned and taken on the Time card. Comp Time will now be calculated and applied based on the Overtime rules where an employee must physically work 40 hours before Comp Time will be calculated at Time and a half. The Tuesday following the end of the Pay Period the Comp Time will appear in the Comp Time bucket for you to begin using. After 20 weeks from the Tuesday the Comp Time was placed in the bucket, if the Comp Time has not been used, eTime will process the Comp Time to be paid in the upcoming pay period. Comp Time cannot exceed 60 hours. Once 60 hours has been reached overtime will be paid.
For example, the Pay Period is April 4 – April 17. Comp Time is earned on April 7 of 2 hours. During the week of April 4 – April 10, you physically worked 40 hours; therefore, the 2 hours for April 7 will be calculated at Time and a half giving 3 hours to be placed in the Comp Time bucket for you. You will not be able to use this 3 hours until Tuesday April 21 (Tuesday after the pay period end date of April 17) when it will be placed in the Comp Time bucket.
To record Comp Time Off, insert a row on the week the Comp Time was taken. On this new row select the Pay Code for Comp Time Off. On this same row in the column of the day the Comp Time was taken, enter the total time that will be documented as Comp Time taken.
Pay Code of Comp Time Off
will be selected from this drop down.
Enter amount of time that was taken for Comp Time.
16 of 97
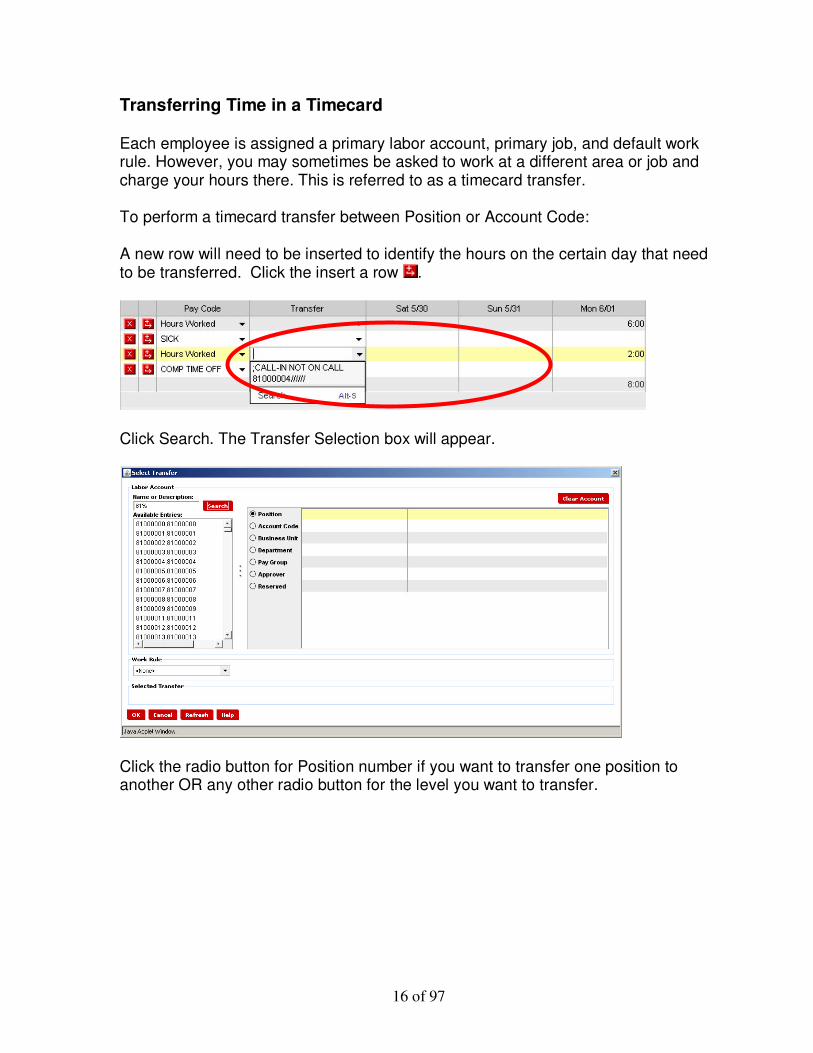
Transferring Time in a Timecard
Each employee is assigned a primary labor account, primary job, and default work rule. However, you may sometimes be asked to work at a different area or job and charge your hours there. This is referred to as a timecard transfer.
To perform a timecard transfer between Position or Account Code:
A new row will need to be inserted to identify the hours on the certain day that need to be transferred. Click the insert a row .
Click Search. The Transfer Selection box will appear.
Click the radio button for Position number if you want to transfer one position to another OR any other radio button for the level you want to transfer.

17 of 97
In the Name or Description field, enter the first part of the labor level with % as wild card.
The List of Positions will appear in the box on the left.
Click the Position number you need and it will show in the right side.

18 of 97
Click button. The Transfer will appear in the Transfer field of the timecard.
Note: Transfers remain in effect on each day one is added, until you cancel them.
Adding Comments
To add a comment to any cell, click within the cell and click ‘Comment’ from the tool bar and then Add Comment.
The Comments box will appear.

19 of 97
Click one of the Available Comments and click OK.
You will see beside the cell where the Comment was added.
You can view the Comments from the Comments Tab at the bottom of the Timecard.
Deleting Comments
To delete a comment in any cell, from the tab ‘Comments’ at the bottom of the time card, highlight the comment you wish to delete.
From the menu bar, click Comment and then Delete Comments.

20 of 97
Saving the Time Card
You need to save your changes to your timecard. The word TIMECARD will be orange indicating changes had been made and saving is required. Click Save from the menu bar.
Approving the Timecard
Approving your timecard ‘submits’ your time card for manager approval. Approval lets a manager know that the timecard is accurate, complete and ready to be sent to payroll for processing.
Approval can be removed if a manager has not submitted the timecards to payroll.
Viewing Accruals in eTime
Accrual Balances are updated instantly once the Timecard is saved. Accruals will reveal the balances for your Exception Time. Monthly earned accruals are granted on the 28th of each month. You must have been employed on the 15th of the month in order to be granted a leave accrual for the month per Board of Regents policy found in the Human Resources Administrative Practice Manual. Accruals may be viewed in two ways – Timecard or My Reports.
From Timecard View Accruals
Click on ‘Approvals’ then ‘Approve’

21 of 97
Click the Accruals Reporting Period tab at the bottom left of the Timecard will reveal the balances for your Exception Time.
Accruals Reporting Period Tab reveals the balances of your Accruals for the current calendar year as well as the totals of the Exception Time taken to date along with the requested that has not be used as of yet.
1. Balances will be reflected based on the date selected in the Balance as of field. Select the date then click the Apply button.
2. The column labeled “Earned To Date” reveals the balance of your accrual as of the date selected in step 1.
3. The column labeled “Taken To Date” reveals the amount of hours that are available for use which is the result of subtracting the hours in the Taken column from the hours in the Earned To Date column.
4. The column labeled “Available” reveals the amount of hours that have been recorded as taken during the calendar year as of the date selected in step 1.
5. The column labeled “Planned Takings” reveals the amount of hours that have been recorded to be taken during the calendar year after the as of the date selected in step 1.
6. The column labeled “Ending Balance” reveals the amount of hours that are available after those hours in the Planned Takings column have been subtracted from the Available hours. This balance will be reflected on the Accruals Tab in the “Balance Without Projected Credits” column.
My Reports to View Accruals
Click My Information tab and then click the My Reports link.
1
2 3 4 5 6

22 of 97
In the My Reports the Accrual Balances and Projections will reveal the balances of your Accruals for the current calendar year as well as the totals of the Exception Time taken to date along with the requested that has not be used as of yet.
Click Accrual Balances and Projections to highlight it. Click the View Report button
.
Your balances will appear.

23 of 97
1. Balances will be reflected based on the date you entered when generating the report.
2. The column labeled “Period Ending Balance” reveals the balance of your accrual as of the date selected in step 1.
3. The column labeled “Furthest Projected Taking Date” reveals the date furthest into the future that you have scheduled to us accrued time.
4. The column labeled “Projected Takings” reveals the amount of hours that you are scheduled to take between the selected date and the furthest projected taking date.
5. The column labeled “Projected Credits” reveals the amount of hours that you are scheduled to earn between the selected date and the furthest projected taking date.
6. The column labeled “Projected Balance” reveals the current balance minus all projected takings and plus all projected credits up through the furthest projected taking date.
7. The column labeled “Balance w/o Proj. Credits” reveals the period ending balance minus any scheduled credits. This balance ignores scheduled resets.
Click the Return button to return to the My Reports.
Holidays in eTime
The holidays for your institution will be posted to your time card by eTime. You will not be able to edit the holiday time. New policy has been applied to which any time worked on a holiday will be paid along with the holiday pay. For example: if your
1
2 3 4 5 6 7

24 of 97
institution works 8 hour days and has scheduled July 4th as your holiday. You have to work 3 hours on July 4th for some reason. You will be paid the 8 hours holiday and the 3 hours worked. You will not be allowed to move the holiday to another day.
Other Reports Available in eTime
Other Reports available to you on the My Reports page is the Schedule Report and the Time Detail Report.
The Schedule Report will show your schedule that you are set to work.
The Time Detail Report reveals the time cards for the Time Period you select.
Requesting Leave Time Off
Since Leave is managed and monitored in eTime, the requesting for leave must be
executed in eTime.
After logging into eTime, from the My Information Tab click My Actions.
To request Time Off, click the link for Monthly Employee - Request Time Off.
Use the � drop down for Request Type to select the Pay Code for the type of Leave you are requesting. Types of leave include Comp Time Off, Vacation, and Sick.

25 of 97
Enter the Date from or use the calendar icon to select the date.
Enter the Date to or use the calendar icon to select the date.
In the Message field you can enter any information you wish to supply for the time off request.
Click Specify Hours.
In the field of Start Time: enter the time your leave is to begin.

26 of 97
Enter the number of hours per day you will be requesting off.
For Day Type click Scheduled and Non-scheduled Days
Click Next.
Click Save and Close. The request is routed to your Reports To Manager who will approve or reject your request.
You will receive an email informing you that your request has been submitted.
You will receive an email informing you that your request has been approved or rejected by your manager.
Upon approval by your manager, the PayCode for the type of leave you requested will now appear on your timecard for the date you requested.
You will also be able to check your Inbox in eTime by clicking My Actions then Inbox.
Cancelling Leave Time Off Request
After logging into eTime, click My Information Tab click My Actions.

27 of 97
To cancel a request for Time Off that has been submitted, click the link for Monthly Employee - Cancel Time Off Request.
Use the drop down for Request Type to select the type of leave you wish to cancel.
Enter the date for the time off you are canceling starts.
Enter the date for the time off you are canceling ends.

28 of 97
Click Save and Close. The request is routed to your Reports To Manager who will approve or reject your request.
You will receive an email informing you that your request has been submitted.
You will receive an email informing you that your request has been approved or rejected by your manager.
Upon approval by your manager, the PayCode for the type of leave you requested will be removed from your timecard.
You will also be able to check your Inbox in eTime by clicking My Actions then Inbox.
Extended Lengths of Leave Time Off Request
Extended lengths of leave time refer to leave that will apply to Family and Medical Leave Act (FMLA), Short Term Disability, Long Term Disability or Military Leave. You can request this type of leave from within eTime.
After logging into eTime, click My Information Tab click My Actions.
To request leave for an extended period of time, click the link for Request Leave Time.

29 of 97
Use the drop down for Leave Category to select the type of leave you wish to request.
Click Next.

30 of 97
Use the drop down for Leave Reason to select the reason for leave you wish to request.
Use the drop down for Leave Frequency to state whether the leave is continuous or intermittent.
Enter the date for when the leave starts.
Enter the date for when the leave ends.
Select how the leave hours will be used.

31 of 97
Enter how many hours will be used each day.
Describe why you need the leave in the description box.
Click Send and Close. The request is routed to your Campus Leave Administrator who will approve or reject your request.
You will receive an email informing you that your request has been submitted.
Your Campus Leave Administrator will process your request, the PayCode for the leave you requested will be recorded from your timecard.
You will also be able to check your Inbox in eTime by clicking My Actions then Inbox.
Cancelling Extended Lengths of Leave Time Off Request
After logging into eTime, click My Information Tab click My Actions.
To request leave for an extended period of time, click the link for Cancel Leave Time.

32 of 97
Use the drop down for Leave Category to select the type of leave you wish to cancel.
Click Next.

33 of 97
Use the drop down for Leave Reason to select the reason for leave you wish to cancel. This needs to be the same values as the original request.
Use the drop down for Leave Frequency to state whether the leave is continuous or intermittent.
Enter the date for when the leave starts.
Enter the date for when the leave ends.

34 of 97
Enter the reason why you are cancelling your original request.
Click Send and Close. The request is routed to your Campus Leave Administrator who will approve or reject your request.
You will receive an email informing you that your request has been submitted.
Your Campus Leave Administrator will process your request, the PayCode for the leave you requested will be removed from your timecard.
You will also be able to check your Inbox in eTime by clicking My Actions then Inbox.
Your Inbox
After logging into eTime, click the General Tab and then Inbox.
Your Inbox is much like your email account at your campus except it reflects any messages or tasks associated with your Time Card, Time Off Requests, and Leave Case Requests.

35 of 97
The Inbox will default into the Tasks section. Click the Messages link to show the Messages section.
Any messages you have regarding leave and time of request s will appear in this section. You may Open, Reply, or Delete the messages by using the tool bar.
You may also send a new message by clicking the New button from the tool bar.

36 of 97
Your Employee’s Time Card and Accruals
Review Your Employee’s Time Card
It is very important to review your employee timecards regularly. BiWeekly timecards must
be approved no later than 9:00 am on the Monday following the end of the pay period.
Payroll must adhere to a very strict timeline to process payroll and submit it to ADP.
Two types of views are associated with employees – Project View and Hourly View.
Project View – time is recorded as hours worked during a day.
BiWeekly (not required to record actual hours)
Monthly = record Leave Time only or Uncompensated Time
Faculty = record Sick Leave only or Uncompensated Time
Hourly View – time is recorded as in and out punches of the actual hours worked
BiWeekly (required to record in and out time) and Students
My Quick Navs section allows you to view, edit, and approve your employees’ time cards.
You can select employee timecards from Reconcile Timecard, Pay Period Close, or
QuickFind.
QuickFind will allow you to select one employee by Name or ID or all at one time.
Reconcile Timecard and Pay Period Close will allow you to select groups of your
employees based on various groupings. These two Quick Navs also allow you to
view timecards based on certain exceptions and actions.
QuickFind
QuickFind allows you to see all the employees for whom you approve their timecards.
1. Click QuickFind from the My QuickNavs Tab.

37 of 97
2. In the Name or ID field, you can use the * to select all the employees that report to
you or enter part of their last name with the * or last name.
3. In the Time Period field use the to select the time period of the time card. You
will be approving the Current Pay Period if the day you are approving is still within
the pay period. You will be approving Previous Pay Period if you are approving after
the pay period has ended.
4. Click the button. Your employees will appear.
5. Select the employee whose time card you want to review.

38 of 97
6. Click Timecard from the menu bar.
7. The timecard will appear.
8. To edit the timecard, see Edit Timecard section.
9. If you want to select all your employees, from QuickFind highlight the first one then
hold down the Shift key and click the last employee to be included. All will be
highlighted. When you click the Timecard link, you can review the next employee by
clicking the arrows . To select a group of employees that are not all in line
with one another, hold down the Ctrl key and click each employees name to be in the
group.

39 of 97
10. If you selected only one employee in Step 4, to review another employee’s timecard,
click the My Quick Navs tab and then QuickFind.
11. Repeat steps 1 through 9
Reconcile Timecard
Reconcile Timecard allows you to see groups of your employees for whom you approve their
timecards. It also identifies all time cards that have certain types of punches on their cards.
IMPORTANT! Any timecards with a Missed Punch will not be paid.
1. Click Reconcile Timecard from the My QuickNavs section.
2. To select the employees to show in the list, in the Name field click the to select
the grouping of employees.
3. In the Time Period field use to select the time period of the time card. You will
be approving the Current Pay Period if the day you are approving is still within the
pay period. You will be approving Previous Pay Period if you are approving after the
pay period has ended.

40 of 97
4. Click the button. Your employees will appear.
5. Each column identifies a type of punch that occurs on the employee’s timecard. If the
condition occurs, a � will appear in the column for the employee.
6. To see all the employees who have a � in the column, click the column heading to
sort the column. Click the column heading twice for the � to show at the top.
7. Highlight the employee who has a missed punch.

41 of 97
8. Click the Timecard link from the menu bar.
9. See Edit Timecard section to correct punches.
10. To review another employee’s timecard, click the My Quick Navs tab and then
QuickFind.
11. Repeat steps 1 through 10.
Pay Period Close
Pay Period Close allows you to see groups of your employees for whom you approve their
timecards. It also identifies all time cards who have certain types of punches on their cards,
if the employee has approved their time card, if manager approval has been made, or if
payroll has signed off on the timecard.
IMPORTANT! Any timecards with a Missed Punch will not be paid.
1. Click Pay Period Close from the My QuickNavs section.
2. To select the employees to show in the list, in the Name field click the to select
the grouping of employees.

42 of 97
3. In the Time Period field use the to select the time period of the time card. You
will be approving the Current Pay Period if the day you are approving is still within
the pay period. You will be approving Previous Pay Period if you are approving after
the pay period has ended.
4. Click the button. Your employees will appear.
5. If the employee’s timecard meets the condition of the card, a � will appear in the
column for the employee.
6. To see all the employees who have a � in the column, click the column heading to
sort the column. Click the column heading twice for the � to show at the top.

43 of 97
7. Highlight the employee who has a missed punch.
8. Click the Timecard link from the menu bar.
9. See Edit Timecard section to correct punches.
10. To review another employee’s timecard, click the My Quick Navs tab and then
QuickFind.
11. Repeat steps 1 through 10.
Edit Your Employee’s Timecard
Two types of views are associated with employees – Project View and Hourly View.
This section will address how to edit the two types of Timecards. Editing involves editing
the punch, adding Pay Codes or adding Comments.
Hourly View Timecard
Hourly View – time is recorded as in and out punches of the actual hours worked
BiWeekly (required to record in and out time) and Students
Schedules in an Hourly View Timecard
Only benefited Bi-Weekly employees will have a schedule. The schedule is to
identify time the employee is to physically work. eTime will mark on the timecard
any day and time based on the employee’s schedule that a punch is not recorded. The
marking is a solid red box for the Hourly View Time card.

44 of 97
Hourly View Missed Punch
IMPORTANT! Any timecards with a Missed Punch will not be paid. eTime will
not allow the Payroll Practitioner to Sign Off on any time card with a missed punch.
Therefore, the time cannot be exported to be processed for payment.
Schedules are shown at the bottom right corner of the time card.
Rounding in an Hourly View Timecard
Rounding rules apply to both in and out punches. If a punch is recorded within the
first 7 minutes of a 15 minute interval, the punch is rounded back to the interval start.
If the punch occurs at 8 minutes or later, it rounds to the start of the next interval.
For example, if the interval starts at 8:00AM, any punch between 8:00AM and
8:07AM rounds back to 8:00AM. Any punch from 8:08AM to 8:14AM rounds
forward to 8:15AM.
HINT: The timecard will always show the actual punch time, but double-clicking on
the punch will open up a box that shows the rounded time.
If there is no schedule, the same rounding rules apply to both in and out punches. If a
punch is recorded within the first 7 minutes of a 15 minute interval, the punch is
rounded back to the interval start. If the punch occurs at 8 minutes or later, it rounds
to the start of the next interval.

45 of 97
Edit the Punch
Missed Punches - Time cards must have an in and out punch. If one of these are
missing, it is classified as a missed punch. A missed punch is identified as a solid red
box. IMPORTANT! Any timecards with a Missed Punch will not be paid.
1. Select your employee’s timecard from one of the methods shown in the Review
Your Employee’s Time Card section.
2. Click within the cell that you wish to edit.
3. Type in the time for the punch. Enter in as the correct time format 00:00 am or
pm. You may enter the a or p as a shortcut. Note: If the employee did not work
and need to be uncompensated, enter 0:00 in the In and Out so that the missed
punch will be removed.
4. Click the button.
Cancel Meal Deduction
BiWeekly employees Pay Rule may include a meal deduction to account for time
spent at lunch. If the time between a punch in and punch out is five hours or greater,
eTime will subtract the meal deduction assigned to the employee. You should know
which of your employees have meal deductions and which do not. In the case where
an employee may have to work through lunch, the meal deduction will need to be
cancelled
1. Right click on the Out punch for the day that you want to cancel the meal
deduction.

46 of 97
2. Click the Edit Punch. Note: You can also click within the cell and select Punch
from the menu bar and then select Edit. The Edit Punch Box will appear.
3. Use the for Cancel Deduction.
4. Select the Meal deduction that is assigned to the employee. Click .

47 of 97
5. Click the button.
6. You will see the Daily Totals change to add the Meal Deduction. You will also
see a red box around the time the Meal Deduction was taken.
7. If you hoover your mouse over the cell with the red box, Cancel Deduction will
be displayed.
Entering Time Off in an Hourly View Timecard
To report time off, enter the correct Pay Code. Instead of entering in-punches and out-
punches for time not worked, enter the number of hours in the Amount column.
The following example shows 4 hours of Comp Time Off for Wednesday and 8 hours
Vacation for Thursday:
Note: There cannot be a Pay Code change on the same line as a punch. If there is a
need for this to happen on the same day as a punch, simply add a line.
Adding a Pay Code
1. If the Pay Code is for the entire number of scheduled days or no hours will be
physically worked that day, in the Pay Code field click the and select the
appropriate Pay Code.
2. In the Amount field, enter the number of hours to be associated with the Pay
Code.
3. If hours had already been recorded, you need to remove those hours in the In
and Out Punch fields by clicking .
Refers to number of hours when adding time off

48 of 97
4. If the Pay Code is for a partial day, insert a row on the day the Pay Code is
to take place.
5. On this new row in the Pay Code field click and select the appropriate Pay
Code.
6. On this same row in the Amount field, enter the number of hours to be
associated with the Pay Code.
An example of a time card that shows time worked and then Sick taken on the
same day:
Updating a Pay Code
1. If the Pay Code selected was incorrect, in the Pay Code field click and
select the appropriate Pay Code.
2. If the number of hours for the Pay Code is incorrect, in the Amount field
highlight the number of hours to be associated with the Pay Code and enter
the correct number.
3. Click the button.
Deleting a Pay Code
1. If the Pay Code should not have been entered on the date shown, on the row
the Pay Code is entered click the .
2. A message to erase the row will appear, click Yes.

49 of 97
3. Click the button.
Editing Incorrect Time Off Request (TOR) Hours
This process only applies to hours recorded in the past that were requested incorrectly
and have NOT been signed off. The employee does not have to have a schedule to
use this method of correction. The approved Time Off Request writes a pay code edit
to the schedule as a holding area.
Note: To correct hours recorded in the future that were requested incorrectly, have
the employee cancel the TOR and resubmit.
To correct hours recorded in the past that were requested incorrectly and
signed off, correct via Historical Edit.
1. From the employee's timecard, verify that the correct Time Period is visible.
Click on Schedule from the menu bar.
2. The Schedule Editor opens for the selected employee. Locate the date to be
modified in the schedule. You will see the scheduled pay code edit (in this
example, it's 9 hours of Vacation on Tues 6/09.)

50 of 97
3. To open the Pay Code Editor, double click directly on the word VACATION
or click once on VACATION, right-click, and select Edit > Pay Code.
4. The Pay Code Editor window opens.
5. Correct the hours in the Amount box and then select OK.
6. The change is visible in the schedule. Click on Save.

51 of 97
7. Click on Timecard to verify changes.
8. Changes should be visible in the timecard. If not, select Actions/Refresh
(from the timecard menu) to force a refresh of the timecard.
9. Validate the change on the timecard.
Deleting Incorrect Time Off Request (TOR) Hours
This process only applies to hours recorded in the past that were requested incorrectly
and have NOT been signed off. The employee does not have to have a schedule to
use this method of correction. The approved Time Off Request writes a pay code edit
to the schedule as a holding area.
Note: To correct hours recorded in the future that were requested incorrectly, have
the employee cancel the TOR and resubmit.
To correct hours recorded in the past that were requested incorrectly and
signed off, correct via Historical Edit.
1. From the employee's timecard, verify that the correct Time Period is visible.
Click on Schedule from the menu bar.

52 of 97
2. The Schedule Editor opens for the selected employee. Locate the date to be
modified in the schedule. You will see the scheduled pay code edit (in this
example, it's 9 hours of Vacation on Tues 6/09.)
3. To delete the Pay Code, double click directly on the word VACATION or
click once on VACATION, right-click, and select Delete.
4. Click on Save.
5. Click on Timecard to verify changes.
6. Changes should be visible in the timecard. If not, select Actions/Refresh
(from the timecard menu) to force a refresh of the timecard.

53 of 97
7. Validate the change on the timecard.
Add Comp Time
The University System of Georgia will now track Comp Time earned and taken on
the Time card. Comp Time will now be calculated and applied based on the
Overtime rules where an employee must physically work 40 hours before Comp Time
will be calculated at Time and a half. The Tuesday following the end of the Pay
Period the Comp Time will appear in the Comp Time bucket for you to begin using.
After 20 weeks from the Tuesday the Comp Time was placed in the bucket, if the
Comp Time has not been used, eTime will process the Comp Time to be paid in the
upcoming pay period. Comp Time cannot exceed 60 hours. Once 60 hours has been
reached overtime will be paid.
For example, the Pay Period is April 4 – April 17. Comp Time is earned on April 7 of 2 hours. During the week of April 4 – April 10, you physically worked 40 hours; therefore, the 2 hours for April 7 will be calculated at Time and a half giving 3 hours to be placed in the Comp Time bucket for you. You will not be able to use this 3 hours until Tuesday April 21 (Tuesday after the pay period end date of April 17) when it will be placed in the Comp Time bucket.
To record Comp Time Off on a partial day, insert a row on the day the Comp Time
was taken. On this new row select the Pay Code for Comp Time Off. On this same
row in the column of the day the Comp Time was taken, enter the total time that will
be documented as Comp Time taken.
Enter amount of time that was taken for Comp Time.
Pay Code of Comp Time Off
will be selected from this drop down.

54 of 97
Transferring Time in a Timecard
Each employee is assigned a primary labor account, primary job, and default work
rule. However, you may sometimes need to charge work hours to a different Position
or Account Code. This is referred to as a timecard transfer.
To perform a timecard transfer between Position or Account Code:
1. In the timecard grid, click � in Transfer column on the row associated with
the punch or amount that you want to transfer.
2. Click Search. The Transfer Selection box will appear.
3. Click the radio button for Position number if you want to transfer one position
to another OR any other radio button for the level you want to transfer.

55 of 97
4. In the Name or Description field, enter the first part of the labor level with %
as wild card.
5. The List of Positions will appear in the box on the left.
6. Click the Position number you need and it will show in the right side.

56 of 97
7. Click button. The Transfer will appear in the Transfer field of the
timecard.
Note: Transfers remain in effect on each day one is added, until you cancel
them.
To perform a timecard transfer between Position/Approver:
1. In the timecard grid, click � in Transfer column on the row associated with
the punch or amount that you want to transfer.

57 of 97
2. Click Search. The Transfer Selection box will appear.
3. Click the radio button for Position number if you want to transfer one position
to another OR any other radio button for the level you want to transfer.
4. In the Name or Description field, enter the first part of the labor level with %
as wild card.

58 of 97
5. The List of Positions will appear in the box on the left.
6. Click the Position number you need and it will show in the right side.
7. Click the radio button beside Approver.
.

59 of 97
8. In the field labeled Name or Description on the left side, enter the Approver
number for the supervisor that will need to approve this transfer. Click the
Search button and the Approver Number and Name will appear in the section
labeled Available Entries:
9. Select the entry for this area you are punching in or out to work. The
selection will appear within the right side beside the radio button you selected.
It will be highlighted in yellow.
10. In the lower left hand corner of the Select Transfer Box, you will combination
of the entries you created.
11. Click OK button . If the entry is incorrect, click the Clear Account
Button. Both entries will be removed. Repeat the previous steps to record the
correct Position and Approver. If you wish to leave the Select Transfer box
without making a selection, click the Cancel Button. Once you clicked OK,
the Labor Account will appear in the transfer box. Note: Once you have

60 of 97
selected this transfer, it will be retained in the drop down for you future
selections and you will not have to search for it again.
Note: Transfers remain in effect on each day one is added, until you cancel
them.
12. If employee within the same day works in his position again after the previous
transfer, you will have to enter the primary account in the transfer. The
system will not default the primary account on that day after a transfer has
been made.
13. Save the timecard.
To perform a timecard transfer for Call In Pay
Call In pay will be calculated based on the time the employee has to work. If the
employee’s Call In is for less than 3 hours of time, a guarantee of 3 hours will be
added to the timecard with the Call In Transfer Work Rule. If the employee hours for
Call In are greater than 3 hours then the actual hours will be applied.
1. In the timecard grid, click the magnifying glass in Transfer column on the row
associated with the punch or amount that you want to mark as Call In.

61 of 97
2. Click Search. The Transfer Selection box will appear.
3. Use the in the Work Rule section.
4. Select the Call In Work Rule that applies.
5. Click button. The Transfer will appear in the Transfer field of the
timecard.

62 of 97
Eventhough this employee only worked 2 hours for Call In, the timecard
reflects the guarantee of 3 hours.
Adding Comments
1. To add a comment to any cell, click within the cell and click ‘Comment’ and then
Add Comment from the menu bar.
2. The Comments box will appear.
3. Click one of the Comments and click OK button.
4. You will see beside the cell where the Comment was added.

63 of 97
5. You can view the Comments from the Comments Tab at the bottom of the
Timecard.
Deleting Comments
1. To delete a comment in any cell, from the tab ‘Comments’ at the bottom of the
time card, highlight the comment you wish to delete.
2. From the menu bar, click Comment and then Delete Comments.
Project View Timecard
Project View – time is recorded as hours worked during a day.
BiWeekly (not required to record actual hours)
Monthly = record Leave Time only or Uncompensated Time
Faculty = record Sick Leave only or Uncompensated Time Edit the Punch
Schedules in a Project View Timecard
Only benefited Bi-Weekly employees will have a schedule. The schedule is to
identify time the employee is to physically work. eTime will mark on the timecard
any day based on the employee’s schedule that time is not recorded. The marking is a
red box around the day. It will be identified as an Unexcused Absence.

64 of 97
Project View Missed Punch
IMPORTANT! Any timecards with a Missed Punch will not be paid. eTime will
not allow the Payroll Practitioner to Sign Off on any time card with a missed punch.
Therefore, the time cannot be exported to be processed for payment.
Schedules are shown at the bottom right corner of the time card.
Edit the Punch
Missed Punches – The Benefited BiWeekly have a schedule as part of their Pay Rule.
The schedule identifies the hours an employee should work per day in the pay period.
If the number of hours have not been entered on one of the days in the pay period, a
missed punch will be identified by a red box around the day of the week.
IMPORTANT! Any timecards with a Missed Punch will not be paid.
1. Select your employee’s timecard from one of the methods shown in the Review
Your Employee’s Time Card section.

65 of 97
2. Click within the cell that you wish to edit.
3. Type in the amount of hours worked. Note: If the employee did not work and
need to be uncompensated, enter 0 as hours so that the missed punch will be
removed.
4. Click the button.
Entering Time Off in a Project View Timecard
Project View shows a week at a time. To report time off, a new row will need to be
added to record a Pay Code and the number of hours in the Amount column.
Adding a Pay Code
1. Click insert a row to add a row for the Pay Code.
2. On this new row in the Pay Code field click and select the appropriate Pay
Code.

66 of 97
3. On this same row in the Amount field for the day the Pay Code applies, enter
the number of hours to be associated with the Pay Code.
An example of a time card that shows a Pay Code of Sick was applied.
Updating a Pay Code
1. If the Pay Code selected was incorrect, in the Pay Code field click the and
select the appropriate Pay Code.
2. If the number of hours for the Pay Code is incorrect, in the Amount field
highlight the number of hours to be associated with the Pay Code and enter
the correct number.
Deleting a Pay Code
1. If a Pay Code is recorded for an occurrence during the employee’s pay week
and should not have been, simply click on the row of the pay code.
2. A message to erase the row will appear, click Yes.
3. Click the button.
Editing Incorrect Time Off Request (TOR) Hours
This process only applies to hours recorded in the past that were requested incorrectly
and have NOT been signed off. The employee does not have to have a schedule to

67 of 97
use this method of correction. The approved Time Off Request writes a pay code edit
to the schedule as a holding area.
Note: To correct hours recorded in the future that were requested incorrectly, have
the employee cancel the TOR and resubmit.
To correct hours recorded in the past that were requested incorrectly and
signed off, correct via Historical Edit.
1. From the employee's timecard, verify that the correct Time Period is visible.
Click on Schedule from the menu bar.
2. The Schedule Editor opens for the selected employee. Locate the date to be
modified in the schedule. You will see the scheduled pay code edit (in this
example, it's 9 hours of Vacation on Tues 6/09.)
3. To open the Pay Code Editor, double click directly on the word VACATION
or click once on VACATION, right-click, and select Edit > Pay Code.
4. The Pay Code Editor window opens.

68 of 97
5. Correct the hours in the Amount box and then select OK.
6. The change is visible in the schedule. Click on Save.
7. Click on Timecard to verify changes.
8. Changes should be visible in the timecard. If not, select Actions/Refresh
(from the timecard menu) to force a refresh of the timecard.

69 of 97
9. Validate the change on the timecard.
Deleting Incorrect Time Off Request (TOR) Hours
This process only applies to hours recorded in the past that were requested incorrectly
and have NOT been signed off. The employee does not have to have a schedule to
use this method of correction. The approved Time Off Request writes a pay code edit
to the schedule as a holding area.
Note: To correct hours recorded in the future that were requested incorrectly, have
the employee cancel the TOR and resubmit.
To correct hours recorded in the past that were requested incorrectly and
signed off, correct via Historical Edit.
1. From the employee's timecard, verify that the correct Time Period is visible.
Click on Schedule from the menu bar.
2. The Schedule Editor opens for the selected employee. Locate the date to be
modified in the schedule. You will see the scheduled pay code edit (in this
example, it's 9 hours of Vacation on Tues 6/09.)

70 of 97
3. To delete the Pay Code, double click directly on the word VACATION or
click once on VACATION, right-click, and select Delete.
4. Click on Save.
5. Click on Timecard to verify changes.
6. Changes should be visible in the timecard. If not, select Actions/Refresh
(from the timecard menu) to force a refresh of the timecard.
7. Validate the change on the timecard.

71 of 97
Add Comp Time
The University System of Georgia will now track Comp Time earned and taken on
the Time card. Comp Time will now be calculated and applied based on the
Overtime rules where an employee must physically work 40 hours before Comp Time
will be calculated at Time and a half. The Tuesday following the end of the Pay
Period the Comp Time will appear in the Comp Time bucket for you to begin using.
After 20 weeks from the Tuesday the Comp Time was placed in the bucket, if the
Comp Time has not been used, eTime will process the Comp Time to be paid in the
upcoming pay period. Comp Time cannot exceed 60 hours. Once 60 hours has been
reached overtime will be paid.
For example, the Pay Period is April 4 – April 17. Comp Time is earned on April 7 of 2 hours. During the week of April 4 – April 10, you physically worked 40 hours; therefore, the 2 hours for April 7 will be calculated at Time and a half giving 3 hours to be placed in the Comp Time bucket for you. You will not be able to use this 3 hours until Tuesday April 21 (Tuesday after the pay period end date of April 17) when it will be placed in the Comp Time bucket.
1. To record Comp Time Off, insert a row on the week the Comp Time was
taken.
2. On this new row click the in the Pay Code field and select the Pay Code for
Comp Time Off.
3. On this same row in the column of the day the Comp Time was taken, enter the
total time that will be documented as Comp Time taken.
Transferring Time in a Timecard
Each employee is assigned a primary labor account, primary job, and default work
rule. However, you may sometimes need to charge work hours to a different Position
or Account Code. This is referred to as a timecard transfer.
To perform a timecard transfer between Position or Account Code:
1. A new row will need to be inserted to identify the hours on the certain day
that need to be transferred. Click the insert a row .
Pay Code of Comp Time Off
will be selected from this drop down.
Enter amount of time that was taken for Comp Time.

72 of 97
2. Click Search. The Transfer Selection box will appear.
3. Click the radio button for Position number if you want to transfer one
position to another OR any other radio button for the level you want to
transfer.
4. In the Name or Description field, enter the first part of the labor level with
% as wild card.
5. The List of Positions will appear in the box on the left.

73 of 97
6. Click the Position number you need and it will show in the right side.
7. Click button. The Transfer will appear in the Transfer field of the
timecard.
Note: Transfers remain in effect on each day one is added, until you
cancel them.
Important Note: In order for another supervisor to see the timecard that
you have transferred to their position, you will need to also transfer on

74 of 97
Approver. You will have a combination of Position/Approver in the
transfer box. See To perform a timecard transfer between
Position/Approver: from the Hourly View Section.
To perform a timecard transfer for Call In Pay
Call In pay will be calculated based on the time the employee has to work. If the
employee’s Call In is for less than 3 hours of time, a guarantee of 3 hours will be
added to the timecard with the Call In Transfer Work Rule. If the employee hours for
Call In are greater than 3 hours then the actual hours will be applied.
1. A new row will need to be inserted to identify the hours on the certain day
that need to be transferred. Click the insert a row .
2. On the new row click the � in the Transfer field.
3. The Transfer Selection box will appear.

75 of 97
4. Use the in the Work Rule section.
5. Select the Call In Work Rule that applies.
6. Click button. The Transfer will appear in the Transfer field of the
timecard.
7. Even though this employee only works 2 hours for Call In, the hours to be
entered on the timecard will need to be the guarantee of 3 hours. If the
hours the employee works for Call In is greater than 3, the actual hours
will need to be recorded. The automatic calculation rule will not apply to
the Project View.
Adding Comments
1. To add a comment to any cell, highlight the cell and choose ‘Comment’ then Add
Comment from the tool bar.

76 of 97
OR right click in the cell and select Add Comment
2. The Comments box will appear.
3. Select the comment that applies then click OK button.

77 of 97
4. You will see beside the cell where the Comment was added.
6. You can view the Comments from the Comments Tab at the bottom of the
Timecard.
Deleting Comments
1. To delete a comment in any cell, from the tab ‘Comments’ at the bottom of the
time card, highlight the comment you wish to delete.
2. From the menu bar, click Comment and then Delete Comments.

78 of 97
Saving the Time Card
You need to save your changes to your employee’s timecard. The word TIMECARD will be
orange indicating changes had been made and saving is required. Click Save from the menu
bar.
A message will appear showing the save was successful and the work TIMECARD will
return to black.
Approving the Timecard
Approving your employee’s timecard ‘submits’ your time card for Payroll’s sign off.
Approval lets a Payroll Practitioner know that the timecard is accurate, complete and ready
for payroll to begin processing. Once you have approved the employee’s time card, the
employee can no longer make any corrections to the time card.
Approval can be removed if a Payroll has not signed off on the timecard for processing.

79 of 97
Click on ‘Approvals’ from the toolbar then ‘Approve’.
Make sure time is correct: Don’t approve until any missed punches are fixed. These are
identified as a solid red box for Hourly View timecards or a red box around the day the
punch should be for Project View. Missed punches will cause the time card to not be paid.
Hourly View Missed Punch Project View Missed Punch
Reminder! You can view Pay Period Close to see the approvals and missed punches on your
employees’ timecards.
Reviewing Totals of a Timecard
On each time card in the lower section, you will see a tab for Totals & Schedule. This tab
allows you to view the totals for each Pay Code that has been recorded on the time card.

80 of 97
1. To view the actions, click the Totals & Schedule tab.
2. The Account section identifies the Labor Levels (categories) that apply to the Pay
Code.
3. The Pay Code and the amount of hours that will apply that Pay Code are shown.
Reviewing the Audit of a Timecard
On each time card in the lower section, you will see a tab for Audits. This tab allows you to
view every time an action has been taken on the time card.

81 of 97
4. To view the actions, click the Audits tab.
5. From the Type of Edit field, click � to select what you wish to view.
6. The detail of the actions performed against the timecard will appear. The audit
provides what the action was and who performed and when the action was performed.

82 of 97
Returning to List of Employees
To return to the list to view another employee, click the My Quick Navs Tab.
See the section Review Your Employee’s Time Card for instructions.
Reports on Your Employees
From any of the three areas that you can select your employees (QuickFind, Reconcile
Timecard, Pay Period Close), you will be able to generate reports on your employees. You
can highlight one employee, a group of employees, or all.
To generate a report:
1. Highlight the employee(s) you wish to produce a report in one of the My Quick Navs
(QuickFind, Reconcile Timecard, Pay Period Close). For the examples, Reconcile
Timecard is being used.
2. Click Reports from the menu bar.
3. The Reports page will appear. Note: You can also access the page from the General
Section of your main page by clicking Reports.

83 of 97
4. In the Show field, you will see Previously Selected Employees. You can use that
selection or choose another by clicking the to select one in the list.
5. Click the + beside the Category for the report link you will to execute.
You can use the scroll bar to see
more selections.

84 of 97
6. Click the report you wish to execute.
7. Click the Set Options Tab to select the parameters.
8. The report parameters box will appear.

85 of 97
9. Select the parameters for the report that you would like the report to have.

86 of 97
10. Click Run Report button. The Status box will appear.
11. Click the Refresh Status button until the Status shows Complete.
12. Highlight the report and click button. The report will open in a new
window.
13. You can save or print the report by using the icons on the page. To close the report
window, click the found in the upper right hand corner of the window. The Report
Run Status window will appear.
14. Click the Select Report Tab to return to the Reports page to select another report.

87 of 97
Other My Quick Navs
Other My Quick Navs provide information regarding your employees.
Worked & Paid Time Off will provide based on the employee selection and the Time Period
selected Total Time Off and Total Worked Time for the Time period.
Employee Information will provide the specifics in eTime for your employees.
Adjustments
At some point Time Off may be missed and determined after Payroll has been processed.
For example, an employee is sick and the Sick Pay Code was not recorded on the employee’s
time card. You will need to email your Payroll Practitioner the information on the employee
as to what date the time off occurred. The Payroll Practitioner will have to make a historical
edit to the employee’s leave balance.
Assigning Your Approval Authority to Another
The assignment of your approval of timecards to another manager while you are unavailable
will be performed through Manager Delegation. Through this delegation, managers can
perform your tasks using their own user names and passwords. This process helps to keep
business processes moving even when you are not there.

88 of 97
Reviewing your Enterprise eTIME functions
After you identify a situation that requires you to delegate your timekeeping and/or
scheduling tasks to another manager, you should review your QuickNavs, menu options, and
base group of employees to determine the functions you need the other manager to perform.
The basic question that should be asked is “What exactly do I need another manager to do
while I am unavailable?” The answer will determine the role you will define for that
manager. Your eTime Systems Administrator at your campus will be able to help you to
define a role that matches your specific needs.
Delegating your Tasks to Another Manager
1. Click the General Tab.
2. Click Actions.
3. Click Run Proxy Manager Delegation link.

89 of 97
4. The Create Delegation form will appear.
5. Use the � in the Delegate field to select the Delegate to whom you wish to make the
assignment.
6. In the Start Date field use calendar to select the date for which you wish the manager
to begin executing your tasks.

90 of 97
7. In the End Date field use calendar to select the date for which you wish the manager
to no longer execute your tasks.
8. In the Role field use � to select the role that identifies the tasks you want the
manager to perform for you. If you need assistance in identifying the role, contact
your campus eTime Systems Administrator.
9. In the Existing Delegations box you will see the assignment you have created.
10. Click Save and Close button.

91 of 97
11. The delegation request will be sent to the manager’s Inbox. Once the manager has
accepted the delegation, a message will be sent to your Inbox. To access your inbox,
click the General tab.
12. Click Inbox. The Inbox will appear with the Tasks tab detail showing.
13. Click Messages. You will see a message stating that the manager has accepted or
rejected the delegation.
Manually Cancelling Assignment Tasks to Another Manager
1. Click the General Tab.
2. Click Actions.

92 of 97
3. Click Run Proxy Manager Delegation link.
4. The Select Action form will appear. Click the radio button beside the Remove
Existing Delegation. Click Next.
5. The Existing Delegations box will appear. Select the delegation you wish to cancel.
6. Click the Delete Button.
7. The cancellation of the delegation request will be sent to the manager’s Inbox.

93 of 97
Accepting or Declining A Manager’s Delegation Request
When a manager sends you a request for assistance in performing his or her timecard or leave
time off requests tasks, Enterprise eTIME automatically places a message and accompanying
task in your Inbox. The message specifies the start and end dates and the role you would
assume. You can accept or decline the delegation by replying to the message.
1. Click the General Tab.
2. Click Inbox.
3. On the Tasks tab, select the appropriate delegation request and click Edit.
4. In the Action section, select the appropriate option to either accept or decline the
delegation request. You can add a message in the Comment box.
5. 3

94 of 97
6. Click Save & Close.
Changing to Another Manager’s Access
After you accept a delegation request, Enterprise eTIME automatically provides you access
to the functions granted to you on the start date specified in the request. Enterprise eTIME
provides a “Switch Role” link that lets you perform your timekeeping and/or scheduling
tasks, as well as the other manager’s tasks that were delegated to you, in one session; you do
not need to log out and then log back on using the other manager’s user name and password.
1. From your eTime window, you will see a new link labeled Switch Role.
2. Click the Switch Role link.

95 of 97
3. Click the radio button beside the name of the manager for whom you will be
approving timecards.
4. Click the Switch Role button.
5. You now can access the employees who belong to the manager you selected. Click
My QuickNavs tab and select Quick Find.
6. Notice the Switch Role displays the name of the manager for whom you have
accepted the delegation request.
7. By clicking the Find button, you will now be able to see the employees for the other
manager.

96 of 97
8. You can perform edits, approvals and other actions to these employees as you wold
for your own employees.
Switching Back to Your Access
After you accept have completed the tasks for the other manager, you can return to your own
employees by switching the role by to you.
1. From your eTime window, you will see a new link labeled Switch Role.
2. Click the Switch Role link.
3. Click the radio button beside Myself.
4. Click the Switch Role button.

97 of 97
5. You now can access your employees. Click My QuickNavs tab and select Quick
Find.
6. Notice the Switch Role displays Myself again.
Logging Off eTime
After completing or reviewing your information, you need to log off of eTime.
The Log Off link is located in the upper right hand corner of the eTime page.