bitterstone dwarf handbookohrhammer.online/wp-content/uploads/bitterstone/bitter... ·...
TRANSCRIPT

1

2
“The time had come. The wait had passed quickly by the reckoning of our people, but still every day spend in preparation and argument had seem like an age. The Dragonback mountains are huge and sprawling, home of hundreds of clans, mines and quarries. It took time to reach them all, to pass on the news, to wait for anger to boil up within the mind of the dawi.
But now the time has come. Given enough of it to consider the wrong, given enough time to reflect on it and compare it to the wrongs of the past, we have become angry. Muttering started in the deep places, hammering away at the walls in unsettling rhythms. They chanted in the lightless halls of Ekrund and stoked the eternal fires of the forges. They smelted iron and beat gromril, they marched along the winding ways of the Ungdrin, pouring out the mines of Ekrund, their faces masked by helms, accompanied by booming war horns.
The defeat kindled a fire in the deep vaults. The fire grows, rippling out in every corner of the Dragonback Mountains until it becomes a roaring inferno. The longbeards have been roused from their torpor. No dissenting voices have been raised, no old grudges had been unearthed. The Dwarfs of Ekrund are united in slow, cold fury and the rock itself rang from their ironshod threads. The time has come that the dawi will make the mountains tremble.”
Ekrund’s Grudgekeeper Durgrum Deepstrike at the muster of the throng in late 2522 IC

3
Index Introduction ............................................................................................................ 5
Important Basics ....................................................................................................... 5
Addons:............................................................................................................... 5
Discord: .............................................................................................................. 5
Tripple Pots ......................................................................................................... 6
Tome of Knowledge Set ‘The Winds Impervious .......................................................... 7
The Dwarf 12men ..................................................................................................... 8
Setup .................................................................................................................. 8
Combat Tactics: ................................................................................................... 12
The core Slayer Damage Drop: ................................................................................. 12
Engineer Warband Builds .......................................................................................... 13
The Engineer Turret Handbook ............................................................................... 13
Grenadier Mk II `Drafi Pattern` ............................................................................... 17
Tinkerer Mk I `Gragmaoc Pattern` ............................................................................ 23
Slayer builds .......................................................................................................... 27
AoE Slayer Mk I `Gyllin Pattern` ............................................................................ 27
Ironbreaker builds ................................................................................................... 29
Shield Ironbreaker Mk II `Gwelthaz Pattern` ............................................................... 30
Build: ............................................................................................................. 31
Rotation: ........................................................................................................ 34
Grudge Level Management .................................................................................. 44
Gear: ............................................................................................................. 46
Talismans: ...................................................................................................... 48
Pots: ............................................................................................................. 48
Renown: ........................................................................................................ 48
2H Vengeance Ironbreakers – `Imperator and Conqueror Pattern` ...................................... 52
2H Ironbreaker Mk II ` Imperator Pattern` ............................................................... 52
2H Ironbreaker Mk II ` Conqueror Pattern` .............................................................. 57
Runepriest builds.................................................................................................... 59

4
Heal Runepriest Mk I `Minipuce Pattern` .................................................................. 60
Abilities ......................................................................................................... 60
Tactics ............................................................................................................ 63
Mastery ......................................................................................................... 64
Morale ............................................................................................................ 65
Rotation ........................................................................................................ 66
Cleansing ........................................................................................................ 71
Positioning ..................................................................................................... 72
Gear ............................................................................................................... 73
Talismans ....................................................................................................... 74
Renown ......................................................................................................... 74
Defenses .......................................................................................................... 75
Add-Ons .........................................................................................................78
Enemy ............................................................................................................78
Aura ............................................................................................................. 79
AoE DPS Runepriest Mk I `Kolland Pattern` .............................................................. 80
Generic Class Description Mk II `Drukhon Pattern` ....................................................... 81
Small Scale Dwarf Builds .......................................................................................... 82
Kegsniper Mk III `Thorbolt Pattern` ........................................................................ 82
Authors ................................................................................................................ 89

5
Introduction This Handbook is a collection of Dwarven builds which are all used for the Dwarf 12men Group as well as the Dwarf Warband. The focus is RvR, which means you will find here less Single Target specs, but more utilities to fight other warbands. Therefore, most of the builds have limited small scale potential. That’s why you will find tactics or abilities you usually don’t need if you run alone on your dwarf or in a Scenario 6men. Although for completition I have listed here the Kegsniper build in its separate section at the end.
If you are a healing Runepriest it is essential that you read the build and guide conducted by Minipuce, likewise if you are an Ironbreaker have a look at Wahr’s thorough IB builds.
Captain Lesti Ardisson, 3rd Bitterstone Thunderers, Ekrund in autumn 2522 IC.
Important Basics There are several important basics that you need to understand and have to fight to your full capability in RvR. These are:
Addons: To fight more efficiently there are two basic Addons EVERY Dwarf must use. The first one is a new working version of the Enemy Addon. It let you get the Targets of your Warband main assist as well as put a giant Purple Marker on my head, so you don’t lose me in the thick of battle. Link to a working version of the Enemy Addon: http://ohrhammer.online/wp-content/uploads/Bitterstone/Enemy_Bitterstone.rar
The second addon is Swift Assist. It does basically the same as the Enemy Addon, but sometimes the enemy Addon bugs out, wheras Swift Assist will still work all the time. Still for a giant purple Arrow on my Head use the Enemy Addon.
For a guide to combine Swift Assist and Enemy have a look here: https://www.returnofreckoning.com/forum/viewtopic.php?f=66&t=26643
Discord: You need to hear at least your Warband leader for calls and directions. The Bitterstone Discord can be found here: https://discord.gg/srRS6b2
6
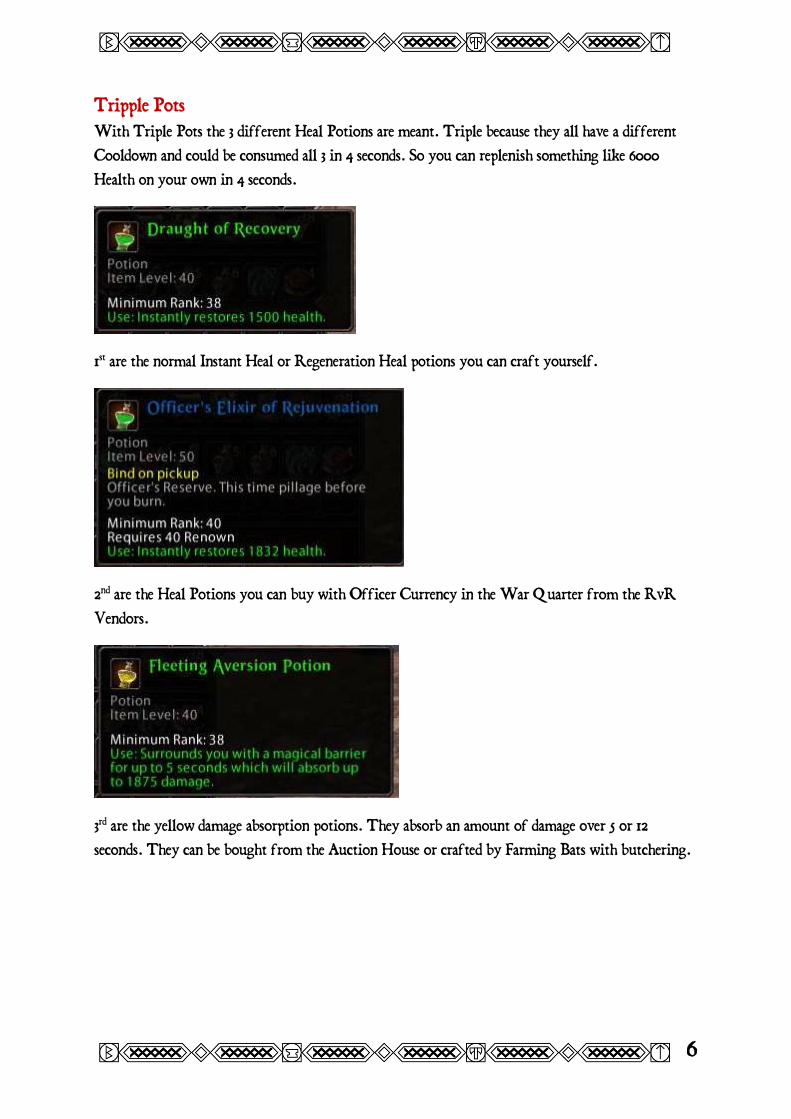
Tripple Pots With Triple Pots the 3 different Heal Potions are meant. Triple because they all have a different Cooldown and could be consumed all 3 in 4 seconds. So you can replenish something like 6000 Health on your own in 4 seconds.
1st are the normal Instant Heal or Regeneration Heal potions you can craft yourself.
2nd are the Heal Potions you can buy with Officer Currency in the War Quarter from the RvR Vendors.
3rd are the yellow damage absorption potions. They absorb an amount of damage over 5 or 12 seconds. They can be bought from the Auction House or crafted by Farming Bats with butchering.

7
Tome of Knowledge Set ‘The Winds Impervious “The winds Impervious” is a ToK Set that is important as an early defense build Jewel Set that can be achieved quite easily and has a lot of Initiative and Armor Bonus. The Values of this Set can be found here:
https://wiki.returnofreckoning.com/index.php/The_Winds_Impervious
If you click on each item name you will find the questname and location where to get them.

8
The Dwarf 12men The Dwarf 12 men is the prototype build for party 1 and 2 of a dwarf warband. It is the inner core of any dwarf warband. When it is functioning, you can slab on more parties or groups to support its key functions.
Setup The Dwarf 12men consists of the following classes:
Party 1 IB: Shield Ironbreaker Mk II `Gwelthaz Pattern`
IB: Shield Ironbreaker Mk II `Gwelthaz Pattern`
AoE Slayer Mk I `Gyllin Pattern`
AoE Slayer Mk I `Gyllin Pattern`
Heal Runepriest Mk I `Minipuce Pattern`
Heal Runepriest Mk I `Minipuce Pattern`
Party 2 Shield Ironbreaker Mk II `Gwelthaz Pattern`
2H Vengeance Ironbreakers – `Imperator and Conqueror Pattern`The Engineer Turret Handbook
Before we venture into each Engineer build each Engineer should check what the current turrets do in RoR. First what the Change says what the Turrets do in the current setup of RoR, followed by my fieldtesting. - When summoning a turret of a different type than the last, all stacks of Improvised Upgrades are lost. - Each turret now has a distinct set of bonuses granted by Improvised Upgrade stacks: Gun Turret (Sniper) - Improves your range, PENDING: [and that of your turret,] by 5% per stack to a maximum of 20%. Meaning you have max Range after 4 stacks. -Lesti: The Gunturret is the most squishy one as he gets the least hitpoints when summoning.

9
Bombardment Turret (Mobility / DoT) - When you are within 26-50 feet of your turret, you will neither lose nor gain Improvised Upgrades stacks. - Improves your turret's range by 5% per stack to a maximum of 40%. - Provided you have at least one Improvised Upgrade stack, allows you to use Path of the Grenadier skills while moving. - EXPERIMENTAL: The Bombardment turret will now grant Improvised Upgrades stacks out to 40 feet, and hold them out to 80 feet. - Shortens the duration and tick interval of Path of the Grenadier and Tinkerer DoTs by approximately 5% per stack for a maximum reduction of 35%. - Lesti: the Bombardturret gets medium health when compared to the other turrets. Bitterstone Tests: Decreased Dot Time WORKS on this Abilities:
Frag Grenade (Full Buff from 15sec to 9sec, from tic 3 secs, to tic 1,8secs, still 5 tics total, same damage) Acid Bomb (Full Buff from 21sec to 13sec, from tic 3 secs, to tic 1,85secs, still 7 tics total, same damage) Sticky Bomb (Full Buff from 15sec to 9sec, same damage, not tested the activated ability.) Friction Burn (Full Buff from 9sec to 5sec, from tic 3 secs, to tic 1,66secs, still 3 tics total, same damage) Decreased Dot Time DON‘T works on this Abilities Incendiary shot (Works as intended I guess. Change log says Grenade and Tinkerer Dots decrease.) Signal Flare (Works as intended I guess. Change log says Grenade and Tinkerer Dots decrease.) Keg (Is a Tinkerer dot but isn't affected) Lighting Rod (Rod makes 4 hits, one every 3 secs. Before and after Grenade Turret Buff.) Napalm (Napalm makes a hit every 2 secs. Before and after Grenade Turret Buff.) Phosphourous Shell
Flame Turret (Defensive Close Combat AoE) - Improves your chance to Dodge and Disrupt by 4% per stack to a maximum of 32%. - Improves your turret's chance to Dodge and Disrupt by 10% per stack to a maximum of 80%. - Providing you have at least one Improvised Upgrade stack, allows you to use Path of the Grenadier skills while moving. - Increases the radius of any of your AoE skills by 6.25% per stack to a maximum of 50%. - Increases your AoE cap by 2 per stack.

10
- Reduces your cast range by 5% per stack to a minimum of 60% of its normal value. - Lesti: the Flame Turrets gets the most hitpoints when compared to the other turrets. Bitterstone Tests: I made some tests on the increased AoE Range of the Flame turret. Increased AoE Radius works on the following abilities for sure: Static discharge Fricition burn Blunderbuss Blast Barbed Wire Frag Grenade (stacs with Extra Powder tactic.) Acid Bomb (stacs with Extra Powder tactic.) Self Destruct (Only if used with Flame Turret and Flame Turret Buff) Phosphorous Shell Increased AoE Radius DOES NOT increase the following AoE Abilities: Lightning Rod (Bugtracker Ticked closed: Devs say works as intended) Keg (Bugtracker Ticked closed: Devs say works as intended) Napalm (Bugtracker Ticked closed: Devs say works as intended) Landmine (Bugtracker Ticked closed: Devs say works as intended) MAGNET (Enemies which are on 65 feet are affected. No increase or decrease on pull range. Snare Range need test.) No current tests on: Flashbang Sticky Bomb Strafing Run Shock grenade
Tests on AoE Cap increase. Get Increased AoE Cap: Static discharge (Hits 11 npcs. So AoE Cap was increased.) Fricition burn Blunderbuss Blast Frag Grenade Phosphourous Shell Get NOT increased AoE Cap:

11
Ligthing Rod (Still hits only 9 npcs max. Works as designed) Keg (Works as designed) Napalm (works as designed) Conclusion: Gun turret gives you range and an armor debuff. Bombard turret gives you the ability to cast ST grenades while running and greatly increases the Damage output of Friction Burn. The same Damage but in 2sec tics instead of 3 sec tics. Flame turret increase your 30 feet AoE Abilities to 45 feet Range like Friction burn, or Static discharge. Also you can hit with an Acid grenade on your target anyone in 30 feet range. At the same time your AoE Target Cap goes up from 9 targets to 25 targets. That is a big whooping ass increase. And with the Range increase you will also hit on 45 feet any destro. That is why we encourage the use of the Flame turret on the Dwarf Gunline Warbands. We fight 24 or more destros at the same time. We need more Damage on everyone of them.
12
Grenadier Mk II `Drafi Pattern`
AoE DPS Runepriest Mk I `Kolland Pattern`
Heal Runepriest Mk I `Minipuce Pattern`
Heal Runepriest Mk I `Minipuce Pattern`
Combat Tactics:
The idea is to be far more mobile than a heavy engineer group. The Grenadier, AoE Runepriest and the two Slayers can stay mobile and dish out damage at the same time. Instead of the classic M2 Raze bomb the Focus is to build up the Slayers with their IB buffs and then drop the Slayers AoE Damage in a very short timeslot. The AoE RP supports with the AoE Healdebuff and as of 01.11.2018 a unique Armor Debuff, the Grenadier with Onslaught Gear will provide an additional Armor Debuff.
The core Slayer Damage Drop:
You need to be CC'ed first to be immune and not interrupted while using Retribution to expose full burst potential. Basically, you need to spam ID and flurry + shatter limb and never use Retribution unless you are immune to CC. When you are immune, drop your rage, wait for Furious state to get the 20 sec rampage's buff up, use the AP buff, then rotate with usual skills ie Flurry/ ID and when you are berzerk use Retribution while still in rampage and try to hit the back or rear of the enemy to proc Flanking tactic. If you have M2, use it just before dropping Retribution.

13
Engineer Warband Builds
The Engineer Turret Handbook Before we venture into each Engineer build each Engineer should check what the current turrets do in RoR. First what the Change says what the Turrets do in the current setup of RoR, followed by my fieldtesting. - When summoning a turret of a different type than the last, all stacks of Improvised Upgrades are lost. - Each turret now has a distinct set of bonuses granted by Improvised Upgrade stacks: Gun Turret (Sniper) - Improves your range, PENDING: [and that of your turret,] by 5% per stack to a maximum of 20%. Meaning you have max Range after 4 stacks. -Lesti: The Gunturret is the most squishy one as he gets the least hitpoints when summoning. Bombardment Turret (Mobility / DoT) - When you are within 26-50 feet of your turret, you will neither lose nor gain Improvised Upgrades stacks. - Improves your turret's range by 5% per stack to a maximum of 40%. - Provided you have at least one Improvised Upgrade stack, allows you to use Path of the Grenadier skills while moving. - EXPERIMENTAL: The Bombardment turret will now grant Improvised Upgrades stacks out to 40 feet, and hold them out to 80 feet. - Shortens the duration and tick interval of Path of the Grenadier and Tinkerer DoTs by approximately 5% per stack for a maximum reduction of 35%. - Lesti: the Bombardturret gets medium health when compared to the other turrets.

14
Bitterstone Tests: Decreased Dot Time WORKS on this Abilities:
Frag Grenade (Full Buff from 15sec to 9sec, from tic 3 secs, to tic 1,8secs, still 5 tics total, same damage) Acid Bomb (Full Buff from 21sec to 13sec, from tic 3 secs, to tic 1,85secs, still 7 tics total, same damage) Sticky Bomb (Full Buff from 15sec to 9sec, same damage, not tested the activated ability.) Friction Burn (Full Buff from 9sec to 5sec, from tic 3 secs, to tic 1,66secs, still 3 tics total, same damage) Decreased Dot Time DON‘T works on this Abilities Incendiary shot (Works as intended I guess. Change log says Grenade and Tinkerer Dots decrease.) Signal Flare (Works as intended I guess. Change log says Grenade and Tinkerer Dots decrease.) Keg (Is a Tinkerer dot but isn't affected) Lighting Rod (Rod makes 4 hits, one every 3 secs. Before and after Grenade Turret Buff.) Napalm (Napalm makes a hit every 2 secs. Before and after Grenade Turret Buff.) Phosphourous Shell
Flame Turret (Defensive Close Combat AoE) - Improves your chance to Dodge and Disrupt by 4% per stack to a maximum of 32%. - Improves your turret's chance to Dodge and Disrupt by 10% per stack to a maximum of 80%. - Providing you have at least one Improvised Upgrade stack, allows you to use Path of the Grenadier skills while moving. - Increases the radius of any of your AoE skills by 6.25% per stack to a maximum of 50%. - Increases your AoE cap by 2 per stack. - Reduces your cast range by 5% per stack to a minimum of 60% of its normal value. - Lesti: the Flame Turrets gets the most hitpoints when compared to the other turrets. Bitterstone Tests: I made some tests on the increased AoE Range of the Flame turret. Increased AoE Radius works on the following abilities for sure: Static discharge Fricition burn Blunderbuss Blast Barbed Wire Frag Grenade (stacs with Extra Powder tactic.) Acid Bomb (stacs with Extra Powder tactic.) Self Destruct (Only if used with Flame Turret and Flame Turret Buff)

15
Phosphorous Shell Increased AoE Radius DOES NOT increase the following AoE Abilities: Lightning Rod (Bugtracker Ticked closed: Devs say works as intended) Keg (Bugtracker Ticked closed: Devs say works as intended) Napalm (Bugtracker Ticked closed: Devs say works as intended) Landmine (Bugtracker Ticked closed: Devs say works as intended) MAGNET (Enemies which are on 65 feet are affected. No increase or decrease on pull range. Snare Range need test.) No current tests on: Flashbang Sticky Bomb Strafing Run Shock grenade
Tests on AoE Cap increase. Get Increased AoE Cap: Static discharge (Hits 11 npcs. So AoE Cap was increased.) Fricition burn Blunderbuss Blast Frag Grenade Phosphourous Shell Get NOT increased AoE Cap: Ligthing Rod (Still hits only 9 npcs max. Works as designed) Keg (Works as designed) Napalm (works as designed) Conclusion: Gun turret gives you range and an armor debuff. Bombard turret gives you the ability to cast ST grenades while running and greatly increases the Damage output of Friction Burn. The same Damage but in 2sec tics instead of 3 sec tics. Flame turret increase your 30 feet AoE Abilities to 45 feet Range like Friction burn, or Static discharge. Also you can hit with an Acid grenade on your target anyone in 30 feet range.

16
At the same time your AoE Target Cap goes up from 9 targets to 25 targets. That is a big whooping ass increase. And with the Range increase you will also hit on 45 feet any destro. That is why we encourage the use of the Flame turret on the Dwarf Gunline Warbands. We fight 24 or more destros at the same time. We need more Damage on everyone of them.

17
Grenadier Mk II `Drafi Pattern` Updated 02.11.2018
Description:
The Engineer’s Grenadier tree in comparison the ST-focused Rifleman and the Utility-focused Tinkerer mainly consists of Corporal based AoE damage.
Due to the abilities bound to this tree having less range you will not be able to stay in the backline all the time and thus need a bit more of defenses, while still being able to put pressure on your enemies.
Usually the Grenadier is a rather underestimated Mastery and often referred to as dealing fluff damage or using kill stealing, while not being viable in small-scale. Nevertheless, in large-scale its advantages especially in a Dwarf-only warband are very important.
The Grenadier can be tweaked in both an offensive and defensive way, and we are focusing on a balance that on the one hand makes it viable for warband play with not being too squishy, with on the other hand still being offensive enough to deal serious AoE damage.
Also, the following builds will favor mobile gameplay to be able to follow the dynamics of RvR.
Remember: When running in RvR you will most likely use the Flame Turret which will further reduce your range, while you gain significant boni to both your avoidance of ranged attacks and an increased AoE target cap from the usual 9 up to 21 targets with full eight turret stacks.
Build:
The Essential Grenadier Mastery (40/40)
This build describes the must-haves for your Grenadier warband setup.
The Bombadier General Mastery (40/70)
The 40/70 build will be the goal for high level Grenadiers.
Note: The 9pt Mastery has been changed to Phosphorous Shells, while Strafing Run has been made a core ability.
As mentioned later, Strafing Run should not be used in any rotation in warband play, apart from the direct order of your leader.
Both builds include Bugman’s Best as an additional safety component for you and your group.
Tactics:

18
Ancestral Inheritance: While operating more near the frontline the Grenadier will more likely be a target of the enemy’s melee train and thus needs armor for defenses.
Masterful Aim: While we are not using Fightin’ Chance, which will reduce your survivability and thus being counter-productive, this tactic is essential for still reaching enough Ballistic Skill.
Pierce Defenses: To improve the frontline’s penetration by reducing block and parry we slot this tactic, that will trigger when any of our AoE attacks is defended against in the first place.
Extra Powder: While Acid Bomb, Fragmentation Grenade and Phosphorous Shells will be the main damage abilities, increasing their AoE radius will further push the pressure. Along with the increased target cap from your Flame Turret this will be one the most important parts, since it also helps you to hit the backlines of your enemy’s warband.

19
Rotation:
To get the best out of your Corporal-based attacks you foremost need to reduce the enemy’s resistances with Acid Bomb.
Since Fragmentation Grenade has been changed to dealing Corporal damage rather than physical, its dots will be the second ones to apply.
At this point applied two AoE dots over 21 and 15 seconds, which along with Flame Turret hin up to 21 people in a 30 feet radius.
Depending on your position and the enemy’s movement you can now either follow up with Napalm Grenade on a closer specific spot or use Phosphorous Shells for hitting the backline with its higher range.

20
Since we already increased our AoE radius and target cap, the usage of your Morale 3 ability Explosive Shots becomes even more viable.
When a coordinated morale drop is called out by your leader, every target hit by your already burning Napalm Grenade will also trigger Explosive Shots every 2 seconds and increase the number of enemies hit exponentially, plus you can push it further with using Blunderbuss Blast, since its direct damage also triggers your M3.
When under influence of this ability, avoid using your other Grenades since they are AoE and won’t trigger the M3’s effect and focus on direct damage. Even a well-aimed Focused Fire or Hipshot will help in this situation.
In theory you can hit up to 21 enemies every second for 10 seconds with 300 damage each, which can be much more potent than any M4 with 2.400 damage.
Gear:
Since our goal is to reach a reliable amount of Ballistic Skill before improving our defenses, the best-in-slot armor set will be a full set of Conqueror.
Before being able to wear the full set you can use a mixture of the higher Wounds from Beastlord and Toughness and Armor boni from Annihilator for better defenses. You can combine full Annihilator with Beastlord or full Beastlord with Annihilator, at least using 3 Annihilator pieces for the Armor bonus.

21
Another alternative for lower levels is the Ruin set, which can also be mixed for some more Ballistic Skill, but less defenses and should only be used as an intermediate solution.
One of the main focuses in warband environment will be reaching your Morale 3 ability Explosive Shots as soon as possible. Therefore, all accessories should consist of morale gear, which can be achieved via random world drops, from auction house or our guild vault, where several green and higher ones are stored.
Completely equipped with morale gear you will be able to achieve a bonus of +15 (+2 for each jewelry, +3 for the belt and +4 for the backpiece). The Ruin chest has another +3, and there are also several weapons with +3 morale bonus, the green ones are easier to get or buy, while purple ones are often expensive and don’t necessarily have good main stats.
For the weapons the best bet is to use SC weapons until you get epic quest weapons or Subjugator ones.
Sum up you have 143 Ballistic Skill from Annihilator and around 180 from all accessories. Combined with the Masterful Aim tactic you should be around 700 at level 40, plus the Ballistic Skill from your weapons. You aim should be landing at 800 for enough damage from your AoE, while Weapon Skill isn’t of any use for attacking, due to your attacks being mostly Corporal instead of physical and attacks like Blunderbuss Blast are mainly used for triggering your M3, as mentioned earlier.
Talismans:
Primarily your Wounds should be high enough in WB environments, since this will be the only thing helping to survive morale bombs, whose damage you cannot mitigate in any way yourself.
Secondary goal can be either Toughness or Armor, while Armor is too expensive in most cases.
Pots:
Armor pots are mandatory to compensate your Light Armor especially since Armor Talismans are rather expensive.
The second pot depends on your actual main stats and can either push your Ballistic Skill or your Toughness more. Consider using Liniments, too, since a combination of Toughness and Critical Hit Reduction is viable, too.
Renown:
Your secondary goal is being not too squishy when fighting against one or more warbands, not falling to AoE damage too easily. Therefore, a mixture of Critical Hit Reduction and avoidance in

22
form of Deft Defender and Reflexes is the best bet, filled up with Wounds for the single points left.
The endgame goal should be this:
http://waronlinebuilder.org/#renown;00003000000030404000000000

23
Tinkerer Mk I `Gragmaoc Pattern` Stand: 03.11.2018
Description:
The Engineer’s Tinkerer tree in comparison the ST-focused Rifleman and the AoE-focused Grenadier mainly consists of Utility skills.
Due to the abilities bound to this tree having a more supportive character you will be able to stay in the backline, while still being able to put pressure on your enemies and support your group.
The Tinkerer can be the perfect addition to every Warband so we are focusing on a balance between dishing out Damage and being a useful support for the group.
Remember: When running in RvR you will most likely use the Flame Turret which will further reduce your range, while you gain significant boni to both your avoidance of ranged attacks and an increased AoE target cap from the usual 9 up to 21 targets with full eight turret stacks.
Build:
The Basic Tinkerer (40/40) https://officialrorbuilder.herokuapp.com/career/engineer/s?l=40&r=40&tl=4&mp=0&pA=0&pB=9&pC=13&m1=3653&m2=3645&m3=3655&m4=false&ma=3679,3677,3665&mm=&mt=3639&t=3659,3648,3650,3674
It's the basic cookiecutter Build for every Tinkerer.
As already mentioned, Strafing Run should not be used in any rotation in warband play, apart from the direct order of your leader.
Tactics:
Ancestral Inheritance: Since we are pulling enemies near we should focus a bit on our defenses. Ancestral Inheritance is the perfect tactic for this purpose.
Masterful Aim: While we are not using Fightin’ Chance, which will reduce our survivability and thus being counter-productive, this tactic is essential for still reaching enough Ballistic Skill.

24
Pierce Defenses: The best utility tactic you can get. You can boost the damage of your warband essentially by debuffing the enemy.
Well-Oiled Machine: Movement is an integral part of warband play and helps to avoid straying too far from your groups and losing your turret boni.
or
Extra Ammo: This one is the bread and butter in keep defence situations like a funnel. Your Healer will love you.
The last two tactics are optional. You change them according to the situation. While moving you use Well-Oiled Machine and when you are in a defense or attacking a Keep you use Extra-Ammo.
Rotation to pull:
1. Flame Turret:
Cast it right where you stand you will need it.
2. Magnet:
Now make sure to invite some Enemies to the party. The more the merrier.
3. Self-Destruct
Make sure they will stay right where they are.
4. Blunderbuss:
Get some damage through and switch it with

25
5. Bugman's Best for some healing. Rotation for Damage:
1. Acid Bomb 2. Phoshor Shell 3. Friction Burn 4. Static Discharge
Gear:
Since our goal is to reach a reliable amount of Ballistic Skill before improving our defenses, the best-in-slot armor set will be a full set of Conqueror.
Before being able to wear the full set you can use a mixture of the higher Wounds from Beastlord and Toughness and Armor boni from Annihilator for better defenses. You can combine full Annihilator with Beastlord or full Beastlord with Annihilator, at least using 3 Annihilator pieces for the Armor bonus.
Another alternative for lower levels is the Ruin set, which can also be mixed for some more Ballistic Skill, but less defenses and should only be used as an intermediate solution.
One of the main focuses in warband environment will be reaching your Morale 3 ability Explosive Shots as soon as possible. Therefore, all accessories should consist of morale gear, which can be achieved via random world drops, from auction house or our guild vault, where several green and higher ones are stored.
Completely equipped with morale gear you will be able to achieve a bonus of +15 (+2 for each jewelry, +3 for the belt and +4 for the backpiece). The Ruin chest has another +3, and there are also several weapons with +3 morale bonus, the green ones are easier to get or buy, while purple ones are often expensive and don’t necessarily have good main stats.
For the weapons the best bet is to use SC weapons until you get epic quest weapons or Subjugator ones.
Talismans:
Primarily your Wounds should be high enough in WB environments, since this will be the only thing helping to survive morale bombs, whose damage you cannot mitigate in any way yourself.
Secondary goal can be either Toughness or Armor, while Armor is too expensive in most cases.
Pots:

26
Armor pots are mandatory to compensate your Light Armor especially since Armor Talismans are rather expensive.
Toughness Pots are the second one since we need to push our defences.
Renown:
First, we go full Deft Defender. We need to keep standing so we need to boost our dodge and disrupt.
Next, we specc into Futile Strikes to keep our chance to get critted at a minimum.
With the rest you can either increase crit or some more wounds. Just take a look of what you need more.
27
Slayer builds
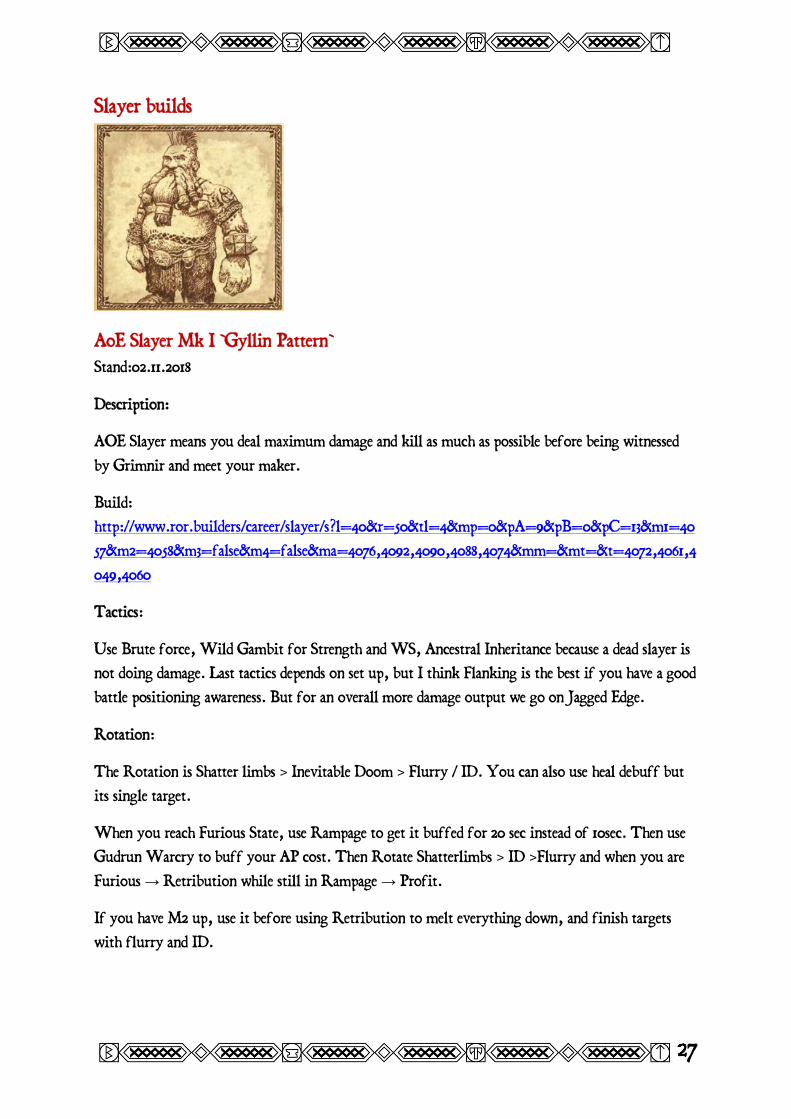
AoE Slayer Mk I `Gyllin Pattern` Stand:02.11.2018
Description:
AOE Slayer means you deal maximum damage and kill as much as possible before being witnessed by Grimnir and meet your maker.
Build: http://www.ror.builders/career/slayer/s?l=40&r=50&tl=4&mp=0&pA=9&pB=0&pC=13&m1=4057&m2=4058&m3=false&m4=false&ma=4076,4092,4090,4088,4074&mm=&mt=&t=4072,4061,4049,4060
Tactics:
Use Brute force, Wild Gambit for Strength and WS, Ancestral Inheritance because a dead slayer is not doing damage. Last tactics depends on set up, but I think Flanking is the best if you have a good battle positioning awareness. But for an overall more damage output we go on Jagged Edge.
Rotation:
The Rotation is Shatter limbs > Inevitable Doom > Flurry / ID. You can also use heal debuff but its single target.
When you reach Furious State, use Rampage to get it buffed for 20 sec instead of 10sec. Then use Gudrun Warcry to buff your AP cost. Then Rotate Shatterlimbs > ID >Flurry and when you are Furious → Retribution while still in Rampage → Profit.
If you have M2 up, use it before using Retribution to melt everything down, and finish targets with flurry and ID.

28
The idea is to be berzerk all the time, if you are getting focused, always exhaust your rage with No Escape or Wild swing before Detaunting, and then stick to your guard, drink pots > Even the Odds and never show your back.
Gear:
Gear with mix set: Conq / dominator and Beastlord for WS.
Try to get Both wound bonus with domi and Conq. If you want more crit and Dmd take conq boots and conq belt. If you want more tankiness, Domi boot and domi belt.
Talismans:
With tactics and set bonuses you don’t really need more strength, put full WS to max parry and penetrate armor, because you will hit tanks a lot.
Pots:
Strength and Armor.
Renown:
You Cannot do damage if you are dead. Your task is to be on berzerk most of the time without dying so, Max Futile Strike and try to get under 5% chance to be crit. Then Dodge and disrupt and rest in parry.

29
Ironbreaker builds
Ironbreaker is one of these careers that can be very diverse. It’s very hard to make a guide for Ironbreaker “build”, because basically it’s all about playstyle and not the build. The more I play the more I realize that this career can make it all – turtle tank, super utility, dps (even as SnB!). Perfect career for min/max. There are many possible ways to play Ironbreaker. I’ll describe what I find most useful for Dwarfs Warband! Cheers.

30
Shield Ironbreaker Mk II `Gwelthaz Pattern` Stand:
SnB IB is there to control the battlefield and soak up damage for your lads. Usually referred to as “Buffbot” you can do much more than just buffing. What you can achieve is really depends on ping and how much people out there in oRvR (lagz), because playing IB is totally a state-of-art. It is indeed the hardest class to master and its way ahead in terms of complicity even comparing to his Destro “brother” - Blackguard (mainly because it’s way easier to manage Hate than Grudge).
Reading further you will understand why.
Description:
Ironbreaker is king of small scale. Shield Ironbreaker is a very tough tank, bringing lots of things which are sadly single-target, so to make it shine in Warband play which usually is a freaking AoE slideshow you need good ping/PC and very dedicated player’s skill to make a good use of ST buffs/debuffs.
But nothing is so deadly and tough as a Shield Ironbreaker “Oath Friend”. Playing Shield Ironbreaker in Warband you have to take it as it is - your amazing play won’t be noticed most of times. But your bad usage of common tank’s stuff will be noticed for sure. It’s not a KotBS (press your auras buttons and HtL) or SM (spam WW), but nothing can boost Slayer or defend BW as good as skilled Shield Ironbreaker.
Shield Ironbreaker has many “selfish” buffs and requires of you to press a lot of buttons to benefit the group. But it pays off, because if you know you did your maximum and your party knows they had their crit, parry, absorb, HtL etc which led to it’s amazing performance nothing can beat a feeling of very difficult job done.
Shield Ironbreaker can be played many ways and you are there to find your own, but some general advices/requirements for Dwarfs Warband are below.

31
Build: RR 70+
“Gwelthaz - The Last one Standing”
https://officialrorbuilder.herokuapp.com/career/ironbreaker/s?l=40&r=70&tl=4&mp=0&pA=5&pB=11&pC=9&m1=3748&m2=3758&m3=3759&m4=3760&ma=3781,3765,3772&mm=&mt=3775&t=3775,3752,3743
I’d recommend to not try this at home use this build before RR 70+, because you will lack parry buff (and lads in Warband really need it). Very balanced build lacking a little bit of utility that can be covered by runnies, slayers, engis.
Pros: very self-sufficient, ideal to soak up damage, additional 10% block for a tactic slot and -5% dmg adds to your survivability a lot.
Cons: no avalanche for mobility, no CD increase, no OHD, tho all of that can be covered by rest careers. Most important - no runic shield (which soak up crits and can be very handy).
RR 60+
Priority № 1 (condition - BiS gear, top talis) – “All-in-One build” http://www.ror.builders/career/ironbreaker/s?l=40&r=60&tl=4&mp=0&pA=7&pB=5&pC=9&m1=3748&m2=3758&m3=3759&m4=3760&ma=3765,3772,3781,3779&mm=&mt=3778,3766,3780&t=
This is full utility build, you will miss more (than 5) tactic presets running it. That’s almost what I use (I have Furious Reprisal instead of Powered Etchings). Last one take (RR 70) is either Furious Reprisal or Powered Etchings. For Dwarfs Warband I suggest Furious Reprisal as last take.
Serious note (!!!):
Be sure that you saw this thread and did everything to be able to track Shattered Limbs on Destro target from Slayers if you use Furious Reprisal because those don’t stack: https://www.returnofreckoning.com/forum/viewtopic.php?f=66&t=17466
Pros: uber utility, you can change and fit any situation “on a move”, hell you can even change tactic preset just right before a clash happens and adapt to terrain or enemy composition!
Cons: survivability on your own, reliable on healers
Priority № 2 (condition - lack of some final BiS pieces, good talis, bad ping) – “Selfish trispec”
http://www.ror.builders/career/ironbreaker/s?l=40&r=60&tl=4&mp=0&pA=5&pB=5&pC=13&m1=3748&m2=3758&m3=3759&m4=3760&ma=3765,3772,3781,3779,3783&mm=&mt=&t=
Choose this one if your ping is kinda meh, you experience freezes and/or cannot react and smash buttons like a teenager. This build will leave you a plenty of space to make mistakes.

32
Pros: very easy and user-friendly, GnM in Warband environment makes you almost immortal beside coordinated morale drop which you overlooked and/or decided to stood in (like in an eye of tornado).
Cons: Boring. It’s a real “Buffbot”, your rotation is simple, not that much buttons to press, features to bring.
RR 40-50+
https://officialrorbuilder.herokuapp.com/career/ironbreaker/s?l=40&r=50&tl=4&mp=0&pA=7&pB=5&pC=9&m1=false&m2=false&m3=false&m4=false&ma=3765,3772,3781,3779&mm=&mt=3766,3778&t=
https://officialrorbuilder.herokuapp.com/career/ironbreaker/s?l=40&r=40&tl=4&mp=0&pA=0&pB=11&pC=9&m1=false&m2=false&m3=false&m4=false&ma=3772,3781,3779&mm=&mt=3775,3778,3780&t=
And many others. Most crucial thing is that for oRvR you have to bring parry and crit buffs (both is strongly encouraged). Runic shield is not mandatory but i find it very helpful.
Actually, Shield Ironbreaker starts to “work” and “perform” past RR 50. Path from 40 to 50 is most ungrateful, like raising combat rank from 30 to 40 while you don’t have all your tools and not bolstered anymore.
Tactics:
RR 70+
“Gwelthaz - Last one Standing”
Preset 1: Rugged, Seasoned Veteran, Shield Mastery, Seen it All Before
This should be default one, even at 0% chance to get critical hit you will be getting crits, so beside this build is already very defensive more defensive is always better and movement is key in oRvR anyways.
Preset 2: Rugged, Seasoned Veteran, Shield Mastery, Ancestral Inheritance
Use this if destro is heavy on melee, like they love to (im about those 6-7 choppas Warbands).
Preset 3: Rugged, Seasoned Veteran, Shield Mastery, Sweet Revenge
Plus +15% for yourself. Offensive one. Use this one if you feel Dwarfs are lacking damage. It won't help radically, but your Earthshatter gonna hurt more.
Nothing to choose from on this build. You can also use Stoutness of Stone for faster KD recovery or Dwarven Riposte for constant Grudge supply. Running Dwarven Riposte you will become a
33
true Buff Master. You can circle thru all your party mates and rebuff them parry+crit on cooldown. Tho i find it better to have more defense.
RR 60+
“All-in-One build”
On this one you will definitely want more presets. You have all decent tactics available for IB. I’ll describe presets according to role you can fulfil without them being numbered.
Full utility: Rugged, Avalanche, Punishing Knock, Furious Reprisal
Bring all you’ve got! This one is very good on small clashes (like 24 vs. 24), the more the blob the worse it becomes in terms of your survivability. Makes you a beast in pug scenario, but without Seasoned Veteran it’s kinda harsh in big fights.
Defensive utility: Rugged, Avalanche, Punishing Knock, Seasoned Veteran
Suggest to run by “default”. Good mobility, dmg reduction proc and OHD. Very balanced one.
Reprisal: Rugged, Avalanche, Furious Reprisal, Seasoned Veteran
Should be run if low on slayers or versus heavy sorc setups. See rotation section for notes about furious reprisal usage.
Turtle: Rugged, Seen it All Before, Ancestral Inheritance, Seasoned Veteran
Should be run versus heavy melee setups.
Siege: Rugged, Ancestral Inheritance, Seasoned Veteran, Avalanche
Switch for this one in funnel situations. Pretty obvious, healing component of Avalanche helps a lot than fluff aoe is all around and you can use HtL for healing yourself.
OHD: Rugged, Seasoned Veteran, Punishing Knock, Seen it All Before
Nice semi-defensive-mobile-utility setup, good for small fights. Can be used in blob vs. blob too.
Powered Etching: Rugged, Seasoned Veteran, Powered Etching, Avalanche
Use this one if you are assigned for AoE KB. Use this only with offensive gear set. There are variations of this - you can change Avalanche with Seen it All Before, tho Avalanche is better and will garant you speed buff which you can trigger with HtL.
Offensive utility: Rugged, Seasoned Veteran, Sweet Revenge, Punishing Knock
Low chances to run this one, Earthshatter is mostly for slow, but if tanks don’t seem to melt like butter (beside morale drop obviously) and leader is feeling that Warband lacks damage - use this.
There are many possible combinations for Powered Etching - Rugged and Powered Etching are mandatory.

34
Also, many combinations for Offensive utility - Rugged, Seasoned Veteran and Sweet Revenge are mandatory.
“Selfish trispec”
This build lacks utility very much. So, it’s down to Rugged and Seasoned Veteran being mandatory and rest is up to you.
Preset 1: Ancestral Inheritance, Rugged, Seasoned Veteran, Seen it All Before
Defensive, imo should be run by default. Leaves you a space for Spirit Resistance pot instead of Armor. Using Armor pot is ok too, you can never be enough on armor.
Preset 2: Rugged, Seasoned Veteran, Seen it All Before, Sweet Revenge
Offensive one. In this build Earthshatter will hurt a lot more due to more points into Brotherhood.
RR 40-50+
At low RR you will have to stick to mandatory Rugged, Seasoned Veteran, Seen it All Before and 4th can be Ancestral Inheritance, Shield Mastery (if taken, instead of AI) or Avalanche (if taken, instead of AI).
Rotation: Hardest part of it all. Your so called “rotation” is always highly dependant on situation. There is no possible way to make it in a simple way like - “press 1, press 3, 1 again” everything is very conditional. Due to this reasoning i’ll describe common behaviour and special cases (what to do, when to do, how to do). I feel the need to also write down common tank basics.
First things first. I’ll begin with two most important tank skills for Warband environment, their mechanic and how you should use them. Those two skills are - “Challenge” and “Hold The Line!”, they benefit your lads in most important way. Properly using just those two you are doing good job for whole Warband. I don’t mention your most useful buff - “Guard” and i won’t describe guard swapping, conditions for it and rest, because it’s plain simple (no rocket science) and should be known by whoever will be reading this.
Just few more words about “Guard” - in Warband environment you are assigned to guard one target. Guard swapping/floating can do more harm in Warband environment in case something will go out of your control or you will miss something happening (you are not robot, you will fail, sometimes horribly). Discipline is of highest priority, so if you are assigned to guard one particular Slayer do it. No matter if healer in your party dropping - it can be his/her bad position or bad awareness and prediction to be caught with his/her safe buttons on CD (and there are more healers to res him which should be their highest priority). But! All this about “Guard” is not an axiom or ultimate truth, there can be situations where you need to swap guard for another tank or healer or another DPS. It all comes with learning and your skill of evaluating the situation. Neither guide will cover things that are obvious reading tooltip and i on purpose ignore “Mask your buff/debuff” game because in oRvR it doesn’t matter that much as in small scale.
35
One more thing before main stuff begins - you are obliged to:
- keybind your “Guard” button
- keybind your “Oath Friend” button
- do not use NerfedButton playing IB
Guard button should be very comfortable to press and Oath Friend is even more - it should be a button you can easily smash any moment (your Oath Friend swapping is most crucial thing for party and you in case you need Grudge). NerfedButton is shit for IB because actually there is no rotation, everything requires your awareness and should be used under conditions that are hard to predicted and “programme”.

36
Challenge
Mechanics: Challenge works in square zone of 65 (length) x 35 (width) ft in an angle you position your character. Here is a picture:
Red square is a zone where all targets will get debuff. PoV (point of view) is a direction (angle) you are looking at. If you change PoV to another angle, red square will also change it’s angle (it’s position) accordingly like descripted in skill tooltip - “in front of you”. This skill doesn’t stack.
Afaik skill has no AoE cap, so you debuff infinite number of enemies if they are stacked inside that red square. I feel it and in a midst of battle i’m pretty sure i saw more than 9 enemies debuffed. Haven’t tested it on purpose.
What, when and how to do: Challenge is biggest reliable source of neglecting enemy non-morale damage. -30% of outgoing damage. Trade-off (if you are “hitted” by person affected 3 times it disappears, “hit” means you get damage, so if you block/parry/dodge/disrupt - it doesn’t counts, and debuff is handled personally, so if target A hit you 3 times it won’t make debuff disappear on target B) is mostly random, can appear very quick or it’s possible to have applied debuff wears off so some “lucky” destro can be doing 30% less damage for 15 seconds. Challenge can be used: on cooldown or on call. Good time to use it is: 1) 1st one right on clash (ensure you are not challenging just tank wall); 2) 2nd one is 2-3 seconds; 3) 3rd one in 5 seconds; 4) 4th in 10 seconds; 5) 5th in 15 seconds; 6) 6th in 20 seconds; 7) 7th in 25 seconds; 8) 8th in 30 seconds. Rinse and repeat. Why so many challenges right at the start? You need to buy your healers time to put HoT’s on everyone, proc their stuff on as many people as possible and recover their AP to prepare for real damage spikes having morales raising. It’s possible to land 4th Challenge earlier if needed but rest should have interval of time to ensure all DPS are locked down constantly. This skill is allowed to use on CD even if your leader is making a calls for it in the beginning, but battles are harsh (and most don’t react well), so if you done the first one “on call” don't be shy to use it further on CD even if not being asked to. Challenge should be rotated and up as much as possible. It cannot be dispelled so nothing enemy can do besides hitting tanks (which is a hard task even if not under HtL).
Serious note: usage of this skill is highest priority of all your stuff, you need to track it constantly, evaluate situation and use it than you feel it’s needed. You better not have it outside of cooldown.

37
So, talking about what to do. There are few main steps that are advised to be done:
- Find most concentration of Sorcs, Magi, Choppas, Maras (if not possible than any dps who are in range of “red square”);
- Position yourself to get as many as possible (do not spend on it more than 2 seconds). Try to keep enemy dps in the middle of red square so none shall escape of being debuffed;
- Press button;
- If you went on flank or moved a bit forward to put challenge at this stage go back a bit, hide yourself in your frontline to not waste debuff immediately being focused or exposed to all aoe damage.
Notes:
Do not aim it on tanks and healers. It’s pretty much pointless.
It also can be done in a simple way, stand in front of tank line if enemy is stacked enough and you feel that backline (sorcs, magi) will be affected. Tho i have a habit to flank a little bit to ensure all targets covered if i’m not HtL’ing like mad.
Hold the Line!
Mechanics: HtL works in a cone of 50ft length x 10-25ft width behind you character. It affects not only your group but any order toon. Animation of this skill is “almost” correct. Here is a picture:
HtL stacks on one person if done by 3 tanks resulting to 45% dodge/disrupt. And it stacks with flame turret buff so engi under 3 HtL, turret buff and deft defender is invincible for ranged non-morale attacks.
Afaik HtL affects up to 9 allies.
What, when and how to do: Beginners often underestimate this skill. If done right, in right time and place it significantly increase Warband survivability against sorcs non-morale bombing (which is actually very huge part of their damage and puts up strong pressure). Fighting Warband vs.

38
Warband HtL and challenge are main tank contribution to warband beside specific situations and career buffs.
RoR has something wrong with positioning (it was not like that in live) server side, so player A almost always sees player B incorrect and vice versa. And this you have to account using HtL, on your screen players are behind you, but it doesn’t 100% mean they are actually behind. To account it you should move few steps forward before/while using HtL. It is strongly prohibited to stay still unless funnel happening (even a small steps forward is better than just standing). While HtL’ing you also need to pay attention of its width, so click on players on the left/right of you to ensure they are covered (if situation is kinda static and you are able to, else forget it).
HtL should be used in between of ALL your actions. In a fight you should be using it if:
- you are not using Challenge;
- you are not using Earthshatter;
- you are not using punt or KD;
- you are not interrupting with Taunt;
- you are not debuffing;
- you are not buffing.
So basically, on your every move being on foot in a fight - you use HtL.
Note:
Exists only one exception - destro Warband is very heavy on melee (choppas and maras). Even 4 sorcs is enough for you to use HtL nonstop.
Also 15% of dodge/disrupt is good by itself, but if you see someone started to use it - join in. 45% is much better than 15%.
Another important note - if you assigned to guard Slayer (here and further it’s just an example, tho engi doesn’t require such care), try to keep up with him, if Slayer rush in you should be few steps in front of him, covering Slayer with HtL versus sorcs/magi (they blow Slayers up veeeery fast). It’s recommended to have AP pots (bought with medallions) so you can use “Flee” as charge, stand in front of your guarded Slayer and HtL him while Slayer blows up sorcs/magi (they blow Sorcs/Magi up veeeery fast). Slayers usually aware when to start backline push (and with 2 abilities to boost speed they are quite fast at this) and when to start their deadly AoE rotations against squishies, so you need to trust your Slayer and go in as well (buff him runic shield, corp resist (on a move) and crit (once Slayer is in its melee range), if Challenge is up use it no matter what. You have to evaluate outcomes and beware that if you can’t catch up with your Slayer (say he used Charge and you were ~15ft behind him, so even if you use “Flee” you won’t catch him, because remember Charge is 50% speed increase, Flee is just 30%) look around and decide if lads behind you need HtL or not, because being in front of your Slayer with not enough AP to HtL for decent time while he/she makes a push on softies doesn’t help. If lads need HtL you use flee, ap pot and HtL. If

39
not - use flee, try to be as close to Slayer as possible and use AP pot right before HtL. Also, if required you can turn your back to enemy and HtL in case gap between you and those you need to HtL is huge and they need it now.
Oath Friend
One of your main Grudge’s resource and mechanism to spread your buffs. Take into account few important things:
- it doesn’t trigger GCD, so you can swap it freely;
- Grudge gain decreases depending on your own Grudge level;
- there is no party only restriction, you can buff and put it on whoever you want;
- your buffs range is 50ft and Grudge gain range is also 50ft, it’s not that much, keep it in mind.
According to this you should be swapping it a lot. I’ll describe few situations in general. For example, you are assigned to guard and buff one particular Slayer, but your party trail behind by like 30-40ft of Warband leader so you can put your Oath Friend to gain Grudges before clash actually happens on a) warband leader, who is probably first one to engage; b) tank who is closer to enemy; to gain enough grudge for either Runic Shield, Parry or Crit buff (depends on composition you are up against, if rdps heavy than better to use runic shield so your guardie could position better and find a gap to attack, plus getting rage or turret stacks for burst, if melee heavy same with Parry, if your Warband has better position, numbers or in any other way exceeds opposing Warband than buff crit for more damage right from the start) for your assigned target. So what you do - swap OF for whoever gonna be attacked first, get 30 grudge and swap it back to buff your target.
Keep in mind that depending on composition you will have to keep your main buffs (runic shield, parry, crit) up on 2-3 targets. So, train this skill of Oath Friend swapping, you have to be fast doing it.
According to grudge gain decrease mechanic there is a little sense in swapping OF to gain grudge of target getting attacked if you are above 60 (better to not do it after 50 grudge) in Warband vs. Warband environment.
Grudge Unleashed
You need to keep track of your AP pool. I use latest VinyUI, also possible to use Pure for this. Grudge gain in big fights is insane, you are at 100 in no time, keeping balance between Grudge and AP is crucial. Your main benefit for Warband is Challenge, HtL (AP) and parry, shield, crit (Grudge), but Grudge buffs are not dependent on Grudge level, so basically it doesn’t matter if you are 40-60 or 100 for buffing. But if you can’t Challenge (30 AP) and HtL (20 AP/sec) in the moment it’s needed most it can result in huge damage spike strike, if your healers won’t make it (e.g. caught in morale CD, safe buttons CD and under CD increase, heal debuffed) your Warband can wipe. Thus, you need to have this skill keybinded and be always ready to use it if low on AP or drained (which is a big issue fighting destro). Exists only one exception - enemy is close to a wipe

40
and your Warband needs all the pressure, so you keep high grudge and use all your AoE (in following order - Earthshatter, Rune-Etched Axe and Shield Sweep). In this case if your AP pot is not on CD - use it and help your Warband with every damaging skill you can bring (at 100 Grudge rune-etched axe damage is ok, shield sweep will do too even it doesn’t scale with Grudge).
Taunt
Main use of it in Warband vs. Warband is interrupts. Learn animation of destro classes (for this purpose it’s highly recommended to level some at least in T1, strongly advised to level sorc to r40 or learn its rotation thru videos). Most important stuff to interrupt is:
- DoK’s Blood Offering;
- Sorcs casts;
- Resurrections of any destro healer.
Taunt interrupt can’t be defended against and has no cast time, so pay attention to what is going on and use it often. Raze can be interrupted too, but if it’s not coordinated 6-8 tanks raze drop it’s not your highest priority.
Medium importance stuff:
- Tanks raze;
- Tanks HtL;
- Long cast of shaman or zealot (those are rarely noticed, because they are either a) at a very long range (90-100 ft) of your Taunt (65 ft); b) casting under Focused Mind M2 (cuts cast time by a half); c) under reducing cast time procs).
- Choppa’s pull (personally i wouldn’t bother, you need an unhuman reaction to notice it in a big blob and interrupt).
DoK/WP are so good for Warband play because they have very short casts/group instants and you won’t have time to react, so don’t bother.
Punting (Away with Ye)
It’s strongly recommended to use Binding Grudge (slow) before using punt. If your target has (depending on a career) a skill to break slow on CD, it will be a hard time for them to come back. Ironbreaker punt is quite a distance to compare with rest tank’s punts.
Runic Shield, Oathbound, Ancestor’s Fury
Those 3 are your greatest buffs, they overshadow all others and have highest priority if you are buffing. Melee train on your lads (not those covered from feet with Gromril, no)? Buff (swapping Oath Friend) your squishes +25% parry. Heavy magic damage bombing incoming? Buff your assigned target Runic Shield (10 sec CD). Rush in on a flank of spread destro WB? Slayer/Engi/DPS Runnie gonna enjoy +10% crit.

41
Why Runic Shield is even here among those that have no CD and can be spammed? Because it as any absorb shield soaks up crits. Runic Shield is triggered by any non-physical damage. It is a best way you have to prevent spike damage of sorc along with Cleanse/Shield/HoT rotation from RP. Also Runic Shield should be buffed ASAP because it increases your Grudge gain level.
Stubborn as Stone
Low Grudge cost, aim to keep it up on most exposed teammates and yourself as much as possible. Remember half of sorc damage is Corporeal. Sadly haste buff doesn’t affect your Oath Friend.
Important note - this one should be used as filler, so if you have nothing to do (not in melee range) and okaish amount of grudge use it.
Watch An’ Learn
Very strong small scale buff which sadly has very limited use in Warband vs. Warband environment, because you are tanking, not DPS’ing and it doesn’t give Weapon Skill for your Slayer (and they should be already high on WS). So it’s only important uses are a) helping your healer to survive, before applying armor and toughness buff (in case you already did parry, runic shield and crit buff) use WaL; b) on a push (while you are in melee range) for Slayer because they always lack AP, again use it after you did all of your main buffs and now buffing strength (cause if not high into Vengeance with 2h Inspiring Attack is higher in terms of Strength buff than Ancestor’s Fury) and toughness. It’s just 10 seconds so if you forget to use this - no worries. This buff is mainly for small scale fights. Also “hit” here means the same as Challenge, so if you are blocked/parried it gives your Oath Friend nothing.
Punishing Blow
One of your most damaging skill (2nd is Earthshatter). Not dependant on grudge, so can be cast right away. What is very important about this skill is that “movement” means pretty much anything your enemy can do (using a skill, buffing while standing still - it all intentionally counts as “movement”). What does not count as “movement” is auto-attack.
Earthshatter
Should be mostly used as AoE snare in Warband vs. Warband environment. But this one is very damaging too. So if you happen to be at 100 Grudges, don’t be shy, buff yourself str/crit (it scales bad with str, so if you are short on time just do a crit buff) and use this one. Try to always accompany this one with str/crit buff if using it for damaging purpose.
Grip of Stone
Usage of this skill should be done very careful. Nothing is worse than free immunities. It may be used if you decide that situation is terrible. Like:
- you got punted in a long distance with slow applied, you landed right in destro melee blob rushing into your backline. You can use this one to slow them down/waste their CD to get out of root. It should be done in a follow order: a) Grip of Stone; b) look how many escaped; c) if many use

42
Juggernaut+Flee+AP pot (if you have Avalanche slotted than HtL to get yourself a +30% speed buff); d) catch them up (those who escaped); e) Earthshatter.
- your Warband is spread out in a big line, and a destro WB is on the corner (a strong one, big numbers or names) you can use to buy some time to regroup. It may cause more harm this way, better to just use earthshatter+flee.
- fight is very scattered and you happen to appear with some of your lads in their backline, but leader is calling to group up on some point, so you can use it to further disrupt their movement. Only if their frontline is far away
So usage of this skill should be partly restricted, because it can mess up usage of e.g. Strafing Run on raze drop.
Furious Reprisal
One of the skills Ironbreaker community’s opinions wary. Important thing is - it applies CD increase thru immunity. CD increase puts even instantcast stuff on 1 second CD, so it’s very good. Few moments to apply:
- Choppa, Mara, Sorc pass by with granted immunity for KD. Be his/her guest and grant them CD increased accompanied with Kneecapper. They love it.
- you push backline and have healer in your melee range. They love it too. Kneecapper as a gift too (it reduces all critical chances, even healing ones).
Kneecapper
Amazing debuff. Always give it to sorcs, healers, maras, choppas, magi, WE whoever of those are in your melee range. Having 50+ Grudge is a start point to use this one, do not use this one below 50 Grudge. At 100 Grudge it’s possible to interrupt your rotation for valuable sorc or mara target to apply debuff.
Stone Breaker
Main source of armor debuff should be runnies and engis. But if you are very high at Grudge and some valuable target (DoK, Shaman, Mara, Sorc, melee SH) is in your melee range you can interrupt your main tanking stuff.
Punishing Knock
Very important tactic of your. It reduces OUTGOING (which is pretty rare, huh) healing. Also DoK’s love this one with all their dark heart, because they can’t cleanse it (it’s a “Curse”). It’s activated with your Inspiring Attack, so whenever you are in melee range with any healer throw him a debuff (interrupting your tank job is allowed and highly welcomed for this).
Morales
Rank 1: Rock Clutch is advised as default pick up, because you can’t break free from morale root. Champion’s Challenge is worse because you are stuck too and lads need your Challenge, HtL and

43
Guard. Armor debuff is very good but Dwarfs Warband should apply armor debuff with engis and runnies, ST doesn’t help much because it’s all about AoE in oRvR. Rock Clutch breaks position and if you are lucky to catch up a proper moment you can basically shutdown 1 person from a fight.
Rank 2: Raze. Shield Wall is for PvE and Skin of Iron for 2h small scale.
Rank 3: Distracting Bellow. Gromril on live was partywide (wish we would have it here at RoR). Gromril is very good, but too selfish.
Rank 4: Immaculate Defense.

44
Grudge Level Management As an addition here is a small example of actual skills usage depending on Grudge level:
Grudge 0-25
Offensive:
Only one “rotation” is possible here, it’s - Put up pressure on single target
Punishing Blow <-> Binding Grudge (<-> is because it’s not mandatory to put up slow first, it actually really depends on situation if fight just started you can use Punishing Blow and pray you will get past 25 Grudges in 1 GCD) -> Shield of Reprisal (if available) -> Guarded Attack/Inspiring Attack (depends on target and your guard, if hitting something with high str/ws use inspiring attack first, also use it first if guarding Slayer because it has a fixed amount of str buff) -> (only at 25 Grudges, no point to waste GCD on this before, much better to swap Oath Friend and buff somebody armor or corp resists or whatever) Heavy Blow.
At 25 Grudge if you need to put fast pressure (which is not what you are fancy at anyways) go with
Punishing Blow -> Shield of Reprisal (if available) -> Heavy Blow -> Binding Grudge -> Heavy Blow -> filler -> Heavy Blow -> Binding Grudge (because you will actually exceed this range and in terms of damage it will be highest possible)
Being on this level of Grudges you should not aim to assist your DPS with damage. But if you feel that your DPS needs some help use the rotations above.
Defensive:
What you want to do is get Grudge as fast as possible. Help yourself with Oath Friend and your spammables cost just 15, so as soon as you have 15 Grudge buff your Oath Friend either crit or parry depending on situation. If you are receiving beating from melee train passing by buff parry for yourself no matter what your Oath Friend needs.
Filler: Stubborn as Stone
Situational: Furious Reprisal, Away with Ye, Powered Etching, Punishing Knock.
Note:
This Grudge span is very quick, you will be passing it in Warband vs. Warband in a very first seconds of fight.
Grudge 25-99
Offensive:
In case you have str/crit buff go with
(25+ Grudge) Stone Breaker -> Punishing Blow <-> Binding Grudge -> Shield of Reprisal (if available) -> Heavy Blow -> Binding Grudge (if your Grudge level increases fast, rebuff Stone

45
Breaker and Binding Grudge on break points from skills tooltip) -> Heavy Blow -> (at 75+ Grudge) Earthshatter
In case you don’t - concentrate on buffing
Starting from 75+ Grudge Earthshatter goes first (good to accompany it with Taunt on some squishy which will be in it’s range).
Defensive:
Here goes a thing. Starting from 30 Grudge you can buff Runic Shield, which has sub effect - each “hit” (means even disrupted one) will give you 15 Grudges, so if you are standing in some magical fluff under somebody’s HtL you can get 100 Grudges instantly. That’s very important and as soon as you have 30 Grudge buff somebody (depending on situation, better to Oath Friend swap than to buff it only for yourself) Runic Shield. It almost always will pays off. All you need is HtL, magical dots or fluffy aoe around.
Filler: Heavy Blow, Stubborn as Stone
Outside of melee range: Stubborn as Stone, Runic Shield, Ancestor’s Fury (for your ranged DPS)
Situational: Grudge Unleashed, Furious Reprisal, Away with Ye, Punishing Knock, Powered Etching.
Note:
This Grudge span is long, you will be staying in it mostly. So priority goes this way - 1) tanking common stuff -> 2) situational/offensive (if required) -> 3) 3 main buffs -> 4) rest of buffs -> 5) fillers
Grudge 100
Offensive: Earthshatter -> Rune-Etched Axe -> Shield Sweep (it’s all about AoE, don’t forget)
Use Stone Breaker and Kneecapper on every valuable target in your range until some of above mentioned skills are off CD.
Defensive: Actually you should rarely be with this much Grudges, so don’t slack and buff up!
Filler: all your buffs
Note:
You should not be reaching this level but only on purpose to prepare for huge Earthshatter usage under str/crit buff. Priority list is the same as 25-99 Grudge range.

46
Gear: Some general stats advise first:
- avoidance > all.
- armor should be mitigating 75% damage (3300 armor unbuffed) but your avoidance should be very
high to keep it this way (25+ block, ~30 parry). If low RR -> lack avoidance -> use more armor.
- You shouldn’t be running around with less than 600 toughness (close to 700 (700+ is better) and
till 800 is a good amount).
- Initiative should be not less than 275 (buffed).
- wounds as high as possible, ideally keep it at least 800 unbuffed.
- Strength should be kept not lesser than 300.
Common set
Helm: Conq
Shoulder: Conq
Chest: Conq
Belt: Conq
Gloves: Conq
Boots: Conq
Variables
Cloak: Subj/Genesis/Ravack (can be bought at AH, lair boss cloak with 2% block)/Beastlord (high wounds which is always good for oRvR)
Jewelry 1: Genesis of Everlasting/Beastlord/Gunbad (with block). WI is also possible in this spot
Jewelry 2: Genesis of Everlasting (24 toughness/24 wounds). WI is also possible in this spot
Jewelry 3: Genesis of Everlasting (24 ini). WI is also possible in this spot
Jewelry 4: Genesis of Everlasting (3% block).
Also very common mix is Everlasting plus Undying. I like combination of 3 Everlasting (toughness/wounds, 24 ini, 3% block) and 2 Undying (cloak and toughness/wounds). 3 Everlasting i choose because this way you can spec only 2 points into Futile Strike, so it saves you 15 points of RR for better investments into avoidance.

47
Important note - do not underestimate full Everlasting. HP regen is a thing actually (it lowers the pressure on your healers, not as much as GnM, but significantly). Running full Undying is also a good thing, but on its fragment part there is 3% parry (block is better).
Weapon: Not many options here. SC 39/39 (has 2% reduce chance to get critical hit which is awesome for a starter), Subj (I recommend hammer because of corp dmg proc), SC 40/45.
Shield: (i will start from lowest priority to highest) T4 epic shield with bubble proc (mini-subj), SC 39/39, T4 empire influence shield (defense formula also depends on shield block rating, this one has huge block rating plus very high defensive stats +35 toughness/wounds), Subj is on par with SC 40/45 one (i prefer subj because of proc and ini stat). Do not bother running anything else.
Offensive set
Helm: Dominator
Shoulder: Dominator
Chest: Beastlord
Cloak: Beastlord
Belt: Conq
Gloves: Dominator
Boots: Conq
Jewelry 1: Beastlord
Jewelry 2: Genesis of Everlasting (24 toughness/24 wounds). WI is also possible
Jewelry 3: Genesis of Everlasting (24 ini). WI is also possible
Jewelry 4: Genesis of Everlasting (3% block). WI is also possible
Weapon: Subj 1h hammer or axe (hammer preferably because of corp dmg proc)
Shield: Subj (strongly preferable) or SC one (39/39 or 40/45 whatever you have).
This gear set should be worn if your role includes applying AoE KB. In deftard setup you will be blocked/parried very much. In this gear you will be 600+ strength buffed, which is okaish number for such a role.

48
Talismans: For “Common set” gear all but one Strength. One high Initiative talisman (at least +23) is required.
For “Offensive set” gear all but two Strength. Two high Initiative talisman (at least +23) are required (one is slotted into Beastlord cloak, 2nd where ever you want).
It’s very common for Ironbreakers to slot Toughness and/or Wounds. What my experience shows is that having above 700 toughness won’t be game changing. Having 10k hp is good, but surviving a morale drop alone won’t win you a fight.
It’s possible to further boost your survivability with Toughness/Wounds/even Armor talis but it should be done only if you are low RR. Being low RR means lack of avoidance from renown. Having defensive talis slotted also requires you to attack enemy from rear or back, which is possible but you need skillz and very good ping (plus good PC) for that (to be able to go on enemy back, KD or debuff and than back in front again for HtL your lads).
Pots: Depending on a build and tactic setup chosen by you as a most “default” you will be using:
Strength/Toughness plus Armor/Spirit Resistance pots. Possible to use Wounds/Initiative liniments and not slot Initiative talis, but imo its cheaper and easier to buy some talis and forget than resupply liniments constantly. That +60 wounds won’t be game changing and mentioned above gear setups will leave you at 800+ wounds anyways (with conq proc you will be over 9k hp).
I found no more Liniments worth of using beside small scale and/or solo roaming.
Renown: Renown spec depends on your gear setup. For offensive one you will need 1 more point into Futile Strike as you won’t have 5% from conq set bonus.
Note: Deft defender is of personal preferences, it’s not mandatory to run full points of it in WB, you can go with higher parry instead. Destro usually has quite a numbers of melee, so if you aren’t running Armor tactic you really better go for Reflexes (parry).
Common set

49
RR 60+
RR 65+

50
RR 75
Offensive set
RR 60+

51
RR 70+
RR 80

52
2H Vengeance Ironbreakers – `Imperator and Conqueror Pattern` Two-hander is a nice thing for small brawl (one can wonder), “common” rule that bringing a bigger gun to gunfight gives you a better chance of winning doesn’t work here sadly. There is no utility and things you bring to a Warband besides AoE KB with double snare (one from tactic, one from Earthshatter). But anyways, I can see two possible options for it. Offensive and defensive.
2H Ironbreaker Mk II ` Imperator Pattern` Stand:
Offensive one. This is a Hammerer actually. This build will ensure that Rune-Etched Axe will find skulls to crack. This build requires gear that is hard to obtain.
Description:
Talking seriously, it’s the only possible way (imo) of having a decent chance to AoE KB tanks, mdps and rest of parry/block stacking lads. You have to be playing as you are an alone pugging Slayer, you will have to prepare a lot (and I mean it) triple pots.
Playing Vengeance Ironbreaker in warband setting leaves you no choice but to play more DPS style, so wait a second or few before rushing in. Mark your guard, watch it, but you’d better stay under somebody’s HtL.
Your role is to shatter the enemy lines, keep them snared and interrupt. In that order.
Build:
https://officialrorbuilder.herokuapp.com/career/ironbreaker/s?l=40&r=60&tl=4&mp=0&pA=9&pB=0&pC=13&m1=3748&m2=3758&m3=3759&m4=3760&ma=3767,3765,3783,3781,3779&mm=&mt=3766&t=3766,3752,3742,3744
Requires RR60+. Last take at 70 – Avalanche or Punishing Knock (depends if you have SC 40/45 2h hammer or not). You have no block, offensive gear, no HtL, so GnM is strongly advised to stay at frontline and not melt like unguarded slayer.
Rest is obvious.
Tactics:
Preset 1: Rugged, Powered Etchings, Seen it All Before, Sweet Revenge
Lack of grudge tactic should be overcomed with smart Oathfriend placement.
Preset 2: Rugged, Powered Etchings, Stoutness of Stone, Sweet Revenge
Between preset 1 and 2 is a little difference, it depends on player to choose his “main”, I personally feel that those permasnares from shamans and tanks are more annoying. I like to be moving and

53
moving fast. But once your leader calls for an AoE Kb and you are in 3 seconds KD yourself you pretty much messed up.
Preset 3: Rugged, Powered Etchings, Unstoppable Juggernaut/Ancestral Inheritance/Avalanche, Sweet Revenge
This preset is actually free/defensive. If you don’t have blue armor pot use AI, else you slot Avalanche (pretty mandatory if you use 2h SC hammer) or UJ (its pretty good actually).
Preset 4: Rugged, Powered Etchings. Sweet Revenge, Dwarven Riposte
In case you don’t feel you are OK floating Oathfriend around. Why Dwarven Riposte and not Rising Anger? Rising Anger is a must have tactic for solo play/small scale. Dwarven Riposte is a way better Grudge feeder than one can imagine. You will be guarding somebody; guard damage gets parried - +30 Grudge. You will be at 100 Grudge almost constantly. Rising Anger requires you to hit target (and you will have just 2 AoE skills – earthshatter for snare, and axe for AoE kb and snare), taking into account no proper orvr fight lasts more than 30 seconds, just think how much you will be able to hit? With all that random mara, choppa and SH AoE damage you will be parrying a lot.
Preset 5: Rugged, Powered Etchings, Long Reach, Sweet Revenge
Use this one ONLY if you are fighting in a strange spot with lots of terrain, stairs or something else which might leave you no choice but to use AoE kb on call while not ideally positioned.
Rotation:
Cause of Grudge mechanic there is actually no rotation, nothing set in stone. Ironbreaker is all about awareness, quick decision making and talking about 2h it even triples. So it’s like in SnB section but here ill just write some important notes for using your skills:
1. There is one important thing that differs slightly playing SnB or 2h rotation wise – DO WHATEVER (BUFF) BEFORE YOU ARE AT LEAST 50 GRUDGES. Before that point don’t even bother trying to kill anything.
2. To apply AoE kb with this level of parry/block reduce/strikethrough and strength level you can actually use rune-etched axe right in their faces under Imperator proc.
3. Almost always use Earthshatter for snare, not for damage. Slow the frontline, slow whatever, but slow first, damage 2nd.
4. With so many points into Vengeance you better be using your armor debuff on CD.
5. You are by any chance out there killing some softies, to score a kill (practice it with mobs!) you have to be very quick and do the following:

54
- Search target that can be KD with Cave-In
- Use armor debuff (don’t even bother to check if onslaughter engi or runi applied some)
- Buff strength (Inspiring Attack)
- Buff crit
- Taunt
- Cave-In
- Earthshatter
- Heavy blow
6. It’s very important to keep your corp/haste buff up 100% time. Your AA hits like a truck on its own.
7. Your WS buff is also an AP feed. Use it on Slayer, they always need AP. He won’t have time to call for it, so you have to be watching him yourself. Once Slayer goes all in and charge into enemy, beside Challenge best thing you can do is feed him even more AP. So if you see him attacking backline, be fast pick yourself a softie and beat him with your buffs skills so Slayer will have endless AP (beware that its 50ft, but you should be in guards range anyways). It’s also possible to feed healers or HtL’ing tanks, but it’s like with all things about IB – its state-of-art.
8. One of the most amazing SnB skills is “Hold the Line!” in this setup you are able to punt tanks who are using it so you will help your engineers/runnies to land damage. Do it! Check Imperator proc, if it’s up you will have 17% block strikethru (10 just for wearing 2h weapon and 7 from proc), it’s enough to punt HtL’ing tanks away without losing time to position yourself properly and thus reduce dodge/disrupt.
Rest skills are same as SnB.
Gear:
Full damage set
Helm: Imperator
Shoulder: Imperator
Chest: Dominator
Cloak: Beastlord
Belt: Dominator

55
Gloves: Dominator
Boots: Dominator
Jewelry 1: Beastlord
Jewelry 2: Genesis of Warrior (24 str/24 wounds)
Jewelry 3: Genesis of Warrior (24 ini)
Jewelry 4: Genesis of Warrior (3% parry)
Weapon: Scenario two-hander (the one that is 40/45). If you don’t have it Subj will do (you won’t need Avalanche if you use subj).
Defensive set (super hard to obtain stuff)
Helm: Imperator
Shoulder: Imperator
Chest: Redeye
Cloak: Redeye
Belt: T4 Influence (with very high resists). Conq is also possible
Gloves: Redeye
Boots: Redeye
Jewelry 1: Genesis of Warrior or WI (with high spirit resist)
Jewelry 2: Genesis of Warrior (24 str/24 wounds)
Jewelry 3: Genesis of Warrior (24 ini) Jewelry 4: Genesis of Warrior (3% parry) Weapon: Earthsplit (no kidding)
Talismans:
x3 Initiative (at least +23 ones). If wearing defensive set x2 of this. x3 Toughness (at least +23 ones) x2 Strength (any will do)

56
Pots:
For oRvR you will need blue ones: Armor +825 (crucial to be at 4,1k spot). If wearing defensive set you can go with standard +660 one. Toughness +100 (crucial to be at 600 spot)
Renown:
Basically, you better be RR70+ for this. Here is a main thing you should be aiming for:
If under RR70
Drop Reflexes IV because melee is not your biggest concern anyways. Put points into Wounds, Initiative and Toughness (whatever you think you lack the most).
If higher than RR70
All to Wounds.

57
2H Ironbreaker Mk II ` Conqueror Pattern` Stand:
Defensive one.
Description:
Same as Imperator. The only difference is that your rune-etched axe gonna be blocked/parried by quite more. The trade-off for Warband is that none needs to babysit you. You will be pretty tanky.
Build:
https://officialrorbuilder.herokuapp.com/career/ironbreaker/s?l=40&r=70&tl=4&mp=0&pA=9&pB=5&pC=9&m1=false&m2=false&m3=false&m4=false&ma=3767,3765,3772,3781,3779&mm=&mt=3766&t=
If not RR70+ drop Runic Shield (you would probably need to run Dwarven Riposte tactic if so, cause shield feed lots of Grudges on fluff aoe).
https://officialrorbuilder.herokuapp.com/career/ironbreaker/s?l=40&r=70&tl=4&mp=0&pA=9&pB=5&pC=9&m1=false&m2=false&m3=false&m4=false&ma=3767,3765,3772,3781,3779&mm=&mt=3766&t=
Also, possible. With this build replace Earthsplit with Subj 2h hammer.
Tactics:
Same as Imperator Ironbreaker, but keep in mind that Avalanche is a nice defensive tactic and you can use it in main preset instead of snare/stun reduce.
Rotation:
Same as Imperator Ironbreaker. Beside few things:
1) You are very tanky and can go in as an “almost” proper tank. So, don’t be shy.
2) You HAVE to be using rune-etched axe from rear or even back, so you actually need to be always kinda “flanking” in regards of your own Warband
Gear:
Helm: Conq
Shoulder: Conq
Chest: Conq
Cloak: Beastlord

58
Belt: Conq
Gloves: Conq
Boots: Dominator (or whatever actually, you can even go with Conq boots if you enjoy the stats)
Jewelry 1: Beastlord
Jewelry 2: WI
Jewelry 3: WI
Jewelry 4: WI
Weapon: Earthsplit (no jokin, its uber with that defensive proc). If running 2nd build than replace it with Subj 2h hammer.
Talismans:
All Strength
Pots:
Toughness + Armor/Spirit Resistance.
Renown:
Same as Imperator Ironbreaker

59
Runepriest builds
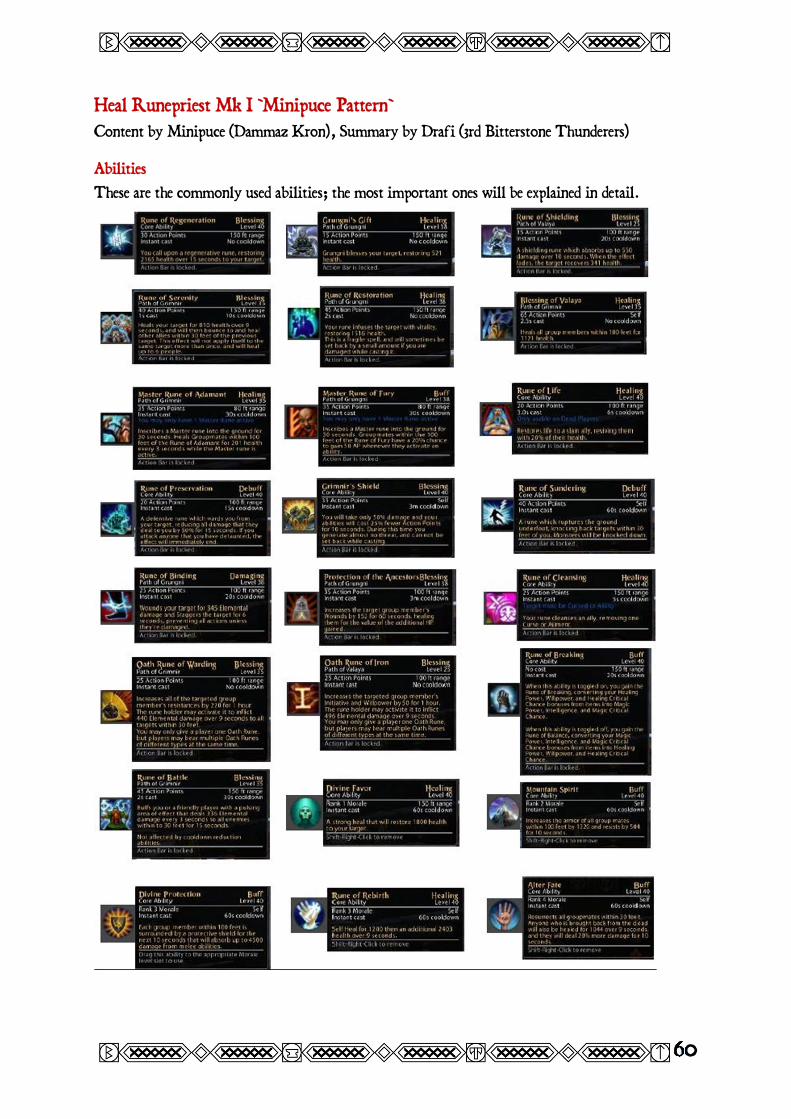
60
Heal Runepriest Mk I `Minipuce Pattern` Content by Minipuce (Dammaz Kron), Summary by Drafi (3rd Bitterstone Thunderers)
Abilities These are the commonly used abilities; the most important ones will be explained in detail.
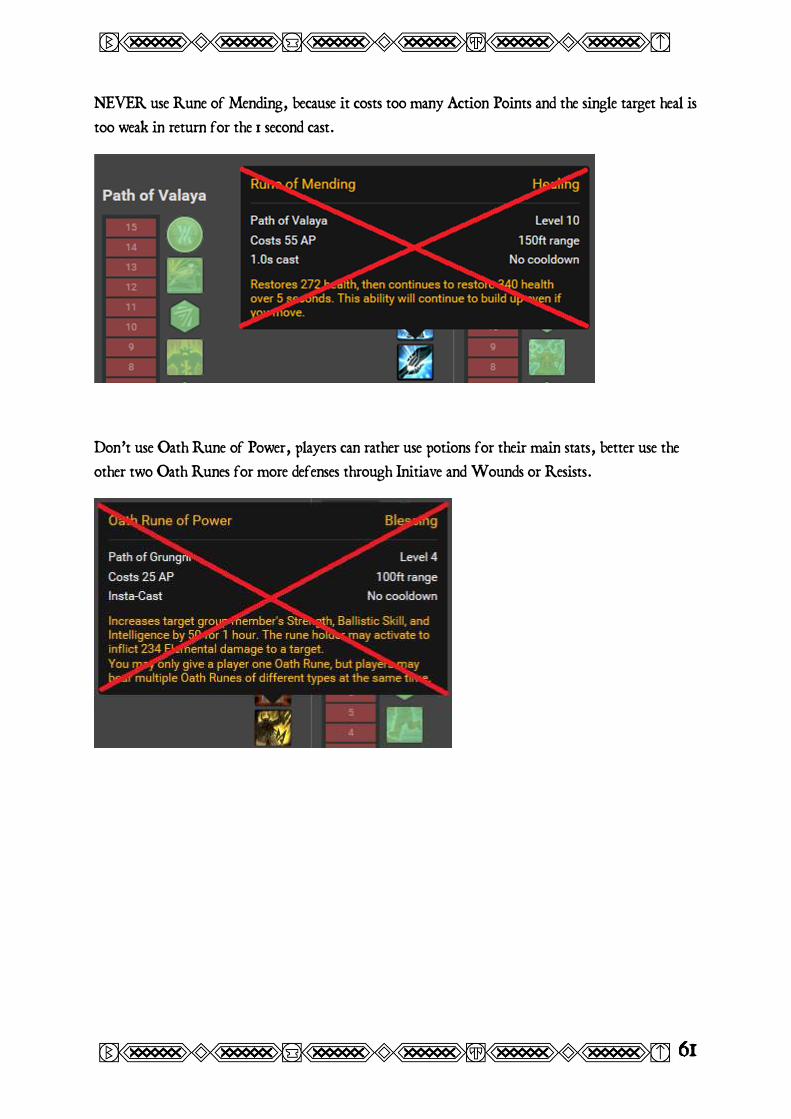
61
NEVER use Rune of Mending, because it costs too many Action Points and the single target heal is too weak in return for the 1 second cast.
Don’t use Oath Rune of Power, players can rather use potions for their main stats, better use the other two Oath Runes for more defenses through Initiave and Wounds or Resists.

62
When using your self-resurrect Oath Rune of Sactuary you should not apply it before charging into battle, because most likely it will be debuffed inbetween anyway. So if you are about to die, put in on yourself just before dying to avoid losing it.
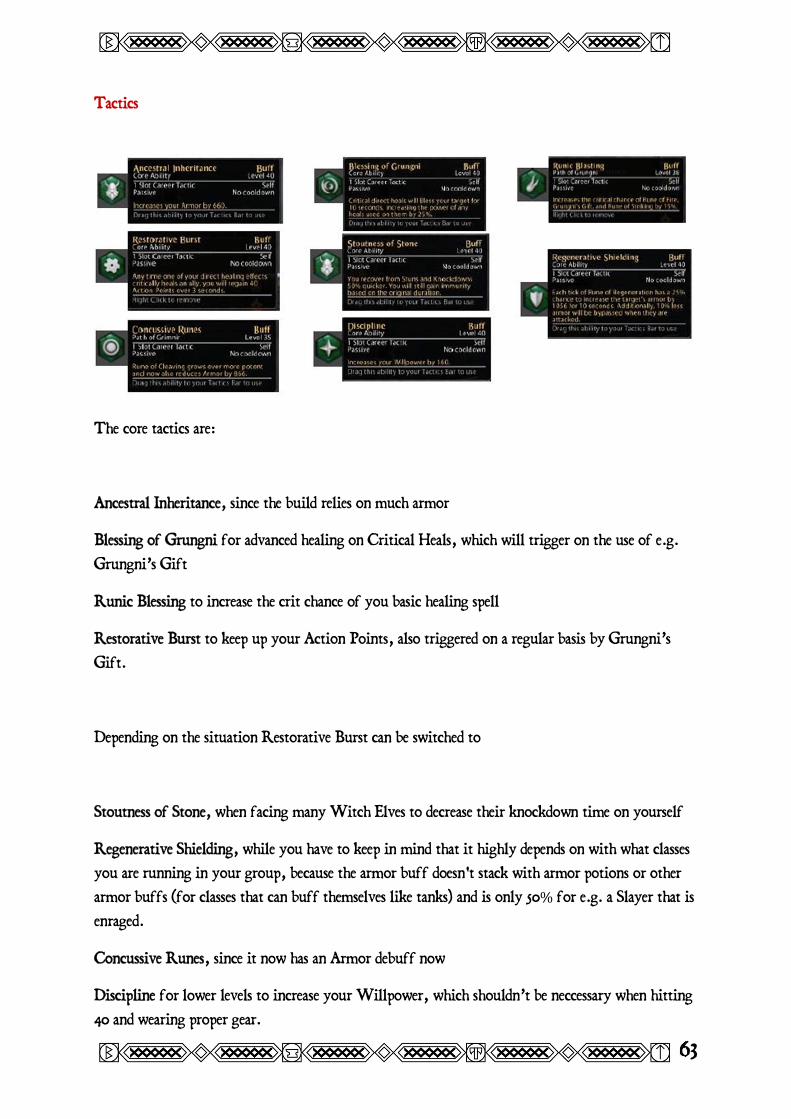
63
Tactics
The core tactics are:
Ancestral Inheritance, since the build relies on much armor
Blessing of Grungni for advanced healing on Critical Heals, which will trigger on the use of e.g. Grungni’s Gift
Runic Blessing to increase the crit chance of you basic healing spell
Restorative Burst to keep up your Action Points, also triggered on a regular basis by Grungni’s Gift.
Depending on the situation Restorative Burst can be switched to
Stoutness of Stone, when facing many Witch Elves to decrease their knockdown time on yourself
Regenerative Shielding, while you have to keep in mind that it highly depends on with what classes you are running in your group, because the armor buff doesn't stack with armor potions or other armor buffs (for classes that can buff themselves like tanks) and is only 50% for e.g. a Slayer that is enraged.
Concussive Runes, since it now has an Armor debuff now
Discipline for lower levels to increase your Willpower, which shouldn’t be neccessary when hitting 40 and wearing proper gear.

64
Mastery
Put as much as possible into Path of Grungni, because your most important base heal Grungni’s Gift will profit from it plus you want to use Rune of Bonding for escape or catching a fleeing enemy.
Put points in Path of Grimnir to get the Rune of Adamant as a static AoE heal and the Concussive Runes for applying the new Armor debuff.
Rune of Battle is optional.

65
Morale
Divine Favor for a quick panic heals on an important player.
Mountain Spirit is mandatory and the BEST Morale ability in your repertoire, always preferred before using M3 and best to use it as often as possible.
If you reach M3 you can use Rune of Rebirth in small-scale or solo.

66
Rotation
Put the first AoE heal on the ground to apply heals-over-time in scenario or warband groups. For roaming and mobile situations, you may skip this part.
Put another heal-over-time on an important player or yourself (optional).

67
Apply one more group heal-over-time (optional).
Focus-heal players with Grungni’s gift until either your Master Rune of Adamant vanishes and has to be re-applied, or use another Rune of Serenity when it is out of cooldown.
Grungni’s gift is your bread-and-butter spell which is instant and thus can be spammed every 1.2 seconds (Global Cool Down - GCD) to trigger your Blessing of Grungni and Restorative Burst.

68
This chart is an example of the usage and overall heals done by the several spells with the respective rotation that has been mentioned before. (Example of the player Kiiminka)

69
Usually in large scale you will also use group heals like Rune of Serenity and Blessing of Valaya.

70
In Scenarios it’s more situational and a mix of several abilities with less focus on only one.

71
Cleansing To keep focused players alive which are e.g. hit by a Sorcerer’s rotation (see Add-Ons) you first cleanse with Rune of Cleansing, followed by a shield bubble and one or more heals/HoTs while Rune of Cleansing is on cooldown of 5 seconds, applying another Cleanse afterwards until all debuffs are gone.

72
Positioning Put a point in your head for both you and your enemy and try to fill the space in between with as much friendly players as possible. Move accordingly to keep this situation.
Try either to hide in terrain or lose as much Line of Sight (LoS) as possible to your enemy, keeping as many friendly players between you and them.
Respectively move in the opposite direction of your enemy. You can this way stay in range for your heals while getting less hit. Stay mobile to react to the enemies ‘movement.

73
Gear 5 pieces of Conqueror, 4 pieces of Beastlord and 3 pieces of Genesis.
This way you trade the Healing Critical Chance boni for more survivability, but still keep your Willpower up with the 4-piece Beastlord Bonus, while also keeping the avoidance-proc from Conqueror.
Most Runepriests rather run full Conqueror and full Genesis, this way they have more heal crit but lack survivability, both is possible though.

74
Talismans Armor > Wounds > Willpower/Initiative
You want to have at least 3.000 Armor, better 3.300 as explained later.
Wounds is the only way to counter Morale attacks in RvR and you should have around 7.000.
Initiative further reduces your Chance to be Critically Hit, which should be <0%.
Alternatively, you can take Willpower to keep your Willpower around 800, anything above 800 has not much more heal in return.
Renown
Only a living healer is a good healer, so after putting points into Healing Critical Chance, you try to reduce your Chance to be Critically Hit as much as possible through Futile Strikes and some more Initiative. So, avoid being focused too much by Ranged DPS classes, Deft Defender increases your avoidance.
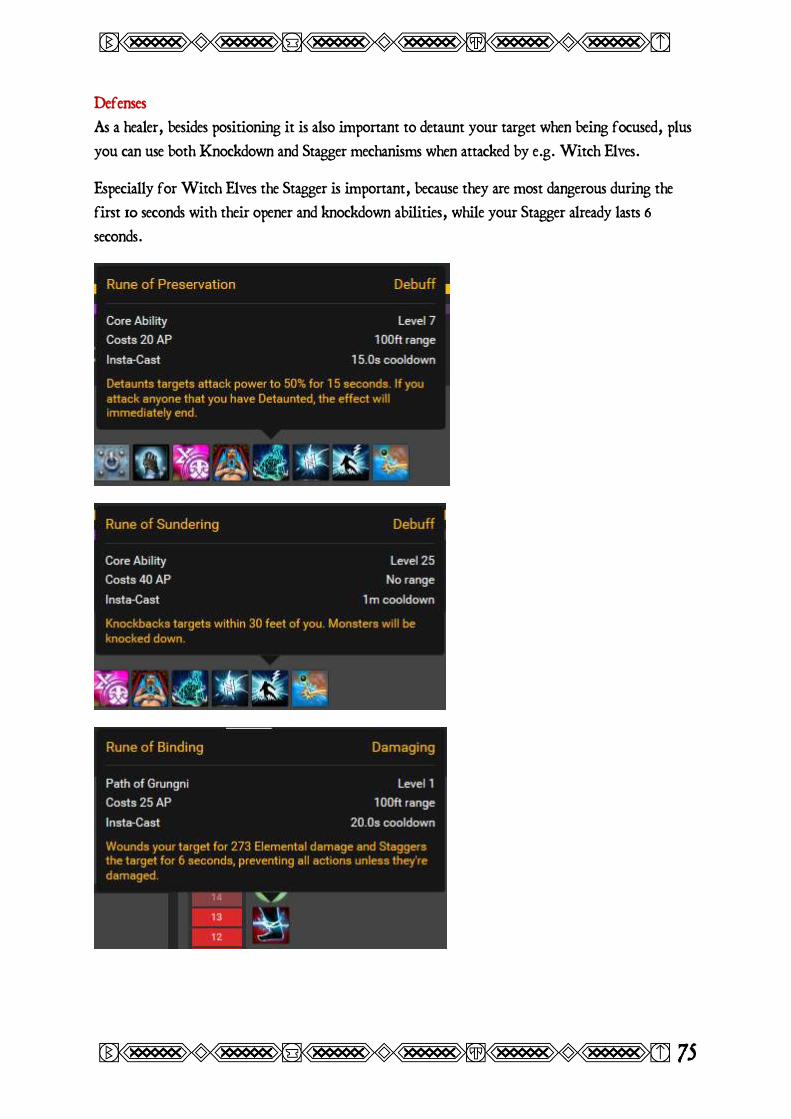
75
Defenses As a healer, besides positioning it is also important to detaunt your target when being focused, plus you can use both Knockdown and Stagger mechanisms when attacked by e.g. Witch Elves.
Especially for Witch Elves the Stagger is important, because they are most dangerous during the first 10 seconds with their opener and knockdown abilities, while your Stagger already lasts 6 seconds.

76
This graph explains why it makes more sense to invest in Armor than in Toughness.
The damage is reduced more with the same points spent in Armor, than spending them in Toughness.

77
Furthermore, the spot of 3.000 Armor is the least value to both counter high Strength and high Weapon Skill specs, considering being debuffed etc. you should aim for 3.300 Armor.

78
Add-Ons
Enemy – see squares on the right for focus-healing and visibility of buffs (Rune/HoT).
The timer on the right side shows how long e.g. Master Rune of Adamant will stay on the ground.
The small colored dots on the green Unit Frames show active buffs and HoTs.

79
Aura To be able to quickly react to dangerous rotations and DoTs from e.g. a Sorcerer (Chillwind, Word of Pain, etc.) and cleanse them, you can put single spells in the middle of your screen.

80
AoE DPS Runepriest Mk I `Kolland Pattern`
https://officialrorbuilder.herokuapp.com/career/rune-priest/s?l=40&r=40&tl=4&mp=1&pA=11&pB=0&pC=9&m1=false&m2=false&m3=false&m4=false&ma=3885,3869&mm=&mt=3882,3884,3872&t=3872,3882,3884,3855
DPS RP^
WORK IN PROGRESS
Stand:
Description:
Build:
Tactics:
Rotation:
Gear:
Talismans:
Pots:
Renown:

81
Generic Class Description Mk II `Drukhon Pattern` Stand:
Description:
Build:
Tactics:
Rotation:
Gear:
Talismans:
Pots:
Renown:

82
Small Scale Dwarf Builds These builds are not useful for a 12 or 24 men Dwarf Warband. But usefull in small Scale engagements.
Kegsniper Mk III `Thorbolt Pattern` Update 23.10.2018 Kegsniper Mk III ‘Thorbold Pattern’ Description: The Kegsniper is the epitome of Single Target (ST) Damage over a Range. Also he is mostly useless in a WB vs WB Environment. You will simply melt to all the AoE around you and your healers can’t keep you alive in the fights. If you join a WB you can hang back and Snipe Healers, but if your WB moves through the enemies to push to the Rez-Section you can’t follow. If you try to be on the frontline and drop AoE on them you have the wrong spec. A Armor Grenadier or DPS Tinkerer are more suited for that. The build itself is squishy and relies on positioning and taking out Sorcs and Healers in one or two rotations. You can’t go on tanks and heavy armor DOKs as most of your rifle abilities will be mitigated by the targets armor. Also the Kegsniper relies on a Sniper buddy and a very fast Target selection and Targetchange synchronized with your Snipe buddy. With a Sniperbuddy you can usually kill any squishy in one rotation. Most Tanks in 1.5 rotation. Builds are a difficile thing. There are a lot of nice Tactics out there and you need to play with the stuff you think useful. The following build is the ‘Thorbold Pattern’. Tested and perfected the time on RoR by the current highest Renown Engineer out there. There are of course other builds. Some more mobile, some more Resilient, but this Build excels at two points: Keep Snipe and Ambush Sniping. You want basically to achieve two things. 1. Get the extra Crit Tactic Tracer Rounds 2. Get A lot of Ballistic Skill and Weaponskill. 3. Stay alive in Keep Defenses on your own.

83
Build:
The build is focused on the whole concept of the ‘Thorbold Pattern’. Maximum Crits, your own Beer and hitting like a Dwarf Train.
If you are Below RR 70+ take this:
Armor Piercing is the ice on the cake. Crit Tactic, Keg and Snipe is your bread and beer.
Tactics:
Like seen in the Build the Used Tactics are: Masterfull Aim (+BS) Fighting Chance (+BS, +WS, +S, -T) Hollow Points (Dot on Snipe, Gunblast) Tracer Rounds (+15% Crit if near turret) Rotation:
Dot Signal Flare Dot Incendary [Armor Piercing Rounds] Snipe Or here: [Armor Piercing Rounds] Focused Fire

84
<- At this point the Target should be dead if running with a Sniper Buddy. Hipshot Gunblast Armor piercing Rounds: In the rotation you see it before Snipe, or directly after Snipe. The thing is, if you Snipe and then your bullet flies and you are capable of hitting Armor Piercing Round before the Bullet hit its Target the Armor strike through will be calculated in the shot and you still have 3 more seconds on its duration. If you hit it before the snipe it will help on your Signal Flare Dot. If you have Crackshot you can build them in too instead of gunblast. Crakshot is useful vs Doks as they need their weapons for some of their healing rotations as a melee Dok. Also if you have someone close no reason not to use flashbang or concussive Grenade instead of gunblast. An interrupt or knockback is always nice.

85
Gear:
The current (04.06.2018) max Sniper Gear is: 5 Pieces of Conqueror Gear (RvR) 3 Genesis Jewels 3 Beastlorditems (Cloak, Jewel, Book) Instead of going full Genesis the 3 Beastlorditems gives you +~58 WS. But if you don’t get the Beastlorditems just go full Genesis Set.
Also on a very personal note I use the full Conqueror Gear, but use the Onslaught Gloves, as these gives you +5 feet. This is not much, but on some keeps it is the range you need to hit from outer Oil into inner Keep 3rd floor.
Gear Update: 22.11.2018
There are 3 new Sets in the game. The Sentinel one from dungeons, the Vanquisher one from RvR and the 3rd which name I have forgotten from SCs. Form all the three the Sentinel one looks like the most promising with the Healdebuff on the Target. We will do some further testing on it.
Talismans:
The ‘Thorbold Pattern’ Sniper relies heavily on WS to get the Damage through. If the enemy gets you, you are dead anyway. So you go full WS Talismans. Pots:
Armor/BS If you have the above mentioned Gear, Build, Renown and full WS the BS Pot will bring you right near the BS Softcap. The Full conqueror Gear will give you regularly the +100 BS to hit the softcap. ALSO if you can get your Hands on the Liniment 'Something something of the Wild Hunt' use them. They give BS and +5% Crits for 30 mins. These are currently only harvestable in Gunbad.

86
Renown:
I usually prefer Daft Defender on any Engineer. The increase of Dodge/Disrupt is not to dismiss and improves your survivability greatly. Especially if you use Gunturret and are not under the protection of the flame turret buff. BUT the ‘Thorbold Pattern’ is the epitome of a squishy Sniper.
So, we go like this:
Full Weaponskill, Full Crits. Of course, if you arent RR80 you start with maxing out your WS and after that going into Crits. If you are at some odd numbers in between just get some BS. As mentioned several times Ranged Crit is better than BS. Example: Gunblast does at BS 800 roughly ~1000 Damage. These are rough numbers as with Gunturret and Armor Buff it goes +/-20%. If you Crit with Gunblast you do +50% Damage. That is +500 Damage. So if you have +1% Crit chance, this 1% counts as +5 Damage. In 99 Cases you don't get anything from the 1%. But in 1/100 cases it makes +500 Damage. So, this +1% counts as +5 Damage. If you buy Renown BS, you get for 5 RR something like +20 BS (+4dps). If you buy Crit you get +2% for 5 RR. And the +2% are on the Gunblast something like +10 Damage on average. You can’t compare the 10>4 because gunblast has a 2 sec casttime. So the dps bonus is doubled for it. Still Crit is king.

87
What is about Weapon skill: Updated 04.06.2018 Weapon skill (WS) is reducing the enemy’s armor. But recent tests with the formula and ingame show a horrible increase in DPS vs several Targets. BUT getting more WS instead of BS has a point in the game. For example. At 600 BS you have the choice to put in 20 BS or 20 WS. 20 Bs gives you more DPS, (should be 4) and 20 WS gives you more Armor Penetration. So of your Physical Damage more comes through. This "more through" is overall at 600 BS LESS than simply going +20BS. BUT at around 800 BS more BS and more WS get at a Break Even Point. Meaning the extra on +20 BS is the same like getting +20 WS. Meaning extra Damage (BS) is the same as not extra damage but more armor strike through (WS). So up to 800 BS you can go straight there and put in more BS Talis. From 800 BS you can split up. And if you are close to the Softcap (~1050 BS) you should definitely go to more WS. Also remember that WS only helps on physical Damage. Not on your Corporeal Grenadier and Tinkerer Stuff. Well it does something on Shotgun or Landmine. But the bread and butter of your Tinkerer/Grenadier is Corporeal Damage. What you CAN do:
With that build you hit like a truck. With a Sniper buddy you can even kill Tanks quite fast. But you have to remind the four Ps of a Sniper. Position, position, position, position. You need to be always at 100 feet to the next melee spot. And in a Keep Defence Sniping you need to be most of the time out of sight. In the lakes you need to hide in the bushes most of the time. What you CAN’T do:
You can’t survive in the first line of a Warband. If you want to do that get the Armor Tactic, some Wounds and Armor Talis and spec into middle and right Tree. Pull and melt, pull and melt… You can’t roam with a 6 men and kill running away Shamans. If you want to do that get in ‘Well-oiled machine’ to summon Bombard turrets instantly and throw Grenades at them. If a Witch Elf catches you, you are dead though. On the Armor Tinkerer I have fought of 5 WEs over 30 minutes while sitting at an BO and sipping my tee, pretending to be afk. One after the next ofc. Your Armor and Keg plus some good pots keeps you alive to pretty much outsit and kill them. Some Knockback in or an exploding turret and they begin to realize their error. On the ‘Thorbold Pattern’ you are pretty much dead if that happens. There are ways to prepare for an BO or Flag Defence vs WEs, but they will get you a lot of times.

88
Instruction Videos:
Keep Defence Sniping - Training Part 1
https://www.youtube.com/watch?v=nRo9pgQsmSI
The Rotation - Training Part 2
https://www.youtube.com/watch?v=sUSUUfoROkI

89
Authors Without the help of the following fellow Dawis this handbook would never been completed.
Gwelthaz - Drengi guide
Gragmaoc - Tinkerer guide
Drafi - Grenadier, and RP guide
Wahr - IB Guide
Drengk - fluff and corrections
Minipuce - RP guide in all its glory. The charts are from Groumf from Dammaz Kron if I’m correct.
Lesti Ardisson - overall lead, DPS RP guide, Kegsniper guide
Potshot – Grafics, Front cover, Header and Footer pics, Propaganda Posters