biozone scientific international manual.pdf · biozone scientific international ... 4. gently lift...
TRANSCRIPT


2 3
BioZone Scientific Internationalcontact information
Americas Europe
7751 Kingspointe Parkway, Suite 124 Linnoitustie 4 B
Orlando, FL 32819 02600 Espoo
United States of America Finland
Phone: +1 (407) 876 2000 Phone: + 358 (0)20 743 6622
www.biozonescientific.com
Contents ChecklistInside the shipping box you should find:
• Your new BioZone AirCare air purifier.• Remote Control with batteries.• AC/DC power cord.• Owner’s Guide with Warranty Conditions.• Warranty card (USA only).
If any of these items are missing, please notify BioZone Scientific by calling the nearest office.
Inspection ChecklistCheck for shipping damage. If unit appears damaged, do not plug it in or attempt to use it. Report immediately to freight carrier and notify BioZone.
Safety• Do not look directly at the UV lamp when lit.• Do not open the back cover of your unit without first unplugging the power cord.• Do not place your unit so airflow to the fan is blocked. This may cause the fan to
break or other damage.• If your unit falls into water, do not reach into the water. Unplug the
unit immediately.• Do not operate your unit if it has a damaged cord or plug. • Do not place cord near heated surfaces.• If your unit has been damaged, dropped or submerged in water, please call BioZone
for inspection and repair.
Operation Features • UV Lamp Life Monitor• 4-Level Time Selection• 3-Level Fan Speed• Portable Infrared Remote Controller (range up to 19 feet / 6 meters)
Power and “Lamp Life” RESET
1. The ON/OFF button switches the device:a. ON - Standard Mode (Unit power on, light indicators on) b. ON - Night Mode (Unit power on, light indicators off)c. OFF (Unit power off)
2. The Power light shows whether the device is powered and operating normally and also indicates when the accumulated lamp life reaches 8,760 hours (1 year) and needs replacement.a. When the light is ON in green color, the device is powered and working
normally.b. When the light is ON in red color, the accumulated lamp life has reached 1
year and needs replacement.
3. Whenever a new UV lamp is installed, the “Lamp Life” RESET button MUST be pressed to reset the timer within the microcontroller to 8,760 hours. The timer will only register lamp life while the unit is powered on.a. When the new UV lamp is installed correctly and “Lamp Life” RESET is
pressed, the Power light will flash 2 times in red color then turn to green color and begin to operate normally.
b. If the red light keeps flashing, it indicates that the “Lamp Life” RESET button has not been pressed. Re-install the UV lamp and press the “Lamp Life” RESET button until the Power light turns to green color.
4. The ON/OFF button controls the cycle of the operation. The control sequence is in the following manner:
BEFORE USE OPERATION
(Continuous Loop)
ON - Standard Mode ON - Night Mode OFF
OFF ON - Night Mode ON - Standard Mode
4 5
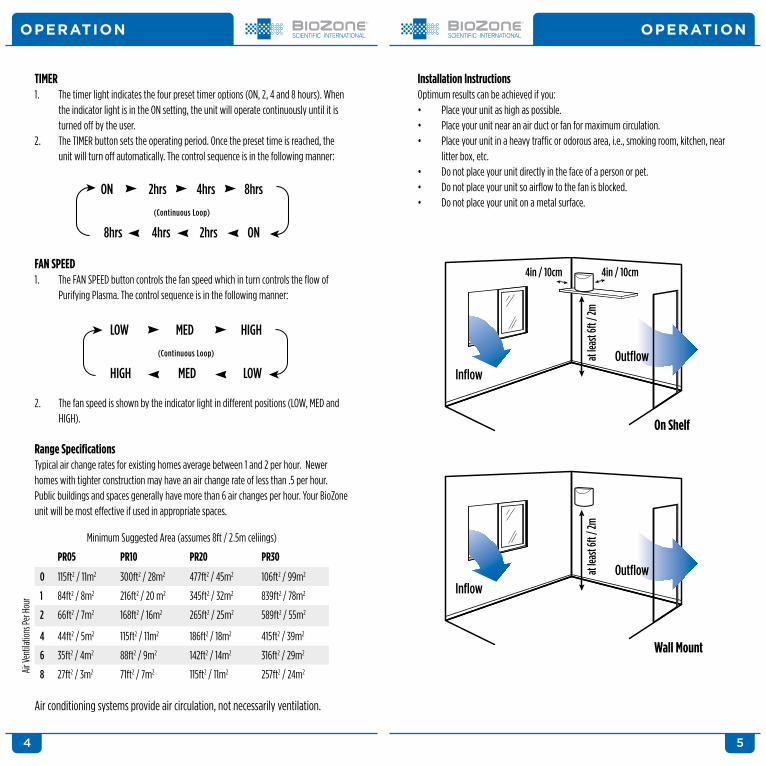
TIMER1. The timer light indicates the four preset timer options (ON, 2, 4 and 8 hours). When
the indicator light is in the ON setting, the unit will operate continuously until it is turned off by the user.
2. The TIMER button sets the operating period. Once the preset time is reached, the unit will turn off automatically. The control sequence is in the following manner:
FAN SPEED1. The FAN SPEED button controls the fan speed which in turn controls the flow of
Purifying Plasma. The control sequence is in the following manner:
2. The fan speed is shown by the indicator light in different positions (LOW, MED and HIGH).
Range SpecificationsTypical air change rates for existing homes average between 1 and 2 per hour. Newer homes with tighter construction may have an air change rate of less than .5 per hour. Public buildings and spaces generally have more than 6 air changes per hour. Your BioZone unit will be most effective if used in appropriate spaces.
Minimum Suggested Area (assumes 8ft / 2.5m celiings)
PR05 PR10 PR20 PR30
0 115ft2 / 11m2 300ft2 / 28m2 477ft2 / 45m2 106ft2 / 99m2
1 84ft2 / 8m2 216ft2 / 20 m2 345ft2 / 32m2 839ft2 / 78m2
2 66ft2 / 7m2 168ft2 / 16m2 265ft2 / 25m2 589ft2 / 55m2
4 44ft2 / 5m2 115ft2 / 11m2 186ft2 / 18m2 415ft2 / 39m2
6 35ft2 / 4m2 88ft2 / 9m2 142ft2 / 14m2 316ft2 / 29m2
8 27ft2 / 3m2 71ft2 / 7m2 115ft2 / 11m2 257ft2 / 24m2
Air conditioning systems provide air circulation, not necessarily ventilation.
Installation InstructionsOptimum results can be achieved if you:• Place your unit as high as possible.• Place your unit near an air duct or fan for maximum circulation.• Place your unit in a heavy traffic or odorous area, i.e., smoking room, kitchen, near
litter box, etc.• Do not place your unit directly in the face of a person or pet.• Do not place your unit so airflow to the fan is blocked.• Do not place your unit on a metal surface.
OPERATION OPERATION
On Shelf
Wall Mount
InflowOutflowat
leas
t 6ft
/ 2m
4in / 10cm 4in / 10cm
InflowOutflowat
leas
t 6ft
/ 2m
LOW MED HIGH
(Continuous Loop)
HIGH MED LOW
ON 2hrs 4hrs 8hrs
(Continuous Loop)
8hrs 4hrs 2hrs ON
Air V
entil
atio
ns P
er H
our

6 7
BioZone units require only a minimal amount of maintenance. We suggest you open your unit and clean the UV lamp and the case periodically with a soft cloth and alcohol. Make sure the power cord is unplugged before attempting to open the case. Failure to keep the lamp and the interior clean will hinder the purifying ability of your unit.
UV Lamp ReplacementAfter approximately one year of continuous use, the UV lamps will lose their effectiveness and need to be replaced (even though the lamps may still appear to be functioning). To replace the lamp:1. Turn the unit off.2. Unplug the power cord from the electrical outlet.3. Unscrew the back panel of the unit. The UV lamp is mounted on this panel.4. Gently lift the lamp out of the clamps.5. Locate the lamp socket and pull this off the end of the lamp.6. Replace with new BioZone lamp (use of any other lamp will void warranty).7. Close and screw the back panel in place.8. Plug the power cord back into the electrical outlet.9. Press the “Lamp Life” RESET button and then turn the unit on. (Power light will flash
2 times in red color, then turn to green color and begin to operate normally.)10. The UV Lamp contains small traces of mercury. Dispose of the old lamp in
accordance with local hazardous material disposal laws.
Replacement PartsContact your sales representative for replacement of lamps and other components. Use of parts other than those supplied by the original manufacturer will void warranty.
UV Lamp for model PR05: BioZone Lamp #10-08010UV Lamp for model PR10: BioZone Lamp #10-08025UV Lamp for model PR20: BioZone Lamp #10-08050UV Lamp for model PR30: BioZone Lamp #10-08100
Troubleshooting
1. Power light not lit. Check the following: - is the unit turned on? - is the unit plugged in? - is the electrical outlet working?
2. Lamp indicator light not lit. Check the following: - is the unit turned on and the fan working? - is the lamp connector securely attached? - is it time to replace the lamp? (See “Maintenance” section)
3. Low air flow. Check the following: - is the fan input or output obstructed?
4. Remote control does not function. Check the following: - is the unit more than 19 ft / 6 m away? - is it time to replace the batteries?
Specifications
Purification Method: Photoplasma / PhotochemistryTreatment Area: (See “Range Specifications” section)Ozone Output: Accumulation will not exceed 0.04 ppm when used according to recommendations. (See “Range Specifications” section)Ion Generation: Photo ionization of negative ionsControl Panel Indication: A) Power indicator light B) Timer indicator light C) Fan Speed indicator light D) UV Lamp indicator lightTimer Control: Continuous / 2 / 4 / 8 (hours)Fan Control: Low Fan / Med Fan / High FanLamp Life Monitor: 8,760 HoursRemote Control: Infra Red 3-Key Remote ControlRemote Control Distance: 19 ft / 6 m maximumMaterials: ASA, Aluminum CompositePower Cord: AC / DC transformer, “B” type - center pin “+”Electrical Input: 12V DCCertifications: Wall Adapter: UL, CE, CSA; Ballast: TÜV; Lamp: CEManufacturer’s Part Number: PR05, PR10, PR20, PR30
TROUBLESHOOTINGMAINTENANCE
Remove Screws
UV Lamp
8
Warranty Activation Process (USA only):•BioZoneoffersa1-YearWarrantyonBioZoneproducts.•Warrantycoveragebeginsonthepurchasedate.•Registrationcardmustbefilledoutcompletelyandreturnedwithin10daysofpurchaseto activate warranty.
Warranty conditions (USA only):•BioZoneguaranteestheapplianceagainstdefectsinmaterialandworkmanshipundernormaluseand appropriate voltage for one year from the date of purchase.•Warrantyisnotapplicabletoanappliancethathasbeentamperedwithoralteredinanywayorwhich has been subjected to misuse, abnormal voltage input, power interruption, electric shock, negligence or accident, force majeure or act of God, or whose serial number has been altered, effaced or removed.•Warrantydoesnotcoverfailuresduetoimproperorunreasonableusageormaintenanceoftheproduct or damages due to accident, improper packing, unauthorized tampering, alteration or modification as determined by BioZone.•Warrantydoesnotcovertherepairoftheinteriorortheexteriorfinishofthecasing,controlplateor knobs, accessories, or consumable parts of the said appliance.•Warrantydoesnotcoverreplacementlamps.BioZonelampsarecoveredbya1-YearProratedWarranty.•Warrantywillcoveranyrepairsorreplacementsofanydefectiveparts.Defectivepartsthathavebeen replaced become BioZone property.•Warrantydoesnotcovertransportationorshippingcoststoorfromourrepairfacilities.•WarrantyisvalidonlyifBioZonereplacementlampsandpartsareused.•ProductwillberepairedorreplacedatthesolediscretionofBioZoneengineers.•Theprovisionsofthiswarrantyareinlieuofanyotherwrittenwarranty,whetherexpressedorimplied, written or oral, including any warranty of merchantability or fitness for a particular purpose. The manufacturer’s maximum liability shall not exceed the actual purchase price paid by you for the product. In no event shall the manufacturer be liable for special, incidental, consequential or indirect damages.
Warranty return process (USA only):1. Contact your sales representative or the nearest office for specific return instructions and to receive your RMA (return authorization) number. Any returnnot labeled with an RMA number will be systematically refused.2. Pack the product in its original box and in the same manner you received it or as similaras possible. Label the outside of the box with your RMA number.3. Return the product with proof of purchase. Any return not including a proof a purchasewill be systematically refused.4. Label and ship the unit, freight prepaid to the address provided with your RMA number.
WARRANTY