bindingsource and bindingnavigator - information … prog ii - c sharp... · web viewstep 3: now we...
TRANSCRIPT

COURSE NAME: Computer Programming II – C# with Database
COURSE CODE: CPRG2301
TOPIC: BindingSource and BindingNavigator Controls in Windows Form
LECTURE 14
Working With a BindingNavigator Control in Windows Form
The BindingSource offers the easiest way to navigate through records in a data source. Iit is designed to simplify the process of binding controls to an underlying data source. Whereas a BindingNavigator is paired mostly with a BindingSource control to move through data records on a form and interact with them.
The BindingNavigator control provides a UI for navigating records in a form. Generally this control is used with the BindingSource control to move from a record to another record. By default this control has a series of buttons for moving to next and previous records as well as first and last records, to add a new record and to delete a record. Here we will use this control in our Windows application.
At first we should have some records. So we create a Database and insert some records into the database table.
Create Database
CREATE DATABASE EMP
USE EMP
CREATE TABLE EMP_DETAIL( E_ID INT PRIMARY KEY, E_NAME VARCHAR(30), E_AGE INT, E_CITY VARCHAR(30), E_DEPARTMENT VARCHAR(20) ) INSERT INTO EMP_DETAIL VALUES(11,'ALOK KUMAR',24,'DELHI','IT') INSERT INTO EMP_DETAIL VALUES(12,'RAJESH TRIPATHI',22,'ALLAHABAD','SALES') INSERT INTO EMP_DETAIL VALUES(13,'SATISH KUMAR',23,'JHANSI','PRODUCT') INSERT INTO EMP_DETAIL VALUES(14,'MANOJ SINGH',22,'NOIDA','MARKETING') INSERT INTO EMP_DETAIL VALUES(15,'AMIT MAHESHWARI',25,'ALLIGARH','IT') INSERT INTO EMP_DETAIL VALUES(16,'DEEPAK DWIJ',24,'NOIDA','IT')
I am showing a screen shot of all records of an EMP_DETAIL table so that it can become easy
1

to understand.
SELECT * FROM EMP_DETAIL
Now create a Windows Forms application. Follow the given steps.
Step 1 : Go to Toolbox and take a BindingSource and a BindingNavigator control.
Step 2: It will add to your form like in the following figure.
2

Step 3: Now we set DataSource and DataMember properties to a BindingSource object. Now select BindingNavigator and go to its property window. Set the "BindingSource" property to bindingSource1. Look at the following figure.
Step 4: Take five Labels and five TextBox controls. Set the Text property of the Labels to "ID", "Name", "Age", "City", and "Department" and the name property of the TextBoxes to "txtid",
3
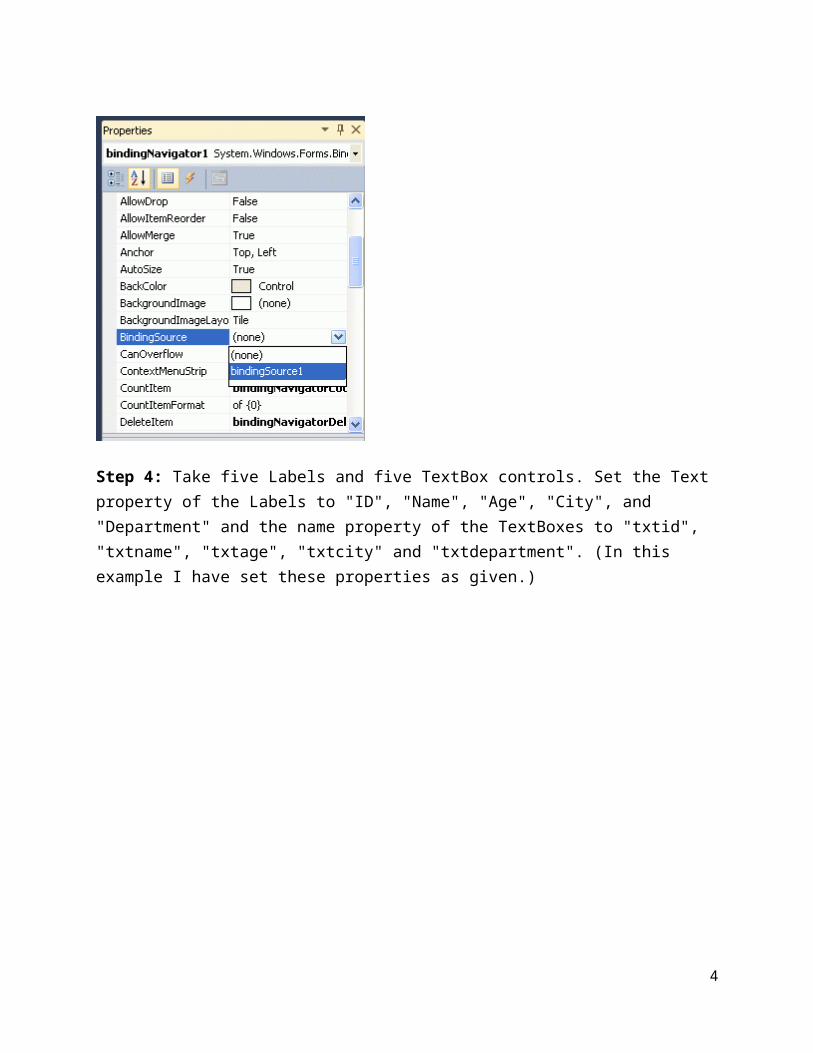
"txtname", "txtage", "txtcity" and "txtdepartment". (In this example I have set these properties as given.)
Step 5: Now select a TextBox and go to its Text property under DataBindings.
Step 6 : Click at Text property -> Click at bindingSource1 and select appropriate column. (Look at the following figure; I am selecting "E_ID" to show the value of this column in the TextBox.)
4

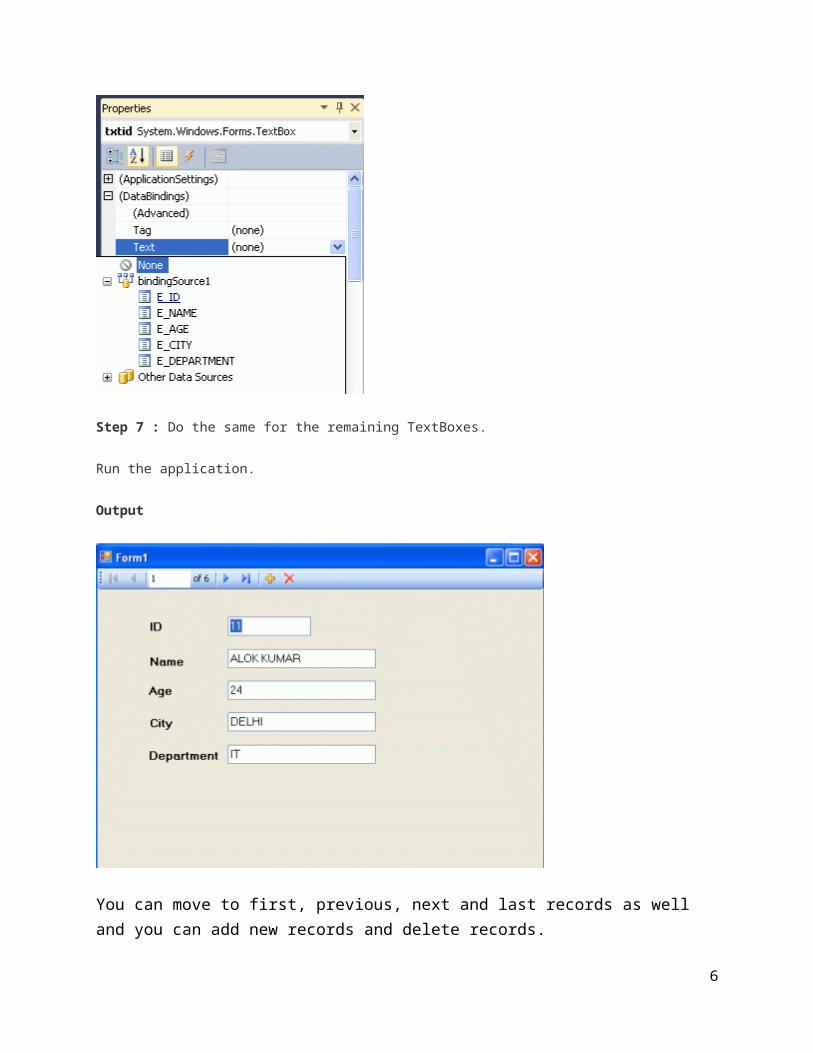
Step 7 : Do the same for the remaining TextBoxes.
Run the application.
Output
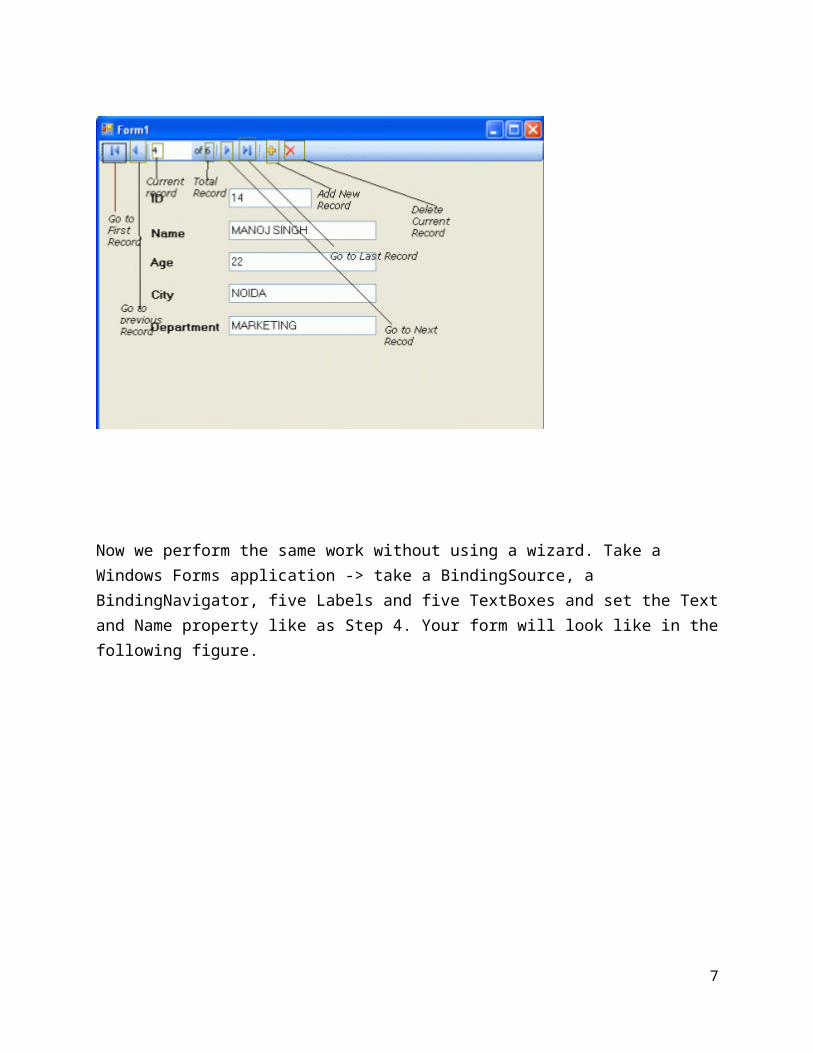
You can move to first, previous, next and last records as well and you can add new records and delete records.
5
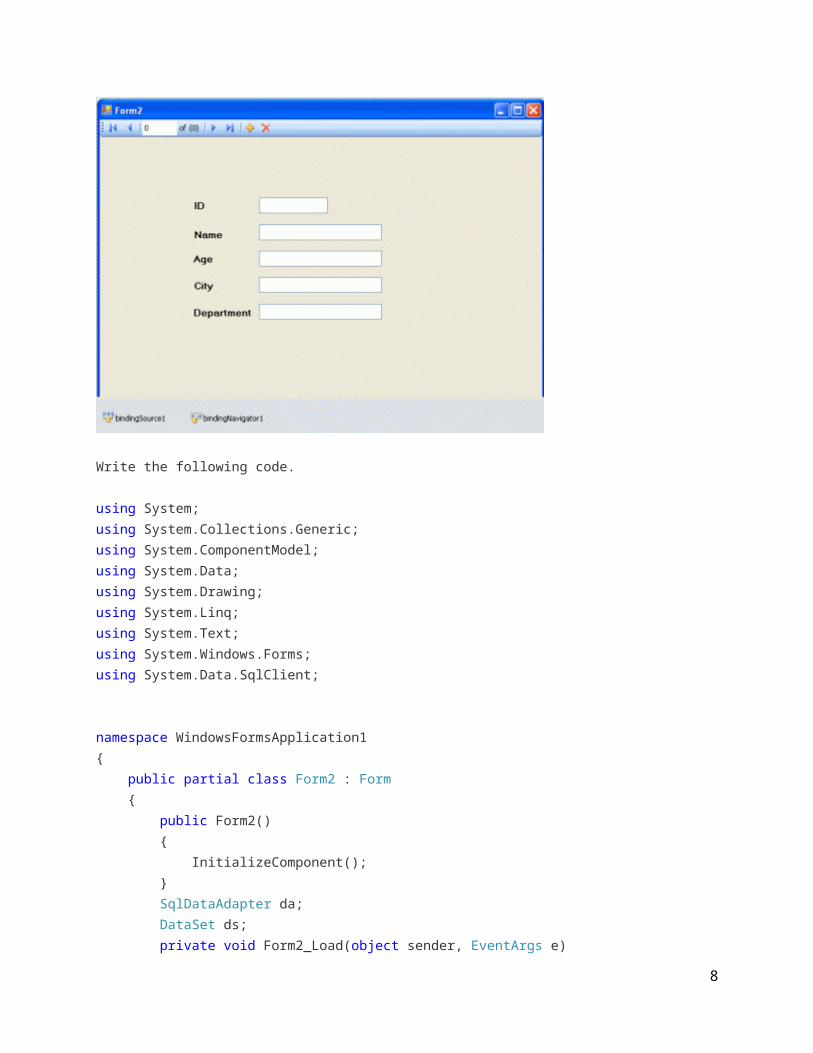
Now we perform the same work without using a wizard. Take a Windows Forms application -> take a BindingSource, a BindingNavigator, five Labels and five TextBoxes and set the Text and Name property like as Step 4. Your form will look like in the following figure.
6
Write the following code.
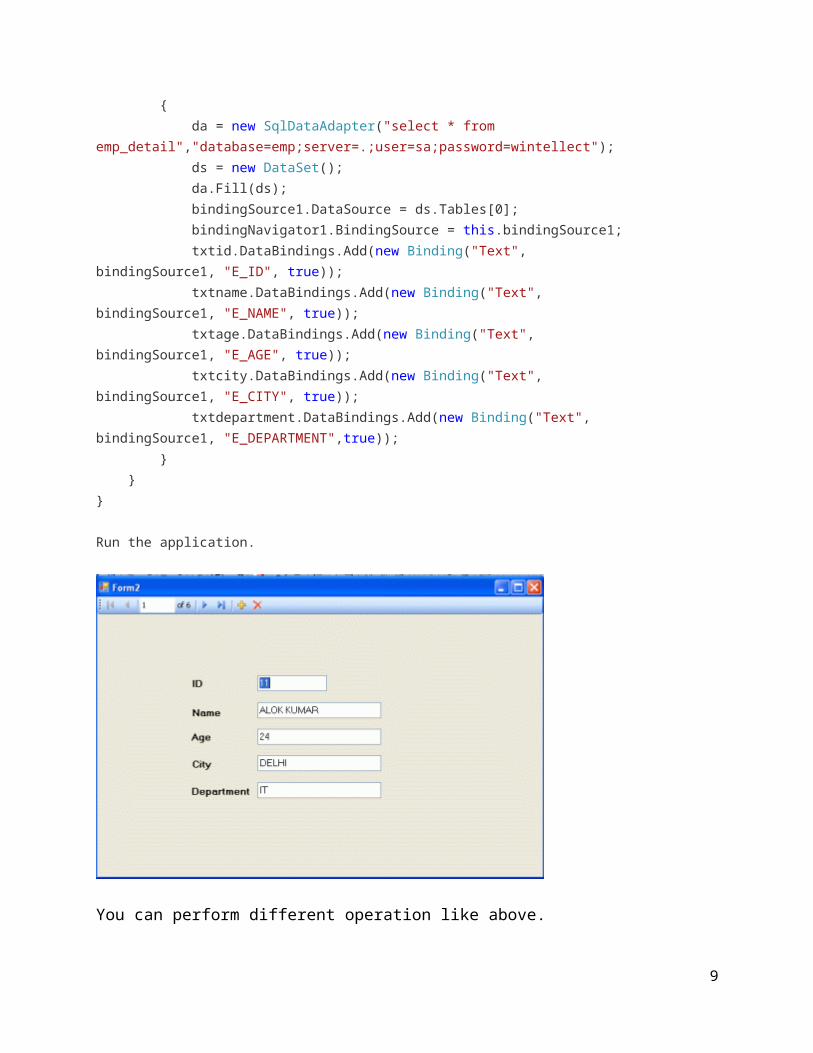
using System;using System.Collections.Generic;using System.ComponentModel;using System.Data;using System.Drawing;using System.Linq;using System.Text;using System.Windows.Forms;using System.Data.SqlClient; namespace WindowsFormsApplication1{ public partial class Form2 : Form { public Form2() { InitializeComponent(); } SqlDataAdapter da; DataSet ds; private void Form2_Load(object sender, EventArgs e) { da = new SqlDataAdapter("select * from emp_detail","database=emp;server=.;user=sa;password=wintellect"); ds = new DataSet(); da.Fill(ds); bindingSource1.DataSource = ds.Tables[0]; bindingNavigator1.BindingSource = this.bindingSource1; txtid.DataBindings.Add(new Binding("Text", bindingSource1, "E_ID", true)); txtname.DataBindings.Add(new Binding("Text", bindingSource1, "E_NAME", true)); txtage.DataBindings.Add(new Binding("Text", bindingSource1, "E_AGE", true)); txtcity.DataBindings.Add(new Binding("Text", bindingSource1, "E_CITY", true)); txtdepartment.DataBindings.Add(new Binding("Text", bindingSource1, "E_DEPARTMENT",true)); } }} Run the application.
7
You can perform different operation like above.
BindingSource and BindingNavigator
8
Introduction
What is BindingSource?
It supports the binding of control elements in a form, and can be seen as a link between a data source and a control element. It provides advantages over traditional data binding such as:
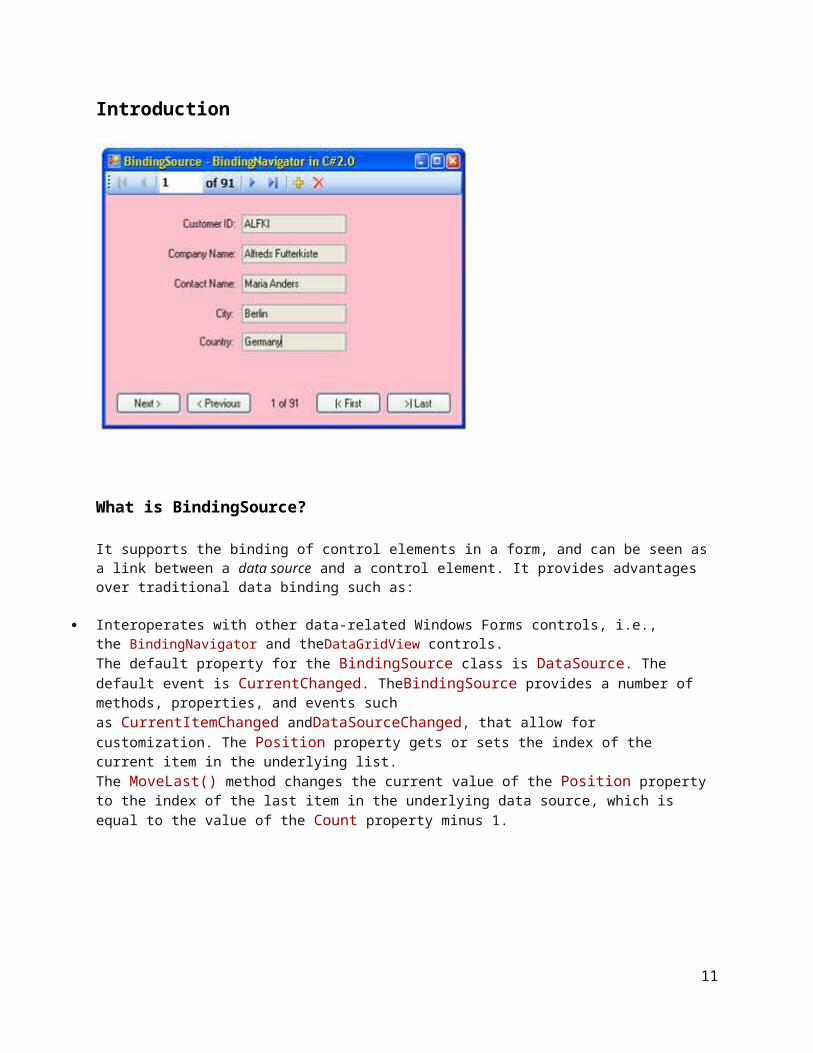
Interoperates with other data-related Windows Forms controls, i.e., the BindingNavigator and theDataGridView controls.The default property for the BindingSource class is DataSource. The default event is CurrentChanged. TheBindingSource provides a number of methods, properties, and events such as CurrentItemChanged andDataSourceChanged, that allow for customization. The Position property gets or sets the index of the current item in the underlying list. The MoveLast() method changes the current value of the Position property to the index of the last item in the underlying data source, which is equal to the value of the Count property minus 1.
For example:
9

//attach the BindingSource to the DataGridView.this.customersDataGridView1.DataSource = this.customersBindingSource1;
or
//gets the total number of the items.int count = this.flagsBindingSource.Count;
or
//gets or sets the index of the current item.int pos = this.customersBindingSource1.Position;
or
//moves to the last item in the list.//MoveLast() OR equivalentthis.bindingSource1.Position = this.bindingSource1.Count - 1;
Data Binding With »BindingSource« in a Windows Application
If you want to navigate through records in a data source as mentioned before, the BindingSource offers the better and easiest way to do this. You can bind a BindingSource component to the data source, and then bind, e.g., TextBox controls to the BindingSource as we will see later. We can then use the built-in navigation methods on the BindingSource such as MoveNext(), MovePrevious(), MoveFirst(), and MoveLast().The easiest way to see the BindingSource and BindingNavigator in action is as follows: choose the menu options: Data-->Show Data Source-->Add New Data Source. After you establish the connection, choose a DataSet, and select a table, you will see in the Data Source window the table you chose. From there, now you can drag/drop the table onto the Windows Form, and you get the data from the dragged table on aDataGridView including the BindingSource, DataSet, TableAdapter, and BindingSource automatically.But we want to go another way which I think is the better way to understand and see how BindingSource andBindingNavigator work together.First drag/drop five TextBoxes, six Labels, four Buttons, and a BindingSource from the Toolbox onto the form.
10
Now we have to adjust the two properties for the objects to find the data source clearly, which are:
DataSource DataMember
After setting the DataSource in the Properties window, click "Add Project Data Source..."
In the next dialog window, you choose the database, and click Next.
11

Through the Next button, you come to a new dialog. Here you search for an available database connection, or you create a new connection.
After you click the Next button, you will get the following dialog where you choose your database object, in other words: you choose here the table "Customer" and tick it, and click the Finish button.
12

Now, you have created and added, as you can see, a new typed DataSet "northwindDataSet". Mark theDataMember in the Properties window, and click the "Customers" table. Now, an of TableAdapter is created. A TableAdapter is similar to a DataAdapter, but related to a DataTable. For example: if it describes the table "Customers", then the name of the TableAdapter is customersTableAdapter; for the table "Authors", the name would be authorsTableAdapter etc.Now you have to combine all the control elements (TextBoxes) with the BindingSource object. You can do this in the Properties window entry "DataBinding" of each TextBox.
13

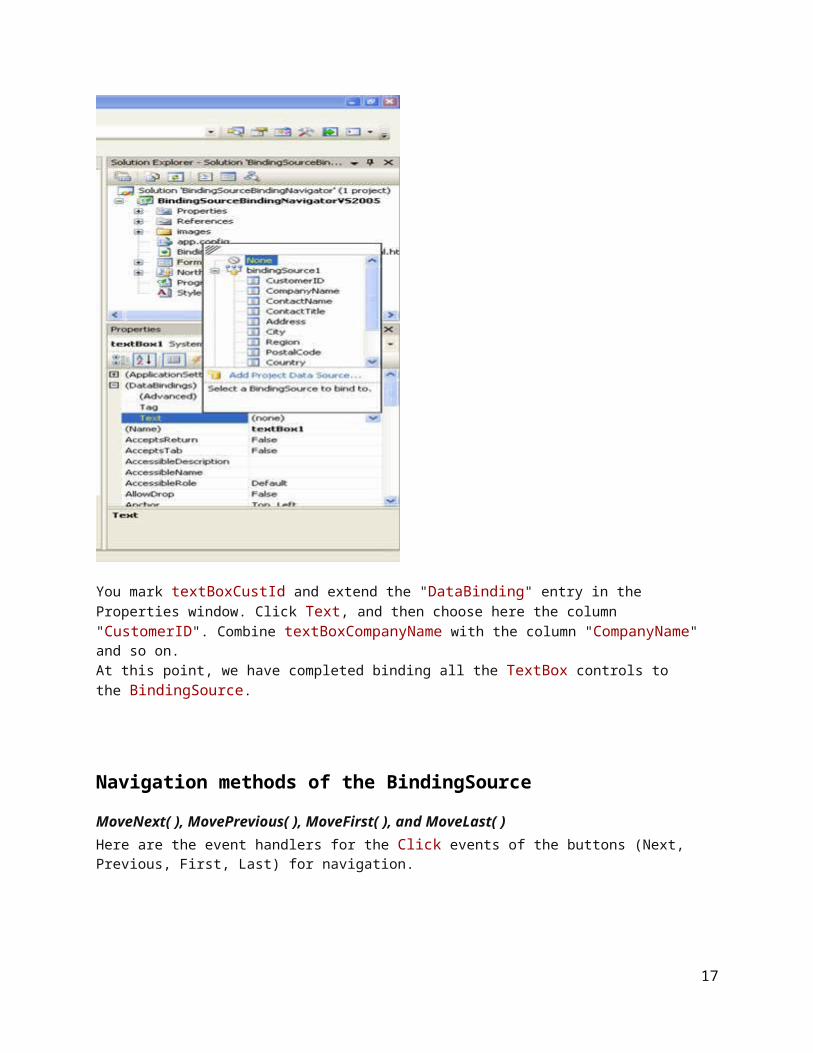
You mark textBoxCustId and extend the "DataBinding" entry in the Properties window. Click Text, and then choose here the column "CustomerID". Combine textBoxCompanyName with the column "CompanyName" and so on.At this point, we have completed binding all the TextBox controls to the BindingSource.
Navigation methods of the BindingSource
MoveNext( ), MovePrevious( ), MoveFirst( ), and MoveLast( )Here are the event handlers for the Click events of the buttons (Next, Previous, First, Last) for navigation.
Next button:
14

private void btNext_Click(object sender, EventArgs e) { if (this.bindingSource1.Position + 1 < this.bindingSource1.Count) { this.bindingSource1.MoveNext(); this.fnDisplayPosition(); } }
Previous button: Collapse | Copy Code
private void btPrevious_Click(object sender, EventArgs e){ this.bindingSource1.MovePrevious(); this.fnDisplayPosition();}
First button: Collapse | Copy Code
private void btFirst_Click(object sender, EventArgs e){ this.bindingSource1.MoveFirst(); this.fnDisplayPosition();}
Last button: Collapse | Copy Code
private void btLast_Click(object sender, EventArgs e){ this.bindingSource1.MoveLast(); this.fnDisplayPosition();}
Display the position of the current record: Collapse | Copy Code
private void fnDisplayPosition(){ this.labelPosition.Text = this.bindingSource1.Position + 1 + " of " + this.bindingSource1.Count;}
You can run the application, and the four navigation buttons should function now. But we have not implemented the BindingNavigator yet.
15

What is BindingNavigator?
The BindingNavigator control represents a standard way to navigate and manipulate data on a form. It is a special-purpose ToolStrip control for navigating and manipulating controls on the Windows Form.In most cases, a BindingNavigator is combined with a BindingSource control to move through data records on a Windows Form. It is easy to modify the BindingNavigator component if you want to add additional or alternative commands for the user.Now, from the Toolbox, drag/drop a BindingNavigator onto the Form, and the Windows Forms Designer puts it by default on the top automatically.
And at last, that brings us to our final operation. The BindingNavigator still does not know where the data source is. We have to show the BindingNavigator where its data source is. Mark bindingNavigator1 on the Form1[Design] and set the BindingNavigator control's BindingSource property to the BindingSource (here:bindingSource1) on the Form.
16
Now the BindingNavigator is ready to do its task as a link between the data source and the control elements.
17