better mixes
DESCRIPTION
better mixesTRANSCRIPT

Better mixes
In this unit of work we leaned about various terms relation to our mixes and how in theory we could make them better. We were given performers to record and mix and also some additional peace which we had the option to use to mix. The perices I’ve chosen to talk about today is the two live recordings and tracks we can work it out by the Beatles (which was a cover ) and toto’s Africa which also was a cover )
One being a static mix. A static mix if when the track does not require any volume automation. Automation can be very helpful because levels can change mid way through recording epically if you are doing a live recording where there is more than one musician in the room recoding at the same time. We encountered this problem in the 1st track we recoded. Because there was very soft drums at the begging in and as soon as the build up of the song came on everyone else got louder because the drummer was playing a lot harder and here is where automation would be used.
Here you can see the levels of the drums are very low and we had loads of head room to prepare for the build-up. Now you can see in the picture below as soon as the drummer hits harder on the kit we see that we have a lot more level of the drums now. And our head room is just about right.
if we just checked the levels of the drum mics at the beginning and we did not know about the build up and we put a lot of gain on the channels we could have been clipping at the end of the mix because we did not allow our self enough head room for the whole track to come up in volume. We encountered this
problem on our 1st take of the recoding session because we thought we had given our self enough head room to cover all instrument being recording however we noticed that we were clipping because when the drums kicked in it brought all the other musicians up as well because it was a live recoding. So for the rest of the take we changed the levels and input monitoring around until we have a good head room to clear all channels as we had a right balanced up to dbfs.
Signal to noise ratio
Signal to noise ratio is measure of signal strength comparative to background noise. The ratio is usually measured in decibels (dB).
On the song pans labyrinth song we had a problem with signal to noise ratio and mic placement. Because we had an acoustic guitar to record with no pickup we had to use a mic to pick up the guitar signal. However we had a huge problem because we were doing a live recording we had alot on bleed from the drum kit on this mic. As soon as the drums come in the mic just picked up the drums instead of the guitar. The guitar was in audible and therefore we had a lot of problems trying to save the guitar track what we had recorded. we had used eq on the channel already and this did take away some of the bleed from the drum kit but didn’t do enough to make the guitar track stand out when the drums kicked in. If I was to recoded again with a similar scenario I would of done an overdub of the guitar after the live take. This would then enable me to have a clean guitar track which would stand out in the mix.
Signal to noise ratio is important because if you have a low signal to noise ratio when you boost the channel to make the track louder you will also boost the
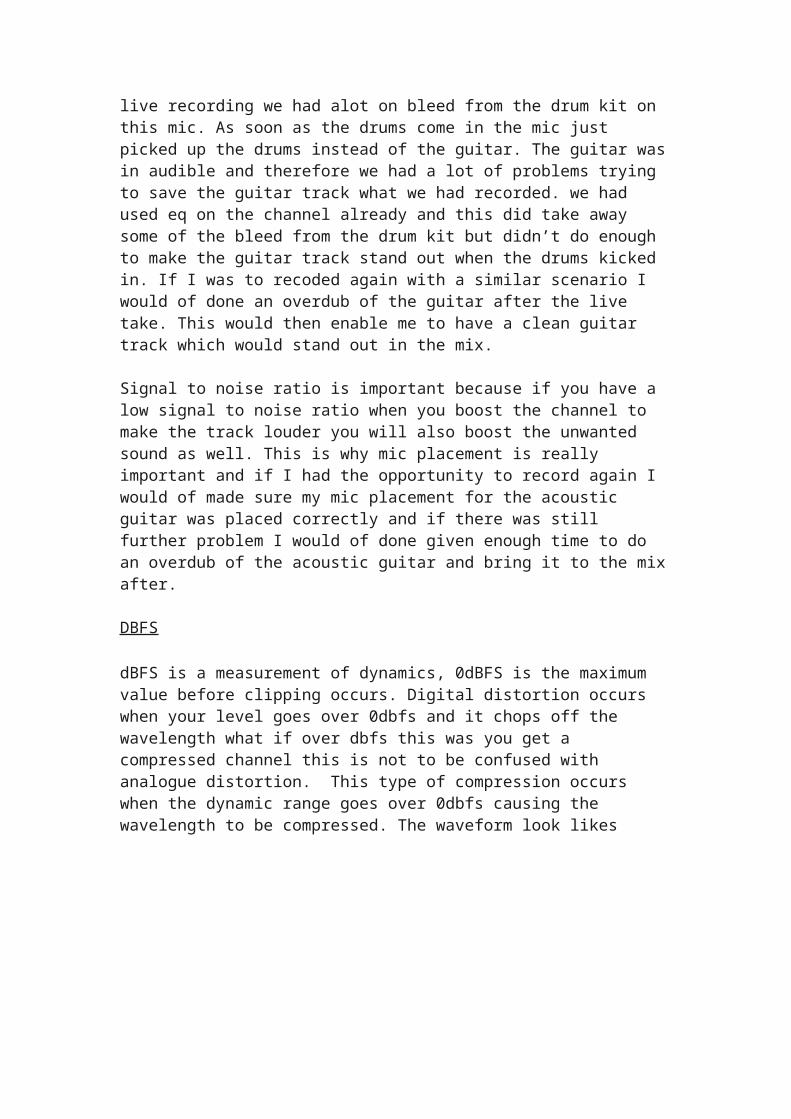
unwanted sound as well. This is why mic placement is really important and if I had the opportunity to record again I would of made sure my mic placement for the acoustic guitar was placed correctly and if there was still further problem I would of done given enough time to do an overdub of the acoustic guitar and bring it to the mix after.
DBFS
dBFS is a measurement of dynamics, 0dBFS is the maximum value before clipping occurs. Digital distortion occurs when your level goes over 0dbfs and it chops off the wavelength what if over dbfs this was you get a compressed channel this is not to be confused with analogue distortion. This type of compression occurs when the dynamic range goes over 0dbfs causing the wavelength to be compressed. The waveform look likes this.
dbfs is helpful because it allows you to know when your system is running at oits highest headroom before clipping.
Our mix of fight with the fire flies was mixed just right where we had no clipping occurring and everything was level.
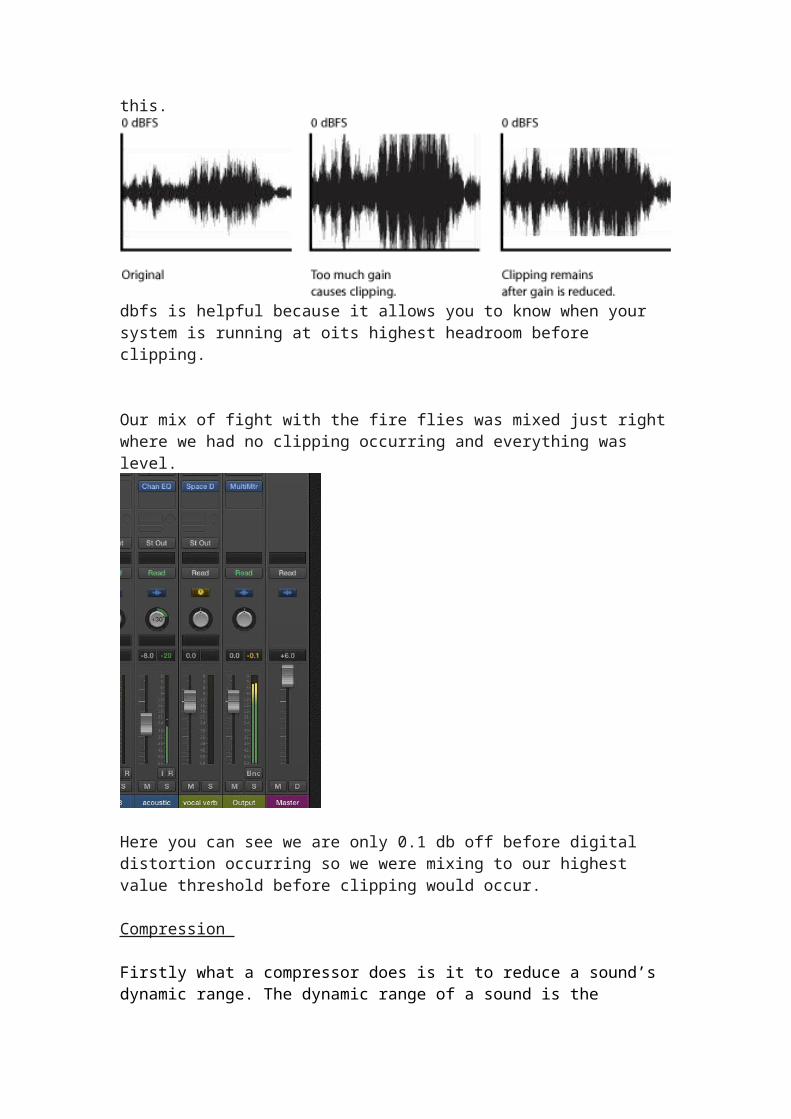
Here you can see we are only 0.1 db off before digital distortion occurring so we were mixing to our highest value threshold before clipping would occur.
Compression
Firstly what a compressor does is it to reduce a sound’s dynamic range. The dynamic range of a sound is the difference between the quietest and loudest wave lengths. If you want a more even level overall you compress the channel to bring up the quitter sounds and lower the louder sounds it using a compressor.
this is the standard compressor which is on logic x. here you can see all the different aspects if the compressor.
Threshold Ratio Make up gain Knee Attack Release
Threshold and ratio
To start to talk about compression these are the two most important controls in the compressor. The threshold is a volume level (dB) that when a wave length goes over the threshold I will lower the wavelength what is clipping and bring up the low parts of the singal. If you look at the meter at the top of the compressor it will let you know when the compressor is actively working. If your signal goes
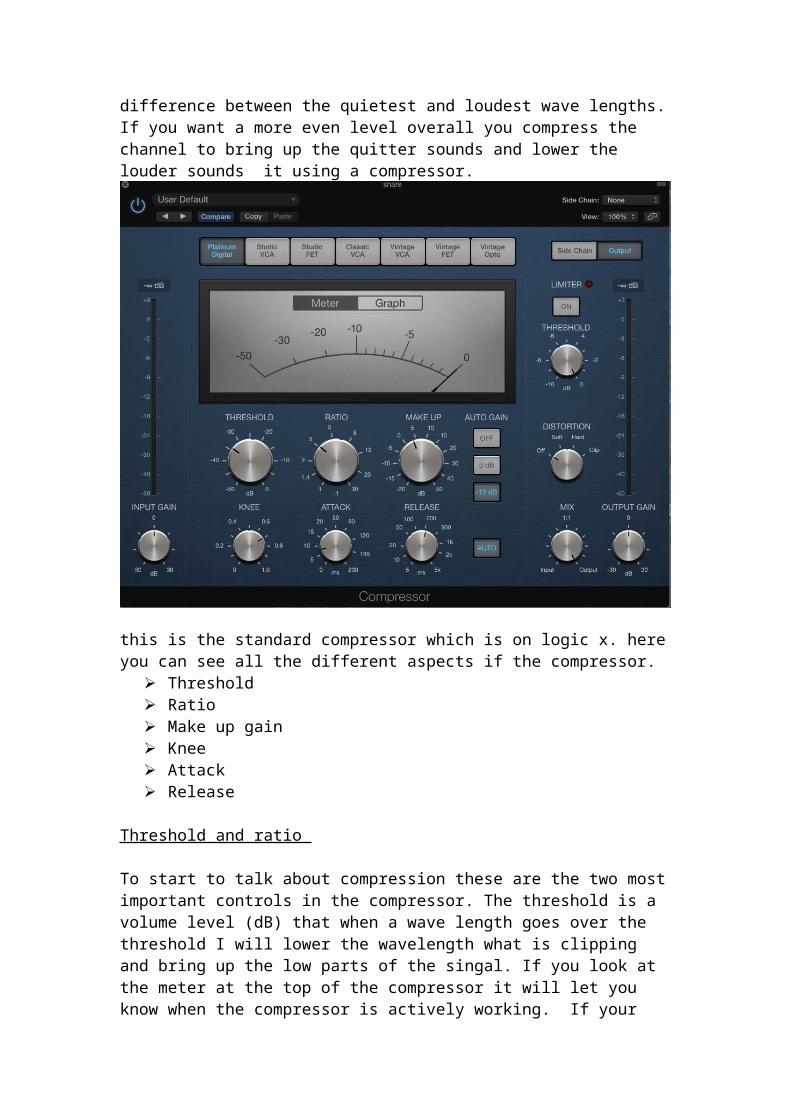
above the threshold it will then be turned down. The amount it is turned down by will depend on the ratio and the threshold.
Ratio is also important because it determine how much the signal is compressed by so if you start off with a ratio of 5:1 every 5 parts of the wavelength, which goes over the threshold, one will be turned down. The higher the ratio the more compression will be added to the wavelength.
Attack and Release
(Ms- milliseconds )
“The attack and release controls determine how quickly compression kicks in once the signal goes above the threshold and how long it takes to bring the signal back to normal level the signal dips below it again.”
http://www.soundstosample.com/blog/how-to/how-to-use-compression
The attack is the time is how long it takes for the compressor to start working to compress the signal. The longer the ms the longer it will take for the compressor to compress the wavelength.
So by using the attack and release knobs you can change the compression to what suits the track and what best suits the sound you are looking for. If you want to increase the ‘punch’ of an element go for a slower attack. And if you want to decrease the ‘punch’ go for a fast attack.
Release is the time taken for the compressor to restore compression the wavelength so you have a normal un compressed signal. If you have a really slow release however and the compressor will squash the volume down for too long this will cause the sound to loose dynamics and all life out of the track.
I used the attack and release knobs to aid in all my tracks, on the Beatles mix of the song we can work it our I used an attack of 8 ms and a relice of 230ms on the

top snare. I used this because I was looking for a somewhat punchy sounding snare what was quite snappy and would stand out in the mix.
On most of the channels on the Beatles mix I did not take anymore that 5db gain reduction off because I feel once over 5 db the signal gets too compressed and looses dynamics.
Limiter/ limiting
A limiter is a compressor which has a ratio of infinity to one. This means that all wavelengths above the threshold gets turned down. A limiter can be useful for bass guitar I used this on the Beatles track instead of a compressor. Because im using it on bass you can get away with using more compression the wave length even more. This is why I chose a limiter because it allowed us to limit the wave length so nothing goes over the threshold. Giving us more headroom and frequency’s spare to use elsewhere in the mix.
Eq
Parametric eq have 3 different variables these are Frequency Band width Db (boost/cut)
Different instrument have different active range. When you understand what frequencies should be active on an instrument you will be able to find out which you can cut out. This will clean up your mix and make it sound less muddy and will give your more headroom and it will free up some frequency’s which you could boost on other channels.
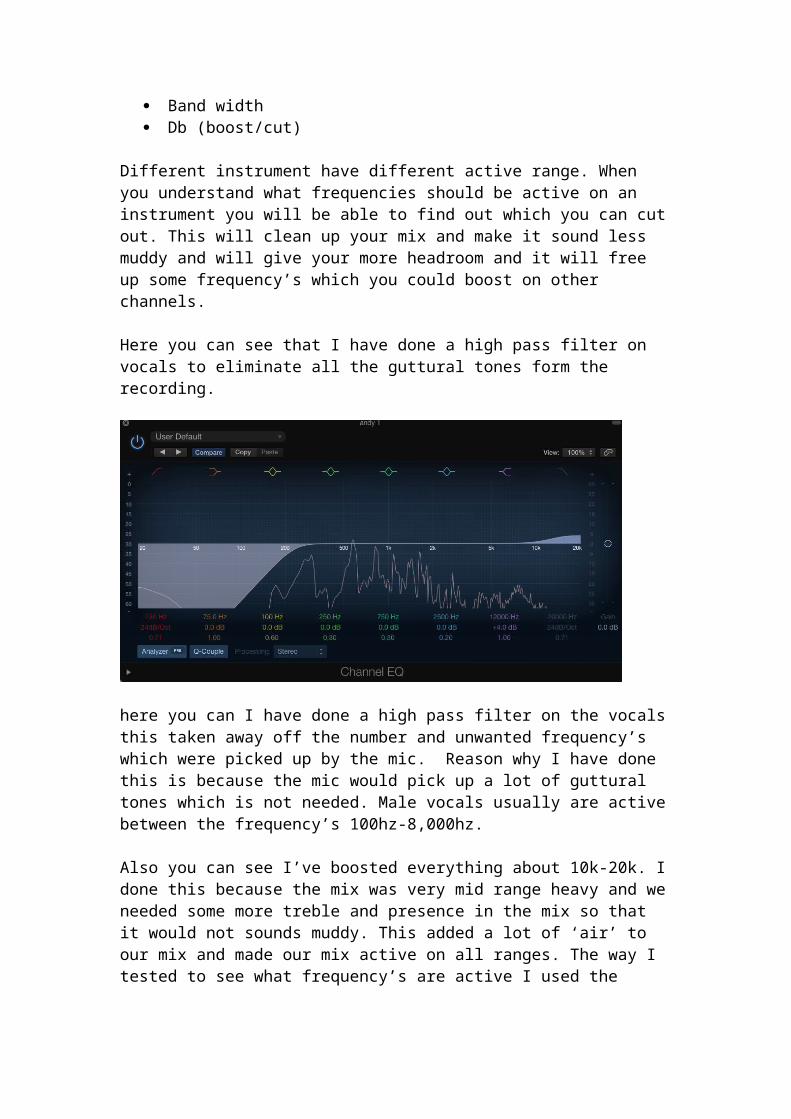
Here you can see that I have done a high pass filter on vocals to eliminate all the guttural tones form the recording.

here you can I have done a high pass filter on the vocals this taken away off the number and unwanted frequency’s which were picked up by the mic. Reason why I have done this is because the mic would pick up a lot of guttural tones which is not needed. Male vocals usually are active between the frequency’s 100hz-8,000hz.
Also you can see I’ve boosted everything about 10k-20k. I done this because the mix was very mid range heavy and we needed some more treble and presence in the mix so that it would not sounds muddy. This added a lot of ‘air’ to our mix and made our mix active on all ranges. The way I tested to see what frequency’s are active I used the multi meter which is available under metering and it looks like this.
Here you can see that I have a lot of activity around 125hz to about 4khz. By adding a high pass filter it increased the 8k-20khz range leaving out the mix giving it a more life to the vocals and the overall mix it self. This also made the vocals stand out and be separated from other instrument active in the same frequency’s like a guitar, toms and bass.
Overall I think the actually recording of the performers went well we didn’t have any technical issues when we run these recording sessions. However if the performers were given more in time I think the recordings would of come out better because I fell that with more time they would of became tighter as a group. Also if I would be given a chance to record again I would look into doing an overdub of the acoustic guitar on pans labyrinth track because when the drums come it we had a lot of bleed on this mic from the drums and made the guitar track inaudible. Additionally in am happy with all mixes but one in particular is the Beatles we can work it out. Reason for this is because I think personally this is one of my best mixes and also I think that the way it was mixed it has captured a Beatles vibe in the hard left and right panning. However when mixing this track I realised when the track slows down the bass goes slightly out of time and when the track is brought back up to speed the bass is fractionally out of time. Apart from this I think it is one of my better mixes because all these track were a static mixes I feel that automation would of aided me to get a
slightly more professional sounding mix. However on the Beatles mix I feel that no automation was needed even if I was given the chance to use it. In the live recording I also feel that these went well and overall im happy with the work I happy produced.