bedienungsanleitung user's manual mode d'emploi …premier-solutions.biz/user...
TRANSCRIPT

© CopyrightNachdruck verboten!
Reproduction prohibited!Réproduction interdit!
Prohibida toda reproducción.
Für weiteren Gebrauch aufbewahren!Keep this manual for future needs!Gardez ce mode d’emploi pour desutilisations ultérieures!Guarde este manual para posteriores usos.
BEDIENUNGSANLEITUNGUSER'S MANUALMODE D'EMPLOI
MANUAL DEL USUARIO
CDP-2400Dual-CD-Player

Das neueste Update dieser Bedienungsanleitung finden Sie im Internet unter:You can find the latest update of this user manual in the Internet under:
Vous pouvez trouvez la dernière version de ce mode d'emploi dans l'Internet sous:Vd. puede encontrar la versión más reciente de este manual en el Internet bajo:
www.omnitronic.com


MULTI-LANGUAGE-INSTRUCTIONS
InhaltsverzeichnisTable of contents
Sommaire/Contenido
1. EINFÜHRUNG............................................................................................................................................... 62. SICHERHEITSHINWEISE............................................................................................................................. 63. BESTIMMUNGSGEMÄSSE VERWENDUNG.............................................................................................. 74. GERÄTEBESCHREIBUNG .......................................................................................................................... 8
4.1 FEATURES.............................................................................................................................................. 84.2 BESCHREIBUNG DOPPEL-CD-PLAYER............................................................................................... 94.3 STEUEREINHEIT .................................................................................................................................. 10
5. INSTALLATION .......................................................................................................................................... 146. BEDIENUNGSHINWEISE........................................................................................................................... 14
6.1 INBETRIEBNAHME ............................................................................................................................... 146.2 CD-SCHUBFACH .................................................................................................................................. 146.3 VFD-DISPLAY........................................................................................................................................ 156.4 PLAY/PAUSE......................................................................................................................................... 156.5 TITELAUSWAHL ÜBER DIE TRACK-TASTEN..................................................................................... 156.6 EINSTELLUNG DER WIEDERGABEGESCHWINDIGKEIT ................................................................. 166.7 CUEING ................................................................................................................................................. 166.8 INTERAKTIVES SCRATCH-RAD.......................................................................................................... 176.9 SEQUENZWIEDERHOLUNG (LOOP-FUNKTION) .............................................................................. 176.10 SAMPLER-MODUS ............................................................................................................................. 186.11 EFFEKTE............................................................................................................................................. 196.12 BEAT SYNC-FUNKTION..................................................................................................................... 206.13 FADERSTART ..................................................................................................................................... 206.14 STAND BY-MODUS ............................................................................................................................ 216.15 ENDE DER BENUTZUNG................................................................................................................... 21
7. VORSICHTSMASSNAHMEN ..................................................................................................................... 218. REINIGUNG UND WARTUNG ................................................................................................................... 219. TECHNISCHE DATEN................................................................................................................................ 22
1. INTRODUCTION ......................................................................................................................................... 232. SAFETY INSTRUCTIONS .......................................................................................................................... 233. OPERATING DETERMINATIONS.............................................................................................................. 244. DESCRIPTION ............................................................................................................................................ 25
4.1 FEATURES............................................................................................................................................ 254.2 MAIN UNIT............................................................................................................................................. 254.3 CONTROLLER ...................................................................................................................................... 26
5. INSTALLATION .......................................................................................................................................... 306. OPERATION ............................................................................................................................................... 30
6.1 SETUP ................................................................................................................................................... 306.2 CD-TRAY ............................................................................................................................................... 306.3 VFD-DISPLAY........................................................................................................................................ 316.4 PLAY/PAUSE......................................................................................................................................... 316.5. SELECTING A TRACK VIA THE TRACK-BUTTONS .......................................................................... 316.6 ADJUSTING THE PLAYBACK-SPEED................................................................................................. 316.7 CUEING ................................................................................................................................................. 326.8 INTERACTIVE SCRATCH-WHEEL....................................................................................................... 336.9 MEMORIZING A SEQUENCE (LOOP-FUNCTION) ............................................................................. 336.10 SAMPLER-MODE................................................................................................................................ 336.11 EFFECTS............................................................................................................................................. 346.12 BEAT SYNC-FUNCTION..................................................................................................................... 356.13 FADERSTART ..................................................................................................................................... 356.14 STAND BY-MODE ............................................................................................................................... 366.15 END OF OPERATION ......................................................................................................................... 36
7. PRECAUTIONS........................................................................................................................................... 36

8. CLEANING AND MAINTENANCE ............................................................................................................. 379. TECHNICAL SPECIFICATIONS................................................................................................................. 371. INTRODUCTION ......................................................................................................................................... 382. INSTRUCTIONS DE SÉCURITÉ ................................................................................................................ 383. EMPLOI SELON LES PRÉSCRIPTIONS................................................................................................... 394. DESCRIPTION ............................................................................................................................................ 40
4.1 FEATURES............................................................................................................................................ 404.2 BLOC DES LECTEURS......................................................................................................................... 414.3 BLOC DE COMMANDE......................................................................................................................... 42
5. INSTALLATION .......................................................................................................................................... 456. UTILISATION .............................................................................................................................................. 46
6.1 MISE EN MARCHE................................................................................................................................ 466.2 TIROIR D'ACCÈS DU CD...................................................................................................................... 466.3 VFD-DISPLAY........................................................................................................................................ 466.4 PLAY/PAUSE......................................................................................................................................... 476.5 CHANGEMENT DE PLAGES................................................................................................................ 476.6 RÉGLAGE DE LA VITESSE DE LECTURE.......................................................................................... 476.7 CUEING ................................................................................................................................................. 476.8 ROUE SCRATCH INTERACTIVE ......................................................................................................... 486.9 RÉPÉTITION D’UNE SÉQUENCE (FONCTION LOOP)....................................................................... 496.10 MODE DE SAMPLER .......................................................................................................................... 496.11 EFFETS ............................................................................................................................................... 506.12 FONCTION BEAT SYNC..................................................................................................................... 516.13 FADERSTART ..................................................................................................................................... 526.14 MODE STAND BY ............................................................................................................................... 526.15 FIN D'UTILISATION............................................................................................................................. 52
7. PRECAUTIONS........................................................................................................................................... 528. NETTOYAGE ET MAINTENANCE............................................................................................................. 539. CARACTÉRISTIQUES TECHNIQUES....................................................................................................... 54
1. INTRODUCCIÓN......................................................................................................................................... 552. INSTRUCCIONES DE SEGURIDAD .......................................................................................................... 553. INSTRUCCIONES DE MANEJO ................................................................................................................ 564. DESCRIPCIÓN DEL APARATO ................................................................................................................ 57
4.1. FEATURES........................................................................................................................................... 574.2 UNIDAD PRINCIPAL ............................................................................................................................. 584.3 CONTROLADOR ................................................................................................................................... 59
5. INSTALACIÓN ............................................................................................................................................ 626. MANEJO ..................................................................................................................................................... 63
6.1 PUESTA EN MARCHA.......................................................................................................................... 636.2 BANDEJA DEL CD ................................................................................................................................ 636.3 PANTALLA VFD .................................................................................................................................... 636.4 LECTURA/PAUSA ................................................................................................................................. 646.5. SELECCIÓN DE UNA CANCIÓN MEDIANTE LOS BOTONES TRACK............................................. 646.6 AJUSTE DE LA VELOCIDAD DE LECTURA........................................................................................ 646.7 ESCUCHA.............................................................................................................................................. 646.8 RUEDA SCRATCH INTERACTIVA ....................................................................................................... 656.9 MEMORIZAR UNA SECUENCIA (FUNCIÓN LOOP) ........................................................................... 666.10 MODO DE SAMPLER.......................................................................................................................... 666.11 EFECTOS ............................................................................................................................................ 676.12 FUNCIÓN BEAT SYNC ....................................................................................................................... 696.13 FADERSTART ..................................................................................................................................... 696.14 MODO STAND BY............................................................................................................................... 706.15 FINAL DEL MANEJO........................................................................................................................... 70
7. PRECAUCIONES........................................................................................................................................ 708. LIMPIEZA Y MANTENIMIENTO................................................................................................................. 709. ESPECIFICACIONES TÉCNICAS.............................................................................................................. 71

10602365X17NXS_V_1_0.DOC23/71
OPERATING INSTRUCTIONS
CDP-2400Dual-CD-Player
CAUTION!Keep this device away from rain and moisture!Never open the housing!
For your own safety, please read this user manual carefullybefore you initial start-up.
Every person involved with the installation, operation and maintenance of this device has to- be qualilfied- follow the instructions of this manual- consider this manual to be part of the total product- keep this manual for the entire service life of the product- pass this manual on to every further owner or user of the product- include every supplementay update with the original manual
1. INTRODUCTIONThank you for having chosen a OMNITRONIC CDP-2400. You have acquired a reliable and powerful device.If you follow the instructions given in this manual, we can assure you that you will enjoy this device for manyyears.
Unpack your OMNITRONIC CDP-2400.
Please make sure that there are no obvious transport damages. Should you notice any damages on the A/Cconnection cable or on the casing, do not take the device into operation and immediately consult your localdealer.
2. SAFETY INSTRUCTIONS
CAUTION!Be careful with your operations. With a dangerous voltage you can suffer a dangerouselectric shock when touching the wires!
This device has left our premises in absolutely perfect condition. In order to maintain this condition and toensure a safe operation, it is absolutely necessary for the user to follow the safety instructions and warningnotes written in this user manual.

10602365X17NXS_V_1_0.DOC24/71
Important:Damages caused by the disregard of this user manual are not subject to warranty. The dealer willnot accept liability for any resulting defects or problems.
Always plug in the power plug least. Make sure that the power-switch is set to OFF position before youconnect the device to the mains.Keep away from heaters and other heating sources!
If the device has been exposed to drastic temperature fluctuation (e.g. after transportation), do not switch iton immediately. The arising condensation water might damage your device. Leave the device switched offuntil it has reached room temperature.
Never put any liquids on the device or close to it. Should any liquid enter the device nevertheless, disconnectfrom mains immediately. Please let the device be checked by a qualified service technician before youoperate it again. Any damages caused by liquids having entered the device are not subject to warranty!
This device falls under protection-class II and features a protective insulation.
Never let the power-cord come into contact with other cables! Handle the power-cord and all connectionswith the mains with particular caution!
Make sure that the available voltage is not higher than stated on the AC voltage selector.
Make sure that the power-cord is never crimped or damaged by sharp edges. Check the device and thepower-cord from time to time.
Always disconnect from the mains, when the device is not in use or before cleaning it. Only handle thepower-cord by the plug. Never pull out the plug by tugging the power-cord.
CAUTION: Turn the amplifier on last and off first!
Please note that damages caused by manual modifications on the device or unauthorized operation byunqualified persons are not subject to warranty.
Keep away children and amateurs!
CAUTION: High volumes can cause hearing damage!
There are no serviceable parts inside the device. Maintenance and service operations are only to be carriedout by authorized dealers.
3. OPERATING DETERMINATIONSThis device is a professional CD-player for playing CDs. This product is allowed to be operated with analternating current of 115/230 V, 50/60 Hz and was designed for indoor use only.
Do not shake the device. Avoid brute force when installing or operating the device.
When choosing the installation-spot, please make sure that the device is not exposed to extreme heat,moisture or dust. There should not be any cables lying around. You endanger your own and the safety ofothers!
Do not operate the device in extremely hot (more than 30° C) or extremely cold (less than 5° C)surroundings. Keep away from direct insulation (particularly in cars) and heaters.
Operate the device only after having familiarized with its functions. Do not permit operation by persons notqualified for operating the device. Most damages are the result of unprofessional operation!
Never use solvents or aggressive detergents in order to clean the device! Rather use a soft and damp cloth.
Please use the original packaging if the device is to be transported.
10602365X17NXS_V_1_0.DOC25/71
Never remove the serial barcode from the device as this would make the guarantee void.
If this device will be operated in any way different to the one described in this manual, the product may sufferdamages and the guarantee becomes void. Furthermore, any other operation may lead to dangers likeshort-circuit, burns, electric shock, etc.
4. DESCRIPTION
4.1 FeaturesDual-CD-player with Anti-Shock buffer2 touch sensitive scratch-wheels made of aluminium • Cue Scratch-function: when touching the scratch-wheel back to cue-point • Cue Sequence Scratch-function: when touching the scratch-wheel back to theoccupied cue-point • Realtime-scratch-function without delay and time limit • Vinyl Cue-function for searchingCue-points like with a turntable • The Vinyl Cue-function disables the frame-function of the CD-player • AutoBeatcounter or via Tap-button • Different DSP-sound-effects like brake, reverse, motor off, flanger, echo andauto pan with adjustable parameters • Time and Ratio-parameters individually adjustable • All sound-effectscan be combined with one another (e.g. scratch and echo and flanger or reverse and echo and then brake...)• Beat Sync-function: all effects can be adjusted in accordance with the track speed • All adjusted effect-parameters can be memorized and recalled from up to 500 CDs • Sampler-unit with 3 x 7 seconds sampler-time, adjustable sample-pitch and sample-volume • All adjusted sample-parameters can be memorized andrecalled from up to 500 CDs • Three cue-point hotkeys, which can be recalled from up to 500 CDs •Seamless loop-function and reloop-function • Faderstart-function-function • Speed-control range adjustableto +/- 4 %, +/- 8 %, +/- 16 % or +/- 100 % • With Main Tempo-function • Track-buttons for selecting the track •Additional +10-button • Stable 44.1 kHz S/PDIF digital output via RCA • Search-encoder • Relay-function viaFaderstart-socket • The 2 x 10 second Anti-Shock buffer keeps the CD from jumping • With illuminated CD-tray • Exquisit design with anodized aluminium-frontpanel • Comfortable operation due to well-structuredfrontpanel-design, back-lit buttons, and large display • Pitch-adjustment via Pitchfader is displayed (in % orBPM) • With Faderstart-function for controlling the CD-player from the mixer • Track-buttons for selecting thetrack • Display switchable from track remain time to total remain time to track playback time • 19"-dimensions: Driver unit 2 u, Controller 4 u
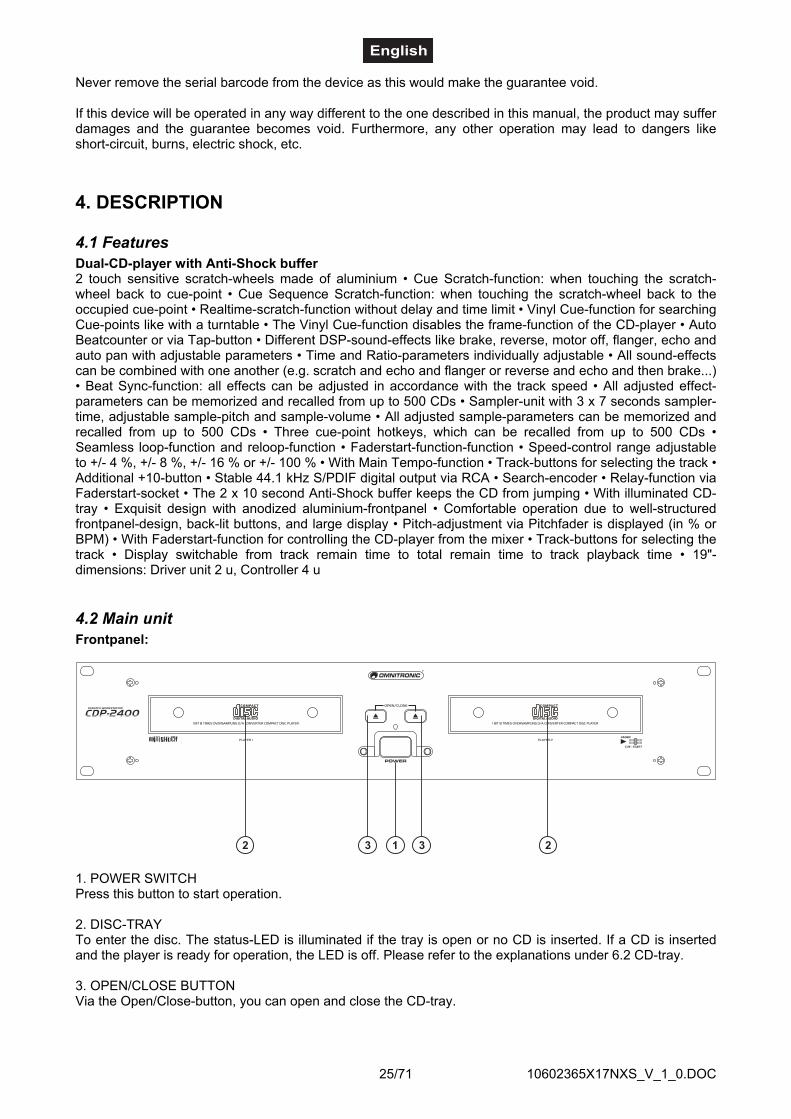
4.2 Main unitFrontpanel:
1. POWER SWITCHPress this button to start operation.
2. DISC-TRAYTo enter the disc. The status-LED is illuminated if the tray is open or no CD is inserted. If a CD is insertedand the player is ready for operation, the LED is off. Please refer to the explanations under 6.2 CD-tray.
3. OPEN/CLOSE BUTTONVia the Open/Close-button, you can open and close the CD-tray.

10602365X17NXS_V_1_0.DOC26/71
Rear panel:
4. AC CONNECTION
5. REMOTE CONTROLConnect the controller via these plugs. Make sure that you connect the player Unit 1 to the controller Unit 1and the player Unit 2 to the controller Unit 2.
6. AUDIO OUT-SOCKETSThe music-signal of these sockets is analogue. Connect the output to the respective input of your mixer.
7. VOLTAGE SELECTORMake sure that the indication corresponds to the available voltage.
8. DIGITAL OUT-SOCKETThe music-signal of this socket is digital. Connect the output to the respective input of a digital amplifier forexample.
4.3 ControllerIn order to design this user manual as structured as possible, only one side of the controller is described.
Frontpanel:

10602365X17NXS_V_1_0.DOC27/71
1. SECTION UNIT 1The left part of the controller is designed for controlling the left CD-player (1).
2. SECTION UNIT 2The right part of the controller is designed for controlling the right CD-player (2).
3. OPEN/CLOSE BUTTONSVia the Open/Close-buttons, you can open and close the respective CD-tray.
4. SEARCH-WHEELVia the Search-wheel, you can quickly scan forwards and backwards. Turn the Search-wheel to the right inorder to scan forwards and turn it to the right in order to scan backwards. The further you turn the Search-wheel the higher the scanning-speed. In the pause-mode, the current frame is repeated as soon as you turnthe Search-wheel.
5. PARAMETER TIME-CONTROLWith the Parameter Time-control, you can adjust the effect time.
6. PARAMETER RATIO-CONTROLWith the Parameter Ratio-control, you can adjust the effect ratio.
7. TRACK-BUTTONSVia the Track-buttons, you can select the desired track. Please refer to the explanations under 6.5 Selectinga track via the Track-buttons.
8. REVERSE-BUTTONWith the Reverse-button, you can activate the Reverse-function. Please refer to the explanations under 6.11Effects.
9. SCRATCH/SKID-BUTTONWith the Scratch-button, you can activate the Scratch-function. Please refer to the explanations under 6.8Interactive scratch-wheel and 6.11 Effects.
10. FILTER/PHASE-BUTTONWith the Filter/Phase-button, you can activate the Filter-function or Phase-function. Please refer to theexplanations under 6.11 Effects.
11. HOLD-BUTTONWith the Hold-button, you can hold the settings of the effect-parameters and sample-parameters. Pleaserefer to the explanations under 6.11 Effects.
12. ECHO/FLANGER-BUTTONWith the Echo/Flanger-button, you can activate the Echo-effect or Flanger-effect. Please refer to theexplanations under 6.11 Effects.
13. TRANS/PAN-BUTTONWith the Trans/Pan-button, you can activate the Trans-effect or Pan-effect. Please refer to the explanationsunder 6.11 Effects.
14. AMBER/RED-BUTTONWith the Amber/Red-button, you can select the desired effect layer.
15. BEAT SYNC-BUTTONSVia the Beat Synch-buttons, you can adjust the effects to the current track's beat.
16. MAIN TEMPO-BUTTONWith the MAIN TEMPO-button, you can adjust the pitch of an adjusted playback speed. Press the MAINTEMPO-button in order to adjust the pitch.
17. PITCH CONTROL-BUTTONWith this button, you can switch the speed-adjustment via the pitchfader off (LED off). Please refer to 6.6Adjusting the playback-speed.

10602365X17NXS_V_1_0.DOC28/71
18. PITCHFADERYou can adjust the desired speed with the Pitchfader. The display shows the current percentage.
19. DISPLAYVFD-display for displaying the different modes and functions. Please refer to the explanations under 6.3VFD-display.
20. LOOP IN/REALTIME CUE-BUTTONBy pressing the In-button, you can memorize the Cue-point. Furthermore, you can program the In-button of asequence which will be repeated then.Please refer to the explanations under 6.9 Memorizing a sequence (Loop-function)and 6.8 Interactivescratch-wheel.
21. LOOP OUT-BUTTONBy pressing the Out-button, you can memorize the Loop Out-button. The player will repeat the memorizedsequence until you press the Out-button once more.
22. RELOOP-BUTTONVia the RELOOP-button, you can call up a memorized sequence once more.
23. CUE-BUTTONPause-mode:In the pause-mode, you can cue by pressing and holding the Cue-button. As soon as you let the Cue-buttonloose, the player returns to the track-start or the Cue-point.Playback-mode:If you press the Cue-button during playback, the player returns to the track-start or the Cue-point and goesinto Pause-mode.On the Cue-button, you can memorize the fourth Cue-point.Please refer to the explanations under 6.7 Cueing.
24. PLAY/PAUSE-BUTTONWith the Play/Pause-button, you can start the playback and stop it again. Please refer to the explanationsunder 6.4 Play/Pause.
25. SINGLE-BUTTONFor choosing single playback or continous play. By pressing this button once, the display shows „SINGLE“.The current track is then played once and the player goes into Pause-mode at the next track-start.
26. TIME-BUTTONThe display can be switched from track remain time (Remain) to total remain time (total remain) or trackplayback time (Elapsed).
27. MEMORY/RECALL-BUTTONWith this button, you can memorize the current Cue-point, the current sample or the sample-parameter viaone of the three Bank/Cue-buttons. Press the Memory/Recall-button (LED on) and the desired Bank/Cue-button. Please refer to the explanations under 6.7 Cueing and 6.10 Sampler-mode.You can memorize up to 3 Cue-points and samples with sample-parameters of different titels and recallthem via the respective Bank/Cue-button.Please note that the maximum sample-length is 7 seconds.In the Effect-mode, you can memorize the adjusted effect parameters by adjusting the parameter andpressing the Memory/Recall-button.You can recall all memorized Cue-points, samples and effect-parameters from up to 500 CDs by switchingthe CD-player on, pressing the Memory/Recall-button (LED on) and inserting the respective CD.
28. SAMPLER-BUTTONBy pressing the Sampler-button (Sampler LED on), you can recall a sample you memorized on one of theBank/Cue-buttons before.The memorized samples of a CD remain in the memory until you switch off the CD-player or overrite thesamples.You can recall all memorized Cue-points, samples and effect-parameters from up to 500 CDs by switchingthe CD-player on, pressing the Memory/Recall-button (LED on) and inserting the respective CD.Please refer to the explanations under 6.10 Sampler-mode.

10602365X17NXS_V_1_0.DOC29/71
29. BANK/CUE-BUTTONSYou can memorize a Cue-point and a sample on every Bank/Cue-button. The memorized Cue-button or thesample (press Sampler-button first) can be recalled via the respective Bank/Cue-button.
30. SCRATCH-WHEELPlayback-mode:Via the Scratch-wheel, you can adjust the playback-speed by +/- 100 %. Please refer to the explanationsunder 6.6 Adjusting the playback-speed.Pause-mode:In the pause-mode, the current frame is repeated as soon as you turn the Scratch-wheel.Via the Scratch-wheel, you can slowly search within a title forwards and backwards. In this way, you caneasily find a Cue-point for example.Turn the Scratch-wheel to the right in order to search forwards and turn itto the right in order to search backwards. The faster you turn the Scratch -wheel the higher the searching-speed. Please refer to the explanations under 6.7 Cueing.Vinyl Cue-function:If you press the Scratch-button, you can activate the VINYL CUE-function. This function disables the frame-function of the CD-player and you can search for the Cue-point as with a turntable. Please refer to theexplanations under 6.8 Interactive scratch-wheel.Cue Scratch-function:Press and hold the Scratch-button until the LED is lit. The aluminium surface of the scratch-wheel is nowactivated. When touching the scratch-wheel, the player returns to the cue-point.
31. BPM-BUTTONVia the BPM-button, you can switch the display from beats per minute (BPM) to speed-adjustment in %.Press and hold the BPM-button in order to switch form manual to automatic beatcounter.
32. TAP-BUTTONVia the Tap-button, you can display the beats per minute of a track. Press the button in the rhythm of themusic. The display shows the current beats per minute (BPM).
33. 4/8/16/100%-BUTTONWith this button, you can select the speed-adjusting range between +/- 4 % (LED red), +/- 8 % (LED flashesred) +/- 16 % (LED blue) or +/- 100 % (LED flashes blue). Please refer to 6.6 Adjusting the playback-speed.
34. PITCH BEND-BUTTONSWith the Pitch Bend-buttons, you can adjust the playback-speed temporarily by up to +/- 100 %. Please referto 6.6 Adjusting the playback-speed.If you press and hold the Pitch Bend - button, the playback speed decreases down to 0. This effect iscomparable with the Motor Off-effect.
Rear panel:
35 36 35 36

10602365X17NXS_V_1_0.DOC30/71
35. CONNECTOR PORTSConnect the main unit here.
36. CONTROL-SOCKETSVia the Control-socket, the respective CD-player can be remotely controlled. If you are using a mixer withFaderstart-function connect the player with the Control Out-socket. Please note that these sockets mustnever be connected with any voltage. Please refer to 6.13 Faderstart.
5. INSTALLATIONInstall the CD-player on a plane surface or in your rack.
Make sure that the inclination angle will not exceed 15°, as the CD cannot be read correctly otherwise.
Rack-installation: This CD-player is built for 19" racks (483 mm). The rack you use should be a Double-Door-Rack where you can open the frontpanel and the rear panel. The rack should be provided with a cooling fan.When mounting the CD-player into the rack, please make sure that there is enough space around the deviceso that the heated air can be passed on. Steady overheating will damage your device.You can fix the CD-player with four screws M6 in the rack.Be aware that fastening the device with four screws on the front panel is not enough. In order to ensuresafety, additional fastening by using ground and side bars is necessary.
CAUTION: Make sure that the CD-player is switched off (power-switch in outer position) before you connectit to the mains in order to avoid damages on your loudspeakers.
Connect the CD-player with the RCA-cable to your mixer via the Audio Out-sockets. Make sure that theright/left occupation (plug-colour red/white) is the same at both devices.
Make sure that the indication on the Voltage-selector corresponds to the available voltage in order to avoidsevere damages. Only plug the power-plug into safety-sockets.
Connect your CD-player with the mains.
6. OPERATION
6.1 SetupSwitch the CD-player on via the Power-switch.When the device is on and the tray has no disc, "NO DISC" appears on the display.
6.2 CD-trayPress Open/Close-button in order to open the disc tray. The CD-tray opens, the status-LED flashes and thedisplay shows "OPEN".Insert your CD in the CD-tray. Make sure that you only hold the CD with 2 fingers on the edge. Avoidtouching the inside area of the CD.
CAUTION: Do not close the tray by pushing it as this could harm the construction.
Press the Open/Close-button again in order to close the tray. The status-LED flashes until the tray is closed.The LED is turned off and the player is ready for operation.

10602365X17NXS_V_1_0.DOC31/71
6.3 VFD-displayIf the CD is improperly positioned,"ERR" or "NO DISC" appears on the display.If the CD is properly positioned, the total number of tracks and the total playback time are shortly displayed.
The player jumps to the first track and is in thePause-mode (Play/Pause-LED flashes). Please notethat the player automatically jumps to the sectionwhere the music starts.Below "TRACK" the track number is displayed. Thetrack remain time is displayed in M (MIN), S (SEC)and F (FRAME).By using the Time-button, the time-indication can beswitched from track remain time (Remain) to totalremain time (Total Remain) to track playback time(Elapsed).Below the time-indication, 10 bars are displayedshowing the remaining track-time visually. Theshorter the track remain time becomes, the less barsare displayed. 15 seconds before the track-end, thebars in the display start flashing.By pressing the Single-button, the CD-player is putinto Single-mode and the display shows "SINGLE".The indication "0.0" means that the playback-speedhas not been changed. If you adjust the playback-speed via the Pitchfader (Pitch-LED is flashing), therespective percentage is indicated in the display.
6.4 Play/PauseIn the Pause-mode the the time-indication in the display stands still and the Play/Pause-LED flashes. Theplayback of the first track can be started by pressing the Play/Pause button. In the Playback-mode, the time-indication in the display is running and the Play/Pause-LED shines permanently.If you wish to interrupt the playback, press the Play/Pause-button and the laser stops at the position whereyou stopped.
6.5. Selecting a track via the Track-buttonsYou can select the desired track via the Track-buttons.In order to play a track from the beginning, press the Track-buttons until the desired track number isdisplayed. If you hold the respective Track-button, the CD-player will run through the track numbers until youlet the button loose.«-button:If you press the «-button once, playback starts at the beginning of the previous track. If a track is alreadyplayed back, you can start the current track from the beginning.»-button:If you press the »-button once, the playback starts at the beginning of the next track, if you press it twice thefollowing track, etc.Please note that the CD-player calls the track up in the mode you pressed the Track-button. If the CD-playeris in the Play-mode at track 1 for example and you press the »-button, the player jumps to track 2 andimmediately starts playback.+10-button:By pressing the +10-button, the CD-player jumps 10-stepwise from track number to track number (e. g. 06,16, 26, 06).
6.6 Adjusting the playback-speed
Possibility 1:Via the Pitchfader, you can adjust the playback-speed by up to +/-100 %.Put the CD-player into playback-mode. Press the Pitch Control-button in order to activate the Pitchfader(LED on).Select the speed-adjustment range by pressing the 4/8/16/100%-button: +/- 4 % (LED red), +/- 8 % (LEDflashes red) +/- 16 % (LED blue) or +/- 100 % (LED flashes blue).

10602365X17NXS_V_1_0.DOC32/71
Adjust the playback-speed via the Pitchfader (Pitch-LED of the respective speed is on).
Possibility 2:Via the Pitch Bend-buttons you can adjust the playback-speed temporarily.Put the CD-player into playback-mode. Press the desired Pitch Bend-button. After letting the Pitch Bend-button loose, the player automatically returns to the original playback-speed.
Motor Off-effect:The Motor Off-effect equals the slow stopping of the turntable, if the motor is switched off. This effect isactivated via the Pitch Bend - button. If you hold the Pitch Bend - button, the playback-speeds decreasesdown to 0. If the CD has "stopped", you can re-activate playback by releasing the Pitch Bend - button.
Possibility 3:In the playback-mode, you can adjust the playback-speed by +/- 100 % via the Scratch-wheel. The adjust-ment will be temorary with the Hold-button not activated and permanent with pressed Hold-button.
6.7 CueingAuto-Cue function:After switching on and after pressing the Track-buttons, the player automatically jumps to the section wherethe music starts. This function enable to minimize the transitions between two tracks.If the Auto Cue-function is disabled, a time interval remains between two tracks until the music starts. If theAuto Cue-function is activated (the display shows "Auto Cue"), the music starts immediately.
Back-Cue function:If you press the Cue-button during playback, the player returns to the track-start or Cue-point (In-button) andgoes into Pause-mode. Please note that this function is only available within one track.
Bop-function:When calling the Cue-point via the Reloop-button the player remains in the play-mode.
Memorizing the Cue-point:
Possibility 1:The player is in Playback-mode.Press the In-button and the Cue-point is memorized. The Cue-indicator shortly flashes.As soon as you press the Cue-button, the player returns the Cue-point and goes into Pause-mode.
Possibility 2:The player is in Playback-mode.Press the Play/Pause-button and the player goes into Pause-mode.Select the Cue-point via the Scratch-wheel. The display shows the selected starting-point (e.g. 3:42 22).Press the In-button and the Cue-point is memorized. The Cue-indicator shortly flashes.As soon as you press the Cue-button, the player returns the Cue-point and goes into Pause-mode.
Possibility 3:The player is in Pause-mode or in Playback-mode.Press the Track-button to select the desired track. The Cue-indicator shortly flashes and the Cue-point is setto the track-start.
Memorizing several Cue-points:With the CDP-2400, you can memorize up to 4 different Cue-points of different tracks and recall them via theBank/Cue-button or the Cue-button, respectively.Press the Memory/Recall-button (LED on) and the desired Bank/Cue-button in order to memorize the currentCue-point on the Bank/Cue-button.By pressing the respective Bank/Cue-button, you can recall the Cue-points memorized via theMemory/Recall-button. The last memorized Cue-point can be recalled by pressing the Cue-button.The memorized Cue-points can be overritten at any time. Please note that the Cue-points can only bedeleted by switching the CD-player off an on again.You can recall all memorized Cue-points from up to 500 CDs after switching the CD-player off. Therefore,you have to switch the CD-player on, press the Memory/Recall-button (LED on) and insert the respectiveCD. The display shows "Recall" until the loading process is finished.

10602365X17NXS_V_1_0.DOC33/71
6.8 Interactive scratch-wheelWith the Scratch-button, you can activate the Scratch-function. This button features 3 different functions.
Pitch Bend-functionPlease refer to the explanations under 6.6 Adjusting the playback-speed.
Vinyl Cue-function:The CDP-2400 features a Vinyl Cue-function for searching Cue-points like with a turntable.
Realtime programming of the Cue-points or Loop-points, respectively:The player is in Playback-mode.Press the Play/Pause-button and the player goes into Pause-mode.Press the Scratch-button in order to disable the frame-function of the CD-player. The CD-player is now in theRealtime Cue-mode. Select the Cue-point by turning the Scratch-wheel forwards and backwards. Repeatedturning forwards of the Scratch-wheel produces a playback resembling the playback-speed via thePlay/Pause-button. Press the In-button in order to memorize the Cue-point.
Cue Scratch-function:Press and hold the Scratch-button until the LED is lit. The aluminium surface of the scratch-wheel is nowactivated. When touching the scratch-wheel, the player returns to the cue-point.
6.9 Memorizing a sequence (Loop-function)With the Loop-function, you can repeat a programmable sequence. Please note that you can only recall thissequence within one track. If you also wish to insert in other tracks, you need to memorize the sequence assample on one of the Bank/Cue-buttons.
Memorizing the Loop-points:
Possibility 1:The player is in Playback-mode.If the In-button is pressed in the playback-mode, the CD keeps running and the A-point (starting-point) ismarked. By pressing the Out-button, the B-point (end-point) of the sequence is marked.The player repeats the sequence between A-point and B-point until you press the Out-button once more.
Possibility 2:The player is in Playback-mode.Press the Play/Pause-button and the player goes into Pause-mode.Select the A-point (starting-point) via the Scratch-wheel. The display shows the selected A-point (e.g. 3:4222). Press the In-button and the selected A-point is marked.Select the B-point (end-point) via the Scratch-wheel. The display shows the selected B-point (e.g. 3:51 11).Press the Out-button and the selected B-point is marked.The player repeats the sequence between A-point and B-point until you press the Out-button once more.
You can repeat the sequence once more if you press the Reloop-button.
6.10 Sampler-modeSet the Loop In-point and Loop Out-point like described above. If a sample is to be memorized on aBank/Cue-button, only the first 7 seconds will be memorized.
Memorizing several samples:With the CDP-2400, you can memorize up to 3 different samples of different tracks and recall them via theBank/Cue-button.Press the Memory/Recall-button (LED on) and the desired Bank/Cue-button in order to memorize the currentsample on the Bank/Cue-button.The memorized samples can be overwritten at any time. Please note that the samples can only be deletedby switching the CD-player off an on again.You can recall all memorized samples from up to 500 CDs after switching the CD-player off. Therefore, youhave to switch the CD-player on, press the Memory/Recall-button (LED on) and insert the respective CD.The display shows "Recall" until the loading process is finished.

10602365X17NXS_V_1_0.DOC34/71
Playback of memorized samples:
Continuous-mode:By pressing the Sampler-button (LED on) and the respective Bank/Cue-button, you can recall the samplesmemorized via the Memory/Recall-button. The sample will be repeated until you press the Sampler-buttonagain (LED off).The memorized samples can be played back at any time. If the Sampler-button is pressed duruing theplayback of the CD, the sample mixes with the CD-playback. If the Sampler-button is pressed in the Pause-mode, the sample alone is being played back. The sample playback-speed can temporarily be adjusted viathe Pitch Bend-buttons.
One-shot-mode:Press the Sampler-button until the LED flashes. The current sample is stopped and the player goes into one-shot-mode. When you press the desired Bank/Cue-button now, the sample is only played once.Press the Sampler-button again (LED off) in order to leave this mode.
Adjusting and memorizing the sample-pitch and sample-volumeThe sample-pitch and the sample-volume can individually be adjusted and memorized for every sample.Press the Sampler-button (LED on) and the respective Bank/Cue-button in order to recall the sample.Press the Hold-button (LED on) in order to hold the parameter-adjustments. If you do not press the Hold-button, the adjustments are only temporary and the CD-player returns to the memorized settings.By turning the Parameter Time-control, you can adjust the sample-pitch to SP 1000 (maximum pitch-adjustment) to SP -1000 (minimum pitch-adjustment).By turning the Parameter Ratio-control, you can adjust the sample-volume to SV 255 (maximum sample-volume) to SV 000 (minimum sample-volume).These temporary settings remain until you switch off the CD-player.If you wish to memorize these settings with the sample, press the Memory/Recall-button (LED on) and hold itfor one second. In this way, the adjusted parameters can be recalled via the Recall-function.
Using temporary samplesThe temporary samples on the Bank/Cue-buttons remain in the buffer memory if you change the CD withoutswitching the CD-player off. Please note that these samples are only temporarily available and cannot bememorized on the new CD. This means, that such temporary samples will be deleted from the buffermemory when you will switch off the CD-player. However, the original samples can be recalled from therespective CD using the Recall-function.
6.11 EffectsThe different effects can be activated via the respective Effect-button. If the effect is activated, the respectiveLED is on.
The effect-parameters can be adjusted via the Parameter Time-control and the Parameter Ratio-control.Press the Hold-button (LED on) in order to hold the parameter-adjustments. If you do not press the Hold-button, the adjustments are only temporary and the CD-player returns to the memorized settings.If you wish to memorize these settings press the Memory/Recall-button (LED on) and hold it for one second.In this way, the adjusted parameters can be recalled via the Recall-function.
You can recall all memorized effect-parameters from up to 500 CDs after switching the CD-player off.Therefore, you have to switch the CD-player on, press the Memory/Recall-button (LED on) and insert therespective CD. The display shows "Recall" until the loading process is finished.
Reverse-function:The unlimited reverse play can be activated via the Reverse-function. The playback-direction can bechanged as often as you like by pressing the Reverse-button. The Reverse-time (PT) modifies the playback-speed and can be adjusted between -1000 and 1000 as pitch change from -100 % to +100 %.
Scratch-function:The scratch-function resembles the scratching with a turntable. By turning the Scratch-wheel forwards andbackwards, different scratching-effects can be produced. If you turn the Scratch-wheel continuouslyforwards, the playback resembles the playback-speed via the Play/Pause-button.
Skid-effect:When choosing the Skid-effect, the original sound is modified in accordance with the Parameter-control.

10602365X17NXS_V_1_0.DOC35/71
The Skid-time (PT) can be adjusted between 0 and 9990. The Skid-rate (PR) can be adjusted between 0and 9990.
Filter-effect:When choosing the Filter-effect, the original sound is modified in accordance with the Parameter-control.The Filter-rate (PR) can be adjusted between 0 and 255.
Phase-effect:When choosing the Phase-effect, the original sound is modified in accordance with the Parameter-control.The Phase-time (PT) can be adjusted between 0 and 9990. The Phase-rate (PR) can be adjusted between 0and 255.
Echo-effect:When choosing the Echo-effect, an echo is added to the original sound. The Echo-time (PT) modifies therepeating frequency and size of the echo and can be adjusted between 0 and 2000 ms.The Echo-rate (PR) modifies the feedback of the echo-effect and can be adjusted between 0 and 255.
Flanger-effect:When choosing the Flanger-effect, the effect of a jet engine is added to the original sound. The Flanger-time(PT) modifies the sound of the flanger-effect and can be adjusted between 0 and 9990 ms.The Flanger-rate (PR) modifies the depth of the flanger-effect and can be adjusted between 0 and 255.
Trans-effect:When choosing the Trans-effect, the original sound is modified in accordance with the Parameter-control.The Trans-time (PT) can be adjusted between 0 and 9990. The Trans-rate (PR) can be adjusted between 0and 255.
Pan-effect:When choosing the Pan-effect, the sound is cyclically directed to the left and right side. The Pan-time (PT)modifies the changing speed and can be adjusted between 0 and 9990 ms.
Overview over the effect-parameters:
Effects Parameter PT Parameter PRAdjustable value Default value Adjustable value Default value
Reverse -1000 - 1000 ms 0 msSkid 0-9990 ms 10 ms 0 - 9990 10Filter 0-9990 ms 6000 ms 0 - 255 0Phase 0 - 9900 ms 300 ms 0 - 255 0Echo 0 - 2000 ms 350 ms 0 - 255 128Flanger 0 - 9990 ms 1000 ms 0 - 255 179Trans 0 - 9900 ms 0 - 255 153Pan 0 - 9990 ms 450 ms
6.12 Beat Sync-functionYou can either adjust the effect-time via the Parameter Time-control or more comfortably via the Presets ofthe Beat Sync-function.
Example:Press the Auto BPM-button during playback and wait until the display shows the current value.Press the Echo-button. Adjust the Parameter Time-control and watch the Beat Sync-LEDs.When the Echo-time corresponds to a whole note, the 1/1 LED is lit.In this way, the Beat Sync-LEDs show the most common time adjustments.
Via the Beat Sync-buttons, you can quickly and easily select the desired tact.
6.13 FaderstartWith the CDP-2400, you have the possibility to start the CD-player directly from the mixer. Make sure thatthe Faderstart-socket is connected with the respective socket on the mixer. Additionally, the Audio Out-

10602365X17NXS_V_1_0.DOC36/71
sockets have to be connected with the Line-input sockets of your mixer. Please note that the Faderstart-function only works with the appropriate mixers. Insert the CD and select the desired track (Pause-mode).Start playback from your mixer.Please note that the Faderstart-function is a Cue-point Faderstart-function. This means that the CD-playerstarts playback after activating the respective channel of the mixer and goes into Pause-mode and returns tothe Cue-point after activating the channel again.
Prerequisites for the Faderstart-operation:The mixer has to be connected via a 3.5 mm mono jack with the CD-player. For starting the playback, thejack's positive pin (tip) is to be connected with the audio mass via a short impulse. For pausing the playback,the jack's negative pin (sleeve) is to be connected with the audio mass via a short impulse. The mixer has tobe equipped with a switch, button or fader that will connect the tip with the audio mass for starting theplayback and the sleeve for pausing the playback when the respective channel is activated.
Relay-functionIn the Relay-operation, the device automatically switches to the other player after every track. In this way,you have the possibility to enlarge the music program by using several CDs.
Possibility 1:Connect the Faderstart-sockets of the two CD-players with one another. Choose Single or Continuous viathe SGL/CTN-button. The playback switches from one player to the other.Example:Press the Single-button (The display shows "SINGLE") on both CD-players. Start playback of CD1. As soonas the current track of CD1 is finished, the player automatically starts CD2. The first CD-player goes intoPause-mode. You can enter a new CD or memorize a Cue-point at the respective player in the Pause-Mode.
6.14 Stand By-modeAfter 15 minutes, the player automatically goes into Stand By-mode. This means that the laser pick-up willshut down. In this way, the unit maintains a longer durability.
6.15 End of operationBefore you switch off the device, please make sure that no CD remains in the player. All memorized Cue-points, samples and effect-parameters are stored inside the CD-player and can be also be recalled afterswitching the CD-player off.Also make sure that the CD-tray is completely closed before you switch off. If this is not the case, switch thedevice on again and close the tray with the Open/Close-button.
7. PRECAUTIONSThis CD player cannot be compared to conventional Hifi CD players - even if they have almost the sameappearance. This player is much more rugged in order to withstand the strenous road use and consistenttransports of mobile discotheques. We recommend to put the CD player on plastic foam or on rubber feet inorder to avoid skipping, which is caused by vibrations of low frequencies. The same thing holds true if theCD player is mounted in a rack an the rack is exposed to such frequencies.Should you have further problems, please refer to the chart below.The adjustments of the Pitchfader change the FM frequencies. Should the display repeatedly show "ERR"adjust the frequencies.
Have the connections correctly been carried out?Is your amplifier and your mixer properly adjusted?Have you kept to all instructions given in this manual?
SYMPTOMS POSSIBLE CAUSES SOLUTIONDevice does not react when swit-ching on.
Connection to mains disrupted. Check AC plug and ACconnection.
Player does not start operation CD is badly positioned or dirty Reposition CD with label atop orclean with a dry and soft cloth.
No sound Check the mixer and amplifier Possibly exchange connections.

10602365X17NXS_V_1_0.DOC37/71
connectionsDoes not read the program The player is in normal playback
modePress the Play/Pause-button andre-program
Pop noise Mixer or amplifier connectionsinapropriate
Check cable and jack quality
Faderstart does not work Missing Audio Out-connection Connect the Audio Out-socketswith the Line-input sockets of yourmixer
8. CLEANING AND MAINTENANCE
Disconnect from mains before starting maintenance operation!
DANGER TO LIFE!
We recommend a frequent cleaning of the device. Please use a soft lint-free and moistened cloth. Never usealcohol or solvents!
There are no servicable parts inside the device. Maintenance and service operations are only to be carriedout by authorized dealers.
Should you need any spare parts, please use genuine parts.
If the power supply cable of this device becomes damaged, it has to be replaced by a special power supplycable available at your dealer.
Should you have further questions, please contact your dealer.
9. TECHNICAL SPECIFICATIONS
Power supply: 115/230 V AC, 50/60 HzPower consumption: 25 WType: Dual Compact Disc PlayerAvailable disc: Standard CDs 8 and 12 cmQuantisation: D/A-converter: 1 BitSampler frequency: 44.1 kHzFrame-accuracy: 1/75 secPitch adjustment: +/- 4 %, +/- 8 %, +/- 16 %, +/- 100 %Display: Remaining track time and track playback timeDistortion: 0.01 %, 1 KHzS/N-ratio: 86 dBChannel seperation: 83 dBFrequency range: 20 - 20,000 Hz; +/- 0 dBAudio output: unbalanced via RCAOutput level: 1 VrmsDigital ouput: unbalanced via RCA, 44.1 kHz stableDimensions: 482 x 88.8 x 262 mm (CD-player)
482 x 177 x 65 mm (control unit)19"-dimensions
Weight: 5.5 kg (CD-player)3 kg (control unit)
Please note: Every information is subject to change without prior notice. 22.10.2003 ©