bca donor manager 3 manager 3.0... · 2 bca donor manager 3.0 general program operation general...
TRANSCRIPT

1
BCA Donor Manager 3.0
Reference Manual
April, 2009

2
BCA Donor Manager 3.0 General Program Operation General Program Conventions There are some general program operating principles which apply across all the modules of the program. These are:
- double clicking on a Date field brings up a popup calendar - Date field format is according to the Windows Regional Settings, and therefore could be different
from one computer to the next - holding the mouse cursor over a data entry field or command button will in many cases pop up
more detailed instructions that apply to that field or button
Main Menu Once in Donor Manager 3.0, the Main Menu (see below) appears. This menu will navigate you through all the program features of Donor Manager. Menu selections are explained in more detail in the following pages, in order of how they appear in the menus.
3
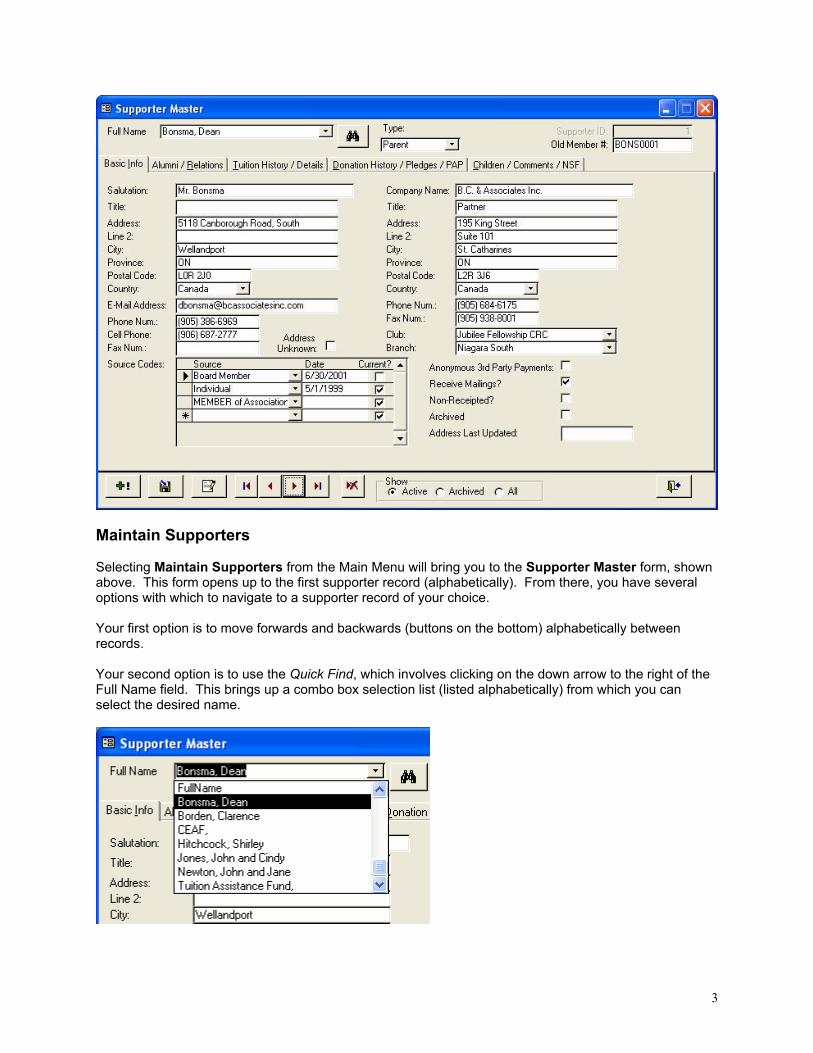
Maintain Supporters Selecting Maintain Supporters from the Main Menu will bring you to the Supporter Master form, shown above. This form opens up to the first supporter record (alphabetically). From there, you have several options with which to navigate to a supporter record of your choice. Your first option is to move forwards and backwards (buttons on the bottom) alphabetically between records. Your second option is to use the Quick Find, which involves clicking on the down arrow to the right of the Full Name field. This brings up a combo box selection list (listed alphabetically) from which you can select the desired name.
4
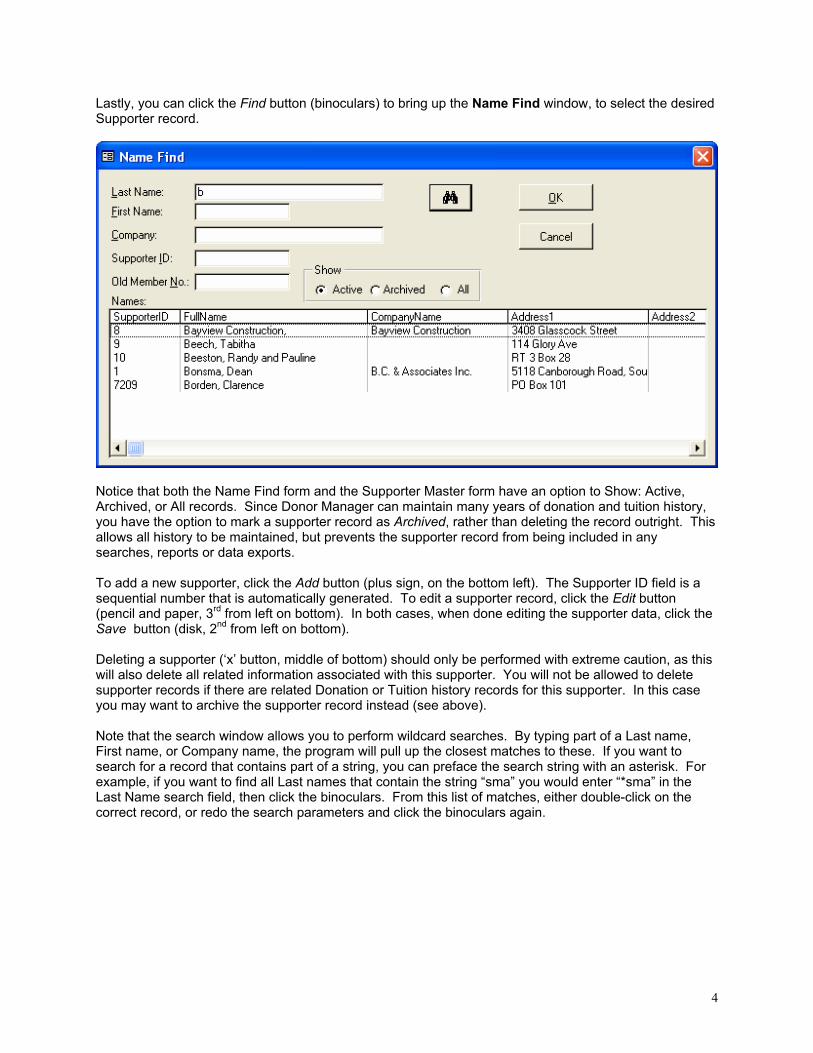
Lastly, you can click the Find button (binoculars) to bring up the Name Find window, to select the desired Supporter record.
Notice that both the Name Find form and the Supporter Master form have an option to Show: Active, Archived, or All records. Since Donor Manager can maintain many years of donation and tuition history, you have the option to mark a supporter record as Archived, rather than deleting the record outright. This allows all history to be maintained, but prevents the supporter record from being included in any searches, reports or data exports. To add a new supporter, click the Add button (plus sign, on the bottom left). The Supporter ID field is a sequential number that is automatically generated. To edit a supporter record, click the Edit button (pencil and paper, 3rd from left on bottom). In both cases, when done editing the supporter data, click the Save button (disk, 2nd from left on bottom). Deleting a supporter (‘x’ button, middle of bottom) should only be performed with extreme caution, as this will also delete all related information associated with this supporter. You will not be allowed to delete supporter records if there are related Donation or Tuition history records for this supporter. In this case you may want to archive the supporter record instead (see above). Note that the search window allows you to perform wildcard searches. By typing part of a Last name, First name, or Company name, the program will pull up the closest matches to these. If you want to search for a record that contains part of a string, you can preface the search string with an asterisk. For example, if you want to find all Last names that contain the string “sma” you would enter “*sma” in the Last Name search field, then click the binoculars. From this list of matches, either double-click on the correct record, or redo the search parameters and click the binoculars again.

5
Basic Info Back in the Supporter Master form, the Basic Info tab shows supporter name and address information, company information (for reference purposes only), and also gives you pull down menus to select Churches and Chapters. This form also allows you to select Source Codes, and you can enter as many source codes as apply to this supporter. Note that you need to check the Current checkbox in order for a given source code to apply for that supporter. If the box is not checked, this source code will be ignored in later sorting and selection. This tab also allows you to check off whether 3rd party contributions from this supporter are anonymous or not. This means that if this supporter has made tuition payments on behalf of another family, then their name will not appear on Tuition Statement and other reports that detail those payments. Other fields available here indicate whether a supporter will receive mailings or not, whether contributions from this supporter record are deemed to be non-receipted, and whether the supporter record is to be marked Archived or not. Note that if the supporter has been marked as Archived and you later want to reactivate this supporter, you can simply view all Archived records, find the record you want, click the Edit button, and uncheck the Archived field.
6
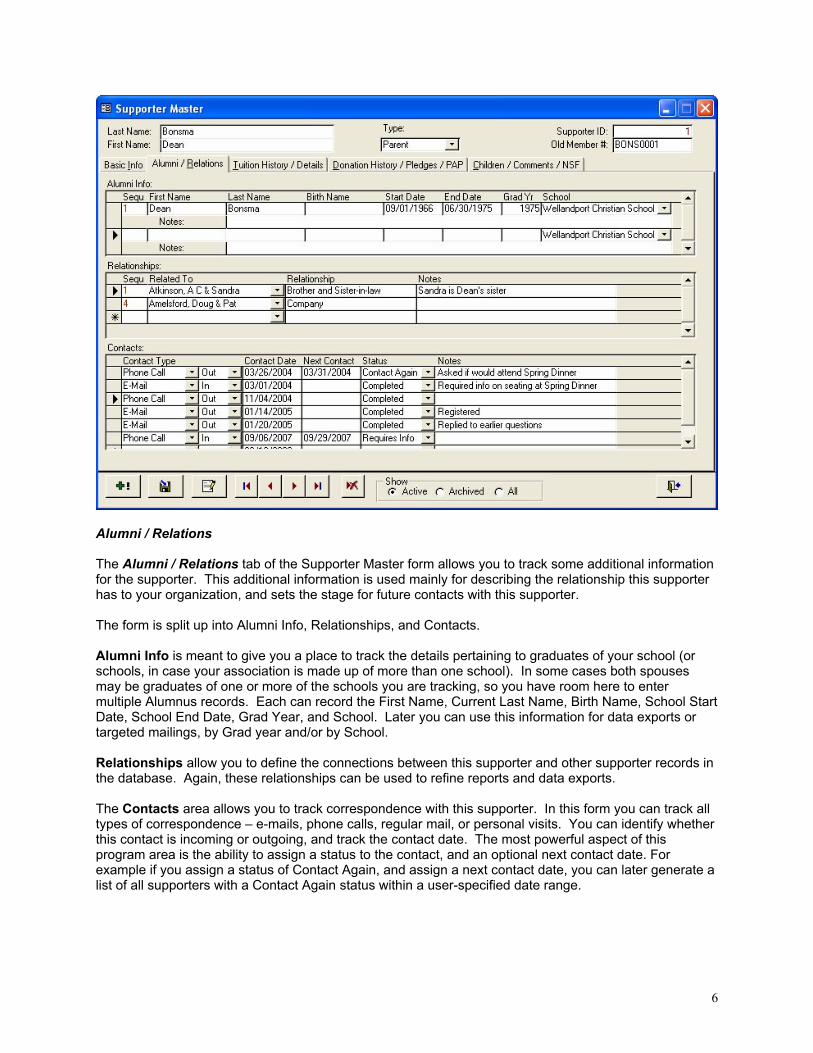
Alumni / Relations The Alumni / Relations tab of the Supporter Master form allows you to track some additional information for the supporter. This additional information is used mainly for describing the relationship this supporter has to your organization, and sets the stage for future contacts with this supporter. The form is split up into Alumni Info, Relationships, and Contacts. Alumni Info is meant to give you a place to track the details pertaining to graduates of your school (or schools, in case your association is made up of more than one school). In some cases both spouses may be graduates of one or more of the schools you are tracking, so you have room here to enter multiple Alumnus records. Each can record the First Name, Current Last Name, Birth Name, School Start Date, School End Date, Grad Year, and School. Later you can use this information for data exports or targeted mailings, by Grad year and/or by School. Relationships allow you to define the connections between this supporter and other supporter records in the database. Again, these relationships can be used to refine reports and data exports. The Contacts area allows you to track correspondence with this supporter. In this form you can track all types of correspondence – e-mails, phone calls, regular mail, or personal visits. You can identify whether this contact is incoming or outgoing, and track the contact date. The most powerful aspect of this program area is the ability to assign a status to the contact, and an optional next contact date. For example if you assign a status of Contact Again, and assign a next contact date, you can later generate a list of all supporters with a Contact Again status within a user-specified date range.

7
Refer to the Main Menu item Maintain Calls/Contacts for an alternative method and additional information on recording general and supporter correspondence.
8
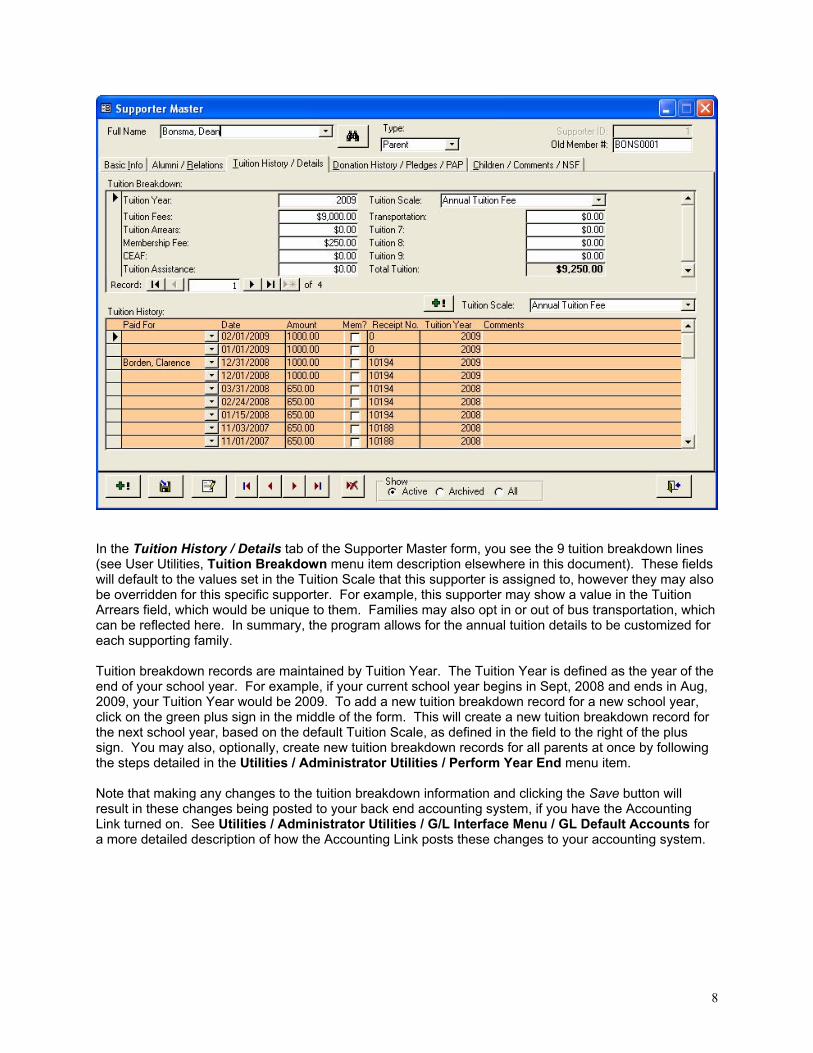
In the Tuition History / Details tab of the Supporter Master form, you see the 9 tuition breakdown lines (see User Utilities, Tuition Breakdown menu item description elsewhere in this document). These fields will default to the values set in the Tuition Scale that this supporter is assigned to, however they may also be overridden for this specific supporter. For example, this supporter may show a value in the Tuition Arrears field, which would be unique to them. Families may also opt in or out of bus transportation, which can be reflected here. In summary, the program allows for the annual tuition details to be customized for each supporting family. Tuition breakdown records are maintained by Tuition Year. The Tuition Year is defined as the year of the end of your school year. For example, if your current school year begins in Sept, 2008 and ends in Aug, 2009, your Tuition Year would be 2009. To add a new tuition breakdown record for a new school year, click on the green plus sign in the middle of the form. This will create a new tuition breakdown record for the next school year, based on the default Tuition Scale, as defined in the field to the right of the plus sign. You may also, optionally, create new tuition breakdown records for all parents at once by following the steps detailed in the Utilities / Administrator Utilities / Perform Year End menu item. Note that making any changes to the tuition breakdown information and clicking the Save button will result in these changes being posted to your back end accounting system, if you have the Accounting Link turned on. See Utilities / Administrator Utilities / G/L Interface Menu / GL Default Accounts for a more detailed description of how the Accounting Link posts these changes to your accounting system.

9
The bottom half of the screen shows the tuition payment history for this supporter, in reverse date order. Fields of note on this form: Tuition Scale: This default scale value can be set to whatever scale applies for this supporter. Once set, the tuition breakdown fields will default to whatever was entered for that scale. Paid For: If this field is blank, it indicates that the tuition payment has been made on the supporter’s own behalf. If there is another name in this field, it indicates that the payment has been made as a third party payment on behalf of the name shown. Mem?: If this field is checked off, it indicates that the payment is designated for Membership Fees. This value is considered a capital contribution, for receipting purposes, and thus is not subject to the Cost of Education deduction for this family. Tuition Year: The Tuition Year refers to the school year that this payment applies to. For example, if your school year runs from September 2008 to June 2009, the Tuition Year would be 2009.
10
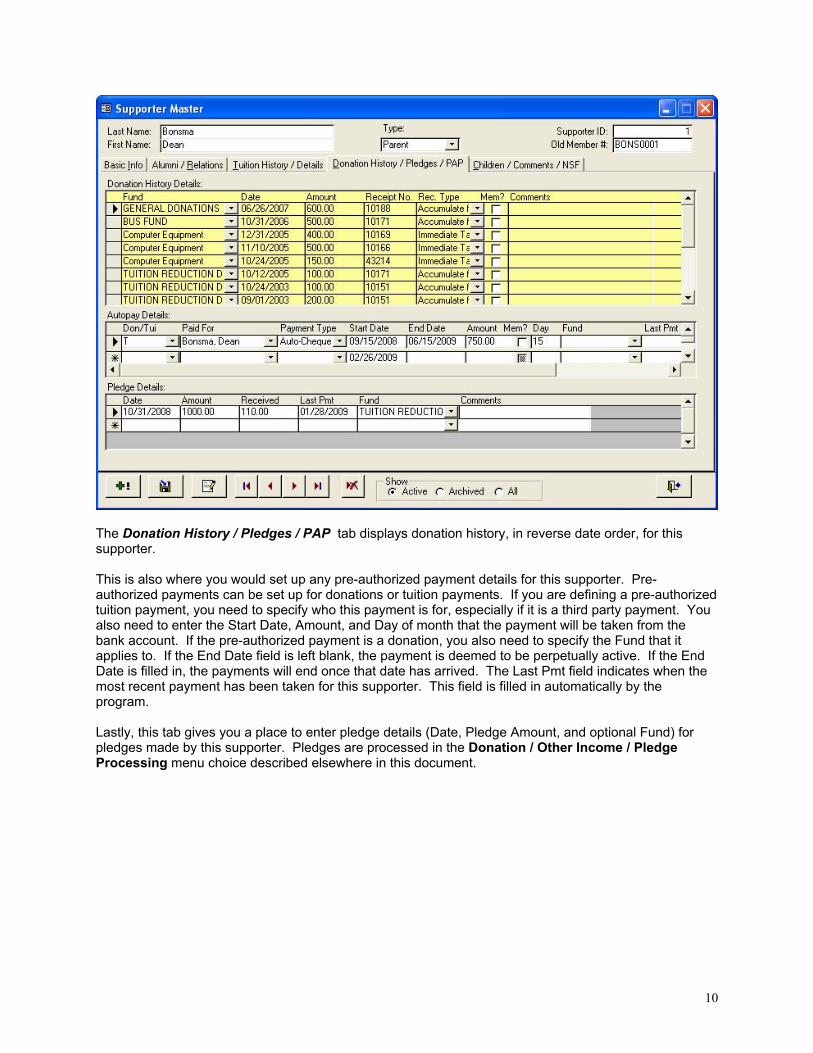
The Donation History / Pledges / PAP tab displays donation history, in reverse date order, for this supporter. This is also where you would set up any pre-authorized payment details for this supporter. Pre-authorized payments can be set up for donations or tuition payments. If you are defining a pre-authorized tuition payment, you need to specify who this payment is for, especially if it is a third party payment. You also need to enter the Start Date, Amount, and Day of month that the payment will be taken from the bank account. If the pre-authorized payment is a donation, you also need to specify the Fund that it applies to. If the End Date field is left blank, the payment is deemed to be perpetually active. If the End Date is filled in, the payments will end once that date has arrived. The Last Pmt field indicates when the most recent payment has been taken for this supporter. This field is filled in automatically by the program. Lastly, this tab gives you a place to enter pledge details (Date, Pledge Amount, and optional Fund) for pledges made by this supporter. Pledges are processed in the Donation / Other Income / Pledge Processing menu choice described elsewhere in this document.
11
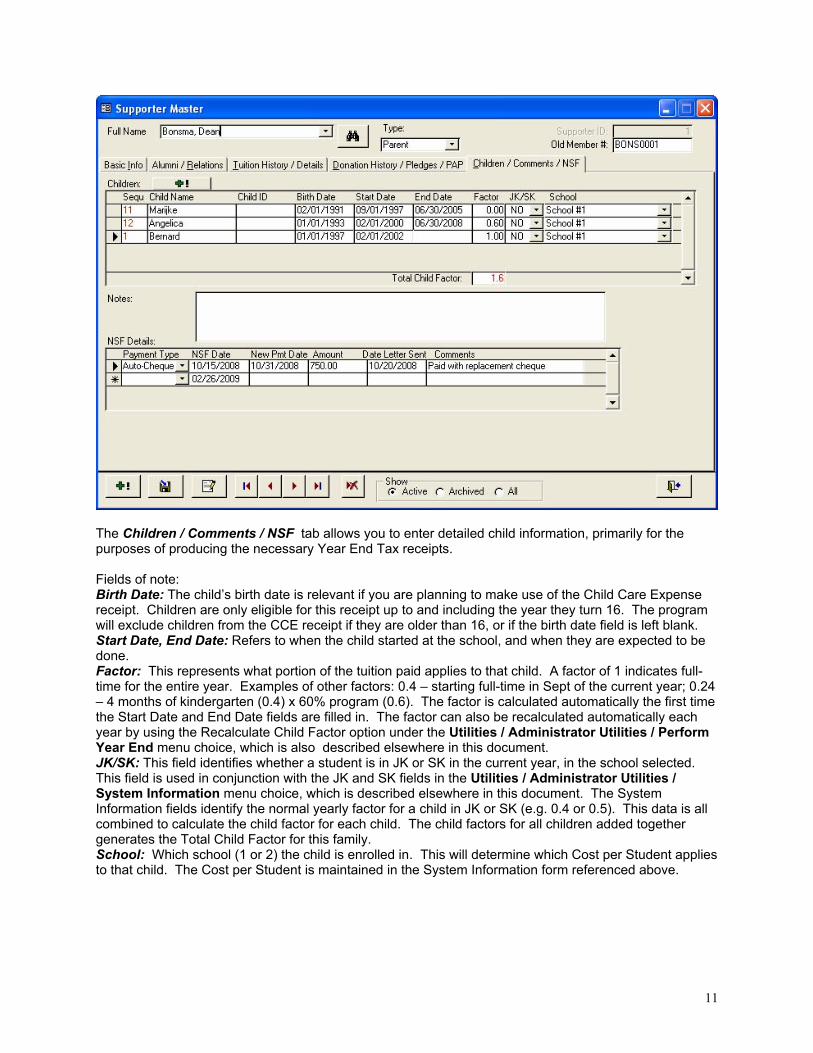
The Children / Comments / NSF tab allows you to enter detailed child information, primarily for the purposes of producing the necessary Year End Tax receipts. Fields of note: Birth Date: The child’s birth date is relevant if you are planning to make use of the Child Care Expense receipt. Children are only eligible for this receipt up to and including the year they turn 16. The program will exclude children from the CCE receipt if they are older than 16, or if the birth date field is left blank. Start Date, End Date: Refers to when the child started at the school, and when they are expected to be done. Factor: This represents what portion of the tuition paid applies to that child. A factor of 1 indicates full-time for the entire year. Examples of other factors: 0.4 – starting full-time in Sept of the current year; 0.24 – 4 months of kindergarten (0.4) x 60% program (0.6). The factor is calculated automatically the first time the Start Date and End Date fields are filled in. The factor can also be recalculated automatically each year by using the Recalculate Child Factor option under the Utilities / Administrator Utilities / Perform Year End menu choice, which is also described elsewhere in this document. JK/SK: This field identifies whether a student is in JK or SK in the current year, in the school selected. This field is used in conjunction with the JK and SK fields in the Utilities / Administrator Utilities / System Information menu choice, which is described elsewhere in this document. The System Information fields identify the normal yearly factor for a child in JK or SK (e.g. 0.4 or 0.5). This data is all combined to calculate the child factor for each child. The child factors for all children added together generates the Total Child Factor for this family. School: Which school (1 or 2) the child is enrolled in. This will determine which Cost per Student applies to that child. The Cost per Student is maintained in the System Information form referenced above.

12
Donation / Other Income / Pledge Processing The Donation / Other Income / Pledge Processing Submenu is essentially arranged in the order the processes are performed. The basic procedure is defined by:
- Enter and edit donations, post dated donations, pledge receipts, and other income (Current Donation Entry)
- Alternatively, you could process an Autopay (pre-authorized payment) batch, to record a batch of payments
- Print a batch report for either Donations, Post Dated Donations, or Other Income (a batch report is required before entries can be posted)
- Directly edit the unposted transactions to make minor corrections or additions (Edit Current Donations Table)
- Post Donations, Post Dated Donations, or Other Income to permanent transaction history. Note that transactions will not be posted until they have successfully appeared on a Donation Batch report.
13
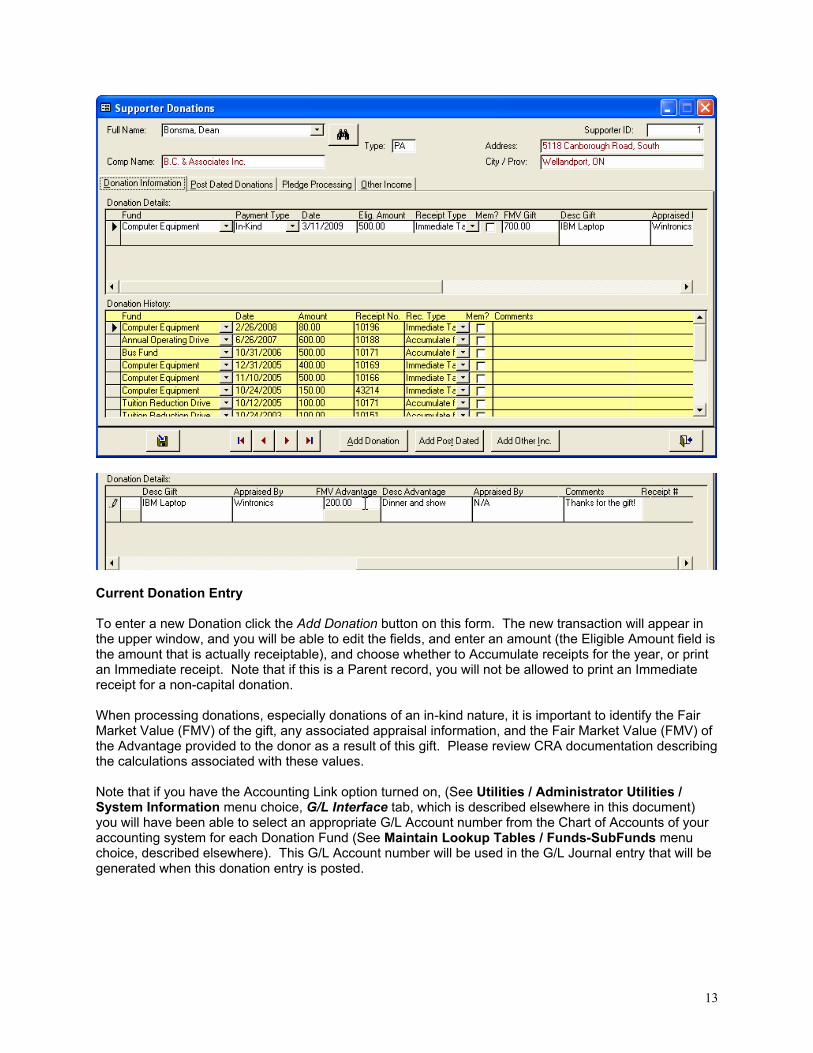
Current Donation Entry To enter a new Donation click the Add Donation button on this form. The new transaction will appear in the upper window, and you will be able to edit the fields, and enter an amount (the Eligible Amount field is the amount that is actually receiptable), and choose whether to Accumulate receipts for the year, or print an Immediate receipt. Note that if this is a Parent record, you will not be allowed to print an Immediate receipt for a non-capital donation. When processing donations, especially donations of an in-kind nature, it is important to identify the Fair Market Value (FMV) of the gift, any associated appraisal information, and the Fair Market Value (FMV) of the Advantage provided to the donor as a result of this gift. Please review CRA documentation describing the calculations associated with these values. Note that if you have the Accounting Link option turned on, (See Utilities / Administrator Utilities / System Information menu choice, G/L Interface tab, which is described elsewhere in this document) you will have been able to select an appropriate G/L Account number from the Chart of Accounts of your accounting system for each Donation Fund (See Maintain Lookup Tables / Funds-SubFunds menu choice, described elsewhere). This G/L Account number will be used in the G/L Journal entry that will be generated when this donation entry is posted.
14
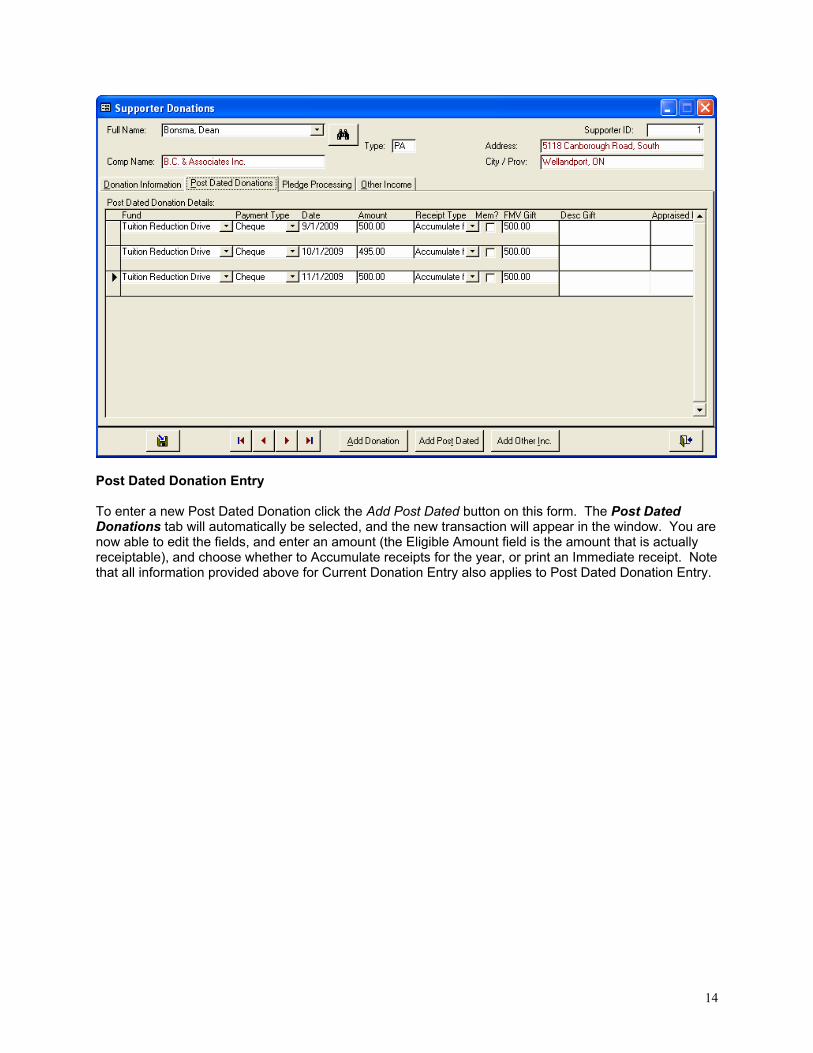
Post Dated Donation Entry To enter a new Post Dated Donation click the Add Post Dated button on this form. The Post Dated Donations tab will automatically be selected, and the new transaction will appear in the window. You are now able to edit the fields, and enter an amount (the Eligible Amount field is the amount that is actually receiptable), and choose whether to Accumulate receipts for the year, or print an Immediate receipt. Note that all information provided above for Current Donation Entry also applies to Post Dated Donation Entry.

15
Pledge Processing To process a pledge, click on the Pledge Processing tab, and click on the pledge line you wish to process. A window will pop up allowing you to enter the amount of the pledge that you will be receiving (Current Amount -- doesn’t have to be the entire amount), and the Payment Date for the receipt. Clicking the Ok button will do several things:
- Update the Received field in the Pledge record, to reflect what was there before plus the new amount you just entered
- Update the Last Pmt date field in the Pledge record, to match the Payment Date you just entered for the pledge receipt
- Populate a Current Donation entry record with this data.
From this point on, this donation amount will be processed normally, as a Current Donation Entry, so you would proceed to the Print Donation Batch Report menu choice.
16
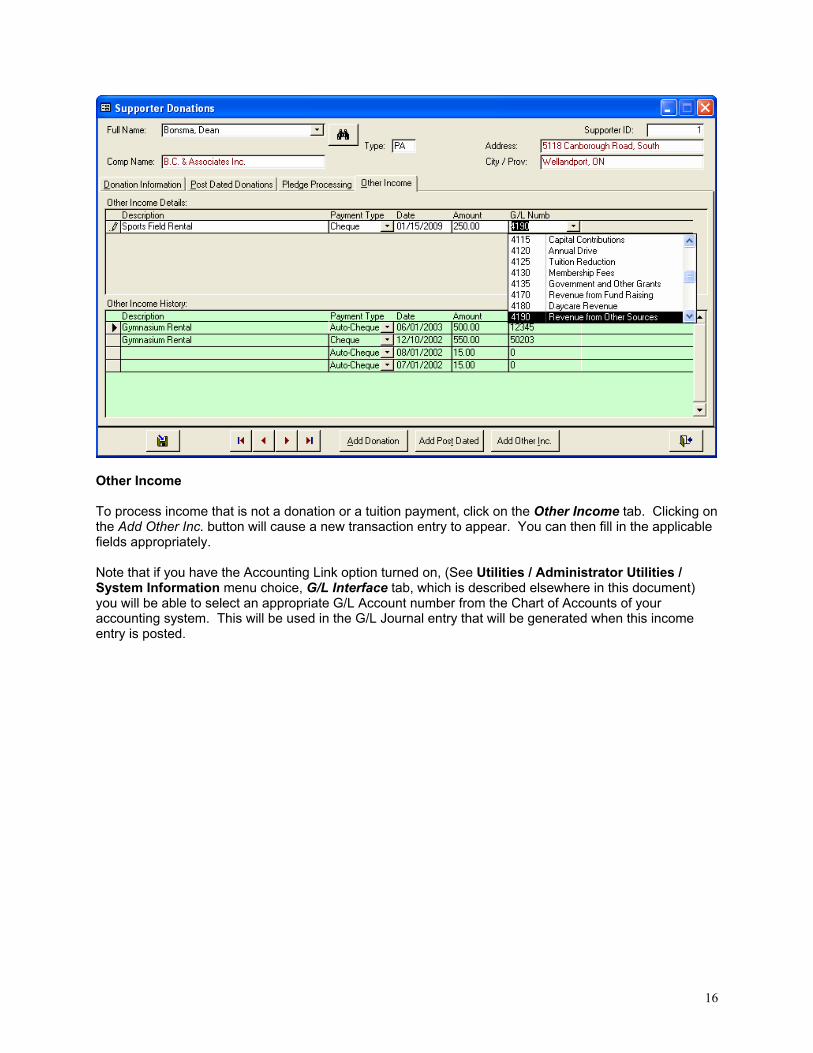
Other Income To process income that is not a donation or a tuition payment, click on the Other Income tab. Clicking on the Add Other Inc. button will cause a new transaction entry to appear. You can then fill in the applicable fields appropriately. Note that if you have the Accounting Link option turned on, (See Utilities / Administrator Utilities / System Information menu choice, G/L Interface tab, which is described elsewhere in this document) you will be able to select an appropriate G/L Account number from the Chart of Accounts of your accounting system. This will be used in the G/L Journal entry that will be generated when this income entry is posted.
17
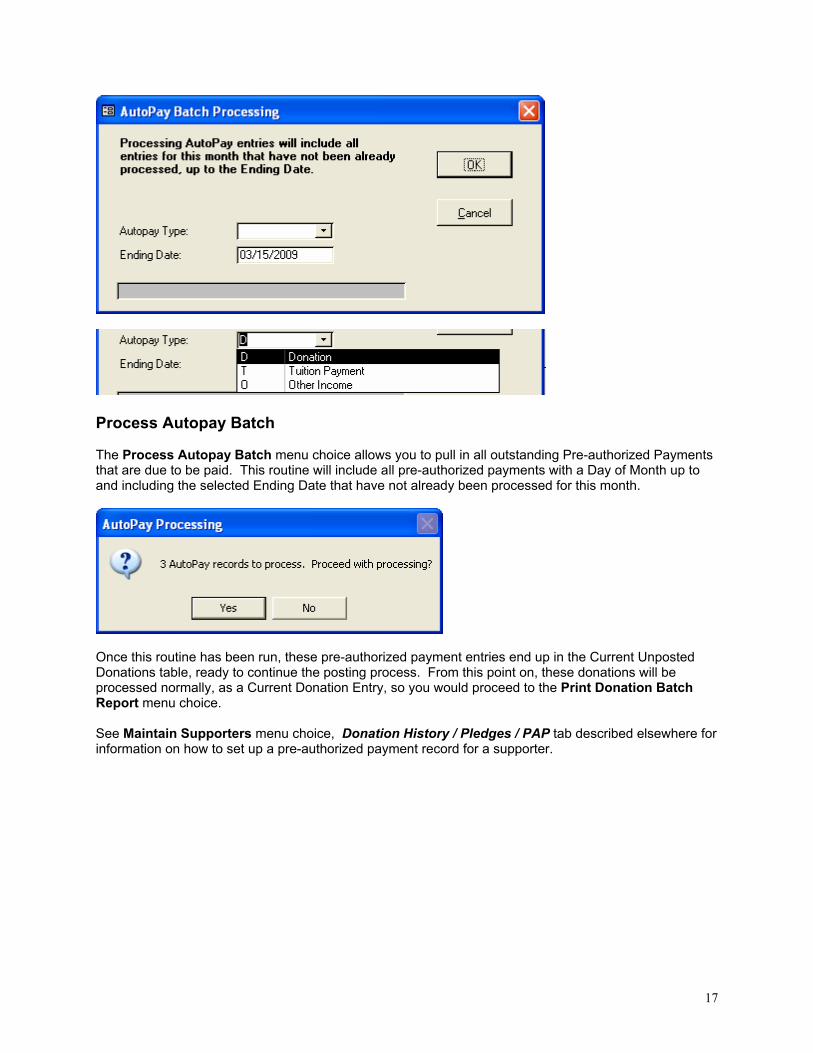
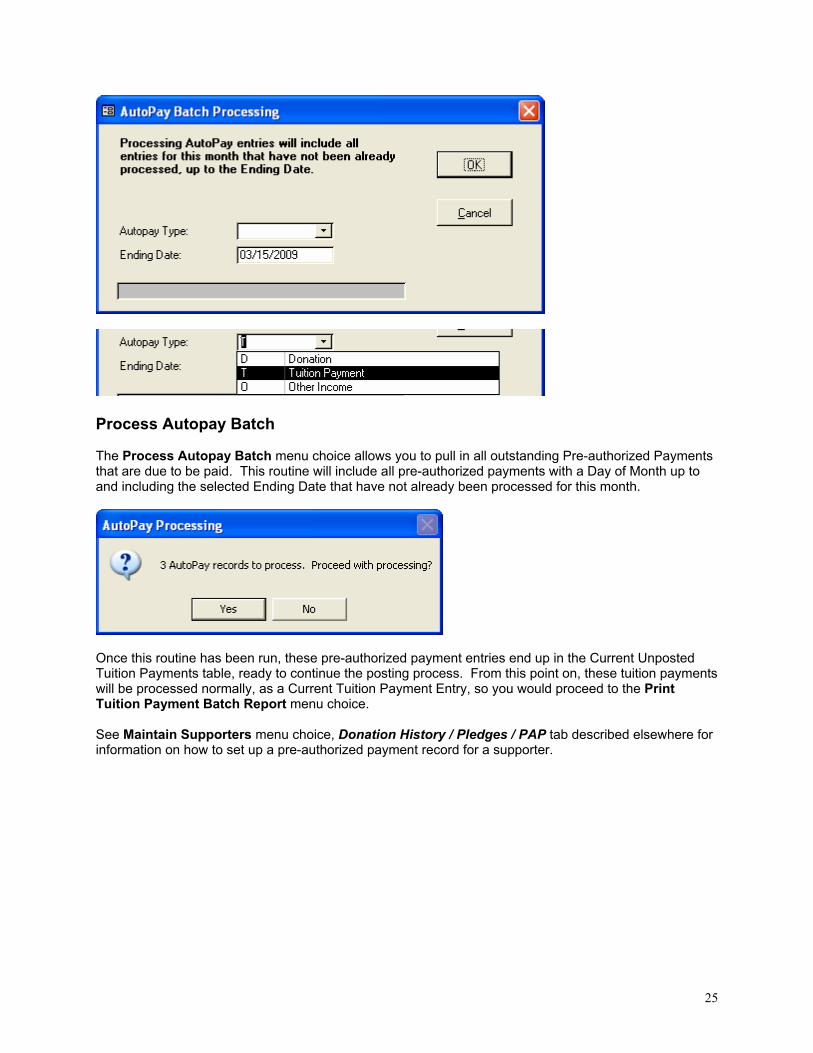
Process Autopay Batch The Process Autopay Batch menu choice allows you to pull in all outstanding Pre-authorized Payments that are due to be paid. This routine will include all pre-authorized payments with a Day of Month up to and including the selected Ending Date that have not already been processed for this month.
Once this routine has been run, these pre-authorized payment entries end up in the Current Unposted Donations table, ready to continue the posting process. From this point on, these donations will be processed normally, as a Current Donation Entry, so you would proceed to the Print Donation Batch Report menu choice. See Maintain Supporters menu choice, Donation History / Pledges / PAP tab described elsewhere for information on how to set up a pre-authorized payment record for a supporter.
18
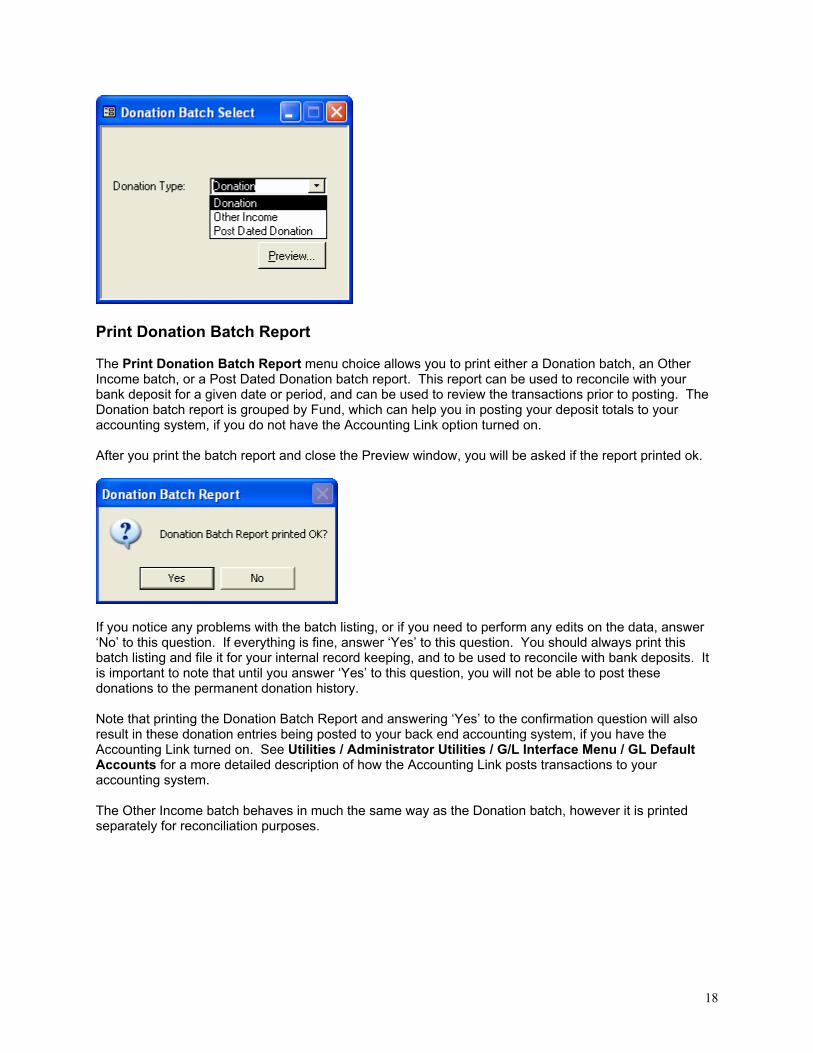
Print Donation Batch Report The Print Donation Batch Report menu choice allows you to print either a Donation batch, an Other Income batch, or a Post Dated Donation batch report. This report can be used to reconcile with your bank deposit for a given date or period, and can be used to review the transactions prior to posting. The Donation batch report is grouped by Fund, which can help you in posting your deposit totals to your accounting system, if you do not have the Accounting Link option turned on. After you print the batch report and close the Preview window, you will be asked if the report printed ok.
If you notice any problems with the batch listing, or if you need to perform any edits on the data, answer ‘No’ to this question. If everything is fine, answer ‘Yes’ to this question. You should always print this batch listing and file it for your internal record keeping, and to be used to reconcile with bank deposits. It is important to note that until you answer ‘Yes’ to this question, you will not be able to post these donations to the permanent donation history. Note that printing the Donation Batch Report and answering ‘Yes’ to the confirmation question will also result in these donation entries being posted to your back end accounting system, if you have the Accounting Link turned on. See Utilities / Administrator Utilities / G/L Interface Menu / GL Default Accounts for a more detailed description of how the Accounting Link posts transactions to your accounting system. The Other Income batch behaves in much the same way as the Donation batch, however it is printed separately for reconciliation purposes.

19
When you choose to print a Post Dated Donation batch report, the Ending Date field becomes visible. The purpose of this is to include all post dated donations up to and including the selected Ending Date that have not already been processed. If you run this routine once per month, for example, all post dated donation entries from the last time it was run up to the Ending Date will be included. Once this routine has been run, these post dated donation entries end up in the Current Unposted Donations table, ready to continue the posting process. From this point on, these donations will be processed normally, as a Current Donation Entry, so you would proceed either to the Edit Current Donations Table menu choice, if you need to make any data changes, or directly to the Post Current Donations menu choice, if you are ready to post.
20
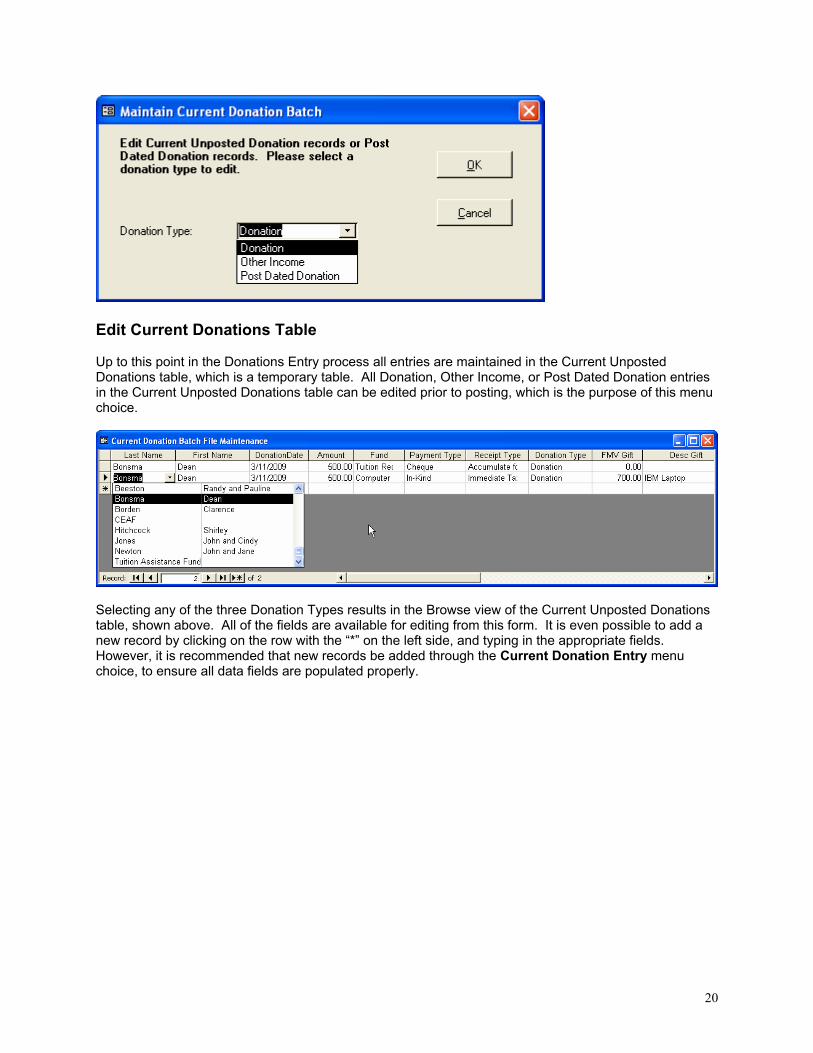
Edit Current Donations Table Up to this point in the Donations Entry process all entries are maintained in the Current Unposted Donations table, which is a temporary table. All Donation, Other Income, or Post Dated Donation entries in the Current Unposted Donations table can be edited prior to posting, which is the purpose of this menu choice.
Selecting any of the three Donation Types results in the Browse view of the Current Unposted Donations table, shown above. All of the fields are available for editing from this form. It is even possible to add a new record by clicking on the row with the “*” on the left side, and typing in the appropriate fields. However, it is recommended that new records be added through the Current Donation Entry menu choice, to ensure all data fields are populated properly.
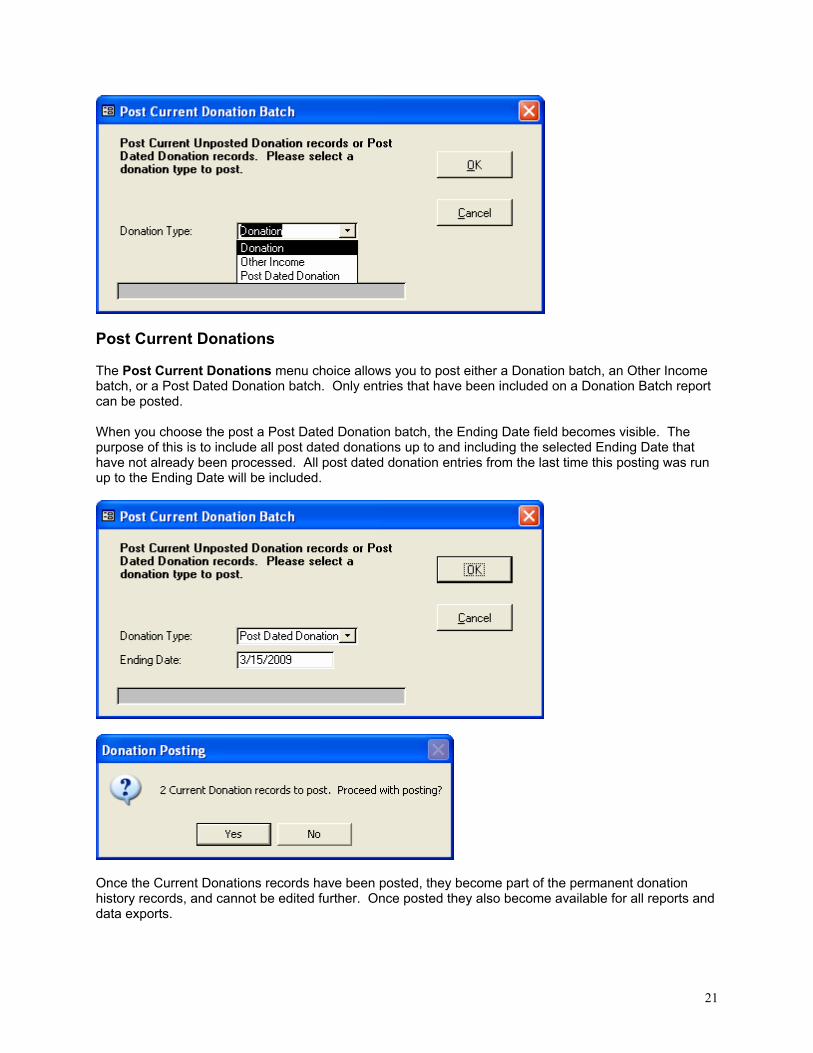
21
Post Current Donations The Post Current Donations menu choice allows you to post either a Donation batch, an Other Income batch, or a Post Dated Donation batch. Only entries that have been included on a Donation Batch report can be posted. When you choose the post a Post Dated Donation batch, the Ending Date field becomes visible. The purpose of this is to include all post dated donations up to and including the selected Ending Date that have not already been processed. All post dated donation entries from the last time this posting was run up to the Ending Date will be included.
Once the Current Donations records have been posted, they become part of the permanent donation history records, and cannot be edited further. Once posted they also become available for all reports and data exports.
22
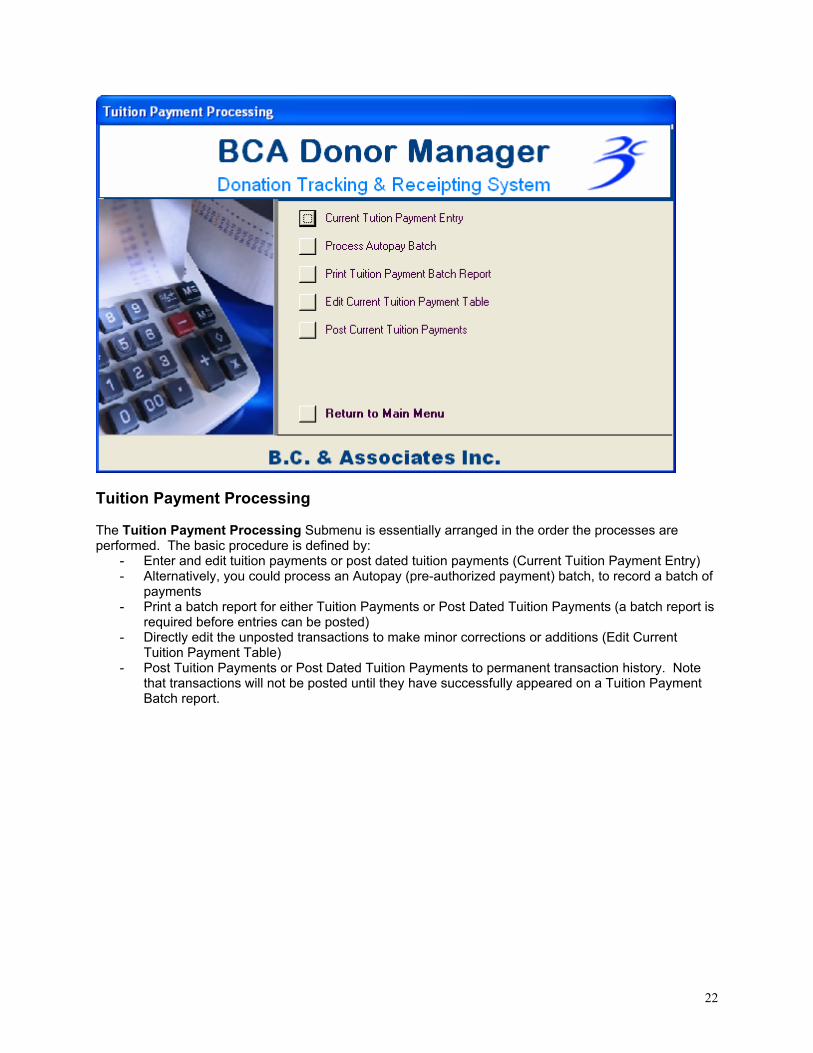
Tuition Payment Processing The Tuition Payment Processing Submenu is essentially arranged in the order the processes are performed. The basic procedure is defined by:
- Enter and edit tuition payments or post dated tuition payments (Current Tuition Payment Entry) - Alternatively, you could process an Autopay (pre-authorized payment) batch, to record a batch of
payments - Print a batch report for either Tuition Payments or Post Dated Tuition Payments (a batch report is
required before entries can be posted) - Directly edit the unposted transactions to make minor corrections or additions (Edit Current
Tuition Payment Table) - Post Tuition Payments or Post Dated Tuition Payments to permanent transaction history. Note
that transactions will not be posted until they have successfully appeared on a Tuition Payment Batch report.
23
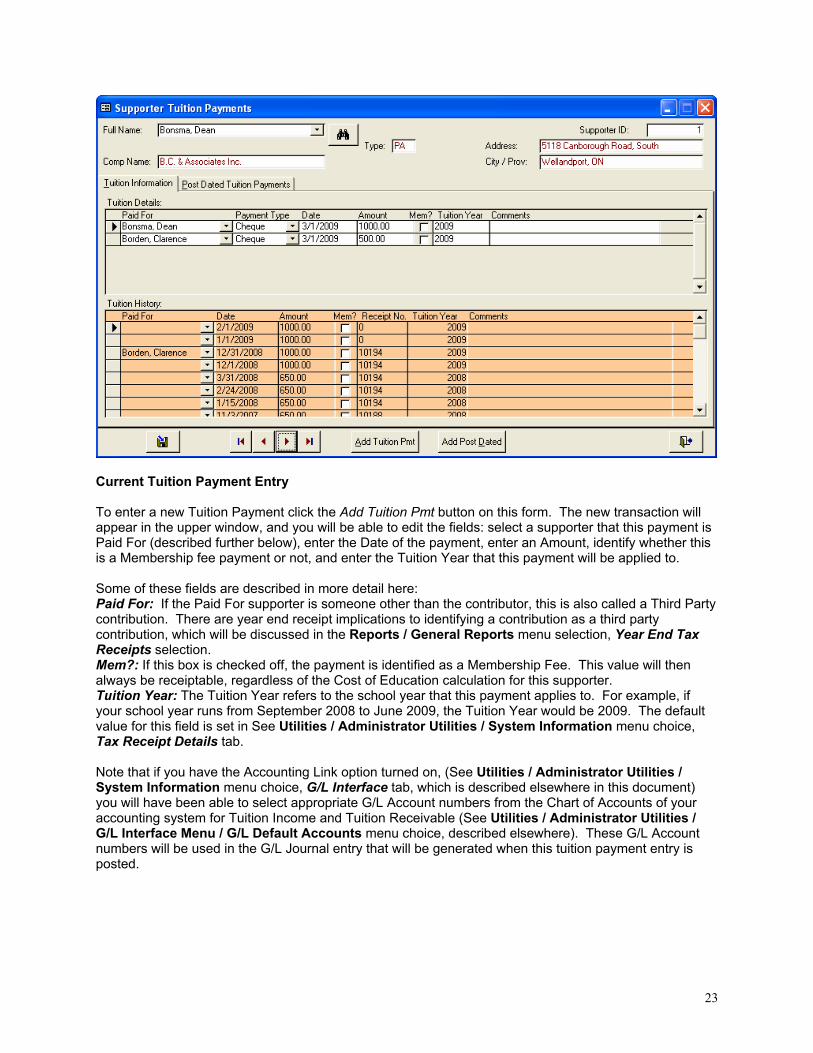
Current Tuition Payment Entry To enter a new Tuition Payment click the Add Tuition Pmt button on this form. The new transaction will appear in the upper window, and you will be able to edit the fields: select a supporter that this payment is Paid For (described further below), enter the Date of the payment, enter an Amount, identify whether this is a Membership fee payment or not, and enter the Tuition Year that this payment will be applied to. Some of these fields are described in more detail here: Paid For: If the Paid For supporter is someone other than the contributor, this is also called a Third Party contribution. There are year end receipt implications to identifying a contribution as a third party contribution, which will be discussed in the Reports / General Reports menu selection, Year End Tax Receipts selection. Mem?: If this box is checked off, the payment is identified as a Membership Fee. This value will then always be receiptable, regardless of the Cost of Education calculation for this supporter. Tuition Year: The Tuition Year refers to the school year that this payment applies to. For example, if your school year runs from September 2008 to June 2009, the Tuition Year would be 2009. The default value for this field is set in See Utilities / Administrator Utilities / System Information menu choice, Tax Receipt Details tab. Note that if you have the Accounting Link option turned on, (See Utilities / Administrator Utilities / System Information menu choice, G/L Interface tab, which is described elsewhere in this document) you will have been able to select appropriate G/L Account numbers from the Chart of Accounts of your accounting system for Tuition Income and Tuition Receivable (See Utilities / Administrator Utilities / G/L Interface Menu / G/L Default Accounts menu choice, described elsewhere). These G/L Account numbers will be used in the G/L Journal entry that will be generated when this tuition payment entry is posted.
24
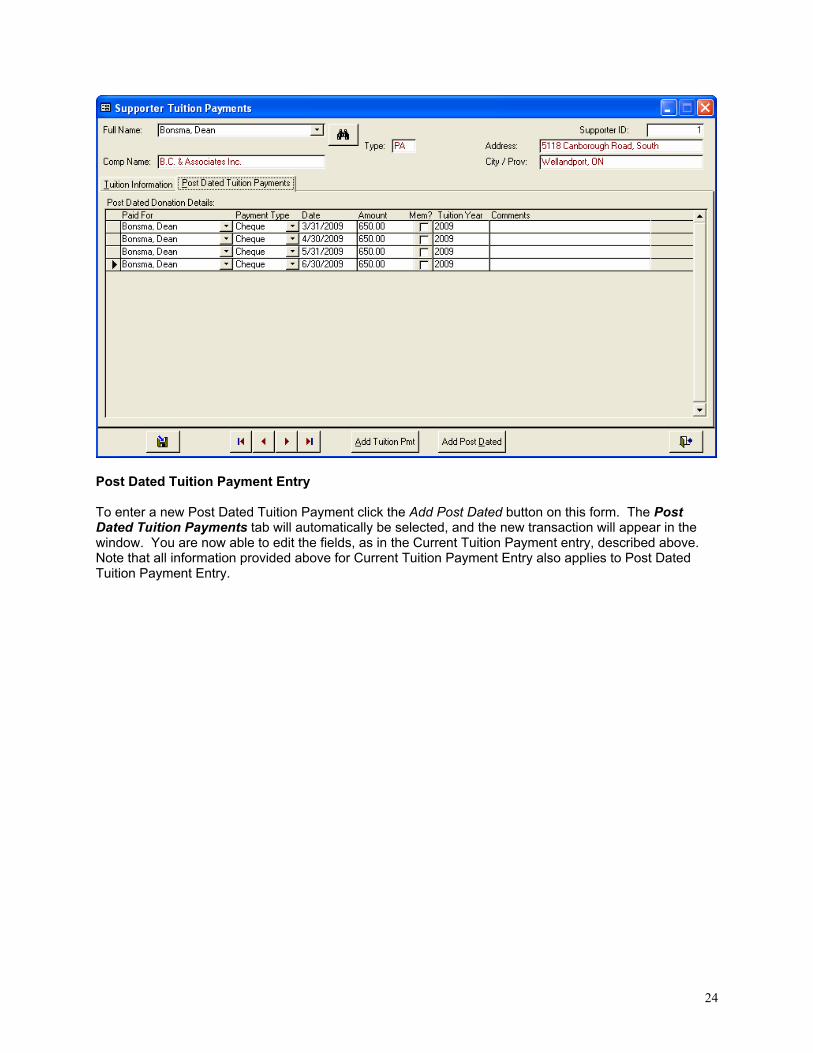
Post Dated Tuition Payment Entry To enter a new Post Dated Tuition Payment click the Add Post Dated button on this form. The Post Dated Tuition Payments tab will automatically be selected, and the new transaction will appear in the window. You are now able to edit the fields, as in the Current Tuition Payment entry, described above. Note that all information provided above for Current Tuition Payment Entry also applies to Post Dated Tuition Payment Entry.
25
Process Autopay Batch The Process Autopay Batch menu choice allows you to pull in all outstanding Pre-authorized Payments that are due to be paid. This routine will include all pre-authorized payments with a Day of Month up to and including the selected Ending Date that have not already been processed for this month.
Once this routine has been run, these pre-authorized payment entries end up in the Current Unposted Tuition Payments table, ready to continue the posting process. From this point on, these tuition payments will be processed normally, as a Current Tuition Payment Entry, so you would proceed to the Print Tuition Payment Batch Report menu choice. See Maintain Supporters menu choice, Donation History / Pledges / PAP tab described elsewhere for information on how to set up a pre-authorized payment record for a supporter.
26
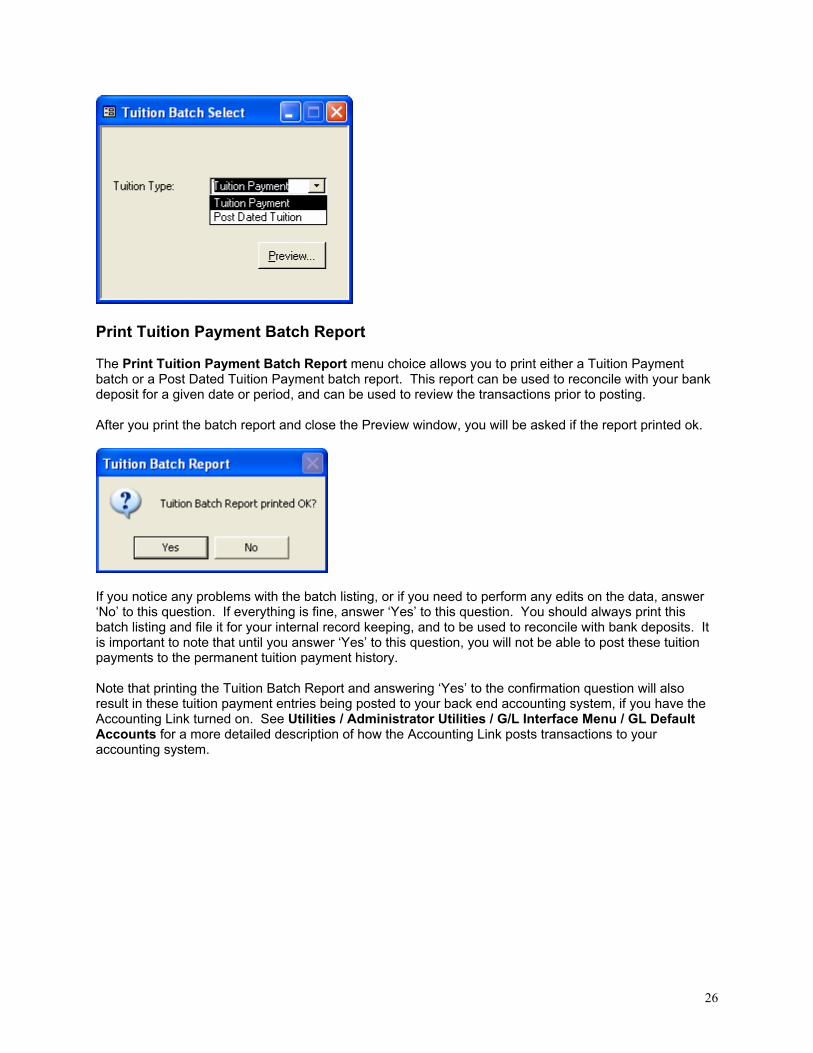
Print Tuition Payment Batch Report The Print Tuition Payment Batch Report menu choice allows you to print either a Tuition Payment batch or a Post Dated Tuition Payment batch report. This report can be used to reconcile with your bank deposit for a given date or period, and can be used to review the transactions prior to posting. After you print the batch report and close the Preview window, you will be asked if the report printed ok.
If you notice any problems with the batch listing, or if you need to perform any edits on the data, answer ‘No’ to this question. If everything is fine, answer ‘Yes’ to this question. You should always print this batch listing and file it for your internal record keeping, and to be used to reconcile with bank deposits. It is important to note that until you answer ‘Yes’ to this question, you will not be able to post these tuition payments to the permanent tuition payment history. Note that printing the Tuition Batch Report and answering ‘Yes’ to the confirmation question will also result in these tuition payment entries being posted to your back end accounting system, if you have the Accounting Link turned on. See Utilities / Administrator Utilities / G/L Interface Menu / GL Default Accounts for a more detailed description of how the Accounting Link posts transactions to your accounting system.

27
When you choose to print a Post Dated Tuition Payment batch report, the Ending Date field becomes visible. The purpose of this is to include all post dated tuition payments up to and including the selected Ending Date that have not already been processed. All post dated tuition payment entries from the last time it was run up to the Ending Date will be included. Once this routine has been run, these post dated tuition payment entries end up in the Current Unposted Tuition Payments table, ready to continue the posting process. From this point on, these tuition payments will be processed normally, as a Current Tuition Payment Entry, so you would proceed either to the Edit Current Tuition Payment Table menu choice (if you need to make any changes to the data), or directly to the Post Current Tuition Payments menu choice, if you are ready to post.
28
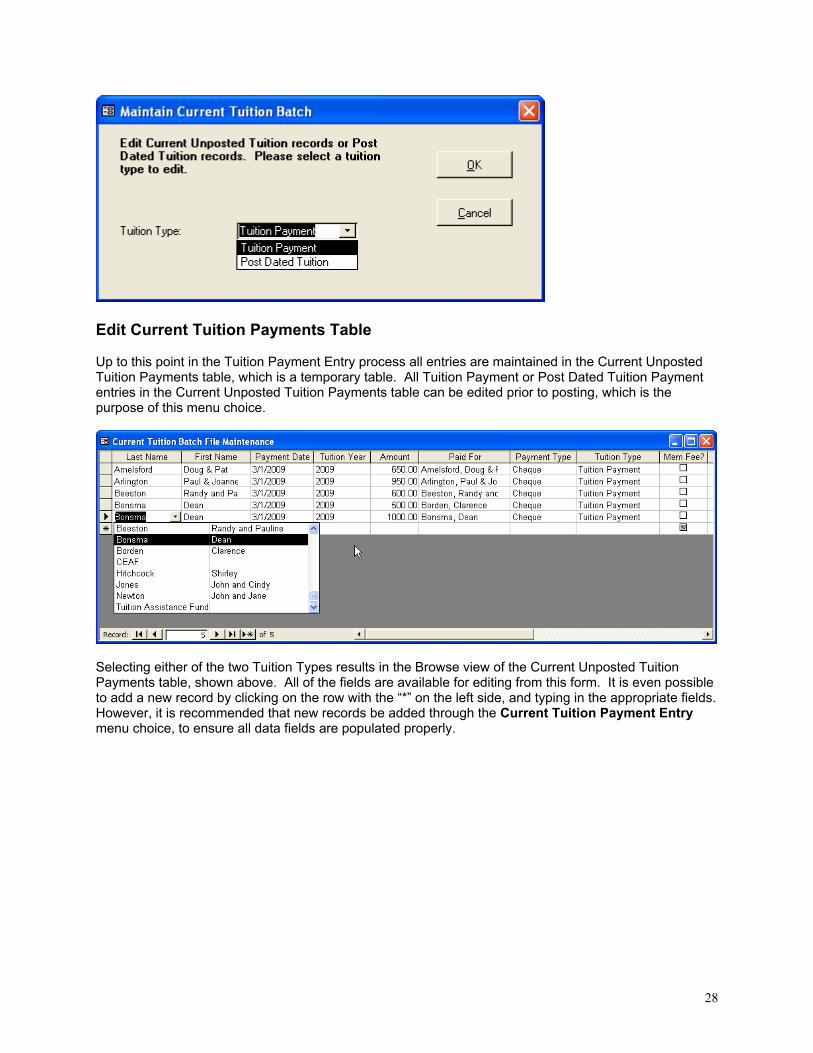
Edit Current Tuition Payments Table Up to this point in the Tuition Payment Entry process all entries are maintained in the Current Unposted Tuition Payments table, which is a temporary table. All Tuition Payment or Post Dated Tuition Payment entries in the Current Unposted Tuition Payments table can be edited prior to posting, which is the purpose of this menu choice.
Selecting either of the two Tuition Types results in the Browse view of the Current Unposted Tuition Payments table, shown above. All of the fields are available for editing from this form. It is even possible to add a new record by clicking on the row with the “*” on the left side, and typing in the appropriate fields. However, it is recommended that new records be added through the Current Tuition Payment Entry menu choice, to ensure all data fields are populated properly.
29
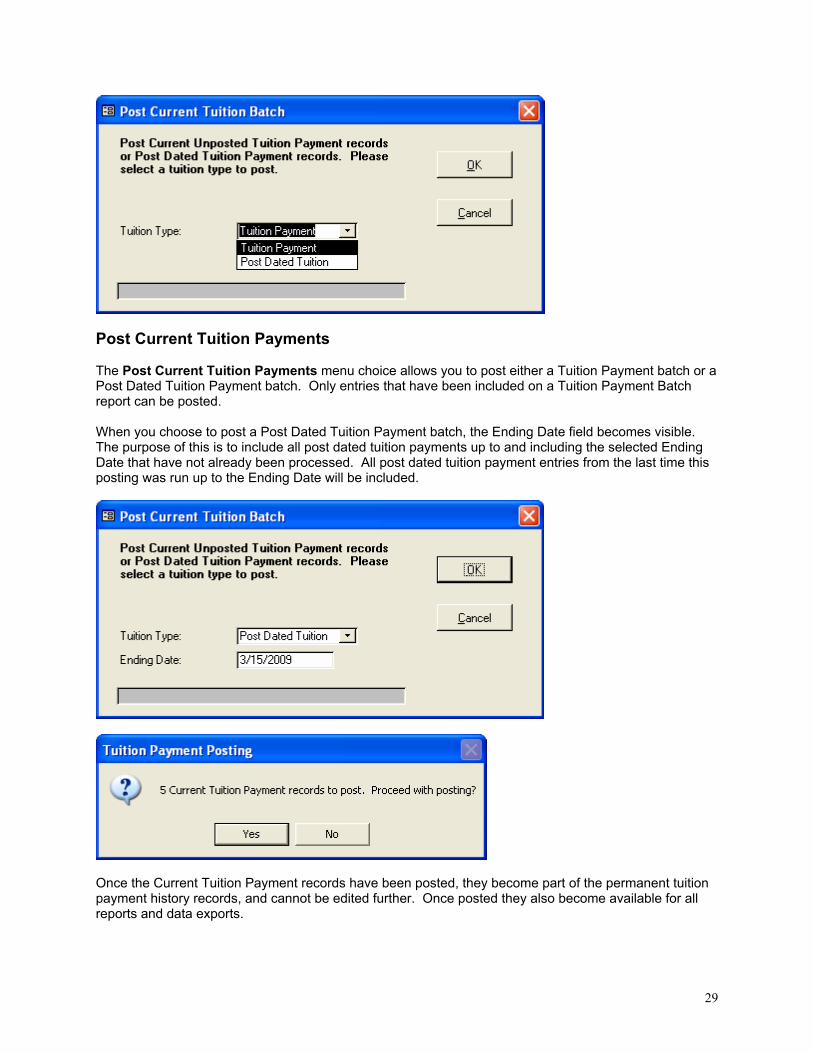
Post Current Tuition Payments The Post Current Tuition Payments menu choice allows you to post either a Tuition Payment batch or a Post Dated Tuition Payment batch. Only entries that have been included on a Tuition Payment Batch report can be posted. When you choose to post a Post Dated Tuition Payment batch, the Ending Date field becomes visible. The purpose of this is to include all post dated tuition payments up to and including the selected Ending Date that have not already been processed. All post dated tuition payment entries from the last time this posting was run up to the Ending Date will be included.
Once the Current Tuition Payment records have been posted, they become part of the permanent tuition payment history records, and cannot be edited further. Once posted they also become available for all reports and data exports.
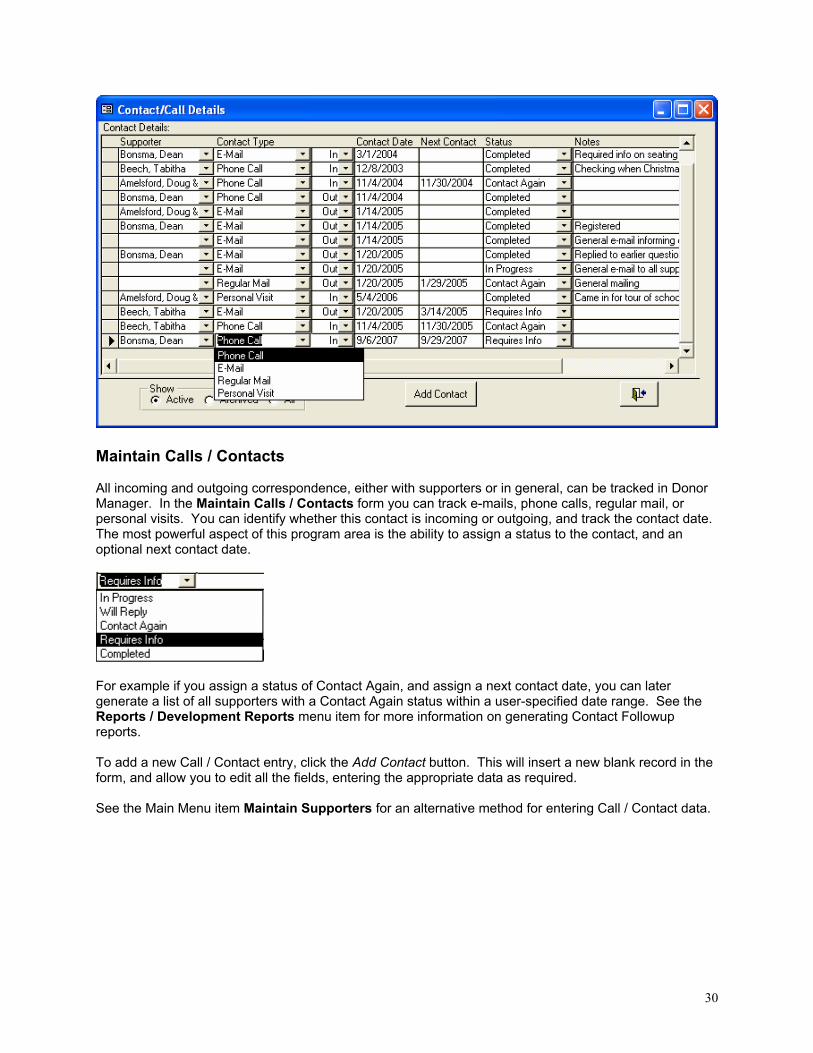
30
Maintain Calls / Contacts All incoming and outgoing correspondence, either with supporters or in general, can be tracked in Donor Manager. In the Maintain Calls / Contacts form you can track e-mails, phone calls, regular mail, or personal visits. You can identify whether this contact is incoming or outgoing, and track the contact date. The most powerful aspect of this program area is the ability to assign a status to the contact, and an optional next contact date.
For example if you assign a status of Contact Again, and assign a next contact date, you can later generate a list of all supporters with a Contact Again status within a user-specified date range. See the Reports / Development Reports menu item for more information on generating Contact Followup reports. To add a new Call / Contact entry, click the Add Contact button. This will insert a new blank record in the form, and allow you to edit all the fields, entering the appropriate data as required. See the Main Menu item Maintain Supporters for an alternative method for entering Call / Contact data.

31
Reports Reports in Donor Manager are broken down into General Reports and Development Reports. General Reports includes the broad categories of Supporter List reports, Tuition Payment-based reports, Donation-based reports, and Tax Receipts. Development Reports also includes Supporter List reports, but further includes Alumni reports, Relationship reports, and Contact Followup reports.
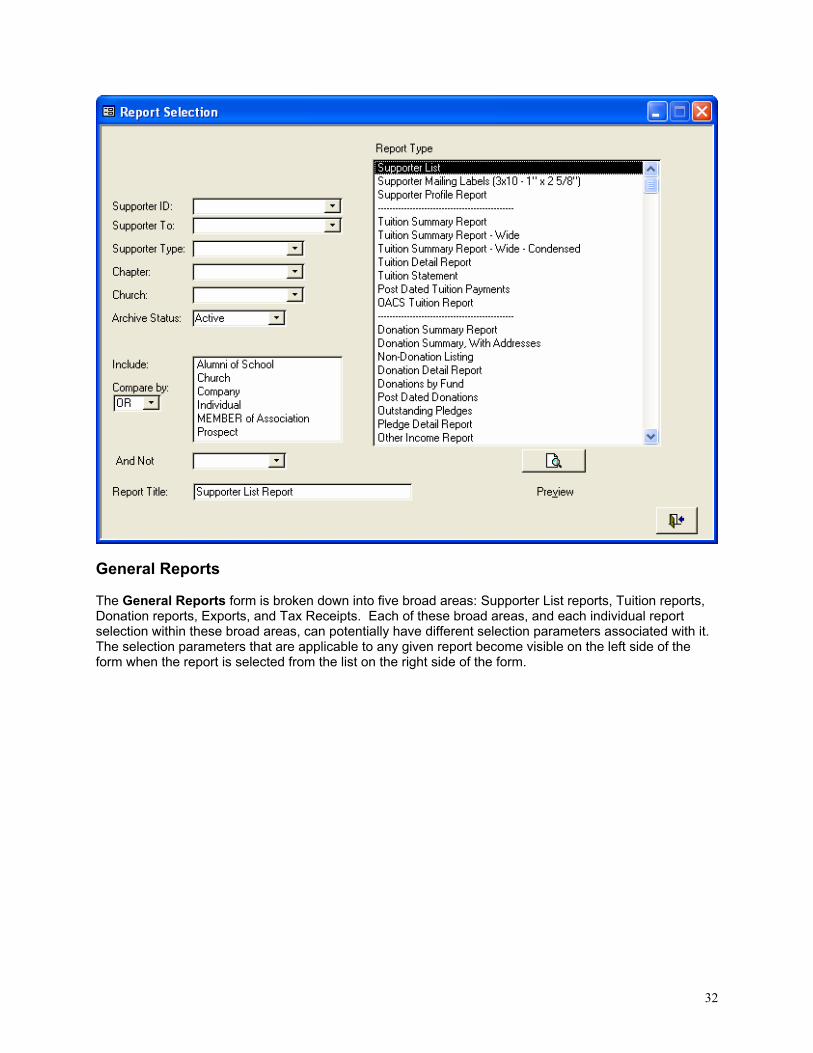
32
General Reports The General Reports form is broken down into five broad areas: Supporter List reports, Tuition reports, Donation reports, Exports, and Tax Receipts. Each of these broad areas, and each individual report selection within these broad areas, can potentially have different selection parameters associated with it. The selection parameters that are applicable to any given report become visible on the left side of the form when the report is selected from the list on the right side of the form.

33
General Report Parameters: Start Date/End Date: Applies to transaction reports such as Tuition Summary or Donation Summary Supporter ID/Supporter To: Used mainly in the Supporter List and Supporter Export options, to limit the report to a range of supporters Supporter Type: Used to limit the report to the selected type (e.g. Supporter or Parent) Chapter/Church: Used to select supporter records by Chapter or Church. These two fields are user-defined fields, meaning that you can change the meaning of these fields to track any information you want. See the Utilities / Administrator Utilities / System Information menu choice, described elsewhere in this document, for information on how to customize these fields to suit your organization. Archive Status: Allows you to select between Active and Archived supporters, where applicable. Include / Compare By / And Not: These three parameters refer to the Source Codes that have been assigned to supporter records. These can be used in many combinations to create a very powerful selection mechanism. For example, you could choose to include all supporters tagged as Alumni AND Member AND NOT Parent. Within the Include list, multiple entries can be selected at once simply by clicking on each of the entries that you would like to include in the selection criteria. Report Title: The title that will appear on the top of a report (when it is modifiable). Specific for Tuition Reports: Tuition Year: Applies only to Tuition reports; is used in conjunction with the Start Date and End Date to select the records to include in the report Tuition Format: This allows you to select between Tuition Due (includes all payments by the parent on their own behalf, and all third party payments made by another party on the parents’ behalf), Tuition Payments (includes only payments made by the supporter, either on their own behalf or on someone else’s behalf), and Tuition Due – Prorated (same as Tuition Due, except that it calculates what should be owed based on the dates entered, rather than based on the tuition due for the entire year).
34
Tuition Select: This allows you to select between Include All Parents (whether they have made a payment or not), Only Parents with a Payment, and Only Parents with Non-Zero Balance. Exclude Where Net Tuition = 0: If this check box is checked, only Parent records that have a Tuition Breakdown record with a non-zero total for the selected tuition year will be included in the report. Specific for Donation Reports: Fund: Used for Donation reports, to limit donation records by the fund they were assigned to Total >=: This parameter appears for certain Donation reports, and allows the report to select those donors who have given more than a specified dollar value in the date range Type: Applies only to Non-Donation report; allows you to specify whether to check Donation Only, or All Contribution Types (i.e. checking for non-contribution of any sort) within the selected Start Date and End Date range. Specific for Exports: Output Format: Allows you to specify whether the exported data will be Summary data only, or Detail data. Export Format: Allows you to choose which file format your export will be saved in: ASCII Delimited (comma delimited), Excel Spreadsheet, dBASE Table, or Access Table. Note that the export file location is maintained in the Utilities / Administrator Utilities / System Information menu choice, under the System Defaults tab. File names are stored there without the extension, which gets added automatically based on your format choice: TXT, XLS, DBF, or MDB. Specific for Tax Receipts: Sort Order: This field allows you to specify the printed sort order for the tax receipts selected. You can choose to print sorted by Supporter Name, Supporter ID, or Church. Note that the Church field is one of the user-modifiable fields. See the Utilities / Administrator Utilities / System Information menu choice, described elsewhere in this document, for information on how to customize this field to suit your organization. Receipt Format: Allows you to select between Original Receipt and Reprint Receipt. These options function differently depending on whether you have selected to print Immediate Tax Receipts or Year End Tax Receipts (see below). Old Receipt #: When you select Reprint Receipt for either Immediate Tax Receipts or Year End Tax Receipts, a new field appears which allows you to select which receipt you would like to reprint. Only receipts that appear in this list are available for reprint. Immediate Tax Receipts: When you choose Original Receipt, receipts will be printed for all Donations that have been flagged as Immediate, and have not already been receipted, within the selected date range. Note that the Receipt # field is automatically generated to be a unique, sequential #, and cannot be changed by the user. Year End Tax Receipts: When you choose Original Receipt, receipts will be printed for all Tuition Payments and all Donations that have been flagged as Accumulate for the year. This will generally include all contributions for parents. Note that it is possible to rerun an Original Year End Receipt multiple times. Each time the original receipt is run it will redo all the corresponding Year End calculations for Cost of Education, Operating Contributions, Capital Contributions, and Third Party Contributions. The Cost of Education is based on the CPS 1/CPS 2 values in the Tax Receipt Details tab of the Utilities / Administrator Utilities / System Information menu choice. These values are multiplied by the Total Child Factor value for each family, for each school, found in the Maintain Supporters menu choice, under the Children / Comments / NSF tab, to determine the total Cost of Education for the family. The total eligible receipt amount for the year is calculated by taking the total Operating Contributions, subtracting the Cost of Education, and adding the total Capital Contributions. If the Cost of Education is greater than the Operating Contributions for the family, the remaining Cost of Education is deducted from the contributions of any Third Party contributors, until the Cost of Education is covered. Capital
35
Contributions are always receiptable, regardless of whether the Cost of Education has been covered or not. When you choose Reprint Receipt, you must select the Year End receipt that you want to reprint from the list that appears in the Old Receipt # field. In this case no calculations are done, only saved values are used for the Cost of Education, Operating Contributions, Capital Contributions, and Third Party Contributions. Note also that the Receipt # field is automatically generated to be a unique, sequential #, and cannot be changed by the user. Child Care Tax Receipt: When you choose Original Receipt, Child Care Expense (CCE) receipts will be printed for all Parents. These receipts are based on the CCE 1/CCE 2 values in the Tax Receipt Details tab of the Utilities / Administrator Utilities / System Information menu choice. This value is multiplied by the Total Child Factor value for each family, found in the Maintain Supporters menu choice, under the Children / Comments / NSF tab, to determine the total Child Care Expense receipt value. This is the same Total Child Factor that is used to calculate the Cost per Student for the Year End Tax Receipt (see above). Note that the CCE Receipt only applies for children up to and including the year they turn 16 years old. E.g. For the 2008 receipt, any child with a birth year of 1991 or earlier is not included. For this reason, a Birth Date needs to be entered for each child in the Maintain Supporters menu choice, under the Children / Comments / NSF tab. If the birth date field is left blank, that child is not included in the count that is used for the receipt, regardless of the Factor value for that child. When you choose Reprint Receipt, you must select the CCE receipt that you want to reprint from the list that appears in the Old Receipt # field. In this case no calculations are done, only saved values are used for the CCE receipt reprint. Note also that the Receipt # field is automatically generated to be a unique, sequential #, and cannot be changed by the user. Special Notes: Electronic Signatures for Tax Receipts: To add digital signatures to the tax receipts, you need to create a graphic of the signature and save it as a JPEG file. The easiest way to do this is to sign a blank sheet with your normal signature, and then scan this into the computer, saving it as a JPEG file. The program is looking for graphic files with a specific name, in the same folder as the Donor Manager program. For the first signature, the file name is Signature_1.jpg. For the second signature (if you have indicated in Utilities / Administrator Utilities / System Information that you are using two signature lines), the file name is Signature_2.jpg. A couple of other things to keep in mind when working with digital signature files:
- the image should be cropped, so that the signature itself takes up as much space as possible in the file
- the image works best if it has a size around 270 x 75, or some proportional multiple of that - you should scan with a relatively high quality setting on your scanner, to achieve the best
possible printed output - experience has shown that signing large, using a marker like a Sharpie shows up best on the
receipts

36
Development Reports The Development Reports form introduces several reports and exports specific to school community development or advancement. In addition to the Supporter List reports that are also found on the General Reports form, you can also choose Alumni reports and Contact Followup reports. Each individual report selection can potentially have different selection parameters associated with it. The selection parameters that are applicable to any given report become visible on the left side of the form when the report is selected from the list on the right side of the form. Many of the selection parameters are common to the ones used in the General Reports form. These are described in the General Reports section above. Other parameters are described below. Specific for Alumni Reports: Start Date/End Date: These dates refer to the Graduation Year that was entered with the Alumni information (see the Maintain Supporters menu choice, under the Alumni / Relations tab). Type: This option allows you to select to Print, Excel Export, or ASCII Export (comma delimited). Note that the export file location is maintained in the Utilities / Administrator Utilities / System Information menu choice, under the System Defaults tab. The entry controlling the Alumni export is called General Mail Merge. File names are stored there without the extension, which gets added automatically based on your format choice: XLS or TXT, in this case.
37
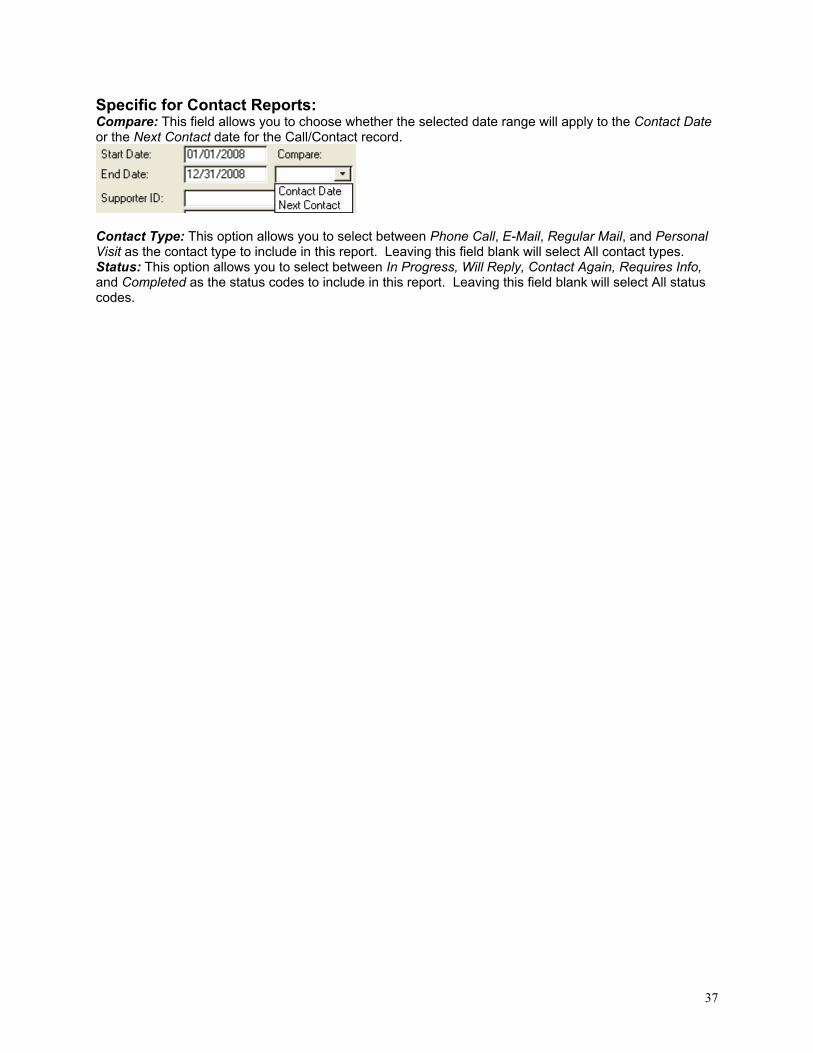
Specific for Contact Reports: Compare: This field allows you to choose whether the selected date range will apply to the Contact Date or the Next Contact date for the Call/Contact record.
Contact Type: This option allows you to select between Phone Call, E-Mail, Regular Mail, and Personal Visit as the contact type to include in this report. Leaving this field blank will select All contact types. Status: This option allows you to select between In Progress, Will Reply, Contact Again, Requires Info, and Completed as the status codes to include in this report. Leaving this field blank will select All status codes.

38
Tables SubMenu Choose Maintain Lookup Tables from the Main Menu, and you will come to the Tables SubMenu. There are a number of lookup tables within Donor Manager that make data entry easier, and improve the consistency of the data.

39
Funds/Subfunds Funds and Subfunds are used for Donation entry, and for subsequent sorting and grouping of donation data. The Fund No (2 char) and Subfund No (3 char) are shortcut fields that are helpful in reports, when grouping of donation data is required. When the Fund No is filled in but the Subfund is left blank, this identifies the main header record for that fund, for reporting purposes. Note that if you have the Accounting Link option turned on, (See Utilities / Administrator Utilities / System Information menu choice, G/L Interface tab, which is described elsewhere in this document) you will be able to select appropriate G/L Account numbers from the Chart of Accounts of your accounting system for each Fund and Subfund. These G/L Account numbers will be used in the G/L Journal entry that will be generated when donations referencing these funds are posted. Also of note in this form is the Capital check box field. A parent is allowed to request an Immediate tax receipt for donations made, but only for donations made to a Capital fund. Donations by parents to other funds will result in the donation amount being included in the year end Charitable Donation tax receipt. There is no limit to the number of funds and subfunds you can have in the Fund/Subfund List.

40
Churches The Church List allows you to maintain the list of available churches that supporters may belong to. This information is later used in the Maintain Supporters menu choice, where each supporter can be assigned to a church. This field is used in the report selection form for selecting and grouping supporter data for reports and exports. This list is used by one of the two fields which have been designated as user-defined fields. This means that you can change the meaning of this field and its related lookup table to track any information you want, if you don’t have the need to track Church information. See the Utilities / Administrator Utilities / System Information menu choice, described elsewhere in this document, for information on how to customize this field and lookup table to suit your organization. There is no limit to the number of churches you can have in the Church List.
41
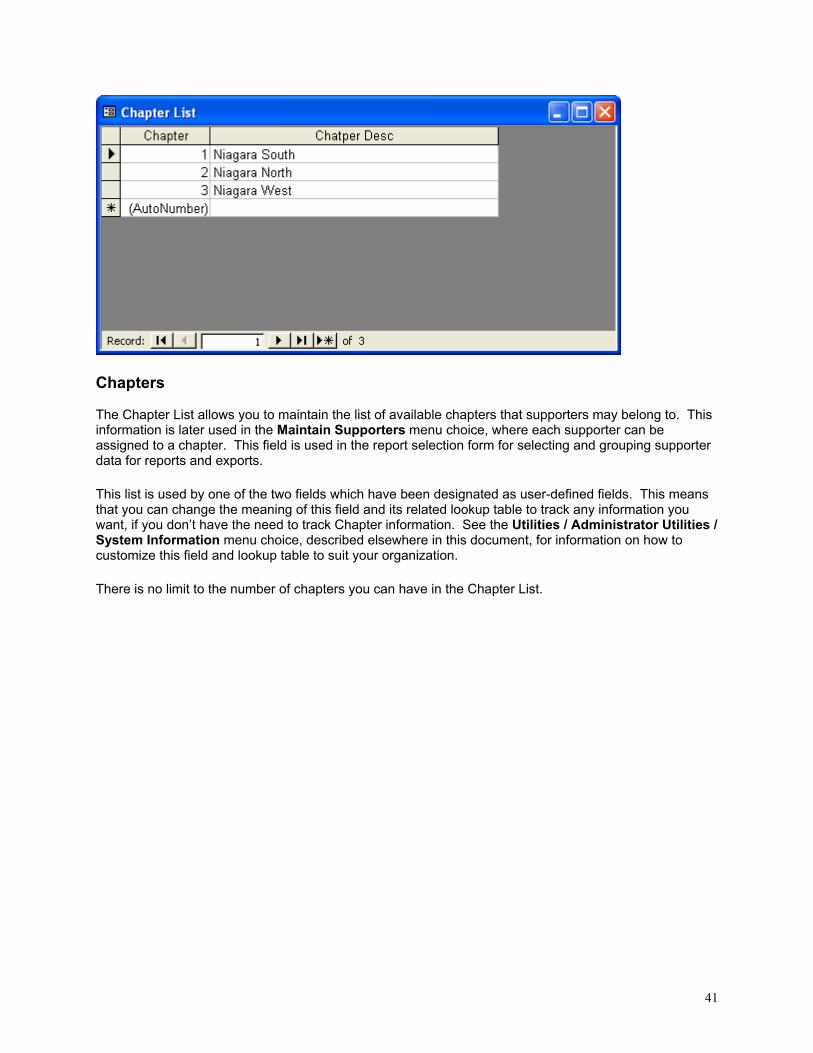
Chapters The Chapter List allows you to maintain the list of available chapters that supporters may belong to. This information is later used in the Maintain Supporters menu choice, where each supporter can be assigned to a chapter. This field is used in the report selection form for selecting and grouping supporter data for reports and exports. This list is used by one of the two fields which have been designated as user-defined fields. This means that you can change the meaning of this field and its related lookup table to track any information you want, if you don’t have the need to track Chapter information. See the Utilities / Administrator Utilities / System Information menu choice, described elsewhere in this document, for information on how to customize this field and lookup table to suit your organization. There is no limit to the number of chapters you can have in the Chapter List.
42
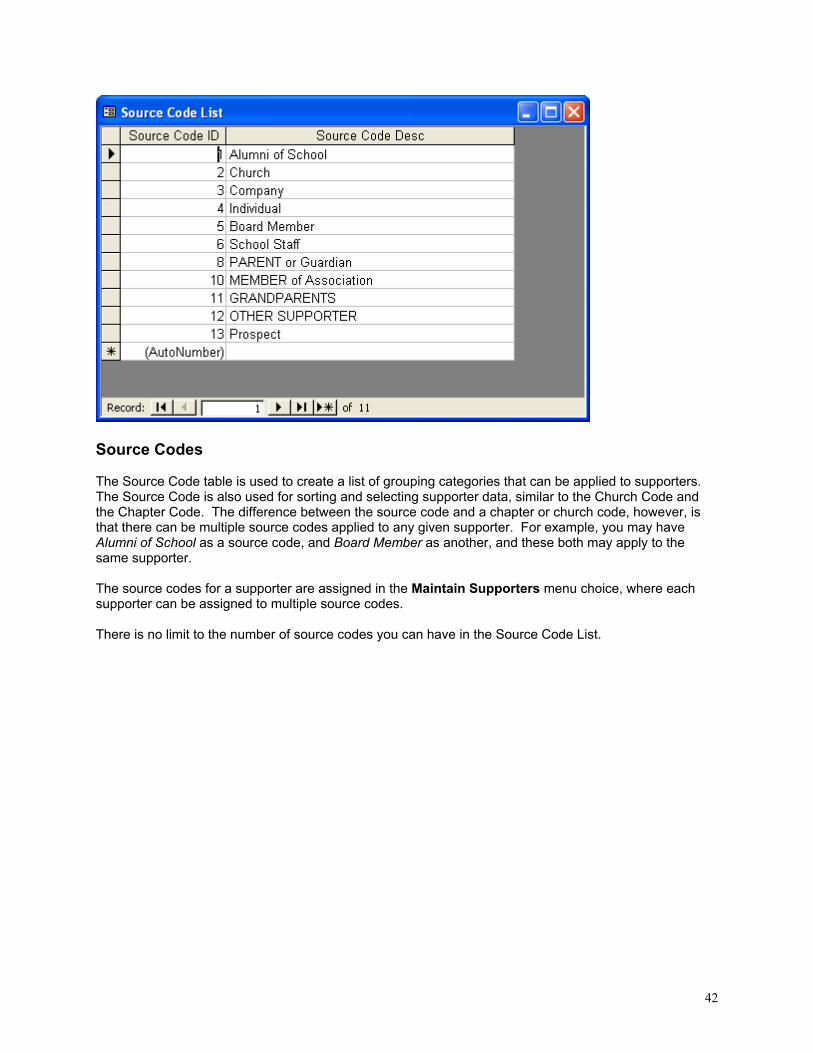
Source Codes The Source Code table is used to create a list of grouping categories that can be applied to supporters. The Source Code is also used for sorting and selecting supporter data, similar to the Church Code and the Chapter Code. The difference between the source code and a chapter or church code, however, is that there can be multiple source codes applied to any given supporter. For example, you may have Alumni of School as a source code, and Board Member as another, and these both may apply to the same supporter. The source codes for a supporter are assigned in the Maintain Supporters menu choice, where each supporter can be assigned to multiple source codes. There is no limit to the number of source codes you can have in the Source Code List.
43
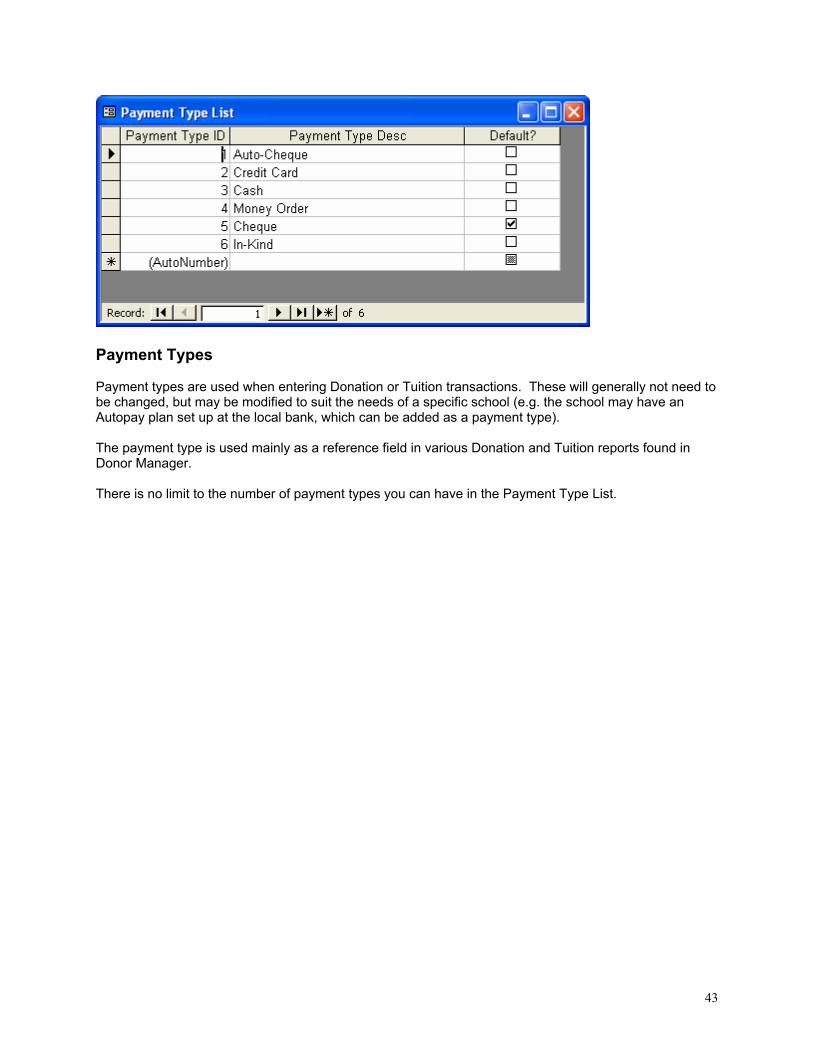
Payment Types Payment types are used when entering Donation or Tuition transactions. These will generally not need to be changed, but may be modified to suit the needs of a specific school (e.g. the school may have an Autopay plan set up at the local bank, which can be added as a payment type). The payment type is used mainly as a reference field in various Donation and Tuition reports found in Donor Manager. There is no limit to the number of payment types you can have in the Payment Type List.

44
* Countries Countries can be added if the school has supporters in countries other than Canada or United States. The country for a supporter is assigned in the Maintain Supporters menu choice, where each address references a specific country.

45
Administrator Utilities
46
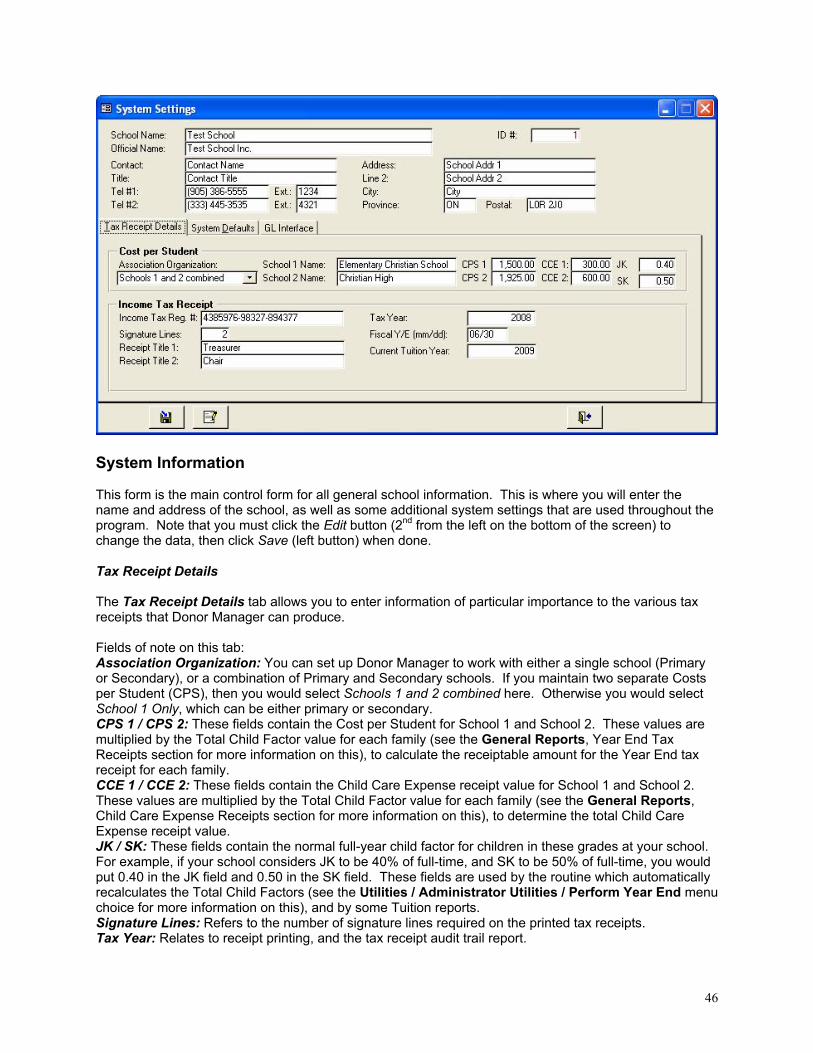
System Information This form is the main control form for all general school information. This is where you will enter the name and address of the school, as well as some additional system settings that are used throughout the program. Note that you must click the Edit button (2nd from the left on the bottom of the screen) to change the data, then click Save (left button) when done. Tax Receipt Details The Tax Receipt Details tab allows you to enter information of particular importance to the various tax receipts that Donor Manager can produce. Fields of note on this tab: Association Organization: You can set up Donor Manager to work with either a single school (Primary or Secondary), or a combination of Primary and Secondary schools. If you maintain two separate Costs per Student (CPS), then you would select Schools 1 and 2 combined here. Otherwise you would select School 1 Only, which can be either primary or secondary. CPS 1 / CPS 2: These fields contain the Cost per Student for School 1 and School 2. These values are multiplied by the Total Child Factor value for each family (see the General Reports, Year End Tax Receipts section for more information on this), to calculate the receiptable amount for the Year End tax receipt for each family. CCE 1 / CCE 2: These fields contain the Child Care Expense receipt value for School 1 and School 2. These values are multiplied by the Total Child Factor value for each family (see the General Reports, Child Care Expense Receipts section for more information on this), to determine the total Child Care Expense receipt value. JK / SK: These fields contain the normal full-year child factor for children in these grades at your school. For example, if your school considers JK to be 40% of full-time, and SK to be 50% of full-time, you would put 0.40 in the JK field and 0.50 in the SK field. These fields are used by the routine which automatically recalculates the Total Child Factors (see the Utilities / Administrator Utilities / Perform Year End menu choice for more information on this), and by some Tuition reports. Signature Lines: Refers to the number of signature lines required on the printed tax receipts. Tax Year: Relates to receipt printing, and the tax receipt audit trail report.
47
Fiscal Y/E: Refers to the School year, and relates primarily to printing Tuition related reports. Entered as MM/DD. Current Tuition Year: This field acts as a default value, when adding new Tuition Payment transactions, and also when printing Tuition reports. All tuition payments are grouped by tuition year, in order to properly track the accounts receivable details for each family. If you are currently entering tuition payments into the 2008/2009 school year, your Current Tuition Year would be 2009.
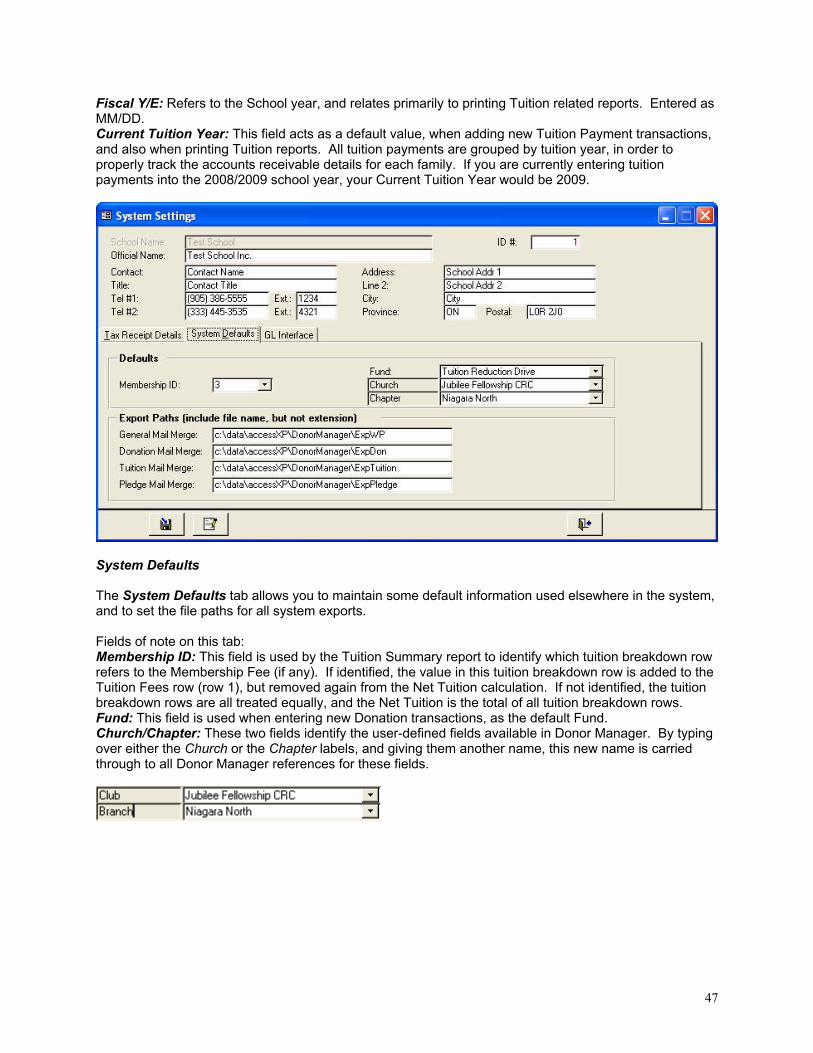
System Defaults The System Defaults tab allows you to maintain some default information used elsewhere in the system, and to set the file paths for all system exports. Fields of note on this tab: Membership ID: This field is used by the Tuition Summary report to identify which tuition breakdown row refers to the Membership Fee (if any). If identified, the value in this tuition breakdown row is added to the Tuition Fees row (row 1), but removed again from the Net Tuition calculation. If not identified, the tuition breakdown rows are all treated equally, and the Net Tuition is the total of all tuition breakdown rows. Fund: This field is used when entering new Donation transactions, as the default Fund. Church/Chapter: These two fields identify the user-defined fields available in Donor Manager. By typing over either the Church or the Chapter labels, and giving them another name, this new name is carried through to all Donor Manager references for these fields.

48

49
Export Paths: These fields identify the file name and location of all exports available from the Report Selection form. These paths must exist in your computer, otherwise the export will generate an error. The file, however, does not need to exist, but will be created by the export routine. Note that the file names should not include file extensions (e.g. TXT or XLS). The extension is generated automatically by the export routine, depending on which export format you choose.
GL Interface The GL Interface tab allows you to specify the location of your back end accounting system data, as well as the login name and login password (if applicable) for this accounting dataset. If you are not interfacing with any accounting system, you can select None in the GL Interface field. Note that you can currently choose between either Simply Accounting by Sage or Sage BusinessVision as a back end accounting system. More details on how to configure the Accounting Link option can be found in the Utilities / Administrator Utilities / G/L Interface Menu menu choice, which is described elsewhere in this document.
50
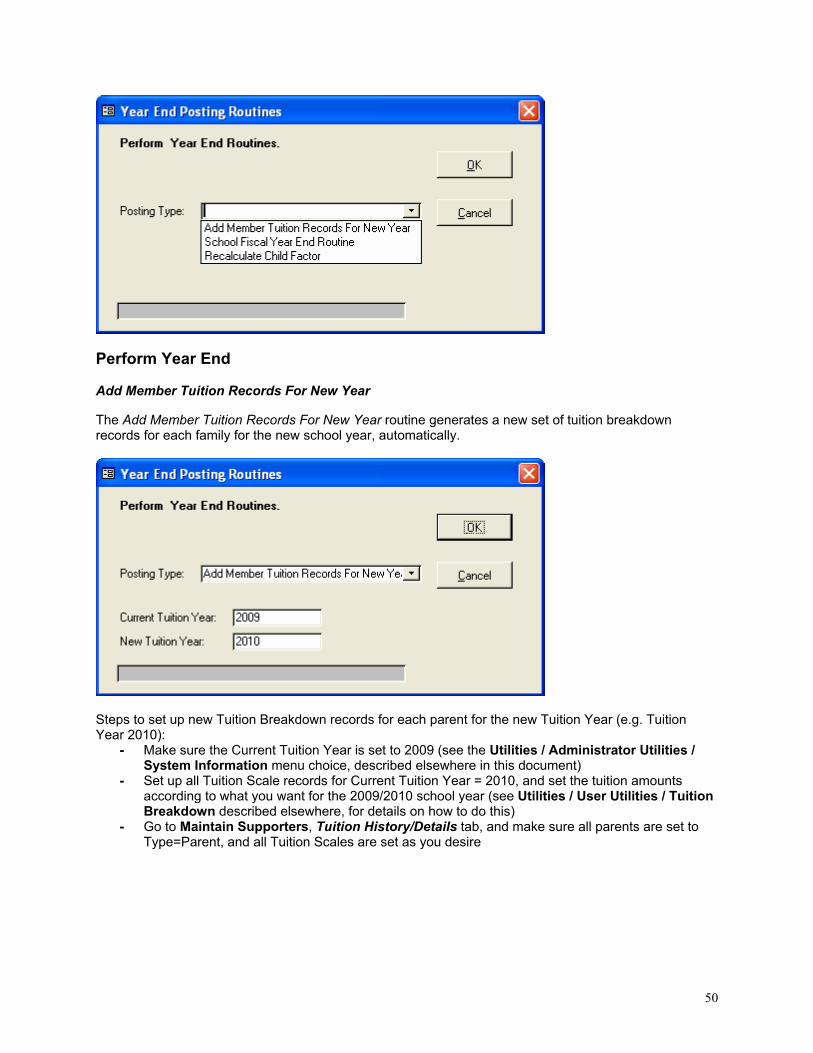
Perform Year End Add Member Tuition Records For New Year The Add Member Tuition Records For New Year routine generates a new set of tuition breakdown records for each family for the new school year, automatically.
Steps to set up new Tuition Breakdown records for each parent for the new Tuition Year (e.g. Tuition Year 2010):
- Make sure the Current Tuition Year is set to 2009 (see the Utilities / Administrator Utilities / System Information menu choice, described elsewhere in this document)
- Set up all Tuition Scale records for Current Tuition Year = 2010, and set the tuition amounts according to what you want for the 2009/2010 school year (see Utilities / User Utilities / Tuition Breakdown described elsewhere, for details on how to do this)
- Go to Maintain Supporters, Tuition History/Details tab, and make sure all parents are set to Type=Parent, and all Tuition Scales are set as you desire

51
- Under "Add Member Tuition Records for New Year", the Current Tuition Year will show as 2009
and the New Tuition Year will show as 2010 - Click OK to generate a Tuition Breakdown record for all parents, for the 2009/2010 (2010) Tuition
Year, based on the Tuition Scale set for each parent.
- Go to Utilities / Administrator Utilities / System Information, and set the Current Tuition Year
to 2010, to complete the change to the new school year. School Fiscal Year End Routine The School Fiscal Year End Routine calculates the Tuition Owing for all school families from the previous year, and places this value in the "Tuition Arrears" row of the tuition breakdown (2nd row). Steps (e.g. to calculate Arrears for 2009/2010 school year):
- Make sure that Member Tuition Records have been created for the 2009/2010 school year (see Add Member Tuition Records For New Year above)
- Make sure the Current Tuition Year is set to 2009 (see the Utilities / Administrator Utilities / System Information menu choice, described elsewhere in this document)
- Click OK
52
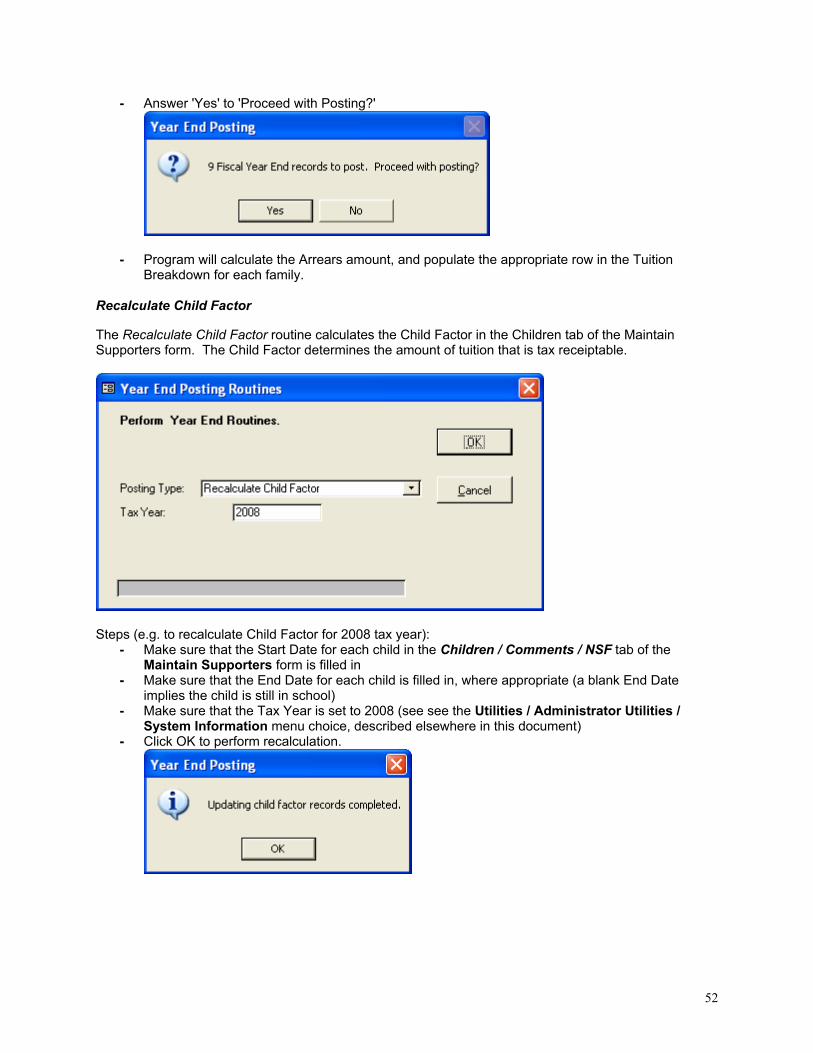
- Answer 'Yes' to 'Proceed with Posting?'
- Program will calculate the Arrears amount, and populate the appropriate row in the Tuition Breakdown for each family.
Recalculate Child Factor The Recalculate Child Factor routine calculates the Child Factor in the Children tab of the Maintain Supporters form. The Child Factor determines the amount of tuition that is tax receiptable.
Steps (e.g. to recalculate Child Factor for 2008 tax year):
- Make sure that the Start Date for each child in the Children / Comments / NSF tab of the Maintain Supporters form is filled in
- Make sure that the End Date for each child is filled in, where appropriate (a blank End Date implies the child is still in school)
- Make sure that the Tax Year is set to 2008 (see see the Utilities / Administrator Utilities / System Information menu choice, described elsewhere in this document)
- Click OK to perform recalculation.
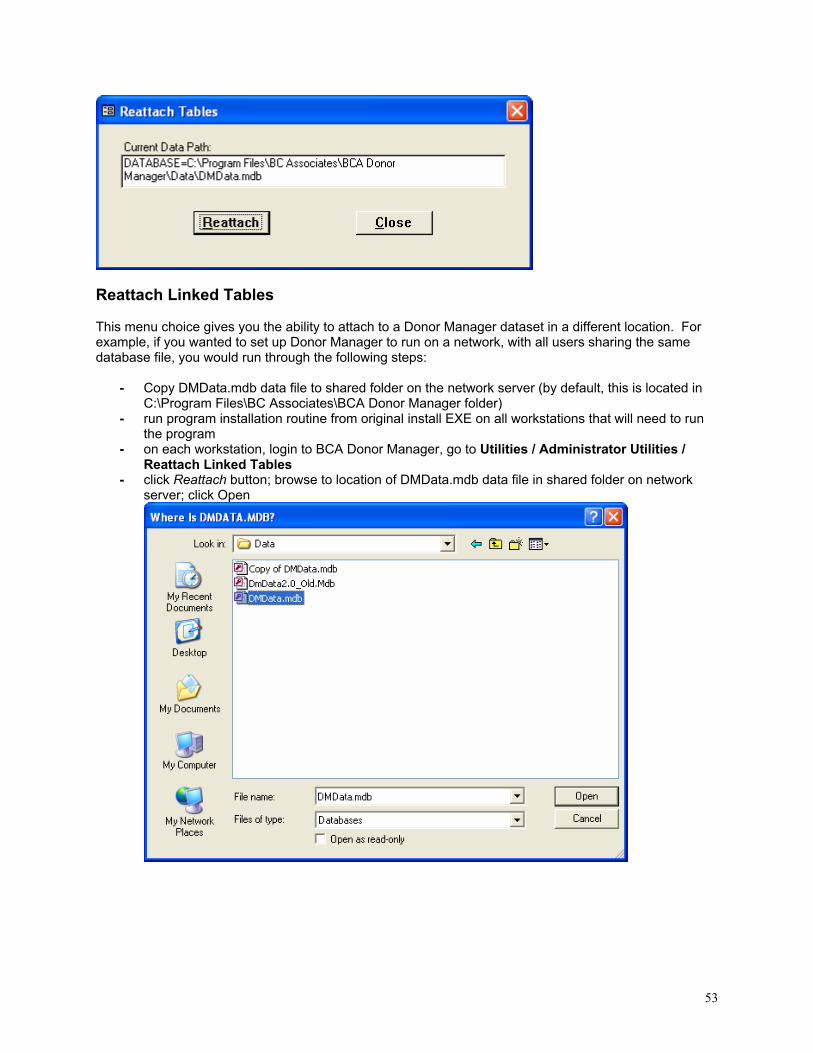
53
Reattach Linked Tables This menu choice gives you the ability to attach to a Donor Manager dataset in a different location. For example, if you wanted to set up Donor Manager to run on a network, with all users sharing the same database file, you would run through the following steps:
- Copy DMData.mdb data file to shared folder on the network server (by default, this is located in C:\Program Files\BC Associates\BCA Donor Manager folder)
- run program installation routine from original install EXE on all workstations that will need to run the program
- on each workstation, login to BCA Donor Manager, go to Utilities / Administrator Utilities / Reattach Linked Tables
- click Reattach button; browse to location of DMData.mdb data file in shared folder on network server; click Open
54
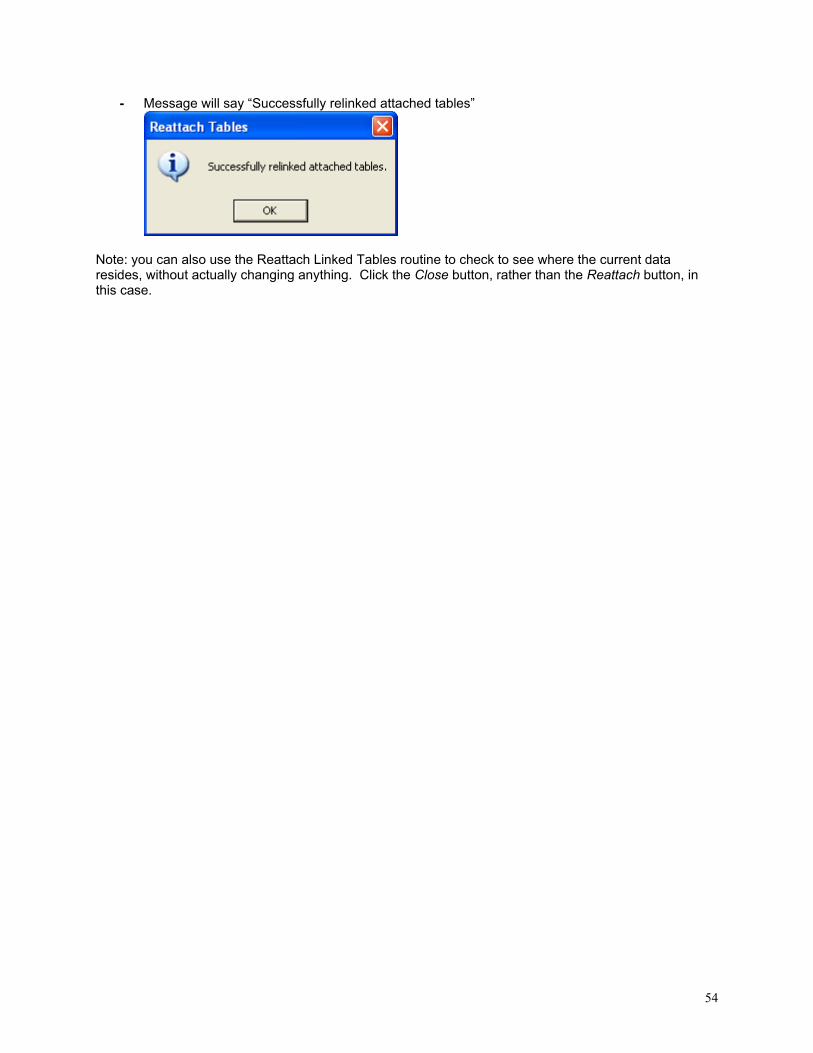
- Message will say “Successfully relinked attached tables”
Note: you can also use the Reattach Linked Tables routine to check to see where the current data resides, without actually changing anything. Click the Close button, rather than the Reattach button, in this case.
55
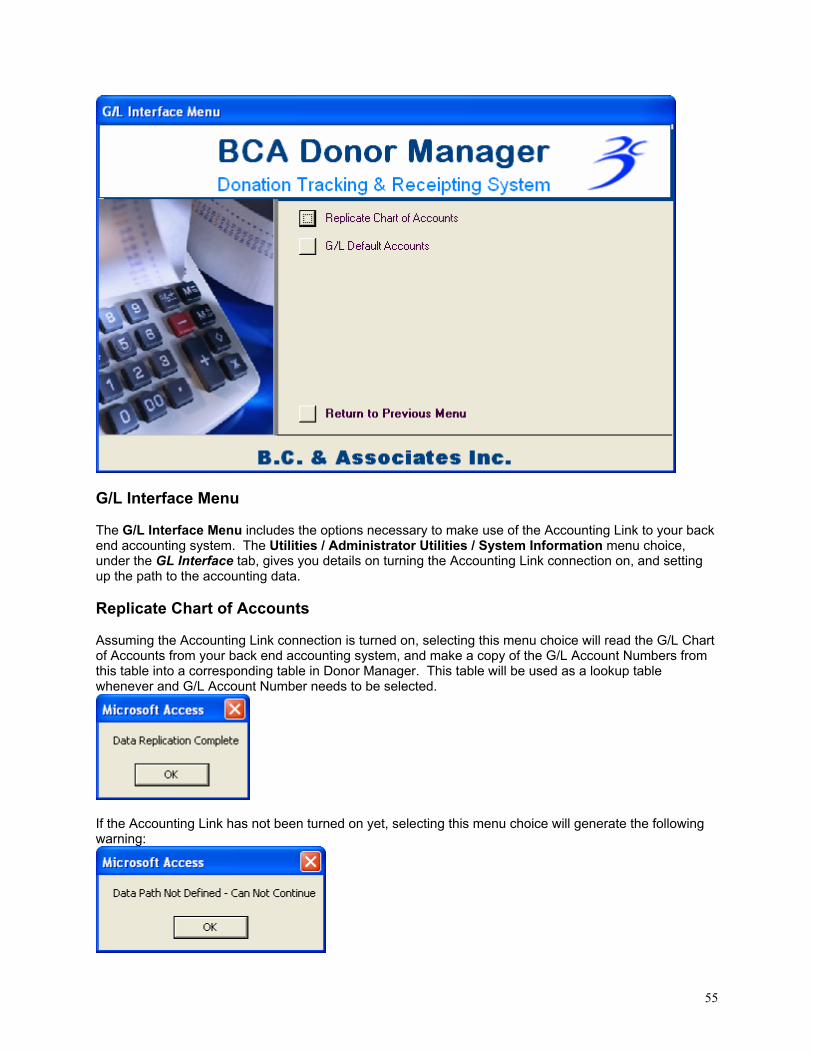
G/L Interface Menu The G/L Interface Menu includes the options necessary to make use of the Accounting Link to your back end accounting system. The Utilities / Administrator Utilities / System Information menu choice, under the GL Interface tab, gives you details on turning the Accounting Link connection on, and setting up the path to the accounting data. Replicate Chart of Accounts Assuming the Accounting Link connection is turned on, selecting this menu choice will read the G/L Chart of Accounts from your back end accounting system, and make a copy of the G/L Account Numbers from this table into a corresponding table in Donor Manager. This table will be used as a lookup table whenever and G/L Account Number needs to be selected.
If the Accounting Link has not been turned on yet, selecting this menu choice will generate the following warning:
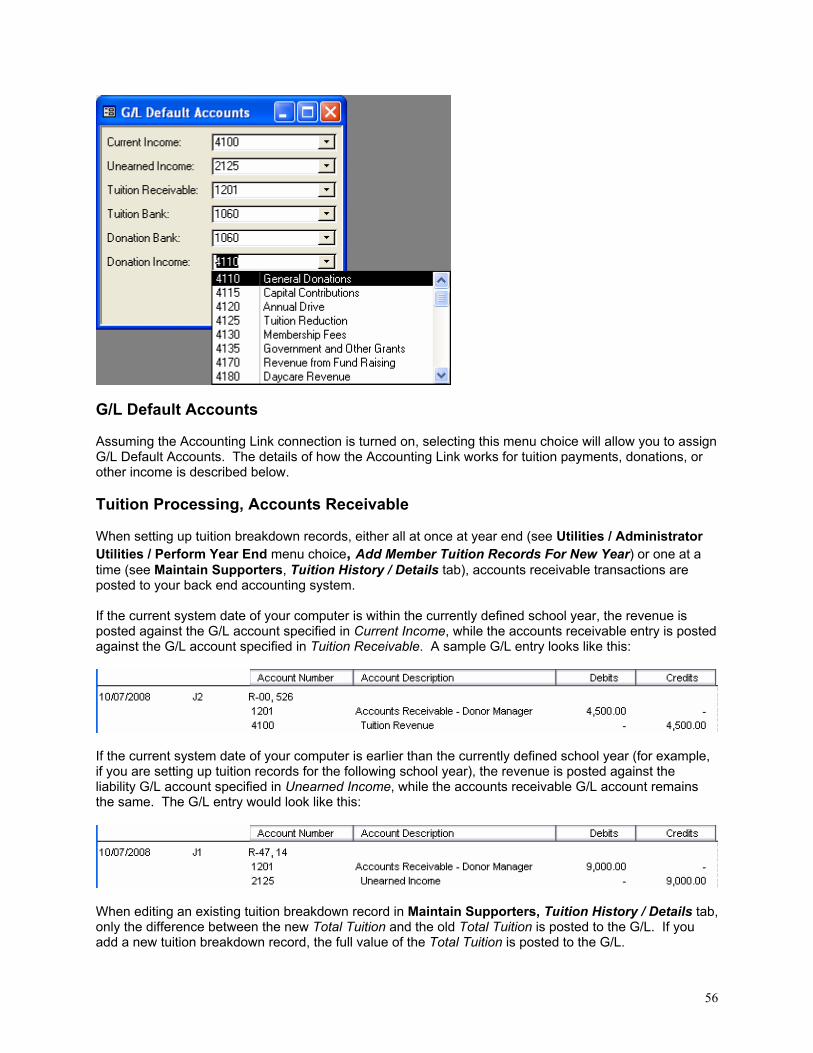
56
G/L Default Accounts Assuming the Accounting Link connection is turned on, selecting this menu choice will allow you to assign G/L Default Accounts. The details of how the Accounting Link works for tuition payments, donations, or other income is described below. Tuition Processing, Accounts Receivable When setting up tuition breakdown records, either all at once at year end (see Utilities / Administrator Utilities / Perform Year End menu choice, Add Member Tuition Records For New Year) or one at a time (see Maintain Supporters, Tuition History / Details tab), accounts receivable transactions are posted to your back end accounting system. If the current system date of your computer is within the currently defined school year, the revenue is posted against the G/L account specified in Current Income, while the accounts receivable entry is posted against the G/L account specified in Tuition Receivable. A sample G/L entry looks like this:
If the current system date of your computer is earlier than the currently defined school year (for example, if you are setting up tuition records for the following school year), the revenue is posted against the liability G/L account specified in Unearned Income, while the accounts receivable G/L account remains the same. The G/L entry would look like this:
When editing an existing tuition breakdown record in Maintain Supporters, Tuition History / Details tab, only the difference between the new Total Tuition and the old Total Tuition is posted to the G/L. If you add a new tuition breakdown record, the full value of the Total Tuition is posted to the G/L.
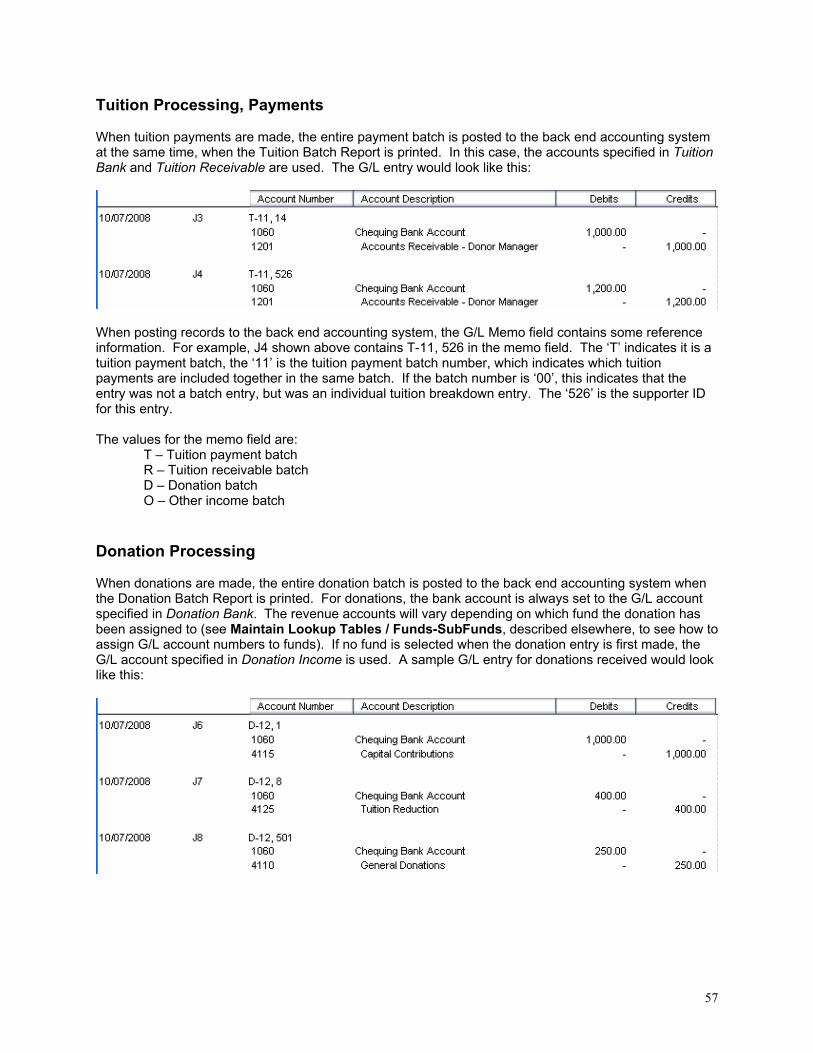
57
Tuition Processing, Payments When tuition payments are made, the entire payment batch is posted to the back end accounting system at the same time, when the Tuition Batch Report is printed. In this case, the accounts specified in Tuition Bank and Tuition Receivable are used. The G/L entry would look like this:
When posting records to the back end accounting system, the G/L Memo field contains some reference information. For example, J4 shown above contains T-11, 526 in the memo field. The ‘T’ indicates it is a tuition payment batch, the ‘11’ is the tuition payment batch number, which indicates which tuition payments are included together in the same batch. If the batch number is ‘00’, this indicates that the entry was not a batch entry, but was an individual tuition breakdown entry. The ‘526’ is the supporter ID for this entry. The values for the memo field are:
T – Tuition payment batch R – Tuition receivable batch D – Donation batch O – Other income batch
Donation Processing When donations are made, the entire donation batch is posted to the back end accounting system when the Donation Batch Report is printed. For donations, the bank account is always set to the G/L account specified in Donation Bank. The revenue accounts will vary depending on which fund the donation has been assigned to (see Maintain Lookup Tables / Funds-SubFunds, described elsewhere, to see how to assign G/L account numbers to funds). If no fund is selected when the donation entry is first made, the G/L account specified in Donation Income is used. A sample G/L entry for donations received would look like this:

58
Other Income Processing With Other Income processing, the entire batch is posted to the back end accounting system when the Other Income Batch Report is printed. In this case, the bank account is always set to the G/L account specified in Donation Bank. The revenue accounts will vary, and are set directly when the other income transaction is entered. A sample G/L entry for other income would look like this:
Simply Accounting Posting If you are using Simply Accounting by Sage, accounts receivable transaction entries are posted to a text file which needs to be imported into Simply to complete the posting. Once this file is imported into Simply, it needs to be deleted, to allow for the next batch to be posted. If this file has not been deleted and another posting is attempted, you will be warned that you cannot continue until this file has been imported into Simply and then deleted.
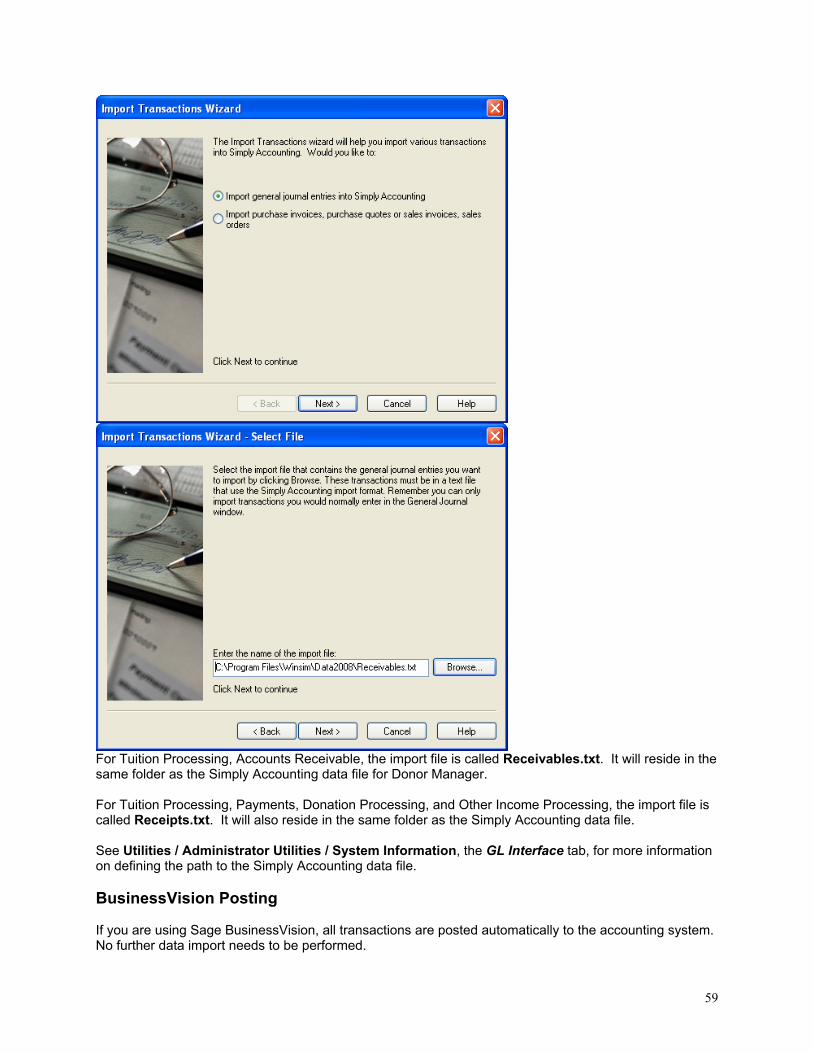
59
For Tuition Processing, Accounts Receivable, the import file is called Receivables.txt. It will reside in the same folder as the Simply Accounting data file for Donor Manager. For Tuition Processing, Payments, Donation Processing, and Other Income Processing, the import file is called Receipts.txt. It will also reside in the same folder as the Simply Accounting data file. See Utilities / Administrator Utilities / System Information, the GL Interface tab, for more information on defining the path to the Simply Accounting data file. BusinessVision Posting If you are using Sage BusinessVision, all transactions are posted automatically to the accounting system. No further data import needs to be performed.
60
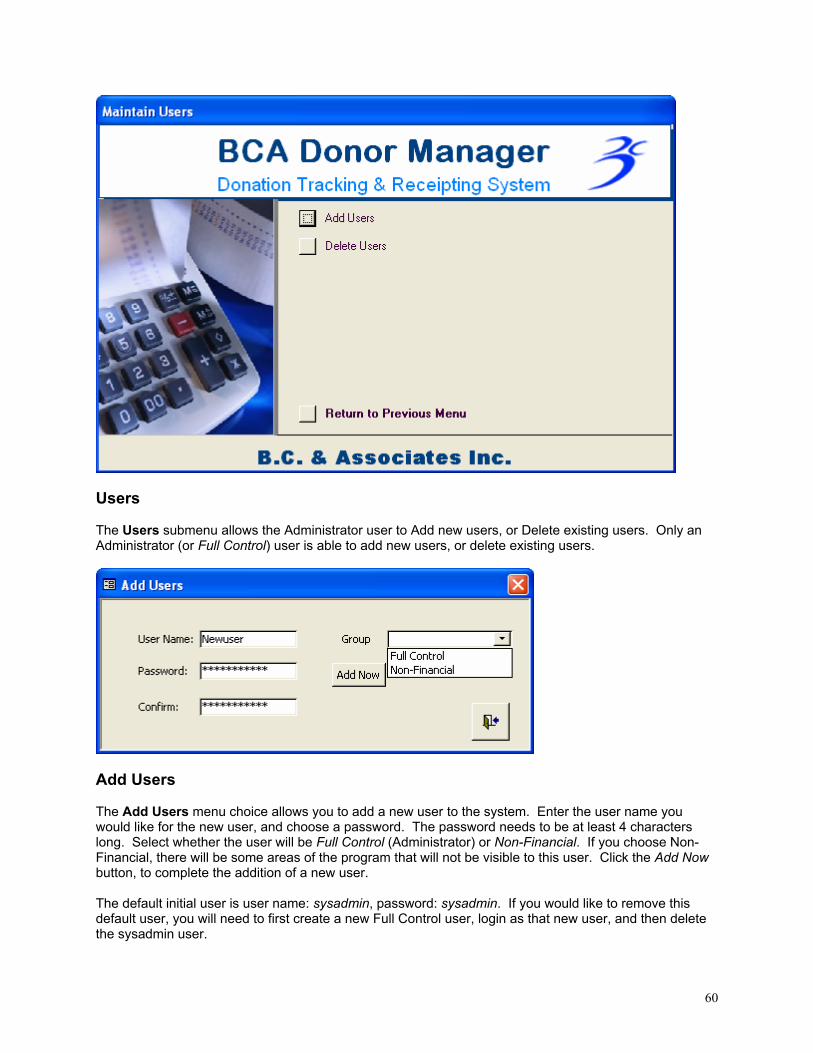
Users The Users submenu allows the Administrator user to Add new users, or Delete existing users. Only an Administrator (or Full Control) user is able to add new users, or delete existing users.
Add Users The Add Users menu choice allows you to add a new user to the system. Enter the user name you would like for the new user, and choose a password. The password needs to be at least 4 characters long. Select whether the user will be Full Control (Administrator) or Non-Financial. If you choose Non-Financial, there will be some areas of the program that will not be visible to this user. Click the Add Now button, to complete the addition of a new user. The default initial user is user name: sysadmin, password: sysadmin. If you would like to remove this default user, you will need to first create a new Full Control user, login as that new user, and then delete the sysadmin user.

61
Delete Users The Delete Users menu choice allows you to delete an existing user from the system. All the users are shown, however you are not able to delete the user that you logged in with. This ensures that you always have at least one Full Control user with which to login.
After selecting the user you want to delete, click the Delete Selected button. After confirmation, this will delete the selected user from the system.
62
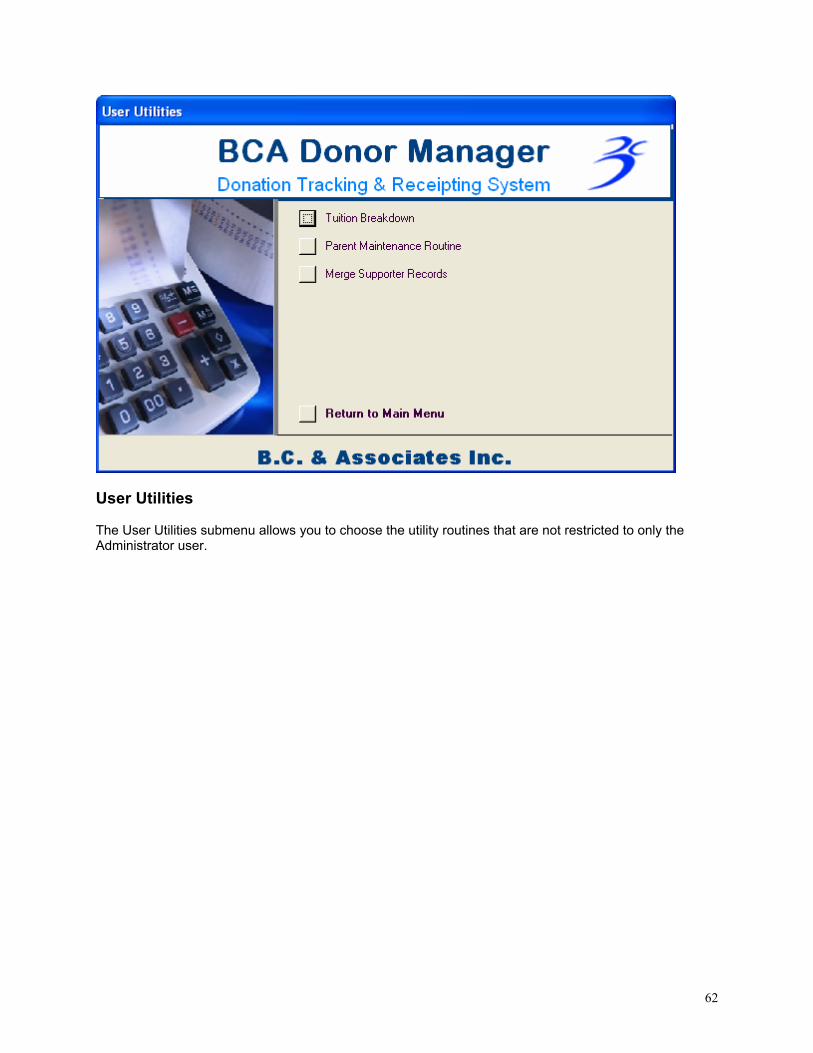
User Utilities The User Utilities submenu allows you to choose the utility routines that are not restricted to only the Administrator user.
63
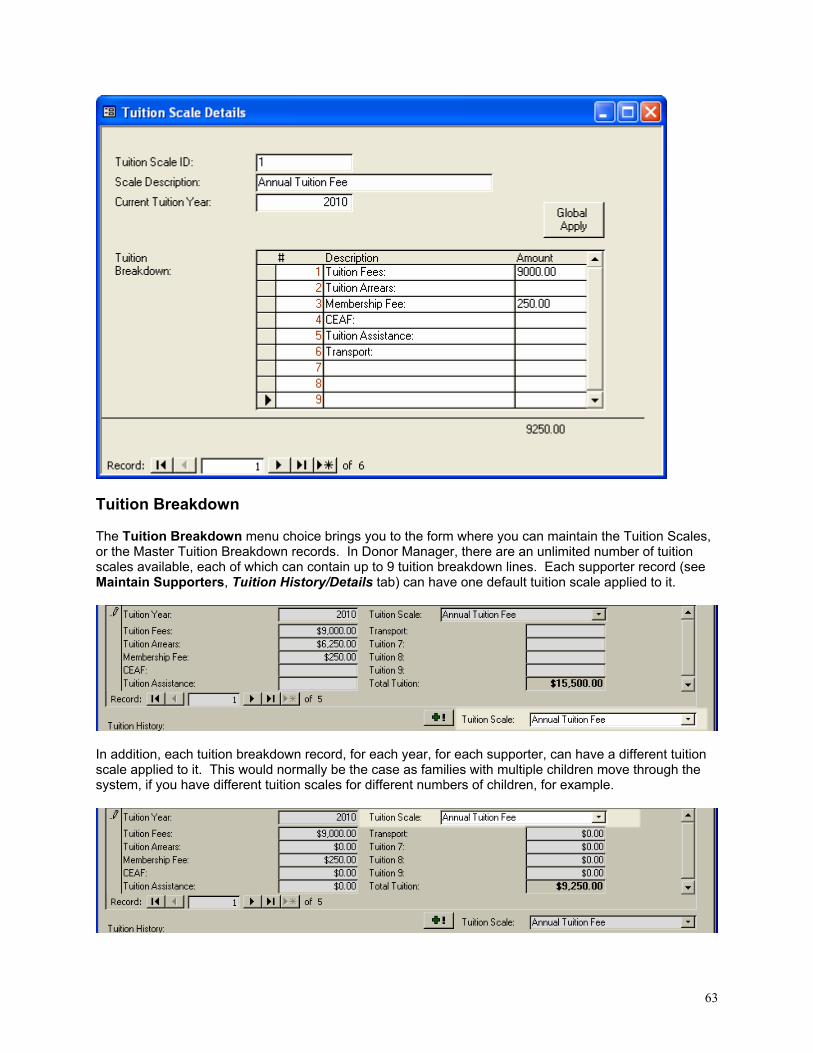
Tuition Breakdown The Tuition Breakdown menu choice brings you to the form where you can maintain the Tuition Scales, or the Master Tuition Breakdown records. In Donor Manager, there are an unlimited number of tuition scales available, each of which can contain up to 9 tuition breakdown lines. Each supporter record (see Maintain Supporters, Tuition History/Details tab) can have one default tuition scale applied to it.
In addition, each tuition breakdown record, for each year, for each supporter, can have a different tuition scale applied to it. This would normally be the case as families with multiple children move through the system, if you have different tuition scales for different numbers of children, for example.

64
Fields of note on this form: Total Scale ID: This field represents the unique identifier for the tuition scale record, and is the value that is stored in each supporter record. Current Tuition Year: This field represents the tuition year that the tuition scale applies to. By assigning a future value to this field, it is possible to set up tuition scale records for future school years, in advance. Tuition Breakdown: These 9 rows represent how the tuition total is broken down. The total of lines 1 through 9 represents the Total Tuition for the year, and is displayed at the bottom of the form. Note: When setting up the tuition scales, the following general notes apply:
- position 1 on the breakdown is strongly recommended to be reserved for Tuition Fees - position 2 on the breakdown must be reserved for Tuition Arrears (which is automatically
calculated in the Utilities / Administrator Utilities / Perform Year End routine) - clicking the Global Apply button will update all tuition breakdown entries for all supporters
assigned to that tuition scale, for that tuition year - clicking the Global Apply button will not update position 2 (Tuition Arrears) on the tuition
breakdown under any circumstances.
65
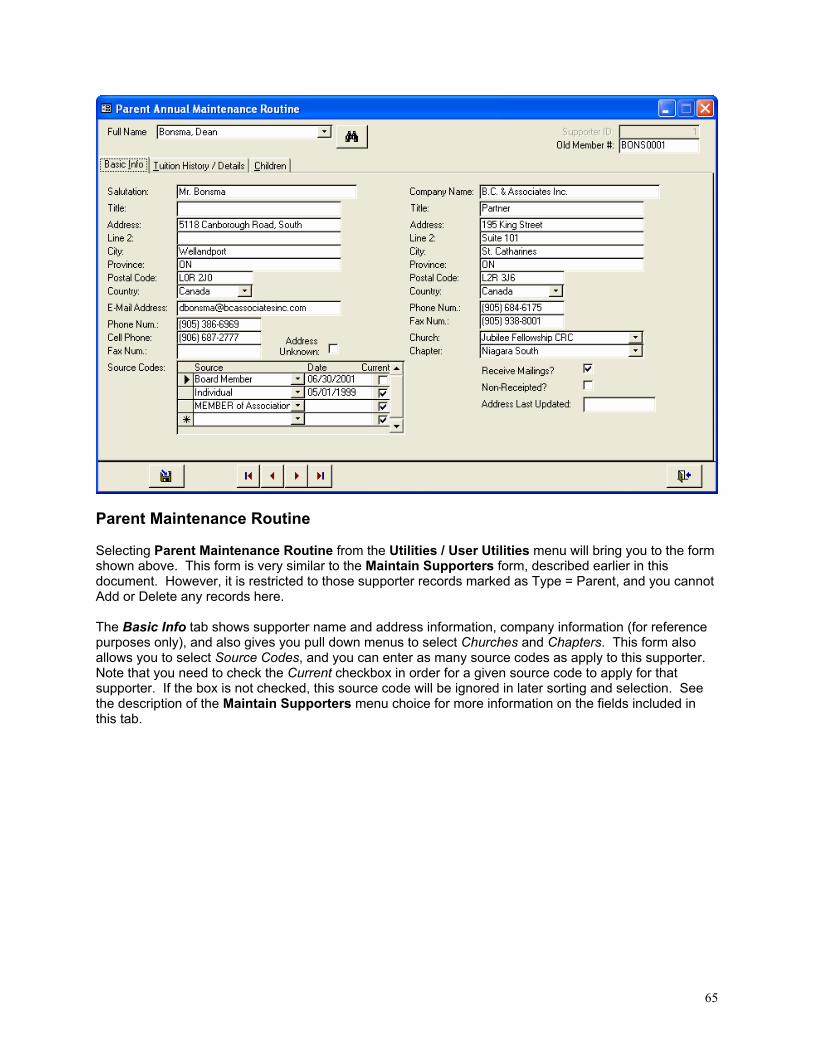
Parent Maintenance Routine Selecting Parent Maintenance Routine from the Utilities / User Utilities menu will bring you to the form shown above. This form is very similar to the Maintain Supporters form, described earlier in this document. However, it is restricted to those supporter records marked as Type = Parent, and you cannot Add or Delete any records here. The Basic Info tab shows supporter name and address information, company information (for reference purposes only), and also gives you pull down menus to select Churches and Chapters. This form also allows you to select Source Codes, and you can enter as many source codes as apply to this supporter. Note that you need to check the Current checkbox in order for a given source code to apply for that supporter. If the box is not checked, this source code will be ignored in later sorting and selection. See the description of the Maintain Supporters menu choice for more information on the fields included in this tab.

66
Tuition History / Details The main purpose of the Parent Maintenance routine can be found in the Tuition History / Details tab. This tab provides a slightly different view of the Tuition History than that found in Maintain Supporters. Several of the tuition detail fields for records that have already been posted can be edited here. The Tuition Year field and the Membership check box can both be directly edited here, simply by clicking on the field and typing the new value. The correct tuition year is critical to successfully using Donor Manager to track accounts receivable information. Also, checking off a tuition payment as a Membership Fee means that this value can be receipted regardless of the Cost of Education calculation for this family. In addition, this screen also gives you the option to Split a payment into two or more separate entries. By clicking the Split button on the record you want to split, an edit window pops up.
Let’s say you want to take one payment for $1,000, and split that up into one regular tuition payment of $750, and one membership fee payment of $250. Click on the Split button on the desired entry, enter $250 into the Current Amount field, and click OK.
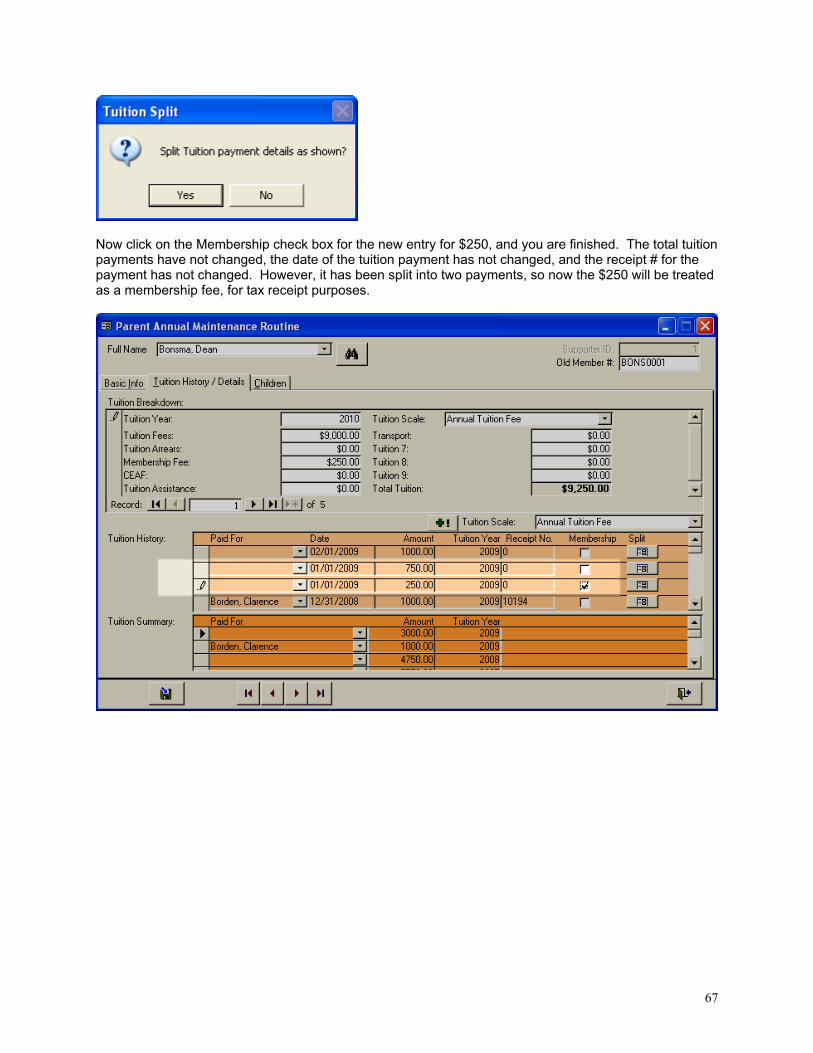
67
Now click on the Membership check box for the new entry for $250, and you are finished. The total tuition payments have not changed, the date of the tuition payment has not changed, and the receipt # for the payment has not changed. However, it has been split into two payments, so now the $250 will be treated as a membership fee, for tax receipt purposes.
68
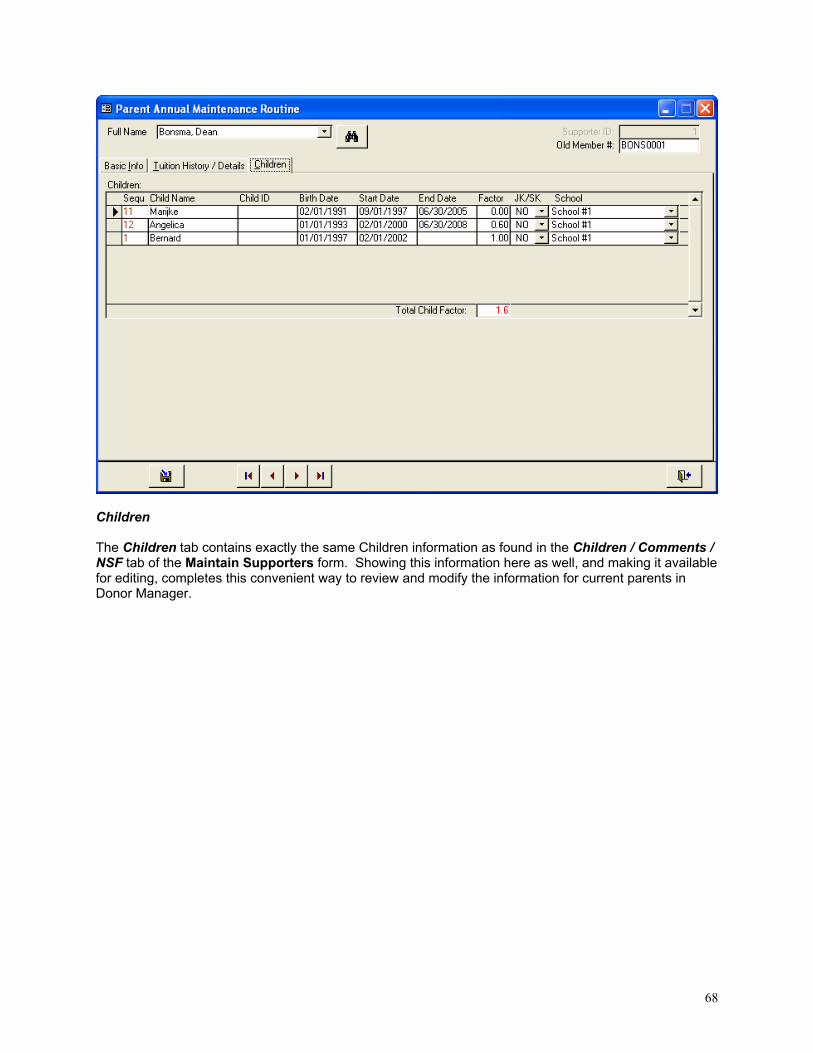
Children The Children tab contains exactly the same Children information as found in the Children / Comments / NSF tab of the Maintain Supporters form. Showing this information here as well, and making it available for editing, completes this convenient way to review and modify the information for current parents in Donor Manager.
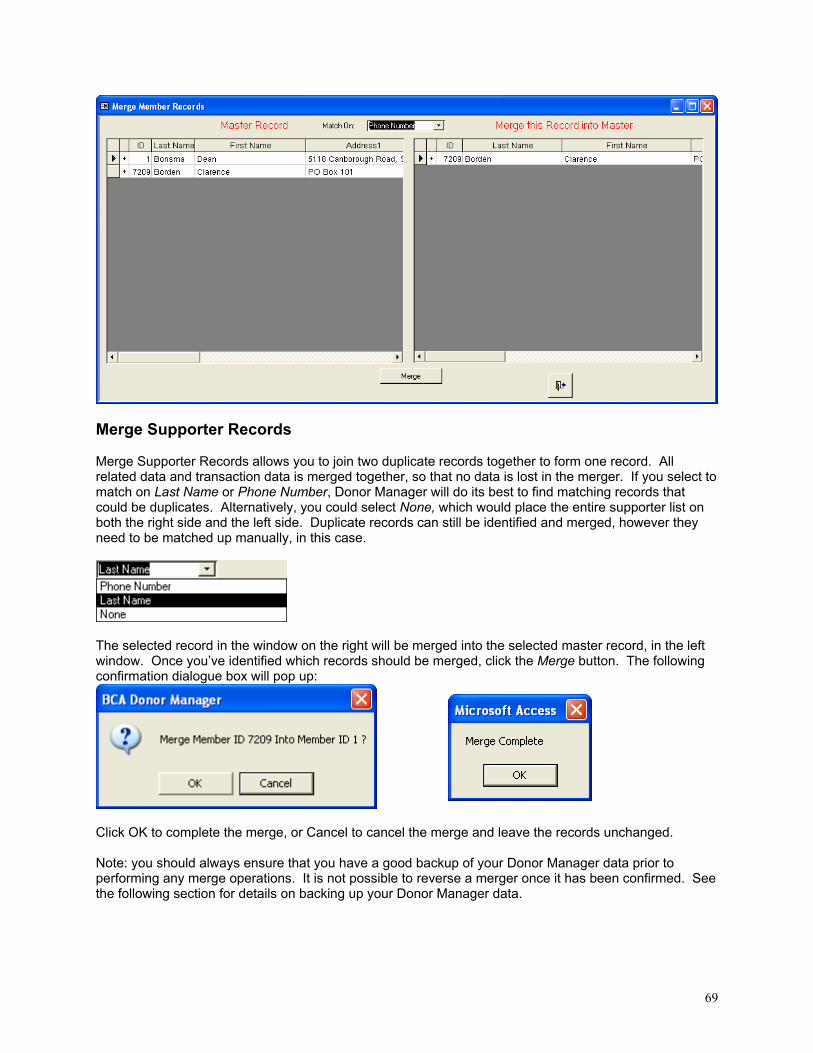
69
Merge Supporter Records Merge Supporter Records allows you to join two duplicate records together to form one record. All related data and transaction data is merged together, so that no data is lost in the merger. If you select to match on Last Name or Phone Number, Donor Manager will do its best to find matching records that could be duplicates. Alternatively, you could select None, which would place the entire supporter list on both the right side and the left side. Duplicate records can still be identified and merged, however they need to be matched up manually, in this case.
The selected record in the window on the right will be merged into the selected master record, in the left window. Once you’ve identified which records should be merged, click the Merge button. The following confirmation dialogue box will pop up:
Click OK to complete the merge, or Cancel to cancel the merge and leave the records unchanged. Note: you should always ensure that you have a good backup of your Donor Manager data prior to performing any merge operations. It is not possible to reverse a merger once it has been confirmed. See the following section for details on backing up your Donor Manager data.

70
Data Backup
It is important to regularly backup your Donor Manager data, to prevent data loss due to a computer crash or some catastrophic user error. Donor Manager is based on Microsoft Access, and therefore backing up the data is quite simple. All the data is contained within one file – called DMData.mdb. By backing up this one file (copying it to a memory stick or a CD or DVD) you are backing up all the Donor Manager data. If you have installed Donor Manager on only one computer, and are not sharing the data with other users, it is very likely that DMData.mdb will reside in the same folder as the program itself – C:\Program Files\BC Associates\BCA Donor Manager, by default (see above). If you have installed Donor Manager on multiple computers, and are sharing data among more than one user, it is likely that the DMData.mdb data file resides on a shared network drive. You can go to Utilities / Administrator Utilities / Reattach Linked Tables to find the path to the DMData.mdb data file, in order to ensure you are backing up the proper file.