battery exchange in bsf7 and bsf8 stations - sportident€¦ · battery exchange in bsf7 and bsf8...
TRANSCRIPT
Battery exchange in BSF7 and BSF8 stations
V1.1 22.09.2015
SPORTident GmbH • Arnstadt • Germany • www.sportident.com • [email protected] 1/9
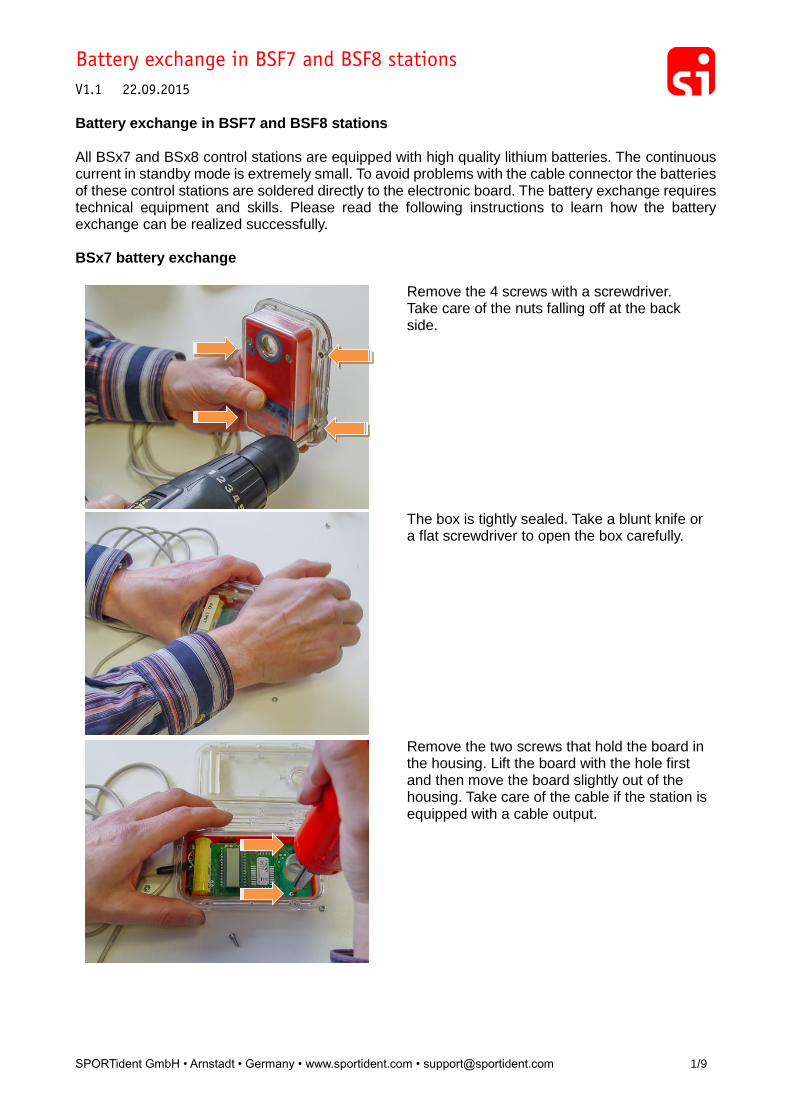
Battery exchange in BSF7 and BSF8 stations All BSx7 and BSx8 control stations are equipped with high quality lithium batteries. The continuous current in standby mode is extremely small. To avoid problems with the cable connector the batteries of these control stations are soldered directly to the electronic board. The battery exchange requires technical equipment and skills. Please read the following instructions to learn how the battery exchange can be realized successfully. BSx7 battery exchange
Remove the 4 screws with a screwdriver. Take care of the nuts falling off at the back side.
The box is tightly sealed. Take a blunt knife or a flat screwdriver to open the box carefully.
Remove the two screws that hold the board in the housing. Lift the board with the hole first and then move the board slightly out of the housing. Take care of the cable if the station is equipped with a cable output.
Battery exchange in BSF7 and BSF8 stations
V1.1 22.09.2015
SPORTident GmbH • Arnstadt • Germany • www.sportident.com • [email protected] 2/9
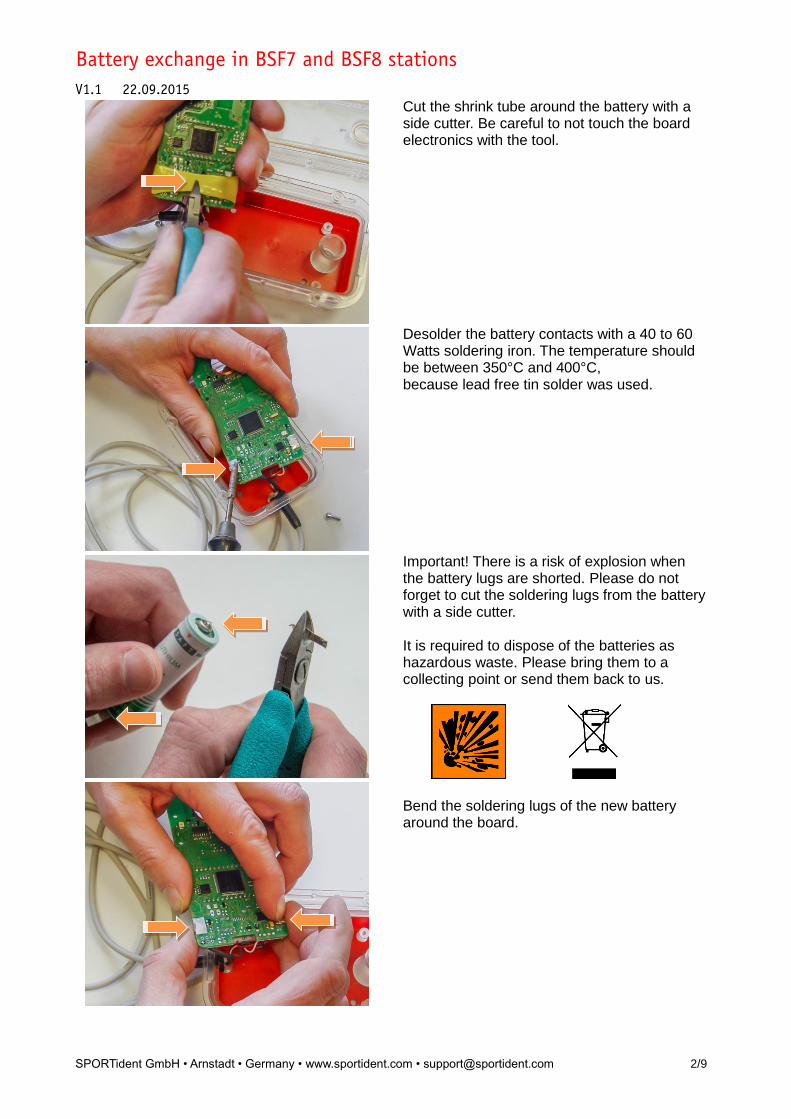
Cut the shrink tube around the battery with a side cutter. Be careful to not touch the board electronics with the tool.
Desolder the battery contacts with a 40 to 60 Watts soldering iron. The temperature should be between 350°C and 400°C, because lead free tin solder was used.
Important! There is a risk of explosion when the battery lugs are shorted. Please do not forget to cut the soldering lugs from the battery with a side cutter. It is required to dispose of the batteries as hazardous waste. Please bring them to a collecting point or send them back to us.
Bend the soldering lugs of the new battery around the board.

Battery exchange in BSF7 and BSF8 stations
V1.1 22.09.2015
SPORTident GmbH • Arnstadt • Germany • www.sportident.com • [email protected] 3/9
Pay attention to the right polarity of the battery! The green ring on the battery is the minus pole, „+“ and „-“ are marked on the printed circuit board.
To solder on the battery, additional tin solder is necessary. Please use only lead-free tin solder, we recommend alloy Sn 95.5 / Ag 3.8 / Cu 0.7 with a diameter less than 1.0 mm.
While contacting the solder lugs to the solder pads the station gets a reset signal and is brought on-line with 2 beeps. Press down the lugs with a spiky tweezer while soldering and wait for the soldering pads to cool down until you can safely touch them.
Slip the shrink tube over the stations board starting from the top. Do not remove the cable from the BSM7 station.

Battery exchange in BSF7 and BSF8 stations
V1.1 22.09.2015
SPORTident GmbH • Arnstadt • Germany • www.sportident.com • [email protected] 4/9
Put the shrink tube evenly over the battery as shown in the picture. Start heating it up with a heat gun at level 2. Move the board back and forth over the heat gun for about one second for each side. A perfect result can be seen in the pictures. If the shrink tube cracks, replace it and use a new one. Be sure to not cover the LED at the back side of the board.
Put the board carefully back in the case and fasten the screws. Clean the rubber ring with some alcohol and apply silicone spray to ensure a proper sealing of the rubber ring.
Close the case and fasten the screws. Use a low gear level for the cordless screwdriver. You need to reset the battery parameters, check the settings and set the time of the station with Config+ afterwards (see below). Complete!
Battery exchange in BSF7 and BSF8 stations
V1.1 22.09.2015
SPORTident GmbH • Arnstadt • Germany • www.sportident.com • [email protected] 5/9
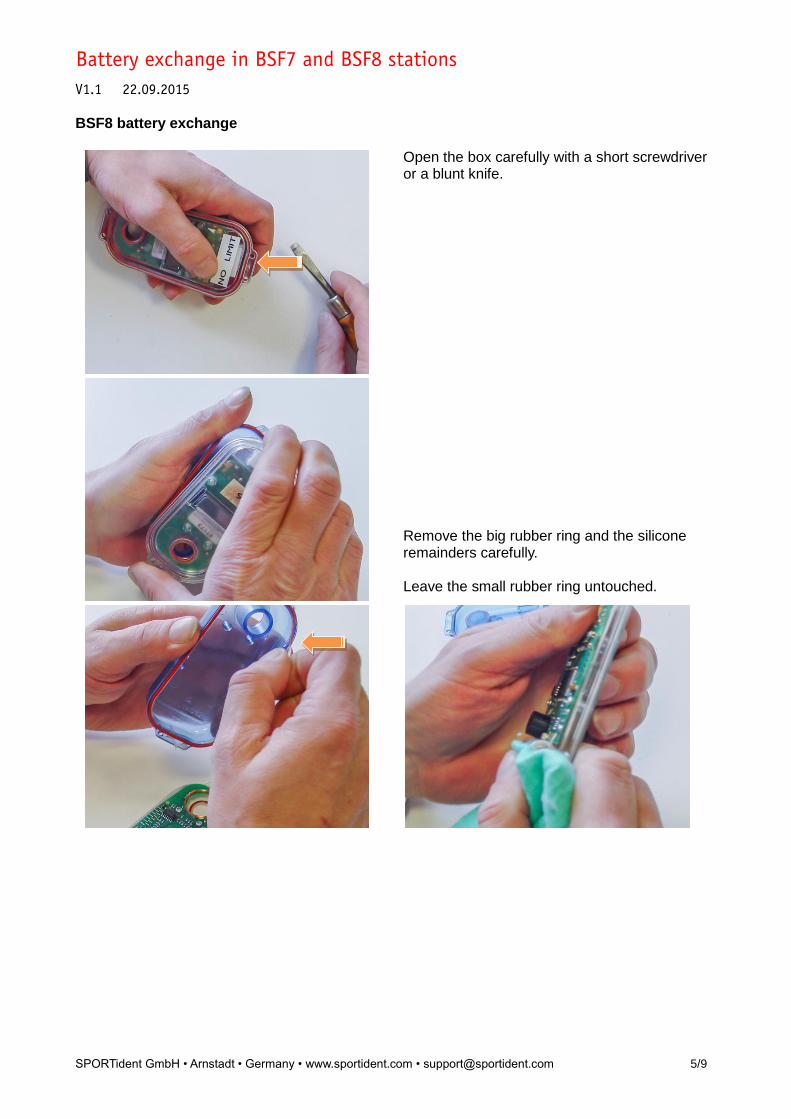
BSF8 battery exchange
Open the box carefully with a short screwdriver or a blunt knife.
Remove the big rubber ring and the silicone remainders carefully. Leave the small rubber ring untouched.

Battery exchange in BSF7 and BSF8 stations
V1.1 22.09.2015
SPORTident GmbH • Arnstadt • Germany • www.sportident.com • [email protected] 6/9
Desolder the battery contacts with a 40 to 60 Watts soldering iron. The temperature should be between 350°C and 400°C, because lead free tin solder was used.
Important! There is a risk of explosion when the battery lugs are shorted. Please do not forget to cut the soldering lugs from the battery with a side cutter. It is required to dispose of the batteries as hazardous waste. Please bring them to a collecting point or send them back to us.
To bend the soldering lugs of the new battery, use the gauge (article number 33370). Pay attention to the right polarity of the battery! The green ring on the battery is the minus pole, „+“ and „-“ are marked on the printed circuit board.

Battery exchange in BSF7 and BSF8 stations
V1.1 22.09.2015
SPORTident GmbH • Arnstadt • Germany • www.sportident.com • [email protected] 7/9
To solder on the battery, additional tin solder is necessary. Please use only lead-free tin solder, we recommend alloy Sn 95.5 / Ag 3.8 / Cu 0.7 with a diameter less than 1.0 mm. While contacting the solder lugs to the solder pads the station gets a reset signal and is brought on-line with 2 beeps. Press down the battery with a finger while soldering and wait for the soldering pads to cool down until you can safely touch them.
Put the big rubber ring in the groove of the ground plate. Press it inside with the special case (article number 33360).
Cover the large rubber ring with a small quantity of liquid silicone continually. The small round rubber ring is not covered with silicone and must not be touched. We strongly recommend to only use our special electronics silicone as it does not corrode the rubber sealing or plastic parts.

Battery exchange in BSF7 and BSF8 stations
V1.1 22.09.2015
SPORTident GmbH • Arnstadt • Germany • www.sportident.com • [email protected] 8/9
Clench together the ground plate and the upper part.
Put the station in a dry and warm place. It takes 24 hours until the silicone is hardened. Finally remove the excess silicone with a plastic strip with a sharp edge. Do not use metal tools to no damage the housing. Clean up the station with a soft cloth.
Clean up the station with a soft cloth. You need to reset the battery parameters, check the settings and set the time of the station with Config+ afterwards (see below). Complete!

Battery exchange in BSF7 and BSF8 stations
V1.1 22.09.2015
SPORTident GmbH • Arnstadt • Germany • www.sportident.com • [email protected] 9/9
Writing new battery parameters to the station To write the battery change date and to reset the consumption counter in the station, you need to enable the service mode in Config+. You can use the shortcut on your Desktop to do this.
1. Right click on the shortcut and bring up the properties dialog.
2. In the text box “Target:” scroll to the most right position and append a “ --service” after the last quote character.
3. The last few characters should look like this: \SPORTident.ConfigPlus.exe" --service.
4. Confirm the changes with OK.
Now start up Config+ by clicking on the Desktop icon.
1. First select your device connection and choose direct or remote depending on which device battery to have changed.
2. Read/verify the device settings and correct if required.
3. In the menu “Service” select the sub menu “New device battery…”.
4. In the upcoming dialog select the desired parameters. Usually you want to change the usage counter and the battery date.
5. Click OK to apply the settings. Repair material
Article number Description
33310
Battery lithium 2000 mAh / AA (BSF7), lithium batteries will be shipped in the original packaging unit of 30 pieces
33320 Battery lithium 1000 mAh / 1/2 AA (BSF8), lithium batteries will be shipped in the original packaging unit of 30 pieces
33330 Flexible O-ring seals BS8 (1 piece each) 33341 Liquid Silicone (60 ml for approx. 60 pcs.) 33350 Shrink tubing for battery (BSF7) 33360 Special case for press the O-ring seals in the BSF8 case 33370 Gauge for bending the 1/2 AA battery cable