battery cage mechanics for the renewable energy vehicle...
TRANSCRIPT

Battery Cage Mechanics for the Renewable
Energy Vehicle Project
Christian A. Tietzel
10415074
School of Mechanical Engineering, The University of Western Australia
Supervisor: Associate Professor Kamy Cheng
School of Mechanical Engineering, The University of Western Australia
Co-Supervisor: Professor Thomas Braunl
School of Electrical, Electronic and Computer Engineering, The University
of Western Australia
Final Year Project Thesis
School of Mechanical Engineering
The University of Western Australia
Submitted: October 26th, 2009

Final Year Thesis, 2009
I Christian A. Tietzel, 10415074
Project Summary
In Australia there is growing recognition of the need for actions to address the
increasing effects of global warming. There is therefore a greater requirement for
renewable energy technologies. Australia has a heavy dependence on automobile
transportation which produces large amounts of green house gases and hence requires
an alternative solution. In 2009 the Renewable Energy Vehicle team from The
University of Western Australia converted a Lotus Elise sports car into an electric drive
system whilst striving to maintain its performance characteristics and road worthiness.
A Hyundai Getz commuter vehicle which was converted in 2008, was analysed
throughout 2009, and upgraded where necessary to maximise performance efficiency
and comfort. The vehicle is now undergoing approval from the Department for Planning
and Infrastructure.
This project is responsible for the placement, design and construction of the battery
cages for the Lotus Elise. The placement depends upon many factors such as the centre
of gravity and axle loadings which will also affect the performance of the vehicle. The
design is required to adhere to the rules set out in the national guidelines for the
installation of electric drives in motor vehicles which must be read in conjunction with
other relevant codes and standards. The battery cages were designed and analysed with
the aid of SolidWorks and ANSYS Workbench. They were then constructed and
installed predominantly by the UWA Electrical Engineering workshop and are currently
operational.
The Hyundai Getz battery cage enclosure was sealed and temperature tested, and an
active venting system was designed and installed to maximise the efficiency and
lifetime of the batteries. The system is currently operational and automatically
controlled by a thermostat.

Final Year Thesis, 2009
II Christian A. Tietzel, 10415074
Letter of Transmittal
Christian A. Tietzel
169 Broome Street
Cottesloe, WA, 6011
26th October, 2009
Professor David Smith
Dean
Faculty of Engineering, Computing and Mathematics
The University of Western Australia
35 Stirling Highway
Crawley, WA, 6009
Dear Professor Smith
I am pleased to submit this thesis, entitled “Battery Cage Mechanics for the
Renewable Energy Vehicle Project”, as part of the requirement for the degree of
Bachelor of Engineering.
Yours Sincerely
Christian A. Tietzel
10415074

Final Year Thesis, 2009
III Christian A. Tietzel, 10415074
Acknowledgements
This project would not have been successfully completed without the continual support
and guidance from many personnel. I would firstly like to thank my mechanical
engineering supervisor, Kamy Cheng, for his continual advice and guidance on all
topics explored in my project. Secondly to thank my co-supervisor, Thomas Braunl,
who has managed the REV team throughout 2009 to produce a safe working vehicle.
I would like to thank the Electrical Engineering workshop for their patience and time
spent fabricating and installing the components designed. In particular I would like to
mention Ken Fogden, who has also given continual advice in all design aspects of the
vehicle. Similarly, thanks to the Mechanical workshop, particularly Derek Goad, for
fabrication of individual components. I would also like to thank Jeremy Leggoe for his
advice on thermodynamic topics covered in the design of the venting system for the
Hyundai Getz.
To all the members of the REV team and all the additional people that have contributed
in some way, I would like to say thank you, as this project has largely been a team effort
which would not have been completed without the input from all members and
associates.

Final Year Thesis, 2009
IV Christian A. Tietzel, 10415074
Contents
1 Introduction ............................................................................................................... 1
1.1 Background ........................................................................................................ 1
1.2 Project Objectives ............................................................................................... 3
2 Literature Survey ....................................................................................................... 4
2.1 Chapter Overview ............................................................................................... 4
2.2 Battery Cage Location ........................................................................................ 4
2.3 Lithium-Ion Batteries ......................................................................................... 7
2.4 Battery Cage Codes and Standards .................................................................... 8
3 Battery Cage Ventilation System for Hyundai Getz ............................................... 10
3.1 Overview .......................................................................................................... 10
3.2 Design ............................................................................................................... 10
3.3 Results & Discussion ........................................................................................ 23
4 Battery Restraint System for Lotus Elise ................................................................ 27
4.1 Overview .......................................................................................................... 27
4.2 Design Process.................................................................................................. 27
4.3 Results & Discussion ........................................................................................ 34
5 Manufacture and Implementation Safety Requirements ......................................... 54
6 Conclusion & Future Work ..................................................................................... 55
7 References ............................................................................................................... 57
8 Appendices .............................................................................................................. 60

Final Year Thesis, 2009
V Christian A. Tietzel, 10415074
Nomenclature
Ac Minor diameter area
Ac Cross sectional area
ae Minimum distance from the edge of a hole to the edge of a ply measured in the direction of the component of a force plus half the bolt diameter
As Surface area
As Tensile stress area
df Diameter of the bolt
Dh Hydraulic diameter
E Young’s modulus
f Friction factor
FFront impact Front impact force
fuf Minimum tensile strength
g Gravitational acceleration
h Convection heat transfer coefficient
k Thermal conductivity
l Length of bar
L Length of tube
Lc Characteristic length
Lt Thermal entry length
m Mass
n Number of routes
Ntf Nominal tensile capacity
Nu Nusselt number
p Perimeter
P Pitch
Pr Prandtl number
q Flow rate
Q Heat transfer rate
R Thermal resistance
RaL Rayleigh’s number
Re Reynolds number
T Temperature
Tavg Average temperature
tp Thickness of ply
T∞ Ambient Temperature
Vavg Average velocity
Vb Nominal bearing capacity
Vf Nominal shear capacity
β Volume expansivity
Δl Elongation distance

Final Year Thesis, 2009
VI Christian A. Tietzel, 10415074
ΔPL Pressure loss
∆T Change in temperature
ε Strain
εmax Maximum strain
v Kinematic viscosity
ρ Density
σy Yield strength

Final Year Thesis, 2009
1 Christian A. Tietzel, 10415074
1 Introduction
1.1 Background
Australia and the world are becoming more aware and responsive to the effects of
climate change. The Intergovernmental Panel on Climate Change found in their fourth
assessment report 2007, that there is a 90% chance that global warming is caused by
greenhouse gas emissions (Pachauri & Reisinger 2007). With these realisations, and
also given the limited supply of oil, Australia ratified the Kyoto Protocol in December
2007 and requires immediate research and development for renewable energy
technologies. Of the 576 million tonnes of carbon dioxide emitted in Australia in 2006,
14% was due to transportation (Department of Climate Change 2008). As a result of
Australia’s small population and large land mass there is a high reliance on automobile
transportation. Hence there is high demand in the car industry for zero emission
vehicles to be available to the public. These cars must have the performance, luxuries
and comparative costs to be a competitive viable option for everyday users.
The Renewable Energy Vehicle (REV) team at The University of Western Australia
(UWA) was re-started in 2008 by Professor Thomas Braunl and Associate Professor
Kamy Cheng with an aim to develop renewable energy vehicle technologies, that is,
ways of powering a vehicle without relying on petrol or diesel. The REV team precursor
project had looked at hydrogen technologies but with electric vehicles being far simpler,
cost effective and easier to charge from a standard plug point (Braunl 2009), the focus
was changed. Although an electric vehicle must be charged from the power grid, the
equivalent level of CO2 emissions per kilometre are still less than the level of emissions
for the most recent technology petrol vehicles. For example the new electric MINI,
MINI-E, when charged from an Australian outlet produces the equivalent of
approximately 14.6kg of CO2 per 100km (see Appendix A for calculation) compared to
the petrol MINI Cooper which produces 16.1kg of CO2 per 100km (MINI 2009b).
However as electricity generating renewable energy technologies rapidly grow this gap
will widen. To confirm this point, the REV team charges it’s vehicles from solar cells
located on the roof of the UWA Electrical Engineering building. Furthermore, future
electric vehicles will generally be used to commute by day and charge up overnight on
low-peak electricity. This won’t affect dirty coal power stations as they will be running
to cover the base load requirement and it will be a long time until there are enough
electric cars to increase this requirement (Marshall 2009). To demonstrate the viability

Final Year Thesis, 2009
2 Christian A. Tietzel, 10415074
of renewable energy transportation, everyday commuter and performance vehicles are
used for conversion. If these cars can be converted at a low cost without sacrificing
performance characteristics and practical features, they will be a competitive alternative
for public users.
In 2008 the UWA REV team converted a Hyundai Getz, five-seater commuter vehicle
into an electric drive vehicle. In 2009 the REV team aims to convert a Lotus Elise S2,
two seater performance vehicle into electric drive. The aims of this project it to work
closely with the REV team whilst managing the Lotus mechanical students to achieve
completion of the vehicle by the end of 2009, and assist in upgrading the Hyundai
where necessary. The main focus is on the design and construction of the battery cages
for the Lotus, as well as analysis and design of a venting system for the Hyundai.

Final Year Thesis, 2009
3 Christian A. Tietzel, 10415074
1.2 Project Objectives
This project focuses on battery cages for the REV team in 2009. The major task of this
project is to complete the structural designs of battery cages and necessary mountings
for the 2002 model Lotus Elise in accordance with the Australian Design Rules for
modification of production and individually constructed vehicles. A total of 100
lithium-ion batteries or as close to must be housed in the vehicle. In designing the
battery cages, particular consideration must be given to the affects the battery
placements have on the overall performance of the vehicle. This must be done in
conjunction with members of the REV team who are focusing on the drive mechanics,
suspension, analysis of the weight distribution and cooling systems for the Lotus Elise.
The second focus of this project is on the ventilation of the currently operating battery
cage for the 2008 model Hyundai Getz. The current Hyundai Battery Cage adhered to
the relevant Australian Design Rules at the time of construction but the batteries are
reaching temperatures above which their life expectancy is reduced. The batteries or
connections are also unexpectedly releasing an irritating odour intermittently. Hence
there is a requirement for a sealed ventilation system for the battery cage. This project
will focus on the mechanical designs for the system to overcome these issues.
As the REV team aims to promote the electric car as a practical alternative to the
common petrol powered vehicle, both cars must be aesthetically pleasing in all aspects.
This report will initially focus on the Hyundai Getz ventilation system followed by the
methodology for design of the battery cages for the Lotus Elise in 2009.

Final Year Thesis, 2009
4 Christian A. Tietzel, 10415074
2 Literature Survey
2.1 Chapter Overview
This chapter explores the various considerations that be must be made when designing a
battery cage for an automotive vehicle and briefly describes the impacts they can have
on the overall performance of the vehicle. The effects of operating conditions on
lithium-ion batteries are also discussed as well as the relevant guidelines that must be
adhered to in conjunction with the Australian Design Rules for modification of
production and individually constructed vehicles
2.2 Battery Cage Location
Particular considerations must be given to the placement of the battery cages due to the
relatively large weight they add to the vehicle. Altering the weight distribution of the
vehicle can change the ride height and centre of gravity, affecting the handling of the
car. The total weight of the vehicle also affects the acceleration and top speed.
Therefore suitable placements of the batteries must be found that have minimal effects
on these characteristics, whilst being structurally safe.
2.2.1 Weight Implications
For directional stability when driving an automotive vehicle, understeer is preferred,
that is it tends to travel in a straight line, as oppose to oversteer where the car tends to
spin. A way of understanding the directional stability of the vehicle is to consider the
position of the neutral steer point (NSP) in relation to the position of the horizontal
centre of gravity (COG) and the centre of pressure (COP), see Figure 1 below. The NSP
is the point at which a laterally applied force would cause a vehicle to move sideways
without yawing. To achieve understeer, the NSP must be behind the COG, hence during
a turn the tyre forces act at the NSP and the inertia forces at the COG, the combined
forces tend to yaw the car out of the bend and into a straight line. However if the car is
subject to side winds, the wind force will act at the COP which is generally located in
front of the COG, coupling this force with the forces acting on the tyres at the NSP, the
car will tend to yaw away from the wind (Bastow 2004). Therefore it is desired that the
NSP is kept behind the COG but the distance between the NSP and COP is kept at a
minimal.

Final Year Thesis, 2009
5 Christian A. Tietzel, 10415074
Figure 1: Relative Positions of NSP, COG and COP on a vehicle (Bastow 2004).
Similarly to the horizontal COG, the vertical COG should also be kept constant or
otherwise lower. A low COG is desirable as it is generally associated with fewer driving
dynamic problems and increased vehicle performance during cornering and braking
(Reimpell 2001).
Altering the overall weight of the vehicle can have significant affects on the
acceleration and top speed. From Newton’s second law, it is clear that the acceleration
varies directly with mass for a given force, even when incorporating the added inertia of
the vehicles rotating parts, the acceleration for a given accelerating force is still
inversely proportional to the mass of the vehicle. Similarly for speed and range of the
vehicle with a fixed amount of energy, the weight is inversely proportional (Leitman &
Brant 2009).
By altering the weight distribution and overall weight of the vehicle the ride height can
also be changed. The ride height of a vehicle can be defined as the distance between the
chassis of a vehicle and level ground. Changes in the ride height of the vehicle can
significantly affect the suspension and handling, for example it can alter the roll axis of
the vehicle and for ride height differences from side to side it can effect torque steer
(Bastow 2004). Changing the ride height can also affect things such as the headlamp dip
angle and vehicle ground clearance.
Hence it is vitally important, when selecting positions to place parts in an electric
vehicle conversion that all the above factors are taken into account. It is ideal to keep
the weight distribution, total weight and ride height the same as before conversion but
not at the cost of safety.

Final Year Thesis, 2009
6 Christian A. Tietzel, 10415074
2.2.2 Current Electric Vehicles
As seen with the Hyundai Getz converted by the REV team in 2008, there has to be a
balance of practicality, aesthetics and vehicle performance. The battery cage in the
Hyundai Getz (see Figure 2) was located in the rear boot of the vehicle. This was an
obvious place to put the forty five lithium-ion batteries as there was inadequate room in
the front engine bay and it was discouraged to sacrifice a passenger seat. However this
did cause weight distribution issues with the Department for Planning and Infrastructure
(DPI) who conveyed their concerns for overloading of the rear axle. An adequate
solution was found by the 2009 REV team of upgrading the rear axle springs. This was
approved by a professional automotive engineer. Therefore although identical
performance issues were avoided in the Hyundai Getz, the advantages of each design
must be prioritised and dealt with accordingly. For the Hyundai Getz, overloading of the
rear axle was unavoidable without sacrificing a passenger seat.
Figure 2: Hyundai Getz Battery Cage in the boot.
Current electric vehicle designs and concept models were also studied for ideas on
battery placements. To maintain the COG and ride height, most cars have the batteries
located as low and central as possible in the vehicle, for example the Holden Volt and
MINI-E (see Figure 3) for reasons discussed previously. For vehicles designed and built
initially as electric drives, all components can be fitted and designed compactly around
the battery packs which demand a large space. As opposed to the constraints imposed
on the REV team who must convert purpose built petrol vehicles using the available
space left from the removal of petrol engine components for battery placements.
Battery cage
Lithium-ion batteries

Final Year Thesis, 2009
7 Christian A. Tietzel, 10415074
Figure 3: MINI-E (MINI 2009a) & Holden Volt (Holden 2009) battery placements respectively.
2.3 Lithium-Ion Batteries
Both the Hyundai Getz and Lotus Elise are powered by Thunder Sky lithium-ion
batteries, models TS-LFP90AHA and TS-LFP60AHA respectively. Lithium-ion
batteries are now the standard for electric vehicles due to their high power and energy
density, and long life cycle compared to lead-acid and nickel metal hydride batteries,
although this performance comes at a relatively large cost (Siguang 2009). Lithium-ion
batteries produce the same amount of energy as nickel metal hydrides but they are
typically forty percent smaller and half the weight (Dhameja 2001). This is essential in
an electric vehicle as the total weight and distribution are the critical factors in
determining the number of batteries stored on board.
The safe operating temperature for these batteries is displayed as anywhere from -25°C
to 75°C although to prolong the usable life and maximise performance of these
batteries, the temperature must be monitored. For lithium-ion batteries the immediate
performance is increased for higher temperatures. For increased temperature the
discharge capacity of each cell is increased (see Figure 4). Essentially the available
energy lost internally in each cell is decreased as the higher temperature lowers the
batteries internal resistance.
Figure 4: Discharge capacity vs. Voltage for various temperatures (Thunder Sky 2007)

Final Year Thesis, 2009
8 Christian A. Tietzel, 10415074
However at elevated temperatures, the battery cells life time is reduced (Garche &
Jossen 2000). A study on the life of lithium-ion batteries for back up applications kept
them on continuous float charge with periodic discharging. It found that the cell
degradation is significantly accelerated at elevated temperatures, a 15°C increase in
temperature cuts the cell life in half (Asakura, Shimomura & Shodai 2003). Therefore
there must be a compromise between battery performance and battery lifetime during
discharging. However temperatures should be kept as low as possible for charging.
2.4 Battery Cage Codes and Standards
As both the Hyundai Getz and Lotus Elise must be registered and roadworthy, they
must comply with the Australian Design Rules (ADRs) for modification of production
and individually constructed vehicles (ICVs). Both vehicles are classified as a passenger
car, code MA. Section LO Vehicle Standards Compliance of the National Code of
Practice for Light Vehicle Construction and Modification (NCOP) outlines the
minimum requirements for the assessment and certification of compliance with the
ADRs for ICVs. The vehicles must also comply with the specific regulations of
NCOP14 National Guidelines for the Installation of Electric Drive in Motor Vehicles
(Australian Motor Vehicle Certification Board Working Party 2006), of which the
relevant battery cage codes and standards will be outlined further.
NCOP14 stipulates that the vehicle batteries must be fixed in position and housed in a
battery restraint system which can adequately withstand vehicle crash accelerations set
out in Table 1, for example for front impact they must withstand twenty times gravity,
times the battery mass.
Front Impact 20 g Side Impact 15 g Rear Impact 10 g Vertical (rollover) Impact 10 g
Table 1: Acceleration requirements that battery restraint system must withstand.
All batteries that contain liquid or give off gases must be sealed from the vehicle
interior so neither liquid nor gas can leak into the vehicle. Depending on the batteries,
they can be individually sealed and externally vented directly to the atmosphere, or the
battery cage must be fully enclosed in a sealed compartment. Following further
discussions with the DPI about sealed batteries, this regulation is only applicable for
lead acid batteries as they can give off hydrogen in sufficient quantities to cause an

Final Year Thesis, 2009
9 Christian A. Tietzel, 10415074
explosion. Furthermore the battery restraint system must be constructed of corrosion
resistant material or adequately coated.
Should a ventilation system for gases be required, the inlet and outlet openings should
be external to the vehicle. They should also be placed where the local pressure favours
the required air flow direction. The air flow rate should be adequate to remove gas
formation, and the inlets and outlets should be placed at opposite ends of the enclosure.
A forced ventilation system may be required depending on the type and size of the
vents, particularly for lead acid batteries. The system should operate automatically and
extract gas from the battery compartment and not blow air in, as to avoid blowing gas
into the interior of the vehicle through leaks in the compartment.
There are several other miscellaneous regulations that the vehicle must comply with or
consider, including clear labelling of the battery compartment with the appropriate
hazard symbols and an indication of the voltage likely to be encountered. It is also
recommended that the vehicle be designed for prolonged operation in Australia’s wide
range of climatic conditions including ambient temperatures from -10°C up to 50°C.
The regulations also advise on considering the overall weight supported by the vehicle
and the specific weight on each component due to the addition of the electric motor and
batteries. The total weight could be less but the weight distribution could be
significantly different, overloading individual components. When performing these
calculations, the weight of the laden vehicle must be taken into consideration allowing
at least 68kg per passenger plus 13.6kg of luggage for each. All regulations stated above
must be adhered to in conjunction with any other relevant sections of the NCOP.

Final Year Thesis, 2009
10 Christian A. Tietzel, 10415074
3 Battery Cage Ventilation System for Hyundai Getz
3.1 Overview
The Hyundai Getz battery cage does not require sealing or venting in accordance with
the ADRs as sealed lithium-ion batteries are used. However the batteries in the battery
cage which was designed in a previous year (Ip 2008) have been reaching temperatures
above which the life expectancy is reduced during charging and discharging. Hence
there is a requirement for an active venting system. The batteries or connections are also
unexpectedly creating an irritating odour in the car cabin intermittently once every few
weeks. It is suspected that this is from the heating of their casings or the cabling as the
batteries are individually sealed and not meant to release gases (Thunder Sky 2007).
The gas was tested several times for safety by the UWA chemistry lab and returned
each time to be unknown, containing standard air properties. Therefore for the comfort
and safety of the driver and passengers, removal of this gas is required by sealing the
battery cage.
3.2 Design
3.2.1 Design Requirements
1. To actively vent the cage for cooling purposes, a fan(s) is required to provide a
constant airflow throughout. The optimal temperature for the batteries during
discharging to increase its discharge capacity is 75⁰C, the maximum safe limit of the
batteries. However, as discussed in section 2.3 Lithium-Ion Batteries, this can
dramatically decrease the operating life of the batteries. As a compromise, a maximum
discharging temperature of 60⁰C was agreed upon by the REV team. During charging
the batteries should also be kept at a relatively low temperature to increase their
operating life. It was agreed that it should only rise by a maximum of 5⁰C above
ambient temperature to prolong the life. Hence an appropriate fan(s) must be sought to
operate under these requirements.
2. To conceal the odour from the batteries, the cage must be sealed air tight. As an
active venting system is required for cooling, the air flow must have an inlet and an
outlet to the outside of the vehicle.

Final Year Thesis, 2009
11 Christian A. Tietzel, 10415074
3.2.2 Testing and Constraints
To measure the level of cooling required throughout the vehicle during discharging,
temperatures throughout the cage were taken whilst performance testing the car. The
maximum temperature reached during discharging was 55⁰C, however this temperature
was reached on a cool winter’s day when the ambient temperature was only 23⁰C. If
designing to the maximum ambient temperature of 50⁰C set out in NCOP14, the
batteries would easily rise above the maximum limit of 60⁰C. Hence a maximum
temperature rise of 10⁰C is taken as a worst case scenario for discharging.
Readings of the battery temperatures were also taken during charging. The maximum
temperature reached throughout the cage during charging was 38⁰C when the ambient
temperature was 16⁰C. As vehicle charging is normally done overnight, when ambient
temperatures are low and usually reach no more than 25⁰C, the system is design so the
batteries rise to a maximum of 30⁰C. Hence a maximum 5⁰C temperature rise is taken
as a worst case scenario for charging.
The cage has been built previously to adhere to the guidelines set out in NCOP14, one
of which is a strength requirement. Therefore the active venting system and sealing of
the battery cage must be done whilst not altering any of the structural members. Due to
the limited room in the boot of the Hyundai Getz, the entire floor space has been
utilised, leaving no room for a fan(s) or duct inlets or outlets on the sides of the cage
(see Figure 2 above). Hence the spare tyre wheel well underneath the cage is used for
housing the fan(s) and allowing for inlet and outlet ducts into the cage. These ducts will
then run to the bottom of the well to the outside of the vehicle. This also adds to the
aesthetics of the vehicle. The wheel well is 200mm deep, also limiting the dimensions
of the fan(s) choice. The only available power source during charging and discharging
is 12 volts, hence also limiting appropriate fans. This must all be completed at a
relatively low cost, with the total cost of the fan(s) amounting to less than $200.
3.2.3 Fan Technical Requirements
The two critical factors in selecting the correct fan(s) are the required airflow and the
pressure loss. These were calculated using equations and theories from Chapters 16 to
20 and constants from Appendix 1 of Thermal-Fluid Sciences (Cengel 2008) and are
referred to in the following sections 3.2.3.1 Required Airflow and 3.2.3.2 Pressure Loss.

Final Year Thesis, 2009
12 Christian A. Tietzel, 10415074
3.2.3.1 Required Airflow
The initial step in determining the required airflow is to calculate the rate of heat
generated from the batteries (Q) which is equal to the total rate of heat transfer from the
batteries. The transfer of heat from the batteries can be assumed to be primarily from
conduction and convection, see Figure 5 below.
Figure 5: Diagram of heat flow from Hyundai Getz batteries.
This diagram can be summarised into a thermal circuit (Figure 6) to assist in
calculations. The sides and bottom of the batteries are against thin aluminium which is
an excellent conductor of heat, the resistance due to conduction through these walls can
therefore be assumed to be zero as the temperature difference from one side to the other
is negligible. A thermal circuit is analogous to an electrical circuit where the thermal
resistance corresponds to the electrical resistance, the temperature difference
corresponds to the voltage difference and the rate of heat transfer corresponds to the
electrical current. Therefore the rate of heat transfer through the top path in Figure 6 can
be assumed to be constant through each resistor. Hence the rate of heat transfer only
needs to be calculated through one resistor for the top path. The total rate of heat
generated from the batteries can be calculated by adding the three paths rate of heat
transfer together.

Final Year Thesis, 2009
13 Christian A. Tietzel, 10415074
Figure 6: Thermal circuit for Hyundai Getz batteries.
To calculate the rate of heat transfer through the top path (QT ), equations for natural
convection of a horizontal enclosure with a hot bottom surface and isothermal walls is
used. Hence it is assumed that T1 equals T2, the temperatures on the inner and outer
surface of the thin perspex cover of the cage. Initially Rayleigh’s number must be
determined for an enclosure (equation 3.1) using the constants set out in Table 2
including the temperature T1 of the perspex which was measured during testing.
Discharging Charging Battery temperature (TB) 55⁰C 38⁰C Perspex temperature (T1) 40⁰C 28⁰C Change in temperature (∆T) 15⁰C 10⁰C Average temperature (Tavg) 47.5⁰C 33⁰C Volume expansivity (β) 1/(320.5K) 1/(306K) Prandtl number (Pr) 0.7228 0.7268 Thermal conductivity (k) 0.02735W/mK 0.02625W/mK Kinematic viscosity (v) 1.798x10⁻⁵m2/s 1.655x10⁻⁵m2/sSurface area (As) 0.4437m Distance between top and bottom surface (Lc) 0.05m
Table 2: Various constants for calculation of free convection of enclosure. Note: For the appropriate constants, values are taken at the average temperature.
∆ (3.1)
Following this Nusselt’s number (Nu) can be calculated using equation 3.2, which is the
dimensionless convection heat transfer coefficient specific to the flow regime. It can
then be transferred into equation 3.3 to give a rate of heat transfer through the top path.
The calculation results are summarised in Table 3.

Final Year Thesis, 2009
14 Christian A. Tietzel, 10415074
1 1.44 1/
1 (3.2)
∆ (3.3)
Discharging Charging RaL 128,316 106,335 Nu 4.223 4.049
15.37W 9.43W
Table 3: Summary of calculations for natural convection of top enclosure.
Next the rate of heat transfer through the bottom surface and side surfaces must be
calculated using natural convection over horizontal and vertical plate equations. For
these calculations the values from Table 4 are used and firstly inserted into equation 3.4
to calculate Rayleigh’s number (RaL) for the bottom and side surfaces separately.
Discharging Charging Battery temperature (TB) 55⁰C 38⁰C Ambient temperature (T∞) 23⁰C 16⁰C Average temperature (Tavg) 39⁰C 27⁰C Volume expansivity (β) 1/(312K) 1/(300K) Prandtl number (Pr) 0.7255 0.7296 Thermal conductivity (k) 0.02662W/mK 0.02551W/mK Kinematic viscosity (v) 1.702x10⁻⁵m2/s 1.562x10⁻⁵m2/s Bottom Surface Side Surfaces Perimeter of bottom surface (p) 2.982m Not Applicable Surface area (As) 0.4437m 0.6560m Characteristic length of bottom surface (Lc) 0.1488m (As/p) 0.220m (Height)
Table 4: Constants for calculation of free convection of bottom and side surfaces. Note: For the appropriate constants, values are taken at the average temperature.
(3.4)
Given the calculated Raleigh numbers, they are inserted into equations 3.5 and 3.6 for
bottom and side surfaces respectively to calculate Nusselt’s number. Following this the
rate of heat transfer can be calculated using equation 3.7, see Table 5 for a summary of
the calculated values.
0.27 / (3.5)
0.825. /
. / / / (3.6)
(3.7)

Final Year Thesis, 2009
15 Christian A. Tietzel, 10415074
Bottom Surface Side Surface Discharging Charging Discharging Charging
RaL 8,302,167 7,087,646 26,831,858 22,906,632 Nu 14.49 13.93 41.57 39.73
36.81W 23.31W 105.59W 66.49W
Table 5: Summary of calculations for natural convection of bottom and side surfaces.
Now that the rate of heat transfer through each path has been calculated, they can be
added up for discharging and charging to obtain the total rate of heat transfer from the
batteries which is equal to the total rate of heat generated (QT ) from the batteries.
This gives 157.77W and 99.23W respectively. For both discharging and charging the
allowable maximum temperature rise of the batteries from ambient is known as 10⁰C
and 5⁰C respectively, therefore to achieve these constraints, the allowable total thermal
resistance (RTotal) for the thermal circuit can be calculated using equation 3.8 and gives
0.06338K/W and 0.05039K/W.
∆ (3.8)
Since the battery cage is going to be cooled from ducts beneath, the air will flow up
through the batteries, over the top of the enclosure and back down through the batteries.
Hence there will be heat transferred from the batteries from forced convection through
the gaps between the batteries and forced convection over the top of the enclosure
(Figure 7). Note that due to the small size of the gaps between the batteries, the effects
of natural convection were previously ignored.
Figure 7: Diagram of heat flow from Hyundai Getz batteries with forced convection.

Final Year Thesis, 2009
16 Christian A. Tietzel, 10415074
Therefore the thermal circuit can be summarised in Figure 8 below. Note that heat
transferred through the top of the enclosure can now be assumed to be negligible as the
airflow will remove this heat.
Figure 8: Thermal circuit for Hyundai Getz batteries with forced convection.
The thermal resistance through the side surfaces and the bottom will remain constant, so
the total resistance from forced convection must be low enough to achieve the total
required thermal resistance for the system. The thermal resistance through the sides and
bottom can be determined from equation 3.9 and then used in equation 3.10 with the
total required thermal resistance to determine the required thermal resistance from
forced convection (RForced Conv). The resulting values are 0.08827K/W for discharging
and 0.06344K/W for charging, see Table 22 of Appendix B for summary of thermal
resistance values. Note that if forced convection wasn’t required, the thermal resistance
from natural convection of the enclosure would be less than the calculated values for
RForced Conv. This is not the case, refer to Appendix C for the calculated values.
/ (3.9)
(3.10)
The undetermined and required variable in the system to achieve this overall resistance
is the flow rate through the battery cage to achieve forced convection. The total flow
rate through the gaps must equal the flow rate over the top of the enclosure at steady
state. Therefore a system of equations can be set up to determine the flow rate. Firstly
RForced Conv can be split into its components as seen in equation 3.11.

Final Year Thesis, 2009
17 Christian A. Tietzel, 10415074
(3.11)
Firstly to determine the thermal resistance for forced convection over the top of the
batteries (RForced Conv(Top)), a series of equations for flow through a tube can be used to
obtain an equation in terms of the flow rate (q) and other known variables. The flow is
assumed as tube flow as this is the most relevant flow regime over the top of the
batteries, however instead of using the surface area (As) of the entire tube, As is assumed
to equal the area on top of the batteries which is within the flow path. As these
equations are developed for a circular tube, the diameter is taken as the hydraulic
diameter (Dh) equal to four times the cross sectional area divided by the perimeter. Note
an iterative approach was used to determine the type of flow present, laminar or
turbulent. Reynolds number (Re) for all cases was calculated to range from 750 to 1490
which is less than 2300 where the flow becomes transitional, therefore the flow is
assumed laminar. Reynolds number over the top is so low because of the low flow
velocity due to the large cross sectional area. Next the thermal entry length (Lt) can be
calculated in equation 3.12 to range from 2.57m to 5.14m which is much longer than the
total length of the tube, therefore the flow can be assumed to be thermally developing
laminar flow.
0.05 (3.12)
For thermally developing laminar flow, the Nusselt number can be calculated using
equation 3.13. Using this and the other relevant basic flow equations set out in
Appendix D, they can be substituted into each other to give the final equation 3.14.
3.66.
./ (3.13)
3.66
.
.
(3.14)
Table 6 below states the various constants that need to be inserted into equation 3.14 to
achieve final equations 3.15 for discharging and 3.16 for charging.

Final Year Thesis, 2009
18 Christian A. Tietzel, 10415074
Discharging Charging Prandtl number (Pr) 0.7228 0.7296 Thermal conductivity (k) 0.02735W/mK 0.02551W/mK Kinematic viscosity (v) 1.798x10⁻⁵m2/s 1.562 x10⁻⁵m2/sWetted perimeter of duct (p) 1.84m Cross sectional area (Ac) 0.0435m2
Hydraulic diameter of tube (Dh) 0.0946m Length of tube (L) 0.340m Surface area within tube flow (As) 0.2958m2
Table 6: Constants to determine equations for forced convection over the top. Note: For the appropriate constants, discharging values are taken at 50⁰C and 25⁰C for charging.
0.08552 3.66
. (3.15)
0.07977 3.66
. (3.16)
If one fan is used to cool the system, given the 77mm diameter ducting to be used, there
are twelve different directions in which the air can flow to the top of the batteries,
directly up, forward then up and back then up, see Figure 9. Similarly the air can flow
down to the outlet duct in a similar fashion. If two fans were used there would be twice
the number of routes. Hence the thermal resistance is calculated for one rectangular
tube, assuming equal flow rate through each tube equal to the total flow rate (q) on the
number of routes (n).
Figure 9: One row of batteries (left) and inlet duct with flow directions (right)
To determine the thermal resistance for forced convection through one gap to the top of
the batteries and back down (RForced Conv(1 Tube)) , a series of equations were used for
turbulent flow in tubes. Although the air flows up through a gap, over the top and then
back down a gap, the total length of the gaps are combined and analysed as one tube
with their total surface areas combined, this is acceptable as all other variables are
equal. For these paths the flow was initially assumed turbulent. For turbulent flow, the
hydrodynamic and thermal entry lengths can be assumed to equal ten times the

Final Year Thesis, 2009
19 Christian A. Tietzel, 10415074
hydrodynamic diameter. Since the length of the tubes are much longer than this,
entrance effects can be presumed negligible, therefore assuming fully developed
turbulent flow in the entire tube. Given fully developed turbulent flow, Nusselt’s
number can be determined using equation 3.17. Using this and the other relevant basic
equations for tube flow set out in Appendix D, formula 3.18 can be determined in terms
of the appropriate constants.
0.023 . . (3.17)
..
.
(3.18)
Table 7 below states the various constants that need to be inserted into equation 3.18 to
achieve the final equations, 3.19 for discharging and 3.20 for charging.
Discharging Charging Prandtl number (Pr) 0.7228 0.7296 Thermal conductivity (k) 0.02735W/mK 0.02551W/mK Kinematic viscosity (v) 1.798x10⁻⁵m2/s 1.562 x10⁻⁵m2/sWetted perimeter of duct (p) 0.032m Cross sectional area (Ac) 5.50x10⁻⁵m2 Hydraulic diameter of tube (Dh) 6.88x10⁻³m
Total length of tube (L) 0.429m Surface area within tube (As) 0.0137m2
Table 7: Constants to determine equations for forced through one duct. Note: For the appropriate constants, discharging values are taken at 50⁰C and charging at 25⁰C.
1.100 10 , , .
(3.19)
1.030 10 , , .
(3.20)
The total thermal resistance due to flow through the batteries (RForced Conv(Tubes)) can then
be found using the parallel resistance equation to give equations 3.21 for forced
convection through the tubes for discharging and 3.22 for charging.
1.100 10 , , .
(3.21)
1.030 10 , , .
(3.22)
Using equation 3.11 and substituting in the relevant formulas, the equation can be
solved for total flow rate values for charging and discharging and for one or two fans,
see Appendix E for formulas. These values are summarised in Table 8 below.

Final Year Thesis, 2009
20 Christian A. Tietzel, 10415074
Discharging Charging Required total flow rate with 1 fan (q) 7.35x10⁻³m3/s (7.4L/s) 10.7x10⁻³m3/s (11L/s)Required total flow rate with 2 fans (q)
-Required flow rate for each6.22x10-3m3/s (6.2L/s)3.11x10-3m3/s (3.1L/s)
9.00x10⁻³m3/s (9.0L/s)4.50x10-3m3/s (4.5L/s)
Table 8: Required total flow rates for discharging and charging.
Therefore the critical required fan flow rates are 4.5L/s with two fans and 11L/s with
one fan, both from charging.
3.2.3.2 Pressure Loss
To find the appropriate fan that can support the calculated flow rates, the corresponding
pressure loss (ΔPL) must be determined for each. All pressure loss is assumed to be
from flow between the batteries, flow over the large area on top of the batteries is
assumed negligible in comparison. As previously described, the flow rate through each
tube can be approximated to equal, the total flow rate (q) divided by the number of
paths (n) and since these paths are in parallel, the pressure loss across each can be
assumed equal and equal to the total pressure loss. Modelling one tube between the
batteries with average velocities calculated from equation 8.5 and Reynolds number
from 8.4 of Appendix D, a corresponding friction factor using a Moody chart for a
smooth tube can be determined. The pressure loss can then be calculated using equation
3.23, these values are summarised in Table 9. All other relevant variables were taken
from Table 7.
∆ (3.23)
1 Fan 2 Fans Density (ρ) 1.184kg/m3 1.184kg/m3 Average velocity (Vavg) 16.21m/s 6.82m/s Reynolds number (Re) 7141 3004 Friction factor (f) 0.033 0.043 Pressure loss (ΔPL) 320Pa 73.8Pa
Table 9: Calculated pressure losses for critical required flow rates
Note Reynolds number was determined to equal 7141 and 3004 for the critical values of
a one and two fan system respectively remembering that the flow was assumed
turbulent between the batteries. Tube flow is said to generally be transitional from 2300
to 4000, the one fan system can clearly be assumed turbulent although the two fan
system flow is theoretically transitional. However due to fluctuations in flow from an
intended thermostat controlled system, vibrations in the vehicle and especially increases
Final Year Thesis, 2009
21 Christian A. Tietzel, 10415074
and decreases in natural flow from driving, the flow can be assumed turbulent for
calculations of the Nusselt number.
Therefore the technical requirements for each 12V fan in a one or two fan system can be
summarised in Table 10 below.
One Fan Two Fans
q 11L/s 4.5L/sΔPL 320Pa 73.8Pa
Table 10: 12 volt Fan(s) technical requirements.
3.2.4 Concealment of Battery Cage
To seal the battery cage to prevent gases leaking into the car cabin, the walls parallel to
the side of the car had to be covered which previously were not. The plate in the bottom
of the battery cage also had to be redesigned to accommodate the duct inlets and outlets
of the venting system. As the inlet and outlet ducts are also located underneath the
vehicle it is possible for large amounts of water to be propelled inside, therefore guards
overlapping the entire duct were required for prevention. Additionally, filters to prevent
any moist air entering the battery cage are required.
SolidWorks 2008 SP4.0, a computer aided drafting (CAD) software package was used
to design components. This provided easy alterations of designs and clear drawings for
fabrication. Fabrication of the sheet metal was prepared by the UWA Electrical
Engineering workshop, and installed in the vehicle in G50 of the UWA Electrical
Engineering building with assistance.
3.2.5 Design Safety
There were various considerations which had to be taken into account in designing the
active venting system, with the key risks outlined below.
Initially components within the battery cage were leaking gases every now and then
which could be hazardous. These gases were tested by the UWA Chemistry Laboratory
several times and came back each time containing general air properties, not containing
anything harmful. However, as a safety precaution and to mitigate the risk these gases
are required to be vented to the outside of the vehicle. Therefore during installation it is
important to ensure that every air gap is sealed air tight.

Final Year Thesis, 2009
22 Christian A. Tietzel, 10415074
Risk 1: Hazardous gases (assuming they are hazardous) contained in the vehicle with
passengers (Table 11):
Consequence Likelihood Risk Before Mitigation Severe Likely High After Mitigation Severe Rare Low
Table 11: Risk 1 Values
The second reason for the active venting system is to prevent the batteries from
exceeding 60°C. If the batteries exceed 150°C, although unlikely, they can rupture,
releasing hydrogen fluoride and hydrogen phosphide (Thunder Sky 2007). Having a
venting system in place mitigates the possibility of this happening.
Risk 2: Batteries exceeding 150°C and rupturing releasing hazardous gases (Table 12):
Consequence Likelihood Risk Before Mitigation Severe Unlikely Medium After Mitigation Severe Rare Low
Table 12: Risk 2 Values
The main concern when designing the venting system is the prevention of water from
the exterior of the vehicle entering the interior of the battery cage and touching the live
144 volt system. This could conduct electricity through the battery cage and the rest of
the vehicle. Several safety measures are in place to mitigate this risk. Firstly guards
underneath the vehicle will prevent any water entering the ducts and if they do, each
individual duct tubing inlet and outlet is offset from each other, further preventing the
flow of water. Additionally, as previously mentioned, each duct contains a filter, this is
at the top of each duct to prevent any moist air entering the cage, this will also prevent
small amounts of water proceeding into the cage if it penetrates the previously
mentioned measures.
Risk 3: Water entering the battery cage and conducting electricity through the vehicle
(Table 13):
Consequence Likelihood Risk Before Mitigation Severe Possible Medium After Mitigation Severe Rare Low
Table 13: Risk 3 Values
Note: Please see Appendix F for the risk matrix used to determine the level of risk
before and after mitigation.

Final Year Thesis, 2009
23 Christian A. Tietzel, 10415074
3.3 Results & Discussion
3.3.1 Fan Selection
A large number of electronic and computer shops were investigated to find a fan(s)
which met the appropriate technical requirements, size and costs. Although most fans
found at dedicated computer shops were all less than $30, they barely met the required
flow rate for zero pressure loss, under the systems calculated pressure loss these fans
did not operate.
No fan found met the requirements for a one fan system, to sustain the high pressure
loss of 320Pa, the size of the fans were too large to fit in the wheel well of the vehicle.
For a two fan system only two manufacturers were found with fans that met the
requirements, Mirconel and ebmpapst. Comparatively, the Micronel fan, model D604T
was more appropriate as it had a circular end to attach a duct (see Figure 10).
Figure 10: Micronel fan D604T (Micronel 2009).
However once the manufacturer was contacted about this product, they disclosed that in
some cases the fan vanes cracked, they suggested a different brushless model, D604Q,
which retailed at $598.13. This was much more than the allowable budget. Therefore
the ebmpapst models were further investigated. There were several appropriate models,
the 3212 range, and the 8212 range of models. The determining features between these
models were availability, price and sound level, the chosen model was 8212JN. As seen
from Figure 11 below the operating conditions are well within the fans capabilities. For
fan dimensions see Appendix G.
64mm 60mm

Final Year Thesis, 2009
24 Christian A. Tietzel, 10415074
Figure 11: Graph of pressure loss versus airflow for 8212JN fan (ebm-papst 2009).
3.3.2 Final Design & Installation
The final design of the sheet metal walls and floor to conceal the battery cage is
displayed in Figure 12, for fully dimensioned drawings see Appendix H. As can be
seen, ducts from the base of the battery cage have to run to the bottom of the wheel well
to exhaust the air to the outside of the vehicle. For this, ducts used to cool computer
CPU’s were used as they fitted perfectly around the outside of the 80mm square fan
casings.
Figure 12: Final design of additional components made for the venting system (mm).
Sheet metal guards were created to be placed underneath the vehicle (Figure 12) to
prevent water entering the ducts. Note the guards at the front face forward to create a
positive pressure to force air through the ducts and the ducts at the rear face backwards
to create a negative pressure to assist in pulling the air out of the ducts. Each duct also
contains a plastic guard to prevent any objects entering the cage and also a filter to
prevent moist air and water entering.
Once the system was installed, electrical engineering members of the REV team
inserted a thermostat into the battery cage to automatically operate the fans when
Calculated worst case operating conditions

Final Year Thesis, 2009
25 Christian A. Tietzel, 10415074
necessary. Therefore if the temperature inside the battery cage reaches 5⁰C above
ambient temperature when charging, the fans switch on, and if the temperature inside
ever exceeds 60⁰C then the fans also switch on. To assist in removing any odours from
leaking into the cabin, the fans switch on for one minute every hour to extract the air.
Concealing the cage was exceptionally difficult as none of the structural members could
be altered as this would affect its strength. Therefore to prevent any air gaps around the
sheet metal, the edges were covered with a weather proof rubber to form a tight seal and
all other gaps were filled with adhesive foam.
3.3.3 Testing
Once the system was completely installed the battery temperatures were tested. The
batteries were charged in different ambient temperatures to test whether the cells would
exceeded 5°C above ambient. Figure 13 displays the range of temperatures taken from
the batteries during different ambient temperatures.
Figure 13: Maximum and minimum cell temperatures during charging.
As can be seen the battery temperatures maximum and minimum vary markedly. This is
because the higher temperature batteries are more centrally located where limited air
flows around the cells which do not have a duct placed underneath or close to them. The
average minimum temperature increase above ambient is 5.9°C and the average
maximum temperature increase is 8.3°C. Although the cell temperatures are slightly
exceeding the specified 5°C above ambient, this is acceptable as the key purpose was to
minimise the temperature rise during charging. This is clearly viewable as the maximum

Final Year Thesis, 2009
26 Christian A. Tietzel, 10415074
temperature rise recorded during initial testing was 22°C when ambient was 16°C, far
more than any recordings after installation.
Valuable testing data is limited for discharging as the batteries rarely exceed 60°C
without extreme ambient temperatures. As this project was completed before the
summer months commenced, only one day experienced in late October had an ambient
temperature above 30°C. The ambient temperature on this day was 37°C, and although
the vehicle was driven until the batteries went flat, they did not exceed 55°C. This is
because the guards underneath the vehicle at the duct inlets and outlets are orientated to
favour the direction of flow, creating a natural airflow through the battery cage whilst
driving, hence negating the need for fans up to this temperature. Although limited data
was recorded during discharging, this is acceptable as the critical technical requirements
for the system were determined from charging. Therefore if the system is operating as
expected during charging, it is safe to assume that it will also during discharging.
3.3.4 Discussion
The entire venting system is operating as required although temperatures are slightly
exceeding 5°C above ambient during charging due to the limited flow around some
batteries. This could be improved by placing smaller inlet and outlet ducts and more of
them underneath the battery cage to get a more even flow around each cell. However
this is not necessary, as the initial goal was to reduce the temperature rise during
charging which has been achieved. Temperature rises of 5°C to 10°C above ambient are
acceptable.
If the initial designs of the battery cage had considered the need for a venting system, it
could have allowed for ducts on the sides of the battery cage above the batteries, or if
aesthetics were not an issue, ducts could be attached on top of the battery cage. This
would allow a fan to pull air in one side and out the other, creating a constant flow over
the top of the batteries. Although the air would not have flowed in the gaps between the
batteries, the pressure loss over the top would have been minor in comparison. From the
investigations done to find an appropriate fan, it was evident that the fans ability to
operate at a high pressure corresponded to its cost. Therefore if only a small pressure
loss was present across the top, a high flow rate fan would be available at a much lower
cost and perhaps only one would be necessary, significantly decreasing the overall costs
of the system.

Final Year Thesis, 2009
27 Christian A. Tietzel, 10415074
4 Battery Restraint System for Lotus Elise
4.1 Overview
The Lotus Elise (Figure 14) must house a large number of lithium-ion batteries to
supply energy to the high performance electric motor. This project focuses on the
battery cages that hold these batteries in place; they must have several practical
capabilities and also adhere to the relevant ADRs. This chapter details the requirements
and methodology followed for development of the battery cages.
Figure 14: The REV team’s 2002 model Lotus Elise.
4.2 Design Process
4.2.1 Battery Cage Design Requirements
1. The Lotus must house as close to one hundred lithium-ion batteries as possible to
power the 400V electric motor. Leaving out a few batteries due to space is satisfactory
although considerably reducing the number would have significant performance effects
on the electric motor and hence the car.
2. The battery cages must be as easily accessible as possible. This is to aid in removing
failing cells during operation and assist the electrical engineers for frequent alterations
to the electronics within the battery cages.
3. The batteries must be held tight in place but have at least a 20mm clearance above the
batteries for a battery management system applied to each cell and connections between
the cells.
4. The battery cages must be sealed from the cabin to prevent any release of gases to the
passengers as was experienced in the Hyundai Getz.
5. Similarly to the Hyundai Getz, the Lotus Elise is not required to be vented in
accordance with the ADRs as lithium-ion batteries are being used. However to

Final Year Thesis, 2009
28 Christian A. Tietzel, 10415074
maximise performance and operating life of the batteries, a venting system will be
required. An analysis and design of a venting system for the Lotus was performed under
guidance by a colleague of the REV team, Timothy Wallace. Hence the battery cages
must be designed to assist in an efficient cooling system.
6. The battery cages must be placed in positions to achieve as similar weight
distribution as possible to the original specifications. If not this can affect the ride
height, COG and in turn driving characteristics as detailed in section 2.2.1 Weight
Implications.
4.2.2 Constraints
1. As outlined in section 2.4 Battery Cage Codes and Standards, the cages must adhere
to the standards set out in NCOP14 to comply with the ADRs. The most critical
requirement for design of the battery cages is the required forces they must withstand of
20g times the battery mass for front impact, 15g for side impact and 10g for rear and
vertical impact (Australian Motor Vehicle Certification Board Working Party 2006).
2. An obvious but critical determinant of battery placement is available space in the
vehicle with all the petrol engine components removed. Figure 15 displays the original
petrol components that were removed from the vehicle.
Figure 15: Lotus Elise with original petrol components.
Replacing these components with the electric motor and suitable drive mechanics is a
priority. Certain parts within the Lotus are also unmodifiable, for example initially it
was hoped that the crumple zone in the front of the vehicle would be modifiable to store

Final Year Thesis, 2009
29 Christian A. Tietzel, 10415074
batteries (Figure 16) whilst still performing as required. However after discussions with
the Department for Planning and Infrastructure (DPI) they conveyed their concerns as it
would alter the safety of the vehicle and would have to be rebuilt, analysed and certified
by a professional engineer. Due to the limited resources and time constraints on the
REV team, this was not an option. Likewise, the firewall behind the seats in the vehicle
is unmodifiable without similar problems (Figure 16). See Appendix I for a full
schematic of the 2002 model Lotus Elise chassis.
Figure 16: Lotus Elise crumple zone (left) and rear firewall behind seats (right).
3. As the electric vehicle is attempting to mimic the performance characteristics of the
Lotus petrol vehicle, none of the performance enhancing features can be altered. For
example although the front crumple zone is unmodifiable due to safety constraints, it is
also preferred that this and the fibre glass shell around the crumple zone are unchanged
as this area has air flowing through it to create a downwards force on the front of the
vehicle, which is highly desired for a rear heavy vehicle (Figure 16). Clearly the
stereotypical streamline characteristics of the Lotus Elise are desired to be kept constant
as well.
4. When choosing the appropriate placement for the batteries it is also important to
consider the vehicle structure adjacent to support the batteries. Every attempt was made
to reuse existing mounts and bolt holes.
5. The battery cages must be completed at a relatively low cost of labour and material
and be easy to manufacture within a short period of time due to the number of battery
cages that would be required.

Final Year Thesis, 2009
30 Christian A. Tietzel, 10415074
4.2.3 Battery Specifications
The energy sources for the electric motor are lithium-ion phosphate batteries by
Thunder Sky, model TS-LFP60AHA, with a nominal voltage of 3.2V. These batteries
are individually sealed and weigh 2.106kg each. The batteries must be stored upright or
flat on the largest face, however the former is preferred. The dimensions of the batteries
are displayed in Figure 17.
Figure 17: Individual lithium-ion battery dimensions (Thunder Sky 2007).
4.2.4 Material
A suitable material was chosen for the battery cages to meet the following key
requirements:
Readily available to the workshop
Low cost
High yield strength
Easily weldable
Easily modifiable for changes at later stages.
The two materials which best meet these requirements were aluminium and mild steel,
with the major differences in density and strength, see Table 14 for details. However
once analysing preliminary designs of the battery cages with aluminium, its strength
properties were too low for the requirements of the ADRs given the available space.
Therefore as a sacrifice for weight, mild steel was chosen as the most suitable candidate
with intent to use as little as possible.
Aluminium (AS1866 6060/T5) Steel (AS3679.1 Grade 300)Density 2700kg/m3 8050kg/m3 Minimum Yield Strength 110MPa 320MPa Minimum Tensile Strength 150MPa 440MPa
Table 14: Properties of aluminium (Standards Australia 1997) and steel (Standards Australia 1996) materials.

Final Year Thesis, 2009
31 Christian A. Tietzel, 10415074
4.2.5 Computer Aided Drafting Modelling and Analysis
All conceptual and final designs were built in the CAD software SolidWorks 2008
SP4.0. SolidWorks provides an easy to use platform for developing and modifying
designs at a later stage.
Once designs were completed within SolidWorks they were imported into ANSYS
Workbench 11.0 SP1 to perform a stress analysis. SolidWorks output files are
compatible with ANSYS Workbench geometries. Therefore if structures did not pass
the stress analysis in ANSYS Workbench they were easily modified within SolidWorks
and imported again (see Figure 18).
Figure 18: Interactive Process for design between SolidWorks and ANSYS Workbench.
4.2.6 Design Methodology
The general process followed for the design of each battery cage can be summarised in
the flowchart of Figure 19 below. Once the design requirements and constraints were
defined, the battery cages could be developed in a SolidWorks model. Following, a
mock battery cage was made from ply wood to test that it fitted in position and also
logistically for removal. Once the cages passed these tests, a stress analysis was
performed in ANSYS Workbench to check their adherence to the NCOP14 crash
accelerations. To obtain an accurate result it is ideal that each mesh is refined to obtain a
maximum stress which is converged to within 5%. If they did not pass, this process was
repeated until a satisfactory design was developed. Although most cages were mounted
on existing structural members and bolts, some cages required additional mounting
designs. Where necessary these mount designs were analysed in a similar process.
Feedback was continually sought from the UWA Electrical Engineering workshop for
ease of manufacture to limit the number of workshop hours required. Once all designs
were completed, they were approved by the appropriate REV team supervisors for

Final Year Thesis, 2009
32 Christian A. Tietzel, 10415074
construction. The strength of all bolts used to secure the battery cages and mounts were
also analysed in accordance with the Australian standards under the crash impact
accelerations.
Develop SolidWorks (CAD) Design
Construct a Mock Battery Cage
Identify Design Requirements and Constraints
Perform Finite Element Analysis Testing on the Cage with the Appropriate Forces
set out in NCOP14
Do Dimensions Fit Statically and Logistically for
Removal?
Does the Cage withstand the Forces
Applied without Yielding?
Designs Approved by Supervisor?
Fabrication by Workshop
NoNo
Yes
Yes
Yes
No
Is Additional Mounting Required?
No
Develop SolidWorks (CAD) Design
Perform Finite Element Analysis Testing on the
Mount with the Appropriate Forces set out in NCOP14
Yes
Does the Mount withstand the Forces
Applied without Yielding?
Yes
No
Figure 19: Flowchart of design process for battery cages.

Final Year Thesis, 2009
33 Christian A. Tietzel, 10415074
4.2.7 Design Safety
The task for design and construction of the cages to house the batteries is based around
safety. The key purpose of the cages is to restrain the batteries in place, with particular
attention focused on their restraint during crash impacts. However the key risks
considered in designs of the battery cages and their mounts are outlined below.
To adhere to the ADRs the battery cages must withstand the crash accelerations set out
in NCOP14 to mitigate the risk of them coming loose in a crash. If they did not they
could cause severe harm to passengers or bystanders.
Risk 1: Batteries braking free from the battery cage during a crash (Table 15):
Consequence Likelihood Risk Before Mitigation Severe Likely High After Mitigation Severe Rare Low
Table 15: Risk 1 Values
It is possible that during a crash, the battery cage supports or bolts could fail, releasing
the cages to be thrown throughout the vehicle and colliding with a passenger or
bystander. To mitigate this risk they must also be designed to withstand the crash
accelerations of NCOP14.
Risk 2: Battery cage braking free from the vehicle during a crash due to failure of the
supports or bolts (Table 16):
Consequence Likelihood Risk Before Mitigation Severe Likely High After Mitigation Severe Rare Low
Table 16: Risk 2 Values
As with Hyundai Getz venting system, particular attention must be taken to seal the
battery cages from water to prevent it conducting the high voltages contained within,
throughout the vehicle. Therefore each battery cage must be sealed water tight to
mitigate this risk.
Risk 3: Water entering the battery cage and conducting electricity through the vehicle
(Table 17):
Consequence Likelihood Risk Before Mitigation Severe Possible Medium After Mitigation Severe Rare Low
Table 17: Risk 3 Values

Final Year Thesis, 2009
34 Christian A. Tietzel, 10415074
When designing all new parts for the vehicle, they must be designed not to alter any of
the chassis members in the vehicle to weaken their structural capacity, as well as any
other safety components such as the crumple zone. If they have to be modified,
adequate analysis must prove the capability of modified components, this will mitigate
the risk of compromising the current vehicle structure.
Risk 4: Failure of the current vehicle structure from modifications (Table 18):
Consequence Likelihood Risk Before Mitigation Major Possible Medium After Mitigation Major Rare Low
Table 18: Risk 4 Values
Note: Please see Appendix F for the risk matrix used to determine the level of risk
before and after mitigation.
4.3 Results & Discussion
4.3.1 Initial Battery Cage Locations
There were several designs considered for the battery cages and drive system in the
Lotus. As the drive system concepts and designs were developed, the battery cage
designs also evolved and went through many changes to allow for modifications.
In an effort to maintain the initial weight distribution of the vehicle, as many batteries as
possible were required to be placed forward of the rear axle. There was not any
available space in the front of the vehicle without modifying the fibreglass shell or the
crumple zone which should be avoided as previously described. Therefore the next
available space moving backwards, is the previous location of the fuel tank, directly
behind the seats (Figure 20).
Moving into the rear engine compartment, some decisions had to be made on the drive
mechanics to identify the available space. After an analysis by REV team member,
Frans Ho, it was realised that a single speed differential would be adequate to replace
the gearbox and maintain the performance characteristics of the vehicle due to the
relatively flat torque curve of the electric motor. This layout would remove the heavy
and large gearbox and replace it with a smaller differential located between the wheels.
There would then be adequate space forward of the rear axle to locate all the required
batteries with two layers placed where the gearbox was located, see Figure 20 below.

Final Year Thesis, 2009
35 Christian A. Tietzel, 10415074
Figure 20: Isometric CAD drawing of the rear structure and components.
However after extensive research by the REV team, a suitable differential which met
the size, cost and technical requirements could not be found by mid 2009. Therefore the
existing gearbox had to be maintained onto which the electric motor was directly
mounted.
4.3.2 Final Battery Cage Locations and Designs
With the existing gearbox maintained, there were three positions chosen to place
batteries, in the area where the fuel tank was located, one layer above the gearbox and
motor, and under the boot in the rear of the vehicle. Placing batteries in the rear of the
vehicle was not preferable, however due to the limited space this was unavoidable. Each
final design which passed the acceleration requirements will be discussed further,
however the stress analysis and reasons for selection of material dimensions will be
presented in the following section.
As in the initial design, batteries were placed in the fuel tank area, as this is the
available space farthest forward of the rear axle. Between the fuel tank and the cabin
was only a thin sheet of aluminium, therefore to allow easy access to this area, this was
removed with the intention of replacing it with a detachable cover, once the battery
cages were installed. A single mock battery cage, initially three by nine batteries was
constructed from ply wood to confirm it would fit in the space and could also be
adequately removed. However it was quickly realised that there was only enough room
for a battery cage two by nine and this would have to be broken into three separate
cages in order to place and remove them due to protruding parts. This way one could be

Final Year Thesis, 2009
36 Christian A. Tietzel, 10415074
slotted in either side and the centre one last (Figure 21). In this area there are two
horizontal chassis members which the fuel tank was previously bolted to, these
members were also used to mount the battery cages which slotted in between.
Figure 21: Final fuel tank battery cage design (left) and installed cages (right), (mm).
Unlike the other cages, the equal angle bar across the top at the rear is facing
backwards. This is so the last battery can be inserted as it is only two batteries wide so
each battery is butted up against a face. This fuel tank area is concealed from the cabin
by a sheet metal cover bolted on and from underneath by the diffuser which runs under
the vehicle. Therefore these battery cages did not need individual sealing to prevent
water entering or gases escaping into the cabin. Each face is left open to assist airflow
except the front face which is covered with sheet metal to assist in packing the batteries
tightly together to avoid vibrations. The final fuel tank battery cage design is displayed
in Figure 21. For fully dimensioned drawings see Appendix J.
Above the gearbox and motor a battery cage of 49 batteries, 7 by 7 was designed, see
Figure 22. A mock battery cage was initially constructed as it was hoped more batteries
could fit to lessen the load in the rear battery cage. However due to the car computer,
motor, gearbox and their mounts, and the fibreglass cover, a maximum of 49 batteries
could be fitted very tightly in between. There is less than a 10mm gap between the top
of the battery cage and the fibreglass cover, therefore every bolt had to be countersunk
flush with the top of the cage. Given this limited available space, modification of
designs to strengthen the cage were restricted, this is discussed further in the following
section. A separate mount was required to support the central battery cage and had to be
designed so the above cage was sitting as low as possible (Figure 22). Therefore the top
Rear firewall from inside cabin

Final Year Thesis, 2009
37 Christian A. Tietzel, 10415074
surface of the mount/bottom of the battery cage is preferably at the same level as the
highest point below, which is the gearbox/motor adapter plate. Therefore the mount
passes over the gearbox at its lower points where adequate space had to be left to
account for movement in the gearbox due to its damped mounting points. By
lengthening the bolts, existing bolt holes from the vehicle were used to attach the mount
so as to not modify the strength of the chassis by drilling new holes. For fully
dimensioned drawings of the central battery cage see Appendix K and for the mount see
Appendix L.
Figure 22: Final central battery cage and mount design (mm).
The last battery cage is located in the very rear of the vehicle, underneath the boot
where the muffler and exhaust was situated. Although it is preferable not to place
batteries this far back, this was unavoidable given the number of batteries required and
available space. The battery cage is however kept as low as possible to maintain a low
centre of gravity. The final rear battery cage contains 32 batteries, 8 by 4, see Figure 23
below. For fully dimensioned drawings see Appendix M.

Final Year Thesis, 2009
38 Christian A. Tietzel, 10415074
Figure 23: Final rear battery cage design (mm).
This battery cage is mounted to the car from above by rails used to support the boot.
These rails however were only rated to support 50kg, therefore requiring strengthening.
Under guidance this analysis was performed by REV team member, Adam Doster.
Initially the rails were going to be replaced with thicker aluminium but due to a lack of
appropriate sizes, 3mm thick mild steel was used. The original rails were also not a
standard size, they have the outside bottom corners removed to allow movement in the
suspension wishbones. This was overcome by using a smaller hollow tube to raise the
larger rectangular steel tube to the original height, see Figure 24. The top of the battery
cage however has to sit level with the top of a structural member in front of it.
Therefore aluminium spacers were used to lower the cage to this height (Figure 25).
Figure 24: Original aluminium (left) and upgraded steel rails (right), (mm).
A CAD model rear of the seats of all the major components was created to aid in
designing parts to be inserted in the vehicle. The final design of all components installed
can be seen below in Figure 25.

Final Year Thesis, 2009
39 Christian A. Tietzel, 10415074
Figure 25: Isometric CAD drawing of the rear structure and components.
To be able to remove the batteries from the cages, each cage has bolted down flat
rectangular steel straps across the top which can be easily removed. To hold the
batteries tight, these straps have rubber door stoppers bolted underneath them every
battery width, hence each battery is supported on all four corners. Plastic spacers were
lathed to make sure every stopper is compressed by 3mm once the straps are bolted
down so there is no movement, see Figure 26 below.
Figure 26: Stoppers and spacers securing batteries vertically.
All welds on the battery cages were produced using MIG welding. As all the cells
within the cage have to sit flat to assist in connecting the batteries, all welds had to be
ground flush. Therefore every bar welded had to be chamfered to ensure full penetration
of the weld so grinding the weld back would not remove its strength. As described in
section 4.2.7 Design Safety, each battery cage has to be sealed water tight. As
previously stated the fuel tank battery cages are concealed as oppose to the central and
Stoppers
Spacers

Final Year Thesis, 2009
40 Christian A. Tietzel, 10415074
rear cages. The Lotus Elise does have a diffuser running under the entire length of the
vehicle, therefore preventing the majority of water entering the vicinity of the rear and
central battery cages. However to be certain, every vertical and bottom face of these
battery cages was covered with sheet metal and sealed with an adhesive. The top of the
central cage was covered with perspex with weather proof rubber edges which fold over
the sides to prevent any water entering. The perspex allows easy inspection of the
batteries and also adds to the aesthetics of the vehicle. The top of the rear battery cage is
sealed by an aluminium plate which supports the motor controller directly on top. As
there will be little water contacting the battery cages, coating the steel with paint was
adequate to prevent corrosion and the sheet metal contains an anodized layer increasing
its corrosion resistance.
To secure each battery cage in place, high tensile M8 bolts (grade 12.9) were used, see
the following section for stress analysis. Additionally all nuts used were nylon inserted
“nylock” nuts to prevent the nut working loose.
4.3.3 Stress Analysis
A stress analysis of the proposed battery cage designs was carried out using ANSYS
Workbench. As outlined in section 2.4 Battery Cage Codes and Standards, they must
withstand 20g for front impact, 15g for side impact and 10g for rear and vertical impact.
The mounts and bolts used were also checked for their adherence to these forces.
Once importing the SolidWorks models into ANSYS Workbench, the appropriate
supports and forces were applied. A simulation was then run obtaining a safety factor
for the yield strength of the material against the maximum equivalent (von-Mises)
stress. Each component was designed to a minimum safety factor of 1. This is because
of the allowance the DPI has already built into their large acceleration requirements.
The maximum equivalent stress on every component was converged to within 5% by
means of refining the mesh, discussed in section 4.3.3.2 Analysis Refinement.
4.3.3.1 Battery Cages Applied Forces
Depending on the size of each battery cage, the required forces it must withstand vary.
They can be calculated by the required acceleration times the total battery mass (m), i.e.
for front impact (FFront impact) see equation 4.1 below. The required forces for each
battery cage are summarised in Table 19.

Final Year Thesis, 2009
41 Christian A. Tietzel, 10415074
20 9.81 (4.1)
Fuel tank battery cage Central battery cage Rear battery cageNumber of batteries 6 49 32
Total battery mass, m (kg) 12.64 103.19 67.39 Total force (N) Front impact 2,479 20,247 13,222
Side impact 1,859 15,185 9,917 Rear impact 1,240 10,123 6,611 Vertical impact 1,240 10,123 6,611
Table 19: Required forces each battery cage must withstand.
As the batteries are rigidly fixed in place, there would be minimal movement of the
batteries within the cage during a crash. Therefore force from movement of the batteries
within the cage is assumed negligible. Additionally, as the batteries have a thick plastic
casing, there would be considerable deformation of the batteries when a force is applied
across one face of the cage, therefore only transferring a partial load to the opposite
inner face. For safety it is assumed that no force is transferred to the other side via the
batteries, therefore the battery cages are over designed as essentially the face with the
force applied is absorbing the entire force and only transferred through the battery cage
structural members. Hence a separate static analysis is carried out applying each of the
forces evenly across the appropriate face of each battery cage. As the cages are an
assembly of several parts, within ANSYS Workbench multiple faces cannot be selected
and a force evenly distributed across them. Therefore a pressure had to be calculated to
apply to each part face for the appropriate side. The exposed area of each face is
obtained, and the pressure to evenly distribute across each face can be calculated by
dividing this into the force, these values are summarised in Table 24 of Appendix N.
4.3.3.2 Analysis Refinement
The mesh of each structure was refined until the maximum stress converged to within
5%, as previously stated. Convergence was achieved by increasing the mesh relevance
which increases the fineness of the mesh by increasing the number of elements and
decreasing the element size. In the vicinity of critical locations, spheres of influence
were used decreasing the element size to obtain a more accurate solution.
When converging the stress, care had to be taken with an understanding and awareness
of the most likely failure points to be able to disregard unrealistic outputs from
simulations. A common problem encountered was singular stresses around the fixed
bolt holes used to mount the components. Originally these bolts holes were constrained
by fixing the inside face of the hole, however this created singular stresses around the

Final Year Thesis, 2009
42 Christian A. Tietzel, 10415074
edges, exaggerating the actual stress values. An example of this is displayed in Figure
27 below. Therefore to overcome this problem, as the bolt would be rigidly fixed it is
similar to constraining the component at a point. Hence majority of the externally fixed
bolt holes which were analysed were modelled as a fixed point. The bearing capacity of
the steel around these bolt holes was also checked manually which will be discussed in
section 4.3.3.7 Bolt Stress Analysis.
Figure 27: Singular stresses around a fixed bolt hole where the darker shades represent
higher stresses.
The strain under loading was also manually calculated for several points to confirm its
adherence to the materials properties. This was done by using the total deformation
output from ANSYS Workbench and then calculating the strain at the most critical
points and comparing this to the maximum allowable strain (εmax) of 0.0016, calculated
from the yield strength (σy) and Young’s modulus (E) (Australian Institute of Steel
Construction 1999), see equation 4.2. An example of this is from the central battery
cage where the total deformation is displayed in Figure 28.
0.0016 (4.2)
Unrealistically large stresses
Significantly lower adjacent stresses
Bolt hole

Final Year Thesis, 2009
43 Christian A. Tietzel, 10415074
Figure 28: Total deformation (m) of the central battery cage from front impact.
Taking the maximum deformation point from the centre of the vertical flat bar of height
(l), an approximation of the elongation distance (Δl) can be calculated to be 0.0344mm
using Pythagoras’ theorem on the drawing in Figure 29. Hence from equation 4.3 the
calculated strain (ε) for this member is determined to be 0.000170, far less than εmax.
Figure 29: Approximation of elongation of vertical member of central battery cage.
∆ . 0.000170 (4.3)
This method was followed and the strain was calculated for several points on all
simulated structures to verify results.
4.3.3.3 Fuel Tank Battery Cage
The three identical fuel tank battery cages were analysed separately as they are
individually mounted. It was originally hoped that the cage could be built from
aluminium, however after running an analysis with the appropriate material properties it

Final Year Thesis, 2009
44 Christian A. Tietzel, 10415074
was quickly realised this would not suffice the given forces. Due to the limited available
space within the fuel tank area, using thicker or hollow section rectangular members to
add strength was not an option. Therefore thin 3mm mild steel was used. As can be seen
from Figure 30, with the structure fixed by the four bolt holes, it comfortably passes all
acceleration requirements.
Vertical Impact
Side ImpactFront Impact
Rear Impact
Towards the rear of the vehicle
Figure 30: Fuel tank battery cage safety factor contours for front (top left), side (top
right), rear (bottom left) and vertical (bottom right) impact accelerations.
4.3.3.4 Central Battery Cage
The central battery cage is fixed for analysis by four points in the bottom corners of the
battery cage where it is mounted. Following the analysis of the fuel tank battery cages it
was clear that aluminium was not going to be adequate for the larger cages. Initially the
cage was designed using all 3mm thick members, however after continual analysis
every member was upgraded to 5mm. It would have been preferred to use rectangular

Final Year Thesis, 2009
45 Christian A. Tietzel, 10415074
hollow sections 32mm wide, 13mm high and 1.6mm thick for the horizontal flat bars
across the top and bottom. This would have prevented failure from bending when under
the largest force from front impact. However this was not possible as it would have
increased the overall height of the battery cage exceeding the height of the available
space. The flat diagonal bars on the side of the cage were added to transfer the large
front impact force from the top down to the corner bolted joints. This prevents the top of
the cage translating in relation to the bottom. As displayed in Figure 31, the battery cage
passes all impact accelerations with 5mm thick mild steel.
Vertical Impact
Side ImpactFront Impact
Rear Impact
Towards the front of the vehicle
Figure 31: Central battery cage safety factor contours for front (top left), side (top
right), rear (bottom left) and vertical (bottom right) impact accelerations.
4.3.3.5 Rear Battery Cage
The rear battery cage is fixed by four points on top of the cage in the corners, where it is
mounted to the rails on the back of the car. This cage was also initially analysed with

Final Year Thesis, 2009
46 Christian A. Tietzel, 10415074
3mm thick members but this failed under the required accelerations. Therefore
continual analysis was carried out upgrading different members to 5mm thick. The
optimal solution was found using 5mm thick members for the equal angle bars and
3mm for the flat bars. Again, it would have been preferred to use hollow section
members however due to height restrictions this was not possible. As with the central
battery cage, diagonal side bars were added, however these face in the opposite
direction to transfer the largest front impact force from the bottom to the bolted joints at
the top. As displayed in Figure 32 the rear battery cage passes all impact acceleration
requirements.
Vertical Impact
Side ImpactFront Impact
Rear Impact
Towards the rear of the vehicle
Figure 32: Rear battery cage safety factor contours for front (top left), side (top right),
rear (bottom left) and vertical (bottom right) impact accelerations.

Final Year Thesis, 2009
47 Christian A. Tietzel, 10415074
4.3.3.6 Central Battery Cage Mount
The required forces the mount must withstand are the same forces applied to the central
battery cage transferred through the joints. The horizontal forces i.e. the font impact,
side impact and rear impact can be applied as point forces on the mount at the bolted
joints (Figure 33). As the cage sits flat on top of the mount, the vertical force must be
applied as a pressure force across the top surface area. This pressure equals 282,371Pa
given an area of 0.03585m2 and the vertical force of 10,123N. As opposed to the battery
cages, the side force must be applied from both sides as the mount is not symmetrical.
The mount has two bolts in each leg, these were treated as fixed points for analysis. The
angle bar on the base of the two front legs is also resting on a structural chassis member
of the vehicle, therefore this is treated as a compression only support vertically.
Similarly the rear legs are butted up against a chassis member from behind, therefore
this can also be treated as a compression only support horizontally (Figure 33).
Figure 33: Central cage mount position of applied forces and supports (mm).
The central battery cage mount had to be designed so the above cage was sitting as low
as possible, this restricted the available space to support the upper structure. This is the
reason for the diagonal support bar being attached to the angle bar section at such a high
point. For better support it would have been attached lower, however the gearbox was
obscuring the path. Additionally the horizontal bar running length ways with the vehicle
on the passenger side had to be offset from the mounted leg, see Figure 33. This created
additional bending stresses where it insects the front bar. Therefore to reduce the
bending moment, an extra support bar was added transferring load directly to the
support leg and effectively reducing the length of the offset bar, hence reducing the
Compression only support horizontally
Bolted battery cage joints
Towards the rear of the vehicle Bolted chassis joints
Compression only support vertically
Offset bar from leg and extra support
Restricted height of support bar

Final Year Thesis, 2009
48 Christian A. Tietzel, 10415074
bending moment. The final mount safety factor contours for the given impact
accelerations whilst applying the discussed constraints are displayed in Figure 34.
Passenger Side ImpactFront Impact
Vertical Impact
Rear ImpactDriver Side Impact
Towards the rear of the vehicle
Figure 34: Central battery cage mount safety factor contours for front (top left), passenger side (top right), driver side (middle left), rear (middle right) and vertical
(bottom) impact accelerations.

Final Year Thesis, 2009
49 Christian A. Tietzel, 10415074
4.3.3.7 Bolt Stress Analysis
All the cages and mounts are bolted down using M8 high strength structural bolts, grade
12.9. These bolts have a minimum tensile strength (fuf) of 1220MPa (Standards
Australia 1995). The maximum shear and tensile forces applied to the bolts must be
checked against the bolts capacity. The maximum bearing force, which is equal to the
maximum shear force for all given cases as it is just one steel ply joined to another, is
also checked against the structural steels capacity.
The nominal shear capacity (Vf) can be calculated to be 26.25kN using equation 4.4
(Standards Australia 1998) given a basic minor diameter of 6.647mm (Standards
Australia 1985) to produce a minor diameter area (Ac) of 34.70mm2.
0.62 (4.4)
The nominal tensile capacity (Ntf) of the bolt must also be determined. The tensile stress
area (As) must initially be calculated using equation 4.5 (Standards Australia 1985)
given the pitch (P) is 1.25mm and the diameter of the bolt (df) is 8mm. It is determined
to be 36.61mm2. Following Ntf can be calculated to be 44.66kN using equation 4.6
(Standards Australia 1998).
0.9382 (4.5)
(4.6)
The nominal bearing capacity (Vb) of the steel is the lesser of the two calculated values
for local bearing failure (equation 4.7) and plate-tearout failure (equation 4.8) (Standards
Australia 1998).
3.2 (4.7)
(4.8)
Where the minimum thickness (tp) of the steel used is 3mm and the minimum tensile
strength of the steel is 440MPa. Equation 4.8 determines the nominal bearing capacity
for the steel subject to a component of force acting towards an edge, therefore ae is the
minimum distance from the edge of a hole to the edge of the steel, measured in the
direction of the component of a force, plus half the bolt diameter (Standards Australia
1998), which is 11mm for all cases. Therefore the nominal bearing capacities are
calculated to be 33.79kN and 14.52kN with the lesser obviously being 14.52kN.
The design forces must all be less than the nominal capacities multiplied by their
capacity factors (Standards Australia 1998), summarised in Table 20.

Final Year Thesis, 2009
50 Christian A. Tietzel, 10415074
Nominal capacity Capacity factor Maximum design force Shear force on bolt 26.25kN 0.80 21.00kN Tension force on bolt 44.66kN 0.80 35.73kN Bearing force on steel 14.52kN 0.90 13.07kN Table 20: Maximum design forces for bolt shear and tension and bearing on the ply.
As previously stated, the maximum shear force on the bolts is equal to the maximum
bearing force on the surrounding steel for all cases. Therefore failure from the bolts
shearing can be neglected as the bearing capacity of the steel is less than the shear
capacity of the bolt. Hence the steel around the bolt will fail from bearing forces
through plate tear-out failure first.
The maximum tension and shear/bearing forces are assumed to be divided evenly
between each bolt. Therefore for each battery cage the maximum shear/bearing force is
assumed equal to the front impact force divided by four. The only battery cage which is
in pure tension from impact is the rear cage where the vertical impact force is divided
by four to obtain the maximum tension force on the bolts. The maximum forces are
summarised in Table 21. The central battery cage mount is bolted down in 8 locations,
four vertically and four horizontally using larger M10 high tensile bolts. It also has
multiple compression only supports and as the forces applied to it are equal to the forces
applied to the central battery cage, it can safely be assumed that failure to the battery
cage bolts would occur first. Hence it is neglected from Table 21.
Maximum shear/bearing force Maximum tension force Fuel tank battery cage 620N - Central battery cage 5062N - Rear battery cage 3306N 1653N
Table 21: Maximum shear/bearing and tension forces from impact accelerations applied to the bolts on each battery cage.
As can be seen, all shear/bearing forces are far less than 13.07kN and the tension force
is less than 35.73kN, therefore failure under these conditions will not occur.
4.3.4 Discussion
The steel structures of the battery cages were fabricated by various workshops. Initially
it was intended that the UWA Electrical Engineering workshop would manufacture all
cages, however due to the unexpected workload the entire vehicle placed on them, the
UWA Mechanical Engineering workshop and a professional electric vehicle conversion
company, EV Works, fabricated the central and rear battery cages respectively. All
other sealing and components for keeping the batteries held tight were fabricated by the

Final Year Thesis, 2009
51 Christian A. Tietzel, 10415074
author in the UWA Electrical Engineering workshop with close guidance on machinery
such lathes. Figure 35 displays a picture of the fabricated central and rear battery cages
installed in the vehicle.
Figure 35: Central and rear battery cages installed in the vehicle.
Discussion and inspection of previously converted vehicles by EV works was carried
out. They used the same material and similar designs for housing their batteries,
confirming the suitability of designs optimised in this project. However there is a “grey”
area in the impact acceleration requirements of NCOP14. The current standards do not
specifically outline a method for treating the batteries contained in the battery cage. EV
Works in the past have treated the batteries as rigid bodies, transferring load from one
side of the battery cage to the other (Mr R Mason, 2009, pers. comm., 28 August). This
adds significant strength to the battery cage, reducing the material thickness required for
the larger cages. However as previously stated, the batteries used for this project are
sealed in a plastic cover, therefore treating the batteries as rigid bodies for transferring
load was deemed inappropriate. Therefore calculations performed without this
consideration are a worst case scenario.
Testing the battery cages to verify results was investigated. Initially it was hoped that
destructive testing could be carried out on the battery cages. However this required the
fabrication of a second battery cage for each position. This was not financially viable
for the REV team and there was also inadequate available staff within the UWA
Electrical or Mechanical workshops to fabricate them in priority of other projects. If this
Rear Battery Cage
Central Battery Cage
Motor Controller
Vehicle Computer

Final Year Thesis, 2009
52 Christian A. Tietzel, 10415074
was possible, the cages would have been tested under the most critical load direction
until destruction using the Instron machine within the UWA Civil Engineering
workshop. This would verify the maximum load they could withstand. Secondly, strain
gauge testing could be carried out on the battery cages verifying the stress results from
ANSYS Workbench. However there was inadequate time available to do testing as the
battery cages were not completed until early September and were installed straight in
the vehicle. This was unavoidable as previously explained, the UWA Electrical
Engineering workshop had insufficient staff to complete the cages earlier even though
final designs were placed with them in late May, leading to external fabrication.
However for the purpose of the vehicle and to meet the DPI requirements, physical
testing is not required. The final battery cages meet all of the original objectives and
DPI requirements.
A venting system analysis for the Lotus battery cages was carried out under guidance by
REV team member Timothy Wallace. As the vehicle is not yet operating, testing could
not be done to calculate the amount of heat generated from each battery cage. Therefore
an assumption was made that the same amount of heat would be generated per volume
of batteries for the Lotus Elise as for the Hyundai Getz, using the values calculated in
this report. The final design incorporates a single required fan for each the central and
rear battery cages mounted on the side at the top. Therefore there is little pressure loss
as the air only flows across the top of the batteries, hence the requirement for only one
fan per cage, as opposed to the Hyundai Getz which required two as they were mounted
from underneath. The battery cages in the fuel tank area do not require an active venting
system as the cages are not individually sealed and are only 2 batteries wide, therefore
exposing a larger surface area to assist in heat flow. Additionally, the diffuser running
under the fuel tank area has perforations in it to assist in air flow during driving. It was
also preferable not to have fans directly underneath the passenger as this would cause
additional noise.
The maximum number of batteries were placed forward of the rear axle, although due to
the retainment of the original gearbox, there was little alternative choices available to fit
up to 100 batteries, with the final arrangement containing 99. The placement of the rear
battery cage had the largest impact on the weight distribution however this was
unavoidable. The original front to rear weight distribution was 33/67 and with the
modifications it is now 32/68 (Tang 2009), virtually identical, therefore only having

Final Year Thesis, 2009
53 Christian A. Tietzel, 10415074
minimal effects on the handling of the vehicle. Although when taking into account the
required passenger and luggage weights, the rear axle now exceeds its maximum limit
by 34kg (Tang 2009) which is solely due to the compulsory allowance of 13.6kg of
luggage per passenger. This luggage is placed rearward of the rear axle in the original
boot, however as there is now no boot space available due to electronics, discussions
with the DPI will have to be carried out to gain special consideration to remove the
luggage allowance or move it forward in the passenger compartment. There have also
been discussions with a professional automotive engineer who will have to approve the
vehicle to the DPI, who believes that as the vehicle weight distribution is virtually
identical, and hence the driving characteristics also, that the vehicle will be approved
(Mr D Stevens, 2009, pers. comm., 8 October). If not further investigations will have to
be carried out in upgrading the rear suspension and other necessary components.
Weight distribution issues were the critical determining factors in almost all mechanical
designs by the REV team for conversion of the Lotus. However as this vehicle is
converted as an example of a viable option from petrol vehicles, it should be noted that
vehicles that are purpose built as electric drives can be designed to fit components
around battery packs which demand a large space, and placed in more central locations.
A purpose built electric car would not suffer the constraints imposed on the REV team
who must convert a petrol vehicle using the limited space left after the removal of petrol
engine components. This is reinforced by observing placement of the batteries in the
electric Tesla Roadster (Figure 36) which is based on a Lotus Elise. All the batteries are
placed centrally and low directly behind the seats.
Figure 36: Battery placement in the Tesla Roadster (Tesla Motors 2009).

Final Year Thesis, 2009
54 Christian A. Tietzel, 10415074
5 Manufacture and Implementation Safety Requirements
Throughout construction and installation, the UWA Electrical and Mechanical
Engineering workshops, and G50 laboratory of the UWA Electrical Engineering
building were utilised. G50 stores the vehicles and is generally a place for the students
to operate within where as the workshops provides additional machinery and staff
assistance to fabricate components.
For access to the workshops and laboratory, a safety induction was performed to ensure
a clean and safe working environment (School of Mechanical Engineering 2009). The
safety induction outlines the rules and regulations for operating unsupervised within the
workshops and laboratory. Upon completion of the safety induction, it is the student’s
responsibility to uphold these rules and regulations, which are outlined in Appendix O.
As mechanical group leader for the Lotus Elise, the author was also responsible for
ensuring each group member completed a safety induction, and also monitored the
behaviour of students within the workshops and laboratory throughout the year.
The general safety inductions did not cover the safe operating procedures for particular
machinery within the workshops. Therefore safe operating procedures were outlined by
workshop technicians prior to use. Throughout this project, machinery that was required
for operation during fabrication of components includes the sheet metal cutting
guillotine, drill press and lathes. MIG welding was performed by the workshop staff on
behalf of the author. These each have their own safe operating procedures (UWA
Occupational Therapist 2001) outlined in Appendix P. One battery cage was fabricated
by EV Works who used identical machinery requiring similar operating procedures.
Throughout fabrication and installation of components, care had to be taken to enforce
the above safety requirements especially as group leader. Additionally, as there are high
voltages within the battery cages, caution had to be taken towards electrical safety,
ensuring a qualified technician disconnected the power before removal of any electrical
components. When installing electrical wires, particular care was taken to ensure that
the wires were sufficiently insulated and not resting on sharp edges which could
potentially wear the wire down and become hazardous. All high voltages were clearly
labelled with the appropriate hazard symbols. Care also had to be taken when installing
the battery cages to follow proper lifting techniques and use of appropriate machinery as
the battery cages filled with cells can weigh up to 125kg.

Final Year Thesis, 2009
55 Christian A. Tietzel, 10415074
6 Conclusion & Future Work
The Hyundai Getz currently contains a fully automatic temperature controlled active
venting system. The system is sealed and vented to the exterior of the vehicle with two
12 volt fans. It will significantly improve the life expectancy of the expensive lithium-
ion battery cells used to power the vehicle. It decreases the batteries temperature during
charging and monitors the temperature during discharging to maintain an optimal level
as a compromise between life expectancy and discharge capacity. As the system is
sealed and vented to the exterior it also eliminates any gases released from within the
battery cage moving around the cabin. To ensure the gases still do not leak into the
cabin, the fans switch on briefly every hour to expel them to the outside.
The battery cages were completed to the specified requirements set out by the DPI,
specifically the crash accelerations they must withstand. A thorough stress analysis was
carried out using SolidWorks and ANSYS Workbench to obtain an optimal design.
Although there were difficulties in determining the best placement for the battery cages
to not modify the cars initial specifications and characteristics, the final result had little
impact on the weight distribution of the vehicle. The installation of all the battery cages
is currently complete and the REV team’s electrical engineers are currently installing all
electrical components, concluding the final tasks for completion of the vehicle. As
viewed from the current installation of the battery cages, they will serve their purpose as
expected, allowing relatively easy removal and inspection of the batteries as well as
holding the batteries firmly down during operation.
Managing the Lotus Elise mechanical team provided an insight into the necessity for
organised project management with particular emphasis on planning and time
management. Although the car is not currently complete, significant effort was made to
foresee the critical path of the project, so it was not delayed due to the design of parts by
the mechanical team. Unfortunately difficulty with workshop availability led to a delay
in completion of the project, which is now expected as mid November.
Upon the future completion of the vehicle, the REV team will require a professional
automotive engineer to approve the vehicle and allow the DPI to inspect it for its
adherence to the relevant ADRs. Particularly attention will be focused on the
overloading of the rear axle; if it isn’t immediately approved there will be a requirement
for future REV team members to modify the rear of the vehicle by upgrading the

Final Year Thesis, 2009
56 Christian A. Tietzel, 10415074
suspension. As in the Hyundai Getz, only the springs may be required to be modified
for overloading of the rear axle. Once approved a vehicle license can be acquired.
NCOP14 National Guidelines for the Installation of Electric Drive in Motor Vehicles is
currently under review with significant changes expected. Therefore should the battery
cage crash accelerations be lowered or the method for analysis of the battery cages
outlined further or altered, there may be a future requirement for the REV team to
modify or rebuild the battery cages with a lighter or thinner material to improve the
performance of the vehicle. Also if there is a future requirement for testing of the
battery cages, this can also be performed by a future REV team member through strain
gauge testing or destructive testing on the Instron machine if spare battery cages are
fabricated.
The REV team aims to complete the Lotus Elise electric conversion whilst maintaining
the original performance specifications. This will demonstrate an electric sports car as a
viable option for future public users. Therefore to confirm this, the REV team will need
to carry out appropriate performance testing on the vehicle at an approved race track
once completed.
Final Year Thesis, 2009
57 Christian A. Tietzel, 10415074
7 References
Asakura, K, Shimomura, M & Shodai, T 2003, 'Study of life evaluation methods for Li-ion batteries for backup applications', Journal of Power Sources, vol. 119-121, pp. 902-905.
Australian Institute of Steel Construction 1999, Design Capacity Tables for Structural
Steel, 3rd edn, AISC, Sydney NSW. Australian Motor Vehicle Certification Board Working Party 2006, National Guidelines
for the Installation of Electric Drives in Motor Vehicles, Department of Infrastructure, Transport, Regional Development and Local Government, Australia [31 March 2009].
Bastow, D 2004, Car suspension and handling, Professional Engineering Publishing,
Bury St. Edmunds. Braunl, T, The REV Project, The University of Western Australia. Available from:
http://therevproject.com/ [22 April 2009]. Cengel, YA 2008, Fundamentals of thermal-fluid sciences, McGraw-Hill, Boston. Department of Climate Change 2008, National Greenhouse Gas Inventory 2006,
Department of Climate Change, Canberra [31 March 2009]. Dhameja, S 2001, 'The Li-ion Battery', in Electric Vehicle Battery Systems, Elsevier
Newnes, p. 10. ebm-papst, 8212JN, ebm-papst. Available from:
http://www.ebmpapst.com/en/products/compact-fans/axial-compact-fans/axial_compact_fans_detail.php?pID=53943&PHPSESSID=edcwraol [28 July 2009].
Energy Task Force 2004, Securing Australia's Energy Future, Australian Government,
Barton, ACT. Garche, J & Jossen, A 2000, 'Battery management systems (BMS) for increasing battery
life time', in Telecommunications Energy Special Conference, 2000, p. 81. Holden, The Electric Volt, GM Holden Ltd. Available from:
http://www.holden.com.au/holden-innovation/volt [27 March 2009]. Ip, C 2008, Battery Restraint System Design and Performance Evaluation for
Renewable Energy Vehicle Project, Final Year Project, The University of Western Australia.
Leitman, S & Brant, B 2009, Build your own electric vehicle. Lotus Cars Ltd 2001, Service Notes Elise, Norfolk, England. Marshall, R 2009, 'GM Hollers for a Marshall', Wheels, vol. March 2009, p. 155.

Final Year Thesis, 2009
58 Christian A. Tietzel, 10415074
Micronel, SERIES D604T/Q, Micronel. Available from: http://www.micronel.com/ProductPage-D.asp?pType=D604T/Q&pReset=y&pTitle=D604T%2FQ [22 July 2009].
MINI, MINI-E, BMW Group Australia. Available from:
http://www.mini.com.au/scripts/main.asp?PageID=29428 [1 April 2009]. MINI, MINI Cooper, BMW Group Australia. Available from:
http://www.mini.com.au/scripts/main.asp?PageID=13589&LEVEL=2 [1 April 2009].
Pachauri, RK & Reisinger, A 2007, Climate Change 2007 Synthesis Report,
Intergovernmental Panel on Climate Change, [31 March 2007]. Reimpell, J 2001, The automotive chassis : engineering principles, 2nd edn,
Butterworth Heinemann, Oxford. School of Mechanical Engineering 2009, Project Safety Induction, UWA, Perth. Siguang, L 2009, 'Study on battery management system and lithium-ion battery',
Proceedings - 2009 International Conference on Computer and Automation Engineering, ICCAE 2009, p. 222.
Standards Australia 1985, AS 1275-1985 : Metric screw threads for fasteners, SAI
Global, Strathfield NSW. Standards Australia 1995, AS/NZS 4291.2:1995 : Mechanical properties of fasteners -
Nuts with specified proof load values - Coarse thread, SAI Global, Strathfield NSW.
Standards Australia 1996, AS/NZS 3679.1:1996 : Structural steel - Hot-rolled bars and
sections, SAI Global, Strathfield NSW. Standards Australia 1997, AS/NZS 1866:1997 : Aluminium and aluminium alloys -
Extruded rod, bar, solid and hollow shapes, SAI Global, Strathfield NSW. Standards Australia 1998, AS 4100-1998 : Steel structures, SAI Global, Strathfield
NSW. Tang, D 2009, Suspension System for the Renewable Energy Vehicle Project, Third
Year Project, The University of Western Australia. Tesla Motors, Under the Skin, Tesla Motors. Available from:
http://www.teslamotors.com/design/under_the_skin.php [12 April 2009]. Thunder Sky, Thunder Sky LiFeYPO4 Power Battery Specifications, Thunder Sky
Energy Group Limited. Available from: http://www.thunder-sky.com/products_en.asp [14 May 2009].
UWA Occupational Therapist, Safety in Workshops, UWA. Available from:
http://www.safety.uwa.edu.au/policies/safety_in_workshops [15th September 2009].

Final Year Thesis, 2009
59 Christian A. Tietzel, 10415074
UWA Safety & Health Manager 2007, UWA Electrical Safety Pamphlet, UWA, Perth.

Final Year Thesis, 2009
60 Christian A. Tietzel, 10415074
8 Appendices
8.1 Appendix A – MINI-E CO2 emissions
Electricity delivered to households produces the equivalent of 950-1000kg of
CO2/MWh (Energy Task Force 2004). Given a MINI-E consumes 0.15kWh/km (MINI
2009a), if the MINI-E was charged from a standard household plug point, it would be
producing the equivalent of 14.2-15kg of CO2/100km or an average of 14.6kg of
CO2/100km.
8.2 Appendix B - Thermal resistance values for Hyundai Getz battery cage
Discharging Charging RTotal 0.06338K/W 0.05039K/W
RConv(Bottom) 0.8694K/W 0.9437K/W RConv(Sides) 0.3031K/W 0.3309K/W RForced Conv 0.08827K/W 0.06344K/W
Table 22: Summary of thermal resistance values for Hyundai Getz battery cage.
8.3 Appendix C - Thermal Resistance of Natural Convection of Getz Enclosure
The thermal resistance from natural convection of the Hyundai Getz battery cage
enclosure can be calculate using equation 8.1 to give 0.9757K/W for discharging and
1.0602K/W for charging. Note these values are greater than the required calculated
values for forced convection, hence proving the requirement for a fan.
(8.1)
8.4 Appendix D – Forced Convection over and between Getz batteries
The following equations, 8.2-8.6 were substituted into each other to obtain final
equations 3.14 and 3.18 for tube flow.
(8.2)
(8.3)
(8.4)
(8.5)
(8.6)

Final Year Thesis, 2009
61 Christian A. Tietzel, 10415074
8.5 Appendix E – Formulas for Required Flow Rate
.3.911 10 2,033,071 . 1.272 10 , , .
(8.7)
.3.659 10 2,340,245 . 1.191 10 , , .
(8.8)
8.6 Appendix F – Risk Matrix
Each risk can be classified as low, medium, high or extreme before and after mitigation
using the risk matrix below (Table 23).
Table 23: Risk Matrix
8.7 Appendix G – Dimension of 8212JN Fan for Hyundai Getz
Figure 37: Dimensions of 8212JN fan for Hyundai venting system (ebm-papst 2009).
8.8 Appendix H – Hyundai Getz Venting System Drawings
See the following 6 pages for fully dimensioned drawings of the Hyundai Getz venting
system. Please note, the scaling dimensions in the bottom left corner of the details pain
are only relevant when printed on A3 paper.
Likelihood Insignificant Minor Moderate Major Severe
Rare Low Low Low Low LowUnlikely Low Low Low Medium MediumPossible Low Low Medium Medium MediumLikely Low Medium Medium High High
Almost certain Low Medium Medium High Extreme
Consequence

1: 5
D E FC
12
34
BA
32
15
C D
46
78
A B
1 : 1
UWA
1041
5074
C.T
IETZ
EL
16/0
5/09
VEN
TING
SYS
TEM
ISO
MET
RIC
Solid
Wor
ks S
tude
nt L
icen
se A
cade
mic
Use
Onl
y

1 : 5
D E FC
12
34
BA
32
15
C D
46
78
A B
1 : 2
UWA
1041
5074
C.T
IETZ
EL
16/0
5/09
VEN
TING
SYS
TEM
BOTT
OM
PLA
TE
72.5
0
145
80
68
362.
5050
7.50
1015
362.
50
272
68
476
Solid
Wor
ks S
tude
nt L
icen
se A
cade
mic
Use
Onl
y

1 : 2
D E FC
12
34
BA
32
15
C D
46
78
A B
1 : 3
UWA
1041
5074
C.T
IETZ
EL
16/0
5/09
VEN
TING
SYS
TEM
RIV
ETED
SID
E PL
ATE
S
Left
side
pla
te, t
o b
e riv
eted
ont
o ex
istin
g ca
ge
204
Righ
t sid
e p
late
, to
be
rivet
ed o
nto
exist
ing
cage
470
250
Solid
Wor
ks S
tude
nt L
icen
se A
cade
mic
Use
Onl
y

16/0
5/09
1: 5
D E FC
12
34
BA
32
15
C D
46
78
A B
1 : 4
UWA
1041
5074
C.T
IETZ
EL
VEN
TING
SYS
TEM
CH
ARG
ER G
UARD
PLA
TE18
130
30
272
18
280
30
Solid
Wor
ks S
tude
nt L
icen
se A
cade
mic
Use
Onl
y
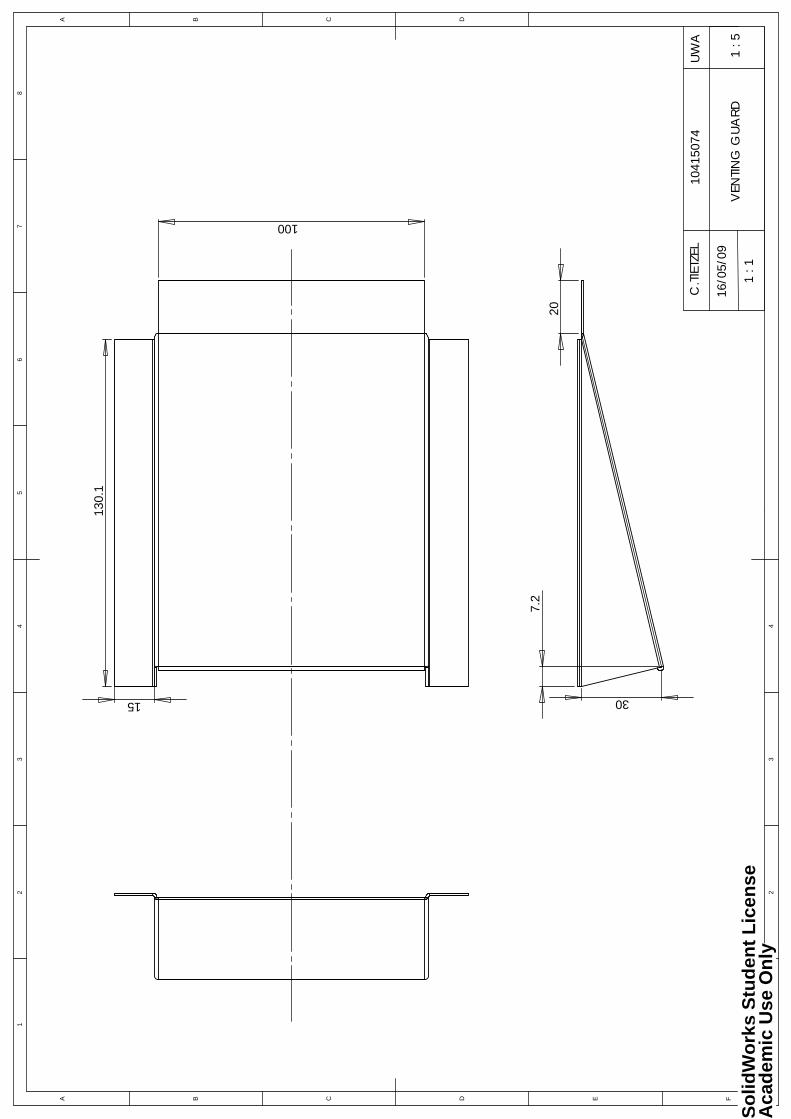
20
30
7.2
100
15
130.
1
78
A B
1 : 5
UWA
1041
5074
C.T
IETZ
EL
16/0
5/09
1 : 1
D E FC
12
34
BA
32
15
C D
46
VEN
TING
GUA
RD So
lidW
orks
Stu
dent
Lic
ense
Aca
dem
ic U
se O
nly

1 : 1
D E FC
12
34
BA
32
15
C D
46
78
A B
1 : 6
UWA
1041
5074
C.T
IETZ
EL
16/0
5/09
VEN
TING
GUA
RD
UP 9
0.00
° R
0.50
DO
WN
90.
00°
R 0.
50
UP 9
0.00
° R
0.50
UP 200.00° R 0.25
DO
WN
90.
00°
R 0.
50
DOWN 13.50° R 0.50 20
.1
152.
3
3.8
31.9
130.
1
16.1
100
13.5°
Solid
Wor
ks S
tude
nt L
icen
se A
cade
mic
Use
Onl
y

Final Year Thesis, 2009
68 Christian A. Tietzel, 10415074
8.9 Appendix I – 2002 Model Lotus Elise Chassis Layout
Figure 38: 2002 model Lotus Elise chassis layout (Lotus Cars Ltd 2001).
8.10 Appendix J – Fuel Tank Battery Cage Drawings
See the following 6 pages for fully dimensioned drawings of the Lotus Elise fuel tank
battery cages. Please note, the scaling dimensions in the bottom left corner of the details
pain are only relevant when printed on A3 paper.

5mm
wel
d b
ead
All j
oint
s are
wel
ded
exc
ept t
he fo
ur b
olte
d jo
ints
on
the
top
All s
teel
ang
le st
ock
is 25
x 2
5 x
3 un
less
oth
erw
ise n
oted
All f
lat b
ars
are
32
x 3
unle
ss o
ther
wise
not
edA
ll hol
es a
re 9
mm
dia
mte
r and
bol
ts M
8
1 : 2
D E FC
12
34
BA
32
15
C D
46
78
A B
1 : 1
UWA
1041
5074
C.T
IETZ
EL
15/0
5/09
Fuel
Ta
nk B
atte
ry C
age
Isom
etric
Stee
l ang
le st
ock
30 x
30
x 3
Fla
t ba
r 25
x 3
Fla
t ba
r 25
x 6

1 : 2
D E FC
12
34
BA
32
15
C D
46
78
A B
1 : 2
UWA
1041
5074
C.T
IETZ
EL
15/0
5/09
Fuel
Ta
nk B
atte
ry C
age
Fron
t
250
206
308
25
352
25

46
78
A B
1 : 3
UWA
1041
5074
C.T
IETZ
EL
15/0
5/09
1 : 2
D E FC
12
34
BA
32
15
C D
Fuel
Ta
nk B
atte
ry C
age
Top
16
9
12.50
9
12.50
121.
34
32
9
12.5
0
25
9
11.50
12.5
0
11.50

67
8
A B
1 : 4
UWA
1041
5074
C.T
IETZ
EL
15/0
5/09
1 : 2
D E FC
12
34
BA
32
15
C D
4
Fuel
Ta
nk B
atte
ry C
age
Righ
t
100
6
73
30
3025
3
129
365
70
85

5
C D
46
78
A B
1 : 5
UWA
1041
5074
C.T
IETZ
EL
15/0
5/09
1 : 2
D E FC
12
34
BA
32
1
Fuel
Ta
nk B
atte
ry C
age
Rea
r

121.
34
1 : 2
D E FC
12
34
BA
32
15
C D
46
78
A B
1 : 6
UWA
1041
5074
C.T
IETZ
EL
15/0
5/09
Fuel
Ta
nk B
atte
ry C
age
Botto
m

Final Year Thesis, 2009
75 Christian A. Tietzel, 10415074
8.11 Appendix K – Central Battery Cage Drawings
See the following 5 pages for fully dimensioned drawings of the Lotus Elise central
battery cage. Please note, the scaling dimensions in the bottom left corner of the details
pain are only relevant when printed on A3 paper.

1 : 3
D E FC
12
34
BA
32
15
C D
46
78
A B
2 : 1
UWA
1041
5074
C.T
IETZ
EL
13/0
7/09
Cen
tral B
atte
ry C
age
Isom
etric
All s
teel
ang
le st
ock
is 25
x 2
5 x
5A
ll fla
t ba
rs a
re 3
2 x
5A
ll hol
es a
re 9
mm
dia
met
er a
nd b
olts
M8
coun
ter s
unk
All j
oint
s are
wel
ded
exc
ept t
he b
olte
d jo
ints
on
the
top

C D
46
78
A B
2 : 2
UWA
1041
5074
C.T
IETZ
EL
13/0
7/09
1 : 3
D E FC
12
34
BA
32
15
Cen
tral B
atte
ry C
age
Fron
t
203
32
243
771
811
25
2524
1

46
78
A B
2 : 3
UWA
1041
5074
C.T
IETZ
EL
13/0
7/09
1 : 3
D E FC
12
34
BA
32
15
C D
Cen
tral B
atte
ry C
age
Top
115
9
32
123
115
16
115

78
A B
2 : 4
UWA
1041
5074
C.T
IETZ
EL
13/0
7/09
1 : 2
D E FC
12
34
BA
32
15
C D
46
Cen
tral B
atte
ry C
age
Righ
t
433
203
393
32

A B
2 : 5
UWA
1041
5074
C.T
IETZ
EL
13/0
7/09
1 : 3
D E FC
12
34
BA
32
15
C D
46
78
Cen
tral B
atte
ry C
age
Botto
m
37.5
0
12.50
9
9
8283
83
32
55.50
12.5
0

Final Year Thesis, 2009
81 Christian A. Tietzel, 10415074
8.12 Appendix L – Central Battery Cage Mount Drawings
See the following 5 pages for fully dimensioned drawings of the Lotus Elise central
battery cage mount. Please note, the scaling dimensions in the bottom left corner of the
details pain are only relevant when printed on A3 paper.

All s
teel
ang
le st
ock
is 25
x 2
5 x
6 un
less
not
edA
ll sq
uare
tub
ing
is 25
x25
& 4
thic
kA
ll rec
tang
ula
r tub
ing
is 25
x13
& 1
.6 th
ick
1 : 3
D E FC
12
34
BA
32
15
C D
46
78
A B
3 : 1
UWA
1041
5074
C.T
IETZ
EL
15/0
8/09
Mot
or C
age
Mou
ntIso
met
ric
Rein
forc
emen
t is 2
0 x
20 x
5 a
ngle
stoc
k
Solid
Wor
ks S
tude
nt L
icen
se A
cade
mic
Use
Onl
y

1 : 3
D E FC
12
34
BA
32
15
C D
46
78
A B
3 : 2
UWA
1041
5074
C.T
IETZ
EL
15/0
8/09
Mot
or C
age
Mou
ntFr
ont
50
115
12
125
50
25
Solid
Wor
ks S
tude
nt L
icen
se A
cade
mic
Use
Onl
y

1 : 3
D E FC
12
34
BA
32
15
C D
46
78
A B
3 : 3
UWA
1041
5074
C.T
IETZ
EL
15/0
8/09
Mot
or C
age
Mou
ntTo
p
560
2020
20
12.50
20
103.
50
48.5
017
.50
148.
50
110
110
18.50
68.5
0
38.5
0
12.50
12.50
142.
50
821
72
70.50
406
36.5
0
350
Solid
Wor
ks S
tude
nt L
icen
se A
cade
mic
Use
Onl
y

1 : 2
D E FC
12
34
BA
32
15
C D
46
78
A B
3 : 4
UWA
1041
5074
C.T
IETZ
EL
15/0
8/09
Mot
or C
age
Mou
ntRi
ght
270
275
Solid
Wor
ks S
tude
nt L
icen
se A
cade
mic
Use
Onl
y

78
A B
3 : 5
UWA
1041
5074
C.T
IETZ
EL
15/0
8/09
1 : 3
D E FC
12
34
BA
32
15
C D
46
Mot
or C
age
Mou
ntRe
ar
79.8
911
1.24
20
Solid
Wor
ks S
tude
nt L
icen
se A
cade
mic
Use
Onl
y

Final Year Thesis, 2009
87 Christian A. Tietzel, 10415074
8.13 Appendix M – Rear Battery Cage Drawings
See the following 5 pages for fully dimensioned drawings of the Lotus Elise rear battery
cage. Please note, the scaling dimensions in the bottom left corner of the details pain are
only relevant when printed on A3 paper.

All s
teel
ang
le st
ock
is 25
x 2
5 x
5A
ll fla
t ba
rs a
re 3
2 x
3A
ll hol
es a
re 9
mm
dia
mte
r and
bol
ts M
8A
ll joi
nts a
re w
eld
ed e
xcep
t the
bol
ted
join
ts o
n th
e to
p
D
46
78
A B
4 : 1
UWA
1041
5074
C.T
IETZ
EL
13/0
7/09
1 : 3
D E FC
12
34
BA
32
15
C
Rea
r Ba
ttery
Ca
geIso
met
ric

67
8
A B
4 : 2
UWA
1041
5074
C.T
IETZ
EL
13/0
7/09
1 : 3
D E FC
12
34
BA
32
15
C D
4
Rea
r Ba
ttery
Ca
geFr
ont
25
926
32
886
243
203
2527
9.33

UWA
1041
5074
C.T
IETZ
EL
13/0
7/09
1 : 3
D E FC
12
34
BA
32
15
C D
46
78
A B
4 : 3
Rea
r Ba
ttery
Ca
geTo
p
123
32
115
9
115
16
115
35
9
12.50

4 : 4
UWA
1041
5074
C.T
IETZ
EL
13/0
7/09
1 : 2
D E FC
12
34
BA
32
15
C D
46
78
A B
Rea
r Ba
ttery
Ca
geRi
ght
250
32
203
210

1 : 3
D E FC
12
34
BA
32
15
C D
46
78
A B
4 : 5
UWA
1041
5074
C.T
IETZ
EL
13/0
7/09
Rea
r Ba
ttery
Ca
geBo
ttom
32

Final Year Thesis, 2009
93 Christian A. Tietzel, 10415074
8.14 Appendix N – Summary of Pressures Applied to each Battery Cage
Fuel tank battery cage Central battery cage Rear battery cageSurface area (m2) Front 0.02816 0.05110 0.05685
Side 0.01701 0.03220 0.02305 Rear 0.03542 0.05110 0.05685
Vertical 0.03139 0.05984 0.05631 Pressure (N/m2) Front 88,039 396,216 232,582
Side 109,311 471,584 430,227 Rear 34,997 198,108 116,291
Vertical 39,490 169,173 117,406 Table 24: Required pressures each battery cage must withstand.
8.15 Appendix O – Safety Induction Key Points Outlined
For access to the G50 laboratory a safety induction was performed, with the major
points outlining:
Keep the laboratory clean and tidy
Shoes must be worn at all times
Long hair must be tied back
Safety glasses, ear protection and gloves must be worn during appropriate
operations
No food, drink or smoking is allowed within the laboratory
The emergency number is 2222 from the UWA telephones or 6488 2222 from
any telephone
Be aware of other people operating within your immediate area and do not
distract them
In case of a fire, activate the nearest fire alarm and do not attempt to put it out
unless you know what you are doing. Proceed to the evacuation area
The assembly area for evacuation is in the Maths building courtyard
Be aware of the nearest first aid box within the room
Generally double adapters, piggyback plugs and extension lead should not be
used
For heavy equipment, be sure to obtain help if needed, otherwise bend your
knees and lift with your legs
When jacking up a vehicle, adequately sign off the area
As high voltage equipment is being used in the vehicles, do not touch high
voltage electrical components without a qualified electrician

Final Year Thesis, 2009
94 Christian A. Tietzel, 10415074
Adequately seal and mark all electrical equipment installed in the vehicles
If a person is shocked medical advice must be sought, even as a precaution. The
WA Electrical Regulations require that all electrical accidents be reported.
Notify the UWA Technical Officer on 6488 2031 or the UWA Electrical
Supervisor on 6488 2016 and also complete a UWA incident/injury report form
(UWA Safety & Health Manager 2007)
Report all hazards and unsafe conditions.
The UWA workshops have their own set of general safety regulations which are
conveyed during an induction and are located on the UWA website (UWA
Occupational Therapist 2001). A safety induction form must be completed before
operating unsupervised within the workshops (School of Mechanical Engineering
2009). The key regulations include the above mentioned with some of the additional
requirements including:
Safety glasses must always be worn at all time
Students must have a workshop staff member present to operate within
Advice and approval must be gained to operate all equipment within the
workshop
Machines must be used for their intended purpose.
8.16 Appendix P – Safe Operating Procedures
Machinery required for operation within the workshops during fabrication includes the
sheet metal cutting guillotine, drill press, lathes, and MIG welding was performed by
the workshop staff. These each have their own safe operating procedures (UWA
Occupational Therapist 2001) outlined further.
Safe operating procedure for sheet metal cutting guillotine:
Ensure the cutting table is kept free of tools and clean
Only cut materials within the capacity of the machine
Take care when lifting and inserting the sheet metal into the machine
Be aware of sharp edges
Only one person should operate the machine at one time
Hold the sheet metal firmly and ensure it has adequate support when operating
the machine

Final Year Thesis, 2009
95 Christian A. Tietzel, 10415074
Ensure fingers are clear from the guillotine before cutting
Using gloves, all scrap material should be put in the bin.
Safe operating procedure for drill press:
Clean the workspace
Ensure the drill bit is tightened with the chuck key and removed from the drill
chuck
Ensure the component to be drilled is adequately clamped or set against stop
bars
Turn on the drill and lower it at a steady rate to continually cut the material
Never leave the drill press running unattended
Turn off the drill press first and clean the workspace of all swarf
Replace all drill bits, chucks and clamps to their original location.
Safe operating procedure for use on the lathes (UWA Occupational Therapist 2001):
The isolating switch must be off while adjustments are made to the machine, for
example gear changing, when removing swarf or when it is not in use
All controls must be in the neutral position before the lathe is started
Measuring instruments or any other components should not be kept on the
moving saddle, lathe bed or head stock
For capstan lathes, stock bar guards should be provided and kept adjusted so that
the bar stock does not project beyond the limits of the guard
The chuck face-plate or other holding devices should be effectively guarded.
Safe operating procedure for welding (UWA Occupational Therapist 2001):
Use the least toxic material or process possible
Ensure there is adequate ventilation in the form of a moveable exhaust hood, or
use appropriate respiratory protective devices as there are toxic fumes given off
from many materials and coatings
Use the appropriate heat protection equipment including gloves for handling the
material
Use the appropriate eye protection and welding shield.