basketball system installation instructions - douglas … · basketball system installation...
TRANSCRIPT
By Douglas Industries, Inc.
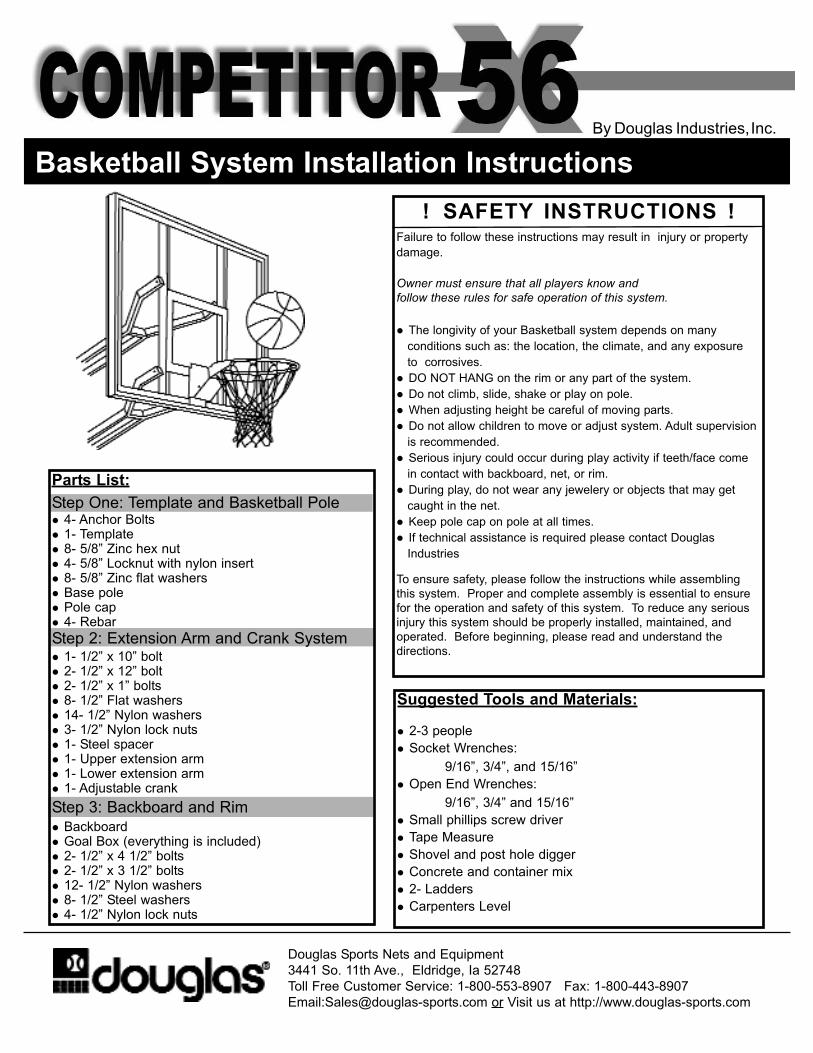
Basketball System Installation Instructions
! SAFETY INSTRUCTIONS !Failure to follow these instructions may result in injury or property
damage.
Owner must ensure that all players know and follow these rules for safe operation of this system.
� The longivity of your Basketball system depends on many
conditions such as: the location, the climate, and any exposure
to corrosives.
� DO NOT HANG on the rim or any part of the system.
� Do not climb, slide, shake or play on pole.
� When adjusting height be careful of moving parts.
� Do not allow children to move or adjust system. Adult supervision
is recommended.
� Serious injury could occur during play activity if teeth/face come
in contact with backboard, net, or rim.
� During play, do not wear any jewelery or objects that may get
caught in the net.
� Keep pole cap on pole at all times.
� If technical assistance is required please contact Douglas
Industries
To ensure safety, please follow the instructions while assembling
this system. Proper and complete assembly is essential to ensure
for the operation and safety of this system. To reduce any serious
injury this system should be properly installed, maintained, and
operated. Before beginning, please read and understand the
directions.
Douglas Sports Nets and Equipment
3441 So. 11th Ave., Eldridge, Ia 52748
Toll Free Customer Service: 1-800-553-8907 Fax: 1-800-443-8907
Email:[email protected] or Visit us at http://www.douglas-sports.com
Suggested Tools and Materials:
� 2-3 people
� Socket Wrenches:
9/16”, 3/4”, and 15/16”
� Open End Wrenches:
9/16”, 3/4” and 15/16”
� Small phillips screw driver
� Tape Measure
� Shovel and post hole digger
� Concrete and container mix
� 2- Ladders
� Carpenters Level
Parts List:
Step One: Template and Basketball Pole� 4- Anchor Bolts� 1- Template� 8- 5/8” Zinc hex nut � 4- 5/8” Locknut with nylon insert� 8- 5/8” Zinc flat washers� Base pole� Pole cap� 4- Rebar
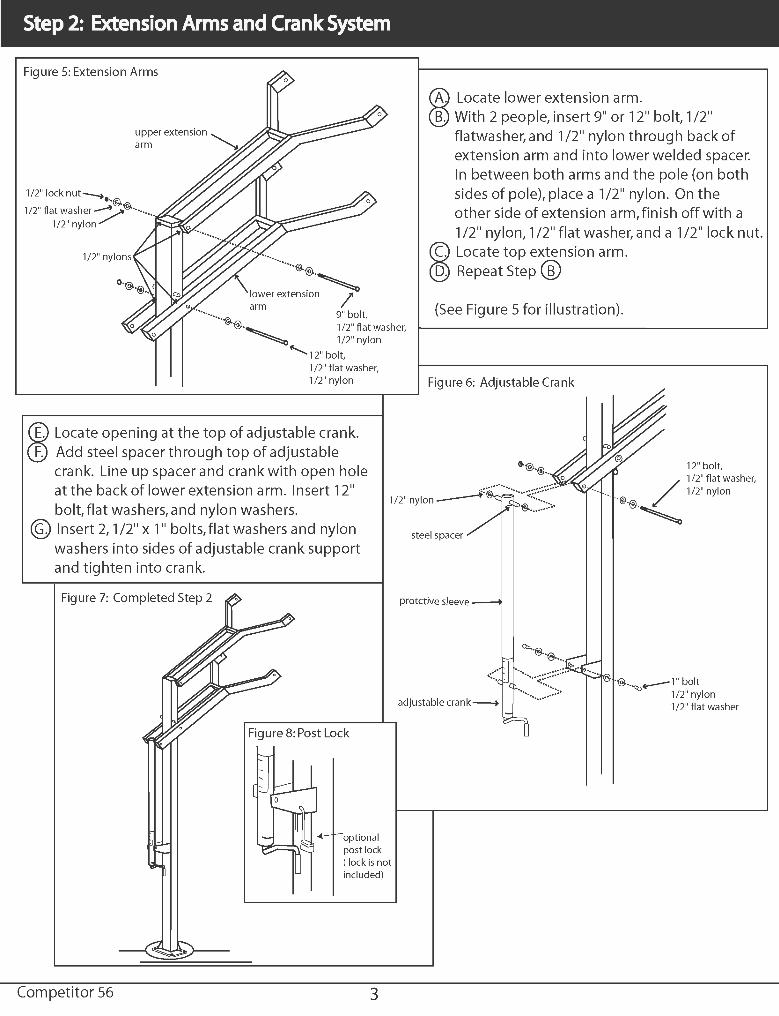
Step 2: Extension Arm and Crank System� 1- 1/2” x 10” bolt� 2- 1/2” x 12” bolt� 2- 1/2” x 1” bolts� 8- 1/2” Flat washers� 14- 1/2” Nylon washers� 3- 1/2” Nylon lock nuts� 1- Steel spacer� 1- Upper extension arm� 1- Lower extension arm� 1- Adjustable crank
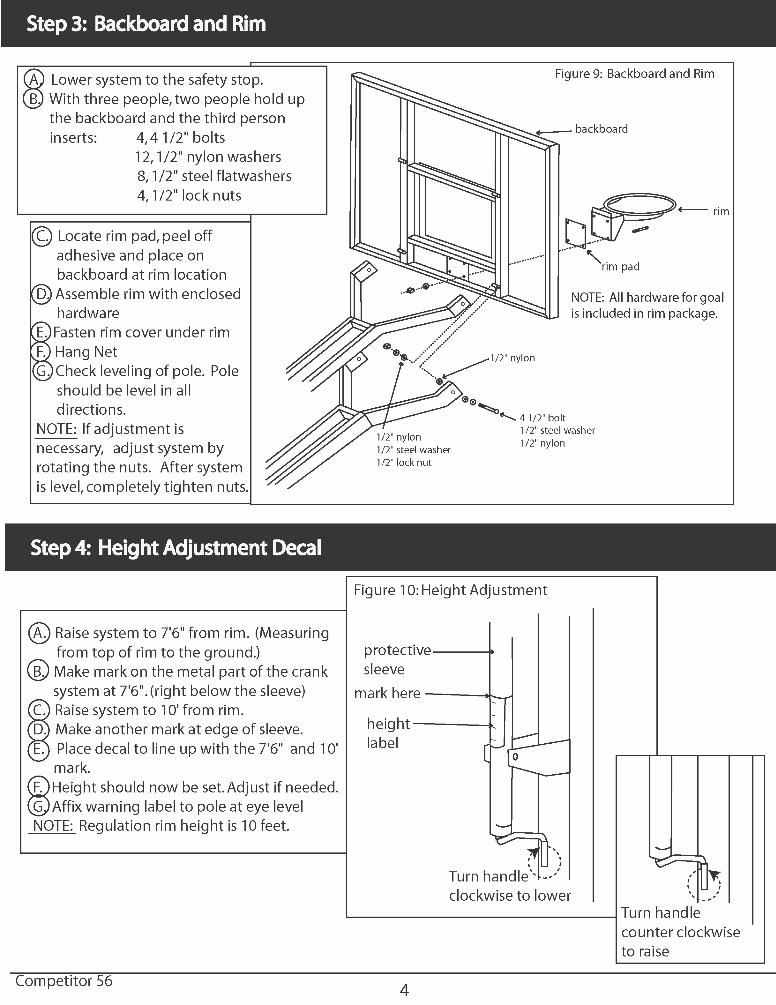
Step 3: Backboard and Rim� Backboard� Goal Box (everything is included)� 2- 1/2” x 4 1/2” bolts� 2- 1/2” x 3 1/2” bolts� 12- 1/2” Nylon washers� 8- 1/2” Steel washers� 4- 1/2” Nylon lock nuts
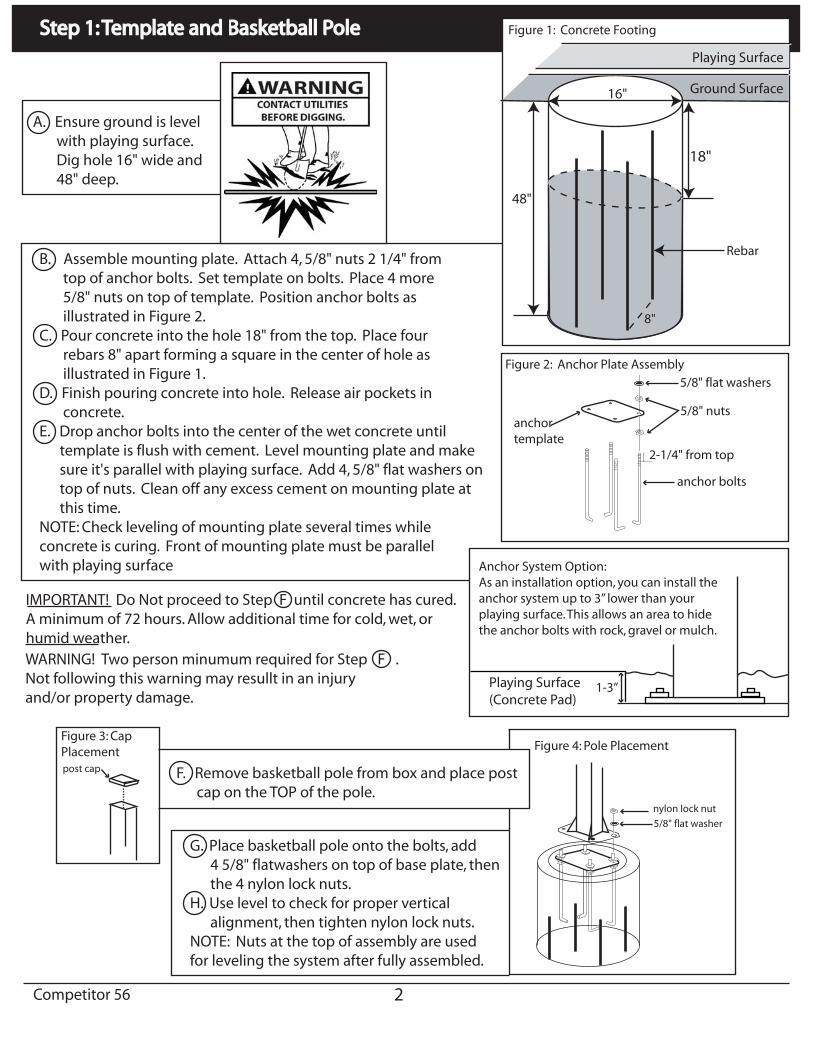
B. Assemble mounting plate. Attach 4, 5/8" nuts 2 1/4" from top of anchor bolts. Set template on bolts. Place 4 more 5/8" nuts on top of template. Position anchor bolts as illustrated in Figure 2.C. Pour concrete into the hole 18" from the top. Place four rebars 8" apart forming a square in the center of hole as illustrated in Figure 1.D. Finish pouring concrete into hole. Release air pockets in concrete.E. Drop anchor bolts into the center of the wet concrete until template is flush with cement. Level mounting plate and make sure it's parallel with playing surface. Add 4, 5/8" flat washers on top of nuts. Clean off any excess cement on mounting plate at this time.NOTE: Check leveling of mounting plate several times while concrete is curing. Front of mounting plate must be parallel with playing surface
Step 1: Template and Basketball PoleStep 1: Template and Basketball Pole
A. Ensure ground is level with playing surface. Dig hole 16" wide and 48" deep.
IMPORTANT! Do Not proceed to Step F until concrete has cured. A minimum of 72 hours. Allow additional time for cold, wet, or humid weather.WARNING! Two person minumum required for Step F . Not following this warning may resullt in an injury and/or property damage.
post cap F. Remove basketball pole from box and place post cap on the TOP of the pole.
G. Place basketball pole onto the bolts, add 4 5/8" flatwashers on top of base plate, then the 4 nylon lock nuts.H. Use level to check for proper vertical alignment, then tighten nylon lock nuts.NOTE: Nuts at the top of assembly are used for leveling the system after fully assembled.
5/8" flat washer
nylon lock nut
2
5/8" nuts
anchor bolts
anchortemplate
2-1/4" from top
5/8" flat washers
Figure 2: Anchor Plate Assembly
Figure 3: Cap Placement Figure 4: Pole Placement
Competitor 56
Playing Surface(Concrete Pad)
1-3”
Anchor System Option:As an installation option, you can install the anchor system up to 3” lower than your playing surface. This allows an area to hide the anchor bolts with rock, gravel or mulch.
16"
48"
Playing Surface
Ground Surface
18"
Rebar
8"
Figure 1: Concrete Footing