banner 9 navigation - montana.edu 9... · the banner and my banner menus. click back to main menuto...
TRANSCRIPT

Banner 9 Basic Navigation
Student Module

Contents (click link to go directly to page)
Welcome to Banner 9 Banner URLs Bookmark Banner URL Login Application Navigator & Main Menu Panel Main Menu Panel Main Menu Panel – Home Button Main Menu Panel – Applications & MyBanner Main Menu Panel – Search (Direct Access) Main Menu Panel – Recently Opened Main Menu Panel – Help Main Menu Panel – Sign Out Dashboard Navigation – Main Search Dashboard Navigation Accessing Banner Pages Basic Navigation – Page Header Basic Navigation – Page Key Block Basic Navigation – Lookup Values Basic Navigation – Multiple Records Basic Navigation – Name Quick Search
Basic Navigation – Parts of a Page (tabs, sections, save) Basic Navigation – Parts of a Page (insert, delete, copy, filter icons) Basic Navigation – Related Menu Basic Navigation – Tools Menu (actions) Basic Navigation – Tools Menu (options, Banner Doc Mgmt BDM) Basic Navigation – Tools Menu (page layout) Basic Navigation – Notification Center Basic Navigation – Data Basic Navigation – Dates Basic Navigation – Multi/Single View Basic Navigation – Filter Data (Query) Basic Navigation – Export Data Basic Navigation – Keyboard Shortcuts for Banner Pages Basic Navigation – Print & Item Properties
2

Welcome to Banner 9 • Welcome to Banner 9, the Student Information System for the MSU 4-campus system. This document
covers basic navigation for Banner 9 including accessing pages and using key features of the system. • Family Educational Rights and Privacy Act (FERPA)
The federal Family Educational Rights and Privacy Act (also called FERPA or the Buckley Amendment) affords students certain privacy rights regarding their education records. Those rights are summarized below.
FERPA protects the privacy of all education records, in any medium, maintained by Montana State University. Although the law was written in 1974, its coverage is not limited to paper copies. All student education records, including records about students contained in computer databases, are protected. Additionally, Montana law protects students' right to privacy and is considered more restrictive in its approach to the release of dependent student information to parents.
• Page Access Disclaimer – forms used in this document are not necessarily forms all users have access to but are simply used as examples.
3

Banner 8 and 9 URLs • PRODUCTION
– Banner 9 (works best with Chrome): – Banner 8 (use IE): https://inf.montana.edu/ssomanager/c/INB
• TEST
– Banner 9 (works best with Chrome): https://testbanner.montana.edu/applicationNavigator/ – Banner 8 (use IE): https://marvin.msu.montana.edu/ssomanager/c/INB
4

Bookmark Banner URL • The Banner URL automatically redirects to a one-time use URL. Saving this URL as a bookmark requires
additional steps to return the URL to the original address which can be reused.
Add to Favorites Bookmarks Bar (to show or hide the Bookmarks Bar Ctrl+Shift+B) – Open Chrome (you should have a new, blank tab open) – Right-click on the Bookmarks Bar* and select Add Page – In the Name field, enter ‘Banner 9 PROD’ or ‘Banner 9 TEST’ – In the URL field, copy/paste PROD or TEST URL provided on page 4 – Click Save
Add to Bookmark Folder – Open Chrome – Go to PROD or TEST URL you wish to bookmark (see page 4) – To the right of the address bar, click Star – In the Name field, enter ‘Banner 9 PROD’ or ‘Banner 9 TEST’ – Choose the folder to create bookmark and click Done – Locate the bookmark you just created, right-click on it and select Edit – In the URL field, clear existing contents & copy/paste PROD or TEST URL provided on page 4 – Click Save
5

Login • For optimal performance, Google Chrome is the suggested browser for Banner 9. • Login with your NetID and password (do not allow browser to save password).
6

Application Navigator & Main Menu Panel • Application Navigator is used to access Banner 9.x applications. The Application Navigator Dashboard is
the main landing page for navigating the system.
• The Main Menu Panel is located along the left side of the dashboard, and contains all tools needed for navigating the system. The main menu panel is sticky which means it is always present and available to you regardless of where you are in the system.
7

Main Menu Panel • The Menu icon is indicated by a group of three horizontal lines at the top left of the page. Click this icon to
display or hide the names of the main menu icons. Note the thin blue line - this is a visual reminder indicating where you are in the menu. You do not need to expand the menu in order to access the icons.
8

Main Menu Panel – Home Button • The Dashboard icon, indicated by a house, is your “home” button. Click this icon or CTRL+SHIFT+X to
return to the dashboard from any location in the system.
9

Main Menu Panel – Applications & MyBanner • The Applications icon is indicated by 9 small boxes in a grid of 3 x 3. Click this icon or CTRL+M to display
the Banner and My Banner menus. Click Back to Main Menu to return to the expanded menu panel.
– Navigate the Banner menu to view all Banner pages and jobs, grouped by module and submodule.
– The My Banner menu, if configured, can be used to quickly access the pages, jobs, menus and QuickFlows that are most important in your daily work.
10

Main Menu Panel – Search Icon • The Search icon, indicated by a magnifying glass, can be used to find pages, jobs, menus, and QuickFlows
using key words or the seven letter object name. Click this icon or CTRL+SHIFT+Y to display the search menu. Click Back to Main Menu to return to the expanded menu panel.
11

Main Menu Panel – Recently Opened • The Recently Opened icon, indicated by an open file folder, displays a list of all pages accessed during
your Banner session and will become active once you begin opening pages. Click this icon or CTRL+Y to open the list and select a page. Click Back to Main Menu to return to the expanded menu panel.
12

Main Menu Panel – Help • The Help icon, indicated by a question mark, displays online help specific to the page you are on. On any
given page, click this icon or CTRL+SHIFT+L to display detailed online help.
13

Main Menu Panel – Sign Out • The Sign Out icon, indicated by a lock, is used to log out of the system. Click this icon or CTRL+SHIFT+F to
ensure you have securely logged out of your Banner session. It is important to use this icon instead of simply closing your browser.
14

Dashboard Navigation – Main Search • The dashboard Search field can be used to search for pages, jobs, menus, and QuickFlows using key words
or the seven letter object name. Use the scroll bar as needed to view the entire list of results. Click on the object name to open it.
15

Dashboard Navigation • The Keyboard Shortcuts icon, located on the bottom right of the dashboard, displays the shortcuts which
can be used to navigate Application Navigator. Keyboard shortcuts for navigating Banner pages are located at the end of this guide and are also available as a one page document.
16

Accessing Banner Pages • As outlined in previous pages, you can access Banner pages, jobs, menus and QuickFlows in one of three
ways: 1. Applications Icon 2. Search Icon 3. Search field
17

Basic Navigation – Page Header • The Page Header contains information about the page such as the page name, version, database (TEST or
PROD) and campus.
• Banner Document Management (BDM) Add & Retrieve icons are also located in the page header for quick
access.
• Use the Close icon (Ctrl+Q) to close the page.
18

Basic Navigation – Page Key Block • Key Block
– When in the Key Block, the fields are displayed in columns and are enterable. When out of the Key Block, the fields are rearranged into a linear format and are not enterable. To access the body of the page, populate the key block data and click Go
– Return to the key block from the body of a page by clicking Start Over
– The Get Started menu bar gives a hint as to what steps to take next
– If a student’s record is marked confidential in the system, a warning will display in the Notification
Center and a “Confidential” label will display in the key block.
19

Basic Navigation – Lookup Values • The Lookup feature allows you to quickly look up available values for a field. Click the Lookup icon (F9)
or double-click in the field to display available values
• In the Criteria field, enter data to further filter results.
• Select a value and click OK, or double-click a value to return the value to the page.
20

Basic Navigation – Multiple Records • Page through the records using the pagination controls (first, last, next, previous, or enter specific page
number), decide how many records you want to review in the grid, and sort the data in ascending or descending order by clicking on column headers (this feature is not available on all columns).
21

Basic Navigation – Name Quick Search • To quickly search by name, press TAB from an ID field, enter your search criteria, and press ENTER. If one
record is found, the ID field will populate. • If more than one record is found, the Extended Search Window appears. Here you can view all results and
further filter by address, birth date, gender, etc.
22

Basic Navigation – Parts of a Page • Many pages have tabs which help organize data – unless greyed out, tabs are active.
• Pages are divided into sections as denoted by the grey bars and contain additional details for the key block
information.
• Move between sections or tabs by clicking the Next Section (Alt+PgDn) & Previous Section (Alt+PgUp) icons located on the bottom left corner of the page. You can move between tabs by clicking on them as well.
• Save changes on the page by using the Save (F10) icon located on the bottom right corner of the page.
23

Basic Navigation – Parts of a Page • Use the horizontal and vertical scroll bars to move side to side or up and down on a page. • You can perform specific functions such as Insert, Delete, Copy and Filter within each section header. Your
cursor must be in the section to activate these functions, otherwise they will be greyed out.
• Collapse or expand sections using the direction arrows within the section headers. This can come in handy when printing a page to hide data you do not need to show.
24
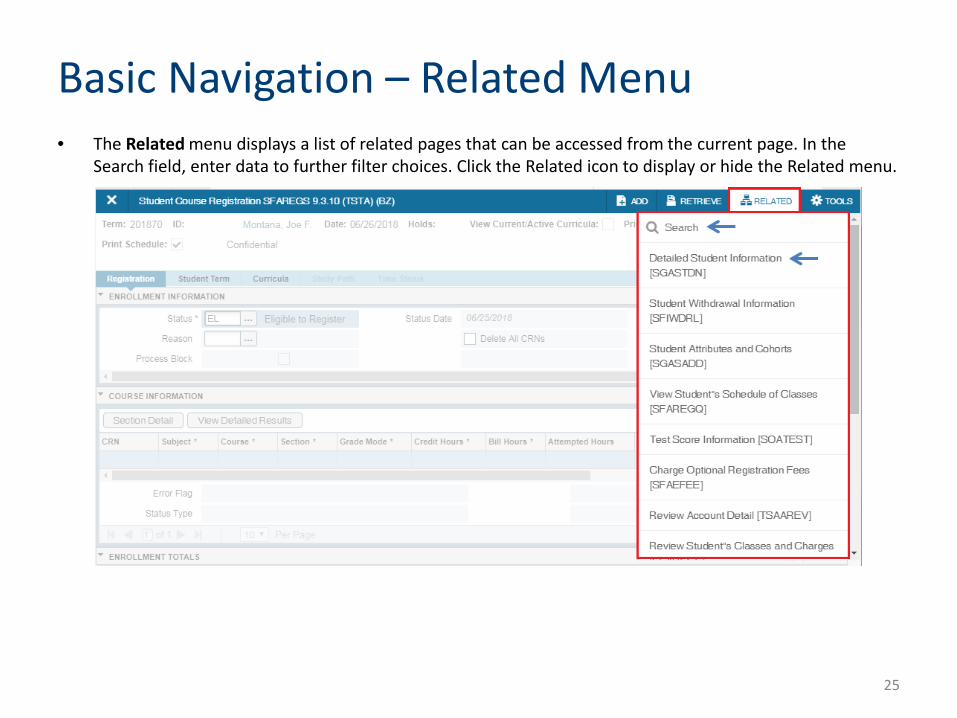
Basic Navigation – Related Menu • The Related menu displays a list of related pages that can be accessed from the current page. In the
Search field, enter data to further filter choices. Click the Related icon to display or hide the Related menu.
25

Basic Navigation – Tools Menu • The Tools menu gives you access to standard Actions, Options specific to the current page, Banner
Document Management (BDM) and Page Layout options. Click the Tools icon to display or hide the Tools menu.
• The Actions section of the Tools menu allows for access to standard tools such as refresh, export, print,
clear record, clear data, item properties, display ID image, Exit QuickFlow and About Banner.
26
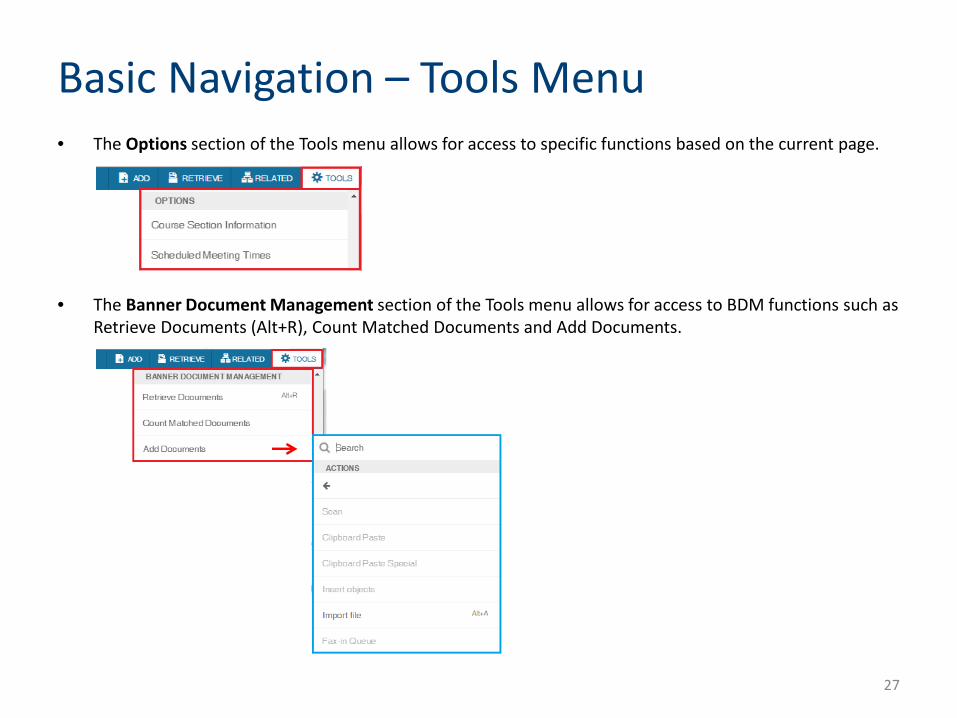
Basic Navigation – Tools Menu • The Options section of the Tools menu allows for access to specific functions based on the current page.
• The Banner Document Management section of the Tools menu allows for access to BDM functions such as
Retrieve Documents (Alt+R), Count Matched Documents and Add Documents.
27

Basic Navigation – Tools Menu • The Page Layout section of the Tools menu provides you with options for switching between Compact
Page Layout and Expanded Page Layout. Compact layout reduces the amount of excessive white space on pages and increases the amount of
information visible on a page, limiting the need to scroll vertically. Compact layout is the default.
Expanded layout displays pages with increased white space and reduces the amount of information visible on a page. This may result in the need to scroll to see all of the info.
28
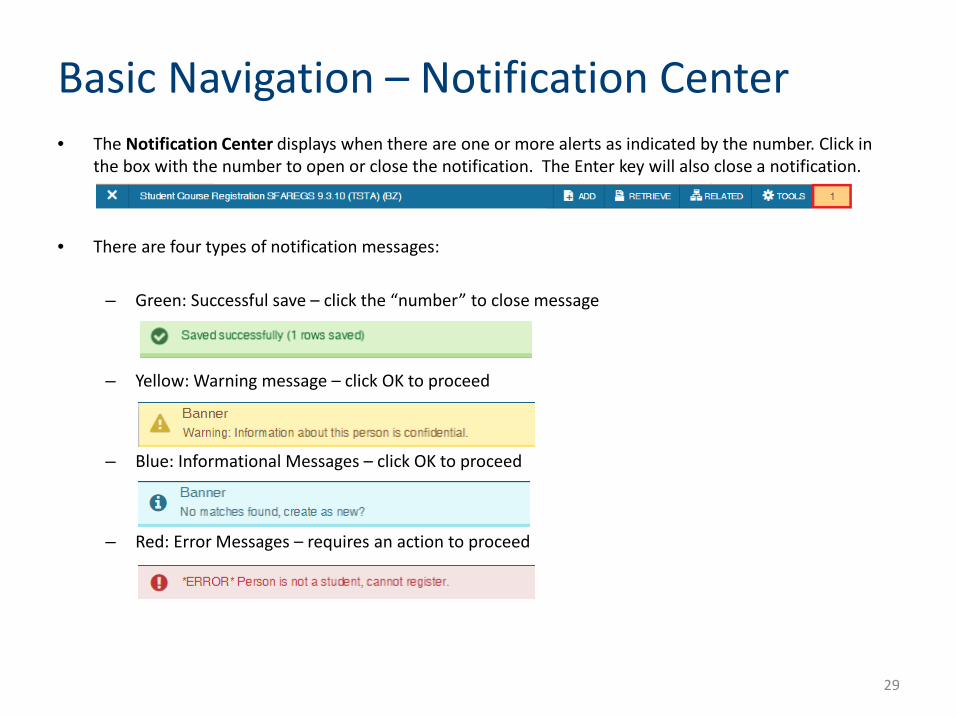
Basic Navigation – Notification Center • The Notification Center displays when there are one or more alerts as indicated by the number. Click in
the box with the number to open or close the notification. The Enter key will also close a notification.
• There are four types of notification messages:
– Green: Successful save – click the “number” to close message
– Yellow: Warning message – click OK to proceed
– Blue: Informational Messages – click OK to proceed
– Red: Error Messages – requires an action to proceed
29

Basic Navigation – Data • Required Fields
– An asterisk (*) displayed next to a field name indicates that the field is required. • Sort Columns
– Many columns can be sorted by clicking on the column header.
• Reorder Columns – Columns can be reordered by dragging them to a new location. This is useful when printing the page
so important data displays.
30

Basic Navigation – Dates • Dates are now displayed as dd/mm/yyyy or 05/01/2018 (in Banner 8, dates displayed as dd-mon-yyyy or
01-May-2018). Dates can be entered directly or by using the calendar icon for date selection.
– Click the date icon to the right of a date field and select desired date. Adjust the month and/or year by clicking the Month and Year dropdown menus. Click the back and forward arrows to navigate from month to month.
– Populate today’s date by entering a “t” in the date field and moving out of the field (move out of the
field by using the tab key or by clicking in a different field). – Enter a specific date as ddmmyy and move out of the field to populate the date.
31

Basic Navigation – Multi/Single View • Some pages give you the option to view records in a grid or one record at a time. Click the Multiple
Records and Single Record icons (Ctrl+G) to switch between views. Use the left/right arrows to navigation through single records.
32

Basic Navigation – Filter Data (Query) • Filtering can be done within sections of a page or in query forms such as SOAIDEN. Basic and Advanced
filtering is available.
• Example: Use the Basic Filter to show a student’s 200 level WRIT courses. – Click the Filter icon within the section header (F7). – Choose the field(s) you want to filter by from the Add Another Field drop-down list. – Enter a value for the field you would like to filter. % can be used as a wildcard for partial search. – Click Go (F8) to view results – Click Filter Again (F7) to perform additional filtering. – To close the filter and display all unfiltered records, click the close icon in upper right corner.
33
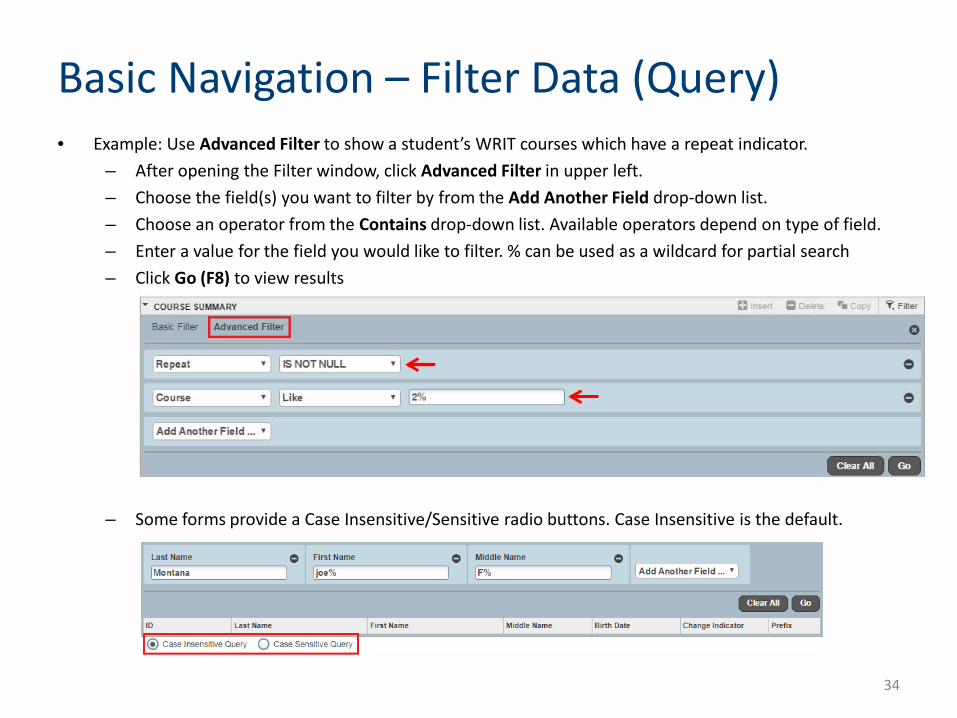
Basic Navigation – Filter Data (Query) • Example: Use Advanced Filter to show a student’s WRIT courses which have a repeat indicator.
– After opening the Filter window, click Advanced Filter in upper left. – Choose the field(s) you want to filter by from the Add Another Field drop-down list. – Choose an operator from the Contains drop-down list. Available operators depend on type of field. – Enter a value for the field you would like to filter. % can be used as a wildcard for partial search – Click Go (F8) to view results
– Some forms provide a Case Insensitive/Sensitive radio buttons. Case Insensitive is the default.
34

Basic Navigation – Export Data • Some pages allow for the export of the data displayed on the page into an Excel spreadsheet.
– Filter data to extract only the data you need (optional) – Go to Tools > Export (Shift+F1) – The file should automatically download to the downloads folder (based on chrome settings). – If asked, choose where you want to save the file, and click Save. – When the download completes, the file will display at the bottom of the window. Click the file name
to open it.
35

Basic Navigation – Keyboard Shortcuts
36

Basic Navigation – Keyboard Shortcuts
37

Basic Navigation – Print & Item Properties • Print Page
– Printing is most effective when using the Compact Page layout. You can reorder columns to move the most important data to appear first and ensure that these columns are visible on the printed page.
– To print the selected page go to Tools > Print (Ctrl + P). • Item Properties TOOLS
– To display all Item Properties for a field, place the cursor in the field and select Tools > Item Properties. The column name for a selected field also displays at the bottom of the page.
Jennifer Moser 9/10/2018 version 4. Portions of this document sourced from a combination of elive presentations & ellucian documentation.
38